

Page 1

Dual DIN in-dash HDD Mobile Navigation System with 7 Widescreen Color
LCD Monitor/DVD Receiver
Système de navigation embarqué à disque dur de format 2-DIN
avec récepteur DVD/moniteur couleur ACL grand écran de 7 po
Sistema de navegación portátil de doble DIN para tablero de mandos, con
disco duro y monitor LCD panorámico de 7 en color y receptor con DVD
CN-NVD905U
Operating Instructions
Manuel d’instructions
Manual de Instrucciones
Please read these instructions (including “Limited Warranty” and “Customer
services directory”) carefully before using this product and keep this manual for
future reference.
Prière de lire attentivement ces instructions (y compris la « Garantie limitée » et le
« Répertoire des services à la clientèle ») avant d’utiliser ce produit et conserver ce
manuel d’instructions pour s’y référer ultérieurement.
Lea con atención estas instrucciones antes de utilizar el producto y guarde este
manual para poderlo consultar en el futuro.
Page 2
Safety information
Read the operating instructions for the unit and all
other components of your car navigation system
carefully before using the system. They contain
instructions about how to use the system in a
safe and effective manner. Panasonic assumes no
responsibility for any problems resulting from failure
to observe the instructions given in this manual.
This manual uses pictographs to show you how to use
the product safely and to alert you to potential dangers
resulting from improper connections and operations.
The meanings of the pictographs are explained below.
It is important that you fully understand the meanings
of the pictographs in order to use this manual and the
system properly.
Observe the following warnings when using
this unit.
The driver should neither watch the display nor
operate the system while driving.
Watching the display or operating the system will
distract the driver from looking ahead of the vehicle
and can cause accidents. Always stop the vehicle
in a safe location and use the parking brake before
watching the display or operating the system. In
some states and countries, passengers are also
prohibited from watching the display.
Follow actual traffi c regulations while driving.
Even while following route guidance, always obey road
signs and abide all traffi c laws. Failure to do so could
cause an accident or injury.
Use the proper power supply.
This product is designed for operation with a negative
grounded 12 V DC battery system. Never operate this
product with other battery systems, especially a 24 V DC
battery system. If it is used in the wrong type of car, it
may cause a fi re or an accident.
Protect the Deck Mechanism.
Do not insert any foreign objects into the slot of this unit.
Do not disassemble or modify the unit.
Do not disassemble, modify the unit or attempt to
repair the product yourself. If the product needs to
be repaired, consult your dealer or an authorized
Panasonic Servicenter.
Do not use the unit when it is out of order.
If the unit is out of order (no power, no sound) or
in an abnormal state (has foreign objects in it, is
exposed to water, is smoking, or smells), turn it off
immediately and consult your dealer.
Refer fuse replacement to qualifi ed service personnel.
When the fuse blows out, eliminate the cause
and have it replaced with the fuse prescribed for
this unit by a qualifi ed service engineer. Incorrect
replacement of the fuse may lead to smoke, fi re, and
damage to the product.
Use the mirror image rear view camera. Failure to
do so may result in an accident or injury.
When using the in-car camera (rear view camera),
always reverse slowly, while checking for safety
with your eyes.
The camera image is perceived differently from
the actual distance. The fi eld of view which can be
displayed is also limited. Reverse slowly, checking
safety by eye, rather than relying on the screen.
Reversing without checking safety can cause
collisions with people and objects.
Keep the SD Memory card out of the reach of
children.
There is a risk that it could be swallowed
accidentally. If the card is swallowed, seek medical
attention immediately.
Warning
This pictograph alerts you to the
presence of important operating
instructions. Failure to heed the
instructions may result in severe injury
or death.
Warning
This pictograph alerts you to the presence
of important operating instructions.
Failure to heed the instructions may result
in injury or material damage.
Caution
English
English
2
3
Page 3

Observe the following warnings when
installing.
Disconnect the lead from the negative (–) battery
terminal before installation.
Wiring and installation with the negative (–) battery
terminal connected may cause electrical shock and
injury due to a short circuit.
Some cars equipped with the electrical safety
system have specifi c procedures of battery terminal
disconnection.
FAILURE TO FOLLOW THE PROCEDURES MAY
LEAD TO THE UNINTENDED ACTIVATION OF THE
ELECTRICAL SAFETY SYSTEM RESULTING IN
DAMAGE TO THE VEHICLE AND PERSONAL INJURY
OR DEATH.
Never use safety-related components for
installation, grounding, and other such functions.
Do not use safety-related vehicle components (fuel
tank, brake, suspension, steering wheel, pedals,
airbag, etc.) for wiring or fi xing the product or its
accessories.
Installing the product on the air bag cover or in a
location where it interferes with airbag operation is
prohibited.
Check for piping, gasoline tank, electric wiring, and
other items before installing the product.
If you need to open a hole in the vehicle chassis to
attach or wire the product, fi rst check where the wire
harness, gasoline tank, and electric wiring are located.
Then open the hole from outside if possible.
Never install the product in a location where it
interferes with your fi eld of vision.
Never have the power cord branched to supply other
equipment with power.
After installation and wiring, you should check the
normal operation of other electrical equipment.
Continuing to use those in abnormal conditions may
cause fi re, electrical shock or a traffi c accident.
Make sure the leads do not interfere with driving or
getting in and out of the vehicle.
Insulate all exposed wires to prevent short
circuiting.
This installation information is designed for
professional installers with knowledge of automobile
electrical safety systems and is not intended for
non-technical, do-it-yourself individuals. It does not
contain instructions on the electrical installation
and avoidance of potential harm to air bag, antitheft and ABS braking or other systems necessary
to install this product. Any attempt to install this
product in a motor vehicle by anyone other than a
professional installer could cause damage to the
electrical safety system and could result in serious
personal injury or death.
If your car is equipped with air bag and/or
anti-theft systems, specifi c procedures may be
required for connection and disconnection of the
battery to install this product.
Before attempting installation of this electronic
component against the manufacturer’s
recommendation, you must contact your car
dealer or manufacturer to determine the required
procedure and strictly follow their instructions.
FAILURE TO FOLLOW THE PROCEDURE MAY
RESULT IN THE UNINTENDED DEPLOYMENT OF
AIR BAGS OR ACTIVATION OF THE ANTI-THEFT
SYSTEM RESULTING IN DAMAGE TO THE VEHICLE
AND PERSONAL INJURY OR DEATH.
TO REDUCE THE RISK FOR FIRE OR ELECTRIC
SHOCK AND ANNOYING INTERFERENCE, USE
ONLY THE INCLUDED COMPONENTS.
This unit operates with a 12 V DC negative ground
auto battery system only. Do not attempt to use it
any other system.
Do not install the monitor in a location which
obstructs driving, visibility or which is prohibited
by applicable laws and regulations.
If the monitor is installed in a location which
obstructs forward visibility or operation of the air
bag or other safety equipment or which interferes
with operation of the car, it may cause an accident.
Never use bolts or nuts from the car’s safety devices
for installation. If bolts or nuts from the steering
wheel, brakes or other safety devices are used for
installation of the monitor, it may cause an accident.
Attach the wires correctly. If the wiring is not
correctly performed, it may cause a fi re or an
accident. In particular, be sure to run and secure the
lead wire so that it does not get tangled with a screw
or the moving portion of a seat rail.
For safety, make sure that the side brake cord is
wired correctly.
If not wired correctly following the instructions,
safety features may cease working and may cause
an accident.
English
3
32
Page 4

Observe the following cautions when using
this unit.
Keep the sound volume at an appropriate level.
Keep the volume level low enough to be aware of
road and traffi c conditions while driving.
Do not insert or allow your hand or fi ngers to be
caught in the unit.
To prevent injury, do not get your hand or fi ngers
caught in moving parts or in the disc slot. Especially
watch out for infants.
This unit is designed for use exclusively in
automobiles.
Do not operate the unit for a prolonged period with
the engine turned off.
Operating the audio system for a long period of time
with the engine turned off will drain the battery.
Do not expose the unit to direct sunlight or
excessive heat.
These will raise the interior temperature of the unit,
and may lead to smoke, fi re, or other damage to the
unit.
Do not use the product where it will be exposed to
water, moisture, or dust.
Exposure of the unit to water, moisture, or dust may
lead to smoke, fi re, or other damage to the unit.
Make especially sure that the unit does not get wet
in car washes or on rainy days.
Do not place items on the opened monitor.
There is risk of breakage to the Liquid crystal panel.
Additionally, spillage from drink containers onto the
device may cause smoke, fi re, electric shock and
breakdown.
Do not expose to strong impact.
Impact such as dropping or hitting the device may
cause breakdown or a fi re.
Do not use the rear view camera except when
backing the car into a parking space or confi rming
the location of a towed trailer, etc.
Caution
Observe the following cautions when
installing.
Refer wiring and installation to qualifi ed service
personnel.
Installation of this unit requires special skills and
experience. For maximum safety, have it installed by
your dealer. Panasonic is not liable for any problems
resulting from your own installation of the unit.
Follow the instructions to install and wire the
product.
Not following the instructions to properly install and
wire the product could cause an accident or fi re.
Take care not to damage the leads.
When wiring, take care not to damage the leads.
Prevent them from getting caught in the vehicle
chassis, screws, and moving parts such as seat rails.
Do not scratch, pull, bend or twist the leads. Do not
run them near heat sources or place heavy objects on
them. If leads must be run over sharp metal edges,
protect the leads by winding them with vinyl tape or
similar protection.
Use the designated parts and tools for installation.
Use the supplied or designated parts and appropriate
tools to install the product. The use of parts other than
those supplied or designated may result in internal
damage to the unit. Faulty installation may lead to an
accident, a malfunction or fi re.
Do not block the air vent or the cooling plate of the unit.
Blocking these parts will cause the interior of the unit
to overheat and will result in fi re or other damage.
Do not install the product where it is exposed to
strong vibrations or is unstable.
Avoid slanted or strongly curved surfaces for
installation. If the installation is not stable, the unit
may fall down while driving and this can lead to an
accident or injury.
Installation Angle
The product should be installed in a horizontal
position with the front end up at a convenient angle,
but not more than 30°.
The user should bear in mind that in some areas there
may be restrictions on how and where this unit must
be installed. Consult your dealer for further details.
We strongly recommend that you wear gloves for
installation work to protect yourself from injuries.
Make sure that wiring is completed before
installation.
To prevent damage to the unit, do not connect the
power connector until all wiring is completed.
Never ground the speaker cords. For example, do not
use a chassis ground system or a three-wire speaker
common system. Each speaker must be connected
separately using parallel insulated wires. If in doubt
about how your car’s speakers are wired, please
consult with your nearest professional installer.
Safety information
(continued)
English
English
4
5
Page 5
Do not connect more than one speaker to one
set of speaker leads. (except for connecting to a
tweeter)
TO REDUCE THE RISK OF FIRE OR ELECTRIC
SHOCK OR PRODUCT DAMAGE, DO NOT EXPOSE
THIS APPLIANCE TO RAIN, SPLASHING, DRIPPING
OR MOISTURE.
Use the specifi ed fuse. Be sure to always use the
specifi ed fuse. If a fuse other than specifi ed fuse is
used, it may cause a fi re or an accident.
Do not damage the cord by pinching or pulling it.
Do not pull or damage the cord. If the cord is not
treated properly, it will short out or be severed and
may cause a fi re or an accident.
When bending the mounting tab of the mounting
collar with a screwdriver, be careful not to injure
your hands and fi ngers.
Various settings that have been stored in the
memory in other on-board equipment may be lost if
the battery terminals are disconnected.
Therefore, we recommend you to make a record of
or to back up the settings before disconnecting the
terminals.
After completing installation of the main unit, set up
the equipment again according to the settings.
Be sure to insulate any exposed wires from the car
chassis. Bundle all cables and keep cable terminals
free from any metal parts.
Note that if your car has a driving computer or a
navigation computer, disconnecting the cable from
the battery may clear the memory.
Run the cords avoiding the spots where the
temperature can be extremely high.
Route the cords of GPS antenna attached to the
outside of the vehicle and in-car camera (rear view
camera) to the inside the vehicle, to stop water
seeping in.
If water seeps in the vehicle during rain or car
washing, it could cause fi re or electric shock.
Mount the navigation unit and the GPS antenna
securely, so that it won’t come off and fall.
Wipe the mounting area clean of dirt, wax etc., then
fasten the camera securely in place.
Re-affi xing adhesive parts or use of general-purpose
double-sided tape could cause weak bonding that
would allow the equipment to drop off while the
vehicle is in motion, causing accident or injury.
Check the state of bonding or mounting (loose
screws etc.) occasionally.
Never assign the “.mp3”, or “.wma” fi le name
extension to a fi le that is not in the MP3/WMA
format. This may not only produce noise from the
speaker damage, but also damage your hearing.
CAUTION:
PLEASE FOLLOW THE LAWS AND REGULATIONS
OF YOUR STATE, PROVINCE OR COUNTRY FOR
INSTALLATION OF THE UNIT.
THIS PRODUCT IS A CLASS I LASER PRODUCT.
USE OF CONTROLS OR ADJUSTMENTS OR
PERFORMANCE OF PROCEDURES OTHER THAN
THOSE SPECIFIED HEREIN MAY RESULT IN
HAZARDOUS RADIATION EXPOSURE.
DO NOT OPEN COVERS AND DO NOT REPAIR BY
YOURSELF. REFER SERVICING TO QUALIFIED
PERSONNEL.
The following applies only in the U.S.A.
Part 15 of the FCC Rules
FCC Warning:
Any unauthorized changes or modifi cations to this
equipment would void the user’s authority to operate
this device.
Notice:
This product has a fl uorescent lamp that
contains mercury. Dispose may be regulated
in your community due to environmental
considerations. For disposal or recycling
information, please contact your local
authorities, or the Electronics Industries
Alliance :
http://www.eiae.org
This system is designed so that you
cannot see moving pictures while you
are driving.
Park your car in a safe place and apply the parking
brake before watching the monitor.
A rear monitor (option) displays moving pictures
while driving.
Note:
Be sure to connect the parking brake connection
lead. (
Installation Instructions)
Notice about handling of a CR
coin cell lithium batteries
This product contains a CR Coin Cell Lithium Battery
which contains Perchlorate Material – special handling
may apply.
See www.dtsc.ca.gov/hazardouswaste/perchlorate.
English
5
54
Page 6

The technology and software contained in this
system cannot be taken out of the country without
permission from the US Government.
Use by government agencies and government-
related bodies is deemed to involve “corporation
rights” requiring use under “DFARS 252.227.7013”.
Operation is subject to the following two conditions:
(1) this device may not cause interference, and (2)
this device must accept any interference, including
interference that may cause undesired operation of
the device.
This product is fully compliant with the IC (Industry
Canada) RSS-310 standard.
It is strictly prohibited to reproduce and use this
map in any form without permission from the
copyright owner.
The traffi c regulation data used in the map database
applies only to passenger cars. Note that regulations
for larger vehicles, motorbikes, and other nonstandard cars are not included in the database.
The marks of companies displayed by this product
to indicate business locations are the marks of their
respective owners. The use of such marks in this
product does not imply any sponsorship, approval,
or endorsement by such companies of this product.
Liquid crystal panel
Do not strongly impact the liquid crystal panel.
Usage temperature range: 0 °C to 40 °C
{32 °F to 104 °F}
When the temperature is very cold or very hot, the
image may not appear clearly or may move slowly.
Also, movement of the image may seem to be out of
synchronization or the image quality may decline in
such environments. Note that this is not a malfunction
or problem.
In order to protect the liquid crystal panel, keep it out
of direct sunlight while the unit is not in use.
Sudden changes in the temperature inside the car
such as those which occur immediately after the car’s
air conditioner or heater has been turned on may
cause the inside of the liquid crystal panel to cloud
over due to water vapor or it may cause condensation
(droplets of water) to form and, as a result, the panel
may not work properly. Do not use the unit while
these symptoms are in evidence but leave the unit
standing for about an hour, and then resume or start
use.
Notes on use
Limitation of liability
If malfunction or damage occurs due to fi re,
earthquake, third-party action, other accident, error
or intent by the customer, misoperation, or use under
other improper conditions, resulting repairs will, as a
general rule, require payment.
Panasonic shall not be liable for any incidental losses
resulting from the use of this product, or from inability
to use this product (loss of business profi ts, change
or loss of memory contents, etc.).
The warranty certifi cate for this product is invalidated
in the event that it is installed in a commercial vehicle
(bus, truck, taxi, commercial car, etc.).
When disposing of this product or transferring it
to a third party, the customer is responsible for
the handling and management (deletion, etc.) of
personal information entered into the system (such as
addresses and telephone numbers of Address Book)
for privacy protection.
Panasonic shall not be liable for such information.
No compensation will be provided for alteration
or loss of map data or basic programs on the hard
disc, caused by improper operation of the system by
yourself or a third party, or by the effects of static
electricity or electrical noise.
No compensation will be provided for content in
case of alteration or loss of information stored in the
system (such as Address Book) caused by improper
operation of the system by yourself or a third party,
the effects of static electricity or electrical noise, or
breakdowns or repairs.
The user is advised to make notes of important
information (such as Address Book) in case of
accidental loss.
“This product incorporates copyright protection
technology that is protected by U.S. patents and
other intellectual property rights. Use of this
copyright protection technology must be authorized
by Macrovision, and is intended for home and
other limited viewing uses only unless otherwise
authorized by Macrovision. Reverse engineering or
disassembly is prohibited.”
English
English
6
7
Page 7

Disc type
Disc DVD CD CD-R/RW
Mark/Logo
Disc Size 12 cm {5}
Video
Format
NTSC/PAL
Audio
Format
LPCM,
MPEG1,
MPEG2,
Dolby Digital
LPCM
(CD-DA)
LPCM
(CD-DA),
MP3/WMA
Region No. 1 (ALL)
Note:
About CD-R/RW and DVD-R/RW, refer to “Notes on
discs”. (
page 107)
Some copy-protected music CDs are not playable.
Discs not supported
The following discs are not played back on this
product.
DVD-Audio
DVD-ROM
DVD-RAM
DVD+R
DVD+RW
dts-DVD
SVCD
VSD
dts-CD
CD-G
CD-ROM (except MP3/WMA)
CD-RW (except MP3/WMA and CD-DA)
CD-R (except MP3/WMA and CD-DA)
SACD
Photo CD
CDV
Hybrid SACD (except CD-DA)
CVD
Divx Video Discs
Video-CD
CD-EXTRA (audio-only playback possible)
DVD with a region number other than “1” or “ALL”.
Playing back a photo CD disc with this unit could
damage the data that is recorded on the disc.
Notes about playing DVD with dts
audio content
This system is not compatible with dts. When playing,
always play non-dts sound. (If dts sound is selected,
this system will output no sound.)
On some discs, sound automatically switches to dts
when playback is stopped and resumed from the
beginning of the disc, so that sound output will be
lost, or the subtitle settings may be changed. If that
happens, reset to the previous settings manually.
Symbols used on jackets
(Examples of such symbols include)
: Number of subtitle languages
: Number of audio tracks
: Number of angles
The numbers indicate the number of languages, tracks,
angles, etc., recorded on the disc.
Screen size (H:V aspect ratio)
: 4:3 standard size
: Letterbox
16:9 wide size
: Playback in Letter box format on a
standard screen (4:3).
: Playback in Pan & Scan format on
a standard screen (4:3).
Note:
The size of the image that is displayed on the screen
depends on the screen mode (“Switch aspect setting”
page 92), and on the screen size for the content on
the disc.
Region management information
This product is designed and manufactured to respond
to the Region Management Information that is recorded
on a DVD disc. If the Region number described on the
DVD disc does not correspond to the Region number of
this product, this product does not play the disc.
Discs that can be played back
Example:
The Region number
for this product is “1”
and “ALL”.
Notes on DVD-R/RW
Only video formatted discs are playable.
Discs in the video recording (VR) format are
unplayable.
Unfi nalized discs are unplayable.
Some discs are unplayable depending on the disc
itself, device, drive and software that are used for disc
recording.
English
7
76
Page 8

CANADA
WARRANTY SERVICE
FOR PRODUCT OPERATION ASSISTANCE, please contact:
Our Customer Care Centre:
Telephone #: (905) 624-5505
1-800 #: 1-800-561-5505
Fax #: (905) 238-2360
Email link: “Contact Us” on www.panasonic.ca
FOR PRODUCT REPAIRS, please locate your nearest Authorized
Servicentre at www.panasonic.ca:
Link : “Servicentres™ locator” under “Customer support”
IF YOU SHIP THE PRODUCT TO A SERVICENTRE
Carefully pack and send prepaid, adequately insured and
preferably in the original carton.
Include details of the defect claimed, and proof of date of
original purchase.
U.S.A.
Obtain Product Information and Operating Assistance; locate
your nearest Dealer or Servicenter; purchase Parts and
Accessories; or make Customer Service and Literature requests
by visiting our Web Site at:
http://www.panasonic.com/support
or, contact us via the web at:
http://www.panasonic.com/contactinfo
You may also contact us directly at:
1-800-211-PANA (7262),
Monday-Friday 9 am-9 pm; Saturday-Sunday 10 am-7 pm, EST.
For hearing or speech impaired TTY users,
TTY : 1-877-833-8855
Accessory Purchases:
Purchase Parts, Accessories and Instruction Books online for
all Panasonic Products by visiting our Web Site at:
http://www.pasc.panasonic.com
or, send your request by E-mail to:
npcparts@panasonic.com
You may also contact us directly at:
1-800-332-5368 (Phone) 1-800-237-9080 (Fax Only)
(Monday-Friday 9 am to 8 pm, EST.)
Panasonic Services Company
20421 84th Avenue South, Kent, WA 98032
(We accept Visa, MasterCard, Discover Card, American Express,
and Personal Checks)
Service in Puerto Rico
Panasonic Puerto Rico, Inc.
Factory Servicenter:
Ave. 65 de Infantería, Km. 9.5, San Gabriel Industrial Park,
Carolina, Puerto Rico 00985
Phone (787) 750-4300, Fax (787) 768-2910
For hearing or speech impaired TTY users,
TTY : 1-866-605-1277
Customer services directory Limited warranty
English
English
8
9
Page 9

U.S.A.
PANASONIC CONSUMER ELECTRONICS COMPANY,
DIVISION OF PANASONIC CORPORATION OF NORTH AMERICA
One Panasonic Way, Secaucus, New Jersey 07094
PANASONIC SALES COMPANY,
DIVISION OF PANASONIC PUERTO RICO, INC.
Ave. 65 de infanteria, Km. 9.5, San Gabriel Industrial Park
Carolina, Puerto Rico 00985
PANASONIC AUTO PRODUCTS
LIMITED WARRANTY
LIMITED WARRANTY COVERAGE
If your product does not work properly because of defects in materials
and workmanship.
Panasonic Consumer Electronics Company or Panasonic Sales Company
(collectively referred to as “the warrantor”) will, for the length of the
period indicated in the chart below, which starts with the date of original
purchase (“warranty period”), at its option either (a) repair your product
with new or refurbished parts, or (b) replace it with a new or refurbished
product. The decision to repair or replace will be made by the warrantor.
Categories Parts Labor
Audio Components (except items listed below) One (1) Year One (1) Year
MXE Series Audio Components (except items
listed below)
Two (2) Years Two (2) Years
Speakers
Defective Car Audio Speakers under warranty
must be exchanged at the place of purchase.
Contact your Dealer for details.
One (1) Year Not Applicable
Accessories (in exchange for defective items) Ninety (90)
Days
Not Applicable
During the “Labor” warranty period, there will be no charge for labor.
During the “Parts” warranty period, there will be no charge for parts. You
must carry in or mail in your product prepaid during the warranty period.
If nonrechargeable batteries are included, they are not warranted. This
warranty only applies to products purchased and serviced in the United
States or Puerto Rico. This warranty is extended only to the original
purchaser of a new product which was not sold “as is”. A purchase
receipt or other proof of the original purchase date is required for
warranty service.
CARRY-IN OR MAIL-IN SERVICE
For Carry-In or Mail-In Service in the United States, call 1-800-211-PANA
(7262) or visit
Panasonic Web Site: http://www.panasonic.com
For assistance in Puerto Rico, call Panasonic Sales Company (787)-7504300 or fax (787)-768-2910.
LIMITED WARRANTY LIMITS AND EXCLUSIONS
This warranty ONLY COVERS failures due to defects in materials
and workmanship, and DOES NOT COVER normal wear and tear or
cosmetic damage. The warranty ALSO DOES NOT COVER damages
which occurred during shipment, failures which are caused by products
not supplied by the warrantor, failures which result from accident,
misuse, abuse, neglect, bug infestation, mishandling, misapplication,
alteration, faulty installation, set-up adjustment, maladjustment of
consumer control, improper maintenance, improper antenna, inadequate
signal reception or pickup, power line surge, improper voltage supply,
lightning, modifi cation, commercial use (such as use in hotels, offi ces,
restaurants, or other business uses) or rental use of the product, or
service by anyone other than the technician from Factory Servicenter or
other authorized service centers, or damage that is attributable to acts of
God.
THERE ARE NO EXPRESS WARRANTIES EXCEPT AS LISTED UNDER
“LIMITED WARRANTY COVERAGE”. THE WARRANTOR IS NOT LIABLE
FOR INCIDENTAL OR CONSEQUENTIAL DAMAGES RESULTING FROM
THE USE OF THIS PRODUCT, OR ARISING OUT OF ANY BREACH
OF THIS WARRANTY. (As examples, this excludes damages for lost
time, cost of having someone remove or re-install an installed unit if
applicable, travel to and from the sevicer, and loss of media, data or
other memory contents. The items listed are not exclusive, but are
for illustration only.) ALL EXPRESS AND IMPLIED WARRANTIES,
INCLUDING THE WARRANTY OF MERCHANTABILITY, ARE LIMITED TO
THE PERIOD OF THE LIMITED WARRANTY.
Some states do not allow the exclusion or limitation of incidental or
consequential damages, or limitations on how long an implied warranty
lasts, so the exclusions may not apply to you.
This warranty gives you specifi c legal rights and you may also have
other rights which vary from state to state. If a problem with this product
develops during or after the warranty period, you may contact your
dealer or Servicenter. If the problem is not handled to your satisfaction,
then write to warrantor’s Consumer Affairs Department at the addresses
of the warrantor.
PARTS AND SERVICE WHICH ARE NOT COVERED BY THIS LIMITED
WARRANTY ARE YOUR RESPONSIBILITY.
Customer’s Record
Model
No.
Serial
No.
Dealer’s
No.
Code
No.
Dealer’s
Address
Date of
Purchase
CANADA
Panasonic Canada Inc.
5770 Ambler Drive, Mississauga Ontario L4W 2T3
PANASONIC PRODUCT LIMITED WARRANTY
Panasonic Canada Inc. warrants this product to be free from defects in
materials and workmanship and agrees to remedy any such defect for a
period as stated below from the date of original purchase.
CAR AUDIO PRODUCT – ONE (1) YEAR, PARTS AND LABOUR
(The labour to install or remove the product is not warranted)
ACCESSOIRES - NINETY (90) DAYS, (IN EXCHANGE FOR DEFECTIVE
ITEMS)
LIMITATIONS AND EXCLUSIONS
This warranty does not apply to products purchased outside Canada or
to any product which has been improperly installed, subjected to usage
for which the product was not designed, misused or abused, damaged
during shipping, or which has been altered or repaired in any way that
affects the reliability or detracts from the performance, nor does it cover
any product which is used commercially. Dry cell batteries are also
excluded from coverage under this warranty.
This warranty is extended to the original end user purchaser only. A
purchase receipt or other proof of the original purchase date is required
before warranty service is performed.
THIS EXPRESS, LIMITED WARRANTY IS IN LIEU OF ALL OTHER
WARRANTIES, EXPRESS OR IMPLIED, INCLUDING ANY IMPLIED
WARRANTIES OF MERCHANTABILITY AND FITNESS FOR A
PARTICULAR PURPOSE.
IN NO EVENT WILL PANASONIC CANADA INC. BE LIABLE FOR ANY
SPECIAL, INDIRECT OR CONSEQUENTIAL DAMAGES.
In certain instances, some jurisdictions do not allow the exclusion or
limitation of incidental or consequential damages, or the exclusion of
implied warranties, so the above limitations and exclusions may not be
applicable.
English
9
98
Page 10

END-USER TERMS
The data (“Data”) is provided for your personal, internal use only and not for resale. It is protected by copyright,
and is subject to the following terms and conditions which are agreed to by you, on the one hand, and
Matsushita
Electric Industrial Co., Ltd. Panasonic Automotive Systems Company (“Panasonic”) and its licensors (including
their licensors and suppliers) on the other hand.
© 2005 NAVTEQ. All rights reserved.
The Data for areas of Canada includes information taken with permission from Canadian authorities, including: © Her
Majesty the Queen in Right of Canada, © Queen’s Printer for Ontario, © Canada Post Corporation, GeoBase
®
.
NAVTEQ holds a non-exclusive license from the United States Postal Service
®
to publish and sell ZIP+4® information.
© United States Postal Service
®
2005. Prices are not established, controlled or approved by the United States Postal
Service
®
. The following trademarks and registrations are owned by the USPS: United States Postal Service, USPS,
and ZIP+4.
TERMS AND CONDITIONS
Personal Use Only.
You agree to use this Data together with Panasonic Navigation System for the solely personal, non-commercial
purposes for which you were licensed, and not for service bureau, time-sharing or other similar purposes.
Accordingly, but subject to the restrictions set forth in the following paragraphs, you may copy this Data only as
necessary for your personal use to (i) view it, and (ii) save it, provided that you do not remove any copyright notices
that appear and do not modify the Data in any way. You agree not to otherwise reproduce, copy, modify, decompile,
disassemble or reverse engineer any portion of this Data, and may not transfer or distribute it in any form, for any
purpose, except to the extent permitted by mandatory laws. Multi-disc sets may only be transferred or sold as a
complete set as provided by Panasonic and not as a subset thereof.
Restrictions.
Except where you have been specifi cally licensed to do so by Panasonic, and without limiting the preceding
paragraph, you may not (a) use this Data with any products, systems, or applications installed or otherwise
connected to or in communication with vehicles, capable of vehicle navigation, positioning, dispatch, real time route
guidance, fl eet management or similar applications; or (b) with or in communication with any positioning devices
or any mobile or wireless-connected electronic or computer devices, including without limitation cellular phones,
palmtop and handheld computers, pagers, and personal digital assistants or PDAs.
Warning.
The Data may contain inaccurate or incomplete information due to the passage of time, changing circumstances,
sources used and the nature of collecting comprehensive geographic data, any of which may lead to incorrect results.
No Warranty.
This Data is provided to you “as is,” and you agree to use it at your own risk. Panasonic and its licensors (and their
licensors and suppliers) make no guarantees, representations or warranties of any kind, express or implied, arising
by law or otherwise, including but not limited to, content, quality, accuracy, completeness, effectiveness, reliability,
fi tness for a particular purpose, usefulness, use or results to be obtained from this Data, or that the Data or server
will be uninterrupted or error-free.
Disclaimer of Warranty:
Panasonic AND ITS LICENSORS (INCLUDING THEIR LICENSORS AND SUPPLIERS) DISCLAIM ANY WARRANTIES,
EXPRESS OR IMPLIED, OF QUALITY, PERFORMANCE, MERCHANTABILITY, FITNESS FOR A PARTICULAR PURPOSE
OR NON-INFRINGEMENT. Some States, Territories and Countries do not allow certain warranty exclusions, so to that
extent the above exclusion may not apply to you.
About the data of the map
English
English
10
11
Page 11

Disclaimer of Liability:
Panasonic AND ITS LICENSORS (INCLUDING THEIR LICENSORS AND SUPPLIERS) SHALL NOT BE LIABLE TO YOU:
IN RESPECT OF ANY CLAIM, DEMAND OR ACTION, IRRESPECTIVE OF THE NATURE OF THE CAUSE OF THE CLAIM,
DEMAND OR ACTION ALLEGING ANY LOSS, INJURY OR DAMAGES, DIRECT OR INDIRECT, WHICH MAY RESULT
FROM THE USE OR POSSESSION OF THE INFORMATION; OR FOR ANY LOSS OF PROFIT, REVENUE, CONTRACTS
OR SAVINGS, OR ANY OTHER DIRECT, INDIRECT, INCIDENTAL, SPECIAL OR CONSEQUENTIAL DAMAGES ARISING
OUT OF YOUR USE OF OR INABILITY TO USE THIS INFORMATION, ANY DEFECT IN THE INFORMATION, OR THE
BREACH OF THESE TERMS OR CONDITIONS, WHETHER IN AN ACTION IN CONTRACT OR TORT OR BASED ON
A WARRANTY, EVEN IF Panasonic OR ITS LICENSORS HAVE BEEN ADVISED OF THE POSSIBILITY OF SUCH
DAMAGES. Some States, Territories and Countries do not allow certain liability exclusions or damages limitations, so
to that extent the above may not apply to you.
Export Control.
You agree not to export from anywhere any part of the Data provided to you or any direct product thereof except in
compliance with, and with all licenses and approvals required under, applicable export laws, rules and regulations.
Entire Agreement.
These terms and conditions constitute the entire agreement between Panasonic (and its licensors, including their
licensors and suppliers) and you pertaining to the subject matter hereof, and supersedes in their entirety any and all
written or oral agreements previously existing between us with respect to such subject matter.
Governing Law.
The above terms and conditions shall be governed by the laws of the State of Illinois, without giving effect to (i) its
confl ict of laws provisions, or (ii) the United Nations Convention for Contracts for the International Sale of Goods,
which is explicitly excluded. You agree to submit to the jurisdiction of the State of Illinois for any and all disputes,
claims and actions arising from or in connection with the Data provided to you hereunder.
Government End Users.
If the Data is being acquired by or on behalf of the United States government or any other entity seeking or applying
rights similar to those customarily claimed by the United States government, this Data is a “commercial item” as that
term is defi ned at 48 C.F.R. (“FAR”) 2.101, is licensed in accordance with these End User Terms, and each copy of
the Data delivered or otherwise furnished shall be marked and embedded as appropriate with the following “Notice of
Use,” and shall be treated in accordance with such Notice:
NOTICE OF USE
CONTRACTOR (MANUFACTURER/SUPPLIER) NAME: NAVTEQ
CONTRACTOR (MANUFACTURER/SUPPLIER) ADDRESS: 222 Merchandise Mart Plaza, Suite 900, Chicago, Illinois
60654
This Data is a commercial item as defi ned in FAR 2.101 and is subject to the End User Terms under which this
Data was provided.
© 2005 NAVTEQ – All rights reserved.
If the Contracting Offi cer, federal government agency, or any federal offi cial refuses to use the legend provided herein,
the Contracting Offi cer, federal government agency, or any federal offi cial must notify NAVTEQ prior to seeking
additional or alternative rights in the Data.
© MAPMASTER
English
11
111110
Page 12
Features
Panasonic welcomes you to our constantly growing family of electronic products owners. We endeavor to give you
the advantages of precise electronic and mechanical engineering, manufactured with carefully selected components,
and assembled by people who are proud of the reputation their work has built for our company. We know this product
will bring you many hours of enjoyments, and after you discover the quality, value and reliability we have built into it,
you too will be proud to be a member of our family.
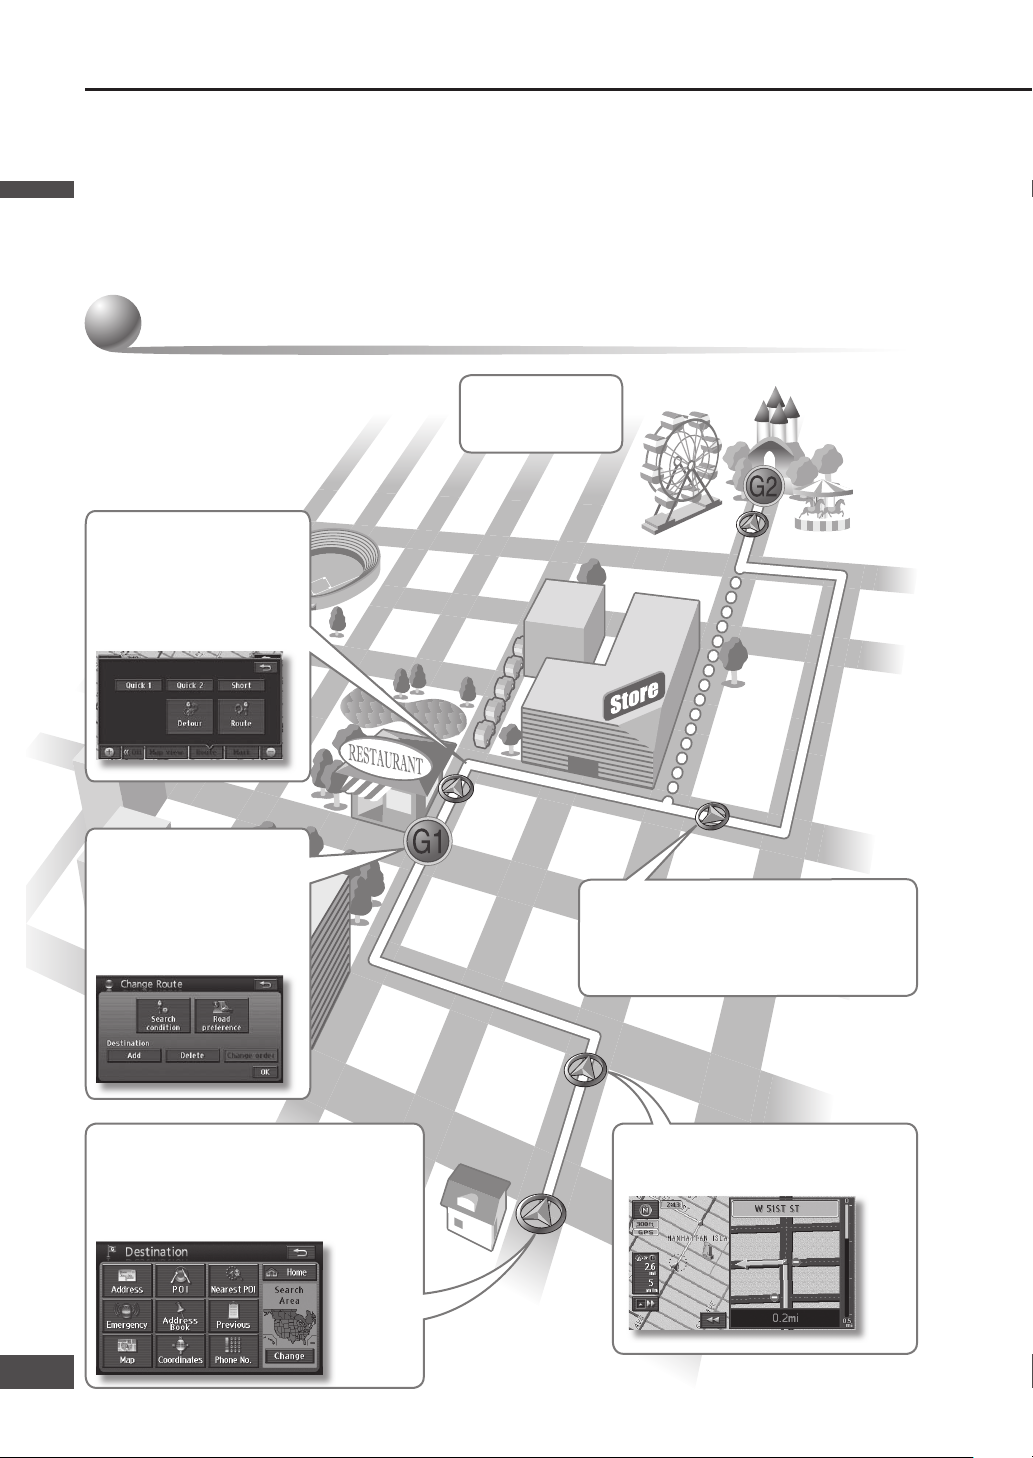
StartStart
Set the destination from the Destination Set the destination from the Destination
menu, and start route guidance.menu, and start route guidance.
High performance Navigation
Near the intersectionNear the intersection
Enlarged intersection map is displayed.Enlarged intersection map is displayed.
Add a destinationAdd a destination
After the destination has After the destination has
been set, it is still possible been set, it is still possible
to set other destinations to set other destinations
(up to 5).(up to 5).
Detour routesDetour routes
When there is congestion When there is congestion
or another problem along or another problem along
the route, search for detour the route, search for detour
routes to avoid it.routes to avoid it.
AutorouteAutoroute
If the vehicle deviates from the guidance If the vehicle deviates from the guidance
route, a new search is performed route, a new search is performed
automatically.automatically.
Goal !Goal !
English
English
12
13
Page 13
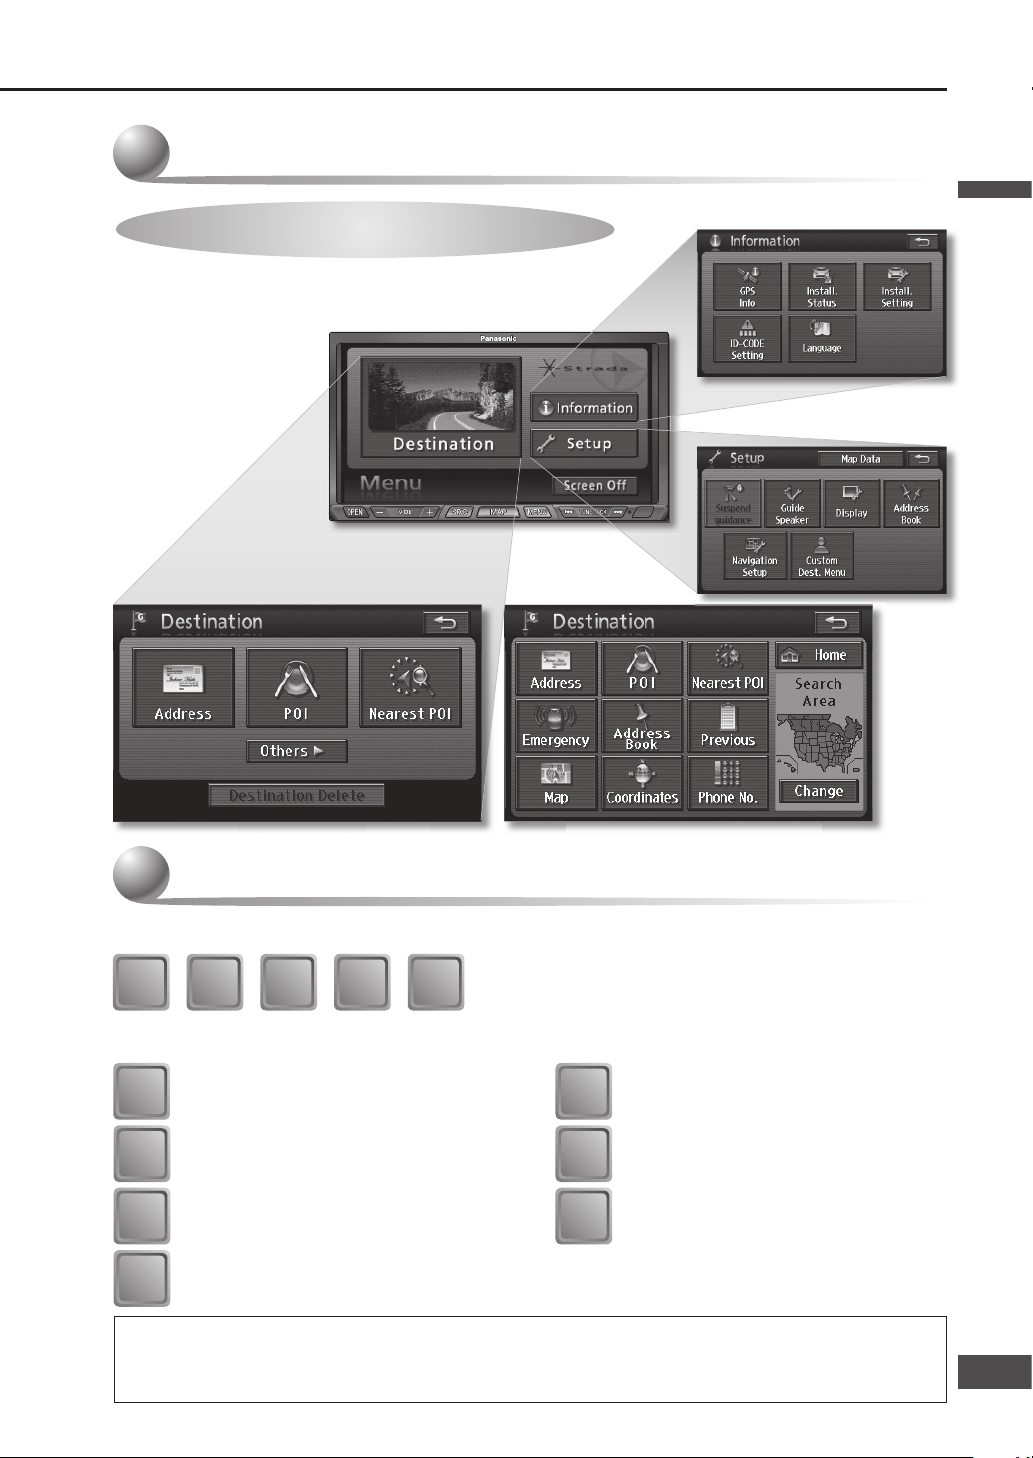
Easy to use
Destination menu
Information menu
Setup menu
Navigation menu
High usability and easy understand GUI
Please refer to the separate “System Upgrade Guidebook” for how to operate this unit when optional devices are connected.
No device is connected to this unit. Basic operations are covered only by this book.
Optional devices are connected to this unit. Refer to the “System Upgrade Guidebook” in addition.
AV features
DVDDVD CDCD
MP3MP3
WMAWMA
FMFM AMAM
Various AV sourcesVarious AV sources
Rear View Rear View
CameraCamera
BluetoothBluetooth
®®
iPodiPod
®®
TVTV
TUNERTUNER
SIRIUSSIRIUS
XMXM
Rear Rear
MonitorMonitor
Connectable Optional devicesConnectable Optional devices
iPod
Direct cable for iPod (CA-DC300U, option)
Optional XM Satellite Radio Tuner (XMD1000)
Optional Digital Adapter Cable (XMDPAN110)
Optional SIRIUS Satellite Radio Tuner
(SIR-PAN1)
Bluetooth hands-free kit
(CY-BT100U, option)
Over-Head monitor
(CY-VHD9401U, option)
TV tuner
(CY-TUN153U, option)
Rear view camera
English
13
1312
Page 14

Contents
Safety information
.................................................2
Notes on use
............................................................6
Discs that can be played back
..........................7
Customer services directory
..............................8
Limited warranty
....................................................9
About the data of the map
................................10
Features
..................................................................12
Contents
..................................................................14
Components
...........................................................15
Names of controls and functions
...................16
Turn on the power
................................................18
Select a language
................................................19
Check the vehicle position
...............................19
Adjust the volume
................................................20
Adjust navigation volume
........................................20
Adjust audiovisual volume
......................................20
Operate the monitor
............................................21
Adjust the monitor angle (TILT)
..............................21
Screen off
................................................................21
Check mounting and wiring
.............................22
Installation confi rmation
.........................................22
Installation setting
...................................................23
GPS information
......................................................23
ID CODE setting
....................................................24
Language
................................................................25
Clock display
.........................................................26
Check map data
....................................................26
Map operations
....................................................28
Current position screen
(displays the vehicle position)
.................................28
Map mode screen
....................................................29
Display during route guidance
.................................29
Day mode and Night mode
......................................29
Switch the map
.......................................................30
Operation of two-screen display
..............................31
Move the map (scroll)
.............................................32
Switch orientation (Heading up/North up)
...............32
Switch the scale
......................................................33
Customize the Destination menu
.............................34
Clear or display route trace
....................................35
Create a route to the destination
...................36
Select the route from 3 routes
.................................38
Change the route
.....................................................38
Change time display
................................................39
Suspend route guidance
..........................................39
Search for a destination
....................................40
Address search
.......................................................40
POI (Point of interest) search
..................................42
Nearest POI search
..................................................44
Emergency search
...................................................46
Address Book search
..............................................47
Previous search
.......................................................47
Map search
.............................................................48
Coordinates search
.................................................48
Phone number search
.............................................49
Return Home
...........................................................49
Display POI icons
....................................................50
Search for nearby POI icons
....................................51
Edit the route
.........................................................52
Add a destination
....................................................52
Change the order of destinations
............................54
Delete a destination
.................................................55
Search again for the route
.......................................56
The search looks for nearby detour routes
..............56
Set search conditions for each section of the route
.....57
Select the road to use
..............................................58
Check the route
.....................................................59
Use the demo to check the route
.............................59
Route scrolling
........................................................59
During route guidance
.......................................60
Display the All route screen manually
.....................60
Autoroute
................................................................60
Voice guidance on ordinary roads
...........................61
Voice guidance on freeways
....................................61
Request voice guidance
..........................................61
Register a location
..............................................62
Register a Contact
...................................................62
Display the Edit Contacts screen
.............................63
Edit the Contact information
....................................64
Delete a Contact
......................................................65
Register an Area to avoid
........................................66
Delete an Area to avoid
............................................67
Display the Edit area to avoid screen
.......................67
Edit Area to avoid information
.................................68
Basic audiovisual operations
..........................70
Switch audiovisual source
.......................................70
Turn the audiovisual source off
...............................70
Switch from the Audiovisual screen to the
navigation screen
....................................................70
Radio
........................................................................71
Switch to radio (AM or FM)
.....................................71
FM operation screen
................................................71
AM operation screen
...............................................71
Tuning
.....................................................................71
Preset memory
........................................................72
Auto preset memory
................................................72
Play a disc
..............................................................73
Disc insert (CD/DVD)
..............................................73
Disc eject (CD/DVD)
................................................73
Switch to disc (DVD, CD, MP3/WMA)
.....................74
DVD operation screen
.............................................74
DVD menu
...............................................................75
Stop
........................................................................76
Pause
......................................................................76
Select chapter/title
...................................................77
Fast forward/Fast reverse
........................................77
Switch the audio language
......................................78
Switch the subtitle language
...................................78
Switch the angle
......................................................79
English
English
14
15
Page 15
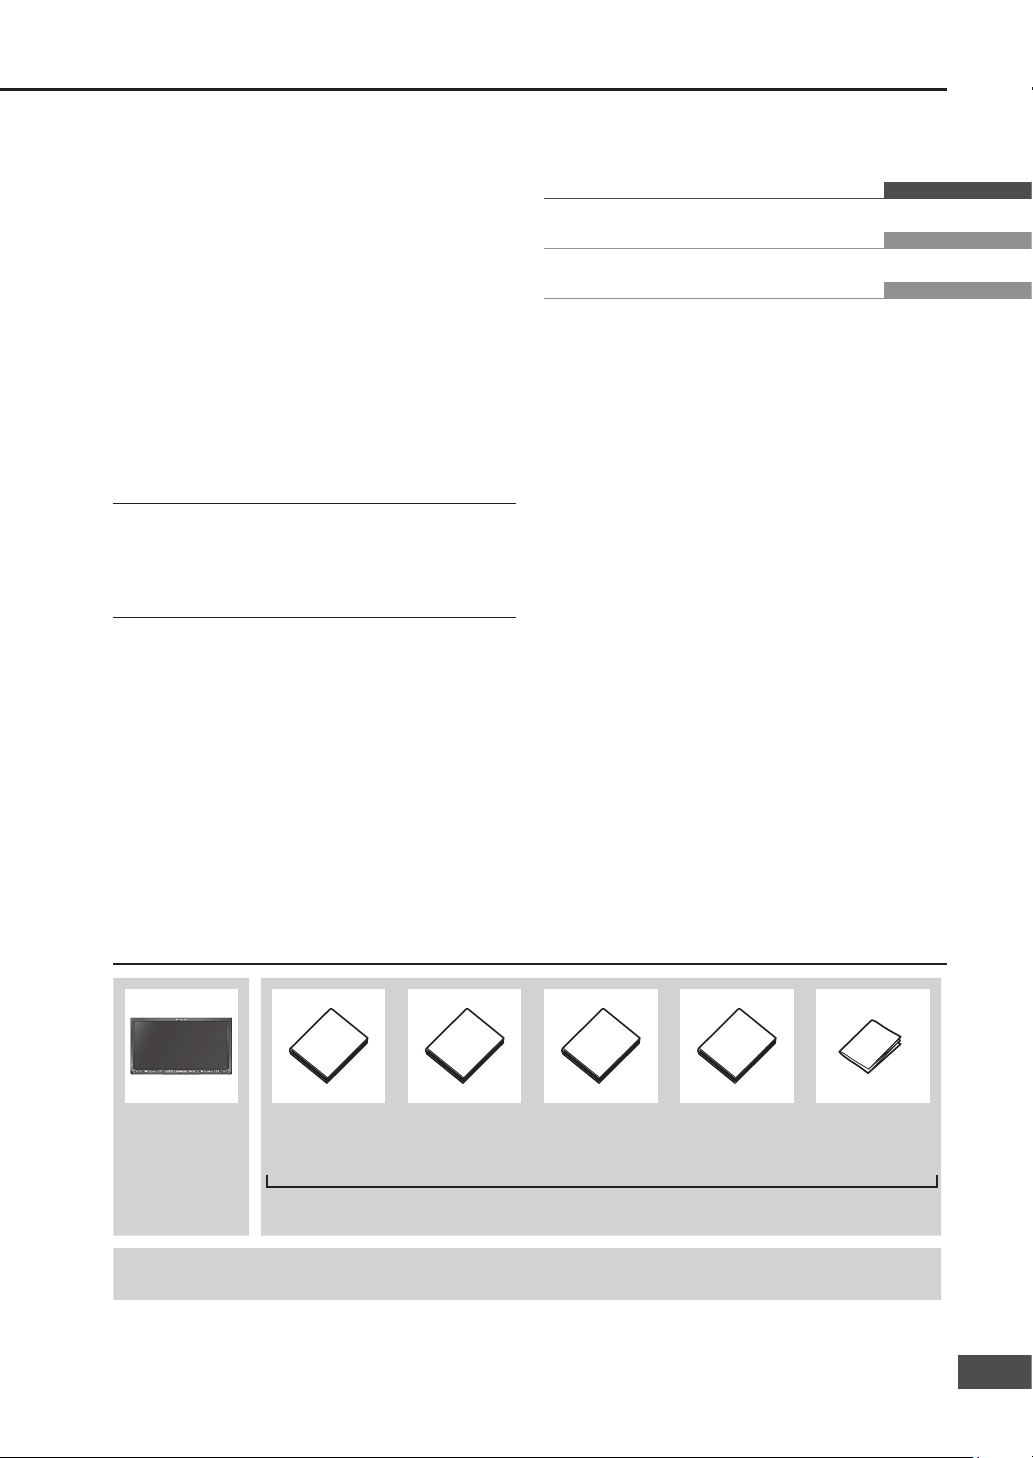
Car navigation
unit
Quick Reference
Guidebook
(YEFM262812)
Operating
Instructions
(YEFM285972)
System Upgrade
Guidebook
(YEFM285973)
Installation
Instructions
(YEFM294342)
Owner
Information Card
(YEFM07481)
Qty: 1
Instruction kit
Qty: 1
Installation hardware (screws, cords, etc.)
(
Installation Instructions)
Note:
The number in parentheses underneath each accessory part name is the part number for maintenance and service.
Accessories and their parts numbers are subject to modifi cation without prior notice due to improvements.
Components
Display the top menu
..............................................79
Display the title menu
..............................................79
Top menu and title menu operations
.......................80
CD operation screen
...............................................81
MP3/WMA operation screen
..................................81
Select track/fi le
.......................................................81
Folder selection
......................................................81
Fast forward/Fast reverse
........................................81
Select a folder from the list
....................................82
Select a fi le from the list
.........................................82
Scan play
................................................................82
Folder scan play
.....................................................82
Random play
..........................................................83
Folder random play
................................................83
Repeat play
............................................................83
Folder repeat play
...................................................83
Display fi le information
..........................................83
Change navigation settings
.............................84
Change audio and video settings
...................88
Language code list
..............................................96
How to enter text
..................................................97
Troubleshooting
...................................................98
Maintenance
........................................................106
Notes on discs
....................................................107
Notes on MP3/WMA
..........................................108
What is a navigation system?
.......................110
POI category list
.................................................112
Defi nition of terms
.............................................113
Index
.......................................................................114
Specifi cations
......................................................115
English
Français
Español
English
1514
Page 16
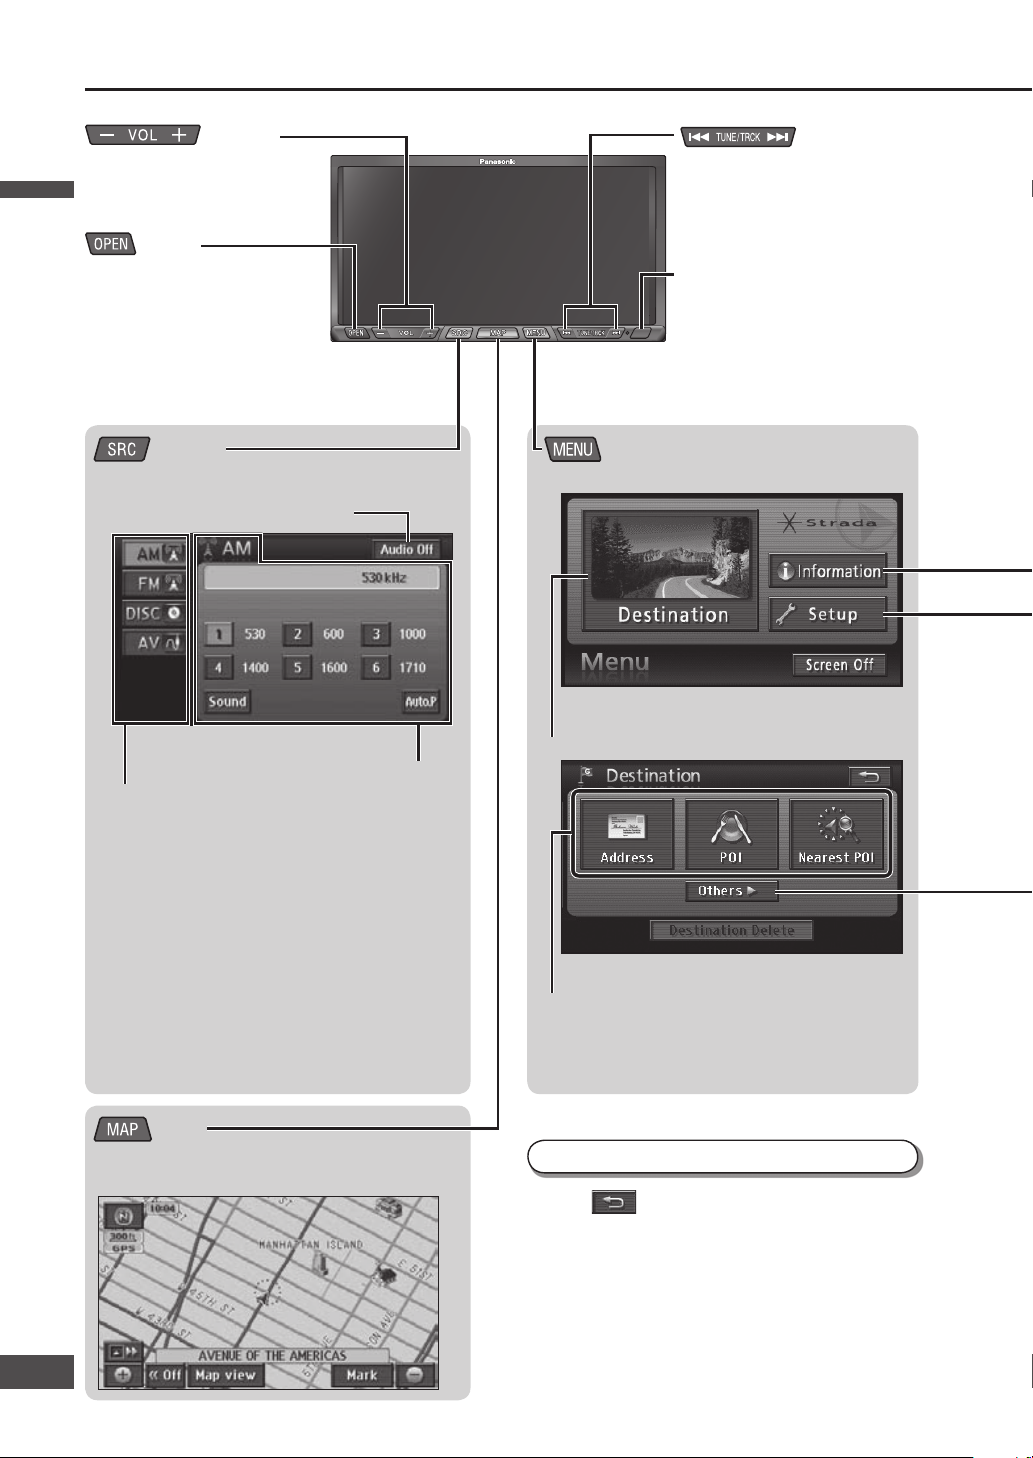
(Volume)
Adjusts audiovisual volume.
(
page 20)
(Source)
Displays the Audiovisual source operation screen.
(Navigation)
Displays the Navigation menu.
(Map)
Displays the vehicle position (current position).
(
page 28)
(Tune/Track)
Selects a station. ( page 71)
Skips a track/chapter.
( page 77, 81)
Fast forward/Fast reverse
(
page 77, 81)
Switches the source.
AM: (
page 71)
FM: (
page 71)
DISC: (
page 74)
XM*
1
: ( System Upgrade Guidebook)
SIRIUS*
2
: ( System Upgrade Guidebook)
iPod*
3
: ( System Upgrade Guidebook)
AV: (
System Upgrade Guidebook)
Displays the Destination menu.
Audio Off/Audio On: (
page 70)
Displays three commonly used search methods
(shortcuts).
Any three desired search methods can be
selected as shortcuts. (
page 34)
Current source
Names of controls and functions
To go back to the previous screen
Touch in the top right of the screen.
< Navigation menu>
<Destination menu>
<Audiovisual source operation screen>
*1 This is displayed when an XM Satellite Radio
Tuner (XMD1000) is connected.
*
2
This is displayed when a SIRIUS Satellite Radio
Tuner (SIR-PAN1) is connected.
*
3
This is displayed when an iPod is connected.
(Open)
Displays/hides the Open/Tilt/
Eject screen. (
page 21)
Closes the monitor.
(
page 73)
Remote control sensor
Use this to operate the Car TV
(CY-TUN153U, option) with the
remote control unit provided.
Navigation and other audiovisual
operations cannot be performed
from the remote control unit.
English
English
16
17
Page 17

Panel open
SD Memory card slot
Only used for map data and
software updates.
It cannot be used for playing
back audio format such as SD
audio.
CD/DVD slot
Suspend (Resume) guidance*: ( page 39)
Guide Speaker: ( page 20)
Display: ( page 92)
Address Book: ( page 62)
Navigation Setup: ( page 84)
Custom Dest. Menu: ( page 34)
Map Data: ( page 26)
* Only be operated during route guidance.
Address: ( page 40)
POI (Point Of Interest): ( page 42)
Nearest POI: ( page 44)
Emergency: ( page 46)
Address Book: ( page 47)
Previous: ( page 47)
Map: ( page 48)
Coordinates: ( page 48)
Phone No.: ( page 49)
Home: ( page 49)
Change: ( page 36)
GPS Info: ( page 23)
Install. Status: ( page 22)
Install. Setting: ( page 23)
ID-CODE Setting: ( page 24)
Language: ( page 25)
Rear View*: ( System Upgrade Guidebook)
* This is displayed when a rear view camera is
connected.
Displays the Information menu.
Displays the Setup menu.
Displays all search methods.
< Destination menu (All)>
<Setup menu>
<Information menu>
English
17
1716
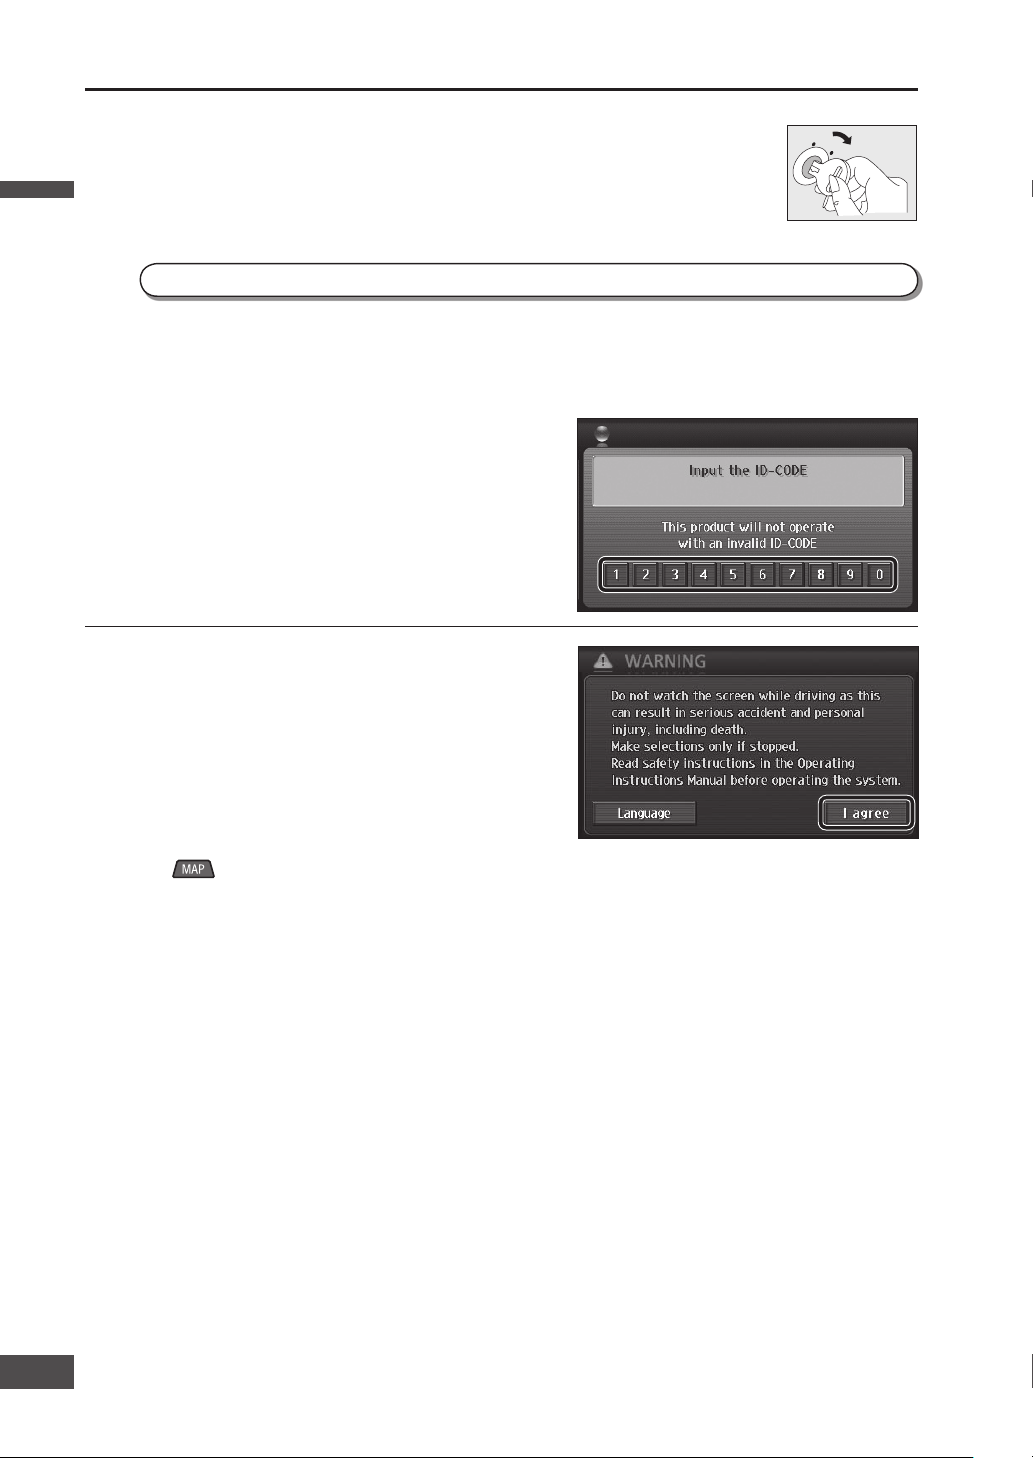
Page 18
ACC
ON
Turn on the power Select a language
Enter the 4-digit ID code.
Note:
In case you forget the ID code, please consult your
nearest Panasonic Servicenter.
1
Start the engine. (Or turn the key to ACC.)
Turn on the navigation system power. (It takes a few seconds for the screen to
appear.)
2
Read the precautions on the
WARNING screen, then touch
[I agree].
The current position screen (vehicle position) is
displayed.
Change the language used. ( page 19)
Note:
If is pressed when the audiovisual screen is
displayed, the display switches to current position
screen.
If ACC is left on for a long period of time without
running the engine, it can run the battery down.
Do not start driving until the current position screen
is displayed.
The system is preparing to boot up.
After moving this unit to a different vehicle, or after changing the battery or disconnecting its cables, the
Input ID Code screen is displayed the next time the system starts.
Generally, it is not necessary to enter the ID code each time when using the unit if it has not been
disconnected from the main power supply (car battery).
When setting the ID CODE
( page 24)
English
English
18
19
Page 19
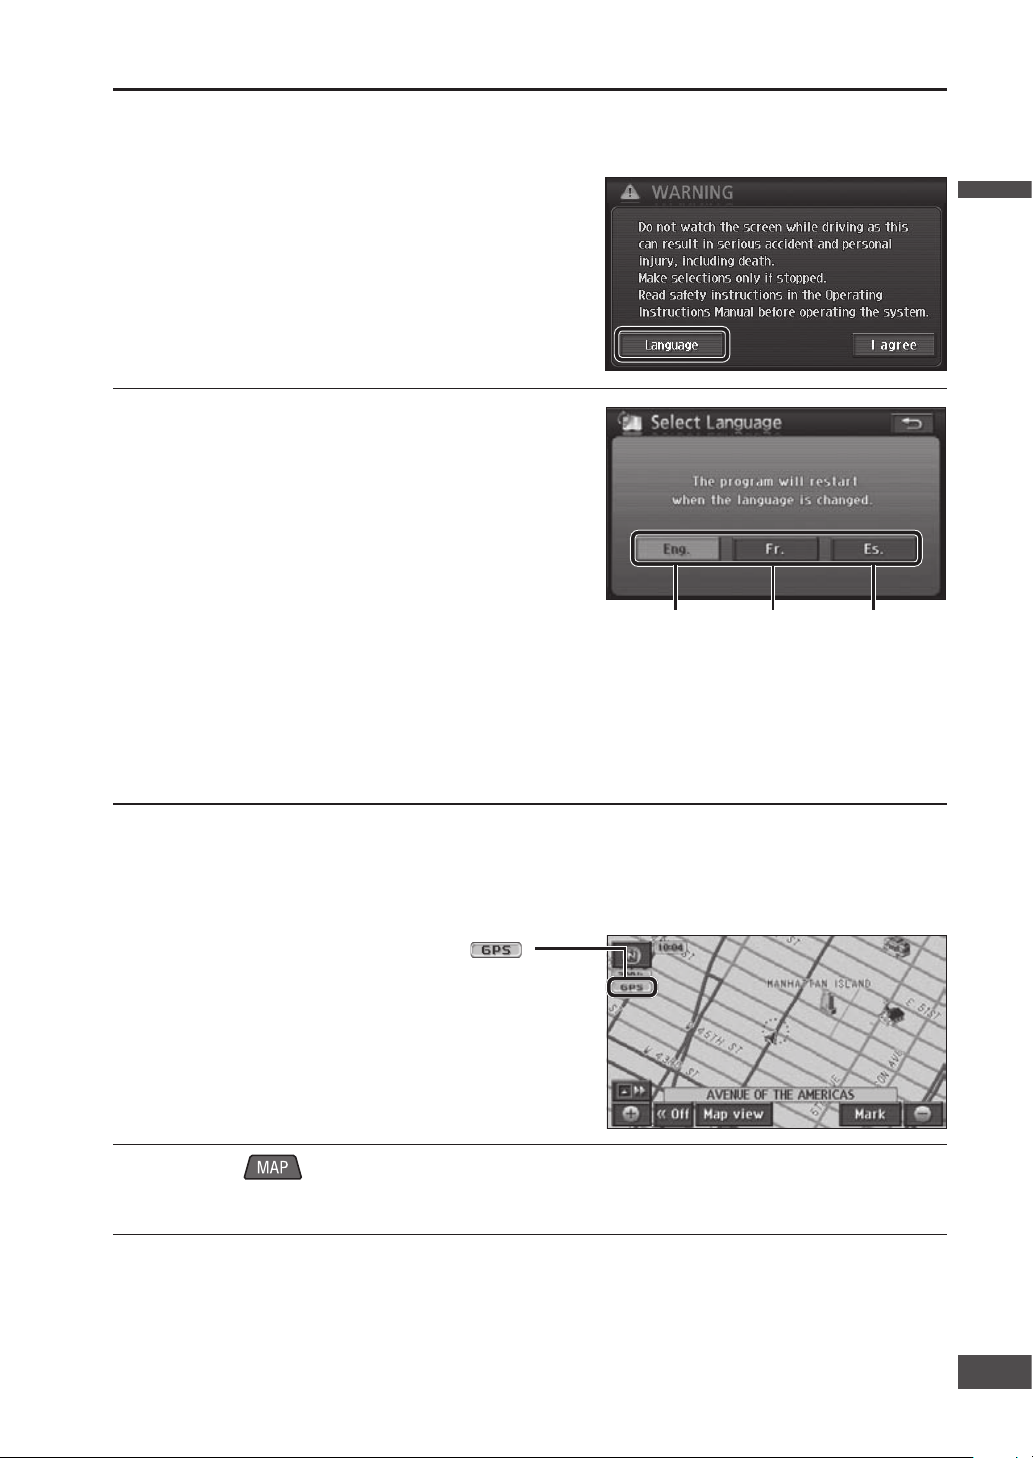
First, select the language to use on this system. The available languages are English, French and Spanish.
English
(Default)
French Spanish
When the power is fi rst turned on, the map display may differ from the actual vehicle position. Once the
GPS receives satellite signals, the map display will eventually shift to the area around the vehicle (the
current position screen). Use a clearly visible point to check your position. If the vehicle position is not
displayed correctly, check GPS reception.
( page 23)
Check the vehicle position
1
Touch [Language] on the
WARNING screen.
2
Touch the language to use.
[Eng.]: English (Default)
[Fr.]: French
[Es.]: Spanish
The system restarts if the language is changed.
Note:
The language used for the touch keys, explanatory text,
voice guidance and other content can be changed. Place
names and street names do not change.
The language can also be changed on the Information
menu. (
page 25)
1
Check that the GPS mark ( )
is displayed.
It may take some time for the GPS mark to appear.
If there is no GPS mark, or if the mark continues to
fl ash, check GPS reception.
(
page 23)
2
Press to display the current position screen.
3
Continue for a while along a road with good visibility.
(60 minutes or more)
The discrepancy between the position of the vehicle mark on the map screen and the actual vehicle
position will be corrected.
English
19
1918
Page 20
Adjusts the volume
for voice guidance.
Checks the volume.
Press .
Adjustment range: 0 – 40
Each press turns the volume up (down) one level.
Pressing and holding or turns the volume up or down
continuously.
Note:
Volume settings for DVD and AV are stored separately from the
volume settings for other sources.
Adjust the volume
Note:
The navigation volume cannot be adjusted by
.
Adjust navigation volume Adjust the monitor angle ( TILT)
Adjust audiovisual volume
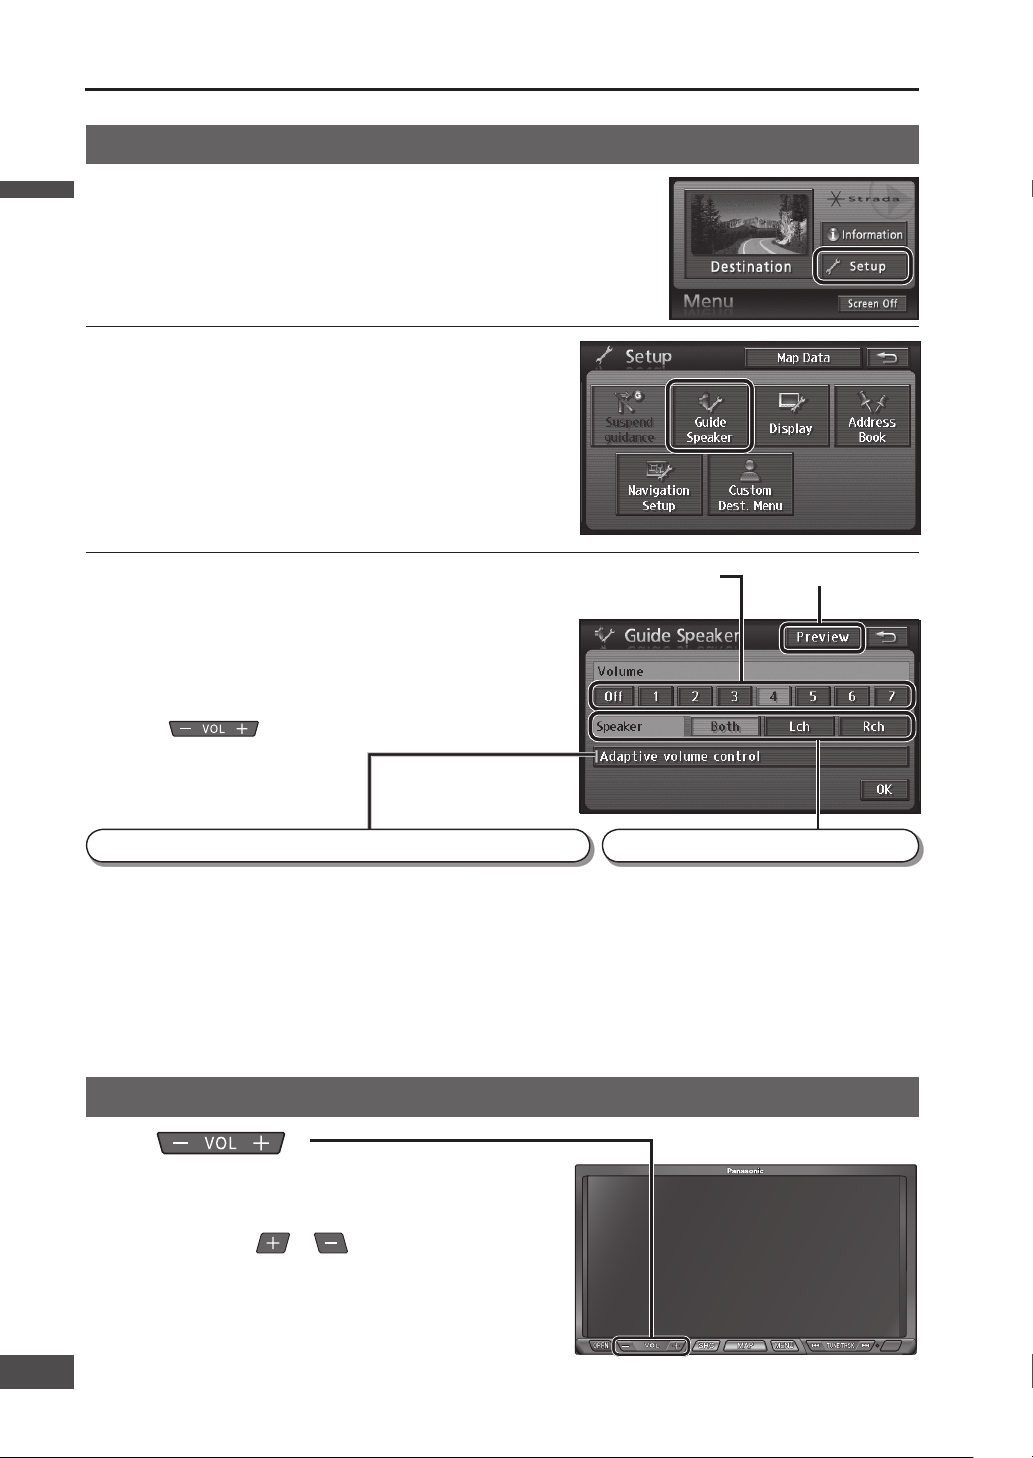
1
Select [Setup] from the Navigation
menu.
( page 16)
2
Select [Guide Speaker].
3
Select a setting [1] – [7] to adjust
volume.
Select [Off] to cancel voice guidance.
1 2 3 4 5
To switch the volume automatically according to the speed
When vehicle speed exceeds 50 miles (80 km) per hour, the guidance
volume is automatically raised by one step.
Touch [ Adaptive volume control].
Touch it again to cancel Adaptive volume control.
default : On
Note:
If guidance volume is set to [Off] or [7], it will not switch.
To set voice guidance speaker
Sets the speakers which output navigation
voice guidance.
Touch [Both]/[Lch]/[Rch].
Down
Up
English
English
20
21
Page 21
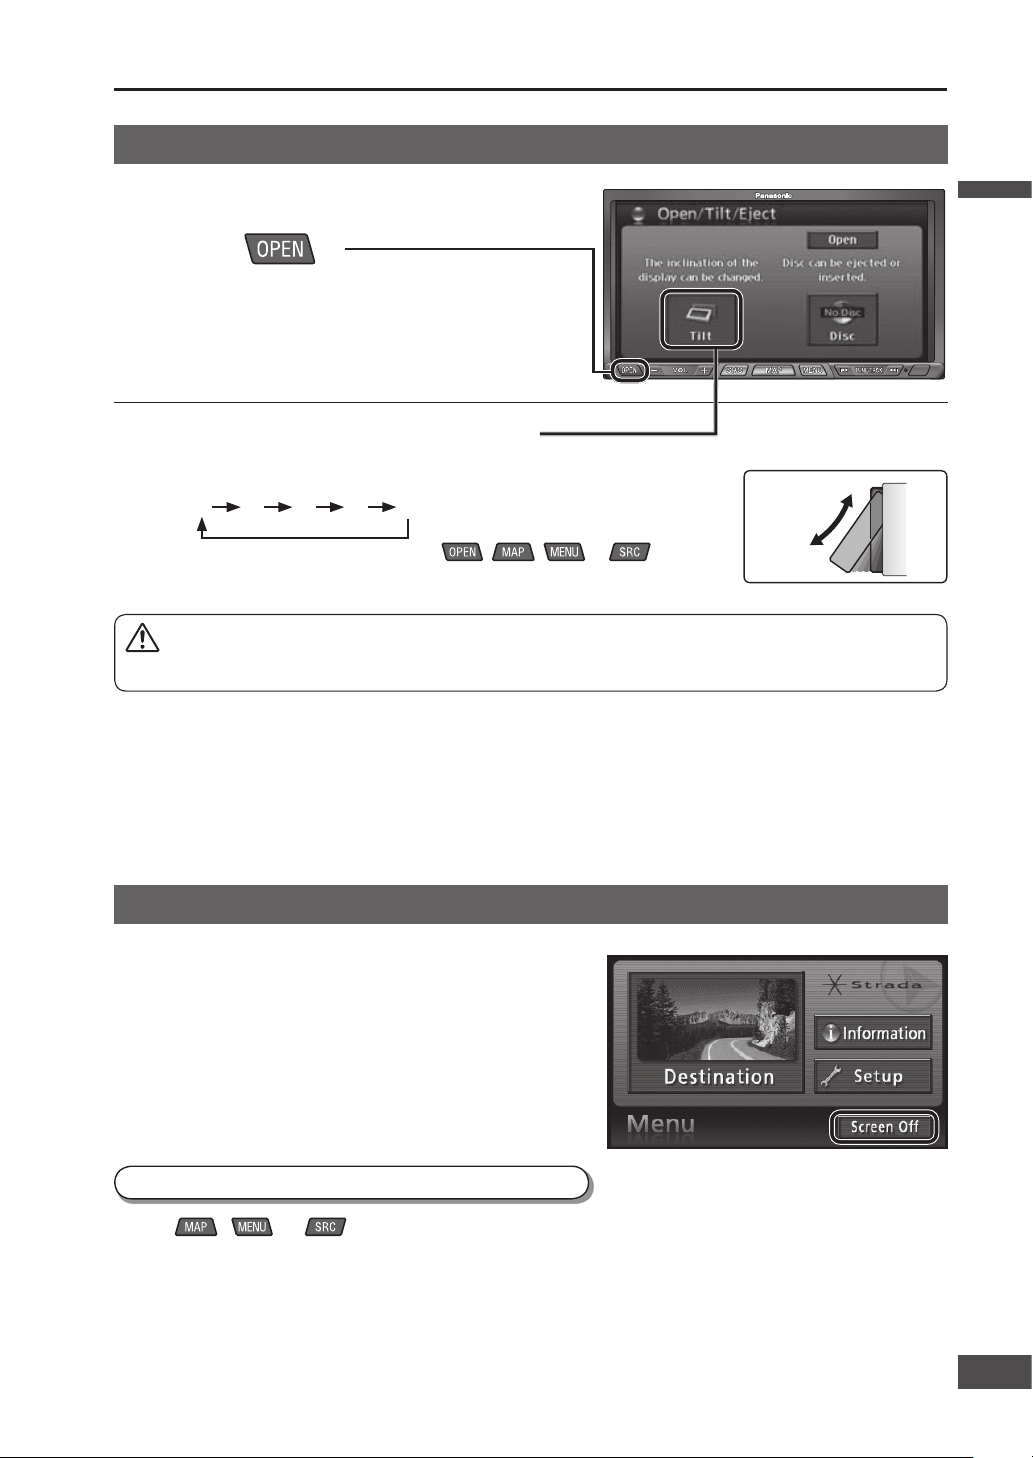
Note:
When the engine is turned off, the monitor returns to the fully closed position.
Next time the engine is started, the monitor opens to the previously adjusted angle.
Adjust the brightness of the screen for easy visibility. ( page 92)
Do not force the monitor forward by hand, or block its operation.
Do not strike the monitor strongly. (For example, take care when moving luggage in and out of the vehicle.)
Adjust the angle to give easy visibility at the position mounted.
Operate the monitor
Screen off
Select [Screen Off] from the Navigation
menu.
( page 16)
The system operates as follows, depending on the specifi c
Screen Off settings.
(
page 86)
[On]: Screen display is switched off, but sound remains on.
[Off]: Both screen display and sound are switched off.
Illumination (button illumination) is not switched off.
Press , or .
To display the screen
Caution:
Take care to avoid your fi ngers from becoming trapped as the monitor opens and closes.
1
Press .
The Open/Tilt/Eject screen is displayed.
2
Touch [Tilt] to adjust the angle.
Each touch switches the angle as shown below.
1 2 3 4 5
When operation is complete, press , , or .
UP
DOWN
English
21
2120
5
1
Page 22
Check mounting and wiring
Installation confi rmation
Check the state of mounting and wiring.
Refer to the Installation Instructions for details.
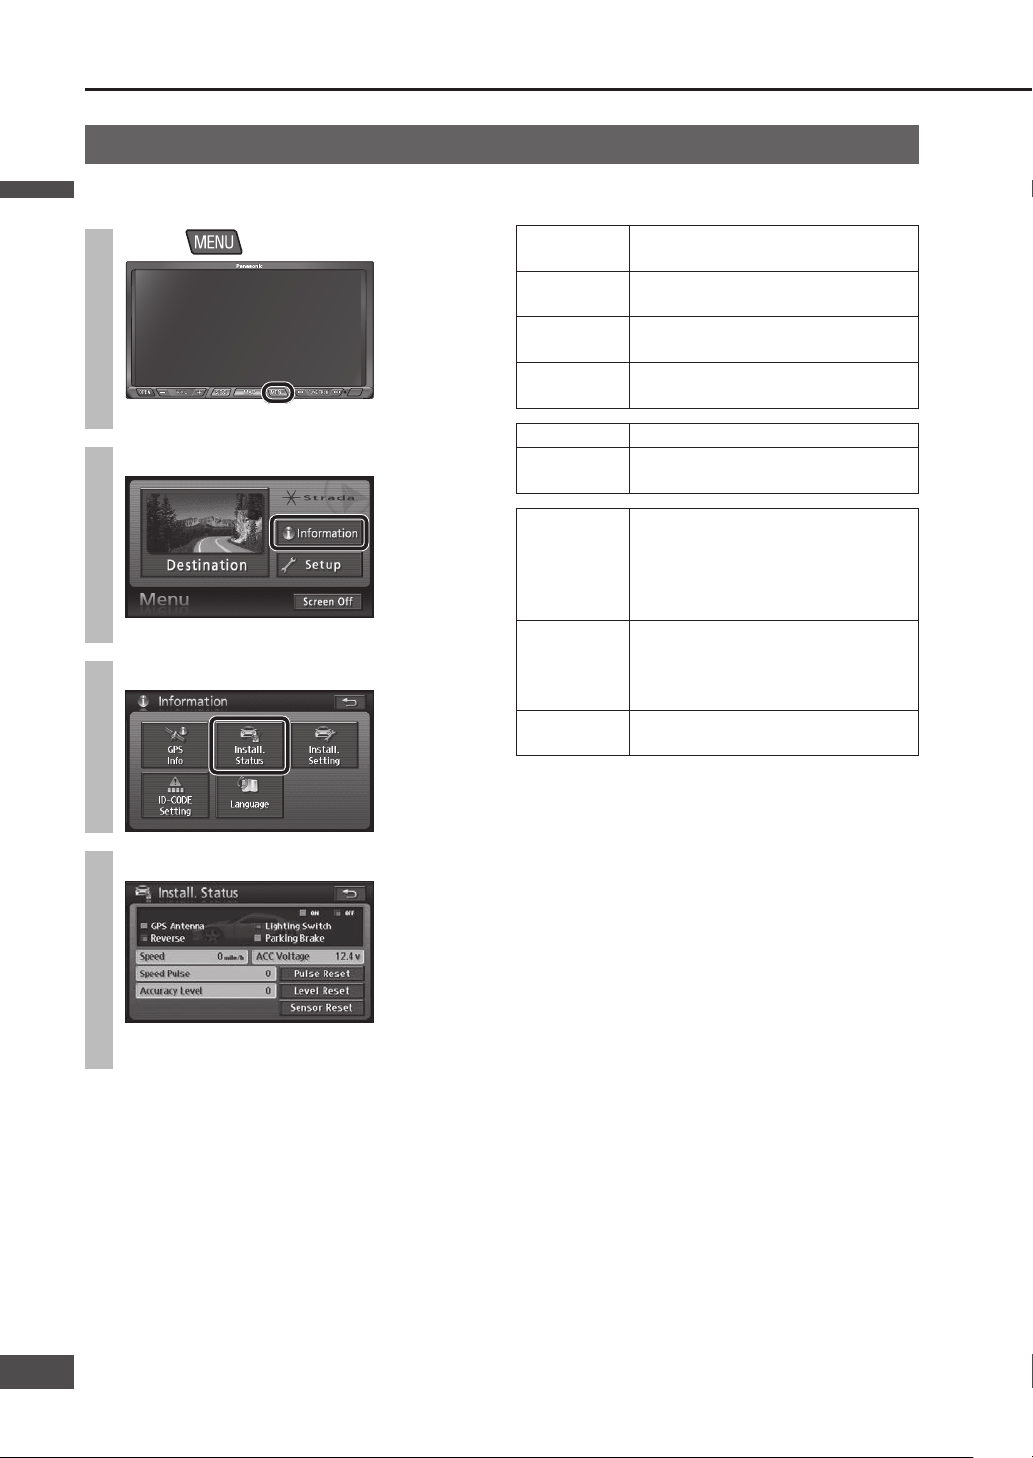
1
Press
.
The Navigation menu is displayed.
2
Select [Information].
The Information menu is displayed.
3
Select [Install. Status].
4
Check mounting.
The items you can check are shown in the table
on the right.
The items you can check
GPS Antenna If the antenna is connected normally,
this indicates “ON”.
Lighting
Switch
If the vehicle side lights are switched
on, this changes to indicate “ON”.
Reverse When the shift lever is shifted to
reverse, this changes to indicate “ON”.
Parking Brake When the parking brake is pulled, this
changes to indicate “ON”.
Speed Vehicle speed is displayed.
ACC Voltage The display should normally be
approximately 12 V. (11 to 16 V)
Speed Pulse The reading changes to “0” when
[Pulse Reset] is pressed. If the system
is functioning normally, the number
should be different after the vehicle
has moved.
Accuracy
Level
The reading changes to “0” when
[Level Reset] is pressed. The number
changes after the vehicle has moved.
(Level 4 is the maximum)
Sensor Reset The reading changes to uncorrected
when [Sensor Reset] is pressed.
Note:
In the following situations, please reset “Speed Pulse”,
“Accuracy Level” and “Sensor Reset”.
The unit has been transferred to another vehicle.
The tires have been changed.
The tires have been rotated.
On routes that involve congestion and frequent
stop-start driving, such as in town, routes with many
left and right turns, and routes where GPS signal
reception is poor, the correction process could take a
long time and leave errors in the stored content.
For some vehicle models, the vehicle mark may stop
moving when speed increases, but that does not
indicate a malfunction when it takes place during the
correction process.
English
English
22
23
Page 23
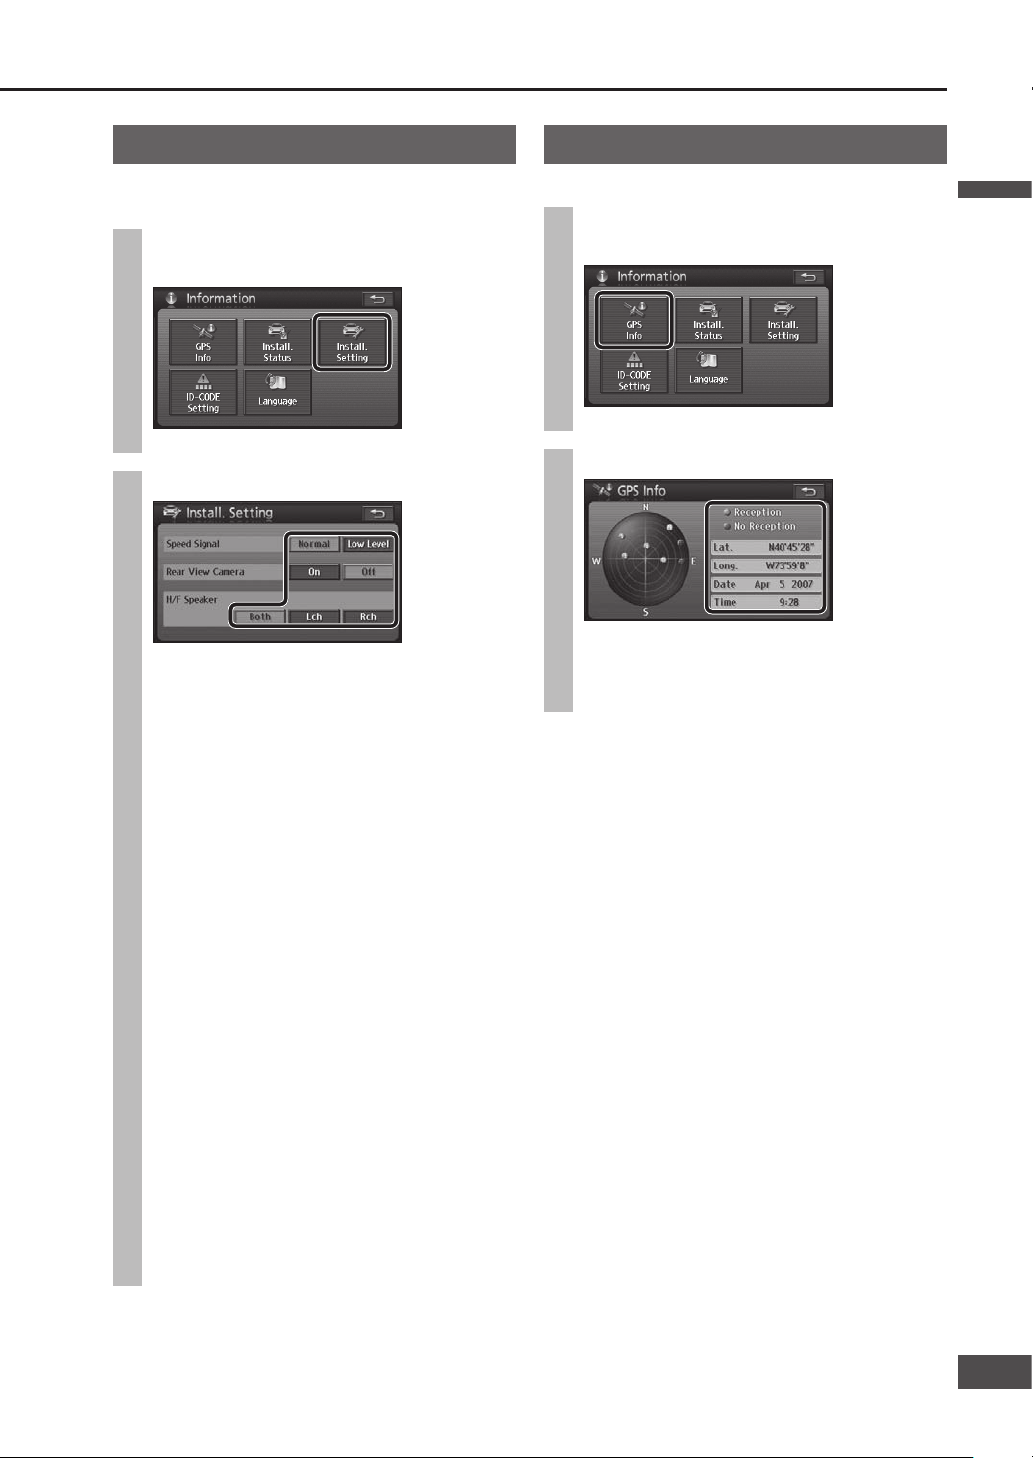
GPS information
Check GPS information reception.
1
Select [GPS Info] from the
Information menu.
The GPS Info screen is displayed.
2
Check the reception.
Use a clearly visible point to check reception.
Check that at least three satellite numbers
are being received, and that the latitude and
longitude are displayed.
Note:
If GPS reception is not continuous, check connections
to the GPS antenna, and its mounting position.
Installation setting
Set the state of mounting and wiring.
Refer to the Installation Instructions for details.
1
Select [Install. Setting] from the
Information menu.
The Install. Setting screen is displayed.
2
Make settings.
Speed Signal:
Set the speed signal detection level. (It should
be set to [Normal] in normal circumstances.)
Select [Low Level] if the voltage of the speed
signal is low and the signal cannot be detected.
default: [Normal]
Rear View Camera:
Set whether or not to switch to the
image from the rear view camera when
the shift lever is in the reverse position.
(
System Upgrade Guidebook)
[On]: Set this if a rear view camera is
connected.
[Off]: Set this if no rear view camera is
connected.
default: [Off]
Note:
The image from the rear view camera may be
blurred in the night or a dark place.
H/F Speaker:
Set the speakers to use for audio output of
hands-free conversation if a hands-free kit
featuring Bluetooth
®
technology (CY-BT100U,
option) is connected.
[Both]: Front Left/Right speaker
[Lch]: Front Left speaker
[Rch]: Front Right speaker
default: [Both]
English
23
2322
Page 24
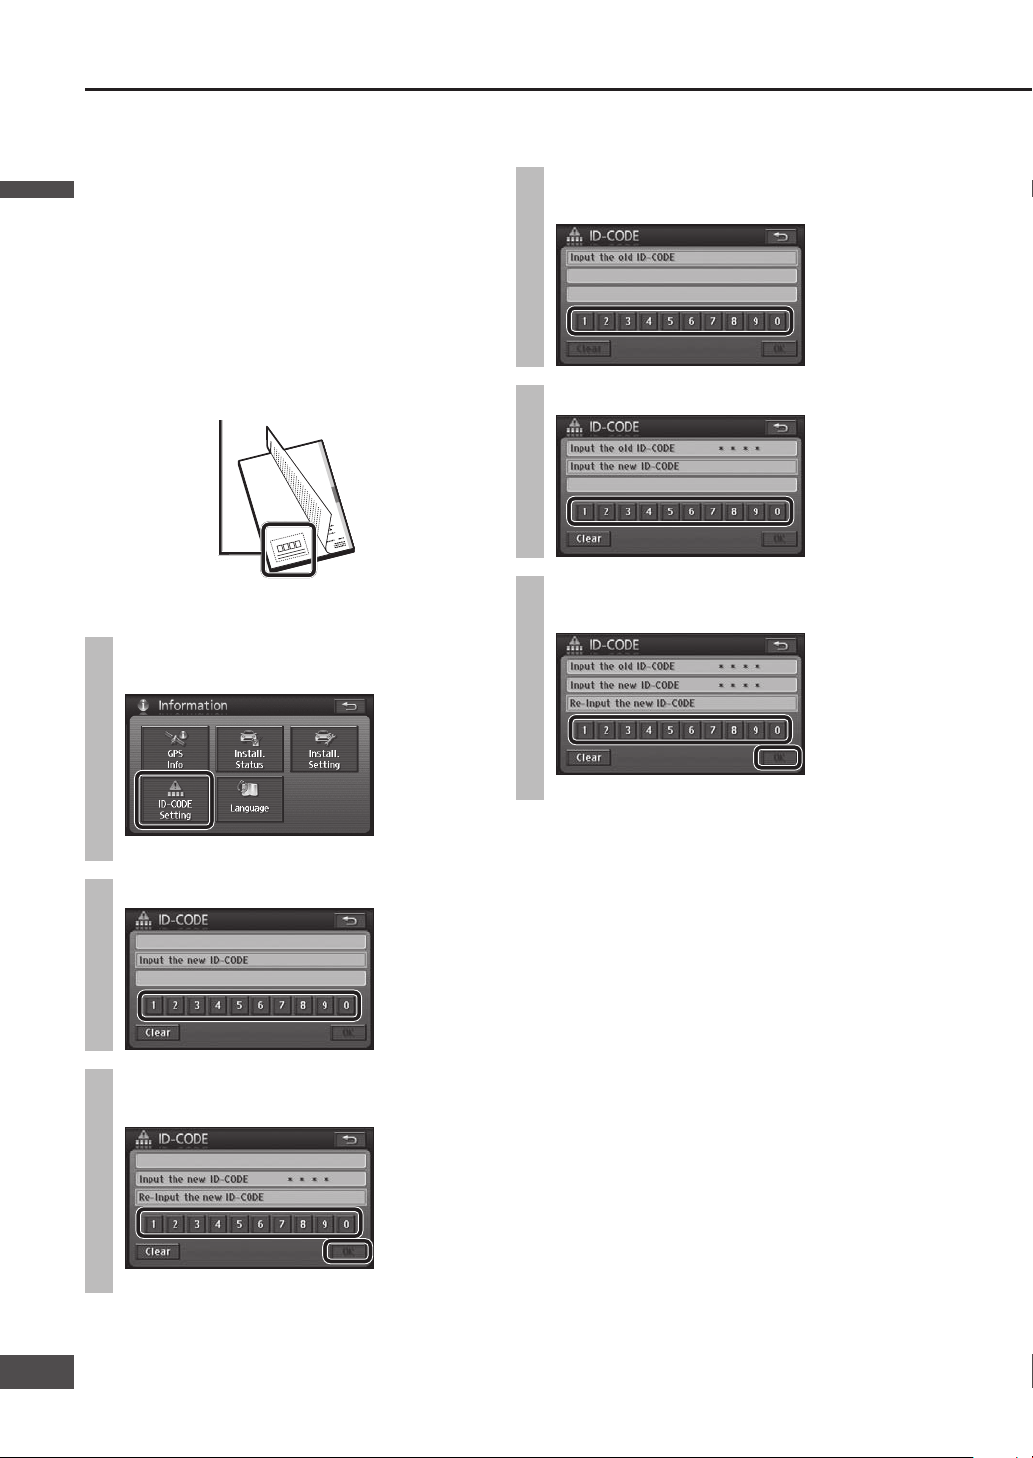
ID CODE setting
Prior to operating this unit, it is advisable to assign a
4-digit ID code for security. Once the ID code has been
set, the unit cannot be operated if the main power supply
is disconnected then re-connected. It is electrically
locked so that a thief cannot use the stolen unit unless
that person knows the code you have set.
The ID code operation must be performed only by the
person to whom the unit belongs.
default: None
Record your registered ID code and keep it in a secure
location. If you forget it, you will be unable to use this
unit.
Copy and use the ID code memo at the back of this
manual.
To set the ID code
1
Select [ID-CODE Setting] from the
Information menu.
The ID CODE setting screen is displayed.
2
Enter the 4-digit ID code.
3
Re-enter the 4-digit ID code, then
select [OK].
The ID code is set.
To change the ID code
1
Enter the current ID code on the ID
CODE setting screen.
2
Enter the new ID code.
3
Re-enter the new ID code, then
select [OK].
The ID code is updated to the new entry.
English
English
24
25
ep it in
, and ke
o
m
he ID code
e
343
ll in t
m
fi
w,
code
ID
memo belo
n.
Copy the
catio
ation
cation
fi
c
fi
ti
n
a secure lo
code d’identi
’ide
le
e d
d
remplir
co
sûr.
i-dessous,
ote de
N
endroit
note c
cación
fi
r dans un
Copier la
identi
e
et conserve
igo de
igo d
d
ene el có
l
r seguro.
a
abajo, rel
en un lug
Anotación del cód
anotación
y guárdelo
Copie la
cación,
fi
identi
905U
CN-NVD
Model No.
ID CODE
342
Page 25
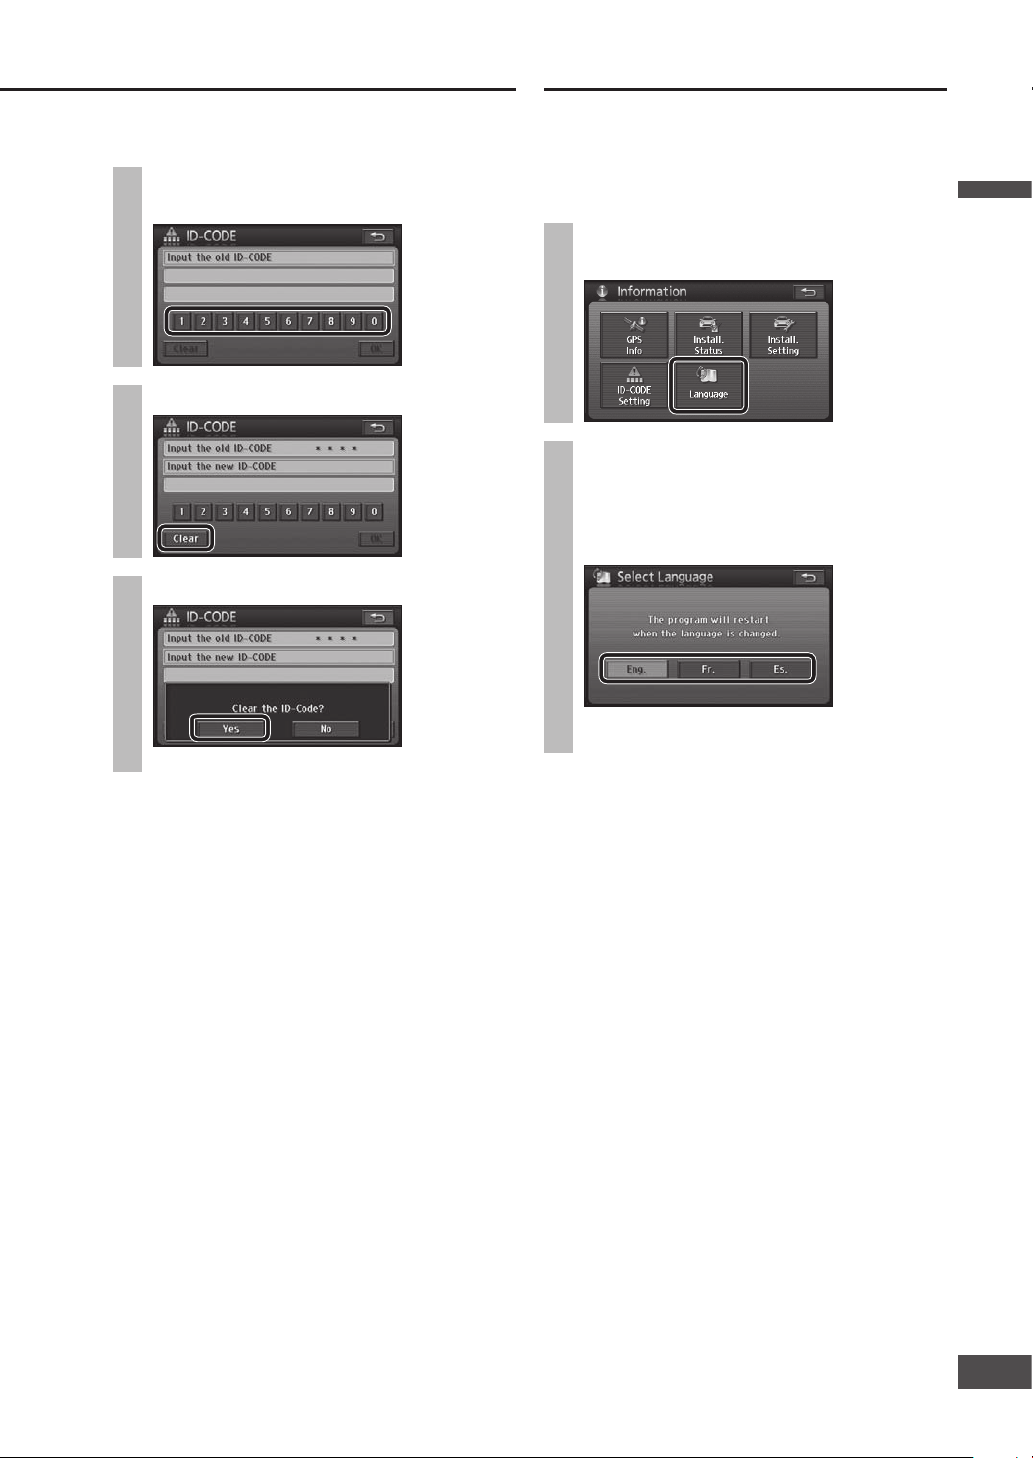
To cancel the ID code
1
Enter the 4-digit ID code on the ID
CODE setting screen.
2
Select [Clear].
3
Select [Yes].
The ID code setting is cancelled.
Note:
Should your unit ever require service, cancel your ID
code before sending for repair.
The ID code setting cannot be eliminated even by the
memory clear function.
The inputted code is not displayed for your security.
Select the language to use on this system.
The language can also be changed at boot up.
(
page 19)
default: [Eng.]
1
Select [Language] from the
Information menu.
2
Select the language to use, from
[Eng.]/[Fr.]/[Es.].
Eng. : English
Fr. : French
Es. : Spanish
Restarts the system to change the language
setting.
If you forget the ID code...
If you forget the ID code, please consult your nearest
Panasonic Servicenter.
Language
English
25
2524
Page 26
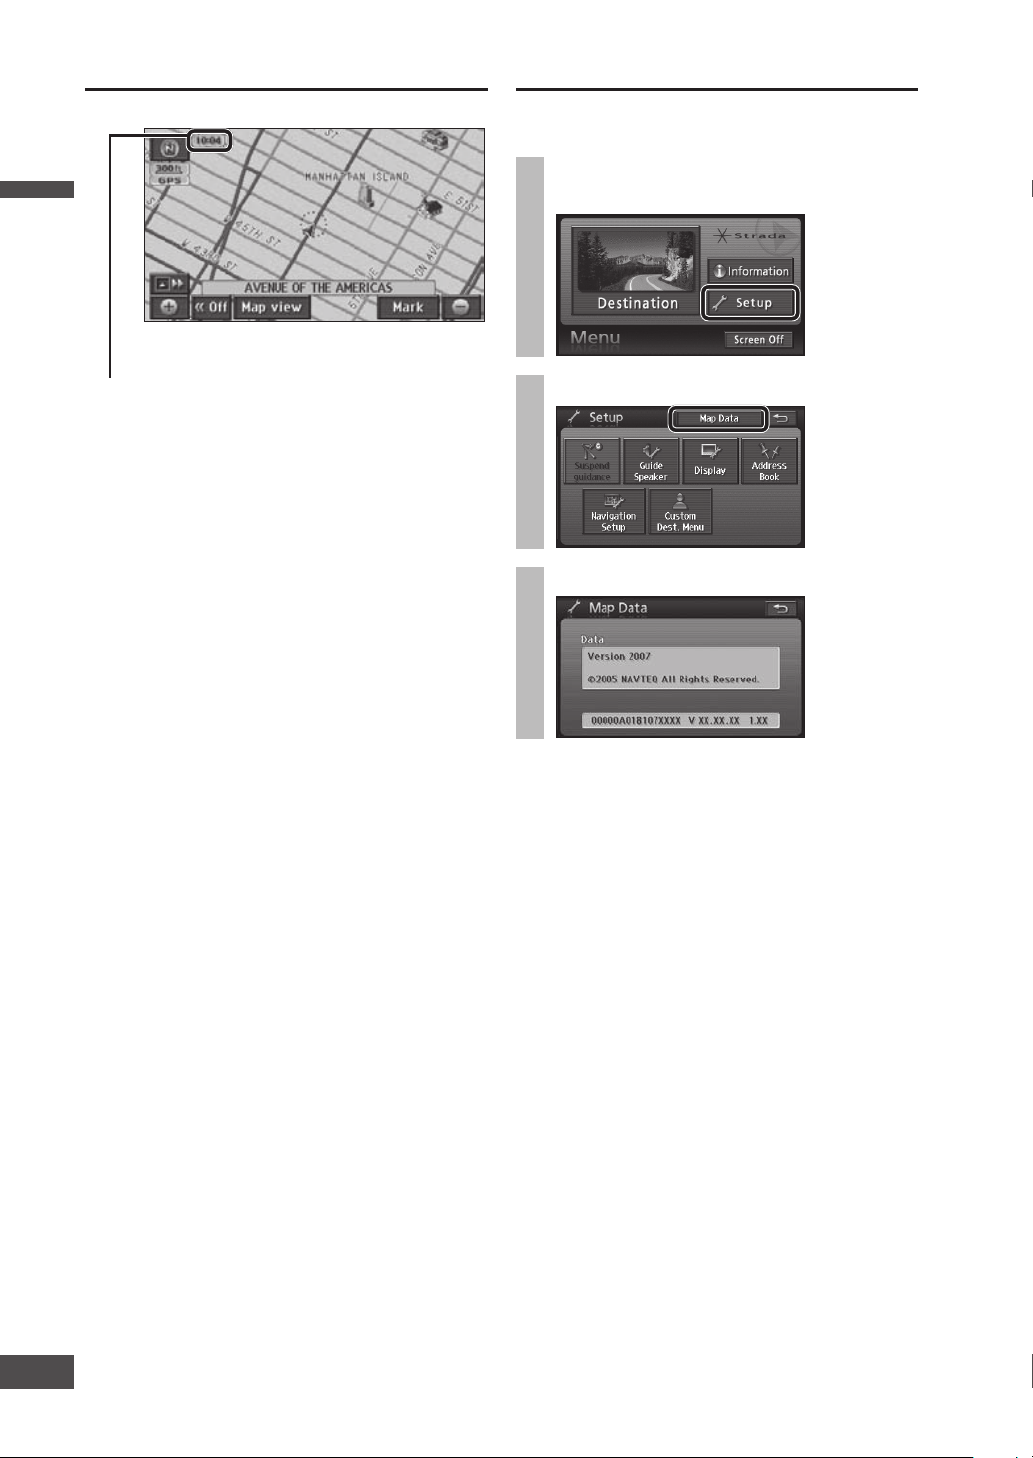
The current version of the map data can be checked.
1
Select [Setup] from the Navigation
menu.
2
Select [Map Data].
3
Check the map data.
Clock display
The clock is adjusted automatically, using a signal from
GPS satellites.
(The clock cannot be adjusted manually.)
Note:
The clock can only display on the map screen.
It cannot be displayed on audiovisual screen and
menu screen.
The time zone can be changed ( page 84).
It does not change automatically.
default : EST (Eastern Standard Time)
It can be set to display/not display. ( page 84)
Clock display Check map data
English
English
26
27
Page 27

English
27
Navigation
Operations
Map operations
Create a route to the destination
Search for a destination
Edit the route
Check the route
During route guidance
Register a location
Contact
Area to avoid
2726
Page 28
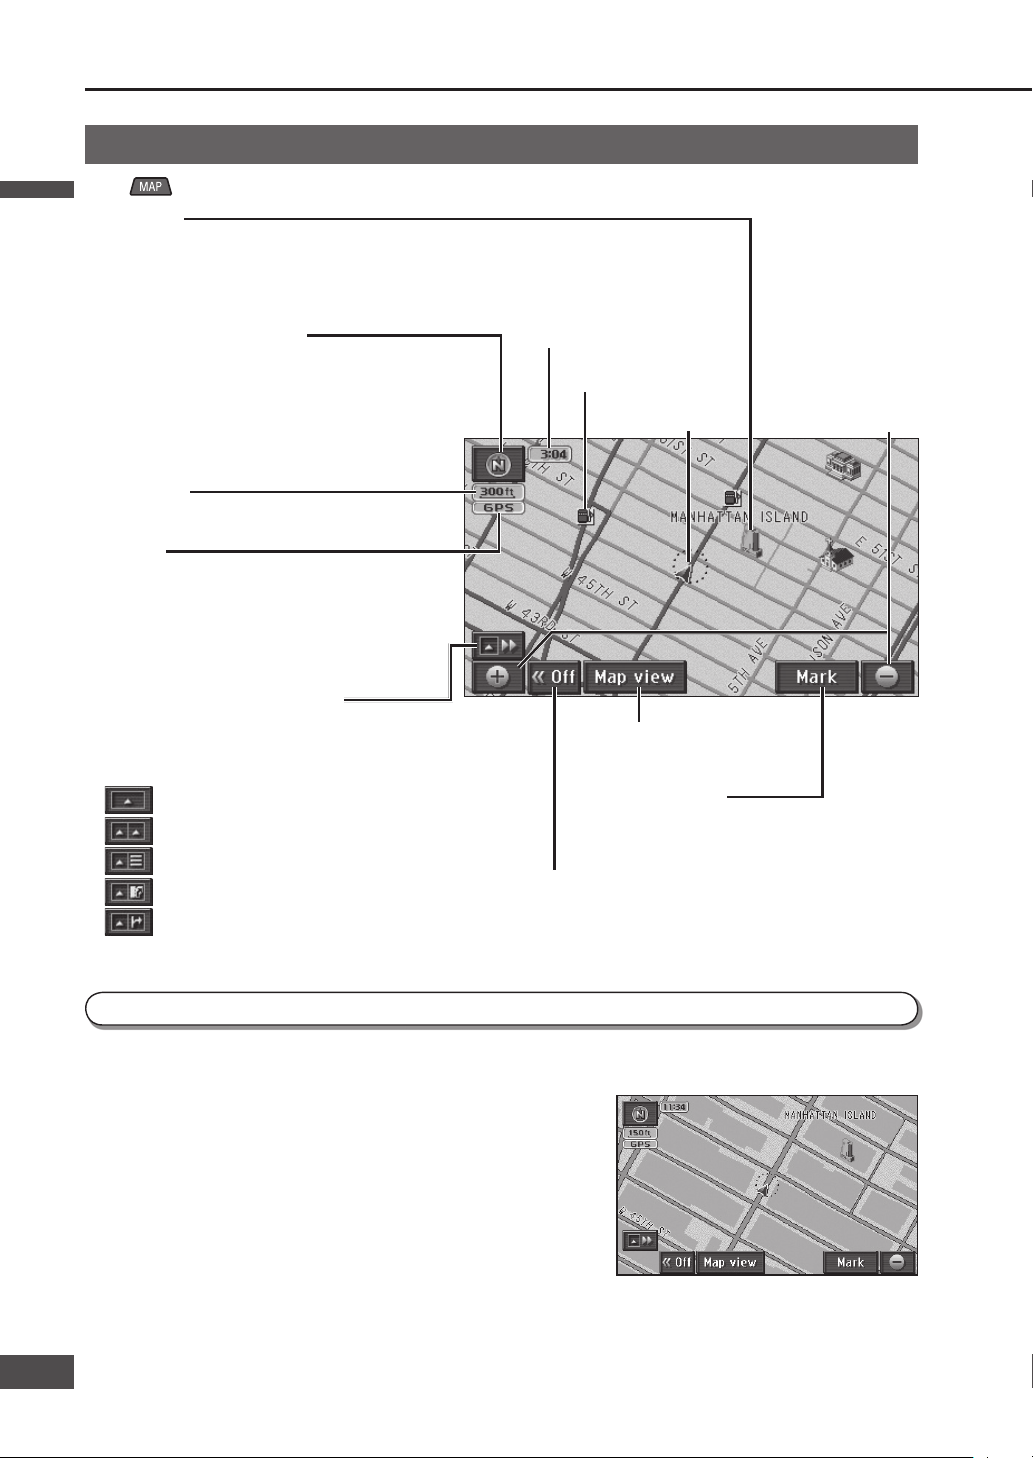
GPS mark
This is displayed when vehicle position is
calculated using GPS satellites.
When it is not displayed, or when it fl ashes
continuously, check the GPS antenna
mounting position.
[Map view]
Displays the Map view menu.
[Mark] (
page 62)
Registers the point at the center of the map as
a Contact (Address Book).
[<<Off]
Clears touch keys from the map.
Touch [On>>] to display the touch keys again.
Zoom in/Zoom out
(
page 33)
Zooms in/zooms
out the map scale.
Map operations
Current position screen (displays the vehicle position)
Press to display the current position (vehicle position) screen.
Type of guidance map (
page 30)
Displays the type of the current guidance
map. Touch the icon to display the Guidance
map switch menu.
: One-screen display
: Two-screen display
: Turn list
: Enlarged intersection map
: Highway transition zoom map
Orientation mark (
page 32)
Displays the orientation of the map.
Touch the icon to switch between North up and
Heading up orientations.
North up: North is at the top of the map.
Heading up: The direction of motion is towards
the top of the map.
Scale display
The scale of the map is displayed.
Vehicle mark
City map
3D landmark
Displays specifi c POIs as 3D landmarks.
Scale: 150 ft – 0.5 mile (50 m – 500 m*)
* This is the scale when “km” is set as the distance setting (
page 84).
Screen can be set to display/not display. ( page 84)
When the scale is 150 ft (50 m*), the display can be switched to a map showing detailed building shapes. ( page 33)
* This is the scale when “km” is set as the distance setting
(
page 84).
Note:
The display cannot switch to that content in areas which
lack city map data.
Clock display (
page 26)
POI icons (
page 50)
English
English
28
29
Page 29
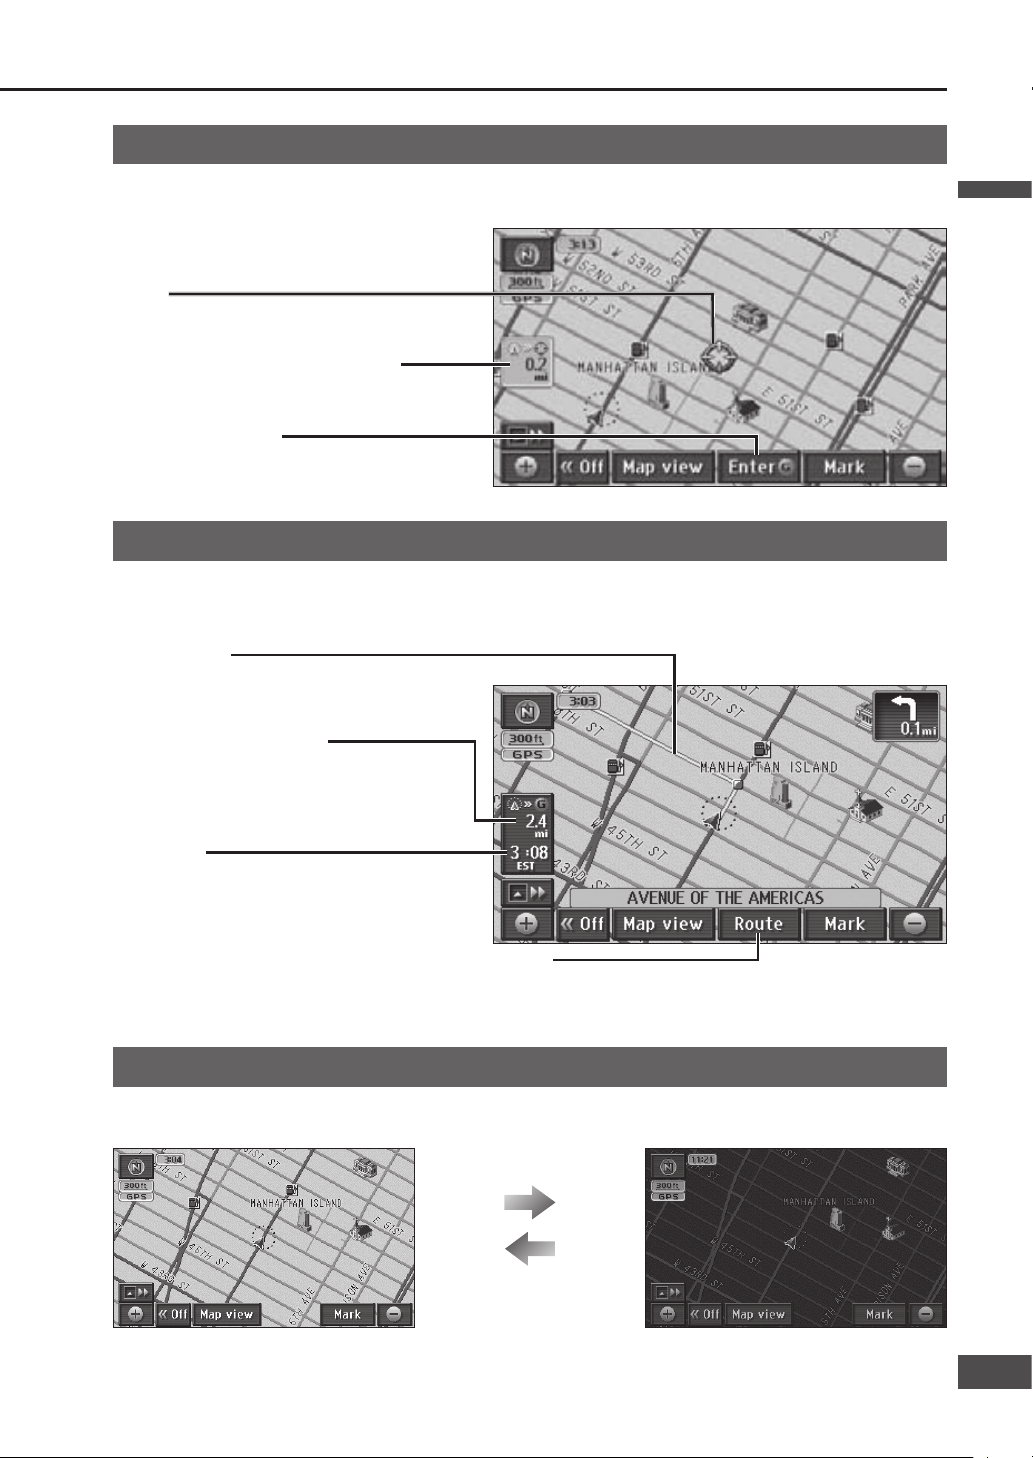
[Enter ] (
page 53)
Sets the point at the center of the map as a
destination.
Map mode screen
When the map is scrolled ( page 32), the display switches to the Map mode screen.
Unless stated otherwise, the touch keys function in the same way as on the current position screen.
Cursor
Displays the center of the map.
Display during route guidance
During route guidance, various guidance screens are displayed as circumstances require.
Unless stated otherwise, the touch keys function in the same way as on the current position screen.
The distance from the center of the map
to the vehicle position.
Arrival time
The estimated arrival time at the destination is
displayed.
When in the Map mode screen, the straight
distance from the center of the map to the
destination is displayed.
The display can be toggled to show remaining
time. (
page 39)
Guidance route
The route is displayed by a yellow line.
Remaining distance display
The distance to the destination is displayed.
If multiple destinations have been set, the
distance to the next destination is displayed.
[ Route]
Searches again for a route to the next destination.
The search conditions, etc. can be changed. ( page 38)
Day mode and Night mode
When the headlights or side lights are lit, the screen display switches to improve map visibility.
Day mode
Night mode
Note:
If [DAY MODE] is selected from the night mode screen, the screen can be switched to Day mode. ( page 92)
Lights lit
Lights turned off
English
29
2928
Page 30
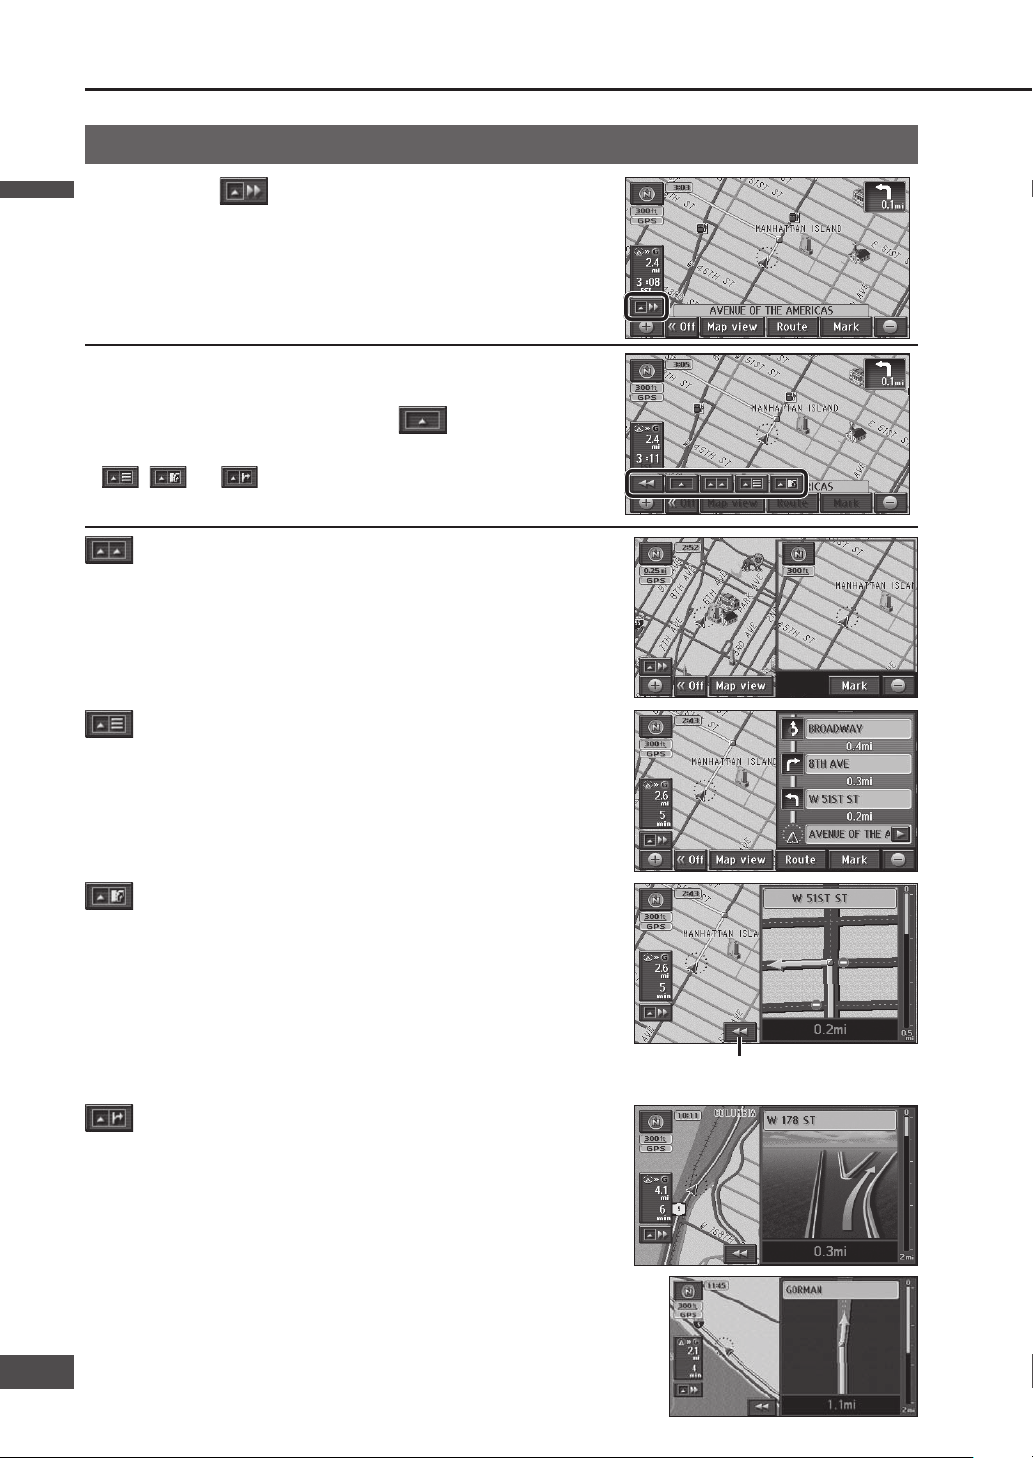
Enlarged intersection map
The distance to the next intersection, the name of the road to turn onto,
and the direction to turn are displayed.
The intersection is displayed approximately 0.25 miles (400 m*) in
advance. (In residential area)
The intersection is displayed approximately 0.5 miles (800 m*) in
advance. (In non-residential area)
In some cases, an intersection may be displayed even if the route does
not require a turn at that intersection.
Turn list
Course information is displayed for intersections on the route.
Highway transition zoom map
During highway driving, the distance to the junction, the place the road
heads to, the name of the road to turn onto, and the direction to turn are
displayed.
The junction is displayed approximately 2 miles (2 km*) in advance.
Switch the map
Map operations
(continued)
Two-screen display
The screen is split in two for map display.
A map such as the one on the right is displayed for junctions
which are not in the database of the highway transition zoom map.
1
Touch .
2
Select the map from the icons.
Refer below for the meanings of the icons.
One-screen display is used when is selected.
Note:
, and are displayed during route guidance when
there is map data that can be displayed.
Remove the enlarged map.
* This is the distance when “km” is set as the distance
setting (
page 84).
English
English
30
31
Page 31

Operation of two-screen display
[Display POI icons]
Touch to toggle POI icon display on or off for the
right screen.
This cannot be used if POI icons are not displayed
on the one-screen display or on the left screen.
(
page 50)
Zoom in/Zoom out
( page 33)
Zooms in or out the map scale.
Returns to left screen operation.
Operation of the left screen
Operation of the right screen
1
Touch the right screen.
The right screen becomes the screen that can
be operated.
2
Operate the right screen.
The screen can be operated in the
same way as a one-screen display.
Note:
The map cannot be scrolled.
English
31
3130
Page 32

Map operations
(continued)
Move the map ( scroll)
Note:
Even if the scale and orientation of the map are switched in Map mode screen, pressing returns the display
to the original settings.
Switch orientation ( Heading up/ North up)
The display can be switched between Heading up, with the heading direction towards the top of the map, and North
up, with north at the top of the map.
Heading is up
(Heading up)
Touch .
The display switches to North up.
North is up
(North up)
Touch .
The display switches to Heading up.
Note:
The Map mode screen cannot be switched from
North up to Heading up.
To switch from North up to Heading up
To switch from Heading up to North up
1
Touch the screen.
The point touched becomes the center of the screen
and the cursor “
” is displayed. (Map mode screen)
2
Touch and hold in the direction to
scroll.
Scrolling continues while the screen is touched.
(Continuous scroll)*
Touching near the center of the map causes low-
speed scrolling, and the scroll speed increases the
closer to the periphery the screen is touched.
* The map cannot be scrolled while the vehicle is in
motion.
English
English
32
33
Page 33

Switch the scale
Touch and hold to switch the scale as if zooming in or out.
The scale range is from 150 ft (50 m*) to 300 miles (500 km*).
* This is the distance when “km” is set as the distance setting
(
page 84).
: Zooms in.
: Zooms out.
Touch or to display the scale bar. Touch the number for each
scale to switch to that scale.
(The map cannot be switched to the scale while the vehicle in motion.)
When the scale is 150 ft (50 m),
Touch
.
The city map is displayed.
The map is displayed at a scale which allows display of the
entire route from the current position to the next destination.
Note:
This function can be used when setting a destination.
If the distance to the destination is so long that it cannot be
displayed within a more detailed scale, it is displayed at the
300 mile (500 km*) scale.
This operation is unavailable on city maps.
* This is the scale when “km” is set as the distance setting
(
page 84).
Touch .
To cancel city map display
Touch
.
Touch .
Touch
.
To display the city map
To see the entire route from the current position to the next destination
English
33
3332
Page 34

Map operations
(continued)
Customize the Destination menu
Three items displayed in the Destination menu can be changed. It is convenient
to set frequently used items on the Destination menu.
1
Touch [Setup] from the
Navigation menu.
2
Touch [Custom Dest. Menu].
3
Touch three items to select them
for inclusion in the Destination
menu.
Always select three items.
Touch [Default] to select [Address], [POI] and
[Nearest POI].
4
Touch [OK].
The selected items are registered to the Destination
menu.
They are arranged in order of selection, from the left.
English
English
34
35
Page 35

Clear or display route trace
Route trace
The route the vehicle has driven along is marked for up to approximately 125 miles (200 km*). When the distance
driven exceeds 125 miles (200 km*), the route trace is deleted, starting from the earliest recorded.
The route trace can be cleared and re-displayed, as required.
The display scale can be switched between 150 ft (50 m*) and 32 miles (50 km*).
* This is the scale when “km” is set as the distance setting (
page 84).
Route trace
Note:
When route trace is not displayed, the route trace data is not recorded.
Touch [Record] on the Change map
view screen.
Starts recording a route trace from the current position.
If “No” was selected in step 3 of the “To clear route trace”
procedure, the route trace that was displayed before it was
cleared is displayed again.
To clear route trace
To display route trace
1
Touch [Map view] on the
current position screen.
The Change map view screen is displayed.
2
Touch [Stop].
3
Touch [Yes] to clear display and
route trace data.
Touch [No] to clear the display
without deleting the route trace
data.
English
35
3534
Page 36

To switch the search area
The Search area function divides United States, Canada
and Puerto Rico into 14 areas, so that the search can be
narrowed to a specifi ed area. Areas other than the one
specifi ed are not subject to searching.
Touch [Change].
Touch the area to search.
<Search Area screen>
Select [OK].
The area to search switches.
Note:
The default is [US8].
Hawaii is [US12].
The Search Area screen is also displayed when [US8]
is selected from Address search (
page 40), POI
search (
page 42) or Phone No. search ( page 49).
Display the current
search area.
Choose this to
display the Search
Area screen.
Create a route to the destination
1
Search for the destination on the Navigation menu.
Use the search function to search for the destination.
Navigation menu
Touch [Destination].
Destination menu
Touch [Others].
Setting frequently used items on the Destination
menu makes it easier to search for destinations.
( page 34)
Destination menu (All)
The Destination setting screen (a map of the
area around the destination) is displayed as the
result of the search.
The List screen
: Moves the cursor to the previous/next screen.
: Moves the cursor to the previous/next item.
: Scrolls to display the parts of names which cannot
be displayed fully at fi rst. Scrolling stops at the last
name, and
is displayed.
Touch
to return to the previous display.
English
English
36
37
Page 37

Roads and distances used
The total route length is displayed, together with the
distances using highways, toll roads, time-restricted
roads, seasonally restricted roads, ferries and car trains.
To check the route
[3 routes]: Three types of routes to the destination
are displayed. (
page 38)
[Route]: The Change Route screen is displayed.
(
page 38)
Note:
If there are transit destinations ( page 52), [3 routes]
will not be displayed.
The demo starts if [Start] is touched for 3 seconds.
(
page 59)
The All route screen can be displayed even after
guidance starts. (
page 60)
The turn list cannot be displayed. To display the turn
list, display the All route screen manually after route
guidance starts. (
page 60)
There are cases where a part of the route that you set
is not displayed due to the scale of the map. However,
it does not affect the audio assist function.
Checking the route to be used
The route selection status for the route to use is displayed.
Example:
: Use
: Do not use
: Highway
: Time-restricted road
: Ferry
: Toll road
: Seasonally restricted road
: Car train
[Road preference]: The type of road to use can be
changed. (
page 58)
If the destination has been set
The following two touch keys will be displayed instead of
[Enter].
[New ]: The set destination is cancelled and a
new destination is set.
[Add to ]: A new destination is set in addition to
the previously set destination.
Note:
[Info.]: Information on the POI is displayed. Nothing
is displayed if there is no information.
(
page 50)
2
Touch [Enter] when the map
displaying the destination
appears.
A search is made for the route from the
vehicle position to the destination.
The destination (set location) is marked with
a
.
3
Touch [Start] when the All
route screen is displayed.
Route guidance begins.
Distance and time display
The distance and time (such as estimated arrival time
or remaining time) to the next destination are displayed.
Refer to page 39 for how to switch the time display.
All route screen Destination setting screen
English
37
3736
Page 38

Select the route from 3 routes
Select your favored route from among the 3 routes
based on different search conditions.
1
Select [3 routes] from the All route
screen.
The 3 routes display screen is displayed.
2
Select a route.
[Quick1]: The route searched for under the time
priority search condition.
[Quick2]: A different route searched for under the
same search conditions as the current
route.
[Short]: The route searched for under the distance
priority search condition.
The All route screen is displayed for the selected
route.
Three types of color-coded routes are displayed.
Select [Info.] to display the 3 Routes Information
screen.
Various route information (remaining time,
total route length, toll road, highway, ferry,
and car train) is displayed.
When a route is selected, the All route screen
is displayed for the selected route.
Note:
The routes displayed may be the same in some cases.
Maps cannot be scrolled on screens which display the
3 routes display screen.
If there are transit destinations (page 52), [3 routes]
will not be displayed.
[3 routes] cannot be displayed on the manually
displayed All route screen.
Change the route
The conditions used for the search can be changed.
Select [Route] on the All route
screen.
The Change Route screen is displayed.
Select [Search condition] to change the type of
route search conditions. (
page 57)
Select [Road preference] to select the road to
use. (
page 58)
Destination: Destinations can be added,
re-ordered and deleted.
(
page 52, 54, 55)
Create a route to the destination
(continued)
English
English
38
39
Page 39

Change time display
Switches the display of time to destination between
estimated arrival time and remaining time.
Select .
Touch [Arrival time] ([Re-maining time]) to
switch the display to estimated arrival time
(remaining time).
Touch [] to return to the previous display.
If a transit destination has been set
If there is a transit destination ( page 52), the
distance and the estimated arrival times and
remaining times for each destination are listed. Touch
a destination on the list to display the distance and
time (estimated arrival time or remaining time) for that
destination.
Touch [] to return to the previous display.
Suspend route guidance
If guidance for the set route is not required, route
guidance can be suspended. This is a convenient
function for driving on smaller roads or in well-known
areas.
1
Select [Setup] from the Navigation
menu during route guidance.
The Setup menu is displayed.
2
Select [Suspend guidance].
Suspends route display and voice guidance.
The set destination is not cancelled.
Note:
To suspend voice guidance but leave the route
displayed, set “Auto voice guidance” to [Off].
(
page 84)
Resume route guidance
While route guidance is suspended,
Select [Resume guidance] from the
Setup menu.
( above)
Route display and voice guidance resume.
English
39
3938
Page 40

Address search
Search for the destination address from the street name.
1
Select [Address] from the Destination
menu (All).
The Address search screen is displayed.
2
To search by street
Enter the street name.
Go to step 3 -
To search by city
Select [City].
Go to step 3 -
How to enter text (page 97)
To search by street
3
ı
Select [List].
3
ı
Select the street from the list.
3
ı
Select the city from the list.
The address range list is displayed.
Go to step 4
Select [Input name] to refi ne your search by city.
Search for a destination
English
English
40
41
Page 41

To search by city
3
ı
Select [Input city name].
To search for a city from previous city
searches
Select the city from the list (up to 5).
Go to step 3 -
Select [Search Area] to change the Search area.
(
page 36)
Go to step 2
3
ı
Enter the city name and select [List].
3
ı
Select the city from the list.
3
ı
Enter the street name and select [List].
Choosing [List] without inputting a street name
lists all streets in that city.
3
ı
Select the street from the list.
The address range list is displayed.
Go to step 4
4
Select the address range from the
list.
5
Enter the house number and select
[OK].
The map is displayed.
If you select [OK] without entering the house
number, the map showing the vicinity of the
street selected is displayed.
6
Select [Enter].
The All route screen is displayed after the search
is complete.
7
Select [Start].
Route guidance starts .
Note:
If there is only one candidate for city, address range
and house number, the list is not displayed, and the
process advances to the next step.
If there is no city or address range data for the
selected street, the map is displayed for an area
centered around the street.
To cancel refi nement by city, select [City], then
[Any city].
English
41
4140
Page 42

POI (Point of interest) search
Use a POI name to search for a destination.
1
Select [POI] from the Destination
menu (All).
The POI search screen is displayed.
2
Enter the name.
How to enter text (page 97)
3
Set the search conditions.
To refi ne your search by category
Select [Category].
Go to step 4 -
To refi ne your search by city
Select [City].
Go to step 4 -
If there is no refi ne search setting
Select [List].
Go to step 5
To search by category
4
ı
Select a main category.
Select [List all categories] to display the
sub-categories within all main categories.
Select [Cancel] to cancel the set category.
4
ı
Select a sub-category.
Go to step 3
Search for a destination
(continued)
English
English
42
43
Page 43

To search by city
4
ı
Select [Input city name].
To search for a city from previous city
searches
Select the city from the list (up to 5).
Go to step 3
Select [Search Area] to change the Search area.
(
page 36)
Go to step 2
4
ı
Enter the city name and select [List].
4
ı
Select the city from the list.
Go to step 3
5
Select the POI from the list.
The map is displayed.
If there are multiple facilities of the same name
in the same category, such as branches of a
supermarket chain, the number of applicable
facilities is displayed next to the icon. When
a POI with multiple instances is selected, the
branches are listed.
The list can be sorted.
[Dist. sort]: The list is sorted in order of
proximity.
[Name sort]: The list is sorted in
alphabetical order.
6
Select [Enter].
The All route screen is displayed after the search
is complete.
7
Select [Start].
Route guidance starts.
Note:
To cancel refi nement by city, select [City], then
[Any city].
English
43
4342
Page 44

Nearest POI search
Search for POIs in the area around the current position,
the destination and the last map displayed.
1
Select [Nearest POI] from the
Destination menu (All).
The Nearest POI search screen is displayed.
2
Select the point for the center of the
search.
[Current Position]: Current position screen
[Map]: Last displayed map
[1]/[2]/[3]/[4]/[5]: Destination and transit
destinations
[1]/[2]/[3]/[4]/[5] are displayed according to the
number of a destination and transit destinations
set.
If [Current Position] is selected
Go to step 4
3
Move the cursor to the center of the
area to search and select [Enter].
4
Select a main category.
Select [List all categories] to display the
sub-categories within all main categories.
5
Select a sub-category and select
[OK].
Up to 5 sub-categories can be selected.
To cancel a selected sub-category, select it
again.
6
Select [Show list].
POIs within a radius of 20 miles (32 km*) of the
search position (the current position or the cursor
position on the Map mode screen) are searched
for and listed in order of proximity to the current
position. Up to 200 matches can be made.
* This is the range when “km” is set as the
distance setting (
page 84).
To re-select sub-categories, select [Select
category] and repeat from step 4.
7
Select the POI from the list.
The map is displayed.
The displayed distance is the straight distance
from the vehicle position to the POI.
Select [Sort by] to sort the list.
[Distance]: The list is sorted in order of
proximity.
[Category]: The list is sorted by category.
[Name]: The list is sorted in alphabetical
order.
Select [On route] to search for POIs along the
guidance route. (
page 45)
[On route] is not displayed if route guidance is
not in use.
Search for a destination
(continued)
English
English
44
45
Page 45

8
Select [Enter].
The All route screen is displayed after the search
is complete.
9
Select [Start].
Route guidance starts.
Note:
If multiple telephone numbers are registered under the
same name, each is listed.
Search for POIs along the route
Only POIs that are on or close to the guidance route
are searched for and displayed. The search range is a
distance of 150 ft (50 m*) from either side of the route.
* This is the range when “km” is set as the distance
setting (
page 84).
1
Select [On route] from the Nearest
POI
( page 44, step 7)
or nearest POI
( page 51, step 4)
search list.
POIs found by the search are listed, and the
touch keys show the name, the icon, and the
distance along the route from the current
position.
Select [Sort by] to sort the list.
[Distance]: The list is sorted in order of
proximity.
[Category]: The list is sorted by category.
[Name]: The list is sorted in alphabetical
order.
2
Select a POI.
The map is displayed.
The POI name and the distance along the route
from the current position are displayed on the
map.
3
Select [Add to ].
Select [New ] to delete all currently set
destinations and set as new destinations.
4
Select [Add] for the section to add.
The All route screen is displayed after the search
is complete.
5
Select [Start].
Route guidance starts.
Note:
If no route is displayed on the map screen, it is not
possible to search for POIs along the route.
English
45
4544
Page 46

When stopped
1
Select [Emergency] from the
Destination menu (All).
The Emergency selection screen is displayed.
2
Select a category from the list.
The list of POIs is displayed.
3
Select the POI from the list.
The list can be sorted.
[Name sort]: The list is sorted in alphabetical
order.
[Dist. sort]: The list is sorted in order of
proximity.
4
Select [Enter].
The All route screen is displayed after the search
is complete.
5
Select [Start].
Route guidance starts.
In motion
If the driver is also the operator of the navigation
system, he or she must stop the vehicle in a safe place
before operating it.
1
Select [Emergency] from the
Destination menu (All).
The Emergency selection screen is displayed.
2
Select a category from the list.
The nearest POI to the current position is
displayed.
3
Select [Enter].
The All route screen is displayed after the search
is complete.
4
Select [Start].
Route guidance starts.
Search for a destination
(continued)
Emergency search
The search fi nds hospitals/police stations/service & maintenance within a radius of 100 miles (160 km*).
* This is the range when “km” is set as the distance setting (
page 84).
English
English
46
47
Page 47

Previous search
Automatically store set destinations and search for
destinations from that history. (Up to 20 destinations)
1
Select [Previous] from the
Destination menu (All).
The Previous search screen is displayed.
2
Select a previous point from the list.
Select [Previous start point] to display the
previous start point.
3
Select [Enter].
The All route screen is displayed after the search
is complete.
4
Select [Start].
Route guidance starts.
Note:
When there are more than 20 routes, the oldest are
deleted sequentially. Register necessary points as
Contacts. (
page 62)
To clear previous points, refer to page 86.
Address Book search
Search for a destination from among registered
Contacts.
You must register locations to use this feature.
(
page 62)
1
Select [Address Book] from the
Destination menu (All).
The Address Book search screen is displayed.
2
Select the Contact from the list.
The list can be sorted.
[Icon]: Display according to the type of
icon. (
page 64)
[Date]: Display Contacts in order of
registration.
3
Select [Enter].
The All route screen is displayed after the search
is complete.
4
Select [Start].
Route guidance starts.
English
47
4746
Page 48
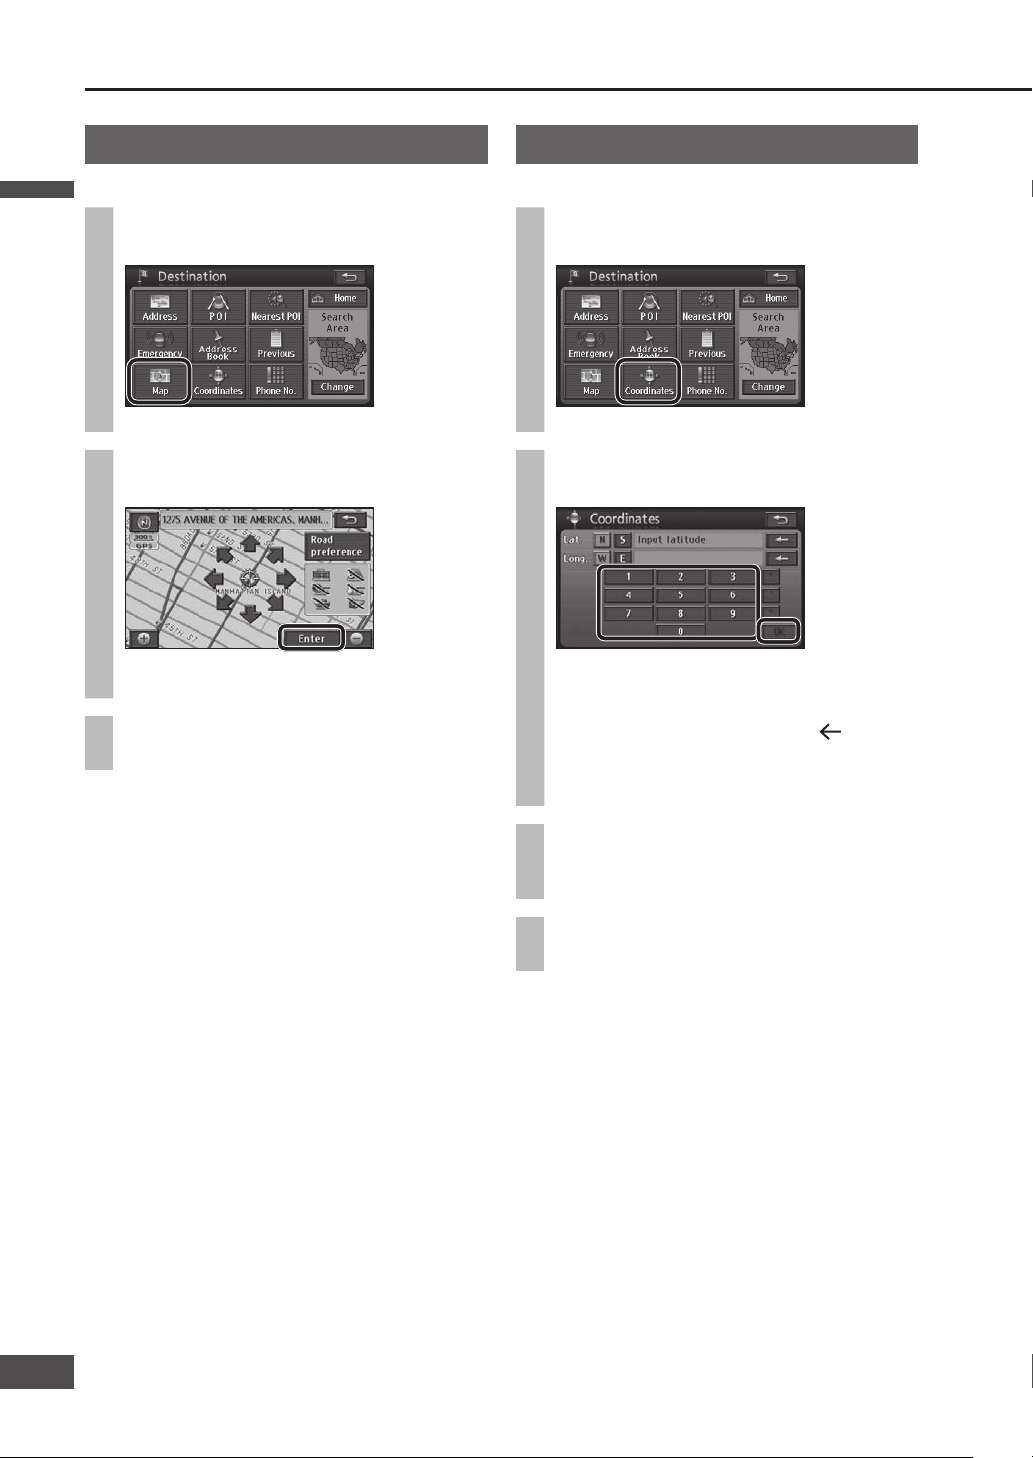
Map search
Search for a destination from the map.
1
Select [Map] from the Destination
menu (All).
The previously displayed map is displayed.
2
Move the cursor to the position to set
as the destination and select [Enter].
The All route screen is displayed after the search
is complete.
3
Select [Start].
Route guidance starts.
Coordinates search
Use coordinates to search for a destination.
1
Select [Coordinates] from the
Destination menu (All).
The Coordinates search screen is displayed.
2
Enter the coordinates and select
[OK].
When entering a latitude, select [N] for north
and [S] for south; and select [E] for east and [W]
for west when entering a longitude.
To correct the coordinates, select [ ] to delete
digits one at a time.
A map is displayed according to the coordinates
input.
3
Select [Enter].
The All route screen is displayed after the search
is complete.
4
Select [Start].
Route guidance starts.
Search for a destination
(continued)
English
English
48
49
Page 49

Return Home
Once the home location is registered, it is simple to fi nd
a route home from the current position.
You must register the home location to use this
feature. (
page 64)
1
Select [Home] from the Destination
menu (All).
Starts the route search.
2
Select [Start].
Route guidance starts.
If home location has not been
registered
Select [Home] from Destination menu (All) to display the
Set Home confi rmation screen.
1
Select [Yes] on the Set Home
confi rmation screen.
2
Search for home.
Refer to pages 40 – 49 for the search method.
3
Select [Enter].
Home is registered.
Phone number search
Use a telephone number to search for a destination.
1
Select [Phone No.] from the
Destination menu (All).
The Phone number search screen is displayed.
2
Enter the telephone number and
select [OK].
The telephone number list is displayed.
To correct the number, select [ ] to delete
digits one at a time.
3
Select the POI from the list.
The map is displayed.
Numbers with different area codes are also
displayed.
A list is not displayed if there is only one
matching number.
4
Select [Enter].
The All route screen is displayed after the search
is complete.
5
Select [Start].
Route guidance starts.
English
49
4948
Page 50

Display POI icons
POI icons for frequently used POIs (Gas stations,
restaurants, etc.) can be displayed on the map. Detailed
information can also be shown for the displayed POI
icons. (Scale: 150 ft – 0.5 mile (50 m – 1 km*))
* This is the scale when “km” is set as the distance
setting (
page 84).
1
Select [Map view] on the current
position screen.
The Change map view screen is displayed.
2
Select [Display POI icons].
The Display POI Icons screen is displayed.
3
Select POI icons from the list and
select [OK].
Selected POI icons are displayed on the map.
Up to 5 icons can be selected. Selected POI
icons are displayed at the upper left.
Selected POI icons can be cancelled by selecting
them again.
Select [Delete] to cancel all selected POI icons.
The icons for displayed POIs can be changed.
Refer to page 84 for the change method.
To select other POI icons, select [Other POIs]
Go to step 4
4
Select a main category.
Select [List all categories] to display the
sub-categories within all main categories.
5
Select POI icons displayed from the
list and select [OK].
Selected POI icons are displayed on the map.
Up to 5 icons can be selected.
To choose another category, select [More], then
repeat from step 4.
To see information on POI icons
1
Put the cursor on POI icons, which
will cause the cursor to fl ash.
The POI name is displayed.
2
Select [Info.].
POI information is displayed.
Select [Enter ] to set it as the destination. If a
destination has already been set, [Add to
] or
[New
] is displayed. Refer to page 37 for details.
[Mark]: Registers the point at the center of the
map as a Contact (Address Book).
Note:
POI name display is automatically removed after it has
been displayed for approximately 6 seconds.
If multiple POIs exist for the same building, the POI icons
may overlap on the map. In that case, the POI names are
displayed sequentially as their POI icons are selected.
Departments and sections within the same POI may,
in some cases, be displayed as individual POI icons.
Search for a destination
(continued)
English
English
50
51
Page 51

Search for nearby POI icons
This search covers POIs within a radius of 20 miles
(32 km*) from the current position, or from the center
of the cursor.
* This is the range when “km” is set as the distance
setting (
page 84).
1
Select [Map view] on the current
position screen.
The Change map view screen is displayed.
2
Select [Display POI icons].
The Display POI Icons screen is displayed.
3
Select the POI icons to search for,
then select [List Nearest POIs].
The names of POIs and their distance from the
current position are displayed on touch keys.
4
Select a POI from the list.
The map is displayed.
Select [Sort by] to sort the list.
[Distance]: The list is sorted in order of
proximity.
[Category]: The list is sorted by category.
[Name]: The list is sorted in alphabetical
order.
Select [On route] during route guidance to
search for POIs along the guidance route.
(
page 45)
5
Select [Enter ].
6
Select [Enter].
The All route screen is displayed after the search
is complete.
7
Select [Start].
Route guidance starts.
Note:
This function cannot be used if POI icons are not
displayed.
The displayed distance is the straight distance from
the vehicle position (if a nearby POI was searched
for from the current position screen), or the straight
distance from “
” (if a nearby POI was searched for
from the map screen).
Up to 200 POIs can be searched for, in order of
proximity.
If multiple telephone numbers are registered under the
same name, each is listed.
English
51
5150
Page 52

6
Select [Add] for the section to add.
The Change Route screen is displayed.
7
Select [OK].
The All route screen is displayed after the search
is complete.
To add further destinations, select [Add] and
repeat the procedure from step 4.
8
Select [Start].
Route guidance starts.
Note:
[3 routes] is not displayed on the All route screen if
multiple destinations have been set.
Set destinations are marked by “ ” – “ ”.
Add a destination
After the destination has been set, it is still possible to
set other destinations (up to 5). If 5 destinations have
already been set, delete one before adding another.
Add from the current position
screen
1
Select [Route] on the current
position screen.
The Re-route search screen is displayed.
2
Select [Route].
The Change Route screen is displayed.
3
Select [Add].
4
Search for the destination to add.
Refer to pages 40 – 49 for the search method.
[Home] is not displayed.
5
Select [Enter] on the map screen.
Edit the route
English
English
52
53
Page 53

Add on the Map mode screen
1
Move the cursor to the intended
destination and select [Enter ].
Make the setting on a map of 0.5 mile (500 m*)
or more detailed scale.
* This is the scale when “km” is set as the
distance setting (
page 84).
2
Select [Add to ].
The All route screen is displayed after the search
is complete.
Select [New ] to delete all currently set
destinations and set new destinations.
3
Select [Start].
Route guidance starts.
Note:
The destination set by the one-touch method is set as
“
” (the fi rst destination).
To change the order of destinations, refer to “Change
the order of destinations” on page 54.
Add from the Destination menu
1
Search for the destination to add
from the Destination menu (All).
Refer to pages 40 – 49 for the search method.
2
Select [Add to ].
Select [New ] to delete all currently set
destinations and set new destinations.
3
Select [Add] for the section to add.
The All route screen is displayed after the search
is complete.
4
Select [Start].
Route guidance starts.
English
53
5352
Page 54

Change the order of destinations
1
Select [Change order] on the Change
Route screen.
The Reorder destinations screen is displayed.
2
Select the destination names in
the order in which you want to pass
through them, then select [OK].
The names of the selected destinations are
displayed in bold text, and numbered to indicate
the order in which the route passes through
them.
To cancel the setting, select [Undo] or select the
name of the destination to cancel.
If there are no other operations for 3 seconds
after the order of destinations is confi rmed, the
order is automatically confi rmed and the Change
Route screen is displayed.
3
Select [OK].
The All route screen is displayed after the search
is complete.
Edit the route
(continued)
4
Select [Start].
Route guidance starts.
Note:
This function can only be used when multiple
destinations have been set.
English
English
54
55
Page 55

Delete a destination
Select a destination and delete it
1
Select [Delete] on the Change Route
screen.
The Delete Destinations screen is displayed.
The Delete Destinations screen can also be
displayed by selecting [Destination Delete] from
the Destination menu.
2
Select the destination to delete.
If only one destination has been set, the
procedure moves to the next step without
displaying the Delete Destinations screen.
Select [Delete all] to delete all destinations.
3
Select [Yes].
The destination is deleted.
Delete the next destination that
the route passes through with
one touch
Select [Delete next ] on the
Re-route search screen.
Searching starts and guidance of new route
begins.
Note:
This function can only be used when multiple
destinations have been set.
English
55
5554
Page 56

Search again for the route
During route guidance, the route search can be repeated
when the current position screen is displayed. The
search conditions used for the route currently followed
can be changed for a new search.
1
Select [Route] on the current
position screen.
The Re-route search screen is displayed.
2
Select search conditions from
[Quick1]/[Quick2]/[Short].
Searching starts and guidance of the new route
begins.
[Quick1]: The search looks for a route with the
shortest travel time. (Recommended
route)
[Quick2]: The search looks for a route that
differs from the displayed route but
uses the same search conditions as
the current guidance route.
[Short]: The search looks for a route with the
shortest distance to the destination.
Note:
If multiple destinations have been set, the search to
the next destination is repeated.
Edit the route
(continued)
The search looks for nearby detour routes
It can search for a route that detours around the route
ahead of the vehicle.
1
Select [Route] on the current
position screen.
The Re-route search screen is displayed.
2
Select [Detour].
The Detour screen is displayed.
3
Select the detour distance.
The possible detour distance varies with the
distance setting (
page 84) and the road
currently used.
Searching starts and guidance of the new route
begins.
To detour around entire the whole route, select
[Entire route].
Note:
This function can only be used while driving along the
route.
In some cases the route displayed may not be a
detour.
miles km
General road
1 mile
3 miles
5 miles
1 km
3 km
5 km
Highway
5 miles
15 miles
25 miles
5 km
15 km
25 km
English
English
56
57
Page 57

Set search conditions for each section of the route
Search conditions ([Quick1]/[Quick2]/[Short]) can be set
for each section.
1
Select [Route] on the current
position screen.
The Re-route search screen is displayed.
2
Select [Route].
The Change Route screen is displayed.
3
Select [Search condition].
The Search Condition screen is displayed.
4
Select the search conditions for each
section.
Select search conditions from [Quick 1]/
[Quick 2]/[Short].
If there are transit destinations, only [Quick] and
[Short] will be displayed for sections after the
fi rst transit destination.
[Quick]: The search looks for a route with the
shortest travel time. (Recommended
route)
[Short]: The search looks for a route with the
shortest distance to the destination.
5
Select [OK].
The All route screen is displayed after the search
is complete.
6
Select [Start].
Route guidance starts.
English
57
5756
Page 58

Select the road to use
Routes can be set that consider roads the driver wants
to use and does not want to use.
1
Select [Route] on the current
position screen.
The Re-route search screen is displayed.
2
Select [Route].
The Change Route screen is displayed.
3
Select [Road preference].
The Road Preference screen is displayed.
4
Select desired roads to use and
select [OK].
The following six types of road can be selected.
Operation indicators light for the selected items.
[ Allow highway]
[ Allow time-restricted road]
[ Allow ferry]
[ Allow toll road]
[ Allow season-restricted road]
[ Allow car train]
To cancel the item, select it again.
5
Select [OK].
The All route screen is displayed after the search
is complete.
6
Select [Start].
Route guidance starts.
Note:
Even if the roads to use have been set, the search
may fi nd routes that do not use them, if using those
would necessitate a major diversion. In that case, set
a destination on the road to be used.
Edit the route
(continued)
English
English
58
59
Page 59

Use the demo to check the route
Runs the route demo.
Touch and hold [Start] on the All
route screen until there is a short
“blip” sound.
The demo shows route guidance to the
destination.
Press , or to end the demo.
Note:
The demo cannot be used on the All route screen that
is called up from the Change map view screen.
(
page 60)
If the driver starts driving during the demo, it stops
and route guidance starts.
Check the route
Route scrolling
The map screen can be scrolled along the route.
1
Select [Map view] on the map
screen.
The Change map view screen is displayed.
2
Select [Route preview].
: The map scrolls in the direction of the
destination at low speed.
: The map scrolls in the direction of the
starting point at low speed.
: The map scrolls in the direction of the
destination at high speed.
: The map scrolls in the direction of the
starting point at high speed.
: Jumps to the next destination.
: Jumps to the starting point, or to
the previous destination (if multiple
destinations have been set).
: Pause scrolling.
Note:
The map cannot be scrolled if the guidance route is
not displayed on the screen.
Only the jump function can be used while driving.
Map scrolling stops if the map scale is switched.
English
59
5958
Page 60

During route guidance
Autoroute
If the vehicle deviates from the guidance route, a new
search is performed automatically and a new route to the
destination from the current position is displayed.
Note:
Autoroute does not operate for areas where there are
no roads to the search target, such as within park
sites. Autoroute only starts when it judges that the
vehicle is moving along a search subject road.
Display the All route screen manually
The All route screen, displaying the route from starting
point to destination, can be displayed manually.
1
Select [Map view] on the map
screen.
The Change map view screen is displayed.
2
Select [Route overview].
The All route screen is displayed.
Select [Start] to start route guidance.
Select [Route] to display the Change Route
screen. (
page 38)
The distance to the next destination is displayed,
together with estimated arrival time, remaining
time, etc. (
page 29)
The estimated arrival time and remaining time
can be switched. (
page 39)
If the vehicle is not on the route, the direction
and distance to the destination are displayed.
Select [Turn List] to display the turn list.
Note:
The following operations are not available from the
manually displayed All route screen.
[3 routes] display
Demo
Use the All route screen, which is displayed
automatically after route searching is complete, to
access [3 routes] and demo displays. (
page 37)
Road
name
Section
distance
Displays the map for
the selected point.
Displays current
position/destination/
direction to turn, etc.
English
English
60
61
Page 61
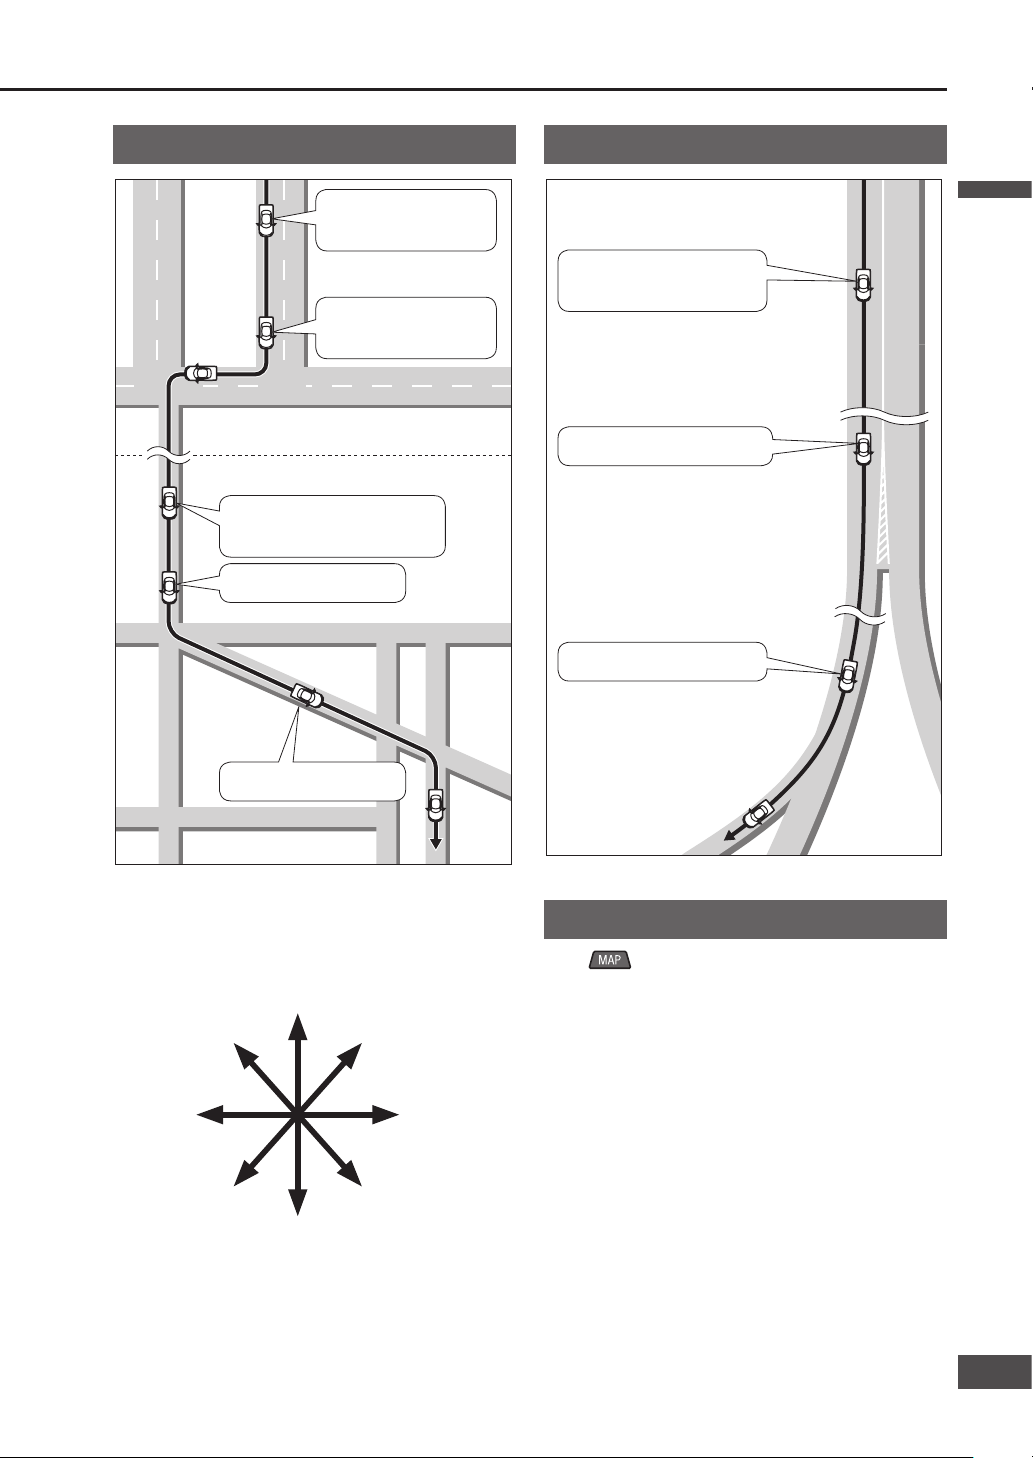
In half of a mile
(800 m*), right turn.
Next right, and then,
left turn.
Non residential area
Residential area
In a quarter of a mile
(400 m*), slight left turn.
Next slight left.
Slight right turn ahead.
Keep right onto XX.
In 2 miles (3 km*), keep
right onto XX.
The exit on the right.
Voice intersection guidance
The direction in which to turn is stated as one of eight
directions.
Note:
Some voice guidance may be omitted, depending on
the speed of the vehicle.
Voice guidance on main
routes
Voice guidance near
exits
Request voice guidance
Press during route guidance to display the name*
of the current position and provide voice guidance of the
distance to the next intersection, destination, etc.
* The name of the current position is displayed
according to nearby place name, POI name or street
name, etc.
Voice guidance on freeways
Voice guidance on ordinary roads
* This is the distance when “km” is set as the distance
setting (
page 84).
Guidance immediately before turns
A sound is played back immediately before a turn to let
you know when to turn.
Left turn Right turn
Straight
Make a legal U-turn
Slight left turn Slight right turn
Sharp left turn Sharp right turn
English
61
6160
Page 62

Register a Contact
(Up to 106 locations, including home)
To register the current position
Select [Mark] on the current position
screen.
The position of the vehicle mark at that time is
registered.
Note:
The registered Contact is marked with a “ ”.
To register on the map screen
Move the cursor to the location to
register and select [Mark].
The cursor position is registered.
Make the setting on a map of 0.5 mile (500 m*)
or more detailed scale.
* This is the scale when “km” is set as the
distance setting (
page 84).
Note:
The registered Contact is marked with a “ ”.
To register from the Navigation
menu
1
Select [Address Book] from the
Setup menu.
The Address Book screen is displayed.
2
Select [Register] for “Contacts”.
3
Search for the location to register.
Refer to pages 40 – 49 for the search method.
[Home] is not displayed.
4
Select [Enter].
Make the setting on a map of 0.5 mile (500 m*)
or more detailed scale.
* This is the scale when “km” is set as the
distance setting (
page 84).
5
Select [OK].
Select the items to correct or input. ( page 64)
Register a location (Contact)
English
English
62
63
Page 63

Display the Edit Contacts screen
1
Select [Address Book] from the
Setup menu.
The Address Book screen is displayed.
2
Select [Edit] for “Contacts”.
The Contact list is displayed.
3
Select a Contact.
The Edit Contacts screen is displayed.
The list can be sorted.
[Icon]: The list is sorted according to the
type of icon.
[Date]: The list is sorted in order of
registration.
Display from the map screen
1
Move the cursor to the Contact.
The Contact name is displayed on the top of
screen.
2
Select [Info.].
The Contact information is displayed.
3
Select [Edit].
The Edit Contacts screen is displayed.
Select [Enter ] to set it as the destination. If
a destination has already been set, [Add to ]
or [New ] is displayed. Refer to page 37 for
details.
Note:
Please be aware, that in the unlikely event of
product failure or software malfunction, or in
cases where your unit needs to be sent in for
service, saved data in your address book may
be lost.
English
63
6362
Page 64

Edit the Contact information
Preparation
Select the Contact and display the Edit Contacts
screen. (
page 63)
Change an icon
1
Select [Icon] on the Edit Contacts
screen.
2
Select an icon.
The selected icon is displayed on the map for the
Contact.
Select [Page 1]/[Page 2]/[With sound] to change
the list. Select [With sound] to make a sound
when the vehicle approaches a Contact.
If the icon was selected from the [With
sound] list
Select to check the sound that will be
made as the vehicle approaches the Contact.
Select [Direction guidance bell] to sound a
bell only when the point is approached from
the desired direction.
Use [
] or [ ] to adjust the direction from
which to make the sound on approach.
Select [Enter].
[Direction guidance bell] setting is
complete.
Note:
Select [No icon] from [Page 2] to avoid displaying an
icon on the Contact.
Set a Contact for home
Only one Contact can be set as home.
Select [Set Home] on the Edit
Contacts screen.
A Contact is set for home.
When [Del. Home] is selected, the home setting
is cancelled.
If another Contact has already been registered
as home, select [Yes] to cancel the old home
setting and change to the new home setting.
Set the name of a Contact
1
Select [Name] on the Edit Contacts
screen.
2
Enter the name and select [OK].
The entered text is set as the name.
The name may have up to 70 characters.
How to enter text ( page 97)
Set whether or not to display a
name on the map
Select [On]/[Off] under “Show name”.
[On]:
Displays the name of the Contact on the map.
[Off]:
Does not display the name of the Contact on
the map.
Register a location (Contact)
(continued)
English
English
64
65
Page 65

Change the position of a Contact
1
Select [Location] on the Edit
Contacts screen.
2
Move the cursor to the location to
which you wish to move the Contact
and select [Enter].
Moves the Contact to the center of the cursor.
Make the setting on a map of 0.5 mile (500 m*)
or more detailed scale.
* This is the scale when “km” is set as the
distance setting (
page 84).
Register a telephone number to
a Contact
1
Select [Phone No.] on the Edit
Contacts screen.
2
Enter the phone number and select [OK].
The entered number is set as the phone number.
Delete a Contact
Once a Contact is deleted, it cannot be restored. Check
thoroughly before deleting.
1
Select [Address Book] from the
Setup menu.
The Address Book screen is displayed.
2
Select [Delete] for “Contacts”.
The Contact list is displayed.
3
Select the Contact to delete.
The list can be sorted.
[Icon]: The list is sorted according to the
type of icon.
[Date]: The list is sorted in order of
registration.
Select [Del.all] to delete all destinations.
4
Select [Yes].
The Contact is deleted.
English
65
6564
Page 66

Register an Area to avoid
Points and areas to detour around on the route to the
destination can be registered. When an Area to avoid is
registered, route searches will look for routes that avoid
that point or area. (Up to 10 locations)
1
Select [Address Book] from the
Setup menu.
The Address Book screen is displayed.
2
Select [Register] for “Area to avoid”.
3
Search for the center of the Area to
avoid.
Refer to pages 40 – 49 for the search method.
[Home] is not displayed.
4
Move the cursor to the Area to avoid
and select [Enter].
Make the setting on a map of 0.5 mile (500 m*)
or more detailed scale.
* This is the scale when “km” is set as the
distance setting (
page 84).
5
Select
or to change the
size of the Area to avoid.
Select on the bottom line to register the area
centered on the cursor as an Area to avoid.
6
Select [Enter].
If the destination is set, route searching is
performed.
The registered Area to avoid is displayed on the
map screen as
or (range).
Note:
When [+] or [–] are used to switch the map scale,
the map switches but the size of the square frame
indicating the area does not switch.
In the following situations, a route search may
produce a route passing through an Area to avoid.
If the vehicle or the destination is inside the Area to
avoid.
When a route that detours around the Area to
avoid cannot be found, such as when there is only
one road between the vehicle position and the
destination.
Highways, toll roads and ferries within an Area to
avoid are not subject to detour.
To make the highway you want to avoid as a subject
to detour, set the size of the Area to avoid to
and
set it on the highway.
When near an Area to avoid, an indirect route may
be produced to avoid any roads entering the Area to
avoid.
Register a location (Area to avoid)
(continued)
English
English
66
67
Page 67

Delete an Area to avoid
Once an area is deleted, it cannot be restored.
Check thoroughly before deleting.
1
Select [Address Book] from the
Setup menu.
The Address Book screen is displayed.
2
Select [Delete] for “Area to avoid”.
The list of areas to avoid is displayed.
3
Select the Area to avoid to delete.
Select [Delete all] to delete all areas.
4
Select [Yes].
If the destination is set, route searching is
performed.
Display the Edit area to avoid
screen
1
Select [Address Book] from the
Setup menu.
The Address Book screen is displayed.
2
Select [Edit] for “Area to avoid”.
The list of areas to avoid is displayed.
3
Select the Area to avoid to edit.
The Edit area to avoid screen is displayed.
Note:
Please be aware, that in the unlikely event of
product failure or software malfunction, or in
cases where your unit needs to be sent in for
service, saved data in your address book may
be lost.
English
67
6766
Page 68

Register a location (Area to avoid)
(continued)
Edit Area to avoid information
Preparation
Select the Area to avoid and display the Edit area to
avoid screen. (
page 67)
Set the name of the Area to avoid
1
Select [Name] on the Edit area to
avoid screen.
2
Enter the name and select [OK].
The entered text is set as the name.
The name may have up to 70 characters.
How to enter text ( page 97)
Change the position of the Area
to avoid
1
Select [Location] on the Edit area to
avoid screen.
2
Move the cursor to the location to
which you wish to move the Area to
avoid and select [Enter].
Move the Area to avoid to the center of the cursor.
Make the setting on a map of 0.5 mile (500 m*)
or more detailed scale.
* This is the scale when “km” is set as the
distance setting (
page 84).
Change the size of the Area to
avoid
1
Select [Change area size] on the Edit
area to avoid screen.
2
Select
or to select the area
size.
3
Select [Enter].
If the destination is set, route searching is
performed.
English
English
68
69
Page 69

English
69
Audiovisual
Operations
Radio
Play a disc
(DVD/Audio CD/MP3/WMA)
Refer to the System Upgrade Guidebook for information on SIRIUS,
XM, iPod and TV.
Video from the DVD/Line-in is not displayed while the vehicle is in motion.
Stop in a safe place and engage the parking brake before watching video.
(Even while the vehicle is in motion, video is output to the second monitor (see System
Upgrade Guidebook).)
6968
Page 70

Switch audiovisual source
1
Press
.
The Audiovisual source operation screen is
displayed.
2
Select an audiovisual source.
The system switches to the selected source.
[AM]: Switches to AM radio.
[FM]: Switches to FM radio.
[DISC]*1: Switches to a corresponding disc.
(DVD, CD, MP3/WMA)
[XM]*2: Switches to XM Satellite Radio.
[SIRIUS]*3: Switches to SIRIUS Satellite
Radio.
[iPod]*4: Switches to iPod.
[AV]: Switches to Line-in.
*
1
This system is able to identify disc types
automatically, switching to DVD, CD or MP3/
WMA.
*
2
This is displayed when an XM Satellite Radio
Tuner (XMD1000) is connected.
*
3
This is displayed when a SIRIUS Satellite
Radio Tuner (SIR-PAN1) is connected.
*
4
This is displayed when an iPod is connected.
Note:
When [] ([]) is displayed, there is a source that
is not displayed on the screen. Select [] ([]) to
switch the screen.
[Traffi c]: The Traffi c Channels of XM Satellite
Radio and SIRIUS Satellite Radio can
be memorized for easy access to traffi c
information. (
System Upgrade Guidebook)
Refer to the System Upgrade Guidebook for
information on the operation of accessories sold
separately.
Refer to page 88 for operation of [Sound].
Turn the audiovisual source off
Select [Audio Off] on the Audiovisual
source operation screen.
The audio and video stop.
To turn audiovisual source back on
Select [Audio On] on the Audiovisual
source operation screen.
The audio and video display is shown.
Switch from the Audiovisual screen to the navigation screen
Press while the audiovisual
screen is displayed.
The display switches to the current position
screen, but audio output continues.
Note:
Turn the audiovisual source off to output only
navigation sound and image. (
above)
Basic audiovisual operations
English
English
70
71
Page 71

Switch to radio (AM or FM)
Select [AM] or [FM] on the
Audiovisual source operation screen.
The system switches to the Radio operation
screen (AM or FM).
Radio
FM operation screen
Tuning
Station selection
Press .
The frequency switches.
Seek tuning
Press and hold until the
frequency changes, then release it.
Starts Seek tuning, which stops when a station
is received.
While the button is held down, stations will not
be received even when they are detected.
Frequency
Auto preset mode indicator
Auto presettingPreset stations
Tune by selecting a preset number.
List selection
Frequency
Auto presetting
Specify the range for Auto presetting
[Each]: Perform Auto presetting for the displayed list
bands (6 ch).
[All]: Perform Auto presetting for the entire list from
FM1 to 3 (18 ch).
List numbers
Stereo indicator
Auto preset mode indicator
AM operation screen
Preset stations
Tune by selecting a preset number.
English
71
7170
Page 72

Preset memory
The station being received can be stored manually under
a selected number. (Manual preset)
Select the frequency, then touch and
hold the number under which you
wish to store the frequency for at
least 2 seconds.
The station being received is stored under the
selected number.
Note:
It is also possible to search automatically for
receivable frequencies and store them.
Under FM, 6 channels can be stored for each channel
list (FM1, FM2 and FM3). (18 channels in total)
The channel list switches as shown below, each time
[Band] is selected.
Select a stored station
Selects the stored station.
Select a station (number) from the
Preset stations.
The radio switches to the selected station.
Auto preset memory
Search automatically for receivable stations and store
them. (Up to 18 FM and 6 AM stations)
Touch and hold [Auto. P] for at least
2 seconds.
Auto preset mode is engaged and the Auto
preset mode indicator illuminates.
Stations are stored in order of reception quality.
The stored stations are overwritten and updated
every time this operation is performed.
If no receivable stations are found, tuning goes
through the whole frequency range and returns
to the original station.
Note:
Even in Auto preset mode, station selection and
manual preset can still be used.
Under FM, [Each] or [All] can be selected to specify
the Auto presetting range.
[Each]:
Auto presetting is performed for the displayed
list band (6 channels). The other two lists are
not subject to Auto preset mode.
[All]: Auto presetting is performed for all lists FM1
to 3 (18 channels).
To cancel Auto preset mode
Select [Auto. P].
Auto preset mode is cancelled.
Stations stored under Auto preset mode are
cleared.
The radio returns to the preset station that was
stored before Auto preset mode was engaged.
(continued)
English
English
72
73
FM1 FM2 FM3
Page 73

Disc insert (CD/DVD)
1
Press
.
The Open/Tilt/Eject screen is displayed.
2
Select [Disc].
The monitor opens.
If there is a disc inside, it is ejected
automatically.
3
Insert a disc.
Printed side
The monitor closes automatically.
Note:
The disc is played automatically after insertion.
3 {8 cm} discs can only be inserted in a 3 {8 cm} disc
cartridge.
The DVD Hint screen
The DVD Hint screen is displayed when a DVD is
inserted. It presents a simple explanation of DVD
operation.
Check the explanation, then select
[OK].
The DVD Hint screen disappears.
Note:
Once [OK] is selected, the DVD Hint screen will not
be displayed again until the engine stops. It appears
again after the engine is restarted or the key is turned
to ACC ON.
Disc eject (CD/DVD)
1
Select [Disc] on the Open/Tilt/Eject
screen.
The monitor opens and the disc is ejected.
2
Remove the CD/DVD.
Select [Close] to close the monitor.
Pressing also closes the monitor.
Play a discRadio
English
73
7372
Page 74

Switch to disc
(DVD, CD, MP3/WMA)
Select [DISC] (DVD, CD, MP3/WMA)
on the Audiovisual source operation
screen.
The system switches to disc (DVD, CD, MP3/
WMA).
The Disc operation screen (DVD, CD, MP3/
WMA) is displayed.
Note:
Audio and video may be interrupted briefl y while the
format is identifi ed.
Restrictions on the disc itself may prevent operation
from proceeding as described in this manual.
(“
” is displayed on the monitor.) Refer to the disc
instructions manual for details.
Play a disc
(continued)
DVD operation screen
When the source is switched to DVD, the DVD operation
screen is displayed automatically.
To display the DVD operation screen manually, press
while DVD is the source.
Read the section on “Discs that can be played back”
carefully. ( page 7)
Switches the aspect ratio
PLAY
This screen can be operated while the vehicle is in
motion. It is convenient for watching DVD videos on
the rear monitor. (
System Upgrade Guidebook)
Displays the DVD playback screen
Playing timeTitle No. Chapter No.
Note:
Refer to page 92 for operation of [ASPECT].
DVD DVD
English
English
74
75
Page 75

DVD menu
Touching the screen during DVD playback displays Short menu 1. Select [NEXT PAGE] and [PREV PAGE] to switch
between screens.
Short menu 2
This menu can be used for DVD menu operations, etc.
[MOVE BUTTONS]: Switches touch key display
positions. (
page 80)
[<<Off]: Temporarily hides the touch keys.
Touch [On>>] to display the touch
keys again.
[DIRECT TOUCH]: Turns on or off the direct touch
function, for touching DVD menu
items directly to select them. If
the function is turned off, the
cursor keys are displayed.
(
page 80)
Short menu 1
This menu can be used for DVD playback operations.
[DISPLAY]: Adjusts tone. ( page 92)
[TOP MENU]/[Menu]: Displays the disc menu (Refer
to the instructions provided with
the disc being played for how to
operate). (
page 79)
[HIDE BUTTONS]: Hides the touch keys.
[]: Fast reverse (
page 77)
[]: Stop (
page 76)
[]: Pause (
page 76)
[]: Play (
page 76)
[]: Fast forward (
page 77)
Short menu 3
This menu can be used for DVD playback-related
settings.
[SETUP]: Displays the Setup menu. (
page 94)
[SEARCH]: Inputs the title number to cue the title.
(
page 77)
[RETURN]: Moves to a predetermined position on
the disc and starts playback from that
position.
[Audio]: Switches the audio language.
(
page 78)
[SUB-TITLES]: Switches the subtitle language.
(
page 78)
[Angle]: Switches the angle. (
page 79)
Displays title numbers/chapter numbers
Displays the current sound settings and
number of channels
Note:
Aspect setting is fi xed to wide while the Short menu is displayed.
[PREV PAGE]:
Switches to Short menu 2
[NEXT PAGE]:
Switches to Short menu 1
[PREV PAGE]:
Switches to Short menu 1
[NEXT PAGE]:
Switches to Short menu 3
English
75
7574
Page 76

Play a disc
(continued)
Stop
Select [] from Short menu 1.
Resume playback
Select [] from Short menu 1.
Playback starts from where it stopped.
Pause
Select [] from Short menu 1.
Resume playback
Select [] from Short menu 1.
Playback resumes from where it stopped.
[] can also be selected to start playback.
Slow playback
Touch and hold [] while
playback is paused.
Slow playback continues for as long as it is
touched.
Release to return to pause.
DVD DVD
English
English
76
77
Page 77

Fast forward/Fast reverse
Press and hold .
Fast forward or fast reverse continues while the
button is pressed.
Press and hold
to fast forward.
Press and hold
to fast reverse.
Release to return to normal playback.
Depressing [] or [] from Short menu 1
will also cause fast forward/reverse.
Select chapter/title
Chapter selection
Press .
Press to play from the next chapter.
Press to play the currently playing chapter
from the beginning. Press twice or more to play
the preceding chapter.
Input the title number to cue the
title
1
Select [SEARCH] from Short menu 3.
2
Enter the title number and select
[Enter].
Playback starts from the input title number.
If there is no title on the DVD matching the input
title number, the currently playing title continues.
Select [ ] to delete one character.
Select [<<Off] to display the video screen.
Select [On>>] to return to the title number input
screen.
English
77
7776
Page 78

Play a disc
(continued)
Switch the audio language
If the disc contains multiple audio languages, the audio
language can be switched.
1
Select [Audio] from Short menu 3.
The audio numbers and languages are displayed.
2
Select [Audio].
The audio languages switch each time [Audio] is
selected.
Note:
The preferred playback language can be set.
(
page 94)
Switch the subtitle language
If the disc contains multiple subtitle languages, the
subtitle language can be switched.
1
Select [SUB-TITLES] from
Short menu 3.
The subtitle numbers and languages are
displayed.
2
Select [SUB-TITLES].
The subtitle languages switch each time
[SUB-TITLES] is selected.
The subtitle displays toggle between show and
hide each time [Hide] is selected. The switch is
displayed in bold-faced type when the subtitles
are hidden.
In some cases it may take time for the subtitles
to appear.
Note:
The preferred display language can be set. ( page 94)
DVD DVD
English
English
78
79
Page 79

Switch the angle
If the disc contains multiple angles, the angle can be
switched.
1
Select [Angle] from Short menu 3.
2
Select [Angle].
The angle switches each time [Angle] is selected.
Note:
If the multi-angle mark display is switched on under
DVD Setup menu (
page 94), the angle mark is
displayed in the upper right of the screen when angle
switching is possible.
Audio language, subtitle
language and angle
In some cases it may only be possible to switch these
functions from the top menu or from DVD Setup
menu. (
page 94)
When the power is turned on or the disc is changed,
the language set under DVD settings is prioritized as
the audio and subtitle language.
The number of audio languages, subtitle languages
and angles varies between discs. Refer to the disc
instructions for details.
Display the top menu
The top menu varies between discs. Refer to the disc
instructions for details.
Select [TOP MENU] from Short menu 1.
The top menu is displayed.
Short menu 2 is displayed.
Refer to page 80 for item selections.
Display the title menu
The title menu varies between discs. Refer to the disc
instructions for details.
Select [Menu] from Short menu 1.
The title menu is displayed.
Short menu 2 is displayed.
Refer to page 80 for item selections.
English
79
7978
Page 80

Play a disc
(continued)
Top menu and title menu operations
Use direct touch to select
Menu items can be selected by touching them directly
(the direct touch function).
Preparation:
When the direct touch function is off (when the cursor
keys are displayed), select [DIRECT TOUCH] to turn
the direct function on.
Touch items in the top menu or title
menu to select them.
The display switches to the selected item.
Note:
The menu items included differ between discs.
Functions may not always follow user operations, as
playback differs according to the content of the disc.
Direct touch may not be usable with some discs. In
that case, use the cursor keys to make selections.
If direct touch is switched on, the screen mode is fi xed
to wide, provided there is an item that can be selected
for the DVD image.
Select [<<Off] to hide the touch keys. Select [On>>] to
display the touch keys.
When an item was selected but the unit did not
recognize which item was selected, the screen near
the selected area is enlarged. If this occurs, select the
item again.
Use the cursor keys to select
The cursor keys can be used to select menu items.
1
Select [DIRECT TOUCH] from Short
menu 2.
The cursor keys are displayed.
Select [DIRECT TOUCH] again to turn the
direct touch function on. When the direct touch
function is turned on, the cursor keys disappear.
2
Use the cursor keys to select an
item, then select [Enter].
The display switches to the selected item.
Change the display positions of
touch keys
Select [MOVE BUTTONS] from Short
menu 2.
The display position changes between top and
bottom every time the item is selected.
DVD CD/MP3/WMA
English
English
80
81
Page 81
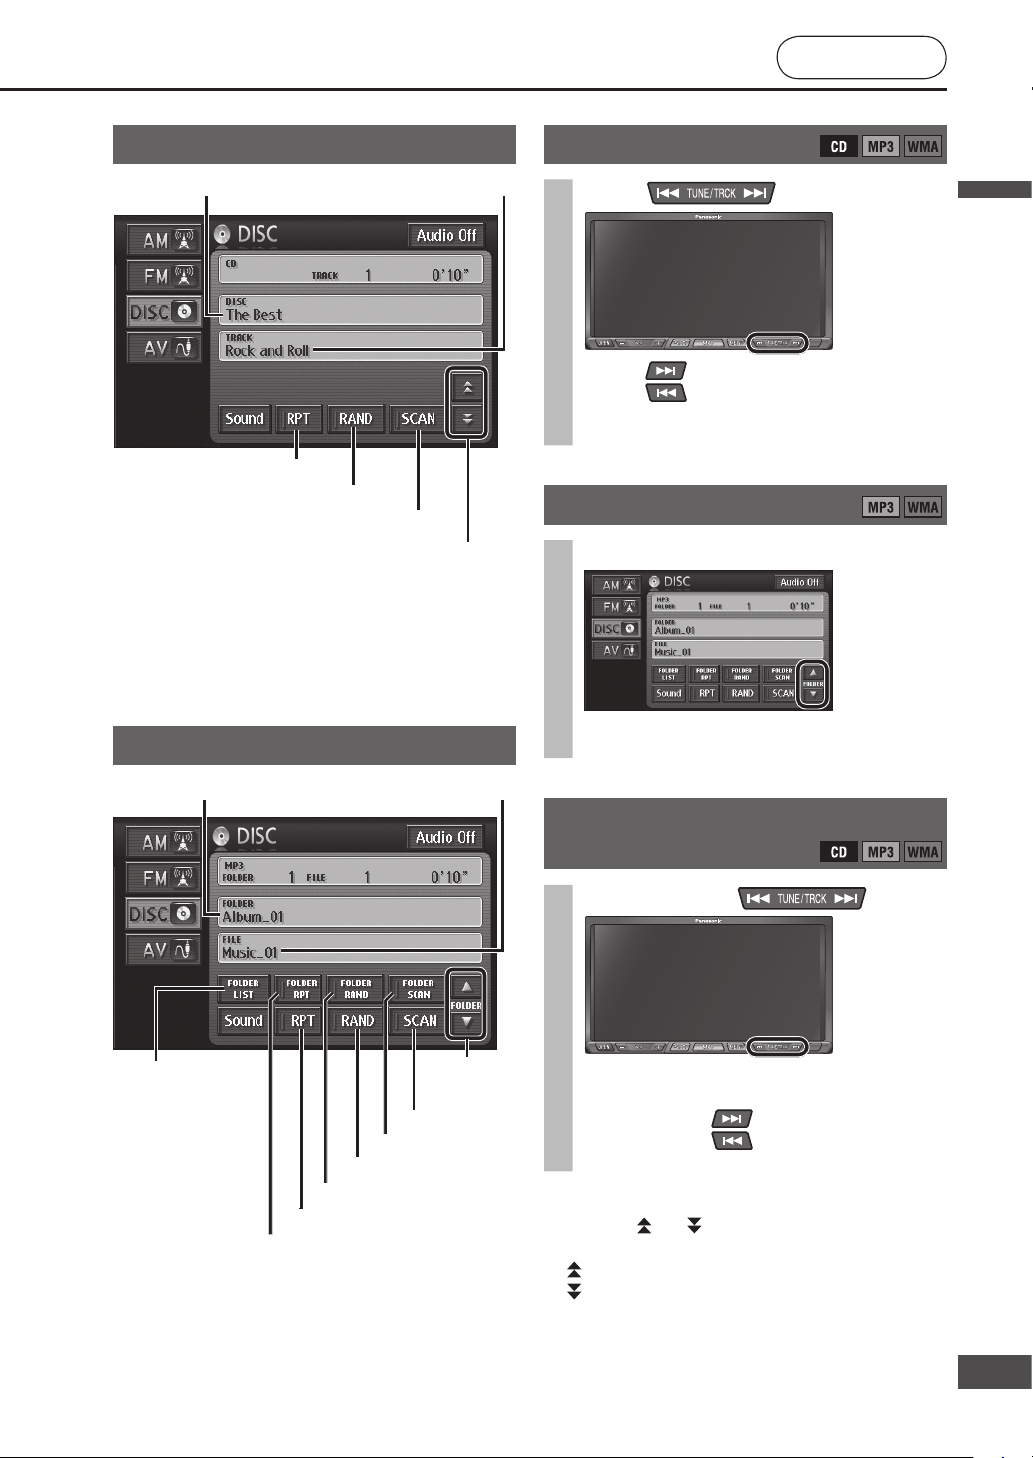
CD operation screen
* Only displayed with CD-Text compatible discs.
Note:
dts CD cannot be played.
CD EXTRA video cannot be played.
MP3/ WMA operation screen
Select track/fi le
Press .
Press to play from the next track/fi le.
Press to play the currently playing track/
fi le from the beginning. Press twice or more to
play the preceding track/fi le.
Folder selection
Select [] or [].
Starts playing the fi rst track in the selected
folder.
Fast forward/Fast reverse
Press and hold .
Fast forward or fast reverse continues while
button is pressed.
Press and hold
to fast forward.
Press and hold
to fast reverse.
Release to return to normal playback.
Note:
For a CD, [ ] or [ ] on the CD operation screen can
also be selected to fast forward/fast reverse.
[
]: Touch and hold the button to fast forward.
[
]: Touch and hold the button to fast reverse.
Release to return to normal playback.
Scan play
Random play
Repeat play
Fast forward/Fast reverse
Track name*Disc name*
Displays the
Folder list
Folder
selection
File name
Folder name
Scan play
Random play
Repeat play
Folder Scan play
Folder Random play
Folder Repeat play
English
81
8180
Page 82
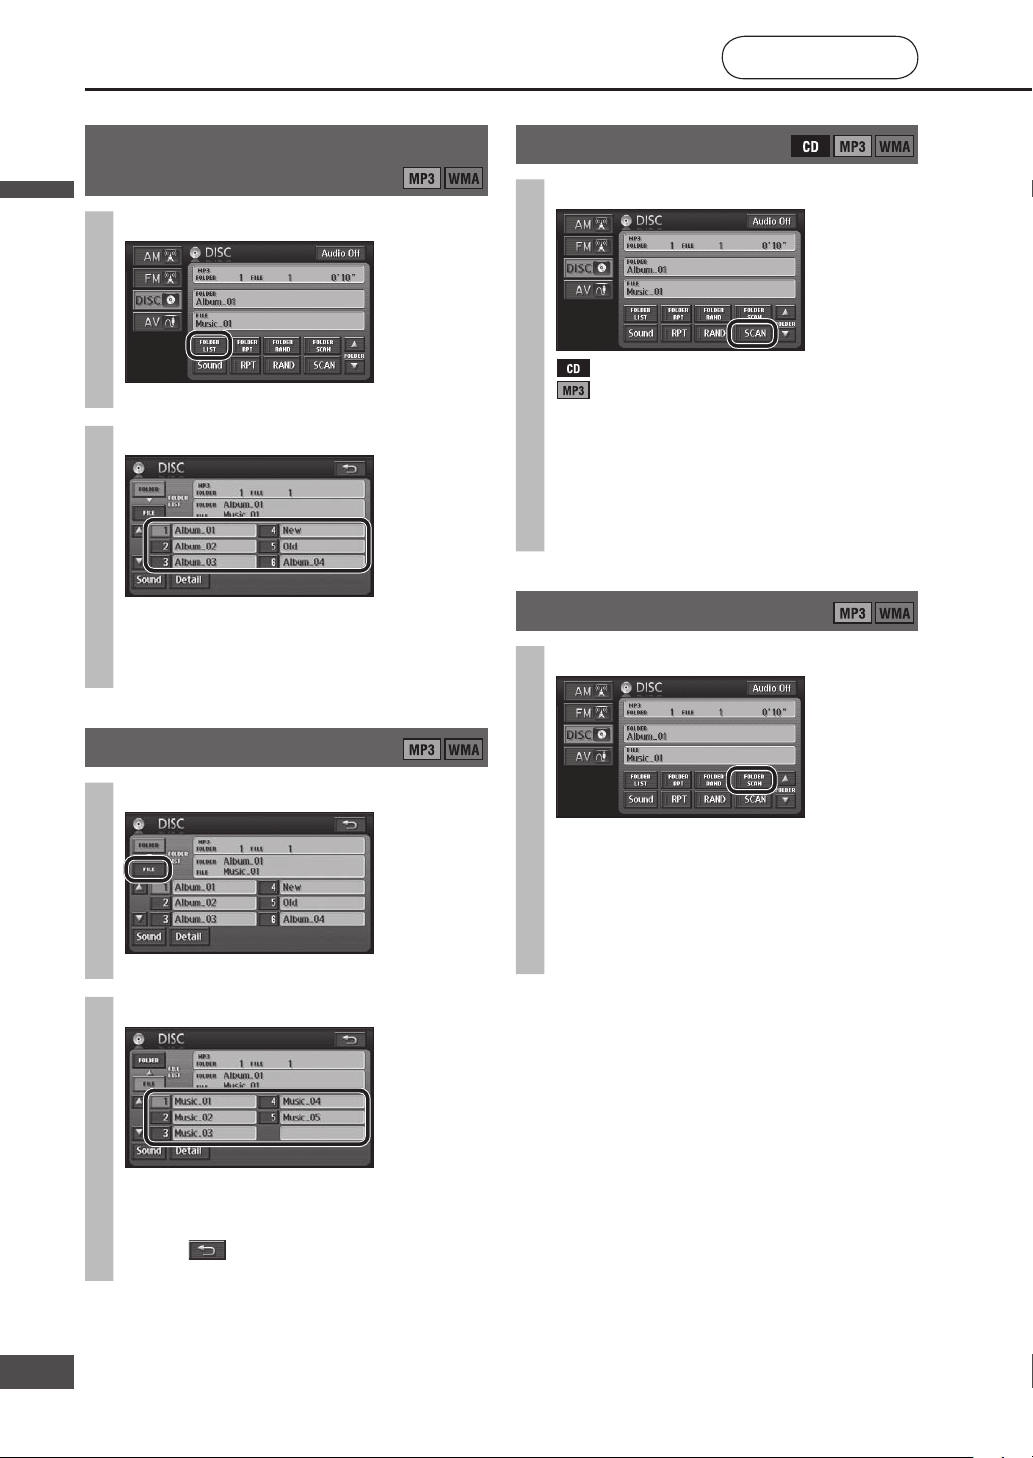
Select a folder from the list
1
Select [FOLDER LIST].
The Folder list screen is displayed.
2
Select a folder from the list.
Starts playing the fi rst track in the selected
folder.
If there are seven or more folders, select [] or
[] to switch between pages of the list.
Select a fi le from the list
1
Select [FILE] from the folder list.
The File list screen is displayed.
2
Select a fi le from the list.
Starts playing from the selected fi le.
If there are seven or more fi les, select [] or []
to switch between pages of the list.
Select to return to the MP3/WMA operation
screen.
Scan play
Select [SCAN].
: Scans all tracks.
: Files in the folder currently being played are
scanned.
Each track is played for approximately
10 seconds.
Select [SCAN] again to return to normal
playback.
Scan will be automatically ended when it has run
through all tracks/all fi les in a folder.
Folder scan play
Select [FOLDER SCAN].
10 seconds is played from the beginning of each
fi le at the top of each folder, starting with the
folder after the one being played.
Select [FOLDER SCAN] again to return to normal
playback.
Scan will be automatically ended when it has run
through the fi rst fi les in all folders.
Play a disc
(continued)
English
English
82
83
Page 83

Random play
Select [RAND].
: All tracks are played in random order.
: Files in the folder currently being played are
played in random order.
Select [RAND] again to return to normal
playback.
Note:
Random selection means that the tracks/fi les are
constantly played at random from among all tracks
or all fi les in a folder, so the same track/fi le may be
played any number of times.
Folder random play
Select [FOLDER RAND].
Files in all folders of the disc are played in
random order.
Select [FOLDER RAND] again to return to normal
playback.
Note:
Folder random selection means that the fi les are
constantly played at random from among all fi les in all
folders, so the same fi le may be played any number of
times.
Repeat play
Select [RPT].
The track/fi le being played is played repeatedly.
Select [RPT] again to cancel the repetition.
Folder repeat play
Select [FOLDER RPT].
The fi le in the same folder as the fi le being
played is played repeatedly.
Select [FOLDER RPT] again to cancel the
repetition.
Display fi le information
Select [Detail] on the Folder/File list
screen.
The Detail screen is displayed for the content
being played.
Select to return to the Folder list or File list
screen.
Note:
Depending on the recorded content, the text may be
displayed incorrectly, or may not be displayed at all.
For safety reasons, the fi le information is not displayed
while the vehicle is in motion.
CD/MP3/WMACD/MP3/WMA
English
83
8382
Page 84

Basic navigation
settings
1
Select [Setup] from the
Navigation menu.
2
Select [Navigation
Setup].
3
Make settings.
( right table)
Use [ ] or [ ] to display the
next page.
Note:
Select [Default] to go to the screen
for selecting default setting.
Select [Yes] to return settings to the
defaults.
Items Settings
Distance
Set the units for distances and scales displayed on the screen or used in
voice guidance. default: [miles]
Estimated travel time
Changes the average vehicle speed that is the
basis for estimated arrival time. Settings can
be made for urban road, country road and
highway road types.
default: Urban road: 25 mph (40 km/h)
Country road: 35 mph (55 km/h)
Highway: 55 mph (90 km/h)
Select [Change speed].
Keyboard layout
Changes the key layout for text input.
default: [ABC]
Time zone
Sets the Time zone and Daylight Saving Time
to use.
default: Time zone: [EST]
Daylight Saving Time: [Off]
Select [Change].
Display POI icons
Changes the POI icons displayed on the
Display POI Icons screen. (
page 50)
Select [Chg. category]. Select the POI icon to change.
3D landmark
Sets to display/not display 3D landmarks. ( page 28)
default: [On]
Display clock
Sets to display/not display the clock on the navigation screen.
default: [On]
Voice guidance in SRC mode
Sets whether or not to use voice guidance output for navigation when
displaying and listening to an Audiovisual screen (radio, DVD, CD, etc.).
default: [On]
Auto voice guidance
Sets whether or not to automatically give voice guidance during route
guidance, such as when approaching an intersection.
default: [On]
Change navigation settings
English
English
84
85
Page 85

[km] ...... Sets kilometer for distance displays.
[miles] ... Sets mile for distance displays.
Adjustment range <5 mph (5 km/h) steps>
Urban road: 5 mph – 25 mph (5 km/h – 40 km/h)
Country road: 5 mph – 35 mph – 55 mph (5 km/h – 55 km/h – 90 km/h)
Highway: 5 mph – 55 mph – 75 mph (5 km/h – 90 km/h – 120 km/h)
Select [Default] to return settings to the defaults.
Select
[OK].
[ABC] .... Sets alphabetical order for the key layout.
[QWE] ... Sets QWERTY for the key layout.
[AZE] ..... Sets AZERTY for the key layout.
[PST] ..... Pacifi c Standard Time
[AST] ..... Atlantic Standard Time
[HST] .... Hawaii Standard Time
[CST] ..... Central Standard Time
[EST] ..... Eastern Standard Time
[MST] .... Mountain Standard Time
[NST] .... Newfoundland Standard Time
[AKST] .. Alaska Standard Time
Select
[OK].
Set Daylight Saving Time.
[On] ....... Sets Daylight Saving Time.
[Off] ...... Does not set Daylight Saving Time.
Select [Default] to return
settings to the defaults.
Select a main category.
Select [List all categories]
to display all sub-categories
within the main categories.
Select a sub-category as POI icon.
Select
[OK].
[On] ....... Displays the 3D landmark.
[Off] ...... Does not display the 3D landmark.
[On] ....... Displays the clock.
[Off] ...... Does not display the clock.
[On] ....... Provides voice guidance while an Audiovisual screen is displayed.
[Off] ...... Does not provide voice guidance while an Audiovisual screen is displayed.
[On] ....... Provides voice guidance at intersections.
[Off] ...... Does not provide voice guidance at intersections.
English
85
8584
Page 86

Items Settings
Delete previous point
The record of previously set destinations
(
page 47) can be deleted.
Select [Delete]. Select the previous point to delete from the list.
Current position
Incorrect vehicle display position and
direction on the map can be corrected.
Select [Adjust]. Move the cursor to the position to set as
Operation sound
Sets whether or not to output sounds during operation.
default: [Off]
Audio output at “Screen Off”
Sets whether or not to output audio when the screen is off.
default: [On]
Map color “Day”
Changes the map display colors for day mode. ( page 29)
default: [1]
Map color “Night”
Changes the map display colors for night mode. ( page 29)
default: [3]
Menu picture
Changes the icon for the Destination button on the Navigation menu.
The icon changes to represent morning, midday, evening and night,
depending on the time of day.
default: [1]
Format SD card
Formats the SD memory card.
This function is for use with future versions
of this software.
Select [Format].
Basic navigation
settings (continued)
1
Select [Setup] from the
Navigation menu.
2
Select [Navigation
Setup].
3
Make settings.
( right table)
Use [ ] or [ ] to display the
next page.
Note:
Select [Default] to go to the screen
for selecting default setting.
Select [Yes] to return settings to the
defaults.
Change navigation settings
(continued)
English
English
86
87
Page 87

Select [Del.all] to delete all previous points.
Select
[Yes].
the vehicle position, then select [Enter].
Select [ ] or [ ] to adjust the orientation of the vehicle.
Select
[Enter].
: Rotates
counterclockwise.
: Rotates clockwise.
[On] ....... Outputs sounds during operation.
[Off] ...... Does not output sounds during operation.
[On] ....... Outputs audio when the screen is off.
[Off] ...... Does not output audio when the screen is off.
[1] ...... Route has easy-to-see colors when driving during the day and under brightly lit conditions.
[2] ...... Icons have easy-to-see colors when driving during the day and under brightly lit conditions.
[3] ...... Route has easy-to-see colors when driving at night and under low light conditions.
[4] ...... Icons have easy-to-see colors when driving at night and under low light conditions.
[Yes] .........Formats the memory.
[No] ........... Does not format the memory.
Note:
Data deleted during formatting cannot be restored.
Consider this before formatting the memory.
Morning Midday Evening Night
[1] ......
[2] ......
[3] ......
[Off] ... Always displays the same icon, regardless of the time of day.
English
87
8786
Page 88

Surround effects Settings
[SRS CS Auto]
What is SRS CS Auto?
SRS CS Auto is a surround system tailored
for use in a vehicle, using a Circle Surround
decoder. It reproduces a sound fi eld
equivalent to 5.1 ch, without using a center
speaker or subwoofer.
SRS CS Auto is only enabled if a rear
speaker (4 ch, 4.1 ch) is connected.
default: [Off]
Select [On].
Surround effects
1
Select [Sound] on
any Source operation
screen.
(Example: AM)
2
Select the item to set.
3
Make settings.
( right table)
Note:
SRS CS Auto will be turned off
automatically if you change Balance
Fader/Speaker Setting/Graphic
Equalizer setting.
Change audio and video settings
is a trademark of SRS Labs, Inc.
CS Auto technology is incorporated under
license from SRS Labs, Inc.
English
English
88
89
Page 89
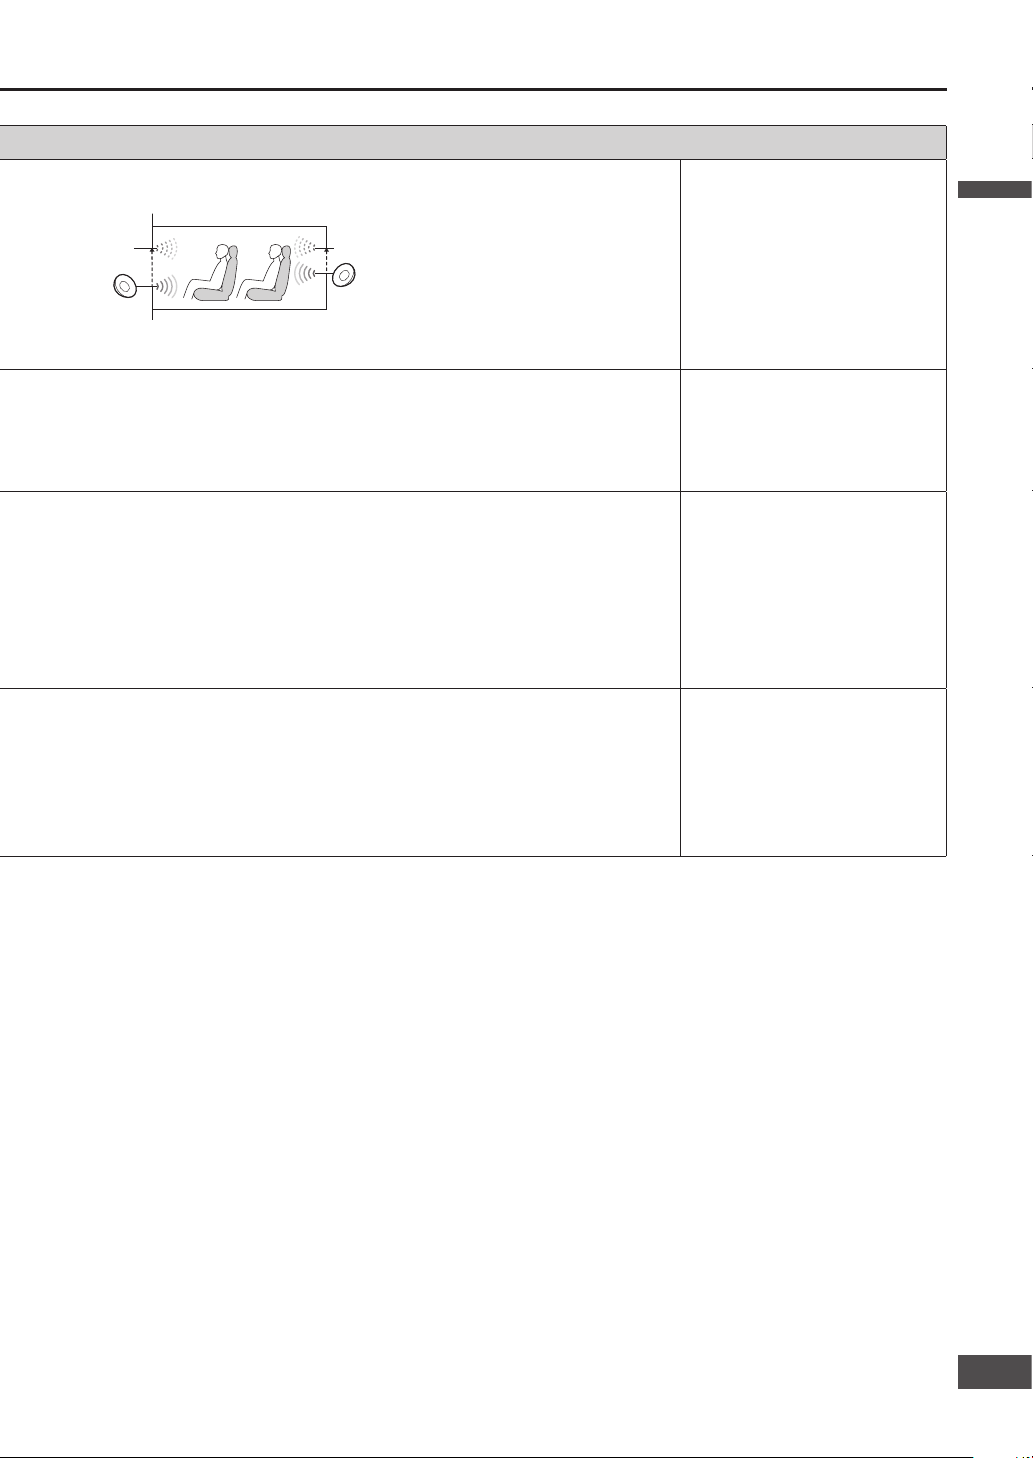
[ Focus]
Adjusts so that the sound seems to be coming from ear height.
Actual height at which sound is generated from the speakers
default: 5
Adjustment range:
Front: 0 – 5 – 10
Rear: 0 – 5 – 10
[ TruBass]
Bass strength can be set for each speaker.
Even if no subwoofer is used, the bass sound is almost as powerful.
(If a subwoofer is used, the bass sound will be even more impressive.)
default: 4
Adjustment range:
Front: 0 – 4 – 10
Rear: 0 – 4 – 10
Subwoofer: 0 – 4 – 10
[ Mix to Rear]
When playing a DVD for which the dialog and music are played from the front
channel and sound effects from the rear channel, it may be diffi cult to hear the
dialog from the rear seats.
Set Mix to Rear to combine output of front channel components (such as
dialog) with the rear speaker output, making dialog easier to hear from the rear
seats while maintaining the realism of surround sound.
default: 40 %
Adjustment range:
0 % – 40 % – 100 %
[ Speaker Size]
Make settings to match the size of the connected speakers.
If the Speaker Size settings are changed, the TruBass setting value for the
changed speakers is returned to the default setting.
default: [Large]
Front:
Select [Small] or [Large].
Rear:
Select [Small] or [Large].
English
89
8988
Page 90

Surround effects Settings
[Balance Fader]
Adjusts output levels for left/right (Balance) and front/rear (Fader).
default: 0
[Speaker Setting]
Adjusts the output level for each speaker.
default: Speaker Level: 0 dB
Speaker Delay: 0 cm
Subwoofer: 120 Hz
[ Speaker Level]
Adjusts the output level for
each speaker.
[ Speaker Delay]
Sets the distance of each
speaker from the reference
point.
[ Subwoofer]
When a subwoofer
is connected, set the
maximum number of Hz for
audio to be output from the
subwoofer.
(Cutoff frequency)
[Graphic Equalizer]
default: [EQ1]
Adjust the Graphic
Equalizer.
Register the current
adjustment values.
Load registered adjustment
values.
Surround effects
(continued)
1
Select [Sound] on
any Source operation
screen.
(Example: AM)
2
Select the item to set.
3
Make settings.
( right table)
Note:
SRS CS Auto will be turned off
automatically if you change Balance
Fader/Speaker Setting/Graphic
Equalizer setting.
Change audio and video settings
(continued)
Flat: (Flat) Flat frequency response
EQ1: (Rock) Speedy and heavy sound
EQ2: (Pop) Wide-ranged and deep sound
EQ3: (Vocal) Clear sound
EQ4: (Jazz) Jazz-specifi c deep sound
EQ5: (Club) Club and disco-specifi c sound
Frequency
(Hz)
Settings
60 160 400 1 k
Hz
3 kHz6 kHz12 k
Hz
Flat ±0 ±0 ±0 ±0 ±0 ±0 ±0
EQ1 +3 +1 ±0 –1 +1 +2 +3
EQ2 +2 +1 +1 +1 +1 +2 +2
EQ3 +1 +1 +1 +2 +2 +3 +3
EQ4 +3 +3 +1 –2 –1 +2 +4
EQ5 +4 +3 ±0 +4 +2 +3 +4
English
English
90
91
Page 91

Adjust the Balance/Fader.
Adjustment range: Balance ([Left]/[Right]): 7 (Left) – 0 – 7 (Right)
Fader ([Front]/[Rear]): 7 (Front) – 0 – 7 (Rear)
Adjust the output level for each speaker.
Adjustment range: –12 dB – 0 dB – 12 dB
Make the speaker from which the test signal (a buzzing sound) is audible at the lowest volume the reference, then
adjust other speakers so they are heard with the same speaker sound.
Input the distance to each speaker.
Adjustment range:
0 cm – 500 cm
When the distance is set, the
timing of sound output from
the other speakers is delayed to
match the speaker furthest from
the reference point.
(Approximately 0.3 ms per
10 cm)
Set the listening position as the reference point.
Measure the distance horizontally.
Set the frequency.
Adjustment range: 60 Hz – 120 Hz – 200 Hz
Adjust the level for each frequency band.
Adjustment range: –4 – 0 – 4
(–10 dB – ±0 dB – +10 dB)
Touch and hold the setting to register, from [EQ1] to [EQ5], for at least 2 seconds.
Note:
Settings cannot be registered to [Flat].
Touch and hold [Flat] for 2 seconds or more to return all settings to the defaults.
Select the settings to load, from [Flat] to [EQ5].
Front L
Front R
Reference point
Rear L Rear R
Subwoofer
50 cm
120 cm
130 cm
140 cm
70 cm
Speaker
Measure this distance Reference point
English
91
9190
Page 92
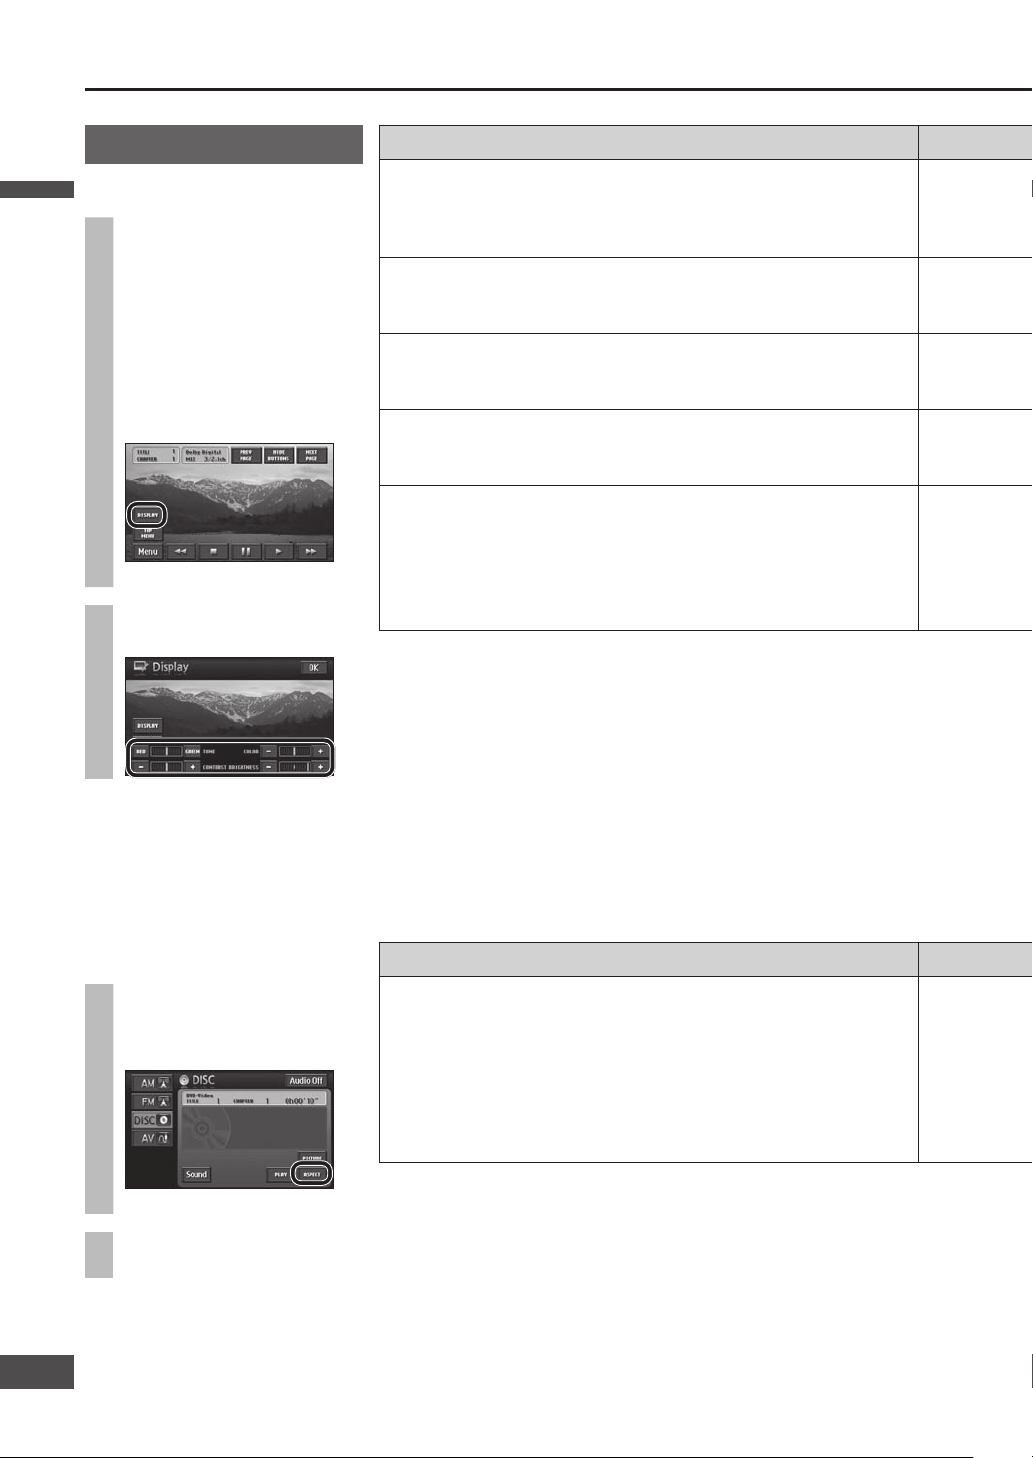
Items Settings
CONTRAST
[+]: Makes clearly defi ned contrast
between black and white
[–]: Reduces the contrast between black
and white
BRIGHTNESS
[+]: Brighter
[–]: Darker
TONE*
[RED]: Emphasizes red
[GREEN]: Emphasizes green
COLOR*
[+]: Intensifi es color
[–]: Fades color
DAY MODE
The night mode screen can be switched to day mode screen.
Note:
[DAY MODE] is displayed on the night mode screen.
default: Off
* The image quality of the DVD/AV/Rear view camera can be adjusted.
Color/Tone cannot be adjusted on the map screen.
Items Settings
Screen display can be switched.
Compressing or extending the screen for business use or public
performance risks infringing copyrights protected under copyright
laws.
Extending a non-wide screen (4:3) image to fi ll a wide screen hides
part of the edge of the image, or distorts the image. View video in
normal mode, which respects the intentions of the producer.
default: [Wide]
Switch aspect setting
1
Select [ ASPECT] when
the DVD/AV operation
screen is displayed.
(Example: DVD)
2
Make settings.
( right table)
Screen adjustment
Adjust image quality
1
Select [Display] from
the Setup menu.
Or, when the screen is
on DVD/AV/Rear view
camera, touch part of
the screen to display the
touch keys, then select
[DISPLAY].
(Example: DVD)
2
Make settings.
( right table)
Note:
Image quality adjustment settings
are stored for day mode and night
mode.
Change audio and video settings
(continued)
English
English
92
93
Page 93

Adjust contrast.
Adjustment range: 1 – 6 – 11
default: 6
Select [OK].
Adjust brightness.
Adjustment range: 1 – 6 – 11
default: 11
Select [OK].
Adjust color.
Adjustment range: 1 (Red) – 6 – 11 (Green)
default: 6
Select [OK].
Adjust color saturation.
Adjustment range: 1 – 6 – 11
default: 6
Select [OK].
When [DAY MODE] is selected during night mode display, it switches to day mode. Select it
again to return to night mode.
Note:
The day mode switched to using [DAY MODE] is not the same brightness as normal day
mode.
Select [OK].
[Normal] ........... 4:3 (w h) screen. Left and right sides are black.
[Wide] .............. 16:9 (w h) screen.
English
93
9392
Page 94

Items Settings
[ Audio Language]
Sets the audio language.
default: English
[ Subtitle Language]
Sets the subtitle language.
default: English
[ DVD Language]
Sets the menu language displayed.
default: English
[Angle Mark]
Sets whether to display or not display the angle mark.
default: On
[ DVD software mode]
Set the image size for use when playing video from a wide DVD.
default: 16:9 Wide
Note:
Set the software setting according to the symbol used on jacket.
(
page 7)
DVD software mode is ignored if Pan & Scan or Letterbox is already
set in the software.
Screen aspect of the display unit is changed according to the aspect
setting (
page 92) and DVD software’s aspect.
[Parental Control Level]
Restricts the DVD video that can be played.
default: 8
DVD Setup menu
1
Select [SETUP] on Short
menu 3.
2
Select the item to set.
3
Make settings.
( right table)
Note:
Select [Default] to go to the screen
for selecting default setting.
Change audio and video settings
(continued)
English
English
94
95
Page 95

[English] [French] [Spanish] [German]
[Italian] [Dutch] [Japanese] [Others]
Select [Others].
To set a language other
than those listed, select
[Others] and enter the
language code.
Select [ ] to delete one character.
Note:
Refer to the “Language code list” on page 96 for language codes.
If the priority audio language is already registered for the disc, the audio language registered on the disc is used to
play back. If the disc does not contain the set audio language, that language cannot be played.
On ......... Displays the multi angle mark.
Off ......... Does not display the multi angle mark.
The setting changes as shown below, every time “DVD software mode” is selected.
16:9 Wide .............. plays a video in wide screen (16:9).
4:3 Letterbox ......... plays wide-screen video in Letterbox mode (in which black bands appear at the top and bottom
of the screen).
4:3 Pan & Scan ..... plays wide-screen video in Pan & Scan mode (in which the left and right edges of the screen
are cut off).
Enter a 4-digit code number and select [Enter].
Select [ ] to delete one character.
Note:
At the time of purchase, no code number has been
set. The 4-digit number entered when making the
initial settings becomes the code number.
If no code number has been entered, the code
number is displayed at the top as “----”.
Once a code number is entered, the code number
will be required the next time the item is used, and
thereafter. Do not forget the code number. If you
forget your code number, touch [
] 10 times to
initialize the setting (returning to the state with no
code number setting).
Select the parental lock level, from [1] to [8].
Parental lock levels are in three main types.
Level 1: Only DVD for children can be played
(playback of general and adult-oriented
DVD video is prohibited).
Levels 2 to 7: Only DVD for children and general audiences
can be played (play of adult-oriented DVD
video is prohibited).
Level 8: All DVD can be played.
Note:
If the parental lock applies to a DVD that is played, the
code number input screen is displayed. Playback starts
after the correct code number is input and [Enter] is
selected.
16:9 Wide 4:3 Letterbox 4:3 Pan & Scan
English
95
9594
Page 96

Language code list
For “Others” (page 95)
Input the 4-digit language code, pressing the buttons [0] to [9]. Select [Enter] to fi nalize.
Note:
Setting is fi nished and the display returns to the main menu.
For retrying selection during number entry, select [Clear].
Code Language Name
0101 Afar
0102 Abkhazian
0106 Afrikaans
0113 Amharic
0118 Arabic
0119 Assamese
0125 Aymara
0126 Azerbaijan
0201 Bashkir
0205 Belorussian
0207 Bulgarian
0208 Bihari
0209 Bislama
0214 Bengali,Bangla
0215 Tibetan
0218 Breton
0301 Catalan
0315 Corsican
0319 Czech
0325 Welsh
0401 Danish
0405 German
0426 Bhutani
0512 Greek
0514 English
0515 Esperanto
0519 Spanish
0520 Estonian
0521 Basque
0601 Persian
0609 Finnish
0610 Fiji
0615 Faroese
0618 French
0625 Frisian
0701 Irish
0704 Scottish Gaelic
0712 Galician
0714 Guarani
0721 Gujarati
0801 Hausa
0809 Hindi
0818 Croatian
0821 Hungarian
0825 Armenian
0901 Interlingua
Code Language Name
0905 Interlingue
0911 Inupiag
0914 Indonesian
0919 IceLandic
0920 Italian
0923 Hebrew
1001 Japanese
1009 Yiddish
1023 Javanese
1101 Georgian
1111 Kazakh
1112 Greenlandic
1113 Cambodian
1114 Kannada
1115 Korean
1119 Kashmiri
1121 Kurdish
1125 Kirghiz
1201 Latin
1214 Lingala
1215 Laotian
1220 Lithuanian
1222 Latvian
1307 Malagasy
1309 Maori
1311 Macedonian
1312 Malayalam
1314 Mongolian
1315 Moldavian
1318 Marathi
1319 Malay
1320 Maltese
1325 Burmese
1401 Nauru
1405 Nepali
1412 Dutch
1415 Norwegian
1503 Occitan
1513 Afan
1518 Oriya
1601 Punjabi
1612 Polish
1619 Pashto,Pushto
1620 Portuguese
1721 Quechua
1813 Rhaeto
Code Language Name
1814 Kirundi
1815 Rumanian
1821 Russian
1823 Kin
1901 Sanskrit
1904 Sind
1907 Sango
1908 Serbo-Croat
1909 Shin
1911 Slovak
1912 Slovenian
1913 Samoan
1914 Shona
1915 Somali
1917 Albanian
1918 Serbian
1919 Siswati
1920 Sesotho
1921 Sudanese
1922 Swedish
1923 Swahili
2001 Tamil
2005 Telugu
2007 Tajik
2008 Thai
2009 Tigrinya
2011 Turkmen
2012 Tagalog
2014 Setswana
2015 Tongan
2018 Turkish
2019 Tsonga
2020 Tatar
2023 Twi
2111 Ukrainian
2118 Urdu
2126 Uzbek
2209 Vietnamese
2215 Volapuk
2315 Wolof
2408 Xhosa
2515 Yoruba
2608 Chinese
2621 Zulu
English
English
96
97
Page 97

The text entry method explained here is used to enter or
change names for address search, city names, Contacts,
areas to avoid and other text.
1
Enter the text.
Lower case text cannot be entered on the Input
street name and Input city name screens.
2
Once text entry is complete, select
[OK] or [List]*.
* [List] is displayed on the Input street name and
Input city name screens.
Note:
The number of characters that can be input varies
between entry items. Refer to the descriptions of each
item.
The keyboard layout can be changed. ( page 84)
Enter alphabetic characters
Select [A-Z].
Select [] to enter lower case characters.
Select [] to enter upper case characters.
When [] is selected, [] is displayed.
Enter accented characters
Select [À-Ý].
Select [] to enter lower case characters.
Select [] to enter upper case characters.
Enter numerals and symbols
Select [0-9].
Select [1/2] to display the next page.
Select [2/2] to display the previous page.
Enter spaces/Delete characters
Select [Space] to enter a space.
Select [ ] to delete one character.
How to enter text
English
97
9796
Page 98

If you suspect something wrong
Check and take steps as described below.
If the described suggestions do not solve the problem,
it is recommended to take the unit to your nearest
authorized Panasonic Servicenter. The product should
be serviced only by qualifi ed personnel. Please refer
checking and repair to professionals.
Panasonic shall not be liable for any accidents arising
out of neglect of checking the unit or your own repair
after your checking.
Never take measures except those indicated by
italic letters in “Possible solution” described below
because those are too dangerous for users to handle
themselves.
Warning
If the unit is out of order (no power, no sound) or
in an abnormal state (has foreign objects in it, is
exposed to water, is smoking, or smells), turn it
off immediately and consult your dealer.
Do not disassemble, modify the unit or attempt to
repair the product yourself. If the product needs to
be repaired, consult your dealer or an authorized
Panasonic Servicenter.
Common
Problem Possible cause Possible solution
No power to the unit
The power cord (battery, power and ground) is connected the wrong way.
Check the wiring.
Fuse blows out.
Eliminate the cause of fuse blowout and replace the fuse with new one.
Consult your dealer.
The vehicle engine is not running.
Start the engine. (ACC ON is also usable.)
Sound is not
generated.
The wiring of speaker lines is not correct, or a break or poor contact exists.
Check the wiring in accordance with the wiring diagram. (Installation
Instructions)
Turn the volume up.
Noise
There is an electromagnetic-wave generator such as a cellular phone near the unit
or its electrical lines.
Keep the electromagnetic-wave generator such as a cellular phone away
from the unit and the wiring of the unit. In case the noise cannot be
eliminated due to the wiring harness of the car, consult your dealer.
The contact of the ground lead is poor.
Make sure that the ground lead is connected to an unpainted part of the
chassis securely.
Noise is made in
step with engine
revolutions.
Alternator noise comes from the car.
Change the wiring position of the ground lead.
Mount a noise fi lter.
Some operations are
not executable.
Some operations are not executable in particular modes such as menu mode.
Read the Operating Instructions carefully and cancel the mode. If the unit is
still out of order, consult your dealer.
No sound from
speaker(s)
There is a break, a short circuit, poor contact or wrong wiring regarding the
speaker wiring.
Check the speaker.
The power of the unit
fails unintentionally.
The safety device works.
Consult your dealer, or your nearest Panasonic Servicenter.
Troubleshooting
English
English
98
99
Page 99

Common
Problem Possible cause Possible solution
Nothing is displayed
on the monitor.
Navigation images are
not displayed.
The screen is switched off.
Press , , or .
The power cord is not connected properly.
Check the connection.
The fuse in the power cord or power connector has blown.
Consult your dealer.
The navigation unit is
hot.
It has been running for a long period.
If the navigation is functioning normally, this is not a problem.
The vertical angle
of the monitor is not
adjustable.
Check whether it is pressing against some obstruction, or if a cable is trapped
somewhere.
Sound does not
come from one of the
left/right/front/rear
speakers.
Check the volume balance of the Balance and Fader controls.
The sound quality
is poor. (The sound
skips.)
If the sound is from DVD/CD, clean dust off the disc.
The mounting of the unit needs adjusting.
Adjust the angle to within 30° and mount it securely so that it does not
vibrate.
There is sound, but no
video.
The parking brake cable is disconnected.
Check the wiring.
The parking brake is not engaged.
Engage the parking brake.
Volume is too loud
at startup (while the
opening screen is
displayed).
Startup sound is output at the navigation volume.
Adjust navigation volume.
English
99
9998
Page 100

Car navigation
Problem Possible cause Possible solution
The vehicle position is
not displayed.
The display is on Map mode screen.
Press .
The vehicle position
is not displayed
correctly.
The GPS mark is not
displayed.
The vehicle position changed while ACC was off. Movement of the vehicle by ferry
or car train, rotation by parking lot turntable, towing, etc.
Drive for a while on a road with good reception.
Error in the signal from the GPS satellite is excessive.
Drive for a while on a road with good reception.
The GPS signal cannot be received due to obstructions.
GPS signals will be received when the obstruction is no longer in the way.
The GPS antenna is mounted in a bad position.
Mount antenna in a position where it can receive GPS signals easily.
Distance correction is not complete.
Check distance correction precision (Accuracy Level).
The GPS antenna cable is incompletely connected, or the vehicle speed signal
cable, relay cable, etc., are not connected correctly.
Check the wiring.
Registered points or
detour memory are not
registered.
Settings do not
change.
A searched route was
deleted.
The power was turned off immediately after a Contact or area to avoid was
registered or a setting was changed.
Register those again.
Power was turned off immediately after searching for a route.
Search for the route again.
The desired road is not
included in the route.
A road away from the start location and destination was specifi ed.
Add a destination close to the specifi ed road.
There is no voice
guidance.
The volume is set to “0” under Guide Speaker setting.
Adjust the volume under Guide Speaker.
The vehicle has deviated from the route.
Check the route guidance display on the current position screen.
Move back to the route.
Search again for a route.
The vehicle is moving backwards along the route.
Check the direction to the next destination.
Search again for a route.
The audio cable is not connected correctly.
Check the wiring.
Audio output is
audible, but navigation
voice guidance is not.
The volume is set to “0” under Guide Speaker setting.
Adjust the volume under Guide Speaker.
The route uses toll
roads even when
ordinary road search
is prioritized.
Even when ordinary road search is prioritized, the route may employ toll roads due
to the current position and the destination.
This is not a malfunction. When making a route on ordinary roads, add a
destination on the road you want to use.
Troubleshooting
(continued)
English
English
100
101
 Loading...