

Page 1

Troubleshooting
Network Camera
Model No. BB-HCM381 (AC Adaptor Type)
Indoor Use Only
BB-HCE481 (PoE Type)
This manual is for both BB-HCM381 (AC Adaptor Type) and BB-HCE481 (PoE
Type). Available features and operations are different in part depending on the
model. Read the Operating Instructions on the Setup CD-ROM carefully and use
the Network Camera properly.
Table of Contents
Troubleshooting................................................................... 3
BB-HCM381 Indicator Display Troubleshooting ........................................ 3
BB-HCE481 Indicator Display Troubleshooting ......................................... 5
Camera Setup Troubleshooting................................................................. 7
Camera Image/Page Display Troubleshooting .......................................... 9
Operation Bar Troubleshooting................................................................ 16
Audio Problems Troubleshooting............................................................. 17
Image Buffer/Transfer Troubleshooting.................................................... 21
SD Memory Recording Troubleshooting ................................................. 22
IPv6 Troubleshooting ............................................................................... 23
IPsec Troubleshooting ............................................................................. 24
Miscellaneous Troubleshooting ............................................................... 26
Page 2

Trademarks
• Microsoft, Windows and ActiveX are either registered trademarks or
trademarks of Microsoft Corporation in the United States and/or other
countries.
• All other trademarks identified herein are the property of their respective
owners.
Abbreviations
• UPnP is the abbreviation for "Universal Plug and Play".
• "Network Camera" is called "Camera" in this manual.
• "Setup CD-ROM" is called "CD-ROM" in this manual.
Troubleshooting
2
Page 3

Troubleshooting
Troubleshooting
The Panasonic Network Camera support website "http://panasonic.co.jp/pcc/
products/en/netwkcam/" includes various technical information in addition to the
contents in this troubleshooting section. Access the website if this troubleshooting
does not solve your problem.
BB-HCM381 Indicator Display Troubleshooting
Problem Cause and Remedy
The indicator
lights or blinks
orange.
The indicator
continues
blinking orange.
The indicator
continues
blinking orange
(2-second
interval).
• The Ethernet cable is not connected properly.
→ Connect the Ethernet cable properly.
• The PC, The Ethernet hub or router is not working.
→ Confirm that PC, Ethernet hub and router are working.
• The Ethernet cable is partly disconnected.
→ Change it to another Ethernet cable.
• The camera is turned off when updating firmware.
→ If you access the camera using a web browser, the Update
Firmware page will be displayed. Update the firmware
following the procedure (see page 164 of the Operating
Instructions on the CD-ROM). If you fail to update the
firmware, see page 26.
• The router on your network is turned off.
→ Turn the router on, and wait until the line is connected.
• An error has occurred in UPnP™ port forwarding.
→ Set up the camera again in [Automatic Setup] using the
Setup Program following the instructions in Getting
Started.
3
Page 4

Problem Cause and Remedy
Troubleshooting
The indicator
continues
blinking green.
The indicator
does not light up.
The indicator
continues
blinking red.
• Automatic setup is not complete.
→ Complete the setup following the instructions in Getting
Started.
• The camera did not receive an IP address from the DHCP
server.
→ When setting [Automatic Setup] or [DHCP Setup], the
camera may not be assigned an IP address due to network
failures. Ask your ISP or network administrator for more
information.
• The indicator display is disabled.
→ Check if the indicator control is disabled (see page 159 of
the Operating Instructions on the CD-ROM).
• The attached AC adaptor is not being used.
→ Confirm that the standard AC adaptor PSLP1242 (Order
No. PSLP1242Z) is being used.
• A cross cable is being used.
→ Some hubs and routers do not support the cross cable.
Use a category 5 straight cable.
• The camera may be malfunctioning.
→ If you cannot access the camera, the camera may be
malfunctioning. Call the authorized service center.
• The camera may be malfunctioning.
→ If you cannot access the camera, the camera may be
malfunctioning. Call the authorized service center.
4
Page 5

Troubleshooting
BB-HCE481 Indicator Display Troubleshooting
Problem Cause and Remedy
The indicator
lights or blinks
orange.
The indicator
continues
blinking orange.
The indicator
continues
blinking orange
(2-second
interval).
The indicator
continues
blinking green.
• The Ethernet cable is partly disconnected.
→ Change it to another Ethernet cable.
• The camera is turned off when updating firmware.
→ If you access the camera using a web browser, The
Update Firmware page will be displayed. Update the
firmware following the procedure (see page 164 of the
Operating Instructions on the CD-ROM). If you fail to
update the firmware, see page 26.
• An error has occurred in UPnP™ port forwarding.
→ Set up the camera again in [Automatic Setup] using the
Setup Program following the instructions in Getting
Started.
• Automatic setup is not complete.
→ Complete the setup following the instructions in Getting
Started.
• The camera did not receive an IP address from the DHCP
server.
→ When setting [Automatic Setup] or [DHCP Setup], the
camera may not be assigned an IP address due to network
failures. Ask your ISP or network administrator for more
information.
5
Page 6

Problem Cause and Remedy
Troubleshooting
The indicator
does not light up.
• The indicator display is disabled.
→ Check if the indicator control is disabled (see page 159 of
the Operating Instructions on the CD-ROM).
• A cross cable is being used.
→ Some hubs and routers do not support the cross cable.
Use a category 5 straight cable.
• The camera is not connected to the PoE hub.
→ Connect the camera to the PoE hub.
• The PoE hub is turned off.
→ Turn on the PoE hub.
• The Ethernet cable is partly disconnected.
→ Change it to another Ethernet cable.
• The camera is improperly connected to the PoE hub.
→ Refer to the PoE hub's manual.
• Too many clients are connected to the PoE hub.
→ Some PoE hubs have a limit for wattage. Connect the
cameras referring to the PoE hub's manual without
exceeding the limit.
• The camera or the PoE hub may be malfunctioning.
The indicator
continues
blinking red.
→ If another PoE-supported device is connected to the PoE
hub and it works, the camera may be malfunctioning. Call
the authorized service center.
• There is a relay connector or a hub between the camera and
the PoE hub.
→ Directly connect the camera to the PoE hub with an
Ethernet cable.
• The standard PoE cable is not being used.
→ Use a 4-pair UTP/STP Cat 5 cable.
• The camera may be malfunctioning.
→ If you cannot access the camera, the camera may be
malfunctioning. Call the authorized service center.
6
Page 7

Camera Setup Troubleshooting
Note
• If you are experiencing any problems, it is recommended that you
temporarily disable all firewall, pop-up killer, and virus detection
software. Once the problem is identified and corrected, you can restart
the Setup Program.
Problem Cause and Remedy
Troubleshooting
Setup fails using
Setup Program.
The E-mail that
has a link to the
Viewnetcam.com
website does not
come.
DynamicDNS
registration fails.
• More than 20 minutes have passed since the camera was
turned on.
→ Turn the camera off, and turn the camera on again. Then
set up the camera again.
• Multiple camera IP addresses are overlapping.
→ If you are installing multiple cameras, turn the cameras on
one by one.
• Network problems may have occurred during setup.
→ Confirm that your network is working. Turn the camera off,
and turn the camera on again (see page 18 of the
Operating Instructions on the CD-ROM). Then set up the
camera again.
• The E-mail address that you registered on the
Viewnetcam.com website is wrong.
→ Register your correct E-mail address on the
Viewnetcam.com website at:
http://www.viewnetcam.com.
• The router-connected PC has failed to access the Internet.
→ Refer to the router's manual and try to connect to the
Internet through your PC. Once Internet connection has
been confirmed, you can register to DynamicDNS.
7
Page 8

Problem Cause and Remedy
Troubleshooting
Setup Program
does not list any
cameras.
UPnP™ port
forwarding setup
fails.
• Your firewall or antivirus software is blocking the connection.
→ To avoid any possible problems, temporarily disable any
firewall or antivirus software, and set up the camera again.
If you cannot disable your firewall or antivirus software,
you can set up the camera using the MAC address (see
page 189 of the Operating Instructions on the CD-ROM).
• The camera is connected over a different network.
→ Set up the camera from a PC connected to the same router
as the camera.
• Confirm that an IP address is assigned to your PC.
→ If an IP address is not assigned to your PC, assign one
(see page 185 of the Operating Instructions on the CDROM).
• UPnP™ is disabled on the router.
→ Enable UPnP™ on the router following the router manual.
• The camera was turned on before the router was turned on.
→ Turn the router on first, and then turn the camera on.
• The default gateway is not set, or the settings are wrong.
→ Set the default gateway correctly (see page 54 or page 59
of the Operating Instructions on the CD-ROM).
• The router does not support UPnP™.
The camera IP
address and port
number have
been forgotten.
The password
has been
forgotten.
An error message
is displayed on
the camera status
by the Setup
Program.
→ Enable port forwarding on your router following the router
manual.
→ Clicking [Camera Setup] on the Setup Program displays the
camera list. The camera list shows the MAC address on the
bottom of the camera. The camera IP address and port
number are shown next to the MAC address.
→ Press the FACTORY DEFAULT RESET button to reset the
camera to default. Set up the camera again.
• An error on the Setup Program caused the error message.
→ Turn the camera off, and turn the camera on again (see
page 18 of the Operating Instructions on the CD-ROM).
8
Page 9
Troubleshooting
Camera Image/Page Display Troubleshooting
Problem Cause and Remedy
The camera
cannot be
accessed.
• The camera IP address has changed.
→ Enter the correct IP address in the address bar of the web
browser.
• An IPv6 address was entered in the address bar of Internet
Explorer.
→ Internet Explorer does not support IPv6 addresses. Use a
DynamicDNS service such as the Viewnetcam.com
service.
• The default gateway or DNS server addresses may be wrong.
The correct IP addresses are required especially when you
are using the Viewnetcam.com service.
→ Assign the correct default gateway and DNS server
addresses (see page 54 or page 59 of the Operating
Instructions on the CD-ROM).
• The connection type is wrong (see page 54 or page 59 of the
Operating Instructions on the CD-ROM).
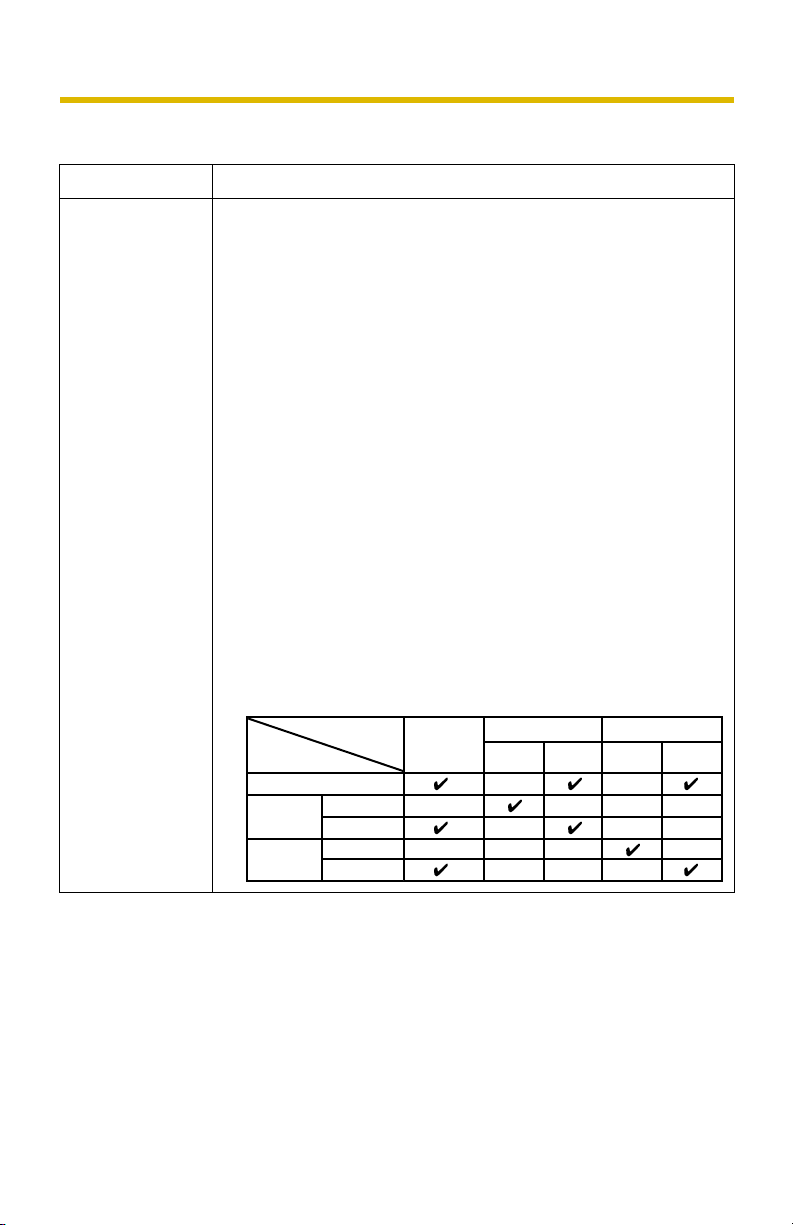
→ If the camera does not connect to the network using the
[Auto Negotiation] setting, set up the camera and the
router referring to the following table.
Network Camera
Router or hub
Auto Negotiation
100Base-
TX
10Base-T
Full Duplex
Half Duplex
Full Duplex
Half Duplex
Auto
Negotiation
—
—
100Base-TX
Full
Duplex
—
—
—
—
Half
Duplex
—
—
—
10Base-TX
Full
Duplex
Half
Duplex
—
—
—
——
—
—
9
Page 10

Problem Cause and Remedy
Troubleshooting
The camera
cannot be
accessed on the
LAN.
The camera can
be accessed on
the LAN, but
cannot be
accessed from
the Internet.
• The connected router does not have a loopback feature.
→ Access the camera with local network IP address.
• The wrong IP address class is assigned to the camera.
→ If you access the camera on the LAN, the PC IP address
and the camera IP address must be set in the same class.
Set the camera IP address same as the class of the PC IP
address (see page 185 of the Operating Instructions on the
CD-ROM).
• The web browser is accessing a proxy server.
→ Set the web browser to access the Internet directly (see
page 192 of the Operating Instructions on the CD-ROM).
• The camera was accessed on the same LAN by entering the
registered URL (or the router's global IP address) when using
a DynamicDNS service.
→ To access a camera on the same LAN, use the address for
its local network address.
• The default gateway address may be wrong.
→ Set the correct default gateway address (see page 54 or
page 59 of the Operating Instructions on the CD-ROM).
• UPnP™ is disabled on the router.
→ Enable UPnP™ on the router following the router manual.
• Port forwarding is not enabled on the router (see page 75 of
the Operating Instructions on the CD-ROM).
→ Enable port forwarding following the router manual.
• Firewalls such as packet filtering on the router are blocking
camera access.
→ Set the router to allow access to the camera following the
router manual.
• You are accessing the camera using a local IP address.
→ Access the camera with the global IP address of the router
and port number of the camera.
10
Page 11

Problem Cause and Remedy
Troubleshooting
Authentication
windows are
consequently
displayed.
Only half of the
image is
displayed.
The camera
image is not
displayed, or not
displayed
properly.
Camera images
are not displayed
on the MultiCamera page.
• The user name and password for the administrator have been
changed. Or the user name and password for the general
users have been changed.
→ Close the web browser, and access the camera again.
• You are using Internet Explorer 4.xx or lower.
→ Upgrade Internet Explorer to version 6.0 or greater.
®
•ActiveX
Controls are not installed in Internet Explorer.
→ ActiveX Controls should be installed to display video
(Motion JPEG). For the ActiveX Controls installation
method, see page 26 of the Operating Instructions on the
CD-ROM when using Microsoft® Windows® XP Service
Pack 2, or see page 25 of the Operating Instructions on the
CD-ROM when using other operating systems.
• The network is congested.
→ Pages may not be displayed immediately. Wait for a
moment.
• The web browser is accessing a proxy server.
→ Set the web browser to access the Internet directly (see
page 192 of the Operating Instructions on the CD-ROM).
• The images may not be displayed if private IP addresses and
global IP addresses (or domain names) are mixed on the
Multi-Camera page.
→ To view the images within the LAN, set the Multi-Camera
page using private IP addresses. To view the images from
the WAN side, set the Multi-Camera page using global IP
addresses (or domain names).
The error
message
"ERROR CODE
(4/12002)" is
displayed, and
the image is not
displayed.
• A wrong IP address or domain name may be set on the MultiCamera page.
→ Set the correct IP address or domain name.
• If the correct IP address or domain name was already set, the
network connection may be timed out.
→ Access the network when it is less busy, or close other
software that is connected to the network.
11
Page 12

Problem Cause and Remedy
Troubleshooting
The Top page or
image is not
displayed on the
mobile phone.
A gray screen is
displayed.
Video suddenly
changes to still
images.
• Only the IP address and port number are entered.
→ Enter "/mobile" after entering "IP Address:Port Number".
• A 320 x 240 resolution image is not displayed.
→ Mobile phones do not support 320 x 240 resolution
images.
• The file size of the image is exceeding the capacity of the
mobile phone.
→ View the image at 160 x 120 resolution.
• The mobile phone supports only XHTML.
→ Enter "/mobileX" by following an IP address and port
number.
• There are currently more than 30 different users trying to
access the video (Motion JPEG).
→ Reduce the number of users accessing the camera to
below 30, or change the video to still images.
• Operation time has been specified.
→ A gray screen is displayed outside the operation time. This
is normal.
• The video (Motion JPEG) display period is set on the General
User page.
→ To view video continuously, set [Unlimited] for the limit
continuous motion JPEG (see page 99 of the Operating
Instructions on the CD-ROM).
12
Page 13

Problem Cause and Remedy
Troubleshooting
The image is out
of focus.
• The lens is dirty or dust is attached. Fingerprints, dust, stains,
etc. on the lens can degrade the performance of the Automatic
Focusing feature.
→ Wipe the lens with lens cleaning paper.
• Manual focusing may be set.
→ Press appropriate one of the Focus buttons at the
operation bar (see page 29 of the Operating Instructions
on the CD-ROM).
• Blurred images may have been registered when registering or
modifying the preset button or home position button.
→ Adjust the focus in manual focusing again, or press the AF
button.
• The object is too close to the camera.
→ Move the object away from the camera or adjust the zoom.
• Some objects are difficult to focus on by AF button.
→ Press the AF button and put it into operation again. When
the objects are still out of focus, adjust the focus using
manual focusing, or change the objects using Pan/Tilt
operation or Zooming features.
• The Automatic Focus Range is set incorrectly for the type of
image you are viewing.
→ Confirm the Automatic Focus Range setting (see page 86
of the Operating Instructions on the CD-ROM). When
viewing images within 1 m of the camera, set to "Macro".
When viewing images further than 1 m from the camera,
set to "Normal".
The color on the
image is strange.
• The white balance is not set appropriately.
→ Adjust the white balance on the Camera page (see page
86 of the Operating Instructions on the CD-ROM).
• The color display setting on your PC is set lower than 16 bits.
→ Set the color display to 16 bits or higher.
13
Page 14

Problem Cause and Remedy
Troubleshooting
The image has
noise.
An old image is
displayed.
The image
refreshes very
slowly.
• The object is dark.
→ Increase the light level in the area around the camera.
• AC Power Source Frequency setting is incorrect.
→ Confirm the AC Power Source Frequency setting (see
page 86 of the Operating Instructions on the CD-ROM).
• The colors setting of the monitor is set to less than 16 bit high
color.
→ Set it to 16 bit high color or greater.
• Old images are temporarily stored on the web browser.
→ Set [Every visit to the page] on the web browser to check
for temporary Internet files (see page 195 of the Operating
Instructions on the CD-ROM).
• Multiple users are accessing the camera.
→ Wait until fewer users are accessing the camera.
• You are not using an Ethernet switching hub.
→ If you view multiple cameras on the Multi-Camera page
without an Ethernet switching hub, the image refreshes
slowly. Use an Ethernet switching hub.
• The image may refresh slowly, depending on image
resolution, image quality, network traffic, PC performance, SD
memory recording, using IPsec or what is being viewed.
Scan lines
deviate on the
screen.
• The maximum bandwidth usage is limited.
→ Increase the max. bandwidth usage on your network (see
page 54 or page 59 of the Operating Instructions on the
CD-ROM).
• The camera is in color night view mode.
→ The image refreshes slowly in color night view mode. Make
the area around the camera brighter.
• Scan lines may deviate when viewing moving objects with
resolution at 640 x 480 because of the interlace-type CCD.
→ Set "Vertical Resolution (for 640 x 480 mode)" to "240
(Better for motion images)" on the Camera page.
14
Page 15

Problem Cause and Remedy
Troubleshooting
When accessing
the camera, the
Update Firmware
page is displayed.
Camera images
are not displayed
properly on a TV
connected to the
camera.
• The camera firmware may be damaged because the power
was turned off during an update, etc.
→ Download the latest firmware from the Panasonic Network
Camera support website and update the firmware.
• The camera is connected to a TV that uses an incompatible
system such as the PAL system.
→ The camera uses the NTSC system for its video output
signals. Use an NTSC-compatible TV.
• The camera is in color night view mode.
→ Disable color night view mode. When the camera is in color
night view mode, camera images may not be displayed
properly.
15
Page 16

Operation Bar Troubleshooting
Problem Cause and Remedy
Troubleshooting
The pan/tilt,
zoom, focus, click
to center and
preset features
do not work.
• Your PC is not connected to the camera.
→ Click [Refresh] on the web browser. Confirm that the image
refreshes, and you can operate the pan/tilt/zoom/focus
functions.
• The camera is not turned on.
→ Turn the camera on.
• Multiple users are operating the camera simultaneously.
→ Wait for a moment, and access the camera again.
• The pan/tilt/zoom/focus function reaches the end of its range.
→ Confirm that the end display is displayed on the operation
bar.
• The pan/tilt range is restricted.
→ Adjust the pan/tilt range settings (see page 29 of the
Operating Instructions on the CD-ROM).
• The Automatic Focus Range is set incorrectly for the type of
image you are viewing.
→ Confirm the Automatic Focus Range setting (see page 86
of the Operating Instructions on the CD-ROM). When
viewing images within 1 m of the camera, set to "Macro".
When viewing images further than 1 m from the camera,
set to "Normal".
Some buttons of
the operation bar
are not displayed.
• The feature is not permitted on the General User page.
→ Set [Permit access from guest users] (see page 99 of the
Operating Instructions on the CD-ROM), or log in to the
camera as an administrator.
16
Page 17

Audio Problems Troubleshooting
Problem Cause and Remedy
Troubleshooting
The Listen button
is gray.
The Talk button is
gray.
Neither Listen nor
Talk button can
be used.
• The [Input] setting is set to [Disable] on the Audio page.
→ Change it to [Enable]. (See page 92 of the Operating
Instructions on the CD-ROM)
• In the access level settings on the General User page, [Listen]
is not permitted.
→ Select [Listen]. (See page 99 of the Operating Instructions
on the CD-ROM)
• The [Output] setting is set to [Disable] on the Audio page.
→ Change it to [Enable]. (See page 92 of the Operating
Instructions on the CD-ROM)
• In the access level settings on the General User page, [Talk] is
not permitted.
→ Select [Talk]. (See page 99 of the Operating Instructions
on the CD-ROM)
• When accessing a camera on a LAN, the web browser is being
accessed through a proxy server.
→ Change the settings so that a proxy server is not used.
(See page 192 of the Operating Instructions on the CDROM)
• When accessing a camera on a LAN, the web browser is being
accessed through a proxy server.
→ Change the settings so that a proxy server is not used.
(See page 192 of the Operating Instructions on the CDROM)
17
Page 18

Problem Cause and Remedy
Troubleshooting
Audio cannot be
heard on the
computer.
The Audio
Control Bar is not
displayed.
• The Listen button appears like this:
→
Click the Listen button. (It will change to .)
→ There are too many simultaneous audio connections. Wait
for a while, and try to access again.
• The Listen button is gray.
→ [Listen] is not permitted on the General User page. Permit
it. (See page 99 of the Operating Instructions on the CDROM)
• The volume is set to its minimum.
→ Adjust the volume on the volume adjustment toolbar.
• The computer volume is set to mute or minimum volume.
→ Open the PC's Volume Control window, and uncheck the
output master and Wave/MP3's Mute checkbox, then
adjust the volume.
• The Audio Control Bar is not displayed when the number of
simultaneous accesses exceeds the maximum number.
→ Wait for a moment, and access the camera again.
• Both the [Output] and [Input] settings are set to [Disable] on
the Audio page.
→ Change them to [Enable]. (See page 92 of the Operating
Instructions on the CD-ROM)
• In the access level settings on the General User page, both
[Listen] and [Talk] are not permitted.
→ Permit both [Listen] and [Talk]. (See page 99 of the
Operating Instructions on the CD-ROM)
18
Page 19

Problem Cause and Remedy
Troubleshooting
Audio is not
produced from an
external speaker
connected to the
camera.
• The Talk button appears like this:
→
Click the Talk button. (It will change to .)
• The Talk button is gray.
→ [Talk] is not permitted on the General User page. Permit it.
(See page 99 of the Operating Instructions on the CDROM)
• Microphone is not selected on your PC's volume control
screen.
→ Click [Options]→[Properties]→, and check [Recording] on
the Volume Control window. In the "Show the following
volume controls" column, check [Microphone], and click
[OK]. Check [Select] on the Recording Control window.
• The PC's microphone input setting is set to mute.
→ Open the PC's Volume Control window, check the
microphone checkbox and then adjust the volume controls.
• A speaker is not connected to the camera.
→ The camera's audio output terminal is a line output.
Connect it to an external speaker with a built-in amplifier
(see Getting Started).
• An amplifier is not connected to the camera.
→ The camera's audio output terminal is a line output.
Connect it to an external speaker with a built-in amplifier
(see Getting Started)
• Audio can only be received for short periods of time.
→ Change the settings to extend the PC Audio Input Timeout.
(See page 92 of the Operating Instructions on the CDROM)
• The camera speaker volume settings are set to their minimum.
→ Adjust the volume settings to an appropriate volume.
• The camera is being accessed through a proxy server.
→ The audio feature cannot be used when the camera is
accessed through a proxy server.
19
Page 20

Problem Cause and Remedy
Troubleshooting
Noise can be
heard.
Audio is
interrupted.
• The plug of the external microphone or speaker is dirty.
→ Wipe the connection terminal of the microphone or
speaker.
• The external microphone or speaker is not connected
properly.
→ Correctly connect the external microphone or speaker.
• The audio from your PC speaker is being caught by your PC
microphone, then the camera is transmitting the audio as
noise.
→ Check [mute] for the microphone column on the volume
control screen. Then the PC will stop transmitting audio to
the camera.
• Other applications are being run on the computer.
→ Close all other applications on your computer.
• The max. bandwidth is set to [Unlimited] on the Network page.
→ Reduce the max. bandwidth value (see page 54 or page
59 of the Operating Instructions on the CD-ROM).
• The mute for pan/tilt is set to [Enable] on the Audio page.
→ This is not a problem.
• The input volume from the external microphone or speaker is
small.
→ When the audio is interrupted when listening, change
sensitiveness to [Maximum] on the Audio page. When the
audio is interrupted when talking, adjust the microphone
volume on the PC's Volume Control window.
20
Page 21

Image Buffer/Transfer Troubleshooting
Problem Cause and Remedy
Troubleshooting
The camera does
not transfer an
image by E-mail
or FTP.
• An error occurred during transmission to the E-mail or FTP
server.
→ See the Protocol column on the Status page (see page
161 of the Operating Instructions on the CD-ROM), and
check if the error is displayed.
• The default gateway and DNS server addresses are not
assigned correctly.
→ Assign them correctly (see page 54 or page 59 of the
Operating Instructions on the CD-ROM).
• Your login ID and password for the E-mail or FTP are invalid.
→ Make sure that you enter your correct login ID and
password.
• The camera cannot transfer the image because [No
authentication] is set on the Trigger page.
→ Change the authentication method to [POP before SMTP
authentication] or [SMTP authentication], and set the
Login ID and Password (if you select [POP before SMTP
authentication], set the POP3 Server IP Address), then try
transferring by E-mail again. (See page 109, 120 or 132 of
the Operating Instructions on the CD-ROM)
• For E-mail transfer, the SMTP server supports authentication
methods other than the PLAIN and LOGIN methods of SMTP
authentication. For example, CRAM-MD5.
The camera does
not transfer an
image to a mobile
phone.
→ For SMTP authentication of the camera, only the PLAIN
and LOGIN methods are supported. Please confirm with
your ISP.
• The image quality is not set to [Mobile Phone] on the Image
Buffer/Transfer page.
→ Set the image quality to [Mobile Phone].
• Some mobile phones do not support 320 x 240 resolution.
→ Set the resolution to [160 x 120]
21
Page 22

Problem Cause and Remedy
Troubleshooting
The image is
slowed down on
the Buffered
Image page, or
the camera
transfers an old
image.
• The transfer interval is too short.
→ Set the transfer interval longer than the current setting (see
page 105, page 116 or page 128 of the Operating
Instructions on the CD-ROM).
SD Memory Recording Troubleshooting
Problem Cause and Remedy
Cannot write
onto the SD
memory card.
It takes time to
record.
• It is writing protected.
→ Cancel the writing protection.
• Sometimes it takes time when it is formatted on a PC.
→ Format it on the camera (see page 148 of Operating
Instructions on the CD-ROM).
22
Page 23

IPv6 Troubleshooting
Problem Cause and Remedy
Troubleshooting
The camera
cannot be
accessed when
using an IPv6
address.
• The IPv6 address is not set on the camera.
→ Check if the IP address and default gateway are displayed
in the network (IPv6) column of the status page (see page
161 of the Operating Instructions on the CD-ROM). If
neither or only one is displayed, it is possible that the
connection is incorrect or that the IPv6 router is not set
properly. Set them correctly.
• IPv6 has not been set up on your PC.
→ IPv6 is not set up in Windows XP when purchased.
Change the settings to enable it. (See page 21 of the
Operating Instructions on the CD-ROM)
• Router filtering is enabled.
→ Permit camera access from the WAN side in router
settings.
• Your network or ISP may not support IPv6 at this time.
23
Page 24

IPsec Troubleshooting
Problem Cause and Remedy
Troubleshooting
The camera
cannot be
accessed in
transport mode.
The camera
cannot be
accessed in
tunnel mode.
• IPsec policy settings are restricted.
→ Decrease the number of computers connected
simultaneously, and wait for a moment, or shorten the
lifetime in the PC's IPsec settings.
• IPsec settings have not been set on your PC.
→ Set IPsec settings on your PC. See the Panasonic Network
Camera support website (http://panasonic.co.jp/pcc/
products/en/netwkcam/) for more details.
• The pre-shared key is not set correctly.
Set the same pre-shared key for the camera and your PC
→
(see page 66 of the Operating Instructions on the CD-ROM).
• On the VPN router within the network, tunnel mode has been
set.
→ Transport mode and tunnel mode can not be used at the
same time. Cancel the PC's IPsec settings, and
communicate using tunnel mode.
*1
• Either the PC's SA
or Camera's SA is not established.
→ Disable the PC's IPsec settings, and enable it again.
• The pre-shared key is not set correctly.
→ Set the same pre-shared key for the camera and the VPN
router (see page 69 of the Operating Instructions on the
CD-ROM).
• The VPN router is not set correctly.
→ Set the IKE and IPsec policy on the VPN router correctly
(see page 71 and page 72 of the Operating Instructions on
the CD-ROM).
1
• Either the VPN router's SA*
or camera's SA is not
established.
→ Restart the VPN router and the camera.
24
Page 25

Problem Cause and Remedy
Troubleshooting
E-mail or FTP
transfer cannot
be performed in
transport mode.
• The network settings are not set correctly.
→ Cancel the IPsec settings on the server, PC and camera,
and check that camera images can be transferred. If they
can be transferred, the IPsec settings were not set
correctly. Set them correctly (see page 66 of Operating
Instructions on the CD-ROM).
• The pre-shared key is not set correctly.
→ Set the same pre-shared key for the camera, and server
(see page 66 of the Operating Instructions on the CDROM).
• There is an e-mail server or FTP server within the tunnel mode
network.
→ Transport mode and tunnel mode cannot be used at the
same time. Cancel the e-mail server or FTP server's IPsec
settings, and communicate using tunnel mode.
1
• Either the server's SA*
or camera's SA is not established.
→ Restart the camera.
*1 SA (Security Association) refers to establishing a secure connection for an encrypted
communication that uses IPsec or IPv6 by exchanging and sharing information such as the
encryption scheme and key before communicating, or refers to an established virtual
encrypted communication pathway.
25
Page 26

Miscellaneous Troubleshooting
Problem Cause and Remedy
Troubleshooting
The ActiveX
controls cannot
be installed.
The firmware is
not updated.
• Security software disables the ActiveX controls installation.
→ Close the security software, and install the ActiveX
controls again.
• The firmware updating was not completed due to the power
being turned off, network failure or other cause.
→ Update the firmware again following these steps.
Turn the camera off, and turn the
camera on again.*
Enter the IP address in the web browser to access
the camera.
Is the Top page displayed?
Access the Maintenance page and click [Status].
Check the firmware version on the Status page.*
Is the version updated?
1
No
Yes
2
No
Yes
Update the firmware.*
The firmware update is completed.
3
1
See page 18 of the Operating Instructions on the CD-
*
ROM.
2
See page 161 of the Operating Instructions on the CD-
*
ROM.
3
See page 164 of the Operating Instructions on the CD-
*
ROM about updating firmware.
26
Page 27

Problem Cause and Remedy
Troubleshooting
The shortcut
icon is not
displayed in the
My Network
Places folder.
The problem
cannot be fixed.
• The UPnP™ Windows component is not installed in Windows
XP or Windows Me.
→ Install the UPnP™ Windows component in Windows XP or
Windows Me (see page 195 of the Operating Instructions
on the CD-ROM).
• Call the authorized service center.
27
Page 28

The information in this document is subject to change without notice.
Panasonic Communications Co., Ltd.
1-62, 4-chome, Minoshima, Hakata-ku, Fukuoka 812-8531, Japan
Copyright:
This material is copyrighted by Panasonic Communications Co., Ltd., and may be reproduced
for internal use only. All other reproduction, in whole or in part, is prohibited without the written
consent of Panasonic Communications Co., Ltd.
2006
Panasonic Communications
Co., Ltd. All Rights Reserved.
PQQX15198ZA
KK0306JT0 (CE)
 Loading...