


Model AK-HBU931P
Before attempting to connect, operate or adjust this product, please read these
instructions completely.
Build-up Unit
2
Safety precautions
CAUTION
RISK OF ELECTRIC SHOCK
DO NOT OPEN
CAUTION: TO REDUCE THE RISK OF ELECTRIC SHOCK,
DO NOT REMOVE COVER (OR BACK).
NO USER SERVICEABLE PARTS INSIDE.
REFER SERVICING TO QUALIFIED SERVICE PERSONNEL.
The lightning flash with arrowhead symbol,
within an equilateral triangle, is intended to
alert the user to the presence of uninsulated
“dangerous voltage” within the product’s
enclosure that may be of sufficient
magnitude to constitute a risk of electric
shock to persons.
The exclamation point within an equilateral
triangle is intended to alert the user to the
presence of important operating and
maintenance (service) instructions in the
literature accompanying the appliance.
WARNING:
TO REDUCE THE RISK OF FIRE OR SHOCK
HAZARD, DO NOT EXPOSE THIS
EQUIPMENT TO RAIN OR MOISTURE.
This class A digital apparatus complies with
Canadian ICES-003.
Cet appareil numérique de la classe A est
conforme à la norme NMB-003 du Canada.
CAUTION:
TO REDUCE THE RISK OF FIRE OR SHOCK
HAZARD AND ANNOYING INTERFERENCE,
USE ONLY THE RECOMMENDED ACCESSORIES .
FCC Note:
This device complies with Part 15 of the FCC Rules.
To assure continued compliance follow the attached
installation instructions and do not make any
unauthorized modifications.
This equipment has been tested and found to comply
with the limits for a class A digital device, pursuant to
Part 15 of the FCC Rules. These limits are designed
to provide reasonable protection against harmful
interference when the equipment is operated in a
commercial environment. This equipment generates,
uses, and can radiate radio frequency energy and, if
not installed and used in accordance with the
instruction manual, may cause harmful interference
to radio communications. Operation of this equipment
in a residential area is likely to cause harmful
interference in which case the user will be required to
correct the interference at his/her own expense.
indicates safety information.
For CANADA

3
Contents
Safety precautions . . . . . . . . . . . . . . . . . . . . . . . . . . . . . . . . . . . . . . . . . . . . . . . . . . . . . . . . . . . . . . . . . . . . . . . . .2
Overview . . . . . . . . . . . . . . . . . . . . . . . . . . . . . . . . . . . . . . . . . . . . . . . . . . . . . . . . . . . . . . . . . . . . . . . . . . . . . . . .3
Operating precautions . . . . . . . . . . . . . . . . . . . . . . . . . . . . . . . . . . . . . . . . . . . . . . . . . . . . . . . . . . . . . . . . . . . . . .3
Controls and their functions . . . . . . . . . . . . . . . . . . . . . . . . . . . . . . . . . . . . . . . . . . . . . . . . . . . . . . . . . . . . . . . . . .4
Mounting methods . . . . . . . . . . . . . . . . . . . . . . . . . . . . . . . . . . . . . . . . . . . . . . . . . . . . . . . . . . . . . . . . . . . . . . . . .8
Connections . . . . . . . . . . . . . . . . . . . . . . . . . . . . . . . . . . . . . . . . . . . . . . . . . . . . . . . . . . . . . . . . . . . . . . . . . . . . . .9
External dimension drawings . . . . . . . . . . . . . . . . . . . . . . . . . . . . . . . . . . . . . . . . . . . . . . . . . . . . . . . . . . . . . . . .10
Specifications . . . . . . . . . . . . . . . . . . . . . . . . . . . . . . . . . . . . . . . . . . . . . . . . . . . . . . . . . . . . . . . . . . . . . . . . . . .11
The model AK-HBU931P is a build-up unit which is designed for use with the AK-HC931P multi-format camera.
When installed in the multi-format camera, it enables a large lens to be mounted, thus yielding the same range of
operations as that afforded by a larger camera.
Overview
≥ Be absolutely sure to supply the build-up unit’s power from the multi-format camera.
≥ Handle the viewfinder carefully.
Dropping the viewfinder or subjecting it to strong impact may cause malfunctioning and/or accidents.
≥ Operate the unit within a temperature range of 32oF to 104oF (0oC to + 40oC). Operation in locations below 32oF or above
104oF may adversely affect the internal parts.
≥ Be absolutely sure to turn off the power before connecting or disconnecting the cables.
≥ Do not use the unit outdoors.
≥ Install the unit at a distance of at least 3.3 ft (1 meter) from the monitor.
≥ Maintenance
Disconnect the optical fiber cable plug, and wipe the unitr with a dry cloth. To remove stubborn dirt, soak a cloth in diluted
kitchen detergent and wring it out well, and then wipe the unit gently.
Operating precautions
≥ Avoid using benzine, paint thinners or other volatile substances.
≥ If a chemically treated cloth is to be used, read the precautions for its use carefully.
Caution
4
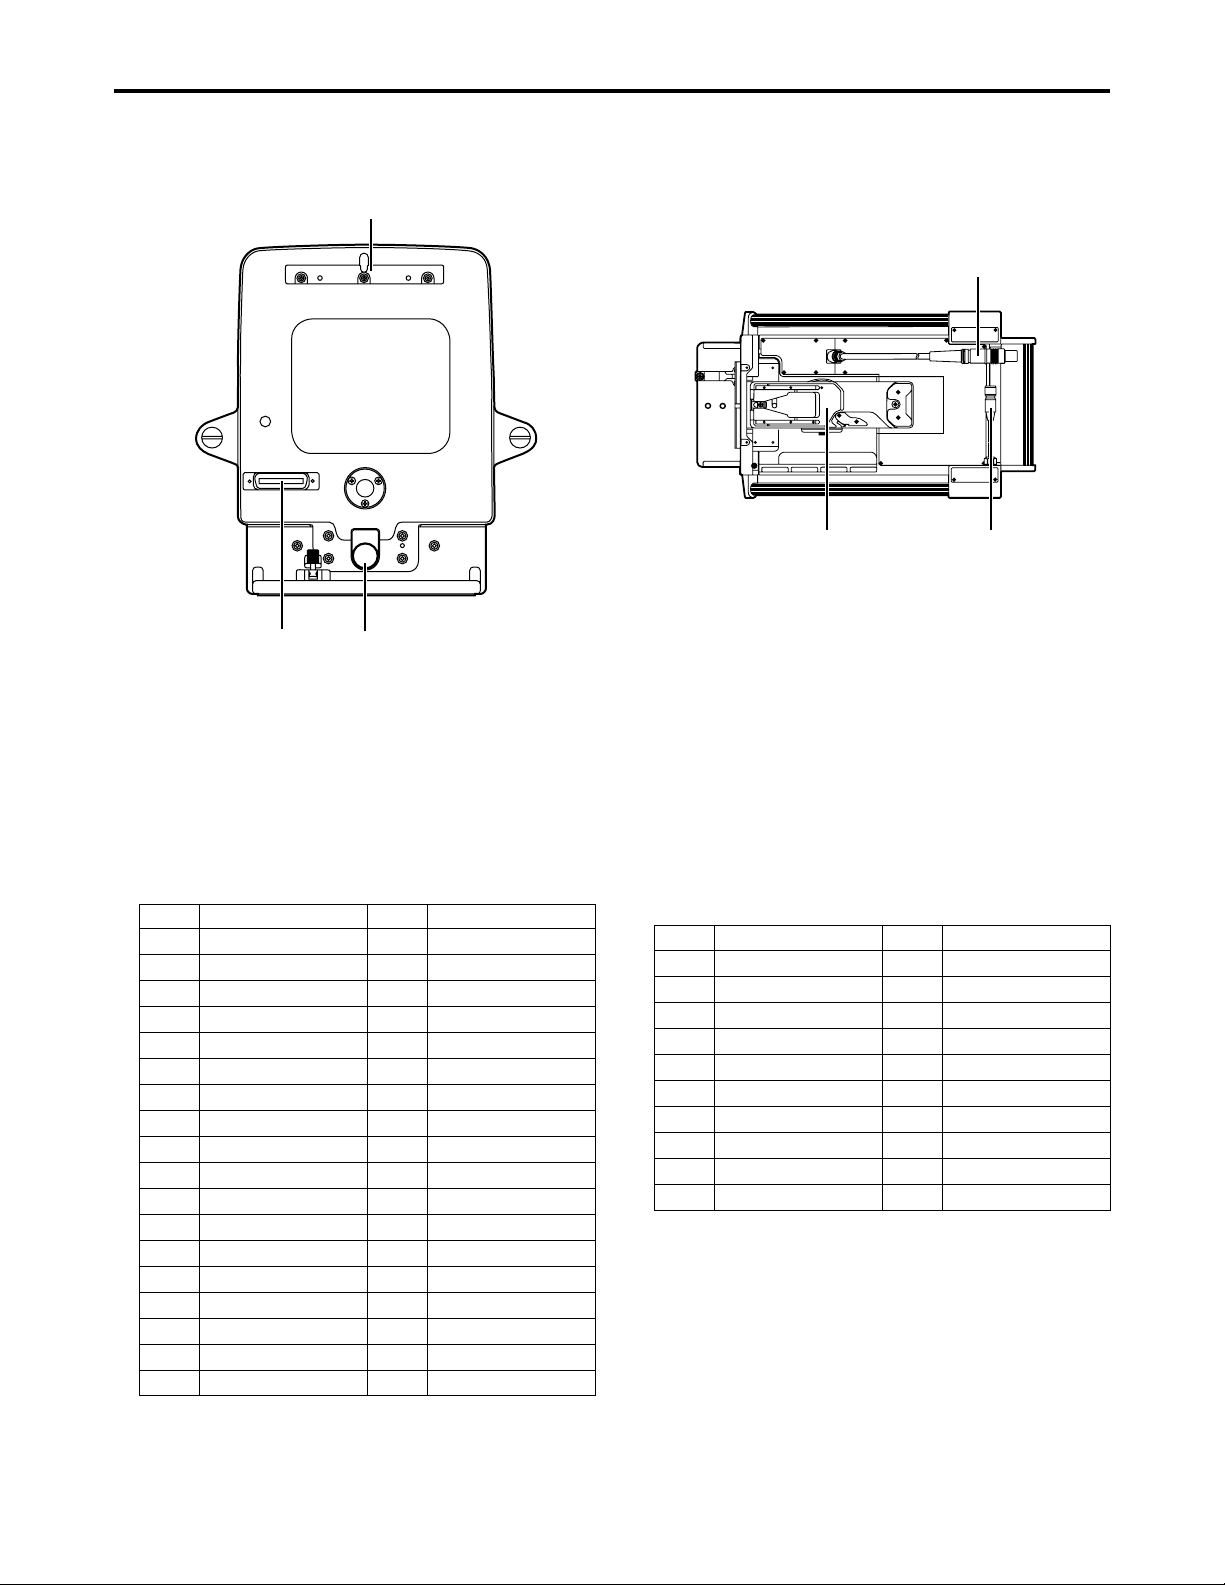
Controls and their functions
1
2
3
1 Lens guide
The 2/3z box-type lens is attached by hooking it onto this
guide. Align the guide pin of the lens with the center
groove, and attach.
2 Lens anchoring knob
This is rotated clockwise to anchor the lens.
3 Lens connector
Lens connector (57-20360 made by DDK)
Front Panel
5
4 6
4 Camera mounting base
This is used to attach the camera. For details, refer to
the operating instructions of the camera concerned.
5 Optical fiber cable for connecting camera [CAM]
Use this to connect the unit to the optical fiber connector
on the multi-format camera (AK-HC931P).
6 Interface cable for connecting camera [EXT I/O]
Use this to connect the unit to the EXT I/O connector on
the multi-format camera (AK-HC931P).
Top Panel
Pin No.
1
2
3
4
5
6
7
8
9
10
11
12
13
14
15
16
17
18
Signal
N.C.
N.C.
N.C.
DC +12V
POWER GND
SIGNAL GND
DOBY GND
EXT. MODE (A)
EXT. MODE (B)
EXT. MODE (C)
16:9/4:3 SEL
IRIS POSITION
ZOOM POSITION
RET1
RET2
FOCUS POSITION
IRIS CONTROL
IRIS AUTO/REMOTE
Pin No.
19
20
21
22
23
24
25
26
27
28
29
30
31
32
33
34
35
36
Signal
N.C.
N.C.
TALLY CONT1
N.C.
N.C.
LENS CODE (A)
LENS CODE (B)
LENS CODE (C)
LENS CODE (D)
EXT CONT A
EXT CONT B
N.C.
INCOM1 PROD/ENG
I
NCOM2 PROD/ENG
INCOM1 SW
INCOM2 SW
N.C.
N.C.
Pin No.
1
2
3
4
5
6
7
8
9
10
Signal
BU ACTIVE
ANALOG GND
RET-1
RET-2
RET-3
DIGITAL GND
CAMERA DATA
CAMERA CONTROL
DC +12 V
POWER GND
Pin No.
11
12
13
14
15
16
17
18
19
20
Signal
MONITOR SIGNAL
MONITOR GND
DC +5 V
DC +3.15 V
DC +2.7 V
IRIS CONTROL
IRIS POSITION
ZOOM POSITION
FOCUS POSITION
IRIS AUTO/REMOTE