

Panasonic AG-DVX200EJ, AG-DVX200EN, AG-DVX200ED Operating Instructions Manual
Operating Instructions
Vol.1
Vol.1
Memory Card Camera-Recorder
Model No. AG-DVX200EJ
AG-DVX200EN
AG-DVX200ED
Please read first
This document explains basic operations of the unit. For more detailed explanation, please refer
to “Operating Instructions Vol.2” (PDF file) which is recorded in the enclosed CD-ROM.
Please read these instructions carefully before using this product, and save this manual for future
use.
F0815MT0
Printed in Japan
ENGLISH
SQT1045
Information for Your Safety
For the AC mains plug of three pins
∫ Caution for AC mains lead
For your safety, please read the following text
carefully.
This appliance is supplied with a moulded three
pin mains plug for your safety and convenience.
A 5-ampere fuse is fitted in this plug.
Should the fuse need to be replaced please
ensure that the replacement fuse has a rating of
5-ampere and that it is approved by ASTA or
BSI to BS1362.
Check for the ASTA mark Ï or the BSI mark Ì
on the body of the fuse.
If the plug contains a removable fuse cover you
must ensure that it is refitted when the fuse is
replaced.
If you lose the fuse cover the plug must not be
used until a replacement cover is obtained.
A replacement fuse cover can be purchased
from your local dealer.
WARNING:
To reduce the risk of fire, electric shock or product damage,
≥ Do not expose this unit to rain, moisture, dripping or splashing.
≥ Do not place objects filled with liquids, such as vases, on this unit.
≥ Use only the recommended accessories.
≥ Do not remove covers.
≥ Do not repair this unit by yourself. Refer servicing to qualified service personnel.
Before use
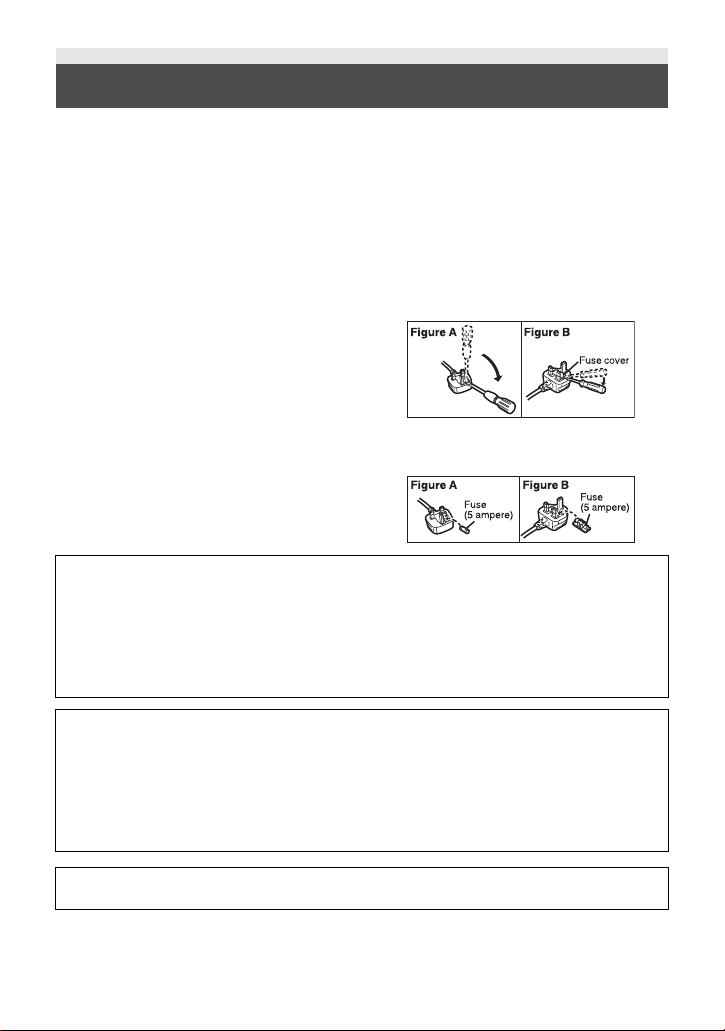
Remove the connector cover.
How to replace the fuse
The location of the fuse differ according to the
type of AC mains plug (figures A and B).
Confirm the AC mains plug fitted and follow the
instructions below.
Illustrations may differ from actual AC mains
plug.
1. Open the fuse cover with a screwdriver.
2. Replace the fuse and close or attach the
fuse cover.
CAUTION!
To reduce the risk of fire, electric shock or product damage,
≥ Do not install or place this unit in a bookcase, built-in cabinet or in another confined space.
Ensure this unit is well ventilated.
≥ Do not obstruct this unit’s ventilation openings with newspapers, tablecloths, curtains, and
similar items.
≥ Do not place sources of naked flames, such as lighted candles, on this unit.
The mains plug is the disconnecting device. Install this unit so that the mains plug can be
unplugged from the socket outlet immediately.
2
SQT1045 (ENG)
(AG-DVX200EJ)
This unit is intended for use in moderate climates.
(AG-DVX200EN/ED)
This unit is intended for use in tropical climates.
∫ Concerning the battery
Warning
Risk of fire, explosion and burns. Do not disassemble, heat above 60 oC or incinerate.
CAUTION
≥ Danger of explosion if battery is incorrectly replaced. Replace only with the type
recommended by the manufacturer.
≥ When disposing of the batteries, please contact your local authorities or dealer and ask for the
correct method of disposal.
For Europe only
∫ EMC Electric and magnetic compatibility
This symbol (CE) is located on the rating plate.
∫ Product identification marking
Product Location
Memory Card Camera-Recorder Bottom
Battery charger Bottom
AC adaptor Bottom
(ENG) SQT1045
3
∫ Disposal of Old Equipment and
ャモヵヵユンヺ
Batteries
Only for European Union and
countries with recycling
systems
These symbols on the
products, packaging, and/
or accompanying
documents mean that
used electrical and
electronic products and
batteries must not be
mixed with general
household waste.
For proper treatment, recovery and
recycling of old products and used
batteries, please take them to applicable
collection points in accordance with your
national legislation.
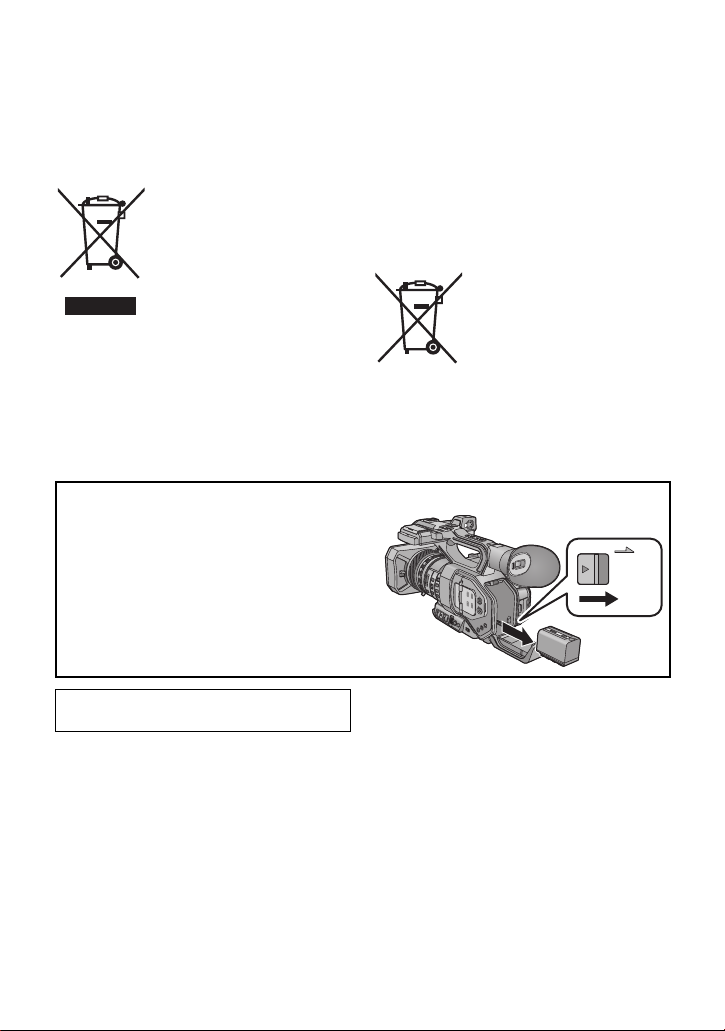
To remove the battery
Main Power Battery (Lithium ion Battery)
(Refer to page 18 for the detail.)
Open the battery cover, and slide the battery
release lever.
Back-up Battery (Lithium Battery)
≥ For the removal of the battery for disposal at
the end of its service life, please consult
your dealer.
By disposing of them correctly, you will
help to save valuable resources and
prevent any potential negative effects on
human health and the environment.
For more information about collection and
recycling, please contact your local
municipality.
Penalties may be applicable for incorrect
disposal of this waste, in accordance with
national legislation.
Note for the battery
symbol (bottom symbol):
This symbol might be used
in combination with a
chemical symbol. In this
case it complies with the
requirement set by the
Directive for the chemical involved.
AEEE Yönetmeliğine Uygundur.
AEEE Complies with Directive of Turkey.
4
SQT1045 (ENG)

Note regarding the Power Management function specified under COMMISSION REGULATION
(EC) No 1275/2008 implementing Directive 2009/125/EC of the European Parliament and of the
Council.
This device is designed and manufactured for use at a broadcasting station and/or in a similar
environment.
This device is not equipped with a Power Management function or the Power Management function
is set to OFF as it will prevent the device from fulfilling its intended purpose for the reasons below.
1. If the device is a Studio Camera, a Weather Camera, a Mixer or other processor:
A Power Management function may cause the device to suddenly stop during recording
or while On Air.
2. If the device is a Studio Monitor:
A Power Management function may cause video for the confirmation of whether a signal
is normal, or whether the signal has been lost, to be un-viewable.
3. If the device is a Camera Recorder:
A professional camera recorder must be able to start quickly at any time, but a Power
Management function will cause an increase in the time taken to resume from Stand-by
mode.
∫ About the recording method
for recording motion pictures
This unit can record motion pictures using three
different recording methods, including MOV,
MP4 and AVCHD
* AVCHD Progressive (1080/60p, 1080/50p)
supported.
MOV and MP4:
These recording methods are suitable for
editing images. Audio is recorded in linear
PCM.
≥ Those methods are not compatible with
motion pictures recorded in AVCHD format.
≥ Those methods can record motion pictures in
formats that support 4K. 4K motion pictures
offer a resolution four times higher than that
of full high-definition motion pictures.
AVCHD:
This recording method is suitable for playback
on a high-definition compatible external monitor.
Audio is recorded in Dolby
*
.
®
Digital.
∫ Regarding system frequencies
The NTSC/PAL region setting can be switched
in [SYSTEM FREQ]. (l 28)
≥ You cannot store AVCHD scenes recorded
with different system frequencies on the
same SD card. If you have switched the
system frequency, use another SD card.
∫ Indemnity about recorded
content
Panasonic does not accept any responsibility
for damages directly or indirectly due to any
type of problems that result in loss of recording
or edited content, and does not guarantee any
content if recording or editing does not work
properly. Likewise, the above also applies in a
case where any type of repair is made to the
unit.
(ENG) SQT1045
5

∫ About Condensation
(When the lens, the viewfinder
or LCD Monitor is fogged up)
Condensation occurs when there is a change in
temperature or humidity, such as when the unit
is taken from outside or a cold room to a warm
room. Please be careful, as it may cause the
lens, the viewfinder or LCD monitor to become
soiled, moldy, or damaged.
When taking the unit to a place which has a
different temperature, if the unit is accustomed
to the room temperature of the destination for
about one hour, condensation can be
prevented. (When the difference in temperature
is severe, place the unit in a plastic bag or the
like, remove air from the bag, and seal the bag.)
When condensation has occurred, remove the
battery and/or the AC adapter and leave the
unit like that for about one hour. When the unit
becomes accustomed to the surrounding
temperature, fogginess will disappear naturally.
∫ About security
Be careful about the possibility of theft or loss of
the unit, and be careful not to leave the unit
unattended. Please note that Panasonic does
not accept any responsibility for the
compromise, manipulation, and loss of
information caused by these events.
∫ Caution regarding laser beams
The lens may suffer damage if struck by a laser
beam. Make sure that laser beams do not strike
the lens when shooting in an environment
where laser devices are used.
∫ Cards that you can use with
this unit
SDHC Memory Card and SDXC Memory
Card
≥ 4 GB or more Memory Cards that do not have
the SDHC logo or 48 GB or more Memory
Cards that do not have the SDXC logo are
not based on SD Memory Card
Specifications.
≥ Refer to page 21 for more details on SD
cards.
∫ For the purposes of these
operating instructions
≥ The battery pack is referred to as the
“Battery”.
≥ SDHC Memory Card and SDXC Memory
Card are referred to as the “SD card”.
≥ Function that can be used for Recording
Mode:
Function that can be used for Playback
Mode:
≥ Scene(s) recorded with [REC MODE] set to
[MOV] or [MP4]: "MOV/MP4 scene(s)".
≥ Scene(s) recorded with [REC MODE] set to
[AVCHD]: "AVCHD scene(s)".
≥ Pages for reference are indicated by an
arrow, for example: l 00
≥ These operating instructions are designed for
use with models AG-DVX200EJ/EN/ED.
Such as screen illustrations are as an
example AG-DVX200EJ.
6
SQT1045 (ENG)

Contents
∫ How to open the Operating Instructions PDF file
When you insert the CD-ROM and open the [INDEX.pdf] in the CD-ROM, the Operating
Instructions list will be displayed. Click the document name of the Operating Instructions you
would like to open.
≥ Adobe Reader is required to view the PDF file. Please download it from the homepage of
Adobe Systems Incorporated.
Information for Your Safety...................... 2
Accessories...............................................8
Optional accessories........................... 8
Preparation
What you can do with this unit ................ 9
Recording to the SD card .................... 9
Linking to external devices.................. 9
Names and Functions of Main
Parts ......................................................... 11
Power supply........................................... 17
Charging the battery ......................... 17
Inserting/removing the battery........... 18
Charging and recording time ............. 19
Connecting to the AC outlet.............. 20
Preparation of SD cards ......................... 21
Cards that you can use with this
unit .................................................... 21
Inserting/removing an SD card.......... 22
Turning the unit on/off ............................ 23
Selecting a mode .................................... 23
Using the LCD monitor/Viewfinder........ 24
Using the LCD monitor...................... 24
How to use the touch screen ............ 25
Viewfinder adjustment....................... 25
Setting date and time.............................. 26
Recording
Switching between Auto and Manual
Mode ........................................................ 30
Using the zoom ....................................... 31
Manual Recording .................................. 32
Focus ................................................ 32
White Balance ................................... 32
Iris/Gain adjustment .......................... 33
Manual shutter speed ....................... 33
USER button ........................................... 34
Setting the USER button ................... 34
Using the USER button..................... 34
Functions of the USER button .......... 35
Playback
Motion picture/Still picture playback .... 37
Menu
Using the menu screen .......................... 39
Menu structure ........................................ 40
Others
Cautions for use ..................................... 42
About copyright ...................................... 45
Specification ........................................... 47
Selecting the Recording Method ...........27
Formatting media .............................. 27
System frequency Selection.............. 28
Language Selection .......................... 28
Selecting a media to record ................... 28
Recording motion picture with this
unit ...........................................................29
Recording still pictures .......................... 29
(ENG) SQT1045
7
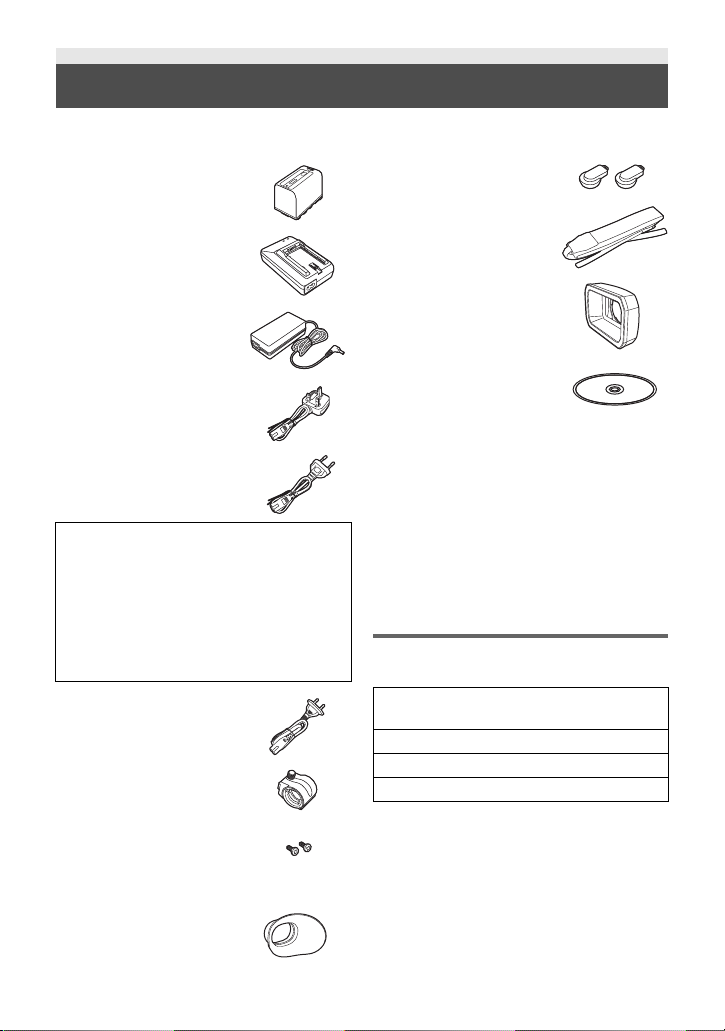
Accessories
Check the accessories before using this unit.
Keep the accessories out of reach of children to prevent swallowing.
Battery pack*
Battery charger
1
INPUT terminal cap
*2
(2 caps)
Shoulder strap (l 15)
AC adaptor
AC cable (2 cables)
(AG-DVX200EJ/EN)
≥ In Saudi Arabia, always use
A.
Caution for AC Mains Lead
FOR YOUR SAFETY PLEASE READ THE
FOLLOWING TEXT CAREFULLY.
This product is equipped with 2 types of AC
mains cable, Type C
Appropriate mains cable must be used in
each local area, since the other type of mains
cable is not suitable.
AC cable (2 cables)
(AG-DVX200ED)
Microphone holder (l 16)
Microphone holder
mounting screws (l 16)
12 mm length
(2 screws)
B and Type BF A.
Lens hood
CD-ROM
(Solely for PC)
Operating Instructions
*3
*1 The part number of the battery pack is
VW-VBD58. Before purchasing an extra
battery pack, check the optional
accessories section. To purchase extra
accessories, contact your dealer.
*2 The INPUT terminal caps are supplied
with the microphone holder.
*3 The lens hood is attached to this unit at
the time of purchase.
Optional accessories
Some optional accessories may not be
available in some countries.
Super-directional Electret Microphone
(AG-MC200G)
Battery pack (lithium/VW-VBD58)
Battery charger (AG-B23)
LED video light (VW-LED1)
Product numbers correct as of August.
2015. These may be subject to change.
Eye cup (l 15)
8
SQT1045 (ENG)
Preparation
A SDHC Memory Card/SDXC Memory Card*
2
B USB 3.0 (Device mode)*
3
C PC
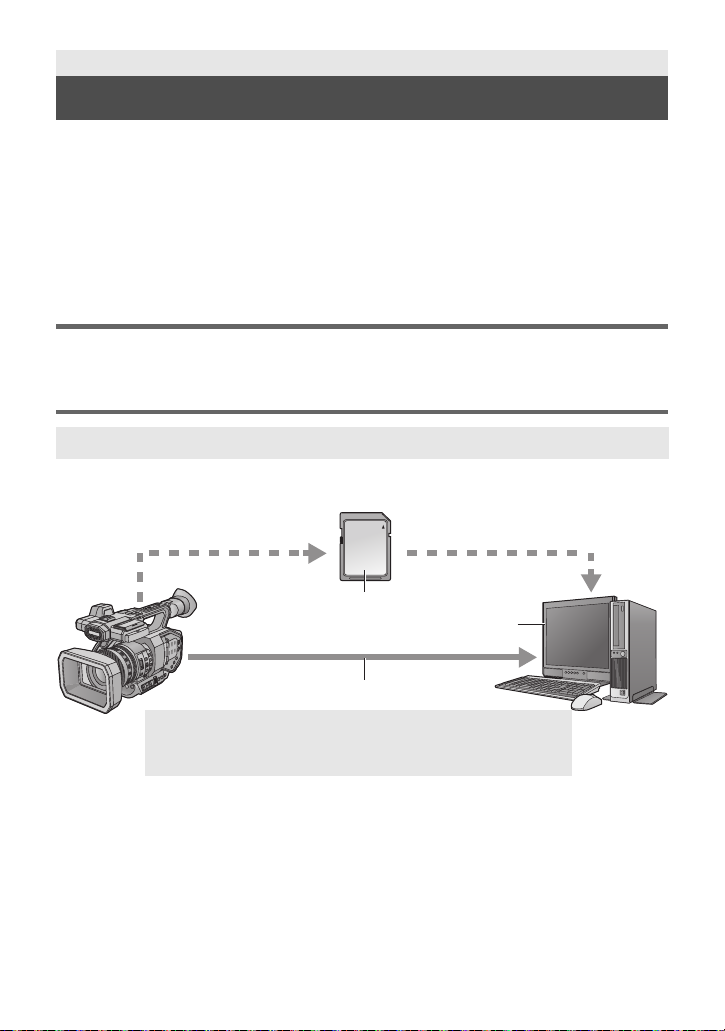
What you can do with this unit
This unit is a 4K*1 camera recorder with the following features:
*1 Please refer to page 47 about recording format of this unit.
≥ The 4/3-type large sensor allows you to record beautifully defo cused images with shallow depth
of field as ultra high-definition 4K motion picture.
≥ V-Log L (12 stops) allows you to record expressive images with greater latitude.
≥ Recording at a variable frame rate of up to 120 fps (for FHD) is possible.
≥ It incorporates the 5-Axis Hybrid Image Stabilizer, Custom AF function, and ND filters (1/4, 1/16,
and 1/64).
≥ Supported recording media include SDHC Memory Card and SDXC Memory Card.
Recording to the SD card
A variety of recording functions support recording to the SD card.
≥ This unit supports relay/simultaneous/background/dual codec recording using double card slots.
Linking to external devices
USB Device Mode
Transfer data (files) to perform nonlinear editing on another device (PC, etc.).
≥ This unit supports USB 3.0.
*2 SD cards are optional and not supplied with this unit.
*3 A USB 3.0 cable is not supplied with this unit. Use a commercially-available double-shielded
USB 3.0 cable with a ferrite core.
If possible, we recommend using a cable with a length of 1.5 m or less.
(ENG) SQT1045
9
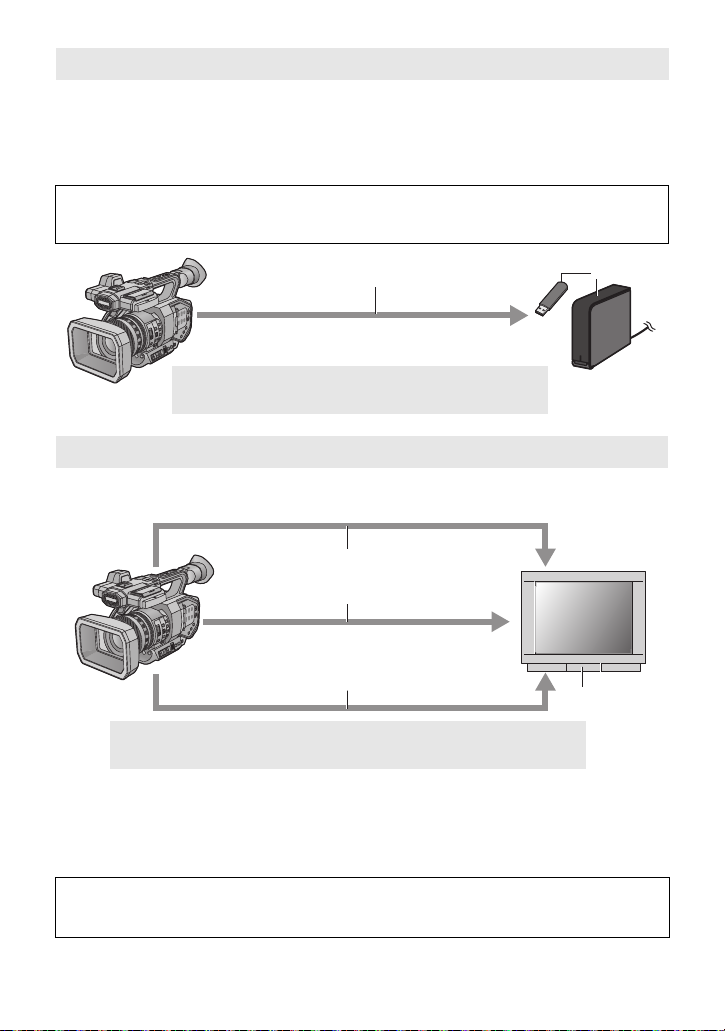
USB Host Mode
A USB 3.0 (Host mode)
B External media device (commercially-available)
A Audio cable*
1
B HDMI cable*
2
C BNC cable*
3
D External monitor
If you connect an external media device, such as USB HDD or USB flash memory (commerciallyavailable) to this unit, you can copy motion pictures and still pictures recorded on this unit to the
external media device.
It can also play back the scenes and still pictures copied to the external media device.
≥ This unit supports USB 3.0.
Refer to the following support site for information about an external media device.
http://pro-av.panasonic.net/
(This Site is English only)
Connecting to an external monitor
Connect an external monitor to output images.
≥ It is also possible to output 4:2:2 (10bit) images, depending on the [OUTPUT BITS] setting.
*1 Use a commercially-available audio cable (3.5 mm diameter jack to RCA cable).
*2 Use a commercially-available High Speed HDMI cable.
If possible, we recommend using a cable with a length of 3 m or less.
*3 To connect to the SDI OUT or VIDEO OUT terminal, use a double-shielded BNC cable
equivalent to 5C-FB (commercially-available).
When connecting with an HDMI cable using an HDMI-to-DVI converter, etc., be sure to
connect the HDMI cable to the connector of this unit last.
Connecting the HDMI cable to the connector of this unit first may result in malfunction.
10
SQT1045 (ENG)
Preparation
4
7
6
9
8
10
11
12
13
14
15
18
17
16
23
22
20
19
21
24
5
3
1
2
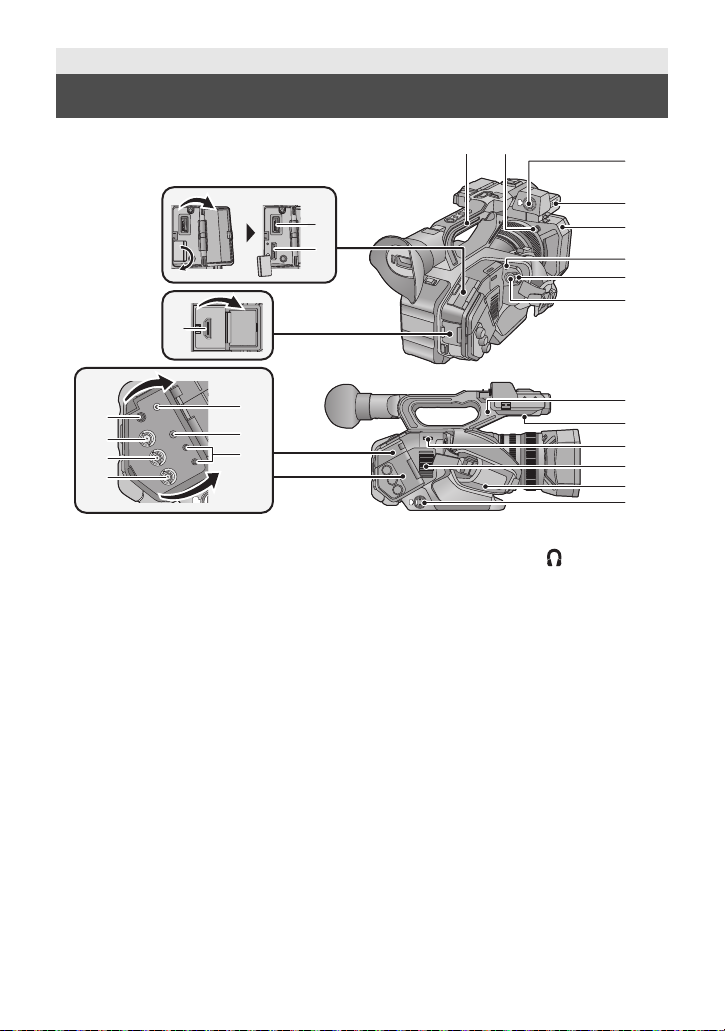
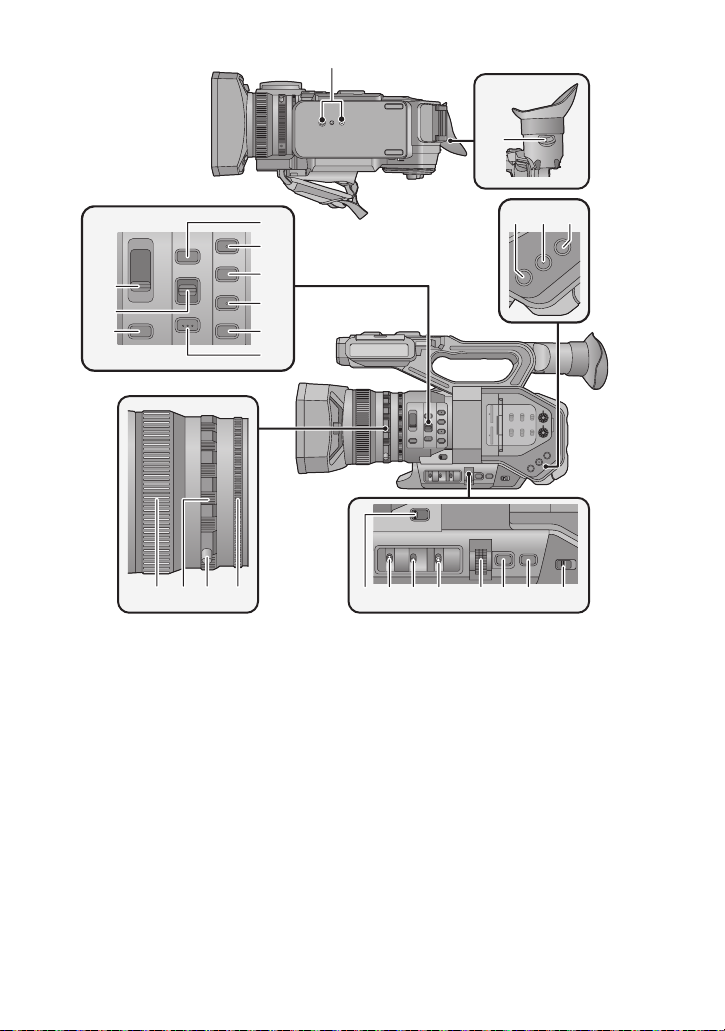
Names and Functions of Main Parts
1 USB HOST terminal
2 USB DEVICE terminal
3 HDMI OUT connector [HDMI]
4Handle
5 Lens hood release button
6 Audio input terminal 1 (XLR 3 pin)
[AUDIO INPUT1] (l 16)
7 Microphone holder attachment part
(l 16)
8 Lens hood
9 Status indicator (l 23)
10 Power switch (l 23)
11 Recording start/stop button (l 29)
12 DC input terminal [DC IN] (l 20)
≥ Do not use any other AC adaptors e xcept the
supplied one.
13 SDI OUT terminal
14 TC PRESET IN/OUT terminal
15 VIDEO OUT terminal
16 Headphone terminal [ ]
≥
Excessive sound pressure from earphones
and headphones can cause hearing loss.
≥ Listening at full volume for long periods may
damage the user ’s ears.
17 AUDIO OUT terminal
18 Camera remote terminal [CAM
REMOTE]
≥ FOCUS IRIS terminal (3.5 mm diameter mini
jack)
≥ ZOOM S/S terminal (2.5 mm diameter super
mini jack)
19 Pin holder
≥ Attaches the zoom ring pin removed from this
unit.
20 Speaker
21 Shoulder strap fixture (l 15)
22 Inlet (cooling fan)
23 Hand strap (l 15)
24 Audio input terminal 2 (XLR 3 pin)
[AUDIO INPUT2] (l 16)
(ENG) SQT1045
11
25
36 37 3938
454443 46 47 48 49 50
32
33
28
31
30
34
35
29
27
424140
26
25 Tripod receptacle (l 16)
26 Eyepiece corrector lever (l 25)
27 ND filter switch [ND FILTER]
28 Focus auto/Manual/¶ switch
[FOCUS A/M/¶] (l 32)
29 Iris button [IRIS] (l 32)
30 FOCUS ASSIST button
31 User 1 button [USER1] (l 34)
32 User 2 button [USER2] (l 34)
33 User 3 button [USER3] (l 34)
34 User 4 button [USER4] (l 34)
35 PUSH AUTO button
36 Focus ring (l 32)
37 Zoom ring (l 31)
38 Zoom ring pin
39 Iris ring (l 32)
12
SQT1045 (ENG)
40 User 5 button [O.I.S.] (l 34)
41 User 6 button [ZEBRA] (l 34)
42 User 7 button [WFM] (l 34)
43 Zoom switch [MANU/SERVO] (l 31)
44 Display/Mode check switch [DISP/
MODE CHK]
45 Gain switch [GAIN] (l 33)
46 White Balance switch [WHITE BAL]
(l 32)
47 Jog dial [SEL/PUSH SET] (l 32)
48 Menu button [MENU] (l 39)
49 Shutter speed button [SHUTTER] (l 33)
50 Auto/Manual switch [AUTO/MANU]
(l 30)
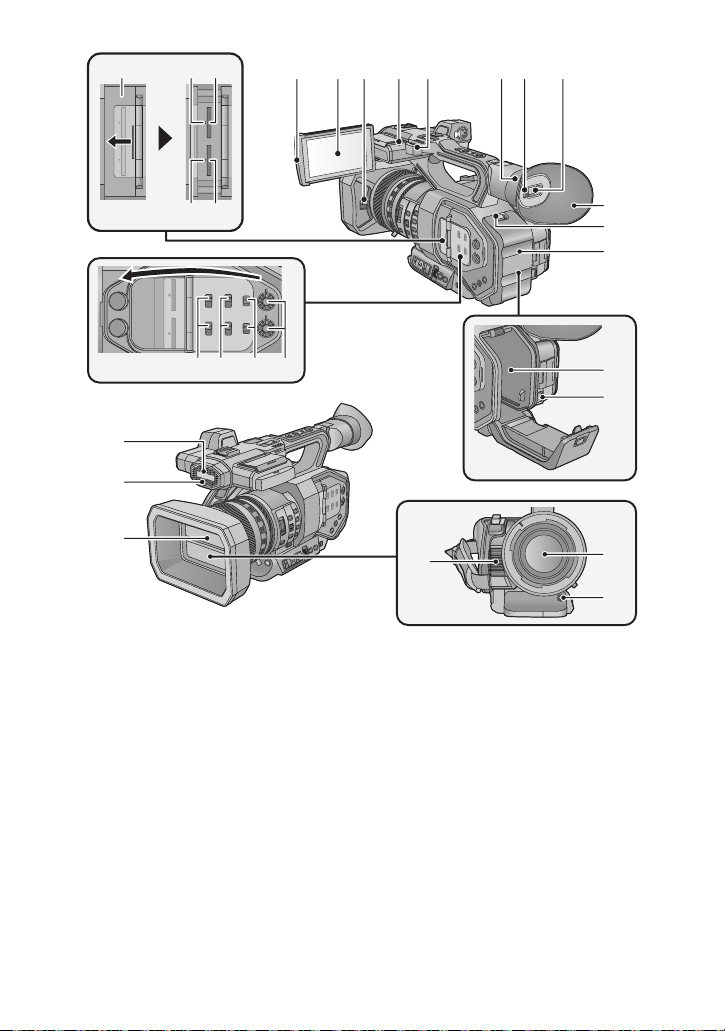
595756 58
51
61
60
63 64 66 676562
5352
5554
68
69
70
72
71
75
74
77
78
76
73
51 SD Card slot cover (l 22)
52 Access lamp (card 1) (l 22)
53 Card slot 1 (l 22)
54 Access lamp (card 2) (l 22)
55 Card slot 2 (l 22)
56 INPUT1 / INPUT2 switches
57 CH1 SELECT/CH2 SELECT switches
58 CH1/CH2 switches
59 AUDIO LEVEL CH1/AUDIO LEVEL CH2
knobs
60 LCD monitor extract part (l 24)
61 LCD monitor (Touch screen) (l 25)
62 Lens cover open/close lever (l 14)
63 Recording lamp (Rear)
64 Shoulder strap fixture (l 15)
65 Eye cup mount (l 15)
66 Eye sensor
67 Viewfinder (l 25)
68 Eye cup (l 15)
69 Open/close lever [OPEN] (l 18)
70 Battery cover (l 18)
71 Battery holder (l 18)
72 Battery release lever [BATTERY] (l 18)
73 Built-in microphone
74 Recording lamp (Front)
75 Lens cover (l 14)
76 Exhaust opening (cooling fan)
77 Lens (LEICA DICOMAR)
78 Auto white balance button [AWB] (l 32)
(ENG) SQT1045
13

79 80 81 82 83
OPEN
CLOSE
84 85 86 87
79 Accessory shoe
80 Sub zoom lever (l 31)
≥ This lever functions in the same manner as
the zoom lever.
81 Zoom lever [T/W] (In Recording Mode)
(l 31)
Volume lever [rVOLs]/Thumbnail
display switch [ / ] (In Playback
Mode)
82 User 8 button [REC CHECK] (l 34)
83 Handle mounting hole
(Size of the mounting hole)
j 1/4-20UNCk2
j 3/8-16UNCk2
84 Thumbnail button [THUMBNAIL] (l 23)
85 Counter button [COUNTER]
86 Counter reset/Time code setting button
[RESET/TC SET]
87 Color Bar Screen button [BARS]
88 Sub recording start/stop button
≥ This button functions in the same manner as
the recording start/stop button.
88
∫ Opening/closing the lens cover
You can open/close the lens cover by sliding the lens cover open/close lever.
≥ When this unit is not in use, close the lens cover to protect the lens.
≥ Do not press the lens cover hard. This may damage the lens or the lens cover.
≥ Depending on the various filters or the MC protector attached to the front side of this unit's lens,
you may not be able to open/close the lens cover or attach the lens hood.
14
SQT1045 (ENG)
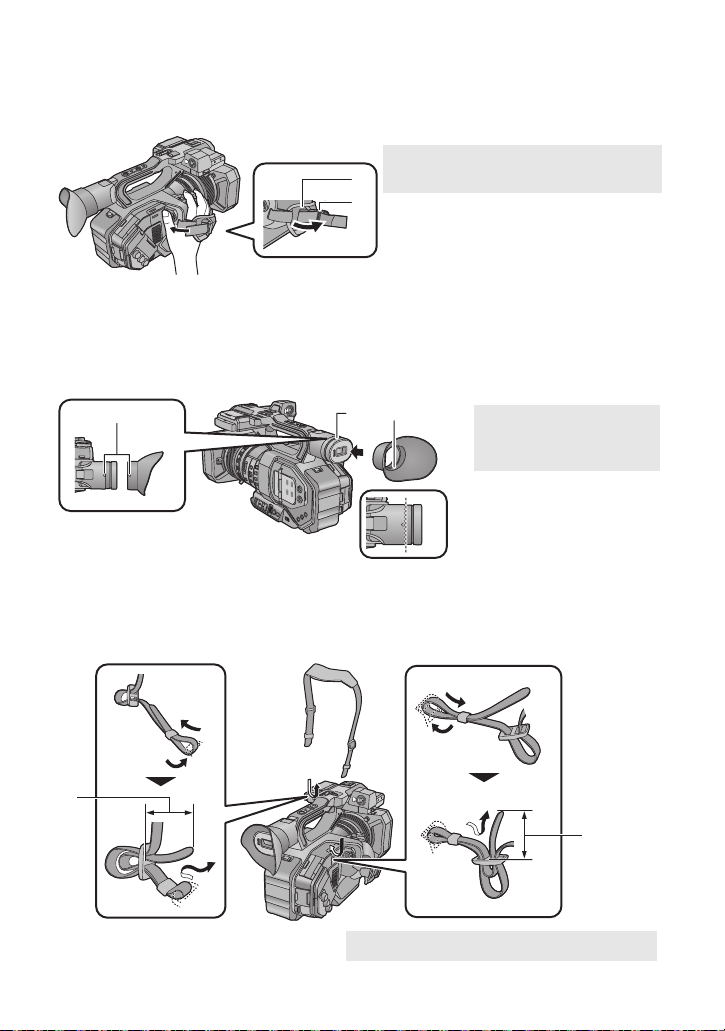
∫ Adjust the length of the hand strap so that it fits your hand.
1 Open the buckle.
2 Pull the end of the belt.
A Mounting marks
B Notch
C Protrusion
A 20 mm or longer
Adjust the hand strap according to the size of your hand.
≥ If you find it difficult to fasten the buckle B, move the pad A towards you, and fasten the buckle
B again.
∫ Attaching the eye cup
1 Align the mounting mark on the eye cup mount with the corresponding mark on
the eyecup.
2 Attach the eye cup so that the notch on the eye cup mount is aligned with the
protrusion inside the eye cup.
≥ Push the eye cup in until it reaches the mounting mark. (D)
∫ Attaching the Shoulder strap
We recommend that you attach the shoulder strap (supplied) before going out of doors to record so
as to avoid dropping this unit.
(ENG) SQT1045
15

∫ Attaching the front microphone
A Microphone holder attachment part
B Microphone holder
C Microphone holder mounting screws
D AUDIO INPUT1 terminal (XLR 3 pin)
E Microphone cable clamper
F Microphone holder screw
G External microphone (optional)
A INPUT terminal cap
A Tripod receptacle
≥ The microphone holder is set up so that a 21 mm external microphone (AG-MC200G: optional)
can be attached. Check in advance whether the microphone you wish to use can be attached.
1 Attach the microphone holder to the microphone holder attachment part.
≥ Attach by using a commercially available screw driver.
≥ When attaching the microphone holder, be sure to tighten the screws firmly even though you
might hear a squeaking sound.
2 Attach an external microphone
(optional) to the microphone
holder, and tighten the
microphone holder screw.
3 Connect the external
microphone to the AUDIO
INPUT1 terminal (XLR 3 pin).
≥ When wiring the microphone cable, use
the cable clamper of this unit.
≥ Keep the microphone holder screw,
zoom ring pin and INPUT terminal cap
out of reach of children to prevent
swallowing.
∫ Attaching the INPUT terminal
cap
Attach the INPUT terminal cap while the AUDIO
INPUT1, 2 terminals (XLR 3 pin) are not used.
16
SQT1045 (ENG)
∫ Attaching the tripod
≥ There are tripod mounting holes that are
compatible with 1/4-20UNC and 3/8-16UNC
screws. Use the size that matches the
diameter of the tripod’s fixing screw.
≥ Attaching a tripod with a screw length of
5.5 mm or more may damage the unit.
 Loading...