

Page 1
Your Palm® Treo™ 680
Smartphone
User Guide
Page 2

Intellectual Property Notices
© 2006 Palm, Inc. All rights reserved. Blazer, HotSync, Palm, Palm
OS, Treo, VersaMail, and the Palm and Treo logos are among the
trademarks or registered trademarks owned by or licensed to Palm,
Inc. This product contains ACCESS Co., Ltd.’s NetFront 3.0 Internet
browser software. © 1996-2005 ACCESS Co., Ltd. and ACCESS
Systems America, Inc. NetFront is the trademark or registered
trademark of ACCESS Co., Ltd. in Japan and in other countries except
the United States of America. NetFront is a registered trademark of
NetFront Communications, Inc. in the United States of America and
is used under a license. Documents To Go is a trademark or
registered trademark of DataViz, Inc. A portion of the enclosed
product is © copyrighted by Fraunhofer IIS (2005). All rights rese rved.
All other brand and product names are or may be trademarks of, and
are used to identify products or ser vices of, their respective owners.
This product is protected by one or more of the following United
States patents:
7,007,239; 6,976,226; 6,975,304; 6,965,375; 6,961,567; 6,961,029;
6,957,397; 6,952,571; 6,950,988; 6,947,975; 6,947,017; 6,943,667;
6,940,490; 6,924,752; 6,907,233; 6,906,701; 6,906,741; 6,901,276;
6,850,780; 6,845,408; 6,842,628; 6,842,335; 6,831,662; 6,819,552;
6,804,699; 6,795,710; 6,788,285; 6,781,824; 6,781,575; 6,766,490;
6,745,047; 6,744,451; 6,738,852; 6,732,105; 6,724,720; 6,721,892;
6,712,638; 6,708,280; 6,697,639; 6,687,839; 6,685,328; 6,665,803;
6,618,044; 6,590,588; 6,539,476; 6,532,148; 6,523,124; 6,519,141;
6,516,202; 6,490,155; 6,480,146; 6,457,134; 6,456,247; 6,442,637;
6,441,824; 6,437,543; 6,429,625; 6,425,087; 6,389,572; 6,388,877;
6,381,650; 6,363,082; 6,344,848; 6,317,085; 6,241,537; 6,222,857;
6,185,423; 6,147,314; 6,115,248; 6,064,342; D421,251; D429,252;
D466,128; D478,091. Patent pending.
This product also is licensed under United St ates patent 6,058,304.
A portion of this software includes software modules developed by
the Independent JPEG group. MPEG Layer-3 audio decoding
technology is licensed from Fraunhofer IIS and Thomson. MPEG-4
audio coding technology and advanced video technology licensed by
Fraunhofer IIS.
This product is protected by certain intellectual prope rty rights of
Microsoft. Use or distribution of such technology outside of this
product is prohibited without a license from Microsoft.
The TREO trademark is used by Palm in Sweden and Denmark with
the express consent of Pfizer and its affiliated companies. The
products marketed and/or sold by Palm under the TREO trademark
are in no way affiliated with Pfizer or its business.
Swedish: Varumärket Treo används av Palm i Sverige och Danmark
med uttryckligt tillstånd från Pfizer och dess dotterbolag. De
produkter som marknadsförs och/eller säljs av Palm under varumärket
Treo ska på inget sätt alls kopplas samman med Pfizer eller dess
verksamh et.
Danish: Treo-varemærket anvendes af Palm i Danmark og Svirge
med udtrykkelig tilladelse fra P fizer og Pfizers associerede selskaber.
De produkter, der markedsføres og/eller sælges af Palm under
Treo-varemærket, er på ingen måde tilknyttet Pfizer eller Pfizers
virksomhed.
Disclaimer and limitation of liability
Palm, Inc. and its suppliers assume no responsibility for any damage
or loss resulting from the use of this guide. Palm, Inc. and its
suppliers assume no responsibility for any loss or claims by third
parties that may arise through the use of this software. Palm, Inc. and
its suppliers assume no responsibility for any damage or loss caused
by deletion of data as a result of malfunction, dead battery, or repairs.
Be sure to make backup copies of all important data on other media
to protect against data loss.
PN: 185-10425-00
v. 1.0
Page 3

Contents
Welcome . . . . . . . . . . . . . . . . . . . . . . . . . . . . . . . . . . . . . . . . . . . . . . . . . . . . . . . . . . . 1
What do I need to get started? . . . . . . . . . . . . . . . . . . . . . . . . . . . . . . . . . . . . . . . . 3
Chapter 1: Setting up . . . . . . . . . . . . . . . . . . . . . . . . . . . . . . . . . . . . . . . . . . . . . . . . . . 5
Treo 680 overview . . . . . . . . . . . . . . . . . . . . . . . . . . . . . . . . . . . . . . . . . . . . . . . . . . 7
Inserting the SIM card and battery . . . . . . . . . . . . . . . . . . . . . . . . . . . . . . . . . . . . . . 9
Charging the battery . . . . . . . . . . . . . . . . . . . . . . . . . . . . . . . . . . . . . . . . . . . . . . . . . 11
Maximizing battery life . . . . . . . . . . . . . . . . . . . . . . . . . . . . . . . . . . . . . . . . . . . . . . . 13
Making your first call . . . . . . . . . . . . . . . . . . . . . . . . . . . . . . . . . . . . . . . . . . . . . . . . 15
Setting up your computer for synchronization . . . . . . . . . . . . . . . . . . . . . . . . . . . . .16
Synchronizing information—the basics . . . . . . . . . . . . . . . . . . . . . . . . . . . . . . . . . .23
Chapter 2: Moving around on your Palm
Moving around the screen . . . . . . . . . . . . . . . . . . . . . . . . . . . . . . . . . . . . . . . . . . . .27
Using the keyboard . . . . . . . . . . . . . . . . . . . . . . . . . . . . . . . . . . . . . . . . . . . . . . . . . 31
Opening applications . . . . . . . . . . . . . . . . . . . . . . . . . . . . . . . . . . . . . . . . . . . . . . . . 35
Chapter 3: Your phone . . . . . . . . . . . . . . . . . . . . . . . . . . . . . . . . . . . . . . . . . . . . . . . . . 39
Turning your Treo 680 on and off . . . . . . . . . . . . . . . . . . . . . . . . . . . . . . . . . . . . . . . 41
Making calls . . . . . . . . . . . . . . . . . . . . . . . . . . . . . . . . . . . . . . . . . . . . . . . . . . . . . . . 43
Receiving calls . . . . . . . . . . . . . . . . . . . . . . . . . . . . . . . . . . . . . . . . . . . . . . . . . . . . . 47
Using voicemail . . . . . . . . . . . . . . . . . . . . . . . . . . . . . . . . . . . . . . . . . . . . . . . . . . . . 48
What can I do when I’m on a call? . . . . . . . . . . . . . . . . . . . . . . . . . . . . . . . . . . . . . . 50
How many minutes have I used? . . . . . . . . . . . . . . . . . . . . . . . . . . . . . . . . . . . . . . . 56
Entering names and phone numbers . . . . . . . . . . . . . . . . . . . . . . . . . . . . . . . . . . . . 57
Defining favorite buttons . . . . . . . . . . . . . . . . . . . . . . . . . . . . . . . . . . . . . . . . . . . . . 61
Using a hands-free device . . . . . . . . . . . . . . . . . . . . . . . . . . . . . . . . . . . . . . . . . . . . 64
®
Treo™ 680 smartphone . . . . . . . . . . . . . . .25
iii
Page 4

Customizing phone settings . . . . . . . . . . . . . . . . . . . . . . . . . . . . . . . . . . . . . . . . . . . 69
What are all those icons? . . . . . . . . . . . . . . . . . . . . . . . . . . . . . . . . . . . . . . . . . . . . . 75
Chapter 4: Your email and other messages . . . . . . . . . . . . . . . . . . . . . . . . . . . . . . . . . 79
Which email application should I use? . . . . . . . . . . . . . . . . . . . . . . . . . . . . . . . . . . . 81
The VersaMail application . . . . . . . . . . . . . . . . . . . . . . . . . . . . . . . . . . . . . . . . . . . . 81
Messaging . . . . . . . . . . . . . . . . . . . . . . . . . . . . . . . . . . . . . . . . . . . . . . . . . . . . . . . . 95
Chapter 5: Your connections to the web and wireless devices . . . . . . . . . . . . . . . . . .107
Web browser . . . . . . . . . . . . . . . . . . . . . . . . . . . . . . . . . . . . . . . . . . . . . . . . . . . . . . 109
Connecting your computer to the Internet through your Treo . . . . . . . . . . . . . . . . . 118
Connections with Bluetooth devices . . . . . . . . . . . . . . . . . . . . . . . . . . . . . . . . . . . . 121
Chapter 6: Your photos, videos, and music . . . . . . . . . . . . . . . . . . . . . . . . . . . . . . . . . 125
Camera . . . . . . . . . . . . . . . . . . . . . . . . . . . . . . . . . . . . . . . . . . . . . . . . . . . . . . . . . . . 127
Pictures & Videos . . . . . . . . . . . . . . . . . . . . . . . . . . . . . . . . . . . . . . . . . . . . . . . . . . . 131
Pocket Tunes . . . . . . . . . . . . . . . . . . . . . . . . . . . . . . . . . . . . . . . . . . . . . . . . . . . . . . 136
Chapter 7: Your personal information organizer . . . . . . . . . . . . . . . . . . . . . . . . . . . . . . 143
Calendar . . . . . . . . . . . . . . . . . . . . . . . . . . . . . . . . . . . . . . . . . . . . . . . . . . . . . . . . . . 145
World Clock . . . . . . . . . . . . . . . . . . . . . . . . . . . . . . . . . . . . . . . . . . . . . . . . . . . . . . . 152
Tasks . . . . . . . . . . . . . . . . . . . . . . . . . . . . . . . . . . . . . . . . . . . . . . . . . . . . . . . . . . . . 154
Chapter 8: Your memos and documents . . . . . . . . . . . . . . . . . . . . . . . . . . . . . . . . . . . 159
Documents To Go Professional . . . . . . . . . . . . . . . . . . . . . . . . . . . . . . . . . . . . . . . . 161
Memos . . . . . . . . . . . . . . . . . . . . . . . . . . . . . . . . . . . . . . . . . . . . . . . . . . . . . . . . . . . 162
Voice Memo . . . . . . . . . . . . . . . . . . . . . . . . . . . . . . . . . . . . . . . . . . . . . . . . . . . . . . . 163
Chapter 9: Your application and info management tools . . . . . . . . . . . . . . . . . . . . . . . 165
Using Find . . . . . . . . . . . . . . . . . . . . . . . . . . . . . . . . . . . . . . . . . . . . . . . . . . . . . . . . 167
Viewing and using the alerts . . . . . . . . . . . . . . . . . . . . . . . . . . . . . . . . . . . . . . . . . . 167
Calculator . . . . . . . . . . . . . . . . . . . . . . . . . . . . . . . . . . . . . . . . . . . . . . . . . . . . . . . . . 168
iv
Page 5

Installing applications . . . . . . . . . . . . . . . . . . . . . . . . . . . . . . . . . . . . . . . . . . . . . . . . 170
Removing applications . . . . . . . . . . . . . . . . . . . . . . . . . . . . . . . . . . . . . . . . . . . . . . .172
Viewing application info . . . . . . . . . . . . . . . . . . . . . . . . . . . . . . . . . . . . . . . . . . . . . . 173
Sending information with Bluetooth wireless technology . . . . . . . . . . . . . . . . . . . . 174
Beaming information . . . . . . . . . . . . . . . . . . . . . . . . . . . . . . . . . . . . . . . . . . . . . . . . 176
Synchronizing information—advanced . . . . . . . . . . . . . . . . . . . . . . . . . . . . . . . . . . .179
Using expansion cards . . . . . . . . . . . . . . . . . . . . . . . . . . . . . . . . . . . . . . . . . . . . . . .185
Chapter 10: Your personal settings . . . . . . . . . . . . . . . . . . . . . . . . . . . . . . . . . . . . . . . 191
System sound settings . . . . . . . . . . . . . . . . . . . . . . . . . . . . . . . . . . . . . . . . . . . . . . . 193
Display and appearance settings . . . . . . . . . . . . . . . . . . . . . . . . . . . . . . . . . . . . . . . 194
Applications settings . . . . . . . . . . . . . . . . . . . . . . . . . . . . . . . . . . . . . . . . . . . . . . . . 197
Locking your Treo and info . . . . . . . . . . . . . . . . . . . . . . . . . . . . . . . . . . . . . . . . . . . . 199
System settings . . . . . . . . . . . . . . . . . . . . . . . . . . . . . . . . . . . . . . . . . . . . . . . . . . . .206
Connecting to a VPN . . . . . . . . . . . . . . . . . . . . . . . . . . . . . . . . . . . . . . . . . . . . . . . . 208
Chapter 11: Common questions . . . . . . . . . . . . . . . . . . . . . . . . . . . . . . . . . . . . . . . . . 211
Upgrading . . . . . . . . . . . . . . . . . . . . . . . . . . . . . . . . . . . . . . . . . . . . . . . . . . . . . . . . . 213
Desktop software installation . . . . . . . . . . . . . . . . . . . . . . . . . . . . . . . . . . . . . . . . . . 215
Resetting your Treo . . . . . . . . . . . . . . . . . . . . . . . . . . . . . . . . . . . . . . . . . . . . . . . . . 215
Replacing the battery . . . . . . . . . . . . . . . . . . . . . . . . . . . . . . . . . . . . . . . . . . . . . . . .217
Screen . . . . . . . . . . . . . . . . . . . . . . . . . . . . . . . . . . . . . . . . . . . . . . . . . . . . . . . . . . . 219
Synchronization . . . . . . . . . . . . . . . . . . . . . . . . . . . . . . . . . . . . . . . . . . . . . . . . . . . . 220
Phone . . . . . . . . . . . . . . . . . . . . . . . . . . . . . . . . . . . . . . . . . . . . . . . . . . . . . . . . . . . . 227
Hands-free devices . . . . . . . . . . . . . . . . . . . . . . . . . . . . . . . . . . . . . . . . . . . . . . . . . . 229
Email . . . . . . . . . . . . . . . . . . . . . . . . . . . . . . . . . . . . . . . . . . . . . . . . . . . . . . . . . . . . . 230
Messaging . . . . . . . . . . . . . . . . . . . . . . . . . . . . . . . . . . . . . . . . . . . . . . . . . . . . . . . . 231
Web . . . . . . . . . . . . . . . . . . . . . . . . . . . . . . . . . . . . . . . . . . . . . . . . . . . . . . . . . . . . . 232
Camera . . . . . . . . . . . . . . . . . . . . . . . . . . . . . . . . . . . . . . . . . . . . . . . . . . . . . . . . . . . 235
Making room on your Treo . . . . . . . . . . . . . . . . . . . . . . . . . . . . . . . . . . . . . . . . . . . .236
v
Page 6

Third-party applications . . . . . . . . . . . . . . . . . . . . . . . . . . . . . . . . . . . . . . . . . . . . . . 237
Error messages . . . . . . . . . . . . . . . . . . . . . . . . . . . . . . . . . . . . . . . . . . . . . . . . . . . . 238
Where to learn more . . . . . . . . . . . . . . . . . . . . . . . . . . . . . . . . . . . . . . . . . . . . . . . . . . 241
Terms . . . . . . . . . . . . . . . . . . . . . . . . . . . . . . . . . . . . . . . . . . . . . . . . . . . . . . . . . . . . . . 243
Regulatory information . . . . . . . . . . . . . . . . . . . . . . . . . . . . . . . . . . . . . . . . . . . . . . . . . 247
Specifications . . . . . . . . . . . . . . . . . . . . . . . . . . . . . . . . . . . . . . . . . . . . . . . . . . . . . . . . 259
Index . . . . . . . . . . . . . . . . . . . . . . . . . . . . . . . . . . . . . . . . . . . . . . . . . . . . . . . . . . . . . . 263
vi
Page 7

Welcome
Congratulations on the purchase of your
®
Palm
Tr eo™ 680 smartphone! In one
compact and indispensable device, you
now have all of the following:
• Contacts application that stores the
names, phone numbers, and even
pictures of friends, family, business
contacts—everyone you stay in touch
with
• Email application for receiving and
sending email (business and personal)
• Palm OS
storing your appointments, to-do lists,
memos, and more
• Expansion card slot that accepts cards
(MultiMediaCard/SD/SDIO; sold
separately) for storing music files,
videos, dictionaries, games, and lots of
other applications
• A VGA (640x480) digital camera for
snapping photos and capturing short
videos
®
personal info applications for
• Text and multimedia messaging
• MP3 player
• Applications for reading, creating, and
editing Microsoft Office files and
viewing PDF files
• Software for entering names,
addresses, and more on your computer,
and then transferring them to your
smartphone with one press of a button
NOTE Phone and text messaging services
require a service contract with your
wireless service provider. Web, email, and
multimedia messaging services require a
service contract and data services, such as
GPRS or EDGE, from your wireless service
provider. Data speeds vary based on
network availability and capacity.
What’s in the box?
You should have received all the following
items in the Treo 680 box:
Hardware
• Treo 680
• SIM card from your wireless service
provider (not included with all models)
WELCOME
1
Page 8
KEY TERM
SIM (Subscriber Identity Module)
card The smartcard that you insert into your
smartphone and identifies you to the mobile
network. It contains your mobile account
information, such as your phone number and
the services to which you subscribe. Phone
book entries and SMS messages can also be
stored on the SIM card.
• Rechargeable battery
• AC charger with international adapter(s)
(if required in your region)
• USB sync cable
• Headset
Documentation and software
• Read This First setup booklet
• Quick Reference Guide
• Palm Software Installation CD, which
includes the following:
®
• Palm
• Bonus software for your smartphone
• Your Palm Treo 680 Smartphone User
Desktop software
Guide (this guide)
• Palm warranty
2
WELCOME
Page 9

What do I need to get started?
This guide helps you set up your Treo 680
and quickly learn to use it. To get started,
you need all the items that came in the
Treo 680 box (see What’s in the box?
the following:
• A SIM card. If you do not already have a
SIM card and your smartphone box did
not contain a SIM card, you need to
contact your wireless service provider
to get one. Be sure to sign up for a
mobile account with data services. To
use your smartphone on your wireless
service provider’s network, the SIM
), plus
card must be inserted into your
smartphone. Without a SIM card, you
can only make emergency calls, such as
112 or 911.
• You must be in a location where you are
within coverage of your wireless service
provider’s network.
• An electrical outlet
• The computer with which you want to
synchronize your personal information
NOTE To use email, web browsing, and
multimedia messaging, your wireless
service provider plan must include data
services. Please contact your wireless
service provider for details about your data
service options.
WELCOME
3
Page 10

4
WELCOME
Page 11

Setting up
Congratulations on the purchase of your new Palm®Tr eo™ 680
smartphone. You’re about to discover the many things about
your smartphone that will help you better manage your life and
have fun, too.
As you become more familiar with your smartphone, you’ll
want to personalize the settings and add applications to make it
uniquely yours. But first, take these few easy steps to set up
your smartphone and get it running.
Benefits
• Know where your smartphone
controls are located
• Start using your smartphone right
away
• Establish a link between your
smartphone and your computer
CHAPTER
1
Page 12

In this chapter
Treo 680 overview . . . . . . . . . . . . . . . . . . . . . . . . . . . . . . . . . . . . . . 7
Inserting the SIM card and battery. . . . . . . . . . . . . . . . . . . . . . . . . . 9
Charging the battery. . . . . . . . . . . . . . . . . . . . . . . . . . . . . . . . . . . . . 11
Maximizing battery life. . . . . . . . . . . . . . . . . . . . . . . . . . . . . . . . . . . 13
Making your first call . . . . . . . . . . . . . . . . . . . . . . . . . . . . . . . . . . . . 15
Setting up your computer for synchronization . . . . . . . . . . . . . . . . . 16
Synchronizing information—the basics . . . . . . . . . . . . . . . . . . . . . . 23
Page 13

SETTING UP
1
Treo 680 overview
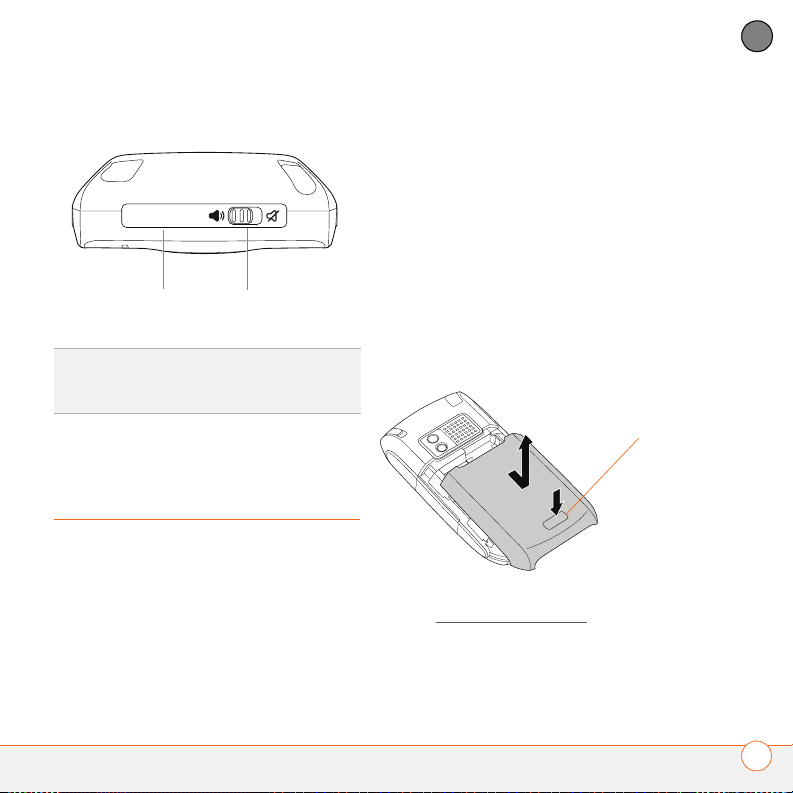
Front view
Indicator light (phone
and charge indicator)
Vol ume
Side button
Send
Phone
TIP
Protect your screen. Be careful to store
your smartphone away from items that might
scratch or crush the screen. Visit
www.palm.com/
cases and other useful accessories.
treo680gsm to find carrying
Earpiece
5-way navigator and
Center button
Power/End
Applications
Menu
Messaging
Calendar
DID YOU KNOW
screen is on, you can press and hold the Side
button to open the Voice Memo application.
You can also change your button settings and
select an application of your choice; see
Reassigning buttons
?
When your smartphone
for details.
CHAPTER
7
Page 14

1
SETTING UP
CHAPTER
Back view
Speaker
Stylus
Self-portrait mirror
Battery door
release
Camera lens
Headset jack
Expansion slot door
IMPORTANT The Treo 680 speaker
Microphone
Multi-connector
includes a large magnet, so be sure to
keep your smartphone away from credit
cards or other items that could be
demagnetized.
8
Page 15
SETTING UP
1
Top view
Ringer switchInfrared (IR) port
DID YOU KNOW
sounds at once. You don’t need to hunt for Off
buttons all over the device.
?
The Ringer switch silences all
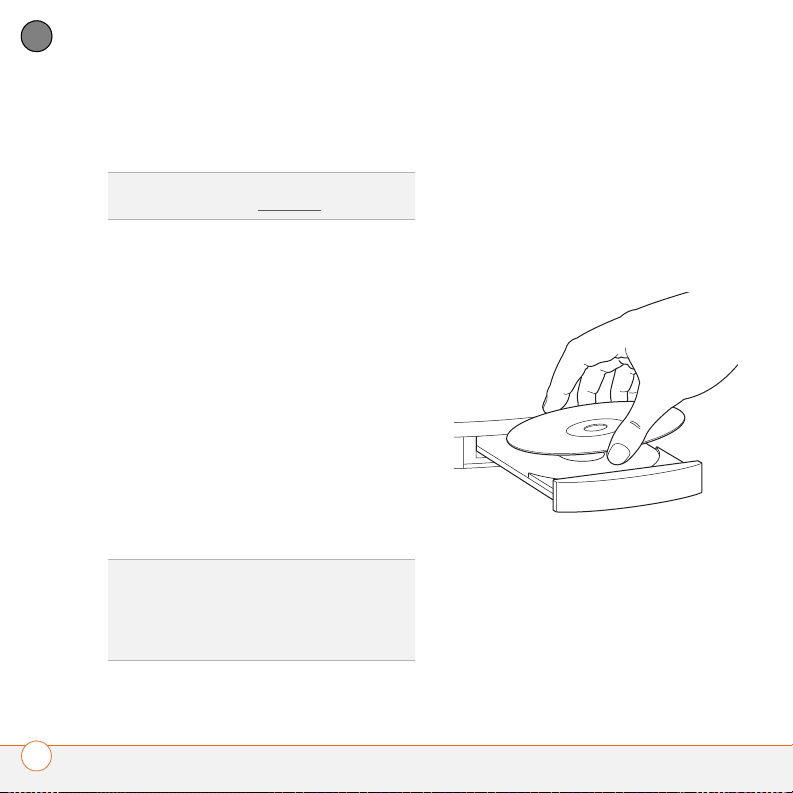
Inserting the SIM card and battery
Your SIM card contains account
information such as your phone number
and voicemail access number. To use the
phone, email, or web features, the SIM
card must be inserted in your smartphone.
NOTE Your SIM card may already be
installed in your smartphone. Follow steps
1–3 to check. If a SIM card did not come
with your smartphone, you may already
have one; otherwise, your wireless service
provider will give you one when you
subscribe.
1 Use one hand to press the Battery
door release button and use your other
hand to slide the battery door
downward to remove it from your
smartphone.
Battery door
release
2 If the battery is installed, remove it.
(See Replacing the battery
3 Slide the SIM tray out of the slot inside
the smartphone. If the SIM card is
already installed, skip to step 6.
for details.)
CHAPTER
9
Page 16

1
CHAPTER
SETTING UP
4 Align the notch on the SIM card with
the notch in the SIM tray. Insert the
notched end of the SIM card into the
SIM tray, and then press the other end
of the card until it falls into place.
Notch
6 Align the metal contacts on the battery
with the contacts inside the battery
compartment, insert the battery into the
compartment at a 45-degree angle, and
then press it into place.
Battery
contacts
Smartphone
contacts
5 Slide the SIM tray back into the slot
inside the smartphone.
IMPORTANT Use the battery that came
with your Treo 680. Do not use a battery
from another Treo model in your Treo 680.
Similarly, do not use the Treo 680 battery in
another Treo model. Using a battery that is
designed for another Treo model can
damage your Treo 680. For info on
10
Page 17
SETTING UP
1
replacement batteries, see Replacing the
battery.
7 Slide the battery door onto the back of
the smartphone until it clicks into place.
8 Your Treo screen wakes up and begins
the setup process. When the language
selection screen appears, select the
language you want to use, and then
follow the onscreen instructions to set
up your Treo.
TIP
If your Treo does not turn on, you need to
connect it to the AC charger. If it still does not
turn on after being connected to the AC
charger for five minutes, then do a soft reset.
See Performing a soft reset
IMPORTANT Always use the same
.
language for your Treo, your computer
operating system, and your desktop
software. Otherwise, you may lose
information or have difficulty with
synchronization. Support is not provided for
mismatched language setups.
TIP
The power-saving feature turns off the Treo
screen after a period of inactivity. To wake up
the screen, press and release Power/End,
and then press Center on the 5-way to turn off
Keyguard.
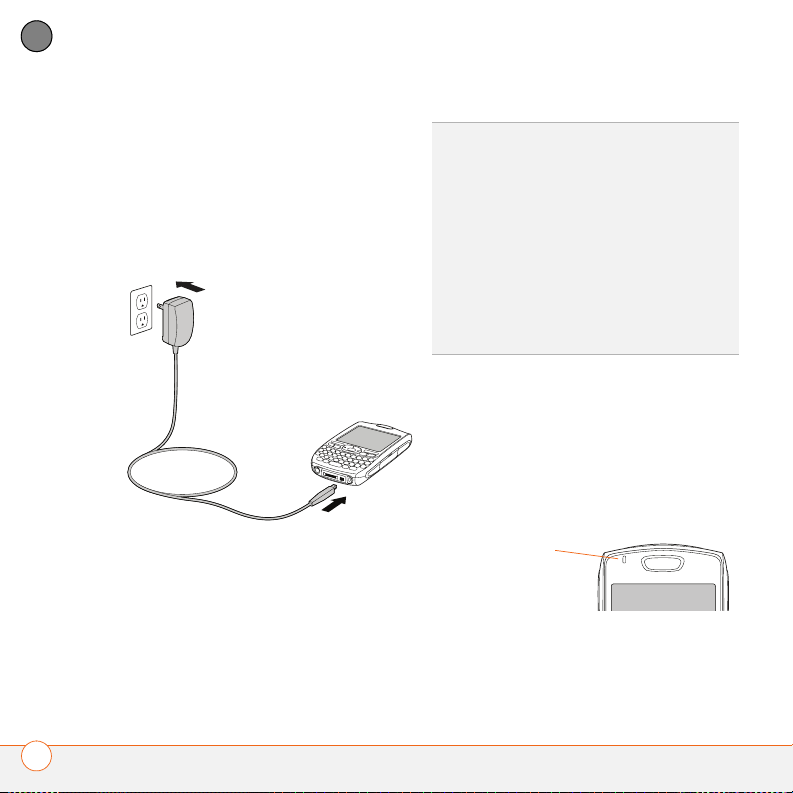
Charging the battery
The battery comes with a sufficient charge
to complete the setup process and activate
your phone. After activation, we
recommend charging your smartphone for
three hours (or until the indicator light is
solid green) to give it a full charge. See
Maximizing battery life
maximizing the life of your Treo battery.
TIP
To avoid draining the battery, charge your
smartphone every day, especially if you use
your phone often.
DID YOU KNOW
fully drained, your info is still stored safely on
your smartphone until you recharge the
battery or connect your smartphone to a
power source.
?
for tips on
If your battery ever becomes
CHAPTER
11
Page 18
1
SETTING UP
CHAPTER
1 If necessary, connect the international
adapter to the AC charger plug.
2 Plug the AC charger into a wall outlet.
3 Connect the charger cable to the
bottom of your smartphone. Make sure
the arrow on the connector is facing up,
toward the screen.
DID YOU KNOW
smartphone without the AC charger by
connecting it to your computer with the sync
cable. However, it takes longer to charge the
battery without the AC charger, and if your
laptop isn’t plugged into a power source, it can
drain the laptop’s battery. For the quickest
charge time, use the AC charger.
TIP
with the sync cable, the indicator light may
not turn on. To make sure the battery is
charging, check the onscreen battery indicator.
?
You can also trickle charge your
When trickle charging your smartphone
4 To confirm that your smartphone is
charging, check the indicator light on
your smartphone.
• Solid red indicates that your
smartphone is charging.
• Solid green indicates that your
smartphone is fully charged.
Indicator light
12
Page 19

SETTING UP
1
TIP
If the battery is fully drained, it may take a
few moments for the indicator light to turn on
when you begin charging.
TIP
If the indicator light does not turn on when
you connect your smartphone to the AC
charger, double-check the cable connection
and the electrical outlet to which it is
connected.
When your Treo is on (see Turning your
Treo 680 on and off), the onscreen battery
icon displays the charging status:
A red lightning bolt indicates that
the battery is connected to a wall
outlet and is charging.
A green lightning bolt indicates that
the battery is connected to a wall
outlet and is fully charged.
A partial battery without a lightning
bolt indicates that the battery is not
connected to a wall outlet and it
has some power.
An almost empty battery that is red
at the bottom indicates that you
need to charge the battery
immediately.
TIP
To see exactly how much power is left in
your battery, tap the onscreen battery icon.
Battery icon
Maximizing battery life
Battery life depends on how you use your
smartphone. You can maximize the life of
your battery by following a few easy
guidelines:
IMPORTANT Use the battery that came
with your Treo 680. Do not use a battery
from another Treo in your Treo 680.
Similarly, do not use the Treo 680 battery in
another Treo. Using a battery that is
CHAPTER
13
Page 20
1
SETTING UP
CHAPTER
designed for another Treo can damage your
Treo 680. For info on replacement
batteries, see Replacing the battery
.
• If you don’t plan to use the wireless
features on your Treo for a while, turn
off your phone (see Turning your phone
on and off) and let all calls be picked up
TIP
You can buy an extra battery as a spare for
long airplane trips or periods of heavy use. To
purchase batteries that are compatible with
your Treo 680, go to www.palm.com/
treo680gsm.
by voicemail.
• As with any mobile phone, if you are in
an area with no wireless coverage, your
Treo searches for a signal, which
consumes power. If you cannot move to
an area of better coverage, temporarily
• Charge your smartphone whenever you
can. Charge it overnight. The battery
has a much longer useful life when it is
topped off frequently, rather than
charging it after it is fully drained.
• The wireless features (phone, email,
messaging, and web) and media
features (camera, media players,
eBooks, and games) of your
smartphone consume more power than
its organizer features. Speakerphone
usage also consumes more power than
turn off your phone. While your phone is
off, you can continue to use the
nonwireless features of your Treo.
• Turn down the screen brightness (see
Adjusting the brightness
• Decrease the settings in Power
).
Preferences and turn off Beam Receive
(see Optimizing power settings
• Turn off the Bluetooth
®
feature if you’re
).
not using it. See Connecting to a
Bluetooth hands-free device.
using the earpiece. If you use the
wireless, speakerphone, and media
features often, keep an eye on the
battery icon and charge when
necessary.
14
Page 21
SETTING UP
1
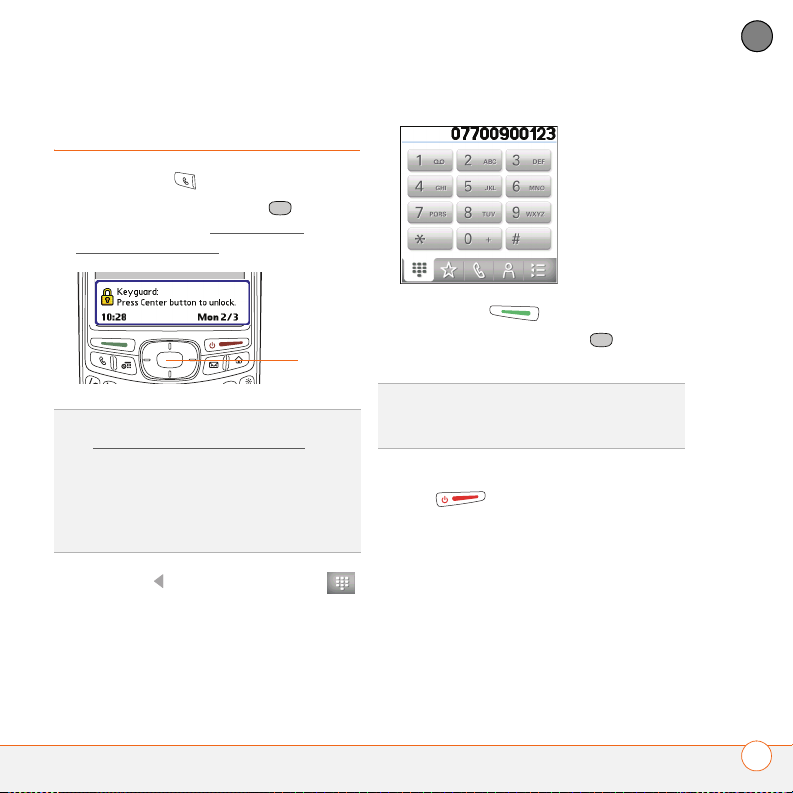
Making your first call
1 Press Phone .
2 If prompted, press Center to turn
off Keyguard (see Locking your
keyboard (Keyguard) for more info).
Center
TIP
If Check SIM Card appears in the title bar,
see Inserting the SIM card and battery
TIP
If No Service appears in the title bar,
you’re outside a wireless coverage area. If you
believe you are in a wireless coverage area
and this problem persists, contact your
wireless service provider for assistance.
3 Press Left to select the Dial Pad
tab.
4 Tap the onscreen Dial Pad to enter the
number you want to call.
.
5 Press Send to dial the number.
6 If prompted, press Center to select
Ye s and turn on your phone.
TIP
If you are inside a coverage area and
cannot complete a call, contact your wireless
service provider for assistance.
7 After you finish the call, press Power/
End to end the call.
Adjusting call volume
While a call is in progress, press the
Vo lu me button on the side of your
smartphone to adjust the call volume.
• To increase the volume, press the upper
half of the Volu me button.
CHAPTER
15
Page 22
1
SETTING UP
CHAPTER
• To decrease the volume, press the
lower half of the Vol um e button.
Vol ume
Side button
TIP
If your phone number doesn’t appear in
Phone Info, make sure your SIM card is
properly inserted in your smartphone. If your
phone number still does not appear in Phone
Info, your wireless service provider may not
support this feature. Look for your phone
number on the plastic holder to which the SIM
card was attached. If you still need assistance,
please contact your wireless service provider.
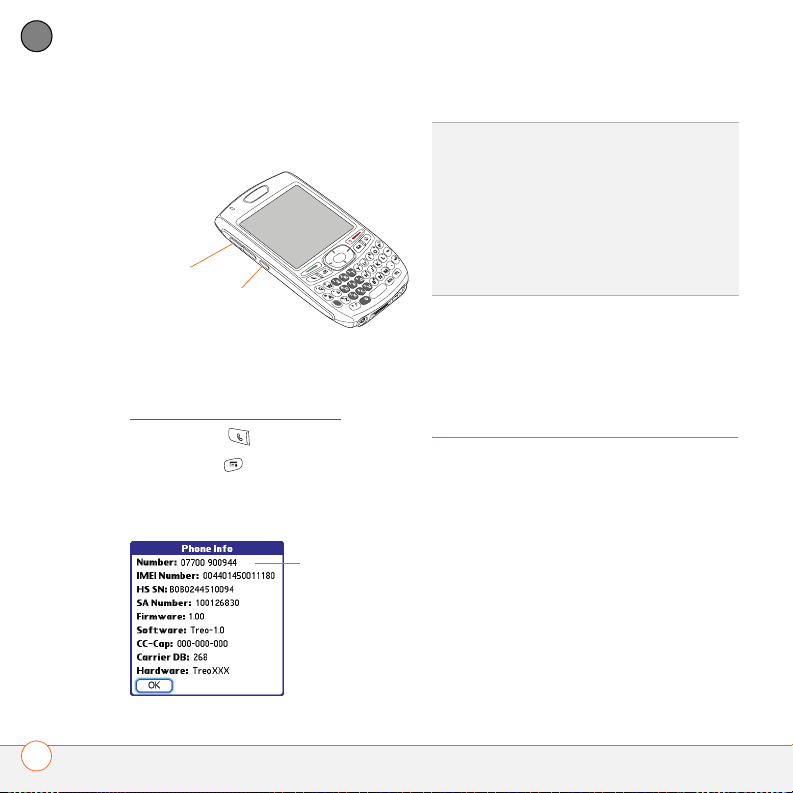
Setting up your
What’s my phone number?
1 Make sure your phone is on (see
Turning your phone on and off
2 Press Phone .
3 Press Menu .
4 Select Options, and then select Phone
Info.
).
Look here for
your phone
number
computer for
synchronization
Why set up a connection between your
smartphone and your computer? So you
can synchronize. Why synchronize? Here
are two good reasons:
• It’s easier to enter names, phone
numbers, and addresses using the big
keyboard on your computer than the
keyboard on your smartphone. Whether
you enter or change information on your
computer (using Palm
software or Microsoft Outlook for
®
Desktop
16
Page 23

SETTING UP
1
Windows) or on your smartphone, you
automatically update the info in both
places when you synchronize. So
there’s no need to enter the info twice.
• You have a backup copy of all your info.
Should anything happen to your
smartphone, your info still exists on
your computer.
We strongly recommend that you
synchronize your smartphone with your
computer frequently to keep your
information up-to-date (and backed up) in
both locations.
Before you can synchronize, you need to
install the desktop synchronization
software and connect the sync cable to
your computer.
System requirements
Your computer should meet the following
minimum system profiles for Windows or
Mac computers:
• Windows 2000 or XP (or later)
• 32MB of available memory (RAM)
• 170MB of free hard disk space
• CD drive
• Available USB port
• Mac OS X version 10.2 or later
• 128MB of total memory (RAM)
• 190MB of free hard disk space
• CD drive
• Available USB port
®
Upgrading from another Palm OS
NOTE If you are setting up your first Palm
®
OS
device, skip ahead to Installing the
device
desktop synchronization software.
You can transfer all compatible applications
and information from your previous Palm
OS device—whether it’s a handheld or a
Treo— to your new Treo 680, so long as the
space taken up by all the info you want to
transfer is 64MB or less. This includes your
calendar events, contacts, memos, and
tasks, as well as your application settings
and any compatible third-party applications
and files.
When you install the desktop software
from the Palm Software Installation CD,
some third-party applications may be
quarantined because they are not
compatible with the Palm OS software
CHAPTER
17
Page 24

1
SETTING UP
CHAPTER
version 5.4.9 on your Treo 680.
Quarantined files are not installed on your
• At the bottom of the screen, select
Size.
Treo 680, nor are they deleted; these files
are placed in a new folder on your
computer: C:\Program Files\Palm\<device
name>\PalmOS5 Incompatible Apps.
(Can’t find a Palm folder in Program Files?
Then look for a folder labeled palmOne or
Handspring instead. For more info, see I
can’t find my user folder.)
IMPORTANT Do not synchronize your Treo
680 with any previous versions of
Palm Desktop software.
• Look at the numbers on the Free
Space line and subtract the number
on the left from the number on the
right to calculate the space used. For
TIP
We do not recommend using third-party
utilities that back up your old device’s
information onto an expansion card and then
transfer the info to your Treo 680. Such
methods transfer all applications to your
smartphone, including ones that are not
designed to work with Palm OS version 5.4.9.
1 Calculate how much space your apps
and info occupy on your previous Palm
OS device:
• In Applications View, open the menus.
• Select Info on the App menu.
example, on the device shown here,
22.4 – 17.5 = 4.9. This means that
4.9MB of space is occupied on this
device.
2 If the space occupied on your previous
device is 64MB or less, then go to step
3. If the space occupied is greater than
64MB, then do any of the following to
reduce the storage space you’re using
before you go to the next step:
• Delete any third-party applications
that you no longer use.
18
Page 25

SETTING UP
1
• Move large files, such as eBooks and
images, to an expansion card.
• Move third-party applications to an
expansion card.
• Purge old info in applications such as
Calendar (Date Book), Tasks (To Do),
and email. Refer to the
documentation that came with your
previous device for instructions on
these items.
3 Synchronize your previous device with
your previous desktop software to back
up your information one last time.
4 Install the desktop synchronization
software from your new Palm Software
Installation CD (see Installing the
desktop synchronization software).
5 During the installation process, sync
your Treo 680 with your new desktop
software as instructed. When
prompted, do the following:
• Connect your Treo 680 to your
computer (see Connecting your
smartphone to your computer).
• Indicate whether you want to sync
only the info in your PIM apps
(Calendar, Contacts, Memos, and
Tasks) or all info and apps (excluding
apps known to be incompatible).
• Select a device name for your Treo
680; be sure to select the same name
that you used for your old device.
(This is the name that appears in the
User list in Palm Desktop software.)
6
MAC ONLY If you have pictures on
your previous device, copy them from
your previous device to an expansion
card or beam them to your Treo 680.
7 If you plan to continue using your
previous device, perform a hard reset
on your previous device to remove its
associated device name. (See the
documentation that came with your
previous device for instructions on
performing a hard reset.) Each device
you synchronize with your computer
must have a unique name. The next
time you synchronize your previous
device with your computer, be sure to
assign it a new name.
If any third-party applications are
quarantined during the installation, do not
manually install them. Contact the
third-party developer for software updates
CHAPTER
19
Page 26
1
SETTING UP
CHAPTER
and info about compatibility with your Treo
680.
1 Close any applications that are currently
running on your computer, including
those that are minimized. Your
TIP
If you have trouble upgrading or finding
quarantined files, see Upgrading
.
computer needs to have all its
resources available to install the
software.
Installing the desktop synchronization software
IMPORTANT Even if you already own a
2 Insert the Palm Software Installation CD
into the CD drive on your computer.
Palm OS device and have installed a
previous version of the desktop software,
you must install the software from the
Palm Software Installation CD that came
with your Treo 680.
BEFORE YOU BEGIN If you are installing
on a computer at work, make sure your
computer is configured to let you install
new software. Contact your company’s
IT department for help.
3 If you are installing on a Mac,
TIP
If you want to sync info with applications
other than Palm Desktop or Microsoft
Outlook, you need to purchase additional
third-party sync software. This sync software
is sometimes called a conduit.
double-click the CD icon on the desktop,
and then double-click the
PalmSoftware.pkg icon.
4 When the installation wizard opens,
follow the onscreen instructions. Please
20
Page 27

SETTING UP
1
note these important points about the
installation process:
• When the language selection screen
appears, select the same language
you selected on your Treo 680.
• WINDOWS ONLY You can choose
which desktop software you want to
use for synchronization:
Palm Desktop software or Microsoft
Outlook.
NOTE Whether you select to synchronize
with Microsoft Outlook or Palm Desktop
software, Palm Desktop software is still
installed on your computer. If you use
Outlook as your desktop email application,
select Outlook as your desktop
synchronization software. Remember that
when you enter information on your
computer, enter it in the software you
selected in this step.
• The install process prompts you to
connect your smartphone to your
computer. Go to the next section.
0
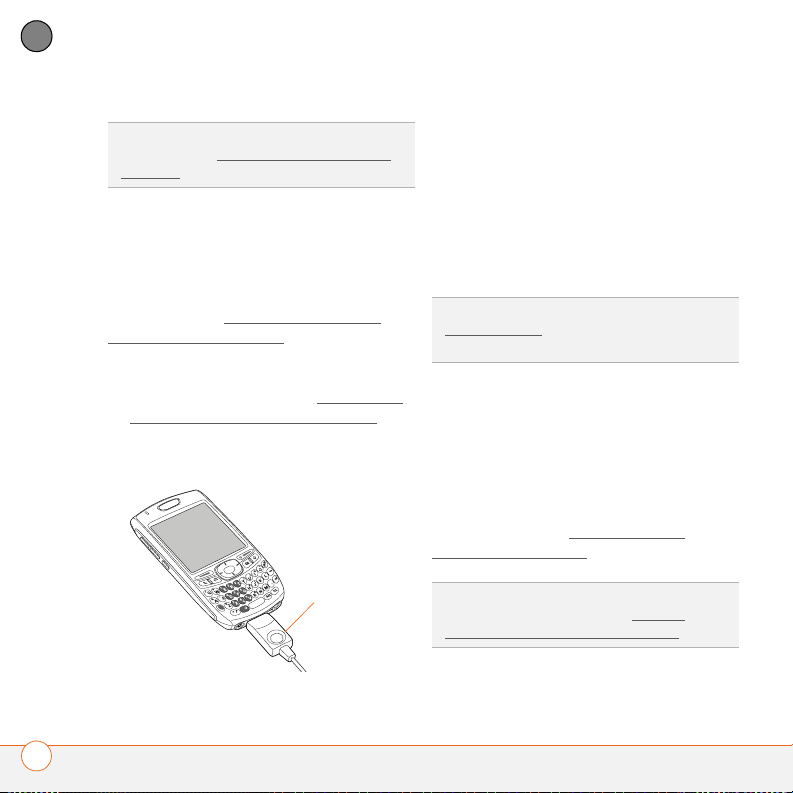
Connecting your smartphone to your computer
After you install the desktop software (see
Installing the desktop synchronization
software), you’re ready to connect your
smartphone to your computer.
BEFORE YOU BEGIN To set up your
computer, you need the sync cable that
came with your Treo 680.
1 If necessary, connect the international
adapter to the AC charger plug.
2 Plug the AC charger into a wall outlet.
3 Plug the USB sync cable into an
available USB port or a powered USB
hub on your computer.
TIP
For best performance, plug your sync
cable directly into a USB port on your
computer. If your computer has USB ports on
both the front and back, we suggest using the
back port; the front port is often a low-power
port. If you use a USB hub, make sure the hub
has its own power supply.
CHAPTER
21
Page 28

1
SETTING UP
CHAPTER
4 With the sync button facing up, connect
the sync cable to the bottom of your
smartphone. Do not press the sync
button until you are instructed to do so.
Sync cable
5 Connect the charger cable to the
bottom of your smartphone.
You are now ready to synchronize; go to
Synchronizing information—the basics
.
Sync button
22
Page 29

SETTING UP
1
Synchronizing
information—the
basics
Synchronizing means that info you enter or
change in one place (your smartphone or
your computer) is automatically entered or
changed in the other; so there’s no need to
enter the info twice. We strongly
recommend that you sync your
smartphone with your computer or
corporate server frequently to keep your
0
Computer type Desktop software What syncs and where
Windows Microsoft Outlook
Windows Palm Desktop All apps sync with Palm Desktop
Mac Palm Desktop All apps sync with Palm Desktop
info up-to-date (and backed up) in
both locations.
The info from all the following applications
is updated by default each time you sync
your smartphone with your desktop
software:
How each application syncs depends on
your computer type and the desktop
software you are using, as follows:
• Calendar, Contacts, Memos, and
Tasks sync with Outlook
• Pictures & Videos syncs with
Palm Desktop
CHAPTER
23
Page 30
1
SETTING UP
CHAPTER
TIP
For more sync options, including which
apps sync, see Synchronizing information—
advanced.
Messages on both your computer and
your smartphone indicate that
synchronization is in progress.
3 Wait until you see the message on your
BEFORE YOU BEGIN To sync your info,
you must install Palm Desktop software
from the Palm Software Installation CD
that came with your Treo 680—even if you
sync with Outlook or another third-party
application. See Installing the desktop
synchronization software for instructions.
1 Connect your Treo 680 to your
computer, as described in Connecting
your smartphone to your computer.
2 Press the sync button on the sync
cable.
smartphone that the HotSync operation
is complete; then disconnect the sync
cable. Do not disconnect the sync cable
until you see this message.
TIP
Problems synchronizing? See
Synchronization
suggestions.
for troubleshooting
If you’re finishing your initial setup, you
now have the option to install bonus
software from the Palm Software
Installation CD. If you choose to install
some of the bonus software, you need to
sync again to install the software on your
smartphone. You can also install bonus
software later; see Installing bonus
software from the CD.
TIP
Sync button
For info on locating your pictures and
videos on your computer, see Viewing
pictures and videos on your computer.
24
Page 31

Moving around on your Palm®Treo™ 680 smartphone
Have you ever been to a new city and felt a bit lost until you
figured out that the numbered streets run north/south and the
avenues run east/west? Learning to move around on your
smartphone is similar. Most Palm OS
same set of controls. So once you learn how to use these
controls on your Palm
all over town and you won’t even need a map.
Benefits
• Find and open applications quickly
• Access extra features with menus
• Move around in applications with
one hand, using the 5-way
navigator
®
Tr eo™ 680 smartphone, you’ll be driving
®
applications use the
• Access many more characters and
symbols than are displayed on the
keyboard
CHAPTER
2
Page 32

In this chapter
Moving around the screen . . . . . . . . . . . . . . . . . . . . . . . . . . . . . . . . 27
Using the keyboard . . . . . . . . . . . . . . . . . . . . . . . . . . . . . . . . . . . . . 31
Opening applications . . . . . . . . . . . . . . . . . . . . . . . . . . . . . . . . . . . . 35
Page 33

MOVING AROUND ON YOUR PALM®TREO™ 680 SMARTPHONE
2
Moving around the screen
To move around the Treo 680 screen, you
can use the 5-way navigator for
one-handed navigation, or you can tap
items on the screen with the stylus. With
use, you will find your own favorite way to
scroll, highlight, and select menu items.
Center
Left
TIP
Some third-party applications may not
work with the 5-way navigator, and you must
use the stylus instead
DID YOU KNOW
icons to indicate directions on the 5-way.
These are different from any onscreen arrows
that you tap with your stylus or select with the
5-way to display pick lists.
?
In this guide, we use arrow
The 5-way includes the following buttons:
Up
Right
Down
CHAPTER
27
Page 34

MOVING AROUND ON YOUR PALM®TREO™ 680 SMARTPHONE
2
CHAPTER
Highlighting and selecting items
On most screens, one item—a button, a
list entry, or a check box—is highlighted by
default. The highlight identifies which item
is affected by your next action. Use Left ,
Right , Up , and Down on the
5-way to move the highlight from one item
to another.
TIP
If the item you want doesn’t appear on the
screen, try tapping the onscreen scroll arrows
to view more info.
Colored background: When a phone
number, text, an email address, a web link,
or an item in a list is highlighted, the item is
displayed as white text against a colored
Learn to recognize the highlight. It can take
two forms:
Border glow: When an entire screen, an
background. Examples of lists include the
Contacts list, the Messaging Inbox, and the
Tasks list.
onscreen button (such as Done, New, or
OK), or a pick list is highlighted, a glow
appears around its border. If an entire
screen is highlighted, the glow appears at
the top and bottom of the screen only.
After highlighting an item, you can select or
activate it by pressing Center , or by
TIP
When a border appears at the top and
bottom of a list screen, press Center on the
5-way to highlight the first item in the list.
tapping the item with the stylus.
TIP
After you open an application (see
Opening applications
the 5-way to highlight various screen
elements.
), experiment with using
28
Page 35

MOVING AROUND ON YOUR PALM®TREO™ 680 SMARTPHONE
2
Highlighting text
You can use the stylus to highlight text on
the screen.
• Tap and drag the stylus across the text
you want to highlight.
• To highlight a word, double-tap it.
• To highlight a paragraph, triple-tap it.
Accessing command buttons
In most applications, command buttons
such as New, OK, and Details appear at the
bottom of the screen. In many cases, you
can jump directly to these buttons instead
of scrolling to them.
• From a list screen, such as the Memos
list, press Right to jump to the first
button.
• From a screen where you create or edit
entries, such as Contact Edit, press
Center to jump to the first button.
• From a dialog box, such as Edit
Categories, press Up or Down to
scroll to the buttons.
Selecting menu items
Many applications have menus to give you
access to additional features. These menus
are usually hidden from view, but they
appear when you press Menu . To get
the most out of your smartphone, it’s a
good idea to familiarize yourself with the
additional features available through the
various application menus.
1 Press Menu to display an
application’s menus.
Menu shortcut
2 Press Right and Left to switch
between menus.
3 Press Up and Down to highlight a
menu item.
4 Press Center to select the menu
item, or press Menu to close the
menu and cancel your selection.
CHAPTER
29
Page 36

MOVING AROUND ON YOUR PALM®TREO™ 680 SMARTPHONE
2
CHAPTER
TIP
Most menu items have menu shortcuts
listed in the menu. To use a menu shortcut,
press Menu plus the shortcut letter. You don’t
have to see the menu item to use the menu
shortcut. For example, when you’re in
Calendar, you can press Menu + N to create a
new event.
• To exit the pick list without making a
selection, press Left or Right .
Stylus: Use your stylus to tap the pick list.
• Tap the item you want from the list.
• To exit the pick list without making a
selection, tap outside the list.
Selecting options in a pick list
A range of options is often presented in a
type of menu called a pick list, which can
be identified by a downward-pointing
arrow. Pick lists are different from the
application menus previously described.
The application menus give you access to
additional features and pick lists let you
select the contents for a particular field.
You can select items from a pick list with
the 5-way or the stylus.
5-way: Use the 5-way to highlight the
pick list, and then press Center to
display the items in the list.
• Press Up and Down to highlight
the item you want.
• Press Center to select the
highlighted item.
30
Page 37

MOVING AROUND ON YOUR PALM®TREO™ 680 SMARTPHONE
2
Using the keyboard
Option
Shift/Find
NOTE Your keyboard may have a different
layout based on the country where you
purchased your smartphone.
CHAPTER
Backlight
Backspace
Return
Menu
AltSpace
31
Page 38

MOVING AROUND ON YOUR PALM®TREO™ 680 SMARTPHONE
2
CHAPTER
TIP
When using the keyboard, most people
find it easiest to hold the Treo with two hands
and use the tips of both thumbs to press the
keys.
• To turn Caps Lock on, press Shift/
Find twice. To turn it off, press
Shift/Find once. When Caps Lock
is on, an underlined up arrow
appears in the lower-right corner of the
screen.
DID YOU KNOW
keyboard backlight that turns on and off when
the screen turns on or off. The backlight also
dims when an active call lasts longer than a
specified period of time. See Optimizing
power settings to adjust the automatic
shut-off and dimming intervals.
Entering lowercase and uppercase letters
• To enter lowercase letters, press the
desired keys.
• To enter an uppercase letter, press
Shift/Find and then press a letter
key. You don’t need to press and hold
Shift/Find while entering a letter.
When Shift is active, an up arrow
appears in the lower-right corner of the
screen.
• To turn Option Lock on, press Option
?
The Treo 680 includes a
twice. To turn it off, press Option
Entering numbers, punctuation, and symbols
Numbers, punctuation, and symbols
appear above the letters on the keys.
To enter these characters, do one of
the following:
Symbol
Letter
• Press Option , and then press the
key with the desired character shown
above the letter. You don’t need to press
and hold Option while pressing the
second key. When Option is active, the
symbol appears in the lower-right
corner of the screen.
symbol appears in the lower-right
corner of the screen.
once. When Option Lock is on, the
32
Page 39

MOVING AROUND ON YOUR PALM®TREO™ 680 SMARTPHONE
2
DID YOU KNOW
automatically default to Option Lock, such as
the Dial Pad tab in the Phone application or
the Calculator. In this case, you do not need to
press Option to enter numbers.
?
Some application views
Entering other symbols and accented characters
Symbols and accented characters that do
not appear on the keyboard are available by
using the Alt key.
1 Enter the character that corresponds to
the symbol or accented character you
want. See the table on the next page.
2 Press Alt .
3 Press Up , Down , Right , or Left
to highlight the desired character.
4 Press Center to insert the
character.
DID YOU KNOW
grouped by their similarity to the base key. For
example, the alternate characters for the e key
are é, è, ë, and ê.
?
Alternate characters are
CHAPTER
33
Page 40

MOVING AROUND ON YOUR PALM®TREO™ 680 SMARTPHONE
2
CHAPTER
0
Symbols and accented characters
Enter… Then press
Enter… Then press
Alt to
select…
Alt to
select…
Enter… Then press
Alt to
select…
a á à ä â ã å æ n ñ u ú ù ü û
A Á À Ä Â Ã Å Æ N Ñ U Ú Ù Ü Û
b or B ß o ó ò ö ô œ õ x or X x ¤
c ç ¢ © O Ó Ò Ö Ô Œ Õ y ý ÿ
C Ç ¢ © p or P ¶ Y Ý Ÿ
e é è ë ê r or R ® ! ¡
E É È Ë Ê s ß š ? ¿
i í ì ï î S ß Š : :-) :-( ;-)
I Í Ì Ï Î t or T ™ $ £ ¥ ¢
l or L £
Press Alt by itself, after a space or at the beginning or end of a line, to select these
characters:
; _ • \ % = ° ÷ £ ¥ ¢ [ ] { } < > « » © ® ™ ~ ^ ø |
34
Page 41

MOVING AROUND ON YOUR PALM®TREO™ 680 SMARTPHONE
2
Opening applications
When you open an application using a
quick button or Applications View, you
automatically close the app you were
previously using.
Phone
Calendar
Using the quick buttons
The front of the Treo 680 has three quick
buttons—Phone, Calendar, and
Messaging—that open applications. The
fourth button opens Applications View (see
Using Applications View
TIP
You can customize the quick buttons
yourself; see Reassigning buttons
).
for details.
Applications
Messaging
CHAPTER
35
Page 42

MOVING AROUND ON YOUR PALM®TREO™ 680 SMARTPHONE
2
CHAPTER
Each of quick button opens two
applications:
• To access a button’s primary application,
simply press the button.
Button Primary app
Phone
Calendar
Messaging
• To access a button’s secondary
Using Applications View
You can access all available applications
through Applications View.
1 Press Applications .
TIP
If prompted, press Center on the 5-way to
turn off Keyguard (see Locking your keyboard
(Keyguard) for more info).
2 Use the 5-way to highlight the
application you want to use.
application, press Option and then
press the quick button.
Buttons Secondary app
+ Web
+ Memos
3 Press Center to open the selected
+ Email
application.
In Applications View, you can also do any of
DID YOU KNOW
your smartphone screen.
?
Pressing Option + Menu dims
the following:
36
Page 43

MOVING AROUND ON YOUR PALM®TREO™ 680 SMARTPHONE
2
• Press Applications repeatedly to
cycle through various categories of
applications. See Applications settings
for more info on categories.
• Enter the first few letters of the
application’s name to highlight it. For
example, if you press P, it highlights
Phone; if you then press R, it highlights
Prefs. If you pause and then press R, it
highlights the first application that starts
with R.
CHAPTER
37
Page 44

MOVING AROUND ON YOUR PALM®TREO™ 680 SMARTPHONE
2
CHAPTER
38
Page 45

Your phone
The Phone application is your home base for making and receiving calls
and for storing info about the people you need to stay in touch with.
You can creatively manage multiple calls, such as swapping between
calls, sending text messages to ignored calls, and creating conference
calls with up to five callers. Your Palm
perform all these tasks with ease.
And you can do more than manage your phone calls, too. You can send
text messages, open applications, go to your favorite web pages, see
your upcoming appointments, and even find out how many unread
email messages you have.
Benefits
• Stay in touch—you choose how
• Save time with shortcuts to your
favorite info
®
Tr e o™ 680 smartphone helps you
• Have fun: add wallpaper and
ringtones
CHAPTER
3
Page 46

In this chapter
Turning your Treo 680 on and off . . . . . . . . . . . . . . . . . . . . . . . . . . . 41
Making calls . . . . . . . . . . . . . . . . . . . . . . . . . . . . . . . . . . . . . . . . . . . 43
Receiving calls . . . . . . . . . . . . . . . . . . . . . . . . . . . . . . . . . . . . . . . . . 47
Using voicemail . . . . . . . . . . . . . . . . . . . . . . . . . . . . . . . . . . . . . . . . 48
What can I do when I’m on a call? . . . . . . . . . . . . . . . . . . . . . . . . . . 50
How many minutes have I used?. . . . . . . . . . . . . . . . . . . . . . . . . . . 56
Entering names and phone numbers. . . . . . . . . . . . . . . . . . . . . . . . 57
Defining favorite buttons . . . . . . . . . . . . . . . . . . . . . . . . . . . . . . . . . 61
Using a hands-free device . . . . . . . . . . . . . . . . . . . . . . . . . . . . . . . . 64
Customizing phone settings. . . . . . . . . . . . . . . . . . . . . . . . . . . . . . . 69
What are all those icons? . . . . . . . . . . . . . . . . . . . . . . . . . . . . . . . . . 75
Page 47

YOUR PHONE
3
Turning your Treo 680 on and off
NOTE Throughout this guide we use the
term smartphone to describe your device
and its physical aspects. We use the term
phone to describe the feature of your Treo
that lets you connect to your wireless
service provider network to make and
receive calls and transmit data.
The phone and the screen of your Treo 680
can be turned off and on separately. This
means that you can wake up the screen to
use just the organizer features of your
smartphone, without turning on the phone.
Also, when the screen is turned off, the
phone can be on and ready for you to
receive and make calls.
Waking up the screen and turning it off
Wake up the screen and leave the phone
turned off when you want to use only the
organizer features of your Treo 680; for
example, when you’re on a plane and want
to look at your calendar.
1 Press and release Power/End
to wake up the screen.
TIP
You can also press any of the quick buttons
or the Applications button to wake up your
smartphone screen.
Power/End
Center
2 Press Center to turn off Keyguard.
For more info about turning Keyguard on
and off, see Locking your keyboard
(Keyguard).
3 Press and release Power/End
to turn off the screen and lock the
keyboard.
TIP
You can set how long the screen stays on.
Press Applications, select Preferences,
select Power, and then adjust the Auto-off
after setting.
CHAPTER
41
Page 48

YOUR PHONE
3
CHAPTER
Turning your phone on and off
When your phone is on, it is connected to
your wireless service provider’s network
(provided you are in a coverage area) so
go to the Main tab of the Phone
application and you see the Signal
Strength icon at the top of the
screen.
that you can make and receive phone calls
TIP
and use wireless services, such as email,
messaging, and the web browser. During
initial setup, your phone is automatically
If you’re outside a coverage area, No
Service appears in the upper-left corner and
the indicator light flashes red.
turned on, so you can use wireless
services right away.
If you turn off your phone, you can still use
the organizer features such as Calendar
and Contacts, as well as the media
features such as Pocket Tunes and Pictures
& Videos. You might hear this referred to as
flight mode because you must turn your
phone off when you’re on a plane.
1 Wake up the screen.
2 Press and hold Power/End to
turn on your phone.
TIP
If the Ringer switch is in the Sound On
position, you hear a series of tones when you
turn your phone on and off (see Silencing
sounds).
You know your phone is on and that
3 Press and hold Power/End
again to turn off your phone.
You know your phone is off when you
go to the Main tab of the Phone
application and you see Phone Off at
the top of the screen.
Opening the Phone application
Press Phone to display the Main tab in
the Phone application.
Status icons
Tabs
you’re inside a coverage area when you
42
Page 49

YOUR PHONE
3
DID YOU KNOW
appears when you press the Phone button.
See Customizing the Main tab in the Phone
application for details. If you change the
default tab, you need to modify the steps in
this chapter accordingly.
?
You can choose which tab
Making calls
There are several ways to make a call. Try
them all to find out which way you like
best.
Dialing using the onscreen Dial Pad
1 Press Phone .
2 Select the Dial Pad tab.
3 Enter the phone number by tapping the
onscreen Dial Pad with the stylus.
TIP
Press Backspace to delete numbers
you’ve entered. To cancel the call altogether,
press Phone to return to the Main tab in the
Phone application.
4 Press Send to make the call.
DID YOU KNOW
directly into the Dial Pad. Copy a number from
another application, press Phone and select
the Dial Pad tab. Open the Edit menu and
select Paste. Press Send to dial the number.
?
You can paste numbers
Dialing using the keyboard
1 Press Phone .
2 Press the numbered keys to enter the
phone number. (You don’t need to press
Option.)
CHAPTER
43
Page 50

YOUR PHONE
3
CHAPTER
SIM card (see tip on Viewing your SIM
Phonebook).
1 Press Phone .
2 Select the Contacts tab.
3 Using the keyboard, just start entering
one of the following for the contact you
want to call:
• First name (JOH for John)
• Last name (SMI for Smith)
3 Press Send to make the call.
TIP
After you enter a phone number, you can
also press Center on the 5-way to select
whether you want to make a phone call or
send a text message to that number.
Dialing by contact name
You need to have names and numbers in
your contact list before you can make a call
• First initial and last name (JSM for
John Smith)
For example, entering SM would display
Smilla Anderson, John Smith, and
Sally Martin. Entering JSM finds only
John Smith.
Text appears
here as you
enter it
by contact name. You can add contacts
directly into your smartphone (see Adding a
contact), but the fastest way to enter lots
of contacts is to enter them in your
desktop software and then synchronize to
transfer them to your smartphone (see
Synchronizing information—the basics
).
You can also import contacts from your
44
Page 51

YOUR PHONE
3
TIP
To restart your search, press Backspace to
delete letters you’ve entered. Or press Phone
to return to the Main tab in the Phone
application.
4 Select the number you want to dial.
5 Press Send to make the call.
TIP
To see more info for a contact, highlight
the name and press Center on the 5-way to
view the address, company, and other details.
DID YOU KNOW
search for a contact by entering a name from
the Main tab in the Phone application, you can
change a setting to do that (see Customizing
phone settings).
?
If you want to be able to
Dialing with a speed-dial favorite button
Your smartphone comes with a few
predefined speed-dial favorite buttons, but
you can also create your own favorites. See
Creating a speed-dial favorite button
.
1 Press Phone .
2 Select the Favorites tab.
3 Use the 5-way to highlight the
speed-dial favorite you want.
Look for the icon to distinguish a
speed-dial favorite from other types of
favorites.
TIP
To view more favorite buttons, repeatedly
press Down on the 5-way.
TIP
You can see all the contact numbers for
the selected person or business. Highlight a
speed-dial favorite button and press Space
on the keyboard.
4 Press Send or Center to
make the call.
CHAPTER
45
Page 52

YOUR PHONE
3
CHAPTER
Dialing from a web page or message
Your Treo recognizes most phone numbers
that appear on web pages or in text, email,
or multimedia messages.
1 Select the phone number on the web
page or in the message.
Redialing a recently called number
To dial the last number: Select the
Main tab, and then press and hold
Send to dial the last number you
called.
To select from your most recently dialed
numbers: Select the Main tab, press
Send to open the Redial list,
highlight the number you want to call,
and then press Send again to
make the call.
TIP
If you can’t use the 5-way or stylus to
highlight and dial a phone number on a web
page or in a message, it means that your Treo
doesn’t recognize the number as a phone
number. You can still use the menus to copy
and paste the number into the Dial Pad.
To select from your call history list:
Select the Call Log tab, highlight the
number you want to call, and then press
2 Press Center to open the Dial
Send to dial the number.
Number dialog box.
3 Select Dial to make the call.
46
Page 53

DID YOU KNOW
from Contacts or your Call Log by highlighting
a number, pressing Center on the 5-way, and
then selecting Message.
?
You can send a text message
Receiving calls
To receive calls, your phone must be on.
This is different from having only the
screen turned on (see Turning your phone
on and off). When your phone is off, your
calls go to voicemail.
YOUR PHONE
TIP
See a photo of the person calling you!
Learn how to assign a caller ID photo in
Assigning a caller ID photo
.
To answer a call, do one of the following:
• Press Send .
• Select Answer.
• Press the headset button (if the
headset is attached).
TIP
The headset button may work differently
on headsets other than the one provided with
your smartphone.
3
CHAPTER
DID YOU KNOW
arrives, the music pauses automatically and
resumes when you hang up or ignore the call.
?
If music is playing and a call
NOTE Pressing Phone silences the
ringer, but it does not answer the call.
47
Page 54

YOUR PHONE
3
CHAPTER
To ignore a call, do one of the following:
Using voicemail
Send the call to voicemail: Press Power/
End or select Ignore.
Send the caller a text message: Select
Ignore with Text. This option sends the
call to voicemail and opens a text message
Your wireless service may include
voicemail. Keep in mind that airtime and
other charges may apply when using
voicemail from your phone.
addressed to the caller.
NOTE Sending text messages to land line
phones may not be supported.
Setting up voicemail
1 Press Phone .
2 Press and hold 1 to dial your wireless
To silence the phone while it is ringing, do
one of the following:
• Press any key on your Treo except Send,
Power/End, or the 5-way.
• Slide the Ringer switch to the Sound
Off position. This immediately
service provider’s automated voicemail
system.
TIP
You can also access your wireless service
provider’s voicemail system by selecting the
Favorites tab and then selecting the
Voicemail favorite.
silences all system sounds, including
the ringer.
3 Follow the voice prompts to set up your
voicemail.
DID YOU KNOW
while it is ringing, you can either answer the
call or let it ring through to voicemail.
?
When you silence the ringer
TIP
If you can’t connect to your wireless
service provider’s voicemail system, contact
your wireless service provider for assistance.
48
Page 55

YOUR PHONE
3
Voicemail notification
When you have a new voicemail message,
you are notified with an Alert dialog box.
• To dismiss the Alert dialog box, select
OK.
• To play the message, select Listen.
When you have messages that you have
not listened to, a Voicemail icon also
appears in the title bar of the Phone
application. You can also select this icon to
listen to your voicemail.
Listening to voicemail messages
1 Press Phone .
2 Press and hold 1 to dial the voicemail
system.
TIP
You can also select the Voicemail favorite
button to dial the voicemail system.
3 Enter your voicemail password using
the keyboard.
TIP
Remember, you don’t need to press
Option to enter numbers, *, or # during a call.
NOTE If you defined Extra Digits for the
Voicemail favorite button (see Editing a
favorite button for details), you can select
this button to enter your password.
CHAPTER
49
Page 56

YOUR PHONE
3
CHAPTER
What can I do when I’m on a call?
Use the 5-way or stylus to select the
onscreen buttons. Here’s what the buttons
do:
0
Turns on the speakerphone, which
When you make or receive a call, Active
Call View appears.
means that you and everybody
around you can hear the call. (Of
course, the caller can hear you as
TIP
If the screen dims during a call, press any
key except Send or Power/End to restore the
screen brightness.
DID YOU KNOW
screen stays at full brightness during phone
calls. See Optimizing power settings
details.
?
You can set how long the
for
well.) The advantage is that you
can check your calendar, look up
contact info, take notes, and use
other features during a call. This
button is not available when you
use a headset.
Turns off the speakerphone when it
is on.
Caller’s name
and number
Call duration
Call status
Replaces the Speakerphone button
when you use a Bluetooth
®
hands-free device. Select this
button to stop using the hands-free
device and switch to holding your
smartphone to your ear.
Puts a call on hold, and the call
Button label
status changes to On Hold. To take
the call off hold, select this button
again.
50
Page 57

YOUR PHONE
3
Lets you make another call while
the first call is on hold; see Making
a second call for details. For info on
handling a second incoming call,
see Receivi
ng a second call (call
waiting).
Opens the Dial Pad so you can use
it to dial additional numbers, such
as an extension or a response to a
voice prompt.
Dials any extra digits (such as a
password or an extension) that you
assigned to a speed-dial favorite
button. See Defining favorite
buttons for information on defining
extra digits. This button disappears
after you select it to dial the
numbers.
Mutes the microphone so that you
and the noise around you can’t be
heard on the other end. The call
status changes to Muted. When
you want to speak, be sure to
select the Mute button again.
DID YOU KNOW
onscreen buttons when you’re on a call? You
can disable the screen’s touch-sensitive
feature during phone calls, see Locking your
screen.
?
Do you accidentally press
Ending a call
Do one of the following:
• Press Power/End .
• Press the button on the headset (if the
headset is attached).
Switching applications during a call
You can use your organizer apps and other
applications while you’re talking on the
phone; so go ahead and check your
calendar, or go to Memos and enter the
driving directions your caller is giving you.
You can even send text messages while
you’re on a call.
NOTE What you can’t do, however, is
make a data connection while on a call.
This means that you can’t browse the web
or send or receive email or multimedia
messages.
CHAPTER
51
Page 58

YOUR PHONE
3
CHAPTER
1 (Optional) If you want to continue
talking while viewing another
application, select Speakerphone or
connect a headset (see Using a
hands-free device).
2 Press Applications .
3 Select the icon for the application you
want to open.
4 When you’re ready to leave the app,
open another app or press Phone
to return to Active Call View.
DID YOU KNOW
between Active Call View and the Main tab in
the Phone app, so you can access other tabs,
such as Contacts and Favorites, during a call.
?
You can press Phone to toggle
Saving phone numbers
After you complete a call to a number that
is not in your Contacts list, you are
prompted to add the number to your
Contacts list.
TIP
You can turn the Add New Number prompt
on and off. In Contacts, open the Options
menu, and select Preferences. To turn this
option on, check the Ask to add unknown
phone numbers after calls box. To turn this
option off, uncheck this box.
• To create a new contact entry for this
number, select Create a New Contact,
and enter the contact’s info.
• To add this number to an existing
contact entry, select Add to a Contact,
and then select the contact. This pastes
the number into the first available phone
number field for that contact.
• To decline adding this number, select
Cancel.
52
Page 59

YOUR PHONE
3
• To disable the Add New Number
prompt, check the Don’t ask me this
again box, and then select Cancel.
If you don’t add a number right away, follow
these steps to add it later.
1 Press Phone .
2 Select the Call Log tab.
3 Highlight the number you want to save.
4 Press Menu .
5 Select Add Contact.
6 Select New to create a new contact, or
select Add to add this number to an
existing contact.
7 Enter the information for the entry, and
then select Done.
Making a second call
You can make a second call while your first
call is still active.
1 Dial the first number and wait until the
person answers.
2 Put the first call on hold by pressing
Send or selecting Hold .
3 Select Add Call .
4 Dial the second number.
NOTE To do this, you can use any of the
methods described in Making calls
.
5 When the Dial another call prompt
appears, select Ye s .
6 Select Swap to switch between
the two calls.
7 To end the active call, press Power/End
.
DID YOU KNOW
you can continue your conversation with the
remaining call.
?
When you hang up one call,
Receiving a second call (call waiting)
When you are on a call, you can receive a
second call and have separate
conversations with each caller. When the
second call comes in, you hear a call
CHAPTER
53
Page 60

YOUR PHONE
3
CHAPTER
waiting tone and the Call Waiting dialog
box appears. You can do any of the
following to handle the second call:
• To place the current call on hold and
answer the new call, press Send
or select Answer.
• To send the new call to voicemail, select
in your mobile account may be deducted
for each call included in the conference call.
1 While the first call is active, make a
second call.
2 Select Conference . This joins you
and the two calls in a conference call.
Ignore.
• To send the new call to voicemail and
send the caller a text message, select
Ignore with Text.
NOTE Sending text messages to land line
phones may not be supported.
• To hang up the current call and answer
the new call, press Power/End .
• To switch between the original call and
the second call you answered, select
Swap or press Send .
Making a conference call
You can join a total of five other calls in a
3 To add more calls to the conference,
select Hold , dial another number,
and then select Conference to add
the new call.
4 To end the conference, make sure the
conference is the active call, and then
press Power /End .
conference call, provided that your network
and service plan include 6-way
conferencing. Please contact your wireless
service provider for more information.
Additional charges may apply and minutes
54
Page 61

YOUR PHONE
3
TIP
If you want to continue a conversation
with one of the people on a conference call,
you can extract that call from the conference.
Select Extract Call (the onscreen button on
the far right), and then select the call you want
to extract.
Forwarding all calls
You can forward all your calls to another
telephone number. You can also selectively
forward certain calls (see Forwarding calls
under certain conditions). Please check
with your wireless service provider about
availability and pricing of forwarded calls,
as additional charges may apply.
1 Press Phone .
2 Press Menu .
3 Select Options, and then select Call
Preferences.
4 Select the Forward all calls pick list.
• If the forwarding number appears in
the pick list, select the number.
• If the forwarding number does not
appear in the pick list, select Edit
Numbers, and then select New.
Enter a forwarding number, including
the area code and country code if
they are different from your mobile
phone number. Select OK. Select the
number you just entered, and then
select OK.
5 Select OK.
TIP
After you set the number you want to
forward all your calls to, the call forwarding
icon appears in the title bar (see What are all
those icons?). We also recommend that you
call your Treo 680 to confirm that your call
forwarding settings work properly.
TIP
To turn off forwarding for all calls, select
Off from the Forward all calls pick list.
Forwarding calls under certain conditions
You can forward calls to another number
when the line is busy, a call is unanswered,
your smartphone is off, or you are outside a
coverage area.
CHAPTER
55
Page 62

YOUR PHONE
3
CHAPTER
1 Press Phone .
2 Press Menu .
3 Select Options, and then select Call
Preferences.
4 Select the Forward all calls pick list and
select Off.
5 Select any of the following pick lists:
When busy: Forwards calls if the phone
is busy.
Not answered: Forwards calls if you do
not answer.
Off/No service: Forwards calls when
your smartphone is not connected to a
mobile network.
6 If the forwarding number appears in the
pick list, select the number. If the
forwarding number does not appear in
the pick list, select Edit Numbers and
then select New. Enter a forwarding
number, and select OK. Select the
number you just entered.
7 Select OK, and then select OK again.
How many minutes have I used?
1 Press Phone .
2 Select the Call Log tab.
3 Press Menu .
4 Select To t a l s from the Record menu.
5 (Optional) To reset the counters to zero,
select Reset Counters.
6 Select Done.
56
Page 63

YOUR PHONE
3
Entering names and phone numbers
Contacts is where you enter information
about the people you want to stay in
contact with. You can get to this info from
the Phone application, to dial phone
numbers and create favorites, and from the
Messaging and email applications, to send
messages. When you create a contact, you
can also assign a photo and ringtone ID to
that contact, so you know when they call
you.
Adding a contact
1 Press Phone .
2 Select the Contacts tab.
3 Press Menu .
4 Select New Contact from the Record
menu.
5 Use the 5-way to move between
fields as you enter info.
DID YOU KNOW
beginning of a contact’s last name, such as
#Smith, the contact appears at the top of your
contact list.
6 Do any of the following:
Add a caller ID photo: Select the
Picture box. (See Assigning a caller ID
photo for more info.)
Add a caller ID ringtone: Select the
Ringtone pick list. (See Assigning a
caller ID ringtone for more info.)
Place the entry in a category and
mark it private: Select Details. (See
Working with private entries
info.)
?
If you add a symbol at the
for more
CHAPTER
57
Page 64

YOUR PHONE
3
CHAPTER
Add a note to an entry: Select Note
.
Display additional fields for this
contact: Select Plus .
7 After you enter all the information,
select Done.
TIP
To edit the entries on your SIM card you
must either Import them into Contacts or
press Applications, select SIM Book, and
edit them in the phone book on your SIM card.
5 Select Edit.
6 Make changes to the entry as
TIP
Import contacts from your SIM card
quickly and easily. In the Contacts list, open
the Record menu and select Import from
SIM.
Viewing or changing contact information
1 Press Phone .
2 Select the Contacts tab.
3 Begin entering one of the following for
the contact you want to view or edit:
• First name (JOH for John)
• Last name (SMI for Smith)
• First initial and last name (JSM for
John Smith)
4 Select the name of the entry you want
to open.
necessary, and then select Done.
Assigning a caller ID photo
1 Press Phone .
2 Select the Contacts tab.
3 Open the contact you want to add the
photo to (see Viewing or changing
contact information).
4 Select Edit.
5 Select the Picture box and do one of
the following:
• Select Camera to take a photo and
add it to this contact entry when you
save the photo.
• Select Photos and select an existing
photo that you want to assign to this
contact.
58
Page 65

YOUR PHONE
3
6 Select Done.
DID YOU KNOW
contacts in Microsoft Outlook or
Palm Desktop software and you install the
desktop software from the Palm Software
Installation CD, the pictures are automatically
added to your contact entries on your
smartphone when you sync. If you use
third-party synchronization software, picture
sync may not be supported. Check with the
software developer for information.
?
If you assign pictures to your
Assigning a caller ID ringtone
Caller ID ringtones can let you know who is
calling before you even look at your
smartphone. This is a great way to identify
calls from important people in your life and
to screen calls that you’d prefer not to
answer.
1 Press Phone .
2 Select the Contacts tab.
3 Open the contact to whom you want to
give a caller ID ringtone (see Viewing or
changing contact information).
4 Select Edit.
5 Select the Ringtone pick list and select
a tone for this contact entry.
6 Select OK.
TIP
You can assign a ringtone to an entire
category of contacts. For example, use a
special ringtone for categories such as Family,
Work, or Golf Buddies. Select the category
pick list in the upper-left corner and select Edit
Categories. Select the category, and then
select Edit. Select the ringtone on the Edit
Category screen.
CHAPTER
59
Page 66

YOUR PHONE
3
CHAPTER
Customizing Contacts
1 Press Phone .
2 Select the Contacts tab.
3 Press Menu .
4 Select Options, and then select
Preferences.
5 Set any of the following options:
Remember Last Category: Sets
whether Contacts opens to the last
category you selected.
Show SIM Phonebook: Sets whether
SIM Phonebook appears as an option in
the category pick list. When you check
this box, you can view entries in the
phone book on your SIM card.
Ask to add unknown phone numbers
after calls: Sets whether you are
prompted to add phone numbers that
are not in your Contacts list after a call.
You can add unknown numbers to an
existing contact or create a new contact
Deleting a contact
1 Open the contact you want to delete.
2 Press Menu .
3 Select Delete Contact from the Record
menu, and then select OK.
Creating a business card for beaming
1 Create a new contact and enter your
own business card info.
2 Open the contact entry containing your
business card info.
3 Press Menu .
4 Select Select Business Card from the
Record menu.
TIP
After you create your business card, you
can beam it to another device with an IR
port—provided the device supports beaming
with Palm OS
Main tab in the Phone application, open the
Record menu, and then select Beam
Business Card.
®
devices. Go to Contacts or the
entry.
List By: Sets whether the Contacts list
is sorted by last name or company
name.
60
Page 67

YOUR PHONE
3
Viewing your SIM Phonebook
1 Press Phone .
2 Select the Contacts tab.
3 Press Menu .
4 Select Options, and then select
Preferences.
5 Make sure the Show SIM Phonebook
box is checked.
6 Select OK.
7 In the Contacts list, select the category
pick list at the top of the screen and
select SIM Phonebook.
TIP
If you imported contacts from your SIM
card to Contacts, you may want to uncheck
the Show SIM Phonebook box to avoid
seeing duplicate entries.
TIP
Need to copy a contact to your phone
book on your SIM card? In Contacts, select
the contact you want to copy, open the
Record menu, and then select Export to
SIM.
Defining favorite buttons
Your Treo provides an unlimited number of
favorite buttons for quick access to the
following common tasks:
• Dialing a phone number (speed-dial)
• Opening an application
• Accessing a web page
• Addressing a message (text, MMS, or
email)
• Accessing voicemail (preset on your
Tr eo )
TIP
Your wireless service provider may preset
favorite buttons on your smartphone that are
customized for their services.
CHAPTER
61
Page 68

YOUR PHONE
3
CHAPTER
5 Enter a label for the favorite:
• If the entry is for an existing contact,
select Lookup. Start entering the last
name of the contact, and select the
contact when it appears in the lookup
list.
• If the entry is for a new contact, enter
the label, press Down , and enter
the number.
DID YOU KNOW
600/650, most of your favorites should
transfer from your old Treo along with your
other info. However, you may need to
rearrange the order in which your favorites
appear by opening the Record menu and then
selecting Organize Favorites. For more info
about upgrading, see Upgrading from another
Palm OS®device.
Creating a speed-dial favorite button
1 Press Phone .
2 Select the Favorites tab.
3 Press Menu .
4 Select New Favorite on the Record
menu.
?
If you’re upgrading from a Treo
6 (Optional) Enter a Quick Key.
KEY TERM
Quick Key A letter that you can
press and hold to activate a favorite from any
tab in the Phone app. For example, create a
speed-dial button for your mother’s number
and enter the letter M for “Mom” as the
Quick Key. Then when you want to call her, go
to the Phone app and press and hold M. Your
smartphone dials the number.
62
Page 69

YOUR PHONE
3
7 (Optional) Select More, and then select
advanced options:
Extra Digits: Defines additional digits to
dial, such as a password or extension.
To enter a one-second pause, insert a ,
(comma) between digits. To add a
longer pause, either enter more
commas, or enter a p to add a 3-second
pause.
Dial Extra Digits Automatically: Dials
predefined extra digits immediately
after dialing the phone number, when
checked.
8 Select OK.
DID YOU KNOW
ringtone for a contact. See Assigning a caller
ID ringtone for details.
?
You can assign a special
Creating other types of favorite buttons
DID YOU KNOW
Email favorite, you can enter multiple
addresses; simply separate each address with
a comma. This is an easy way to send
messages to a group of people.
?
When creating a Message or
1 Press Phone .
2 Select the Favorites tab.
3 Press Menu .
4 Select New Favorite on the Record
menu.
5 Select the Ty p e pick list and select
Application, Message, Email, or Web
Link.
6 Enter a label for the favorite and enter
any other necessary information on
the screen.
7 (Optional) Enter a Quick Key.
8 Select OK.
Editing a favorite button
1 Press Phone .
2 Select the Favorites tab.
3 Highlight the favorite button you want to
edit.
4 Press Menu .
5 Select Edit Favorite on the Record
menu.
6 After you make your changes, select
OK.
CHAPTER
63
Page 70

YOUR PHONE
3
CHAPTER
TIP
To arrange your favorites, open the Record
menu and select Organize Favorites.
Highlight the favorite you want to move, and
then press and hold Option + Up or Down to
move the button to another position. Select
Done.
Deleting a favorite button
TIP
Some favorites, such as voicemail, cannot
be deleted. If a favorite can’t be deleted, the
Delete button does not appear on the screen.
1 Press Phone .
2 Select the Favorites tab.
3 Highlight the favorite button you want to
delete.
4 Press Menu .
5 Select Edit Favorite on the Record
menu.
6 Select Delete.
Using a hands-free device
If you need to use your phone while driving
and this is safe and permitted in your area,
use a phone headset (wired headset
included) or car kit (sold separately) for
hands-free operation. Using a hands-free
device also makes it easy to check your
calendar, look up contact info, take notes,
and use other features during a call.
In addition to the headset included with
your Treo, your Treo is compatible with the
following types of hands-free devices that
are sold separately:
• Wired headsets and car kits with a
2.5mm connector (3-pin or 4-pin)
• Wireless headsets and car kits enabled
with Bluetooth 1.1 or 1.2 wireless
technology
7 Select OK.
TIP
The headset designed for Treo 180/270/
300 is not compatible with your Treo 680.
Check the specifications for your
hands-free device to confirm compatibility.
64
Page 71

YOUR PHONE
3
When in doubt, ask the manufacturer if the
product is compatible with your Treo 680.
To view a list of compatible Bluetooth
hands-free devices, go to www.palm.com/
treo680gsm-support.
NOTE You cannot use a hands-free device
with Bluetooth wireless technology to
listen to music files.
TIP
To listen to music in stereo, you can
purchase the Palm 2-in-1 Stereo Headset. If
you want to use a stereo headset with a
3.5mm connector, then you need to purchase
a stereo adapter. Visit www.palm.com/
treo680gsm for more info on audio
accessories.
Using a wired headset
When using the headset that is included
with your smartphone, you can press the
headset button to perform any of the
following tasks:
• Answer an incoming call
• Answer a call-waiting call
• Resume a call that you put on hold (not
available when multiple calls are in
progress)
• Swap between two calls (one on hold
and one active)
• Hang up the active call
TIP
On other headsets, the headset button
may work differently than the button on the
headset included with your Treo 680.
Microphone
Headset
button
Speaker
CHAPTER
65
Page 72

YOUR PHONE
3
CHAPTER
Connecting to a Bluetooth hands-free device
from another Bluetooth device. See the
documentation that came with your
hands-free device for instructions.
KEY TERM
Partnership Two devices—for
example, your smartphone and a hands-free
device—that can connect because each
device finds the same passkey on the other
device. Once you form a partnership with a
device, you don’t need to enter a passkey to
connect with that device again. Partnership is
also known as paired relationship, pairing,
trusted device, and trusted pair.
1 Press Applications and select
Bluetooth or tap the Bluetooth
icon in the title bar.
2 Select Bluetooth On.
NOTE The Bluetooth icon changes from
gray to blue to let you know that Bluetooth
technology is turned on.
Once you set up a partnership with a
Bluetooth hands-free device, you can
communicate with that device whenever it
is turned on and within range. Bluetooth
range is up to 30 feet in optimum
environmental conditions. Performance
and range may be reduced by physical
obstacles, radio interference from nearby
electronic equipment, and other factors.
TIP
If you hear a headset buzz or experience
poor microphone performance, your headset
may be incompatible with your Treo 680.
BEFORE YOU BEGIN Prepare your
hands-free device to accept a connection
3 (Optional) Enter a device name that
identifies your Treo 680 when it is
discovered by other Bluetooth devices.
NOTE Use the same device name for all
your Bluetooth connections. If you change
the device name, you need to recreate any
partnerships you already created.
66
Page 73
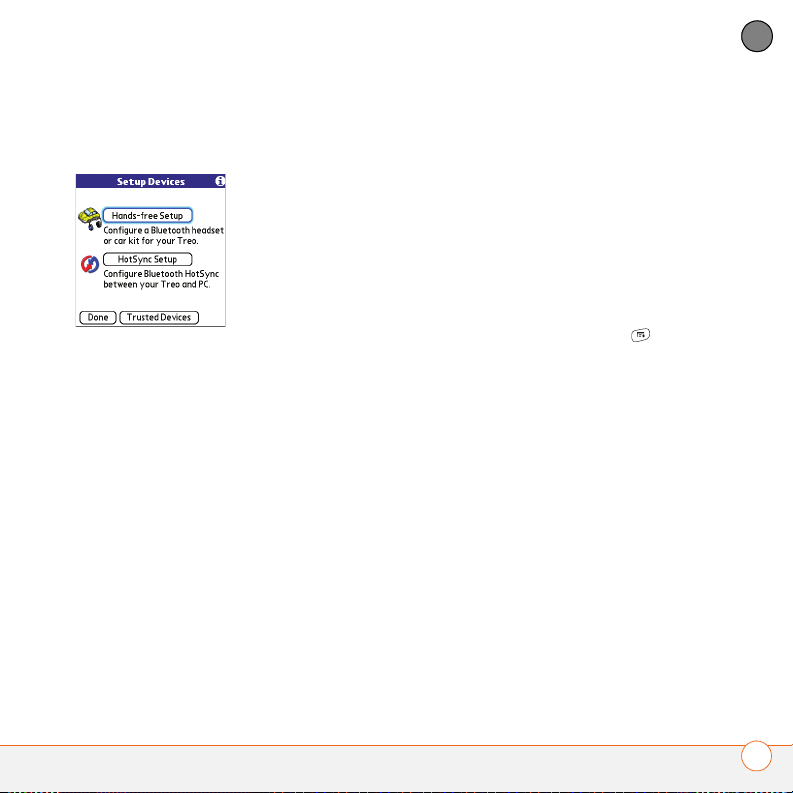
YOUR PHONE
3
4 Select Setup Devices.
5 Select Hands-free Setup.
6 Follow the onscreen instructions to
create a partnership with the specific
hands-free device. When prompted,
enter a passkey.
IMPORTANT Some hands-free devices
have a predefined passkey; if so, you can
find the passkey in the documentation for
that device. Other devices provide a screen
where you enter a passkey that you make
up. In either case, you must use the same
passkey on both your smartphone and your
hands-free device. We recommend that
where possible, you make up a passkey of
16 alphanumeric characters (letters and
numerals only) to improve the security of
your smartphone. The longer the passkey,
the more difficult it is for the passkey to be
deciphered.
7 After you finish setting up the device,
select Done to return to Trusted
Devices View.
NOTE For some car kits, you need to
initiate a Bluetooth connection from your
smartphone to complete the partnership
process. To do this, highlight the car kit in
Trusted Devices View, press Menu ,
and then select Connect.
8 (Optional) Enable advanced hands-free
features by pressing the multifunction
button (MFB) on the hands-free device.
You can tell the connection is successful
when you see a light blue headset icon in
the title bar of the Phone application. You
can now use your Treo 680 with the
Bluetooth hands-free device.
Using a Bluetooth hands-free device
After you create a partnership with your
Bluetooth hands-free device and you turn it
on within range (up to 30 feet), the Treo
automatically routes all calls to the
hands-free device instead of to the
CHAPTER
67
Page 74

YOUR PHONE
3
CHAPTER
earpiece on your Treo. When a call comes
in, your smartphone rings and the
hands-free device beeps. Even if you
answer the call on your Treo, the call goes
to the hands-free device. If you prefer to
route calls to the earpiece on your Treo,
you can change the settings on your
smartphone to do this; see Customizi
advanced settings for your hands-free
device for details.
TIP
If you’re using a Bluetooth hands-free
device and you want to return to the earpiece
or a wired headset during a call, select Cancel
Bluetooth in Active Call View. To return the
call to the hands-free device, open the
Options menu and select Connect
Bluetooth.
• Place a call on hold and answer a
call-waiting call
• Hang up a single call
• Transfer an outgoing call from the
earpiece on your Treo to the hands-free
device
• Ignore an incoming call
ng
• Redial the last number you called from
the hands-free device
DID YOU KNOW
Bluetooth hands-free device, the last one you
connected to becomes the active device. To
switch between devices, turn off the active
device before you try to connect to the other
device.
?
If you have more than one
Customizing advanced settings for your
The features of your hands-free device vary
by model. Check the documentation for
your hands-free device for details about
these features. Your Treo 680 can support
the following actions, provided that your
hands-free device also supports them:
• Answer an incoming call
• Hang up a call and answer a call-waiting
hands-free device
You can set whether your hands-free
device automatically answer calls, provided
the device supports this feature.
1 Press Applications and select
Prefs .
2 Select Hands-free.
call
68
Page 75

YOUR PHONE
3
3 Do one of the following:
To send all calls to your hands-free
device: Check the Always route calls
to handsfree box. Select the Auto
answer pick list and select whether you
want your hands-free device to
automatically answer incoming calls and
how quickly it answers.
To choose between the earpiece on
your Treo and your hands-free device
on a call-by-call basis: Uncheck the
Always route calls to handsfree box.
When the phone rings, you can answer
the call with your hands-free device by
pressing the multifunction button on
your hands-free device, or you can
answer the call with the earpiece on
your Treo by using the controls on your
smartphone (see Receiving calls
4 Select Done.
Customizing phone
CHAPTER
settings
DID YOU KNOW
compatible ringtone directly to your
smartphone (see Downloading files from a
web page). You can also download ringtones
to your computer and then email them to your
smartphone.
Selecting ringtones
You can set various tones for various types
of incoming calls.
1 Press Phone .
2 Press Menu .
).
3 Select Options, and then select Sound
Preferences.
4 Select the Application pick list and
select Ring Tones.
?
You can download any
69
Page 76

YOUR PHONE
3
CHAPTER
Roaming: A special tone for incoming
calls when you’re outside your home
mobile network. This tone overrides all
other ringtones, unless you select No
Sound.
9 Select Done.
DID YOU KNOW
contact or an entire category of contacts.
?
You can assign a ringtone to a
5 Select the Vol um e pick list and select
the volume level.
6 Select the Vibrate pick list and select
when you want your smartphone to
vibrate for an incoming call.
7 (Optional) Check the Escalate ring
tone volume box if you want the ring to
play softly and then increase to full
volume the longer it rings.
8 Select a ringtone from the pick list to
identify each of the following:
Known Caller: An incoming call from
someone in your Contacts or Favorites.
Unknown Caller: An incoming call from
someone identified by caller ID who is
not in your Contacts or Favorites. This
includes callers that have blocked their
caller ID.
Creating and managing ringtones
You can also record sounds and use them
as ringtones.
1 Press Phone .
2 Press Menu .
3 Select Options, and then select Sound
Preferences.
4 Select Manage.
5 Do one of the following:
• To record a sound, select New.
• To play a sound, select it with the
5-way .
• To delete a sound, highlight it and
press Backspace .
• To send a sound, highlight it and
select Send.
70
Page 77

YOUR PHONE
3
6 Select Done twice.
TIP
You can also create a new sound by
selecting New in Sound & Alerts Preferences.
Selecting Phone alert tones
You can set various tones for various types
of alerts.
1 Press Phone .
2 Press Menu .
3 Select Options, and then select Sound
Preferences.
4 Select the Application pick list and
select Phone Alerts.
5 Select the Vol um e pick list and select
the volume level.
6 Select the Vibrate pick list and select
when you want your smartphone to
vibrate for a phone alert.
7 Select an alert tone from the pick list for
each of the following:
Voicemail Alert: Plays when you have
new voicemail.
Coverage in/out: Plays when you move
into or out of a coverage area.
8 Select Done.
Adjusting call volume
While a call is in progress, press the
Volume button on the side of your Treo to
adjust the call volume.
• To increase the volume, press the upper
half of the Volu me button.
• To decrease the volume, press the
lower half of the Vol um e button.
CHAPTER
71
Page 78

YOUR PHONE
3
CHAPTER
1 Press Phone .
2 Press Menu .
3 Select Options, and then select Call
Barring.
Vol ume
Side button
4 Select the Outgoing and Incoming pick
lists, and then select the type of calls
you want to prevent.
5 Select OK.
Adjusting ringer volume
When a call is not in progress and music is
not playing, press the Vo lu me button on
the side of your Treo to adjust ringer
volume, and then press the Side button to
confirm your selection.
Barring calls
Call Barring lets you prevent unauthorized
calls on your smartphone. You must enter
your Call Barring password every time you
change your Call Barring preferences.
Contact your wireless service provider if
you do not know this password or if you
need more information.
Customizing the Main tab in the Phone application
Phone Display Options let you customize
the appearance and entry mode of the
Main tab in the Phone application.
1 Press Phone .
2 Press Menu .
3 Select Options, and then select Phone
Display Options.
4 Set any of the following options:
Wallpaper: Sets the wallpaper that
appears on the Main tab in the Phone
application. To change the wallpaper,
select the thumbnail image and then
select an image to use as wallpaper.
TIP
Call barring may not be available in some
areas.
72
Page 79

YOUR PHONE
3
DID YOU KNOW
background for Calendar Agenda View. See
Customizing display options for your calendar
for details.
?
You can also set the
Fade: Adjusts the intensity level of the
wallpaper image.
Ty p i n g … : Sets whether typing in the
Main tab in the Phone app displays the
Dial Pad and enters numbers you want
to dial, or whether it displays the
Contacts tab and starts a contacts
search.
TIP
If you select the Typing starts contacts
search option, you can still enter a phone
number from the Main tab in the Phone app
by pressing Option followed by the number.
Show Calendar event: Sets whether
the current event from the Calendar
application appears in the Main tab in
the Phone app. When this option is
enabled, you can then select this event
to jump to the Calendar app.
Default View: Sets the tab that appears
when you press Phone .
CHAPTER
5 Select OK.
Setting your dialing preferences
Dialing preferences let you assign a prefix
to your phone numbers. For example, you
can automatically dial a 1 before all 10-digit
phone numbers. You can add a different
prefix based on the length of the phone
number.
1 Press Phone .
2 Press Menu .
3 Select Options, and then select Dial
Preferences.
4 Set any of the following options:
Dialing from North America: Formats
phone numbers using North American
conventions (XXX-XXX-XXXX).
73
Page 80

YOUR PHONE
3
CHAPTER
Always dial +1 in front of the area
code: Adds a 1 in front of 10-digit phone
numbers. This option is available only
when Dialing from North America is
enabled.
To 7 digit numbers: Adds a prefix to
7-digit numbers. For example, enter
your own area code to automatically add
your area code when you dial local
numbers.
Manually selecting the wireless network
You may be able to search for other
wireless network services in your current
location.
1 Press Phone .
2 Press Menu .
3 Select Select Network from the
Options menu.
4 Select another network, if available.
To (6), (5), (4), digit numbers: Adds a
prefix to numbers with the specified
number of digits. For example, if all the
phone numbers in your office have the
408 area code and a 555 exchange,
followed by a 4-digit extension, select 4
and enter the prefix 408555. To call a
colleague, simply dial your colleague’s
4-digit extension; your smartphone
automatically dials the rest and makes
the call. You can also create contact
entries with just the extension number
and then dial the number from your
Contacts list.
5 Select OK.
5 Select OK.
Using TTY
A TTY (also known as TDD or text
telephone) is a telecommunications device
that allows people who are deaf or hard of
hearing, or who have speech or language
disabilities, to communicate by telephone.
74
Page 81
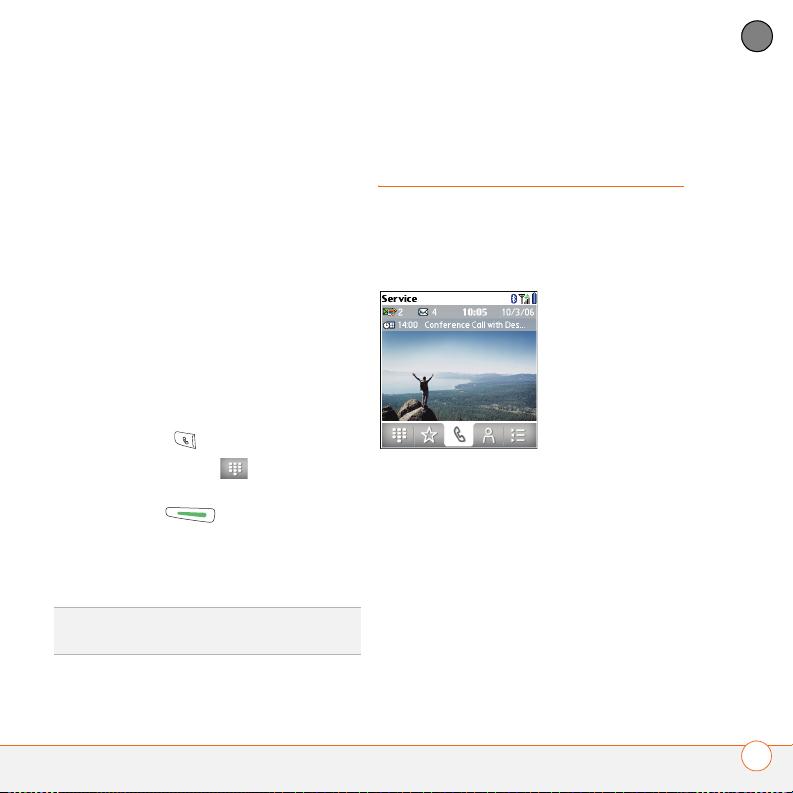
YOUR PHONE
3
Your Treo 680 is compatible with select
TTY devices. You can connect a TTY/TDD
machine to your smartphone through the
headset jack, but you cannot use your
headset jack with a headset while this
mode is enabled. Please check with the
manufacturer of your TTY device for
connectivity information and to ensure that
the TTY device supports digital wireless
transmission.
To use TTY, you may need to make
additional arrangements with your wireless
service provider. Please contact your
wireless service provider’s customer
service department for more information.
1 Press Phone .
2 Select the Dial Pad tab.
3 Enter #*TTY.
4 Press Send .
5 When a message appears indicating
that TTY is enabled, select OK. To
disable TTY, repeat these steps.
TIP
A red T appears at the top of the Phone
screen to indicate that TTY is enabled.
What are all those icons?
You can monitor the status of several items
using icons in the title bar in the Phone
application:
CHAPTER
75
Page 82

YOUR PHONE
3
CHAPTER
0
Your phone is on and you are in
your wireless service provider’s
coverage area. If you are outside
a coverage area, No Service or
No Service—SOS Only appears
instead. No Service means that
there is no coverage at all and
No Service—SOS Only means
that you can call only
emergency numbers, such as
112. When you turn off your
phone, Phone Off appears.
Call forwarding is active.
Your phone is on. The bars
display the signal strength. The
stronger the signal, the more
bars that appear. If you are
outside a coverage area, no bars
appear.
Your phone is on and a GPRS or
EDGE network is within range,
but you are not actively
You have new voicemail
messages. You can select this
icon to retrieve your messages.
If you have alternate line service
(ALS), the left side is shaded
when you have voicemail on
line 1, and the right side is
shaded when you have
voicemail on line 2.
You have a new alert, such as a
Calendar alarm or a new text
message. To view the alert,
press and hold Center or
select the icon. See Viewing
and using the alerts.
The Bluetooth wireless
technology icon appears in gray
when this feature is off, in blue
when this feature is on, and in
reverse blue when your
smartphone is communicating
with another Bluetooth device.
transmitting data. You can still
make and receive calls.
Your phone is on and a GPRS or
EDGE data connection is active.
76
Page 83

YOUR PHONE
3
This icon replaces the Bluetooth
icon when your smartphone is
connected to a Bluetooth
hands-free device. This icon
appears in dark blue when a call
is in progress and in light blue
when a call is not in progress.
This icon replaces the Bluetooth
icon when your smartphone is
connected to your computer
using a dial-up networking
(DUN) connection.
Your battery is partially drained.
When the battery drains to 20%
of its capacity, the icon changes
from blue to red. At 10% of its
capacity, you begin to receive
warning messages, and at 5%
of its capacity, the smartphone
beeps (if the Ringer switch is in
the Sound On position) and the
icon changes from red to clear.
Your battery is being charged.
The lightning bolt turns from red
to green when the battery is
fully charged and your
smartphone remains connected
to the charger.
Your battery is fully charged and
your smartphone is not
connected to the charger.
You have new text or
multimedia messages. The
number next to the icon
indicates the number of unread
messages in your Inbox. You
can select this icon to retrieve
your messages.
You have new email messages.
The number next to the icon
indicates the number of unread
messages in your Inbox. If you
set up multiple email accounts
on your smartphone, this
number reflects only the
account that you most recently
accessed. You can select this
icon to retrieve your messages.
CHAPTER
77
Page 84

YOUR PHONE
3
CHAPTER
KEY TERM
GPRS (General Packet Radio
Service) A mobile connectivity technology
that provides persistent data connections.
(Additional charges may apply.)
KEY TERM
EDGE (Enhanced Data rate for GSM
Evolution) An enhanced version of GPRS
that delivers data speeds that are up to three
times faster than standard GPRS connections.
(Additional charges may apply.)
DID YOU KNOW
?
You can tap the Bluetooth
icon to quickly turn Bluetooth wireless
features on and off.
TIP
To display the remaining battery power,
tap the battery icon at the top of the screen.
78
Page 85

Your email and other messages
CHAPTER
4
You already know how efficient email and messaging are for
staying in touch. Now your Palm
you a new level of convenience: email on the go. Enjoy the
ease and speed of communicating with friends, family, and
colleagues anywhere you can access your wireless service
provider’s data network.
You can send photos to your friends and family, or create
Microsoft Word or Excel files and send them to your
colleagues. You can also receive attachments to view and edit
at your convenience.
Benefits
• Access email on the go
• Send and receive photos, sound
files, Word and Excel files, and
more
®
Tr eo™ 680 smartphone brings
• Save messages from your
computer to view at a convenient
time
Page 86

In this chapter
Which email application should I use? . . . . . . . . . . . . . . . . . . . . . . . 81
The VersaMail application. . . . . . . . . . . . . . . . . . . . . . . . . . . . . . . . . 81
Messaging . . . . . . . . . . . . . . . . . . . . . . . . . . . . . . . . . . . . . . . . . . . . 95
Page 87

YOUR EMAIL AND OTHER MESSAGES
4
Which email application should I use?
Your Treo 680 includes the VersaMail®
application (called Email in Applications
View), which you can use to access your
corporate, personal, and fee-based Internet
email. You can also access web-based
email, like Yahoo! Mail or Hotmail, from the
web browser on your Treo.
TIP
An email application is not an email
provider. An email application just transfers
messages from an account that you have
already set up with a provider.
KEY TERM
Email provider The service you
use to send and receive email. Your email
provider’s name appears between the @
symbol and the dot in your email address.
NOTE You must activate data services on
your your wireless service provider account
before you can use email on your
smartphone.
The VersaMail application
Before you can use VersaMail, you need to
enter your email account settings. If you
have multiple email accounts, you must
enter settings for each email account.
After you enter your email account
settings, see the User Guide for the
VersaMail Application on your computer for
info on sending and receiving messages
and customizing your VersaMail settings.
Windows: Start>Programs>Palm
Mac: Insert the Palm Installation CD and
click the link to the User Guide for the
VersaMail Application in the
Documentation folder.
How do I get started?
1 If either of the following is true, read the
User Guide for the VersaMail
Application on your computer:
• You used the VersaMail application on
your previous Palm OS
®
device, and
CHAPTER
81
Page 88

YOUR EMAIL AND OTHER MESSAGES
4
CHAPTER
you want to transfer those settings to
your smartphone.
• You plan to use VersaMail to access
an email account on a Microsoft
Exchange ActiveSync server, a Lotus
Notes server, or a Microsoft MAPI
server.
2 If your email provider is listed in the
following table, then skip to Setting up
VersaMail to work with common
providers.
Australia: Bigpond Mail and OptusNet.
Belgium: Scarlet, Skynet, Swing, and
Tiscali Belgium.
Brazil: UOL.
Canada: Rogers High Speed and
Sympatico.
Denmark: Cybercity, Sonofon, TDC, and
Tiscali.
Finland: TeliaSonera.
France: 9 Telecom, Cegetel,
Club-Internet, Free, Freesurf, La Poste,
Noos, Orange, SFR.net, Tele2, Tiscali,
Wanadoo, and yahoo!.
Germany: debitel E-Mail, E-Plus imail,
Freenet Email-Office, GMX eMail,
T-online eMail, Vodafone eMail, and
Web.de E-Mail.
Hong Kong: 1O1O, 3-DUALBAND-,
Netvigator (IMS), and One2Free.
Ireland: o2 Ireland and Vodafone
Ireland.
Italy: interfree, kataweb, libero, Tim,
tin.It, and Tiscali.
Malaysia: Jaring and Maxis Net.
Mexico: Mensaje Telcel and yahoo!.
Netherlands: @Home, Chello, Het Net,
Planet Internet, Tiscali, Wanadoo,
XS4ALL, and Zonnet.
New Zealand: Vodafone NZ.
Norway: Telenor and Netcom.
Philippines: GlobeQuest and Pacific
Internet - PH.
Singapore: Pacific Internet, Singnet,
and StarHub.
Spain: Movistar, Telefonica, Terra.es,
Vodafone, and Wanadoo.
82
Page 89

YOUR EMAIL AND OTHER MESSAGES
4
Sweden: Bredbandsbolaget, Chello,
Com Hem, Tele2, TeliaSonera Mail,
Vodafone Euromail, and yahoo!.
Switzerland: Bluewin, GMX, green.ch,
Orange, Sunrise (my), Sunrise Freesurf,
SwissOnline, Tiscali, and yahoo!.
Ta i w a n : HiNet Umail.
Thailand: AIS Mail.
United Kingdom: Blueyonder, BT
Internet, BT Openworld, BT Yahoo!,
Clara.net, Demon, Freeserve, Lycos,
NTL, O2, Orange, Pipex, Tiscali, UK
Online, Virgin, Vodafone, Wanadoo, and
yahoo!.
United States: AOL, Apple.Mac, AT&T
Worldnet, Bell South, Cablevision,
Charter, Comcast, CompuServe,
EarthLink, Gmail, Mail.com, NetZero,
Speakeasy, Verizon DSL, and Yahoo!.
3 If your email provider’s name is not
listed, then you need to obtain the
following info from your system
administrator or ISP, and then skip to
Setting up VersaMail to work with other
providers:
• Mail protocol: POP or IMAP
• Incoming and outgoing mail server
names, such as mail.myisp.com
• Incoming and outgoing mail server
port numbers, such as 110 (incoming
POP), 143 (incoming IMAP), or 25
(outgoing POP or IMAP)
• (If necessary) Security settings: APOP,
ESMTP, SSL
Setting up VersaMail to work with common providers
1 Press Applications and select
Email to open the VersaMail
application.
2 If prompted to select an initial setup
option, select Continue.
3 Make up a name that describes this
account and enter it in the Account
Name field. For example, Work Email.
4 Select the Mail Service pick list, and
then select your email provider, such as
EarthLink, and then select Next.
CHAPTER
83
Page 90

YOUR EMAIL AND OTHER MESSAGES
4
CHAPTER
Setting up VersaMail to work with other providers
1 Press Applications and select
Email to open the VersaMail
application.
2 If prompted to select an initial setup
option, then select Continue.
3 Make up a name that describes this
5 Enter the username for your email
account. Your username usually appears
before the @ symbol in your email
address.
NOTE For some email providers, such as
Gmail, your username is your entire email
address. Check with your email provider if
you are not sure what to enter as your
account and enter it in the Account
Name field. For example, Work Email.
4 Select the Mail Service pick list, and
then select Other.
5 Select the Protocol pick list, select POP
or IMAP (based on the info you got from
your system administrator or ISP), and
then select Next.
username.
6 Select the Password box, enter your
email account password, select OK, and
then select Next.
7 Select Next, and then select Done.
TIP
To enter settings for another email
account, open the Accounts menu and select
Account Setup.
84
Page 91

YOUR EMAIL AND OTHER MESSAGES
4
6 Enter the username for your email
account. Your username usually appears
before the @ symbol in your email
address.
NOTE For some email providers, such as
Gmail, your username is your entire email
address. Check with your email provider if
you are not sure what to enter as your
username.
7 Select the Password box, enter your
email account password, select OK, and
then select Next.
8 Enter your email address and the
names of the incoming and outgoing
mail servers, and then select Next.
9 If your system administrator or ISP
provided port numbers or security
settings, select Advanced, and then
enter those settings.
TIP
You can also select Advanced to set more
options for incoming and outgoing messages.
10 Select Done.
Creating and sending messages
1 From the Inbox, select New.
2 Begin entering one of the following for
the addressee:
• Email address
• First name
• Last name
TIP
If you enter address info that matches one
or more of your contacts, VersaMail displays
the matching contacts. To accept a
suggestion, select the correct contact. To
send to a different address, keep entering the
email address or name.
3 Enter the subject and message text.
TIP
To move between fields, press Up or
Down on the 5-way.
4 Select one of the following:
Send: Connects and sends all
messages immediately. If the message
cannot be sent for any reason, the
message is stored in your Outbox.
Outbox: Puts the message in the
Outbox to send later.
CHAPTER
85
Page 92

YOUR EMAIL AND OTHER MESSAGES
4
CHAPTER
Drafts: Saves the message so you can
continue working on it at another time.
Attaching photos and videos
1 Create the message to which you want
to attach the photo or video.
2 On the New Message screen, select
the red paper clip icon in the
upper-right corner.
3 From the Ty p e pick list, select Photo/
Video.
DID YOU KNOW
attempts to send a message; if it is still not
successful, an alert message appears and you
must try to manually send the message again.
Adding attachments to your messages
You can attach several types of files to your
email messages.
.
TIP
To remove an attachment, select the file in
the Attachments box, and then select
Delete.
?
VersaMail makes up to five
4 On the Select Media screen, select the
Album pick list to go to the album
containing the photo or video you want,
and then check the box to the left of the
photo or video.
5 Select Done.
.
TIP
To attach more than one file to a message,
repeat steps 3 and 4.
86
Page 93

YOUR EMAIL AND OTHER MESSAGES
4
Attaching ringtones
1 Create the message to which you want
to attach the ringtone.
2 On the New Message screen, select
the red paper clip icon in the
upper-right corner.
3 From the Ty p e pick list, select Sounds.
TIP
Ringtones that are copy-protected appear
in the Sounds application with a lock icon. You
can use these ringtones on your phone, but
you cannot send them as attachments.
4 Select the ringtone you want, and then
select Insert.
5 Select Done.
Attaching Word, Excel, PowerPoint, and PDF files
1 Create the message to which you want
to attach the file.
2 On the New Message screen, select
the red paper clip icon in the
upper-right corner.
3 From the Ty p e pick list, select
Documents.
4 Select the file you want on the
Documents screen.
5 Select Done.
Attaching other types of files
1 Create the message to which you want
to attach the item.
2 On the New Message screen, select
the red paper clip icon in the
upper-right corner.
3 From the Ty p e pick list, select the type
of file to attach—for example, Address,
Appointment, or Memo/Text.
4 Select the item you want from the list in
the Ty p e box.
5 Select Done.
Receiving and viewing messages
1 From any mailbox, select Get or Get &
Send.
2 From the Inbox, select the message you
want to view.
CHAPTER
87
Page 94

YOUR EMAIL AND OTHER MESSAGES
4
CHAPTER
Replying to or forwarding messages
When you respond to messages, you can
select whether to include the original text
(see Customizing your email settings
DID YOU KNOW
sends all messages as plain text only, with all
HTML tags stripped, even if you are
forwarding or replying to a message that was
originally received as HTML.
?
The VersaMail application
).
1 From the Inbox or another folder, open
the message you want to respond to.
2 In Message View, select Reply. Select
whether to reply to just the sender or to
reply to both the sender and all
addressees on the message.
3 Enter your reply.
3 If a large incoming message is
truncated, select More .
TIP
When viewing a message, tap the scroll
arrows at the top of the screen to view the
previous or next message.
4 Select Done.
4 Select Send.
TIP
You can also tap the folder icon to the left
of the attachment name to open a menu of
tasks you can do with the attachment,
including View, Install, or Unzip, depending on
the attachment file type; Save to card to save
the attachment to an expansion card; or select
Viewer to select the application you want to
use to view the attachment.
88
Page 95

YOUR EMAIL AND OTHER MESSAGES
4
Viewing attachments
There are a number of attachment types
you can open with the built-in software
on your smartphone (for example,
Microsoft Word, Excel, PowerPoint, and
PDF files; ringtones; and photos).
1 From any folder, open the message with
the attachment you want to view.
Messages with downloaded
attachments appear with a paper clip
icon to the left of the message icon.
TIP
If an attachment is not downloaded
because it is larger than your maximum
message size, the paper clip icon does not
appear, and the attachment does not display
at the bottom of the message screen. Select
More to download and display any
attachments.
2 Tap the attachment name at the bottom
of the message screen to view it in the
default viewer on your smartphone.
TIP
You can also tap the folder icon to the left
of the attachment name to open a menu of
tasks you can do with the attachment,
including View, Install, or Unzip, depending on
the attachment file type; Save to card to save
the attachment to an expansion card; or select
Viewer to select the application you want to
use to view the attachment.
3 When you finish with the attachment,
select Done to return to the
Attachments dialog box.
NOTE If there is no Done button, press
Applications and select Email to
return to the account’s Inbox.
Managing your messages
The status icons that appear near the
messages in your Inbox indicate the
following:
0
The message is unread when the
subject appears in bold.
The message includes an
attachment.
CHAPTER
89
Page 96

YOUR EMAIL AND OTHER MESSAGES
4
CHAPTER
The message includes a meeting
invitation.
This message has high priority.
2 Press Menu .
3 Select Delete on the Message menu.
4 If a confirmation dialog box appears,
select OK to confirm deletion.
You can rearrange the message list to
make it easier to find and view messages.
• In the Inbox, select Sort, and then
select one of the following: Sort by
Date, Sort by Name, Sort by Subject.
• To quickly switch between folders in list
view, select the folder pick list at the
top of the screen and select the desired
folder.
Deleting selected messages from the Inbox
When you delete a message from the
Inbox, it moves to the Trash folder.
1 Select the bullet next to the icon of each
message that you want to delete. To
select adjacent messages, drag the
stylus so it touches the bullet to the left
of each message. Lift the stylus and
TIP
To delete a single message, select the
envelope icon next to the message, and then
select Delete from the list.
Deleting messages by date
You can quickly delete a group of
messages by selecting a range of dates.
1 Press Menu .
2 Select Delete Old on the Message
menu.
3 Select the folder and a date range for
the messages you want to delete.
4 Select OK.
5 If a confirmation dialog box appears,
select OK to confirm deletion.
TIP
To empty (or purge) the Trash folder, open
the Message menu and select Empty Trash.
drag again to select more adjacent
messages.
90
Page 97

YOUR EMAIL AND OTHER MESSAGES
4
Switching accounts
If you create more than one email account
in VersaMail, you need to switch from
account to account to get, send, and
otherwise manage the messages in each
account.
1 Press Menu .
2 Select Accounts, and then select an
account.
DID YOU KNOW
quick button, you can press that button
repeatedly to switch between your different
email accounts.
?
If you assigned VersaMail to a
Customizing your email settings
You can customize the VersaMail settings
for each individual email account on your
Treo. The preferences you set apply only to
the email account you are currently
viewing. If you have multiple accounts,
configure each account separately.
You can set up a schedule to automatically
retrieve email messages; set preferences
for how and when messages are retrieved;
add a signature to an outgoing message;
and more. For complete information on all
of the email settings you can customize,
see the User Guide for the VersaMail
Application on your computer.
Windows: Start>Programs>Palm
Mac: Insert the Palm Installation CD and
click the link to the User Guide for the
VersaMail Application in the
Documentation folder.
Scheduling Auto Sync
You can set up VersaMail to automatically
download new email messages to your
smartphone with the Auto Sync feature.
TIP
You need to set up a separate Auto Sync
schedule for each email account. This feature
may not work with email accounts that require
VPN connection.
1 Press Menu .
2 Select Options, and then select
Preferences.
CHAPTER
91
Page 98

YOUR EMAIL AND OTHER MESSAGES
4
CHAPTER
3 Select Auto Sy nc.
TIP
After you set up a scheduled Auto Sync
and select Get Mail, from then on, only new
messages are retrieved during Auto Sync.
Selecting alert tones
When you schedule Auto Sync for a given
account, you can choose a sound—such as
a bird, a phone, or an alarm—to let you
4 Check the Auto-sy nc box.
5 Select the Every pick list and select the
time interval, from 5 minutes to
12 hours.
NOTE If you set a more frequent interval,
you may need to recharge your Treo battery
more often.
6 Select the Start Time and End Time
boxes, and then select the hour, the
minute, and AM or PM to enter the time
for the first and last Auto Sync to take
place. Select OK.
know when new email arrives.
1 From any mailbox screen, press
Menu .
2 Select Options, and then select
Preferences.
3 Select Alerts.
4 Check the Alert me of new mail box.
TIP
To receive notifications of successful Auto
Sync retrievals only, uncheck the Alert me of
auto sync failures box. Leave the box
checked if you want to receive notifications of
both successful and failed Auto Sync
retrievals.
7 Select the days you want the schedule
to be active. You can choose any
number of days, but you can set up only
one schedule for each email account.
8 Select OK, and then select Get Mail.
5 Select the Alert Sound pick list, and
then select a sound. Your Treo plays a
brief demo of the sound.
6 Select OK.
92
Page 99

YOUR EMAIL AND OTHER MESSAGES
4
Setting preferences for getting messages
1 From any mailbox screen, press
Menu .
2 Select Options, and then select
Preferences.
3 Select Incoming.
4 Set any of the following preferences,
and then select OK.
Get: Indicates whether to get message
subjects only or entire messages.
Ask Every Time: Indicates if you want
to see a dialog box for selecting
subjects only or entire messages each
time you retrieve email. If the box is
unchecked, messages are retrieved
according to the option you select in the
Get pick list.
Unread messages (IMAP accounts
only): Downloads only unread mail to
your smartphone. If you don’t check this
box and you select Get & Send, all the
messages on your mail server are
downloaded to your Inbox, including
messages you’ve read.
TIP
The POP protocol does not support
retrieval of unread mail only from the server. If
you have a POP email account, VersaMail
downloads all messages regardless of
whether you have read them, and regardless
of whether the Unread messages box is
checked.
Mail from last: Gets messages sent
within the number of days you specify.
Download attachments: Automatically
downloads files attached to email,
except for attachments that exceed the
maximum message size.
Maximum message size: Sets the
maximum size of an incoming email
message. Enter the size in kilobytes
(KB). The default is 5KB, but you can
enter any size up to 2048KB
[approximately 2 megabytes (MB)],
CHAPTER
93
Page 100

YOUR EMAIL AND OTHER MESSAGES
4
CHAPTER
including attachments. The maximum
message size that you can retrieve is
60KB for the body text and
approximately 5MB of total data for any
attachments.
Message Format: Sets the format for
messages you retrieve.
• HTML: Displays messages sent in
HTML format with basic formatting
intact and displays other messages as
plain text.
• Text: Displays all messages as plain
text, regardless of the format in which
they were sent.
Attaching a signature to a message
You can attach a personal signature, with
info like your company’s address and
phone numbers, to the bottom of all
messages you send.
1 From any mailbox screen, press
Menu .
2 Select Options, and then select
Preferences.
3 Select Signature.
4 Check the Attach Signature box.
5 Enter your signature information, and
then select OK.
Working with Microsoft Exchange ActiveSync
Microsoft Exchange ActiveSync works with
the VersaMail, Calendar, and Contacts apps
on your smartphone to directly access
corporate groupware information on a
Microsoft Exchange 2003 server. You can
synchronize business email, calendar, and
contact info with the Exchange 2003
server from your smartphone without
using a desktop computer.
When you create a Microsoft Exchange
ActiveSync account in the VersaMail
application, your email, calendar, and
contact info sync directly with the
Exchange Server; information does not
sync with the desktop software application
on your computer, such as Microsoft
Outlook or Palm Desktop software. Other
information that is stored on your
computer, such as tasks and memos,
continues to synchronize with your desktop
software.
94
 Loading...