

Page 1

TABLE OF CONTENTS
Important Information 4
Computer Basics 5
Safety and Comfort............................................................................................. 5
Safety Precautions......................................................................................... 5
Computer Environment ....................................................................... 5
Cables ............................................................................................. 5
Cleaning your Computer .................................................................... 5
Health Precautions........................................................................................ 5
Getting to Know your Computer......................................................................... 6
The Keyboard and Mouse ............................................................................. 6
Cordless Devices ............................................................................... 6
Mouse or Touchpad ........................................................................... 7
Keyboard ......................................................................................... 7
Multimedia Keys (on selected keyboards) ............................................. 8
Your Computer’s Drives................................................................................ 9
Memory Card Reader ........................................................................ 9
Optical Drives ................................................................................. 10
Batteries (Notebooks).................................................................................. 10
Battery Life ...................................................................................... 11
Replacing Batteries .......................................................................... 11
Battery Disposal .............................................................................. 11
Ports and Connectors.................................................................................. 11
USB (Universal Serial Bus) ................................................................ 11
IEEE 1394 ..................................................................................... 11
PC Cards (PCMCIA) ........................................................................ 12
Legacy Ports ................................................................................... 12
Sound connectors ............................................................................ 12
TV-Out ........................................................................................... 13
Communication Ports ....................................................................... 13
Turning your Computer ON/OFF ............................................................... 13
Turning your Computer ON .............................................................. 13
Turning your Computer OFF .............................................................. 13
Forced Shutdown ............................................................................ 14
Power Options ................................................................................ 14
Upgrading your Computer........................................................................... 14
Memory ......................................................................................... 15
Storage .......................................................................................... 15
Convergence .................................................................................. 15
Warranty ....................................................................................... 15
Recycling ........................................................................................ 15
First steps on the Net........................................................................................ 16
Get Connected! .......................................................................................... 16
www.packardbell.com
Quick Start & Troubleshooting Guide
Page 2

Internet Service Provider ................................................................... 16
Connection Types ............................................................................ 16
Surf the Net!............................................................................................... 18
Internet Explorer Features ................................................................. 18
Outlook Express Features ................................................................. 18
Packard Bell Website ....................................................................... 20
Using Windows and Software ........................................................................... 21
Setup my PC............................................................................................... 21
Your Computer's Documentation ................................................................ 21
Packard Bell InfoCentre .................................................................... 21
Software Documentation .................................................................. 23
Your Software Library ................................................................................. 23
Where is my Software? .................................................................... 23
Playing Multimedia Files ............................................................................ 24
Volume Controls......................................................................................... 24
Adjusting the Volume ....................................................................... 25
Helpdesk 26
Safe Computing................................................................................................ 26
Maintenance............................................................................................... 26
Packard Bell Master CD/DVD Creator ............................................... 26
Run Windows System Tools .............................................................. 27
Manage your HDD .......................................................................... 30
Security ...................................................................................................... 30
Protect your Computer against Viruses ............................................... 30
Secure your Internet Connection ........................................................ 32
Prevent Spyware Infections ............................................................... 33
Use Windows Security Center ........................................................... 33
How Do I Know when my Computer Is at Risk? ................................... 34
Updates ...................................................................................................... 34
Diagnose & Repair............................................................................................. 36
Top 5 Troubleshooting Cases ...................................................................... 36
Nothing Displays on the Screen ........................................................ 37
The Screen Freezes when the Packard Bell Logo Displays ..................... 39
The Screen Freezes when the Windows Logo Displays ......................... 40
The Windows Desktop Displays, but the Operating System is not stable . 42
The Screen Displays Applications, but They Crash or Run Erratically ...... 43
Miscellaneous Troubleshooting ................................................................... 44
Keyboard & Mouse / Touchpad ........................................................ 44
Display .......................................................................................... 45
Sound ............................................................................................ 46
Internet ........................................................................................... 47
Printer ............................................................................................ 50
Adding Software and Hardware ....................................................... 51
Packard Bell Snapsys................................................................................... 52
Tracking Changes .......................................................................... 52
Hardware Diagnostic Tools ............................................................... 53
Page 3

System Tools ................................................................................... 53
Options .......................................................................................... 54
Packard Bell Smart Restore.......................................................................... 54
Uninstalling and Reinstalling Software ................................................ 54
Resetting your Hardware Configuration .............................................. 55
Recovery .......................................................................................................... 55
Packard Bell Recovery Program ................................................................... 56
Starting the Recovery Program .......................................................... 56
Using the Recovery Program with Master DVD/CDs ............................. 59
Packard Bell Limited Warranty 61
Regulatory Information 66
Software License 69
Index 70
Page 4
IMPORTANT INFORMATION
Thank you for purchasing a Packard Bell computer!
This guide has been designed to introduce you to the features of your computer and assist in your computing
experience. It will also help you maintain your computer and troubleshoot in case you encounter a problem.
Packard Bell Master CD/DVD Creator
Master CD/DVD Creator
Use
recovery data to CDs or DVDs. No separate copies of the
Windows discs and Microsoft utilities are provided. All the
programs are included in your recovery data in a specific partition
of your hard disk drive (see page 26 for details).
Set up my PC
To make it easy, Packard Bell has gathered all important setup
steps in one application! Make sure you run
configure your Internet access, antivirus program, Identity card,
etc. (see page 21 for details).
Packard Bell InfoCentre
To discover more about your computer, please make sure you
Packard Bell InfoCentre
check
installed on your computer (see page 21 for details).
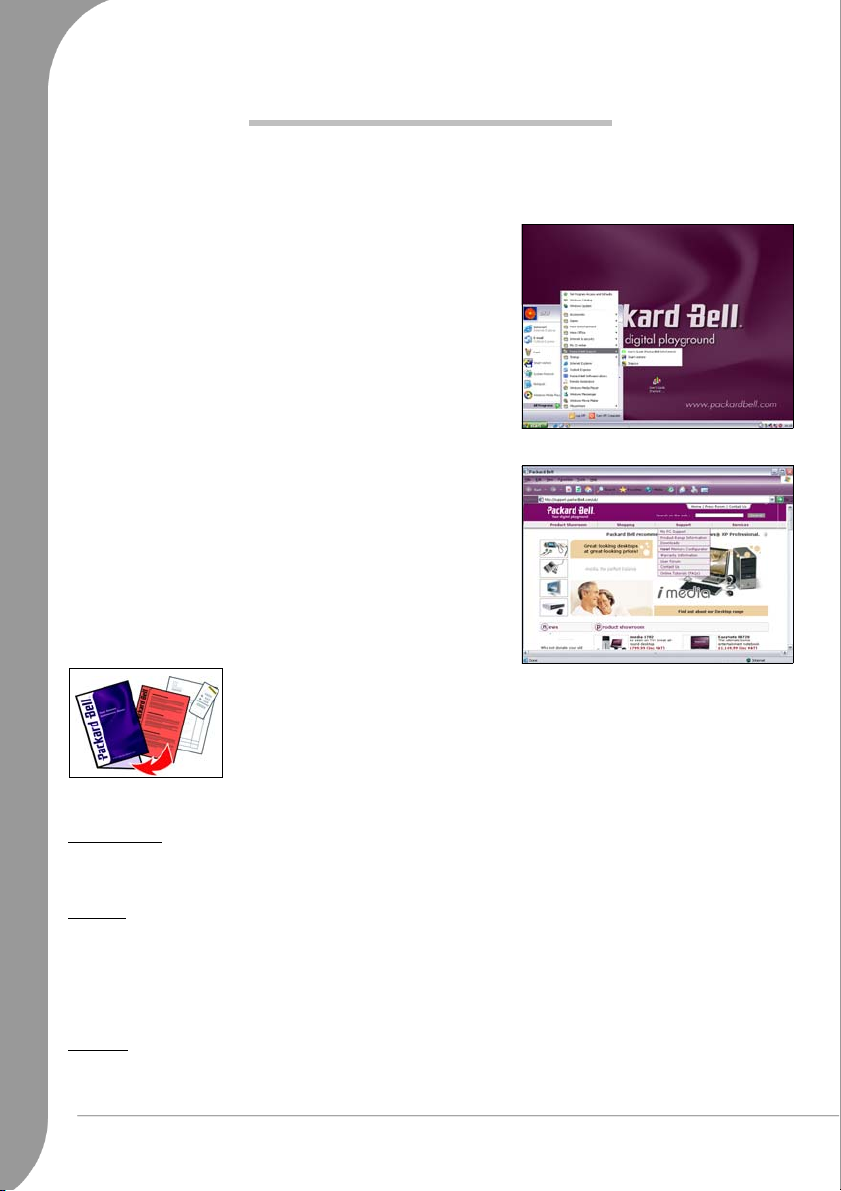
Packard Bell Website
Remember to visit www.packardbell.com often! Check out the
Support section: it contains up-to-date information, help, drivers
and downloads.
to copy/transfer your computer's
Setup my PC
to
, the electronic user‘s guide
Packard Bell Support
Make sure you write down your computer serial number, date and place of
purchase and model name on the cover of this guide. Also, save your proof of
purchase and
Warranty & Service Sheet
. If you call us, please write down any error
message causing the problem, and have the computer in front of you and switched
on if possible. Having these items to hand when contacting us will ensure better
and quicker service.
Copyright Notic
Packard Bell Quick Start & Troubleshooting Guide.
may be reproduced or transmitted, in any form or by any means, whether electronic, chemical, manual or otherwise, including but
not limited to photocopying, recording, or information storage and retrieval systems, for any purpose without prior written permission
of Packard Bell B.V.
Disclaimer
Packard Bell B.V. specifically disclaims all warranties, either express or implied, including, but not limited to, implied warranties of
merchantability and fitness for a particular purpose with respect to this product and documentation. Updates to software and hardware
components are made regularly. Therefore some of the instructions, specifications and pictures in this documentation may differ
slightly from your particular situation. All items described in this guide are for illustration purposes only and may not apply to your
particular situation. No legal rights or entitlements may be obtained from descriptions made in this manual. Packard Bell B.V. reserves
the right to revise or make changes or improvements to this product or documentation at any time without obligation to notify any
person of such revisions or improvements. In no event shall Packard Bell B.V. be liable for any consequential or incidental damages,
including but not limited to loss of business profits or any other commercial damages, arising out of the use of this product.
Trademark
Microsoft, Outlook and Windows XP are registered trademarks of Microsoft Corporation. FireWire is a trademark of Apple Computer,
Inc. PS/2 is a trademark of International Business Machines Corporation. Packard Bell is a registered trademark of Packard Bell B.V.
All other company or product names are trademarks, registered trademarks or service marks of their respective owners.
4 -
Packard Bell Quick Start & Troubleshooting Guide
e
Copyright © 2006 Packard Bell B.V. All Rights Reserved. No part of this manual
Page 5

COMPUTER BASICS
SAFETY AND COMFORT
Safety Precautions
Please follow the guidelines below to use your computer comfortably and to avoid health problems.
Computer Environment
Make sure that the computer:
✓ is away from direct sunlight and sources of heat;
✓ is away from magnetic fields or any device generating static electricity;
✓ is kept at least 30 centimetres away from a mobile phone;
✓ is not in a dusty or damp environment;
✓ is not placed on a carpet or any other surface that may have an electrical charge.
Cables
Make sure that:
✓ cables are not strained and that there is no risk of people walking or tripping over them;
✓ other devices do not crush the cables;
✓ power cords are connected to a grounded electrical outlet;
✓ the power outlet is easily accessible and as close to the computer as possible (do not overload it with
too many adapters).
Cleaning your Computer
✓ Always unplug your computer from the power outlet before cleaning it (and remove the battery if you
are using a notebook);
✓ do not use liquid or aerosol cleaners, use a damp cloth instead;
✓ never spray cleaning product directly on the screen;
✓ if dust has accumulated inside your computer, do not use a vacuum cleaner to remove it;
✓ if you spill liquid on your computer or any device attached to it, switch it off immediately, unplug the
power cord (and remove the battery if you are using a notebook) and make sure it is completely dry
before switching it on again. Wait overnight if necessary.
Health Precautions
If you work or play for hours at a time, then make sure you take regular breaks. Look away from the
computer's screen once in a while. Do not use your computer if you are tired.
To use your computer comfortably, remember the following:
✓ Sit up straight with your back relaxed
✓ Adjustable chair
✓ Feet flat on floor or on footrest
✓ Desk height 60-70 cm from the floor
✓ Free space around the computer and devices to allow proper ventilation
✓ Top of monitor at eye level
✓ Eye distance 45-70 cm from screen
✓ Easy access to drives and controls
Computer Basics -
5
Page 6
✓ If the “warmth” symbol is present on the underside of the computer, this indicates that the
underside surface can become hot. Avoid continuous body contact and do not place the computer on your lap while it is operating.
✓ Some disorders of the hands, wrists, arms, neck, shoulders, legs and back may be associated with, or
aggravated by certain repetitive actions. To reduce your risk of developing these disorders, type with
your wrists straight and your hands and wrists floating above the keyboard. If you experience periods of
pain, tingling, numbness or other discomfort, please contact your doctor.
✓ We advise that parents monitor the use of games by their children. If you or your child experience any of
the following symptoms: dizziness, blurred vision, eye or muscle twitches, loss of consciousness, disorientation, any involuntary movement or convulsion, IMMEDIATELY discontinue use and consult your
doctor. This may happen even if the person has no medical history of epilepsy.
GETTING TO KNOW YOUR COMPUTER
The Keyboard and Mouse
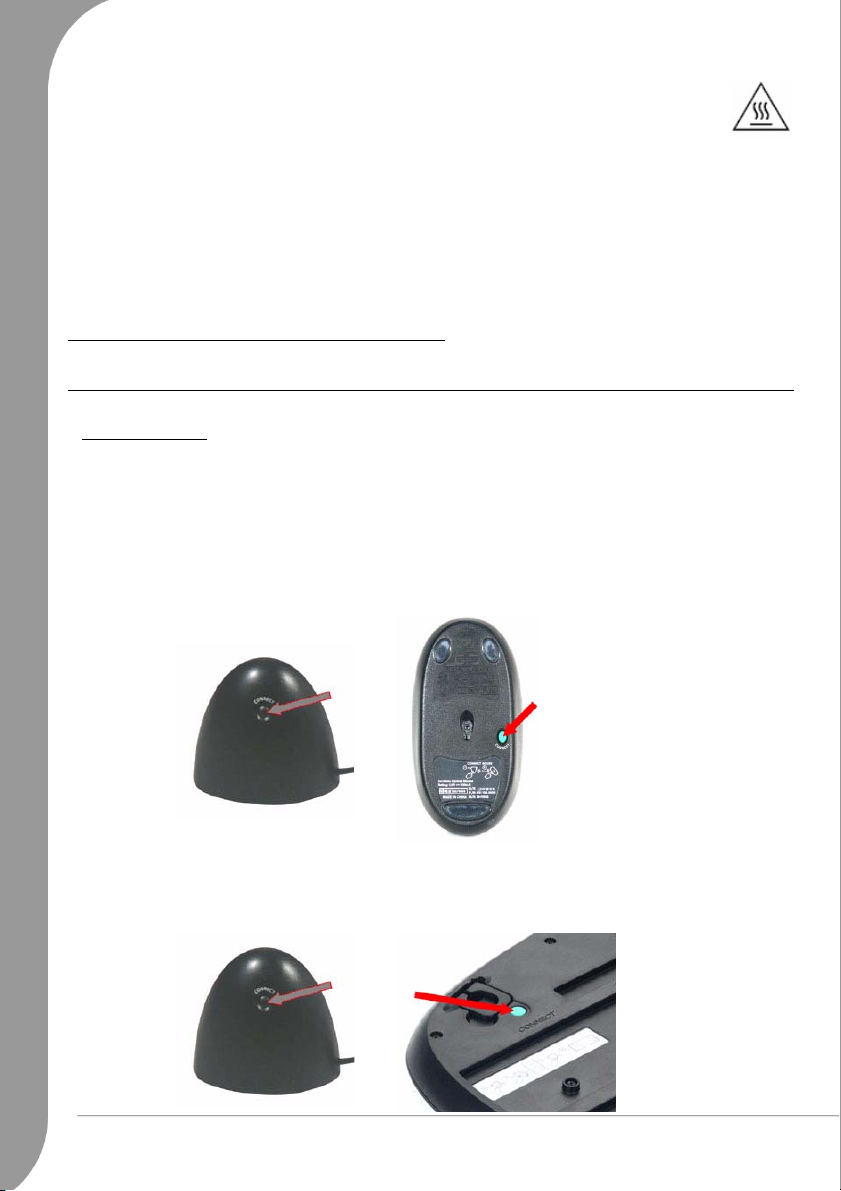
Cordless Devices
The cordless mouse and keyboard normally connect automatically as soon as you turn your computer on.
However, if the cordless mouse and keyboard do not work after installation, you should try to manually
establish communication with the receiver.
1. First check that the batteries for the keyboard and mouse are inserted correctly.
2. Then identify the mouse:
− Press the connect button on the receiver.
− Turn the mouse over.
− Use a thin object (such as a pen tip) to press the connect button on the mouse.
3. Identify the keyboard:
− Press the connect button on the receiver.
− Turn the keyboard over.
− Use a thin object (such as a pen tip) to press the connect button on the keyboard.
6 -
Packard Bell Quick Start & Troubleshooting Guide
Page 7
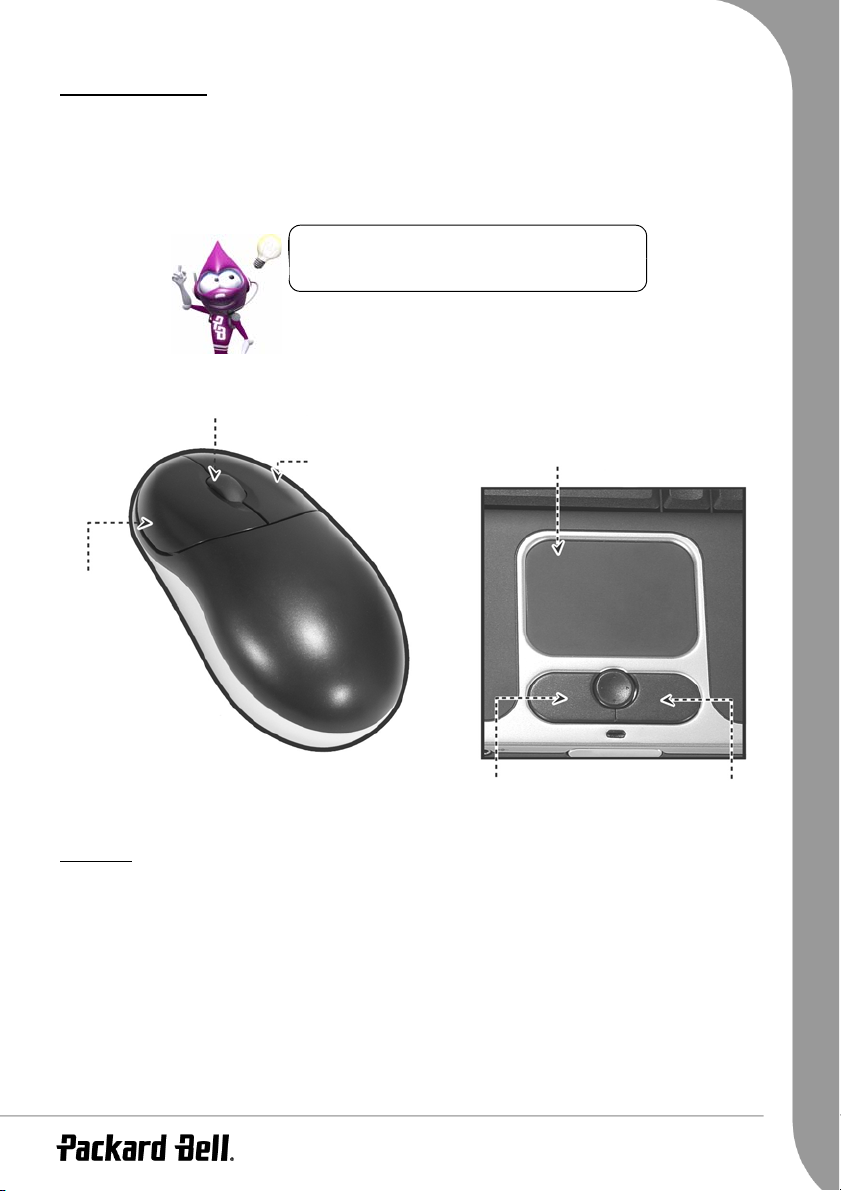
Mouse or Touchpad
The mouse or the touchpad (for portable computers) controls the arrow on the screen. This arrow is called
the pointer or the cursor. When you move the mouse over a hard and flat surface, or when you drag your
finger across the touch-sensitive pad, the pointer will follow this movement. Click one of the buttons on
the top of your mouse, or one of the buttons of the touchpad, to select or activate the command the cursor
is pointing at.
Improve the motion and visibility of your pointer!
Click on Start > Control Panel > Printers and other
Hardware > Mouse > Pointer Options.
Use the scroll wheel or button to move
through compatible applications
Right-click to bring
up a pop-up menu
Left-click to
select the item
that the pointer
is pointing at
Two quick taps on the surface of a
touchpad will perform the same
action as a double-click
Double-click to start
the program the cursor
is pointing at, or select
an entire paragraph
when typing text
Left-click Right-click
Keyboard
The keyboard is used to enter data or commands. The functions of the keys depend on the program you
are using. The keyboard displayed in this guide is just an example. The layout of your keyboard may vary
slightly. For a full description of your keyboard, please refer to
InfoCentre
.
Computer Basics -
7
Page 8
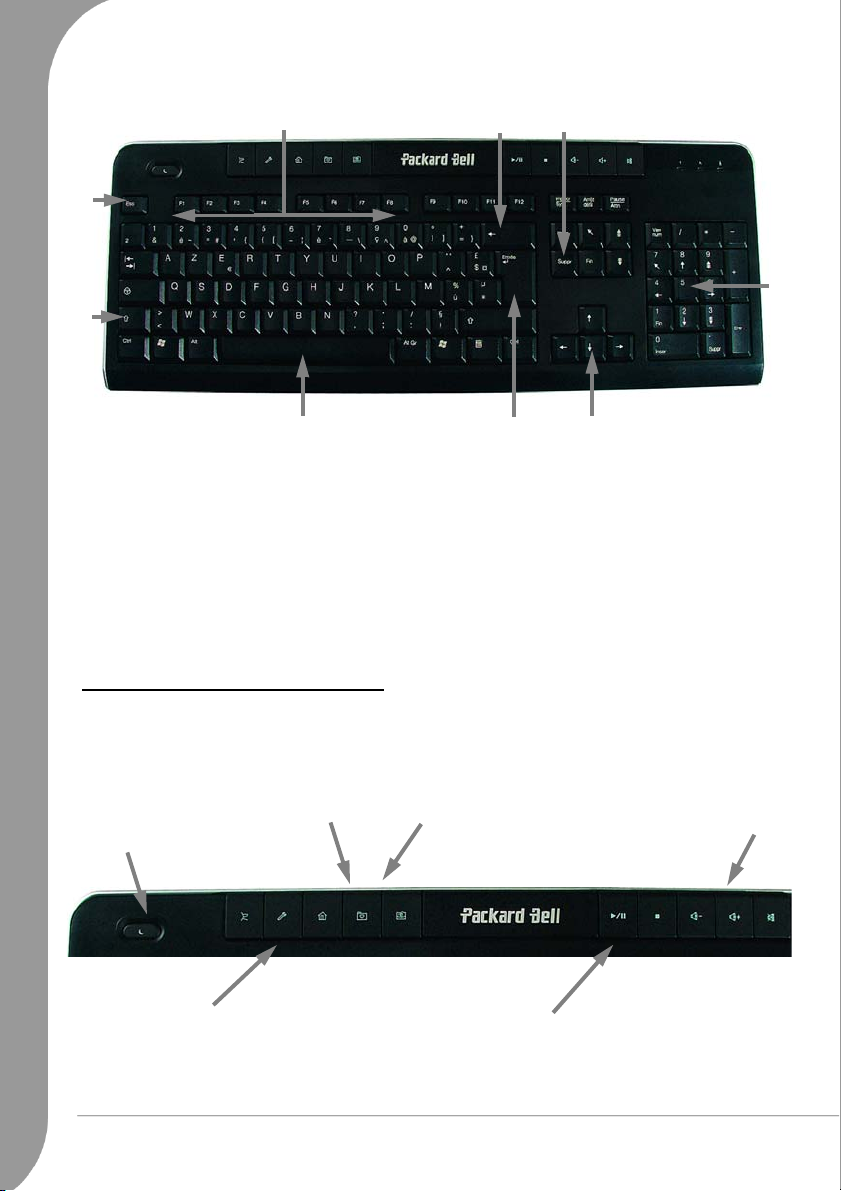
➒
A
➑
➊
➋
➌
➍
➐
1. Numbers: Used to enter numbers and special characters. Press [Shift] simultaneously for characters on the
top and press [Ctrl] + [Alt] for characters on the right.
2. Backspace: Used to go back one space and delete the last key pressed.
3. Del: Deletes characters to the right of the cursor or any highlighted item.
4. Numeric keypad: Functions as a second set of cursor keys. Press the [Numlock] key to enter numbers.
5. Arrow keys: Move the cursor up, down, left and right.
6. Enter: Press to enter a command, insert a paragraph break in a text or accept a chosen option.
7. Space: used to enter an empty space in your text.
8. Shift: Use simultaneously with a letter key to enter capital letters.
9. Esc: Cancels most current tasks.
Multimedia Keys (on selected keyboards)
Display your
ctivate Standby
(sleep) mode
Favorites
Launch Outlook Express
/ Internet Explorer
➏
➎
Volume controls:
Volume-/+, mute
Go to Packard Bell online services:
Shopping, Support, Homepage
8 -
Packard Bell Quick Start & Troubleshooting Guide
Multimedia controls:
play/pause, stop
Page 9
To optimise space and weight, notebook computers use compact keyboards. These include keys that
activate special features, such as the embedded numeric keypad.
Numlock: Press the [Numlock] key to
activate or deactivate the Numeric Keypad
Fn: Use simultaneously with the [F1] to [F12] keys to
activate special functions
Your Computer’s Drives
The drives described below are commonly used on Packard Bell computers. However, this does not mean
that they are present on the computer you have purchased, nor that it is limited to these drives. To view
documentation specific to the model you have purchased, please check
Memory Card Reader
Memory cards are used in a wide selection of digital cameras, PDAs, MP3 players
and mobile phones. Selected computers include an “all-in-one” memory card
reader that allows you read and write the most common types, such as MMC
(Multi Media Card™), CF (Compact Flash®), IBM Microdrive™, SM (Smart
Media™), SD (Secure Digital)™, or MS (Memory Stick®).
InfoCentre
.
Formatting a Card
Before using a card for the first time, it should be formatted.
1. Insert your card in the corresponding slot and click on Start > My Computer.
2. Right-click on the card icon and select Format.
3. Click on Start in the format window and then click on OK.
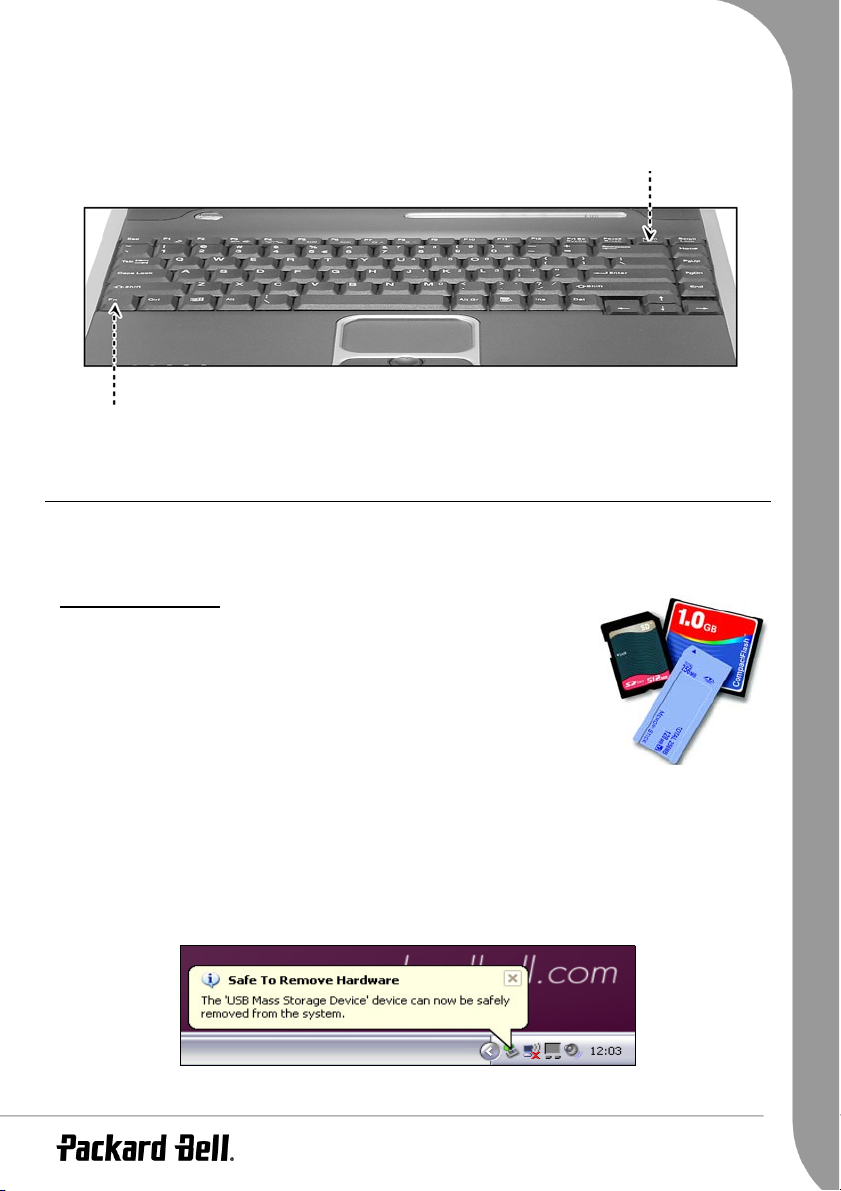
Removing a card from an External Card Reader
1. Click on the Safely Remove Hardware icon in the Notification Area (next to the clock).
2. Click on Safely remove USB Mass Storage Device.
3. Wait until a
Safe to Remove Hardware
message is displayed.
4. Remove the card.
Computer Basics -
9
Page 10

Optical Drives
Most computers are equipped with a DVD drive. A DVD drive can read audio CDs, CDs containing data
(files and programs), Video CDs and recordable CDs, plus DVDs, DVD movies and most recordable DVDs.
CD and DVD Types
If your computer is equipped with a CD or a CD-writer drive, then you will only be able to play CD-type
discs.
If your computer is equipped with a CD or DVD-writer, you can use this device to duplicate your CDs,
create your own music compilations, digital photo albums or keep a safe copy of your valuable data.
Before copying a CD, make sure that its content is not protected by Trademarks and Copyrights, and
that you are authorised to replicate it. In most countries you are allowed to make an archival backup
of software or copy music for your own personal use.
CD and DVD-writers support two main types of writable discs:
"R": You can only write the disc once. When you have saved your files you will not be able to delete them
or use the disc again.
"RW": You can re-write the disc to save or delete your files. It is ideal for backing up your important data.
Precautions
✓ Insert the disc into the drive before you start a program.
✓ Do not eject the disc without first closing the program that is using the disc. This could potentially
cause your computer to stop responding. Should this happen, restart your computer by using the Windows Task Manager (see page 43).
✓ If the tray does not eject, you may try to open it manually:
1. Switch your computer off.
2. Carefully insert a straightened paper clip into the emergency eject port (if available). Do not use a
pencil as the lead may break inside the eject port and damage the drive.
✓ Keep the disc tray closed whenever you are not using the drive.
Batteries (Notebooks)
While you are away from an AC power supply, your computer uses a rechargeable battery. This battery can
be removed, which allows you to carry multiple batteries for long journeys, or to replace an aged battery
that has lost performance.
Although the battery is fully charged at the factory, transit and shelf time may reduce the initial battery
charge. The first time you use your computer, connect the AC power adapter and charge the battery
completely
Check
about your notebook
10 -
Packard Bell Quick Start & Troubleshooting Guide
InfoCentre
to learn more
Page 11
Battery Life
Battery life depends on how the computer is used, the battery's capacity and the computer's design.
Batteries will start to perform less (50% of maximum time reached in a laboratory environment) with age.
Every couple of months you should do a complete discharge of the (NiMH) battery, followed by an uninterrupted full battery recharge to ensure reliable battery operation.
Replacing Batteries
A lithium battery in some computers maintains system configuration information. In the event that the
battery fails to maintain system configuration information, we recommend that you replace the battery.
Battery Disposal
Batteries contain a mix of chemicals that should be treated with care. Ultimate disposal of the batteries
should be handled according to all national laws and regulations. Do not place used batteries in your
regular waste.
Ports and Connectors
The ports and connector types described below are commonly used on Packard Bell computers. However,
this does not mean that they are present on the computer you have purchased, nor that it is limited to these
ports. To view documentation specific to the model you have purchased, please check
Precautions
✓ Before you attach any device, check the installation instructions that were supplied with it.
✓ Do not remove a device if the computer is using it.
✓ Most devices are "hot-pluggable". This means they can be added or removed while the computer is on.
They will be detected and installed automatically. However, they must be deactivated before they can
be removed from the computer (see "Removing a card" on page 9).
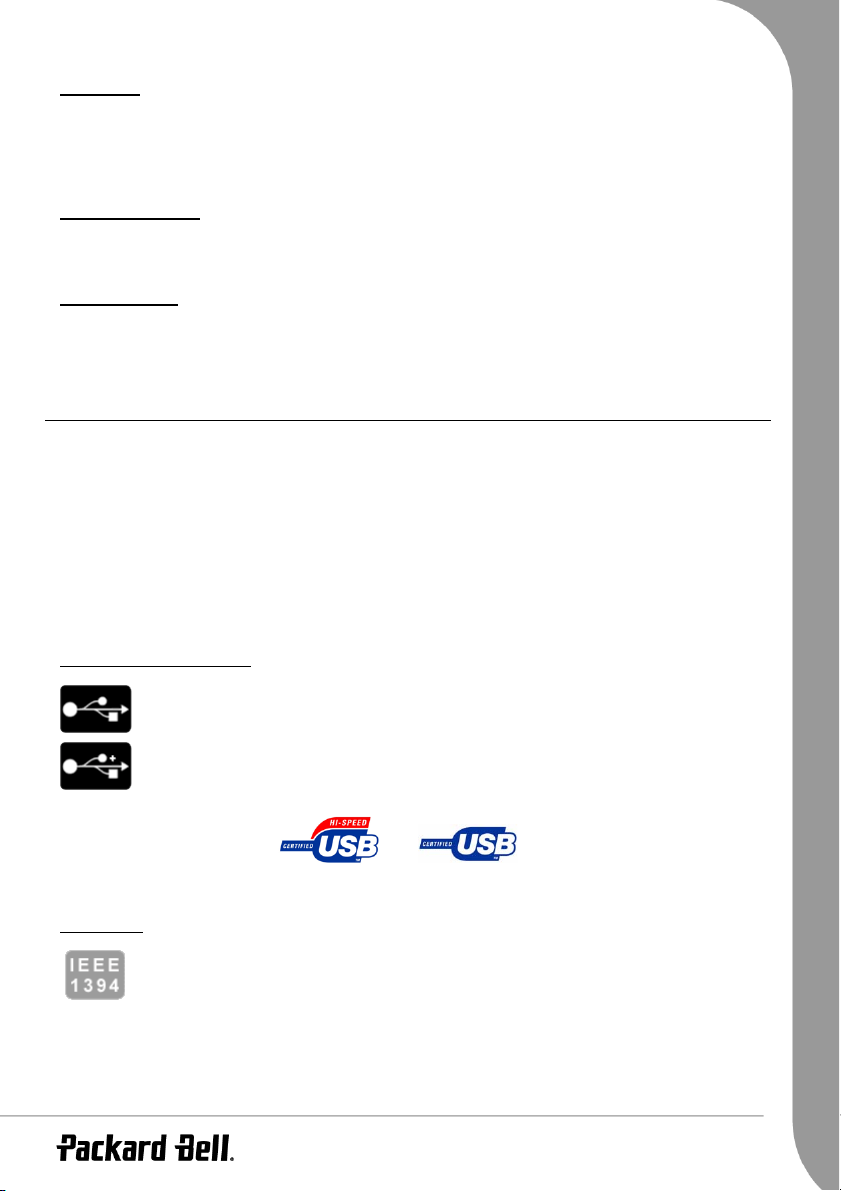
USB (Universal Serial Bus)
USB ports provide an easy-to-use "hot-pluggable" connection.
InfoCentre
.
IEEE 1394
USB 2.0 connectors can provide greater speeds to USB 2.0 certified Hi-speed devices. Fullspeed or low-speed devices will function at the same speed as on earlier versions of USB.
Devices can be distinguished by the logos below:
An IEEE 1394 port (aka FireWire™ or i.LINK) allows you to connect high-speed digital
devices to your computer, such as digital video cameras, external hard disk drives, or
scanners.
Computer Basics -
11
Page 12
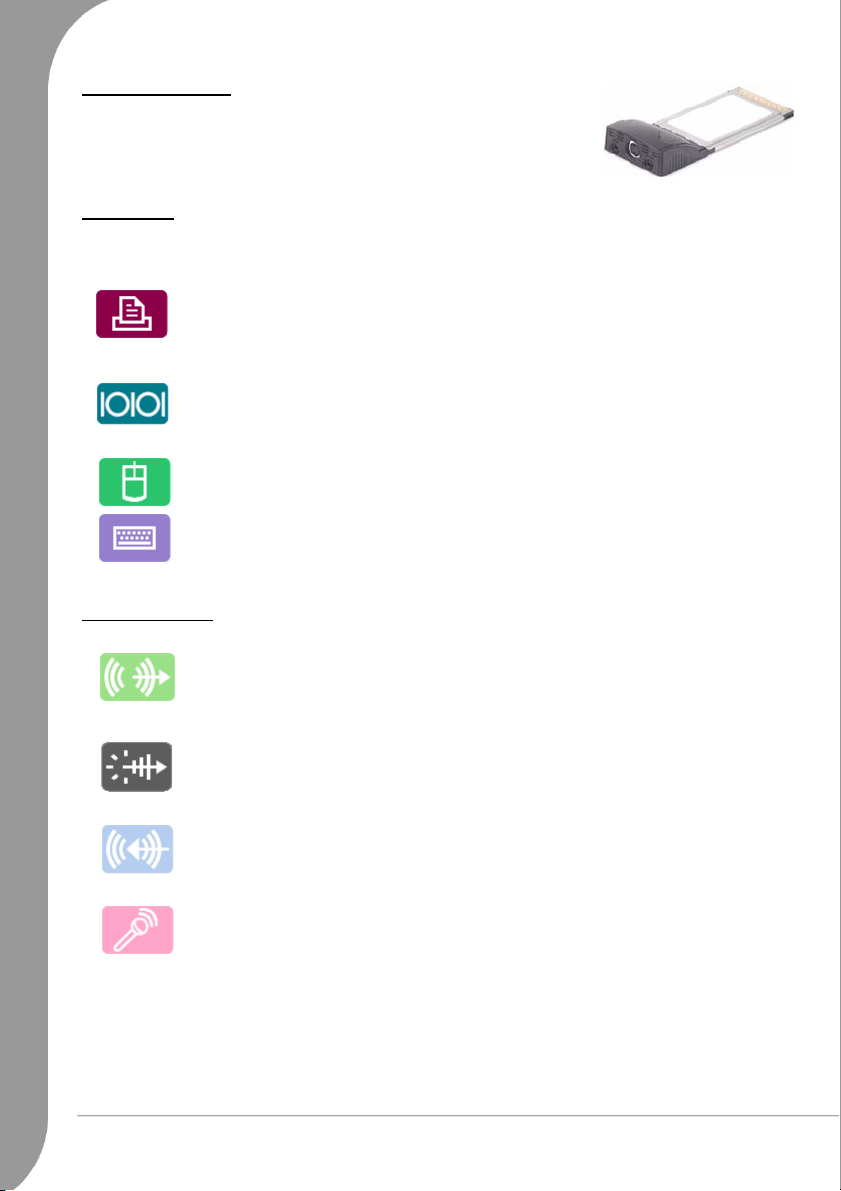
PC Cards (PCMCIA)
PC Cards (aka PCMCIA) are small credit card sized devices that allow you
to easily expand your computer. These are typically found on notebooks.
Each PC Card slot that your computer is equipped with can accept a PC
Card device, though the type of card each slot accepts may be different.
Legacy Ports
Legacy ports are provided on most computers to ensure that older devices can still be used. Unlike "hotpluggable" devices, you need to turn off your computer before adding or removing a legacy-type device.
Parallel (- printer or LPT port): to connect printers, scanners or external disk drives.
Serial (- communication or COM port): to connect an external modem, a mouse or a
digital camera.
PS/2: to connect a mouse or keyboard.
Sound connectors
Line-Out: to connect speakers to your computer.
Fibre-optic Line-Out: to enjoy S/PDIF quality sound. If you own a 5.1 speaker set
connected to an amplifier with fibre-optic entry, you can enjoy Dolby Digital sound
when playing DVDs on your computer.
Line-In: to connect a sound source to your computer.
Microphone: to connect a mono microphone with a 3.5 mm plug.
12 -
Packard Bell Quick Start & Troubleshooting Guide
Page 13
TV-Out
A TV-Out port allows you to use a television (with appropriate Video-In connector) as
an external display device. To transmit sound, you will also need to connect the LineOut port of your computer to your television.
Communication Ports
Modem: to connect a dial-up modem and connect to the Internet via a phone line.
Network (LAN or Ethernet port): to share a common communications line and
resources with other computers.
Other types of modem, such as DSL, cable or Wi-Fi devices, can be connected to your
computer using the USB ports or PC Card slots.
The network port looks very similar to the modem port; they are often situated near each other and
can easily be mistaken. The network port is slightly larger than the modem port.
In thunderstorm conditions, make sure that you disconnect all your connection cables; unplug the
modem from the telephone line, the TV port from the aerial socket and any network cable. A lightning strike to nearby telephone lines or an aerial could damage your modem, network or TV card
or even your whole computer. Please note that the product warranty does not apply if damage to
your computer is the result of a lightning strike.
Turning your Computer ON/OFF
Turning your Computer ON
1. First, switch ON any devices connected to your computer (including a monitor) by pressing the main
ON/OFF switches on these devices.
2. Then switch ON your computer by pressing the main ON/OFF switch.
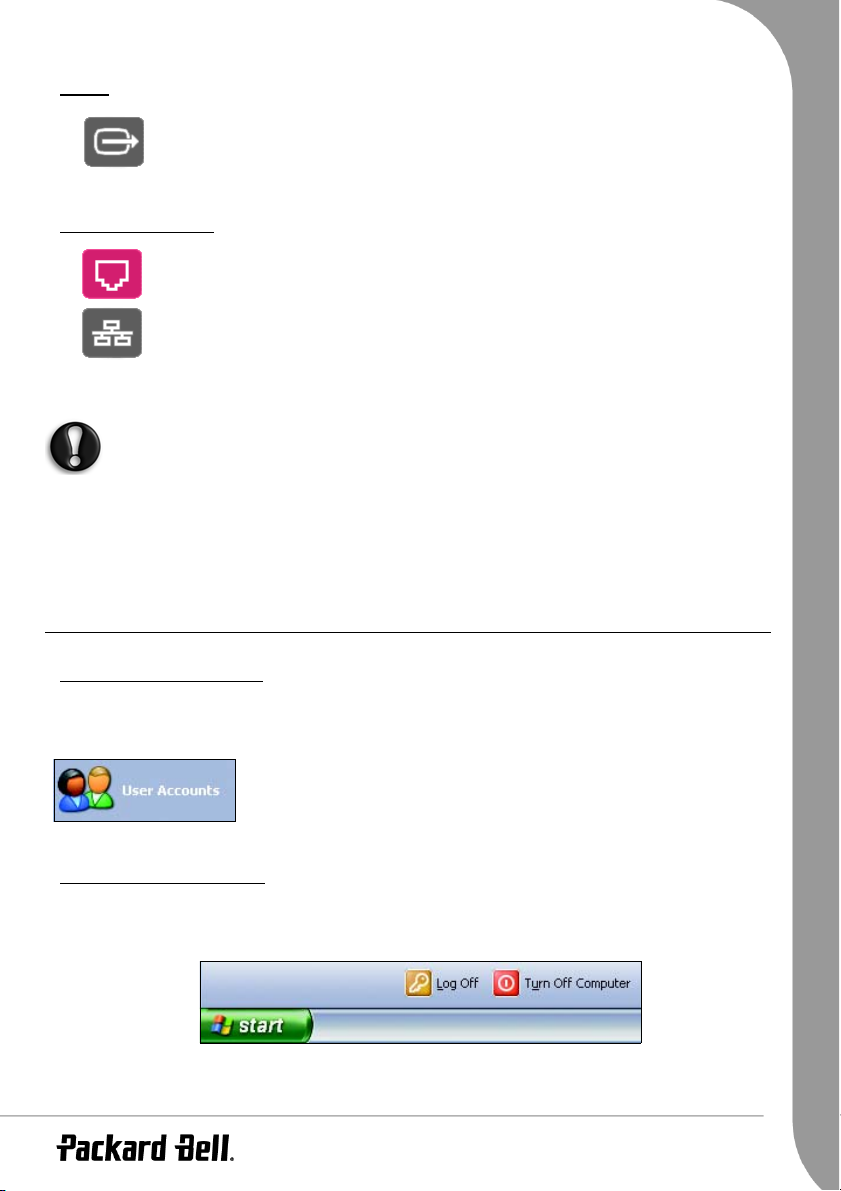
To share the family computer and have your own system settings every time
you turn on the computer, you can set up accounts for each user. You can
access and modify your accounts at any time by clicking on Start > Control
Panel > User Accounts.
Turning your Computer OFF
Make sure all applications are closed before you turn off your computer.
➋
➊
Computer Basics -
13
Page 14
➌
➋
Forced Shutdown
If you are having problems turning off your
computer, then try using the
utility provides information about your system’s
performance and displays details about programs
and processes running on your computer.
Press the [Ctrl]+[Alt]+[Del] keys simulta-
➊
➊
neously or right-click on an empty space on
the taskbar and select Task Manager in the
pop up menu.
If your computer still does not respond, press the computer power button to turn your computer
off. Keep this button pressed until all of the LEDs turn off and wait for roughly 30 seconds before
turning the computer on again.
Task Manager
. This
Once the computer has shut down, switch OFF any external
devices, such as the monitor, if they have a power button.
You may also turn off your computer without going to the
Windows Start menu. Simply close all your applications and
press the power button.
➌
Power Options
The power options of Windows can control your computer’s power state
and allow you to save energy. Depending on your needs, you can define the
power scheme that suits you best. Three power saving modes are provided:
Turn off device, Standby and Hibernate.
To learn more about personalising your computer,
click on Start > Help and Support.
Upgrading your Computer
Packard Bell strives to make your computing experience as easy and pleasant as possible. Because your
computing needs may evolve, Packard Bell is here to help you choose the right accessories and make the
most of your computer.
14 -
Packard Bell Quick Start & Troubleshooting Guide
Page 15
Memory
Memory (RAM) is a key component of your computer. If you run memory-intensive applications such as
image or digital-video editing or 3D games, adding some memory will increase the computer performance
and help your computer run faster.
To help you find out the memory module that is best suited to your Packard Bell computer, you can use
our online configurator on www.packardbell.com! The step-by-step configurator is your best pick to find
the right module quickly and easily with no risk of error, at a competitive price.
Storage
Whether you need additional storage space, need to create backups or need removable storage to carry
your data, an external hard disk drive will be a convenient solution to expand your computer. Simply plug
it into a FireWire or USB port and "drag and drop" to transfer your valuable data in a few seconds. To make
temporary backups, this is a lot quicker than burning a CD or DVD! High capacity drives are also ideal for
storing your favourite music, photos and videos and take them with you everywhere you go!
Visit www.packardbell.com to discover our accessories and buy online or locate a store near you!
Convergence
Packard Bell aims at making the most of today's increasingly digital world with products that are ideally
suited to popular and emerging digital activities. Our products integrate the best technologies and allow
you to benefit from the latest advances, such as broadband Internet, Wi-Fi networking and digital media.
Our home entertainment range includes LCD TVs, digital TV and media receivers, DVD recorders, as well
as a collection of MP3 players to bring technology and entertainment with you wherever you go!
Visit www.packardbell.com today and enter the Lounge, where
technology is always stress-free and personally enriching!
Warranty
Packard Bell computers come with a high quality and comprehensive warranty packages. For further peace
of mind, optional PB Care packs let you extend the standard warranty up to three years and upgrade to onsite service for desktops. For information, please visit www.packardbell.com.
If your warranty has expired, or if PB Care packs are not available in your area, don't panic, Packard Bell
has the answer. Packard Bell has appointed Authorized Service Centers to provide you with high quality
service! You will benefit from the service of experienced technicians, trained on your Packard Bell product.
Recycling
You just bought a new computer or a new monitor and wonder what you can do with your old
equipment? Don't just toss it! Packard Bell encourages you to recycle!
Most computer equipment contains hazardous materials, which are best kept out of landfills. Through
recycling, many materials used in computers can be recovered and used again. Many charitable organizations collect computer equipment, other companies can repair and sell used computers.
Computer Basics -
15
Page 16
FIRST STEPS ON THE NET
Get Connected!
Using the Internet has become natural part of daily computing. To make it easier, Packard Bell has included
all the tools you need to get started!
Internet Service Provider
To get connected, you need to register with an Internet Service Provider (ISP), which supplies the physical
connection between your computer and the Internet. Certain computers come with a selection of ISPs
already preinstalled.
➌
➍
➋
➊
If you wish to use an ISP of your own, please refer to the instructions supplied with the installation pack.
Avoid using several ISPs.
Connection Types
Depending on your computer model, your location and your communication needs, you have several ways
to connect to the Internet.
Dial-Up
Most computers include a standard dial-up connector. This allows you to connect to the Internet using
the telephone line. With a dial-up connection, you cannot use the modem and the telephone simultaneously on a single phone line. This type of connection is recommended only if you have limited use of
the Internet as the connection speed is low and connection time is typically charged per hour.
DSL
DSL (Digital Subscriber Line) is an "always-on" connection that runs over the phone line. As DSL and
phone do not use the same frequencies, you can use your telephone at the same time you are connected
to the Internet . To be eligible for DSL, you must be located near a phone company's central office
(service is sometimes unavailable in rural areas). Connection speeds vary depending on your location, but
DSL generally provides very fast and reliable Internet connection (download speeds are significantly
higher than upload speeds). As the connection is always-on, it is generally charged at fixed monthly rates.
16 -
Packard Bell Quick Start & Troubleshooting Guide
Page 17

Cable
A cable connection provides fast and "always-on" Internet service via a cable television line. This service is
generally available in large cities. You can use your telephone and watch cable TV at the same time you
are connected to the Internet. As it is a shared connection, the connection speed can slow down when
lots of people in the same neighbourhood are online.
LAN
A LAN (Local Area Network) is a group of computers (for example, within an office building or home)
that share a common communications line and resources. When you set up a network, you can share
files, peripheral devices (such as a printer) and an Internet connection. You can set up a LAN using wired
technologies (such as Ethernet) or wireless technologies (such as Wi-Fi or Bluetooth).
Wi-Fi
Wi-Fi (short for "wireless fidelity") is an increasingly popular type of wireless local area network (WLAN)
that uses the 802.11 standard. Setting up a Wi-Fi network is easy and allows you to share files, peripheral
devices and an Internet connection. If you have a notebook computer, you can even surf the Internet
from anywhere in your home or even in your backyard! To set up your network or access Wi-Fi in a
public place, you need one of the following hardware devices (some of these may already be supplied
with your computer):
• Memory card (Compact Flash, SD card, etc.): insert it into a memory card reader.
• PCMCIA card: insert it into a PC Card slot (typically on notebooks).
• USB adapter: plug it into a USB port.
• PCI Network Card: insert it into a PCI slot on your computer's motherboard.
• Router ("network access point"): plug it to a USB, or Ethernet port, or to your modem.
Many businesses, schools, airports, hotels, and fastfood facilities offer public access to Wi-Fi networks.
If you have a Wi-Fi notebook, you can connect to
the Internet in these "hot spots". Many charge a
daily or hourly rate for access, but some are free.
PLC
PLC (Power Line Communication) allows you to create a high performance
network with your power line plugs. PC activities such as data exchange,
accessing a network printer or Internet access is all done over the existing electrical wiring in the house. To set up a PLC network, all you need to do is plug
adapters on your power plugs and quickly configure your computer. Adapters,
such as the Packard Bell net2plug solution, enable you to set up or expand a
home network easily and economically.
To discover more on net2plug, visit www.packardbell.com!
Computer Basics -
17
Page 18
Surf the Net!
To surf the Internet, you need a program called an Internet browser. The browser included on your
computer is
(where available), or click on Start > Internet.
Internet Explorer Features
Microsoft Internet Explorer
. To open your browser, press the Internet button on your keyboard
➊
➋
➏
➐
➌
➍
➑
1. Click on Help or press [F1] on your keyboard.
2. Reduce, maximize or close the window
3. If the page is not completely visible on your screen, use the up and down arrows in the scroll bar. Alternatively, use the arrow keys on your keyboard, or the scroll button of your mouse or touchpad.
4. Hyperlink: click to jump to another topic or page.
5. Left-click and hold to resize the window
6. Toolbar
7. Address Bar: Type in a web address and click on the Go button.
8. Status Bar
➎
Outlook Express Features
Your computer includes
messages can include files, photos, sounds and videos and will be delivered in just a few seconds anywhere
in the world!
To open the program, click on Start > E-mail.
18 -
Packard Bell Quick Start & Troubleshooting Guide
Microsoft Outlook Express
, which allows you to send and receive e-mail. Your
Page 19
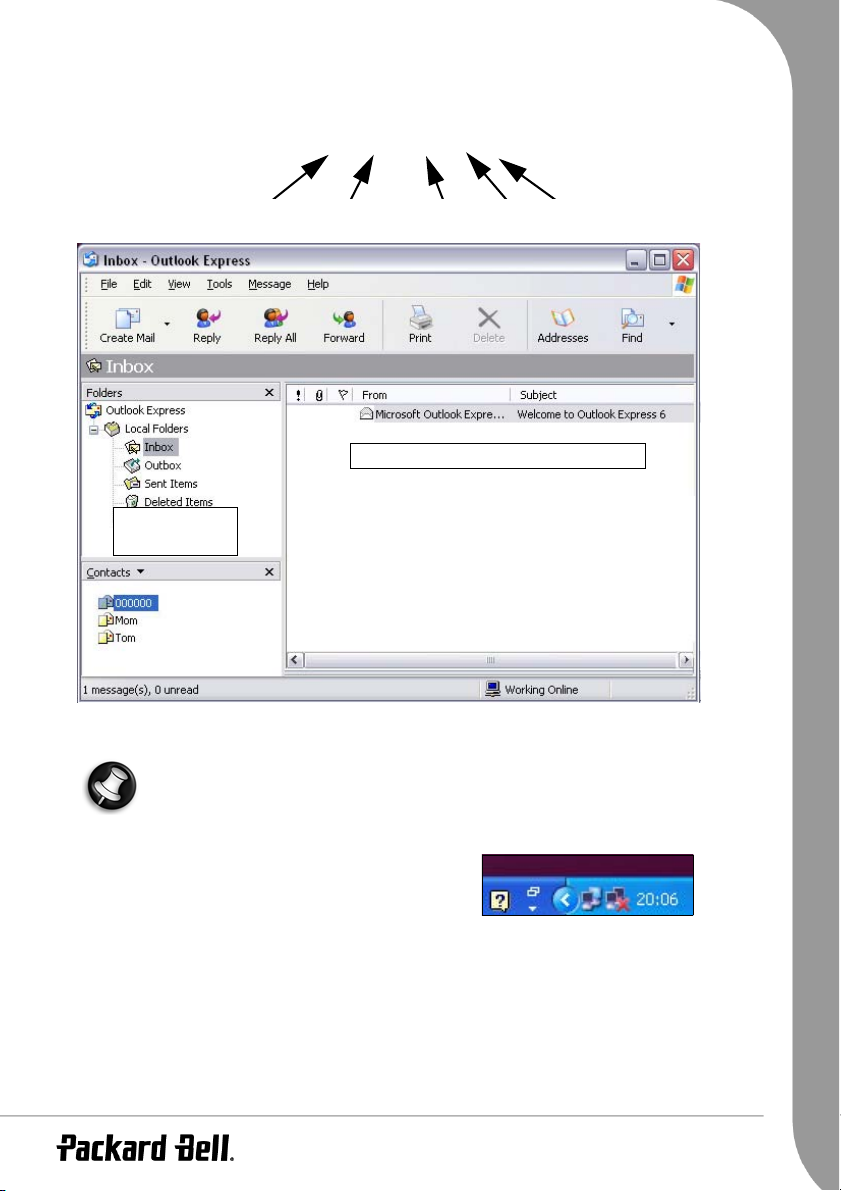
When you subscribe to an Internet provider, you usually get one or more e-mail addresses (for you and
your family members). Example:
Granny@packardbell.com
Username “at” Domain “dot” Extension
Display the content of the selected folder
Folders to store
your messages
You can write your messages off-line and connect to the Internet only when sending
or receiving.
To know when you are online, look for two small computers
in the Notification Area, next to the clock. If your computer
is equipped with a network port, you may see a similar icon
marked with a red cross over it when inactive.
Computer Basics -
19
Page 20
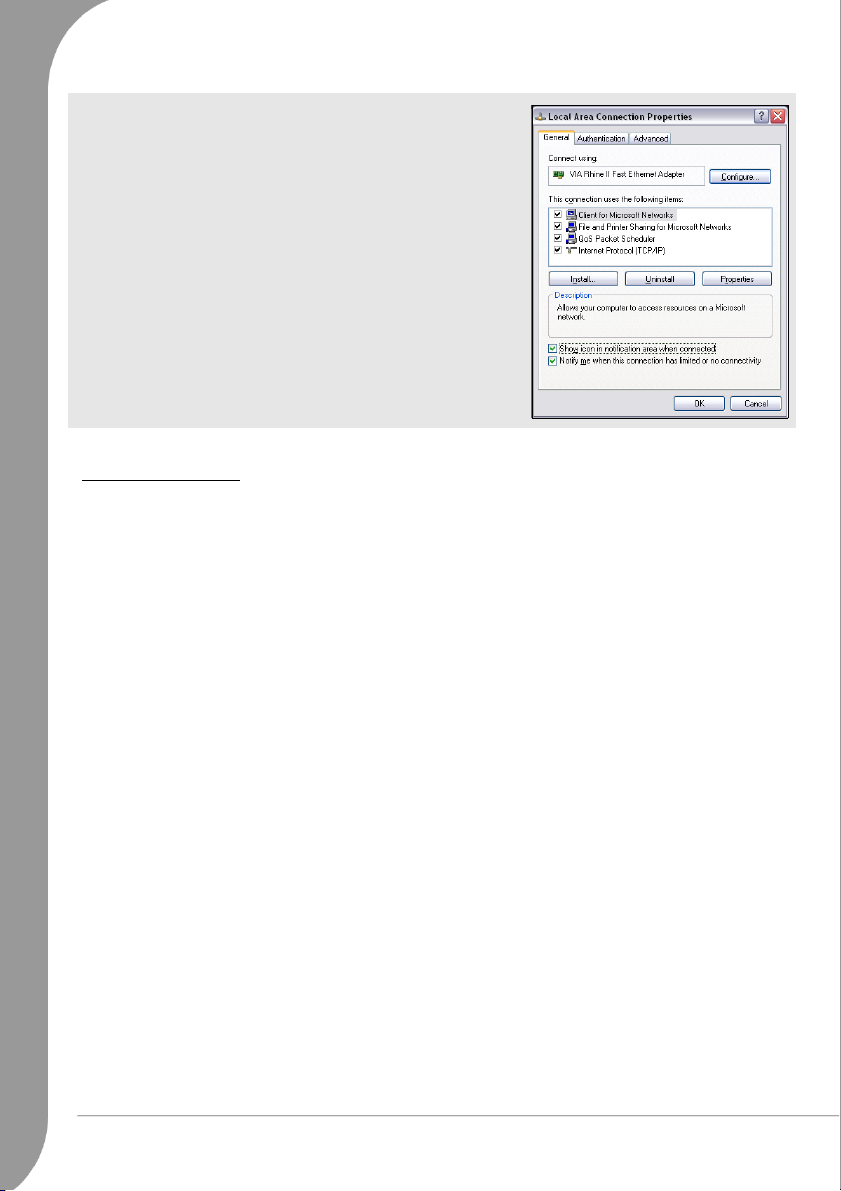
If you cannot see this icon:
1. Click on Start > Control Panel > Network and Internet Connections > Network Connections.
2. Right-click on the connection icon and select Properties.
3. Select Show icon in Notification Area when connected.
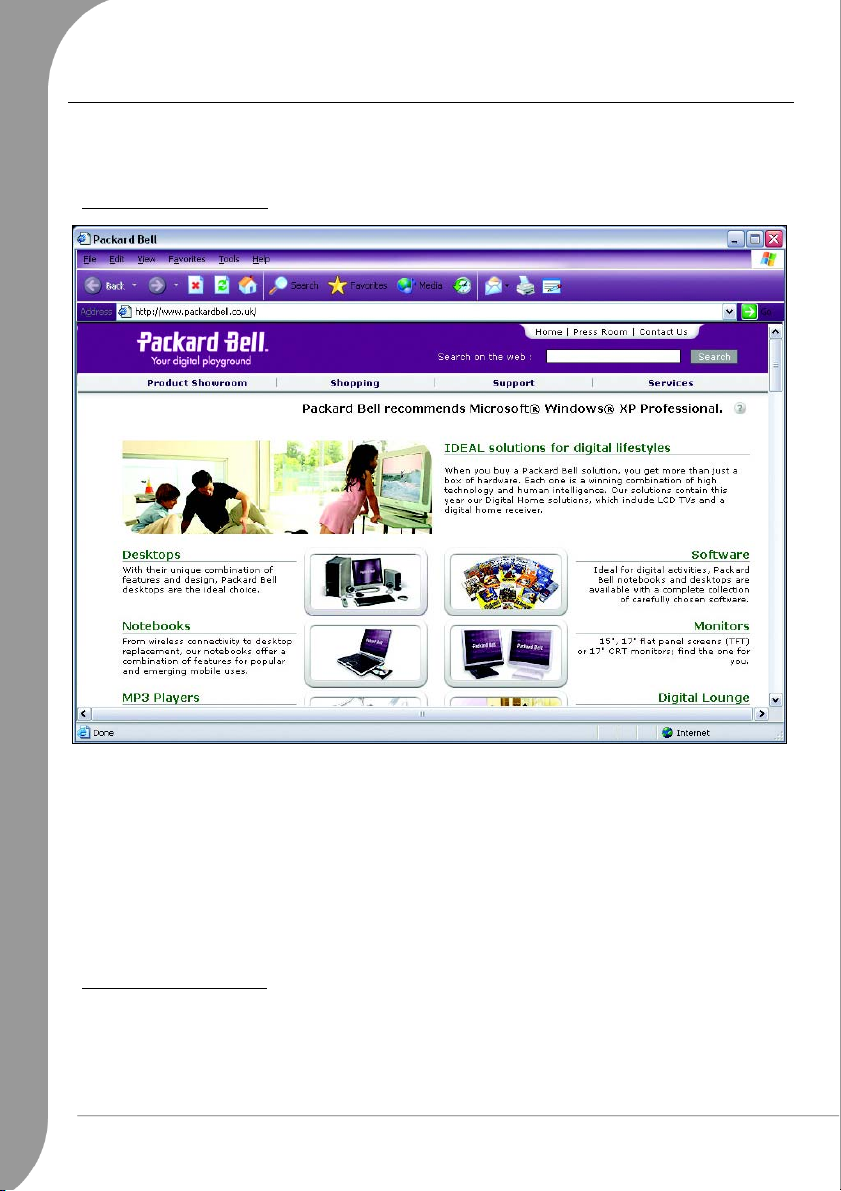
Packard Bell Website
To get you started why not visit our website, www.packardbell.com!
Packard Bell is dedicated to provide you with on-going personalised support. Check out our Support
section to get help tailored to your needs:
✓
My PC Support
cific to your computer!
✓ The
Troubleshooter
not be available in all countries).
✓ Enter keywords in the
✓ Enter the
patches and upgrades for programs and firmware.
✓ Share your experiences with other Packard Bell users and find help in the
can recognize your computer serial number and instantly give you all information spe-
can help you find solutions in case you have a problem with your computer (may
Search
Downloads
box and find all the support articles related to your search!
area to search for and download driver updates for your computer, as well as
User Forum
.
✓ You can also search for product information by range or category, read about your warranty and find
contact information.
To learn more about the latest technologies offered by Packard Bell, check out our
With the
few clicks!
www.packardbell.com is your gateway to a world of online activities and services: visit us regularly for the
latest information and downloads!
20 -
Shopping
section, you can also locate a store near you, or get the latest Packard Bell products in a
Packard Bell Quick Start & Troubleshooting Guide
Product Showroom
.
Page 21
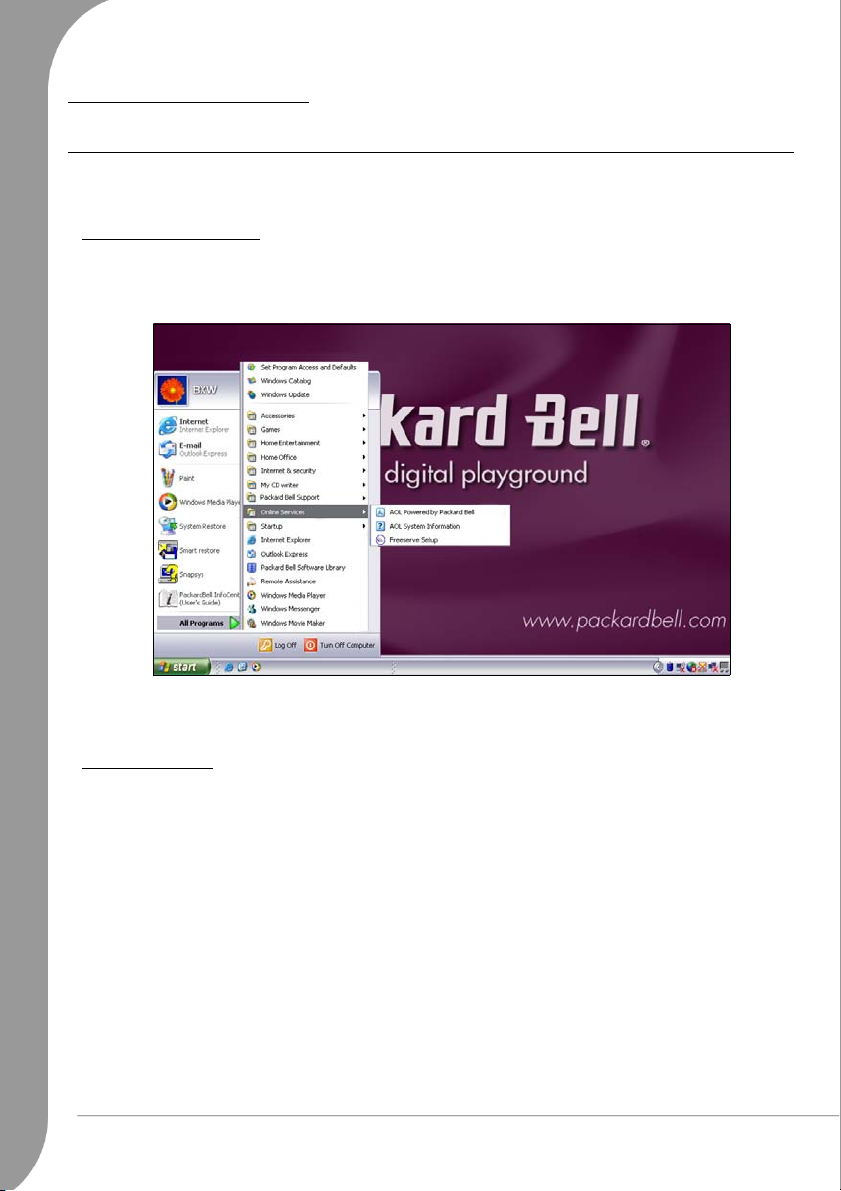
USING WINDOWS AND SOFTWARE
Setup my PC
To make it easy, Packard Bell has gathered all important setup steps into one application!
To launch
you can return to the application at any time by clicking on this icon, or from the Start
menu and Control Panel.
A wizard will guide you through the steps to install your Internet access, antivirus software,
telephone and gaming programs, run
your
The number of options may differ according to your computer model and region.
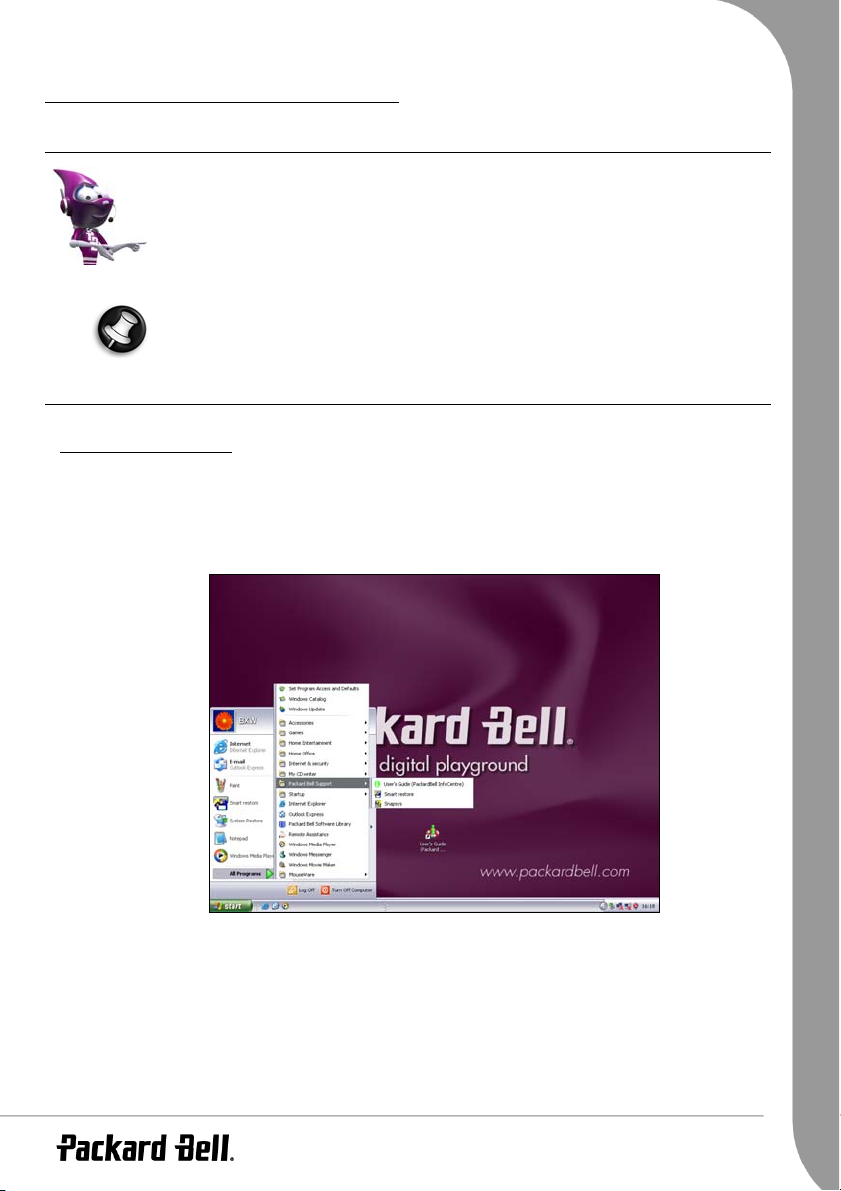
Your Computer's Documentation
Packard Bell InfoCentre
This guide is not the only reference for information about your computer!
user’s guide contains comprehensive documentation on your computer, giving you the help you need
directly on your screen.
To open
click on Start > All Programs > Packard Bell Support > User’s Guide (Packard Bell InfoCentre).
InfoCentre
Setup my PC
PC Identity Card
, double-click on the User’s Guide (Packard Bell InfoCentre) icon on your desktop or
, simply click on the icon on your desktop. If you skip some steps,
. Simply select the items you wish to setup and follow the prompts!
InfoCentre
and
Master CD/DVD Creator
InfoCentre
, and print
, your electronic
➌
➍
➋
➊
My Computer: Contains all the technical information about your computer's components and useful tips
on how to upgrade your computer.
Accessories: Discover a collection of accessories specially designed for your Packard Bell computer.
Internet: Describes the Internet tools that are installed on your computer and useful tips about the
Internet.
Tutorials: Contains a series of helpful articles on performing day-to-day tasks for beginners or advanced
computer users.
Links: Display an electronic version of the
Website.
Quick Start & Troubleshooting Guide
or visit the Packard Bell
Computer Basics -
21
Page 22
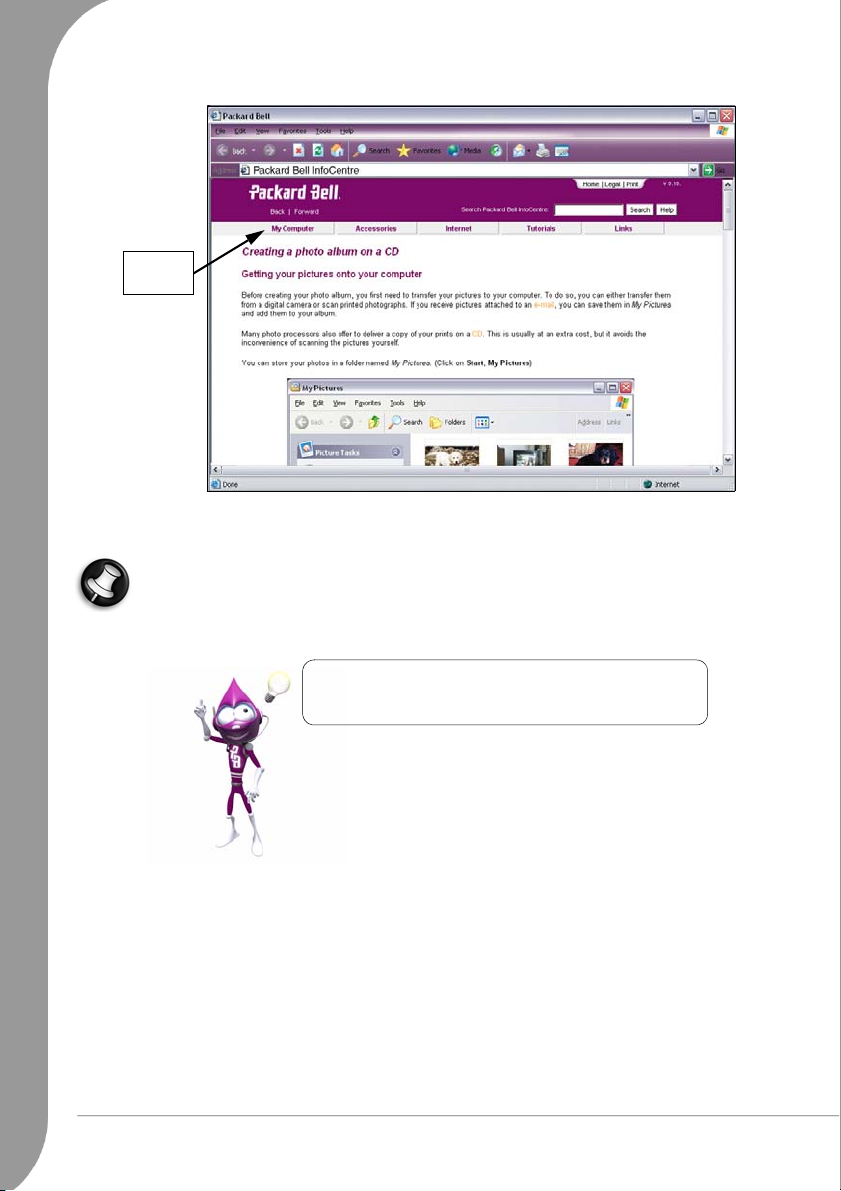
Select a
category
The number of categories and titles available may differ according to the computer you purchased.
Remember to visit www.packardbell.com often! Check out
the Support section: it contains up-to-date information,
help, drivers and downloads.
22 -
Packard Bell Quick Start & Troubleshooting Guide
Page 23

Software Documentation
Most of the applications preinstalled on your computer by Packard Bell feature an online documentation file.
➌
➍
➋
➊
If you need help while using a program, press [F1] on your keyboard, or click on Help or the Help
icon (typically a ? sign).
Your Software Library
Where is my Software?
Packard Bell computers include a wide range of software applications. The types of programs and categories available on your computer depend on the model you purchased.
Your software can be found:
✓ Preinstalled: your software is ready to use or to set up. However, some titles require a CD or DVD to
run (typically, games or encyclopædia). You will find these discs in your computer's packaging.
✓ On a CD or DVD: the software first needs to be installed. To do so, click on Start > All Programs >
Packard Bell Software Library. An installation wizard will start automatically and all you have to do is
follow the instructions on the screen.
Computer Basics -
23
Page 24

Playing Multimedia Files
You can use
software to play your audio CDs. Certain computers
also include all-in-one programs such as
PowerCinema
programs bring together all your entertainment
applications and allow you to play movies, video,
photos, music and more!
The Windows Autoplay function allows you to choose
the way Windows handles media files on devices with
removable storage (digital camera, CD, DVD, etc). If
you have inserted an audio CD or a DVD movie,
Windows will automatically display a dialogue box and
ask you to choose how you want to play it. If Windows
asks you to select a DVD player, we recommend that
you always choose the DVD player included with your
software collection.
Windows Media Player
or
Windows Media Center
, or other audio
. These
Volume Controls
Apart from the volume control on your computer, keyboard, monitor or speakers (depending on your
equipment), you can also adjust the volume and balance of your speakers from Windows.
24 -
Packard Bell Quick Start & Troubleshooting Guide
Page 25

Adjusting the Volume
To adjust the volume, simply click on the Speaker icon located in the Notification
Area, next to the clock.
If you cannot see the speaker icon:
1. Click on Start > Control Panel > Sounds, Speech, and
Audio Devices.
2. Select Sounds and Audio Devices.
3. Select Place volume icon in the taskbar.
Drag the slider up or down to adjust the volume. Click in the Mute box to mute the volume.
Click again to resume playback.
To access advanced volume control settings, double-click on the Speaker icon located in the
Notification Area to open the
Volume Control
window.
Computer Basics -
25
Page 26

HELPDESK
SAFE COMPUTING
To make the most of your new computer and ensure it runs smoothly for a long time, you should use the
programs below and regularly perform the actions described in this guide.
Maintenance
Packard Bell Master CD/DVD Creator
Master CD/DVD Creator
drive to a "Master DVD" or a set of "Master CDs". When you create this copy, you have the option to
either retain the recovery data on your computer (strongly recommended) or to permanently delete it and
only save a copy on Master DVD/CDs.
Certain computers are provided with Master DVD/CDs instead of the recovery data on the computer's hard disk drive. In this case, the Master CD/DVD Creator program is not required.
If your computer was not originally equipped with a CD or a DVD writer and you add one later,
you can install Master CD/DVD Creator. To do so, use Smart Restore to install both Master CD/
DVD Creator and the burning software provided by Packard Bell.
allows you to make a safe copy of the recovery data stored on your hard disk
Please read carefully before using
✓ The recovery data contains all the programs that were originally supplied with your computer, includ-
ing your operating system. No separate copies of the Windows discs and Microsoft utilities are provided.
✓ If you delete the recovery data from your computer, you will no longer be able to use all the options of
the Packard Bell
ery process will take up to 1 hour.
✓ The Master DVD/CDs that you create will only contain the software that was originally on the hard
disk of your computer when it left the factory. Your personal files and other software that you have
installed will not be copied.
✓ You can create only one set of Master DVD/CDs for your computer.
Master CD/DVD Creator Checklist
✓ A blank recordable DVD or several CD-Rs; Do not use rewritable CDs or DVDs.
✓ The burning software that was pre-installed on your computer by Packard Bell.
✓ A CD marker pen to label your discs. Do not use stickers on the disc faces.
✓ This operation takes time. During the whole process, do not shut down the computer or run any other
programs. Make sure that your screen saver, power saving mode and antivirus program are deactivated (do not forget to re-activate your antivirus after the procedure).
✓ Should a power failure occur while you are creating your Master DVD/CDs, please restart
CD/DVD Creator
tion files function correctly.
26 -
Packard Bell Quick Start & Troubleshooting Guide
Recovery Program
Master CD/DVD Creator
(including restoring your personal data and settings) and the recov-
at the earliest opportunity. The program will automatically verify that your restora-
:
Master
Page 27

Creating your Master DVD/CDs
1. You can launch
Support > Smart Restore). Throughout the process, you will be guided by on-screen instructions.
Please read them carefully!
Master CD/DVD Creator
from
Smart Restore
Click on this icon to start
(Start > All Programs > Packard Bell
Master CD/DVD Creator
2. The program will create one disc at a time. A counter in the lower left part of the windows indicates
the number of discs to create as well as the number of discs created so far. When it is finished, the program will check each disc for errors.
3. After creating your discs, you will have the option to either retain the recovery data on your computer
or to permanently delete it and only save a copy on Master DVD/CDs. We strongly recommend that
you keep the recovery data, as this will allow you to perform a partial recovery (to restore your operating system and your personal data) and to use
4. Label your Master DVD/CDs (Master CD 1, 2, etc.). Use a CD marker pen to write on the disc's label
side. Do not use stickers on the disc faces.
5. Store your Master DVD/CDs in a safe place. They contain the recovery data of your computer and can
be used with Packard Bell utilities such as
Smart Restore
quickly and easily.
Smart Restore, Snapsys
, and the
Recovery Program
.
Accessing the Extra Free Space
For convenience, your hard disk may have been partitioned into two virtual drives. If so, you can store all
your personal data ("Documents and Settings", such as photo, video, music files, etc.) on one drive and
use the other for program files. Likewise, if your computer includes two physical hard disks, then your
personal data will be included on one drive, and your system files on the other.
If you have deleted the recovery data from your computer (not recommended), the extra free space will
appear as a new virtual hard disk drive. Your hard disk will then be partitioned into 3 drives (if you have
2 hard disks, the system files drive will be partitioned into 2). The computer usually names this new drive
"LOCAL DISK". To access it, click on Start > My computer and select LOCAL DISK.
HDD (C:) stores
system files
DATA (D:) stores
data
LOCAL DISK appears if
you removed the recovery
data from your computer
Run Windows System Tools
Windows XP includes some convenient tools to keep your computer in good shape. Use these tools on a
regular basis to maintain your reliable and speedy system! To make it easier,
Scheduled Tasks utility, which you can customize to run specific tasks regularly.
System Tools
includes a
Helpdesk -
27
Page 28

The descriptions below mention one way of running the
access these tools, including:
Start > Control Panel > Performance and Maintenance.
Start > All Programs > Accessories > System Tools.
Start > All Programs > Packard Bell Support > Snapsys.
Start > My Computer, right-click on the HDD icon and select Properties.
System Tools
, but there are several other ways to
➌
➍
➎
➋
➊
Here is a description of the main tasks we recommend you perform:
Error Checking
Using the
lost. It checks and repairs two types of errors:
✓ file system errors, such as fragmented files that were not deleted and files with invalid sizes or dates;
✓ physical errors, which occur in your hard disks so-called cluster and/or sector areas that may wear out
1. Click on Start > My computer. Right-click on the HDD icon and select Properties.
2. Click on Tools and Check Now in the Error-checking field.
3. Tick Automatically fix file system errors in the options area. If you tick Scan for and attempt recovery
Check Disk
over time.
of bad sectors, your computer will carry out the physical error checking for a few minutes and will
need to restart. Click on Start to proceed.
tool regularly prevents your system from getting unreliable and information getting
28 -
Packard Bell Quick Start & Troubleshooting Guide
Page 29

Disk Cleanup
The
Disk Cleanup
unused files, such as temporary Internet files, files in the Recycle Bin and other temporary files that you
can safely delete.
1. Click on Start > My computer. Right-click on the HDD icon and select Properties.
2. Select the General tab and click on Disk Cleanup.
3. Tick each category in the
Wizard helps free up space on your hard drive. It searches your drive and displays
Files to delete
area you wish to delete and click on OK.
Disk Defragmenter
With the creation and deletion of files over time, scattering occurs all over the hard disk area and affect
performance. The
your computer run faster and more efficiently.
Running the
tear on your hard drive and thus decrease the chance of a fault developing at a later date.
Disk Defragmenter
Disk Defragmenter
helps you rearrange the items stored on your hard drive to make
once a month (depending on computer usage) will decrease wear and
1. Perform a
2. Click on Start > My computer. Right-click on the HDD icon and select Properties.
3. Click on Tools and Defragment Now.
4. Click on the volume you want to defrag and click on Defragment to start. The whole process may take
several hours to complete. It is best not to use your computer while running the
any changes on your system may cause the process to restart. If you divided your hard disk in several
partitions you should perform the same action for each partition.
Disk Cleanup
and close all open programs.
Disk Defragmenter
as
Helpdesk -
29
Page 30

Manage your HDD
Check the remaining free space on your hard disk drive
1. Click on Start > My computer.
2. Right-click on the HDD icon and select Properties.
3. The Hard Disk Properties window displays the amount of used
space and free space on your hard disk. If your hard disk is almost
full (less than 100 MB remaining), you should consider freeing
some space.
To see easily how much space is used and how much is left, simply
place your pointer over the hard disk drive icon. The information
will automatically appear.
Free some Space on your Hard Disk
1. Uninstall the programs you no longer use.
• To remove software titles that were originally provided with your computer, click on Start > All
Programs > Packard Bell Support > Smart Restore.
• To remove additional software titles, click on Start > Control Panel > Add or Remove Programs.
2. Archive files on recordable CDs or DVDs (if your computer is equipped with a CD or DVD writer) and
erase them from the hard disk.
3. Empty the Recycle Bin (this tool is also included in the
When you delete a file from your computer, Windows places it in the Recycle Bin. All the deleted files remain there until you decide to permanently
delete them from your computer or to restore them to their original location. Double-click on the Recycle Bin on the desktop and click on Empty
Recycle Bin or select only the items you want to delete. Items deleted from
external devices, such as memory cards, do not go to the Recycle Bin, they
are permanently deleted.
Disk Cleanup
):
Security
Protect your Computer against Viruses
What is a Virus?
Malicious software, typically called "viruses", are programs designed to infect and damage computers.
Most viruses are transmitted over the Internet, e-mails or malicious Websites. A typical virus will replicate
and pass itself undetected to multiple computers. Other forms of nuisance, such as Trojan horses, worms
or spam can infect your computer in various ways, using up resources or clogging up a network.
Run an Antivirus Program
Typically a leading antivirus application is already available on your computer. If you have not already
done so, you can activate it through the
viruses, including files that you download from the Internet and will quarantine or delete any suspicious
file. As new viruses appear every day, make sure you keep this program updated at least once a week.
Windows Security Center
30 -
Packard Bell Quick Start & Troubleshooting Guide
can help you update and run the antivirus regularly. Even if your computer is
Setup my PC
application. The antivirus checks your computer for
Page 31

not connected to the Internet an antivirus program can be useful as a virus could be transmitted via
pirated software, removable disks or over a local network.
Please note that most antivirus programs require a subscription after an “evaluation period”. We
strongly recommend that you subscribe to such programs in order to get antivirus updates after
this limited period.
What to Do if I Find a Virus?
If your antivirus has identified viruses, it will display instructions to remove them safely from your system.
If a virus is found on a file before it is opened, simply delete the infected file. Make sure you also delete it
permanently from your Recycle Bin.
• If the virus has overwritten some files, you need to delete these files. You can only restore these files if
you have previously made backups.
• Notify everyone in your address book or anyone you may have shared files with.
• If the virus is in the memory of your system, you may need to perform a recovery.
Packard Bell guarantees that your computer was 100% virus free at the time of purchase and does
not cover damages due to viruses.
Tips to Avoid Viruses
Download from trusted Websites: If you download a file from a Website, make sure it is from a legitimate
and reputable source. If you are uncertain, you can download the suspicious file on a removable disk and
then scan it for viruses.
Beware of e-mail attachments:
• Do not open any attachment if you do not know the sender or are unsure about it. Even if the e-mail
comes from a trusted source, always exercise extreme caution with file attachments.
• Save the attached files on your computer (for instance in
directly from your mailbox.
• Never download or execute a file attached to the e-mail. Always scan the files for viruses before opening them.
• Never open attachments with double file extensions (i.e. "picture.bmp.exe" or "list.txt.vbs" and containing file extensions such as ".vbs", ".shs", or ".pif"). These extensions are used by some programs, but
rarely in documents attached to e-mail (if so, chances are that they host viruses).
• Do not trust the icons of the attached files. A familiar icon can in fact be a disguised malicious file
(make sure you check the extension).
My Documents
) instead of opening them
Delete junk e-mails: Do not forward any chain e-mail! If you are unsure about a virus warning contained
in a chain e-mail, then check one of the many Websites posting updated information on hoaxes. Do not
open attachments in unsolicited commercial e-mails, and do not click on hyperlinks contained in these
advertisements.
Close the preview pane of your Inbox: This will prevent suspicious e-mails from displaying automatically.
Some specific types of viruses ("worms") can be concealed in the text of an e-mail. This means they can
infect your computer if they are automatically previewed.
1. If your preview pane is on, click on View on the Toolbar and select Layout in the menu.
2. Click on the box next to
Show preview pane
to remove the tick.
Helpdesk -
31
Page 32

Secure your address book: Many viruses spread by
forwarding themselves to everyone in your address book.
To avoid this, you can create a fake entry in your address
book called "000000". This contact will appear first in
your address book. If a virus attempts to send itself to all
your contacts, it will be blocked by this first fake contact.
You will then either receive an error message reporting
an invalid e-mail address or the e-mail will remain in your
Drafts
or
Outbox
sure you permanently delete it from your
. Simply delete it from there and make
Make regular backups: If you make regular copies of your personal files on CDs or DVDs and store them
in a safe place, you won't lose any valuable data in the event that a destructive virus infects your
computer.
Deleted Items
.
Secure your Internet Connection
What is a Personal Firewall?
A personal firewall is a software program designed to prevent unauthorized access to or from a private
network. It acts as a shield to protect your Internet connection from unwanted connections, some of
which may attempt to take control of your computer to install or re-distribute viruses or malicious
programs. Each connection to your computer is monitored - programs that attempt to receive information
without your permission are detected and the firewall will display an alert. You can then decide if you
will allow the connection, if the connection is to a program you are currently using then normally you
would allow it (i.e. a game connecting to a multi-player server or an encyclopaedia making a content
update).
Use a Personal Firewall
There is a wide variety of firewalls available, you can buy them from computer stores or download them
from the Internet. Windows XP has a built-in firewall that you can use straight away:
1. Click on Start > Control Panel > Network and Internet
Connection > Network Connections.
2. Select the Internet connection that you want to protect and
click on Change settings of this connection or right-click on the
Internet connection icon and select Properties.
3. On the properties screen click on the Advanced tab:
4. In the section
tick in the box. Then click OK to turn on the firewall.
5. You will notice that your connection icon now has a small pad
lock icon to show that it is protected.
Internet Connection Firewall
you need to place a
Adjust Internet Explorer Security Settings
Internet sites use small files called cookies to keep track of user preferences and information. You can
adjust your Internet browser's security settings to determine how much -or how little- information you
are willing to accept from a Website. Using the Medium security level allows safe surfing and is appropriate for most Internet sites.
32 -
Packard Bell Quick Start & Troubleshooting Guide
Page 33

To access Internet Explorer security settings:
1. In Internet Explorer, click on Tools > Internet Options.
2. Select the Security tab and move the slider to set a security level.
Prevent Spyware Infections
What is Spyware?
Spyware refers to generally unwanted programs that are downloaded onto your computer while
connected to the Internet, often without you knowing it. Once it has infected your computer, it can
snoop on your browsing activity, collect personal information, cause pop-up ads to appear, or even change
the configuration of your computer. Spyware consumes resources on your computer; it can slow down
your Internet connection or entire computer system, and even cause crashes.
Spyware is sometimes used by unscrupulous companies to monitor and track the sites you visit on the
Internet so as to determine your web-surfing habits and display targeted pop-up ads on your screen.
However, some kinds of spyware go beyond simple tracking and actually monitor keystrokes and capture
passwords and other functions which pose a definite security risk.
Download and Run anti- spy Tools
Traditional antivirus programs and firewalls do not offer protection from such deceptive or unwanted
software; you will need to download special software to remove it from your computer.
You can download efficient anti-spy tools for free from many sources, including the Microsoft website.
These programs will help you detect and remove spyware applications, thus protecting your privacy and
ensuring your computer runs smoothly. Be careful! Some malicious programs claim to stop spyware, but
they are actually installing on your computer and will prevent real anti-spyware programs from operating
correctly in the future.
Like antivirus software, make sure you regularly run and update the program to keep your computer free
of spyware.
Use Windows Security Center
Windows provides a central area from where you can control the security settings of your computer,
helping you to protect it from Internet attacks and ensuring that the latest security updates have been
downloaded and installed on your computer.
To open the
Security Center
, click on Start > Control Panel > Security Center.
Alternatively, if a security alert has been reported (in the Notification Area, next to the clock) then you can
click on the notification balloon or double-click on the small Security Center icon. If the icon is hidden,
click on the arrow to show all the Notification Area icons.
The
Security Center
protect your computer:
Windows Firewall
cations.
Windows. The antivirus application varies according to the program installed on your computer.
indicates the status and settings used for three of the most important applications that
Windows Firewall, Windows Automatic Updates
and
Windows Automatic Updates
are provided by Microsoft as part of
and the virus protection appli-
Helpdesk -
33
Page 34

Windows Firewall
A firewall is a security system designed to prevent unauthorized access to or from a private network. It
acts as a shield to block dangerous Internet threats and keep the information on your computer safe and
private.
Windows Updates
If you have an active Internet connection, Windows can check for important updates for your computer
and install them automatically. These updates include security patches and program updates that can
improve your computing experience and help protect your computer against new viruses and attacks.
Virus Protection
Your computer should be protected by an antivirus program at all times; while attacks are rare, they can
be destructive, possibly destroying all the information on your computer with little hope of recovery. The
Security Center
updated. Keeping the antivirus program updated allows it to guard against new viruses and attack techniques.
monitors the status of the antivirus program and reminds you if it has not been recently
How Do I Know when my Computer Is at Risk?
If the
Security Center
some of your programs do not work correctly, your computer may be infected by malicious software.
However, do not blame any computer problem on a virus! If you suspect your computer is infected, the
first thing to do is update -if you have not already done so, and run your antivirus and anti-spyware
software.
reports an alert, or if your computer behaves erratically, crashes unexpectedly or if
Updates
As new viruses, worms, and other threats are discovered everyday, keeping your security applications and
operating system up-to-date is crucial. Windows, combined with other security applications can protect your
computer from Internet attacks and ensure that the latest security updates have been downloaded and
installed on your system. To keep your computer safe with all the latest programs, please perform the
following actions (these topics are described previously in this guide, see page 33):
✓ Perform updates when prompted by
Windows Security Center
✓ Update your antivirus
✓ Use Microsoft
34 -
Packard Bell Quick Start & Troubleshooting Guide
Windows Automatic Updates
:
Page 35

Update your anti-spy tool.
✓
✓ See page 33 for more on spyware.
✓ Update your antivirus (if not already done so with
✓ See page 30 for more on viruses.
✓ Run
Windows Update
Windows Security Center
)
Windows Update
date via Internet downloads. It allows you to choose
updates for your computer's operating system, software
programs, and hardware. New content is added to the
Windows Update Website regularly, so you can always
get the most recent updates and solutions to protect your
computer and keep it running smoothly.
• Start > Help and Support Center > Keep your computer up-to-date with Windows Update, or
• Start > Control Panel > Performance and Maintenance
> System > Automatic Updates.
can help you keep your computer up-to-
Helpdesk -
35
Page 36

DIAGNOSE & REPAIR
We all experience problems with our computer from time to time so do not panic! Before calling us, please
read the following. This troubleshooting guide will help you diagnose and solve some common problems.
Please note that the solutions proposed in either one of the cases below may not be limited to that specific
case and may be used to solve other computer issues.
Check the latest fixes on www.packardbell.com.
Our online Troubleshooter can help you find
solutions in a few clicks!
Top 5 Troubleshooting Cases
Have a look at the "symptoms" described below, see if they match the problem you encounter with your
computer and follow the steps to fix the issue. Also remember to read our recommendations in the previous
chapter ("Safe Computing", page 26) to get the most of your computer and prevent problems in the future.
✓ Nothing Displays on the Screen (page 37)
✓ The Screen Freezes when the Packard Bell Logo Displays (page 39)
✓ The Screen Freezes when the Windows Logo Displays (page 40)
✓ The Windows Desktop Displays, but the Operating System is not stable (page
42)
✓ The Screen Displays Applications, but They Crash or Run Erratically (page 43)
36 -
Packard Bell Quick Start & Troubleshooting Guide
Page 37

1. Nothing Displays on the Screen
✓ Make sure that you have switched on both your computer and your monitor.
✓ Your computer is in suspend or power saving mode.
1. If the computer is in power saving mode, move the mouse or press a key on the keyboard to "wake
up" the computer. The light should turn green.
2. If the computer is in suspend mode, press the power button. After a short pause the light should light
up and you will be able to use your computer.
✓ A screen saver may be active.
1. Strike any key to reactivate the display.
2. If you wish to change the screen saver properties:
a. Close all open programs, with the exception of
Windows.
b. Right-click on an empty spot on the Windows desktop.
c. Select Properties from the menu.
d. Adjust the screen saver properties and the monitor
energy saving features to your needs.
✓ Check your Installation poster.
1. Check the power cord connections between your computer
and the power outlets.
2. Certain computers are equipped with two video ports, one on the motherboard (“integrated video”)
and another on a high-performance graphics card using an expansion slot.
Helpdesk -
37
Page 38

.
Always connect your monitor to the graphics card, if present. If one video port does not work,
then please try the other. The number of items available will depend on your computer’s configuration.
✓ Test the power cords:
1. Unplug the power cord from your monitor.
2. Unplug the power cord of the computer and plug it into the monitor (and the other end to a working
wall socket).
3. Power on only the monitor and watch if the power LED of the monitor is lit.
✓ Test the power socket:
1. Plug any other electrical device on the wall socket and check if it works.
2. If it does not, your wall socket is probably faulty.
✓ Try to reset your computer:
1. Unplug the computer's power cord from the wall socket (and remove the battery if you are using a
notebook) and keep the power button pressed for at least ten seconds.
2. Then release it, connect the power cord again and press the power button to turn on your computer.
Before you connect or disconnect the power cord to the back of the computer, please ensure
that the power plug is disconnected from the wall outlet.
✓ Check your battery (notebook):
1. Check that the battery is correctly inserted.
2. Check that the battery is sufficiently charged.
3. Connect the AC adapter and attempt to start the notebook.
4. If your notebook uses a "smart battery": turn off your notebook, remove the battery and press the
contact next to the gauge.
✓ Disconnect or remove additional devices:
A faulty device or notebook battery can in some situations prevent the system from booting.
Removing additional external devices (such as a printer, a scanner, a modem, etc.)
1. Disconnect all external devices from your computer, except the monitor cable and the keyboard.
2. Try to restart your computer and check if it works fine.
3. If it does not, restart your computer without the keyboard and mouse. If it solves your problem, please
contact the Customer Contact Center.
Removing the battery on a notebook
1. Remove the battery. Usually, you just have to unlock it at the bottom of the base and pull it out.
2. Leave the AC power adaptor plugged to both your computer and the wall socket.
3. Try to switch your computer on and wait for at least 15 minutes.
4. Check if the power adapter gets warm.
38 -
Packard Bell Quick Start & Troubleshooting Guide
Page 39

Check
InfoCentre
Removing additional internal hardware (such as additional memory, a network card, etc.)
1. Remove any additional internal device you have installed. Note that if a third party installed a device,
we advise you to refer to them to remove the device.
2. Try to restart your computer and check if it works fine.
to learn more about your notebook.
Depending on your warranty conditions, you might not be allowed to open the chassis by yourself. Please
refer to your
If you are sure you want to proceed, please first touch the ground to prevent electrostatic damages and
unplug the power cord before opening the chassis (and remove the battery if you are using a notebook).
Warranty & Service Sheet
before proceeding.
✓ Check USB ports.
When the USB connector on the front of the chassis is damaged (for instance when inserting a USB plug
upside-down), it can short circuit the system, thus preventing the computer from booting.
1. To determine whether the USB connector is the root cause of the problem, disconnect the USB cable
from the motherboard. Only do so if your warranty entitles you to and if you are an advanced user.
2. Try to restart your computer and check if it works fine.
3. If it does, replacing the USB assembly of that particular motherboard will solve the problem entirely.
2. The Screen Freezes when the Packard Bell Logo Displays
When the computer starts, it first performs a test of all system requirements. When the computer is functioning correctly, it emits a short beep and starts up. However, if the test fails, the computer may freeze
when the Packard Bell logo displays.
✓ Try to boot but press the [TAB] or [ESC] key to display some details.
✓ Set the BIOS to default settings.
Press [F1] or [F2] when starting your computer to enter the BIOS. This controls the hardware of your
computer. You should only enter the BIOS if you are an advanced user, or when asked to do so by a
qualified technician.
Helpdesk -
39
Page 40

1. Select Exit in the top menu using the arrow keys or mouse (if available).
2. Select the Default Values in the menu and press [Enter]. Press [OK] to confirm.
3. Select Save Changes and Exit and press [Enter]. Press [OK] to confirm.
4. The computer will automatically reboot.
✓ Try to boot with a different boot device.
Press [F8] when starting your computer to enter the boot menu (this feature may not be available on all
computers). If your first boot device is HDD, change it into CD or DVD using the arrow keys and press
[Enter] to exit.
✓ Disconnect or remove additional devices.
Please read "Removing additional external devices", "Removing the battery on a notebook" and "Removing
additional internal hardware" on page 38.
3. The Screen Freezes when the Windows Logo Displays
During the boot process, Windows runs a number of checks. If it detects incorrect settings, damaged or
missing software or hardware components, the system will likely hang. To fix this, try to restart your
computer using one of the options below.
✓ Boot in
1. Switch your computer and monitor on.
2. When the Packard Bell logo appears, press [F5] on your keyboard for a few seconds. If necessary, press
3. Use the arrow keys to highlight Safe Mode and press [Enter].
✓ Start with the
This option will restore the system settings that were in effect the last time the computer started
successfully. This may cause to lose data that you have entered after the last successful boot.
1. Switch your computer and monitor on.
2. When the Packard Bell logo appears, press [F5] on your keyboard for a few seconds. If necessary, press
3. Use the arrow keys to highlight Last Known Good Configuration and press [Enter].
Safe Mode
[F8] to access the advanced startup options.
to use basic files and drivers.
Last Known Good Configuration
[F8] to access the advanced startup options.
.
✓ Uninstall software.
If your computer does not function correctly after you have installed new programs, try uninstalling them.
1. For software that was originally provided with your computer, click on Start > All Programs > Packard
Bell Support > SmartRestore.
2. For any additional software, click on Start > Control Panel > Add or Remove Programs.
40 -
Packard Bell Quick Start & Troubleshooting Guide
Page 41

➌
➍
➎
➋
➊
✓
Go back to previous restore point with
System Restore monitors the changes to your computer and automatically creates restore points to revert
to a previous time if necessary. It can undo harmful changes to your computer and restore its settings and
performance, while saving your personal data files (such as documents, browsing history, drawings,
favourites, or e-mails).
When you restore your computer you will need to reinstall any programs you installed after the
restore point was created. These programs will not work until you do this. System Restore does not
uninstall programs. To do this, you should use Add or Remove Programs in the Control Panel.
System Restore
.
Access System Restore from the Windows desktop
If you succeeded in starting your computer using
Click on Start > All Programs > Accessories > System Tools > System Restore.
Access System Restore during boot-up
If you cannot access the Windows desktop:
1. Press the [F11] key upon start-up when the Packard Bell logo appears. This will open the Recovery Pro-
gram.
2. Select Windows XP System Restore and click on Next. Your computer will automatically restart and
open System Restore.
You can use System Restore to:
Restore your computer to an earlier time
This option will return to your computer to how it was on an earlier date, without affecting your personal
documents or e-mails (it will not restore lost documents either). By default Windows XP saves snapshots of
itself when major changes are made to the Operating System (e.g. driver installations or specific software).
This is useful when a driver installation failed, or when you changed a system setting, and it did not work.
1. Click on Restore my computer to an earlier time, and then click on Next.
2. Select from the calendar the date when the restore point was created and click on Next. All the restore
points that were created on the selected date are listed by name in the list box to the right of the calendar.
3. In the confirmation screen, click on Next to restore the computer to the selected date and time.
Create a Restore Point
Windows creates restore points automatically at regularly scheduled times or before certain programs or
drivers are installed. This option allows you to create your own restore points when you need to.
Safe Mode
or
Last Known Good Configuration
:
Helpdesk -
41
Page 42

1. Click on Create a restore point, and then click on Next.
2. Enter a description to identify this restore point.
this name.
3. To finish, click on Create.
Undo the last restoration
If the system fails after restoring the computer to a certain date, you can use this option to undo the restoration.
Alternately, you can use
settings that worked.
1. Restart the computer, press [F5] on your keyboard for a few seconds. If necessary, press [F8] to access
the advanced startup options.
2. Use the arrow keys to highlight Last Known Good Configuration and press [Enter].
Last Known Good Configuration
System Restore
to restore the system to your most recent
automatically adds the date and time to
✓ Disconnect or remove additional devices.
Please read "Removing additional external devices", "Removing the battery on a notebook" and "Removing
additional internal hardware" on page 38.
4. The Windows Desktop Displays, but the Operating System is not stable
Even when your computer starts successfully, you cannot go further and use your programs correctly. Ask
yourself the following questions and try to find the solution to your problem with the answers proposed.
✓ Did you install new programs?
Installing new software may cause conflict with your existing software. If your computer does not function
correctly after you have installed new programs, try to uninstall them.
1. For software that was originally provided with your Packard Bell computer, click on Start > All Programs > Packard Bell Support > SmartRestore.
2. For any additional software, click on Start > Control Panel > Add or Remove Programs.
✓ Did you notice strange behaviour in Internet browser or E-mail program?
Most problems affecting Internet applications, and potentially your whole operating system are caused by
malicious software propagated when you are connected. To check if your computer has been infected, run
a check with your antivirus and anti-spyware programs. To be fully efficient, these protection programs
must be up-to-date. Please refer to the "Security" chapter (page 30) to learn more about keeping your
computer safe.
✓ Update your system files using Windows Update
Windows Update is a catalogue of items such as drivers, security fixes, critical updates, the latest Help files,
and Internet products that you can download to keep your computer running smoothly and up-to-date.
1. Click on Start > Help and Support Center > Keep your computer up-to-date with Windows Update.
2. Select Scan for updates and Yes when prompted to install any required software or device drivers.
42 -
Packard Bell Quick Start & Troubleshooting Guide
Page 43

✓
Did you install new hardware?
When you install a new hardware device, Windows usually detects it automatically and copies the appropriate files (drivers) to your computer to make it work. This process modifies the system files and can
sometimes generate conflicts within Windows.
Device Manager
1. Open the Device Manager (Start > Control Panel > Performance and Maintenance > System >Hard-
ware > Device Manager). This allows you to view the status of your hardware devices.
2. If you see any “!” or “?” signs in front of a device name, going back to a previous version of that driver may
help. Right-click on your device and select
Properties
. Click on the
Driver
tab and select
Roll Back Driver
.
✓ Go back to previous restore point with
System Restore
to a previous time if necessary. It can undo harmful changes to your computer and restore its settings and
performance, while saving your personal data files (such as documents, browsing history, drawings,
favourites, or e-mails). Please see page 41 for more details.
monitors the changes to your computer and automatically creates restore points to revert
System Restore
.
5. The Screen Displays Applications, but They Crash or Run Erratically
When your programs run erratically, there are good chances that your operating system may not be functioning correctly. Please also check the recommendations on the previous case (page 42) if the steps below
do not help solve your problem.
✓ Close programs using Windows Task Manager
If you cannot close your programs by clicking on the cross in the top right corner of the screen, try using
the
Task Manager
1. Press the [Ctrl]+[Alt]+[Del] keys simultaneously or right-click on an empty space on the taskbar and
select Task Manager in the pop up menu.
2. Select the failing program in the list and click on End Task.
.
✓ Does this happen with only one application?
If you notice that a specific program does not work correctly, try uninstalling and reinstalling it.
1. For software that was originally provided with your computer, click on Start > All Programs > Packard
Bell Support > SmartRestore.
2. For any additional software, click on Start > Control Panel > Add or Remove Programs.
✓ Are there updates available for the erratic application(s)?
Helpdesk -
43
Page 44

If you do not notice improvement after reinstalling your program, please check the software editor's
Website for updates. If the program was originally supplied with your computer, you may check the
Packard Bell Support Website on www.packardbell.com for downloads as well.
✓ Is your computer up-to-date?
Malicious programs such as virus and spyware can infect your computer and cause some of your programs
to malfunction. To fix this problem and avoid it in the future, make sure you run
antivirus and anti-spyware regularly and get the latest updates. For more on keeping
your computer up-to-date, please refer to the "Updates" chapter on page 34.
Miscellaneous Troubleshooting
Keyboard & Mouse / Touchpad
My Keyboard Does Not Work
1. The Numeric pad is disabled
When the Num Lock key is active, the Numeric pad can be used to enter numbers, like the keyboard of a
calculator. When the [Num Lock] key is not activated the keypad either functions as a second set of cursor
keys (on "full-sized" keyboards), or they revert to normal letter keys (on certain compact keyboards).
On some computers, the Num lock icon is shown in the Notification Area or a LED on the keyboard
indicates that it is enabled.
2. Your keyboard is not properly connected (see your Installation Guide).
a. Switch your computer OFF.
b. Disconnect then reconnect the keyboard properly.
c. Switch your computer ON.
3. Your cordless keyboard is not properly connected.
a. Check that the receiver is connected properly (see page 11).
b. If your receiver uses a USB connector, try to connect it to another port.
c. Also check your batteries.
USB keyboard or mouse
My Mouse or Touchpad Does Not Work
1. Your mouse is not properly connected.
Follow the same procedure as for checking keyboard connection.
44 -
Packard Bell Quick Start & Troubleshooting Guide
PS/2 keyboard or mouse
Page 45

2. The mouse needs to be cleaned
a. Switch your computer OFF.
b. Turn the mouse upside down.
c. Open the underside of the mouse.
d. Extract the track ball from the mouse belly and clean it.
e. Gently clean the bearings in the track ball housing with a moist soft
cloth. If it needs further cleaning, carefully remove any dirt that has
accumulated on the bearings with a solid, blunt object.
Optical mice do not have a track ball and do not get as dirty as regular mice since they do not pick
up as much dust.
3. The controller properties are not properly set up.
If the pointer moves with difficulty, too quickly or too slowly, or if
double clicking does not work all the time, try adjusting the properties of your controller.
a. Click on Start > Control Panel > Printer and other Hardware >
Mouse.
b. Click on the different tabs to access the properties and modify
how your mouse or touchpad acts.
c. Click on Apply to confirm your settings then on OK to close the
window.
Display
The Display Is Not Centred or Gets Wavy
1. The image is smaller or larger than the screen surface.
a. Adjust the monitor display, image size and/or position with the screen controls.
b. If you have an LCD screen, use its optimal resolution. LCD screens are designed to use a specific
resolution. Changing this resolution may cause the display to grow beyond or shrink away from the
edges of the screen. (See your monitor documentation and/or
InfoCentre
).
2. I see thin lines scrolling down the screen, flickering images or wavy displays.
a. Interference from other appliances or magnetic sources may cause irregular images on your screen.
b. Switch your computer off and restart it. This should automatically adjust your display.
The magnitude of interference, noise or distortion depends on your screen's
proximity to sources such as TV sets, mobile phones, other monitors, refrigerators, large stereo speakers, power adapters, halogen lighting with built-in
power supply or motor driven appliances. Faulty fluorescent light assemblies
or the proximity to high voltage lines can also cause distorted images. Place
your computer as far as possible from these sources.
If there is no source interference, or removing the source of interference does
not alleviate the symptoms, please refer to your monitor documentation to
perform a series of screen adjustments (image size and position, refresh rate,
degauss, etc.). Certain adjustments may not be available, depending on the
display technology used.
Helpdesk -
45
Page 46

Sound
Upon Startup, My Computer Emits a Continuous Beeping Sound
1. There is a keyboard or mouse detection failure: Check your keyboard and mouse connections (see page
6).
2. There is a stuck key on the keyboard or a stuck button on the mouse or touchpad:
a. Switch your computer OFF.
b. Press all the keys of your keyboard to ensure that no key is stuck.
c. Tap the mouse/touchpad buttons to ensure that none of them are stuck.
d. Switch your computer ON again.
My Computer Has no Sound
1. The speaker volume may be set too low.
Adjust the volume controls (either on your speakers, keyboard, or on the computer).
2. Your speakers may not be connected properly (only applies to external speakers).
a. Check all the speaker cables to ensure that they are connected properly.
b. If your speakers are equipped with a power adapter, make sure that it is plugged into a power
source (wall outlet or back of your monitor) and that the speaker power is on.
3. The Windows main volume control needs adjusting.
a. Click on the speaker icon on the right side of the Notification Area to make the volume control bar
appear.
b. If you cannot see this icon, go to the Control Panel to display it (see page 25).
c. If this icon has "disappeared", click on the arrow in the Notification Area and then on the icon to
display it (to reduce clutter in the Notification Area, icons that have not been used in a while are
hidden).
4. Your computer's volume control settings needs adjusting.
a. Double-click on the speaker icon in the Notification Area
(see step 3 above).
b. Adjust the Balance to make sure that sound comes from
both speakers.
c. Click and hold the slider to adjust the volume level.
d. Make sure the Mute option is NOT checked.
e. To display more volume controls, click on Options > Prop-
erties.
5. Your sound hardware does not work properly.
a. Check that your sound card is correctly configured. Click on Start > Control Panel > Sounds,
Speech, and Audio Devices > Sounds and Audio Devices. In the
ties
window, select the Hardware tab.
b. Run
Smart Restore
6. Your computer will not play audio CDs.
a. Make sure that your computer sound is set up properly (see previous steps).
b. Make sure that the disc's printed side is facing upward in the drive and that the disc is lying flat in
the drive tray.
c. Wait for the disc drive's indicator light (busy signal) to stop flashing before you try to start the CD
player program.
46 -
Packard Bell Quick Start & Troubleshooting Guide
to easily uninstall and reinstall the faulty components drivers (see page 54).
Sound and Audio Devices Proper-
Page 47

d. Make sure that the disc's surface is clean and scratch free.
e. Make sure the CD is not copy-protected. Some audio CDs include a copy protection mechanism to
avoid illegal copying. This mechanism prevents the CDs from being played or copied on a computer. In this case, playback is only possible on conventional CD or DVD players.
Internet
In order to get the best possible Internet connection, ensure that you:
✓ Always connect to a grounded power socket;
✓ Connect your modem directly to the phone socket; and
✓ Avoid using telephone extension cables (this degrades the signal quality).
✓ In thunderstorm conditions, make sure that you disconnect your modem from the telephone line and
pull out the power cord from the power outlet.
You Cannot Connect to the Internet
1. Your account details have not been released yet.
a. After you have just performed your online subscription with an Internet Service Provider (ISP), it is
recommended that you restart your computer to complete the Internet setup process.
b. The first time you use your Internet connection, your account may not be accepted immediately.
Certain ISPs require a short setup period to process your account details. Please wait 30 minutes
before you try to connect to their services again.
2. You entered an incorrect user name and/or password.
a. Check your user ID and password. Re-type them if necessary.
b. Check exact spelling (upper and lower case, or any punctuation).
c. Check the login and setup information given to you by your ISP
3. The server you are trying to connect to is out of order.
Check with your ISP whether the service is available.
4. Your Internet settings (browser, e-mail, or connection) may have been changed.
When you subscribe, your ISP usually provides connection details (user name, password, server phone
number, e-mail address, etc.). Check these details and restore your Internet settings, following the
procedure given by your ISP.
5. Your account with your Internet Service Provider has been terminated or your ISP server is unavailable.
Contact your ISP and check the access conditions to their Internet server.
Helpdesk -
47
Page 48

6. You have moved and your dialling location has changed.
a. Change your settings by clicking on Start > Control
Panel > Printers and Other Hardware > Phone and
Modem Options.
b. Select the Dialing Rules tab and click on the Edit but-
ton.
c. Specify your new location and click on OK.
7. You have performed a complete recovery using the
Recovery Program
a. If you subscribed to one of the ISPs offered by Pack-
ard Bell, try reinstalling the Internet service.
b. Click on Start > All Programs > Online Services and
select your provider's name.
You are using a dial-up modem
1. The modem may not be connected properly.
Check the modem cable connections between the computer and the telephone socket (see your
lation Guide
).
.
If your computer has a network port, make sure your modem cable is connected to your
modem port and not to your network port (see page 13)
Instal-
2. The telephone line may already be in use.
Free the telephone line before you dial a modem connection. You cannot phone and connect to the
Internet at the same time if both your telephone and your modem use the same line.
3. There is no dial tone
a. Disconnect your modem and plug in a telephone to check the integrity of your telephone line. If
you can hear a normal dialling tone on the phone, then your modem or cable may be defective.
b. Check that the dial type is correctly set-up for your country. Click on Start > Control Panel > Print-
ers and other Hardware > Phone and Modem Options > Dialing rules.
4. The modem is used by another program ("COM port in use" error message).
You may have a telephone or fax program running; These use the modem and make it unavailable for
other applications:
a. Close all programs that might use the modem (e.g. your telephone or fax software).
b. Restart the computer. This will reset all connections.
5. The modem does not work at all.
Run
Smart Restore
48 -
Packard Bell Quick Start & Troubleshooting Guide
to easily reset and reinstall the faulty drivers (see page 54).
Page 49

You are using DSL or cable connection
1. Your DSL connection has not been activated.
Your ISP must contact your local telephone operator to activate DSL access on your line. This may take
several weeks. To enquire about your connection, please contact your ISP.
2. Your DSL modem is not picking up the line.
a. Check all cable connections (e.g., plugs, sockets, filters).
b. Disconnect your modem and plug in a telephone to check the integrity of your telephone line. If
you can hear a normal dialling tone on the phone, then your modem or cable may be defective.
3. Your modem is defective.
Check the status lights on your modem and refer to manufacturer's documentation. If the problem
persists and the connection has been previously working, then contact your ISP.
When Surfing the Internet, You Get an Error Message
1. You are not connected.
a. Look at the lower right part of the Notification Area.
b. If you cannot see this icon, click on Start > Control Panel > Network
and Internet Connections > Network Connections. Right-click on
the connection icon and select Properties. Select Show icon in notification area when connected.
3. A connection to the remote site cannot be established.
Try again later or check with your ISP whether the service is available.
4. A pop up message warns you that the page contains errors (e.g. “the page contains javascript errors”).
Simply click on OK to close the message window.
You Cannot Send or Receive E-mails
1. You are not connected.
To send and receive e-mails, you need to be connected to the Internet. Look for the computer icons at the
lower right part of the Notification Area. Please see "When surfing the Internet, you get an error message"
page 49.
2. Your ISP or that of your recipient is having technical difficulties.
Helpdesk -
49
Page 50

Try again later or check with your ISP whether the service is available.
3. Using several ISPs or e-mail accounts can cause problems.
Check that you have selected the correct ISP for the account you are attempting to use.
4.
Outlook Express
Close
Outlook Express
5. Your Internet account settings may have been changed.
a. Disconnect from the Internet: Close
b. Check your connection details (username, password, server phone number, e-mail address, etc.)
and restore your Internet settings, following the procedure given by your ISP.
6. You have sent a message but and get an error message in reply.
a. Check the spelling of your recipient's e-mail address.
b. Check with your recipient that the e-mail address is still valid.
has stopped responding.
and any other applications, restart your computer and try again.
Outlook Express
and any other applications.
Printer
The guidelines below cover the most common types of problems encountered with printers. Please read
your printer's manual for specific instructions. Should you need further assistance, please contact the
manufacturer of your printer.
My Printer Does not Work
1. The printer is OFF: Switch the printer ON.
2. The printer is OFF Line: Press the printer's on line button.
3. The printer is out of paper: Add paper.
4. The paper is jammed: See your printer's user's guide for information about clearing paper jams.
5. The printer has generated an error message: See your printer's manual for information about resolving
error messages.
6. The printer is not connected properly:
a. Check that the cables are securely connected to the printer and computer.
b. Use a grounded AC power outlet (or power strip). Remember to shut down your computer and printer
before disconnecting or reconnecting any cables (even if your printer uses a USB connection).
USB connection
Parallel connection
7. No power is supplied to the printer.
a. Plug the printer into a different wall socket.
b. Restart the computer and printer again and try printing to determine if the previous socket was
faulty.
8. The printer cable is damaged: if you have another printer cable, try using it to determine if your printer
cable is faulty.
9. Your printer is not installed correctly in Windows: Try reinstalling your printer. See your printer's manual for information about installing the printer in Windows.
50 -
Packard Bell Quick Start & Troubleshooting Guide
Page 51

Adding Software and Hardware
In the event you encounter a problem with a new program or hardware, please check the supplied documentation as well as the manufacturer's Website. For support, please contact the manufacturer's hotline.
Packard Bell cannot be held responsible for any damage caused by adding hardware or software.
Software
Packard Bell Software
To install, remove or reinstall a program originally included with your Packard Bell computer, you can use
Smart Restore
(see page 54).
Additional Software
Before purchasing new programs, check that they can run on your computer. Each software program has
system requirements, such as the amount of memory or hard drive space needed to run. These
requirements can usually be found printed on the software box.
1. Check your computer's specifications:
My Computer Information
Click on Start > Help and Support > Use tools to view
your computer information and diagnose problems (under
Pick a task
) > My Computer information.
System Information
Click on Start > All Programs > Accessories > System Tools
> System Information. Select an item and click on + to
display more options.
For a quick overview of your computer's
specifications, please read the dedicated
sticker on your computer's packaging.
2. Installing a program
When you install a new program, first read the instructions included with it as installation instructions
can vary from product to product.
a. Before installing any new program, be sure all other applications are closed.
b. Insert the CD or DVD. Most CDs or DVDs start automatically and display an installation screen. If
the disc does not start automatically:
c. Right-click on the disc's icon and select Explore. Double-click on the Setup (or Install) icon and fol-
low the on-screen instructions.
Helpdesk -
51
Page 52

3. Uninstalling a program
a. Click on Start > Control Panel > Add or Remove
Programs.
b. Select a program from the list.
c. Click on Change or Remove Programs.
Hardware
Before purchasing a new hardware device, check that it can be used on your computer.
1. Check your computer's specifications (see page 51).
2. Internal hardware component
If you wish to install an internal hardware component, it will be necessary to open your computer.
For best results, an authorised service provider should perform such installation. For further information on
upgrading your system's Random Access Memory (RAM) or Processor (CPU), please refer to
InfoCentre
.
If installing an adapter card (PCI or AGP), please refer to the documentation provided with the card.
3. External hardware device
Installing a new hardware device such as a printer, scanner, joystick, etc. is not a complicated task.
Each type of device has its own installation specifications, so please check the documentation provided
with each device to know how to install it properly. Remember to shut down your computer and device
before disconnecting or reconnecting any cables.
If you have problems installing your new hardware, you should check the supplied manual first. If
you are still having difficulties, please contact the manufacturer or retailer, or check their Website
for more help and advice.
Packard Bell Snapsys
If you suspect that a hardware device may not be working correctly, you can use
changes in the system configuration.
tenance utilities.
To open this program, click on Start > All Programs > Packard Bell Support > Snapsys.
During some tests,
on-screen instructions. The program will prompt you and restart automatically if required.
Snapsys
may need to restart your computer or to reboot in DOS mode. Simply follow the
Snapsys
also provides a series of shortcuts to other computer main-
Tracking Changes
When you launch
It will then display the original state of your computer and show the changes that have been made since it
was purchased. This will allow you to keep track of device driver modifications.
52 -
Packard Bell Quick Start & Troubleshooting Guide
Snapsys
, it will first scan your computer and notify you if there have been any changes.
Snapsys
to identify the
Page 53

Click on the + sign
in front of each item
to display details
To compare the original state of your computer with the current state, Snapsys will access your
recovery data. If you have removed it from your computer, you will need to use your Master DVD/
CDs.
Hardware Diagnostic Tools
This option allows you to check some basic components, such as the condition of your drives, your
computer's memory, or test sound and graphic output.
Double-click on the item you
want diagnosed.
The number of items
available will depend on your
computer’s configuration.
System Tools
Snapsys features a series of tools allowing you to perform checks and maintenance tasks on your computer
to ensure that it runs properly any time you need it. Please refer to page 27 to learn more about the system
tools included on your computer.
Helpdesk -
53
Page 54

Options
Snapsys monitors the changes and automatically creates log files with detailed information on your
computer's history. If you contact the Packard Bell Customer Contact Centre regarding a hardware failure,
you may be asked to send these log files so they can be analysed by qualified technicians. To do this, you
will need to be connected to the Internet. If you use the same line for your telephone and your modem,
your telephone must not be in use.
Packard Bell Smart Restore
Smart Restore
Bell computer, and restore your original drivers. You can also use
DVD Creator
To open this program, click on Start > All Programs > Packard Bell Support > Smart Restore.
Before starting, save your current work and close all running applications, including any antivirus software.
allows you to safely remove or reinstall the software originally included with your Packard
program (please see page 26 for more information).
Smart Restore
to launch the
Master CD/
➌
➍
➋
➊
To install or reinstall software,
your computer, you will need to use your
Uninstalling and Reinstalling Software
You may want to remove some of the programs provided by Packard Bell if you do not use them any
longer. Alternately, you may want to reinstall a program if it has been corrupted and does not work, or, if it
keeps generating errors on the computer.
Some programs can not be uninstalled.
Select the Software tab. When you position the pointer over a software name, its colour changes, indicating
that you can select it.
54 -
Packard Bell Quick Start & Troubleshooting Guide
Smart Restore
Master DVD/CDs
will access your backup data. If you have removed it from
.
Page 55

The red x indicates
the program is
marked for uninstall
• To select a program to reinstall, click on its name once. A green tick will appear in front of it.
• To select a program to uninstall, click on its name a second time. A red cross will appear in front of it.
• To deselect a program, click on its name a third time.
You may select as many programs as you wish.
another without requiring any further intervention.
Once your have made your selection, click on OK. You will be prompted for confirmation. Click on YES to
Smart Restore
allow
procedure.
to start reinstalling/uninstalling the software, or on NO if you wish to abort the
Smart Restore
Use the scroll bar to
view software titles
that are not visible.
will reinstall or uninstall them one after
Resetting your Hardware Configuration
If you encounter some problems with your original computer hardware drivers, you may want to restore
the hardware configuration so that it is exactly as it was when your Packard Bell computer left the factory.
This option is available on selected computers only and it should only be used under supervision of a
Customer Contact Center representative.
RECOVERY
If the troubleshooting steps in the previous chapter did not help fix your problem, you can run the
Bell Recovery Program
giving you an option to retain all settings and personal data for later retrieval.
. This will restore your computer to the same state as when you purchased it, while
Helpdesk -
Packard
55
Page 56

Packard Bell Recovery Program
The
Packard Bell Recovery Program
• Complete Recovery:
− Removes all your personal data and restores your computer to its original factory state. Using this option,
all your data will be lost (personal documents and settings, drivers updates, etc.)
− Retains the data partition for later retrieval unless the "Delete all user files" option is selected.
• Partial Recovery: Restores your original operating system and software to their original factory state
without deleting your personal data.
✓ Before using the Recovery Program, please FIRST try to fix your computer with Windows XP System
Restore.
✓ DO NOT SAVE your data in C:\WINDOWS. During the recovery process, all data contained in this
folder will be deleted.
✓ The procedure described below is only applicable if your recovery data is stored on your computer's hard
disk. If you wish to restore your computer using
✓ After recovery, all software titles that you have installed on your computer must be reinstalled before
you can use them again. Only the pre-installed titles (e.g. DVD Player, CD-writer) will function without
additional installation.
✓ If you were given a choice of languages when you first setup your computer, you can only recover your
operating system in the language you chose originally.
✓ Due to the wide range of reasons for which the Recovery Program may be used, no guarantee can be
given that all data will be retained.
allows two types of recovery:
Please read carefully before using the Recovery Program!
Master DVD/CDs
, please see instructions on page 26.
Starting the Recovery Program
Prepare your Computer
1. Backup your personal files
Save a copy of your personal documents onto CDs, DVDs, memory cards or high capacity disks. Please
InfoCentre
refer to
2. Return your computer to its original configuration
a. Remove any additional hardware components (e.g. sound card, video card, network card) that you
may have added to your computer.
b. Re-install the original Packard Bell hardware components if you have removed them.
c. Make sure that your keyboard, mouse, monitor and speakers are connected properly (if appropriate
for your computer).
d. Disconnect any additional devices that you have connected to your computer (e.g. scanner, printer,
etc.)
56 -
Packard Bell Quick Start & Troubleshooting Guide
to learn how to create backups.
Page 57

Launch the Recovery Program
Press the [F11] key upon start-up when the Packard Bell logo appears, or use the
shortcut in
Smart Restore
(Start > All Programs > Packard Bell Support).
If your computer cannot display the Windows desktop, restart your computer. Press the [F11] key
upon start-up when the Packard Bell logo appears to start the Recovery Program.
1. Select Recovery Program and click on Next.
2. Choose between Complete Recovery and Partial
Recovery and click on Next.
Recovery Program
Complete Recovery will remove all your
personal data and restore your computer to
its original factory state.
Partial Recovery step by step:
1. Select which User profile (or User Account) to
retain from the list and click on Next.
• If you select the "No Profile" option, you will
need to create one or several new profiles as
when you started the computer for the first
time. However, all personal data that was
stored on the computer will be retained.
• If you restore a specific user profile, your
computer will display the Windows desktop of that specific profile in the same state as it was before
the recovery, but redundant program shortcuts in the Start menu will be removed.
In both cases all your personal data and settings will be retained in the Documents and Settings folder on
the hard disk drive.
Helpdesk -
57
Page 58

2. The next screen displays a summary of your selected options. Click on Next to launch the recovery.
There may be a delay the first time that Windows restarts after the recovery process. This delay depends
on the amount of data that must be retrieved from the selected account.
If you used the partial recovery or the complete recovery without deleting all user files, you will notice
that the desktop shortcuts and start menu folders of the previous installation have not been removed.
These shortcuts and folders are no longer operative and you should delete them manually. You may also
remove folders for applications you no longer wish to use. Do not delete folders for software that you did
not originally install yourself - they may contain important Windows files. Finally, reinstall software titles
you wish to use.
Your hard disk may have been partitioned into two virtual drives. If so, you can store all your personal
data ("Documents and Settings", such as photo, video, music files, etc.) on one drive and use the other for
program files. Likewise, if your computer includes two physical hard disks, then your personal data will
be included on one drive, and your system files on the other.
HDD (C:) stores
system files
DATA (D:) stores
data
LOCAL DISK appears if
you removed the recovery
data from your computer
After the partial recovery or the complete recovery without deleting all user files has completed and if you
have used default Windows settings, you may retrieve your data in the following locations:
Your Documents and Settings:
If your computer includes a non-partitioned hard disk:
C:\Documents and Settings\[Chosen User Name]\...
If your computer includes two physical hard disks or a partitioned hard disk:
D:\Documents and Settings\[Chosen User Name]\...
Applications:
C:\Program Files\[Application Name]\...
Other files:
You can use the Windows Search Engine to find other files.
If you used the complete recovery without deleting all user files or the partial recovery because
of a virus infection, you will have to install an updated anti virus in order to clean your personal
files located in the DATA unit. Otherwise the system will still be infected.
58 -
Packard Bell Quick Start & Troubleshooting Guide
Page 59

Using the Recovery Program with Master DVD/CDs
If your recovery data is not on your computer's hard drive, you can use the Recovery Program with Master
DVD/CDs.
Starting the Recovery Program
1. Turn ON your computer.
2. Insert the Master CD or DVD into the drive and close the tray.
3. If Windows is running, then restart your computer by clicking on Start > Turn Off Computer > Restart.
It will automatically boot from the CD or DVD.
4. The drive's busy light should blink to show that your computer is booting on the disc.
5. If your computer does not boot from the CD or DVD, please see page 39 to learn how to set the BIOS
to default settings.
Using the Recovery Program
You can choose several options from the main menu:
1. Standard System Restore
This option resets your computer to the original factory settings. All files that were on the hard disk drive
when you purchased your computer will be restored. Your computer will be exactly the same as when it
left the factory.
All files you have added or created yourself and all changes made to the original files will be lost after
the recovery process!
Before you begin, save a copy of your personal documents onto CDs, DVDs, memory cards or high
capacity disks. Please refer to InfoCentre to learn how to create backups.
✓ The first part of the restoration process will take about half an hour. Please do not remove the Master
CD/DVD from the drive and do not shut down your computer!
✓ During the process, you will be asked to insert your Master DVD/CDs. Please do so, and press the
[Enter] key to continue.
✓ An on-screen message will inform you when the restoration is finished. Before continuing, you will
have to remove the Master CD or DVD from the disc drive. Then press any key to restart your computer.
✓ The computer will restart and the Windows installation procedure will start. Please be patient as this
procedure may take as long as one hour to complete. During this time, your computer will not only
reinstall all your original software but also restore your hardware configuration. Once this is finished
you will have to perform the first start process, just like the first time you switched on your computer.
2. Advanced options
This option allows you to reinstall Windows only or make changes to Windows setup.
Helpdesk -
59
Page 60

Reinstall Windows Only: This process formats your hard drive and performs a new installation of
Windows with the minimum settings. All the data including your personal files will be permanently
deleted. Before you begin this process, do not forget to backup your valuable files.
These options should only be used by advanced PC users or if you are asked to do so by a qualified
Packard Bell technician. If you are not 100% sure that you want to continue, choose the Cancel
option by pressing the [Escape] or the [3] key.
3. Tools
This option includes a series of advanced tools to maintain your hard disk and check your Master DVD/
CDs for potential errors.
These options should only be used by advanced PC users or if you are asked to do so by a Customer
Contact Center representative. If you are not 100% sure that you want to continue, choose the Cancel option by pressing the [Escape] or the [3] key.
• Edit: Runs the Microsoft MS-DOS editor to write, edit and modify MS-DOS program files.
• Fdisk: Runs the hard disk partition manager utility. Inappropriate use of Fdisk may result in an irreversible loss of all the data located on the hard disk. Partitioning software such as Fdisk, Gdisk or Partition
Magic should be used only by advanced Computer users.
• Format Hard Drive: Performs a quick format of the computer's hard disk drive. Inappropriate use of the
Format command may result in an irreversible loss of all the data located on the hard disk.
4. Cancel to return to DOS
Closes the Recovery Program and exits to DOS mode. Should you find that the computer has returned to
DOS, this intends to be used by technicians. Simply restart your computer.
60 -
Packard Bell Quick Start & Troubleshooting Guide
Page 61

PACKARD BELL LIMITED WARRANTY
1. DEFINITIONS
− “Packard Bell” shall mean the Packard Bell sales office of the country in which the Packard Bell Product has
been purchased or if there is no Packard Bell sales office in this country: Packard Bell B.V., Nieuweweg 279,
6603 BN, Wijchen, The Netherlands.
− “Customer” or “You” shall mean the end-user or the purchaser of the Packard Bell product.
− “Product” shall mean Packard Bell branded hardware - desktop, notebook and /or monitor, including peripher-
als or consumable items (such as notebook battery) – or software, which are delivered with the Product in the
factory packaging.
− "Peripheral" shall mean any hardware device other than processor or memory, connected to the computer (optical drive, hard disk, keyboard, monitor, mouse, speakers, printer, scanner, etc.).
− "Consumable" shall mean any supplementary item delivered with the product, to be used with the Product (a
Lithium-ion battery, earphones, cables, remote control, etc.).
− “Software” shall mean a Software program that is pre-installed on the Product or delivered with the Product in
the factory packaging.
− “Warranty” shall mean the warranty applicable by law in the country of purchase of the Product or the contractual warranty You are entitled to as a result of the purchase of the Product.
− “Warranty Period” shall mean the period during which you are entitled to the application of the Warranty on
the Product. The Warranty Period starts from the date of purchase or delivery of the Product.
− “Service & Support” or "Customer Contact Center" or "CCC" shall mean the Packard Bell technical assistance
and service provided by its technician or technical representative and the Packard Bell call centre that is accessible to You.
− “Country” shall mean the country of purchase of the Product by You.
− “Warranty & Service Sheet” shall mean the document supplied in the factory packaging on which You will find
the Warranty Period and the type of service You are entitled to on the Product purchased as well as the contact
information to contact Service & Support in the Country.
2. H
OW TO ACTIVATE THE PACKARD BELL WARRANTY
Packard Bell understands your needs for product excellence as well as Service & Support.
In order to supply the best Service & Support when necessary, Packard Bell recommends You to activate the applicable
Warranty as soon as Your Product is installed.
This Warranty is subject to the registration of the Product via the on-line registration software (wherever available).
The Customer will provide Packard Bell with the correct date of purchase in order to obtain the Warranty Period. In
case of doubt, the Customer will provide Packard Bell with a copy of the proof of purchase (invoice or delivery note).
Packard Bell will keep a record of all registrations of personal data in order to provide appropriate Service & Support
and adequate assistance to You during the Warranty Period. Packard Bell will protect this personal data to its best
effort and may transfer this personal data to third party in order to ensure Service & Support is carried out. You may
refuse transfer of personal data, have access to and/or modify your personal data by sending a letter to Packard Bell’s
address in the Country reproduced on the Warranty & Service Sheet. Packard Bell will handle all personal data
according to the applicable data protection laws.
ARRANTY COVERAGE
3. W
Packard Bell warrants that the Product and the Software are free from defect in material and workmanship for the
Warranty Period set out in the Warranty & Service Sheet, included with the Product. Packard Bell guarantees that
the Product is free of viruses (or other pre-programmed devices with similar effect) at the moment of first use only.
Please note that peripherals/accessories and consumable items may have a different Warranty Period as set out in
these Warranty conditions or Your Warranty & Service Sheet.
This warranty is limited to the replacement of the Product or part recognised as defective with an identical or comparable Product or part, new or equivalent to new. This warranty covers the repair, parts and labour included or
exchange, as set out below, during the Warranty Period.
Any items missing from the original packaging of the Product must be reported to Service & Support within 90 days
from the date of purchase. No missing items can be provided free of charge after this period as the Customer is considered to have accepted the Product as delivered. To report any missing items please contact the relevant support
number that you can find on the Warranty & Service Sheet.
Packard Bell Limited Warranty -
61
Page 62

Software Warranty only applies to Software that was originally supplied with the Product. It does not provide the
Customer with Software usage support. Any other Software (e.g. games) is subject to the third party licence and
warranty conditions.
Specifically for batteries:
Disposable batteries that may be included with the Product are not covered by any contractual/limited warranty.
Notebook batteries are expressly excluded from warranty. Any charging time or battery life otherwise indicated
merely corresponds to indicative timeframes which may vary depending on End-User’s use and provided the EndUser respects Packard Bell advices to optimize the battery life time.
Specifically for Liquid Crystal Display (“LCD”) screens:
Packard Bell strives to provide the highest quality LCD display products in the industry. Your Product meets the Class
2 specifications under the ISO 13406-2 industry guidelines for LCD monitors.
LCD monitors use a technology based on pixels. A pixel is a combination of three sub-pixels (red, green and blue)
that produce a specific colour. There are millions of these sub-pixels on each LCD screen. Pixel faults on LCD screens
can be comprised of whole pixels or sub-pixels going dark, staying permanently lit or flashing.
The ISO 13406-2 standard allows for a certain number of pixel faults based on the number of total pixels in the
monitor (determined by the screen size). Packard Bell will replace an LCD monitor during the Warranty Period if it
meets the following criteria:
Size Number of pixels Type 1 Type 2 Type 3 Faulty Cluster 1 Faulty Cluster 2
Bright Dark Subpixel
Cluster of errors
type 1 or 2 in
5X5 pixels
Cluster of errors
type 3 in 5X5
pixels
15" 1 024 x 768 786 432 2 2 4 1 2
17” 1280 x 1024 1 310 720 3 3 7 1 3
19” 1280 x 1024 1 310 720 3 3 7 1 3
Type 1: A full pixel is always visible on the screen, resulting in a white point.
Type 2: A full pixel does never illuminate at all, resulting in a dark point.
Type 3: One or two sub-pixels are always switched on or switched off, resulting in a pixel of one of the basic colours
(red, green, blue, cyan, magenta, yellow). Or a continuously blinking pixel occurs.
Faulty Cluster 1: Within a field of 5x5 pixels there are several malfunctions of Type 1 or Type 2.
Faulty Cluster 2: Within a field of 5x5 pixels there are several malfunctions of Type 3. Whenever this is reasonable
and at the sole discretion of Packard Bell or when this is mandatory by national consumer legislation of the Country,
Packard Bell may limit or extend the Warranty Period on the Product.
If your monitor’s documentation defines a different pixel policy, then this overrules the pixel policy described in this
Limited Warranty.
Whenever this is reasonable and at the sole discretion of Packard Bell or when this is mandatory by national consumer
legislation of the Country, Packard Bell may limit or extend the Warranty Period on the Product.
If the Customer requests Service & Support in another country than the Country and/or when the Warranty period
on the Product is finished, Service & Support will be invoiced to the Consumer.
ARRANTY EXCLUSIONS
4. W
This Warranty does not apply when:
− Defective accessories, consumable items and/or peripherals have not been delivered in the factory packaging of
the Product or have been purchased separately from the Product;
− Problems are caused by hardware or software which have not been delivered in the factory packaging of the
Product;
− The original identification marks have been altered or removed from the Product;
− Defects or failures are due to accident, neglect or misuse, failure of or defect in electrical power, external elec-
trical circuitry, unusual physical or electrical stress, air conditioning or environmental controls, the effects of
weather influences; the use of items not provided by Packard Bell;
62 -
Packard Bell Quick Start & Troubleshooting Guide
Page 63

− Defects are caused by a virus or another pre-programmed device with similar effect;
− The Customer has forgotten, lost or removed any password (including BIOS password) which provides him from
having access to the Product;
− The Customer, any third party to Packard Bell or any third party to its authorised service provider has modified,
adjusted, repaired, serviced or installed the Product;
− The use or installation of the Product is not in compliance with Packard Bell’s documentation;
− The Product defect is due to any reason which in Packard Bell’s sole discretion is not a result of a defect in ma-
terial or workmanship;
− The Customer has not followed all procedures set out in this Limited Warranty.
5. L
IMITATION OF LIABILITY
This Warranty replaces all other warranties, whether express or implied, including but not limited to implied warranty
of merchantability and fitness for a particular purpose with respect to the Product and its documentation.
Packard Bell’s liability hereunder is limited to the repair of the Product or the replacement thereof. In particular,
Packard Bell shall not be liable to replace or repair the Product if the Warranty is not applicable due to the reasons
set out in section 4.
In any event, Packard Bell shall in no circumstances be liable for any other costs, charges, expenses, loss or damage
of any nature whatsoever: direct or indirect, consequential or incidental, including but not limited to loss of business
profits or any other commercial damages, loss of data, arising out of the use of the Product or of the presence of a
virus (or pre-programmed device with a similar effect) on the Product or of the Service & Support intervention.
Save with regard to death or personal injury caused by the negligence of Packard Bell, its employees or service
provider, and strict product liability, this limited liability represents Packard Bell's entire liability with respect to the
Product and with respect to goods or services supplied herein and Packard Bell shall have no other obligation, duty,
or liability whatsoever in contract, tort (including liability for negligence) or otherwise to the Customer.
However, this limitation of liability does not in any way affect or limit the Customer's statutory rights under the
national legislation governing the sale of consumer goods in the Country.
Packard Bell shall not be liable for any failure or delay in performance due to any cause beyond its control. Such
circumstances include, but are not limited to, interrupted telephone service, airport closures that interrupt parts
delivery, acts of god, weather conditions, labour strikes, and the inability to contact You to confirm scheduling.
If, during a “Carry-in”, “Drop-in” or “PURR” Intervention, the CCC representative establishes that the repair is not
covered by the Warranty, the repair will not be completed until it has been completely paid for. Should such circumstances arise, Packard Bell will contact the Customer with a repair quote. If the Customer would like to have the unit
returned unrepaired, then this can be arranged after Customer payment has been received for the incurred transport
and diagnostic costs.
ARRANTY UPGRADES
6. W
Depending on the Country of purchase of the Product, it may be possible to purchase Extended Warranty. Please
contact your Customer Contact Center or the store where You purchased Your Product for more details. If You have
purchased such an Extended Warranty, the general conditions applicable to this Extended Warranty will prevail over
this Warranty.
7. D
ATA BACKUP REQUIREMENT
Repair of Product may involve the re-formatting of the Hard Disk Drive (“HDD”) and consequently the loss of data
stored on the HDD.
Packard Bell strongly advises the making of regular backup copies on various media (floppy disk, CDs, etc.) of any documents, data, files and/or software stored on their Product. You will be responsible for backing up data stored in the
Product prior to contacting Packard Bell Customer Contact Center and receiving Service & Support from Packard Bell.
Packard Bell and its authorised service providers are not liable for data that is lost or damaged during the Service &
Support process.
8. H
OW TO OBTAIN PACKARD BELL WARRANTY SERVICE & SUPPORT
In the unlikely event of a Product incident, Packard Bell recommends that You perform a rapid technical investigation
to find the problem with the user documentation supplied to You with the Product on paper and in electronic format,
and the recovery tools that are pre-installed on the Product’s HDD.
Would the problem persist, You should contact the relevant Packard Bell Customer Contact Center in the Country
using the “Contact Information” as set out in the Warranty & Service Sheet, and have the following information available:
Packard Bell Limited Warranty -
63
Page 64

− The serial number of the Product, which can be found on the back of your computer’s base unit (desktop) and
is preceded by S/N. On notebooks it is printed on the bottom. This serial number is essential for providing the
necessary service and MUST therefore be included in all correspondence with Packard Bell.
− The original proof of purchase of the Product;
− The operating system installed on this Product;
− Details of any software or hardware modifications made to the Product;
− Assure that the problem is not caused by third party hardware or software;
− Exact description of all failure messages;
− If contact is made by phone, You should be in front of Your Product and this is turned on (if possible).
A Customer Contact Center representative will provide Service & Support to diagnose and if possible correct the
defect over the telephone. If the failure cannot be resolved by telephone support, Packard Bell will repair the Product
as per the applicable service level to the Product. A procedure will be agreed upon between You and the CCC representative. Before any repair is carried out you have to make sure that:
− You have made backup copy of the data stored on Your Product;
− All non-Packard Bell software or hardware components are removed from the Product;
Packard Bell reserves the right to charge parts and labour if Packard Bell discovers no defect or problem in the
Product, if the Customer has not complied with one of the conditions set out in this section or if the defect is a
customer induced defect (for example if the defect is caused by neglect or misuse).
9. S
ERVICE & SUPPORT INTERVENTION
If, to the sole opinion of the Customer Contact Center representative, intervention is required, Packard Bell will,
according to the CCC representative decision, repair or replace the Product, PROVIDED THAT:
− You have followed all procedures set out in this Limited Warranty;
− You have removed all non-Packard Bell software or hardware components;
− You have removed the BIOS password, if any, before the intervention.
Each service type is limited to the Country of purchase of the Product.
If You or an authorised representative are not at the agreed location at the time and date of the appointment, You
may be charged for any subsequent visits.
Packard Bell reserves the right to refuse to provide the service to any location at which, to Packard Bell’s sole opinion,
the safety of Packard Bell’s technical representative or the ability to provide the Service & Support described herein
would be jeopardised.
Packard Bell cannot be held responsible for any loss or damage to the Product in total or in part, when it has been
sent to Packard Bell by the Customer without complying with the procedures defined in section 8 and 9 above.
Repair of the Product may involve the re-formatting of the HDD and consequently the loss of data stored on the HDD.
Therefore You must comply with the terms of section 7 above.
TYPES OF SERVICE IN CASE OF REPAIR
10.
Performance of Service & Support will be of a different type, depending on the Product. You will find the type of
Service that is applicable to Your Product on the Warranty & Service Sheet that can be found in the factory packaging.
Please note that all Software issues will be supported on the phone, Web or by e-mail.
Please note that the Extended Warranty purchased by You can modify the service type defined on the Warranty &
Service Sheet.
Regardless of the applicable service type, You have to follow the Service & Support intervention procedure defined in
section 9 above.
The description of the different service types is as follows:
a) Carry-In
− The Customer packages the complete Product securely in the factory or equivalent packaging;
− The Customer encloses a copy of the original proof of purchase (sales invoice) and any other relevant sales doc-
umentation;
− The Customer encloses a detailed description of the problem with the Product;
− The Customer delivers the complete package to a Packard Bell authorised service location in the vicinity of the
Customer's residence, as indicated by a CCC representative; or
− The Customer delivers the complete package to the store where the Product was purchased;
− Costs of repair or replacement of defective parts and labour will be borne by Packard Bell.
64 -
Packard Bell Quick Start & Troubleshooting Guide
Page 65

b) Drop-In
− The Customer packages the complete Product securely in the factory or equivalent packaging;
− The Customer encloses a copy of the original proof of purchase (sales invoice) and any other relevant sales doc-
umentation;
− The Customer encloses a detailed description of the problem with the Product;
− The Customer delivers the complete package to the location indicated by a CCC representative, in the vicinity
of the Customer's residence.
− Costs of repair or replacement of defective parts and labour will be borne by Packard Bell.
c) Pick-up, Repair & Return ("PURR")
− The Customer packages the complete Product securely in the factory or equivalent packaging;
− The Customer encloses a copy of the original proof of purchase (sales invoice) and any other relevant sales doc-
umentation;
− The Customer encloses a detailed description of the problem with the Product;
− An appointment with the Customer or any authorised representative will be arranged by Packard Bell for the
collection and return of the Product at the agreed location;
− Costs of transport, repair or replacement of defective parts and labour will be borne by Packard Bell.
d) On-site
− An appointment for the repair intervention will be agreed upon between Packard Bell and the Customer;
− The Customer will produce the proof of purchase of the Product to the technical representative who will attend
the appointment;
− Costs of travel, repair or replacement of defective parts and labour will be borne by Packard Bell.
If the Product cannot be serviced at the agreed location, the technical representative may decide to take the Product
with him and return it after repair has been performed.
e) Self-repair
Packard Bell Easy Repair procedure:
Packard Bell Easy Repair is a Service program that allows the End-User to do some repair on his computer by himself.
The program is offered to the End-User who feels confident and is willing to make a basic item swap on his own. Only
items easy to replace and with no risk of damage are in the Packard Bell Easy Repair scope. The End-User can benefit
from faster repair, greater flexibility and he can keep using his computer in the event that the item to be replaced is
not an essential component for system function. In agreement with the End-User, Packard Bell will provide the EndUser with a replacement item for the one diagnosed as defective. The replacement item will be sent together with
work instructions and an anti-static wrist strap. The End-User can plan the repair at his convenience and will return
the defective item to Packard Bell within 7 days after shipment of the new item. When calling the Contact Centre
for system diagnosis, the End-User will be provided with accurate instructions on how to proceed.
f) Exchange
This procedure is complementary to the above mentioned service levels.
Components that can be replaced without the use of a tool are called “Customer Replaceable Items”.
In the event that, according to the Packard Bell Customer Contact Center representative, the problem is caused by a
Customer Replaceable Item, the CCC representative may decide to send the item in replacement to the Customer by
registered mail return (receipt requested) with a note explaining the procedure to return the defective Customer
replaceable Item.
Packard Bell reserves the right to request a credit card reference and may invoice the Customer if the defective
Customer Replaceable Item is not returned to Packard Bell within 15 days after receipt by Customer of the item in
replacement.
11. T
RANSFER OF WARRANTY
In case of change of ownership of the Product, this Warranty is transferable with the Product.
Important: The new end-user will be entitled to the application of the remainder of the Warranty Period on the
Product transferred under two cumulative conditions:
− The new end-user must be in possession of the original proof of purchase of the Product, and,
− Details on the Product’s change of ownership must be sent to Packard Bell at the address reproduced in the
Warranty & Service Sheet.
Packard Bell Limited Warranty -
65
Page 66

REGULATORY INFORMATION
EUROPEAN NOTICE
Products with the CE marking comply with both the Electromagnetic Compatibility Directive (89/336/EEC) and the
Low Voltage Directive (73/23/EEC) - modified by the Directive 93/68/EEC - issued by the Council of the European
Communities.
Compliance with these directives implies conformity to the following European Standards:
EN55022 (1994+A1:1995+A2:1997): Radio disturbance characteristics
EN55024 (1998+A1:2001): Immunity characteristics
EN61000-3-2 (2000): Limitation of harmonic current emissions
EN61000-3-3 (1995+A1:2001): Limitation of voltage fluctuation and flicker in low-voltage supply system
EN60950-1 (2001): Product Safety. If your computer includes a telecommunication network board, the input/output
socket is classified as Telecommunication Network Voltage (TNV-3).
Note for computers equipped with wireless controllers:
Hereby, Packard Bell B.V., declares that the wireless devices provided with this computer include a low power radio
transmitter in full compliance with the essential requirements and other relevant provisions of Directive 1999/05/
EC for Low Voltage, EMC and RF of the R&TTE.
For specific information regarding your computer model, please refer to Packard Bell InfoCentre, your electronic
user‘s guide.
RODUCT DISPOSAL
P
The Waste Electrical and Electronic Equipment (WEEE) Directive requires that used electrical and electronic products must be disposed of separately from normal household waste in order to promote reuse,
recycling, other forms of recovery and to reduce the quantity of waste to be eliminated with a view to
reducing landfill. This concerns your computer and all its accessories, such as a keyboard, mouse,
remote control, speakers, etc. When you dispose of such products, please follow the guidance of your
municipal authority and/or ask your retailer when purchasing a new product.
Battery Disposal (when applicable)
Ultimate disposal of the batteries should be handled according to all national laws and regulations. Do not place used
batteries in your regular waste: the incineration, landfilling or mixing of batteries with the municipal solid waste
stream is prohibited by law in most countries. Contact your local waste management officials for other information
regarding the environmentally sound collection, recycling, and disposal of the batteries.
CAUTION: RISK OF EXPLOSION IF BATTERY IS REPLACED BY AN INCORRECT TYPE. DISPOSE OF USED
BATTERIES ACCORDING TO THE INSTRUCTIONS.
M
ODIFICATIONS TO THE PRODUCT
CE Marking
Packard Bell B.V. cannot be held responsible for unauthorised modifications made by the user and the consequences
thereof, which may alter the conformity of the product with the CE Marking.
Radio Frequency Interference
The manufacturer is not responsible for any radio or TV interference caused by unauthorised modifications to this
equipment.
66 -
Packard Bell Quick Start & Troubleshooting Guide
Page 67

CONNECTIONS AND REMOTE EARTHS
PELV (Protected Extra Low Voltage)
To ensure the extra-low voltage integrity of the equipment, only connect equipment with mains-protected electricallycompatible circuits to the external ports.
SELV (Safety Extra Low Voltage)
Every input and output of this product is classified as Safety Extra Low Voltage.
Remote Earths
To prevent electrical shock, connect all local (individual office) computers and computer support equipment to the
same electrical circuit of the building wiring. If you are unsure, check the building wiring to avoid remote earth conditions.
Building Supply
Only connect the equipment to a building supply that is in accordance with current wiring regulations in your
country. In the U.K., these are the IEE regulations.
BABT’s Apparatus Approval
This equipment complies with BABT’s Apparatus Approval No. NS/G/1234/J/100003 with regard to indirect
Connection to the BT Public Switched Telephone Network. Refer to OFTEL statement SA29 for further information.
P
OWER SUPPLY AND CABLES
Power Supply
The power supply socket-inlet and socket-outlet (if equipped) are classified as Hazardous Voltage.
You must unplug the power supply cord to disconnect the equipment from the power supply (and remove the battery
if you are using a notebook). In that aim, the socket-outlet should be installed near to the equipment and should be
easily accessible.
In the European countries, before plugging the power cord into an AC outlet, check that the voltage selector switch
of the computer's power supply (if available) is in the position “230 V”. In the U.S.A. and Canada, before plugging
the power cord into an AC outlet, check that the voltage selector switch of the computer's power supply (if available)
is in the position “115 V”.
Under no circumstances should the user attempt to disassemble the power supply. The power supply has no userreplaceable parts. Inside the power supply are hazardous voltages that can cause serious personal injury.
A defective power supply must be returned to your dealer.
Power Cables
This equipment requires a 3-wire, grounded power cord. The cord length must not exceed 2.5 metres. To prevent
electrical hazards, do not remove or disable the ground contact on the power cord. Replace the power cord if it gets
damaged. Contact your dealer for an exact replacement. In Europe, the plug must be rated for 250 VAC, 10 amp
minimum. In the U.S.A. and Canada, the plug must be rated for 125 VAC, 10 amp minimum. The plug must display
an international agency approval marking. The cord must be suitable for use in the end-user country. Consult your
dealer or the local electrical authorities if you are unsure of the type of power cord to use in your country.
Cables
The EMC performance of the system is guaranteed only if the cable and interface use efficient shielding.
The use of shielded interface cable is required for USB, IEEE1394, serial, printer, game, analogue or digital audio/
video, Ethernet LAN, PS2, TV or FM antennas, and generally all high speeds cables’ interfaces.
Use only UL Listed No. 26AWG or larger telecommunication cords.
Only Ethernet LAN or RTC modem cable can have length exceeding 3 meters.
For Ethernet LAN cable, use FTP shielded cables only (cat ≥ 5).
Heat Build-up and Portable Computers
The AC adapter and the underside of the computer can become hot after prolonged use. Sustained physical contact
with either should be avoided.
Regulatory Information -
67
Page 68

CHASSIS COVER REMOVAL AND REPLACEMENT
Before removing the chassis cover to service or modify the equipment, you must disconnect all power and modem
cords (and remove the main battery in portable computers). You then must close the chassis before you plug in and
switch on the equipment.
L
ASER COMPLIANCE STATEMENT
The optical devices are tested and certified to be compliant with International Electrotechnical Commission
IEC60825-1 and European EN60825-1 standards for Class 1 laser products.
Class 1 laser products are not considered hazardous. The optical devices are designed such that there is never human
access to laser radiation above a Class 1 level during normal operation or prescribed maintenance conditions.
The optical devices installed in your computer are designed for use solely as components of such electronic product
and therefore do not comply with the appropriate requirements of Code of Federal Regulation Sec. 1040.10 and Sec.
1040.11 for COMPLETE laser products.
Because exposure to laser radiation is extremely hazardous, under no circumstances should the user attempt to disas-
semble the laser device.
68 -
Packard Bell Quick Start & Troubleshooting Guide
Page 69

SOFTWARE LICENSE
Packard Bell B.V. License Agreement (CD and/or DVD Products). This copy of the original is your proof of license.
Please treat it as valuable property.
IMPORTANT
READ CAREFULLY BEFORE OPENING SOFTWARE PACKET(S).
The following License Agreement applies to you. This is a legal agreement between you (either individual or an entity)
and Packard Bell B.V. By opening the sealed software packet(s) you are agreeing to be bound by the terms of this
Agreement. If you do not agree to the terms of this Agreement, promptly return the unopened software packet(s) and
the accompanying terms (including written materials and binders or other container(s)), as well as your entire
computer system in the place you obtained them for a full refund.
P
ACKARD BELL B.V. SOFTWARE LICENSE
1. Grant of License
This Packard Bell B.V. License Agreement (“License”) permits you to use one copy of the specified version of the
Packard Bell B.V. CD and/or DVD product identified above (“SOFTWARE”, which includes at least one CD or DVD
disc and may include one or more floppy disks) on any single computer, provided the SOFTWARE is in use on only
one computer at any time. If you have multiple Licenses for the SOFTWARE, then at any time you may have as many
copies of the SOFTWARE in use as you have Licenses. The SOFTWARE is “in use” on a computer when it is loaded
into the temporary memory (i.e. RAM) or installed in the permanent memory (e.g. hard disk, CD and/or DVD, or
other storage device of that computer, except that a copy installed on a network server for the sole purpose of distribution of other computer is not “in use.” If the anticipated number of users of the SOFTWARE will exceed the
number of applicable Licenses, then you must have a reasonable mechanism or process in place to assure that the
number of persons using the SOFTWARE concurrently does no exceed the number of Licenses. If the SOFTWARE is
permanently installed on the hard disk or the storage device of a computer (other than a network server) and one
person uses that computer more than 80% of the time it is in use, then that person may also use the SOFTWARE on
a portable or home computer.
2. Copyright
The SOFTWARE is owned by Packard Bell B.V. or its suppliers and is protected by United States copyright laws and
international treaty provision. Therefore, you must treat the SOFTWARE like any other copyrighted material (e.g. a
book or musical recording) except that you may either (a) make one copy of the floppy disk portion of the SOFTWARE, if any, solely for backup or archival purposes, or (b) transfer the floppy disk portion of the SOFTWARE to a
single hard disk provided you keep the original solely for backup or archival purposes. You may not copy the CD and/
or DVD disc portion of the SOFTWARE or the written materials accompanying the SOFTWARE.
3. Other Restrictions
You may not rent or lease the SOFTWARE, but you may transfer the SOFTWARE and accompanying written materials
on a permanent basis provided you retain no copies and the recipient agrees to the terms of this Agreement. You may
not reverse engineer, decompile or disassemble the SOFTWARE. Any transfer of the SOFTWARE must include the
most recent update and all prior versions.
Software License -
69
Page 70

INDEX
A
Attachments ..................................................... 31
Audio CDs ..................................... 10, 24, 46, 47
Autoplay........................................................... 24
B
Backups...................................................... 15, 32
Batteries ..................................................... 10, 66
Battery disposal .............................. 11, 62, 66
Battery life ........................................... 11, 62
Replacing batteries ..................................... 11
Smart batteries ........................................... 38
Bios............................................................ 39, 59
Boot process..................................................... 40
Browser............................................................ 18
C
Cable modem............................................. 13, 49
Cables .......................................................... 5, 67
CD & DVD drives ............................................. 10
Cleaning your computer ..................................... 5
Computer environment ...................................... 5
Connectors....................................................... 11
Control devices
Keyboard ........................................... 6, 7, 44
Mouse ................................................... 6, 44
Touchpad............................................... 7, 44
Convergence .................................................... 15
Copy protection................................................ 47
Copyright notice................................................. 4
Cordless devices ................................................. 6
Cursor................................................................ 7
D
Device Manager ............................................... 43
Diagnose & Repair ............................................ 36
Dial-up modem........................................... 13, 48
Disk Cleanup.................................................... 29
Disk Defragmenter ........................................... 29
Documentation
Packard Bell InfoCentre.......................... 9, 21
Packard Bell Website.................................. 20
Drives ................................................................ 9
Card reader.................................................. 9
Hard Disk Drive (see HDD)
Optical drives............................................. 10
DSL ........................................................... 16, 49
DVD films........................................................ 10
E
E-mail .................................................. 18, 31, 49
Attachments .............................................. 31
Outlook Express......................................... 18
Epilepsy warning................................................ 6
Error checking ................................................. 28
External hardware devices ............................... 52
F
Firewall...................................................... 32, 34
Formatting a card............................................... 9
H
HDD (Hard Disk Drive)
Free space............................................ 27, 29
Management.............................................. 30
Recovery data ............................................ 26
Health precautions ............................................. 5
Helpdesk.......................................................... 26
I
IEEE ................................................................ 11
InfoCentre ................................................... 7, 11
Installing software ............................................ 54
Interference ............................................... 45, 66
Internal hardware ............................................ 39
Internet
Connection.................................... 13, 16, 32
Firewall ............................................... 32, 34
Internet Explorer
Features..................................................... 18
Security settings......................................... 32
Internet Service Provider (ISP).......................... 16
K
Keyboard ................................................. 6, 7, 44
Multimedia.................................................. 8
Notebook..................................................... 9
L
LAN (Local Area Network)............................... 17
Last Known Good Configuration.......... 40, 41, 42
70 -
Packard Bell Quick Start & Troubleshooting Guide
Page 71

LCD screen ...................................................... 45
M
Maintenance
HDD management ..................................... 30
Master CD/DVD Creator ..................... 26, 54
System tools ......................................... 27, 53
Master CD/DVD Creator ....................... 4, 26, 54
Memory ........................................................... 15
Memory card...................................................... 9
Memory card reader........................................... 9
Monitor...................................................... 37, 45
Mouse.......................................................... 6, 44
Multimedia files................................................ 24
Multimedia keyboard.......................................... 8
N
Notebook ............................................... 9, 10, 38
O
Optical drives ................................................... 10
Outlook Express ......................................... 18, 50
P
Packard Bell InfoCentre................ 4, 9, 21, 52, 56
Packard Bell Master CD/DVD Creator.............. 26
Packard Bell Recovery Program................... 55, 56
Packard Bell Smart Restore ............................... 54
Packard Bell Snapsys......................................... 52
Packard Bell Website ........................................ 20
PC Card ........................................................... 12
PLC (Power Line Communication) ................... 17
Pointer ............................................................... 7
Ports & Connectors
Communication ......................................... 13
IEEE .......................................................... 11
Legacy........................................................ 12
TV-out ....................................................... 13
USB ........................................................... 11
Power Cinema.................................................. 24
Power cords ....................................................... 5
Power ON/OFF................................................ 13
Power saving modes ......................................... 14
Printer.............................................................. 50
R
Recovery
Recovery Program ...................................... 56
System Restore........................................... 41
Recovery Data .................................................. 26
Regulatory Information..................................... 66
Removable media devices................................... 9
Removing hardware ........................................... 9
Removing software........................................... 30
Restore points .................................................. 41
S
Safe computing ................................................ 26
Safe mode .................................................. 40, 41
Safety precautions .............................................. 5
Screen saver..................................................... 37
Security
Antispyware............................................... 33
Antivirus.................................................... 30
Internet connection.................................... 32
Set up my PC............................................. 21
Updates ..................................................... 34
Windows Security Center..................... 33, 34
Set up my PC ................................................... 21
Shutdown ........................................................ 14
Smart Restore....................................... 48, 54, 55
Snapsys ............................................................ 52
Software
Installing software...................................... 54
Removing software..................................... 30
Set up my PC............................................. 21
Software library.......................................... 23
Software License........................................ 69
Speakers........................................................... 24
Spyware ........................................................... 33
Storage............................................................. 15
Support
Online Troubleshooter ............................... 36
Packard Bell InfoCentre.............................. 21
Packard Bell Website.................................. 20
Suspend mode.................................................. 37
System requirements ........................................ 51
System Restore................................................. 43
System tools
Disk Cleanup ............................................. 29
Disk Defragmenter..................................... 29
Error checking ........................................... 28
T
Task Manager .................................................. 43
Touchpad..................................................... 7, 44
Troubleshooting ............................................... 26
Display ...................................................... 45
Internet ..................................................... 47
Index -
71
Page 72

Keyboard & mouse ..................................... 44
Printer ....................................................... 50
Sound ........................................................ 46
Top 5 cases ................................................ 36
TV-out.............................................................. 13
U
Uninstalling hardware ........................................ 9
Uninstalling software ........................................ 54
Update
Antispyware............................................... 35
Antivirus.................................................... 35
Windows automatic updates................. 34, 35
Upgrading
Recycling ................................................... 15
Storage....................................................... 15
Warranty.................................................... 15
USB ................................................................. 11
V
Viruses
Antivirus.................................................... 30
Tips ........................................................... 31
Volume controls............................................... 24
W
Warranty.......................................... 4, 15, 39, 61
Wi-Fi................................................................ 17
Windows
Using Windows ......................................... 21
Windows automatic updates .......... 33, 34, 35
Windows Firewall...................................... 33
Windows Media Center ............................. 24
Windows Media Player .............................. 24
Windows Security Center .................... 33, 34
72 -
Packard Bell Quick Start & Troubleshooting Guide
 Loading...