

Oursson DW4001TD User Manual [ru]
DW4001TD
EN Instruction manual
RU Руководство по эксплуатации

220-240 V~
 N
N
 L
L

 < 0°С
< 0°С 
1
2
3
3
4 |
5 |
1
5
2 |
3 |
4 
4

D
2 |
4 |
|
|
|
5 |
|
|
1 |
7 |
8 |
9 |
 6
6
3
|
|
|
|
|
|
|
|
|
|
|
|
|
|
|
|
|
|
1 |
2 |
|
|
|
E |
|||
5
3 |
4 |
5
1
2
F
6

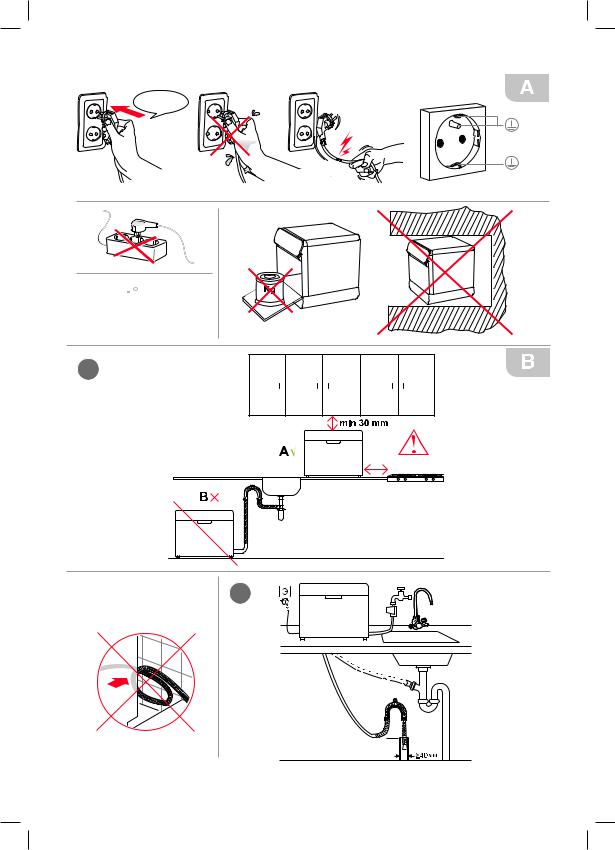
SAFETY INSTRUCTIONS, Рiс. А
Danger symbol
A reminder to user about high voltage.
Warning symbol
A reminder to user about the necessity
of operating exactly according to the instructions.
When using electrical appliances should take the following precautions:
•Use the device according to the following instructions manual.
•Install the device on a stable surface.
•Use only the tools, which are included in the product set.
•To protect against risk of electrical shock do not put the cord in water or other liquid. If for some reason the water got into the unit, contact an authorized service center (ASC) OURSSON AG.
•For power supply, use a power grid with proper characteristics.
•Do not use the device in areas where the air can contain vapors of flammable substances.
•Never attempt to open the device by yourself– it could possibly be the reason of an electrical shock can lead to product malfunction and will invalidate the manufacturer’s warranty. For repair and maintenance, contact only authorized service centers meant for repair of products under the trademark OURSSON.
•When moved from a cool to a warm place and vice versa unpack it before use and wait 1-2 hours without turning it on.
•In order to prevent electrical shock do not immerse the entire product or the wires into the water.
•Be particularly careful and cautious when using the device near children.
•The power cord is specially made relatively short in order to avoid the risk of injury.
•Do not allow the cord to hang over the sharp edge of the table or touch hot surfaces.
•Do not connect this device to a grid which is overloaded with other appliances: it can lead to the fact that the device will not function properly.
•Do not install the device near gas and electric stoves and ovens.
•After use, make sure to disconnect the device from the power grid.
•Keep the device from bumps, falls, vibration and other mechanical influences.
•Make sure to disconnect the device from the power grid before cleaning or changing accessories.
•Do not use the device outdoors.
•This appliance is not intended for use by persons (including children) with reduced physical, sensory or mental capabilities, or lack of experience and knowledge. They can only use the device under the supervision of the person responsible for their safety, or after instruction on the safe use of the device. Do not allow children to play with the product.
•This product is intended only for use in the home.
•If the power cord is damaged, it must be replaced by
Risk of burn symbol |
EN |
Reminder for user |
|
of high temperatures. |
|
a specialist from the authorized service center (ASC) OURSSON AG to avoid danger.
•Use only the tools, which are included in the product set.
•When cleaning the appliance do not use abrasives and organic cleaners (alcohol, gasoline, etc.). When cleaning the device it is allowed to use a small amount of neutral detergent.
RECOMMENDATIONS
•Please read the instruction manual before using the device. Keep the manual after reading for further use.
•All illustrations in this manual are schematic representations of real objects, which may differ from the actual images.
•It is forbidden to use extension cords or adapters for this device, Pic. А.
The operation of this device in any case does not imply application of any force to it, as this may damage the product due to user fault.
•Do not place heavy objects on the door when it is open, do not lean on it, Pic. A. The device may lean forward. Do not leave the appliance with the door open unattended.
•Do not use the device if the ambient temperature is below 0°C degrees, Pic. A.
• Do not touch the heating element during or immediately after use.
•When operating the dishwasher, open the door very carefully. There is a risk of water splashing, and the escaping steam may have a high temperature. This can cause burns.
Keep children away from detergent and also away from the open door of the dishwasher. Do not let children drink the water from the device. Water may be contaminated with detergent residues. Detergents can be extremely dangerous if swallowed. Avoid contact with skin and eyes.
•Avoid the accumulation of combustible materials around and below the device, such as lint, paper, rags, and chemicals.
•Make sure that the detergent drawer is empty after completing the wash cycle.
•The dishwasher is designed to wash ordinary household items. Do not wash in the dishwasher items contaminated with gasoline, paint, etc.
•Avoid sudden changes in temperature and humidity.
Do not exceed the maximum number of 4 sets of utensils.
7

INSTALLATION AND CONNECTION, Pic. B
•Unpack the device and remove all packaging material.
•Check for accessories. The presence of water stains and water stains inside the device is normal.
•Retain the original packaging.
•Inspect the device for defects and deformations.
•It is recommended to install the device in the vicinity of an existing water supply tap, drainage holes for water.
•Сonnect the device only to the cold water main.
•Install the appliance on a horizontal level, heatresistant surface, keeping the distance from the walls/ furniture, providing sufficient space for ventilation of the device and free opening of the door, Pic. B-1.
This device must not be built-in. Pic. A. Make sure that the device does not slip on the surface.
•It is not recommended to set the device on the floor,
Pic. B-1.
•Blocking the ventilation holes can damage the device. Ventilation holes in the bottom (if provided by the design) must not be covered by carpet.
•Install the device so that access to the outlet is free.
•Do not cover the device or place objects on top of it.
•The device must be connected to the water supply only with the help of new sets of
hoses; old hoses should not be reused.
•Connect the device to a power outlet that is grounded, Pic. A. Do not remove the grounding from the electrical connection cable.
Water pressure:
•Minimum 0.03 MPa (0.3 bar)
•Maximum 0.6 MPa (6 bar)
•At higher water pressures: install a pressure reducing valve at the inlet.
•Before first use, wipe the body of the device with a dry and soft cloth.
Before connecting, make sure the device is unplugged.
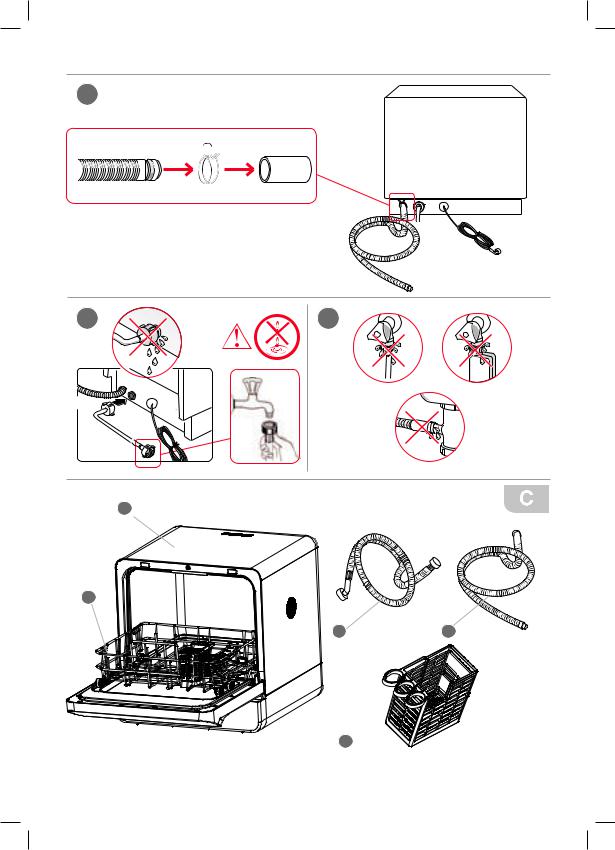
Drain hose connection
1.Place the «double wire clamp» on the drain hose, Pic. B-3.
2.Install the drain hose on the drain hole of the dishwasher and secure it with the «double wire clamp». Please note that the drain hose should not be twisted, pinched and without loops, Pic. B-1.
3.Connect the other end of the drain hose to a sewer pipe with a diameter of at least 40 mm or connect to a sink siphon, Pic. B-2.
Note: The free end of the drain hose should be at a height of 400 to 1000 mm and should not be immersed in water to avoid reverse water flow.
If necessary, make a hole in the kitchen worktop to organize the drain hose and connect it under the sink.
Connecting the water supply hose, Pic. B-4
1. Make sure that the water supply hose is not kinked.
2.With increased water pressure, install a pressure reducing valve at the inlet.
3.Connect the cold water supply hose to a ¾ ”threaded line and make sure the connection is tight. Do not use too much force so as not to damage the threads.
Note:
•If the water pipes are new or have not been used for a long period of time, let the water drain to make sure that the water is clean and free from contamination. Otherwise, there is a risk that the water intake may become blocked and the device may be damaged.
•Turn off the water supply if you are not using a dishwasher.
After connecting the drain hose and the water supply hose, plug in the device. Make sure that there are no leaks anywhere after
the first wash cycle, Pic. B-5 .
PRODUCT SET, Рiс. C
Dishwasher........................................................... |
1 pc. |
Hose for water supply .......................................... |
1 pc. |
Drain hose ........................................................... |
1 pc. |
Cutlery basket ...................................................... |
1 pc. |
Basket for dishes ................................................. |
1 pc. |
Instruction manual ............................................... |
1 pc. |
Warranty card ...................................................... |
1 pc. |
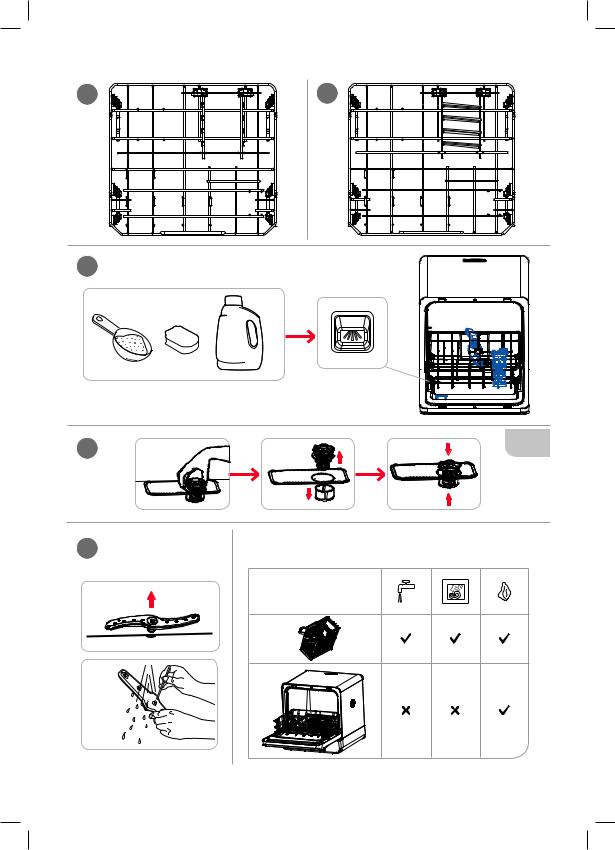
ELEMENTS OF DESIGN, Рiс. D
 Basket for dishes
 Detergent drawer
 Control Panel
 Vent
Vent
 Sprayer
 Door
Door
 Drain hole
 Water inlet hose
 Power cable
UTILIZATION
Control panel, Pic. D-3
 – ON/OFF button
 – Quick Wash program
 – ECO program
 – Intensive Wash program


 – Display
Display indications:
•washing temperature, lights up after selecting a program
•the time for the program cycle, lights up after selecting a program
Note: After selecting a program, the temperature and time indicators will be displayed alternately.
• error codes
8

– Rinse/intermediate wash program |
|
|
|
– Start/Pause: press the button to start or pause |
|
|
|||
|
|
|
|
the dishwasher. After turning on the device, press |
– Activation of the program «YOUR CHOICE» |
|
and hold the button for 3 seconds to cancel the |
||
– Sterilization program |
|
program and enter standby mode. |
||
|
|
|||
PROgRAm FUnCTiOn
|
|
|
|
|
|
|
Program runtime, |
Consumed |
Volume of used |
Detergent |
|
|
|
Program |
Description |
|
Cycle stages |
electricity |
|||
|
|
|
|
min. |
water (L) |
volume (g) |
||||
|
|
|
|
|
|
|
(kWh) |
|||
|
|
|
|
|
|
|
|
|
|
|
|
|
|
|
Quick wash of tly |
|
Main wash (50°C) |
|
|
|
|
|
|
|
|
|
|
|
|
|
||
|
|
|
|
soiled dishes |
|
Rinse with hot water 1 |
28 |
0,30 |
3,9 |
6-10 |
|
|
|
|
|
||||||
|
|
|
|
|
||||||
Quick wash |
|
|
Rinse with hot water 2 |
|
|
|
|
|||
|
|
|
|
|
|
|
||||
|
|
|
|
|
|
|
|
|
|
|
|
|
|
|
Standard program |
|
Main wash (55°C) |
|
|
|
|
|
|
|
|
for medium soiled |
|
Rinse with cold water |
|
|
|
|
ECO |
dishes. The |
|
Rinse with hot water 1 |
|
|
|
|
|||
most efficient in |
|
Rinse with hot water 2 |
|
|
|
|
||||
|
|
|
|
|
139 |
0,46 |
5,0 |
9 |
||
|
|
|
|
terms of energy |
|
Drying |
||||
|
|
|
|
|
|
|
|
|
||
|
|
|
|
consumption and |
|
|
|
|
|
|
|
|
|
|
water consump- |
|
|
|
|
|
|
|
|
|
|
tion |
|
|
|
|
|
|
|
|
|
|
|
|
|
|
|
|
|
|
|
|
|
Washing heav- |
|
Main wash (50°C) |
|
|
|
|
|
|
|
|
ily soiled dishes |
|
Rinse with hot water 1 |
|
|
|
|
Intensive washing |
(pots, pans, |
|
Rinse with hot water 2 |
147 |
0,58 |
6,8 |
6-10 |
|||
dishes with dried |
|
Rinse with hot water 3 |
||||||||
|
|
|
|
|
||||||
|
|
|
|
|
|
|
|
|
||
|
|
|
|
foods) |
|
Rinse with hot water 4 |
|
|
|
|
|
|
|
|
|
|
Drying |
|
|
|
|
|
|
|
|
Pre-washing / |
|
Main wash (35°C) |
|
|
|
|
|
|
|
|
rinsing dishes that |
|
Rinse with cold water |
14 |
0,04 |
2,7 |
– |
Rinse/intermedi- |
you plan to wash |
|
Drying |
|||||||
|
|
|
|
|
||||||
later |
|
|
|
|
|
|
||||
ate wash |
|
|
|
|
|
|
||||
|
|
|
|
|
|
|
||||
|
|
|
|
|
|
|
|
|
|
|
|
|
|
|
Dishwashing with |
|
Main wash (72°C) |
|
|
|
|
|
|
|
|
increased water |
|
Drying |
|
|
|
|
Sterilization |
temperature. Suit- |
|
|
30 |
0,24 |
1,3 |
0-10 |
|||
able for washing |
|
|
||||||||
|
|
|
|
|
|
|
|
|
|
|
|
|
|
|
baby food bottles, |
|
|
|
|
|
|
|
|
|
|
cans, etc. |
|
|
|
|
|
|
|
|
|
|
|
|
|
|
|
|
|
|
|
|
|
The program pro- |
|
Main wash (50°C) |
10 |
0,09 |
1,4 |
|
|
|
|
|
vides an individual |
|
|
||||
|
|
|
|
|
|
|
|
|
|
|
YOUR CHOICE |
wash time. 6 op- |
|
|
|
|
|
|
|||
|
Main wash 1 (50°C) |
20 |
0,16 |
2,7 |
|
|||||
tions from 10 to 60 |
|
|
||||||||
|
|
|
|
|
Main wash 2 (50°C) |
|
||||
|
|
|
|
minutes. The time |
|
|
|
|
|
|
|
|
|
|
|
|
|
|
|
|
|
|
|
|
|
will change each |
|
Main wash 1 (50°C) |
|
|
|
|
|
|
|
|
time the button is |
|
..... |
30 |
0,23 |
4,0 |
|
|
|
|
|
pressed. Press |
|
Main wash 3 (50°C) |
|
|
|
|
|
|
|
|
and hold the but- |
|
|
|
|
|
|
|
|
|
|
|
Main wash 1 (50°C) |
|
|
|
0-10 |
|
|
|
|
|
ton for 3 seconds |
|
|
|
|
||
|
|
|
|
|
….. |
40 |
0,27 |
5,4 |
||
|
|
|
|
|
|
|||||
|
|
|
|
to activate the |
|
|
||||
|
|
|
|
|
Main wash 4 (50°C) |
|
|
|
|
|
|
|
|
|
camera backlight. |
|
|
|
|
|
|
|
|
|
|
|
|
|
|
|
|
|
|
|
|
|
The backlight will |
|
Main wash 1 (50°C) |
|
|
|
|
|
|
|
|
turn off automati- |
|
….. |
50 |
0,34 |
6,7 |
|
|
|
|
|
cally |
|
Main wash 5 (50°C) |
|
|
|
|
|
|
|
|
|
|
|
|
|
|
|
|
|
|
|
|
|
Main wash 1 (50°C) |
|
|
|
|
|
|
|
|
|
|
..... |
60 |
0,40 |
8,1 |
|
|
|
|
|
|
|
Main wash 6 (50°C) |
|
|
|
|
|
|
|
|
|
|
|
|
|
|
|
Note: The Sterilization program can be used as a separate program, or as an additional function for the following programs: Intensive washing, quick washing, ECO program. To activate “Sterilization” as an additional function, press and hold the  button for 3 seconds. In this case, it will automatically start after the end of the main program.
9
 Loading...