

Oursson BM1023JY User Manual [ru]
BM1023JY
EN Instruction manual RU Руководство по эксплуатации
1

2
220-240 В~
5
2
4
3
6
1
A
V~
W
B
BM1023JY
1
5
2
4
3
6
7
1
С
3
6
2
3
1
2
3
4
6
5
1
3:03
1
2
5
4
3
D
4

5
SAFETY INSTRUCTIONS, Рiс. А
Danger symbol
A reminder to user about high voltage.
Warning symbol
A reminder to user about the necessity
of operating exactly according to the instructions.
EN
Risk of burn symbol
Reminder for user
of high temperatures.
When using electrical appliances should take the following precautions:
• Use the device according to the following instructions
manual.
• Install the device on a stable sur face.
• Use only the tools, which are included in the product set.
• To protect against risk of electric al shock do not
put the cord in water or other liquid. If for some
reason the water got into the unit, contact an au thorized service center (ASC) OURSSON AG.
• For power supply, use a power grid with proper char-
acteristics.
• Do not use the device in areas where the air can con-
tain vapors of ammable substances.
• Never attempt to open the device by yourself –
it could possibly be the reason of an electrical
shock can lead to product malfunction and will
invalidate the manufacturer’s warranty. For repair and maintenance, contact only authorized
service centers meant for repair of products under the trademark OURSSON.
• When moved from a cool to a warm place and vice
versa unpack it before use and wait 1-2 hours without
turning it on.
• In order to prevent electrical shock do not im-
merse the entire product or the wires into the
water.
• Be particularly careful and cautious when using the
device near children.
• Do not touch any hot parts, as this may cause
injury.
• The power c ord is specially made relatively short in
order to avoid the risk of injury.
• Do not allow the cord to hang over the sharp edge of
the table or touch hot surfaces.
• Do not connect this device to a grid which is overloaded with other appliances: it can lead to the fact
that the device will not function properly.
• Do not install the device near gas and electric stoves
and ovens.
• After use, make sure to disconnect the device from
the power grid.
• Keep the device from bumps, falls, vibration and oth-
er mechanical inuences.
• Make sure to disconnect the devic e from the power
grid before cleaning or changing accessories.
• Do not use the device outdoors.
• This appliance is not intended for use by persons
(including children) with reduced physical, sensory or mental capabilities, or lack of experience and
knowledge. They can only use the device under the
supervision of the person responsible for their safety,
or after instruction on the safe use of the device. Do
not allow children to play with the product.
• This product is intended only for use in the home.
• If the power cord is damaged, it must be replaced by
a specialist from the authorized service center (ASC)
OURSSO N AG to avoid danger.
• Use only the tools, which are included in the product set.
• When cleaning the appliance do not use abrasives
and organic cleaners (alcohol, gasoline, etc.). When
cleaning the device it is allowed to use a small
amount of neutral detergent.
When you turn it on for the rst time, there may
be a slight burn smell, which may be emitted
during the rst heating of the heating element
of the device. During next uses, this smell won’t
be emitting.
The operation of this device in any case does
not imply application of any forc e to it, as this
may damage the product due to user fault.
RECOMMENDATIONS
• Please read the instruction manual before using the
device. Keep the manual after reading for further use.
• All illustrations in this manual are schematic representations
of real objects, which may dier from the actual images.
The lid may be opened only when you need
to add dierent ingredients and only when you
hear a sound signal. Do not open the lid when
the device is working
• Do not remove the baking mold when the device is
working.
• Do not immerse the baking mold into the water.
• Be careful when using the mold, any damage may
lead to malfunction of the mold.
• Remove the baking mold only by the handle, do not
shake it.
Non-stick coating of the mold may change
color when exposed to moisture and steam,
but this will not aect its performance.
• The device must be plac ed on smooth horizontal sur-
face within 5 cm. from the wall/ furniture and 10 cm.
from the edge of the sur face
• Do not cover the device whit a towel or napkin when
it is operating.
• Do not touch the baking mold, inner surfac e
of the device, heating element, and ventilation
holes when the device is working or immedi ately after use, to avoid burns.
6
• Use potholders or oven mitts to remove the
mold from the device.
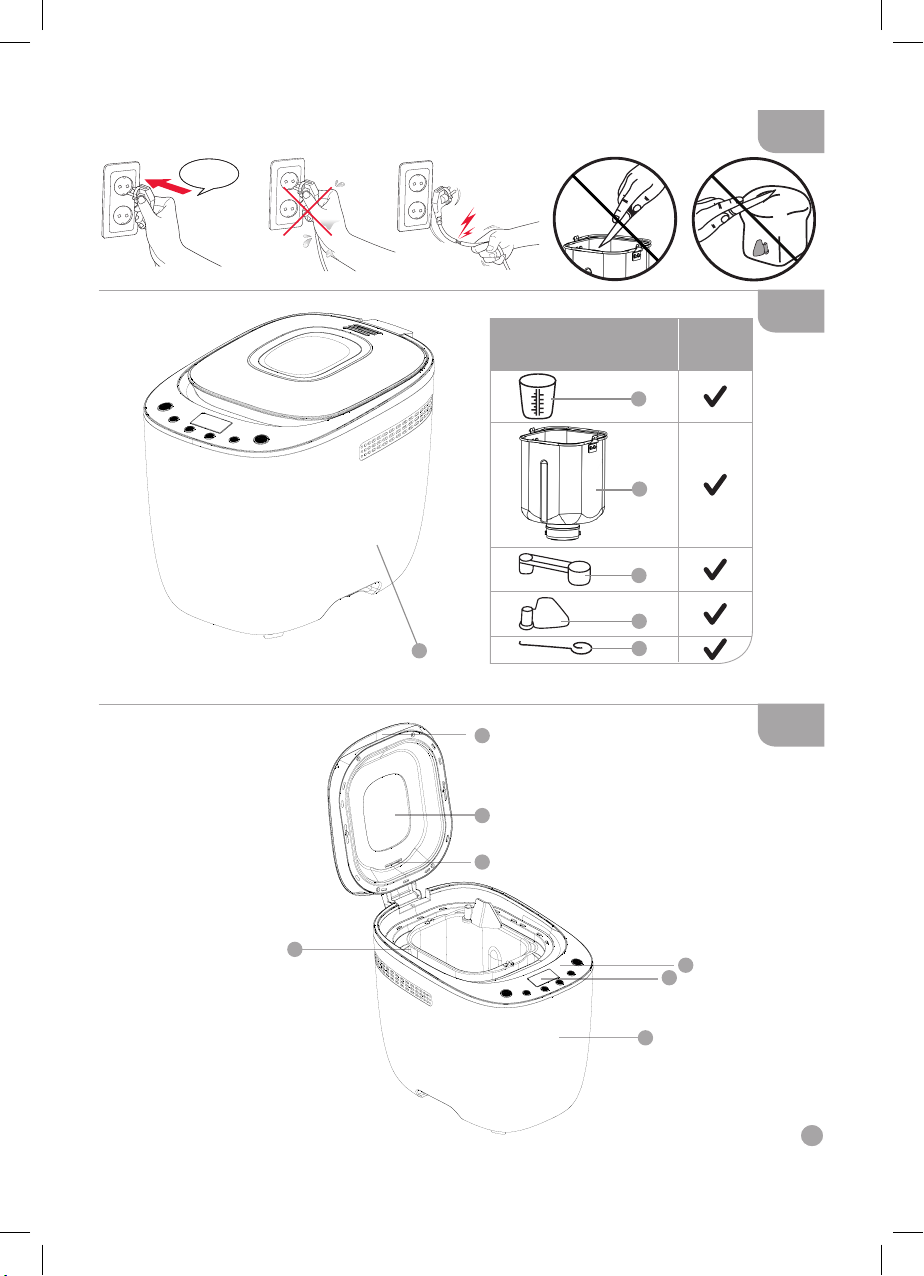
PRODUCT SET, Рiс. В
1
Bread maker ....................................................... 1 pc.
2
Baking mold ........................................................ 1 pc.
3
Kneading Blade .................................................. 1 pc.
4
Measuring spoon ................................................ 1 pc.
5
Measuring cup (200 ml) ...................................... 1 pc.
6
Hook.................................................................... 1 pc.
Power Cord.............................................................. 1 pc.
Instruction manual ................................................... 1 pc.
ELEMENTS OF DESIGN, Рiс. С
1
Viewing window
2
Heating element
3
Steam exhaust
4
Lid’s handle
5
Control panel
6
Display
OPERATION
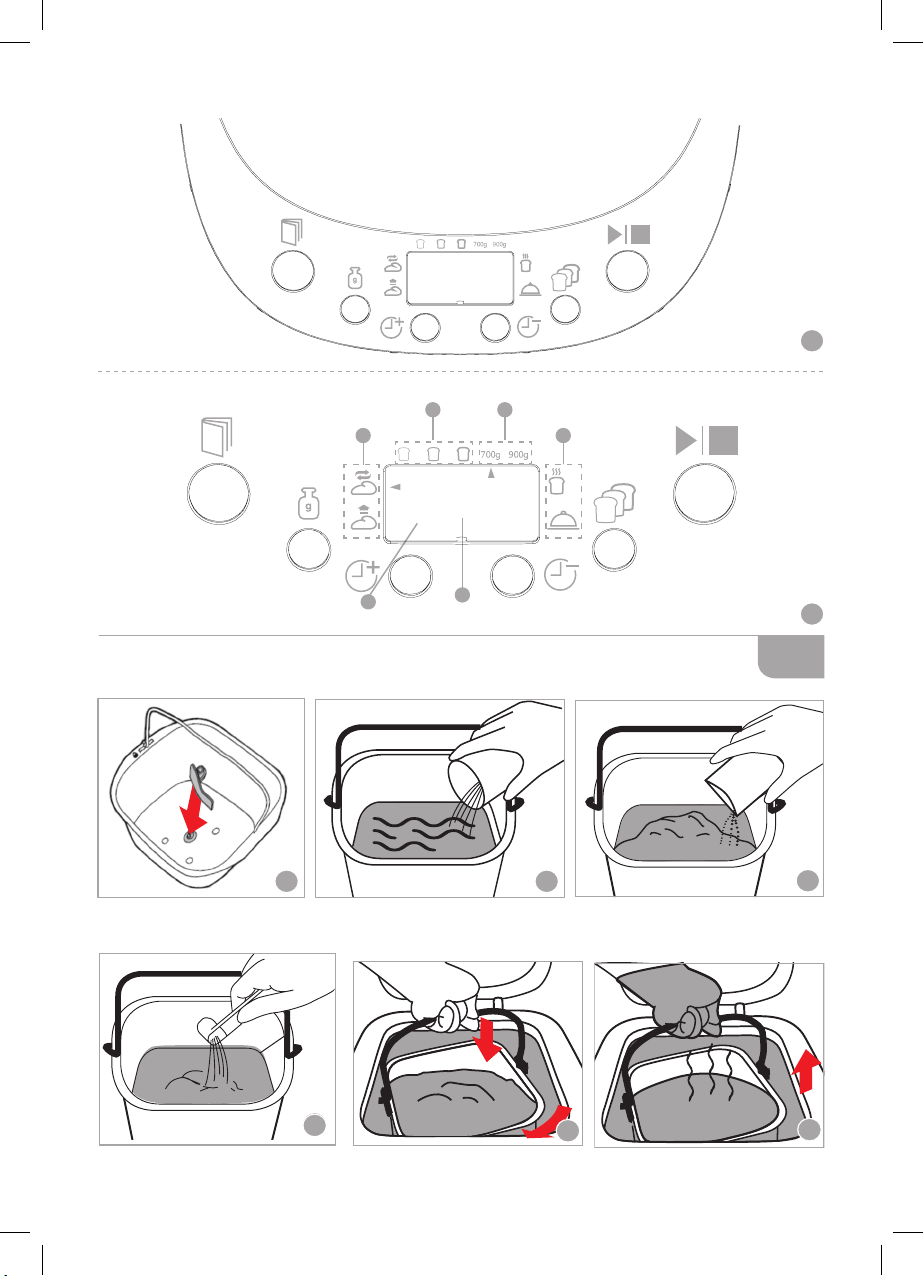
Control panel, Рiс. С-2
Program selecting button (Classic, French,
Whole wheat, etc.)
Button for selecting baking weight. Used for
selecting the weight of the bread: ~ 700 g and
~ 900 g
Select crust color button (light/mid/dark)
Delayed baking time button or to set time in
these programs: BASIC, FRENCH, WHOLE
WHEAT, QUICK, SWEET, DOUGH,
GLUTEN FREE, CAKE, KNEADING.
Changing the cooking time in the programs:
YOGHURT and BAKE. One press equals 10
minutes
Use this button to START, to PAUSE or STOP
the current program. To cancel the selection or
to stop the program, press and hold it for a few
seconds. You will hear a long sound
Display, Рiс. С-3
1
Program indication (kneading/lifting)
2
Selected baking weight indication
3
Time, required for the program, indication
4
Serial number of the selected program
5
Program indication (baking/heat preservation)
6
Selected crust color indication
Modes
Press button on the control panel to select one of the
baking programs, dough/jam/yogurt preparation: BASIC,
FRENCH, WHOLE WHEAT, QUICK, SWEET, DOUGH,
GLUTEN FREE, CAKE, JAM, YOGURT, BAKE,
KNEADING.
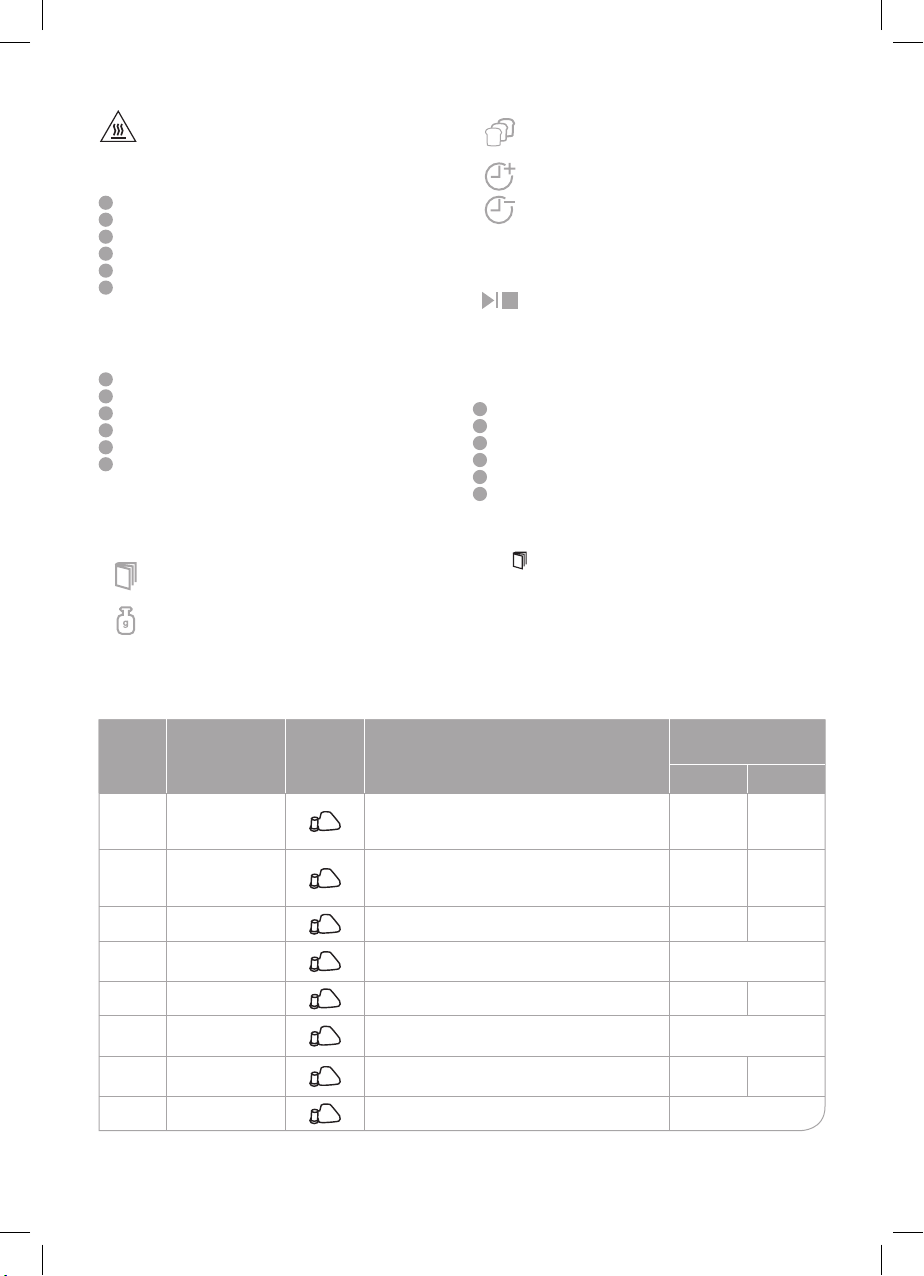
PURPOSE OF THE PROGRAMS
Program
number
1 Basic
2
3
4
5
6
7
8
Program
French
Whole wheat
Quick
Sweet
Dough
Gluten free
Cake
Kneaning
Blade
Note
Cooking time (h:min)
700 g 900 g
Suitable for baking white and rye bread
from baking our.
3:03 3:10
Suitable for recipes with reduced sugar,
allows to bake bread with a crispy crust
3:50 4:00
and brittle air crumb.
Baking bread from wholemeal our. 3:47 3:55
Used for quick bread baking. Bread is
more dense, but not less tasty.
2:25
Used for sweet baking. 3:00 3:05
Preparation of classic yeast dough with
additives for dierent bakery products.
Cooking of bread from our without gluten, such
as rice, buckwheat, corn, etc.
1:30
3:30 3:35
Used for baking cakes. 2:55
7
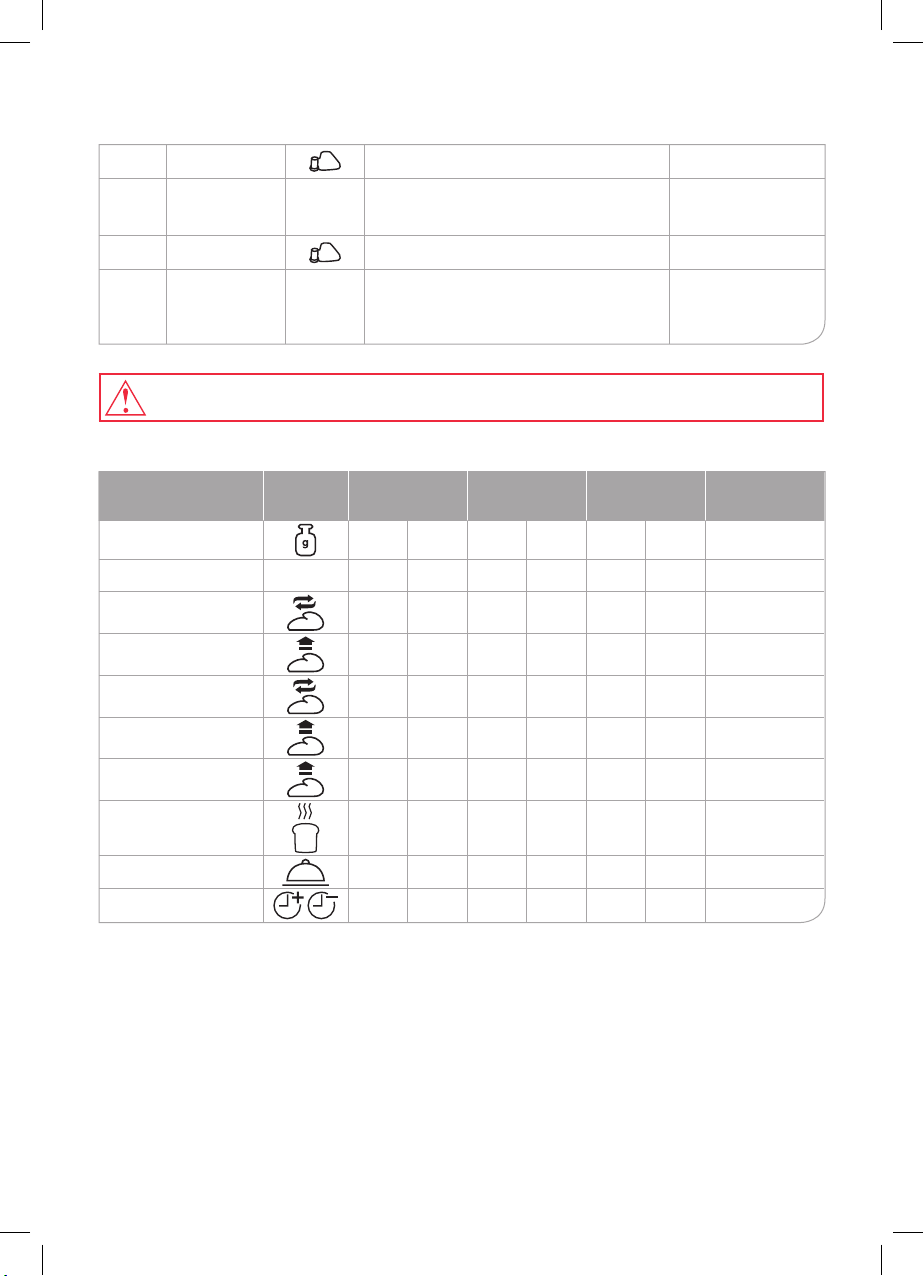
PURPOSE OF THE PROGRAMS
9
Jam
10
Yogurt
11
Kneading
Bake
12
Before using YOGURT and BAKE programs, remove the kneading blade beforehand.
Preparing homemade jam. 1:20
Preparing homemade yogurt with the use
of natural ingredients.
Used for additional kneading dough. 0:18
Used for baking cakes, bread from
dough prepared earlier and to bring
bread to readiness, which for some
reason turned out half-baked.
PROGRAMS DESCRIPTION
Programs Icon Basic bread French bread
Baking size
Program completion time
(h:m)
1st kneading (min)
1st ination (min)
2nd kneading (min)
2nd ination (min)
700 900 700 900 700 900 -
3:03 3:10 3:50 4:00 3:47 3:55 2:25
9 10 16 18 9 10 10
20 20 40 40 25 25 12
14 15 19 22 18 20 13
25 25 30 30 35 35 -
Whole wheat
bread
6-12 hrs.
(10 hrs.
by default)
10 min - 1 hr
(1 hour by default)
Quick
3rd ination (min)
Baking (min)
Warm bread (min)
Timer (hour)
8
40 40 45 45 60 60 30
75 80 80 85 80 85 80
60 60 60 60 60 60 60
13:00 13:00 13:00 13:00 13:00 13:00 13:00
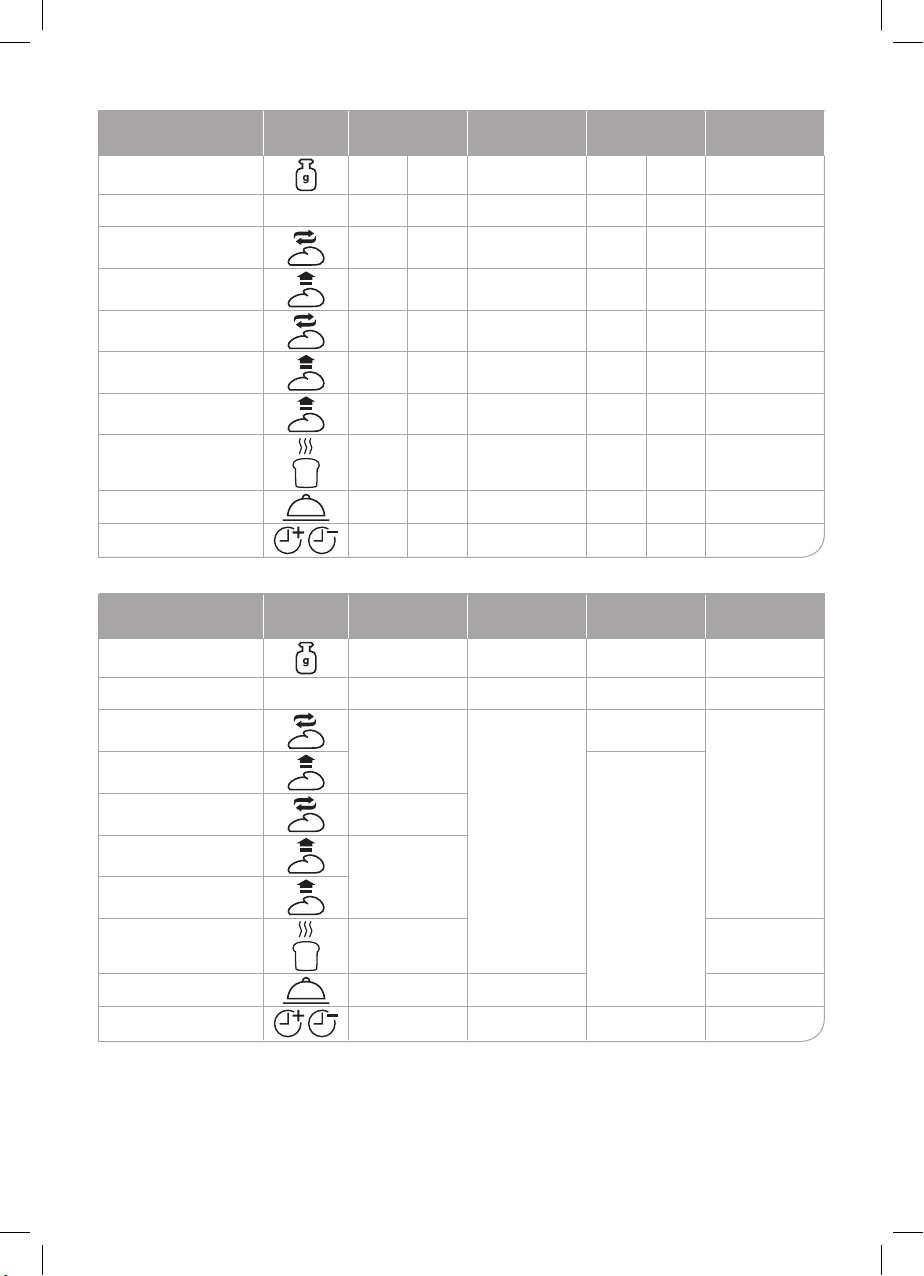
Programs Icon Sweet Dough Gluten free bread Cake
Baking size
Program completion time
(h:m)
1st kneading (min)
700 900 - 700 900 -
3:00 3:05 1:30 3:30 3:35 2:55
10 10 18 12 12 10
1st ination (min)
2nd kneading (min)
2nd ination (min)
3rd ination (min)
Baking (min)
Warm bread (min)
Timer (hour)
Programs Icon Jam Yogurt Kneading Bake
Baking size
Program completion time
(h:m)
1st kneading (min)
1st ination (min)
2nd kneading (min)
2nd ination (min)
3rd ination (min)
15 15 - 20 20 5
10 10 - 13 13 20
30 30 30 45 45 30
40 40 42 45 45 35
75 80 - 75 80 75
60 60 - 60 60 60
13:00 13:00 13:00 13:00 13:00 13:00
- - - -
1:20
15
-
45
6:00 - 12:00
(10:00)
6:00 - 12:00
(10:00 by defoult)
0:18 1:00
18
-
-
Baking (min) 20
Warm bread (min)
Timer (hour)
0:10 - 1:00
(1:00 by defoult)
- - 60
- - 13:00 -
9
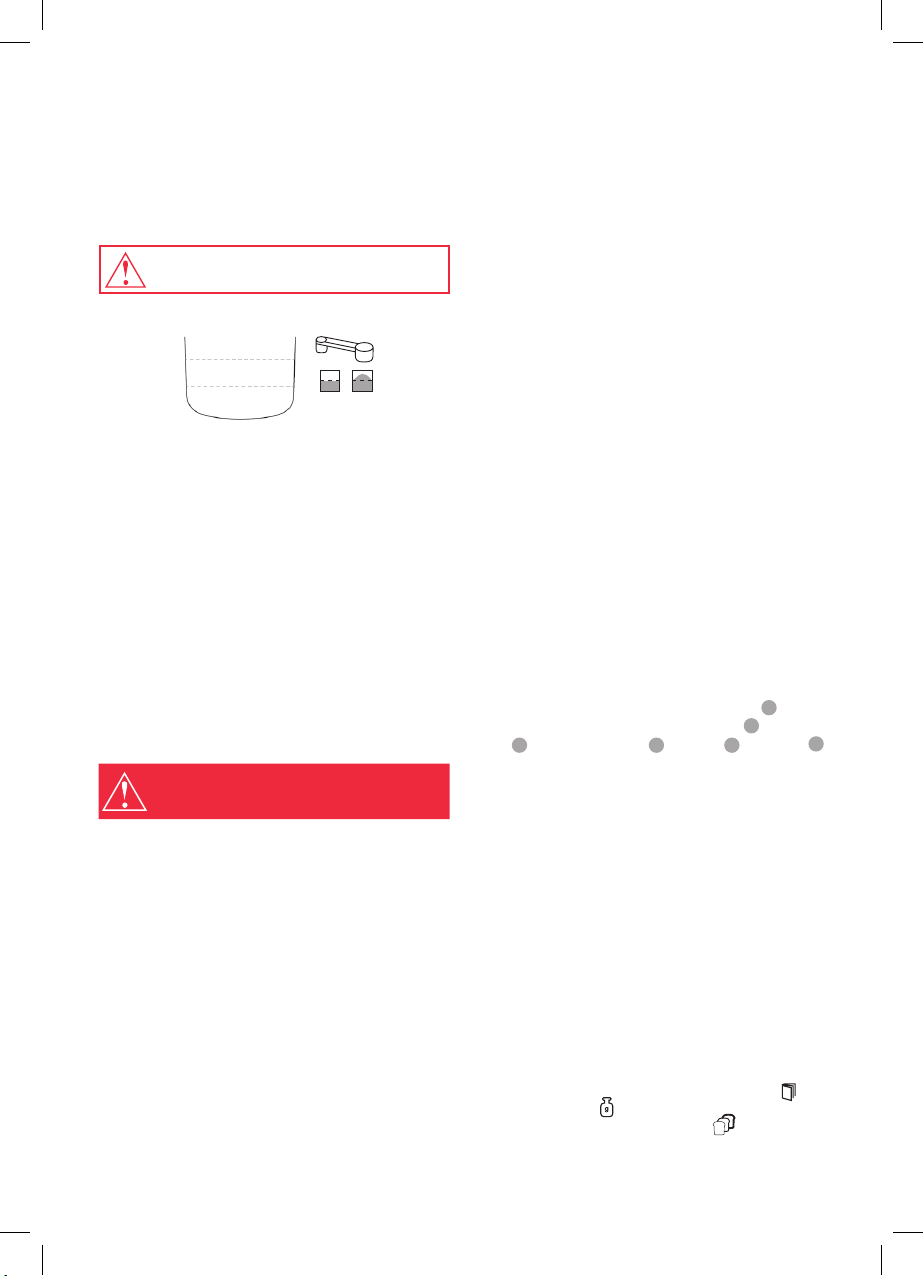
INGREDIENTS FOR MAKING BREAD
Carefully follow the sequence when adding ingredients
into the bread maker. Yeast should always be placed
at the top and be dry. For proper dosage, always use a
measuring cup and measuring spoon that include into
the product set. Always ll the measures to the edges.
When lling the measures do not crush the contents.
All ingredients used for bread maker must be
room temperature.
Bread maker is designed for baking mold bread weighing
up to 900 grams.
YEAST
DRY INGREDIENTS
LIQUIDS
√
Х
INGREDIENTS SELECTION
Flour
Main bread component, contains gluten (helps the bread
to rise, gives it rigidity).
Wheat our is obtained by grinding wheat grains. Bran
and germ are removed during processing. The most suit-
able for baking bread is our marked with «baking».
Whole our made from whole-wheat grain, including the
bran and germ. Bread made from this our is very healthy,
but requires other conditions for baking and? When baked
is smaller and harder. Other names: wholegrain, cereal.
Rye our is obtained by grinding the grains of rye. In com-
parison to wheat, rye our has more iron, magnesium and
potassium that is essential for the human body. However,
the content of gluten is lower, so the bread is more dense
and small. When baking rye bread do not exceed the
amount of rye our in the recipe, it can lead to overheating
of the motor. The recipe uses peeled rye our.
Flour must be weighed, then sift through a
sieve for oxygen saturation and for a higher
quality of baked bread.
DRY YEAST
Provide dough inflation. Use only yeast that does not require
prior fermentation (do not use fresh compressed yeast or
dry yeast that requires fermentation before use). In addition,
it is recommended using yeast that has «fast-acting yeast»
on the package. When using packet yeast, immediately
close the package after use, store it in the refrigerator, use
within the period recommended by the manufacturer.
WATER
Use drinking water. Always measure liquid with the help
of measuring cup.
SALT
УImproves the taste and intensifies the effect of gluten on dough inflation. Bread may get smaller in size
and lose taste with careless use of salt.
FAT
Adds flavor and softness to bread. It is recommended to
use butter or margarine.
SUGAR
Supplies yeast, imparts a sweet taste to bread, changes
crust color. As sugar, you may use sugar powder, unrefined cane sugar, honey, molasses, etc.
If using dried fruit, such as raisins, figs, apricots, etc., add
less sugar.
DAIRY
Add flavor and nutritional value. If you use milk instead
of water, bread nutritional value will be higher, but do
not use delayed start, or milk may turn sour. Reduce the
amount of water in proportion to the amount of milk.
FRUITS, NUTS, VEGETABLES
When you add additional ingredients into the bread,
you must take in account sugar, water and fat that they
contain.
Therefore, the total weight of the filler must not exceed
15% of the total weight of the starting products. The
height of the finished bread with additives may be slightly
lower than that, without them because impurities disturb
gluten structure of the dough. Fillers should be added after a sound signal.
READY-TO-BAKE BREAD MIXTURES
You can use ready-to-bake bread mixtures in the bread
maker. It is recommended to use the packages for 700
-900 grams of baking main or quick breads, or use half
of the mixture.
UTILIZATION
Before first use, wipe the body of the device 1 and in-
ner part with a soft, dry cloth. Baking mold
3
blade
, measuring spoon 4 and cup 5 and hook 6
вwash with warm water and detergent. Dry all the parts.
Before assembling or disassembling, make sure that
the device is unplugged.
2
, kneading
Order of operation:
1. Open the lid of the bread maker. Take the baking mold
by the handle and carefully turn it counter clockwise
until it stops, to unlock it. Then remove the baking mold
straight up, holding the handle.
2. Install the kneading blade, Pic. D-1.
3. Place into the mold ingredients according to the reci-
pe, beginning with liquid and nishing with dried ones.
Remove water and our from the outer surfaces of the
mold, Pic. D-2, 3, 4.
4. Place the mold into the bread maker, carefully inserting it into the baking chamber. Turn it clockwise until it
stops, to lock it, Pic. D-5.
5. Carefully close the lid of the bread maker. Plug it in,
display will light up and you will hear a signal.
6. Select the number of the required program by
ton, set the size
recipe, set the required crust color
rameter and the preparation time will be displayed.
of the baked bread according to
. Selected pa-
but-
10
 Loading...