

Oster OSTERIZER, OSTERIZER Classic User Manual
Visit us at www.oster.com P.N. 114279
User Manual
OSTERIZER
®
CLASSIC BLENDER

2
IMPORTANT SAFEGUARDS
When using electrical appliances, basic safety precautions should be followed,
including the following:
READ ALL INSTRUCTIONS BEFORE USE
• Unplug cord from outlet when not in use or before cleaning.
•To protect against risk of electrical shock, do not immerse the cord,
plug or motor base in water other liquids.
• Do not let cord hang over edge of table or counter or touch hot surfaces.
• Never leave appliance unattended when in use.
• Close supervision is necessary when used near children.
•Avoid contact with moving parts. Keep hands and utensils out of jar
while blending to prevent personal injury or damage to the blender.
A rubber spatula may be used only when the blender is not running.
• The blade is sharp. Handle with care.
•Always put the lid on the jar before operating the blender.
• Do not operate any appliance with a damaged cord or plug or after
the appliance malfunctions or is dropped or damaged in any manner.
Return the appliance to the nearest Authorized Sunbeam Appliance Service
center for examination, repair or electrical or mechanical adjustment.
•Do not use outdoors or for commercial purposes; this appliance is for
household use only.
• Use this appliance for its intended use as described in this manual.
•When blending hot liquids, remove center piece of two-piece cover.
•To reduce the risk of injury, never place cutter-assembly blades on base
without jar properly attached.
• Always operate on a flat surface.
•Unplug the blender when it is not in use, before taking off or putting
on parts and before cleaning.
•The use of attachments, not made by manufacturer, including canning
or ordinary jar and processing assembly parts, is not recommended
by Sunbeam Products, Inc. and may cause risk of injury to persons.
THIS PRODUCT IS FOR HOUSEHOLD USE ONLY
The maximum rating marked on the product is based on the attachment
that draws the greatest load. Other attachments may draw less power.
P
Please follow the instructions below to ensure the safe use of the power cord.
• This appliance is equipped with a polarized plug. This type of plug has one
blade that is wider than the other. This plug will fit in a polarized outlet only
one way. This is a safety feature intended to help reduce the risk of electrical
shock. If you are unable to insert the plug into the outlet, contact a qualified
electrician to replace the obsolete outlet. Do not attempt to defeat the safety
purpose of the polarized plug by modifying the plug in any way.
•You may use an extension cord, if necessary, but be certain to follow
these guidelines:
–The marked electrical rating of the extension cord must be at least
120/127 Volt, 60 Hz, 10A.
–The extension must be arranged so that it will not drape over the
countertop or tabletop, will not be within the reach of children
and will not be tripped over.
• Do not pull, twist, or otherwise abuse the power cord.
SAVE THESE INSTRUCTIONS

3
THIS PRODUCT IS FOR HOUSEHOLD USE ONLY
The maximum rating marked on the product is based on the attachment
that draws the greatest load. Other attachments may draw less power.
P
OWER
C
ORD
I
NSTRUCTIONS
Please follow the instructions below to ensure the safe use of the power cord.
• This appliance is equipped with a polarized plug. This type of plug has one
blade that is wider than the other. This plug will fit in a polarized outlet only
one way. This is a safety feature intended to help reduce the risk of electrical
shock. If you are unable to insert the plug into the outlet, contact a qualified
electrician to replace the obsolete outlet. Do not attempt to defeat the safety
purpose of the polarized plug by modifying the plug in any way.
•You may use an extension cord, if necessary, but be certain to follow
these guidelines:
–The marked electrical rating of the extension cord must be at least
120/127 Volt, 60 Hz, 10A.
–The extension must be arranged so that it will not drape over the
countertop or tabletop, will not be within the reach of children
and will not be tripped over.
• Do not pull, twist, or otherwise abuse the power cord.
SAVE THESE INSTRUCTIONS
4
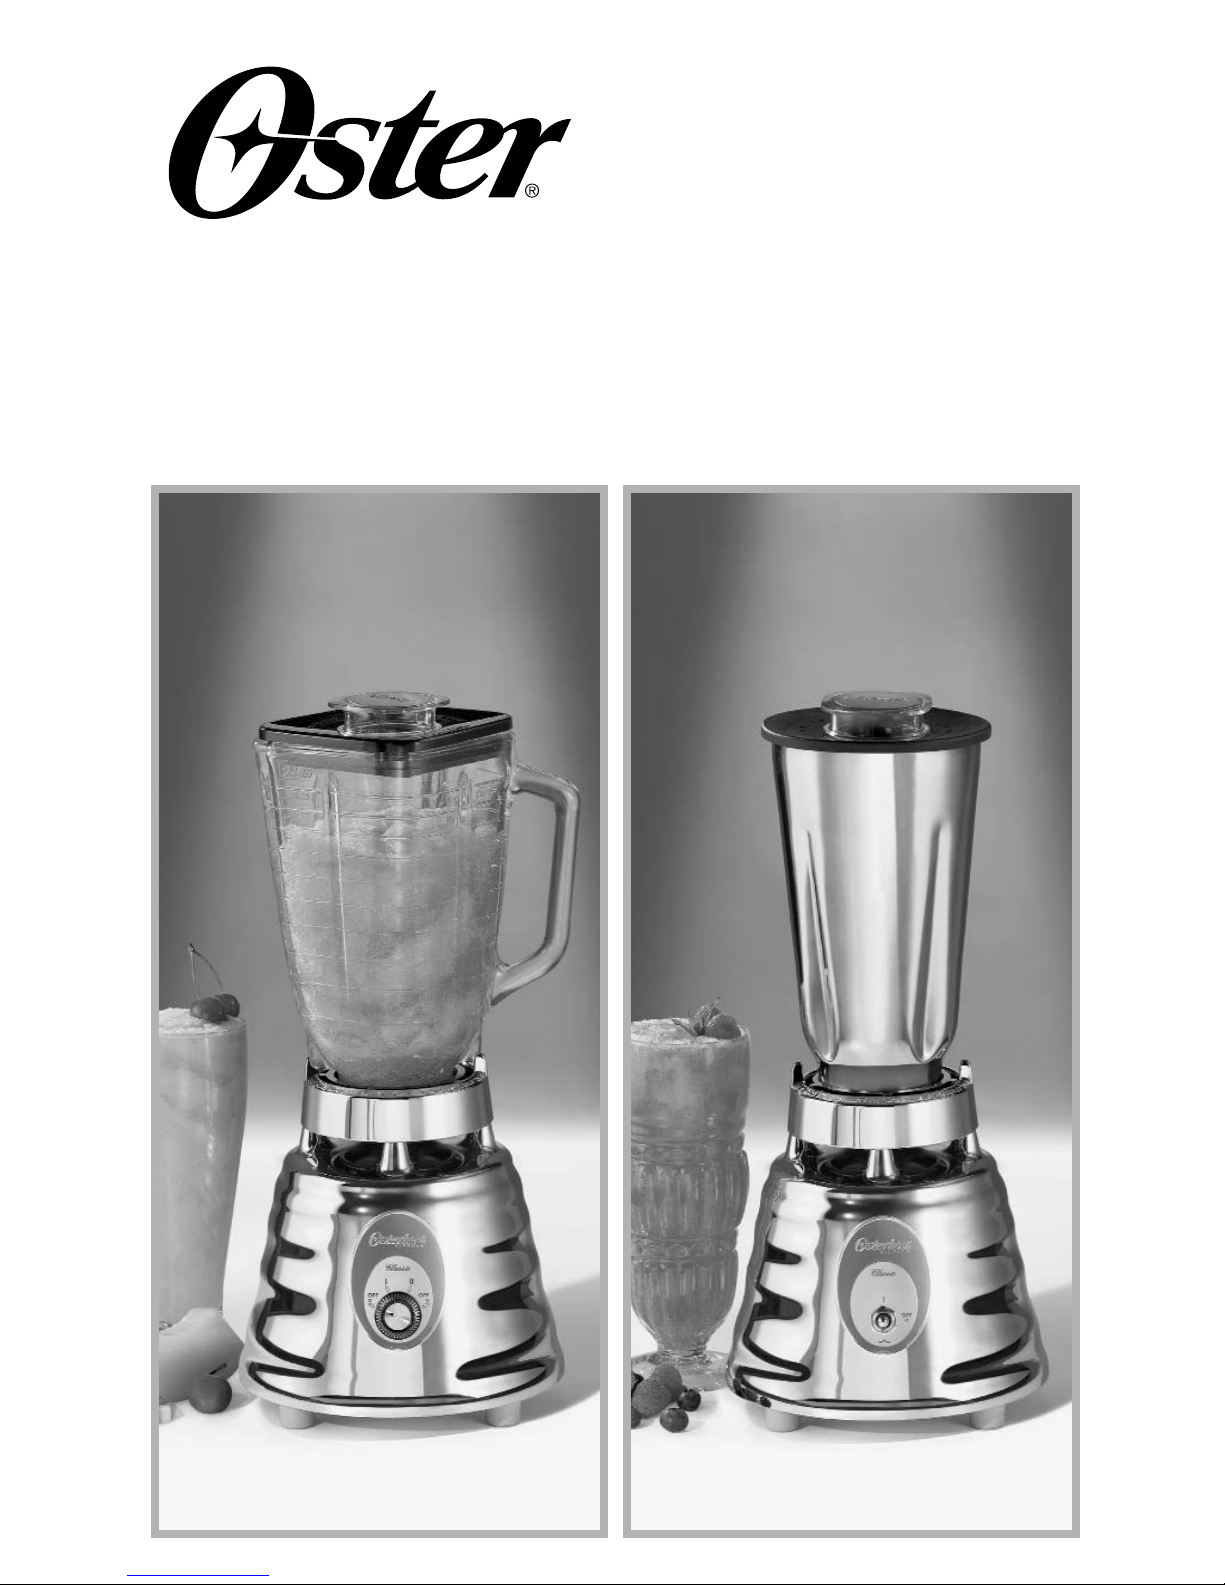
WELCOME
Congratulations on your purchase of an OSTER®Blender!
To learn more about
OSTER
®
products, please visit us at www.oster.com.
LEARNING A
BOUT YOUR BLENDER
F
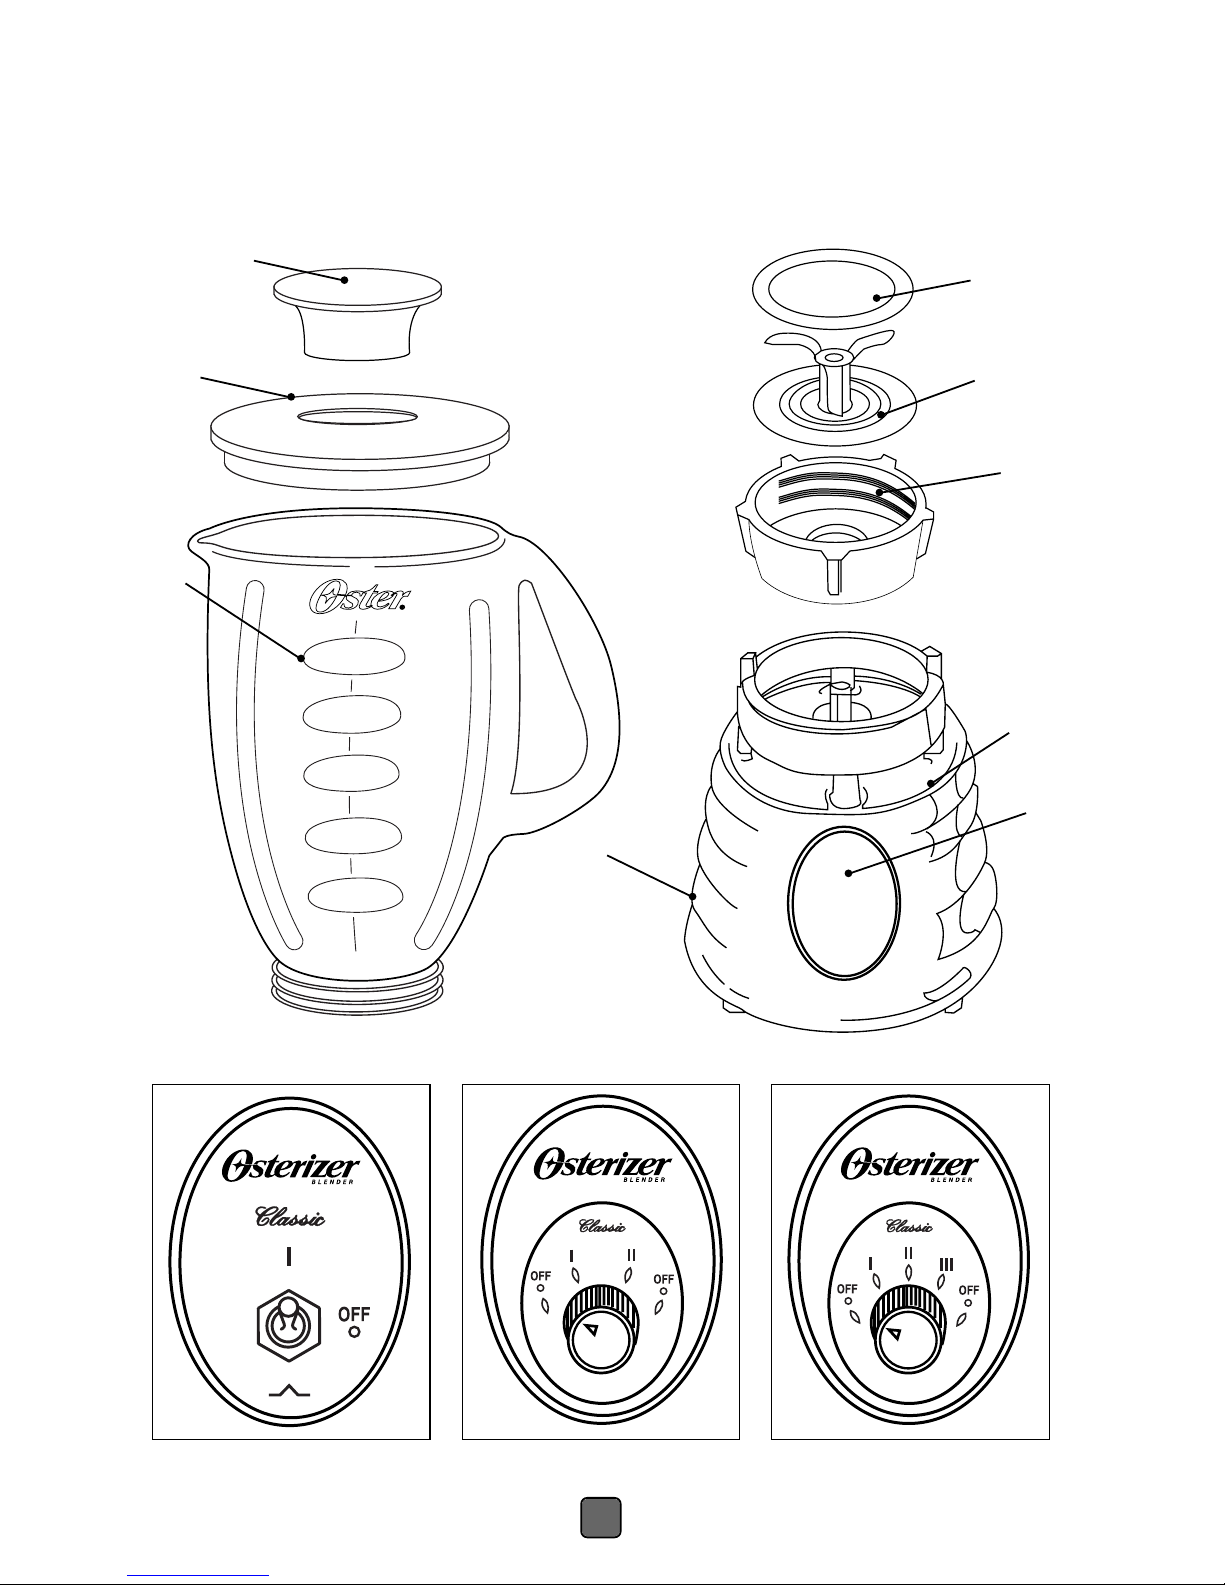
EATURES OF YOUR OSTERIZER
A. Feeder cap for adding ingredients while blending
B. Leak Proof Lid
C. Jar – Your OSTER
• 5-cup Dishwasher Safe/Scratch Resistant Glass Jar
•6-cup Break-Resistant Jar
• 5-cup Double-Walled, Insulated Thermal Jar – keeps frozen drinks,
smoothies and milkshakes cold for hours
D. Sealing Ring for tight seal
E. Ice Crush Blade pulverizes ice for smooth frozen drinks
F. Threaded Bottom Cap
G. Powerful Motor with exclusive ALL-METAL DRIVE
for extra durability
H. Control Panel
I. Convenient Cord Storage (select models only)
Clean blender according to the instructions in the “Cleaning and Storing Your Blender”
section.
Jar Assembly:
Turn jar upside down so the small opening is at the top. (Figure 1)
Place sealing ring over jar opening. (Figure 2)
Place blade into jar. (Figure 3)
VARYING CONTROL PANELS
HHH
A
B
C
D
E
F
G
I
H
®
®
®
FIGURE 1 FIGURE 2 FIGURE 3

5
F
EATURES OF YOUR OSTERIZER
®
C
LASSIC BLENDER
A. Feeder cap for adding ingredients while blending
B. Leak Proof Lid
C. Jar – Your OSTER®Blender includes one of the following:
• 5-cup Dishwasher Safe/Scratch Resistant Glass Jar
•6-cup Break-Resistant Jar
• 5-cup Double-Walled, Insulated Thermal Jar – keeps frozen drinks,
smoothies and milkshakes cold for hours
D. Sealing Ring for tight seal
E. Ice Crush Blade pulverizes ice for smooth frozen drinks
F. Threaded Bottom Cap
G. Powerful Motor with exclusive ALL-METAL DRIVE™system
for extra durability
H. Control Panel
I. Convenient Cord Storage (select models only)
U
SING YOUR BLENDER
Clean blender according to the instructions in the “Cleaning and Storing Your Blender”
section.
Jar Assembly:
Turn jar upside down so the small opening is at the top. (Figure 1)
Place sealing ring over jar opening. (Figure 2)
Place blade into jar. (Figure 3)
FIGURE 1 FIGURE 2 FIGURE 3
6
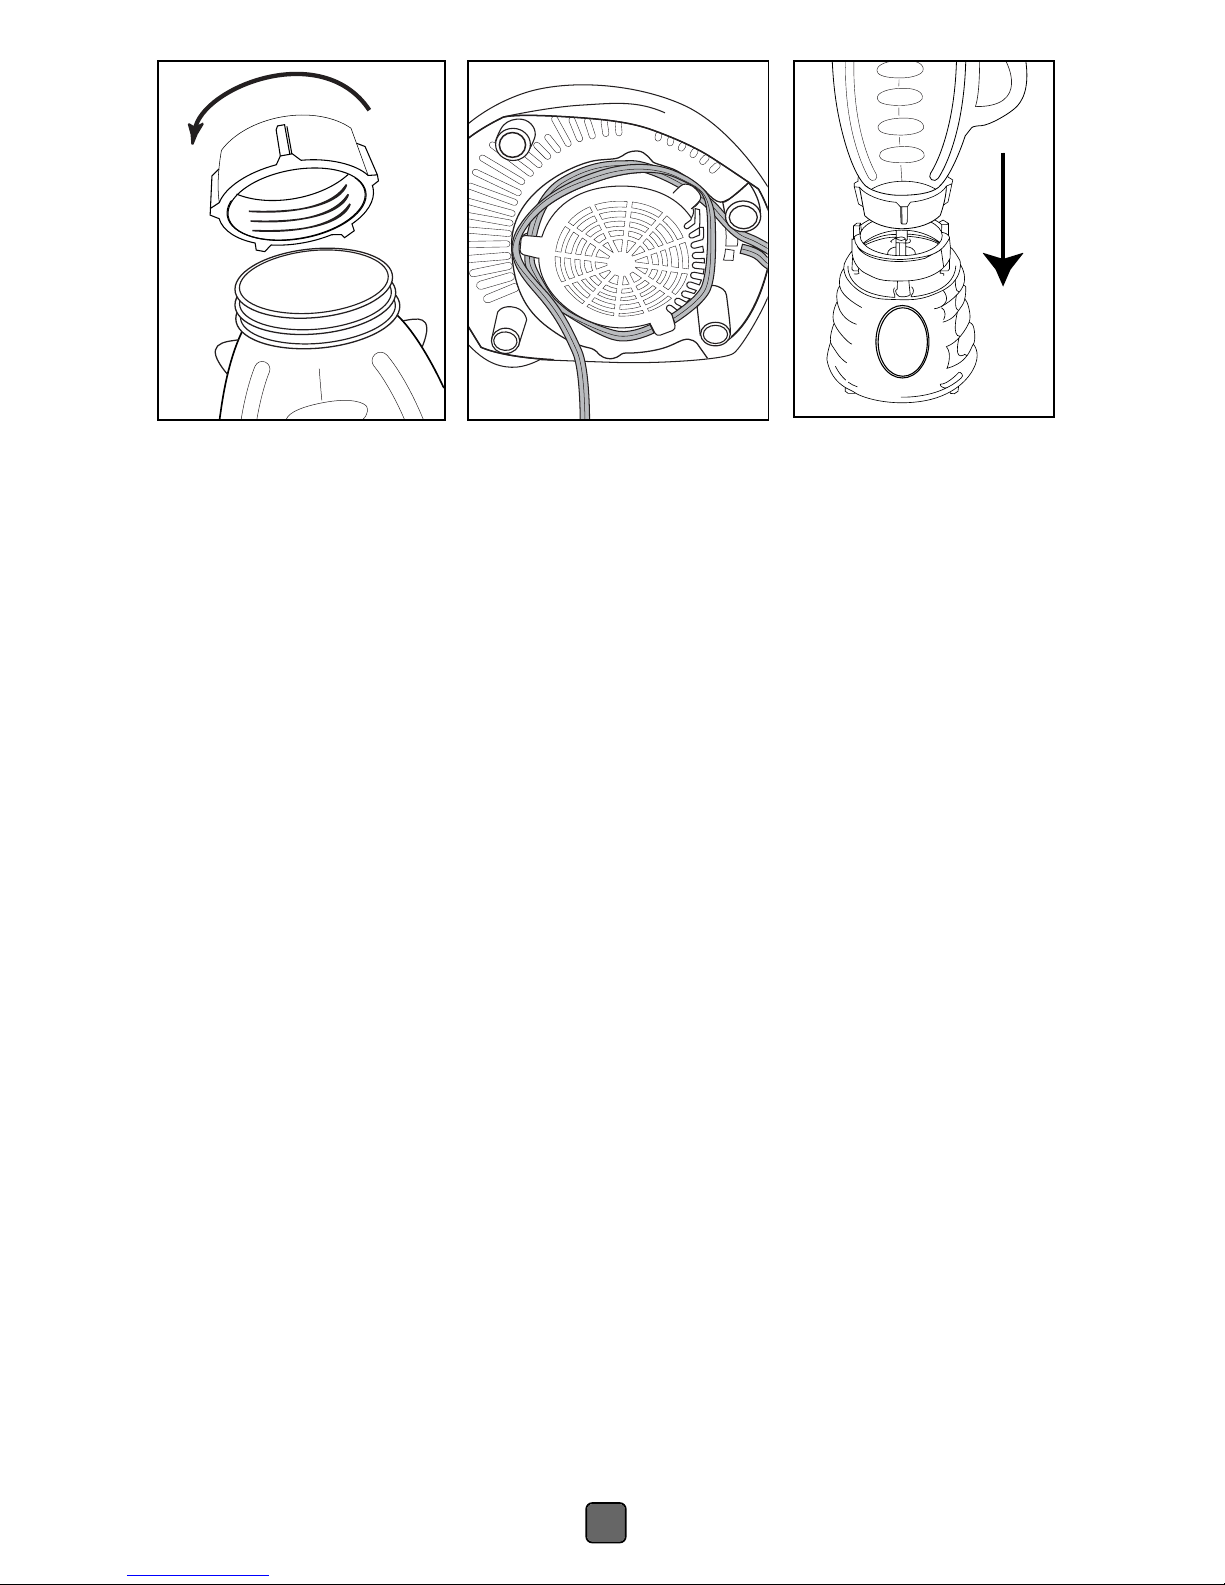
Place threaded bottom cap over blade and turn clockwise to tighten. (Figure 4)
Wrap the power cord from the cord storage area on the base of the blender
until the cord is the length you desire. (Figure 5)
Place jar assembly onto base. (Figure 6)
Place ingredients into jar.
Place lid with feeder cap on jar.
Plug the power cord into a 120 Volt AC electrical outlet.
TOGGLE MODELS
Push switch up and blend ingredients to desired consistency.
Push switch to OFF to stop the blender and turn blender off.
To use PULSE, push switch down for desired length of time.
Release PULSE and allow blade to stop. Repeat cycle as desired.
DIAL MODELS
Turn dial to desired speed and blend ingredients to desired consistency.
Turn dial to OFF to stop the blender and turn blender off.
To use PULSE, turn dial to PULSE or speed I for desired length of time.
Turn dial back to OFF and allow blade to stop. Repeat cycle as desired.
BLENDING TIPS
• Put liquids in the jar first, unless a recipe says otherwise.
•Crushing ice: Crush 6 ice cubes or
approximately 2 cups of ice at a time.
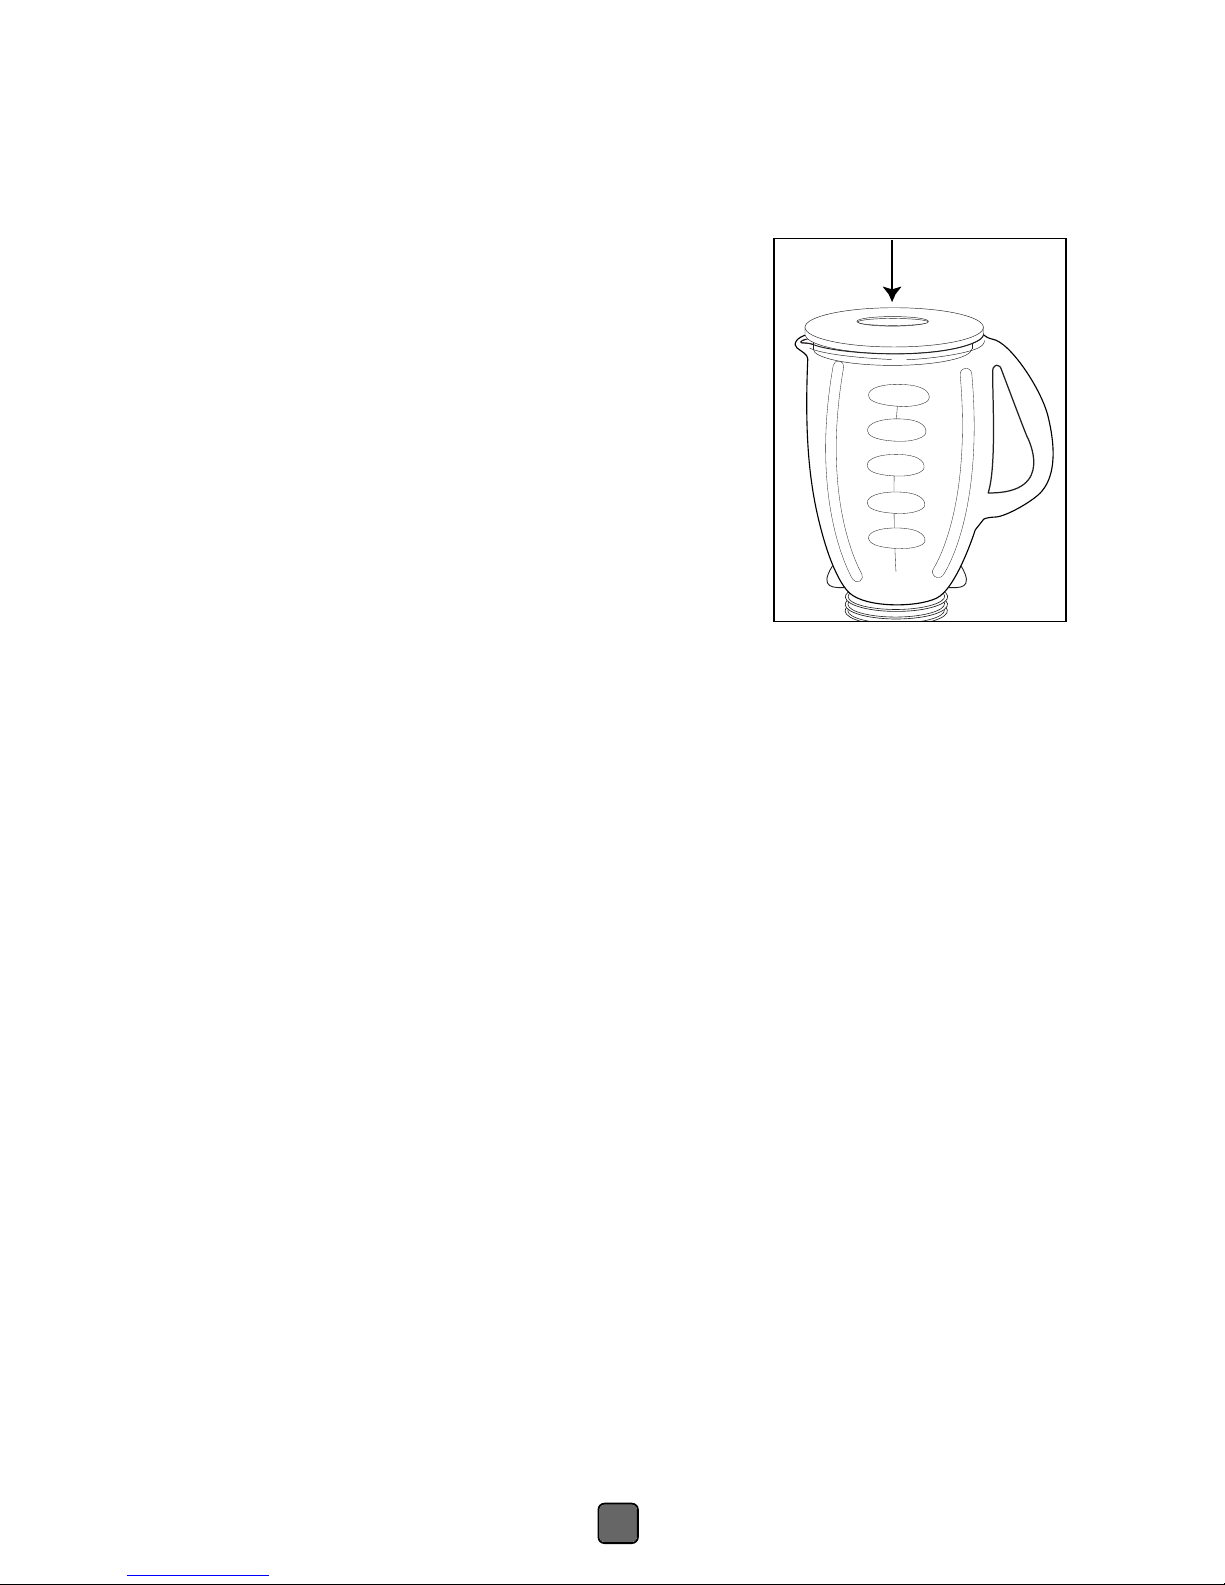
• Do not remove the lid while in use. Remove
feeder cap to add smaller ingredients. (Figure 7)
• Hot Foods: Open the feeder cap to vent steam.
Tilt feeder cap away from you. Keep hands away
from the cover opening to prevent possible burns.
When working with hot liquids, remove feeder
cap and start blending at a low speed.
Then move to a faster speed. Do not
add liquid over the 4 cup (1 Liter) level.
• Cut all firm fruits and vegetables, cooked
meats, fish and seafood into pieces no larger
than 3/4 inch (1.8 cm) to 1 inch (2.5 cm).
Cut all kinds of cheeses into pieces no larger
than 3/4 inch (1.8 cm).
• This blender will not mash potatoes, whip egg whites or substitute dairy
toppings, mix stiff dough or grind raw meat.
C
LEANING AND
IMPORTANT: UNPLUG BEFORE CLEANING BASE and DO NOT
IMMERSE THE BLENDER BASE IN WATER OR ANY OTHER LIQUIDS.
Use a damp, soft sponge with mild detergent to clean the outside of the
blender base. All parts except for the blender base are dishwasher safe.
Place sealing ring in bottom basket of dishwasher. You can also wash
the parts in warm, soapy water. Rinse and dry.
E
ASYCLEAN
Pour 3 cups of warm water in the blender jar. Add 1 – 2 drops of liquid
dishwashing detergent. Blend detergent for 10 –15 seconds. Empty jar of
soapy water into sink. Rinse jar thoroughly with clean water.
NOTE: Easy Clean is not a substitute for regular cleaning described above.
It is especially important to disassemble and thoroughly clean your blender
when processing milk, dairy products, meats, seafood and eggs.
After cleaning, reassemble blade to jar with sealing ring and collar.
Store blender with cover ajar to prevent container odor.
FIGURE 4 FIGURE 5
FIGURE 6
7
BLENDING TIPS
• Put liquids in the jar first, unless a recipe says otherwise.
•Crushing ice: Crush 6 ice cubes or
approximately 2 cups of ice at a time.
• Do not remove the lid while in use. Remove
feeder cap to add smaller ingredients. (Figure 7)
• Hot Foods: Open the feeder cap to vent steam.
Tilt feeder cap away from you. Keep hands away
from the cover opening to prevent possible burns.
When working with hot liquids, remove feeder
cap and start blending at a low speed.
Then move to a faster speed. Do not
add liquid over the 4 cup (1 Liter) level.
• Cut all firm fruits and vegetables, cooked
meats, fish and seafood into pieces no larger
than 3/4 inch (1.8 cm) to 1 inch (2.5 cm).
Cut all kinds of cheeses into pieces no larger
than 3/4 inch (1.8 cm).
• This blender will not mash potatoes, whip egg whites or substitute dairy
toppings, mix stiff dough or grind raw meat.
C
LEANING AND
S
TORING
Y
OUR
B
LENDER
IMPORTANT: UNPLUG BEFORE CLEANING BASE and DO NOT
IMMERSE THE BLENDER BASE IN WATER OR ANY OTHER LIQUIDS.
Use a damp, soft sponge with mild detergent to clean the outside of the
blender base. All parts except for the blender base are dishwasher safe.
Place sealing ring in bottom basket of dishwasher. You can also wash
the parts in warm, soapy water. Rinse and dry.
E
ASYCLEAN
Pour 3 cups of warm water in the blender jar. Add 1 – 2 drops of liquid
dishwashing detergent. Blend detergent for 10 –15 seconds. Empty jar of
soapy water into sink. Rinse jar thoroughly with clean water.
NOTE: Easy Clean is not a substitute for regular cleaning described above.
It is especially important to disassemble and thoroughly clean your blender
when processing milk, dairy products, meats, seafood and eggs.
STORING YOUR BLENDER
After cleaning, reassemble blade to jar with sealing ring and collar.
Store blender with cover ajar to prevent container odor.
FIGURE 7

8
P
ROCESSING
F
OODS IN
B
LENDER
PROCESSED UNPROCESSED SPECIAL
FOOD QUANTITY QUANTITY INSTRUCTIONS
Apples
3/4 cup (200 mL) 1 cup (250 mL) of 1 inch (2.5 cm) pieces
Pulse 2 times
Apple Juice
1-1/2 cups (375 mL) 1 medium, peeled, cored, cut into eighths
Liquefy continuously
+ 1 cup (250 mL) liquid
Breadcrumbs
1/2 cup (125 mL)
1 slice, torn in 8 pieces
Pulse 1 – 4 times
Cabbages, Red & White
1-1/2 cups (375 mL) 3 cups (750 mL) of 1 inch (2.5 cm) pieces
Chop continuously in
2 – 4 cups water. Drain.
Carrots
1 cup (250 mL) 1 cup (250 mL) Pulse 2 times
2 cups (500 mL) 2 cups (500 mL) Pulse 4 times in
2-4 cups water. Drain.
Celery
3/4 cup (200 mL) 1 cup (250 mL) of 1 inch (2.5 cm) pieces
Pulse 2 – 3 times
Cheese, Cheddar
1 cup (250 mL) 1 cup (250 mL) of 1 inch (2.5 cm) pieces
Pulse 2 times
Cheese, Swiss
1 cup (250 mL) 1 cup (250 mL) of 1 inch (2.5 cm) pieces
Pulse 5 times
Cheese, Hard or Semi-Hard 1 cup (250 mL) 1 cup (250 mL) of 1 inch (2.5 cm) pieces
Grate continuously
Coconut
1 cup (250 mL) 1 cup (250 mL) of 1 inch (2.5 cm) pieces
Grate continuously
Coffee Beans
1 cup (250 mL) 1 cup (250 mL) Grind 45 seconds for
percolators & 60 seconds
for drip.
Cookies, Wafer
1/2 cup (125 mL) 10 wafers
Pulse 3 times
Crackers, Graham
1/2 cup (125 mL) 8 crackers
Pulse 3 times
Cranberries, Fresh
3/4 cup (200 mL) 1 cup (250 mL)
Pulse 2 times
Dried Fruit
Scant 1/2 cup (125 mL) 1/2 cup (125 mL)
Chop continuously
+ 1/2 cup flour
for 15 seconds
Eggs, Hard Cooked
3/4 cup (200 mL) 2 eggs of 1 inch (2.5 cm) pieces
Chop continuously
for 30 seconds
Meat, Boneless, Cooked
1 cup (250 mL) 1 cup (250 mL) of 1 inch (2.5 cm) pieces
Chop continuously
Nuts, Almonds, Peanuts,
Pecans, Walnuts
1 cup (250 mL)
1 cup (250 mL)
Pulse 2 – 4 times
Onions
1-1/2 cups (375 mL) 3 cups (750 mL) of 1 inch (2.5 cm) pieces
Pulse 1 time in
2-4 cups of water. Drain.
Peppers
2/3 cup (150 mL)
1 cup (250 mL)
Pulse 1 time
Peppercorns
1/2 cup (125 mL)
1/2 cup (125 mL)
Grind continuously
Nutmeg
1 Tablespoon (15 mL)
3 nuts, shell removed
Grind continuously
Ginger Root
1/4 cup (50 mL)
2 – 3 pieces 1 inch (2.5 cm) each
Grind continuously
Note: Since foods vary in size, consistency and freshness, you may need to add or subtract a processing
time from the number stated in this chart or the recipes that follow to obtain the results you desire.
1 can (16 ounces or 454 g) whole tomatoes, drained
4 1-inch (2.5 cm) pieces green pepper
2 1-inch (2.5 cm) pieces onion
1/2 of marinated or fresh jalapeño pepper, seeded
1/4 teaspoon (1 mL) cider vinegar
1/4 teaspoon (1 mL) cumin
4-8 drops hot pepper sauce
Place all ingredients into blender container. Cover and process 2 times at PULSE
until vegetables are chopped. Serve with corn chips.
Place all ingredients except 1/2 of 1 avocado into blender container. Cover and
process at ON until smooth.
to keep mixture around the agitator blades. Cover and continue to process.)
Remove cover and add remaining avocado. Cover and process 2-3 times at PULSE
until desired consistency. Serve with corn chips, crackers or raw vegetables.
Put all ingredients into blender container. Cover and process at ON until smooth.

9
R
ECIPES
Appetizers
SALSA
1 can (16 ounces or 454 g) whole tomatoes, drained
4 1-inch (2.5 cm) pieces green pepper
2 1-inch (2.5 cm) pieces onion
1/2 of marinated or fresh jalapeño pepper, seeded
1/4 teaspoon (1 mL) cider vinegar
1/4 teaspoon (1 mL) cumin
4-8 drops hot pepper sauce
Place all ingredients into blender container. Cover and process 2 times at PULSE
until vegetables are chopped. Serve with corn chips.
YIELD: APPROXIMATELY 1 CUP (250 ML)
GUACAMOLE
2 large, ripe avocados, peeled and cubed
1/2 medium potato, cubed
1 tablespoon (15 mL) lemon juice
2 1-inch (2.5-cm) pieces onion
1/4 teaspoon (1 mL) salt
Place all ingredients except 1/2 of 1 avocado into blender container. Cover and
process at ON until smooth.
(If necessary, stop blender, use rubber spatula
to keep mixture around the agitator blades. Cover and continue to process.)
Remove cover and add remaining avocado. Cover and process 2-3 times at PULSE
until desired consistency. Serve with corn chips, crackers or raw vegetables.
YIELD: 1-1/2 CUPS (375 ML)
MOCK SOUR CREAM
1 tablespoon (15 mL) milk
1 tablespoon (15 mL) lemon juice
1 cup (250 mL) low-fat cottage cheese
Put all ingredients into blender container. Cover and process at ON until smooth.
YIELD: 1 CUP (250 ML)

10
FRUIT DIP
1/2 cup (125 mL) lemon yogurt 1/2 teaspoon (2 mL) grated lemon rind
1 tablespoon (15 mL) honey 1/4 teaspoon (1 mL) lime juice
8 ounces (227 g) Neufchatel Cheese, cut in 1-inch (2.5 cm) pieces
Put yogurt, honey, lemon rind, and lime juice into blender container.
Cover and process at ON until lemon rind is finely grated. With motor running,
remove feeder cap and add cheese. Continue to process until smooth.
Refrigerate several hours. Serve with fresh fruit.
Y
IELD
: 1-1/2 C
UPS
(375 ML)
VARIATIONS:
Substitute equal portions of any variety yogurt; i.e., mixed berry or peach,
for lemon yogurt.
CLASSIC SWISS FONDUE
1 clove garlic 3 tablespoons (45 mL) cornstarch
1 cup (250 mL) dry white wine 3 tablespoons (45 mL) Kirsch
1 cup (250 mL) milk dash white pepper
1 pound (454 g) natural Swiss cheese, dash nutmeg
cut in 1-inch (2.5 cm) cubes
Put all ingredients, including garlic, into blender container. Cover and process
at ON until smooth. Pour into a fondue pot and cook at HI, stirring constantly
until mixture is heated and bubbly. Reduce heat to MED-LO to serve.
S
ERVES
4-6 ASM
AINCOURSE
, 10-12 ASA
PPETIZER
Non-Alcoholic Beverages
T
OMATO J
UICE COCKTAIL
2 cups (500 mL) tomato juice
1 thin slice lemon with peel
2 sprigs parsley
1/2-inch strip (1 cm) green pepper
8-inch stalk (20 cm) celery, cut in 1-inch (2.5 cm) pieces
1/2-inch slice (1 cm) cucumber, unpeeled
1/4 teaspoon (1 mL) Worcestershire sauce
Salt to taste
6 ice cubes
Put all ingredients into blender container. Cover and process at ON until all
ingredients are liquefied. YIELD: APPROXIMATELY 3-1/2 CUPS (875 ML)
2 cups (500 mL) vanilla ice cream, softened
1/4 cup (50 mL) milk
1/2 teaspoon (2 mL) vanilla extract
Put all ingredients into blender container. Cover and process at ON until smooth.
(If necessary, stop blender, use rubber spatula to keep mixture around the
agitator blades.)
Reduce milk to 1/4 cup (50 mL) and add 1/4 cup (50 mL) chocolate syrup.
Omit vanilla extract. Process as previous Milk Shake recipe.
1/4 cup (50 mL) lemonade concentrate, thawed, undiluted
3/4 cup (200 mL) water
2 cups (500 mL) strawberries
2 tablespoons (30 mL) sugar
1 cup (250 mL) ice cubes
Put all ingredients into blender container. Cover and process at ON until slushy.
1/2 cup (125 mL) milk
1/2 cup (125 mL) apple juice
2 cups (500 mL) fruit (strawberries, bananas or peaches)
cut in 1-inch (2.5 cm) pieces
2 tablespoons (30 mL) sugar
1/2 teaspoon (2 mL) vanilla extract
1 cup (250 mL) ice cubes
Put all ingredients except ice into blender container. Cover and process at ON
until smooth. With motor running, remove feeder cap and add ice cubes.
Continue to process until smooth.

11
VANILLA MILK SHAKE
2 cups (500 mL) vanilla ice cream, softened
1/4 cup (50 mL) milk
1/2 teaspoon (2 mL) vanilla extract
Put all ingredients into blender container. Cover and process at ON until smooth.
(If necessary, stop blender, use rubber spatula to keep mixture around the
agitator blades.)
YIELD: 2 C
UPS (500 ML)
CHOCOLATE
MILK SHAKE
Reduce milk to 1/4 cup (50 mL) and add 1/4 cup (50 mL) chocolate syrup.
Omit vanilla extract. Process as previous Milk Shake recipe.
STRAWBERRY
COOLER
1/4 cup (50 mL) lemonade concentrate, thawed, undiluted
3/4 cup (200 mL) water
2 cups (500 mL) strawberries
2 tablespoons (30 mL) sugar
1 cup (250 mL) ice cubes
Put all ingredients into blender container. Cover and process at ON until slushy.
YIELD: 3 CUPS (750 ML)
FRUIT SMOOTHIE
1/2 cup (125 mL) milk
1/2 cup (125 mL) apple juice
2 cups (500 mL) fruit (strawberries, bananas or peaches)
cut in 1-inch (2.5 cm) pieces
2 tablespoons (30 mL) sugar
1/2 teaspoon (2 mL) vanilla extract
1 cup (250 mL) ice cubes
Put all ingredients except ice into blender container. Cover and process at ON
until smooth. With motor running, remove feeder cap and add ice cubes.
Continue to process until smooth.
YIELD: 3 CUPS (750 ML)

12
MEXICAN CHOCOLATE
1/2 cup (125 mL) semi-sweet chocolate morsels
1 tablespoon (15 mL) instant coffee powder
1/2 teaspoon (2 mL) vanilla extract
1/4 teaspoon (1 mL) cinnamon
2 cups (500 mL) hot milk
Put all ingredients into blender container. Cover blender and vent feeder cap.
Process at PULSE until morsels are dissolved. Serve hot.
YIELD: A
PPROXIMATELY 2-1/2 CUPS (625 ML)
Alcoholic Beverages
DAIQUIRI
1/2 cup (125 mL) water
3 ounces (90 mL) light rum
1 can (6 ounces or 177 mL) frozen limeade concentrate
1-1/2 cups (375 mL) ice cubes
Put all ingredients except ice into blender container. Cover and process at ON.
With motor running, remove feeder cap and add ice cubes. Continue to process
until smooth.
YIELD: 2 CUPS (500 ML)
FROZEN DAIQUIRI
Omit water and add an additional 1-1/2 cups (375 mL) ice cubes. Process as previous
Daiquiri recipe.
BLUE MARGARITA
1/2 cup (125 mL) water
3 ounces (90 mL) gold tequila
1-1/2 ounces (45 mL) blue Curaçao
1 can (6 ounces or 177 mL) frozen limeade concentrate
1-1/2 cups (375 mL) ice cubes
Put all ingredients except ice into blender container. Cover and process at ON.
With motor running, remove feeder cap and add ice cubes. Continue to process
until smooth. Serve over ice in a salt-rimmed glass.
YIELD: 3 CUPS (750 ML)
Omit water and add an additional 1-1/2 cups (375 mL) ice cubs.
Process until slushy.
Substitute an equal amount of triple sec for the blue Curaçao.
Process as previous Margarita recipe.
1/2 cup (125 mL) water
4 ounces (125 mL) bourbon
1 can (6 ounces or 177 mL) frozen lemonade concentrate
1 can (6 ounces or 177 mL) frozen orange juice concentrate
1 cup (250 mL) ice cubes
Put all ingredients except ice into blender container. Cover and process at ON
until smooth. With motor running, remove feeder cap and add ice cubes.
Continue to process until smooth. Garnish with an orange slice and a
maraschino cherry.
1 cup (250 mL) cream of coconut
3/4 cup (200 mL) unsweetened pineapple juice
4 ounces (125 mL) light rum
1 tablespoon (25 mL) milk
1 can (8 ounces or 227 g) juice-packed pineapple
2 cups (500 mL) ice cubes
Put all ingredients except ice into blender container. Cover and process at ON.
With motor running, remove feeder cap and add ice cubes. Continue to process
until smooth. Garnish with a pineapple slice. Y
3 ounces (90 mL) gin
1 tablespoon (15 mL) lemon juice
1 cup (250 mL) orange sherbet, softened slightly
1 cup (250 mL) ice cubes
Put all ingredients into blender container. Cover and process at ON until of
sherbet-like consistency. Spoon into cocktail glasses and serve with short straws.
 Loading...