

Oster OSF1613MB, OSF1613MW Instruction Manual
MODELS
MODELOS
Instruction Manual
16” STAND FANS
PLEASE READ ALL INSTRUCTIONS BEFORE USING
Manual de Instrucciones
VENTILADORES DE PEDESTAL DE 40,6 cm
LEA TODAS LAS INSTRUCCIONES ANTES DE USAR
OSF1613MB
OSF1613MW
OSF1613MB
OSF1613MW
OSF1613MW_MB_13ESM1.indd 1 7/18/13 8:53 AM

When using electrical appliances, basic safety precautions should always be followed to
reduce the risk of re, electric shock, and injury to persons. These precautions include:
• Read all instructions before using this appliance.
• Use fan only for purposes described in the instruction manual.
• To protect against electrical shock do not immerse unit, plug or cord in water or spray
with liquids. Plug the appliance directly into electrical outlet.
• Unplug from outlet when not in use, when moving fan from one location to another,
before putting on or taking off parts and before cleaning.
• Avoid contact with moving parts.
• Do not operate in the presence of explosive and/or ammable fumes.
• To avoid re hazard, NEVER place the cord under rugs or any parts near an open
ame, cooking or other heating appliance.
• Do not operate any appliance with a damaged cord or plug after the appliance
malfunctions, or has been dropped/damaged in any manner. Take it to an Authorized
Service Center for its examination and/or repair.
• The use of attachments not recommended or sold by the appliance manufacturer may
cause hazards.
• Do not use outdoors. Do not let the cord hang over the edge of a table, counter or
come in contact with hot surfaces or leave exposed to high trafc areas.
• To disconnect, grip plug and pull from wall outlet. Never yank on cord.
• Always use on a dry, level surface.
• Do not operate fan until fully assembled with all parts properly in place.
• This product is intended for household use ONLY and not for commercial or industrial
applications.
• This appliance is not intended for use by persons (including children) with reduced
physical, sensory or mental capabilities, or lack of experience and knowledge, unless
they have been given supervision or instruction concerning use of the appliance by a
person responsible for their safety. Children should be supervised to ensure that they
do not play with the appliance.
• Close supervision is necessary when any appliance is used by or near children, or
incapacitated individuals.
SAVE THESE INSTRUCTIONS
IMPORTANT SAFEGUARDS
1
OSF1613MW_MB_13ESM1.indd 2 7/18/13 8:53 AM
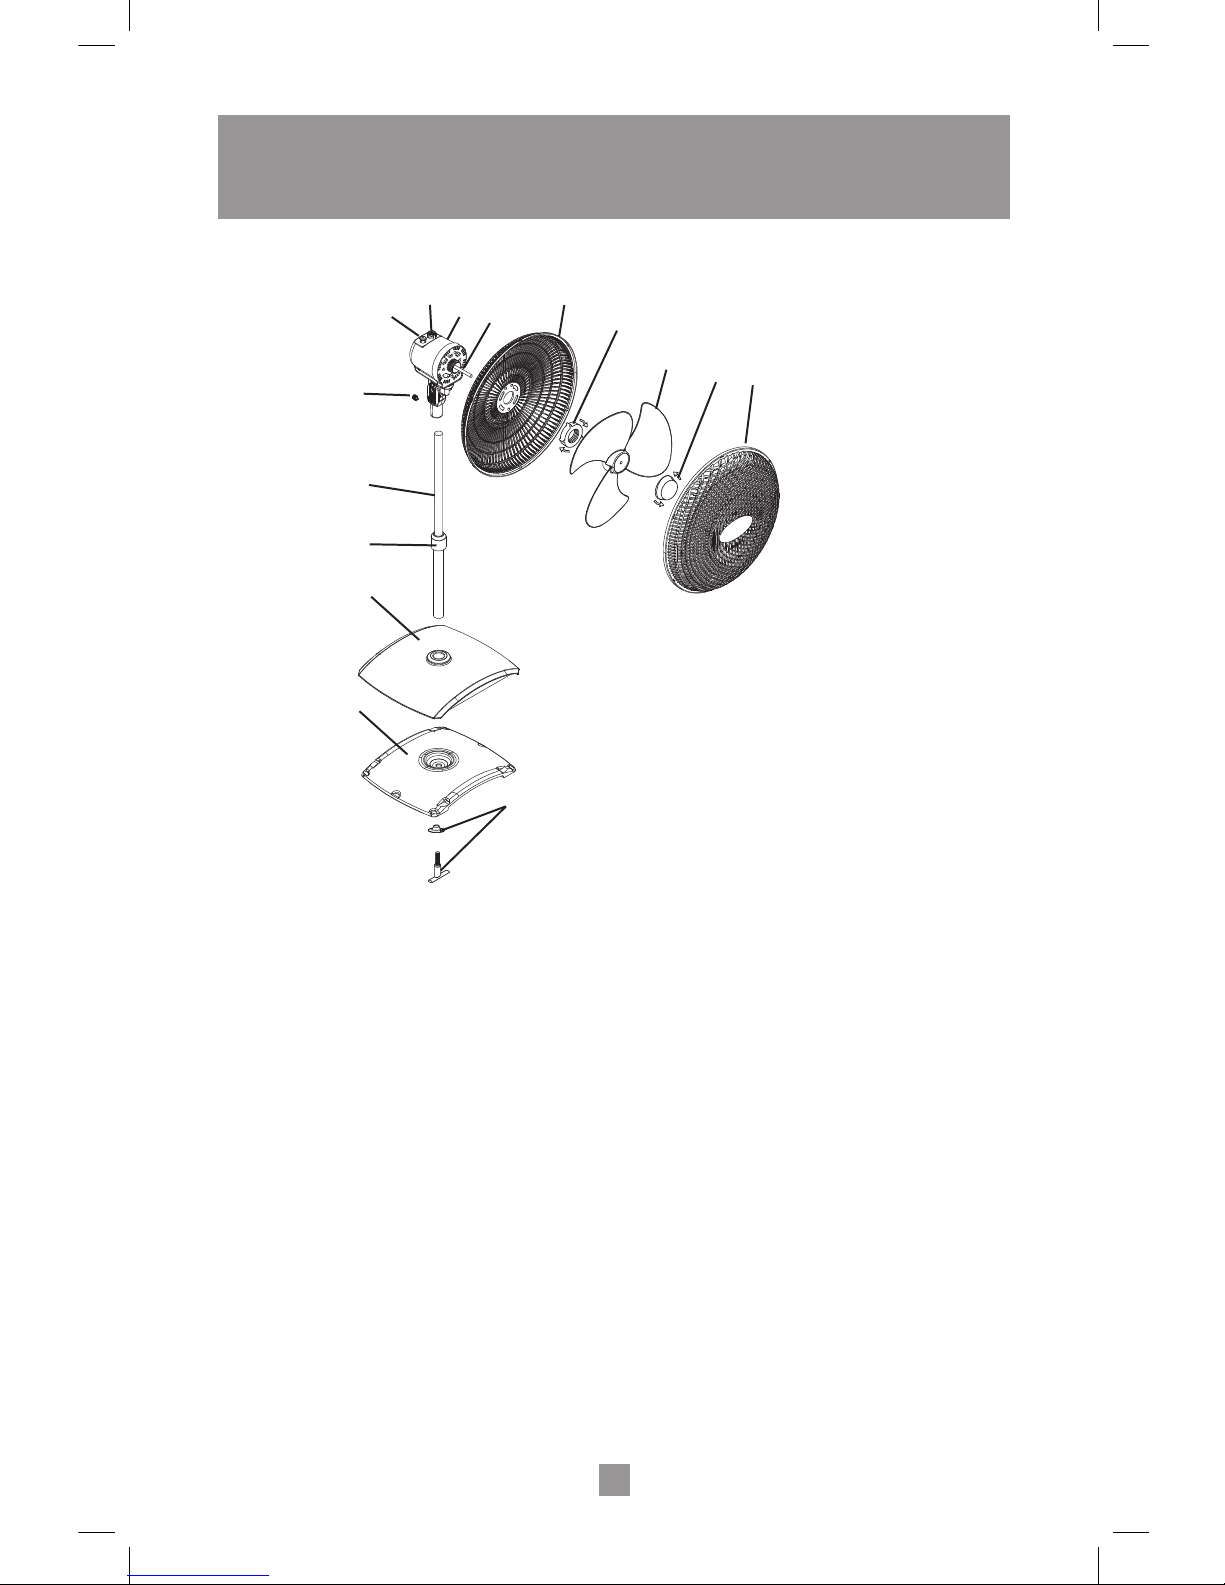
DESCRIPTION OF THE APPLIANCE
2
A. Front Grill
B. Fan Blade Lock Nut
C. Fan Blade
D. Rear Grill Nut
E. Rear Grill
F. Motor Shaft
G. Motor Housing
H. Power/Speed knob
I. Oscillation Button
J. Handscrew
K. Expandable Pole
L. Height Adjustment Knob
M. Base
N. Weight
O. Screw/Washer/Knob
Assembly
A
B
D
C
E
F
J
H
I
L
K
G
M
N
O
OSF1613MW_MB_13ESM1.indd 3 7/18/13 8:53 AM

BEFORE USING FOR THE FIRST TIME
Read and follow all the instructions for this section on use and care and nd a place to
keep this instruction manual ready for future reference.
For your convenience, record the complete model number (located at the bottom of the
motor) and the date you received the product, together with your purchase receipt and
attach to the warranty and service information. Retain in the event that the warranty
service is required.
NOTE: The use of attachments not recommended or sold by Sunbeam Products, Inc.
may cause re, electrical shock, injury or damage to the product.
ASSEMBLY INSTRUCTIONS
Base / Pole Assembly
1. Extend the upper pole through the top of the lower pole and secure it rmly by turning
the height adjustment knob clockwise.
2. Remove the screw/washer/knob assembly from the pole by turning counter-clockwise.
3. Insert the screw/washer/knob assembly through the weight and base into the lower
pole, and turn clockwise until tight.
Fan Head Assembly
You are now ready to assemble the fan head.
1. Remove plastic sleeve on motor shaft, if included. Position the rear grill over the
motor shaft, making certain the 2 notches at the top and 1 notch at the bottom of the
rear grill t over the protruding notches on the motor housing. Make sure the rear grill
ts securely against the motor housing.
2. Fasten the rear grill in place using the rear grill nut. Turn the nut clockwise and tighten
rmly.
3. Slide the fan blade, with the hollowed interior of the fan blade facing toward the rear
grill, rmly onto the motor shaft. Make sure that the fan blade rests on the pin on the
motor shaft.
NOTE: The shaft screw portion should protrude from the front of the blade.
4. Secure the fan blade onto the motor shaft by turning the blade cap counter-clockwise
(make sure the blade is rmly in position).
5. Center the front grill, ensuring the Oster™ logo is horizontal and parallel to the oor,
and press onto rear grill after aligning snaps.
Final Assembly
Fit fan head assembly onto pole/base assembly, and turn handscrew clockwise until tight.
INSTRUCTIONS FOR USE
3
OSF1613MW_MB_13ESM1.indd 4 7/18/13 8:53 AM

OPERATING INSTRUCTIONS
1. Set fan on a dry, level surface.
2. Plug power cord into the appropriate outlet.
3. Turn the knob at the top of the motor housing to select the desired fan speed or turn it
off: “0” for Off, “1” for Low Speed, “2” for Medium Speed, and “3” for High Speed.
4. To oscillate the fan head, push the oscillation button “ ” at the top of the motor
housing down. To stop the oscillation, pull the oscillation button “ ” up.
ADJUSTMENT INSTRUCTIONS
Height Adjustment
This fan is equipped with an expandable pole, which allows you to adjust the height of the
fan according to your preference.
Tilt Adjustment
To change the tilting angle of the fan head, move the fan head manually to the desired
angle.
MAINTENANCE AND CLEANING
4
CLEANING AND MAINTENANCE
Follow these instructions to correctly and safely care for your fan.
• Always unplug the fan before cleaning or disassembling.
• Be sure to clean your fan with a soft cloth moistened with a mild soap solution.
• Do not allow water to drip on or enter into the fan housing.
• Do not use gasoline, thinner, or benzene as a cleaner.
• Lightly run a vacuum cleaner nozzle over the fan grill to remove any dust or dirt that
may have accumulated.
Fan Blade Cleaning Instructions
This fan is equipped with a removable grill that allows the consumer to remove the grill
and its components without the need of any tools.
Make sure the fan is unplugged before disassembling and cleaning the fan blade.
Carefully remove the front grill. Wipe the blade with a soft cloth moistened with a mild
soap solution. DO NOT allow any liquid to drip into or enter the motor housing. Snap the
front grill onto the fan. Make sure all parts are secured prior to operating the fan.
OSF1613MW_MB_13ESM1.indd 5 7/18/13 8:53 AM
 Loading...