

Page 1
User’s Manual
3.0 Cu. Ft. Compact Refrigerator
PTT030707
Model: OR03SCGBS
Page 2

TABLE OF CONTENTS
SAFETY INFORMATION 3
PRODUCT DESCRIPTION 3
BEFORE USING YOUR REFRIGERATOR 4
TIPS FOR SAVING ENERGY 4
INSTALLATION INSTRUCTIONS 4
OPERATION INSTRUCTIONS 5
THERMOSTAT CONTROL 5
DEFROSTING INSTRUCTIONS 5
CLEANING INSTRUCTIONS 6
REVERSING THE DOOR 6
CARE AND MAINTENANCE 6
TROUBLESHOOTING 7
SPECIFICATIONS 8
Page 3
SAFETY INFORMATION
READ ALL SAFETY INSTRUCTIONS BEFORE USING THIS REFRIGERATOR
When using an electrical appliance, basic precautions should always be followed, including the
following:
Danger: Risk of child entrapment. Before you throw away your refrigerator or freezer, take off the
•
doors. Leave the shelves in place so that children cannot easily climb inside.
Please ensure this refrigerator is properly connected to the power supply.
•
Do not use an extension cord, as this can negatively affect the refrigerator’s performance.
•
When transporting this refrigerator, keep the unit in an upright position. Do not tilt the refrigerator
•
beyond 45 degrees or place the unit upside down.
Do not touch the cooled surfaces while the refrigerator is running, especially with wet hands, as they
•
may stick to the colder surfaces.
It is recommended that the refrigerator is positioned away from any combustible sources such as
•
gas, etc, nor should such objects be stored in the refrigerator.
Do not freeze bottled liquids. Doing so may cause glass bottles and aluminum cans to explode.
•
If the refrigerator fails to cool properly, dispose of spoiled foods as needed.
•
All repairs should be made by a qualifi ed service technician. Repairs made by non-qualifi ed
•
personnel will void the warranty.
Do not defrost the refrigerator with other electric devices (hair dryer, etc) and never scrape the ice or
•
frost layer with sharp tools.
The rating plate is inside the refrigerator or on the rear wall.
•
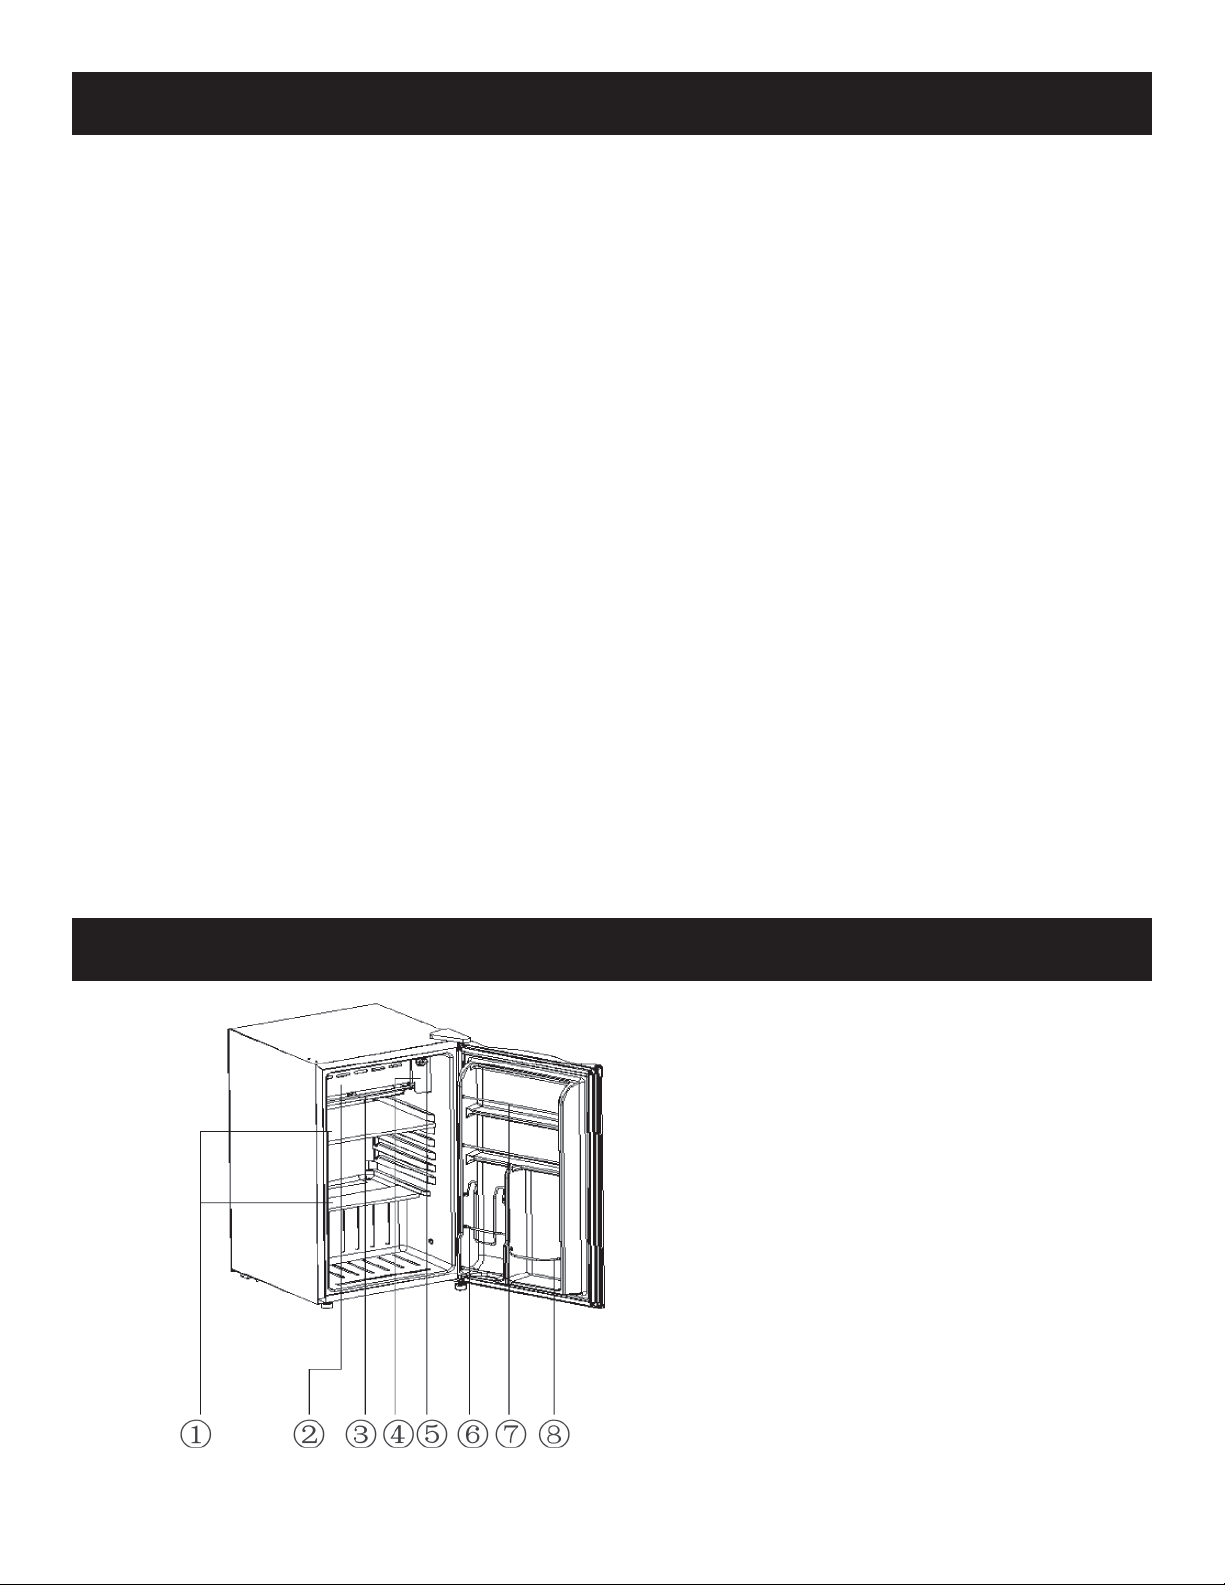
PRODUCT DESCRIPTION
Removable food shelf
1.
Freezer compartment
2.
Drip tray
3.
Temperature thermostat box
4.
Temperature dial
5.
Dairy rack
6.
Food rack
7.
Bottle rack
8.
3
Page 4

BEFORE USING YOUR REFRIGERATOR
Before connecting the refrigerator to the power supply, let the unit stand upright for 4 hours to
•
reduce the possibility of the cooling system malfunctioning due to improper handling.
Clean your refrigerator thoroughly before putting into use.
•
Use the parts diagram to insure proper positioning of internal components.
•
TIPS FOR SAVING ENERGY
Keep the refrigerator and freezer doors closed as much as possible, especially in warm/humid
•
conditions.
Maintain adequate ventilation around the back and sides of the refrigerator.
•
Maintain a thermostat of “4” under normal use.
•
Allow warm food to cool to room temperature before placing in the refrigerator or freezer.
•
Excessive ice build up will increase energy consumption. Defrost the refrigerator and freezer when
•
ice/frost is 1/4” thick.
INSTALLATION INSTRUCTIONS
Install the refrigerator in a convenient location away from extreme
•
heat and cold. Allow suffi cient clearance between the refrigerator and
sidewall so the door will open without obstruction. The refrigerator is
not designed for recessed installation.
Select a space with a strong, level fl oor. This unit is not recommended
•
for carpeting or other soft, uneven surfaces.
Allow 5 inches of space between the refrigerator’s side and the wall.
•
In addition, suffi cient clearance (160 degrees) should be maintained to
allow the door to properly and completely open.
The refrigerator must be correctly connected to the power supply.
•
Do not use an extension cord.
•
This refrigerator is not designed to be installed in an outside area such
•
as a garage or porch. Ambient temperatures below 50 degrees or
above 90 degrees will hinder the performance of the refrigerator.
Wait 3-5 minutes before restarting the refrigerator if you unplug the
•
unit. The unit may fail to operate if restarted too quickly.
4
Page 5

OPERATION INSTRUCTIONS
Clean your refrigerator thoroughly. Wipe the outside with a soft, dry cloth, the interior with a
•
clean, moist cloth.
Insert the power cord into the power supply outlet.
•
Turn the thermostat dial to “7”. Close the door and let the refrigerator operate for 20 minutes.
•
Reduce the thermostat to a mid-range setting (“4”) on the thermostat control.
•
THERMOSTAT CONTROL
To control the internal temperature, adjust the thermostat dial. “1” is the
•
warmest setting; “7” is the coldest setting.
To turn the refrigerator off, turn the thermostat dial to “0”. Turning the
•
temperature dial to “0” stops the cooling cycle but does not shut off the power
supply to the unit. To turn off the power supply, unplug the refrigerator from
the power supply outlet.
The dial may be set any place on the scale. It does not have to be set exactly on
•
a number.
To make ice cubes in the freezer compartment, adjust the thermostat to the
•
coldest setting (“7”).
DEFROSTING INSTRUCTIONS
Defrost the freezer compartment when the ice/frost is approximately 1/4 inches thick.
•
Set the thermostat dial to “0” to defrost.
•
Remove all contents from the freezer compartment.
•
Leave the freezer door open to allow accumulated ice/frost to melt.
•
Remove large pieces of ice as needed.
•
Do not use hot water or other electric heating devices to melt the accumulated ice.
•
After defrosting, remove accumulated ice/water and wipe the freezer compartment dry with a soft
•
cloth.
Restart the unit.
•
5
Page 6

CLEANING INSTRUCTIONS
Cleaners: Never use harsh, abrasive cleaners, heavy-duty cleaners, or solvents on any surface.
•
Exterior: Wipe with damp, sudsy cloth, rinse, and dry. For stubborn stains and for periodic waxing,
•
use silicon wax.
Freezer: When the refrigerator needs defrosting, turn the thermostat to “OFF” (“0”). Do not use
•
sharp instruments to scrape off ice/frost.
Refrigerator Section: Wash shelves, other removable parts, and interior in warm, sudsy water, rinse
•
and dry.
Magnetic Door Seals: Wash with warm, sudsy water.
•
REVERSING THE DOOR
CARE AND MAINTENANCE
POWER CORD REPLACEMENT: If the refrigerator’s power cord is damaged, have it replaced by a
•
qualifi ed repair agent.
The refrigerator should be cleaned on a regular basis. It is necessary to have an adequate ventilation
•
space around the refrigerator in order to attain proper performance, dissipation of heat, maintain
effi ciency, and lower power consumption. Clearance of a minimum of 5 inches should be
maintained at the rear and sides of the unit and 8 inches at the top.
To attain proper performance, be sure to plug the refrigerator into a properly grounded 115/60 Hz
•
outlet.
Do not modify the power cord under any circumstances to allow the unit to be plugged in to a non-
•
grounded outlet. To avoid heat damage to the power cord, please ensure the cord does not come in
proximity to or in direct contact with the refrigerator’s compressor.
Please avoid installing the refrigerator in a location where the unit will come in contact with water
•
or moisture to minimize the rusting of metal parts.
•
The refrigerator should not be installed near any heat source or in a location where it will come in
direct contact with the sunlight.
6
Page 7

TROUBLESHOOTING
Before asking for service, please check each item below if you have trouble with your refrigerator:
SITUATION WHAT TO DO
Unplug the refrigerator from the power supply
The refrigerator is not being used for an
extended amount of time
The refrigerator does not work
You would like to move the refrigerator
The refrigerator seems too warm
•
Remove all contents from the refrigerator
•
Dry the interior and leave the door open for a few days
•
Check to see if there is power failure
•
Check to see if the power plug is plugged into the power
•
supply
Check to see if the fuse has blown in the main power
•
supply
Secure all movable parts and contents
•
Transport the refrigerator only in an upright position.
•
In any other positions, you may damage the compressor.
Check to see that the door is closing properly and the
•
seal is not damaged.
Check to see that the interior circulation is not
•
obstructed by having too many goods stored inside (the
refrigerator is overloaded).
Do not store anything hot, without fi rst cooling it room
•
temperature.
Ensure there is suffi cient clearance around all sides and
•
above the refrigerator.
The refrigerator is too cold
The defrosting water overfl owed into
the refrigerator and onto the fl oor
The refrigerator’s cabinet front heats up
Condensation is forming on the front of
the refrigerator
The refrigerator is making unusual
noises
The temperature control dial may be set too high
•
If you place foods that contain a lot of moisture directly
•
under the cooling outlets, they will freeze easily. This
does not indicate a refrigerator malfunction.
Check that the drain pipe and the drain hose are not
•
clogged.
Check that the drain pan is housed properly.
•
In order to avoid condensation, there is an anti-
•
condensation pipe that heats up the cabinet when
running. This does not indicate a refrigerator
malfunction.
Condensation may form on the outside when the
•
humidity level is high. This is the same result as the
condensation formed when chilled water is poured
into a glass. This does not indicate a refrigerator
malfunction.
Ensure the refrigerator is sitting evenly.
•
Ensure no objects have fallen behind the refrigerator.
•
Ensure no objects are vibrating or rattling inside the
•
unit.
7
Page 8

SPECIFICATIONS
Capacity 3.0 Cu. Ft.
Electrical Rating 115V~/60Hz/1.3A
Refrigerant R134a/1.77 oz/50g
Net Weight 50.7 lbs
Unit Dimensions (inches, H x W x D) 31.23 x 17.5 x 18.5
8
Page 9

© 2007 Sunbeam Products, Inc. doing business as Jarden Consumer Solutions. All rights reserved.
®
is a registered trademark of Sunbeam Products, Inc. used under license.
Oster
Distributed by Petters Consumer Brands, LLC. 4400 Baker Road, Minnetonka, MN 55343.
For service, support and warranty information, in the US call 1-866-866-6283.
 Loading...