

Page 1
4-QUART WOODEN BUCKET
ICE CREAM MAKER
User Guide:
FRSTIC-WDB
www.oster.com
For product questions contact:
Sunbeam Consumer Service
USA : 1.800.334.0759
Canada : 1.800.667.8623
www.oster.com
©2013 Sunbeam Products, Inc. doing business as
Jarden Consumer Solutions. All rights reserved.
Distributed by Sunbeam Products, Inc. doing business as
Jarden Consumer Solutions, Boca Raton, Florida 33431.
Printed in China
P.N. 172666 GCDS-OST32586-JC
Safety
How to use
Cleaning
Recipes
Warranty
FRSTIC-WDB_13EM1.indd 48-1 1/14/14 9:44 AM
Page 2

www.oster.com
www.oster.com
2
3
IMPORTANT SAFEGUARDS
When using electrical appliances, basic safety precautions should always
be followed including the following:
READ ALL INSTRUCTIONS BEFORE USE
1. Read all instructions before using.
2. To protect against electrical shock, do not immerse cord, plug, or
motor in water or other liquid.
3. Close supervision is necessary when any appliance is used by or near
children.
4. To disconnect, switch power to O and unplug from outlet.
Disconnect when not in use, before putting on or taking o parts, and
before cleaning.
5. Avoid contacting moving parts.
6. Do not operate any appliance with a damaged cord or plug or after
the appliance malfunctions, or has been dropped or damaged in any
manner. See warranty to return for examination, repair, or electrical
or mechanical adjustment. Appliance serviced only by authorized
agent.
7. The use of accessory attachments (not recommended or sold by the
manufacturer) may cause re, electric shock or injury.
8. Do not use outdoors.
9. Do not let cord hang over edge of table or counter, or touch heated
surfaces, including the stove.
10. Do not use appliance for other than intended use.
11. Do not operate your Ice Cream Maker dry. Always have ice cream
mixture in the ICE CREAM CANISTER when you plug in your
appliance.
12. Do not use extension cord.
This appliance is for household use only. No user-serviceable parts inside. Power
Unit never needs lubrication. Do not attempt to service this product.
POLARIZED PLUG INFORMATION
This appliance has a polarized plug (one blade is wider
than the other). To reduce the risk of electric shock,
this plug is intended to t into a polarized outlet only
one way. If the plug does not t fully into the outlet,
reverse the plug. If it still does not t, contact a qualied electrician. Do not
attempt to modify the plug in any way. If the plug ts loosely into the AC outlet
or if the AC outlet feels warm do not use that outlet.
SAVE THESE INSTRUCTIONS
FRSTIC-WDB_13EM1.indd 2-3 1/14/14 9:44 AM
Page 3
www.oster.com
www.oster.com
4
5
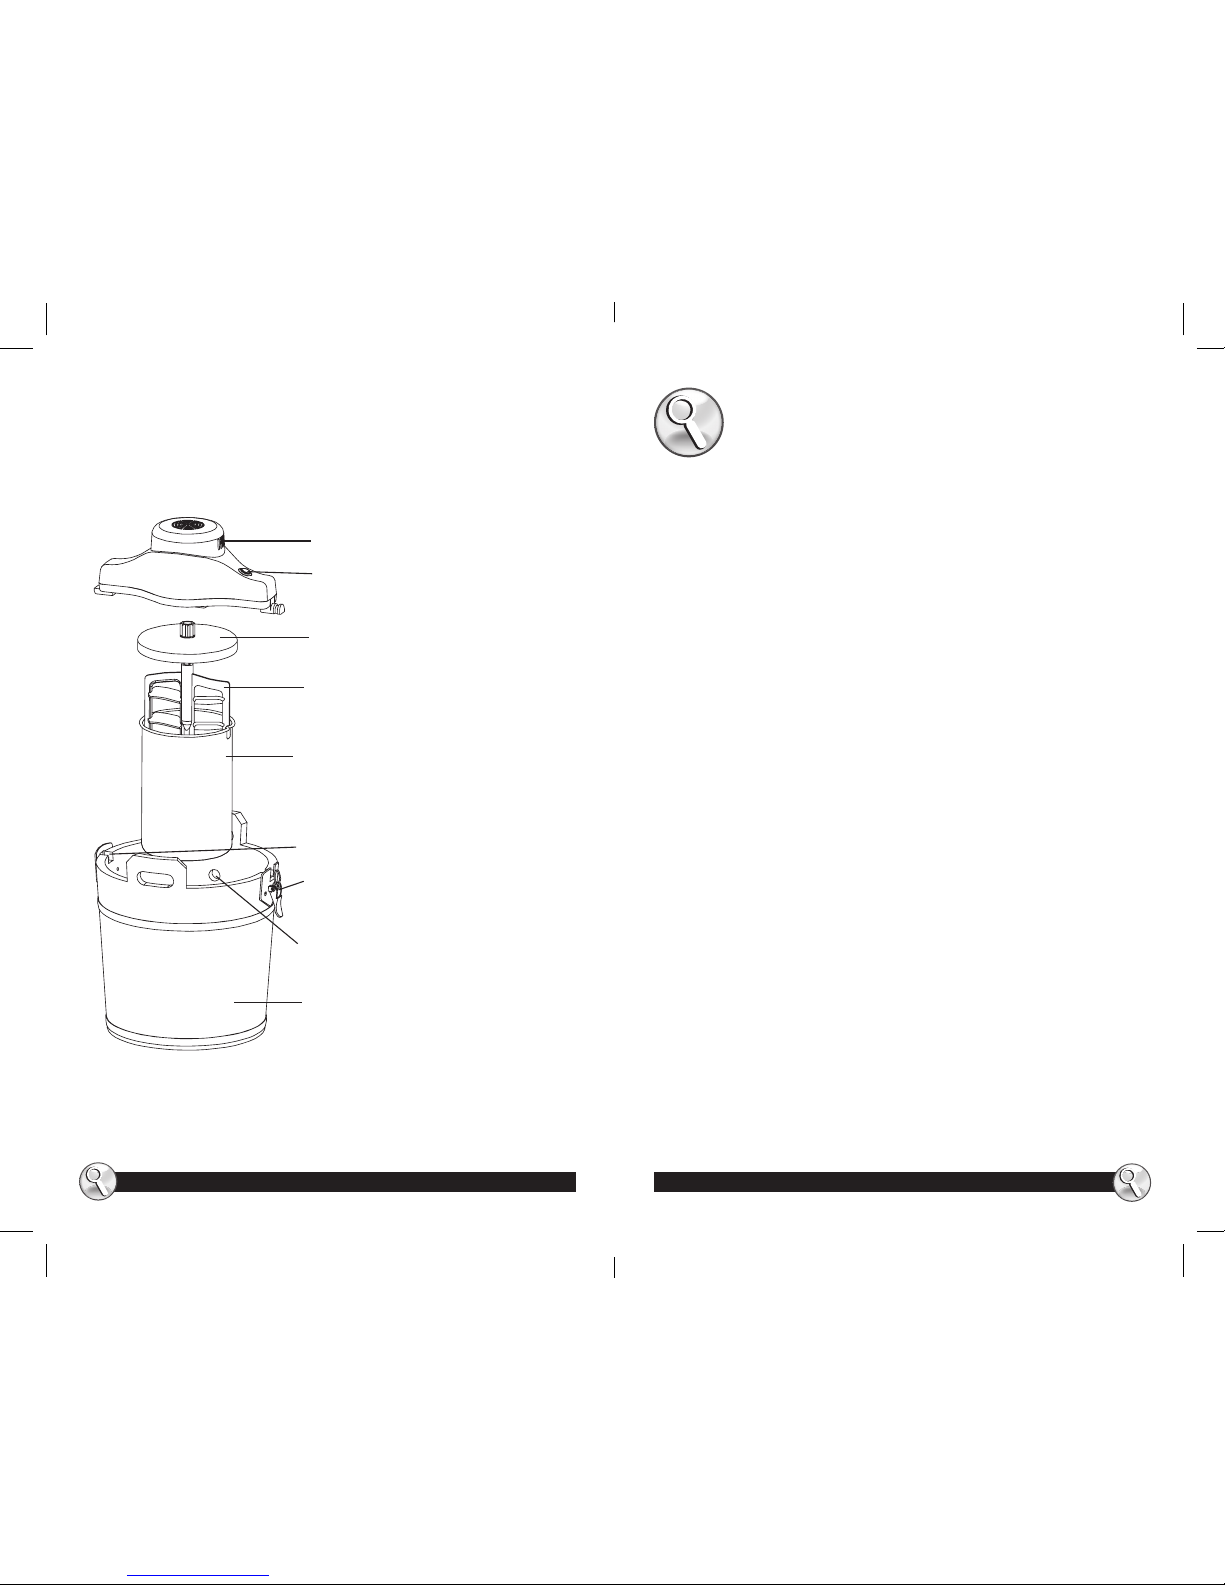
PARTS IDENTIFICATION
KNOW YOUR ICE CREAM MAKER
HOW TO:
Before You Use Your Ice Cream Maker
BEFORE USE: Fill bucket 2/3 full of water. Let soak for
90 minutes. This will allow the wood to swell to ensure
the bucket does not leak.
NOTE: Before using for the rst time, wash all parts except
MOTOR DRIVE (see “How To Clean Your Ice Cream Maker”).
How To Use Your Ice Cream Maker
1. Mix your favorite ice cream recipe thoroughly in a
bowl PRIOR to putting it in the DASHER. TIP: Chill
(in the refrigerator) ice cream mixture and ICE
CREAM CANISTER prior to making ice cream.
2. While ice cream mixture and CAN are chilling, place
cleaned wood bucket on a at surface counter top.
Place DASHER and COVER nearby.
3. Once mixture and CAN are chilled, remove from
refrigerator to start the ice cream making process.
4. Pour chilled ice cream mixture into chilled ICE
CREAM CANISTER. Do not ll above the max level
marked on the inside of the CAN.
5. Insert DASHER into ICE CREAM CANISTER. Then place
COVER on ICE CREAM CANISTER by lining up the
stem on the DASHER with the hole on the COVER.
6. Carefully insert the ICE CREAM CANISTER with COVER
into the center of the BUCKET. Make sure ICE CREAM
CANISTER engages with the bottom of the BUCKET.
7. Carefully slide the rectangular tab (located on
opposite end of power switch) into the square bracket
I
G
H
F
E
D
C
B
A
A. Motor
B. Power Switch
C. Cover
D. Dasher
E. Ice Cream Canister
F. Bucket Slot
G. Latching Handle
H. Drain Hole
I. Wooden Bucket
FRSTIC-WDB_13EM1.indd 4-5 1/14/14 9:44 AM
Page 4

www.oster.com
www.oster.com
6
7
slot on BUCKET, align the MOTOR DRIVE over ICE
CREAM CANISTER so that the stem of the DASHER
engages hole in the bottom of the MOTOR DRIVE.
Rotate ICE CREAM CANISTER slightly until MOTOR
DRIVE engages ICE CREAM CANISTER COVER. Lock in
MOTOR DRIVE into BUCKET with latching handle.
8. Plug Power cord into outlet.
9. Switch power to on and make sure the ICE
CREAM CANISTER starts to rotate. While ICE
CREAM CANISTER is rotating, begin to distribute
approximately 2 inches of ice cubes around the
inside bottom of the BUCKET. Sprinkle approximately
1/4 cup of rock salt uniformly over the layer of ice.
(NOTE: The DASHER does not move, the ICE CREAM
CANISTER rotates around the DASHER.)
10. Continue to layer ice and then rock salt until level
reaches top of rotating ICE CREAM CANISTER.
(NOTE: If CAN stops rotating - turn unit o manually turn the ICE CREAM CANISTER until it
seems to turn smoothly - as ice cubes might have
jammed against the rotating ICE CREAM CANISTER then turn the power back on.)
11. Ice cream should churn for approximately 30-40
minutes. CAN will STOP turning when ice cream is
complete. Switch power to O, unplug cord and
remove the MOTOR DRIVE. Motor will not turn
back on until it cools down - approximately 15-25
minutes. NOTE: Should ice cream maker stop before
churning is complete, check to see if ice cubes are
jammed against the rotating ICE CREAM CANISTER.
12. Once MOTOR DRIVE is removed, clear away ice
and salt from the top of the ICE CREAM CANISTER
COVER. Carefully remove COVER and DASHER.
Recommend to use a rubber spatula to remove the
ice cream from the DASHER.
How to Harden and Ripen Ice Cream
1. Pack ice cream down into ICE CREAM CANISTER
and replace COVER. Place plastic wrap over COVER
and secure with a rubber band.
2. Clean out salt and melted ice from inside of wood
BUCKET by rinsing in the sink - do not place
BUCKET in the dishwasher.
3. Place ICE CREAM CANISTER wrapped with plastic
wrap and rubber band back in the wood BUCKET.
4. Repack ice and salt layers (see “How To Use Your Ice
Cream Maker”, previous section) covering entire
ICE CREAM CANISTER including COVER.
5. Cover the BUCKET with a folded towel or a few
newspapers for insulation and allow to harden for
two to three hours. Hardening time varies with
type of ice cream mixture used.
Home freezer method
Ice Cream Canister:
1. Pack ice cream down into ICE CREAM CANISTER
and replace COVER. Place plastic wrap over COVER
and secure with a rubber band.
2. Place in home freezer for several hours.
Plastic Containers:
1. Spoon ice cream into plastic container; allow 1/2
inch for expansion. Cover with a tight-tting lid.
2. Place in home freezer for several hours.
FRSTIC-WDB_13EM1.indd 6-7 1/14/14 9:44 AM
Page 5

www.oster.com
www.oster.com
8
9
IMPORTANT POINTS
DRAIN HOLE: Check frequently to make sure excess
salt water ows freely through the Drain Hole. A
blocked drain hole may allow salt water to seep into
the Ice Cream Canister and ruin the ice cream.
AUTO SAFETY SHUT OFF:
This Ice Cream Maker is supplied with an auto safety
shuto. Should the motor become overheated it will
turn o. In order to restart the Ice Cream Maker the
following steps must be followed:
1. Unplug the Ice Cream Maker.
2. Wait at least 20 minutes for the motor to cool down.
3. Plug in and operate normally.
Care & Cleaning
How To Clean Your Ice Cream Maker
Motor Drive: Switch power to O and unplug cord.
Never put MOTOR DRIVE in water. Wipe with a slightly
damp cloth. MOTOR DRIVE never needs lubrication.
Do Not Immerse in Liquids.
Ice Cream Canister, COVER, and DASHER: Wash
in hot, soapy water. Rinse and dry thoroughly.
IMPORTANT: ICE CREAM CANISTER should be towel
dried; if left to “air dry,” water spots may appear. Do
not replace COVER until Ice Cream Canister is dry. Do
not put any parts in dishwasher.
Ice Cream BUCKET: After every use, clean thoroughly
to remove salt water residue.
Helpful Hints
• To achieve a smooth textured ice cream, carefully
follow the ice and salt amounts indicated. As the
ice melts and the ice level decreases, add small
amounts of ice to maintain the original level.
• To loosen jammed ice, turn the power switch to
O and twist the ICE CREAM CANISTER several
times. Turn the power switch back on to restart the
churning process. If jamming continues, add 2 cups
of water to BUCKET.
• Ice cream should churn approximately 25-35
minutes or until motor stops. If you choose to
churn less than the 3/4 volume of liquid recipe, the
motor may not stop. Occasionally check mixture
until ice cream looks like uy mashed potatoes.
Unplug and remove MOTOR DRIVE.
• Set in sink or above sink drain to catch excess
water.
• Some recipes require the mixture to be pre-
cooked. Make the recipe at least one day ahead.
This will allow the mixture to cool completely and
adds volume.
• Uncooked recipes will yield best results when
an electric mixer is used to cream the eggs and
sugar. This helps increase volume in the ice cream
mixture. Eggs must be cooked properly. See our
eggbased recipes for instructions.
FRSTIC-WDB_13EM1.indd 8-9 1/14/14 9:44 AM
Page 6

www.oster.com
www.oster.com
10
11
• Most ice cream recipes are a combination of
cream, milk, eggs and sugar. You can use any
type of cream you like, but the type of cream you
use will aect the avor and texture. The higher
percentage of fat, the richer the ice cream and
the softer the texture. For example, heavy cream
has at least 36% fat, followed by: whipping cream
(30%), coee or light cream (18%) and half & half
(10%). Any combination can be used, but make
sure the liquid measurement remains the same. For
example, lighter ice creams can be made by using
more milk than cream, or by eliminating cream
altogether. Skim milk may be used, but there will
be a noticeable dierence in texture and taste.
• The avor of a sorbet will depend greatly on the
ripeness and sweetness of the fruit and/or juice. If
fruit is too tart, add sugar; if the fruit is very ripe,
decrease or omit the sugar. Freezing subdues
sweetness, so the recipe will not be quite as sweet
when frozen.
• Articial sweeteners can be used as a substitute for
sugar.
NOTE: Heat aects the sweetness of articial
sweetener. Only add articial sweeteners to mixture
that are cold or have been completely cooled. When a
recipe calls for heating liquid to dilute sugar, omit the
heating process and simply stir in the sweetener until
it is well dissolved.
The following table shows substitutions for articial
sweetener used in place of sugar:
• The ice cream mixture should be liquid when
preparation starts. Do not use sti mixtures (i.e.
whipped cream, frozen liquids).
• The room temperature may aect the freezing
time.
• Time varies depending on recipe.
Questions?
Please call 800-334-0759 or visit us at www.oster.com
1 packet of sweetener = 2 teaspoons (10ml) sugar
6 packets = 1/4 cup (60ml)
8 packets = 1/3 cup (75ml)
12 packets = 1/2 (125ml)
FRSTIC-WDB_13EM1.indd 10-11 1/14/14 9:44 AM
Page 7

www.oster.com
www.oster.com
12
13
Recipes
Old Fashioned Vanilla Ice Cream
21/4 cups sugar
1
/4 cup plus 2 tablespoons our
1
/2 teaspoon salt
5 cups milk
4 eggs, beaten
4 cups whipping cream
2 tablespoons vanilla extract
Combine sugar, our and salt in saucepan. Gradually stir in milk.
Cook over medium heat approximately 15 minutes or until
thickened, stirring constantly.
Gradually stir about 1 cup of hot mixture into the beaten eggs. Add
egg mixture to remaining hot mixture, stirring constantly. Cook 1
minute; remove from heat. Refrigerate 2 hours. Combine whipping
cream and vanilla in large bowl; add chilled mixture, stirring with
wire whisk to combine. Follow how to use your Ice Cream Maker
Steps.
Cookies and Cream Ice Cream: Crumble chocolate sandwich
cookies (25 cookies for 4 quart, 30 cookies for 5 quart, or 40 cookies
for 6 quart) into mixture before freezing.
Coee Ice Cream: Combine instant coee (4 tablespoons for 4
quart, 5 tablespoons for 5 quart, or 6 tablespoons for 6 quart) with
sugar, our and salt. Follow how to use your Ice Cream Maker Steps.
Cinnamon Black Walnut Ice Cream
4 cups whipping cream
4 cups half and half
2 cups sugar
21/2 cups chopped black walnuts
1 tablespoons vanilla extract
1 teaspoon cinnamon
1
/2 teaspoon salt
Combine all ingredients. Cover; refrigerate 30 minutes. Follow how
to use your Ice Cream Maker Steps.
Chocolate Ice Cream
22/3 cups sugar
2 tablespoons cornstarch
1
/2 teaspoon salt
6 cups milk
4 eggs, beaten
6 squares semisweet chocolate, melted
11/3 cup half and half
2 cups whipping cream
2 teaspoons vanilla extract
Combine sugar, cornstarch and salt in a saucepan. Gradually stir in
milk.
Cook over medium heat until mixture comes to a simmer, stirring
constantly. Gradually stir about 1 cup of the hot mixture into the
beaten eggs. Add to remaining hot mixture, stirring constantly. Cook
and stir over low heat until slightly thickened (about 2 minutes). Stir
in melted chocolate. Beat with a whisk until mixture is smooth. Stir
in half and half, whipping cream and vanilla. Cover and refrigerate 2
hours. Follow how to use your Ice Cream Maker Steps.
Hint For Lower-Fat Recipes
For lower fat content, substitute 1% milk for whole milk, whole
milk for half and half; and evaporated skim milk for whipping
cream. Higher fat dairy products – such as whipping cream –
create a smooth, rich and creamy dessert. Lower fat dairy products
create a lighter dessert with a slightly dierent texture.
FRSTIC-WDB_13EM1.indd 12-13 1/14/14 9:44 AM
Page 8

www.oster.com
www.oster.com
14
15
Chocolate Chip Ice cream
21/2 cups milk
23/4 cups sugar
1 teaspoon salt
21/2 cups half and half
11/2 teaspoons vanilla extract
6 cups whipping cream
12 oz. (2 cups) grated semisweet chocolate or chocolate chips
Scald milk until bubbles form around edge of pan. Remove from heat.
Add sugar and salt. Stir until dissolved. Stir in half and half, vanilla and
whipping cream. Cover and refrigerate 30 minutes. Follow how to use
your Ice Cream Maker Steps.
After removing DASHER, immediately stir in chocolate.
Mint Chocolate Chip: Add peppermint extract (2 teaspoons for 4 quart,
2
1
/2 teaspoons for 5 quart, or 1 tablespoon for 6 quart) and green food
coloring (
1
/2 teaspoon for 4 quart, 1/2 teaspoon plus 1/8 teaspoon for 5
quart, or
3
/4 teaspoon for 6 quart) to mixture before refrigerating. Follow
how to use your Ice Cream Maker Steps.
Vanilla Ice Cream
2 cups milk
13/4 cups sugar
1
/2 teaspoon salt
2 cups half and half
1 tablespoon vanilla extract
4 cups whipping cream
Scald milk until bubbles form around edge of pan. Remove from
heat. Add sugar and salt. Stir until dissolved. Stir in half and half,
vanilla extract and whipping cream. Cover and refrigerate 30
minutes. Follow how to use your Ice Cream Maker Steps.
Strawberry: Add pureed strawberries (4 cups for 4 quart, 5 cups for 5
quart, or 6 cups for 6 quart) to chilled mixture before freezing.
Banana: Add mashed bananas (3 cups for 4 quart, 3
1
/2 cups for 5
quart, or 4 cups for 6 quart) to chilled mixture before freezing.
Peach: Add pureed peaches (4 cups for 4 quart, 5 cups for 5 quart, or
6 cups for 6 quart) to chilled mixture before freezing.
Rocky Road Ice Cream
2 cups milk
6 squares (1 oz. each) semisweet chocolate
13/4 cups sugar
1
/2 teaspoon salt
2 cups half and half
1 tablespoon vanilla extract
4 cups whipping cream
2 cups mini marshmallows
11/2 cups chocolate chips
1 cup chopped pecans
Combine milk and semisweet chocolate in saucepan. Stirring
constantly, cook over medium heat until chocolate is melted.
Remove from heat. Add sugar and salt. Stir until dissolved. Stir in
remaining ingredients. Cover and refrigerate 30 minutes. Follow
how to use your Ice Cream Maker Steps.
Peppermint Ice cream
21/2 cups milk
2 cups sugar
1 teaspoon salt
21/2 cups half and half
11/2 teaspoons vanilla extract
6 cups whipping cream
2 cups peppermint candy
Scald milk until bubbles form around edge of pan. Remove from
heat. Add sugar and salt. Stir until dissolved. Stir in half and half,
vanilla and whipping cream. Cover and refrigerate 30 minutes. Place
peppermint candy in a plastic bag. Break into large pieces (about
1
/4-inch) with a mallet or rolling pin. Stir into chilled mixture. Follow
how to use your Ice Cream Maker Steps.
FRSTIC-WDB_13EM1.indd 14-15 1/14/14 9:44 AM
Page 9

www.oster.com
www.oster.com
16
17
Praline Almond Fudge Ice Cream
21/4 cups light brown sugar
1
/4 cup plus 2 tablespoons our
1
/2 teaspoon salt
5 cups milk
4 eggs, beaten
4 cups whipping cream
2 tablespoons vanilla extract
2 cups slivered almonds
3 tablespoons butter
1 cup chocolate fudge topping
Combine brown sugar, our and salt in a saucepan. Gradually stir in
milk. Cook over medium heat about 15 minutes or until thickened,
stirring constantly. Gradually stir about 1 cup of the hot mixture into
the beaten eggs. Add to remaining hot mixture, stirring constantly.
Cook 1 minute; remove from heat. Refrigerate 2 hours. Combine
whipping cream and vanilla in large bowl; add chilled mixture,
stirring with a wire whisk to combine. Sauté almonds in butter over
low heat about 5 minutes. Stir into ice cream mixture. Follow how to
use your Ice Cream Maker Steps. Swirl chocolate fudge topping
through ice cream after it has stopped churning. (Note: This is easier
to do as you transfer ice cream into another container.)
Spiced cider Sorbet
4 cups apple cider or apple juice
2 cups sugar
1 teaspoon whole cloves
4 whole cinnamon sticks
4 cups unsweetened applesauce
2 cups cranberry juice
1
/4 cup lemon juice
Combine apple cider/juice, sugar, cloves and cinnamon sticks in
saucepan. Bring to a boil over medium heat , stirring occasionally.
Boil 5 minutes. Remove from heat. Remove cloves and cinnamon
sticks with a slotted spoon; discard. Stir in applesauce, cranberry and
lemon juices. Cover refrigerate 1 hour. Follow how to use your Ice
Cream Maker Steps.
Strawberry Sorbet
2 quarts fresh or frozen strawberries, thawed
1 cup sugar
2 cups water
2 tablespoons lemon juice
Puree strawberries and combine with sugar. Let stand 2 hours. Add
water and lemon juice. Cover; refrigerate 30 minutes. Follow how to
use your Ice Cream Maker Steps.
Vanilla Ice Milk
3 cups skim milk
11/2 cups sugar
1
/4 teaspoon salt
9 cups whole milk
11/2 teaspoon vanilla extract
Thoroughly combine all ingredients. Cover and refrigerate 30
minutes. Follow how to use your Ice Cream Maker Steps. Stir after
freezing to blend any unfrozen skim milk into frozen mixture.
Chocolate Ice Milk
21/2 cups skim milk
81/2 cups whole milk
4 squares semisweet chocolate
22/3 cups sugar
1 teaspoon salt
2 teaspoons vanilla extract
Combine skim and whole milk in saucepan. Add semisweet
chocolate. Cook over medium heat until chocolate is melted, stirring
constantly. Remove from heat. Add sugar and salt. Stir until
dissolved. Stir in vanilla. Cover and refrigerate 2 hours. Follow how to
use your Ice Cream Maker Steps. Stir after freezing to blend any
unfrozen skim milk into frozen mixture.
FRSTIC-WDB_13EM1.indd 16-17 1/14/14 9:44 AM
Page 10

www.oster.com
www.oster.com
18
19
Frozen Cinnamon Nut Yogurt
8 cups vanilla yogurt
2 cups sugar
1 teaspoon cinnamon
1
/4 teaspoon salt
2 cups whipping cream
2 teaspoons vanilla extract
2 cups walnut pieces
Thoroughly combine yogurt, sugar, cinnamon and salt in mixing
bowl. Stir in whipping cream and vanilla. Add nuts. Cover and
refrigerate 30 minutes. Follow how to use your Ice Cream Maker
Steps.
Frozen Strawberry Yogurt
8 cups plain yogurt
3 cups frozen, sliced straw-berries in syrup, thawed
11/2 cup sugar
2 cups whipping cream
Thoroughly combine all ingredients in mixing bowl. Cover and
refrigerate 30 minutes. Follow how to use your Ice Cream Maker
Steps.
Frozen Piña Colada Yogurt
8 cups vanilla yogurt
1 cup sugar
2 cans crushed pineapple, undrained (151/4 oz.)
1 can cream of coconut (15 oz. can)
1 cup whipping cream
11/2 teaspoons rum avoring
Thoroughly combine yogurt and sugar in mixing bowl. Stir in
remaining ingredients. Cover and refrigerate 30 minutes. Follow
how to use your Ice Cream Maker Steps.
Frozen Cherry Yogurt
4 cups fresh or frozen dark, sweet cherries, pitted and thawed
8 cups plain yogurt
2 cups whipping cream
11/4 cups sugar
2 tablespoons vanilla extract
Puree half of the cherries. Set aside remaining whole cherries.
Combine pureed cherries with yogurt, whipping cream, sugar and
vanilla. Cover and refrigerate 30 minutes. Follow how to use your Ice
Cream Maker Steps. Remove DASHER and stir in reserved whole
cherries before hardening and ripening.
Frozen Blueberry Yogurt
5 cups fresh or frozen blueberries, thawed
5 cups plain yogurt
2 cups half and half
2 cups sugar
Mash blueberries and combine with remaining ingredients. Cover
and refrigerate 30 minutes. Follow how to use your Ice Cream Maker
Steps.
Frozen Banana Yogurt
8 cups vanilla yogurt
2 cups sugar
1
/4 teaspoon salt
2 cups whipping cream
2 teaspoons vanilla extract
2 cups ripe, mashed bananas
Thoroughly combine yogurt, sugar, salt, whipping cream and vanilla
in mixing bowl. Cover and refrigerate 30 minutes. Add mashed
bananas to chilled mixture before freezing. Follow how to use your
Ice Cream Maker Steps.
FRSTIC-WDB_13EM1.indd 18-19 1/14/14 9:44 AM
Page 11

www.oster.com
www.oster.com
20
21
Lime-Coconut Greek Frozen Yogurt
7 cups plain Greek yogurt
13/4 cups sugar
2
/3 cup lime juice
1
/4 cup grated lime peel
2 cups half and half
11/2 cups aked coconut, Toasted*
Thoroughly combine yogurt, sugar, salt, whipping cream and vanilla
in mixing bowl. Cover and refrigerate 30 minutes. Add mashed
bananas to chilled mixture before freezing. Follow how to use your
Ice Cream Maker Steps.
NOTES
__________________________________________________________
__________________________________________________________
__________________________________________________________
__________________________________________________________
__________________________________________________________
__________________________________________________________
__________________________________________________________
__________________________________________________________
__________________________________________________________
__________________________________________________________
__________________________________________________________
__________________________________________________________
__________________________________________________________
__________________________________________________________
__________________________________________________________
__________________________________________________________
__________________________________________________________
__________________________________________________________
__________________________________________________________
__________________________________________________________
FRSTIC-WDB_13EM1.indd 20-21 1/14/14 9:44 AM
Page 12

www.oster.com
www.oster.com
22
23
1 Year Limited Warranty
Sunbeam Products, Inc. doing business as Jarden Consumer Solutions
or if in Canada, Sunbeam Corporation (Canada) Limited doing business
as Jarden Consumer Solutions (collectively “JCS”) warrants that for
a period of one year from the date of purchase, this product will be
free from defects in material and workmanship. JCS, at its option, will
repair or replace this product or any component of the product found
to be defective during the warranty period. Replacement will be made
with a new or remanufactured product or component. If the product
is no longer available, replacement may be made with a similar
product of equal or greater value. This is your exclusive warranty. Do
NOT attempt to repair or adjust any electrical or mechanical functions
on this product. Doing so will void this warranty.
This warranty is valid for the original retail purchaser from the date of
initial retail purchase and is not transferable. Keep the original sales
receipt. Proof of purchase is required to obtain warranty performance.
JCS dealers, service centers, or retail stores selling JCS products do
not have the right to alter, modify or any way change the terms and
conditions of this warranty.
This warranty does not cover normal wear of parts or damage resulting
from any of the following: negligent use or misuse of the product,
use on improper voltage or current, use contrary to the operating
instructions, disassembly, repair or alteration by anyone other than
JCS or an authorized JCS service center. Further, the warranty does not
cover: Acts of God, such as re, ood, hurricanes and tornadoes.
What are the limits on JCS’s Liability?
JCS shall not be liable for any incidental or consequential damages
caused by the breach of any express, implied or statutory warranty
or condition.
Except to the extent prohibited by applicable law, any implied warranty
or condition of merchantability or tness for a particular purpose is
limited in duration to the duration of the above warranty.
JCS disclaims all other warranties, conditions or representations,
express, implied, statutory or otherwise.
JCS shall not be liable for any damages of any kind resulting from the
purchase, use or misuse of, or inability to use the product including
incidental, special, consequential or similar damages or loss of prots,
or for any breach of contract, fundamental or otherwise, or for any
claim brought against purchaser by any other party.
Some provinces, states or jurisdictions do not allow the exclusion
or limitation of incidental or consequential damages or limitations
on how long an implied warranty lasts, so the above limitations or
exclusion may not apply to you.
This warranty gives you specic legal rights, and you may also have
other rights that vary from province to province, state to state or
jurisdiction to jurisdiction.
How to Obtain Warranty Service
In the U.S.A.
If you have any question regarding this warranty or would like to
obtain warranty service, please call 1-800-334-0759 and a convenient
service center address will be provided to you.
In Canada
If you have any question regarding this warranty or would like to
obtain warranty service, please call 1-800-667-8623 and a convenient
service center address will be provided to you.
In the U.S.A., this warranty is oered by Sunbeam Products, Inc. doing
business as Jarden Consumer Solutions located in Boca Raton, Florida
33431. In Canada, this warranty is oered by Sunbeam Corporation
(Canada) Limited doing business as Jarden Consumer Solutions,
located at 20 B Hereford Street, Brampton, Ontario L6Y 0M1. If you
have any other problem or claim in connection with this product,
please write our Consumer Service Department.
PLEASE DO NOT RETURN THIS PRODUCT TO ANY OF
THESE ADDRESSES OR TO THE PLACE OF PURCHASE.
FRSTIC-WDB_13EM1.indd 22-23 1/14/14 9:44 AM
 Loading...