

Osoto Voting System User Manual

TopA interactive teaching system user’
s manual
Catalog
Chapter I System Introduction............................................................3
1.1 Brief introduction.................................................................3
1.2 Benefits.................................................................................3
1.3 Features................................................................................4
1.4 Range of applications...........................................................5
1.5 Inventory component............................................................6
1.6 Movement environment........................................................6
Chapter Installation guideⅡ ...............................................................6
2.1 Software installation.............................................................6
2.2 Receiver Installation.............................................................7
2.3 Startup system......................................................................8
2.4 Uninstall System...................................................................8
Chapter Hardware for useⅢ ..............................................................9
3.1 Teacher remote.....................................................................9
3.2 Student remote....................................................................12
3.3 Mini electronic white board (optional)...............................15
3.4 Receiver..............................................................................20
Chapter Student ManagementⅣ ......................................................21
4.1 Introduction........................................................................21
4.2 Teacher management..........................................................22
4.3 Student management...........................................................24
4.4 Class management..............................................................29
Chapter Courseware EditⅤ .............................................................40
5.1 Prepare for courseware content..........................................40
5.2 Insert multimedia................................................................42
1

TopA interactive teaching system user’
s manual
5.3 Classroom exam.................................................................44
5.4 Clear...................................................................................46
5.5 Preview...............................................................................47
5.6 Export courseware..............................................................47
Chapter Ⅵ Interactive teaching........................................................49
6.1 Interactive teaching module................................................50
6.2 Presentation teaching module.............................................78
6.3 Floating window.................................................................91
6.4 Quit system.........................................................................95
Chapter Edit Exam AnswerⅦ .........................................................97
Chapter Classroom RecordⅧ ..........................................................98
2

TopA interactive teaching system user’
s manual
Chapter I System Introduction
1.1 Brief introduction
Interactive teaching system is designed to assist teacher and students to
have better communication in class, engage students, keep them alert and
improve their performance. Real-time teacher-student interaction makes teacher
know students’ learning status clearly and can adjust teaching schedule
accordingly.
Teacher can make teaching plan in PowerPoint, which is easy to use and no
need to learn other courseware editing software. Real-time student feedback
makes teacher take more importance in interactive details of teaching plan and
ease their work burden.
Teacher takes activities through PowerPoint, including Instant questions
and answers, Quick-response mode, selected person answered, students
comments etc. Students use remote to respond and answer questions, which can
maintain their attention and promote discuss and collaboration. System offers
many functions such as brush-pencil, eraser, magnifier, focus lamp etc. to meet
various course needs and creating more effective teaching.
1.2 Benefits
1. TopA Interactive teaching products use of RF technology, the direction of
the remote control signal transmission without limit (the traditional infrared
remote control with the direction of limitations).
2. TopA Interactive teaching products have broke through the bottleneck
3

TopA interactive teaching system user’
s manual
which a computer can only be used by a person at the same time, and the simple
installation, didn’t need the extra back guy, only used the simple remote control,
could let each student, teacher carry on the teaching interaction through a
computer. Like this has saved the computer’s funds and the following service
and the overhead charge.
3. TopA Interactive teaching easy to study easily to use, convenient, cheap,
broke traditional teacher to speak the passive aspect which the student listened,
strengthened interaction between teachers' and students'.
4. Teacher can discover promptly student's problem in learning process,
with the aim of completing the remedial work.
5. Can automatically change volume, statistical learning achievement, and
to study and record-keeping on the network, saving teacher time, but also to
facilitate the parents abreast of their children's learning progress and learning.
1.3 Features
1. The software and hardware synchronization development, has the
stability easily extremely, the simplicity of operator to study.
2. The interactive pattern is diverse, may enhance interaction between
teachers' and students', the enhancement classroom study atmosphere.
3. Uses PPT, Flash and so on to carry on the teaching directly, may use the
interactive teaching function equally.
4. The multimedia computer storage test question, many kinds of teaching
ways choose at will.
5. Facilitates easily to study, automatic grading, the statistics, lighten the
teacher work load.
6. The paint brush function may label the key content at will.
7. Screen shot capture function interception screen.
8. The screen animation capture function records the teacher to teach the
entire process, is advantageous for the student to finish class studies or being
absent from class student's enrolling in supplementary lessons repeatedly.
9. The electron raises hand the function, meets the demonstration needs.
4

TopA interactive teaching system user’
s manual
10. You may see that the topic answers the record and grades the record.
11. The report form statistics graph, the record class and grade, individual
study course, provide the accurate data detailed for the education evaluation.
12. Using 2.4G RF wireless transmission technology, without directional
limit.
13. The teacher may be separated from the platform, in the classroom any
remote position control operation, draws close to the student.
14. Laser function instruction key.
1.4 Range of applications
TOPA system’s use pattern, is teacher sets the topic using the computer or
oral asks the question, the student answers with study the vitality, the computer
can present the student to answer the result and the statistical result immediately,
the teacher may carry on the recovery teaching on the scene according to the
answer situation; After the class, the teacher may also pull and read the material,
analyzes each student to accept the situation and learning capability, makes the
corresponding teaching adjustment.
Application scope:
Guide the teaching activities
Controls the teaching material screening
Comments the test along with the hall feedback
Group competitions
Competes answers activities
Selects the human to answer
Elects by ballot votes
Performance gives the minute
5

TopA interactive teaching system user’
s manual
1.5 Inventory component
When you open the packing, please according to detailed list check the
content in the packing, in order to avoid create inconveniently for yours use. A
set of complete multimedia interaction teaching system, should contain the
following module:
CD-ROM, the teacher machines, the student machines, the mini electronic
whiteboard (to be possible match), the receiver, the USB cable and the
instruction for use.
1.6 Movement environment
Uses in the following condition's situation, can interact teaching system's
function display incisiveness. Multimedia classrooms (basic requirements:
Multimedia platform/computers, projector, is projected screen/electron white
board).
It is suitable in Windows 2000/XP/2003/Vista operating system.
Chapter Ⅱ Installation guide
2.1 Software installation
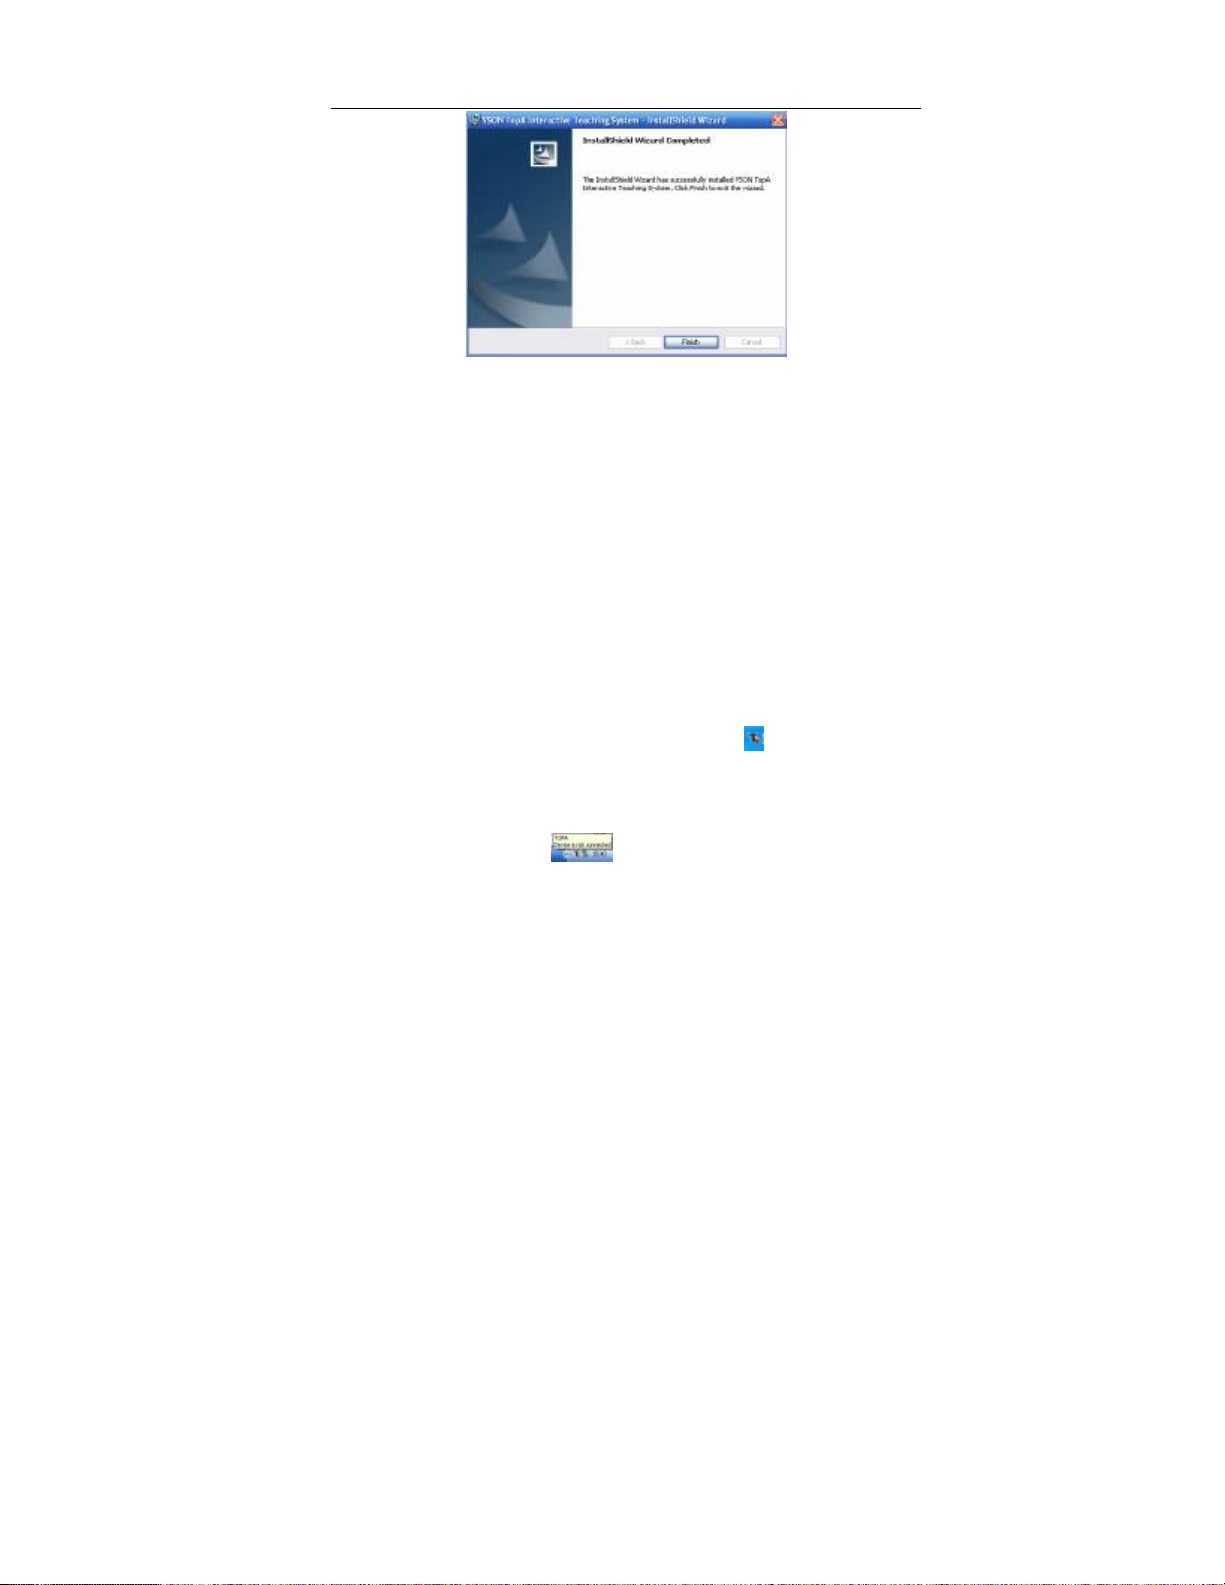
Run the installation process, in accordance with the step by step installation
wizard prompts to complete the installation.
Installation wizard is complete, the following pop-up interface, click “OK”
button.
6
TopA interactive teaching system user’
s manual
2.2 Receiver Installation
2.2.1 Driver installation in the first use
After disassembling the receiver packing, joins the USB line the receiver,
a USB line end is connected including the above the receiver, an end inserts
computer's USB receptacle, if the first installment, the computer could prompt
“finds the new hardware”, waited the computer to demonstrate that “the new
hardware already installed completes and may use” then; The later use inserts
directly then.
2.2.2 Examination the connection status of receiver
When start the teaching system, the system icon “ ” will appear on the
toolbar. Receiver program will detect that the receiver is connected or not
automatically. Before connection the receiver, Mouse over the icon, show “This
equipment has not connected” ;
After connection the receiver, Mouse over the icon, show “This equipment
7

TopA interactive teaching system user’
s manual
has connected” .
Note: The software and hardware installment as well as the installment
matters needing attention please detailed please refer to TopA interactive
teaching _ installation guide _V3.1.1.doc.
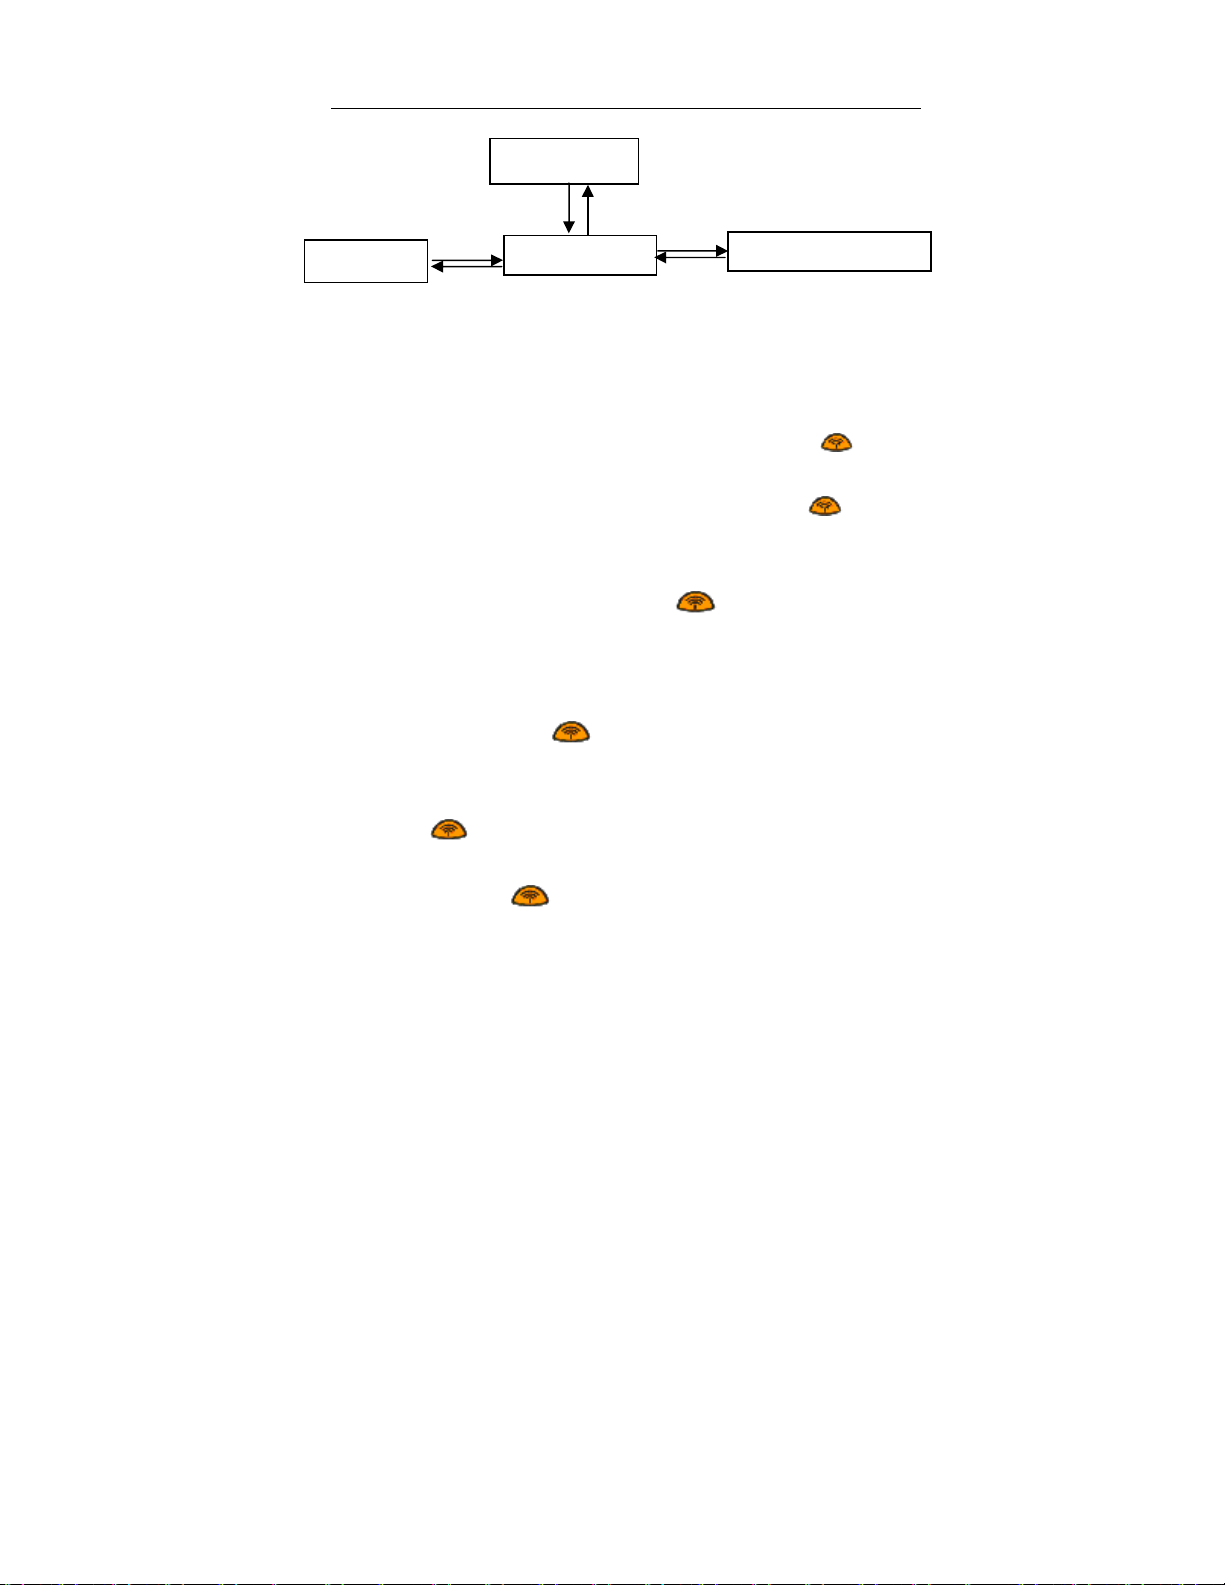
2.3 Startup system
The overall system software divides into four big functional modules: the
student manage, the courseware edition, the interactive teaching and the
examination pattern.
Method 1: In the "Start" - "Programs" - "VSON TopA Interactive
Multimedia Teaching System", select "TAC interactive teaching", "TAE Edit the
answer", "TAM student management" to activate the corresponding function
module.
Method 2: On the desktop, double-click the icon interactive teaching
" " to log on to class then enter an interactive teaching system.
Note: before carrying on the teaching please the first editor good teaching
courseware, open “Microsoft office PowerPoint” to be possible to carry on the
courseware edition, how to edit the courseware please to refer to chapter V of
this manual.
2.4 Uninstall System
If you want to uninstall the interactive multimedia teaching system, please
according to follow these steps.
Method 1: On the desktop, click the "Start" - "Settings" - "Control Panel" "Add or Remove Programs." Select the "VSON TopA interactive teaching
system" in the open programs dialog box to click "Remove."
Method 2: On the desktop, click the "Start" - "Programs" - "VSON TopA
Interactive Teaching System" - "Uninstall System"
Note: After uninstalling, you can find VsonTopA folder is still there. This
is because you created when you run the TopA file or folder can not be
uninstalled program removed. If they are no longer useful to you, you can delete
them.
8
TopA interactive teaching system user’
s manual
Chapter Ⅲ Hardware for use
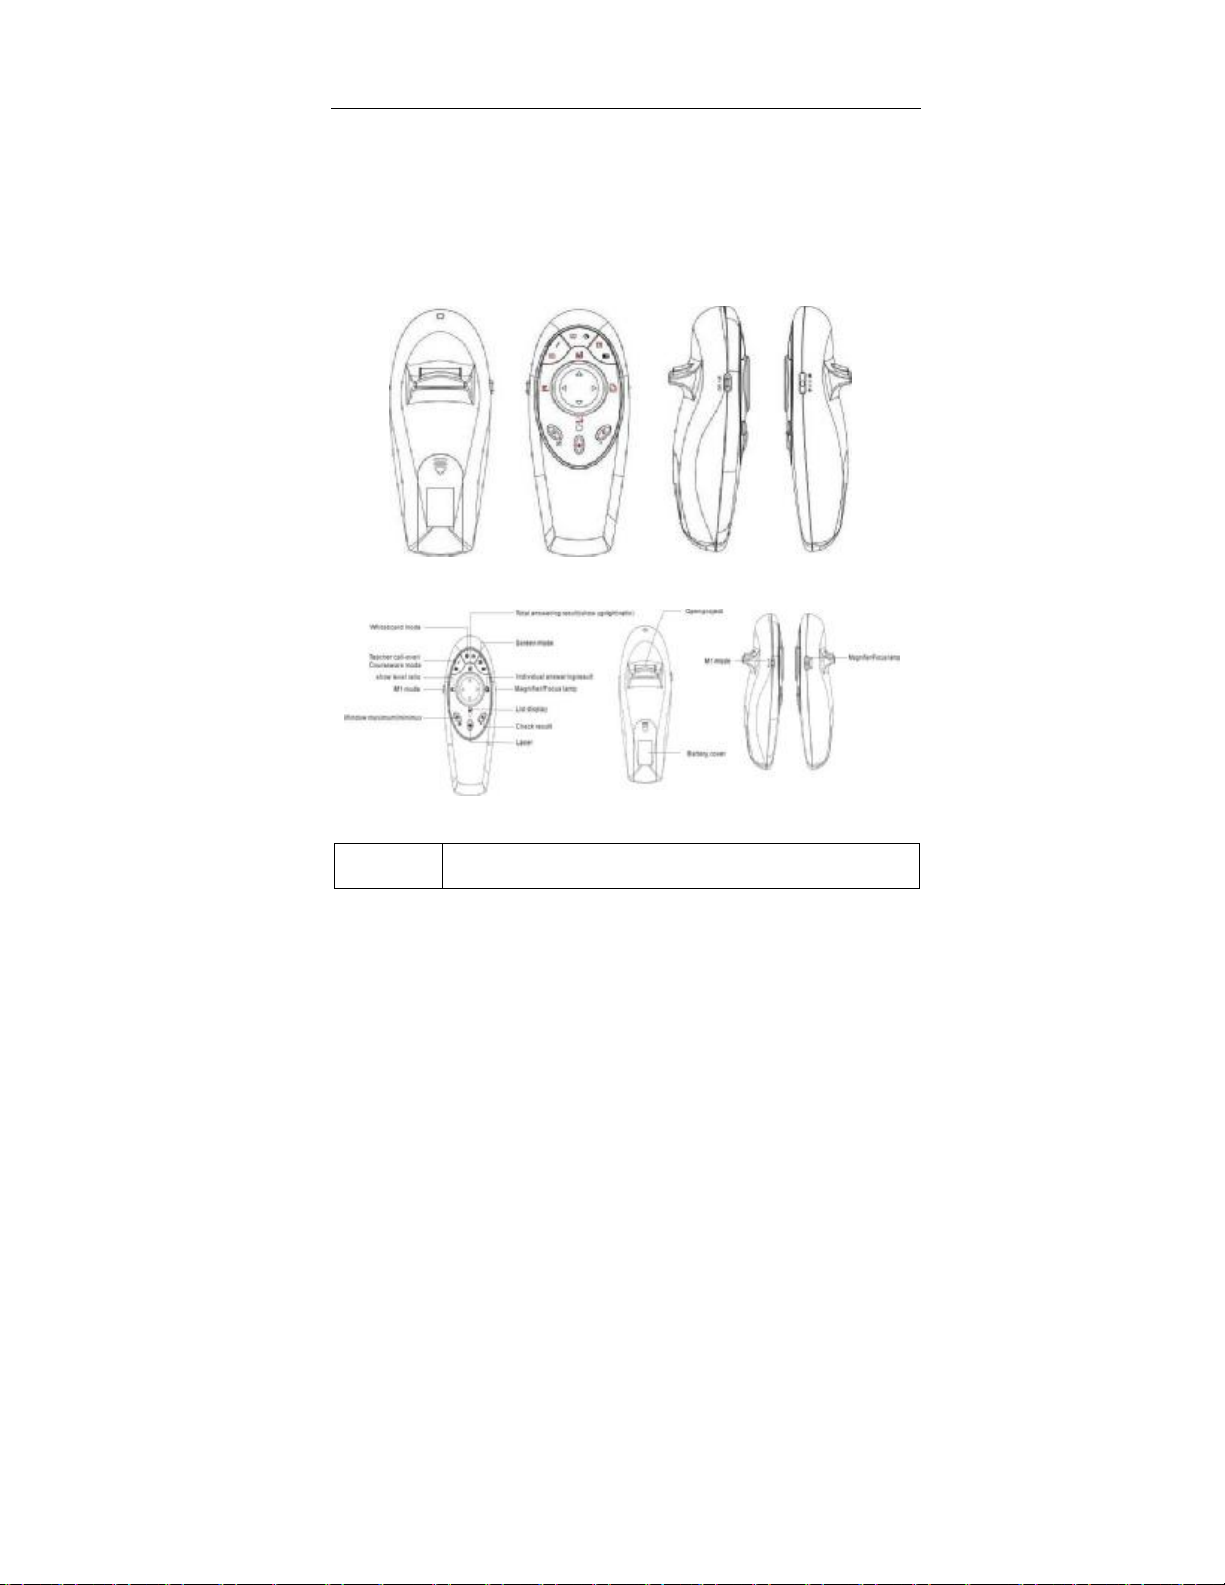
3.1 Teacher remote
Teacher remote Appearance view
3.1.1 M1 mode (the side button is allocated M1 mode)
M1 model function and instructions:
Key Operations
9

TopA interactive teaching system user’
s manual
When entering the students call-on interface, press the key two
times, Teacher can sign in. When opening the PPT, press the
key can switch to the courseware mode.
Press, switch to whiteboard mode
Press, switch to screen mode
Back key
Press, open project file dialog box( *.tap *.tae *.taa interactive
teaching file)
In the maximize statistical graphics interface, press the key to
show the total answering result by upright ratio.
In the maximize statistical graphics interface, press the key to
show the total answering result by level ratio.
In the maximize statistical graphics interface, press the key to
show the individual answering result.
In the maximize statistical graphics interface, press the key to
display the answer result by list.
Press the key to maximum or minimum the graphic window.
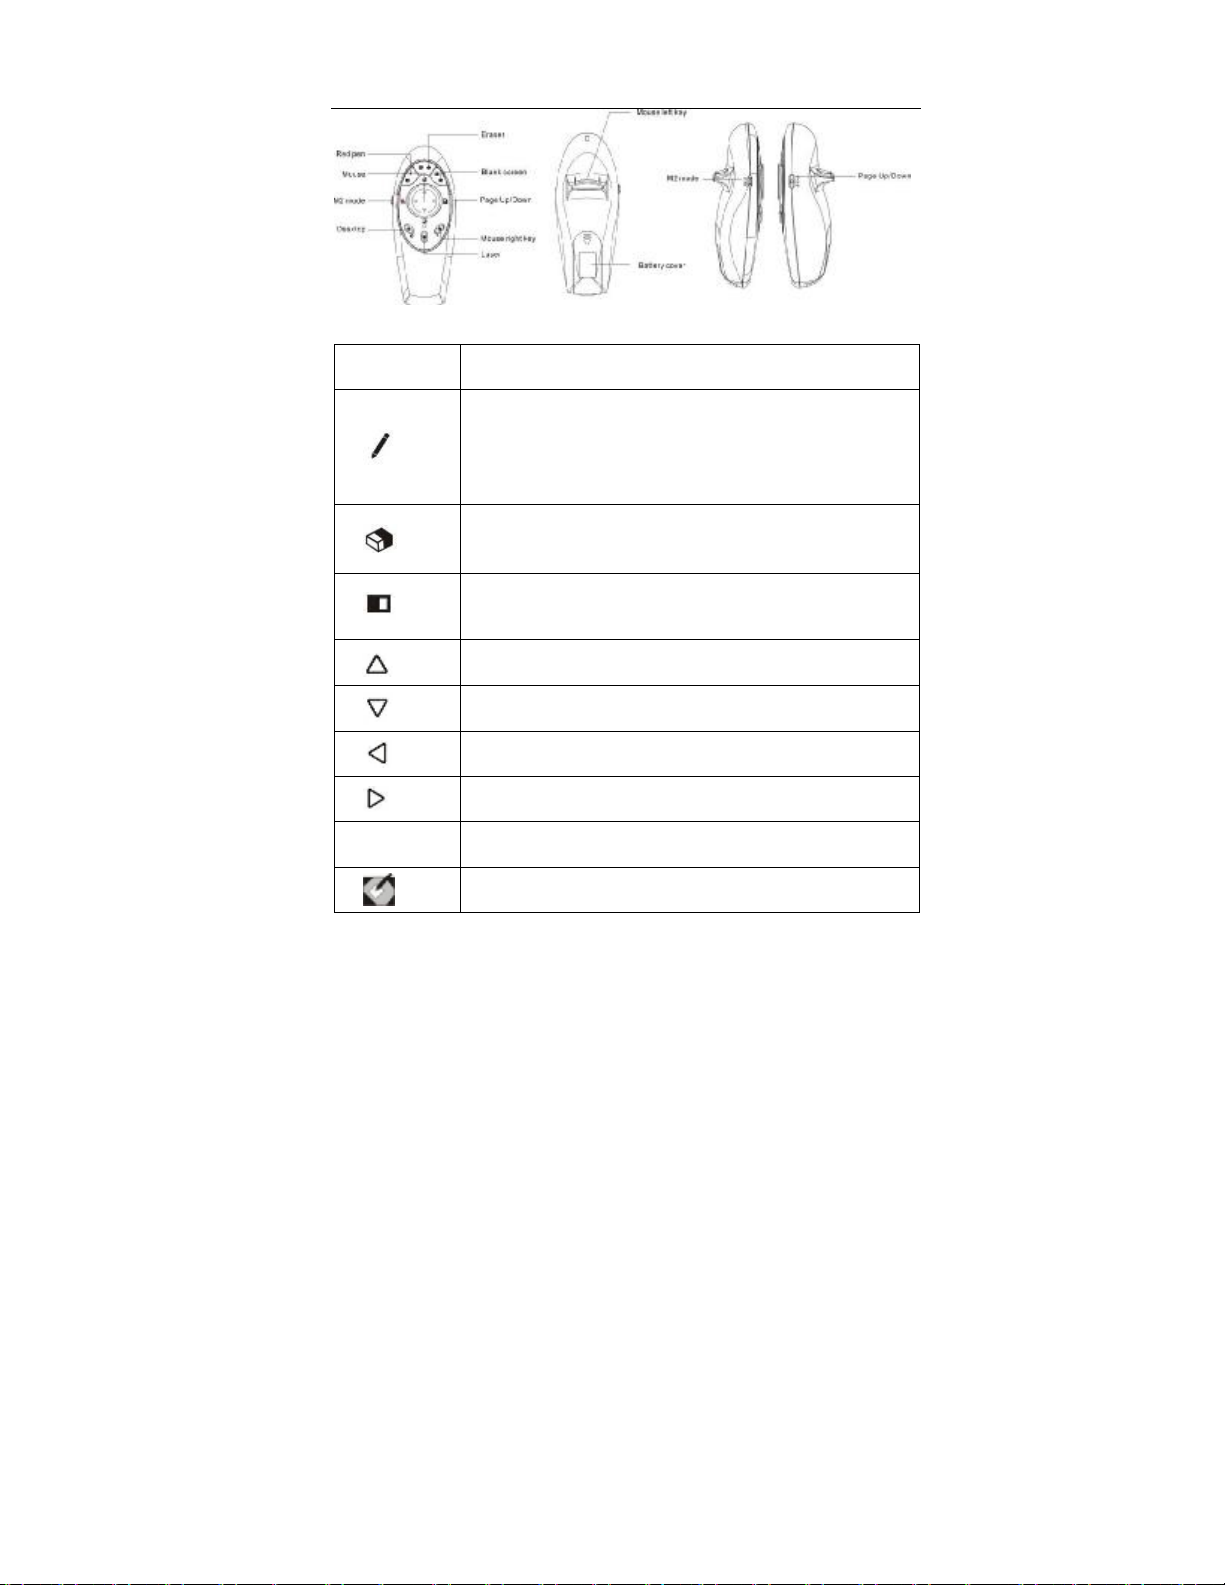
3.1.2 M2 Mouse mode (the side button is allocated M2 mode)
10
Press the key can check or close the answers.
Page up
Page down
Laser
TopA interactive teaching system user’
s manual
M2 model function and instructions:
Key Operations
Press the key, open the red pen, then press mouse left key
Back key
and move mouse key, you can mark the
presentation importance.
Press the key, open the eraser function, erase the written
trace.
Press the key, enter the blank screen status, and press again,
return to previous state.
Mouse cursor up
Mouse cursor down
Mouse cursor left
Mouse cursor right
Mouse left key
11
Press, on desktop

TopA interactive teaching system user’
s manual
Mouse right key
Touch up the right side button, you can open magnifier
function.
Touch down the right side button, you can open down focus
lamp
Laser
3.2 Student remote
Student remote front appearance view
Student remote back front appearance view
3.2.1 Function explanation
12

TopA interactive teaching system user’
s manual
Student remote working state
1. Digital input status: The starting default enters to the digital input state,
when the digital input state the LCD display up “123”, the downlink display is
the user input data. The downlink data-in most length is 6. Press the send button,
the LCD uplink display “ 123” and the transmission symbol, reusable sent.
2. Examination status: At the same time press the “transforms key” and “C
(Clear)” key 3 seconds to enter the examination status, press the keys again for 3
seconds, quit into the digital input status. LCD display test status symbol at
uplink and examination data at downlink. Below the far left is the right question
number, such as "23 -", the number of title 1 ~ 150. The importation of the
answer to a maximum of 6 months, when input 6 the answer, the title of its
branches showed that by the switch button, you can look up or down. Press the
send button four seconds, sending test data.
3. Channel modification status: At the same time press the “transforms key”
and “3 key” 3 seconds to enter the examination status, press the keys again, quit
into the digital input status. LCD do not show up at uplink, the next channel
number acts. At downlink the far left shows "CH", such as the "CH 1", said the
current channel number is the first channel. By forward or backward button so
that the current channel number keys increase or decrease.
4. ID display: At the same time press the “transforms key” and “1 key” 3
seconds to enter the examination status, press the keys again, quit into the digital
input status. ID status LCD shows signs up "", unde⊙ r the acts of the decimal
form of the machine ID code, ID code 000000 ~ 065536 range.
5. Hibernation status: Within 4 seconds without any movement, close LCD
light; 15 seconds did not move automatically into the dormant state, Press any
key to exit hibernation sleep state.
13
TopA interactive teaching system user’
s manual
Digital input status
Channel modification status
Switch working mode
Examination status
ID display
3.2.2 Operation Instruction
1. Call-over: In the window of student call-over, everyone input his/her
student ID by remote and correct confirmation, press send button “ ”. If sent
successfully, the interactive teaching system’s icon will become red from blue.
2. Question: Press “-” button, and again press sent button “ ”, you can
question to your teacher. If sent successfully, the student’s name will be
appeared in lower right corner of the interface.
3. Send content: Press the send button “ ”, will send the contents of
liquid crystal display. Can only send a maximum of six-digit (LCD screen can
display up to six figures).
4. Question of true-false answer: Students press “7 (Y)” button or “9 (N)”
button, and then send button “ ”.
5. Question of choice question: Student press “1,2,3,4” button answer
monomial or press “1,2,3,4,5,6”button answer multiple choice, then press the
send button “ ”, "1,2,3,4, 5, 6" correspond "ABCDEF" option.
6. Question of gap-fill: Student press the button of digital zone, then
press the send button “ ”, Fill in the blank can include scores, negative,
decimal and so on.
14

TopA interactive teaching system user’
s manual
7. Delete the contents of LCD: Input, if the students found that liquid
crystal display on the content and the content they want to enter does not match.
They can press “C” key clear the wrong characters before send it, please re-enter
the right contents and send.
8. Test condition: Simultaneously holds down the “transforms key + `C
(clear) '” key 3 seconds to enter show ID status. Holds down once again, exit to
the digital input state.
9. Channel revision condition: Simultaneously holds down the “transforms
key + `3'” key 3 seconds to enter the channel revision status. Once again holds
down, exit to the digital input state.
10. Examines ID status: Simultaneously holds down the “transforms key +
`1'” key 3 seconds to enter show ID status. Once again holds down, exit to the
digital input state.
11. Change the answer: Questions are still the state of the subject, the
student can send the answer on many occasions. System will receive the last
contents sent as the last answer.
12. Hibernation status: Within 4 seconds without any movement, close
LCD light; 15 seconds did not move automatically into the dormant state, Press
any key to exit hibernation sleep state.
Note: For the convenience of users accustomed to the different mode, to
enter the sleep time is slightly different.
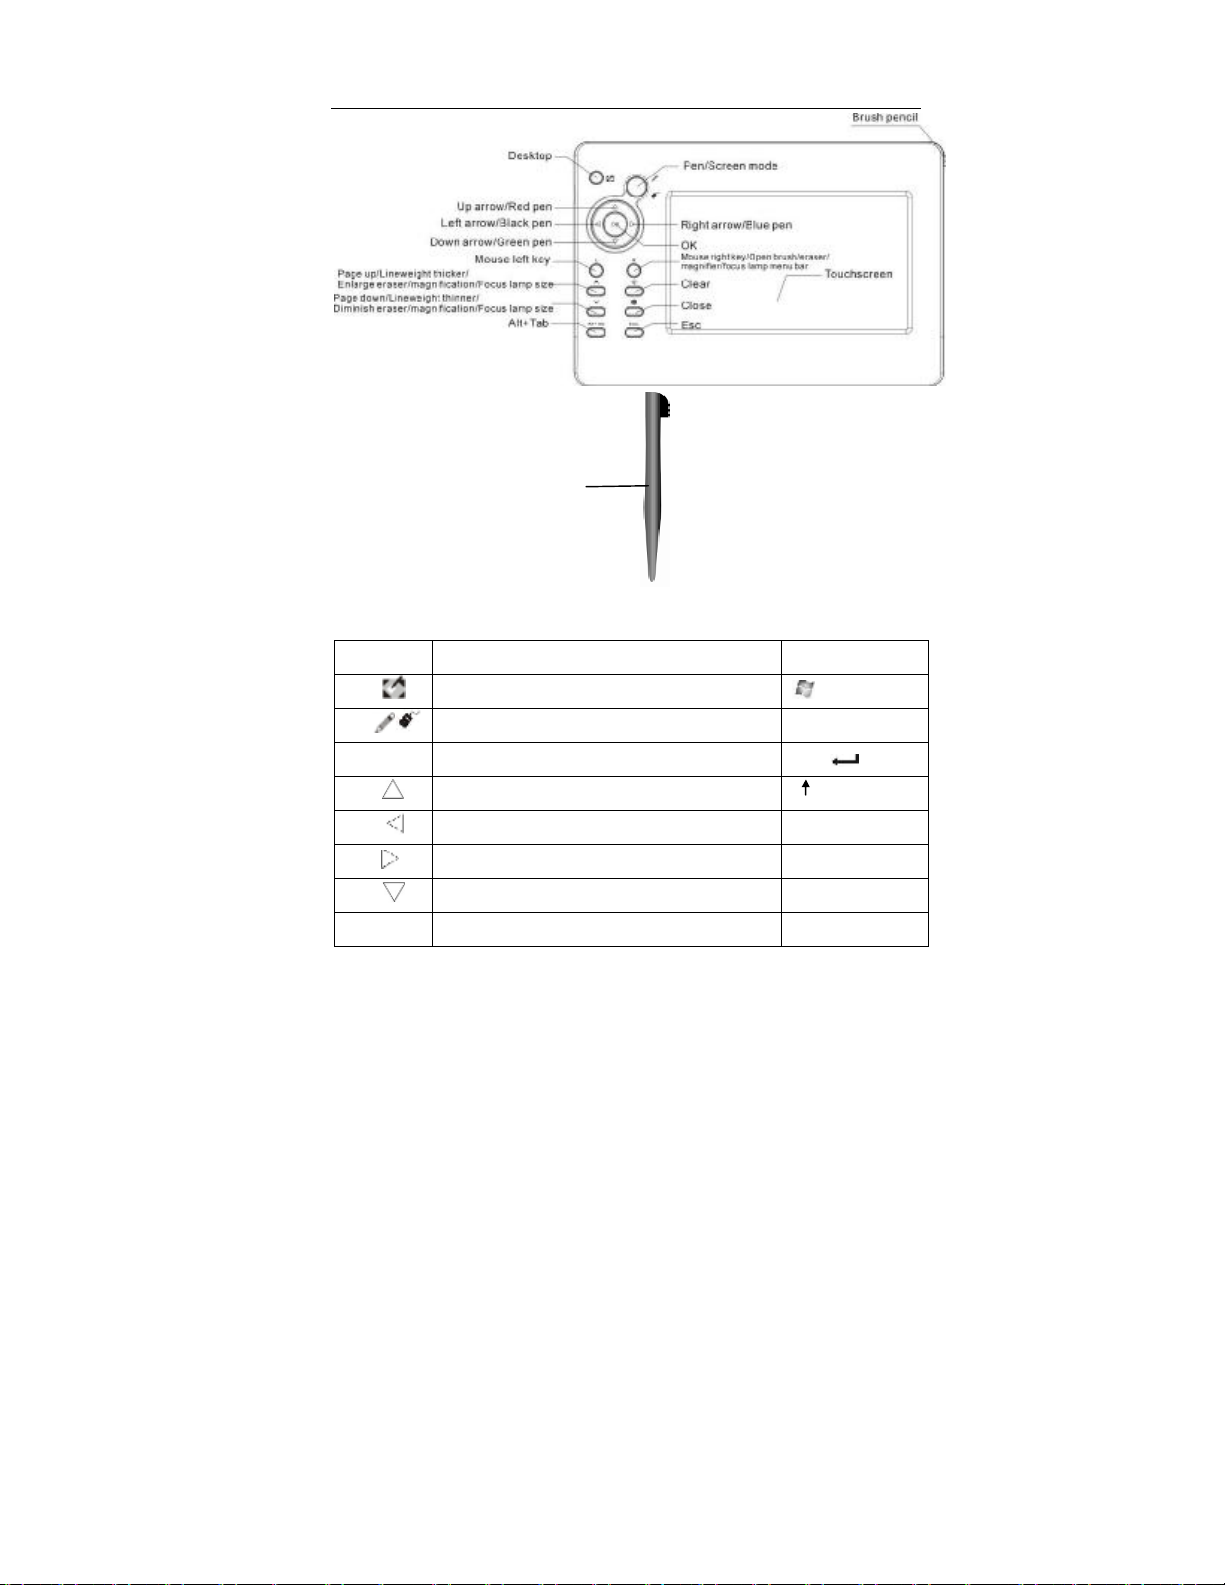
3.3 Mini electronic white board (optional)
Front appearance view:
15
TopA interactive teaching system user’
s manual
Function Button Instruction:
KEY FUNCTION Shortcut key
Touch pen
Desktop +D
Colorized pen/Screen mode
OK Enter Enter
UP arrow /Red pen
Left arrow/Black pen
Right arrow/Blue pen
Down arrow/Green pen
L Mouse left button
16

TopA interactive teaching system user’
s manual
R
Alt+Tab Switch current windows Alt+Tab
ESC Esc Esc
3.3.1 Calibration screen
In order to cause the mini electronic White board the size to become the
proportion with your computer facility, before used, please by all means must
first calibrate.
Lower-right corner in the taskbar right-click the System icon “ ”, the
pop-up pull-up menu, select "mini-whiteboard screen correction."
Mouse right button/Open brush pencil
/eraser/magnifier/focus lamp menu bar
Pre. Page/Line weight thicker/
Enlarge eraser size /magnification /focus
lamp size
Next page/Line weight thinner/
Diminish eraser size/magnification /focus
lamp size
Clear handwriting
Close current window Alt+F4
Page Up
Page Down
Springs in the system interface, with a hand-written pen click the twinkle
center in mini electron white board, carries on to the screen calibrates point by
point. (Please defer screen twinkle order to click in white board relevant
position). After Calibration screen completes, the hand-written board Calibration
17
TopA interactive teaching system user’
s manual
screen interface will exit automatically.
3.3.2 Remote control
The touch control screen is absolutely convenient to do any interactive
operations, and operate the applications on PC using the touch pen.
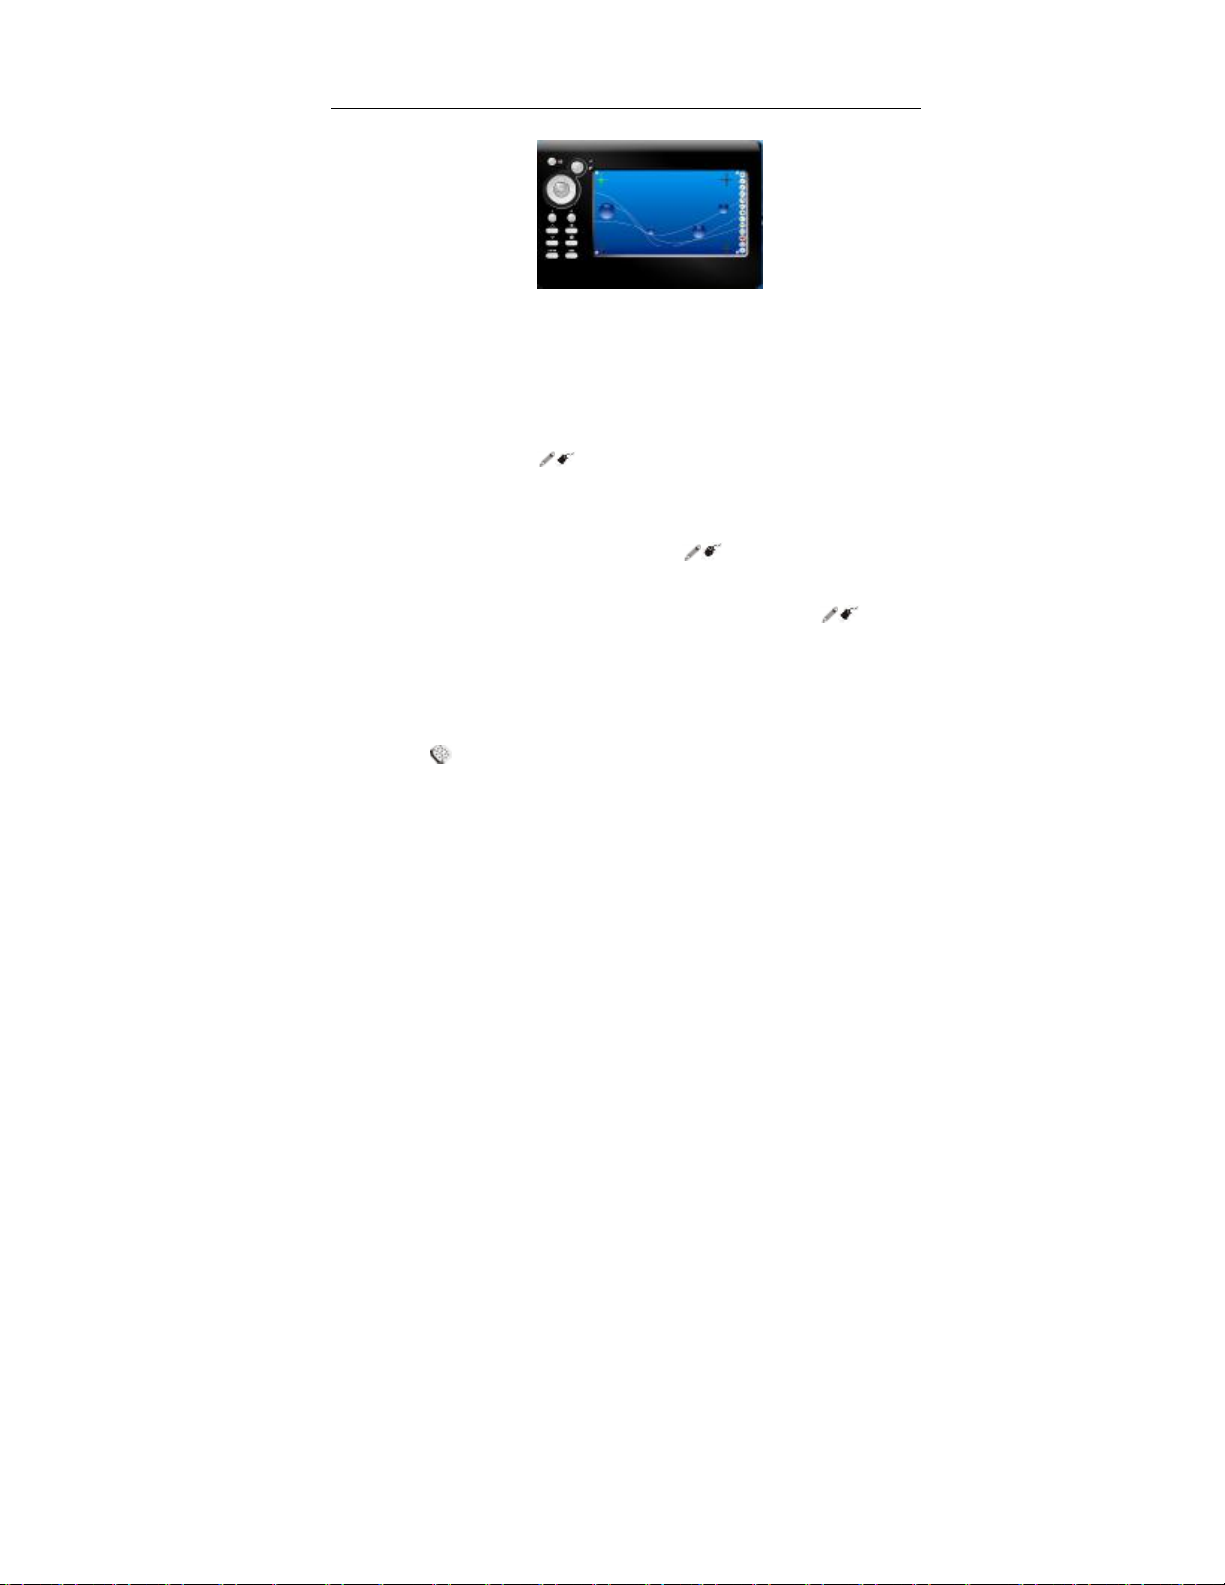
3.3.3 Switch mode
Press and hold the “ ” button on the mini white board, user can
remark or label on the white board via the touch pen by pressing the ”L” key
and move the touch pen. Real-time data will be transmitted to and displayed
on the computer screen. Press and hold the “ ” button again, will switch
into the screen mode, at the moment, user could run other applications and
move the mouse pointer on desktop. Note, When you press the “ ” button,
don’t touch the mini white board touch screen with the touch pen or other
objects.
3.3.4 Clear Screen
Press “ ” button on the white board to clear the text we write on the PC
screen. As well as, you can press “E” button on the keyboard to clear the
handwritten on the touch screen.
3.3.5 Mouse right/left key
Press the “R” or “L” key on the white board, just like clicking the mouse
right or left key. As well as ,when you use the brush pencil, or eraser, or
18

TopA interactive teaching system user’
s manual
magnifier or focus lamp, press the “R” button, you can open corresponding
menu bar to set up some parameters. At the same time press the “L”button
and move the touch pen, user could draw lines, erase handwritten with the
eraser, move the magnifier or focus lamp in corresponding function mode.
3.3.6 Keyboard function
① Press “ ” key, show desktop.
② Press “ ” key, just like press the “Enter ”button on the keyboard.
The “③ ”, “ ”, “ ”, “ ” keys, equivalent to the four directions
arrows. But, when you use the brush pencil, you can respectively press the
four buttons to change pen’s color. Press “ ” button is on behalf of
opening the red pen. Press “ ” button is on behalf of opening the green
pen. Press “ ” button is on behalf of opening the black pen. Press “ ”
button is on behalf of opening the blue pen.
Press ④ “ ” or “ ”, work as page up or page down on the keyboard.
However, when you use the brush pencil, or eraser, or magnifier or focus
lamp, press the “ ” button, you could make the line weight thicker, or
enlarge the eraser size, magnification or focus lamp size. And press the
“ ” button, you could make the line weight thinner, or diminish the
eraser size, magnification or focus lamp size.
Press “Alt+Tab” key, could switch the current applications.⑤
Press “Esc”⑥ key, it works as “Esc”button on the keyboard.
⑦ Press “ ” can close the current window. It works as press “Alt+F4” key
on the keyboard at the same time.
⑧ As well as, it supports the pen shortcuts. On the keyboard, press the “R”
button, you can open the red pen; press the “G” button, can open the green
pen; “B” button open the blue pen, “Y” button can open the yellow pen.
19
TopA interactive teaching system user’
s manual
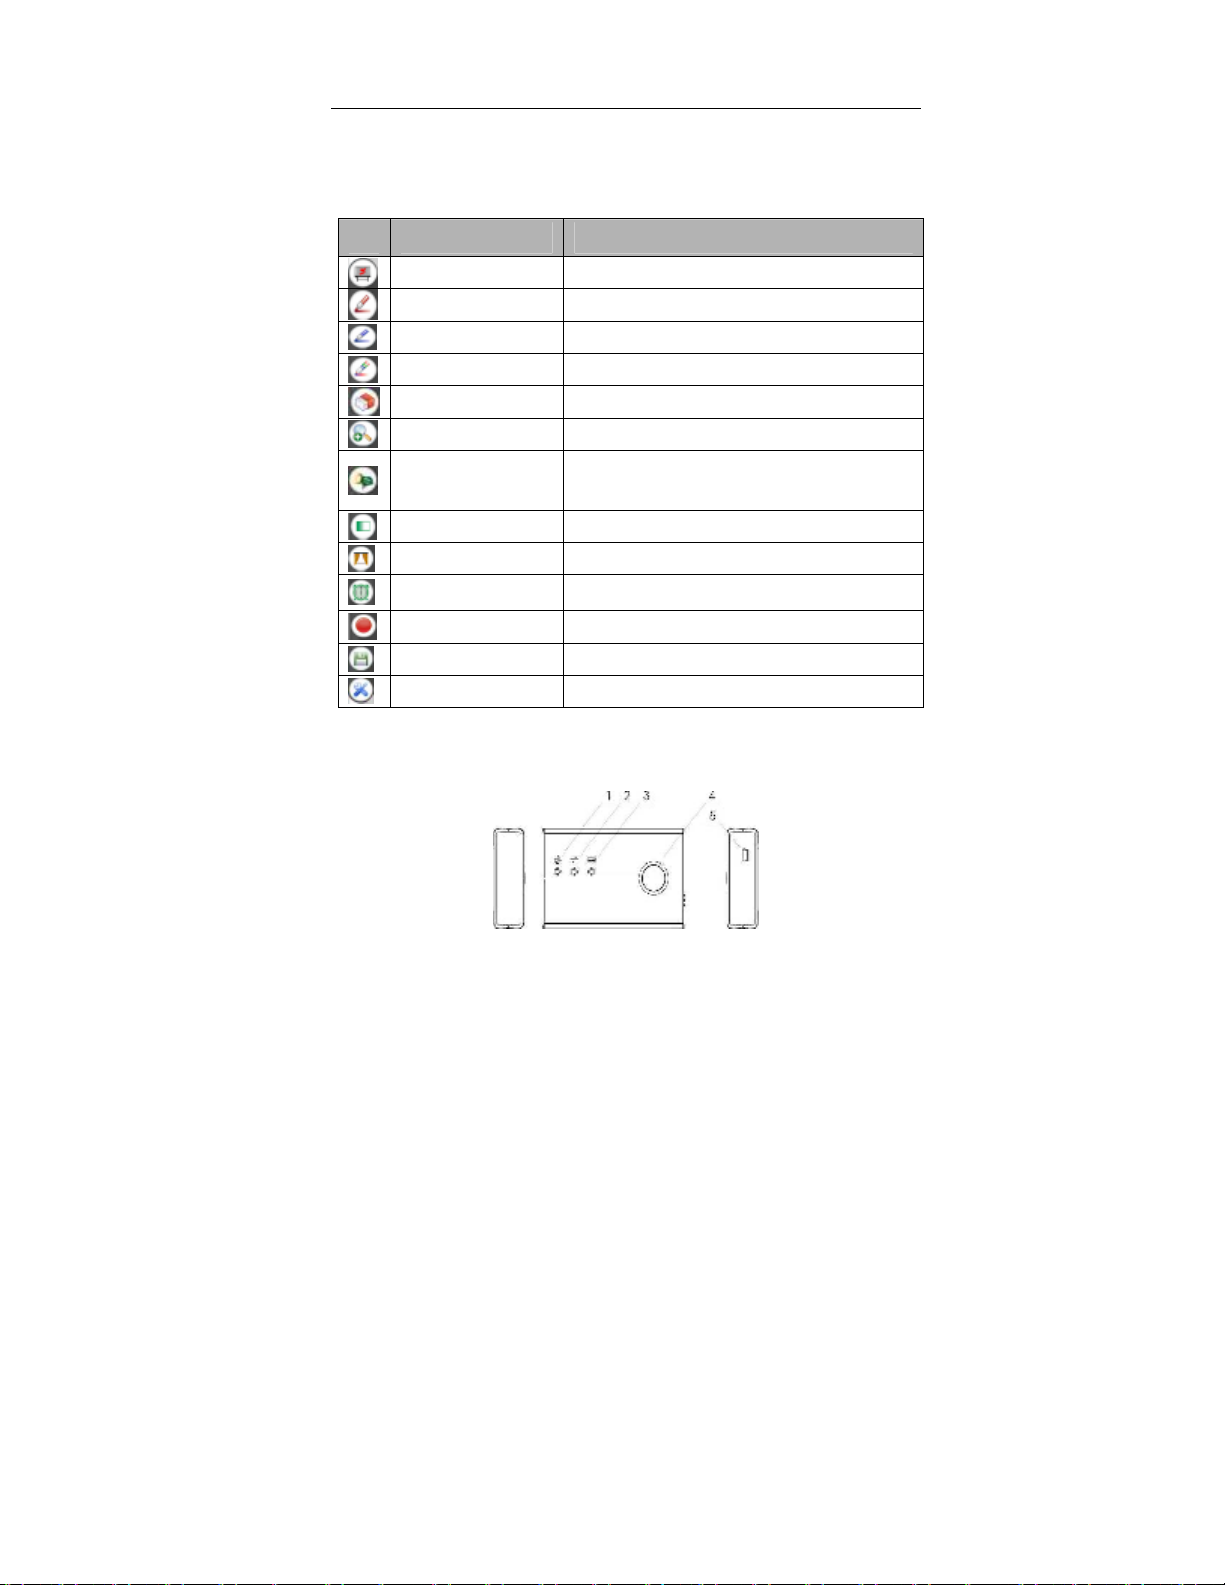
3.3.7 Presentation
On the touch pad screen, there is a upright menu bar, you can do operations
by clicking the icons with the touch pen. Below is the function table:
key
Whiteboard mode Press, open whiteboard mode
Red pen Press, open the red pen
Blue pen Press, open blue pen
Colorized pen Press, open the colorized pen(default)
Eraser Press, open the eraser
Magnifier Press, open the magnifier
Focus lamp Press, open the focus lamp
Blank screen Press, the window will be blank
Curtain window Press, the window will be curtain status
Timer Press, show a timer
Video Press ,start video
Save file Press, save current screen picture
Parameters setting Press, open the settings dialog box
3.4 Receiver
Function Operations
20

TopA interactive teaching system user’
s manual
1. Power indicator light: Insert UBS lines to USB plug of PC, power indicator
light will be bright.
2. RF signal indicator light: Receiving signal, RF signal indicator light lit.
3. USB communication indicator light: When USB data transfer, the USB
communication indicator light will be bright.
4. The button is no functional.
5. USB plug.
Chapter Ⅳ Student Management
4.1 Introduction
Before use the teaching system, please set the information of classes,
teachers and students first.
Open the student management window, to set the information:
“Start” —“All programs” —“VSON TopA Interactive teaching system”
—“TAM Student Management”
21

TopA interactive teaching system user’
s manual
Main window of student management
4.2 Teacher management (Add, Delete, Modify)
1. Add teacher information method:
① On main window of student management, click the “ ” button, open
the teacher management window.
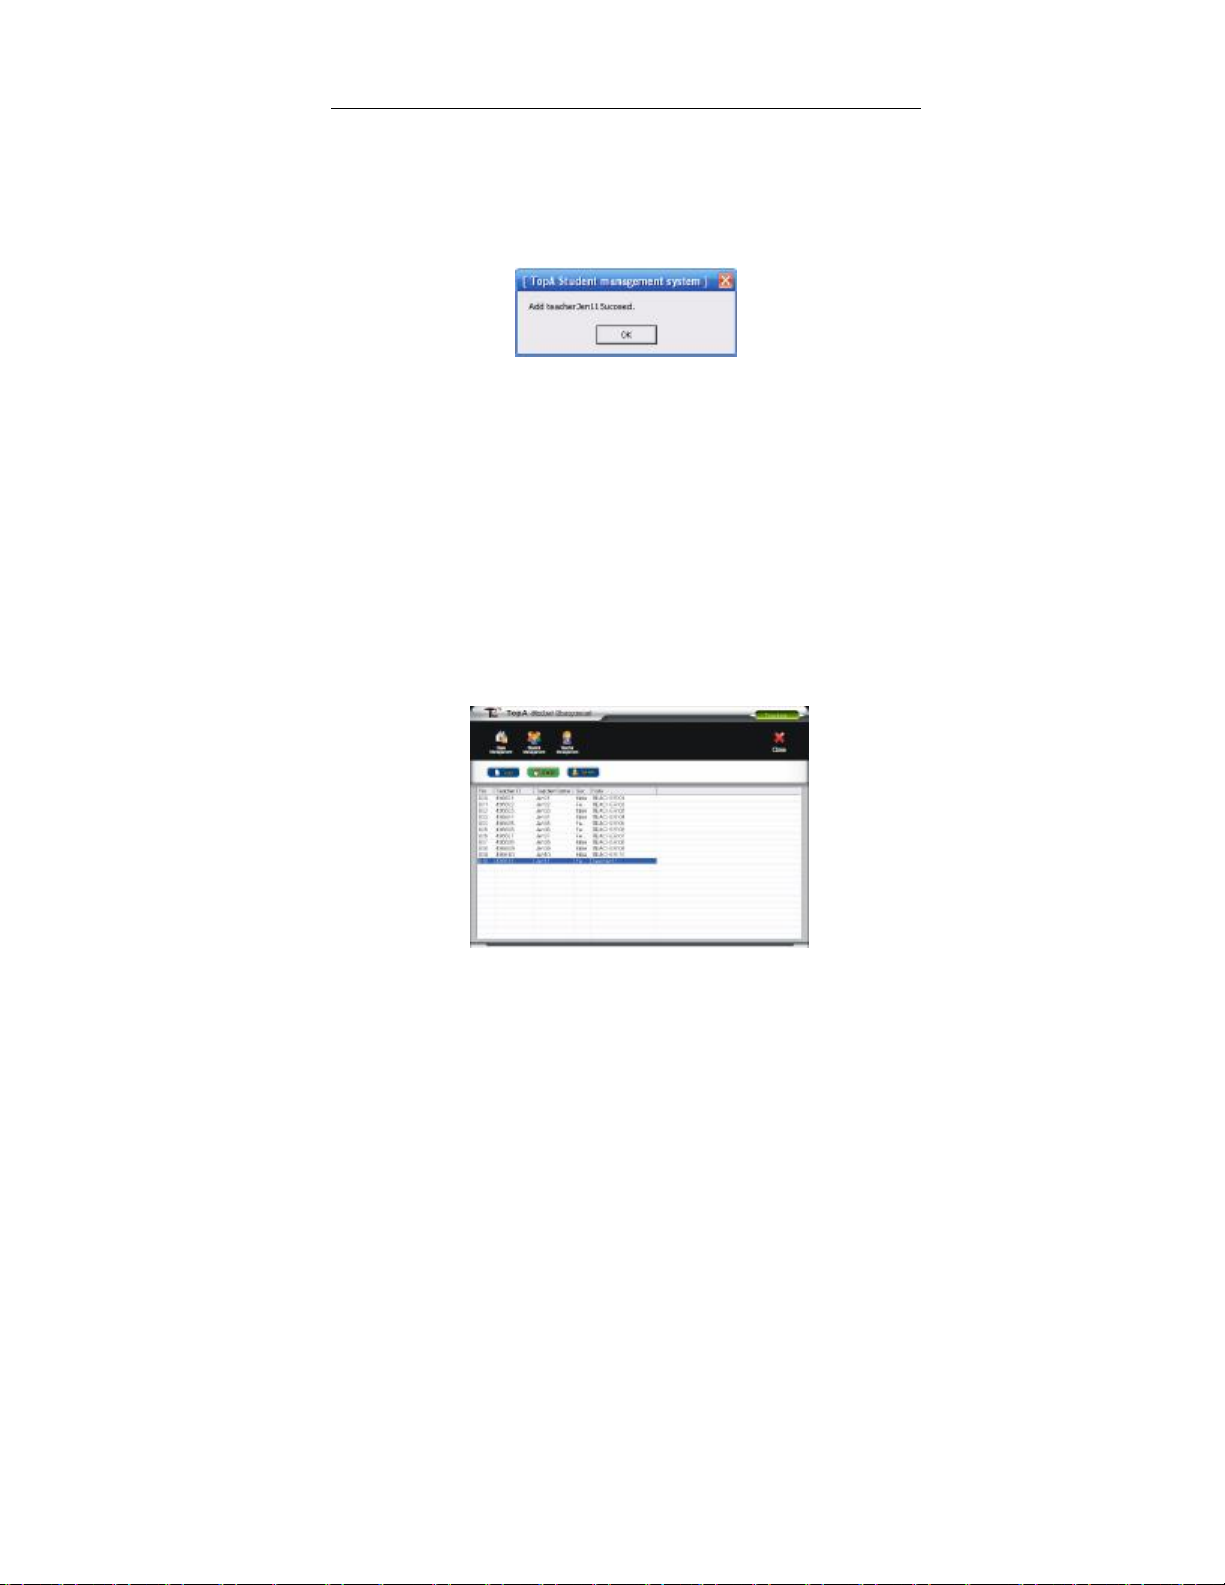
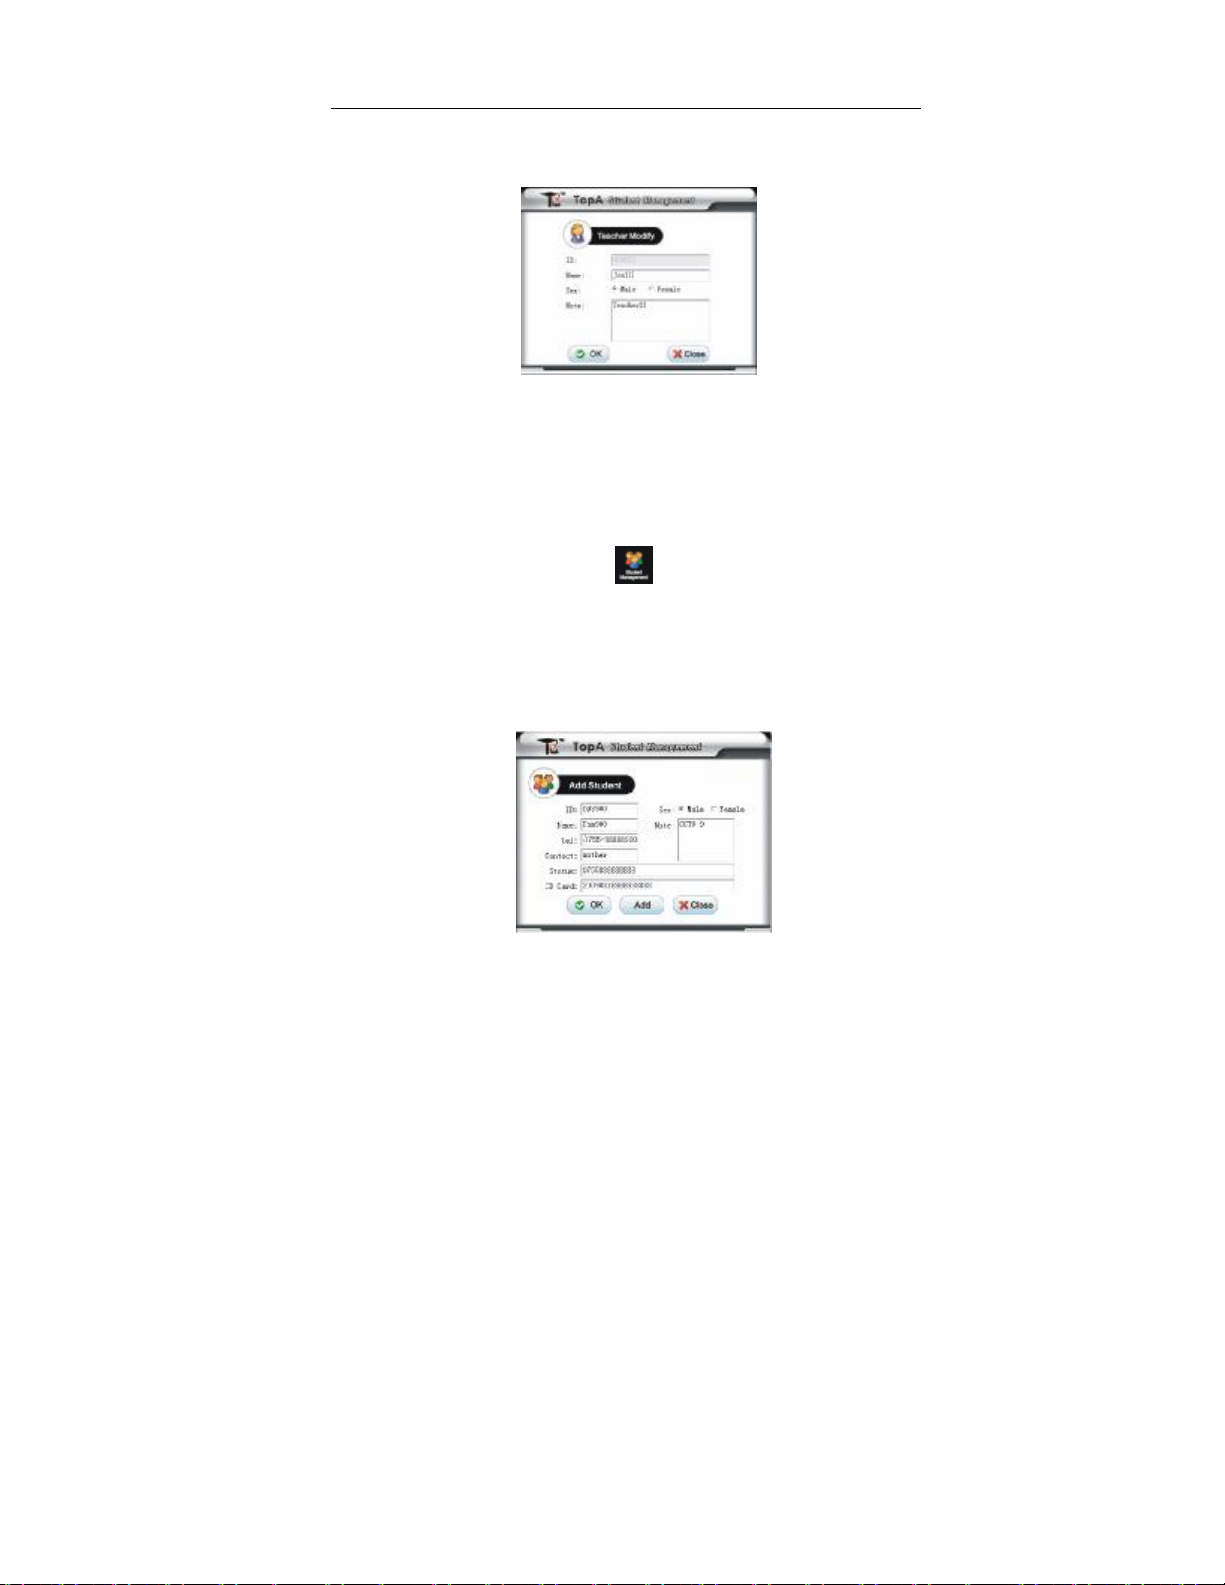
② After enter to the teacher manages window, click the [add] button, after
filling in related information in [increases teacher] dialog box, click the [OK]
button completes the addition.
22
TopA interactive teaching system user’
s manual
③ Springs increases the successful prompt dialog box, click the “OK”, this
time has succeeded increased a teacher the material. May repeatable
operations to add, you need to increase completely after all teachers
information, click the [close] button, close the [increases teacher]
window.
Note: The teacher code can be less than six digits (Including 6).
2. Delete teacher information method:
① Access to teacher management window, you can see the teachers the
information has been added into the list, click to select the teachers
need to modify or delete the information.
② Click the [delete] button above.
③ In the pop-up dialog box, click the [OK] button to complete the teacher
data deletion.
3.Modify teacher information method:
①In teachers list select the teacher you want to change click the [Modify]
button.
23
TopA interactive teaching system user’
s manual
⑤ Pop up modification information window, modify some data, and click
the [OK] button to complete.
4.3 Student management (Add, Delete, Modify, Import and
Query)
1. Add student information:
① In main window, click the icon
② Enter into the student management window, click the [add] button,
Pop-up the [add students] window.
③ In the Pop-up [add students] window, please fill in the student
information about name, tel., and so on.
24
TopA interactive teaching system user’
s manual
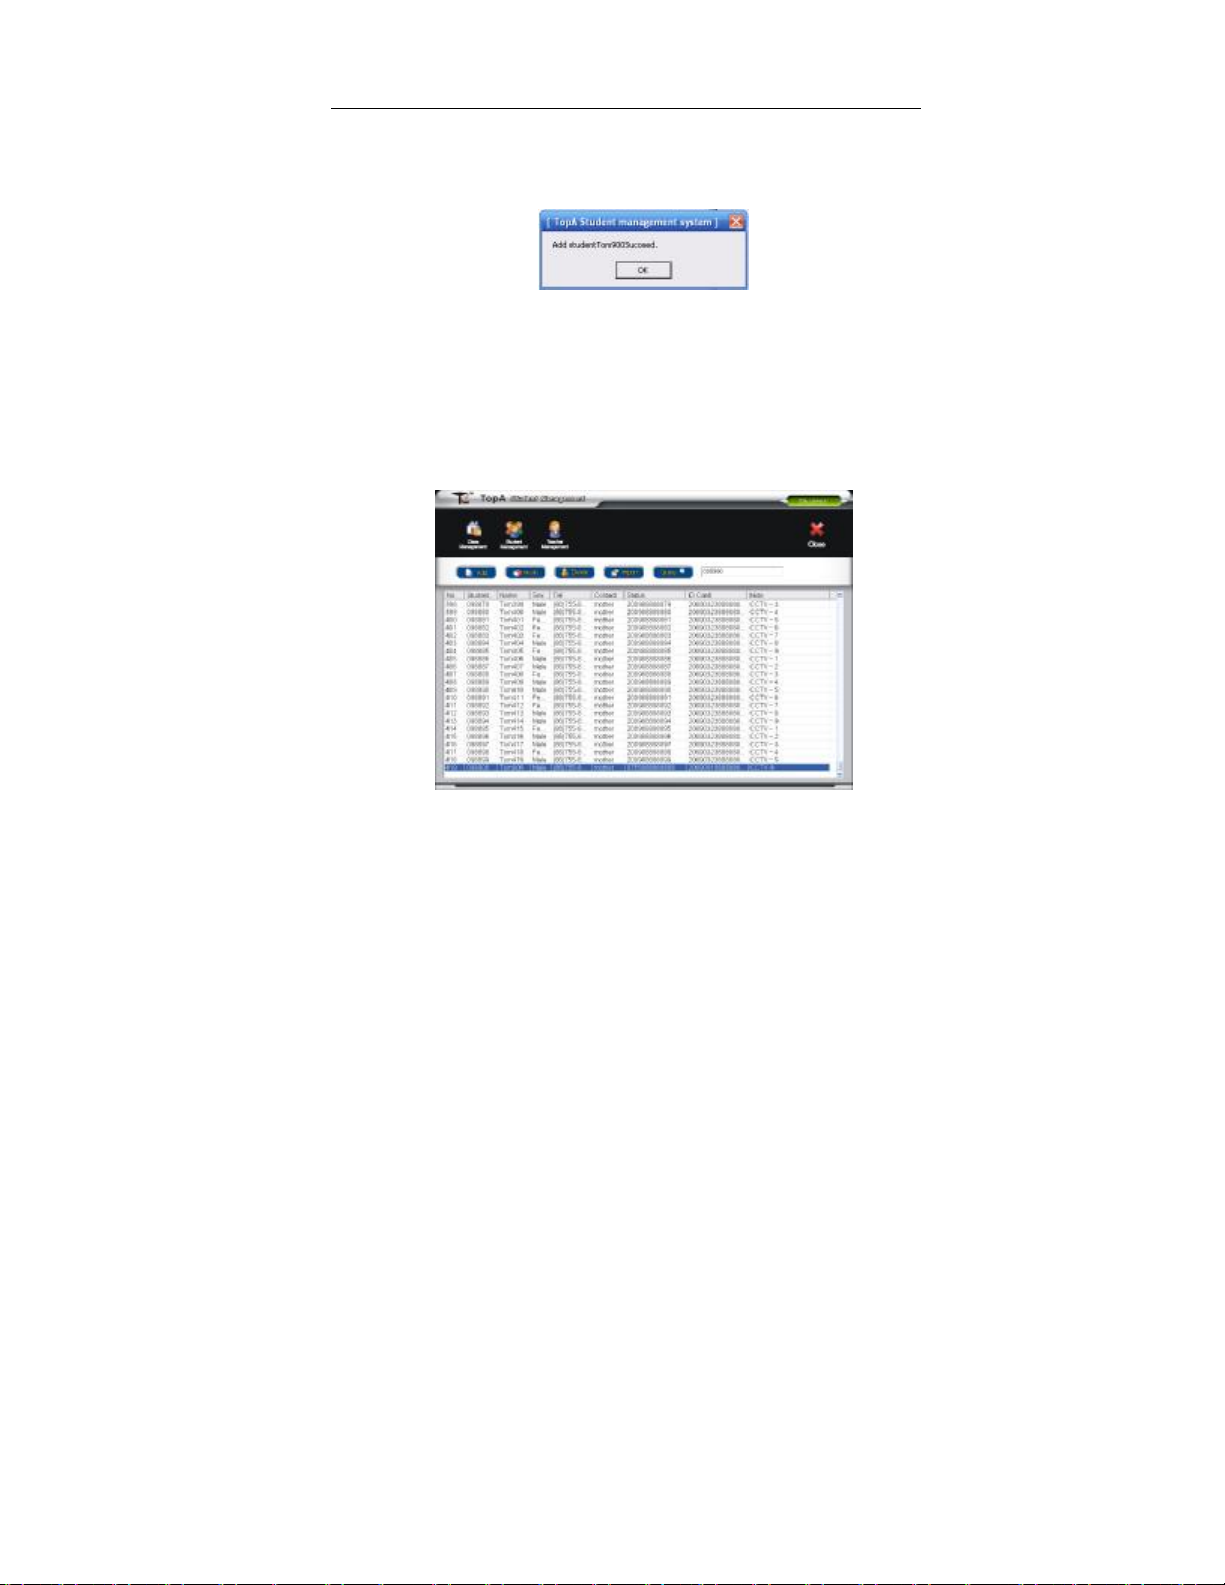
④ After increasing the student data input finished, click the [OK] button,
will Pop-up the “add students is successful” prompts the frame, click the [OK]
button, the success increases the student.
⑥ If want to continue to add student, in the window of [add student
information], click [add] button, refer to previous steps to operate. Click
[close] button to quit the window.
⑦ The add student will display on the list.
Note: The student code can be less than six digits (Including 6).
2. Delete or modify student information:
Any student has to go to others school, the delete function can be used
to delete the student information. The modification function can be used to
modify student information.
25
TopA interactive teaching system user’
s manual
① Into the Student Administration window, you can see information about
the students has been added into the list.
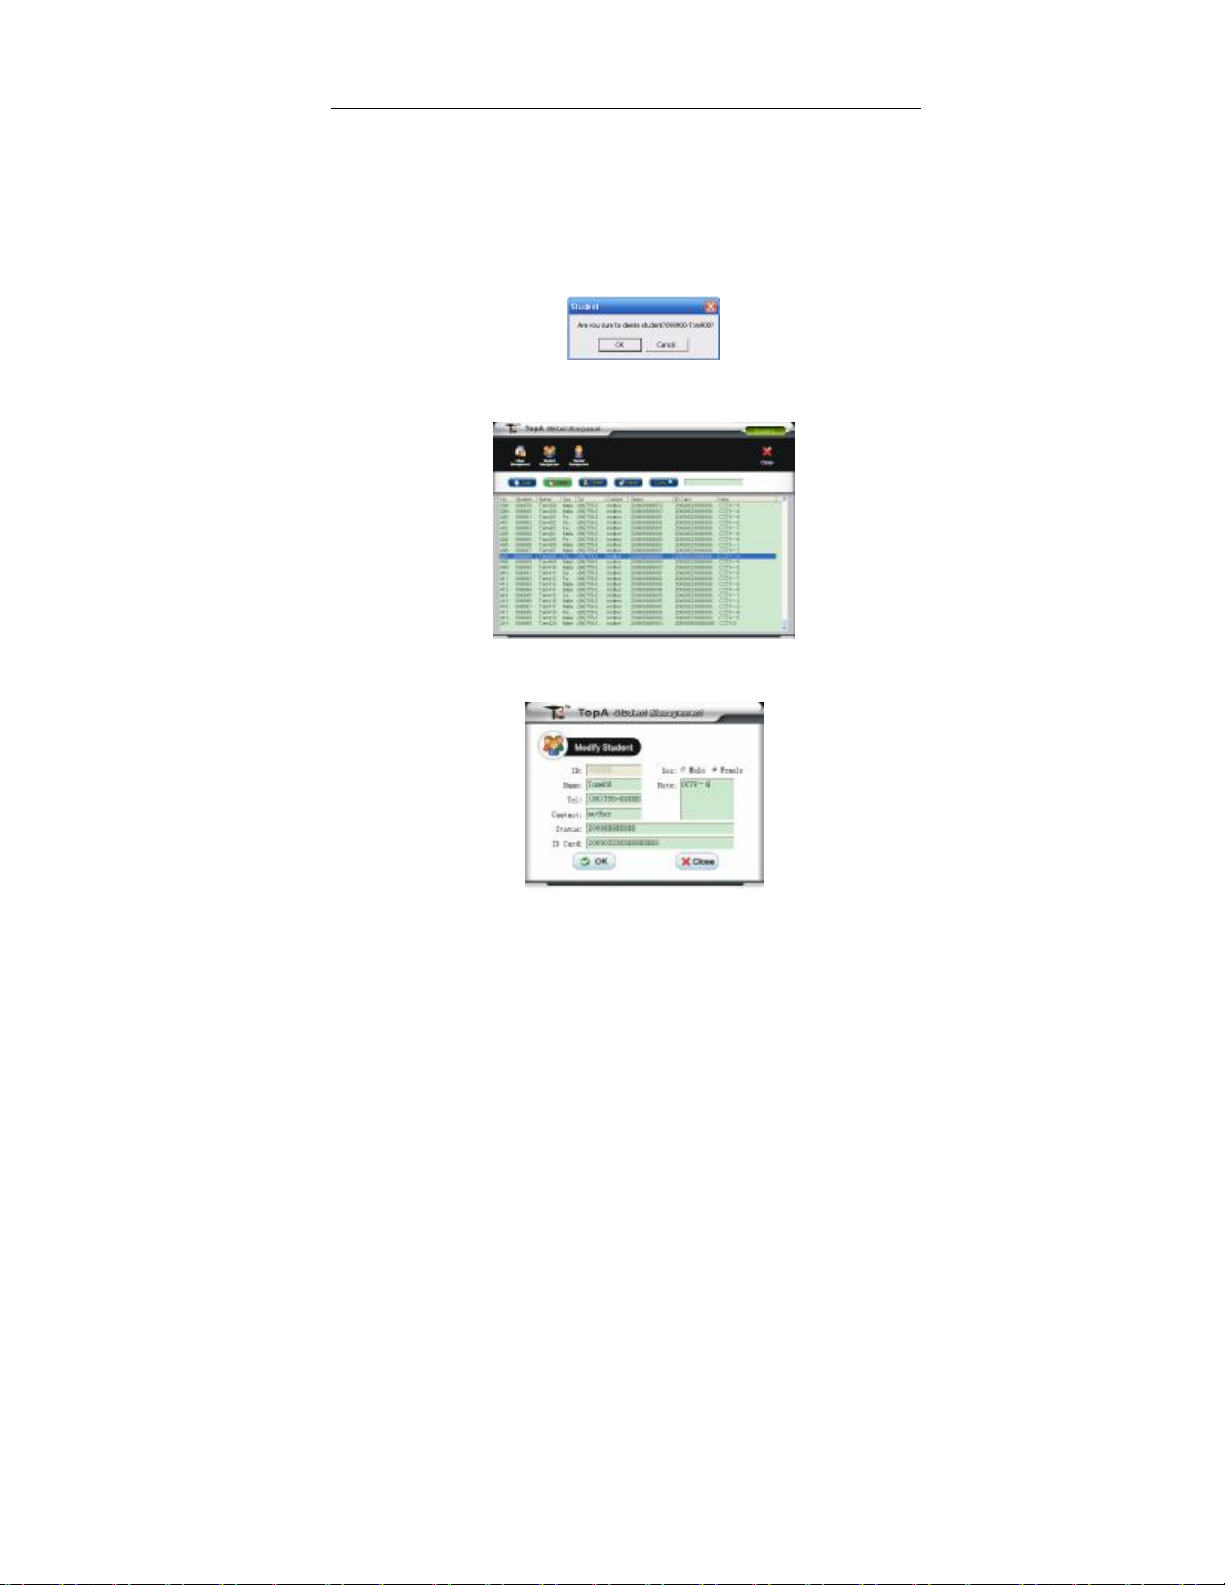
② Mouse over the student information row which you want to delete, then
click [delete] button.
③ Pop up delete prompt box, click [OK] button to delete the teacher
information from list.
④ In teacher management window, select the teacher information row on
the list which you want to modify, click [modify] button.
⑤ Pop-up modification information window, modify some data, and click
[OK] button to complete.
Pop up success prompt box, click ⑥ [OK] button to complete.
26
TopA interactive teaching system user’
s manual
3. Import student data:
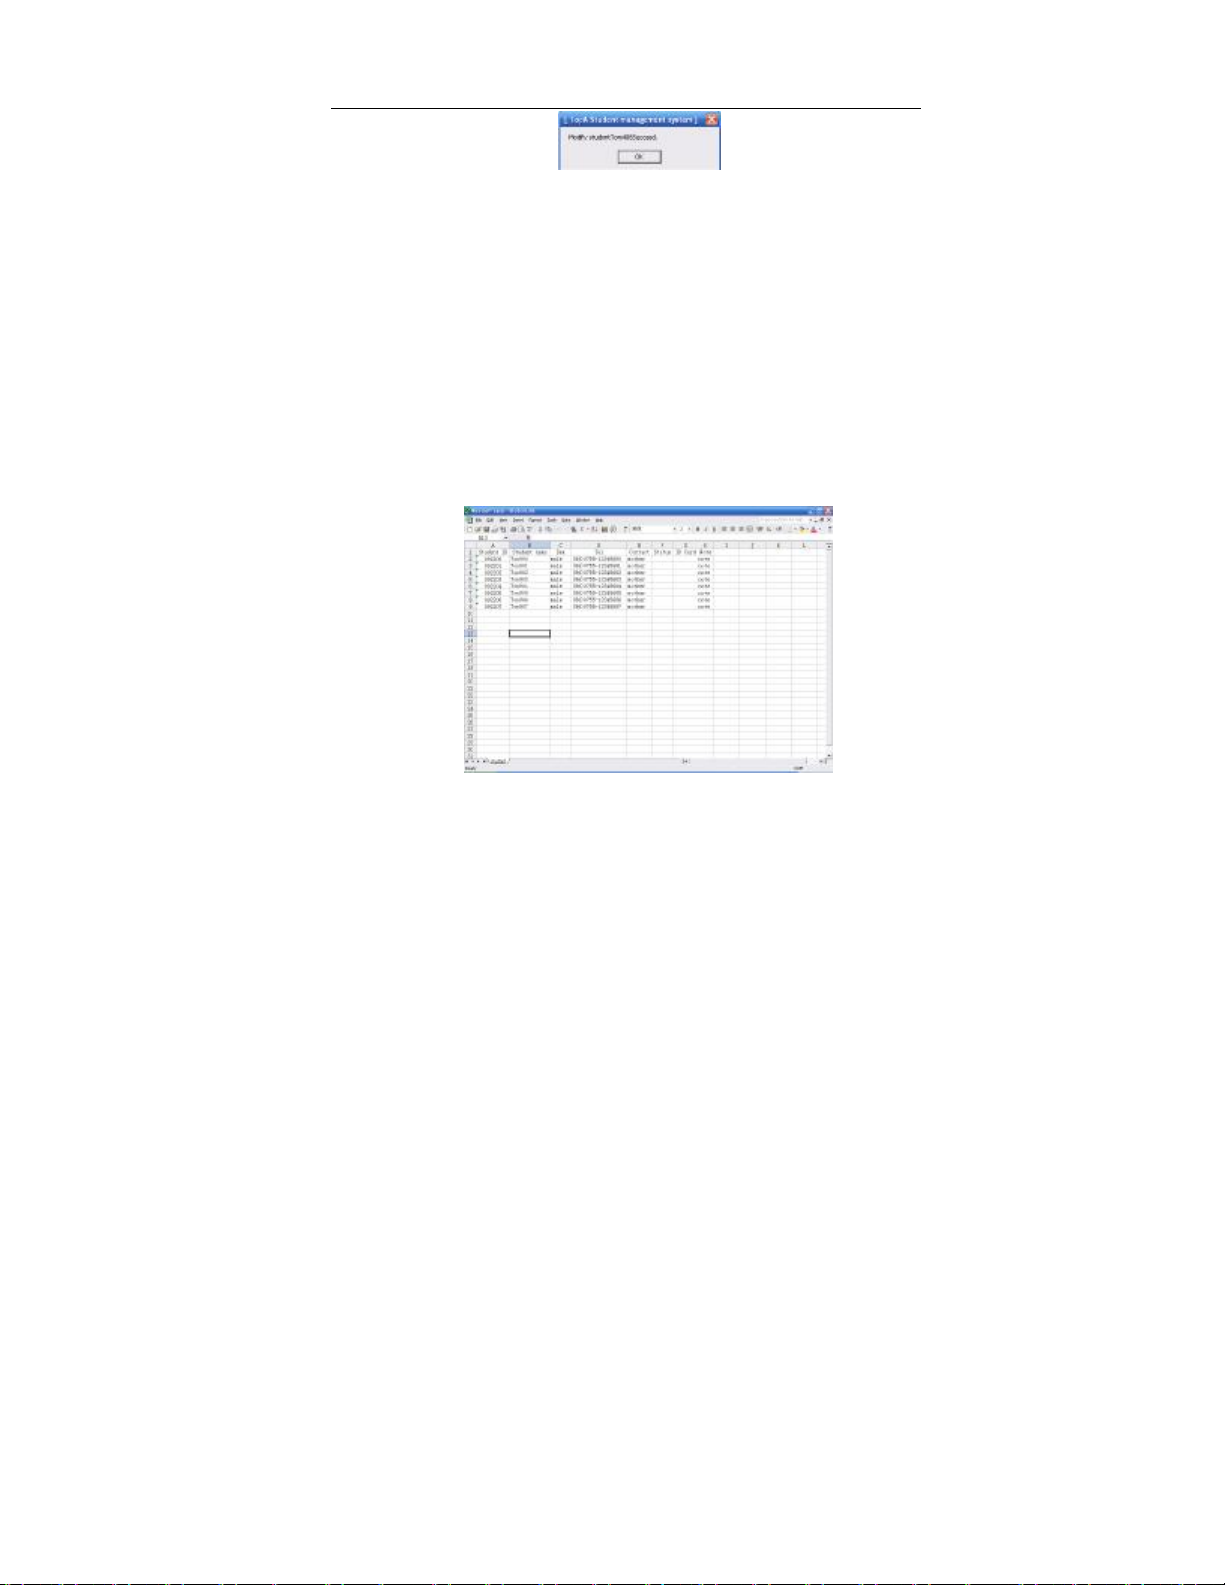
① Start- All programs –VSON TopA Interactive Teaching System –
Example (Student) .xls
② Refer to the contents in example, new a excel file (in order to facilitate
subsequent viewing, not to amend the information in the template list)
Note: In column of student ID, please enter a single quote " ' ", then
enter the corresponding number of places.
Assumed the new EXCEL file is saved as "Students.Xls" and
stored in the desktop.
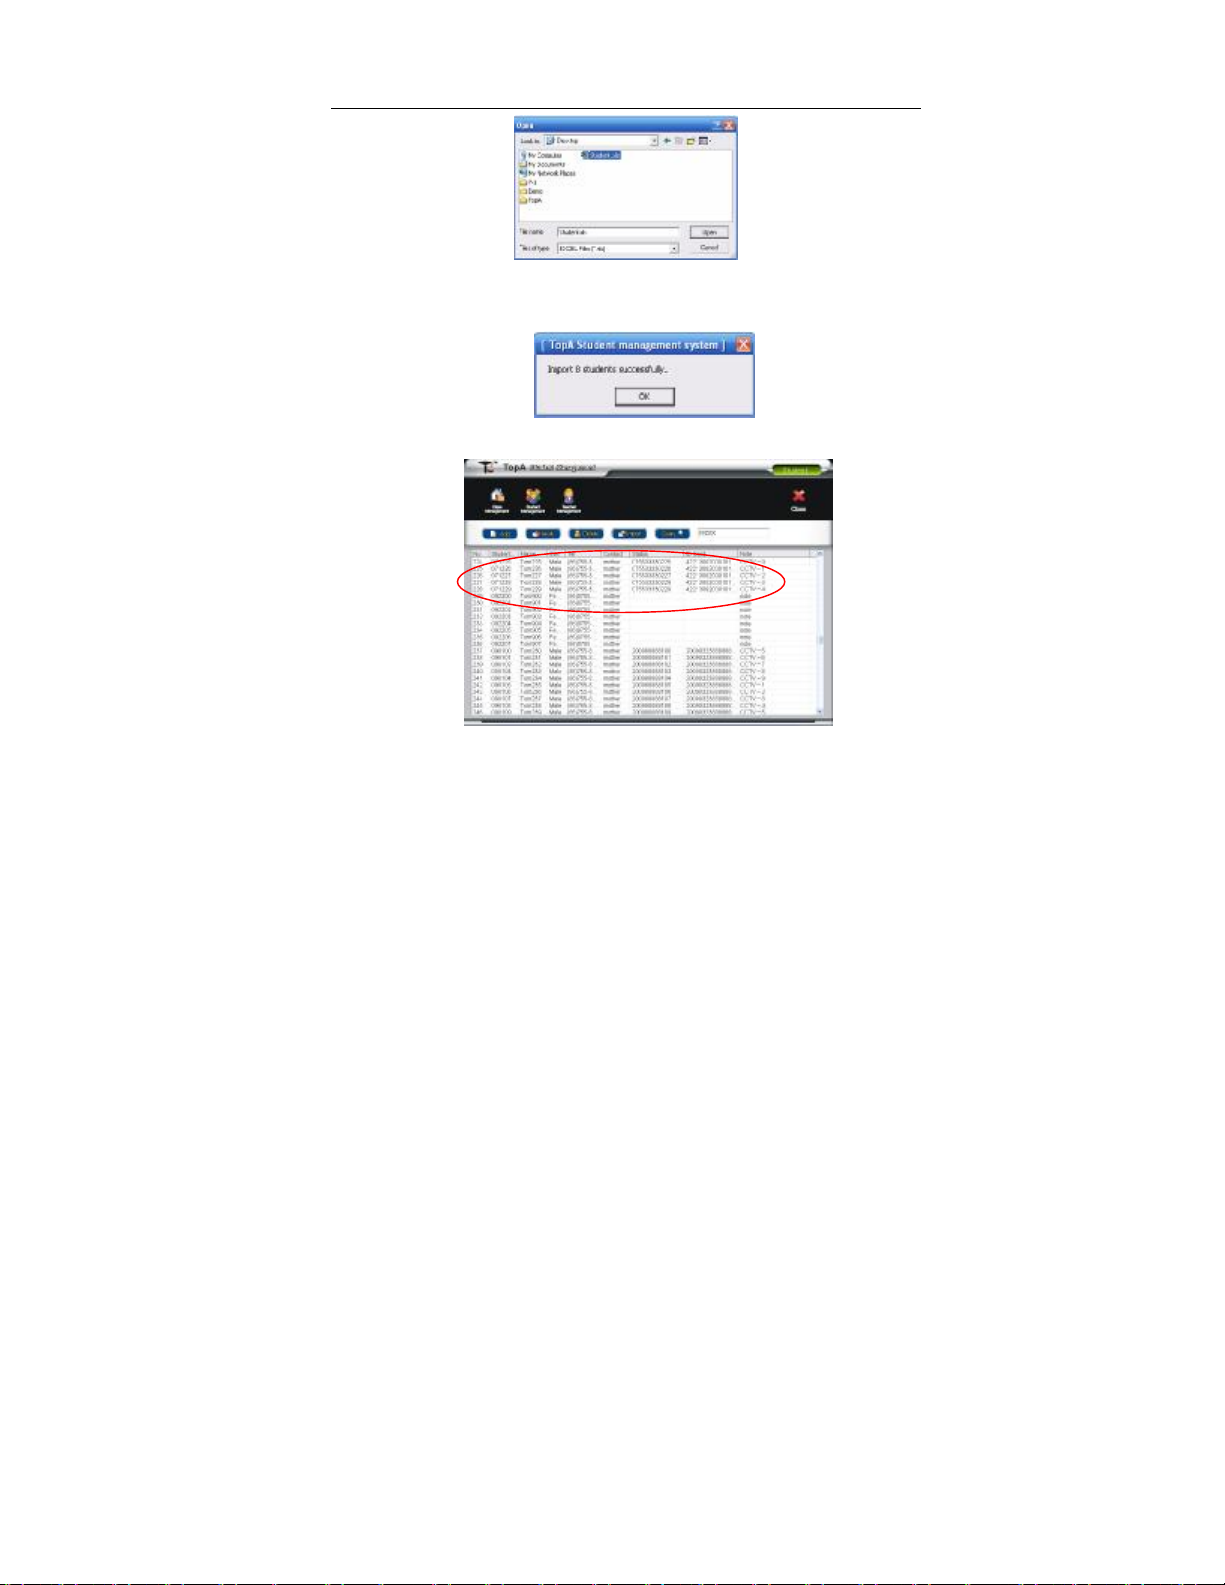
③ In student management window, click the [Import] button.
④ Pop-up open dialog box, find the new EXCEL file of Student.xls, click
[open] button.
27
TopA interactive teaching system user’
s manual
⑤ Pop-up success prompt box, click the [OK] button to finish operations of
importing student information.
⑥ Imported students will display on the list.
4. Query student information:
① In student management window, input query condition in the textbox:
Student ID, Name, tel. or sex etc.
② Click [Query] button, the results display by list.
28
TopA interactive teaching system user’
s manual
Query result
Query condition
4.4 Class management (Add, Delete, Modify, Join student,
Remove student, Group management, Import and Export)
1. Add class information:
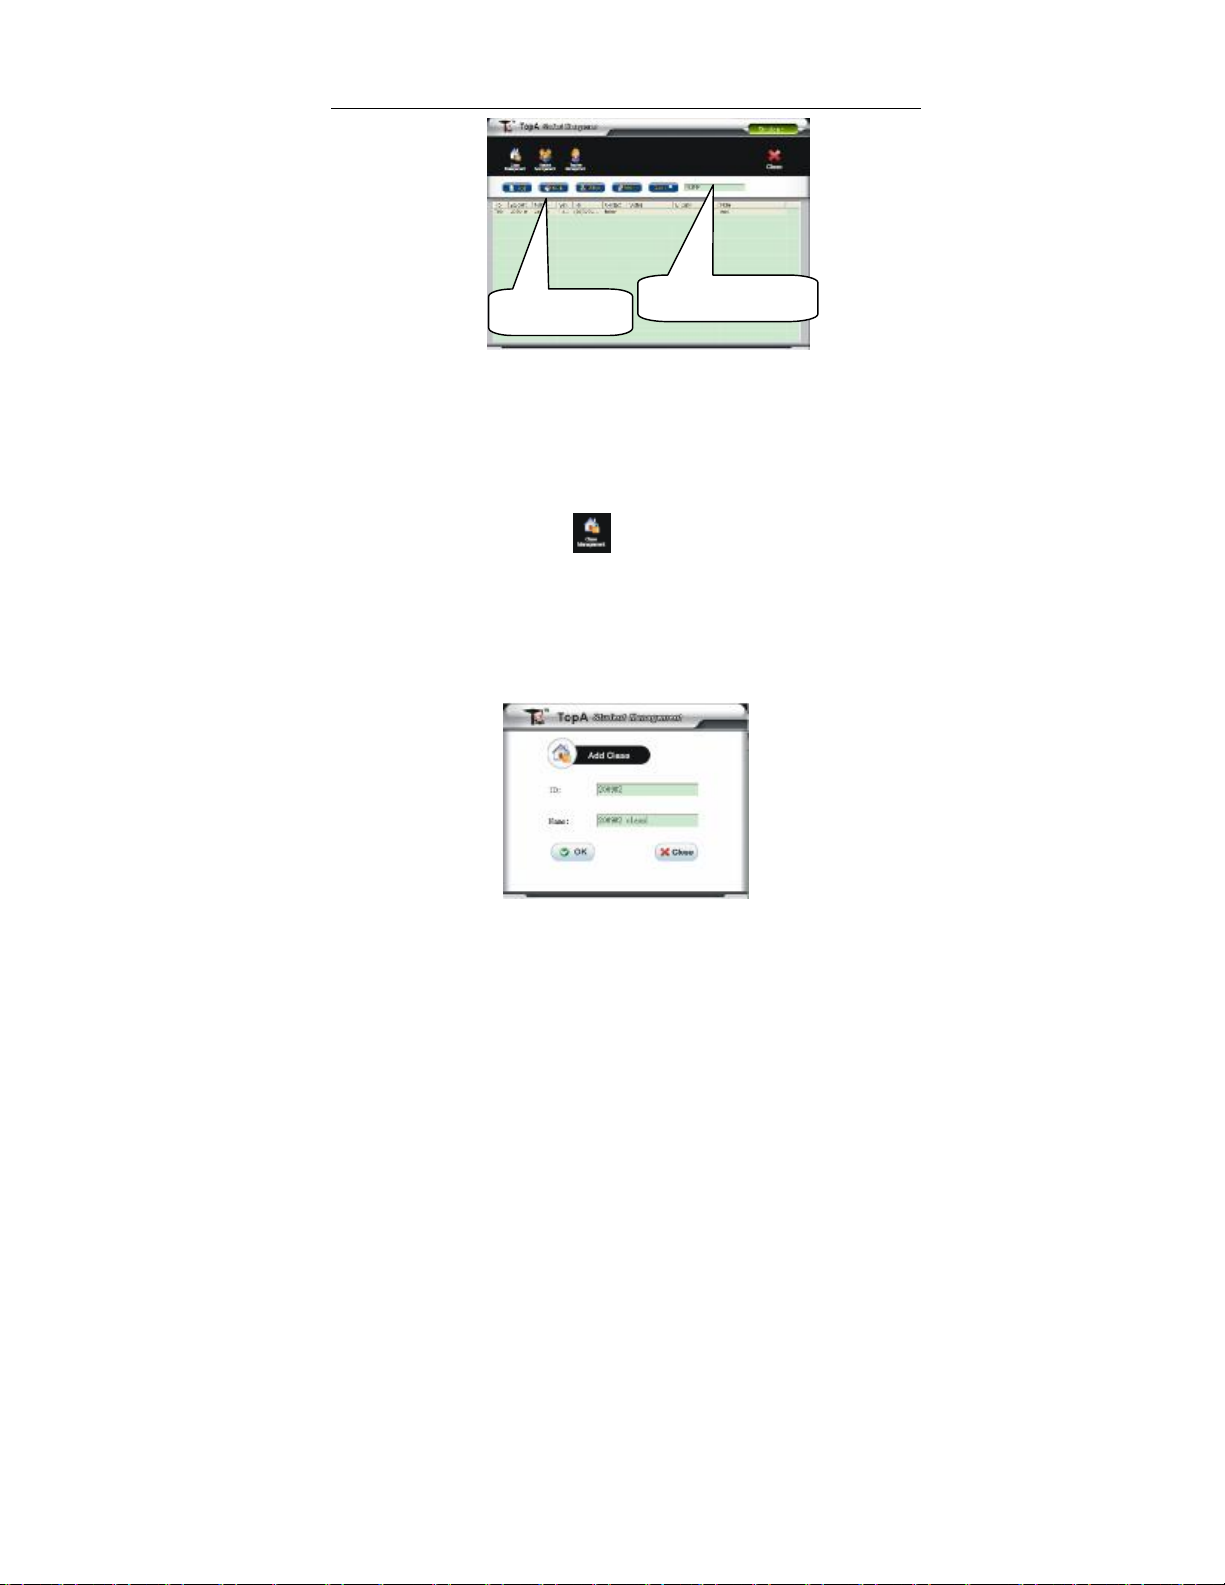
① In main window, click button to enter into [class management]
window, then click the [add] button, will Pop-up the [add class]
window.
② Pop up a window of add class information, please fill in the class
information about ID and name, then click [OK] button to complete.
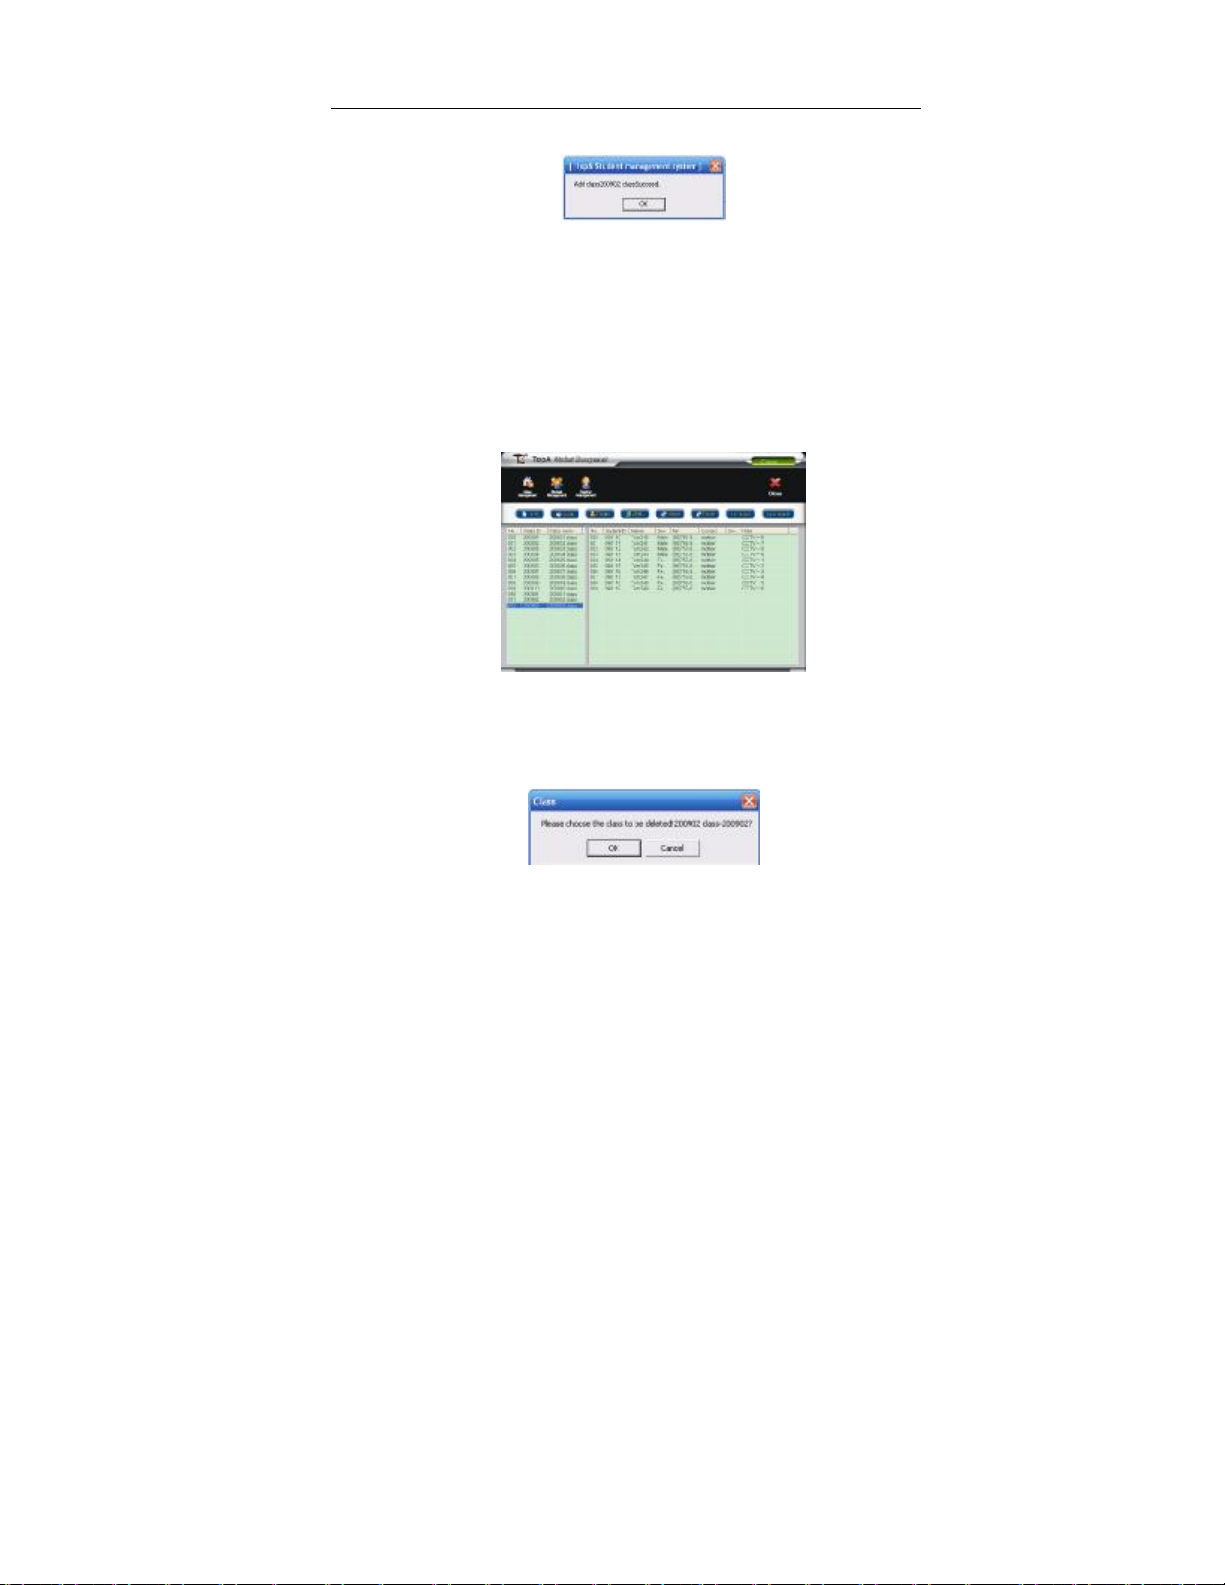
③ Pop up success prompt box, click the [OK] button to succeed adding a
29
TopA interactive teaching system user’
s manual
class information.
The add ④ class will display on the list.
⑤ Click the [close] button to quit the add window. If want to continue to
add class, repeat the above steps.
2. Delete or modify class information:
① Enter into the [class management] window, select the class which you
want to delete to click the [delete] button.
② Pop-up delete prompt box, click the [OK] button to delete the class
which you select, if you click the [cancel] button will does not carry
on the deletion operation.
③Pop up success box, click [ok] button to delete the class information
from list.
30
 Loading...