

Page 1
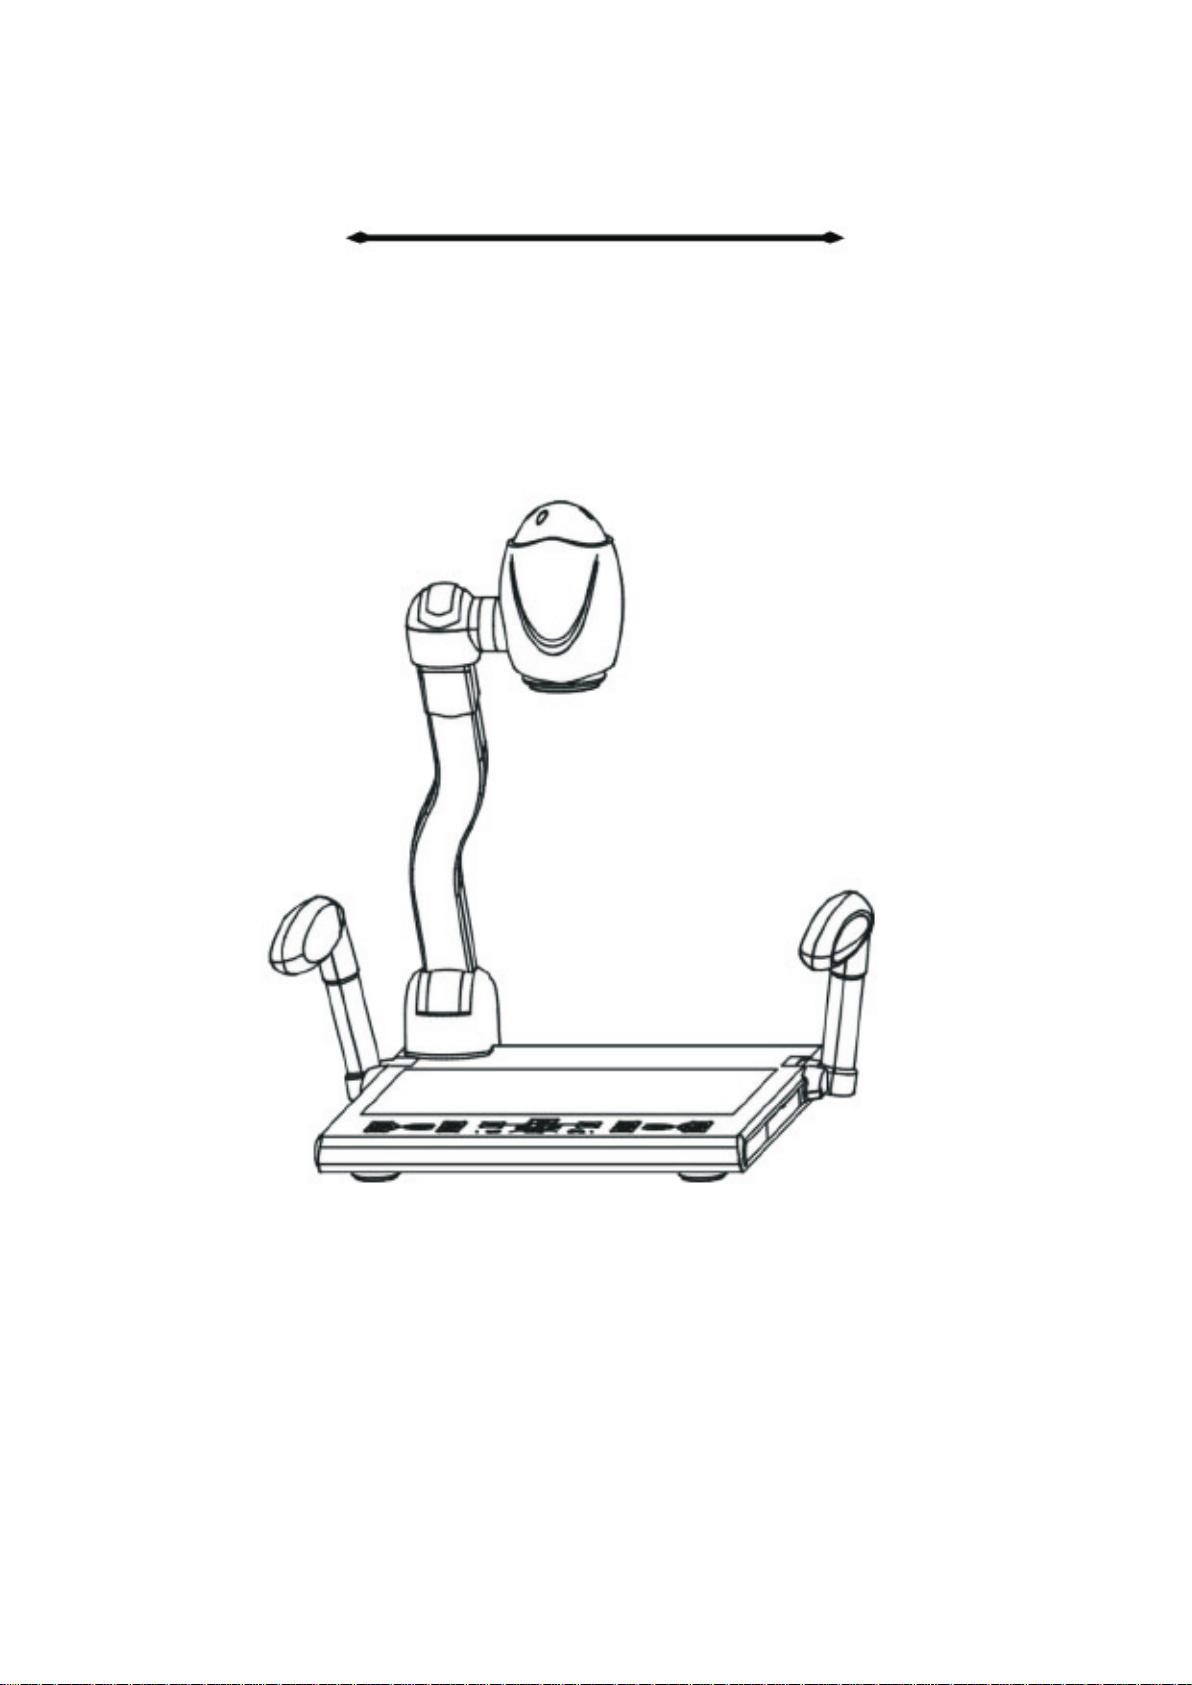
NewVission
DIGITAL VISUALIZER
User Manual
NV-1024
Pls read carefully before installation and keep reservation
Page 2

Content :
Safety Notice..............................................................................
Feature Instruction......................................................................
Struction & components..............................................................
Whole struction...................................................................
Back/side connections........................................................
Connection Surrondings.............................................................
Whole Connections.............................................................
Basic Operation..........................................................................
Unfold process...................................................................
Fold process......................................................................
Methods of Usage.......................................................................
Control Panel.....................................................................
Remote controller...............................................................
PC RS-232 controlling........................................................
2
3
5
5
5
7
7
8
8
8
9
9
14
17
Daily Maintainace and Attention..................................................
Problem and Solution..................................................................
Attached list................................................................................
Technical Specification................................................................
18
19
20
21
- 1 -
Page 3
Safety Notice :
Warning: Pls don't let it in rain or put it into wet
environment in order to prevent from fire breaking or leak
of electricity. The visual presenter includes high voltage
accessories and dangerous, so installing will fully and
repairing spareparts are prohibited, just the professional
can do these.
1. Before using, pls see power voltage and frequency same or not. To keep safe,
users must be consciously that power socket should be three poles: L-line,
N-line, G-line, and connect them in right way.
2. User must get G-line of all equipment’s input and output ports through before
turning power on, in order to avoid the unexpected damage caused by mute /
high-voltage. Don’t insert or pull out cables with electricity.
3. Pls don’t rebuild visual presenter or use it without outer shell.
4. Pls don’t drop something easy-fire, liquid or metal into, otherwise, will easily
break the visual presenter or make troubles for visual presenter. Pls don’t put
something easy-fire or liquid on the table.
5. Don’t take it in the environment of high tempreture, wetness, corrodible gas like
acid oralkali, more-dust, and shakiness. Put it on special-steady desk , and
don’t put the visual presenter on unsteady tabletop or don’t put 1KG things on
the baselight table.
6. Pls clean it by dry cloth, and cut down electricity before cleaning, users also
can not use liquid dilution, volatilised gasoline, insecticide or other chemistry
solvent.
7. Pls pull power-plug out if long time no use.
8. Don’t let children play visual presenter to prevent from electric-shock.
9. Pls turn off power immediately if there are some abnormal appearance (noise
or smoking) and pull power-plug out.
- 2 -
Page 4

Featured Instruction :
Welcome to use visual presenter. Pls read "Manual
Operation Booklet" attentively before usage. We sincerely
hope this booklet will bring convinience and skilled method
to you.
R Japan and Korea Fashionable Outer Design with smooth line, combines
fashion and creation;
R Special sensitive touch-key design, prevents dust and water from, may use
for long(palent);
R Special drawer function, human-being design, may store remote controller,
pick-up pens, pick-up stick and others into;
R All joints featured with no press damping design, easily operated;
R No need turn visual presenter on to get through: when PC signal comes to
visual presenter, continually connect with monitor., and no need turn visual
presenter on;
R VGA belt width 440MHz with long cable, image brightness and comparison
can be improved up to 1/3, makes image more beautiful and clear;
R Put digital volume adjustment inner, make volume adjustment more easier
(correct), can output original voice;
R Specially provide with ESD protection, won‟t break inner spareparts when
pull out/plug into with electricity;
R Total zoom 80, make the smallest letters and number biger and clear to show;
R High Digital : image proceeds by professional video device, 850,000 high
resolution, (1024x768) CMOS image signal with high clarity, shows in digital
unit, image is extremely clear, no shining, no shaking, image steady, color
elements deoxidized well, when capturing small and tiny B/W characters,
there is no white edge, shaking, shinning and other problems can connect
with projector directly, rear projector TV, or monitor RGB port, specially
suitable for school’s demonstration or B/W character teaching.
≥
- 3 -
Page 5

R Powerful image proceeded, freeze, color/B/W, Positive/Negative, mirror,
brightness adjusted, rotate, image/text, comparison, image storage;
R Multi-input, multi-output, combine intelligently, switch multi-media to
demonstrate;
R Camera can turn 350 vertically or horizontally
R methods of control: control panel, remote controller, RS-232, USB
R Microphone socket which can adjust volume can connect with cable or
eternal microphone.
- 4 -
Page 6
Struction & components :
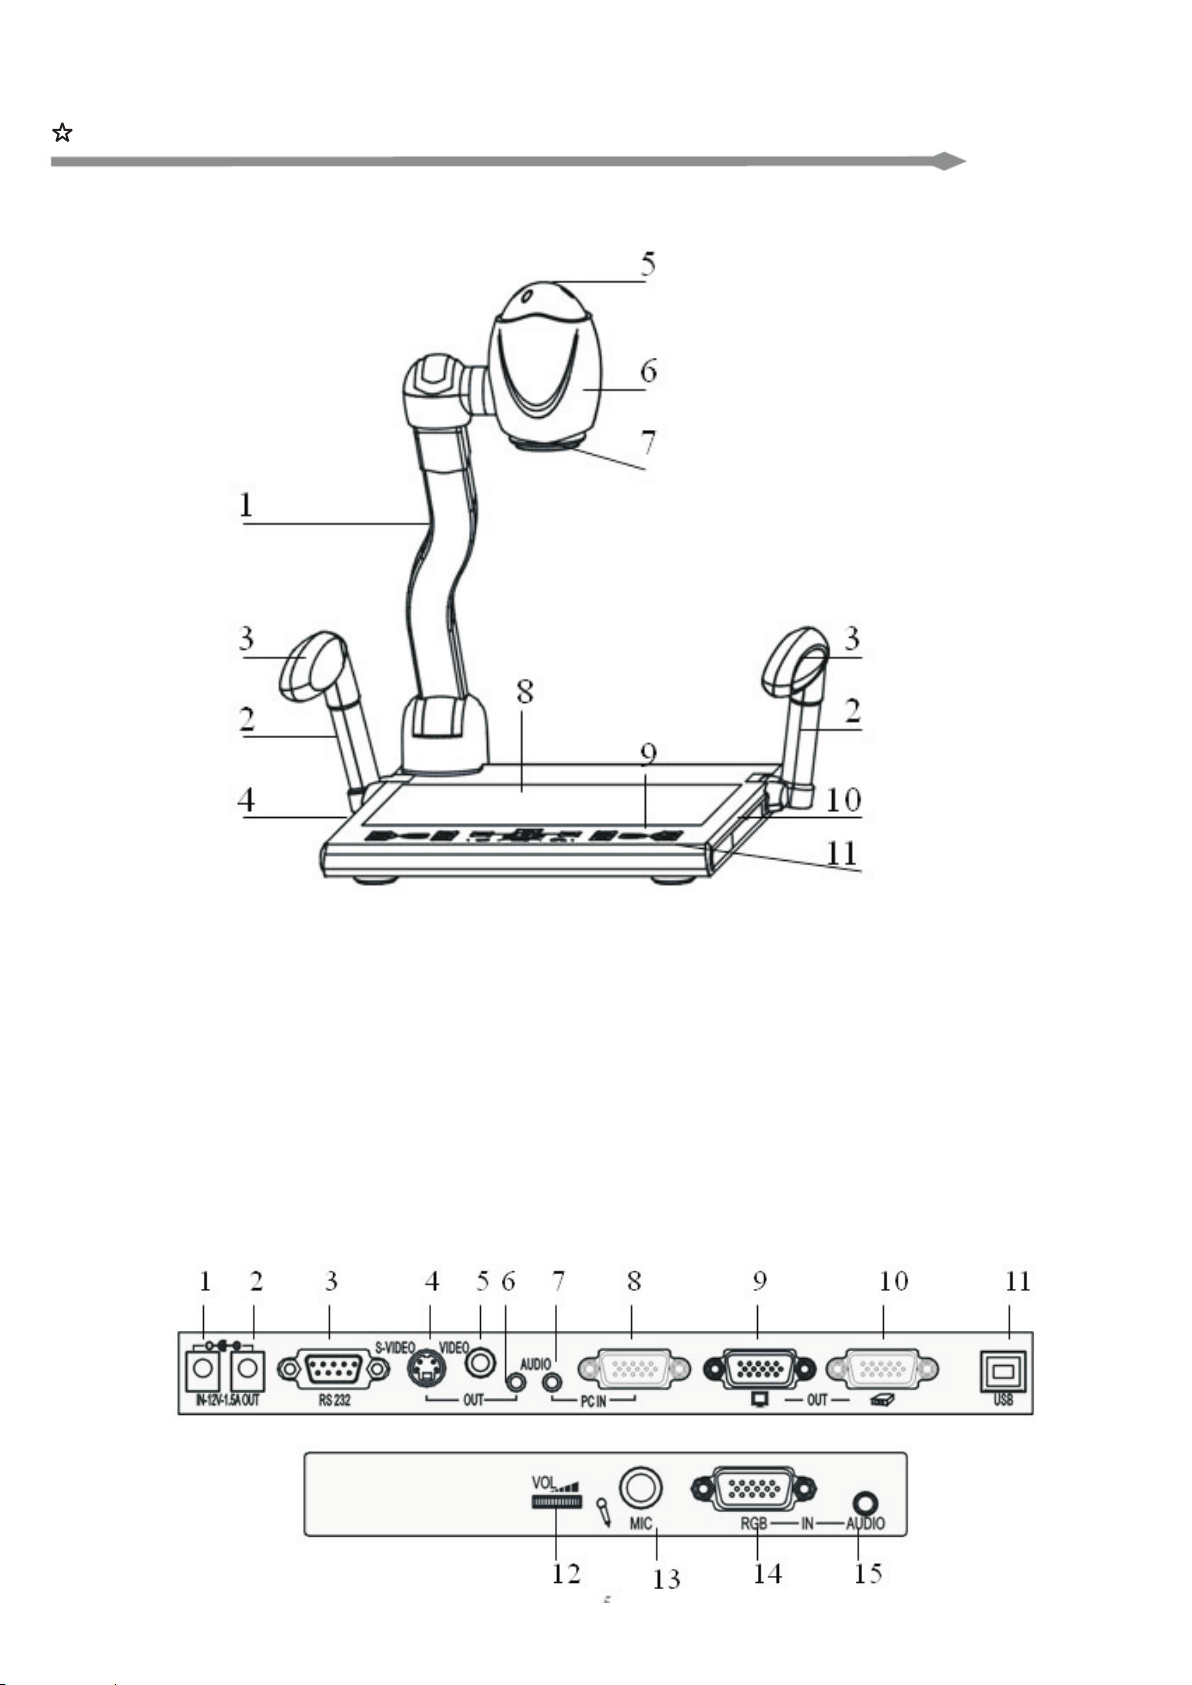
=Whole Structure :
1.Main Pole; 2.Assistant lamp Arms; 3.assistant lamps; 4.drawer
(once Push to rebound, twice push to recover.
Attention: don’t pull it out of the position with heavy strength);
5.Infrared Receiver Window; 6.Camera Outshell; 7.CameraCover;
8.Baselight; 9.Back Connections; 10.Side connections;
11.Control Panel.
=back/side connections :
- 5 -
Page 7
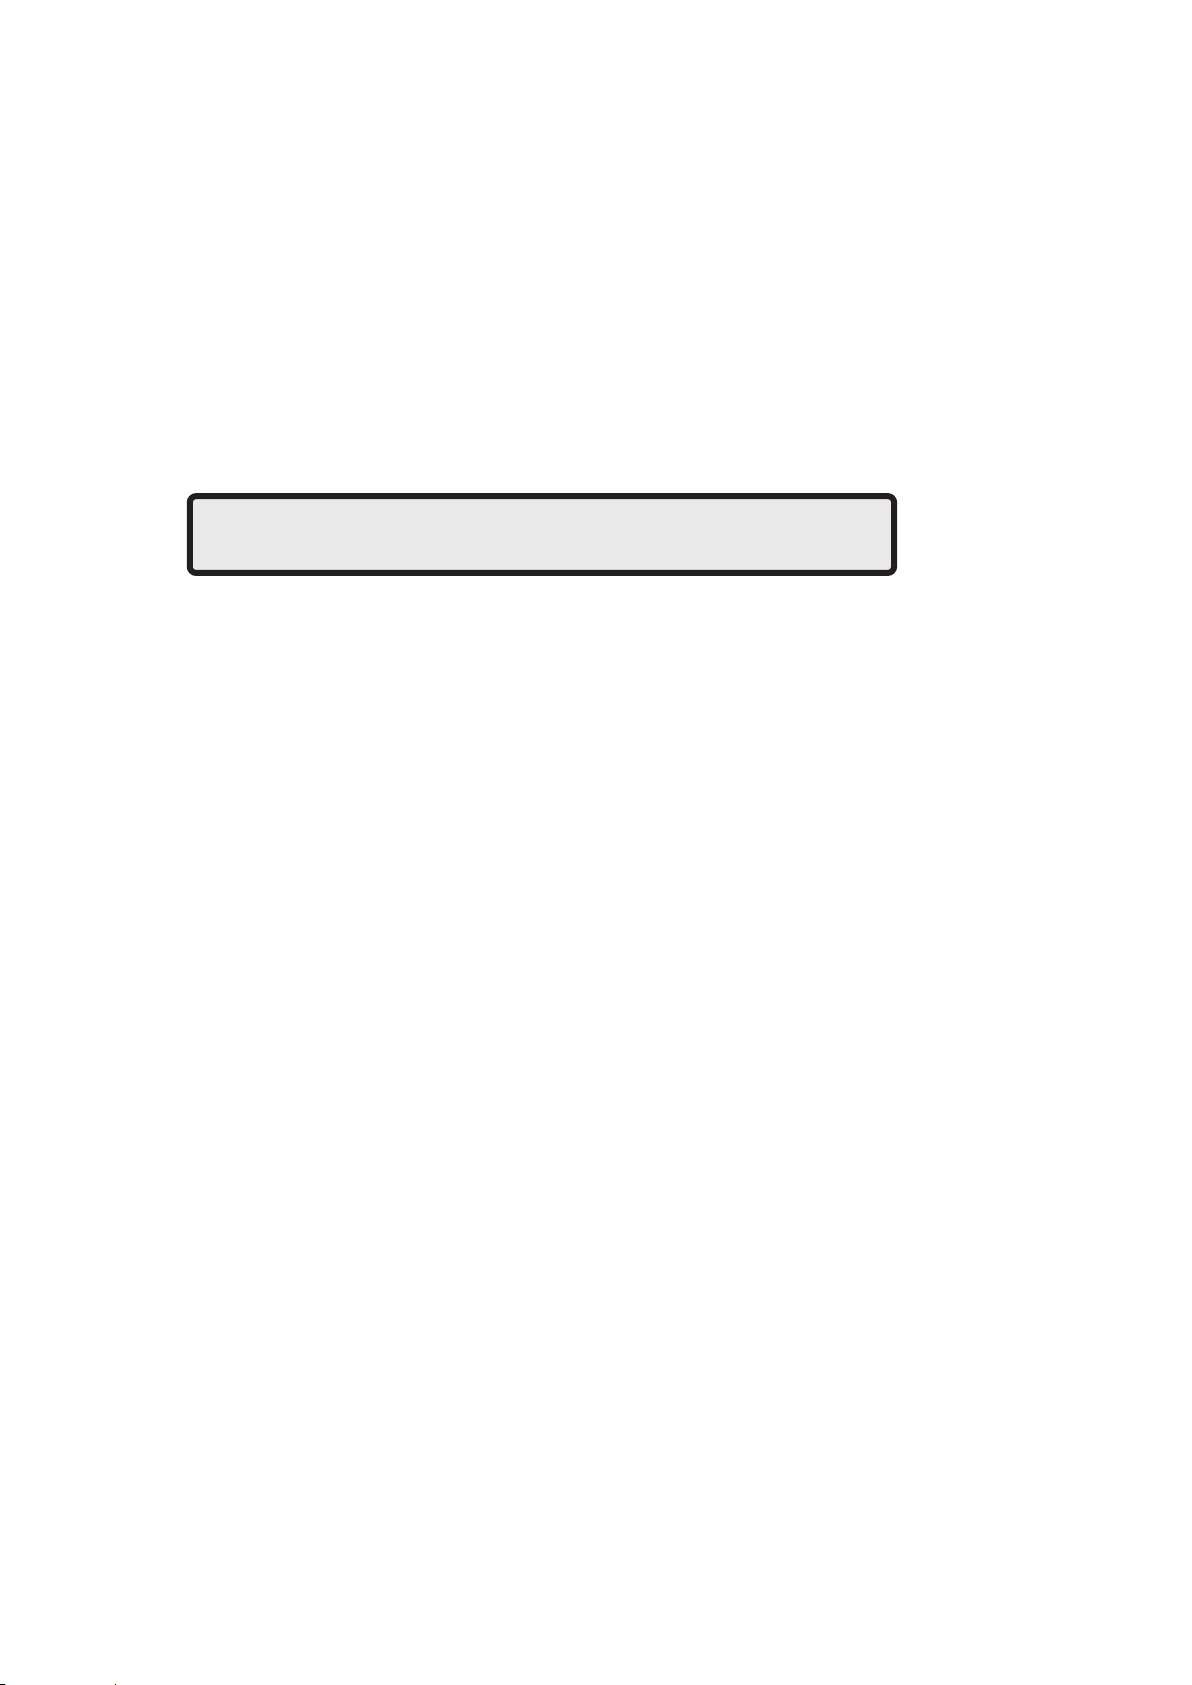
1.DC12V power input; 2.DC12V power output; 3.RS-232 controlling
port, RS-232 multi-functioned cable connect to PC’s COM port
(If select central controller’s spareparts, this port is used for
RS-232 F/M cable); 4.S-VIDEO output port (selected); 5.Video
Output Port (selected); 6.Stereo Output; 7.PC Stereo Input
Port; 8.PC RGB input port; 9.Output port to Monitor; 10.Output
port to Projector(or rear projector TV); 11.USB Port; 12.Microphone
Volume Adjustment; 13.Microphone Plug; 14. RGB Input Port;
15.Stereo Input.
Note: pls check exact goods for the standard.
- 6 -
Page 8
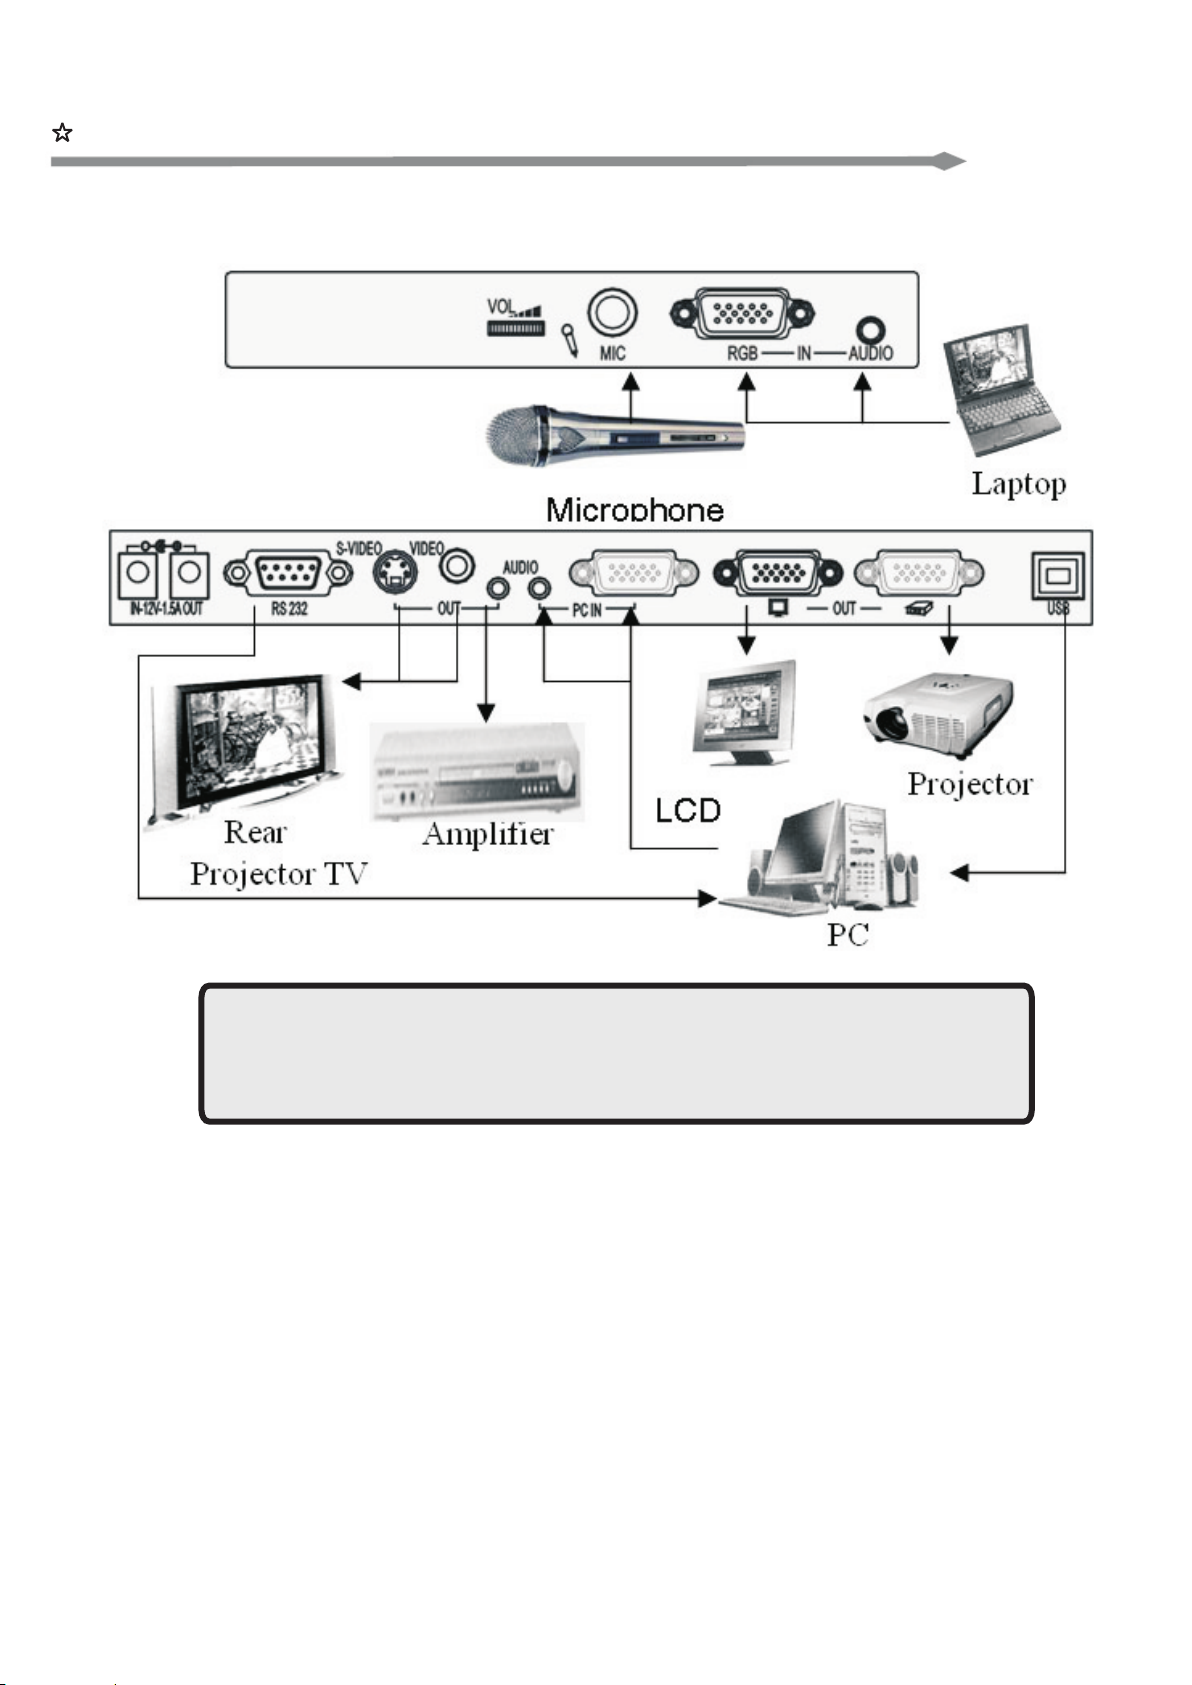
Connection Surrondings:
=Whole Connections :
Note: pls cut down Surronding equipment’s power
before start operation.
- 7 -
Page 9
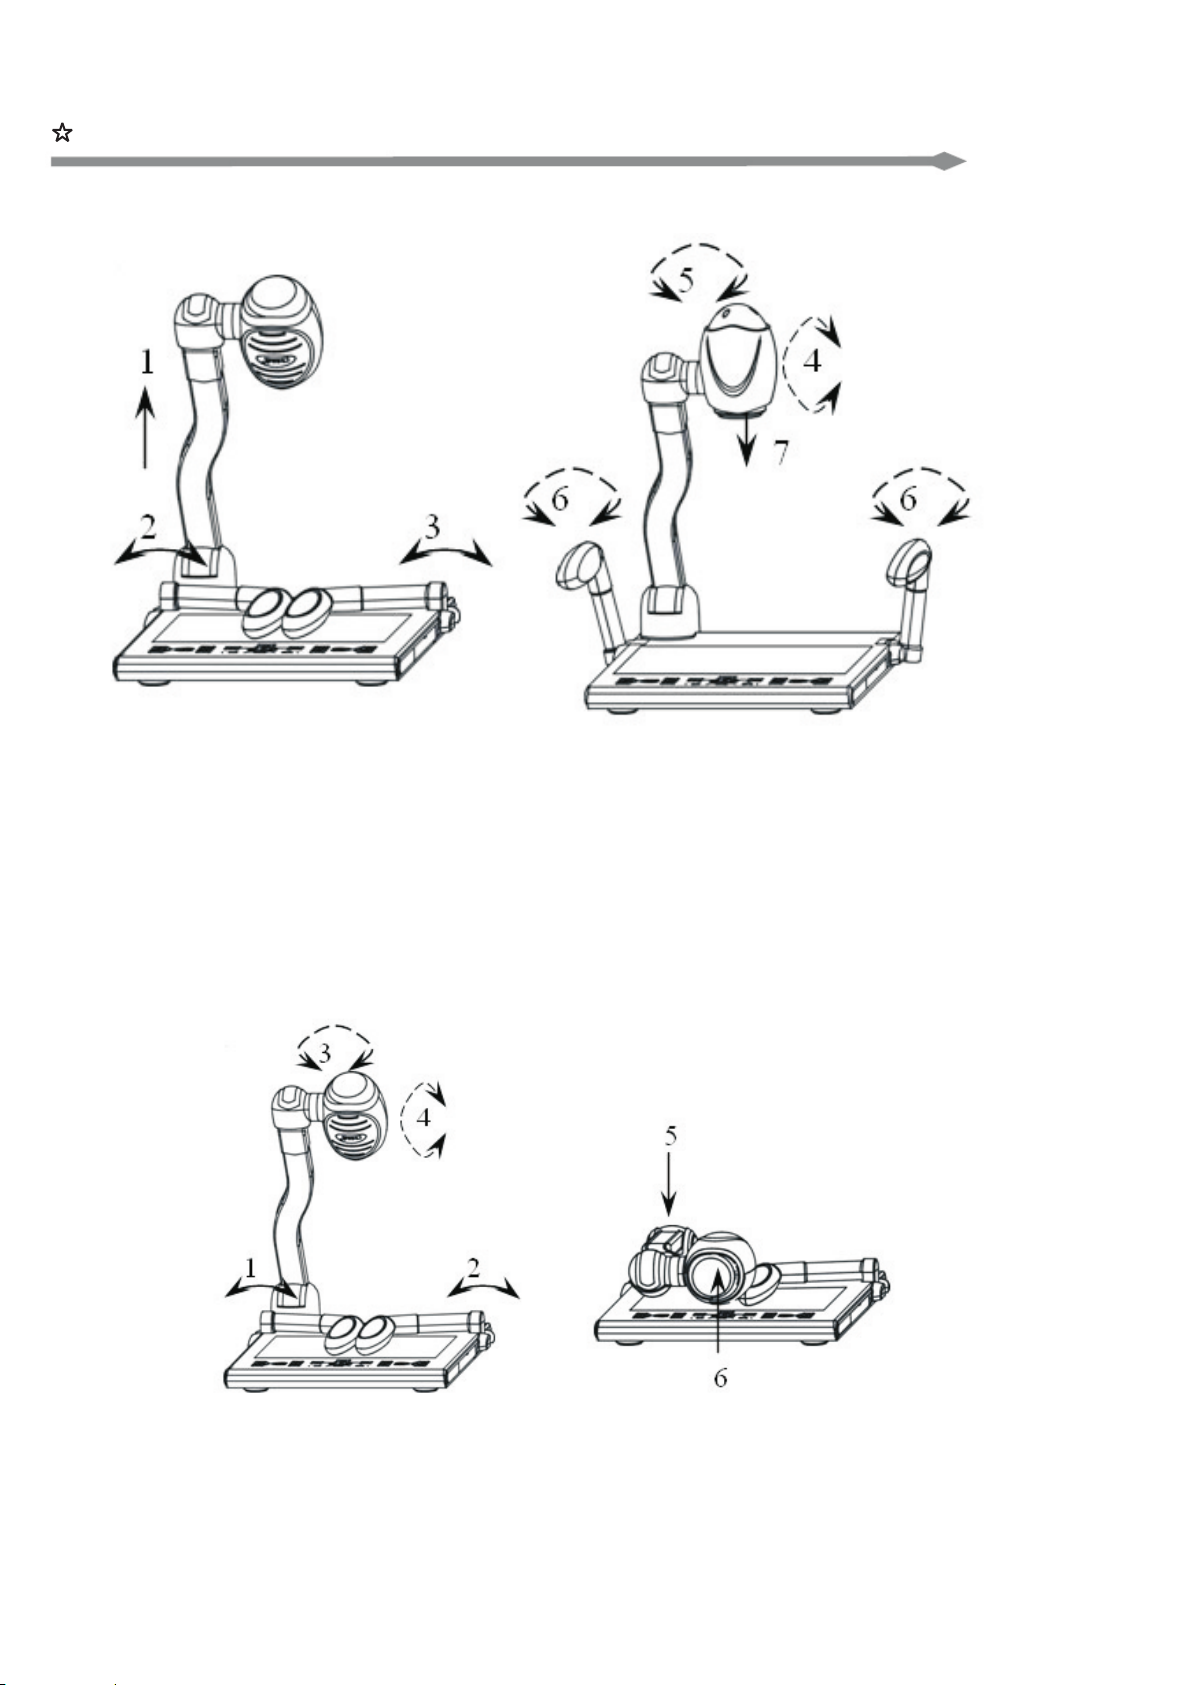
Basic Operations:
=Unfold Steps :
1.Lift the pole; 2.Lift assitant lamp to the left; 3.Lift assistant
lamp to the right; 4.adjust Camera angle vertically; 5.adjust
camera angle horizonally; 6.adjust assitant lamps’ angle properly;
7.take Camera cover off(Note: Pls rotate it to the right, don’t pull
with heavy strength).
=Fold Steps :
1.Press left assitant lamp arm down; 2.Press the right lamp arm
down; 3.adjust Camera outershell horizonally to parallel with the
pole; 4.adjust Camera outershell vertically to parallel with the pole;
5.put the pole down; 6.put Camera cover on (Note:don’t rotate, cover
it directly).
- 8 -
Page 10
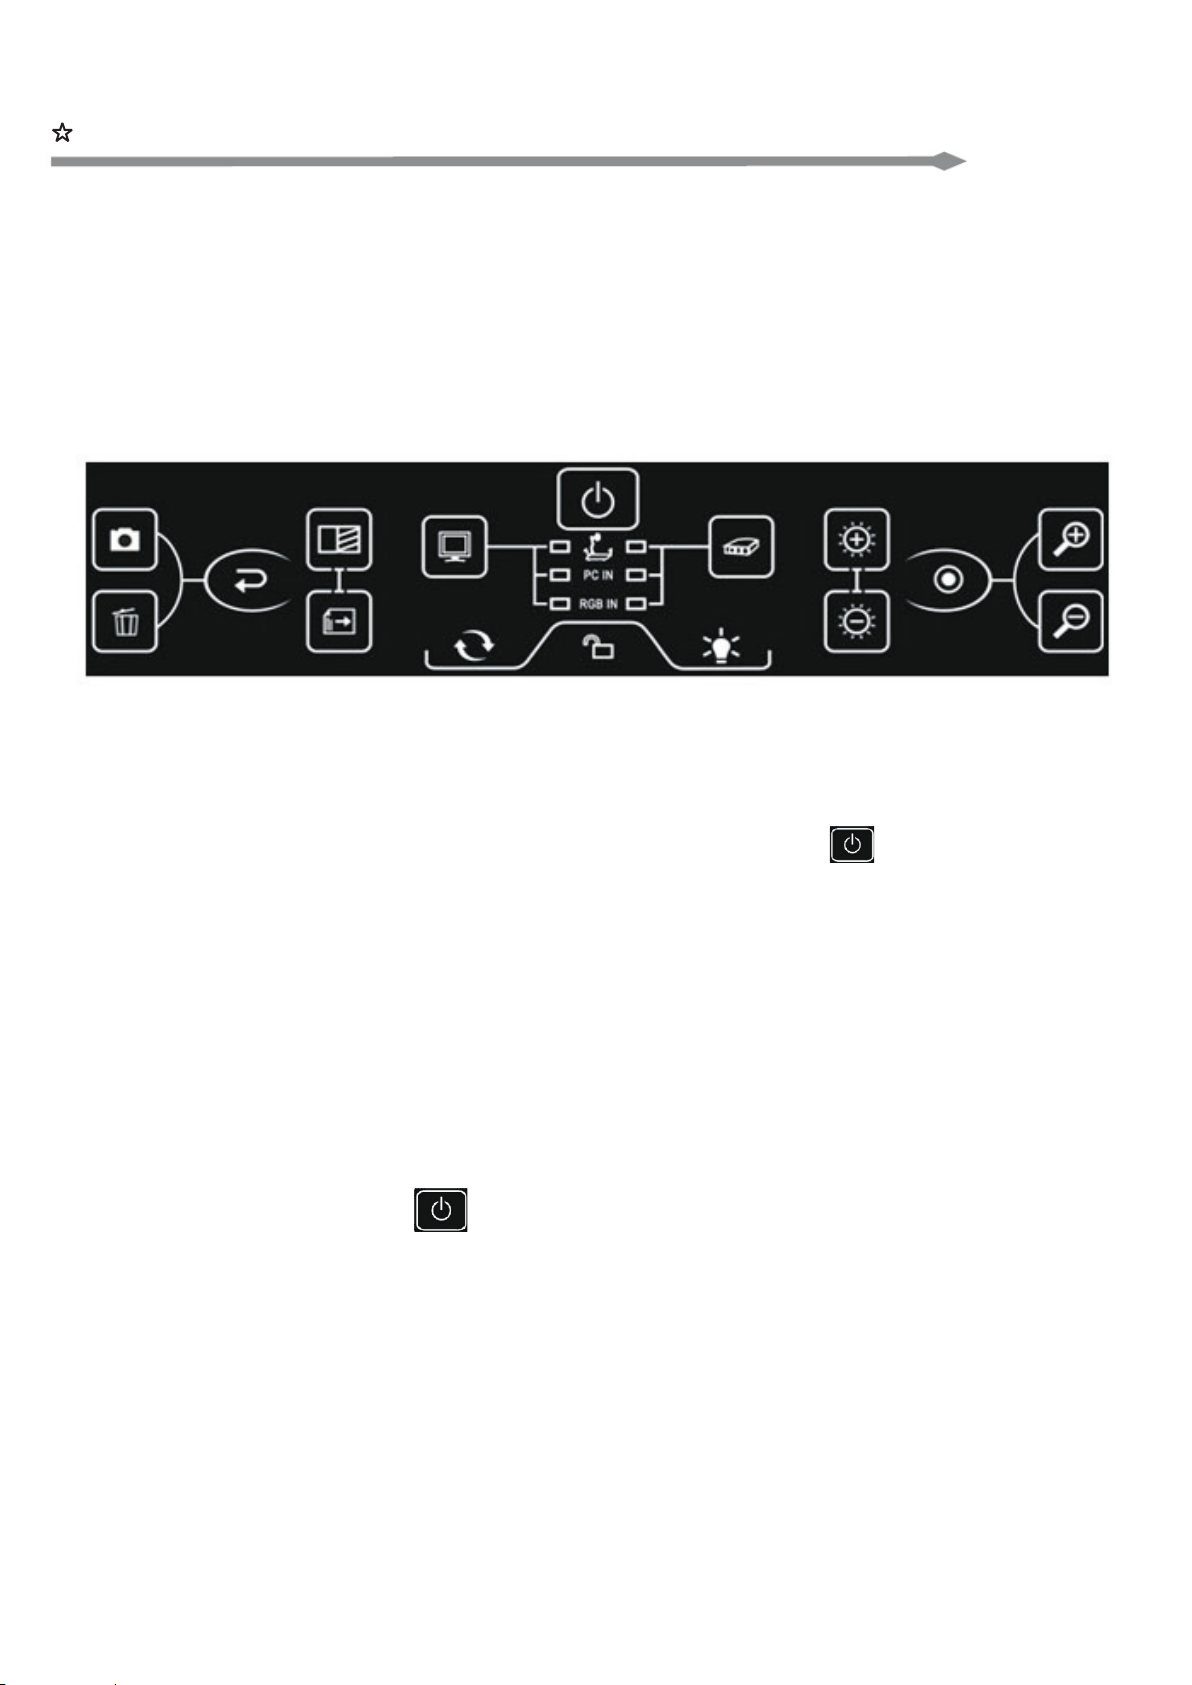
Methods of Usage:
There are three methods of operation: 1. Control Panel 2. remote controller 3.
.
control it through RS-232 Port supported by Computer’s Window System. Three
methods can be executed individually, and can be fixed up.
1. Control Panel:(Note:pls check exact goods for the standard.)
=System acquiesces the following:
It is into awaiting state when visualiser’s power on ,and " “ light will be on,
meanwhile it acquiesces PC output to monitor and projector, thus PC’s monitor
and projector’s light will be on. Light of "volume+" and "volume-" will be on, at this
time user can adjust volume. This visualiser adopts sensitive touch key, just
touch it with finger to use, don’t strike with heavy metal or heavy strengh to
=Turn on:
After connections, press , and it turns from red shinning to red, means the
visual presenter’s power is on. When heard of “Bee” twice, users can start
operation. Please try again to open projector when user found that projector’s
- 9 -
Page 11
=Turn off:
When turn off, press 2 seconds, after heard of a voice of “Bee”, this indicator
will become from red shinning to red, means get into state of waiting, and visual
presenter has been turned off. If visual presenter has central controller function,
when turn visual presenter off, press this button 2 seconds, after a voice of
“Bee”, power indicator shines fastly, meanwhile visual presenter can not be
controlled by any button. When power indicator gets into shining slowly,
press again to turn off projector. After 2 minutes of “Bee”, it is into state of
waiting, at same time projector’s power has been cut down (delayed to turn
off).
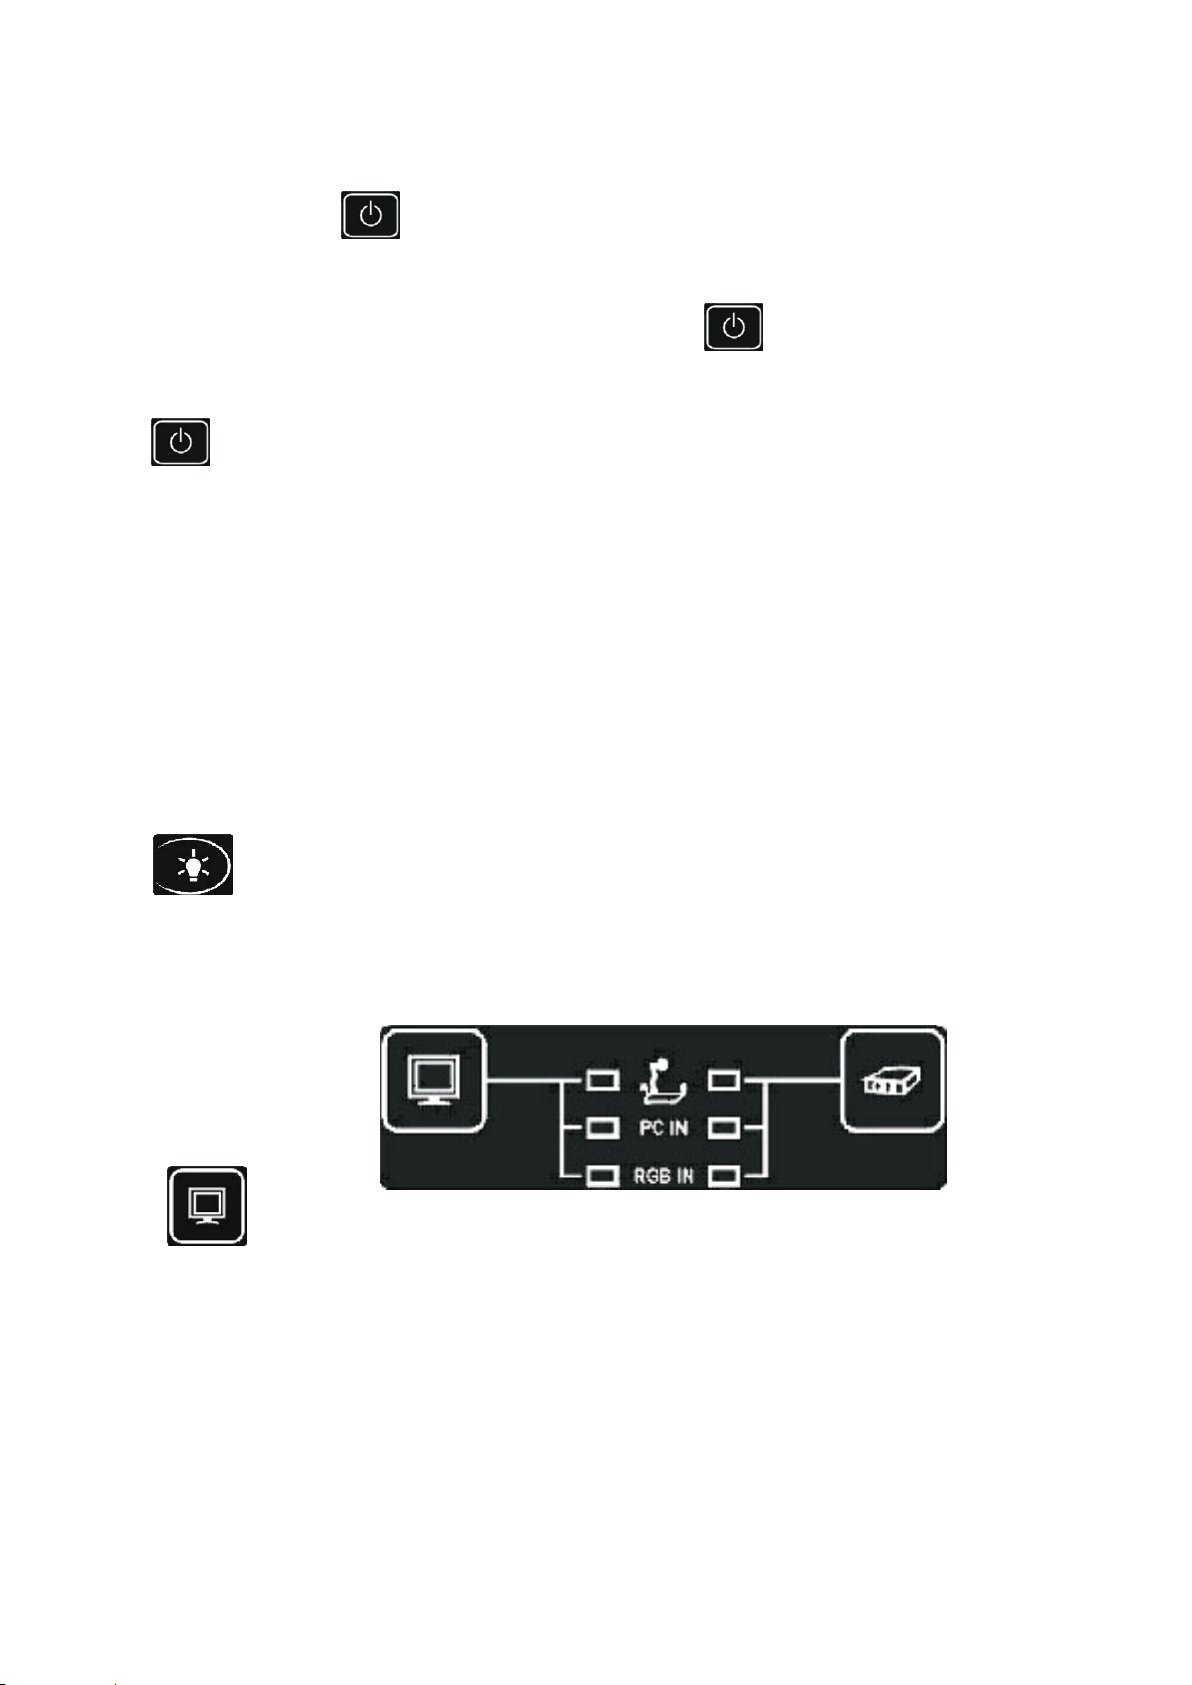
When it is into state of turning off,visual presenter will switch "PC IN" (PC’s
signal) into monitor automatically. (It is get through without signal of turning on).
=Lamp Selection:
Press button, users can turn on/off assitant lamps or baselight.
=Preview/shooting:
Signal output to monitor(preview): Press this button repeatedly to
select visual presenter’s signal, PC signal, and RGB signal’s input. When select
visual presenter’s signal, the indicator will become red(other two indicators will be
off),when select PC signal input, the indicator will be on red (other two indicators
will be off) ,when select RGB signal input, the indicator will be red( other two
previewing indicators will be off).
- 10 -
Page 12
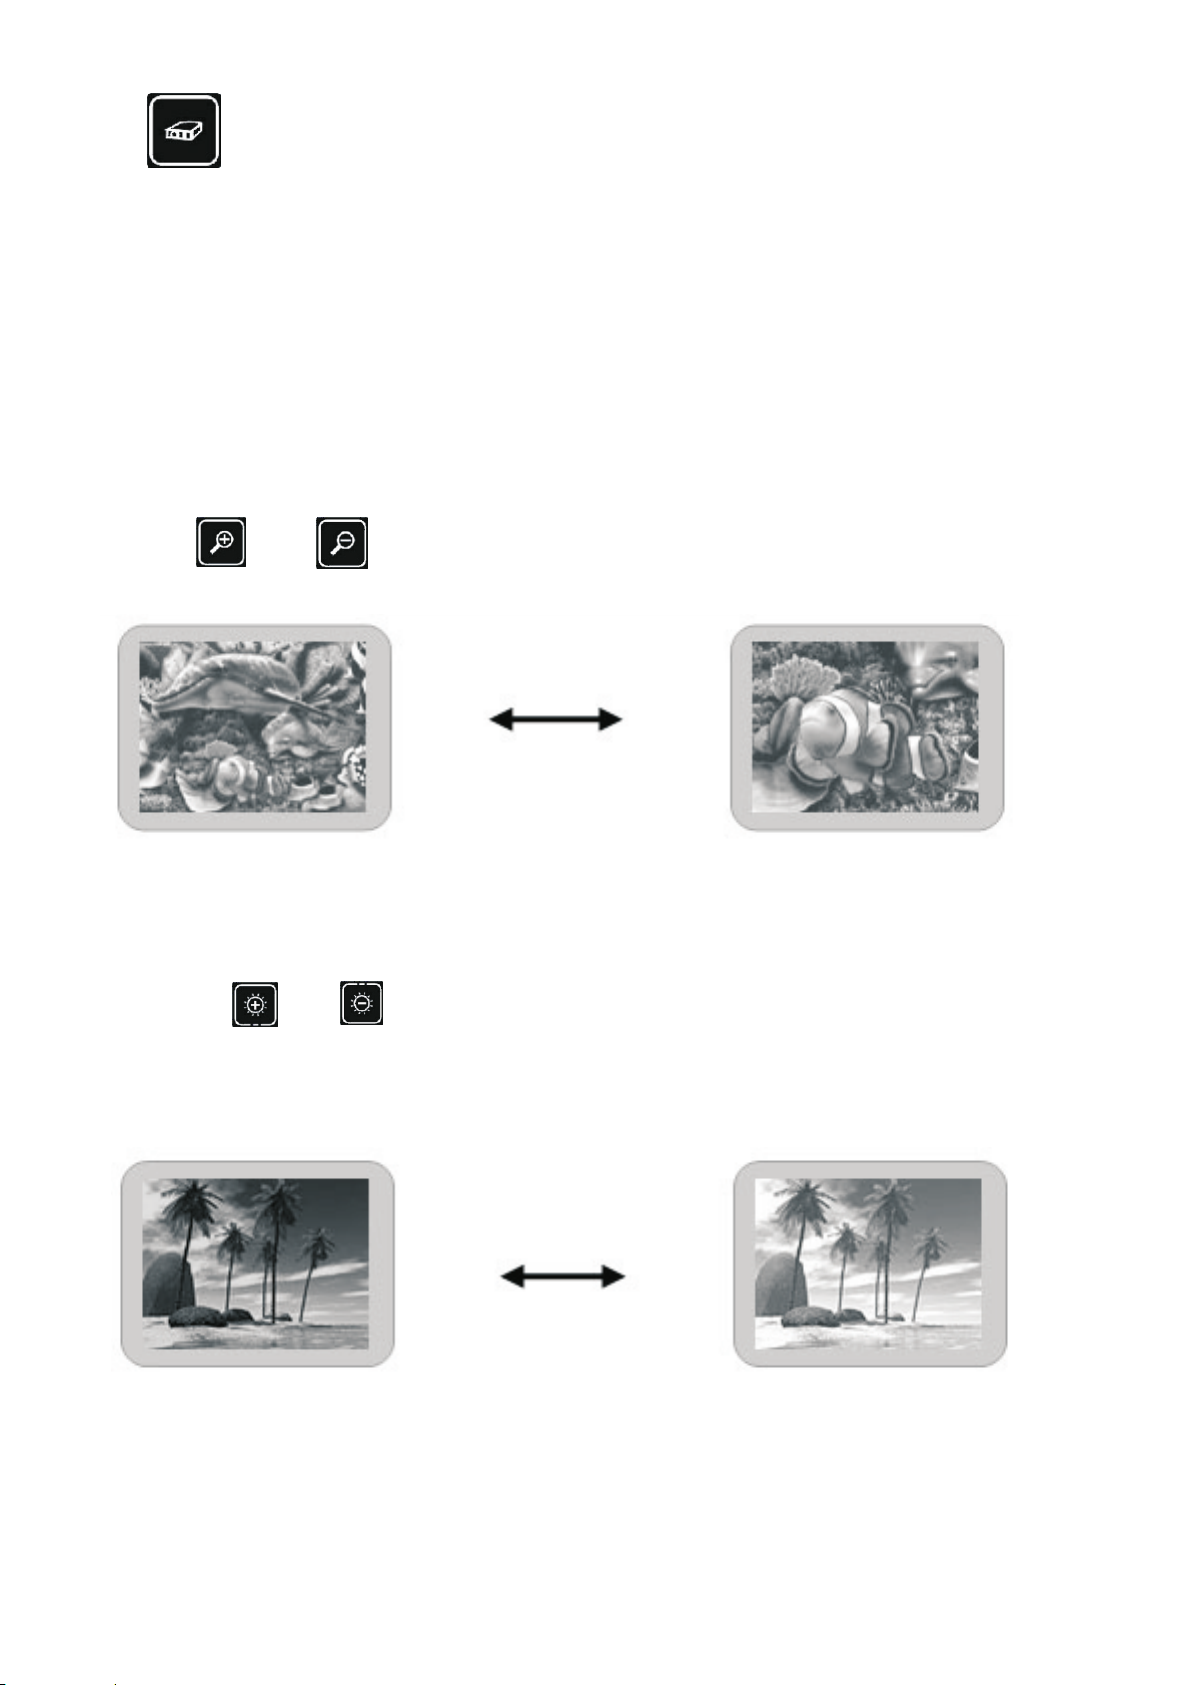
Signal output to projector(shooting): Press this button repeatedly to
select visual presenter’s signal, PC signal, and RGB signal’s output. When it is into
asynchronous state, please select visual presenter firstly, when PC and RGB
signal output to monitor, press this button again, image will output to projector,
meanwhile audio will output as followed, the indicator will become from shinning
red to red.
=Focus adjustment:
Adjusting focus button can change the range of Camra camera, touching or
pressing on or button,can magnify image or deflate image
gradually or continually.
=Brightness adjustment:
Adjusting brightness can change the output brightness from Camra ,touching or
pressing on or button can change the bightness, leting it go by hand will
stop adjusting of brightness.
- 11 -
Page 13
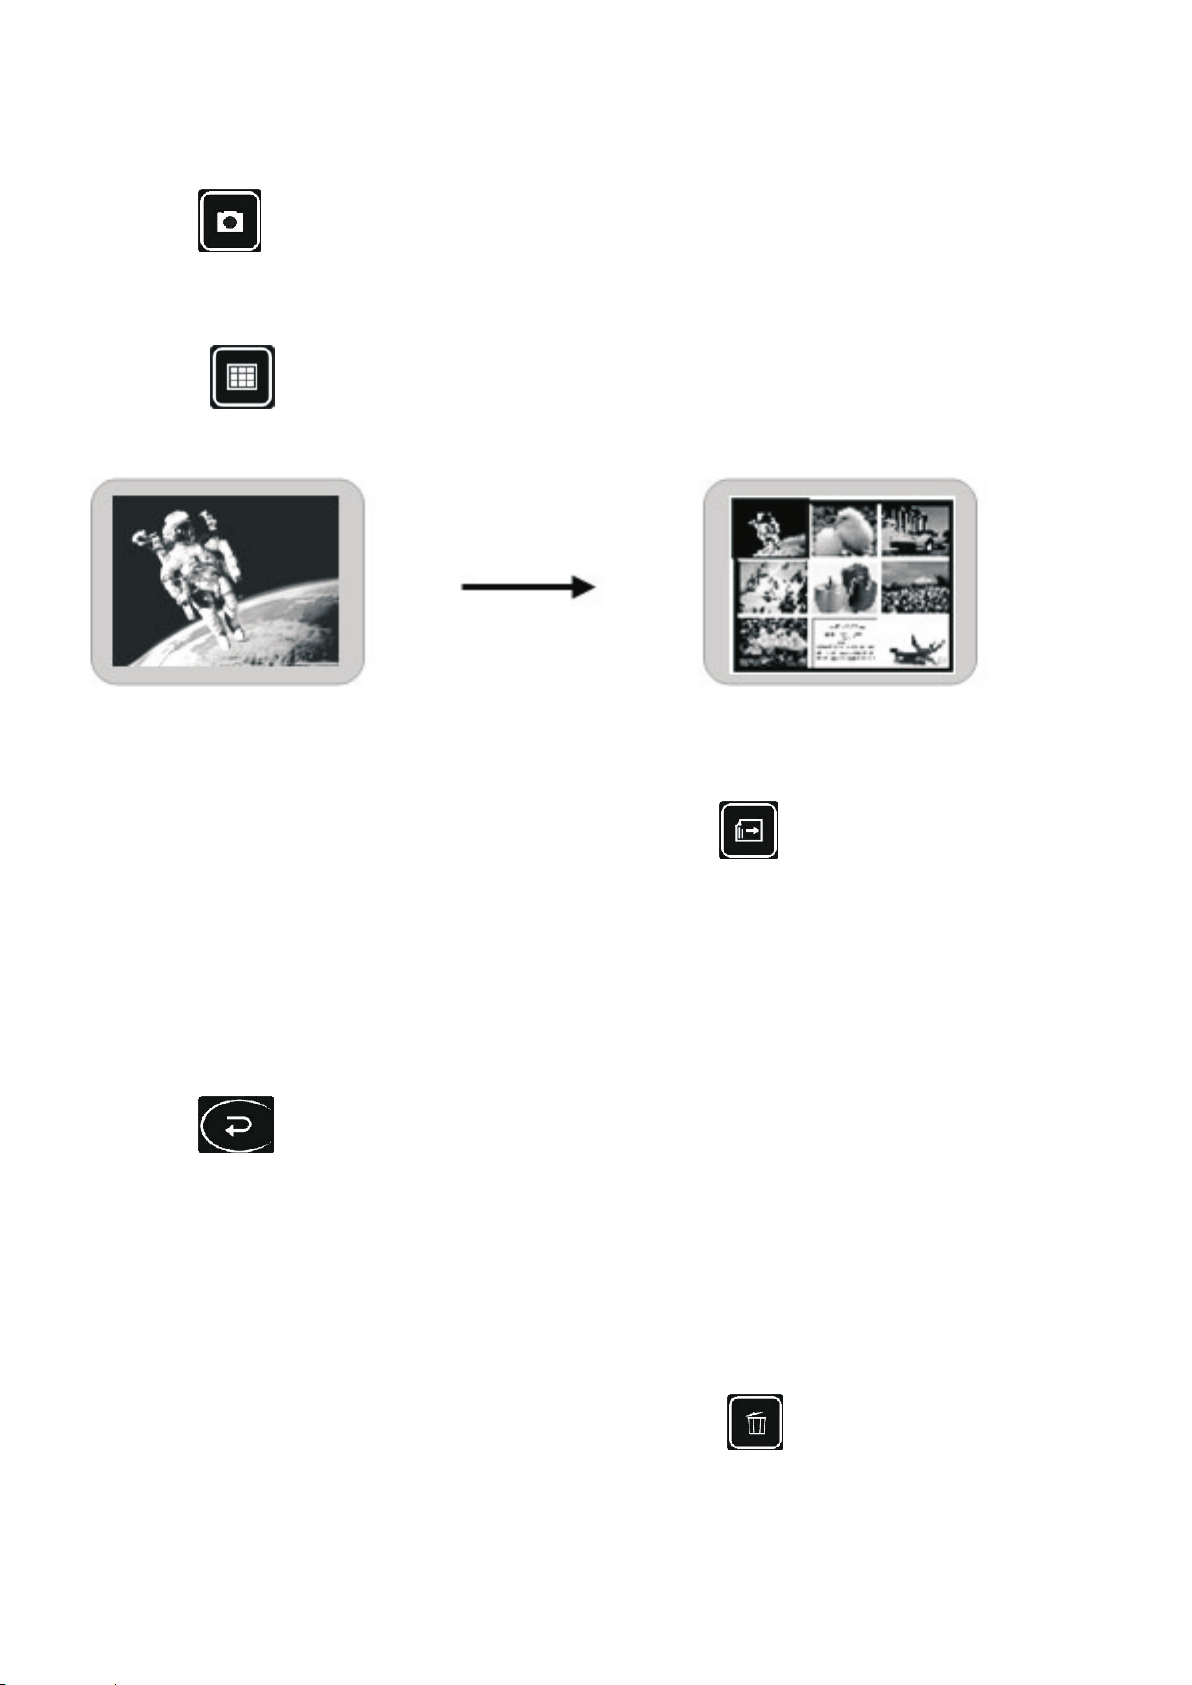
=Storage:
Pressing button can store present image.
=Splitted Screen
Pressing button can show storage of image in full screen or splited
screen.
=Select Image:
When it is in the state of splited screen,pressing button can recycle or
delete images. Press one second for next image
=Recycle:
Pressing button can recycle selected images.
=Delete Image:
When it is in the state of splited screen, pressing button can delete
selected images. Press one second for deleting stored images.
- 12 -
Page 14
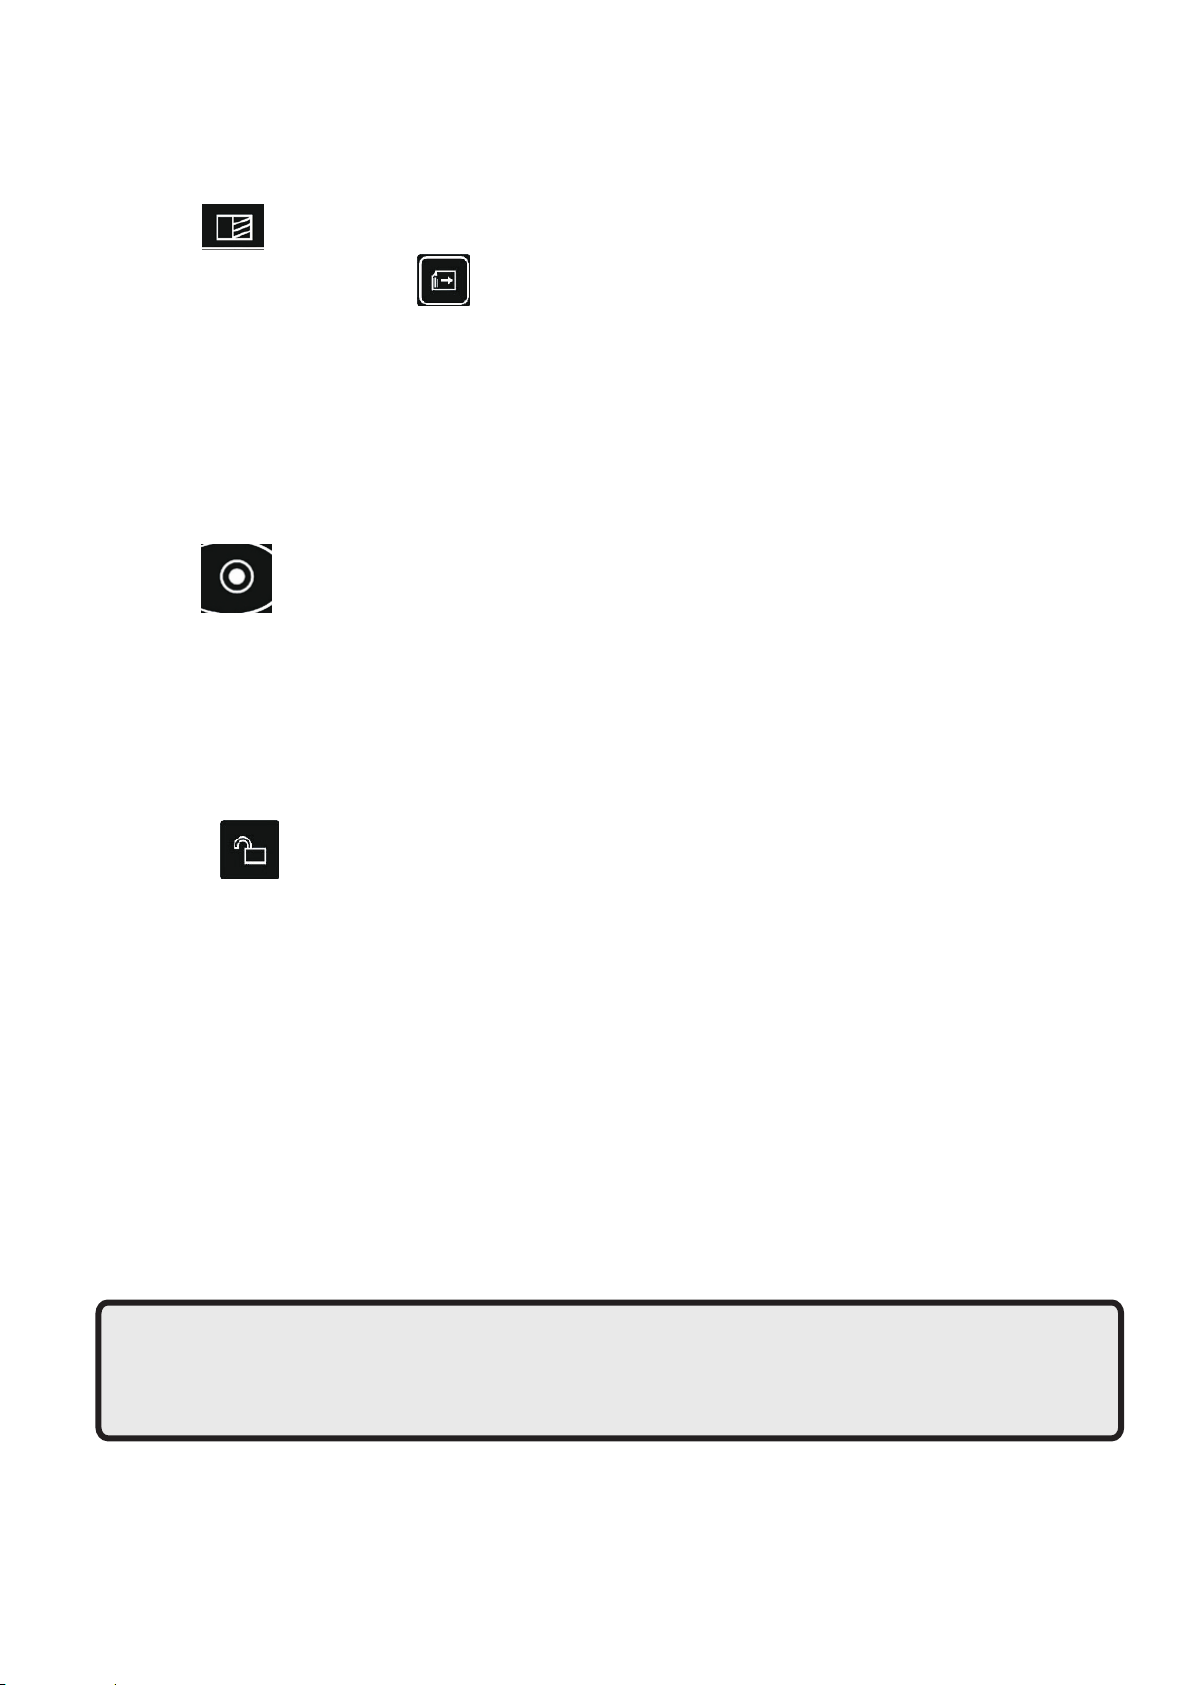
=Division:
Pressing button can display the right part of the saved image on the
splited screen; pressing button can change to another right part of the
saved image.
=Auto Focus:
Pressing button,the focus will adjusts itself automatically.
=Lock and Unlock:
Pressing button“1”second can unlock.
Visual presenter acquiesces that it will unlock after 20 seconds automatically
without any touching, at this time users can only operate indicated buttons, others
should be unlocked before operation.
Note: visual presenter adopts indicator to guide operation
and this human-nature design make operation more vividly.
- 13 -
Page 15
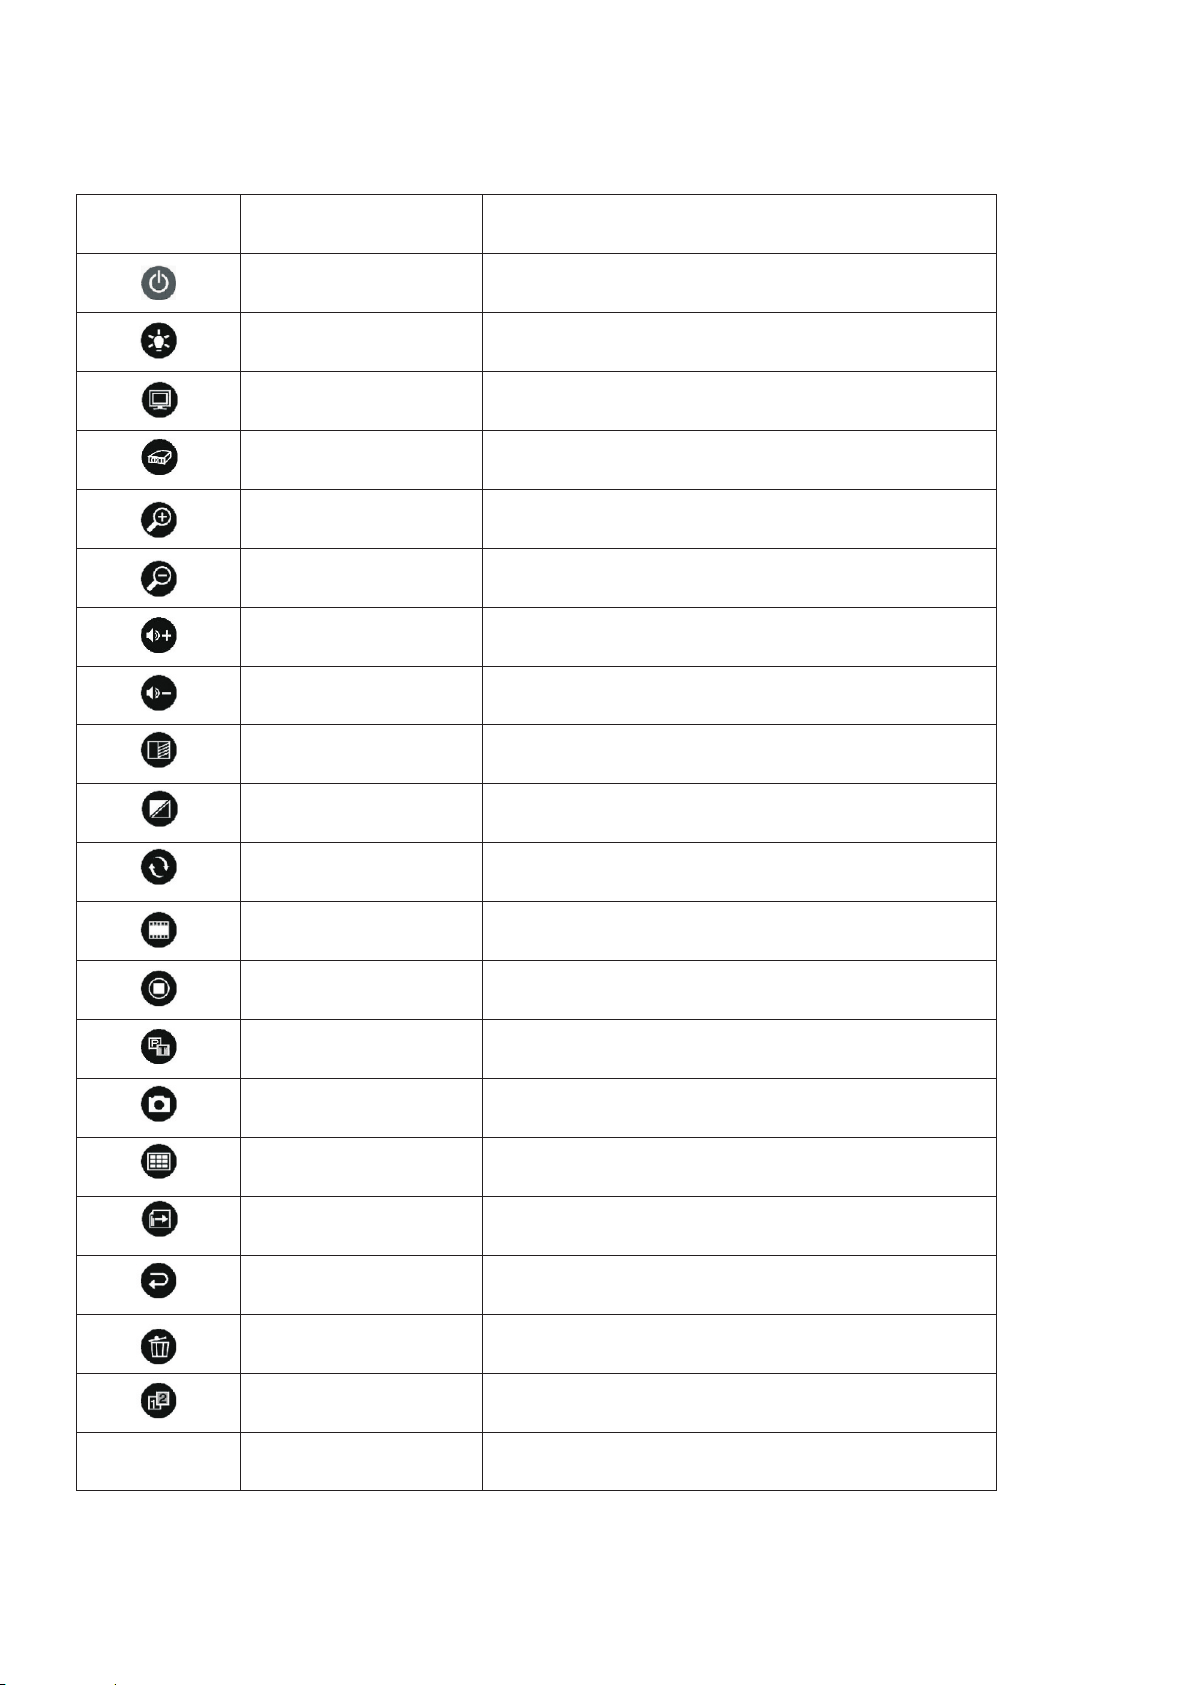
2. Remote Controller:
Image Function
POWER
LAMP
MONITOR
PROJECTOR
ZOOM
ZOOM
VOLUME
VOLUME
DIVISION
Description
Turn on/ Turn off, or decode projector's on
On / Off of light and baselight, or decode
projector’s off
Output Signal to Monitor
Output Signal to projector or TV
Enlarge image
Contract image
Increase volume
Reduce volume
Freeze the left part of image,move and
compare with right part of image
B.W
ROTATE
NEGATIVE
FREEZE
TEXT
CAPTURE
PREVIEW
NEXT
PLAYBACK
DELETE
W/B & Color of image
Rotate image for angle of 90 or 180
Show image in positive / negetive form
Freeze the shooting image
Display picture in text/image form
Store the current image
Display images in splited form
Choose next picture to recycle or delete
Display stored image fulfilled screen
Delete choosed picture in splited state
SIGNAL
Choose signal 1 or 2(selected)
- 14 -
Page 16
2. OSD Controller:
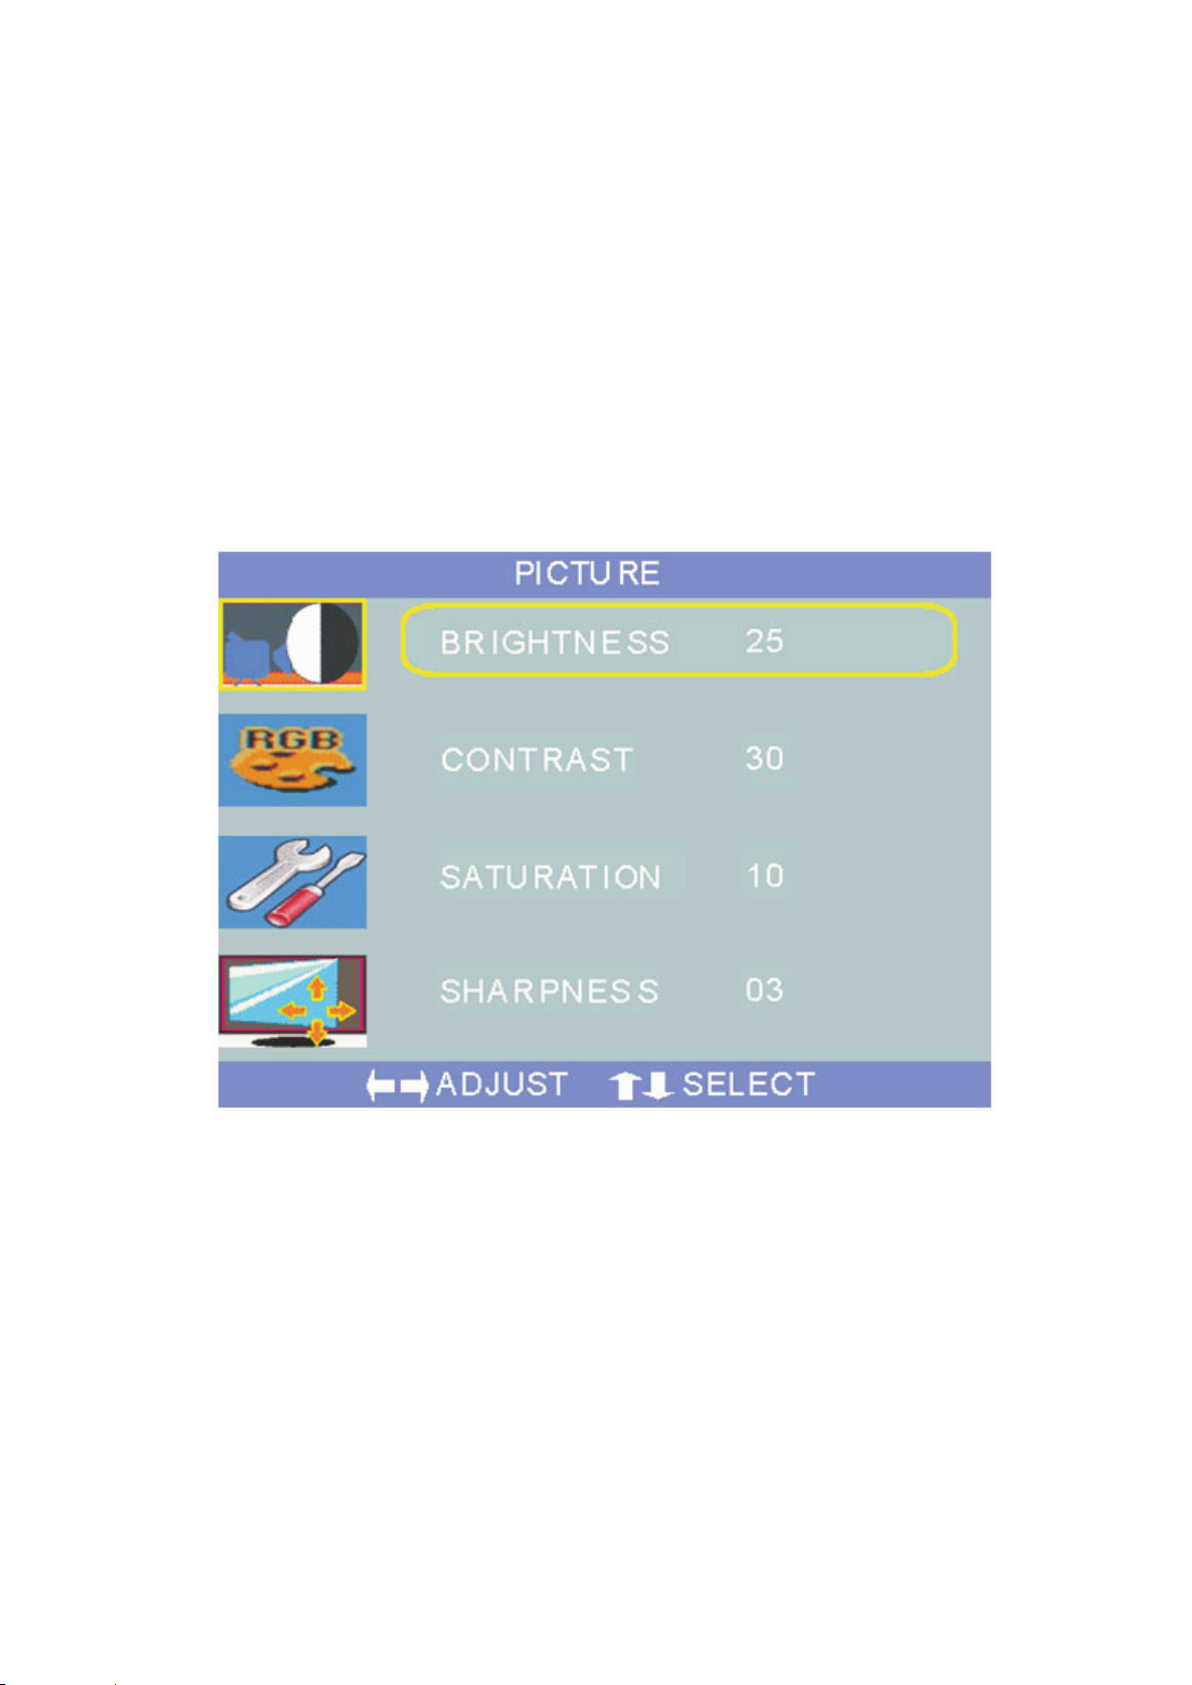
OSD menu operation: PICTURE, RGB, RESOLUTION and SYSTEM. Operate
as shown below:
In the normal state, press FOCUS for 3 seconds to enter into the main menu, and
then press WIDE or TELE button to enter into PICTURE, RGB, RESOLUTION or
SYSTEM setup. After entering into the menu, press WIDE or TELE to select the
option to be set up, and then press Far or Near to set up the detailed specification
under each option.
Pressing “Tele” “Wide” to come to the image setting selection, pressing “Focus” to
come to operation, pressing “Tele” “Wide” to select operation itms needed
,pressing “Far” “Near” to setup the selected items. After entering the image setting
,which could setup the brightness , contrast , saturation and acutance .
- 15 -
Page 17
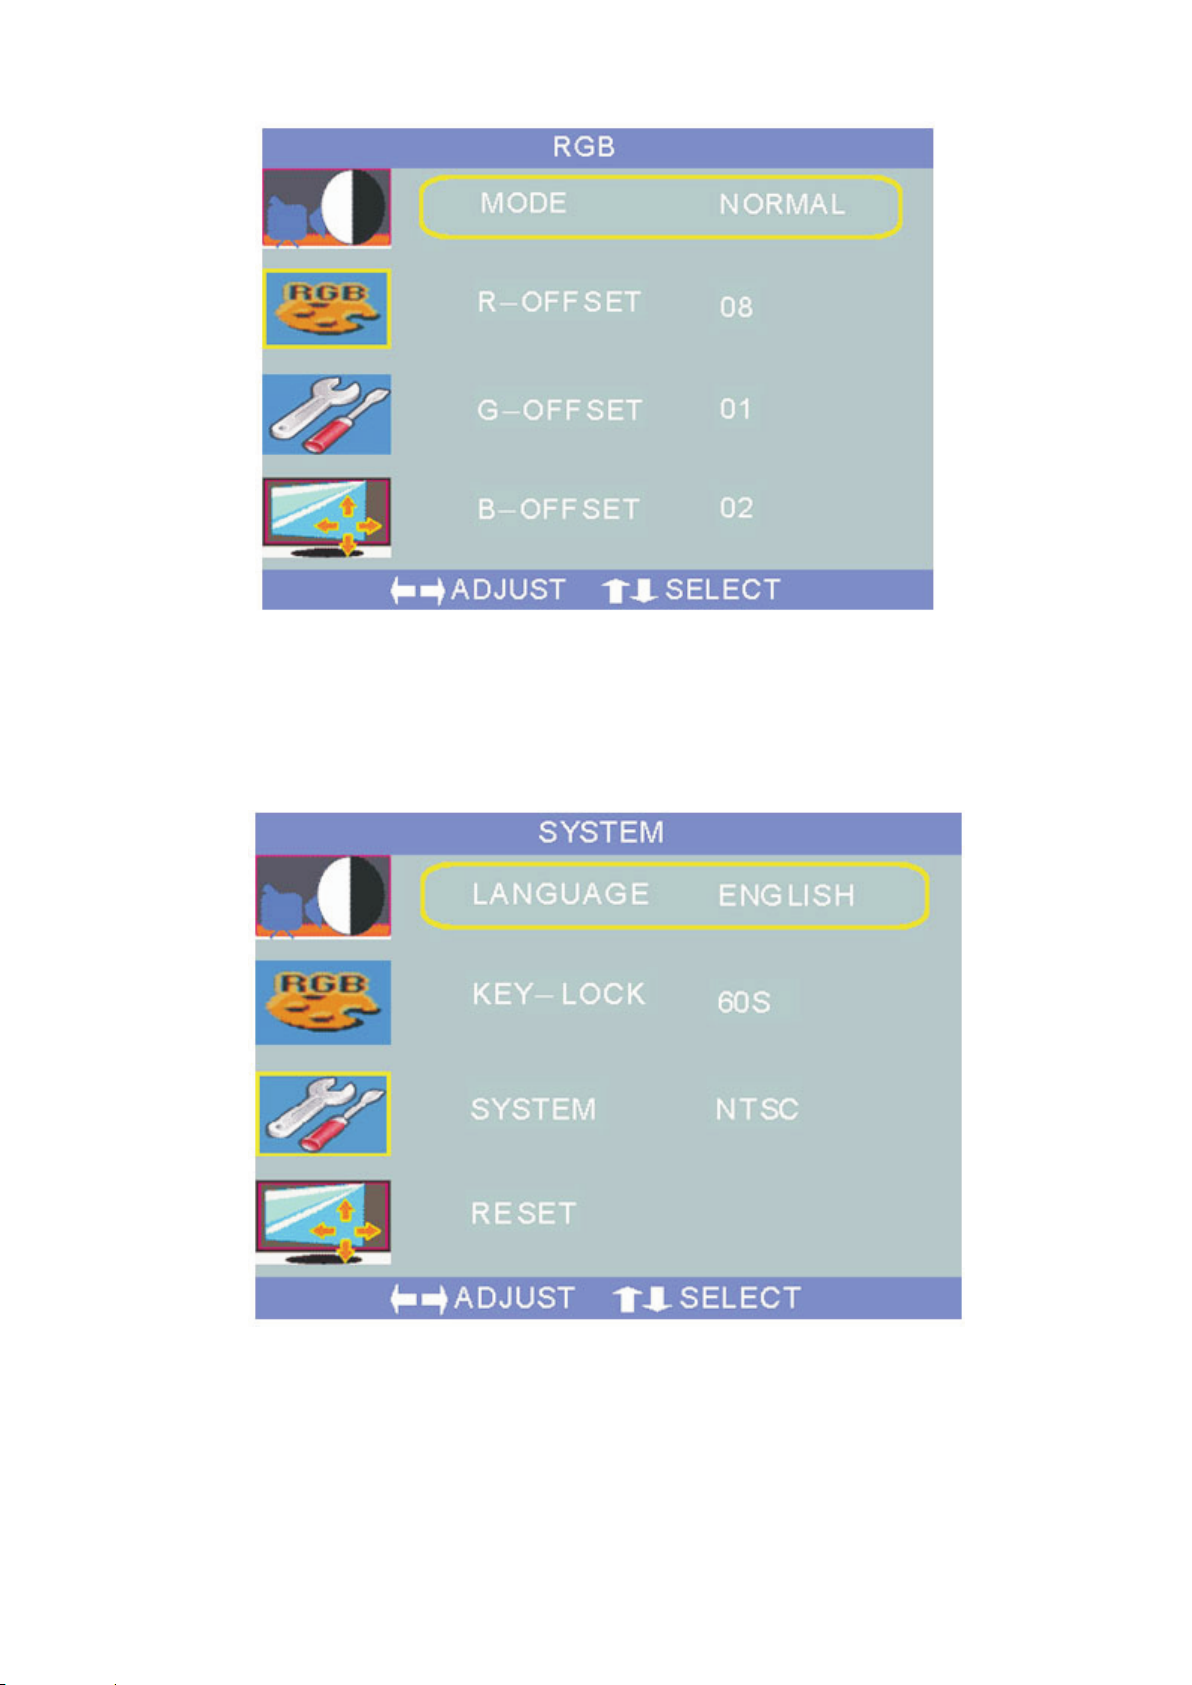
After entering the color selection item, which could select the mode of beforehand
default color, or select the user-defined mode, then come to the adjust of ROFFSET, G-OFFSET and B-OFFSET
After entering to the system setting item, which could select the language. Pal
,NTSC and default setting could be choosed offered by TV mode .
- 16 -
Page 18
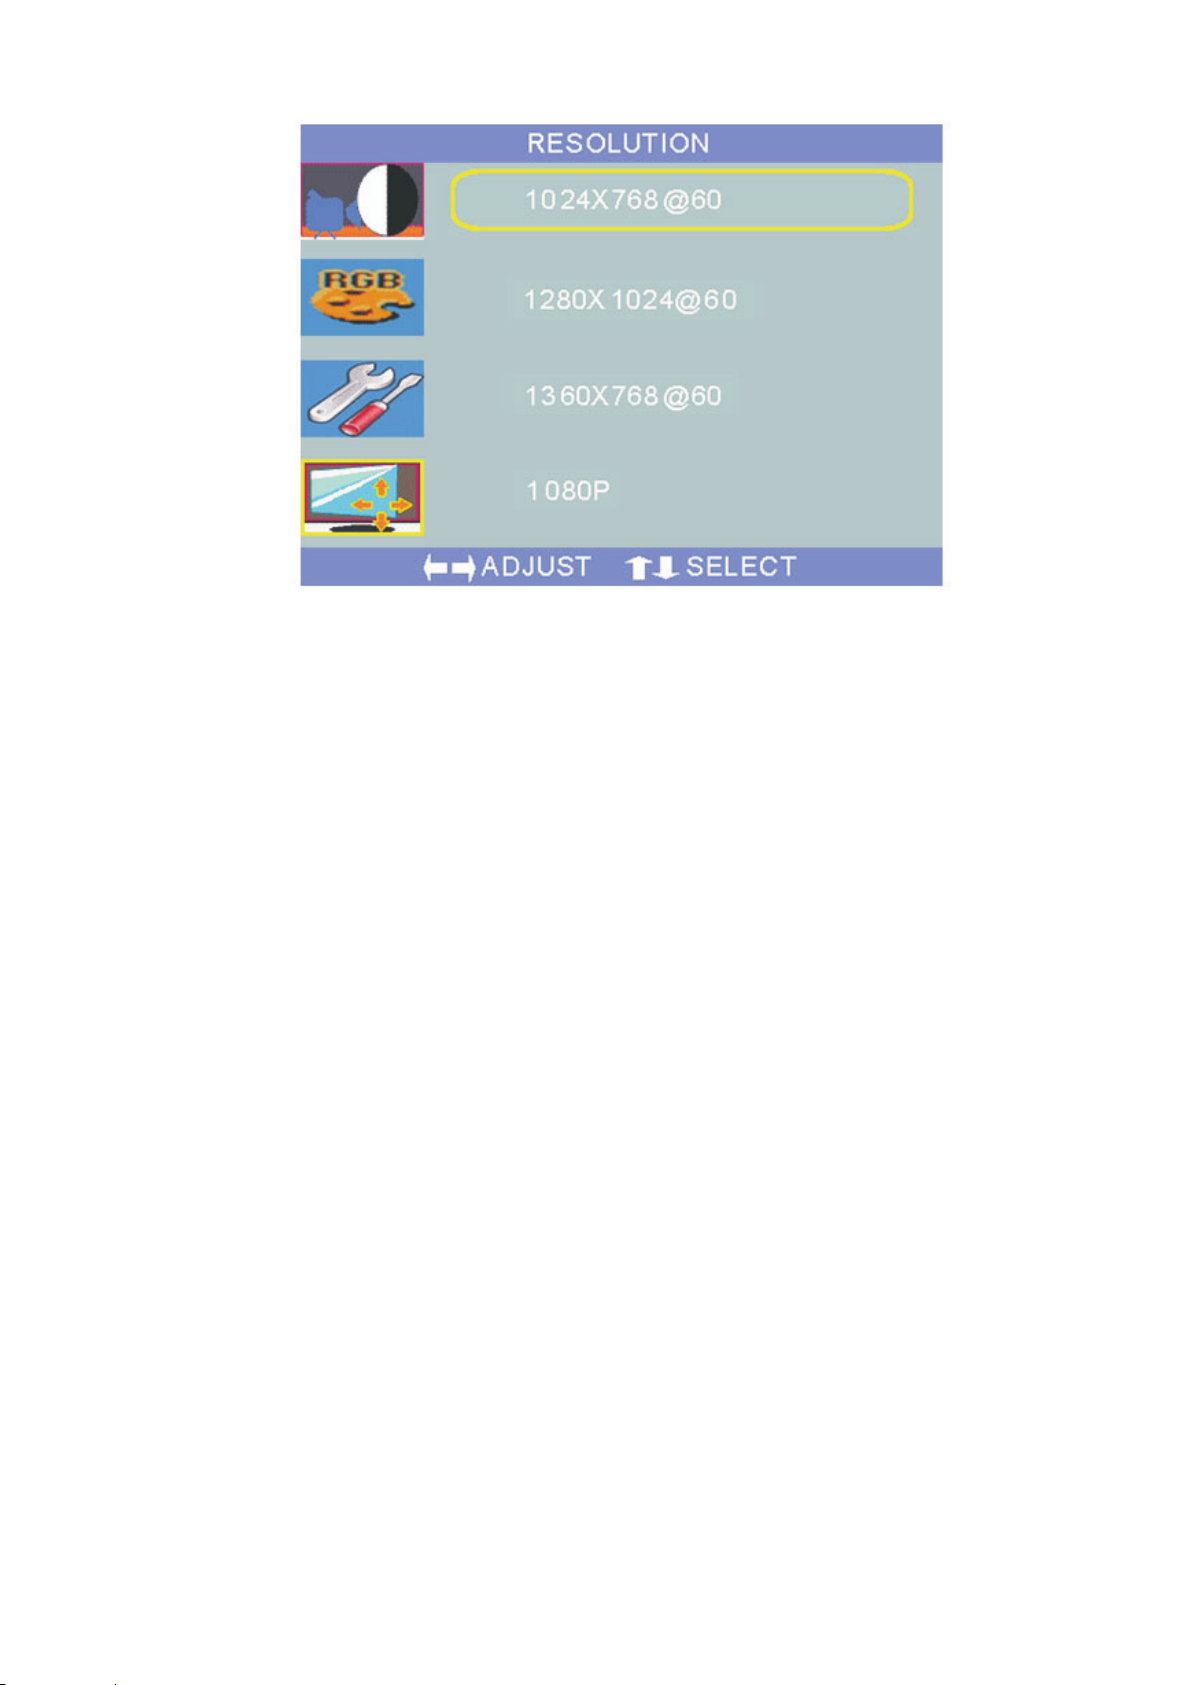
After entering into the RESOLUTION page, you can set up the resolution.
4.PC RS-232:(it functioned same as remote controller, pls check attached disc).
- 17 -
Page 19

Daily Maintenance and Attention:
1. Pls don’t turn on/off power frequently, in order not to shorten using time
of Camera.
2. Lamps should not get on/off frequently and sunddenly, in order to lengthen
their lifetime.
3. Don’t make Camera opposite to strong light, such as sunlight or sun.
4. Pls turn off power when users intend to move it, and pull plug out, let the
pole down to move, and don’t lift the pole or assistant lamp arms to move.
5. Pls don’t rotate assistant lamps horizontally.
6. Press left/right lamps down without heavy strength.
7. Attention to get out of wetness when it is in wet condition, if user has found
that can not focus clearly, don't touch Camera by hand, use special paper to
clean. If necessary, short-sighted lens to make clearance.
8. Pls pull out power plug when long time unused, and cover with cloth or
plastic things.
9. The valid time is 8 years, if for lasting time, pls send visual presenter to
after-sale service or repaired center for checking.
- 18 -
Page 20
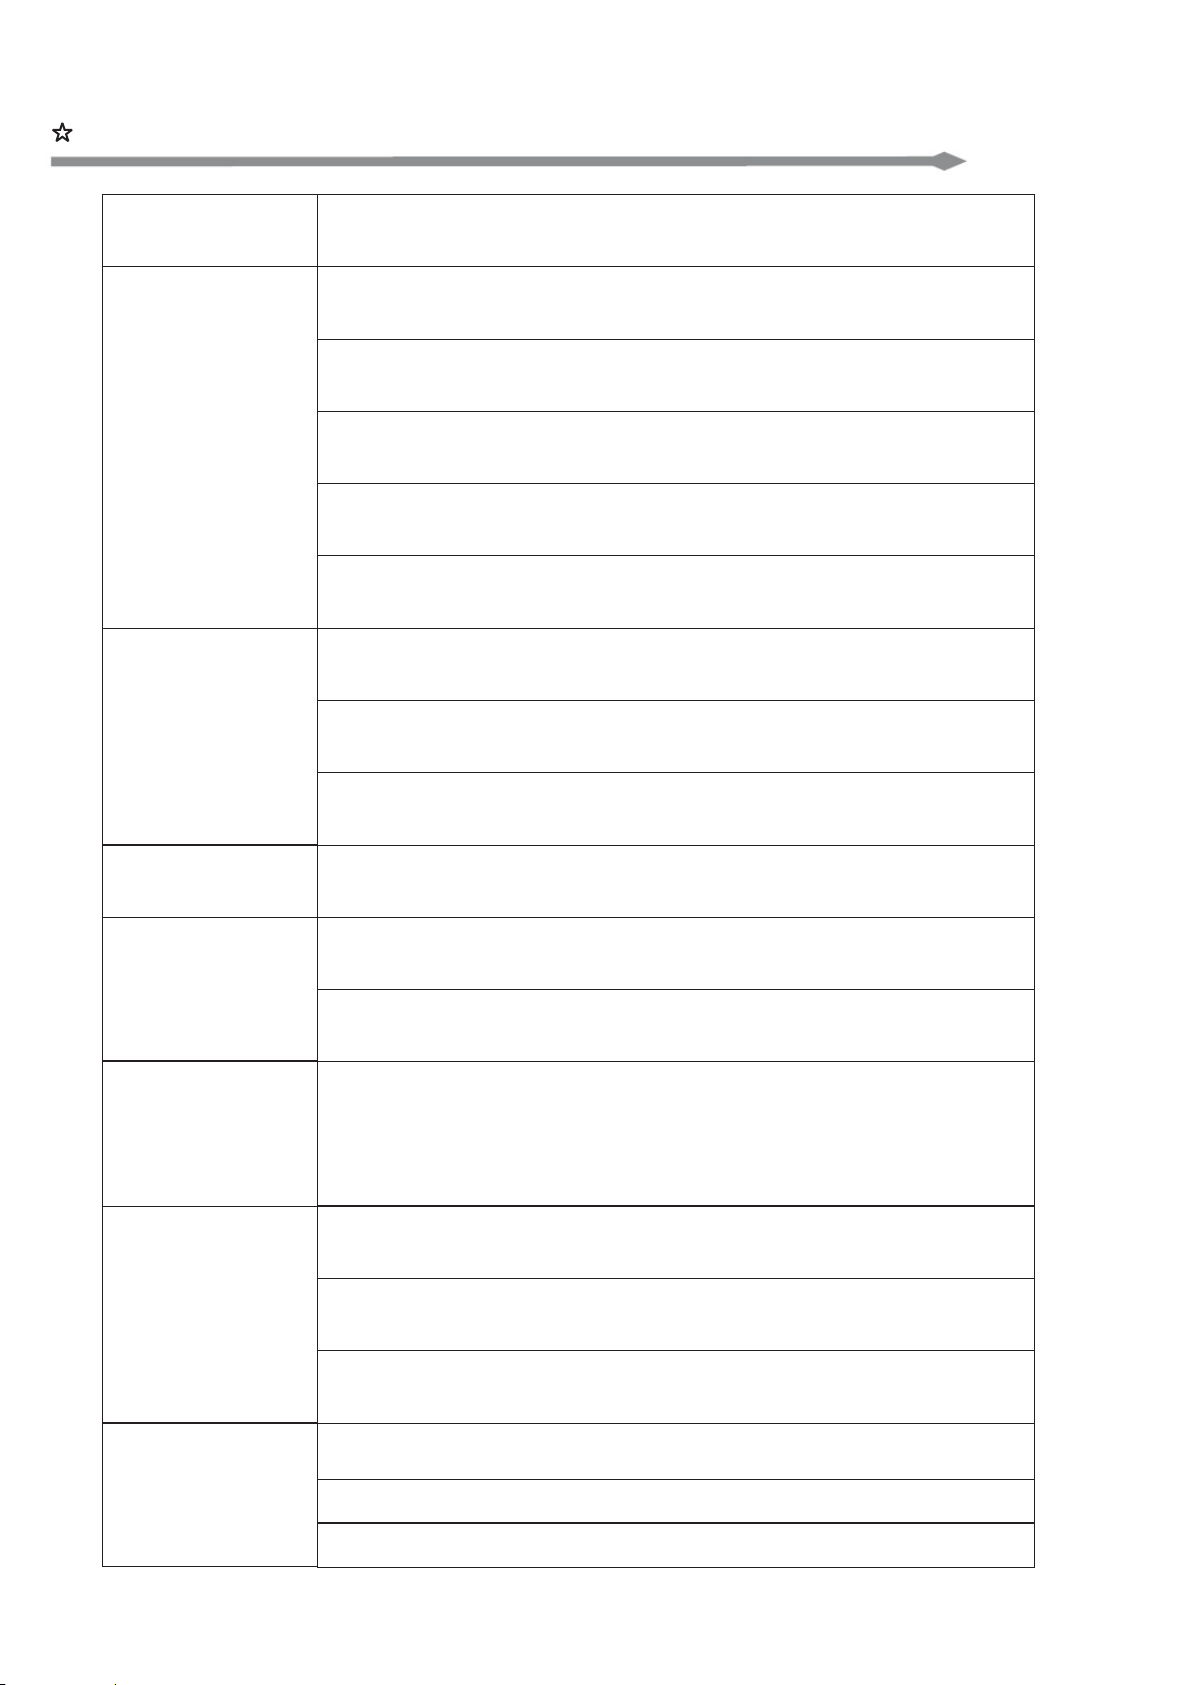
Problems and Solutions:
Image Analysis and Solution
Check power cable, connect again
Press power in to electricity
No image
no sound
Image is
not clear
Noise-wave
is exist
Image is
too dark
Audio cable or RGB cable connected in wrong way,
pls connect again.
Input/output connect correctly or not?
Camera cover has not been taken off
Distance between things and Camera is too close, so can
not focus normally, to adjust and make it more than 330mm.
Surface of things are too brilliance or reflects, adjust light
darker
Camera is dirty Pls clean Camera or shortsighted lens
underside
There is noise-wave exsited when enlarge image in
extremely dark environment. Pls turn on assisted lamps
Pls turn on assisted lamps
Pls adjust brightness, increase brightness
Buttons
on panel are
invalid
Remote
controller
no
response
Microphone no
sound
Press two buttons synchronically or press too slowly,
visualiser will be no reply. One time one button, make
interval time longer when press two buttons
Confirm there is no other things between visualiser and
remote controller to effect
Confirm distance between visual presenter and remote
controller is within 5M
Pls check battery fine and in correct connection or used
out yet?
Check audio cable is good and correct or not
Check microphone work well or not
Check volume of microphone is lowest or not
- 19 -
Page 21
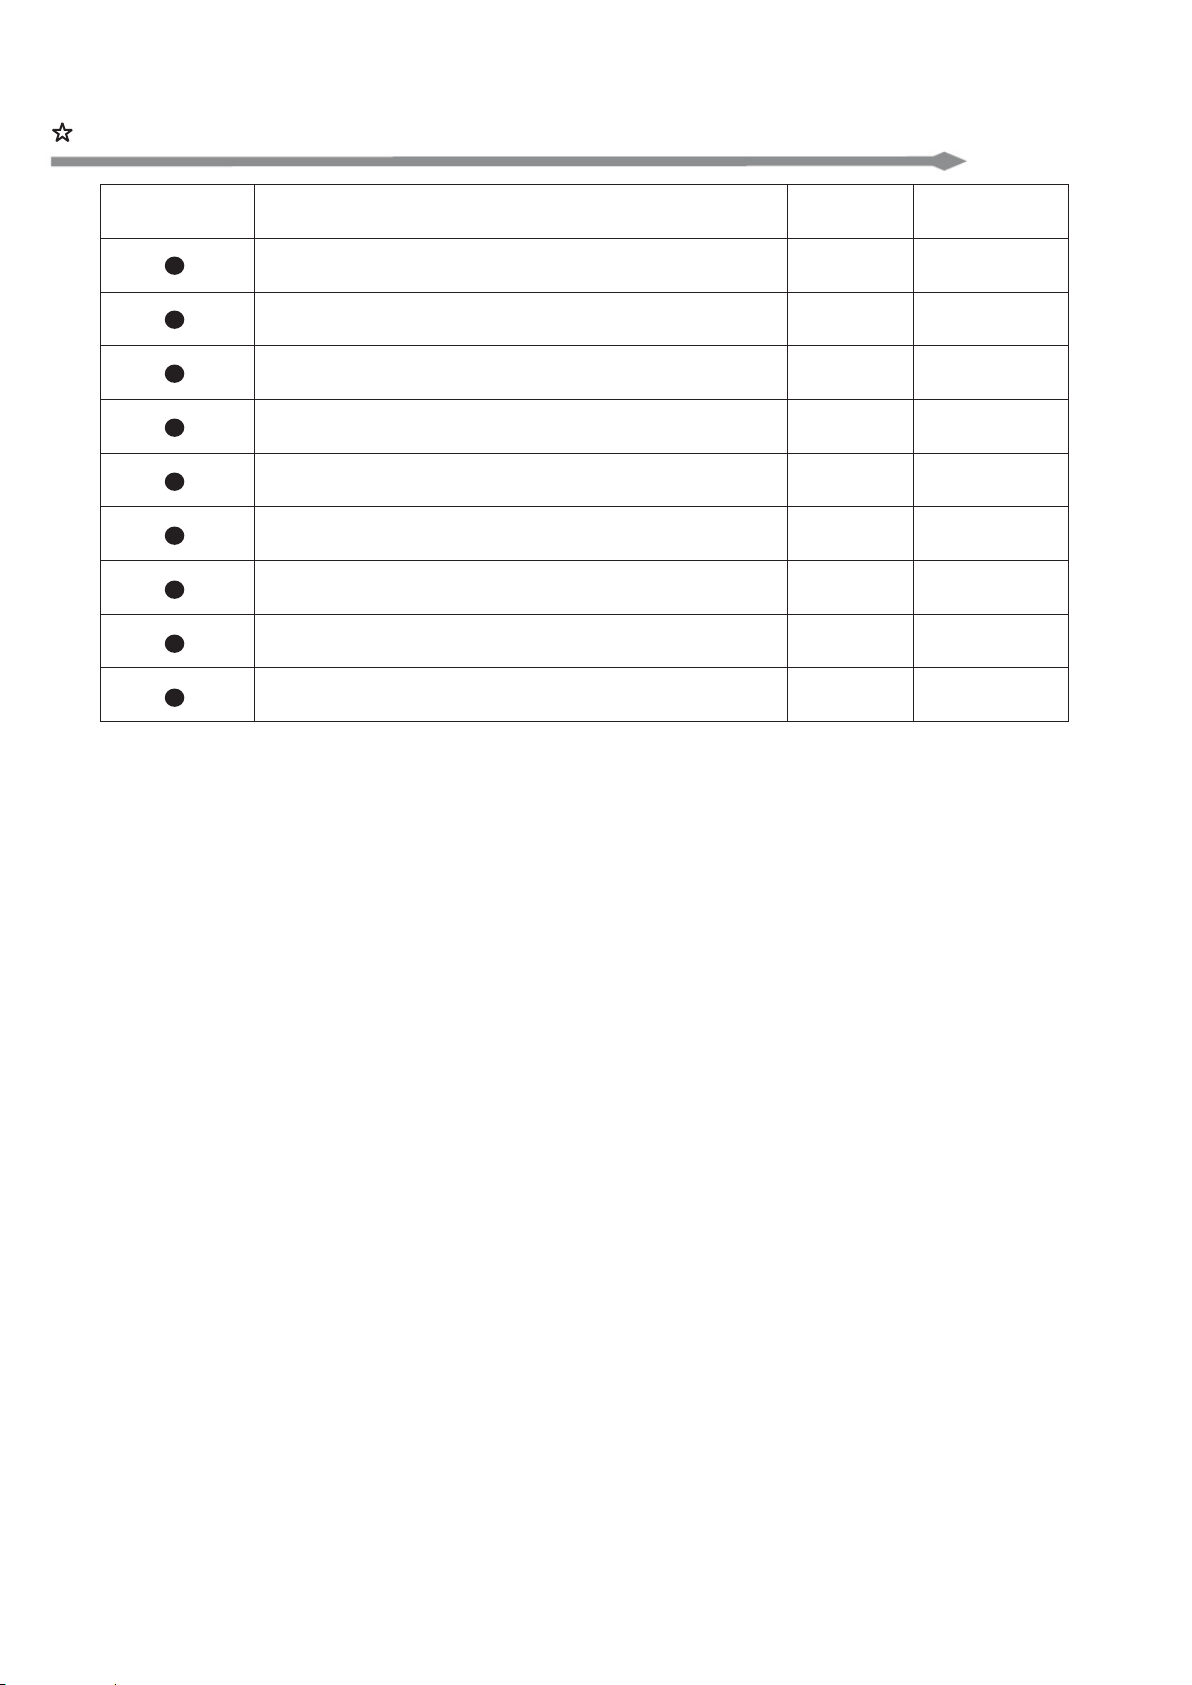
Attached list:
Name Unit Quantity
Control software (disc)
Remote controller
Adapter
VGA cable
RS-232 multi-functioned cable
¢3.5Audio cable
Infrared shooting cable
DB-9 (to projector’s RS232 port)
USB cable
PC 1
PC
PC
PC
PC
PC
PC
SET
PC
1
1
1
1
1
2
1
1
- 20 -
Page 22
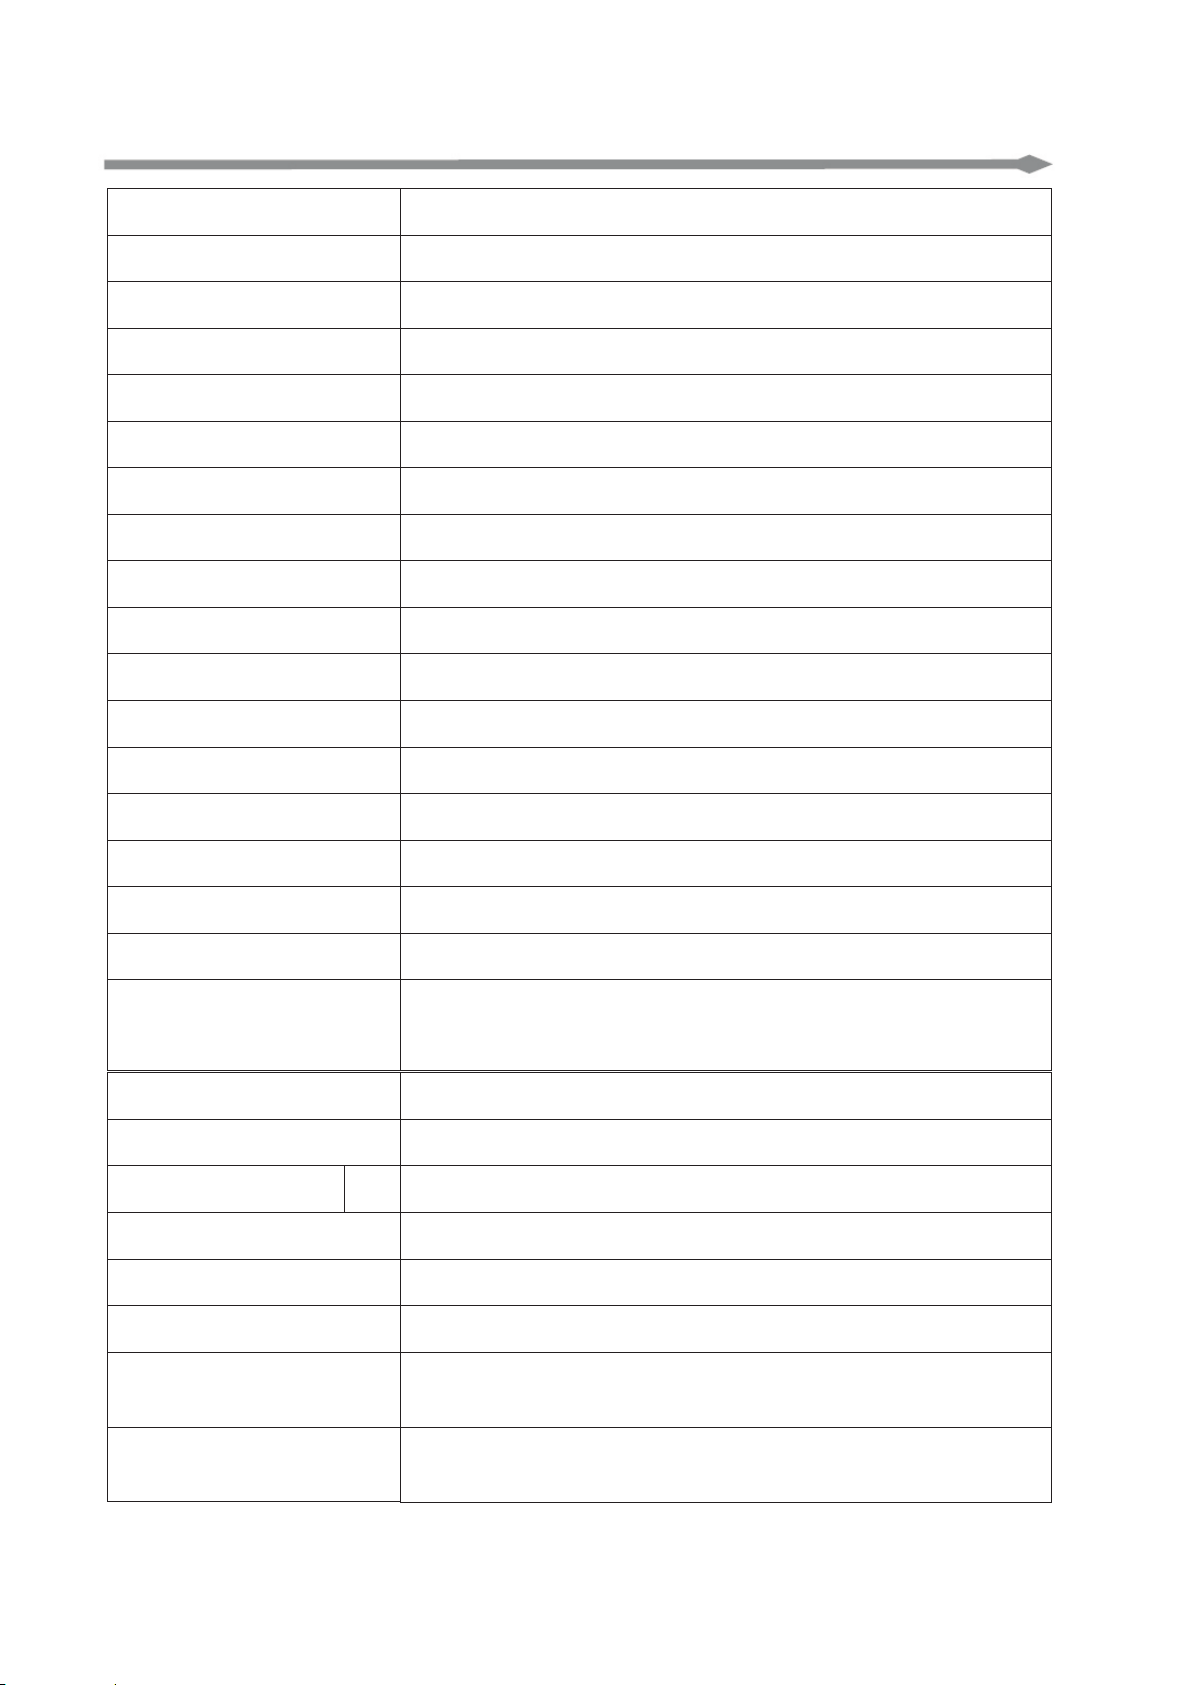
Technical Specification:
Specification
Technology
Lens
Shooting Area
Zoom(Optical-Digital)
Focus
Image Sensor
Total Effective Pixels
Resolution
Image Rotaion
Frame Rate
Aspect Ratio
Images Memory
NV-1024
CMOS
F1.6~3.7, f3.9~85.8 mm
210X297 mm (Landscape)
12X Optical + 8X Digital Zoom
Auto and Manual
1/3" Image Sensor
850,000
XGA (1024*768)
180 Degree
30 fps
4:3
9 Images
Demonstration
Aperture
White Balance
Split Screen
Image Effect
Remote Effect
Camera Rotation
Lighting System
Top Lamp
Base Lamp
Input/ Output
AV Input
Auto
Auto/ Manual
Split Two Half Right/ Left
Color/BW, negative, mirror, text/ graphic, Brightness
control, Freeze, electric Volume Control
Infrared Remote Control
350 Degree horizontally and Vertically
LED Iamps*2
LED Iamps
Microphone Input*1
Audio frequency (stereo)*2
AV Output
Video*1 S-Video * 1
Audio frequency (stereo)*1
- 21 -
Page 23
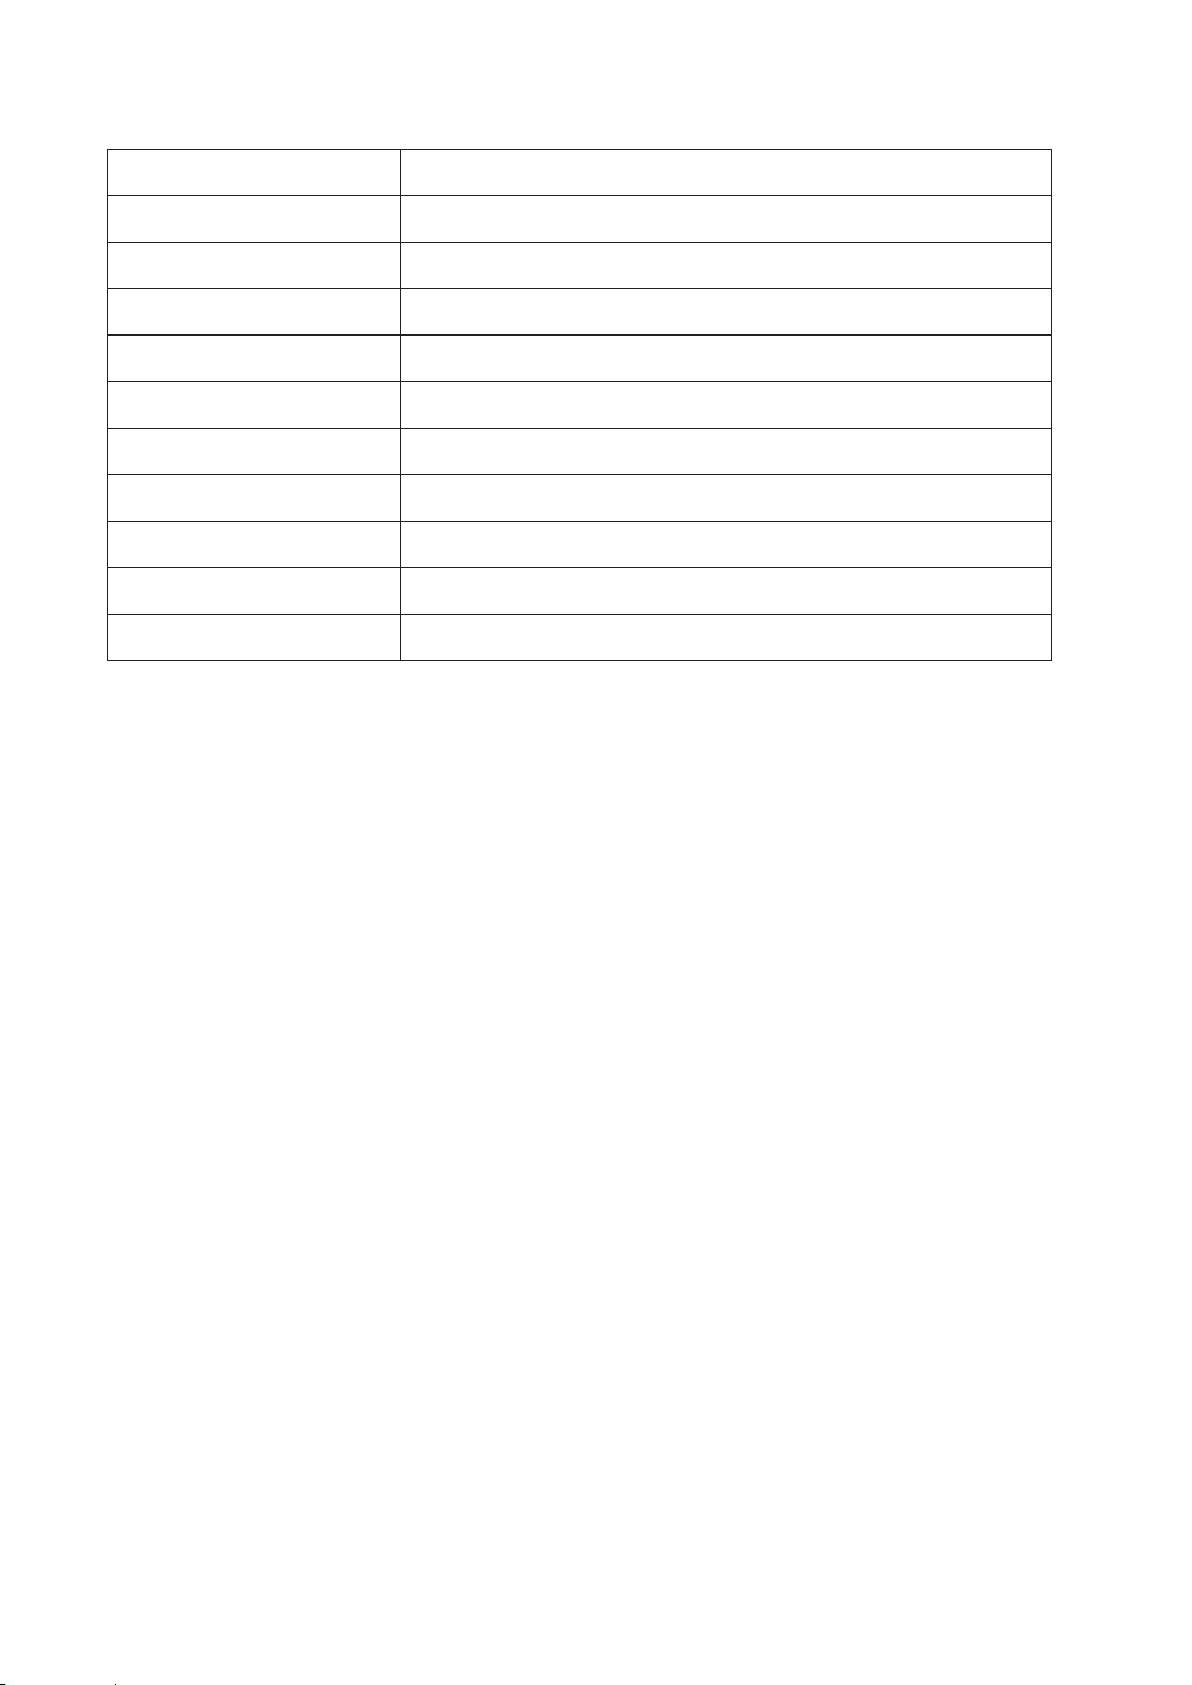
VGA Input
RGB*2 (3 routes matrix switch)
VGA Output
RS-232 Port
USB Port
RGB*2 (Matrix output)
Provided
Provided
Power
Power Supply
Power Source
Energy Consumption
Dimension/Weight
Setup
Fold
* Design and specifications are subject to change without prior notice.
DC 12V 1.5A
100-240Volts 50-60HZ
<= 15W
470*435*520mm
490*493*140mm
5 KGS
- 22 -
Page 24

Guangzhou Osoto Electronic Equipment Co., Ltd.
No. 301, Building G, Jingye No. 4 Street, Yushu Industry Park, Science town, Guangzhou, China
Made In China
 Loading...