

INSTRUCTION MANUAL
Premium 102mm f/7.0 ED Refractor
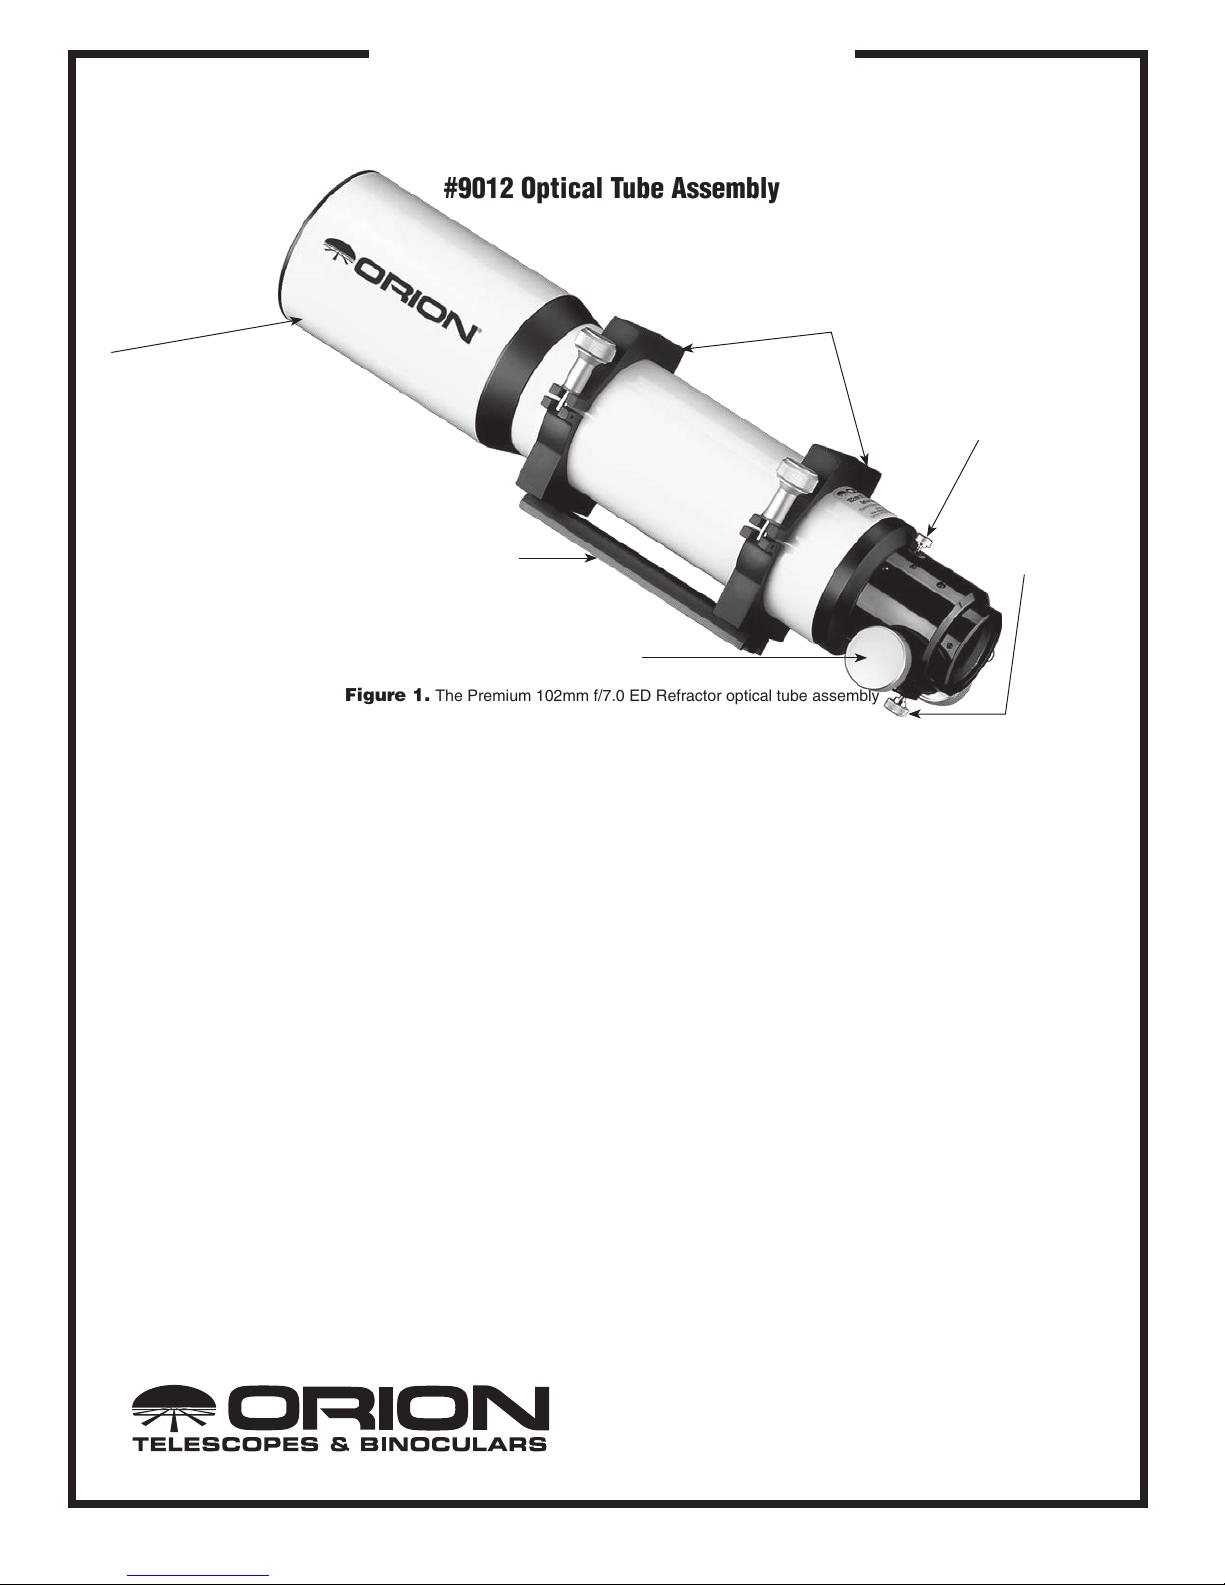
#9012 Optical Tube Assembly
Tube rings
Extendable lens shade
Rotation lock
thumbscrew
Dovetail mounting plate
Focus wheel
Figure 1. The Premium 102mm f/7.0 ED Refractor optical tube assembly
Congratulations on your purchase of an Orion Premium
102mm f/7.0 ED refractor optical tube. Your telescope has been
designed with high quality optics and excellent mechanical construction. The ED glass in the objective lens means you’ll enjoy
images with far less color distortion than those seen in a standard refractor, and the smooth dual-speed Crayford focuser will
make getting sharp images a breeze. These instructions will
help you set up and use your telescope.
Getting Started
The Premium 102mm f/7.0 ED comes fully assembled from
the factory. The telescope’s optics have been installed and collimated, so you should not have to make any adjustments to
them.
Please keep the original shipping box! In the unlikely event
you should need to ship the telescope back to Orion for warranty repair service, you should use the original packaging.
The box also makes a very good container for storing the telescope when it is not in use.
Mounting the Telescope
The Premium 102mm ED refractor can be mounted on Orion
equatorial mounts using the included tube rings and dovetail
mounting plate. The dovetail mounting plate connects directly
to the equatorial mount’s dovetail holder. The dovetail holder
has two securing knobs to keep the dovetail plate securely in
Focus lock
thumbscrew
place. Be sure to loosen these two knobs prior to connecting
the telescope to the mount. While grasping the telescope firmly, place the dovetail mounting plate into the mount’s dovetail
holder and tighten the clamping knobs to secure the optical
tube.
An equatorial mount is desirable for astronomical viewing
as it allows easy manual and/or motorized electronic tracking of celestial objects as the Earth rotates. Setting circles on
equatorial mounts also enable you to locate objects by their
celestial coordinates (right ascension and declination), which
can be found in many observing books and star atlases.
The Premium 102mm ED refractor can also be easily mounted
on altazimuth mounts like the Orion VersaGo which utilizes a
dovetail holder like Orion equatorial mounts. Follow the previous directions to couple the telescope to the VersaGo mount’s
dovetail holder.
Extendable Lens Shade
The Premium 102mm ED refractor features an extendable lens
shade that can help prevent dew accumulation on the objective lens as well as block stray light or glare from entering the
telescope. Once you have mounted the telescope, gently pull
forward on the lens shade to extend it. Be careful to not touch
the objective lens. The lens shade should be retracted during
storage or at times when the telescope is not in use.
Providing Exceptional Consumer Optical Products Since 1975
Customer Support (800)-676-1343
E-mail: support@telescope.com
Corporate Offices (831)‑763‑7000
89 Hangar Way, Watsonville, CA 95076
IN 318 Rev B 02/09
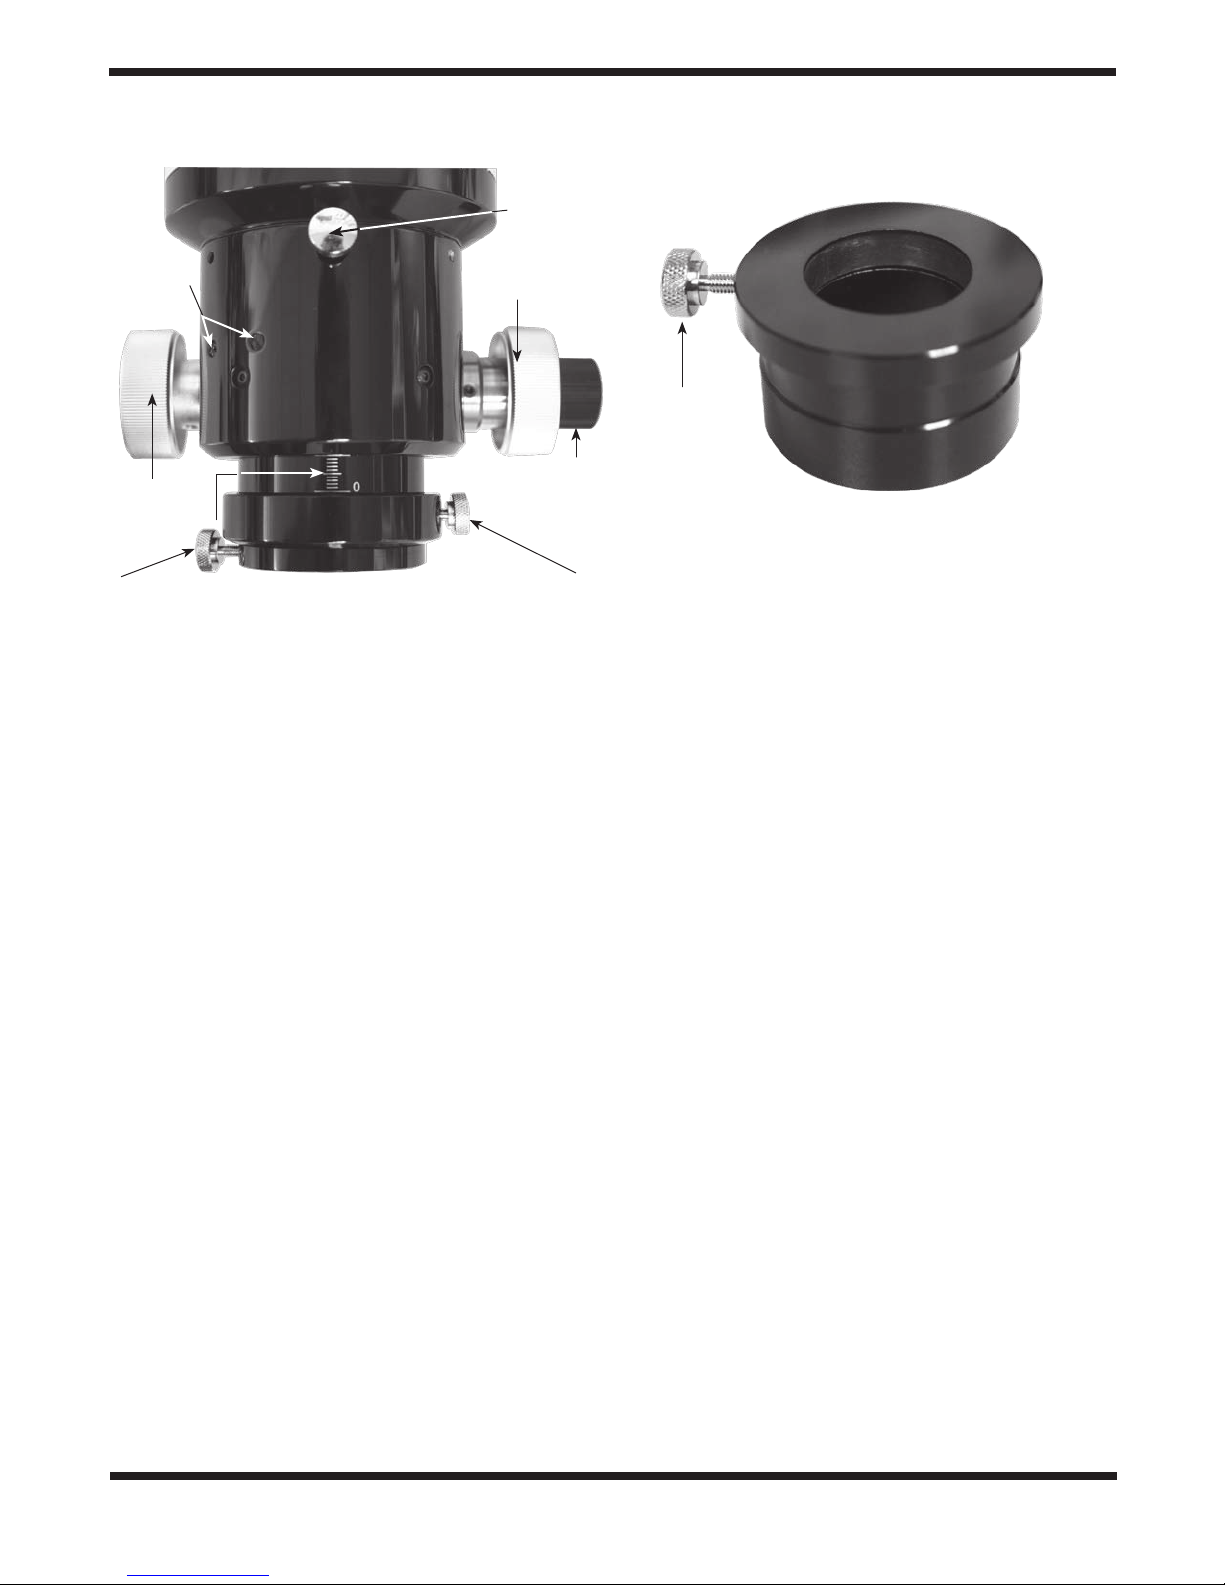
Finder base
mounting
holes
Rotation
lock thumbscrew
Focus wheel
Thumbscrew
Focus wheel
Fine focus wheel
Millimeter scale
1.25" adapter thumbscrew
Drawtube thumbscrew
Figure 2. The 2" dual-speed Crayford focuser
Use of Optional Eyepieces, Diagonal, and Finder
Scope
The Premium 102mm ED does not come with a finder scope,
diagonal or eyepieces in order to grant the user the greatest
versatility in customizing the instrument to suit their tastes.
However, certain rules for using accessories still apply.
You can attach an optional Orion dovetail mounting base to
the telescope in order to attach a finder scope. To install the
dovetail mounting base, remove the two screws located off to
the side of the focuser (Figure 2). Position the dovetail finder
scope base above the exposed threaded holes, and attach
the base to the tube using the two flat head Phillips machine
screws provided with the refractor. Any Orion finder scope with
a dovetail bracket will fit into the dovetail mounting base.
The Premium 102mm ED refractor can use almost any 2"
diagonal and eyepiece. To install a diagonal, unthread the
thumbscrew on the focuser drawtube (Figure 2) until the
internal brass ring is flush with the interior of the drawtube.
Insert the diagonal and secure it with the thumbscrew, which
will compress the brass ring around the inserted barrel of
the diagonal. Then insert an eyepiece into the diagonal and
secure it with the thumbscrew(s) on the diagonal.
Use of 1.25" Eyepieces and Diagonals
If you wish to use 1.25" eyepieces and/or a 1.25" diagonal
with the Premium 102mm ED, the 1.25" eyepiece adapter is
required (Figure 3). 1.25" eyepieces usually allow higher magnification than 2" eyepieces. This is especially desirable for
high power observation of objects in our solar system such as
the Moon and planets.
To use 1.25" accessories, simply insert the 1.25" eyepiece
adapter into the drawtube as you would a 2" accessory. Be
sure to secure the adapter in place with the thumbscrew on
Figure 3. The 1.25" eyepiece adapter
the drawtube. You can now insert a 1.25" accessory into the
adapter for use.
The 2" Dual-Speed Crayford Focuser
The Premium 102mm ED comes equipped with a dual-speed
Crayford focuser. The Crayford design allows for smooth,
precise focusing without any image shift that typical rack-andpinion designs experience.
The focuser features dual-speed adjustment with the fine
focus wheel (Figure 2). This small black wheel allows precise
focus adjustment at a ratio of 11:1, meaning eleven turns of
the fine focus wheel equals one turn of the focus wheel. Use
the focus wheels to achieve rough focus on your target object,
then use the fine focus wheel for the most precise focus in
order to coax out even more image detail. You’ll be amazed at
the amount of detail fine focus adjustments allow you to view
on targets such as the lunar surface, planets, star clusters,
and other celestial objects.
If you find that the focus wheels are too tight or too loose, you
can make adjustments to the drawtube tension by using the
drawtube tension adjustment set screw located on the bottom
of the focuser between the focus wheels. Make adjustments
to this set screw with the provided hex key until the focuser
motion feels comfortable. Please note that you must have at
least some tension applied to the focuser drawtube or else it
will not move when you turn the focus wheels.
Once you have achieved focus, you can lock the focuser in
place by tightening the focus lock thumbscrew located on the
bottom of the focuser between the focus wheels (Figure 1).
Locking the focuser in place can be especially useful for imaging applications. Be sure to loosen the focus lock thumbscrew
before making additional focus adjustments.
The focuser drawtube is labeled with a millimeter scale to be
used as a reference (Figure 2). This scale can be useful to
quickly reach focus on previously viewed objects. When initially observing (or imaging) an object with the Premium 102mm
ED, make a note of the scale marker position once the object
is in focus. When you view the same object during a different
2

observing session, you can quickly reach focus by setting the
millimeter scale to the previously noted position.
A useful feature of the focuser is that it can be rotated relative
to the tube. This enables you to customize the orientation of
the focus wheels to the most convenient position. To rotate,
loosen the focuser rotation lock thumbscrew (Figure 2) by a
few turns while holding the focuser steady. Adjust the orientation of the focuser and then tighten the focuser rotation lock
thumbscrew to secure the desired position
Calculating Magnification (Power)
It is desirable to have a range of eyepieces of different focal
lengths, to allow viewing over a range of magnifications. To
calculate the magnification, or power, of a telescope, simply
divide the focal length of the telescope by the focal length of
the eyepiece:
Telescope F.L. ÷ Eyepiece F.L. = Magnification
For example, the Premium 102mm ED, which has a focal
length of 714mm, used in combination with a 25mm eyepiece,
yields a power of 28.5x.
714 ÷ 25 = 28.5X
Every telescope has a useful limit of power of about 45x-60x
per inch of aperture. Claims of higher power by some telescope manufacturers are a misleading advertising gimmick
and should be dismissed. This means the highest useful
magnification for the Premium 102mm ED is approximately
180-240x. Keep in mind that at higher powers, an image will
always be dimmer and less sharp (this is a fundamental law of
optics). The steadiness of the air (the “seeing”) will also limit
how much magnification an image can tolerate.
Always start viewing with your lowest-power (longest focal
length) eyepiece in the telescope. After you have located and
observed the object with it, you can try switching to a higher-power eyepiece to ferret out more detail, if atmospheric
conditions permit. If the image you see is not crisp and steady,
reduce the magnification by switching to a longer focal length
eyepiece. As a general rule, a small but well-resolved image
will show more detail and provide a more enjoyable view than
a dim and fuzzy, overmagnified image.
Note About Chromatic Aberration
Chromatic aberration literally means color distortion.
Whenever light passes through one material to another, light
of different wavelengths (color) is bent by different amounts.
This is a problem that plagues refractor-type telescopes, since
light passes through both air and glass to form an image. Most
astronomical objects emit a spectrum comprised of many different wavelengths of light, so each wavelength will be bent
by a slightly different amount when passing through a lens.
This results in each color of light reaching precise focus at a
slightly different point, which reduces image sharpness.
The Premium 102mm ED is designed to minimize chromatic
aberration. The objective lens comprises two individual lens
elements, one of which is made of “ED” (Extra-low Dispersion)
glass, a special type of glass that has superior refractive properties compared to normal types of glass. The use of this ED
glass minimizes the amount of chromatic aberration, resulting
in a cleaner, sharper image compared to that in standard achromatic refractors.
Imaging with the Premium 102mm ED Refractor
The Premium 102mm ED refractor’s f/7.0 optics make it an
excellent choice for astro-imaging. The telescope has been
designed with plenty of inward focus travel. This is a great
convenience for many imaging applications which require
additional devices, such as off-axis guiders and filter wheels,
between the telescope and camera. Without additional inward
focus travel, these devices would be difficult, if not impossible,
to use. As a consequence of this, extension tubes may be
necessary to reach focus with a camera if no other devices
are placed between the telescope and camera.
Using a digital SLR camera with the telescope requires a Tring for your model of camera and a 2" camera adapter. A 2"
extension tube may also be required.
To use the Premium 102mm ED with the Orion StarShoot
imaging cameras, an extension tube will generally be required.
No other camera adapters should be needed.
Contact Orion Customer Service at 800-676-1343 for more
details on camera adapter and extension tube options.
Care & Maintenance
Give your telescope reasonable care and it will last a lifetime.
When not in use, keep its dust cover on as well as the dust cap
for the eyepiece opening. Store it indoors or in a dry garage.
Do not leave the telescope outside when not in use.
Orion offers a foam-lined hard case for the Premium 102mm
ED refractor which is an excellent choice for both storage
and safe transport of the telescope. Contact Orion Customer
Service for details.
The optical tube is aluminum and has a smooth painted surface that should resist scratches and smudges. If a scratch
does appear on the tube, it will not harm the telescope.
Smudges on the tube can be wiped off with standard household surface cleaners.
Any quality optical lens tissue and cleaning fluid specifically
designed for multi-coated optics can be used to clean the
telescope’s objective lens as well as the lenses of eyepieces
and finder scopes. Never use regular glass cleaner or cleaning fluid designed for eyeglasses. Before cleaning with fluid
and tissue, blow any loose particles off the lens with a blower
bulb or compressed air, or lightly brush the lens with a soft
camel hair brush. Apply some cleaning fluid to a tissue, never
directly on the optics. Wipe the lens gently in a circular motion,
then remove any excess fluid with a fresh lens tissue. Oily fingerprints and smudges may be removed using this method.
Use caution; rubbing too hard may scratch the lens! Clean
only a small area at a time, using a fresh lens tissue on each
area. Never reuse tissues.
3

Specifications
Objective lens diameter: 102mm (4.0")
Objective lens: Air-spaced doublet, one element
made of ED glass
Objective lens coating: Fully multi-coated
Focal length: 714mm
Focal ratio: f/7.0
Lens cell: Machined aluminum
Focuser: Crayford, accepts 2" accessories,
dual-speed focus adjustment,
rotatable
1.25" adapter: Included, threaded for 2" filters
Optical tube: Seamless aluminum
Tube interior: 3x baffles, painted flat black
Mounting provision: Tube rings (2) and dovetail mounting
ing plate included
Weight: 8 lbs. 2 oz.
Length: 16.9"
Hard Case: Optional
One-Year Limited Warranty
This Premium 102mm f/7.0 ED Refractor is warranted against defects in materials or workmanship for
a period of one year from the date of purchase. This warranty is for the benefit of the original retail purchaser only. During this warranty period Orion Telescopes & Binoculars will repair or replace, at Orion’s
option, any warranted instrument that proves to be defective, provided it is returned postage paid to:
Orion Warranty Repair, 89 Hangar Way, Watsonville, CA 95076. If the product is not registered, proof
of purchase (such as a copy of the original invoice) is required.
This warranty does not apply if, in Orion’s judgment, the instrument has been abused, mishandled, or
modified, nor does it apply to normal wear and tear. This warranty gives you specific legal rights, and
you may also have other rights, which vary from state to state. For further warranty service information,
contact: Customer Service Department, Orion Telescopes & Binoculars, 89 Hangar Way, Watsonville,
CA 95076; (800)-676-1343.
Orion Telescopes & Binoculars
89 Hangar Way, Watsonville, CA 95076
Customer Support Help Line (800)‑676‑1343 • Day or Evening
4
 Loading...