

Page 1
Factory Packaged Controls
PREHEAT-X Controller
Technical Guide
Page 2
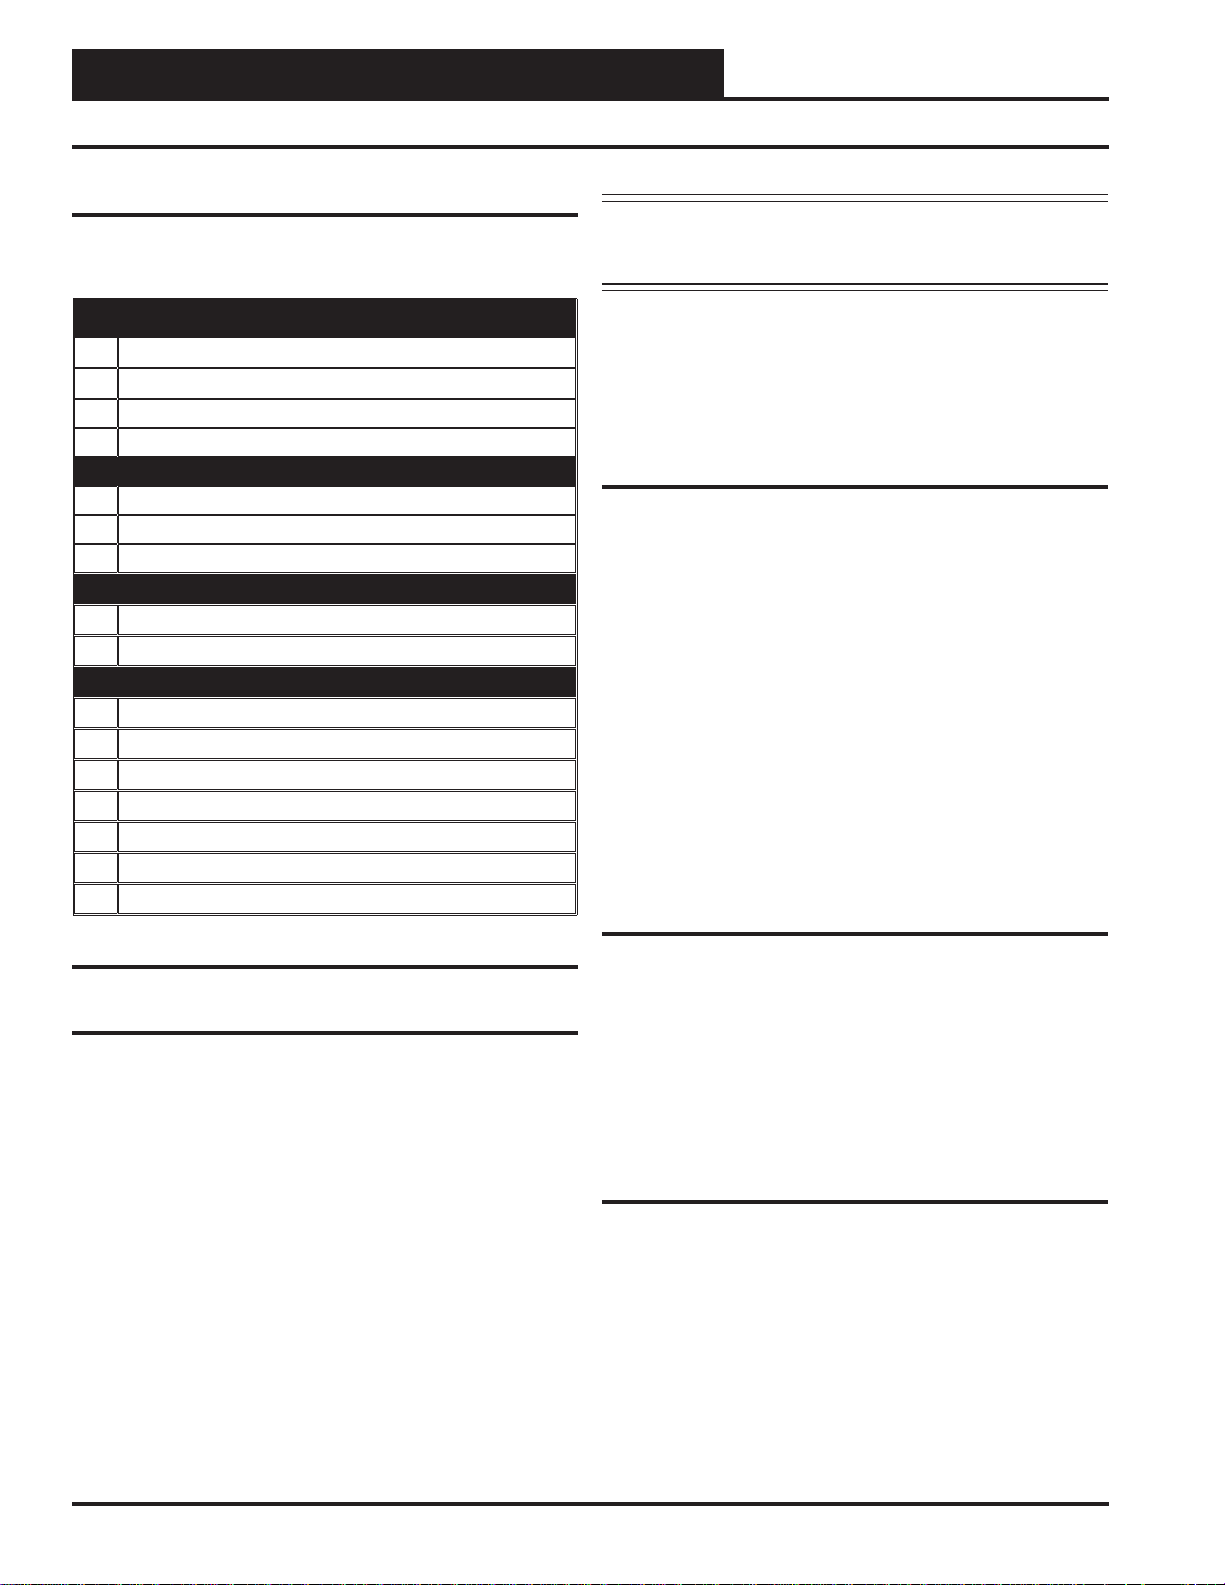
PART NUMBER CROSS REFERENCE TABLE
PART DESCRIPTION
PREHEAT-X Controller OE377-26-00061 V48510 V48510
VCC-X Controller OE338-23B-VCCX V43420 N/A
VCB-X Controller OE332-26B-VCBX V28940 J00142
VCM-X E-BUS Controller OE332-23E-VCMX V07150 31422
Leaving Air Temperature Sensor OE231 P87140 28503
Entering Air Temperature Sensor OE250 P87150 N/A
EBC E-BUS Cables - varying lengths EBC-XXXF V167XX N/A
HSSC Cables - varying lengths HSSC-XXXF Varies N/A
WattMaster Controls Inc.
8500 NW River Park Drive · Parkville, MO 64152
Toll Free Phone: 866-918-1100
PH: (816) 505-1100 · FAX: (816) 505-1101 ·
E-mail: mail@wattmaster.com
Visit our web site at www.orioncontrols.com
WattMaster Form: AA-PREHEATX-TGD-01C
ORION
www.aaon.com
AAON® Manual Part No.: V48520
Copyright April 2015 WattMaster Controls, Inc.
®
AAON
is a registered trademark of AAON, Inc., Tulsa, OK.
Neither WattMaster Controls, Inc. nor AAON® assumes any
responsibility for errors or omissions in this document.
This document is subject to change without notice.
AAON
TULSA
AAON
COIL
Page 3

TABLE OF CONTENTS
GENERAL INFORMATION ................................................................................................................4
Overview ..................................................................................................................................................................4
Features ...................................................................................................................................................................4
INSTALLATION & WIRING ............................................................................................................... 5
Important Wiring Considerations ..............................................................................................................................5
Input Wiring ..............................................................................................................................................................6
Output Wiring ...........................................................................................................................................................7
INPUTS/OUTPUTS ........................................................................................................................... 8
OPERATION MODES ........................................................................................................................ 9
Stand-Alone Mode ...................................................................................................................................................9
Communicating Mode ..............................................................................................................................................9
LCD DISPLAY SCREENS ................................................................................................................12
TROUBLESHOOTING ..................................................................................................................... 21
LED Diagnostics ....................................................................................................................................................21
Troubleshooting Conditions & Alarms ..........................................................................................................................21
Temperature Sensors ...................................................................................................................................................22
APPENDIX A - Temperature Sensors ............................................................................................ 23
Leaving Air Temperature Sensor Installation .........................................................................................................23
Leaving Air Temperature Sensor Wiring Chart .......................................................................................................24
APPENDIX B - PREHEAT-X BACnet ............................................................................................... 25
PREHEAT-X BACnet MS/TP Connection ..............................................................................................................25
PREHEAT-X BACnet Points...................................................................................................................................26
PREHEAT-X Technical Guide
3
Page 4
OVERVIEW
General Information
Overview
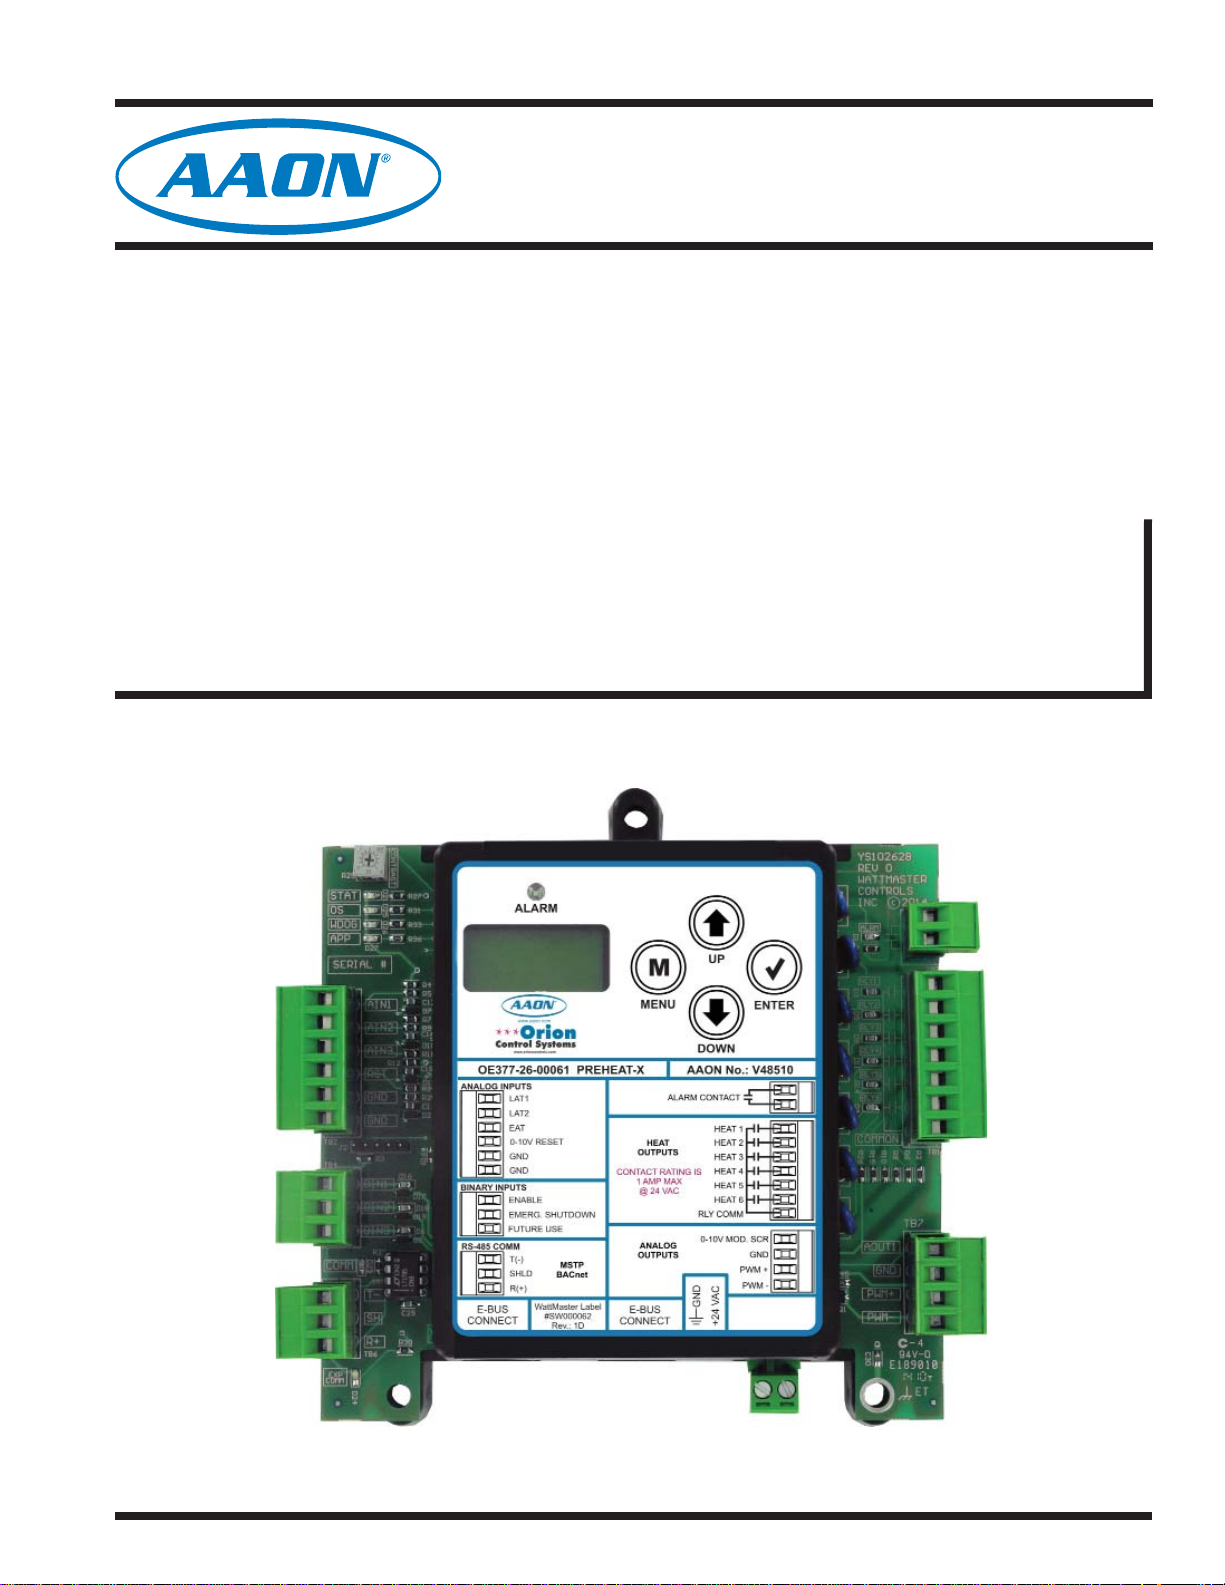
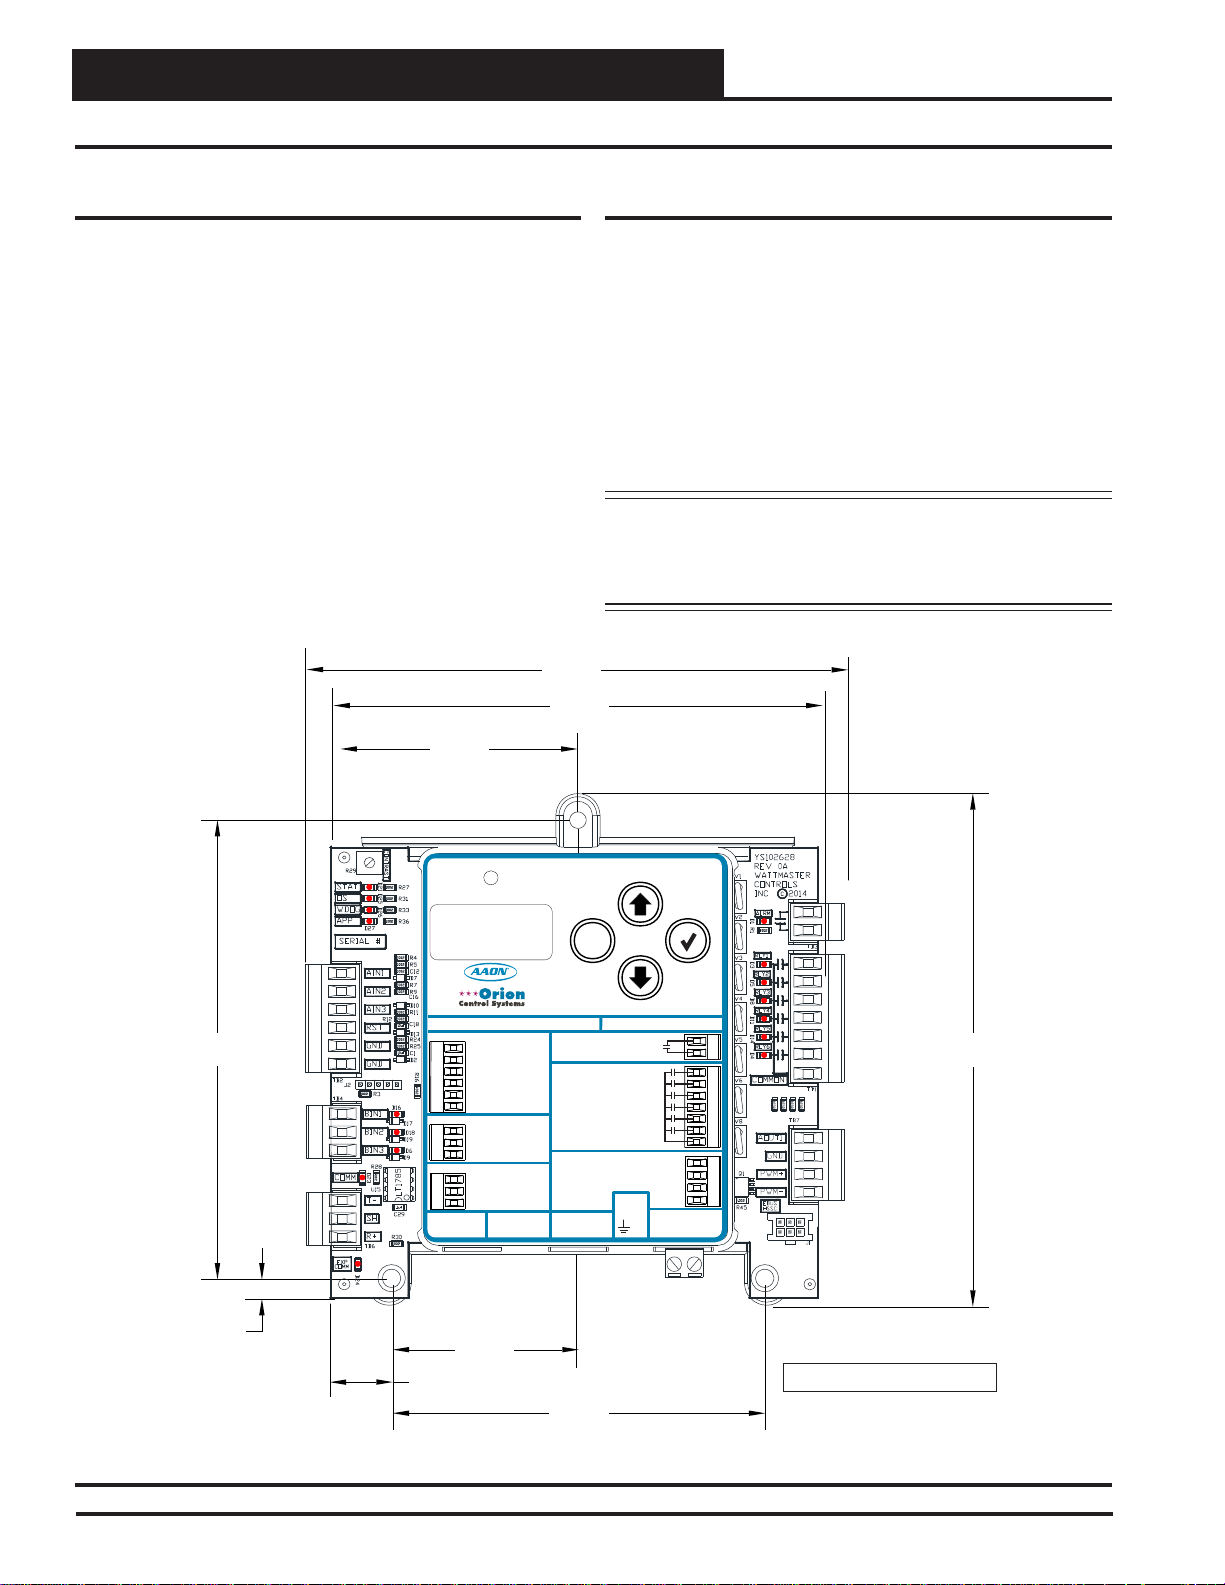
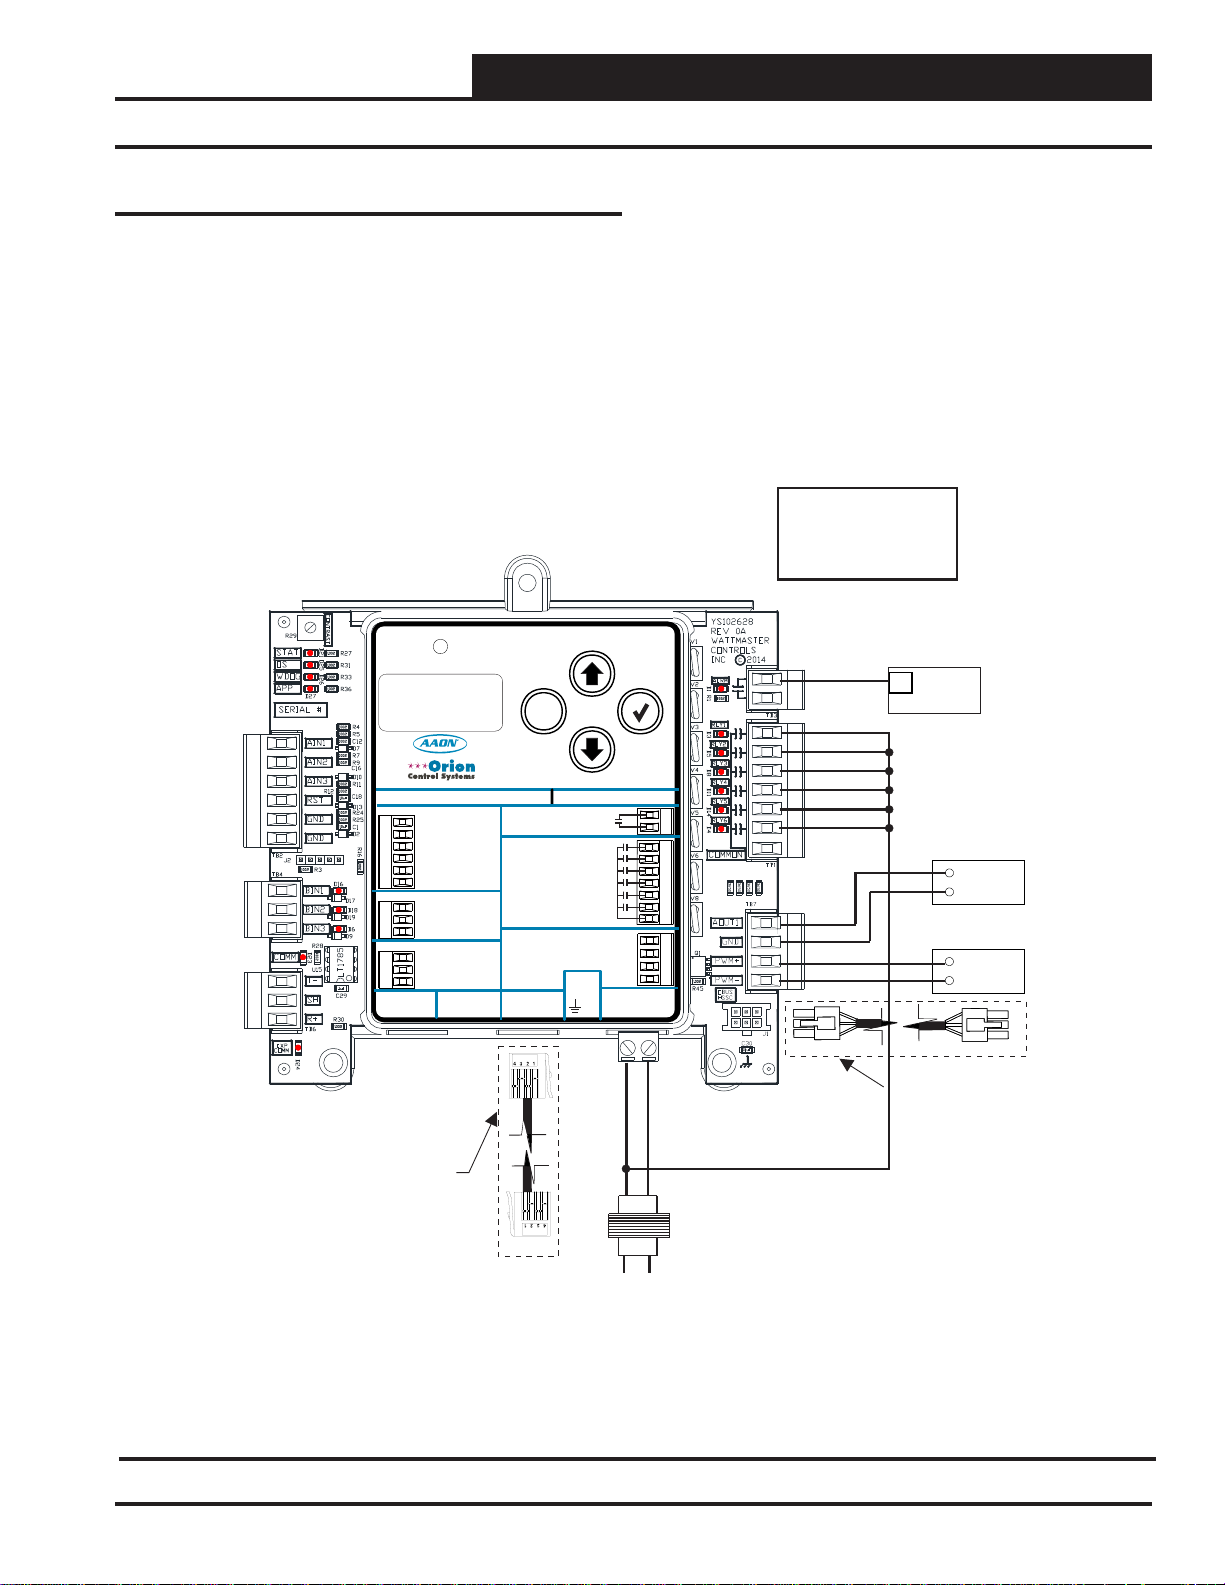
The OE377-26-00061 PREHEAT-X Controller (AAON Part No.
V48510) is designed to control fi xed stages of Preheat and optional
modulating Preheat to maintain a desired Preheat Leaving Air T emperature Setpoint. See Figure 1 for dimensions.
The controller can be used as a stand-alone controller or communicating with an AAON Unit Controller. The PREHEAT-X controller
connects to an AAON unit controller via a modular cable. See Figur e
2, page 5 for wiring details.
5.73
5.24
2.62
Features
The PREHEAT-X Controller:
• Can be operated as a stand-alone controller or
communicating with the VCC-X, VCB-X, and
VCM-X E-BUS Controllers
• Monitors the Preheater Leaving Air Temperature and
Leaving Air Reset Signal and controls to maintain
Setpoint
• Contains a 2 x 8 LCD character display and 4 buttons
that allow for status display and setpoint changes
NOTE: The PREHEAT-X Controller contains no user-
serviceable parts. Contact qualifi ed technical
personnel if your
operating correctly.
PREHEAT-X Controller is not
5.04
0.21
ALARM
ALARM
M
M
MENU
www.aaon.com
www.aaon.com
www.orioncontrols.com
www.orioncontrols.com
OE377-26-00061 PREHEAT-X AAON No.: V48510
OE377-26-00061 PREHEAT-X AAON No.: V48510
ANALOG INPUTS
ANALOG INPUTS
LAT1
LAT1
LAT2
LAT2
EAT
OAT
0-10V RESET
0-10V RESET
GND
GND
GND
GND
BINARY INPUTS
BINARY INPUTS
ENABLE
ENABLE
EMERG. SHUTDOWN
EMERG. SHUTDOWN
FUTURE USE
FUTURE USE
RS-485 COMM
RS-485 COMM
T(-)
T(-)
MSTP
SHLD
SHLD
BACnet
R(+)
R(+)
WattMaster Label
E-BUS
#LB102XXX-A
Rev.: 1A
CONNECT
E-BUS
WattMaster Label
CONNECT
#S 000062W
Rev.: 1D
MENU
ALARM CONTACT
ALARM CONTACT
HEAT
OUTPUTS
HEAT
OUTPUTS
CONTACTRATING IS
1 AMP MAX
CONTACTRATING IS
@ 24 VAC
1 AMP MAX
@ 24 VAC
ANALOG
ANALOG
OUTPUTS
OUTPUTS
E-BUS
E-BUS
CONNECT
CONNECT
DOWN
DOWN
RLYCOMM
RLYCOMM
0-10V MOD. SCR
0-10V MOD. SCR
GND
GND
2.04
0.57
4.09
UP
UP
HEAT1
HEAT1
HEAT2
HEAT2
HEAT3
HEAT3
HEAT4
HEAT4
HEAT5
HEAT5
HEAT6
HEAT6
ENTER
ENTER
5.63
GND
GND
PWM +
PWM +
PWM -
PWM -
+24 VAC
+24 VAC
Note: iDepth s 1.49 inches.
Figure 1: OE377-26-00061 PREHEAT-X Controller Dimensions (In Inches)
4
PREHEAT-X Technical Guide
Page 5

WIRING
Important Wiring Considerations
Important Wiring Considerations
Please read carefully and apply the following information when
wiring the
requires the following electrical connections:
1.
2.
3. Leaving Air Temperature Sensors, Entering Air
4. All 24 VAC wiring must be connected so that all ground
PREHEAT-X Controller. The PREHEAT-X Controller
18 gauge minimum wire unless otherwise noted.
24 VAC power connection with an appropriate VA rating.
Temperature Sensor, and Heat Enable must have 24 gauge
minimum wire.
wires remain common. Failure to follow this procedure can
result in damage to the module and connected devices.
5. All wiring is to be in accordance with local and
national electrical codes and specifi cations.
6. Check all wiring leads at the terminal block for tightness.
Be sure that wire strands do not stick out and touch
adjacent terminals. Confi rm that all transducers required for
your system are mounted in the appropriate location and
wired into the correct terminals.
WARNING: Observe polarity! All boards must be wired
GND-to-GND and 24 VAC-to-VAC. Failure
to observe polarity could result in damage to
the board.
PREHEAT-X Technical Guide
5
Page 6
WIRING
Inputs Wiring
Inputs Wiring
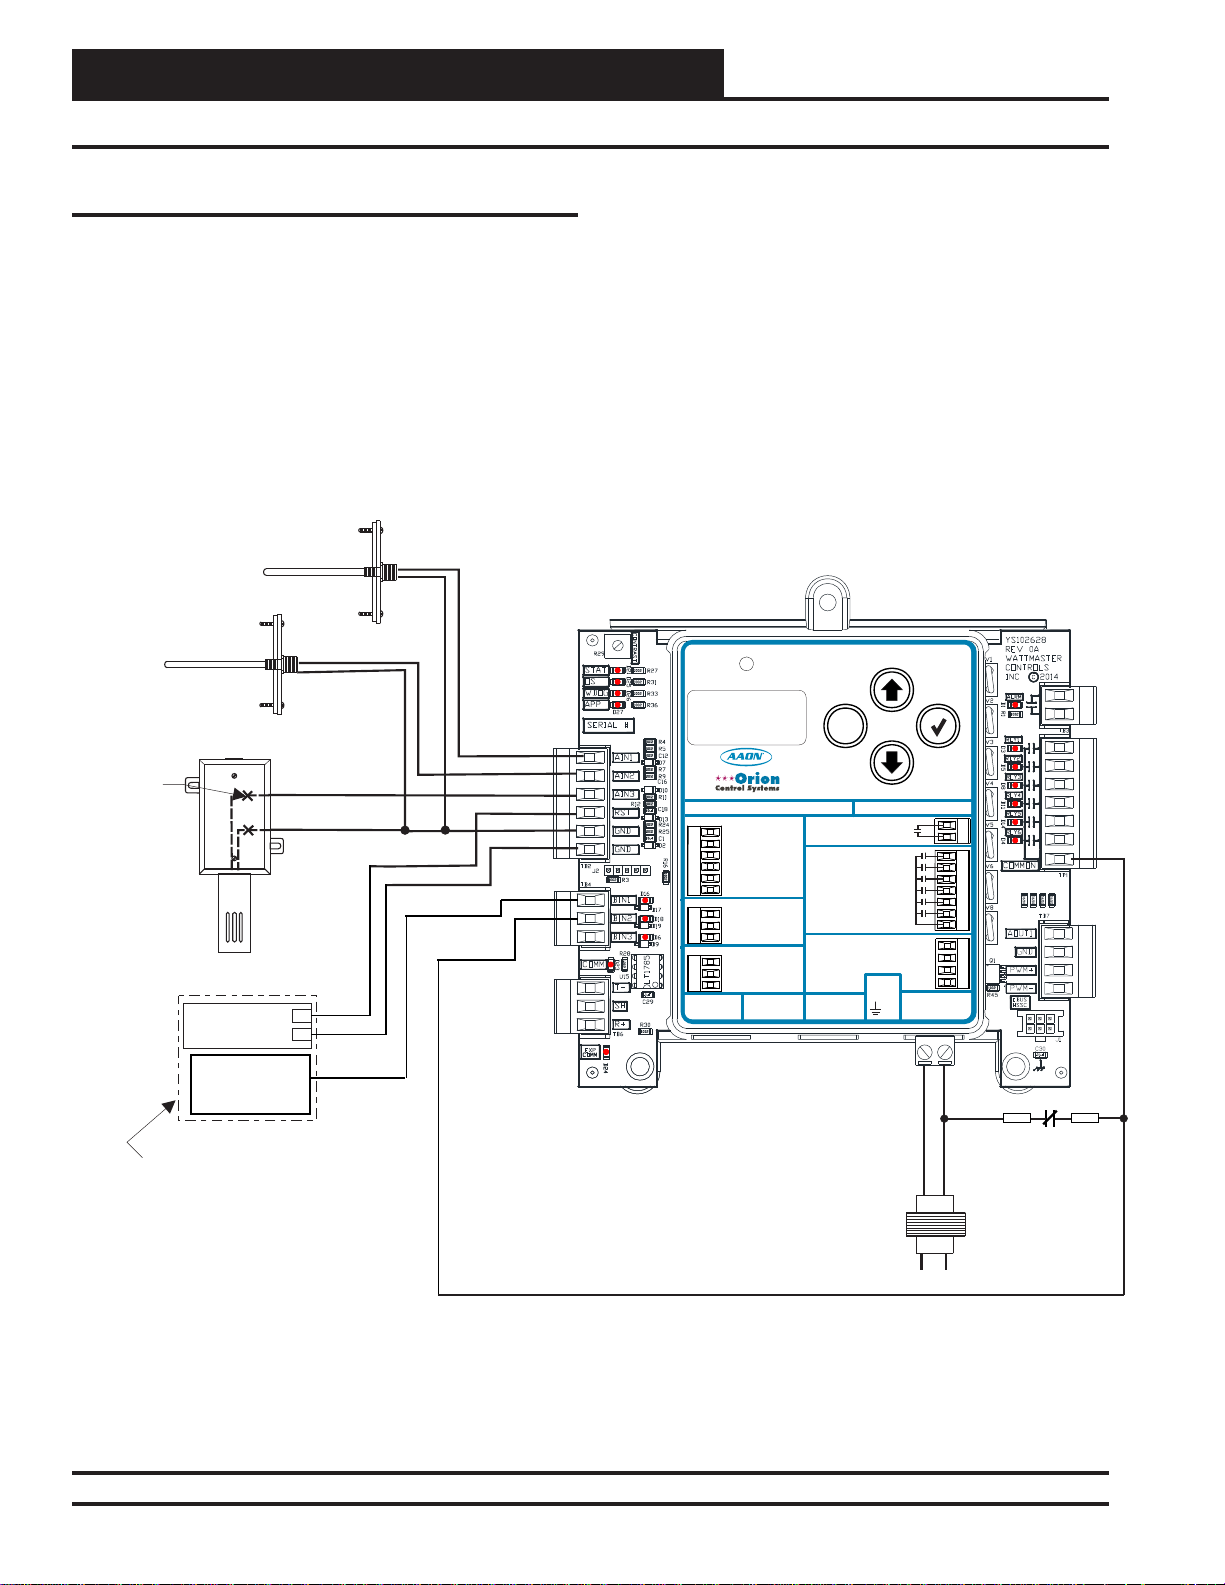
The PREHEA T-X Controller works as Stand-Alone or communicating with the VCM-X E-BUS, VCB-X, or VCC-X Controller. For
connection to a VCM-X E-BUS, VCB-X, or VCC-X Controller,
use an E-BUS Cable connecting to the appropriate E-BUS ports on
those controllers. The Reset Input and Heat Enable are only used in
Stand-Alone Mode. See Figure 2 below for Inputs Wiring.
Mount Inside PREHEAT-X
Leaving Air 2
Temperature Sensor
Mount Inside PREHEAT-X
Box Wall
Entering Air
Temperature Sensor
Make Splice
Connections
Inside Sensor
Enclosure
As Shown. Seal All
Conduit Fittings
With Silicone
Mount Sensor Outdoors
In Shaded Protected
Area & In Upright
Position As Shown
Reset In
Signal (24 VAC)
NOTE: Reset In And Heat
Enable Inputs Are Used In
Stand-Alone Mode Only
Leaving Air 1
Temperature Sensor
Box Wall
0-10 VDC
GND
+
-
Heat Enable
W1
Emergency
Shutdown
AIN1
AIN2
AIN3
RST
GND
GND
BIN1
BIN2
PREHEAT-X CONTROLLER
(OE377-26-00061)
ALARM
ALARM
UP
UP
M
M
MENU
www.aaon.com
www.aaon.com
www.orioncontrols.com
www.orioncontrols.com
OE377-26-00061 PREHEAT-X AAON No.: V48510
OE377-26-00061 PREHEAT-X AAON No.: V48510
ANALOG INPUTS
ANALOG INPUTS
LAT1
LAT1
LAT2
LAT2
EAT
OAT
0-10V RESET
0-10V RESET
GND
GND
GND
GND
BINARY INPUTS
BINARY INPUTS
ENABLE
ENABLE
EMERG. SHUTDOWN
EMERG. SHUTDOWN
FUTURE USE
FUTURE USE
RS-485 COMM
RS-485 COMM
T(-)
T(-)
MSTP
SHLD
BACnet
SHLD
R(+)
R(+)
WattMaster Label
WattMaster Label
E-BUS
#LB102XXX-A
CONNECT
Rev.: 1A
E-BUS
#S 000062W
CONNECT
Rev.: 1D
MENU
ALARM CONTACT
ALARM CONTACT
HEAT
OUTPUTS
HEAT
OUTPUTS
CONTACTRATING IS
1 AMP MAX
CONTACTRATING IS
@ 24 VAC
1 AMP MAX
@ 24 VAC
ANALOG
ANALOG
OUTPUTS
OUTPUTS
E-BUS
E-BUS
CONNECT
CONNECT
DOWN
DOWN
HEAT1
HEAT1
HEAT2
HEAT2
HEAT3
HEAT3
HEAT4
HEAT4
HEAT5
HEAT5
HEAT6
HEAT6
RLYCOMM
RLYCOMM
0-10V MOD. SCR
0-10V MOD. SCR
PWM +
GND
GND
+24 VAC
+24 VAC
GND
PWM +
PWM -
PWM -
GND
ENTER
ENTER
GND
24VAC
40 VA
Transformer
Minimum
N.C.
SAFETIES
(BY OTHERS)
COM
Figure 2: PREHEAT-X Inputs Wiring Diagram
6
Line
PREHEAT-X Technical Guide
Page 7
WIRING
Outputs Wiring
The PREHEA T-X Controller works as Stand-Alone or communicating with the VCM-X E-BUS, VCB-X, or VCC-X Controller. For
connection to a VCM-X E-BUS, VCB-X, or VCC-X Controller , use
an E-BUS Cable connecting to the appropriate E-BUS ports on those
controllers. See Figure 3 below for Outputs Wiring.
Outputs Wiring
PREHEAT-X CONTROLLER
(OE377-26-00061)
ALARM
ALARM
UP
UP
M
M
MENU
www.aaon.com
www.aaon.com
www.orioncontrols.com
www.orioncontrols.com
OE377-26-00061 PREHEAT-X AAON No.: V48510
OE377-26-00061 PREHEAT-X AAON No.: V48510
ANALOG INPUTS
ANALOG INPUTS
LAT1
LAT1
LAT2
LAT2
EAT
OAT
0-10V RESET
0-10V RESET
GND
GND
GND
GND
BINARY INPUTS
BINARY INPUTS
ENABLE
ENABLE
EMERG. SHUTDOWN
EMERG. SHUTDOWN
FUTURE USE
FUTURE USE
RS-485 COMM
RS-485 COMM
T(-)
T(-)
MSTP
SHLD
SHLD
BACnet
R(+)
R(+)
WattMaster Label
WattMaster Label
E-BUS
#LB102XXX-A
CONNECT
Rev.: 1A
E-BUS
#S 000062W
CONNECT
Rev.: 1D
MENU
ALARM CONTACT
ALARM CONTACT
HEAT
OUTPUTS
HEAT
OUTPUTS
CONTACTRATING IS
1 AMP MAX
CONTACTRATING IS
@ 24 VAC
1 AMP MAX
@ 24 VAC
ANALOG
ANALOG
OUTPUTS
OUTPUTS
E-BUS
E-BUS
CONNECT
CONNECT
DOWN
DOWN
HEAT1
HEAT1
HEAT2
HEAT2
HEAT3
HEAT3
HEAT4
HEAT4
HEAT5
HEAT5
HEAT6
HEAT6
RLYCOMM
RLYCOMM
0-10V MOD. SCR
0-10V MOD. SCR
PWM +
PWM +
GND
GND
+24 VAC
+24 VAC
GND
PWM -
PWM -
ENTER
ENTER
GND
Note:
All Relay Outputs Are
Normally Open And Rated
For 24 VAC Power Only.
1 Amp Maximum Load.
Alarm
Relay
Contact
Heat 1 Relay
Heat 2 Relay
Heat 3 Relay
Heat 4 Relay
Heat 5 Relay
Heat 6 Relay
Modulating SCR
(0-10 VDC)
+
–
PWM SSR
+
–
EBC E-BUS Cable
Connects To
VCC-X Or VCB-X Controller’s
Expansion Port
Figure 3: PREHEAT-X Outputs Wiring Diagram
PREHEAT-X Technical Guide
GND
24VAC
40 VA
Transformer
Minimum
Line
HSSC E-BUS Cable
Connects To
VCM-X Controller’s
Expansion Port
7
Page 8
INPUTS & OUTPUTS
Inputs and Outputs
I/O Map
See Table 1 below to reference the inputs and outputs that are avail-
able on the PREHEAT-X Controller.
Analog Inputs
1 Leaving Air Temperature 1 (LAT1)
2 Leaving Air Temperature 2 (LAT2)
3 Entering Air Temperature Sensor
4 Reset In (0-10 VDC)
Binary Inputs
1 Heat Enable
2 Emergency Shutdown
3 Future Use
Analog Outputs
1 0-10 VDC Mod SCR
2 PWM SSR
Relays
1 Alarm
2 Heat 1
3 Heat 2
4 Heat 3
5 Heat 4
6 Heat 5
7 Heat 6
NOTE: For AIN1 through AIN3, all T emperature Sensors must
be Thermistor Type III which provide 77.0°F @ 10K
Ohms Resistance.
Reset Input (0-10 VDC)
Used only in stand-alone operation. The Leaving Air Temperature
Setpoint can be reset by supplying a 0-10 VDC signal to the RST
IN low voltage terminal block. This reset signal is optional and need
only be used if you require resetting of the discharge air temperature.
Binary Inputs
Heat Enable Contact (HEAT EN)
This input is only required when the controller is used in stand-alone
operation; it is not required when communicating with an AAON
Unit Controller. The Heat Enable input is activated by a 24VAC
signal supplied from a building automation system to enable the
PREHEAT-X Controller. The controller will not operate without
24VAC being applied to this input terminal when used in a standalone confi guration. When the Heat Enable signal is lost or turned
off, all stages de-activate immediately.
Emergency Shutdown Input
This wet contact (24 VAC) input is used to initiate shutdown of the
HV AC unit when a N.C. Smoke Detector (by others), Firestat (by others), or other shutdown condition (by others) occurs and the contact
is opened. The controller remains active and can initiate alarm relays.
Analog Outputs
Table 1: PREHEAT-X Controller Inputs & Outputs
Analog Inputs
Leaving Air Temperature 1 (LAT1)
When enabled, the PREHEAT-X Controller will control to a Leaving Air Temperature Setpoint. The Controller can be confi gured to
use only LAT 1 for this purpose. Typically, the average of LAT1
and LAT2 is used.
Leaving Air Temperature 2 (LAT2)
When enabled, the PREHEAT-X Controller will control to a Leaving Air Temperature Setpoint. The Controller can be confi gured to
use only LAT 2 for this purpose. Typically, the average of LAT1
and LAT2 is used.
Entering Air Temperature
When the Entering Air Temperature falls below the Entering Air
Temperature Setpoint, preheat will be enabled.
8
0-10 VDC Modulating SCR
Depending on the type of Heat used, this output will supply a 0-10
VDC output signal for control of the modulating SCR Heat.
Pulse Width Modulating SSR
Depending on the type of Heat used, this output will supply a 12 V
PWM Output Signal for control of the modulating SSR Heat.
Relay Outputs
Relay #1 - Alarm
This relay sends a signal when an alarm is enabled.
Relays #2 - 6—Fixed Stage Heat Outputs
PREHEAT-X Technical Guide
Page 9

OPERATION MODES
Outputs and Operation Modes
Operation Modes
The PREHEA T -X Controller can be used stand-alone or communicating with an AAON Unit Controller using a modular cable.
Stand-Alone Mode
When used in a stand-alone application, the PREHEA T -X Controller
will modulate SCR or SSR Heat and stage any additional fi xed stages
to maintain the Leaving Air T emperature setpoint con fi gured on the
PREHEA T-X Controller LCD display . The PREHEA T-X Controller
is activated by a 24VAC signal to the HEAT EN input.
Communicating Mode
When the PREHEA T-X Controller is connected and communicating
with an AAON Unit Controller via a modular cable, the necessary
information will be passed between the PREHEAT-X and the Main
Unit Controller to properly operate in the Heating Mode.
If the communication is interrupted between the PREHEAT-X
Controller and the Main Controller, both boards will show an alarm
and the PREHEA T-X outputs will turn off. When communication is
restored, the alarms will go away.
In this confi guration, the Leaving Air T emperature Setpoints and the
Preheat Enable Sepoints are set using the Main Controller.
PREHEAT-X Technical Guide
9
Page 10

SEQUENCE OF OPERATIONS
Operation Modes
Zone
Zone
Preheat Enable
Stand Alone Mode
Enabled when the Binary Input is closed and the Entering Air Temperature is below setpoint.
E-BUS Communications Mode
Enabled by an E-BUS command when the Entering Air T emperature
falls below the Preheat Setpoint.
BACnet Communications Mode
Enabled by BACnet command or Binary Input, whichever occurs
fi rst.
Leaving Air Sensor
The controller can be confi gured to use one of three sensor confi gu-
rations for control.
• Leaving Air Sensor 1 only (LAT1)
• Leaving Air Sensor 2 only (LAT2)
• Average Leaving Air Temperature which averages
LAT1 and LAT2
Modulating Heat
• If confi gured, the Modulating Heat output will be used
as the fi rst stage of heat.
• Analog Voltage Output can be adjusted between
0-10 VDC as needed to maintain the Leaving Air
Setpoint.
• Controlled by an Internal PID Loop.
Heat Staging Up
The following conditions must be met before the fi rst (next) stage
of heat can be energized:
• Preheat Enable Signal/Command must be active.
• The LAT must be below the LAT Setpoint by any
amount.
• If Mod Heat is confi gured, it must be at 100% for the
Stage Up Delay.
• The Minimum Off Time must be met.
• The Stage Up Delay must be met (for second stage
and above).
Leaving Air Setpoint
Stand Alone
• Leaving Air Temperature Setpoint can be reset
between the LAT Setpoint and LAT Setpoint Reset
Limit.
• The Reset Source is based on a 0-10 VDC input and
range can be adjusted using the LAT Setpoint Reset
Source Low and LAT Setpoint Reset Source High
Setpoints.
E-BUS and BACnet Communications Mode
• A Leaving Air Temperature Setpoint will be sent to
the controller.
• This value is stored in volatile memory and will be
lost at reset.
• There are separate Leaving Air T emperature Setpoints,
depending on if the unit is in Heating, Vent, or Cool
Mode.
Heat Staging Down
The following conditions must be met before a stage of heat can be
de-energized:
• Preheat Enable Signal/Command is deactivated
-OR- the LAT must be above the LAT Setpoint by the
LAT Deadband.
• If Modulating Heat is confi gured, it must be at 0% for
the stage down delay.
• The Minimum Run time must be met.
• The Stage Down Time must be met.
10
PREHEAT-X Technical Guide
Page 11

Emergency Shutdown
The Emergency Shutdown input must always be used and wired
as a 24 VAC normally closed contact. If an Emergency Shutdown
occurs, and that contact opens:
• All outputs will be immediately de-energized.
• An alarm will be generated.
High Leaving Air Temperature Alarm
• If the Leaving Air T emperature is above the LA T High
Temperature Alarm Limit for more than the Alarm
Delay all heating outputs will be de-energized
immediately.
• An alarm will be generated.
• A manual reset will be required.
SEQUENCE OF OPERATIONS
Operation Modes
Low Leaving Air Temperature Alarm
If the Leaving Air Temperature is below the LAT Low Temperature
Alarm Limit for more than 2 minutes, the heat will remain on but
an alarm will be generated.
PREHEAT-X Technical Guide
11
Page 12

LCD DISPLAY SCREENS
Navigation Keys
LCD Display Screen & Navigation
Keys
The PREHEAT-X Controller allows you to make confi guration
changes, view status, change setpoints, create force modes, and
perform diagnostics using the keypad next to the LCD display. See
Figure 4 and refer to Table 2 for descriptions.
Figure 4: LCD Display and Navigation Keys
NAVIGATION
KEY
MENU
UP
DOWN
ENTER
Use the MENU key to navigate through the
PREHEAT-X Main Menu Screens.
Use this key to adjust setpoints and change
confi gurations.
Use this key to adjust setpoints and change
confi gurations.
Use the Enter key to move through screens
within Main Menu categories. Also, use this
key to save setpoints and confi guration
changes.
KEY FUNCTION
Table 2: Navigation Key Functions
12
PREHEAT-X Technical Guide
Page 13

LCD DISPLAY SCREENS
Main Screens Map
PREHEAT
CONTROL
STATUS
SOFTWARE
VER X.XX
PREHEAT
ENABLED
CONT TMP
50.3
LA SPT
70.0
STGS ON
2
MOD HEAT
32%
SET
POINTS
LA SPT
70.0
RST LMT
70.0
EA EN SP
55.0
LA1 CAL
0.0
LA2 CAL
0.0
EA CAL
0.0
ALARMS
NO
ALARMS
E-SHDN
OK
LA1 SENS
OK
LA2 SENS
OK
LOW LAT
OK
HI LAT
OK
CONFIG
HEAT STG
3
MOD HEAT
YES
LAT CFG
AVERAGE
AOUT VLO
0.0
AOUT VHI
10.0
MOD Kp
15.0
COMM
CONFIG
COM MODE
S-ALONE
EBUS CFG
VCB-X
MAC ADDR
0
BAC ID
15000
BAC BAUD
38.400
LA1 TEMP
50.6
LA2 TEMP
50.0
AVG TEMP
50.3
ENT AIR
26.6
EA SENS
OK
COM STAT
OK
MOD Ki
6.0
MOD TIME
10.0
MOD Kd
4.0
STG UP
20
STG DWN
20
MIN RUN
20
MIN OFF
20
Figure 5: PREHEAT-X Main Screens Map
PREHEAT-X Technical Guide
SCALING
DEG.F
13
Page 14

LCD DISPLAY SCREENS
PREHEAT-X Main Screens
PREHEAT-X Main Screens
Refer to the following map when navigating through the LCD Main
Screens. The fi rst screen is an initialization screen. To scroll through
the rest of the screens, press the
Press to scroll through PREHEAT Screens.
Press to go to STATUS Screens.
Press to scroll through STATUS Screens.
Press to go to SETPOINTS Screens.
<MENU> button.
PREHEAT
CONTROL
STATUS
CONFIG
Press to scroll through CONFIGURATION Screens.
Press to go to COMM Confi guration Screens.
COMM
CONFIG
Press to scroll through COMM Screens.
SET
POINTS
Press to scroll through SETPOINTS Screens.
Press to go to ALARMS Screens.
ALARMS
Alarms will display automatically.
Press to go to CONFIGURATION Screens.
14
PREHEAT-X Technical Guide
Page 15

LCD DISPLAY SCREENS
Status Screens
Status Screens
Refer to the following map when navigating through the Status
Screens. From the STATUS Screen, press
through the screens.
STATUS
Status Screens shown below will scroll automatically if LCD display is
left on this screen for 20 seconds.
SOFTWARE
V.XXX
CURRENT SOFTWARE VERSION
Displays the current software version installed in the controller.
PREHEAT
ENABLED/DISABLED
PREHEAT
Gives the Enabled status for the Preheat Mode. The controller can
be enabled from one of the following: (1) Binary Input in Stand-Alone
Mode, (2) E-BUS command from VCB-X or VCM-X, (3) BACnet Point.
<ENTER> to scroll
STGS ON
#
CURRENT NUMBER OF ACTIVE STAGES
Displays the number of heat stages currently energized.
This includes the First Modulating Stage of Heat.
MOD HEAT
XX.X%
MODULATING HEATING OUTPUT
Displays the current Modulation output Percentage of both
the Analog and PWM outputs (they control together).
LA1 TEMP
XX.X
LEAVING AIR TEMPERATURE 1
Displays the Leaving Air Temperature 1 Sensor’s current reading.
CONT TMP
XX.X
CONTROL TEMPERATURE
Displays the current controlling temperature. This could be one of the
following based on confi guration: (1) Leaving Air Sensor 1,
(2) Leaving Air Sensor 2, or (3) the average of both.
LA SPT
LEAVING AIR TEMPERATURE SETPOINT
Displays the current Leaving Air Setpoint that the controller is trying to
maintain. This value can come from the following based on
confi guration: (1) Internal Setpoints +/- Setpoint Reset Input, (2) E-BUS
input from VCM-X, VCB-X, VCC-X, or (3) BACnet Point.
LA2 TEMP
XX.X
LEAVING AIR TEMPERATURE 2
Displays the Leaving Air Temperature 2 Sensor’s current reading.
AVG TEMP
XX.X
AVERAGE TEMPERATURE
Displays the current average temperature of both
Leaving Air Temperature Sensors.
ENT AIR
XX.X
ENTERING AIR TEMPERATURE
Displays the current Entering Air Temperature Sensor reading.
PREHEAT-X Technical Guide
15
Page 16

LCD DISPLAY SCREENS
Setpoint Screens
Setpoint Screens
Refer to the following map when navigating through the Setpoint Screens. From the SETPOINTS Screen, press <ENTER>
to scroll through the screens and change setpoints. Use the <UP>
and <DOWN> arrow keys to change your selections. Then press
<ENTER> to save the new setpoint.
NOTE: When the PREHEAT-X is operating in
Communications Mode, these setpoint screens
will not appear on the LCD display because
they are controlled by the Main Controller.
SET
POINTS
LA SP
XX.X°F
XX.X°C
LEAVING AIR TEMPERATURE SETPOINT
Will display only in stand-alone mode. This is the target temperature
while the heating is enabled. If you are using the reset signal, this is the
setpoint it will calculate to at zero volts.
The LA Setpoint is set by the LCD Display in stand-alone mode and is
set by the Main Controller in communicating mode.
EA EN SP
XX.X°F
XX.X°C
ENTERING AIR ENABLE SETPOINT
This is the temperature at which Preheat is enabled. The Entering Air
Enable Setpoint is set by the LCD Display in stand-alone mode and is
set by the Main Controller in communicating mode.
Minimum Default Maximum
-40°F
-40°C
55°F
12.7°C
90°F
32°C
LA1 CAL
XX.X°F
XX.X°C
LEAVING AIR SENSOR 1 CALIBRATION OFFSET
If the sensor is reading incorrectly, you can use this screen to enter an
offset temperature to adjust the sensor’s temperature. Enter a positive
value to raise the sensor’s temperature or a negative value to lower the
sensor’s temperature.
Minimum Default Maximum
-100.0°F
-55.5°C
0.0°F
0.0°C
100.0°F
55.5°C
Minimum Default Maximum
35°F
1.6°C
70°F
21°C
90°F
32°C
RST LMT
XX.X°F
XX.X°C
RESET LIMIT SETPOINT
Will display and be used only in stand-alone mode. If Remote Reset is
being utilized, this will be the Leaving Air Setpoint when the Reset Voltage Input is at 10VDC.
Minimum Default Maximum
0°F
°C
70°F
°C
120°F
°C
LA2 CAL
XX.X°F
XX.X°C
LEAVING AIR SENSOR 2 CALIBRATION OFFSET
If the sensor is reading incorrectly, you can use this screen to enter an
offset temperature to adjust the sensor’s temperature. Enter a positive
value to raise the sensor’s temperature or a negative value to lower the
sensor’s temperature.
Minimum Default Maximum
-100.0°F
-55.5°C
0.0°F
0.0°C
100.0°F
55.5°C
16
PREHEAT-X Technical Guide
Page 17

LCD DISPLAY SCREENS
Setpoint & Alarm Screens
EA CAL
XX.X°F
XX.X°C
ENTERING AIR SENSOR CALIBRATION OFFSET
If the sensor is reading incorrectly, you can use this screen to enter an
offset temperature to adjust the sensor’s temperature. Enter a positive
value to raise the sensor’s temperature or a negative value to lower the
sensor’s temperature.
Minimum Default Maximum
-100.0°F
-55.5°C
0.0°F
0.0°C
100.0°F
55.5°C
Alarm Screens
Refer to the following map when viewing Alarm Screens. These
screens will display automatically when alarms are present. For
alarm troubleshooting, see pages 21-22.
ALARMS
ALARMS
The alarms are as follows:
NO ALARMS: This will be shown if there are no current alarms.
E-SHDN: If 24VAC is removed from the Emergency Shutdown Input,
this alarm will activate and the controller will turn off all outputs. The
alarm will be disabled when voltage has returned.
LA1 SENS: The fi rst Leaving Air T emperature Sensor has been discon-
nected, shorted, open, or missing for more than 60 seconds. This alarm
will be disabled when the sensor is working again.
LA2 SENS: The second Leaving Air Temperature Sensor has been
disconnected, shorted, open, or missing for more than 60 seconds. This
alarm will be disabled when the sensor is working again.
LO LAT: This indicates a Leaving Air Temperature Cutoff Alarm condi-
tion which is activated if the Controlling Leaving Air Temperature has
dropped below 35ºF for more than 2 minutes. The alarm will be disabled
if after a fi xed delay period the Leaving Air Temperature has risen above
35ºF.
HI LA T: This indicates a Leaving Air Temperature Cutof f Alarm condition
which is activated if the Controlling Leaving Air Temperature has risen
above 120ºF. All outputs will stage off.
EA SENS: The Entering Air Temperature Sensor has been disconnect-
ed, open, shorted, or missing for more than 60 seconds. This alarm will
be disabled when the sensor is working again.
COM STAT: Communications have been lost with the main controller
for more than 30 seconds. This alarm will disable when communications
resume.
PREHEAT-X Technical Guide
17
Page 18

LCD DISPLAY SCREENS
Confi guration Screens
Confi guration Screens
Refer to the following map when navigating through the Con guration Screens. From the CONFIG Screen, press
<ENTER> to
scroll through the screens and change setpoints. Use the <UP> and
<DOWN> arrow keys to change your selections. Press <ENTER> to
save any changes.
CONFIG
HEAT STG
0-6
# OF HEAT STAGES
Select the total number of Heat Stages including the Modulating
Stage. Range is 0-6. Default is 0.
MOD HEAT
YES/NO
AOUT VHI
0.0-10.0 VOLTS
MAXIMUM SCR VOLTAGE
This is the High Voltage setting for the Analog Output. It sets the volt-
age level needed for 100%. Range is 0 -10. Default is 10.
MOD Kp
15.0
INTEGRAL CONSTANT
This is the Internal PID Kp Constant. Do not make changes to this
value unless told to do so by WattMaster Technical Support.
.
MOD Ki
6.0
MODULATING HEAT
If either the Analog or PWM Modulating Heat output is being used, this
must be set to YES. Default is NO.
LAT CFG
LAT1,LAT2,
AVERAGE
LEAVING AIR TEMPERATURE SENSOR CONFIGURATION
LAT1: Use Leaving Air Temperature Sensor 1 as the Controlling Temp.
LAT2: Use Leaving Air Temperature Sensor 2 as the Controlling Temp.
AVERAGE: Use the Average of LAT1 & LAT2 as the Controlling Temp.
Default is AVERAGE.
AOUT VLO
0.0-10.0 VOLTS
MINIMUM SCR VOLTAGE
This is the Low Voltage setting for the Analog Output. It sets the
voltage level needed for 0%. Range is 0 -10. Default is 0.
.
AIRFLOW INTEGRAL
This is the Internal PID Ki Constant. Do not make changes to this value
unless told to do so by WattMaster Technical Support.
MOD TIME
1-120 SEC
MODULATION RATE
This is the time period setting that determines how often a change is
made to the modulating output. Range is 1 - 120 seconds.
Default is 20.
MOD Kd
6.0
DERIVATIVE CONSTANT
This is the Internal PID Kd Constant. Do not make changes to this
value unless told to do so by WattMaster Technical Support.
18
PREHEAT-X Technical Guide
Page 19

LCD DISPLAY SCREENS
Confi guration Screens
STG UP
0-1200 SECONDS
STAGE UP DELAY
If confi gured for SCR modulation, this is the amount of time (in sec-
onds) the controller must wait to activate an additional stage of heat if
the Min Off Time is met. Range is 0 - 1200. Default is 180.
STG DWN
0-1200 SECONDS
STAGE DOWN DELAY
If confi gured for SCR modulation, This is the amount of time (in sec-
onds)the controller must wait to deactivate a stage of heat if the Min
Run time is met. Range is 0 - 1200. Default is 180.
MIN RUN
0-1200 SECONDS
MIN OFF
0-1200 SECONDS
MINIMUM OFF TIME
This is the amount of time (in seconds) a stage of heat must remain off
before it can be activated. Range is 0 - 1200. Default is 60.
SCALING
DEG. F
DEG. C
TEMPERATURE SCALE
Fahrenheit (default) or Celsius.
This setting is used only in stand-alone mode.
MINIMUM RUN TIME
This is the amount of time (in seconds) a stage of heat must remain on
before it can be deactivated. Range is 0 - 1200. Default is 120.
PREHEAT-X Technical Guide
19
Page 20

LCD DISPLAY SCREENS
Communicating Confi guration Screens
Communication Confi guration Screens
Refer to the following map when navigating through the Communicating Con guration Screens. From the COM CONFIG Screen,
press
<ENTER> to scroll through the screens and change setpoints.
Use the <UP> and <DOWN> arrow keys to change your selections.
Press <ENTER> to save any changes.
COMM
CONFIG
COMM MODE
BACNET, EBUS,
S-ALONE
This setting confi gures the communications mode. The choices are (1)
BACNET, (2) EBUS, or (3) S-ALONE (default).
COMMUNICATION MODE
MAC ADDR
0-128
BACnet® - CURRENT MAC ADDRESS
Valid range is 0 to 128. Default is 0.
BAC ID
0-30,000
®
BACnet
Range is 0-30,000. Default is 15,000..
BACnet® - CURRENT BAUD RATE
9600, 19200, 38400, 57600, 76800. Default is 38400.
- CURRENT ID Start
BAC BAUD
38400
E-BUS CFG
VCM-X, VCB-X,
VCC-X or NONE
E-BUS CONFIGURATION
Select the type of controller that the PREHEAT-X is connected to. The
choices are VCM-X, VCB-X, VCC-X, or NONE (default). NOTE: You
must cycle power after changing this setting.
20
PREHEAT-X Technical Guide
Page 21

TROUBLESHOOTING
LED Diagnostics & Alarms
LED Diagnostics
The PREHEAT-X Controller is equipped with LEDs that can be
used to verify operation and perform troubleshooting. See Figure
6, below for the LED locations. The LEDs associated with these
inputs and outputs allow you to see what is active without using a
voltmeter. The LEDs and their uses are as follows:
STATUS LEDs
POWER - This green LED will light up to indicate that 24 VAC
power has been applied to the controller.
Diagnostic LEDs
ALARM - This red LED located on the PREHEAT-X Controller’s
cover above the LCD display will light up to indicate an alarm. The
type of alarm(s) will be shown on the LCD display.
ALARM LED
Communication LED
COMM - This yellow LED will light up and blink when communica-
tions are detected.
Relay LEDs
RL Y 1-6 - These green LEDs will light up and stay lit as long as the
Heat Relay(s) is active.
Binary Input LEDs
HEAT EN - This green LED will light up when Heat is enabled.
EMERGENCY SHUTDOWN - This green LED will light up when
Emergency Shutdown is enabled.
STAT LED
OS LED
WDOG LED
APP LED
HEAT ENABLE LED
EMERGENCY
SHUTDOWN LED
COMM LED
ALARM
UP
M
www.aaon.com
www.orioncontrols.com
OE377-26-00061 PREHEAT-X AAON No.: V48510
ANALOG INPUTS
LAT1
LAT2
EAT
0-10V RESET
GND
GND
BINARY INPUTS
ENABLE
EMERG. SHUTDOWN
FUTURE USE
RS-485 COMM
T(-)
MSTP
SHLD
BACnet
R(+)
WattMaster Label
E-BUS
CONNECT
#S 000062W
Rev.: 1D
MENU
ALARM CONTACT
HEAT
OUTPUTS
CONTACT RATING IS
1 AMP MAX
@ 24 VAC
ANALOG
OUTPUTS
E-BUS
CONNECT
DOWN
HEAT 1
HEAT 2
HEAT 3
HEAT 4
HEAT 5
HEAT 6
RLY COMM
0-10V MOD. SCR
GND
+24 VAC
Figure 6: PREHEAT-X Controller LED Locations and Descriptions
GND
PWM +
PWM -
ALARM LED
ENTER
PREHEAT-X Technical Guide
21
Page 22

TROUBLESHOOTING
Alarms & LED Locations
Troubleshooting Alarms
Mechanical Failure:
• Check relay outputs on the PREHEAT-X for 24 VAC
output.
• Verify output voltage (VOUT and GND) to SCR or
PWM
• Verify that the Leaving Air Temperature Sensor(s) is
connected to AIN1 and/or AIN2 and GND on the
PREHEAT-X
• Verify Leaving Air Temperature Sensor probe(s) is
mounted correctly
• Remove AIN1 and AIN2 and GND wiring from the
PREHEAT-X and ohm the sensor out (this may
indicate open or failed wiring). Refer to chart in back
of this guide for readings.
Leaving Air Temperature Failure:
• Verify that the Leaving Air Temperature Sensor(s) is
connected to the AIN1 and/or AIN2 and GND on the
PREHEAT-X.
• Remove AIN1 and AIN2 and GND wiring from the
PREHEAT-X and ohm the sensor out (this may
indicate open or failed wiring). Refer to chart in back
of this guide for readings.
Communications Loss:
• Check COMM LED on PREHEAT-X.
• Verify 24 VAC power to all interconnected
WattMaster controllers.
• Verify connection between the PREHEAT-X
and associated WattMaster controllers.
• In communication mode (connected to a an AAON
Unit with modular cable), verify PREHEAT-X
confi guration on AAON unit.
22
PREHEAT-X Technical Guide
Page 23

APPENDIX A
Leaving Air Temperature Sensor Installation
Mounting the Leaving Air Temperature
Sensor
• The Leaving Air T emperature (LA T) Sensor should be
located in PREHEAT-X box’s output location.
• Locate the sensor in the center of the widest part of the
PREHEA T -X box wall. Use the supplied template and a
5/16” drill to make a hole for the sensor.
• Install the gasket over the probe and mount securely to
the box wall using the supplied sheet metal screws. Be sure
the gasket is compressed to provide an air tight seal.
• For best accuracy, apply insulation on the outside of the
box wall, over the sensor. This will help prevent thermal
gradients from affecting the sensor.
Leads Are Non-Polarized. Butt Splice Leads
To 24 Gauge Wire Minimum.
Connect Leads to ”AIN1 And/Or “AIN2” And “GND” On
PREHEAT-X Controller. See Figure 2 on page 5 for
details.
WARNING: Make sure your Leaving Air Temperature
Sensor(s) are mounted and wired according
to these instructions prior to testing the unit
or else the modulating valve will not control
properly and may damage your equipment.
Inside Wall of PREHEAT-X Box
Figure 7: Leaving Air Temperature Sensor Installation
PREHEAT-X Technical Guide
23
Page 24

TROUBLESHOOTING
LAT Sensor Testing
Leaving Air Temperature Sensor
If you suspect the Leaving Air Temperature Sensor is not reading
correctly, make sure the wiring terminal connections are tight and
that any wiring splices are properly connected. You can check the
operation of the Leaving Air Temperature Sensor by measuring
the resistance or voltage using a digital multimeter. Set the meter
to DC Volts. Place the positive probe on the AIN terminal and the
negative probe on the GND terminal. Read the DC Volts and fi nd
that voltage in Table 3.
Read the temperature corresponding with that voltage and determine
if this is close to the actual temperature the sensor is exposed to. If the
temperature from the chart is different by more than a few degrees,
you probably have a defective or damaged sensor. You can also
check the sensor resistance to determine correct operation. To read
the resistance, set the meter to Ohms. Unplug the sensor connector
from the board and measure the resistance across the disconnected
wires. This resistance should match the corresponding temperature
from Table 3.
Temperature to Resistance/Voltage Chart
Temp
(°F)
-10 -23.3 93333 2.98
-5 -20.6 80531 2.94
0 -17.8 69822 2.89
5 -15.0 60552 2.83
10 -12.2 52500 2.77
15 -9.4 45902 2.71
20 -6.7 40147 2.64
25 -3.9 35165 2.57
30 -1.1 30805 2.49
35 1.6 27140 2.41
40 4.4 23874 2.33
45 7.2 21094 2.24
50 10.0 18655 2.15
52 11.1 17799 2.11
54 12.2 16956 2.08
56 13.3 16164 2.04
58 14.4 15385 2.00
60 15.6 14681 1.96
62 16.7 14014 1.93
64 17.8 13382 1.89
66 18.9 12758 1.85
Table 3: 0-3.3 V Temperature Sensor - Voltage &
Resistance for Type III Sensors
Temp
(°C)
Resistance
(Ohms)
Voltage @
Input (VDC)
Temperature to Resistance/Voltage Chart
Temp
(°F)
68 20.0 12191 1.81
69 20.6 11906 1.79
70 21.1 11652 1.78
71 21.7 11379 1.76
72 22.2 11136 1.74
73 22.7 10878 1.72
74 23.3 10625 1.70
75 23.9 10398 1.68
76 24.4 10158 1.66
78 25.6 9711 1.63
80 27.8 9302 1.59
82 27.8 8893 1.55
84 28.9 8514 1.52
86 30.0 8153 1.48
88 31.1 7805 1.45
90 32.2 7472 1.41
95 35.0 6716 1.33
100 37.8 6047 1.24
105 40.6 5453 1.16
110 43.3 4923 1.09
115 46.1 4449 1.02
120 48.9 4030 .95
125 51.7 3656 .88
130 54.4 3317 .82
135 57.2 3015 .76
140 60.0 2743 .71
145 62.8 2502 .66
Temp
(°C)
Resistance
(Ohms)
Voltage @
Input (VDC)
Table 3, continued: 0-3.3 V Temperature Sensor Voltage & Resistance for Type III Sensors
Thermistor Sensor Testing Instructions
1.) Use the resistance column to check the thermistor sensor while
disconnected from the controllers (not powered).
2.) Use the voltage column to check sensors while connected to
powered controllers. Read voltage with meter set on DC volts. Place
the “-” (minus) lead on GND terminal and the “+” (plus) lead on the
sensor input terminal being investigated.
If the voltage is above 3.3 VDC, the sensor or wiring is “open.” If
the voltage is less than 0.05 VDC, the sensor or wiring is shorted.
24
PREHEAT-X Technical Guide
Page 25

PREHEAT-X BACnet® Connection To MS/TP Network
Programming Note:
Use Communication
Configuration Screens In
LCD Display To Program
The BACnet Settings.
See Page 20
MS/TP Connection
To BACnet
For Details.
®
APPENDIX B
PREHEAT-X
CONTROLLER
ALARM
ALARM
ALARM
UP
UP
UP
M
M
M
MENU
MENU
www.aaon.com
www.aaon.com
www.aaon.com
www.orioncontrols.com
www.orioncontrols.com
www.orioncontrols.com
OE377-26-00061 PREHEAT-X AAON No.: V48510
OE377-26-00061 PREHEAT-X AAON No.: V48510
OE377-26-00061 PREHEAT-X AAON No.: V48510
ANALOG INPUTS
ANALOG INPUTS
ANALOG INPUTS
LAT1
LAT1
LAT1
LAT2
LAT2
LAT2
OAT
EAT
OAT
0-10V RESET
0-10V RESET
0-10V RESET
GND
GND
GND
GND
GND
GND
BINARY INPUTS
BINARY INPUTS
BINARY INPUTS
ENABLE
ENABLE
ENABLE
EMERG. SHUTDOWN
EMERG. SHUTDOWN
EMERG. SHUTDOWN
FUTURE USE
FUTURE USE
FUTURE USE
RS-485 COMM
RS-485 COMM
RS-485 COMM
T(-)
T(-)
T(-)
MSTP
MSTP
SHLD
SHLD
SHLD
BACnet
BACnet
R(+)
R(+)
R(+)
WattMaster Label
E-BUS
E-BUS
#LB102XXX-A
Rev.: 1A
CONNECT
CONNECT
E-BUS
WattMaster Label
WattMaster Label
#S 000062W
#S 000062W
CONNECT
Rev.: 1D
Rev.: 1B
MENU
ALARM CONTACT
ALARM CONTACT
ALARM CONTACT
HEAT
HEAT
OUTPUTS
OUTPUTS
HEAT
OUTPUTS
CONTACT RATING IS
CONTACT RATING IS
1 AMP MAX
1 AMP MAX
CONTACT RATING IS
@ 24 VAC
@ 24 VAC
1 AMP MAX
@ 24 VAC
ANALOG
ANALOG
ANALOG
OUTPUTS
OUTPUTS
OUTPUTS
E-BUS
E-BUS
E-BUS
CONNECT
CONNECT
CONNECT
DOWN
DOWN
DOWN
HEAT 1
HEAT 1
HEAT 1
HEAT 2
HEAT 2
HEAT 2
HEAT 3
HEAT 3
HEAT 3
HEAT 4
HEAT 4
HEAT 4
HEAT 5
HEAT 5
HEAT 5
HEAT 6
HEAT 6
HEAT 6
RLY COMM
RLY COMM
RLY COMM
0-10V MOD. SCR
0-10V MOD. SCR
0-10V MOD. SCR
PWM +
PWM +
PWM +
PWM -
PWM -
GND
GND
GND
+24 VAC
+24 VAC
+24 VAC
ENTER
ENTER
ENTER
GND
GND
GND
PWM -
T SHLD
R +
Typical Terminal Blocks. All
Line Voltage
Wiring To Be T To T, SHLD
(G) To SHLD (G) & R To R
Wiring Notes:
1.) All wiring to be in accordance with local and national electrical
codes and specifications.
2.) All communication wiring to be 18 gauge minimum, 2 conductor
twisted pair with shield. Use Belden #82760 or equivalent.
Figure 8: PREHEAT-X BACnet Connection to MS/TP Network
GND
24VAC
Size Transformer For
Correct Total Load.
PREHEAT-X Controller =
40 VA
PREHEAT-X Technical Guide
25
Page 26

APPENDIX B
PREHEAT-X BACnet® Points
BACnet® Properties for the PREHEAT-X
PARAMETER OBJECT DESCRIPTION LIMITS
Active
Controlling
Setpoint
Number of
Heat Stages
On
Modulating
Output
Position
All Alarms
Bitfi eld
Entering Air
Temperature
Leaving Air
Temp Sensor 1
Leaving Air
Temp Sensor 2
Leaving Air
Average Temp
Reset Input
Percentage
Enable Input
Value
Shutdown
Input Value
Preheat Enable
Status
Alarm Relay
Status
Heat 1 Relay
Status
Heat 2 Relay
Status
Heat 3 Relay
Status
Heat 4 Relay
Status
Heat 5 Relay
Status
Heat 6 Relay
Status
AI: 1 The current Active
Controlling Setpoint
AI:2 The current number of heat
stages on
AI: 3 The current Modulating
Output Position
AI: 4 The current Alarm Status
in a Bitfi eld
AI: 5 The current Entering Air
Temperature
AI:6 The current Leaving Air
Sensor 1 Temperature
AI:7 The current Leaving Air
Sensor 2 Temperature
AI: 8 The current Average
Leaving Air Temperature
AI:9 The current Setpoint Reset
Input Percentage
BI: 1 The current value of the
Enable Binary Input
BI: 2 The current value of the
Emergency Shutdown
Binary Input
BI: 3 The current Enable status
of the controller
BI: 4 The current status of the
Alarm Relay
BI: 5 The current status of the
Heat 1 Relay
BI: 6 The current status of the
Heat 2 Relay
BI: 7 The current status of the
Heat 3 Relay
BI: 8 The current status of the
Heat 4 Relay
BI: 9 The current status of the
Heat 5 Relay
BI: 10 The current status of the
Heat 6 Relay
Read Only
Read Only
Read Only
Read Only
See Alarm
Bits, this page.
Read Only
Read Only
Read Only
Read Only
Read Only
Read Only
0 = Off
1 = On
Read Only
0 = Off
1 = On
Read Only
0 = Off
1 = On
Read Only
0 = Off
1 = On
Read Only
0 = Off
1 = On
Read Only
0 = Off
1 = On
Read Only
0 = Off
1 = On
Read Only
0 = Off
1 = On
Read Only
0 = Off
1 = On
Read Only
0 = Off
1 = On
BACnet® Properties for the PREHEAT-X
PARAMETER OBJECT DESCRIPTION LIMITS
Emergency
Shutdown
Alarm
Leaving Air
Sensor 1
Alarm
Leaving Air
Sensor 2
Alarm
Low Leaving
Air Temp
Alarm
High Leaving
Air Temp
Alarm
Entering Air
Sensor Alarm
Remote Enable AV: 1 Enables the Preheat from
Remote
Leaving Air
Setpoint
Remote
Entering
Air Enable
Setpoint
BI: 11 The current Emergency
Shutdown Alarm status
BI: 12 The current Leaving Air
Sensor 1 Alarm status
BI: 13 The current Leaving Air
Sensor 2 Alarm status
BI: 14 The current Low Leaving
Air Temp Alarm status
BI: 15 The current High Leaving
Air Temp Alarm status
BI: 16 The current Entering Air
Sensor Alarm status
the BACnet front end
AV: 2 Controlling Leaving Air
Setpoint from the BACnet
front end
AV: 3 Entering Air Enable
Setpoint from the BACnet
Front end
Read Only
0 = Off
1 = On
Read Only
0 = Off
1 = On
Read Only
0 = Off
1 = On
Read Only
0 = Off
1 = On
Read Only
0 = Off
1 = On
Read Only
0 = Off
1 = On
Read / Write
0 = Disabled
1 = Enabled
Read/ Write
35.0 ºF
Read / Write
-40.0 ºF90.0
PREHEAT-X BACnet® Property
Identifi er
BACNETPropertyIdentifi er :
AllAlarmGroup1Bits ::= BIT STRING {
Reserved (0),
BadLeavingAir1 (1),
BadLeavingAir2 (2),
LowLeavingAir (3),
HighLeavingAir (4),
Reserved (5),
BadEnteringAir (6),
CommAlarm (7),
ShutDownAlarm (8)
Volatile
Volatile
90.0
ºF
Volatile
ºF
26
PREHEAT-X Technical Guide
Page 27

NOTES
PREHEAT-X Technical Guide
27
Page 28

www.aaon.com
2425 So. Yukon Ave • Tulsa, OK 74107-2728
Ph: (918) 583-2266 • Fax: (918) 583-6094
AAON® Manual Part No. V48520
WattMaster Manual Form No: AA-PREHEATX-TGD-01C
 Loading...