

Page 1

EN
TABLE OF CONTENTS
About this guide ......................................... 2
Product overview ........................................ 3
Getting started ........................................... 5
Batteries .................................................. 5
Safety cord .............................................. 5
Switch between modes .......................... 5
Change settings ..................................... 5
Clock ........................................................... 6
Alarm ........................................................... 6
Timer ........................................................... 7
Stopwatch ................................................... 9
Pacer ........................................................ 1 2
Backlight ................................................... 13
Safety and care ........................................ 1 4
Warnings ................................................... 1 4
Troubleshooting ........................................1 5
Specifications ........................................... 1 6
Additional resources ................................ 19
1
Page 2

EN
ABOUT THIS GUIDE
Congratulations on your selection of the Oregon
Scientific Hockenheim 500-Lap Stopwatch
(SL-929). This powerful device bundles clock,
alarm, stopwatch, timer, and pacer features into
a single hand-held tool you can use for all your
sporting activities.
Keep this manual handy as you use your new
product. It contains practical step-by-step
instructions, as well as technical specifications
and warnings you should know.
In this box, you will find:
• Stopwatch
• Safety cord
• User manual
2
Page 3

EN
PRODUCT OVERVIEW
1
2
3
4
5
DESCRIPTIONS
1. Start / Stop button
2. Lap / Reset button
3. Mode button ( 5)
4. Backlight button ( 13)
5. Safety cord ( 5)
3
Page 4
EN
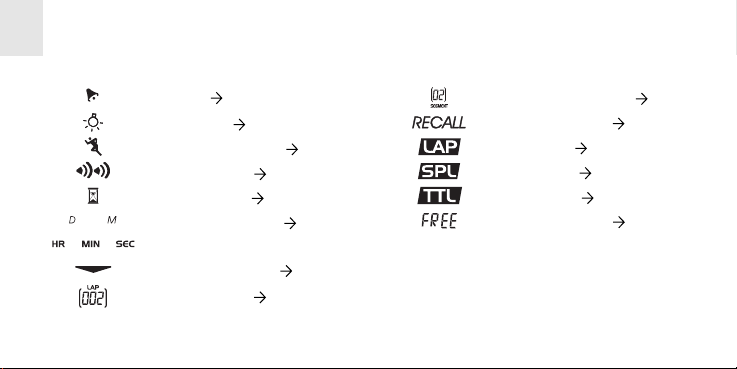
LCD ICON DESCRIPTION
Alarm ( 6 , 7)
Backlight ( 13)
Stopwatch Mode ( 9)
Pacer Mode ( 12 , 13)
Timer Mode ( 7)
Clock / Calendar ( 6)
Elapsed time
Stopwatch units ( 9)
Lap number ( 11)
LCD ICON DESCRIPTION
Segment number ( 11)
Memory recall ( 11)
Lap time ( 9)
Split time ( 9)
Total time ( 9)
Laps available ( 10)
4
Page 5

EN
GETTING STARTED
BATTERIES
Batteries are supplied with this product.
Replace them whenever the display becomes
dim. Use a coin to remove the battery
compartment lid (on the back of the Stopwatch).
Be sure to match the correct polarity, as sho wn
in the battery compartment.
SAFETY CORD
Thread the safety cord through the loop on the
bottom of the unit.
SWITCH BETWEEN MODES
Press MODE.
CHANGE SETTINGS
Press and hold MODE for 2 seconds. Then,
press LAP / RESET or START / STOP to
change each setting. Press and hold for
fast-setting mode. Press MODE to switch
between options.
5
Page 6
EN
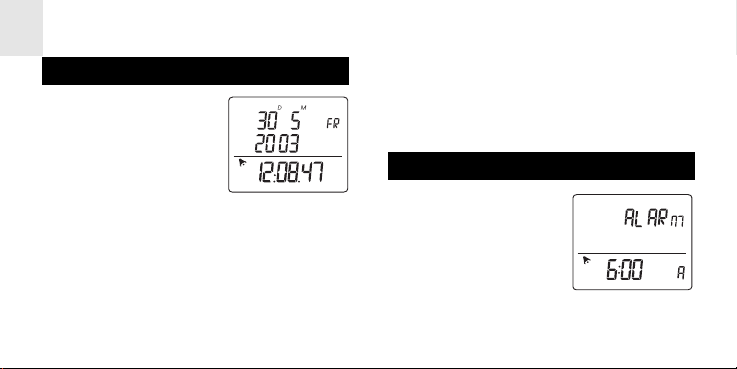
CLOCK
The Clock Mode shows
the date, month, year, da y
of week, current time, and
alarm status.
SET OR CHANGE THE CLOCK
1. Press MODE to switch to the Clock Mode.
2. Press and hold MODE for 2 seconds to
enter the setting mode.
3. Select the 12/24-hour format, second,
minute, hour, year , month, and date. Press
LAP / RESET or STA RT / STOP to change
the setting. Press MODE to confirm.
ALARM
When activated, the
alarm beeps continuously for 30 seconds.
6
Page 7

EN
SET ALARM TIME
1. Press MODE to switch to Alarm Mode.
2. Press and hold MODE for 2 seconds to
enter the setting mode.
3. Select the hour and minute. Press LAP /
RESET or START / STOP to change the
setting. Press MODE to confirm.
ACTIVATE / DEACTIVATE ALARM
In Alarm Mode, press START / STOP or LAP /
RESET. displays when the alarm is
activated.
TO TURN THE ALARM OFF
Press any button.
TIMER
Use the Timer Mode to
measure a set length of
time, such as an hour, or
to compete against your
best time for an activity.
You can run up to 3
Timers simultaneously.
7
Page 8

EN
SET TIMER
1. Press MODE to switch to Timer Mode.
2. Press and hold MODE for 2 seconds to
enter the setting mode.
3. Select the hour, minute, second, and count
method. There are three count methods,
as follows:
CS - Count down and stop
CR - Countdown and repeat
CU - Countdown, then count up
Press LAP / RESET or START / STOP to
change the setting. Press MODE to
confirm.
4. To set additional Timers, press LAP/
RESET, then repeat Steps 2 - 3.
START / STOP / PAUSE TIMER
Press START / STOP.
CLEAR TIMER
Stop the timer. Then, press and hold LAP/
RESET for 2 seconds.
8
Page 9

EN
TIMER ALARM
An alarm will beep every second during the
last 5 seconds of the timer. A second alarm
will beep for 10 seconds at the end of the
timed period. Press any button to stop the
alarm.
STOPWATCH
With the stopwatch, you
can perform the following
tasks:
• Mark up to 500 laps
• View lap, split, and cumulative time
• Save, recall, and erase up to 99 memory
segments with date / time stamp
• Change the unit of measurement
SET STOPWATCH
1. Press MODE to
switch to Stopwatch
Mode. The following
information will show:
9
Page 10

EN
• Laps available ( )
• Number of segments saved
• Display format
• Stopwatch units ( )
• Stopwatch mode
2. (Optional) To change Stopwatch units,
press and hold MODE for 2 seconds. The
unit settings will flash. Then, press STAR T
/ STOP to switch between the options.
• HR:MIN:SEC (1/100 second resolution)
• SEC (1/100 second resolution)
• HR (1/100000 hour resolution)
• MIN (1/1000 minute resolution)
Press MODE to confirm.
3. Press LAP / RESET to create a new
memory segment.
4. Press STOP / START to start the
Stopwatch and switch views.
10
Page 11

EN
START / PAUSE / STOP STOPWATCH
Press START / STOP.
MARK A LAP
Press LAP / RESET with
the Stopwatch running.
The Lap and
Split times will freeze for 5 seconds.
CLEAR STOPW A TCH
Stop the Stopwatch. Then, press LAP /
RESET. (This creates a new memory segment.)
VIEW MEMORY SEGMENTS (RECALL)
1. Stop the Stopwatch.
2. Press MODE. The
number of laps, date
/ time stamp, and
segment number will
show for each
segment.
3. Press START / STOP to switch between
memory segments.
4. Press LAP / RESET to view the lap, split,
and cumulative times for a segment. Press
LAP / RESET again to view additional laps.
11
Page 12

EN
The Stopwatch will beep twice when no
more laps are available.
ERASE MEMORY SEGMENTS
1. Stop the Stopwatch.
2. Press and hold MODE for 2 seconds.
3. Press and hold START / STOP for 2
seconds to erase the last memory
segment. Or, press and hold START /
STOP for 4 seconds to erase all memory
segments.
4. Press LAP / RESET to confirm. “Erase
done” will show on the display.
PACER
The Pacer can be set to
beep at a rate of 30 - 240
steps per minute.
SET PACER
1. Press MODE to
switch to Pacer Mode.
2. Press and hold MODE for 2 seconds to
set the beep rate (30 - 240 beeps per
minute). Press START / STOP or LAP /
RESET to change the value. Press MODE
to confirm.
12
Page 13

EN
START / STOP PACER
Press START / STOP. The Pacer icon
will blink, and the Stopwatch will beep once
per step.
USE PACER WITH STOPWATCH
Set and start the Pacer. Then, press MODE to
switch to Stopwatch Mode. Follow the
instructions on pp. 9 - 11 to use the Stopwatch.
BACKLIGHT
Press BACKLIGHT to illuminate the
backlight for 5 seconds.
AUTO BACKLIGHT
To illuminate the Backlight on any key press,
press and hold BACKLIGHT for 2 seconds.
The Backlight icon will steadily show in the
top right corner of the display, and any k ey press
will activate the Backlight for 5 seconds. To
deactivate, press and hold BACKLIGHT
again for 2 seconds.
13
Page 14

EN
SAFETY AND CARE
Wash the unit with a slightly damp cloth and
mild detergent.
WARNINGS
This product is designed to give you years of
service if handled properly. Observe the
following guidelines:
• Never immerse the unit in water. This can
cause electrical shock and damage the
unit.
• Do not subject the unit to extreme force,
shock, or fluctuations in temperature or
humidity.
• Do not tamper with the internal
components.
• Remove the batteries if storing this product
for a long period of time.
• Do not scratch the LCD display.
• Do not make any changes or modifications
to this product.
• Unauthorized changes may void your right
to use the product.
14
Page 15

EN
• The contents of this user guide are
subject to change without notice.
• Images not drawn to scale.
TROUBLESHOOTING
Check here before contacting our customer
service department.
Problem Symptom Remedy
Backlight Backlight is dim
or no backlight
Clock Strange date /
time
Change
batteries(
Set clock
( 6)
5)
Problem Symptom Remedy
Blinking
icon
Display Display is dim Change
Stopwatch Wrong unit Change unit
Pacer /
Stopwatch /
Timer icon is
blinking
15
You may be
running one of
these Modes in
the background.
batteries(
( 10)
5)
Page 16

EN
Problem Symptom Remedy
Stopwatch
(continued
No lap /
segment
)
memory
available
Less than
500 laps
available
Erase some
memory
segments
12)
(
Laps are
cumulative
across all
memory
segments.
Erase some
segments
(
12)
SPECIFICATIONS
Main unit dimensions
L x W x H 70 × 88 × 21 mm
(2.76 × 3.46 × 0.83 inches)
Weight 76 grams (0.17 lbs)
With batteries
Clock
Clock display HH:MM:SS
Hour format 12 hr AM / PM or 24 hour
Calendar DD/MM/YYYY and auto
day-of-week
16
Page 17

EN
Range 2000 to 2099
Resolution +/- 1 second per day
Alarm 30-second beep alarm
Stopwatch
Range 00:00:00 to 23:59:59
(HRS:MIN:SEC)
Resolution 4 options:
HR:MIN:SEC (1/100 sec)
SEC (1/100 sec)
MIN (1/1000 min)
HR (1/100000 hr)
Memory 99 segments with date /
time stamp
Laps 500 cumulative (number
of laps will reduce as
memory segments
increase)
Display Laps, Split, Cumulative
Time
Pacer
Ran ge 30 to 240 beeps per
minute
17
Page 18

EN
Timer
Range 00:00:00 to 23:59:59; 3
Timers can be run
con-currently
Options Countdown-stop; Count
down-repeat;
Countdown-Count up
Temperature and Water Resistance
Operating 0 °C to 50 °C
(32 °F to 122 °F)
Storage -10 °C to 60 °C
(14 °F to 140 °F)
Water resistance Splash proof only
Power
Main unit 1 x CR2032 3V lithium
battery
18
Page 19

ADDITIONAL RESOURCES
Visit our website (www.oregonscientific.com)
to learn more about your new product and
other Oregon Scientific products such as
digital cameras, hand-held organizers, health
and fitness gear, and weather stations. The
website also includes contact information for
our customer service department, in case you
need to reach us.
© 2003 Oregon Scientific. All rights reserved.
EN
19
Page 20

OREGON
SCIENTIFIC
500-Lap Stopwatch
(Model #: SL-929 Hockenheim)
User Manual
 Loading...