

Page 1

Projection Clock with FM Radio
Dual-Band RF
Model: RRM326P
USER MANUAL
CONTENTS
Introduction .............................................................. 2
Product Overview .................................................... 2
Front View ............................................................ 2
Back View ............................................................. 3
LCD Display ......................................................... 3
Getting Started ......................................................... 4
Batteries ............................................................... 4
AC Adaptor ........................................................... 4
About RF Reception ................................................. 4
Turn the Radio Reception ON / OFF .................... 5
Clock / Calendar ....................................................... 5
Clock / Calendar Display ...................................... 5
Set Clock / Calendar ............................................ 5
FM Radio ................................................................... 6
Operating the Radio ............................................. 6
Radio Stations ...................................................... 6
Sleep .................................................................... 6
Backlight ................................................................... 6
Alarm ......................................................................... 7
Alarm Display and Sound ..................................... 7
Set the Alarm(s) ................................................... 7
Activate / Deactivate the Alarm(s) ........................ 7
Snooze / Turning the Alarm OFF .......................... 7
Projection Unit ......................................................... 7
Reset the Clock ........................................................ 8
Warnings ...................................................................8
Troubleshooting ....................................................... 9
Technical Specifications ......................................... 9
Notices .................................................................... 10
Statement of Responsibility ................................10
About Oregon Scientific ........................................ 10
EC-Declaration of Conformity ...............................10
1
EN
RRM326P_EN_output 03/09/2005, 14:441
Page 2

EN
INTRODUCTION
Thank you for selecting the Oregon Scientific™ DualBand RF Projection Clock with FM Radio. This device is
designed to give you many years of reliable service,
including the following conveniences:
• Radio-controlled calendar clock
• Rotating projection unit with vertical or horizontal
projection
• FM radio
• Sleep function
• Buzzer or radio alarm with 8-minute snooze function
•Time / alarm status projection unit
•Time zone hour offset function
• Backlight for clock
In the box, you will find:
PRODUCT OVERVIEW
FRONT VIEW
• Clock Unit
•2 x UM-3 / AA 1.5V batteries
• 4.5V AC / DC adaptor
Keep this manual handy as you use your new product. It
contains practical step-by-step instructions, as well as
technical specifications and warnings you should know.
RRM326P_EN_output 03/09/2005, 14:442
1. SLEEP: Activate sleep function
2. SNOOZE / LIGHT: Activate 8-minute snooze function,
or backlight and projector
3. LCD display
4. TUNING
frequencies
5. RADIO ON / OFF: Switch radio on or off
6. Volume
7. Projector: Projects time and alarm status
2
/ : Toggle up or down through radio
/ : Increase or decrease volume
Page 3

BACK VIEW
1. FOCUS: Turn to focus the projected image
2. Image Rotation: Twist to rotate the image display
between the vertical and horizontal
3. 4.5V AC / DC Adaptor Socket
4. FM Radio Antenna Wire
5.
RESET: Press to return all values to the default settings
6. EU / UK: Select nearest radio signal base i.e.
England or Germany
7. PROJECTION ON: Slide to ON for continuous
image projection when the AC power is connected
8. ALARM ON / OFF: Switch alarm on or off
9. ALARM: Toggle between alarm and calendar display
10. STATION: Toggle through preset radio stations
11.
MODE: Toggle between setting modes /
confirm
12. Battery Compartment (cover on): 2 x UM-3 / AA
1.5V batteries
LCD DISPLAY
1. Time
2. Alarm on / off
3. Radio alarm on / off
4. Alarm time
5. RF clock reception
6. Battery status
7. Offset time zone
8. AC adaptor is disconnected
9. FM radio display / sleep / volume level
3
EN
settings
RRM326P_EN_output 03/09/2005, 14:443
Page 4
EN
GETTING STARTED
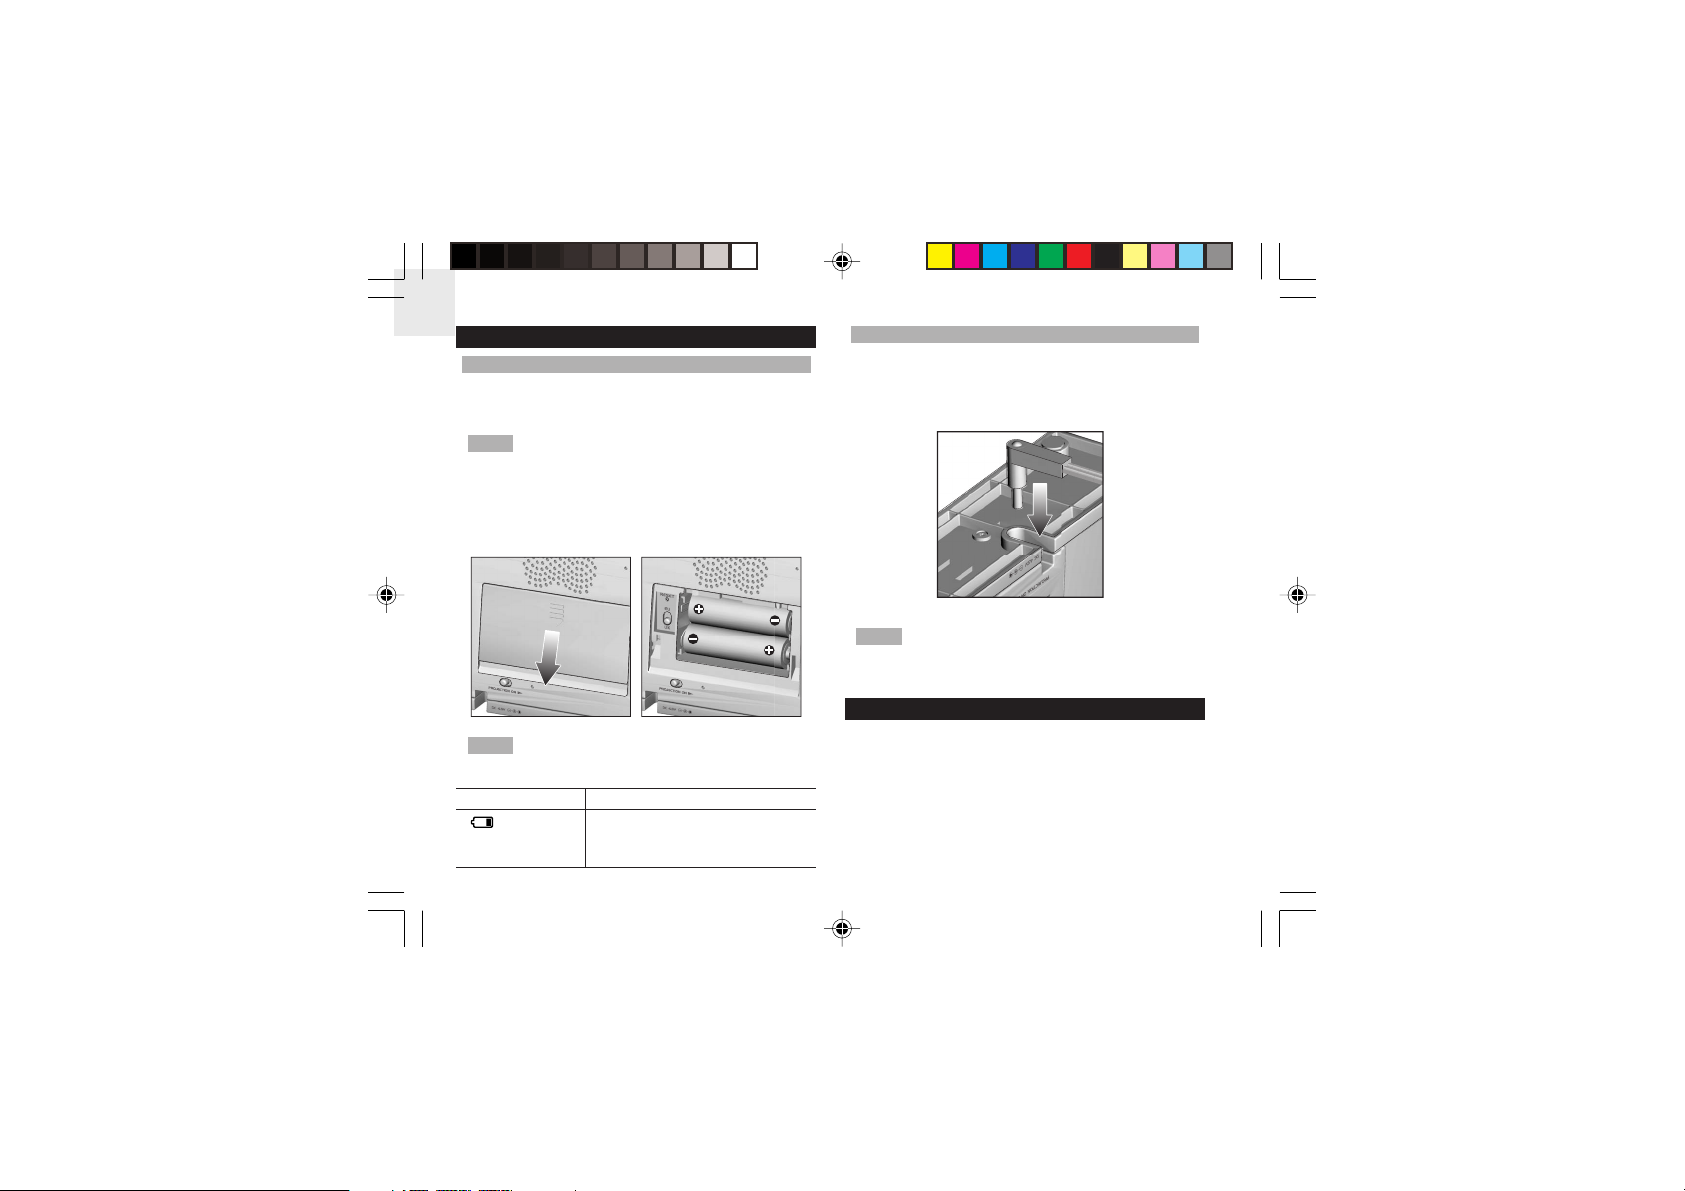
BATTERIES
Batteries are supplied with this product:
•2 x UM-3 / AA 1.5V batteries
NOTE It is recommended that you use alkaline batteries
with this product for longer performance.
Insert batteries before first use, matching the polarity
(+ and -) as shown below. Press RESET after each
battery change.
NOTE Do not use rechargeable batteries with this
product.
BATTERY ICON MEANING
Batteries are low, or there are no
batteries installed and only the
adaptor is connected
AC ADAPTOR
The batteries serve as a back-up power supply. For
continuous use of the projector, install the AC adaptor at
the base of the unit as shown below.
NOTE To help conserve energy, turn the PROJECTION
ON switch to OFF when you do not wish to use it.
ABOUT RF RECEPTION
This clock can automatically synchronize the date and
time with official time-keeping organizations in Frankfurt
(Germany) and Rugby (England). The unit can pick up a
Radio Frequency (RF) signal when it is within 1500km
(932 miles) of these locations.
4
RRM326P_EN_output 03/09/2005, 14:444
Page 5

To select the most suitable radio signal for your location,
slide the UK / EU switch to the appropriate setting. Press
RESET whenever you change the selected setting.
NOTE For best results, place the clock away from
metal or electrical objects, and near a window with a
clear view to the sky.
TURN THE RADIO RECEPTION ON / OFF
To turn the radio reception ON:
• Press VOL
• The RF reception icon will appear and flash on the
display to indicate it is searching for the RF signal.
Once batteries have been installed in the clock, the reception
icon will flash to indicate it is searching for a signal.
When the reception signal has been received the reception
icon will show the signal strength by displaying between
0 and 3 waves:
STRONG SIGNAL WEAK SIGNAL NO SIGNAL
To turn the radio reception OFF:
• Press and hold VOL
• The RF reception icon will disappear from the display.
and hold for 2 seconds.
for 2 seconds.
CLOCK / CALENDAR
EN
CLOCK / CALENDAR DISPLAY
Press MODE to toggle between 3 types of display
(Clock with seconds, Clock with day, Clock with time
zone offset).
SET CLOCK / CALENDAR
1. Press and hold MODE for 2 seconds. The time zone
offset hour digits will flash. When an offset hour has
been set (e.g. +1), the time displayed will be the RF
clock time plus 1 hour.
5
RRM326P_EN_output 03/09/2005, 14:445
Page 6

EN
2. Press VOL or to change the setting.
3. Press MODE to confirm the setting and move onto
the next one.
4. The settings appear in the following order: Time zone
hour offset, 12 / 24 hour format, hour, minute, year,
MM / DD or DD / MM format, month, day and
language for day of the week.
5. Press ALARM, ALARM ON / OFF, TUNING
SLEEP, or RADIO to exit the Clock Setting Mode.
or ,
3. Press TUNING
press and hold for 2 seconds to enable auto-search
for an available frequency.
4. Press any key to stop auto-search.
RADIO STATIONS
To set a radio station, press and hold STATION while on
a frequency. The unit can store up to 8 preset stations in
chronological order.
or to change radio frequency,
FM RADIO
This product has a built-in FM radio for your entertainment.
In order to conserve power, the FM radio only works
when the AC adaptor is plugged in.
OPERATING THE RADIO
1. Press RADIO to switch the radio on.
2. Press VOL
RRM326P_EN_output 03/09/2005, 14:446
or to change the radio volume.
Press STATION to return to the last station that you
listened to. Use the STATION button to scroll through the
8 preset stations.
SLEEP
The radio is equipped with a countdown sleep timer that
can be set to switch the radio off after up to 120 minutes.
1. Press SLEEP to enter sleep mode.
2. Use the SLEEP button to change the sleep time
setting (120, 90, 60, 45, 30, 15, 0).
3. Press any key to exit sleep mode – the sleep timer
will be automatically activated.
BACKLIGHT
Press SNOOZE / LIGHT to activate the backlight for 5
seconds.
6
Page 7

ALARM
ALARM DISPLAY AND SOUND
This product has two types of daily alarm that can be set
to go off at the same time every day. You can choose to
be woken up by the radio or by a buzzer alarm. Press
ALARM at any time to toggle between the calendar and
the alarm display.
NOTE
If the radio alarm time is reached when the AC
adaptor is not connected the unit will default to buzzer alarm.
SET THE ALARM(S)
1. Press and hold ALARM for 2 seconds.
2. Use VOL
3. Press ALARM to confirm the setting and move onto
the next one.
4. The settings appear in the following order: Hour,
minute, alarm type (i.e. radio alarm or buzzer alarm).
5. If radio alarm is selected, preset station and preset
volume can also be altered.
or to change the flashing setting.
6. Press ALARM to exit alarm setting mode.
7. The daily alarm will be on automatically after setting.
ACTIVATE / DEACTIVATE THE ALARM(S)
• Press the ALARM ON / OFF to enable or disable the
daily alarm.
• When the buzzer alarm / radio alarm icon appears on
the display the alarm is activated. When the icons do
not appear the buzzer alarm / radio alarm is deactivated.
SNOOZE / TURNING THE ALARM OFF
When activated, the alarm icon flashes, the backlight
and projector turn on for 8 seconds. The buzzer alarm
sounds for 2 minutes if no key is pressed. The radio will
remain on for 120 minutes if no key is pressed.
To silence the alarm:
• Press SNOOZE / LIGHT to silence it for 8 minutes.
The buzzer alarm or radio alarm icon will flash to
show snooze is enabled.
OR
• Press any key except SNOOZE / LIGHT to mute the
alarm and activate it again in 24 hours.
PROJECTION UNIT
The projection unit can display both time and alarm
status. To use this feature:
7
EN
RRM326P_EN_output 03/09/2005, 14:447
Page 8

EN
• Slide the PROJECTION switch ON to activate
continuous projection. However, this function will not
work unless the AC / DC adaptor is used.
• Adjust the FOCUS knob to make the image clearer.
• Manually tilt the projection unit to position the image.
NOTE You can also press the SNOOZE / LIGHT button
to project the time and alarm status for 5 seconds.
RESET THE CLOCK
Insert a thin blunt instrument into the hole below RESET
to return to the default settings.
The default settings are:
EU Clock Time: 12.00
UK Clock Time: 12:00 pm
Date: 1st January 2005
Language: English
Time Offset: +0
Alarm Time: 6.00 AM
Daily Alarm(s): Disabled
EU Display Setting: 24hr, DD / MM
UK Display Setting: 12hr, DD / MM
WARNINGS
This product is designed to give you years of service if
handled properly. Oregon Scientific will not be responsible
for any deviations in the usage of the device from those
specified in the user instructions or any unapproved
alterations or repairs of the product. Observe the following
guidelines:
• Do not clean any part of the product with benzene,
thinner or other solvent chemicals – this may cause
permanent damage that is not covered by the guarantee.
When necessary, clean it with a damp cloth.
• Never immerse the product in water. This can cause
electrical shock and damage the product.
• Do not subject the product to extreme force, shock,
or fluctuations in temperature or humidity.
• Do not tamper with the internal components.
• Do not mix new and old batteries or batteries of
different types.
• Do not use rechargeable batteries with this product.
• Remove the batteries if storing this product for a long
period of time.
• Do not scratch the LCD display.
NOTE The technical specification of this product and
contents of this user manual are subject to change
without notice. Images not drawn to scale.
8
RRM326P_EN_output 03/09/2005, 14:448
Page 9

TROUBLESHOOTING
PROBLEM SYMPTOM REMEDY
Clock time is No radio signal
not correctly set
No alarm Alarm does not Turn on the setting
Operation
not normal do not perform
Calendar Strange day Check it is set to
Clock Cannot change Disable the radio
Clock / Calendar
reception away from PCs,
sound
Certain functions
clock signal and set
Cannot auto- 1. Adjust batteries
synchronize 2. Press RESET
the clock
Place the clock far
phones, and other
electronic equipment
and near a windowsill.
Wait for at least 24
hours
Reset the clock
your own language
manually
TECHNICAL SPECIFICATIONS
EN
TYPE DESCRIPTION
Main Unit Dimensions
L x W x H 161 x 30 x 103 mm
(6.34 x 1.18 x 4.06 inches)
Weight (without battery) 235 g (0.52 lbs)
Main Unit RF
RF Clock Frequency DCF77 (EU) or MSF60 (UK)
System
Synchronization Auto or disabled
FM Band Range 87.5-108.0 MHz
Main Unit Display
Clock HH:MM:SS
HH:MM: Day of week
HH:MM: Time zone hour offset
Hour Format 12hr AM / PM (MSF Format)
24hr (DCF Format)
Calendar DD / MM or MM / DD, user
selectable. Weekday language:
E, D, F, I, S.
Alarm • 2-minute alarm
• 8-minute snooze
Power
Main Unit 2 x UM-3 / AA 1.5V batteries
or 4.5V AC / DC adaptor
9
RRM326P_EN_output 03/09/2005, 14:449
Page 10

EN
NOTE It is recommended that you use alkaline batteries
with this product for longer performance.
NOTE Design and specifications are subject to change
without notice.
NOTICES
STATEMENT OF RESPONSIBILITY
Oregon Scientific will not be held liable for any bodily
injury, death, property damages, or any other claims of
whatever nature resulting from the misuse or negligence
of the product, whether intentional or unintentional.
We hope you will find all the information you need on our
website, however if you’re in the US and would like to
contact the Oregon Scientific Customer Care department
directly, please visit:
support
OR
Call 949-608-2848.
For international enquiries, please visit:
www2.oregonscientific.com/about/international/
default.asp
www2.oregonscientific.com/service/
Oregon Scientific will not be responsible for any deviations
in the usage of the device from those specified in the user
instructions or any unapproved alternations or repairs of
the product.
ABOUT OREGON SCIENTIFIC
Visit our website (www.oregonscientific.com) to learn
more about Oregon Scientific products such as digital
cameras; MP3 players; children’s electronic learning products
and games; projection clocks; health and fitness gear;
weather stations; and digital and conference phones. The
website also includes contact information for our customer
care department in case you need to reach us, as well as
frequently asked questions and customer downloads.
RRM326P_EN_output 03/09/2005, 14:4410
EC-DECLARATION OF CONFORMITY
Hereby, Oregon Scientific, declares that this Dual-Band
RF Projection Clock with FM Radio RRM326P is in
compliance with the essential requirements and other
relevant provisions of Directive 1999/5/EC.
A copy of the signed and dated Declaration of Conformity
is available on request via our Oregon Scientific Customer
Service.
COUNTRIES RTTE APPROVAL COMPLIED
All EC countries, Switzerland
and Norway
10
CH
N
Page 11

Dual-Band RF Projection Clock with FM Radio
Model: RRM326P
USER MANUAL
11
EN
RRM326P_EN_output 03/09/2005, 14:4411
Page 12

EN
© 2005 Oregon Scientific. All rights reserved.
086-003827-010
12
RRM326P_EN_output 03/09/2005, 14:4412
 Loading...