


AC 1113 - F/N 563397
ORIGINAL INSTRUCTION MANUAL
POLE SAW MODEL PS250
MANUEL D’INSTRUCTIONS ORIGINAL
SCIE À LONG MANCHE MODÈLEPS250
MANUAL DE INSTRUCCIONES ORIGINAL
SIERRA DE POSTE MODELO PS250


1
OREGON® Cordless Tool System
POLE SAW MODEL PS250
AC 1113 - F/N 563397
ENGLISH . . . . . . . . . . . . . . . . . . . . . . . . . . . . . . . . . . . . . . . . . . . . . . 2
WARNING: READ AND UNDERSTAND ALL SAFETY WARNINGS AND ALL INSTRUCTIONS. FAILURE TO FOLLOW
THE WARNINGS AND INSTRUCTIONS MAY RESULT IN ELECTRIC SHOCK, FIRE AND/OR SERIOUS INJURY.
SAVE ALL WARNINGS AND INSTRUCTIONS FOR FUTURE REFERENCE.
FRANÇAIS . . . . . . . . . . . . . . . . . . . . . . . . . . . . . . . . . . . . . . . . . . . . 34
AVERTISSEMENT: VEUILLEZ LIRE ET COMPRENDRE TOUS LES AVERTISSEMENTS DE SÉCURITÉ ET TOUTES
LES INSTRUCTIONS. LE NON-RESPECT DES AVERTISSEMENTS DE SÉCURITÉ ET DES INSTRUCTIONS PEUT ENTRAÎNER
UNE DÉCHARGE ÉLECTRIQUE, UN INCENDIE ET/OU DES BLESSURES GRAVES.
CONSERVEZ L’ENSEMBLE DES AVERTISSEMENTS ET INSTRUCTIONS POUR RÉFÉRENCE ULTÉRIEURE.
ESPAÑOL . . . . . . . . . . . . . . . . . . . . . . . . . . . . . . . . . . . . . . . . . . . . . 66
ADVERTENCIA: LEA Y COMPRENDA TODAS LAS ADVERTENCIAS DE SEGURIDAD Y TODAS LAS INSTRUCCIONES.
NO SEGUIR LAS ADVERTENCIAS Y LAS INSTRUCCIONES PUEDE PROVOCAR CHOQUES ELÉCTRICOS, INCENDIOS Y/O
LESIONES GRAVES.
CONSERVE TODAS LAS ADVERTENCIAS E INSTRUCCIONES COMO REFERENCIA PARA EL FUTURO.
This instruction manual contains translations of a manual drafted in English and are provided to assist
those who do not speak English as their first language. Being a technical writing, some terms may not
have a like or equivalent meaning as translated. Therefore, you should not rely on this translation, and
should cross-reference the English version, where relying on the translated instructions could result in
harm to your person or property.
Ce manuel d’instructions est une traduction d’un manuel rédigé en anglais, fournie pour aider ceux dont
l’anglais n’est pas la langue maternelle. Étant donné qu’il s’agit d’un document technique, certains termes
peuvent ne pas avoir de signification similaire ou équivalente lorsqu’ils sont traduits. Par conséquent,
vous ne devez pas vous fier à cette traduction et devriez consulter la version anglaise également, au cas
où les instructions traduites pourraient provoquer des blessures ou des dommages matériels.
Este manual de instrucciones contiene traducciones de un manual redactado en inglés y se provee para
ayudar a aquellas personas que no hablan inglés. Dado que el manual es un documento técnico, es
posible que algunos términos no tengan un significado similar o equivalente al traducirlos. Por lo tanto,
no debe confiar en esta traducción y debe consultar la versión en inglés; confiar en las instrucciones
traducidas podría provocar lesiones personales o daños materiales.

2
TABLE OF CONTENTS
OREGON® Cordless Tool System
POLE SAW MODEL PS250
AC 1113 - F/N 563397
TABLE OF CONTENTS
SYMBOLS AND LABELS . . . . . . . . . . . . . . . . . . . . . . . . . . . . . . . . . .3
POLE SAW NAMES AND TERMS. . . . . . . . . . . . . . . . . . . . . . . . . . . . .4
PRODUCT IDENTIFICATION . . . . . . . . . . . . . . . . . . . . . . . . . . . . . . .5
SAFETY RULES . . . . . . . . . . . . . . . . . . . . . . . . . . . . . . . . . . . . . . . .6
GENERAL POWER TOOL SAFETY WARNINGS . . . . . . . . . . . . . . .6
WORK AREA SAFETY . . . . . . . . . . . . . . . . . . . . . . . . . . . . . . . .6
ELECTRICAL SAFETY . . . . . . . . . . . . . . . . . . . . . . . . . . . . . . . .6
PERSONAL SAFETY . . . . . . . . . . . . . . . . . . . . . . . . . . . . . . . . .7
POWER TOOL USE AND CARE. . . . . . . . . . . . . . . . . . . . . . . . . .8
BATTERY TOOL USE AND CARE . . . . . . . . . . . . . . . . . . . . . . . .8
SERVICE. . . . . . . . . . . . . . . . . . . . . . . . . . . . . . . . . . . . . . . . .8
POLE SAW SAFETY WARNINGS . . . . . . . . . . . . . . . . . . . . . . . . .8
STORAGE, TRANSPORTING, AND DISPOSAL. . . . . . . . . . . . . . .10
BATTERY SAFETY . . . . . . . . . . . . . . . . . . . . . . . . . . . . . . . . . 11
CHARGER SAFETY . . . . . . . . . . . . . . . . . . . . . . . . . . . . . . . .11
UNPACKING AND ASSEMBLY . . . . . . . . . . . . . . . . . . . . . . . . . . . . . 13
ASSEMBLING THE EXTENDABLE SHAFT. . . . . . . . . . . . . . . . . .13
FILLING THE BAR AND CHAIN OIL RESERVOIR . . . . . . . . . . . . . 14
ASSEMBLING THE GUIDE BAR AND SAW CHAIN . . . . . . . . . . . .15
TENSIONING THE SAW CHAIN . . . . . . . . . . . . . . . . . . . . . . . . 16
OPERATING THE POLE SAW . . . . . . . . . . . . . . . . . . . . . . . . . . . . . . 17
BATTERY PACK AND CHARGER. . . . . . . . . . . . . . . . . . . . . . . .17
GENERAL OPERATION . . . . . . . . . . . . . . . . . . . . . . . . . . . . . .19
CUTTING . . . . . . . . . . . . . . . . . . . . . . . . . . . . . . . . . . . . . . .21
MAINTENANCE AND CLEANING . . . . . . . . . . . . . . . . . . . . . . . . . . .24
INSPECTION. . . . . . . . . . . . . . . . . . . . . . . . . . . . . . . . . . . . .24
CLEANING . . . . . . . . . . . . . . . . . . . . . . . . . . . . . . . . . . . . . .25
SHARPENING THE SAW CHAIN . . . . . . . . . . . . . . . . . . . . . . . .25
MAINTAINING THE GUIDE BAR . . . . . . . . . . . . . . . . . . . . . . . . 27
REPLACING A WORN SAW CHAIN . . . . . . . . . . . . . . . . . . . . . .27
REPLACING A WORN GUIDE BAR . . . . . . . . . . . . . . . . . . . . . . 27
REPLACING THE DRIVE SPROCKET . . . . . . . . . . . . . . . . . . . . . 28
TENSIONING . . . . . . . . . . . . . . . . . . . . . . . . . . . . . . . . . . . . 28
BATTERY PACK . . . . . . . . . . . . . . . . . . . . . . . . . . . . . . . . . . .28
CHARGER . . . . . . . . . . . . . . . . . . . . . . . . . . . . . . . . . . . . . .28
ADDITIONAL MAINTENANCE INFORMATION . . . . . . . . . . . . . .28
TROUBLESHOOTING . . . . . . . . . . . . . . . . . . . . . . . . . . . . . . . . . . . 29
SPECIFICATIONS AND COMPONENTS . . . . . . . . . . . . . . . . . . . . . . . 31
WARRANTY AND SERVICE . . . . . . . . . . . . . . . . . . . . . . . . . . . . . . .32
© Blount, Inc. Pricing and specifications subject to change without notice. All rights reserved. OREGON® is a registered
trademark of Blount, Inc. in the United States and/or in other countries.

3
SYMBOLS AND LABELS
OREGON® Cordless Tool System
POLE SAW MODEL PS250
AC 1113 - F/N 563397
SYMBOLS AND LABELS
These symbols and labels appear on the pole saw, battery, and charger.
SYMBOL NAME EXPLANATION
CLASS II
CONSTRUCTION
DESIGNATED DOUBLE INSULATED CONSTRUCTION
TOOLS
SAFETY ALERT
SYMBOL
INDICATES THAT THE TEXT THAT FOLLOWS EXPLAINS
A DANGER, WARNING, OR CAUTION.
READ
INSTRUCTIONS
THE ORIGINAL INSTRUCTION MANUAL CONTAINS
IMPORTANT SAFETY AND OPERATING INFORMATION.
READ AND FOLLOW THE INSTRUCTIONS CAREFULLY.
WEAR EYE
PROTECTION
WEAR EYE PROTECTION WHEN OPERATING THE POLE
SAW.
WEAR HEARING
PROTECTION
WEAR HEARING PROTECTION WHEN OPERATING THE
POLE SAW.
WEAR HAND
PROTECTION
WEAR GLOVES WHEN OPERATING THE POLE SAW
AND WHEN HANDLING THE SAW CHAIN.
WEAR HEAD
PROTECTION
WEAR A HARD HAT WHEN USING THE POLE SAW.
WEAR FOOT
PROTECTION
WEAR APPROPRIATE CLOSEDTOE WORK BOOTS
WHEN OPERATING THE POLE SAW.
SOUND POWER SOUND POWER LEVEL IS 90 DB.
TWOHANDED
HOLD
HOLD POLE SAW WITH BOTH HANDS.
ONEHANDED HOLD DO NOT HOLD THE POLE SAW WITH ONE HAND.
DO NOT USE A
LADDER
NEVER STAND ON A LADDER WHEN USING THE POLE
SAW.
DO NOT INCINERATE DO NOT DISPOSE IN FLAMES.
DO NOT DISPOSE
DO NOT THROW IN HOUSEHOLD WASTE. TAKE TO AN
AUTHORIZED RECYCLER.
DO NOT EXPOSE TO
RAIN
DO NOT OPERATE THE CHARGER IN WET
CONDITIONS.
INDOOR USE ONLY INTENDED FOR INDOOR USE ONLY.
OPERATING
TEMPERATURE
ONLY USE THE BATTERY PACK AT A TEMPERATURE
BETWEEN 32°F TO 104°F 0°C AND 40°C.
CUTTING TOOL
CUTTING TOOL. DO NOT TOUCH THE CHAIN WITHOUT
FIRST DEACTIVATING THE POLE SAW BY REMOVING
THE BATTERY PACK.
USE CARE AROUND
ELECTRICAL LINES
NEVER OPERATE THE POLE SAW NEAR ANY WIRES
THAT MAY BE CARRYING ELECTRIC CURRENT.
REMOVE BATTERY
REMOVE THE BATTERY BEFORE PERFORMING ANY
MAINTENANCE.

4
POLE SAW NAMES AND TERMS
OREGON® Cordless Tool System
POLE SAW MODEL PS250
AC 1113 - F/N 563397
POLE SAW NAMES AND TERMS
Alignment flange: The protrusion on the
bar pad that fits into the bar slot.
Automatic oiler: The system that automatically lubricates the guide bar and
saw chain.
Bar pad: The mounting pad on the
cutting head that helps ensure proper
alignment of the guide bar.
Bar slot: The cutout portion of the guide
bar that fits onto the alignment flange
and the mounting stud.
Blade cover: The plastic cover that protects the guide bar and saw chain when
the pole saw is not in use.
Branch removal hook: A curved metal part
on the end of the cutting head used for
pulling loose limbs from trees.
Bystander safety zone: A ft ( m) circle
around the operator that must remain
free from tripping hazards, bystanders,
children, and pets.
Chain gauge: The thickness of the saw
chain drive link, indicated by the part
number stamped on the drive links.
Chain pitch: The distance between any
three rivets on the saw chain divided
by two, indicated by the part number
stamped on the drive links.
Debris deflector: A plastic trough on the
cutting head that channels dust and
wood chips away from the operator
during cutting.
Depth gauge tool: A tool that, when
placed on top of the saw chain during
sharpening, ensures that the cutting
depth is set correctly.
Drive link: The fin-shaped link of the saw
chain that fits into the groove on the
guide bar.
Drive sprocket: The toothed part that
drives the saw chain.
Extendable shaft: The shaft between the
powerhead and the cutting head that
can be lengthened to reach limbs higher
in trees.
Extension collar: A rotating plastic part on
the extendable shaft that is loosened to
allow extension and tightened to keep
the extendable shaft in place.
File guide: A tool that, when combined
with the proper saw chain file, ensures
that saw chain cutters are sharpened at
the correct angle.
Guide bar: A railed structure that supports
and guides the saw chain. Sometimes
simply called the “bar”.
Harness: A safety device worn by the
operator and connected to the pole saw
that helps distribute the weight of the
pole saw.
Motor housing: The plastic sheath into
which the extendable shaft is fitted during assembly.
Pole saw powerhead: A pole saw without
the extendable shaft, saw chain, or guide
bar.
Rear handle: The support handle located
at or toward the rear of the saw.
Saw chain: A loop of chain with cutting
teeth that cuts the wood and is driven by
the powerhead and is supported by the
guide bar. Sometimes simply called the
“chain”.
Side cover: The plastic cover on the cutting head that covers the drive sprocket
and tensioning screw.
Tensioning pin: The metal part attached to
the tensioning screw that fits through the
hole on the guide bar.
Tensioning screw: The threaded part
inside the cutting head that is adjusted to
control the tension of the saw chain.
Trigger lock-out: A movable stop that prevents the unintentional operation of the
trigger switch until manually actuated.
Trigger switch: A device that turns the
pole saw on and off.
Wear parts: Parts such as the saw chain
and guide bar that wear during use and
can be replaced by the user.

5
PRODUCT IDENTIFICATION
OREGON® Cordless Tool System
POLE SAW MODEL PS250
AC 1113 - F/N 563397
PRODUCT IDENTIFICATION
KNOW THE POLE SAW
NOTE: See “Unpacking and assembly” for a list of included items.
BRANCH REMOVAL HOOK
CUTTING HEAD
SIDE COVER
SIDE COVER
KNOB
CHAIN CATCH
BLADE COVER
DRIVE SPROCKET
BAR PAD
ALIGNMENT FLANGE
BAR SLOT
TENSIONING PIN
GUIDE BAR
SAW CHAIN
DEBRIS DEFLECTOR
MOUNTING STUD
TENSIONING SCREW
REAR HANDLE GRIP
TRIGGER SWITCH
LOCKOUT
TRIGGER SWITCH
HARNESS ATTACHMENT RING
MOTOR HOUSING
EXTENDABLE SHAFT
EXTENSION COLLAR
PRODUCT NAME PLATE
BATTERY PORT
BATTERY PACK
BATTERY RELEASE
OIL TANK CAP
POWERHEAD
6
SAFETY RULES
OREGON® Cordless Tool System
POLE SAW MODEL PS250
AC 1113 - F/N 563397
INTRODUCTION
The pole saw is designed for regular maintenance and cutting of branches
in ( cm) or less in diameter. Other uses may cause injury and are not
recommended. However, even with this technology, it is recognized that
residual risk, such as thrown objects, still exist. The operator is directed to
closely read, understand, and follow all safety precautions to reduce potential
injury from these risks.
SAFETY RULES
GENERAL POWER TOOL SAFETY WARNINGS
WARNING: READ AND UNDERSTAND ALL SAFETY WARNINGS
AND ALL INSTRUCTIONS. FAILURE TO FOLLOW THE WARNINGS
AND INSTRUCTIONS MAY RESULT IN ELECTRIC SHOCK, FIRE AND/OR
SERIOUS INJURY.
SAVE ALL WARNINGS AND INSTRUCTIONS FOR FUTURE REFERENCE. THE
TERM “POWER TOOL” IN THE WARNINGS REFERS TO YOUR MAINSOPERATED
CORDED POWER TOOL OR BATTERY OPERATED CORDLESS POWER TOOL.
WORK AREA SAFETY
• Keep work area clean and well lit.
Cluttered or dark areas invite accidents.
• Do not operate power tools in
explosive atmospheres, such as in the
presence of flammable liquids, gases
or dust. Power tools create sparks which may
ignite the dust or fumes.
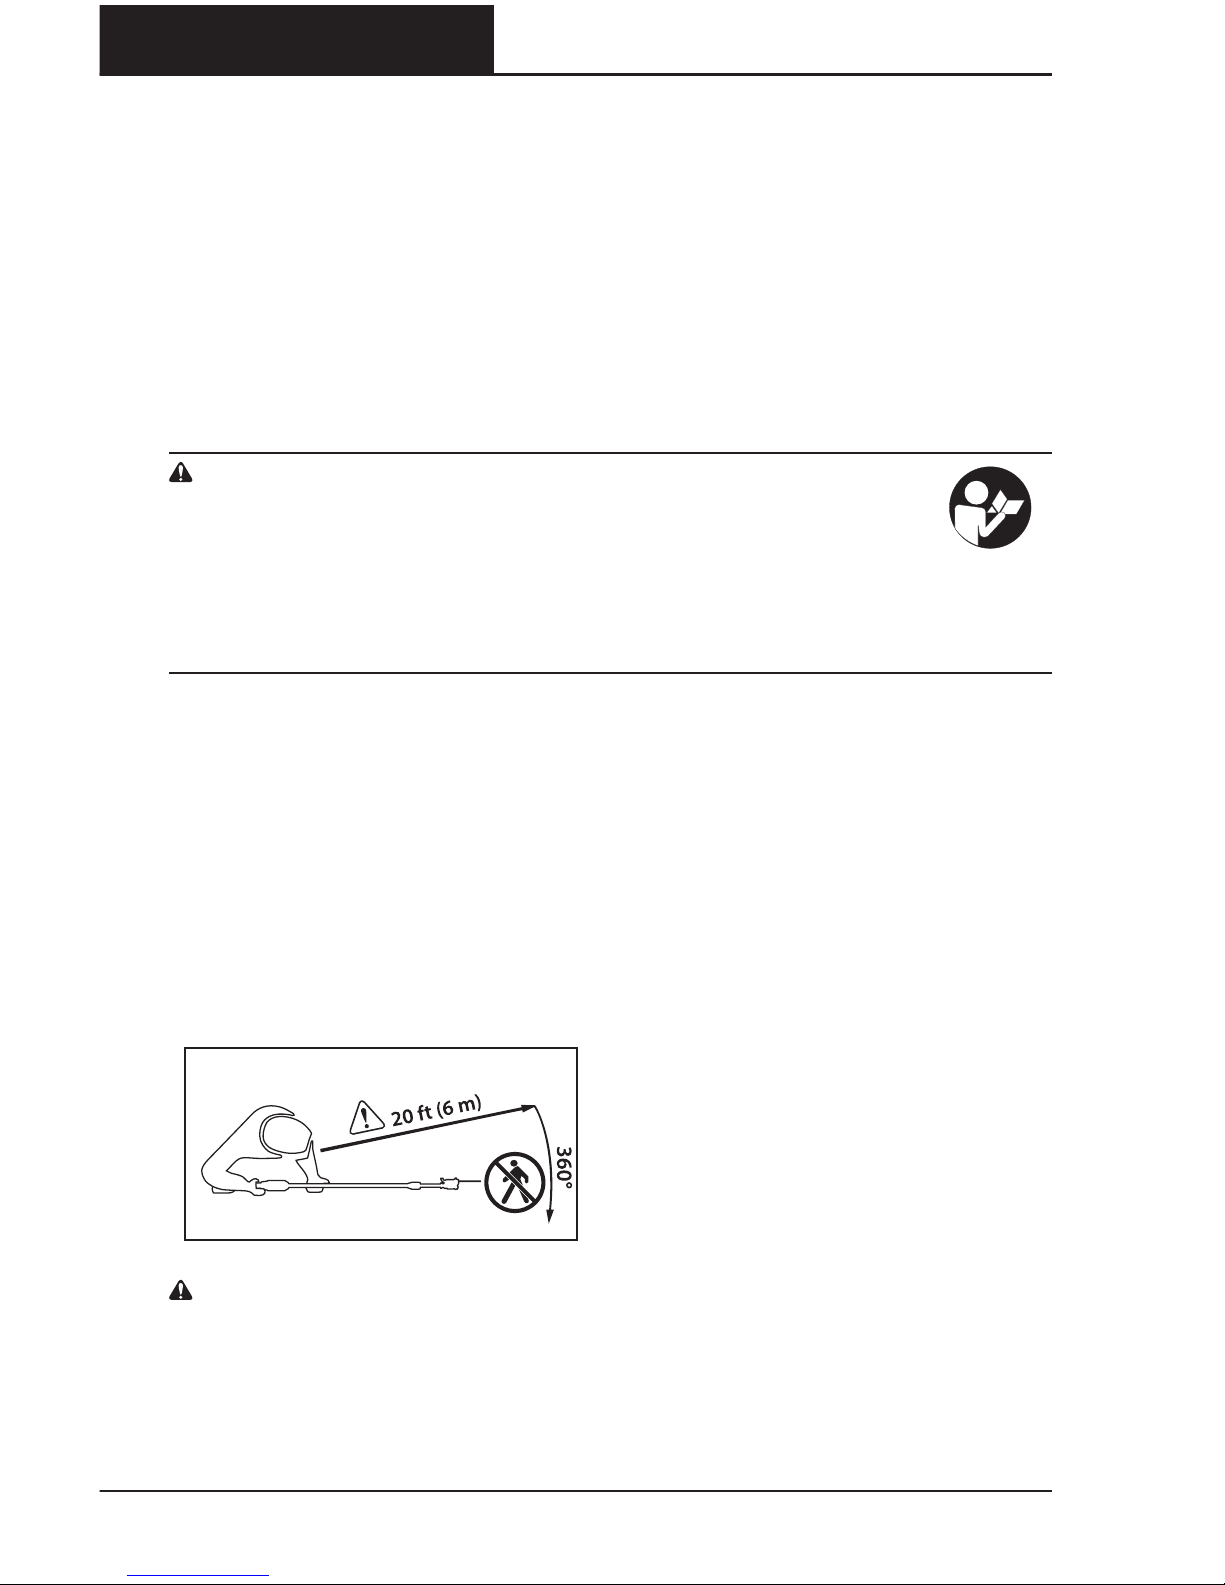
• Keep children and bystanders away
while operating a power tool (Fig. ).
Distractions can cause you to lose control.
CAUTION: ESTABLISH A
BYSTANDER SAFETY ZONE OF 20 FT
6 M PRIOR TO OPERATION OF THIS
EQUIPMENT. Bystander safety zone is a
20 ft (6 m) circle around the operator that
must remain free from bystanders, children,
and pets.
ELECTRICAL SAFETY
• Power tool plugs must match the
outlet. Never modify the plug in any
way. Do not use any adapter plugs with
earthed (grounded) power tools.
Unmodified plugs and matching outlets will
reduce risk of electric shock.
• Avoid body contact with earthed or
grounded surfaces, such as pipes,
radiators, ranges and refrigerators.
There is an increased risk of electric shock if
your body is earthed or grounded.
• Do not expose power tools to rain or
wet conditions. Water entering a power
tool will increase the risk of electric shock.
• Do not abuse the cord. Never use
the cord for carrying, pulling or
unplugging the power tool. Keep cord
away from heat, oil, sharp edges or
moving parts. Damaged or entangled cords
increase the risk of electric shock.
• When operating a power tool
outdoors, use an extension cord
suitable for outdoor use. Use of a cord
suitable for outdoor use reduces the risk of
electric shock.
FIG. 1

7
SAFETY RULES
OREGON® Cordless Tool System
POLE SAW MODEL PS250
AC 1113 - F/N 563397
• If operating a power tool in a damp
location is unavoidable, use a residual
current device (RCD) protected supply
or ground fault circuit interrupter
(GFCI). Use of a RCD (GFCI) reduces the risk of
electric shock.
PERSONAL SAFETY
• Stay alert, watch what you are
doing and use common sense when
operating a power tool. Do not use a
power tool while you are tired or under
the influence of drugs, alcohol or
medication. A moment of inattention while
operating power tools may result in serious
personal injury.
• Use personal protective equipment.
Always wear eye protection.
Protective equipment such as dust mask,
non-skid safety shoes, hard hat, or hearing
protection used for appropriate conditions will
reduce personal injuries.
• Prevent unintentional starting. Ensure
the switch is in the off-position before
connecting to power source and/or
battery pack, picking up or carrying
the tool. Carrying power tools with your
finger on the switch or energizing power tools
that have the switch on invites accidents.
• Remove any adjusting key or wrench
before turning the power tool on.
A wrench or a key left attached to a rotating
part of the power tool may result in personal
injury.
• Do not overreach. Keep proper footing
and balance at all times (Fig. ).
This enables better control of the power tool in
unexpected situations.
• Dress properly. Do not wear loose
clothing or jewelry. Keep your hair,
clothing and gloves away from moving
parts. Loose clothes, jewelry or long hair can
be caught in moving parts.
• If devices are provided for the
connection of dust extraction and
collection facilities, ensure these are
connected and properly used.
Use of dust collection can reduce dust-related
hazards.
• Prolonged use of power tools has been
reported to cause vascular, muscular,
or neurological disorders (such as
vibration white finger or Raynaud’s
syndrome). To reduce the risk of injury,
follow these instructions:
– Wear gloves and keep hands and body
warm.
– Maintain a firm grip on the pole saw,
but do not use prolonged, excessive
pressure.
– Take frequent breaks.
The vibration in normal use can differ
from the stated values depending on the
material being cut, maintenance of the
cutting system, and other factors.
FIG. 2
8
SAFETY RULES
OREGON® Cordless Tool System
POLE SAW MODEL PS250
AC 1113 - F/N 563397
POWER TOOL USE AND CARE
• Do not force the power tool. Use the
correct power tool for your application.
The correct power tool will do the job better
and safer at the rate for which it was designed.
• Do not use the power tool if the switch
does not turn it on and off.
Any power tool that cannot be controlled with
the switch is dangerous and must be repaired.
• Disconnect the plug from the power
source and/or the battery pack from
the power tool before making any
adjustments, changing accessories, or
storing power tools.
Such preventive safety measures reduce the
risk of starting the power tool accidentally.
• Store idle power tools out of the reach
of children and do not allow persons
unfamiliar with the power tool or these
instructions to operate the power tool.
Power tools are dangerous in the hands of
untrained users.
• Maintain power tools. Check for
misalignment or binding of moving
parts, breakage of parts and any other
condition that may affect the power
tool’s operation. If damaged, have the
power tool repaired before use.
Many accidents are caused by poorly
maintained power tools.
• Keep cutting tools sharp and clean.
Properly maintained cutting tools with sharp
cutting edges are less likely to bind and are
easier to control.
• Use the power tool, accessories and
tool bits etc. in accordance with these
instructions, taking into account the
working conditions and the work to
be performed. Use of the power tool for
operations different from those intended
could result in a hazardous situation.
BATTERY TOOL USE AND CARE
• Recharge only with the charger
specified by the manufacturer.
A charger that is suitable for one type of
battery pack may create a risk of fire when
used with another battery pack.
• Use power tools only with specifically
designated battery packs.
Use of any other battery packs may create a
risk of injury and fire.
• When battery pack is not in use, keep
it away from other metal objects, like
paper clips, coins, keys, nails, screws
or other small metal objects, that can
make a connection from one terminal
to another. Shorting the battery terminals
together may cause burns or a fire.
• Under abusive conditions, liquid may
be ejected from the battery; avoid
contact. If contact accidentally occurs, flush
with water. If liquid contacts eyes, additionally
seek medical help. Liquid ejected from the
battery may cause irritation or burns.
SERVICE
Have your power tool serviced by a
qualified repair person using only
identical replacement parts.
This will ensure that the safety of the
power tool is maintained.
POLE SAW SAFETY WARNINGS
DANGER: CONTACT WITH A
MOVING SAW CHAIN WILL RESULT
IN SERIOUS PERSONAL INJURY. KEEP
HANDS AND BODY AWAY FROM MOVING
SAW CHAIN.

9
SAFETY RULES
OREGON® Cordless Tool System
POLE SAW MODEL PS250
AC 1113 - F/N 563397
DANGER: CONTACT WITH
ELECTRICAL WIRING DURING USE
MAY CAUSE EXPOSED METAL PARTS
OF THE TOOL TO BECOME LIVE,
RESULTING IN SERIOUS PERSONAL
INJURY. ALWAYS HOLD THE POLE SAW
BY THE INSULATED GRIPPING SURFACES
DURING OPERATION.
WARNING: THE USE OF AN
IMPROPERLY ASSEMBLED POLE SAW
MAY RESULT IN SERIOUS PERSONAL
INJURY. ONLY USE THIS TOOL AFTER IT HAS
BEEN PROPERLY ASSEMBLED ACCORDING
TO “UNPACKING AND ASSEMBLY” IN THIS
MANUAL.
WARNING: MOMENTS OF
INATTENTION DURING OPERATION
OF THE POLE SAW MAY RESULT IN
SERIOUS PERSONAL INJURY. BEFORE
STARTING THE POLE SAW, MINIMIZE ALL
DISTRACTIONS, KEEP BODY PARTS AWAY
FROM SAW CHAIN, AND MAKE SURE THE
CHAIN IS NOT IN CONTACT WITH ANY
OBJECTS.
WARNING: USING ONE HAND TO
OPERATE THE POLE SAW CAN
RESULT IN PERSONAL INJURY. USE
BOTH HANDS WHEN OPERATING THE POLE
SAW SEE FIG 3.
CAUTION: CONTACT FROM FLYING
DEBRIS, OR ACCIDENTAL CONTACT
WITH THE SAW CHAIN, MAY RESULT
IN PERSONAL INJURY. ALWAYS WEAR
PROTECTIVE EQUIPMENT FOR HEAD,
HANDS, LEGS AND FEET.
CAUTION: LIMBS UNDER TENSION
CAN “SPRING BACK” AND CONTACT
THE OPERATOR OR THROW THE POLE
SAW OUT OF CONTROL, RESULTING
IN PERSONAL INJURY. ALWAYS BE ALERT
FOR WOOD UNDER TENSION WHICH MAY
STRIKE THE OPERATOR OR POLE SAW WHEN
CUT.
CAUTION: IMPROPER CHAIN
TENSION OR LUBRICATION MAY
INCREASE THE CHANCE OF INJURY
DUE TO KICKBACK. ALWAYS FOLLOW
THE INSTRUCTIONS IN “TENSIONING THE
SAW CHAIN” IN THIS MANUAL.
CAUTION: WET OR GREASY
GRIPPING SURFACES MAY CAUSE A
LOSS OF CONTROL OF THE TOOL,
RESULTING IN PERSONAL INJURY.
ALWAYS KEEP HANDLES DRY, CLEAN, AND
FREE OF OIL AND GREASE.
CAUTION: USING THE POLE SAW
FOR APPLICATIONS OTHER THAT ITS
DESIGNED PURPOSE MAY RESULT IN
A HAZARDOUS CONDITION. THE POLE
SAW IS DESIGNED SOLELY FOR CUTTING
SMALL WOOD BRANCHES.
CAUTION: TO PREVENT
ACCIDENTAL CONTACT WITH THE
SAW CHAIN DURING TRANSPORT,
ALWAYS FIT THE BLADE COVER AND
KEEP HANDS AND FINGERS AWAY
FROM TRIGGER AREA FIG. 4.
FIG. 3
FIG. 4
10
SAFETY RULES
OREGON® Cordless Tool System
POLE SAW MODEL PS250
AC 1113 - F/N 563397
STORAGE, TRANSPORTING,
AND DISPOSAL
STORING THE POLE SAW
• Remove the battery pack from the pole
saw.
• Clean pole saw thoroughly.
• Install the blade cover.
• Store in a dry place.
• Keep out of reach of children or pets.
• It is normal for a small amount of oil to
seep from the guide bar when the pole
saw is not in use. To protect against
seepage, install the blade cover and
place an absorbent pad under the bar.
STORING THE BATTERY PACK
When storing the battery pack longer
than nine months, follow these
guidelines:
• Remove the battery pack from the pole
saw or charger.
• Store in a cool, dry place.
• Keep out of reach of children or pets.
• To prolong battery life, never store
battery pack in a completely discharged
condition (with no indicator lights lit)
(Fig. ).
• Store at a temperature between -°F to
°F (-°C and °C).
STORING THE CHARGER
• Remove battery pack from the charger.
• Disconnect charger from power source.
• Store in a dry place.
• Keep out of reach of children or pets.
See “Maintenance and Cleaning” for more
information.
TRANSPORTING THE POLE SAW
Prepare the pole saw as described
in “Storing the pole saw” before
shipping. Use the blade cover during
transportation and storage, and if
desired, drain the bar and chain oil to
reduce seepage.
TRANSPORTING THE BATTERY PACK
Observe respective local and national
regulations when shipping lithium ion
batteries, compulsory labeling may be
required.
POLE SAW AND CHARGER DISPOSAL
The OREGON® product is designed and
manufactured with high quality materials
and components which can be recycled
and reused. Please dispose of this
equipment in an environmentally correct
manner at a local community waste
collection/recycling center.
BATTERY PACK DISPOSAL
Do not dispose of battery pack in
household garbage or incinerate. Local
waste management and recycling
agencies have information on proper
recycling or disposal instructions. Battery
packs can be collected in the United
States or Canada through Rechargeable
Battery Recycling Corporation. OREGON®
has already paid the costs involved to
recycle battery packs. Return end of life
battery packs to participating retailer or
recycling center. Return locations and
more information can be found at
www.callrecycle.org or --BATTERY.
FIG. 5
INDICATOR LIGHTS

11
SAFETY RULES
OREGON® Cordless Tool System
POLE SAW MODEL PS250
AC 1113 - F/N 563397
BATTERY SAFETY
WARNING: IMPROPER BATTERY
CARE CAN CAUSE THE BATTERY TO
LEAK HAZARDOUS CHEMICALS,
OVERHEAT, EMIT SMOKE, BURST,
FLARE, EXPLODE, AND/OR IGNITE.
FOLLOW THESE SAFETY RULES.
CAUTION: DO NOT DISPOSE
OF THE BATTERY PACK IN THE
HOUSEHOLD WASTE OR FIRE.
LITHIUM ION BATTERY PACKS
SHOULD BE RECYCLED BY A LOCAL
AUTHORIZED RECYCLER.
IMPORTANT: EXPOSURE TO
EXCESSIVE HEAT CAN CAUSE A LOSS
IN PERFORMANCE AND/OR SERVICE
LIFE. DO NOT EXPOSE BATTERY
PACK TO EXCESSIVE HEAT, SUCH AS
THE INTERIOR OF A VEHICLE IN HOT
WEATHER.
• Do not attempt to recharge a non-
rechargeable battery pack.
• Do not disassemble or modify the
battery pack. This can damage safety
features.
• Do not connect the positive (+) and
negative (-) terminals with metal objects
or store the battery pack with metal
objects such as coins or screws. This
can cause short-circuiting and generate
enough heat to cause burns.
• Do not incinerate the battery pack or
expose to excessive heat. This can melt
insulation or damage safety features.
• Do not use, charge, or store near heat
higher than °F (°C). This can
cause overheating and internal shortcircuiting.
• Do not expose to extremely wet
conditions. This can damage safety
features, cause extremely high current
and voltage charging, and lead to
abnormal chemical reactions.
• Use only the charger specifically
designed for the battery pack, and
follow the safety precautions described
in “Charger Safety”. Using another
charger can damage safety features,
cause extremely high current and
voltage charging, and lead to abnormal
chemical reactions.
• Do not use OREGON® branded battery
packs in non-OREGON® branded tools.
• Do not strike, pierce, or throw the
battery pack, and do not use a damaged
or deformed battery pack.
• If recharging fails, do not attempt to
recharge.
• If the battery pack gives off an odor,
generates heat, or is discolored,
deformed, or abnormal in any way
during use, recharging, or storage,
immediately remove from the pole saw
or charger.
• Any liquid leaking from the battery is
corrosive, can damage eyes and skin,
and may be toxic if swallowed.
CHARGER SAFETY
IMPORTANT SAFETY INSTRUCTIONS
WARNING: RISK OF
ELECTRIC SHOCK. WHEN USED
OUTDOORS, INSTALL ONLY
TO A COVERED “CLASS A” GFCI
PROTECTED RECEPTACLE THAT
IS WEATHERPROOF WITH THE
POWER UNIT CONNECTED TO
THE RECEPTACLE. IF ONE IS NOT
PROVIDED, CONTACT A QUALIFIED
ELECTRICIAN FOR PROPER
INSTALLATION. ENSURE THAT THE
POWER UNIT AND CORD DO NOT
INTERFERE WITH COMPLETELY
CLOSING THE RECEPTACLE COVER.

12
SAFETY RULES
OREGON® Cordless Tool System
POLE SAW MODEL PS250
AC 1113 - F/N 563397
IMPORTANT: THIS APPLIANCE IS NOT
INTENDED FOR USE BY PERSONS
INCLUDING CHILDREN WITH
REDUCED PHYSICAL, SENSORY OR
MENTAL CAPABILITIES, OR LACK
OF KNOWLEDGE, UNLESS THEY
HAVE BEEN GIVEN SUPERVISION
OR INSTRUCTION BY A PERSON
RESPONSIBLE FOR THEIR SAFETY.
CHILDREN SHOULD BE SUPERVISED
TO ENSURE THAT THEY DO NOT PLAY
WITH THE APPLIANCES.
IMPORTANT: USE THIS CHARGER
ONLY WITH THE SUPPLIED POWER
CORD, MAKING SURE THAT THE
INPUT PLUG CORRECTLY MATES TO
THE OUTPUT RECEPTACLE.
When using electrical products, basic
precautions should always be practiced
including the following:
• Read and follow all safety instructions
before use. Read and follow all instructions
that are on the product or provided with the
product.
• Save these instructions.
• Do not use an extension cord.
• Damaged or entangled cords increase
the risk of electric shock. Do not abuse
the cord. Never use the cord for carrying,
pulling or unplugging the power tool. Keep
cord away from heat, oil, sharp edges or
moving parts.
• Do not expose the charger to rain.
For indoor use only.
• Do not use within feet ( m) of a
pool.
• Do not use in a bathroom.

13
UNPACKING AND ASSEMBLY
OREGON® Cordless Tool System
POLE SAW MODEL PS250
AC 1113 - F/N 563397
UNPACKING AND ASSEMBLY
UNPACKING
WHAT’S IN THE BOX?
The pole saw requires some assembly
before use. These items ship with the
pole saw:
• Powerhead
• Extendable shaft with attached
cutting head
• Guide bar
• Saw chain
• Blade cover
• Harness
• Screwdriver
• Allen wrench
• Two Allen screws
• Bar and chain oil
• Charger and power cord (if so equipped)
• Battery (if so equipped)
After removing the pole saw from the
box, inspect it carefully to ensure no
damage has occurred during shipping,
and that no parts are missing. If any parts
are damaged or missing, do not use the
pole saw. Contact OREGON® Cordless
Tool System at .. to obtain
replacement parts.
ASSEMBLY
DANGER: TO AVOID SERIOUS
PERSONAL INJURY, DO NOT
OPERATE THE POLE SAW WITHOUT
THE EXTENDABLE SHAFT, GUIDE
BAR, SAW CHAIN, AND SIDE COVER
PROPERLY ASSEMBLED.
WARNING: A BATTERY OPERATED
TOOL WITH THE BATTERY PACK
INSERTED IS ALWAYS ON AND CAN
START ACCIDENTALLY. REMOVE
THE BATTERY PACK FROM THE
POLE SAW BEFORE ATTACHING THE
EXTENDABLE SHAFT, BAR, AND
CHAIN.
ASSEMBLING THE
EXTENDABLE SHAFT
The extendable shaft fits into the motor
housing on the powerhead (Fig. ).
• It is important to ensure that the
internal drive shaft is properly seated.
To ensure proper seating, use a
clean rag to pull the aluminum drive
shaft out from the fiberglass pole—
approximately in ( cm). Using the
rag, turn the aluminum shaft while
pushing down slightly. This will allow
the drive shaft to properly seat on the
shaft inside of the motor housing. The
cylindrical end of the drive shaft will be
completely hidden below the rim of the
motor housing once properly seated.
FIG. 6

14
UNPACKING AND ASSEMBLY
OREGON® Cordless Tool System
POLE SAW MODEL PS250
AC 1113 - F/N 563397
• After properly seating the aluminum
drive shaft, push down on the fiberglass
pole so that is slides into the opening of
the motor housing.
• Locate the provided Allen screws and
place them into the holes on the red
cap. The red cap on the motor housing
acts as compression fit to hold the pole
in place.
• Use the supplied mm Allen wrench
to partially tighten the Allen screws.
Continue tightening the screws by
alternating between screws until both
of the screws are tight. Note: You may
need to press the red cap tighter onto
the motor housing to allow the screws
to make contact with the internal
threads.
FILLING THE BAR AND CHAIN
OIL RESERVOIR
IMPORTANT: BAR AND CHAIN OIL
PREVENTS PREMATURE WEAR.
NEVER OPERATE THE POLE SAW
IF OIL IS NOT VISIBLE. CHECK OIL
LEVEL FREQUENTLY AND FILL AS
NEEDED.
Bar and chain oil is required to properly
lubricate the guide bar and saw chain.
The pole saw is equipped with an
automatic oiler that deposits oil on the
bar and chain when running, keeping
them properly lubricated. Use OREGON®
bar and chain oil for best results. It is
specially designed to provide low friction
and faster cuts. NEVER use oil or other
lubricants not specifically designed for
use on the bar and chain. This can lead to
a clogged oil system, which may cause
premature wear of the bar and chain.
• Place the pole saw on its side on a firm,
flat surface, so that the oil cap is on top
(Fig. ).
• Clean any debris from the cap area.
• Remove the cap.
• Carefully pour the bar and chain oil into
the reservoir.
• Replace the cap and make sure oil is
visible in the reservoir.
If oil is not visible in the reservoir,
additional bar and chain oil is necessary.
FIG. 7

15
UNPACKING AND ASSEMBLY
OREGON® Cordless Tool System
POLE SAW MODEL PS250
AC 1113 - F/N 563397
ASSEMBLING THE GUIDE BAR
AND SAW CHAIN
WARNING: A BATTERY OPERATED
TOOL WITH THE BATTERY PACK
INSERTED IS ALWAYS ON AND CAN
START ACCIDENTALLY. REMOVE
THE BATTERY PACK FROM THE
POLE SAW BEFORE ATTACHING THE
EXTENDABLE SHAFT, BAR, AND
CHAIN.
Wear gloves and remove the battery.
Make sure the bar pad, drive sprocket,
and tensioning pin are free of debris.
• Adjust the tensioning screw as far back
toward the rear of the cutting head as it
will go.
• Place the guide bar on the bar pad by
sliding the bar slot over the alignment
flange (Fig. ), making sure the
tensioning pin is inserted in the bottom
hole in the tail of the bar.
• Loop the saw chain onto the drive
sprocket so that the cutting edges of
the teeth along the top of the bar face
away from the cutting head (Fig. ).
• Feed the chain into the groove of the
bar and slide the bar away from the
motor to remove slack from the chain
(Fig. ). Adjust the position of the
tensioning pin until it engages the hole
in the bar.
• Install the side cover, making sure the
chain catch is properly seated in its hole,
then lightly tighten the side cover knob
(Fig. ).
IMPORTANT: THE SAW CHAIN MUST
BE PROPERLY TENSIONED BEFORE
USING. SEE “TENSIONING THE SAW
CHAIN”.
MOUNTING
STUD
ALIGNMENT
FLANGE
BAR PAD
TENSIONING
SCREW
TENSIONING
PIN
FIG. 8
FIG. 9
FIG. 10
FIG. 11
16
UNPACKING AND ASSEMBLY
OREGON® Cordless Tool System
POLE SAW MODEL PS250
AC 1113 - F/N 563397
TENSIONING THE SAW CHAIN
WARNING: A BATTERY OPERATED
TOOL WITH THE BATTERY PACK
INSERTED IS ALWAYS ON AND CAN
START ACCIDENTALLY. REMOVE
THE BATTERY PACK FROM THE
POLE SAW BEFORE ATTACHING THE
EXTENDABLE SHAFT, BAR, AND
CHAIN.
Wear gloves.
• Remove the battery before tensioning.
• Loosen the side cover knob.
• Hold up the nose of the guide bar
(Fig. ), and tighten the tensioning
screw.
• Tighten the tensioning screw until the
lowest cutters underneath the bar
solidly contact the bar (Fig. ).
• Tighten the side cover knob.
• Saw chain tension is correct when, with
some effort, a gloved hand can pull the
chain smoothly around the bar. The
chain should touch the underside of the
bar rail (Fig. ).
After a short period of use, allow the
chain to cool and once again check the
tension (remove the battery first). Watch
tension carefully for the first half-hour
of use and periodically throughout the
life of the chain, readjusting as required
when the chain and bar are cool to the
touch. Never tighten chain when it is hot.
Chain will stretch as a result of normal
use, but insufficient oil, aggressive use,
or failure to perform recommended
maintenance can lead to premature
stretching.
FIG. 12
FIG. 13
FIG. 14

17
OPERATING THE POLE SAW
OREGON® Cordless Tool System
POLE SAW MODEL PS250
AC 1113 - F/N 563397
OPERATING THE POLE SAW
BATTERY PACK AND CHARGER
WARNING: TO REDUCE THE RISK
OF SHOCK, DO NOT CHARGE THE
BATTERY PACK IN THE RAIN.
BATTERY PACK LED CHARGELEVEL
INDICATOR
The lithium ion battery pack is equipped
with an LED charge-level indicator. To test
the charge level of the battery pack, press
the indicator button on the battery pack’s
face (Fig. ).
No lights: recharge.
One steady green light:
less than % charged.
Charge battery pack before use.
Two steady green lights:
–% charged.
Three steady green lights:
–% charged.
Four steady green lights:
–% charged.
CONNECTING THE CHARGER
If the charger includes a separate power
cord, connect the charger cord to the
charger and to the proper electrical outlet
(Fig. ).
Only use the cord set that was supplied
with the charger. At first use, verify that
the plug type matches the receptacle.
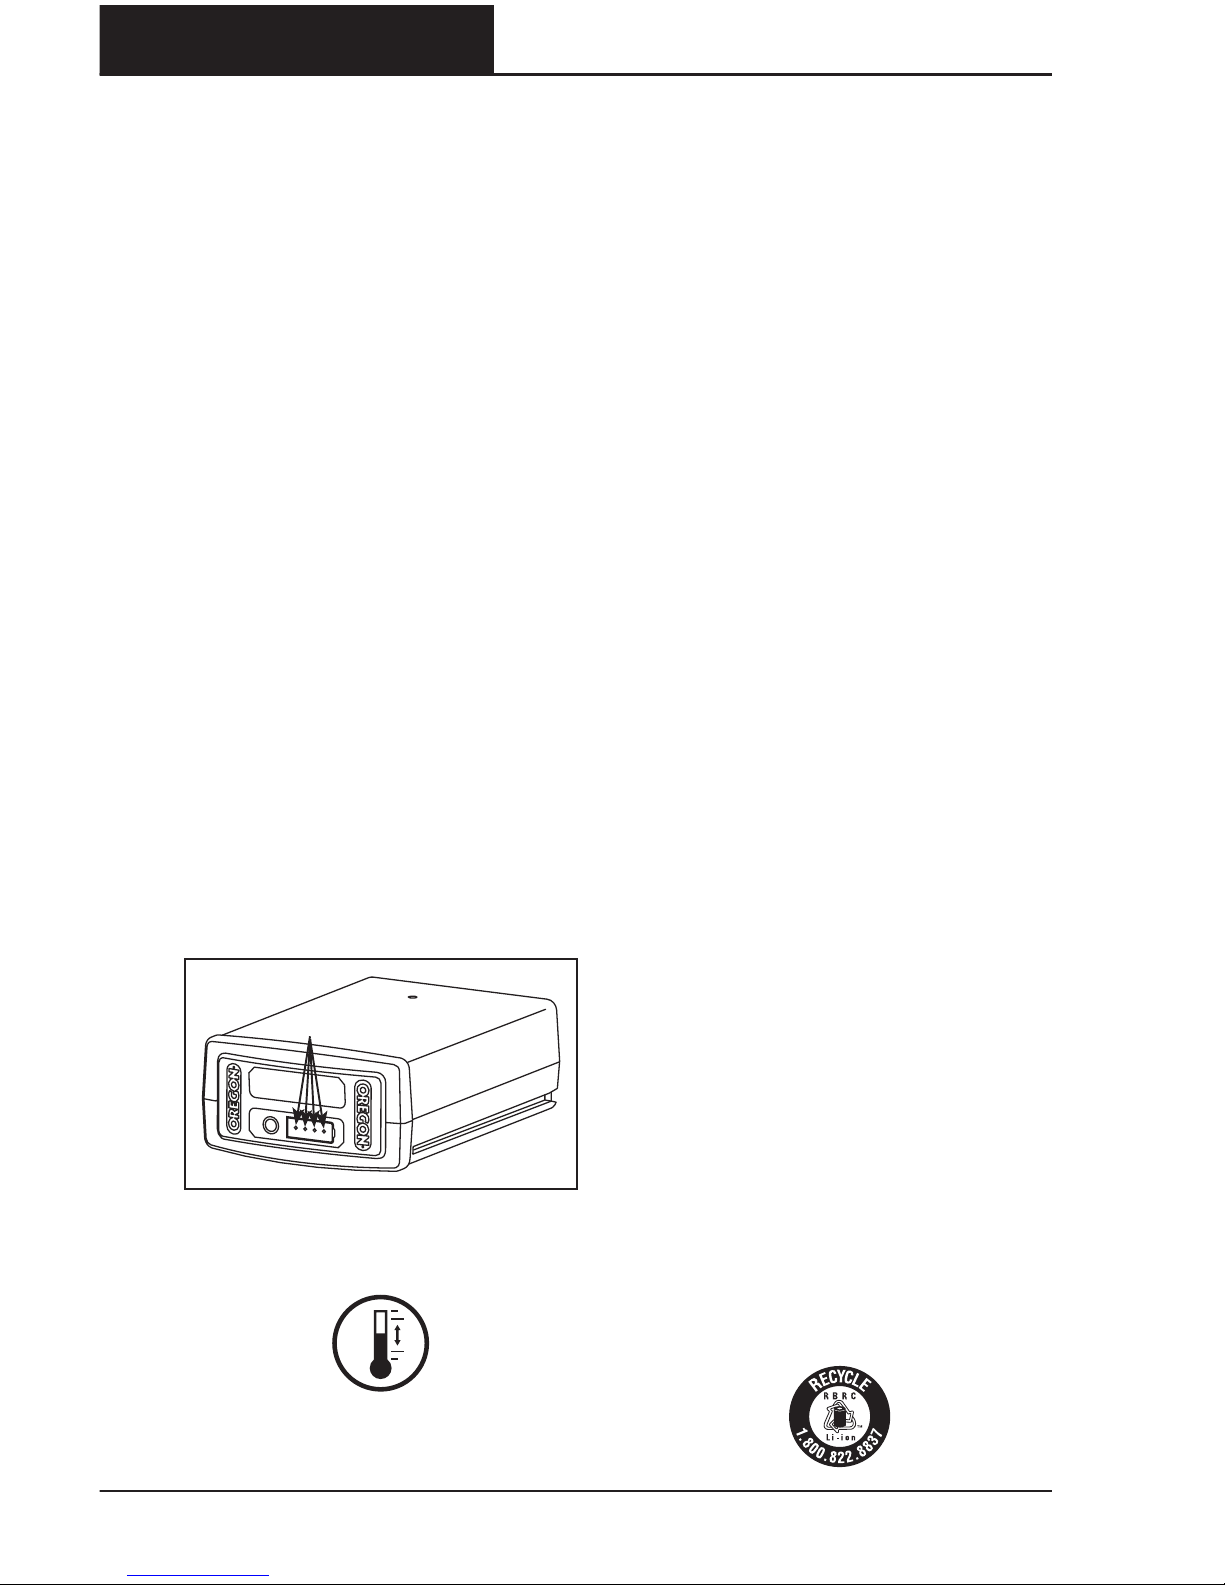
CHARGER LED CHARGESTATE
INDICATOR
The battery charger is equipped with
an LED charge-state indicator that
indicates the state of charging as
well as conditions that may delay or
prevent charging (Fig. ).
Note: Until a battery pack is inserted, no
lights will be visible.
Blinking orange light: a fault
condition exists. There are
several potential causes. See
“Troubleshooting” in this manual.
Steady orange light: the battery
pack temperature is beyond the
acceptable range (°F/°C to
°F/°C). Allow the battery pack
to reach the acceptable
temperature range before
charging. The pack may be left on
the charger as the temperature
adjusts. Charging will begin when
the proper temperature is
reached.
Blinking green light: battery pack
is charging.
Steady green light: battery pack is
ready for use.
FIG. 15
INDICATOR LIGHTS
INDICATOR BUTTON
FIG. 16
FIG. 17

18
OPERATING THE POLE SAW
OREGON® Cordless Tool System
POLE SAW MODEL PS250
AC 1113 - F/N 563397
CHARGING THE BATTERY PACK
WARNING: FAILURE TO FOLLOW
PROPER CHARGING PROCEDURES
MAY CAUSE EXCESSIVE VOLTAGE,
EXCESSIVE CURRENT FLOW, LOSS
OF CONTROL DURING CHARGING,
LEAKAGE OF HAZARDOUS
CHEMICALS, HEAT GENERATION,
BURSTING, OR FIRE. FOLLOW THESE
CHARGING INSTRUCTIONS.
With the charger cord connected to the
charger and plugged into an electrical
outlet, align the grooves in the battery
with the rails on the charger and slide the
battery pack onto the charger until fully
seated (Fig. ).
Check the charge-state indicator for
charging conditions.
INSERTING AND RELEASING
THE BATTERY PACK
Only use the OREGON® brand battery
packs specified in these operating
instructions.
Align the groove in the battery with the
rails inside the battery port. Firmly insert
the battery pack into the pole saw’s
battery port, pressing forward until it
clicks as it locks into place (Fig. ).
To remove the battery pack, lift up on
the battery release, grasp the sides of the
battery pack, and remove it (Fig. ).
FIG. 18
FIG. 19
FIG. 20

19
OPERATING THE POLE SAW
OREGON® Cordless Tool System
POLE SAW MODEL PS250
AC 1113 - F/N 563397
GENERAL OPERATION
DANGER: TO AVOID SERIOUS
PERSONAL INJURY, DO NOT
OVERREACH AND DO NOT STAND
ON A LADDER, STEPSTOOL, OR
ANY RAISED POSITION THAT IS NOT
FULLY SECURED.
DANGER: TO AVOID SERIOUS
PERSONAL INJURY, DO NOT STAND
DIRECTLY UNDER THE LIMB BEING
WORKED ON. STAND AWAY SO THAT
THE LIMB FALLS SAFELY TO THE
GROUND.
WARNING: TO REDUCE THE RISK
OF INJURY, ALWAYS WEAR PROPER
BOOTS, GLOVES, HEAD, EAR, AND
EYE PROTECTION.
OPERATING TEMPERATURE
This pole saw is designed to operate
within a temperature range of °F to
°F (°C to °C).
GRIP
Always grip the tool with both hands. For
right-handed operation, grasp the
extendable shaft comfortably with the
left hand and the rear handle with the
right. Wrap fingers firmly around each
handle (Fig. ).
For left-handed operation, grasp the
extendable shaft comfortably with the
right hand and the rear handle with the
left (Fig. ).
Hold the pole saw at about a ° angle
(Fig. ); this is the least tiring work
position and helps ensure a safe distance
from falling debris.
RIGHTHANDED GRIP
FIG. 21
LEFTHANDED GRIP
FIG. 22
FIG. 23
60°

20
OPERATING THE POLE SAW
OREGON® Cordless Tool System
POLE SAW MODEL PS250
AC 1113 - F/N 563397
FOOTING
Stand with both feet on solid ground,
with weight evenly spread between
them.
Hold the pole saw as close as possible to
the body to maintain control (Fig. ).
USING THE HARNESS
The harness helps to balance the pole
saw and distribute the weight of the pole
saw across the body, increasing comfort
for extended use.
This harness is equipped with a quickrelease that can be operated with one
hand (Fig. ).
• Wear the harness over the head and the
shoulder opposite the trigger hand.
• Adjust the strap length so that the clip
is about the same height as the hip
(Fig. ).
• Place the pole saw on a flat surface with
the harness loop facing up.
• Attach the harness clip to the harness
loop (Fig. ).
ADJUSTING THE SHAFT LENGTH
The pole saw features an extendable
shaft that allows greater reach into taller
trees.
For ease of use, extend the shaft only
as much as necessary to reach the work
safely.
• Turn off the pole saw and remove the
battery pack.
FIG. 24
FIG. 25
FIG. 26
FIG. 27

21
OPERATING THE POLE SAW
OREGON® Cordless Tool System
POLE SAW MODEL PS250
AC 1113 - F/N 563397
• Turn the extension collar counter
clock-wise () until the shaft slides
freely (Fig. ).
• Slide the shaft until it is the desired
length ().
• Turn the extension collar clockwise to
lock the shaft in place.
STOPPING THE POLE SAW
Release the trigger switch to stop the
pole saw.
STARTING THE POLE SAW
WARNING: TO REDUCE THE RISK
OF INJURY, NEVER DEFEAT THE
INTERLOCK BY TAPING, WIRING, OR
TYING DOWN THE TRIGGER LOCK
OUT.
If using the harness, put on the harness
and attach the harness clip to the
attachment ring. Grasp the extendable
shaft and the rear handle firmly (Fig. ).
Squeeze the trigger lock-out () with the
palm of the hand, and the trigger switch
() with the fingers.
CUTTING
BASIC CUTTING
DANGER: TO REDUCE THE RISK OF
SHOCK, NEVER OPERATE THIS TOOL
NEAR ANY WIRES OR CABLES WHICH
MAY BE CARRYING ELECTRIC
CURRENT.
ELECTRICITY CAN ARC FROM ONE
POINT TO ANOTHER. MAINTAIN A
DISTANCE OF AT LEAST 50 FT 15 M
BETWEEN THE POLE SAW AND ANY
ELECTRICAL LINE CARRYING LIVE
CURRENT OR BRANCH CONTACTING
AN ELECTRICAL LINE. BEFORE
WORKING CLOSER THAN 50 FT 15 M,
CONTACT ELECTRIC UTILITY AND
MAKE SURE THE CURRENT IS TURNED
OFF FIG. 30.
FIG. 28
1
2
1 TRIGGER LOCKOUT
2 TRIGGER SWITCH
FIG. 29
FIG. 30
50 FT
15 M

22
OPERATING THE POLE SAW
OREGON® Cordless Tool System
POLE SAW MODEL PS250
AC 1113 - F/N 563397
WARNING: TO REDUCE THE RISK
OF INJURY, WEAR PROPER BOOTS,
GLOVES, HEAD, EAR, AND EYE
PROTECTION.
WARNING: TO REDUCE THE RISK
OF INJURY, ALWAYS BE SURE OF
FOOTING AND HOLD THE POLE SAW
FIRMLY WITH BOTH HANDS WHILE
THE MOTOR IS RUNNING.
WARNING: FALLING LIMBS MAY
BOUNCE WHEN THEY HIT THE
GROUND. NEVER WORK UNDER THE
LIMB BEING CUT.
Observe all applicable national and
municipal rules and regulations for cutting.
Take frequent breaks to reduce the risk
of injury.
Before beginning to cut, make sure the
saw chain is properly tensioned, the
automatic oiler is functioning, and the
chain is sharp.
Saw chains are made to cut wood only.
Do not use the pole saw to cut any other
materials, and do not allow the chain
to come into contact with dirt or rocks.
These materials are extremely abrasive
and will wear away protective plating
from the chain in a very short time.
Sharpen or replace the saw chain if any of
these conditions occur:
• The pressure required to make cuts
increases noticeably
• The number of cuts possible on one
battery charge decreases
• Wood chips coming off of the chain are
very fine or dust-like
Do not work with a dull chain as it will
increase the effort required to cut, cause
jagged cuts, and increase wear on the
pole saw. Never force a dull chain to cut.
Begin cutting by lightly pressing the
guide bar against the wood. Use only light
pressure, letting the saw do the work.
Maintain a steady speed throughout the
cut, releasing pressure just before the
end of the cut.
If the saw stops suddenly when cutting,
remove the saw from the cut, then resume
cutting using lighter pressure on the limb.
PRUNING
• Clear the work area. Falling limbs may
bounce or “spring back” after they hit
the ground, so it is essential to keep the
ground clear to provide multiple retreat
paths.
• Plan retreat paths before beginning
to cut, and make sure there are no
obstructions. Always know how to get
out of the way of falling branches.
• Make sure bystanders or helpers are
a safe distance from falling branches.
Bystanders or helpers should not
stand directly in front of or behind the
operator. See Fig. in “Work area safety”.
• Maintain solid footing and hold the
pole saw firmly with both hands. Do not
overreach. Never climb a tree or ladder
to reach high limbs.
• Prune lower limbs before pruning
higher ones.
• Allow the saw chain to achieve full
speed before cutting.
• Apply light pressure to the branch.
• For long limbs (Fig. ), cut the end of the
limb first () to relieve pressure from the
limb, then prune closer to the trunk ().
1
2
FIG. 31

23
OPERATING THE POLE SAW
OREGON® Cordless Tool System
POLE SAW MODEL PS250
AC 1113 - F/N 563397
• Thick limbs (greater than inches in
diameter) can splinter or pinch the chain
when making a single cut from the top.
To avoid pinching or splintering (Fig. ),
first make one shallow relief cut on the
bottom surface of the limb (), then cut
the limb all of the way through from the
top of the limb ().
• After most of the limb has been
removed, make one smooth cut near
the trunk (Fig. )
1
2
FIG. 32
FIG. 33

24
MAINTENANCE AND CLEANING
OREGON® Cordless Tool System
POLE SAW MODEL PS250
AC 1113 - F/N 563397
MAINTENANCE AND CLEANING
POLE SAW
WARNING: FAILURE TO IDENTIFY
AND REPLACE DAMAGED OR
WORN PARTS CAN CAUSE SERIOUS
PERSONAL INJURY. INSPECT THE
POLE SAW REGULARLY. REGULAR
INSPECTION IS THE FIRST STEP
TO PROPER MAINTENANCE.
FOLLOW THE GUIDELINES
BELOW TO MAXIMIZE SAFETY
AND SATISFACTION. HAVE ANY
DAMAGED OR EXCESSIVELY WORN
PARTS REPLACED IMMEDIATELY.
WARNING: A BATTERY OPERATED
TOOL WITH THE BATTERY PACK
INSERTED IS ALWAYS ON AND CAN
START ACCIDENTALLY. REMOVE THE
BATTERY PACK FROM THE POLE SAW
BEFORE INSPECTING, CLEANING, OR
PERFORMING MAINTENANCE.
CAUTION: WHEN CLEANING THE
POLE SAW, DO NOT IMMERSE IN
WATER OR OTHER LIQUIDS.
INSPECTION
Before each use, and after the pole saw is
dropped, inspect these parts:
• Handles: Rear handle and extendable
shaft should not have cracks or other
damage. They should be clean and dry.
• Guide Bar: The bar should be straight and
free of chips, cracks, or excessive wear.
• Saw Chain: The chain should be
properly tensioned and sharp, and all
components free of cracks, chips, or
excessive wear. See “Tensioning the saw
chain” and “Sharpening the saw chain”.
• Side Cover: The side cover should be
free of cracks or other damage. It should
fit tightly to the saw body with no
warping. Make sure the chain catch is
free of cracks.
• Battery Pack: The battery pack should
be clean, dry, and show no signs of
puncture, impact, or other damage. The
contacts should be clean, dry and free
of debris.
• Battery Port: The battery port and
contacts should be clean, dry, and free
of debris.
• Oil Level: Make sure the oil reservoir is
full before use.
• Automatic Oiler: When the pole saw is
running without the guide bar and saw
chain attached, a small amount of oil
should seep from the hole in the bar
pad. See “Checking the automatic oiler”.
• Motor Housing: Check for cracks in the
cover and debris in the air intake vents.
• Harness: Fabric should not be cut or
frayed, and adjustment buckles and clip
should be free from cracks.
• Extension Collar: Make sure the extension
collar is free from cracks or other damage
and that it holds the extendable shaft
firmly in place when tightened.
Periodically inspect these parts:
• Drive Sprocket: Look for deep grooves,
broken teeth, or burrs.
• Tensioning Screw: Inspect the head
and body of the tensioning screw for
excessive wear, stripped or crossed
threads, or other damage.
• Cutting Head, Underneath Side Cover:
Make sure the bar mounting stud is not
bent, stripped, or cross-threaded and
that the bar pad and alignment flange
are free of debris and intact.
• Charger: The charger should be clean,
dry, and free of punctures or other
damage. The battery tray and contacts
should be free of debris. The cord
should not be frayed or damaged.
• Screws: Make sure all screws are tight,
paying particular attention to the four
screws between the extendable shaft
and the cutting head.

25
MAINTENANCE AND CLEANING
OREGON® Cordless Tool System
POLE SAW MODEL PS250
AC 1113 - F/N 563397
CLEANING
WARNING: TO REDUCE THE RISK
OF INJURY, REMOVE BATTERY PACK
BEFORE CLEANING.
CAUTION: WHEN CLEANING THE
POLE SAW POWER HEAD, DO NOT
IMMERSE IN WATER OR OTHER
LIQUIDS.
• Remove wood chips and other debris
from the battery port. Make sure the
contacts are clean and dry.
• After use, clean debris from the saw
chain and guide bar. Wipe power head
with a clean cloth moistened with a mild
soap solution. Never use harsh cleaners
or solvents.
• Always clean out wood chips, saw dust,
and dirt from the bar groove when
replacing the chain.
SHARPENING THE SAW CHAIN
It is recommended that an OREGON®
Service Dealer sharpen the chain, but it
can also be sharpened by the operator.
WARNING: IF THE CHAIN IS
INCORRECTLY SHARPENED OR
THE DEPTH GAUGE IS SET TOO
LOW, THERE IS AN INCREASED
RISK OF INJURY. ALWAYS SHARPEN
THE CHAIN ACCORDING TO THE
SPECIFICATIONS DESCRIBED IN THIS
MANUAL.
IMPORTANT: SHARPENING
ACCORDING TO THESE
INSTRUCTIONS WILL ADDRESS
MINOR DAMAGE TO THE SAW
CHAIN FROM CONTACT WITH DIRT
OR SIMILAR OCCURRENCES. TO
REPAIR MORE SERIOUS SAW CHAIN
DAMAGE SUCH AS AFTER CONTACT
WITH CONCRETE, TAKE THE CHAIN
TO AN AUTHORIZED OREGON®
SERVICE DEALER, OR REPLACE THE
CHAIN.
Chain sharpening requires these tools
(available in a kit from OREGON®; see
“Specifications and components”):
• File guide
• . mm round saw chain sharpening file
(use only special saw chain sharpening
files)
• . inch (. mm) depth gauge tool
• Flat file
After collecting the tools, wear gloves
and eye protection, and remove the
battery. Then, file the chain to set the
depth gauge:
• Loosen the side cover knob and remove
side cover.
• Adjust the tensioning screw as far back
toward the rear of the cutting head as it
will go.
• Remove the chain.
• Place the chain in a vise to hold it steady.
• Place the depth gauge tool on top of
the chain so that one depth gauge
protrudes through the slot in the tool.
• If the depth gauge extends above the
top of the slot, file the depth gauge
down level with the top of the tool
using a flat file (Fig. ). Never file the
depth gauge down enough to exceed
the depth gauge setting specified in this
manual.
FLAT FILE
DEPTH GAUGE
TOOL
FIG. 34
26
MAINTENANCE AND CLEANING
OREGON® Cordless Tool System
POLE SAW MODEL PS250
AC 1113 - F/N 563397
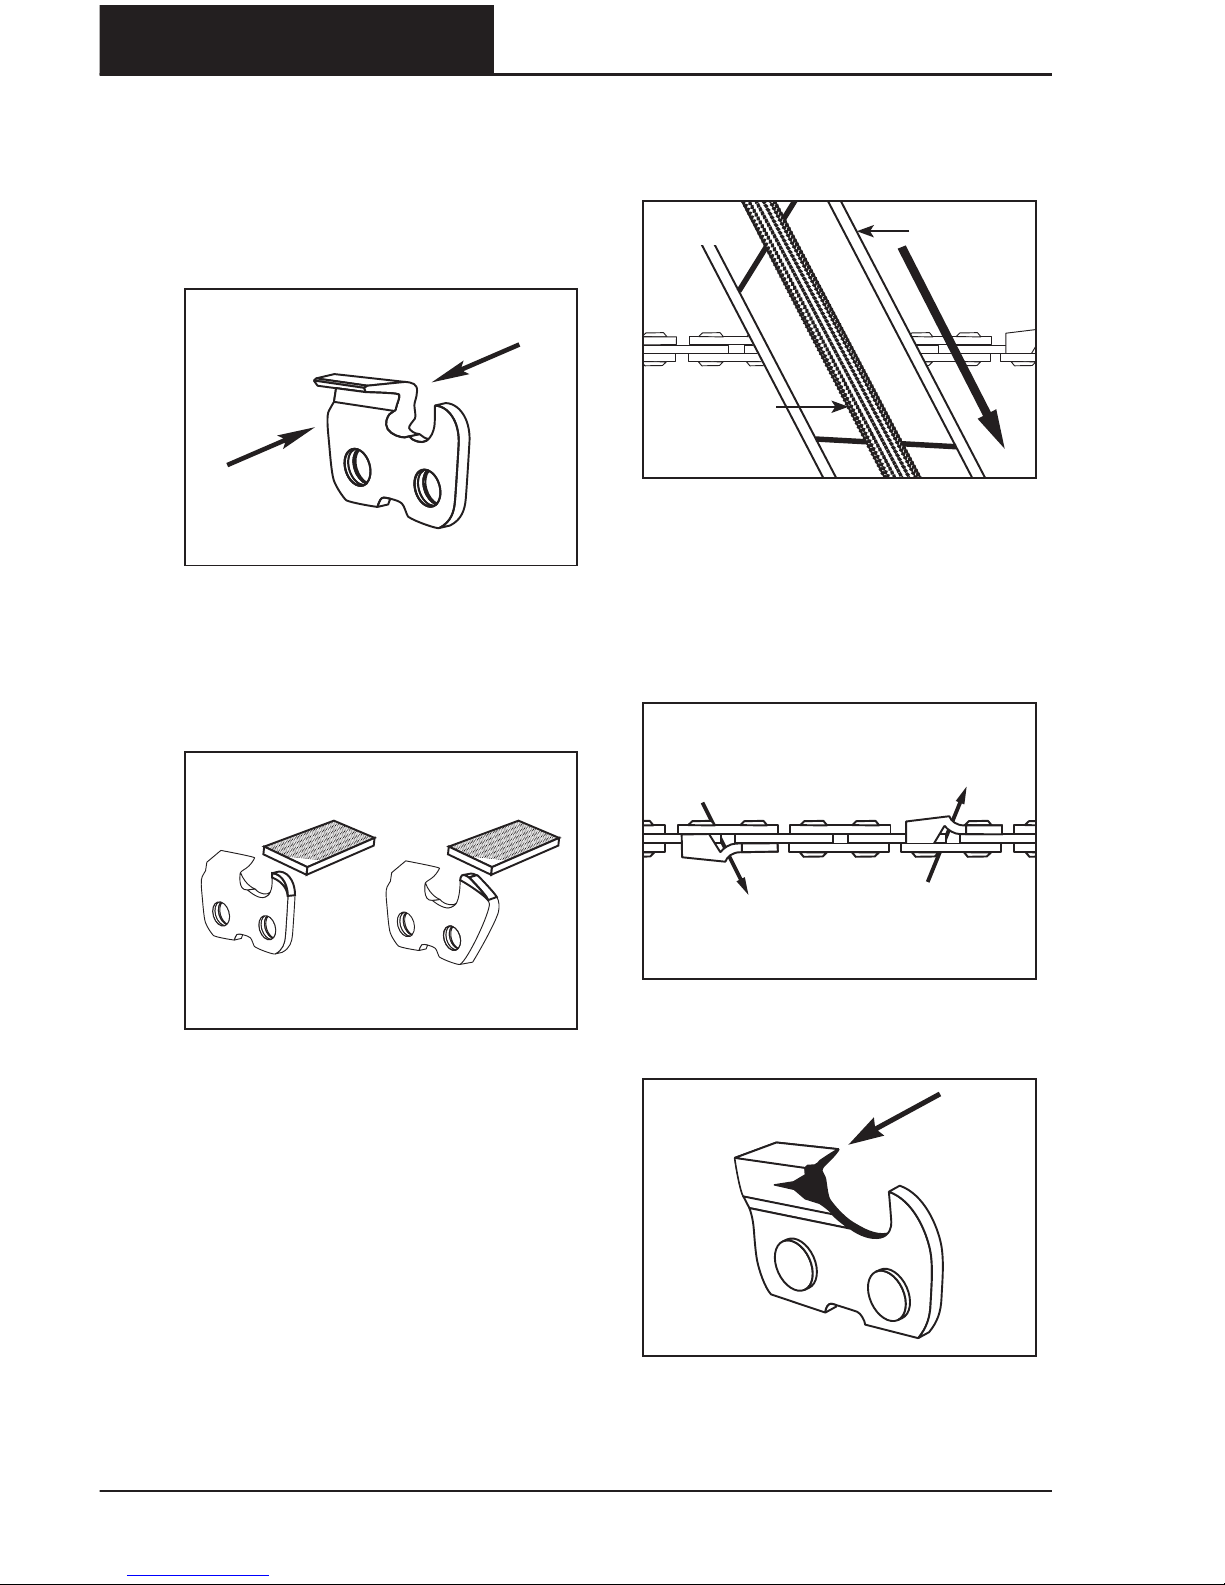
IMPORTANT: SHARPEN IN ONE
DIRECTION ONLY, FROM INSIDE TO
OUTSIDE. NEVER SHARPEN WITH A
BACKANDFORTH MOTION.
• File from the inside surface of the depth
gauge to the outside (Fig. ).
• Remove the depth gauge tool.
• After lowering, always file off the front
corner of each depth gauge parallel to
its original rounded or ramped shape
(Fig. ).
• Repeat for each depth gauge on the
chain.
After setting the depth gauge, sharpen
the cutters:
• Place the chain file into the file guide.
• Align the file guide so that the correct
top plate filing angle marked on the file
guide is parallel to the chain (Fig. ).
• Sharpen cutters on one side of the chain
first. Make - strokes with the file from
the inside of each cutter to the outside.
Use the same number of strokes on
each cutter. Then, turn the pole saw
around and repeat for cutters on the
other side of the chain (Fig. ).
• File back any damage on the chrome
top or side plates (Fig. ).
FIG. 35
OUTSIDE
INSIDE
FIG. 36
FIG. 37
FILE GUIDE
ROUND FILE
FIG. 38
FIG. 39
27
MAINTENANCE AND CLEANING
OREGON® Cordless Tool System
POLE SAW MODEL PS250
AC 1113 - F/N 563397
• Keep all cutter lengths equal.
• After sharpening all cutters, use the file
guide to check the depth gauges again.
Reset the depth gauge if necessary.
• Replace the chain, replace the side
cover, and replace the battery.
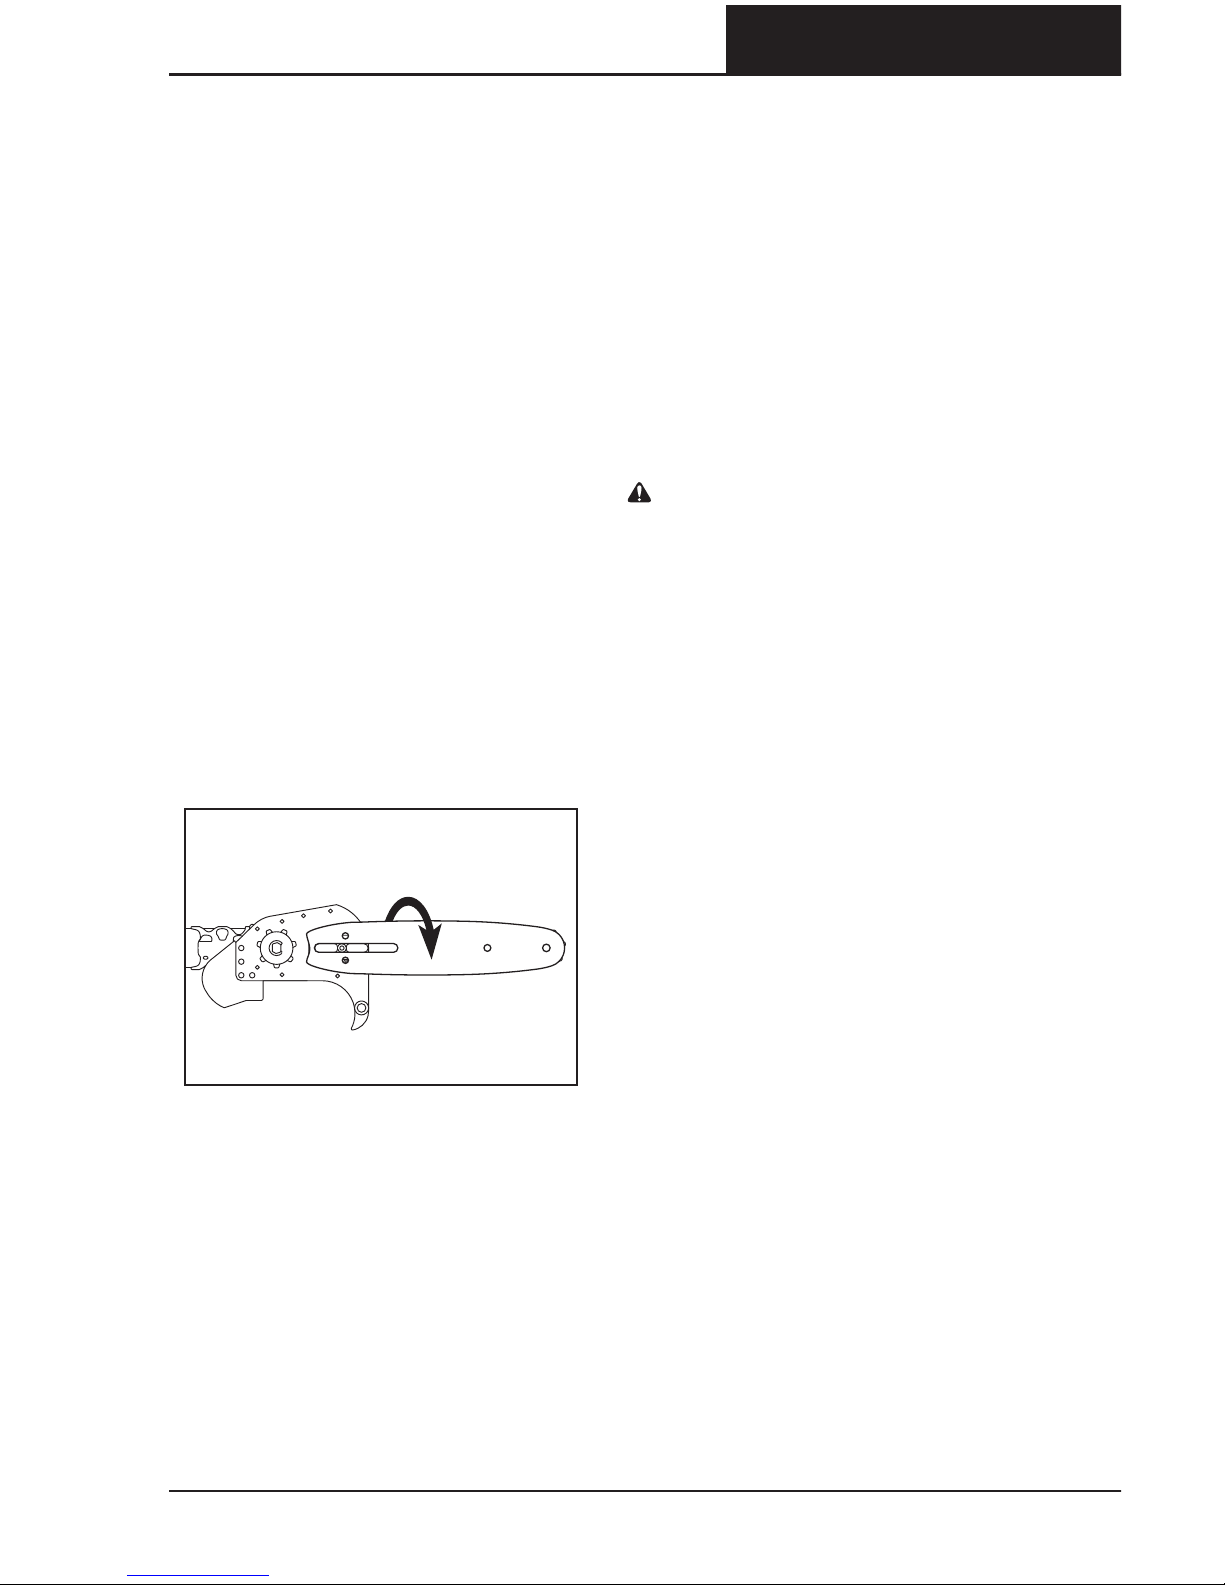
MAINTAINING THE GUIDE BAR
To even bar wear and maximize bar life,
flip the bar occasionally.
Wear gloves.
• Remove the battery.
• Loosen the side cover knob and remove
the side cover.
• Adjust the tensioning screw as far back
toward the rear of the cutting head as it
will go.
• Remove the bar and chain.
• Flip the bar vertically (Fig. ) and
reinstall the bar and chain as described
in “Assembling the guide bar and saw
chain”.
REPLACING A WORN
SAW CHAIN
When the saw chain becomes cracked or
has broken teeth, or when it is stretched
to the point that it cannot be kept at
proper tension, it must be replaced.
Wear gloves.
• Remove the battery.
• Loosen the side cover knob and remove
the side cover.
• Adjust the tensioning screw as far back
toward the rear of the cutting head as it
will go.
• Remove the bar and chain.
• Install the new chain as described in
“Assembling the guide bar and saw
chain”.
• Tension the chain as described in
“Tensioning the saw chain”.
REPLACING A WORN
GUIDE BAR
WARNING: THE EDGES OF A WORN
GUIDE BAR, PARTICULARLY THE
EDGES OF THE GROOVE WHERE
THE CHAIN TOUCHES THE BAR,
CAN BE EXTREMELY SHARP. USE
APPROPRIATE HAND PROTECTION.
When the guide bar becomes cracked
or has excessive wear around the edges,
particularly in the groove where the
saw chain touches the bar, it must be
replaced. Also, if the nose sprocket is
worn, has teeth missing, or does not turn
smoothly, the bar must be replaced.
Wear gloves.
• Remove the battery.
• Loosen the side cover knob and remove
the side cover.
• Adjust the tensioning screw as far back
toward the rear of the cutting head as it
will go.
• Remove the bar and chain.
• Install the new bar as described in
“Assembling the guide bar and saw
chain”.
• Tension the chain as described in
“Tensioning the saw chain”.
FIG. 40

28
MAINTENANCE AND CLEANING
OREGON® Cordless Tool System
POLE SAW MODEL PS250
AC 1113 - F/N 563397
REPLACING THE DRIVE
SPROCKET
Replace the drive sprocket after every
two saw chain replacements, or when the
sprocket is damaged.
Wear gloves when removing and
replacing the bar and chain.
• Remove the battery.
• Loosen the side cover knob and remove
the side cover.
• Adjust the tensioning screw as far back
toward the rear of the cutting head as it
will go.
• Remove the bar and chain.
• Use a small flat screwdriver to pry open
and remove the e-clip, then remove the
drive sprocket and washers (Fig. ).
• Insert the new drive sprocket with a
washer on each side, and install the new
e-clip (Fig. ).
• Replace the bar and chain as described
in “Assembling the guide bar and saw
chain”.
• Tension the chain as described in
“Tensioning the saw chain”.
TENSIONING
IMPORTANT: ONLY TENSION THE
SAW CHAIN WHEN THE CHAIN IS
COOL. A HOT CHAIN MAY CONTRACT
AND DAMAGE THE GUIDE BAR OR
CHAIN AS IT COOLS.
If the chain does not touch the underside
of the bar when the pole saw is off and
cool, it should be tensioned.
Tension the chain as described in
“Tensioning the saw chain”.
BATTERY PACK
IMPORTANT: THERE ARE NO USER
SERVICEABLE PARTS INSIDE
THE BATTERY PACK. DO NOT
DISASSEMBLE.
Lithium ion batteries have a finite
operating life. If the amount of cutting
time per charge decreases noticeably, the
battery pack is at the end of its useful life
and should be replaced.
• Make sure the battery pack, including
the contacts, is clean, dry, and has no
signs of puncture, impact, or other
damage. Broken batteries can cause
fires or emit hazardous chemicals.
• Clean dirty contacts with a soft, dry cloth.
Dirt or oil can cause a poor electrical
connection, resulting in loss of power.
CHARGER
• Unplug the charger from the electrical
outlet.
• Clean dirty contacts with a soft, dry
cloth.
ADDITIONAL MAINTENANCE
INFORMATION
For further information on maintaining
the saw chain, guide bar, and drive
sprocket, consult the OREGON®
Maintenance and Safety Manual at
http://oregonproducts.com/
maintenance/manual.htm.
FIG. 41
FIG. 42

29
TROUBLESHOOTING
OREGON® Cordless Tool System
POLE SAW MODEL PS250
AC 1113 - F/N 563397
TROUBLESHOOTING
Use this table to see possible solutions for possible problems with the pole saw. If
these suggestions do not solve the problem, see “Warranty and service”.
SYMPTOM POSSIBLE CAUSE RECOMMENDED ACTIONS
Motor stops while
cutting
Chain pinched in cut
Undercut limb to relieve pressure on limb. See
“Cutting”.
Overheating of control
system
Let the control system cool down.
Motor does
not run or runs
intermittently
Battery discharged Recharge. See “Battery pack and charger”.
Trigger lock-out not
pressed
Press the trigger lock-out before squeezing the
trigger switch. See “General operation”.
Battery pack not fully
inserted
Press the battery pack into the battery port until it
clicks into place.
Battery contacts dirty
Remove the battery pack, remove debris from the
battery port, and then clean the contacts with a
clean, dry cloth.
Battery pack cold
Allow the battery pack to warm to the minimum
operating temperature of 32°F (0°C).
Debris in side cover
Remove battery pack, then remove side cover and
clean out debris.
Overheating of motor Let the motor cool down.
Motor runs, but
saw chain does not
rotate
Chain not engaging
drive sprocket
Reinstall the chain, making sure the drive links on
the chain are fully seated on the drive sprocket. See
“Replacing a worn saw chain”.
Guide bar nose sprocket
is not turning
Replace the guide bar. See “Replacing a worn guide
bar”.
Drive shaft not properly
seated in motor housing
coupler
Repeat process for “Assembling the extendable
shaft”. Drive shaft must be properly seated into
coupler.
Pole saw does not
cut properly
Insufficient chain
tension
Tension the chain. See “Tensioning the saw chain”.
Dull chain See “Sharpening the saw chain”.
Chain installed
backwards
Install the chain with the teeth facing the correct
direction. See “Replacing a worn saw chain”.
Worn chain
Replace the chain. See “Replacing a worn saw
chain”.
Dry or excessively
stretched chain
Check the oil level. Refill oil reservoir if necessary.
See “Filling the bar and chain oil reservoir”.
Chain not in bar groove
Reseat chain onto groove. See “Assembling the
guide bar and saw chain”.
Bar and chain
excessively hot
and/or smoking
Chain is underlubricated
Check the oil level. Refill oil reservoir if necessary.
See “Filling the bar and chain oil reservoir”.

30
TROUBLESHOOTING
OREGON® Cordless Tool System
POLE SAW MODEL PS250
AC 1113 - F/N 563397
SYMPTOM POSSIBLE CAUSE RECOMMENDED ACTIONS
Battery pack does
not charge
Battery pack over/
under temperature
protection is activated
This may occur when the saw is run continuously
or exposed to high ambient temperatures.
Allow the battery pack to reach the acceptable
temperature before charging. See “Battery pack
and charger”.
Dirty or damaged
contacts on battery
pack or charger
Inspect the contacts on the both the battery pack
and charger. If necessary, clean according to the
instructions in this manual. Reinsert battery pack
into the charger, making sure it is fully seated.
Battery pack is at the
end of its life
All batteries have a limited life. If the battery pack
is more than two years old or has been recharged
frequently, it may be time to replace it. Replace
only with the battery pack specified for this pole
saw.
Charger faulty
Have the function checked at an approved service
location.
Low cut time per
battery charge
Dull chain See “Sharpening the saw chain”.
Worn chain
Replace the chain. See “Replacing a worn saw
chain”.
Dry chain
Check the oil level. Refill oil reservoir if necessary.
See “Filling the bar and chain oil reservoir”.
Over tensioned chain See “Tensioning the saw chain”.
Improper cutting
technique
Follow guidelines in “Cutting”.
Debris in side cover
Remove battery pack, then remove side cover and
clean out debris.
Battery pack not fully
charged
Recharge. See “Battery pack and charger”.
Blinking orange
light on charge
state indicator
Charger short circuit,
charger over current,
over voltage limit, open
circuit on battery pack,
or charge/pre-charge
time out error
1. Make sure the charger cord is connected to both
the charger and the electrical outlet.
2. Make sure the charger is receiving the correct
voltage.
3. Try charging another battery pack designed for
this charger.
If this does not correct the problem, have the
function checked at an approved service location.

31
SPECIFICATIONS AND COMPONENTS
OREGON® Cordless Tool System
POLE SAW MODEL PS250
AC 1113 - F/N 563397
SPECIFICATIONS AND COMPONENTS
WARNING: USING REPLACEMENT PARTS OTHER THAN THOSE SPECIFIED
IN THIS GUIDE INCREASES THE RISK OF INJURY. NEVER USE CUTTING
ATTACHMENTS OTHER THAN THOSE DESCRIBED IN THIS MANUAL.
REPLACEMENT COMPONENTS PART NUMBER
GUIDE BAR 564284
SAW CHAIN R34
BATTERY PACK, MODEL B600E 548208
BATTERY PACK, MODEL B400E 545938
BATTERY PACK, MODEL B500S 545937
CHARGER WITH CORD, MODEL C600 540580
RAPID CHARGER WITH CORD, MODEL C750 548185
SAW CHAIN SHARPENING KIT 38278
CHARGER, MODEL C600
INPUT 100240V~ 5060Hz 60W
INPUT U.S. AND CANADA ONLY 120V~ 60Hz 60W
OUTPUT 41.5V 1.25A
POWER CORD
US/CAN P/N: 546636 EU P/N: 547383
UK P/N: 547384 AU/NZ P/N: 560663
BATTERY PACK
TYPE LITHIUM ION
OPERATING TEMPERATURES 32°F TO 104°F 0°C TO 40°C
MODEL
CAPACITY,
NOMINAL
VOLTAGE,
NOMINAL
C600 CHARGE
TIME APPROX.
B600E 4.00 Ah / 144 Wh +36 VDC 210 MINUTES
B400E 2.40 Ah / 89 Wh +37 VDC 120 MINUTES
B500S 1.25 Ah / 47 Wh +37 VDC 60 MINUTES
POLE SAW
OIL CAPACITY 3.4 oz 100 ml)
BAR AND CHAIN OIL OREGON® BRAND
DRY WEIGHT WITH BATTERY 13.5 lb 6.12 kg
DRY WEIGHT WITHOUT
BATTERY, BAR, AND CHAIN
10.1 lb 4.58 kg
SOUND POWER LEVEL 90 dB (K, 0.18 dB)
VIBRATION .81 m/s
2
(K, .14 m/s2)
MAX BAR LENGTH 8 inch (20 cm)
CHAIN PITCH 3/8 inch Low Profile™
CHAIN GAUGE .043 inch
DRIVE SPROCKET TEETH 7
NO LOAD CHAIN SPEED 47.4 ft/s (14.5 m/s)

32
WARRANTY AND SERVICE
OREGON® Cordless Tool System
POLE SAW MODEL PS250
AC 1113 - F/N 563397
WARRANTY AND SERVICE
WARRANTY
Blount, Inc. warrants all registered
OREGON® Cordless Tools and Chargers
for a period of three () years and all
registered OREGON® Cordless Battery
Packs for two () years from original
date of purchase. Registered OREGON®
Cordless Tools, Battery Packs and
Chargers are warranted for two () years
if used for commercial purposes. This
limited warranty applies to the OREGON®
Cordless Tool System manufactured
products. During the warranty period,
Blount will replace or, at its option,
repair for the original purchaser only,
free of charge, any product or part
which is found upon examination by
Blount to be defective in material and/
or workmanship. The purchaser shall be
responsible for all transportation charges
and any cost of removing any part
submitted for replacement under this
warranty.
To register your product, visit the
“support” section of OregonCordless.com.
SERVICE AND SUPPORT
INFORMATION
Visit us on the web at
OregonCordless.com for service center
information, or contact our customer
service department at ..
for assistance, additional technical
advice, repair, replacement parts, or to
register the product.
For safety, use only genuine factory
replacement parts on the pole saw. Our
service center is staffed with trained
personnel to efficiently provide support
and assistance with adjustment, repair,
or replacement of all OREGON® Cordless
Tool System products.


34
AC 1113 - F/N 563397
TABLE DES MATIÈRES
Système d’outils à batterie OREGON
MD
SCIE À LONG MANCHE MODÈLE PS250
TABLE DES MATIÈRES
SYMBOLES ET ÉTIQUETTES . . . . . . . . . . . . . . . . . . . . . . . . . . . . . . . . . . . 35
NOMS ET TERMES RELATIFS À LA SCIE À LONG MANCHE . . . . . . . . . . . . . . . 36
IDENTIFICATION DU PRODUIT . . . . . . . . . . . . . . . . . . . . . . . . . . . . . . . . . 37
RÈGLES DE SÉCURITÉ. . . . . . . . . . . . . . . . . . . . . . . . . . . . . . . . . . . . . . . . 38
AVERTISSEMENTS DE SÉCURITÉ GÉNÉRAUX
POUR LES OUTILS ÉLECTRIQUES . . . . . . . . . . . . . . . . . . . . . . . . . . . 38
SÉCURITÉ DE LA ZONE DE TRAVAIL . . . . . . . . . . . . . . . . . . . . . . . . . 38
SÉCURITÉ ÉLECTRIQUE. . . . . . . . . . . . . . . . . . . . . . . . . . . . . . . . . . 38
SÉCURITÉ PERSONNELLE . . . . . . . . . . . . . . . . . . . . . . . . . . . . . . . . 39
UTILISATION ET ENTRETIEN DES OUTILS ÉLECTRIQUES . . . . . . . . . . . 40
UTILISATION ET ENTRETIEN DES
OUTILS FONCTIONNANT À BATTERIE . . . . . . . . . . . . . . . . . . . . . . . 41
SERVICE . . . . . . . . . . . . . . . . . . . . . . . . . . . . . . . . . . . . . . . . . . . . 41
AVERTISSEMENTS DE SÉCURITÉ DE LA SCIE À LONG MANCHE . . . . . . 41
ENTREPOSAGE, TRANSPORT ET MISE AU REBUT . . . . . . . . . . . . . . . . 42
SÉCURITÉ DE LA BATTERIE . . . . . . . . . . . . . . . . . . . . . . . . . . . . . . . 43
SÉCURITÉ DU CHARGEUR . . . . . . . . . . . . . . . . . . . . . . . . . . . . . . . 44
DÉBALLAGE ET MONTAGE . . . . . . . . . . . . . . . . . . . . . . . . . . . . . . . . . . . . 45
MONTAGE DE L’ARBRE EXTENSIBLE . . . . . . . . . . . . . . . . . . . . . . . . . 45
REMPLISSAGE DU RÉSERVOIR D’HUILE POUR BARRE ET CHAÎNE . . . . . 46
MONTAGE DU GUIDECHAÎNE ET DE LA CHAÎNE DE TRONÇONNEUSE. 47
MISE EN TENSION DE LA CHAÎNE DE TRONÇONNEUSE. . . . . . . . . . . . 48
UTILISATION DE LA SCIE À LONG MANCHE . . . . . . . . . . . . . . . . . . . . . . . . 49
BLOC DE BATTERIE ET CHARGEUR . . . . . . . . . . . . . . . . . . . . . . . . . . 49
FONCTIONNEMENT GÉNÉRAL. . . . . . . . . . . . . . . . . . . . . . . . . . . . . 51
COUPE . . . . . . . . . . . . . . . . . . . . . . . . . . . . . . . . . . . . . . . . . . . . . 53
ENTRETIEN ET NETTOYAGE . . . . . . . . . . . . . . . . . . . . . . . . . . . . . . . . . . . 56
INSPECTION . . . . . . . . . . . . . . . . . . . . . . . . . . . . . . . . . . . . . . . . . 56
NETTOYAGE . . . . . . . . . . . . . . . . . . . . . . . . . . . . . . . . . . . . . . . . . 57
AFFÛTAGE DE LA CHAÎNE DE TRONÇONNEUSE. . . . . . . . . . . . . . . . . 57
ENTRETIEN DU GUIDECHAÎNE . . . . . . . . . . . . . . . . . . . . . . . . . . . . 59
REMPLACEMENT D’UNE CHAÎNE DE TRONÇONNEUSE USÉE. . . . . . . . 59
REMPLACEMENT D’UN GUIDECHAÎNE USÉ . . . . . . . . . . . . . . . . . . . 59
REMPLACEMENT DU PIGNON D’ENTRAÎNEMENT . . . . . . . . . . . . . . . 60
MISE EN TENSION . . . . . . . . . . . . . . . . . . . . . . . . . . . . . . . . . . . . . 60
BLOC DE BATTERIE. . . . . . . . . . . . . . . . . . . . . . . . . . . . . . . . . . . . . 60
CHARGEUR . . . . . . . . . . . . . . . . . . . . . . . . . . . . . . . . . . . . . . . . . . 60
RENSEIGNEMENTS D’ENTRETIEN SUPPLÉMENTAIRES. . . . . . . . . . . . . 60
DÉPANNAGE. . . . . . . . . . . . . . . . . . . . . . . . . . . . . . . . . . . . . . . . . . . . . . 61
CARACTÉRISTIQUES ET COMPOSANTS . . . . . . . . . . . . . . . . . . . . . . . . . . . 63
GARANTIE ET SERVICE . . . . . . . . . . . . . . . . . . . . . . . . . . . . . . . . . . . . . . . 64
© Blount, Inc. Les tarifs et caractéristiques peuvent être modifiés sans préavis. Tous droits réservés. OREGON MD est une marque
déposée de Blount, Inc aux États-Unis et/ou dans d’autres pays.

35
AC 1113 - F/N 563397
SYMBOLES ET ÉTIQUETTES
Système d’outils à batterie OREGON
MD
SCIE À LONG MANCHE MODÈLE PS250
SYMBOLES ET ÉTIQUETTES
Ces symboles et étiquettes apparaissent sur la scie à long manche, la batterie et le chargeur.
SYMBOLE NOM EXPLICATION
CONSTRUCTION DE
CLASSE II
OUTILS DE CONSTRUCTION À DOUBLE ISOLATION
INDIQUÉS
SYMBOLE D’ALERTE DE
SÉCURITÉ
SIGNALE QUE LE TEXTE SUIVANT INDIQUE UN
DANGER, UN AVERTISSEMENT OU UNE MISE EN
GARDE.
LIRE LES
INSTRUCTIONS
LE MANUEL D’INSTRUCTIONS ORIGINAL CONTIENT
DES RENSEIGNEMENTS IMPORTANTS SUR LE
FONCTIONNEMENT ET LA SÉCURITÉ. LISEZ ET
SUIVEZ ATTENTIVEMENT CES INSTRUCTIONS.
PORTER UNE
PROTECTION
OCULAIRE
PORTEZ DES LUNETTES DE PROTECTION LORSQUE
VOUS UTILISEZ LA SCIE À LONG MANCHE.
PORTER UNE
PROTECTION AUDITIVE
PORTEZ UNE PROTECTION AUDITIVE LORSQUE
VOUS UTILISEZ LA SCIE À LONG MANCHE.
PORTER DES GANTS DE
PROTECTION
PORTEZ DES GANTS LORSQUE VOUS UTILISEZ
LA SCIE À LONG MANCHE ET LORSQUE VOUS
MANIPULEZ LA CHAÎNE DE TRONÇONNEUSE.
PORTER UN CASQUE
DE SÉCURITÉ
PORTEZ UN CASQUE DE SÉCURITÉ LORSQUE VOUS
UTILISEZ LA SCIE À LONG MANCHE.
PORTER DES
CHAUSSURES DE
PROTECTION
PORTEZ DES BOTTES DE SÉCURITÉ FERMÉES
APPROPRIÉES LORSQUE VOUS UTILISEZ LA SCIE À
LONG MANCHE.
PUISSANCE
ACOUSTIQUE
LE NIVEAU DE PUISSANCE ACOUSTIQUE
EST DE 90 DB.
UTILISATION À DEUX
MAINS
TENEZ LA SCIE À LONG MANCHE À DEUX MAINS.
UTILISATION À UNE
MAIN
NE TENEZ PAS LA SCIE À LONG MANCHE AVEC UNE
SEULE MAIN.
NE PAS UTILISER
D’ÉCHELLE
N’UTILISEZ JAMAIS LA SCIE À LONG MANCHE
DEBOUT SUR UNE ÉCHELLE.
NE PAS INCINÉRER NE LA PAS JETEZ PAS DANS LE FEU.
NE PAS ÉLIMINER
COMME UN REBUT
DOMESTIQUE
NE LA JETEZ PAS DANS LES ORDURES MÉNAGÈRES.
APPORTEZLA DANS UN CENTRE DE RECYCLAGE
AUTORISÉ.
NE PAS EXPOSER À LA
PLUIE
N’UTILISEZ PAS LE CHARGEUR DANS DES ENDROITS
HUMIDES.
UTILISATION
EN INTÉRIEUR
UNIQUEMENT
CONÇU POUR UNE UTILISATION EN INTÉRIEUR
UNIQUEMENT.
TEMPÉRATURE DE
FONCTIONNEMENT
UTILISEZ LE BLOC DE BATTERIE UNIQUEMENT À
UNE TEMPÉRATURE COMPRISE ENTRE 0 ET 40 °C
ENTRE 32 ET 104 °F.
OUTIL DE COUPE
OUTIL DE COUPE. NE TOUCHEZ PAS LA CHAÎNE AVANT
D’AVOIR PRÉALABLEMENT DÉSACTIVÉ LA SCIE À
LONG MANCHE EN RETIRANT LE BLOC DE BATTERIE.
ÊTRE PRUDENT À
PROXIMITÉ DES LIGNES
ÉLECTRIQUES
N’UTILISEZ JAMAIS LA SCIE À LONG MANCHE PRÈS
DE CÂBLES SUSCEPTIBLES DE TRANSPORTER DU
COURANT ÉLECTRIQUE.
RETIRER LA BATTERIE
RETIREZ LA BATTERIE AVANT TOUTE OPÉRATION
D’ENTRETIEN.

36
AC 1113 - F/N 563397
NOMS ET TERMES RELATIFS À
LA SCIE À LONG MANCHE
Système d’outils à batterie OREGON
MD
SCIE À LONG MANCHE MODÈLE PS250
NOMS ET TERMES RELATIFS À LA SCIE À LONG
MANCHE
Bride d’alignement : protubérance sur le
coussinet de barre qui s’adapte dans la fente
de la barre.
Huileur automatique : système qui lubrifie
automatiquement le guide-chaîne et la
chaîne de tronçonneuse.
Coussinet de barre : coussinet de montage
sur la tête de coupe qui permet d’assurer
l’alignement correct du guide-chaîne.
Fente de barre : partie découpée du
guide-chaîne qui s’adapte sur la bride
d’alignement et le goujon de fixation.
Couvre-lame : cache en plastique qui
protège le guide-chaîne et la chaîne de
tronçonneuse lorsque la scie à long manche
n’est pas utilisée.
Crochet à branche : pièce en métal incurvée
sur l’extrémité de la tête de coupe pour
détacher les branches coupées des arbres.
Zone de sécurité des observateurs : cercle de
m ( pi) autour de l’opérateur dans lequel
aucun objet pouvant faire trébucher, ni
aucun observateur, enfant et animal, ne doit
se trouver.
Calibre de chaîne : épaisseur du maillonguide de la chaîne de tronçonneuse,
indiquée par le numéro de pièce estampé
sur les maillons-guides.
Pas de chaîne : distance entre trois rivets sur
la chaîne de tronçonneuse divisée par deux,
indiquée par le numéro de pièce estampé
sur les maillons-guides.
Pare-débris : rigole en plastique située sur
la tête de coupe qui achemine la poussière
et les copeaux de bois loin de l’opérateur
pendant la coupe.
Outil de calibrage de profondeur : outil qui,
lorsqu’il est placé sur le dessus de la chaîne
de tronçonneuse pendant l’affûtage, assure
le réglage correct de la profondeur de
coupe.
Maillon-guide : maillon en forme d’aileron de
la chaîne de tronçonneuse qui s’insère dans
la rainure du guide-chaîne.
Pignon d’entraînement : pièce dentée qui
entraîne la chaîne de tronçonneuse.
Arbre extensible : arbre entre le bloc-moteur
et la tête de coupe qui peut être allongé
pour atteindre des branches plus hautes
dans les arbres.
Collier d’extension : pièce en plastique
pivotante sur l’arbre extensible qui est
desserrée pour permettre l’extension et
serrée pour maintenir l’arbre extensible en
place.
Guide-lime : outil qui, une fois combiné
avec la lime de chaîne de tronçonneuse
appropriée, permet d’affûter les couteaux
de la chaîne de tronçonneuse selon l’angle
adapté.
Guide-chaîne : structure à rail qui soutient
et guide la chaîne de tronçonneuse. Parfois
simplement appelée « barre ».
Harnais : dispositif de sécurité utilisé par
l’opérateur et attaché à la scie à long
manche qui permet de distribuer le poids
de la scie.
Boîtier du moteur : gaine en plastique
dans laquelle l’arbre extensible est installé
pendant le montage.
Bloc-moteur de la scie à long manche : scie
à long manche sans arbre extensible, sans
chaîne et sans guide-chaîne.
Poignée arrière : poignée de soutien
située au niveau ou vers l’arrière de la
tronçonneuse.
Chaîne : boucle de chaîne avec denture
de coupe qui coupe le bois, entraînée
par le bloc-moteur et soutenue par le
guide-chaîne. Parfois simplement appelée
« chaîne ».
Panneau latéral : panneau en plastique situé
sur la tête de coupe qui couvre le pignon
d’entraînement et la vis de tension.
Tige de tension : pièce métallique fixée sur la
vis de tension qui se place dans l’orifice du
guide-chaîne.
Vis de tension : pièce filetée à l’intérieur de la
tête de coupe servant à régler la tension de
la chaîne de tronçonneuse.
Verrou de la gâchette : arrêt mobile qui
empêche l’activation involontaire de
l’interrupteur à gâchette jusqu’à ce qu’il soit
actionné manuellement.
Interrupteur à gâchette : dispositif de marche/
arrêt de la scie à long manche.
Pièces d’usure : pièces telles que la chaîne de
tronçonneuse et le guide-chaîne qui s’usent
pendant le fonctionnement et peuvent être
remplacées par l’utilisateur.

37
AC 1113 - F/N 563397
IDENTIFICATION DU PRODUIT
Système d’outils à batterie OREGON
MD
SCIE À LONG MANCHE MODÈLE PS250
IDENTIFICATION DU PRODUIT
CONNAÎTRE LA SCIE À LONG MANCHE
REMARQUE : Consultez la section « Déballage et montage » pour obtenir la liste des
éléments inclus.
CROCHET À BRANCHE
TÊTE DE COUPE
PANNEAU
LATÉRAL
PANNEAU LATÉRAL
BOUTON
ATTRAPECHAÎNE
COUVRELAME
PIGNON D’ENTRAÎNEMENT
COUSSINET DE BARRE
BRIDE D’ALIGNEMENT
FENTE DE
BARRE
TIGE DE TENSION
GUIDECHAÎNE
CHAÎNE DE TRONÇONNEUSE
PAREDÉBRIS
GOUJON DE FIXATION
VIS DE TENSION
POIGNÉE ARRIÈRE
VERROUILLAGE
D’INTERRUPTEUR
À GÂCHETTE
INTERRUPTEUR À GÂCHETTE
ANNEAU DE FIXATION
DE HARNAIS
BOÎTIER DU MOTEUR
ARBRE EXTENSIBLE
COLLIER D’EXTENSION
PLAQUE D’IDENTIFICATION DU PRODUIT
PORT DE
BATTERIE
BLOC DE
BATTERIE
DÉGAGEMENT DE LA BATTERIE
BOUCHON DE RÉSERVOIR D’HUILE
BLOCMOTEUR

38
AC 1113 - F/N 563397
RÈGLES DE SÉCURITÉ
Système d’outils à batterie OREGON
MD
SCIE À LONG MANCHE MODÈLE PS250
INTRODUCTION
La scie à long manche est conçue pour l’entretien régulièr et la coupe des branches
de cm ( po) de diamètre maximum. Les autres utilisations peuvent provoquer des
blessures et ne sont pas recommandées. Toutefois, même avec cette technologie, il
est admis qu’un risque résiduel, comme la projection d’objets, demeure. L’opérateur
doit lire, comprendre et suivre attentivement toutes les précautions de sécurité afin de
réduire les risques de blessure potentielle.
RÈGLES DE SÉCURITÉ
AVERTISSEMENTS DE SÉCURITÉ GÉNÉRAUX POUR LES OUTILS
ÉLECTRIQUES
AVERTISSEMENT : VEUILLEZ LIRE ET COMPRENDRE TOUS LES
AVERTISSEMENTS DE SÉCURITÉ ET TOUTES LES INSTRUCTIONS. LE NON
RESPECT DES AVERTISSEMENTS ET DES INSTRUCTIONS PEUT ENTRAÎNER UN
CHOC ÉLECTRIQUE, UN INCENDIE ET/OU DES BLESSURES GRAVES.
CONSERVEZ L’ENSEMBLE DES AVERTISSEMENTS ET INSTRUCTIONS POUR RÉFÉRENCE
ULTÉRIEURE. LE TERME OUTIL ÉLECTRIQUE UTILISÉ DANS LES AVERTISSEMENTS
FAIT RÉFÉRENCE À VOTRE OUTIL FONCTIONNANT SUR SECTEUR AVEC CORDON OU À
BATTERIE SANS FIL.
SÉCURITÉ DE LA ZONE DE
TRAVAIL
• Gardez la zone de travail propre et bien
éclairée. Les endroits encombrés ou sombres
favorisent les accidents.
• N’utilisez pas d’outils électriques dans
des atmosphères explosives, comme en
présence de liquides inflammables, de
gaz ou de poussière. Ces outils produisent des
étincelles qui peuvent enflammer la poussière ou
les vapeurs.
• Gardez les enfants et les observateurs à
l’écart lorsque vous utilisez un outil
électrique (Fig. ). Les distractions peuvent
vous faire perdre le contrôle.
ATTENTION : ÉTABLISSEZ UNE ZONE
DE SÉCURITÉ DES OBSERVATEURS
DE 6 M 20 PI AVANT D’UTILISER
CET ÉQUIPEMENT. La zone de sécurité des
observateurs est un cercle de 6 m (20 pi) autour de
l’opérateur, dans lequel aucun observateur, enfant
ni animal ne doit se trouver.
SÉCURITÉ ÉLECTRIQUE
• La fiche d’alimentation de l’outil doit
correspondre à la prise de courant. Ne
modifiez jamais la fiche de quelque
façon que ce soit. N’utilisez pas de fiche
d’adaptation avec des outils électriques
mis à la terre. Des fiches non modifiées et des
prises de courant correspondantes réduiront le
risque de choc électrique.
• Évitez tout contact corporel avec des
surfaces mises à la terre telles que les
tuyaux, les radiateurs, les cuisinières et
les réfrigérateurs. Il existe un risque accru de
décharge électrique si votre corps est mis à la
terre.
• N’exposez pas les outils électriques à la
pluie ou à des conditions humides. L’eau
pénétrant dans un outil électrique augmente le
risque de choc électrique.
• Ne malmenez pas le cordon. N’utilisez
jamais le cordon pour transporter,
tirer ou débrancher l’outil électrique.
Gardez le cordon à l’écart de la chaleur,
de l’huile, des bords tranchants et des
pièces mobiles. Des cordons endommagés
ou enchevêtrés augmentent le risque de choc
électrique.
• Lorsque vous vous servez d’un outil
électrique à l’extérieur, utilisez une
rallonge adaptée pour l’extérieur. Un
cordon adapté à un usage extérieur réduit le
risque de choc électrique.
FIG. 1

39
AC 1113 - F/N 563397
RÈGLES DE SÉCURITÉ
Système d’outils à batterie OREGON
MD
SCIE À LONG MANCHE MODÈLE PS250
• S’il est inévitable d’utiliser un outil
électrique dans un endroit humide, faitesle avec une alimentation protégée par un
dispositif à courant différentiel résiduel
(DDR) ou un disjoncteur de fuite à la terre
(DDFT). L’utilisation d’un DDR (DDFT) réduit le
risque de choc électrique.
SÉCURITÉ PERSONNELLE
• Restez vigilant, regardez ce que vous
faites et faites preuve de bon sens lorsque
vous utilisez un outil électrique. N’en
utilisez pas lorsque vous êtes fatigué ou
sous l’influence de drogues, d’alcool ou
de médicaments. Un moment d’inattention
lors de l’utilisation d’outils électriques peut
entraîner des blessures corporelles graves.
• Utilisez les équipements de protection
individuelle. Portez toujours une
protection oculaire. Lorsqu’ils sont utilisés
dans les conditions appropriées, les équipements
de protection tels que les masques anti-poussière,
les chaussures de sécurité antidérapantes, les
casques de sécurité ou les protections auditives
réduisent les risques de blessures corporelles.
• Empêchez tout démarrage intempestif.
Assurez-vous que l’interrupteur est en
position d’arrêt avant de brancher l’outil
électrique à la source d’alimentation et/ou
au bloc de batterie, de le ramasser ou de
le transporter. Transporter des outils électriques
avec votre doigt sur l’interrupteur, ou encore, les
mettre sous tension alors que l’interrupteur est en
position de marche, favorise les accidents.
• Retirez toute clé de réglage avant de
mettre l’outil électrique en marche.
Une clé laissée sur une pièce rotative de l’outil peut
entraîner des blessures corporelles.
• Ne vous penchez pas trop en avant.
Gardez une position stable et en équilibre
à tout moment (Fig. ). Cela permet un
meilleur contrôle de l’outil électrique en cas
d’imprévu.
• Habillez-vous convenablement. Ne portez
pas de vêtements amples ni de bijoux.
Gardez vos cheveux, vêtements et gants
à l’écart des pièces mobiles. Les vêtements
amples, les bijoux et les cheveux longs peuvent
être happés par des pièces mobiles.
• Si des dispositifs sont prévus pour le
raccordement d’installations d’extraction
et de collecte de poussière, assurez-vous
qu’ils sont connectés et correctement
utilisés. L’utilisation d’un dispositif de collecte
de poussière peut réduire les risques liés à la
poussière.
• Il a été signalé que l’utilisation prolongée
des outils électriques peut causer
des troubles vasculaires, musculaires
ou neurologiques (par exemple, le
phénomène du doigt mort causé par les
vibrations ou le syndrome de Raynaud).
Pour réduire le risque de blessure, suivez les
instructions suivantes :
– Portez des gants et gardez vos mains ainsi
que votre corps au chaud.
– Tenez fermement la scie à long manche,
mais n’exercez pas de pression prolongée
et excessive.
– Faites des pauses fréquemment.
Les vibrations lors d’une utilisation normale
peuvent différer des valeurs indiquées selon
le matériau coupé, l’entretien du système de
coupe et d’autres facteurs.
FIG. 2

40
AC 1113 - F/N 563397
RÈGLES DE SÉCURITÉ
Système d’outils à batterie OREGON
MD
SCIE À LONG MANCHE MODÈLE PS250
UTILISATION ET ENTRETIEN DES
OUTILS ÉLECTRIQUES
• Ne forcez pas l’outil électrique. Utilisez
l’outil approprié pour votre application.
L’outil électrique approprié réalisera mieux le
travail, et de façon plus sûre, à la vitesse pour
laquelle il a été conçu.
• N’utilisez pas l’outil électrique si vous ne
pouvez l’allumer ou l’éteindre à l’aide de
l’interrupteur. Tout outil électrique qui ne peut
être commandé avec l’interrupteur est dangereux
et doit être réparé.
• Débranchez la fiche de la source
d’alimentation et/ou le bloc de batterie
de l’outil électrique avant d’effectuer tout
réglage, changement d’accessoires ou
de l’entreposer. De telles mesures de sécurité
préventive réduisent le risque de démarrage
intempestif de l’outil électrique.
• Entreposez les outils électriques non
utilisés hors de portée des enfants et
évitez que des personnes ne connaissant
pas bien l'outil l’utilisent. Les outils
électriques sont dangereux entre les mains de
novices.
• Entretenez les outils électriques. Vérifiez
s’il n’y a pas de mauvais alignement ou de
blocage des pièces mobiles, de rupture
de pièces et toute autre condition qui
pourrait nuire au bon fonctionnement
de l’outil. S’il est endommagé, faites-le
réparer avant de l’utiliser. De nombreux
accidents sont causés par des outils électriques
mal entretenus.
• Assurez-vous que les outils de coupe
restent tranchants et propres. Les outils de
coupe bien entretenus et toujours tranchants sont
moins susceptibles de se coincer et plus faciles à
contrôler.
• Utilisez l’outil électrique, les accessoires,
les embouts, etc. conformément à
ces instructions, en tenant compte
des conditions de travail et du travail
à effectuer. L’utilisation de l’outil pour des
opérations différentes de celles prévues pourrait
entraîner une situation dangereuse.
UTILISATION ET ENTRETIEN DES
OUTILS FONCTIONNANT À
BATTERIE
• Ne rechargez l’outil qu’à l’aide du
chargeur spécifié par le fabricant. Un
chargeur indiqué pour un certain type de bloc de
batterie peut entraîner un risque d’incendie en cas
d’utilisation avec un autre bloc de batterie.
• N’utilisez les outils électriques qu’avec les
blocs de batterie spécifiquement indiqués.
L’utilisation de tout autre bloc de batterie peut
entraîner un risque d’incendie ou de blessure.
• Hors utilisation, conservez le bloc de
batterie à l’écart des autres objets
métalliques tels que les trombones, pièces
de monnaie, clés, clous, vis et autres petits
objets métalliques pouvant établir une
connexion entre les deux bornes. Provoquer
un court-circuit entre les bornes de la batterie peut
entraîner des brûlures ou un incendie.
• En cas d’utilisation abusive, la batterie
peut éjecter une certaine quantité de
liquide; évitez tout contact. En cas de contact
accidentel, rincez à l’eau. En cas de contact avec les
yeux, consultez également un médecin. Le liquide
éjecté peut entraîner des irritations ou des brûlures.
SERVICE
Faites réparer votre outil électrique par un
réparateur qualifié utilisant uniquement
des pièces de rechange identiques. Cela
garantira que la sécurité de l’outil est
maintenue.
AVERTISSEMENTS DE SÉCURITÉ
DE LA SCIE À LONG MANCHE
DANGER : LE CONTACT AVEC
UNE CHAÎNE DE TRONÇONNEUSE
EN MOUVEMENT ENTRAÎNE DES
BLESSURES GRAVES. CONSERVEZ LES MAINS
ET LE CORPS HORS DE PORTÉE DE LA CHAÎNE DE
TRONÇONNEUSE EN MOUVEMENT.

41
AC 1113 - F/N 563397
RÈGLES DE SÉCURITÉ
Système d’outils à batterie OREGON
MD
SCIE À LONG MANCHE MODÈLE PS250
DANGER : LE CONTACT AVEC
UN CÂBLE ÉLECTRIQUE PENDANT
L’UTILISATION PEUT RENDRE LES
PIÈCES MÉTALLIQUES EXPOSÉES
CONDUCTRICES ET PROVOQUER DES
BLESSURES GRAVES. TENEZ TOUJOURS LA
SCIE À LONG MANCHE PAR LES SURFACES DE
PRISE ISOLÉES PENDANT L’UTILISATION.
AVERTISSEMENT : L’UTILISATION
D’UNE SCIE À LONG MANCHE MONTÉE
DE FAÇON INCORRECTE PEUT
PROVOQUER DES BLESSURES GRAVES.
UTILISEZ CET OUTIL UNIQUEMENT LORSQU’IL
EST CORRECTEMENT MONTÉ CONFORMÉMENT
À LA SECTION DÉBALLAGE ET MONTAGE DE
CE MANUEL.
AVERTISSEMENT : LES MOMENTS
D’INATTENTION PENDANT
L’UTILISATION DE LA SCIE À LONG
MANCHE PEUVENT ENTRAÎNER DES
BLESSURES GRAVES. AVANT DE DÉMARRER
LA SCIE À LONG MANCHE, PENSEZ À MINIMISER
TOUTES LES DISTRACTIONS, À TENIR VOTRE
CORPS HORS DE PORTÉE DE LA CHAÎNE DE
TRONÇONNEUSE ET À VOUS ASSURER QUE LA
CHAÎNE N’EST PAS EN CONTACT AVEC UN OBJET.
AVERTISSEMENT : L’UTILISATION DE
LA SCIE À LONG MANCHE AVEC UNE
SEULE MAIN PEUT ENTRAÎNER DES
BLESSURES. UTILISEZ LES DEUX MAINS
LORSQUE VOUS TRAVAILLEZ AVEC LA SCIE À
LONG MANCHE VOIR LA FIG. 3.
ATTENTION : LE CONTACT AVEC
DES DÉBRIS VOLANTS OU LE CONTACT
INVOLONTAIRE AVEC LA CHAÎNE DE
TRONÇONNEUSE PEUT ENTRAÎNER
DES BLESSURES. PORTEZ TOUJOURS UN
ÉQUIPEMENT DE PROTECTION POUR LA TÊTE,
LES MAINS, LES JAMBES ET LES PIEDS.
ATTENTION : LES BRANCHES
TENDUES PEUVENT REVENIR EN
ARRIÈRE SUBITEMENT ET TOUCHER
L’OPÉRATEUR OU LUI FAIRE PERDRE
LE CONTRÔLE DE LA SCIE À LONG
MANCHE, ENTRAÎNANT ALORS DES
BLESSURES. SOYEZ TOUJOURS ATTENTIF AUX
BRANCHES SOUS TENSION QUI POURRAIENT
FRAPPER L’OPÉRATEUR OU LA SCIE À LONG
MANCHE UNE FOIS COUPÉES.
ATTENTION : UNE TENSION OU UNE
LUBRIFICATION DE CHAÎNE INADAPTÉE
PEUT AUGMENTER LES RISQUES DE
BLESSURES DUES À LA FORCE DE
RECUL. SUIVEZ TOUJOURS LES INSTRUCTIONS
DE LA SECTION MISE EN TENSION DE LA
CHAÎNE DE TRONÇONNEUSE DE CE MANUEL.
ATTENTION : UNE SURFACE DE
PRISE HUMIDE OU GRASSE PEUT FAIRE
PERDRE LE CONTRÔLE DE L’OUTIL,
PROVOQUANT DES BLESSURES. GARDEZ
TOUJOURS LES POIGNÉES SÈCHES, PROPRES ET
EXEMPTES D’HUILE ET DE GRAISSE.
ATTENTION : L’UTILISATION DE
LA SCIE À LONG MANCHE POUR DES
APPLICATIONS NON PRÉVUES PEUT
CONSTITUER UN DANGER. LA SCIE À LONG
MANCHE EST CONÇUE UNIQUEMENT POUR LA
COUPE DES PETITES BRANCHES.
ATTENTION : AFIN D’ÉVITER UN
CONTACT INVOLONTAIRE AVEC LA
CHAÎNE DE TRONÇONNEUSE PENDANT
LE TRANSPORT, INSTALLEZ TOUJOURS
LE COUVRELAME ET GARDEZ VOS
MAINS ET DOIGTS ÉLOIGNÉS DE LA
ZONE DE LA GÂCHETTE FIG. 4.
FIG. 3
FIG. 4

42
AC 1113 - F/N 563397
RÈGLES DE SÉCURITÉ
Système d’outils à batterie OREGON
MD
SCIE À LONG MANCHE MODÈLE PS250
ENTREPOSAGE, TRANSPORT ET
MISE AU REBUT
ENTREPOSAGE DE LA SCIE À LONG
MANCHE
• Retirez le bloc de batterie de la scie à long
manche.
• Nettoyez soigneusement la scie à long
manche.
• Installez le couvre-lame.
• Entreposez-le dans un lieu sec.
• Tenez-le hors de portée des enfants et des
animaux.
• Il est normal qu’une petite quantité d’huile
s’écoule par le guide-chaîne lorsque la scie
à long manche n’est pas utilisée. Pour éviter
les fuites, installez le couvre-lame et placez
un coussinet absorbant sous la barre.
ENTREPOSAGE DU BLOC DE BATTERIE
Lorsque vous entreposez le bloc de batterie
pendant plus de neuf mois, suivez les
directives ci-dessous :
• Retirez le bloc de batterie de la scie à long
manche ou du chargeur.
• Entreposez-le dans un lieu frais et sec.
• Tenez-le hors de portée des enfants et des
animaux.
• Pour prolonger la durée de vie du bloc de
batterie, ne l’entreposez jamais dans un
état complètement déchargé (aucun
témoin allumé) (Fig. ).
• Entreposez-le à une température comprise
entre - °C et °C (- °F et °F).
ENTREPOSAGE DU CHARGEUR
• Retirez le bloc de batterie du chargeur.
• Débranchez le chargeur de la source
d’alimentation.
• Entreposez-le dans un lieu sec.
• Tenez-le hors de portée des enfants et des
animaux.
Pour plus de renseignements, consultez la
section « Entretien et nettoyage ».
TRANSPORT DE LA SCIE À LONG MANCHE
Préparez la scie à long manche comme décrit
dans la section « Entreposage de la scie à
long manche » avant le transport. Utilisez
le couvre-lame pendant le transport et
l’entreposage, et au besoin, purgez l’huile de
la barre et de la chaîne pour réduire les fuites.
TRANSPORT DU BLOC DE BATTERIE
Respectez les réglementations locales
et nationales relatives au transport des
batteries au lithium-ion, un étiquetage
obligatoire peut être requis.
MISE AU REBUT DE LA SCIE À LONG
MANCHE ET DU CHARGEUR
Le produit OREGON
MD
est conçu et fabriqué
avec des matériaux et des composants de
haute qualité qui peuvent être recyclés et
réutilisés. Veuillez vous débarrasser de cet
équipement en respectant l’environnement,
dans un centre de collecte/recyclage des
déchets local.
MISE AU REBUT DU BLOC DE BATTERIE
Ne pas incinérer ni jeter les batteries au
lithium-ion dans les ordures ménagères. Les
organismes locaux de récupération et de
recyclage connaissent les moyens
d’élimination et de recyclage adéquats. Les
batteries peuvent être récupérées aux ÉtatsUnis et au Canada par Rechargeable Battery
Recycling Corporation. OREGON
MD
a déjà
défrayé le coût de recyclage de vos
batteries. Rapporter vos batteries épuisées
aux détaillants participant au programme
ou à votre centre de recyclage. La liste des
sites de récupération et d’autres
renseignements sont affichés à
www.callrecycle.org ou encore vous
pouvez composer le --BATTERY.
FIG. 5
TÉMOINS INDICATEURS

43
AC 1113 - F/N 563397
RÈGLES DE SÉCURITÉ
Système d’outils à batterie OREGON
MD
SCIE À LONG MANCHE MODÈLE PS250
SÉCURITÉ DE LA BATTERIE
AVERTISSEMENT : L’ENTRETIEN
INAPPROPRIÉ DE LA BATTERIE
PEUT PROVOQUER UNE FUITE DE
PRODUITS CHIMIQUES DANGEREUX,
UNE SURCHAUFFE, UNE ÉMISSION
DE FUMÉE; LA BATTERIE PEUT
ÉGALEMENT ÉCLATER, EXPLOSER ET/OU
S’ENFLAMMER. RESPECTEZ CES RÈGLES
DE SÉCURITÉ.
ATTENTION : NE JETEZ PAS LE BLOC
DE BATTERIE DANS LE FEU OU À LA
POUBELLE. ENVOYEZ LES BLOCS DE
BATTERIE AU LITHIUMION DANS
UN CENTRE DE RECYCLAGE LOCAL
AUTORISÉ.
IMPORTANT : L’EXPOSITION À UNE
CHALEUR EXCESSIVE PEUT ENTRAÎNER
UNE PERTE DE CAPACITÉ ET/OU
RÉDUIRE SA DURÉE UTILE. NE PAS
EXPOSER LA BATTERIE À UNE CHALEUR
EXCESSIVE PAR EXEMPLE À L’INTÉRIEUR
D’UN VÉHICULE PAR TEMPS CHAUD
• Ne tentez pas de recharger un bloc de
batterie non rechargeable.
• Ne pas ouvrir ou modifier la batterie.
Cela peut endommager les dispositifs de
sécurité.
• Ne reliez pas les bornes positive (+) et
négative (-) avec des objets métalliques et
n’entreposez pas le bloc de batterie avec
des objets métalliques tels que des pièces
de monnaie ou des vis. Cela peut entraîner
un court-circuit et générer assez de chaleur
pour provoquer des brûlures.
• N’incinérez pas le bloc de batterie et ne
l’exposez pas à une chaleur excessive.
Cela peut faire fondre l’isolation ou
endommager les dispositifs de sécurité.
• N’utilisez pas, ne rechargez pas et
n’entreposez pas la batterie près d’une
source de chaleur supérieure à °C
( °F). Cela peut provoquer une
surchauffe et un court-circuit interne.
• Ne l’exposez pas à des conditions
extrêmement humides. Cela peut
endommager les dispositifs de sécurité,
produire un courant et une tension de
charge très élevés et conduire à des
réactions chimiques anormales.
• Utilisez exclusivement le chargeur
spécialement conçu pour le bloc de
batterie et suivez les consignes de
sécurité décrites dans la section « Sécurité
du chargeur ». L’utilisation d’un autre
chargeur peut endommager les dispositifs
de sécurité, produire un courant et une
tension de charge très élevés et conduire à
des réactions chimiques anormales.
• N’utilisez pas les blocs de batterie de la
marque OREGON
MD
dans des outils d'une
autre marque.
• Ne frappez pas, ne percez pas et ne jetez
pas le bloc de batterie; n’en utilisez pas un
qui soit endommagé ou déformé.
• Si la recharge échoue, ne la retentez pas.
• Si le bloc de batterie dégage une odeur,
devient chaud, se décolore, se déforme ou
s’il semble anormal de quelque façon que
ce soit pendant l’utilisation, la recharge ou
l’entreposage, retirez-le immédiatement de
la scie à long manche ou du chargeur.
• Tout liquide s’écoulant de la batterie est
corrosif, peut endommager les yeux ainsi
que la peau et peut être toxique s’il est avalé.
SÉCURITÉ DU CHARGEUR
INSTRUCTIONS DE SÉCURITÉ
IMPORTANTES
AVERTISSEMENT : RISQUE DE
CHOC ÉLECTRIQUE. LORSQU’IL EST
UTILISÉ À L’EXTÉRIEUR, INSTALLEZLE
UNIQUEMENT SUR UNE PRISE PROTÉGÉE
PAR UN DISJONCTEUR DE FUITE À LA
TERRE DDFT CLASSE A , COUVERTE
ET RÉSISTANTE AUX INTEMPÉRIES,
AVEC LE BLOC D’ALIMENTATION
BRANCHÉ À LA PRISE. SI CELUICI N’EST
PAS FOURNI, COMMUNIQUEZ AVEC
UN ÉLECTRICIEN QUALIFIÉ POUR UNE
INSTALLATION CORRECTE. ASSUREZ
VOUS QUE LE BLOC D’ALIMENTATION
ET LE CORDON N’EMPÊCHENT PAS LE
COUVERCLE DE LA PRISE DE SE FERMER
COMPLÈTEMENT.

44
AC 1113 - F/N 563397
RÈGLES DE SÉCURITÉ
Système d’outils à batterie OREGON
MD
SCIE À LONG MANCHE MODÈLE PS250
IMPORTANT : CE CHARGEUR NE
DOIT PAS ÊTRE UTILISÉ PAR DES
PERSONNES ENFANTS INCLUS
AYANT DES DÉFICIENCES PHYSIQUES,
SENSORIELLES OU MENTALES,
OU QUI NE POSSÈDENT PAS LES
CONNAISSANCES SUFFISANTES,
À MOINS QU’ELLES N’AIENT REÇU
DES INSTRUCTIONS OU QU’ELLES
SOIENT SOUS LA SUPERVISION D’UNE
PERSONNE RESPONSABLE DE LEUR
SÉCURITÉ. LES ENFANTS DOIVENT
TOUJOURS ÊTRE SURVEILLÉS POUR
S’ASSURER QU’ILS NE JOUENT PAS AVEC
LE CHARGEUR.
IMPORTANT : UTILISEZ CE CHARGEUR
UNIQUEMENT AVEC LE CORDON
D’ALIMENTATION FOURNI, EN VOUS
ASSURANT QUE LA FICHE D’ENTRÉE
S’ADAPTE CORRECTEMENT À LA PRISE
DE SORTIE.
Les précautions de base doivent toujours
être appliquées lors de l’utilisation de
produits électriques, notamment les
suivantes :
• Lisez et suivez toutes les instructions de
sécurité avant utilisation. Lisez et suivez
toutes les instructions figurant sur le produit ou
fournies avec celui-ci.
• Conservez ces instructions.
• N’utilisez pas de rallonge.
• Des cordons endommagés ou
enchevêtrés augmentent le risque de
choc électrique. Ne malmenez pas le cordon.
N’utilisez jamais le cordon pour transporter,
tirer ou débrancher l’outil électrique. Gardez le
cordon à l’écart de la chaleur, de l’huile, des bords
tranchants et des pièces mobiles.
• N’exposez pas le chargeur à la pluie.
Pour une utilisation en intérieur uniquement.
• Ne l’utilisez pas à moins de m ( pi)
d’une piscine.
• Ne l’utilisez pas dans une salle de bain.

45
AC 1113 - F/N 563397
DÉBALLAGE ET MONTAGE
Système d’outils à batterie OREGON
MD
SCIE À LONG MANCHE MODÈLE PS250
DÉBALLAGE ET MONTAGE
DÉBALLAGE
CONTENU DE LA BOÎTE
La scie à long manche nécessite un
assemblage avant utilisation. Ces éléments
sont fournis avec la scie à long manche :
• Powerhead
• Arbre extensible avec tête de coupe fixée
• Guide-chaîne
• Chaîne de tronçonneuse
• Couvre-lame
• Harnais
• Tournevis
• Clé Allen
• Deux vis Allen
• Huile pour barre et chaîne
• Chargeur et cordon d’alimentation
(si équipé)
• Batterie (si équipé)
Après avoir retiré la scie à long manche de la
boîte, examinez-la avec attention pour vous
assurer qu’elle n’a subi aucun dommage
pendant le transport et qu’aucune pièce ne
manque. Si des pièces sont manquantes ou
abîmées, n’utilisez pas la scie à long manche.
Afin d’obtenir des pièces de rechange,
communiquez avec OREGON
MD
Cordless
Tool System en appelant le --.
MONTAGE
DANGER : AFIN D’ÉVITER LES
BLESSURES GRAVES, N’UTILISEZ PAS
LA SCIE À LONG MANCHE SI L’ARBRE
EXTENSIBLE, LE GUIDECHAÎNE, LA
CHAÎNE DE TRONÇONNEUSE ET LE
PANNEAU LATÉRAL NE SONT PAS
CORRECTEMENT INSTALLÉS.
AVERTISSEMENT : UN OUTIL
FONCTIONNANT À BATTERIE, AVEC
LE BLOC DE BATTERIE INSÉRÉ, EST
TOUJOURS SOUS TENSION ET PEUT
DÉMARRER ACCIDENTELLEMENT.
RETIREZ LE BLOC DE BATTERIE DE LA
SCIE À LONG MANCHE AVANT DE FIXER
L’ARBRE EXTENSIBLE, LA BARRE ET LA
CHAÎNE.
MONTAGE DE L’ARBRE
EXTENSIBLE
L’arbre extensible s’engage dans le boîtier
du moteur sur le bloc-moteur (Fig. ).
• Il est important de s’assurer que l’arbre
d’entraînement interne est correctement
installé. Pour assurer une bonne
assise, utilisez un chiffon propre pour
sortir d’environ po ( cm) l’arbre
d’entraînement en aluminium de la perche
en fibre de verre. Puis en vous servant
du chiffon, tournez l’arbre en aluminium
tout en le poussant légèrement vers le
bas. L’arbre d’entraînement sera ainsi
placé correctement contre l’arbre à
l’intérieur du carter du moteur. L’extrémité
cylindrique de l’arbre d’entraînement sera
complètement cachée sous le rebord
du carter du moteur une fois installée
correctement.
FIG. 6

46
AC 1113 - F/N 563397
DÉBALLAGE ET MONTAGE
Système d’outils à batterie OREGON
MD
SCIE À LONG MANCHE MODÈLE PS250
• Après avoir correctement installé l’arbre
d’entraînement en aluminium, enfoncez
la perche en fibre de verre pour la faire
glisser dans l’ouverture du carter moteur.
• Prenez les vis Allen fournies et insérezles dans les trous du bouchon rouge. Le
bouchon rouge du carter du moteur agit
comme raccord de compression pour tenir
la perche en place.
• Utilisez la clé Allen de mm pour serrer
partiellement les vis Allen. Continuez à
serrer les deux vis de fixation en alternance
jusqu’à ce qu’elles soient bien serrées.
Remarque : il vous faudra peut-être
appuyer sur le bouchon rouge du carter du
moteur pour permettre aux vis d’atteindre
le filetage interne.
REMPLISSAGE DU RÉSERVOIR
D’HUILE POUR BARRE ET CHAÎNE
IMPORTANT : L’HUILE POUR BARRE ET
CHAÎNE PERMET D’ÉVITER UNE USURE
PRÉMATURÉE. N’UTILISEZ JAMAIS LA
SCIE À LONG MANCHE SI L’HUILE N’EST
PAS VISIBLE. VÉRIFIEZ SOUVENT LE
NIVEAU D’HUILE ET REMETTEZEN SI
NÉCESSAIRE.
L’huile pour barre et chaîne est requise
pour lubrifier de manière adaptée le guidechaîne et la chaîne de tronçonneuse. La scie
à long manche est équipée d’un huileur
automatique qui dépose l’huile sur la barre
et la chaîne pendant le fonctionnement, les
maintenant ainsi parfaitement lubrifiées.
Utilisez de l’huile pour la barre et la chaîne
OREGON
MD
afin d’obtenir les meilleurs
résultats. Elle est spécialement conçue pour
offrir moins de frottement et des coupes
plus rapides. N’utilisez JAMAIS de l’huile
ou d’autres lubrifiants qui ne sont pas
spécifiquement conçus pour une utilisation
sur la barre et la chaîne. Cela pourrait
obstruer le système d’huile, provoquant
potentiellement une usure prématurée de la
barre et de la chaîne.
• Placez la scie à long manche sur le côté sur
une surface solide et plane, de sorte que le
bouchon d’huile soit orienté vers le haut
(Fig. ).
• Nettoyez tous les débris de la zone du
bouchon.
• Retirez le bouchon.
• Versez soigneusement l’huile pour barre et
chaîne dans le réservoir.
• Replacez le bouchon et assurez-vous que
l’huile est visible dans le réservoir.
Si l’huile n’est pas visible dans le réservoir, il
est nécessaire d’ajouter de l’huile pour barre
et chaîne.
FIG. 7

47
AC 1113 - F/N 563397
DÉBALLAGE ET MONTAGE
Système d’outils à batterie OREGON
MD
SCIE À LONG MANCHE MODÈLE PS250
MONTAGE DU GUIDECHAÎNE
ET DE LA CHAÎNE DE
TRONÇONNEUSE
AVERTISSEMENT : UN OUTIL
FONCTIONNANT À BATTERIE, AVEC
LE BLOC DE BATTERIE INSÉRÉ, EST
TOUJOURS SOUS TENSION ET PEUT
DÉMARRER ACCIDENTELLEMENT.
RETIREZ LE BLOC DE BATTERIE DE LA
SCIE À LONG MANCHE AVANT DE FIXER
L’ARBRE EXTENSIBLE, LA BARRE ET LA
CHAÎNE.
Déposez la batterie en veillant à porter des
gants. Assurez-vous que le coussinet de
barre, le pignon d’entraînement et la tige de
tension sont exempts de débris.
• Réglez la vis de tension aussi loin que
possible vers l’arrière de la tête de coupe.
• Placez le guide-chaîne sur le coussinet de
barre en faisant glisser la fente de la barre
sur la bride d’alignement (Fig. ), en vous
assurant que la tige de tension est insérée
dans l’orifice inférieur de la queue de la
barre.
• Enroulez la chaîne de tronçonneuse sur le
pignon d’entraînement de sorte que les
bords tranchants de la denture le long du
haut de la barre soient dirigés à l’opposé de
la tête de coupe (Fig. ).
• Passez la chaîne dans la rainure de la barre
et glissez la barre loin du moteur pour
supprimer le jeu de la chaîne (Fig. ).
Réglez la position de la tige de tension
jusqu’à ce qu’elle s’engage dans l’orifice de
la barre.
• Installez le panneau latéral, en veillant à ce
que l’attrape-chaîne soit correctement inséré
dans son orifice, puis serrez légèrement le
bouton du panneau latéral (Fig. ).
IMPORTANT : LA CHAÎNE DE
TRONÇONNEUSE DOIT ÊTRE
CORRECTEMENT TENDUE AVANT
UTILISATION. VOIR LA SECTION
MISE EN TENSION DE LA CHAÎNE DE
TRONÇONNEUSE .
GOUJON DE
FIXATION
BRIDE
D’ALIGNEMENT
COUSSINET
DE BARRE
VIS DE
TENSION
TIGE DE
TENSION
FIG. 8
FIG. 9
FIG. 10
FIG. 11

48
AC 1113 - F/N 563397
DÉBALLAGE ET MONTAGE
Système d’outils à batterie OREGON
MD
SCIE À LONG MANCHE MODÈLE PS250
MISE EN TENSION DE LA CHAÎNE
DE TRONÇONNEUSE
AVERTISSEMENT : UN OUTIL
FONCTIONNANT À BATTERIE, AVEC
LE BLOC DE BATTERIE INSÉRÉ, EST
TOUJOURS SOUS TENSION ET PEUT
DÉMARRER ACCIDENTELLEMENT.
RETIREZ LE BLOC DE BATTERIE DE LA
SCIE À LONG MANCHE AVANT DE FIXER
L’ARBRE EXTENSIBLE, LA BARRE ET LA
CHAÎNE.
Portez des gants.
• Retirez la batterie avant d’effectuer la mise
en tension.
• Desserrez le bouton du panneau latéral.
• Maintenez le renvoi du guide-chaîne vers
le haut (Fig. ), puis serrez la vis de tension.
• Serrez la vis de tension jusqu’à ce que les
lames inférieures situées sous la barre
entrent fermement en contact avec la
barre (Fig. ).
• Serrez le bouton du panneau latéral.
• La tension de la chaîne de tronçonneuse
est correcte lorsque, par un certain effort,
vous pouvez tirer la chaîne sans heurt
autour de la barre avec un gant. La chaîne
doit toucher la partie inférieure du rail de la
barre (Fig. ).
Après une courte utilisation, laissez la
chaîne refroidir et vérifiez à nouveau
sa tension (retirez d’abord la batterie).
Contrôlez attentivement la tension pendant
la première demi-heure d’utilisation, puis
régulièrement pendant toute la durée de
vie de la chaîne, en réajustant si nécessaire
lorsque la chaîne et la barre sont froides
au toucher. Ne serrez jamais la chaîne
lorsqu’elle est chaude.
La chaîne va se détendre pendant
l’utilisation normale, mais un manque
d’huile, une utilisation agressive ou un
non-respect des consignes d’entretien
recommandées peut provoquer un
étirement prématuré.
FIG. 12
FIG. 13
FIG. 14

49
AC 1113 - F/N 563397
Système d’outils à batterie OREGONMD
SCIE À LONG MANCHE MODÈLE PS250
UTILISATION DE LA SCIE À LONG MANCHE
BLOC DE BATTERIE ET
CHARGEUR
AVERTISSEMENT : POUR RÉDUIRE LES
RISQUES DE CHOCS, NE RECHARGEZ
PAS LE BLOC DE BATTERIE SOUS LA
PLUIE.
INDICATEUR DE NIVEAU DE CHARGE DE
LA BATTERIE
La batterie au lithium-ion est munie d’un
indicateur de niveau de charge à DEL. Pour
vérifier le niveau de charge du bloc de
batterie, appuyez sur le bouton d’indication
qui se trouve sur sa face avant (Fig. ).
Aucun témoin allumé : rechargez.
Un témoin vert fixe : moins de %
chargé. Rechargez le bloc de batterie
avant de l’utiliser.
Deux témoins verts fixes :
à % chargé.
Trois témoins verts fixes :
à % chargé.
Quatre témoins verts fixes :
à % chargé.
BRANCHEMENT DU CHARGEUR
Si le chargeur comprend un cordon
d’alimentation séparé, branchez le cordon
du chargeur au chargeur et à la prise de
courant appropriée (Fig. ).
Utilisez uniquement le cordon amovible
fourni avec le chargeur. Lors de la première
utilisation, vérifiez que le type de fiche
correspond à la prise de courant.
INDICATEUR DEL DE L’ÉTAT DE CHARGE
DU CHARGEUR
Le chargeur de batterie est équipé d’un
indicateur d’état de charge à DEL qui
indique l’état de la charge ainsi que les
conditions pouvant retarder ou empêcher la
charge (Fig. ).
Remarque : aucun témoin ne sera visible
tant qu’un bloc de batterie ne sera pas
inséré.
Témoin orange clignotant : présence
d’une anomalie. Plusieurs causes
sont possibles. Consultez la section
« Dépannage » de ce manuel.
Témoin orange fixe : la température
du bloc de batterie dépasse la plage
acceptable ( °C à °C / °F à
°F). Laissez le bloc de batterie
atteindre la plage de températures
acceptable avant la recharge. Le
bloc peut être laissé sur le chargeur
pendant que la température
s’ajuste. La recharge commence
lorsque la bonne température est
atteinte.
Témoin vert clignotant : le bloc de
batterie se recharge.
Témoin vert fixe : le bloc de batterie
est prêt à l’emploi.
FIG. 15
TÉMOINS INDICATEURS
BOUTON D’INDICATION
FIG. 16
FIG. 17
UTILISATION DE LA SCIE
À LONG MANCHE

50
AC 1113 - F/N 563397
Système d’outils à batterie OREGONMD
SCIE À LONG MANCHE MODÈLE PS250
RECHARGE DU BLOC DE BATTERIE
AVERTISSEMENT : LE NONRESPECT
DES PROCÉDURES DE RECHARGE
CORRECTES PEUT ENTRAÎNER UNE
INTENSITÉ DE COURANT ET UNE
TENSION EXCESSIVES, UNE PERTE DE
CONTRÔLE PENDANT LA RECHARGE,
UNE FUITE DE PRODUITS CHIMIQUES
DANGEREUX, UNE GÉNÉRATION DE
CHALEUR, UN ÉCLATEMENT OU UN
INCENDIE. SUIVEZ CES INSTRUCTIONS
DE RECHARGE.
Avec le cordon du chargeur connecté au
chargeur et branché dans une prise
électrique, alignez les rainures de la batterie
avec les rails situés sur le chargeur et faites
glisser le bloc de batterie sur le chargeur
jusqu’à ce qu’il soit complètement installé
(Fig. ).
Vérifiez l’indicateur d’état de charge pour
connaître les conditions de charge.
INSERTION ET LIBÉRATION
DU BLOC DE BATTERIE
N’utilisez que les blocs de batterie de la
marque OREGON
MD
spécifiés dans ce mode
d’emploi.
Alignez la rainure de la batterie avec les rails
situés à l’intérieur du port de batterie.
Insérez fermement le bloc de batterie dans
le port de batterie de la scie à long manche,
en appuyant vers l’avant jusqu’à entendre le
déclic produit lorsqu’il s’enclenche (Fig. ).
Pour retirer le bloc de batterie, soulevez le
levier de dégagement de la batterie,
saisissez les côtés de la batterie et retirez-la
(Fig. ).
FIG. 18
FIG. 19
FIG. 20
UTILISATION DE LA SCIE
À LONG MANCHE

51
AC 1113 - F/N 563397
Système d’outils à batterie OREGONMD
SCIE À LONG MANCHE MODÈLE PS250
FONCTIONNEMENT GÉNÉRAL
DANGER : AFIN D’ÉVITER LES
BLESSURES GRAVES, N’ESSAYEZ PAS
D’ATTEINDRE DES ZONES HORS DE
PORTÉE OU DE MONTER SUR UNE
ÉCHELLE, UN ESCABEAU OU TOUTE
POSITION ÉLEVÉE QUI N’EST PAS
TOTALEMENT SÉCURISÉE.
DANGER : POUR ÉVITER LES
BLESSURES GRAVES, NE VOUS TENEZ
PAS DIRECTEMENT SOUS LA BRANCHE
QUE VOUS COUPEZ. TENEZVOUS
ÉLOIGNÉ AFIN QUE LA BRANCHE TOMBE
AU SOL EN TOUTE SÉCURITÉ.
AVERTISSEMENT : POUR RÉDUIRE
LES RISQUES DE BLESSURES, PORTEZ
TOUJOURS DES BOTTES, GANTS,
CASQUES, PROTECTION AUDITIVES ET
LUNETTES ADAPTÉS.
TEMPÉRATURE DE FONCTIONNEMENT
Cette scie à long manche est conçue pour
fonctionner à une température comprise
entre °C et °C ( °F et °F).
PRISE
Tenez toujours l’outil avec les deux mains.
Pour les droitiers, tenez l’arbre extensible
confortablement avec la main gauche et la
poignée arrière avec la main droite.
Empoignez fermement chaque poignée
(Fig. ).
Pour les gauchers, tenez l’arbre extensible
confortablement avec la main droite et la
poignée arrière avec la main gauche (Fig. ).
Orientez la scie à long manche selon un
angle d’environ ° (Fig. ); il s’agit de la
position de travail la moins fatigante et qui
vous permet de conserver une distance de
sécurité en cas de chute de débris.
POIGNÉE DROITE
FIG. 21
POIGNÉE GAUCHE
FIG. 22
FIG. 23
60°
UTILISATION DE LA SCIE
À LONG MANCHE

52
AC 1113 - F/N 563397
Système d’outils à batterie OREGONMD
SCIE À LONG MANCHE MODÈLE PS250
POSITION STABLE
Tenez-vous sur vos deux pieds sur
une surface ferme, en répartissant
équitablement le poids sur vos jambes.
Tenez la scie à long manche aussi près que
possible du corps pour en conserver le
contrôle (Fig. ).
UTILISATION DU HARNAIS
Le harnais aide à équilibrer la scie à long
manche et distribuer son poids sur le corps,
améliorant ainsi le confort pendant une
utilisation prolongée.
Ce harnais est équipé d’une attache rapide
pouvant être actionnée avec une seule main
(Fig. ).
• Portez le harnais par-dessus la tête et
l’épaule opposée à la main sur la gâchette.
• Réglez la longueur de la sangle de façon à
ce que l’attache soit située au niveau des
hanches (Fig. ).
• Placez la scie à long manche sur une
surface plane, la boucle de harnais orientée
vers le haut.
• Fixez l’attache du harnais sur la boucle du
harnais (Fig. ).
RÉGLAGE DE LA LONGUEUR DE L’ARBRE
La scie à long manche est dotée d’un arbre
extensible qui permet de gagner en hauteur
pour atteindre les arbres plus grands.
Pour faciliter l’utilisation, déployez l’arbre
uniquement dans la mesure nécessaire pour
atteindre la zone de travail en toute sécurité.
• Éteignez la scie à long manche et déposez
le bloc de batterie.
FIG. 24
FIG. 25
FIG. 26
FIG. 27
UTILISATION DE LA SCIE
À LONG MANCHE

53
AC 1113 - F/N 563397
Système d’outils à batterie OREGONMD
SCIE À LONG MANCHE MODÈLE PS250
• Tournez le collier d’extension dans le sens
inverse des aiguilles d’une montre ()
jusqu’à ce que l’arbre glisse librement
(Fig. ).
• Faites glisser l’arbre jusqu’à atteindre la
longueur désirée ().
• Tournez le collier d’extension dans le sens
des aiguilles d’une montre pour verrouiller
l’arbre en position.
ARRÊT DE LA SCIE À LONG MANCHE
Relâchez l’interrupteur à gâchette pour
arrêter la scie à long manche.
DÉMARRAGE DE LA SCIE À LONG
MANCHE
AVERTISSEMENT : POUR RÉDUIRE
LES RISQUES DE BLESSURE, NE
FAUSSEZ JAMAIS LE VERROUILLAGE
EN FRAPPANT, EN CÂBLANT OU EN
ATTACHANT LE VERROUILLAGE DE
GÂCHETTE.
Si vous utilisez le harnais, mettez le harnais
et attachez l’attache du harnais sur l’anneau
de fixation. Tenez fermement l’arbre
extensible et la poignée arrière (Fig. ).
Appuyez sur le déverrouillage de la gâchette
() avec la paume de la main et sur
l’interrupteur à gâchette () avec les doigts.
COUPE
COUPE DE BASE
DANGER : POUR RÉDUIRE LES
RISQUES D’ÉLECTROCUTION,
N’UTILISEZ JAMAIS CET OUTIL PRÈS
D’UN FIL OU CÂBLE SUSCEPTIBLE DE
TRANSPORTER DU COURANT
ÉLECTRIQUE.
L’ÉLECTRICITÉ PEUT FAIRE UN ARC D’UN
POINT À UN AUTRE. MAINTENEZ UNE
DISTANCE D’AU MOINS 15 M 50 PI
ENTRE LA SCIE À LONG MANCHE ET
TOUTE LIGNE ÉLECTRIQUE
TRANSPORTANT DU COURANT OU
BRANCHE EN CONTACT AVEC UNE LIGNE
ÉLECTRIQUE. AVANT DE TRAVAILLER À
MOINS DE 15 M 50 PI D’UNE LIGNE
ÉLECTRIQUE, COMMUNIQUEZ AVEC LE
FOURNISSEUR D’ÉLECTRICITÉ ET
ASSUREZVOUS QUE LE COURANT EST
COUPÉ FIG. 30.
FIG. 28
1
2
1 VERROUILLAGE DU
DÉCLENCHEUR
2 INTERRUPTEUR
À GÂCHETTE
FIG. 29
FIG. 30
15 M
50 PI
UTILISATION DE LA SCIE
À LONG MANCHE

54
AC 1113 - F/N 563397
UTILISATION DE LA SCIE
À LONG MANCHE
Système d’outils à batterie OREGONMD
SCIE À LONG MANCHE MODÈLE PS250
AVERTISSEMENT : POUR RÉDUIRE
LES RISQUES DE BLESSURES, PORTEZ
TOUJOURS DES BOTTES, GANTS,
CASQUES, PROTECTIONS AUDITIVES ET
LUNETTES ADAPTÉES.
AVERTISSEMENT : POUR RÉDUIRE
LES RISQUES DE BLESSURES, GARDEZ
TOUJOURS UNE POSITION STABLE
ET TENEZ LA SCIE À LONG MANCHE
FERMEMENT AVEC LES DEUX MAINS
PENDANT QUE LE MOTEUR TOURNE.
AVERTISSEMENT : LES BRANCHES
QUI TOMBENT PEUVENT REBONDIR
LORSQU’ELLES TOUCHENT LE SOL.
NE TRAVAILLEZ JAMAIS SOUS UNE
BRANCHE EN TRAIN D’ÊTRE COUPÉE.
Observez toutes les règles et réglementations
municipales et nationales relatives à la coupe.
Faites régulièrement des pauses pour
réduire les risques de blessure.
Avant de commencer à couper, assurezvous que la chaîne de tronçonneuse
est correctement tendue, que le huileur
automatique fonctionne et que la chaîne
est affûtée.
Les chaînes de tronçonneuse sont conçues
pour couper du bois uniquement. N’utilisez
pas la scie à long manche pour couper
d’autres matériaux et ne laissez pas la chaîne
entrer en contact avec des saletés ou des
pierres. Ces matériaux sont extrêmement
abrasifs et useront le placage de protection
de la chaîne très rapidement.
Affûtez ou remplacez la chaîne de
tronçonneuse dans les cas suivants :
• La pression requise pour effectuer des
coupes augmente de façon notable.
• Le nombre de coupes possibles sur une
charge de batterie diminue.
• Les copeaux de bois évacués par la chaîne
sont très fins, voire en poussière.
Ne travaillez pas avec une chaîne émoussée
car l’effort de coupe sera accru, les découpes
deviendront irrégulières et l’usure de la scie
à long manche sera plus rapide. Ne forcez
jamais sur une chaîne émoussée.
Commencez à couper en appuyant
légèrement le guide-chaîne contre le bois.
Appliquez uniquement une faible pression,
en laissant la tronçonneuse faire le travail.
Maintenez une vitesse constante tout au
long de la coupe, en relâchant la pression
juste avant la fin de la coupe.
Si la tronçonneuse s’arrête soudainement
pendant la coupe, retirez-la de l’entaille,
puis reprenez la coupe en appliquant une
pression plus faible sur la branche.
ÉLAGAGE
• Nettoyez la zone de travail. Les branches
qui tombent peuvent rebondir ou revenir
en arrière subitement lorsqu’elles touchent
le sol, c’est pourquoi il est essentiel de
conserver un sol propre afin de vous
ménager des issues de repli.
• Prévoyez des issues avant de commencer
la coupe et assurez-vous qu’il n’y a pas
d’obstacles. Sachez toujours comment
quitter la zone où les branches tombent.
• Veillez à ce que les observateurs ou les
aides se trouvent à une distance sûre des
branches qui tombent. Les observateurs
ou les aides ne doivent pas se tenir
directement devant ou derrière l’opérateur.
Voir la Fig. dans la section « Sécurité de la
zone de travail ».
• Gardez une position stable et tenez
fermement la scie à long manche avec les
deux mains. Ne vous penchez pas trop en
avant. Ne montez jamais dans un arbre
ou sur une échelle pour atteindre des
branches hautes.
• Élaguez les branches du bas en premier.
• Attendez que la chaîne de tronçonneuse
atteigne sa pleine vitesse avec de
commencer la coupe.
• Appliquez une légère pression sur la
branche.
• Pour les branches longues (Fig. ), coupez
d’abord l’extrémité de la branche () pour
en réduire la pression, puis élaguez en vous
rapprochant du tronc ().
1
2
FIG. 31

55
AC 1113 - F/N 563397
UTILISATION DE LA SCIE
À LONG MANCHE
Système d’outils à batterie OREGON
MD
SCIE À LONG MANCHE MODÈLE PS250
• Les branches épaisses (supérieures à cm
[ po]) de diamètre) peuvent se briser en
éclat ou pincer la chaîne pendant une
simple coupe depuis le dessus. Pour éviter
les éclats ou les pincements (Fig. ),
effectuez d’abord une coupe en relief peu
profonde sur la partie inférieure de la
branche (), puis coupez l’ensemble de la
branche depuis la partie supérieure ().
• Une fois qu’une grande partie de la
branche est enlevée, procédez à une coupe
régulière près du tronc (Fig. )
1
2
FIG. 32
FIG. 33

56
AC 1113 - F/N 563397
ENTRETIEN ET NETTOYAGE
Système d’outils à batterie OREGON
MD
SCIE À LONG MANCHE MODÈLE PS250
ENTRETIEN ET NETTOYAGE
SCIE À LONG MANCHE
AVERTISSEMENT : LE MANQUEMENT
À IDENTIFIER ET À REMPLACER LES
PIÈCES ENDOMMAGÉES OU USÉES
PEUT CAUSER DES BLESSURES GRAVES.
INSPECTEZ LA SCIE À LONG MANCHE
RÉGULIÈREMENT. UNE INSPECTION
RÉGULIÈRE EST LA PREMIÈRE ÉTAPE
D’UN ENTRETIEN ADÉQUAT. SUIVEZ
LES DIRECTIVES CIDESSOUS AFIN
DE MAXIMISER LA SÉCURITÉ ET LA
SATISFACTION. FAITES REMPLACER
IMMÉDIATEMENT TOUTES LES PIÈCES
ENDOMMAGÉES OU EXCESSIVEMENT
USÉES.
AVERTISSEMENT : UN OUTIL
FONCTIONNANT À BATTERIE, AVEC
LE BLOC DE BATTERIE INSÉRÉ, EST
TOUJOURS SOUS TENSION ET PEUT
DÉMARRER ACCIDENTELLEMENT.
RETIREZ LE BLOC DE BATTERIE DE
LA SCIE À LONG MANCHE AVANT
D’INSPECTER, DE NETTOYER OU
D’EFFECTUER UN ENTRETIEN.
ATTENTION : LORSQUE VOUS
NETTOYEZ LA SCIE À LONG MANCHE, NE
L’IMMERGEZ PAS DANS L’EAU OU DANS
D’AUTRES LIQUIDES.
INSPECTION
Avant chaque utilisation et en cas de chute
de la scie à long manche, inspectez les
pièces suivantes :
• Poignées : la poignée arrière et l’arbre
extensible ne doivent pas présenter de
fissures ou d’autres dommages. Ils doivent
être propres et secs.
• Guide-chaîne : la barre doit être droite et
exempte de copeaux, fissures ou d’usure
excessive.
• Chaîne de tronçonneuse : la chaîne doit
être correctement tendue et affûtée; tous
les composants doivent être exempts de
fissures, copeaux ou usure excessive. Voir
les sections « Mise en tension de la chaîne
de tronçonneuse » et « Affûtage de la
chaîne de tronçonneuse ».
• Panneau latéral : le panneau latéral ne
doit pas présenter de fissures ou d’autres
dommages. Il doit se placer fermement
sur le corps de la tronçonneuse sans
déformation. Assurez-vous que l’attrapechaîne ne présente pas de fissures.
• Bloc de batterie : le bloc de batterie doit
être propre, sec et ne pas présenter de
signes de perforation, d’impact ou d’autres
dommages. Les contacts doivent être
propres, secs et exempts de débris.
• Port de batterie : les ports et contacts
de batterie doivent être propres, secs et
exempts de débris.
• Niveau d’huile : assurez-vous que le
réservoir d’huile est plein avant utilisation.
• Huileur automatique : lorsque la scie à long
manche est en marche sans guide-chaîne
ni chaîne de tronçonneuse, une petite
quantité d’huile doit s’écouler par l’orifice
du coussinet de barre. Voir la section
« Contrôle de l’huileur automatique ».
• Boîtier du moteur : recherchez d’éventuelles
fissures dans le panneau et des débris dans
les évents d’admission d’air.
• Harnais : le tissu ne doit pas être coupé ou
effiloché, l’attache et les boucles de réglage
ne doivent pas présenter de fissures.
• Collier d’extension : assurez-vous que le
collier d’extension ne présente pas de
fissures ou d’autres dommages et qu’il
soutient fermement l’arbre extensible en
place une fois serré.
Vérifiez régulièrement les pièces suivantes :
• Pignon d’entraînement : recherchez
d’éventuelles entailles profondes, dentures
cassées ou bavures.
• Vis de tension : inspectez la tête et le corps
de la vis de tension pour détecter une
éventuelle usure excessive, des filetages
foirés ou faussés, ou d’autres dommages.
• Tête de coupe, panneau latéral inférieur :
assurez-vous que le goujon de fixation de
barre n’est pas plié, foiré ou faussé et que le
coussinet de barre et la bride d’alignement
sont exempts de débris et intacts.
• Chargeur : le chargeur doit être propre,
sec et exempt de perforations ou d’autres
dommages. Le support et les contacts de
batterie doivent être exempts de débris. Le
cordon ne doit pas être effiloché ou abîmé.
• Vis : assurez-vous que toutes les vis sont
serrées, notamment les quatre vis entre
l’arbre extensible et la tête de coupe.

57
AC 1113 - F/N 563397
ENTRETIEN ET NETTOYAGE
Système d’outils à batterie OREGON
MD
SCIE À LONG MANCHE MODÈLE PS250
NETTOYAGE
AVERTISSEMENT : POUR RÉDUIRE
LES RISQUES DE BLESSURES, RETIREZ
LE BLOC DE BATTERIE AVANT LE
NETTOYAGE.
ATTENTION : LORSQUE VOUS NETTOYEZ
LA TÊTE DE LA SCIE À LONG MANCHE,
NE L’IMMERGEZ PAS DANS L’EAU OU
DANS D’AUTRES LIQUIDES.
• Retirez les copeaux de bois et autres débris
du port de batterie. Assurez-vous que les
contacts sont propres et secs.
• Après utilisation, enlevez les débris de
la chaîne de tronçonneuse et du guidechaîne. Essuyez le bloc-moteur avec un
chiffon propre imbibé d’eau savonneuse.
N’utilisez jamais de produits nettoyants
abrasifs ni de solvants.
• Retirez toujours les copeaux de bois, la
sciure et la saleté de la rainure de la barre
lorsque vous replacez la chaîne.
AFFÛTAGE DE LA CHAÎNE DE
TRONÇONNEUSE
Il est recommandé de faire appel à un
fournisseur de service OREGON
MD
pour
affûter la chaîne, mais elle peut également
être affûtée par l’opérateur.
AVERTISSEMENT : SI LA CHAÎNE EST
MAL AFFÛTÉE OU QUE LE CALIBRE DE
PROFONDEUR EST RÉGLÉ TROP BAS,
LE RISQUE DE BLESSURE EST ACCRU.
AFFÛTEZ TOUJOURS LA CHAÎNE
CONFORMÉMENT AUX SPÉCIFICATIONS
DU PRÉSENT MANUEL.
IMPORTANT : UN AFFÛTAGE CONFORME
À CES INSTRUCTIONS PERMETTRA
DE TRAITER LES DÉGÂTS MINEURS
SUR LA CHAÎNE DE TRONÇONNEUSE
DUS AU CONTACT AVEC DES SALETÉS
OU AUX INCIDENTS SEMBLABLES.
POUR RÉPARER DES DÉGÂTS PLUS
IMPORTANTS SUR LA CHAÎNE COMME
APRÈS UN CONTACT AVEC DU BÉTON,
ENVOYEZ LA CHAÎNE CHEZ UN
FOURNISSEUR DE SERVICE OREGON
MD
AUTORISÉ OU REMPLACEZ LA CHAÎNE.
L’affûtage de la chaîne nécessite les outils
suivants (disponibles dans une trousse
OREGON
MD
; voir la section « Spécifications et
composants ») :
• Guide-lime
• Lime d’affûtage de chaîne de
tronçonneuse circulaire de , mm (utilisez
uniquement des limes d’affûtage de chaîne
de tronçonneuse spéciales)
• Outil de calibrage de profondeur de
, mm (, po)
• Lime plate
Après avoir rassemblé les outils, mettez des
gants et des lunettes de protection, puis
retirez la batterie. Limez ensuite la chaîne
pour régler le calibre de profondeur :
• Desserrez le bouton du panneau latéral et
déposez-le.
• Réglez la vis de tension aussi loin que
possible vers l’arrière de la tête de coupe.
• Déposez la chaîne.
• Placez la chaîne dans un étau pour la
maintenir fermement.
• Placez l’outil de calibrage de profondeur
sur le dessus de la chaîne pour qu’un
calibre de profondeur dépasse par la fente
de l’outil.
• Si le calibre de profondeur dépasse du haut
de la fente, limez le calibre de profondeur
jusqu’au niveau de la partie supérieure de
l’outil à l’aide d’une lime plate (Fig. ). Ne
limez jamais le calibre de profondeur plus
que le réglage de calibre de profondeur
indiqué dans ce manuel.
LIME PLATE
OUTIL DE CALIBRAGE
DE PROFONDEUR
FIG. 34

58
AC 1113 - F/N 563397
ENTRETIEN ET NETTOYAGE
Système d’outils à batterie OREGON
MD
SCIE À LONG MANCHE MODÈLE PS250
IMPORTANT : AFFÛTEZ DANS UN SENS
UNIQUEMENT, DE L’INTÉRIEUR VERS
L’EXTÉRIEUR. N’AFFÛTEZ JAMAIS PAR
UN MOUVEMENT D’AVANT EN ARRIÈRE.
• Limez depuis la surface intérieure du
calibre de profondeur vers l’extérieur
(Fig. ).
• Retirez l’outil de calibrage de profondeur.
• Après abaissement, limez toujours le coin
avant de chaque calibre de profondeur
parallèlement à sa forme originale arrondie
ou crantée (Fig. ).
• Répétez la procédure pour chaque calibre
de profondeur sur la chaîne.
Après le réglage du calibre de profondeur,
affûtez les lames :
• Placez la lime de chaîne dans le guide-lime.
• Alignez le guide-lime afin que l’angle de
limage de plaque supérieure correct repéré
sur le guide-lime soit parallèle à la chaîne
(Fig. ).
• Affûtez les lames sur un côté de la chaîne
en premier. Donnez à coups de lime de
l’intérieur de chaque lame vers l’extérieur.
Appliquez le même nombre de coups sur
chaque lame. Puis, retournez la scie à long
manche et répétez la procédure pour les
lames de l’autre côté de la chaîne (Fig. ).
• Limez tous les dommages sur la partie
supérieure chromée et les plaques latérales
(Fig. ).
FIG. 35
EXTÉRIEUR
INTÉRIEUR
FIG. 36
FIG. 37
GUIDELIME
LIME
ARRONDIE
FIG. 38
FIG. 39

59
AC 1113 - F/N 563397
ENTRETIEN ET NETTOYAGE
Système d’outils à batterie OREGON
MD
SCIE À LONG MANCHE MODÈLE PS250
• Conservez la même longueur pour toutes
les lames.
• Après affûtage des lames, utilisez le
guide-lime pour vérifier les calibres de
profondeur à nouveau. Réglez à nouveau
le calibre de profondeur si nécessaire.
• Replacez la chaîne, le panneau latéral et la
batterie.
ENTRETIEN DU GUIDECHAÎNE
Pour égaliser l’usure de la barre et optimiser
sa durée de vie, retournez la barre
régulièrement.
Portez des gants.
• Retirez la batterie.
• Desserrez le bouton du panneau latéral et
déposez-le.
• Réglez la vis de tension aussi loin que
possible vers l’arrière de la tête de coupe.
• Déposez la barre et la chaîne.
• Retournez la barre à la verticale (Fig. ) et
installez de nouveau la barre et la chaîne
comme décrit dans la section « Montage
du guide-chaîne et de la chaîne de
tronçonneuse ».
REMPLACEMENT D’UNE CHAÎNE
DE TRONÇONNEUSE USÉE
Lorsque la chaîne de tronçonneuse
commence à se fissurer, présente une
denture cassée ou elle est détendue au
point de ne plus pouvoir maintenir la
tension correcte, elle doit être remplacée.
Portez des gants.
• Retirez la batterie.
• Desserrez le bouton du panneau latéral et
déposez-le.
• Réglez la vis de tension aussi loin que
possible vers l’arrière de la tête de coupe.
• Déposez la barre et la chaîne.
• Installez la nouvelle chaîne comme décrit
dans la section « Montage du guide-chaîne
et de la chaîne de tronçonneuse ».
• Tendez la chaîne comme décrit dans la
section « Mise en tension de la chaîne de
tronçonneuse ».
REMPLACEMENT D’UN GUIDE
CHAÎNE USÉ
AVERTISSEMENT : LES BORDS D’UN
GUIDECHAÎNE USÉ, NOTAMMENT LES
BORDS DE LA RAINURE À L’ENDROIT OÙ
LA CHAÎNE TOUCHE LA BARRE, PEUVENT
ÊTRE EXTRÊMEMENT TRANCHANTS.
UTILISEZ DES GANTS DE PROTECTION
APPROPRIÉS.
Lorsque le guide-chaîne commence
à se fissurer ou présente une usure
excessive autour des bords, notamment
dans la rainure à l’endroit où la chaîne
de tronçonneuse touche la barre, il doit
être remplacé. Si le pignon de renvoi est
également usé, présente une denture
cassée ou ne tourne pas de façon régulière,
la barre doit être remplacée.
Portez des gants.
• Retirez la batterie.
• Desserrez le bouton du panneau latéral et
déposez-le.
• Réglez la vis de tension aussi loin que
possible vers l’arrière de la tête de coupe.
• Déposez la barre et la chaîne.
• Installez la nouvelle barre comme décrit
dans la section « Montage du guide-chaîne
et de la chaîne de tronçonneuse ».
• Tendez la chaîne comme décrit dans la
section « Mise en tension de la chaîne de
tronçonneuse ».
FIG. 40

60
AC 1113 - F/N 563397
ENTRETIEN ET NETTOYAGE
Système d’outils à batterie OREGON
MD
SCIE À LONG MANCHE MODÈLE PS250
REMPLACEMENT DU PIGNON
D’ENTRAÎNEMENT
Remplacez le pignon d’entraînement tous
les deux remplacements de chaîne ou
lorsque le pignon est abîmé.
Portez des gants lorsque vous déposez et
reposez la barre et la chaîne.
• Retirez la batterie.
• Desserrez le bouton du panneau latéral et
déposez-le.
• Réglez la vis de tension aussi loin que
possible vers l’arrière de la tête de coupe.
• Déposez la barre et la chaîne.
• Utilisez un petit tournevis plat pour forcer
l’ouverture et déposer l’attache en E, puis
déposez le pignon d’entraînement et les
rondelles (Fig. ).
• Insérez le nouveau pignon d’entraînement
avec une rondelle sur chaque côté et
installez la nouvelle attache en E (Fig. ).
• Replacez la barre et la chaîne comme décrit
dans la section « Montage du guide-chaîne
et de la chaîne de tronçonneuse ».
• Tendez la chaîne comme décrit dans la
section « Mise en tension de la chaîne de
tronçonneuse ».
MISE EN TENSION
IMPORTANT : TENDEZ LA CHAÎNE
DE TRONÇONNEUSE UNIQUEMENT
LORSQUE LA CHAÎNE EST FROIDE. UNE
CHAÎNE CHAUDE PEUT SE CONTRACTER
ET ABÎMER LE GUIDECHAÎNE OU LA
CHAÎNE LORSQU’ELLE REFROIDIT.
Si la chaîne ne touche pas la face inférieure
de la barre lorsque la scie à long manche est
éteinte et froide, elle doit être tendue.
Tendez la chaîne comme décrit dans la
section « Mise en tension de la chaîne de
tronçonneuse ».
BLOC DE BATTERIE
IMPORTANT : LE BLOC DE BATTERIE NE
CONTIENT AUCUNE PIÈCE POUVANT
ÊTRE RÉPARÉE PAR L’UTILISATEUR. NE LE
DÉMONTEZ PAS.
Les piles au lithium-ion ont une durée de
fonctionnement prédéterminée. Si le temps
de coupe par recharge diminue de façon
marquée, le bloc de batterie est à la fin de sa
vie utile et doit être remplacé.
• Assurez-vous que le bloc de batterie, y
compris les contacts, est propre et sec et
ne présente aucun signe de perforation,
d’impact ou d’autres dommages. Les
batteries endommagées peuvent causer
des incendies ou émettre des produits
chimiques dangereux.
• Nettoyez les contacts sales avec un
chiffon doux et sec. La saleté ou l’huile
peut provoquer une mauvaise connexion
électrique entraînant une perte de
puissance.
CHARGEUR
• Débranchez le chargeur de la prise
électrique.
• Nettoyez les contacts sales avec un chiffon
doux et sec.
RENSEIGNEMENTS D’ENTRETIEN
SUPPLÉMENTAIRES
Pour plus de renseignements sur l’entretien
de la chaîne de tronçonneuse, le guidechaîne et le pignon d’entraînement,
consultez le manuel d’entretien et de
sécurité OREGON
MD
à l’adresse
http://oregonproducts.com/maintenance/
manual.htm.
FIG. 41
FIG. 42

61
AC 1113 - F/N 563397
DÉPANNAGE
Système d’outils à batterie OREGON
MD
SCIE À LONG MANCHE MODÈLE PS250
DÉPANNAGE
Utilisez ce tableau pour voir les solutions possibles en réponse aux problèmes que vous
pourrez rencontrer avec la scie à long manche. Si ces suggestions ne résolvent pas le
problème, consultez la section « Garantie et service ».
SYMPTÔME CAUSE POSSIBLE ACTIONS RECOMMANDÉES
Le moteur s’arrête
pendant la coupe
La chaîne est pincée
pendant la coupe
Coupez d’abord sous la branche pour relâcher la
pression sur la branche. Voir la section « Coupe ».
Surchauffe du système de
contrôle
Laissez le système de contrôle refroidir.
Le moteur ne
fonctionne pas
ou fonctionne par
intermittence
Batterie déchargée
Rechargez la batterie. Consultez la section « Bloc de
batterie et chargeur ».
Verrouillage du
déclencheur non
actionné
Actionnez le verrouillage de la gâchette avant
d’appuyer sur l’interrupteur à gâchette. Consultez la
section « Fonctionnement général ».
Bloc de batterie pas
complètement inséré
Enfoncez le bloc de batterie dans le port de la batterie
jusqu’à ce qu’il s’enclenche.
Contacts de la batterie
sales
Retirez le bloc de batterie, enlevez les débris du port
de la batterie, puis nettoyez les contacts avec un
chiffon propre et sec.
Bloc de batterie froid
Laissez le bloc de batterie se réchauffer à la température
minimale de fonctionnement de 0 °C (32 °F).
Débris dans le panneau
latéral
Déposez le bloc de batterie, puis retirez le panneau
latéral et enlevez les débris.
Surchauffe du moteur Laissez le moteur refroidir.
Le moteur tourne,
mais la chaîne de
tronçonneuse ne
tourne pas
La chaîne n’entraîne pas
le pignon d’entraînement
Réinstallez la chaîne en vous assurant que les
maillons-guides sur la chaîne sont entièrement
engagés sur le pignon d’entraînement. Voir la section
« Remplacement d’une chaîne de tronçonneuse
usée ».
Le pignon de renvoi du
guide-chaîne ne tourne
pas
Remplacez le guide-chaîne. Voir la section
« Remplacement d’un guide-chaîne usé ».
Arbre d’entraînement mal
installé dans le raccord
du carter de moteur
Répétez le processus pour l’« Assemblage de l’arbre
télescopique ». L’arbre d’entraînement doit être
correctement installé dans le raccord.
La scie à long
manche ne coupe
pas correctement
Tension de chaîne
insuffisante
Tendez la chaîne. Voir la section « Mise en tension de
la chaîne de tronçonneuse ».
Chaîne émoussée
Voir la section « Affûtage de la chaîne de
tronçonneuse ».
Chaîne installée vers
l’arrière
Installez la chaîne avec la denture orientée dans le
sens correct. Voir la section « Remplacement d’une
chaîne de tronçonneuse usée ».
Chaîne usée
Remplacez la chaîne. Voir la section « Remplacement
d’une chaîne de tronçonneuse usée ».
Chaîne sèche ou
extrêmement détendue
Vérifiez le niveau d’huile. Remplissez le réservoir
d’huile si nécessaire. Voir la section « Remplissage du
réservoir d’huile pour barre et chaîne ».
La chaîne n’est pas dans
la rainure de la barre
Replacez la chaîne sur la rainure. Voir la section
« Montage du guide-chaîne et de la chaîne de
tronçonneuse ».

62
AC 1113 - F/N 563397
DÉPANNAGE
Système d’outils à batterie OREGON
MD
SCIE À LONG MANCHE MODÈLE PS250
SYMPTÔME CAUSE POSSIBLE ACTIONS RECOMMANDÉES
La barre et la
chaîne sont
excessivement
chaudes et/ou
fument
La chaîne n’est pas
suffisamment lubrifiée
Vérifiez le niveau d’huile. Remplissez le réservoir
d’huile si nécessaire. Voir la section « Remplissage du
réservoir d’huile pour barre et chaîne ».
Le bloc de batterie
ne se charge pas
La protection du bloc
de batterie contre les
températures élevées/
faibles est activée
Cela peut se produire lorsque la tronçonneuse est
utilisée de manière continue ou exposée à des
températures ambiantes élevées. Laissez le bloc de
batterie atteindre la température acceptable avant
la charge. Consultez la section « Bloc de batterie et
chargeur ».
Contacts sales ou
endommagés sur le
bloc de batterie ou le
chargeur
Inspectez les contacts sur le bloc de batterie et sur le
chargeur. Si nécessaire, nettoyez conformément aux
instructions de ce manuel. Insérez de nouveau le bloc
de batterie dans le chargeur, en vous assurant qu’il est
complètement encastré.
Le bloc de batterie est à
la fin de sa vie utile
Toutes les batteries ont une durée limitée. Si le bloc
de batterie a plus de deux ans ou a été rechargé
fréquemment, il est peut-être temps de le remplacer.
Remplacez uniquement par un bloc de batterie
spécifié pour cette scie à long manche.
Chargeur défectueux
Faites vérifier son fonctionnement auprès d’un centre
de service agréé.
Faible temps
de coupe par
recharge de
batterie
Chaîne émoussée
Voir la section « Affûtage de la chaîne de
tronçonneuse ».
Chaîne usée
Remplacez la chaîne. Voir la section « Remplacement
d’une chaîne de tronçonneuse usée ».
Chaîne sèche
Vérifiez le niveau d’huile. Remplissez le réservoir
d’huile si nécessaire. Voir la section « Remplissage du
réservoir d’huile pour barre et chaîne ».
Chaîne trop tendue
Voir la section « Mise en tension de la chaîne de
tronçonneuse ».
Technique de coupe
incorrecte
Suivez les directives dans la section « Coupe ».
Débris dans le panneau
latéral
Déposez le bloc de batterie, puis retirez le panneau
latéral et enlevez les débris.
Bloc de batterie pas
complètement chargé
Rechargez la batterie. Consultez la section « Bloc de
batterie et chargeur ».
Lumière orange
clignotant sur
l’indicateur d’état
de charge
Erreur de courtcircuit du chargeur,
de dépassement de
courant du chargeur, de
dépassement de limite
de tension, de circuit
ouvert sur le bloc de
batterie ou de délai de
charge/pré-charge
1. Assurez-vous que le cordon du chargeur est
raccordé au chargeur et à la prise de courant.
2. Assurez-vous que le chargeur reçoit la tension
correcte.
3. Essayez de charger un autre bloc de batterie conçu
pour ce chargeur.
Si cela ne résout pas le problème, faites vérifier son
fonctionnement auprès d’un centre de service agréé.

63
AC 1113 - F/N 563397
CARACTÉRISTIQUES
ET COMPOSANTS
Système d’outils à batterie OREGON
MD
SCIE À LONG MANCHE MODÈLE PS250
CARACTÉRISTIQUES ET COMPOSANTS
AVERTISSEMENT : L’UTILISATION DE PIÈCES DE RECHANGE AUTRES QUE CELLES
SPÉCIFIÉES DANS CE MANUEL AUGMENTE LE RISQUE DE BLESSURES. N’UTILISEZ
JAMAIS DES ACCESSOIRES DE COUPE AUTRES QUE CEUX DÉCRITS DANS CE MANUEL.
PIÈCES DE REMPLACEMENT NUMÉRO DE PIÈCE
GUIDECHAÎNE 564284
CHAÎNE DE TRONÇONNEUSE R34
BLOC DE BATTERIE, MODÈLE B600E 548208
BLOC DE BATTERIE, MODÈLE B400E 545938
BLOC DE BATTERIE, MODÈLE B500S 545937
CHARGEUR AVEC CORDON, MODÈLE C600 540580
CHARGEUR RAPIDE AVEC CORDON, MODÈLE C750 548185
TROUSSE D’AFFÛTAGE DE CHAÎNE DE TRONÇONNEUSE 38278
CHARGEUR, MODÈLE C600
ENTRÉE DE 100 À 240 V ~ DE 50 À 60 Hz, 60 W
ENTRÉE ÉTATSUNIS ET CANADA
UNIQUEMENT
120 V ~ 60 Hz, 60 W
SORTIE 41,5 V
, 1,25 A
CORDON D’ALIMENTATION
RÉF. É.U./CAN : 546636 RÉF. UE : 547383
RÉF R.U. : 547384 RÉF. AU/NZ : 560663
BLOC DE BATTERIE
TYPE LITHIUMION
TEMPÉRATURE DE
FONCTIONNEMENT
0 À 40 °C 32 À 104 °F
MODÈLE
CAPACITÉ
NOMINALE
TENSION
NOMINALE
C600, TEMPS
DE CHARGE
APPROXIMATIF
B600E 4,00 Ah / 144 Wh +36 VDC 210 MINUTES
B400E 2,40 Ah / 89 Wh +37 VDC 120 MINUTES
B500S 1,25 Ah / 47 Wh +37 VDC 60 MINUTES
SCIE À LONG MANCHE
CONTENANCE EN HUILE 100 ml 3,4 oz)
HUILE POUR BARRE ET
CHAÎNE
MARQUE OREGON
MD
POIDS À SEC AVEC BATTERIE 6.12 kg 13.5 lb
POIDS À SEC SANS BATTERIE,
BARRE ET CHAÎNE
4.58 kg 10.1 lb
NIVEAU DE PUISSANCE
ACOUSTIQUE
90 dB (K, 0.18 dB)
VIBRATIONS .81 m/s
2
(K, .14 m/s2)
LONGUEUR DE BARRE MAX 20 cm 8 po)
PAS DE CHAÎNE Low ProfileMC de 10 mm (3/8 po)
CALIBRE DE CHAÎNE 1 mm (0,043 po)
DENTURE DU PIGNON
D’ENTRAÎNEMENT
7
VITESSE DE LA CHAÎNE HORS
CHARGE
14,5 m/s (47,4 pi/s)

64
AC 1113 - F/N 563397
GARANTIE ET SERVICE
Système d’outils à batterie OREGON
MD
SCIE À LONG MANCHE MODÈLE PS250
GARANTIE ET SERVICE
GARANTIE
Blount, Inc. garantit tous les chargeurs et
outils sans fil OREGON
MD
enregistrés pour
une période de trois () ans et tous les blocs
de batterie sans fil OREGON
MD
enregistrés
pour une période de deux () ans à compter
de la date d’achat initiale. Les chargeurs,
blocs de batterie et outils sans fil OREGON
MD
enregistrés sont garantis deux () ans s’ils
sont utilisés à des fins commerciales. Cette
garantie limitée s’applique aux produits
OREGON Cordless Tool System. Pendant
la période de garantie, Blount réparera ou,
à sa discrétion, remplacera sans frais pour
l’acheteur d’origine seulement tout produit
ou toute pièce ayant un défaut de matériau
ou de main-d’œuvre confirmé après
vérification de Blount. Le propriétaire sera
responsable de tous les frais de transport
et du coût de démontage de toute pièce
soumise pour remplacement en vertu de la
garantie.
Pour enregistrer votre produit, visitez la
rubrique « Soutien » de OregonCordless.com.
RENSEIGNEMENTS DE SERVICE
ET DE SOUTIEN
Visitez-nous sur le Web à l’adresse
OregonCordless.com pour obtenir des
renseignements sur les centres de service
ou communiquez avec notre service de
soutien à la clientèle au - pour
une assistance, des conseils techniques
supplémentaires, une réparation, des pièces
de rechange ou pour un enregistrement de
produit.
Par souci de sécurité, utilisez uniquement
des pièces de rechange authentiques
d’usine sur la scie à long manche. Le
personnel de notre centre de service a été
formé pour vous fournir aide et soutien
de façon efficace pour tout réglage,
réparation ou remplacement requis pour
tous les produits du système d’outils sans fil
OREGON
MD
.


66
AC 1113 - F/N 563397
ÍNDICE
Sistema de herramientas inalámbricas OREGON®
SIERRA DE POSTE MODELO PS250
ÍNDICE
SÍMBOLOS Y ETIQUETAS . . . . . . . . . . . . . . . . . . . . . . . . . . . . . . . . . . . . . 67
NOMBRES Y TÉRMINOS DE LA SIERRA DE POSTE. . . . . . . . . . . . . . . . . . . . . 68
IDENTIFICACIÓN DEL PRODUCTO. . . . . . . . . . . . . . . . . . . . . . . . . . . . . . . 69
REGLAS DE SEGURIDAD. . . . . . . . . . . . . . . . . . . . . . . . . . . . . . . . . . . . . . 70
ADVERTENCIAS DE SEGURIDAD GENERALES
SOBRE LA HERRAMIENTA MECÁNICA. . . . . . . . . . . . . . . . . . . . . . . . 70
SEGURIDAD EN EL ÁREA DE TRABAJO . . . . . . . . . . . . . . . . . . . . . . . 70
SEGURIDAD ELÉCTRICA . . . . . . . . . . . . . . . . . . . . . . . . . . . . . . . . . 70
SEGURIDAD PERSONAL . . . . . . . . . . . . . . . . . . . . . . . . . . . . . . . . . 71
USO Y CUIDADO DE LA HERRAMIENTA MECÁNICA . . . . . . . . . . . . . . 72
USO Y CUIDADO DE LA HERRAMIENTA DE BATERÍAS . . . . . . . . . . . . . 72
SERVICIO TÉCNICO . . . . . . . . . . . . . . . . . . . . . . . . . . . . . . . . . . . . 72
ADVERTENCIAS DE SEGURIDAD SOBRE LA SIERRA DE POSTE . . . . . . . 72
ALMACENAMIENTO, TRANSPORTE Y ELIMINACIÓN . . . . . . . . . . . . . . 74
SEGURIDAD DE LA BATERÍA . . . . . . . . . . . . . . . . . . . . . . . . . . . . . . 75
SEGURIDAD DEL CARGADOR . . . . . . . . . . . . . . . . . . . . . . . . . . . . . 75
DESEMPAQUE Y ARMADO . . . . . . . . . . . . . . . . . . . . . . . . . . . . . . . . . . . . 77
ARMAR EL EJE DE EXTENSIÓN. . . . . . . . . . . . . . . . . . . . . . . . . . . . . 77
LLENAR EL DEPÓSITO DE ACEITE DE LA BARRA Y LA CADENA . . . . . . 78
ARMAR LA BARRA DE GUÍA Y LA CADENA DE LA SIERRA . . . . . . . . . . 79
TENSADO DE LA CADENA DE LA SIERRA . . . . . . . . . . . . . . . . . . . . . 80
USAR LA SIERRA DE POSTE. . . . . . . . . . . . . . . . . . . . . . . . . . . . . . . . . . . . 81
BATERÍA Y CARGADOR . . . . . . . . . . . . . . . . . . . . . . . . . . . . . . . . . . 81
OPERACIÓN GENERAL . . . . . . . . . . . . . . . . . . . . . . . . . . . . . . . . . . 83
CORTE . . . . . . . . . . . . . . . . . . . . . . . . . . . . . . . . . . . . . . . . . . . . . 85
MANTENIMIENTO Y LIMPIEZA. . . . . . . . . . . . . . . . . . . . . . . . . . . . . . . . . . 88
INSPECCIÓN . . . . . . . . . . . . . . . . . . . . . . . . . . . . . . . . . . . . . . . . . 88
LIMPIEZA . . . . . . . . . . . . . . . . . . . . . . . . . . . . . . . . . . . . . . . . . . . 89
AFILAR LA CADENA DE LA SIERRA . . . . . . . . . . . . . . . . . . . . . . . . . . 89
MANTENIMIENTO DE LA BARRA DE GUÍA . . . . . . . . . . . . . . . . . . . . . 91
REEMPLAZAR UNA CADENA DESGASTADA DE LA SIERRA . . . . . . . . . 91
REEMPLAZAR UNA BARRA DE GUÍA DESGASTADA . . . . . . . . . . . . . . 91
REEMPLAZAR LA RUEDA DENTADA DE ACCIONAMIENTO . . . . . . . . . 92
TENSADO . . . . . . . . . . . . . . . . . . . . . . . . . . . . . . . . . . . . . . . . . . . 92
BATERÍA . . . . . . . . . . . . . . . . . . . . . . . . . . . . . . . . . . . . . . . . . . . . 92
CARGADOR . . . . . . . . . . . . . . . . . . . . . . . . . . . . . . . . . . . . . . . . . 92
INFORMACIÓN ADICIONAL SOBRE EL MANTENIMIENTO . . . . . . . . . . 92
RESOLUCIÓN DE PROBLEMAS . . . . . . . . . . . . . . . . . . . . . . . . . . . . . . . . . 93
ESPECIFICACIONES Y COMPONENTES . . . . . . . . . . . . . . . . . . . . . . . . . . . . 95
GARANTÍA Y SERVICIO TÉCNICO . . . . . . . . . . . . . . . . . . . . . . . . . . . . . . . . 96
© Blount, Inc. Los precios y las especificaciones pueden cambiar sin previo aviso. Todos los derechos reservados.
OREGON ® es una marca comercial de Blount, Inc. en los Estados Unidos y/o en otros países.

67
AC 1113 - F/N 563397
SÍMBOLOS Y ETIQUETAS
Sistema de herramientas inalámbricas OREGON®
SIERRA DE POSTE MODELO PS250
SÍMBOLOS Y ETIQUETAS
Los siguientes símbolos y etiquetas aparecen en la sierra de poste, en la batería y en el cargador.
SÍMBOLO
NOMBRE EXPLICACIÓN
CONSTRUCCIÓN DE
CLASE II
HERRAMIENTAS DE CONSTRUCCIÓN DESIGNADAS
CON DOBLE AISLAMIENTO.
SÍMBOLO DE ALERTA DE
SEGURIDAD
INDICA QUE EL TEXTO QUE SIGUE EXPLICA UN
PELIGRO, UNA ADVERTENCIA O UNA PRECAUCIÓN.
LEA LAS INSTRUCCIONES
EL MANUAL DE INSTRUCCIONES ORIGINAL CONTIENE
INFORMACIÓN IMPORTANTE SOBRE LA SEGURIDAD Y
EL USO. LEA Y SIGA LAS INSTRUCCIONES ATENTAMENTE.
UTILICE PROTECCIÓN
PARA LOS OJOS
USE PROTECCIÓN PARA LOS OJOS AL UTILIZAR LA
SIERRA DE POSTE.
USE PROTECCIÓN PARA
LOS OÍDOS.
USE PROTECCIÓN PARA LOS OÍDOS AL UTILIZAR LA
SIERRA.
UTILICE PROTECCIÓN
PARA LAS MANOS
USE GUANTES AL UTILIZAR LA SIERRA DE POSTE Y AL
MANIPULAR LA CADENA DE LA SIERRA.
USE PROTECCIÓN PARA
LA CABEZA.
USE UN CASCO AL UTILIZAR LA SIERRA DE POSTE.
USE CALZADO DE
SEGURIDAD.
USE BOTAS DE TRABAJO CERRADAS Y ADECUADAS
CUANDO UTILICE LA SIERRA DE POSTE.
POTENCIA DEL SONIDO EL NIVEL DE INTENSIDAD SONORA ES DE 90 DB.
AGARRE CON DOS
MANOS
SUJETE LA SIERRA DE POSTE CON AMBAS MANOS.
AGARRE CON UNA MANO
NO SOSTENGA LA SIERRA DE POSTE CON UNA
MANO.
NO USE UNA ESCALERA.
NUNCA SE PARE SOBRE UNA ESCALERA AL UTILIZAR
LA SIERRA DE POSTE.
NO INCINERAR NO ARROJE EL PRODUCTO AL FUEGO.
NO DESECHAR
NO DESECHE EL PRODUCTO CON LA BASURA
DOMÉSTICA. LLÉVELO A UN CENTRO DE RECICLAJE
AUTORIZADO.
NO EXPONGA EL
PRODUCTO A LA LLUVIA.
NO USE EL CARGADOR EN CONDICIONES HÚMEDAS.
USO EN INTERIORES
ÚNICAMENTE
PARA USO EN INTERIORES ÚNICAMENTE.
TEMPERATURA
OPERATIVA
ÚNICAMENTE USE EL MÓDULO DE LA BATERÍA A UNA
TEMPERATURA ENTRE 0 °C Y 40 °C 32 °F Y 104 °F.
HERRAMIENTA DE CORTE
HERRAMIENTA DE CORTE. NO TOQUE LA CADENA
SIN ANTES DESACTIVAR LA SIERRA DE POSTE AL
EXTRAER EL MÓDULO DE LA BATERÍA.
TENGA CUIDADO
CUANDO ESTÉ CERCA DE
LAS LÍNEAS ELÉCTRICAS.
NUNCA USE LA SIERRA DE POSTE CERCA DE CABLES
QUE PUEDAN TENER CORRIENTE ELÉCTRICA.
QUITE LA BATERÍA.
QUITE LA BATERÍA ANTES DE REALIZAR CUALQUIER
TAREA DE MANTENIMIENTO.

68
AC 1113 - F/N 563397
NOMBRES Y TÉRMINOS
DE LA SIERRA DE POSTE
Sistema de herramientas inalámbricas OREGON®
SIERRA DE POSTE MODELO PS250
NOMBRES Y TÉRMINOS DE LA SIERRA DE POSTE
Brida de alineación: protuberancia en la
almohadilla de la barra que encaja en la
ranura de la barra.
Engrasador automático: sistema que lubrica
automáticamente la barra de guía y la
cadena de la sierra.
Almohadilla de la barra: almohadilla de
montaje en el cabezal de corte que ayuda a
garantizar la alineación correcta de la barra
de guía.
Ranura de la barra: parte recortada de la
barra de guía que se ajusta en la brida de
alineación y el perno de montaje.
Funda de la cuchilla: funda de plástico que
protege la barra de guía y la cadena de la
sierra cuando la sierra de poste no está en
uso.
Gancho para extraer ramas: pieza metálica y
curvada en el extremo del cabezal de corte
que se usa para extraer las ramas sueltas de
los árboles.
Zona de seguridad para transeúntes: un círculo
de m ( pies) alrededor del operador en
el que no debe haber objetos con los que
el operador pudiera tropezar, transeúntes,
niños ni mascotas.
Calibre de la cadena: espesor de los eslabones
motrices de la cadena de la sierra, indicado
por el número de pieza impreso en los
eslabones motrices.
Paso de la cadena: distancia entre cualquiera
de los tres remaches de la cadena de la sierra,
dividida por dos, indicada por el número de
pieza impreso en los eslabones motrices.
Desviador de suciedad: soporte de plástico en
el cabezal de corte que canaliza el polvo y las
virutas de madera lejos del operador durante
el corte.
Herramienta del calibre de la profundidad: herramienta que, cuando se la coloca en la parte
superior de la cadena de la sierra durante
el afilado, garantiza que la profundidad de
corte esté ajustada correctamente.
Eslabón motriz: eslabón en forma de aleta
de la cadena de la sierra que se ajusta en la
ranura de la barra de guía.
Rueda dentada de accionamiento: parte
dentada que acciona la cadena de la sierra.
Eje de extensión: eje entre el cabezal de
potencia y el cabezal de corte que se puede
alargar para llegar a las ramas superiores de
los árboles.
Collarín de extensión: pieza de plástico
giratoria ubicada en el eje de extensión que
se afloja para permitir la extensión y se ajusta
para mantener el eje de extensión en su
lugar.
Guía de la lima: herramienta que, al combinarse con la lima adecuada de la cadena
de la sierra, garantiza que los cortadores de
la cadena de la sierra se afilen en el ángulo
correcto.
Barra de guía: estructura con rieles que
soporta y guía la cadena de la sierra. A veces,
simplemente se la llama "barra".
Arnés: dispositivo de seguridad usado por
el operador y conectado a la sierra de poste
que ayuda a distribuir el peso de la sierra de
poste.
Carcasa del motor: cubierta de plástico en
la que se ajusta el eje extensible durante el
armado.
Cabezal de potencia de la sierra de poste: sierra
de poste sin el eje de extensión, la cadena de
la sierra ni la barra de guía.
Mango trasero: mango de apoyo ubicado en
la parte trasera de la sierra o cerca de esta.
Cadena de la sierra: bucle de cadena con
dientes de corte que cortan la madera; es
accionada por el cabezal de potencia y se
apoya en la barra de guía. A veces, simplemente se la llama “cadena”.
Funda lateral: funda de plástico en el cabezal
de corte que cubre la rueda dentada de
accionamiento y el tornillo tensor.
Clavija de tensión: pieza metálica unida al
tornillo tensor que se ajusta a través del
orificio de la barra de guía.
Tornillo tensor: parte roscada en el interior del
cabezal de corte que se ajusta para controlar
la tensión de la cadena de la sierra.
Bloqueo del acelerador: tope móvil que evita
la activación accidental del interruptor de
gatillo hasta que se lo accione en forma
manual.
Interruptor de gatillo: dispositivo que enciende y apaga la sierra de poste.
Piezas de desgaste: ciertas piezas, como la
cadena de la sierra y la barra de guía, que se
desgastan durante el uso y que el usuario
puede cambiar.

69
AC 1113 - F/N 563397
IDENTIFICACIÓN DEL PRODUCTO
Sistema de herramientas inalámbricas OREGON®
SIERRA DE POSTE MODELO PS250
IDENTIFICACIÓN DEL PRODUCTO
CONOZCA LA SIERRA DE POSTE
NOTA: Consulte la sección “Desempaque y armado” para obtener una lista de los elementos
que se incluyen.
GANCHO PARA EXTRAER RAMAS
CABEZAL DE CORTE
CUBIERTA
LATERAL
CUBIERTA
LATERAL
PERILLA
RETÉN DE LA CADENA
FUNDA DE LA CUCHILLA
RUEDA DENTADA DE ACCIONAMIENTO
ALMOHADILLA DE LA BARRA
BRIDA DE ALINEACIÓN
RANURA DE
LA BARRA
CLAVIJA DE TENSIÓN
BARRA
DE GUÍA
CADENA DE LA SIERRA
DESVIADOR
DE SUCIEDAD
PERNO DE MONTAJE
TORNILLO TENSOR
MANGO TRASERO
BLOQUEO DEL
INTERRUPTOR
DE GATILLO
INTERRUPTOR DE GATILLO
ANILLO DE FIJACIÓN
DEL ARNÉS
CARCASA DEL MOTOR
EJE DE EXTENSIÓN
COLLARÍN DE EXTENSIÓN
PLACA DE NOMBRE DEL PRODUCTO
PUERTO DE
LA BATERÍA
MÓDULO DE
LA BATERÍA
DESBLOQUEADOR DE LA BATERÍA
TAPA DEL TANQUE DE ACEITE
CABEZAL DE POTENCIA

70
AC 1113 - F/N 563397
Sistema de herramientas inalámbricas OREGON®
SIERRA DE POSTE MODELO PS250
INTRODUCCIÓN
La sierra de poste está diseñada para realizar un mantenimiento regular y para cortar
ramas de cm ( in) o menos de diámetro. Otros usos pueden causar lesiones y no
se recomiendan. Sin embargo, incluso con esta seguridad, debe reconocerse que aún
existen riesgos residuales, como los objetos despedidos. Se recomienda al operador
leer, comprender y seguir atentamente todas las precauciones de seguridad para
reducir las posibles lesiones personales debidas a estos riesgos.
REGLAS DE SEGURIDAD
ADVERTENCIAS DE SEGURIDAD GENERALES SOBRE LA HERRAMIENTA
MECÁNICA
ADVERTENCIA: LEA Y COMPRENDA TODAS LAS ADVERTENCIAS
DE SEGURIDAD Y TODAS LAS INSTRUCCIONES. NO SEGUIR ESTAS
ADVERTENCIAS E INSTRUCCIONES PODRÍA PROVOCAR UNA DESCARGA
ELÉCTRICA, UN INCENDIO O LESIONES PERSONALES GRAVES.
GUARDE TODAS LAS ADVERTENCIAS E INSTRUCCIONES PARA CONSULTARLAS
EN EL FUTURO. EL TÉRMINO “HERRAMIENTA ELÉCTRICA” EN LAS ADVERTENCIAS SE
REFIERE A SU HERRAMIENTA ALIMENTADA DESDE LA RED CABLEADA O A BATERÍA
INALÁMBRICA.
SEGURIDAD EN EL ÁREA DE
TRABAJO
• Mantenga el área de trabajo limpia y bien
iluminada. Las zonas abarrotadas u oscuras
son propensas a los accidentes.
• No use herramientas eléctricas en
ambientes explosivos, como aquellos
con presencia de líquidos, gases o polvo
inflamables. Las herramientas eléctricas crean
chispas que podrían encender el polvo o los
gases.
• Mantenga a los niños y a los transeúntes
alejados mientras use una herramienta
eléctrica (Fig. ). Las distracciones podrían
hacerle perder el control.
PRECAUCIÓN: ESTABLEZCA
UNA ZONA DE SEGURIDAD PARA
TRANSEÚNTES DE 6 M 20 PIES ANTES
DE USAR ESTE EQUIPO. La zona de
seguridad para transeúntes es un círculo de 6 m
(20 pies) alrededor del operador en el que no
debe haber transeúntes, niños ni mascotas.
SEGURIDAD ELÉCTRICA
• El enchufe de una herramienta eléctrica
debe coincidir con el tomacorriente.
Nunca modifique el enchufe en forma
alguna. No use adaptadores con las
herramientas eléctricas puestas a tierra.
El uso de enchufes no modificados y
tomacorrientes adecuados reduce el riesgo de
que se produzcan descargas eléctricas.
• Evite el contacto del cuerpo con
superficies conectadas a tierra,
como tuberías, radiadores, estufas y
refrigeradores. Hay un mayor riesgo de sufrir
una descarga eléctrica si su cuerpo está puesto
a tierra.
• No exponga las herramientas eléctricas a
condiciones húmedas ni de lluvia. Si entra
agua en una herramienta eléctrica, habrá mayor
riesgo de que ocurra una descarga eléctrica.
• No abuse el cable de alimentación. Nunca
use el cable para transportar, acarrear
ni desenchufar la herramienta eléctrica.
Mantenga el cable alejado del calor, el
aceite, los bordes filosos y las piezas
móviles. Un cable dañado o enredado conlleva
mayor riesgo de que se produzca una descarga
eléctrica.
• Para usar una herramienta eléctrica al aire
libre, use un prolongador apto para uso
al aire libre. El uso de un cable apto para uso al
aire libre reduce el riesgo de que se produzca una
descarga eléctrica.
FIG. 1
REGLAS DE SEGURIDAD

71
AC 1113 - F/N 563397
Sistema de herramientas inalámbricas OREGON®
SIERRA DE POSTE MODELO PS250
• Si es inevitable usar la herramienta
eléctrica en un lugar húmedo, utilice un
suministro protegido con un disyuntor
diferencial (RCD) o disyuntor por falla a
tierra (GFCI). La utilización de un RCD (GFCI)
reduce el riesgo de que se produzca una descarga
eléctrica.
SEGURIDAD PERSONAL
• Permanezca alerta, esté atento a lo que
hace y use su sentido común al usar
una herramienta eléctrica. No use una
herramienta eléctrica si está cansado
o si está bajo la influencia de drogas,
alcohol o medicamentos. Si se despista por
un momento mientras usa una herramienta
eléctrica, podría sufrir lesiones personales graves.
• Use equipo de protección personal.
Siempre use protección para los ojos.
El uso de equipo de protección adecuado
para las condiciones de trabajo, como una
máscara contra el polvo, calzado de seguridad
antideslizante, un casco de seguridad o
protección para los oídos, reduce el riesgo de
sufrir lesiones personales.
• Evite el arranque accidental de la
herramienta. Asegúrese de que
el interruptor esté en la posición
de apagado antes de conectar la
herramienta a la fuente de alimentación
o al módulo de la batería y antes de
levantar o transportar la herramienta.
Transportar herramientas eléctricas con el
dedo sobre el acelerador o energizarlas con el
interruptor en la posición de encendido es buscar
un accidente.
• Quite toda llave de ajuste antes de
encender la herramienta eléctrica.
Si se deja una llave conectada a una pieza móvil
de la herramienta eléctrica, podrían producirse
lesiones personales.
• No se estire. Mantenga un apoyo firme y
un buen equilibrio en todo momento
(Fig. ). Esto permite un mejor control de la
herramienta en caso de situaciones inesperadas.
• Vístase correctamente. No use ropa ni
joyas sueltas. Mantenga su cabello, su
ropa y sus guantes alejados de las piezas
móviles. La ropa, las joyas o el cabello sueltos
podrían quedar atrapados en las piezas móviles.
• Si se proporcionan dispositivos para la
conexión de instalaciones de extracción
y recolección de polvo, asegúrese de
que estas estén conectadas y de que se
utilicen en forma adecuada. La utilización
de sistemas de recolección de polvo puede
reducir los peligros relacionados con el polvo.
• Se ha informado que el uso prolongado
de herramientas eléctricas provoca
trastornos vasculares, musculares o
neurológicos (como el dedo blanco por
vibración o síndrome de Raynaud). Para
reducir el riesgo de sufrir lesiones, siga estas
instrucciones:
– Utilice guantes, y mantenga las manos y
el cuerpo calientes.
– Sujete la sierra de poste con firmeza,
pero no ejerza una presión prolongada y
excesiva.
– Descanse con frecuencia.
La vibración durante el uso normal puede
diferir de los valores que se consignan
dependiendo del material que se corta, el
mantenimiento del sistema de corte y otros
factores.
FIG. 2
REGLAS DE SEGURIDAD

72
AC 1113 - F/N 563397
REGLAS DE SEGURIDAD
Sistema de herramientas inalámbricas OREGON®
SIERRA DE POSTE MODELO PS250
USO Y CUIDADO DE LA
HERRAMIENTA MECÁNICA
• No fuerce la herramienta eléctrica. Use la
herramienta eléctrica adecuada para su
aplicación. La herramienta eléctrica adecuada
hará el trabajo mejor y en forma más segura al
ritmo para el cual fue diseñada.
• No use la herramienta eléctrica si el
interruptor no permite encenderla y
apagarla. Toda herramienta que no pueda
controlarse con el interruptor es peligrosa y debe
repararse.
• Desconecte el enchufe de la fuente de
alimentación o quite el módulo de la
batería de la herramienta eléctrica antes
de hacer cualquier ajuste sobre ella,
cambiar accesorios o almacenarla. Estas
medidas de seguridad preventivas reducen
el riesgo de arranques accidentales de la
herramienta.
• Almacene las herramientas eléctricas
que no se encuentren en uso fuera del
alcance de los niños y no permita que
las usen personas que no conozcan
la herramienta eléctrica ni estas
instrucciones. Las herramientas eléctricas
son peligrosas en las manos de usuarios no
capacitados.
• Dé mantenimiento a las herramientas
eléctricas. Verifique que las piezas
móviles no estén mal alineadas ni
atascadas, que no haya piezas rotas y
que no haya ninguna otra condición
que pudiera afectar el funcionamiento
de la herramienta. Si la herramienta se
daña, hágala reparar antes de usarla.
Muchos accidentes ocurren por no dar un buen
mantenimiento a las herramientas eléctricas.
• Mantenga las herramientas de corte
afiladas y limpias. Las herramientas de
corte con buen mantenimiento y bordes de
corte afilados tienen menos probabilidades de
atascarse y son más fáciles de controlar.
• Utilice la herramienta mecánica, los
accesorios, las brocas, etc. de acuerdo con
estas instrucciones, tomando en cuenta
las condiciones de trabajo y la tarea por
realizar. El uso de la herramienta eléctrica para
tareas distintas de las previstas podría provocar
una situación peligrosa.
USO Y CUIDADO DE LA
HERRAMIENTA DE BATERÍAS
• Recargue la herramienta únicamente con
el cargador que especifica el fabricante.
Un cargador que sea adecuado para un tipo de
batería podría originar un riesgo de incendio
cuando se usa con otra.
• Use las herramientas eléctricas únicamente
con los módulos de batería específicamente
designados. El uso de otros módulos de batería
puede crear riesgo de lesiones e incendios.
• Cuando no use la batería, manténgala
alejada de otros objetos metálicos,
como sujetapapeles, monedas, llaves,
clavos, tornillos y otros objetos metálicos
pequeños que pudieran establecer una
conexión entre un terminal y el otro. Un
cortocircuito entre los terminales de la batería
puede provocar quemaduras o un incendio.
• En condiciones de abuso, podría salir
líquido proyectado de la batería. Evite
el contacto con este líquido. Si ocurre
accidentalmente el contacto con el líquido,
enjuague la zona de contacto con agua. Si el líquido
entra en contacto con los ojos, busque también
asistencia médica. El líquido proyectado por la
batería puede causar irritación o quemaduras.
SERVICIO TÉCNICO
Encargue el servicio técnico de su
herramienta eléctrica a un técnico
de reparación calificado que utilice
únicamente piezas de repuesto idénticas.
Esto garantizará que se mantenga la
seguridad de la herramienta eléctrica.
ADVERTENCIAS DE SEGURIDAD
SOBRE LA SIERRA DE POSTE
PELIGRO: EL CONTACTO CON
LA CADENA EN MOVIMIENTO DE
LA SIERRA PROVOCARÁ LESIONES
PERSONALES GRAVES. MANTENGA
LAS MANOS Y EL CUERPO ALEJADOS DE LA
CADENA EN MOVIMIENTO DE LA SIERRA.

73
AC 1113 - F/N 563397
REGLAS DE SEGURIDAD
Sistema de herramientas inalámbricas OREGON®
SIERRA DE POSTE MODELO PS250
PELIGRO: EL CONTACTO CON EL
CABLEADO ELÉCTRICO DURANTE
EL USO PUEDE PROVOCAR QUE LAS
PIEZAS METÁLICAS EXPUESTAS DE
LA HERRAMIENTA CONDUZCAN LA
ELECTRICIDAD, LO CUAL PUEDE
CAUSAR LESIONES PERSONALES
GRAVES. DURANTE EL USO, SOSTENGA
SIEMPRE LA SIERRA DE POSTE POR LAS
SUPERFICIES DE AGARRE AISLADAS.
ADVERTENCIA: EL USO DE
UNA SIERRA DE POSTE ARMADA
INCORRECTAMENTE PUEDE CAUSAR
LESIONES PERSONALES GRAVES. SOLO
USE ESTA HERRAMIENTA LUEGO DE ARMARLA
CORRECTAMENTE SEGÚN LA SECCIÓN
“DESEMPAQUE Y ARMADO” DE ESTE MANUAL.
ADVERTENCIA: LOS MOMENTOS
DE FALTA DE ATENCIÓN DURANTE EL
USO DE LA SIERRA DE POSTE PUEDEN
CAUSAR LESIONES PERSONALES
GRAVES. ANTES DE ENCENDER LA SIERRA
DE POSTE, REDUZCA AL MÍNIMO TODAS LAS
DISTRACCIONES, MANTENGA LAS PARTES
DEL CUERPO ALEJADAS DE LA CADENA DE LA
SIERRA Y ASEGÚRESE DE QUE LA CADENA NO
ESTÉ EN CONTACTO CON NINGÚN OBJETO.
ADVERTENCIA: USAR UNA SOLA
MANO PARA OPERAR LA SIERRA DE
POSTE PUEDE CAUSAR LESIONES
PERSONALES. USE AMBAS MANOS AL
OPERAR LA SIERRA DE POSTE CONSULTE LA
FIG. 3.
PRECAUCIÓN: EL CONTACTO CON
LA SUCIEDAD PROYECTADA, O EL
CONTACTO ACCIDENTAL CON LA
CADENA DE LA SIERRA, PUEDEN
CAUSAR LESIONES PERSONALES.
SIEMPRE USE UN EQUIPO DE PROTECCIÓN PARA
LA CABEZA, LAS MANOS, LAS PIERNAS Y LOS PIES.
PRECAUCIÓN: LAS RAMAS BAJO
TENSIÓN PUEDEN “REBOTAR” Y
GOLPEAR AL OPERADOR O HACER QUE
LA SIERRA DE POSTE QUEDE FUERA DE
CONTROL, LO CUAL PUEDE CAUSAR
LESIONES PERSONALES. SIEMPRE ESTÉ
ATENTO A LA MADERA BAJO TENSIÓN QUE
PUEDA GOLPEARLO O A LA SIERRA DE POSTE
AL CORTAR.
PRECAUCIÓN: UNA TENSIÓN O
LUBRICACIÓN INADECUADAS DE
LA CADENA PUEDEN AUMENTAR LA
PROBABILIDAD DE SUFRIR LESIONES
DEBIDO AL REBOTE. SIEMPRE SIGA LAS
INSTRUCCIONES DESCRITAS EN LA SECCIÓN
“TENSADO DE LA CADENA DE LA SIERRA” EN
ESTE MANUAL.
PRECAUCIÓN: LAS SUPERFICIES DE
AGARRE HÚMEDAS O ENGRASADAS
PUEDEN PROVOCAR UNA PÉRDIDA DE
CONTROL DE LA HERRAMIENTA, LO
CUAL CAUSA LESIONES PERSONALES.
MANTENGA SIEMPRE LOS MANGOS SECOS,
LIMPIOS Y LIBRES DE ACEITE Y GRASA.
PRECAUCIÓN: EL USO DE LA SIERRA
DE POSTE PARA APLICACIONES
DIFERENTES DE SU USO PREVISTO
PODRÍA PRODUCIR UNA SITUACIÓN
PELIGROSA. LA SIERRA DE POSTE ESTÁ
DISEÑADA EXCLUSIVAMENTE PARA CORTAR
MADERAS O RAMAS PEQUEÑAS.
PRECAUCIÓN: PARA EVITAR EL
CONTACTO ACCIDENTAL CON LA
CADENA DE LA SIERRA DURANTE EL
TRANSPORTE, SIEMPRE COLOQUE LA
FUNDA DE LA CUCHILLA Y MANTENGA
LAS MANOS Y LOS DEDOS ALEJADOS
DE LA ZONA DEL GATILLO FIG. 4.
FIG. 3
FIG. 4

74
AC 1113 - F/N 563397
REGLAS DE SEGURIDAD
Sistema de herramientas inalámbricas OREGON®
SIERRA DE POSTE MODELO PS250
ALMACENAMIENTO,
TRANSPORTE Y ELIMINACIÓN
ALMACENAR LA SIERRA DE POSTE
• Extraiga el módulo de la batería de la sierra
de poste.
• Limpie minuciosamente la sierra de poste.
• Instale la funda de hoja.
• Almacene en un lugar seco.
• Mantenga fuera del alcance de los niños o
las mascotas.
• Es normal que se filtre una pequeña
cantidad de aceite desde la barra de guía
cuando la sierra de poste no está en uso.
Para evitar filtraciones, coloque la funda de
la cuchilla y una almohadilla absorbente
debajo de la barra.
ALMACENAMIENTO DEL MÓDULO DE
LA BATERÍA
Cuando almacene la batería por más de
nueve meses, siga estas pautas:
• Quite el módulo de la batería de la sierra
de poste o del cargador.
• Almacene en un lugar fresco y seco.
• Mantenga fuera del alcance de los niños o
las mascotas.
• Para prolongar la vida útil de la batería,
nunca almacene el módulo de la batería
completamente descargado (sin ninguna
luz indicadora encendida) (Fig. ).
• Almacene a una temperatura entre los
- °C y °C (- °F y los °F).
CÓMO ALMACENAR EL CARGADOR
• Retire la batería del cargador.
• Desconecte el cargador de la fuente de
energía.
• Almacene en un lugar seco.
• Mantenga fuera del alcance de los niños o
las mascotas.
Consulte “Mantenimiento y limpieza” para
obtener más información.
TRANSPORTAR LA SIERRA DE POSTE
Antes de transportarla, prepare la sierra
de poste como se describe en la sección
“Almacenar la sierra de poste”. Use la
funda de la cuchilla durante el transporte
y el almacenamiento y, si lo desea, drene
el aceite de la barra y de la cadena para
reducir las filtraciones.
CÓMO TRANSPORTAR LA BATERÍA
Cumpla con las reglamentaciones locales
y nacionales al enviar baterías de litios
de iones. Es posible que se requiera un
etiquetado especial.
ELIMINACIÓN DE LA SIERRA DE POSTE Y
DEL CARGADOR
El producto OREGON® se diseña y fabrica
con materiales y componentes de alta
calidad que pueden reciclarse y reutilizarse.
Tenga a bien desechar este equipo de
forma adecuada desde el punto de vista
medioambiental en un centro de reciclaje o
recolección de residuos local.
ELIMINACIÓN DEL MÓDULO DE LA
BATERÍA
No incinere ni deseche la batería junto a los
residuos domésticos. Los organismos
locales de reciclaje y de gestión de residuos
tienen información sobre cómo reciclar o
desechar los residuos correctamente. En los
Estados Unidos y Canadá, la recolección de
baterías está a cargo de Rechargeable
Battery Recycling Corporation (Empresa de
Reciclaje de Baterías Recargables).
OREGON® ya cubrió los gastos del reciclaje
de las baterías. Lleve las baterías en desuso
a un comercio minorista o un centro de
reciclaje participante. Si desea obtener la
ubicación de los centros de entrega u otra
información, visite www.callrecycle.org o
llame al --BATTERY.
FIG. 5
LUCES INDICADORAS

75
AC 1113 - F/N 563397
REGLAS DE SEGURIDAD
Sistema de herramientas inalámbricas OREGON®
SIERRA DE POSTE MODELO PS250
SEGURIDAD DE LA BATERÍA
ADVERTENCIA: NO CUIDAR LA
BATERÍA CORRECTAMENTE PODRÍA
HACER QUE LA BATERÍA DERRAME
SUSTANCIAS QUÍMICAS PELIGROSAS,
SE SOBRECALIENTE, EMITA HUMO,
ESTALLE, CREE UNA LLAMARADA,
EXPLOTE O SE INCENDIE. SIGA ESTAS
REGLAS DE SEGURIDAD.
PRECAUCIÓN: NO DESECHE
EL MÓDULO DE LA BATERÍA CON
LA BASURA DOMICILIARIA NI LO
INCINERE. LOS MÓDULOS DE BATERÍA
DE IONES DE LITIO DEBEN RECICLARSE
EN UN CENTRO DE RECICLAJE
AUTORIZADO LOCAL.
IMPORTANTE: LA EXPOSICIÓN AL
CALOR EXCESIVO PUEDE PERJUDICAR
EL RENDIMIENTO DE LA BATERÍA O
REDUCIR SU VIDA ÚTIL. NO EXPONGA
LAS BATERÍAS A TEMPERATURAS
DE CALOR EXTREMAS, COMO POR
EJEMPLO DENTRO DE UN VEHÍCULO
EN UN DÍA CALUROSO.
• No intente recargar un módulo de batería
que no sea recargable.
• No desarme ni modifique la batería.
Esto podría dañar las características de
seguridad.
• No conecte los terminales positivo (+)
y negativo (-) con objetos metálicos ni
almacene la batería junto con objetos
metálicos como monedas o tornillos. Esto
puede provocar un cortocircuito y generar
suficiente calor como para provocar
quemaduras.
• No incinere el módulo de la batería
ni lo exponga a calor excesivo. Esto
podría derretir el aislamiento o dañar las
características de seguridad.
• No use, cargue ni almacene la batería
cerca de una fuente de calor a más
de °C ( °F). Esto podría provocar
sobrecalentamiento y un cortocircuito
interno.
• No exponga la batería a condiciones
de extrema humedad. Esto puede
dañar las características de seguridad,
producir una carga con corriente y
voltaje extremadamente altos y provocar
reacciones químicas anormales.
• Use únicamente el cargador
específicamente diseñado para el módulo
de la batería y siga las precauciones de
seguridad que se describen en la sección
“Seguridad del cargador”. Usar otro
cargador puede dañar las características
de seguridad, producir una carga con
corriente y voltaje extremadamente altos y
provocar reacciones químicas anormales.
• No use módulos de batería marca
OREGON® en herramientas que no sean
marca OREGON®.
• No golpee, perfore ni arroje la batería, y no
utilice una batería dañada ni deformada.
• Si la recarga falla, no vuelva a intentarla.
• Si el módulo de la batería despide
olor, genera calor, se decolora, se
deforma o presenta cualquier tipo de
anomalía durante el uso, la recarga o el
almacenamiento, quítela inmediatamente
de la sierra de poste o del cargador.
• Todo líquido que pierda la batería es
corrosivo, puede dañar los ojos y la piel, y
puede ser tóxico si se traga.
SEGURIDAD DEL CARGADOR
INSTRUCCIONES DE SEGURIDAD
IMPORTANTES
ADVERTENCIA: RIESGO DE
DESCARGA ELÉCTRICA. SI USA
LA HERRAMIENTA AL AIRE LIBRE,
CONÉCTELA ÚNICAMENTE A UN
TOMACORRIENTE CUBIERTO “CLASE
A” QUE ESTÉ PROTEGIDO POR
UN DISYUNTOR POR CORRIENTE
DIFERENCIAL GFCI Y QUE SEA
IMPERMEABLE, INCLUSO CON LA
UNIDAD CONECTADA. SI NO CUENTA
CON UN TOMACORRIENTE DE ESTE
TIPO, PÓNGASE EN CONTACTO CON UN
ELECTRICISTA CALIFICADO PARA SU
CORRECTA INSTALACIÓN. ASEGÚRESE
DE QUE LA UNIDAD DE ALIMENTACIÓN
Y EL CABLE NO EVITEN QUE LA
CUBIERTA DEL TOMACORRIENTE
CIERRE POR COMPLETO.

76
AC 1113 - F/N 563397
REGLAS DE SEGURIDAD
Sistema de herramientas inalámbricas OREGON®
SIERRA DE POSTE MODELO PS250
IMPORTANTE: ESTE ARTEFACTO
NO ESTÁ DISEÑADO PARA SER
USADO POR PERSONAS INCLUIDOS
LOS NIÑOS CON CAPACIDADES
FÍSICAS, PERCEPTIVAS NI MENTALES
REDUCIDAS O QUE NO TENGAN LOS
CONOCIMIENTOS ADECUADOS,
A MENOS QUE ESTÉN BAJO LA
SUPERVISIÓN E INSTRUCCIÓN DE
UNA PERSONA RESPONSABLE POR
SU SEGURIDAD. SUPERVISE A LOS
NIÑOS PARA ASEGURARSE DE QUE NO
JUEGUEN CON LOS ARTEFACTOS.
IMPORTANTE: USE ESTE CARGADOR
ÚNICAMENTE CON EL CABLE DE
ALIMENTACIÓN QUE SE PROVEE Y
ASEGÚRESE DE QUE EL ENCHUFE
SE CONECTE CORRECTAMENTE AL
TOMACORRIENTE.
Al utilizar productos eléctricos, siempre
deben seguirse precauciones básicas entre
las que se incluyen las siguientes:
• Lea y siga todas las instrucciones de
seguridad antes de usar la herramienta.
Lea y siga todas las instrucciones de seguridad
que se encuentren en el producto o que se
incluyan con el mismo.
• Conserve estas instrucciones.
• No utilice un cable de extensión.
• Un cable dañado o enredado conlleva
mayor riesgo de que se produzca
una descarga eléctrica. No abuse el
cable de alimentación. Nunca use el cable
para transportar, acarrear ni desenchufar la
herramienta eléctrica. Mantenga el cable alejado
del calor, el aceite, los bordes filosos y las piezas
móviles.
• No exponga el cargador a la lluvia.
El cargador es solo para uso en interiores.
• No utilice a menos de m ( ft) de una
piscina.
• No utilice en un baño.

77
AC 1113 - F/N 563397
DESEMPAQUE Y ARMADO
Sistema de herramientas inalámbricas OREGON®
SIERRA DE POSTE MODELO PS250
DESEMPAQUE Y ARMADO
DESEMPAQUE
QUÉ HAY EN LA CAJA?
Se deben seguir algunos pasos de armado
antes de usar la sierra de poste. Los
siguientes elementos se envían con la sierra
de poste:
• Cabezal de potencia
• Eje de extensión con cabezal de corte
unido
• Barra de guía
• Cadena de la sierra
• Funda de hoja
• Arnés
• Destornillador
• Llave Allen
• Dos tornillos Allen
• Aceite para la barra y la cadena
• Cargador y cable de alimentación (si se
encuentran equipados).
• Batería (si se encuentra equipada).
Luego de quitar la sierra de poste de la
caja, examínela cuidadosamente para
asegurarse de que no haya sufrido daños
durante el envío y de que no falten piezas.
Si hay piezas dañadas o faltan piezas, no
use la sierra de poste. Llame al Sistema
de herramientas inalámbricas OREGON®
al .. para obtener piezas de
repuesto.
ARMADO
PELIGRO: PARA EVITAR LESIONES
PERSONALES GRAVES, NO USE
LA SIERRA DE POSTE SI EL EJE DE
EXTENSIÓN, LA BARRA DE GUÍA, LA
CADENA DE LA SIERRA O LA CUBIERTA
LATERAL NO ESTÁN ARMADOS
CORRECTAMENTE.
ADVERTENCIA: UNA HERRAMIENTA
A BATERÍA CON EL MÓDULO DE
LA BATERÍA CONECTADO SIEMPRE
ESTÁ EN CONDICIONES DE
FUNCIONAR Y PUEDE ARRANCAR
ACCIDENTALMENTE. EXTRAIGA EL
MÓDULO DE LA BATERÍA DE LA SIERRA
DE POSTE ANTES DE CONECTAR EL
EJE DE EXTENSIÓN, LA BARRA Y LA
CADENA.
ARMAR EL EJE DE EXTENSIÓN
El eje de extensión encaja en la carcasa del
motor en el cabezal de potencia (Fig. ).
• Es importante asegurarse de que
el eje motor interno esté asentado
correctamente. Para asegurarse de que
quede bien asentado, use un trapo limpio
y extraiga el eje motor de aluminio del
poste de fibra de vidrio unos in ( cm)
aproximadamente. Con el trapo, gire el eje
de aluminio y al mismo tiempo presiónelo
ligeramente. Esto permitirá que el eje
motor se asiente correctamente en el eje
que se encuentra dentro de la carcasa
del motor. Una vez que esté asentado
correctamente, el extremo cilíndrico del
eje motor quedará completamente oculto
debajo del reborde de la carcasa del
motor.
FIG. 6

78
AC 1113 - F/N 563397
DESEMPAQUE Y ARMADO
Sistema de herramientas inalámbricas OREGON®
SIERRA DE POSTE MODELO PS250
• Después de asentar correctamente el
eje motor de aluminio, presione el poste
de fibra de vidrio para introducirlo por la
abertura de la carcasa del motor.
• Ubique los tornillos Allen que se
proporcionan y colóquelos en los agujeros
de la tapa roja. La tapa roja de la carcasa
del motor funciona como un ajuste de
compresión que mantiene el poste en su
lugar.
• Use la llave Allen de mm suministrada
para ajustar parcialmente los tornillos
Allen. Continúe ajustando y alterne entre
los tornillos, hasta que ambos tornillos
estén bien ajustados. Nota: Es posible que
deba presionar la tapa roja para que se
ajuste más a la carcasa del motor de modo
que los tornillos hagan contacto con las
roscas internas.
LLENAR EL DEPÓSITO DE ACEITE
DE LA BARRA Y LA CADENA
IMPORTANTE: EL ACEITE DE LA BARRA
Y LA CADENA EVITA EL DESGASTE
PREMATURO. NUNCA USE LA SIERRA
DE POSTE SI NO PUEDE VER EL ACEITE.
VERIFIQUE EL NIVEL DE ACEITE CON
FRECUENCIA Y LLENE EL DEPÓSITO
CUANDO SEA NECESARIO.
El aceite de la barra y la cadena es necesario
para lubricar adecuadamente la barra
de guía y la cadena de la sierra. La sierra
de poste cuenta con un engrasador
automático que deposita aceite en la
barra y la cadena cuando estas están
en funcionamiento para mantenerlas
lubricadas. Para obtener mejores resultados,
use aceite OREGON® para la barra y la
cadena. Está diseñado especialmente para
proporcionar una baja fricción y cortes más
rápidos. NO use aceite ni otros lubricantes
que no estén diseñados específicamente
para su uso en la barra y la cadena. Esto
puede provocar una obstrucción en el
sistema de aceite, lo cual puede ocasionar
un desgaste prematuro de la barra y la
cadena.
• Coloque la sierra de poste de costado
sobre una superficie firme y plana, de
modo que la tapa del aceite quede en la
parte superior (Fig. ).
• Limpie cualquier suciedad de la zona de
la tapa.
• Quite la tapa.
• Vierta cuidadosamente el aceite para la
barra y la cadena en el depósito.
• Coloque la tapa y asegúrese de que puede
ver el aceite en el depósito.
Si no ve el aceite en el depósito, deberá
colocar más aceite para la barra y la cadena.
FIG. 7

79
AC 1113 - F/N 563397
DESEMPAQUE Y ARMADO
Sistema de herramientas inalámbricas OREGON®
SIERRA DE POSTE MODELO PS250
ARMAR LA BARRA DE GUÍA Y LA
CADENA DE LA SIERRA
ADVERTENCIA: UNA HERRAMIENTA
A BATERÍA CON EL MÓDULO DE
LA BATERÍA CONECTADO SIEMPRE
ESTÁ EN CONDICIONES DE
FUNCIONAR Y PUEDE ARRANCAR
ACCIDENTALMENTE. EXTRAIGA EL
MÓDULO DE LA BATERÍA DE LA SIERRA
DE POSTE ANTES DE CONECTAR EL
EJE DE EXTENSIÓN, LA BARRA Y LA
CADENA.
Colóquese guantes y extraiga la batería.
Asegúrese de que la almohadilla de la barra,
la rueda dentada de accionamiento y la
clavija de tensión estén libres de suciedad.
• Ajuste el tornillo tensor hacia atrás y hacia
la parte posterior del cabezal de corte
tanto como sea posible.
• Coloque la barra de guía en la almohadilla
de la barra al deslizar la ranura de la barra
sobre la brida de alineación (Fig. ) y
asegúrese de que la clavija de tensión esté
insertada en el orificio inferior de la cola de
la barra.
• Pase la cadena de la sierra sobre la rueda
dentada de accionamiento de manera que
los bordes de corte de los dientes a lo largo
de la parte superior de la barra queden
opuestos al cabezal de corte (Fig. ).
• Introduzca la cadena en la ranura de la
barra y deslice la barra lejos del motor para
tensar la cadena (Fig. ). Ajuste la posición
de la clavija de tensión hasta que encaje
en el orificio de la barra.
• Instale la cubierta lateral y asegúrese de que
el retén de la cadena esté bien asentado
en su orificio; luego, ajuste ligeramente la
perilla de la cubierta lateral (Fig. ).
IMPORTANTE: LA CADENA DE LA
SIERRA DEBE ESTAR CORRECTAMENTE
TENSADA ANTES DE USARLA.
CONSULTE LA SECCIÓN “TENSADO DE
LA CADENA DE LA SIERRA”.
PERNO DE
MONTAJE
BRIDA DE
ALINEACIÓN
ALMOHADILLA
DE LA BARRA
TORNILLO
TENSOR
CLAVIJA DE
TENSIÓN
FIG. 8
FIG. 9
FIG. 10
FIG. 11

80
AC 1113 - F/N 563397
DESEMPAQUE Y ARMADO
Sistema de herramientas inalámbricas OREGON®
SIERRA DE POSTE MODELO PS250
TENSADO DE LA CADENA DE LA
SIERRA
ADVERTENCIA: UNA HERRAMIENTA
A BATERÍA CON EL MÓDULO DE
LA BATERÍA CONECTADO SIEMPRE
ESTÁ EN CONDICIONES DE
FUNCIONAR Y PUEDE ARRANCAR
ACCIDENTALMENTE. EXTRAIGA EL
MÓDULO DE LA BATERÍA DE LA SIERRA
DE POSTE ANTES DE CONECTAR EL
EJE DE EXTENSIÓN, LA BARRA Y LA
CADENA.
Utilice guantes.
• Extraiga la batería antes de realizar el
tensado.
• Afloje la perilla de la cubierta lateral.
• Sostenga la punta de la barra de guía
(Fig. ) y ajuste el tornillo tensor.
• Ajuste el tornillo tensor hasta que las
cuchillas inferiores debajo de la barra
entren firmemente en contacto con la
barra (Fig. ).
• Ajuste la perilla de la cubierta lateral.
• La tensión de la cadena de la sierra es
correcta cuando, con una mano
enguantada y un poco de esfuerzo, se
puede tirar de la cadena suavemente
alrededor de la barra. La cadena debe
tocar la parte inferior del riel de la barra
(Fig. ).
Después de un corto período de uso, deje
que la cadena se enfríe y vuelva a verificar
la tensión (extraiga la batería primero).
Controle cuidadosamente la tensión
durante la primera media hora de uso y
periódicamente durante la vida útil de
la cadena. Vuelva a ajustarla según sea
necesario cuando la cadena y la barra estén
frías al tacto. Nunca ajuste la cadena si está
caliente.
La cadena se estirará como resultado del
uso normal, pero la falta de aceite suficiente,
el uso agresivo o la falta de mantenimiento
recomendado pueden causar un
estiramiento prematuro.
FIG. 12
FIG. 13
FIG. 14

81
AC 1113 - F/N 563397
USAR LA SIERRA DE POSTE
Sistema de herramientas inalámbricas OREGON®
SIERRA DE POSTE MODELO PS250
USAR LA SIERRA DE POSTE
BATERÍA Y CARGADOR
ADVERTENCIA: PARA REDUCIR
EL RIESGO DE SUFRIR DESCARGAS
ELÉCTRICAS, NO CARGUE EL MÓDULO
DE LA BATERÍA BAJO LA LLUVIA.
INDICADOR LED DEL NIVEL DE CARGA
DE LA BATERÍA
La batería de iones de litio está equipada
con un indicador LED de nivel de carga.
Para ver el nivel de carga de la batería,
presione el botón del indicador en el frente
del módulo de la batería (Fig. ).
Sin luces: recargue.
Una luz verde fija: menos del % de
carga. Cargue la batería antes
de utilizarla.
Dos luces verdes fijas:
entre el % y el % de carga.
Tres luces verdes fijas:
entre el % y el % de carga.
Cuatro luces verdes fijas:
entre el % y el % de carga.
CÓMO CONECTAR EL CARGADOR
Si el cargador cuenta con un cable de
alimentación independiente, conecte el
cable del cargador al cargador y a un
tomacorriente adecuado (Fig. ).
Usé únicamente los cables que vinieron
con el cargador. La primera vez que use el
cargador, verifique que el tipo de enchufe
coincida con el tomacorriente.
INDICADOR LED DEL ESTADO DE
CARGA DEL CARGADOR
El cargador de la batería está equipado con
un indicador LED del estado de carga que
indica el estado de carga y las condiciones
que podrían retrasar o impedir la carga
(Fig. ).
Nota: hasta que no se inserte un módulo de
la batería, no se verá ninguna luz.
Luz naranja intermitente: existe
una condición de falla. Hay varias
causas posibles. Consulte la sección
"Solución de problemas" de este
manual.
Luz naranja fija: la temperatura del
módulo de la batería está fuera del
rango aceptable ( °C/ °F a
°C/ °). Permita que el módulo
de la batería alcance el rango de
temperatura aceptable antes de
cargarlo. El módulo se puede dejar
en el cargador mientras se ajusta la
temperatura. La carga comenzará
cuando se alcance la temperatura
adecuada.
Luz verde intermitente: la batería se
está cargando.
Luz verde fija: el módulo de la
batería está listo para utilizar.
FIG. 15
LUCES INDICADORAS
BOTÓN DEL INDICADOR
FIG. 16
FIG. 17

82
AC 1113 - F/N 563397
USAR LA SIERRA DE POSTE
Sistema de herramientas inalámbricas OREGON®
SIERRA DE POSTE MODELO PS250
CÓMO CARGAR LA BATERÍA
ADVERTENCIA: NO SEGUIR LOS
PROCEDIMIENTOS DE CARGA
ADECUADOS PUEDE PROVOCAR
VOLTAJE EXCESIVO, FLUJO DE
CORRIENTE EXCESIVO, PÉRDIDA
DE CONTROL DURANTE LA CARGA,
FILTRACIÓN DE PRODUCTOS
QUÍMICOS PELIGROSOS, GENERACIÓN
DE CALOR, ESTALLIDO O INCENDIO.
SIGA ESTAS INSTRUCCIONES DE
CARGA.
Con el cable del cargador conectado al
cargador y enchufado en un tomacorriente,
alinee las ranuras de la batería con los
carriles del cargador y deslice el módulo de
la batería en el cargador hasta que esté
completamente asentado (Fig. ).
Verifique el indicador del estado de carga
para conocer las condiciones de carga.
INTRODUCCIÓN Y DESBLOQUEO
DE LA BATERÍA
Utilice únicamente los módulos de la
batería de marca OREGON® especificados
en estas instrucciones operativas.
Alinee la ranura de la batería con los
carriles dentro del puerto de la batería.
Inserte firmemente el módulo de la batería
en el puerto de la batería de la sierra de
poste, presionando hacia adelante hasta
que haga clic en señal de que encajó en su
sitio (Fig. ).
Para extraer el módulo de la batería,
levante la liberación de la batería, sujete
los laterales del módulo de la batería y
extráigalo (Fig. ).
FIG. 18
FIG. 19
FIG. 20

83
AC 1113 - F/N 563397
USAR LA SIERRA DE POSTE
Sistema de herramientas inalámbricas OREGON®
SIERRA DE POSTE MODELO PS250
OPERACIÓN GENERAL
PELIGRO: PARA EVITAR SUFRIR
LESIONES PERSONALES GRAVES, NO
SE ESTIRE MÁS ALLÁ DE SU ALCANCE
NI SE PARE SOBRE UNA ESCALERA, UN
TABURETE NI EN UNA POSICIÓN DE
ALTURA QUE NO ESTÉ TOTALMENTE
ASEGURADA.
PELIGRO: PARA EVITAR SUFRIR
LESIONES PERSONALES GRAVES, NO
SE PARE DIRECTAMENTE DEBAJO
DE LA RAMA SOBRE LA CUAL ESTÁ
TRABAJANDO. ALÉJESE PARA QUE
LA RAMA PUEDA CAER DE MANERA
SEGURA AL SUELO.
ADVERTENCIA: PARA REDUCIR EL
RIESGO DE SUFRIR LESIONES, SIEMPRE
USE PROTECCIÓN PARA LA CABEZA,
LOS OÍDOS Y LOS OJOS, BOTAS Y
GUANTES ADECUADOS.
TEMPERATURA OPERATIVA
Esta sierra de poste está diseñada para
operar dentro de un rango de temperatura
de °C a °C ( °F a °F).
SUJECIÓN
Siempre agarre la herramienta con ambas
manos. Para el uso diestro, sujete el eje de
extensión cómodamente con la mano
izquierda y el mango trasero con la derecha.
Envuelva los dedos firmemente alrededor
de cada empuñadura (Fig. ).
Para el uso izquierdo, sujete el eje de
extensión cómodamente con la mano
derecha y el mango trasero con la izquierda
(Fig. ).
Sujete la sierra de poste a
aproximadamente un ángulo de °
(Fig. ); esta es la posición de trabajo
menos agotadora y ayuda a garantizar una
distancia segura del lugar donde cae
suciedad.
SUJECIÓN CON LA
MANO DERECHA
FIG. 21
SUJECIÓN CON LA
MANO IZQUIERDA
FIG. 22
FIG. 23
60°

84
AC 1113 - F/N 563397
USAR LA SIERRA DE POSTE
Sistema de herramientas inalámbricas OREGON®
SIERRA DE POSTE MODELO PS250
POSICIÓN
Párese con ambos pies sobre suelo sólido,
con el peso distribuido de manera uniforme
entre ellos.
Sostenga la sierra de poste tan cerca del
cuerpo como sea posible para mantener el
control (Fig. ).
USAR DEL ARNÉS
El arnés ayuda a equilibrar la sierra de poste
y a distribuir el peso de la sierra de poste
a través del cuerpo, lo cual aumenta la
comodidad para un uso prolongado.
Este arnés cuenta con una liberación rápida
que se puede operar con una sola mano
(Fig. ).
• Use el arnés sobre la cabeza y el hombro
opuesto al lado del gatillo.
• Ajuste la longitud de la correa de manera
que el broche esté aproximadamente a la
misma altura que la cadera (Fig. ).
• Coloque la sierra de poste sobre una
superficie plana con el lazo del arnés hacia
arriba.
• Una el broche del arnés al lazo del arnés
(Fig. ).
AJUSTAR LA LONGITUD DEL EJE
La sierra de poste cuenta con un eje de
extensión que permite llegar mejor a los
árboles más altos.
Para facilitar el uso, extienda el eje
únicamente en la medida necesaria para
alcanzar el objetivo de manera segura.
• Apague la sierra de poste y extraiga el
módulo de la batería.
FIG. 24
FIG. 25
FIG. 26
FIG. 27

85
AC 1113 - F/N 563397
USAR LA SIERRA DE POSTE
Sistema de herramientas inalámbricas OREGON®
SIERRA DE POSTE MODELO PS250
• Gire el collarín de extensión hacia la
izquierda () hasta que el eje se deslice
libremente (Fig. ).
• Deslice el eje hasta que quede en la
longitud deseada ().
• Gire el collarín de extensión hacia la
derecha para bloquear el eje en su lugar.
DETENER LA SIERRA DE POSTE
Suelte el interruptor de gatillo para detener
la sierra de poste.
ARRANCAR LA SIERRA DE POSTE
ADVERTENCIA: PARA REDUCIR EL
RIESGO DE SUFRIR LESIONES, NUNCA
ANULE EL SISTEMA DE BLOQUEO AL
UNIR, CABLEAR O ATAR EL BLOQUEO
DEL GATILLO.
Si usa el arnés, colóqueselo y una el broche
del arnés al anillo de fijación. Sujete el eje
de extensión y el mango trasero con
firmeza (Fig. ). Presione el bloqueo del
gatillo () con la palma de la mano y el
interruptor de gatillo () con los dedos.
CORTE
CORTE BÁSICO
PELIGRO: PARA REDUCIR EL RIESGO
DE DESCARGAS ELÉCTRICAS, NUNCA
OPERE ESTA HERRAMIENTA CERCA DE
CABLES QUE PUEDAN TENER
CORRIENTE ELÉCTRICA.
LA ELECTRICIDAD PUEDE SALTAR DE
UN PUNTO A OTRO. MANTENGA UNA
DISTANCIA DE AL MENOS 15 M 50 FT
ENTRE LA SIERRA DE POSTE Y
CUALQUIER LÍNEA ELÉCTRICA QUE
CONDUZCA CORRIENTE O RAMA EN
CONTACTO CON UNA LÍNEA
ELÉCTRICA. ANTES DE TRABAJAR A
MENOS DE 15 M 50 FT, PÓNGASE EN
CONTACTO CON EL SERVICIO
ELÉCTRICO PÚBLICO Y ASEGÚRESE DE
QUE LA CORRIENTE ESTÉ APAGADA
FIG. 30.
FIG. 28
1
2
1 BLOQUEO DEL
GATILLO
2 INTERRUPTOR
DE GATILLO
FIG. 29
FIG. 30
15 M
50 FT

86
AC 1113 - F/N 563397
USAR LA SIERRA DE POSTE
Sistema de herramientas inalámbricas OREGON®
SIERRA DE POSTE MODELO PS250
ADVERTENCIA: PARA REDUCIR EL
RIESGO DE SUFRIR LESIONES, USE
PROTECCIÓN PARA LA CABEZA, LOS
OÍDOS Y LOS OJOS, BOTAS Y GUANTES
ADECUADOS.
ADVERTENCIA: PARA REDUCIR
EL RIESGO DE SUFRIR LESIONES,
ASEGÚRESE SIEMPRE DE TENER BUEN
APOYO Y SOSTENGA LA SIERRA DE
POSTE FIRMEMENTE CON AMBAS
MANOS MIENTRAS EL MOTOR ESTÉ EN
FUNCIONAMIENTO.
ADVERTENCIA: LAS RAMAS QUE
CAIGAN PUEDEN REBOTAR LUEGO DE
TOCAR EL SUELO. NUNCA TRABAJE
DEBAJO DE LA RAMA QUE ESTÁ
CORTANDO.
Cumpla con todas las reglas y
reglamentaciones nacionales y municipales
aplicables para cortar.
Tome descansos con frecuencia para
reducir el riesgo de sufrir lesiones.
Antes de empezar a cortar, asegúrese de que
la cadena de la sierra esté correctamente
tensada, que el engrasador automático esté
funcionando y que la cadena esté afilada.
Las cadenas de la sierra están hechas
exclusivamente para cortar madera. No
use la sierra de poste para cortar cualquier
otro material y no permita que la cadena
entre en contacto con tierra o piedras. Estos
materiales son extremadamente abrasivos y
desgastarán el revestimiento de protección
de la cadena en un tiempo muy corto.
Afile o cambie la cadena de la sierra si
ocurre alguna de estas condiciones:
• La presión requerida para hacer cortes
aumenta notablemente.
• La cantidad de cortes posibles con una
sola carga de la batería disminuye.
• Salen astillas de madera muy finas o como
si fueran polvo de la cadena.
No trabaje con una cadena desafilada ya
que esto aumentará el esfuerzo necesario
para cortar, provocará cortes irregulares y
aumentará el desgaste de la sierra de poste.
Nunca fuerce una cadena desafilada a cortar.
Empiece a cortar presionando ligeramente
la barra de guía contra la madera. Aplique
solo una presión ligera y deje que la sierra
haga el trabajo.
Mantenga una velocidad constante durante
todo el corte y libere la presión justo antes
del final del corte.
Si la sierra se detiene repentinamente al
cortar, extraiga la sierra del corte y luego
reanude el corte con una presión ligera
sobre la rama.
PODA
• Despeje el área de trabajo. Las ramas
caídas pueden rebotar o “volver”
después de tocar el suelo, por lo que es
fundamental mantener el suelo despejado
para proporcionar varias vías de despeje.
• Planee las vías de despeje antes de
empezar a cortar y asegúrese de que no
haya obstáculos. Sepa siempre cómo salir
del camino ante la caída de ramas.
• Asegúrese de que los transeúntes o
ayudantes estén a una distancia segura
de las ramas que puedan caer. Los
transeúntes o ayudantes no deben estar
directamente en frente ni detrás del
operador. Consulte la Fig. de la sección
“Seguridad en el área de trabajo”.
• Mantenga un apoyo sólido y sostenga la
sierra de poste firmemente con ambas
manos. No se estire. Nunca se suba a un
árbol o a una escalera para alcanzar las
ramas altas.
• Pode las ramas más bajas antes de podar
las más altas.
• Deje que la cadena de la sierra alcance la
velocidad máxima antes de cortar.
• Aplique una presión ligera en la rama.
• Para las ramas largas (Fig. ), corte primero
el extremo de la rama () para aliviar la
presión de la rama, y luego pode más
cerca del tronco ().
1
2
FIG. 31

87
AC 1113 - F/N 563397
USAR LA SIERRA DE POSTE
Sistema de herramientas inalámbricas OREGON®
SIERRA DE POSTE MODELO PS250
• Las ramas gruesas (más de cm de
diámetro) pueden astillar o pellizcar la
cadena al hacer un solo corte desde la
parte superior. Para evitar el pellizcado o
el astillado (Fig. ), primero haga un corte
de alivio poco profundo en la superficie
inferior de la rama (), y luego corte la
rama completamente desde la parte
superior ().
• Tras haber extraído la mayor parte de la
rama, haga un corte suave cerca del tronco
(Fig. ).
1
2
FIG. 32
FIG. 33

88
AC 1113 - F/N 563397
MANTENIMIENTO Y LIMPIEZA
Sistema de herramientas inalámbricas OREGON®
SIERRA DE POSTE MODELO PS250
MANTENIMIENTO Y LIMPIEZA
SIERRA DE POSTE
ADVERTENCIA: LA OMISIÓN DE
IDENTIFICACIÓN Y REEMPLAZO DE
PIEZAS DAÑADAS O DESGASTADAS
PUEDE CAUSAR LESIONES PERSONALES
GRAVES. INSPECCIONE LA SIERRA
DE POSTE REGULARMENTE. LA
INSPECCIÓN REGULAR ES EL PRIMER
PASO PARA EL MANTENIMIENTO
ADECUADO. SIGA LAS PAUTAS
ESTABLECIDAS A CONTINUACIÓN
PARA MAXIMIZAR LA SEGURIDAD Y LA
SATISFACCIÓN. REEMPLACE CUALQUIER
PIEZA DAÑADA O EXCESIVAMENTE
DESGASTADA INMEDIATAMENTE.
ADVERTENCIA: UNA HERRAMIENTA
A BATERÍA CON EL MÓDULO DE LA
BATERÍA CONECTADO SIEMPRE ESTÁ
EN CONDICIONES DE FUNCIONAR Y
PUEDE ARRANCAR ACCIDENTALMENTE.
EXTRAIGA EL MÓDULO DE LA BATERÍA
DE LA SIERRA DE POSTE ANTES DE
INSPECCIONARLA, LIMPIARLA O
REALIZAR EL MANTENIMIENTO.
PRECAUCIÓN: CUANDO LIMPIE LA
SIERRA DE POSTE, NO LA SUMERJA EN
AGUA NI EN OTROS LÍQUIDOS.
INSPECCIÓN
Antes de cada uso, y la sierra de poste si se
cae, revise las siguientes partes:
• Mangos: el mango trasero y el eje de
extensión no deben tener grietas ni otros
daños. Deben estar limpios y secos.
• Barra de guía: la barra debe estar recta
y no debe estar astillada, agrietada ni
desgastada de manera excesiva.
• Cadena de la sierra: la cadena debe estar
correctamente tensada y afilada y los
componentes no deben estar astillados,
agrietados ni desgastados de manera
excesiva. Consulte las secciones “Tensado
de la cadena de la sierra” y “Afilar la cadena
de la sierra”.
• Cubierta lateral: la cubierta lateral no debe
estar agrietada ni dañada. Debe encajar
perfectamente en el cuerpo de la sierra, sin
deformaciones. Asegúrese de que el retén
de la cadena no esté agrietado.
• Módulo de la batería: el módulo de la
batería debe estar limpio, seco y no debe
mostrar signos de punción, impacto ni de
cualquier otro daño. Los contactos deben
estar limpios, secos y libres de suciedad.
• Puerto de la batería: el puerto y los
contactos de la batería deben estar
limpios, secos y libres de suciedad.
• Nivel de aceite: asegúrese de que el
depósito de aceite esté lleno antes de
utilizar el producto.
• Engrasador automático: cuando la sierra
de poste esté en funcionamiento sin
que la barra de guía ni la cadena estén
colocadas, se filtra una pequeña cantidad
de aceite desde el orificio de la almohadilla
de la barra. Consulte la sección “Verificar el
engrasador automático”.
• Carcasa del motor: verifique que no haya
grietas en la cubierta ni suciedad en las
rejillas de entrada de aire.
• Arnés: la tela no debe estar cortada ni
deshilachada y las hebillas de ajuste y el
broche no deben estar agrietados.
• Collarín de extensión: asegúrese de que el
collarín de extensión no esté agrietado ni
dañado y que sostenga el eje de extensión
firmemente en su lugar cuando se lo ajuste.
Inspeccione periódicamente las siguientes
piezas:
• Rueda dentada de accionamiento: busque
surcos profundos, dientes rotos o zumbidos.
• Tornillo tensor: inspeccione la cabeza y
el cuerpo del tornillo tensor en busca de
desgaste excesivo, roscas desmontadas o
cruzadas, u otros daños.
• Cabezal de corte, cubierta lateral inferior:
asegúrese de que el perno de montaje de la
barra no esté doblado, desmontado ni que
la rosca esté cruzada y que la almohadilla
de la barra y la brida de alineación estén
intactas y libres de suciedad.
• Cargador: el cargador debe estar limpio,
seco y no debe estar perforado ni dañado.
La bandeja y los contactos de la batería
deben estar libres de suciedad. El cable no
debe estar dañado ni desgastado.
• Tornillos: asegúrese de que todos los
tornillos estén ajustados y preste especial
atención a los cuatro tornillos entre el eje
de extensión y el cabezal de corte.

89
AC 1113 - F/N 563397
MANTENIMIENTO Y LIMPIEZA
Sistema de herramientas inalámbricas OREGON®
SIERRA DE POSTE MODELO PS250
LIMPIEZA
ADVERTENCIA: PARA REDUCIR
EL RIESGO DE SUFRIR LESIONES,
EXTRAIGA EL MÓDULO DE LA BATERÍA
ANTES DE LIMPIAR.
PRECAUCIÓN: CUANDO LIMPIE LA
SIERRA DE POSTE, NO LA SUMERJA EN
AGUA NI EN OTROS LÍQUIDOS.
• Quite las virutas de madera y otra suciedad
del puerto de la batería. Asegúrese de que
los contactos estén limpios y secos.
• Después del uso, limpie la suciedad de
la cadena de la sierra y la barra de guía.
Limpie el cabezal de potencia con un paño
limpio, humedecido con una solución
a base de jabón neutro. Nunca use
limpiadores ni solventes fuertes.
• Limpie siempre las virutas de madera, el
aserrín y la suciedad de la ranura de la
barra cuando reemplace la cadena.
AFILAR LA CADENA DE LA SIERRA
Se recomienda que un concesionario de
servicio técnico OREGON® afile la cadena;
no obstante, también la puede afilar el
operador.
ADVERTENCIA: SI LA CADENA NO
ESTÁ CORRECTAMENTE AFILADA O
SI EL CALIBRE DE LA PROFUNDIDAD
ES MUY BAJO, EXISTE UN MAYOR
RIESGO DE SUFRIR LESIONES. SIEMPRE
AFILE LA CADENA SEGÚN LAS
ESPECIFICACIONES DESCRITAS EN
ESTE MANUAL.
IMPORTANTE: EL AFILADO DE
ACUERDO CON ESTAS INSTRUCCIONES
PROVOCARÁ UN DAÑO MENOR EN
LA CADENA DE LA SIERRA POR EL
CONTACTO CON LA SUCIEDAD O
CASOS SIMILARES. PARA REPARAR UN
DAÑO MÁS GRAVES EN LA CADENA
DE LA SIERRA COMO EL CONTACTO
CON HORMIGÓN, LLEVE LA CADENA
A UN CONCESIONARIO DE SERVICIO
TÉCNICO OREGON® AUTORIZADO O
REEMPLACE LA CADENA.
Para afilar la cadena se necesitan las
siguientes herramientas (disponibles
en un kit provisto por OREGON®;
consulte la sección “Especificaciones y
componentes”):
• Guía de la lima
• Lima redondeada de , mm para afilar la
cadena de la sierra (use únicamente limas
especiales para afilar la cadena de la sierra)
• Herramienta del calibre de la profundidad
de , mm (, in)
• Lima plana
Después de reunir las herramientas, use
guantes y protección para los ojos y
extraiga la batería. Luego, lime la cadena
para ajustar el calibre de la profundidad:
• Afloje la perilla de la cubierta lateral y
extraiga la cubierta lateral.
• Ajuste el tornillo tensor hacia atrás y hacia
la parte posterior del cabezal de corte
tanto como sea posible.
• Extraiga la cadena.
• Coloque la cadena en una prensa para
mantenerla firme.
• Coloque la herramienta del calibre de
la profundidad en la parte superior de
la cadena de manera que un calibre de
la profundidad sobresalga a través de la
ranura en la herramienta.
• Si el calibre de la profundidad se extiende
por encima de la parte superior de la
ranura, lime el nivel inferior del calibre
de la profundidad con la parte superior
de la herramienta usando una lima plana
(Fig. ). Nunca lime el calibre de la
profundidad lo suficientemente abajo
como para superar el ajuste del calibre de
la profundidad que se especifica en este
manual.
LIMA PLANA
HERRAMIENTA DEL
CALIBRE DE LA
PROFUNDIDAD:
FIG. 34

90
AC 1113 - F/N 563397
MANTENIMIENTO Y LIMPIEZA
Sistema de herramientas inalámbricas OREGON®
SIERRA DE POSTE MODELO PS250
IMPORTANTE: AFILE SOLO EN UNA
DIRECCIÓN, DESDE ADENTRO HACIA
AFUERA. NUNCA AFILE CON UN
MOVIMIENTO DE ADELANTE HACIA
ATRÁS.
• Lime desde la superficie interior del calibre
de la profundidad hacia la exterior (Fig. ).
• Quite la herramienta del calibre de la
profundidad.
• Después de bajar, siempre lime la esquina
frontal de cada calibre de la profundidad
de manera paralela a su forma redondeada
o en aumento (Fig. ).
• Repita estos pasos para cada calibre de la
profundidad de la cadena.
Después de establecer el calibre de la
profundidad, afile las cuchillas:
• Coloque la lima de la cadena en la guía de
la lima.
• Alinee la guía de la lima de modo que el
ángulo correcto de limado de la placa
superior que se indica en la guía de la lima
quede paralelo a la cadena (Fig. ).
• Afile las cuchillas en un lado de la cadena
primero. Haga o trazos con la lima
desde el interior de cada cuchilla hacia el
exterior. Use la misma cantidad de trazos
en cada cuchilla. Luego, gire la sierra de
poste y repita estos pasos para las cuchillas
del otro lado de la cadena (Fig. ).
• Lime nuevamente cualquier daño en la
parte superior del cromo o las placas
laterales (Fig. ).
FIG. 35
EXTERNO
INTERNO
FIG. 36
FIG. 37
GUÍA DE LA
LIMA
LIMA
REDONDEADA
FIG. 38
FIG. 39

91
AC 1113 - F/N 563397
MANTENIMIENTO Y LIMPIEZA
Sistema de herramientas inalámbricas OREGON®
SIERRA DE POSTE MODELO PS250
• Mantengas todas las longitudes de las
cuchillas iguales.
• Después de afilar todas las cuchillas, use la
guía de la lima para verificar nuevamente
los calibres de la profundidad. Si es
necesario, restablezca el calibre de la
profundidad.
• Reemplace la cadena, reemplace la
cubierta lateral y reemplace la batería.
MANTENIMIENTO DE LA BARRA
DE GUÍA
Para que la barra se desgaste de manera
pareja y para maximizar su vida útil, voltee
la barra de vez en cuando.
Utilice guantes.
• Extraiga la batería.
• Afloje la perilla de la cubierta lateral y
extraiga la cubierta lateral.
• Ajuste el tornillo tensor hacia atrás y hacia
la parte posterior del cabezal de corte
tanto como sea posible.
• Extraiga la barra y la cadena.
• Voltee la barra de forma vertical (Fig. ) y
vuelva a instalar la barra y la cadena como
se describe en la sección “Armar la barra de
guía y la cadena de la sierra”.
REEMPLAZAR UNA CADENA
DESGASTADA DE LA SIERRA
La cadena de la sierra debe ser reemplazada
cuando se agrieta o se estira hasta el
punto de que no se puede mantener a una
tensión adecuada, o cuando se rompen sus
dientes.
Utilice guantes.
• Extraiga la batería.
• Afloje la perilla de la cubierta lateral y
extraiga la cubierta lateral.
• Ajuste el tornillo tensor hacia atrás y hacia
la parte posterior del cabezal de corte
tanto como sea posible.
• Extraiga la barra y la cadena.
• Instale la cadena nueva como se describe
en la sección “Armar la barra de guía y la
cadena de la sierra”.
• Tense la cadena como se describe en la
sección “Tensado de la cadena de la sierra”.
REEMPLAZAR UNA BARRA DE
GUÍA DESGASTADA
ADVERTENCIA: LOS BORDES DE UNA
BARRA DE GUÍA DESGASTADA, SOBRE
TODO LOS BORDES DE LA RANURA
DONDE LA CADENA TOCA LA BARRA,
PUEDEN ESTAR MUY AFILADOS. USE
PROTECCIÓN ADECUADA PARA LAS
MANOS.
La barra de guía debe ser reemplazada
cuando se agrieta o presenta un desgaste
excesivo alrededor de los bordes, en
particular en la ranura donde la cadena de
la sierra toca la barra. La barra también debe
ser reemplazada si la rueda dentada de la
punta está desgastada, le faltan dientes o
no gira suavemente.
Utilice guantes.
• Extraiga la batería.
• Afloje la perilla de la cubierta lateral y
extraiga la cubierta lateral.
• Ajuste el tornillo tensor hacia atrás y hacia
la parte posterior del cabezal de corte
tanto como sea posible.
• Extraiga la barra y la cadena.
• Instale la barra nueva como se describe
en la sección “Armar la barra de guía y la
cadena de la sierra”.
• Tense la cadena como se describe en la
sección “Tensado de la cadena de la sierra”.
FIG. 40

92
AC 1113 - F/N 563397
MANTENIMIENTO Y LIMPIEZA
Sistema de herramientas inalámbricas OREGON®
SIERRA DE POSTE MODELO PS250
REEMPLAZAR LA RUEDA
DENTADA DE ACCIONAMIENTO
Reemplace la rueda dentada de
accionamiento después de cada dos
reemplazos de la cadena de la sierra, o
cuando la rueda dentada esté dañada.
Use guantes al extraer y reemplazar la barra
y la cadena.
• Extraiga la batería.
• Afloje la perilla de la cubierta lateral y
extraiga la cubierta lateral.
• Ajuste el tornillo tensor hacia atrás y hacia
la parte posterior del cabezal de corte
tanto como sea posible.
• Extraiga la barra y la cadena.
• Use un destornillador plano y pequeño
para abrir el broche en E haciendo palanca
y extraerlo, y quite la rueda dentada de
accionamiento y las arandelas (Fig. ).
• Inserte la rueda dentada de accionamiento
nueva con una arandela en cada lado e
instale el broche en E nuevo (Fig. ).
• Reemplace la barra y la cadena como se
describe en la sección “Armar la barra de
guía y la cadena de la sierra”.
• Tense la cadena como se describe en la
sección “Tensado de la cadena de la sierra”.
TENSADO
IMPORTANTE: TENSE ÚNICAMENTE
LA CADENA DE LA SIERRA CUANDO
LA CADENA ESTÉ FRÍA. UNA CADENA
CALIENTE SE PUEDE CONTRAER Y
DAÑAR LA BARRA DE GUÍA O LA
CADENA A MEDIDA QUE SE ENFRÍA.
Se debe tensar la cadena si esta no toca la
parte inferior de la barra cuando la sierra de
poste está apagada y fría.
Tense la cadena como se describe en la
sección “Tensado de la cadena de la sierra”.
BATERÍA
IMPORTANTE: EL MÓDULO DE LA
BATERÍA NO CONTIENE PIEZAS QUE
EL USUARIO PUEDA REPARAR. NO LO
DESARME.
Las baterías de iones de litio tienen una
duración predeterminada. Si la cantidad
de tiempo de corte por carga se reduce en
forma considerable, el módulo de la batería
se encuentra al final de su vida útil y debe
reemplazarse.
• Asegúrese de que el módulo de la batería,
incluidos los contactos, esté limpio, seco y
de que no tenga indicios de perforación,
impacto ni otro tipo de daño. Las baterías
rotas pueden provocar incendios o
despedir productos químicos peligrosos.
• Limpie los contactos sucios con un paño
suave y seco. La suciedad o el aceite
pueden provocar una conexión eléctrica
deficiente, lo cual produce una pérdida de
energía.
CARGADOR
• Desenchufe el cargador del tomacorriente.
• Limpie los contactos sucios con un paño
suave y seco.
INFORMACIÓN ADICIONAL
SOBRE EL MANTENIMIENTO
Para obtener información adicional
sobre el mantenimiento de la cadena
de la sierra, la barra de guía y la rueda
dentada de accionamiento, consulte el
Manual de seguridad y mantenimiento de
OREGON® en http://oregonproducts.com/
maintenance/manual.htm.
FIG. 41
FIG. 42

93
AC 1113 - F/N 563397
RESOLUCIÓN DE PROBLEMAS
Sistema de herramientas inalámbricas OREGON®
SIERRA DE POSTE MODELO PS250
RESOLUCIÓN DE PROBLEMAS
Utilice esta tabla para ver las posibles soluciones para los problemas potenciales de
la sierra de poste. Si estas sugerencias no resuelven el problema, consulte la sección
"Garantía y servicio técnico".
SÍNTOMA POSIBLE CAUSA MEDIDAS RECOMENDADAS
El motor se detiene
durante el corte
La cadena pellizcada en
el corte.
Corte la rama por debajo para aliviar la presión sobre
la rama. Consulte la sección “Corte”.
Sobrecalentamiento del
sistema de control
Deje que el sistema de control se enfríe.
El motor no
funciona o
funciona en forma
intermitente.
La batería está
descargada.
Recargue. Consulte la sección "Módulo de la batería y
cargador".
El bloqueo del acelerador
no está presionado.
Presione el bloqueo del gatillo antes de apretar
el interruptor de gatillo. Consulte la sección "Uso
general".
La batería no está
completamente insertada.
Presione la batería hacia el puerto de batería hasta oír
un clic al trabarse en su lugar.
Los contactos de la
batería están sucios.
Retire la batería, retire los desechos del puerto de
batería, y luego limpie los contactos con un paño
limpio y seco.
La batería está fría.
Permita que el módulo de la batería se caliente a la
temperatura operativa mínima de 0 °C (32 ° F).
Suciedad en la cubierta
lateral
Extraiga el módulo de la batería y luego quite la
cubierta lateral y limpie la suciedad.
Sobrecalentamiento del
motor
Deje que el motor se enfríe.
El motor funciona,
pero la cadena de la
sierra no gira,
La cadena no está
enganchada en la
rueda dentada de
accionamiento.
Vuelva a instalar la cadena y asegúrese de que
los eslabones motrices de la cadena estén
completamente asentados en la rueda dentada de
accionamiento. Consulte la sección “Reemplazar una
cadena desgastada de la sierra”.
La rueda dentada de la
punta de la barra no gira.
Reemplace la barra de guía. Consulte la sección
“Reemplazar una barra de guía desgastada”.
Eje motor asentado
incorrectamente en el
acoplador de la carcasa
del motor
Repita el proceso de “Armar el eje de extensión”. El
eje motor debe estar asentado correctamente en el
acoplador.
La sierra de
poste no corta
adecuadamente.
Tensión insuficiente de la
cadena
Tense la cadena. Consulte la sección “Tensado de la
cadena de la sierra”.
Cadena desafilada Consulte la sección “Afilar la cadena de la sierra”.
Cadena instalada al revés
Instale la cadena con los dientes hacia la dirección
correcta. Consulte la sección “Reemplazar una cadena
desgastada de la sierra”.
Cadena desgastada
Reemplace la cadena. Consulte la sección “Reemplazar
una cadena desgastada de la sierra”.
Cadena seca o
excesivamente estirada
Verifique el nivel de aceite. Rellene el depósito de
aceite si fuera necesario. Consulte la sección “Llenar el
depósito de aceite de la barra y la cadena”.
La cadena no está en la
ranura de la barra.
Vuelva a colocar la cadena en la ranura. Consulte
la sección “Armar la barra de guía y la cadena de la
sierra”.

94
AC 1113 - F/N 563397
RESOLUCIÓN DE PROBLEMAS
Sistema de herramientas inalámbricas OREGON®
SIERRA DE POSTE MODELO PS250
SÍNTOMA POSIBLE CAUSA MEDIDAS RECOMENDADAS
La barra y la cadena
están excesivamente
calientes o sale
humo de ellas.
La cadena no tiene
suficiente lubricación.
Verifique el nivel de aceite. Rellene el depósito de
aceite si fuera necesario. Consulte la sección “Llenar el
depósito de aceite de la barra y la cadena”.
La batería no se
carga.
La protección de la batería
contra temperaturas altas/
bajas está activada.
Esto puede ocurrir cuando la sierra se usa
continuamente o está expuesta a temperaturas
ambientales elevadas. Permita que el módulo de la
batería alcance la temperatura aceptable antes de
cargarlo. Consulte la sección "Módulo de la batería y
cargador".
Los contactos de la
batería o del cargador
están sucios o dañados.
Inspeccione los contactos de la batería y del
cargador. Si es necesario, limpie de acuerdo con las
instrucciones de este manual. Vuelva a insertar el
módulo de la batería en el cargador y asegúrese de
que esté completamente asentado.
La batería está llegando al
final de su vida útil.
Todas las baterías tienen una vida útil limitada. Si
el módulo de la batería tiene más de dos años o
ha sido recargado con frecuencia, tal vez sea hora
de reemplazarlo. Reemplácelo únicamente con el
módulo de la batería especificado para esta sierra de
poste.
Hay una falla en el
cargador.
Verifique el funcionamiento en un lugar de servicio
técnico aprobado.
Se obtiene poco
tiempo de corte en
relación con la carga
de la batería.
Cadena desafilada Consulte la sección “Afilar la cadena de la sierra”.
Cadena desgastada
Reemplace la cadena. Consulte la sección “Reemplazar
una cadena desgastada de la sierra”.
Cadena seca
Verifique el nivel de aceite. Rellene el depósito de
aceite si fuera necesario. Consulte la sección “Llenar el
depósito de aceite de la barra y la cadena”.
La cadena está demasiado
tensa.
Consulte la sección “Tensado de la cadena de la sierra”.
La técnica de corte no es
la adecuada.
Siga las pautas que figuran en la sección “Corte”.
Suciedad en la cubierta
lateral
Extraiga el módulo de la batería y luego quite la
cubierta lateral y limpie la suciedad.
La batería no está
completamente cargada.
Recargue. Consulte la sección "Módulo de la batería y
cargador".
El indicador
del estado de
carga muestra
una luz naranja
intermitente.
Cortocircuito del
cargador, excesiva
corriente del cargador,
exceso del límite de
voltaje, circuito abierto
en la batería o error en
el tiempo de espera de
carga/precarga.
1. Asegúrese de que el cable del cargador esté
conectado al cargador y al tomacorriente.
2. Asegúrese de que el cargador reciba el voltaje
correcto.
3. Intente cargar otro módulo de la batería diseñado
para este cargador.
Si esto no corrige el problema, verifique el
funcionamiento en un lugar de servicio técnico
aprobado.

95
AC 1113 - F/N 563397
ESPECIFICACIONES Y
COMPONENTES
Sistema de herramientas inalámbricas OREGON®
SIERRA DE POSTE MODELO PS250
ESPECIFICACIONES Y COMPONENTES
ADVERTENCIA: EL USO DE PIEZAS DE REPUESTO QUE NO SEAN LAS
MENCIONADAS EN ESTA GUÍA AUMENTA EL RIESGO DE SUFRIR LESIONES. NUNCA
USE ACCESORIOS DE CORTE DISTINTOS A LOS DESCRITOS EN ESTE MANUAL.
COMPONENTES DE REPUESTO NÚMERO DE PIEZA
BARRA DE GUÍA 564284
CADENA DE LA SIERRA R34
BATERÍA, MODELO B600E 548208
BATERÍA, MODELO B400E 545938
BATERÍA, MODELO B500S 545937
CARGADOR CON CABLE, MODELO C600 540580
CARGADOR RÁPIDO CON CABLE, MODELO C750 548185
KIT PARA AFILAR LA CADENA DE LA SIERRA 38278
CARGADOR, MODELO C600
ENTRADA 100240 V~ 5060 Hz 60 W
ENTRADA
EE. UU. Y CANADÁ
ÚNICAMENTE
120 V~ 60 Hz 60 W
SALIDA 41,5 V
1,25 A
CABLE DE ALIMENTACIÓN
N.° DE PIEZA EN EE. UU/CAN.: 546636
N.° DE PIEZA EN EUROPA: 547383
N.° DE PIEZA EN EL REINO UNIDO: 547384
N.° DE PIEZA EN AU./NZ: 560663
MÓDULO DE LA BATERÍA
TIPO IONES DE LITIO
TEMPERATURAS DE
FUNCIONAMIENTO
DE 0 °C A 40 °C 32 °F A 104 °F
MODELO
CAPACIDAD,
NOMINAL
VOLTAJE,
NOMINAL
C600 TIEMPO DE
CARGA APROX.
B600E 4,00 Ah / 144 Wh +36 VCC 210 MINUTOS
B400E 2,40 Ah/89 Wh +37 VCC 120 MINUTOS
B500S 1,25 Ah/47 Wh +37 VCC 60 MINUTOS
SIERRA DE POSTE
CAPACIDAD DE ACEITE 100 ml 3,4 oz)
ACEITE PARA LA BARRA Y LA
CADENA
MARCA OREGON®
PESO EN SECO CON LA BATERÍA 6.12 kg 13.5 lb
PESO EN SECO SIN LA BATERÍA,
LA BARRA NI LA CADENA
4.58 kg 10.1 lb
NIVEL DE POTENCIA DEL
SONIDO
90 dB (K, 0.18 dB)
VIBRACIÓN .81 m/s
2
(K, .14 m/s2)
LONGITUD MÁXIMA DE LA
BARRA
20 cm (8 in)
PASO DE LA CADENA 3/8 in Low Profile™
CALIBRE DE LA CADENA 0,043 in
DIENTE DE LA
RUEDA DENTADA DE
ACCIONAMIENTO
7
VELOCIDAD DE LA CADENA
SIN CARGA
14,5 m/s (47,4 ft/s)

96
AC 1113 - F/N 563397
GARANTÍA Y SERVICIO TÉCNICO
Sistema de herramientas inalámbricas OREGON®
SIERRA DE POSTE MODELO PS250
GARANTÍA Y SERVICIO TÉCNICO
GARANTÍA
Blount, Inc. ofrece una garantía de tres ()
años de duración para las Herramientas
inalámbricas y los Cargadores OREGON®
registrados y de dos () años de duración
para los módulos de Baterías inalámbricas
OREGON® registrados a partir de la fecha
de la compra original. Las Herramientas
inalámbricas, los Módulos de Baterías y los
Cargadores OREGON® registrados tienen
una garantía de dos () años de duración
si se utilizan para fines comerciales. Esta
garantía limitada se aplica a los productos
del Sistema de herramientas inalámbricas
marca OREGON®. Durante el período de
garantía, Blount reemplazará o, según su
decisión, reparará sin cargo toda pieza
o producto adquirido por el comprador
original y cuyo material o fabricación
presenten fallas según el criterio de Blount
después de examinarlos. El comprador
deberá hacerse responsable de los gastos
de transporte y de cualquier gasto por la
extracción de cualquier pieza que deba ser
reemplazada durante la vigencia de esta
garantía.
Para registrar su producto, visite la sección
“Support” (Soporte) de OregonCordless.com.
INFORMACIÓN SOBRE SERVICIO
TÉCNICO Y SOPORTE
Visítenos en Internet, en
OregonCordless.com, a fin de obtener
información sobre los centros de servicio
técnico, o comuníquese con nuestro
departamento de servicio al cliente
llamando al ..., a fin de obtener
asistencia, asesoramiento técnico adicional,
reparaciones, piezas de repuesto o para
registrar un producto.
Por su seguridad, use solo repuestos
originales de fábrica en las sierras de poste.
Nuestro centro de atención al cliente
cuenta con personal capacitado que le
brindará un servicio de asistencia y soporte
técnico eficiente al momento de ajustar,
reparar o cambiar cualquier producto del
Sistema de herramientas inalámbricas
OREGON®.


OregonCordless.com
Blount International Inc.
4909 Southeast International Way
Portland, OR 97222-4679
USA
 Loading...