

Page 1

Oregon® Mechanical Timber
Harvesting Handbook
Page 2

Our handbook provides information we consider critical to the
performance (defined as production, reliability, and life of operation)
and safe use of Oregon Harvester Cutting Systems.
A Harvester saw chain based cutting system is composed of a drive
sprocket, guide bar, and a loop of saw chain, that is not hand-held,
and designed to work with mechanical harvester machines.
In offering this information, we do not assume any responsibility
for the design or manufacturer of equipment, nor the content of the
literature supplied.
Introduction
Safety Symbol
This safety symbol is used to highlight safety messages.
When you see this symbol, read and follow the safety message
to avoid severe personal injury.
Page 3

Table of Contents
Introduction
Key Safety Information .................................. 1 – 4
• Chain Shot Warning ...........................................1
• How Chain Shot Happens ......................................2
• Minimizing the Risk of a Chain Shot Event .......................3
• Operator, Ground Personnel, and Bystander Safety. . . . . . . . . . . . . . . 3
• Guard and Shields ............................................3
• Windows .....................................................4
• A Cutting System .............................................4
Chain Catcher ................................................5
Chain Shot Guard ............................................5
Operational Recommendations
Operational Parameters, Service Life, and Safety .............7
Technical Data ..........................................7 – 8
Lubrication ............................................. 8 – 9
Chain Tension .........................................9 – 10
Saw Chain Speed ......................................... 12
Installation and Break-In .................................. 13
Best Practices ............................................ 14
• Daily Inspections ............................................14
• Replacement Schedule ......................................14
• Use Sharp Chain ............................................14
• Cutting Safety ...............................................15
Saw Chain
Terminology ..........................................19 – 21
• Saw Chain Pitch .............................................19
• Saw Chain Gauge ............................................19
• Parts of a Cutter .............................................20
• Parts of Saw Chain ...........................................20
• How a Cutter Works .........................................20
Oregon® Harvester Saw Chain
• 18HX .................................................. 21 – 22
• 19HX .................................................. 23 - 24
• 11H ................................................... 25 – 26
• 11BC .................................................. 27 – 28
Page 4

Saw Chain Maintenance
Saw Chain Maintenance ...............................29 – 30
• Clean .......................................................29
• Inspect. . . . . . . . . . . . . . . . . . . . . . . . . . . . . . . . . . . . . . . . . . . . . . . . . . . . . . 29
• Discard .....................................................29
• Repair ......................................................35
• Clean and Lubricate ..........................................30
Sharpening and Maintenance ..........................31 – 38
• Filing and Grinding Angles ....................................31
• Optional Sharpening Angles ..................................32
Sharpening and Maintenance Tools ....................33 – 34
• Multi-Purpose Tool Functions .................................34
• Sharpening Saw Chain with a Round File .......................35
• Sharpening Saw Chain with a Grinder. . . . . . . . . . . . . . . . . . . . . . . . . .36
• Setting the Vise Assembly ....................................36
Grinding Wheels .......................................... 37
• Vitrified Grinding Wheels .....................................37
How to Set Depth Gauges ................................. 38
Saw Chain Repair
How to Break Out Rivets .................................. 39
Joining Saw Chain ....................................40 – 42
Saw Chain Troubleshooting ...........................43 – 50
• Cuts Slow, Cuts Rough, or Won’t Hold an Edge ............ 43 – 45
• Cutters or Tie-Straps Wear Heavily or Break ...................46
• Drive Links Wear Heavily or Break ....................... 47 – 48
• Sharpening Drive Link Tangs .................................49
• Saw Chain Has Tight Joints ...................................49
• Saw Chain Cuts Crookedly/Leans to One Side/Cuts Unevenly ....50
Guide Bars
Understanding Bar Part Numbers ......................... 53
Guide Bar Types ......................................54 – 55
Bar Noses ................................................ 56
Guide Bar Mount Types
and Drive Sprocket Tooth Counts ......................56 – 70
• .404"-Pitch Guide Bar Mounts .............................57– 61
• .404"-Pitch Jet-Fit
® Guide Bar Mounts .................... 62 – 63
• 3/4"-Pitch Guide Bar Mounts ............................ 64 – 78
• 3/4"-Pitch Symmetrical Two-Ended Guide Bar Mounts ..........73
• 3/4"-Pitch Asymmetrical Double-Ended Mounts ............74 - 75
Page 5

Guide Bar Maintenance
Basic Guide Bar Maintenance Tasks ...................77 – 78
Replacing Nose Sprockets on
HS Harvester Guide Bars ..............................79 – 80
Replacing Nose Sprockets with Replacement Nose Kits on
RH, SM, and SN Harvester Guide Bars ..................81-82
Guide Bar Troubleshooting
Guide Bar Rail Conditions .............................83 – 86
Guide Bar Nose Conditions ............................87 – 88
Guide Bar Mount Conditions ............................... 89
Jet-Fit® Guide Bar Mount Conditions ...................... 90
Drive Sprockets
Drive Sprocket Types ................................... 91-93
HarvesterLok® Information ............................... 93
Common Drive Shaft Configurations – .404" ................ 94
Drive Sprocket Alignment ..............................95-96
Troubleshooting Drive Sprockets .......................... 97
Hydraulic Pump Information .............................. 98
Notes ................................................. 99-101
Page 6
1 Mechanical Timber Harvesting Handbook
Key Safety Information
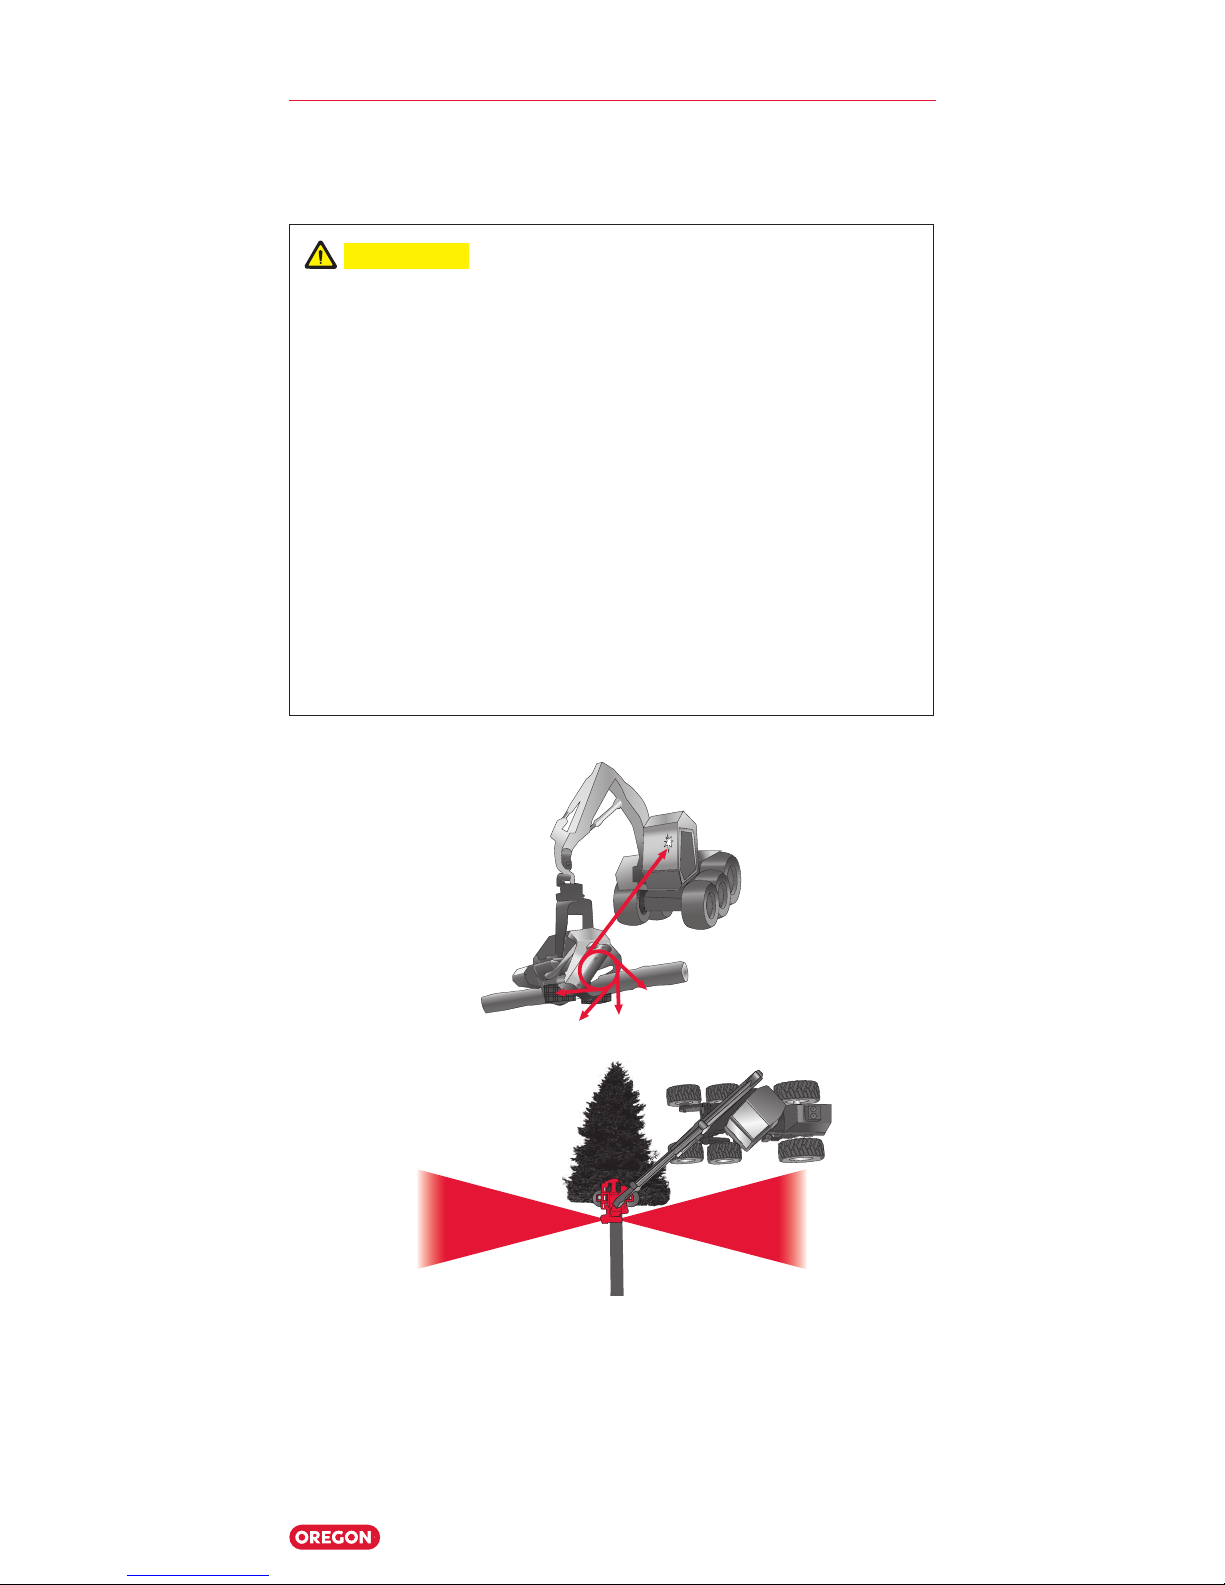
SHOT CONE ZONE SHOT CONE ZONE
WARNING: There is risk of serious injury or death to the
machine operator, ground personnel and bystanders from
chain shot. A Chain Shot Event (CSE) occurs when a piece or
pieces of cutting chain from the end of a broken saw chain in
mechanized timber harvesting or processing is ejected at a
high velocity. Chain shot typically originates near the drive end
of the cutting system but can also originate from the guide bar
tip area. Saw chain pieces usually travel in the cutting plane of
the guide bar, but can deviate to either side (see illustration
below). Although the "Shot Cone Zone" reflects the most likely
chain shot path, deflections can occur, substantially expanding
where chain pieces may travel. To minimize risk, operators
should keep out of the Shot Cone Zone, ground personnel and
bystanders should be at least 230 feet away from cutting
operations and out of the Shot Cone Zone.
Chain Shot
Page 7
Mechanical Timber Harvesting Handbook
2
Key Safety Information
How Chain Shot Happens
1. The saw chain breaks
2. After a saw chain break, the “free” end of the saw chain begins
to whip away from the break.
3. If the saw chain is not contained by the saw box or a chain
shot guard, the broken saw chain’s free end can speed up
rapidly, carrying immense dynamic energy.
4. At the peak of the whip, saw chain pieces may break loose
and be ejected at high speed.
Page 8

3 Mechanical Timber Harvesting Handbook
Important Safety Information
Minimizing the Risk of a Chain Shot Event
To minimize your risk of a chain shot event:
• You should follow the recommendations of your equipment
manufacturer and those contained in this handbook.
• Your machine should be equipped with appropriate window
enclosures, chain catchers, chain shot guards, and snow
holes (shielded or closed) near the cutting system on the
saw box.
Never use saw chain that has:
• Broken, cracked, or damaged components.
• Excessive saw chain stretch.
• Loose rivet joints (if the rivet rotates, the joints are too loose).
Operator, Ground Personnel, and Bystander Safety
• Never engage in a cut with yourself, ground personnel,
or bystanders in the Shot Cone Zone (see pages 1 for
complete illustration).
• Always cut as close to the ground as possible to reduce the
distance that any potential ejected pieces could travel.
Guards and Shields
• Equipment should be equipped with appropriate guards,
shields, and window enclosures to minimize the exposure of
the operator, ground personnel, and bystanders to the cutting
plane and Shot Cone Zone of the cutting system.
• Ground personnel and bystanders should comply with
the setback requirement defined by your equipment
manufacturer (at least 230 feet or 70 meters).
Page 9
Mechanical Timber Harvesting Handbook
4
Important Safety Information
Windows
• The glazing of the operator's enclosure window should
comply with local codes for impact resistance. The glazing
should be replaced if any scratches (or other damage)
obstructs the operator's effective viewing of the cutting
operation.
• It should be noted that the UV portion of the light spectrum
degrades the properties of polycarbonates (i.e. through
time your protection decreases). Consult your equipment
manufacturer or replacement glazing supplier for
recommended replacement interval.
• Before upgrading, always check with your equipment
manufacturer as it may change the operational integrity of
the operator enclosure.
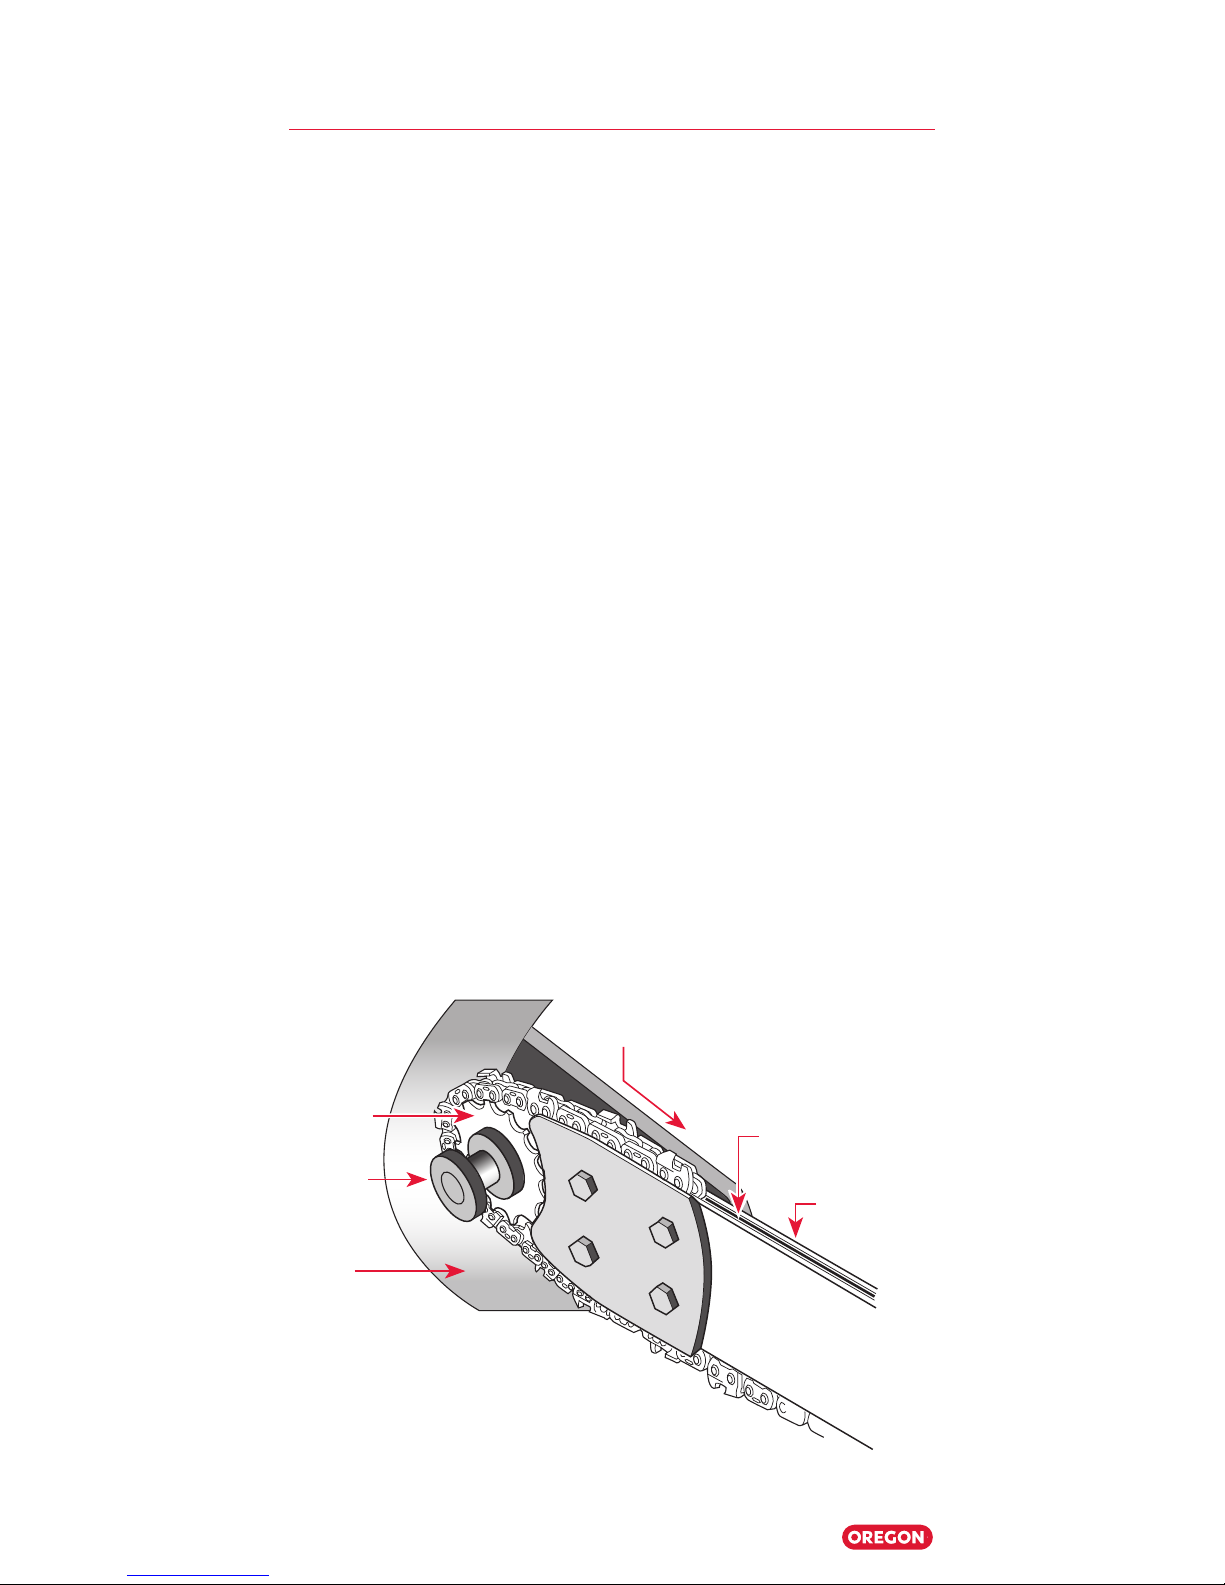
Cutting System
A saw chain based cutting system is composed of a drive sprocket,
guide bar, and a loop of saw chain.
• The illustration below is a representation of the drive end of
a cutting system and how the chain catcher and chain shot
guard interrelate.
• Every equipment operator should be aware of the safety
equipment that should always be present in the saw box.
Consult your equipment manufacturer if any of these devices
appear damaged or are missing.
Drive
sprocket
Direction of chain travel
Bar groove
Guide bar
Chain
catcher
Chain
shot
guard
Page 10

5 Mechanical Timber Harvesting Handbook
Chain Catcher
A chain catcher prevents a saw chain that has escaped from the
bar groove from being “thrown” from the saw box. Chain catchers
resemble a sturdy spool and are placed in line with the drive
sprocket. A small gap on one side of the chain catcher allows
installation and removal of the saw chain.
Chain Shot Guard
A chain shot guard is a piece of material mounted behind the drive
sprocket; it performs two functions:
1. It absorbs the energy of a broken saw chain coming into
contact with the saw box, reducing the risk of ejected parts
during a chain shot event.
2. It acts as an extension of the saw box, reducing the risk of a
thrown loop of saw chain (or saw chain parts) escaping the
saw box.
Important Safety Information
Chain
catcher
Chain shot guard
Page 11

Mechanical Timber Harvesting Handbook
6
Operational
Recommendations
Page 12

7 Mechanical Timber Harvesting Handbook
Cutting Systems Operational Parameters, Service Life,
and Safety.
Recommendations for saw chain speed and guide bar feed load
(listed in our Technical Data tables) are intended to provide a
balance between performance and cutting system life.
WARNING: Exceeding recommendations may result in
cutting system wear and shorter service life. Exceeding
recommendations may increase the potential for chain shot
events and potential injury or death. At no time should you
exceed recommended maximum chain speed.
Technical Data (English Units)
Oregon Saw Chain Part
Number
.404" Pitch 3/4" Pitch
18HX 19HX 11BC 11H
Operating Parameters
Guide bar/saw chain oil
oz./cut 0.1 0.1 0.4 0.4
Power, hp min/max 5/65 20/65 5/90 10/100
Force on guide bar to tension
saw chain, lbs.
110 110 150 150
Guide Bar Feed Load, at Center, lbs.
Min/max 30/200 30/200 30/300 30/300
Recommended 150 150 200 200
Saw Chain Speed, Ft./Min
Min/max 3000/8000 3000/8000 1500/7000 1500/7000
Recommended 8000 8000 6000 6000
Operational Recommendations
Page 13

Mechanical Timber Harvesting Handbook
8
Lubrication
Your cutting systems operates in challenging environments and
depend on sufficient lubrication to minimize wear and extend the
life of operation.
Both bar and chain oils and grease can provide adequate
lubrication to the cutting system when used correctly.
When using grease, ideal settings can vary based on temperature
and other work-site conditions. Always begin by consulting your
manufacturer’s recommendations.
Regular inspection of your cutting system will let you know if any
adjustments are needed.
• Both hydraulic fluid and used motor oil are not approved
lubricants and their use can the warranty of your cutting
system.
• Hydraulic fluid does not provide sufficient properties for
preventing wear of your cutting system.
• Used oils may contain acidic compounds and abrasive
particles that can compromise the cutting system's
effectiveness and increase wear.
Operational Recommendations
Technical Data (Metric Units)
Oregon Saw Chain Part Number
.404" Pitch 3/4" Pitch
18HX 19HX 11BC 11H
Operating Parameters
Guide bar/Saw chain oil
mL/cut 3 3 10 10
Power, at saw motor kW min/max 5/50 15/50 5/65 5/75
Force on guide bar to tension
saw chain, N
490 490 668 668
Guide Bar Feed Load, at Center, N
Min/max 100/900 100/900 100/1300 100/1300
Recommended 700 700 900 900
Saw Chain Speed, m/sec
Min/max 15/40 15/40 10/35 10/35
Recommended 40 40 30 30
Page 14

9 Mechanical Timber Harvesting Handbook
At startup:
• Adequate time must be allowed for your lubrication to reach
your cutting system.
In cold weather, or when using a new guide bar or saw chain, your
system will require additional time. Follow these guidelines:
• Run the saw chain slowly while cycling the guide bar until
lubricant can be observed leaving the tip of the guide bar.
• With oil-based lubrication systems, ensure a fine screen is
installed in the fill port to minimize debris.
• Use a light/winter-weight lubricant. If possible, increase your
per-cut flow rate.
• Some oiling systems can actually deliver
less oil when the control is simply
“turned up,” beyond a certain point.
This is especially the case with fixed
displacement, frequency/pulse type
systems.
• If the pulses are set to occur too frequently, it is possible that
the oil doesn’t have a chance to flow into the pump cylinder
before it is cycled.
• If your equipment has this type of system, always visually
verify correct lubrication on the cutting system after making
changes.
• Periodically cycle the cutting system without cutting (air cuts)
in order to increase the amount of lubricant present and to
ensure the system is working.
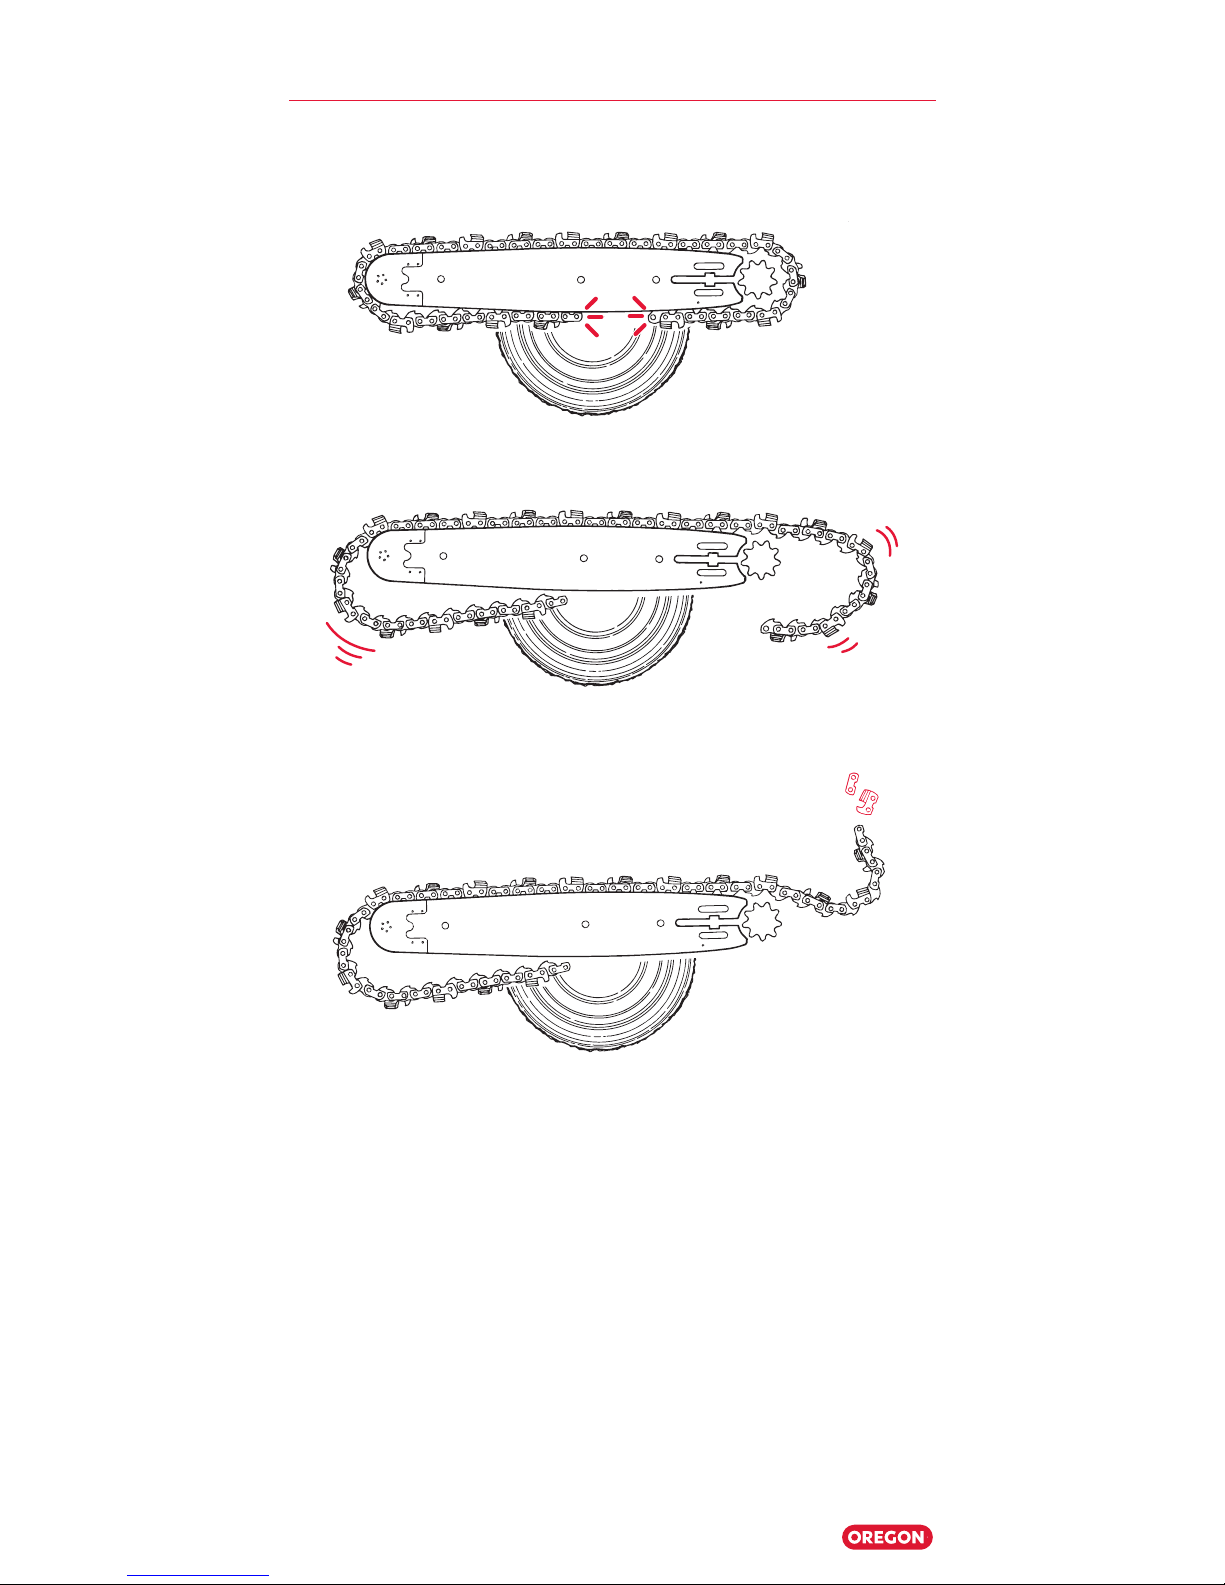
Chain Tension
Exceeding recommendations will shorten your cutting system’s
life of operation.
The recommended amount of force applied by the guide bar to
tension saw chain:
• .404"-pitch saw chain is 110 pounds (490 N).
• 3/4"-pitch saw chain is 150 pounds (668 N).
0° C -32° F
Operational Recommendations
Page 15

Mechanical Timber Harvesting Handbook
10
Operational Recommendations
Manual Tensioning Systems
• Saw chain should be tight enough to pull the chassis of the
saw chain firmly against the perimeter of the guide bar.
• Tension needs to be checked regularly.
• Only tension saw chain when it is cool. Steel expands
when hot and contracts as it cools. As a result, it could
cause damage to your guide bar or saw motor if tensioned
when hot.
• At shut down or breaks, relieve saw chain tension to prevent
damage to the cutting system (saw motor, bar tip, saw chain
chassis) as the saw chain cools and contracts.
• In cold weather, maintain proper tension. Check tension often
with manual tensioning systems.
Checking Tension
To check for proper tension, grasp the saw chain at the mid-span
of the guide bar and pull the saw chain away from the bar rails.
• For hard nose guide bars, the drive link tangs should nearly
come out of the bar groove.
• For sprocket nose guide bars, the saw chain chassis
should come out of the bar groove/away from the bar
rails approximately 1/8 inch ( approximately 3 mm). When
released, the chassis should snap back against the bar rails.
1/8"
Page 16

11 Mechanical Timber Harvesting Handbook
Automatic Tensioning Systems
An automatic tensioning system is the most effective means
to keep proper saw chain tension, especially if it is designed to
compensate for the saw chain’s high speed around a guide bar
(the saw chain will lengthen as its speed increases).
The system can be optimized to respond to the changing loop
length as your saw chain goes from rest, to full speed, to rest.
As your saw chain speeds up, your guide bar will need to move
forward to maintain proper tension. Otherwise, tension will
decrease as much as 50 percent and can result in a thrown loop
of saw chain. As your saw chain slows to a rest, the chain will
decrease in length, and the guide bar will need to move back.
Otherwise, the excessive tension will potentially damage your
cutting system.
Refer to our Technical Data Tables (page 7) for the
recommended amount of force applied to the guide bar to
properly tension your saw chain.
Operational Recommendations
Page 17

Mechanical Timber Harvesting Handbook
12
Saw Chain Allowable Spindle RPM
Drive
Sprocket Teeth
RPM
(.404" Pitch)
RPM
(3/4" Pitch)
Maximum Recommended Maximum
7 - 6500 7600
8 - 5700 6700
9 13100 5100 5900
10 11800 4500 5300
11 10700 4100 4800
12 9800 3800 4400
13 9000 3500 4100
14 8400 3200 3800
15 7800 3000 3500
16 7300 - -
17 6900 - -
18 6500 - -
19 6200 - -
20 5900 - -
21 5600 - -
22 5300 - -
• Recommended and Maximum .404" saw chain speed:
8000 ft/min (40.64 m/s)
• Recommended 3/4" saw chain speed:
6000 ft/min (30.48 m/s)
• Maximum 3/4" saw chain speed:
7000 ft/min (35.56 m/s)
Operational Recommendations
Page 18
13 Mechanical Timber Harvesting Handbook
Installation and Break-In
The critical time for saw chain occurs during the break-in period
for a new (or newly sharpened) saw chain.
We recommend transporting your new (or newly sharpened) saw
chain to the job site in a container with lubricant. Leave them in
the container until they are needed.
• If you do not transport your saw chain as suggested above,
then lubricate your saw chain prior to use.
After installation, increase the saw speed gradually for the first
2 to 4 minutes of running while cycling the guide bar. Do this until
you observe lubricant leaving the tip of the guide bar.
For manual tensioning systems, check and adjust as necessary.
1/8"
Operational Recommendations
Page 19

Mechanical Timber Harvesting Handbook
14
Operational Recommendations
Best Practices
Daily Inspections
Check your safety devices at least once per shift :
• Chain shot guard
• Chain catcher
• Shields on snow holes
• Windows
• Cutting system
Run chain and guide bar in sets to equalize wear across the
cutting system.
Replacement Schedule
.404" Pitch
• 1-2-10 (1 drive sprocket, 2 guide bars, 10 loops of saw chain).
3/4" Pitch
• 1-2-6 (1 drive sprocket, 2 guide bars, 6 loops of saw chain).
Use Sharp Chain
Replace saw chain at least once or more per shift. Maintaining
sharp chain on the cutting system will pay off in many ways:
• Sharp chain cuts faster.
• Less energy (pressure and time) overall is used to complete
a cut, so wear on the entire cutting system is reduced.
A slightly dull chain can be lightly sharpened instead of needing to
be ground back significantly. It is best to lightly sharpen a slightly
dull chain often to provide more and faster cuts.
Replace the saw chain at least once per shift. This can vary
significantly with the type of timber being cut, the terrain, and
other environmental factors.
If the cuts are getting slower, it’s worth the time to get out of the
cab and exchange the chain for a sharp one.
Page 20

15 Mechanical Timber Harvesting Handbook
Cutting Safety
• Ensure you and all other personnel are clear of the Chain Shot
Zone (see pages 1).
• Always cut as close to the ground as possible. This should
reduce lubricant mist and wood chip dust on the cab and
radiators, reduce timber cracking during cut-to-length
processing, and reduce the range of any broken cutting
system components.
WARNING: There is risk of serious injury or death to the
machine operator, ground personnel and bystanders from
chain shot. Do not exceed our recommendations for saw chain
speed, feed-force, lubrication, tension, and maintenance.
Notice: Following these best practices consistently will
increase your safety and the life of your cutting system.
Operational Recommendations
Page 21

Mechanical Timber Harvesting Handbook
16
Page 22

17 Mechanical Timber Harvesting Handbook
Saw Chain
Page 23

Mechanical Timber Harvesting Handbook
18
Page 24
Saw Chain
19 Mechanical Timber Harvesting Handbook
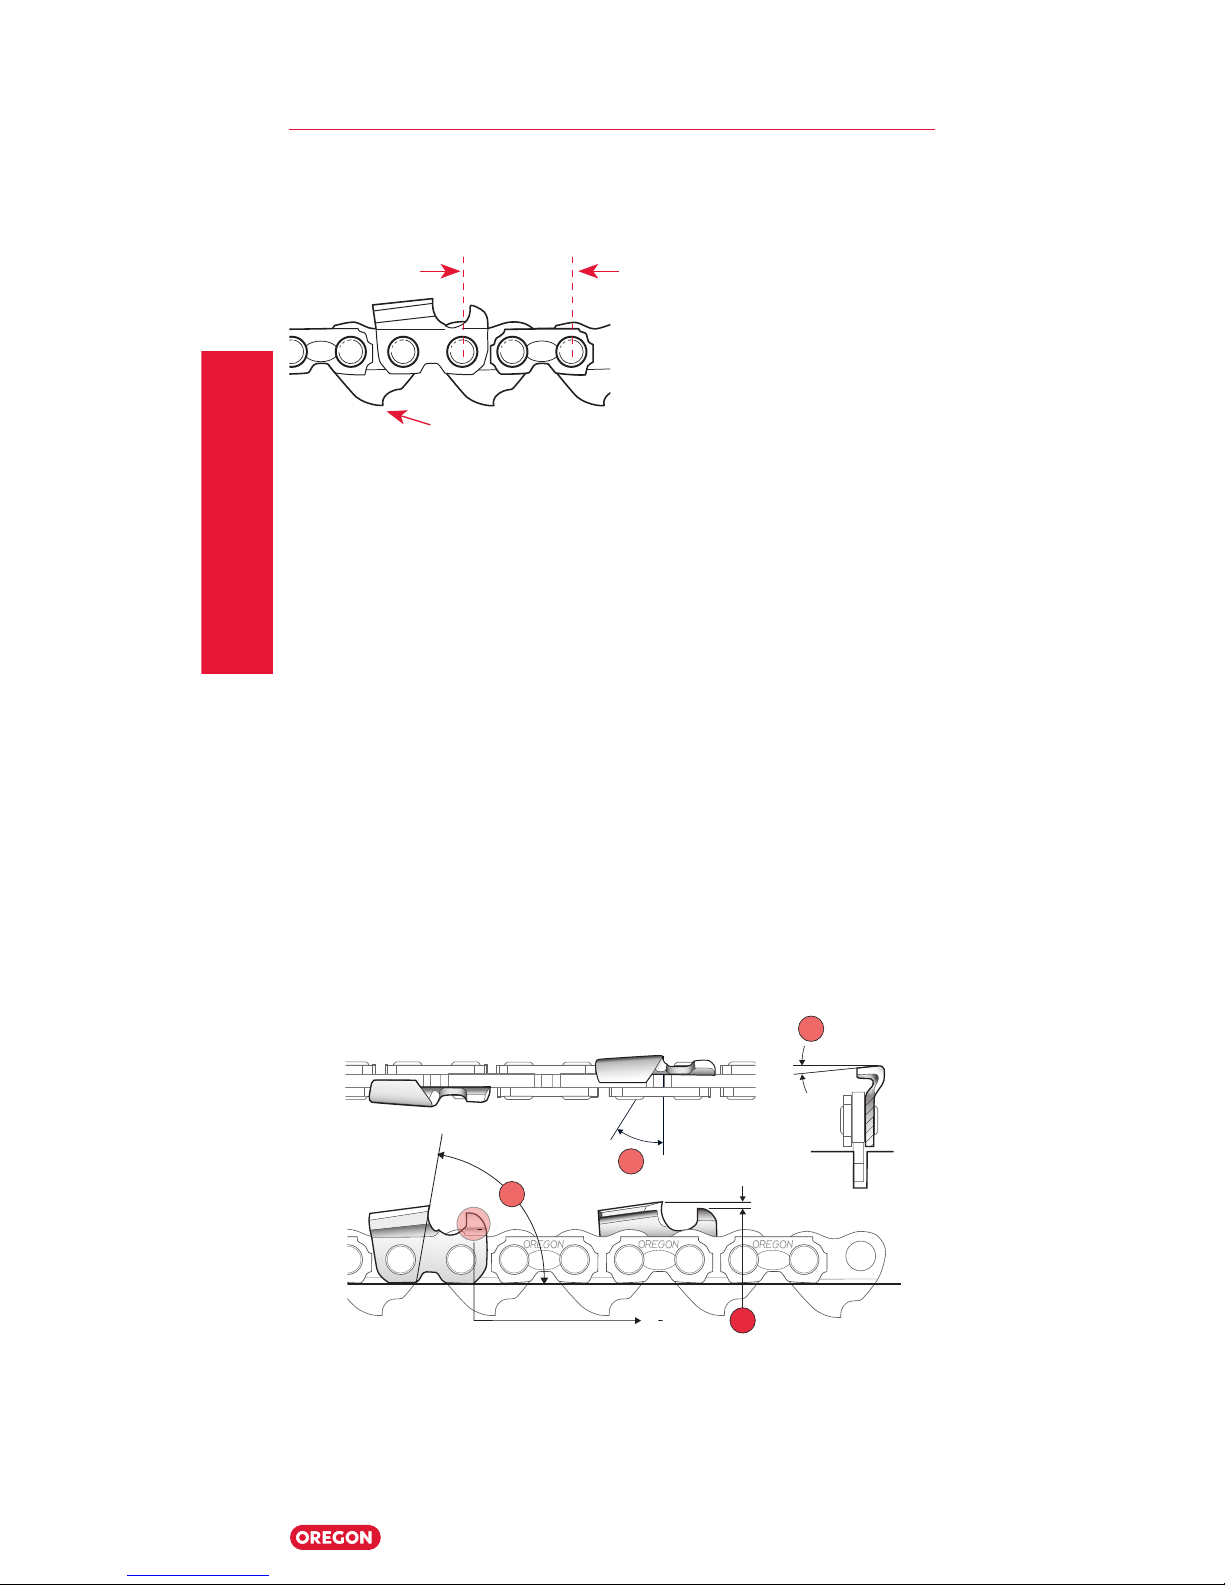
Terminology
Saw Chain Pitch
Saw chain pitch is the distance between any three consecutive
rivets, divided by two. Oregon Harvester saw chain is available in
both .404" and 3/4" pitch.
Saw Chain Gauge
Saw Chain Gauge is the term used to describe the thickness of the
drive link tang, which fits into the groove of the guide bar.
Oregon Harvester saw chain gauges are:
• 0.080" (2.0 mm)
Oregon has an 18X or 19X stamped on the drive link tang.
• 0.122" (3.1 mm)
Oregon has an 11 stamped on the drive link tang.
Ensure you use the correct recommendations for your saw chain
(refer to the tables that follow).
A
B
N
o
25 = .025"
30 = .030"
50 = .050"
60 = .060"
D
C
N
o
A. Top plate angle C. Top plate cutting angle
B. File guide angle D. Depth Gauge Setting
OREGON
18X 18X 18X
OREGON
÷ 2
Tang
Saw Chain
Page 25
Saw Chain
Mechanical Timber Harvesting Handbook
20
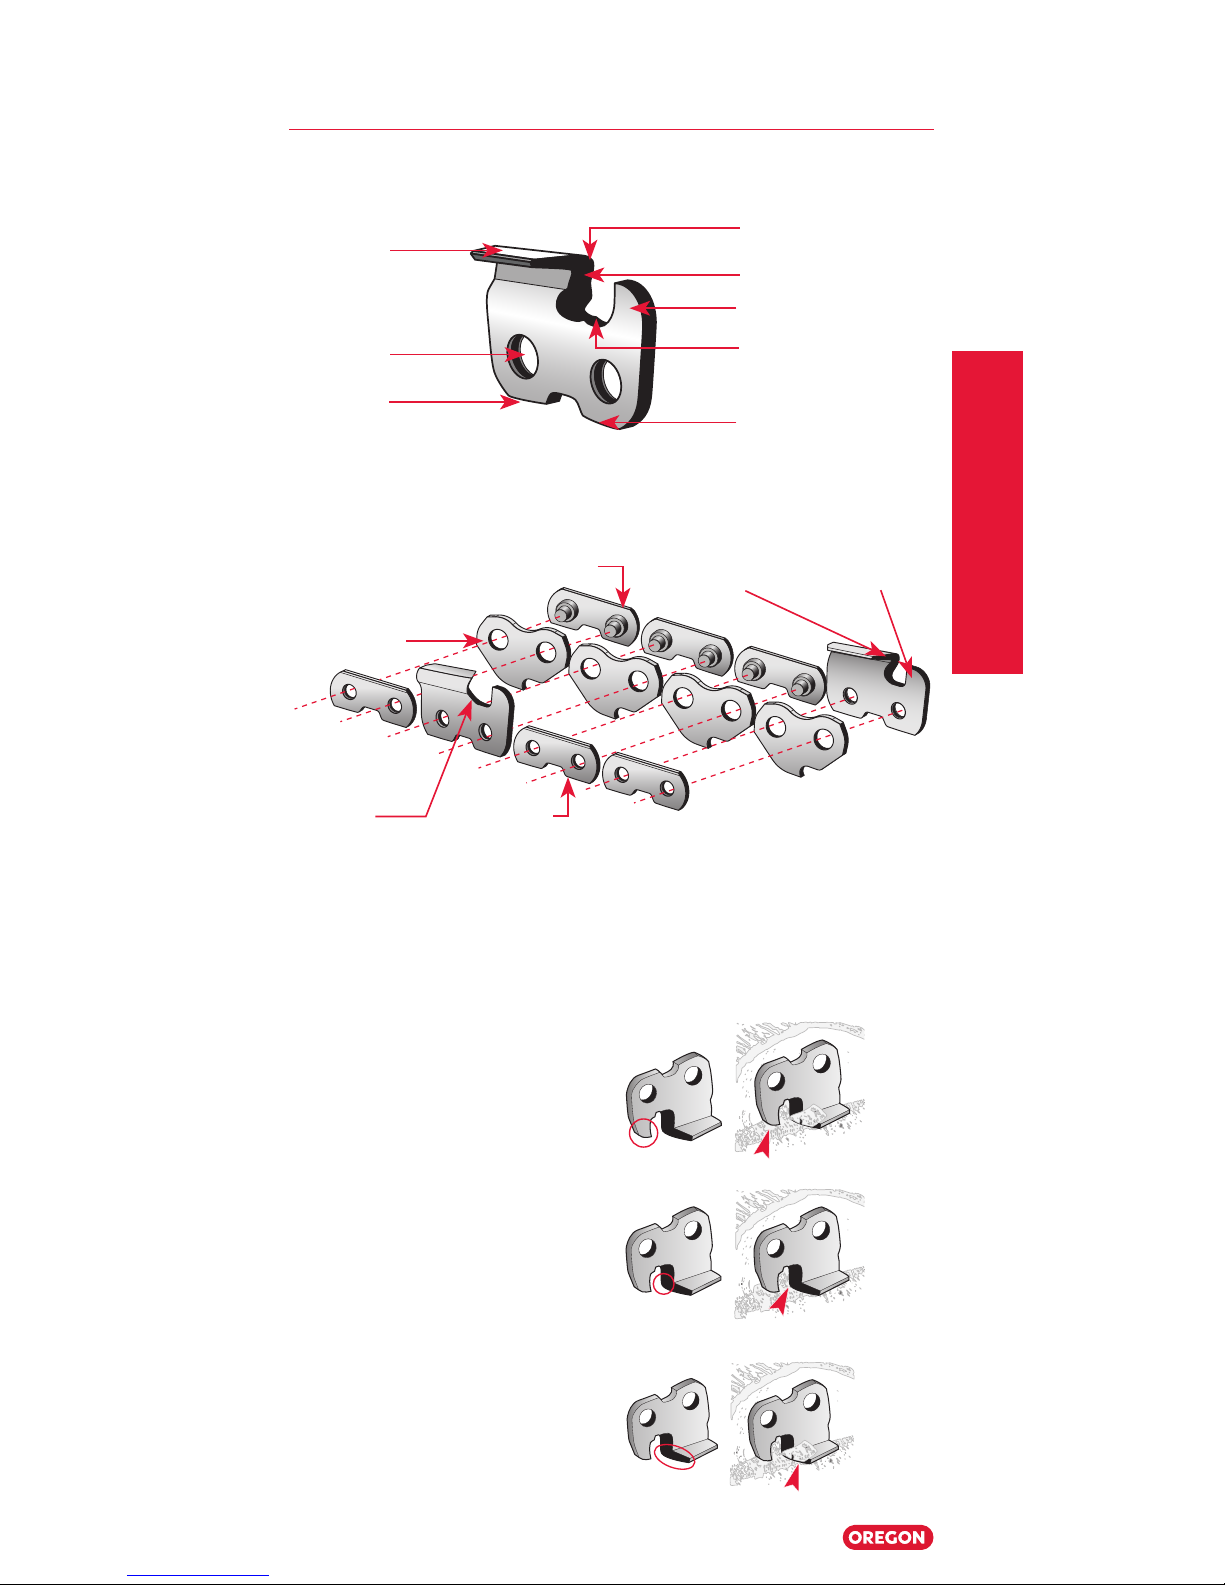
Saw Chain
Parts of a Cutter
Parts of a Saw Chain
How a Cutter Works
Understanding how cutters work can help you realize why proper
saw chain maintenance is so important.
1. The depth gauge rides on
the wood and controls the
bite of the working corner.
2. The working corner and
side plate sever the wood
fibers across the grain.
3. The top-plate cutting angle
chisels out the severed
wood fibers, lifting them up
and out of the kerf.
Working (cutting)
corner
Top plate
Rivet hole
Heel
Toe
Depth gauge
Gullet
Side plate
Rivet
Drive link
Left-hand
cutter
Depth
gauge
Right-hand
cutter
Tie-strap
Page 26

Saw Chain
21 Mechanical Timber Harvesting Handbook
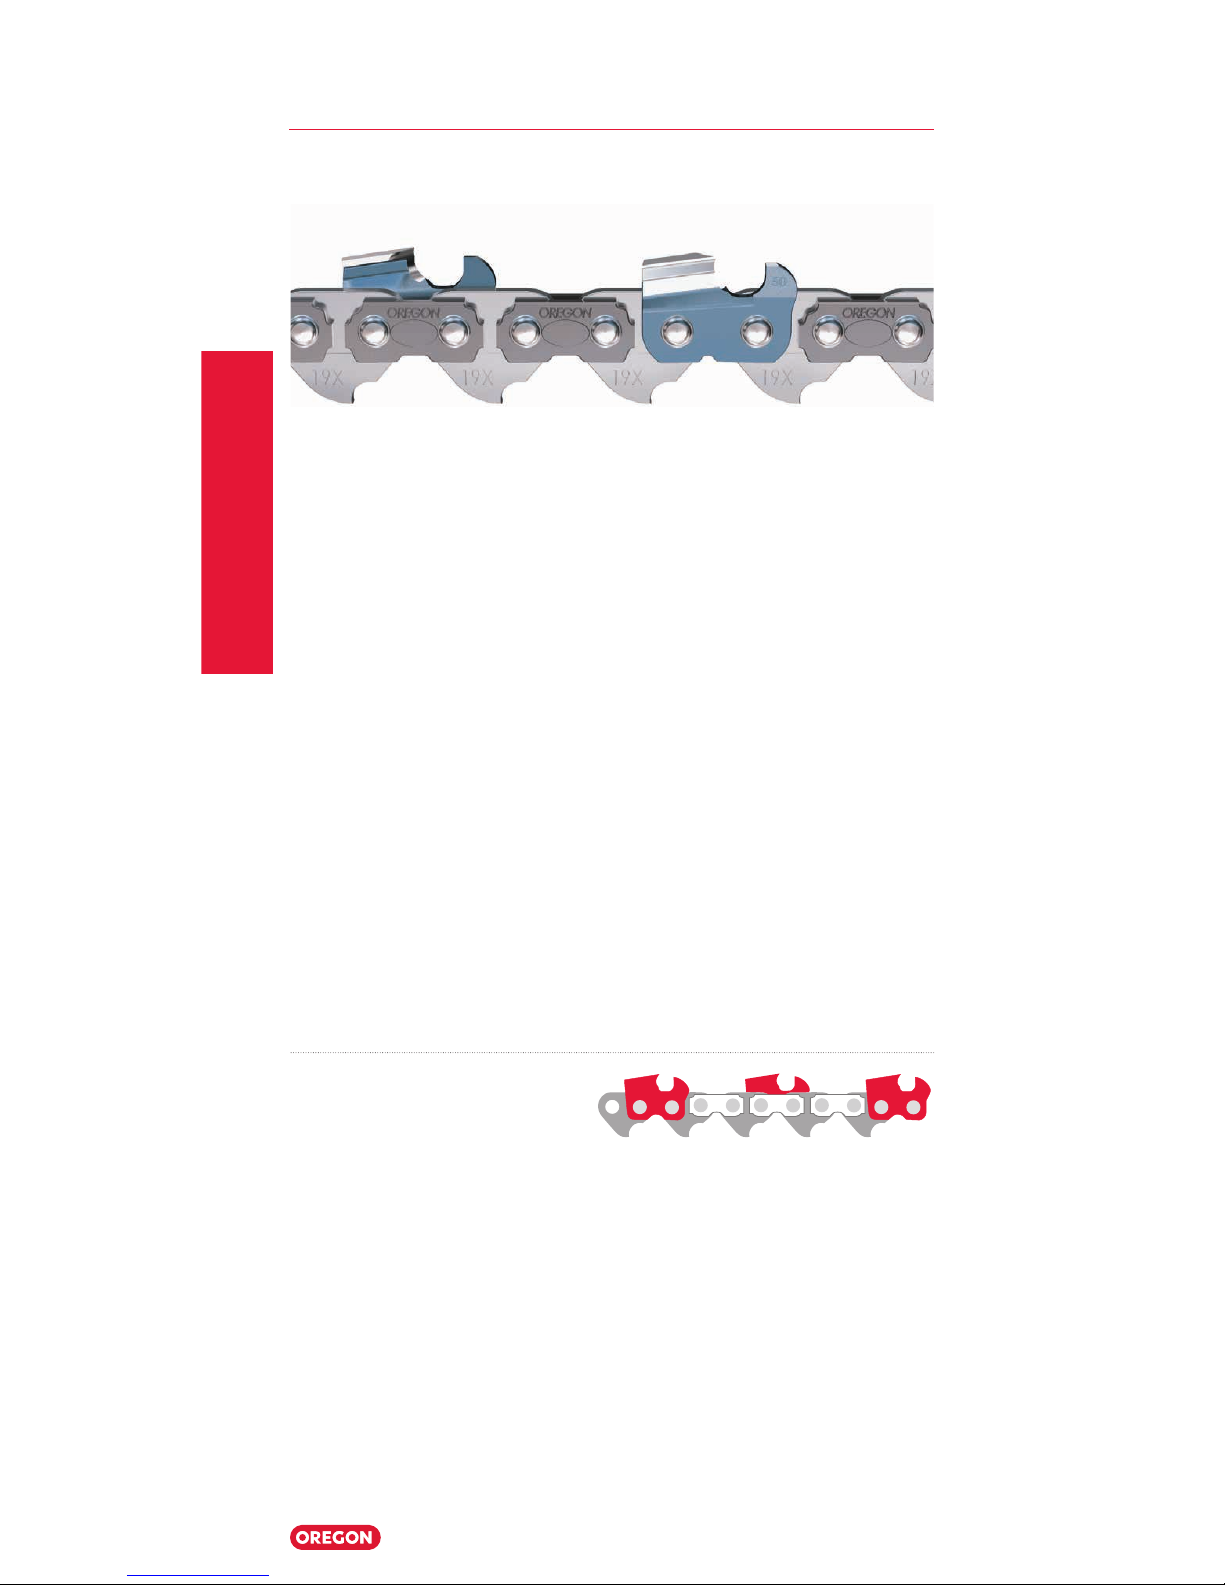
18HX – Harvester Saw Chain, Micro Chisel® – .404"
Features and Benefits
• Micro Chisel cutters have small-radius working corners for
excellent performance and ease of maintenance.
• Patented saw chain steel that provides greater durability,
especially in cold cutting conditions.
• Blued cutters provide superior corrosion resistance and
improved strength.
• Wider, tougher coined drive links are thicker above the groove
for increased strength.
• Larger rivets for reduced saw chain stretch.
• Wider kerf for reduced guide bar binding.
• LubriTec
™
tie-straps help keep oil where it’s needed – on the
saw chain.
No. Gauge Pitch Standard Sequence
18HX .080"
2.0 mm
.404"
Oregon® Harvester Saw Chain
Page 27

Saw Chain
Mechanical Timber Harvesting Handbook
22
Micro Chisel®
Cutter
End View Harvester ONLY
File File
File
Guide
Depth
Gauge
5-3/4"
Grind
Wheel
4-1/8"
Grind
Wheel
70502 12211 31686 38850 OR534-316 OR4125-316
596397 Harvester multi-purpose tool
|X|
A B
C
D
7/32" 35° 10° 80°
.050"
1.27 mm
3/16" 35° 10° 60°
.050"
1.27 mm
Oregon® Harvester Saw Chain
Page 28
Saw Chain
23 Mechanical Timber Harvesting Handbook
19HX – Harvester Saw Chain, Chamfer Chisel™ – .404"
The 19HX chain is optimized for modern high-flow, high-power
heads and saw motors for faster cutting speed. It features tall
chamfer chisel cutters that combine best-in-class durability with
improved chip clearance, to deliver faster and more consistent
cuts in all types of wood.
Features and Benefits
• A new, taller and more aggressive chamfer chisel cutter is
designed to deliver faster cutting speed compared to 18HX.
• Oregon's largest and thickest .404" components are designed
to provide improved strength and superior durability
compared to 18HX.
• Patented saw chain steel that provides greater durability,
especially in cold cutting conditions.
• Blued cutters provide superior corrosion resistance and
improved strength.
• Recommended for use with rim-type sprockets only.
No. Gauge Pitch Standard Sequence
19HX .080"
2.0 mm
.404"
Oregon® Harvester Saw Chain
Note: Operating Parameters for this chain requires a minimum of
20 horsepower.
Page 29
Saw Chain
Mechanical Timber Harvesting Handbook
24
Chamfer Chisel™
Cutter End View Harvester ONLY
File File
File
Guide
Depth
Gauge
5-3/4"
Grind
Wheel
4-1/8"
Grind
Wheel
70502 12211 31686 38850 OR534-316 OR4125-316
596397 Harvester multi-purpose tool
|X| A B C D
7/32" 35° 10° 80°
.050"
1.27 mm
3/16" 35° 10° 60°
.050"
1.27 mm
Note: The use of any other than Oregon 19HX part numbers for
repair or joining loops is not approved and voids the product
warranty. The effectiveness and durability of a chain loop
assembled with anything other than these genuine and approved
replacement parts cannot be guaranteed and is the responsibility
of the those servicing the chain.
Oregon® Harvester Saw Chain
Page 30

Saw Chain
25 Mechanical Timber Harvesting Handbook
11H – Harvester Saw Chain, Semi-Chisel – 3/4"
The 11H semi-chisel cutter features more aggressive design for
maximum performance on more powerful machines.
Features and Benefits
• Semi-chisel cutters make 11H an aggressive,
high-performance saw chain.
• Tested, proven chassis delivers superior strength and
outstanding durability.
• Patented saw chain steel that provides greater durability,
especially in cold cutting conditions.
• Advanced chrome plating process for excellent stay-sharp
and edge-holding durability.
• 11H cutters are designed for longer stay-sharp, and feature
an offset footprint to help minimize guide bar “knife-edging.”
No. Gauge Pitch Standard Sequence
11H .122"
3.1 mm
3/4"
Oregon® Harvester Saw Chain
Page 31

Saw Chain
Mechanical Timber Harvesting Handbook
26
Semi-Chisel End View Harvester ONLY
File File
File
Guide
Depth
Gauge
5-3/4"
Grind
Wheel
4-1/8"
Grind
Wheel
90410 12211 107529 26800 OR534-316 –
533700 Harvester multi-purpose tool
|X|
A B
C
D
5/16" 30° 0° 80°
.060"
1.52 mm
5/16" 30° 0° 80°
.070"
1.78 mm
5/16" 30° 0° 50°
.060"
1.52 mm
5/16" 30° 0° 50°
.070"
1.78 mm
11H cutters are set to .060" / 1.52 mm at the factory and should
be left at those settings for cold cutting conditions. In other
conditions, .070" / 1.788 mm will yield better cutting performance.
Oregon® Harvester Saw Chain
Page 32

Saw Chain
27 Mechanical Timber Harvesting Handbook
11BC – Harvester Saw Chain, Chipper – 3/4"
11BC is a big 3/4"-pitch .122"-gauge saw chain, built for
mechanical harvester/processor applications. Features classic
chipper-style cutters.
Features and Benefits
• Chipper cutters have fully rounded working corners and side
plates for a big, aggressive bite, easy sharpening, and edgeholding durability.
• Tested, proven chassis delivers superior strength and
outstanding durability.
• Patented saw chain steel that provides greater durability,
especially in cold cutting conditions.
No. Gauge Pitch Standard Sequence
11BC .122"
3.1 mm
3/4"
Oregon® Harvester Saw Chain
Page 33

Saw Chain
Mechanical Timber Harvesting Handbook
28
Chipper End View Harvester ONLY
File File
File
Guide
Depth
Gauge
5-3/4"
Grind
Wheel
4-1/8"
Grind
Wheel
90410 12211 31686 26800 OR534-316 –
533700 Harvester multi-purpose tool
|X|
A B C D
5/16" 35° 0° 85°
.060"
1.52 mm
5/16" 35° 0° 60°
.060"
1.52 mm
Oregon® Harvester Saw Chain
Page 34

Saw Chain
29 Mechanical Timber Harvesting Handbook
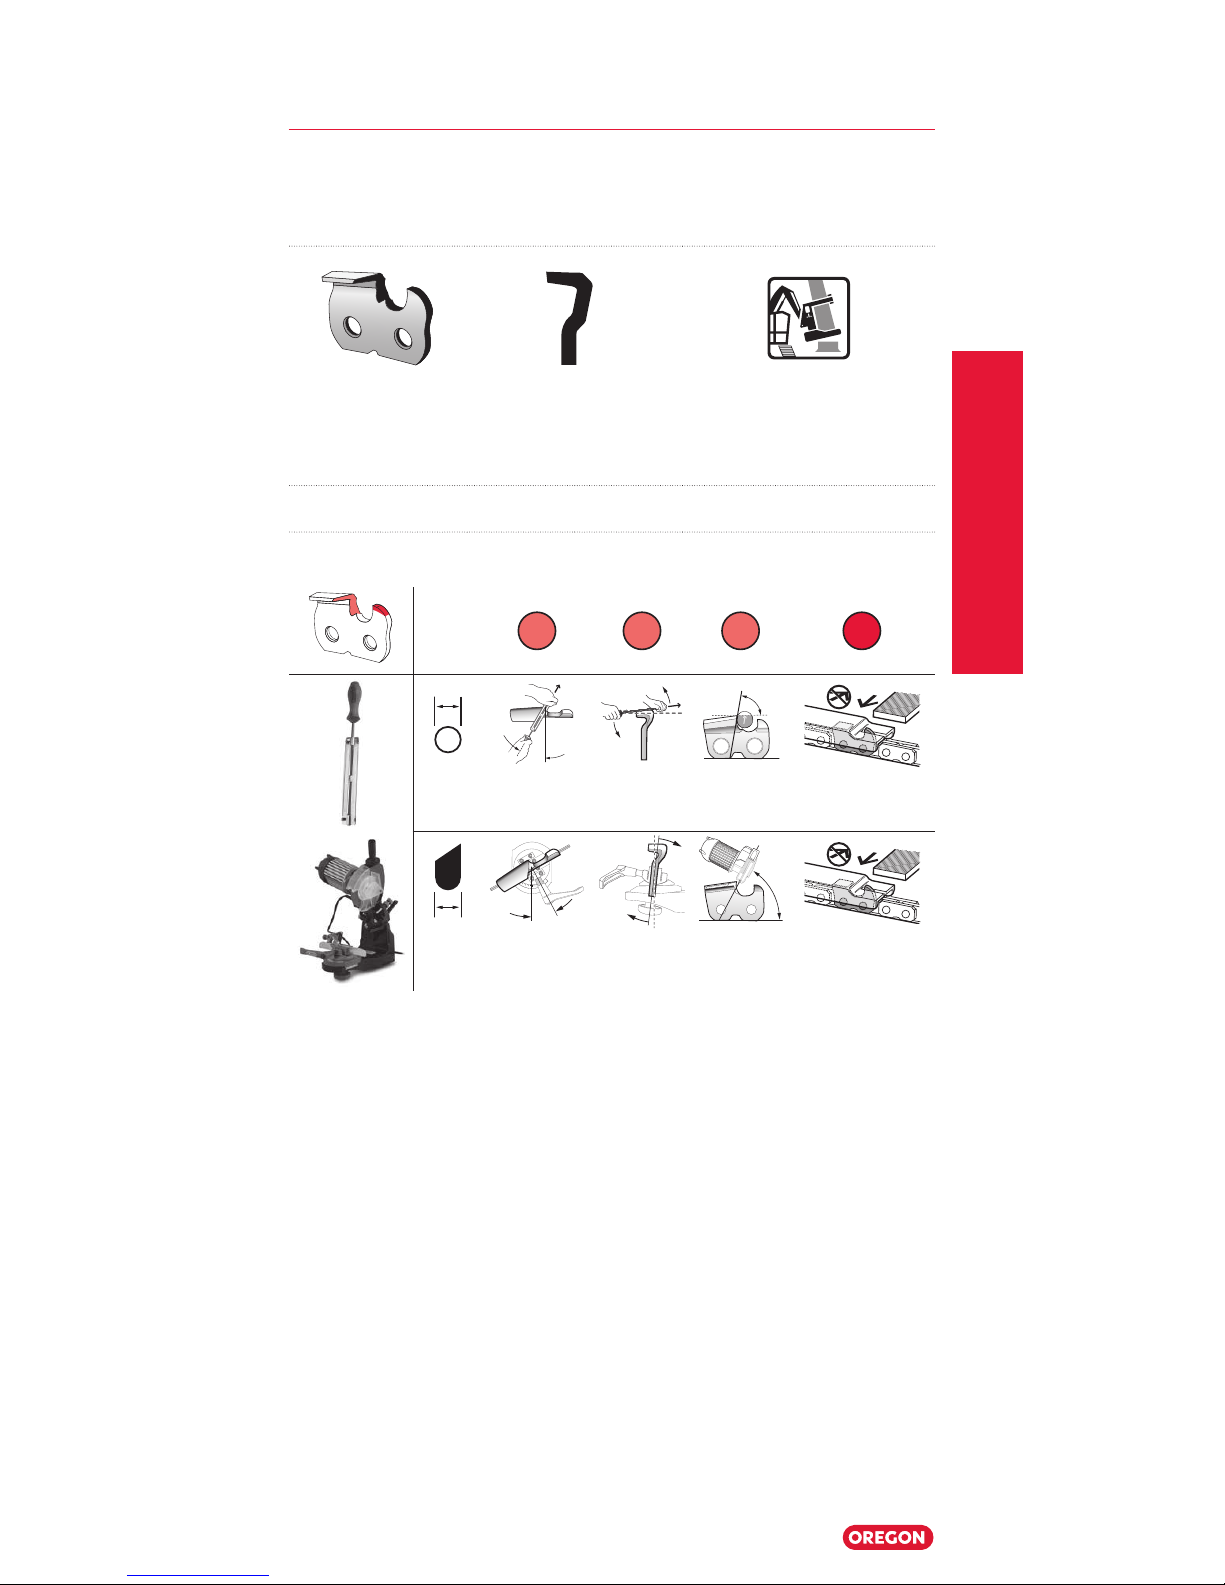
Saw Chain Maintenance
Saw Chain Maintenance
Before sharpening, you should:
Clean
• Clean your saw chain, removing dirt, debris, and lubricant.
This step is required before you inspect the chain.
Inspect
• In a well-lit area and using Oregon's Multi-Purpose Tool and
Stretch Gauge, inspect your saw chain for Chain Stretch.
• Inspect for broken, cracked, damaged, or missing saw chain
components.
• Inspect loose rivets. If you can turn a rivet with your fingers its
loose.
• Inspect for excessive stretch, stretch is actually wear
occurring to the flange of the rivet and the holes in your drive
links.
• Inspect the chain chassis for abnormal wear patterns, which
are indicators of other cutting system issues with the guide
bar and drive sprocket.
Decide to Discard or Repair
Discard
Discard your saw chain when it has:
• Broken
• Broken and parts are missing
• Excessive stretch
• Loose Rivets
WARNING: To reduce risk of injury, always use personal
protective equipment (gloves and safety glasses) when
handling saw chain.
Page 35

Saw Chain
Mechanical Timber Harvesting Handbook
30
Repair
• Replace bent, cracked, or damaged saw chain components
only when the proper tools and new components are
available.
• When replacing damaged components, ensure the
replacements match the worn components. New parts need
to be filed to match the parts you're removing to ensure the
chain's durability is not affected.
• Only use new Oregon components to replace Oregon
damaged components. Never interchange components
between manufacturers.
Clean and Lubricate
After grinding, chains should be cleaned to remove filing and
grinding debris. After cleaning, lubricate, and or store in a
container with lubricant.
Saw Chain Maintenance
WARNING: Always use new components when repairing
broken or damaged chains.
OREGON OREGON
OREGON OREGON
Page 36

Saw Chain
31 Mechanical Timber Harvesting Handbook
Saw Chain Maintenance
Sharpening and Maintenance
See the following charts for more detail on sharpening angles.
Filing and Grinding Angles
|X|
A
B
C
D
18HX 7/32" 35° 10° 80°
.050"
1.27 mm
19HX 7/32" 35° 10° 80°
.050"
1.27 mm
11BC 5/16" 35° 0° 85°
.060"
1.52 mm
11H 5/16" 30° 0° 80°
060"
1.52 mm
11H 5/16" 30° 0° 80°
070"
1.778 mm
18HX 3/16" 35° 10° 60°
.050"
1.27 mm
19HX 3/16" 35° 10° 60°
.050"
1.27 mm
11BC 5/16" 35° 0° 60°
.060"
1.52 mm
11H 5/16" 30° 0° 50°
060"
1.52 mm
11H 5/16" 30° 0° 50°
070"
1.778 mm
Page 37

Saw Chain
Mechanical Timber Harvesting Handbook
32
Optional Sharpening Angles
Oregon provides a factory grind to suit a majority of our users, but
we also provide the approved, alternative sharpening
specifications that users may prefer for certain cutting conditions.
*For non-winter cutting conditions, the 11H depth gauge setting
may be increased to 0.070" / 1.788 mm.
Cutting Conditions
A
B
C
D
18HX/19HX
Factory
35° 10° 60° .050" • 1.27 mm
Softwood
40° 20° 60° .050" • 1.27 mm
Hardwood
35° 10° 60° .050" • 1.27 mm
Frozen
40° 5° 60° 040" • 1.02 mm
11BC
Factory
35°
0°
60° 060" • 1.52 mm
Softwood
35° 15° 60° 060" • 1.52 mm
Hardwood
35° 0° 60° 060" • 1.52 mm
Frozen
40° 0° 60° .050" • 1.27 mm
11H*
Factory
30° 10° 50° 060" • 1.52 mm
Softwood
35° 20° 50° 070" • 1.78 mm
Hardwood
30° 10° 50° 070" • 1.78 mm
Frozen
25° 5° 50° 060" • 1.52 mm
Saw Chain Maintenance
Page 38

Saw Chain
33 Mechanical Timber Harvesting Handbook
Saw Chain Maintenance
Sharpening and Maintenance Tools
710-120✝
Standard
720-120✝
All-in-One Auto Grinder
730-120✝*
Standard Auto Grinder
✝
Only available in USA.
*Sharpens 3/4" pitch only
620-120 (620-230)
Bench Grinder with
Hydraulic Assist
530-120H
3/4" Pitch
Bench Grinder
520-120 (520-230)
.404" Pitch
Bench Grinder
24548-SI
Heavy-Duty Chain
Breaker and Bar Nose
Rivet Driver
24549-SI
Heavy-Duty
Rivet Spinner
108742SI
Heavy-Duty Rivet Spinner
3/4" Pitch Rivet Spinner
Adaptor Kit
Page 39

Saw Chain
Mechanical Timber Harvesting Handbook
34
505033
Breaker Anvil for
Harvester Bar Noses
25049
Breaker Anvil
3/4" Pitch Saw Chain
533700
3/4" Pitch Harvester Multi-Purpose Tool
596397
.404" Pitch Harvester Multi-Purpose Tool
Harvester Multi-Purpose Tool Functions
Bar Alignment Tool Bar Groove Cleaner Bar Groove Depth
Bar Straightener
Grinding Wheel
Dress Gauge Chain Stretch Gauge
1
Plastic tool not intended for bar straightening. A retired chain section can be used
for this purpose.
Saw Chain Maintenance
Page 40

Saw Chain
35 Mechanical Timber Harvesting Handbook
Saw Chain Maintenance
18HX 31686 40458 – 70502 12211 38850 OR 534-316 596397
19HX 31686 40458 – 70502 12211 38850 OR 534-316 596397
11BC 107617 – 90410 – 12211 – OR 534-516 533700
11H 107617 – 90410 – 12211 – OR 534-516 533700
Note: The above products have different Part Numbers outside of
North America.
File or grind to good chrome, removing all damage and keeping
all cutter geometry equal, while following and not exceeding
recommendations for angles and depth gauges settings.
Sharpening Saw Chain with a Round File
Using the correct file guide is
the easiest way to maintain
the saw chain because it
always lays flat along the
top plate. It keeps the file in
the correct height location of
1/5th, or 20%, of the correct
file’s diameter above the cutter’s top plate while helping you keep
the correct top plate angle.
Refer to the Filing Angles (pg. 31) or Optional Sharpening
Modifications chart (pg. 32) for individual specifications.
1. Inspect the cutters of your loop of
saw chain.
2. Begin filing on the chain’s left or right-hand
cutter with the most damage, sharpening
all the cutters from one side of the chain at
a time.
3. Be sure you
remove all
damage while
keeping all
geometries
equal.
60
= 1/5th or
20% above
top plate
OREGON OREGON
A
A=B
B
Page 41

Saw Chain
Mechanical Timber Harvesting Handbook
36
Saw Chain Maintenance
4. Always file from the inside of the chassis to the outside as
shown below.
5. Repeat the process for the cutters on the other side of the
chain, keeping all geometries equaland finishing all cutters
from one side of your saw chain at the same time.
Sharpening Saw Chain with a Grinder
Refer to the Grinding Angles (pg. 31) or Optional Sharpening
Modifications chart (pg. 32) for individual specifications.
Setting the Vise Assembly
Set the vise assembly to the:
• Set the vise assembly
to the recommended
Top-Plate Angle A
(see page 31) and
Side-Plate Angle B
(see page 31).
• Set the grinder head to the recommended
Top-Plate Cutting Angle C. (See page 31.)
C
inside
outside
A
B
WARNING: To reduce risk of Injury, be sure to read your
grinder’s owner’s manual for instructions on how to adjust
settings, and don’t forget to wear safety goggles.
Page 42

Saw Chain
37 Mechanical Timber Harvesting Handbook
Grinding Wheels
No matter what kind of grinding wheel you use, be sure to keep it
clean and well maintained.
Vitrified Grinding Wheels
Dress them often to maintain the correct shape using a rotary
wheel dresser or a dressing brick.
For 11BC, 18HX, and 19HX use a full radius dress as seen below.
For 11H, use a modified radius and flat radius as seen below.
Full radius
Side-plate
angle
Side-plate
angle
1/8" – Flat
3/16"
radius
Saw Chain Maintenance
1/8" (3.17 mm) flat
50°
3/16" (4.76 mm) radius
WARNING: Grinding wheels can break. To reduce risk of
injury, inspect for damage including cracks, and voids.
• Run Grinder for one minute before grinding.
• Keep tool guards in place.
Page 43

Saw Chain
Mechanical Timber Harvesting Handbook
38
Saw Chain Maintenance
How to Set Depth Gauges
After filing or grinding, check and adjust depth gauges – depth
gauges control the “bite” of your saw chain.
Using the correct depth gauge tool for your saw chain:
1. Place the tool on top of your saw chain so one depth gauge
protrudes through the slot of the tool.
2. If the depth gauge extends above the slot, file it down with a
flat file, filing from the inside of the cutter to the outside so
that it is level with the depth gauge tool.
inside
outside
3. Never exceed recommended specifications. Doing so will
negatively affect the life of operation and increase the
potential for a chain shot event.
Page 44

Saw Chain
39 Mechanical Timber Harvesting Handbook
Saw Chain Repair
How to Break Out Rivets
1. Determine the appropriate anvil and anvil slot for the pitch of
your saw chain.
2. Insert the saw chain to be broken into the proper slot of the
anvil, then push it forward until the bottom tie-strap is flush
with the far side of the anvil slot.
3. Drive links should be supported on both sides of the slot,
as shown.
3. Insert the portion of the saw chain for breaking into the
proper slot of the saw chain anvil and push saw chain forward
until the bottom tie-strap is flush with the far side of slot. (The
drive link will then be supported on both sides of the slot.)
4. Position the rivet head directly under the punch. When
breaking the saw chain at a cutter, make sure the cutter is in
the top position on an anvil as shown below.
5. If you are using a bench model chain breaker, pull the handle
of the chain breaker down. If you are using a handheld punch,
center the punch on the rivet head and strike the punch.
In either case, do not use excessive force.
WARNING: To reduce risk of injury, wear eye protection
and gloves.
Page 45

Saw Chain
Mechanical Timber Harvesting Handbook
40
Saw Chain Repair
Joining Saw Chain
Only use NEW Oregon replacement parts that are the
correct size and type to join and repair Oregon saw chain.
Oregon replacement parts are not designed for use in
other manufacturers’ saw chain.
• Joining a loop of saw chain at a cutter is not recommended;
only join your saw chain at a tie-strap location.
• The rivet head must be snug and secure while allowing all
joined parts to move freely.
• For best results with Oregon Harvester Saw
Chain, we recommend using the Oregon
Heavy-Duty Rivet Spinner to spin the
chains. Consult with your local
Oregon dealer to acquire a
Heavy-Duty Rivet Spinner
(24539-SI).
1. Place the preset tie-strap on a flat outer surface of a saw
chain breaker anvil. Be sure the rivets are pointing up.
a. Do not use a
hammer to form
rivet heads for
Oregon .404"-pitch
harvester saw
chain.
b. For Oregon
3/4"-pitch
harvester saw
chain, it is
recommended to
strike the rivet once after assembly before spinning.
Make sure to only strike the rivet.
2. If you're replacing a cutter, break at the tie-strap location in
front of and behind the cutter you’re replacing.
18HX 18HX
18HX 18HX
Rivet shape
before spinning
Properly formed
rivet head
Page 46

Saw Chain
41 Mechanical Timber Harvesting Handbook
Saw Chain Repair
3. Cutter and tie-strap replacement parts should be filed back to
match the existing chassis parts as shown below.
4. Place the preset tie-strap on a flat outer surface of a breaker
anvil with the rivets pointing up.
5. Assemble the saw chain to the preset tie-strap.
6. Assemble the tie-strap with brand mark or dot face up and the
notch toward the drive link tangs.
18HX 18HX 18HX 18HX
18HX 18HX 18HX 18HX
OREGON OREGON OREGON OREGON
OREGON OREGONOREGONOREGON
Page 47

Saw Chain
Mechanical Timber Harvesting Handbook
42
Saw Chain Repair
Additional Chain Joining Instructions
Follow these instructions to join your Harvester saw chain with
the rivet spinner:
1. For Oregon .404"-pitch Harvester Saw Chain (18HX, 19HX),
use take up handle “A” and anvil “A”. Do not use a hammer to
assemble.
2. For Oregon 3/4"-pitch Harvester Saw Chain (11BC, 11H), use
part number 108724. Strike the rivet with a hammer once to
set the rivet in the tie-strap before being spun.
3. After spinning, tension and twist the chain with gloved hands,
and look carefully for any relative movement between joined
tie-straps and their rivets.
4. No relative movement is acceptable – if observed, the joint
should be spun further.
5. Placing a drop of oil between the rivet head and the tie-strap
before twisting can make it easier to see relative motion. The
oil will visibly move with capillary action if there is even the
tiniest separation between the parts.
Page 48

Saw Chain
43 Mechanical Timber Harvesting Handbook
Saw Chain Troubleshooting
Most Harvester saw chain problems are caused by:
• Excessive saw chain speed and/or feed force.
• Poor maintenance practices.
• Lack of lubrication or the use of poor quality lubricants.
Here are the things to look for and the associated corrective
actions you should take:
Cuts slow, cuts rough, or won’t hold an edge
Look closely at your saw chain’s cutters and compare them to the
following illustrations.
1. Light abrasive damage on side plates.
Cause: Cutters came in contact with light
abrasive materials.
Symptoms: Very slow cutting
Remedy: File cutters back until all damage
is removed.
2. Severe abrasive damage on side
and/or top-plates.
Cause: Cutters hit or cut material other than
wood, such as rock, dirt, or sand. This type of
damage typically occurs when cutting close
to the ground.
Symptoms: Saw chain won’t cut or cuts
crookedly if the damage is to one side of
saw chain. Possible guide bar rail damage.
Remedy: File cutters back until all damage
is removed.
50˚
20˚
3. Too much top-plate filing angle.
Cause: Excessive top-plate angle while filing
or grinding.
Symptoms: Cutting angle is very sharp, but dulls
fast. Cutting action rough and erratic.
Remedy: Resharpen cutters while holding the
file at the correct top-plate filing angle for the
saw chain. Be sure the file guide is stamped
with the saw chain’s correct top-plate angle.
Page 49

Saw Chain
Mechanical Timber Harvesting Handbook
44
Saw Chain Troubleshooting
20˚
4. Too little top-plate filing angle.
Cause: Filed or ground at less than the
recommended angle.
Symptoms: Slow cutting. Requires extra effort
to cut. Possible binding in cut.
Remedy: Resharpen cutters while holding the
file at the correct top-plate filing angle for the
saw chain. Be sure the file guide is stamped
with the saw chain’s correct top-plate angle.
5. Too much top-plate cutting angle.
Cause: File held too low or file is too small.
Grinders: Saw chain ground at the wrong topplate cutting angle or using an incorrectly-sized
grinding wheel.
Symptom: Poor stay-sharp. Rapid dulling.
Cuts fast for a short time, then dulls.
Remedy: Resharpen cutters with the correct file
in the right size, held in the correct position. Use
correct file guide.
6. Too little top-plate cutting angle.
Cause:
File held too high or file is too large.
Grinders: Saw chain ground at the wrong top
plate cutting angle or an incorrectly sized grinding
wheel.
Symptoms:
Slow cutting. Premature wear to saw
chain and guide bar rails.
Remedy: Resharpen cutters using the correct
file guide that is the right size and in the correct
position.
7. Too much hook in the side plate.
Cause: File held too low or the file is too small.
Grinders: Saw chain ground at the wrong topplate cutting angle, grinding wheel is too small
or is grinding too deep into the body of cutter.
Symptoms: Rough cutting. Saw chain grabs.
Cutters dull quickly or won’t hold cutting edge.
Top plate breakage and/or saw chain stretch.
Remedy: Resharpen cutters using the correct
file in the right size held in the correct position.
Page 50

Saw Chain
45 Mechanical Timber Harvesting Handbook
Saw Chain Troubleshooting
8. Backslope on the side plate.
Cause: File held too high or the file is too large.
Grinders: Saw chain ground at the wrong topplate cutting angle, grinding wheel is too large,
or the grinding wheel is not grinding deep
enough
into the body of cutter.
Symptoms: Slow cutting. Premature wear to
saw chain and guide bar rails.
Remedy: Resharpen cutters using the correct
file guide in the right size held in the correct
position.
9. Low depth gauges.
Cause: Depth gauge never lowered.
Symptoms: Rough cutting. Saw chain grabs.
Excessive wear to the heel of cutters, opposing
tie-straps, guide bar rails. Top-plate breakage
and/or saw chain stretch.
Remedy: In most cases, cutters cannot be filed
back enough to correct for depth gauges that
are too low. Replace the saw chain.
10. High depth gauges.
Cause: Too much depth gauge removed;
depth gauge damaged in use.
Symptoms: Slow cutting. Excessive wear
to the saw chain and guide bar rails.
Remedy: File depth gauges down to their
correct height.
Note: See pages 31 – 38 for the proper filing techniques
to use when applying the remedies above.
Page 51

Saw Chain
Mechanical Timber Harvesting Handbook
46
Saw Chain Troubleshooting
Cutters or tie-straps wear heavily or break.
11. Excessive heel wear on cutters
and opposite tie-straps; cracks under
rear rivet holes.
Cause: Forcing dull saw chain to cut. Low
depth gauge settings. Lack of lubrication.
Loose saw chain tension.
Symptoms: Excessive heel wear on cutters.
Saw chain breakage. Excessive saw chain
stretch.
Remedy: Replace worn or cracked cutters
and/or tie-straps. Sharpen cutters properly
and often. Use proper saw chain tension
and plenty of lubrication.
12. Tie-straps or cutters, broken
in the center.
Cause: Incorrect field assembly of saw
chain components.
Symptoms: Broken tie-straps or cutters.
Remedy: Replace broken components.
See “Joining Saw Chain” on pages 40 – 42.
Be sure to spin chain joints precisely.
13. Bottoms of tie-straps and cutters worn out of square.
Cause: Worn guide bar rails.
Symptoms: Bottoms of tie-straps and cutters worn out of square.
Remedy: If saw chain is worn excessively, replace saw chain. If guide
bar groove is too wide, replace guide bar. If rails are worn, dress top
of guide bar to square. Maintain proper lubrication and saw chain
tension. See “Guide Bar Troubleshooting” on pages 83 – 90.
Page 52

Saw Chain
47 Mechanical Timber Harvesting Handbook
Saw Chain Troubleshooting
Drive links wear heavily or break.
14. Straight or concave bottoms.
Cause: Straight bottoms are due to shallow
guide bar body groove. Concave bottoms
are due to shallow guide bar nose groove.
Symptoms: Drive link tangs worn straight
or concave. Drive links can’t clean guide
bar groove. Tendency to throw saw chain
from guide bar.
Remedy: Replace guide bar, drive sprocket
or both. Sharpen drive links or replace
entire saw chain if many drive links are
damaged.
15. Battered and broken bottoms.
Cause: Worn or broken drive sprocket.
Loose saw chain tension or saw chain
jumping from guide bar groove. Results in
damage from revolving drive sprocket.
Symptoms: Drive links are burred or nicked.
Drive links may not fit in guide bar groove.
Drive links can’t clean the guide bar groove.
Remedy: Maintain proper tension to
prevent saw chain from climbing out of
the spur drive sprocket. Keep the guide
bar groove clear of debris. Replace drive
sprocket if worn. Replace drive links or
replace entire saw chain if many drive links
are damaged.
16. Peening in front or back.
Cause: Worn drive sprocket. Pin sprocket
systems are known to concentrate load to
the back of drive link, causing premature
wear.
Symptoms: Change in drive link shape.
Tight joints in the saw chain. Saw chain
stretch. Shortened saw chain life.
Remedy: Replace the drive sprocket and/
or pins. Replace saw chain. Do not attempt
to run a new saw chain on an old drive
sprocket, or an old saw chain on a new
drive sprocket.
Page 53

Saw Chain
Mechanical Timber Harvesting Handbook
48
Saw Chain Troubleshooting
17. Drive link tang turned up.
Cause: Worn drive sprocket.
Symptoms: Drive link tangs hit the bottom.
Remedy: Replace drive sprocket, sharpen
drive link tangs (as shown in Sharpening
Drive Link Tangs; see page 49) if
possible, or replace the saw chain.
18. Sides worn round or thin at bottoms.
Cause: Guide bar rails have spread, or one
rail has worn low, allowing saw chain to
lean over. Improper sharpening angles.
One side of saw chain dull. Use of .063"
gauge saw chain in .080" guide bar.
Symptoms: Saw chain cuts crookedly.
Accelerated guide bar rail and saw
chain wear.
Remedy: Ensure guide bar and saw chain
gauge match. Sharpen cutters frequently,
using recommended angles. Have guide
bar rails serviced by a dealer, or if possible,
dress guide bar rails square. If guide bar
groove is spread too wide, replace guide
bar. If saw chain wear is extensive, replace
the saw chain.
Page 54

Saw Chain
49 Mechanical Timber Harvesting Handbook
Sharpening Drive Link Tangs
Pointed drive link tangs help remove chips and debris from your
guide bar groove. Sharpen damaged tangs back to their original
shape with a round file.
Saw chain has tight joints.
19. Peening on bottom or front of
cutters and tie-straps.
Cause: Improper saw chain tension or a
worn out drive sprocket.
Symptoms: Saw chain stretch or saw
chain breakage.
Remedy: Saw chain with tight joints cannot
be repaired. Replace the saw chain and
maintain proper tension. Replace the rim
drive sprocket if worn.
20. Peening in notches of cutters and
tie-straps.
Cause: Worn spur drive sprocket.
Symptoms: Saw chain stretch or saw
chain breakage.
Remedy: Replace the spur drive sprocket.
Replace the saw chain. Always maintain
proper tension and do not run saw chain
on a worn drive sprocket.
Saw Chain Troubleshooting
Page 55

Saw Chain
Mechanical Timber Harvesting Handbook
50
Saw Chain Troubleshooting
Saw chain cuts crookedly/leans to one side/cuts unevenly
21. Damage to cutters on one side of saw chain.
Cause: Cutters on one side of saw chain are damaged by hitting the
saw box or the ground/debris.
Symptoms: Guide bar and saw chain bind in the cut. Could result
in guide bar and saw chain breakage when removing the guide bar
from tree. Uneven guide bar rail wear.
Remedy: File cutters back enough to remove all damage. Square up
guide bar rails if uneven.
Note: Prevent the bar from being bent and touching the saw
box. Always make sure the felling cut is done before moving the
harvester head with the crane.
22. Different cutter top-plate lengths
Cause: Inconsistent sharpening.
Symptoms: Guide bar and saw chain bind in the cut. Could result
in guide bar and saw chain breakage when removing the guide bar
from tree. Uneven guide bar rail wear.
Remedy: File cutters back to even cutter top-plate lengths. Square
up guide bar rails if uneven.
Page 56

51 Mechanical Timber Harvesting Handbook
Guide Bars
Page 57

Mechanical Timber Harvesting Handbook
52
Page 58

Guide Bar
53 Mechanical Timber Harvesting Handbook
Guide Bars
Understanding Bar Part Numbers
Oregon bar part numbers are printed on the bar package, and
have 10 digits. Here's what each digit means.
75 2 SM R L114
Length Gauge Nose Type Pitch Mount
.404
cm 2
.080"
HS
HL
HR
RH
SM
Solid Steel SprocketNose .404"-pitch bar
Stump Spray Bar – LH
Stump Spray Bar – RH
Solid Steel Replaceable
Sprocket-Nose
.404"-pitch bar
SpeedMax
™
XL
F/R
.404"
B149
B163
D104
D149
L003
L104
L114
L148
L149
L163
L172
L205
M104
M226
N104
N114
Q003
Q104
Q114
Q149
Q163
R104
R114
R149
S149
S163
Y104
42
45
48
54
55
59
60
64
65
67
73
74
75
80
82
88
90
00
(100)
13
(113)
Bar Mount
Gauge
Bar length
Pitch
Page 59

Guide Bar
Mechanical Timber Harvesting Handbook
54
Guide Bars
Guide Bar Types: .404" Pitch
Solid Harvester Solid-Nose Bar HSF
Solid Harvester Replaceable Sprocket-Nose Bar RHF
Jet-Fit
®
Solid Harvester Sprocket-Nose Bar HSF
Jet-Fit
®
Solid Harvester Replaceable Sprocket-Nose Bar RHF
Stump Spray Solid Harvester Sprocket-Nose Bar HRF and HLF
SpeedMax™ XL Harvester Sprocket-Nose Bar SMR
3/4
inch 1
.122"
SN Solid Steel Replaceable
Sprocket-Nose
3/4"-pitch bar
C
3/4"
C159
C211
F212
G138
J134
J211
K205
K187
K225
P155
P207
T043
T130
T132
T133
T138
T145
T146
T151
T152
T161
T168
T177
T190
T208
T210
T217
T219
T221
T222
T223
T224
T227
T229
T230
V127
9135
9136
9155
9164
9191
H175
18
23
24
27
28
29
30
31
32
33
34
35
36
37
38
39
40
43
44
45
51
52
58
59
60
64
65
66
77
DE Solid Steel Double-
Ended 3/4"-pitch bar
A
B
C
D
X
3/4"
UE Solid Steel Unequal
Ended 3/4"-pitch bar
AT Solid Steel Armor Tip
3/4"-pitch bar
V
Very
Large
Radius
3/4"
Page 60

Guide Bar
55 Mechanical Timber Harvesting Handbook
Guide Bar Types: 3/4" Pitch
Harvester Sprocket-Nose Bar SNC
Harvester Sprocket-Nose Bar with Jet-Fit and Stump Spray SNC
Harvest Armor Tip Bar ATV
Double-Ended Slasher / Pond & Deck Bars DEA, DEB, DEC
Symmetrical
Asymmetrical Slasher / Pond & Deck Bars UEA, UEB, UED
Guide Bars
Page 61

Guide Bar
Mechanical Timber Harvesting Handbook
56
.404" Pitch Guide Bar Mounts
Bar Noses: Solid and Replaceable Sprocket Nose
* 25 Rivets per package
Guide Bar Mount Types and Drive Sprocket Tooth Counts
Pitch and
Tooth Count Gauge Part No.
Rivet
Part No.
.404" • 11T 0.080" 101918 529035*
.404" • 11T 0.080" 537245 529035*
.404" • 14T 0.080" SMR14T 578147*
3/4" • 9T 0.122" 40693A 525152*
.404
3/4
Drive Sprocket
Tooth Count
Standard
Mount Type
SpeedMax
Mount Type
Drive Sprocket
Tooth Count
Standard
Mount Type
9 - 11 M 7-8 C, K
11-13 L Q 8 J
13 Y 8 – 9 F
14-16 B, N R 9 – 10 T,V
17-19 D S 11-12 G
Double/Unequal Ender Bars
3/4 3/4
Drive Sprocket
Tooth Count
SpeedMax
Mount Type
Drive Sprocket
Tooth Count
Standard
Mount Type
15 P 9 E
21 H
Page 62

Guide Bar
57 Mechanical Timber Harvesting Handbook
.404" Pitch Guide Bar Mounts
D104
D104
1
2
2
Drive sprocket
tooth count:
17, 18, 19
Dimensions:
.394" x
3.338"
.404" x
.555"
L003
1
2
2
2
2
Drive sprocket
tooth count:
11, 12, 13
Dimensions:
.7/8"
(.875")
.448"
L104
1
2
2
3
3
Drive sprocket
tooth count:
11, 12, 13
Dimensions:
.394" (10
mm) x
3.338"
.555" x
.404"
L114
1
2
2
3
3
Drive sprocket
tooth count:
11, 12, 13
Dimensions:
.394" (10
mm) x
3.338"
.555" x
.404"
.435"
Page 63

Guide Bar
Mechanical Timber Harvesting Handbook
58
.404" Pitch Guide Bar Mounts
L148
1
2
2
3
3
Drive sprocket
tooth count:
11, 12, 13
Dimensions:
.394" (10
mm) x
3.338"
.555" x
.404"
.435"
L205
1
2
1
Drive sprocket
tooth count:
11, 12, 13
Dimensions:
.555" x
.404"
.640"
M104
1
2
2
Drive sprocket
tooth count:
9, 10, 11
Dimensions:
.394" (10
mm) x
3.338"
.555" x
.404"
M226
1
2
2
Drive sprocket
tooth count:
9, 10, 11
Dimensions:
.570" x
3.914"
.311"
Page 64

Guide Bar
59 Mechanical Timber Harvesting Handbook
N104
1
2
2
Drive sprocket
tooth count:
14, 15, 16
Dimensions:
.394" (10
mm) x
3.338"
.555" x
.404"
N114
1
2
2
3
3
Drive sprocket
tooth count:
14, 15, 16
Dimensions:
.394" (10
mm) x
3.338"
.555" x
.404"
.435"
Q003
1
1
1
1
2
Drive sprocket
tooth count:
11,12, 13
Dimensions:
.448"
.875"
Q/R104
1
2
2
R
Q
Drive sprocket
tooth count:
R: 11, 12, 13
Q: 14, 15, 16
Dimensions:
.399" x
3.338"
.404" x
.555"
.404" Pitch Guide Bar Mounts
Page 65

Guide Bar
Mechanical Timber Harvesting Handbook
60
.404" Pitch Guide Bar Mounts
Q/R114
1
2
3
3
2
R
Q
Drive sprocket
tooth count:
Q: 11, 12, 13
R: 14, 15, 16
Dimensions:
.399" x
3.338"
.404" x
.555"
.435"
Q/S163
1
2
2
S
Q
Drive sprocket
tooth count:
Q: 11, 12, 13
S: 17, 18, 19
Dimensions:
.586" x
3.288"
.413" x
.696"
Q/R/S149
1
2
2
3
R
S
Q
Drive sprocket
tooth count:
Q: 11, 12, 13
R: 14, 15, 16
S: 17, 18, 19
Dimensions:
.586" x
3.288"
.413" x
.696"
.492"
Y104
1
2
2
Drive sprocket
tooth count:
13
Dimensions:
.394" (10
mm) x
3.338"
.555" x
.404"
Page 66

Guide Bar
61 Mechanical Timber Harvesting Handbook
.404" Pitch Guide Bar Mounts
B149
13
2
2
Drive sprocket
tooth count:
14, 15, 16
Dimensions:
.581" (15
mm) x
3.406"
.413" x
.848"
.492"
Page 67

Guide Bar
Mechanical Timber Harvesting Handbook
62
.404" Pitch Jet Fit Guide Bar Mounts
B163
1
2
2
Drive sprocket
tooth count:
14, 15, 16
Dimensions:
.581" (15
mm) x
3.406"
.413" x
.838"
D149
1
3
2
2
Drive sprocket
tooth count:
17, 18
Dimensions:
.581" (15
mm) x
3.406"
.413" x
.814"
.492"
L149
1
3
2
2
Drive sprocket
tooth count:
11, 12, 13
Dimensions:
.581" (15
mm) x
3.406"
.413" x
.814"
.492"
L163
1
2
2
Drive sprocket
tooth count:
11, 12, 13
Dimensions:
.581" (15
mm) x
3.406"
.413" x
.814"
Page 68

Guide Bar
63 Mechanical Timber Harvesting Handbook
.404" Pitch Jet Fit Guide Bar Mounts
L172
1
3
2
2
Drive sprocket
tooth count:
11, 12, 13
Dimensions:
.581" (15
mm) x
3.406"
.413" x
.814"
.492"
NOTE: Not interchangeable with L149 or L163 mounts
Page 69

Guide Bar
Mechanical Timber Harvesting Handbook
64
3/4" Pitch Guide Bar Mounts
C159
1
2
2
3
3
Drive sprocket
tooth count:
7, 8
Dimensions:
.635"
x 4.502"
.190"
radius
.151"
radius
C211
1
2
2
Drive sprocket
tooth count:
7, 8
Dimensions:
.394"
x 3.338"
.404"
x .555"
F212
1
2
3
4
4
Drive sprocket
tooth count:
8, 9
Dimensions:
.640"
x 3.640"
.313"
.313"
x .867"
.648"
Page 70

Guide Bar
65 Mechanical Timber Harvesting Handbook
3/4" Pitch Guide Bar Mounts
G138
1
2
2
Drive sprocket
tooth count:
11,12
Dimensions:
.635"
x 7.410"
.650"
J134
1
1
1
1
1
Drive sprocket
tooth count:
8
Dimensions:
.562"
J211
1
2
2
Drive sprocket
tooth count:
8
Dimensions:
.394"
x 3.338"
.555"
x .404"
K177
1
2
2
Drive sprocket
tooth count:
7, 8
Dimensions:
.625"
x 3.25"
.306"
Page 71

Guide Bar
Mechanical Timber Harvesting Handbook
66
3/4" Pitch Guide Bar Mounts
K187
1
2
2
Drive sprocket
tooth count:
7, 8
Dimensions:
.375"
x2.966"
.250"
K205
1
2
2
Drive sprocket
tooth count:
7, 8
Dimensions:
.645"
.410"
K225
1
2
2
Drive sprocket
tooth count:
7, 8
Dimensions:
.581"
x 3.288"
.413"
x .889"
T043 RSN
1
1
3
3
2
2
Drive sprocket
tooth count:
9, 10
Dimensions:
.609"
.562"
.531"
Page 72

Guide Bar
67 Mechanical Timber Harvesting Handbook
3/4" Pitch Guide Bar Mounts
T130
1
2
2
Drive sprocket
tooth count:
9, 10
Dimensions:
.875" x
4.054"
.531" x 3"
T132
1
1
1
1
2
Drive sprocket
tooth count:
9, 10
Dimensions:
.531" x
3.064"
.562"
T133
1
2
2
Drive sprocket
tooth count:
9, 10
Dimensions:
.515" x
4.129"
.515"
T138
1
2
2
Drive sprocket
tooth count:
9, 10
Dimensions:
.635" x
7.410"
.650"
Page 73

Guide Bar
Mechanical Timber Harvesting Handbook
68
3/4" Pitch Guide Bar Mounts
T145
1
1
1
1
Drive sprocket
tooth count:
9, 10
Dimensions:
.570"
T146
1
2
2
2
2
Drive sprocket
tooth count:
9, 10
Dimensions:
.637" x
3.627"
.531"
T151
1
2
2
Drive sprocket
tooth count:
9, 10
Dimensions:
.535" x
3.226"
.531"
T152
1
2
3
3
2
Drive sprocket
tooth count:
9, 10
Dimensions:
.760"
x 5.910"
.562"
.531"
Page 74

Guide Bar
69 Mechanical Timber Harvesting Handbook
3/4" Pitch Guide Bar Mounts
T161
1
3
3
2
Drive sprocket
tooth count:
9, 10
Dimensions:
.447"
x 5.500"
.880" x
.568"
.531" x
2.281"
T168
1
1
2
2
Drive sprocket
tooth count:
9, 10
Dimensions:
.609"
.562"
T177
1
2
2
Drive sprocket
tooth count:
9, 10
Dimensions:
.625" x
3.25"
.306"
T190
1
2
2
Drive sprocket
tooth count:
9, 10
Dimensions:
.760" x
5.25"
.760"
Page 75

Guide Bar
Mechanical Timber Harvesting Handbook
70
3/4" Pitch Guide Bar Mounts
T208
1
2
2
Drive sprocket
tooth count:
9, 10
Dimensions:
.515"
x 4.129"
.770"
T210
1
1
1
1
Drive sprocket
tooth count:
9, 10
Dimensions:
.782"
T217
1
2
2
2
2
Drive sprocket
tooth count:
9, 10
Dimensions:
.787"
x 4.330"
.512"
T219
1
2
2
Drive sprocket
tooth count:
9, 10
Dimensions:
.635"
x 3.312"
.151"
radius
x .190"
radius
Page 76

Guide Bar
71 Mechanical Timber Harvesting Handbook
3/4" Pitch Guide Bar Mounts
T221
1
2
2
Drive sprocket
tooth count:
9, 10
Dimensions:
.760"
x 4.374"
.760"
T222
1
1
1
1
Drive sprocket
tooth count:
9, 10
Dimensions:
.679"
T223
1
1
1
1
1
1
Drive sprocket
tooth count:
9, 10
Dimensions:
.679"
T224
1
1
1
Drive sprocket
tooth count:
9, 10
Dimensions:
.630"
Page 77

Guide Bar
Mechanical Timber Harvesting Handbook
72
T227
1
2
2
Drive sprocket
tooth count:
9, 10
Dimensions:
.875"
x 4.000"
.500" x
1.196"
T229
1
2
2
Drive sprocket
tooth count:
9, 10
Dimensions:
.880"
x 7.584"
.506" x
2.842"
T230
1
2
2
1
Drive sprocket
tooth count:
9, 10
Dimensions:
.562"
.609"
V127
1
1
2
2
3
Drive
sprocket
tooth count:
9, 10
Dimensions:
.812" x
2.577"
.812" x
2.453"
.500"
3/4" Pitch Guide Bar Mounts
Page 78

Guide Bar
73 Mechanical Timber Harvesting Handbook
9135
1
2
3
3
2
Drive
sprocket
tooth count:
9, 10
Dimensions:
.906" x
4.500"
.531" x
3.000"
.375"
9136
1
1
11
Drive sprocket
tooth count:
9, 10
Dimensions:
.516"
9164
Drive sprocket
tooth count:
9, 10
Dimensions:
111
1
1
.531"
3/4" Pitch Guide Bar Mounts
Symmetrical Double-Ended
Page 79

Guide Bar
Mechanical Timber Harvesting Handbook
74
9155
11
11
2
2
2
Drive sprocket
tooth count: 15
Sprocket end
dimension:
.656"
Idler end
dimension:
.531"
9191
1
11
1
2
2
2
Drive sprocket
tooth count: 14
Sprocket end
dimension:
.760"
Idler end
dimension:
.531"
H175
1
1
2
2
2
1
3
3
3
Drive sprocket
tooth count: 21
.656"
.531"
Idler end
dimension:
.531"
3/4" Pitch Guide Bar Mounts
Asymmetrical Double-Ended
Page 80

Guide Bar
75 Mechanical Timber Harvesting Handbook
P155
1 1
1 1
2
2
2
2
2
2
Drive sprocket
tooth count: 15
Sprocket end
dimension:
.656"
Idler end
dimension:
.531"
P207
2
2
2
1
11
1
2
2
2
Drive sprocket
tooth count: 15
Sprocket end
dimension:
.781"
Idler end
dimension:
.531"
3/4" Pitch Guide Bar Mounts
Asymmetrical Double-Ended
Page 81

Guide Bar
Mechanical Timber Harvesting Handbook
76
Page 82

Guide Bar
77 Mechanical Timber Harvesting Handbook
Guide Bar Maintenance
For proper mounting of your guide bar, refer to the operator’s
manual.
Basic Guide Bar Maintenance Tasks
s Before each use l Daily
n Often (hourly, or at refueling) u Weekly, periodically
1. s n Saw chain tensioning (See “Installation and Break-In” pg. 13)
2. l Inspect for damage and component wear; (refer to Guide
Bar Troubleshooting, pgs. 83 – 90) replace as needed.
Check bar groove depth after dressing by using the Oregon
Harvester Multi-Purpose tool.
3.
u Clean guide bar grooves and oil holes.
Oil hole
4. u Turn your guide bar over to equalize bar wear.
5.
u Dress the rail—always dressing from the bar tip to the bar
mount. Note: If using a grinding wheel, direct debris towards
the tail, then clean out the grooves. Grinding debris can cause
the nose components to wear quickly or jam.
Page 83

Guide Bar
Mechanical Timber Harvesting Handbook
78
Guide Bar Maintenance
Bar Rail Dresser, p/n 111589 makes it easy to
remove effects of normal wear and remove
minor damage.
7.
u On sprocket-nose guide bars, check for clearance around
the guide bar’s tip, between the tops of rails, and the
chassis. Replace nose sprockets before cutters or tie-straps
contact the bar nose rails.
1/32"( 0,8 mm )
1/32"
Page 84

Guide Bar
79 Mechanical Timber Harvesting Handbook
Sprocket Nose Replacement: HS
Replacing Nose Sprockets on HS Harvester
Guide Bars
Select a new Harvester nose sprocket with the correct gauge for
your guide bar and saw chain.
1. Using a 1/4" drill bit, drill out head
from each of the nose sprocket
rivets.
2. Punch out the remainder of the
rivets. Use a punch narrow enough
to keep from damaging the rivet
holes in the nose of the guide bar.
3. Use a small screwdriver to spread
the guide bar nose rails just
enough to remove the old nose
sprocket. Clean debris from the
sprocket area.
WARNING: Wear eye protection and gloves.
Page 85

Guide Bar
Mechanical Timber Harvesting Handbook
80
Sprocket Nose Replacement: HS
4. Inside the nose sprocket package, you’ll find the new sprocket
wrapped in a tissue. Be careful to keep the sprocket inside the
tissue as you remove it from the package — bearings are
easily lost. Slide the tissue and the new sprocket, together, into
the guide bar’s nose.
5. Once fully inside the nose, hold
the nose sprocket in place, then
remove the tissue.
6. Align the sprocket’s inner race
holes with the holes in the guide
bar nose. Insert rivets into each
hole through the guide bar. On
used guide bars, the nose rails
could be spread apart. Use a
small clamp to hold the nose
rails together when inserting and
securing the rivets.
7. With the guide bar and rivets solidly
supported on a strong, flat metal
surface, carefully peen the rivet
heads down with the flat end of a
hammer. Be careful to hit only the
rivet head. Do not hit the guide bar
body — this will pinch the nose
sprocket. Rivet heads must be snug
and secure while still allowing the
drive sprocket to turn freely.
8. Clean out the bar groove to ensure it is free of possible
debris.
Page 86

Guide Bar
81 Mechanical Timber Harvesting Handbook
Sprocket Nose Replacement Nose: RH, SM, and SN Guide Bars
Replacing Nose Sprockets with Replacement Nose
Kits on RH, SM, and SN Guide Bars
1. Using the Oregon heavy-duty
chain breaker #24548, break
out the bar tip attachment
rivets.
2. Using the heavy-duty chain
breaker #24548, break out the
remaining rivets. Use a punch
narrow enough to keep from
damaging the rivet holes in the
nose of the guide bar.
3. Remove the old nose. Clean the guide bar’s attachment area.
Insert the rivets through the underside of the nose.
4. With the guide bar
body, nose, and rivet
solidly supported on a
strong flat metal surface,
peen the rivet’s head
down with the flat end of
a hammer. Do not hit the
guide bar body; hit only
the rivet head. To check
installation, grip the guide
bar body in one hand and
twist. The nose and body
should feel like a single,
solid piece. If you feel any
movement in the nose guide bar joint area, or if you hear any
clicking sounds from the same area, tighten the rivet with a
few more hammer strokes.
Page 87

Guide Bar
Mechanical Timber Harvesting Handbook
82
Sprocket Nose Replacement Nose: RH, SM, and SN Guide Bars
5. File down the rails of the new nose to align with the rails of
the old guide bar body.
6. Clean out the bar groove to
ensure it is free of possible
debris.
Page 88

Guide Bar
83 Mechanical Timber Harvesting Handbook
Guide Bar Troubleshooting
Rail Conditions
1. Rails are worn down, groove
becomes shallow.
Cause: Normal wear on rails.
Symptoms: Chain rides on groove
bottom causing drive link damage,
chain leans during cutting.
Remedy: Guide bar is at the end of
life, replace the guide bar. If wear
occurs too quickly, check for proper
lubrication, chain sharpness, and
guide bar feed load.
2. Outside edge of rails develop
wire edges.
Cause: Normal wear on rails.
Symptoms: Left alone, wire edges can
break off and chip away rail material.
Remedy: Use flat file or grinder to
square up the guide bar’s rails and
remove wire edges. If wire edges
develop too quickly, check for proper
lubrication, saw chain sharpness, and
guide bar feed load.
Note: If using a grinding wheel, direct
debris towards the tail, then clean
out the grooves. Grinding debris can
cause nose components to wear
quickly or jam.
3. Rail on one side is worn thin.
Cause: Damaged or dull cutters on
one side (see saw chain section).
Saw chain leaning over in a worn
groove or using a .063"-gauge saw
chain in a .080"-gauge guide bar.
Symptoms: Incomplete cuts, leading
cuts, guide bar bound in the cut.
Remedy: Replace the guide bar,
check for the correct saw chain
gauge, replace the saw chain if
it continues to cut crooked after
sharpening (see Sharpening Saw
Chain, pgs. 35 – 38).
Page 89

Guide Bar
Mechanical Timber Harvesting Handbook
84
4. Rails around the tip of solidnose guide bars show small
cracks or broken-out sections.
Cause: Accidents or irregular operating
techniques, which push drive links
sideways or place excessive pressure on
the nose, can cause breaks or cracks.
Symptoms: Damage to tie-straps and
cutters, saw chain throws, short guide
bar life.
Remedy: Your dealer may be able to
repair minor damage on a relatively
new guide bar. If not, replace guide
bar immediately.
5. Rails around the tip of the
solid-nose guide bars are split
at the bottom of the guide bar
groove.
Cause: Accidents or irregular
operating techniques, which push
drive links sideways or place
excessive pressure on side of the
nose, can cause breaks or cracks.
Symptoms: Rails spread and chain
rides on the groove bottom, causing
drive link damage and the saw chain
leans during cutting.
Remedy: Your dealer may be able to
repair minor damage on a relatively
new guide bar. If not, replace guide
bar immediately.
6. Rails along the guide bar body
or around the tip of sprocket nose
guide bars show blue discoloration.
Cause: Pinched rails, lack of
lubrication, or accidents and improper
cutting techniques. These actions
can push drive links sideways in the
groove, creating extreme frictiongenerated heat.
Symptoms: Blue spots on rails
indicate temperatures reaching 600° F
(315° C) and rail softening. Rails wear
quickly. Saw chain drive link damage.
Remedy: Replace the guide bar and
saw chain.
Guide Bar Troubleshooting
Page 90

Guide Bar
85 Mechanical Timber Harvesting Handbook
Guide Bar Troubleshooting
7. Blue spots at the tail of the
guide bar.
Cause: Misaligned drive sprocket
or rails pinched because debris not
removed from saw pad or guide bar
when the guide bar was installed.
Symptoms: Blue spots on rails
indicate temperatures reaching 600° F
(315° C) and softened rails. Rails wear
quickly. Saw chain drive link damage.
Remedy: Realign drive sprocket and
guide bar using proper shims. Clean
the guide bar and saw pad when
installing a guide bar. Replace the
saw chain.
8. Spread rails.
Cause: (1) Saw chain was struck
broadside by tree, log, or branch stub.
(2) Saw chain was pushed sideways,
forcing drive links to pry guide bar
rails apart.
Symptoms: Guide bar will not enter
log during cut or cannot make a
complete cut.
Remedy: Hammer rails together with
a drive link in the groove as spacer.
Adjust the saw return to allow the
guide bar to go farther into the saw
box. Sharpen delimbing knives. Avoid
moving the tree/log when the guide
bar and saw chain are out of the saw
box. Reduce the guide bar feed speed.
9. Rail chipping in the middle of guide bar.
Cause: Excessive pressure on the guide bar, excessive guide bar
feed speed, cold conditions, lack of lubrication, aggressive saw chain
when cutting in frozen wood.
Symptoms: Damage to the saw chain and reduced guide bar life.
Remedy: Replace the guide bar if rail wear is extensive. Decrease the
guide bar feed force when cutting consists mostly of small-diameter
trees. Increase lubrication, especially in cold conditions. Reduce
aggressiveness of the saw chain when cutting frozen wood.
Page 91

Guide Bar
Mechanical Timber Harvesting Handbook
86
Guide Bar Troubleshooting
10. Rail on one side worn low.
Cause: Damaged or dull cutters on
one side, or saw chain leaning over
in a worn groove, or using .063" saw
chain in .080" guide bar. Most often
one short rail is caused by the cutters
contacting rocks on one side of the
saw chain, usually the cutters closest
to the ground.
Symptoms: Incomplete cuts, leading
cuts, guide bar bound in the cut.
Remedy: Replace the guide bar.
Replace the saw chain. If the saw
continues to cut crookedly after
sharpening, see Sharpening Saw
Chain (pgs. 31 – 38).
Page 92

Guide Bar
87 Mechanical Timber Harvesting Handbook
Guide Bar Troubleshooting
Nose Conditions
11. Chipped rails or excessive rail
wear a few inches back from the
nose end of the bar.
Cause: Loose saw chain tension.
Symptoms: Saw chain damage, saw
chain throwing, shortened guide
bar life.
Remedy: Use proper saw chain
tension and invert the guide bar on the
saw periodically to distribute wear.
12. Rails in the tip of a sprocket-nose
guide bar spread, allowing loss of
bearings.
Cause: Accidents or irregular
operating techniques twist the nose or
push the drive links sideways against
the nose’s rails.
Symptoms: Sprocket breakage.
Remedy: Replace sprocket
components. Keep the guide bar nose
away from objects not intended for
cutting.
13. Sprocket in the sprocket nose
guide bar breaks.
Cause: High saw chain tension,
accidents, saw chain broadsided by
log, pulling saw chain out of the guide
bar rails.
Symptoms: Guide bar nose sprocket
no longer functions.
Remedy: Replace sprocket components.
Use proper saw chain tension.
Page 93

Guide Bar
Mechanical Timber Harvesting Handbook
88
Guide Bar Troubleshooting
14. Nose burned at tip from the
saw chain sliding on rails of the
sprocket nose guide bar, or from
the sprocket being recessed into
the tip.
Cause: High saw chain tension from
automatic saw chain tensioners.
Symptoms: Nose breakage from
bearings wearing quickly and jamming.
Remedy: Decrease the tension applied
by the automatic saw chain tensioner.
15. Loose or missing nose/
attachment rivets.
Cause: The guide bar tip flexing
during operation from difficult cutting
conditions or accidents.
Symptoms: Rivets continue to loosen
until laminates spread and the
bearings are lost.
Remedy: Check rivets every 100 machine
hours. Rehammer loose rivets and
replace rivets if the rivet head is missing.
Always use new rivets.
16. Burn ring around nose rivets.
Cause: Bearings overheated.
Symptoms: Premature breakage,
jamming, wearing of the sprocket
nose components.
Remedy: Check for proper oil flow
rates. Saw chips will plug oil line or
guide bar oil hole. Clean out the bar oil
hole daily. Install a wire mesh screen
on the oil tank filler spout to prevent
chips from getting into the tank.
17. Tabs on the replaceable nose
sprocket (RSN) break off.
Cause: Accidental bending of the nose.
Symptoms: RSN no longer functions.
Remedy: Install new RSN. Avoid
bending the RSN.
Page 94

Guide Bar
89 Mechanical Timber Harvesting Handbook
Mount Conditions
18. Spread or broken guide bar
mounting slot.
Cause: Holding pins/bolts were not
inserted into the guide bar mount holes.
The guide bar is not properly supported
when minor accidents or pinches occur.
Symptoms: The guide bar mount slot
spreads or the guide bar breaks at the
slot prematurely. If a Jet-Fit
®
guide bar
fails from the tip of the middle slot to
the side as shown without the small tab
also breaking, then pins are missing or
broken off.
Remedy: Replace broken guide bars
and use the holding pins/bolts originally
supplied with the guide bar holder.
When purchasing a new harvester head,
consider purchasing head compatible
with Jet-Fit guide bars.
Jet-Fit Mount Conditions
19. Chronic or frequent guide bar
mount breakage on Jet-Fit guide
bars when no accident has occurred.
Cause: The guide bar retraction speed is
too fast. The forward guide bar-sweep
speed is too fast, causing the guide bar
holder to stop quickly at the end of its
rotation.
In either case, the inertia of the guide
bar causes it to over-rotate in the guide
bar mount, putting excessive stress on
the guide bar mount.
Symptoms: Guide bar breakage without
the guide bar being involved in an
accident. Unexplained guide bar mount
breakage.
Remedy: Reduce pressure, or flow, to
the cylinder that sweeps the guide bar
forward, out of the saw box, or retracts
the guide back into the saw box.
Guide Bar Troubleshooting
Page 95

Guide Bar
Mechanical Timber Harvesting Handbook
90
Guide Bar Troubleshooting
20. Occasional failure of Jet-Fit
guide bars when accidents occur.
Cause: The guide bar becomes stuck in
the cut, or an accident occurs causing
the guide bar to become stuck.
Symptoms: The force required to
dislodge the guide bar approaches the
strength of the guide bar holder, during
which the guide bar mount breaks.
Remedy: In this case, the Jet-Fit
guide bar breaks as designed to
prevent damage to the expensive
guide bar mount as shown in the
illustration below.
Guide
Bar
Guide
Bar
Mount
Æ
Page 96

91 Mechanical Timber Harvesting Handbook
Drive Sprockets
Page 97

Mechanical Timber Harvesting Handbook
92
Page 98

Drive Sprocket
93 Mechanical Timber Harvesting Handbook
Drive Sprocket Types
Drive sprockets transfer power from your machine to your saw
chain to drive it around your guide bar. Drive sprockets are the
third member of your saw chain-based cutting system. They
will wear as a team and should be inspected and maintained as
a team.
Type Advantages Disadvantages
Rim
• Best saw chain support
for cutters and tiestraps.
• Setup is
important:
the rim must
be properly
aligned with
guide bar*
*Check the alignment of your rim drive sprocket regularly and
use shims to adjust the rim’s position into correct alignment. See
pages 95 for more information on drive sprocket alignment.
HarvesterLok®
Rim
• Uniform pressure
eliminates distortion,
warping.
• Fittings for smaller
shafts.
• Keyless hub.
• Hex-head set screws
for quick installation,
adjustment, and
removal in the field.
• No space between the
drive sprocket and shaft
gives zero backlash.
• Drive sprocket
must be
aligned to the
drive shaft
to prevent
damage to
the saw chain,
guide bar and
drive sprocket.
Page 99

Drive Sprocket
Mechanical Timber Harvesting Handbook
94
.404" Drive-Shaft Configurations
Type A and D Type B
Ø 1.010"
25.85 mm
Ø 0.880"
22.35 mm
Ø 0.788"
20.015 mm
1.181"
30 mm
0.236"
5.99 mm
2X Ø
0.242"
6.15 mm
Type C
2X 0.974"
24.74 mm
0.250"
6. 35 mm
0.315"
8 mm
4X Ø
0.242"
6.15 mm
Ø 0.985"
25.019 mm
Oregon .404" pitch rim sprockets are configured for use with
Oregon saw chain. Sprockets are compatible with A, B, and C
drive-shaft configurations.
Page 100

Drive Sprocket
95 Mechanical Timber Harvesting Handbook
Drive Sprocket Alignment
596397 .404" Pitch
Harvester Multi-Purpose Tool
533700 3/4" Pitch
Harvester Multi-Purpose Tool
1. Mount your harvester guide bar on your harvester head.
2. Using the tool that matches your saw chain pitch, place the
Harvester Multi-Purpose tool into the groove of your guide bar
and slide it back until it extends to the drive sprocket.
3. Adjust the drive sprocket’s position on the drive shaft until it’s
centered on the Harvester Multi-Purpose Tool.
4. Install shims as necessary to ensure alignment.
5. Secure the drive sprocket in place.
OR-B050 • 0.5 mm
OR-B100 • 1.0 mm
OR-C050 • 0.5 mm
OR-C100 • 1.0 mm
 Loading...