

Page 1

INSTRUCTION MANUAL
MODE D’EMPLOI
BEDIENUNGSANLEITUNG
MANUALE DE ISTRUZIONI
INSTRUCCIONES DE
FUNCIONAMIENTO
MANUAL DE INSTRUEÇÕS
GEBRUIKSAANWIJZING
INSTRUKCJA UZYTKOWANIA
GB
GP801 Speed + Distance System
1
Page 2

GB
Oregon Scientific Speed & Distance System
MODEL NO.: GP801
USER MANUAL
TABLE OF CONTENTS
Now You Know—How Far? How Fast?............................... 3
How It Works ......................................................................... 4
Sports Watch Features ......................................................... 5
Speed and Distance System Features ................................ 6
Useful Applications of the Speed and Distance System... 6
A True Multi-Sport System ................................................... 7
Key Features ......................................................................... 8
Operating the Speed and Distance Transceiver ................ 9
Inserting the Batteries ........................................................ 9
Wearing the Speed and Distance Transceiver ................... 9
Using the GPS System....................................................... 12
GPS System Messages ..................................................... 13
Displaying Data .................................................................. 14
Operating the Speed and Distance Watch.......................... 15
Automatic Time Correction and Setting.........................
Chrono Mode (Chronograph or Stopwatch) ....................... 17
Split or Lap Timing.............................................................. 18
Recall Mode ....................................................................... 19
Timer Mode (Countdown Timer)......................................... 20
Monitor Mode ..................................................................... 21
Odometer Mode ................................................................. 22
2
15
Page 3

Alarm Mode ........................................................................ 22
Options Mode ..................................................................... 23
Water Resistance .................................................................. 25
Maintenance .......................................................................... 25
Watch Battery Replacement ................................................ 26
GPS Transceiver Battery Life and Replacement................ 26
Warnings................................................................................ 27
Specifications........................................................................ 29
Additional Resources ........................................................... 31
Declaration of Conformity .................................................... 32
NOW YOU KNOW — HOW FAR?
HOW FAST?
With the Oregon Scientific GP801 Speed and Distance System,
you have useful, accurate, and fun performance information at
your fingertips. Now you can answer the all-important questions,
“How far? How fast?”
• Speed — Measure your real-time Speed, A verage Speed
and Maximum Speed
• Distance — Measure your Workout Distance. Have your
very own Odometer
• Pace — Measure your real-time Pace, A verage Pace and
Best Pace
GB
3
Page 4
GB
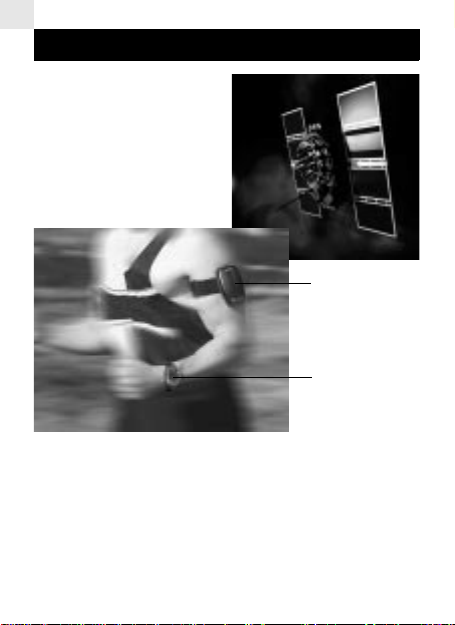
HOW IT WORKS
The Speed and Distance
Monitor uses information from
24 GPS satellites to accurately
and continuously calculate your
speed and distance. That
information is then transmitted
to the Oregon Scientific GP801
Speed & Distance Watch.
Speed and Distance
Transceiver
Oregon Scientific
GP801 Speed and
Distance Watch
4
Page 5
The Oregon Scientific GP801 Speed and Distance Watch
receives and displays your speed and distance right on your
watch.
SPORTS WATCH FEATURES
All by itself, this is a great sports watch with:
•Time and date
• Month, day and date display
• Hourly chime
• 12- or 24-hour format
•Two time zones
Chronograph
• 50- lap memory
•View lap and split times
• Memory recall
5
GB
Page 6

GB
Countdown Timer
Countdown timer with stop, repeat or start chronograph at end
•
Alarm
• Separate daily, weekday and weekend alarms
• 5-minute backup alarm
SPEED AND DISTANCE SYSTEM FEATURES
When you add the Speed and Distance Transceiver,
you have so much more:
• Speed — View your current Speed, Average Speed and
Maximum Speed
• Distance — Measure your Workout Distance
• Pace —Monitor your real-time Pace, A verage Pace and Best
Pace
• Odometer — Have your very own Odometer
• Automatic Time Correction — GPS adjusts Time of Day
for accuracy
USEFUL APPLICATIONS OF THE SPEED
AND DISTANCE SYSTEM
• Time of Day and Monitor modes: See speed and distance
data that tracks your total travel
• Chrono: View Speed and Distance for an event you time
• Timer: View Speed and Distance data that accumulates for
the duration of the Timer
6
Page 7

A TRUE MULTI-SPORT SYSTEM
The Oregon Scientific GP801 Speed and Distance System can
be used to enhance your enjoyment of a wide variety of outdoor
sports including:
• Running • Paddling
•Walking • Boating
• Hiking • Biking
• In-line skating • Soccer
• Ice skating • Horseback riding
• Skiing • …and more!
• Sailing
GB
7
Page 8
GB
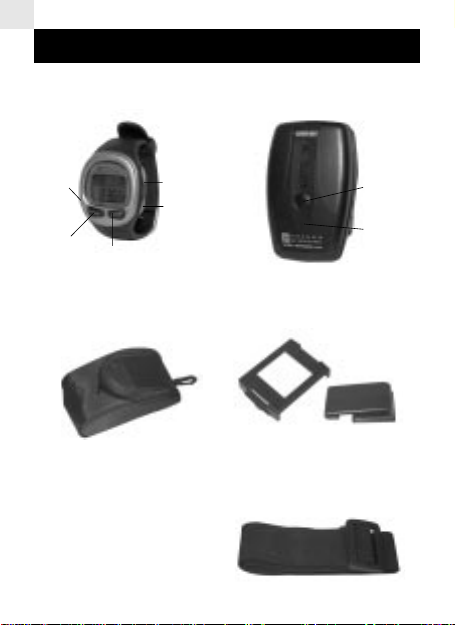
KEY FEATURES
GP801 WATCH
Mode
Start/Stop
Scroll up
CARRYING POUCH
Backlight
Speed and
Distance Display
Split/Reset/Set
8
TRANSCEIVER
ARM UNIT
BELT CLIP
ARM BAND
Transceiver
ON/OFF
Status
Indicator
Page 9

OPERATING THE SPEED AND DISTANCE
TRANSCEIVER
Inserting the Batteries
The Speed and Distance Monitor operates on three AAA batteries
(included).
To insert the batteries, open the back of the case by lifting and
turning the latch ring 1/4 turn counter-clockwise. Lift the back
off. Follow the markings inside the battery compartment to ensure
the new batteries are properly aligned.
Wearing the Speed and Distance Transceiver
• For best results, the Transceiver
needs a clear view of the sky.
• The Transceiver can be worn on
the upper arm or clipped to your
waist. The upper arm will provide
the best results.
• The Watch should be worn so it is
always within 1 meter (about 3
feet) of the Transceiver.
• Clothing can be worn over the Transceiver as long as the
clothing is dry and without metal.
GB
9
Page 10
GB
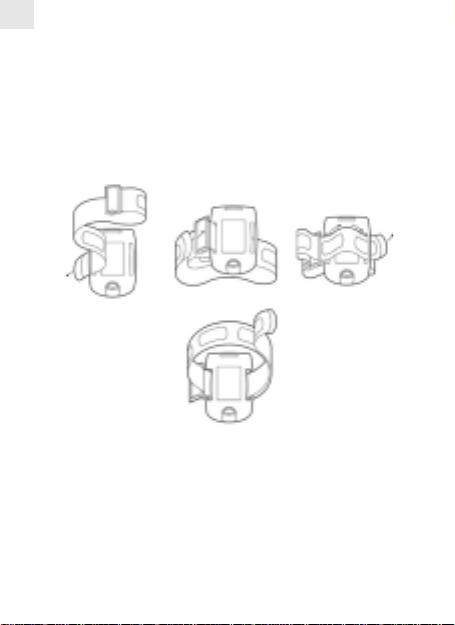
To wear the Transceiver on your upper arm:
Loosen the adjustable armband and wrap the unit around your
upper arm. Pull the armband so that it fits snugly around your
arm. Fasten using hook and loop closure. NOTE: if the armband
is not attached to the unit, rethread with the back of the case
removed from the unit as shown below, making sure the smooth
side faces out (hook and loop closure faces back).
2
1
4
10
3
Page 11

To wear the Transceiver clipped to your belt:
Open the back of the case by lifting and turning latch ring 1/4
turn counter-clockwise.
Lift the back off. Remove armband from the back of Transceiver .
Attach the beltclip to the back of the case by fitting tabs in bot-
tom part of two-part clip into the vertical slots on either side of
back, as shown below (1). Be sure that both parts of clip unit
are properly fitted together as shown below (2) before attaching
the unit to the back of the case. Replace the back.
NOTE: Y ou may attach the clip so that it is oriented vertically or
horizontally by rotating the clip portion of the two-part clip unit
as shown below.
1
2
GB
11
Page 12

GB
Using the GPS System
The GPS system acquires information from satellites in orbit
around the Earth to determine your speed and distance traveled.
For the unit to work properly, you must be outdoors in an
area with a clear view of the sky.
While outdoors in an open area, press and hold the
TRANSCEIVER ON/OFF button to turn on the receiver. The
Status Indicator light on the Transceiver will flash red. When it
has successfully acquired signals from the satellites, the Status
Indicator light will flash green. If the watch displays SEARCHING
for too long, try moving to a more open outdoor area, move
away from metal objects, or try new batteries.
Search Time: On first use, the Transceiver will take up to 5
minutes to establish a link with the satellites. After that, the unit
needs only 15-45 seconds. If you move hundreds of miles from
the location where you last used the Transceiver, the search
will last longer. T urning on the T ransceiver before going outdoors
will cause the acquisition to take longer.
To turn off the Transceiver, press and hold the TRANSCEIVER
ON/OFF button for one second.
To activate the Transceiver at any time (for example, after you
have lost radio transmission),enter the monitor mode (page 21).
12
Page 13

GPS System Messages
GB
The Oregon Scientific Speed and Distance System is a
sophisticated system. During operation, the following messages
on the watch will help you maximize the system’s performance.
SEARCHING – The GPS Transceiver has just been turned on
and is searching the sky trying to acquire signals from enough
satellites to function accurately. If the watch displays
SEARCHING for too long, try moving to a more open outdoor
area, move away from metal objects, or try new batteries.
WEAK GPS SIGNAL – The GPS Transceiver is losing its signals
from the satellites. Move to an area that is more open and free
of metal objects.
If the signal is weak or totally lost for short periods of time, the system
has a technique to maintain reliable speed and distance information.
To conserve battery power, the T ransceiver will shut off if it does
not detect any movement or cannot acquire a signal after 15
minutes.
RADIO LINK BROKEN – The watch is no longer receiving any
speed and distance data from the Transceiver over the radio
link. Check to make sure that the Transceiver is powered on
and that the watch is not more than 1 meter (about 3 feet) away
from it.
RADIO LINK NOISY – The watch is having difficulty receiving
speed and distance data. Make sure the watch is within 1 meter
of the Transceiver. Move away from sources of electrical
interference such as power lines, motors, exercise equipment,
etc. Change the orientation of the Transceiver from vertical to
horizontal or vise versa.
FATAL GPS ERROR – The GPS Transceiver is damaged.
Contact our customer service department.
13
Page 14

GB
Displaying Data
Press the SPEED/DISTANCE button while standing at least 6
feet apart from other users of this system to begin displaying
data. The watch will display speed data on the top line as well
as a wave symbol in the upper left part of the watch display. If
the Transceiver is still searching for satellites, the watch shows
SEARCHING. Once the search is complete you can use the
Speed and Distance features of the watch.
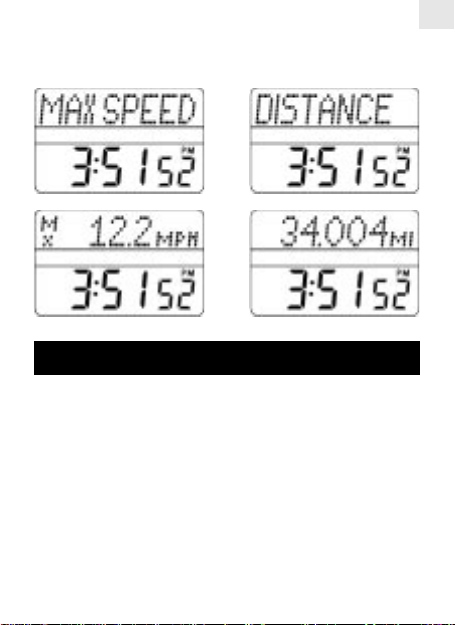
In Time, Chronograph , Timer, and Monitor modes, press
SPEED/DISTANCE button repetitively to view information in this
order: SPEED (current), A VERAGE SPEED, MAXIMUM SPEED,
PACE, AVERAGE PACE, BEST PACE, DISTANCE.
Information in each mode is accumulated independently.
You can manually turn off Speed and Distance data by holding
down the SPEED/DISTANCE button for 2 seconds.
14
Page 15

OPERATING THE SPEED & DISTANCE
WATCH
Push MODE to scroll through the following modes in this order:
Time of Day • Chronograph • Chronograph Recall
• Countdown Timer • Speed and Distance Monitor
• Odometer • Alarm • Options
Automatic Time Correction and Setting:
If the watch is receiving GPS
data from the transmitter, the
system automatically corrects
the time and sets the date
based on the highly accurate
time used by the GPS satellites.
• If you have never set the time
on the watch, the system will
set the watch to UTC (Greenwich Mean Time).
• If you have set the time before first using the Transceiver, it
will change your time to UTC time. You may then need to
adjust for your time zone.
• If you have adjusted the time since using the Transceiver ,the
system will maintain your adjustment and only correct itself
for time it has drifted since you last used the Trans ceiver.
(For example, if you set your watch five minutes fast, the
system will adjust the time so it is exactly five minutes fast.)
GB
15
Page 16

GB
To Set or Adjust Time Zone 1:
1. Press SPLIT/RESET/SET. Hold to Set appears.
2. Continue holding until Set Time appears. Hours will begin
flashing. Press START/STOP to advance the flashing digits.
3. Press MODE to set (in order): MINUTES; DAY OF THE
WEEK; MONTH; DATE; 12- OR 24-HOUR FORMAT;
HOURLY BEEP ON/OFF; BUTTON BEEP WHEN PRESSED
ON/OFF. The selected item will flash. Press START/STOP
to change. In 12-hour format, go through 24 hours to change
from AM to PM.
4. Press SPLIT/RESET/SET to save changes and exit Set T ime.
NOTE: Seconds cannot be manually changed.
To Change Time Zone Display:
1. Press and hold START/STOP for 6 seconds until Hold for
time 2 displays.
2. Follow Steps 3 - 4 above to set Time Zone 2.
To View Time of Day and Speed and Distance:
With the Transceiver functioning and while standing at least six
feet from other users of the GP801, press SPEED/DISTANCE
to begin displaying data. Press repeatedly to select the data to
view.
To Switch Between Time Zone Displays:
Press and hold START/STOP for 6 seconds.
16
Page 17

Chrono Mode (Chronograph or Stopwatch)
The Chronograph (Chrono) will time events up to 100 hours. It
will store to memory the lap number, lap time, split time, average
speed, average pace and
distance for each lap
taken.
A lap time is the time for
a segment of an event. A
split time is the total time
from the beginning of an
event.
Data displayed in
CHRONO mode for
Average Speed, Maximum Speed, Average Pace, Best Pace
and Distance are based only on information received since the
chrono was started.
You can go to other modes while the Chronograph is running. In
the Time display, a stopwatch symbol will appear on the display
to indicate the Chrono is running.
Press START/STOP to begin timing.
Press START/STOP to pause timing. Once the CHRONO is
paused, press START/STOP if you want to resume timing. If
you want to reset the CHRONO, press and hold SPLIT/
RESET/SET.
GB
17
Page 18

GB
Split or Lap Timing
Note: The Display can show either Lap or Split time.
1. Reset the chronometer
to 00:00:00.
2. Press SPLIT/RESET/
SET to choose lap or
split display
3. Press START/STOP to
begin timing. During the
timing of a lap, the upper part of the display
can show speed and distance data if the Transceiver is
operating.
4. Press SPLIT/RESET/SET to store LAP and SPLIT. The main
display freezes while the watch continues timing the next
segment. After 10 seconds the Lap or Split time is again shown
in the main display. If the watch is set to show speed or pace,
then the average value for the current lap is displayed during
the hold period and AV appears in the display.
5. Press SPLIT/RESET/SET again to store another lap. With
the 50-Lap model, if you take more than 50 laps the watch
will display the lap count up to 99 laps and store information
from the last 50 laps to the watch’s memory.
6. At any time, press SPEED/DISTANCE to cycle though time
and distance information that is displayed in upper line during
timing.
7. Press START/STOP to end timing. The display will show either
final lap time or final event time.
18
Page 19

Recall Mode
Chrono Recall allows you to review stored lap information while
the Chrono is running or stopped.
1. In Recall mode, press
SPLIT/RESET/SET repeatedly to display, in
order, Average Speed,
Average Pace, Distance and Lap and Split
times for the first lap.
Lap time appears in
upper line of display.
The lap number display has an R in front of it to indicate
recall. (If you have not saved any laps, NO LAPS STORED
is shown.) Continue to press SPLIT/RESET/SET to display
information for successive laps until the final lap. Press
START/STOP to go back to previous display.
2. If no speed and data information was recorded for a lap, then
only the lap time (in upper line of display) and split time are
shown.
3. Press MODE at any time to return to the Time mode.
4. To rapidly scroll through multiple laps, press and hold SPLIT/
RESET/SET or START/STOP.
GB
19
Page 20

GB
Timer Mode (Countdown Timer)
The Timer will count down from a set length of time up to 100
hours. At the end of the countdown, the Timer will optionally
a) Stop at End, b) Repeat at End or c) Stop and Start the
Chronograph (Chrono must be reset). It will also display selected
speed or distance information for the timed interval.
Setting the Timer:
1. In Timer mode, press and hold the SPLIT/RESET/SET button.
The TENS OF HOURS value will flash. Press START/STOP
to increase the setting.
2. Press MODE. The HOURS display will flash. Press START/
STOP to increase the setting.
3. Repeat for minutes and seconds.
4. Press MODE to view options for the end of the countdown
(stop, repeat, start Chrono). Press START/STOP to select
action.
5. Press SPLIT/RESET/SET to save changes and exit.
6. Press SPEED/DISTANCE button to cycle through type of
speed and distance information to be displayed in the upper
row of the Timer.
20
Page 21

Timer Operation:
1. Press START/STOP to start the Timer . Original time or speed
and distance will be shown in upper display, while remaining
time will be shown in main display.
2. Press START/STOP to stop Timer. Press again to resume or
SPLIT/RESET/SET to reset to original setting.
At the conclusion of the timed period, the watch will play an
alert melody, the backlight will flash, and the timer display will
appear for 10 seconds. The speed or distance information is
displayed if the watch is receiving data. The display will then
return to original mode and reset the Timer.
Pressing any button during the 10 seconds silences the alert
and resets the Timer.
When the Timer is running, an hour glass icon will appear on
the display in the Time of Day Mode.
Monitor Mode
In this mode you can view
both speed and distance
information as you travel
while the GPS receiver is
receiving data. Entering
this mode automatically
activates the receiver.
1. While in Monitor Mode, press SPEED/DISTANCE to select
SPEED, AVERAGE SPEED, MAXIMUM SPEED, PACE,
AVERAGE PACE, BEST PACE, and GPS BA TTER Y LEVEL.
Current speed, pace and GPS battery level are available only
if the receiver is active.
GB
21
Page 22

GB
The last choice displayed will be selected and the information
will appear in the upper line of Monitor. The Main display will
show distance traveled.
2. Press START/STOP to pause data accumulation.
To clear accumulated data, press and hold SPLIT/RESET/SET.
3.
Odometer Mode
The watch keeps track of
the total distance received
by the watch when the
Transceiver is functioning
for up to 10,000 miles or
kilometers.
In Odometer mode, press
and hold SPLIT/RESET/SET to clear accumulated data back
to zero.
Alarm Mode
You can set the alarm for
every day, for only
weekdays, or for only
weekends. The alarm will
operate for the Time Zone
you selected as the primary
time display. At the set
time, the alarm tone will
sound for 20 seconds, the backlight will flash, and the alarm
display will pop up for 20 seconds. If no action is taken, a backup
alarm will sound 5 minutes later. When the alarm sounds, press
any button to silence it.
1. In Alarm mode, press SPLIT/RESET/SET. The HOURS value
will flash.
22
Page 23

2. Press START/STOP to change the flashing display.
3. Press MODE to change TENS OF MINUTES, then again to
set MINUTES, and again to set Alarm type (Daily, Weekday
or Weekend).
4. Press SPLIT/RESET/SET to save and exit Set Alarm mode.
Alarm ON or OFF Setting:
In Alarm mode, press START/STOP to turn the alarm ON or
OFF. When the Alarm is ON, an alarm clock icon appears on
the watch display in Time of Day Mode.
Options Mode
The watch has a variety of
options designed to make
the Speed and Distance System more useful.
1. In the Options Mode,
press SPEED/DISTANCE
to view the options
2. Adjust the settings. To adjust simple settings (On/Of f, Speed/
Pace, etc.), press START/STOP. To adjust numeric settings,
press and hold SPLIT/ RESET/SET. The value (or some part
of it) will begin to flash.
3. Press START/STOP to set the flashing value, and use MODE
to select the next digit. Note that for options that have only
one setting or digit, MODE does nothing.
4. Press SPEED/DISTANCE to switch to another option.
5. When you are done setting, press SPLIT/RESET/SET to save
the changes and exit setting.
23
GB
Page 24

GB
SMOOTHING – This feature makes pace and speed values
easier to read while using the watch by “smoothing” out any
small variations in speed. Y ou might want to enable this feature
if you are viewing pace information and the displayed numbers
appear too “jumpy.” Smoothing has no effect on the accuracy of
the data displayed, nor any effect on the distance accumulated.
UNITS – Choose to have the watch display distance and pace
based in Miles or Kilometers (KM).
BACKLIGHT
Press the Backlight button to activate the light. The backlight
illuminates the entire watch face at night and in low light
conditions.
Press and hold the Backlight button for 3 seconds, until watch
beeps, to activate the night-time viewing mode. Once activated,
any button pushed will cause the backlight to stay on for 3
seconds. The night-time viewing mode will stay activated for 3
hours or until you press and hold the Backlight button again for
3 seconds.
24
Page 25

WATER RESISTANCE
The watch is water-resistant up to 50 meters. The transceiver is
splash-resistant. Refer to the table below for proper use guidelines for the watch.
GB
30m / 100ft
50m / 165ft
100m / 325ft
RAIN
SPLASHES, ETC
OK
OK
OK
SHOWERING
(WARM / COOL
WATER ONLY
OK
OK
OK
LIGHT SWIMMING
/ SHALLOW WATER
NO
OK
OK
SHALLOW DIVING /
SURFING /
WATER SPORT
NO
NO
OK
SNORKELING /
DEEP WATER
DIVING
NO
NO
NO
Should the transceiver be submerged in water, remove the case
back and batteries to let the compartment dry. Wipe the outside
of the unit with a dry cloth.
NOTE
The watch will not display speed and distance informa-
tion when used under water.
When using the watch for aquatic or outdoor sports activities,
observe the following guidelines:
• Do not press the buttons underwater or with wet fingers.
• Rinse with water and mild soap after use.
• Do not use in hot water.
TIPS FOR KEEPING YOUR WATCH FIT:
Keep your watch water resistant! Avoid chemicals (gasoline,
chlorine, perfumes, alcohol, hair sprays, etc.). Rinse after use.
Reduce exposure to heat. Have your watch serviced by an approved service center once yearly.
25
Page 26

GB
MAINTENANCE
The GPS Transceiver and its strap should be rinsed in fresh
water to avoid the buildup of materials that can interfere with
the measurement of your speed and distance.
WATCH BATTERY REPLACEMENT
To avoid the possibility of permanently damaging the watch, WE
STRONGLY RECOMMEND T AKING YOUR W ATCH TO A LOCAL
RETAILER OR JEWELER TO HAVE THE BATTERY REPLACED.
GPS TRANSCEIVER BATTERY LIFE AND
REPLACEMENT
The batteries in the Transceiver will last approximately 12 hours.
With the Transceiver ON and the watch receiving data, you can
check the Transceiver battery level on the watch. Change the
watch to Monitor Mode. Then push SPEED/DISTANCE until you
see GPS BATT LEVEL on the top line of the display. After a
moment the outline of a battery will appear on the display with
the dark area indicating the amount of battery life left.
When the Transceiver has about 30 minutes of battery life left,
the status light will blink faster.
The Transceiver batteries should be replaced when any of the
following things occur:
• The watch no longer receives speed and distance information
from the Transceiver when it is properly worn on the arm.
• The Transceiver cannot acquire satellites.
26
Page 27

To change the batteries, open the back of the case by turning
the latch ring 1/4 turn counter-clockwise. Lift the back off.
Remove the old batteries. Insert new batteries according to the
markings inside the battery compartment.
Always remove dead batteries from the unit. Never mix old and
new batteries.
WARNINGS
To ensure you use your product correctly and safely, read these
Warnings and the entire user manual before using the product.
The warnings given here provide important safety information
and should be observed at all times.
!
WARNINGS
• Observe all traffic and sports safety rules when using this
device during exercise. Do not consult the LCD display
while moving.
• Never attempt to take this device apart or expose the
internal circuitry. Contact the retailer or our customer
service department if it requires servicing.
• Be careful when handling all battery types. Do not mix old
and new batteries, or use batteries not specified by this
manual. Improper use of batteries can cause personal
injury and property damage. Remove all batteries before
storing the product for long periods of time.
• Check all major functions after the device has been unused
for a long period of time. This is to ensure its full operation.
Regularly test and clean the device.
GB
27
Page 28

GB
• Do not subject the product to impact, shock, extreme
temperatures or humidity, wind-born sand, hot water, or
water depths greater than those specified in this manual.
•Take special care when handling a damaged LCD display,
as the liquid crystals can be harmful to your health.
• If the device becomes wet, allow it to completely dry before
using.
• Do not use or store the device in locations that may
adversely affect its performance such as next to heat
sources or electrical equipment, in extreme conditions, or
in direct sunlight.
• Do not use this device in aircrafts or hospitals. The use of
radio frequency products can cause malfunctions in the
control devices of other equipment.
• When disposing of this product, please do so in accordance
with your local waste disposal regulations.
NOTE
The content of this manual is subject to change without
further notice. The illustrations used may differ from the actual
product. No part of this manual may be reproduced without the
permission of the manufacturer.
28
Page 29

SPECIFICATIONS
Watch:
Measurement units Distance (kilometer / mile),
Current Speed (kilometer per
hour / mile per hour) and Distance
Current / Average / Max Speed
(kph / mph)
Current / Average / Best Pace
(kph / mph)
Transceiver:
Reception range about 1 meter (3 feet)
(low battery, electrical
equipment and engines may
affect range)
Measurement mechanism Global Positioning Satellite
(GPS) technology
Stopwatch/Countdown Timer:
Stopwatch 99:59:59 (hours:min:sec)
Resolution 1/100 sec
Timer 99:59:59 (hours:min:sec)
Options Start, stop, reset
Clock:
Date display Day of week, MM / DD
(month / date)
Time display 12 or 24-hour user selectable
(AM/PM); HH:MM:SS
GB
29
Page 30

GB
Alarms Daily / weekday / weekend /
5-minute backup
Time Zones 2 (+/- 23 hours)
Auto Correction Uses GPS receiver (default
Greenwich Mean Time)
Alerts:
Beep Alerts Hourly
On button press
Zone (min / max speed or pace)
Distance (every m/km)
Chronometer:
Measurement units 99:59:59 (hours:min:sec)
Resolution 1/100 sec
Laps 50 laps / split laps
Lap display Lap number,lap time,lap distance,
and average lap speed/pace
Lap recall 50 laps
Odometer 10,000.00 km/mile
Other features:
Backlight: Hi-Glo backlight; 3 sec / 3 hour
(night-time viewing mode)
Water resistance: Watch: 50 meters /
GPS receiver: splash proof
Power:
Power supply Watch – 1x CR2025
Lithium batteries
GPS Transceiver – 3x AAA
Alkaline batteries
30
Page 31

ADDITIONAL RESOURCES
Visit our website ( www.oregonscientific.com) to learn more about
your new watch and other Oregon Scientific products such as
digital cameras, alarm clocks, and weather monitoring systems.
The website also contains contact information for our customer
service department, in case you need to reach us.
GB
31
Page 32

GB
EC-DECLARATION OF CONFORMITY
This products contains the approved transmitter and complies with the
essential requirements of Article 3 of the R&TTE 1995/5/EC Directives, if
used for its intended use and the following standards have been applied:
LDV: 73/23/EEC
Safety: IEC 60950
EMC: 89/336/EEC
Emission: EN300-330-1, -2
Immunity: EN300-683
Additional Information: The product herewith complies with the
requirements of the Low-Voltage Directive 73/23/EEC and the EMC
Directive 89/336/EEC and carries the marking accordingly.
Notifying Body – Underwriters Laboratories Inc., CAB# - 0983; 1285 Walt Whitman
Road, Melville, NY 11747
Hereby, IDT Technology Limited declares that this low power radio
equipment is in compliance with the essential requirements and other
relevant provisions of R&TTE Directive 1999/5/EC.
Alan W.L.WOO
Manager, Quality Assurance
Date: 15 February 2003
2003 Oregon Scientific. All rights reserved.
Radiated Emission 9 kHz to 30 MHz H-Field (magnetic).
Radiated Emission 30 MHz to 1000 MHz E-Field
(Electric). Ref. EN55022
Radiated Immunity 80 MHz to 1000 MHz. Ref. EN61000-4-3
ESD Electrostatic discharge. Ref. EN61000-4-2
R&TTE Compliant Countries:
All EC countries, Switzerland CH
And Norway N
32
Page 33

WARNING: It is your responsibility to use the Oregon Scientific
GP801 Speed+Distance System in a safe manner and to
maintain full awareness of all conditions and surroundings at all
times. Consulting the Oregon Scientific GP801 Speed+Distance
System while moving is unsafe and could result in collision or
other accident causing damage and personal injury to yourself
or others. The Oregon Scientific GP801 Speed+Distance System
contains memory functions that should be used to record your
speed and distance data for later review.
CAUTION: IT IS YOUR RESPONSIBILITY TO USE THIS
PRODUCT PRUDENTLY. THIS PRODUCT IS NOT INTENDED
FOR USE FOR ANY PURPOSE REQUIRING PRECISE
MEASUREMENT OF SPEED OR DISTANCE. THE GPS IS
OPERATED BY THE GOVERNMENT OF THE UNITED
STATES, WHICH IS SOLELY RESPONSIBLE FOR ITS
ACCURACY AND MAINTENANCE. THE SYSTEM IS SUBJECT
TO CHANGES WHICH COULD AFFECT THE ACCURACY AND
PERFORMANCE OF ALL GPS EQUIPMENT.
GB
33
 Loading...