

Page 1

User’s
Guide
Grab-It & Steam-It
Powerful, Lightweight & Durable
Power Broom & Steam Mop
™
Important!
Read this manual carefully, and keep for
future reference.
Page 2
ENGLISH
Enjoy
Call
Click
Contents
Thank you for purchasing the Oreck Grab-It & Steam-It™ Power Broom & Steam Mop. The Oreck
Grab-It & Steam-It™ features a 2-year warranty. Simply install the handle and you are ready to
enjoy your new Oreck Grab-It & Steam-It™ Power Broom & Steam Mop.
Welcome to our Call. Click. customer service program. To speak with an Oreck representative
call or click using the information below.
USA: 1•800•989•3535
Canada: 1•888•676•7325
On the web, point and click at: www.oreck.com
or visit www.oreck.com and click locate a store on the top right.
Safety .............................................................................................................3
Genera l Warnings ....................................................................................................................... 3
Operation .........................................................................................................4
Parts List ..................................................................................................................................... 4
Assembling the Oreck Grab-It & Steam-It™ Handle ................................................................. 5
Operating the Oreck Grab-It & Steam-It
Operating the Power Broom ....................................................................................................... 6
Operating the Steam Mop .........................................................................................................7,8
Deep Sanitizing Instructions ....................................................................................................... 9
General Use & Maintenance ..................................................................................9
Suggested Steam Settings ........................................................................................................... 8
Maintenance ................................................................................................................................ 9
Replacing the Hard Water Filter...............................................................................................................9
Brushroll Maintenance ............................................................................................................... 9
Troubleshooting ............................................................................................... 10
Parts ............................................................................................................................................ 10
Accessories & Replacement Parts .............................................................................................10
Warranty ........................................................................................................ 11
™ ...........................................................................................................
5
SAVE THESE INSTRUCTIONS
Household Use Only
To reduce the risk of electric shock, this equipment has a polarized
plug. A polarized plug has one rounded prong that is wider and one
straight prong. The rounded end goes into the longest socket slot.
This plug will t in a polarized outlet only one way. If the plug does
not t fully in the outlet, reverse the plug. If it still does
not t, contact qualied personnel to install the proper
outlet. Do not alter the plug in any way.
2
Page 3

ENGLISH
Safety
General Warnings
IMPORTANT SAFETY INSTRUCTIONS!
When using an electrical appliance, basic precautions should always be followed, including the
following:
READ ALL INSTRUCTIONS BEFORE USING THIS APPLIANCE
WARNING!: To reduce the risk of fire, electric shock, or injury:
• Do not leave appliance unattended when plugged in. Unplug from outlet when not in use and
before servicing.
• Do not use outdoors or on wet surfaces.
• Do not operate the unit while in the upright and locked position.
• Do not let the unit run while in any one stationary position for any period of time. Keep the unit
moving while in operation.
• Do not allow to be used as a toy. Close attention is necessary when used near children.
• Use only as described in this manual. Use only manufacturer’s recommended attachments.
• Do not use with damaged cord or plug. If appliance is not working as it should, has been dropped,
damaged, left outdoors, or dropped into water, return it to a service center or call customer service
at: US: 1-80 0-989-3535 Canada: 1-888-676-7325
• Do not pull or carry by cord, use cord as a handle, close door on cord, or pull cord around sharp
edges or corners.
• Keep cord away from heated surfaces.
• Do not run appliance over cord.
• Do not unplug by pulling on cord. To unplug, grasp the plug, not the cord.
• Do not handle plug or appliance with wet hands.
• Do not use without the tank cap in place.
• Do not operate the steam function without water in the tank.
• Empty the water tank when the steam cleaner is not in use.
• Do not put any object into openings. Do not use with any opening blocked; keep free of dust, lint,
hair and anything that may reduce performance.
• Keep hair, loose clothing, ngers and all parts of body away from openings and
moving pa rts.
• Do not use to pick up anything that is burning or smoking, such as cigarettes, matches,
or hot ashes.
• Turn off all controls before unplugging.
• Use extra care when cleaning on stairs.
• Do not use to pick up ammable or combustible liquids, such as gasoline or lighter uid, or use in
areas where they may be present.
• Do not use appliance in an enclosed space where ammable, explosive or toxic vapors are given
off by oil base paint, paint thinner, some mothproong substances, or in an area where ammable
dust is present.
• Do not pick up toxic material such as chlorine bleach, drain cleaner, gasoline, etc.
with this appliance.
• Never put additives (such as perfume, stain remover or products containing alcohol) in the water as
they may damage the steam cleaner or make it dangerous to you.
• Product contains chemicals known to the State of California to cause cancer and birth defects.
• Ensure that the water tank’s closure cap has been screwed down fully before use.
• Do not touch any hot areas on the appliance It is normal for the appliance to heat up during
opperation.
• Do not use the appliance to treat any item of clothing while being worn on the body.
• The force and heat of the steam may have an adverse effect on some materials. Always test
the steamer on a small concealed area to determine if it is suitable for treatment with the steam
cleaner.
• Never aim the appliance at people, animals or plants (risk of scalding!).
• Do not aim the appliance at electrical systems or wires.
• Not for use on ne silks, velour, very thin plastics, unsealed hardwood, laminates, engineered
hard oor surfaces, ceilings, drywall and exterior paint of automobiles, electronics or items using
el e c trici t y.
3
Page 4
ENGLISH
Operation
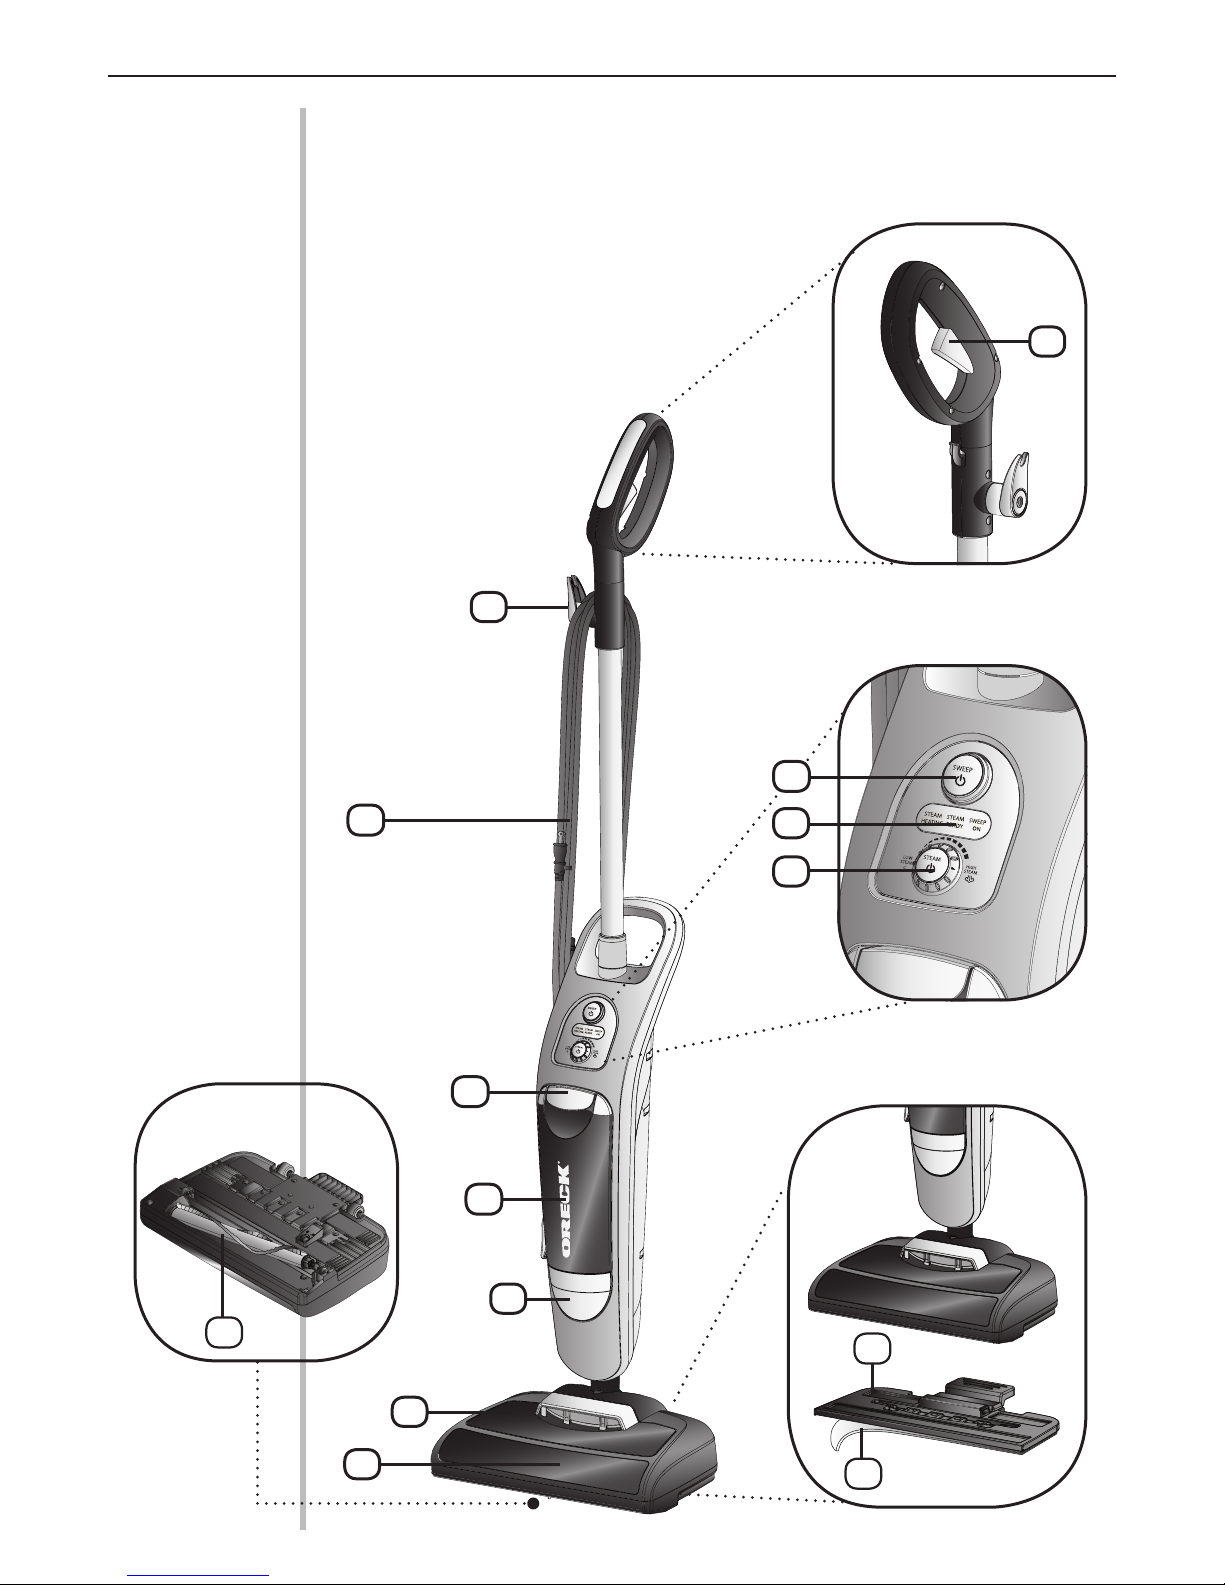
Parts List
1 Cord dump
2 Water Tank Release Lever
3 Water Tank
4 Replaceable Hard Water Filter
5 Lift Out Debris Cup
6 Steam Activation Trigger
7 Power Broom ON/Off Switch
8 S t e a m H e a t i n g / S t e a m R e a d y / S w e e p O n
Indicator Lights
9 Steam On Button/ Steam
Level Adjustment Dial
10 Steam Mop Pad Holder
11 Microber Steam Mop Pad
12 Power Cord
13 Power Head
14 Brushroll
1
6
14
12
7
8
9
2
2
3
4
10
5
13
4
11
Page 5

Operation
continued
ENGLISH
Assembling the Handle
Align the connector tab at the bottom of
1
the Grab-It & Steam-It™ handle with the
receiving port on top of the unit. Insert until a
“snap” is heard.
Snap cord assembly into the cord clip located
2
on the back of the Grab-It & Steam-It™
handle. Leave excess cord at the power head
to allow movement.
1
Connector
Tab
Receiving
Port
Operating the Oreck Grab-It & Steam-It
3
Up-Position Lock - Place foot on power head
and lean handle back gently to release lock for use.
Return handle to the full upright position to engage
lock.
Cord Dump - To release cord, twist cord dump 1/2
4
turn. Slide cord off handle.
Carry Handle - Carry Handle is located on the
5
back of the appliance for easy lifting, carrying, and
steaming stairs.
6
Easy Power Cord Storage -Turn Cord Dump
to the up position, wrap power cord around Cord
Dump and lower cord bracket located below the
Carry Handle.
7
Microfiber Steam Mop Pad Holder- To attach or
release the microber steam mop pad holder, place
foot on release pedal and gently push down, then:
a. To attach the Grab-It & Steam-It’s microber
steam mop pad holder, lower the power head
onto the microber steam mop pad holder.
b. To remove the Grab-It & Steam-It’s microber
steam mop pad holder, lift the
Grab-It & Steam-It ™ appliance away from the
microber steam mop pad holder.
™
2
Cord Clip
3
Power Head
5
4
5
Release Pedal
6 7
a
b
Page 6

ENGLISH
Operation
continued
Power Broom Operation:
Press the “SWEEP ON/OFF” button to activate the brush roll.
1
NOTE: The power broom can operate on hard oors with or without the steam mop pad
holder attached.
NOTE: Remove steam mop pad holder when using on low pile carpeting.
To empty the debris cup grasp the cup handle and lift out.
2
3
Press the release button on the rear of the cup to open and empty.
4
Replace the debris cup.
NOTE: Do not operate the power broom without the debris cup in place.
NOTE: Do not lift the power broom off of the oor while operating.
1 2
Cup
Handle
6
43
Release Button
Page 7

ENGLISH
Operation
continued
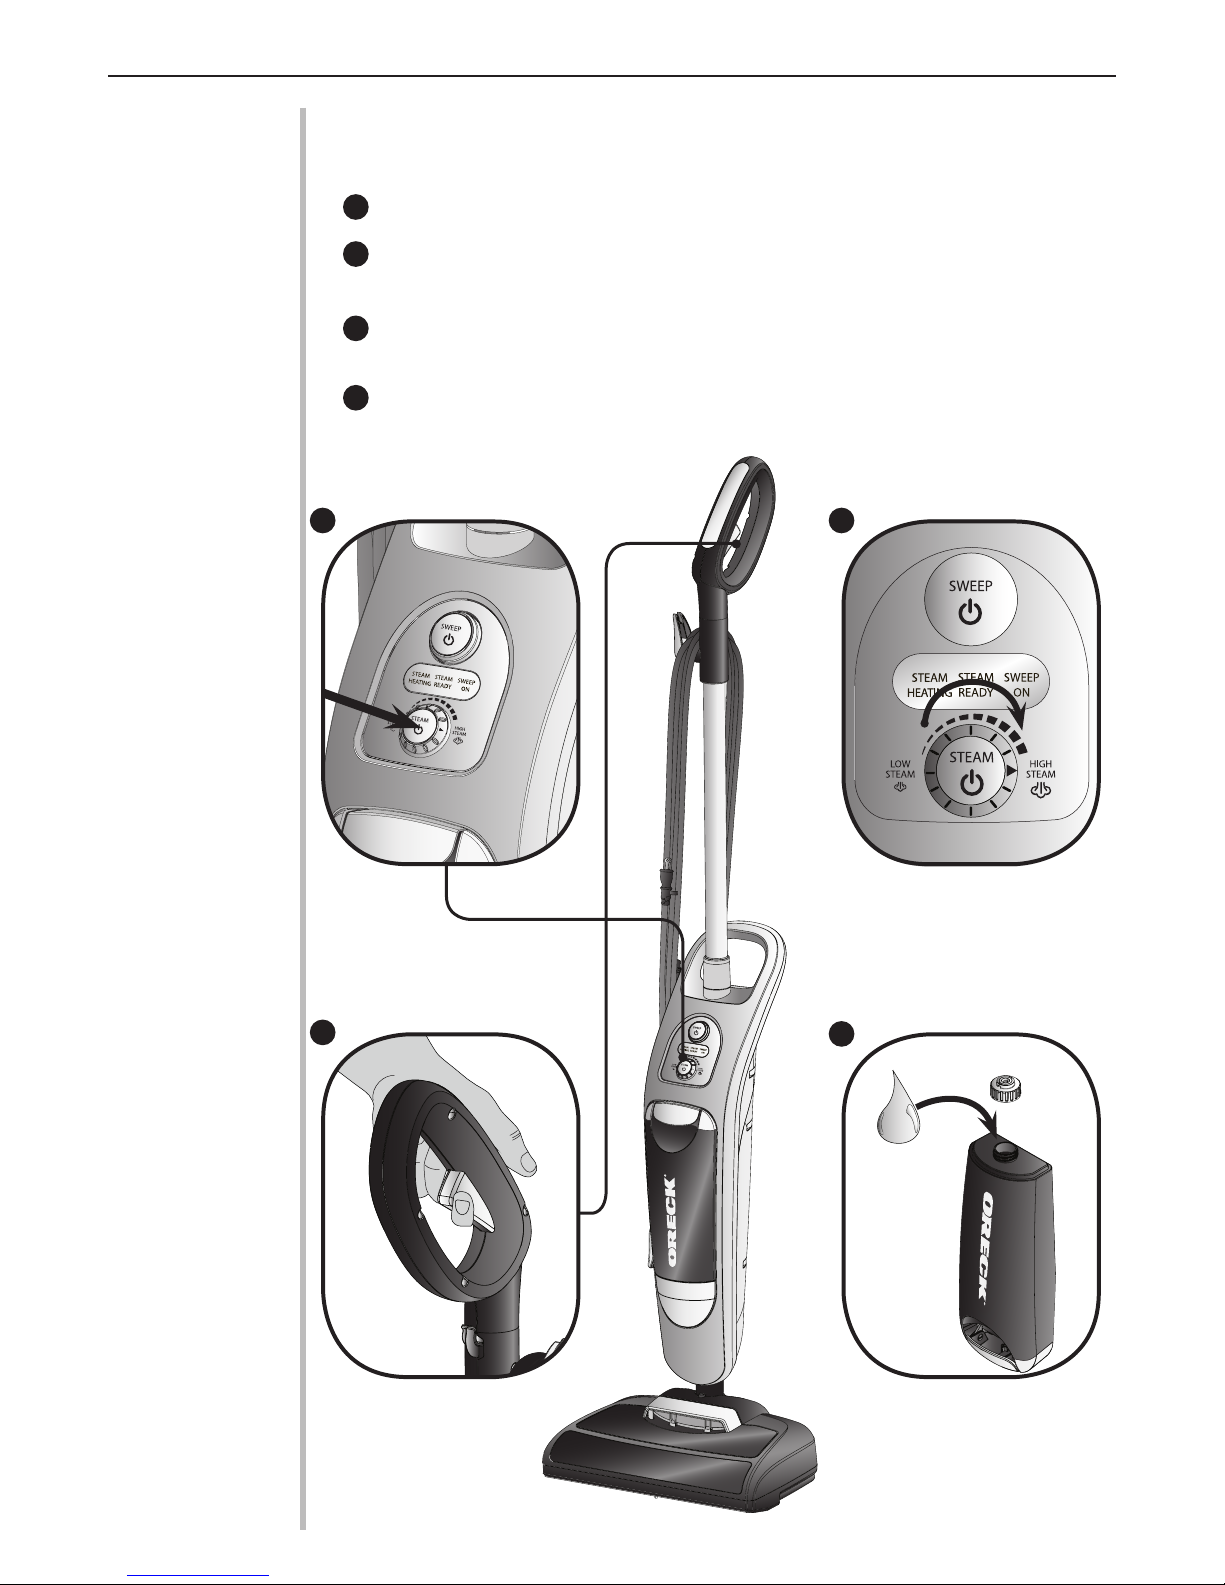
Steam Mop Operation:
1
2
3
4
1 2
Align and attach Velcro® on the microber steam mop pad to the Velcro® on the microber
steam mop pad holder.
To attach the Grab-It & Steam-It’s microber steam mop pad holder, place foot on release pedal
and gently push down, lower the power head onto the microber steam mop pad holder and
LIGHTLY press down to snap into place.
NOTE: Never operate the steam mop without the microber steam mop pad in place.
Grasp the water tank release lever and pull forward to remove the water tank.
Remove cap from the water tank bottom and ll with water. Replace the cap and reinstall the
water tank.
NOTE: Do not attempt to use steam mop without water in tank.
3 4
Release Pedal
7
Page 8
ENGLISH
Operation
continued
Steam Mop Operation: continued
5
Press the “STEAM” button. The “STEAM HEATING” light will come on.
6
Rotate the steam selection button to choose the optimal steam level, right for higher, left
for lower. (Refer to page 9 for suggested settings)
7
When the “STEAM READY” light comes on, press and hold the handle trigger to begin
steam cleaning.
8
W h e n t h e S w e e p a n d S t e a m a p p l i a n c e s t o p s e m i t t i n g s t e a m t u r n t h e p o w e r O F F a n d r e l l
the water tank.
NOTE: When the cloth becomes very wet or dirty replace with a clean, dry cloth.
5
6
7
8
8
Page 9

ENGLISH
Operation
continued
General Use
&
Maintenance
For Deep Sanitizing Clean
Allow unit to heat for one minute.
1
2
Set the steam selection button to HIGH STEAM.
3
Use short scrubbing motions on hard oor area for at least 15 seconds.
Cleaning Surfaces / Suggested Steam Settings
1
Grout on Hard Surfaces Medium to High
2
Tiled Surfaces Low to Medium
3
Sealed Hardwood Low
Maintenance
1
W h e n y o u h a v e n i s h e d s t e a m c l e a n i n g , e n s u r e b o t h o f t h e G r a b - I t & S t e a m - I t ’ s p o w e r s w i t c h e s
are turned off and that the plug is removed from the wall.
2
Empty the remaining water from the water tank.
3
Microber steam mop pads can be machine washed at 140 F maximum. For heavily soiled
pads soak in warm water with detergent or a mild stain remover. Allow cloths to dry
completely before storing. NOTE: DO NOT USE FABRIC SOFTENER
Replacing the Hard Water Filter
The hard water lter will help lter
minerals that reduce the effectiveness
of the steam cleaner. Depending
on hard water conditions and/or use
frequency, the lter should be replaced
every 6 months.
Hard Water Filter
NOTICE
The condition of the hard
water lter affects the
performance of the steam
cleaner. The interval
between lter replacement
depends on the hard water
conditions and the level
of usage.
WARNING: Unplug cord from electrical outlet before servicing.
Brushroll Maintenance
At least once a month, check for and remove excessive lint, string or hair from the revolving
brushroll.
Indicator
Lock
Unlock
Brushroll
IMPORTANT: Rotate screw 1/4 turn until the indicator is aligned with the “unlock” symbol.
A little preventative maintenance will keep your Sweep and Steam looking new and will ensure
continued cleaning effectiveness.
Replacing the Brushroll
The brushroll is designed for long life. Should it ever become worn or frayed, it can be replaced
by an Oreck Authorized Service Center.
9
Page 10

Trouble-
shooting
Service problems that
appear to be major can
often be solved easily.
You can be your own
troubleshooter by
reviewing this guide.
All other servicing
should be done by an
Oreck authorized
service center.
Unit has no power.
Very low or no steam
is emitted when the
steam cleaner is on.
Brushroll is not
turning.
ENGLISH
• Appliance is not properly
plugged into an electrical outlet
or is not switched on.
• The electrical socket is faulty.
• The tank is empty.
• Despite the light, the steam
switch is not activated.
• Large debris has clogged the
inlet.
• The brushroll is set up with a
clutch.
What to doProblem Check
• Insert plug into an electrical outlet and switch the steam
cleaner on
• Check the socket by unplugging the steam cleaner and
plugging it into a different electrical socket.
•. Fill the water tank with water.
•Press down the steam switch fully.
• Clean debris from inlet
• If the brushroll stops/clogged, the clutch will allow the
brushroll motor to keep turning while the brushroll is
stopped. A clicking noise can be heard
Parts
Steamer still does not
operate properly.
• Check all the above points.
• Contact Oreck Authorized Service Center.
All accessories and replacement parts are sold separately. To order, call our customer service
hotline or visit our website. Please have your model number from the data label on the bottom
of the unit.
Replacement Parts
Part NumberItem
Pack of 4 Microber Pads SWSTEAMKIT
Replacement Water Filter SWSTEAMFLTR
Customer Service Hotline USA: 1-800-989-3535 Canada: 1-888-676-7325
website: www.oreck.com
10
Page 11

ENGLISH
Warranty
ORECK MANUFACTURING COMPANY: (Oreck Manufacturing Company gives you the
following limited warranty for this product only if it was originally purchased for residential
use, not resale, from Oreck or an Oreck Authorized Retail Dealer.)
Oreck will repair or replace, free of charge, to the original purchaser, any part that is found to be
defective in material or workmanship within two (2) years of the date of purchase. This limited
warranty applies to normal domestic use. Any commercial use of this product will void this
limited warranty.
This limited warranty does not cover the replacement of expendable or consumable parts
such as carbon motor brushes, belts, bulbs, hard water lters, brushrolls, and other parts
subject to normal wear unless they are defective in material or workmanship.
This limited warranty does not apply to any part subjected to accident, abuse, commercial use,
alteration, misuse, damage caused by an act of God, the use of voltages other than indicated
on the serial number displayed on this product or service of this product by other than Oreck
or a participating Factory Authorized Service Center. Oreck does not authorize any person or
representative to assume or grant any other warranty obligation with the sale of this product.
Oreck does not authorize any person or representative to assume or grant any other warranty
obligation with the sale of this product.
Oreck’s limited warranty is valid only if you retain proof of purchase from Oreck or an Oreck
Authorized Retail Dealer for this product. If you purchase this product from any other source,
your purchase is “AS IS,” which means Oreck grants you no warranty, and that you, not Oreck,
assume the entire risk of the quality and performance of this product, including the entire cost
of any necessary servicing or repairs of any defects.
Oreck’s liability for damages to you for any costs whatsoever arising out of this statement of
limited warranty shall be limited to the amount paid for this product at the time of original
purchase, and Oreck shall not be liable for any direct, indirect, consequential or incidental
damages arising out of the use or inability to use this product.
Some states do not allow the exclusion or limitation of incidental or consequential damages, so
the above limitation or exclusion may not apply to you.
ALL EXPRESS AND IMPLIED WARRANTIES FOR THIS PRODUCT, INCLUDING
IMPLIED WARRANTIES OF MERCHANTABILITY AND FITNESS FOR A
PARTICULAR PURPOSE, ARE LIMITED IN DURATION TO THE WARRANTY PERIOD,
AND NO WARRANTIES, WHETHER EXPRESS OR IMPLIED, WILL APPLY AFTER
THIS PER IOD.
Some states do not allow limitations on the duration of implied warranties, so the above
limitation may not apply to you.
This warranty gives you specic legal rights, and you may also have other rights which vary
from state to state. If appropriate, see additional information for extended warranty.
11
Page 12

ENGLISH
© 2011 Oreck Holdings, LLC.
All rights reserved. All marks, text, logo’s, product congurations and registered trademarks are
owned and used under the authority of Oreck Holdings, LLC.
22082-01 REV A 06/11 ECN# 10447
12
 Loading...