

Page 1

961151992 | ID116481-R1Important: Read carefully before assembly and use.
user
MANUA L
AIR REFRESH
™
2-IN -1 AIR PU RIFIER A ND HUM IDIFI ER
Page 2

THANK YOU
for purchasing an Oreck® product.
Please register your product to initiate warranty, service
plans and expert advice on whole-home cleaning:
online at oreck.com or call 1.800.989.3535(U.S) or
1.888.676.7325 (Canada) to register by phone.
Page 3

3
Table of Contents
Important Safety Instructions 4
Carton Contents 6
Operation 8
Using your machine 8
How the Control Panel and
LCD Display Screen Work 10
Maintenance 12
Emptying the water tank and
draining the machine 12
Replacing the lters 14
Troubleshooting 16
Warranty 18
Spanish 19
French 37
If you need assistance: Visit us at Oreck.com or call us at 1-800-989-3535 (U.S.) or 1.888.676.7325 (Canada)
Page 4

4
IMPORTANT SAFETY INSTRUCTIONS
SAVE THESE INSTRUCTIONS
READ CAREFULLY BEFORE ASSEMBLY AND USE. THIS PRODUCT IS
INTENDED FOR HOUSEHOLD USE ONLY. IF USED COMMERCIALLY
WARRANTY IS VOID.
When using an electrical appliance, basic precautions should always
be followed, including the following:
READ ALL INSTRUCTIONS
BEFORE USING THIS APPLIANCE.
WARNING: TO REDUCE THE RISK OF FIRE,
ELECTRIC SHOCK OR INJURY:
This 2-in-1 Air Purier and Humidier is intended for household use only and
NOT for commercial or industrial use.
• Fully assemble before operating.
• Operate machine only at voltage specied on data plate on back of machine.
• Do not leave appliance when plugged in. Unplug from outlet when not in use and
before cleaning or servicing.
• Do not use outdoors or on wet surfaces.
• Do not allow to be used as a toy. Not intended for use by children age 12 and under.
Close supervision is necessar y when used near children. To avoid injury or damage,
keep children away from product, and do not allow children to place ngers or other
objects into any openings.
• Use only as described in this manual. Use only manufacturer’s recommended
attachments and products.
• Do not use with damaged cord or plug. If appliance is not working as it should, has
been dropped, damaged, left outdoors, or dropped into water, return it to a service
center prior to continuing use.
• Do not pull or carr y by cord, use cord as handle, close a door on cord, or pull cord
around sharp edges or corners. Do not run a vacuum cleaner or other appliance over
cord. Keep cord away from heated surfaces.
• Do not unplug by pulling on cord. To unplug, grasp the plug, not the cord.
• Do not handle plug or appliance with wet hands.
• Do not put any objects into openings. Do not use with any opening blocked; keep
free of dust, lint, hair, and anything that may reduce air ow.
• Keep hair, loose clothing, ngers, and all parts of body away from openings and
moving parts.
• Turn off all controls before unplugging.
• Do not place machine near ammable or combustible liquids, such as gasoline, or
ne wood sandings or use in areas where they may be present.
• Do not run cord under carpeting. Do not cover cord with throw rugs, runners, or
similar coverings. Arrange cord away from trafc areas and where it will not be
tripped over.
• Do not block or partially block the air intake or air exhaust grilles. Ensure that there
is adequate airow around the unit.
• Keep the unit away from heaters/replaces and other hot objects/locations.
Page 5

SAFETY INSTRUCTIONS
5
• Do not place any items on top of the unit, or sit on the unit.
• Never open the front or rear cover while the unit is plugged into a wall outlet.
• Keep children and pets away from the unit.
• Never use compressed gas dusters, canned air, ammable or aerosol cleaners
on the product.
• Always position the appliance on a at, stable, solid surface and never over stretch
the power cord.
• Always remove the water tank and drain the appliance before carrying or
transporting.
• Position the appliance where dirty air is not drawn across your body or head while
sitting or sleeping.
• This appliance produces mist. Keep away from valuables and other electronics.
• Do not leave water stored in the water tank between uses
• Do not place the appliance near sources of heat, such as stove tops, ovens,
radiators, open res, candles or computers.
• Do not move or tilt the appliance when in use. Leaking from the water reservoir
may occur.
IT IS IMPORTANT TO CONSIDER THE FOLLOWING WHEN DECIDING ON WHERE
TO LOCATE THE AIR PURIFIER/HUMIDIFIER:
• Position the product on a at, solid, stable sur face. Never place the unit on soft
surfaces such as a bed or sofa.
• Position the product so the plug on the power cord reaches a standard electrical
outlet for a polarized plug.
• Position the product so the plug on the power cord reaches a standard electrical
outlet for a polarized plug.
WARNING: This product contains chemicals, known to the State
of California to cause cancer and birth defects or other reproductive harm.
WASH HANDS AFTER USING.
CAUTION: TO REDUCE THE RISK
OF DAMAGE:
Store appropriately indoors in a dry place. Do not expose machine to freezing
temperatures.
WARNING: To reduce the risk of electric shock, this
appliance has a polarized plug (one blade is wider than the other). This plug
will t in a polarized outlet only one way. If the plug does not t fully in the
outlet, reverse the plug. If it still does not t, contact a qualied electrician
to install the proper outlet. Do not change the plug in any way.
PLEASE KEEP INSTRUCTIONS FOR FURTHER USE.
Page 6

6
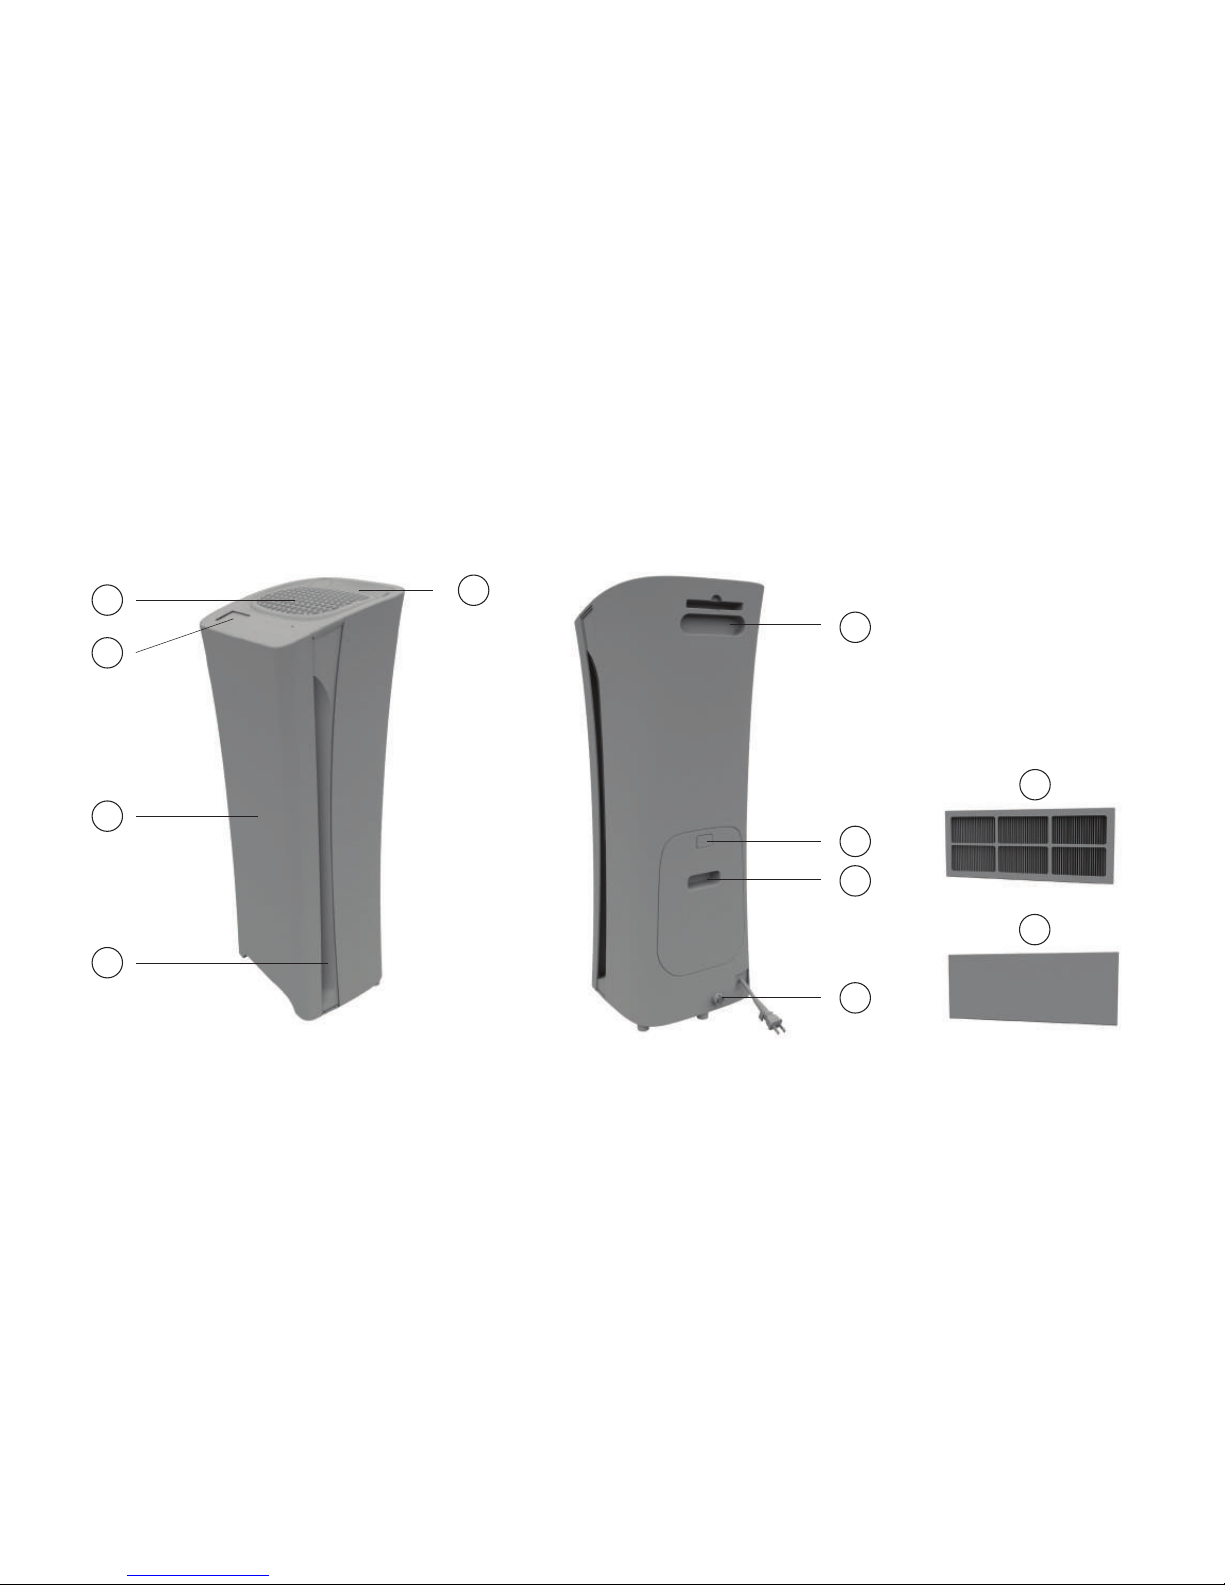
Carton Contents
A
Air Outlet Grill
B
Humidication Outlet
C
Control Panel/LCD Display
D
Filter Cover
E
Side Air Inlet Grill
F
Carry Handle
G
Water Tank Release Clip
H
Water Tank
I
Drainage Cap
J
Main HEPA Filter
K
Odor Filter
Remove all parts from carton and
identify each item shown.
Ensure all parts are located before
disposing of packing materials.
Technical Specifications
Name Voltage Wattage Cord Length Weight (net) Current
Air Refresh
®
120V/60Hz 50W 6 ft. 15 lbs. 0.7A
For maximum results, use in a room approximately 115 sq. ft. in size.
Page 7
PRODUCT FEATURES
7
A
B
F
G
H
I
J
K
C
D
E
Page 8
8
Operation — Using Your Machine
Please read “important safety instructions” before use.
WARNING MAKE SURE THE FILTERS ARE IN PLACE AND CORRECTLY FITTED BEFORE
SWITCHING ON. STAND THE MACHINE ON A HARD FLAT SURFACE AWAY FROM SOURCES OF
HEAT. NEVER BLOCK THE AIR GRILLS, KEEP AIR GRILLS FREE FROM ANY OBSTRUCTION.
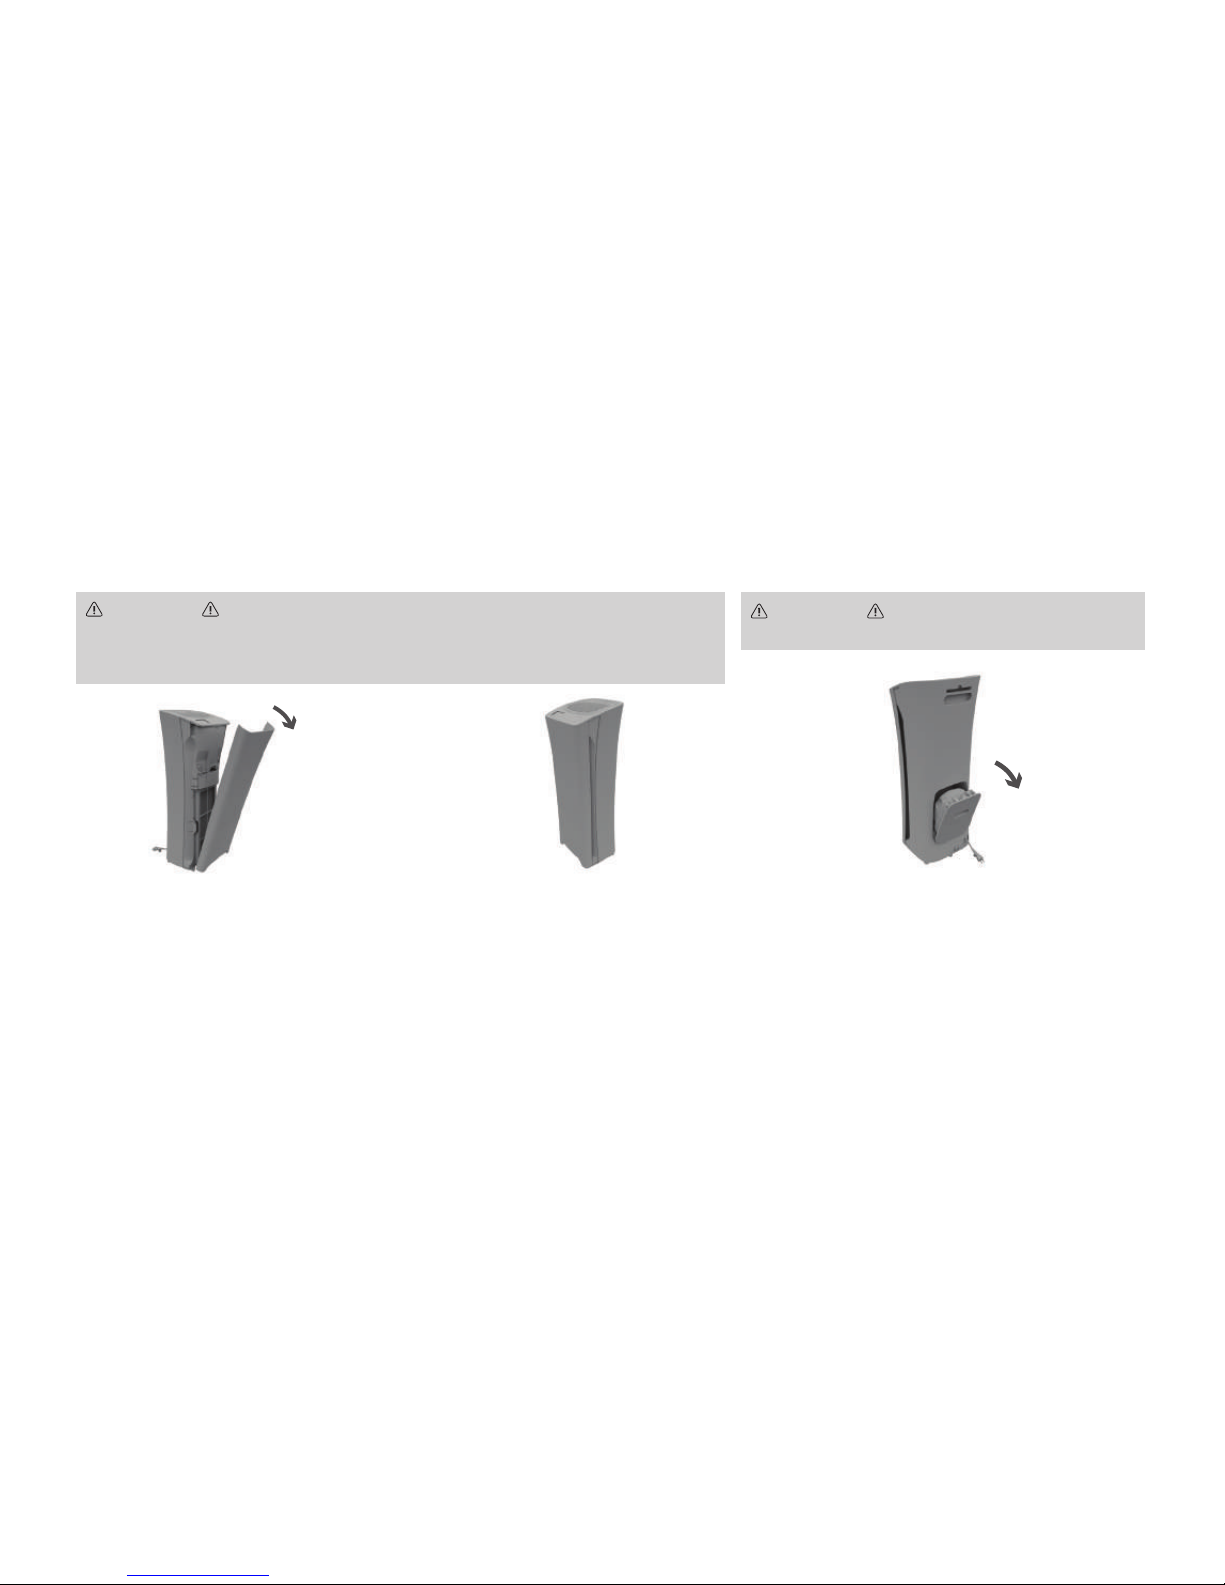
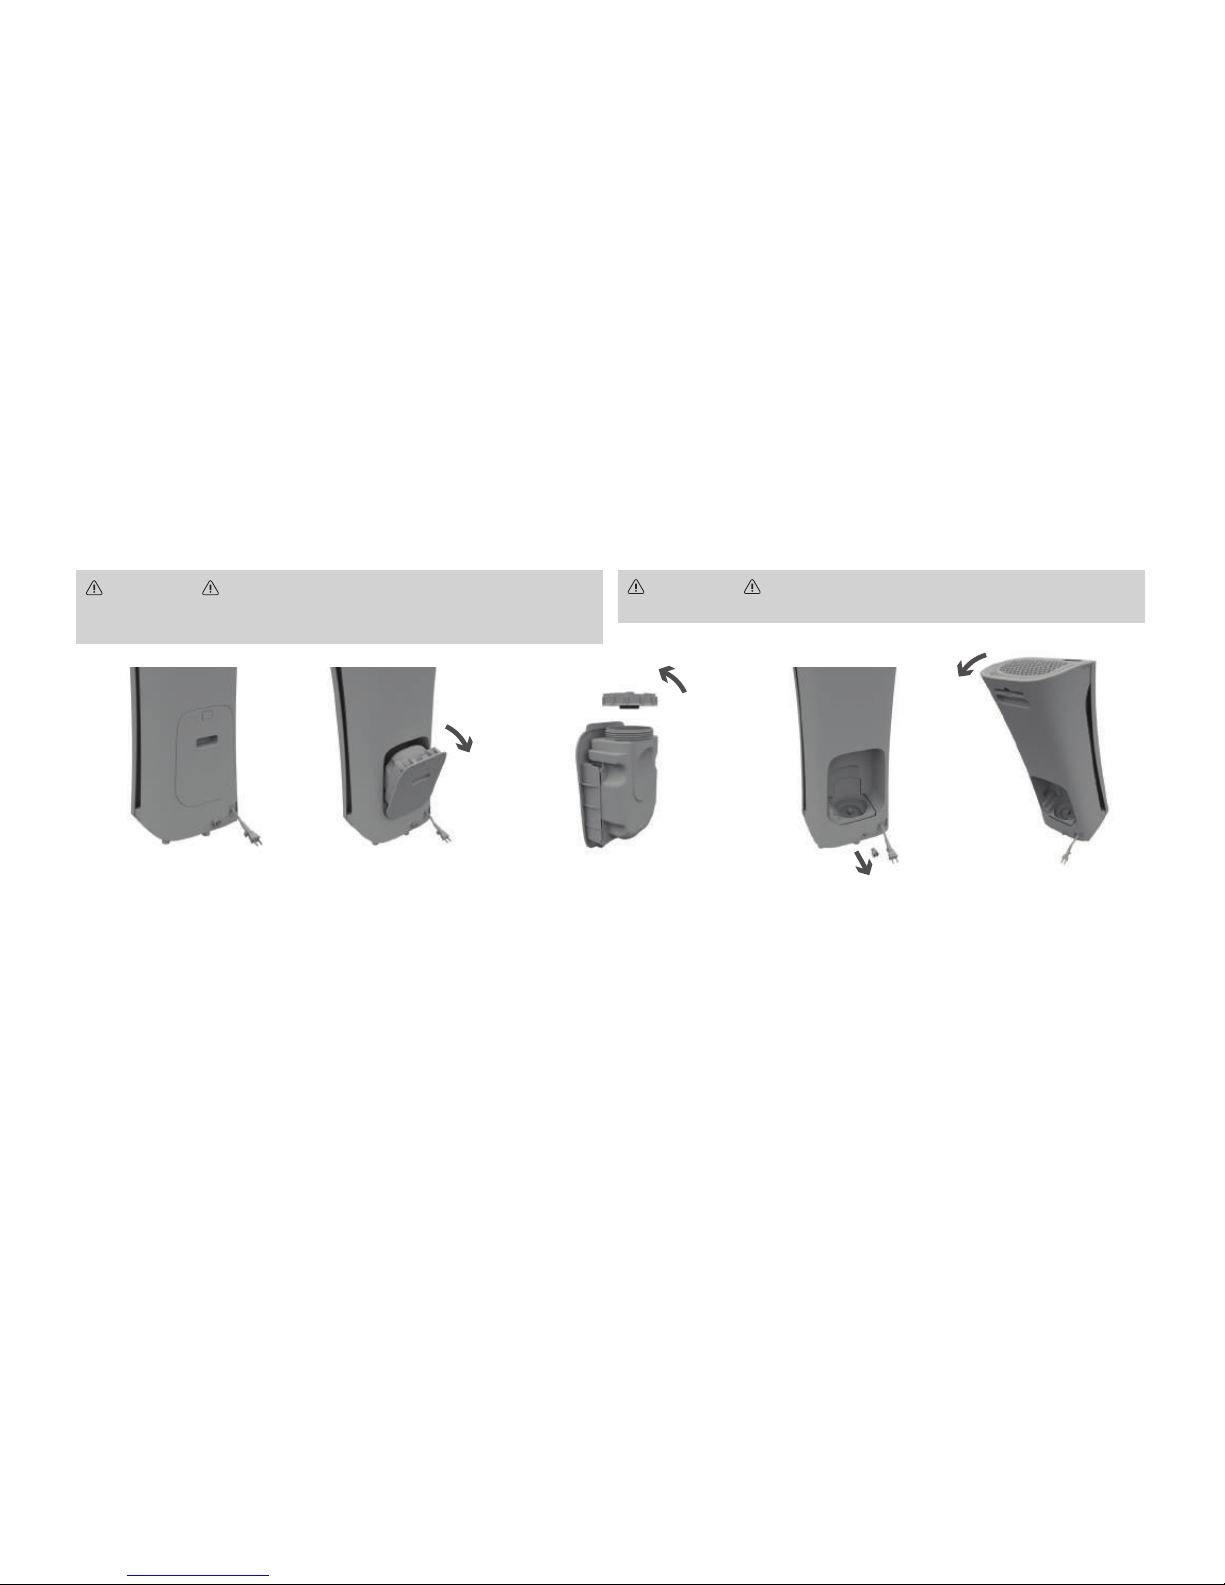
1
Open front panel to check that lters
are in place.
2
Stand your Air Refresh on a hard, at
surface. Make sure the air grills are
free from any obstructions and keep
them free of dust by occasionally
wiping with a dry cloth.
3
Press the water tank release button to
remove the water tank.
Note: The air purier can be utilized without the humidier automatically running. The Humidier cannot be utilized without air purication.
WARNING TO REDUCE THE RISK OF PERSONAL
INJURY, UNPLUG BEFORE CLEANING OR SERV ICING.
Page 9
9
OPERATION — USING YOUR MACHINE
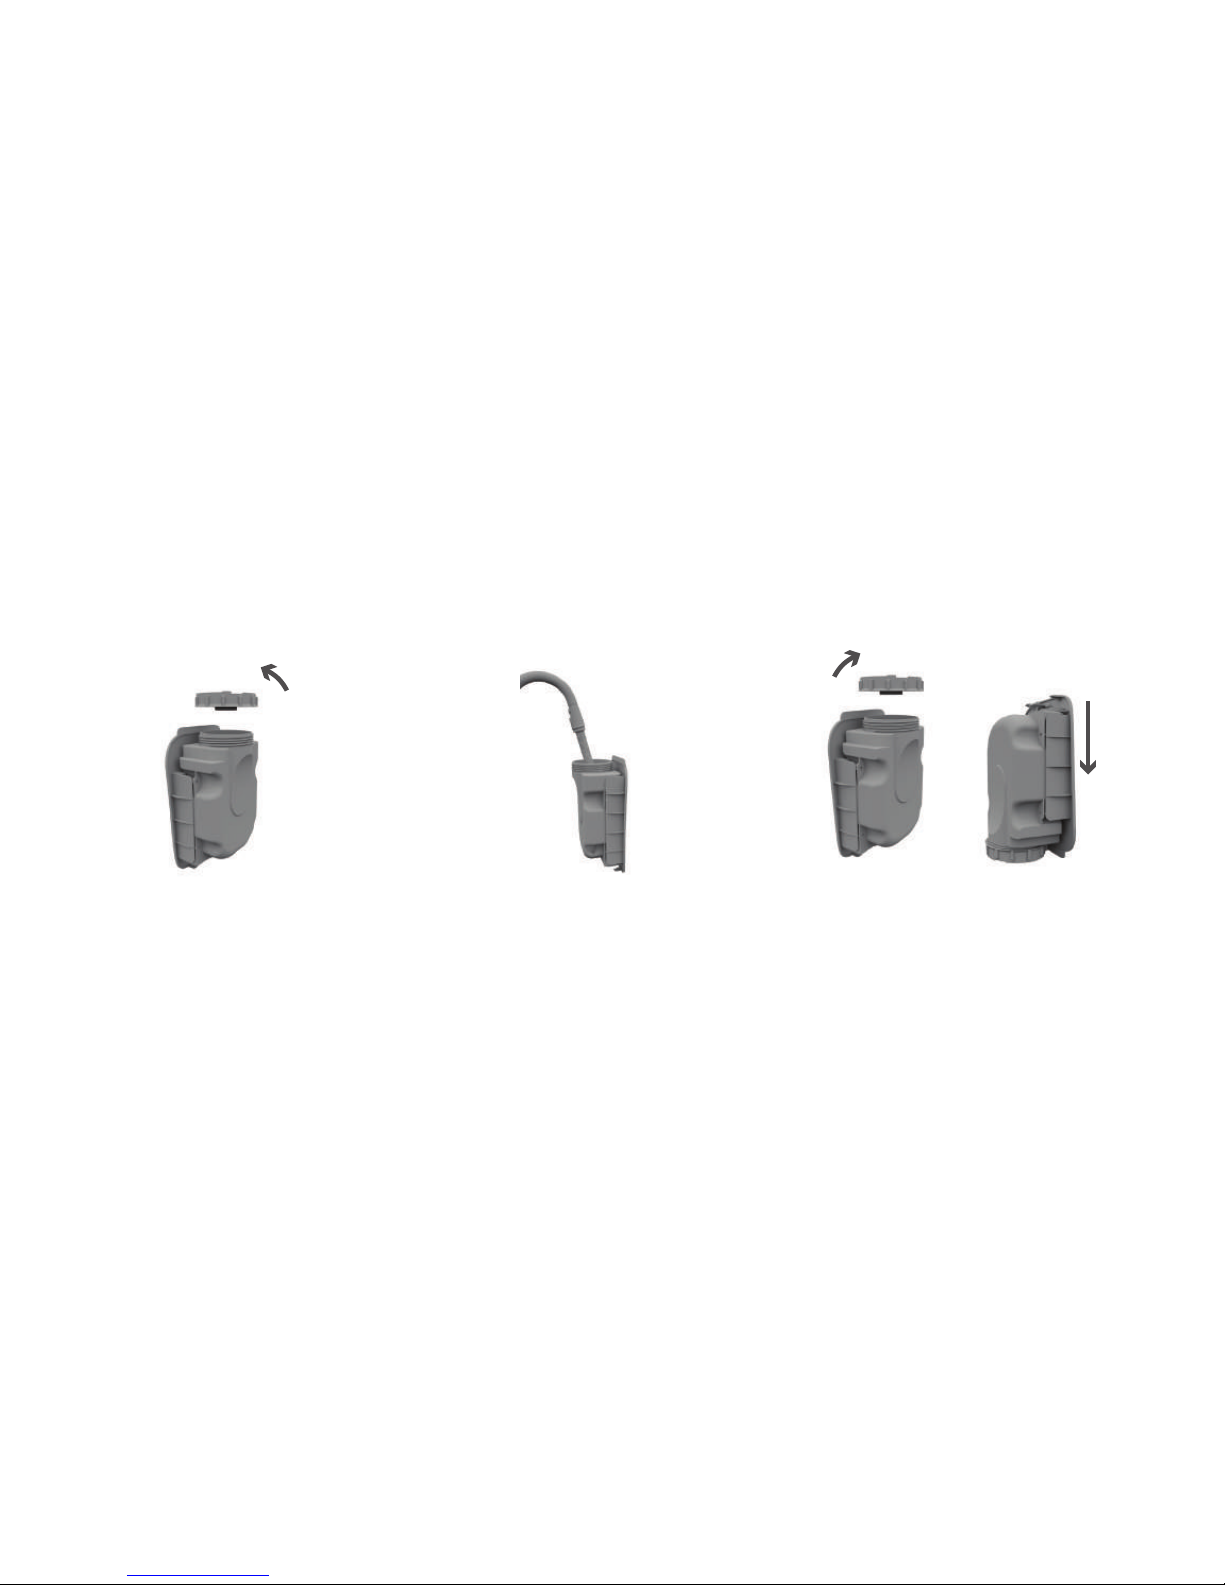
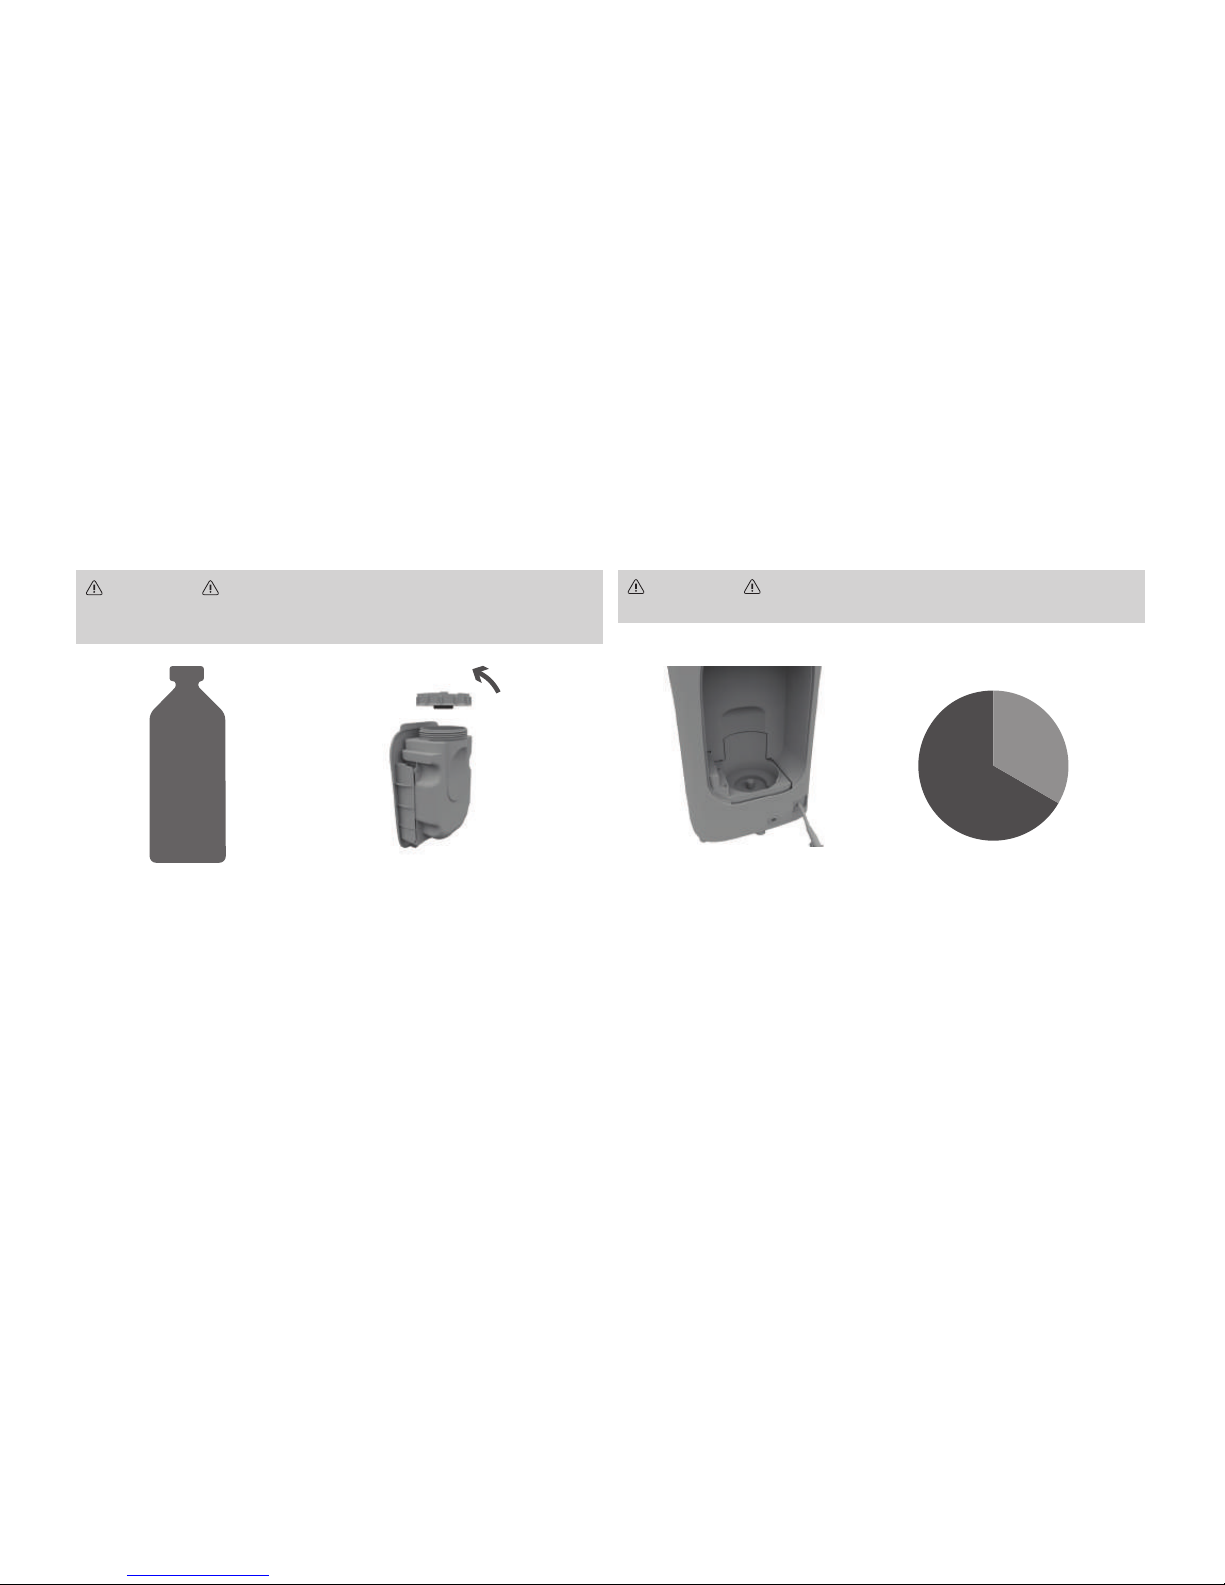
4
Twist the water tank cap counter-
clockwise to open.
5
Fill with distilled or ltered water.
Do not add any fragrances or
scented oils to the water tank.
Tap water not recommended.
6
Tighten the water cap and reinsert the
water tank into the unit until it clicks
into place.
Page 10
10
WARNING IMPORTANT: THE CONTROL PANEL IS TOUCH SENSITIVE, LIGHTLY PRESS THE CONTROLS. WHEN THE MACHINE IS ACTIVATED, THE DIGITAL
HUMIDITY READING OF THE ROOM AND THE SPINNING IMAGE OF THE FAN WILL CONSTANTLY BE DISPLAYED. HUMIDIFICATION STARTS AFTER THE INITIAL WATER
CYCLE. MIST MAY NOT BE VISIBLE IN ALL CONDITIONS.
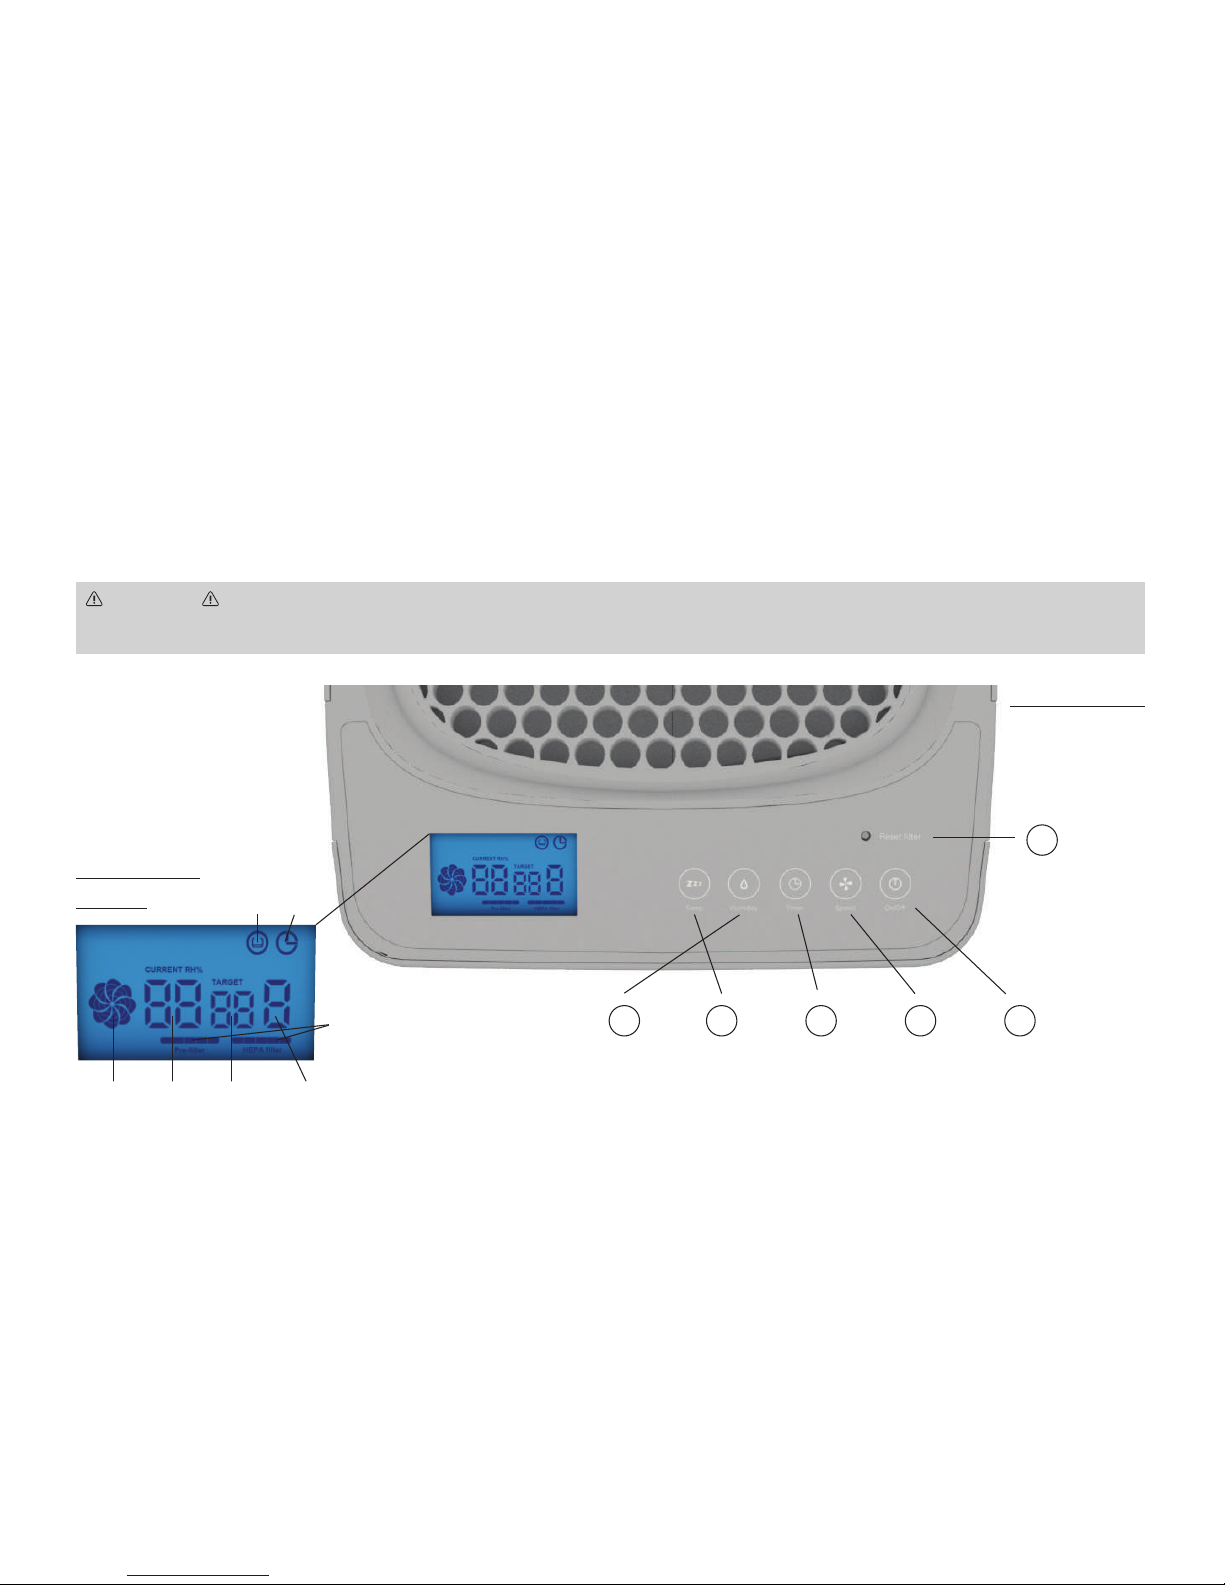
Operation — How the Control Panel and LCD Display Screen Work
A
On/Off
B
Speed
C
Timer
D
Sleep
E
Humidity
F
Reset Filter
Control Panel
LCD Display
Screen
Fig. 6
Fig. 1 Fig. 5 Fig. 4 Fig. 3
Fig. 7
Fig. 2
Page 11

11
HOW THE CONTROL PANEL AND LCD
DISPLAY SCREEN WORK
A
On/Off –Press the ‘on/off’ button once to
switch the unit on. The air purier will activate
and the speed button on the control panel will
illuminate. Humidication will not activate
until the Humidity button is pressed and water
tank is lled.
D
Sleep – Press the ‘sleep’ button, the
fan speed will select Low and the LCD
on the machine will automatically dim.
F
Reset filters –The life bars of the
lters (Fig 7) will decrease gradually
throughout the use of the machine. When it
is time to replace the lters, the life bars will
ash and the LCD display screen will turn red.
After replacing lters, insert a small blunt
instrument such as a pen into the “reset lter”
insert. Press down to determine which lter to
reset. The life bars will fade to show which
lter is selected. Once the correct lter is
selected, keep pressing down until you hear a
beep, then release. The life bars will begin
ashing and then turn solid to show the lter
has been reset.
B
Speed –The fan will activate on medium
speed when the unit is switched on.
1. Press the ‘speed’ button to select
the desired fan speed – Low, Med,
High & Turbo.
2. On the LCD display screen, a fan image will
interpret the fan speed as the speed selected
increases or decreases (Fig. 1).
C
Timer –The timer can be set between
1-8 hours.
1. A timer symbol will appear on the
LCD display screen when the timer is
set (Fig. 2) and the selected number of
hours will be displayed (Fig. 3).
2. Once the timer cycle has complete,
the machine will turn off. If the timer
E
Humidity –Press the ‘Humidity’ button
to activate the ultrasonic humidier.
1. Continue pressing the humidity button to
select the desired relative humidity (RH%)
target. The desired humidity target will show
on the LCD display screen (Fig 4). The machine
will also read the current RH% conditions
and the number will be displayed (Fig. 5).
2. Built-In Humidistat – This machine has
a built-in humidistat, no hot water or steam
is used. The humidier will switch on/off
automatically every time the target RH% is
below or equal to the current RH% until the
tank runs empty or the humidier function
is switched off.
3. Ultrasonic Humidifier: A cool mist and
vapor will disperse through the
small grill behind the control panel.
Note: The air purier will always run when
humidier is turned on.
4. Water Tank Indicator When the water
tank is empty or runs dry, a symbol will
ash on the LCD display screen (Fig. 6)
and the LCD screen will turn red. The
humidier function will turn off until the
tank is relled. The air purication will
remain on until main power button is
manually turned off.
is not set, the machine will constantly
run at the selected speed.
Page 12
12
Regular Maintenance Instructions
2
Press the water
tank release button
to remove the
water tank.
1
Turn the humidier off
and unplug the unit
before removing and
relling the water tank.
WARNING DO NOT LEAVE WATER STORED IN THE WATER TANK
BET WEEN USES. THE WATER TANK SHOULD BE EMPTIED AFTER E ACH USE AND
RE-FILLED WITH DISTILLED OR FILTERED WATER BEFORE USE.
WARNING TO REDUCE THE RISK OF ELECTRIC SHOCK, UNPLUG
BEFORE CLEANING OR SERVICING.
Note: Besides what’s specied, the use of other water treatment products, chemicals, soaps, detergents, or abrasive cleaners are not recommended and
may cause damage to the humidier or affect performance. Water in tank will last approximately 15.5 hours when in “high” mode.
5
Tilt the unit to drain.
3
Twist the water tank cap
counter-clockwise to open.
Empty and rinse tank.
4
Stand the unit over a
sink or bathtub and pull
the drainage cap to
empty additional water.
Page 13

13
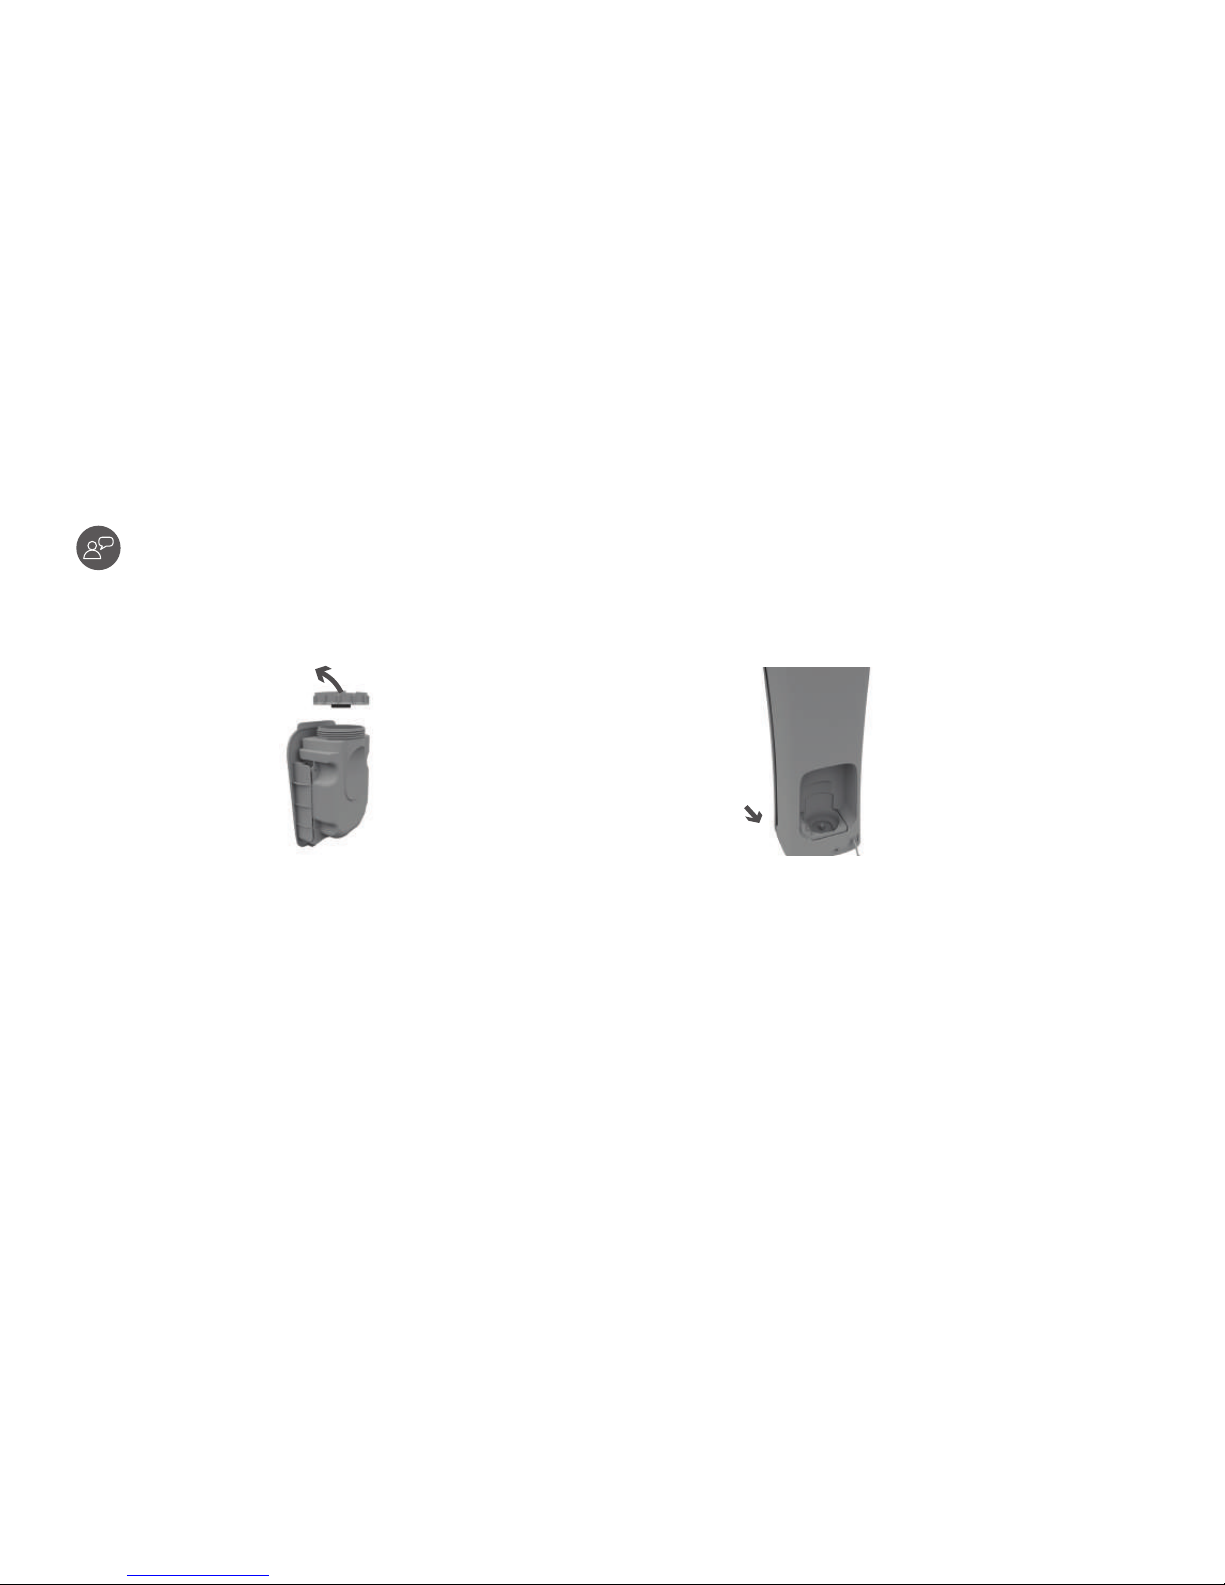
6
Wipe the bottom reservoir
with a dry cloth to prevent
mold.
7
Make sure the water tank
lid is tightly tted and turn
the water tank so the cap is
at the bottom.
8
Insert the water tank into
the machine rst. Push back
until water tank clicks into
place.
9
Push the drainage cap back
into place, making sure it is
correctly tted.
EMPTYING THE WATER TANK AND DRAINING THE MACHINE
CONTACT OUR CUSTOMER CARE LINE
1-800-989-3535 (U.S.) or 1.888.676.7325 (Canada)
Any other servicing should be done by an authorized service representative. If appliance is not working as it should, has been dropped, damaged, left
outdoors, or dropped into water, take it to a service center prior to continuing use.
Page 14
14
Weekly Maintenance Instructions
WARNING DO NOT LEAVE WATER STORED IN THE WATER TANK
BET WEEN USES. THE WATER TANK SHOULD BE EMPTIED AFTER E ACH USE AND
RE-FILLED WITH DISTILLED OR FILTERED WATER BEFORE USE.
WARNING TO REDUCE THE RISK OF ELECTRIC SHOCK, UNPLUG
BEFORE CLEANING OR SERVICING.
Note: Besides what’s specied,the use of other water treatment products, chemicals, soaps, detergents, or abrasive cleaners are not recommended and
may cause damage to the humidier or affect performance. Water in tank will last approximately 15.5 hours when in “high” mode.
2
Pour the 3% hydrogen
peroxide into water tank
until approximately half
full, replace cap and shake
vigorously.
2
Let hydrogen peroxide sit
in both water tank and
humidier base for 20
minutes.
1
Use 3% hydrogen peroxide
to sanitize. Follow
manufacturer warnings
and safety instructions
when using 3% hydrogen
peroxide.
1
Pour approximately 10 oz.
(1 ¼ cup) of 3% hydrogen
peroxide into humidier
base. Ensure the drainage
cap is inserted into
machine
3%
Hydrogen
Peroxide
20 min
Page 15
GETTING STARTED
15
CONTACT OUR CUSTOMER CARE LINE
1-800-989-3535 (U.S.) or 1.888.676.7325 (Canada)
Any other servicing should be done by an authorized service representative. If appliance is not working as it should, has been dropped, damaged, left
outdoors, or dropped into water, take it to a service center prior to continuing use.
3
To remove hydrogen peroxide from water tank:
twist cap counter-clockwise to open. Empty solution and
rinse thoroughly with distilled or puried water until any
residual hydrogen peroxide smell is gone. Wipe outside of
tank with dry cloth.
4
To remove hydrogen peroxide from
humidifier base: stand the unit over a sink or bathtub and pull the
drainage cap to empty additional solution. Rinse thoroughly with
distilled or puried water until any residual hydrogen peroxide smell is
gone. Wipe base with dry cloth.
Page 16
16
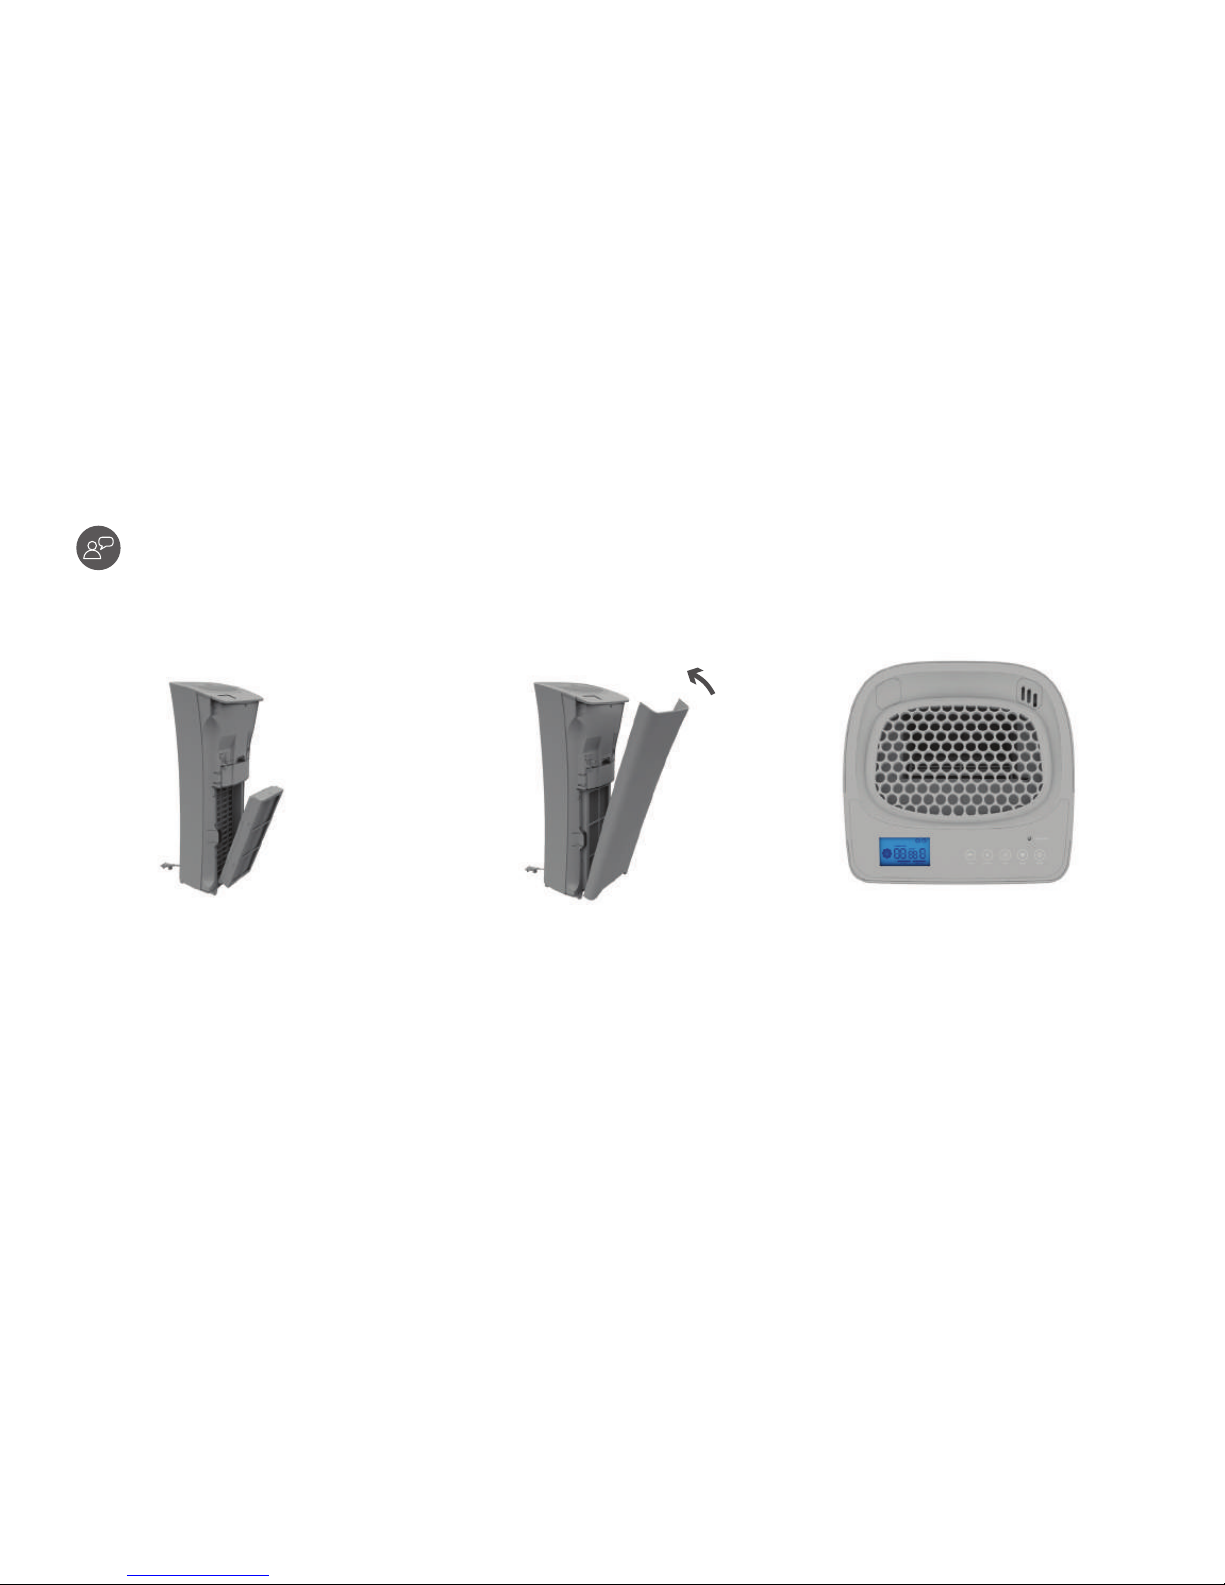
Maintenance — Replacing the filters
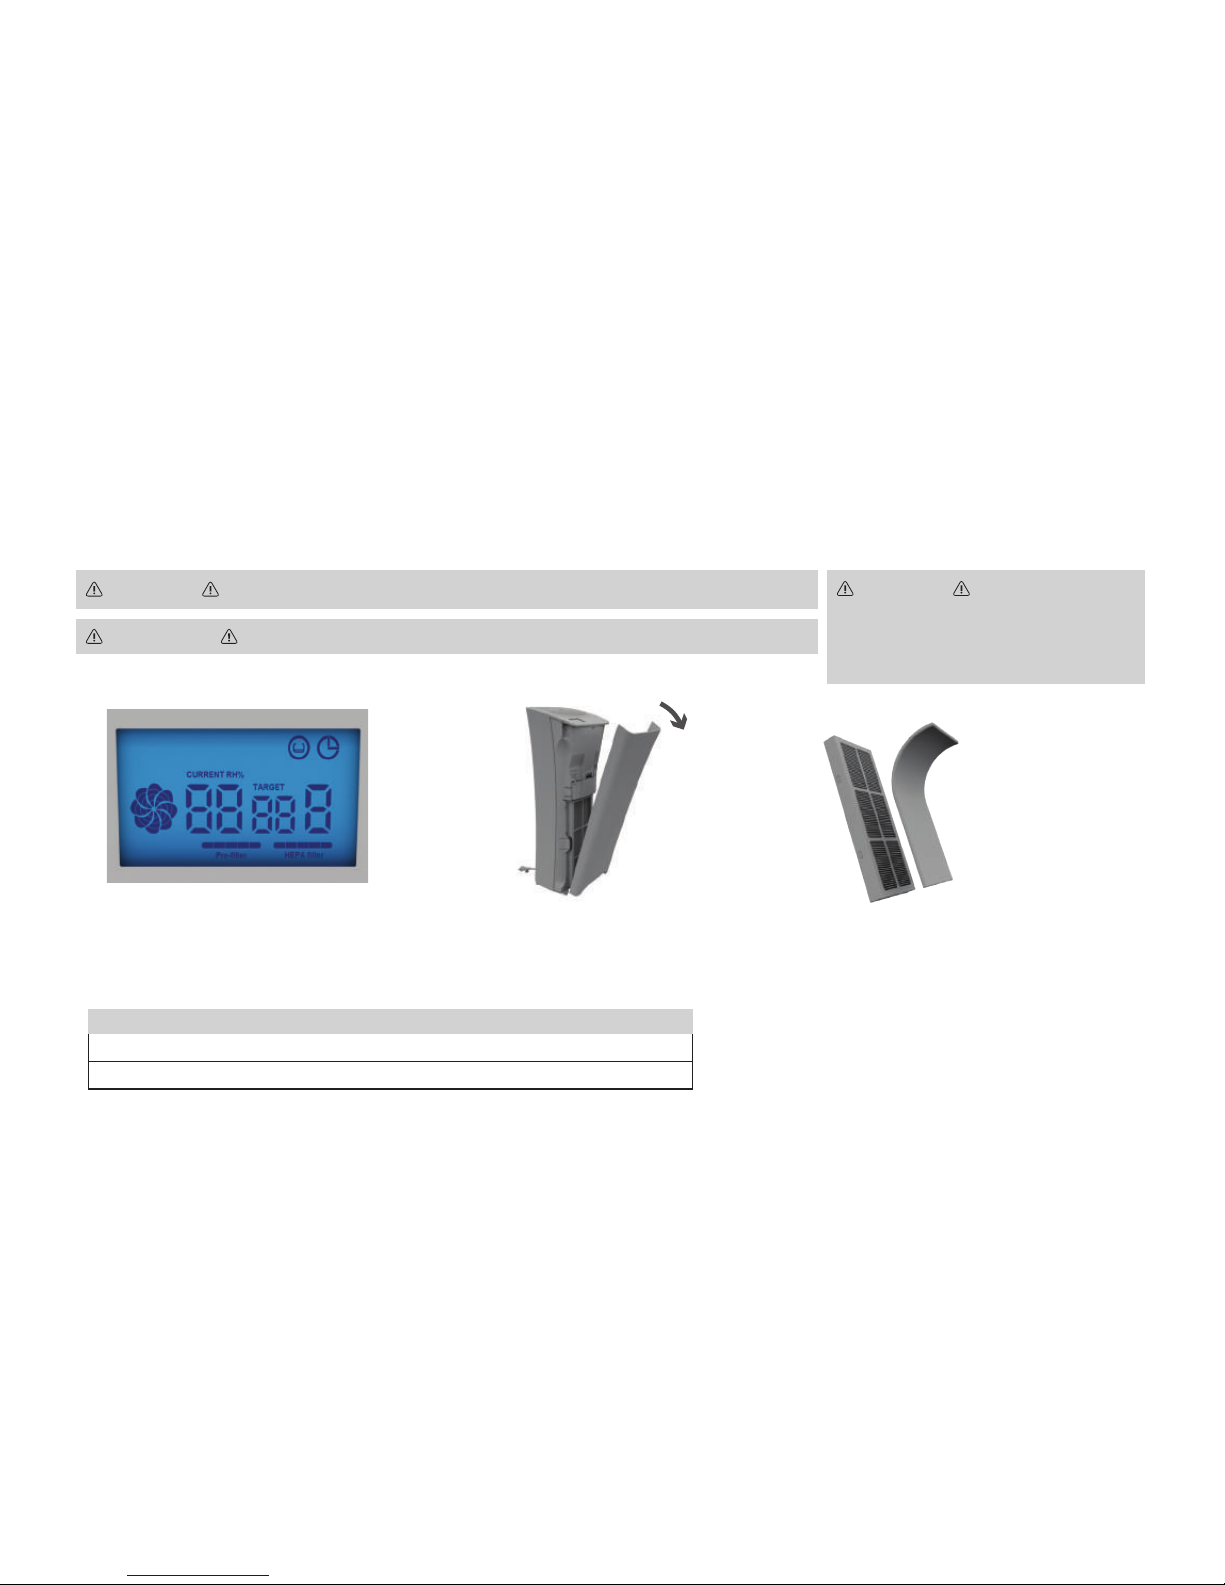
1
When the lters need replacing the life
bars on the display panel will ash and
the display will turn red.
2
Pull either side of the front cover to
remove.
3
Remove all packaging from new lters.
Line up the odor lter and press onto
the hook and eye tabs to attach to
main lter.
IMPORTANT THE FILTERS SHOULD BE REPLACED EVERY 3-6 MONTHS DEPENDENT ON USE.
WARNING TO REDUCE THE RISK OF PERSONAL INJURY, UNPLUG BEFORE CLEANING OR SERVICING.
WARNING THIS COVER IS
PROVIDED WITH AN INTERLOCK TO REDUCE
THE RISK OF ELECTRIC SHOCK. DO NOT DEFE AT
ITS PURPOSE OR ATTEMPT TO SERVICE
WITHOUT REMOVING THE COVER COMPLETELY.
Model # : WK15500B Replacement filter #: AK45510 Type AK
Model # : WK15500CA Replacement filter # : WK05510CA or WK05510NCCA Type: AK
Replacement Filter Guide
Page 17
17
REPLACING THE FILTERS
4
Line up and ret the new lters into
the unit.
5
Line up tabs on the bottom of the lter,
cover with the tabs on the unit. Push
the cover until it clicks into place.
6
Plug in and press the ‘on’ button. After replacing
lters, insert a small blunt instrument such as a pen
into the “reset lter” insert. Press down to determine
which lter to reset. The life bars will fade to show
which lter is selected. Once the correct lter is
selected, keep pressing down until you hear a beep,
then release. The life bars will begin ashing and
then turn solid to show the lter has been reset.
CONTACT OUR CUSTOMER CARE LINE
1-800-989-3535 (U.S.) or 1.888.676.7325 (Canada)
Page 18

18
Troubleshooting
Problem Possible Cause Possible Solution
Unit doesn’t run. 1. Power Cord 1. Plug in power cord.
2. On/Off Switch 2. Push the On/Off Switch rmly to turn on.
3. Wall outlet 3. No voltage in wall plug. Check fuse or breaker in home.
4. Blown fuse or tripped breaker 3. Replace fuse or reset breaker in home.
5. Front cover is off 5. The front cover may not be secure, check the front cover is securely tted.
6. Timer may have nished 6. Reset the timer.
Why is water leaking from my
machine?
1. The unit has not been positioned correctly. 1. Make sure machine is on a at surface.
2. The water tank cap has not been tightened. 2. Tighten water cap.
WARNING TO REDUCE THE RISK OF PERSONAL INJURY, UNPLUG BEFORE CLEANING OR SERVICING.
Service problems can often be solved easily at home. Use this guide to help you troubleshoot. Any other servicing should be done by an authorized service
representative. If appliance is not working as it should, has been dropped, damaged, left outdoors, or dropped into water, take it to a service center prior to
continuing use. Contact our Customer Care Line at 1-800-989-3535 (U.S.) or 1.888.676.7325 (Canada)
Page 19

TROUBLESHOOTING
19
Problem Possible Cause Possible Solution
3. The machine has been moved or tilted with water
in the water tank.
3. Remove the water tank, and drain. Wipe and dry the reservoir.
4. The drainage cap is not correctly tted. 2. Tighten the drainage cap.
Why is the digital display on the
control panel red?
1. The water tank is empty. 1. Go to the maintenance section for further details.
2. The lters need replacing. 2. Go to the maintenance section for further details.
Page 20

20
Warranty
TTI Floor Care North America (ORECK) gives you, the original purchaser of this
product, the following limited warranty only if this product was purchased from
Oreck or an Oreck Authorized Retail Dealer, used only for residential purposes,
and not held for resale.
Oreck will repair or replace, free of charge, any part of this product that is found
to be defective in material or workmanship within two (2) years following the
date of purchase for all residential models. NOTE: warranty is void if used in
a commercial setting. This limited warranty does not cover the replacement
of expendable or consumable parts such as lters, cartridges, and other parts
subject to normal wear unless they are defective in material or workmanship.
This limited warranty does not apply to any part subjected to accident, abuse,
commercial use, alteration, misuse, damage caused by an act of god, or the use
of voltages other than on the data plate of this product. Damage to this product
caused by ser vice performed by someone other t han Oreck or an Or eck Authorized
Retail Dealer is not covered by and is excluded from this warranty. Oreck does
not authorize any person or representative to assume or grant any other warranty
obligation with the sale of this project.
The Oreck limited warranty is valid only if you retain proof of purchase from Oreck
or an Oreck Authorized Retail Dealer for this product. If you purchase this product
from any other source, your purchase is “AS IS,” which means that Oreck grants
you no warrant y, and that you, not Oreck, assume the entire risk of the quality and
performance of the product, including the entire cost of any necessary servicing
or repairs of any defects.
The Oreck liability for damages to you for any costs whatsoever arising from
this limited warranty shall be limited to the amount paid for this product at the
time of original purchase, and Oreck shall not be liable for any direct, indirect,
consequential or incidental damages arising out of the use or inability to use
this product. Some states do not allow the exclusion or limitation of incidental
or consequential damages, so the above limitations or exclusions may not apply
to you.
ALL EXPRESS AND IMPLIED WARRANTIES OTHER THAN THE LIMITED
WARRANTY SET FORTH ABOVE, FOR THE PRODUCT, INCLUDING IMPLIED
WARRANTIES OF MERCHANTABILITY AND FITNESS FOR A PARTICULAR
PURPOSE ARE EXPRESSLY DISCLAIMED TO THE FULLEST EXTENT ALLOWED
BY APPLICABLE LAW.
Notwithstanding the foregoing, no warranty provided herein or arising under any
applicable law shall exceed 2 years in duration. However, some states do not
allow limitations on how long an implied warranty lasts, so the above limitation
may not apply to you.
This warranty shall be governed and construed under the laws of the state of
Ohio. This warranty gives you specic legal rights, and you may also have other
rights, which vary from state to state.
Page 21

M A NUA L
del proprietario
PURIFICADOR Y HUMIDIFICADOR
DE AIRE 2 EN 1
Importante: lea la guía con atención antes de ensamblar
y usar este aparato.
WK15500B 961151992 | ID116481-R0
AIR REFRESH
™
Page 22

GR ACIAS
por adquirir su producto Oreck®.
Registre su producto:
en línea en el sitio oreck.com o comuníquese al
1.800.989.3535 para hacer el registro por teléfono.
Page 23

23
Índice
Instrucciones de seguridad importantes 4
Contenido de la caja 6
Funcionamiento 8
Uso de la máquina 8
Trabajar con el panel de control 10
Mantenimiento 12
Vaciado del tanque de agua y
drenaje de la máquina 12
Reemplazo de los ltros 14
Resolución de problemas 16
Garantía 18
Español 19
Francés 37
Si necesita ayuda, Visítenos en Oreck.com o llámenos al 1-800-989-3535
Page 24

24
INSTRUCCIONES DE SEGURIDAD IMPORTANTES
GUARDE ESTAS INSTRUCCIONES.
LEA ESTE MANUAL CON ATENCIÓN ANTES DE ENSAMBLAR Y
USAR ESTE APARATO. ESTE PRODUCTO TIENE COMO FIN UN
USO DOMÉSTICO ÚNICAMENTE. SI SE LO UTILIZA CON FINES
COMERCIALES, LA GARANTÍA QUEDARÁ ANULADA.
Cuando se utilizan aparatos eléctricos, siempre deben seguirse
precauciones básicas, incluidas las siguientes:
LEA TODAS LAS
INSTRUCCIONES ANTES DE UTILIZAR ESTE APARATO.
ADVERTENCIA: PARA DISMINUIR
EL RIESGO DE INCENDIO, DESCARGA
ELÉCTRICA O LESIONES:
Este puricador y humidicador de aire 2 en 1 tiene como n su uso
doméstico solamente, NO el uso comercial ni industrial.
• Arme la aspiradora por completo antes de ponerla en funcionamiento.
• Opere la máquina únicamente con el voltaje especicado en la placa de datos
ubicada en su parte trasera.
• No descuide el aparato cuando esté enchufado. Desenchúfelo del tomacorriente
cuando no esté en uso y antes de su limpieza o servicio de mantenimiento.
• No utilice la aspiradora en exteriores o en super cies mojadas.
• Evite que se la utilice como un juguete. La unidad no tiene como n el uso por parte
de niños de 12 años o menos. Cuando se la utilice cerca de niños, será necesario
hacerlo bajo una estricta supervisión. Para evitar lesiones o daños, mantenga a los
niños lejos del producto y no permita que coloquen los dedos u otros
objetos en las aberturas.
• Utilícela únicamente según el uso descripto en este manual. Utilice solamente los
accesorios y productos recomendados por el fabricante.
• No la utilice si el cable o el enchufe se encuentran dañados. Si el aparato no
funciona como debe, si se ha caído, dañado o dejado a la intemperie, o si se ha
sumergido en agua, llévelo a un Centro técnico antes de continuar usándolo.
• No tire del aparato ni lo transporte tomándolo por el cable, no use el cable como
una manija, no cierre una puerta sobre el cable ni lo enrosque alrededor de bordes
o esquinas losas. No haga funcionar una aspiradora u otro aparato sobre el cable.
Mantenga el cable lejos de las supercies calientes.
• No lo desenchufe tirando del cable. Para desenchufarlo, agarre el enchufe, no el cable.
• No manipule el enchufe ni el aparato con las manos mojadas.
• No coloque ningún objeto en las aberturas. No utilice la unidad si alguna de sus
aberturas se encuentra bloqueada. Manténgala libre de polvo, pelusas, cabello y
cualquier otro elemento que pueda disminuir el ujo de aire.
• Evite que el cabello, la ropa suelta, los dedos y cualquier otra parte del cuerpo
entren en contacto con las aber turas y las piezas móviles de la unidad.
• Apague todos los controles antes de desenchufar el aparato.
• No coloque la máquina cerca de líquidos combustibles o inamables, tales como
gasolina o restos de madera lijada, ni lo utilice en áreas en las que dichos elementos
puedan estar presentes.
• No pase el cable por debajo del alfombrado. No cubra el cable con alfombras
pequeñas, portacables o cobertores similares. Acomode el cable lejos de las áreas
transitadas, donde nadie se tropiece con él.
Page 25

25
• No bloquee, ni siquiera parcialmente, las rejillas de entrada o salida de aire.
Asegúrese de que exista un ujo de aire adecuado alrededor de la unidad.
• Mantenga la unidad alejada de calentadores/chimeneas y otros objetos/
ubicaciones calientes.
• No coloque ningún objeto encima de la unidad ni se siente sobre ella.
• Nunca abra la cubierta frontal ni trasera mientras la unidad se encuentre
enchufada a un tomacorriente.
• Mantenga a los niños y a las mascotas lejos de la unidad.
• Nunca utilice aspiradoras de aire comprimido, aire enlatado, limpiadores
inamables o aerosoles en el producto.
• Siempre coloque el aparato sobre una supercie plana, estable y sólida y nunca
estire demasiado el cable de alimentación.
• Retire siempre el tanque de agua y drene el aparato antes de trasladarlo o
transportarlo.
• Posicione el aparato donde no se arroje aire sucio sobre su cuerpo o su cabeza
mientras está sentado o durmiendo.
• Este aparato produce rocío. Manténgalo alejado de objetos valiosos y otros
componentes electrónicos.
• No deje agua almacenada en el tanque de agua entre cada uso
• No coloque el aparato cerca de fuentes de calor, como estufas, hornos,
radiadores, llamas abiertas, velas o computadoras.
• No mueva ni incline el aparato cuando lo use. Pueden producirse fugas del
depósito de agua.
ES IMPORTANTE QUE TENGA EN CUENTA LO SIGUIENTE CUANDO DECIDA
DÓNDE UBICAR EL PURIFICADOR/HUMIDIFICADOR DE AIRE:
• Coloque el producto en una supercie plana, sólida y estable. Nunca coloque la
unidad sobre supercies suaves como la cama o el sofá.
• Coloque el producto de manera que el enchufe del cable de alimentación llegue a
un tomacorriente eléctrico estándar o enchufe polarizado.
• Coloque el producto de manera que el enchufe del cable de alimentación llegue a
un tomacorriente eléctrico estándar o enchufe polarizado.
ADVERTENCIA: Este producto contiene químicos
reconocidos por el Estado de California como causantes de cáncer, defectos de
nacimiento u otros daños reproductivos.
LÁVESE LAS MANOS LUEGO DE UTILIZARLO.
PRECAUCIÓN: PARA DISMINUIR EL
RIESGO DE DAÑOS:
Almacénelo apropiadamente en interiores, en un lugar seco. No exponga la máquina a
temperaturas muy frías.
ADVERTENCIA: Para reducir el riesgo de descarga
eléctrica, este aparato tiene un enchufe polarizado (una clavija es más
ancha que la otra). Este enchufe cabe en un tomacorriente polarizado de una
sola manera. SI NO ENCAJA POR COMPLETO EN EL TOMACORRIENTE,
INVIERTA EL ENCHUFE. SI AÚN NO ENCAJA, CONTACTE A UN ELECTRICISTA
CUALIFICADO PARA QUE INSTALE EL TOMACORRIENTE CORRESPONDIENTE.
NO REALICE NINGÚN TIPO DE MODIFICACIÓN EN EL ENCHUFE.
CONSERVE LAS INSTRUCCIONES PARA USO FUTURO.
Page 26

26
Contenidos de la caja de embalaje
A
Rejilla de salida de aire
B
Salida de humidicación
C
Panel de control/
Visualización LCD
D
Cubierta del ltro
E
Rejilla de entrada de
aire lateral
F
Manija para transportar
la unidad
G
Sujetador de liberación del
tanque de agua
H
Tanque de agua
I
Tapa de drenaje
J
Filtro HEPA principal
K
Filtro de olores
Extraiga todas las piezas de la
caja e identique cada artículo
mostrado.
Asegúrese de encontrar todas
las piezas antes de desechar los
materiales de embalaje.
Especificaciones técnicas
Nombre Voltaje Vatiaje Longitud del cable Peso (neto) Corriente
WK15500B 120 V/60 Hz 50 W 6 ft. 15 lbs. 0,7 A
Para obtener los máximos resultados, utilícelo en una habitación de aproximadamente 10,68 metros cuadrados (115 pies cuadrados) de tamaño.
Page 27

27
A
B
F
G
H
I
J
K
C
D
E
Page 28

28
Funcionamiento: Uso de la máquina
Antes de usar la unidad, lea las "Instrucciones de seguridad importantes".
ADVERTENCIA ASEGÚRESE DE QUE LOS FILTROS ESTÉN EN SU LUGAR Y
CORRECTAMENTE COLOCADOS ANTES DEL ENCENDIDO. COLOQUE LA MÁQUINA SOBRE UNA
SUPERFICIE SÓLIDA PLANA LEJOS DE FUENTES DE CALOR. NUNCA BLOQUEE LAS REJILLAS DE
AIRE, MANTENGA LAS REJILLAS DE AIRE LIBRES DE OBSTRUCCIONES.
1
Verique los ltros suministrados
estén correctamente colocados
en su Lugar.
2
Coloque el refrescante de aire
sobre una supercie sólida y plana.
Asegúrese de que las rejillas de
aire estén libres de obstrucciones
y manténgalos libre de polvo
limpiándolos ocasionalmente con
un paño seco.
3
Presione el botón de liberación del
tanque de agua para extraer el tanque
de agua.
Nota: El puricador de aire puede utilizarse sin el funcionamiento automático del humidicador. El humidicador no puede utilizarse sin la puricación de aire.
ADVERTENCIA PARA DISMINUIR EL
RIESGO DE LESIONES FÍSICAS, DESENCHUFE LA UNIDAD
ANTES DE LIMPIARLA O REALIZARLE UN SERVICIO DE
MANTENIMIENTO.
Page 29

29
FUNCIONAMIENTO <- USO DE LA MÁQUINA
4
Doble la tapa del tanque de agua hacia
la izquierda para abrirla.
5
Llene con agua ltrada hasta
la línea de llenado máximo. No
agregue fragancias ni aceites
aromatizantes al tanque de agua.
6
Ajuste la tapa del tanque de agua y
vuelva a colocar el tanque de agua en la
unidad hasta que encastre en su lugar.
Page 30

30
ADVERTENCIA IMPORTANTE: EL PANEL DE CONTROL ES SENSIBLE AL TACTO, PRESIONE LEVEMENTE LOS CONTROLES. CUANDO LA MÁQUINA
ESTÉ ACTIVADA, LE LECTURA DIGITAL DE LA HUMEDAD DE LA HABITACIÓN Y LA IMAGEN GIRATORIA DEL VENTILADOR APARECERÁN CONSTANTEMENTE. LA
HUMIDIFICACIÓN COMIENZA DESPUÉS DEL CICLO DE AGUA INICIAL. ES POSIBLE QUE EL ROCÍO NO SEA VISIBLE EN TODAS LAS CONDICIONES.
Funcionamiento: Cómo funcionan el panel de control y la pantalla de
visualización LCD
A
Encendido/
Apagado
B
Velocidad
C
Temporizador
D
Apagado
automático
E
Humedad
F
Reiniciar el ltro
Panel de control
Visualización LCD
Pantalla
Fig. 6
Fig. 1 Fig. 5 Fig. 4 Fig. 3
Fig. 2
Fig. 7
Page 31

31
CÓMO FUNCIONA LA PANTALLA DEL PANEL DE CONTROL
Y LA PANTALLA LCD
A
Encendido/Apagado: Presione el botón
“encendido/apagado” una vez para encender
la unidad. El puricador de aire se activará y el
botón de velocidad del panel de control se
iluminará. La humidicación no se activará
hasta que se presione el botón Humedad y se
llene el tanque de agua.
D
Apagado automático: Presione el botón
“apagado automático”, la velocidad del
ventilador se seleccionará en Baja y el LCD de
la máquina se atenuará automáticamente.
F
Reiniciar el filtro: Las barras de duración de
los ltros (Fig 7) disminuirán gradualmente
durante todo el uso de la máquina. Cuando
llegue el momento de reemplazar los ltros, las
barras de duración parpadearán y la pantalla de
visualización LCD se volverá de color rojo. Una
vez que reemplace los ltros, inserte un pequeño
instrumento de punta, como un bolígrafo, dentro
de la pieza de inserción de “restablecimiento
del ltro”. Presione para determinar qué ltro se
restablecerá. Las barras de duración se
atenuarán para mostrar cuál ltro se seleccionó.
B
Velocidad : El ventilador se activará a
velocidad media cuando la unidad esté
encendida.
1. Presione el botón “velocidad” para
seleccionar la velocidad deseada del
ventilador: Baja, Media, Alta y Turbo.
2. En el panel de visualización digital, la
imagen de un ventilador interpretará la
velocidad del ventilador a medida que la
velocidad deseada aumenta o disminuye.
C
Temporizador: El temporizador puede
establecerse entre 1 a 8 horas.
1. Aparecerá el símbolo de un temporizados
en la pantalla de visualización LCD cuando el
temporizador se establezca (Fig. 2) y se mostrará
la cantidadde horas seleccionadas (Fig. 3).
2. Una vez que haya nalizado el ciclo de tiempo,
la máquina se apagará. Si no se establece el
temporizados, la máquina funcionará
constantemente a la velocidad seleccionada.
E
Humedad: – Presione el botón “Humedad”
para activar el humidicador ultrasónico.
1. Continúe presionando el botón de humedad
para seleccionar la humedad relativa deseada
(%HR) objetivo. La humedad objetivo deseada
aparecerá en la pantalla de la visualización
LCD (Fig 4). La máquina también llegará a las
condiciones actuales de % HR y se mostrará
el número (Fig. 5).
2. Humidistato integrado: esta máquina
posee un humidistato integrado, no se
usa agua caliente ni vapor. El humidicador se
encenderá/apagará automáticamente cada
vez que el % HR objetivo sea inferior o igual
al % HR actual hasta que se vacíe el tanque o
que la función de humidicador se apague.
3. Humidificador ultrasónico: El rocío y
el vapor se dispersarán a través de la pequeña
rejilla detrás del panel de control. Nota: El
puricador de aire siempre funcionará
cuando se encienda el humidicador.
4. Cuando el tanque de agua esté vacío o seco,
aparecerá un símbolo en la pant alla de la
visualización LCD (Fig 6) y la pantalla LCD
parpadeará de color rojo. La función del
humidicador se apagará hasta que se vuelva a
llenar el tanque. La puricación de aire permanecerá
encendida hasta que el botón de alimentación
principal se apague manualmente.
Page 32

32
Mantenimiento: Vaciado del tanque de agua y drenaje de la máquina
ADVERTENCIA NO DEJE AGUA ALMACENADA EN EL TANQUE DE AGUA
ENTRE CADA USO. DEBE VACIAR EL TANQUE DE AGUA DESPUÉS DE CADA USO Y VOLVER
A LLENARLO CON AGUA POTABLE ANTES DE USARLO.
ADVERTENCIA PARA DISMINUIR EL RIESGO DE DESCARGA
ELÉCTRICA, DESENCHUFE L A UNIDAD ANTES DE LIMPIARLA O
REALIZ ARLE UN SERVICIO DE MANTENIMIENTO.
Nota: El uso de otros productos de tratamiento de agua, productos químicos, jabones, detergentes o limpiadores abrasivos no se recomienda y puede
provocar daños en el humidicador o afectar a su rendimiento. El agua del tanque durará aproximadamente 15,5 horas cuando esté en modo “alto”.
2
Presione el botón de
liberación del tanque
de agua para extraer
el tanque de agua.
3
Gire la tapa del tanque
de agua hacia la
izquierda para abrirla.
Vacíe y enjuague
el tanque.
5
Incline la unidad para
drenarla.
4
Coloque la unidad sobre
un lavabo o tina y tire de la
tapa de drenaje para vaciar
el agua adicional.
1
Apague el humidicador
y desenchufe la unidad
antes de quitar y volver
a llenar el tanque
de agua.
Page 33

33
6
Limpie el depósito inferior
con un paño seco para
evitar que se forme moho.
7
Asegúrese de que la
cubierta del tanque de
agua esté correctamente
ajustada y gire el tanque de
agua para que la tapa
quede en el fondo.
8
Inserte el tanque de agua
en la máquina primero. Tire
hacia atrás hasta que el
tanque de agua encastre en
su lugar.
9
Vuelva a empujar la tapa
de drenaje en su lugar,
asegurándose de que esté
correctamente ajustada.
VACIADO DEL TANQUE DE AGUA Y DRENAJE DE LA
MÁQUINA
COMUNÍQUESE CON NUESTRA LÍNEA DE ATENCIÓN AL CLIENTE
1-800-989-3535
Todo otro servicio de mantenimiento deberá ser realizado por personal técnico autorizado. Si el aparato no funciona como debe, si se ha caído, dañado o
dejado a la intemperie, o si se ha sumergido en agua, llévelo a un Centro técnico antes de continuar usándolo.
Page 34

34
Weekly Maintenance Instructions
Note: Besides what’s specied,the use of other water treatment products, chemicals, soaps, detergents, or abrasive cleaners are not recommended and
may cause damage to the humidier or affect performance. Water in tank will last approximately 15.5 hours when in “high” mode.
2
Deje reposar peróxido
de hidrógeno en tanto
tanque de agua y base del
humidicador durante 20
minutos.
1
Utilice 3 % de peróxido de
hidrógeno para desinfectar
. Siga las advertencias e
instrucciones de seguridad
del fabricante cuando se
utiliza el 3% de peróxido de
hidrógeno
1
Vierta aproximadamente
10 oz (1 ¼ de taza) de
peróxido de hidrógeno
al 3% en base del
humidicador. Asegúrese
de que el tapón de drenaje
se inserta en la máquina
3%
20 min
2
Verter el peróxido de
hidrógeno al 3 % en el
tanque de agua hasta
aproximadamente
medio lleno , vuelva a
colocar la tapa y agitar
vigorosamente
ADVERTENCIA NO DEJE AGUA ALMACENADA EN EL TANQUE DE AGUA
ENTRE CADA USO. DEBE VACIAR EL TANQUE DE AGUA DESPUÉS DE CADA USO Y VOLVER
A LLENARLO CON AGUA POTABLE ANTES DE USARLO.
ADVERTENCIA PARA DISMINUIR EL RIESGO DE DESCARGA
ELÉCTRICA, DESENCHUFE L A UNIDAD ANTES DE LIMPIARLA O
REALIZ ARLE UN SERVICIO DE MANTENIMIENTO.
Hidrógeno
Peróxido
Page 35

35
Cualquier otro servicio debe ser realizado por un representante de servicio autorizado. Si el aparato no está funcionando como debiera, se ha caído, dañado,
dejado a la intemperie o sumergido en agua, llevarlo a un centro de servicio antes de su uso continuado.
3
Para eliminar el peróxido de hidrógeno del tanque
de agua: tapa de rosca izquierda para abrir. solución
vacío y enjuagar bien con agua destilada o puricada
hasta cualquier olor peróxido de hidrógeno residual se ha
ido. Limpie el exterior del tanque con un paño seco.
4
Para eliminar el peróxido de hidrógeno a partir de base del
humidificador: coloque la unidad sobre un lavabo o bañera y tire
de la tapa de drenaje para vaciar la solución adicional. Enjuague bien con
agua destilada o puricada hasta cualquier olor peróxido de hidrógeno
residual se ha ido. Limpie la base con un paño seco.
COMUNÍQUESE CON NUESTRA LÍNEA DE ATENCIÓN AL CLIENTE
1-800-989-3535
Page 36

36
Mantenimiento: Reemplazo de los filtros
1
Cuando deba reemplazar los ltros,
las barras de duración del panel digital
parpadearán y la pantalla se colocará
en rojo.
2
Tire de cualquiera de los lados de la
cubierta frontal para extraerla.
3
Retire todo el embalaje de los ltros
nuevos. Alinee el ltro de olores y
presiónelo contra el gancho y las
pestañas para conectarlo al ltro
principal.
IMPORTANTE LOS FILTROS DEBEN REEMPL AZARSE CADA 3 A 6 MESES, SEGÚN EL USO.
ADVERTENCIA PARA DISMINUIR EL RIESGO DE LESIONES FÍSICAS, DESENCHUFE LA UNIDAD ANTES
DE LIMPIARLA O REALIZARLE UN SERVICIO DE MANTENIMIENTO.
ADVERTENCIA ESTA CU BIERTA
CUENTA CON UN ENCLAVAMIENTO QUE REDUCE
EL RIESGO DE DESCARG A ELÉCTRICA. NO LO
ANULE NI INTENTE REPAR ACIONES SIN QUITAR L A
CUBIERTA POR C OMPLETO.
Nota:
Filtro de reemplazo
AK45510, Tipo AK
Page 37

37
REEMPLAZO DE LOS FILTROS
4
Alinee y vuelva a colocar los nuevos
ltros en la unidad.
5
Alinee las pestañas de la parte inferior
de la cubierta del ltro con las pestañas
de la unidad. Empuje la cubierta hasta
que encastre en su lugar.
6
Enchufe y presione el botón de “encendido”. Después de pequeño
instrumento de punta, como un bolígrafo, dentro de la pieza de
“restablecimiento del ltro”. Presione para determinar qué ltro se
restablecerá. Las barras de duración se atenuarán para mostrar
cuál ltro se seleccionó. Una vez que haya seleccionado el ltro
correcto, siga presionando hasta escuchar un sonido, luego
libérelo. Las barras de duración comenzarán a parpadear y después
quedarán jas para mostrar que el ltro se reestableció.
COMUNÍQUESE CON NUESTRA LÍNEA DE ATENCIÓN AL CLIENTE
1-800-989-3535
Page 38

38
RESOLUCIÓN DE PROBLEMAS
Problema Causa posible Solución posible
La unidad no funciona. 1. Cable de alimentación 1. Enchufe el cable de alimentación.
2. Interruptor de encendido/apagado 2. Con rmeza, presione el interruptor de encendido/apagado para
encenderla.
3. Tomacorriente de pared 3. Verique que no haya voltaje en el tomacorriente. Revise el fusible o el
disyuntor del hogar.
4. Fusible quemado o disyuntor activado. 3. Reemplace el fusible o reestablezca el disyuntor del hogar.
5. Se salió la cubierta frontal 5. Es posible que la cubierta frontal no esté segura, verique si está
correctamente colocada.
6. Que el temporizador no se haya desactivado. 6. Restablezca el temporizador.
ADVERTENCIA PARA DISMINUIR EL RIESGO DE LESIONES FÍSICAS, DESENCHUFE LA UNIDAD ANTES DE LIMPIARLA O REALIZ ARLE UN SERVICIO DE
MANTENIMIENTO.
Los problemas de mantenimiento pueden resolverse fácilmente en el hogar. Utilice esta guía como ayuda de resolución de problemas. Todo otro servicio de
mantenimiento deberá ser realizado por personal técnico autorizado. Si el aparato no funciona como debe, si se ha caído, dañado o dejado a la intemperie,
o si se ha sumergido en agua, llévelo a un Centro técnico antes de continuar usándolo. Comuníquese con nuestra Línea de atención al cliente llamando al
1-800-989-3535
Page 39

39
Problema Causa posible Solución posible
3. La máquina se ha movido o inclinado con agua en
el tanque de agua.
3. Retire el tanque de agua y drene. Limpie y seque el depósito.
4. La tapa de drenaje no está colocada
correctamente.
2. Ajuste la tapa de drenaje.
¿Por qué la pantalla digital del
panel de control está en color
rojo?
1. El tanque de agua está vacío. 1. Vaya a la sección de mantenimiento para obtener más detalles.
2. Los ltros deben reemplazarse. 2. Vaya a la sección de mantenimiento para obtener más detalles.
¿Por qué hay fugas de agua de la
máquina?
1. La unidad no se ha posicionado correctamente. 1. Asegúrese de que la máquina esté en una supercie plana.
2. La tapa del tanque de agua no se ha ajustado. 2. Ajuste la tapa del tanque de agua.
Page 40

40
Garantía
TTI Floor Care North America (ORECK) le ofrece a usted, el comprador original de
este producto, la siguiente garantía limitada únicamente si compró este producto
en Oreck o en un Distribuidor minorista autorizado de Oreck, si es exclusivamente
de uso doméstico, y no para su reventa.
Oreck® reparará o reemplazará gratuitamente toda pieza que resulte defectuosa,
en sus materiales o por su mano de obra, dentro de los dos (2) años siguientes
a la fecha de compra, respecto de todos los modelos de uso doméstico. NOTA:
La garantía quedará anulada si se utiliza la unidad en un contexto comercial.
La presente garantía limitada no cubre la sustitución de piezas fungibles o
consumibles, tales como ltros, cartuchos y demás piezas sujetas a un desgaste
normal, salvo que resultaran defectuosos en sus materiales o por la mano de obra.
Esta garantía limitada no se aplica a ninguna pieza que se haya sometido a usos
desmedidos o comerciales, alteraciones, usos indebidos, uso de voltaje diferente
al establecido en la placa de datos de este producto. El daño a este producto
causado por un servicio realizado por alguna otra persona que no sea Oreck o un
Distribuidor minorista autorizado de Oreck, no cuenta con cobertura y se excluye de
esta garantía. Oreck no autoriza a ninguna persona o representante a que asuma u
otorgue ninguna otra obligación de garantía con la venta de este producto.
La garantía limit ada de Oreck únic amente será v álida si se conser va el comprobante
de compra de Oreck o de un Distribuidor minorista autorizado de Oreck respecto de
este producto. Si adquiere este producto de cualquier otra fuente, su compra será
considerada “EN EL ESTADO EN QUE SE ENCUENTRA”, es decir que Oreck no le
otorgará ninguna garantía y usted, no Oreck, asumirá el riesgo total por la calidad y
el rendimiento de este producto, con inclusión del costo total de toda reparación o
servicio necesarios por cualquier falla.
La responsabilidad de Oreck® por daños y por todo gasto que surja de esta garantía
limitada quedará restringida al monto abonado por este producto al momento de
su compra original, y Oreck® no será responsable de ningún daño directo, indirecto,
emergente o incidental que surja del uso o de la imposibilidad de uso de este
producto. En algunos estados, la exclusión de los daños emergentes o incidentales
no está permitida, de modo que la exclusión o limitación precedentes pueden no
serle aplicables.
QUEDAN EXPRESAMENTE RECHAZADAS EN LA MÁXIMA MEDIDA PERMITIDA
POR LAS LEYES APLICABLES, TODAS LAS GARANTÍAS EXPRESAS E IMPLÍCITAS
DIFERENTES DE LA GARANTÍA LIMITADA ESTABLECIDA ANTERIORMENTE
RESP ECTO DE ES TE PRODU CTO, CON INC LUSIÓN DE L AS GAR ANTÍA S IMPLÍCI TAS
DE APTITUD PARA LA VENTA O ADECUACIÓN A FINES ESPECÍFICOS.
Sin perjuicio de lo anterior, ninguna garantía aquí provista o que surja de alguna
ley aplicable superará los 2 años de duración. Sin embargo, en algunos estados,
las limitaciones sobre la duración de una garantía implícita no están permitidas, de
modo que la limitación precedente puede no ser aplicable en su caso.
Dicha garantía se regirá e interpretará de conformidad con las leyes del Estado de
Ohio. Esta garantía le otorga derechos legales especícos. También puede tener
otros derechos, que varían según el estado.
Page 41

Important : Lisez attentivement les présentes
instructions avant d’assembler et d’utiliser le produit.
MANUEL
de
l’utilisateur
WK15500B 961151992 | ID116481-R0
AIR REFRESH
MC
PURIFICATEUR ET HUMIDIFICATEUR
D’AIR 2EN1
Page 42

MERCI
d’avoir acheté un produit Oreck®.
Veuillez enregistrer votre produit:
en ligne à l’adresse oreck.com ou composer
le 1.800.989.3535 pour inscrire l’appareil
par téléphone.
Page 43

43
Table des matières
Consignes de sécurité importantes 4
Contenu de l’emballage 6
Fonctionnement 8
Utilisation de votre appareil 8
Fonctionnement du tableau de commande 10
Entretien 12
Vidange du réservoir d’eau et
de l’appareil 12
Remplacement des ltres 14
Dépannage 16
Garantie 18
Espagnol 19
Français 37
Pour obtenir de l’aide, visitez notre site Web au Oreck.com ou appelez au 1800989-3535.
Page 44

44
CONSIGNES DE SÉCURITÉ IMPORTANTES
CONSERVEZ CES INSTRUCTIONS
LISEZ ATTENTIVEMENT AVANT L'ASSEMBLAGE ET L'UTILISATION.
CET APPAREIL EST DESTINÉ UNIQUEMENT À UN USAGE
DOMESTIQUE. UNE UTILISATION À DES FINS COMMERCIALES
ANNULERA LA GARANTIE.
Lorsque vous utilisez des appareils électriques, veuillez toujours respecter
entre autres les consignes de sécurité élémentaires suivantes:
VEUILLEZ
LIRE TOUTES LES INSTRUCTIONS AVANT D’UTILISER CET
APPAREIL.
AVERTISSEMENT: POUR RÉDUIRE
LE RISQUE D’INCENDIE, DE DÉCHARGE
ÉLECTRIQUE, DE DOMMAGE OU DE BLESSURE:
Ce puricateur et humidicateur d’air 2en1 est destiné à un usage
domestique seulement et NON à un usage commercial ou industriel.
• Assemblez entièrement l’appareil avant de l’utiliser.
• Faites seulement fonctionner l’appareil à la tension indiquée sur la plaque
signalétique située à l’arrière du puricateur.
• Ne laissez pas l'appareil en marche sans surveillance. Débranchez la che de la
prise de courant dès la n de l'utilisation et avant le nettoyage ou l'entretien.
• N’utilisez pas l’appareil à l’extérieur ni sur des surfaces humides.
• Ne permettez pas aux enfants de jouer avec l’appareil. Cet appareil ne doit pas être
utilisé par des enfants de moins de 12ans. Exercez une surveillance étroite lorsque
l’appareil est utilisé à proximité d’enfants. Gardez l’appareil hors de la portée des
enfants et ne laissez pas ces derniers introduire leurs doigts ou d’autres
objets dans aucune ouverture an d’éviter les blessures ou les bris.
• Utilisez l’appareil uniquement aux ns décrites dans le présent guide. Utilisez
uniquement les accessoires et produits recommandés par le fabricant.
• N’utilisez pas l'appareil lorsque le cordon ou la che est endommagé. Cessez
d’utiliser l’appareil s’il ne fonctionne pas comme prévu, s’il a été échappé sur le
sol ou dans l’eau, s’il est endommagé ou s’il a été laissé à l’extérieur et apportezle au centre de réparations.
• Ne tirez pas et ne transportez pas l’appareil par son cordon, n’utilisez pas le cordon
comme une poignée, ne coincez pas le cordon dans l’embrasure d’une por te et ne le tirez
pas contre des arêtes ou des cornières tranchantes. Ne faites pas rouler d’aspirateur ou
tout autre appareil sur le cordon. Tenez le cordon éloigné des surfaces chaudes.
• Ne débranchez pas l’appareil en tirant le cordon. Débranchez l’appareil en tenant la
che et non le cordon.
• Ne manipulez pas la che ou l’appareil avec des mains mouillées.
• N’insérez aucun objet dans les ouvertures. N’utilisez pas l’appareil si les ouvertures
sont obstruées. Assurez-vous qu’elles sont exemptes de poussière, de mousse, de
cheveux ou de tout ce qui pourrait réduire le débit d’air.
• Gardez les cheveux, les vêtements amples, les doigts et toute autre partie du corps
à l’écart des ouvertures et des pièces en mouvement.
• Éteignez toutes les commandes avant de débrancher l’appareil.
• Ne placez pas l’appareil près de liquides inammables ou combustibles comme de
l’essence et de la sciure de bois. Ne l’utilisez pas non plus dans des endroits où de
telles substances peuvent être présentes.
• Ne faites pas passer le cordon sous une moquette. Ne recouvrez pas le cordon de
carpettes, de tapis chemins ou d’un revêtement similaire. Disposez le cordon de façon
Page 45

45
à ce qu’il soit à l’écart des endroits passants, de sorte que personne ne trébuche dessus.
• Ne bloquez pas, même partiellement, les grilles d'entrée ou d'échappement de l'air.
Assurez-vous que le débit d’air autour de l’appareil est adéquat.
• Gardez l'appareil à l'écart d'un radiateur, d'une cheminée ou d'un autre objet ou
endroit chaud.
• Ne placez pas d'objet sur l'appareil. Ne vous assoyez pas sur l'appareil.
• N’ouvrez jamais le couvercle avant ou arrière de l’appareil si ce dernier est branché
sur une prise murale.
• Tenez les enfants et les animaux à l’écart de l’appareil.
• N’utilisez pas de dépoussiéreurs à gaz comprimé ni de nettoyants à air comprimé,
inammable ou en aérosol sur cet appareil.
• Placez toujours l’appareil sur une surface plane, stable et solide et ne tirez pas
excessivement sur le cordon d’alimentation.
• Retirez toujours le réservoir d’eau et asséchez l’appareil avant de le soulever ou de
le transporter.
• Positionnez l’appareil de façon à ce que l’air souillé ne soit pas dirigé vers votre
corps ou votre tête pendant que vous êtes assis ou que vous dormez.
• Cet appareil produit de la brume. Tenez-le à l’écart d’objets précieux ou d’autres
articles électroniques.
• Ne laissez pas d’eau dans le réservoir entre les utilisations.
• Ne placez pas l’appareil près de sources de chaleur, comme des surfaces de cuisson, des
fours, des radiateurs, des feux accessibles, des chandelles ou des ordinateur s.
• Ne déplacez et n’inclinez pas l’appareil pendant qu’il est en marche. Il est possible
que le réservoir d’eau fuit.
IL EST IMPORTANT DE TENIR COMPTE DES ÉLÉMENTS SUIVANTS LORSQUE VOUS
CHOISISSEZ L’EMPLACEMENT DU PURIFICATEUR ET HUMIDIFICATEUR D’AIR:
• Placez l’appareil sur une surface plane, solide et stable. Ne placez jamais l’appareil
sur des sur faces molles, comme un lit ou un sofa.
• Placez l’appareil de façon à ce que la che du cordon d’alimentation puisse se
brancher sur une prise de courant standard convenant à une che polarisée.
• Placez l’appareil de façon à ce que la che du cordon d’alimentation puisse se
brancher sur une prise de courant standard convenant à une che polarisée.
AVERTISSEMENT: Ce produit contient des produits
chimiques reconnus par l’État de la Californie comme pouvant causer le cancer, des
anomalies congénitales ou d’autres dysfonctions du système reproducteur.
BIEN SE LAVER LES MAINS APRÈS L'UTILISATION.
MISE EN GARDE: POUR RÉDUIRE LES
RISQUES DE DOMMAGE:
Rangez l’appareil adéquatement à l’intérieur et dans un endroit sec. N’exposez pas
l’appareil à des conditions de gel.
AVERTISSEMENT: Cet appareil est équipé d’une
che polarisée (une lame plus large que l’autre) pour diminuer le risque de décharge
électrique. Cette che ne peut être branchée que dans un seul sens à une prise
polarisée. Si la che ne s’insère pas entièrement dans la prise, retournez-la. Si vous
ne pouvez toujours pas l’insérer, communiquez avec un électricien qualié pour faire
installer une prise appropriée. Ne modiez la che en aucun cas.
VEUILLEZ CONSERVER CES INSTRUCTIONS EN VUE D’UNE
UTILISATION ULTÉRIEURE.
Page 46

46
Contenu de l’emballage
A
Grille de sortie d’air
B
Sortie de l’humidité
C
Panneau de commande
et écran ACL
D
Couvercle des ltres
E
Grille latérale d’entrée d’air
F
Poignée de transport
G
Languette de dégagement
du réservoir d’eau
H
Réservoir d’eau
I
Bouchon de drainage
J
Filtre HEPA principal
K
Filtre anti-odeur
Retirez toutes les pièces de
l’emballage et repérez chaque
élément illustré.
Assurez-vous d’avoir répertorié
toutes les pièces avant de jeter le
matériel d’emballage.
Spécifications Techniques
Nom Tension Puissance Longueur du cordon Poids (net) Courant
WK15500B 120V/60Hz 50W 6 ft. 15 lbs. 0,7A
Pour obtenir des résultats optimaux, utilisez l’appareil dans une pièce d’environ 3,26mètres carrés.
Page 47

47
A
B
F
G
H
I
J
K
C
D
E
Page 48

48
Fonctionnement– Utilisation de votre appareil
Veuillez lire les consignes de sécurité importantes avant d’utiliser l’appareil
AVERTISSEMENT ASSUREZ-VOUS QUE LES FILTRES SONT CORRECTEMENT MIS EN
PLACE AVANT DE METTRE L’APPAREIL EN MARCHE. PLACEZ L’APPAREIL SUR UNE SURFACE PLANE
ET SOLIDE À L’ÉCART DE SOURCES DE CHALEUR. NE BLOQUEZ JAMAIS LES GRILLES D’ENTRÉE ET DE
SORTIE D’AIR ET RETIREZ TOUTE SOURCE D’OBSTRUCTION.
2
Placez votre rafraichisseur d’air sur une
surface dure et plane. Assurez-vous
que les grilles d’entrée et de sortie d’air
ne sont pas obstruées et enlevez la
poussière en essuyant périodiquement
avec un chiffon sec.
3
Appuyez sur le bouton de dégagement
du réservoir d’eau an de retirer le
réservoir.
Remarque : Le puricateur d’air peut être utilisé sans que l’humidicateur soit en marche. Toutefois, l’humidicateur ne peut être utilisé sans le
puricateur d’air.
AVERTISSEMENT DÉBRANCHEZ L’APPAREIL
AVANT DE LE NETTOYER OU D’EN EFFECTUER L’ENTRETIEN
AFIN DE RÉDUIRE LE RISQUE DE BLESSURES.
1
Vériez que les ltres fournis sont
correctement en place.
Page 49

49
4
Tournez le bouton du réservoir d’eau
dans le sens contraire des aiguilles
d’une montre pour ouvrir le réservoir.
5
Remplissez-le d’eau jusqu’à la ligne
de remplissage maximal. N’ajoutez
pas de fragrances ni d’huiles
parfumées au réservoir d’eau.
6
Serrez le bouchon du réservoir et
réinsérez le réservoir dans l’appareil
jusqu’à ce qu’il s’enclenche en place.
FONCTIONNEMENT <- UTILISATION DE VOTRE APPAREIL
Page 50

50
AVERTISSEMENT IMPORTANT: LE TABLEAU DE COMMANDE EST TACTILE. VOUS N’AVEZ QU’À APPUYER LÉGÈREMENT SUR LES COMMANDES. LORSQUE
L’APPAREIL EST EN MARCHE, LE TAUX D’HUMIDITÉ DE LA PIÈCE ET LE TÉMOIN DE FONCTIONNEMENT DU VENTIL ATEUR SONT CONSTAMMENT AFFICHÉS. LA FONCTION
D’HUMIDIFICATION DÉBUTE APRÈS LE PREMIER CYCLE DE L’EAU. IL EST POSSIBLE QUE LA BRUME NE SOIT PAS VISIBLE DANS TOUTES LES CONDITIONS.
Fonctionnement– Fonctionnement du tableau de commande
et de l’écran ACL
A
Marche/
arrêt
B
Vitesse
C
Minuteur
D
Mode
veille
E
Humidité
F
Réinitialisation
des ltres
Tableau de
commande
Écran ACL
Fig. 6
Fig. 1 Fig. 5 Fig. 4 Fig. 3
Fig. 2
Page 51

51
FONCTIONNEMENT DU TABLEAU DE COMMANDE
A
Marche/arrêt–Appuyez une fois sur le
bouton d’alimentation pour allumer l’appareil.
Le puricateur d’air est activé, et le bouton de
vitesse s’allume sur le panneau de commande.
L’humidication est activée une fois que vous
avez rempli le réservoir d’eau et appuyé sur le
bouton Humidity.
D
Veille– Appuyez sur le bouton «Veille»,
et la vitesse du ventilateur passera à
lent, et l’éclairage de l’écran ACL de
l’appareil sera automatiquement tamisé.
F
Réinitialisation des filtres– Le nombre
de barres de vie des ltres (Ill. 7)
augmenteront graduellement au cours de
l’utilisation de l’appareil. Lorsque les
ltres doivent être changés, les barres de
vie clignoteront et l’écran d’afchage ACL
passera au rouge. Après avoir remplacé les
ltres, appuyez sur le bouton de réinitialisation
à l’aide d’un petit objet à bout arrondi, comme
un stylo, dans l’orice du bouton de
réinitialisation. Enfoncez an de déterminer
quel ltre doit être réinitialisé. Les barres
de vie s’estomperont pour indiquer quel ltre
est sélectionné.
B
Vitesse– Le ventilateur fonctionne à la
vitesse moyenne lorsque l’appareil est mis
en marche.
1. Appuyez sur le bouton «Vitesse» pour
sélectionner la vitesse désirée du ventilateur
(lente, moyenne, rapide et turbo).
2. Un témoin de ventilateur du panneau
d’afchage numérique représente la vitesse
du ventilateur au l de l’augmentation ou de la
diminution de la vitesse.
C
Minuteur– Le minuteur peut être réglé entre
une et huit heures.
1. Appuyez sur le bouton «Minuteur»
pour régler le nombre d’heures désiré.
2. Une fois que le cycle du minuteur est terminé,
l’appareil fonctionne à la vitesse moyenne. Si
le minuteur n’est pas réglé, l’appareil
fonctionne toujours à la vitesse moyenne.
3. Si le minuteur est réglé au mode veille,
l’appareil fonctionne à la vitesse moyenne une
E
Humidité–Appuyez sur le bouton «Humidité»
pour activer l’humidicateur à ultrasons.
1. Continuez d’appuyer sur le bouton an de
sélectionner le taux d’humidité désiré. Le taux
s’afche sur le panneau d’afchage à côté du
pourcentage d’humidité relative actuel.
2.Humidostat intégré – Cet appareil
est équipé d’un humidostat sans eau ou
vapeur. L’humidicateur s’éteindra et
s’allumera automatiquement chaque fois
que le pourcentage d’humidité relative est
égal au pourcentage d’humidité actuel,
jusqu’à ce que le réservoir soit vide ou
que la fonction d’humidication est
désactivée.
3. Humidicateur à ultrasons : Une brume
ou une vapeur froide sera dispersée par
une petite grille située à l’arrière du tableau
de commande. Remarque : Le puricateur d’air
fonctionne toujours lorsque l’humidicateur
est activé.
fois le cycle du minuteur terminé. 4. Lorsque le réservoir d’eau est vide, un
symbole clignotera à l’écran ACL (g. 6), qui
devient rouge. L’humidication est désactivée
jusqu’à ce que vous remplissiez le réservoir. La
purication de l’air se poursuit jusqu’à ce que
vous appuyiez manuellement sur le bouton
d’alimentation principal pour éteindre l’appareil.
Page 52

52
Entretien– Vidange du réservoir d’eau et de l’appareil
2
Appuyez sur le bouton
de désengagement du
réservoir d’eau pour
le retirer.
3
Tournez le bouchon du
réservoir d’eau dans le
sens contraire des aiguilles
d’une montre pour l’ouvrir.
Videz et rincez le réservoir.
4
Placez l’appareil au-dessus
d’un lavabo ou d’un bain
et tirez sur le bouchon de
drainage pour vider l’eau
restante.
5
Inclinez l’appareil an
de le vider.
AVERTISSEMENT NE LAISSEZ PAS D’EAU DANS LE RÉSERVOIR ENTRE LES
UTILISATIONS. LE RÉSERVOIR D’E AU DOIT ÊTRE VIDÉ APRÈS CHAQUE UTILISATION ET
REMPLI AVEC DE L’EAU FRAÎCHE AVANT D’ÊTRE UTILISÉ.
AVERTISSEMENT DÉBRANCHEZ L’APPAREIL AVANT DE LE
NET TOYER OU D’EN EFFECTUER L’ENTRETIEN AFIN DE RÉDUIRE LE RISQUE
DE DÉCHARGES ÉLECTRIQUES.
Remarque : L’utilisation de produits pour le traitement des eaux, les produits chimiques, les savons, détergents et nettoyants abrasifs n’est pas recommandée
et peuvent endommager l’humidicateur et nuire à sa performance. L’eau du réservoir dure environ 15,5 heures en mode « humidication élevée ».
1
Mettez l’humidicateur
hors tension et
débranchez-le avant
de retirer et de remplir
le réservoir d’eau.
Page 53

53
6
Essuyez le fond du réservoir
avec un chiffon sec
an d’éviter la formation de
moisissure.
7
Assurez-vous que le
couvercle du réservoir
d’eau est bien installé et
tournez le réservoir d’eau
de façon à ce que le
bouchon se trouve au bas
du réservoir.
8
Insérez d’abord le bas du
réservoir dans l’appareil.
Poussez jusqu’à ce que le
réservoir s’enclenche en
place.
9
Remettez le bouchon
de drainage en place et
assurez-vous qu’il est
inséré correctement.
VIDANGE DU RÉSERVOIR D’EAU ET DE L’APPAREIL
COMMUNIQUEZ AVEC NOTRE SERVICE À LA CLIENTÈLE AU
1800989-3535
Toute autre tâche d’entretien doit être conée à un représentant de service autorisé. Cessez d’utiliser l’appareil s’il ne fonctionne pas comme prévu,
s’il a été échappé sur le sol ou dans l’eau, s’il est endommagé ou s’il a été laissé à l’extérieur et apportez-le au centre de réparations.
Page 54

54
Instructions d’entretien hebdomadaire
Remarque : En plus de ce qui est indiqué, l’utilisation d’autres produits de traitement d’eau, de produits chimiques, de savons, de détergents et de
nettoyants abrasifs n’est pas recommandée puisqu’ils pourraient endommager l’humidicateur ou nuire à sa performance. L’eau du réservoir dure environ
15,5heures en mode humidication élevée
2
Laissez agir le peroxyde
d’hydrogène dans le
réservoir d’eau et la base
de l’humidicateur pendant
20 minutes.
1
Utilisez du peroxyde
d’hydrogène de 3 % pour
désinfecter. Respectez
les avertissements et les
mesures de sécurité du
fabricant lorsque vous
utilisez du peroxyde
d’hydrogène 3 %.
1
Versez environ 295 ml (1
1/4 tasse) de peroxyde
d’hydrogène 3 % dans la
base de l’humidicateur.
Assurez-vous que le
bouchon de drainage est
installé dans l’appareil.
3%
Hydrogen
Peroxide
3%
20 min
2
Versez le peroxyde
d’hydrogène 3 % dans le
réservoir d’eau jusqu’à
environ la moitié de la
capacité du réservoir,
fermez le capuchon et
secouez vigoureusement.
AVERTISSEMENT NE LAISSEZ PAS D’EAU DANS LE RÉSERVOIR ENTRE LES
UTILISATIONS. LE RÉSERVOIR D’E AU DOIT ÊTRE VIDÉ APRÈS CHAQUE UTILISATION ET
REMPLI AVEC DE L’EAU FRAÎCHE AVANT D’ÊTRE UTILISÉ.
AVERTISSEMENT DÉBRANCHEZ L’APPAREIL AVANT DE LE
NET TOYER OU D’EN EFFECTUER L’ENTRETIEN AFIN DE RÉDUIRE LE RISQUE
DE DÉCHARGES ÉLECTRIQUES.
D’hydrogène
Peroxyde
Page 55

55
Toute autre réparation doit être effectuée par un représentant de service autorisé. Si l’appareil ne fonctionne pas comme il se doit, a été échappé,
endommagé, laissé dehors ou tombé dans l’eau, le prendre à un centre de service avant utilisation continue.
3
Pour vider le peroxyde d’hydrogène du réservoir
d’eau : Dévissez le capuchon en tournant vers la gauche
pour l’ouvrir. Videz la solution et rincez complètement
avec de l’eau distillée ou ltrée jusqu’à ce que toute odeur
de peroxyde d’hydrogène soit dissipée. Essuyez le fond de
la base de l’humidicateur avec un linge sec.
4
Pour vider le peroxyde d’hydrogène de la base : Placez l’appareil
au-dessus d’un lavabo ou d’un bain et tirez sur le bouchon de drainage
pour vidanger toute la solution résiduelle. Rincez complètement avec
de l’eau distillée ou ltrée jusqu’à ce que toute odeur de peroxyde
d’hydrogène soit dissipée.
COMMUNIQUEZ AVEC NOTRE SERVICE À LA CLIENTÈLE AU
1800989-3535 (U.S) or 1.888.676.7325 (Canada)
Page 56

56
Entretien– Remplacement des filtres
1
Lorsque les ltres doivent être
remplacés, les barres de vie du
panneau d’afchage clignotent, et
l’afchage passe au rouge.
2
Tirez le couvercle avant en le tenant
chaque côté pour le retirer.
3
Retirez les nouveaux ltres de
l’emballage. Alignez le ltre anti-odeur
et xez-le au ltre principal à l’aide des
attaches à crochets et à anneaux.
IMPORTANT LES FILTRES DOIVENT ÊTRE REMPLACÉS TOUS LES3 À 6MOIS SELON L’UTILISATION.
AVERTISSEMENT DÉBRANCHEZ L’APPAREIL AVANT DE LE NETTOYER OU D’EN EFFECTUER
L’ENTRETIEN AFIN DE RÉDUIRE LE RISQUE DE BLESSURES.
AVERTISSEMENT CE COUVERCLE
COMPREND UN VERROUILLAGE ÉLECTRIQUE
AFIN DE RÉDUIRE LE RISQUE DE DÉCHARGES
ÉLECTRIQUES. NE TENTEZ PAS DE MODIFIER CE
DISPOSITIF OU D’EFFECTUER L’ENTRE TIEN DE
L’APPAREIL SANS RETIRER ENTIÈREMENT LE
COUVERCLE.
Remarque :
Filtre de rechange
AK45510, Type AK
Page 57

57
REMPLACEMENT DES FILTRES
4
Alignez le tout et replacez les
nouveaux ltres dans l’appareil.
5
Alignez les languettes au bas du ltre,
puis couvrez-les avec les languettes de
l’appareil. Poussez le couvercle jusqu’à
ce qu’il s’enclenche en place.
6
Branchez l’appareil et appuyez sur le bouton «Marche/
arrêt». Après avoir remplacé les ltres, appuyez sur le bouton
de réinitialisation à l’aide d’un petit objet à bout arrondi,
comme un stylo, dans l’orice du bouton de réinitialisation.
Enfoncez an de déterminer quel ltre doit être réinitialisé.
Les barres de vie s’estomperont pour indiquer quel ltre est
sélectionné. Dès que le bon ltre est sélectionné, maintenez
enfoncé jusqu’à ce que vous entendiez un signal sonore puis
relâchez. Les barres de vie commenceront à clignoter puis
deviendront xes pour indiquer que le ltre a été réinitialisé.
COMMUNIQUEZ AVEC NOTRE SERVICE À LA CLIENTÈLE AU
1800989-3535
Page 58

58
Dépannage
Problème Cause possible Solution possible
L’appareil ne fonctionne pas. 1. Cordon d’alimentation 1. Branchez le cordon d’alimentation.
2. Interrupteur marche/arrêt 2. Appuyez fermement sur l’interrupteur marche/arrêt pour mettre l’appareil
en marche .
3. Prise murale 3. Pas de tension à la prise murale. Vériez les fusibles ou les disjoncteurs du
domicile.
4. Fusible grillé ou disjoncteur déclenché. 3. Remplacez le fusible ou réenclenchez le disjoncteur du domicile.
5. Couvercle avant mal installé 5. Il est possible que le couvercle avant soit mal installé. Vériez qu’il est bien
fermé.
6. Le minuteur est arrêté 6. Réinitialisez le minuteur.
AVERTISSEMENT DÉBRANCHEZ L’APPAREIL AVANT DE LE NETTOYER OU D’EN EFFECTUER L’ENTRETIEN AFIN DE RÉDUIRE LE RISQUE DE BLESSURES.
Les problèmes d’entretien ou de bris peuvent souvent être résolus facilement à la maison. Utilisez le présent guide pour vous aider. Toute autre tâche
d’entretien doit être conée à un représentant de service autorisé. Cessez d’utiliser l’appareil s’il ne fonctionne pas comme prévu, s’il a été échappé sur le
sol ou dans l’eau, s’il est endommagé ou s’il a été laissé à l’extérieur et apportez-le au centre de réparations. Communiquez avec notre service à la clientèle
au 1800989-3535
Page 59

59
Pourquoi s’écoule-t-il de l’eau de
mon appareil?
1. L’appareil n’a pas été positionné correctement. 1. Assurez-vous qu’il se trouve sur une surface plane.
2. Le bouchon du réservoir d’eau n’a pas été bien
serré.
2. Serrez le bouchon.
Problème Cause possible Solution possible
3. L’appareil a été déplacé ou incliné alors que de
l’eau se trouvait dans le réservoir.
3. Retirez le réservoir et videz-le d’eau. Essuyez et séchez le réservoir.
4. Le bouton de drainage est mal inséré. 2. Serrez le bouchon de drainage.
Pourquoi l’écran numérique du
tableau de commande est-il
rouge?
1. Le réservoir d’eau est vide. 1. Consultez la section concernant l’entretien pour obtenir plus de détails.
2. Les ltres doivent être remplacés. 2. Consultez la section concernant l’entretien pour obtenir plus de détails.
Page 60

60
Garantie
TTI Floor Care Nor th America (ORECK) vous offre à vous, premier acheteur de ce
produit, la garantie limitée suivante seulement si le produit a été acheté chez
Oreck ou un détaillant Oreck autorisé et qu’il est utilisé à des ns domestiques
et non pour la revente.
Oreck réparera ou remplacera sans frais toute pièce qui s’avère défectueuse
en raison d’un vice de matière ou de fabrication dans les deux (2) ans suivant
la date d’achat, et ce, pour tous les modèles résidentiels. REMARQUE : La
garantie est nulle si l’appareil est utilisé à des ns commerciales. La présente
garantie limitée ne couvre pas le remplacement des pièces d’usure ou des
consommables comme les ltres, les cartouches et toute autre pièce sujette
à l’usure normale, sauf si elles présentent des vices de matériaux ou de
fabrication.
Cette garantie limitée ne s’applique pas à aucune pièce défectueuse causée
par un accident, un usage abusif, par l’utilisation commerciale, la mauvaise
utilisation et endommagée par un cas fortuit ou une tension autre que celle
indiquée sur la plaque signalétique du produit. Le dommage à ce produit causé
par l’entretien effectué par une entité que Oreck ou un détaillant autorisé de
Oreck n’est pas couvert par et exclus de la présente garantie. Oreckmd n’autorise
aucune personne et aucun représentant à assumer ou à accorder d’autres
obligations de garantie liées à la vente de cet appareil.
La garantie limitée de Oreckmd est valide uniquement si vous conservez la
preuve d’achat de cet appareil Oreckmd ou d’un détaillant autorisé Oreckmd. Si
vous achetez cet appareil auprès de toute autre source, votre achat est « TEL
QUEL », ce qui signie que Oreckmd ne vous offre aucune garantie et que vous,
et non Oreckmd, assumez tous les risques liés à la qualité et à la performance de
cet appareil, y compris l’ensemble des coûts relatifs aux tâches d’entretien ou
de réparation en cas de défectuosité.
La responsabilité de Oreck à votre endroit pour tous les coûts, quels qu’ils
soient, découlant de cette garantie limitée sera limitée au montant payé
pour cet appareil au moment de l’achat initial. Oreckmd ne peut être tenue
responsable d’aucun dommage direct, indirect, immatériel ou accidentel causé
par l’utilisation de cet appareil ou de l’impossibilité de l’utiliser. Certains États
ne permettent pas l’exclusion ou la limitation des dommages consécutifs. Par
conséquent, les exclusions ou les limitations précédentes pourraient ne pas
être applicables dans votre cas.
TOUTE GARANTIE EXPLICITE OU IMPLICITE AUTRE QUE LA GARANTIE
LIMITÉE PRÉSENTÉE CI-DESSUS POUR CET APPAREIL, Y COMPRIS LES
GARANTIES IMPLICITES DE QUALITÉ MARCHANDE ET DE CONVENANCE À
UN USAGE PARTICULIER, EST EXPRESSÉMENT DÉCLINÉE PENDANT TOUTE
L’ÉTENDUE COMPLÈTE PRÉVUE PAR LA LOI EN VIGUEUR.
Nonobstant ce qui précède, aucune garantie fournie ici ou découlant de toute
loi en vigueur ne peut dépasser une durée de 2 ans. Cependant, certaines
provinces n’acceptent pas les limitations de garantie concernant la durée d’une
garantie implicite et les limitations ci-dessus ne s’appliquent peut-être pas à
votre cas.
La présente garantie sera régie et interprétée selon les lois de l’État de l’Ohio.
La présente garantie vous donne des droits précis. Vous pouvez également
avoir d’autres droits, lesquels varient d’une province à l’autre.
Page 61

61
Page 62

Techtronic Floor Care Technology Limited
Distributed by Royal Appliance Mfg. Co. Glenwillow, Oh 44139
user
MANUA L
 Loading...