

Page 1
3323-8882 REV B
UK: 0845 603 0153
WWW.ORECK.COM
VISIT ONE OF OUR OVER
450 STORE LOCATIONS
UK: 0845 603 0153
WWW.ORECK.CO.UK
SIMPLY AMAZING
®
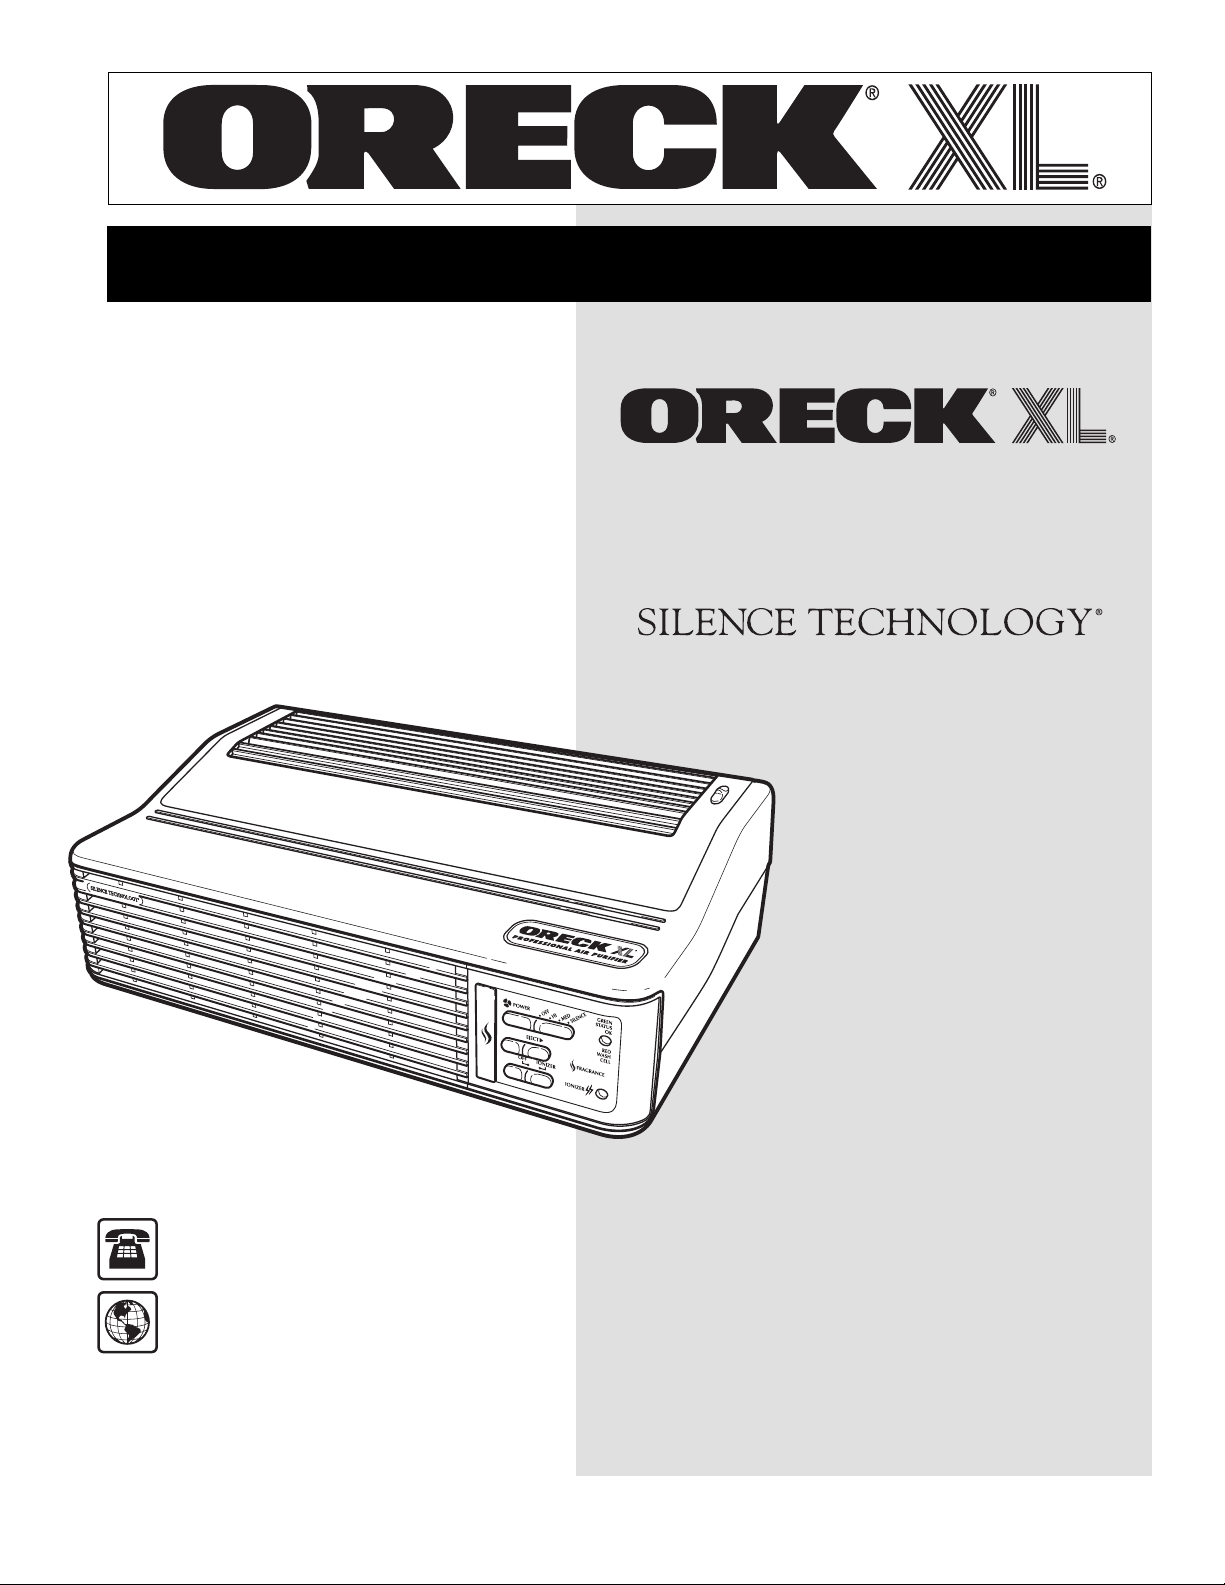
USER’S GUIDE
PROFESSIONAL
AIR PURIFIER
WITH
AIR8 UK
Series
•IMPORTANT•
SAVE THIS BOOKLET!
Includes:
• Warranty
• Safety Warnings
• Parts List
• Operating Instructions
• Accessories List
• Trouble Diagnosis
Page 2

BEFORE OPERATING AIR PURIFIER,
READ ALL INSTRUCTIONS
SAFETY &
GENERAL INFORMATION
IN THIS MANUAL CAREFULLY.
TABLE OF CONTENTS
SAFETY &
GENERAL INFORMATION . . . . . . . .page 2
Important Safety Instructions . . . . . . . . . . .page 2
Important Plug Information . . . . . . . . . . . . .page 3
Warranty . . . . . . . . . . . . . . . . . . . . . . . . . . .page 3
Maintenance and Customer Service . . . . . .page 3
INTRODUCTION . . . . . . . . . . . . . . . . .page 3
How Your Oreck Air Purifier Works . . . . . . .page 3
Oreck Air Purifier Placement and Start-Up . . .page 4
OPERATION . . . . . . . . . . . . . . . . . . . . .page 4
Oreck Air Purifier’s Silence Technology® . . .page 4
Additional Information . . . . . . . . . . . . . . . . .page 5
MAINTENANCE . . . . . . . . . . . . . . . . . .page 5
Cleaning the Cabinet . . . . . . . . . . . . . . . . . .page 5
Cleaning the Electronic Collector Cell . . . . .page 5
IMPORTANT SAFETY
INSTRUCTIONS
When using an electrical appliance, basic
precautions should always be followed,
including the following:
READ ALL INSTRUCTIONS BEFORE
USING THIS AIR PURIFIER
WARNING
To reduce the risk of fire,
electric shock, or injury:
• Do not use outdoors or on wet surfaces.
• Use only as described in this manual.
• Do not use with damaged cord or plug. If appliance is not
working as it should, has been dropped, damaged, left
outdoors, or dropped into water, return it to a service
center or call customer service at:
UK: 0845 603 0153
• Do not unplug by pulling on cord. To unplug, grasp the
plug, not the cord.
• Do not handle plug or appliance with wet hands.
• Do not put any object into openings. Do not use with any
opening blocked; keep free of dust, lint, hair and anything
that may reduce air flow.
• Keep hair, loose clothing, fingers and all parts of body
away from openings and moving parts.
• Turn off all controls before unplugging.
• Do not use appliance in an enclosed space where
oxygen, flammable, explosive or toxic vapors are given off
or in an area where flammable dust is present.
Replacing the Charcoal Odor
Absorber (Optional)
Replacing Cell After Cleaning . . . . . . . . . . .page 6
Replacing Fragrance Cartridge . . . . . . . . . .page 6
. . . . . . . . . . . . . . . . . . .
page 6
ACCESSORIES &
TROUBLESHOOTING . . . . . . . . . . . . .page 7
Accessor
roub
T
ies . . . . . . . . . . . . . . . . . . . . . . . . .page 7
leshooting Guide
. . . . . . . . . . . . . . . .
page 7
SAVE THESE INSTRUCTIONS
CAUTION
I
nstalling a wet or even damp Collector Cell into the Air
Purifier may cause melting of internal components during
use.
• DO NOT place a wet or damp Collector Cell in the Air
Purifier.
• DO NOT wash the Charcoal Odor Absorber. Replace, if
necessary.
• Dry the Collector Cell thoroughly outside of the Air Purifier
before reinstalling it into the Air Purifier. Ensure that all
areas including corners and areas that may trap water are
dry before reinstalling into the Air Purifier.
FOR COMMERCIAL USE:
High voltage from Collector Cell may cause ignition of
flammable or explosive gases/particles in the circulating
air.
• DO NOT use in an area that contains flammable or
explosive gases/particles in the circulating air.
2
Page 3

Important Plug Instructions
Maintenance and Customer Service
Where Necessary for Plug to be Fitted
The wires in this main lead are coloured in accordance with the
ollowing code:
f
Blue or Black: Neutral Brown or Red: Live
Green/Yellow or Green: Earth
As the colours of the wires in the main
lead of this appliance may not correspond
with the coloured markings identifying the
terminals in your plug, proceed as follows:
The wire which is coloured Blue or Blac
must be connected to the Neutral terminal
which is marked with the letter
The wire which is coloured Brown or Red must be connected to
the Live terminal which is marked with the letter
Neither wire is to be connected to the earth pin of the 3 pin plug.
The Green/Yellow or solid Green wire must be connected to the
Earth terminal marked with the letter
Replace fuse with same rated fuse.
N.
k
L.
E.
Warranty
ORECK MANUFACTURING COMPANY: (Oreck 21180 Johnson
Road; Long Beach, MS, USA 39560 gives you the following
warranty for this product only if it was originally purchased for
residential use, not resale from Oreck or an Oreck Authorized
Retail Dealer.)
Oreck will repair or replace, free of charge, to the original
purchaser, any part that is found to be defective in material or
workmanship within two (2) years of date of purchase. Parts
replaced or repaired by Oreck will be covered for the balance of
the original warranty or ninety (90) days, whichever is longer.
This warranty does not cover the replacement of expendable or
consumable parts such as filters, cartridges and other parts
subject to normal wear unless they are defective in material or
kmanship
or
w
This warranty does not apply to any part subjected to accident,
abuse, alteration, misuse, damage caused by act of God, the
use of v
displayed on this product or service of this product by other than
Oreck or a participating Factory Authorized Service Center.
Oreck does not authorize any person or representative to
assume or grant any other warranty obligation with the sale of
this product.
k’
Orec
from Oreck or an Oreck Authorized Retail Dealer for this
product. If you purchase this product from any other source, your
purchase is
and that you, not Oreck, assume the entire risk of the quality
and perf
necessary servicing or repairs of any defects.
This warranty is in addition to your statutory and other legal
rights.
.
umber
oltages other than indicated on the ser
alid only if y
anty is v
arr
s w
,” which means Oreck grants you no warranty,
“AS IS
mance of this product, including the entire cost of an
or
ou retain proof of purchase
ial n
y
Your Oreck Air Purifier is a product of precise engineering. If you
require additional information or have problems with your Oreck
appliance, you may call ORECK customer service at:
0845 603 0153
UK:
Please specify the model number and serial/code number which
can be found on the data plate on the back of the Air Purifier.
Save your sales or purchase slip. Should your Oreck appliance
require warranty service in the UK, present this slip to the
uthorized Service Center as your proof of purchase date or,
A
call customer service.
INTRODUCTION
The air you breathe is filled with thousands of particles of air
pollution. Some of the pollutants like dust and lint are large
enough to be visible to the naked eye, but pollutants such as
pollen, smok
Your Oreck Air Purifier has been designed to capture and
destroy visible and invisible pollutants and provide you the
luxury of clean air living in your home or office.
Airborne particles and odors are removed from air passing
through the unit by the process of electrostatic precipitation and
an activated charcoal odor absorber. The fragrance feature
releases a pleasant aroma with the newly cleaned air.
How Your Oreck Air Purifier Works
1.
Polluted air enters the Air Purifier through the front grill. As
the air is pulled through, a Pre-Filter helps trap large particles
(hair, lint, etc.).
2. Positive Charging Wires electrostatically charge smaller
particles (dust, smoke, pollen, etc.).
3. The positively charged particles then enter the negatively
charged Electronic Collector Cell, where the aluminum plates
attract and retain the particles and subsequently destroy
bacteria, mold, viruses, and fungi. It works like a powerful
magnet and the particles remain until the Electronic Collector
Cell is cleaned.
4. The air then passes through a Charcoal Odor Absorber that
helps remove household odors.
5. Next, the Air Revitalizer (Ionizer) releases negative ions to
freshen the air
Revitalizer is designed to be left on continually to provide a
clean scent.
The negativ
combine with dust, causing the dust to fall out of the air. This
eature giv
f
dust. You can also turn off the Air Revitalizer to limit any dust
collecting around the Air Purifier.
Finally, electronically cleaned air passes back into the room
through the top g
e, germs, bacteria, etc., are microscopic in size.
(fig.1)
vides a pleasant, clean smell.
It pro
.
e ions created b
ou an easy
es y
ill.
r
y the Air Re
, centralized place to wipe away
vitalizer may also
The Air
**Reconditioned units carry a 6 month warranty from date of
purchase.
3
Page 4

PRE-FILTER
ELECTRONIC
COLLECTOR CELL
P
OSITIVE
C
HARGING WIRES
CHARCOAL ODOR
ABSORBER
(OPTIONAL)
POWERFUL FAN
A
IR
R
EVITALIZER
2
1
5
3 4
1
1
3
4
5
2
Oreck Air Purifier Placement and Start-Up
1. Open box and check parts. Box should include one
Professional Air Purifier, Oreck fragrance cartridge, Charcoal
Odor Absorber and User’s Guide.
2. Your Air Purifier draws in dirty air for cleaning. Place the Air
Purifier in a location where the dirty air is not drawn across
your head or body while sitting or sleeping.
3. Insert the Oreck fragrance cartridge (optional) and the
Charcoal Odor Absorber (optional).
The fragrance cartridge is located in the “User’s Guide”. Slide
the
FRAGRANCE tab on the front control panel of the Air
Purifier to eject and the drawer will open (
fragrance cartridge and close the drawer.
The Charcoal Odor Absorber is located with the unit in
a separate plastic bag. The Charcoal Odor Absorber
snaps into the back of the Collector Cell (see instructions
with Absorber).
fig.2). Insert
5
. AIR DIRECTION CONTROL: Slide switch on top of unit
controls the louvers and enables you to direct airflow to
desired areas.
NOTE: You may notice an occasional sharp snapping
sound coming from your unit. This is a normal occurrence
called “arcing” and results as large particles of dust are
collected in the Electronic Collector Cell. Should prolonged
or continuous arcing occur, the Electronic Collector Cell
should be thoroughly cleaned and dried completely
(See “Cleaning Collector Cell”).
2
OPERATION
our Air Pur
Y
contin
at any time.
1. MAIN POWER SWITCH: Turn the unit on by sliding the power
witch to the f
s
MED for normal use - SILENCE for SILENCE TECHNOLOGY
quietest oper
2. FRAGRANCE CARTRIDGE: Fragrance compartment switch
ejects drawer for access to fragrance cartridge. Insert
fragrance cartridge and close drawer. (One fragrance
car
3. IONIZER POWER SWITCH: Turns the Ionizer ON or OFF.
The indicator light will glow green when ON and functioning
proper
be turned ON or OFF without impacting the Air Purifier’s
cleaning eff
4. POWER INDICATOR LIGHT: The indicator light will glow
green when the unit is operating normally. It will flash red
when the Collector Cell requires cleaning.
will glo
This is normal and only a test of the system.
ifier works best if you leave it in operation
, and it provides multiple settings for convenient use
uously
an speed you prefer:
ation
(fig.2).
idge is included.)
tr
The Ioniz
.
ly
w red f
er provides a pleasant, clean smell. It can
eness
ectiv
or a moment when unit is fir
.
or maxim
HI f
NOTE: The light
st turned on.
um cleaning -
®
Oreck Air Purifier’s Silence Technology
The Oreck Professional Air Purifier offers Silence Technology
for the quietest operation. The Collector Cell cleans as effectively
on the Silence setting as it does on the High setting - only the
4
s speed changes
an’
f
as well on Silence as on High, but will clean the room more
slowly as it circulates less air.
As a result, y
.
®
®
our Oreck Air Purifier cleans
Page 5

Additional Information
WARNING: DO NOT USE THIS ELECTRONIC AIR PURIFIER
WHEN OXYGEN TANKS ARE BEING USED OR IN THE
PRESENCE OF COMBUSTIBLE GASES.
TANT NOTES:
IMPOR
●
Place or mount the Air Purifier near a standard electrical
outlet. Do not block either the air intake or outlet grill.
●
Never place your Air Purifier on soft surfaces (such as bed,
sofas or carpet), near computers or next to sources of heat
(such as sto
●
Make sure the front grill is securely locked in place.
●
A safety switch is installed behind the grill of your electronic
Air Purifier. If the grill is not properly secured in place, the unit
will not operate. If your unit fails to operate, remove the front
grill and reinstall it, being sure that the lower right-hand side
of the grill (next to the control panel) is firmly locked in place.
●
Plug the power cord into the nearest available standard
electrical outlet. (See data label on bottom of your Air Purifier
for electrical specifications and power consumption.)
●
Do not use an extension cord to supply power to your Air
Purifier.
●
Do not place open flames (including candles) directly in front
of the air purifier.
ve tops, ovens, etc.)
2. Loosen the front g
bottom.
Press in the lock (half-moon) on the left side and
remove the grill
rill retainer screw at the front of the cabinet
(fig. 3).
3. Pull the Collector Cell out of the cabinet by using the two
small handles on the front of the Collector Cell
(fig. 4).
3
4
MAINTENANCE
Cleaning the Cabinet
You can clean the Air Purifier cabinet with mild, non-abrasive
cleanser and a soft cloth.
electrical power source. Do not spray cleansers or furniture
polish into louvers or grill areas.
Cleaning the Electronic Collector Cell
IMPORTANT: Do not try to clean the Collector
Cell by inserting a cloth, brush, or other
vice between the cell plates.
de
Cell should be cleaned with Oreck’s Assail-A-
®
Cell
cleaner or using soap and water (see
in this section).
Step 6,
Collector Cell may damage it.
Indicator light is green under normal operation and
flashes red when the Collector Cell requires cleaning.
The red "WASH CELL" light will flash or illuminate
when it is time to clean y
Purifier is still filtering the air when the red light
illuminates.
It is not necessary to wait for the red "WASH CELL" light before
cleaning the Collector Cell. Even if the “WASH CELL” light is not
red, Oreck recommends cleaning the Collector Cell every 4 to 8
weeks, or more often if snapping becomes frequent.
Cleaning your Oreck Air Purifier is a snap too... and a must for
efficient operation. To clean proceed as follows:
n the unit off and unplug it from the electr
ur
1. T
If wall mounted, remove unit from wall.
IMPORTANT: Unplug the unit from its
The Collector
ting objects in the
Inser
our Air
our Collector Cell.
Y
er source.
w
ic po
4. Snap off the Charcoal Odor Absorber from the back of the
Collector Cell. Change as necessary for continued odor
removal
(fig. 5).
5. Slide off Pre-Filter. This can be cleaned with the Collector Cell
and reused
(fig. 6).
NOTE: Handle the Electronic Collector Cell with care.
Damaged metal plates and/or broken s will cause the Air
Purifier to malfunction.
coal Odor Absorber
Char
6.
Oreck’s Assail-A-Cell®cleaner is an excellent way to clean an
(Do not wash the disposab
.)
le
Electronic Collector Cell. Be sure to spray between each cell
very surface. Allow product to soak for a few
er e
plate and co
v
minutes, not allowing it to dry. Rinse thoroughly with water. For
extremely heavy deposits, repeat the process.
If you prefer not to use Oreck’s Assail-A-Cell
®
cleaner, you
may also decide to soak the Electronic Collector Cell in warm
ater in a kitchen sink or bathtub. Mild dish detergent (powder
w
or liquid) ma
y be added to the w
ater to help break do
wn the
dirt on the Collector Cell. The Collector Cell should be allowed
to soak for two to three hours.
e from the
obacco smok
T
e (tar) is especially hard to remo
v
Collector Cell. If the Purifier has been cleaning tobacco
, the Collector Cell ma
e
smok
y need to soak longer
, or it ma
need to be cleaned a second time.
In either case, the Collector Cell should be allowed to air dry
ore re-inser
bef
ting it.
k does not recommend the use of
Orec
heated or compressed air as part of the drying process.
y
5
Page 6

5
6
IMPORTANT: Dry the Collector Cell thoroughly outside of
the Air Purifier before reinstalling it into the Air Purifier.
Ensure that all areas including corners and areas that may
trap water are dry before reinstalling into the Air Purifier.
If the power indicator light is red after replacing Collector
Cell, then the Collector Cell is still wet. Remove Collector
Cell and allow it to finish drying
Replacing Fragrance Cartridge
1. Open Fragrance Cartridge compartment by sliding the
Fragrance compartment release switch
2. Remove Fragrance Cartridge from center of the compartment
w one
and replace with a ne
3. Close compartment until it locks (fig. 9).
NOTE: One Fragrance Cartridge is included.
(fig.8).
(fig. 7).
7
8
Replacing The Charcoal Odor Absorber
(Optional)
In addition to air purification, your Oreck Air Purifier provides the
additional benefit of odor removal. The odor removal function is
optional. Your Oreck Air Purifier will continue to remove harmful
airborne particles with its permanent Electronic Collector Cell
ven if you choose not to use the optional Charcoal Odor
e
Absorber
Odor absorption effectiveness will gradually deteriorate over time
unless the Charcoal Odor Absorber is replaced. While every
environment is different, Oreck suggests that the Charcoal Odor
Absorber be replaced every two months or as needed.
IMPORTANT: DO NOT wash the Charcoal Odor Absorber.
Replace, if necessary.
.
Replacing Collector Cell After Cleaning
1. Snap in the Charcoal Odor Absorber (fig.5).
2. Slide in the Pre-Filter (fig.6).
3. Slide Collector Cell into cabinet, using handles (fig. 4).
4. Replace front grill. Unit is now ready for operation (fig. 3).
NOTE: An occasional “arcing” sound is normal when
operating the unit immediatel
should stop after a few minutes of operation.
y after c
leaning the Cell and
9
6
Page 7

ACCESSORIES &
TROUBLESHOOTING
CALL CUSTOMER SERVICE HOT LINE
UK: 0845 603 0153
Whenever calling, please be sure to have your model from the
data plate.
Accessories (Sold Separately)
ITEM PART #
1. Pre-Filter 7780-8040
2. Ionizer/Electronic Collector Cell 5510-7064
3. Charcoal Odor Absorber (Set of 4) AT4PK7
4. Wall Mounting Kit 8660-0201
5. Oreck Fresh Air
Spring Mulberries
Blooming Jasmine
UK: 0845 603 0153
Shipping Address:
Oreck UK
P.O. Box 201
Exeter
Devon
Ex 1 1XB
®
Scent Cartridges
®
, 8pk. FA2PK
®
, 8pk. FA3PK
Troubleshooting Guide
Service problems that appear to be major can often be solved
easily. You can be your own troubleshooter by reviewing the
t below. It pinpoints problems and how to correct them.
char
Remember, check the simple things first.
PROBLEM CHECK WHAT TO DO
UNIT
DOES NOT TURN
ON
INDICATOR LIGHT ON
UNIT
IS FLASHING RED
OR
HAS TURNED RED
RED
INDICATOR LIGHT
WILL
NOT TURN OFF
UNIT DOES NOT
REMOVE POLLUTANTS
UNIT SPARKS,
CRACKLES AND POPS
T REMOVE
NO
DOES
ODOR
UNIT STILL DOES NOT
OPERATE PROPERLY
1. Power Cord
2. Selector Switch
3. Front Grill
Ionizer/Electronic
Collector Cell
er/Electronic
Ioniz
Collector Cell
Ionizer/Electronic
Collector Cell
Ionizer/Electronic
Collector Cell
Old Charcoal Odor
Absorber
Check all the above
points
1. Plug in power cord
2. Set selector switch
for desired blower
speed.
3. Reinsert front grill
until it is flush with
cabinet front. Tap
grill lightly, if
necessary, to fully
insert.
Wash Collector Cell.
Make sure it is
thoroughly clean & dry
before re-installing it.
Collector Cell may
1.
not be completely
dry.
2. Cell may be
damaged with a
broken wire.
3. The “Dirty Cell”
sensor may not be
working correctly.
4. If you believe the
Collector Cell is
damaged or the unit
is not working
correctly, return the
unit to the Service
Center.
Wash Collector Cell.
Make sure it is
thoroughly clean & dry
before re-installing it.
1. Sparking or
popping noise
occurs when a
large particle is
captured in the
Collector Cell.
2. If the unit is arcing
excessively, the
Cell ma
Try cleaning the
Collector Cell.
3. If excessive
arcing continues
after proper cleaning,
the Collector Cell
y be damaged
ma
or wet. Return unit
to the Service
Center
Replace Charcoal
Odor Absorber.
Return unit to the
Service Center.
y be dir
.
ty.
ALL OTHER SERVICING SHOULD BE DONE BY AN
ORECK AUTHORIZED SERVICE CENTER.
7
Page 8

© 2005 Oreck Holdings, LLC. All Rights Reserved. All word mark, logos, product configurations, and registered trademarks are owned and used under the authority of
Oreck Holdings, LLC.
3323-8882 REV B
08/05 ECN# R-8147
 Loading...