ORBIT IRRIGATION 57860 User Manual

Battery Operated
SPRINKLER TIMER
with Inline Valve
No external power source needed
Ideal for remote locations and drip irrigation
Full waterproof construction Easy-Set Logic™ Programming
MODEL 57860
PN 57860-24 rA

Table of Contents
Help: Before returning this sprinkler timer to the store, contact Orbit® Technical Service at: 1-800-488-6156 or 1-801-299-5555.
Listings: The sprinkler timer complies with UL-1951. Appropriate international models are CE® approved.
Notice: The information in this manual is primarily intended for the user who will establish a watering schedule and enter that schedule into the sprinkler timer. This product is intended to be used as an automatic sprinkler timer to be used near the valves, typically underground in a valve box, as described in this manual.
Buttons, Dial and Display................................................................................................. |
2 |
Install Batteries................................................................................................................ |
4 |
Programming your Timer................................................................................................. |
5 |
Additional Features.......................................................................................................... |
6 |
Installing the Valve........................................................................................................... |
8 |
Installing the Timer........................................................................................................ |
10 |
Glossary of Terms........................................................................................................... |
11 |
Troubleshooting.............................................................................................................. |
12 |
Instructions en français................................................................................................. |
13 |
Instrucciones en españo................................................................................................ |
29 |
|
|
PROOF NO: 6 |
|
|
|
DATE: 03.03.10 |
|
|
|
DES: SM SPCK: XX |
|
|
|
JOB NO: NA |
|
|
|
||
|
|
CLIENT: Orbit |
|
|
|
SKU: 57860 |
|
|
|
||
P 801 295 9820 |
UPC: NA |
||
F 801 951 5815 |
|||
|
|||
www.fluid-studio.net |
FILE NAME: 57860-24 rA.indd |
||
1065 South 500 West |
SOFTWARE: InDesign CS3 |
||
Bountiful, Utah 84010 |
|||
|
|
|
|
DIMENSIONS:
FLAT: W: 12" H: 4.5"
FINISHED: W 6" D: " H 4.5"
COLORS
|
|
|
color |
|
color |
|
|
|
Registration |
|
non printing |
|
non printing |
|
|
|
|
|
PMS |
|
PMS |
|
PMS |
|
|
|
|
|
|||
|
K |
|
???? |
|
???? |
|
???? |
ADDITIONAL INSTRUCTIONS:
·Font sizes cannot be smaller than 7 pt.
·Translation proofing code: LB527613
·
1
Printers are responsible for meeting print production requirements. Any changes must be approved by the client and Fluid Studio.
PRINTED PIECE MUST MEET DESIGNATED SPECIFICATIONS ON THIS FORM.
© 2007 Fluid Studio. This work is the property of Fluid Studio, and cannot be used, reproduced or distributed in any way without their express permission.

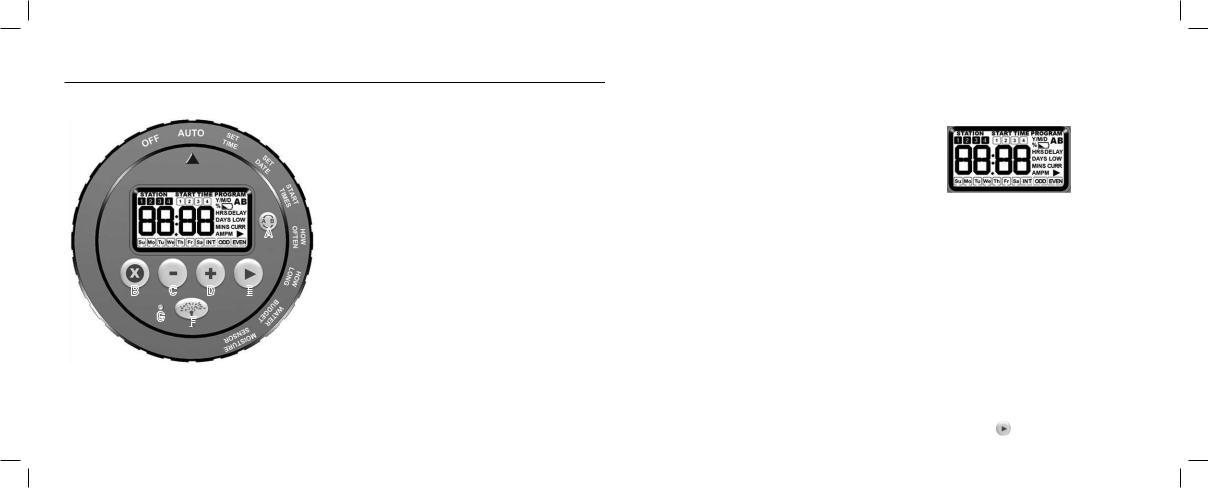
Buttons, Dial and Display
A
B C D E

G F

2
Buttons
A Toggle between Programs A and B B Clear settings or cancel events
C Decrease value
D Increase value, select HOW OFTEN setting or access RAIN DELAY mode
E Move cursor or toggle AM/PM
F Access MANUAL WATERING mode G Reset all timer settings
Dial
OFF
All timer functions are OFF
AUTO
Timer is set for automatic operation and will only water in this dial position
SET TIME
Set the time of day
SET DATE
Set the year, month and day
START TIMES
Set start times for Programs A and B
HOW OFTEN
Set the days or interval you want to water
HOW LONG
Set station run times (0 to 240 minutes)
WATER BUDGET
Seasonal Adjustment - change station run times all at once – 10% to 200%
Display |
2 |
3 |
|
|||||
|
|
|
|
|||||
1 |
|
|
|
|
|
|
|
4 |
|
|
|
|
|
||||
|
|
|
|
|||||
|
|
|
|
|
|
5 |
||
|
|
|
|
|
|
|||
6 |
|
|
7 |
|
|
||||
|
|
|
|
|
1 Shows current station while programming or watering
2 Shows current start time while programming
3 Displays active program(s) while programming or watering
4 Y=Year, M=Month, D=Day for setting date
5 Indicates low batteries (replace batteries if showing)
6 Indicates day of week and watering days selection
7 Indicates that more options are available for that dial position by pressing the button
3

Install Batteries |
Programming your Timer |
Step 1 |
Step 2 |
Step 3 |
Step 4 |
4
Step 1
Remove cap
Step 2
Separate program pod from base
Step 3
Insert 3 AA batteries as indicated in the battery compartment
Step 4
Return program pod to base
Note: During battery changes, programming will be preserved for 30 seconds.
Step 1
Press reset button.
Step 2–Set Time
Turn the dial to SET TIME.
Press  or
or  to set the current time.
To quickly switch between AM or PM press  .
.
Step 3–Set Date
Turn the dial to SET DATE.
Press  or
or  to set the current year then press
  .
.
Press  or
or  to set the current month then press
  .
.
Press  or
or  to set the current day.
Step 4–Start Times
Turn the dial to START TIMES.
Press  to select the desired program.
NOTE: Use program B only if you want to schedule watering independent of Program A.
Press  or
or  to set the desired start time.
If more cycles are desired then press  and set another start time (up to 4).
To delete a start time press  .
.
NOTE: If start times overlap then the second start time will water after the first is finished.
Step 5–How Often
Turn the dial to HOW OFTEN.
Press  to select the desired program.
5

Programming your Timer |
ADDITIONAL FEATURES |
Press  to select the desired days to water: select either days of the week, interval (every 1 to 32 days), or odd/even days.
Press  to highlight your option(s).
If INT is chosen press  or
or  to change interval.
Press  or
or  to deselect an option.
Step 6–How Long
Turn the dial to HOW LONG.
Press  to select the desired program. Press
  to select the desired station.
Press  or
or  to set the run time (0 to 240).
Repeat for other stations if needed.
6
Step 7–Auto
Turn the dial to AUTO.
The set program(s) will run automatically.
Manual Watering
To manually run a program:
Press  while dial is in the AUTO position. The timer will run all set programs.
To select only the A or B program, or individual stations:
Press  to select only A or B program.
Press  again to set individual watering times for stations.
NOTE: Manual watering of a set program (A or B) will only work after programming has been set up.
Press  to cancel watering.
Off
Turn dial to OFF.
No watering may occur while in the OFF position.
Water Budget
Turn dial to WATER BUDGET.
NOTE: This feature allows for seasonal adjustments.
Set the value to 100% to water exactly as programmed.
For a 10 minute run time, 50% will reduce it to be 5 minutes and 200% will increase it to 20 minutes.
Press  to select the desired program.
Press  or
or  to set the budget value (10% - 200%).
Press  to reset the value to 100%.
NOTE: The % symbol will show on the screen when the value for A or B is anything other than 100%.
Rain Delay
NOTE: Rain Delay will cancel all scheduled watering for a 24hr, 48hr, or 72hr period.
Press  while dial is in the AUTO position.
Press  until the desired delay is displayed.
Do not press any buttons for 3 seconds to start the delay.
Press  to stop Rain Delay and return to scheduled watering.
7

Installing the Valve |
Installing the Valve |
Installing the Valve
After flushing line, install the valve using appropriate fittings (not included) for your system (see figure below). DO NOT OVERTIGHTEN. Do not use pipe joining
compound. Use thread seal tape only. Note arrow on valve for water flow direction.
1" |
1" |
8
Valves have tapered fittings and therefore require seven to eight turns of thread seal tape to prevent leaking and to guard against the connections bottoming out. To prevent possible leaking, make sure that the valve, fittings and pipe are properly aligned.
Hose
Poly
PVC
Test the System
After all pipe and fittings have been installed, turn the water supply on and check for leaks with the valve closed.
The system is now ready to be controlled electrically from the timer or manually by opening the manual lever/screw.
Draining
In freezing areas, the valves and lines will need to be drained. Refer to the Orbit® Layout Guide or local dealer to recommend proper drain points. To insure the electric valve is completely drained in the fall, turn off the main sprinkler shut-
off valve and electrically run each valve dry for a few minutes. Turn timer to the OFF position.
Cautions
•Check local codes for valve types and permit information.
•If static water pressure exceeds 80 psi, a pressure regulator should be used.
•For outdoor use with cold water only. Not for indoor use. Place valves so they drain away from the house.
Notes
•Where possible, always protect valves with an Orbit® Valve Box and place gravel in the bottom.
•Test all lines and fittings before burying the system.
•Use a filter if you will not be using culinary water in your system.
9

Connecting the TIMER |
Glossary of Terms |
Connect the timer to the valve after you have programmed it. This timer will only operate with DC solenoids that have been included in the package. Replace any original solenoids on valves connected to the timer with these DC solenoids.
1.Make sure the main timer unit is fully inserted into the docking bay.
2.Twist on the protective timer cover tight enough to ensure a waterproof, dirtproof seal. Do not over-tighten.
Connecting Timer to Valve
1.Attach timer clip to valve solenoid.
2.Remove plug from the recepticle marked “1” on the bottom of the timer.
3.Insert wire connector into the recepticle marked “1” on the bottom of the timer. Ensure that the connector fully seats into the recepticle.
10
4.Attach timer to timer clip.
5.Rotate dial to OFF. Wait 60 seconds to allow the timer to close all valves.
6.Rotate dial to AUTO and replace cap.
Step 1 |
Step 2 |
Step 3 |
Step 4 |
Step 5 |
Step 6 |
Timer- A device that is responsible for turning an automatic watering system on and off.
Cycle Start Time- The time the program begins watering the first station.
Multiple Start Times- A feature that allows a program to be operated multiple times on the same day.
Program (A or B)- One or more watering stations that share a common programmed watering schedule.
Rain Delay- A feature that prevents the sprinkler timer from running it’s
scheduled watering program for a specific duration.
Solenoid- The electrical part on a sprinkler (irrigation) valve that opens and closes the valve.
Stacking- When a start time is set before the previous program has completed, that
start time will be “stacked” or delayed, and will start upon completion of the previous program.
Station (Watering Station)- An area where the watering (irrigation) is all controlled by a single control valve.
Valve (Watering or Irrigation Valve)- Used in conjunction with sprinkler timers – a convenient way to deliver water to lawns, plants and gardens.
Watering Program- See Program (A or B). Zones- See “Station (Watering Station).”
11

Troubleshooting
One or more stations do not turn on:
1.Make sure programming is correct.
2.Make sure programming is not in OFF or Rain Delay mode.
3.Remove jack, clean debris, re-plug jack.
4.Clean debris from solenoid.
5.Replace batteries.
6.Replace solenoid.
Stations turn on when they are not supposed to:
1.Turn down water pressure.
2.Check programming to make sure start times are correct. Check A and B programs and start times 1-4.
One station is stuck on and will not shut off:
1.Make sure jack is plugged in.
2.Replace valve.
3.Clean any particles of dirt or debris stuck in valve or solenoid.
12
4.Replace valve diaphragm.
5.Replace solenoid.
All stations do not turn on:
1.Make sure programming is not in OFF or Rain Delay mode.
2.Lack of power due to depleted batteries or faulty solar panel (optional).
3.Programming is incorrect.
Timer will not power up:
1.Make sure batteries are installed correctly.
2.Replace batteries.
Stations continue to turn on and off when they are not programmed to:
1.Make sure one start time is programmed with no overlapping schedules.
2.Turn down water pressure.
3.Check A and B programs and start times 1-4.
Alimentée par piles
MINUTERIE POUR ARROSEUR
Avec vanne en ligne
Aucune source d’alimentation externe n’est nécessaire.
Parfait pour les emplacements éloignés et l’irrigation goutte à goutte.
Entièrement étanche
Programmation avec système Easy-Set Logic™
MODÈLE 57860
 Loading...