

Opticum XS65-COMBO Quick Start Manual
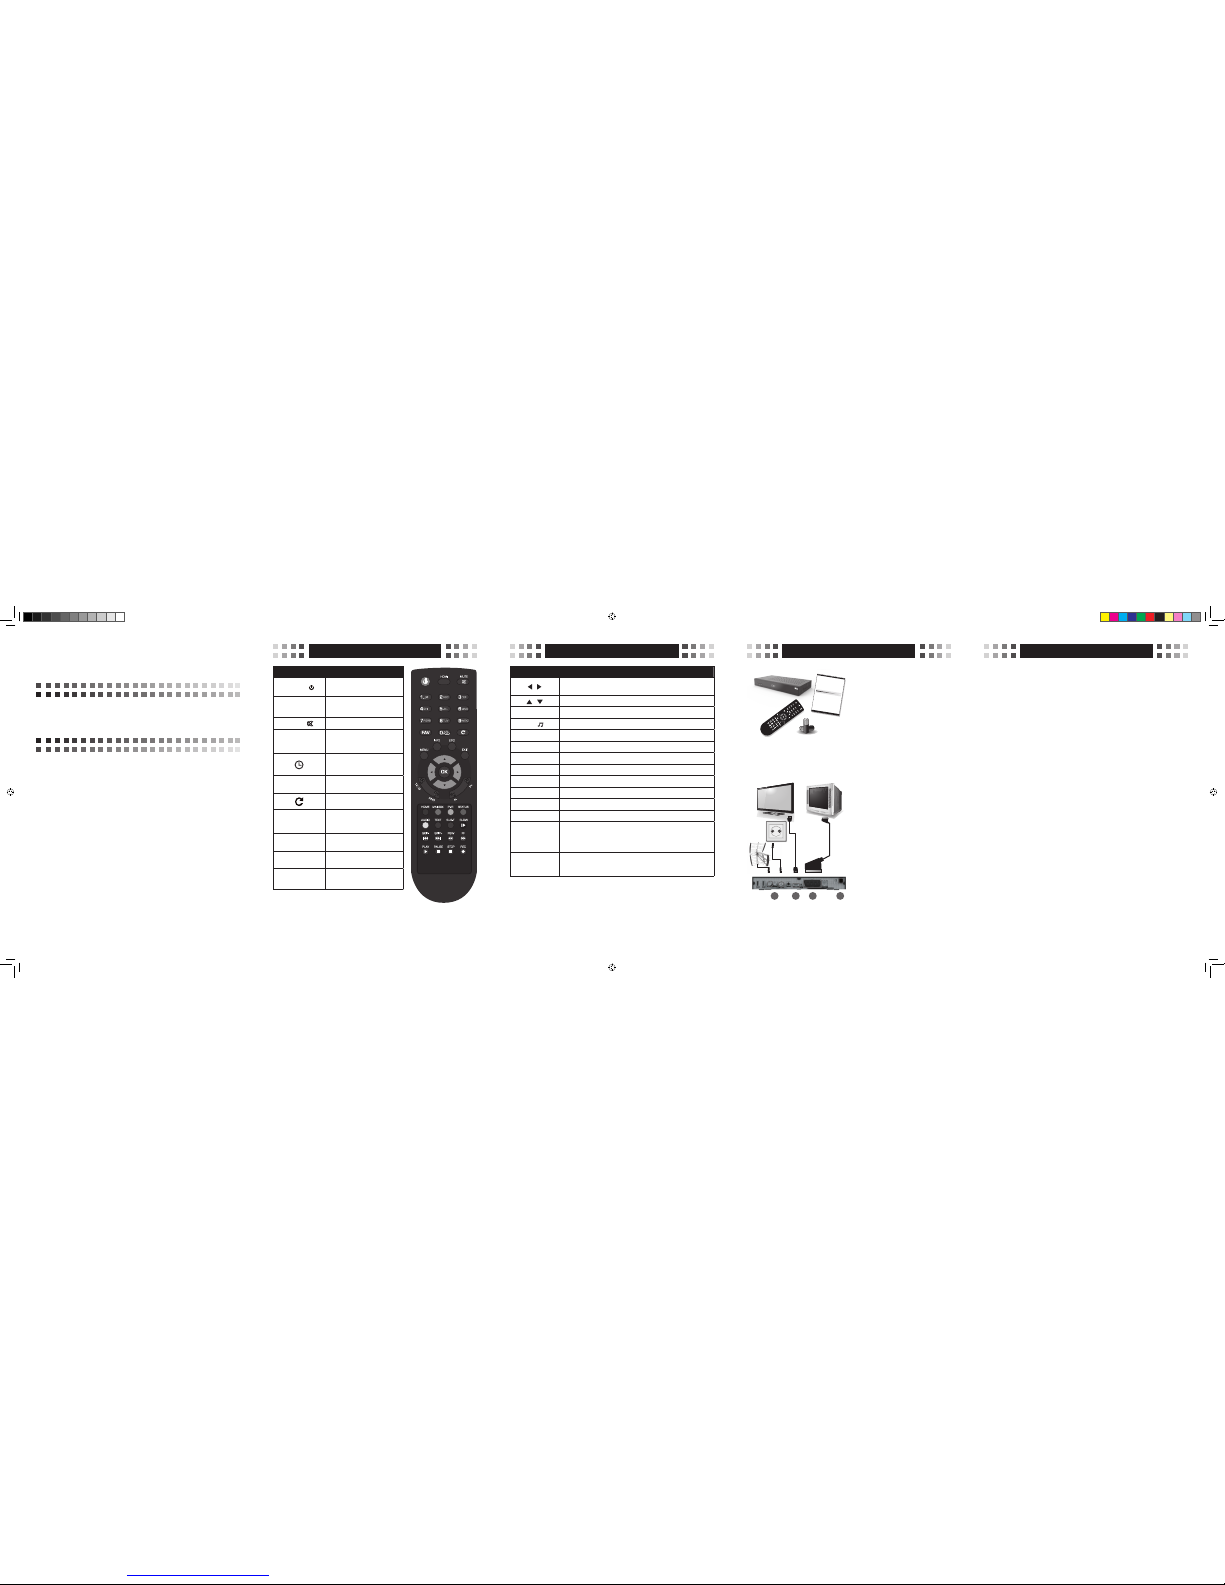
Remote control Remote control Basic connecon Notes on usage
Quick start
HD Digital Satellite Receiver
One smart card reader
Support of SD / HD (MPEG2 / MPEG4
H.264), DVB-S, DVB-S2, DVB-T
High definition video output – HDMI
Port USB 2.0
Low power consumption in Standby mode –
below 1 W
Support of DiSEqC 1.0, 1.1
Electronic Programme Guide – EPG
Display on the front panel – LED 4 digits
Button Function
POWER—
turns the receiver on/off from/
to a standby mode
HDMI
selects the resolu tion of the
image output
MUTE —
turns on/off the audio sound
Number buttons
select channels; let you enter
programming parameters in
the menu
sets the sleep timer for
10/30/60/90/120 min
FAV
displays and scrolls to your
favourite list of channels
returns to the previous channel
MENU
displays the main menu on the
screen; returns to the previous
menu
INFO
displays the infobar of the
programme
EPG
displays the electronic
programme guide
EXIT Exits the on screen-menu
Button Function
/
adjust the volume, moves th e cursor to the left or right i n the
menu
/ changes channels, moves th e cursor up and down
OK displays the channels list, selects the menu options
TV / selec ts the TV/Radio source
FIND lets you find a channel by it s number
SUB-T subtitles settings
HOME optional function ( availab le in some versions)
STATUS displays the window of the st atus
AUDIO audio settings
TEXT displays Teletext for a current channel
PVR displays the li st of recordings (optional)
MAILBOX displays the list of Your payments
SLOW, SKIP-,
SKIP+, REW, FF,
PLAY, PAUSE,
STOP, REC
sets video options (time shift, playing, recording)(optional)
RED, GREEN,
YELLOW, BLUE,
WHITE, BLACK
Colour buttons: use the m according to the instr uction on screen
Automatic power turn-of f
In accordance with the cur rent EU requirements, the receive r you have just purchased is
equipped with a featur e Automatic Power OFF. It switches the r eceiver to a stand-by mode
after 3 hours from its l ast activity. It mean s that if within this time n o command is sent to the
receiver from the remote co ntrol buttons or keyp ad on the front panel , it gets turned off. Th e
moment of turning off wil l be proceede d ( 2 minutes ear lier) by a releva nt message on t he screen
of the TV set. Please no te that this feature is ena bled by default in EU coun tries, however, at
your own request, it ca n be disabled by choosin g an appropriate optio n in the menu.
Connecting to an external USB drive
While selecting and u sing an external USB d rive ( an external ha rd drive, flash memo ry), make
sure:
• it is compatible with USB 2 .0 standard and has ap propriate write and re ad speed
• it has one single partit ion adequately form atted
• if necessary, it can be sup plied with power fro m an external char ger (in particul ar it refers to
external USB hard driv es that have high power consum ption)
• you do not disconnect it du ring the process of data w riting/reading
• it is not completely full or h ighly fragmented
Negligence of the above reco mmendations can lead to f aulty work of the device s and cause
their damage.
The manufacturer d oes not take respon sibility for dama ge caused direct ly or indirectl y by any
problems resulting in d ata loss on the exte rnal USB drive conn ected to the receive r. Nor does
he give warranty on any oth er data on the U SB drive conne cted to the dev ice in case of its f aulty
work.
Package content
After purchasing the rece iver , please
unpack it and make sure the foll owing
items are included:
• Receiver
• Remote control
• Quick start manual
• Batteries – 2 x AAA ( o ptional)
To install batteries in the rem ote control
remove the battery comp artment cover. If
there are batteries alr eady there, remove
them and insert the new o nes. Make sure
the positive and negative en ds are facing
the correct directio n as shown. Replace
the battery compartment cover.
Model ID:XS65-COMBO MC/2014/09
Connecting
(1) Connect the satellite cab le into the
SAT input on the receiver and connec t
aerial into the AERIAL IN.
(2) Connect the receiver wi th a flat panel
TV using a HDMI cable, or
(3) Connect the receiver wi th a
conventional TV, using a SCART c able.
(4) Finally, plug the power cord into a wall
outlet.
Turn on the TV set and turn on the re ceiver
using POWER button on the rem ote
control. After few minute s, the interface
of the product set-up should be d isplayed
on screen (OSD). If the TV set d oes not
display OSD, the wrong input so urce
must have been selected . See the TV
set documentation to double check the
settings.
ENGLISH ENGLISH ENGLISH ENGLISH ENGLISH ENGLISH ENGLISH ENGLISH ENGLISH ENGLISH ENGLISH ENGLISH ENGLISH ENGLISH ENGLISH ENGLISH ENGLISH ENGLISH ENGLISH ENGLISH ENGLISH ENGLISH ENGLISH ENGLISH ENGLISH ENGLISH ENGLISH ENGLISH ENGLISH ENGLISH ENGLISH ENGLISH ENGLISH ENGLISH ENGLISH ENGLISH ENGLISH ENGLISH
ENGLISH ENGLISH ENGLISH ENGLISH ENGLISH ENGLISH ENGLISH ENGLISH ENGLISH ENGLISH ENGLISH ENGLISH ENGLISH ENGLISH ENGLISH ENGLISH ENGLISH ENGLISH ENGLISH ENGLISH ENGLISH ENGLISH ENGLISH ENGLISH ENGLISH ENGLISH ENGLISH ENGLISH ENGLISH ENGLISH ENGLISH ENGLISH ENGLISH ENGLISH ENGLISH ENGLISH ENGLISH ENGLISH
Digital Cable Receiver
KP 07/2012
ModelID: X2
• Slot for Smart Card
• Support of SD/HD (MPEG2 / MPEG4) DVB-C systems
• High definion video output - HDMI
• Standard resoluon video output - SCART
• High speed USB 2.0 port
• PVR Ready
• Time Shi (pause, rewind)
• Automac Stand-by
• Low power consumpon in Stand-by mode,
below 1W
• Mullingual menu, including English
• Electronic Program Guide - EPG
• 4 digit LED display on front panel
• Mulmedia Player Full HD 1080p
Quick Start
1 2 3 4
XS65-COMBO_ENG_REV02.indd 1 2014-09-11 12:09:11
Menu structure and features descripon
Trouble shoong
Technical specicaon
Model: Digital satellite receiver DVB-S2
Display type: LED, digit s: 4, buttons:3 , micro switch
Slot: card reader
Input frequency: .................950-2150MHz
RF input connector: ..............IEC169-24, Female, 250mA
Input impedance : ................75Ω
RF loop connector : ..............IEC169-24, Female
Modulaon technique:. . . . . . . . . . . .QPSK (DVB-S), QPSK/ 8PSK/
H8PSK/ 16APSK (DVB-S2)
Modulaon technique:. . . . . . . . . . . .MPEG2 (MP@ML),
AVC/H.264(HP@L4.1)
Video resoluon: .................480, 576, 720, 1080
Audio decoding : .................MPEG-1, 2 Layer 1 & 2
Input/output : ...................HDMI, SCART, Coaxial d igital
audio, USB, Ethernet
Supply voltage: ..................~ 230V/50Hz
Power consumpon: ..............< 18 W
Standby consumpon: ............< 1 W
Operang temperatur e : ..........5-40C
Operang humidity : .............< 95%
Net weight: ......................< 1,5 kg
Size: ............................260mm × 110mm × 35mm
The weight and size dimensio ns are not very a ccurate value s!
The device might be upgrade d and its quali ty improved at an y
me, therefore the above sp ecicaons m ay be subject to
change (by the manufactu rer) without fu rther noce .
Issues Possibile explanations Suggested solutions
Suggested solutions The p ower cord is not plug ged correct ly.
Plug the cord securely i n to the wall outle t.
If there is still no power, reb oot the device
after 5-10 min. Check at the rea r of the
device if the power switch i s on the posit ion
1 ( switched on)
The receiver does
not decode the coded
channels
The Conax card is not inse rted or is inser ted
incorrectly into the c ard slot
Insert the card into th e slot with the gol d
contacts facing down.
The card has not been act ivated.
Contact your servi ce provider to fi nd out
how to activate the card
Channels are not found
The satellite dish is not ad justed well
Adjust the aerial; make s ure the signal
strength indicato r is blue and the qu ality
indicator - green
Searching parameters are incorrect
Enter the correct freq uency param eters/
bands
No picture
The output cord is conne cted incorre ctly Connect the output cord correctl y.
The video output mode o f the unit is diffe rent
from the mode of the monit or
Reset the working mode
No colour
The output cord is connected incorrectly. Connect the output cord correctly
The video output mode of th e unit is differ ent from
the mode of the monitor.
Reset the working mode.
The remote control does
not work
Batteries are not inserted correctly
Insert the batteries wi th the poles in the r ight
direction
Batteries are flat Replace the batteries in th e remote
The distance between th e remote contro l and the
receiver is too large
Try using the remote at a closer r ange
The remote sensor of the uni t must not be cover ed
by other objects
Relocate the receiver; remove the obstacles
Incorrect language of
audio sound or subtitles
The wrong language was cho sen in the Menu
settings
Reset the language.
No sound
The unit is mute
Press the Mute button to tur n off the Mute
mode
The volume level is too low Adjust the volume as required
The cord is connected incorrectly Reconnect the cord.
Severe picture
distortion
The signal received is inte rfered or weak
Adjust the aerial; make sure the s ignal
strength indicator is blue and the quality
indicator - green
Menu Feature Menu Feature
Menu structure and features descripon
The table below present s the most freque nt issues which you can en counter when using
the receiver. Most of them can be ex plained and solved in a sim ple way. If none of these
troubleshooting tips apply, please contact the relevant service centre.
Safety precauons
CAUTION
RISK OF ELECTRIC SHOCK.
DO NOT OPEN.
ATTENTION:
Warning: The symbol of a l ightening as h in the equilate ral triangle is u sed to warn the us er of
dangerous voltage an d to prevent the ri sk of electric s hock.
Warning: In order to prevent the risk of electric shock it is not recommended to open the hous-
ing of the unit. It shoul d be only serv iced by the quali ed sta.
Warning: An exclamaon mark in the equilateral triangle is used to remind the user of important acons and main tenance.
Note: In order to use the device correctly, you must get familiar with the manual instrucons
and keep them in a secure p lace for a future r eference.
Warning: Do not use the device in the places exposed to the risk of contact with water. Avoid
installing it near s inks, washba sins, washin g machines, wa ter pools, etc
Warning : Do not place can dles or lamps o n the device to avoid t he risk of re.
Warning: The unit should be connecte d to a power supply of the type described in the manua l. If you are not sure of
the type of power suppl y ( e.g. 120V or 230 V) , please cont act your loca l dealer or the l ocal power pla nt.
Warning: Do not open the housing and do not touch anything insid e the device. If there is need to open the housing,
please contact your l ocal dealer o r the relevant s ervice centr e.
Note: Use the device al ways with its hous ing in o rder to prevent the emission of elec tromagnec radiaon and
exposure to the radia on from outsi de.
Device maintenance: Disconnect the unit from the power supply. Clean the device, its panel and the remote control
with a so cloth dapped i n a small amount of w ater and so dete rgent.
Addional accessories: Never apply or connect addional accessories without a consent of the manufacturer as it
can cause the risk of r e, electric s hock or other pe rsonal injur ies.
Placement: The a im of the ou tlets and openings i n the device housing is to venlate t he unit and prevent it f rom
overheang. You must not cover these openings or hinder the heat transfer by placing the device on so surfaces
such as a sofa, bed, etc . Do not place the d evice next to heat ers, radiato rs or other sour ces of heat.
Power cord: Pla ce the powe r cord ou t of the way. Please, pay aen on to the condion of the co rd at the plug,
outlets and where it e xits the device .
Foreign bodies i n the devi ce: Do not i nsert for eign bodie s through t he opening s in the d evice, as t hey can tou ch
voltage points or sho rt out parts a nd cause re or e lectric sho ck. Never spray o r spill any liqui d on the receiver.
Note: Moisture may for m on the device in th e following sit uaons:
When the unit is sudde nly removed fro m a cold or venlate d room to the warm a rea
• Aer the heang has bee n turned on
• In a steamy or humid room
If moisture condensates inside the device, it can fail to work correctly. To solve this problem, the device must be
disconnected from p ower for about t wo hours, in whi ch me the moist ure should eva porate to dryn ess.
Spare parts: If some parts need replacing, please ensure that the service centre uses the spare parts recommended
by the manufacture r or having the sam e propere s as the original o nes.
Using unauthorized p arts can res ult in re, elec tric shock or a nother danger.
Safety check: Aer any maintenance or repair done, the user should request the service engineer to carry out a
general safety che ck of the device in or der to ensure it i s in proper cond ion
Environmental protecon
Aenon!
Your product is marked wi th this symbol. I t indicates that it s hould not be dispo sed of with other
household waste at th e end of its working l ife. Any used elec tronic or elect ric equipment sh ould
be separated from th e general was te and recycle d responsib ly according t o the act on res ponsible
waste disposal.
Following the implementaons of the EU provisions concerning the responsible waste disposal,
household users can return all used electronic and electric equipment to the indicated electronic
waste collecon points free of charge. When purchasi ng a new device , the old one can be returned
to the retailer.
Contact your loca l government oce t o receive more info rmaon.
If the product has ba eries, pleas e remove them as req uired by law.
A proper disposal of el ectri c and elec troni c waste pr omotes th e susta inable re use of mate rial res ources an d recycl ing.
In this way you prevent pos sible harm to the e nvironment or h uman health.
Uncontrolled electric and electronic waste disposal can cause harm to the environment.
Informaon for busi ness users in EU co untries
If the product you want t o disposed of w as used for bu siness purp oses, ple ase contac t your deale r to obtain inf orma-
on on the way of its collecon, disposa l and recycling as well as on possible cos ts. If you want to disposed of a small
unit, it can be return ed to the local e lectronic was te collecon p oint.
Informaon for busi ness users in no n-EU countrie s
If you want to dispose of the used product, please con tact your local gover nment oce to obtain informaon on
appropriate form of recycling.
Channels editor
- TV channels list
- Radio channels list
- My favourite
- Delete All
Antenna installaon
- Search channels
- Scan free-to-air channels on
Astra satellite
- Advanced install aon of an antenna a nd
channels search
RED (scan satellite)
GREEN (scan TP)
YELLOW (edit TP)
BLUE (Blindscan)
List of satellites
System sengs
- Informaon
- Soware update via OTA sat ellite
- Video and audio
- Display sengs
- Time
- Parental lock
- Language
- OSD
- Audio descripon
- Others
- Factory sengs
Access card
Drive sengs
- USB informaon
- Recording sengs
- Update via USB
- Safely remove the USB di sc
Recordings (oponal)
- My recordings
- My lms
- My photos
- My music
This menu manages you r channels lis ts.
- manages the TV chan nels list.
- manages the radio cha nnels list.
- manages channels ad ded to My favourit e
- deletes the channel s from all lists .
This menu enables you t o scan channe ls and congure
installaon.
- enables you to search c hannels.
- enables you to search a ddional chan nels via Astr a
satellite.
- enables you to choose t he type of inst allaon
conguraon of the con verter/antenna par ameters and
channels search.
- scans channels fro m one satell ite (selec ted from th e list).
- scans channels from one transponder (selected from
the list).
- enables you to edit lis ts of transpon ders for each
satellite, enable s you to scan the sel ected transp onders.
- scans the whole sate llite without u sing the list of
transponders.
- scans the whole sate llite without u sing the list of
transponders.
This menu enables you t o set up the featur es of the device.
- displays the informa on about the re ceiver, its versio n
soware and model n umber.
- enables you to update t he soware via s atellite.
- selects sengs fo r audio and vide o – denion
16:9/4:3, RGB/CVBS.
- enables you to change it s contrast, b rightness and
saturaon.
- enable s you to se t me, ad just G TM me zo nes; ma nual
opon available.
- enables you to block th e access to the men u and
selected Channels.
- enables you to selec t the language of t he menu, audio
tracks and Teletext .
- changes transpare ncy of OSD and the d uraon of the
infobar display.
- turns on the addion al audio narra on.
- sets other feature s – automac power s witch-o.
- resets the device to it s original se ngs.
This menu displays inf ormaon abou t the card and ri ghts to
access the channels.
To menu umożliwia zarzą dzanie funkcj ami Timeshi ,
nagrywanie oraz odtwarzanie nagranych audycji.
- enables you to set the fe atures of record ing.
- enables you to change se ngs of recordi ng and
meshi.
- enables you to update the reciev er’s soware via a USB
drive.
- enables you to safely r emove the USB disc f rom the
device without a risk of d ata loss.
This menu contains al l mulmedia re corded by the use r.
- displays all material r ecorded by the de vice.
- displays the list of lm s present on a USB dr ive.
- displays all photos pre sent on a USB drive .
- displays all songs pre sent on a USB drive .
XS65-COMBO_ENG_REV02.indd 2 2014-09-11 12:09:11
 Loading...