

Page 1

Receiver
XS65
Manual
digital satellite receiver
KK 02/15
Page 2

Contents
Brief description 4
1.1 Basic features 4
1.2 Package Contents 4
1.3 Front panel 5
1.4 Rear Panel 5
1.5 Remote Control 6
Installation 8
2.1 Connection 8
2.2 First start 9
2.3 List of satellites 11
2.4 Antenna Installation 12
2.5 Easynd 19
2.6 Automatic switch-o of the receiver 19
2.7 Conditional Access Card 19
Operation 20
3.1 Basic functions 20
3.2 Changing channels 20
3.3 Sleep Timer 21
3.4 Information Bar 21
3.5 EPG (electronic program guide) 21
3.6 TIMER 23
3.7 Radio channels 24
3.8 Find 24
3.9 Mailbox 25
3.10 PVR – recording programs 25
3.11 Time Shift 27
3.12 Status 28
3.13 AUDIO 29
3.14 Teletext 29
3.15 Subtitles 29
2
Page 3

Menu 30
4.1 Main Menu 30
4.2 Edit Channel 30
4.3 Installing the antenna 33
4.4 System Settings 33
4.5 Media player 38
4.6 Network / APP 40
4.7 Access Card 42
4.8 Setup Disk 43
Troubleshooting 44
Safety Precautions 46
Environmental protection 48
Technical Specications 49
Contents
3
Page 4

Brief description
1.1 Basic features
1. Smart Card reader in Conax Conditional access system
2. Support of SD / HD (MPEG2 / H.264), DVB-S, DVB-S2
3. High resolution video output - HDMI
4. Standard video output - SCART
5. 2 ports in USB 2.0 standard
6. PVR Ready – recording to an external drive
7. Time Shift (video pausing and rewinding)
8. Automatic Stand-by
9. Low power consumption in stand-by mode, below 1W
10. DiSEqC system operation
11. Multilingual menu
12. Electronic Program Guide - EPG
13. 4-digit LED on the front panel
14. Media player Full HD 1080p
15. Globo Remote – an app for Android devices
16. Internet Radio
17. Fast Channel Change
18. Subtitle support
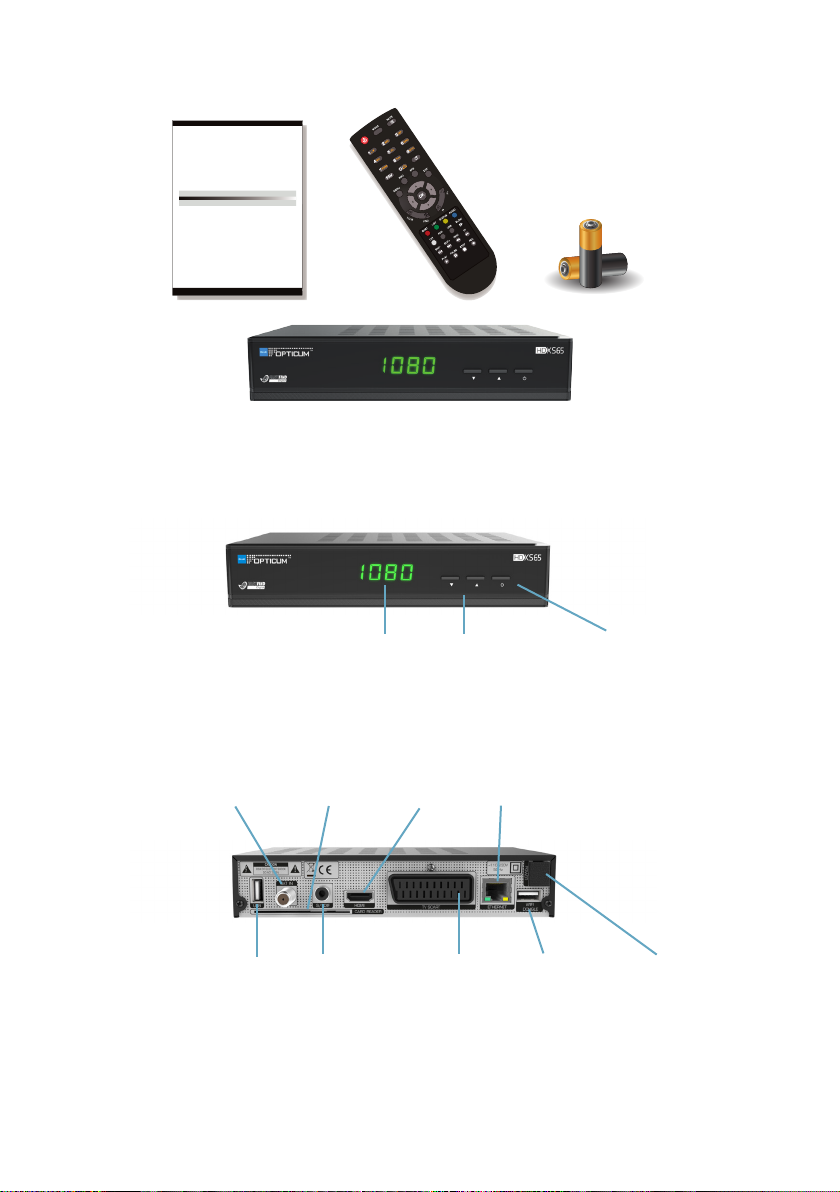
1.2 Package content
1. Receiver
2. Remote Control,
3. Batteries - 2 x AAA (optional)
4. User Manual
1
4
Page 5
ENGLISH ENGLISH ENGLISH ENGLISH ENGLISH ENGLISH ENGLISH ENGLISH ENGLISH ENGLISH ENGLISH ENGLISH ENGLISH ENGLISH ENGLISH ENGLISH ENGLISH ENGLISH ENGLISH ENGLISH ENGLISH ENGLISH ENGLISH ENGLISH ENGLISH ENGLISH ENGLISH ENGLISH ENGLISH ENGLISH ENGLISH ENGLISH ENGLISH ENGLISH ENGLISH ENGLISH ENGLISH ENGLISH
ENGLISH ENGLISH ENGLISH ENGLISH ENGLISH ENGLISH ENGLISH ENGLISH ENGLISH ENGLISH ENGLISH ENGLISH ENGLISH ENGLISH ENGLISH ENGLISH ENGLISH ENGLISH ENGLISH ENGLISH ENGLISH ENGLISH ENGLISH ENGLISH ENGLISH ENGLISH ENGLISH ENGLISH ENGLISH ENGLISH ENGLISH ENGLISH ENGLISH ENGLISH ENGLISH ENGLISH ENGLISH ENGLISH
Digital Terresal Receiver
KP 07/2012
ModelID: X2
• Slot for Smart Card
• Support of SD/HD (MPEG2 / MPEG4) DVB-C systems
• High definion video output - HDMI
• Standard resoluon video output - SCART
• High speed USB 2.0 port
• PVR Ready
• Time Shi (pause, rewind)
• Automac Stand-by
• Low power consumpon in Stand-by mode,
below 1W
• Mullingual menu, including English
• Electronic Program Guide - EPG
• 4 digit LED display on front panel
• Mulmedia Player Full HD 1080p
Quick Start
1.3 Front Panel
change channels/
move cursor
1.4 Rear Panel
signal
input
Brief description
USB1
PVR
card reader
HDMI
ethernet
output
S/PDIF USB2
SCART
output
Power on/odisplay
power cord
WiFi
5
Page 6
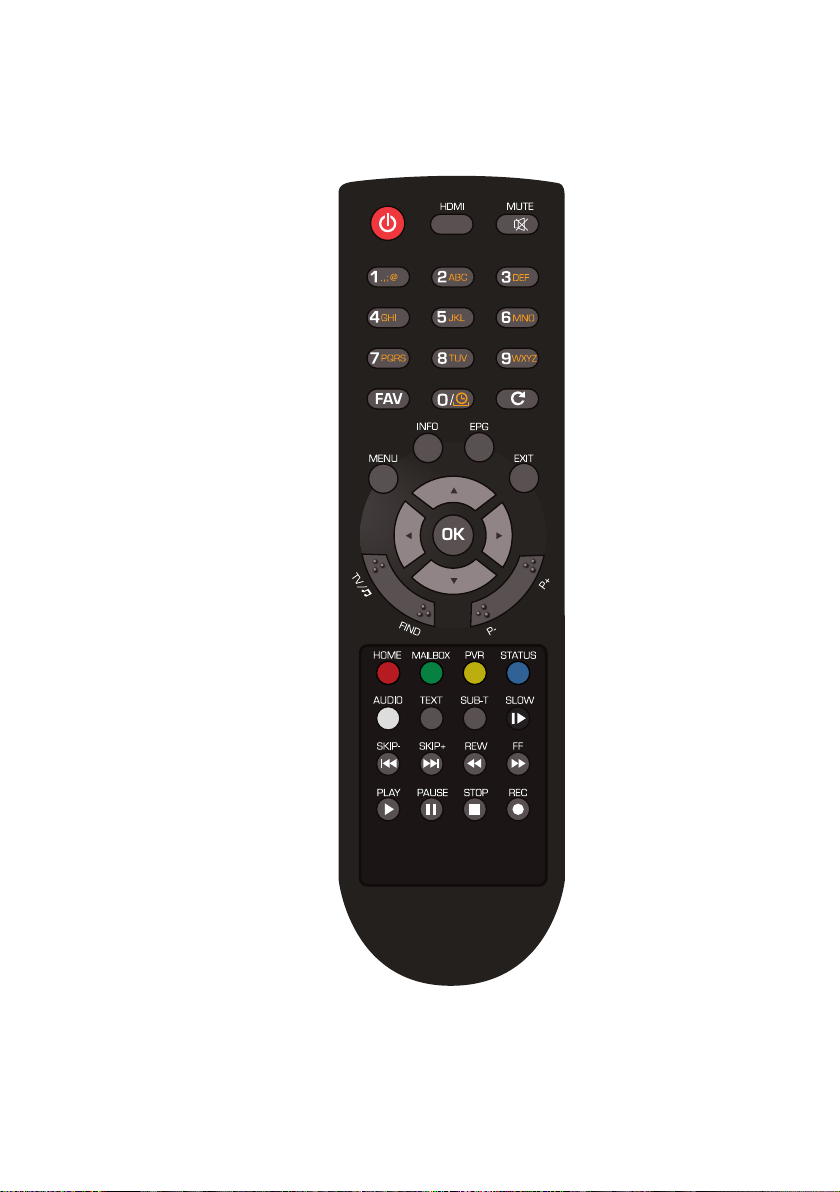
1.5 Remote Control
6
Page 7
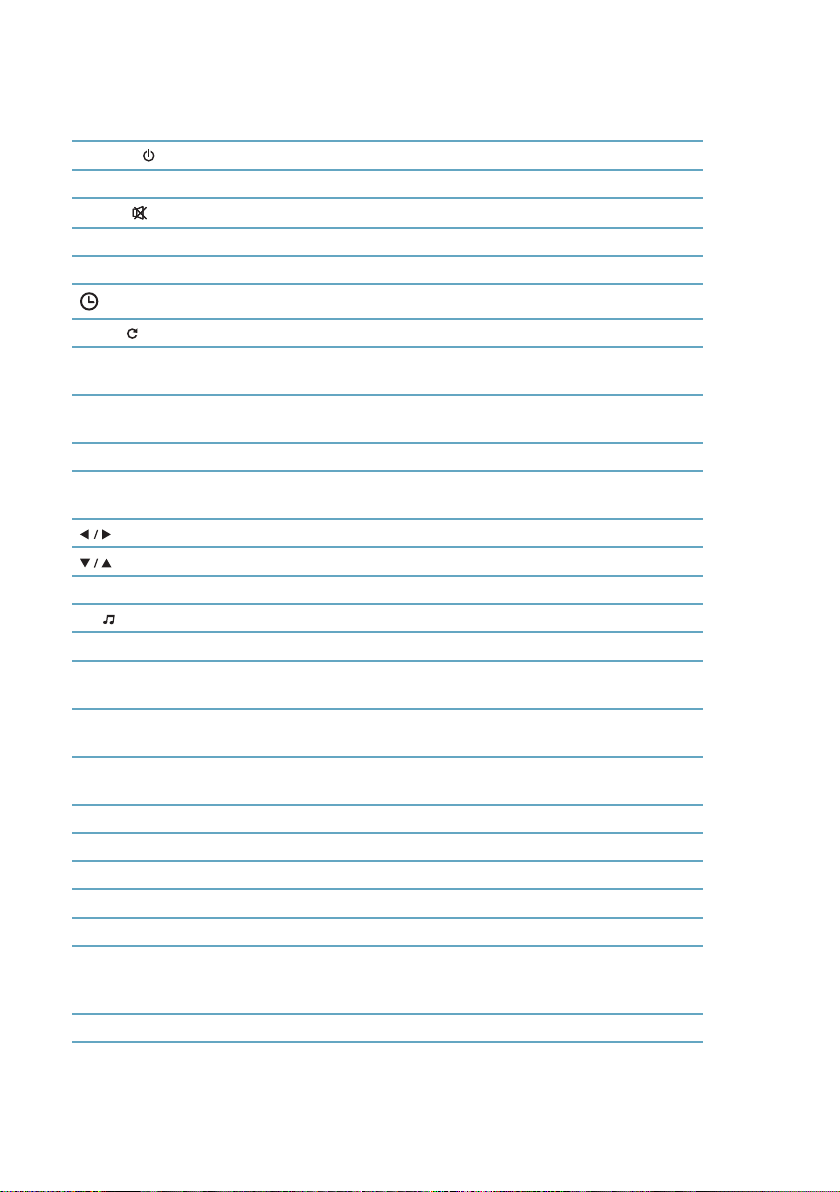
Button Function
POWER -
HDMI Switches HDMI output resolution of the image.
MUTE -
0–9 Set the channel; Allows you to enter the parameters in the menu.
FAV Display the list of groups of favorite channels by a category.
LAST - Switch to previously viewed channel.
MENU Displays the main menu on the screen; goes back to the previous
INFO Display information about the current function or a channel infor-
EPG Displays the electronic program guide on the screen.
EXIT Cancel the user selection; proceeds from the menu to the viewing
OK Displays the channel list. Select function in the menu.
TV/ Switch between TV and Radio mode.
FIND Allows you to search channels by name.
P-/P+ Switches to the next or previous page in the channel list and in the
HOME The optional function (depending on the software version of the
MAILBOX Displays a list of payments in the Conditional Access Card menu.
PVR Open PVR recordings. Inserted disk is required.
STAT US Displays information about the receiver.
AUDIO Audio settings / select audio track.
TEXT Show teletext of the channel (if available).
SUB -T Conguration of subtitles.
SLOW, SKIP-, SKIP+,
REW, FF, PLAY,
PAUSE, STOP, REC
colorful buttons various functions depending on the menu
Turns on / o the receiver from / to standby mode
Turns on / o the sound.
Select the auto switch to standby mode. O / 10/30/60/90/120 min.
menu level.
mation bar.
mode.
Regulate the volume of the receiver; controls the cursor left / right.
Changes channel; controls the cursor move up / down.
EPG view.
receiver).
This function is optional
Control video functions (time shift, playback, recording).
Brief description
7
Page 8
Installation
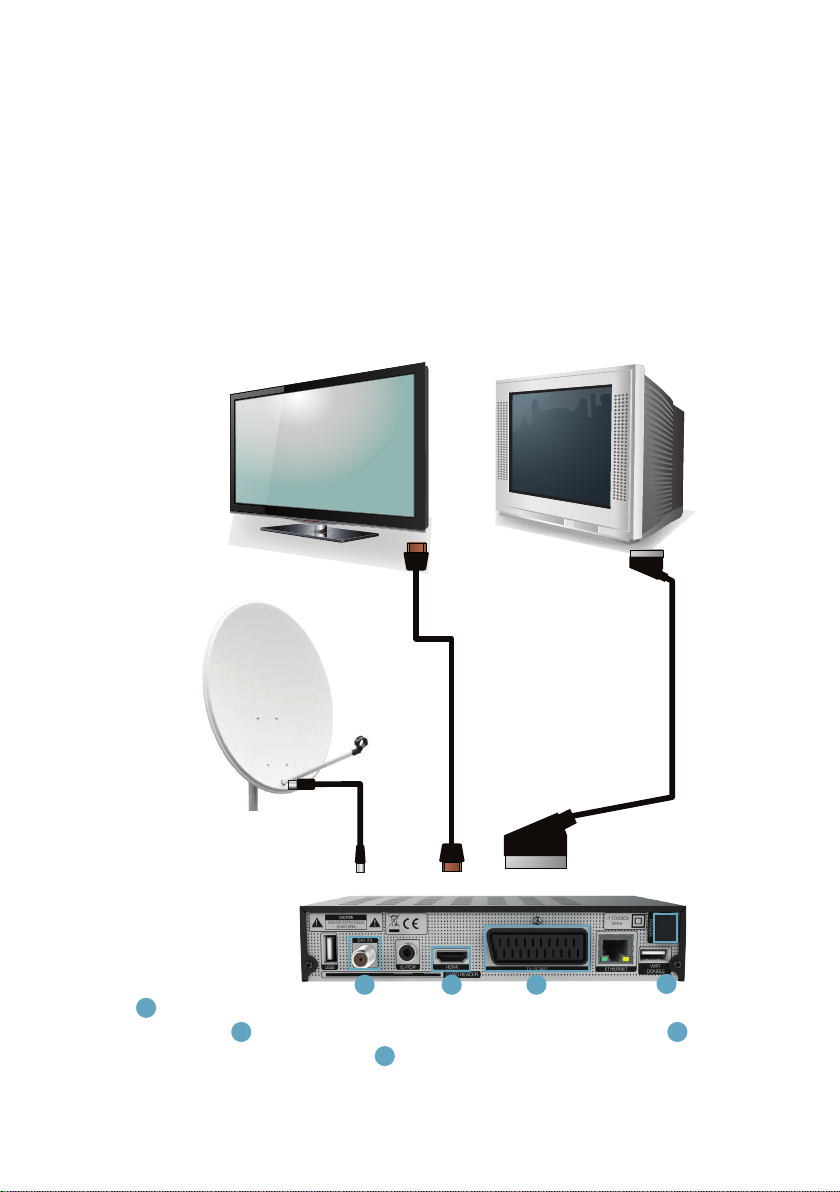
Read this chapter to nd out:
1. how to connect the receiver to your TV,
2. how to install the antenna,
3. how to congure the receiver,
4. and how to use the USB drives with the receiver.
2.1 Connection
2
21
1
Connect the antenna to the input according to the installation guide on
the screen. 2 Connect the at screen TV with an HDMI cable or 3 connect
CRT TV using a SCART cable. 4 Plug the power cord into an electrical
8
outlet.
3
4
Page 9

2.2 Starting up for the rst time
Turn the TV on and using its functions set the input to the receiver. Turn on
the receiver by pressing the POWER button . The installation guide OSD (On
Screen Display - items displayed on the screen by the receiver) will appear on
the screen. In the subsequent stages of the guide, you can set the basic parameters of the receiver. At any time you can return to the previous options
using the EXIT button and then you can change your selection. All the setting can be changed in the main menu again.
2.2.1 Language Selection
When you start the guide, the receiver asks you rst to select the language.
Press / to select the desired language and press OK.
2.2.2 Selecting the screen format
Choose the right aspect ratio for your screen (Auto, 4: 3 Pan Scan, 4: 3 Letter
Box) or 16: 9 Widescreen) and press the OK button.
2.2.3 End of the Guide
After a suitable USB is connected, press OK. The receiver will show a message
that it is ready to work. You can go watch, go back to connection of the antenna or settings in order to ne-tune and search for channels. The receiver
will also test the signal. If the tuner is not congured properly, the signal will
not be received correctly and you cannot see all the available channels.
2.3 List of satellites
Press / to select the item you want to edit. Using the red button you can
change the name of the satellite, and also set the length and direction of E East and W - West.
Installation
9
Page 10
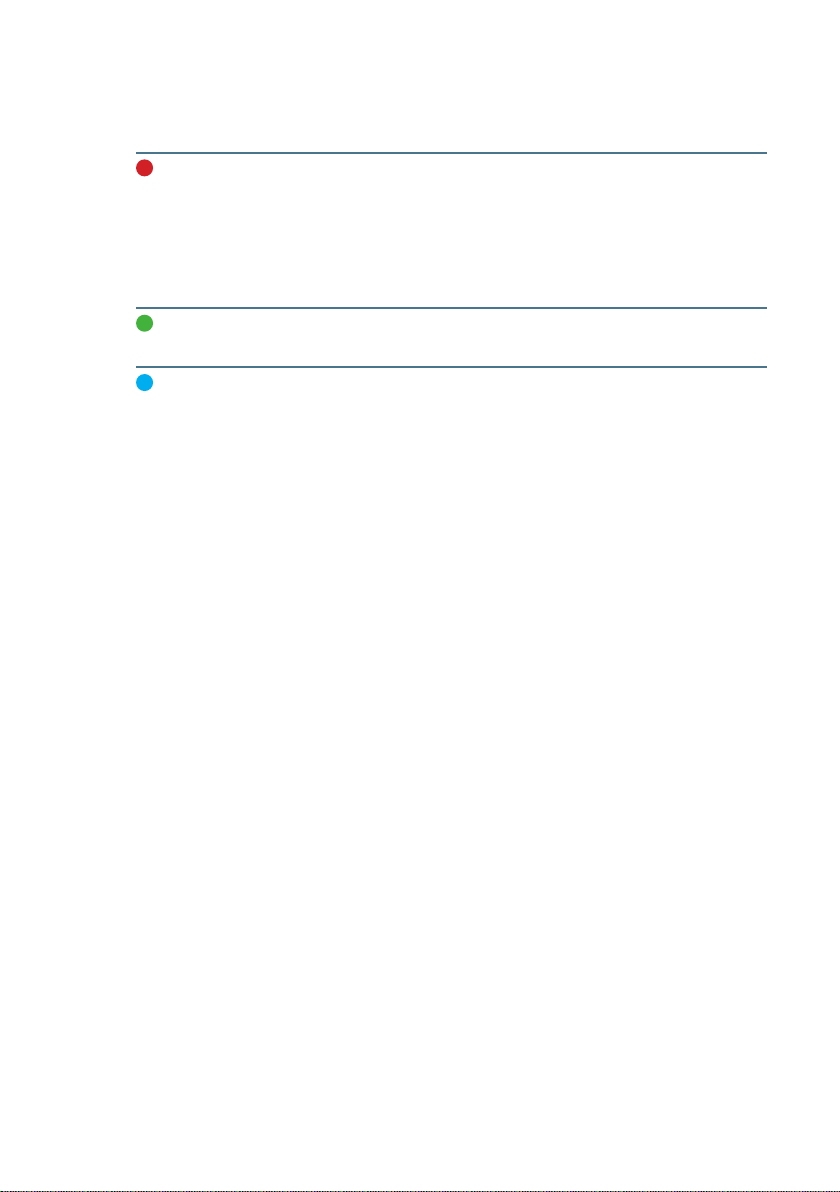
[OK] – Select Use the OK button, select the satellite to be received – a
star symbol will show, which satellite is selected.
Edit Using the red button you can change the name of the
satellite, and also set the longitude and direction of E-east
and W - West. Enter values using the numeric buttons on
the remote control. Use colorful buttons for appropriate
action. Red changes case, green removes characters, yellow
conrm changes and blue cancel them.
Add Using the green button, you can add a satellite. Edit it in the
same way as described in the section above - Edit.
Delete With the blue button, you can delete a satellite from the
list. Removal of the satellites will delete access to the
transponders and the channels. A message on the screen
will warn you about that. If you really want to delete the
satellite, highlight „Yes” and press OK.
10
Page 11
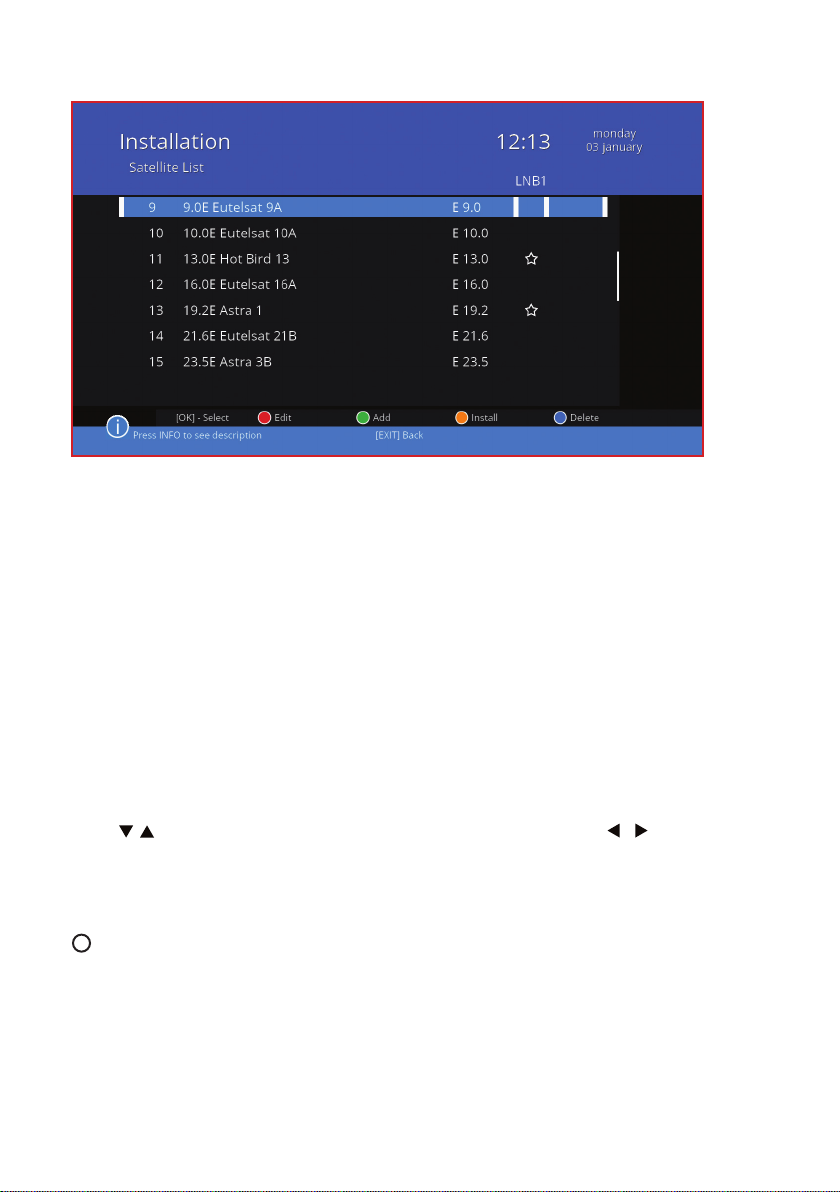
2.4 Antenna Installation
In this menu, you can install the antenna and then search for channels. Antenna installation process is often complicated because it requires technical
knowledge and additional multiple devices. In many cases you will not need
the knowledge of the advanced settings. Modern technologies allow to adjust the antenna without leaving home, using the receiver. When installing
the antenna, however, it is necessary to use additional manuals for the antenna, converters, switches or motor used. For a single LNB, leave the default
conguration for DiSEqC switch, select the appropriate port settings and select Scan using colored keys.
The strength and the quality of the signal is shown on the bottom of the
screen in the form of strips and percentages.Use this as a hint to set up the
antenna the best way.
Press / to select the item you want to set, and then using the / give it
the appropriate settings.
2.4.1 Scanning options - color key functions
Change to motor Press the white button to select motor
/Change to xed or LNB for adjusting the antenna position.
Installation
11
Page 12

Scan the satellite Press the Red button to scan a single satellite. De-
tailed satellite scan options:
Satellite Select the satellite to scan.
FTA Only Select No or Yes, if you want to search only unen-
crypted channels.
Network search Select No or Yes, if you want to scan only the frequ-
encies with the NIT (Network Information Table).
Tuner Choose a tuner if there is more than one connec-
ted.
Scan Press OK to start a scan.
12
Page 13
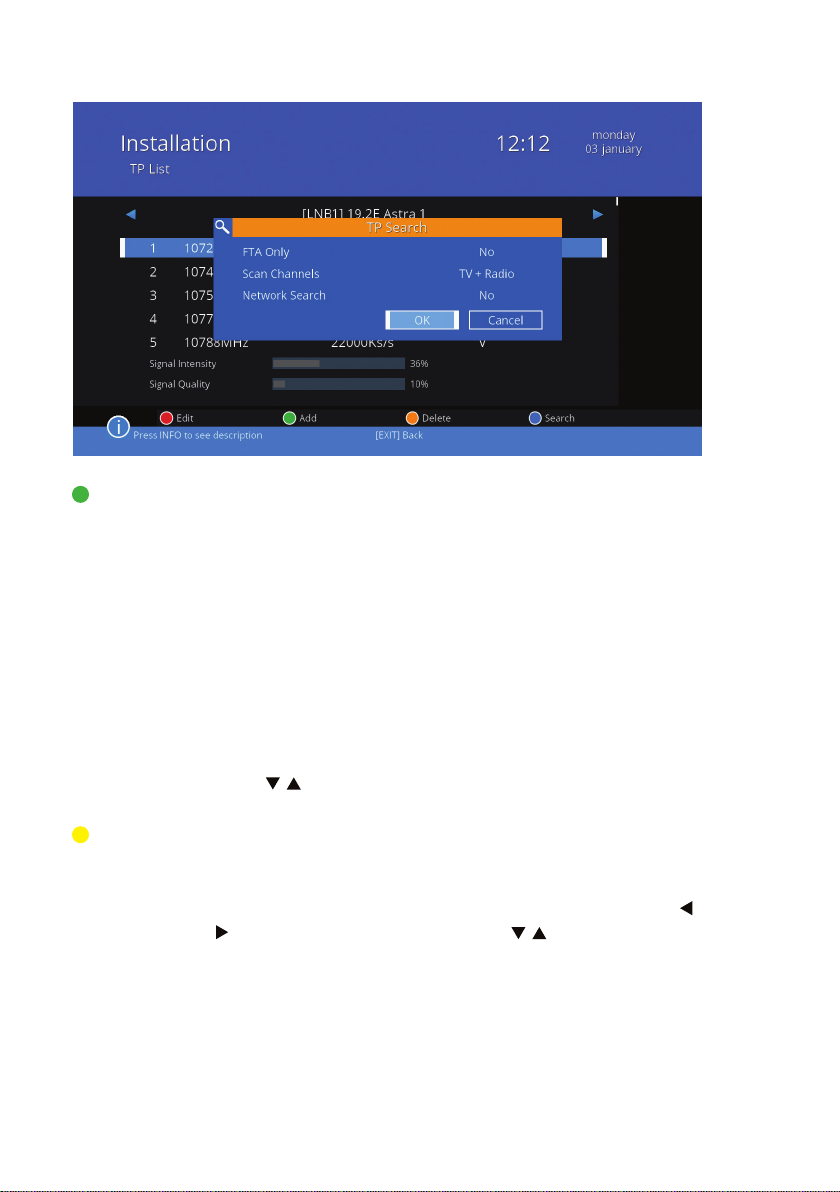
TP search Transponder scan. Press the green button to scan the
transponder. In the window that appears after 3 seconds
on the screen, set the options:
F TA only Select Yes if you want to search only unencrypted
channels.
Scan channels Select the type of channels you want to search (TV,
radio, or both at once).
Network search Select Yes, if you want to scan only the frequen-
cies with the NIT (Network Information Table).
When this option is selected, the progress bar is
not display.
Press / to go to OK and press the OK button to start
scanning, or choose Cancel to return to the settings.
Edit TP Operations in the transponder list. Press the yellow but-
ton to see a list of transponders. This feature is also available after pressing the green button and after an exit from
the window of a single transponder scan settings. Press /
to change the satellite. Using the / buttons select the
transponder. You can read the signal strength and quality.
Installation
13
Page 14
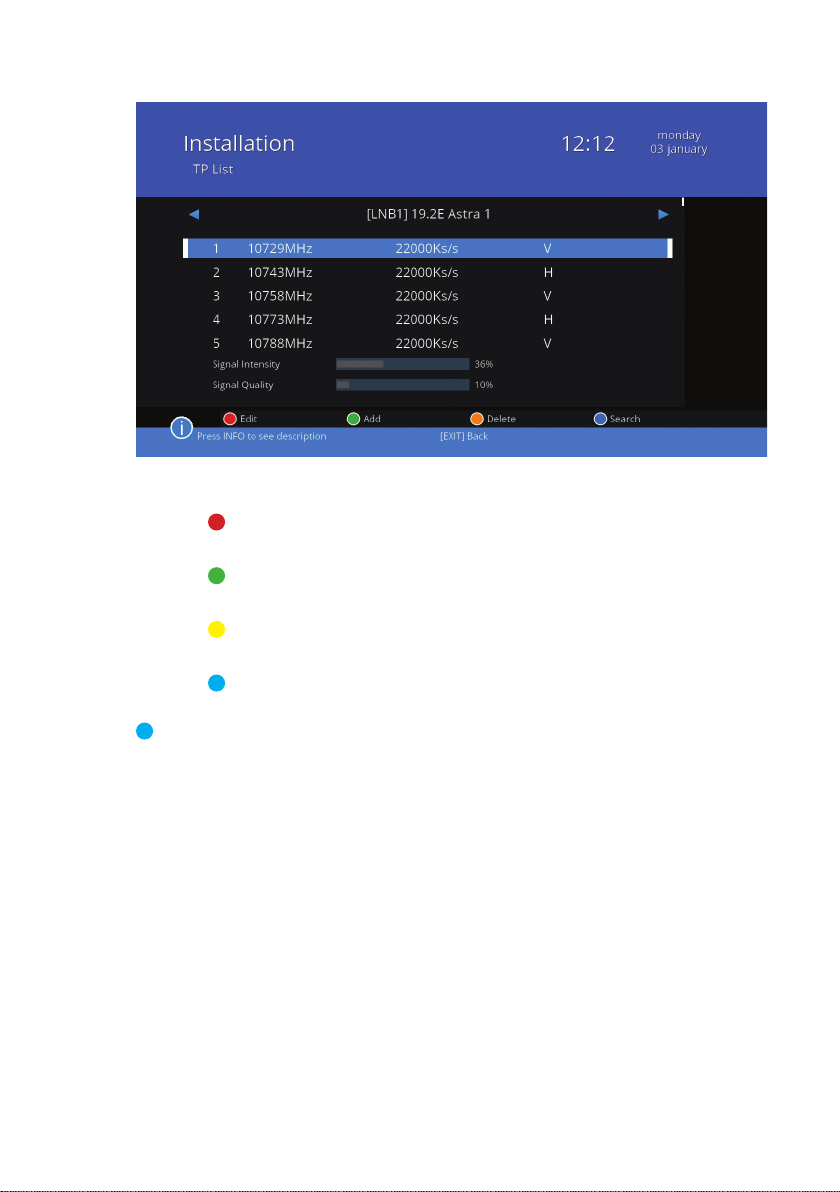
Features available in the edit transponder window (colored buttons):
Edit Set frequency, symbol rate and polarization for
the selected transponder.
Add Add a new transponder, set its frequency, symbol
rate and polarization.
Delete Delete a transponder. Conrm your decision by
selecting „Yes” and press OK or select „No” to exit.
Search Scan a transponder as in TP Scan menu (described
above).
Blindscan Automatic scan. Press the BLUE button to go to search for
channels without making any additional settings. Blindscan is an operation that scans all available transponders
and frequencies, and therefore takes longer than other
scans to nish.
14
Page 15
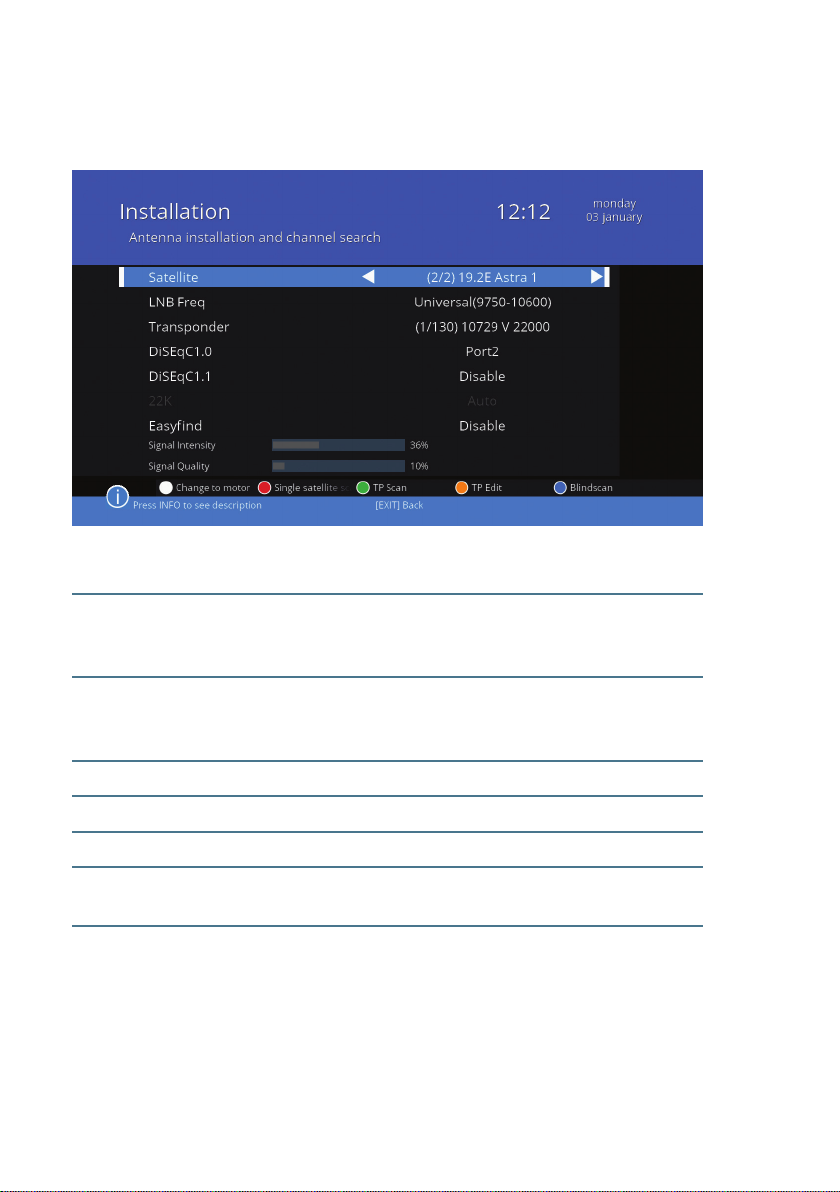
2.5.2 Scanning options – using the LNB
Press the white button to select how to set the antenna to the LNB.
Satellite Select the satellite you want to use. You can choose from
the satellites that were previously selected and marked
with a star on the list of satellites.
LNB Frequency Select the frequency at which the converter is working. This
choice has an impact on what further options are possible
to set in this menu.
Transponder Select a transponder according to your needs.
DiSEqC1.0 Select the port to which you have connected the DiSEqC.
DiS E q C1.1 Adjust the DiSEqC1.1 to receive signals from more sources.
22K Disable 22K for LNB with unusual frequency. With universal
values, the parameter is set to „Automatic”
Easynd Enable EasyFind, if you have a converter that supports it.
This function is described in section 2.6 on page 19.
Installation
15
Page 16
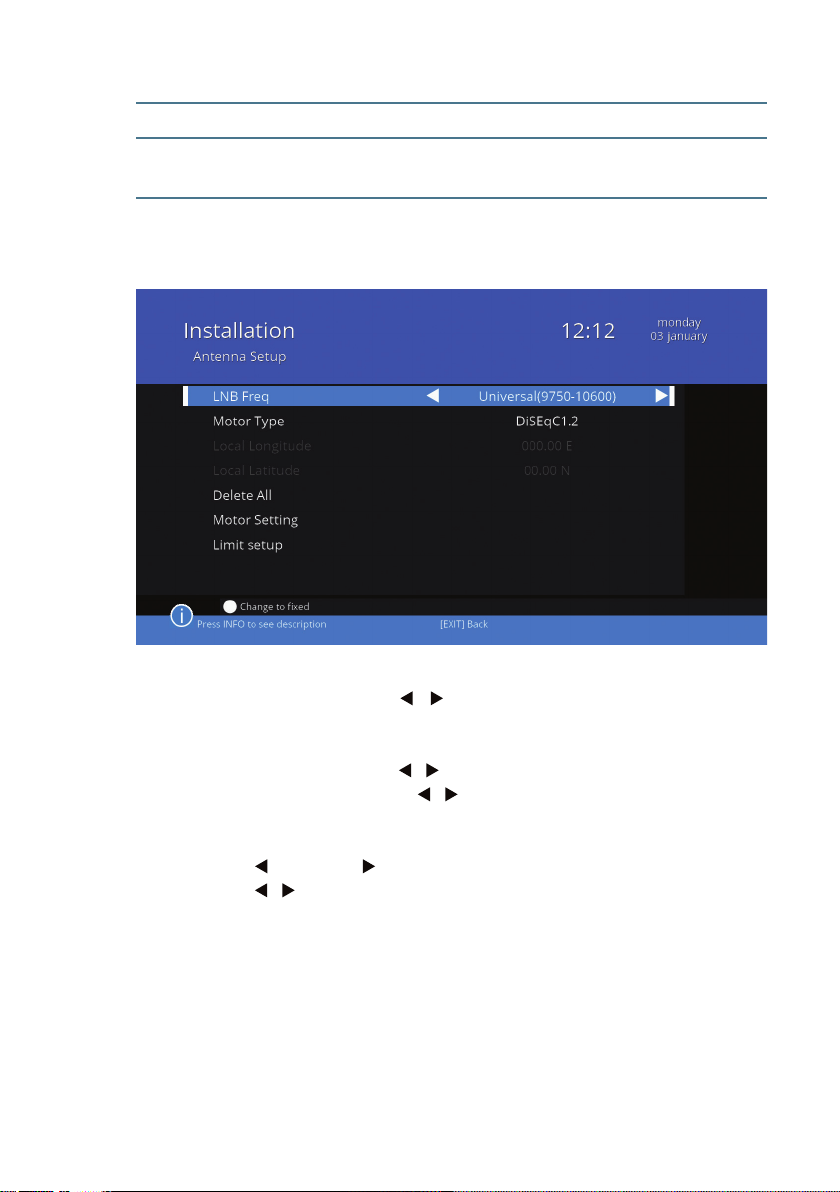
IF Channel Select IF Channel (1 to 8).
Delete all Delete all the settings of the antenna; available if
the DiSEqC1.2 was selected.
Motor Setting detailed settings of the motor.
(Dierent settings depending on the selected
standard USALS / DiSEqC1.2)
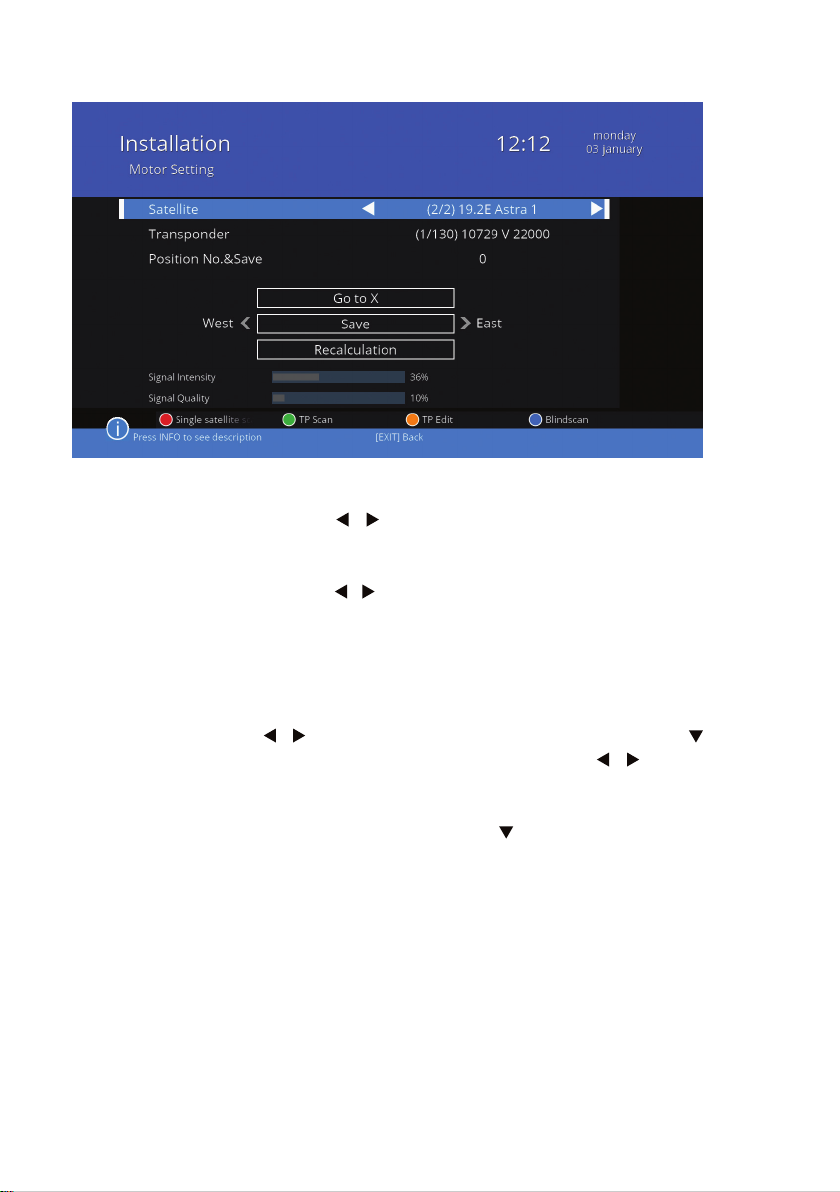
Settings for DiSEqC1.2:
Satellite Press / to select the satellite. You can choose
from satellites marked with a star symbol that are
already on the list of satellites.
Transponder Press / to select a transponder.
Position No.&Save Press / to select the number you want to as-
sign the position of the antenna.
Go to X Go to the saved position.
West Save/Stop East
Press / to rotate the antenna to the west or to the east.
Press OK to save the item under the pre-selected number, or to stop
the rotation of the antenna.
Recalculation Highlight and press OK to calculate and check the
position of the antenna.
16
Page 17
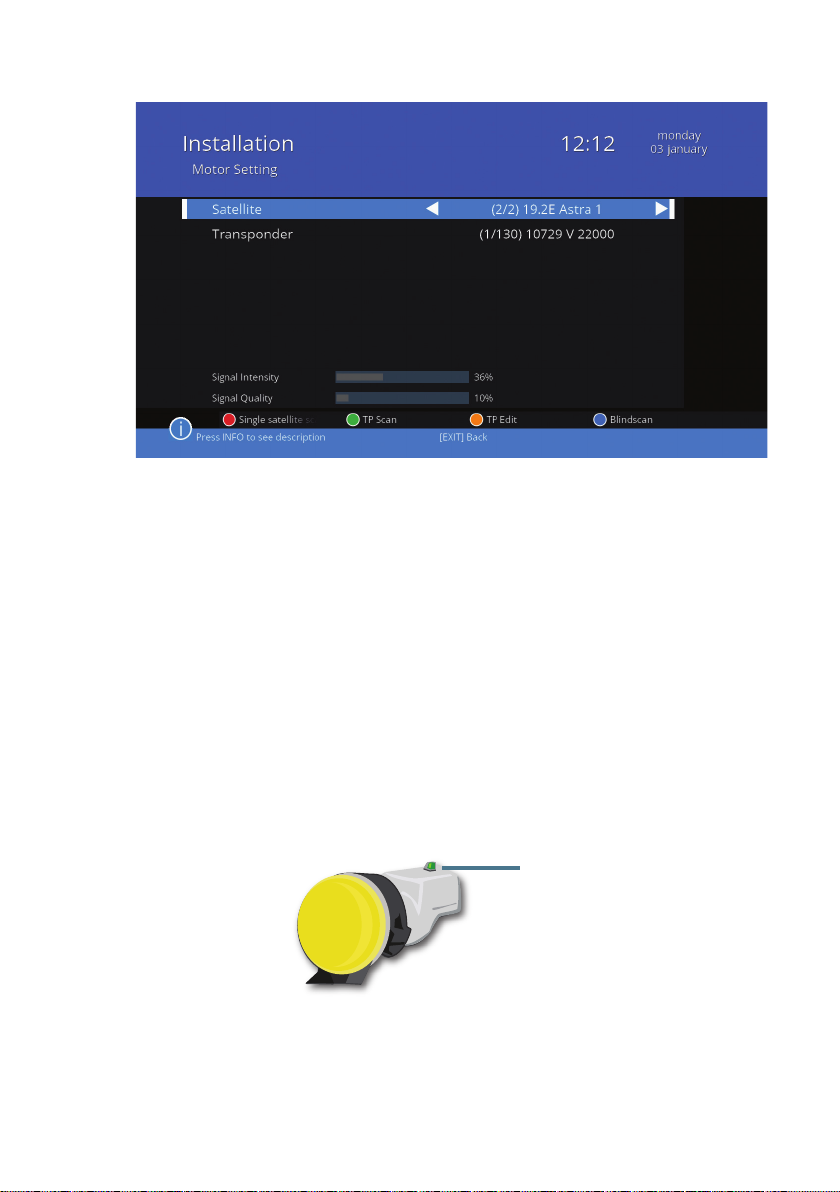
Settings for USALS:
Satellite Press / to select the satellite. You can choose
from satellites marked with a star symbol already
on the list of satellites.
Transponder Press / to select a transponder.
The antenna should automatically turn to the selected satellite and
transponder.
Limit setup this settings allow you to set lthe farthest point to which
the rotor turns the antenna. This function is used when
there are physical barriers that would stop the antenna.
Press / to turn on the western or eastern limit. Using
button go to West < Limit setup > East. Press / to turn
the antenna to the west or east, and press OK. There will
be information of the limit that was set on the screen. To
return to the relevant point, press and then click OK.
Installation
17
Page 18
2.5 Easynd
Easynd is a feature that allows you to set the position of a satellite dish
without compass, another person and technical understanding. You need
the matching Easy nd LNB (which is the gizmo on the end of the dish arm
that collects the satellite signal and sends it to the receiver). Set the elevation
of the dish according to your location and point the dish East. In the Antenna
Installation menu choose a satellite and go to the right column with features
of a satellite and scroll down to Easynd. Enable it with the button. The diode
on the LNB now will indicate if the satellite dish receive strong signal. Slowly
move the dish. If the light pn LNB glows yellow it means you get the dish closer to stronger signal. Continue slowly until it ashes green and then when
it glows permanently green you are locked onto the satellite with a strong signal. If you want to adjust the dish to satellite again you can turn on Easynd
function in the status menu.
green diode on
the LNB
18
Page 19

2.6 Automatic Power Down
In accordance to the EU requirements, your receiver has been equipped with
the „Automatic Power Down” function. After a set amount of time, the receiver will automatically switch to the standby mode. It means that in practice, if the receiver doesn’t receive any signal from the remote controller or
from the buttons on the front panel, it switches itself o. Depending on the
model, this function is either on or o. You can disable or enable it using appropriate settings in the menu.
2.7 Conditional Access Card
Without a conditional access card inserted, the device can only receive unencrypted channels. Insert the card to be able to watch encrypted channels.
The card can be obtained from satellite TV providers.
Insert the card into the reader a gold chip facing up. Note! If the location
of the card reader in your decoder is dierent from the picture above, insert
the card the gold chip facing downwards.
Installation
19
Page 20

Operation
Read this chapter to learn how to use and set up the receiver, depending on
your needs.
3
3.1 Basic Features
To turn your receiver ON or to Standby, use the button on the remote control. Choose the desired channel with the / buttons. Alternatively, you can
input the channel number with the numeric buttons on the remote control.
Press OK in viewing mode to display the TV Channel List. The volume can be
adjusted with the / buttons.
3.2 Changing channels
Your receiver is equipped with several ways to change the channels.
1. Directly by selecting the channel number buttons 0-9.
2. Through the channel list and OK button.
3. Using the P +, P- or / .
4. Through the EPG.
5. Through the FAV button – lists of favorite channels.
6. Through the button, to switch to the previously viewed channel.
Direct access through the 0-9 buttons
To gain direct access to a certain channel, simply input its number with the
0–9 keys on the remote control. Channel numbers can be up to four digits
long. Entering a number with less than four digits is possible. Just wait a few
seconds and your receiver will switch to the selected channel or press OK immediately after selecting the channel number.
20
Channel List
Press OK in viewing mode to display a list of channels. Use /
in the channel list to highlight the desired channel and press OK again to
switch to it. Press / or P +, P- to go to the next or previous page by ten
channels. Press OK again to exit the Channel List.
Page 21

P+, P- or /
The P+ and buttons to switch to the next channel.
The P- and buttons to switch to the previous channel.
EPG
Press the EPG in viewing mode to display the electronic program guide. Use
/ , to select a channel from the list and press OK to switch to it.
Favorite
Use the FAV button to see a list of your favorite channels. Use / , to select a
category and then a channel from the list and press OK to switch to it.
Previous
Use the button to switch to the previously viewed channel.
3.3 Sleep Timer
Press on the remote control to set the time after which the receiver turns
o automatically. Press the appropriate number of times to set the desired
time. You can set the time after which the receiver will automatically turn o
to 10, 30, 60, 90, or 120 minutes.
3.4 Information bar
While watching TV you can press the INFO button to display information
about the current program. Using the / buttons you can view information about the following programs on this channel.
3.5 EPG (Electronic Program Guide)
Electronic Program Guide is a function that allows, among others, to view the
current TV program. EPG information is derived from satellites and are dependent on the sender, so the lack of information in the EPG is not due to malfunction of the receiver.
In view of the EPG on the left side is the channel list on the right programs. Use
/ to select the channel. Press OK to switch to the selected channel.
By using the P- and P + change the page - switch EPG view to the next or the
previous ten channels.
Using the and buttons zchange the day for which an information is
Operation
21
Page 22
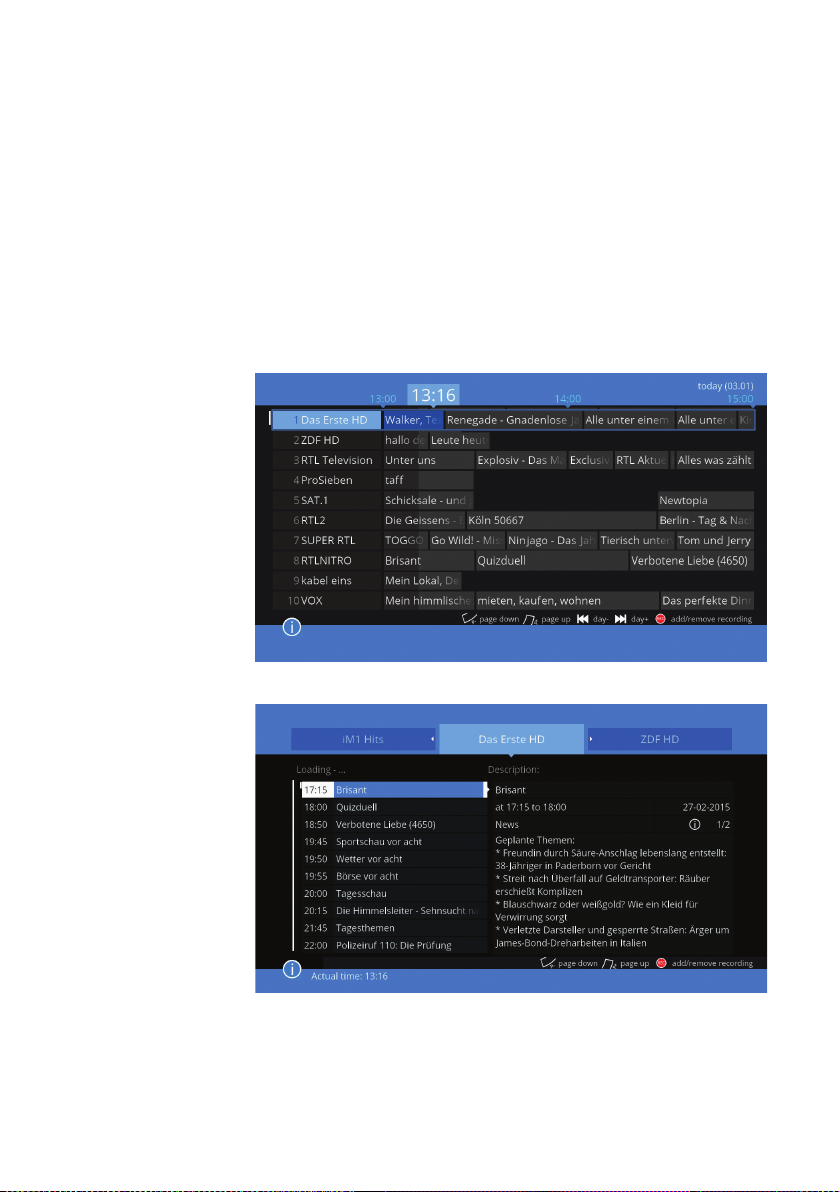
displayed.
Using the REC button, add or delete a recording. This function is described in
the next section 3.6 TIMER
Info bar displays information about the current program. If you want to enlarge it, use the INFO button on the remote control.
In the menu „System Settings” EPG settings (detailed on page 37), you can
congure the behavior and style of the EPG. There are two dierent styles:
the schedule and the newspaper.
EPG – schedule
22
EPG – newspapaer
Page 23
3.6 TIMER
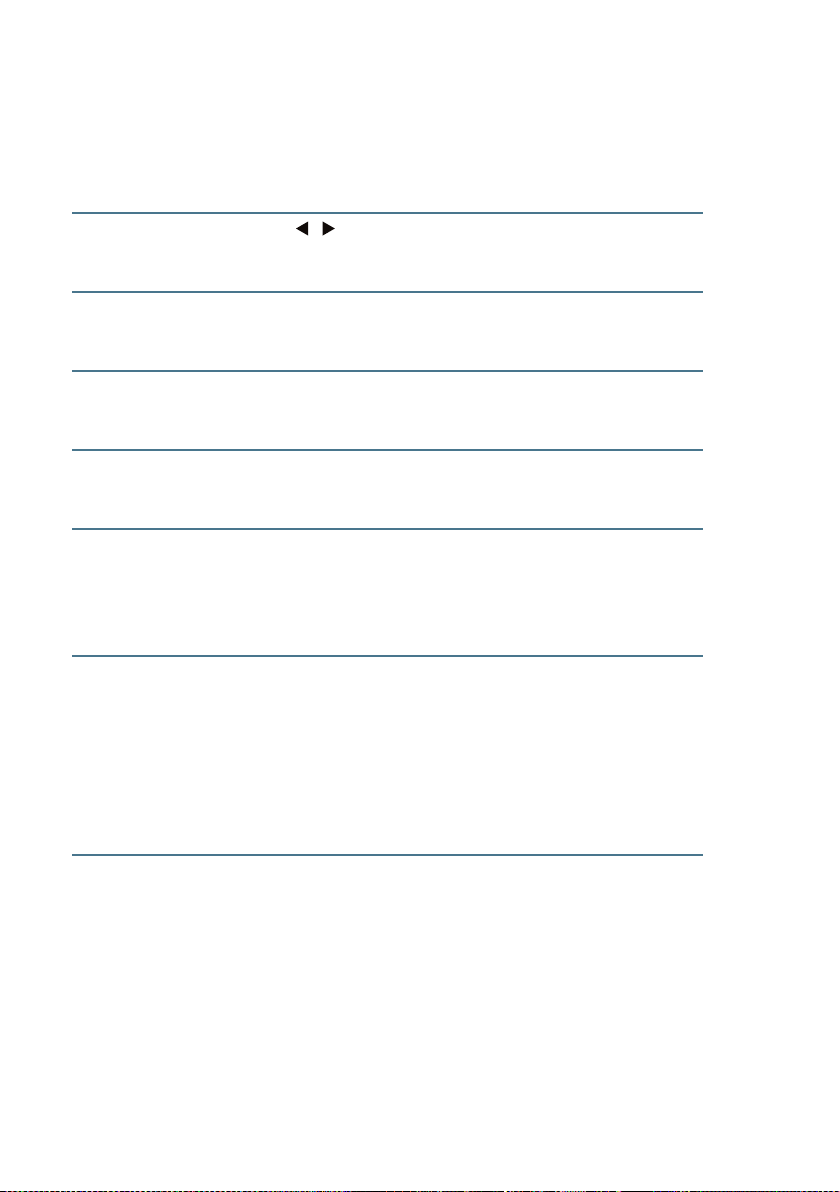
Timer is a function, which can be accessed via the EPG menu by pressing the
REC button. Use the cursor keys to navigate through the options in the
•
timer settings.
Timer mode Press / to set the recording mode. Recording – sin-
gle recording; Cyclic recording – recording repeated
regularly.
Start recording Available if the recording mode is selected. Set the num-
ber of minutes before the scheduled program, when the
receiver is to start recording (from 0 to 30).
Stop recording Available if the recording mode is selected. Set the num-
ber of minutes after a scheduled program when the receiver is to stop recording (from 0 to 30).
Repeat
recording
Choose
weekdays
Don’t show this
window in the
future
Available if cyclic recording mode is selected. Recording
can be repeated every day, once a week or several times
a week.
Available if cyclic recording mode is selected. Highlight
the day and press OK to select the day of the week when
the recording is to be repeated. If you select a few days,
the receiver will ask you if you want to change the mode
to repeat a few times a week.
available if the recording mode is selected. Mark and
save, if you want to disable a window showing the details of the recordings in the EPG view.
This window can be turned back on in the System Settings menu, recording menu (detailed on page 44),
where you can also set the default additional starting
and ending times of the recordings. Recording mode
is set to recording by default.
Operation
23
Page 24
3.7 Radio channels
The receiver is adapted to receive and play digital radio channels available
from a satellite. Use the TV/ button,to switch between TV and radio channels. Radio channels have their own list and EPG. You can manage the radio
channels almost the same way as TV channels.
The receiver also allows you to receive Internet radio via ethernet or wireless
network. This feature is described in detail on p. 41.
3.8 Find
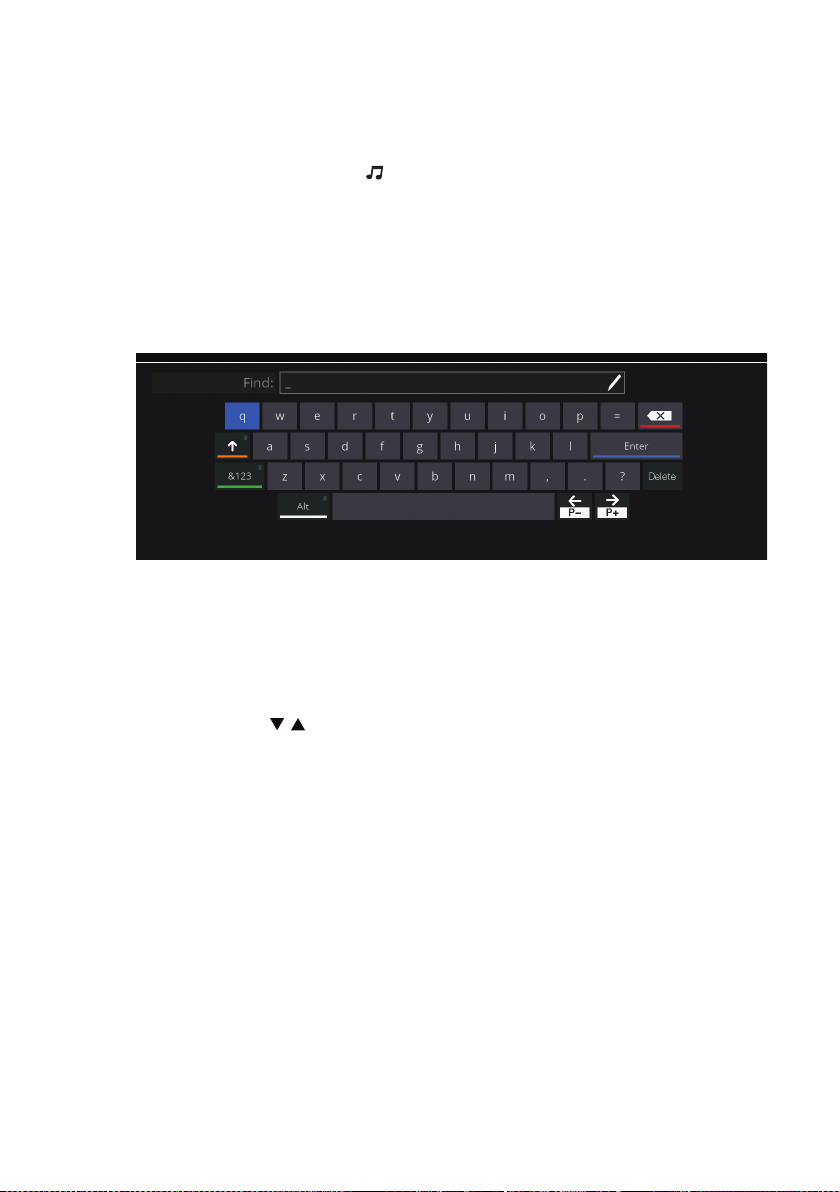
Find is a function that allows you to search for a channel by typing its name.
Press FIND on the remote control to display the Find window. Use the cursor
keys to select a desired character and press OK to enter it into the text box.
After entering the rst letter, a list of channels that contain it in their name.
Press the blue button or move the cursor to „Return” to go to the list of found
channels. Press / to select the found channel and press OK to display it.
24
3.9 Mailbox
This function is optional. Your service provider may send you information
about services and payments. To see a list of messages from the operator,
press MAILBOX (green button).
If you receive a new message, the screen displays the envelope symbol.
Page 25
3.10 PVR – recording programs
List of recordings
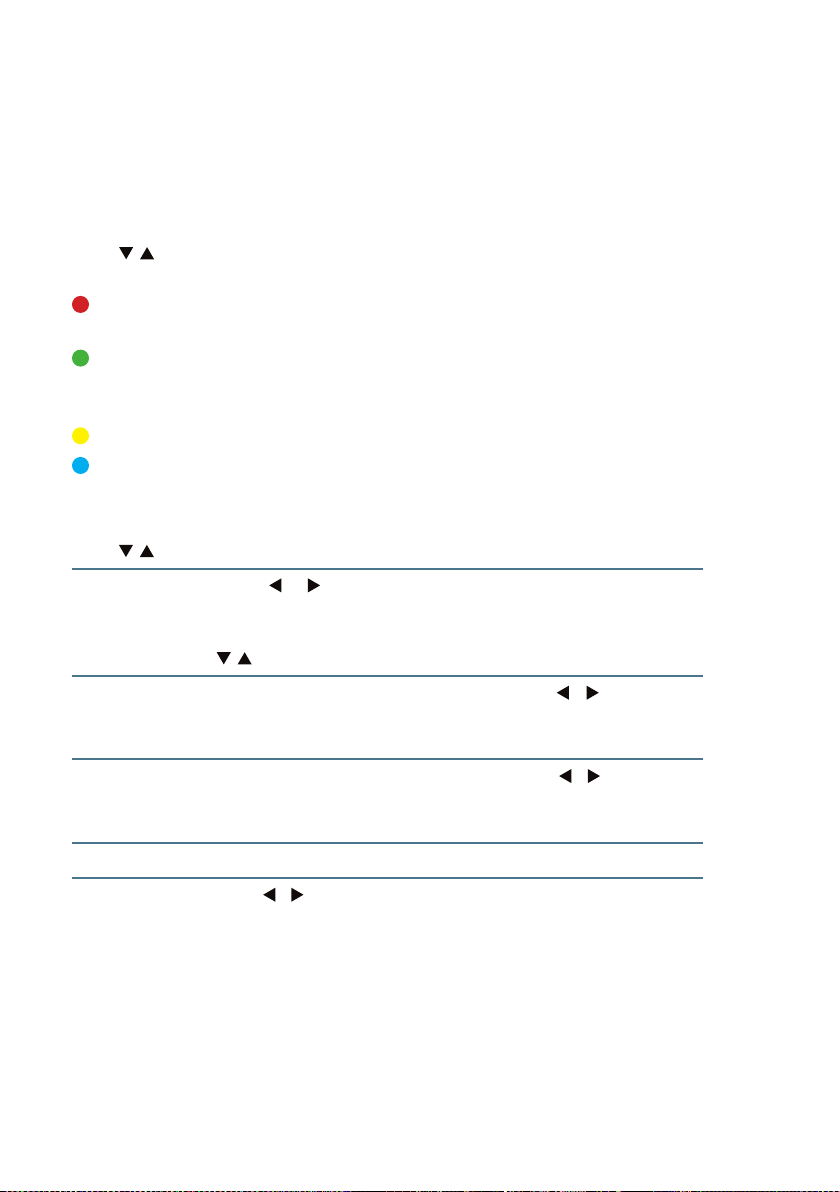
Press the yellow button (PVR) to go to the list of recordings. Already made
recordings are marked with white color and scheduled recordings are red.
Press / to select the recording from the list to edit it. Edit the list of recordings using the colored buttons:
Rename Rename planned or existing recordings. By default, the re-
cordings are saved under the name of the channel.
Block Available only for existing recordings. This function allows
you to assign a password to a recording which prevents
from playing it by unwanted people.
Delete Delete the selected recording.
Add recording Plan an another video recording.
Add a recording
Press / to select the type of setting you want to change.
Wakeup channel Press / to select the channel that broadcasts the
program you want to record. You can also press OK to
display the drop-down list that can be browsed using the
/ buttons.
Wakeup Date Set a date of a planned recording. Press / to highlight
a digit in the date you want to change, and then enter
anew one by using the numeric buttons.
On tim e Set a time for a planned recording. Press / to highlight
adigit of the time you want to set, and then enter a new
one by using the numeric buttons.
Duration Set a duration of a recording using the numeric buttons.
Timer mode Press / to set the recording mode. Recording – a single
recording; Cyclic recording – a recording repeated regularly.
Operation
25
Page 26
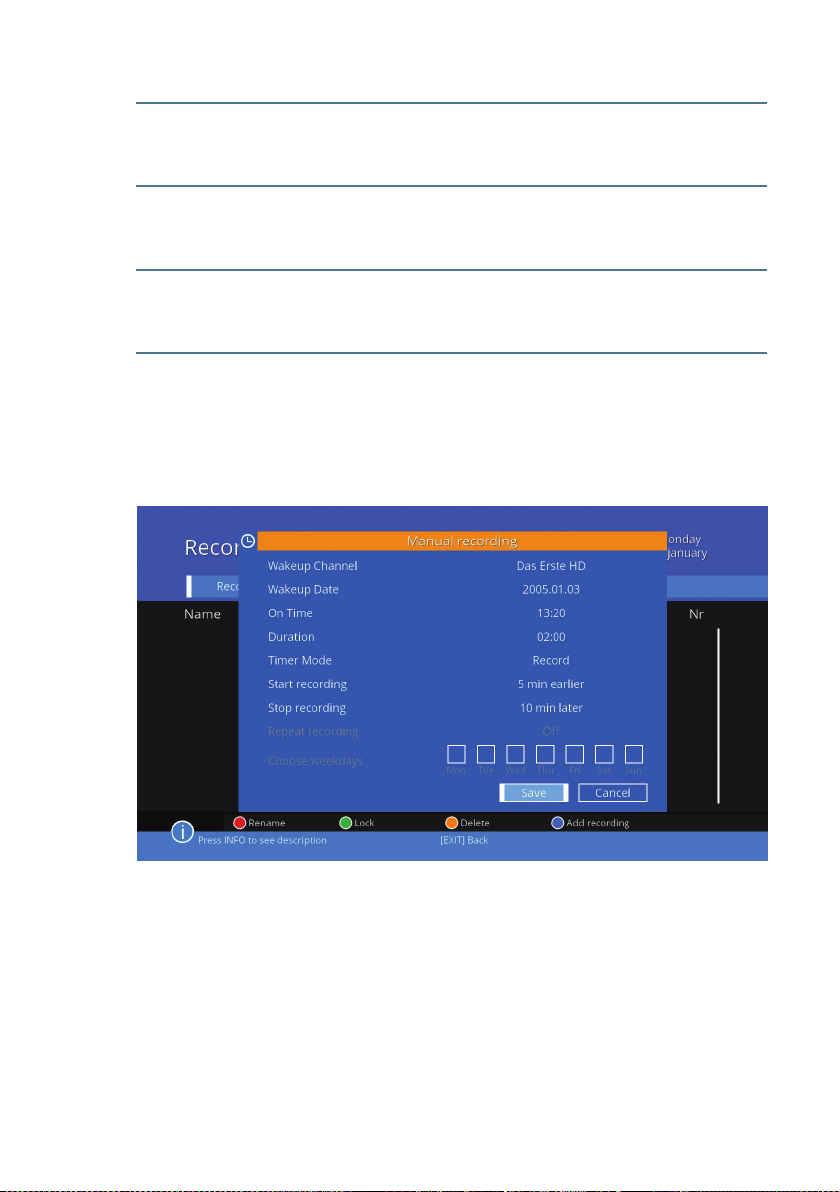
Start recording Available if the mode is set to recording. Set the
number of minutes before the scheduled program
for the receiver to start recording (from 0 to 30).
Stop recording Available if the mode is set to recording. Set the
number of minutes after a scheduled program for
the receiver to stop recording (from 0 to 30).
Repeat recording Available if the mode is set to cyclic recording.
Recording can be repeated Daily, weekly or several
times a week.
Choose weekdays available if cyclic recording mode is selected.
Highlight a day and press OK to select a day of the
week on which the recording is to be repeated. If you
select few days, the receiver will ask you if you want
to change the mode to repeat a few times a week.
26
Page 27
Recording
To make recording possible, connect the USB drive to the receiver. The recording time depends on the size of the USB memory. In a viewing mode, recording directly from the remote control can be turned on by pressing •REC.
The receiver will ask „Do you want to stop the recording at the end of the
program?” With the EPG the receiver knows when the scheduled program
ends and can stop the recording. Select Yes if you want the receiver to end
recording at the right time or not, if you want to decide when to stop it. To
stop the recording, press the STOP button and conrm it selecting Yes.
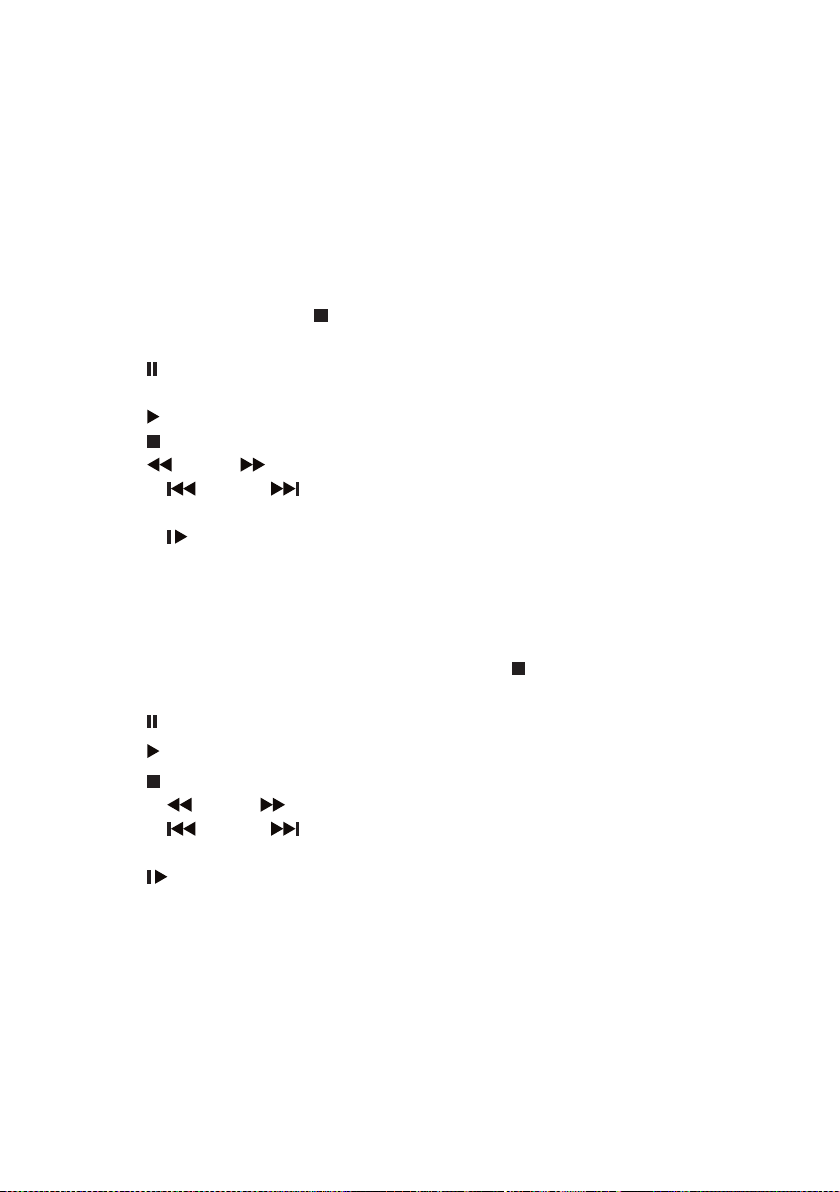
During recording, you can do the following:
• Press (PAUSE) to stop the program. The receiver will continue to record
the rest of the program.
• Press (PLAY) to play the program after a pause.
• Press (STOP) to stop recording.
• Press (REW) / (FF) to rewind and play fast forward.
• Use the (SKIP–) / (SKIP+) to go back and forward by a set amount
of time.
• Use the (SLOW) to slow down the playback of the program.
3.11 Time Shift
Time Shift allows you to stop playing the current program and resume it
later. When using the time shift function, you can not change the channel. To
do this, you must stop the function using the button (STOP). During recordind this function is unavailable.
• Press (PAUSE) in viewing mode to start the time shift function.
• Press (P L AY ) to resume the program.
• Press (STOP) to return to the playback of the current live program.
• Use the (REW) / (FF) to rewind and play fast forward.
• Use the (SKIP–) / (SKIP+) to go back and forward by a set amount
of time.
• Press (SLOW) to slow down the playback of the program.
3.12 Status
To view information about the receiver, its software and its current operation, press the STATUS (blue button).
Operation
27
Page 28
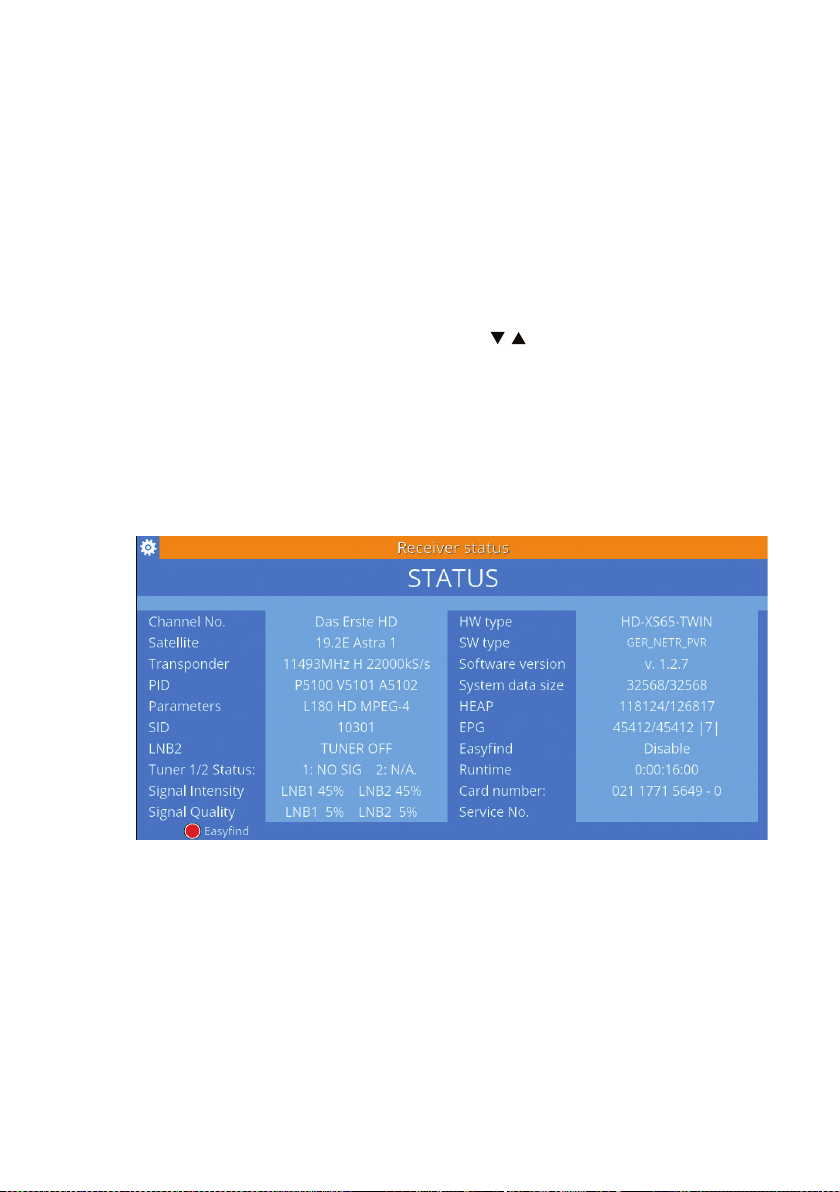
In this window, you can see which channel and which satellite and transponder is being read. There are also information about the both possible tuners:
status, signal strength and quality.
In the receiver status there is also available the EasyFind function. Press the
red button to turn it on or o.
3.13 AUDIO
Some channels provide transmission in several audio formats and in dierent languages. To select a dierent audio track, press AUDIO. The list of available audio tracks will be displayed. Use / , to select the desired audio
track and conrm your choice with OK.
3.14 Te letext
Some satellite channels provide a teletext. Teletext is a service that oers
a variety of textual information, usually on the news from the world, sport,
weather and TV program. Access to teletext can be obtained via the TEXT
28
Page 29

button. Use 0-9 to enter the number of the page you want to view. Colored
buttons on the remote control allow you jump to a specic page immediately, as indicated at the bottom of the teletext. Use / to select the previous
or next page. Press EXIT or TEXT to exit.
3.15 Subtitles
Some channels provide subtitles. Press SUB-T while watching to see a list of
available subtitles. Select subtitles using / and conrm your choice with
OK. Press EXIT to exit without making changes.
Operation
29
Page 30
Menu
Read this chapter to learn how to use the menu of the receiver, and setbthe
receiver to t your needs.
4
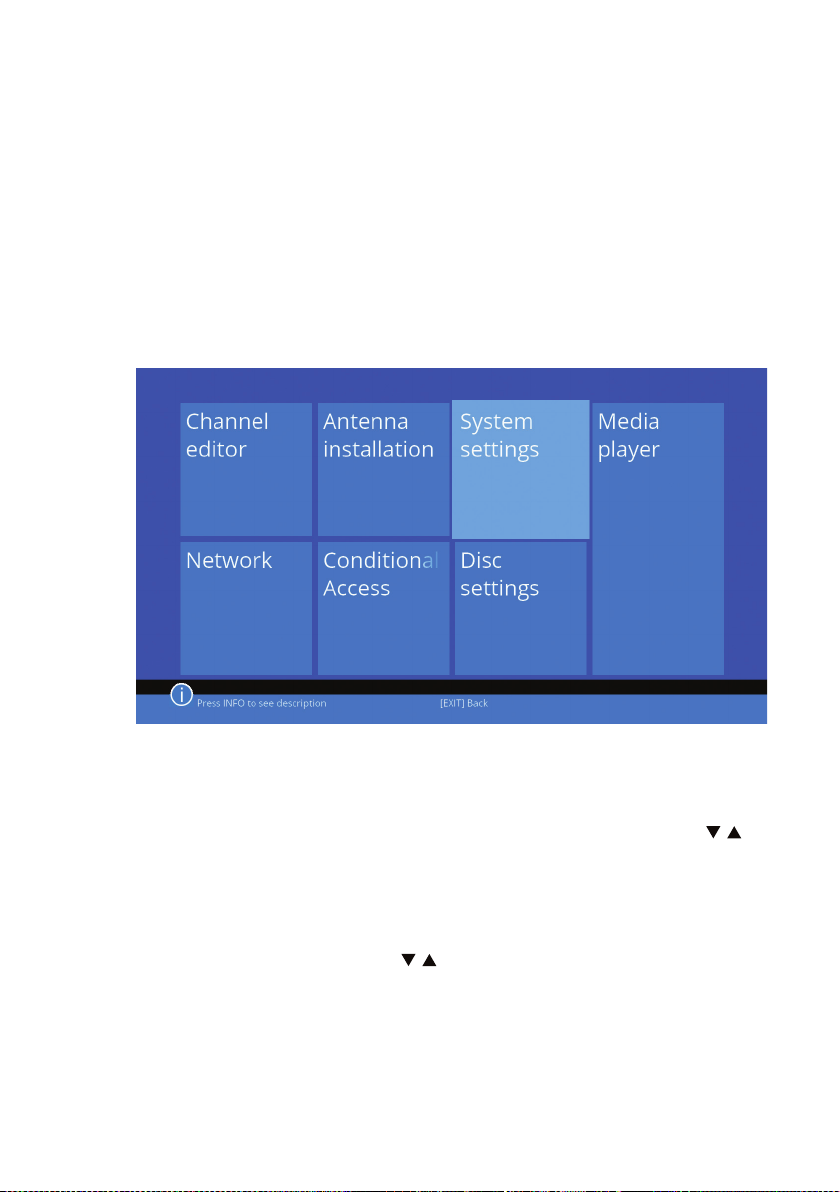
4.1 Main menu
To access the main menu, press the MENU button while in the viewing mode.
Use the cursor keys to navigate through the menus. Use the OK button to select the submenu. Press EXIT or MENU to return to the previous screen.
30
4.2 Edit Channels
Select Edit channels using the cursor keys and press OK to enter. Use / , to
highlight the selected submenu and press OK to enter it. Press EXIT or MENU
to return to the previous menu.
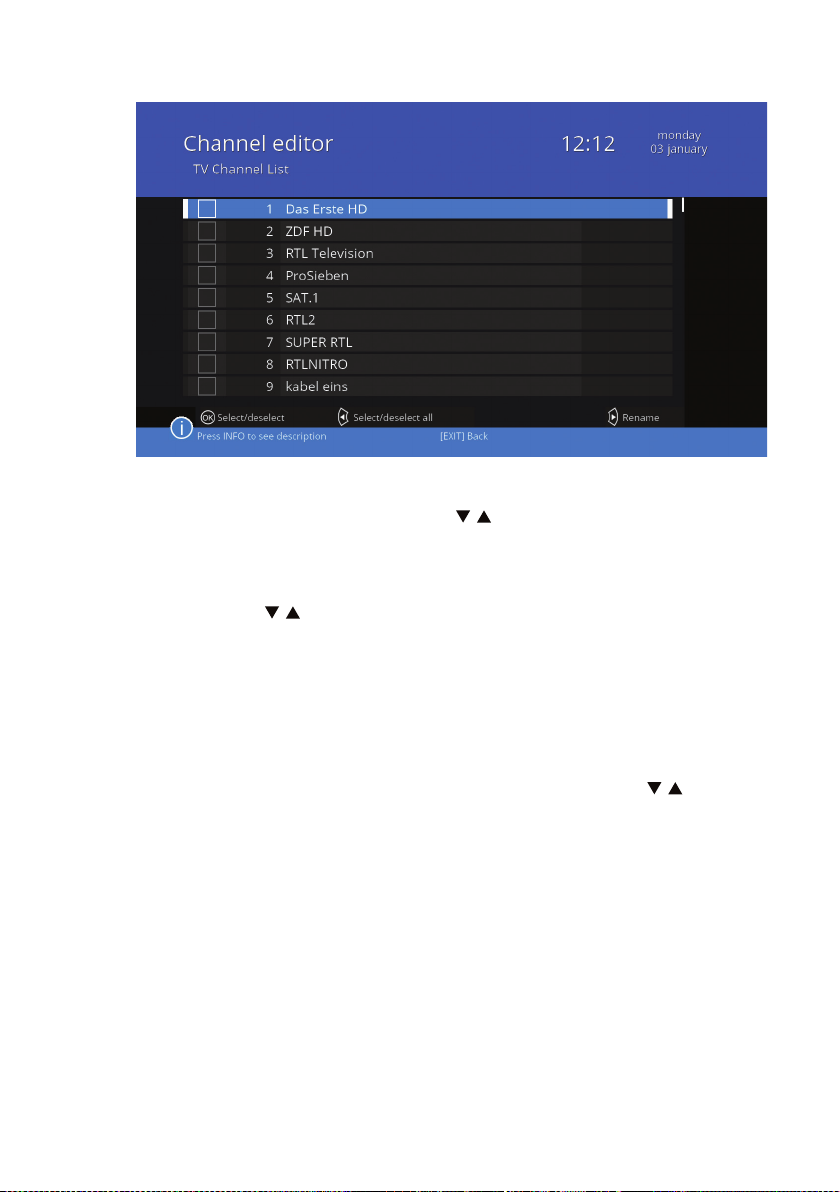
List of TV channels
Select a list of TV channels with / and press OK to enter. In this menu you
can manage the list of channels.
Page 31
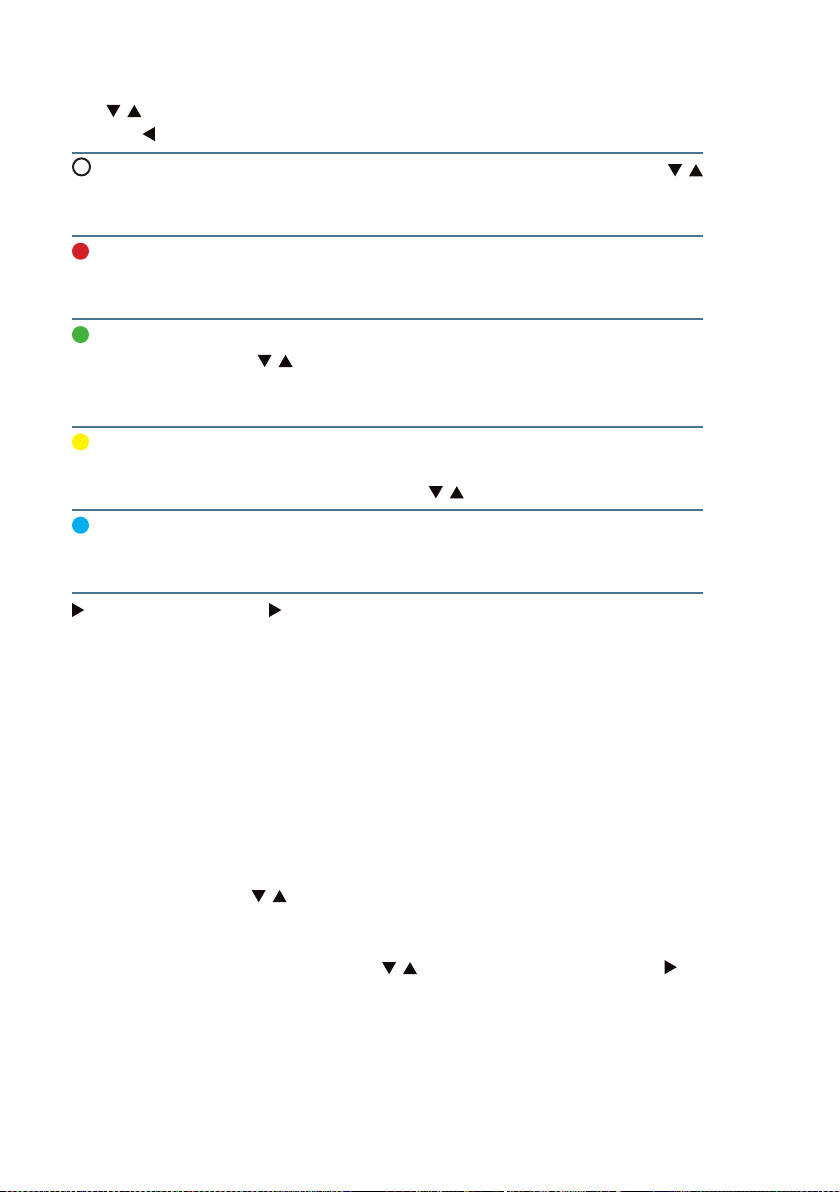
Use / to select the channel you want to select, and then press OK. You can
also use to select or deselect all channels.
Favorites Use the WHITE button on the remote control. Then use /
to select the category you want to assign to a channel and
press OK.
Lock You can lock selected channels so that it can be viewed
only after entering the code – the red button on the remote
control (default password: 0000).
Skip Channels will be marked to skip when changing channels
with / . Despite this, they will be still accessible from the
Channel List. To select the channels to be skipped press the
green button.
Move To activate the move function, press the yellow button. You
can then move selected channels and change the order of
the channel list using the / buttons.
Delete Press the blue button to activate the Delete function. The
selected channel will be deleted from the list. Select Yes to
save the changes or No to discard them.
Rename Press to switch to the channel name change. After
entering the new name, save the changes by pressing the
BLUE button on the remote control.
When you exit the menu after modifying the list, conrm your choice selecting YES, if you want to save the changes or select NO to discard them.
List of radio channels
Managing the list of radio channels is the same as it is for the list of television
channels.
Favorites
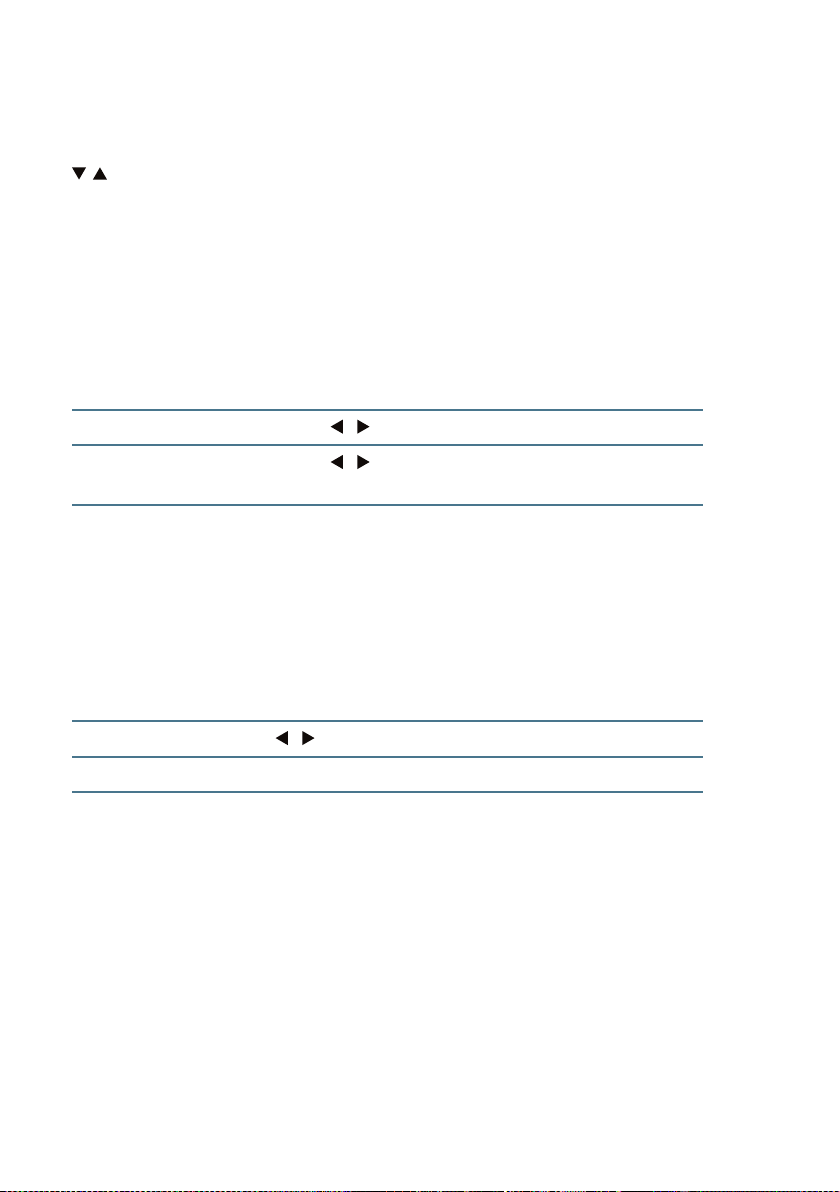
Select Favorites – use / and press OK to enter. In this menu you can manage groups of favorite channels.
Groups of favorites are created by default. They are movies, music, news, etc.
However, you can rename groups. Use / to highlight a group and use , to
change the name of your favorite channels. After entering a new name, press
Menu
31
Page 32
BLUE to save the changes.
To edit a group, rst highlight it using / and then select OK. A group can
be modied only if it has already channels assign. Select the channel that you
want to modify and press OK.
To move the channel in the order of the list, press the YELLOW button, and
then set it with / .
To remove a channel from the list, press the Blue button and conrm your
choice by selecting YES and clicking OK.
When you exit the menu after modifying the list, conrm your choice selecting YES, if you want to save the changes or select NO to discard them.
Delete all
Use this function to delete all channels. Select Delete all with / and press
OK. Select Yes to conrm your choice or NO to reject it.
The Delete all permanently removes all channels from the receiver and you
can not exit the menu mode without rescannig for channels.
4.3 Antenna instalation
Select Antenna Installation using the cursor keys and press OK to enter. In
this menu, there are advanced methods of installing the antenna and scanning for channels. They have been described in detail in the introduction in
Chapter 2. Installation (p. 8-19).
32
Page 33
4.4 System settings
Select System Settings using the cursor keys and press OK to enter. Use
/ to highlight the selected submenu and press OK to enter it. Press EXIT or
MENU to return to the previous menu.
Receiver Information
Here you can nd information on the model of the receiver and its software.
Upgrade by USB
The software and a channel list can be updated using a USB drive. First
upload the software le or a list to the drive.
Update mode With / to select what you want to update.
Update le With / select the le with the new software or a
list of channels.
Start Press OK to begin the update. NOTE! Do not
remove the USB drive during the update. Channel
list and favorites will be deleted and the settings
will be restored to default.
Save a backup copy of the program
In this menu you can save on a USB drive a software and the channel list as
backups.
The scope of data With / to select the type of data you want to save.
File Displays name of the le.
Start Press OK to start recording. NOTE! Do not remove the USB
drive while writing.
Video and audio settings
Using this menu, you can adjust the settings to the TV. The following options
that are available:
Menu
33
Page 34
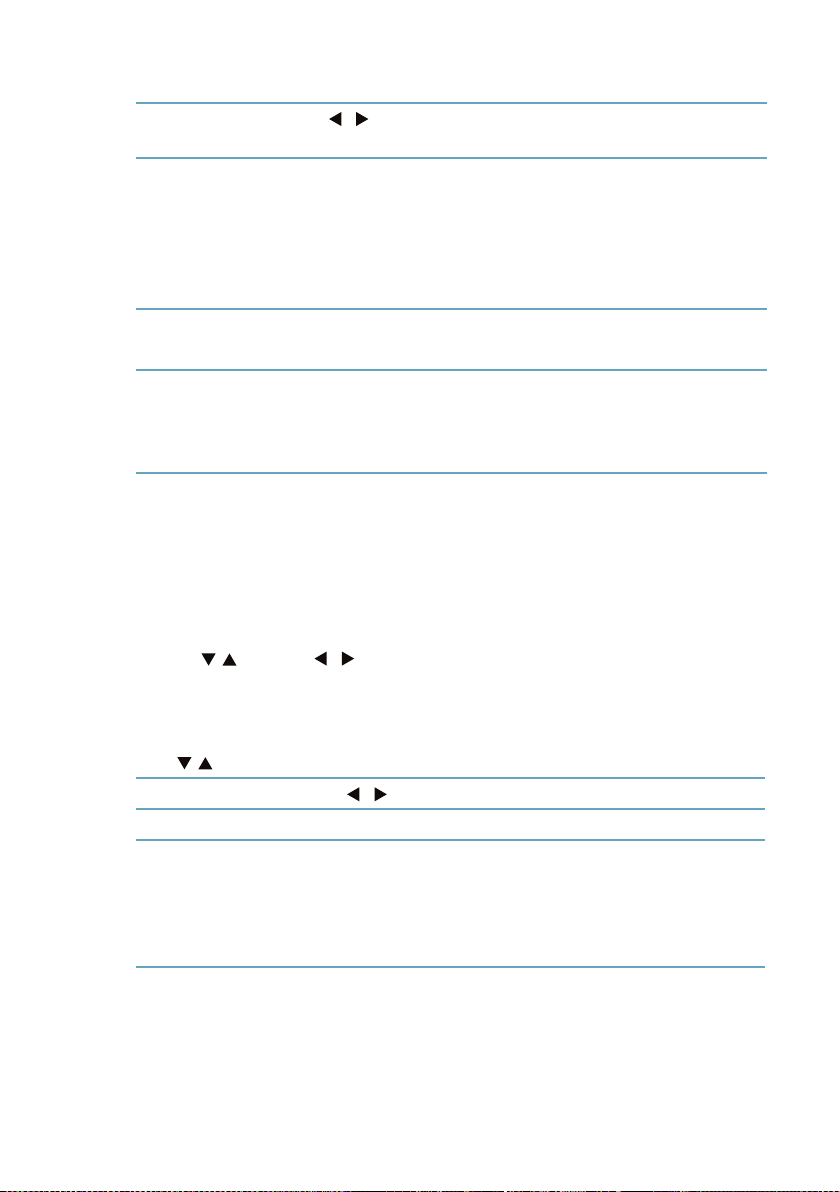
Resolution With / switch between the values from 480i to 1080p.
Apply a resolution that ts your TV.
Format Use this feature to select the aspect ratio and the prefer-
red method of conversion. Available options are: Auto
(automatic detection of aspect ratio), 4: 3 PS (widescreen
image shows the full 16: 9 to 4: 3 TV), 4: 3 LB (black bars
on top and below the picture) and 16: 9 (use this setting
for TVs 16: 9).
Exit Video Use this function to select how to connect to a TV. Select
CVBS or RGB.
Digital Audio
Output
After making the changes, you will be asked to conrm them. Select YES if
you want to use them, or NO to discard them.
Choose between PCM and Bitstream. If the connected
audio device does not have a Dolby Digital decoder, set
this to PCM, otherwise the Bitstream.
Display Settings
In this menu, you can adjust the display settings of the receiver, such as brightness, contrast, saturation, hue and sharpness. To change the value, select
it using / and use / to adapt it to your needs.
Time settings
In this menu, you can set your region and time zone. Select Settings Time
with / and press OK.
Region With / select your region.
GMT Usage Set region, User or O.
GMT Zone This function allows you to select the time zone and is
only available when GMT Usage is enabled. The range
is from GMT -11: 30 - 12: 00 and is increased by half an
hour. Cities located in the zone are displayed at the
bottom of the screen.
34
Page 35
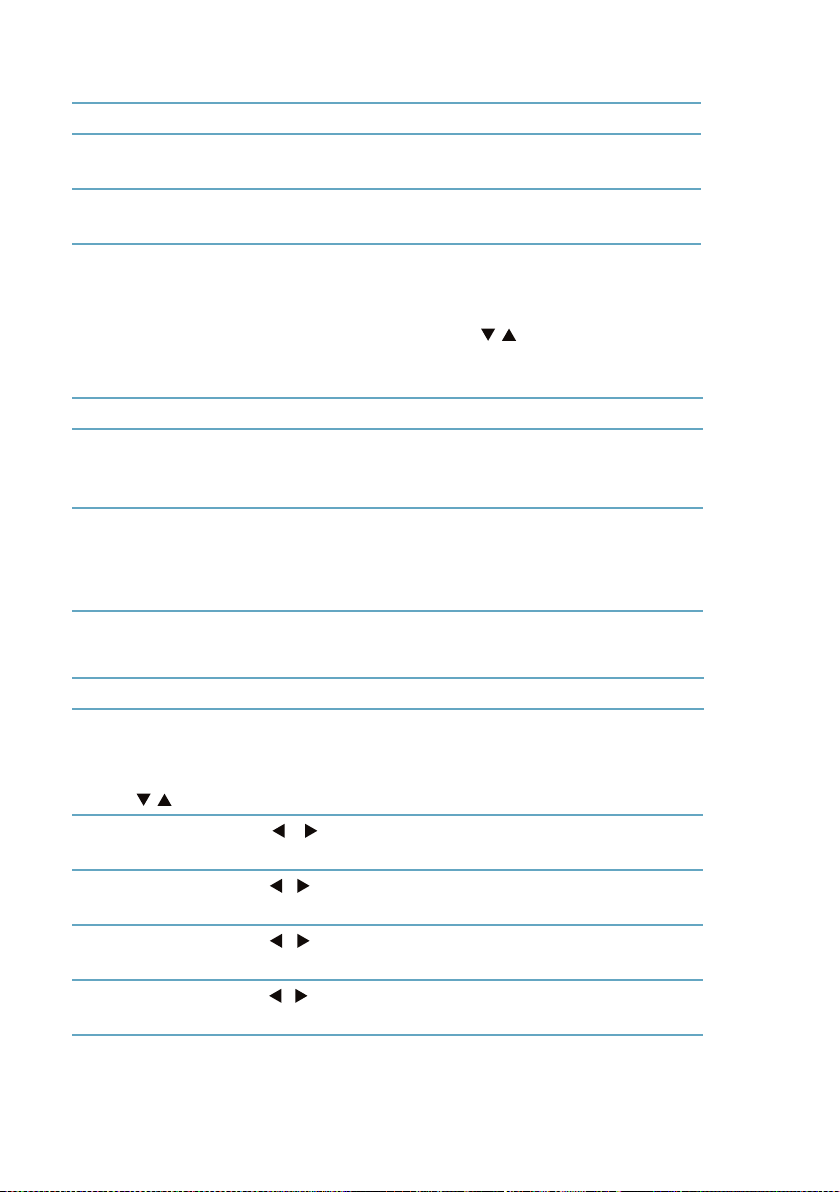
Summer time Select On to add an hour during daylight saving time.
Date Date and Time settings are available when the option
GMT Usage is disabled. With 0-9 to enter the date.
Time Date and Time settings are available when the option
GMT Usage is disabled. Use keys 0-9 to enter the time.
Parental lock
In this menu, you can protect access to the menu and/or channels with a
password. You can also set a new password. Use / to select Parental and
press OK. You will be prompted to enter the password. (Default password:
0000).
Menu lock Locks the main menu. Set to Enable or O.
Channel lock Choose between: Enable or O. When locked,
blocked channels will be available after entering a
password.
Age lock Optional function. Choose between: O, for 7 years,
12 years, 16 years, 18 years. Age-restricted channels
will be displayed only after entering the password
(depending on the broadcaster.)
New password Use the 0-9 buttons to enter your new password (4
digits).
Conrm password Re-enter the password.
Language Settings
In this menu, you can set your language preference. Select Language settings with / and press OK.
Language settings
The rst audio
track
The second
audio track
Subtitle language
Menu
With / select the language for the menus and descriptions of the functions displayed on the screen.
With / select language rst audio track.
With / select language other audio tracks.
With / to select the language for teletext (if available).
35
Page 36
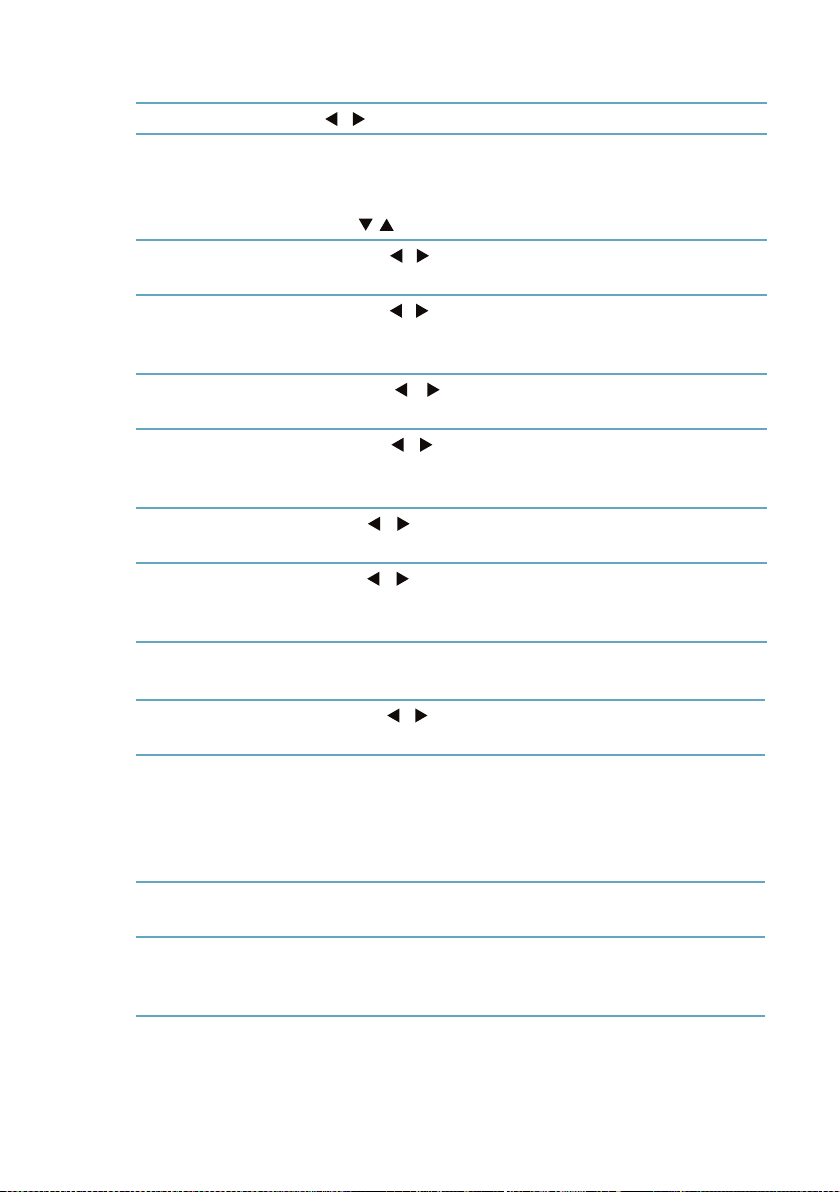
Teletext Use / to select language of the teletext (if available)
OSD Settings
In this menu, you can change the settings for the OSD, which is the menu and
other items displayed. Use / to select OSD Settings and press OK.
Display of
subtitles
Delay of OSD Use the / to set the time after which the program
Transparency of
OSD
Screen saver Use the / to select whether you want the screen
Playback progress bar
Extended channel
list (OK button)
Use the / to set display to Manual, O or On.
information on the screen disappear. The range of
functions is 1-10 seconds.
Use the / to set the transparency of the menu
(O-40%).
saver to appear after prolonged inactivity while
using the menu.
With / select whether you want to see the playback progress bar: at the top or bottom of the screen.
With / enable or disable the extended list. In the
expanded list, you can see a preview of the EPG, which
channels are encoded and recording.
EPG settings
36
Style of EPG Use the / select schedule or newspaper view (for
a detailed description see p. 22.)
EPG channel
switching
EPG recording on
a USB drive
Clear the
contents of the
EPG buer
This option is available in newspaper view. When
switching to the detailed view of the EPG another
channel, the receiver starts playing. If this feature is
disabled, you can view the EPG for other channels
without switching to it.
Enable this feature if you want the EPG information
are stored on an external USB drive.
Clear saved data on USB disk.
Page 37

Others
Automatic power o With the / buttons switch between the values of
timing and O. When this feature is enabled, the receiver turns o after the preset time since last use of
the remote control or the buttons on the unit. Disable
this feature to avoid automatic shutdown.
Clock on display With the / buttons set the clock on or o. If you
set the clock to be displayed all the time, the receiver
does not go into the actual standby mode (not „turn
o”), during which the energy is saved. Despite the
o the TV will consume more electricity.
Alternate remote With the / buttons enable or disable the ability
to support the receiver using an alternative remote
control.
Preview video in
the menu
With the / buttons enable or disable the video
preview, or to what is currently being played in the
menu.
Factory settings
This function allows you to reset the receiver to factory settings, erases all
settings made by the user and scanned channels. It restores the receiver to
the state it was right out of the box. Use / to select Default Settings and
press OK. Then conrm the action by selecting Yes.
4.5 Media player
Select Media player with the cursor keys and press OK to enter. Use / to
highlight the selected submenu and press OK to enter it. Press EXIT or MENU
to return to the previous menu.
This function allows you to play dierent les from a connected USB drive.
Menu
37
Page 38
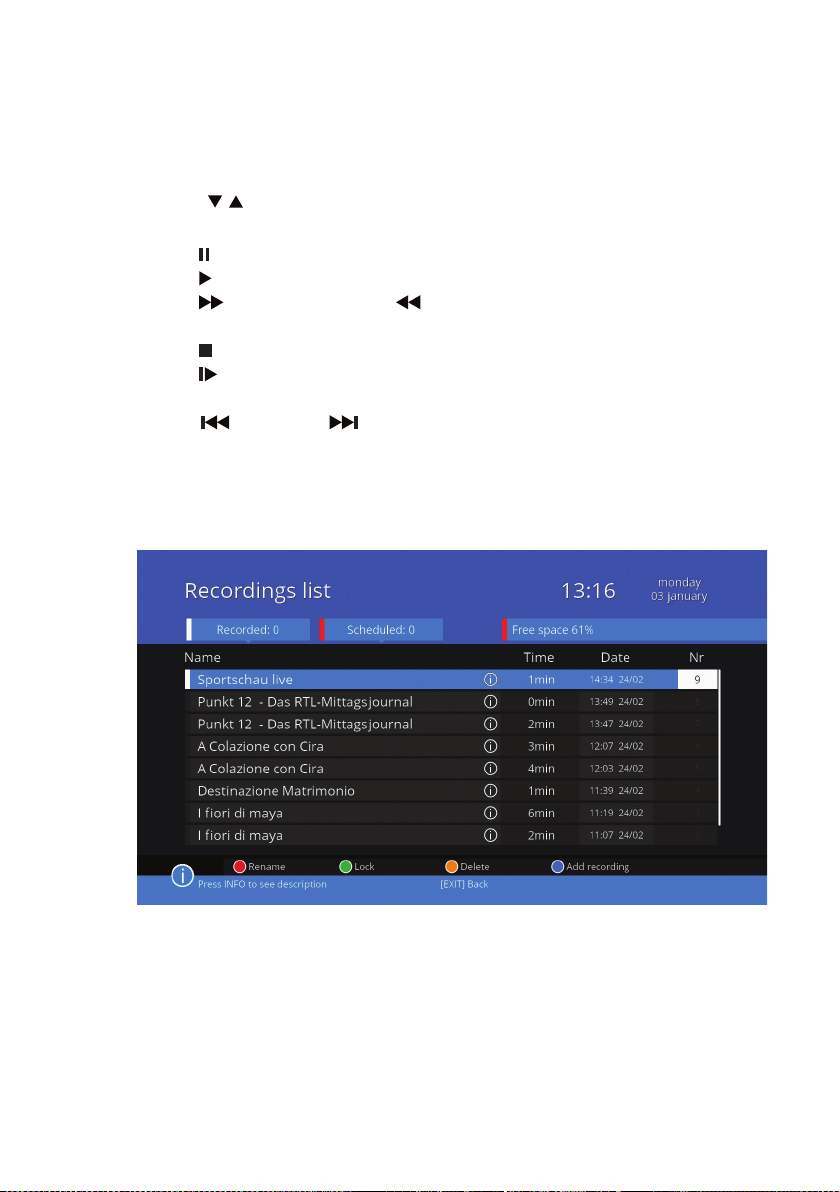
Your recordings
In the menu you record programs already recorded are displayed in white,
and scheduled (timer) in red.
Use the / buttons to highlight the selected recording and press OK to
start play. During playback, you can do the following:
• Use (PAUSE) to stop playback.
• Use (PL AY ) to resume playback at normal speed.
• Use (FF) to play faster or (REW) button to rewind. Press the button
as many times as you need to set the desired speed (x2, x4, x8, x16, x24).
• Use (STOP) to stop playback and return to the list of recordings.
• Use (SLOW) to slow down playback. Press the button as many times as
you need to set the desired speed (x1/2, x1/4, x1/8).
• Use (SKIP–)lub (SKIP+) button to jump to the next or previous
track.
After playback, the unit will automatically return to the list of recordings. You
can manage the list of your recordings using the colored buttons:
38
Page 39
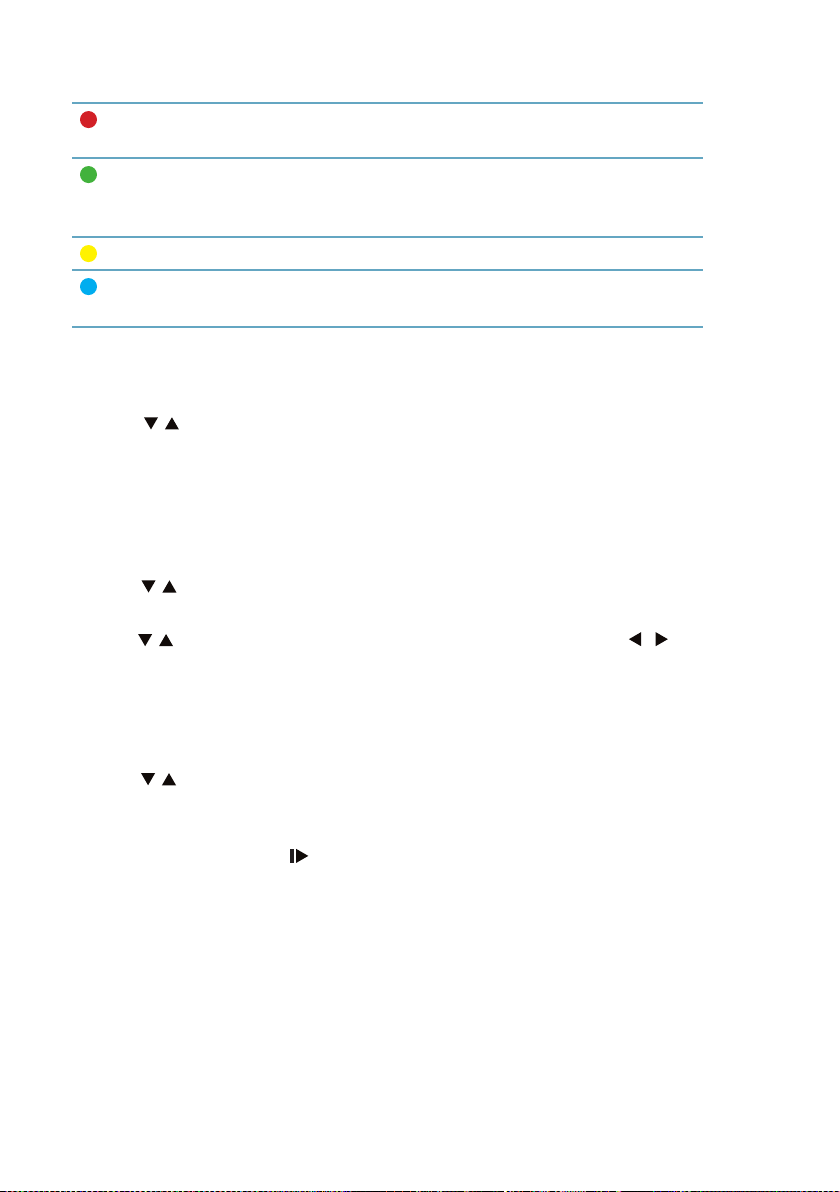
rename
lock
delete
add
recording
Using the red button, go to the window to rename the highlighted record.
Using the green button lock the recording so that wat-
ching it would be possible only after entering the
password. (The default password is 0000)
Remove unwanted recording.
Plan your next video recording. A detailed guide to planning of the recording is located on page 26.
Your videos
In this menu, you can play movies stored on a USB drive.
Use the / buttons to highlight the selected recording and press OK to
start play. During playback, you can perform the same operations as described in the preceding paragraph of your recording.
Your photos
In this menu, you can view images stored on a USB drive.
Use the / buttons to highlight the selected image and press OK to start
to show.
Use the / buttons to switch to the next or previous image. Using / you
can rotate the image clockwise or counterclockwise.
Your music
In this menu, you can play music stored on a USB drive.
Use the / buttons to highlight the desired track and press OK to start to
play it.
During playback, you can perform the same operations as described in section above apart from the (SLOW) action.
Using the YELLOW button, you can set the repeat mode from the list on one
of the three: repeat, random, one after the other.
Menu
39
Page 40
4.6 Network / APP
Select Network / APP using the cursor keys and press OK to enter. Use / , to
highlight the selected submenu and press OK to enter it.
Network Settings
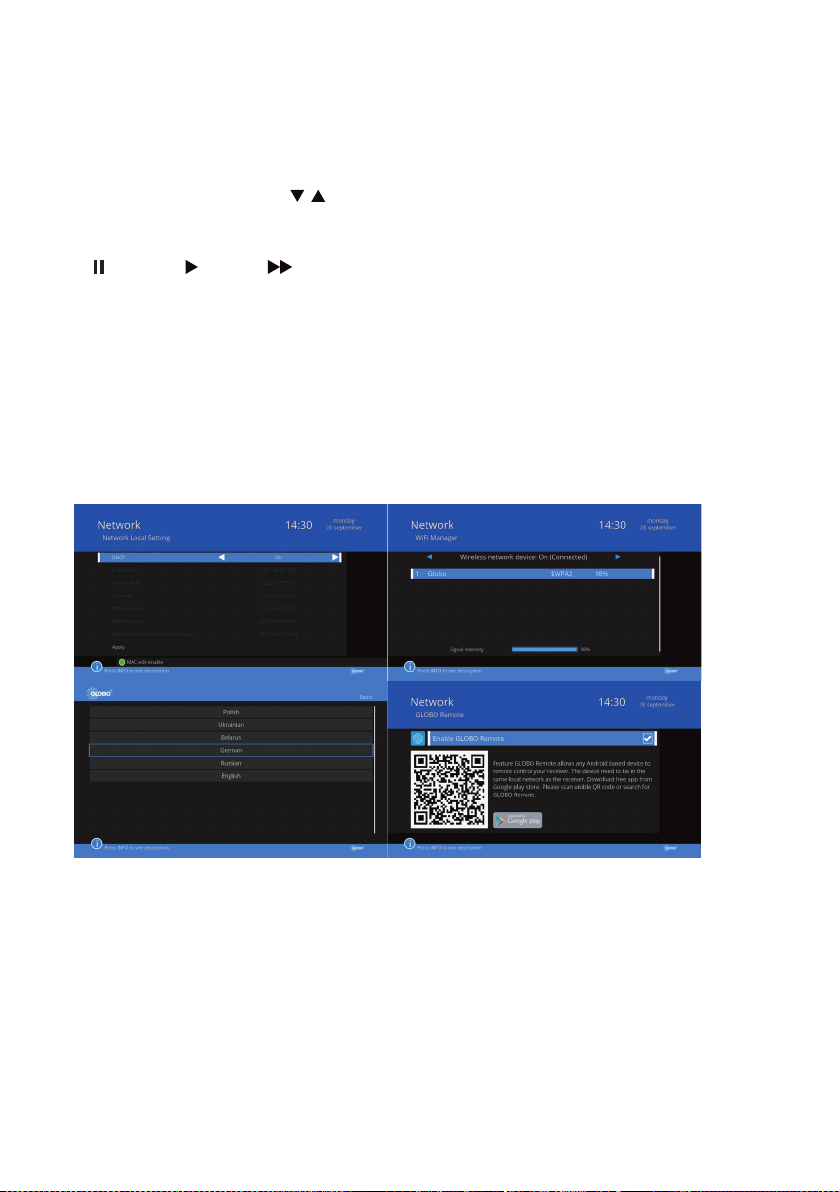
Internet connection can be automatic – via DHCP or set manually. To set the
connection manually, set DHCP to O. Then, using the number buttons on
the remote control, enter the IP address, subnet mask, default gateway, DNS
Primary and Alternate. Go to Conrm and press OK.
Wireless Network Settings
To connect to a wireless network, you must rst equip it with a wireless network card. This is possible by connecting a Wi-Fi card via the USB port. After
connecting the adapter the receiver displays information about the device
is detected, scanning for networks and connecting. Available networks will
be displayed in the list. You can refresh this list using the RED button. To
connect to your network, highlight it with / and press OK. For a secure
network, enter the appropriate password. Type the password, moving around the virtual keyboard using the / and / and selecting characters by
pressing OK. You can select the function below, the „Show key” if you want
the entered password to be visible. After entering the correct password, the
receiver connects to a wireless Internet network.
Update over the Internet
In this menu, you can update the software of the receiver via the internet.
URL Press OK to enter the name of an Internet address, which will be in-
stalled updated software. If you do not know the proper address,
you will not be able to use this function. Type addresses moving on
the virtual keyboard using the / and / and selecting characters by pressing OK. Select the blue button to nish entering or go
to „Save” and press OK.
Start Start Press OK to begin the update. The receiver will start checking
the protocol. If you nd software to download, start the update. You
can interrupt the download updates using the YELLOW button.
40
Page 41
Internet Radio
When the receiver is connected to the internet you can play Internet radio stations. Internet Radio menu displays a list of available radio stations. To navigate through the list, use the / and OK to play. Some radio stations provide
a number of radio channels. Select the channel you want to listen to and
press OK. While listening to Internet radio, you can not use the buttons such
as (PAUSE), (PL AY ), (FF) etc.
Globo Remote
The Globo Remote allows you to remotely control the receiver via any device based on the Android operating system. This device must be in the same
local network as the receiver. Download the free app from the Google Play
store. To do this, scan the QR code appears, or search for an application called Remote GLOBO.
Menu
41
Page 42

4.7 Access card
Select access card using the cursor keys and press OK to enter. Use / to
highlight the selected submenu and press OK to enter it. Press EXIT or MENU
to return to the previous menu.
Status subscription
In this menu, you can check the status of your subscription and the right to
receive the channels.
Change CA PIN
In this menu, you can change the PIN CA. First, enter the current PIN, and
then double-new PIN.
Parental control
In this menu, you can set the type of restrictions on the availability of programs. Use the / buttons to select an age limit and press OK. To make
changes to the CA must provide a valid PIN.
About Conax CA
Here you will nd information about the card number and, optionally, other
additional information.
42
Messages
In this window, you can view the messages that your satellite TV provider can
send information on services and payments.
4.8 Disk Settings
Select the USB drive using the cursor keys and press OK to enter. Use / , to
highlight the selected submenu and press OK to enter it. Press EXIT or MENU
to return to the previous menu.
Information on USB drive
This menu displays the relevant information on the USB device. Select infor-
Page 43
mation about the USB disk drive Settings menu and press OK.
You can check out what is the size of the drive and how much free space is
left on it. Additionally, you can format the disk, using the BLUE button. Conrm the action by selecting Yes.
Connect the USB as on the screen
Displays information about how to properly connect the USB drive to the receiver. The rst is a USB input for additional devices such as a network adapter. While the other is used to connect the drive to record.
Recording Settings
In this menu, you can set the default method of recording.
Jump With the / buttons switch between time-valu-
es (from 30 sec. To 30 min.) Over the scroll is used
during playback and time shift with the (SKIP–)
or (SKIP+),
default start of a
recording
default end of
the recording
Do not show
the details in
the recording
window
The default mode
of recording
Set the number of minutes before the start of the
program the receiver starts recording.
Set how many minutes after the end of the program
the receiver stops recording.
Press OK to enable or disable the recording of detailed
planning available EPG view.
If you turn o the window showing the details of the
recording, you can set the default mode for the planned recording.
Safely remove USB drive
Use this function to safely eject the USB device before manually removing it
from the slot in the receiver. This will prevent the risk of data loss. Use / to
select Safely Remove USB drive and press OK.
Menu
43
Page 44

Troubleshooting
There are various reasons for the malfunction of the receiver. After you apply the following tips, if the receiver still does not work properly, contact a
professional service. Do not open or disassemble the receiver. This can lead
to a dangerous situation and the warranty will be void.
Problem Possible Cause Suggested solution
5
No power
– the LED diode
is o
No signal
found
No picture The picture format is
Channels not
found
The power cord has
not been well connected
The satellite TV cord
has not been well connected
The cord is damaged Change the cord
set wrong
HDMI is set for higher
resolution then available in a TV
The satellite dish is not
adjusted correctly
Searching parameters
are incorrect
Plug the power cord into
the outlet tightly and turn
on the power; if there is
no power still, turn o the
power again, and turn it on
in 5-10 minutes
Plug the satellite TV cord
correctly
Set the correct TV format
Choose another HDMI resolution.
Adjust the aerial; make sure
the signal strength indicator is blue and the quality
indicator - green
Enter the correct frequency
parameters/ bands
44
Page 45

Problem Possible Cause Suggested solution
No response to
remote control
Wrong audio
track/subtitles
No sound The receiver is in the
Serious
distortion of
picture
The receiver
turns o automatically
Receiver is o Plug in the receiver and
Remote control is not
aimed correctly
Front panel is obstructed
Remote control batteries are exhausted
Batteries are plugged
incorrectly
To big distance Use the remote controller
Wrong language is set Change the language in the
mute mode
The volume is too low Adjust the volume
The cord is plugged
incorrectly
The signal is disrupted Plug the cord correctly
The automatic power
down function is on
turn it on
Aim a remote control towards the front panel
Remove the obstacle
Change the batteries
Plug the batteries correctly
within closer range
menu
Cancel the mute with the
button on the remote control
Plug the cord correctly
Turn the automatic power
down o
Troubleshooting
45
Page 46
Safety Precautions
6
ATTENTION:
Warning: Do not use this receiver where contact with or immersion in water
is a possibility. Do not use near ower vase, wash bowls, kitchen sinks,
laundry tubs, swimming pools, etc.
Warning: Do not put the candle or lamp stand on the cabinet; otherwise,
there is the danger of re.
Warning: The unit should be connected to a power supply only of the type
described in the operang instrucons or as marked on the unit. If you are
not sure of the type of power supply (for example, 120 or 230 V) to your
home, consult your local dealer or local power company.
Warning: This product install diodes. Do not open the cabinet or touch any
parts in the inner mechanism. Consult your local dealer for technical service
if the opening is required.
Note: To ensure proper use of this product, please read this User manual
carefully and retain for further reference.
Note: This product install diodes. Do not open the cabinet to avoid the unit
direct exposure to radiaon.
Unit Cleaning: Aer the unit power is turned o, you can clean the cabinet,
panel and remote control with a so cloth lightly moistened with a mild
detergent soluon.
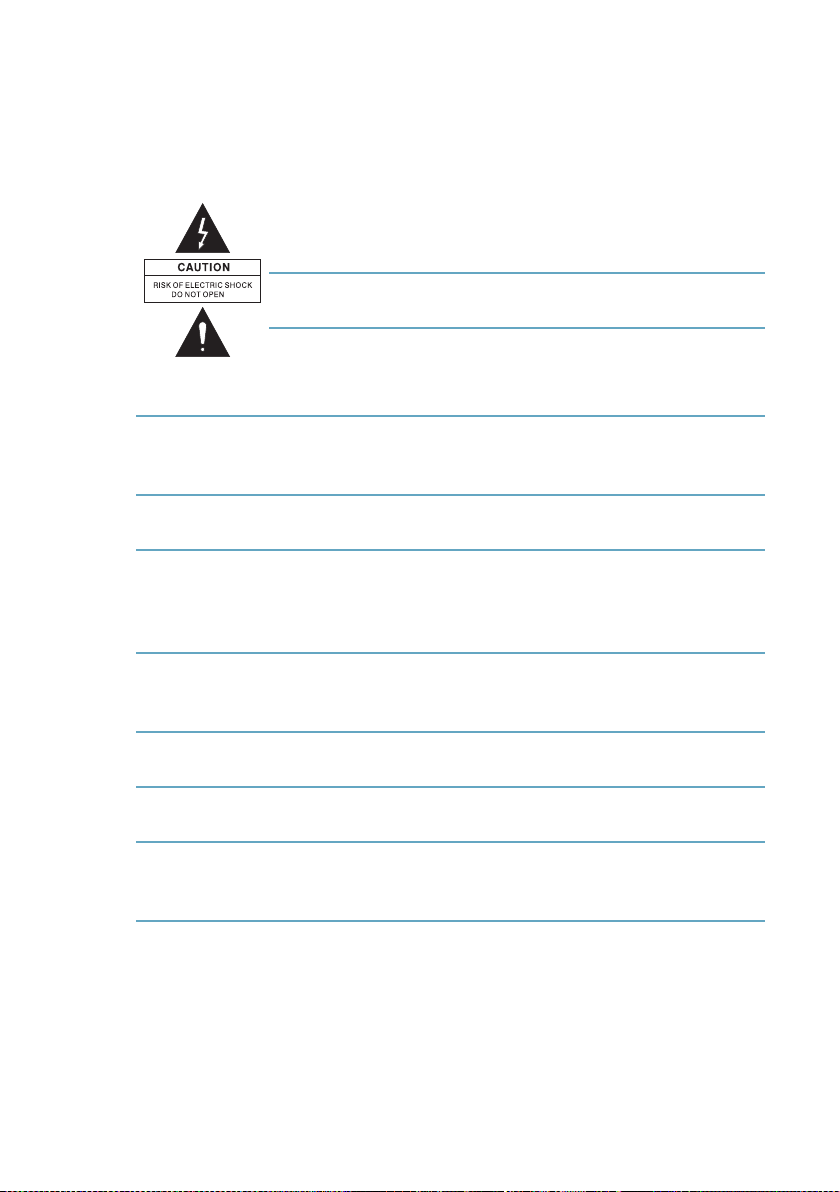
Warning: The lightning ash with arrowhead symbol,
within an equilateral triangle, is intended to alert the
user to „dangerous voltage” and to prevent from a risk of
electric shock.
Warning: To reduce the risk of electric shock, don’t open
the cabinet. Refer servicing to qualied personnel only.
Warning: The exclamaon point within an equilateral
triangle is intended to alert the user to important operang
and maintenance (servicing).
46
Page 47

Aachments: Never add any aachments and/or equipment without the
manufacturer consent; as such addions may result in the risk of re,
electric shock, or other personal injury.
Locang: Slots and openings in the cabinet are provided for venlaon to
protect it from overheang. Do not block these openings or allow them to
be blocked by placing the receiver on a bed, sofa, or other similar surface,
nor should it be placed over a radiator or heat register.
Power-Cord Protecon: Place the power-supply cord out of the way, where
it will not be walked on. Please take special aenons to cords at plugs,
convenience receptacles, and the point where they exit from the unit.
Object and Liquid Entry: Never put objects of any kind into this receiver
through openings, as they may touch dangerous voltage points or short-out
parts that could result in a re or electric shock. Never spill any liquid on
the receiver.
Note: Moisture may be formed on the lens when the unit is suddenly moved
from a cold environment or an air-condion room to a warm place or
immediately aer a heater has been turned on or in a steamy or very humid
room. If the moisture forms inside the unit, it may not operate properly. To
correct this problem, turn on the power and wait about two hours for the
moisture to evaporate.
Parts Replacement: When the unit parts need to be replaced, user should
make sure the service technician use the replacement parts specied by
the manufacturer or having the same characteriscs as the original part.
Unauthorized replacement may put the unit In the risk of re, electric shock
or other hazards.
Safety Check: Aer all the maintenances and repairs are done, user is
required to request the service technician to conduct the overall safety
check to ensure the machine is In the proper condion.
Safety precautions
47
Page 48
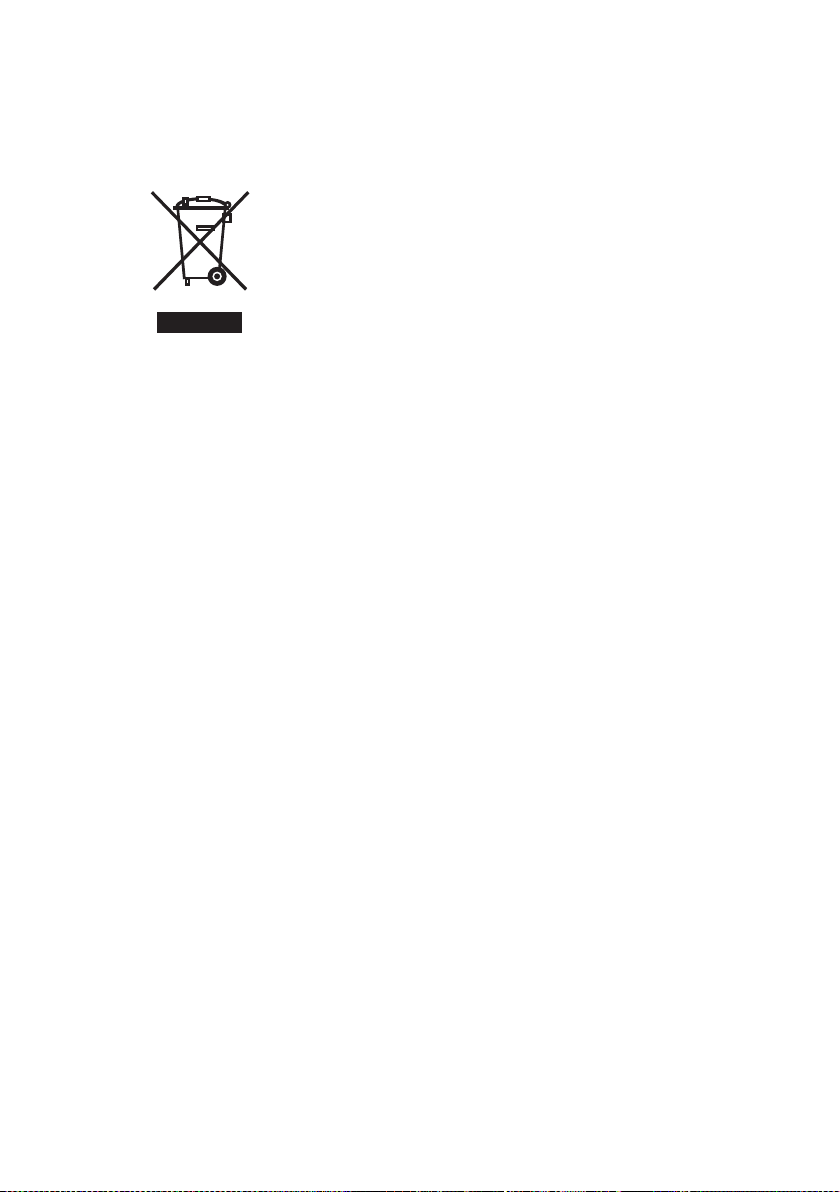
Environment Protection
Attention!
Your product Is marked with this symbol. It means that used
electrical and electronic products should not be mixed with
general household waste. There is a separate collection
system for these products.
Information on Disposal for Users (private households)
in the European Union.
Used electrical and electronic equipment must be treated separately and
In accordance with legislation that requires proper treatment, recovery and
recycling of used electrical and electronic equipment.
Following the implementation by member states, private households within
the EU states may return their used electrical and electronic equipment to
designated collection facilities free of charge*. In some countries* your local
retailer may also take back your old product free of charge if you purchase a
similar new one.
*) Please contact your local authority for further details. If your used electrical
or electronic equipment has batteries or accumulators, please dispose of
these separately beforehand according to local requirements.
By disposing of this product correctly you will help ensure that the waste
undergoes the necessary treatment, recovery and recycling and thus prevent
potential negative eects on the environment and human health which
could otherwise arise due to inappropriate waste handling.
Information on Disposal for Business Users
In the European Union. If the product is used for business purposes and you
want to discard It, please contact your dealer who will inform you about the
take-back of the product. You might be charged for the costs arising from
take-back and recycling Small products (and small amounts)might be taken
back by your local collection facilities.
In other Countries outside the EU.
If you wish to discard of this product, please contact your local authorities
and ask for the correct method of disposal.
7
48
Page 49

Technical Specication
Model: Digital Satellite Receiver DVB-S2
Display Type: LED, 4-digit, Keys 3, micro switch
Slots: Smart Card
Input frequency: 950-2150MHz
RF input connector: IEC 169-24, Female, 250mA
Input impedance: 75 Ω
RF loop connector: IEC169-24, Female, 250mA
Modulation: QPSK (DVB-S), QPSK / 8PSK / H8PSK /
:16APSK (DVB-S2)
Decoding: MPEG2 (MP @ ML), AVC / H.264 ([email protected])
Image resolution: 480i, 576i, 480p, 576p, 720i, 1080i, 1080p
Audio Decoding: MPEG-1, 2 Layer 1 & 2
I / O Connec tions: HDMI, SCART, coaxial digital audio, 2xUSB,
:Ethernet
Supply Voltage: ~ 230V / 50Hz
Power consumption: <10W
Stand-by power consumption: <0.5W
Operating temperature: 5 - 40 ° C
Relative humidity: <95%
Net weight: <0.5kg
Case dimensions: 180mm x 110mm x 35mm
8
Weight and dimensions are not absolutely exact values. Specications are subject to change (by manufacturer) without notice.
Technical specication
49
 Loading...