

Page 1

82C929
MAD16 PRO 16-Bit Audio Card
User's Manual
July, 1994
Version 1.0
Page 2

82C929 MAD16Pro Audio Card
Table of Contents
1. GETTING STARTED ..........................................................................................................1
1.1. ABOUT THE MAD16 PRO AUDIO CARD....................................................................1
1.2. MAD16 PRO FEATURE LIST.....................................................................................1
1.3. WHAT IS IN YOUR PACKAGE?....................................................................................2
1.4. SYSTEM REQUIREMENTS..........................................................................................2
1.5. DOCUMENT CONVENTIONS.......................................................................................2
1.6. LATEST INFORMATION .............................................................................................3
1.7. DEFAULT CONFIGURATION AND OVERVIEW OF SOUND CARD...................................3
2. INSTALLING THE SOUND CARD AND RELATED SOFTWARE................................5
2.1. INSTALLING THE SOUND CARD.................................................................................5
2.2. INSTALLING THE SOFTWARE FOR DOS AND WINDOWS.............................................5
3. TESTING AND CONFIGURING THE SOUND CARD.....................................................8
3.1. OVERVIEW OF SNDINIT TESTING AND CONFIGURATION PROGRAM............................8
3.2. TESTING AND CONFIGURING THE SOUND CARD .........................................................8
3.3. CONFIGURING YOUR SOUND CARD FOR GAMES IN DOS........................................... 11
3.4. CONFIGURING YOUR SOUND CARD TO INTERFACE WITH THE CD-ROM DRIVE .......12
4. MEMORY RESIDENT VOLUME CONTROL UTILITY ...............................................14
4.1. VOLUME TSR PROGRAM DEFINED..........................................................................14
4.2. MEMORY RESIDENT KARAOKE CONTROL UTILITY .................................................14
5. SETTING UP THE CD-ROM INTERFACE TO YOUR SOUND CARD .......................15
5.1. OVERVIEW OF THE MAD16 PRO CD-ROM INTERFACE..........................................15
5.2. CONNECTING A SONY CD-ROM DRIVE ................................................................ 16
5.3. CONNECTING A MITSUMI CD-ROM DRIVE TO MAD16 SOUND CARD.................... 16
5.4. CONNECTING A PANASONIC CD-ROM DRIVE......................................................... 17
6. CONNECTING EXTERNAL DEVICES TO YOUR SOUND CARD .............................19
6.1. CONNECTORS ON THE MAD16 PRO AUDIO CARD...................................................19
6.2. CONNECTING A PAIR OF SPEAKERS OR A HEADPHONE SET TO MAD16 PRO..........19
6.3. CONNECTING EXTERNAL DEVICES TO THE LINE-OUT CONNECTOR.........................19
6.4. CONNECTING EXTERNAL DEVICES TO THE LINE-IN CONNECTOR ............................20
6.5. CONNECTING A MICROPHONE................................................................................ 20
6.6. CONNECTING A JOYSTICK.......................................................................................20
6.7. CONNECTING A MIDI INSTRUMENT........................................................................ 20
6.8. CONNECTING A WAVETABLE SYNTHESIZER DAUGHTER BOARD .............................20
7. CHANGING SOUND CARD CONFIGURATIONS IN WINDOWS............................... 21
7.1. USING THE DRIVERS ICON IN CONTROL PANEL .......................................................21
7.2. ADVNANCE SETTINGS IN WINDOWS .......................................................................23
7.2.1. USE SINGLE MODE DMA........................................................................23
7.2.2. DMA BUFFER SIZE..................................................................................23
8. TROUBLESHOOTING ......................................................................................................24
8.1. RESOLVING HARDWARE CONFLICTS....................................................................... 24
8.2. COMMONLY ENCOUNTERED PROBLEMS AND SOLUTIONS ....................................... 25
9. INDEX.................................................................................................................................30
ii 913-0000-000 Revision 1.0 July, 1994
Page 3

1. Getting Started
1.1. About the MAD16 Pro Audio Card
The MAD16 (MediaChips 16-Bit Audio Controller) is a 16-bit stereo sound card. It
incorporates the best features of Sound Blaster, Sound Blaster Pro, Windows Sound
System, Ad Lib, MPU401 and more. MAD16 Pro is an integrated chip that coordinates
all the interfaces on the card to provide crisp CD quality sound and music.
You can run thousands of Sound Blaster and Sound Blaster Pro compatible games and
applications, plus rapidly growing numbers of Windows business applications that are
compatible to Windows Sound System.
The multiple CD-ROM interface on MAD16 Pro supports SONY, Mitsumi and Panasonic
and IDE CD-ROM drives. Now you can run thousands of exciting multimedia applications
on CDs.
1.2. MAD16 Pro Feature List
User’s Manual
The MAD16 Pro Sound card includes the following features:
Wave Audio - Maximum recording and playback sampling rate of up to 44.1 kHz stereo,
16-bit digital-to-analog and analog-to-digital converter, 16-bit and 8-bit digitizing in stereo
and mono mode
20 - voice FM Music Synthesizer - Yamaha OPL3 FM Synthesizer technology - Plays up
to 20 instruments simultaneously to deliver a high quality of rich and crisp music
Digital / Analog Mixer - Stereo analog mixing from CD-audio, Line-In, FM music &
Digitized voice, Stereo digital mixing from microphone, line-in, CD-audio and line-out,
Master volume control
Built-in Stereo Power Amplifier - 4-watt per channel stereo power amplifier
MIDI Interface / Joystick Port - Built-in integrated MIDI UART interface with
MPU401, IBM PC joystick / game port
CD-ROM Interfaces - CD-ROM interfaces for Mitsumi LU005 / FX001 /FX001D,
Panasonic 522/523, 562/563, SONY CDU 31A/33A, IDE CD-ROM Drive and CD Audio
In Connectors
Other Interfaces - Wave table synthesizer with Wave Blaster interface, Speakers Out,
Line Out, Line In, and Microphone In.
July, 1994 913-0000-000 Revision 1.0 1
Page 4

82C929 MAD16Pro Audio Card
1.3. What is in your package?
You should have the following items in your package:
• MAD16 Pro Audio Card
• MAD16 Pro Installation Disk
• MAD16 Pro User Reference Guide
1.4. System Requirements
The system requirements for using MAD16 Pro Audio Card are:
• IBM - compatible computer models AT, 286, 386, 486, PS/2 (model 25/30) and
compatibles
• 2MB RAM ( 4MB RAM for Windows 3.1 applications
• VGA or SVGA
• 2 MB of free hard disk space for installing all MAD16 Pro software
• MS DOS or PC DOS 3.1 or later
• Windows 3.1 if you intend to run games and applications in Windows
• External speakers, Microphone and Headphones ( optional )
1.5. Document Conventions
Convention Description
bold Bold type is used to indicate an option.
bold italic Bold italic type is used to indicate a directory name or file name.
BOLD UPPERCASE Bold uppercase type is used to denote text you enter.
IMPORTANT This symbol indicates information that might be important to
CAUTION This symbol indicates important information the users need to
some users.
know to avoid software or hardware damages.
<KEY> This symbol indicates a key to press.
!
This symbol indicates a warning message.
2 913-0000-000 Revision 1.0 July, 1994
Page 5
1.6. Latest Information
Please read the readme.txt file in the Installation Disk for any changes made after this
manual was written. Insert the Installation Disk into drive A.
Enter TYPE README.TXT|MORE. Press the <ENTER> key. Press the <ENTER>
key again to move to the next page. You can also print the file if you have a printer.
Warning. To avoid temporary or permanent hearing loss or impairment due to
!
1.7. Default Configuration and Overview of Sound Card
MAD16 Pro sound Card supports both Sound Blaster Pro as well as Windows Sound
System applications. The card is in Sound Blaster Pro mode when the system is booted up.
It switches to Windows Sound System mode when Windows is launched.
unexpected noise or static, always hold your headphones away from your ears before
putting them on.
User’s Manual
The default configuration of MAD16 Pro is as follows:
Mode: Sound Blaster Pro
Interrupt request line: 5
DMA Channel : 1
I/O Port Address: 220H
CD-ROM Interface: None
The Interrupt Request line (IRQ), DMA channel, and I/O port address of the MAD16 Pro
sound card are all software selectable. You can run the configuration program,
sndinit.exe, to change the configuration. The type of CD-ROM drive interface, as well as
the I/O Port Address, IRQ and DMA channel of the CD-ROM drive interface are also
software programmable through sndinit.
Please note that there are two sets of DMA channel , IRQ channel,
!
and I/O Port Address. One set is for the sound card, and another
set is for the CD-ROM interface. The DMA channel, IRQ, and I/O
Port Address of the sound card must be different from those of the
CD-ROM interface or else there will be a hardware conflicts.
July, 1994 913-0000-000 Revision 1.0 3
Page 6
82C929 MAD16Pro Audio Card
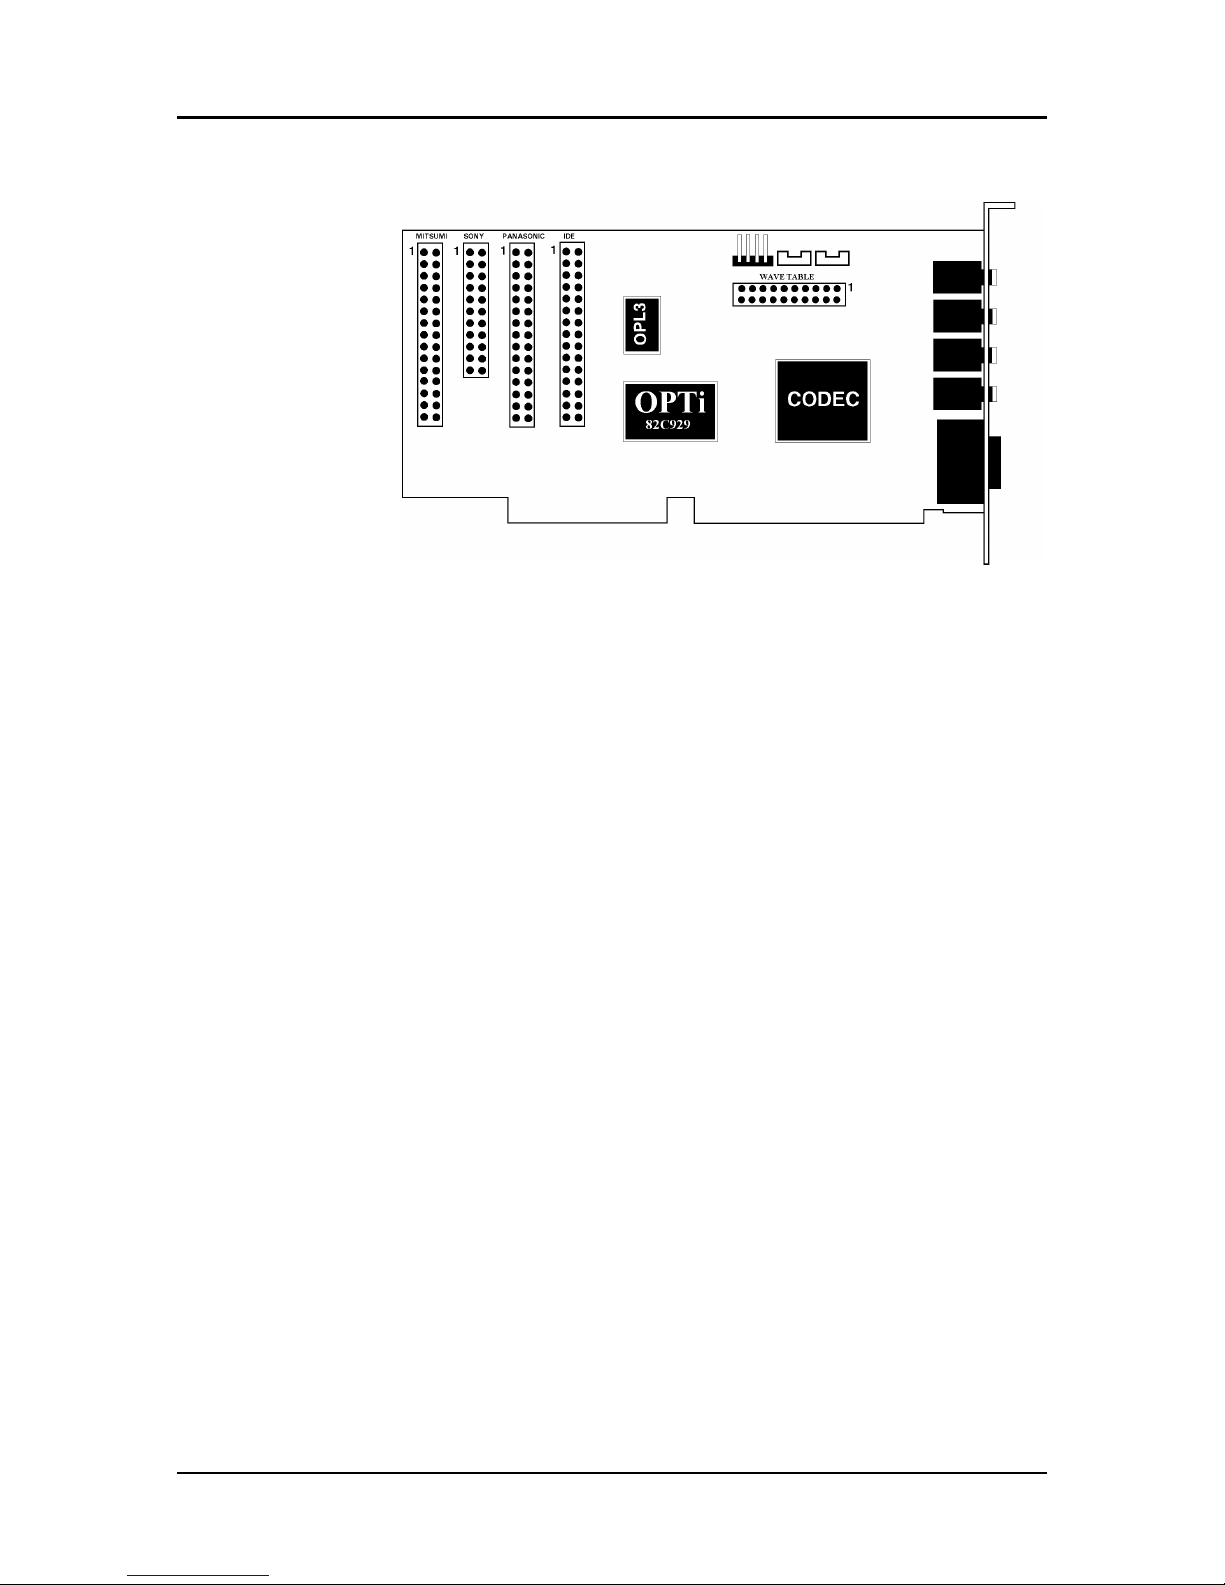
Figure 1. Board Diagram of MAD16 Pro Audio Card
4 913-0000-000 Revision 1.0 July, 1994
Page 7

User’s Manual
2. Installing the Sound Card and Related Software
This chapter describes the process of installing the MAD16 Pro sound card and related
software into your computer system.
2.1. Installing the Sound Card
The following steps describe the procedure to install the sound card into your computer:
1. Turn your computer off and leave the power cable connected to the power outlet as it is.
2. Remove the cover from your computer. Refer to your computer user guide for more
details. Most systems require removing screws from the back of the computer and then
sliding the cover off.
3. Find an unused 16-bit (full-length) expansion slot.
4. Remove the screw from the slot cover. Save the screw for later use. Remove the slot
cover.
5. Pick up your sound card by holding the edge with one hand. Touch any unpainted metal
surface in the computer with the other hand to discharge any static electricity.
6. Align the sound card horizontally with respect to the expansion slot. Insert the sound
card into the expansion slot by pushing it down firmly. Anchor the card's mounting bracket
with the screw you saved from step 4.
IMPORTANT
If you intend to use your MAD16 Pro sound card with the Mitsumi or Sony or Panasonic
or IDE CD-ROM Drives, please go to the Chapter 5 on connecting your CD-ROM
Drives to your sound card before proceeding.
7. Put the cover of the computer back.
8. Connect a pair of speakers to the Speakers-Out connector of the sound card. Refer to
Chapter 3 to connect other external devices to the sound card such as a joystick or a MIDI
instrument.
9. Turn on your computer.
10. Proceed to the next Section to install the MAD16 Pro software.
2.2. Installing the Software for DOS and Windows
MAD16 Pro Installation Disk contains a file named install.exe. This is the MAD16 Pro
software installation program. Follow these steps to install MAD16 Pro software into your
hard disk:
July, 1994 913-0000-000 Revision 1.0 5
Page 8

82C929 MAD16Pro Audio Card
1. Insert the MAD16 Pro Installation Disk into drive A or B. Let us assume that you are
using drive A in this procedure.
2. Type A: at the C:> prompt. Press <ENTER>.
3. Type INSTALL at the a:> prompt. Press <ENTER>. The install program will do the
following for you:
a.) Select MAD16 Pro Install Directory:
Prompt you for the drive and directory where you want MAD16 Pro software to be
installed. Press <ENTER> to accept the default drive and directory.
b.) Location of Windows Directory:
Prompt you for the drive and directory of your Windows directory if you already have
Windows 3.1 installed.
c.) Select CD-ROM Interface:
Asks if you want to interface your sound card to the CD-ROM drive.
If so, you will be prompted for the type of CD-ROM and its hardware settings. Please
refer to the chapter on connecting your CD-ROM to
your sound card if you have not done so.
IMPORTANT
You must state the exact hardware settings that corresponds to your CD-ROM drive. For
example, when you are installing your CD-ROM device driver and you have chosen
340H as the Base Address, then when prompted by your MAD16 Pro installation
software for the CD-ROM Base Address, you must choose 340H which corresponds to
your CD-ROM device driver. You must do the samething for the interrupt request as well
as the DMA channels.
d.) Select MAD16 Pro Hardware Settings:
Prompts you for the hardware settings of your MAD16 Pro sound card. We recommend
that you accept the default settings shown. If you decide to change the default settings later
on, the setup and configuration program sndinit.exe will allow you to do so.
e.) Display Summary:
Displays a summary of the installation options that you have chosen for confirmation
before proceeding.
f.) Modify your system files upon confirmation:
Upon confirmation of your installation options, your MAD16 Pro software will be copied
to your hard disk and you will be asked if your system files ( config.sys, autoexec.bat ) can
6 913-0000-000 Revision 1.0 July, 1994
Page 9

User’s Manual
be updated in order for your sound card to run with your favorite games and applications
after you reboot your system. If you choose YES, your system files will be updated and
your original files will be backed up. If you choose NO, your updated changes will be
created in files with a .MAD file extention. You may then copy these files to your existing
system files at a later time.
g.) Complete Installation:
Complete your MAD16 Pro software installation and prompts you to reboot your
computer for your new changes to take effect. Remove the floppy from the floppy drive
and reboot your system.
After you have rebooted your machine, proceed to the next section to test the sound card.
July, 1994 913-0000-000 Revision 1.0 7
Page 10

82C929 MAD16Pro Audio Card
3. Testing and Configuring the Sound Card
3.1. Overview of Sndinit Testing and Configuration Program
The program sndinit.exe allows you to test and configure the sound card.
The following options are available:
a.) sndinit /b
The /b parameter sets the sound card using the values specified in the configuration file,
sound16.cfg. Install.exe adds this line to your autoexec.bat file so that the sound card is
initialized every time you turn on your computer.
b.) sndinit /?
The /? parameter displays help information that shows you how to use sndinit.exe.
c.) sndinit
Running sndinit.exe without any parameter allows you to change the setting of the card,
adjust volume, and play a digitized audio file.
IMPORTANT
If you want to use a mouse to run the test and configuration program, please make sure
you have the mouse driver installed in DOS. Move the mouse cursor to the option that
you want and click to select an option. You can also use the arrow keys to move to an
option. Press the <ENTER> key or the space bar to select an option. Press <ESC> to
cancel an operation.
3.2. Testing and Configuring the sound card
To test and configure the sound card:
1. Change to the c:\Sound16 installed default directory.
2. Type sndinit, then press the <ENTER> key to run the configuration program.
3. You will see the main menu as shown below:
8 913-0000-000 Revision 1.0 July, 1994
Page 11

User’s Manual
The current configuration is shown on the top of the menu. The default configuration is
shown on the bottom of the menu.
Configure Allows you to change the settings of your sound card.
Sound Test Plays a voice file.
Quit Test Exits the program.
4. Selecting the Configure option from the menu above brings you to the configuration
menu as shown below:
July, 1994 913-0000-000 Revision 1.0 9
Page 12

82C929 MAD16Pro Audio Card
You can select the following options to change the configuration:
Mode Allows you to choose between Sound Blaster Pro mode and Windows Sound
System mode.
Port Allows you to choose the base I/O Port address of the sound card.
IRQ Allows you to choose the Interrupt Request line (IRQ) of the sound card.
DMA Allows you to choose the DMA channels of the Sound Card
CD-ROM Allows you to enter the CD-ROM setup with selection on CD Type and CD-
ROM Interface. Any new changes will require your CONFIG.SYS file to be updated and
your computer to be rebooted.
MPU-401 Allows you to select the MPU-401 Midi Interface.
Game Port Allows you to disable or enable the game port.
OK Tests the card using the configuration you have chosen.
Volume Allows you to change the volume.
Cancel Cancels whatever changes you have made.
5. Selecting the CD-ROM option from the configuration menu above will bring you to the
screen as shown below. Select the CD Type to match up with your CD-ROM model.
Some of the options are in gray tone; these options are not available for the particular type
of drive you have selected. IRQ stands for Interrupt Request; make sure you choose the
same IRQ as the CD-ROM device driver installation. DRQ stands for DMA Request;
choose the same DRQ number as the DMA channel in your CD-ROM device driver
installation. The CD- ROM interface's IRQ and DMA should be different from the sound
10 913-0000-000 Revision 1.0 July, 1994
Page 13

User’s Manual
card's IRQ and DMA channel. Any new changes will require your CONFIG.SYS file to be
updated and your computer to be rebooted.
6. The Volume Settings control panel will pop up if you select the Volume option from the
configuration menu:
• The Master volume setting controls the overall volume.
• The Voice volume setting controls the volume of the voice (Wave) file being played.
• The Music volume setting controls the volume of the music (MIDI) file being played.
• The CD Audio setting controls the volume of CD audio.
Use the mouse or the left and right arrow keys on your keyboard to move from one option
to another. If you are using a mouse, click on the up arrow to increase the volume; click on
the down arrow to decrease the volume. You can also use the up and down arrow keys on
your keyboard to adjust the volume.
Click OK or press <ENTER> to accept the volume settings.
Click Cancel or press <ESC> to cancel any changes you have made.
7. You will hear a musical clip if you select the Sound Test option. Check your speaker
connections or adjust the volume if you do not hear anything.
8. Select the Quit Test option from the main menu to exit the program.
3.3. Configuring your sound card for games in DOS
sndinit will configure your sound card to the default settings for Sound Blaster games
after you have installed the sound card and software. However, if you decide to change
your settings, you need to run sndinit. To change your sound card settings:
a.) Run sndinit and choose Configure.
July, 1994 913-0000-000 Revision 1.0 11
Page 14

82C929 MAD16Pro Audio Card
b.) Select the I/O Port Address, IRQ, and DMA options according to your new choices.
IMPORTANT
Even though you may select any options that do not cause conflicts on your system, some
games may not operate correctly if you do not use the default Sound Blaster settings of
I/O Port Address = 220H, Interrupt = 5, and DMA channel = 1.
c.) Click <OK> to use the new settings. Click <CANCEL> to cancel your selections.
d.) If sndinit reports no errors or conflicts with the new settings, then your sound card will
now work correctly with the new settings. If sndinit reports errors, then you must select
other options instead.
3.4. Configuring your Sound Card to interface with the CD-ROM Drive
sndinit can be used to setup your sound card to interface with CD-ROM Drive. Before
proceeding, make sure you have installed your CD-ROM Drive hardware into your
computer system as well as the CD-ROM Drive's device driver and related software
successfully.
To setup your MAD16 Pro sound card to interface with the CD-ROM Drive:
a.) Run sndinit and choose Configure.
b.) Select the CD-ROM. you will enter into CD-ROM setup menu.
c.) Let's assume that you are using Mitsumi CD-ROM. Choose Mitsumi for the CD Type.
The configuration for the Mitsumi CD-ROM will appear.
d.) At this point, you should have the CD-ROM Drives hardware options which you have
used to setup your CD-ROM Drives while running the CD-ROM drive's installation
program. Make sure you select this in the next Step (e).
e.) Select the I/O Port Address(CD Base), Interrupt(CD IRQ), and DMA Channel(CD
DRQ) options that match with your CD-ROM drive's options.
f.) Select <OK> to accept your settings and you will be notified that your CONFIG.SYS
file must be updated. Select <OK> and the following line will be added to your
CONFIG.SYS file (assuming that you are using I/O Port Address 340H, Interrupt 10 with
DMA disabled, T: M stands for Mitsumi):
DEVICE=C:\Sound16\CDSETUP.SYS /T:M /P:340 /I:10 /D:X
g.) You must now exit the program and REBOOT your computer for the settings to take
effect.
If you decide to change your current CD-ROM options, you need to run sndinit again and
follow the same steps above except the steps a and b. Once you have made your changes,
your CONFIG.SYS file must be updated again; however, you must now manually edit the
12 913-0000-000 Revision 1.0 July, 1994
Page 15

User’s Manual
CD-ROM device driver line in your CONFIG.SYS file to reflect the new changes.
sndinit will only update the CD-ROM interface line as below:
DEVICE=...\CDSETUP.SYS ...
but it will not update the CD-ROM device driver line. You can use the text editor to edit
the line for updating the new changes. Refer to your CD-ROM drive's user mannual for
intructions on changing the CD-ROM device driver line.
July, 1994 913-0000-000 Revision 1.0 13
Page 16

82C929 MAD16Pro Audio Card
4. Memory Resident Volume Control Utility
4.1. Volume TSR program defined
Volume TSR programs are memory resident programs that allow you to change the
volume dynamically by using "HOT KEYS" during a game. This provides a very
convenient and useful way to control the loudness of your games on the fly.
To make use of this feature for the MAD16 sound card, you need to load the program into
the memory first, by typing VOLTSR at the DOS prompt. You can then use the following
hot keys to change the volume while you are in a game:
• CTRL-ALT-U Raises the volume
• CTRL-ALT-D Lowers the volume
• CTRL-ALT-M Mutes the volume
To remove the program from the memory, type VOLTSR /U at the DOS prompt.
Some games do not allow this TSR to take effect. In this case you will not be able to
access these hot keys through the keyboard. If this is the case, you will not be able to use
these hot keys to control the volume. Now You can exit the game, and run sndinit.exe to
adjust the volume or use an external amplifier with its own volume control adjustments.
!
4.2. Memory Resident Karaoke Control Utility
Karaoke TSR programs are memory resident programs that allow you to change the direct
microphone to amplifier volume setting by using " HOT KEYS" during the applications.
To make use of this feature for the MAD16 Pro sound card, you need to load the program
into the memory first by typing:
KARAOKE ON Turn on the Karaoke session
KARAOKE OFF Turn off the Karaoke session
Warning. To avoid temporary or permanent hearing loss or impairment due to
unexpected noise or static, always hold your headphones away from your ears before
putting them on.
After the karaoke session is turn on, you can then use the following hot keys to change the
microphone input volume while you are in the applications.
CTRL-ALT-PageUp Raises the volume
CTRL-ALT-PageDown Lowers the volume
14 913-0000-000 Revision 1.0 July, 1994
Page 17

User’s Manual
5. Setting up the CD-ROM Interface to your Sound Card
5.1. Overview of the MAD16 Pro CD-ROM Interface
There are four CD-ROM interface connectors on the MAD16 Pro sound Card. The
Mitsumi CD-ROM drive interface is a 40-pin connector, and it supports Mitsumi LU005,
FX001 and FX001D. The Sony CD-ROM drive interface is a 34-pin connector is located
next to the Mitsumi CD-ROM drive connector. It supports Sony CDU31A and CDU33A.
The 40-pin connector located next to the Sony connector is the Panasonic connector. It
supports Panasonic models 522, 523, 562 and 563. The 40- pin connector located next to
Panasonic connector is the standard IDE CD-ROM drive that supported by multiple
vendors.
Figure 2 CD-ROM Interface Connectors
The default CD-ROM interface on the sound card is:
CD-ROM type: None
I/O Port Address: 340H
The I/O Port Addresses supported by the sound card are 320H, 330H, 340H and 360H.
Please make a note of this when selecting the I/O Port Address during your CD-ROM
drive's installation process.
If you have a separate CD-ROM controller card, and you do not wish to use the builtin CD-ROM interface in the sound card then, you do not have to make any changes to
your existing environment. Just connect the CD-ROM audio cable to the correct type
of CD Audio-In connector on the sound card as detailed on the figure above.
July, 1994 913-0000-000 Revision 1.0 15
Page 18

82C929 MAD16Pro Audio Card
The next section describes the process of connecting various CD-ROM drive to your
sound card.
5.2. Connecting a SONY CD-ROM Drive
To connect a SONY CD-ROM drive, please follow the following steps:
1. Install the CD-ROM drive into your system. Please refer to the documentation that
comes with your CD-ROM drive for installation.
2. Connect the interface cable from the CD-ROM drive to the 34-pin Sony CD-ROM
interface connector on the sound card.
CAUTION
Make sure that the red line on the interface cable is connected to Pin 1 of the interface
connector on the sound card.
3. If an audio cable is included with your CD-ROM drive, connect it from the CD-ROM
drive to the SONY CD audio input connector on the sound card.
4. When everything is securely connected, put the cover of your computer back on and
power on your computer and proceed with the installation of your SONY CD-ROM's
device driver and related software as intructed by your SONY CD-ROM drive user
mannual. During the installation, you will be asked to select the Base Address, Interrupt,
and DMA channel selection for the SONY CD-ROM drive. Please make a note of your
selections as you will need this information later on.
5. After you have installed your SONY CD-ROM drive's software, you may go to chapter
2 to install your sound card's related device drivers and software if you have not already
done so. During the installation program, you will be asked to state the hardware settings
of your CD-ROM drive. Please use the information which you have gathered from your
CD-ROM device driver setup for setting the interface.
6. However, if you have already installed your sound card's drivers and software, please
run the program sndinit.exe to configure your CD-ROM drive for use. Please refer to
chapter 3 on configuring your CD-ROM drive using sndinit.
5.3. Connecting A Mitsumi CD-ROM Drive to MAD16 Sound card
To connect a Mitsumi CD-ROM drive, follow the following steps:
1. Install the CD-ROM drive into your system. Please refer to the documentation that
comes with your CD-ROM drive for installation.
2. Connect the interface cable from the CD-ROM drive to the 40-pin Mitsumi CD-ROM
interface connector on the sound card.
CAUTION
Make sure that the red line on the interface cable is connected to Pin 1 of the interface
connector on the sound card.
16 913-0000-000 Revision 1.0 July, 1994
Page 19

User’s Manual
3. If an audio cable is included with your CD-ROM drive, connect it from the CD-ROM
drive to the Mitsumi CD audio input connector on the sound card.
4. When everything is securely connected, put the cover of your computer back on and
power on your computer and proceed with the installation of your Mitsumi CD-ROM's
device driver and related software as intructed by your Mitsumi CD-ROM drive user
mannual. During the installation, you will be prompted to select the Base Address,
Interrupt, and DMA channel selection for the Mitsumi CD-ROM drive.
Make a note of your selections as you will need this information later on.
IMPORTANT
You can use either the MTMCDE.SYS or the MTMCDC.SYS driver. Make sure you
select the Software Interrupt Transfer option. Do not use the 16- bit DMA Transfer
option. Enter S when you are prompted for the DMA channel. This specifies that the
DMA channel will be disabled.
5. After you have installed your Mitsumi CD-ROM drive's software, you may proceed to
chapter 2 to install your sound card's related device drivers and software if you have not
already done so. During the installation program, you will be asked for the hardware
settings of your CD-ROM drive. Use the information which you have gathered from your
CD-ROM device driver setup for setting the interface.
6. However, if you have already installed your sound card's drivers and software, then run
the program sndinit.exe to configure your CD-ROM drive for use. Please refer to chapter
3 on configuring your CD-ROM drive using sndinit.
5.4. Connecting a Panasonic CD-ROM Drive
To connect a Panasonic CD-ROM drive, follow the following steps:
1. Install the CD-ROM drive into your system. Refer to the documentation that comes with
your CD-ROM drive for installation.
2. Connect the interface cable from the CD-ROM drive to the 40-pin Panasonic CD-ROM
interface connector on the sound card.
CAUTION
Make sure that the red line on the interface cable is connected to Pin 1 of the interface
connector on the sound card.
3. If an audio cable is included with your CD-ROM drive, connect it from the CD-ROM
drive to the Panasonic CD audio input connector on the sound card.
4. When everything is securely connected, put the cover of your computer back on and
power on your computer and start installing your Panasonic CD-ROM drive's device
driver and related software as instructed by your Panasonic CD- ROM drive's user
mannual. During the installation, you will be asked to select the Base address, Interrupt,
and DMA channel selection for the Panasonic CD-ROM.
July, 1994 913-0000-000 Revision 1.0 17
Page 20

82C929 MAD16Pro Audio Card
Make a note of your selections as you will need this information later on.
5. After you have installed your Panasonic CD-ROM drive's software, you may proceed to
chapter 2 to install your sound card's related device drivers and software if you have not
already done so. During the installation program, you will be asked to state the hardware
settings of your CD-ROM drive. Use the information which you have noted down from
your CD-ROM device driver setup process.
6. However, if you have already installed your sound card's drivers and software, then run
the program sndinit.exe to configure your CD-ROM for use. Please refer to chapter 3 on
configuring your CD-ROM using sndinit.
18 913-0000-000 Revision 1.0 July, 1994
Page 21

User’s Manual
6. Connecting External Devices to your sound card
This chapter describes the connectors on the sound card and the process of connecting
external devices to the sound card. You can connect the following external devices to
MAD16 Pro: a pair of speakers, headphone set, power amplifier, CD-player, microphone,
joystick, and MIDI adapter. Please have the user reference mannuals of the external
devices on hand for reference.
6.1. Connectors on the MAD16 Pro Audio Card
Figure 3 below shows the different external device connectors on the sound card.
Figure 3 - Connecting External Devices to MAD16 Pro
6.2. Connecting A Pair of Speakers Or A Headphone Set to MAD16 Pro
Speakers and headphone set are connected to the Speakers-Out connector on the sound
card. This is the top most connector on the right side of the sound card.
CAUTION
Please use the configuration program, sndinit.exe, to adjust the volume to mid-range
before connecting any speakers or headphone set to the sound card to avoid damages
to yourself or your equipment.
6.3. Connecting External Devices to the Line-Out Connector
The Line-Out connector is the connector immediately below the Speaker-Out connector.
This can be connected to the Line-In connector of any external amplifier, hi-fi set, etc.
July, 1994 913-0000-000 Revision 1.0 19
Page 22

82C929 MAD16Pro Audio Card
6.4. Connecting External Devices to the Line-In Connector
Immediately below the Line-Out connector is the Line-In connector. This can be connected
to the Line-Out connector of any hi-fi set, Receiver, CD-player, synthesizer, etc.
6.5. Connecting A Microphone
A microphone can be connected to the Microphone-In connector on the sound card. This is
the connector immediately below the Line-In connector. Use a dynamic monaural or stereo
microphone with 600 ohms impedence.
6.6. Connecting a Joystick
The joystick / MIDI port is a 15-pin female connector located just below the MicrophoneIn connector. This port can be connected to any IBM PC compatible joystick with a 15-pin
D-sub connector.
Please disable the joystick port on the sound card if you already have a game port or game
card. You can disable the joystick port using the program sndinit.
6.7. Connecting a MIDI Instrument
You need a MIDI adapter to connect a MIDI instrument to the sound card. The MIDI
adapter can be connected to the joystick / MIDI port. You also need MIDI sequencing
software to run MIDI instruments with your computer.
6.8. Connecting a Wavetable Synthesizer Daughter Board
MAD16 Pro comes default with the Yamaha OPL3 FM synthesis for MIDI music.
However, if you have a wavetable synthesizer daughter board upgrade, you may connect it
onto the "WAVETABLE" connector to listen to wavetable synthsized music.
20 913-0000-000 Revision 1.0 July, 1994
Page 23

User’s Manual
7. Changing Sound Card Configurations in Windows
7.1. Using the Drivers icon in Control Panel
This chapter describes the process of changing the DMA channel, IRQ, I/O Port Address,
and Advance Settings of the sound card in Windows 3.1. To change settings under
Windows, please follow the steps below:
1. Start Windows.
2. Select the Main file group.
3. Select the Control Panel icon.
4. Select the Drivers icon.
5. Highlight OPTi MAD16 Pro Audio Driver in the Drivers Dialog Box, and then double
click the Setup button. If you are configuring the options for the OPTi External MIDI
Driver click on it instead and click the Setup button.
July, 1994 913-0000-000 Revision 1.0 21
Page 24

82C929 MAD16Pro Audio Card
6. The MAD16 Pro Audio Device Driver Configuration Dialog Box will appear. Make the
necessary changes by clicking on the selections. Click OK to accept the changes.
7. A dialog box will appear asking if you like to restart windows. Select the Restart Now
button to restart Windows.
22 913-0000-000 Revision 1.0 July, 1994
Page 25

8. If you wish to modify the advance settings, click on Advance Settings and a Window
will appear. Make the necessary changes and click OK. You will be prompted again to
restart Windows.
7.2. Advnance Settings In Windows
User’s Manual
The following is a brief explanation of the options in the Advanced Settings Box:
7.2.1. Use Single Mode DMA
Your computer system may support both Single Mode DMA as well as Demand Mode
DMA. Demand Mode DMA provides a more efficient means of transferring chunks of
data between memory and a device. However, if your system does not support Demand
Mode DMA, you must select Single Mode DMA instead.
7.2.2. DMA Buffer Size
Setting the DMA buffer size tells the CPU how much data to transfer between memory and
a device at one time. If you specify a larger size, it allows the CPU to complete the transfer
of data faster but increases the memory consumption. The default size should be 32
Kilobytes (32K). If you decide to change the buffer size, be sure to make it multiples of 4K
(for example 28K or 36K).
July, 1994 913-0000-000 Revision 1.0 23
Page 26

82C929 MAD16Pro Audio Card
8. Troubleshooting
8.1. Resolving Hardware Conflicts
This chapter describes the possible hardware conflicts between your sound card and other
interface cards in your system, and ways of resolving these conflicts.
Hardware conflicts occur when two or more devices use the same I/O address, IRQ, or
DMA channel. The default setting of the MAD16 Pro Audio Card is as follows:
• DMA = 1
• I/O Address = 220H
• IRQ = 5
This setting might come into conflict with other devices. For example:
• Scanner
• Printer
• SCSI Hard Disk Drive
To resolve hardware conflicts:
1. Find out the current board setting (DMA channel, IRO, I/O port address) of the sound
card by running sndinit.exe.
2. If you know of any peripheral card in your system that is using the same setting, change
the hardware setting on the peripheral card or the sound card.
3. If you are unsure of the settings of the peripheral card, remove all cards except the
sound card and other essential cards from your system. Run sndinit.exe each time you
remove an interface card. If your sound card functions properly after removing an
interface card from your system, the interface card you just removed is in conflict with
your sound card. Find out the DMA channel, Interrupt request line, I/O port address which
the interface card is using. Change the settings on your sound card or the interface card so
that the two are not using the same values.
IMPORTANT
It is advisable to change the jumper settings on the other interface card since some
Sound Blaster games use the default Sound Blaster settings i.e. I/O Port Address =
220H, Interrupt = 5, DMA = 1. These games might not work properly if you change the
jumper settings on the sound card.
24 913-0000-000 Revision 1.0 July, 1994
Page 27

8.2. Commonly Encountered Problems and Solutions
Problem: Your computer would not boot up after you installed MAD16 Pro.
Solution: The sound board was not inserted completely into the 16-bit slot. Refer to
Chapter 2 to install the sound board properly.
Problem: The computer hangs, reboots itself, or issues a parity error after the sound card
is installed.
Solution: There is a hardware conflict between MAD16 Pro and other interface cards in
your system. Run sndinit to find out which hardware setting is giving a hardware conflict.
Problem: A device in your computer does not work or does not work properly after the
sound card is installed.
Solution: There might be a hardware conflict between the sound card and the other device.
Run m16init to find out which hardware setting is conflicting
Problem: Your system hangs when you enter or exit Windows.
User’s Manual
Solution: a.) If you have installed another sound card in your system before, make sure
you have removed all its drivers in Windows including any virtual device driver.
Problem: There is no sound output in games.
a.) There might be conflicts with another device in your system. Refer to Chapter 7 to
reconfigure the Windows driver.
Solution: a.) Check that the speakers are connected properly to the Speakers-Out
connector on the sound card. If your speakers use batteries, make sure that they have the
batteries they need.
b.) The volume setting is too low. Run sndinit.exe to adjust the volume to a higher level.
c.) Make sure that the sound board is inserted properly into the computer.
d.) If your games are Sound Blaster compatible, make sure the card is in Sound Blaster
mode. You can find out what mode the sound card is in by entering SNDINIT /B at the
DOS prompt. Run sndinit.exe if you need to change the mode.
e.) There might be a DMA conflict between the sound card and other interface cards in
your computer. Make sure the DMA channel your sound card is using is not being used by
another device in your system.
f.) Some games need EMM to play digitized voice. Please refer to the documentation that
comes with your game.
July, 1994 913-0000-000 Revision 1.0 25
Page 28

82C929 MAD16Pro Audio Card
Problem: The sound is distorted during sound test or during normal usage.
Solution: a.) Your speakers might be defective or the quality of the speakers is poor. Make
sure you have a good pair of speakers.
b.) Volume setting is too high. Use sndinit.exe to adjust the volume.
c.) Interference from another interface card in your computer. Try to install the sound card
into a different slot.
Problem: There is no music or digitized voice or there is only music in some games (e.g.
XWings, Mixed-Up Mother Goose.)
Solution: a.) Some applications need extended or expanded memory to run properly. Use a
memory manager to set up the required memory in your system. Refer to the application's
user guide on what is required.
b.) You do not have enough memory to run the game. Remove non- essential device drivers
or the volume control TSR program, voltsr.exe, from memory.
c.) You are not in Sound Blaster mode. Type SNDINIT /B to find out what mode you are
in. Type SNDINIT and change to Sound Blaster mode if you are not already in that mode.
d.) Make sure you have the following line in your autoexec.bat file: set blaster=a220 i7 d1
Problem: Your CD-ROM drive doesn't play music CD's.
Solution: a.) Make sure the CD-ROM audio cable is connected to the CD audio-in
connector on MAD16 Pro.
b.) Install the MCI CD Audio driver in Windows. Some applications need this driver to
play music CDs. The driver is provided by Windows.
c.) Check the speakers connection. If your speakers use batteries, make sure they have the
power they needed.
d.) Check the documentation that comes with your CD-ROM drive on setting up your CDROM for playing Audio CDs.
Problem: Your joystick does not work after installing the sound card.
Solution: There is a conflict between the game port on the sound card and the game port in
you system. Run sndinit.exe to disable the game port on the sound card or remove the
additional joystick from your system.
Problem: Joystick is not working properly in some programs.
Solution: The CPU speed of your computer might be too fast. You might want to reduce
the speed. Refer to your computer's manual for intructions on setting up your computer's
operating speed.
26 913-0000-000 Revision 1.0 July, 1994
Page 29

User’s Manual
Problem: You cannot record any sound using a microphone.
Solution: a.) If your microphone has an On/Off switch, make sure the the switch is turned
on.
b.) Make sure you plug the microphone into the mic-in connector.
Problem: You cannot use the hot keys to control the volume while in a game.
Solution: a.) You did not load the program into memory. Type VOLTSR at the DOS
prompt to load the program.
b.) Some games block the TSR from the keyboard. You will not be able to use the hot keys
if this is the case.
Problem: No sound when running Windows application, MIDI files cannot be played, or
you get a MIDI error message.
Solution: a) If you have not installed the MAD16 Pro software as described in Chapter 2,
please do so now.
b) Check that you have the following driver in the installed driver list in the Driver group:
(This group is under the Control Panel group in Main.)
OPTi MAD16 Pro Audio Driver
If you are missing any one of the above drivers, check the system.ini file as follows:
1. Choose RUN from the File menu in Program Manager.
2.Type SYSEDIT in the command Line text box and choose OK. Look for the following
entries:
[drivers]
timer=timer.drv
midimapper=midimap.drv
aux=snd16.drv
midi=snd16.drv
mixer=snd16.drv
wave=snd16.drv
[snd16.drv]
IOAddress=530
Interrupt=11
DMADAC=0
DMAADC=0
3. Add any missing lines if necessary.
July, 1994 913-0000-000 Revision 1.0 27
Page 30

82C929 MAD16Pro Audio Card
c.) Verify that the MIDI mapper is a valid selection. Refer to the Control Panel section of
the Windows manual for more details.
Problem: There is no sound or the sound is distorted when you are running Windows
Sound System applications.
Solution: a.) You need the Microsoft Audio Compression Manager to play compressed
files in Windows Sound System applications. Make sure you have the following line in the
[drivers] section of your system.ini file:
wavemapper=msacm.drv
b.) You have disabled the Single Mode DMA option in the Advance Setting box. Some
motherboards can only support Single Mode DMA and therefore your environment can
only operate under this mode. Proceed to Chapter 7 on changing your Windows driver
configuration to select the Single Mode DMA option in the Advance Settings Box.
Problem: You get the following error message when you boot up your computer:
"The wave file for sound testing could not be found or is corrupted. Please reinstall the file
from the installation diskette."
Solution: The path to the directory where the SOUND16 files are located is not set or the
required file, sndtest.wav, is missing. Type SET at the DOS prompt. If the SOUND16
files are in the sound16 directory in your c: drive, you should see the following line:
sound16=c:\sound16
If this line is not present, type SET sound16=c:\sound16 to set up the path to the sound16
directory temporarily. You need to add the following line to your autoexec.bat file to set
the path permanently:
set sound16=c:\sound16
If the line is already in your autoexec.bat file, check that you have the file sndtest.wav in
your c:\sound16 directory. Rerun the installation program if necessary.
Problem: You get the following error message when you boot up your computer.
"Your start-up configuration file could not be detected. Please reinstall the original file
from your installation diskette."
Solution: The path to the directory where the Sound16 files are located is not set or the
required file, sound16.cfg, is missing. Type SET at the DOS prompt. If the Sound16 files
are in the sound16 directory in your c: drive, you should see the following line:
sound16=c:\sound16
28 913-0000-000 Revision 1.0 July, 1994
Page 31

User’s Manual
If this line is not present, type SET SOUND16=C:\SOUND16 to set up the path to the
SOUND16 directory temporarily. You need to add the following line to your autoexec.bat
file to set the path permanently:
set sound16=c:\sound16
If the line is already in your autoexec.bat file, check that you have the file sound16.cfg in
your c:\sound16 directory. Rerun the installation program if necessary.
July, 1994 913-0000-000 Revision 1.0 29
Page 32

82C929 MAD16Pro Audio Card
9. Index
C
CD-ROM Interface................................................................................................................1
Changing the volume ..........................................................................................................10
Configuring I/O port address............................................................................................... 10
Configuring interrupt request line .......................................................................................10
Connecting a CD-ROM Drive to MAD16.........................................................................15
Connecting External Devices...............................................................................................19
Connecting External Devices to the Line-Out Connector.....................................................19
Connectors on the MAD16 Audio Card............................................................................... 19
D
Default Configuration............................................................................................................3
I
Installing the Software...........................................................................................................5
Installing the Sound Card ......................................................................................................5
J
Joystick Port........................................................................................................................ 20
L
Line-In connector................................................................................................................ 20
Line-Out connector..............................................................................................................19
M
Microphone-In connector ....................................................................................................20
MIDI Port............................................................................................................................20
Mitsumi CD-ROM Drive .....................................................................................................16
Mitsumi CD-ROM drive interface ....................................................................................... 15
R
Reconfiguring Windows Driver...........................................................................................21
S
sampling rate.........................................................................................................................1
Sony CD-ROM drive interface.............................................................................................15
Speakers-Out connector .......................................................................................................19
System Requirements ............................................................................................................2
T
Testing and Configuring the Sound Card.........................................................................8, 12
trouble shooting...................................................................................................................25
V
Volume...............................................................................................................................11
Y
Yamaha OPL3.......................................................................................................................1
30 913-0000-000 Revision 1.0 July, 1994
 Loading...