

Page 1
®
USER MANUAL
READ CAREFULLY BEFORE OPERATION
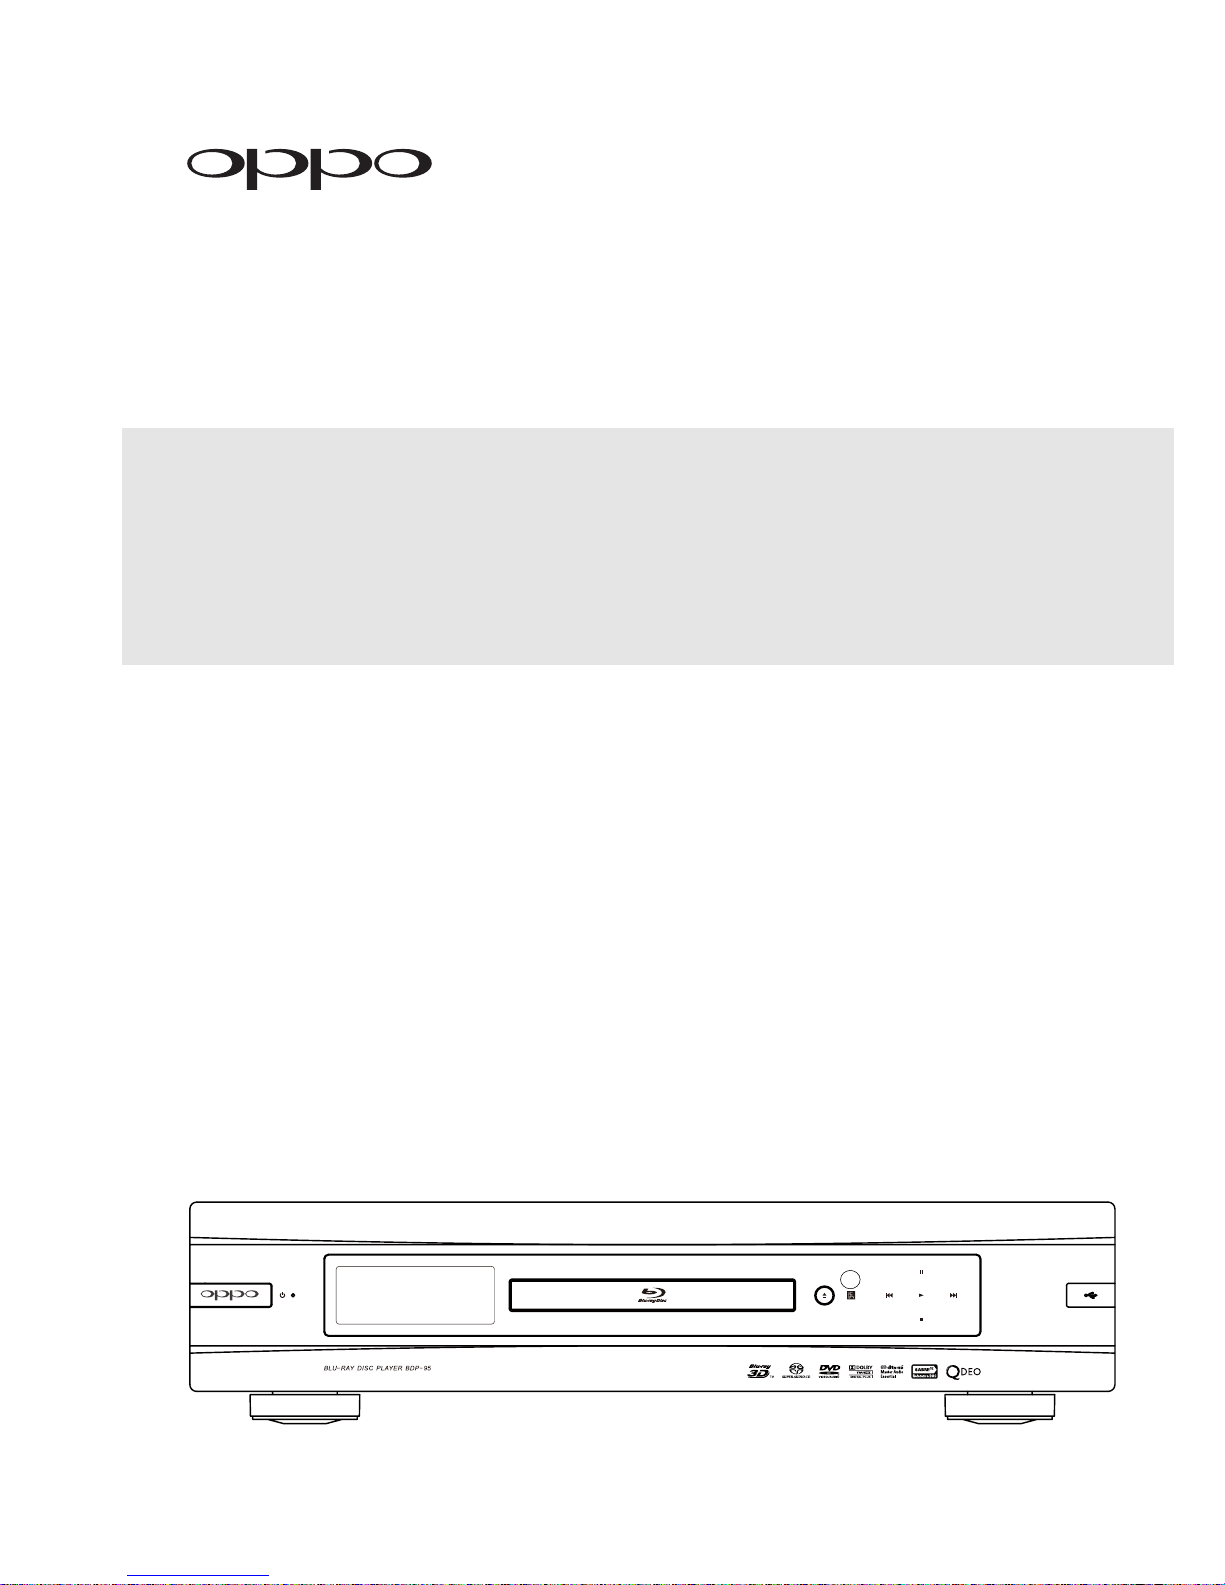
Blu-ray Disc Player BDP-95AU
AU
Page 2

Page 3

Table of Contents
Important Information...............................................................1
Important Safety Instructions ....................................................................................1
Pr
ecautions
Trademarks .................................................................................................................2
Compatible Disc Types ............................................................................................... 3
Discs that cannot be played.............................................................................................................3
Disc care and handling ....................................................................................................................3
Notes about BD-ROM compatibility .................................................................................................4
Copyright Protection...................................................................................................4
Region management information.....................................................................................................4
INSTALLATION ..........................................................................5
Front Panel Controls ................................................................................................... 5
Front Panel Display Window ....................................................................................... 5
Rear Panel Connectors ............................................................................................... 6
Remote Control ........................................................................................................... 7
Remote Control Buttons ..................................................................................................................7
Back Side.........................................................................................................................................8
Battery Installation ...........................................................................................................................8
Using the Remote Control ...............................................................................................................8
Changing the Remote Code ............................................................................................................9
Connecting to a Display (Recommended Methods)................................................. 10
HDMI Connection to a single TV ...................................................................................................10
HDMI Connection to Two (2) TVs................................................................................................ 11
DVI Connection..............................................................................................................................12
Component Video Connection.......................................................................................................
Connecting to an Audio System ............................................................................... 14
Connecting to a Receiver/Amplifier with HDMI Input/Output .........................................................14
Connecting to a Receiver/Amplifier with 7.1ch/5.1ch Audio Input .................................................15
Connecting to a Receiver/Amplifier with Dolby Digital or DTS Decoder........................................16
Connecting to a Stereo Audio System through RCA-style Cable..................................................17
Connecting to a Stereo Audio System through XLR Balanced Cable ...........................................18
Connecting to a Display and Audio System using Dual HDMI.................................19
Connecting to the Internet .......................................................................................20
Internet connection through Ethernet cable ...................................................................................20
Internet connection through wireless adaptor ................................................................................21
Custom Installation................................................................................................... 22
External IR (Infrared Remote) Installation .....................................................................................22
................................................................................................................. 2
...
13
i
Page 4

ii
RS232 Control................................................................................................................................22
Setting Up the Player - Easy Setup Wizard .............................................................. 23
Access the Easy Setup Wizard ......................................................................................................23
Choose the Primary Video Output .................................................................................................23
Select the Best Output Resolution .................................................................................................24
Determine the Display Aspect Ratio ..............................................................................................25
Select the Audio Setting .................................................................................................................27
Complete the Easy Setup Wizard ..................................................................................................27
BASIC OPERATIONS ................................................................ 28
Disc Playback ............................................................................................................ 28
Fast Playback ............................................................................................................ 28
Pause and Frame-by-Frame ...................................................................................... 29
Slow Playback ........................................................................................................... 29
Blu-ray Disc Menu Playback ..................................................................................... 30
DVD Menu Playback .................................................................................................. 30
On-Screen Display ..................................................................................................... 30
Volume Control ......................................................................................................... 31
Mute........................................................................................................................... 31
Audio Language/Track Selection ............................................................................. 31
Subtitle Selection ..................................................................................................... 32
Angle Selection ......................................................................................................... 32
Picture-in-Picture and Secondary Audio .................................................................. 32
BD-Live ...................................................................................................................... 33
ADVANCED OPERATIONS ....................................................... 34
TV System Selection ................................................................................................ 34
Output Resolution ..................................................................................................... 34
Zooming and Aspect Ratio Control .......................................................................... 35
Zoom Levels for HDMI 1 Output ....................................................................................................35
Zoom Levels for HDMI 2 & Analog (Component) Video Output .................................................... 37
Subtitle Shift ............................................................................................................. 38
Repeat Playback ....................................................................................................... 38
Repeat a Selected Section ....................................................................................... 39
Shuffle and Random Playback .................................................................................. 39
Playback by Chapter or Track Number .................................................................... 39
Playback from a Specific Location .......................................................................... 40
DVD and Blu-ray Discs ..................................................................................................................40
CD and SACD discs .......................................................................................................................41
Memory and Automatic Resume .............................................................................. 42
Viewing Pictures on DVD-Audio Discs ..................................................................... 42
Pure Audio Mode ....................................................................................................... 42
Page 5

MEDIA FILE PLAYBACK........................................................... 43
Playback from a USB or e-SATA Drive .....................................................................43
The Home Menu......................................................................................................... 44
Playing Music Files.................................................................................................... 45
Playing Movie Files.................................................................................................... 46
Viewing Photo Files...................................................................................................47
Adding Background Music ........................................................................................47
SETUP MENU OPTIONS........................................................... 48
Using the Setup Menu System.................................................................................. 48
Playback Setup..........................................................................................................51
Video Setup ............................................................................................................... 53
Picture Adjustment.........................................................................................................................56
HDMI Options ................................................................................................................................59
Audio Format Setup...................................................................................................61
Audio Signal Reference Chart .......................................................................................................64
Recommended Audio Format Options ..........................................................................................65
Audio Processing Setup............................................................................................67
Speaker Configuration...................................................................................................................67
Other Audio Processing Settings...................................................................................................71
Device Setup .............................................................................................................73
Network Setup...........................................................................................................76
REFERENCES...........................................................................80
Useful Notes.............................................................................................................. 80
Troubleshooting ........................................................................................................ 80
Specifications............................................................................................................ 82
User Manual Updates Online ....................................................................................82
Language Code List
..................................................................................................83
iii
Page 6
1
Important Information
CAUTION:
CAUTION
RISK OF ELECTRIC SHOCK.
DO NOT OPEN.
CAUTION: TO REDUCE THE RISK OF ELECTRIC
SHOCK, DO NOT REMOVE COVER (OR BACK).
NO USER-SERVICEABLE PARTS INSIDE. REFER
SERVICING TO QUALIFIED SERVICE
PERSONNEL.
The lightning flash with arrowhead symbol, within an
equilateral triangle, is intended to alert the user to the
the product's enclosure that may be of sufficient magnitude to
constitute a risk of electric shock to persons.
accompanying the appliance.
WARNING:
TO REDUCE THE RISK OF FIRE OR ELECTRIC SHOCK,
DO NOT EXPOSE THIS APPLIANCE TO RAIN OR
MOISTURE. DANGEROUS HIGH VOLTAGES ARE
PRESENT INSIDE THE ENCLOSURE. DO NOT OPEN
THE CABINET. REFER SERVICING TO QUALIFIED
PERSONNEL ONLY.
THE APPARATUS SHALL NOT BE EXPOSED TO
DRIPPING OR SPLASHING AND THAT NO OBJECTS
FILLED WITH LIQUIDS, SUCH AS VASES SHALL BE
PLACED ON THE APPARATUS.
presence of uninsulated “dangerous voltage” within
The exclamation point within an equilateral
triangle is intended to alert the user to the
presence of important operation and maintenance
(servicing) instruction in the literature
DANGER OF EXPLOSION IF BATTERY IS INCORRECTLY
REPLACED. REPLACE ONLY WITH THE SAME OR
EQUIVALENT TYPE.
THIS PRODUCT UTILIZES A LASER. USE OF CONTROLS
OR ADJUSTMENTS OR PERFORMANCE OF
PROCEDURES OTHER THAN THOSE SPECIFIED HEREIN
MAY RESULT IN HAZARDOUS RADIATION EXPOSURE.
DO NOT OPEN COVERS AND DO NOT REPAIR
YOURSELF. REFER SERVICING TO QUALIFIED
PERSONNEL.
This label is located on the laser protective housing inside the
product.
CLASS I LASER
PRODUCT
Important Safety Instructions
1) Read these instructions.
2) Keep these instructions.
3) Heed all warnings.
4) Follow all instructions.
5) Do not use this apparatus near water.
6) Clean only with dry cloth.
7) Do not block any ventilation openings. Install in
accordance with the manufacturer’s instructions.
8) Do not install near any heat sources such as radiators,
heat registers, stoves, or other apparatus (including
amplifiers) that produce heat.
9) Do not defeat the safety purpose of the polarized or
grounding-type plug. A polarized plug has two blades
with one wider than the other. A grounding type plug
has two blades and a third grounding prong. The wide
blade or the third prong is provided for your safety. If
the provided plug does not fit into your outlet, consult
an electrician for replacement of the obsolete outlet.
10) Protect the power cord from being walked on or
pinched, particularly at plug, receptacle, and the point
where it exits from the apparatus.
11) Only use attachments/accessories specified by the
manufacturer.
12) Use only with the cart, stand, tripod,
bracket, or table specified by the
manufacturer, or sold with the
apparatus. When a cart is used, use
caution when moving the
cart/apparatus combination to avoid
injury from tip-over.
13) Unplug this apparatus during lightning storms or when
unused for long periods of time.
14) Refer all servicing to qualified service personnel.
Servicing is required when the apparatus has been
damaged in any way, such as power-supply cord or plug
is damaged, liquid has been spilled or objects have fallen
into the apparatus, the apparatus has been exposed to
rain or moisture, does not operate normally, or has been
dropped.
15) Batteries (battery pack or batteries installed) shall not be
exposed to excessive heat such as sunshine, fire or the
like.
Page 7
IMPORTANT INFORMATION
Precautions
Before connecting the AC power cord to the appliance,
make sure the voltage designation of the appliance
corresponds to the local electrical supply. If you are
unsure of your power supply, contact your local power
company. The acceptable power input range is AC ~
115V/~230V, 50/60Hz.
The apparatus with CLASS I construction shall be
connected to a MAINS socket outlet with a protective
earthing connection.
The player is still receiving power from the AC power
source as long as it is connected to the wall outlet,
even if the player itself has been turned off.
Unplug the power cord if you are not going to use the
product for an extended period of time. Hold the power
plug when unplugging. Do not pull on the cord.
The main plug is used as the mechanism for cutting off
power, therefore make sure it is easy to unplug.
CE mark
This product compiles with European Low Voltage
(2006/95/CE), Electromagnetic Compatibility (2004/108/EC)
and Environmentally-friendly design of Energy-related
Products (2009/125/EC) Directives when used and installed
according to this instruction manual.
C-Tick mark
This product complies with Australian C-Tick
electromagnetic compatibility (EMC) emission
requirements, according to the requirements
of the Radiocommunications Labelling
(Electromagnetic Compatibility) Notice 2008.
To ensure proper ventilation around this product, do not
place this product on a sofa, bed or rug. When installing
this product on a wall or bookshelf, you need to provide
appropriate space.
High temperature will lead to abnormal operation of this
unit. Do not expose this unit or batteries to direct sunlight
or near other heating objects.
When moving the player from a cold location to a warm
one, or vice versa, moisture may condense on the laser
pickup unit inside the player. Should this occur, the
Player may not operate properly. In such a case please
turn the unit on for 1-2 hours (without a disc) to facilitate
moisture evaporation.
WEEE symbol
Correct Disposal of This Product. (Waste Electrical
& Electronic Equipment) Applicable in the European
Union and other European countries with separate
collection systems.
This marking on the product, accessories or literature
indicates that the product and its electronic accessories (e.g.
remote handset) should not be disposed of with other
household waste at the end of their working life. To prevent
possible harm to the environment or human health from
uncontrolled waste disposal, please separate these items from
other types of household waste and recycle them responsibly
to promote the sustainable reuse of material resources.
Trademarks
“Blu-ray Disc”, “Blu-ray 3D”, “BONUSVIEW” and “BDLive” are trademarks of Blu-ray Disc Association.
Java and all Java-based trademarks and logos are
trademarks or registered trademarks of Sun
Microsystems, Inc. in the United States and other
countries.
DVD Logo is a trademark of DVD Format/Logo
Licensing Corp., registered in the U.S., Japan and
other countries.
Super Audio CD, SACD and the SACD logo are joint
trademarks of Sony Corporation and Philips Electronics
N.V. Direct Stream Digital (DSD) is a trademark of
Sony Corporation.
“AVCHD” and the “AVCHD” logo are trademarks of
Panasonic Corporation and Sony Corporation.
Designed for Windows Media, Microsoft, HDCD, and
the HDCD logo ar
trademarks of Microsoft Corporation in the United
States and/or other countries.
“480p/720p/1080i/1080p” up-converting arrow logo,
“Source Direct” and “True 24p” logos are trademarks of
OPPO Digital, Inc.
e trademarks or registered
“Qdeo” and “QuietVideo” are trademarks of Marvell or its
affiliates.
32 TM
“SABRE Reference DAC ” is a trademark of ESS
Technology, Inc.
Manufactured un
5,451,942; 5,956,674; 5,974,380; 5,978,762; 6,226,616;
6,487,535; 7,392,195; 7,272,567; 7,333,929; 7,212,872 &
other U.S. and worldwide patents issued & pending. DTS
is a registered trademark and the DTS logos, Synbol,
DTS-HD and DTS-HD Master Audio | Essential are
trademarks of DTS, Inc. © 1996-2008 DTS, Inc. All
Rights Reserved.
Manufactured under license from Dolby Laboratories.
“Dolby” and the double-D symbol are trademarks of
Dolby Laboratories.
HDMI, the HDMI logo and High-Definition Multimedia
Interface are trademarks or registered trademarks of
HDMI Licensing LLC.
“DivX®” is a trademark of DivX, Inc.
All other trademarks are the properties of their respective
owners.
der license under U.S. Patent #’s:
2
Page 8
IMPORTANT INFORMATION
3
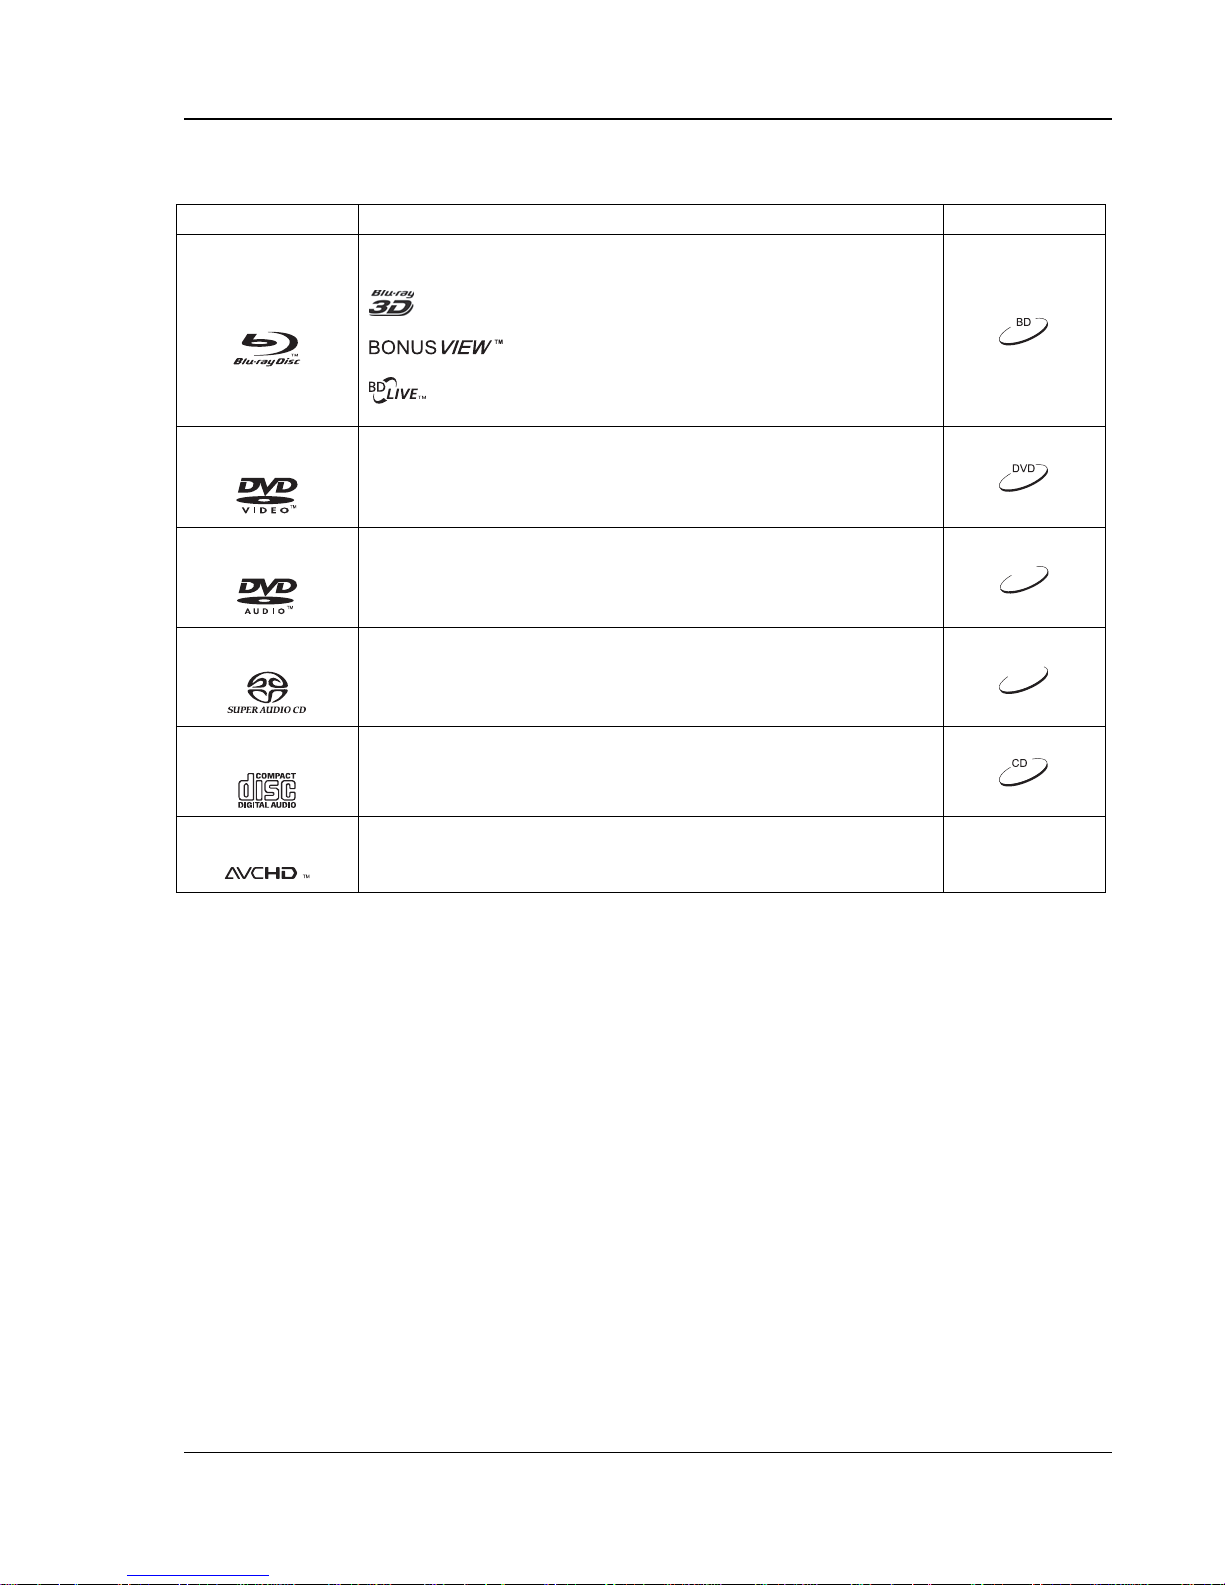
Compatible Disc Types
Type/Logo Features Manual Icon
High Definition (HD) movie and music discs
BD-ROM and BD-RE/BD-R discs in BDMV and BDAV mode, including 8cm
discs (single layer) and DL discs.
BD-Video
DVD-Video
TM
displays and active shutter glasses are required for full 3D movie experience.
packages or Picture-in-Picture functions to be used.
interactive features when the player is connected to the Internet.
High quality movie and music discs
Commercially released DVD discs, DVD+RW/DVD+R/DVD-RW/DVD-R in
DVD-Video format, finalized.
- Discs supporting 3D Blu-ray contents playback. 3D-compatible
- Discs supporting BONUSVIEW that allows Virtual
- Discs supporting BD-Live (BD-ROM version 2 Profile 2) that provides
DVD-Audio
Super Audio CD
CD
AVCHD
Multi-channel or stereo high resolution audio with compressed digital video or
still pictures. Some DVD-Audio discs also contain a DVD-Video portion.
SACD: High resolution audio-only disc with stereo and/or multi-channel audio.
Hybrid disc with both high resolution and CD-compatible layers.
Compact Discs (CD) that contain audio tracks.
High-definition digital video camera format using efficient data compression
coding technology.
Discs that cannot be played
x BDs with cartridge
x DVD-RAMs
x HD DVDs
x Data portion of CD-Extras
x BD-Video/DVD-Video with a different region code
DVD-A
SACD
x Some DualDiscs: A DualDisc is a two sided disc with
DVD on one side and digital audio on the other side. The
digital audio side does not meet the technical
specifications of the Compact Disc Digital Audio (CD-DA)
format so playback is not guaranteed.
x Music discs encoded with copyright protection
technologies: if the discs do not conform to the CD
standard, they may not be playable on this player.
Disc care and handling
x To keep the disc clean from scratches or fingerprints,
handle the disc by its edge. Do not touch the recorded
surface.
x Blu-ray Discs record data in very high density and the
recorded layer is very close to the disc surface. For
this reason, Blu-ray Discs are more sensitive to dust
and fingerprints than DVD. Should you encounter
playback problems and see dirty spots on the disc
surface, clean the disc with a cleaning cloth. Wipe the
disc from the center out along the radial direction. Do
not wipe the disc in a circular motion.
x Do not use record cleaning sprays or solvents such as
benzene, thinner and anti-static spray.
x Do not attach labels or stickers to discs as this may
cause the disc to warp, become imbalanced or too thick,
resulting in playback problems.
x Avoid exposing the discs to direct sunlight or heat
sources.
x Do not use the following discs:
o Discs with exposed adhesive from removed stickers
or labels. The disc may get stuck inside the player.
o Warped or cracked discs.
o Irregularly shaped discs, such as heart or business
card shapes.
Page 9
IMPORTANT INFORMATION
Notes about BD-ROM compatibility
Since the Blu-ray Disc specifications are new and evolving, some discs may not play properly depending on the disc type, version
and encoding. It is possible that a Blu-ray disc manufactured after the player was manufactured uses certain new features of the
Blu-ray Disc specifications. To ensure the best possible viewing experience, the player may need a firmware or software update
from time to time.
Please visit web site www.internationaldynamics.com.au to check if updates are available.
Copyright Protection
This product incorporates copyright protection technology that is protected by U.S. patents and other intellectual property rights. Use of this
copyright protection technology must be authorized by Macrovision Corporation, and is intended for home and other limited viewing uses
only unless otherwise authorized by Macrovision Corporation. Reverse engineering or disassembly is prohibited.
Region management information
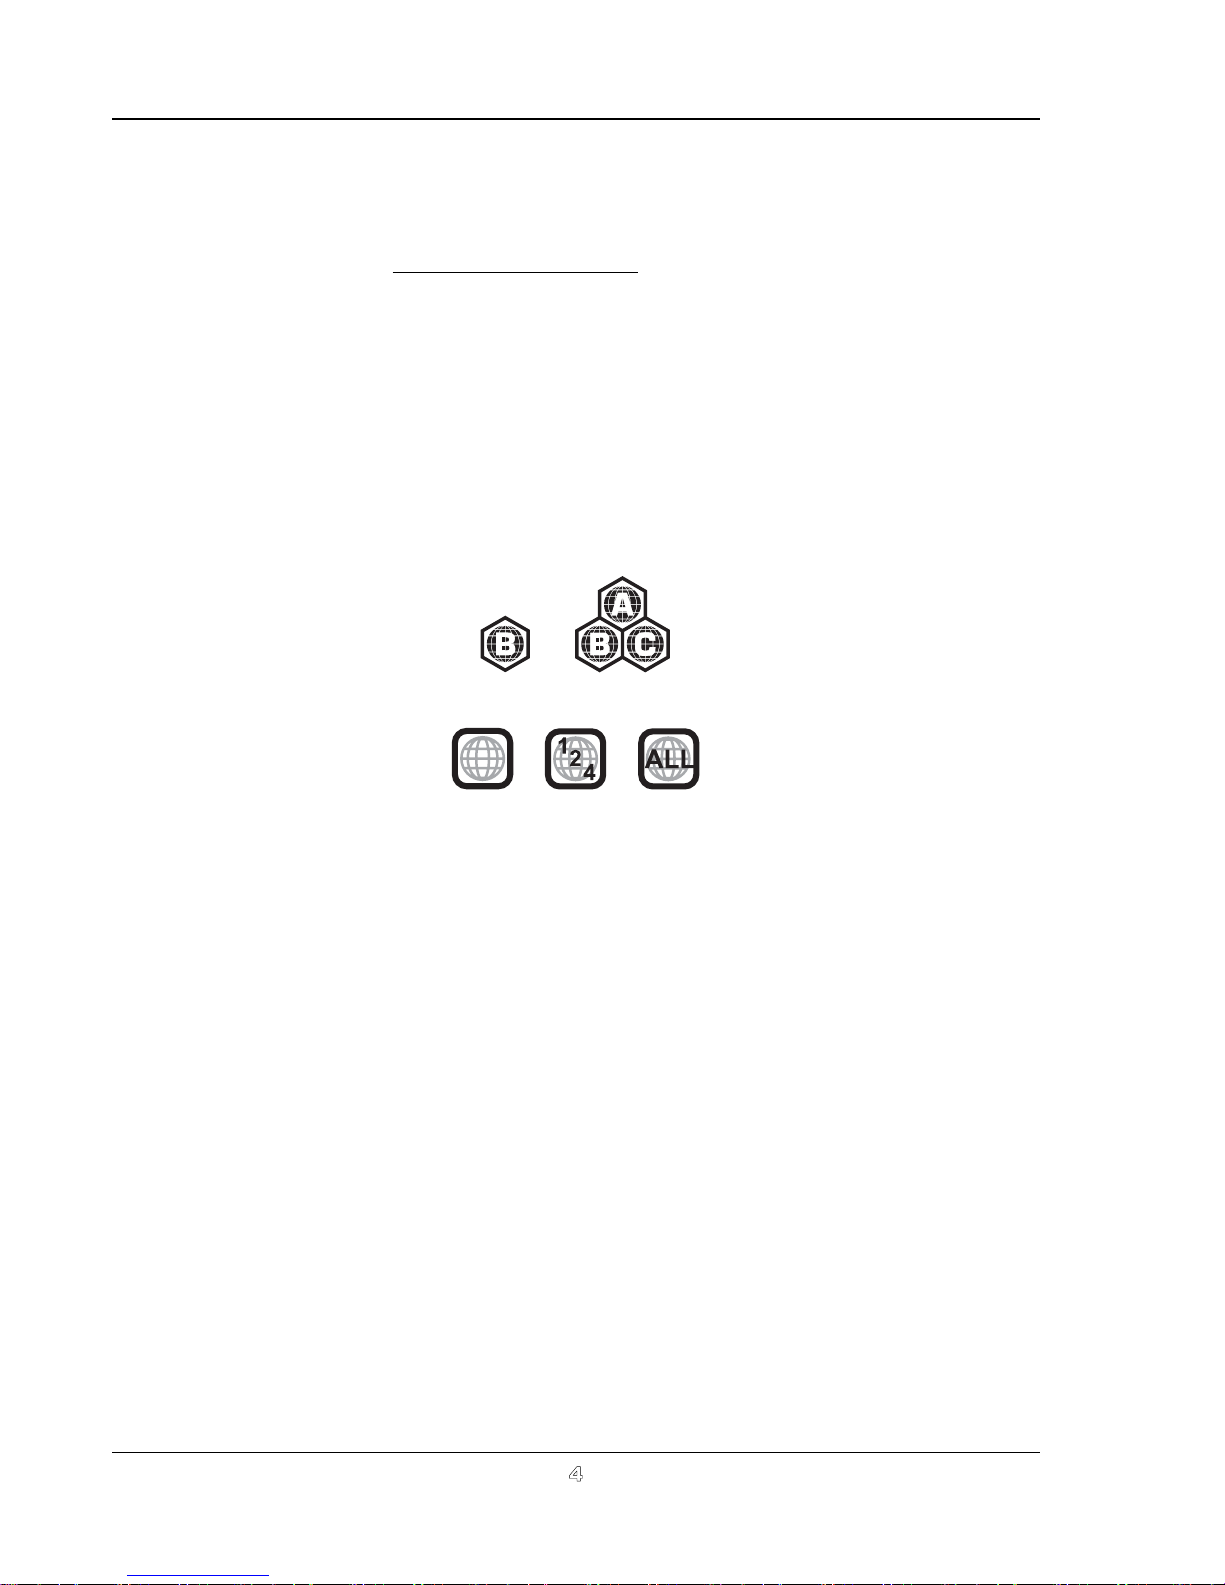
This player is designed and manufactured to respond to the region management information. If the region number of a BD-Video
or DVD disc does not correspond to the region number of this player, this player cannot play the disc.
BD-Video: This player plays BD-Video with marks containing the region code B.
DVD-Video: This player plays DVD-Video with marks containing the region code 4 and ALL.
4
4
Page 10
INST ALLA TION
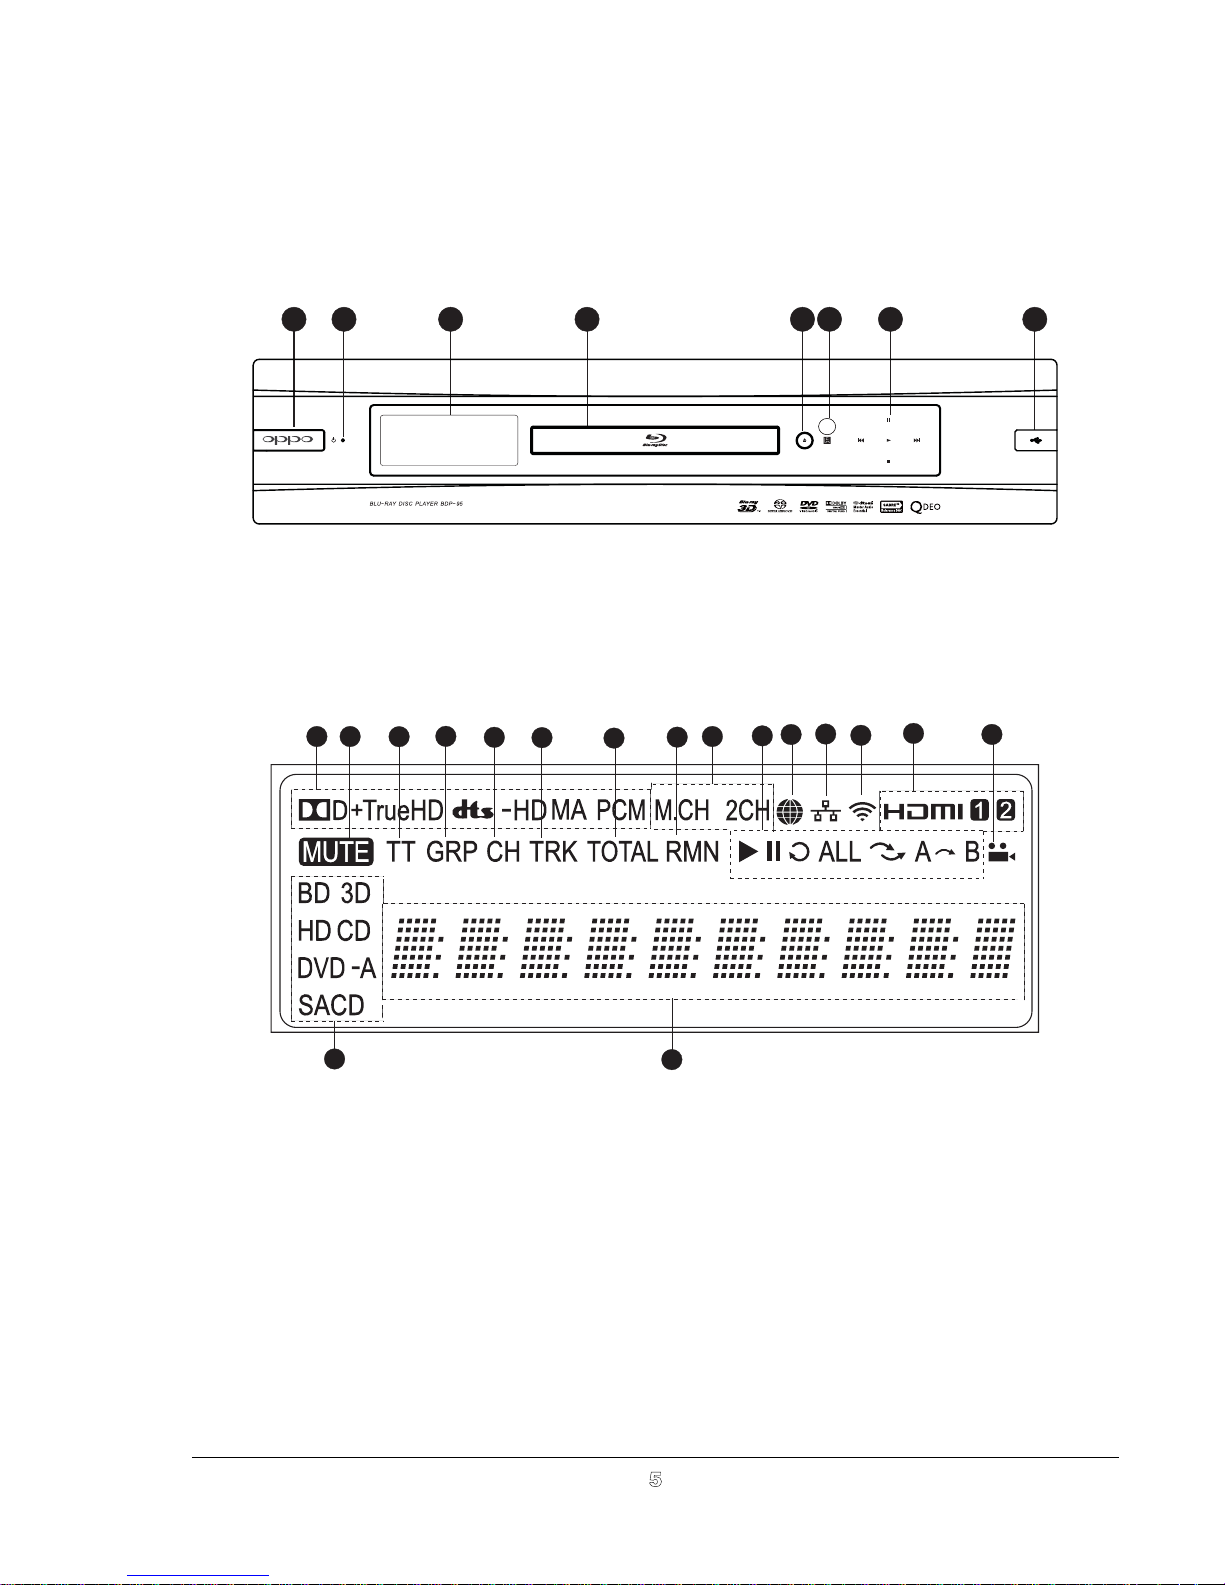
Front Panel Controls
1 32 4 5 6 7 8
AU
1. POWER Button
2. POWER Status
Indicator
3. Front Panel Display
Window
4. Disc Tray
Front Panel Display Window
2161
1. Audio Type Indication – Indicates the type of audio
tracks being played
2. Mute Icon – Indicates that the audio is muted
3. Title – When illuminated, the displayed time applies to
a title
4. Group – When illuminated, the displayed time applies
to a group
5. Chapter – When illuminated, the displayed time applies
to a chapter
6. Track – When illuminated, the displayed time applies to
a track
7. Total – When illuminated, the displayed time is the total
play time
8. Remaining – When illuminated, the displayed time is
the remaining play time
4
3
5
6
5. OPEN/CLOSE Button
6. IR Sensor Window
12
11
10
9
7
8
17
9. Audio Channel Indication – Indicates whether the audio
being played is 2ch stereo or multi-channel surround
10. Playback Status – Indicates playback status such as
Play, Pause, Repeat, Repeat All, Random/Shuffle, and AB Repeat
11. Internet – Indicates the internet is being accessed
12. Ethernet – Indicates that an active Ethernet cable is
attached
13. Wireless – Indicates a
14. HDMI Indication – Indicates the active HDMI output(s)
15. Angle Icon – Indicates that the scene contains additional
camera angle(s)
16. Disc Type – Indicates the type of the disc that is playing
17. Main Display – Text messages and numeric display
7. Playback Control and
Navigation Buttons
8. USB 2.0 Port
14
13
Wireless hotspot is connected
15
5
Page 11
INSTALLATION
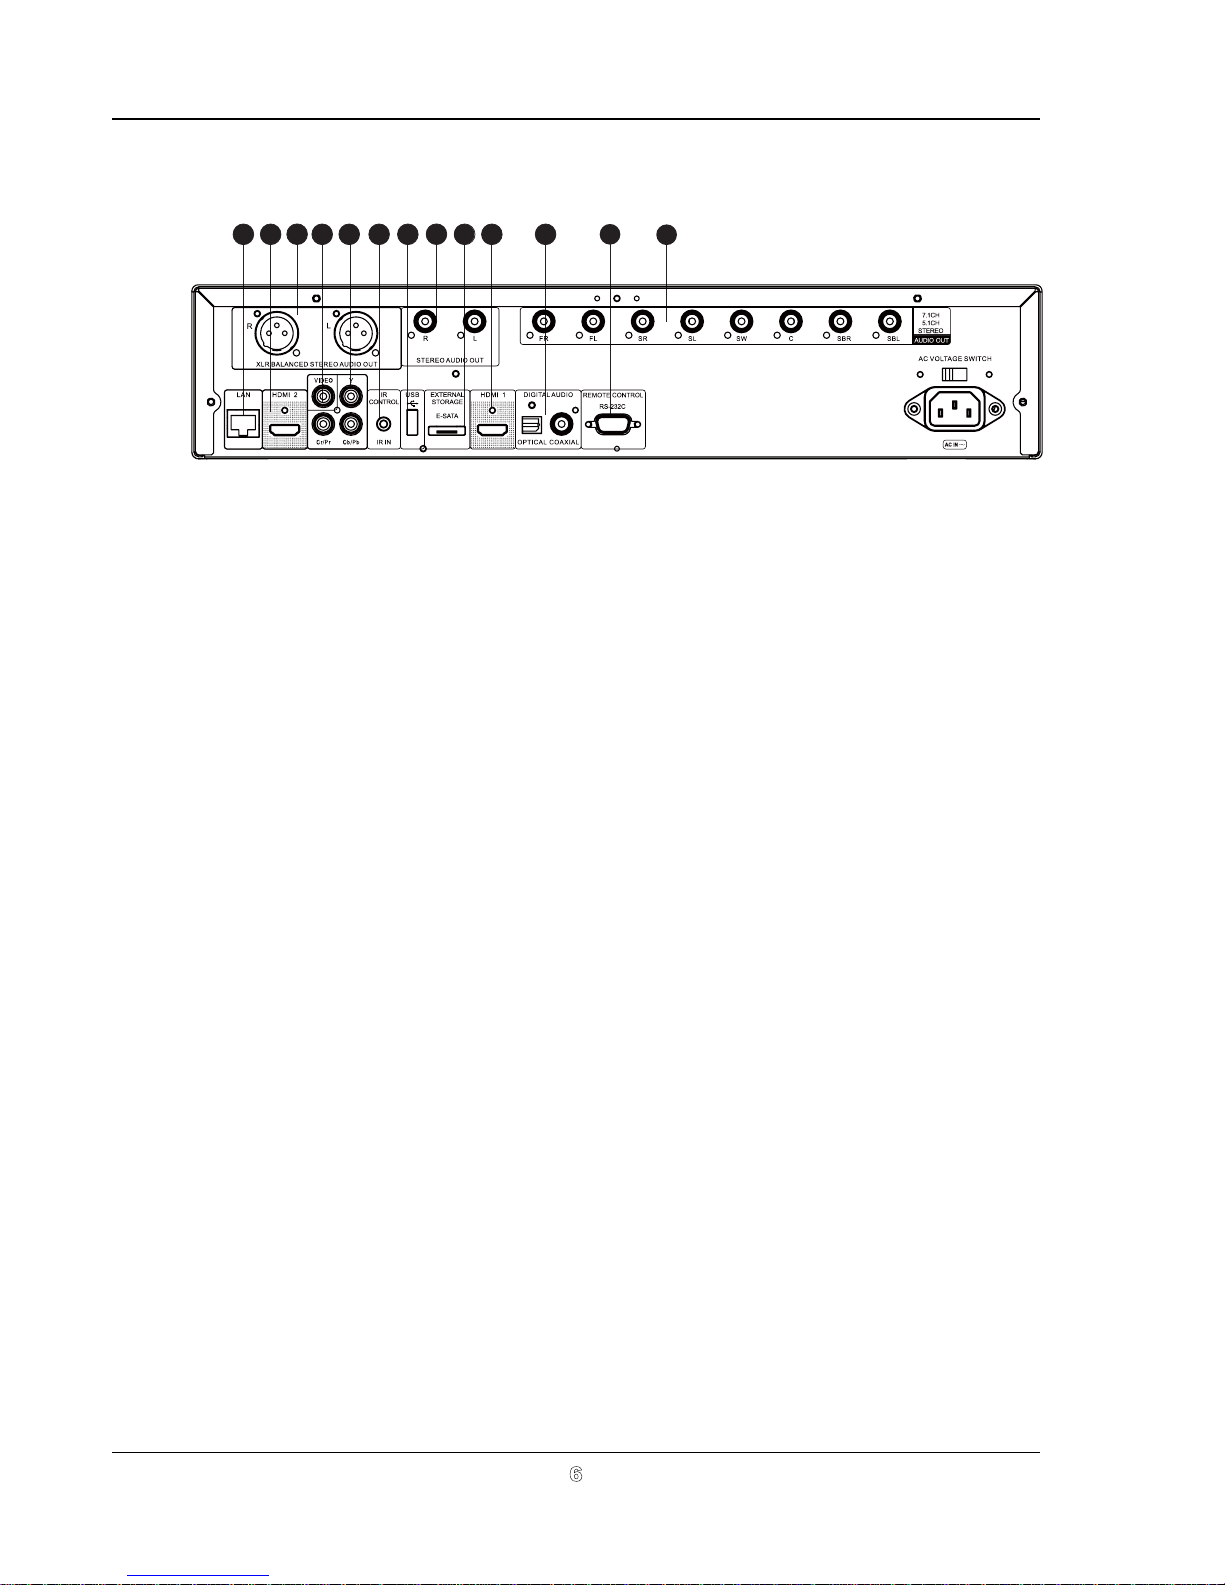
Rear Panel Connectors
38
3
1 4 5 6 7 9 10
2
1. Ethernet LAN Port
2. HDMI 2 Output (3D Compatible)
3. Balanced Stereo Audio Output
4. Composite Video Output
5. Component Video Outputs
8
6. IR IN Port
7. USB 2.0 Port
8. Stereo Audio Output
9. e-SATA Port
10. HDMI 1 Output (3D Compatible)
11
12
13
13
11. Coaxial and Optical Digital Audio
Output
12. RS-232C Port
13. 7.1ch / 5.1ch / Stereo Audio
Output
In addition to the above connectors, the AC power inlet and the AC voltage switch are also located on the rear
panel. The inlet is the IEC60-320 C14 type. The AC voltage switch can be manually adjusted to work at
100V~120V (labeled as ‘115’) or 200V~240V (labeled as ‘230’), please flip the switch according to your
power
Only the included AC power cord or an approved power cord with an IEC60-320 C14 typeline AC voltage.
plug should be used.
6
Page 12
INSTALLATION
7
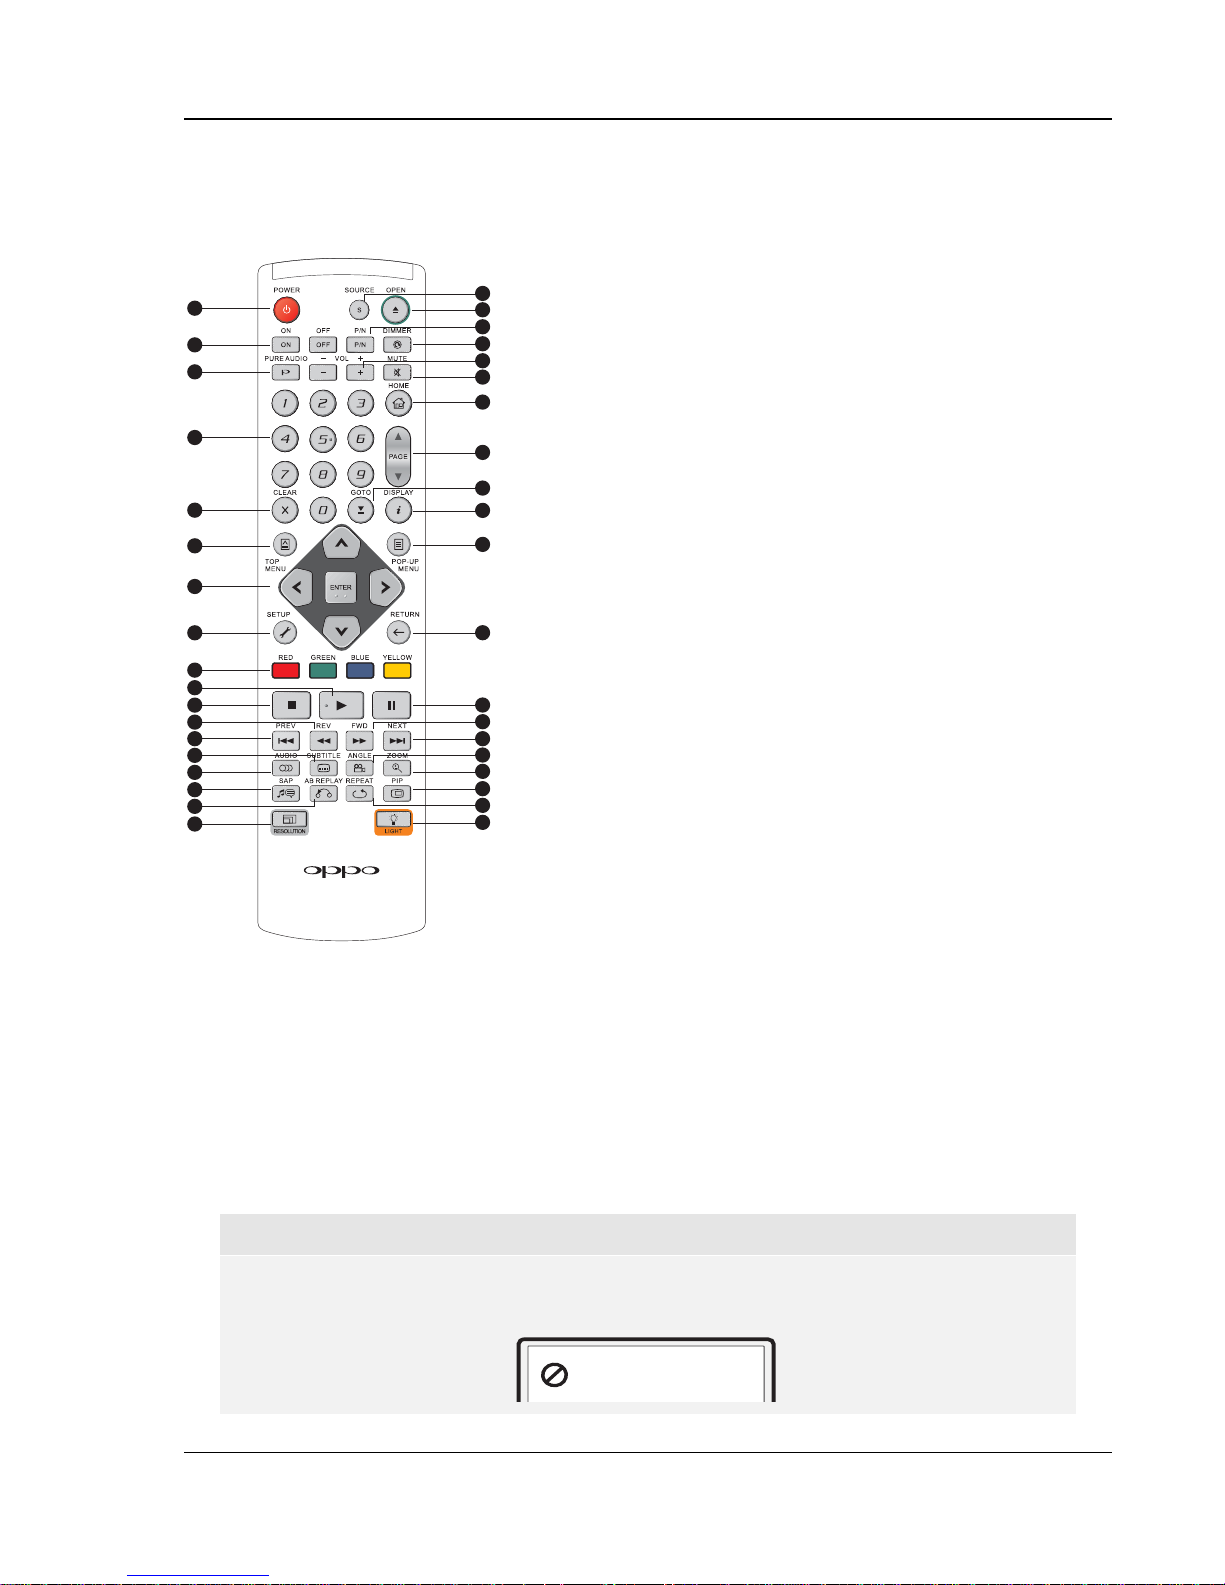
Remote Control
Remote Control Buttons
1
2
3
4
5
6
7
8
9
10
11
2
12
13
14
15
16
17
18
1. POWER: Toggle power
STANDBY and ON
2. ON/OFF: Discrete on/off
power buttons
3. PURE AUDIO: Turn
off/on video
4. NUMBER Buttons: Enter
numeric values
5. CLEAR: Clear numeric
19
20
21
22
23
24
25
input
6. TOP MENU: Show BD
top menu or DVD title
menu
7. ARROW and ENTER
Buttons: Navigate menu
26
selection
8. SETUP: Enter the
27
28
29
player Setup Menu
9. COLOUR Buttons:
Function varies by
content
10. PLAY: Start playback
30
11. STOP: Stop playback
12. REV: Fast reverse play
13. PREV: Skip to previous
31
32
33
34
35
36
37
38
14. SUBTITLE: Change
subtitle language
15. AUDIO: Change audio
language or channel
16. SAP: Turn on/off
Secondary Audio
Program
17. A-B REPLAY: Repeat
play the selected
section
18. RESOLUTION: Switch
output resolution
19. SOURCE: Select the
internet media or
application source
20. OPEN: Open/close the
disc tray
21. P/N: Switch output TV
22. DIMMER: Dim the front
panel display
23. VOLUME +/-
:
Increase/Decrease
volume
24. MUTE: Mute audio
25.
HOME: Go to Home
Menu to select media
source
26. PAGE UP/DOWN:
Show the previous/next
page
27. GOTO: Play from a
specified location
28. DISPLAY: Show/hide
the On-Screen Display
29. POP-UP MENU: Show
BD pop-up menu or
DVD menu
30. RETURN: Return to the
previous menu or mode
31. PAUSE: Pause
playback
32. FWD: Fast forward play
33. NEXT: Skip to the next
34. ANGLE: Change the
camera angle
35. ZOOM: Zoom in/out
and adjust aspect ratio
36. PIP: Show/hide the
Picture-in-Picture
37. REPEAT: Repeat play
38. LIGHT: Activate back
light for the remote
control
system: NTSC, PAL or
MULTI
NOTE
When a button is pressed but its function is invalid or unavailable at the moment, the TV
screen displays a circle with a diagonal line:
Page 13
INSTALLATION
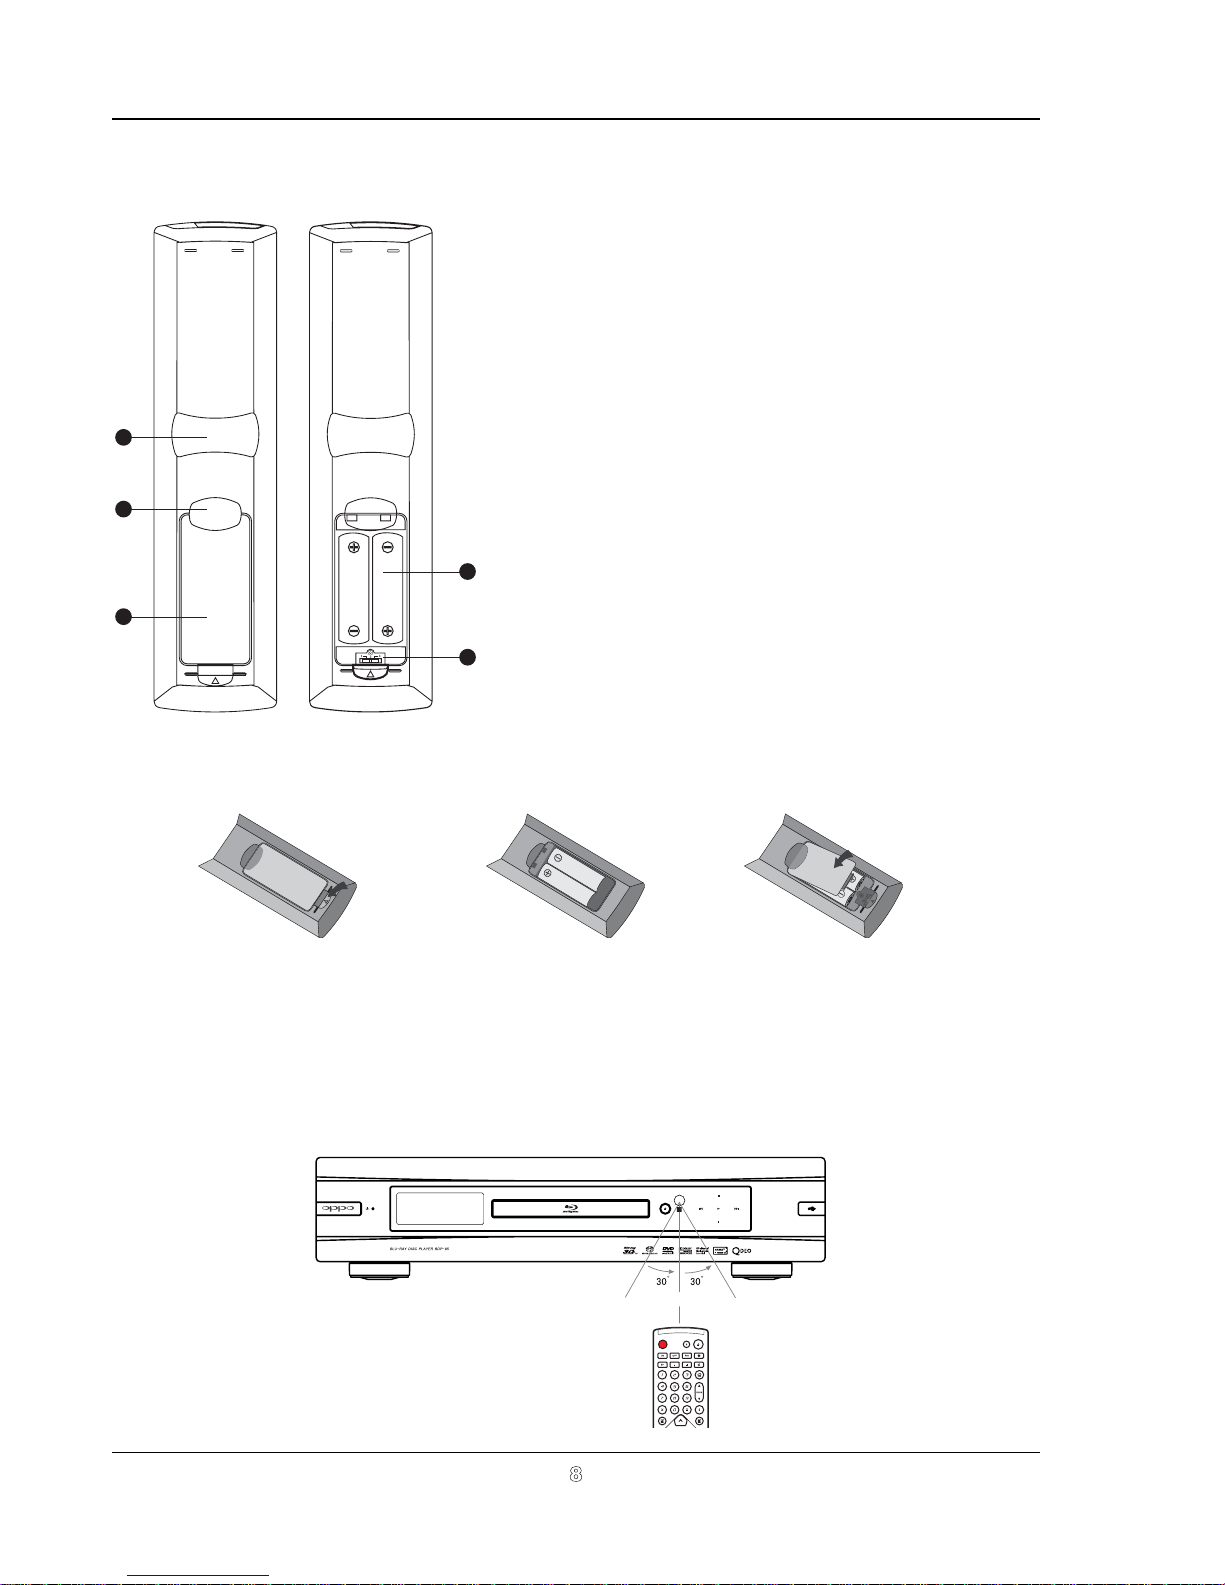
Back Side
1
2
3
1. Index Finger Notch 1: When your index finger is
placed at this notch while holding the remote control,
your thumb is within easy reach of the navigation
buttons (ARROW, ENTER, TOP MENU and POPUP MENU).
2. Index Finger Notch 2: When your index finger is
placed at this notch while holding the remote control,
your thumb is within easy reach of the playback
control buttons (STOP, PLAY, PAUSE, PREV,
NEXT, REV, FWD).
3. Battery Cover: Remove to replace batteries or set
remote code.
4. Batteries: Use (2) size AA or LR6 batteries.
5. Remote Code Switch: Adjust the position of the
4
5
switch to set the remote control to use the indicated
remote code (see details on page 9).
With Battery Cover Battery Cover Removed
Battery Installation
1. Remove the battery
compartment cover
2. Insert batteries 3. Replace the battery
compartment cover
Using the Remote Control
When using the remote control, the front window of the remote control should be pointed to the infrared sensor
on the front panel within an angle of ±30° and a range of about 26 ft.
AU
Within about 26ft
8
Page 14
INSTALLATION
Changing the Remote Code
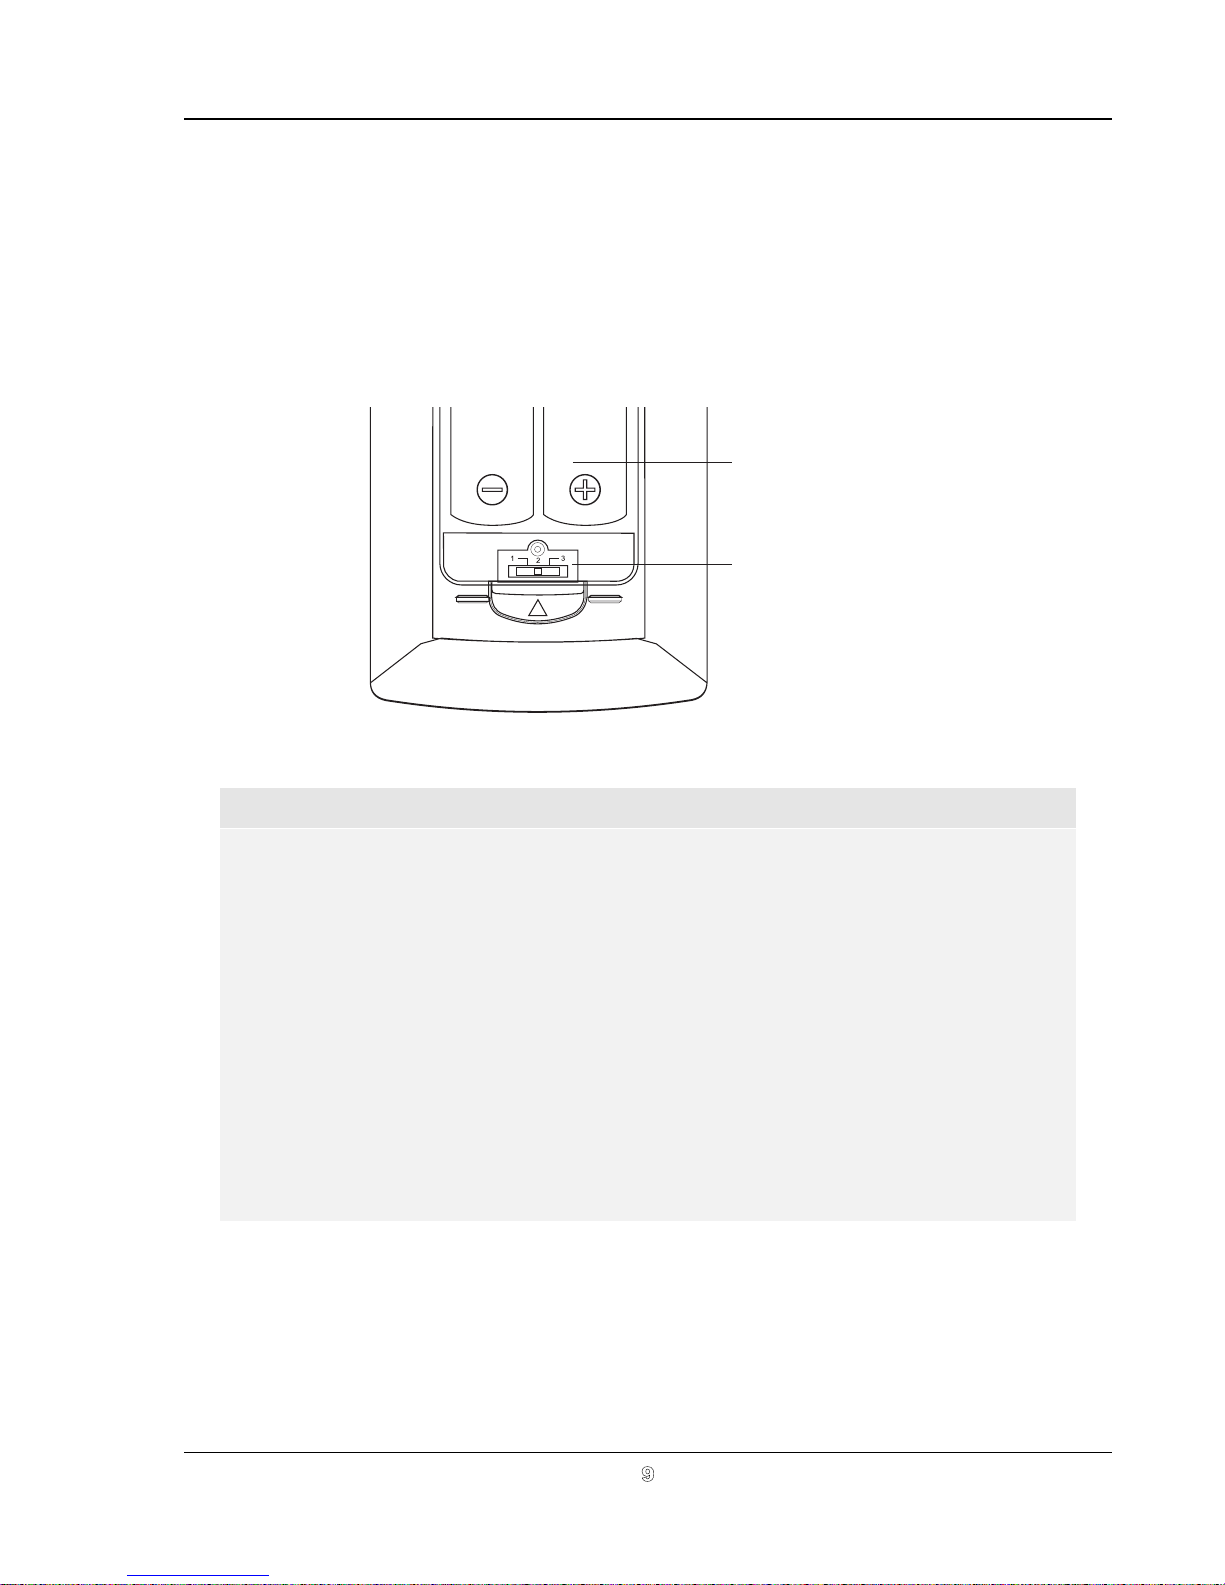
The remote control supports one of three remote codes. The default is “Code 1”. If you have other OPPO
products placed close to the BDP-95
In
this case you can select a different remote code to avoid conflicts.
AU
, they may inadvertently respond to the BDP-95AU remote
To select a new remote code, open the battery compartment cover of the remote control, and then use a ball
pen to flip the switch to one of the positions marked as “1”, “2”, or “3”. Close the battery compartment
point
cover. Make sure that the BDP-95AU player is turned on and the disc tray is ejected. Aim the remote control
at the player. Press and hold the ENTER button for 5 seconds. The player will start using the new remote code.
Battery Compartment
Remote Code Switch
control.
CAUTIONS
x
Never drop the remote control or expose it to moisture.
Never expose the infrared remote sensor on the front panel to direct sunlight or other
x
strong light sources.
x
Remote may not operate consistently when batteries become low. Replace them if
operation deteriorates.
If the remote control will not be used for a long time, please remove the batteries.
x
Use the batteries correctly to avoid possible leakage and corrosion. Do not leave the
x
batteries exposed to direct sunlight or high temperature environment for a long
period of time. Do not heat or expose to flame. Do not mix old and new batteries.
Do not use batteries of different types at the same time. Do not attempt to recharge
the batteries.
x
If battery leakage occurs, do not touch the liquid with bare hands. Wipe out any
liquid inside the battery compartment, and insert new batteries.
9
Page 15
INSTALLATION
Connecting to a Display (Recommended Methods)
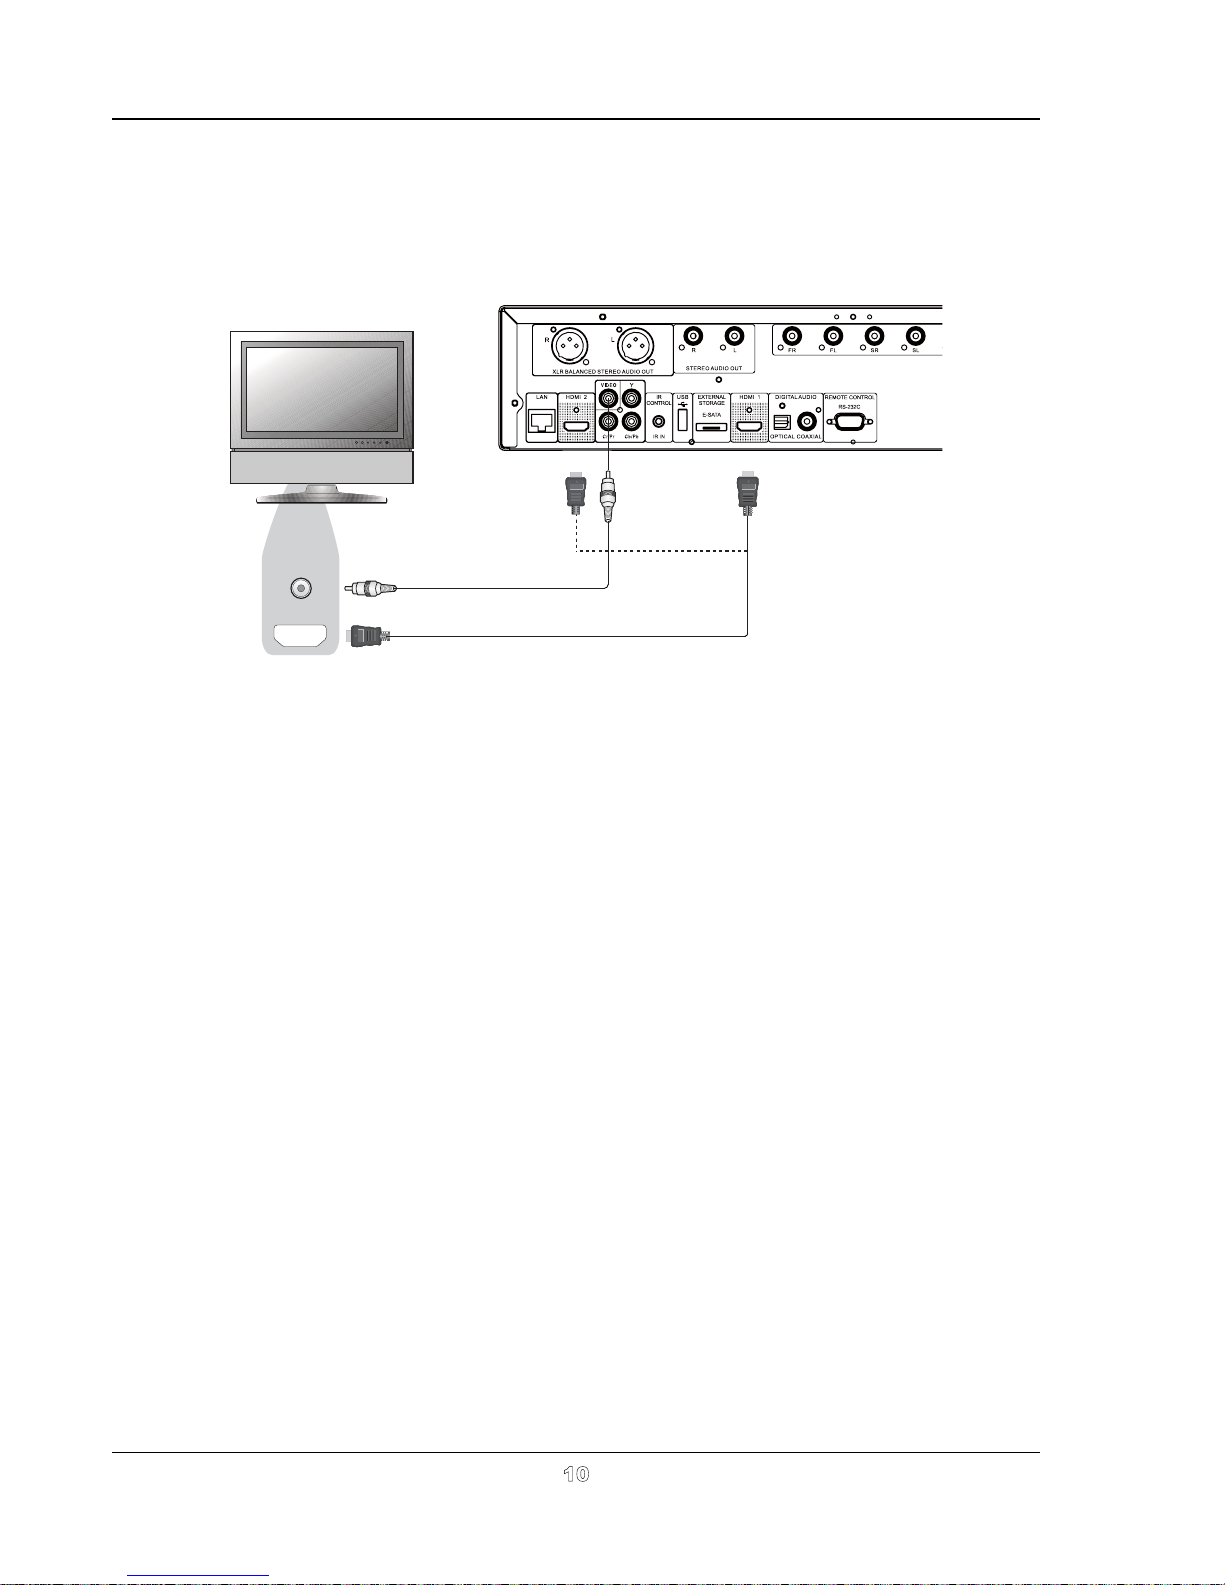
HDMI Connection to a single TV
Rear Panel
Video In
HDMI In
Composite Video Cable (Optional)
HDMI Cable (to HDMI 1 or 2)
Method 1 – HDMI Connection Directly to a single TV
x
If your TV has an HDMI (High-Definition Multimedia Interface) input, you can use the included
HDMI cable to connect the player to the TV. This connection method delivers both video and
audio in a pure digital format via a single cable. The HDMI video output of the player allows for
the highest possible video quality and resolution.
x
There are two HDMI output terminals (HDMI 1 and HDMI 2) on the rear panel of BDP-95AU, both
of which can be connected to your TV. We recommend to use HDMI 1 since it benefits from the
dedicated Marvell QDEO video processor, and set the “Primary Output” option in the setup
menu to “HDMI 1” (please refer to page 53 for more details).
You may connect the composite video cable (not included) to the TV for troubleshooting
x
purposes, in the
recommended to use the
because it only produces a
event that there is a problem with HDMI video. However it is not
composite video as the primary method of video delivery to the TV,
standard definition video signal and forfeits the advantage of high
definition video.
10
Page 16
INSTALLATION
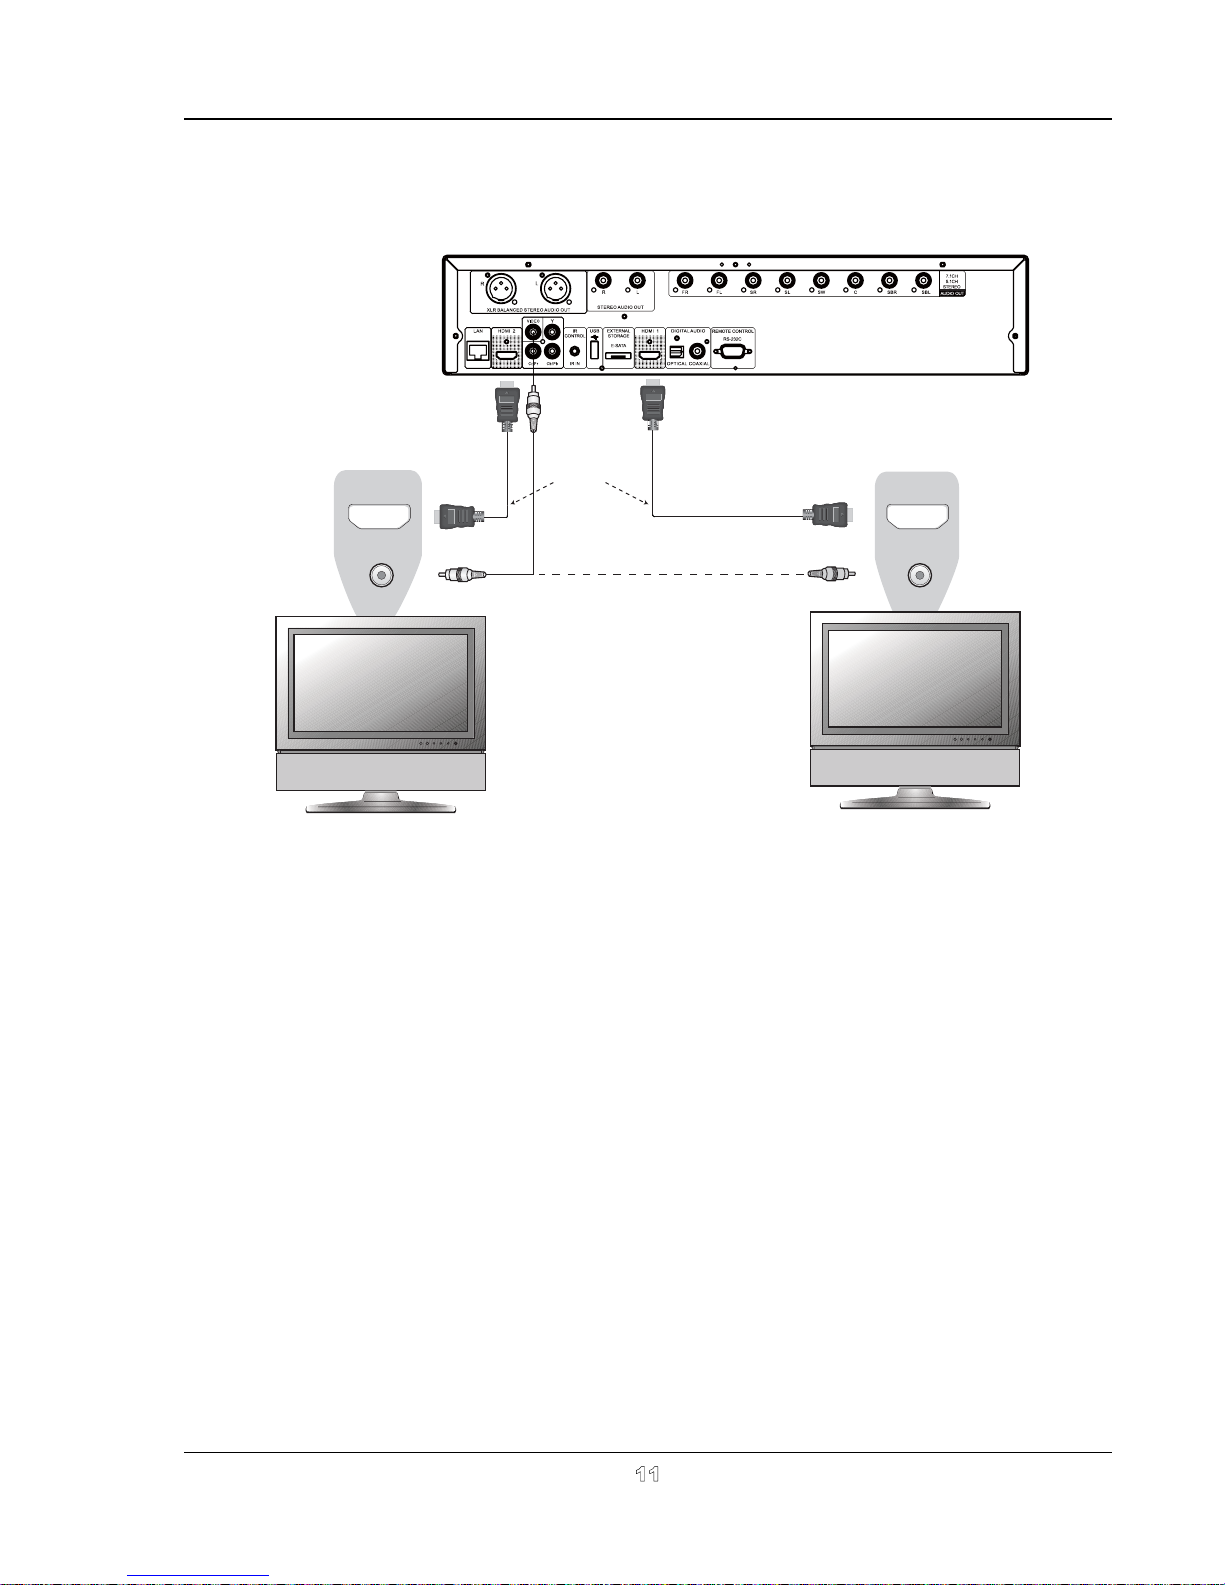
HDMI Connection to Two (2) TVs
Rear Panel
HDMI In
Video In
HDMI Cables
Composite Video Cable
TV 2
(optional)
TV 1
HDMI In
Video In
Method 2 –HDMI Connection Directly to two TVs
x
The two HDMI outputs (HDMI 1 and HDMI 2) available on the rear panel of BDP-95AU can be
connected to two TVs at the same time, and each output can deliver the digital video and audio
signals.
x
We recommend to connect your main TV (the one with larger screen size or the one that you
would watch more often) to HDMI 1 thus to benefit from the dedicated video processor, and set
the “Primary Output” option in the setup menu to “HDMI 2” to make sure that the HDMI 2 can
output high bit rate audio signals (please see more details on page 53).
x
You may connect the composite video cable to one of your TVs for trouble-shooting purpose,
please refer to page 10 for more details.
11
Page 17
INSTALLATION
DVI Connection
Rear Panel
Video In
DVI
DVI
Audio
Composite Video Cable
(optional)
HDMI
(from HDMI 1 or 2)
Audio Cable
- DVI Cable
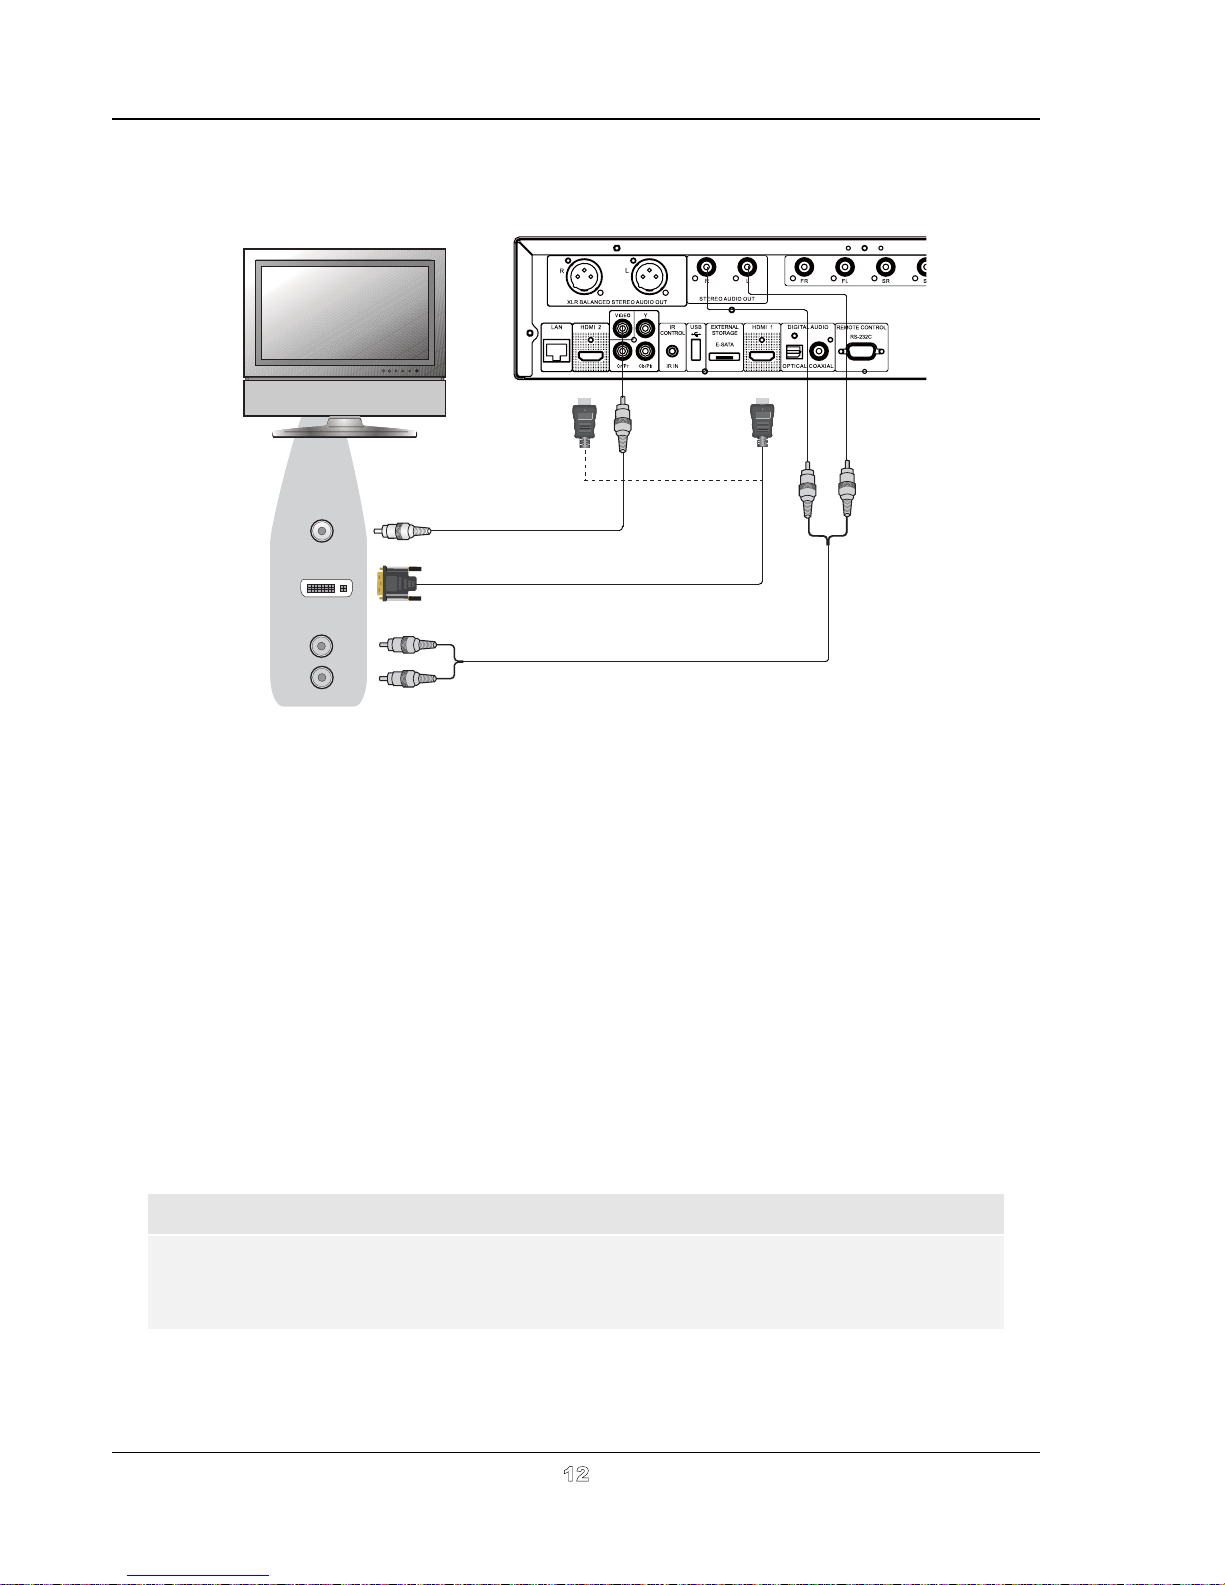
Method 3 – DVI Connection to TV
x If your TV has a DVI input that supports HDCP*, you can purchase an HDMI-DVI adapter cable
to connect the player to the TV. This connection method delivers digital video to the TV without
any signal degradation. The HDMI video output of the OPPO Blu-ray Disc player presents the
highest possible video quality and resolution. We recommend to use HDMI 1 since it can
benefit from the dedicated video processor, and set the “Primary Output” option in the setup
menu to “HDMI 1” (please see more details on page 53).
x Please use the Red/White audio cables (not included) to connect the STEREO AUDIO OUT
terminals of the player to the TV. Make sure the audio cables are connected to the same input
terminal group on the TV as the DVI input. Usually the input terminals are marked as “DVI
Audio ” or “PC Audio”. On some TVs you may need to use an RCA-3.5mm Mini-Jack adapter
cable to connect the audio.
x You may connect the composite video cable to the TV for trouble-shooting purpose, please
refer to page 10 for more details.
*NOTE
HDCP stands for High-bandwidth Digital Content Protection. The HDMI output of the OPPO
Blu-ray Disc player uses HDCP to encrypt the digital audio and video content. The TV needs
to support HDCP so it can decrypt the content and properly display it.
12
Page 18
INSTALLATION
l
Component Video Connection
Rear Pane
Component
Video
Pb/Cb
Pr/Cr
Audio
Y
Component
Video Cables
Audio Cable
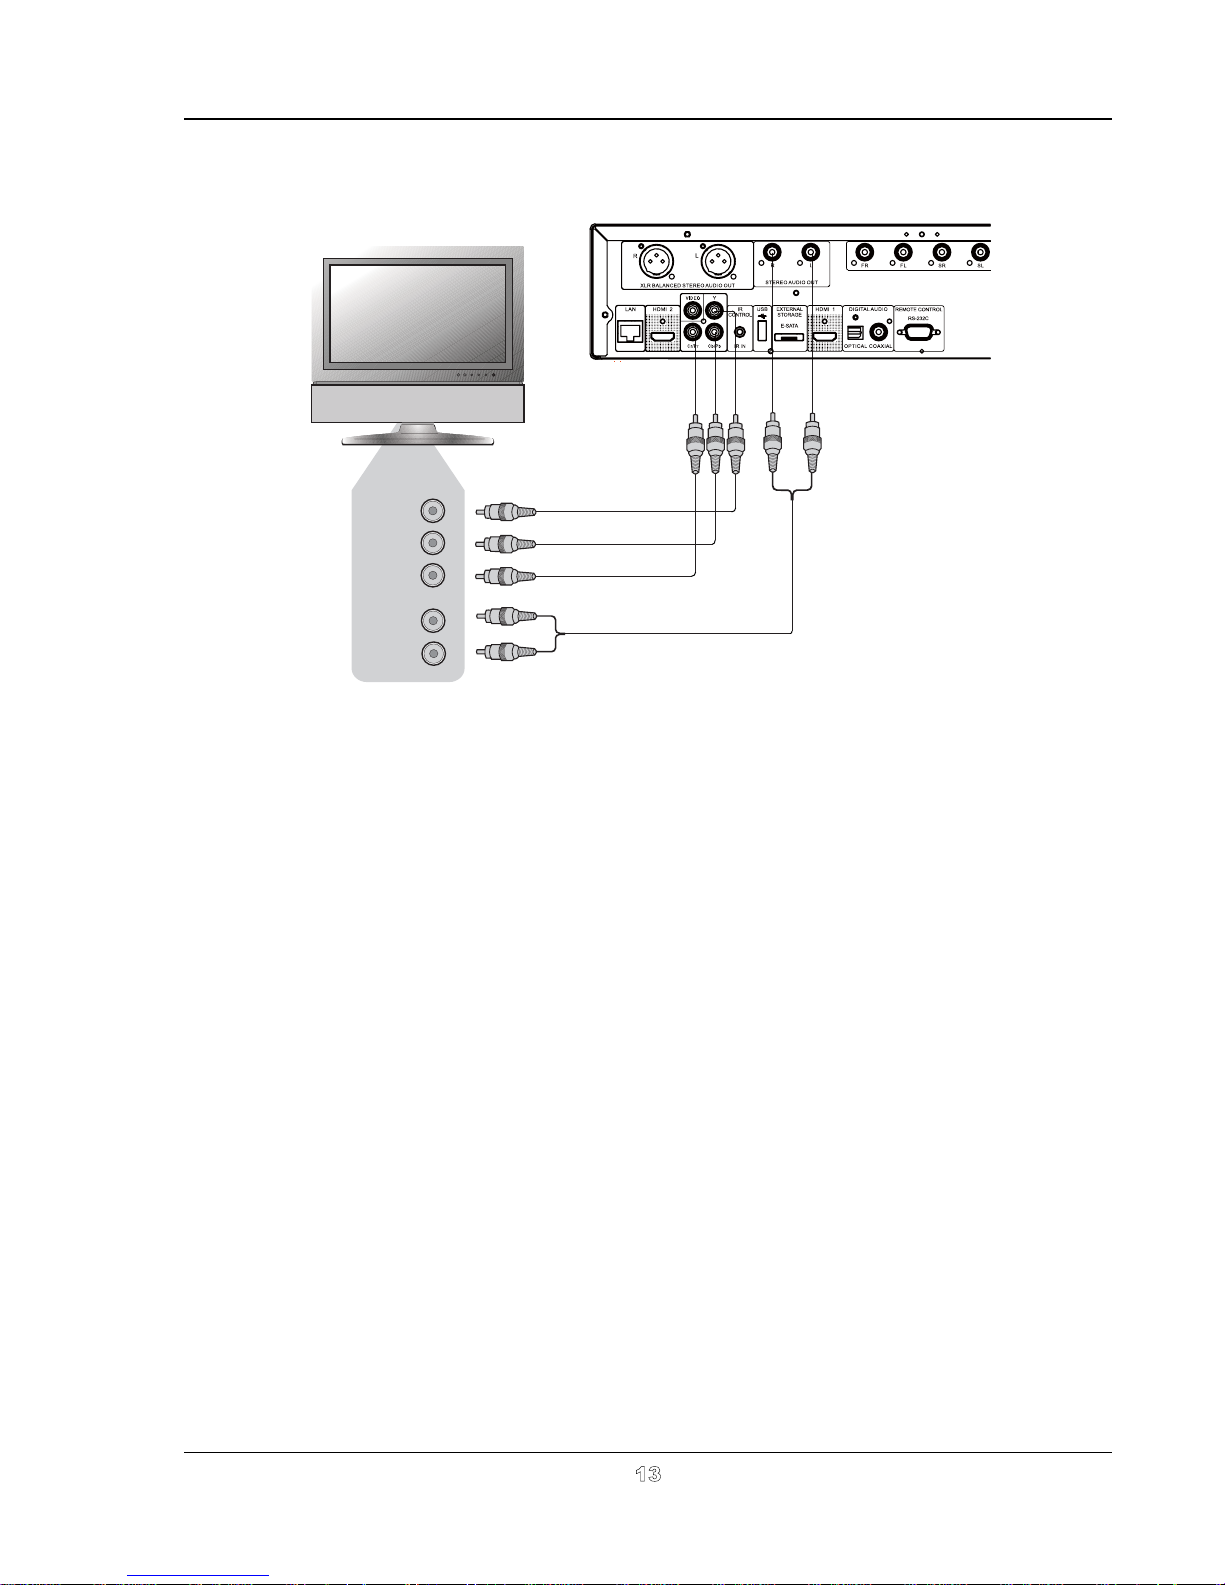
Method 4 – Component Video Connection to TV
x
If your TV has no digital video input but has component video inputs, please use a set of
component video cables to connect the component video output of the player to the TV, and
remember to set the “Primary Output” option in the setup menu to “Analog” (please see more
details on page 53). The connectors are colour coded, so please make sure the cable
connections match on both ends. The component video connection will produce a very clear
picture with high colour accuracy.
x
Please use the Red/White audio cables to connect the STEREO AUDIO OUT terminals on the
rear panel of the player to the TV. Make sure the audio cables are connected to the same input
terminal group on the TV as the chosen component video input.
x
If the “Primary Output” option in the “Video Setup” section of the Setup menu is set to “HDMI
1”or“HDMI 2” (see page 53 for details), the component video connection will not output video
when playing a Blu-ray Disc with 1080p 24Hz content, or will only output video with a low
resolution (480i/576i) when playing a DVD. This is not a malfunction. You must set “Primary
Output”to“Analog” in order to properly use the component video connection.
x
When playing a Blu-ray Disc, video resolution over the component output can be up to 1080i.
1080p content will be interlaced into 1080i signal for the component output.
x
Video up-conversion over the component output is only available for unencrypted discs such as
home video and consumer-created contents. Most commercially pressed DVD discs are CSSencrypted and will be limited to 480i/480p resolution. This restriction applies to the component
output only. The HDMI output is protected with HDCP and has no such restriction.
x
You may connect the composite video cable to the TV for trouble-shooting purpose, please
refer to page 10 for more details.
13
Page 19
INSTALLATION
Connecting to an Audio System
Connecting to a Receiver/Amplifier with HDMI Input/Output
Rear Panel
HDMI In
HDMI Cable
HDMI InHDMI Out
AUDIO/VIDEO MULTI-CHANNEL
HDMI Cable
RECEIVER
(to HDMI 1 or 2)
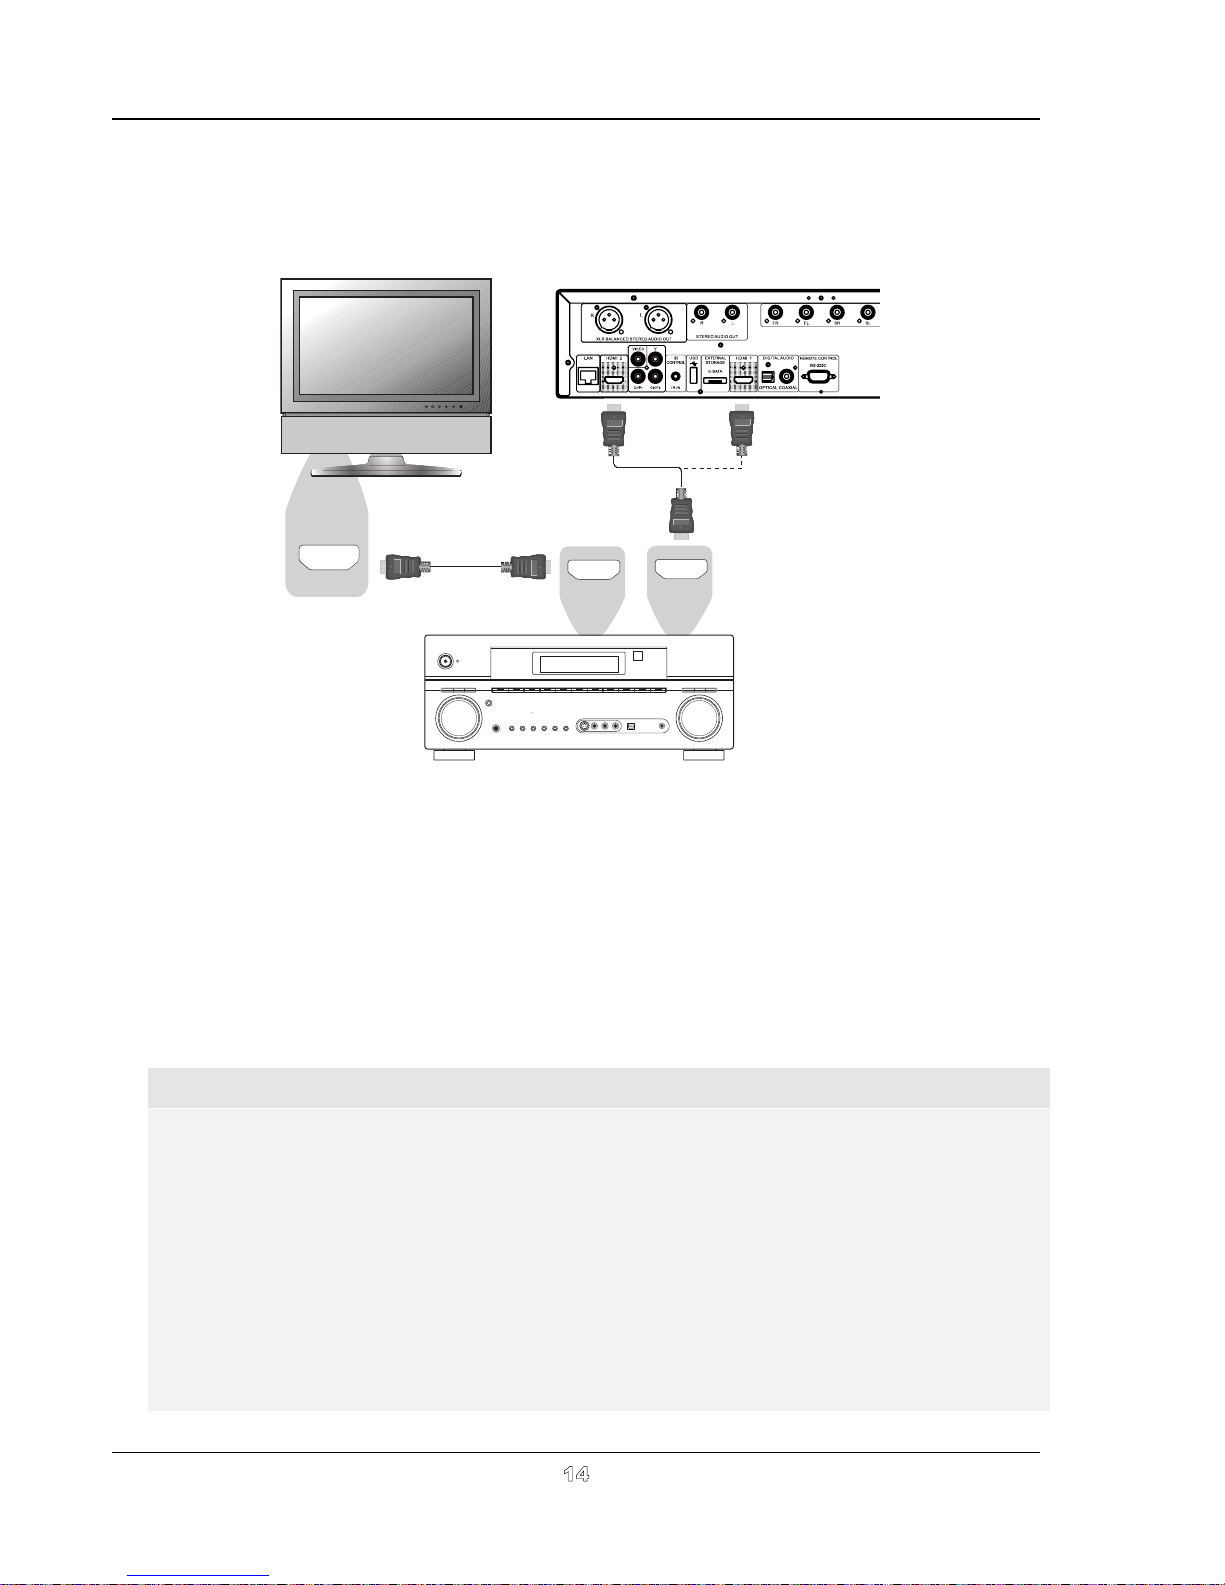
Method 5 – HDMI Connection to Receiver and TV
x
If you have an HDMI-capable receiver that can support HDMI audio, you can simply run an
HDMI cable from the player to your receiver and enable HDMI audio on the receiver (see your
receiver’s owners’ manual for more information). The receiver usually has an HDMI output that
you can connect to your TV to pass the video signal.
x
Either of the HDMI output terminals (HDMI 1 and/or HDMI 2) on the rear panel of the BDP-95AU
can be connected to your receiver. Preference should be given to HDMI 1 for video since it’s the
only output on the machine to benefit from the superior Marvell QDEO video processing solution,
and set the “Primary Output” option in the setup menu to “HDMI 1” (please refer to page
53).
NOTE
HDMI is a single cable that can transport both audio AND video from your player to your display.
Be aware, however, that HDMI is an evolving standard, and there could be compatibility issues. A
receiver that supports audio input over HDMI is required. Some receivers offer HDMI ports solely
for video switching. If your receiver does not have audio input capability, please read the following
sections regarding other connection methods.
In order to play multi-channel audio for all formats, the receiver must support HDMI v1.1 or later.
For Blu-ray Disc, a receiver that supports HDMI v1.3 with decoding capability for Dolby TrueHD
and DTS-HD Master Audio is preferred. Please check the specifications of your receiver to ensure
that it meets the requirements.
The HDMI outputs on the BDP-95AU are HDMI v1.4, which is compatible with HDMI v1.3 and
earlier versions.
14
Page 20
INSTALLATION
Connecting to a Receiver/Amplifier with 7.1ch/5.1ch Audio Input
Rear Panel
Audio Interconnect Cables
L
L
CENTER
R
R
FRONT SURROUND SUBWOOFER S. BACK
L
R
AUDIO/VIDEO MULTI-CHANNEL
RECEIVER
Receiver/Amplifier with 7.1ch Audio Input
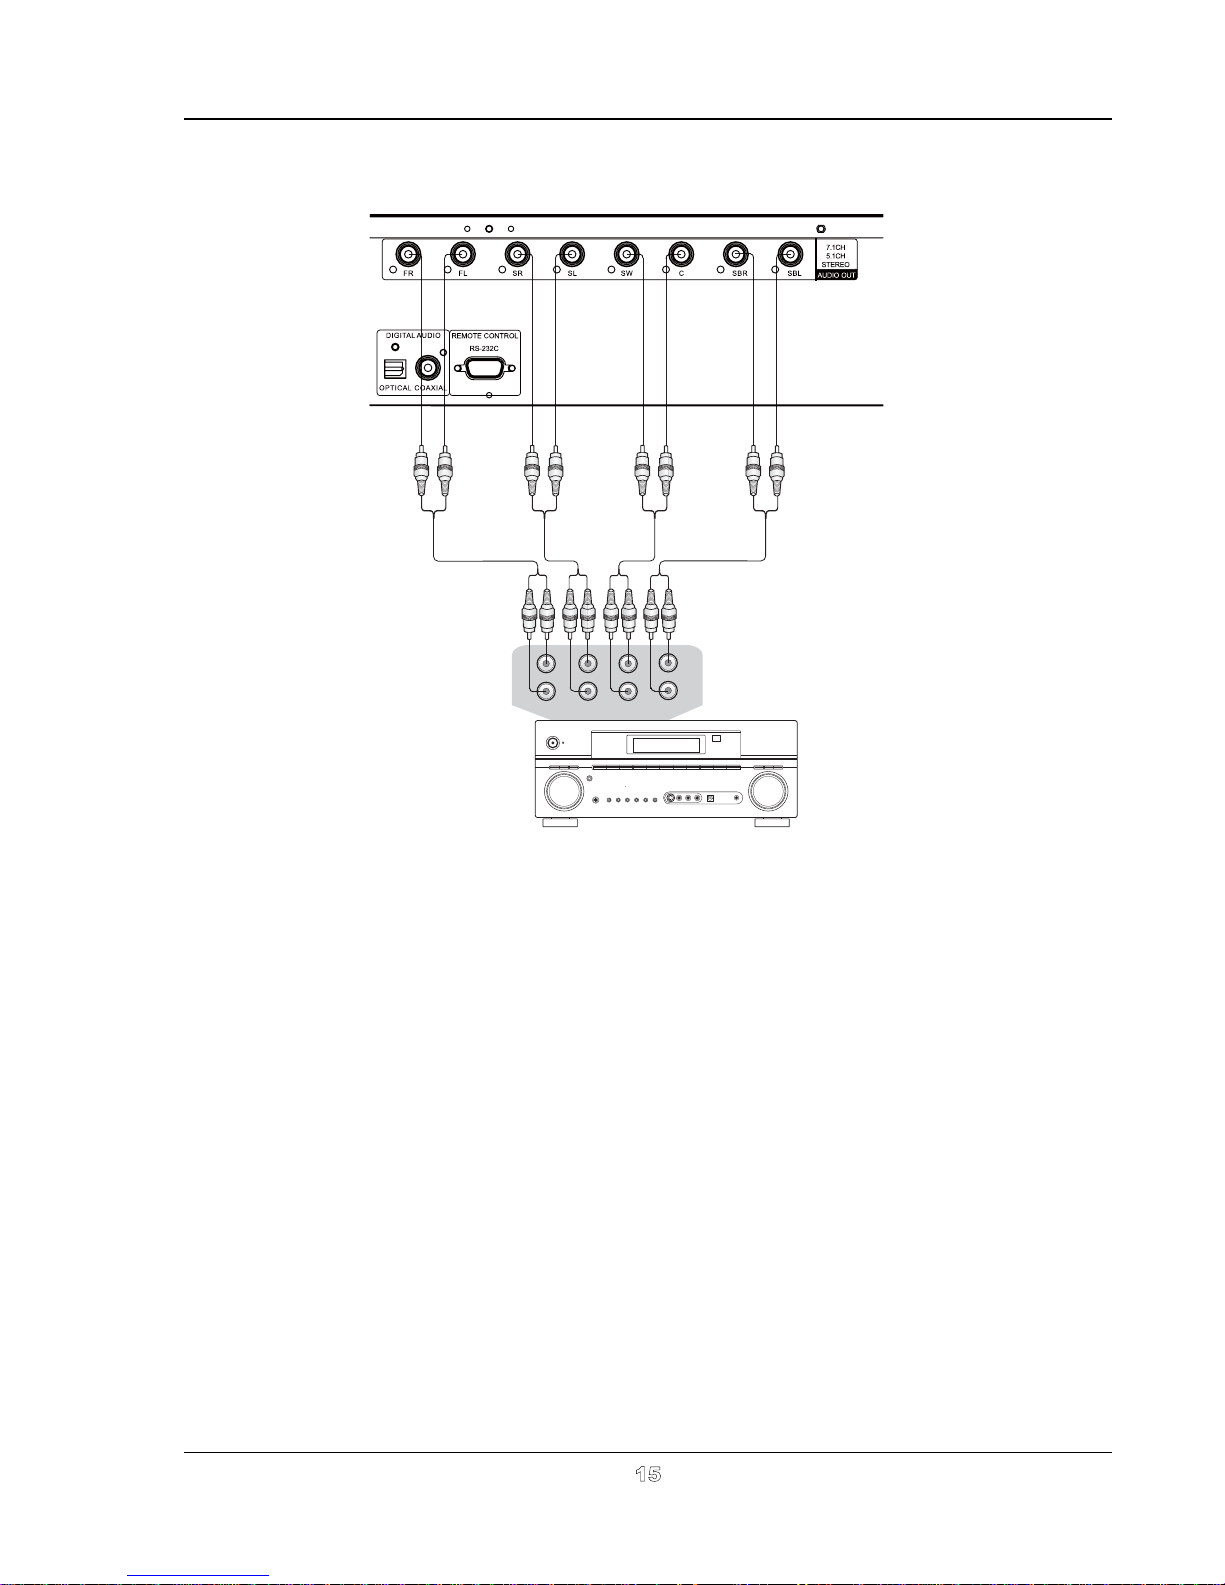
Method 6 – 7.1ch Analog Audio Connection
x
Please use 8 RCA-style audio interconnect cables (not included) to connect the FL (Front Left),
FR (Front Right), SL (Surround Left), SR (Surround Right), C (Center), SW (SubWoofer), SBL
(Surround Back Left) and SBR (Surround Back Right) analog output terminals of the OPPO
Blu-ray Disc player to the corresponding multi-channel analog audio input jacks of your A/V
receiver or amplifier.
x
If the A/V receiver or amplifier only has 5.1ch audio input, do not connect the SBL (Surround
Back Left) and SBR (Surround Back Right) terminals.
15
Page 21
INSTALLATION
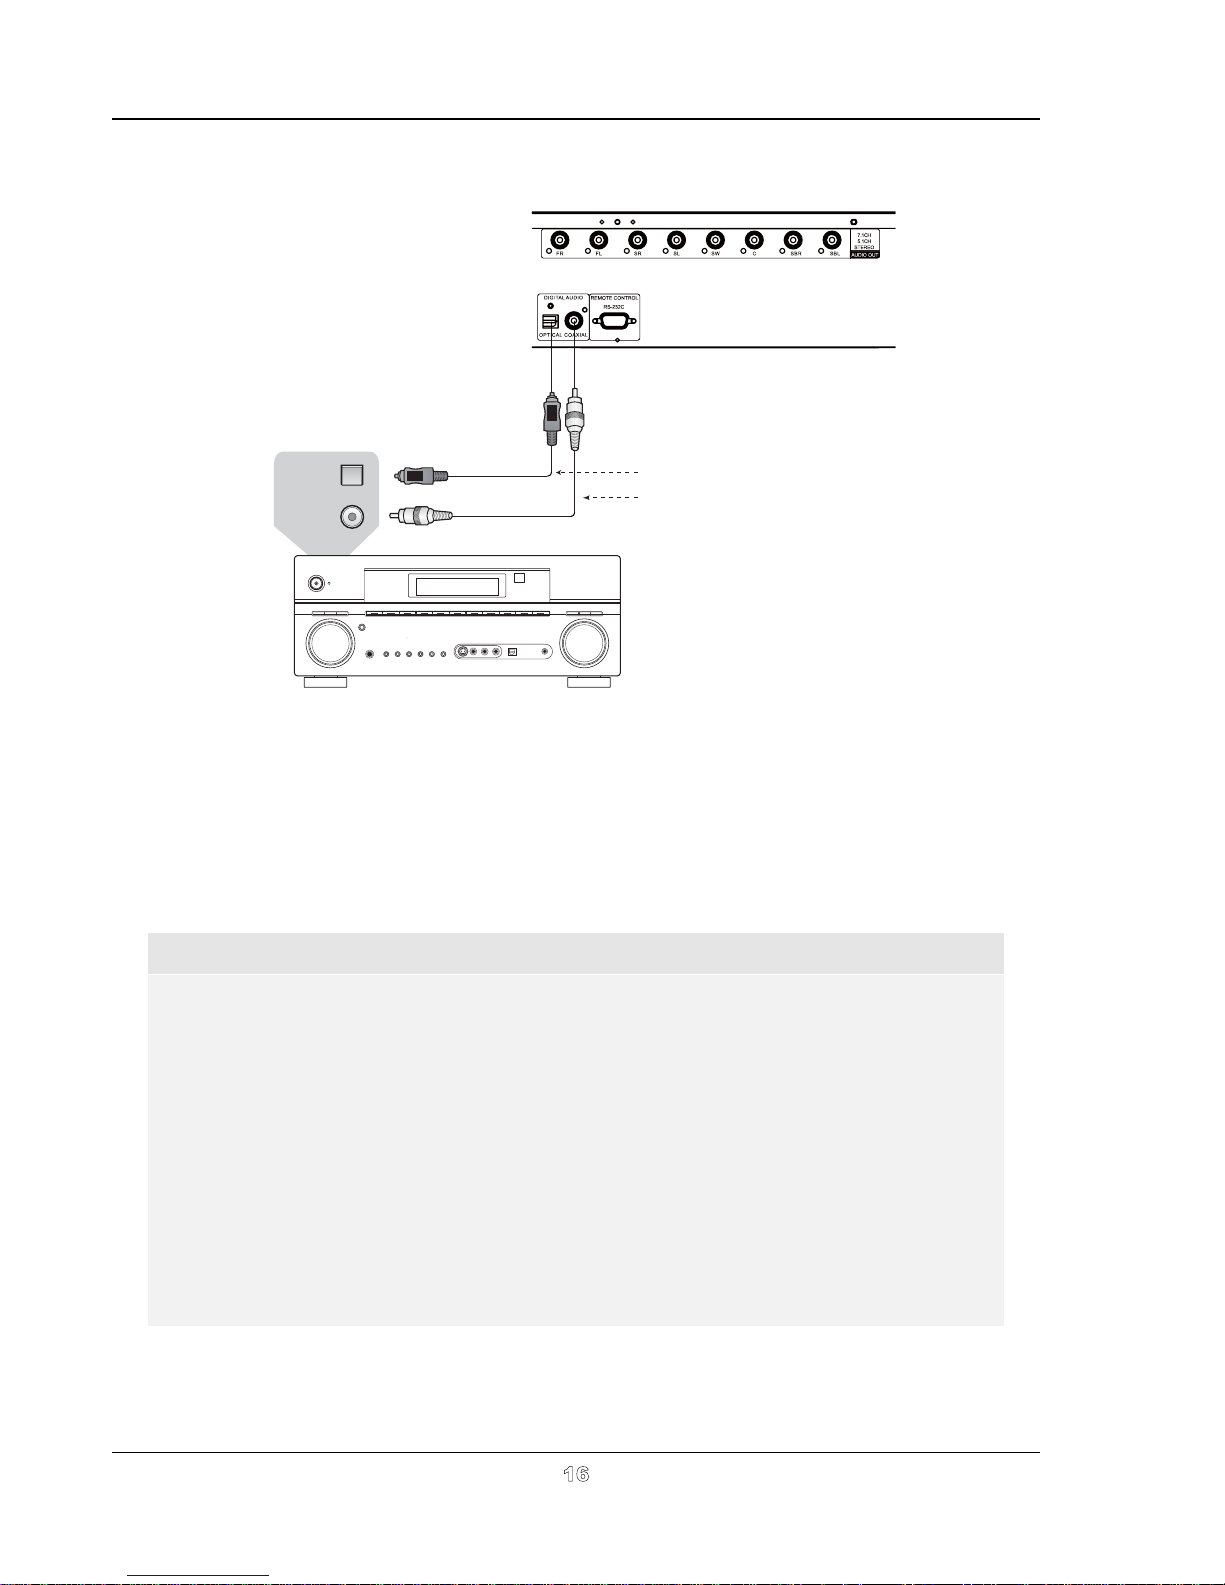
Connecting to a Receiver/Amplifier with Dolby Digital or DTS Decoder
Connect one of these cables:
Optical In
Coaxial In
AUDIO/VIDEO MULTI-CHANNEL
RECEIVER
Optical Digital Audio Cable
Coaxial Digital Audio Cable
Receiver/Amplifier with Dolby Digital or DTS Decoder
Method 7 – Digital Audio Connection
x
Please use either a 75-Ohm coaxial digital audio cable with RCA-style connectors, or an S/PDIF
optical digital audio cable to connect one of the digital audio outputs to the corresponding input
terminal on your A/V receiver. For the detailed setup of coaxial/optical signals, please refer to
page 62.
NOTE
x
Due to bandwidth limitations, high resolution audio formats such as Dolby Digital Plus,
Dolby TrueHD, DTS-HD High Resolution and DTS-HD Master Audio cannot be sent
through the coaxial or optical digital audio output. A reduced resolution version of the
same audio track will be output instead. To listen to high resolution audio formats in
their best quality, please use the HDMI connection if you have a receiver that handles
HDMI audio (see page 14) or use the multi-channel analog outputs if you do not (see
page 15).
x
Due to copyright restrictions, SACD audio cannot be sent through the coaxial or
optical digital audio output. To listen to SACD, please use the HDMI or analog audio
connections.
x
Due to copyright restrictions and bandwidth limitations, full resolution audio from DVDAudio discs cannot be sent through the coaxial or optical digital audio output. To listen
to DVD-Audio in full resolution, please use the HDMI or analog audio connections.
16
Page 22
INSTALLATION
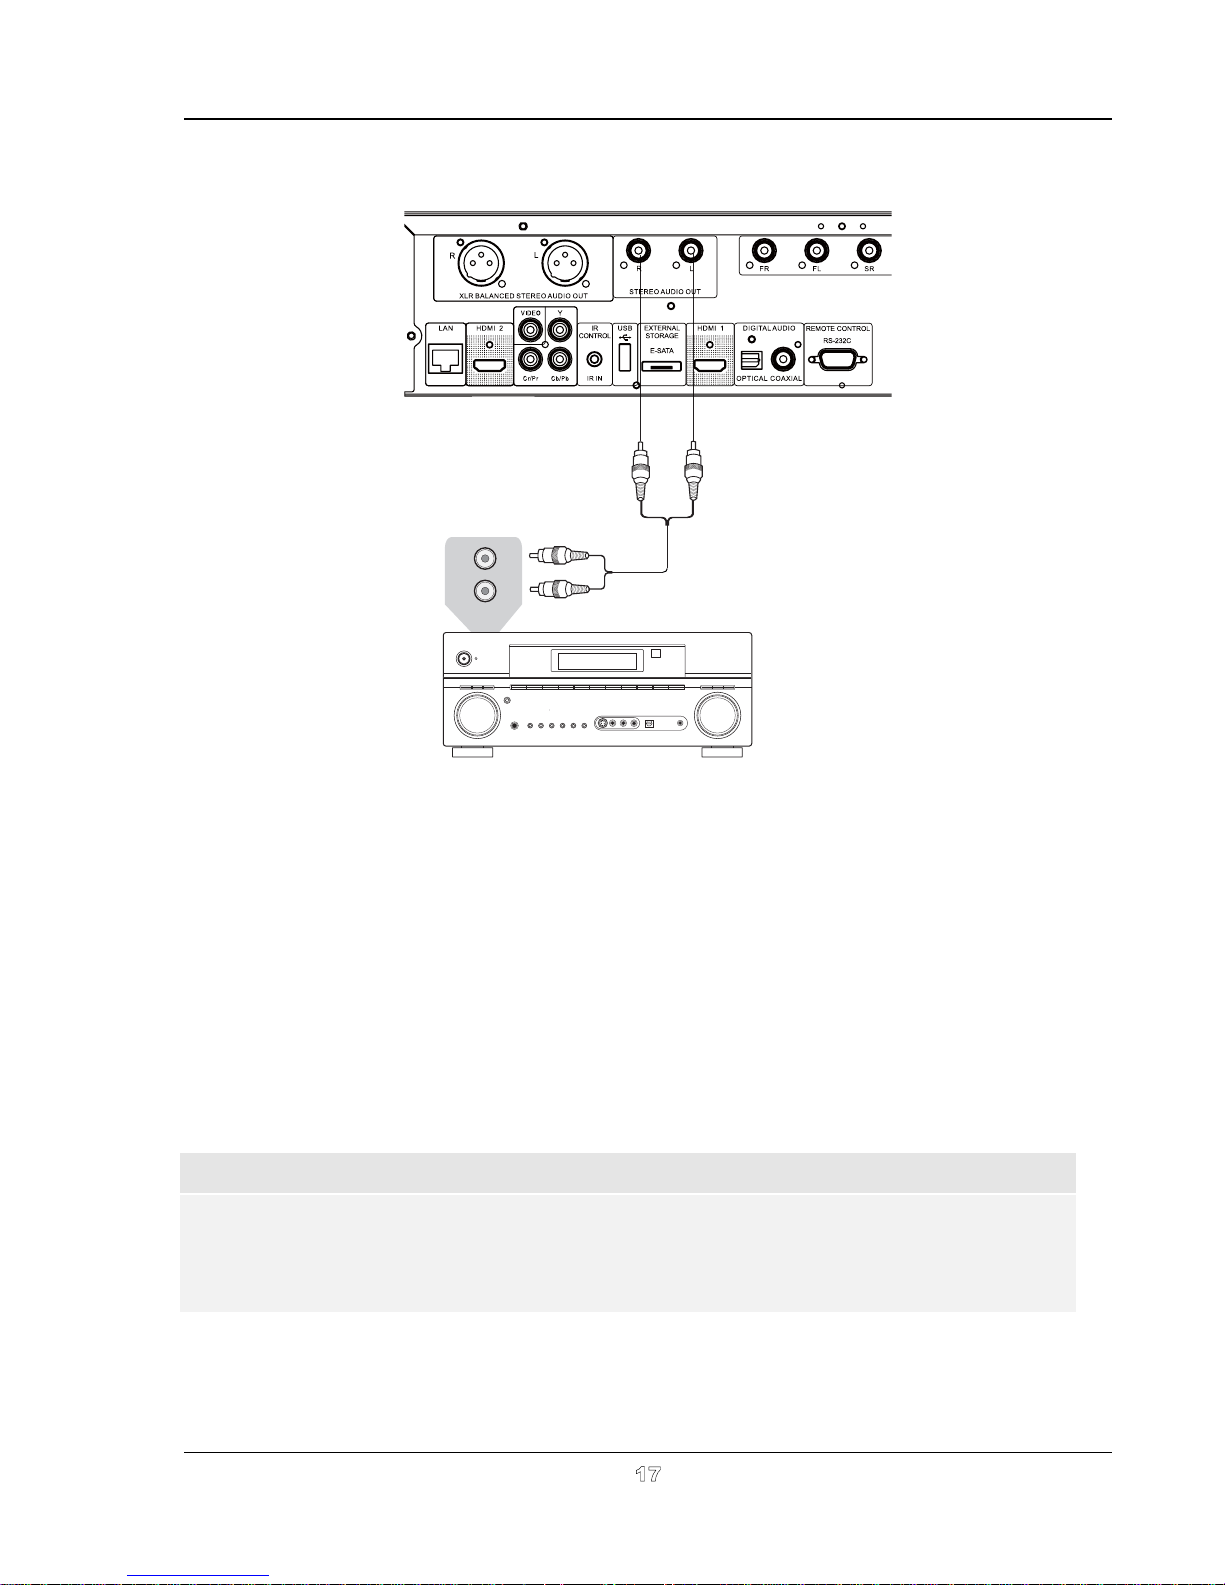
Connecting to a Stereo Audio System through RCA-style Cable
Rear Panel
L
R
AUDIO IN
Audio Interconnect Cable
EIVE
REC
R
IO/VIDEO MULTI-
EL
AUD
CHANN
Stereo or Surround Audio System
Method 8 – Stereo Analog AudioConnectionbyRCAcables
x
If your audio system offers only stereo audio inputs, or if you would like to connect a dedicated
stereo audio system in addition to the surround audio system which is already connected to the
HDMI, coaxial or optical output, you can connect the dedicated stereo audio system to the
STEREO AUDIO OUT terminals of the player.
x
Two groups of dedicated stereo audio outputs are available on the BDP-95AU: the RCA-style
connectors and the XLR balanced connectors (shown in the next page). Please make the choice
according to the available connectors on your audio system. Preference should be given to XLR
connectors since they may provide better noise rejection and signal integrity (refer to the NOTE on
18).
page
NOTE
x
The STEREO AUDIO OUT terminals automatically down-mix the multi-channel audio
source into the stereo signals. However, STEREO AUDIO OUT will NOT be affected by
the “Down mix” modes and other speaker settings in the Audio Processing of Setup Menu
(described in the page 68).
17
Page 23
INSTALLATION
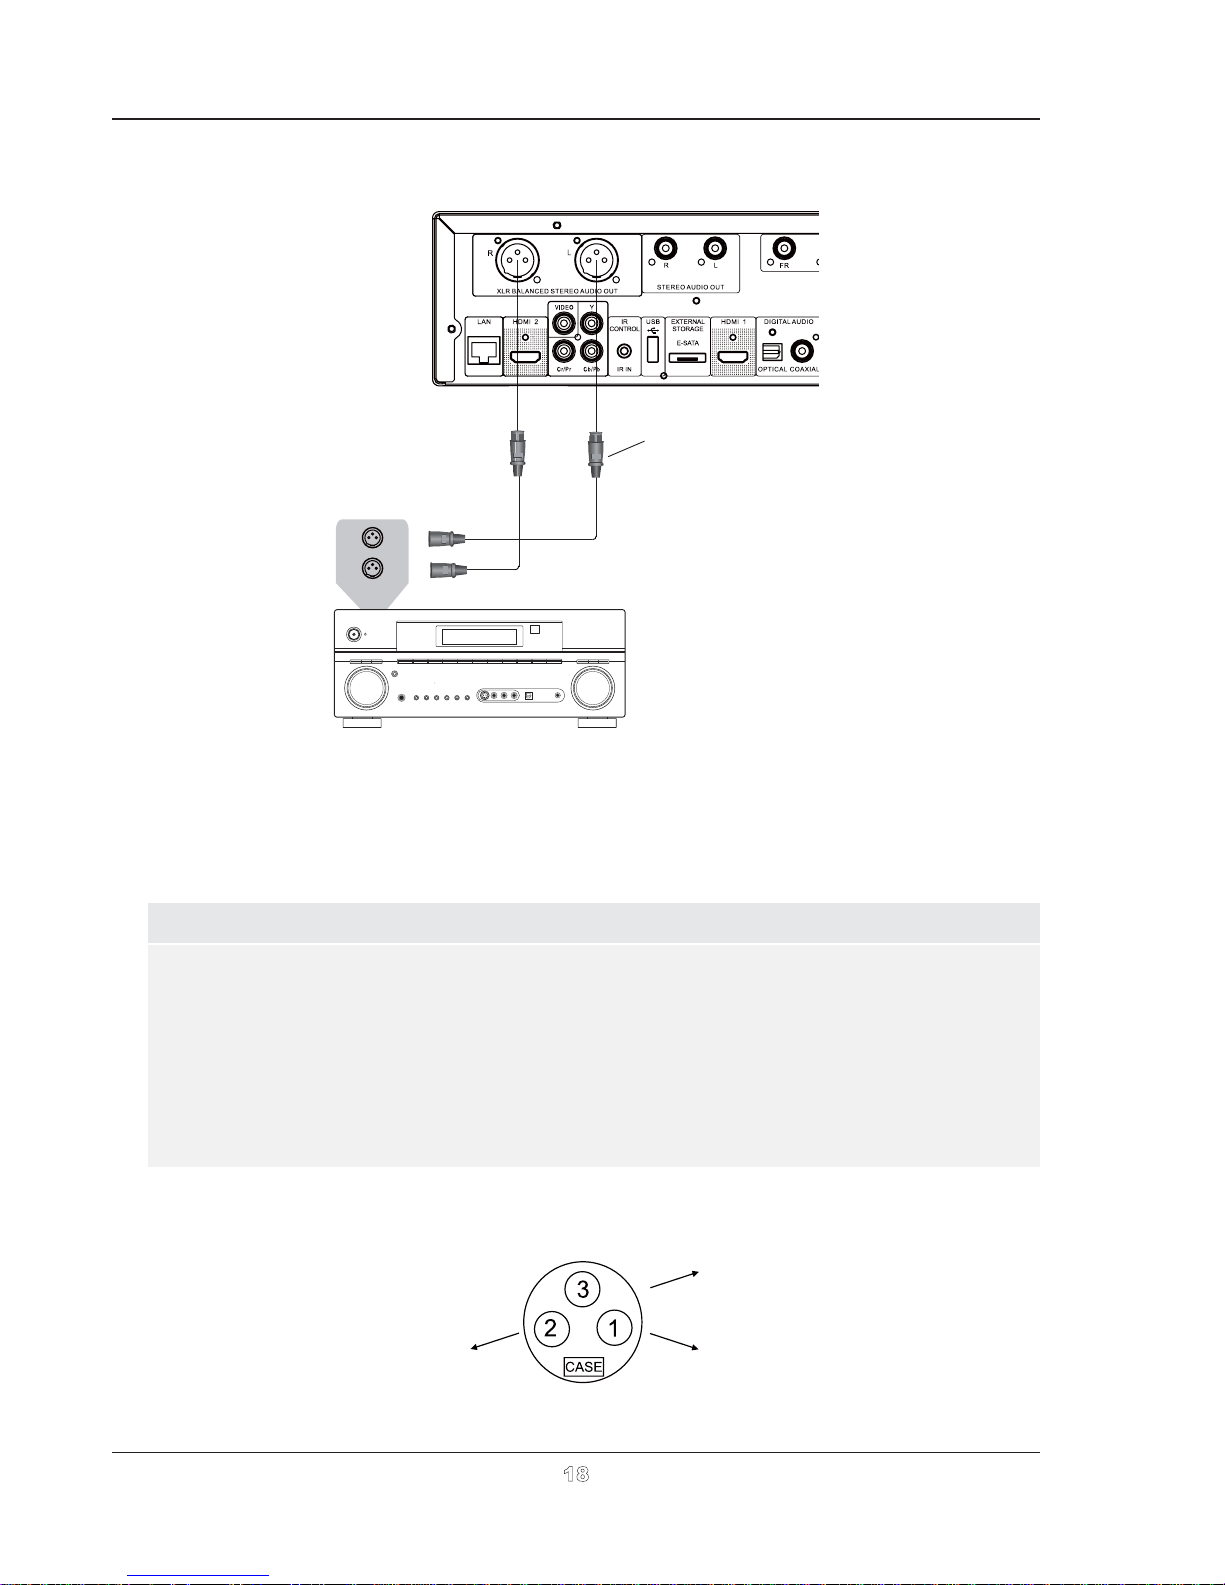
Connecting to a Stereo Audio System through XLR Balanced Cable
Rear Panel
Female Plug(s)
L
R
AUDIO IN
XLR Balanced Audio Cable(s)
AUD
CHANN
IO/VIDEO MULTI -
ELRECEIVE
R
Stereo or Surround Audio System
Method 9 – Stereo Analog Audio Connection by Balanced cables
You can also connect the BALANCED STEREO AUDIO OUT to your stereo audio system.
x
Three-pin (XLR3) cables are needed, and the XLR terminals on the player are male type.
NOTE
x
Balanced audio connectors are used mostly in professional audio electronics, such as high
quality microphones and inter-equipment connections. BDP-95AU utilizes the 3-pin
XLR connector (shown below), which transmits a pair of differential signals (positive /
negative). The amplifier extracts the voltage difference between differential signals, thus the
common noise can be rejected and the signal integrity is improved.
In some audio systems the positions of "hot" (positive) and "cold" (negative) pins are
x
switched. In this case please set “XLR Terminal Polarity” to “Inversion ” in the Audio
Processing of Setup Menu.
XLR Terminal (male) Pins on BDP-95AU
Return terminal
(cold, -)
Positive terminal
(hot, +)
Ground
(cable shield)
18
Page 24
INSTALLATION
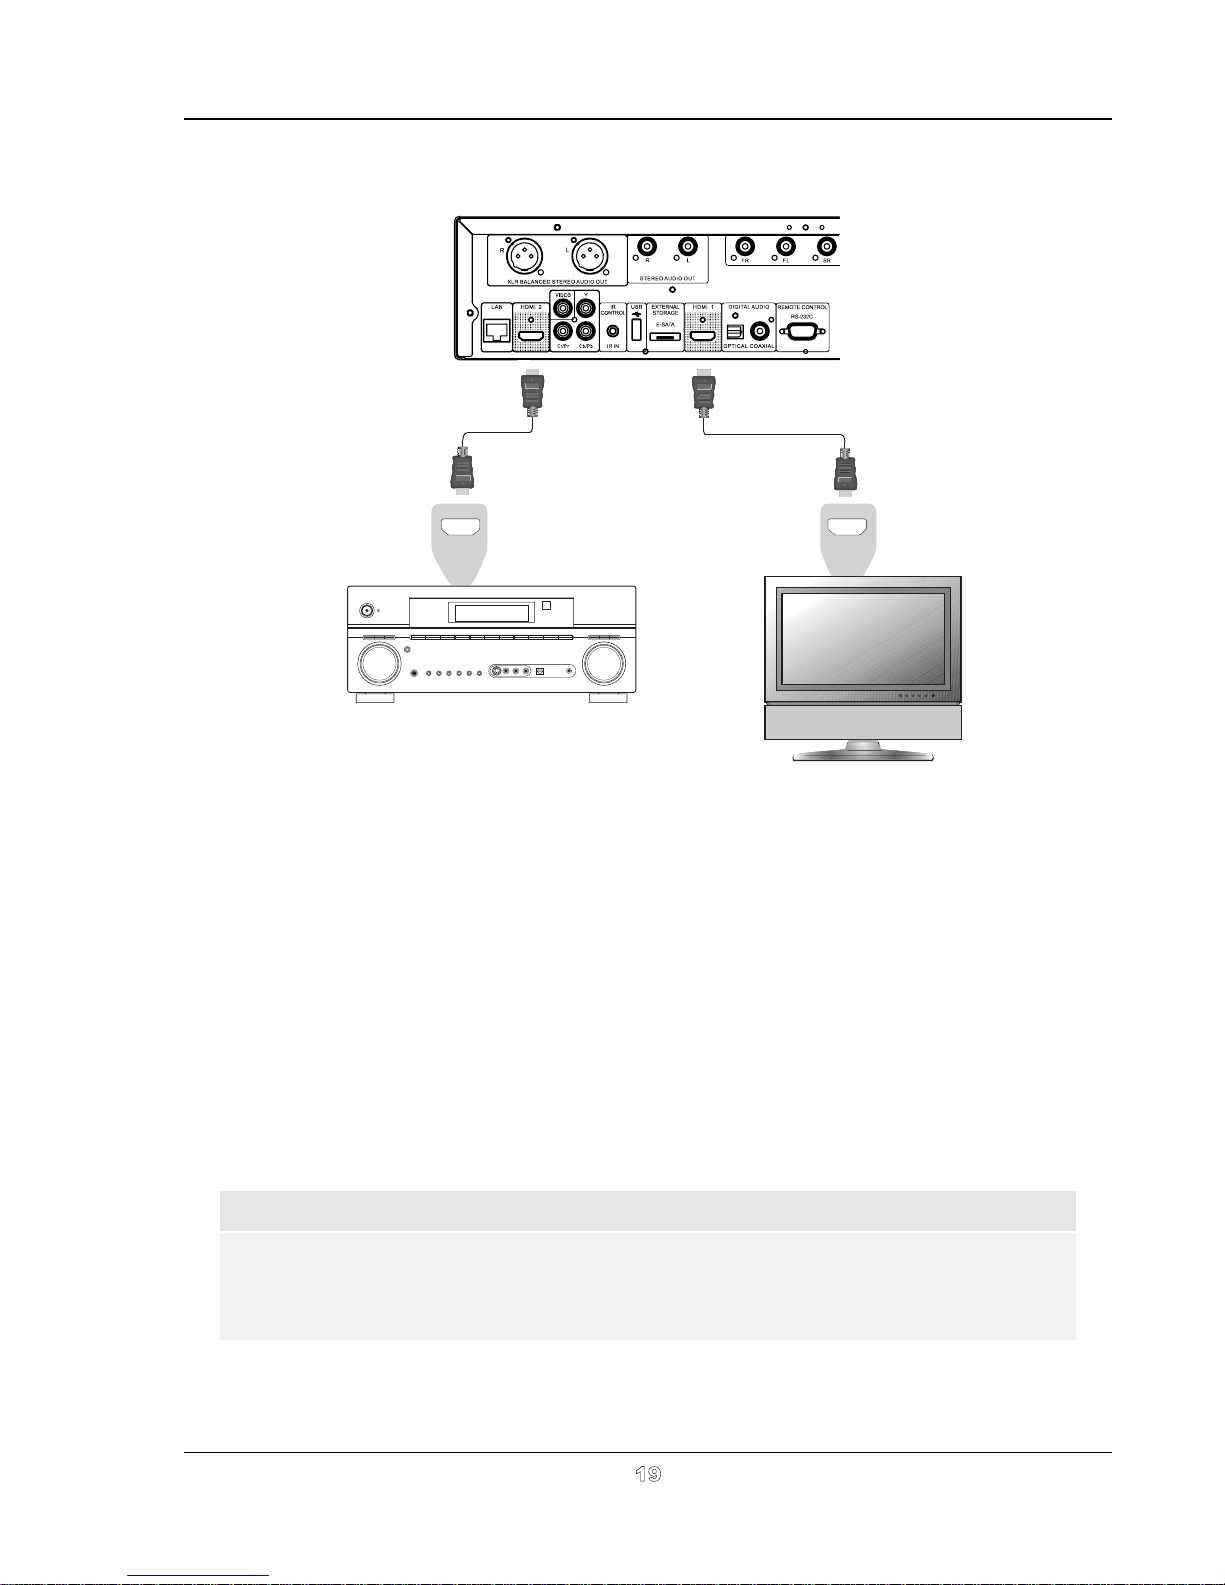
Connecting to a Display and Audio System using Dual HDMI
Rear Panel
HDMI Cable 1
HDMI IN
HDMI IN
HDMI Cable 2
AUDIO/VIDEO MULTI-CHANNEL
RECEIVER
Method 10 – Dual HDMI Connection
x
BDP-95AU provides a Dual HDMI connection to make sure you can enjoy the highest possible
video quality and resolution, in addition to the high bit rate audio content. You can use the
included HDMI cables to connect the HDMI 1 output to your HDTV and connect the HDMI 2
output to your receiver, also set the “Primary Output” option in the Video Setup section of the
Setup menu to “HDMI 1” (see page 53 for details). In this way you can utilize the dedicated
video processor available for HDMI 1 output, and allow your receiver which has no HDMI 1.4
inputs to work without any loss on the digital audio signals.
x
Keep in mind that while Dual HDMI connection is only a recommended method, in fact, both of
the HDMI outputs (HDMI 1 and 2) on th
at the same time, and can be connected to your TV or receiver/amplifier separately (see page 10
and 14 for details).
NOTE
x
Please refer to the notes of HDMI connection available on page 14.
x
If your receiver does not have audio input capability, please try alternate connection
methods discussed on pages 15 to 17.
e BDP-95AU can send out digital audio and video signals
19
Page 25
INSTALLATION
Connecting to the Internet
The OPPO BDP-95AU Blu-Ray Disc Player has significantly improved its internet exploration capabilities
compared to its predecessors. As well as in-home network media sharing via My Network which is
functionally equivalent to DLNA. Additional network applications may be added with future firmware updates.
TheBDP-95AUalsosupportstheBD-Livefeatureoffered on some Blu-ray Disc titles. BD-Live offers extra
downloadable content and additional online interactive programs. Content available on BD-Live vary by discs
and studios, and may include additional subtitles, commentaries, movie trailers, games, or online chat.
Connecting the player to the Internet will also allow the player to obtain firmware updates via the Internet.
(See pages 4 and 73 for more information regarding firmware updates.)
In order to utilize the BD-Live feature or update firmwarevia the Internet, the player needs to be connected to
a broadband Internet connection. It is not necessary to connect to the Internet if you do not intend to use the
network streaming, BD-Live and online firmware updating functionality.
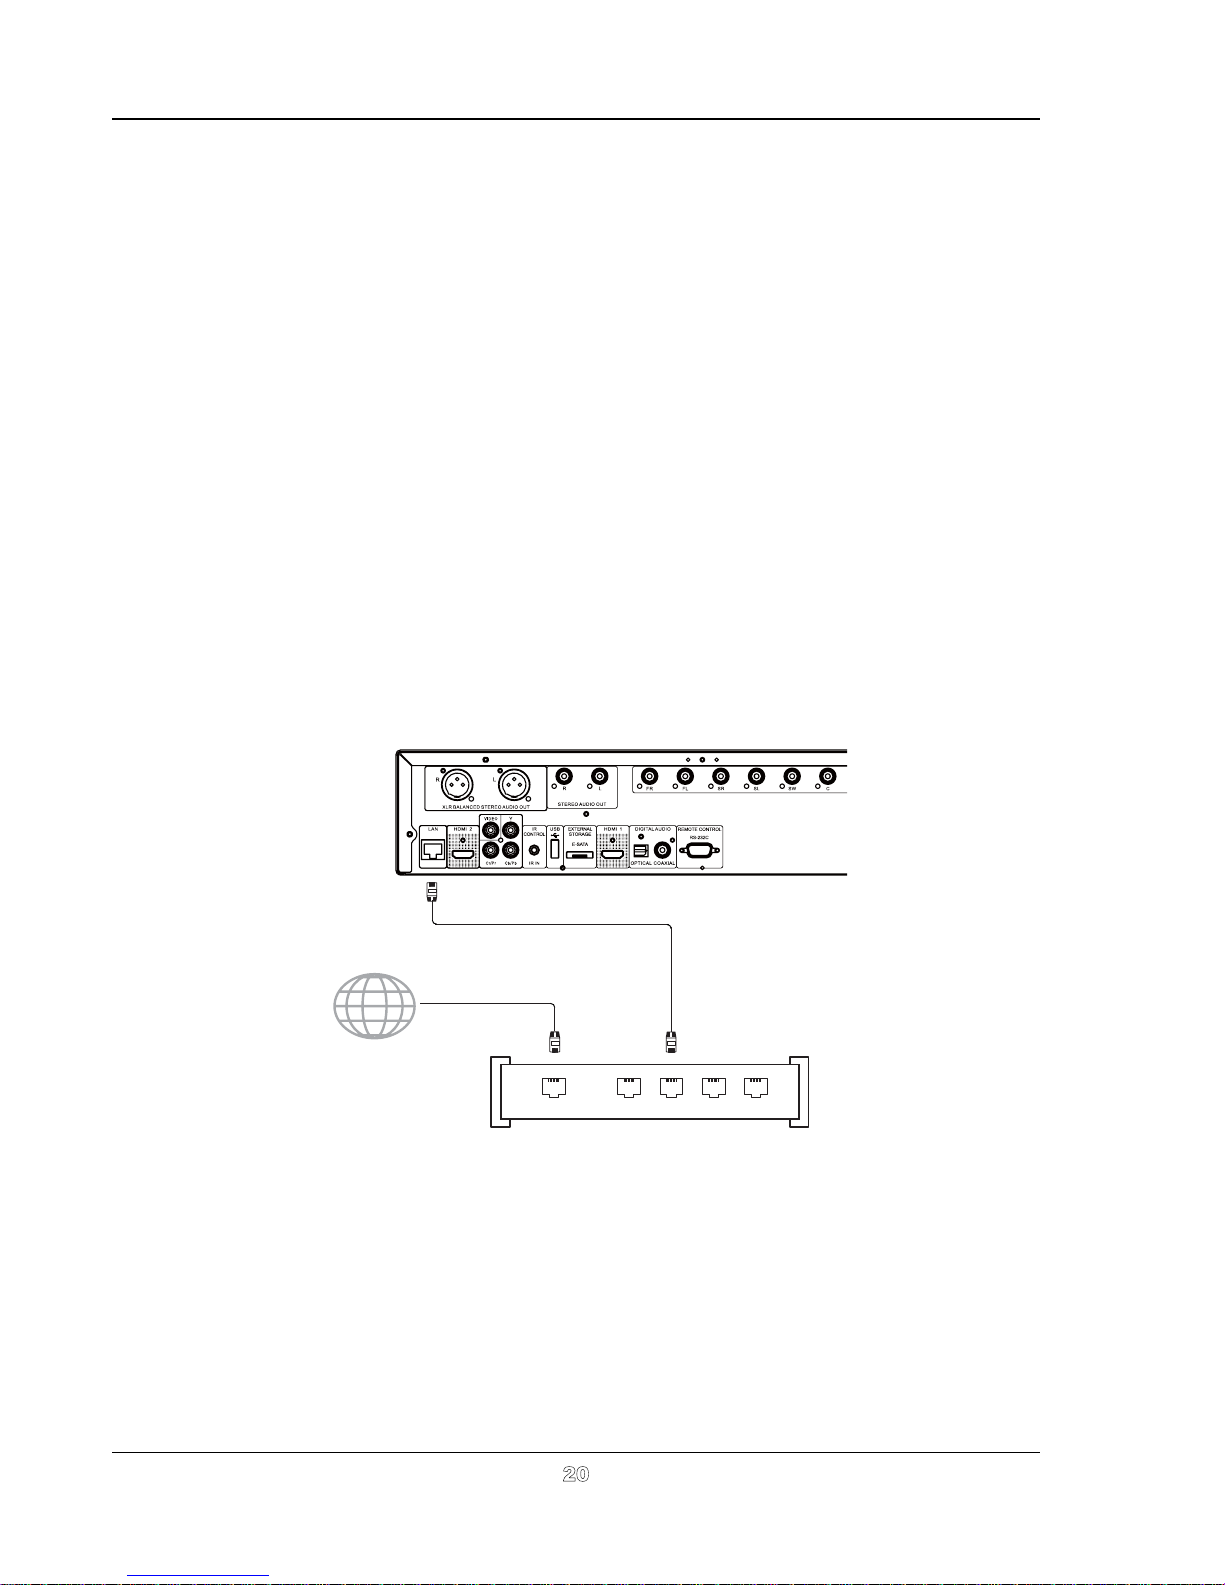
The BDP-95AU provides two network connection methods: through Ethernet cable or through the external
wireless adaptor included with the player. For the fastest and most stable network connection, we
recommend using Ethernet cable whenever it is possible.
Internet connection through Ethernet cable
Rear Panel
Broadband Internet
Connection
Internet
WAN 1 2 LAN 3 4
Broadband Router/Modem
x
Plug one end of a network cable (Category 5/5E straight Ethernet cable) into the LAN port on
Network Cable
(Ethernet)
back of the OPPO Blu-ray Disc player.
x
Plug the other end of the network cable into a LAN port on the broadband router or modem.
x
After physically connecting the player to a broadband Internet connection, some network
configuration may be required. Please refer to the Network Setup section on page 76 for
details.
x
Refer to the operating instructions supplied with the broadband router or modem, or contact the
Internet service provider for questions related to setting up the router or modem.
20
Page 26
INSTALLATION
NOTE
x
Only connect the LAN port of the player to an Ethernet port that supports 10BASE-T or
100BASE-TX. Connecting to any other ports or jacks, such as a phone jack, may
damage the player.
x
Streaming services such as Netflix and Blockbuster may require membership and may
also be limited to service in the US only.
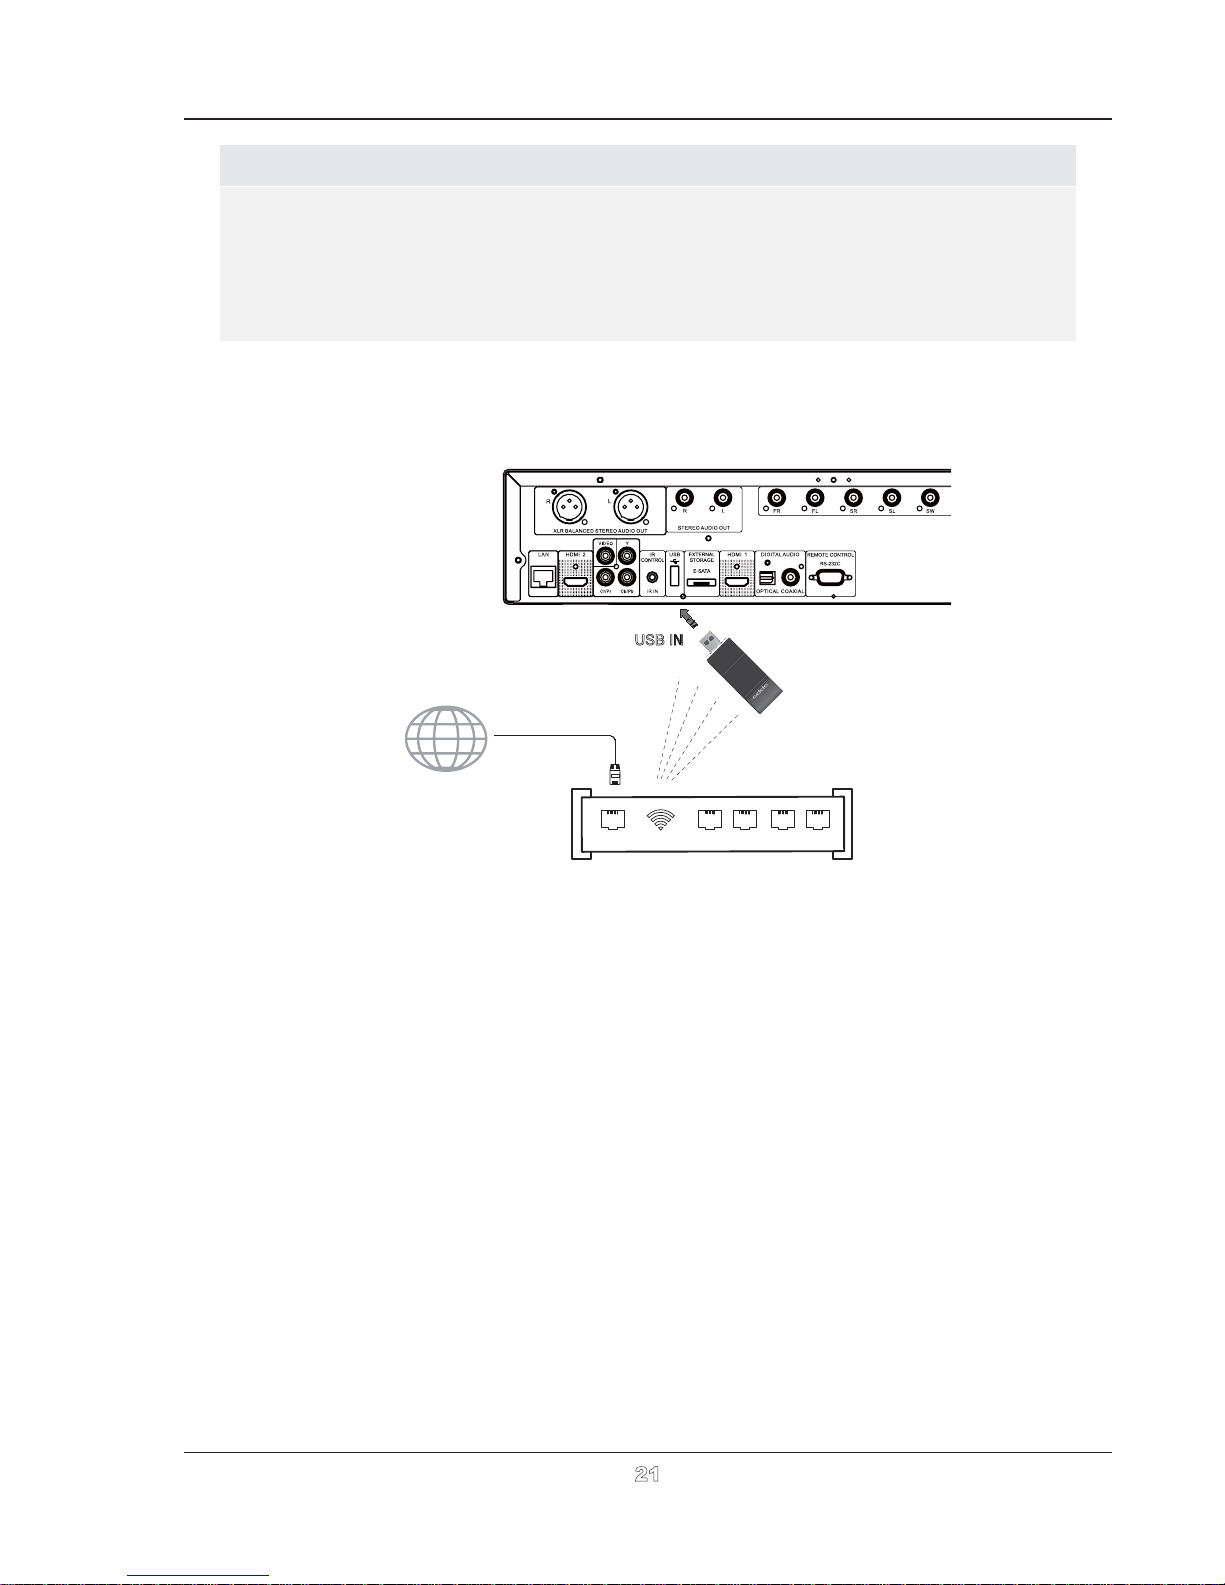
Internet connection through wireless adaptor
Rear Panel
USB IN
Wireless Adaptor
Broadband Internet
Connection
Internet
Internet 1 2 LAN 3 4
WiFi
Wireless Router/Access Point
x
The wireless adaptor included in the BDP-95AU package has been pre-configured to work with
BDP-95AU player. It is compatible with 802.11b/g/n 2.4GHz wireless networks.
x
Make sure the broadband Internet connection is available and the Wi-Fi function on your
wireless router or access point has been turned on, then plug the adaptor into one of the two
USB2.0 ports available on your BDP-95AU.
x
After the physical connection, some network configuration is required. Please refer to the
Network Setup section on page 76 for details.
x
A 6-foot USB extension cable is also included in the package. Connect it between the USB port
on the player and your wireless adaptor if needed.
21
Page 27
INSTALLATION
Custom Installation
External IR (Infrared Remote) Installation
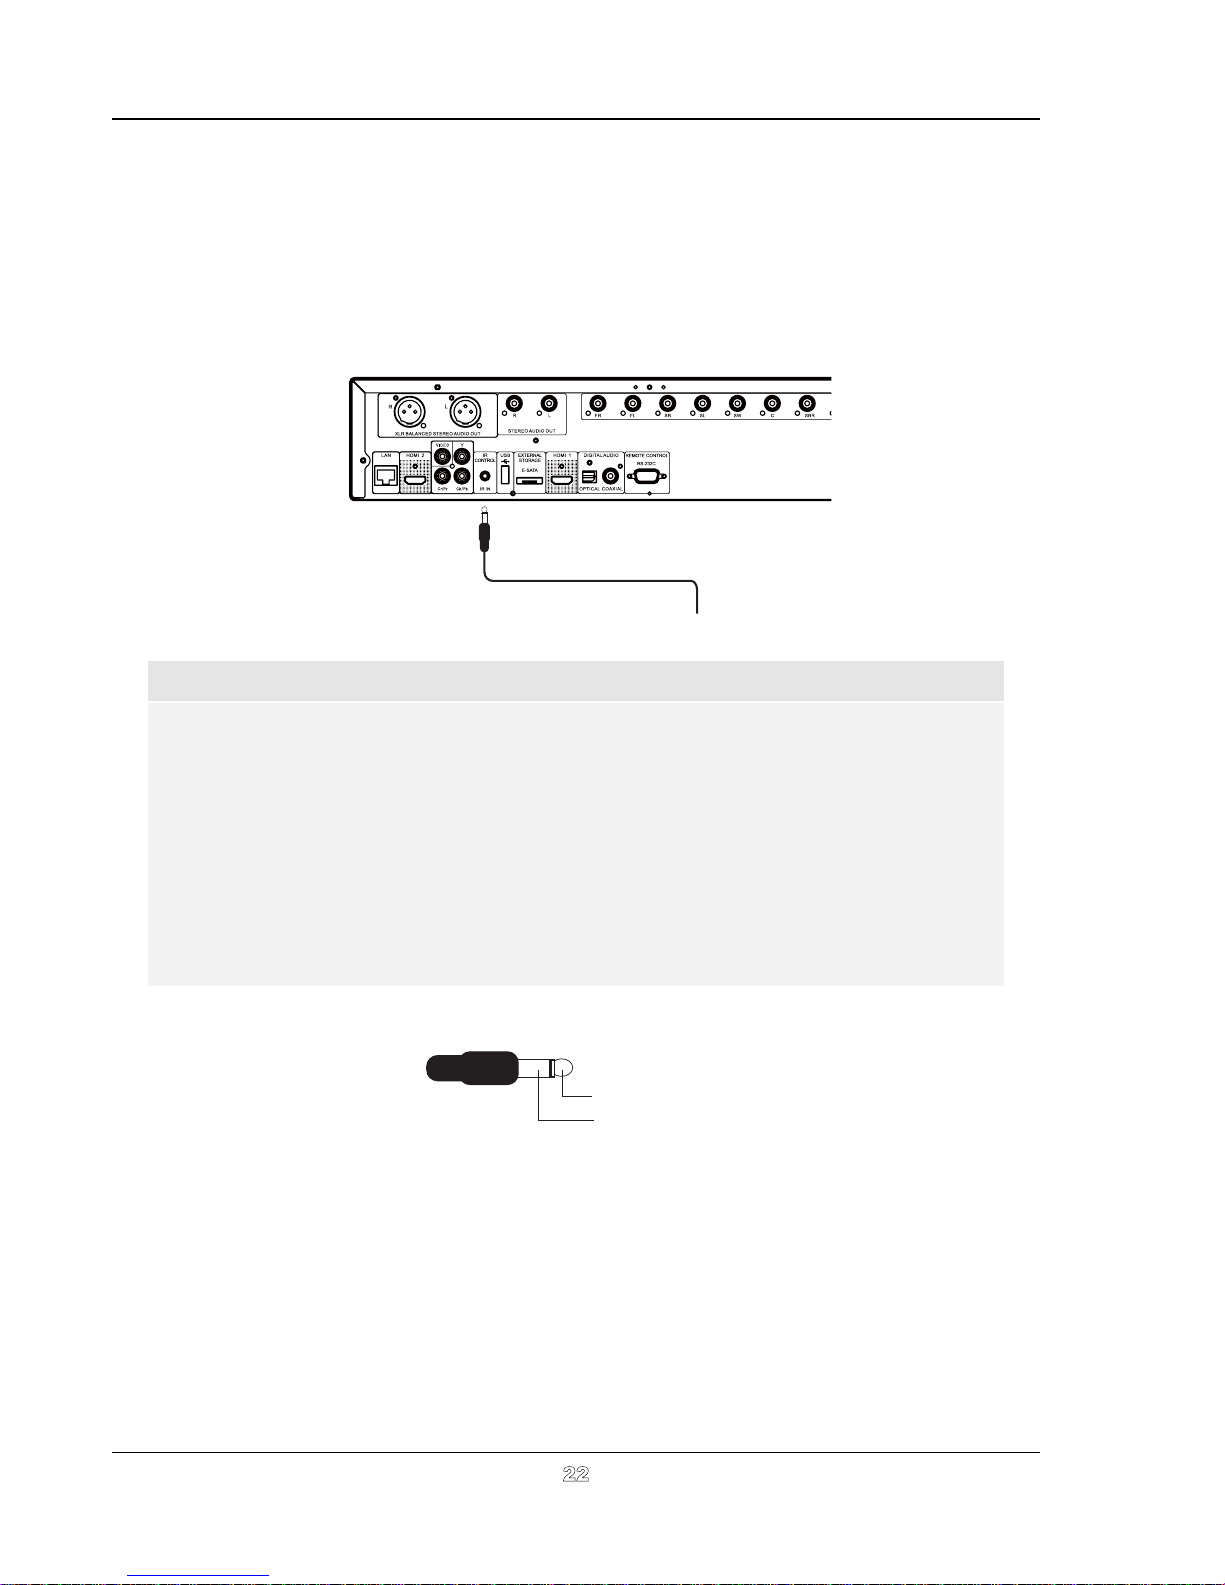
The OPPO BDP-95AU Blu-Ray Disc Player features an IR IN port on its back panel. If the player is to be
installed in an equipment cabinet where direct line-of-sightis not available for remote control, your custom
home theater installer can purchase an external IR Remote Sensor and plug it into the IR IN port. Place the
sensor head at a location where there is direct line-of-sight to ensure reliable operation.
Rear Panel
3.5mm Mono Cable
External IR Remote Sensor
NOTE
When an external IR sensor is plugged in, the original IR sensor window on the front
x
panel will be disabled.
x
OPPO cannot guarantee that the IR IN port will be compatible with devices that are
not manufactured by OPPO. Connecting the IR IN port to an incompatible device may
result in damage to the connected device or the player.
x
The IR port on the BDP-95AU is NOT compatible with the prior external IR
Remote Sensor (IR-ES1) which is used with BDP-83.
x
Please contact OPPO customer support if you plan to integrate the player into an IR
distribution system. Customer support can provide recommendations on how to
properly connect the control signals.
RS232 Control
IR IN Signal Identifications
3.5mm Mono Plug
Tip: IR carrier signal
Sleeve: Ground
The BDP-95AU has an RS232 control port and can be integrated into most custom home theater control
systems. Please ask your custom installer to contact OPPO for the RS232 control protocol.
22
Page 28
INSTALLATION
Setting Up the Player - Easy Setup Wizard
Access the Easy Setup Wizard
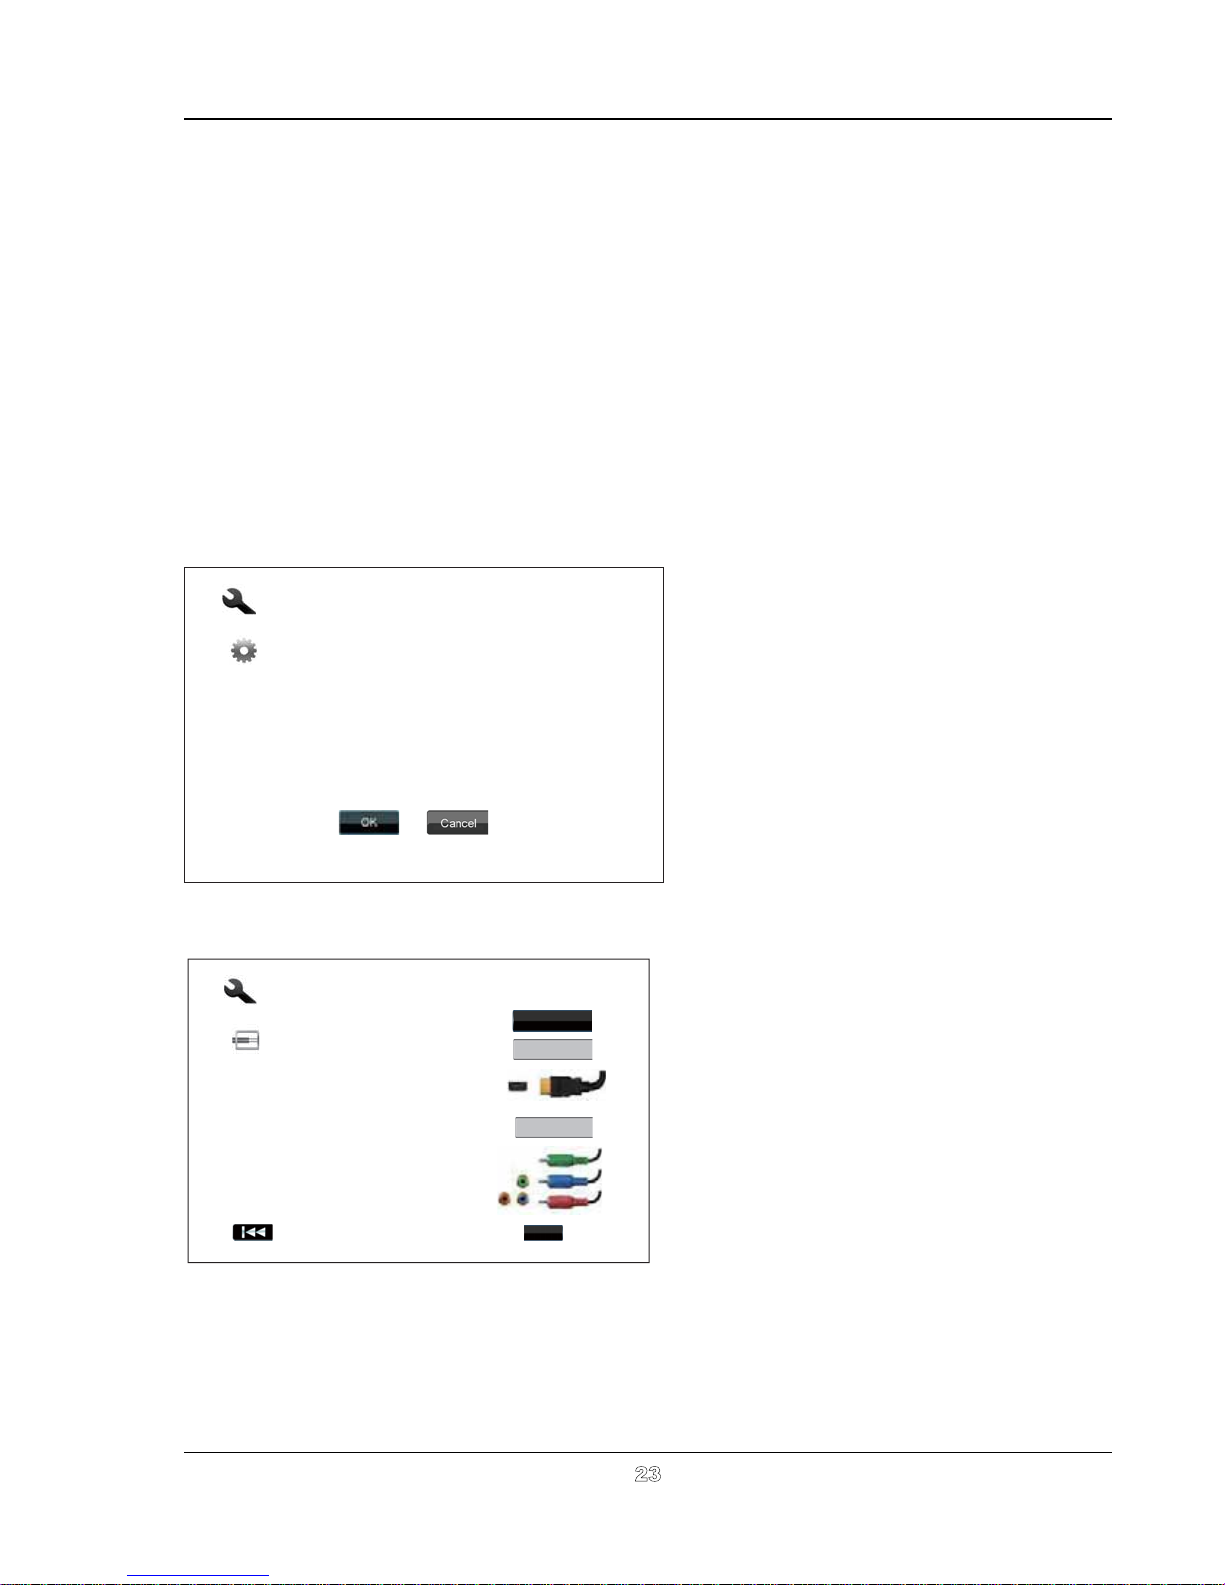
When the player is turned on for the first time, an Easy Setup Wizard screen will appear. It is a series of
guided instructions designed to configure the basic settings for the player.
To start the Easy Setup Wizard, please follow these steps:
1) Turn on the TV.
2) Turn on the player.
3) Switch the input selection on your TV so that the TV displays the signal from the player. You
should see the first step of the Easy Setup Wizard.
If the Easy Setup Wizard has previously been completed or canceled, it will no longer initiate when you turn on
the player. Instead, you will see the background screen with the OPPO and Blu-Ray Disc logos. To access
Easy Setup Wizard, please press the SETUP button on the remote control, select Device Setup, then Reset
Factory Default. Select “OK”toconfirmloading
Easy Setup
Step: 1/6
The Easy Setup Wizard will help you configure the
basic settings for this player. More detailed settings
can be accessed at the Setup Menu at any time after
finishing or exiting the wizard.
Press OK to initiate the Easy Setup Wizard, press
Cancel to exit this Wizard immediately.
the factory default settings. Once the factory
default settings are loaded the Easy Setup Wizard
will appear.
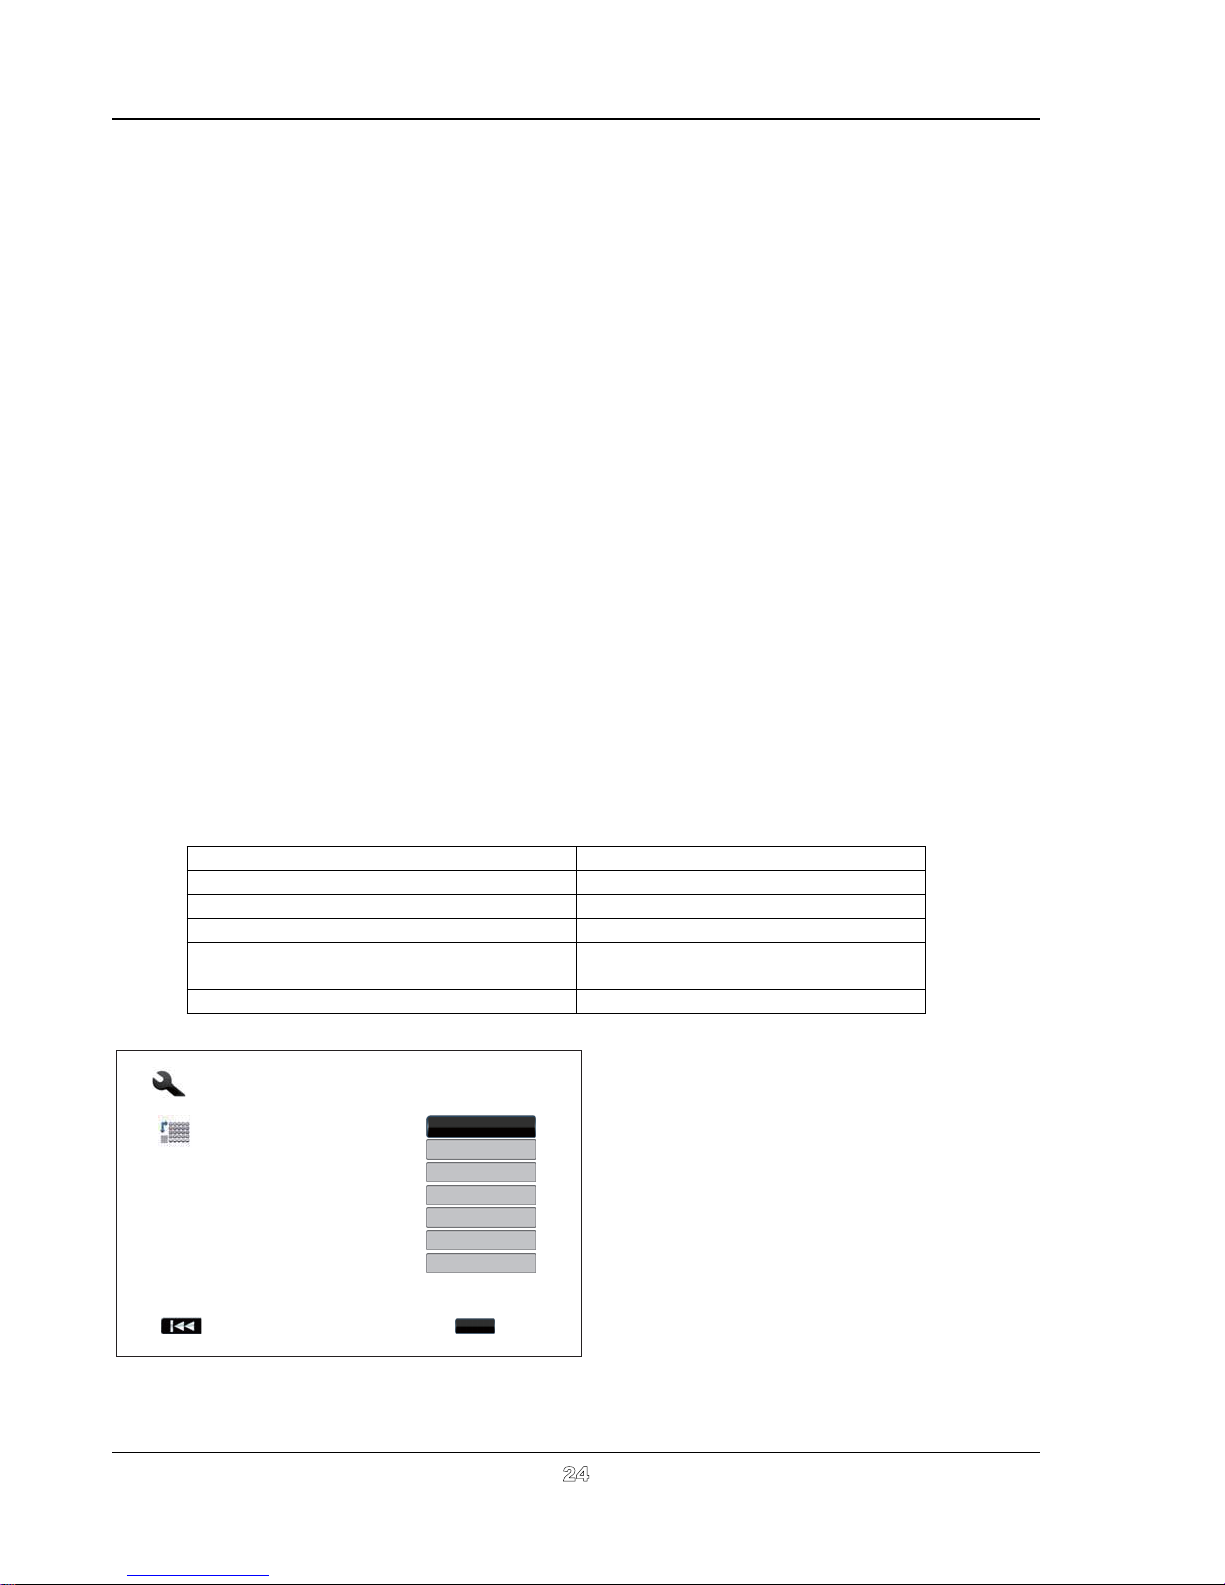
The first step of the Easy Setup Wizard allows you
to skip the entire wizard. If you are familiar with
setting up audio/video equipment and would like to
customize the player settings using its Setup Menu,
you may use the LEFT/RIGHT ARROW buttons to
select the “Cancel” option, then press the ENTER
key to exit the Easy Setup Wizard. Otherwise, to
continue with the Easy Setup Wizard, select the
“OK” option and press the ENTER key.
Choose the Primary Video Output
The player can output video through its HDMI and
Easy Setup
HDMI 1
Step: 2/6
Choose the primary video output that you use.
Better performance will be provided over an HDMI
connection.
HDMI 2
Analog
Enter
txeNsuoiverP
Please note: The best performance will be provided over the HDMI connection. Between the two HDMI
outputs, HDMI 1 should be given priority for use since it benefits from the superior Marvell QDEO video
processing solution.
To make your selection, use the UP/DOWN ARROW buttons to highlight the choice, and then press the
ENTER button to go to the next step.
component output terminals. (Composite video
output is also available but not recommended.) By
setting the “Primary Video Output”option,the
player can optimize video output of the selected
terminal. The choices are “HDMI 1”, “HDMI 2”and
“Analog”. If you connect the player to the TV using
an HDMI cable (see Method 1 on page 10, Method
2 on page 11, Method 5 on page 14, or Method 10 on
page 19), please select “HDMI 1”or“HDMI 2”
correspondingly. If you connect the player to the TV
using component video cables (see Method 4 on
page 13), please select “Analog”.
23
Page 29
INSTALLATION
Select the Best Output Resolution
One of the major advantages of the OPPO Blu-Ray Disc Player is its ability to play high-definition Blu-Ray
video and also up-convert standard definition video stored on DVD discs to high definition. The sophisticated
video processor inside the player ensures that the video will have the best possible colour, detail and motion.
The player offers several standard and high definition video output resolutions. To get the best visual result, it
is important to select an output resolution that best matches your TV or display device.
The rule of thumb when selecting an output resolution is to match the “native resolution” of your TV or display
device as closely as possible. The “native resolution” is the resolution of the actual display component in the
TV, such as the Plasma panel, LCD panel, or DLP™ chip. The TV may accept input signals with lower or
higher resolutions than its native resolution. In such cases the electronics in the TV will up-scale or downscale the video to fit its display component. Unfortunatelymany TVs on the market only do an average job
scaling the video. On the other hand, if you set the OPPO Blu-ray Disc Player to output a resolution that
matches or is very close to the native resolution of the TV, you are more likely to get a great picture.
For the latest generation of 1080p, “Full HD” or “True HD” displays, the best output resolution will naturally be
1080p. (A few early model 1080p displays do not accept 1080p signal. For these displays the best output
resolution to use is 1080i.) For all other digital televisions this will likely be 720p. For CRT tube or rear
projection televisions this will likely be 1080i. For EDTV displays(very rare if they have HDMI or DVI) this will
be or . These are general recommendations that work for most users, but there can480p (NTSC)576p (PAL)
be exceptions. Advanced users may want to try all supported resolutions and choose the one that provides
the best visual result.
The OPPO Blu-ray Disc Player supports a special “Source Direct” output resolution on its HDMI output. This
resolution is recommended for use with external video processors or high-end TVs. In “Source Direct” mode,
the player works as a “transport”. It decodes video from the discs and then sends the raw video signal in its
native resolution and format, without extra processing, to the external video processor or TV. The actual
output resolution varies by content:
noituloseRtuptuOtceriDecruoStnetnoC
i675DVDLAP
i084DVDCSTN
Most Blu-ray Movies (film-source) 1080p 23.976Hz or 1080p 24Hz
Most Blu-ray TV shows or Concerts
1080i
(video-source)
SACD and DVD-Audio 1080i
Depending on your selection of “Primary Video
Easy Setup
Output”, the available output resolution selections
will differ. For the HDMI 1 and HDMI 2 output, the
Step: 3/6
Choose the output resolution which best matches
your TV.
Change will be applied immediately. You will have
15 seconds to either save the new setting or
rollback to the previous output resolution.
Auto
1080p
1080i
720p
480p/576p
480i/576i
Source Direct
following output resolutions are available: Auto,
1080p, 1080i, 720p, 480p/576p, 480i/576i, and
Source Direct. If “Auto” is selected, the player will
determine its output resolution based on the best
signal resolution that the TV can display.
For the Analog (component) output, the following
output resolutions are available: 1080p, 1080i,
Enter
txeNsuoiverP
720p, 480p/576p and 480i/576i. Please note
1080p only applies to HDMI output,
if it is selected
for component video outputs, it will automatically be
down-scaled to 1080i. Please refer to the specifications of your TV to find the best resolution to use.
24
Page 30
INSTALLATION
C
e
o
k
Easy Setup
Step: 3/6
Choose the output resolution which best matches
your TV.
hang
15 sec
rollbac
Confirm Output Resolution
The output resolution has been changed.
15s
Select OK to save the new setting. Select
Cancel to rollback to the previous output
resolution.
NOTE
If you cannot get a picture using the HDMI or Analog (component) output, please
connect the player to the TV using the composite video output, and then use the Setup
Menu to adjust the player settings.
Auto
1080p
1080i
720p
480p/576p
480i/576i
Source Direct
Enter
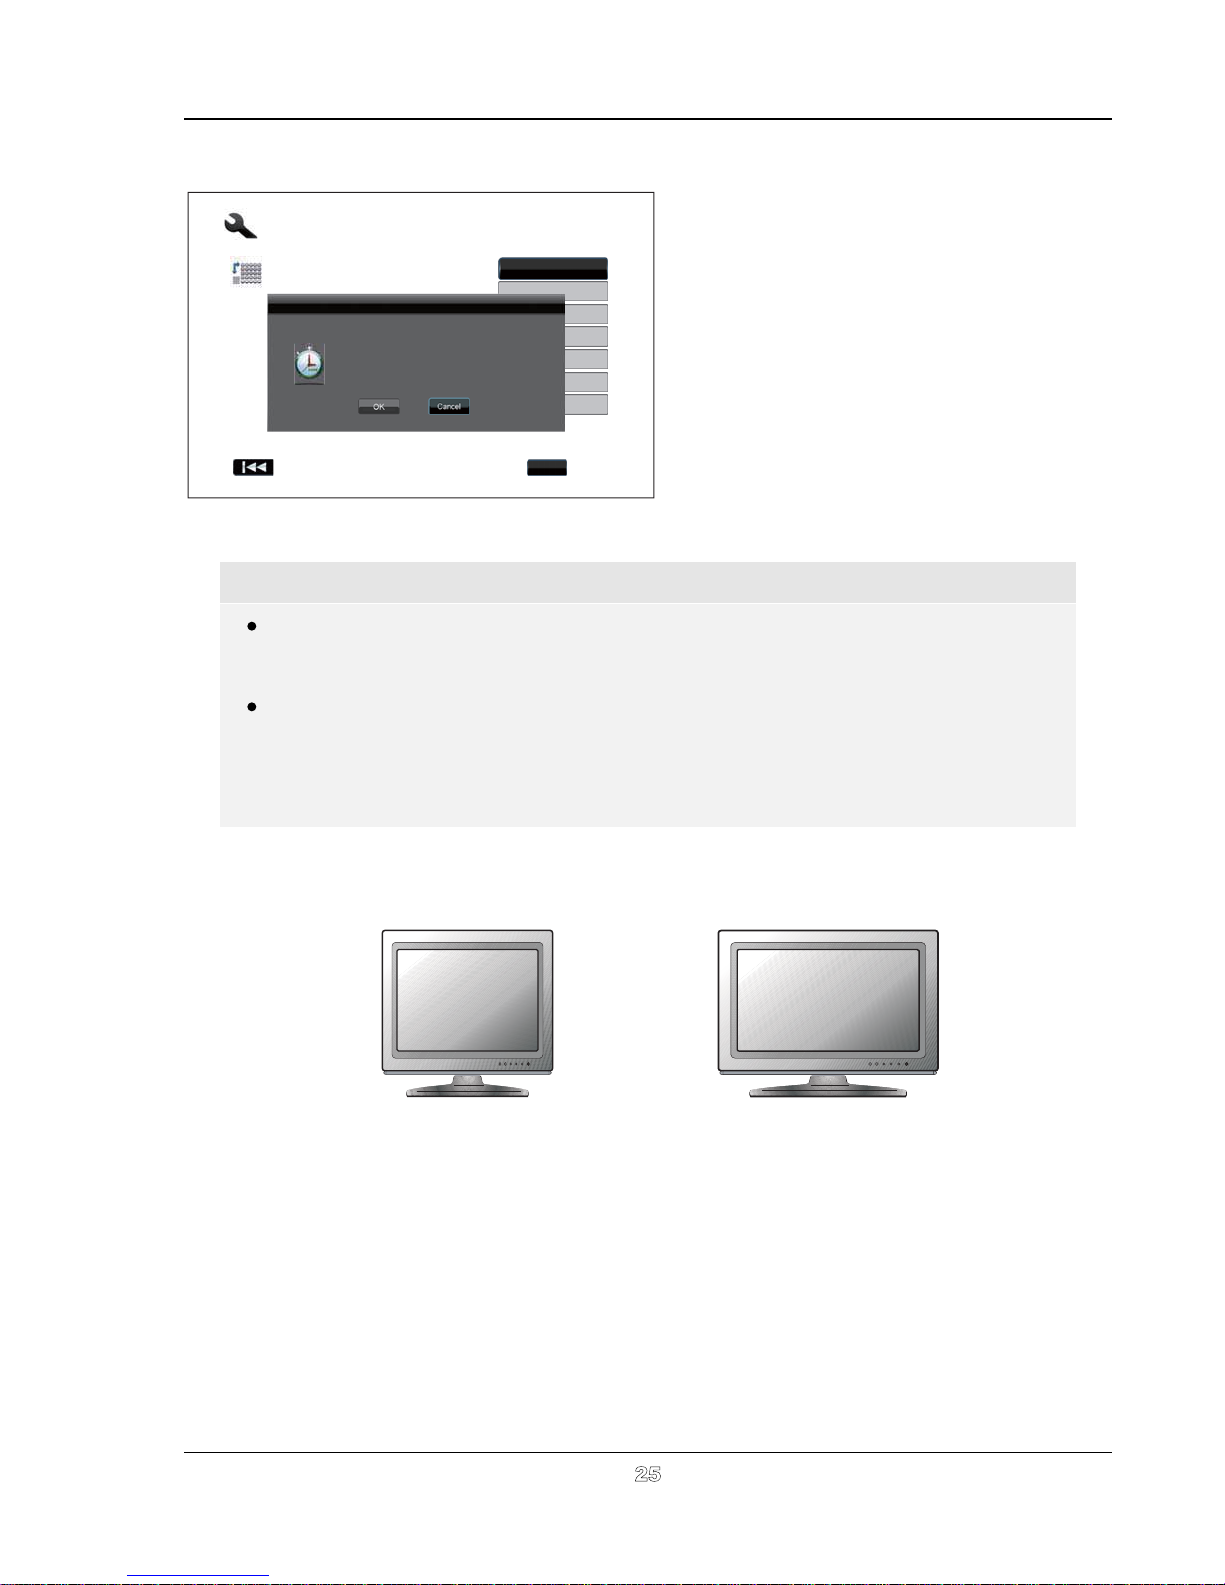
Press the UP/DOWN ARROW buttons to select the
desired output resolution, then press the ENTER
button. The player will apply the selected output
resolution and ask you to confirm the selection. If
your TV supports the selected resolution, you will
see a dialog box with a count-down clock. Use the
LEFT ARROW button to highlight the “OK” option
and press the ENTER button to save the resolution
setting. If your TV does not support the selected
resolution, you may see a black screen or an error
message. In this case please wait for 15 seconds
txeNsuoiverP
and the Easy Setup screen will reappear. Select a
different resolution that your TV can support.
Video up-conversion over the Analog (component) output is only available for
unencrypted discs such as home video and consumer-created contents. Most
commercially pressed DVD discs are CSS-encrypted and will be limited to 576i/576p
resolution. This restriction applies to the component output only. The HDMI output is
protected with HDCP and has no such restriction.
Determine the Display Aspect Ratio
Standard Definition, or 4:3 TV Wide screen, or 16:9 TV
The aspect ratio is the proportional ratio of a TV screen’s width and height. Older television sets generally
have a 4:3 aspect ratio – the width is 4/3 (or 1.33) times the height. Newer wide screen television sets have a
16:9 aspect ratio – the width is 16/9 (or 1.78) times the height. For best performance, the video output of your
player needs to match the screen aspect ratio of your TV. Since almost all Blu-ray Discs and many DVD discs
are released in the wide screen format, it is highly recommended that you use a wide screen TV with the
player.
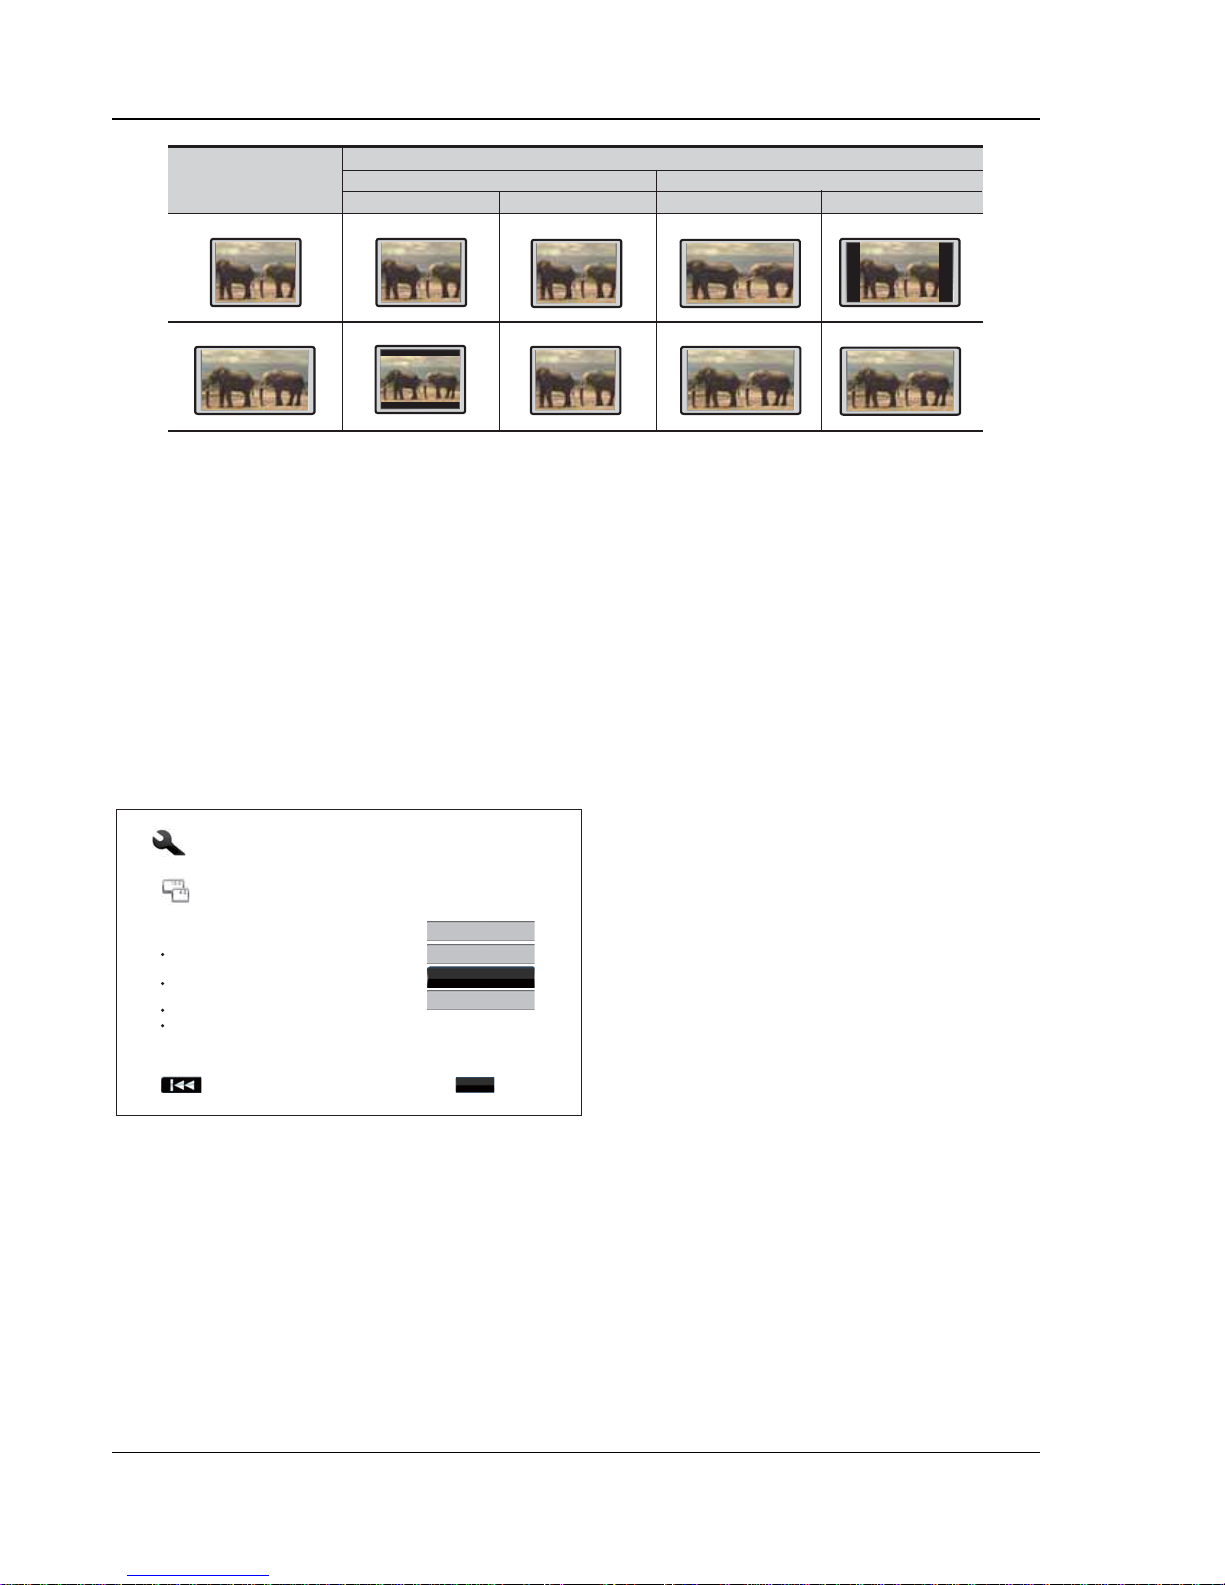
The Aspect Ratio selections are 4:3 Letterbox, 4:3 Pan & Scan, 16:9 Wide and 16:9 Wide/Auto. Depending
on your selection and the video format recorded on the discs, image appearance on the TV screen can be
one of the following:
25
Page 31
INSTALLATION
26
TV Screen Appearance
Original Content
Pan & ScanLetterbox
Wide Wide/Auto
16:94:3
4:3
16:9
If you have a 4:3 or standard definition screen, select one of these options:
x 4:3 Letterbox – 4:3 TV Letterbox. Choose when the display is 4:3. Widescreen image is
displayed in “letterbox” format with black borders on top and bottom (preferred).
x 4:3 Pan & Scan – 4:3 TV Pan and Scan. Choose when the display is 4:3. Both sides of a
widescreen image are clipped (you lose about 30% of the picture).
If you have a widescreen (16:9) display, select one of these options:
x 16:9 Wide – 16:9 (widescreen) sources will be displayed in their native aspect ratio, and 4:3
sources will be horizontally stretched.
x 16:9 Wide/Auto – 16:9 (widescreen) as well as 4:3 sources will be displayed in their native
aspect ratio. Please note that in this mode 4:3 sources will be displayed with black borders on
both left and right sides to maintain the correct 4:3 aspect ratio.
Easy Setup
Step: 4/6
Choose the desired Aspect Ratio for your TV.
4:3 Letterbox: For 4:3 TV. Wide screen content
will be displayed in a letterbox.
4:3 Pan & Scan: For 4:3 TV. Wide screen
content may be cropped on the sides.
16:9 Wide: For 16:9 TV.
16:9 Wide/Auto: For 16:9 TV. 4:3 content will be
displayed with side borders.
4:3 Letterbox
4:3 Pan & Scan
16:9 Wide
16:9 Wide/Auto
Enter
Press the UP/DOWN ARROW buttons to select the
proper aspect ratio for your TV, then press the
ENTER button.
txeNsuoiverP
Page 32
INSTALLATION
Select the Audio Setting
The Blu-ray Disc format brings not only high resolution video, but also high bit rate audio such as Dolby Digital
Plus, Dolby TrueHD, DTS-HD High Resolution and DTS-HD Master Audio. Blu-ray Discs may also include
additional audio features such as menu click sound and Secondary Audio Program (SAP – audio associated
with the secondary video in Picture-in-Picture mode). Dependingon the user preferences and other
audio/video equipment connected to the player, the audio settings need to be adjusted to achieve the best
result. The Easy Setup Wizard offers two basic selections to get you started.
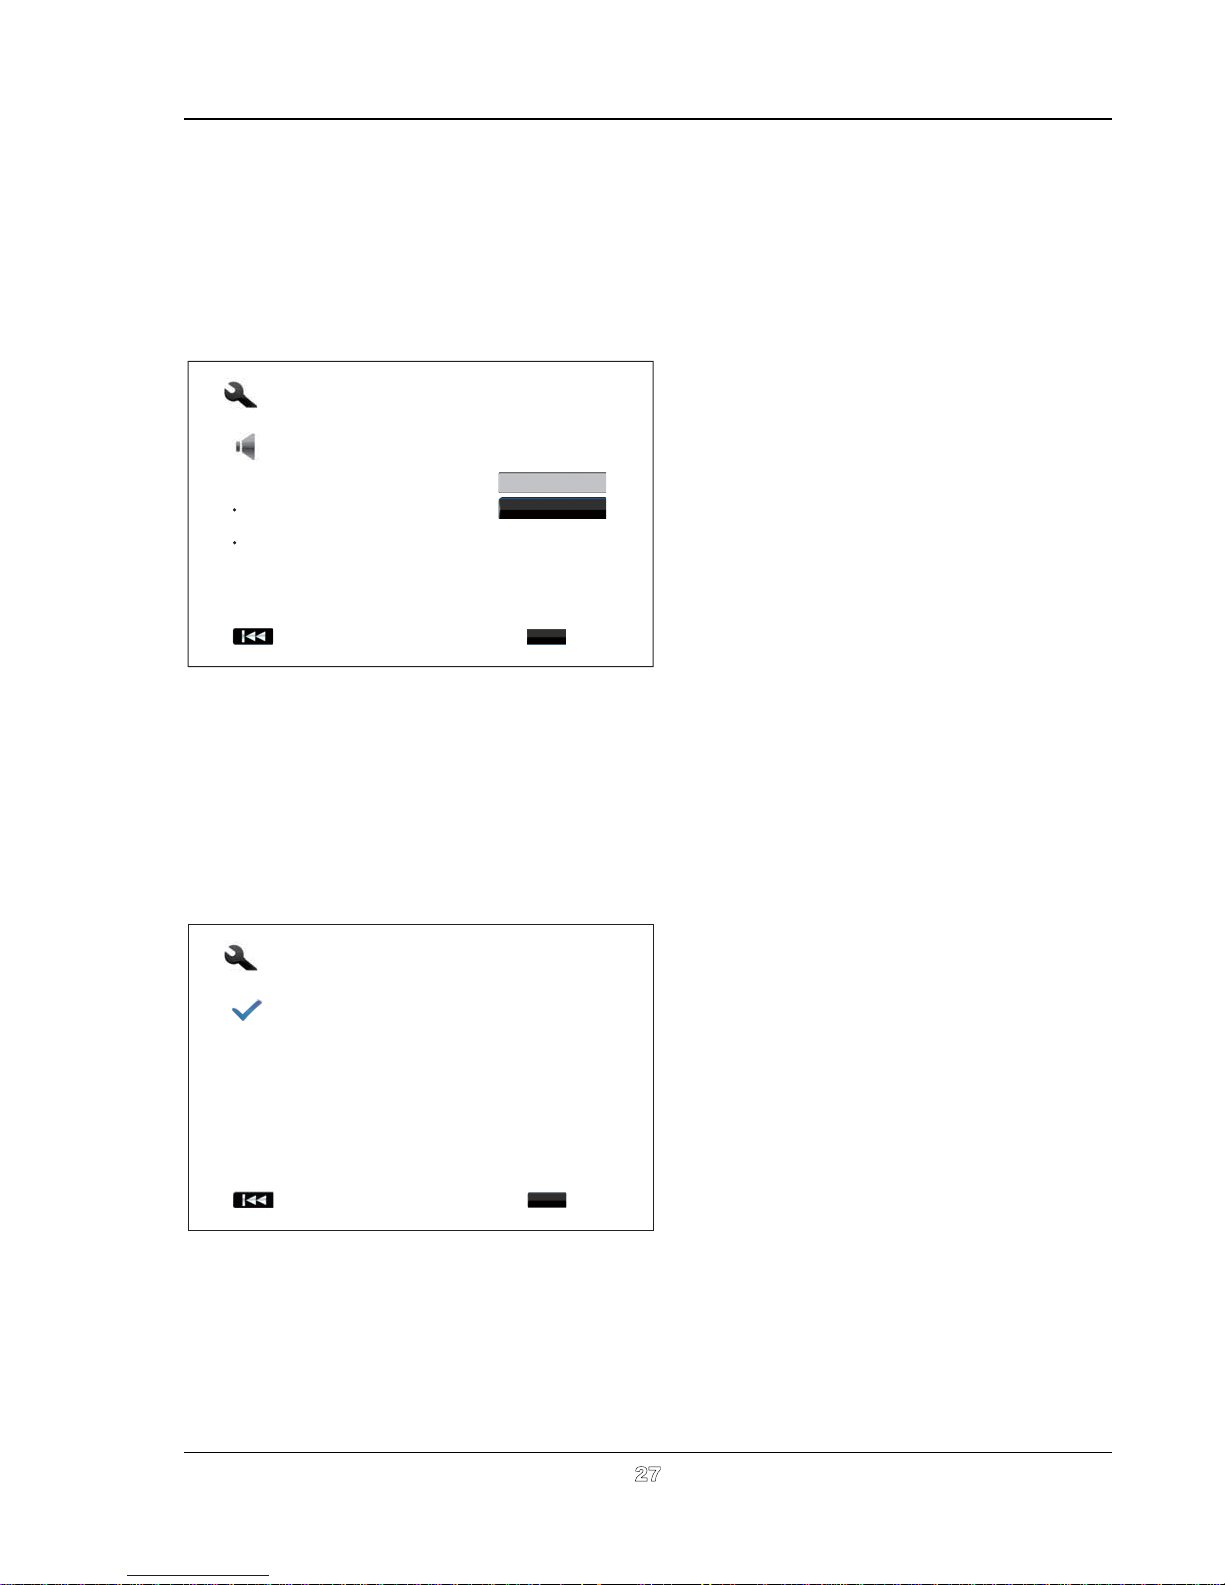
The “Compatible” setting configures audio output
Easy Setup
Step: 5/6
Select the audio setting.
Compatible: For televisions and receivers with
HDMI 1.1/1.2 or Optical/Coaxial connections.
Advanced: For receivers with HDMI 1.3 or higher
version only. Secondary audio program is turned
off by default.
Audio settings can be further customized in the
setup menu.
Compatible
Advanced
Enter
txeNsuoiverP
formats. If you connect the player to a receiver supporting HDMI 1.3 or higher version and high bit rate audio
formats, selecting the “Advanced” setting is recommended. Menu click sound and Secondary Audio Program
are turned off by default.
in a way that is generally compatible with all types
of equipment and content. If you connect the player
to a television directly, or to a receiver with an HDMI
1.1/1.2 or optical/coaxial input, selecting the
“Compatible” setting is recommended. When
menu click sound and Secondary Audio Program
are presented in the content, those will be mixed
into the audio output.
The “Advanced” setting configures audio output to
send the original main audio content to a connected
receiver for decoding and reproducing. It requires a
receiver capable of decoding all high bit rate audio
Press the UP/DOWN ARROW buttons to select one of the audio setting choices, and then press the ENTER
button. The two basic audio setting choices may not cover all situations. You can further customize the audio
settings using the player’s Setup Menu.
Complete the Easy Setup Wizard
Once you have selected the audio setting, the initial
Easy Setup
Step: 6/6
Easy Setup Wizard completed.
Press the Enter button to exit.
Enter
hsiniFsuoiverP
Easy Setup Wizard is completed.
Press the ENTER button to close the Easy Setup
Wizard. Your player is now ready for use. You will
see a background screen with an OPPO and Bluray Disc logo.
Please follow the rest of the User Manual for basic
and advanced operations. Enjoy your new OPPO
Blu-ray Disc Player!
27
Page 33
28
BASIC OPERA TIONS
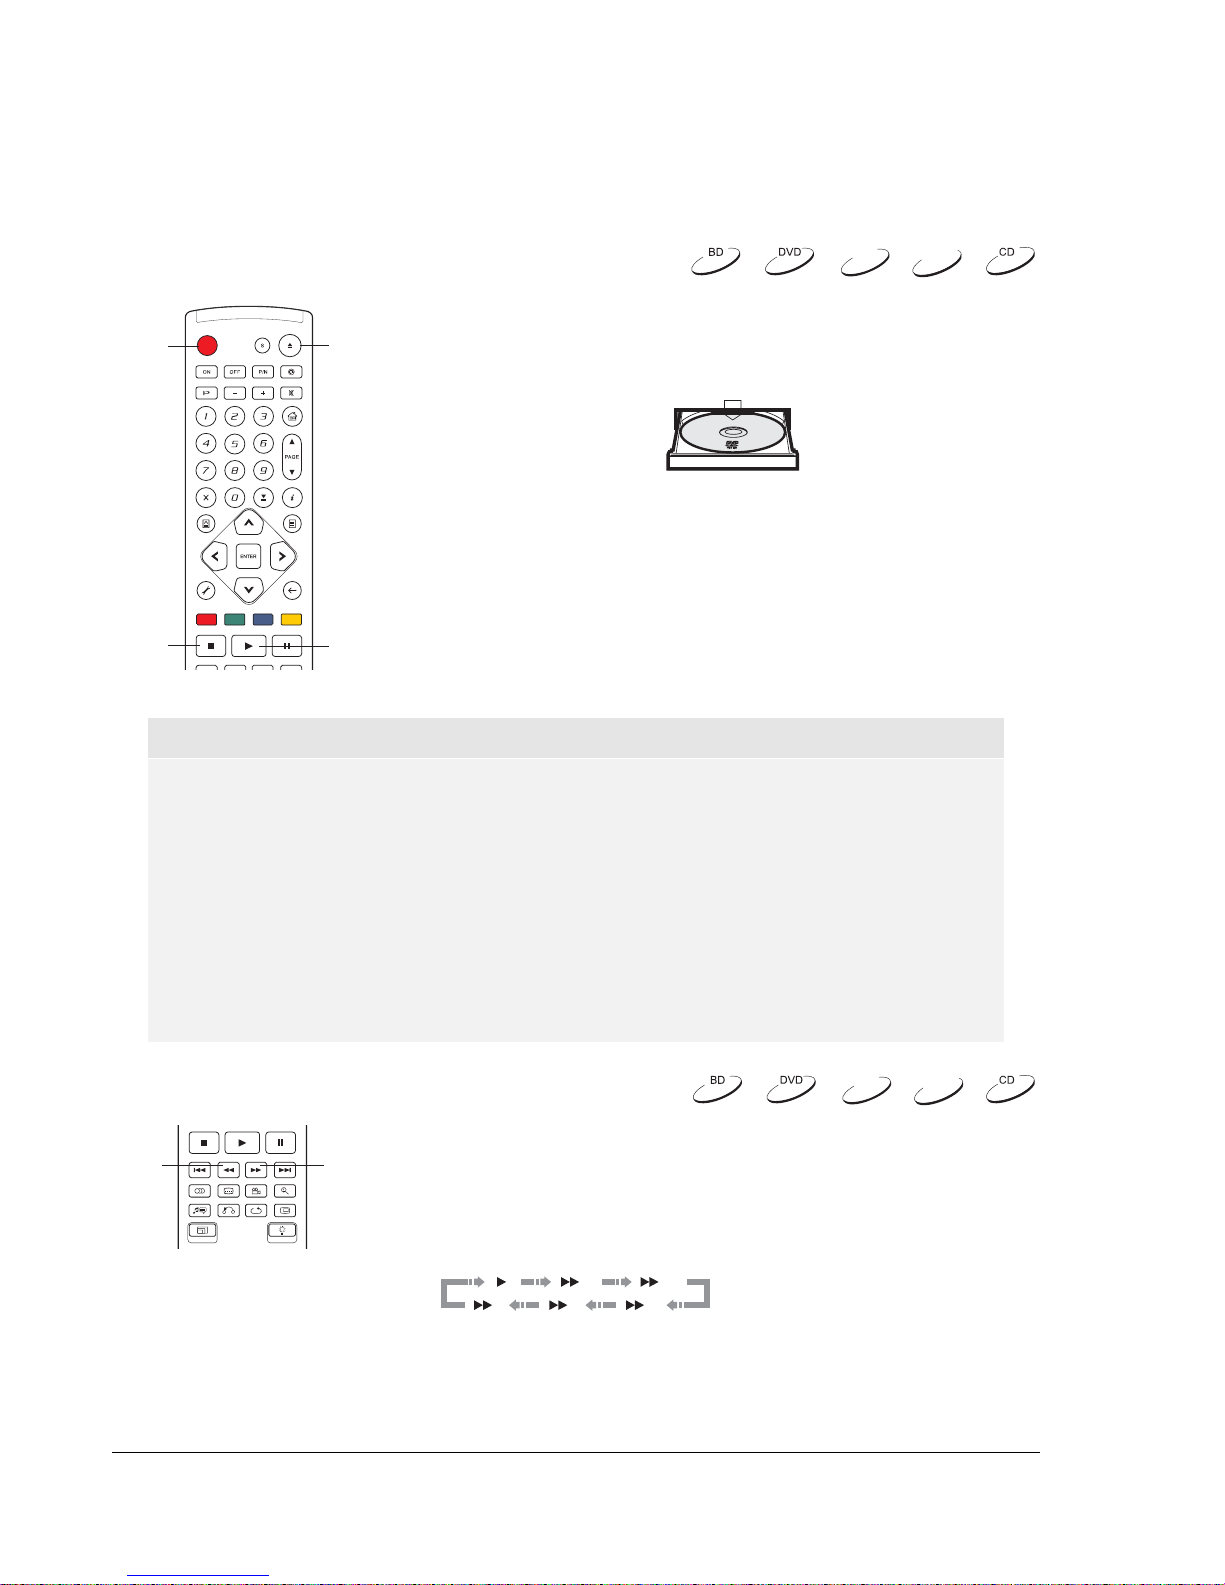
Disc Playback
DVD-A
1ˊ Press the POWER button to turn on the player.
POWER
STOP
OPEN
PLAY
NOTE
x During DVD and some Blu-ray Disc playback, pressing the STOP button for the first time
brings the player to a pre-stop mode. You can resume playback from the stopped point
by pressing the PLAY button. This pre-stop mode allows you to change the player
settings and then resume playback. To completely stop playback, press the STOP
button twice.
2ˊ Press the OPEN/CLOSE (OPEN) button to eject the disc tray.
3ˊ Place the disc with the label side facing up and the recorded
side facing down.
4ˊ Press the OPEN/CLOSE (OPEN) button again to retract the
tray.
5ˊ The player will read the disc information and starts playback.
6ˊ Depending on the content of the disc, a menu or navigation
screen may appear. Please use the navigation ARROW and
SELECT buttons to select the content to play.
7ˊ To stop playback, press the STOP button.
8ˊ To turn off the player, press the POWER button.
SACD
x Certain Blu-ray Discs with BD-Java technology do not support the pre-stop mode.
Pressing the STOP button during playback of such discs will completely stop the disc.
Pressing the PLAY button once the disc is stopped will restart it from the very beginning.
x This unit consumes a tiny amount of power even when it is turned off to STANDBY
mode. If it is not to be used for a long time, unplug it from the household AC outlet.
Fast Playback
DVD-A
You may fast forward or reverse during playback.
REV
FWD
1. Press the FWD button on the remote control and the player
starts fast forward playback. Each press of the FWD button
switches the playback speed in the following sequence:
12
345
SACD
Page 34
BASIC OPERATIONS
29
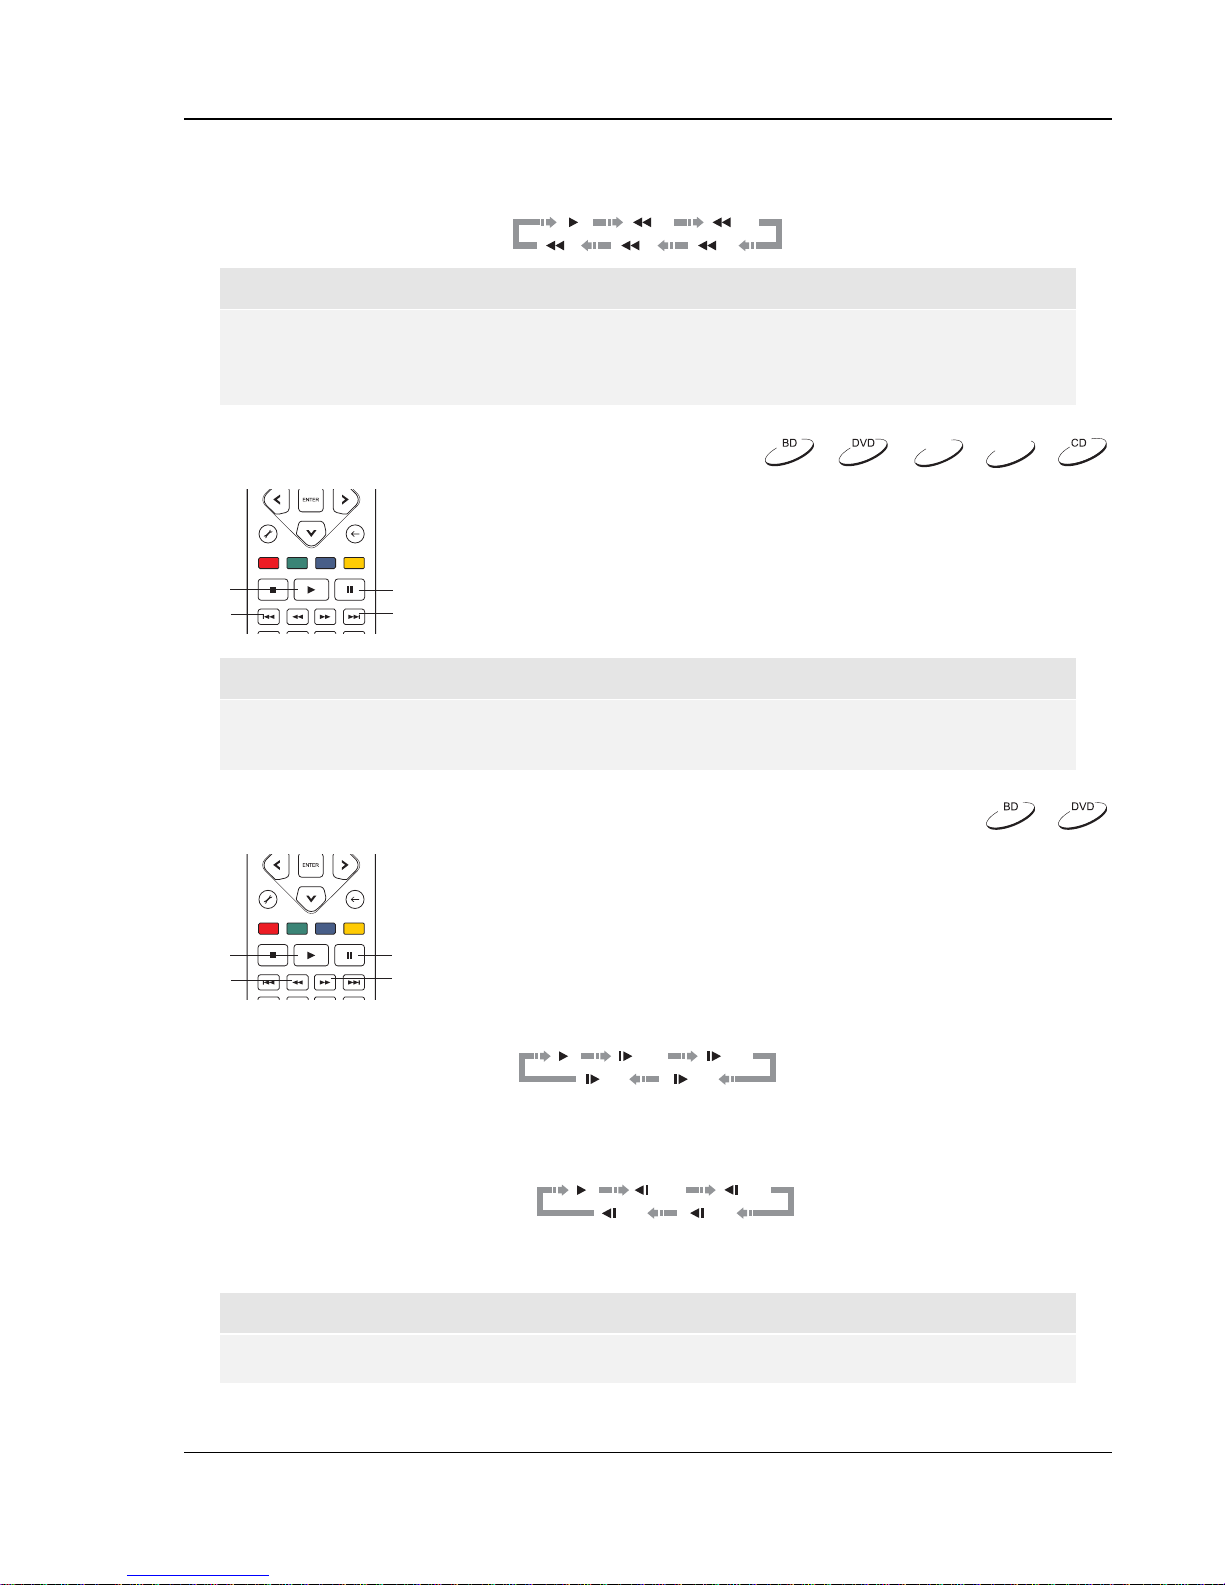
2. Press the REV button on the remote control and the player starts fast reve rse playback. Each
press of the REV button switches the playback speed in the following sequence:
12
345
NOTE
x Certain Blu-ray Discs utilizing the BD-Java technology may have their own fast
forwarding and reversing control. The actual speed varies by disc, and a progress scale
may be displayed by the disc.
Pause and F rame-by-Frame
DVD-A
1. During playback, press the PAUSE button to temporarily pause
the program. In this mode, a PAUSE icon will appear on the TV
screen.
2. While a DVD or Blu-ray Disc is paused, press the PREV or
PLAY
PREV
PAUSE
NEXT
NEXT button to reverse or advance the video frame-by-frame.
3. Press the PLAY button to resume normal playback.
NOTE
If the screen saver is set to “On” or “Energy Saver” (please refer to page 56 for details), after
pausing for 3 minutes the player will activate the screen saver.
Slow Playback
To play the video in slow-motion, please use the following steps.
1. Press the PAUSE button on the remote control to pause the
PLAY
REV
PAUSE
FWD
playback first.
2. Press the FWD button to select a forward slow playback speed.
Each press of the FWD button switches the playback speed in
the following sequence:
SACD
3. Press the REV button to select a reverse slow playback speed. Each press of the REV button
switches the playback speed in the following sequence:
4. To exit the slow playback mode, press the PLAY button.
NOTE
x Certain Blu-ray Discs utilizing the BD-Java technology may not support slow playback.
1/16 1/8
1/41/2
1/16 1/8
1/41/2
Page 35
BASIC OPERATIONS
Blu-ray Disc Menu Playback
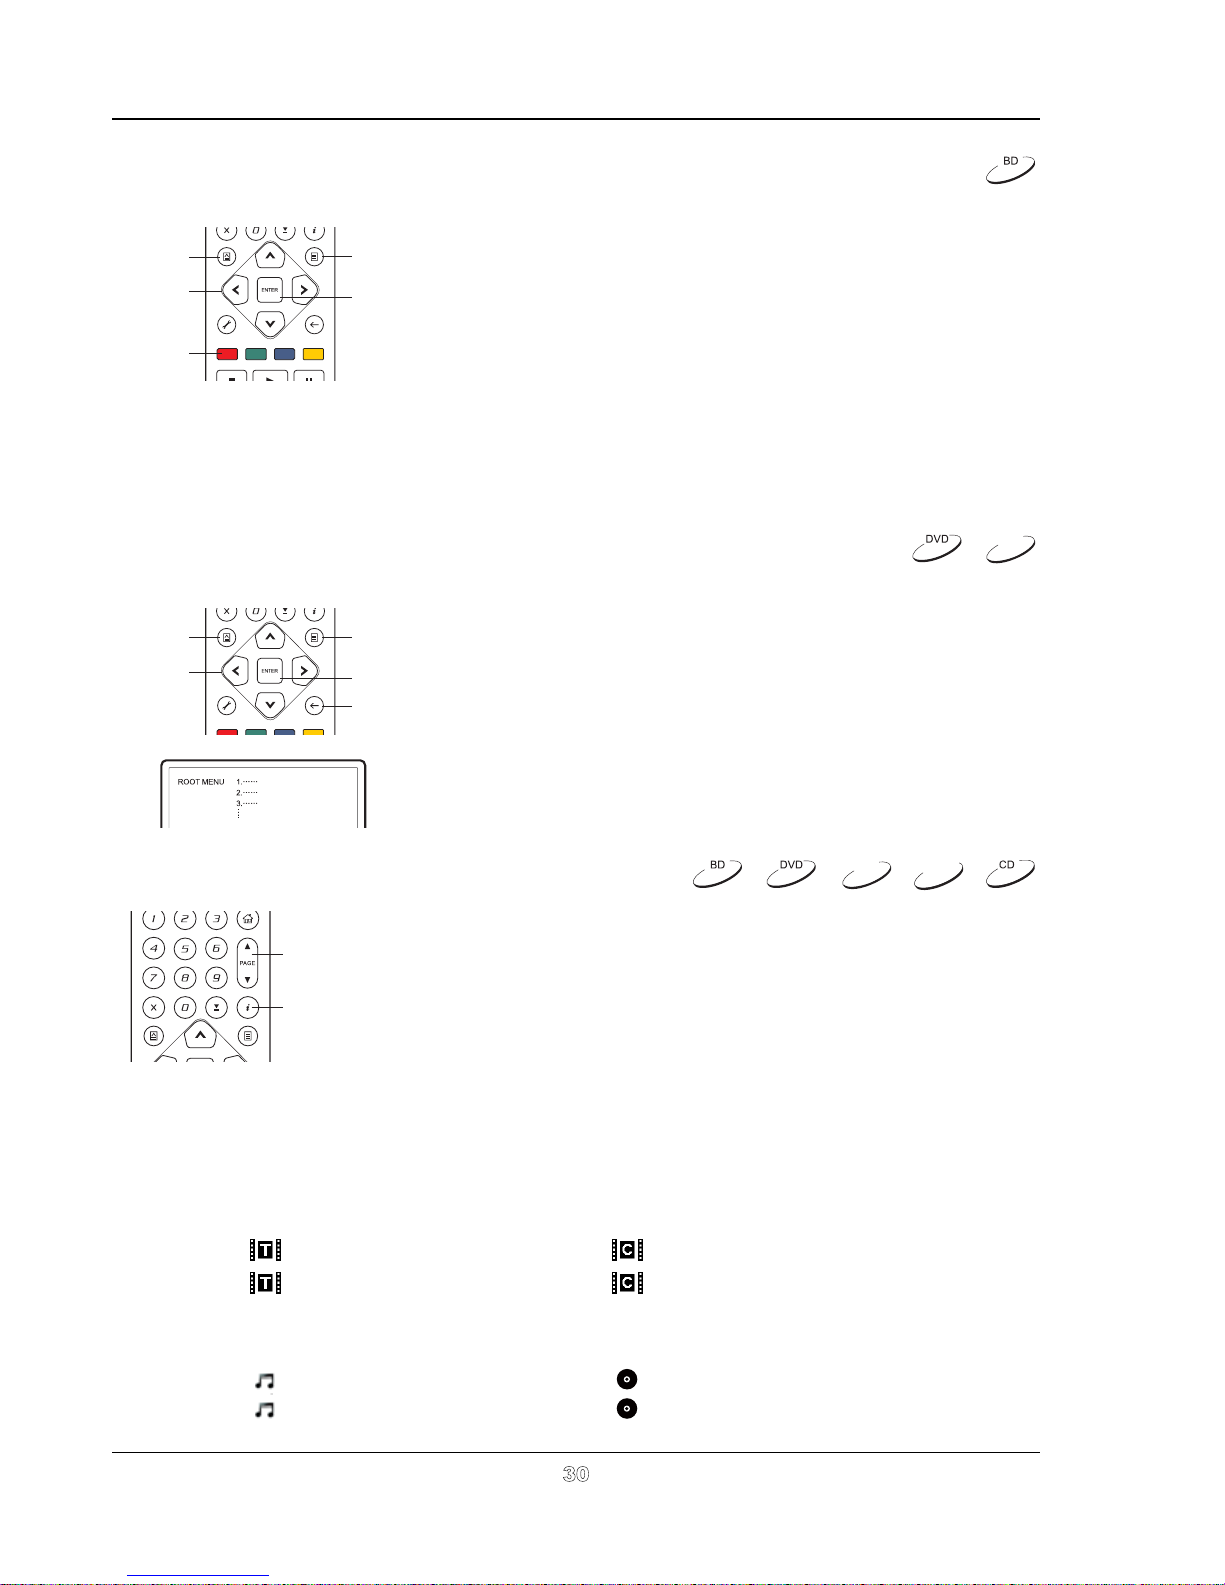
1. Blu-ray Discs usually contain a Top Menu and a Pop-up
TOP
MENU
ARROW
BUTTONS
COLOUR
BUTTONS
POP-UP
MENU
ENTER
2. During playback, press the POP-UP MENU button to
3. Navigate the menu using the ARROW buttons, and then
4. Some menus make use of the COLOUR buttons. You can
Menu. The Top Menu normally appears at the beginning of
the playback, after the previews and copyright messages.
The Pop-up Menu can be accessed during the movie
without interrupting playback.
access the Pop-up Menu. Press the TOP MENU button to
access the Top Menu.
press the ENTER button to make the selection.
select menu functions by pressing the corresponding
COLOUR button on the remote control.
DVD Menu Playback
TOP
MENU
(TITLE)
ARROW
BUTTONS
POP-UP
MENU
(MENU)
ENTER
RETURN
On-Screen Display
PAGE
UP/DOWN
DISPLAY
DVD-A
1. Some DVD discs contain title menu or chapter menu
functions.
2. During playback, press the TOP MENU buttontoreturnto
the disc title menu. Press the POP-UP MENU button to
display the chapter menu. Depending on the disc, one or
both menus may not exist.
3. Navigate the menu using the ARROW buttons, and then
press the ENTER button to make the selection.
4. Press the RETURN button to return to the previous menu.
The return location varies by disc.
DVD-A
SACD
1. During the playback of a DVD or Blu-ray Disc, press the DISPLAY
button on the remote control to show status information; For CD
and SACD, the status information is shown automatically.
2. While the status information is shown, press the PAGE
UP/DOWN buttons to scroll through several display formats. The
playback time information displayed on the front panel changes
together with the on-screen display.
3. Press the DISPLAY button again to hide the on-screen display.
The playback time information display on the front panel will
remain in the selected format.
The following display formats are available:
DVD and Blu-ray Disc:
- Title elapsed time
–
- Title remaining time – - Chapter remaining time
CD and SACD:
- Track elapsed time - Disc elapsed time
– - Track remaining time – - Disc remaining time
- Chapter elapsed time
30
Page 36
BASIC OPERATIONS
In addition to the playback time, the on-screen display may also contain the following information about
the content currently playing:
x
Playback status: an icon indicating play, pause, and fast forward/reverse status.
x
Bit rate meter: an indication of the bit rate of the audio and video stream.
Current and total title numbers. (DVD and Blu-ray Discs)
x
Current and total chapter numbers of the current title. (DVD and Blu-ray Discs)
x
Current and total tracks. (CD and SACD)
x
Audio information: current and total available number of audio tracks, language, format, and
x
channels.
Subtitle information: current and total available number of subtitle tracks and language.
x
Video format information: encoding type, frame rate and original aspect ratio.
x
Volume Control
1. On the BDP-95AU, the volume control only affects the analog
audio output. It does NOT apply to digital audio output (HDMI,
Coaxial and Optical) either in raw bitstream format or in
LPCM format.
2. The VOL +/- buttons on the player remote control is provided
VOL -
VOL +
as an alternative way of controlling the audio volume. It is
recommended that you use this control to make the audio
volume from the player the same as from other sources, such
as TV programs or a VCR.
x
Press the VOL – button to decrease the volume.
x
Press the VOL + button to increase the volume.
NOTE
The volume control does not apply to digital audio output .
Mute
1. Press the MUTE button on the remote control during content
playback to turn off audio output. The TV screen displays a
mute icon. The front panel MUTE indicator will also light up.
2. Press the MUTE button again to resume audio output.
MUTE
DVD-A
DVD-A
SACD
SACD
NOTE
Check the MUTE status on the front panel display of the player when there is no audio
output. You may also press the MUTE button to verify the MUTE status.
Audio Language/Track Selection
AUDIO
DVD-A
SACD
1. To select the audio language or track, press the AUDIO button on
the remote control during playback.
2. Repeat pressing the AUDIO button or use the UP/DOWN
ARROW buttons to choose from all available language or audio
tracks.
31
Page 37
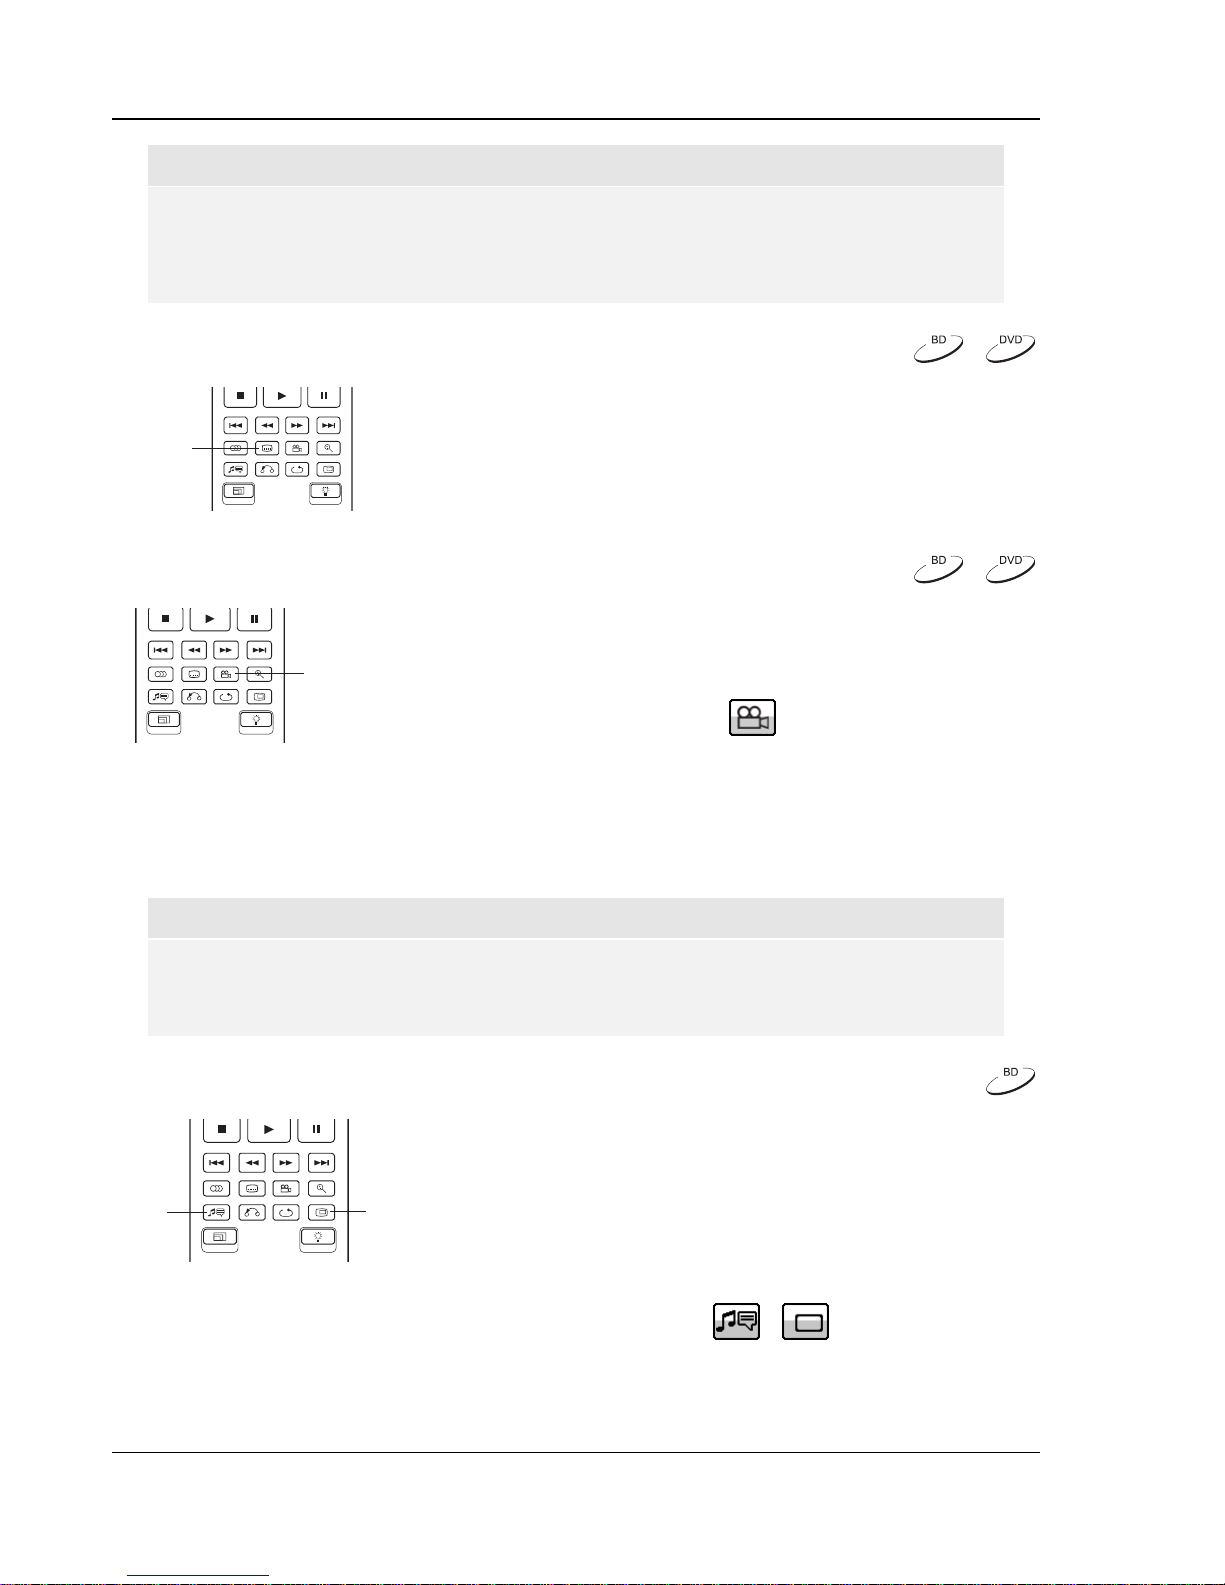
BASIC OPERATIONS
32
NOTE
Availability of languages and audio channels varies by disc. Some DVD-Audio discs allow
audio track selection with the AUDIO button, while others require the user to select from the
audio setup menu of the disc. When playing an SACD with both multi-channel and stereo
contents, the AUDIO button can be used to switch between the two formats.
Subtitle Selection
1. When playing a DVD, Blu-ray Disc or other video programs
recorded with subtitles, press the SUBTITLE button on the
SUBTITLE
remote control to select the desired subtitle.
2. Repeat pressing the SUBTITLE button or use the UP/DOWN
ARROW buttons to choose from all available subtitles.
3. To turn off subtitles, select “Off” from the list.
Angle Selection
1. When playing a DVD or Blu-ray Disc, an angle mark will be
displayed on the screen when the player detects scenes
ANGLE
recorded with multiple angles:
The angle mark is also presented on the front panel display.
2. Press the ANGLE button on the remote control to select the desired playing angle.
3. To resume normal playback, repeat pressing the ANGLE button until the default angle is
displayed.
NOTE
x This function is available only when the discs are recorded with multiple angles.
x The angle mark on the screen can be turned off using the Setup Menu of the player. (see
page 55)
Picture-in-Picture and Secondary Audio
1. Certain Blu-ray Discs contain secondary video (Picture-inPicture, or PIP) and secondary audio. This feature is often
called BONUSVIEW. When such a disc is played, a
SAP
PIP
Picture-in-Picture mark (PIP Mark) and a Secondary Audio
Program mark (SAP Mark) may be displayed on the screen
to alert you to the availability of the secondary audio/video
content.
Page 38

BASIC OPERATIONS
33
2. The disc menu usually features interactive controls to turn on/off the Picture-in-Picture video
and Secondary Audio Program. Please use those controls to select the desired secondary
audio/video content.
3. There is a PIP button on the remote control. If the disc menu does not offer interactive Picturein-Picture controls, please use this button to turn on/off Picture-in-Picture or select from multiple
secondary video programs.
4. There is also a SAP button on the remote control. If the disc menu does not offer interactive
secondary audio controls, please use this button to turn on/off Secondary Audio Program or
select from multiple secondary audio tracks. Secondary Audio Programs are generally only
available when Picture-in-Picture is shown.
NOTE
x This function is available only when the discs are recorded with secondary video and
audio programs.
x Some discs may not play back according to the PIP and SAP buttons. Certain discs can
ignore or override the remote control commands.
x The PIP and SAP Marks on the screen can be turned off using the Setup Menu of the
player (See page 55).
BD-Live
Some Blu-ray Disc titles are released with the BD-Live feature. BD-Live offers extra
downloadable contents and additional online interactive programs. The available BD-Live
contents vary by discs and studios, and may inclu de additional subtitl es, commenta ries,
preview trailers, games, and online chat. The player needs to be connected to the Internet in order to play
BD-Live contents (See page 20).
Depending on how the studios organize their BD-Live contents, some Blu-ray Di scs may start downloading
BD-Live contents when playback starts; some have a BD-Live selection on its main menu; some may show a
prompt to ask whether you would like to start downloading; and some may ask you to sign up for a
membership or account. Please follow the instructions that come with the disc to enjoy BD-Live contents.
Your Internet connection speed, the overall Internet traffic situati on and the capacity of the BD-Live content
servers can all affect how fast BD-Live contents can be downloaded. If you encounter slow downloading or
intermittent playback, please play the disc without accessing the BD-Live features, or try again at a different
time.
When you use the BD-Live feature, the player or disc I D and your IP (Internet Prot ocol) address may be sent
to the content provider via the Internet. Generally, no personally identifiable information is sent. However
technologies exist to match your IP address to a certain geographical area or service provider. Your Internet
service provider also has the knowledge of who is using which IP address. If the BD-Live content provider
requires you to login using a membership or account, the content provider will have access to your
membership or account information. Please check with your Internet service provider and the BD-Live content
providers for their privacy policy.
You can choose to restrict BD-Live Access using the player’s Set up Menu (See page 76).
Page 39
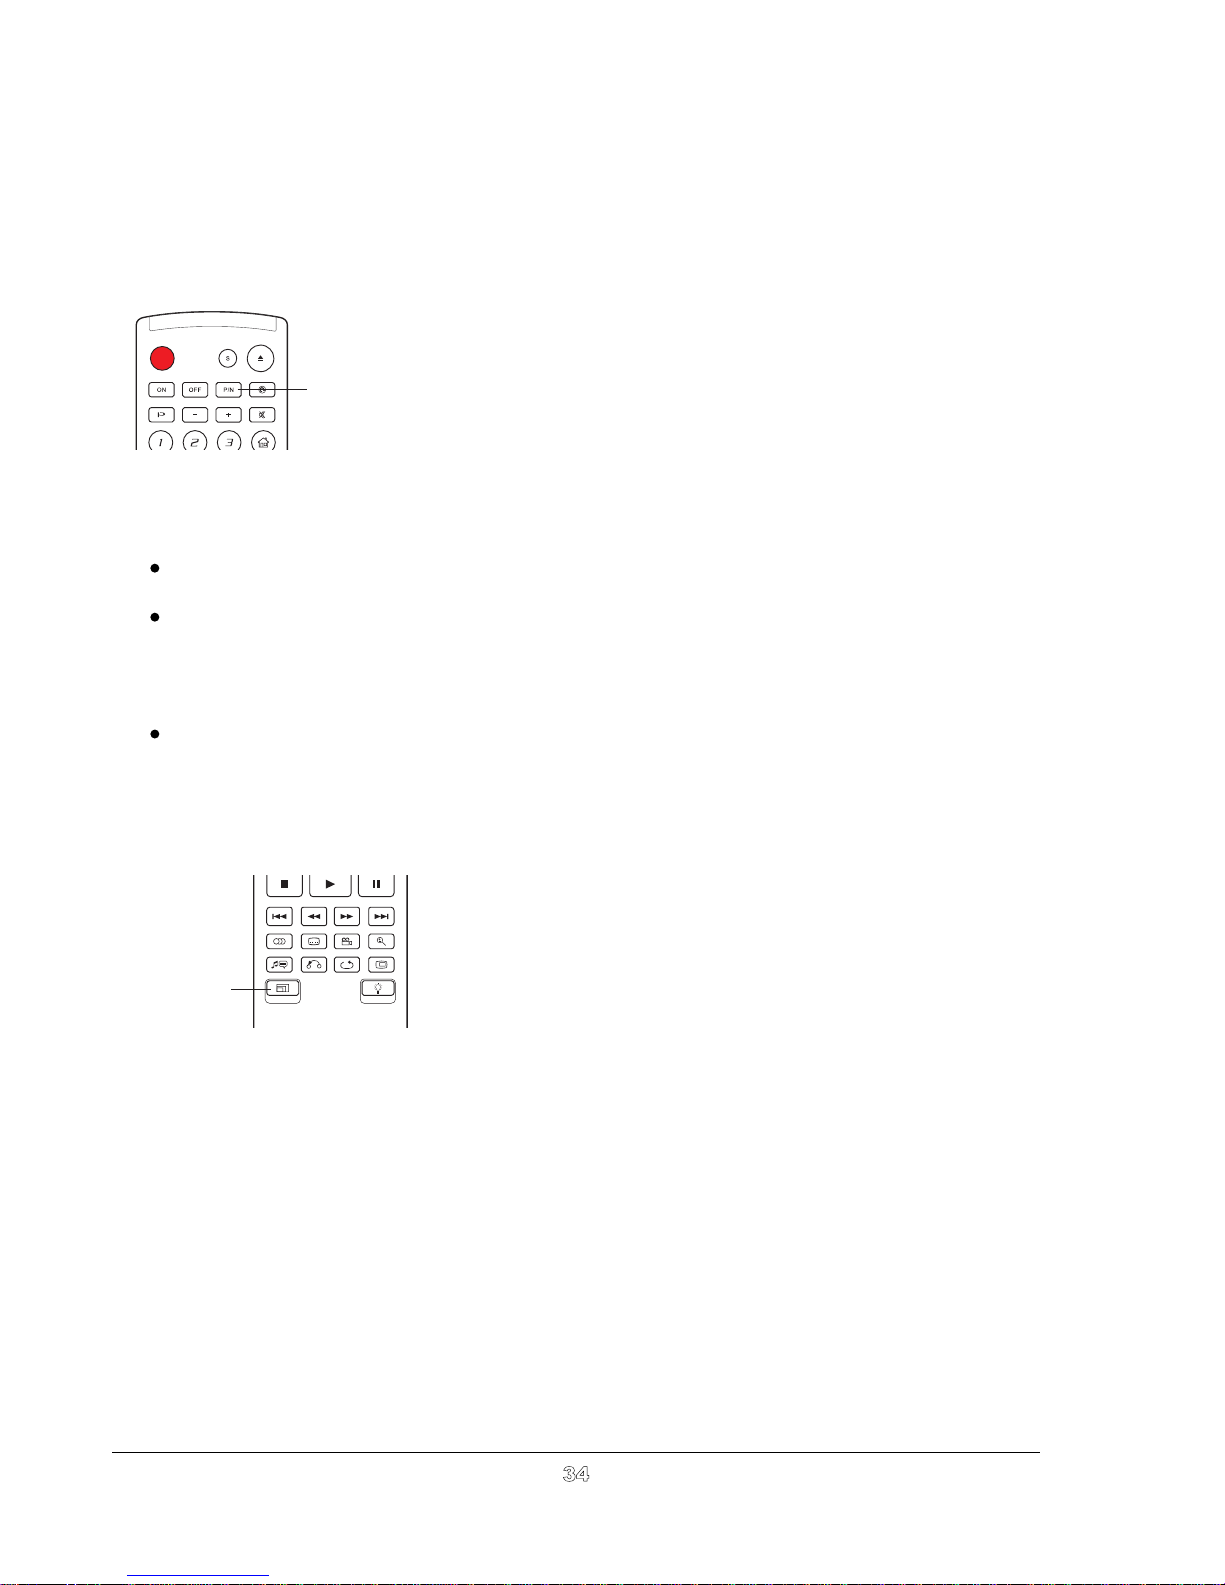
AD V ANCED OPERA TIONS
TV System Selection
P/N
Some points to keep in mind:
When the video output is set to PAL or NTSC system, the player will convert the disc content to
the selected system.
When the video output is set to “Multi”, the player will not perform system conversion. The
“Multi” mode is only to be used if your TV supports both NTSC and PAL systems.
Most TV sets only support one of the or
the TV may not display a picture. In this case repeat pressing the P/N button until a supported
system is selected.
The output system selected with the P/N button will be remembered when the player is turned
off. The output system selection can also be done by setting the “TV System”iteminthe
“Video Setup” section of the player’s Setup Menu. (Refer to page 54 for details.)
Output Resolution
RESOLUTION
While you may want to set the video output system ( / ) to the same
as that supported by your TV, realize that the OPPO Blu-ray Disc Player will
convert any content that is not in the correct format your TV understands. The
default output is PAL .
Press and hold the P/N button for 5 seconds on the remote control to cycle the
video output to , or “Multi” system. The TV screen displays the
selected system name.
NTSC
The OPPO BDP-95AU Blu-ray Disc Player supports multiple output
resolutions. For detailed discussion on how to choose the best output
resolution, please refer to the Select the Best Output Resolution
sectiononpage24ofthismanual.
If you would like to change the output resolution, you may do so by
pressing the RESOLUTION button on the remote control:
PAL
PAL
systems. If the wrong output is selected,
NTSC
PAL
NTSC
1. Make sure the video cable is properly connected.
2. Turn on the TV. Adjust the TV to
3. Make sure that the player is turned on. Although the output resolution can be changed “on the
fly”, it is recommended that you stop playback and take out the disc before changing the output
resolution. Press the RESOLUTION button. A “Resolution Setting” menu appears on the TV
screen. If the TV does not support the current resolution and you cannot see the “Resolution
Setting” menu, the current resolution is also displayed on the front panel.
4. Use the UP/DOWN ARROW buttons to select the new output resolution. You may also press
the RESOLUTION button multiple times to cycle through the available output resolutions. The
new resolution is also displayed on the front panel if you cannot see the “Resolution Setting”
menu on the TV screen.
5. Press the ENTER button to apply the selected output resolution. Or, if you do not want to
change the output resolution, press the RETURN button to exit.
use the proper input (HDMI, DVI or Component).
3
4
Page 40
ADVANCED OPERATIONS
The following output resolutions are available:
PAL output via HDMI 1 or HDMI 2:
Auto
1080p(50Hz/24Hz) 1080i 50Hz 720p 50Hz
576p 576i Source Direct
NTSC output via HDMI 1 or HDMI 2:
Auto
1080p(60Hz/24Hz) 1080i 60Hz 720p 60Hz
480p 480i Source Direct
PAL output via Analog (component):
1080p 50Hz*
1080i 50Hz 720p 50Hz 576p 576i
NTSC output via Analog (component):
1080p 60Hz*
1080i 60Hz 720p 60Hz 480p 480i
* When 1080p is selected for the Analog output, the actual component output resolution will be 1080i.
NOTE
Some TV sets do not support one or more output resolutions (particularly 1080p). If
an incompatible output resolution is selected, you will get a blank screen or an error
message. In this case please select an output resolution that is supported by the TV.
If you cannot get a picture using the HDMI or component output, please connect the
player to the TV using the composite video output, then use the Setup Menu to adjust
the player settings.
Video up-conversion over the component output is only available for unencrypted
discs such as home video and consumer-created contents. Most commercially
pressed DVD discs are CSS-encrypted and will be limited to 576i/576p resolution.
This restriction applies to the component output only. The HDMI output is protected
with HDCP and has no such restriction.
Zooming and Aspect Ratio Control
This feature zooms in or out of the displayed frame and also changes the
aspect ratio (image width vs. height).
ZOOM
Zoom Levels for HDMI 1 Output
The following zoom levels are available when “Primary Output”issetto“HDMI 1”:
Under Scan 1.2 1.3 1.5 2.0 ½ Backto 1:1 again
The zoom level is reset to 1:1 when the disc is ejected, or when the player is turned off.
To change the zoom level, press the ZOOM button on the remote control.
Each press of the ZOOM button will switch the zoom level in sequence.
1:1 (No zooming)
Stretch/Compress Full Screen
DVD-A
35
Page 41
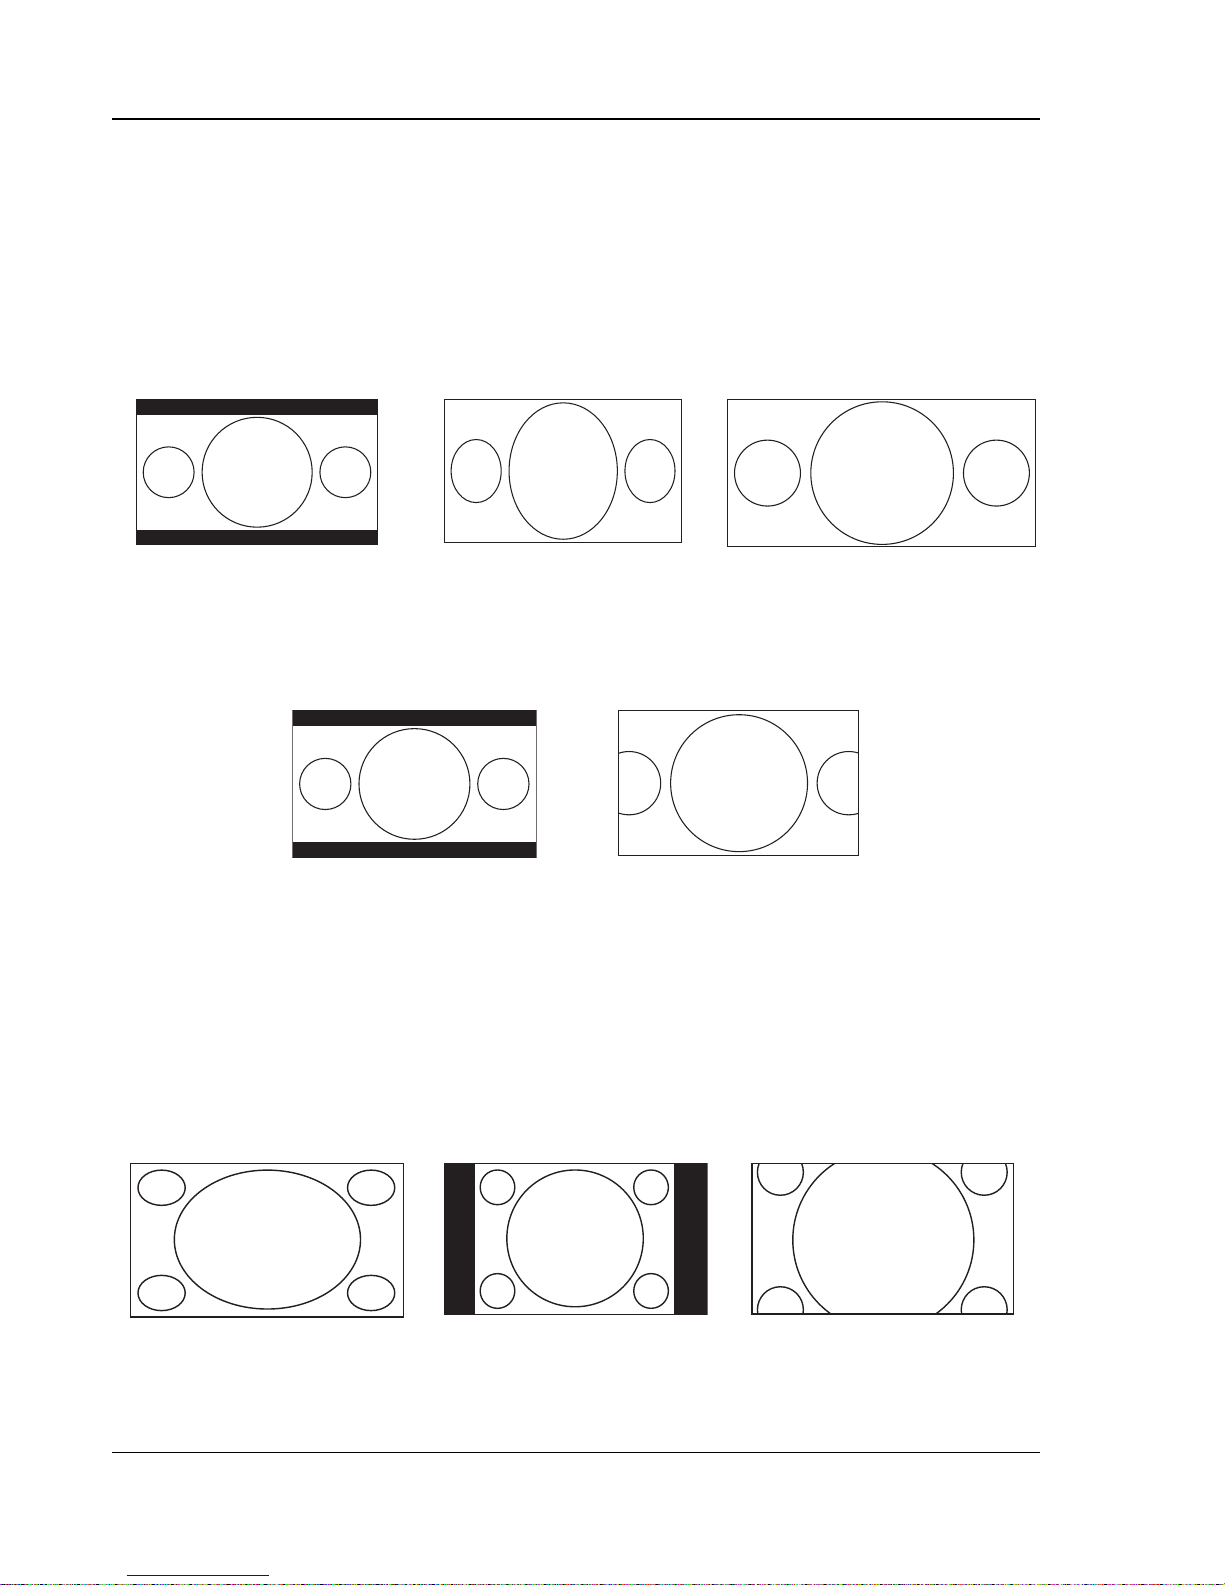
ADVANCED OPERATIONS
36
The available zoom levels depend on the “TV Aspect Ratio” setting in the Setup Menu and the aspect
ratio of the DVD or Blu-ray Disc. The following zoom levels may be useful for some special applications:
1) Playing 16:9 BD or DVD when “TV Aspect Ratio” is set to “16:9 Wide” or “16:9 Wide/Auto”
x Stretch – The image is vertically stretched by 1.33 times. For movies with 2.35:1 aspect ratio,
this zoom level cuts off the black borders at the top and bottom of the image. Users of projector
with anamorphic lens may find this mode helpful.
Original 2.35:1
Widescreen Movie
“Stretch” Zoom Projected through
an Anamorphic Lens
x Full Screen – The image is stretched by 1.33 times for both vertical and horizontal directions.
For movies with 2.35:1 aspect ratio, this zoom level cuts off the black borders at the top and
bottom of the image while maintaining the correct aspect ratio. The left and right sides of the
image are slightly cropped.
Original 2.35:1 Widescreen Movie “Full Screen” Zoom
2) Playing 4:3 BD or DVD when “TV Aspect Ratio” is set to “16:9 Wide”
x 1:1 - The image fills up the entire 16:9 screen but is horizontally stretched. Figures may look
shorter and wider than they should be.
x Compress – The player maintains the correct 4:3 aspect ratio and adds borders to the left and
right sides of the image. The brightness level of the borders can be set by the “Border Level”
setting in the “Picture Adjustment” section of the Setup Menu.
x Full Screen – This zoom level maintains the correct aspect ratio but crops the top and bottom
slightly in order to fit the 4:3 image to the 16:9 screen.
1:1 “Compress” Zoom “Full Screen” Zoom
Page 42
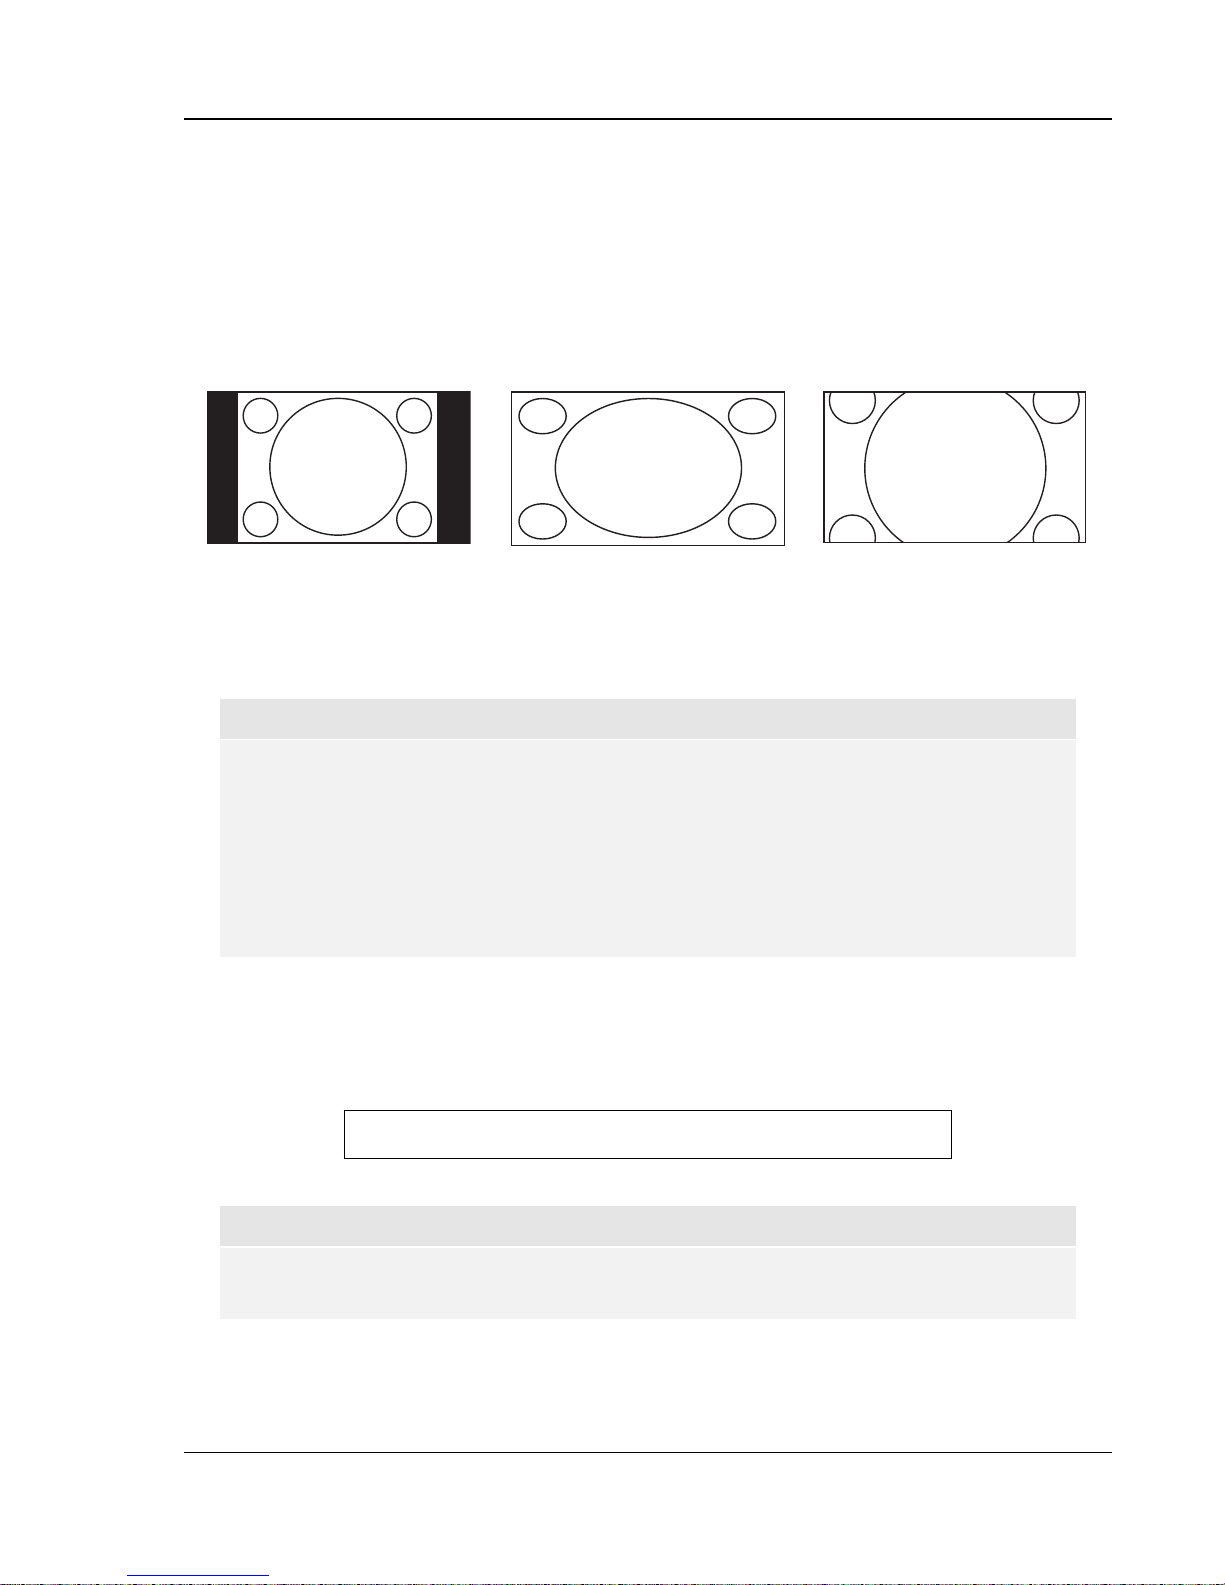
ADVANCED OPERATIONS
37
3) Playing 4:3 BD or DVD when “TV Aspect Ratio” is set to “16:9 Wide/Auto”
x 1:1 – The player maintains the correct 4:3 aspect ratio and adds borders to the left and right
sides of the image.
x Stretch – The image is horizontally stretched by 1.33 times. This zoom level fills up the 16:9
screen, but figures may look shorter and wider than they should be.
x Full Screen – This zoom level maintains the correct aspect ratio but crops the top and bottom
slightly in order to fit the 4:3 image to the 16:9 screen.
1:1 “Stretch” Zoom “Full Screen” Zoom
The “Under Scan” zoom level shrinks the image by 5%. This zoom level may be used to
compensate for TVs that over scan, so the viewer can see the entire image area with no cropping.
All other zoom levels are indicated by their respective zoom ratio.
NOTE
x Some early DVD titles (released from 1997 until early 2000’s) use a 4:3 non-anamorphic
widescreen aspect ratio. When played on a 16:9 display, the content is shown in a small
window with black borders on all four sides. The top and bottom borders are encoded
into the video. The left and right borders are added by the player to maintain the correct
aspect ratio. For this type of discs the “Full Screen” zoom mode can be used to eliminate
the borders.
x Due to the dominance of wide screen or 16:9 TV, NO specific ZOOM levels are provided
for “TV Aspect Ratio” of “4:3 Letterbox” or “4:3 Pan & Scan”
Zoom Levels for HDMI 2 & Analog (Component) Video Output
The following zoom levels are available when “Primary Output” is set to “HDMI 2 & Analog”:
1:1 (No zooming) Æ Stretch/Compress Æ Full Screen
Æ Under Scan Æ 1.2 Æ 1.3 Æ1.5 Æ 2.0 Æ ½ ÆBack to 1:1 again
NOTE
x The ZOOM feature may not be available when certain DVD or Blu-ray Discs are played
because the disc author chooses to disable ZOOM.
Page 43
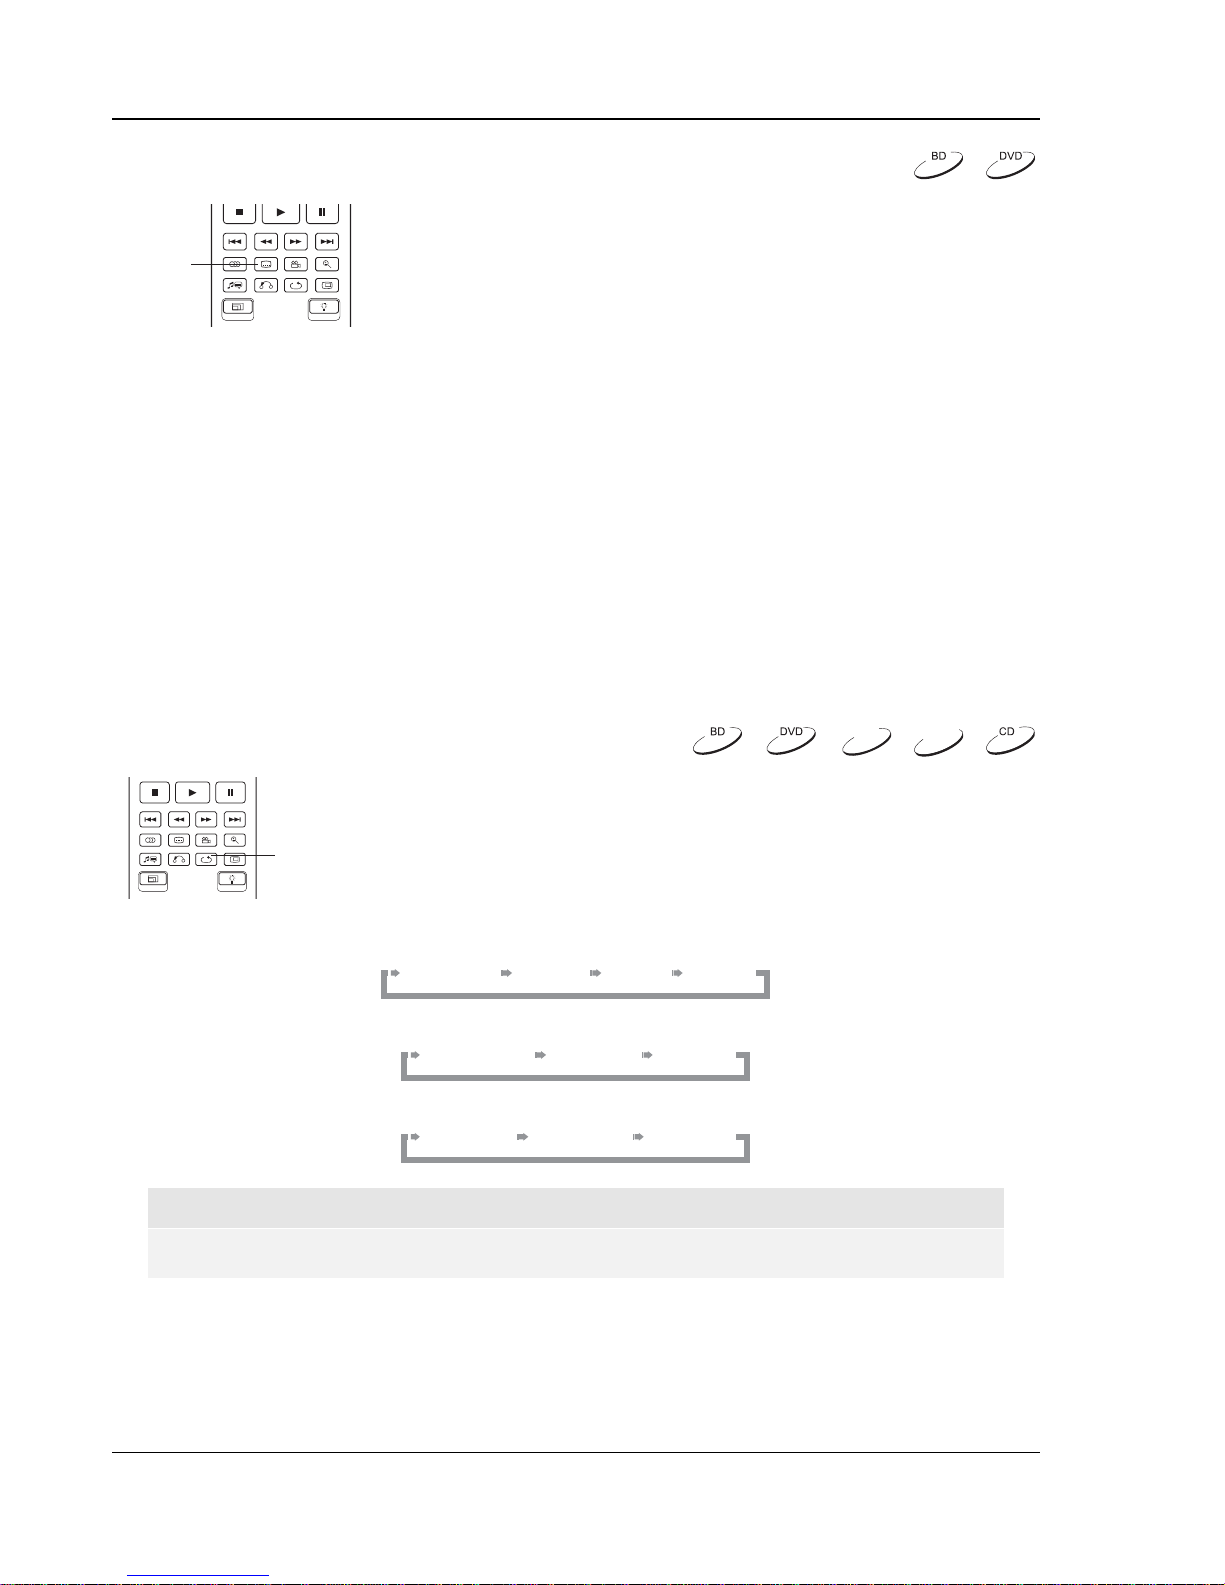
ADVANCED OPERATIONS
38
Subtitle Shift
For customers using a 2.35:1 “Constant Image Height” video projection
system, subtitles may get cut off because they are positioned outside of
SUBTITLE
To shift the display position of subtitles, please follow these steps:
1. When playing a DVD, Blu-ray Disc or other video programs recorded with subtitles, select the
desired subtitle from the disc menu or using the remote. (Please refer to page 32 of this manual.)
2. Press and hold the SUBTITLE button on the remote control until the “Shift Subtitle Position”
prompt appears on the screen.
3. Wait until some subtitle text is shown on the screen. Use the UP/DOWN ARROW buttons to
move the subtitle text to the desired position.
4. Press the ENTER button to set the subtitle display position.
Once the “Subtitle Shift” position is set, it is remembered by the player in the Video Setup > Display
Options > Subtitle Shift setup menu option. The setting will be applied to subtitles of all DVD and Bluray Discs from now on. You can also change the setup menu item directly. Please refer to the “Video
Setup” section beginning at page 55 of this manual for details.
the active video area. The Subtitle Shift feature can be useful to these
customers. The player can shift subtitles up or down so they are
displayed within the active video area.
Repeat Playbac k
To repeat a certain chapter, title, track or disc, press the REPEAT button on the
remote control.
REPEAT
DVD and DVD-Audio:
Blu-ray Disc:
CD and SACD:
NOTE
x Certain Blu-ray Discs may not allow for repeating.
Each press of the REPEAT button switches the repeat mode in the following
sequence:
Repeat Chapter Repeat Title Repeat OffRepeat All
Repeat Chapter Repeat Title Repeat Off
Repeat One Repeat All Repeat Off
DVD-A
SACD
Page 44
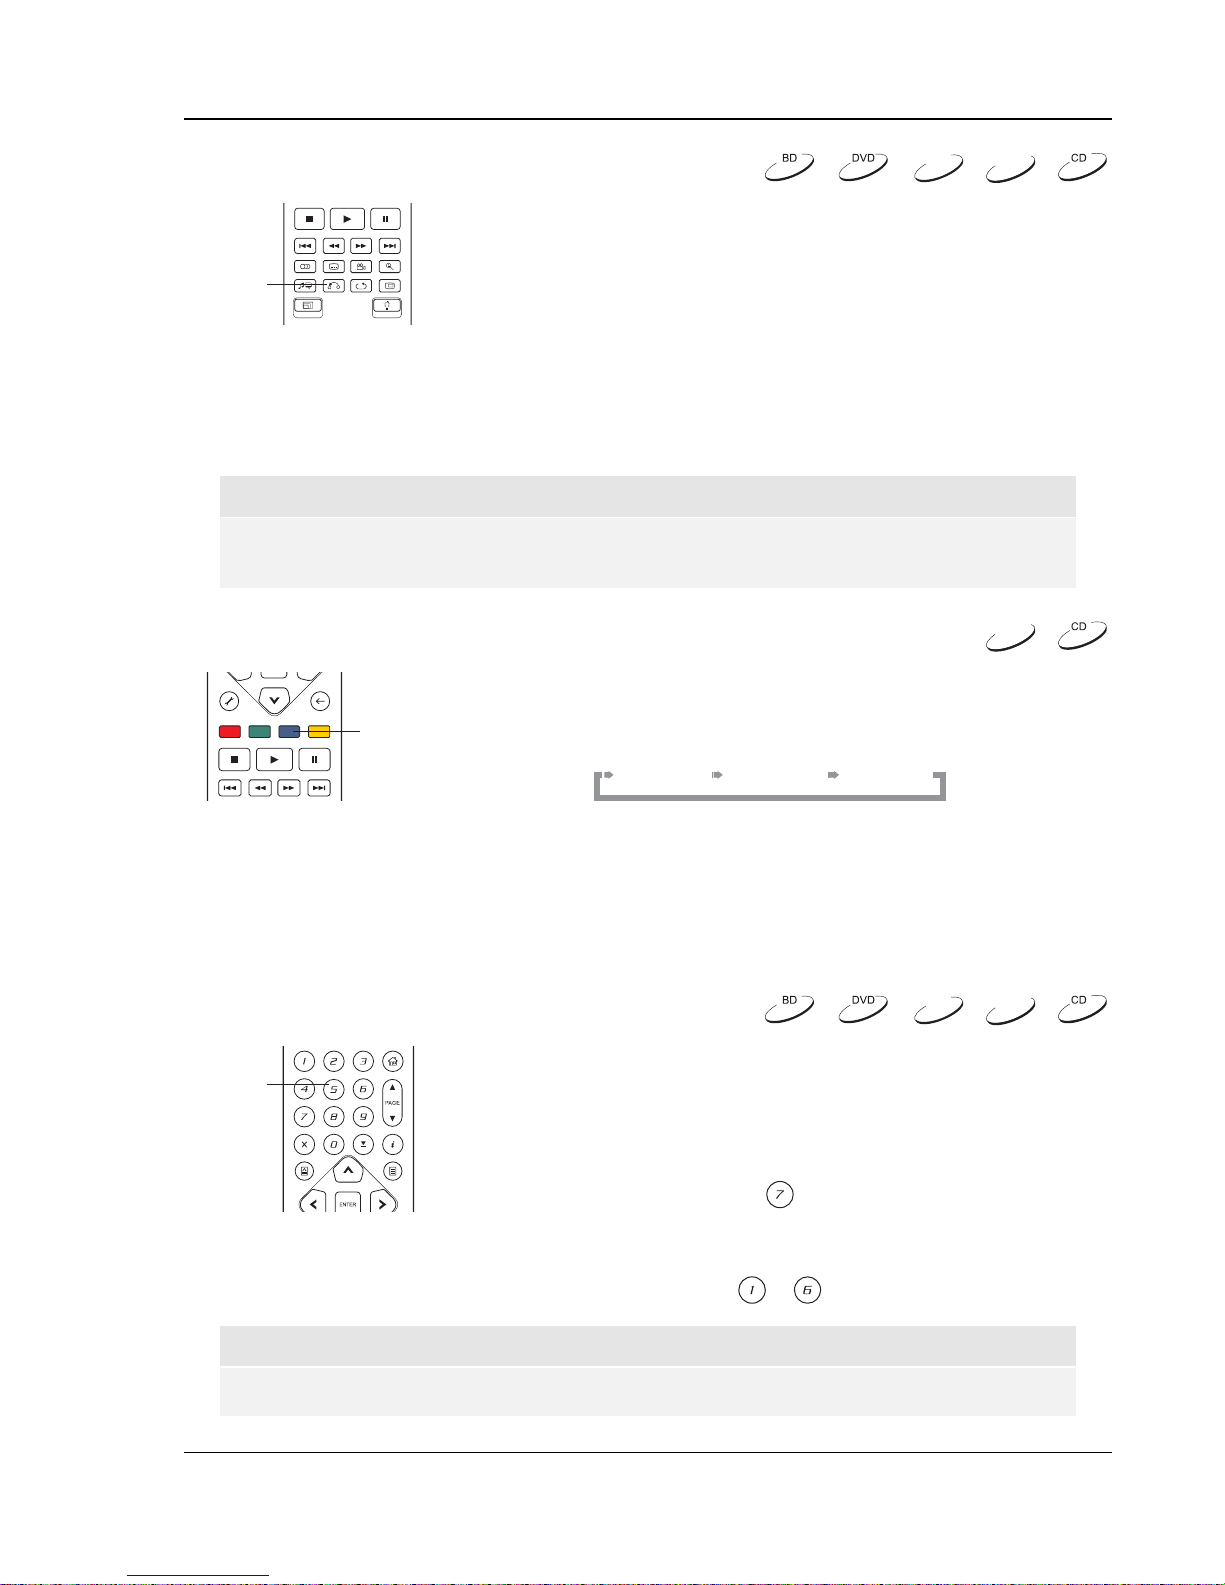
ADVANCED OPERATIONS
39
Repeat a Selected Section
DVD-A
To repeatedly play a specified section, please follow these steps:
1. During normal playback, press the AB REPLAY button on the
AB REPLAY
remote at the desired beginning point (Point A) for the repeat play.
The TV screen displays “A-”.
2. When playback reaches the desired ending point (Point B) for the repeat play, press the AB
REPLAY button again. The player now repeatedly plays back the specified section (A-B). The
TV screen displays “A-B”.
3. Press the AB REPLAY button for the third time to resume normal playback.
NOTE
Not available for all disc formats or contents. Certain Blu-ray Discs may not allow for
repeating.
Shuffle and Random Playback
When playing a CD or SACD, press the BLUE button on the remote control to
activate the Shuffle and Random modes. Each press of the BLUE button
BLUE
switches the playback mode in the following sequence:
SACD
SACD
Shuffle Random Normal
In normal playback mode, each track is played back in sequential order. As the name implies, the
Random playback mode randomly selects a track to play. The Shuffle mode also plays back the tracks
in random order, but it ensures that each track is played only once.
Selecting the Shuffle or Random mode cancels any Repeat mode you may be using. Similarly,
selecting a Repeat mode cancels any Shuffle or Random mode.
Playback by Chapter or T rack Number
DVD-A
SACD
During the playback of a disc, you can use the NUMBER buttons on the
NUMBER
BUTTONS
remote control to directly jump to a specified chapter or track number. For
example:
x To select the seventh track, press the [7] button.
x To select the 16th track, press [1] followed by [6] in quick
succession:
+
NOTE
x Certain DVD-Audio and Blu-ray Discs may not allow for direct chapter selection.
Page 45
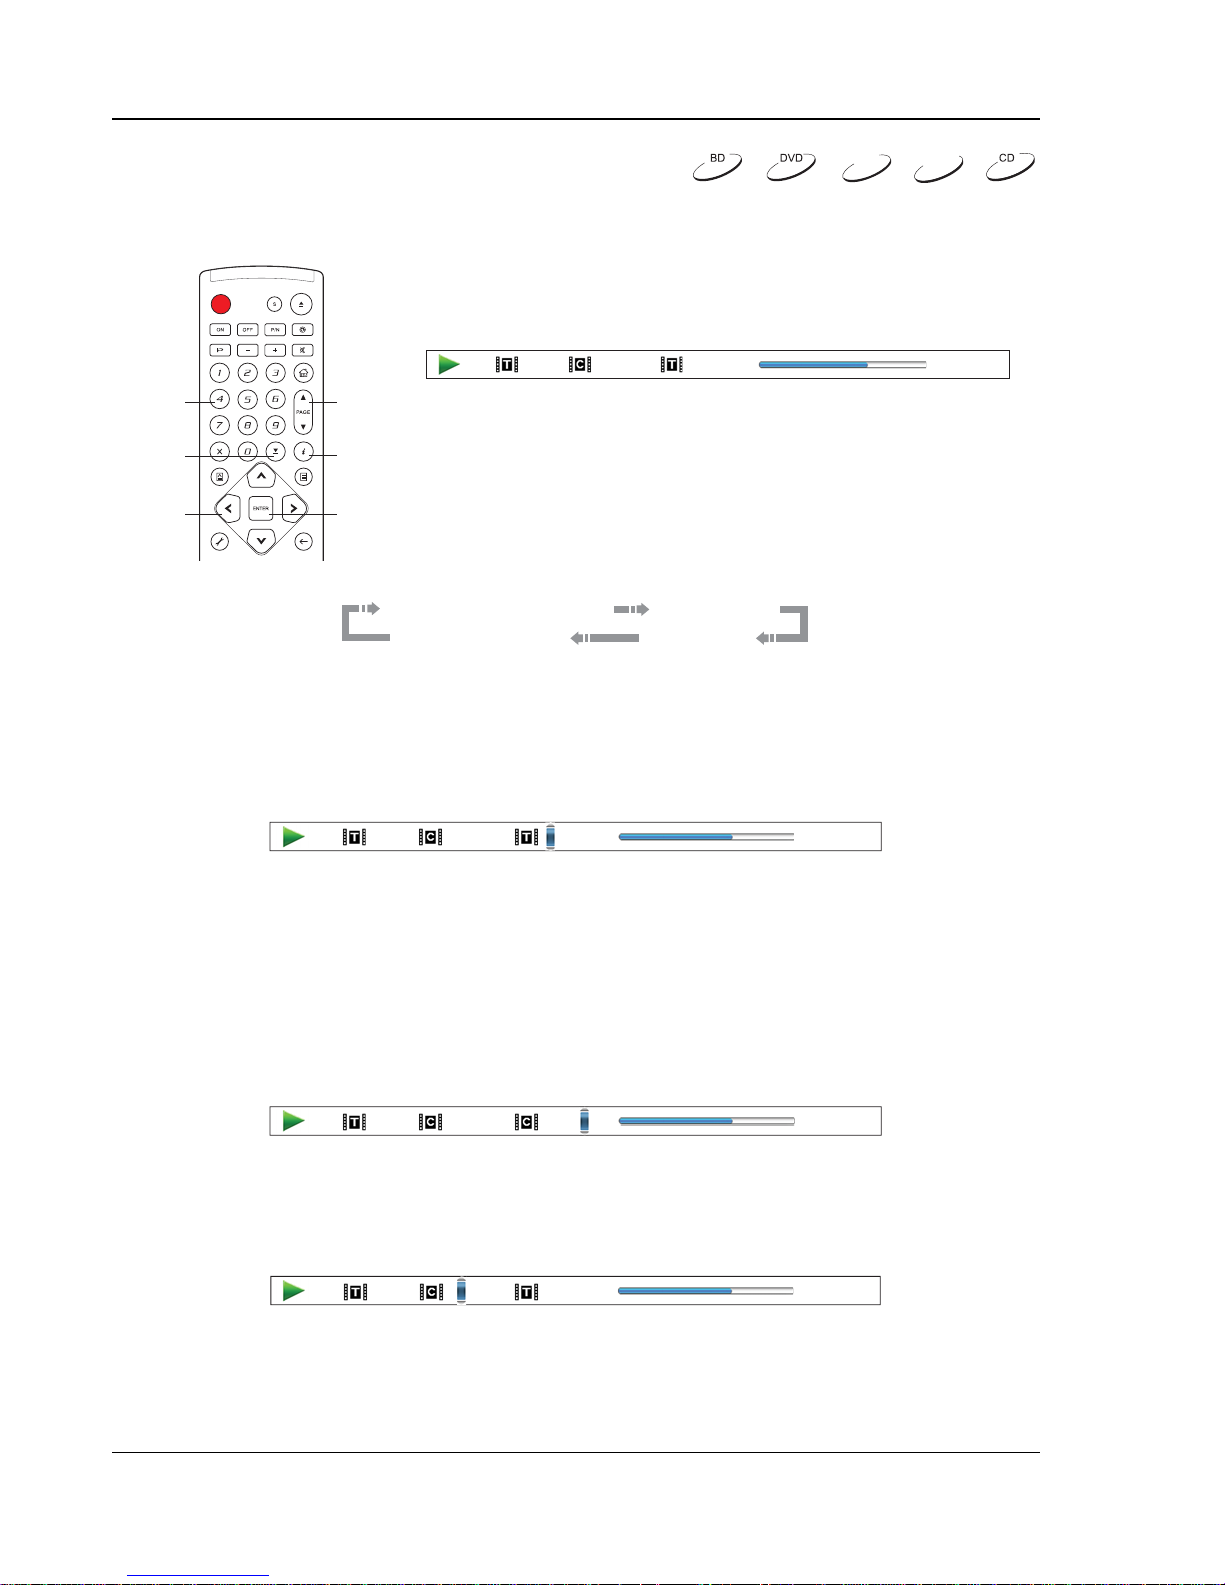
ADVANCED OPERATIONS
40
Playback from a Specific Location
DVD-A
DVD and Blu-ray Discs
During the playback of a DVD or Blu-ray Disc, you may specify a
location to start playback by entering the title, chapter or time
directly. Press the GOTO button to bring up the on-screen display.
1 / 7 5 / 25 00:22:14 00:40:06
NUMBERS
GOTO
ARROWS
1. Title time search. For example, search for a specified time within the currently playing title.
PAGE
UP/DOWN
On top of the video screen, the on-screen display information has
the following components (from left to right): Playing Status, Title,
DISPLAY
Chapter, Time Counter, Progress Indicator, and Total Time. After
pressing the GOTO button for the first time, the cursor will be
ENTER
positioned at the Time Counter. This is the “Time Search” mode.
Each subsequent press of the GOTO button will switch the search
mode in the following sequence:
(Title or Chapter) Time Search Chapter Search
On-Screen Display
Title Search
SACD
x Press the GOTO button to bring up the on-screen display. The cursor will be p ositioned at
the Time Counter. Use the NUMBER or ARROW buttons to enter the hours, minutes and
seconds for your specified search and press the ENTER button.
1 / 7 5 / 25 00:22:14 00:40:06
2. Chapter time search. For example, search for a specified time within the currently playing
chapter.
x Press the DISPLAY button to bring up the on-screen display. Use the PAGE UP or PAGE
DOWN button to switch the display to Chapter Time mode (note the icon placed on the left
of the Time Counter changes from the Title icon to the Chapter icon). Press the GOTO
button to position the cursor at the Time Counter, then use the NUMBER or ARROW
buttons to enter the hours, minutes and seconds for your specified search and pr ess the
ENTER button.
1 / 7 5 / 25 00:06:48 00:08:33
3. Chapter search. For example, search for Chapter 7 of the currently playing title.
x Repeatedly press the GOTO button until the cursor is positioned at the Chapter location.
Use the NUMBER or ARROW buttons to enter or select 7 and press the ENTER button.
1 / 7 5 / 25 00:22:14 00:40:06
4. Title search. For example, search for Title 6 of the currently playing disc.
x Repeatedly press the GOTO button until the cursor is positioned at the Title location. Use
the NUMBER or ARROW buttons to enter or select 6 and press the ENTER button.
Page 46
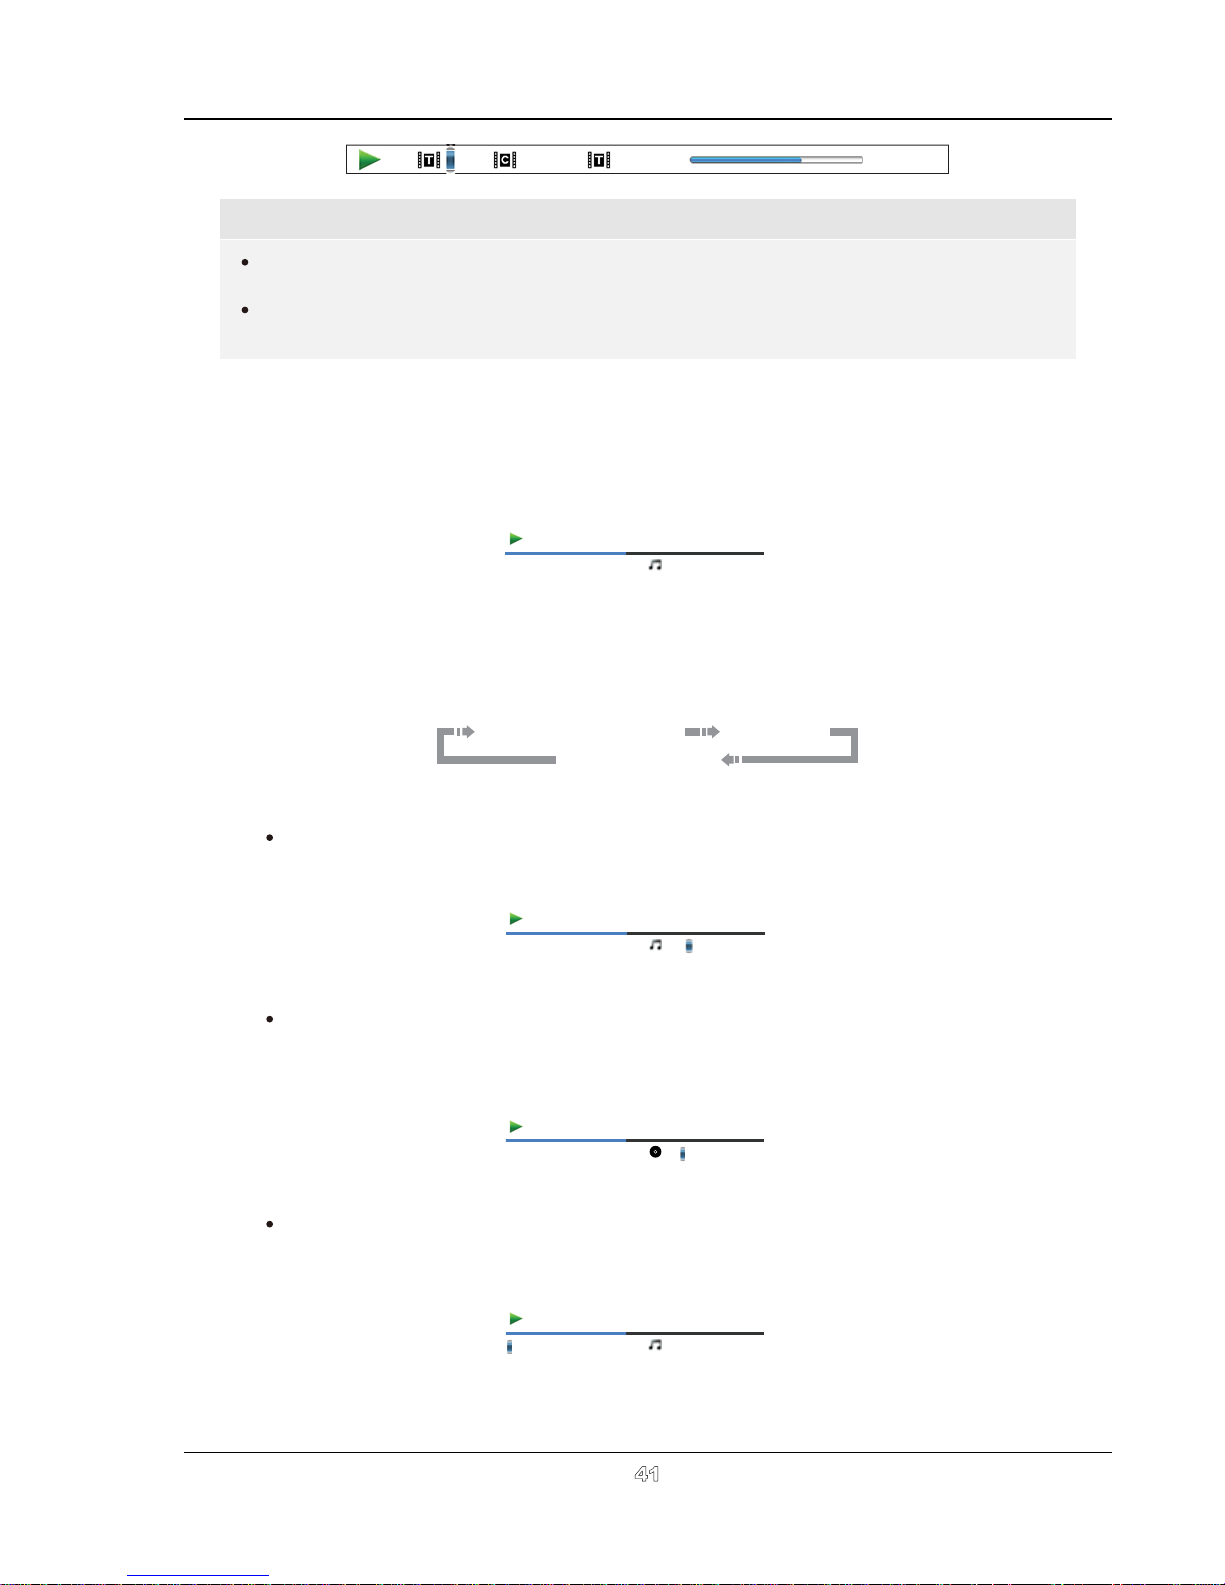
ADVANCED OPERATIONS
1 / 7 5 / 25 00:22:14 00:40:06
NOTE
Some discs may prohibit the search operation. You will not be able to select a search
location, or you may get an “invalid operation” icon after specifying a search location.
Some Blu-ray Discs feature their own search function. Please follow the on-screen
instructions to use the search function provided by such discs.
CD and SACD discs
You may specify a point to start playback by entering the disc elapsed time, track elapsed time or track
number directly. When playing CD and SACD discs, the on-screen display automatically shows on the
TV screen:
Play
1 / 8
The on-screen display has the following components (from left to right): Playing Status, Track Number,
Time Counter, Progress Indicator, and Total Time.
To specify a playback location using one of the following search modes, press the GOTO button. Each
press of the GOTO button switches the search mode in the following sequence:
(Track or Disc)Time Search Track Search
On-screen Display
00˖02:40 / 00˖05:38
1. Track time search. For example, search for a specified time within the currently playing track.
Press the GOTO button to place the cursor on the track Time Counter. Use the NUMBER
or ARROW buttons to enter the hours, minutes and seconds for your specified search and
press the ENTER button.
Play
1 / 8
00:02:40 / 00:05:38
2. Disc time search. For example, search for a specified elapsed time of the entire disc.
While the on-screen display is shown, press the PAGE UP or PAGE DOWN button to
switch the Time Counter to Disc Time mode. Press the GOTO button to place the cursor at
the Disc Time Counter. Use the NUMBER or ARROW buttons to enter the hours, minutes
and seconds for your specified search and press the ENTER button.
Play
1 / 8
00:40:46 / 01:02:33
3. Select a track. For example, search for Track 6 of the currently playing disc.
Repeatedly press the GOTO button until the cursor is placed on the Track Number position.
Use the NUMBER or ARROW buttons to enter or select Track 6 and press the ENTER
button.
Play
1 / 8
00:02:40 / 00:05:38
41
Page 47
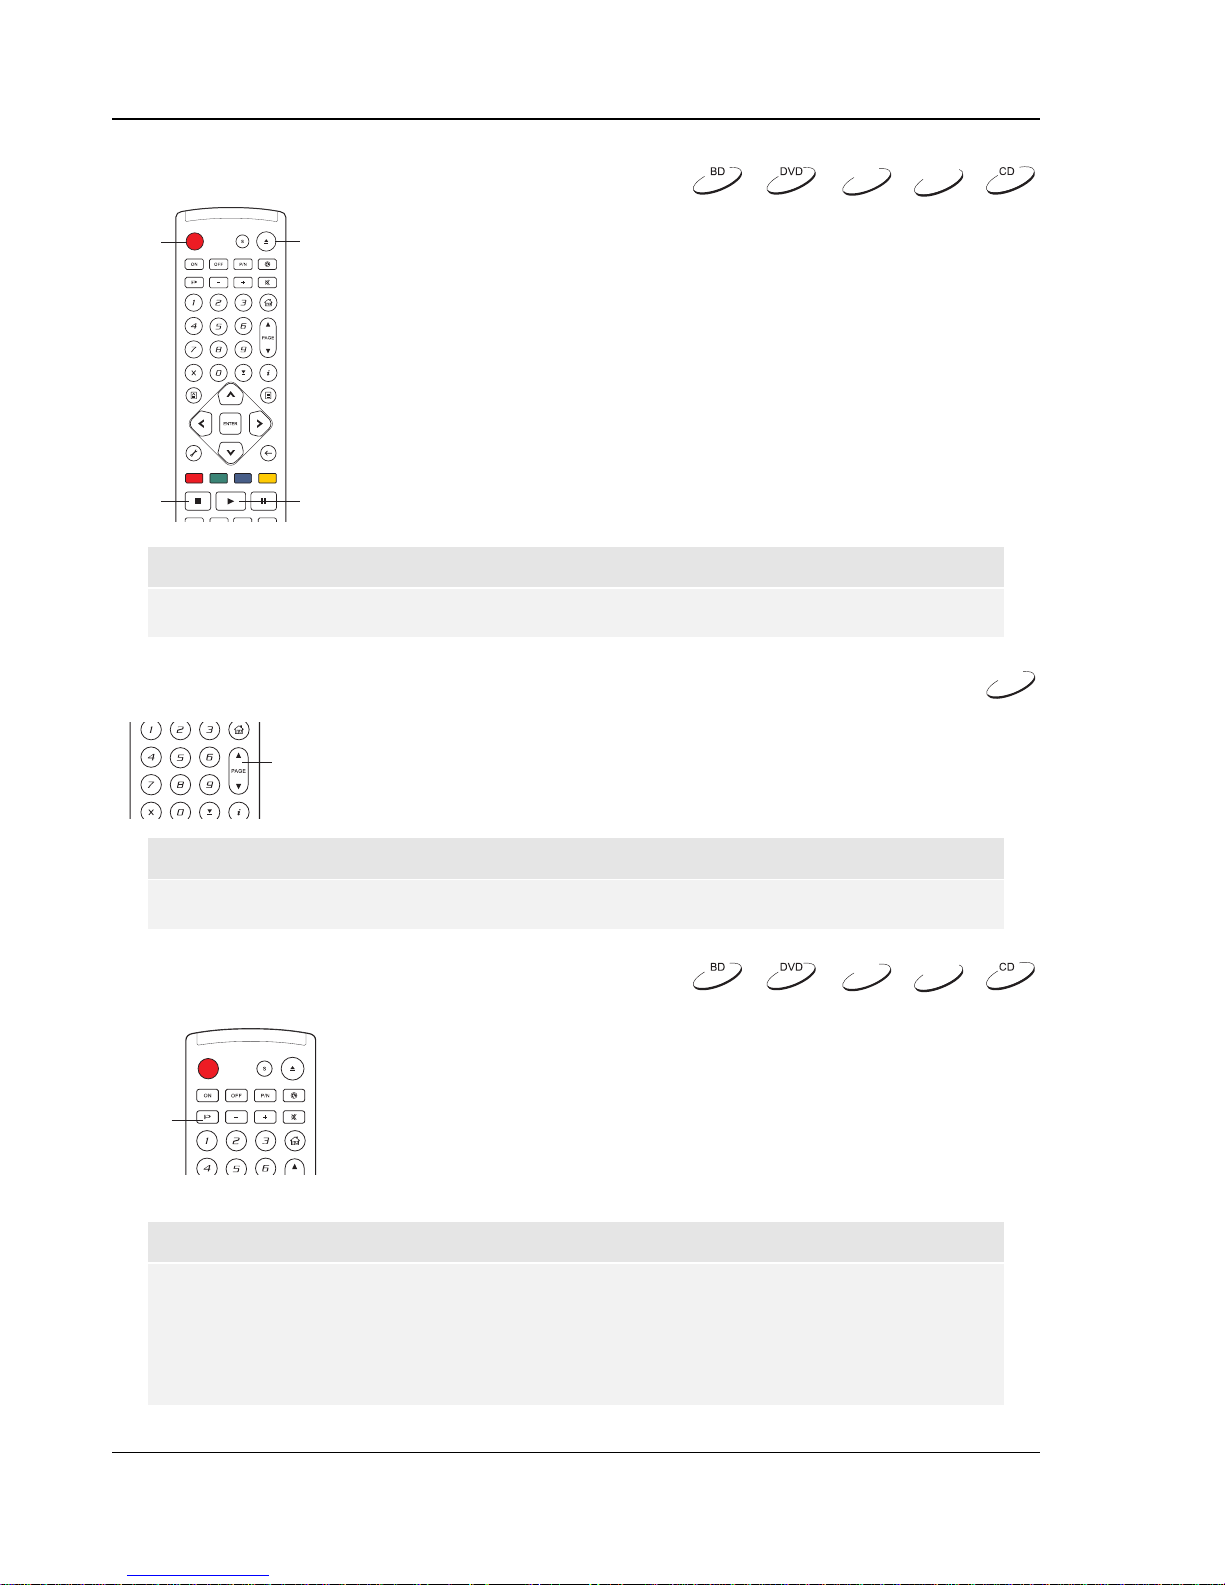
ADVANCED OPERATIONS
42
Memory and Automatic R esume
DVD-A
1. The player automatically remembers the current position when
POWER
OPEN
playback is interrupted. Operations such as STOP, OPEN/EJECT
or turning POWER off will cause the player to save the current
playing position.
2. The position is memorized even after turning off the unit or
changing the disc.
3. When the next time the disc with a memorized playing position is
played back, the player will recognize the saved playing position.
Playback will automatically resume from this saved position.
However if you wish to cancel the automatic resume and start
playback from the beginning, you may press the STOP button when
prompted.
STOP
PLAY
4. The player can remember playback position for up to 5 discs.
When the sixth disc is memorized, the oldest one is replaced.
NOTE
x Some Blu-ray Discs do not support resuming and will always play from the beginning.
Viewing Pictures on DVD-Audio Discs
Some DVD-Audio discs contain static pictures, such as photos of the band or
PAGE
UP/DOWN
narration of the album. When a DVD-Audio track is playing, you may use the
PAGE UP button to select the previous picture or the PAGE DOWN button to
select the next picture.
SACD
DVD-A
NOTE
x Availability of static pictures depends on the DVD-Audio disc.
Pure Audio Mode
DVD-A
You can enjoy higher quality audio by turning off the video processing and
output. The Pure Audio mode reduces any potential interference between the
video and audio signals.
PURE
AUDIO
1. Press the PURE AUDIO button on the remote control to turn off
video and enter Pure Audio mode. Video output will cease, the
power light will dim and the front panel displays will turn off.
2. Press the PURE AUDIO button again to resume video and cancel
Pure Audio mode.
NOTE
x Pure Audio mode is automatically canceled when the unit is switched off or when
playback is stopped.
x Because HDMI carries audio together with video, the HDMI video signal cannot be
completely turned off. A black screen is transmitted instead to minimize any potential
interference.
SACD
Page 48
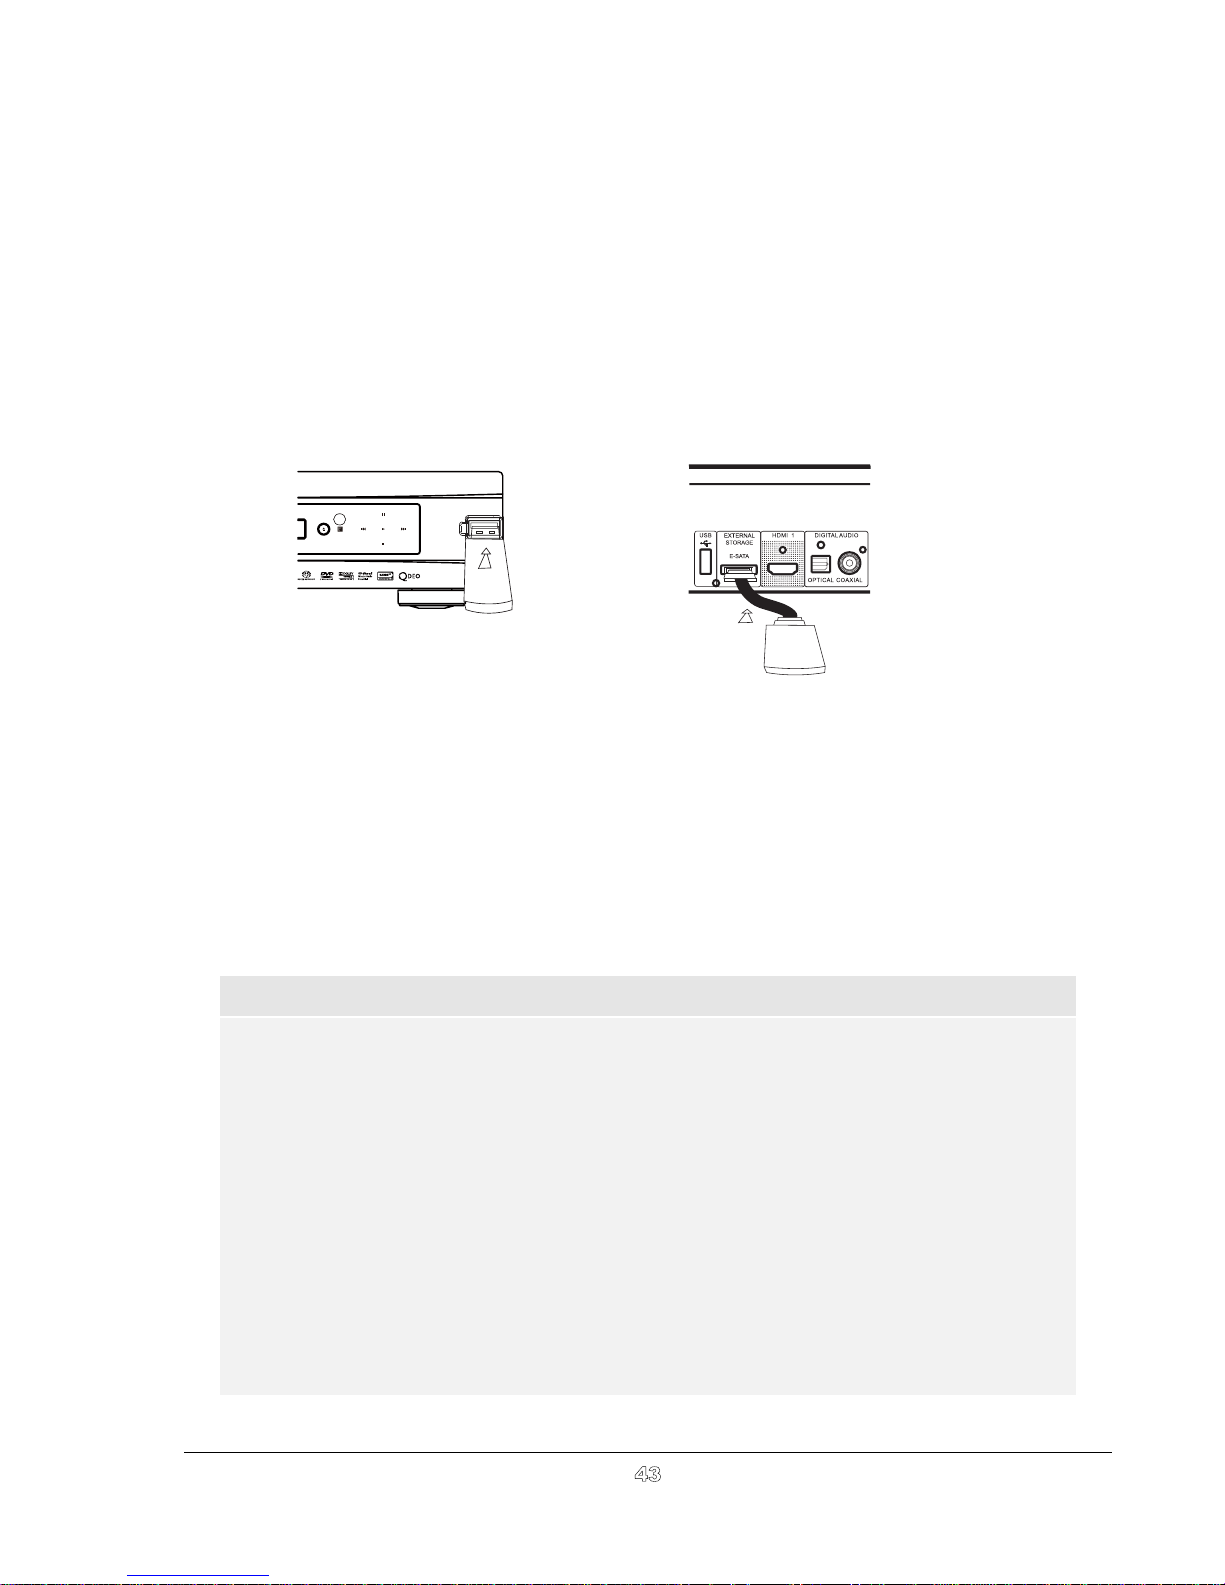
MEDIA FILE PLA YB ACK
In addition to playing standard disc-based formats such as Blu-ray Disc, DVD, CD and SACD, the
OPPO BDP-95AU Blu-ray Disc Player can play media files. You can enjoy digital music, movies and
photos stored on an optical disc (recordable CD or DVD), a USB (Universal Serial Bus) drive, or an eSATA (external Serial ATA) drive. Due to the variation of media, encoding software and techniques
used, compatibility cannot be guaranteed for all user-created or downloaded contents. Support for such
contents is on a best effort basis.
Playback from a USB or e-SA T A Drive
USB
Device
e-SATA
Device
The OPPO BDP-95AU Blu-ray Disc Player is equipped with two USB ports (one on the front panel and the
other on the back) and one e-SATA port on the back. You may use the USB port to plug in a USB drive, or the
e-SATA port to plug in an e-SATA drive.
The USB ports are rated to provide a maximum of 5V, 1000mA power to the USB drive. It is sufficient for
USB thumb drives and flash memory card readers, but may not be sufficient for USB hard disks. It is
recommended to
check with your drive manufacturer for power requirement, or use an external power supply.
For the e-SATA port, you need to use an e-SATA drive with an external power supply.
The e-SATA port on the BDP-95AU does NOT support “hot-plug”. To avoid any damage to your drive and the
port, please always plug in or unplug the drive when the player is turned off.
NOTE
x
This unit supports “USB Mass Storage Class Bulk-Only Transport” devices only. Most
USB thumbs drives, portable hard disk drives and card readers conform to this device
class. Other USB devices such as MP3 players, digital cameras, and mobile phones
may not be compatible.
x
Supported USB drives can be formatted with the FAT (File Allocation Table), FAT32 or
NTFS (New Technology File System) file system.
x
In some cases, an incompatible USB/e-SATA device may cause the player to stop
responding. If this occurs simply turn off the power, remove the USB device, and turn the
player back on.
x
The player accesses the USB drive in read-only mode. In order to minimize the risk of
data corruption, it is recommended that you only unplug the USB device when playback
is completely stopped.
x
DO NOT attempt to plug in a USB connector to the e-SATA port, or plug in an e-SATA
connector to the USB port(s). This might damage both your drive and the port(s).
43
Page 49
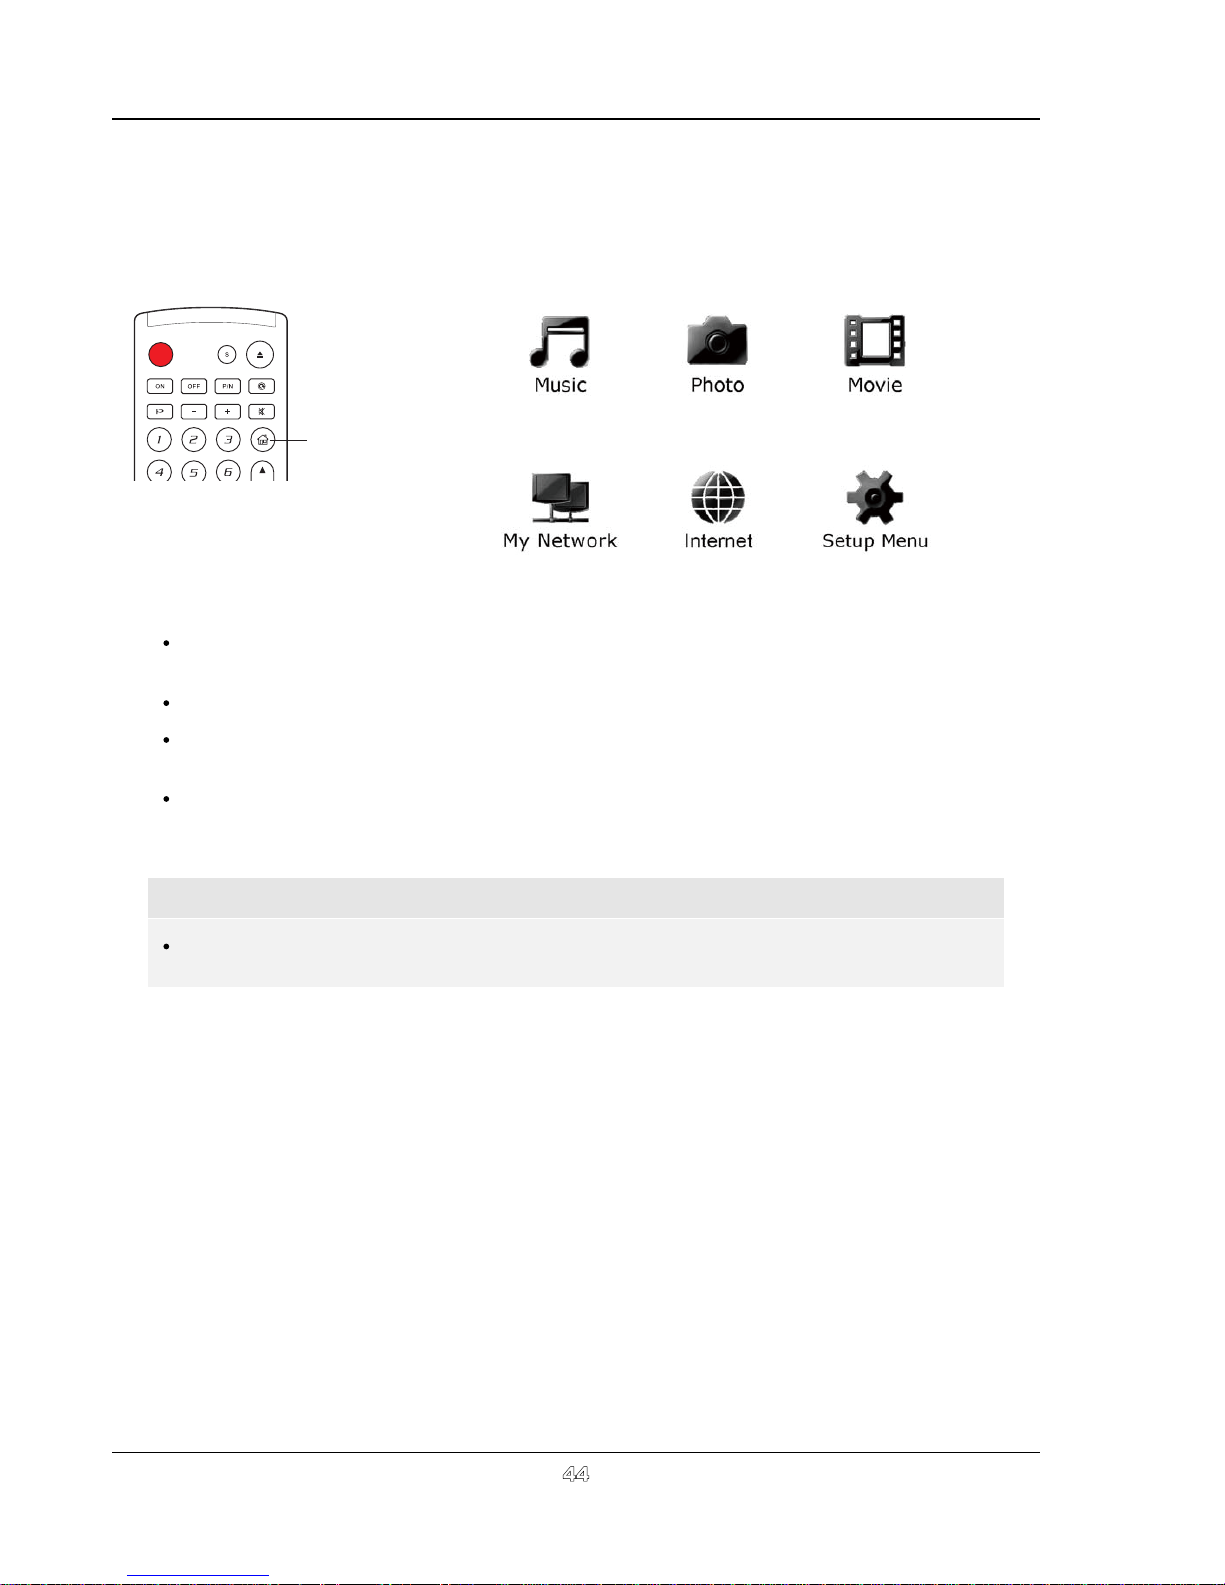
MEDIA FILE PLAYBACK
The Home Menu
When a USB/e-SATA drive or an optical disc stored with media files is inserted, the player presents a “Home
Menu” to assist you in navigating and playing the files. You can also bring up the Home Menu with the HOME
button on the remote control. The Home Menu is the starting point for accessing media files.
HOME
There are eight selections in the HOME Menu:
Depending on what type of media files that you intend to play, you can choose among the
“Music”, “Movie” and “Photo” categories.
“Internet” contains the network applications.
“My Network” is an experimental feature right now. It enables the player to stream audio, video
and photo from media servers on the home network.
“Setup Menu” selection will bring you to the player’s Setup Menu, just like pressing the SETUP
button on the remote control.
NOTE
The experimental features are not officially supported. OPPO does not offer technical
support via email or phone for these experimental features.
44
Page 50
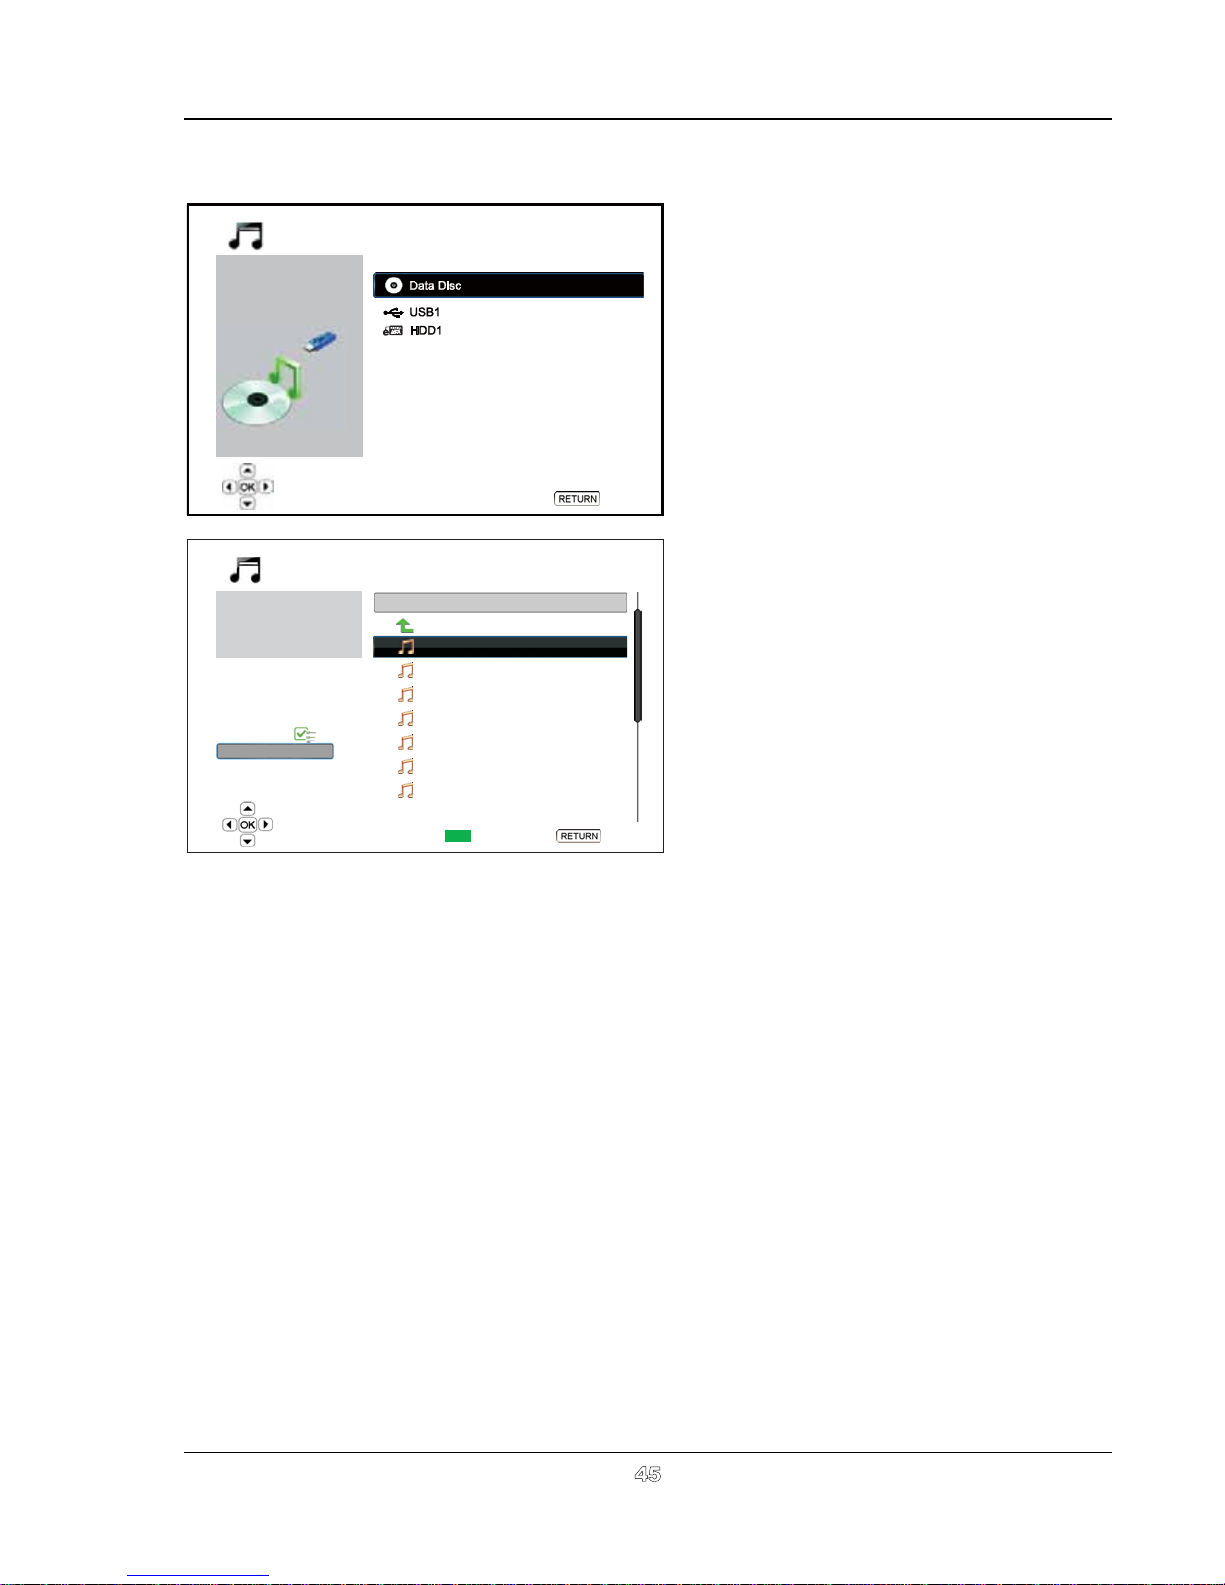
MEDIA FILE PLAYBACK
Playing Music Files
Music
Music
Title: Prelude I C major
Artist: Various
Album: J.S. Bach
Genre: Classical
All Music
Playlist
Browser
Now Playing
USB1
..
Prelude I C major
Prelude II C minor
C sharp major
0
C sharp minor
D major
D minor
E flat major
Add to Playlist
1 / 3 items
Back
01 / 11 items
Back
To play digital music files stored on an optical
disc, USB or e-SATA drive, select “Music” from
the Home Menu. A file browser will appear to
assist you in navigating the files and folders.
The first step is to select the “Data Disc”, USB or
e-SATA device that contains the music files. The
player will take a moment to read the media and
list the folders and music files.
In the music browser, you can perform the
following operations:
x
Press the UP/DOWN ARROW or PAGE
UP/DOWN buttons to move the cursor and
select music files.
x
When a music file is highlighted by the
cursor, press the ENTER or PLAY button
to start playback.
x
Press the GREEN colour button to add the
currently highlighted music file to the
Playlist. A green check mark will appear in
front of the file name, and the Playlist count
in the lower left corner of the screen will
increase by one.
Press the LEFT ARROW button to move the cursor to the Selection Menu in the lower left corner of
x
the screen. This menu contains the following choices:
o All Music – List all music files in a flat view without any directory structure.
o Playlist – List only music files added to the Playlist.
o Browser – List folders and music files according to the original directory structure on the
disc or USB drive.
o Now Playing – Show the status of the currently playing music file.
o Press the RIGHT ARROW button to move the cursor back to the file listing.
If a music file starts playing and there is no other user operation, the “Now Playing” screen will appear
after a few seconds. You can also get to this screen using the “Now Playing” menu. This screen can
show the following information:
x
Playback status: Play, Stop, Pause
x
Playback mode: Shuffle, Random, Repeat One, Repeat All
x
Playback progress: track and time
Other embedded information: If the music file contains supported album art image and tags,
x
those will be displayed.
45
Page 51
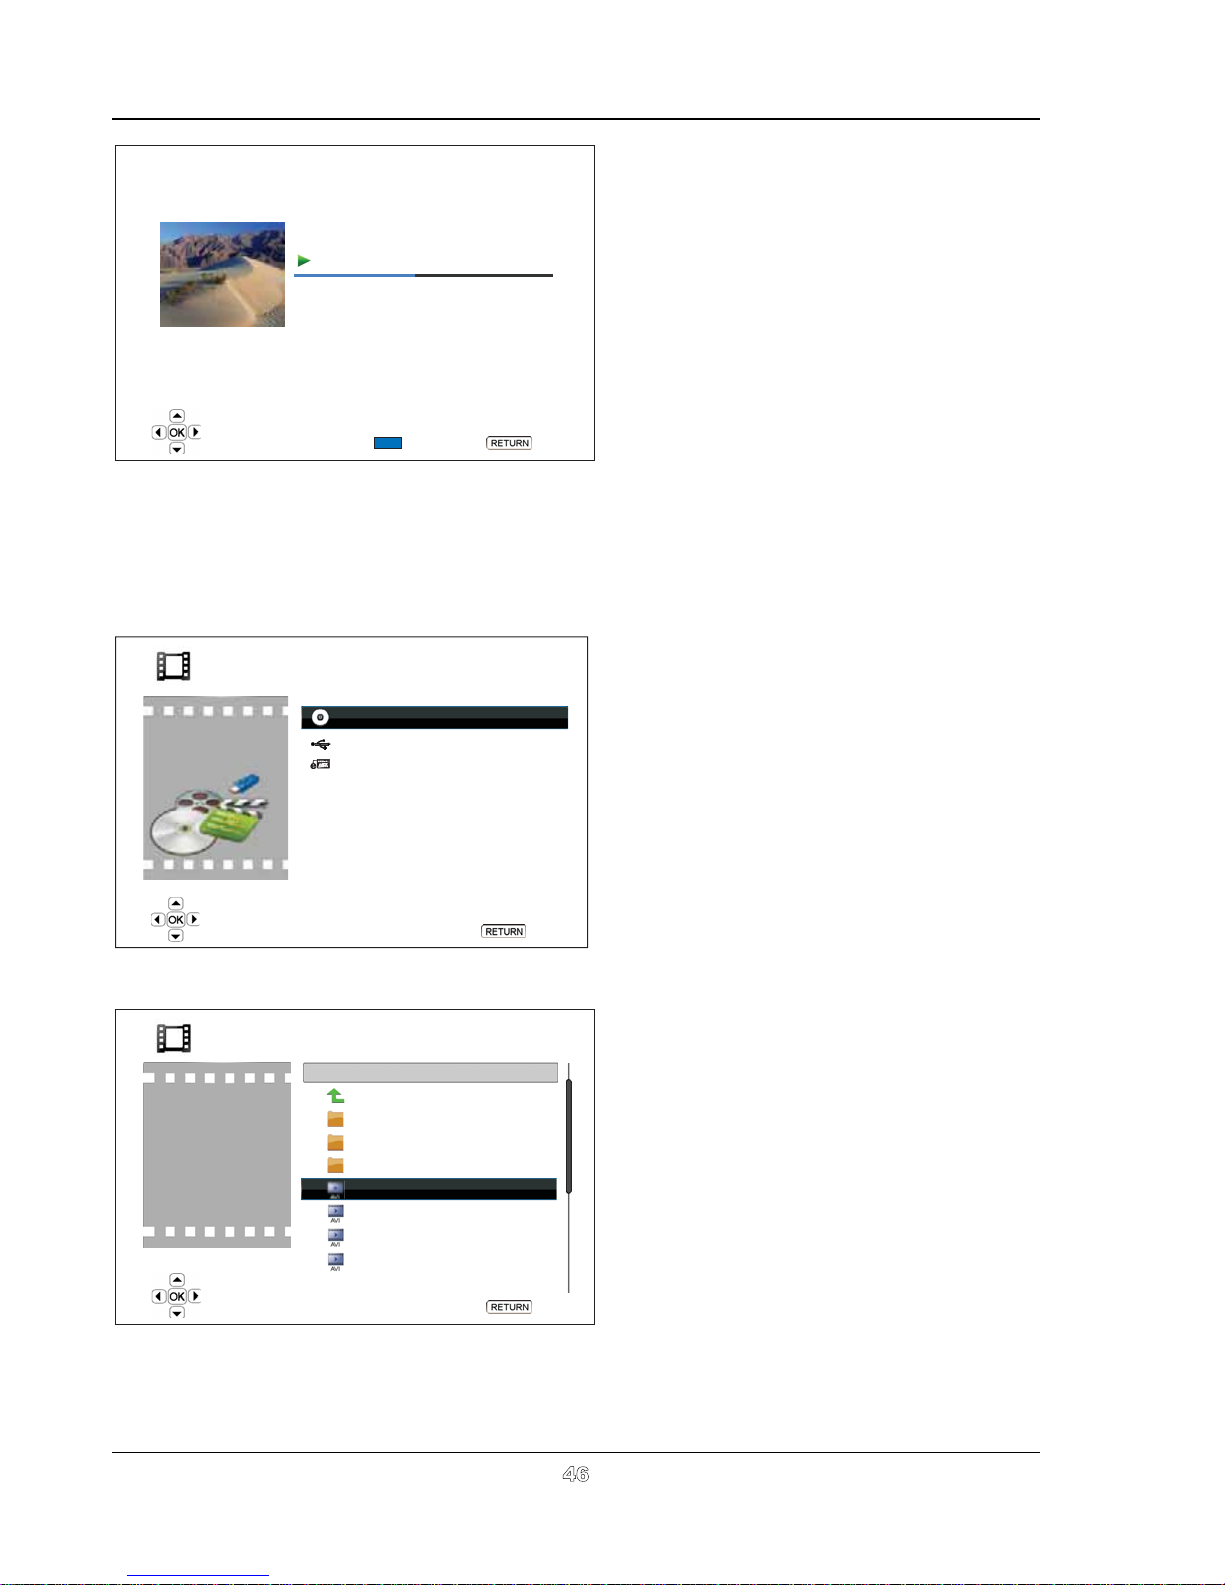
MEDIA FILE PLAYBACK
The following operations are available while
the “Now Playing” screen is shown:
Normal playback control: PLAY,
x
STOP, PAUSE, PREV/NEXT, REV,
and FWD
x
Special playback mode: REPEAT and
Shuffle/Random (BLUE colour button)
x
Return to the Browser without stopping
Play
1 / 11
Title: Prelude I C major
Artist: Various
Album: J.S. Bach
Genre: Classical
Prelude I C major
:
00:02:40 /00 05:38
the music: RETURN
Stop playback and return to the
x
Browser: Press STOP twice.
Shuffle/Random
Back
Playing Movie Files
To play movie files stored on an optical disc, USB or e-SATA drive, select “Movie” from the Home Menu. A
file browser will appear to assist you in navigating the files and folders.
The first step is to select the “Data Disc”, USB or
Movie
1 / 3 items
Data Disc
USB1
HDD1
e-SATA device that contains the movie files. The
player will take a moment to read the media and
list the folders and movie files.
Movie
TotalTime: 3:00:35
Resolution: 640x352
Frame Rate: 24 fps
Format: AVI
USB1
..
CD-R
Classic
Action
New Year Concert
Soccer Match Jul-08
Kingdom
Hitchhiker
Back
04 / 11 items
Back
In the movie browser, you can perform the
following operations:
x
Press the UP/DOWN ARROW or PAGE
UP/DOWN buttons to move the cursor and
select movie files.
When a movie file is highlighted by the
x
cursor, press the ENTER or PLAY button
to start playback.
Once a movie file starts playing, the normal
playback control functions are available. To
stop the movie and return to the file browser,
press STOP twice. You can also press the
HOME button at any time to get back to the
Home Menu.
46
Page 52
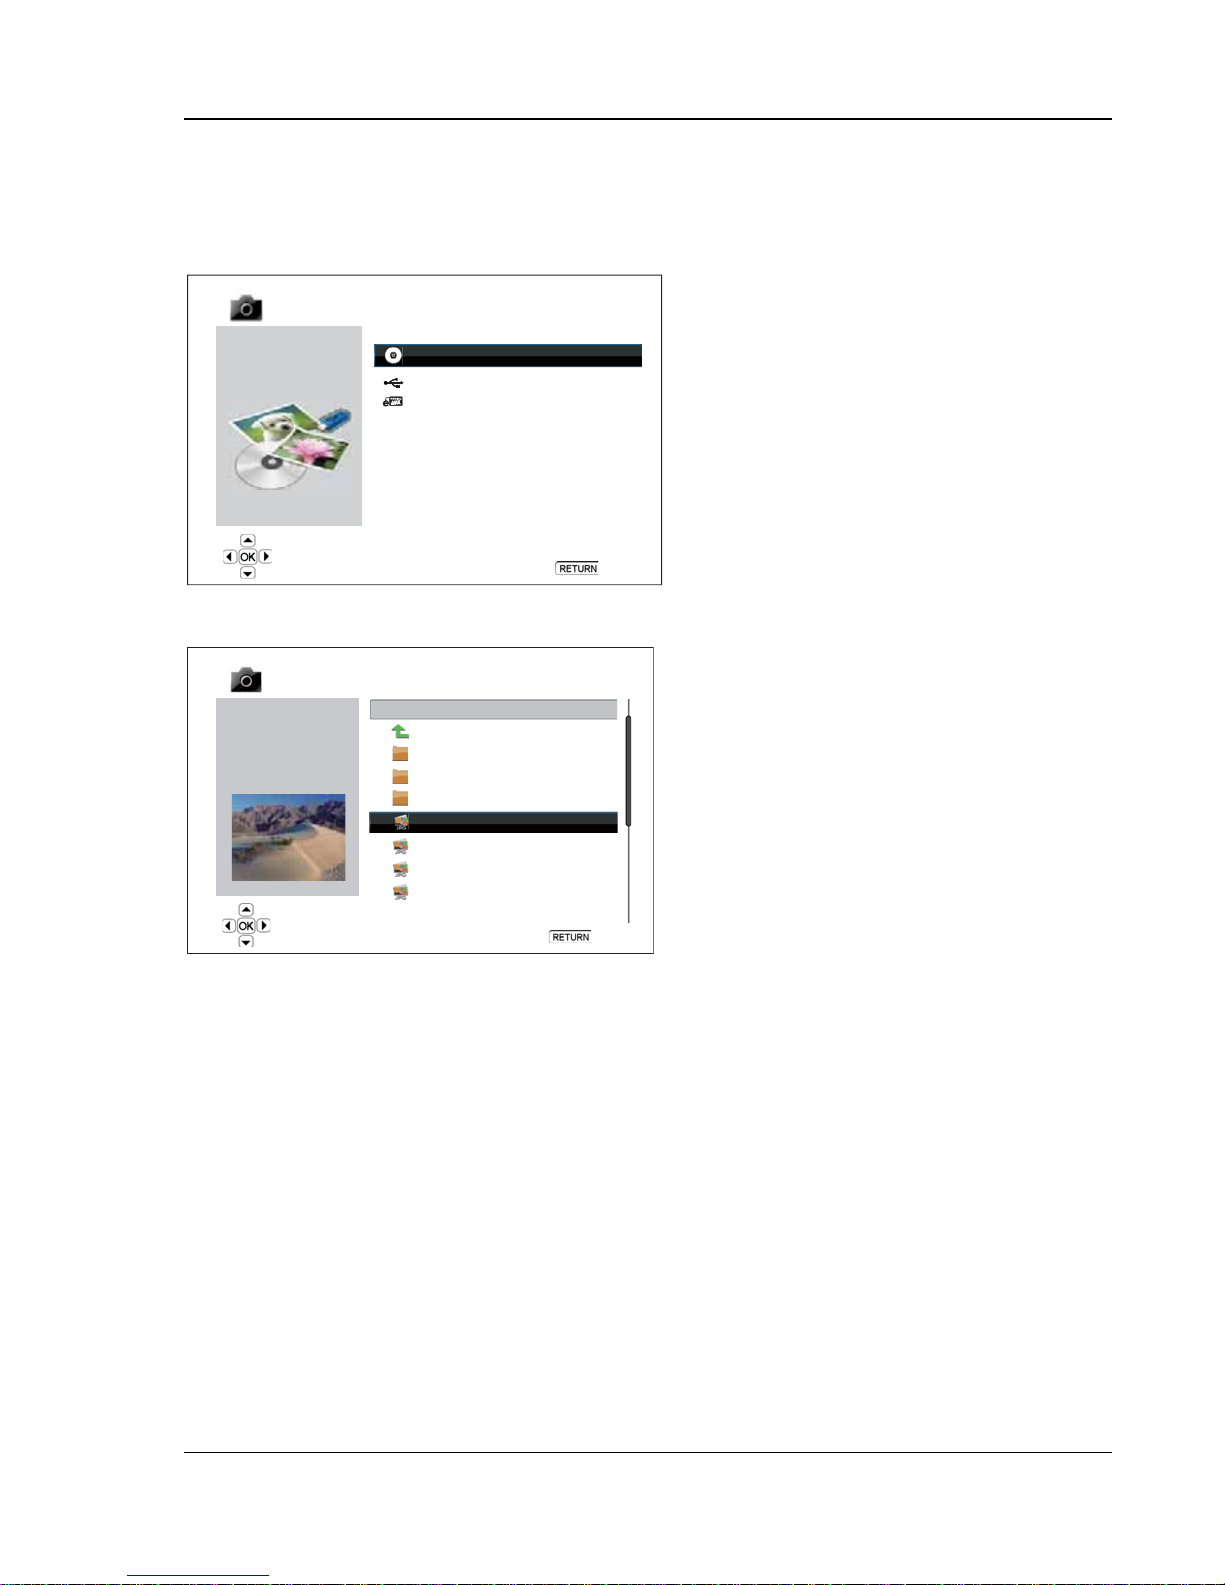
MEDIA FILE PLAYBACK
47
Viewing Photo Files
To view digital photo files stored on an optical disc, USB or e-SATA drive, select “Photo” from the Home Menu.
A file browser will appear to assist you in navigate the files and folders.
The first step is to select the “Data Disc”, USB or
Photo
Photo
Format: JPG
Size: 0.27M
Resolution: 1024x768
Date time: 2007-04-17
Model:
1 / 3 items
Data Disc
USB1
HDD1
Back
04 / 11 items
USB1
..
Yellow Stone
Yosemite
New Year Parade
Sand Dunes
DSCF1023
DSCF1024
DSCF1025
Back
e-SATA device that contains the photo files. The
player will take a moment to read the media and
list the folders and photo files.
In the photo browser, you can perform the
following operations:
x Press the UP/DOWN ARROW or PAGE
UP/DOWN buttons to move the cursor and
select photo files.
x When a photo file is highlighted by the
cursor, press the ENTER or PLAY button
to start playback in a full screen slideshow
fashion.
The following operations are available during the
photo slideshow:
x Show the help screen: DISPLAY
x Normal playback control: PLAY, STOP,
PAUSE, and PREV/NEXT
x Adjust slideshow speed: REV and FWD
x Zoom: ZOOM. Once in a zoom mode the
ARROW buttons can be used to pan the
photo.
x Reflect (flip the photo along its horizontal
axis to make it upside-down): UP ARROW
x Mirror (flip the photo along its vertical axis to
make it a mirror image): DOWN ARROW
x Rotate left (counterclockwise): LEFT ARROW
x Rotate right (clockwise): RIGHT ARROW
x Repeat: REPEAT
x Show photos in “Digest” mode: RED colour button. The “Digest” mode shows the 9 photo thumbnails
in a screen to make visual navigation easy.
x Show EXIF information: GREEN colour button
x Play in random sequence: BLUE colour button
x Change slideshow transition effect: YELLOW colour button.
Adding Background Music
You can add background music to the phot o slideshow. The digital m usic files ca n be stored o n the same
disk as the photos, or on a different USB / e-SATA drive. Start music playback first by selecting “Music” from
the Home menu. Once the music is playing, press the HOME button to get back to th e Home menu, and sta rt
the photo slideshow by selecting “Photo” in the usual manner.
Page 53
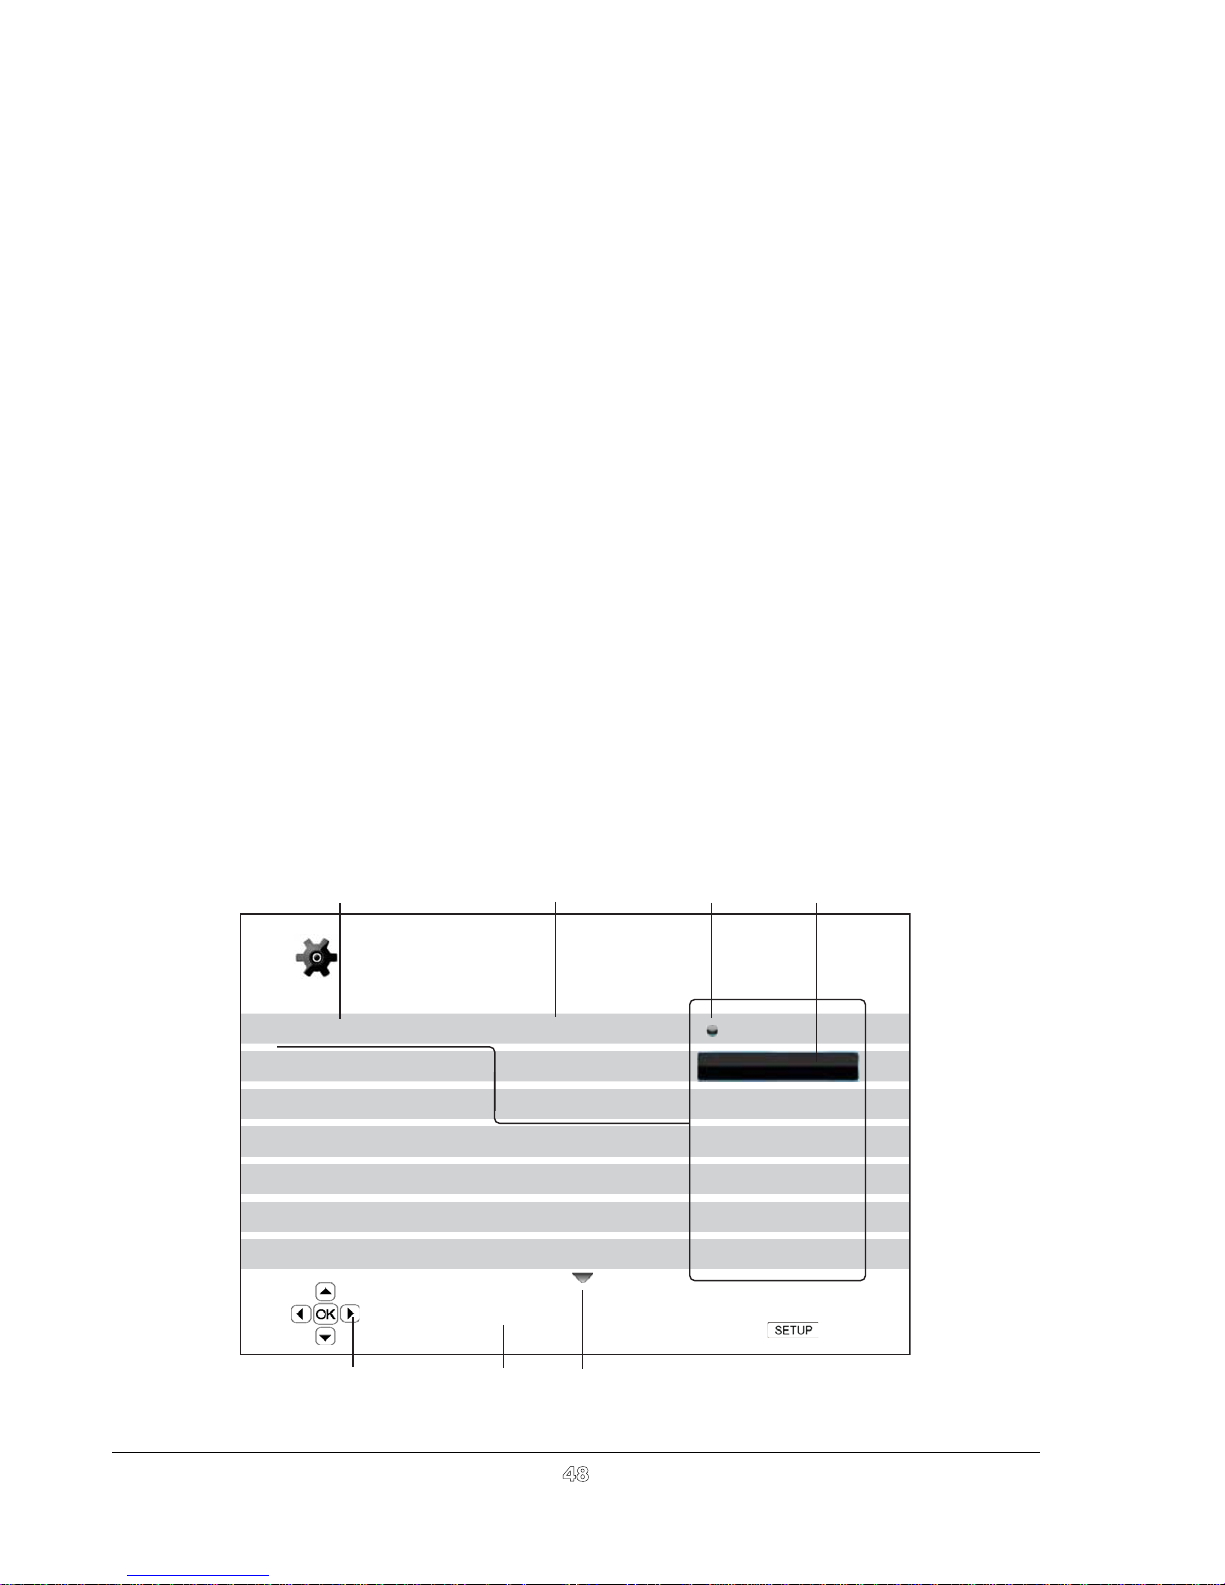
SETUP MENU OPTIONS
The Setup Menu of the OPPO Blu-ray Disc Player presents many setup and configuration options. For
most users, the default configuration will be sufficient and will not require any changes to the settings.
However if you need to configure the player to perfectly match your home theater setup and viewing
preferences, please refer to the following sections for details about each configuration option.
Using the Setup Menu System
In many places of this guide, the player’s Setup Menu needs to be adjusted to match your specific audio/video
configuration. When performing menu adjustments, we will use the following termin
location of the desired function:
Setup Menu Section > Menu Item > Selection
Setup Menu Section is the uppermost Setup Menu level. With the OPPO BDP-95AU there are six (6) Setup
Menu sections listed in the left column of the Setup Menu screen. They are: Playback Setup, Video Setup,
Audio Format Setup, Audio Processing, Device Setup, and Network Setup.
Menu Item is the parameter to be adjusted which appears in the center column of the Setup Menu.Onceyou
enter a Setup Menu Section, the list of Menu Items and their current value are displayed in a box.
Selection is the actual numeric or descriptive element that represents the change being made to the selected
parameter. It is the item located to the right of its correspondingMenu Item.
ology to indicate the
A Scroll Mark appears at the top or bottom of the menu when there are more Menu Items or Selections
than what can fit in a screen. You may use the UP and DOWN ARROW buttons to scroll the display in order
to access additional items.
Setup Menu Section
SelectionCurrent ValueMenu Item
Setup Menu
Playback Setup
Video Setup
Audio Format Setup
Audio Processing
Device Setup
Network Setup
Exit
Playback starts when the PLAY button is pressed
Navigation Cue Help Hint Scroll Mark
SACD Priority
DVD-Audio Mode
Auto Play Mode
Auto Resume
PBC
Parental Control
Language
On
Off
Exit
48
Page 54
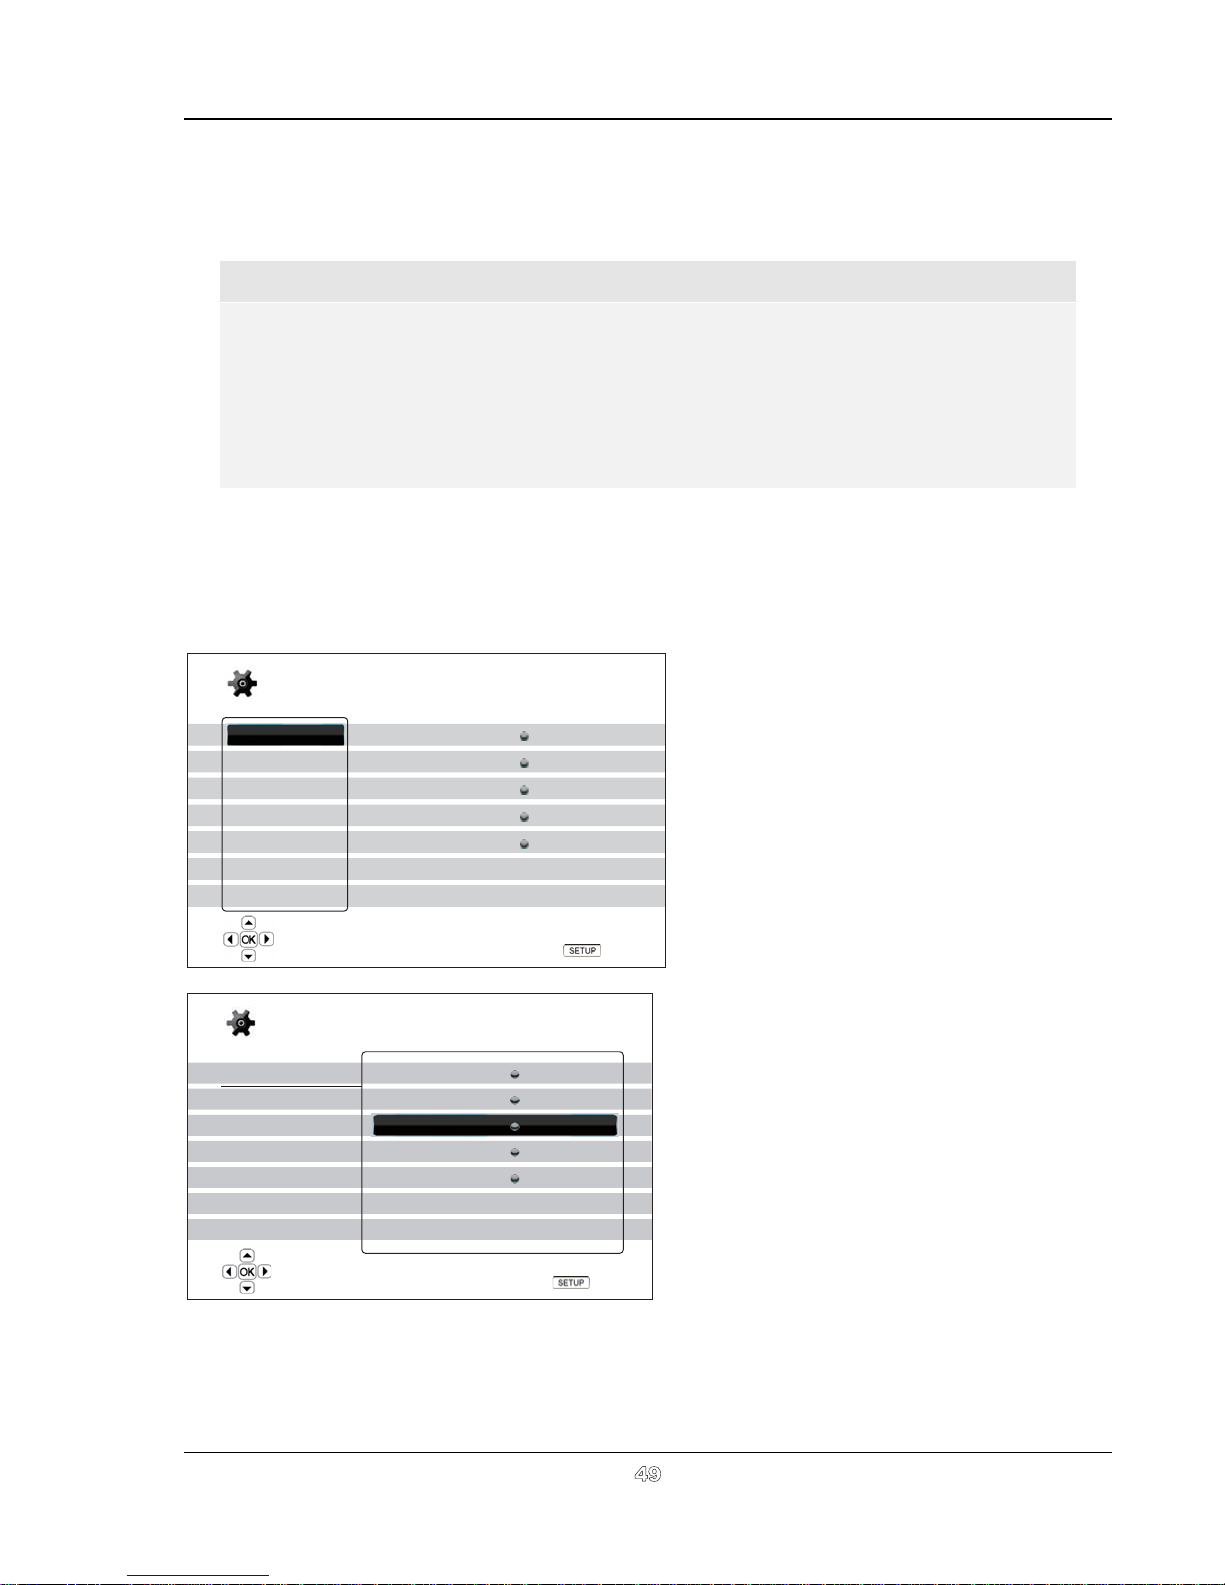
SETUP MENU OPTIONS
The preceding diagram should give a good description of the various elements and their context. In this
screen we could, for example, instruct you to set the Auto Play Mode parameter to Off in the Playback
Setup section. To indicate where we were, you would see the following: Playback Setup > Auto Play
Mode > Off.
NOTE
It is possible that some setup items are grayed-out and inaccessible. This can be caused by
the disc still being played back or interlocking with mutually exclusive setup items. Please
stop playback or eject the disc before trying to change these setup items. If you still cannot
access the setup item, please check for configuration conflicts and consistency. For
example, if “Video Setup > Primary Output”issetto“Analog”, the “Output Resolution >
Auto (or Source Direct)” menu item will be grayed-out. Setting “Primary Output”to“HDMI
1 (or HDMI 2)” will enable the “Auto (or Source Direct)” resolution.
To access the player’s Setup Menu simply press the SETUP button on the remote control. Since some Setup
Menu options can become inaccessible when the player is playing a disc, it is recommended that you operate
the Setup Menu when playback is fully stopped or when there is no disc in the player.
1. Press the SETUP button on the remote control, and the TV screen displays the following:
2. Press the UP/DOWN ARROW buttons to
Setup Menu
select the section. There are 6 sections:
Playback Setup, Video Setup, Audio
Playback Setup
Video Setup
Audio Format Setup
Audio Processing
Device Setup
Network Setup
Exit
SACD Priority
DVD-Audio Mode
Auto Play Mode
Auto Resume
PBC
Parental Control
Language
Multi-Channel
DVD-Audio
On
On
On
Format Setup, Audio Processing,
Device Setup, and Network Setup.
Press the ENTER button or the RIGHT
ARROW button to enter the selected
section.
3. Press the UP/DOWN ARROW buttons to
select the setup item to be changed, and
press the ENTER or RIGHT ARROW
Configure playback preferences
Exit
button to change the setting. When the
scroll icon is shown at the top or bottom of
the Setup Menu, it indicates that there are
more menu items that can be accessed by
Setup Menu
scrolling with the UP/DOWN ARROW
buttons.
Playback Setup
Video Setup
Audio Format Setup
Audio Processing
Device Setup
Network Setup
Exit
SACD Priority
DVD-Audio Mode
Auto Play Mode
Auto Resume
PBC
Parental Control
Language
Multi-Channel
DVD-Audio
On
On
On
For example, in the Playback Setup
section, you may use the UP/DOWN
ARROW buttons to select the “Auto Play
Mode” setup item, and press the ENTER
button to change the “Aut
o Play Mode”
setting.
Set the auto play mode for CD and SACD
Exit
49
Page 55
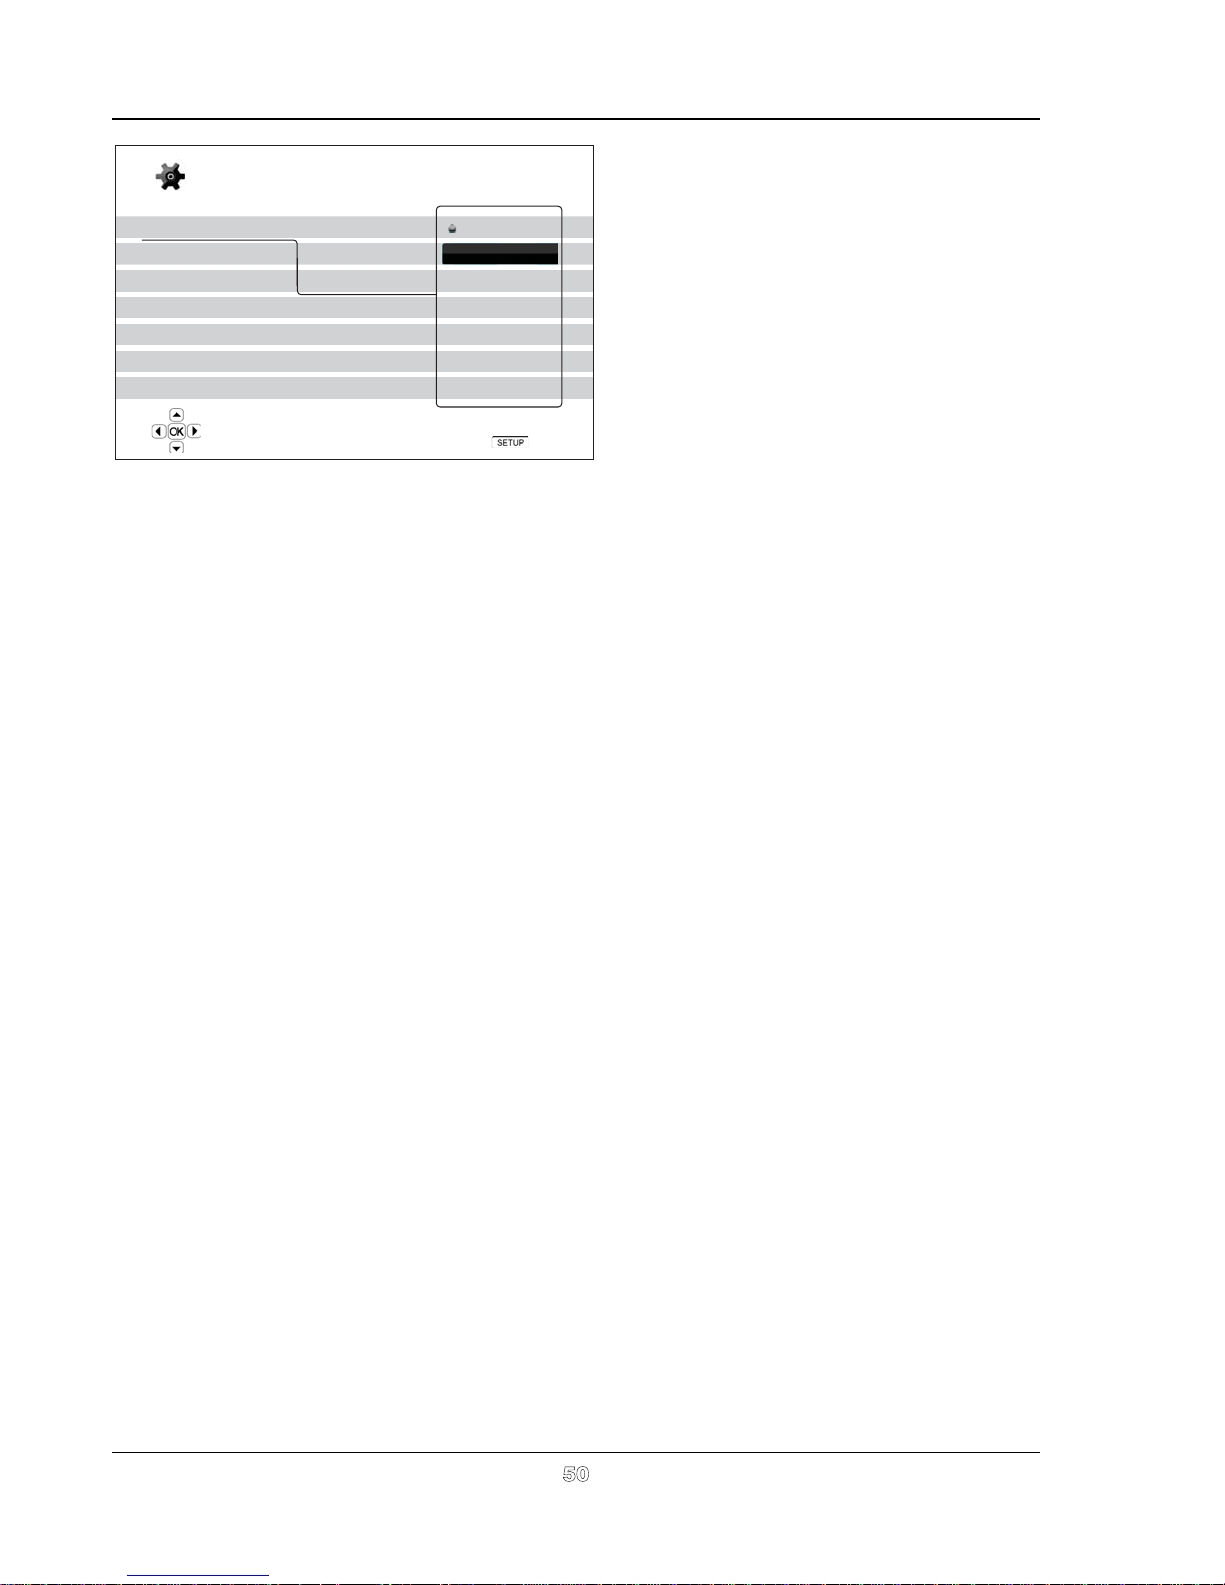
SETUP MENU OPTIONS
4. To select a value from the list of available
Setup Menu
settings, press the UP/DOWN ARROW
buttons and then press the ENTER button
Playback Setup
Video Setup
Audio Format Setup
Audio Processing
Device Setup
Network Setup
Exit
SACD Priority
DVD-Audio Mode
Auto Play Mode
Auto Resume
PBC
Parental Control
Language
On
Off
to confirm.
For example, to select “Off ” for “Auto Play
Mode”, use the UP/DOWN ARROW
buttons to highlight the “Off ” selection and
press the ENTER button.
5. To exit the SETUP menu at any time,
press the SETUP button on the remote
Playback starts when the PLAY button is pressed
Exit
control or select Exit from the Setup Menu
sections.
The settings are permanently saved when the player is turned off using either the front panel power
button or the remote control. If the AC power is interrupted before the player enters standby status, the
settings will not be saved. To ensure proper saving of the SETUP menu settings, please turn off the
player and turn it back on after you make major changes to the SETUP menu options.
50
Page 56
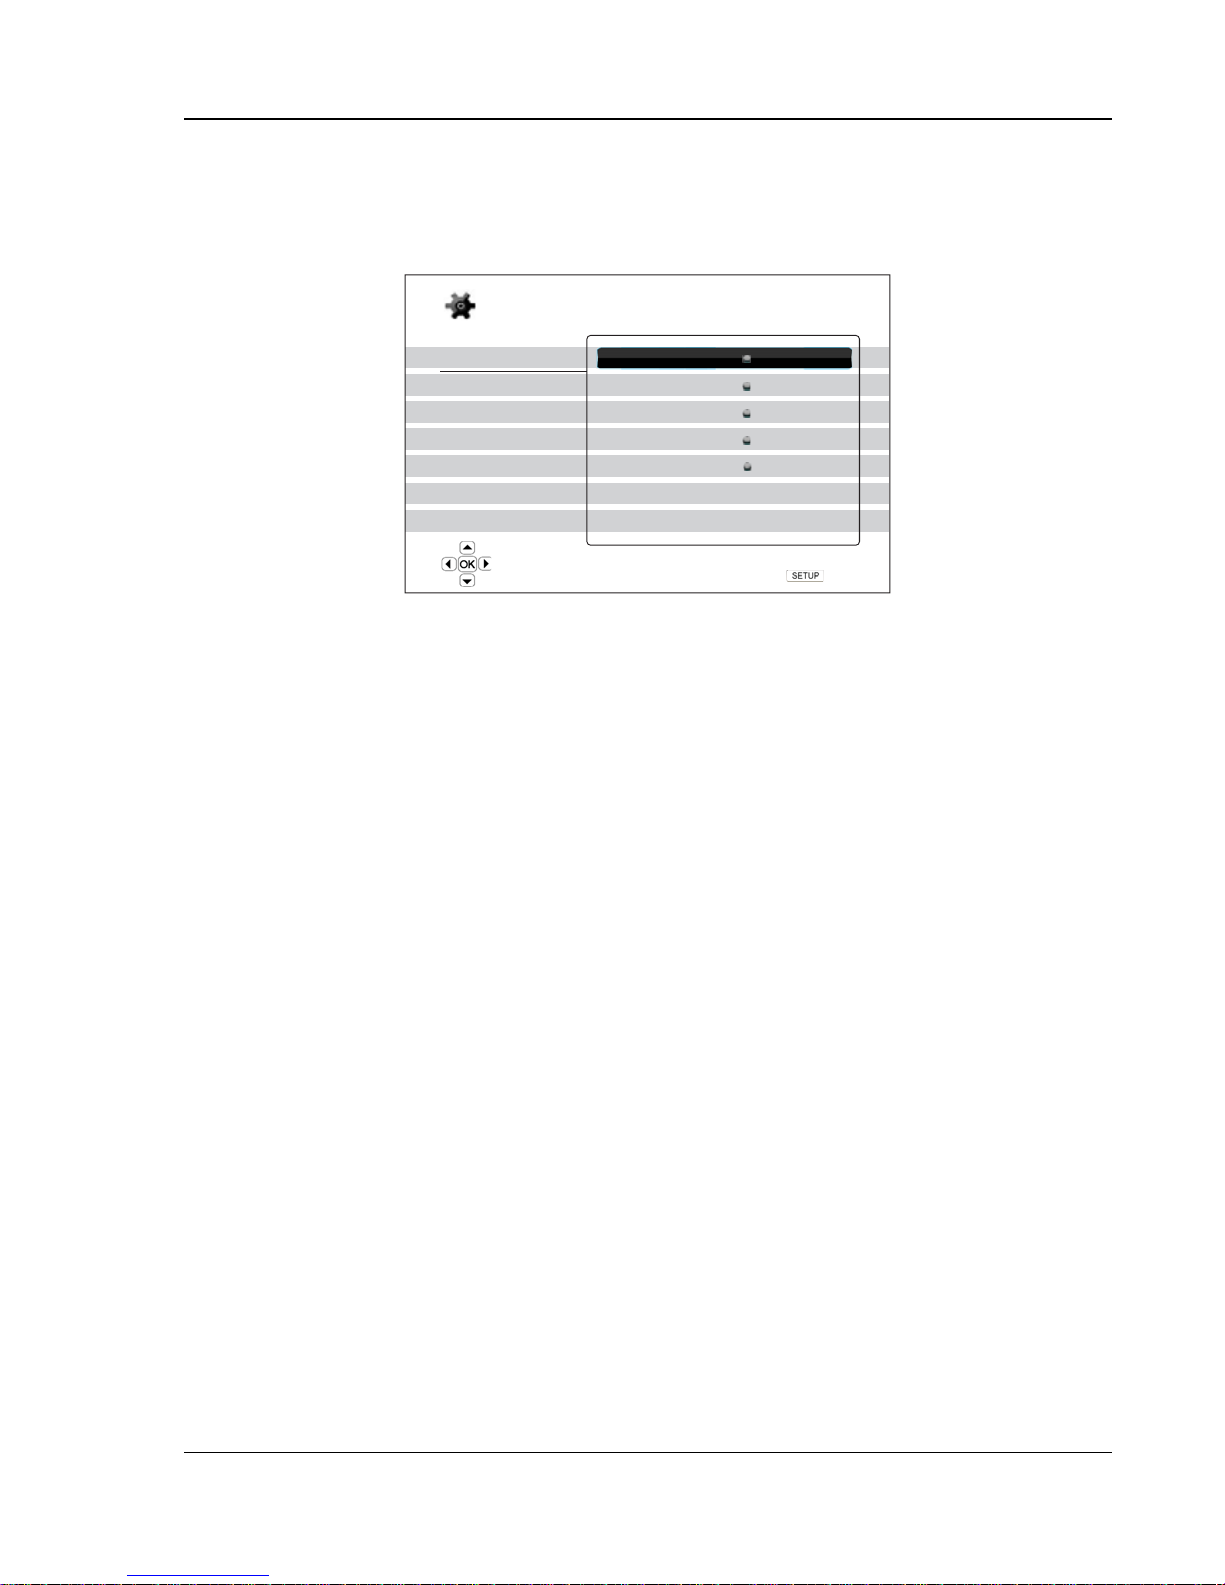
SETUP MENU OPTIONS
51
Playback Setup
The “Playback Setup” section is designed t o configure pl ayback preferen ces for vari ous contents. The setup
items in this section are:
Setup Menu
Playback Setup
Video Setup
Audio Format Setup
Audio Processing
Device Setup
Network Setup
Exit
SACD Priority
DVD-Audio Mode
Auto Play Mode
Auto Resume
PBC
Parental Control
Language
Choose which SACD layer to play
Multi-Channel
DVD-Audio
On
On
On
Exit
1. SACD Priority: To select which audio layer to play for SACD (Super Audio CD). The options
are:
x Multi-Channel – Play the multi-channel surround audio layer
x Stereo – Play the 2-channel stereo audio layer
x CD Mode – Play the CD layer of a hybrid SACD disc
2. DVD-Audio Mode: To select which portion of a DVD-Audio disc to play. The options are:
x DVD-Audio – Play the DVD-Audio portion of the disc with high-resolution audio
x DVD-Video – Play the DVD-Video portion of the disc with Dolby Digital or DTS audio
3. Auto Play Mode (On / Off): To select whether the player shall start playing an audio CD or
SACD automatically. When auto play mode is turn on, these discs will start playing upon
insertion into the player. When auto play mode is turned off, the player will wait for the user to
start playback by pressing the PLAY button.
4. Auto Resume (On / Off): To select whether the disc playback shall start from the previously
saved point or not. This setting applies to CD, SACD, DVD and certain Blu-ray disc. When
auto resume is turned on, the playback automatically starts from the previously saved point.
When auto resume is turned off, the playback starts from the beginning.
5. PBC – Play Back Control: To enable/disable Play Back Control. Play Back Control is a
primitive form of disc menu. The options are:
x On – If the disc contains Play Back Control, show the menu.
x Off – Play back the contents by sequence.
6. Parental Control: To set parental control ratings in order to prevent minors from watching
inappropriate content. This function depends on the disc being properly rated and encoded.
x Press the ENTER button to bring up the rating selection menu.
x To adjust the parental control settings, you must enter the current parental control password.
If you have not set a parental control password yet, the default password is “0000”.
x The parental control menu contains the following sub-items:
Page 57

SETUP MENU OPTIONS
BD Ratings - Press the UP/DOWN ARROW buttons to select the rating allowed for
Blu-ray Discs. “Off” means no ratings control and all discs are allowed to play.
Numbers 1 to 21 corresponds to the age limit. Discs encoded with an age limit that is
equal to or below the selected age will be allowed, and any rating above the selected
age will be blocked.
DVD Ratings - Press the UP/DOWN ARROW buttons to select the rating to allow for
DVD. The available ratings are Kid, G, PG, PG-13, PGR, R, NC-17, Adult and Off. The
selected rating and below will be allowed, and any rating above will be blocked. If “Off”
is selected, all discs are allowed to play.
Area Code – Some Blu-ray Discs may have different parental control ratings for
different geographical areas. At this time the player only supports the parental control
ratings used in the United Kingdom .
Change Password – To change the parental control password, enter a 4-digit number
as the new password. Enter the new password again to confirm. If the two entries are
matching, the new password replaces the old parental control password.
7. Language: To configure language preferences. The menu contains the following sub-items:
Player Language – To choose the display language for the player’s Setup Menu and the
on-screen display. Currently the player supports 8 languages.
Disc Menu Language – To choose the preferred language for displaying DVD and Blu-ray
Disc menus. If a disc menu of the selected language is available, that menu will be shown
instead of the default disc menu.
Audio Language – To choose the preferred audio language for DVD and Blu-ray Discs. If
an audio track of the selected language is available on the disc, the audio track will be
played back.
Subtitle Language – To choose the preferred subtitle language for DVD. If a subtitle of the
selected language is available, it will be displayed. When “Auto” is selected, the subtitle
display is decided by the disc.
NOTE
If your preferred language is not listed in the Audio, Subtitle or Disc Menu options, select
“Other” and enter the Language Code found on page 83 of this manual.
52
Page 58
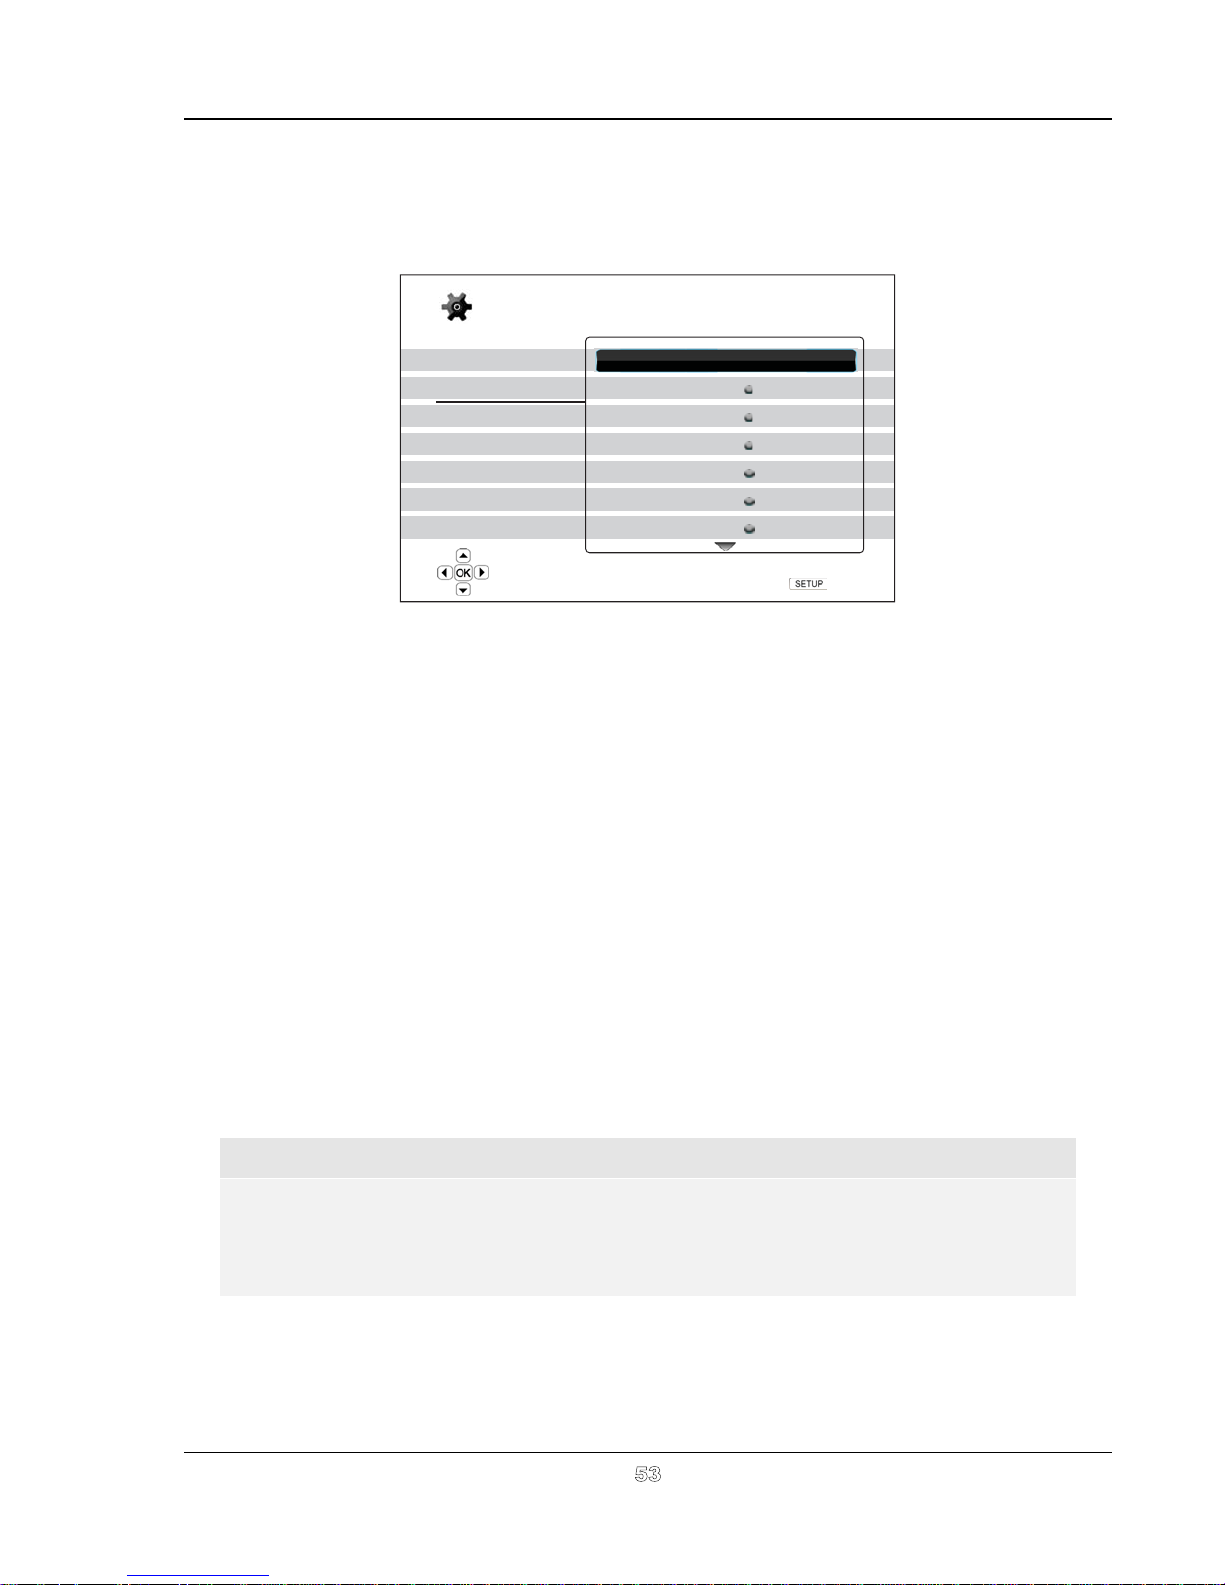
SETUP MENU OPTIONS
Video Setup
The “Video Setup” section of the Setup Menu system allows you to configure video output options. The menu
items in this section are:
Setup Menu
Playback Setup
Video Setup
Audio Format Setup
Audio Processing
Device Setup
Network Setup
Exit
Picture Adjustment
Primary Output
3D Mode
3D TV Size
TV Aspect Ratio
TV System
Output Resolution
Adjust picture control parameters
HDMI 1
Auto
46
16:9 Wide
PAL
Auto
Exit
1. Picture Adjustment: To adjust picture control parameters. The OPPO BDP-95AU Blu-ray Disc
Player provides a wide array of picture controls. Please refer to the Picture Adjustment
section on page 56 of this manual for details of each control.
2. Primary Output: To select the primary video output port. The options are:
x
HDMI 1 – Use HDMI 1 as the primary video output port. This setting will ensure that the
HDMI 1 output gets the best possible picture quality. The dedicated QDEO DE2750 video
processor will be used unless “Source Direct” for output resolution is selected, in which
case QDEO DE2750 video processor is bypassed. Component and composite video output
may not be available or may be limited to a lower resolution based on content source
limitations.
x
HDMI 2 – Use HDMI 2 as the primary video output port. Similar to “HDMI 1”, this setting
ensures that the HDMI 2 output gets the best possible picture quality, except that it utilizes
the video decoder in the player to perform necessary video processing, not the DE2750
video processor.
x
Analog – Use component video as the primary video output port. This setting will ensure
that the component output is always available and displays proper video signals. The video
decoder in the player performs any necessary format conversion, and the DE2750 video
processor is completely bypassed.
NOTE
Copyright control mechanisms encoded on the disc may limit the output resolution of the
component video output. For DVD, if CSS encryption is in use the output resolution is limited
to no more than 480p/576p; for Blu-ray Discs, the output resolution is limited to no more than
1080i, and could be lower if the disc contains the Image Constraint Token.
3. 3D Mode: To choose the video output mode for available 3D contents at the HDMI output ports.
The options are:
x
Auto – Output 3D if supported both by the disc content and the display. The player
automatically checks for the existence of 3D content on the disc and the 3D compatibility of
53
Page 59

SETUP MENU OPTIONS
the TV or projector. If both are qualified, the player sends 3D video from its HDMI output
terminals, otherwise only 2D video is sent out. Active shutter 3D-compatible glasses (which
are not sold by OPPO Digital, Inc.) are required to enjoy the 3D movie on your TV.
Of
f ––Always output 2D video format, even when 3D video exists on the disc. This
guarantee
s the video quality if your TV is not 3D compatible, or some necessary part (such
as the 3D glasses) is missing.
Forced
Force 3D output regardless of 2D/3D TV detected.
4. 3D TV Size: To enter the diagonal screen size of your HDTV. This option applies to 3D mode,
to help the player adjust the 3D image for better visual quality.
Use the number buttons on the remote control to enter the actual diagonal size of your TV
screen, or use the DOWN ARROW button to delete the digits. The default is 46 inches.
5. TV Aspect Ratio: To set the aspect ratio of the player’s output image. The options are:
4:3 Letterbox – Choose this when the display is standard 4:3. A widescreen image is
displayed in “letterbox” format with black borders on top and bottom.
4:3 Pan&Scan – Choose this when the display is standard 4:3. A widescreen image will
be stretched.
16:9 Wide – Choose this when the display is widescreen 16:9. 16:9 materials will be
displayed in its native aspect ratio, and 4:3 materials will be stretched horizontally.
16:9 Wide/Auto
– Choose this when the display is widescreen 16:9. 16:9 materials will be
displayed in its native aspect ratio, and 4:3 materials will be displayed with black borders on
both sides in order to maintain the original 4:3 aspect ratio.
For a detailed description on how to choose a proper TV Aspect Ratio, please refer to the
Determine the Display Aspect Ratio section on page 25 of this manual.
6. TV System: To choose the output video system or broadcast standard (PAL/NTSC) to match
the type of TV. The options are:
(default)
PAL – When playing PAL-encoded discs, no system conversion is performed.
NTSCframe
output
NTSC – When playing NTSC-encoded discs, no system conversion is performed.
encoded contents are converted to NTSC
encoded contents are converted to PAL output. Blu-ray Discs encoded with 24Hz
rate are converted to 50Hz frame rate if neither 1080p24 Output nor Source Direct
resolution is enabled.
PAL-
output. Blu-ray Discs encoded with 24Hz frame
rate are converted to 60Hz frame rate if neither 1080p24 Output nor Source Direct output
resolution is enabled.
Multi-system – No system conversion is performed. The output video system is the same
as that encoded on the disc. Blu-ray Discs encoded with 24Hz frame rate are converted to
60Hz frame rate if neither 1080p24 Output nor Source Direct output resolution is enabled.
Requires a TV that supports both NTSC and PAL systems.
NOTE
DO NOT select “Multi-system” if your TV does not support both PAL and NTSC systems.
The TV display may become a black screen upon inserting a disc encoded in a different
system than your TV supports. Should this happen, you can press the OPEN button to eject
the disc tray, and then use the Setup Menu to correct the “TV System” setting.
54
Page 60

SETUP MENU OPTIONS
7. Output Resolution: To choose the output resolution that best matches your television’s native
resolution. For a detailed description on how to choose a proper output resolution, please refer
to the Select the Best Output Resolution section on page 24 of this manual.
8. 1080p24 Output: To set 1080p 24Hz output options. This option only applies to the HDMI
output at 1080p resolution. Many Blu-ray Discs that originated from theatrical movies are
encoded using 24Hz frame rate, the same number of frames per second as the original
theatrical film. If the TV properly supports 1080p 24Hz, smoother motion can be achieved by
enabling 1080p24 Output for such discs. The available options are:
x
x
(default)
Auto – Video encoded in 24Hz frame rate will be output as 1080p 24Hz if the TV
informs the player
that it can support the 1080p24 signal.
On – Video encoded in 24Hz frame rate will be output as 1080p 24Hz without regard to
whether the TV can support the 1080p24 signal or not. This is useful if the TV can actually
support 1080p24 but does not properly state its capability. Please note that if the TV cannot
support 1080p24, selecting this option will result in no video.
x
Off
– Video encoded in 24Hz frame rate will be converted to 50Hz (PAL) or 6
0Hz (NTSC).
9. HDMI Options: To configure video options that apply only to the HDMI output. This item
contains a sub-menu with multiple configuration options. Please refer to the HDMI Options
section on page 59 of this manual for details of each option.
10. Display Options: To configure the options for displaying
on-screen information. The following
display options are available:
x
Subtitle Shift – To set the display position for subtitles. When the “Subtitle Shift” is set at 0
(default), subtitles are displayed at the original position as specified on the disc. When it is
set at a value between 1 and 5, subtitles are shifted up. When it is set at a value between
-1 and -5, subtitles are shifted down. This feature is helpful for customers using a 2.35:1
“Constant Image Height” video projection system. Subtitles can be shifted to the active
video area so they do not get cut off.
x
OSD Position – To set the display position for the on-screen display (OSD). When the
“OSD Position” is set at 0, the OSD is shown at the top and bottom of the video screen.
When it is set at a value between 1 and 5, the OSD is shifted tow
ards the center of the
video screen. Similar to the subtitle shift setting above, the “OSD Position” feature is helpful
for customers using a 2.35:1 “Constant Image Height” video projection system.
OSD Mode – To select how long the on-screen display information, such as elapsed or
x
remaining time, stays on the TV screen. The available options are:
x
Normal – On-screen display information stays on the TV screen until the user cancels it.
x
Silent – On-screen display information shows on the TV screen for a few seconds and
then disappears. The front panel display still maintains the selected display information.
x
Remaining – On-screen display information stays on the TV screen until the user
cancels it. By default displays remaining time instead of elapsed time.
x
Angle Mark (on/off) – To turn on/off the display of an angle mark whe
Disc with multiple available angles is played. Keeping the angle mark off avoids distraction
from normal movie watching.
x
PIP Mark (on/off) – To turn on/off the display of a Picture-in-Picture mark when a Blu-ray
Disc with secondary video is played. Keeping the PIP mark off avoids distraction from
normal movie watching.
n a DVD or Blu-ray
55
Page 61
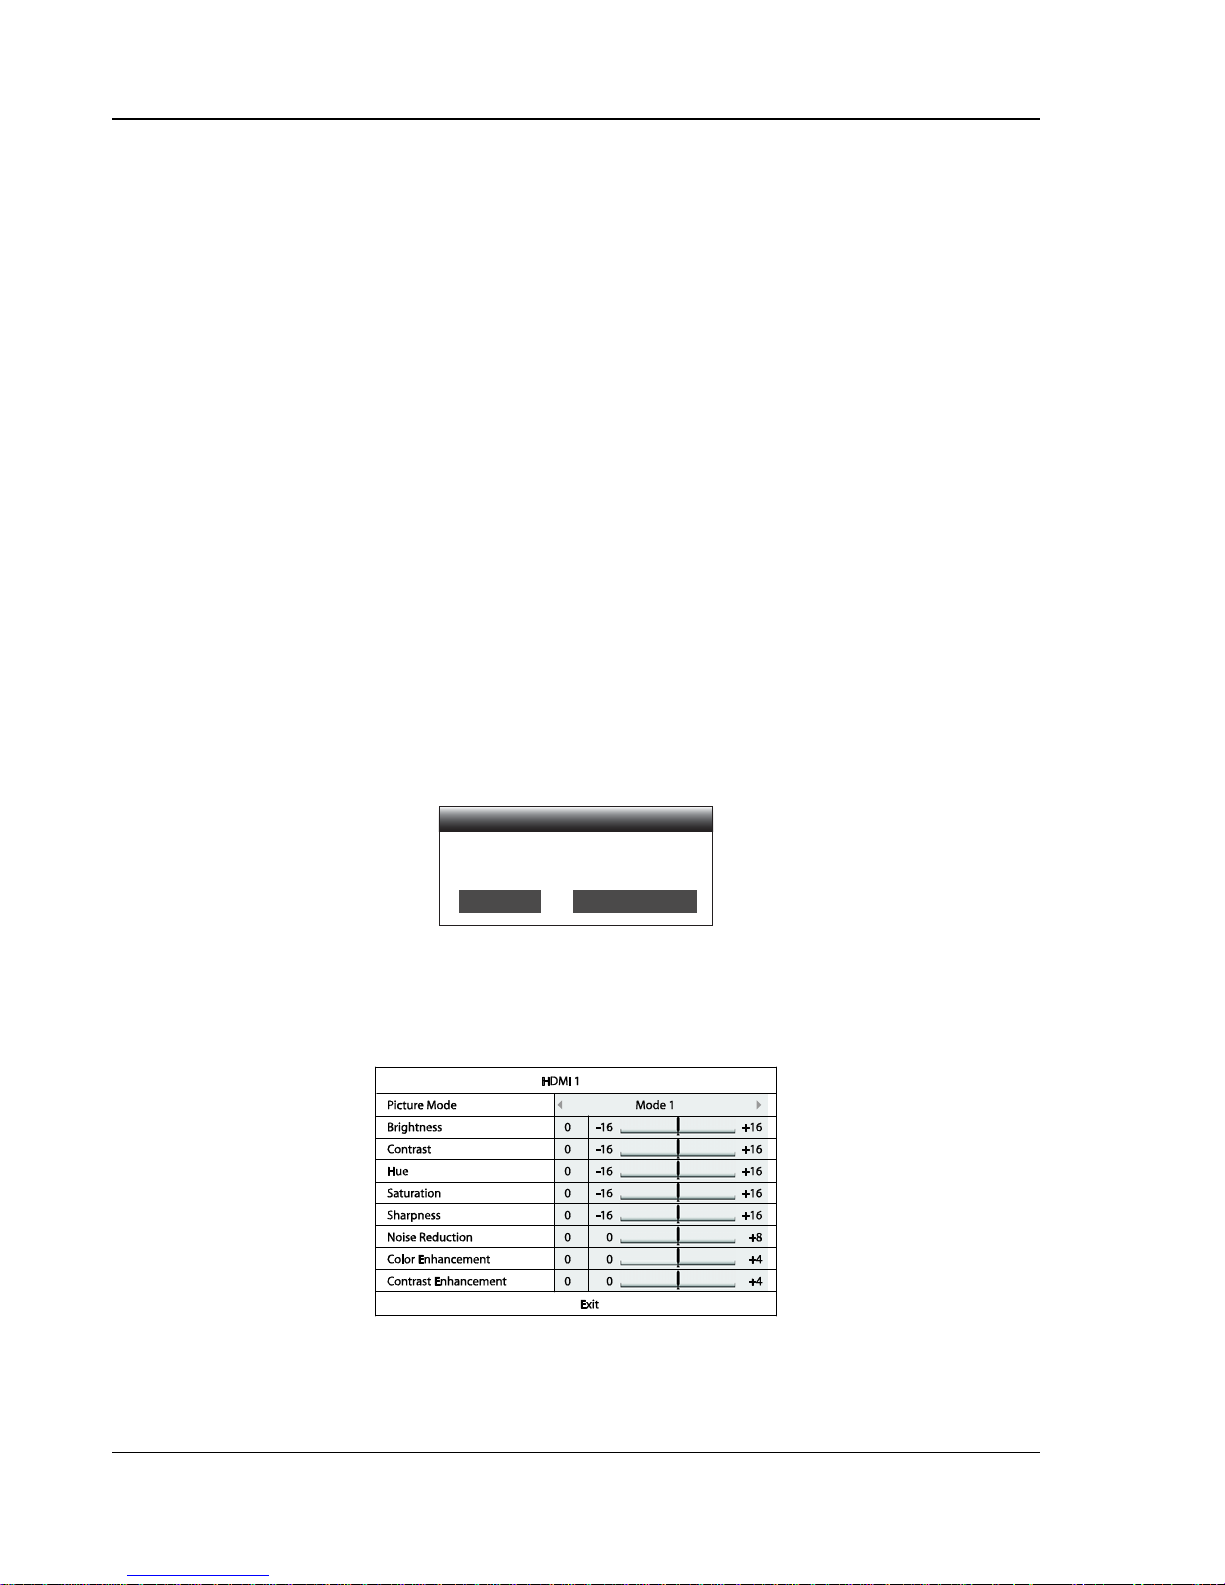
SETUP MENU OPTIONS
56
x SAP Mark (on/off) – To turn on/off the display of a Secondary Audio Program mark when a
Blu-ray Disc with secondary video and audio is played. Keeping the SAP mark off avoids
distraction from normal movie watching.
x Screen Saver – To turn on/off the screen saver function. The screen saver is designed to
minimize burn-in concerns for plasma and CRT display devices. The available options are:
x On – After about 3 minutes of inactivity, the player will show an animated OPPO logo
moving on a black background. This allows most areas of the screen to rest and gives
all areas an equal opportunity to refresh.
x Off – The screen saver will not be activated. Use this option if your TV does not have a
burn-in issue.
x Energy Saver – Video output will be turned off after 3 minutes of inactivity. Many
projectors and LCD TVs will go into a standby or sleep mode and turn off their
projection lamp or LCD backlight lamp, thus saving energy and prolonging the lamp life.
When you press any button on the OPPO remote control or the player’s front panel, the
screen saver will be canceled and video output will be restored. If your TV is already in
standby or sleep mode, you may need to wake up the TV by pressing a button on its
remote or control panel.
Picture Adjustment
Picture Adjustment is a special section of the Video Setup menu. It allows you to fine tune many picture
control parameters in order to achieve the optimal picture quality and visual result. To use Picture Adjustm ent,
press the SETUP button on the remote control to enter the player’s Setup Menu and choose “Video Setup” –
“Picture Adjustment”, then select the primary video output terminal:
Picture Adjustment
Please select your video output
HDMI 1
HDMI 2 & Analog
For information on how to choose your primary video output, please refer to Primary Output on page 53. You
can use the LEFT/RIGHT ARROW to select your ch oice, then press t he ENTER button to bring up the Picture
Adjustment menu. Depending on your primary video output, the detailed Picture Adjust ment menu can be
slightly different:
Picture Adjustment Menu for HDMI 1
Page 62
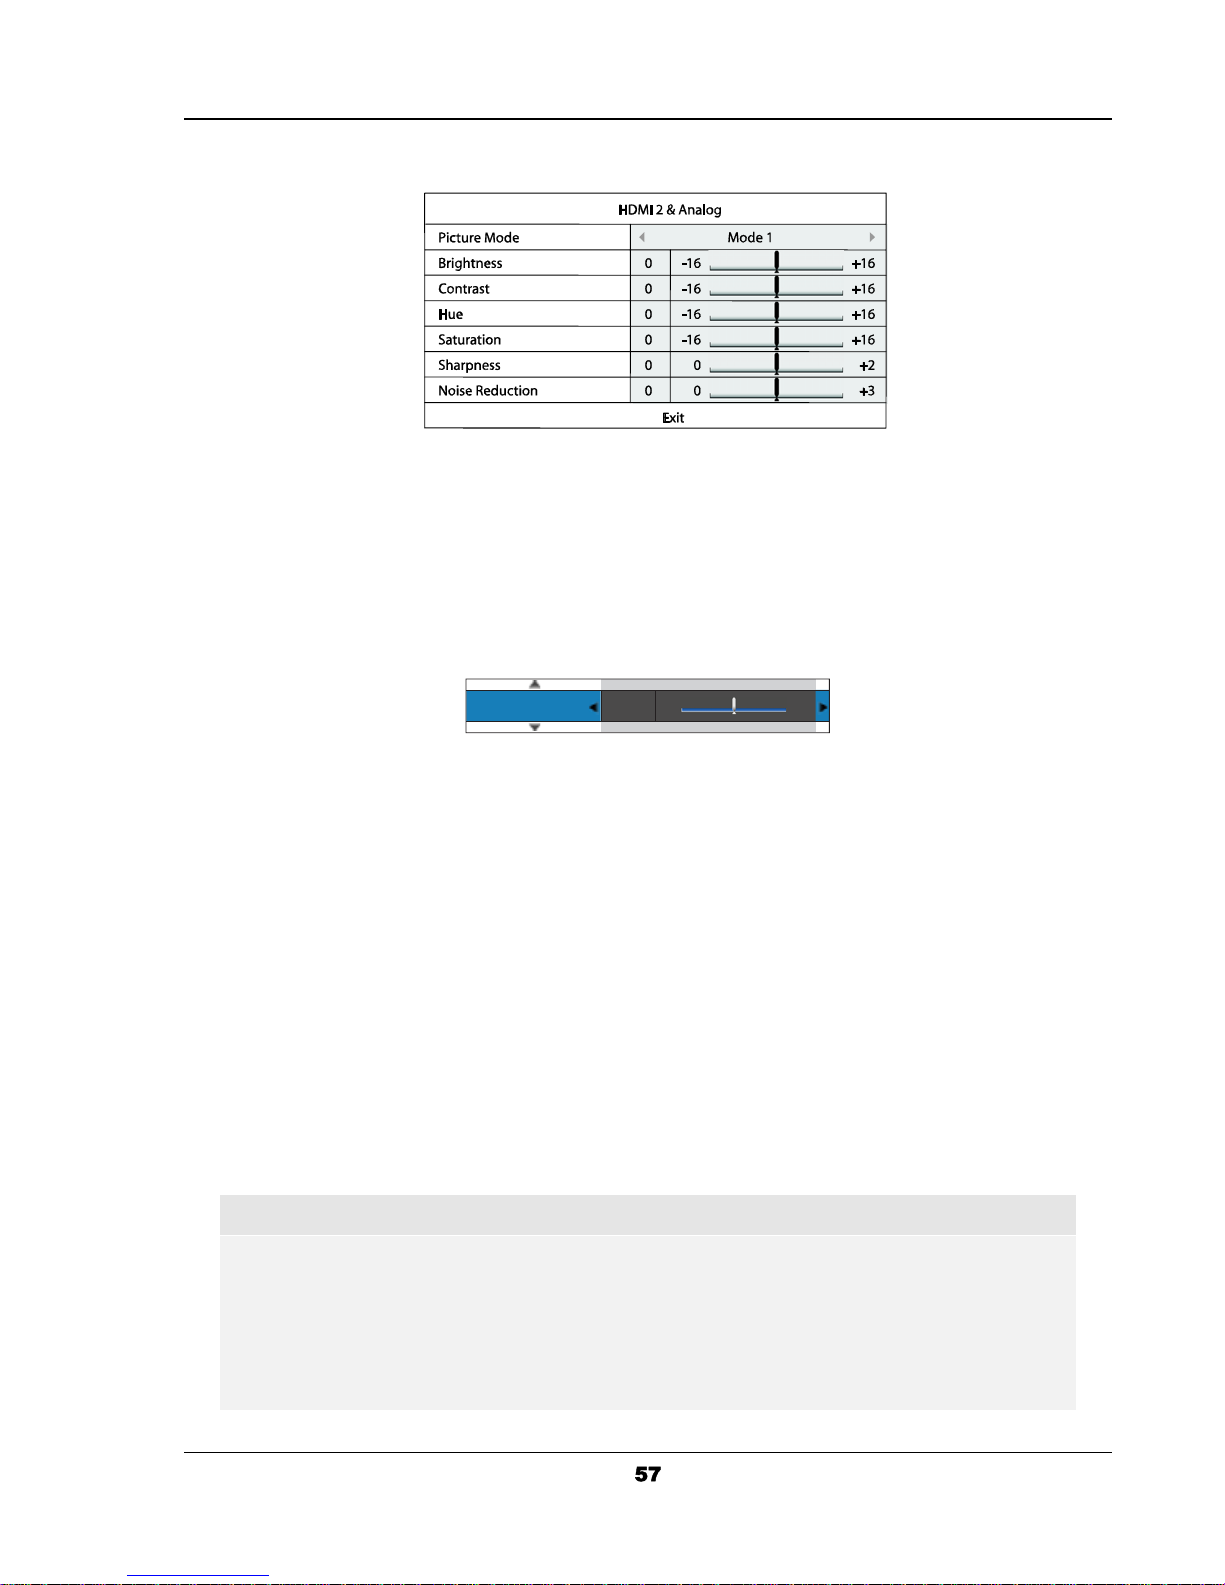
SETUP MENU OPTIONS
Picture Adjustment Menu for HDMI 2 & Analog
To change a picture adjustment parameter, use the UP/DOWN ARROW buttons to highlight the
parameter, and use the LEFT/RIGHT ARROW buttons to change its value.
To aid in the adjustment of picture control parameters, the picture adjustment menu will be reduced to
only show the parameter being adjusted once you press the LEFT/RIGHT ARROW buttons (except the
Picture Mode, which you will directly see the mode name switches between Mode 1, 2 and 3, and all the
other parameters are adjusted automatically to the stored value). The reduced menu will be positioned
near the bottom of the screen.
Brightness 0 -16 +16
You can continue adjusting the current parameter by pressing the LEFT/RIGHT ARROW buttons. To
select another parameter, press the UP/DOWN ARROW buttons. Press the ENTER buttontoreturnto
the large Picture Adjustment menu.
To exit the Picture Adjustment menu and return to the Setup Menu, either select “Exit” or press the
RETURN button.
The following picture adjustment controls are available for all HDMI 1, HDMI 2 and Analog (Component):
1. Picture Mode: To use the customized picture mode saved by you. BDP-95AU allows you to save
up to three (3) customized modes. Press the LEFT/RIGHT ARROW buttons to switch the mode
and all parameters will be automatically adjusted to their stored values. Changes to the current
parameter values will be s
tored automatically when you exit the Picture Adjustment screen or
switch to another Picture Mode.
2. Brightness: To adjust the brightness (black level) of the video output.
3. Contrast: To adjust the contrast (white level) of the video output.
NOTE
Proper brightness and contrast settings are necessary for a quality video output. If you do not
have the correct black and white levels, your images can appear washed out or can lose
detail in shadows when watching darker scenes. Televisions have brightness (black level)
and contrast (white level) controls; however it may require a combination of tweaking both the
player and your television to get the optimal result. We recommend using a calibration disc
such as the Spears & Munsil™ High Definition Benchmark Blu-ray Edition or Digital Video
Essentials HD Basics as aids for adjusting. First adjust the television’s picture controls for
Page 63

SETUP MENU OPTIONS
58
the best possible picture. Once that is done, try changing the player’s settings to further
refine the picture to the optimal result.
4. Hue: To adjust the hue (tint) of the video output.
5. Saturation: To adjust the saturation (colour intensity level) of the video output.
6. Sharpness: To set the sharpness of video output. Sharpness (also called Detail/Edge
Enhancement in previous OPPO players) is a video processing function that can control the
image sharpness but at the same time may cause unwanted artifacts.
For HDMI 1, the sharpness level can be set between -16 and +16. The default is level 0, which
turns off sharpness enhancement. The negative levels may be used to reduce or eliminate
overly sharpened video. However, the picture may appear soft. The positive levels increase
the sharpness.
z At level 1, the player applies low level Detail Enhancement, during which the video
processor isolates the detailed parts from the original image, processes them separately
and integrates back before the final output.
z At level 2, the player increases Detail Enhancement to a higher level. Generally, to make
an image “sharper”, we recommend using level 1 and 2.
z At level 3 and above, the player adds Luminance Transition Improvement (LTI) and
Chroma Transition Improvement (CTI), which further sharpen the luminance transition and
chroma transition. However, we do not recommend using level 3 and above unless the
source content is poorly produced and blurry.
For HDMI 2 & Analog, the sharpness level can be set between 0 and +2. The default is level
0. The higher the level, the sharper the video details are. However, too high a sharpness level
may cause while line etching around objects.
7. Noise Reduction: To select whether the player shall apply video noise reduction processing.
For HDMI 1, the noise reduction level can be set between 0 and 8. The default is level 0,
which turns off noise reduction.
z When set to level 1, the player adjusts the picture quality by reducing the “mosquito noise”
(artifacts around the outlines of objects) and “block noise” (mosaic-like patterns caused by
video compression). These two noise reduction are also called Compression Artifacts
Reduction (CAR) and have several levels of aggressiveness.
z When set to level 2, the player applies the Motion Adaptive Video Noise Reduction (VNR),
which handles the random noise and the film-grain noise (natural variation of picture
intensity caused by film grain). Its level is automatic because there is a noise estimator
circuitry in the video processor that calculates how much noise presents and adjusts the
level of VNR accordingly.
z When set to 3 or 4, the player applies both CAR and Motion Adaptive VNR, with more
aggressive “block noise” reduction at level 4.
z At level 5, the player applies aggressive CAR for low quality video content, and adds
Motion Adaptive VNR at level 6.
z At level 7, the player applies the most aggressive CAR for very low quality video, and
adds Motion Adaptive VNR at level 8.
Remember that excessive noise reduction may cause a loss of details. We recommend
using the noise reduction function only when you encounter poorly encoded or compressed
video that has apparent noise artifacts.
Page 64

SETUP MENU OPTIONS
59
For HDMI 2 & Analog, the noise reduction level can be set between 0 and +3. The default is
level 0. When user increases the level, the player adjusts the picture quality by applying
mosquito noise reduction, random noise reduction and MPEG block noise reduction at the
same time. The higher level user sets, the more aggressive noise reduction functions apply.
The following picture adjustment controls are only available for HDMI 1 video output:
8. Colour Enhancement: To select the colour enhancement level on the video output. This
enhances certain colours in the spectrum and enables vivid colours in outdoor scenes without
causing hue shifts, loss of detail or changes in skin tones.
9. Contrast Enhancement: To select the contrast enhancement level on the video output. This
expands detail in shadows.
HDMI Options
HDMI Options are a sub-menu of the Video Setup menu. It allows you to configure some video settings that
are unique to the HDMI output. To enter this sub-menu, select “HDMI Options” from the Video Setup menu.
To exit this sub-menu, press the RETURN button or the LEFT arrow key. The following HDMI options are
available:
1. Colour Space (HDMI 1) – To select the colour space for the HDMI 1 output. The available
options are:
x Auto (Recommended) – The player checks with the display device to automatically
determine what colour space to use. If the display device supports YCbCr 4:4:4, then it will
be used to avoid extra colour space conversion.
x RGB Video Level – The HDMI output uses RGB colour space and normal signal range
suitable for video displays.
x RGB PC Level – The HDMI output uses RGB colour space and expands the signal ran ge.
The expanded signal range is suitable for personal computer (PC) displays. Some TVs are
designed to be used as a PC monitor, and expect signal in expanded RGB range when the
DVI input is selected. For these displays if the video signal uses the normal RGB range, the
black-white contrast will be reduced. You can set the player to use the RGB PC Level
output and restore proper contrast.
x YCbCr 4:4:4 – The HDMI output uses YCbCr 4:4:4 colo
ur space.
x YCbCr 4:2:2 – The HDMI output uses YCbCr 4:2:2 colour space. Generally this is the colour
space that is closest to the colour space encoded on the discs. (All discs are encoded in
YCbCr 4:2:0 colour space, and the video decoder decodes it into YCbCr 4:2:2.)
2. Colour Space (HDMI 2) – To select the colour space for the HDMI 2 output. The available
options are the same as those for Colo
ur Space (HDMI 1).
3. Deep Colour (HDMI 1) – To select the Deep Colour mode for the HDMI 1 output. Deep Colour is
an OPTION for some TVs or projectors that feature HDMI v1.3 or higher input. Normally, each
pixel of the video image is transmitted using 24-bit data (8-bit per channel for R, G, B or Y, Cb,
Cr). If Deep Colour is supported, each pixel of the video image can be transmitted using 30-bit
(10-bit per channel) or 36-bit (12-bit per channel) data. The increased bit depth should result in
smoother colour transitions and better gradients. The available options are:
x 36 Bits – Use the 36-bit per pixel Deep Colour mode.
Page 65

SETUP MENU OPTIONS
60
x 30 Bits (Dithered) – Use the 30-bit per pixel Deep Colour mode with dithering technique.
x 30 Bits – Use the 30-bit per pixel Deep Colour mode.
x Off (Dithered) –Do not use Deep Colour, but apply the dithering technique.
x Off (default) – Do not use Deep Colour.
4. Deep Colour (HDMI 2) – To select the Deep Colour mode for the HDMI 2 output. The available
options are the same as those for HDMI Deep Colour (HDMI 1).
NOTE
Since the Deep Colour feature is OPTIONAL and may not be supported by all TVs, enabling
Deep Colour while connected to a TV without this feature may result in no effect or no video.
At this time, no disc is encoded with Deep Colour. Enabling Deep Colour will not magically
make colours richer, but will help preserve the maximum precision as a result of video
processing and picture control adjustment.
Dithering is a technique to improve the image colour depth with limited colour quantization.
5ˊDemo Mode – To enable a special split-screen demonstration mode. This is designed for the
demonstration of the Qdeo video processing technology. It can also be used as an aid for
setting picture control adjustments for Noise Reduction, Colour Enhancement and Contrast
Enhancement. It should NOT be used for normal movie watching. The available options are:
x On – The video screen will be split in half. The left side shows vide o without the help of
Qdeo video processing, and the right side demonstrates the result of Qdeo video
processing.
x Off (default) – Normal viewing mode.
NOTE
The demo mode is canceled automatically after the player is turned off.
6ˊ Video Only (HDMI 1) – To choose whether only send video signal (no audio signal) to HDMI 1
terminal or not. The available options are:
x No (default) – Both video and audio signals are sent to HDMI 1 terminal.
x Yes – Only video signal is sent to HDMI 1 terminal. This can be useful if you use HDMI 1
only for video display, no need to lower the volume or mute the HDTV connecting to it.
Page 66
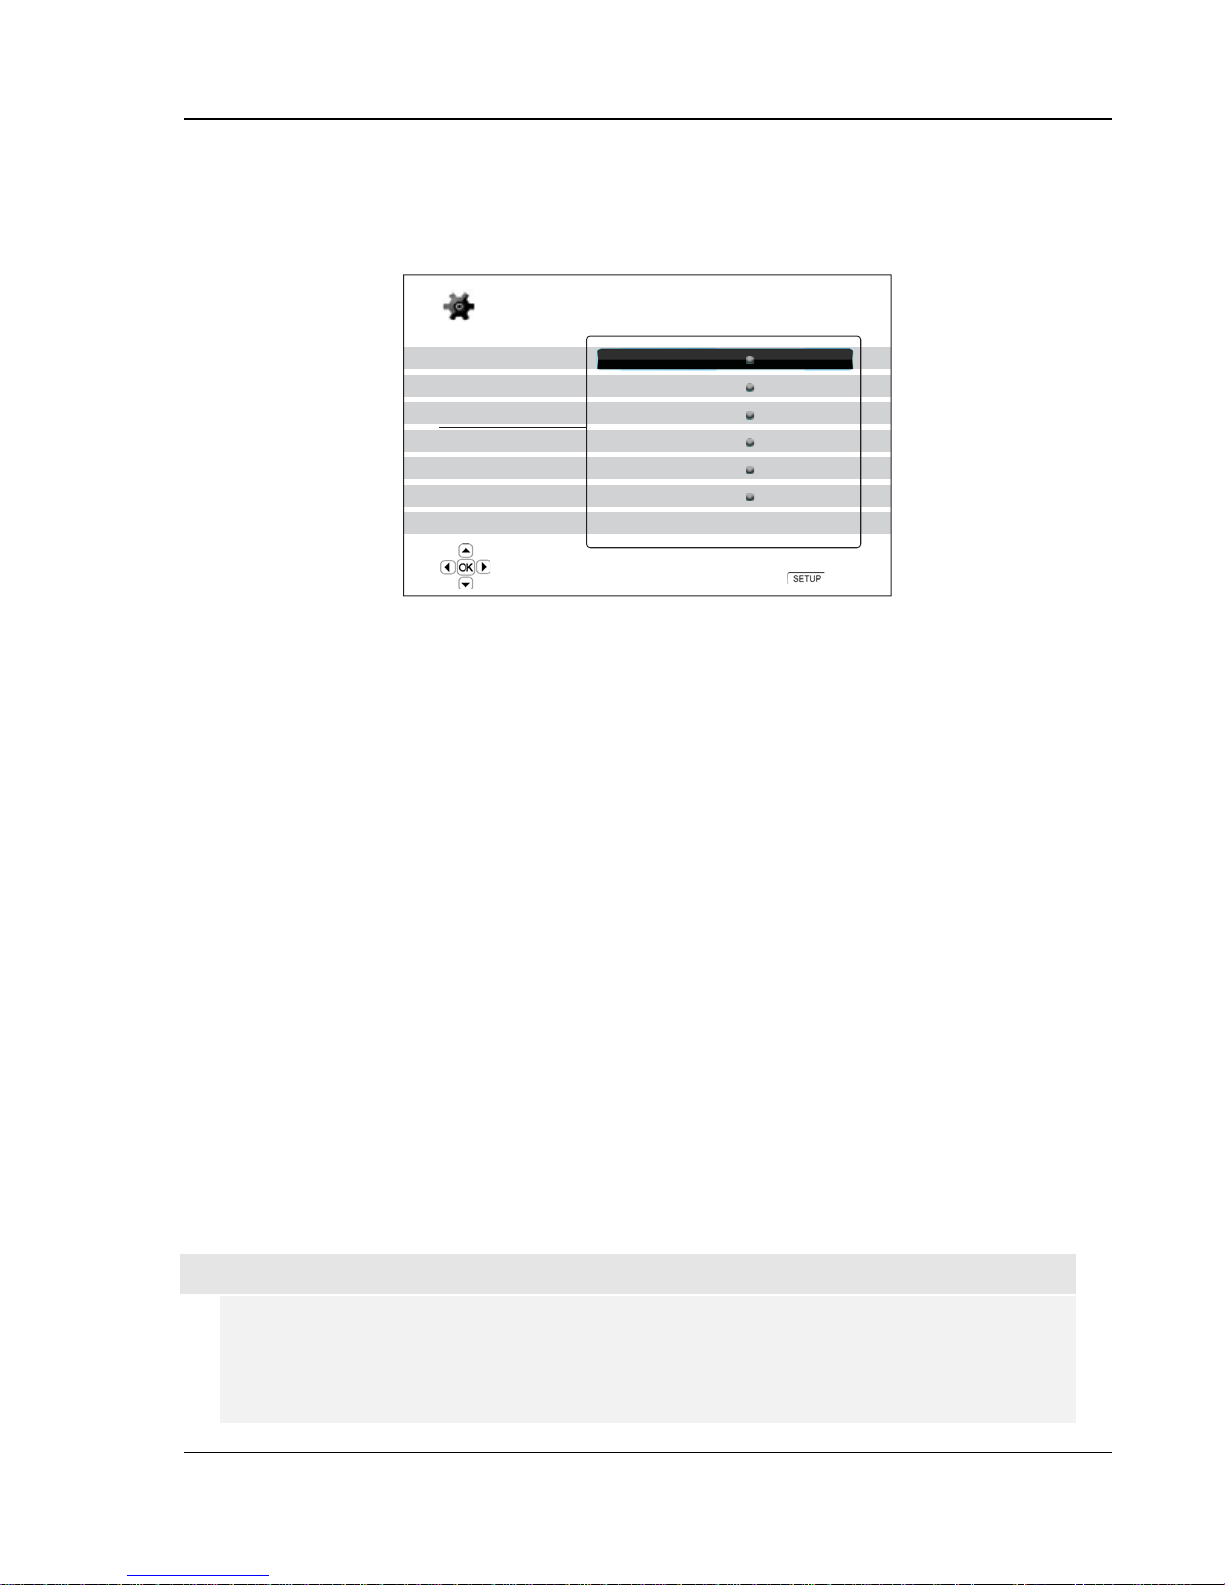
SETUP MENU OPTIONS
61
Audio Format Setup
The “Audio Format Setup” section of the Setup Men u system allows you to configure preferen ces for audio
output formats. The menu items in this section are:
Setup Menu
Playback Setup
Video Setup
Audio Format Setup
Audio Processing
Device Setup
Network Setup
Exit
Set the secondary audio program mixing option
Secondary Audio
HDMI Audio
Coaxial/Optical Output
LPCM Rate Limit
SACD Output
HDCD Decoding
Off
LPCM
LPCM
192k
PCM
On
Exit
1. Secondary Audio: To set the Secondary Audio Program mixing option. Some Blu-ray Discs
contain a secondary audio and video program, such as the director’s commentary. Some Blu-ray
Discs have a sound effect when you make menu choices. This Setup Menu item allows you to
decide whether to mix the Secondary Audio Program and menu clicking sound into the primary
audio. The options are:
x On – The Secondary Audio Program and menu clicking sound are mixed into the primary audio.
Usually this will cause the primary audio volume to be slightly reduced.
x Off – The Secondary Audio Program and menu clicking sound are not mixed into the primary
audio and you cannot hear the secondary audio or menu clicking sound. This setting preserves
the highest possible audio quality for the primary audio.
2. HDMI Audio: To select digital audio output format from the HDMI port. The options are:
x Auto (default) – The player checks with the device connecting to HDMI output to automatically
determine which audio format to use.
x LPCM – Digital audio output via HDMI will be multi-channel Linear PCM format. When this
option is selected, compressed audio bit streams will be decoded by the player. This setting is
recommended when connecting the HDMI output directly to a TV or to a receiver without
advanced audio decoding capabilities.
x Bitstream – Digital audio output via HDMI will be in bitstream format. This option is
recommended when connecting the HDMI output to an A/V receiver or processor that supports
advanced audio decoding, such as Dolby TrueHD and DTS-HD Master Audio.
x Off – No digital audio output via HDMI.
NOTE
If you use HDMI to connect audio to an HDMI A/V receiver or audio processor, it is important
that you choose 720p or higher HDMI output resolution when playing high resolution audio
content (DVD-Audio, SACD, Dolby TrueHD and DTS-HD Master Audio). According to the
HDMI specification, the bandwidth available for audio is proportional to the total bandwidth
used by video. At 480p/576p resolution, the HDMI specification can only support 2 channels
Page 67

SETUP MENU OPTIONS
of audio with high sample rate (up to 192kHz), or 8 channels of audio with standard sample
rate (up to 48kHz). If you play high resolution audio content at the 480p/576p resolution, you
may get reduced audio resolution, incomplete audio channels, or even no audio/video output
at all. Choosing a higher output resolution such as 720p or above allows enough bandwidth
for all high sample rate audio channels.
3. Coaxial/Optical Output: To set the output format for the coaxial/optical digital audio output for
use with Dolby Digital and DTS-compatible receivers. The options are:
x
LPCM – Forces down-mixed 2-channel digital audio output. Choose this setting if your
receiver/amplifier only supports stereo digital (PCM) audio.
x
Bitstream – Passes audio as compressed bitstream format to the receiver/amplifier.
Choose this if your receiver/amplifier can decode Dolby Digital and/or DTS.
4. LPCM Rate Limit: To set the maximum Linear PCM output frequency for the Coaxial/Optical
digital output. This menu item is intended to ensure that the audio output is compatible with
equipment that cannot support high sample rates. It sets an upper limit to decide whether the
player shall down-sample audio. The player does not up-sample audio to higher sample rates.
The options are:
x
48K – Supported by most equipment.
x
96K – Allows a higher sampling rate and frequency response. It can result in better audio
quality. Ensure that the receiver/amplifier can support it.
x
192K (default) – Allows the highest sampling rate and frequency response. It can result in
the best audio quality. However, please ensure your receiver/amplifier can support it.
NOTE
On the BDP-95AU, the “LPCM Rate Limit” can also affect the analog audio performance.
Setting to “192K” may help to get the best analog audio quality.
5. SACD Output: To select audio output format for SACD. The options are:
x
PCM – SACD Direct Stream Digital (DSD) data is converted into multi-channel, highresolution PCM data. The converted PCM data is then output through HDMI or the internal
DAC (Digital to Analog Converter) for the analog audio output ports. If you use a receiver
that supports HDMI v1.1 to listen to SACD, please select this option. You may also want to
select this option if you prefer the sound quality of the DSD-to-PCM conversion.
x
DSD – SACD DSD data is output over HDMI without any conversion. For the analog audio
outputs, DSD data is converted into analog signal directly by the internal DAC. If you use a
receiver that supports HDMI v1.2a with DSD over HDMI, or you prefer the sound quality of
straight DSD to analog, please select this option.
6. HDCD Decoding: To set the audio decoding option for HDCD (High Definition Compatible
Digital) discs. The options are:
x
On – HDCD is decoded by the player. You can enjoy expanded dynamic range and
improved audio resolution.
x
Off – HDCD is treated as regular CD. This is useful when the player is connected to an
HDCD-capable A/V receiver via a digital audio output link (Coaxial, Optical, or HDMI) so the
A/V receiver can perform HDCD decoding.
62
Page 68

SETUP MENU OPTIONS
NOTE
If your receiver is capable of HDCD decoding, it is recommended to set the “HDCD
Decoding”to“Off” on the BDP-95AU, otherwise you might occasionally hear pop or
crackle sounds during the HDCD playback.
63
Page 69
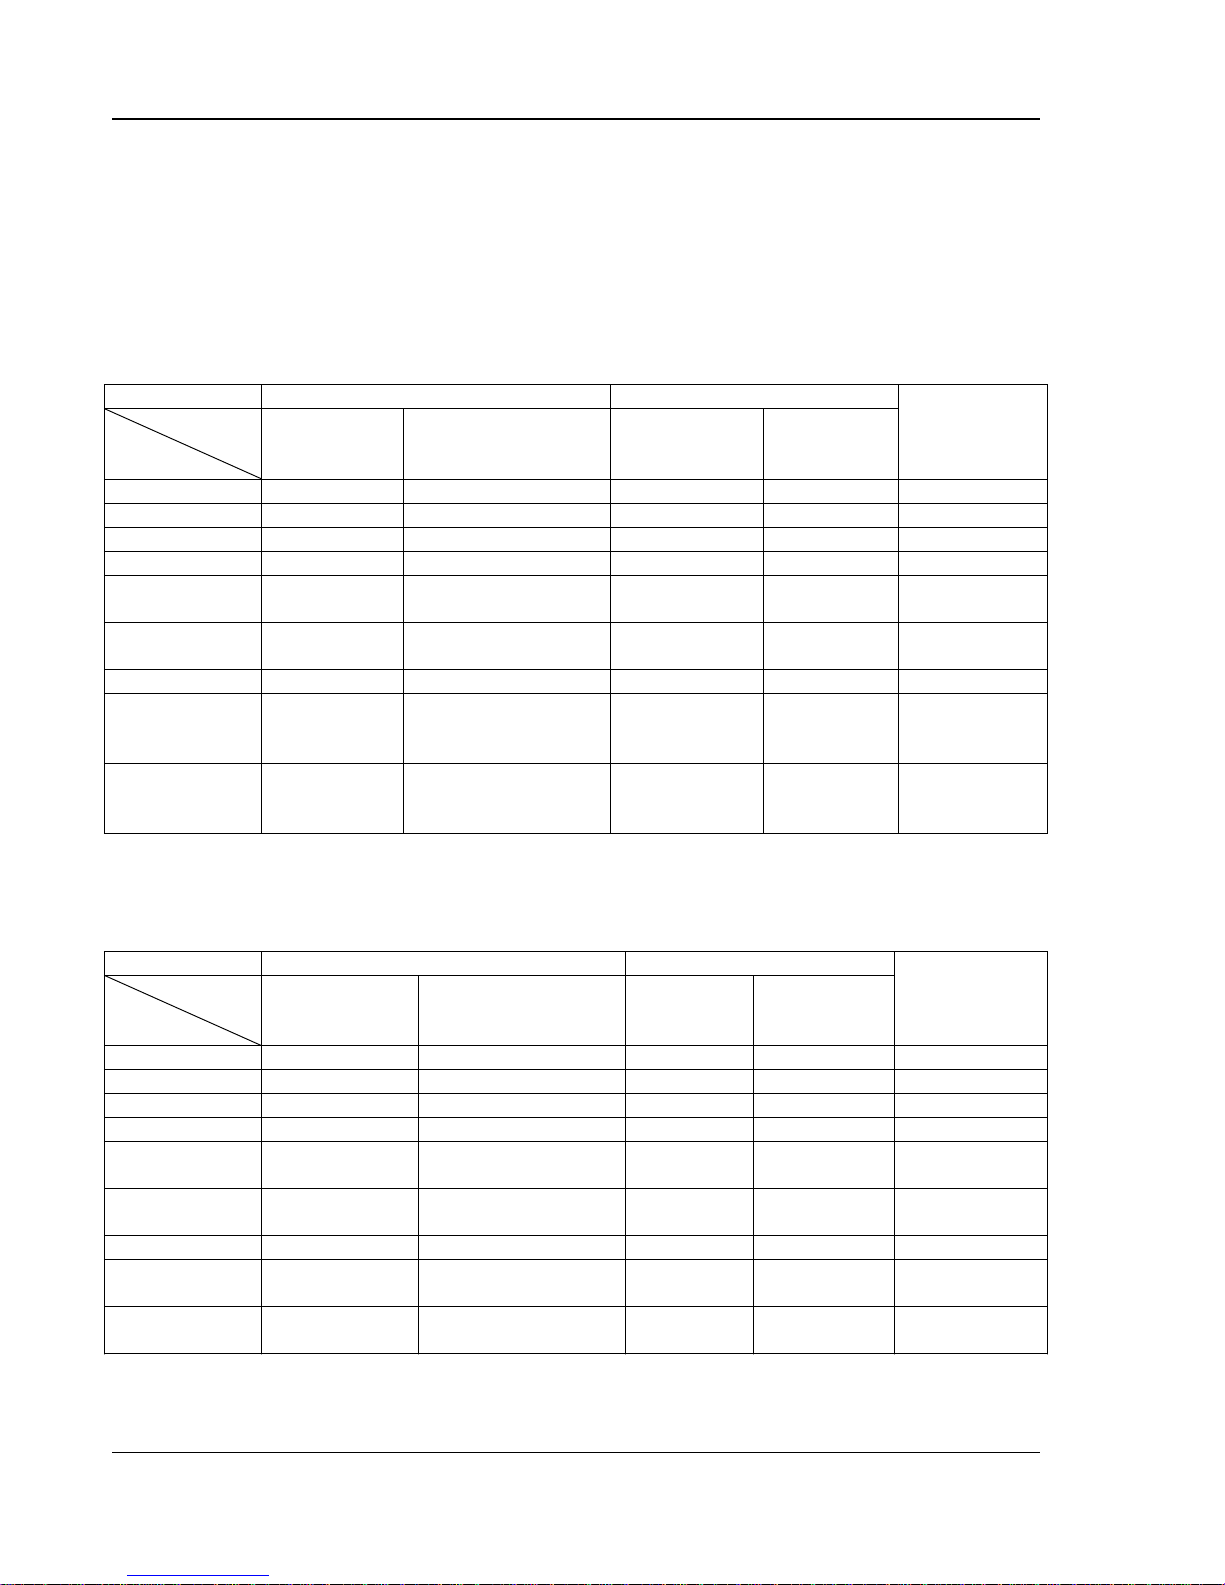
SETUP MENU OPTIONS
64
Audio Signal Reference Chart
Blu-ray Discs may contain many types of audio signal form ats, some of which are hi gh resolution types such
as Dolby TrueHD and DTS-HD Master Audio. Blu- ray Discs also hav e many optional audio components such
as the Secondary Audio Program and menu clicking sound. The player’s Audio Format Setup m enu allows
you to configure the audio output to meet your specific preference. The following chart provides a reference t o
what type of audio signal can be expect ed.
When “Secondary Audio” is set to “Off”:
Output Ports HDMI Output Coaxial/Optical Output
Setting
Source
Bitstream LPCM Bitstream LPCM
Format
LPCM 2ch
LPCM 5.1ch
LPCM 7.1ch
Dolby Digital
Dolby Digital
Plus
Dolby TrueHD
DTS
DTS-HD High
Resolution
DTS-HD
Master Audio
LPCM 2ch LPCM 2ch LPCM 2ch LPCM 2ch 2ch
LPCM 5.1ch LPCM 5.1ch LPCM 2ch LPCM 2ch 5.1ch
LPCM 7.1ch LPCM 7.1ch LPCM 2ch LPCM 2ch 7.1ch
Dolby Digital LPCM 5.1ch Dolby Digital LPCM 2ch 5.1ch
Dolby Digital
Plus
Dolby
TrueHD
LPCM up to 7.1ch Dolby Digital LPCM 2ch Up to 7.1ch
LPCM up to 192kHz
24-bit 7.1ch
Dolby Digital LPCM 2ch Up to 7.1ch
DTS LPCM up to 7.1ch DTS LPCM 2ch Up to 7.1ch
DTS-HD
High
LPCM up to 7.1ch DTS (core) LPCM 2ch Up to 7.1ch
Resolution
DTS-HD
Master Audio
LPCM up to 96kHz
24-bit 7.1ch or
192kHz 24-bit 2ch
DTS (core) LPCM 2ch Up to 7.1ch
Analog MultiChannel
Output
When “Secondary Audio” is set to “On” and the player encounters a disc with secondary audio track or menu
clicking sound:
Output Ports HDMI Output Coaxial/Optical Output
Setting
Source
Bitstream LPCM Bitstream LPCM
Format
LPCM 2ch
LPCM 5.1ch
LPCM 7.1ch
Dolby Digital
Dolby Digital
Plus
Dolby TrueHD
DTS
DTS-HD High
Resolution
DTS-HD
Master Audio
DTS* 2ch LPCM 2ch DTS* LPCM 2ch 2ch
DTS* LPCM 5.1ch DTS* LPCM 2ch 5.1ch
DTS* LPCM 7.1ch DTS* LPCM 2ch 7.1ch
DTS* LPCM 5.1ch DTS* LPCM 2ch 5.1ch
DTS* LPCM up to 7.1ch DTS* LPCM 2ch Up to 7.1ch
DTS*
LPCM up to 192kHz
24-bit 7.1ch
DTS* LPCM 2ch Up to 7.1ch
DTS* LPCM up to 7.1ch DTS* LPCM 2ch Up to 7.1ch
DTS* LPCM up to 7.1ch DTS* LPCM 2ch Up to 7.1ch
DTS* LPCM up to 7.1ch DTS* LPCM 2ch Up to 7.1ch
Analog MultiChannel
Output
Note: All audio output signals are mixed with prima ry, second audio and menu clicki ng sound. DTS * denotes
mixed audio re-encoded into DTS bitstream format.
Page 70

SETUP MENU OPTIONS
Recommended Audio Format Options
Depending on your specific audio/video connection method, the audio format options of the OPPO Blu-ray
Disc Player may need to be adjusted to match your configuration. Please refer to the video and audio
connection methods described previously in this guide and the following audio setup guidelines.
Audio Connection Directly to TV
If the player is connected directly to the TV through HDMI (as described in “Method 1” on page 10), through
DVI and analog L/R audio cables (as described in “Method 3” on page 12), or through component video and
analog L/R audio cables (as described in “Method 4” on page 13), it is recommended that you use the
following audio format options:
o Secondary Audio: On
o HDMI Audio: LPCM
o SACD Output: PCM
o HDCD Decoding: On
o Coaxial Optical Output: (any – not in use)
o LPCM Rate Limit: (any – not in use)
Multi-Channel Digital Audio to Receiver through HDMI
If the player is connected to an A/V receiver or processor with HDMI inputs for high resolution multi-channel
digital audio, you are in luck ! You are now equipped to send all current audio formats to your receiver in pure
digital form. This connection method will typically be as described in “Method 5” on page 14 of this guide.
To get the best possible audio via HDMI, you may need to set the following options on the player’s
audio format Setup Menu, depending on the capabilities of your HDMI-capable receiver:
x
If your receiver supports HDMI v1.3 with decoding capability for high resolution lossless audio
formats such as Dolby TrueHD and DTS-HD Master Audio, please set these audio format
options:
o Secondary Audio: Off (or On if you need secondary audio)
o HDMI Audio: Bitstream
o SACD Output: PCM (or DSD if the receiver supports DSD over HDMI)
o HDCD Decoding: On (or Off if the receiver can decode HDCD)
o Coaxial Optical Output: (any – not in use)
o LPCM Rate Limit: (any – not in use)
x
If your receiver supports HDMI v1.1/1.2 Multi-Channel PCM audio, but not high resolution
lossless audio formats such as Dolby TrueHD and DTS-HD Master Audio, please set these
audio format options:
o Secondary Audio: Off (or On if you need secondary audio)
o HDMI Audio: LPCM
o
SACD Output: PCM (or DSD if the receiver supports DSD over HDMI)
o HDCD Decoding: On (or Off if the receiver can decode HDCD)
o Coaxial Optical Output: (any – not in use)
o LPCM Rate Limit: (any – not in use)
In this configuration you can enjoy all audio formats using the HDMI connection.
65
Page 71

SETUP MENU OPTIONS
Multi-Channel Analog Audio to Receiver
If the player is connected to an A/V receiver through the 7.1ch or 5.1ch analog audio jacks using 8 or 6 RCA
cables (as described in “Method 6” on page 15), you can play all supported audio formats and listen to them
with your A/V receiver and surround sound systems. The following audio format setup options are
recommended:
o Secondary Audio: Off (or On if you need secondary audio)
o HDMI Audio: Off
o SACD Output: PCM or DSD (depending on your listening preference)
o HDCD Decoding: On
o Coaxial Optical Output: (any – not in use)
o LPCM Rate Limit: (any – set to 192k may help to get the best analog
audio quality)
Also set Speaker Configuration in the “Audio Processing” menu:
x
Set Down Mix to “7.1Ch” or “5.1Ch”.
x
Set the speaker size and subwoofer properly according to your actual audio hardware. (see
page 67)
x
Enable or select the multi-channel analog inputs on your receiver
Coaxial or Optical Digital Audio to Receiver
If your audio connection is as described in “Method 7” on page 16 of this guide, and the A/V receiver supports
Dolby Digital and DTS decoding, the following audio format setup options are recommended:
o Secondary Audio: Off (or On if you need secondary audio)
o HDMI Audio: Off
o SACD Output: (any – SACD is not available through the
optical/coaxial output)
o HDCD Decoding: On (or Off if the receiver can decode HDCD)
o Coaxial Optical Output: Bitstream
o LPCM Rate Limit: 48k (or higher if supported by the receiver)
Stereo Analog Audio to Receiver
If you primarily listen to stereo contents or your receiver only offers stereo audio connections, please use the
RCA-style cables to connect the dedicated STEREO AUDIO OUT, or use the XLR3 cables to connect the
BALANCED STEREO AUDIO OUT of the player to your receiver, as described in “Method 8 or 9” on page 17
to 18 of this guide. The following audio format options are recommended:
o Secondary Audio: Off (or On if you need secondary audio)
o HDMI Audio: Off
o SACD Output: PCM or DSD (depending on your listening preference)
o HDCD Decoding: On
o Coaxial Optical Output: (any – not in use)
o LPCM Rate Limit: (any – set to 192k may help to get the best analog
audio quality)
66
Page 72
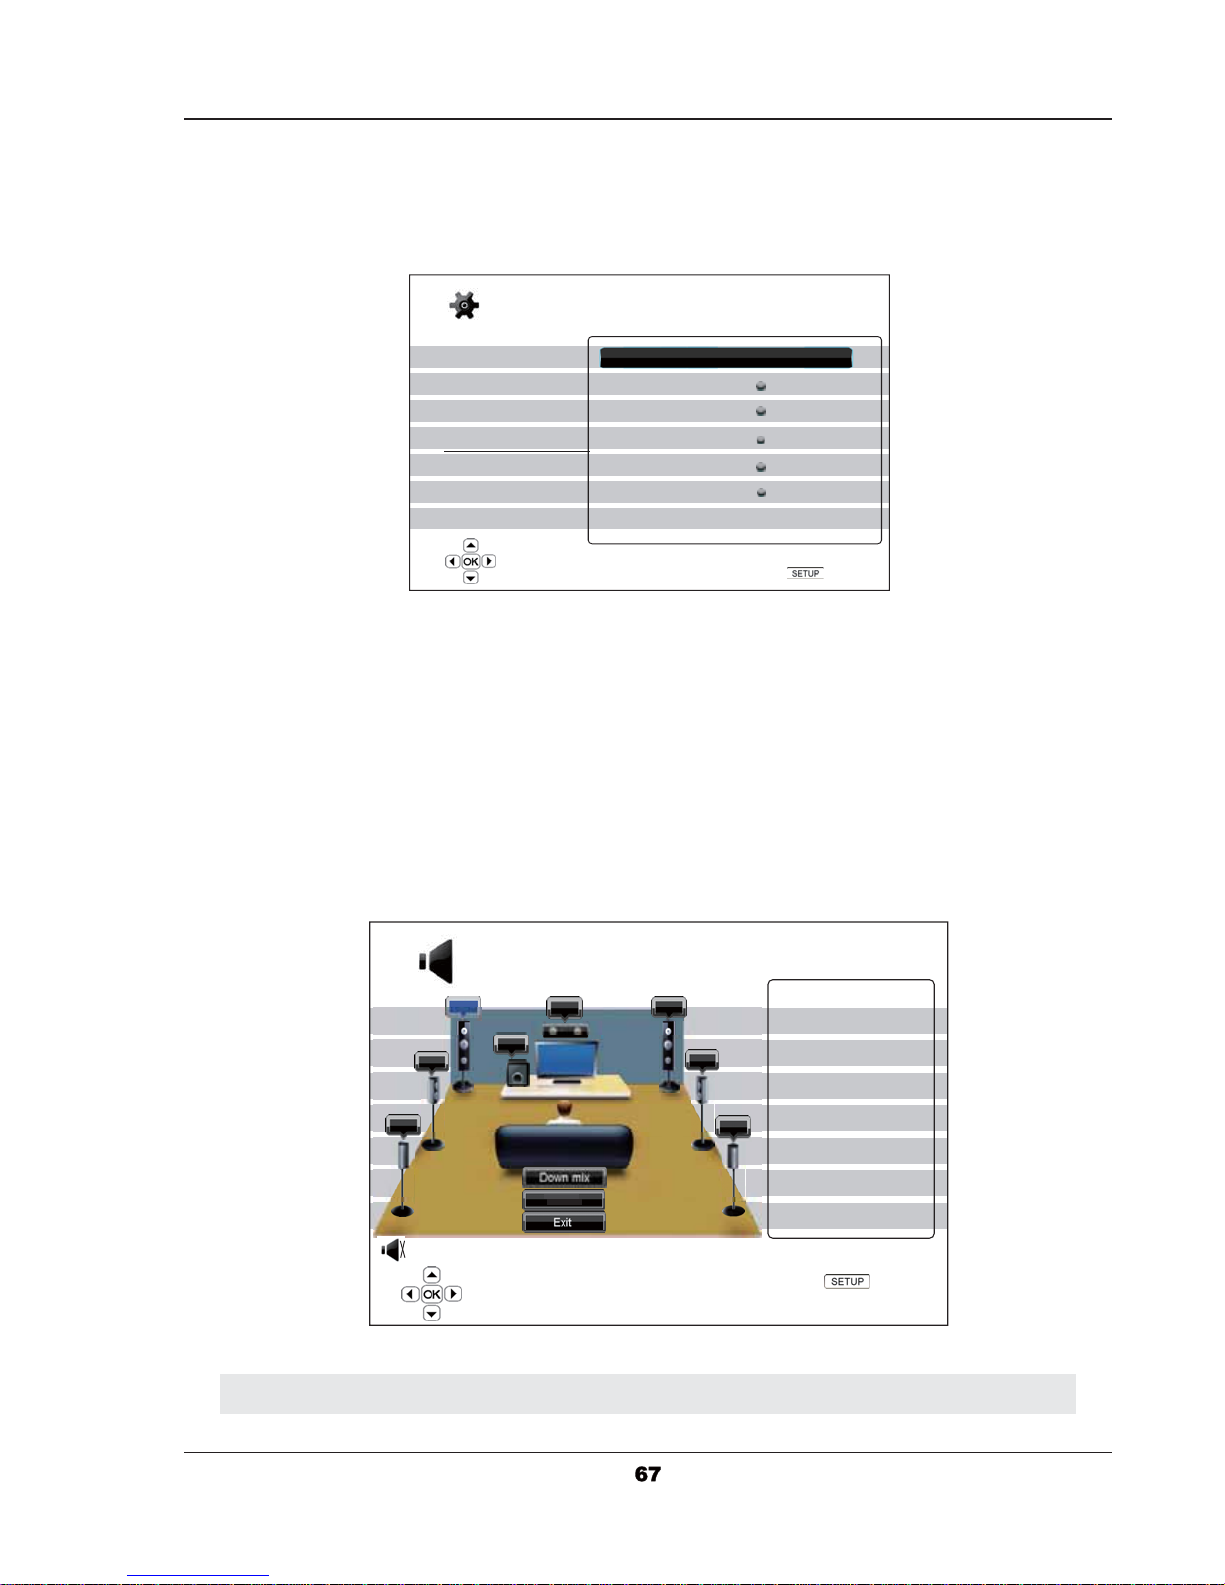
SETUP MENU OPTIONS
Audio Processing Setup
The “Audio Processing Setup” section of the Setup Menu system allows you to configure how the player will
process audio signals before sending them to the output.
Setup Menu
Playback Setup
Video Setup
Audio Format Setup
Audio Processing
Device Setup
Network Setup
Exit
Configure speaker arrangement for the analog output
Speaker Configuration
Crossover Frequency
Dynamic Range Control
Output Volume
XLR Terminal Polarity
Stereo Signal
80Hz
Auto
Variable
Normal
Down-mixed Stereo
Exit
Speaker Configuration
In the Speaker Configuration menu you can configure speaker settings such as down-mix mode,
number of speakers, their distance, size and trim level. The Speaker Configuration menu shows an
illustration of the speaker placements to assist you on properly configuring the speaker parameters.
Upon entering this menu, the cursor is positioned on the front left speaker. You may use the
LEFT/RIGHT ARROW buttons to move the cursor. The RIGHT ARROW button moves the cursor in
clockwise sequence, and the LEFT ARROW button moves the cursor in counterclockwise sequence.
When the cursor is over the “Down Mix”, “Test Tone”or“Exit” options, you can also use the UP/DOWN
ARROW button to highlight these options.
NOTE
SL
SBL
Test Tone : Off
Speaker Configuration
FL
C
SW
Tes t To ne
Configure the front left speaker
FR
Down Mix Mode: 7.1Ch
Front Left Speaker
SR
SBR
Size: Large
Distance: 12.00ft
Trim: 0.0dB
Next Speaker
Exit
Exit
Page 73
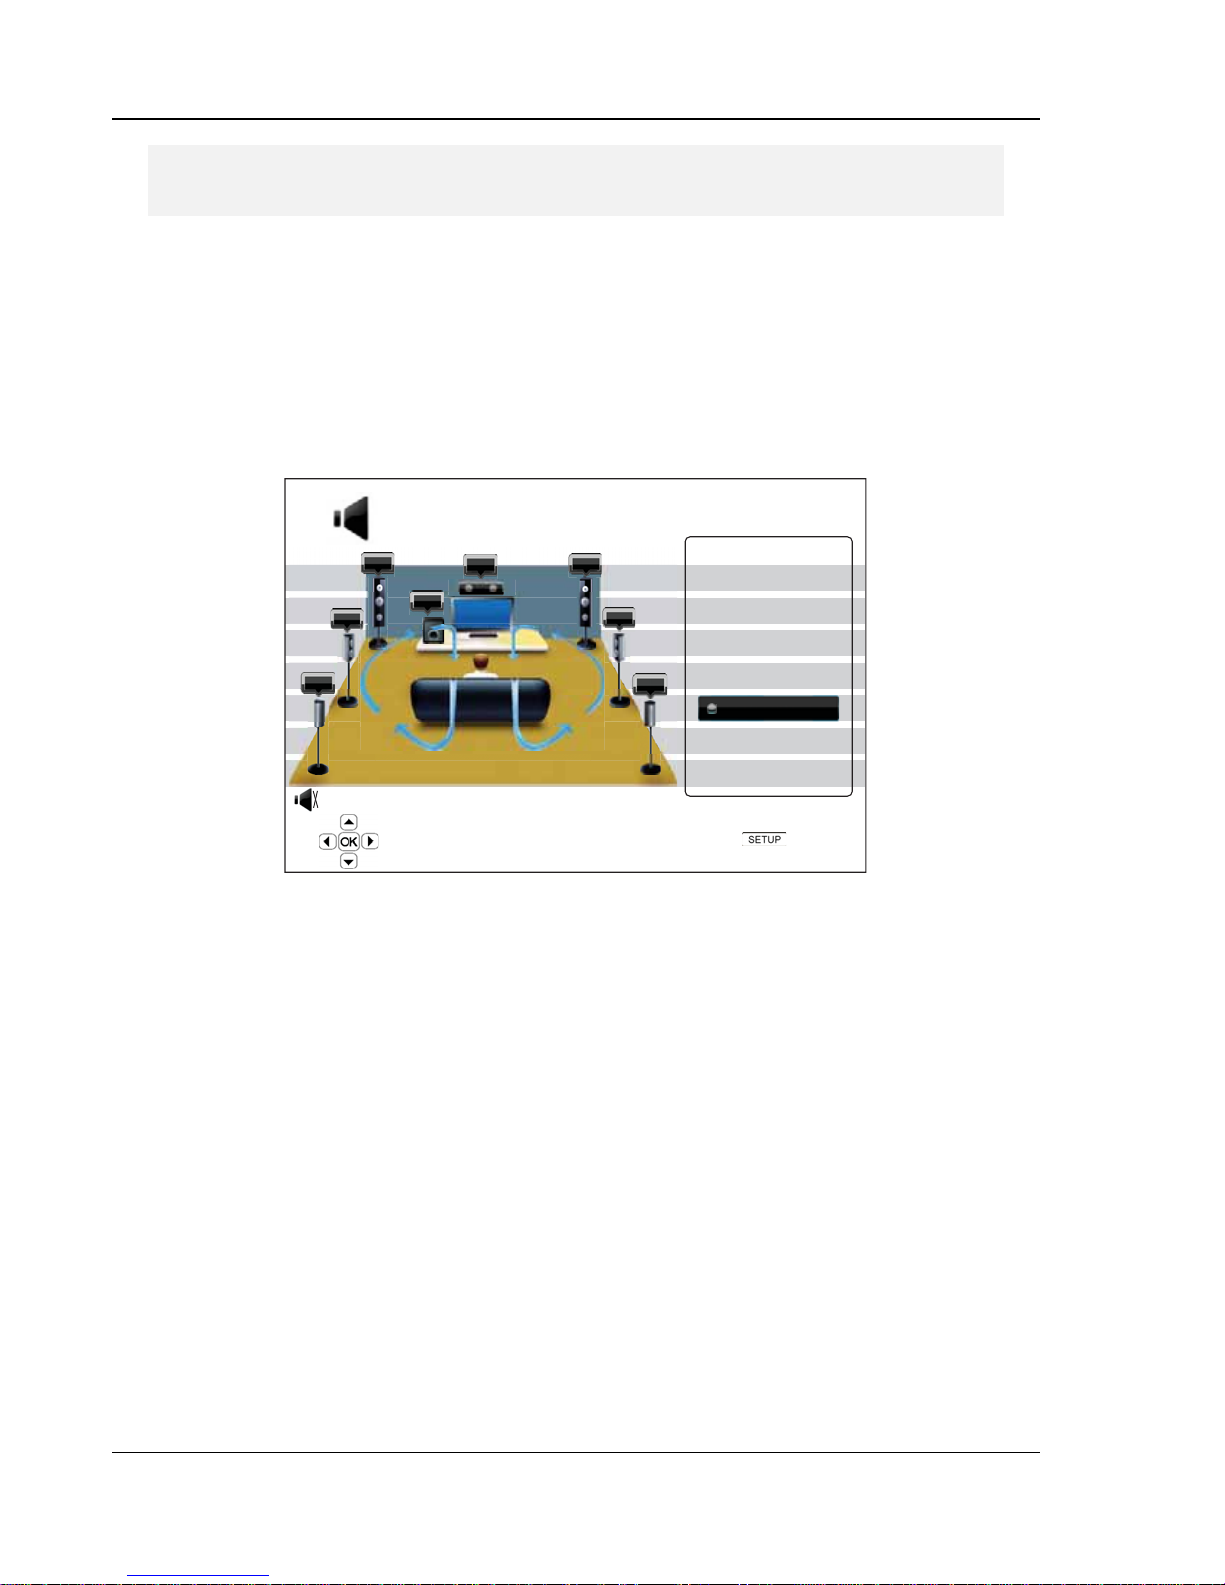
SETUP MENU OPTIONS
68
Speaker Configuration applies to the multi-channel analog audio outputs only. All digital
bitstream and LPCM outputs are unaffected by these settings.
Down Mix Mode
Down mix is the process of converting multi-channel audio to less number of channels. For example,
converting a 5.1ch source to stereo, or converting a 7.1ch source to 5.1ch. Down mixing allows the
audio output from the player to match the exact number of speakers available in your home theater.
The current down mix mode is displayed in the lower right corner of the speaker placement illustration.
To change the audio down mix setting, press the ENTER button while the cursor is over the “Down Mix”
option. The following down mix modes are available:
Speaker Configuration
SBR
Down Mix
LT/RT
Stereo
5.1Ch
7.1Ch
Exit
SL
SBL
Test Tone : Off
FL
C
SW
Choose down mix mode
FR
SR
Down Mix Mode: 7.1Ch
x LT/RT – Left Total/Right Total. The center and surround channels are mixed int o the two front
channels according to the LT/RT matrix. A Dolby Pro Logic receiver will decode the twochannel audio into surround audio.
x Stereo - This mode down-mixes multi-channel audio to 2-channel stereo output. For original
stereo content the output will not change. For original multi-channel content the surround and
center channels will be mixed with the left and right front channels. Recommended for use with
TV sets or stereo receiver/amplifiers.
x 5.1Ch – This mode enables 5.1ch decoded audio output. The number of actual output
channels depends on the disc. If the source content has more channels, the surroun d back
channels will be mixed into the surround channels.
x 7.1Ch – This mode enables 7.1ch decoded audio output. The number of actual output
channels depends on the disc. For 6.1ch contents, the left and right surround back speakers
will both output the same surround back audio channel.
Test Tone
Test tone is a special group of artificially-created sou nds that are used to test your audio speaker system and
help to identify any wiring faults. By default the Test Tone is set to “Off”, with the status display ed in the lower
left corner of the screen.
Page 74
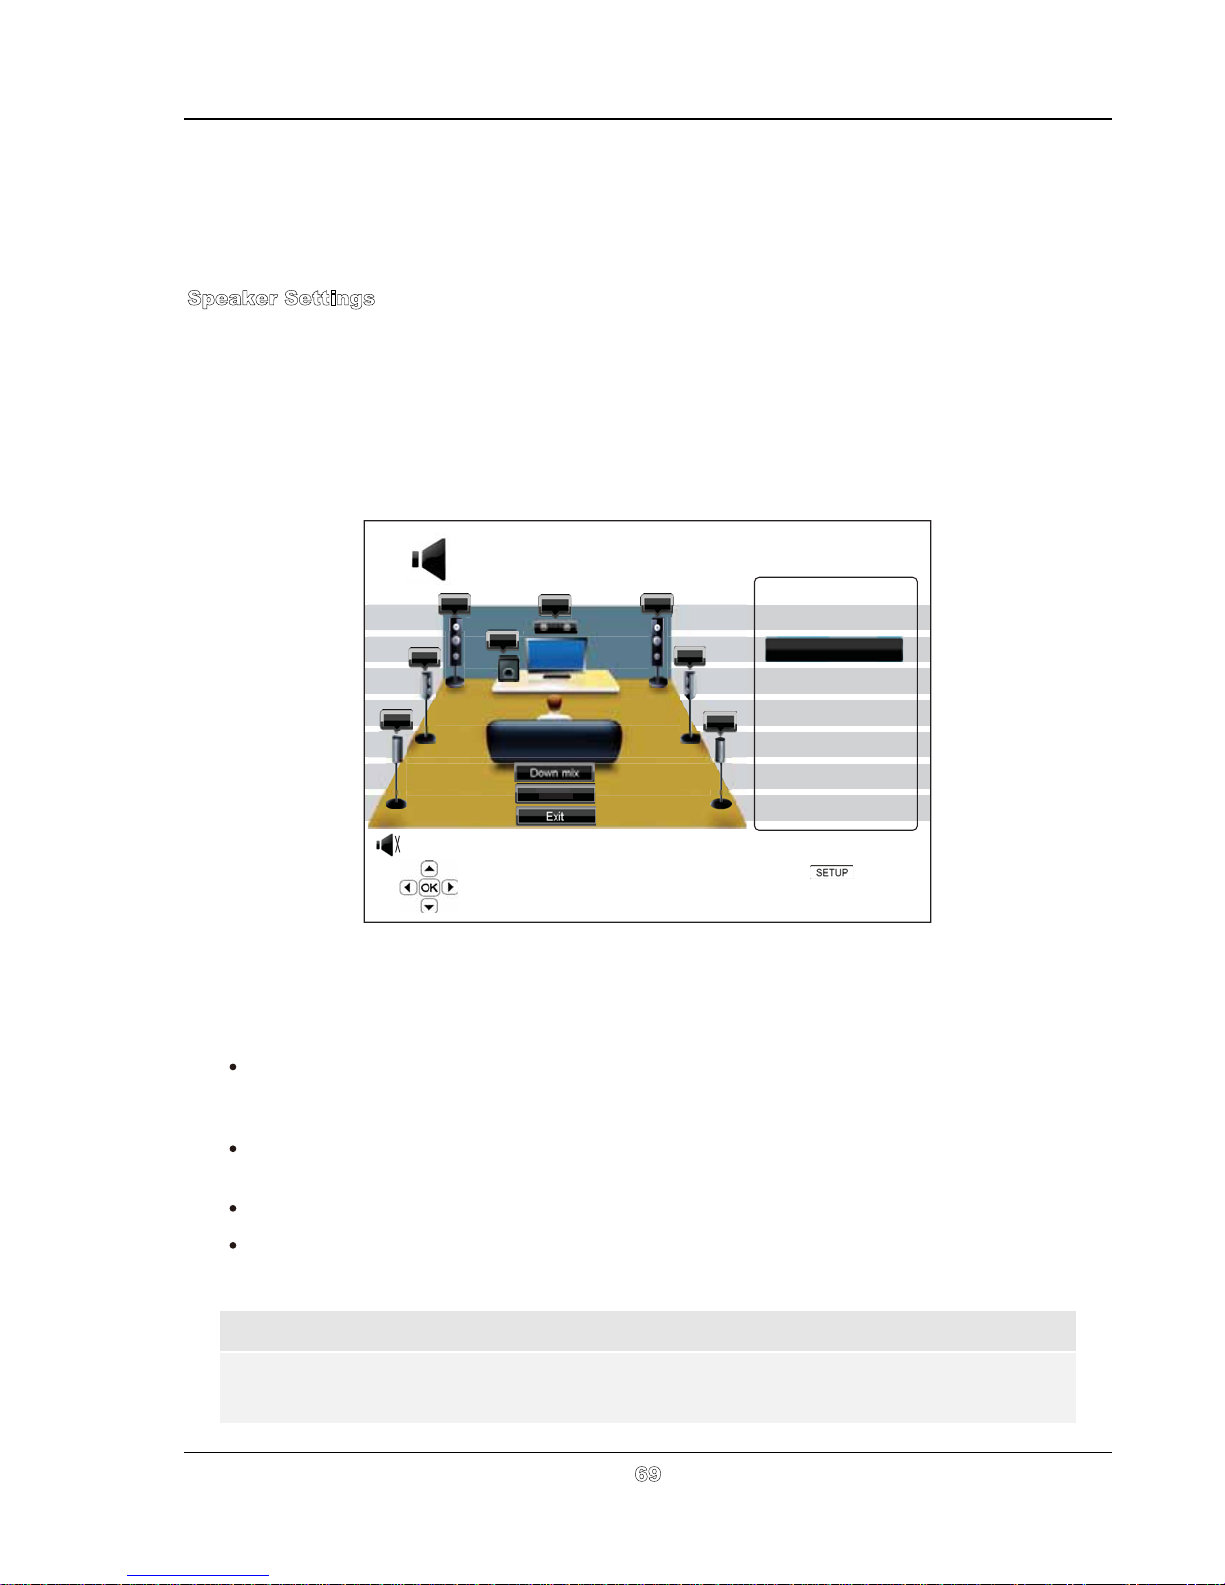
SETUP MENU OPTIONS
To begin the test, press the ARROW buttons to highlight the “Test Tone” option, press the Enter button to
change the test tone status to “On”. Then press ARROW buttons to select a speaker, you will hear the test
sounds. To stop the test process, press ARROW buttons to highlight the “Test Tone” option and press the
Enter button to switch the status back to “Off”. Please note these test tones only apply on multi-channel audio
outputs.
peaker Settings
S
For each speaker in the home theater system, you can set its size, distance and trim level. To configure
a speaker, use the LEFT/RIGHT ARROW buttons to move the cursor to highlight the speaker and press
the ENTER button. The Speaker Settings menu on the right side of the screen will be activated. In the
Speaker Settings menu, use the UP/DOWN ARROW buttons to select a parameter, and then press the
ENTER button to change it. To exit the Speaker Settings menu and return to the Speaker Configuration
illustration, press the LEFT ARROW button or select the “Exit” option. You can also move on to
configure the next speaker by selecting the “Next Speaker” option.
Speaker Configuration
FL
C
FR
Front Left Speaker
SBL
TestTone : Off
SL
SW
Tes t Tone
Down Mix Mode: 7.1Ch
Configure the front left speaker
SR
SBR
Size: Large
Distance: 12.00ft
Trim: 0.0dB
Next Speaker
Exit
Exit
The following speaker parameters can be configured:
1. Size: The speaker size parameter sets bass filtering control for the speakers. The options are:
Large – Bass frequencies are passed to the speakers. The bass frequency is set in the
“Crossover Frequency” option of the “Audio Processing” section of the Setup menu (see page
71 for details).
Small – Bass frequencies are not passed to the speakers to reduce possible distortion. If the
subwoofer is available, bass frequencies are redirected to the subwoofer.
On (for subwoofer only) – Specify that a subwoofer is available.
Off – Speaker for the corresponding position does not exist. Audio for the missing speaker is
redirected to other speakers or discarded if redirection is not possible.
NOTE
The front, surround and surround back speakers are configured as pairs.
“Size” for
size
of one speakerChanges to the will automatically change the other speaker of the pair.
69
Page 75
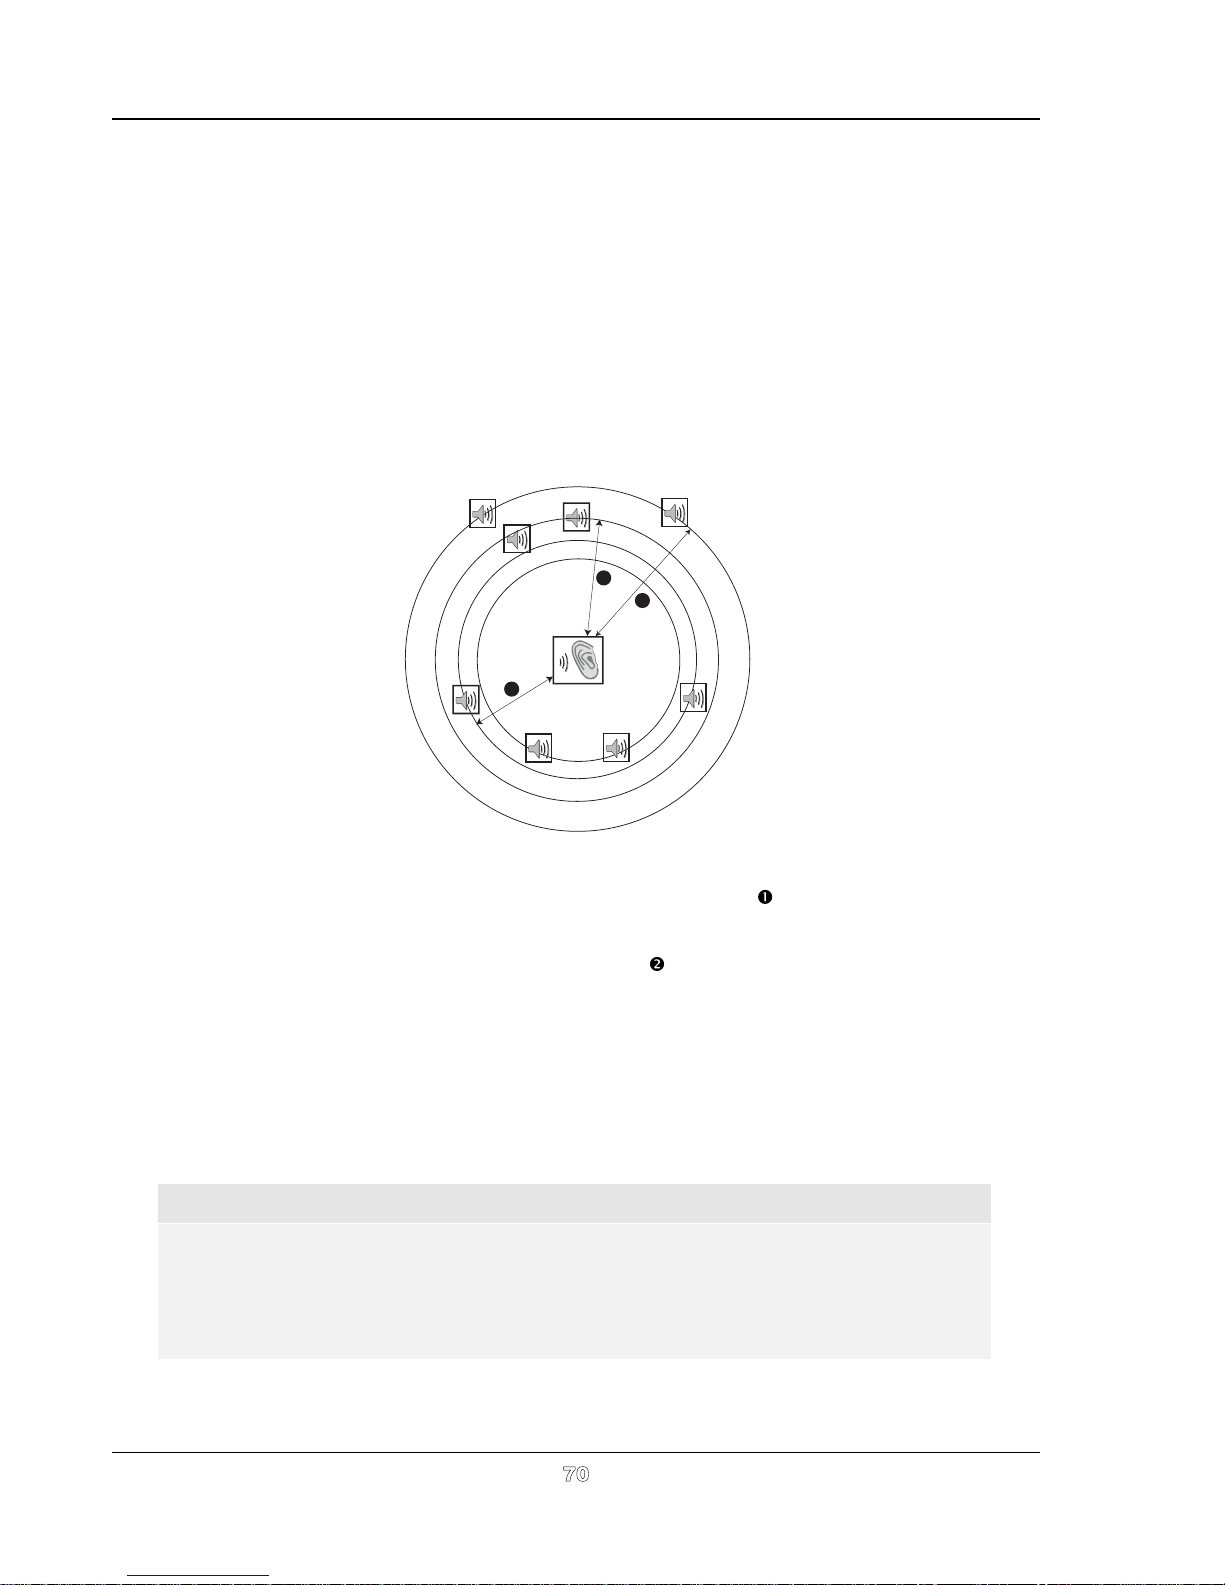
SETUP MENU OPTIONS
2. Distance: The speaker distance parameters set delay control for the corresponding audio channel.
The delay is to compensate for the audio propagation time difference caused by the placement of
speakers.
Speaker distance compensation is not required if the A/V receiver has the capability to adjust
channel delay and compensate for speaker distance differences. However, if your receiver does
not have such functions (most receivers do not offer these functions for their multi-channel analog
input), you may adjust them through the player. Speaker distance delay is only applied if the player
is decoding multi-channel audio. If you use bitstream audio output to your A/V receiver, the
bitstream audio is not adjusted for speaker distance delay.
A typical 7.1-channel speaker layout and their speaker distance measurements are displayed as
below:
Speaker Icons:
FL - Front Left
FR - Front Right
C - Center
SW - Subwoofer
SL - Surround Left
SR - Surround Right
SBL - Surround Back Left
SBR - Surround Back Right
SL
FL
SW
3
C
2
SBL SBR
FR
Distances:
1
SR
1 - Listener to Front
2 - Listener to Center
3 - Listener to Surround Left
In the above diagram, measure the distance (in feet) from the primary listening position to the Front
Left or Front Right Speaker. Enter the distance of the Front Speakers (
in the above picture) into
the “Speaker Configuration” menu.
Next, measure the distance (in feet) from center speaker (
) to the listening position. Move the
cursor to highlight the Center speaker in the Channel Delay setup page, and enter the distance (as
close as possible) in feet. Repeat for each speaker in the system (Center, Surround Left, Surround
Right, Surround Back Left, Surround Back Right and Subwoofer) as available. The player will insert
appropriate delay to make sure sound waves from different speakers arrive at the listener at the
same time.
If the channel delay settings cannot match your speaker configuration, please set
the same
and use your receiver/amplifier to set the channel delay.
NOTE
Starting from the firmware version BDP9x-52-0707 (released on July 13, 2011), It is possible
to independently set distances for each speaker (previously speaker groups were treated as
linked pairs), speaker distances can be set to the actual spatial distance of the speakers
(previously no speaker could be set further from listening position and the Front Left/Right
speakers), speaker distances can now be set in quarter foot increments.
3. Trim Level: The speaker trim level parameters sets the volume of each individual channel.
Channel trim is generally not required since most A/V receivers have the capability to adjust
all distances to
70
Page 76

SETUP MENU OPTIONS
channel trim and compensate for speaker sensitivity differences. However, if your receiver does not
have such functions (many receivers do not support channel trim for their multi-channel analog
inputs), you may adjust channel trim through the player. For most accurate results, it is
recommended that you use test tones from a calibration disc, such as Digital Video Essentials HD
Basics, and a SPL (Sound Pressure Level) meter. The trim level can be set to +/- 10dB in 0.5dB
increments.
NOTE
Starting from the firmware version BDP9x-52-0707 (released on July 13, 2011), the “Test
Tone” can be used in conjunction with the player’s trim control. Each speaker can be set
to independent trim levels and there is no linked pair limitation.
Other Audio Processing Settings
In addition to Speaker Configuration, Crossover Frequency and Dynamic Range Control are audio
processing settings that can be configured:
1. Crossover: To set the Bass Management kick-in frequency for all speakers. When the speaker
size is set to “Small” in “Speaker Configuration” (see page 69), bass information below this
frequency are not passed to the speakers to reduce possible distortion, and if the subwoofer is
available, bass information will be redirected to the subwoofer. The available options are:
x
40Hz / 60Hz / 80Hz / 90Hz / 100Hz / 110Hz / 120Hz / 150Hz / 200Hz / 250Hz – These are
the available crossover frequencies. You can press the UP/DOWN ARROW buttons and
the ENTER buttons to select it. This option applies to all speakers (center, front, surround,
and surround back speakers). By default the crossover frequency is 80Hz.
2. Dynamic Range Control: To set the Dynamic Range Compression (DRC). DRC can smooth out
the sonic peaks and valleys common with wide-range digital audio. Enabling DRC may make low
level audio more audible during low-level listening. Turning off DRC restores the sonic energy
present in the original recording. The available options are:
x
Auto – Play at the dynamic range specified by the disc. This option applies to Blu-ray
Discs only. For other disc types no dynamic range compression is applied.
x
On – Turn on dynamic range compression.
x
Off – Turn off dynamic range compression.
NOTE
The Dynamic Range Compression is applied on the analog audio output, it also works on the
digital audio output (HDMI, Coaxial and Optical) when the audio format is set to PCM.
3. Output Volume: To set to enable or disable the analog volume controls (also known as Variable
Audio). The available options are:
x Variable – Enable the analog volume control. Use the VOL-/+ buttons on the remote to
decrease/increase the analog audio output level (the maximum is 100).
x Fixed – Disable the analog volume control. The VOL-/+ buttons on the remote will no
longer affect the analog audio output, and the volume level is fixed to 100.
71
Page 77

4. XLR Terminal Polarity: To set the polarity of the BALANCED STEREO AUDIO OUT terminals on
BDP-95AU. Please compare the positions of "hot" (positive) and "cold" (negative) pins on BDP-
95AU terminals (shown in the page 18) with those on your audio system. The available options
are:
x
Normal – The XLR three-pin positions on your audio system are the same as those on
BDP-95AU terminals.
x
Inversion – The positions of "hot" (positive) and "cold" (negative) pins on your audio
system are switched comparing with those on BDP-95AU terminals.
5. Stereo Signal: To select the audio source that will be processed and sent out through the STEREO
AUDIO OUT and the XLR BALANCED STEREO AUDIO OUT terminals. The available options a
re:
x Down-mixed Stereo – The stereo or down-mixed stereo signals are processed and sent
out from the dedicated stereo output terminals.
x Front Left/Right – The original Front Left (FL) and Front Right (FR) signals are sent out
from the dedicated stereo output terminals. The purpose is to fully utilize the better DAC
hardware originally assigned to the dedicated stereo outputs for customers who prefer
multi-channel speakers and do not need the dedicated stereo output or zone 2 output.
When this option is selected, the dedicated stereo ou
tput ports should be used as the Front
outputs of the 7.1ch / 5.1ch / Stereo Audio group. The original FL/FR RCA connectors
should not be connected.
72
Page 78
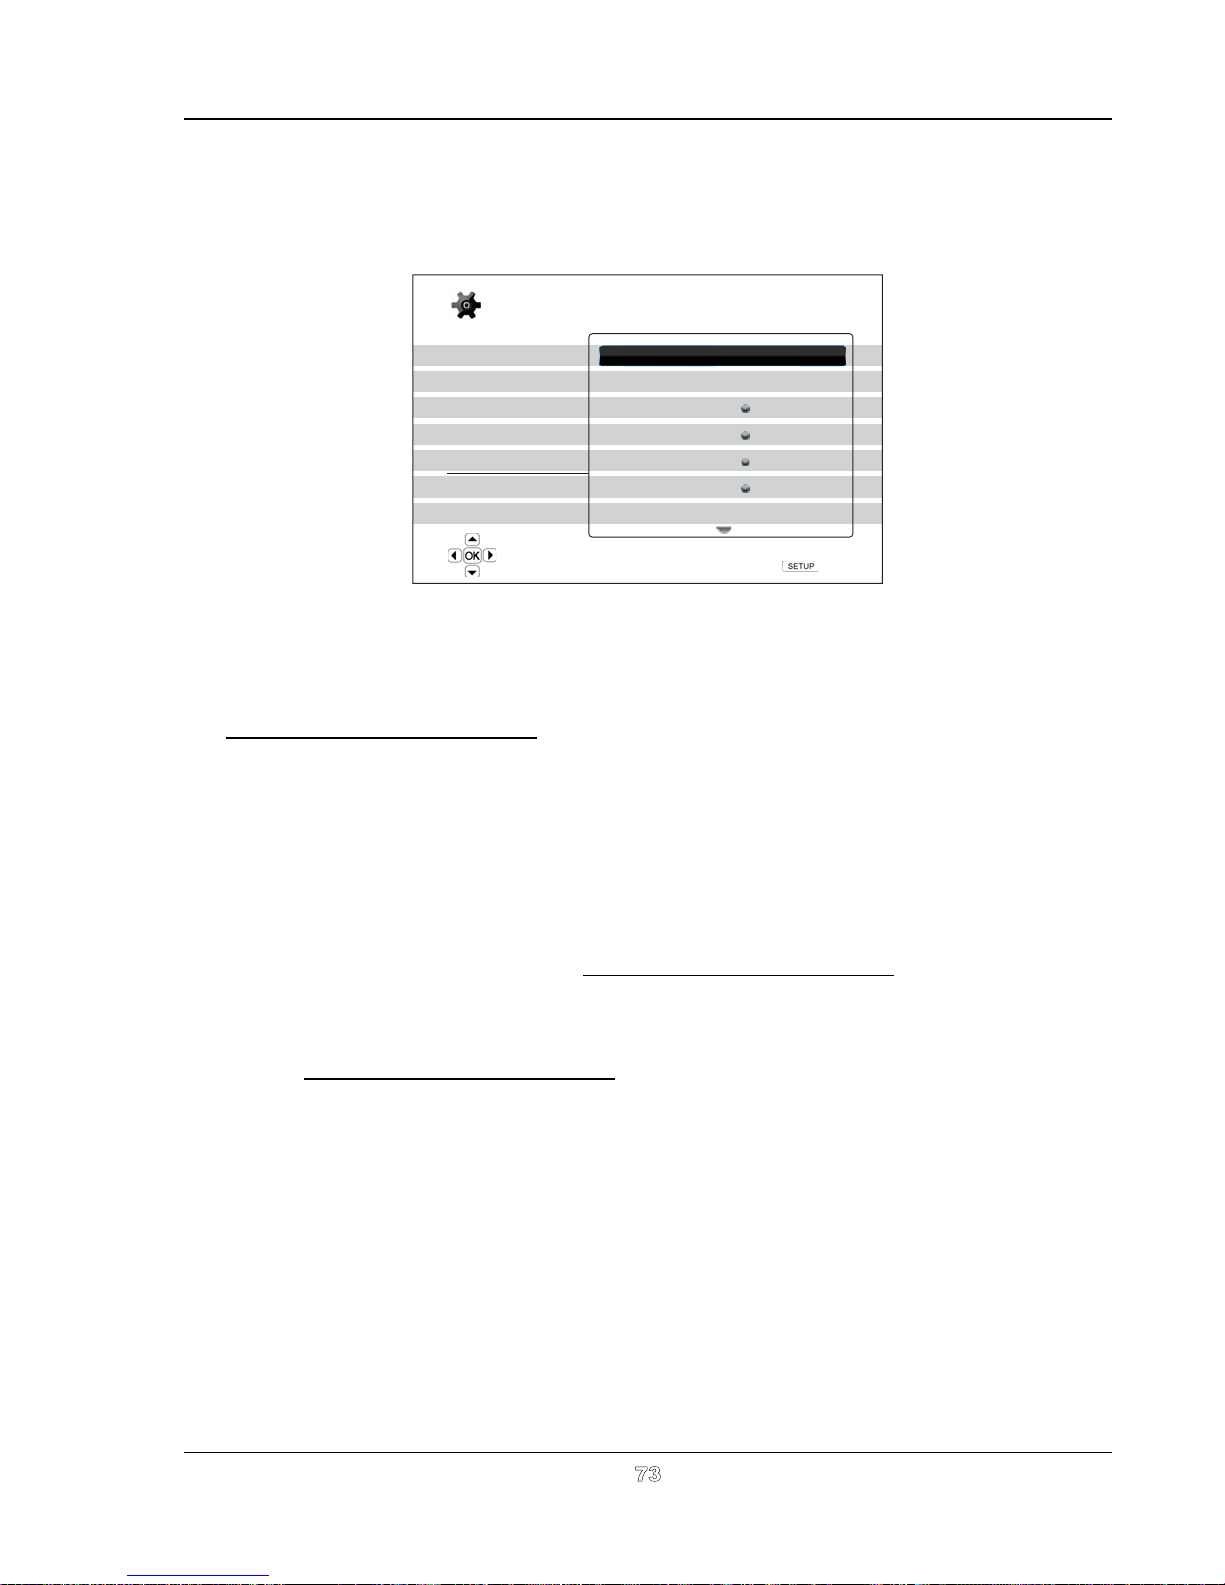
SETUP MENU OPTIONS
Device Setup
The “Device Setup” section of the Setup Menu system allows you to configure additional player options related
to the hardware and control functions. The menu items in this section are:
Setup Menu
Playback Setup
Video Setup
Audio Format Setup
Audio Processing
Device Setup
Network Setup
Exit
View current firmware version and system information
Firmware Information
Firmware Upgrade
Firmware Notification
Remote Control Code
HDMI CEC
Front Panel Display
Persistent Storage
%'3ɯɯɯɯɯɯɯ
On
Code 1
Off
Standard
Exit
1. Firmware Information: To display the currently installed firmware version.
2. Firmware Upgrade: To upgrade the player’s firmware. Should be performed with no disc loaded,
the disc tray shut and no USB device connected to the player.
www.internationaldynamics.com.au to check for firmware update
Please visit web site
and instructions on installing the
updates.
The firmware is
the system software that controls the features and functions of the player. Since
the Blu-ray Disc specifications are new and evolving, it is possible that a Blu-ray disc manufactured
after the player was manufactured uses certain new features of the Blu-ray Disc specifications. To
ensure the best possible viewing experience, the player may need a firmware update from time to
time.
There are three ways to upgrade the player’s firmware. The options are:
x Via Disc –
updates and instructions on installing the updates.
Please visit web site www.internationaldynamics.com.au to check for firmware
Please
follow
instructions that
the
come with the upgrade disc.
x
Via USB –
You may download the firmware files from the web site
www.internationaldynamics.com.au and then use the USB drive to upgrade the player.
Please follow the instructions
Via Network – If the player has a working Internet connection (see
x
on the firmware download web page.
page 20 and 76), you
may upgrade the player directly over the Internet. Please follow the instructions on your TV
screen.
3. Firmware Notification (on/off): To turn on/off the capability that the player automatically check
whether any new firmware versions are available on the server and notify the user about new
firmware on the screen. To receive the notification, a working internet connection is required. By
default it is turned ON.
4. Remote Control Code: The OPPO BDP-95AU Blu-ray Disc Player can respond to one of 4 sets of
remote control codes. The default is “Code 1”. If you have other OPPO products placed close to the
73
Page 79

SETUP MENU OPTIONS
BDP-95AU, the other products may respond to the BDP-95AU remote control. In this case you can
select a different remote code to avoid conflicts. The available codes are:
x
Code 1 – OPPO disc player remote code set 1. This is the default remote code.
x
Code 2 – OPPO disc player remote code set 2. Use this code if you have other OPPO
products placed close to this BDP-95AU.
x
Code 3 – OPPO disc player remote code set 3. Use this code if you have other OPPO
products placed close to this BDP-95AU.
x
Alt. Code – Alternative remote code. The alternative remote control code enables users to
program their universal remote controls that come with TV, projector or A/V receiver to
operate the OPPO player. If the universal remote control has a DVD player control function,
please program it with the code for TOSHIBA, PHILIPS, MAGNAVOX, MARANTZ or
ZENITH DVD players. Since each brand of remote control may have several sets of codes,
you may need to try several times using different codes to find a working code.
If you have selected a new remote code, you must set the remote control handset to use the same code.
Please refer to the Changing the Remote Code section on page 9 of this manual for details. If you have
selected “Alt. Code”, the supplied handset will not operate the player, and you must use a universal
remote control with the properly configured code set.
5. HDMI CEC: To set HDMI Consumer Electronics Control (CEC) mode. CEC is an optional HDMI
feature that enables convenient remote control and automatic setup of consumer electronics over
the HDMI connection. The remote control function allows you to use a single remote handset to
operate multiple devices connected via HDMI. For example, you may use the TV remote to control
playback of the Blu-ray Disc player. The automatic setup function can automatically turn on the TV
and change to the proper input when you start playing a disc in the Blu-ray Disc player. It can also
turn off the player automatically when you turn off the TV. The implementation and compatibility of
this feature varies by device manufacturer. Each may only implement part of the features or add
their own proprietary functions. The manufacturer-specific implementation of the HDMI CEC
function is often given a proprietary name of “…Link” or “…Sync”. The OPPO BDP-95AU Blu-ray
Disc Player provides three HDMI CEC function modes for each of its HDMI outputs:
x
HDMI 1 – HDMI CEC is enabled on HDMI 1 output. Use this mode if your other devices are
compatible with the player.
x
HDMI 1 (Limited) – HDMI CEC is enabled on HDMI 1 output, but the BDP-95AU will only
respond to playback control commands. It will not respond or issue power on/off and input
selection commands. Use this mode if you do not want the automatic setup function to turn
on/off your devices.
x
HDMI 2 – HDMI CEC is enabled on HDMI 2 output. Similar to HDMI 1.
x
HDMI 2 (Limited) – HDMI CEC is enabled on HDMI 2 output, but the BDP-95AU will only
respond to playback control commands. Similar to HDMI 1 (Limited).
x
Off (default) – HDMI CEC feature is turned off on both HDMI output terminals. The player
will not respond to HDMI CEC commands from other devices, nor will it setup other devices
automatically.
6. Front Panel Display: To control the display intensity of the front panel Vacuum Fluorescent Display
(VFD) information windows. If you feel that the display becomes a distraction to your enjoyment of
the video, this option allows you to dim it or turn it off. The available options are:
x
Standard (default) - The VFD windows are at full brightness. The display window will
automatically turn off after 30 seconds, and resume momentarily if there is any user
operation.
74
Page 80

SETUP MENU OPTIONS
x
Dim - The VFD windows are at reduced brightness. The display window will automatically
turn off after 10 seconds, and resume momentarily if there is any user operation.
x
Off – The VFD windows are turned off. In this mode the display will resume momentarily if
there is any user operation.
7. Persistent Storage: To manage the persistent storage for BD-Video contents. The persistent
storage is a data storage area that holds additional contents for BonusView and BD-Livefeatures.
The data will be kept even if you turn off the player. The following persistent storage management
options are available:
x
Storage Device – To select which storage device should be used as the persistent storage.
The OPPO BDP-95AU preserves about 1GB of internal flash memory that can be used for
persistent storage. There are also two (2) USB ports on the player that can accept a USB drive
to be used as the persistent storage. The choices are:
x
Internal Flash – Use the internal flash memory for persistent storage.
x
USB Drive – Use a USB drive for persistent storage. To meet the specification for BD-Live,
a USB flash drive of 1GB or larger is required. A USB hard drive is not recommended.
NOTE
The new storage device choice becomes effective only after the player is restarted. Please
make sure that you turn off the player and then turn it back on after changing the “Storage
Device” option.
x
Total Space – To display the total space of the persistent storage.
x
Available Space – To display the currently available space of the persistent storage. If the
available space becomes too low, some Blu-ray Discs may not play properly.
x
Erase BD-Video Data – To erase the BD-Video data from the persistent storage.
8.
®
VOD DRM: To register or de-register your player for DivX®digital right management for
DivX
video on demand. A register or de-register code will be generated and shown.
9.
Easy Setup: Choose this option to bring up the Easy Setup procedure (see details on page 23).
10.
Reset Factory Defaults: To reset all settings to the factory default value. This operation also
removes any application activation and account information such as with Picasa. The remote
control code, parental control password and ratings will not be reset. This operation is only
available when the playback is completely stopped or when there is no disc loaded.
Page 81
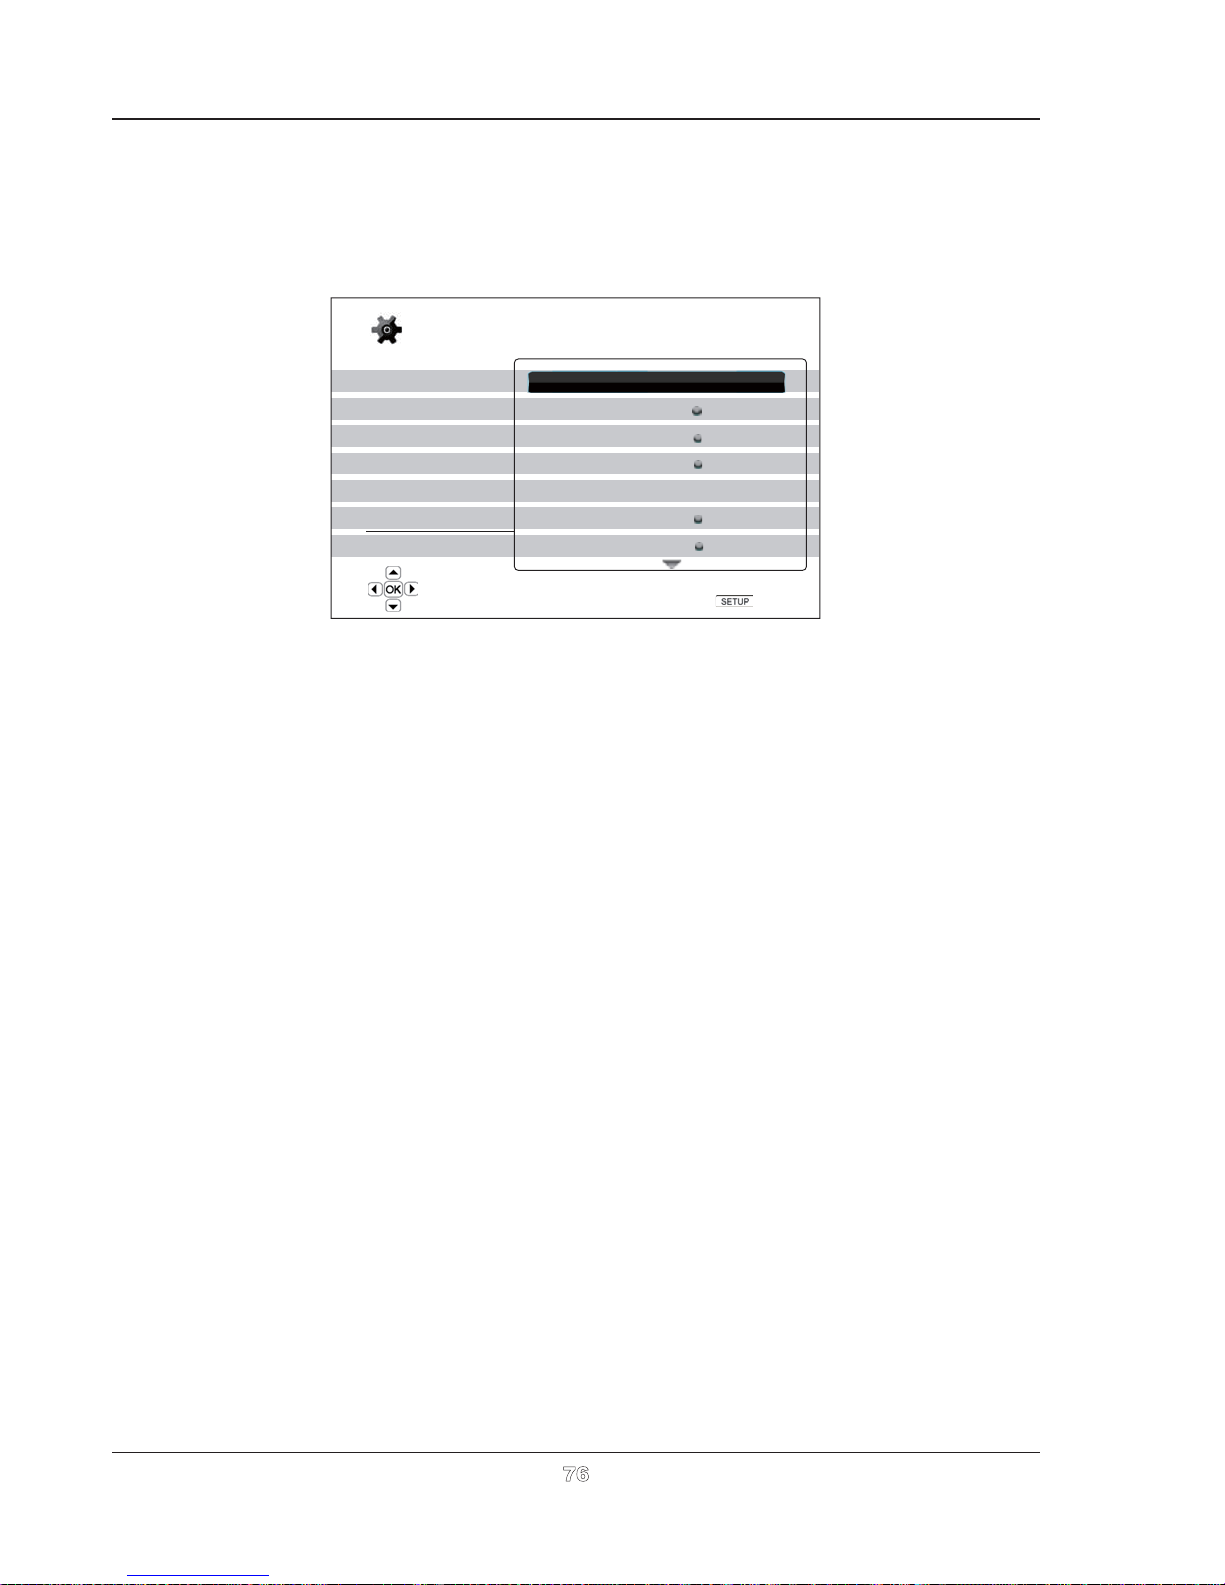
SETUP MENU OPTIONS
Network Setup
The “Network Setup” section of the Setup Menu system allows you to configure the parameters for the
Internet connection of the player, test the connection and restrict BD-Live access. The menu items in this
section are:
Setup Menu
Playback Setup
Video Setup
Audio Format Setup
Audio Processing
Device Setup
Network Setup
Exit
Connection Information
BD-Live Network Access
My Network
Internet Connection
Wireless Setting
IP Setting
Proxy Setting
Display connection information
Not conneted
Off
On
Ethernet
Auto (DHCP)
Off
Exit
1. Connection Information: To display the current internet connection information, such as
connection type, IP address, Ethernet MAC, Wireless MAC, etc.
2. BD-Live Network Access: To restrict BD-Live content access. The available options are:
x
On – BD-Live access is permitted.
x
Limited – BD-Live access is permitted only for contents that have a valid content owner
certificate. Internet access is prohibited if the BD-Live contents do not have a certificate.
This option ensures that you are accessing only authentic content, although it may block
your access to smaller independent content providers.
x
Off (recommended) – BD-Live access is prohibited.
3. My Network: To set the My Network (in-home media sharing) client option. My Network option
enables the player to stream audio, video and photo from media servers within the home network.
The available options are:
x
On (default) – Enable the My Network client. A broadband internet connection is required
(see details on page 20), and the available media servers are listed inside the “My Network”
option of the Home menu (see details on page 44).
x
Off – Disable the My Network client. No media servers will be shown in “My Network”
option, and a warning message will pop up once you enter the “My Network” option.
4. Internet Connection: To select the internet connection type. The available options are:
x
Ethernet (default) – Connect to the internet through the Ethernet cable. Please refer to the
connection instructions on page 20. Choosing this will make the “Wireless Setting” option
in the next row gray and un-selectable.
x
Wireless – Connect to the internet through the provided external wireless adaptor. Please
refer to the conne
ction instructions on page 21. Selecting “Wireless” will start the wireless
setting procedure as described in page 77, and also make the “Wireless Setting” option
selectable.
76
Page 82
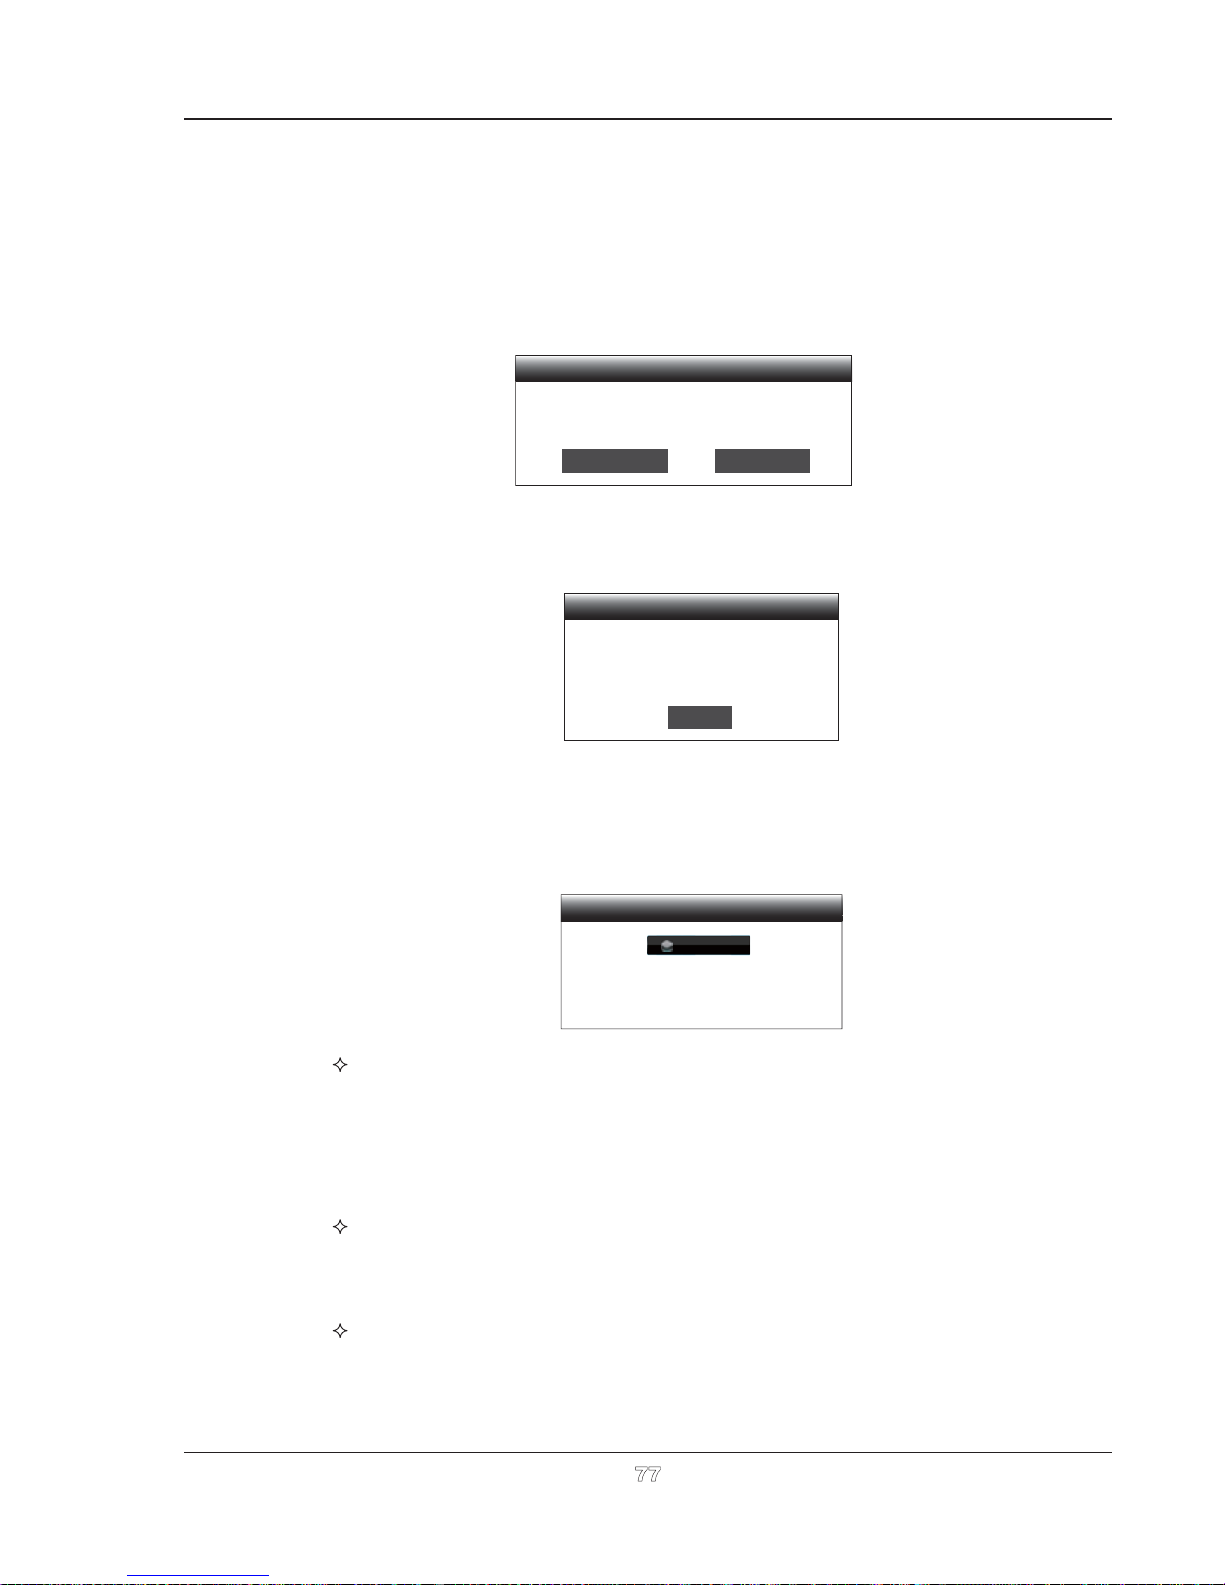
SETUP MENU OPTIONS
x
Off – Internet access is prohibited. This will make all the remaining options in Network
Setup screen gray and un-selectable.
5. Wireless Setting –Tostartthewireless setting procedure. The wireless setting procedure can
be started either by selecting the “Wireless Setting” option, or by selecting “Wireless” inside the
“Internet Connection” option. The procedure is described as follows:
x
The player first searches for the last successful wireless settings. If they exist, a message
will pop up to remind you. The available options are:
Your previous wireless settings have been found
Do you want to use them or start with new settings?
Use Previous Start New
x
Use Previous – To use the last successful wireless setting. A summary of the previous
wireless settings will pop up showing information like SSID (Service Set Identifier),
Security Mode and Security Key (in asterisk *).
SSID Your-SSID
Security Mode Your-Mode
Security Key **********
OK
Then a connection test will be automatically performed and the test result is shown on
the screen.
x
Start New – To start a new wireless configuration. The BDP-95AU supports three
wireless configuration methods and the available options are:
Wireless Setting
Scan
Manual
WPS
Scan for available wireless hot spots
Scan – To scan for available wireless hotspot. The player automatically scans for
any available wireless hotspots nearby and the search results are listed in a
window. You can press the UP/DOWN ARROW buttons to highlight a hotspot then
press the ENTER button to select it. If this hotspot is secured, you need to input
the security key using the remote control. Then a connection test will be
automatically performed and the test result is shown on the screen.
Manual – To manually set the information for a wireless hotspot. You need to use
the remote control to input the SSID, select the Security Mode and input the
Security Key. Then a connection test will be automatically performed and the test
result is shown on the screen.
WPS – To start the Wi-Fi Protected Setup. BDP-95AU supports the WPS standard
to provide an easy and secure establishment of a wireless home network. The
available options are:
77
Page 83

SETUP MENU OPTIONS
PIN – To configure the WPS using a Personal Identification Number. BDP95AU will generate a PIN and you need to input it into the software
control panel of your wireless router or access point. Please follow the onscreen instructions.
PBC - To configure the WPS using Push Button Control. You need to push
a PBC button on your wireless router or access point to initiate the
wireless connection. Please follow the on-screen instructions.
NOTE
SSID is short for Service Set Identifier. It is an identifier for each wireless router or
access point, and is also referred as a network name.
WPS (Wi-Fi Protected Setup)
PIN (Personal Identification Number)
Please Enter the security PIN shown below into the software
control panel of your wireless router or access point, then
click the“NEX T” button below.
PBC (Push Button Connection)
PIN code : Your-PIN
Refresh
Previous
Next
WPS is short for Wi-Fi Protected Setup (WPS). It is the latest standard for easy and
secure wireless home network configuration. It is also named Wi-Fi Simple Config.
To use WPS, a WPS compatible router or access point is required.
6. IP Setting: To determine how the player obtains its IP address. The available options are:
x
Auto (DHCP) - The player automatically obtains its IP address information using DHCP
(Dynamic Host Configuration Protocol). This is the default setting. In most cases,
automatic IP configuration can be used.
x
Manual – Manually enter the numeric IP address information. Set the IP configuration
manually only when the router has no DHCP server functions or when the router’s DHCP
server function is disabled. For more information on how to manually configure the Internet
connection and what values to use, please consult your broadband router/modem
instruction manuals or call your Internet service provider.
x
Internet Connection – Depending on your choice in “Internet
Connection” option, this
can be “Wireless” or “Ethernet”.
x
IP Address: The Internet Protocol address of the player. When “IP Setting”issetto
“Auto (DHCP)”, the value displayed here is obtained using DHCP and cannot be
changed.
x
Subnet Mask: Each IP address has an associated subnet mask. It is used by the
player to decide whether to route network traffic through the router or directly to another
device on the same network. When “IP Setting” is set to “Auto (DHCP)”, the value
displayed here is obtained using DHCP and cannot be changed.
x
Gateway: The IP address of the router. It is also called “default gateway” or “default
router”. When “IP Setting” is set to “Auto (DHCP)”, the value displayed here is
obtained using DHCP and cannot be changed.
Page 84

SETUP MENU OPTIONS
x
DNS 1: The IP address of the first (primary) DNS (Domain Name System) server. DNS
is the mechanism to translate human-readable
When “IP Setting” is set to “Auto
(DHCP)”, the value displayed here is obtained
addresses
to numeric IP addresses.
using DHCP and cannot be changed.
x
DNS 2: The IP address of the second (secondary) DNS server. When “IP Setting”is
set to “Auto (DHCP)”, the value displayed here is obtained using DHCP and cannot be
changed.
7. Proxy Setting: To configure the proxy server settings. The proxy server works as an intermediary
for network communication between clients and other servers, which can provide benefits like
security, anonymity, speedup or circumventing regional restrictions.
x
On – To access the Internet via a proxy server.
x
Proxy Host: To enter the proxy host name using the remote control.
x
Proxy Port: To enter the proxy host port number using the remote control.
x
Off (default) – Do not use a proxy server.
8. Connection Test: To test the Internet connection. It is recommended that you test the connection
when you initially connect the player to the Internet, or whenever changes to “Connection Method”,
“Wireless Setting”, “IP Setting” and other network parameters are made.
79
Page 85
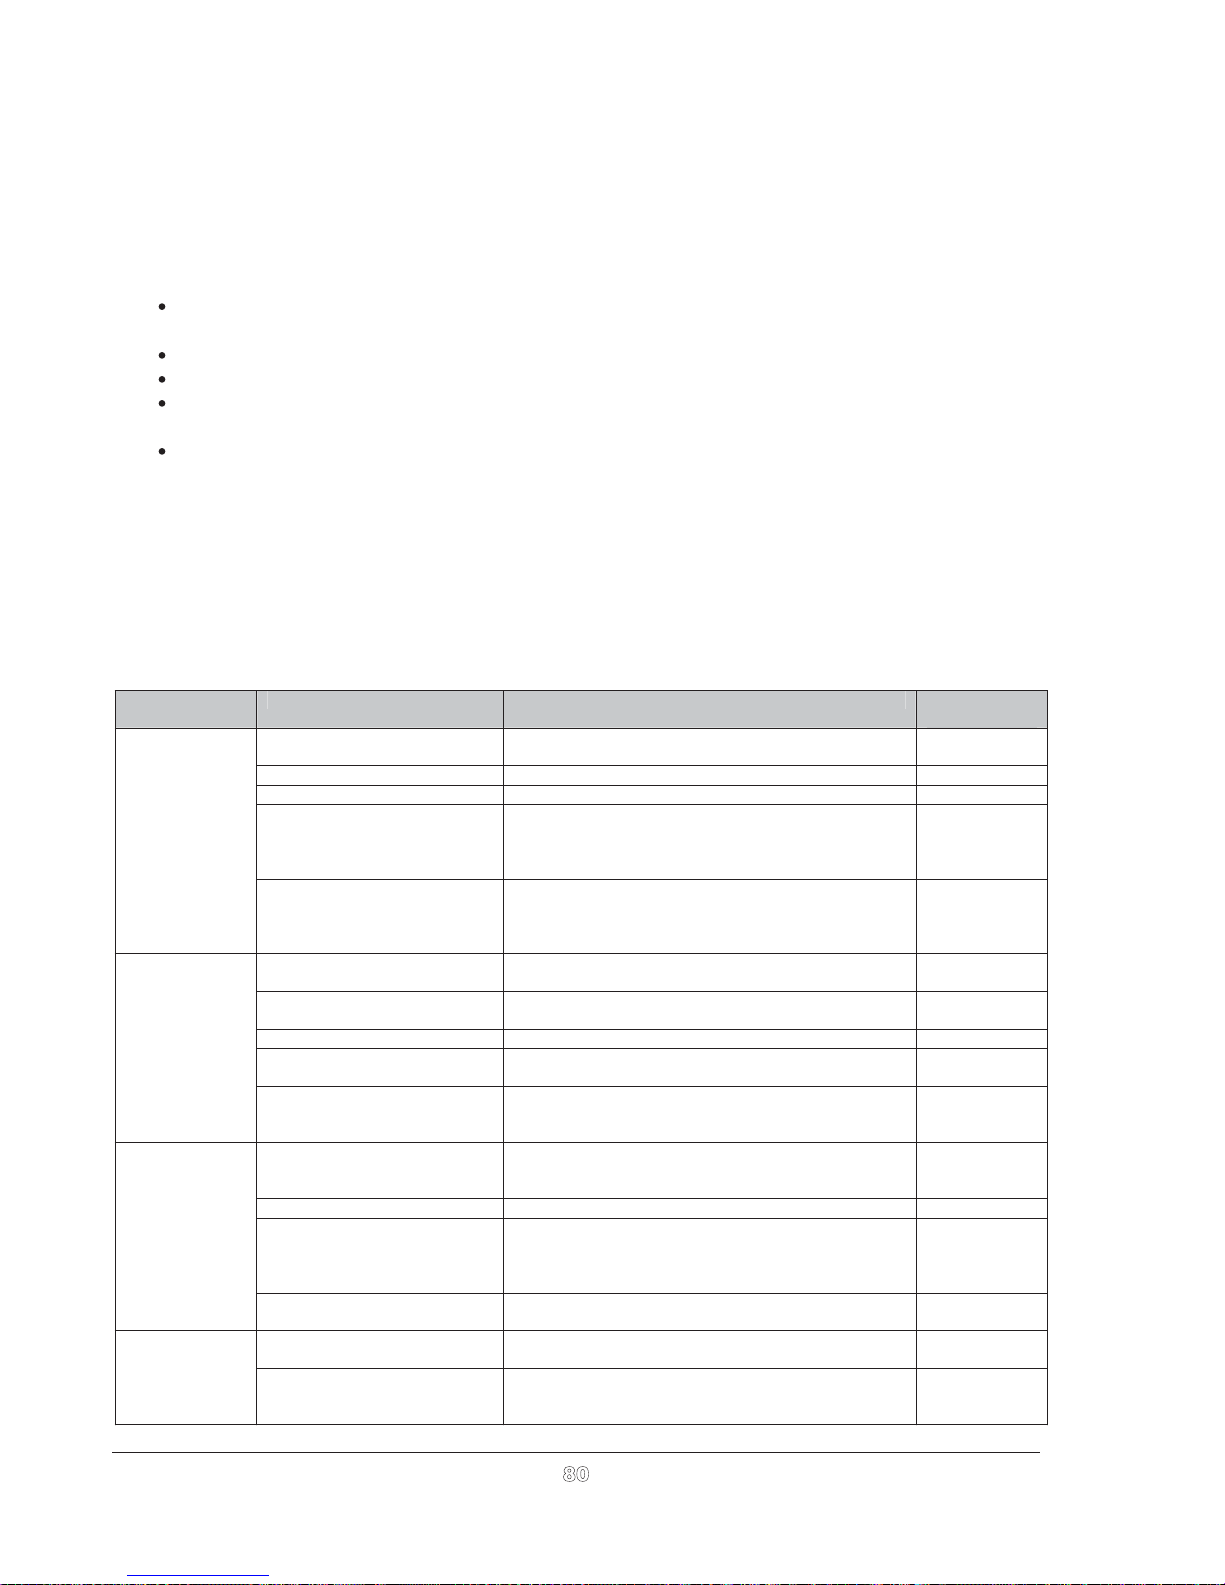
REFERENCES
Useful Notes
In order to prolong the service life of your player, it is recommended to wait at least 30 seconds
before you turn it on again after switching it off.
Remove disc and turn power off after operation.
Some functions of the player may not be applicable to certain discs.
Some discs with special features may not be fully supported by the player. This is not a
malfunction of the unit.
In the case of player malfunction, please turn it off, wait for 30 seconds and turn it back on. If
the problem still exists, please follow the troubleshooting instructions or contact an OPPO
service center.
T roubleshooting
Use this chart to resolve general operational problems. If there are any problems that you cannot
resolve, please contact your OPPO service center.
Symptom Possible Cause Solution Reference
No sound Audio cable is not properly
connected
Mute is activated Press the MUTE button to cancel the mute. 31
Volume is too low Press the VOL + button to increase the volume to 100. 31
SACD is played and the audio
connection is coaxial or optical
digital audio
DVD-Audio is played and the
audio connection is coaxial or
optical digital audio
No picture Video cable is not properly
connected
TV input is not correctly
selected
“Pure Audio” mode engaged Press the PURE button to cancel this mode. 42
Video output format is not
support by the TV
Video system is not supported
by the TV
No colour Video system is not supported
by the TV
Saturation set too low Check the saturation setting on TV and player. 58
Loose or damaged component
video cables
Incorrect video output port If using composite video output, check that the cable is
Incorrect colour Incorrect colou r space setting If using HDMI for video output, check the colour space
Incorrect component video
cable connection
Check audio cable, and then reconnect if necessary. 10 - 19
This is not supported due to copyright restrictions of
SACD. Please use the analog or HDMI audio output.
Alternatively, you may set SACD Priority to CD mode
and the player will play the CD layer.
This is not supported due to copyright restrictions of
DVD-Audio. Please use the analog or HDMI audio
output. Alternatively, you may switch to the DVDVideo playback mode.
Check video cable; reconnect if necessary.
Select the input to which the player is connected.
Select a proper output resolution that is supported by
your TV.
When playback is completely stopped, press and hold
the P/N button or set the correct TV System in the
Setup Menu.
When playback is completely stopped, press and hold
the P/N button or set the correct TV System in the
Setup Menu.
If using component output, check that the three cables
are all properly plugged in and not damaged. Make
sure the colour of the plugs match the jacks on both
ends.
not incorrectly plugged into a component video jack.
setting on the TV and player.
If using component video output, check the three
component video cables to make sure the signals
match on both ends
Page
16, 51
16, 51
10 - 1
34
34, 54
34, 54
13
10
59
13
3
80
Page 86
REFERENCES
81
Picture rolling or
split picture
“No Disc” or
“Unknown Disc”
error
Remote control
failure
Temporary
function failure
Some Setup
Menu items are
grayed out
Video system is not supported
by the TV
No disc or incompatible disc
loaded in player
Dirty disc recording surface Eject the disc and clean any dirt or fingerprints. 3
Disc not properly loaded Eject disc and make sure the label side is facing up
Condensation on the Laser
pick-up head
Remote control is out of range Use the remote control within the effective range. 8
Low battery Replace the batteries. 8
Incorrect remote control code Open the disc tray. Aim the remote at the player. Press
Scratched or damaged disc is
used
Some functions are not
available during playback
Interference from other devices Identify interference by turning off other devices, and
Some setup options cannot be
changed while a disc is playing.
Some setup options may be
mutually exclusive with other
setup options.
When playback is completely stopped, press and hold
the P/N button or set the correct TV System in the
Setup Menu.
Eject disc and check. 28
and the record side is facing down.
Turn on the player, eject the disc and leave the player
on for about an hour.
and hold the ENTER button on the remote for 5
seconds to set the remote code.
Replace the disc. 28
Stop playback completely, then try again. 28
then relocate or replace the offending device
Fully stop playback, eject the disc and try the Setup
Menu again.
34, 54
28
2
9
2
23
Page 87

REFERENCES
Specifications
Designs and specifications are subject to change without notice.
Disc Types* BD-Video, Blu-ray 3D, DVD-Video, DVD-Audio, AVCHD, SACD, CD, HDCD,
Kodak Picture CD, CD-R/RW, DVD±R/RW, DVD±R DL, BD-R/RE
BD Profile BD-ROM Version 2.4 Profile 5 for 3D (also compatible with Profile 1 Version 1.0
Internal Storage 2GB (Approximately 1GB availabl e for BD-Live persistent storage. Actual storage varies
due to system usage)
Output Analog Audio: 7.1ch, 5.1ch, Stereo
Dedicated Stereo Analog Audio: XLR balanced, RCA single-ended
Digital Audio: Coaxial, Optical
HDMI Audio: Stereo, up to 7.1ch high-resolu tion PCM, up to 5.1ch DSD, bitstream
or LPCM conversion of Dolby Digital, Dolby Digital Plus, Dolby TrueHD, DTS, DTSHD High Resolution Audio, and DTS-HD Master Audio.
Analog Video: Composite, Component Video (Y/Pb/Pr, 480i/480p, 720p/1080i
available for non-restri cted content only)
Digital Video: HDMI with HDCP (NTSC: 480i/480p/720p/1080i/1080p/1080p24,
PAL 576i/576p/720p/1080i/1080p/1080p24)
Video
Characteristics
Audio
Characteristics**
General
Specification
Operating
Temperature
Operating
Humidity
Composite Video Amplitude: 1.0Vp-p (75)
Component Video: Y: 1.0Vp-p (75), Pb/Pr: 0.7Vp-p (75)
Frequency Response: (RCA) 20Hz – 20kHz: ±0.2dB, 20Hz – 96kHz: ±1.0dB, (XLR)
20Hz – 20kHz: ±0.3dB, 20Hz – 96kHz:
Signal-to-Noise Ratio: >115dB (A-weighted, no auto-mute)
THD+N: <0.0003% or (1kHz at 44.1k/
Output Level: 2.1 Vrms (RCA) or 4.2 Vrms (XLR) at 0dBFS
Dynamic Range >110dBV
Channel Separation >100dB
Power Supply: ~115 V or ~230V, 50/60Hz AC
Power Consumption: 45W (0.5W Standby)
Dimensions: 430mm x 311mm x 98mm, 16-7/8 x 12-1/4 x 4 inches
Mass: 7kg / 15.4 lbs
5°C - 35°C
41°F - 95°F
15% - 75%
No condensation
>130dB (A-weighted, auto-mute),
110dB (1kHz at 48k/24b, 0dBFS, 20kHz LPF),
16b, 0dBFS, 20kHz LPF)
±2.5dB
<0.
and 1.1)
0017% or -96dB
* Compatibility with user-encoded contents or user-created discs is on a best effort basis with no guarantee due to the
variation of media, software and techniques used.
**Nominal specification.
User Manual Updates Online
An updated version of the User Manual may be available online at the web site
www.internationaldynamics.com.au
(
www.internationaldynamics.com.au
Occasional updates are needed to reflect new features added to the player since the User Manual was
printed. As future firmware updates brings in new features and functions, the online version of the User
Manual will be updated accordingly.
) To read or download the latest online User Manual, go to
and click the Customer Services tab at the top of the page.
82
Page 88

REFERENCES
83
Language Code List
Code Language Name
6565 Afar
6566 Abkhazian
6570 Afrikaans
6577 Amharic
6582 Arabic
6583 Assamese
6588 Aymara
6590 Azerbaijani
6665 Bashkir
6669 Byelorussian
6671 Bulgarian
6672 Bihari
6678 Bengali, Bangla
6679 Tibetan
6682 Breton
6765 Catalan
6779 Corsican
6783 Czech
6789 Welsh
6865 Danish
6869 German
6890 Bhutani
6976 Greek
6978 English
6979 Esperanto
6983 Spanish
6984 Estonian
6985 Basque
7065 Persian
7073 Finnish
7074 Fi jian
7079 Faroese
7082 French
7089 Frisian
7165 Irish
7168 Scots Gaelic
7176 Galician
7178 Guarani
7185 Gujarati
7265 Hausa
7273 Hindi
7282 Croatian
Code Language Name
7285 Hungarian
7289 Armenian
7365 Interlingua
7378 Indonesian
7383 Icelandic
7384 Italian
7387 Hebrew
7465 Japanese
7473 Yiddish
7487 Javanese
7565 Georgian
7575 Kazakh
7576 Greenlandic
7577 Cambodian
7578 Kannada
7579 Korean
7583 Kashmiri
7585 Kurdish
7589 Kirghiz
7665 Latin
7678 Lingala
7679 Laothian
7684 Lithuanian
7686 Latvian,Lettish
7771 Malagasy
7773 Maori
7775 Macedonian
7776 Malayalam
7778 Mongolian
7779 Moldavian
7782 Marathi
7783 Malay
7784 Maltese
7789 Burmese
7865 Nauru
7869 Nepali
7876 Dutch
7879 Norwegian
7982 Oriya
8065 Panjabi
8076 Polish
8083 Pashto, Pushto
Code Language Name
8084 Portuguese
8185 Quechua
8277 Rhaeto-Romance
8279 Romanian
8285 Russian
8365 Sanskrit
8368 Sindhi
8372 Serbo-Croatian
8373 Singhalese
8375 Slovak
8376 Slovenian
8377 Samoan
8378 Shona
8379 Somali
8381 Albanian
8382 Serbian
8385 Sundanese
8386 Swedish
8387 Swahili
8465 Tamil
8469 Telugu
8471 Tajik
8472 Thai
8473 Tigrinya
8475 Turkmen
8476 Tagalog
8479 Tonga
8482 Turkish
8484 Tatar
8487 Twi
8575 Ukrainian
8582 Urdu
8590 Uzbek
8673 Vietnamese
8679 Volapuk
8779 Wolof
8872 Xhosa
8979 Yoruba
9072 Chinese
9085 Zulu
Page 89

51976538
V1.0
Page 90

®
 Loading...