

Page 1
TX-SR501
Introduction
• This Guide describes basic operation of this receiver and connected devices (CD, DVD etc.). For further information about the advanced
functions of this receiver, please refer to the main instruction manual.
• This Guide does not explain connection details for the unit’s rear panel. Please refer to pages 10–23 of the main instruction manual for correct connection information. Otherwise, the entire A/V system may not work properly.
•For more information on the remote controller, refer to the main instruction manual.
Enjoying audio and visual sources
Basic Operation Guide
Important notes
• If MUTING function is activated, the sound will be muted. Make sure MUTING is set to OFF.
• If the headphones are connected, no sound will be heard from the speakers. Do not connect headphones if you wish to listen to the
sound from the speakers.
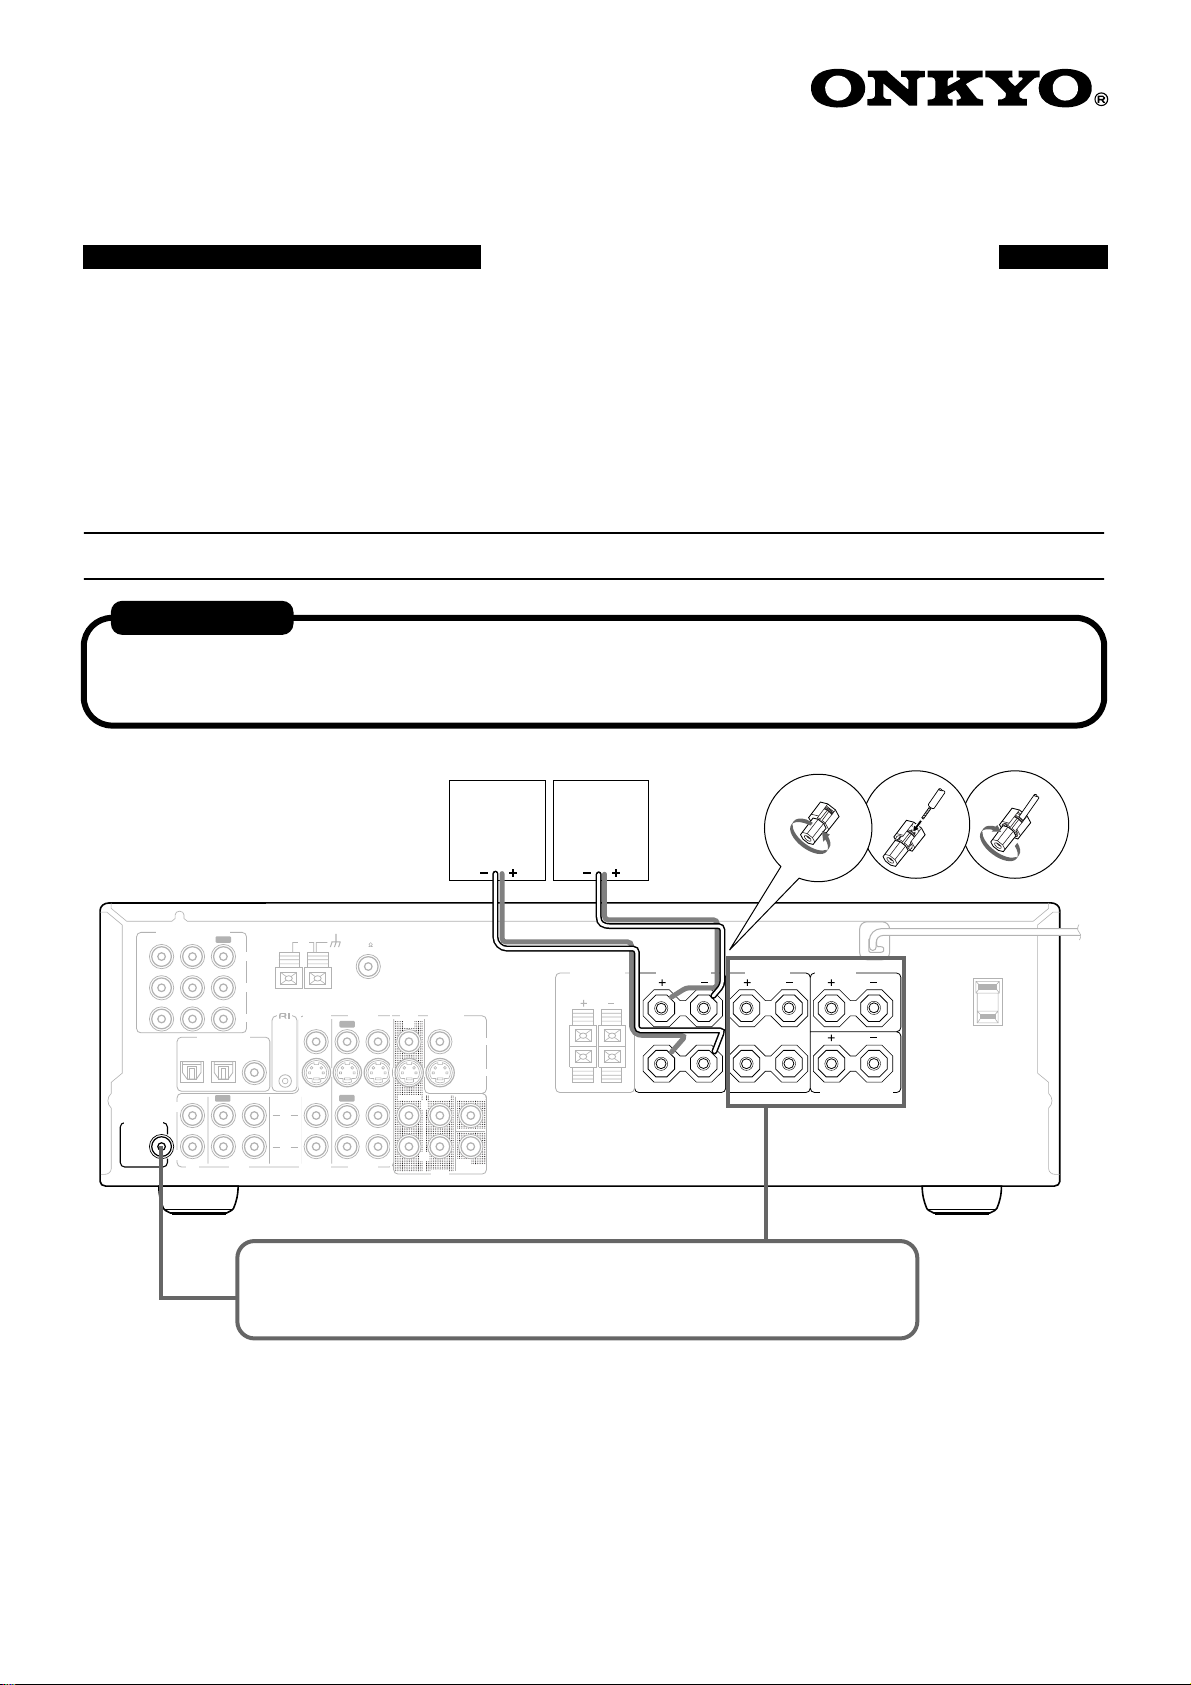
1. 2. 3.
L
R
SURROUND
SPEAKERS
CENTER
SPEAKER
SURROUND BACK
SPEAKER
AC OUTLET
AC 120 V 60 Hz
SWITCHED
W 1 A
120
MAX.
VIDEO 1
IN
SUBWOOFER
PRE OUT
COMPONENT VIDEO
/2/3
DVD IN
OUT
DIGITAL INPUT
OPTICAL COAXIAL
OUT
IN
L
R
CD
12
TAPE
P
PR
Y
B
IN
ANTENNA
REMOTE
CONTROL
L
R
AM
VIDEO 2
VIDEO 2
Front-
right
speaker
FM
75
VIDEO 1
DVD MONITOR
OUT
IN
OUT
OUT
VIDEO 1
IN
IN
FRONT
VIDEO
S VIDEO
SURR
CENTER
L
R
SUB
WOOFER
DVD
IN
IN
Front-
left
speaker
FRONT
SPEAKERS B
L
R
FRONT
SPEAKERS A
L
R
To enjoy surround sound, place the speakers properly as described in “Installing
Your Speakers” on pages 20 and 21, and make necessary settings as described in
“Powering Up & Setting Up the TX-SR501/TX-SR501E” on pages 24 and 25.
Page 2
Wall outlet
The STANDBY indicator lights up.
The STANDBY indicator turns off, and the display area lights up.
To select RCVR mode, press the [RCVR] button.
2
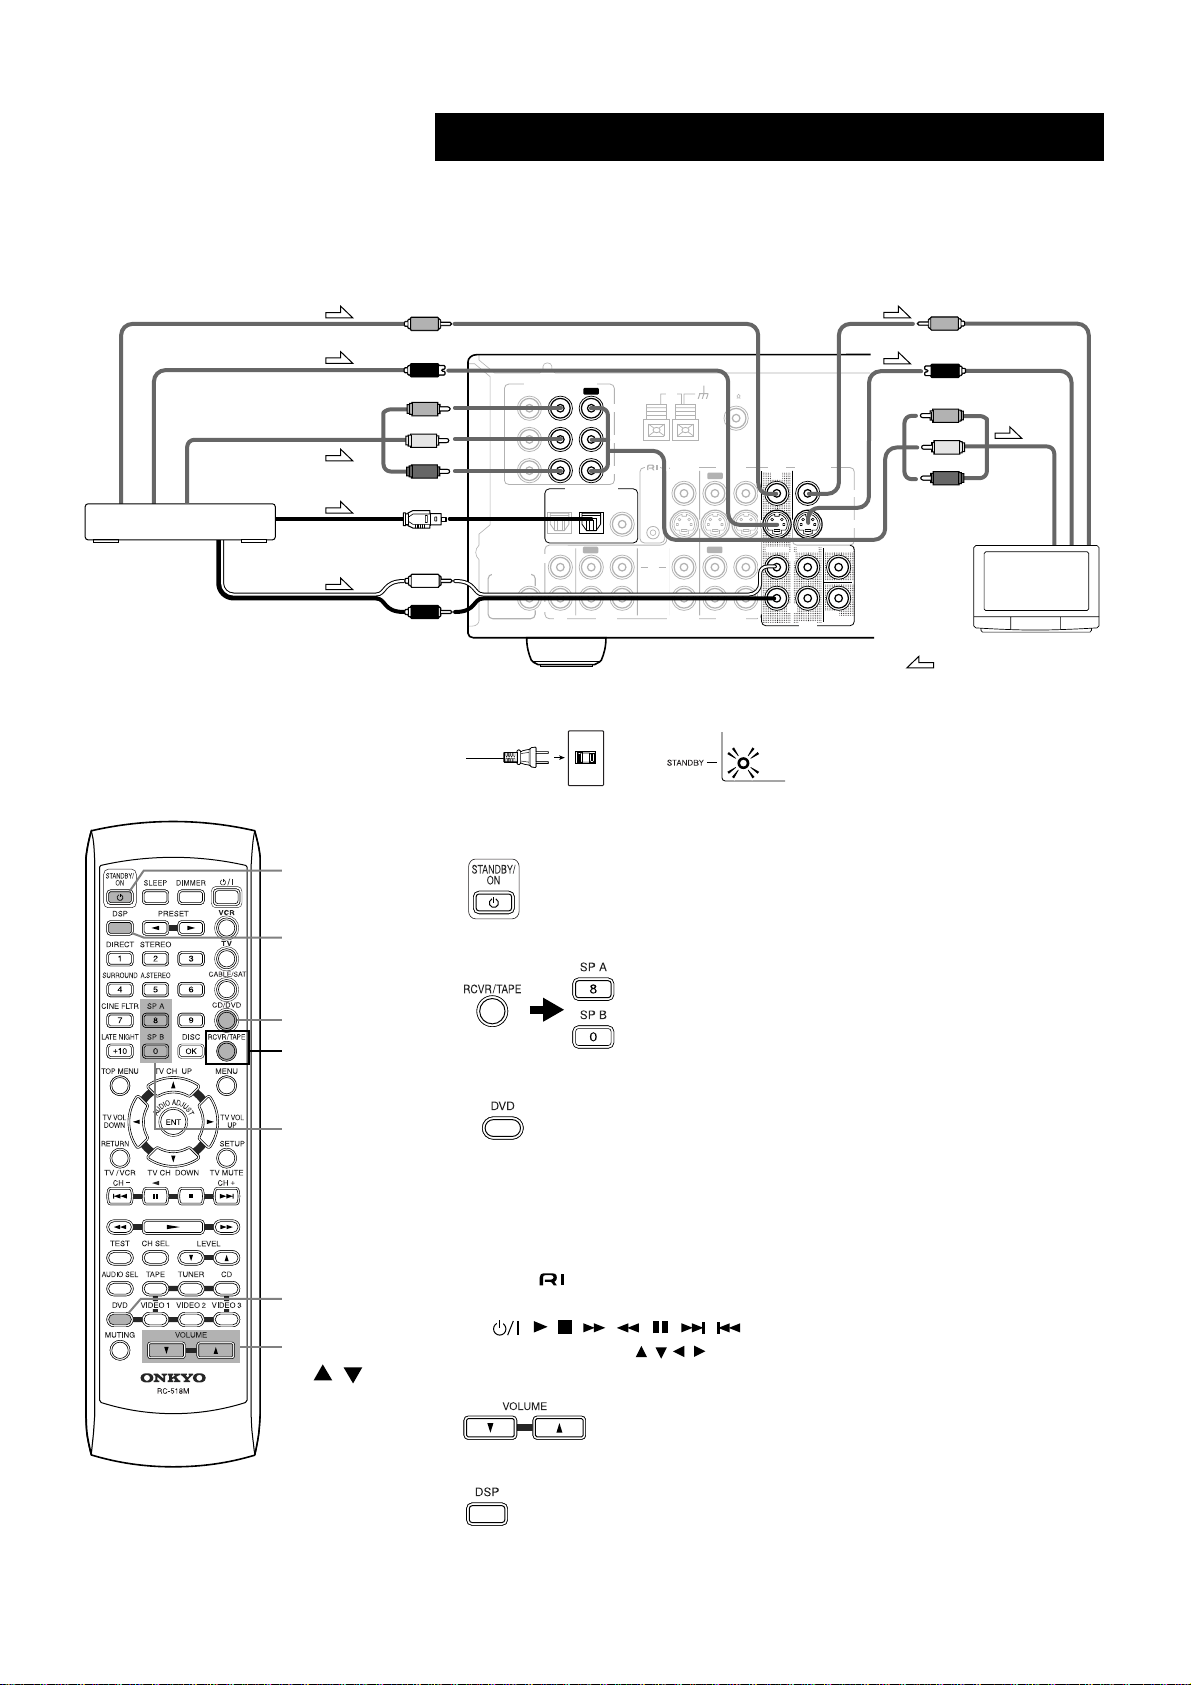
Enjoying DVD
1.
Make sure that connections have been made correctly for the monitor TV
and the DVD Player.
Here, only the typical connections are shown. For details, see pages 12 and 13 of the
main manual.
Video output
S Video output
Component video output
DVD player (DVD)
Analog audio output
Digital audio output
(optical)
3.
STANDBY/
ON
COMPONENT VIDEO
VIDEO 1
/2/3
DVD IN
IN
DIGITAL INPUT
OPTICAL COAXIAL
IN
L
SUBWOOFER
PRE OUT
R
CD
Connect the power cord to a wall outlet.
2.
3.
Turn on the power.
ANTENNA
OUT
12
OUT
TAPE
AM
Y
B
P
VIDEO 1
PR
VIDEO 2
IN
REMOTE
CONTROL
IN
OUT
OUT
IN
L
R
VIDEO 1
VIDEO 2
FM
75
IN
IN
DVD MONITOR
OUT
IN
SURR
FRONT
L
R
DVD
CENTER
SUB
WOOFER
VIDEO
S VIDEO
Video input
S Video input
Component
video input
TV
: Signal flow
8.
DSP
6.
-2.
DVD
Press first
4.
to select
RCVR mode.
4.
SP A/
SP B
5.
DVD
7.
VOLUME
/
4.
Select the speaker system(s) to be used.
5.
Set the Input Select to DVD.
When the digital output from the DVD player is connected to the OPTICAL 2
or COAXIAL input jack of this unit, change the assignment of digital inputs
to input sources by referring to “Assigning Digital Inputs to Input Sources” on
page 24.
6.
Play a DVD.
The video appears on the monitor TV.
To control an Onkyo DVD player
1 Make connection (see page 19 of the main manual).
Press DVD, then press the desired operation button (see page 42 of the main manual).
, , , , , , , , DISC, 1–9, +10, 0, TOP MENU, MENU,
RETURN, SETUP, , and ENT buttons can be used.
7.
Adjust the volume.
8.
Select the listening mode.
/ //
For details, see pages 34–36 of the main manual.
•To enjoy multi channel input, see page 29 of the main manual.
Page 3

Wall outlet
The STANDBY indicator lights up.
The STANDBY indicator turns off, and the display area lights up.
To select RCVR mode, press the [RCVR] button.
2
3
Enjoying Audio Compact Discs (CDs)
1.
Make sure that connections have been made correctly for the CD Player.
Here, only the typical connections are shown. For details, see page 17 of the main manual.
COMPONENT VIDEO
VIDEO 1
/2/3
IN
L
SUBWOOFER
PRE OUT
R
3.
STANDBY/
ON
8.
DSP
DVD IN
OUT
DIGITAL INPUT
OPTICAL COAXIAL
OUT
IN
CD
TAPE
ANTENNA
AM
Y
B
P
PR
REMOTE
CONTROL
12
IN
L
R
2.
3.
4.
FM
75
VIDEO 1
VIDEO 2
IN
IN
VIDEO 2
OUT
OUT
VIDEO 1
IN
IN
DVD MONITOR
OUT
IN
SURR
FRONT
L
R
DVD
CENTER
SUB
WOOFER
VIDEO
S VIDEO
L (White)
R (Red)
Connect the power cord to a wall outlet.
Turn on the power.
Select the speaker system(s) to be used.
Digital audio output (coaxial)
Analog audio output
: Signal flow
CD Player (CD)
6.
-3.
CD
Press first
4.
to select
RCVR mode.
4.
SP A/
SP B
5.
CD
7.
VOLUME
/
Set the Input Select to CD.
5.
When the digital output from CD player is connected to the OPTICAL 1 or 2
input jack of this unit, change the assignment of digital inputs to input sources
by referring to “Assigning Digital Inputs to Input Sources” on page 24.
6.
Play a CD.
To control an Onkyo CD player
1 Make connection (see page 19 of the main manual).
Enter the manufacturer’s code “300” into the remote controller (see page 41 of the
main manual).
Press CD, then press the desired operation button (see page 42 of the main manual).
, , , , , , , , DISC, 1–9, +10, 0 buttons can be used.
7.
Adjust the volume.
8.
Select the listening mode.
For details, see pages 34–36 of the main manual.
Page 4

3.
PRESET
/
2.
TUNER
4.
VOLUME
/
Enjoying the FM/AM radio
1.
Make sure that the power to the TX-SR501 has been turned on, and the
antenna connections have been made correctly. (See pages 22 and 23 of
the main manual.) Also, make sure that broadcast stations have been programmed as presets. (See page 30 and 31 of the main manual.)
2.
Set the Input Select to TUNER (FM or AM).
3.
Select the desired preset station.
4.
Adjust the volume and tonal quality.
If no sound is heard
Refer to the following table for the cause and corrective action. There may be a problem with a connected device. Refer to the user’s guide of
the connected device and make sure that all connections have been made correctly.
The power is turned on but
no sound is heard.
The power is not turned
on, and no sound is heard.
The input signal format does
not match the audio selection
(PCM, DTS, or Multich).
The speaker select switch setting is incorrect.
The MUTING indicator flashes. Press the MUTING button to turn off the MUTING indica-
Connections are incorrect. Make sure that all connections are made correctly.
The power is disconnected from
the AC outlet.
External noise has affected the
internal CPU.
Check the connector being used and select an appropriate
audio option (Auto or Analog).
(See page 28 and 29 of the main manual.)
Match the speaker select switch setting to the speakers you
are using. (See page 32 of the main manual.)
tor. (See page 33 of the main manual.)
(See pages 10–23 of the main manual.)
Plug the power cable to the AC outlet securely.
Unplug the power cable from the AC outlet, wait five seconds, then plug it again.
SN 29343475
Sales & Product Planning Div. : 2-1, Nisshin-cho, Neyagawa-shi, OSAKA 572-8540, JAPAN
Tel: 072-831-8111 Fax: 072-831-8124
ONKYO U.S.A. CORPORATION
18 Park Way, Upper Saddle River, N.J. 07458, U.S.A.
Tel: 201-785-2600 Fax: 201-785-2650 http://www.onkyousa.com
ONKYO EUROPE ELECTRONICS GmbH
Liegnitzerstrasse 6, 82194 Groebenzell, GERMANY
Tel: +49-8142-4401-0 Fax: +49-8142-4401-555 http://www.onkyo.net
ONKYO CHINA LIMITED
Units 2102-2107, Metroplaza Tower I, 223 Hing Fong Road, Kwai Chung,
N.T., HONG KONG Tel: 852-2429-3118 Fax: 852-2428-9039
HOMEPAGE
http://www.onkyo.co.jp/
I0303-1
 Loading...