

Page 1

English Français Español
CD Tuner Audio System
CBX-300
Instruction Manual
Thank you for purchasing an Onkyo CD Tuner Audio System.
Please read this manual thoroughly before making any connections and plugging it in.
Following the instructions in this manual will enable you to obtain
optimum performance and listening enjoyment from your new CD
Tuner Audio System.
Please retain this manual for future reference.
Manuel d’instructions
Nous vous remercions d’avoir opté pour un chaîne Hi-Fi Radio
CD Onkyo. Veuillez lire attentivement ce manuel avant de
connecter l’appareil et de le mettre sous tension.
Observez les instructions données dans ce manuel afin de pouvoir
profiter pleinement de votre nouvel chaîne Hi-Fi Radio CD.
Conservez ce manuel afin de pouvoir le consulter ultérieurement.
Manual de instrucciones
Getting Started
Premiers pas
Primeros pasos
Connections
Branchements
Conexiones
Basic Operation
Manipulations de base
Funcionamiento básico
Playing CDs
Lecture d’un CD
Reproducción de un CD
Playing Your iPod
Lecture d’un iPod
Utilizar el iPod
Listening to the Radio
Écoute de la radio
Escuchar la radio
........................... En-
.................................Fr-
...........................Es-
..............................En-
........................... Fr-
................................ Es-
.......................En-
...............................En-
........................ Fr-
....................En-
..................... Fr-
........................... Es-
.................... Fr-
.................... Es-
.......... Fr-
....... Es-
...... Es-
..........En-
2
2
2
16
16
16
20
20
20
22
22
22
30
30
30
32
32
32
Gracias por adquirir el sistema de audio con sintonizador y CD de
Onkyo.
Antes de realizar las conexiones y de conectar la alimentación, lea
detenidamente este manual.
Si sigue las instrucciones de este manual, logrará el óptimo
rendimiento y el máximo placer de escucha de su nuevo audio con
sintonizador y CD.
Guarde este manual para futuras referencias.
Clock and Timer
Horloge et minuterie
Reloj y Temporizador
Miscellaneous
Divers
Varios
............................................. Fr-
............................................ Es-
.......................En-
...........................En-
En
............... Fr-
............ Es-
Fr Es
40
40
40
49
49
49
Page 2
WARNING:
TO REDUCE THE RISK OF FIRE OR ELECTRIC
SHOCK, DO NOT EXPOSE THIS APPARATUS
TO RAIN OR MOISTURE.
CAUTION:
TO REDUCE THE RISK OF ELECTRIC SHOCK,
DO NOT REMOVE COVER (OR BACK). NO
USER-SERVICEABLE PARTS INSIDE. REFER
SERVICING TO QUALIFIED SERVICE
PERSONNEL.
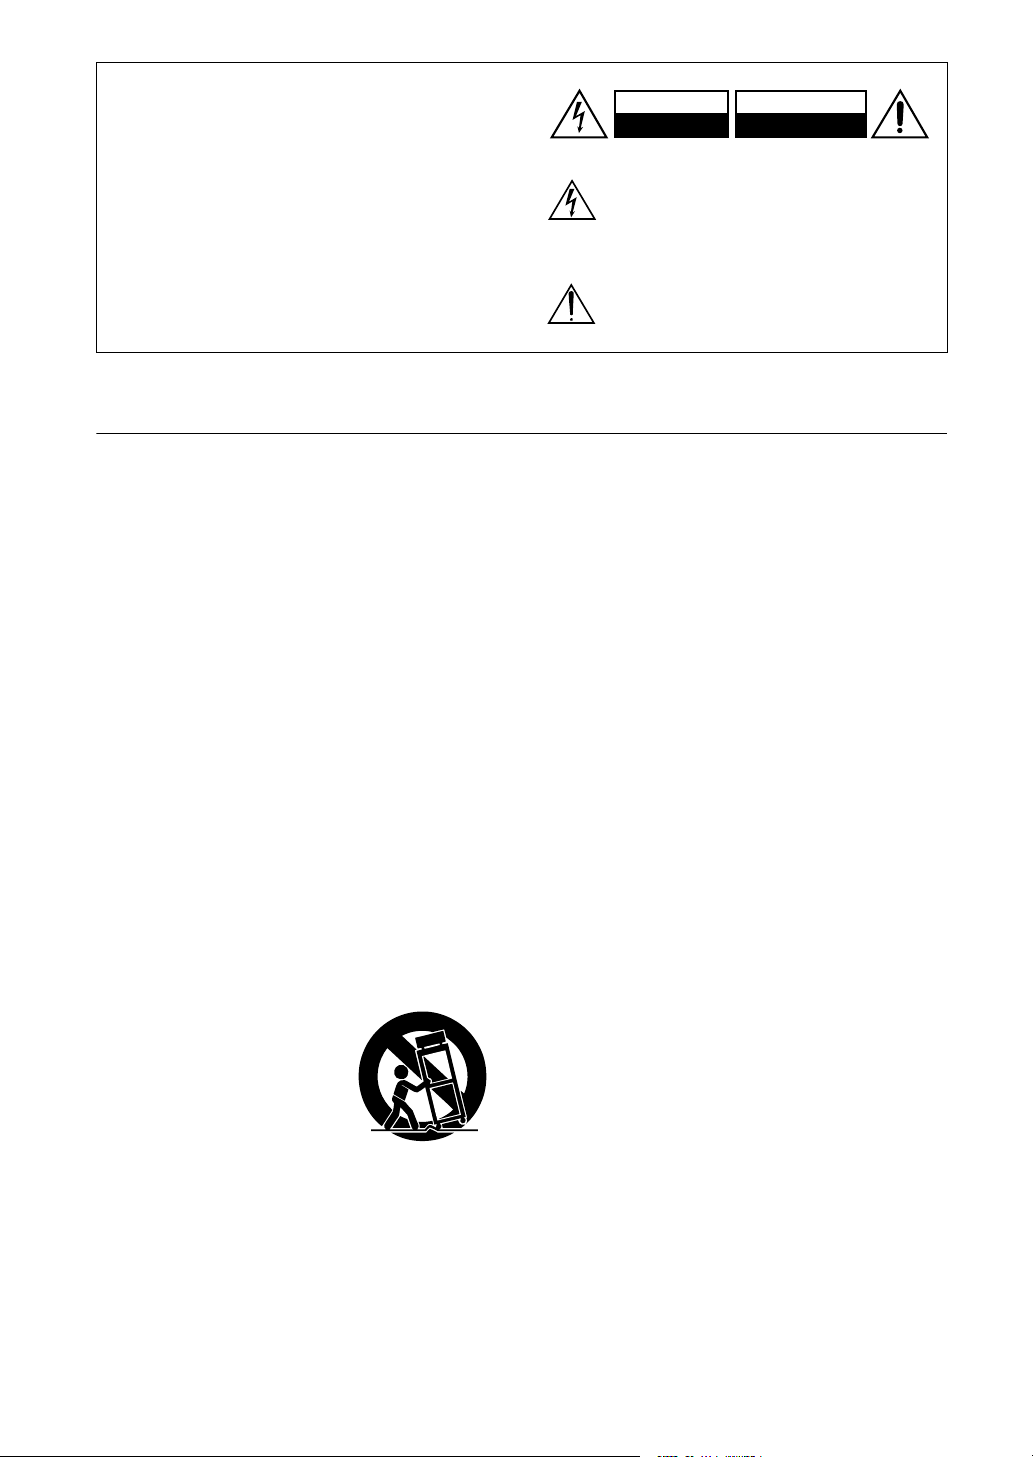
Important Safety Instructions
WARNING
RISK OF ELECTRIC SHOCK
DO NOT OPEN
The lightning flash with arrowhead symbol, within an
equilateral triangle, is intended to alert the user to the
presence of uninsulated “dangerous voltage” within
the product’s enclosure that may be of sufficient
magnitude to constitute a risk of electric shock to
persons.
The exclamation point within an equilateral triangle is
intended to alert the user to the presence of important
operating and maintenance (servicing) instructions in
the literature accompanying the appliance.
AVIS
RISQUE DE CHOC ELECTRIQUE
OUVRIR
NE PAS
1. Read these instructions.
2. Keep these instructions.
3. Heed all warnings.
4. Follow all instructions.
5. Do not use this apparatus near water.
6. Clean only with dry cloth.
7. Do not block any ventilation openings. Install in
accordance with the manufacturer’s instructions.
8. Do not install near any heat sources such as radiators, heat registers, stoves, or other apparatus
(including amplifiers) that produce heat.
9. Do not defeat the safety purpose of the polarized or
grounding-type plug. A polarized plug has two
blades with one wider than the other. A grounding
type plug has two blades and a third grounding
prong. The wide blade or the third prong are provided for your safety. If the provided plug does not
fit into your outlet, consult an electrician for
replacement of the obsolete outlet.
10. Protect the power cord from being walked on or
pinched particularly at plugs, convenience receptacles, and the point where they exit from the apparatus.
11. Only use attachments/accessories specified by the
manufacturer.
12.
Use only with the cart, stand,
PORTABLE CART WARNING
tripod, bracket, or table specified by the manufacturer, or
sold with the apparatus.
When a cart is used, use caution when moving the cart/
apparatus combination to
avoid injury from tip-over.
S3125A
13. Unplug this apparatus during lightning storms or
when unused for long periods of time.
14. Refer all servicing to qualified service personnel.
Servicing is required when the apparatus has been
damaged in any way, such as power-supply cord or
plug is damaged, liquid has been spilled or objects
have fallen into the apparatus, the apparatus has
been exposed to rain or moisture, does not operate
normally, or has been dropped.
15. Damage Requiring Service
Unplug the apparatus from the wall outlet and refer
servicing to qualified service personnel under the
following conditions:
A. When the power-supply cord or plug is damaged,
B. If liquid has been spilled, or objects have fallen
into the apparatus,
C. If the apparatus has been exposed to rain or
water,
D. If the apparatus does not operate normally by
following the operating instructions. Adjust only
those controls that are covered by the operating
instructions as an improper adjustment of other
controls may result in damage and will often
require extensive work by a qualified technician
to restore the apparatus to its normal operation,
E. If the apparatus has been dropped or damaged in
any way, and
F. When the apparatus exhibits a distinct change in
performance this indicates a need for service.
16. Object and Liquid Entry
Never push objects of any kind into the apparatus
through openings as they may touch dangerous voltage points or short-out parts that could result in a
fire or electric shock.
The apparatus shall not be exposed to dripping or
splashing and no objects filled with liquids, such as
vases shall be placed on the apparatus.
Don’t put candles or other burning objects on top of
this unit.
17. Batteries
Always consider the environmental issues and follow local regulations when disposing of batteries.
18. If you install the apparatus in a built-in installation,
such as a bookcase or rack, ensure that there is adequate ventilation.
Leave 20 cm (8") of free space at the top and sides
and 10 cm (4") at the rear. The rear edge of the shelf
or board above the apparatus shall be set 10 cm (4")
away from the rear panel or wall, creating a flue-like
gap for warm air to escape.
En-
2
Page 3

Precautions
1. Recording Copyright
use only, recording copyrighted material is illegal
without the permission of the copyright holder.
2. AC Fuse
serviceable. If you cannot turn on the unit, contact
your Onkyo dealer.
3. Care
with a soft cloth. For stubborn stains, use a soft cloth
dampened with a weak solution of mild detergent and
water. Dry the unit immediately afterwards with a
clean cloth. Don’t use abrasive cloths, thinners, alcohol, or other chemical solvents, because they may
damage the finish or remove the panel lettering.
4. Power
WARNING
BEFORE PLUGGING IN THE UNIT FOR THE
FIRST TIME, READ THE FOLLOWING SECTION CAREFULLY.
AC outlet voltages vary from country to country.
Make sure that the voltage in your area meets the
voltage requirements printed on the unit’s rear panel
(e.g., AC 230 V, 50 Hz or AC 120 V, 60 Hz).
The power cord plug is used to disconnect this unit
from the AC power source. Make sure that the plug
is readily operable (easily accessible) at all times.
Pressing the [STANDBY/ON] button to select
Standby mode does not fully shutdown the unit. If
you do not intend to use the unit for an extended
period, remove the power cord from the AC outlet.
5. Never Touch this Unit with Wet Hands
Never handle this unit or its power cord while your
hands are wet or damp. If water or any other liquid
gets inside this unit, have it checked by your Onkyo
dealer.
6. Handling Notes
• If you need to transport this unit, use the original
• Do not leave rubber or plastic items on this unit
• This unit’s top and rear panels may get warm
• If you do not use this unit for a long time, it may
• When you’ve finished using this unit, remove all
7. Installing this Unit
• Install this unit in a well-ventilated location.
• Ensure that there’s adequate ventilation all
• Do not expose this unit to direct sunlight or heat
•Avoid damp and dusty places.
—The AC fuse inside the unit is not user-
Occasionally you should dust the unit all over
—
packaging to pack it how it was when you originally bought it.
for a long time, because they may leave marks on
the case.
after prolonged use. This is normal.
not work properly the next time you turn it on, so
be sure to use it occasionally.
discs and turn off the power.
around this unit, especially if it’s installed in an
audio rack. If the ventilation is inadequate, the
unit may overheat, leading to malfunction.
sources, because its internal temperature may
rise, shortening the life of the optical pickup.
—Unless it’s for personal
• Install this unit horizontally. Never use it on its
side or on a sloping surface, because it may cause
a malfunction.
• If you install this unit near a TV, radio, or VCR,
the sound quality may be affected. If this occurs,
move this unit away from the TV, radio, or VCR.
8. Moisture Condensation
Moisture condensation may damage this
unit.
Read the following carefully:
Moisture may condense on the lens of the optical
pickup, one of the most important parts inside this
unit.
• Moisture condensation can occur in the following
situations:
– The unit is moved from a cold place to a warm
place.
–A heater is turned on, or cold air from an air
conditioner is hitting the unit.
– In the summer, when this unit is moved from an
air conditioned room to a hot and humid place.
– The unit is used in a humid place.
• Do not use this unit when there’s the possibility
of moisture condensation occurring. Doing so
may damage your discs and certain parts inside
this unit.
If condensation does occur, remove all discs and
leave this unit turned on for two to three hours. By
this time, the unit will have warmed up and any condensation will have evaporated.
—
En-
3
Page 4
Precautions
—Continued
This unit contains a semiconductor laser system and is
classified as a “CLASS 1 LASER PRODUCT”. So, to
use this model properly, read this Instruction Manual
carefully. In case of any trouble, please contact the store
where you purchased the unit.
To prevent being exposed to the laser beam, do not try
to open the enclosure.
CAUTION:
CLASS 1M VISIBLE AND INVISIBLE LASER
RADIATION WHEN OPEN. DO NOT VIEW
DIRECTLY WITH OPTICAL INSTRUMENTS.
THIS PRODUCT UTILIZES A LASER. USE OF
CONTROLS OR ADJUSTMENTS OR PERFORMANCE OF PROCEDURES OTHER THAN THOSE
SPECIFIED HEREIN MAY RESULT IN HAZARDOUS RADIATION EXPOSURE.
The label on the right is
applied on the rear panel.
1. This unit is a CLASS 1
LASER PRODUCT and
employs a laser inside the cabinet.
2. To prevent the laser from being exposed, do not remove the
cover. Refer servicing to qualified personnel.
For North American Models
FCC Information for User
CAUTION:
The user changes or modifications not expressly
approved by the party responsible for compliance could
void the user’s authority to operate the equipment.
NOTE:
This equipment has been tested and found to comply
with the limits for a Class B digital device, pursuant to
Part 15 of the FCC Rules. These limits are designed to
provide reasonable protection against harmful interference in a residential installation.
This equipment generates, uses and can radiate radio
frequency energy and, if not installed and used in accordance with the instructions, may cause harmful interference to radio communications. However, there is no
guarantee that interference will not occur in a particular
installation. If this equipment does cause harmful interference to radio or television reception, which can be
determined by turning the equipment off and on, the
user is encouraged to try to correct the interference by
one or more of the following measures:
• Reorient or relocate the receiving antenna.
• Increase the separation between the equipment and
receiver.
• Connect the equipment into an outlet on a circuit different from that to which the receiver is connected.
• Consult the dealer or an experienced radio/TV technician for help.
En-
4
CAUTION:
USE OF ANY CONTROLS, ADJUSTMENTS, OR
PROCEDURES OTHER THAN THOSE SPECIFIED
HEREIN MAY RESULT IN HAZARDOUS RADIATION EXPOSURE.
For Canadian Models
NOTE:
COMPLIES WITH CANADIAN ICES-003.
For models having a power cord with a polarized plug:
CAUTION:
MATCH WIDE BLADE OF PLUG TO WIDE SLOT,
FULLY INSERT.
THIS CLASS B DIGITAL APPARATUS
TO PREVENT ELECTRIC SHOCK,
For European Models
Declaration of Conformity
We,
ONKYO EUROPE
ELECTRONICS GmbH
LIEGNITZERSTRASSE 6,
82194 GROEBENZELL,
GERMANY
declare in own responsibility, that the ONKYO product
described in this instruction manual is in compliance with the
corresponding technical standards such as EN60065,
EN55013, EN55020 and EN61000-3-2, -3-3.
GROEBENZELL, GERMANY
K. MIYAGI
ONKYO EUROPE ELECTRONICS GmbH
Page 5

Supplied Accessories
Features
Make sure you have the following accessories:
Remote controller
(Battery preinstalled)
Indoor FM antenna
AM loop antenna
iPod dock adapters A and B
Power cord
(Connector type varies from country to country.)
General
• CD tuner audio system with built-in iPod*1 dock
• Supports iPod (5th Generation, photo, and 4th Generation), iPod nano (2nd Generation and 1st Generation), and iPod mini (as of August 2007)
• Built-in stereo hi-fi speakers
• Control your iPod with the remote controller
• Charge your iPod while you listen to your music
• 3-preset equalizer settings
• Line input for external audio source
• Headphones jack
• Dimmable display
• Battery-less memory backup
Speakers
• OMF diaphragm
• Aero Acoustic Drive for powerful and natural sound
Radio
• AM/FM tuner
• 30 presets
• Preset naming
• RDS (Radio Data System) (European models only)
• FM Auto Preset function
CD Player
• Play audio CDs, MP3/WMA*2 CDs (CD-R and
CD–RW)
•4 playback modes: normal, random, memory, and
1-folder
• 2-mode repeat function (current track or all tracks)
• 25-track playlist
Timers and Clock
•4 programmable timers
• Sleep timer
• Snooze function
• AccuClock automatic clock setting (European models
only)
*1 iPod is a trademark of Apple Inc., registered in the U.S. and
other countries.
*2 Windows Media, and the Win-
dows logo are trademarks, or
registered trademarks of
Microsoft Corporation in the
United States and/or other countries.
En-
5
Page 6

Contents
Important Safety Instructions ........................... 2
Precautions......................................................... 3
Supplied Accessories........................................ 5
Features .............................................................. 5
Contents.............................................................. 6
Getting to Know the CBX-300 ........................... 7
Top and Front Panels.................................................7
Display.......................................................................8
Rear Panel..................................................................9
Remote Controller (RC-713S).................................10
Disc Notes......................................................... 13
Installing the iPod Dock Adapters.................. 15
Connecting Antennas...................................... 16
Connecting an External Audio/
Video Source .................................................... 18
About Connections ..................................................18
Connecting Other Components ...............................18
Connecting Your TV or Projector ...........................18
Connecting the Power Cord............................ 19
AccuClock—Automatic Clock Setting
(European models only)...........................................19
Basic Operation................................................ 20
Turning On the CBX-300........................................20
Adjusting the Volume..............................................20
Selecting the Input Source.......................................20
Using Headphones...................................................20
Muting the CBX-300...............................................21
Preset EQ .................................................................21
Changing the Display Brightness ............................21
Listening to the Radio...................................... 32
Tuning into Radio Stations ..................................... 32
Presetting FM Stations Automatically
(Auto Preset) ........................................................... 33
Presetting FM/AM Stations Manually.................... 34
Selecting Preset Stations......................................... 35
Displaying Radio Information ................................ 36
Receiving RDS (European models only)................ 36
Naming Presets ....................................................... 37
Copying Presets ...................................................... 38
Erasing a Preset’s Name ......................................... 39
Erasing Presets........................................................ 39
Setting the Clock .............................................. 40
Setting the Clock..................................................... 40
AccuClock with a Specific Station
(European models only).......................................... 41
Using the Timers ..............................................42
About the Timers .................................................... 42
Programming the Timers ........................................ 43
Turning Timers On and Off .................................... 45
Checking Timer Settings......................................... 45
Using the Snooze Function ..................................... 46
Using the Sleep Timer ............................................ 47
Setting the Maximum Volume .........................48
Troubleshooting ............................................... 49
Specifications ................................................... 53
Playing CDs ...................................................... 22
Using the Top Panel Buttons...................................22
Using the Remote Controller...................................23
Displaying CD Information.....................................23
Selecting MP3/WMA Files .....................................24
Playing the MP3/WMA Files in Only
One Folder ...............................................................26
Displaying MP3/WMA Information .......................26
Memory Playback....................................................27
Random Playback....................................................28
Repeat Playback ......................................................28
Setting MP3/WMA Preferences ..............................29
Playing Your iPod ............................................ 30
Using the Top Panel Buttons...................................30
Using the Remote Controller...................................31
Navigating the iPod Menus with the Remote
Controller.................................................................31
En-
6
Page 7
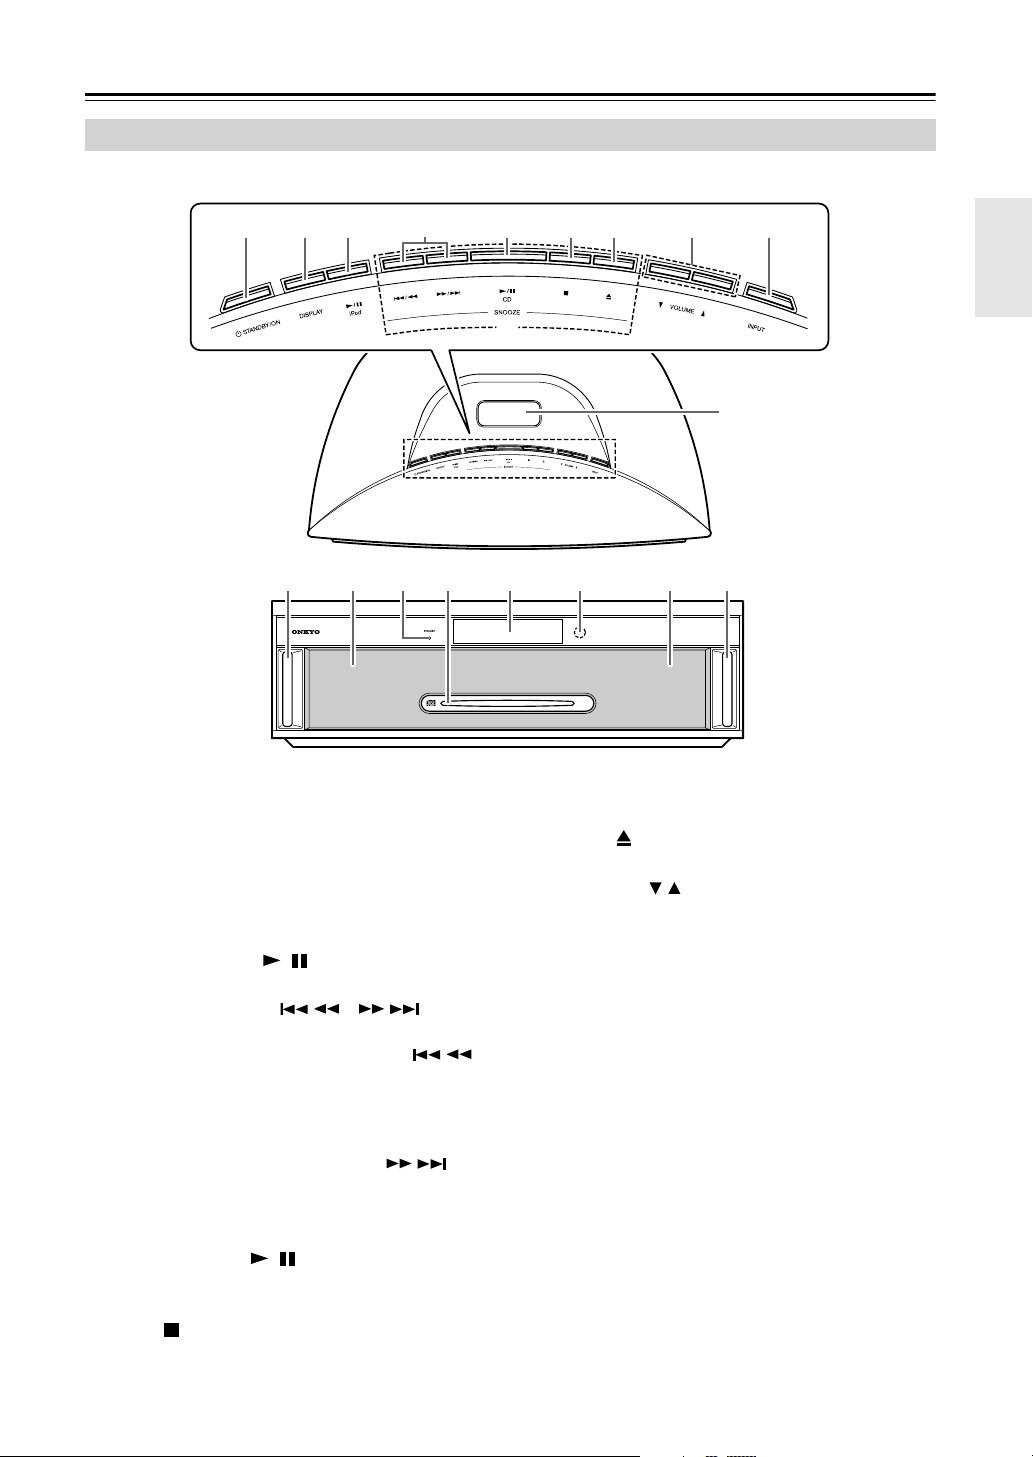
Getting to Know the CBX-300
Top and Front Panels
213456789
J
Top Panel
K
*1 *1*2 *2
Front Panel
The page numbers in parentheses show where you can find the main explanation for each item.
A
STANDBY/ON button (20, 40, 44)
Sets the CBX-300 to On or Standby.
B
DISPLAY button (23, 26, 30, 36)
Used to change the information shown on the display.
C
iPod Play/Pause [ ] button (30)
Starts or pauses playback on the iPod.
Previous and Next [ / ]/[ / ]
D
buttons (22, 30, 35)
For CD and iPod playback, the Previous [ / ]
button selects the previous track. During playback it
selects the beginning of the current track. Pressing
and holding it during playback rewinds. It’s also
used to select radio presets.
For CD and iPod playback, the Next [ / ] button selects the next track. Pressing and holding it
during playback fast forwards. It’s also used to
select radio presets.
CD Play/Pause [ ] button (22)
E
Starts CD playback. Pressing it during playback
pauses playback.
Stop [ ] button (22)
F
Stops CD playback.
/
/
LM N O
G
Eject [ ] button (22)
Ejects the loaded CD.
H
VOLUME [ / ] buttons (20)
Adjust the volume level.
INPUT button (20, 35)
I
Used to select the input source.
SNOOZE (46)
J
Once timed playback of a timer set for snooze has
started, pressing any of these buttons will stop playback for a set number of minutes, just like the
snooze function you find on a typical alarm clock.
K
iPod Dock (15, 30)
Your iPod goes in here. A removable protective
cover is installed to protect the dock connector.
L
STANDBY indicator (19, 20)
Lights up in Standby mode.
Disc slot (22)
M
The CD is loaded here.
Display
N
See “Display” on page 8.
O
Remote control sensor (12)
Receives control signals from the remote controller.
*1: Speaker duct for
Aero Acoustic Drive
*2: Speakers
En-
7
Page 8
Getting to Know the CBX-300
—Continued
Display
1 432 5 6
7 O8 9 J K L M N
SLEEP indicator
A
Lights up when the Sleep function has been set.
MP3 indicator
B
Lights up when an MP3 CD is loaded.
C
WMA indicator
Lights up when a WMA CD is loaded.
D
FOLDER indicator
Lights up while the number and name of an
MP3/WMA folder is being displayed.
E
MUTING indicator
Flashes while the CBX-300 is muted.
Playback mode indicators
F
1FOLDER:
selected.
MEMORY:
selected.
RANDOM:
selected.
REPEAT:
selected for all tracks.
REPEAT 1:
selected for one track.
G
Play and Pause indicators
The Play indicator lights up for playback. The Pause
indicator lights up while playback is paused.
H
TIMER indicators
Show the status of the timers.
TIMER:
grammed.
1, 2, 3, 4:
number lights up.
:
Lights up when a timer has been set for snooze.
Lights up when 1-folder playback is
Lights up when memory playback is
Lights up when random playback is
Lights up when repeat playback is
Lights up when repeat playback is
/
Lights up when a timer has been pro-
When a timer has been programmed, its
Tuning indicators
I
AUTO:
Lights up when Auto mode is selected and
disappears when Mono mode is selected.
:
Lights up when the CBX-300 is tuned to
a radio station.
FM ST:
nal.
RDS (European models only):
the CBX-300 is tuned to a radio station that supports RDS (Radio Data System).
J
FILE indicator
Lights up when an MP3/WMA file number and
name is being displayed.
K
TRACK indicator
Lights up when a CD track number is being displayed.
L
TITLE, ARTIST, and ALBUM indicators
TITLE:
file is being displayed.
ARTIST:
MP3/WMA file is being displayed.
ALBUM:
MP3/WMA file is being displayed.
M
DISC, TOTAL, and REMAIN indicators
These indicators light up when the total time or the
remaining disc or track time is being displayed.
N
CH indicator
Lights up when a radio preset number is being displayed.
O
Message area
Various information is displayed here, including
radio preset numbers, tuning frequency, current
time, volume level, timer settings, mode settings,
and so on.
Lights up when receiving a stereo FM sig-
Lights up when
Lights up when the title of an MP3/WMA
Lights up when the artist name from an
Lights up when the album name from an
En-
8
Page 9

Getting to Know the CBX-300
Rear Panel
1234
—Continued
5
The page numbers in parentheses show where you can find the main explanation for each item.
A
AM ANTENNA terminals (16, 17)
These push terminals are for connecting an AM
antenna.
B
PHONES jack (20)
This stereo minijack is for connecting a pair of stereo headphones for private listening.
C
INPUT LINE jacks (18)
This analog audio input is for connecting an external audio source.
D
VIDEO OUT jack (18)
This composite video output is for connecting to a
video input on your TV or projector. Use it when
you want to use your TV or projector to watch videos or photo slideshows while your iPod is inserted
in the CBX-300’s iPod dock.
*Only works with iPods that support video output.
E
FM ANTENNA jack (16, 17)
This jack is for connecting an FM antenna.
AC INLET (19)
F
The supplied power cord is connected here. The
other end of the power cord should be connected to
a suitable wall outlet.
6
See pages 16–19 for connection information.
En-
9
Page 10
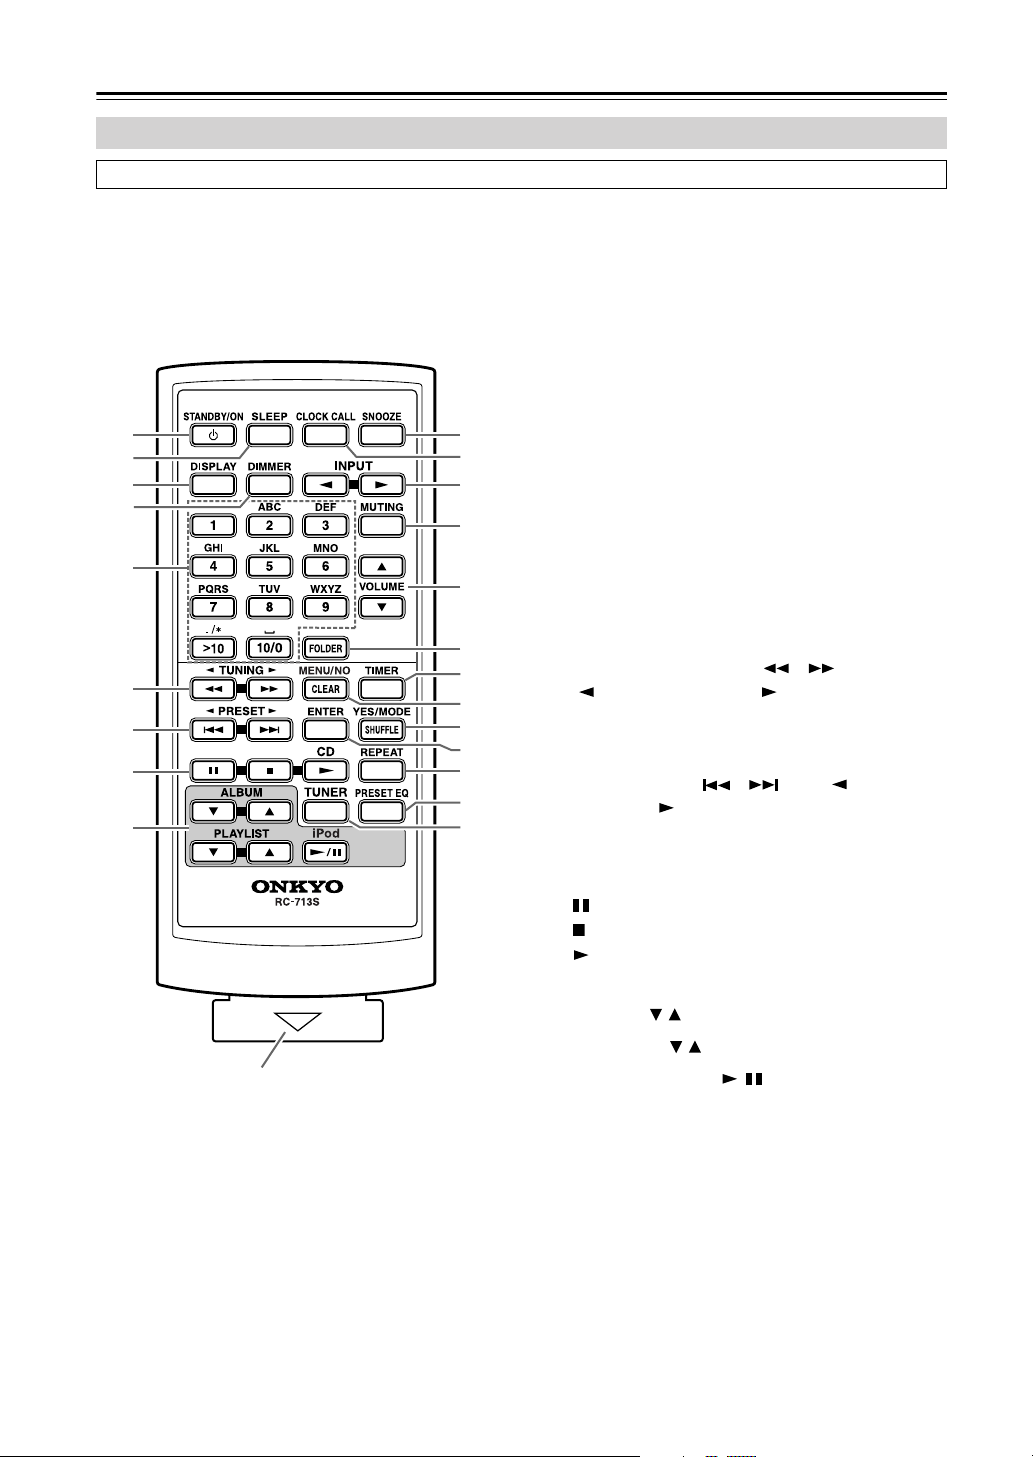
Getting to Know the CBX-300
—Continued
Remote Controller (RC-713S)
See page 31 for details on using the remote controller to control your iPod.
The page numbers in parentheses show where you can
find the main explanation for each item.
STANDBY/ON button (20)
A
Sets the CBX-300 to On or Standby.
B
SLEEP button (47)
Sets the Sleep timer, which turns off the CBX-300
after a specified time.
C
DISPLAY button (23, 26, 30, 36, 37, 40)
A
B
3
4
5
6
7
8
9
J
K
L
M
N
O
P
Q
R
S
T
U
V
Remove the plastic film before
using the remote controller.
Used to change the information shown on the display. Also used to select characters when naming
radio presets.
DIMMER button (21)
D
Sets the display brightness to normal or dim (works
only while the CBX-300 is on).
Number buttons (23, 35, 37, 40)
E
Used to select tracks and radio presets. Also used to
set the clock, set the timers, and enter names for
radio presets.
Rewind/Fast Forward [ ]/[ ] and
F
[ TUNING]/[TUNING ] buttons (23, 31,
32)
Used to rewind or fast forward CD playback. Also
used to tune the radio and edit preset names.
G
Previous/Next [ ]/[ ] and [ PRESET]/
[PRESET ] buttons (23, 31, 35)
Used to select the previous or next CD track. Also
used to select radio presets and edit preset names.
H
CD control buttons (23)
:Pauses playback.
: Stops playback.
: Starts playback.
I
iPod control buttons (31)
ALBUM [ / ]:
PLAYLIST [ / ]:
iPod Play/Pause [ / ]:
back on the iPod.
SNOOZE button (46)
J
Once timed playback of a timer set for snooze has
started, pressing this button will stop playback for a
set number of minutes, just like the snooze function
you find on a typical alarm clock.
K
CLOCK CALL button (40)
Calls up the clock to display the day and time.
Select albums on the iPod.
Select playlists on the iPod.
Starts or pauses play-
En-
10
Page 11

Getting to Know the CBX-300
INPUT [ ]/[ ] buttons (20)
L
Used to select the input source.
MUTING button (21)
M
Mutes the CBX-300.
N
VOLUME [ / ] buttons (20, 23)
Adjust the volume level.
O
FOLDER button (24, 25)
Used to select MP3/WMA folders.
P
TIMER button (40, 41, 43, 45)
Used to set the timers and clock.
MENU/NO/CLEAR button (29, 31, 33, 34, 37–
Q
39, 48)
Used with various functions and settings for selecting, cancelling, and deleting.
R
YES/MODE/SHUFFLE button (26–28, 31, 32,
41)
Used with various functions and settings for confirming and selecting modes.
S
ENTER button (24–27, 29, 31, 33, 34, 37–41,
43–45, 48)
Used to confirm various functions and settings.
T
REPEAT button (28, 31)
Sets repeat playback.
U
PRESET EQ button (21)
Selects the preset equalizer settings.
V
TUNER button (32, 33, 35)
Selects FM or AM radio as the input source.
—Continued
En-
11
Page 12
Getting to Know the CBX-300
—Continued
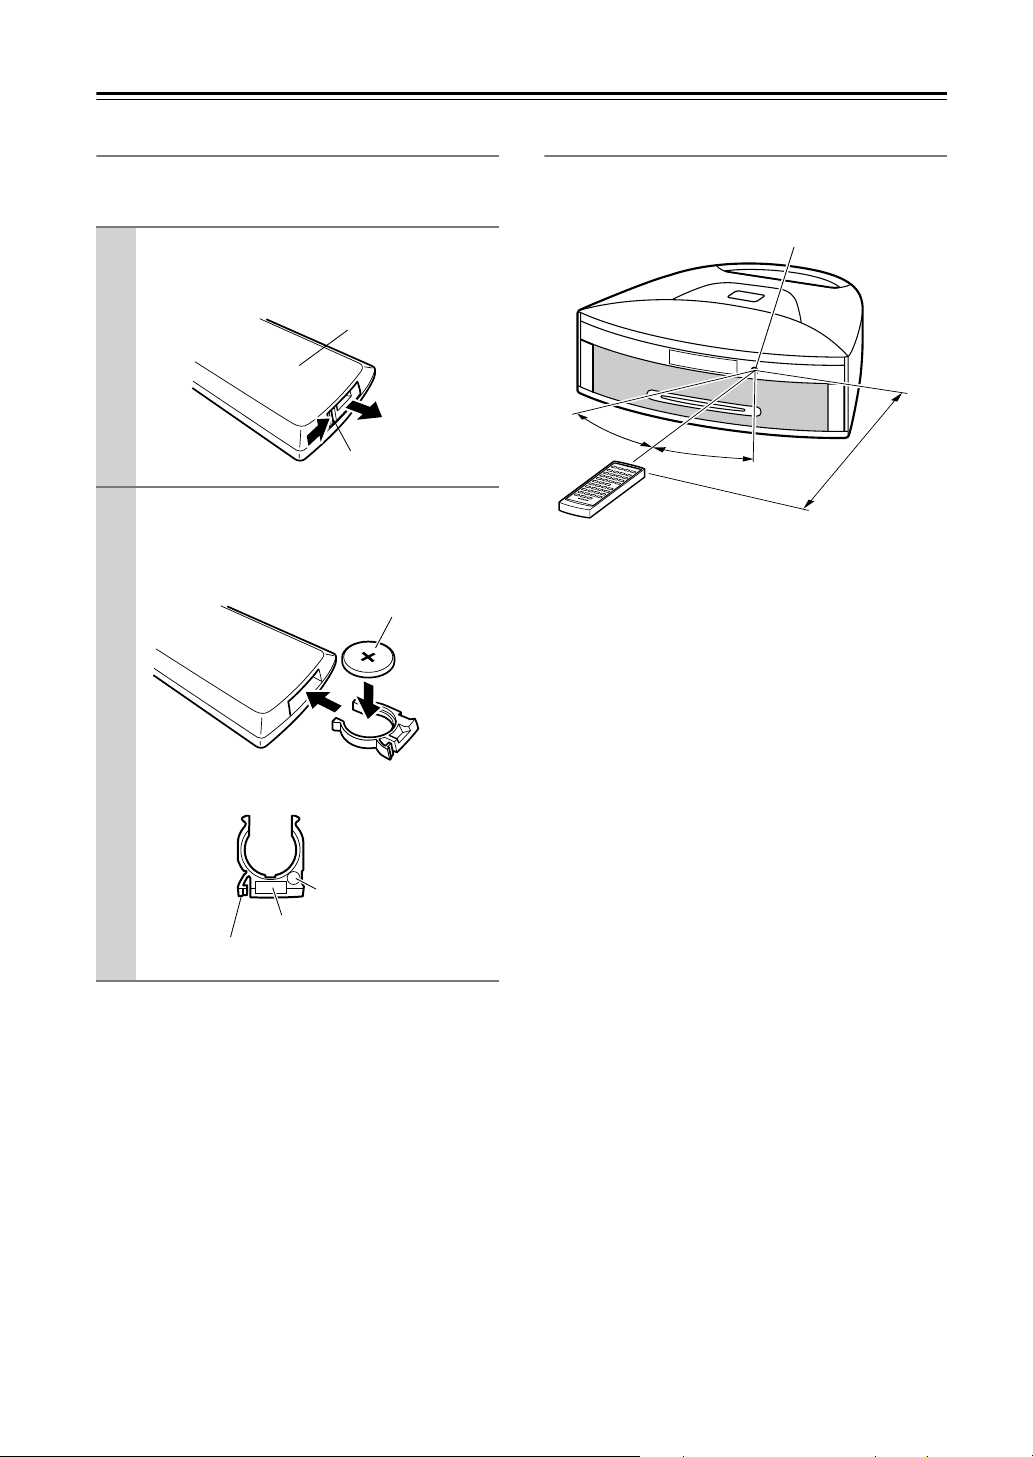
Replacing the Battery
Use only a battery of the same type (CR 2025, lithium
button battery).
While pushing the locking tab toward the
1
center of the remote controller, slide out
the battery holder.
Back of remote
controller
Locking tab
Remove the old battery from the battery
2
holder, insert the new battery, and then
slide the battery holder back into the
remote controller.
Positive (+) side up
Battery holder
Polarity (+) symbol
Battery type
Locking tab
Aiming the Remote Controller
When using the remote controller, point it toward the
CBX-300’s remote control sensor, as shown below.
Remote control sensor
CBX-300
30°
30°
Approx. 5 m (16 ft.)
Notes:
• The remote controller may not work reliably if the
CBX-300 is subjected to bright light, such as direct
sunlight or inverter-type fluorescent lights. Keep this
in mind when installing.
• If another remote controller of the same type is used in
the same room, or the CBX-300 is installed close to
equipment that uses infrared rays, the remote controller may not work reliably.
• Don’t put anything, such as a book, on the remote controller because the buttons may be pressed inadvertently, thereby draining the batteries.
• The remote controller will not work if there’s an obstacle between it and the CBX-300’s remote control sensor.
Notes:
• If the remote controller doesn’t work reliably, try
replacing the battery.
• When removing the battery holder, be careful that you
don’t damage your fingernail.
• Misuse of lithium batteries may cause a fire or chemical burn. Always keep out of reach of children. Never
disassemble, charge, heat above 100˚ C, or incinerate.
CAUTION:
Danger of explosion if battery is incorrectly replaced.
Replace only with the same or equivalent type.
En-
12
Page 13

Disc Notes
Supported Discs
The CBX-300 supports the following discs.
Disc Logo Format or file type
Audio CD
CD-R
CD-RW
CD Extra
• Some audio CDs use copy protection that doesn’t conform to the official CD standard. Since these are nonstandard discs, they may not play properly in the
CBX-300.
• The CBX-300 supports CD-R and CD-RW discs.
However, some CD-R and CD-RW discs may not
work properly for any of the following reasons: disc
burner characteristics, disc characteristics, the disc is
damaged or dirty. See the manual supplied with your
disc burner for more information. Condensation or dirt
on the optical pickup lens can also affect playback.
• The CBX-300 supports 8 cm and 12 cm discs.
• The CBX-300 does not support disc types not listed.
• Don’t use discs with an unusual shape, such as those
shown below, as you may damage the CBX-300.
• Don’t use discs that have residue from adhesive tape,
rental discs with peeling labels, or discs with custommade labels or stickers. Doing so may damage the
CBX-300 and you may not be able to remove the disc
properly.
PCM
Audio CD, MP3, WMA
Audio CD, MP3, WMA
Audio CD (Session 1),
MP3/WMA (Session 2)
Discs Made on Personal Computers
Discs made on personal computers, including those of a
compatible format, may not work properly in the
CBX-300 because of incorrect settings in the disc burning software. Check the manuals supplied with your disc
burning software for additional compatibility information.
MP3/WMA Compatibility
• The CBX-300 can play MP3 and WMA files recorded
on CD-R and CD-RW discs.
• Discs must be in ISO 9660 Level 1 or Level 2, Romeo
or Joliet compliant. Supported formats: Mode 1, Mode
2 Form 1.
• Multisession discs are supported, however, some multisession discs may take a long time to load and some
may not load at all. When burning CDs, we recommend that you use a single-session (disc-at-once) and
select “Disc Close.”
•You can determine the order in which the CBX-300
plays the MP3/WMA files in a folder by prefixing file
names with a 3-digit number. For example,
001.Track.mp3, 002.Track.mp3, and so on.
• Disc, file, and folder names may contain up to 30 characters. MP3/WMA file and folder names (excluding
the extension) are shown on the display.
• The CBX-300 supports up to 499 MP3/WMA files
and folders. Files and folders in excess of this cannot
be played. Note that if the file and folder structure is
very complicated, the CBX-300 may not be able to
read or play all of the MP3/WMA files on the disc.
• MP3/WMA files without the proper extension will not
be recognized. To prevent noise and malfunction, do
not use these extensions for other types of files.
■
MP3
• MP3 files must be MPEG-1/MPEG-2 Audio Layer 3
format with a sampling rate of between 8 kHz and 48
kHz and a bit-rate of between 8 kbps and 320 kbps.
Incompatible files cannot be played.
• MP3 files must have a “.mp3” or “.MP3” filename
extension.
•Variable bit-rate (VBR) MP3 files between 8 kbps and
320 kbps are supported. (Playing times may not display correctly.)
■
WMA
• WMA files must have the copyright option turned off.
• Sampling rates between 8 kHz and 48 kHz and a bitrate of between 32 kbps and 192 kbps are supported.
Incompatible files cannot be played.
•Variable bit-rates (VBR) from 32 kbps to 192 kbps are
supported. (Playing times may display incorrectly
with VBR.)
• WMA files must have a “.wma” or “.WMA” filename
extension.
En-
13
Page 14

Disc Notes
—Continued
About WMA
WMA stands for
compression technology developed by Microsoft Corporation. Audio can be encoded in WMA format by using
Windows Media
Windows Media Audio
®
Player.
and is an audio
Disc Content Organization
■
Audio CD
Audio CDs contain tracks.
Track 2 Track 3 Track 4Track 1
Audio CD
■
MP3/WMA Disc
MP3/WMA discs contain MP3/WMA files organized
in folders.
Folder 1
File 2 File 3 File 1File 1 File 2
Track 5
Folder 2
Handling Discs
•Never touch the underside of a disc. Always hold discs
by the edge, as shown.
Underside
•Never attach adhesive tape or sticky labels to discs.
Cleaning Discs
•For best results, keep your discs clean. Fingerprints
and dust can affect the sound quality and should be
removed as follows. Using a clean, soft cloth, wipe
from the center outwards, as shown. Never wipe in a
circular direction.
MP3/WMA disc (CD-R/CD-RW)
✔
•To remove stubborn dust or dirt, wipe the disc with a
damp, soft cloth, and then dry it with a dry cloth.
•Never use solvent-based cleaning fluids, such as thinner or benzine, commercially available cleaners, or
antistatic sprays intended for vinyl records, as they
may damage the disc.
Storing Discs
• Don’t store discs in places subject to direct sunlight or
near heat sources.
• Don’t store discs in places subject to moisture or dust,
such as in a bathroom or near a humidifier.
•Always store discs in their cases and vertically. Stacking, or putting objects on unprotected discs may cause
warping, scratches, or other damage.
En-
14
Page 15

Installing the iPod Dock Adapters
About the iPod Dock Adapters
The supplied iPod dock adapters can be used with a wide
range of iPod models (4th Generation and photo) and
iPod mini, however, if the Apple iPod Universal Dock
Adapter that fits your iPod is available, it is recommended that you use it instead.
If you have a 5th Generation or later iPod or an iPod
nano, be sure to use the dock adapter that came with it.
The CBX-300 comes with two dock adapters. Each
adapter has a letter on the rear, A or B, as shown below,
so you can determine which iPod models it supports.
A
B
The following table shows which iPod models are supported by each adapter. Be sure to use the correct adapter
for your iPod.
A
B
Installing the iPod Dock Adapters
1. Removing the dock’s protective cover
Keep the protective cover in a safe place so that you
can put it back on if you don’t intend to use the dock
for an extended period.
CBX-300’s top Protective cover
Push the tab forward and lift
off the protective cover
2. Installing the dock adapter
Hold the adapter with its slot facing away from you
and push it into the dock until it clicks into place.
iPod model A B
MENU
4th Generation iPod and
U2 Special Edition
MENU
20 GB
(including U2
Special Edition)
40 GB
✔
✔
✔
iPod mini
MENU
iPod photo
30 GB
40 GB
60 GB
✔
✔
✔
Notes:
• Inserting your iPod into the CBX-300’s dock without
the appropriate adapter installed will damage the dock
connector. Even if the correct adapter is installed,
don’t rock your iPod forcibly while it’s inserted in the
dock, as this will also damage the dock connector.
• When you insert or remove your iPod, carefully move
it straight into or out of the dock at the same angle as
the dock connector.
Make sure the slot is at
the rear.
Removing the Dock Adapters
To remove the dock adapter, insert a small flathead
screwdriver into the slot, and lift it out, as shown below.
En-
15
Page 16
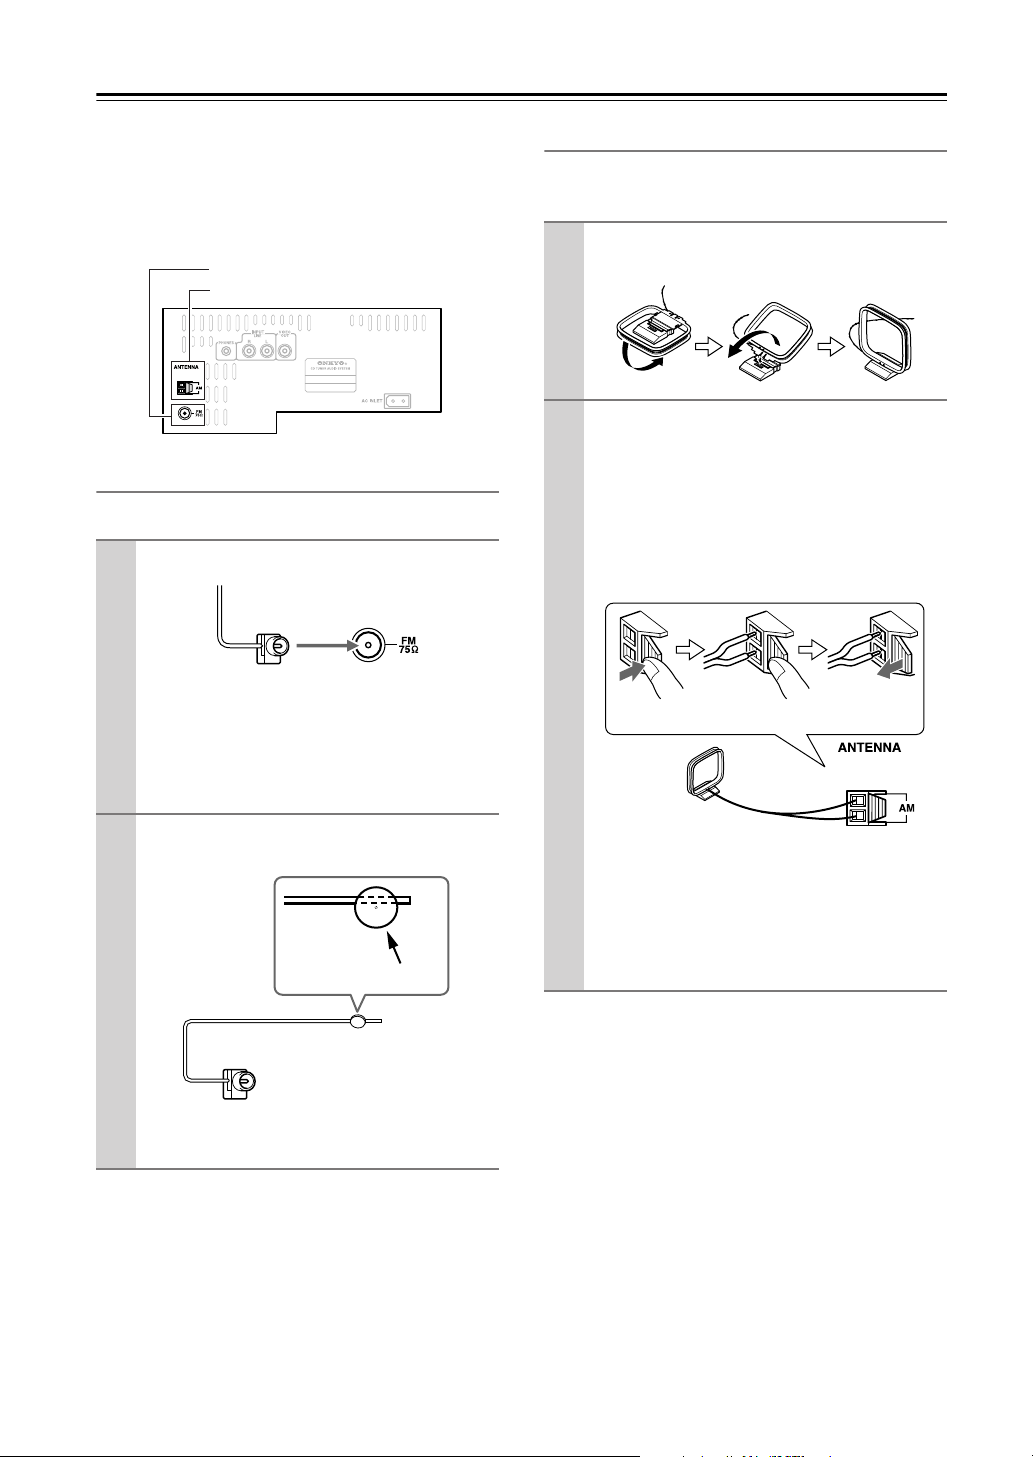
Connecting Antennas
This section explains how to connect the supplied indoor
FM antenna and AM loop antenna, and how to connect
commercially available outdoor FM and AM antennas.
The CBX-300 won’t pick up any radio signals without
an antenna connected, so you must connect the antenna
to use the tuner.
FM antenna jack
AM antenna push terminals
Connecting the Indoor FM Antenna
The supplied indoor FM antenna is for indoor use only.
Attach the FM antenna, as shown.
1
Insert the plug fully
into the jack.
Once the CBX-300 is ready for use, you’ll need to
tune into an FM radio station and adjust the position of the FM antenna to achieve the best possible reception.
Connecting the AM Loop Antenna
The supplied indoor AM loop antenna is for indoor use
only.
Assemble the AM loop antenna, inserting
1
the tabs into the base, as shown.
Connect both wires of the AM loop
2
antenna to the AM push terminals, as
shown.
The antenna’s wires are not polarity sensitive, so
they can be connected either way around.
Make sure that the wires are attached securely and
that the push terminals are gripping the bare
wires, not the insulation.
Push Insert wire Release
Use thumbtacks or something similar to
2
fix the FM antenna into position.
Thumbtacks, etc.
Caution:
when using thumbtacks.
If you cannot achieve good reception with the supplied
indoor FM antenna, try a commercially available outdoor FM antenna instead (see page 17).
Be careful that you don’t injure yourself
Once the CBX-300 is ready for use, you’ll need to
tune into an AM radio station and adjust the position of the AM antenna to achieve the best possible reception.
Keep the antenna as far away as possible from the
CBX-300, power cord, and your TV.
If you cannot achieve good reception with the supplied
indoor AM loop antenna, try using it with a commercially available outdoor AM antenna (see page 17).
En-
16
Page 17
Connecting Antennas
—Continued
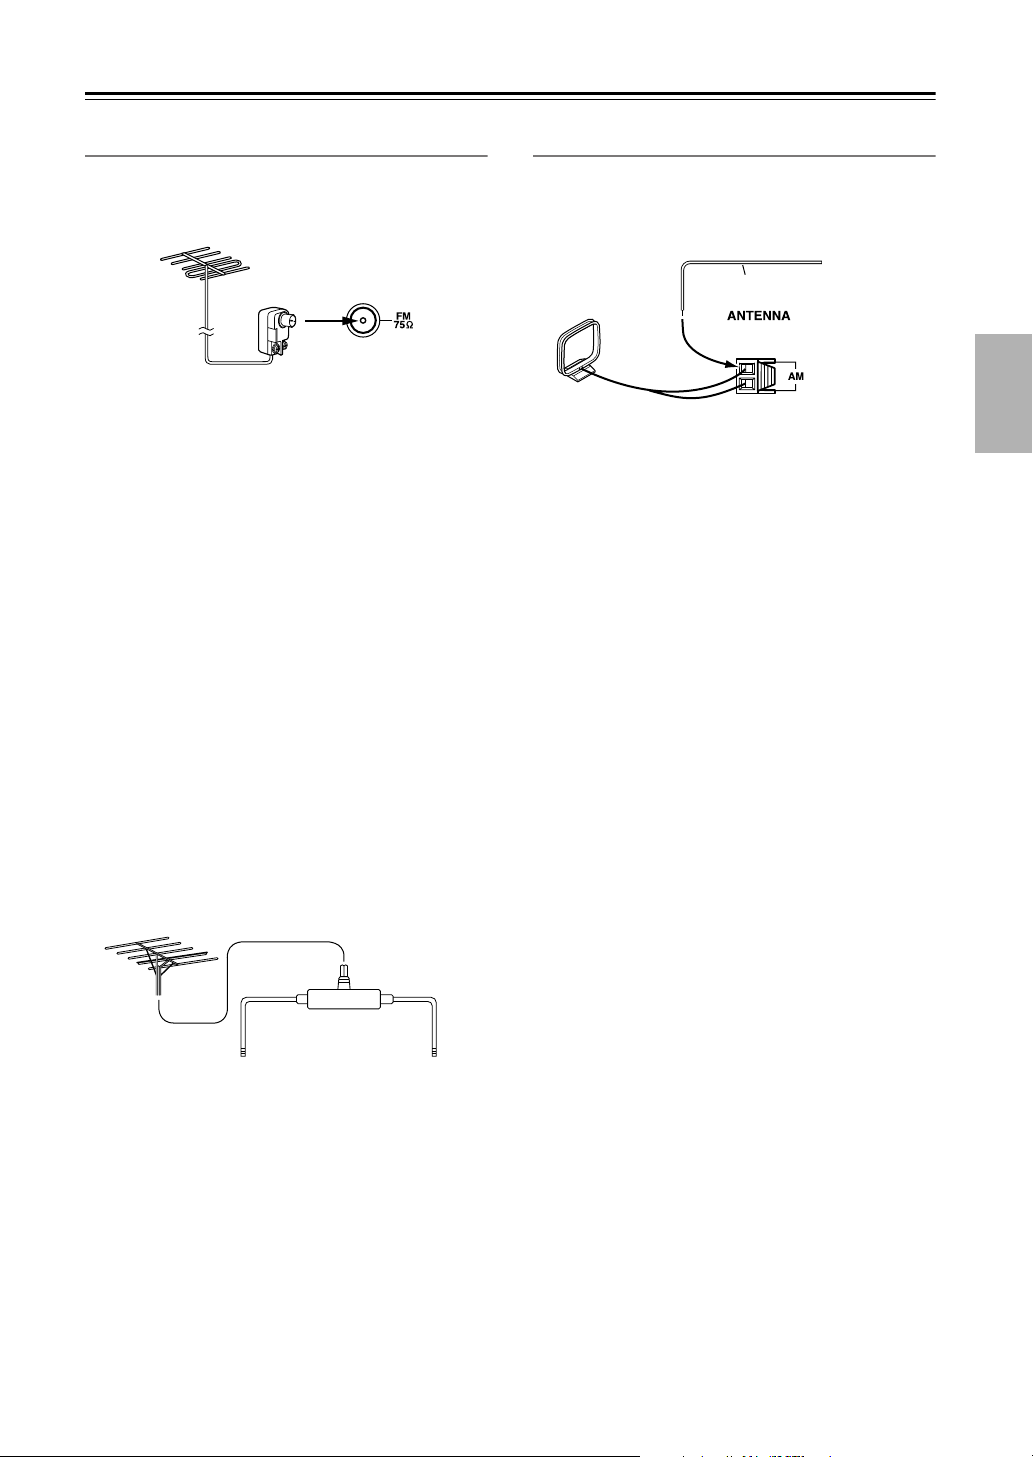
Connecting an Outdoor FM Antenna
If you cannot achieve good reception with the supplied
indoor FM antenna, try a commercially available outdoor FM antenna instead.
The adapter is not supplied with the CBX-300.
You'll need to purchase a push-type adapter.
Screw-on F-type plugs cannot be connected.
Notes:
• Outdoor FM antennas work best outside, but usable
results can sometimes be obtained when installed in an
attic or loft.
•For best results, install the outdoor FM antenna well
away from tall buildings, preferably with a clear line
of sight to your local FM transmitter.
• Outdoor antenna should be located away from possible noise sources, such as neon signs, busy roads, etc.
•For safety reasons, outdoor antenna should be situated
well away from power lines and other high-voltage
equipment.
• Outdoor antenna must be grounded in accordance
with local regulations to prevent electrical shock hazards.
■
Using a TV/FM Antenna Splitter
It’s best not to use the same antenna for both FM and TV
reception, as this can cause interference problems. If circumstances demand it, use a TV/FM antenna splitter, as
shown.
Connecting an Outdoor AM Antenna
If good reception cannot be achieved using the supplied
AM loop antenna, an outdoor AM antenna can be used in
addition to the loop antenna, as shown.
Outdoor antenna
Insulated antenna cable
AM loop antenna
Outdoor AM antennas work best when installed horizontally outside, but good results can sometimes be obtained
indoors by mounting horizontally above a window. Note
that the AM loop antenna should be left connected.
Outdoor antenna must be grounded in accordance with
local regulations to prevent electrical shock hazards.
TV/FM antenna splitter
To CBX-300 To TV (or VCR)
En-
17
Page 18

Connecting an External Audio/Video Source
About Connections
• Before making any connections, read the manuals
supplied with your other components.
• Don’t connect the power cord until you’ve completed
and double-checked all connections.
Connection Color Coding
RCA audio connections are usually color-coded red and
white. Use white plugs to connect left-channel audio
inputs and outputs (typically labeled “L”). Use red plugs
to connect right-channel audio inputs and outputs (typically labeled “R”).
Composite video connections are usually color-coded
yellow. Use yellow plugs to connect composite video
inputs and outputs.
Left (white)
Right (red)
(Yellow)
• Push plugs in all the way to make
good connections (loose connections can cause noise or malfunctions).
•To prevent interference, keep
audio cables away from power
cords.
Analog audio cable
Composite video
Left (white)
Right (red)
(Yellow)
Right!
Wrong!
Connecting Other Components
Connect the CBX-300’s INPUT LINE jacks to the other
component’s audio output jacks.
DVD player
Cassette deck MD recorder
CBX-300’s rear panel
Red White
Analog audio cable (RCA)
: Signal flow
Tip:
•To listen to the component, select the LINE input
source (see page 20).
TV
etc.
Red White
Connecting Your TV or Projector
If you have an iPod that supports video output, you can
watch videos and photo slideshows on your TV or projector while it’s inserted in the CBX-300’s iPod dock.
Using a commercially available composite video cable,
connect the CBX-300’s VIDEO OUT jack to a composite video input on your TV or projector.
TV
: Signal flow
VIDEO INPUT
CBX-300’s rear panel
Composite video cable
Notes:
•To watch videos and photo slideshows on your TV or
projector, on your iPod, set the TV Out setting to On.
• Depending on your iPod model and its software version, video fast forwarding and rewinding, and photo
next and previous functions may not be available.
•Viewing on TV is not possible with iPod models that
do not support video output.
En-
18
Page 19

Connecting the Power Cord
Notes:
• Before connecting the power cord, complete and double-check all other connections.
•Turning on the CBX-300 may cause a momentary power surge that might interfere with other electrical equipment
on the same circuit. If this is a problem, plug the CBX-300 into a different branch circuit.
• Do not use a power cord other than the one supplied with the CBX-300. The supplied power cord is designed exclusively for use with the CBX-300 and should not be used with any other equipment.
•Never disconnect the power cord from the CBX-300 while the other end is still plugged into a wall outlet. Doing so
may cause an electric shock. Always disconnect the power cord from the wall outlet first, and then the CBX-300.
1
2
To wall outlet
1
2
Supplied power cord
(Connector type varies from country to country.)
Connect the supplied power cord to the CBX-300’s AC INLET.
Plug the power cord into a suitable wall outlet.
The STANDBY indicator lights up.
AccuClock—Automatic Clock Setting (European models only)
For the AccuClock function to work properly, the CBX-300 must be able to receive RDS radio stations, which means
an FM antenna must be connected. Be sure to connect an FM antenna before plugging in the power cord (see pages 16
and 17).
The very first time you plug the power cord into a wall outlet, the AccuClock function automatically searches for an
RDS radio station that’s broadcasting CT (Clock Time) information and sets the clock accordingly. While the CT information is being received, “AccuClock…” appears dimly on the display, as shown. Note that it may take several minutes
to set the clock.
If the clock is set successfully, the day and time will be displayed brightly for 2 seconds, as shown.
The AccuClock function automatically updates the clock daily at 2 A.M., 3 A.M., and 2 P.M.
If for some reason the clock cannot be set automatically, see “Setting the Clock” on page 40.
En-
19
Page 20
Basic Operation
STANDBY/ON
STANDBY indicator
(front panel)
VOLUME
Turning On the CBX-300
CBX-300
Remote
controller
PHONES
(rear panel)
INPUT
STANDBY/
ON
INPUT
/
VOLUME
/
Selecting the Input Source
You can select CD, iPod, FM, AM, or LINE, which can
be an external component.
To select the input source, press the remote controller’s
INPUT [ ]/[ ] buttons repeatedly. On the CBX-300,
press the [INPUT] button repeatedly. The input sources
are selected in the following order.
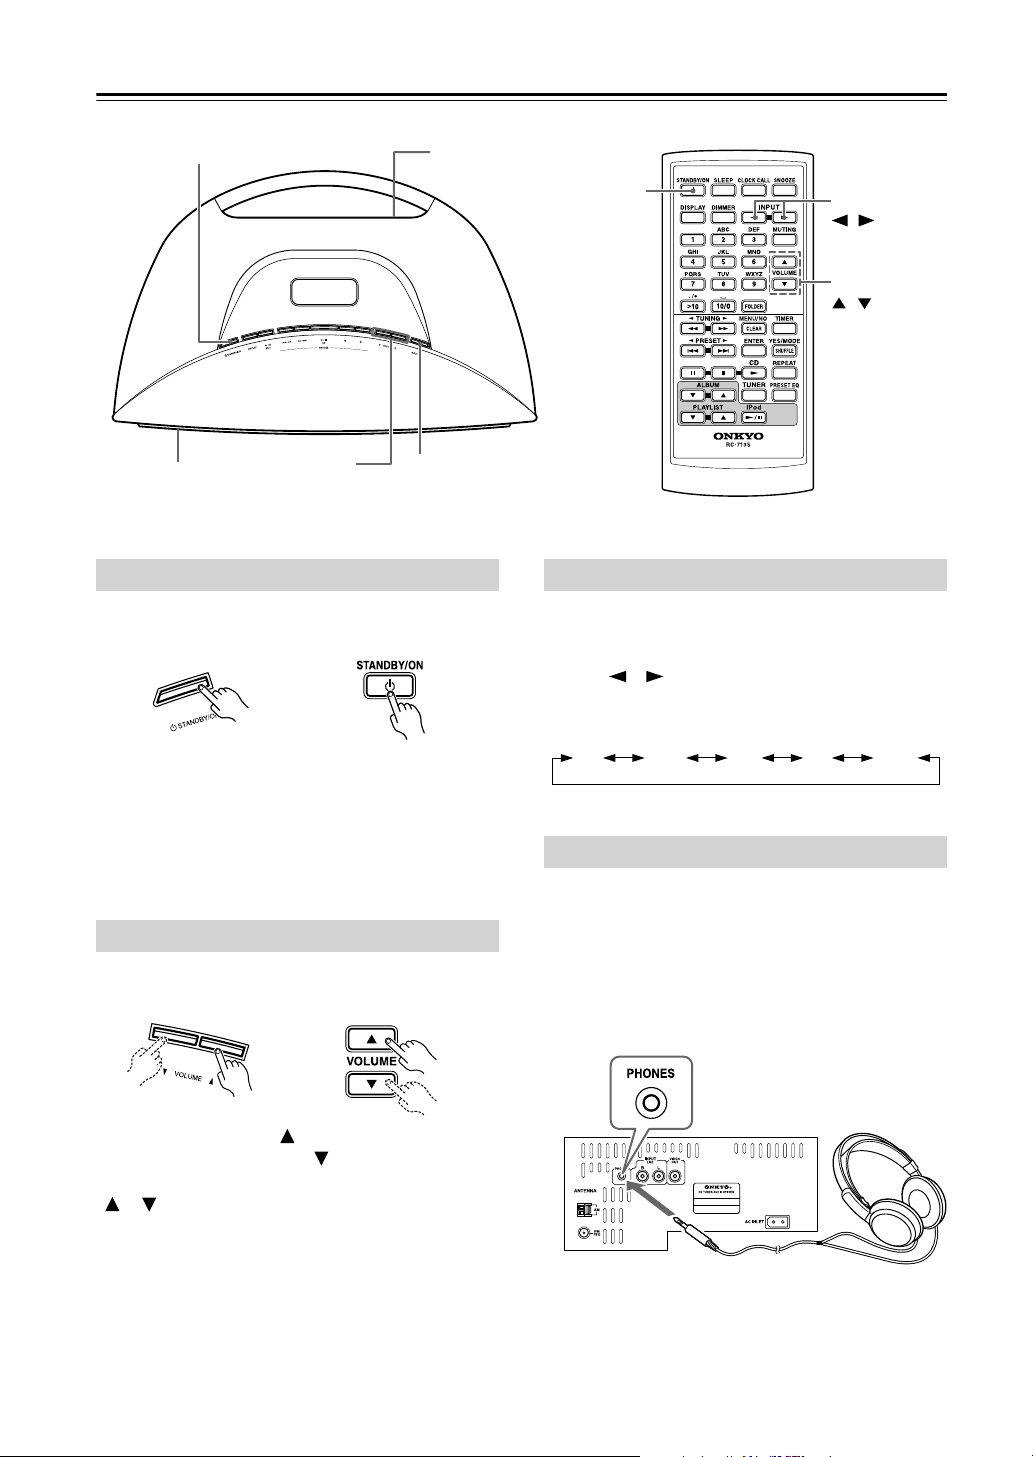
To turn on the CBX-300, press the [STANDBY/ON] button on the CBX-300 or remote controller. The
STANDBY indicator goes off.
Press the [STANDBY/ON] button again to set the
CBX-300 to Standby. The STANDBY indicator lights
up.
Adjusting the Volume
CBX-300
Press the VOLUME Up [ ] button to increase the volume or the VOLUME Down [ ] button to decrease it.
You can also use the remote controller’s VOLUME
[ ]/[ ] buttons.
The adjustable range is: Min, 1 through 43*, Max.
*Depending on the Maximum Volume setting, this value
can be 43 through 49 (see page 48).
Remote
controller
CD FMiPod AM
LINE
Using Headphones
Turn down the volume, then connect your stereo headphones to the PHONES minijack.
You can adjust the volume and mute the sound as normal.
The speakers output no sound while the headphones are
connected.
PHONES jack
En-
20
Page 21
Basic Operation
DIMMER
—Continued
MUTING
PRESET EQ
Muting the CBX-300
To mute the CBX-300, press the remote
controller’s [MUTING] button. “Muting”
appears on the display for a few seconds.
The MUTING indicator flashes continuously while the CBX-300 is muted.
Changing the Display Brightness
You can adjust the brightness of the
CBX-300’s display. Press the remote controller’s [DIMMER] button repeatedly to
select the following options:
Normal Dim
MUTING indicator only flashes continuously
To unmute the CBX-300, press the [MUTING] button
again.
Tips:
While the CBX-300 is muted:
• Press the VOLUME [
or pressing the VOLUME [ ]/[ ] buttons on the
remote controller will unmute the CBX-300.
• If you turn the CBX-300 off, the next time you turn it
on, the CBX-300 will be unmuted.
/
] buttons on the CBX-300
Preset EQ
With the CBX-300’s three preset equalizer
settings, you can change the tone of the
sound.
To select a preset equalizer setting, press the
remote controller’s [PRESET EQ] button
repeatedly. The preset equalizer settings are
selected in the following order.
VOCALSTANDARD DYNAMIC
CLEAR
En-
21
Page 22
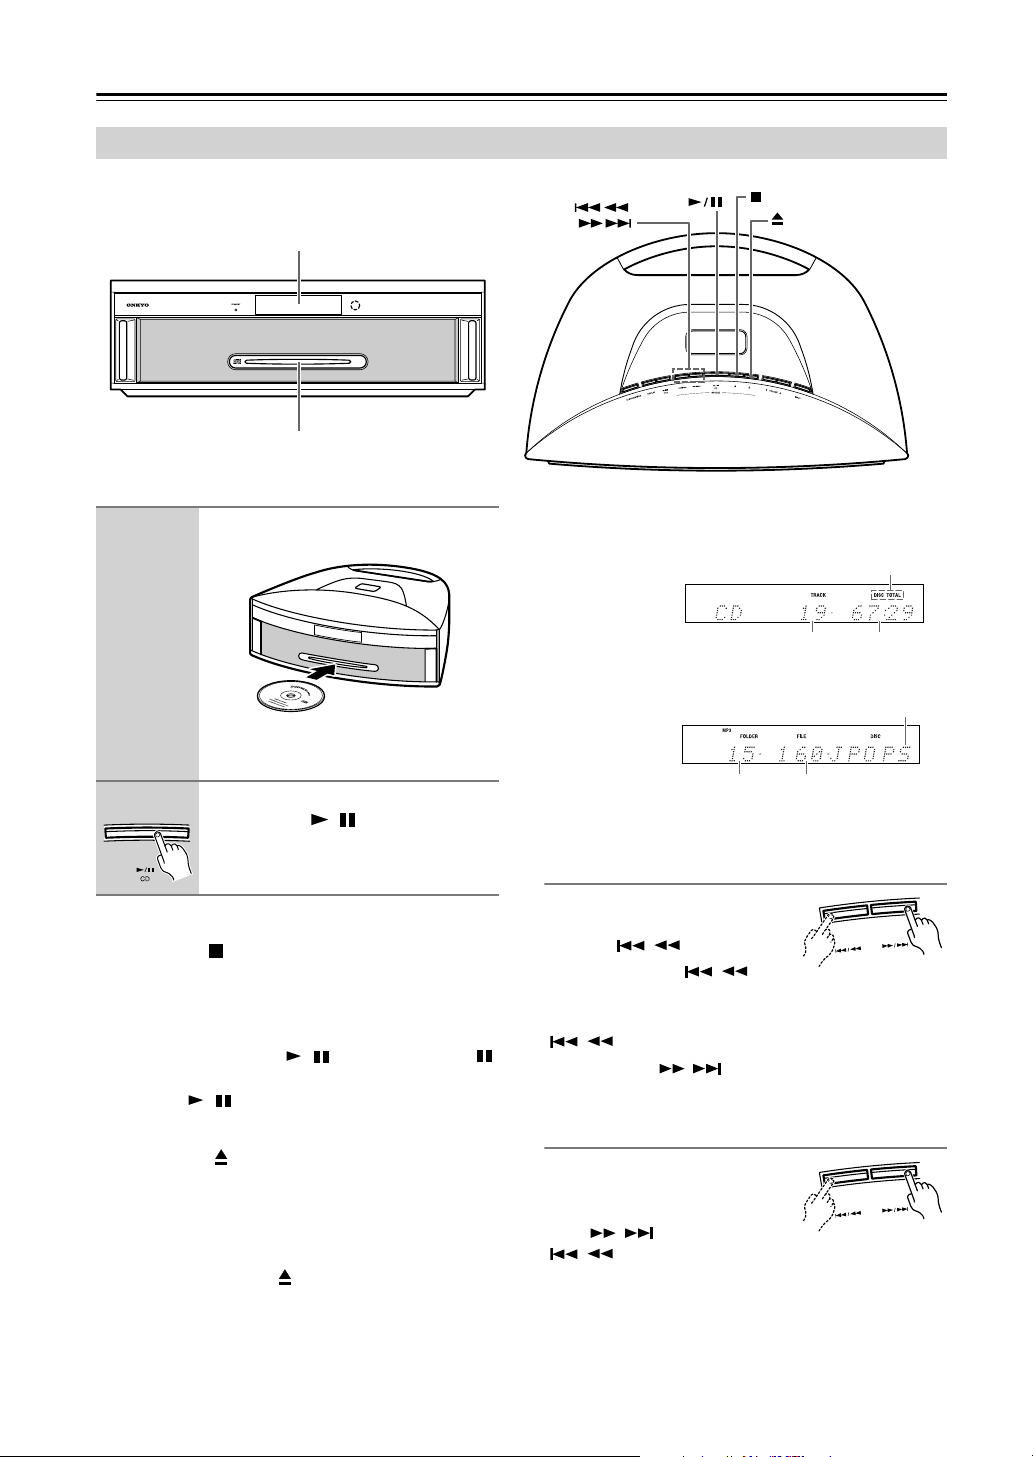
Playing CDs
Using the Top Panel Buttons
Display
Disc slot
/
1
2
To stop playback:
Press the Stop [ ] button.
Playback stops automatically when the last track has
been played.
To pause playback:
Press the CD Play/Pause [ ] button. The Pause
indicator appears. To resume playback, press the CD
Play/Pause [ ] button again.
To remove the CD:
Press the Eject [ ] button.
Tips:
• If you insert a CD while the CBX-300 is on Standby,
it will turn on automatically.
• If you press the Eject [ ] button while the CBX-300
is on Standby, it will turn on automatically and the CD
will be ejected.
Insert the CD into the disc slot with
the label-side facing up.
8 cm discs can be inserted without an
adapter.
To start playback, press the CD
Play/Pause [ ] button.
/
/
/
• Audio CD Display
• MP3/WMA CD Display
Total number
of folders
“DISC TOTAL” lights up
while the disc information is being displayed.
Total number
of tracks
Disc name
Total number
of files
Total playing
time
Selecting Tracks
To return to the beginning of the
track currently playing, press the
Previous [ / ] button.
Press the Previous [ / ] button repeatedly to select earlier tracks.
While playback is stopped, pressing the Previous
[/] button will select the previous track.
Press the Next [
subsequent tracks.
/
] button repeatedly to select
Fast Forward and Rewind
To fast forward or rewind during
playback or while playback is
paused, press and hold down the
Next [ / ] or Previous
[/] button, respectively.
Press and hold
En-
22
Page 23
Playing CDs
—Continued
Using the Remote Controller
Use the number buttons as
shown in the examples below to
select tracks.
To select:
Tr ac k #8
Tr ac k #10
Tr ac k #34
Used to enter numbers over 10.
For MP3/WMA CDs, you can select files
in the current folder with these buttons.
Press to select tracks
• Press the Previous [ ] button to
locate the beginning of the currently
playing or paused track. Press it
repeatedly to select earlier tracks.
• Press the Next [ ] button repeatedly to select subsequent tracks.
For MP3/WMA CDs, you can select files
in other folder
Press:
s (see pages 24 and 25).
Press to display more CD information
Press to adjust the volume
Press the VOLUME Up [ ] button to
turn up the volume. Press the VOLUME
Down [ ] button to turn it down.
Press to fast forward or rewind
During playback or while playback is
paused, press and hold the Fast Forward [ ] button to fast forward, or the
Rewind [ ] button to rewind.
Press to start playback
Pressing this button while the CBX-300
is on Standby will turn on the CBX-300
and start playback.
Press to pause playback
To resume playback, press the Pause
[] or Play [ ] button.
Press to stop playback
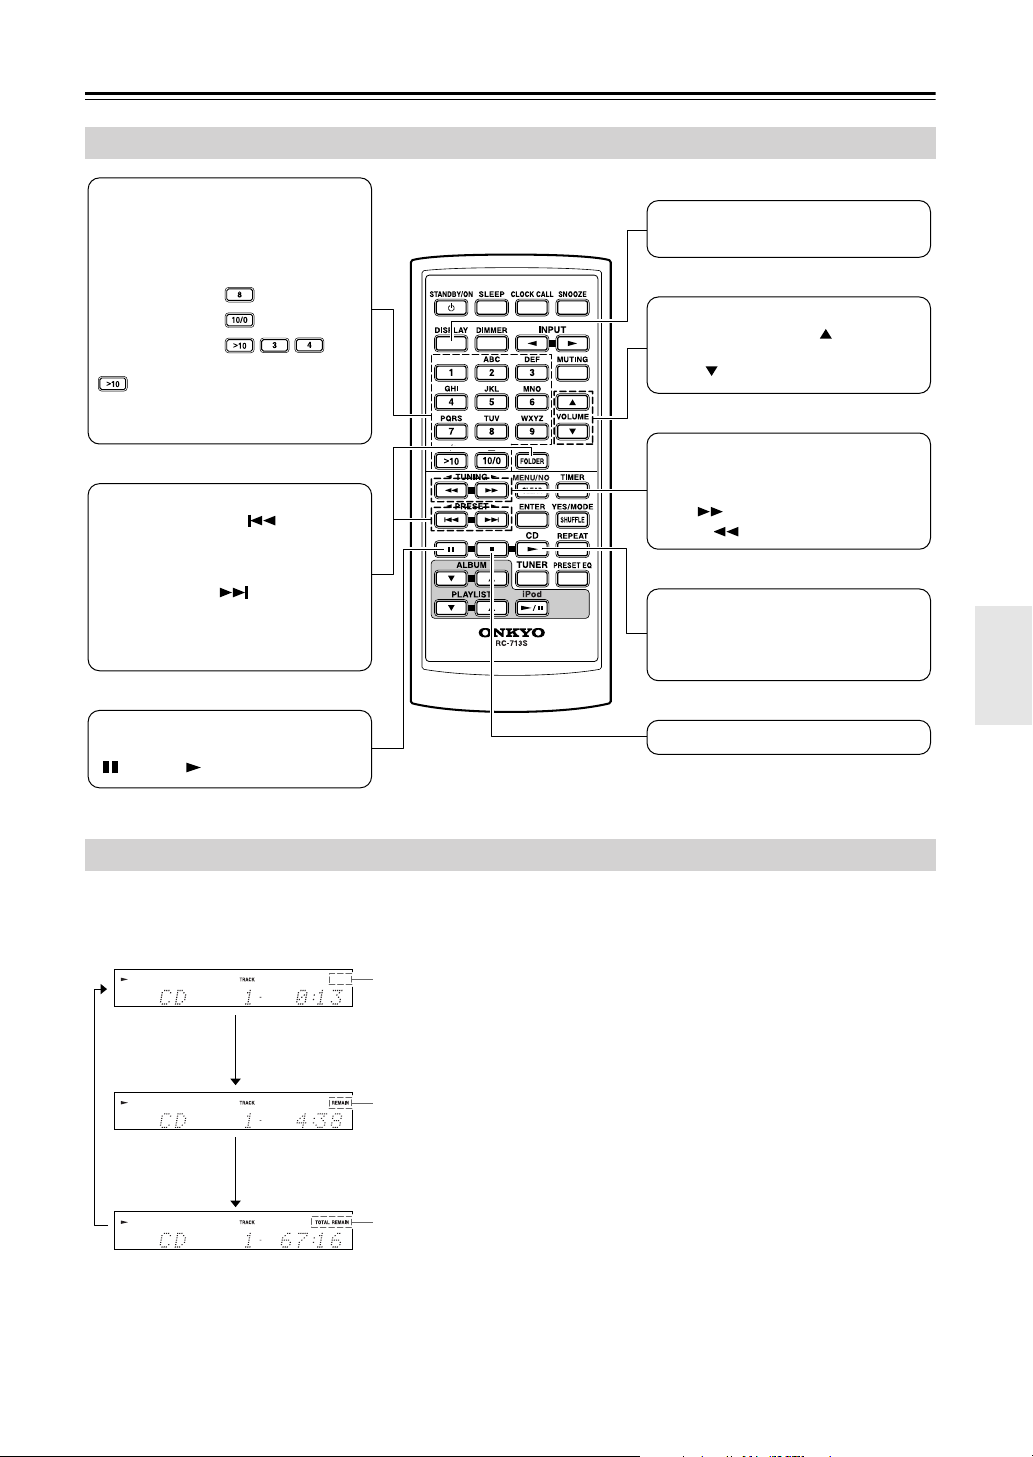
Displaying CD Information
During playback or while playback is paused, press the remote controller’s [DISPLAY] button repeatedly to display the
following CD information.
No indicator.
The elapsed time is normally displayed.
“REMAIN”
Lights up while the remaining track
time is being displayed.
“TOTAL REMAIN”
Lights up while the remaining disc
time is being displayed.
If the total time is more than 99 minutes and 59 seconds, “– –:– –” is displayed.
Note:
• See page 26 for details on displaying MP3/WMA information.
En-
23
Page 24
Playing CDs
—Continued
Selecting MP3/WMA Files
On an MP3/WMA CD, files may be organized hierarchically, with folders containing files and subfolders, as
shown below. On the CBX-300, there are two modes for
selecting MP3/WMA files:
Folder mode. In Navigation mode, you can select
MP3/WMA files by navigating through the folder hierarchy, moving in and out of folders and subfolders. In All
Folder mode, all folders appear at the same level, making
it easy to select folders regardless of the hierarchy.
Root Folder #1
Folder #2
If you don’t select a specific MP3/WMA file or folder for
playback, all of the MP3/WMA files on the CD will be
played in numerical order starting with file #1.
Selecting MP3/WMA Files in Navigation
Mode
/
Navigation mode
File #1
File #10
Folder #3
File #11
File #12
File #13
FOLDER
ENTER
and
All
Folder #4
File #14
File #18
1
2
3
4
5
While playback is stopped, press
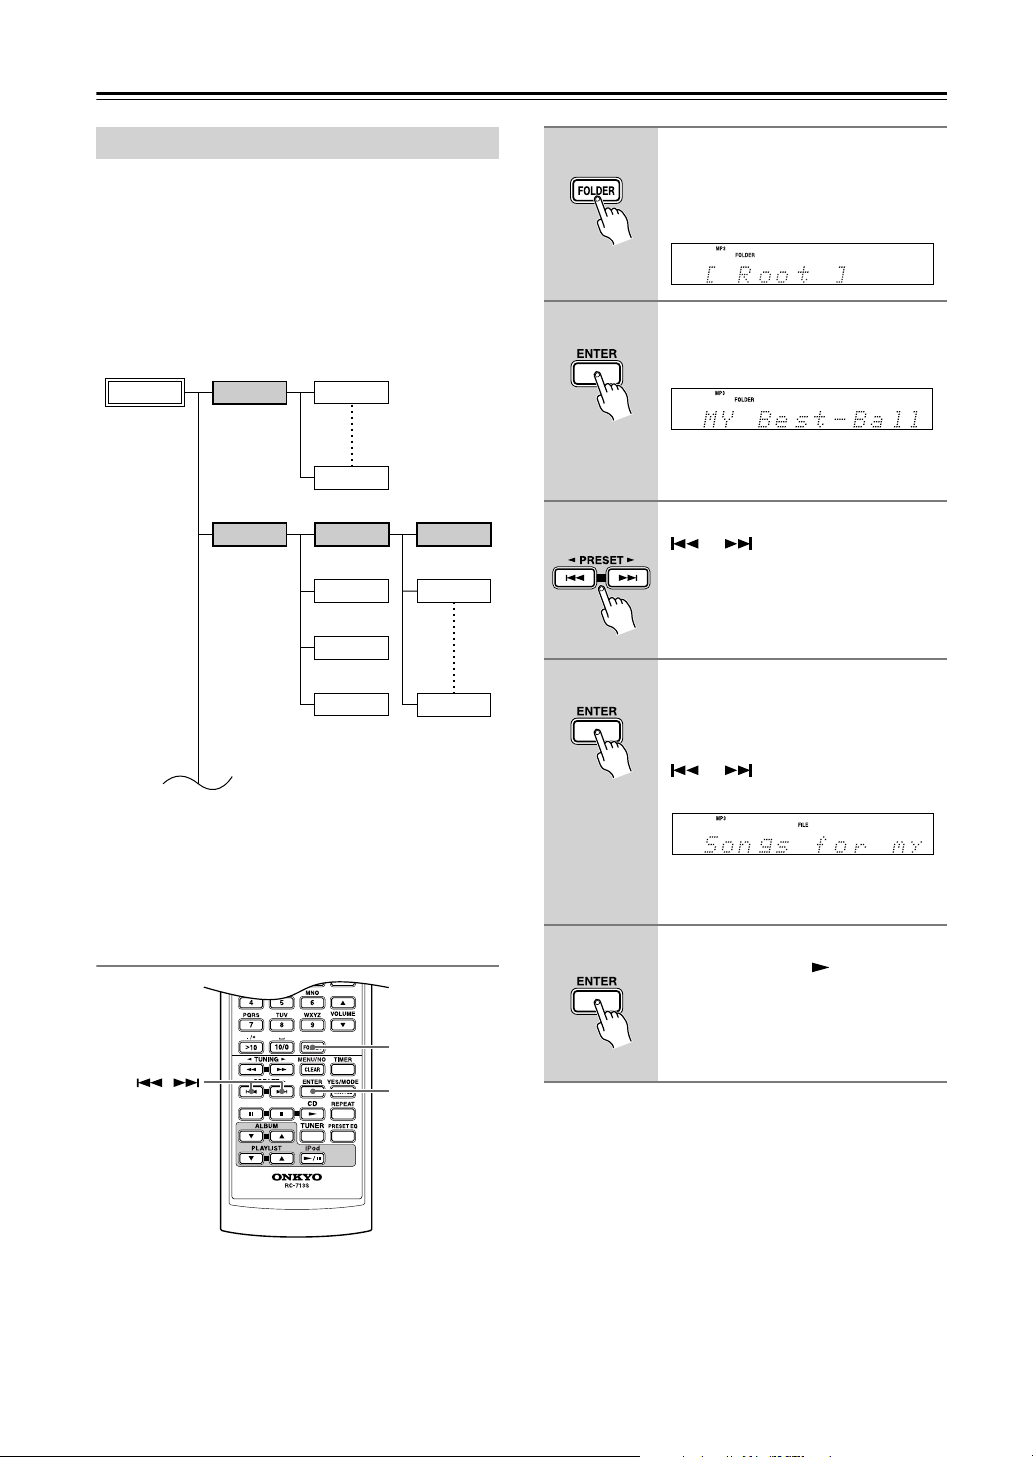
the [FOLDER] button.
The CBX-300 enters Navigation mode
and “Root” appears on the display.
Press [ENTER].
The name of the first folder one level
down from root appears on the display.
If the disc contains no folders, the name
of the first MP3/WMA file is displayed.
Use the Previous and Next
[ ]/[ ] buttons to select
other folders and files at the
same level.
Folders that don’t contain MP3/WMA
files or subfolders can’t be selected.
To access files or subfolders
inside another folder, select the
folder, and then press [ENTER].
Use the Previous and Next
[ ]/[ ] buttons to select the files
and subfolders within that folder.
To move up a level, press the
[MENU/NO] button.
To start playback, press the
[ENTER] or Play [ ] button.
Playback will start with the specified
file or folder and continue until all of
the MP3/WMA files on the disc have
been played.
In Navigation mode, you can select MP3/WMA files by
navigating through the folder hierarchy. This mode can
only be used while playback is stopped.
If random playback or 1-folder playback is currently
selected, press the [YES/MODE] button to cancel it
before proceeding.
En-
24
Page 25
Playing CDs
—Continued
Selecting MP3/WMA Files in All Folder
Mode
Number
buttons
FOLDER
/
In All Folder mode, you don’t have to navigate the folder
hierarchy because all folders that contain MP3/WMA
files appear at the same level.
If random playback is currently selected, press the
[YES/MODE] button to cancel it before proceeding.
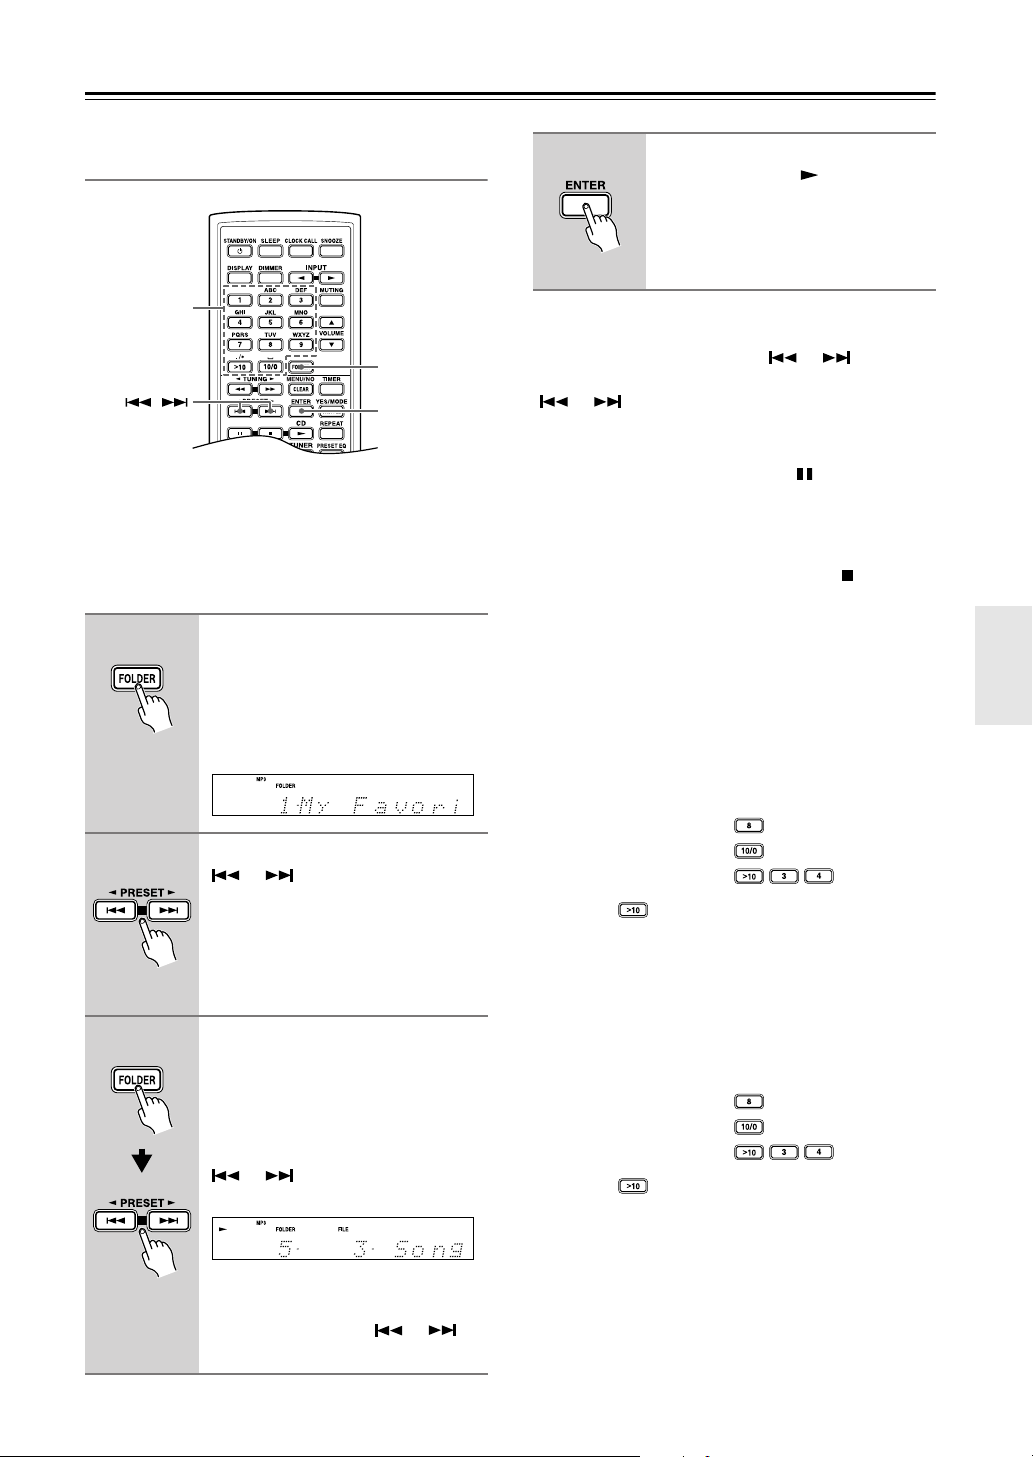
1
While playback is stopped, press
the [FOLDER] button for 2 seconds.
The CBX-300 enters All Folder mode
and the name of the first folder appears
on the display.
ENTER
4
To select an MP3/WMA file in another folder during
playback, press the [FOLDER] button, select the folder
by using the Previous and Next [
and then press [ENTER]. Now use the Previous and Next
[
]
/[ ] buttons to select the MP3/WMA files
within that folder.
■
Pausing Playback
To pause playback, press the Pause [ ] button. To
resume playback, press it again.
■
Cancelling Navigation or All Folder Mode
To cancel Navigation mode or All Folder mode while
selecting MP3/WMA files, press the Stop [ ] button.
■
Selecting Folders and Files by Number
Files and folders can be selected during playback or
while playback is stopped.
1
Press the [FOLDER] button for 2 seconds to enter
All Folder mode.
2
Use the number buttons as shown in the examples
below to enter the folder number.
To start playback, press the
[ENTER] or Play [ ] button.
Playback will start with the specified
file or folder and continue until all of
the MP3/WMA files on the disc have
been played.
]
/[ ] buttons,
2
3
Use the Previous and Next
[ ]/[ ] buttons to select the
other folders.
You can select any folder that contains
MP3/WMA files.
To play the first file in the selected
folder, go to Step 4.
To access the files inside the
folder, press the [FOLDER] button.
The name of the first MP3/WMA file
inside the folder is displayed.
Use the Previous and Next
[ ]/[ ] buttons to select the
MP3/WMA files within the folder.
To select another folder, press the
[FOLDER] button again, and then use
the Previous and Next [ ]/[ ]
buttons to select it.
To select: Press:
Folder #8
Folder #10
Folder #34
Used to enter numbers over 10.
If playback is stopped, playback starts with the first
MP3/WMA file in the specified folder. If playback is
already in progress,
MP3/WMA file in the specified folder.
Use the number buttons to enter the file number.
3
To select: Press:
Playback of the specified file starts.
If a folder contains 99 or less MP3/WMA files
you’ll need to enter two digits when you press the
[>10] button. If a folder contains 100 or more files,
you’ll need to enter three digits when you press the
[>10] button. In this case, single- and double-digit
numbers will need to be preceded by zeros.
press [ENTER]
File #8
File #10
File #34
Used to enter numbers over 10.
to play the first
,
En-
25
Page 26
Playing CDs
—Continued
Playing the MP3/WMA Files in Only One Folder
DISPLAY
/
Normally, all of the MP3/WMA files in all of the folders
on the disc are played. With 1-folder playback, only the
MP3/WMA files in the specified folder are played.
1
Press the [YES/MODE] button
repeatedly until the 1FOLDER indicator appears.
YES/MODE
ENTER
1FOLDER indicator
Displaying MP3/WMA Information
You can display various information about the
MP3/WMA file currently playing, such as title, artist,
and album.
During playback, press the [DISPLAY] button repeatedly to display
the following MP3/WMA information.
Elapsed time:
MP3/WMA file has been playing (default display). If the
elapsed time is more than 99 minutes and 59 seconds,
“– –:– –” is displayed.
File name:
Folder name:
Title:
Title of the current song (if tag present).
The length of time that the current
Name of the current MP3/WMA file.
Name of the current folder.
2
3
Use the Previous and Next
[ ]/[ ] buttons to select the
folder.
You can select any folder that contains
MP3/WMA files.
To start playback, press the
[ENTER] or Play [ ] button.
Playback will start with the first
MP3/WMA file in the specified folder
and continue until all of the MP3/WMA
files in that folder have been played.
Artist:
Name of the artist (if tag present).
Album:
Title of the album (if tag present).
Sampling rate and bit rate:
of the current MP3/WMA file.
Notes:
•You can also use the CBX-300’s [DISPLAY] button to
display this information.
•To display the disc name, press the [DISPLAY] button
while playback is stopped.
• If a file or folder name contains a character that cannot
be displayed, it will be displayed as “File_n” or
“Folder_n,” “n” being the file or folder number.
Sampling rate and bit rate
En-
26
Page 27

Playing CDs
—Continued
Memory Playback
With memory playback, you can create a playlist of up
to 25 tracks.
Number buttons
(see page 23)
(These buttons do
nothing during
memory playback)
/
/
Memory playback can be set only when the input source
is set to CD and playback is stopped.
1
2
Press the [YES/MODE] button
repeatedly until the MEMORY indicator appears.
MEMORY indicator
Use the Previous and Next
[ ]/[ ] buttons to select the
first track you want to add to the
playlist, and then press [ENTER].
Tr ack to be added
to the playlist
CLEAR
ENTER
YES/MODE
Total time of playlist
To remove tracks from the playlist:
Press the [CLEAR] button. Each press
removes the last track from the playlist.
Notes:
• If the total playing time is more than
99 minutes and 59 seconds, “– –:– –”
is displayed.
•You can add up to 25 tracks to the
playlist. If you try to add more, the
message “Memory Full” appears.
3
■
Selecting Other Tracks During Memory
Playback
To select other playlist tracks during memory playback,
use the Previous and Next [ ]/[ ] buttons.
■
Checking What’s on the Playlist
To check what tracks are on the playlist, with playback
stopped, use the Rewind and Fast Forward [ ]/[ ]
buttons to scroll through the playlist.
■
Removing Tracks from the Playlist
While memory playback is stopped, press the [CLEAR]
button. Each press removes the last track from the playlist.
The playlist will be deleted when you cancel memory
playback, select random playback, turn off the
CBX-300, or remove the CD.
To start memory playback, press
the Play [ ] button.
Tr ack currently playing
On the CBX-300, press the Play/Pause
[] button to start memory play-
/
back.
Repeat this step to add additional tracks
to the playlist.
You can also use the number buttons on
the remote controller to select tracks.
To select MP3/WMA files for memory
playback:
In Navigation mode, use steps 1–4 on
page 24. In All Folder mode, use steps
1–4 on page 25.
En-
27
Page 28

Playing CDs
—Continued
Random Playback
With random playback, all of the tracks on the disc are
played in random order.
YES/MODE
Random playback can be set only when the input source
is set to CD and playback is stopped.
1
2
Press the [YES/MODE] button
repeatedly until the RANDOM indicator appears.
RANDOM indicator
To start random playback, press
the Play [ ] button.
Repeat Playback
With repeat playback, you can play an entire CD repeatedly, play one track repeatedly, or combine it with memory playback to play the playlist repeatedly, or random
playback to play all of the tracks on the disc in random
order repeatedly. For an MP3/WMA CD, you can combine repeat playback with 1-folder playback to play all
of the tracks in a specified folder repeatedly.
REPEAT
Press the [REPEAT] button repeatedly until the REPEAT or
REPEAT 1 indicator appears.
REPEAT or REPEAT 1 indicator
Tr ack currently playing
■
Cancelling Random Playback
To cancel random playback, stop playback, and then
press the [YES/MODE] button repeatedly until the
RANDOM indicator disappears.
Random playback is automatically cancelled when the
CD is removed or the CBX-300 is set to Standby.
En-
28
Repeat-1 playback can’t be combined with memory
playback, random playback, or 1-folder playback.
■
Cancelling Repeat Playback
To cancel repeat playback, press the [REPEAT] button
repeatedly until both the REPEAT and REPEAT 1 indicators disappear.
Repeat playback is automatically cancelled when the CD
is removed or the CBX-300 is set to Standby.
Page 29

Playing CDs
—Continued
Setting MP3/WMA Preferences
With the MP3/WMA preferences, you can change the
way MP3/WMA file information is displayed and the
way MP3/WMA CDs are played.
/
The MP3/WMA preferences can be set only when playback is stopped.
1
Press the [MENU/NO] button
repeatedly until “Disc Name?”
appears.
MENU/NO
ENTER
Preferences
Below, the name of each preference is followed by its
options in parentheses, with the default option in bold.
Disc Name? (Display
This preference determines whether or not the disc name
is displayed when an MP3/WMA disc is loaded.
File Name? (Scroll
This preference determines whether or not the file name
scrolls across the display when an MP3/WMA file is
selected.
In Navigation mode (see page 24), the file name scrolls
across the display regardless of this setting.
Folder Name? (Scroll
This preference determines whether or not the folder
name scrolls across the display when an MP3/WMA
folder is selected (in All Folder mode).
In Navigation mode (see page 24), the folder name
scrolls across the display regardless of this setting.
CD Extra? (Audio
This preference applies to CD Extra discs and determines whether music in the audio session or MP3/WMA
files in the data session are played.
/Not Display
/Not Scroll
/Not Scroll
/MP3, WMA
)
)
)
)
2
3
4
5
To cancel the procedure at any point, press the
[MENU/NO] button.
Use the Previous and Next
[ ]/[ ] buttons to select the
preference you want to change.
The preferences are explained in the
next column.
Press [ENTER].
Use the Previous and Next
[ ]/[ ] buttons to select the
preference’s options.
Press [ENTER].
When the preference has been set,
“Complete” appears on the display.
Hide Number? (Disable
This preference determines whether or not the numbers
at the beginning of file and folder names are displayed.
When you create an MP3/WMA CD on a personal computer, you cannot normally determine the playback order
of the files. However, if you number the MP3/WMA files
in order, starting with 01, 02, 03, and so on, they will
play in that order. If you don’t want these numbers to
appear on the display, choose Enable.
The following table shows a few examples of numbered
file and folder names and how they will appear with the
Disable and Enable options.
File/folder name
01 Pops 01 Pops Pops
10-Rock 10-Rock Rock
16_Jazz 16_Jazz Jazz
21st Century 21st Century 21st Century
05-07-20 Album 05-07-20 Album Album
Folder Key? (Navigation
This preference determines how the [FOLDER] button
works. When the All Folder option is selected, pressing
the [FOLDER] button once selects All Folder mode and
pressing and holding it for 2 seconds selects Navigation
mode. When the Navigation option is selected, pressing
the [FOLDER] button once selects Navigation mode and
pressing and holding it for 2 seconds selects All Folder
mode.
/Enable
Hide Number preference
Disable Enable
)
/All Folder
)
En-
29
Page 30
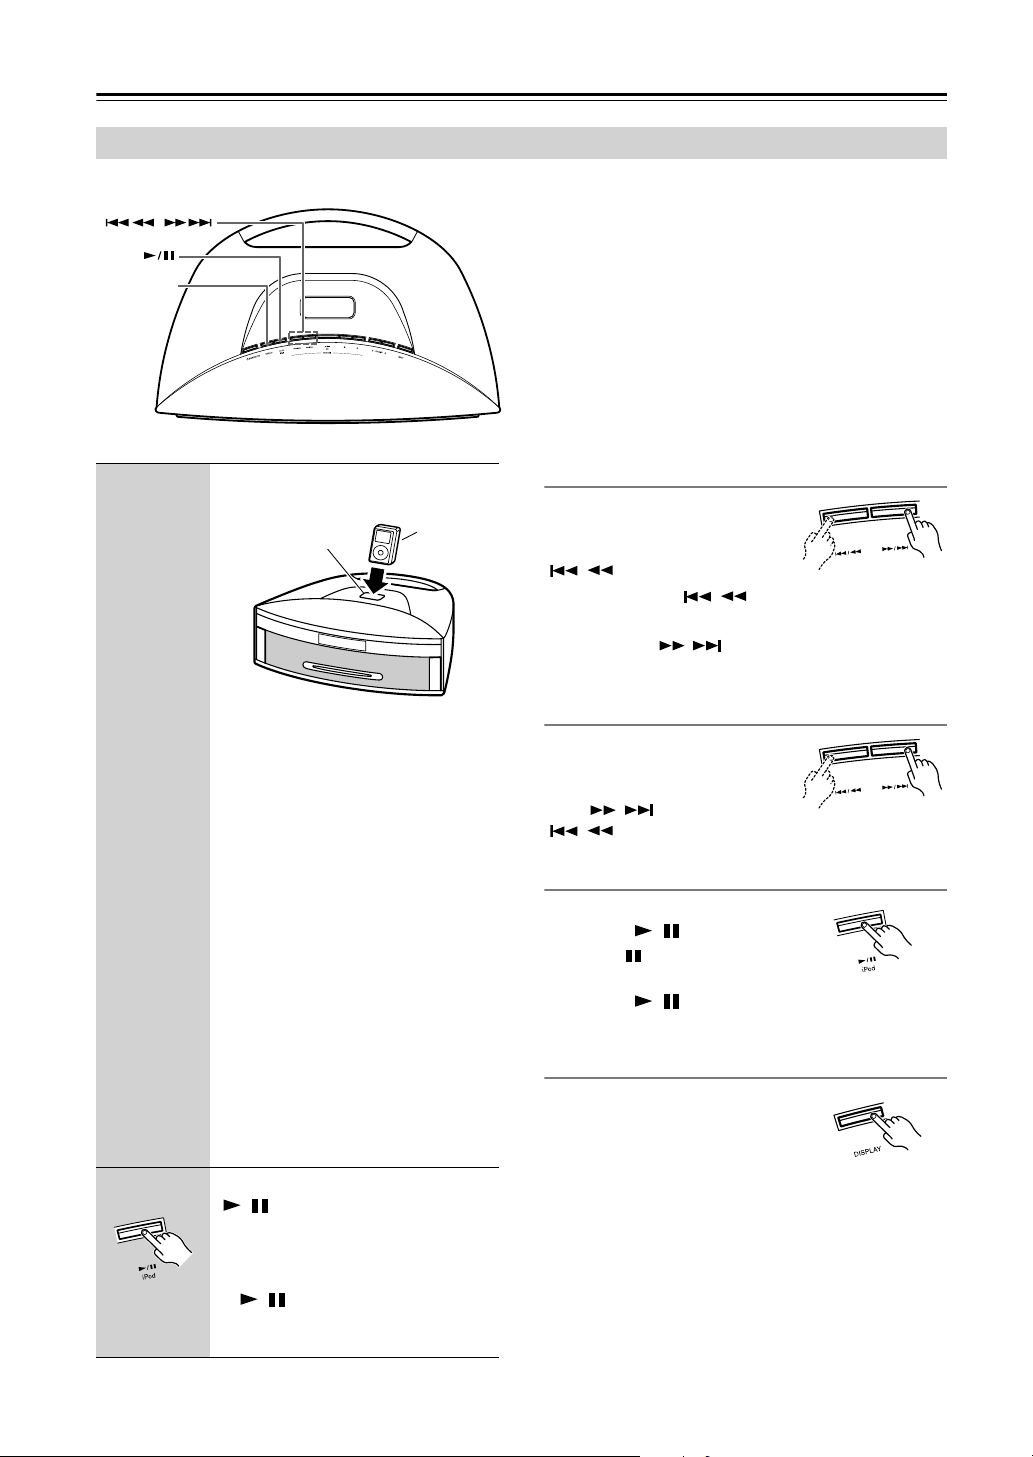
Playing Your iPod
/
/
Using the Top Panel Buttons
The 3rd Generation iPod is not supported.
/
iPod
DISPLAY
Notes:
• Before using your iPod with the CBX-300, be sure to
update your iPod with the latest software, available
from the Apple Web site.
• If you leave your iPod paused when using it on its
own, eventually it will go into hibernation. If you
insert it into the CBX-300 dock in this state, you’ll
need to wait a few moments before your iPod is ready
for use.
•Always remove your iPod from the CBX-300 before
moving the CBX-300.
1
2
Insert your iPod into the
CBX-300’s iPod dock.
iPod dock
Make sure your iPod is properly seated
in the CBX-300’s iPod dock.
The iPod will enter Pause mode.
Notes:
• Remove the CBX-300’s protective
iPod dock cover, and be sure to install
the appropriate dock adapter before
inserting your iPod (see page 15).
•To prevent damage to the dock connector, do not twist or force your iPod
into the dock, and be careful not to
wiggle your iPod while inserting it.
• Do not use with any iPod accessories,
such as FM transmitters and microphones, as they may cause a malfunction.
• If you use a case with your iPod,
always remove it before you insert it.
Otherwise, it may not connect properly and a malfunction may occur.
Press the iPod Play/Pause
[] button.
/
Playback starts.
Tip:
• If you press the iPod Play/Pause
[] button while the CBX-300
/
is on Standby, it will turn on automatically and the iPod will start playing.
iPod
Selecting Tracks
To return to the beginning of the
track that’s currently playing or
paused, press the Previous
[/] button.
Press the Previous [ / ] button repeatedly to select
earlier tracks.
Press the Next [
subsequent tracks.
/
] button repeatedly to select
Fast Forward and Rewind
To fast forward or rewind during
playback or while playback is
paused, press and hold down the
Next [ / ] or Previous
[/] button, respectively.
Press and hold
Pausing Playback
To pause playback, press the iPod
Play/Pause [ ] button.
The Pause indicator appears
on the iPod. Press the iPod
Play/Pause [ ] button again
to resume playback.
iPod Backlight
To turn on your iPod’s backlight,
press the [DISPLAY] button. The
backlight will remain on for 30
seconds.
En-
30
Page 31

Playing Your iPod
—Continued
Using the Remote Controller
Fast forward and rewind
Press and hold down to fast forward or
rewind during playback or when playback is
paused.
Select songs
• Press the Previous [ ] button to
locate the beginning of the currently
playing or paused track. Press it repeatedly to select earlier tracks.
• Press the Next [ ] button repeatedly
to select subsequent tracks.
• When a menu is displayed, these buttons select menu items.
Cancel the CBX-300’s Menu mode
Select albums
During playback, press the Up [ ] button
to select the next album; press the Down
[] button to select the previous album.
Select playlists
During playback, press the Up [ ] button
to select the next playlist; press the Down
[] button to select the previous playlist.
Turn on the iPod’s backlight
The backlight stays on for 30 seconds.
Select the iPod as the source
View the menu
Select menu items
Set the Shuffle function to Songs,
Albums, or Off
Use the iPod’s Settings menu to confirm
which mode is selected.
Set the Repeat function to One, All,
or Off.
Start or pause playback
Pressing this button while the CBX-300 is
on Standby will turn on the CBX-300 and
start playback.
Note:
• Depending on your iPod model, or the type of content being played, some functions may not work as expected.
Navigating the iPod Menus with the Remote Controller
Notes:
• Menu items can only be selected while the dot is
shown on the right-hand side of the CBX-300’s display (Menu mode). During this time, the Next [ ]
and Previous [ ] buttons cannot be used to select
tracks.
• If the iPod returns to its “Now Playing” screen but the
dot is still displayed, wait until the dot disappears, or
press the CD Stop [ ] button to cancel the CBX-300’s
Menu mode before you use the Next [ ] and Previous [ ] buttons to select tracks.
• When navigating the iPod’s menus with the
CBX-300’s remote controller, do not operate any of
the buttons on your iPod, as those operations will not
be recognized by the CBX-300 and will disrupt the
CBX-300’s control of the iPod.
Operating Note:
The volume level is adjusted by using the VOLUME
[/] buttons on the CBX-300 or its remote controller. Adjusting the volume on your iPod has no effect.
In case you inadvertently move your iPod’s volume
control, make sure the volume level is not set too high
before you reconnect your headphones.
1
2
Press the MENU/NO/CLEAR button to view the menu.
Press it again to go back to a previous
menu.
A dot appears on the right-hand side of
the CBX-300’s display indicating that a
menu is being displayed on the iPod.
This Menu mode.
Use the Next [ ] and Previous
[] buttons to select an item on
the menu, and then press
[ENTER].
En-
31
Page 32

Listening to the Radio
or
Tuning into Radio Stations
INPUT ,
TUNING
YES/MODE
TUNER
When tuned to a station, the Tuned indicator
appears. When receiving a stereo FM signal, the FM ST
indicator appears as well.
AUTO
The [YES/MODE] button is used to select Auto mode or
Mono mode. In Auto mode, the output will be stereo or
mono depending on the station being received. In Mono
mode, the output will be mono regardless of the station.
FM ST
1
2
Tuning into weak stereo FM stations
If the signal from a stereo FM station is weak, it may be
impossible to get good reception. In this case, press the
[YES/MODE] button to switch to Mono mode and listen
to the station in mono.
Press the [TUNER] button repeatedly to select FM or AM.
You can also use the INPUT [ ]/[ ]
buttons to select FM or AM.
Use the TUNING [ ]/[ ] buttons
to tune into a station.
Each time you press a TUNING button,
the frequency changes 0.2 MHz for FM
and 10 kHz for AM. On European models, it’s 0.05 MHz steps for FM and
9 kHz steps for AM.
If you press and hold a TUNING button,
the frequency will change continuously.
Once you release the button, tuning will
stop automatically when a frequency on
which a radio station is broadcasting is
found.
Adjusting the Antennas
■ Adjusting and Installing the FM Antenna
Choose a location for the FM antenna while listening
to an FM station.
1
Change the direction of the
antenna to achieve the best
possible reception.
En-
32
■ Adjusting the AM Antenna
Adjust the location and position of the AM
antenna while listening to an AM station to
2
Affix the antenna with a thumbtack. (Do not
push the thumbtack through the antenna.)
Caution: Be careful not to prick your finger!
achieve the best possible reception.
Page 33

Listening to the Radio
—Continued
Presetting FM Stations Automatically (Auto Preset)
With the Auto Preset function, you can automatically preset all of the FM radio stations available in your area in one go.
Presets make it easy to select your favorite stations and eliminate the need to tune the radio manually each time you want
to change stations. The Auto Preset function does not preset AM radio stations (see page 34).
Auto Preset Caution!
1
INPUT
/
MENU/NO
/
ENTER
TUNER
Press the [TUNER] or INPUT
[ ]/[ ] buttons repeatedly until
“FM” appears.
or
Any existing presets will be deleted when the
Auto Preset function is run.
4
Note:
• Depending on your location, a preset may be stored
with no station, and you’ll hear only noise when you
select it. In this case, delete the preset (see page 39).
To start the Auto Preset function,
press [ENTER].
Up to 20 stations can be preset and presets are stored in frequency order.
2
3
Make sure the FM antenna is positioned
to achieve the best possible reception.
Press the [MENU/NO] button, and
then use the Previous and Next
[ ]/[ ] buttons to select
AutoPreset?.
Press [ENTER].
The confirmation message “AutoPreset??” appears.
To cancel the Auto Preset function at this
point, press the [MENU/NO] button.
After Storing Presets You Can:
• Select them (see page 35)
• Name them for easy identification (see page 37)
• Copy them (see page 38)
• Erase them (see page 39)
En-
33
Page 34

Listening to the Radio
or
—Continued
Presetting FM/AM Stations Manually
With the Preset Write function, you can manually preset individual FM and AM radio stations. Presets make it easy to
select your favorite stations and eliminate the need to tune the radio manually each time you want to change stations.
FM stations can also be preset automatically (see page 33).
About Presets
MENU/NO
/
YES/MODE
ENTER
•You can store up to 30 stations as presets and this can be any
combination of FM and AM stations. For example, 27 FM
and 3 AM or 22 FM and 8 AM.
• Although FM and AM presets share the same numbers,
they’re selected independently. For example, preset #1 will
store an FM station when the FM band is selected, and an AM
station when the AM band is selected.
• Stations can be stored to presets in any order. For example,
you could store preset #5 first, #1 second, and so on.
1
2
3
4
5
Tune into the station that you want
to store as a preset (see page 32).
Press the [MENU/NO] button, and
then use the Previous and Next
[ ]/[ ] buttons to select
Preset Write?.
Press [ENTER].
The preset number flashes.
To cancel the Preset Write function at this
point, press the [MENU/NO] button.
Use the Previous and Next
[ ]/[ ] buttons to select a
preset.
To store the station, press
[ENTER].
If no station has yet been stored to the
selected preset, “Complete” appears and
the station is stored.
6
Note: (European models only)
• If the current FM station supports RDS and PS (Program Service Name), the station’s name will be displayed instead of the frequency. (See page 36 for more
on RDS.)
After Storing Presets You Can:
• Select them (see page 35)
• Name them for easy identification (see page 37)
• Copy them (see page 38)
• Erase them (see page 39)
If a station has already been stored in the
selected preset, the message “Overwrite?” appears.
To overwrite the previously stored station, press the [ENTER] or
[YES/MODE] button.
To not overwrite the previously stored
station, press the [MENU/NO] button.
If the message “Memory Full” appears,
all 30 presets have been stored and you’ll
need to erase some presets before you
can store any more stations (see
page 39).
Repeat steps 1 to 5 to preset more radio
stations.
En-
34
Page 35

Listening to the Radio
—Continued
Selecting Preset Stations
You must store some presets before you can select them
(see pages 33 and 34).
INPUT
Number
buttons
PRESET
1
or
Use the [TUNER] or INPUT
[ ]/[ ] buttons to select FM or
AM.
The preset you selected the last time you
listened to the radio will be selected.
/
TUNER
You can also use the number buttons as shown in the examples
below to select presets.
To select:
Preset #8
Preset #10
Preset #22
Used to enter numbers over 10.
■
Selecting Presets on the CBX-300 Top Panel
1 Use the [INPUT] button to select FM or AM.
2 Use the Previous and Next [ / ]/ [
buttons to select a preset.
Tip:
• If you press the remote controller’s [TUNER] button
while the CBX-300 is on Standby, it will turn on automatically and the station that you listened to last time
will be heard.
Press:
]
/
2
Use the PRESET [ ]/[ ] buttons
to select a preset.
Press the PRESET [ ] button to select
the previous preset. Press the PRESET
[] button to select the next preset.
or
En-
35
Page 36

Listening to the Radio
—Continued
Displaying Radio Information
DISPLAY
Press the remote controller’s [DISPLAY] button repeatedly to display more radio information.
You can also use the [DISPLAY] button on the CBX-300’s top panel to display this information.
FM/AM
Frequency
*Preset name
Receiving RDS (European models only)
Press the [DISPLAY] button repeatedly to display the following RDS information.
Frequency and preset number
Preset name (if preset has a name)
Program Service Name
* If the selected preset has no name, “No Name” appears
briefly and then the frequency is displayed. See “Naming Presets” on page 37.
RDS is only available on European models and only in
areas where RDS broadcasts are available.
What is RDS?
RDS stands for
transmitting data in FM radio signals. It was developed
within the European Broadcasting Union (EBU) and
many European FM radio stations use it these days.
The CBX-300 supports and displays Program Service
Name (PS) and Radio Text (RT) RDS data.
The RDS indicator appears on the display when the
CBX-300 is tuned to an FM station that supports RDS.
Notes:
• If the signal from an RDS station is weak, RDS data
may be displayed intermittently or not at all.
• The message “Waiting” may appear while the RT data
is being received.
Radio Data System
and is a method of
En-
Radio Text (if available)
36
Page 37

Listening to the Radio
—Continued
Naming Presets
You can name presets for easy identification. The preset
name may contain of up to eight characters.
DISPLAY
Number
buttons
MENU/NO
1
2
3
4
/
Select the preset you want to
name (see page 35).
Press the [MENU/NO] button, and
then use the Previous and Next
[ ]/[ ] buttons to select
Name In?.
Press [ENTER].
Press the [DISPLAY] button
repeatedly to select one of the following character groups:
•“A” for uppercase letters.
• “a” for lowercase letters.
• “1” for numbers.
• Symbols can be entered in any group.
YES/MODE
ENTER
5
6
• Selecting letters:
Press the number buttons repeatedly
to select the available letters. For
example, press the [2] button repeatedly to select: A, B, or C.
• Selecting numbers:
Use the number buttons to select
numbers.
• Selecting symbols:
Press the [>10] button repeatedly to
select: (space) . / * - , ! ? & ’ ( )
Note:
• Not all of the symbols can be entered
by using the number buttons. Use the
Previous and Next [ ] or [ ]
buttons to select from the full range of
symbols.
When you’ve selected the character you want, press [ENTER], and
then choose the next character.
• Editing characters:
To change or delete a character
you’ve already entered, use the
Rewind and Fast Forward [ ]/[ ]
buttons to select it, and then select
another character, or press the
[CLEAR] button to delete it.
• Inserting a new character:
To insert a new character, use the
Rewind and Fast Forward [ ]/[ ]
buttons to select the character immediately after the insertion point. That
character flashes. Use the Previous
and Next [ ] or [ ] buttons to
select “ ,” press [ENTER], and
then select the new character.
To cancel the Name In function, press the
[MENU/NO] button for 2 seconds.
When you’ve finished entering the
name, press the [YES/MODE] button.
The preset is named and “Complete”
appears on the display.
Character group
Available Characters
A B C D E F G H I J K L M N O P Q R S T U V W X Y Z
a b c d e f g h i j k l m n o p q r s t u v w x y z
0 1 2 3 4 5 6 7 8 9
_ @ ' < > # $ % & * = ; : + - / ( ) ?
! ’ ” , . (space) (insert)
En-
37
Page 38

Listening to the Radio
or
—Continued
Copying Presets
With the Preset Copy function, you can organize your
presets in the order you want. When you copy a preset,
its name is also copied.
MENU/NO
1
2
/
Select the preset you want to copy
(see page 35).
Press the [MENU/NO] button, and
then use the Previous and Next
[ ]/[ ] buttons to select
PresetCopy?.
YES/MODE
ENTER
5
Tip:
• If your favorite station is stored in preset #5 and you
want to make it preset #1, copy preset #5 to preset #1.
To keep the station that’s already stored in preset #1,
you may want to copy it to an unused preset first.
To copy the preset, press
[ENTER].
If no station has yet been stored in the
destination preset, the station is copied
and “Complete” appears.
If a station has already been stored in the
destination preset, the message “Overwrite?” appears.
To overwrite the previously stored station, press the [ENTER] or
[YES/MODE] button.
To not overwrite the previously stored
station, press the [MENU/NO] button.
En-
38
3
4
Press [ENTER].
The number of the preset to be copied
flashes.
Use the Previous and Next
[ ]/[ ] buttons to select the
destination preset.
The number of the destination preset
flashes.
Page 39

Listening to the Radio
—Continued
Erasing Presets
/
Erasing a Preset’s Name
1
2
Select the preset whose name you
want to erase (see page 35).
Press the [MENU/NO] button, and
then use the Previous and Next
[ ]/[ ] buttons to select
NameErase?.
MENU/NO
YES/MODE
ENTER
1
2
3
Select the preset you want to
erase (see page 35).
Press the [MENU/NO] button, and
then use the Previous and Next
[ ]/[ ] buttons to select
PresetErase?.
Press [ENTER].
A message requesting confirmation
appears.
To cancel the Preset Erase function at
this point, press the [MENU/NO] button.
3
To erase the preset’s name, press
the [ENTER] button.
The preset’s name is erased and “Complete” appears on the display.
4
To erase the preset, press
[ENTER].
The preset is erased and “Complete”
appears on the display.
En-
39
Page 40

Setting the Clock
Setting the Clock
STANDBY/ON
DISPLAY
Number
button
/
If you have a North American model, use the following
procedure to set the clock. If you have a European
model, the clock is set by the AccuClock function.
The AccuClock function sets the clock automatically the
very first time the CBX-300 is plugged into a wall outlet
(see page 19).
If for some reason the clock cannot be set automatically,
use the following procedure to set it manually. Note that
when the clock is set manually, it will not be updated
automatically.
1
Press the [TIMER] button repeatedly until “Clock” appears.
CLOCK
CALL
TIMER
ENTER
5
6
7
8
Use the Previous and Next [ ]/
[] buttons to select the day of
the week.
You can select: SUN, MON, TUE, WED,
THU, FRI, or SAT.
Press [ENTER].
To change the time format between 12hour and 24-hour, press the [DISPLAY]
button.
Use the remote controller’s number buttons to enter the current
time.
You can also use the Previous and Next
[ ]/[ ] buttons.
For the 12-hour format
controller’s [>10] button to select A.M.
or P.M.
Press [ENTER].
, use the remote
2
3
4
If you have a North American model, go
to step 4.
Press [ENTER].
Use the Previous and Next [ ]/
[] buttons to select
ManualAdjust.
Tip:
• If the AccuClock function is working,
pressing the [YES/MODE] button will
set the clock based on the RDS CT
information (see page 41, step 6).
Press [ENTER].
The clock is set and the second dot starts
flashing.
Displaying the Day and Time
To display the day and time, press the remote controller’s
[CLOCK CALL] button. Press the button again or perform another operation to cancel the time display.
If the CBX-300 is on Standby, the day and time will be
displayed for 8 seconds.
While the CBX-300 is on, the day and time are displayed
continuously.
Using the 12- or 24-hour Format
To change the time format between 12-hour and 24-hour,
while the day and time are shown on the display, press
the [DISPLAY] button.
Displaying the Time in Standby Mode
To set the CBX-300 so that the time is displayed continuously while it’s on Standby, turn on the CBX-300, and
then press and hold its [STANDBY/ON] button for 2
seconds. To turn off this feature, repeat this procedure.
Note that having the time displayed in Standby mode
will consume more power.
En-
40
Page 41

Setting the Clock
—Continued
AccuClock with a Specific Station
(European models only)
If for some reason the AccuClock function doesn’t set
the clock correctly, you can specify which FM station the
AccuClock function uses. This is especially useful if you
live close to a country’s border where stations from different time zones can be received. Note that the FM station must support RDS CT (Clock Time) information.
TUNING
/
1
Press the [TIMER] button repeatedly until “Clock” appears.
TIMER
YES/MODE
ENTER
5
6
Use the TUNING [ ]/[ ] buttons
to specify the frequency of a station that’s broadcasting RDS CT
information.
Press [ENTER].
The specified frequency will be used the
next time the AccuClock function runs.
If the specified station is not broadcasting RDS, “Not RDS” will be displayed
and it will not be possible to set the clock.
or
To run the AccuClock function
now, press the [YES/MODE] button.
The CBX-300 enters Standby mode, and
“AccuClock…” appears dimly on the
display while the AccuClock function
attempts to set the clock.
If the clock is set successfully, the day
and time will be displayed brightly for 2
seconds, as shown.
2
3
4
Press [ENTER].
Use the Previous and Next [ ]/
[] buttons to select AccuClock.
Press [ENTER].
The frequency of a station that the
CBX-300 has previously searched for
may appear on the display.
Notes:
• Once the AccuClock function is working, it will automatically update the clock daily at 2 A.M., 3 A.M., and
2 P.M., but only when the CBX-300 is on Standby.
• If you’ve set the AccuClock function, but it’s not
updating the time automatically, make sure a strong
signal is being received from the specified RDS station. Also make sure that the station is actually broadcasting CT information. Try another station, if
necessary.
En-
41
Page 42

Using the Timers
The CBX-300 has five timers: four programmable timers
for automated playback, and a sleep timer for turning the
CBX-300 off after a specified period.
The timers can be used to start FM, AM, CD, or iPod
playback at a specified time. You could, for example,
use a timer to turn on the CBX-300 every morning, just
like a radio alarm clock.
About the Timers
The various settings for the four programmable timers
are explained here. For details on the sleep timer, see
page 47.
Repeat Timers
Each timer can be programmed to work just once
(Once), every week (Every), every day (Everyday), or on
a range of days (Days Set).
■
Once
The timer will work just once.
■
Every
The timer will work every week on the specified day and
time.
• Everyday
The timer will work every day.
•Days Set
The timer will work on the specified range of days. With
this setting, you could set up a morning alarm for Monday to Friday.
Timer Indicators
When a timer has been set, the
TIMER indicator and the number
of the timer appear on the display.
When a timer has been set for
snooze, an underscore appears
below its number (see page 46).
Notes:
• The timers work only if the CBX-300 is on Standby. If
it’s on when a timer is supposed to start playback,
nothing will happen.
• While timed playback is in progress, the timer’s Off
time cannot be changed.
TIMER indicator
Timer Example
To wake up to your favorite radio station (preset #1)
every morning, you could program a timer as follows:
Snooze On
7:30
If you want a radio alarm only on weekdays, select Days
Set instead of Everyday and specify MON–FRI.
➔FM➔#1➔
Every➔Everyday➔On 7:00➔Off
Timer Priority
If two or more timers are set to the same On time, the
lowest numbered timer has priority. For example:
Timer 1:
Timer 2:
If two or more timers overlap, the timer with the earliest
start time has priority. For example:
Timer 1:
Timer 2:
If the On and Off times of two timers are the same, the
timer with the earliest start time has priority and the
other timer will fail. For example:
Timer 1:
Timer 2:
07:00 – 13:00 (This timer has priority.)
07:00 – 12:30
9:00 – 10:00
8:00 – 10:00 (This timer has priority.)
0:00 – 1:00 (This timer has priority.)
1:00 – 2:00
En-
42
Page 43

Using the Timers
—Continued
Programming the Timers
Notes:
•You must set the clock before you can program the
timers.
• Before programming a timer to turn on the radio, you
must preset the station you want to use. (See pages 33
and 34.)
• If you don’t operate any buttons for 60 seconds while
programming a timer, the procedure will be cancelled
and the previous display will reappear.
STANDBY/ON
Number buttons
3
4
Use the Previous and Next [ ]/
[] buttons to select the source,
and then press [ENTER].
You can select the following sources:
FM, AM, LINE, CD, or iPod.
If you selected LINE, CD, or iPod, pro-
ceed to step 5.
If you selected FM or AM, use the
Previous and Next [ ]/[ ] buttons to select the radio preset, and
then press [ENTER].
1
2
/
Press the [TIMER] button repeatedly to select timer 1, 2, 3, or 4, and
then press [ENTER].
If “Clock” appears first, you need to set
the clock (see pages 19 and 40).
Use the Previous and Next [ ]/
[] buttons to select Snooze On
or Snooze Off, and then press
[ENTER].
TIMER
ENTER
5
6
Use the Previous and Next [ ]/
[] buttons to select Once or
Every, and then press [ENTER].
Select Once for one-off operation. Select
Every to perform the same operation
every week.
If you selected Every, proceed to step 7.
If you selected Once, use the Previous and Next [ ]/[ ] buttons to select the day, and then
press [ENTER].
You can select: SUN, MON, TUE, WED,
THU, FRI, or SAT.
Proceed to step 9.
En-
43
Page 44

Using the Timers
—Continued
7
8
If you selected Every, use the Previous and Next [ ]/[ ] buttons to select the day, Everyday, or
Days Set, and then press [ENTER].
You can select the following:
MON
SUN
If you selected anything other than Days
Set, proceed to step 9.
If you selected Days Set, use the
Previous and Next [ ]/[ ] buttons to select the first day, and
then press [ENTER].
Use the Previous and Next [ ]/
[] buttons again to select the
last day, and then press [ENTER].
TUE
Days Set Everyday
WED THU
FRI
SAT
10
11
Use the Previous and Next [ ]/
[] buttons to specify the Off
time, and then press [ENTER].
Use the Previous and Next [ ]/
[] buttons to specify the
CBX-300’s volume level, and then
press [ENTER].
You can select Lst, 1, 2, 3, and so on, Lst
being the volume level that was set when
the CBX-300 was last turned off.
TIMER indicator
Number of programmed timer
9
You can select only consecutive days.
Use the Previous and Next [ ]/
[] buttons to specify the On
time, and then press [ENTER].
You can also use the remote controller’s
number buttons to enter the time. For
example, to enter 7:29, press [7], [2], and
[9].
To switch between A.M. and P.M. for the
12-hour format, press the [>10] button.
Note:
• Once the On time has been changed,
the Off time is automatically set to 1
hour later.
The default setting is 15.
12
To return to step 1 and start timer programming all over
again, press the [MENU/NO] button at any point in this
procedure.
Press the [STANDBY/ON] button to
set the CBX-300 to Standby.
Notes:
• Be sure to set the CBX-300 to Standby,
otherwise the timed operation will not
work.
• While a timed operation is in progress,
you can cancel it by pressing the
[TIMER] or [SLEEP] button.
• Memory, random, and 1-folder playback cannot be used with the timers.
En-
44
Page 45

Using the Timers
—Continued
Turning Timers On and Off
Once a timer has been programmed, you can turn it on or
off as necessary. For example, while you’re on holiday,
you may want to turn off the timer you use as an earlymorning alarm.
MENU/NO
TIMER
ENTER
1
2
/
Press the [TIMER] button repeatedly to select timer 1, 2, 3, or 4.
Use the Previous and Next [ ]/
[] buttons to select Timer On or
Timer Off.
Checking Timer Settings
1
2
Press the [TIMER] button repeatedly to select timer 1, 2, 3, or 4, and
then press [ENTER].
Press [ENTER] repeatedly to see
all of the timer’s settings.
Notes:
•You can change the settings by using
the Previous and Next [ ]/[ ]
buttons.
• If you change the settings of a timer
that is off, that timer will be turned on.
•To return to the previous display at any
point in this procedure, press the
[MENU/NO] button.
or
When a timer is turned on, its number
appears on the display.
After a few moments, the previous display reappears.
En-
45
Page 46

Using the Timers
—Continued
Using the Snooze Function
Once timed playback has started, pressing a [SNOOZE]
button will stop playback for a set number of minutes.
Once the snooze time has expired, playback will start
again, just like the snooze function you find on a typical
alarm clock. The default snooze time is 5 minutes, but
can be set from 1 to 30 minutes in 1-minute increments.
While the timed playback is within the specified On and
Off times, you can use the Snooze function any number
of times.
SNOOZE
SNOOZE
ENTER
Timer Setting
When setting the timer, select Snooze On (see page 43).
When timer programming is complete, an underscore
appears below the timer’s number, indicating that the
Snooze function can be used with that timer.
Setting the Snooze Time
You can change the snooze time, but only during timed
playback (i.e., while the timer is On).
Press the [SNOOZE] button to
snooze. While the snooze time is
displayed brightly for 8 seconds,
use the Previous and Next [ ]/
[] buttons to set the snooze
time from 1 to 30 minutes.
The new snooze time will be used the
next the Snooze function is used.
Notes:
• If you press a [SNOOZE] button while the CBX-300
is snoozing, the snooze period will start again.
•To cancel snooze while the CBX-300 is snoozing,
press the [STANDBY/ON] button. The timer will be
turned off and the CBX-300 will go on Standby.
• When a timer is set with Snooze On, during timed
playback, the Previous [ / ], Next [ / ],
CD Play/Pause [ ], Stop [ ], and Eject [ ] buttons on the CBX-300’s top panel work as SNOOZE
buttons. To use the functions normally performed by
these buttons, use the equivalent buttons on the remote
controller instead. To eject a CD with the Eject [ ]
button, either wait until the timer has turned itself off
at the programmed Off time, or cancel the timer by
pressing the [TIMER] button.
•Even if the CBX-300 is snoozing, at the Off time programmed for the timer, the CBX-300 will go on
Standby and playback will not start again.
/
Snooze in Use
Once timed playback has started, press the remote controller’s [SNOOZE] button or a SNOOZE button on the
CBX-300’s top panel (see above illustration) to snooze.
Playback will stop temporarily and the snooze time will
be shown on the display. Once the snooze time has
expired, playback will start again.
En-
46
Page 47

Using the Timers
—Continued
Using the Sleep Timer
With the sleep timer, you can set the CBX-300 so that it
automatically turns off after a specified period.
SLEEP
Press the [SLEEP] button repeatedly to select the required sleep
time.
With the [SLEEP] button, you can set the
sleep time from 90 to 10 minutes in 10
minute steps.
Use the Previous and Next [ ]/[ ]
buttons to set the sleep time in 1 minute
steps from 99 to 1.
SLEEP indicator
When the sleep timer has been set, the
SLEEP indicator appears on the display,
as shown. The sleep time appears on the
display for about 8 seconds, then the previous display reappears.
Checking the Remaining Sleep Time
To check the remaining sleep time, press the [SLEEP]
button.
Note that if you press the [SLEEP] button while the sleep
time is being displayed, you’ll shorten the sleep time by
10 minutes.
Canceling the Sleep Timer
To cancel the sleep timer, press the [SLEEP] button
repeatedly until “Sleep Off” appears.
En-
47
Page 48

Setting the Maximum Volume
You can set the maximum volume for the CBX-300.
By default, the maximum volume is set to 44.
If the content being played is very quiet and there’s not
enough volume with the Maximum Volume setting set to
44, try a higher setting.
Note:
• Increasing the Maximum Volume setting may lead to
audio distortion when listening at volume levels close
to the Max setting.
1
2
Set the CBX-300 to Standby.
Press and hold down the MENU/
NO button for 5 seconds until
“Max Vol” appears on the display.
The current maximum volume is displayed.
/
MENU/NO
ENTER
3
4
Use the Previous [ ] and Next
[] buttons to adjust the maximum volume from 44 to 50.
Press [ENTER].
The maximum volume level is set and
“Complete” appears on the display,
after which, the display returns to normal.
The value that you set here is in fact the
Max value, so you won’t actually see
that volume value on the display. For
example, if you set the maximum volume to 50, the volume values you see
on the display will be Min, 1–49, Max.
En-
48
Page 49
Troubleshooting
If you have any trouble using the CBX-300, look for a solution in this section.
If you can’t resolve the issue yourself, try resetting the CBX-300 before contacting your Onkyo dealer.
To reset the CBX-300 to its factory defaults, unplug the power
cord, and while holding down the CBX-300’s [STANDBY/ON] button, plug the power cord back into the wall outlet. “RESET” will
appear on the display and the CBX-300 will enter Standby mode.
Note that resetting the CBX-300 will delete your radio presets and custom settings.
Power
Can’t turn on the CBX-300.
• Make sure that the power cord is properly plugged into the wall outlet (see page 19).
• Make sure that the power cord is properly plugged into the CBX-300’s AC INLET (see page 19).
• Unplug the power cord from the wall outlet, wait 5 seconds or more, then plug it in again.
The CBX-300 turns off unexpectedly.
• If the sleep timer has been set and the SLEEP indicator is shown on the display, the CBX-300 will turn off automatically after a specified period (see page 47).
• When timed playback finishes, the CBX-300 automatically switches to Standby mode (see pages 42 to 45).
Audio
There’s no sound.
• Make sure the CBX-300’s volume is not set too low (see page 20).
• Make sure the correct input source is selected (see page 20).
• Make sure the CBX-300 is not muted (see page 21).
• Check all connections and correct as necessary (see pages 16 to 19).
• While headphones are connected, the internal speakers output no sound (see page 20).
The sound quality is not good.
• Make sure all audio connecting plugs are pushed in all the way (see page 18).
• The sound quality can be affected by strong magnetic fields, such as that from a TV. Try moving any such devices
away from the CBX-300.
• If you have any devices that emit high-intensity radio waves near the CBX-300, such as a cellular phone that’s being
used to make a call, the CBX-300 may output noise.
• The CBX-300’s precision drive mechanism may emit a faint hissing sound while reading discs during playback or
when searching for tracks. You may be able to hear this noise in extremely quiet environments.
Audio output is intermittent when the CBX-300 is subjected to vibration.
• The CBX-300 is not a portable device. Use it in a location that’s not subject to shock or vibration.
Headphone output is intermittent or there’s no sound.
• This may be due to dirty contacts. Clean the headphones plug. See your headphones’ instruction manual for cleaning
information. Also, make sure that the headphones cable is not broken or damaged.
En-
49
Page 50

Troubleshooting
CD Playback
The disc will not play.
• Make sure the disc has been loaded correctly, with the label-side facing up.
• Check to see if the surface of the disc is dirty (see page 14).
• If condensation is suspected, turn on the CBX-300 and leave it for 1 hour before playing any discs.
• Some CD-R/RW discs may not be playable (see page 13).
It takes a long time for playback to start.
• It may take the CBX-300 a while to read CDs that contain many tracks or files.
Playback jumps.
• The CBX-300 is being subjected to vibration or the disc is scratched or dirty (see page 14).
• The volume may be too loud. Turn down the volume (see page 20).
Can’t add tracks to the playlist for memory playback.
• Make sure there’s a disc in the CBX-300. Also, you can only add valid track numbers. For example, if the CD contains
11 tracks, you cannot add track #12.
Can’t insert a CD.
• Is a CD already loaded? Press the Eject [ ] to find out.
•Always insert CDs horizontally and in the center of the CD slot.
A CD is inserted but the display shows “No Disc” and it won’t play
• Unplug the power cord from the wall outlet, then plug it back in again. With the CBX-300 on Standby, try pressing
the CD Play/Pause [ ] button.
—Continued
/
iPod
There’s no sound.
• Make sure your iPod is properly seated in the CBX-300’s iPod dock. Even very thin iPod cases can prevent the iPod
from seating properly on the dock connector, so always remove any case before inserting your iPod (see page 30).
• Make sure the CBX-300 is turned on, the input source is set to iPod, and the volume is not set too low.
Can’t control your iPod with the CBX-300’s remote controller.
• Make sure your iPod is properly seated in the CBX-300’s iPod dock. Even very thin iPod cases can prevent the iPod
from seating properly on the dock connector, so always remove any case before inserting your iPod (see page 30).
•You may not be able to control your iPod immediately after inserting it into the CBX-300’s iPod dock. In this case,
wait a few moments until your iPod wakes up.
• Depending on your iPod model, its software version, or the content your playing, some functions may not work as
expected (see pages 30 and 31).
• The 3rd Generation iPod is not supported.
There’s no picture on the connected TV.
• On your iPod, set the TV Out setting to On, and then play a video or photo slideshow.
• Make sure your iPod supports video output.
• Make sure the correct input is selected on your TV.
En-
50
Page 51

Troubleshooting
Tuner
Reception is noisy, stereo FM reception suffers from hiss, the Auto Preset function doesn’t preset all stations, or
the FM ST indicator doesn’t light up when tuned to a stereo FM station.
• Check the antenna connections (see pages 16 and 17).
• Change the position of the antenna (see page 32).
•Move the CBX-300 away from a nearby TV or computer.
• Cars or airplanes can cause noisy interference.
• The radio signal will be weakened if it has to pass through a concrete wall before reaching the antenna.
• Switch to Mono mode and listen in mono. The FM ST indicator will go off (see page 32).
• When listening to an AM station, noise may be heard when you operate the remote controller.
• If none of the above improves the reception, install an outdoor antenna (see page 17).
If a power outage occurs or the power cable is disconnected.
• If there’s no power for a long time, the radio presets will be lost. In this case, preset them again (see pages 33 and 34).
Can’t adjust the frequency of the radio.
• Use the remote controller’s TUNING [ ]/[ ] buttons to change the frequency of the radio (see page 32).
RDS doesn’t work (European models only).
• The FM station you are tuned to doesn’t support RDS.
• The radio signal is weak. Change the position of the antenna. If that doesn’t work, install an outdoor FM antenna (see
page 17).
—Continued
Remote Controller
The remote controller doesn’t work properly.
• Replace the battery with a new one.
• The remote controller is too far away from the CBX-300, or there’s an obstacle between them (see page 12).
• The CBX-300’s remote control sensor is being subjected to bright light (inverter-type fluorescent light or sunlight).
• The CBX-300 is located behind the tinted glass doors of a audio rack or cabinet.
External Components
No sound is heard from your turntable.
• Make sure the turntable has a built-in phono equalizer. If the turntable doesn’t have a phono equalizer built-in, you
must provide one.
Timers
The timers don’t work.
• Make sure the clock has been set correctly (see page 40).
•Timed operation will fail if the CBX-300 is on at the specified On time, so make sure it’s set to Standby (see page 44).
• The timer may overlap with another timer. If you program several timers, make sure they don’t overlap (see page 42).
• If you press the [SLEEP] or [TIMER] button while a timed operation is in progress, the timer will be cancelled and
the CBX-300 won’t turn off at the specified Off time (see page 44).
• Make sure the timer is set to suitable volume setting (see page 44).
En-
51
Page 52

Troubleshooting
Clock
The clock displays --:--
•A power outage has occurred and the time setting lost. Set the clock again (see pages 19 and 40). The timers will all
be set to Timer Off, so you’ll need to turn on any necessary timers (see page 45). The timer settings will be preserved.
The time is not displayed in Standby mode.
• Set the CBX-300 so that the time is displayed in Standby mode (see page 40).
AccuClock appears on the display frequently or the clock is not set properly (European models only).
• Make sure the AccuClock function is correctly configured for use with a specific station (see page 41).
• The signal from the station that the AccuClock function is configured to use is weak. Try another station (see page 41).
• The station that the AccuClock function is configured to use is not broadcasting CT (Clock Time) information or does
not support RDS. Try another station (see page 41).
• The AccuClock function cannot set the clock. Set the clock manually (see page 40).
• Once a power outage has been fixed, the AccuClock function will run automatically.
AccuClock no longer works after moving the CBX-300 or antenna (European models only).
• In step 4 of the “AccuClock with a Specific Station” procedure on page 41, try pressing the [CLEAR] button to change
the display to “FM---.--MHz,” and then press the [YES/MODE] button.
• Unplug the power cord from the wall outlet, wait 5 seconds or more, then plug it in again.
You want to turn off the AccuClock function (European models only).
• Set the clock manually (see page 40).
—Continued
Others
“RESET” appears on the display when the power cord is plugged in.
• The power cord has been disconnected for a long time, or a prolonged power outage occurred. All settings have
reverted to their factory defaults, so you’ll need to make any necessary settings again.
Onkyo is not responsible for damages (such as CD rental fees) due to unsuccessful recordings caused by the unit’s
malfunction. Before you record important data, make sure that the material will be recorded correctly.
The CBX-300 contains a microcomputer. In very rare situations, severe interference, noise from an external source,
or static electricity may cause it to malfunction or lockup. In the unlikely event that this should happen, unplug the
power cord, wait at least 10 seconds, and then plug it back in again. If this doesn’t resolve the issue, reset the CBX-300
to its factory defaults (see page 49).
En-
52
Page 53

Specifications
General
Power supply
North American: AC 120 V, 60 Hz
European: AC 230 V, 50 Hz
Power consumption
North American: 29 W
European: 32 W
Standby power consumption
North American: 0.3 W (standby clock display off and no
European: 0.65 W (standby clock display off and no
Dimensions
H × D) 435 × 138 × 267 mm
×
(W
Weight 4.3 kg (9.5 lbs.)
■
Audio input
Analog input LINE
■
Audio output
Analog output PHONES
iPod inserted)
iPod inserted)
×
(17-1/8"
5-7/16" × 10-1/2")
Amplifier
Power output 2ch
×
5 W (10% THD)
Tuner
■
FM
Tuning frequency range
North American: 87.5–107.9 MHz
European: 87.50–108.00 MHz
■
AM
Tuning frequency range
North American: 530–1710 kHz
European: 522–1611 kHz
Preset Channel 30
CD
Frequency response 4 Hz–20 kHz
Audio dynamic range 96 dB
THD (total harmonic
distortion) 0.085%
Wow and flutter Below threshold of measurability
Speakers
Type Full-Range bass reflex
Unit 8 cm (3-1/8") OMF cone (magnetically
shielded)
Specifications and features are subject to change without
notice.
En-
53
Page 54

ATTENTION:
AFIN DE REDUIRE LES RISQUES D’INCENDIE
ET DE DECHARGE ELECTRIQUE, NE PAS EXPOSER CET APPAREIL A LA PLUIE OU A
L’HUMIDITE.
DANGER:
AFIN D’EVITER TOUT DANGER DE DECHARGE ELECTRIQUE, NE PAS OUVRIR LE BOITIER
(OU L’ARRIERE) DE L’APPAREIL. CONFIER
TOUT TRAVAIL D’ENTRETIEN OU DE REPARATION A UN TECHNICIEN QUALIFIE.
Remarques importantes pour votre sécurité
WARNING
RISK OF ELECTRIC SHOCK
DO NOT OPEN
Un symbole d’éclair fléché dans un triangle
équilatéral est destiné à attirer l’attention de
l’utilisateur sur le fait que certains organes internes
non-isolés de l’appareil sont traversés par un courant
électrique assez dangereux pour constituer un resque
d’électrocution.
Un point d’exclamation dans un triangle équilatéral
est destiné à attirer l’attention de l’utilisateur sur des
instructions importantes relatives à l’entretien et à
l’utilisation du produit.
AVIS
RISQUE DE CHOC ELECTRIQUE
OUVRIR
NE PAS
1. Veuillez lire ces instructions.
2. Veuillez conserver ces instructions.
3. Respectez tous les avertissements.
4. Suivez toutes les instructions.
5. Ne vous servez pas de cet appareil à proximité d’eau.
6. Essuyez le boîtier avec un chiffon sec uniquement.
7. Ne bloquez pas les orifices d’aération. Installez cet
appareil en suivant les instructions du fabricant.
8. Ne le placez pas à proximité de sources de chaleur
telles que radiateurs, chauffage, poêles ou autre dispositif (y compris les amplificateurs) générateur de
chaleur.
9. N’essayez pas de circonvenir le dispositif de sécurité que représente une fiche polarisée ou une fiche
avec mise à la terre. Une fiche polarisée dispose de
deux lames dont l’une est plus large que l’autre.
Une fiche avec terre est munie de deux lames ainsi
que d’une broche de mise à la terre. La lame la plus
large ou la broche assurent votre sécurité. Si la fiche
fournie ne peut être insérée dans la prise murale,
demandez à un électricien de remplacer la prise.
10. Protégez le cordon d’alimentation en évitant qu’on
ne marche pas dessus et qu’il ne soit plié (notamment au niveau des fiches, des cache-câbles et de la
sortie de l’appareil).
11. Servez-vous exclusivement des fixations/accessoires préconisés par le fabricant.
12.
Utilisez exclusivement le chariot, le support, le trépied, la
AVERTISSEMENT POUR
SUPPORTS À ROULETTES
fixation ou la table spécifié(e)
par le fabricant ou vendu(e)
avec l’appareil. Un chariot
contenant l’appareil doit toujours être déplacé avec précaution pour éviter qu’il ne se
renverse et blesse quelqu’un.
S3125A
13. Débranchez l’appareil durant un orage ou lorsqu’il
reste inutilisé longtemps.
14. Veuillez faire appel à un technicien qualifié pour
l’entretien. Un entretien est indispensable si l’appareil a été endommagé d’une façon ou d’une autre:
cordon d’alimentation ou fiche endommagée, liquide
renversé ou chute de petits objets dans l’appareil,
exposition à la pluie ou à une humidité excessive,
fonctionnement anormal ou chute de l’appareil.
Fr-
2
15. Dommages nécessitant réparation
Débranchez l’appareil du secteur et confiez-le à un
technicien qualifié lorsque:
A. Le cordon d’alimentation ou sa fiche sont
endommagés.
B. Des objets sont tombés dans l’appareil ou du
liquide a été renversé et a pénétré ce dernier.
C. L’appareil a été exposé à la pluie.
D. L’appareil ne semble pas fonctionner normale-
ment lorsque vous l’utilisez en respectant les ins-
tructions données. N’effectuez que les réglages
préconisés dans le manuel car un mauvais
réglage d’autres commandes risque d’endomma-
ger l’appareil et nécessitera un long travail de
remise en état par un technicien qualifié.
E. L’appareil est tombé ou son boîtier est endom-
magé.
F. Ses performances semblent affectées.
16. Pénétration de corps étrangers et de liquide
Veillez à ne pas insérer d’objets à l’intérieur de
l’appareil car ils pourraient toucher des points de
tension dangereux ou provoquer des court-circuits:
il y a risque d’incendie ou d’électrocution.
Veillez à ne jamais exposer l’appareil à des gouttes
ou des jets d’eau. Ne déposez aucun objet contenant
un liquide (un vase, par exemple) sur l’appareil.
Ne déposez pas de bougies ou d’autres objets brûlants sur cette appareil.
17. Piles
Songez à l’environnement et veillez dès lors à respecter les consignes officielles pour la liquidation de
piles épuisées.
18. Veillez à n’installer cet appareil que dans un rack ou
un meuble qui n’entrave pas la ventilation.
Laissez un espace libre de 20 cm au-dessus et à côté
de l’appareil ainsi que 10 cm en face arrière. La face
arrière du rack ou du meuble doit se trouver à 10 cm
ou plus du mur pour assurer une aération adéquate
en vue de dissiper la chaleur.
Page 55

Précautions
1. Enregistrement et droits d’auteur
l’utilisation privée, tout enregistrement d’œuvres
protégées par des droits d’auteur est interdit sans
l’accord préalable du détenteur de ces droits.
2. Fusible
3. Entretien
4. Alimentation
5. Ne touchez jamais cet appareil avec des mains
6. Remarques concernant la manipulation
—Le fusible à l’intérieur du appareil ne peut
pas être remplacé par l’utilisateur. Si vous n’arrivez
pas à mettre l’appareil sous tension, adressez-vous à
votre revendeur Onkyo.
—Essuyez régulièrement le boîtier de
l’appareil avec un chiffon doux et sec. Vous pouvez
éliminer les taches rebelles avec un chiffon légèrement imbibé d’eau et de détergent doux. Essuyez
ensuite l’appareil avec un chiffon propre et sec.
N’utilisez jamais de chiffons rêches, de dissolvant,
d’alcool ou d’autres solvants chimiques car ceux-ci
pourraient endommager la finition ou faire disparaître la sérigraphie du boîtier.
AVERTISSEMENT
LISEZ LES CONSIGNES SUIVANTES AVANT
DE BRANCHER L’APPAREIL AU SECTEUR
POUR LA PREMIÈRE FOIS.
La tension du secteur change selon le pays. Vérifiez
que la tension du secteur dans votre région correspond aux caractéristiques électriques figurant en
face arrière de l’appareil (CA 230 V, 50 Hz ou
CA 120 V, 60 Hz, par exemple).
Pour débrancher l’unité du secteur, veuillez
déconnecter le cordon d’alimentation. Songez à
faire le nécessaire pour que la fiche du cordon soit
accessible à tout moment.
En appuyant sur le bouton [STANDBY/ON] pour
passer en mode Standby, vous n’éteignez pas
l’appareil. Si vous n’avez pas l’intention d’utiliser
l’appareil pendant une période prolongée,
débranchez-le de la prise de courant.
mouillées
son cordon d’alimentation avec des mains mouillées
ou humides. Si de l’eau ou tout autre liquide pénètre
à l’intérieur de l’appareil, faites-le vérifier par votre
revendeur Onkyo.
• Si vous devez transporter cet appareil, servez-
• N’utilisez pas de liquides volatiles, tels que des
• Les panneaux supérieur et latéraux de l’appareil
• Si vous n’utilisez pas l’appareil durant une
• Lorsque vous avez fini d’utiliser cet appareil, reti-
—Ne manipulez jamais cet appareil ou
vous de l’emballage d’origine pour l’emballer
comme il l’était lors de son acquisition.
bombes insecticides, à proximité de cet appareil.
Ne posez pas d’objets en caoutchouc ou en plastique à demeure sur cet appareil car ils risquent de
laisser des marques sur le boîtier.
peuvent devenir chauds après un usage prolongé.
C’est parfaitement normal.
période assez longue, il risque de ne pas fonctionner convenablement à la prochaine mise sous tension; veillez donc à l’utiliser de temps en temps.
rez le disque et coupez l’alimentation.
—Outre pour
7. Installation de cet appareil
• Installez cet appareil dans un endroit correctement ventilé.
•Veillez à ce que tous les côtés de l’appareil soient
bien ventilés, surtout si vous installez l’appareil
dans un meuble audio. Une ventilation insuffisante peut provoquer une surchauffe de l’appareil
et entraîner un dysfonctionnement.
• N’exposez pas l’appareil aux rayons du soleil ni à
des sources de chaleur car sa température interne
risquerait d’augmenter, raccourcissant la durée de
vie de la tête de lecture optique.
• Evitez les endroits humides ou poussiéreux.
• Placez l’appareil à l’horizontale. N’utilisez
jamais l’appareil en le plaçant à la verticale ou sur
une surface inclinée car cela pourrait provoquer
un dysfonctionnement.
• Si vous installez l’appareil près d’un téléviseur,
d’une radio ou d’un magnétoscope, la qualité du
son pourrait être affectée. Dans ce cas, éloignez
l’appareil du téléviseur, de la radio ou du magnétoscope.
8. Humidité due à la condensation
L’humidité produite par la condensation risque
d’endommager cet appareil.
Lisez attentivement ce qui suit:
De la condensation peut aussi se former sur la lentille de la tête de lecture optique, l’un des composants vitaux de l’appareil.
•Voici les situations où de la condensation risque
de se former:
– Quand vous déplacez l’appareil d’un lieu froid
dans un endroit plus chaud.
– Quand vous allumez un appareil de chauffage
ou qu’un climatiseur souffle de l’air froid sur
l’appareil.
– Quand, en été, vous déplacez l’appareil d’une
pièce climatisée dans un endroit chaud et
humide.
– Quand vous utilisez l’appareil dans un endroit
humide.
• N’utilisez pas cet appareil s’il y a risque de con-
densation. Cela risquerait d’endommager les disques et certains composants internes de
l’appareil.
En présence de condensation, retirez le disque et
laissez l’appareil sous tension pendant deux ou trois
heures. Ce délai permettra de chauffer l’appareil et
de faire évaporer la condensation. Pour réduire les
risques de condensation, laissez l’appareil branché
au secteur.
Fr-
3
Page 56

Précautions
—Suite
Cet appareil contient un système laser à semi-conducteurs et est classé parmi les “PRODUITS LASER DE
CLASSE 1”. Lisez attentivement ce manuel d’instructions pour utiliser correctement l’appareil. Si vous avez
le moindre problème, adressez-vous au magasin où vous
avez acheté l’appareil.
Afin d’éviter toute exposition au faisceau laser,
n’essayez jamais d’ouvrir le boîtier de l’appareil.
PRUDENCE:
RADIATION LASER VISIBLE ET INVISIBLE DE
CLASSE 1M QUAND L’APPAREIL EST OUVERT.
NE JAMAIS REGARDER DIRECTEMENT AVEC
DES INSTRUMENTS OPTIQUES.
CET APPAREIL CONTIENT UN LASER. TOUTE
UTILISATION, TOUT RÉGLAGE OU TOUTE
INTERVENTION NON CONFORME AUX INSTRUCTIONS DONNÉES DANS CE MANUEL PEUT
EXPOSER À DES RADIATIONS DANGEREUSES.
Vous trouverez l’étiquette
illustrée ci-contre au dos de
l’appareil.
1. Cet appareil est un PRODUIT LASER DE CLASSE 1 et
contient un laser à l’intérieur de son boîtier.
2. Pour éviter tout risque d’exposition au laser, n’ouvrez
jamais le boîtier. Confiez toute réparation uniquement à un
technicien qualifié.
Modèle pour les Canadien
REMARQUE:
LA CLASSE B EST CONFORME À LA NORME
NMB-003 DU CANADA.
Sur les modèles dont la fiche est polarisée:
ATTENTION:
TRIQUES, INTRODUIRE LA LAME LA PLUS
LARGE DE LA FICHE DANS LA BORNE CORRESPONDANTE DE LA PRISE ET POUSSER JUSQU’AU
FOND.
CET APPAREIL NUMÉRIQUE DE
POUR ÉVITER LES CHOCS ÉLEC-
Modèles pour l’Europe
Déclaration de Conformité
Nous,
ONKYO EUROPE
ELECTRONICS GmbH
LIEGNITZERSTRASSE 6,
82194 GROEBENZELL
ALLEMAGNE
garantissons que le produit ONKYO décrit dans ce manuel est
conforme aux normes techniques: EN60065, EN55013,
EN55020 et EN61000-3-2, -3-3.
GROEBENZELL, ALLEMAGNE
ONKYO EUROPE ELECTRONICS GmbH
K. MIYAGI
Fr-
4
Page 57

Accessoires fournis
Fonctions
Vérifiez que vous avez bien les éléments suivants :
Télécommande
(Pile incluse)
Antenne FM intérieure
Antenne-cadre AM
Adaptateurs A et B pour socle iPod
Caractéristiques générales
• Système audio tuner CD avec socle iPod*1 intégré
• Compatible avec l’iPod (5ème génération, photo et
4ème génération), l’iPod nano (2ème génération et
1ère génération) ainsi que l’iPod mini (en août 2007)
• Haut-parleurs Hi-Fi incorporés
• Pilotez l’iPod avec la télécommande
• Chargez votre iPod en écoutant la musique
•3 réglages d’égalisation préprogrammés
• Entrée ligne pour source audio externe
• Prise pour casque
• Ecran à luminosité réglable
• Mémoire fonctionnant sans piles
Haut-parleurs
• Diaphragme OMF
• Excitation aéro-acoustique produisant un son puissant
et naturel
Radio
•Tuner AM/FM
• 30 présélections
• Assignation de nom aux présélections
• RDS (Radio Data System) (uniquement sur le modèle
européen)
•Fonction de présélection FM automatique
Cordon d’alimentation
(Le type de connecteur dépend du pays.)
Lecteur CD
• Lecture de CD audio, de CD MP3/WMA*2 (CD-R et
CD-RW)
•4 modes de lecture: Normal, Random, Memory et
1-folder
•2 modes de répétition (plage en cours ou toutes les plages)
• Liste de lecture de 25 plages
Minuteries et horloge
•4 minuteries programmables
• Minuterie Sleep
•Fonction Snooze
• Réglage automatique de l’heure AccuClock (uniquement sur le modèle européen)
*1 iPod est une marque commerciale d’Apple Inc., déposée aux
Etats-Unis et dans d’autres pays.
*2 Windows Media et le logo Win-
dows sont des marques commerciales ou déposées de Microsoft
Corporation aux Etats-Unis et/
ou dans d’autres pays.
Fr-
5
Page 58

Sommaire
Remarques importantes pour
votre sécurité...................................................... 2
Précautions......................................................... 3
Accessoires fournis........................................... 5
Fonctions............................................................ 5
Sommaire............................................................ 6
Tour d’horizon de le CBX-300........................... 7
Faces supérieure et avant...........................................7
Écran..........................................................................8
Panneau arrière ..........................................................9
Télécommande (RC-713S)......................................10
Remarques concernant les disques............... 13
Installation des adaptateurs
pour socle iPod ................................................ 15
Connexion d’une antenne ............................... 16
Brancher une source audio/video externe .... 18
À propos des connexions.........................................18
Connexion d’autres éléments...................................18
Connexion d’un téléviseur ou d’un projecteur ........18
Connexion du câble d’alimentation................ 19
Réglage automatique de l’heure: AccuClock
(uniquement sur le modèle européen)......................19
Manipulations de base..................................... 20
Mise sous tension de le CBX-300 ...........................20
Réglage du volume ..................................................20
Sélection d’une source d’entrée...............................20
Utilisation d’un casque ............................................20
Mise en sourdine......................................................21
Egalisation préréglée ...............................................21
Régler la luminosité de l’écran................................21
Choix d’une radio ............................................. 32
Recherche d’une station radio................................. 32
Recherche automatique de stations FM
(Auto Preset) ........................................................... 33
Réglage manuel des stations FM/AM..................... 34
Choix d’une présélection ........................................ 35
Affichage d’informations radio............................... 36
Réception RDS
(uniquement sur le modèle européen)..................... 36
Nommer les présélections....................................... 37
Copier des présélections ......................................... 38
Effacer le nom d’une présélection .......................... 39
Effacer des présélections......................................... 39
Réglage de l’horloge ........................................ 40
Réglage de l’horloge............................................... 40
Régler AccuClock sur une station donnée
(uniquement sur le modèle européen)..................... 41
Utilisation des minuteries................................ 42
A propos des minuteries (Timers)........................... 42
Programmation d’une minuterie .............................43
Activer/couper les minuteries .................................45
Vérification des réglages de minuterie ................... 45
Utiliser la fonction ‘Snooze’................................... 46
Utilisation de la minuterie (Sleep Timer) ............... 47
Régler le volume maximum............................. 48
Dépannage ........................................................ 49
Fiche technique ................................................ 53
Lecture d’un CD ............................................... 22
Utiliser les boutons en face supérieure ....................22
Utilisation de la télécommande ...............................23
Affichage d’informations du CD.............................23
Sélection des fichiers MP3/WMA...........................24
Lecture des fichiers MP3/WMA
d’un seul dossier ......................................................26
Affichage d’informations sur MP3/WMA...............26
Lecture mémoire......................................................27
Lecture aléatoire ......................................................28
Lecture repeat ..........................................................28
Réglage des préférences MP3/WMA ......................29
Lecture d’un iPod............................................. 30
Avec les boutons en face supérieure........................30
Avec la télécommande.............................................31
Naviguer dans les menus de l’iPod avec la
télécommande..........................................................31
Fr-
6
Page 59

Tour d’horizon de le CBX-300
Faces supérieure et avant
213456789
J
Face supérieure
K
*1 *1*2 *2
Panneau avant
Les numéros de page entre parenthèses indiquent où trouver les explications sur chaque élément.
A
Bouton STANDBY/ON (20, 40, 44)
\
Mettre le CBX-300 sous tension ou en mode de
veille.
B
Bouton DISPLAY (23, 26, 30, 36)
À chaque pression sur ce bouton, les informations à
l’écran changent.
C
Bouton iPod Lecture/Pause [ ] (30)
Lance ou interrompt la lecture du iPod.
D
Boutons précédent/suivant
[/]/[ / ] (22, 30, 35)
Pour la lecture du CD et iPod, le bouton Précédent
[/] sélectionne la plage précédente. Pendant
la lecture, ce bouton permet de retourner au début
de la plage en cours. Une pression maintenue en
cours de lecture permet de reculer. Il sert aussi à
sélectionner des stations radio mémorisées.
Pour la lecture du CD et du iPod, le bouton Suivant
[/ ] sélectionne la plage suivante. Une
pression maintenue en cours de lecture permet
d’avancer. Il sert aussi à sélectionner des stations
radio mémorisées.
Bouton CD Lecture/Pause [ ] (22)
E
Lance la lecture du CD. Une pression en cours de
lecture interrompt la lecture.
Bouton [ ] (arrête) (22)
F
Arrête la lecture du CD.
LM N O
G
H
I
/
J
K
L
M
N
/
O
*1: Canal de haut-
*2: Haut-parleurs
Bouton [ ] (éjecte) (22)
Éjecte le CD chargé.
Boutons VOLUME [ / ] (20)
Permet de régler le volume.
Bouton INPUT (20, 35)
Vous permet de sélectionner une source d’entrée.
SNOOZE (46)
Une fois que la lecture programmée d’une minuterie
réglée sur Snooze a commencé, il suffit d’appuyer
sur n’importe lequel de ces boutons pour arrêter la
lecture pour une durée déterminée, comme avec la
fonction Snooze de n’importe quel réveil.
iPod Dock (15, 30)
Insérez votre iPod ici. Un cache est installé pour
protéger le connecteur du socle.
Témoin STANDBY (19, 20)
S’allume en mode veille.
Fente pour disque (22)
Chargez le CD ici.
Ecran
Vo yez “Écran” page 8.
Capteur de télécommande (12)
Il reçoit les signaux de la télécommande.
parleur pour l’excitation aéro-acoustique
Fr-
7
Page 60

Tour d’horizon de le CBX-300
—Suite
Écran
1 432 5 6
7 O8 9 J K L M N
Témoin SLEEP
A
S’allume quand vous activez la fonction de mise en
veille automatique.
Témoin MP3
B
S’allume quand un CD MP3 est chargé.
Témoin WMA
C
S’allume quand un CD WMA est inséré.
D
Témoin FOLDER
S’allume tant que le numéro et le nom d’un dossier
MP3/WMA sont affichés.
E
Témoin MUTING
Clignote quand la mise en sourdine de le CBX-300
est activée.
F
Témoins de mode de lecture
1FOLDER :
dossier est sélectionnée.
MEMORY :
sélectionnée.
RANDOM :
sélectionnée.
REPEAT :
sélectionnée pour toutes les plages.
REPEAT 1 :
sélectionnée pour une plage.
G
Témoins de lecture et pause
Le témoin Play s’allume pour la lecture. Le témoin
Pause s’allume quand la lecture est interrompue.
H
Témoins TIMER
Indiquent l’état des minuteries.
TIMER:
programmée.
1, 2, 3, 4:
son numéro s’allume.
:
S’allume quand une minuterie est réglée sur
Snooze.
S’allume quand la lecture d’un
S’allume quand la lecture mémoire est
S’allume quand la lecture aléatoire est
S’allume que la lecture répétée est
S’allume que la lecture répétée est
/
S’allume quand une minuterie est
Quand une minuterie est programmée,
Témoins du tuner
I
AUTO :
sélectionné et disparaît quand le mode Mono est
sélectionné.
correctement une station radio.
FM ST :
station FM en stéréo.
RDS (uniquement sur le modèle européen) :
S’allume quand le CBX-300 reçoit une station
émettant des informations RDS (“Radio Data
System”).
Témoins FILE
J
S’allume quand le nom et le numéro d’un fichier
MP3/WMA sont affichés.
Témoin TRACK
K
S’allume quand un numéro de plage de CD est
affiché.
Témoins TITLE, ARTIST et ALBUM
L
TITLE:
MP3/WMA est affiché.
ARTIST:
fichier MP3/WMA est affiché.
ALBUM:
fichier MP3/WMA est affiché.
M
Témoins DISC, TOTAL et REMAIN
Ces témoins s’allument quand le temps total ou le
temps résiduel du disque ou de la plage est affiché.
N
Témoin CH
S’allume quand un numéro de présélection radio est
affiché.
O
Zone de message
Diverses informations s’affichent ici: numéro de
station mémorisée, fréquence de la station, heure,
volume, réglages de minuterie, de mode etc.
S’allume quand le mode “Auto” est
:
S’allume quand le CBX-300 capte
S’allume quand l’appareil reçoit une
S’allume quand le nom d’un fichier
S’allume quand le nom de l’artiste d’un
S’allume quand le nom de l’album d’un
Fr-
8
Page 61

Tour d’horizon de le CBX-300
Panneau arrière
1234
—Suite
5
Les numéros de page entre parenthèses indiquent où trouver les explications sur chaque élément.
Prises AM ANTENNA (16, 17)
A
Ces bornes à poussoir servent à brancher une
antenne AM.
Prise PHONES (20)
B
Cette prise pour mini-jack stéréo permet de
brancher un casque stéréo.
Prises INPUT LINE (18)
C
Cette entrée audio analogique permet de brancher
une autre source audio externe.
Prise VIDEO OUT (18)
D
Cette sortie vidéo composite peut être branchée à
une entrée vidéo d’un téléviseur ou d’un projecteur.
Utilisez-la si vous voulez utiliser un téléviseur ou un
projecteur pour visionner des vidéos ou des diaporamas tant que l’iPod est inséré dans le socle iPod du
CBX-300.
*Fonctionne uniquement avec des iPod permettant
une sortie vidéo.
E
Prise FM ANTENNA (16, 17)
Cette prise sert à brancher une antenne FM.
F
AC INLET (19)
Branchez le cordon d’alimentation fourni ici.
Branchez l’autre extrémité du cordon
d’alimentation à une prise de courant de tension
appropriée.
6
Pour en savoir plus sur les connexions, voyez
page 16–19.
Fr-
9
Page 62

Tour d’horizon de le CBX-300
—Suite
Télécommande (RC-713S)
Vo yez page 31 pour savoir comment piloter l’iPod avec la télécommande.
Les numéros de page entre parenthèses indiquent où
trouver les explications sur chaque élément.
Bouton STANDBY/ON (20)
A
Mettre le CBX-300 sous tension ou en mode de
veille.
Bouton SLEEP (47)
B
Sert à programmer la minuterie de désactivation
automatique, qui arrête le CBX-300 à l’heure
A
B
3
4
5
6
7
8
9
J
K
L
M
N
O
P
Q
R
S
T
U
V
Retirez le film en plastique avant
d’utiliser la télécommande.
indiquée.
Bouton DISPLAY (23, 26, 30, 36, 37, 40)
C
Permet de changer les informations affichées à
l’écran. Sélection des caractères lors de l’entrée du
nom d’une présélection radio.
D
Bouton DIMMER (21)
Permet de régler la luminosité de l’écran sur normal
ou atténué (uniquement disponible lorsque le
CBX-300 est mis sous tension).
E
Boutons numériques (23, 35, 37, 40)
Sélection des plages et des présélections radio.
Réglage de l’heure, programmation des minuteries
et entrée de noms pour présélections radio.
Boutons de rebobinage/avance rapide
F
[ ]/[ ] et [ TUNING]/[TUNING ] (23,
31, 32)
Recule ou avance la lecture d’un CD. Syntonisation
de la radio et édition du nom des présélections.
G
Boutons précédent/suivant [ ]/[ ] et
[ PRESET]/[PRESET ] (23, 31, 35)
Passage à la plage de CD précédente ou suivante.
Syntonisation de la radio et édition du nom des
présélections.
Boutons de fonction CD (23)
H
: interrompt momentanément la lecture.
: arrête la lecture.
: lance la lecture.
I
Boutons de contrôle d’un iPod (31)
ALBUM [ / ]:
PLAYLIST [ / ]:
sur un iPod.
iPod Lecture/Pause [ / ]:
interrompt la lecture du iPod.
J
Bouton SNOOZE (46)
Une fois que la lecture programmée d’une minuterie
réglée sur Snooze a commencé, il suffit d’appuyer
sur n’importe lequel de ces boutons pour arrêter la
lecture pour une durée déterminée, comme avec la
fonction Snooze de n’importe quel réveil.
Sélection d’album sur un iPod.
Sélection de listes de lecture
Lance ou
Fr-
10
Page 63

Tour d’horizon de le CBX-300
Bouton CLOCK CALL (40)
K
Rappel de l’horloge pour afficher la date et l’heure.
Boutons INPUT [ ]/[ ] (20)
L
Sélection de la source d’entrée.
M
Bouton MUTING (21)
Coupe le son du CBX-300.
N
Boutons VOLUME [ / ] (20, 23)
Règlent le volume.
O
Bouton FOLDER (24, 25)
Sélection de dossiers MP3/WMA.
Bouton TIMER (40, 41, 43, 45)
P
Réglage des minuteries et de l’heure.
Bouton MENU/NO/CLEAR (29, 31, 33, 34, 37–
Q
39, 48)
Sélection, annulation et suppression pour
différentes fonctions ou paramètres.
Bouton YES/MODE/SHUFFLE (26–28, 31, 32,
R
41)
Confirmation de divers réglages et sélection de
mode.
S
Bouton ENTER (24–27, 29, 31, 33, 34, 37–41,
43–45, 48)
Confirmation avec divers paramètres et fonctions.
T
Bouton REPEAT (28, 31)
Lecture répétée.
U
Bouton PRESET EQ (21)
Sélection des réglages d’égalisation
préprogrammés.
V
Bouton TUNER (32, 33, 35)
Sélection de FM ou AM comme source d’entrée.
—Suite
Fr-
11
Page 64

Tour d’horizon de le CBX-300
—Suite
Remplacer la pile
Utilisez exclusivement une pile de même type (CR 2025,
pile bouton au lithium).
Tout en poussant l’onglet de verrouillage
1
vers le centre de la télécommande,
extrayez le compartiment à pile en le
glissant.
Arrière de la
télécommande
Onglet de verrouillage
Retirez l’ancienne pile du compartiment,
2
insérez la pile neuve et glissez le
compartiment dans la télécommande.
Face positive (+) vers le haut
Compartiment à pile
Symbole de polarité (+)
Type de pile
Onglet de verrouillage
Utilisation de la télécommande
Quand vous utilisez la télécommande, orientez-la
toujours vers le capteur de télécommande de le
CBX-300.
Capteur de télécommande
CBX-300
30°
30°
Environ 5 m
Remarques:
• Si le CBX-300 est exposé à une forte source d’éclairage ou aux rayons du soleil, il pourrait ne pas capter
le signal de la télécommande. Tenez-en compte lors du
choix de l’emplacement.
•L’utilisation d’une autre télécommande du même type
dans la même pièce ou la présence d’un appareil émettant des rayons infrarouge à proximité de le CBX-300
peut provoquer des interférences.
• Ne posez jamais d’objet (livres, etc.) sur la
télécommande car cela risquerait d’enfoncer accidentellement une touche et de vider les piles.
• Si un obstacle se trouve entre le CBX-300 et
la télécommande, l’appareil ne captera pas les signaux
de la télécommande.
Remarques:
• Si la télécommande ne fonctionne plus correctement,
remplacez la pile.
• Lors de l’extraction du compartiment à pile, veillez à
ne pas vous casser les ongles.
• Une mauvaise utilisation des piles au lithium peut provoquer un incendie ou des brûlures chimiques. Gardez-les toujours hors de portée des enfants. Ces piles
ne doivent jamais être démontées, chargées, chauffées
à plus de 100˚C ou incinérées.
ATTENTION:
Le danger d’explosion si la pile est inexactement
remplacer.
Remplacer seulement avec le même ou équivalent type.
Fr-
12
Page 65

Remarques concernant les disques
Disques compatibles
Le CBX-300 peut lire les disques suivants.
Disque Logo
CD audio
CD-R
CD-RW
CD Extra
• Certains CD audio utilisent un protection contre la
copie qui n’est pas conforme à la norme CD officielle.
Étant donné que ces disques ne sont pas standard, il
peuvent ne pas être lus correctement dans le
CBX-300.
• Le CBX-300 est compatible avec les CD-R et les CDRW. Cependant, certains CD-R et CD-RW peuvent ne
pas fonctionner correctement pour l’une des raisons
suivantes : caractéristiques du graveur de disque,
caractéristiques du disque, endommagement ou
encrassement du disque. Consultez le manuel fourni
avec votre graveur de disque pour plus d’informations.
La condensation ou la poussière sur la lentille de lecture optique peuvent également affecter la lecture.
• Le CBX-300 est compatible avec les disques 8 cm et
12 cm.
• Le CBX-300 n’est pas compatible avec les types de
disques non indiqués.
• N’utilisez pas de disques de forme inhabituelle, tels
que ceux représentés ci-dessous, car ils risquent
d’endommager le CBX-300.
• N’utilisez pas de disques présentant des résidus de
ruban adhésif, des disques loués avec des étiquettes
amovibles ou des disques avec des étiquettes faites
maison ou des autocollants. Ceci risque d’endommager le CBX-300 et vous risquez de ne pas pouvoir
enlever le disque correctement.
Format ou type de
fichier
PCM
CD audio, MP3, WMA
CD audio, MP3, WMA
CD audio (session 1),
MP3/WMA (session 2)
Disques créés sur ordinateur
Les disques créés sur ordinateur, y compris de format
compatible, peuvent ne pas fonctionner correctement
dans le CBX-300 en raison de réglages incorrects du
logiciel de gravage de disques. Vérifiez les manuels
fournis avec votre logiciel de gravage pour plus
d’informations sur la compatibilité.
Compatibilité MP3/WMA
• Le CBX-300 peut lire des fichiers MP3 et WMA gravés sur CD-R et CD-RW.
• Les disques doivent répondre à la norme ISO 9660
Level 1 ou Level 2 et être conformes à l’extension
Romeo ou Joliet de cette norme. Formats compatibles:
Mode 1, Mode 2 Form 1.
• Bien que les disques multisession soient compatibles,
dans certains cas, leur chargement peut prendre un
temps considérable ou échouer purement et simplement. Quand vous gravez des CD, nous vous conseillons de travailler en une session (Disc-at-once) et
de sélectionner “Disc Close” (finaliser le disque).
•Vous pouvez définir l’ordre dans lequel le CBX-300 lit
les fichiers MP3/WMA d’un dossier en ajoutant un
préfixe à 3 chiffres aux noms de fichiers. Par exemple:
“001.Track.mp3”, “002.Track.mp3” et ainsi de suite.
• Les noms de disque, de fichier et de dossier peuvent
contenir jusqu’à 30 caractères. Les noms des fichiers
MP3/WMA (sans l’extension) et des dossiers sont
affichés à l’écran.
• Le CBX-300 permet d’utiliser jusqu’à 499 fichiers
MP3/WMA et dossiers. Les dossiers et fichiers excédentaires ne peuvent pas être lus. Notez que si la structure des fichiers et dossiers est fort complexe, le
CBX-300 peut ne pas être en mesure de reconnaître ou
lire tous les fichiers MP3/WMA du disque.
• Les fichiers MP3/WMA sans extension adéquate ne
sont pas reconnus. Pour éviter de générer du bruit et
des dysfonctionnements, n’utilisez pas ces extensions
pour d’autres types de fichiers.
■
MP3
• Les fichiers MP3 doivent être au format MPEG1/MPEG-2 Audio Layer 3, d’une fréquence d’échantillonnage comprise entre 8kHz et 48kHz et d’une
résolution de bit comprise entre 8 kbps et 320 kbps.
Les fichiers incompatibles ne peuvent pas être lus.
• Les noms de fichiers MP3 doivent comporter l’extension “.mp3” ou “.MP3”.
• Les fichiers MP3 à résolution en bit variable (VBR)
comprise entre 8 kbps et 320 kbps sont reconnus.
(L’affichage de la durée de lecture peut être incorrect.)
Fr-
13
Page 66

Remarques concernant les disques
■
WMA
•L’option Copyright des fichiers WMA doit être coupée.
• Des fréquences d’échantillonnage comprises entre
8kHz et 48kHz et des résolutions allant de 32 kbps à
192 kbps sont reconnues. Les fichiers incompatibles
ne peuvent pas être lus.
• Les résolutions en bit variables (VBR) comprises
entre 32 kbps et 192 kbps sont acceptées. (L’affichage
de la durée de lecture peut être incorrect avec une résolution variable.)
• Les noms de fichiers WMA doivent comporter
l’extension “.wma” ou “.WMA”.
Quelques mots sur WMA
WMA est l’acronyme de “
technologie de compression audio développée par
Microsoft Corporation. Les données audio peuvent être
encodées en format WMA avec Windows Media
Player.
Windows Media Audio
”, une
®
—Suite
Manipulation des disques
• Ne touchez jamais la surface inférieure d’un disque.
Tenez toujours les disques par les bords, comme indiqué sur la figure.
Dessous
• Ne collez jamais de ruban adhésif ou d’étiquettes collantes sur les disques.
Organisation du contenu du disque
■
CD audio
Les CD audio contiennent des plages.
Plage 2 Plage 3 Plage 4Plage 1
CD audio
■
Disque MP3/WMA
Les disques MP3/WMA contiennent des fichiers
MP3/WMA agencés en dossiers.
Dossier 1
Fichier 2 Fichier 3 Fichier 1Fichier 1 Fichier 2
MP3/WMA (CD-R/CD-RW)
Dossier 2
Plage 5
Nettoyage des disques
• Pour de meilleurs résultats, veillez à ce que les disques
soient propres. Les traces de doigts et la poussière
peuvent affecter la qualité sonore et doivent être supprimées comme indiqué ci-après. Au moyen d’un chiffon doux et propre, essuyez du centre vers l’extérieur,
comme indiqué sur la figure. N’essuyez jamais de
façon circulaire.
✔
• Pour supprimer de la poussière ou des impuretés tenaces, essuyez le disque avec un chiffon doux humide et
séchez-le avec un chiffon sec.
• N’utilisez jamais de nettoyant contenant des solvants
(diluants ou essence), de nettoyants du commerce ou
de sprays antistatiques destinés aux disques vinyle car
il risquent d’endommager le disque.
Rangement des disques
• Ne rangez pas les disques en lieu exposé à un ensoleillement direct ou à proximité de sources de chaleur.
• Ne stockez pas les disques en lieu humide ou poussiéreux (dans une salle de bain ou à proximité d’un humidificateur par exemple).
• Rangez toujours les disques dans leur boîtier et verticalement. L’empilement ou le dépôt d’objets sur des
disques non protégés peuvent voiler, rayer ou endommager ces derniers.
Fr-
14
Page 67

Installation des adaptateurs pour socle iPod
Adaptateurs pour socle iPod
Les adaptateurs pour socle iPod peuvent être utilisés
avec différents modèles d’iPod (4ème génération et
photo) ainsi qu’iPod mini. Toutefois, si vous disposez
des adaptateurs livrés avec le socle iPod universel
d’Apple, nous vous conseillons d’utiliser ces
adaptateurs.
Si vous disposez d’un iPod de 5ème génération ou d’un
iPod nano, utilisez l’adaptateur fourni avec le baladeur.
Le CBX-300 est livré avec deux adaptateurs pour socle.
Chaque socle est doté d’une lettre à l’arrière, A ou B
(voyez ci-dessous), indiquant les modèles d’iPod
compatibles.
A
B
Le tableau suivant indique les modèles d’iPod compatibles avec les différents adaptateurs. Veillez à utiliser
l’adaptateur adéquat pour votre iPod.
A
B
Installer les adaptateurs pour socle iPod
1. Retirer le cache de protection du socle
Conservez le cache de protection dans un endroit sûr
afin de pouvoir le remettre lorsque le socle reste
inutilisé assez longtemps.
Haut du CBX-300 Cache de protection
Poussez l’onglet vers l’avant et
soulevez le cache de protection
2. Installer l’adaptateur pour socle
Maintenez l’adaptateur en orientant la fente loin de
vous et poussez-le dans le socle jusqu’à ce qu’il s’y
loge avec un déclic.
Modèle d’iPod A B
MENU
iPod de 4ème génération
et Édition spéciale U2
MENU
20GB (dont l’Édi-
tion spéciale U2)
40GB
✔
✔
✔
iPod mini
MENU
iPod photo
30GB
40GB
60GB
✔
✔
✔
Remarques:
• Si vous insérez votre iPod dans le socle du CBX-300
sans l’adaptateur approprié, vous endommagerez le
connecteur du socle. Même après avoir installé le bon
adaptateur, ne secouez pas l’iPod tant qu’il est inséré
dans le socle car cela endommagerait le connecteur.
• Insérez/extrayez l’iPod en ligne droite en suivant
l’angle du connecteur du socle.
Veillez à ce que la fente
soit à l’arrière.
Retirer l’adaptateur pour socle
Pour retirer l’adaptateur, insérez un petit tournevis à tête
plate dans la fente et soulevez-le, comme illustré ci-dessous.
Fr-
15
Page 68

Connexion d’une antenne
Cette section explique comment brancher l’antenne FM
intérieure et l’antenne-cadre AM fournies. Vous
apprendrez aussi comment brancher des antennes FM et
AM extérieures disponibles dans le commerce.
Le CBX-300 ne capte aucun signal radio si vous n’avez
pas connecté d’antenne. Veillez donc à brancher une
antenne si vous comptez écouter la radio.
Prise pour antenne FM
Bornes à poussoir pour antenne AM
Connexion de l’antenne FM intérieure
L’antenne FM fournie est conçue exclusivement pour
une utilisation intérieure.
Branchez l’antenne FM de la façon
1
illustrée.
Branchez la fiche à
fond dans la prise.
Dès que le CBX-300 est prêt pour l’utilisation,
recherchez une station FM et déterminez
l’emplacement idéal de l’antenne FM en vous
basant sur la qualité du signal reçu.
Fixez l’antenne FM au mur à l’aide de
2
punaises.
Connexion de l’antenne-cadre AM
L’antenne-cadre AM fournie est conçue exclusivement
pour une utilisation intérieure.
Assemblez l’antenne-cadre AM en
1
insérant les languettes dans le socle.
Insérez les deux fils de l’antenne-cadre
2
AM dans les bornes à poussoir pour
antenne AM.
Cette antenne n’a pas de polarité. Vous pouvez
donc brancher chaque fil dans une des deux
bornes au choix.
Vérifiez que les bornes à poussoir sont bien en
contact avec les fils et non avec leur gaine.
Appuyez Insérez le fil Relâchez
Dès que le CBX-300 est prêt pour l’utilisation,
recherchez une station AM et déterminez
l’emplacement idéal de l’antenne AM en vous
basant sur la qualité du signal reçu.
Placez l’antenne aussi loin que possible du
CBX-300, d’un téléviseur et de cordons d’alimentation.
Punaises, etc.
Attention :
punaises.
Si la réception FM laisse à désirer avec l’antenne FM
intérieure, remplacez celle-ci par une antenne FM
extérieure (voyez page 17).
Fr-
16
Veillez à ne pas vous blesser avec les
Si la réception AM laisse à désirer avec l’antenne-cadre
AM, remplacez celle-ci par une antenne AM extérieure
(voyez page 17).
Page 69

Connexion d’une antenne
—Suite
Connexion d’une antenne FM extérieure
Si la réception FM laisse à désirer avec l’antenne FM
intérieure fournie, utilisez une antenne FM extérieure
(disponible dans le commerce).
L’adaptateur n’est pas fourni avec le
CBX-300. Procurez-vous un adaptateur à
pousser. Les fiches de type F à visser ne
peuvent pas être branchées.
Remarques:
• Les antennes FM extérieures produisent une réception
optimale en extérieur. Cependant, il suffit parfois de
les installer dans un grenier pour obtenir une réception
suffisante.
• Installez l’antenne FM extérieure en veillant à
l’éloigner au maximum de grands immeubles. Il faut
que l’antenne puisse recevoir correctement les ondes.
• Ne placez jamais l’antenne à proximité d’une source
d’interférences (enseignes lumineuses, routes à
circulation intense, etc.).
•Par mesure de sécurité, ne placez jamais d’antenne à
proximité de lignes à haute tension ou d’appareils à
haute tension.
• Une antenne extérieure doit être branchée à la terre
conformément aux règlements en vigueur pour éviter
les risques d’électrocution.
■
Utilisation d’un répartiteur d’antenne TV/FM
N’utilisez jamais la même antenne pour la réception de
signaux FM et de programmes télévisés car cela pourrait
produire des interférences. Si toutefois le manque
d’espace ne permet que cette solution, utilisez un
répartiteur d’antenne TV/FM.
Connexion d’une antenne AM extérieure
Si l’antenne-cadre AM fournie ne suffit pas à obtenir une
réception satisfaisante, vous pouvez ajouter une antenne
AM extérieure.
Antenne extérieure
Antenne-cadre AM
Dans la mesure du possible, placez l’antenne AM
extérieure en position horizontale et à l’air libre.
Cependant, il suffit parfois de l’installer au-dessus d’une
fenêtre pour obtenir une réception suffisante.
Ne débranchez en aucun cas l’antenne-cadre AM.
Une antenne extérieure doit être branchée à la terre
conformément aux règlements en vigueur pour éviter les
risques d’électrocution.
Câble d’antenne isolé
Répartiteur
d’antenne TV/FM
Vers le CBX-300 Vers le téléviseur
(ou magnétoscope)
Fr-
17
Page 70

Brancher une source audio/video externe
À propos des connexions
•Avant d’effectuer des connexions, consultez les
manuels fournis avec vos autres appareils.
• Ne branchez le cordon d’alimentation secteur
qu’après avoir effectué et vérifié toutes les
connexions.
Code de couleurs des prises
Les connexions audio RCA/Cinch utilisent
généralement un code de couleurs: rouge et blanc. Les
prises et fiches blanches correspondent à l’entrée ou à la
sortie gauche (cette prise s’appelle généralement “L”).
Les prises et fiches rouges correspondent à l’entrée ou à
la sortie droite (cette prise s’appelle généralement “R”).
Les connexions vidéo composite ont généralement la
couleur jaune. Les prises jaunes servent à relier une
entrée ou une sortie vidéo composite.
Blanc (gauche)
Rouge (droite)
• Enfoncez chaque fiche à fond
pour obtenir une connexion
correcte (une connexion lâche
peut provoquer du bruit ou un
dysfonctionnement).
• Pour éviter les interférences,
ne placez pas les câbles audio
à proximité de cordons d’alimentation.
Signaux audio analogiques
Vidéo composite
(Jaune)
Blanc (gauche)
Rouge (droite)
(Jaune)
Correct !
Mauvais
branchement
Connexion d’autres éléments
Branchez les prises INPUT LINE du CBX-300 aux
sorties audio de l’autre élément.
Lecteur DVD
Platine à cassettes
Panneau arrière de CBX-300
rouge blanc
Câble audio analogique (RCA)
: Sens du signal
Astuce:
• Pour écouter l’élément, choisissez la source d’entrée
LINE (voyez page 20).
Téléviseur
Graveur MD
etc.
rouge blanc
Connexion d’un téléviseur ou d’un projecteur
Si vous avez un iPod ayant une sortie vidéo, vous pouvez
visionner des vidéos ou des diaporamas sur téléviseur ou
projecteur tant que l’iPod est inséré dans le socle du
CBX-300. Reliez la sortie VIDEO OUT du CBX-300 à
une entrée vidéo composite du téléviseur ou du
projecteur avec un câble vidéo composite disponible
dans le commerce.
Téléviseur
: Sens du signal
VIDEO INPUT
Panneau arrière de
CBX-300
Câble vidéo composite
Remarques:
• Pour regarder des vidéos et des diaporamas sur votre
téléviseur ou projecteur, réglez le paramètre “TV Out”
sur “On” sur votre iPod.
• Selon le modèle et la version du système de votre
iPod, les fonctions d’avance rapide et de recul de la
vidéo ou de sélection de photo suivante/précédente
peuvent ne pas être disponibles.
• Il est impossible de visionner des images sur téléviseur avec un iPod n’ayant pas de sortie vidéo.
Fr-
18
Page 71

Connexion du câble d’alimentation
Remarques:
•Effectuez et vérifiez toutes les connexions avant de brancher le cordon d’alimentation.
• La baisse de tension momentanée produite quand vous mettez le CBX-300 sous tension pourrait affecter d’autres
appareils électriques. Si cela pose problème, branchez le CBX-300 à un autre circuit.
• Servez-vous exclusivement du cordon d’alimentation fourni avec le CBX-300. Le cordon d’alimentation fourni est
conçu exclusivement pour alimenter le CBX-300. Ne l’utilisez jamais avec d’autres appareils.
• Ne débranchez jamais le cordon d’alimentation de le CBX-300 tant que son autre extrémité est toujours branchée à
une prise de courant. Cela pourrait provoquer une électrocution. Commencez toujours par débrancher le cordon
d’alimentation de la prise de courant puis débranchez-le de le CBX-300.
1
2
Cordon d’alimentation fourni
(Le type de connecteur dépend du pays.)
Vers prise murale
1
2
Branchez le cordon d’alimentation fourni à la prise AC INLET de le CBX-300.
Branchez le cordon d’alimentation à une prise de courant adéquate.
Le témoin STANDBY s’allume.
Réglage automatique de l’heure: AccuClock (uniquement sur le modèle européen)
Pour régler l’horloge avec la fonction “AccuClock”, le CBX-300 doit pouvoir recevoir des stations radio RDS: il faut
donc une antenne FM. Veillez à brancher une antenne FM avant d’essayer d’utiliser cette fonction (voyez page 16 et 17).
La toute première fois que vous branchez le cordon d’alimentation à une prise murale, la fonction AccuClock recherche
automatiquement une station de radio RDS qui émet des informations CT (Clock Time (heure)) et règle l’heure. Tant
que des informations CT sont reçues, “AccuClock…” apparaît à l’écran. Le réglage de l’heure peut prendre quelques
minutes.
Quand le réglage de l’heure est terminé, la date et l’heure sont éclairés 2 secondes.
La fonction AccuClock met automatiquement l’horloge à l’heure à 2 heures, 3 heures et 14 heures.
Si, pour une raison ou une autre, il est impossible de régler l’horloge automatiquement, voyez “Réglage de l’horloge”
page 40.
Fr-
19
Page 72
Manipulations de base
STANDBY/ON
Témoin STANDBY
(Panneau avant)
VOLUME
PHONES
(Panneau arrière)
INPUT
Mise sous tension de le CBX-300
TélécommandeCBX-300
Pour mettre le CBX-300 sous tension, appuyez sur le
bouton [STANDBY/ON] sur le CBX-300 ou sur la
télécommande. Le témoin STANDBY s’éteint.
Appuyez de nouveau sur le bouton [STANDBY/ON]
pour mettre le CBX-300 en mode de veille. Le témoin
STANDBY s’allume.
Réglage du volume
TélécommandeCBX-300
STANDBY/
ON
INPUT
/
VOLUME
/
Sélection d’une source d’entrée
Vous pouvez sélectionner CD, iPod, FM, AM ou LINE
qui peut être un élément externe.
Actionnez plusieurs fois les boutons INPUT [ ]/[ ]
de la télécommande pour choisir la source d’entrée. Sur
le CBX-300, appuyez plusieurs fois sur le bouton
[INPUT]. Les sources d’entrée sont sélectionnées dans
l’ordre suivant.
CD FMiPod AM
LINE
Utilisation d’un casque
Baissez le volume, puis branchez la minifiche d’un
casque stéréo à la prise PHONES.
Vous pouvez régler le volume et couper le son de façon
normale.
Les enceintes n’émettent aucun son lorsque le casque est
branché.
Prise PHONES
Appuyez sur le bouton VOLUME [ ] pour augmenter
le volume ou sur le bouton VOLUME [ ] pour le
diminuer.
Vous pouvez aussi utiliser les boutons VOLUME [ ]/
[] de la télécommande.
La plage de réglage est: Min, 1–43*, Max.
* Selon le réglage du volume maximum, cette valeur
peut être de 43–49 (
Fr-
20
voyez page 48).
Page 73

Manipulations de base
DIMMER
—Suite
MUTING
PRESET EQ
Mise en sourdine
Pour couper la sortie du CBX-300, appuyez
sur le bouton [MUTING] de la
télécommande. Le témoin MUTING clignote
et “Muting” apparaît à l’écran pendant
quelques secondes.
Le témoin MUTING clignote
Régler la luminosité de l’écran
Vous pouvez régler la luminosité de l’écran
du CBX-300. Appuyez plusieurs fois sur le
bouton [DIMMER] de la télécommande
pour sélectionner les options suivantes:
Normal Dim
Pour entendre le CBX-300, appuyez de nouveau sur le
bouton [MUTING].
Astuce:
Quand le CBX-300 est coupé:
• Appuyez sur les boutons VOLUME [
CBX-300 ou sur les boutons VOLUME [ ]/[ ] de
la télécommande pour rétablir le son du CBX-300.
• Si vous mettez le CBX-300 hors tension, le CBX-300
est audible dès que vous le remettez sous tension.
/
] du
Egalisation préréglée
Le CBX-300 propose trois réglages d’égalisation.
Pour sélectionner un réglage d’égalisation,
appuyez plusieurs fois sur le bouton [PRESET EQ] de la télécommande. Les réglages
d’égalisation sont choisis dans l’ordre suivant:
VOCALSTANDARD DYNAMIC
CLEAR
Fr-
21
Page 74

Lecture d’un CD
Utiliser les boutons en face supérieure
Écran
Fente pour disque
/
1
2
Arrêter la lecture:
Appuyez sur le bouton Stop [ ].
La lecture s’arrête automatiquement quand la dernière
plage est terminée.
Interrompre la lecture (Pause):
Appuyez sur le bouton CD Lecture/Pause [ ]. Le
témoin Pause s’affiche. Appuyez de nouveau sur le
bouton CD Lecture/Pause [ ] pour reprendre la lecture.
Extraire le CD:
Appuyez sur le bouton d’éjection du [ ].
Astuces:
• Si vous insérez un CD alors que le CBX-300 est en
veille, il est activé automatiquement.
• Si vous appuyez sur le bouton d’éjection [ ] alors que
le CBX-300 est en veille, il s’active automatiquement
et éjecte le CD.
Insérez le CD en orientant sa face
imprimée vers le haut.
Les disques avec un diamètre de 8cm
peuvent être insérés sans adaptateur.
Pour lancer la lecture, appuyez sur le
bouton CD Lecture/Pause [ ].
/
/
/
• Affichage de CD
audio
• Affichage de CD MP3/
WMA
Nombre total
de dossiers
“DISC TOTAL” s’allume
tandis que les informations
du disque sont interrompues.
Nombre total
de plages
Nombre total
de plages
Temps de
lecture total
Nom du disque
Sélection de la plage
Pour retourner au début de la
plage en cours de lecture, appuyez
sur le bouton Précédent [ /
].
Appuyez plusieurs fois sur le bouton Précédent [ /
] pour sélectionner des plages précédentes.
Quand la lecture est à l’arrêt, une pression sur le bouton
Précédent [ / ] sélectionne la plage précédente.
Appuyez plusieurs fois sur le bouton Suivant [
pour choisir des plages suivantes.
/
Avance rapide et recul
Pendant la lecture ou la pause,
maintenez le bouton [ /
] (suivant) enfoncé pour
avancer rapidement; maintenez le bouton [ / ] (précédent) enfoncé pour reculer.
Pressez et maintenez
enfoncé
]
Fr-
22
Page 75

Lecture d’un CD
—Suite
Utilisation de la télécommande
Utilisez les boutons numériques
de la façon illustrée ci-dessous
pour sélectionner des plages.
Pour choisir:
La plage 8
La plage 10
La plage 34
Entrée de numéros supérieurs à 10.
Avec des CD MP3/WMA, ces boutons
permettent de sélectionner les fichiers
dans le dossier actuel.
Choix des plages
• Appuyez sur le bouton [ ] pour
retourner au début de la plage en
cours de lecture ou de pause. Actionnez-le plusieurs fois pour sélectionner
des plages précédentes.
• Appuyez plusieurs fois sur le bouton
[] pour choisir des plages suivantes.
Sur des CD MP3/WMA, vous pouvez
sélectionner des fichiers dans d’autres
dossiers (
voyez page 24 et 25).
Actionnez:
Actionnez-le pour afficher plus
d’infos sur le CD
Réglage du volume
Appuyez sur le bouton VOLUME [ ]
pour augmenter le volume. Appuyez sur
le bouton VOLUME [ ] pour le diminuer.
Appuyez pour avancer ou reculer
rapidement
Pendant la lecture ou la pause, maintenez le bouton [ ] enfoncé pour avancer rapidement; maintenez le bouton
[] enfoncé pour reculer rapidement.
Démarrage de la lecture
Une pression sur ce bouton CBX-300
quand le CBX-300 est en veille active le
CBX-300 et lance la lecture.
Interruption de la lecture
Pour reprendre la lecture, appuyez sur
le bouton Pause [ ] ou Lecture [ ].
Pressez pour arrêter la lecture.
Affichage d’informations du CD
Durant la lecture ou la pause, appuyez plusieurs fois sur le bouton [DISPLAY] de la télécommande pour afficher les
infos suivantes sur le CD.
Pas d’affichage.
D’habitude, le temps écoulé est affiché.
“REMAIN”
S’allume quand le temps restant sur la
plage en cours de lecture est affiché.
“TOTAL REMAIN”
S’allume quand le temps restant sur le
disque est affiché.
Si la durée totale excède 99 minutes et
59 secondes, “– –:– –” est affiché.
Remarque:
• Pour plus d’informations sur
les disques MP3/WMA, voir
page 26.
Fr-
23
Page 76
Lecture d’un CD
—Suite
Sélection des fichiers MP3/WMA
Sur un MP3/WMA CD, les fichiers sont structurés de
façon hiérarchisée avec des dossiers contenant des sousdossiers et des fichiers comme illustré ci-dessous. Le
CBX-300 a deux modes de sélection de fichiers MP3/
WMA: le mode
mode “Navigation”, vous pouvez sélectionner les
fichiers MP3/WMA en navigant dans la hiérarchie des
dossiers et sous-dossiers. En mode “All Folder”, tous les
dossiers apparaissent sur le même niveau, facilitant leur
sélection indépendamment de la hiérarchie.
Racine Dossier1
Navigation
Dossier2
et le mode
Fichier1
Fichier10
Dossier3
Fichier11
Fichier12
Fichier13
All Folder. En
Dossier4
Fichier14
Fichier18
Si le mode de lecture aléatoire ou 1-folder est
sélectionné, appuyez sur le bouton [YES/MODE] pour
l’annuler avant de poursuivre.
1
2
3
Lorsque la lecture est arrêtée,
pressez le bouton [FOLDER].
Le CBX-300 passe en mode “Navigation” et “Root” (racine) apparaît à
l’écran.
Pressez [ENTER].
Le nom du premier dossier un niveau
au-dessous de la racine s’affiche à
l’écran.
Si le disque n’a pas de dossiers, le nom
de la première fichier s’affiche.
Les boutons [ ]/[ ]
permettent de sélectionner
d’autres dossiers et fichiers au
même niveau.
Les dossiers qui ne contiennent pas de
fichiers MP3/WMA ou de sous-dossiers ne peuvent pas être sélectionnés.
Si vous ne sélectionnez pas de dossier ou de fichier MP3/
WMA spécifique pour la lecture, tous les fichiers MP3/
WMA du CD sont lus selon l’ordre numérique en commençant par le fichier 1.
Sélection des fichiers MP3/WMA en mode
Navigation
FOLDER
/
Le mode Navigation vous permet de sélectionner des
fichiers MP3/WMA en naviguant dans la hiérarchie du
dossiers. Ce mode peut être utilisé uniquement lorsque la
lecture est arrêtée.
ENTER
4
5
Pour accéder aux fichiers ou
sous-dossiers à l’intérieur d’un
autre dossier, choisissez ce
dossier et appuyez sur le bouton
[ENTER].
Utilisez les boutons [ ]/[ ] (précédent/suivant) pour choisir les fichiers
et dossiers voulus dans le dossier
ouvert.
Pour monter d’un niveau dans la hiérarchie, appuyez sur le bouton [MENU/
NO].
Appuyez sur le bouton [ENTER]
ou de lecture [ ] pour lancer la
lecture.
La lecture commence avec le fichier ou
dossier spécifié et se poursuit jusqu’à
ce que tous les fichiers MP3/WMA du
disque aient été lus.
Fr-
24
Page 77

Lecture d’un CD
—Suite
Sélection de fichiers MP3/WMA en mode
All Folder
Boutons
numériques
FOLDER
/
Le mode “All Folder” évite de naviguer dans la hiérarchie des dossiers: tous les dossiers contenant des fichiers
MP3/WMA apparaissent au même niveau.
Si le mode de lecture aléatoire est sélectionné, appuyez
sur le bouton [YES/MODE] pour l’annuler avant de
poursuivre.
1
2
3
Lorsque la lecture est arrêtée,
pressez le bouton [FOLDER]
pendant 2 secondes.
Le CBX-300 passe en mode All Folder
et le nom du premier dossier s’affiche à
l’écran.
Choisissez les autres dossiers
avec les boutons [ ]/[ ]
(précédent/suivant).
Vous pouvez choisir n’importe quel
dossier contenant des fichiers MP3/
WMA.
Pour lire la première fichiers du dossiers sélectionné, allez au point 4.
Pour accéder aux fichiers dans le
dossiers, pressez le bouton
[FOLDER].
Le nom de la première fichiers MP3/
WMA dans le dossiers s’affiche à
l’écran.
Utilisez les boutons [ ]/[ ] (précédent/suivant) pour choisir les fichiers
MP3/WMA dans le dossier ouvert.
Pour sélectionner un autre dossier,
appuyez de nouveau sur le bouton
[FOLDER] et servez-vous des boutons
[ ]/[ ] (précédent/suivant).
ENTER
4
Pour sélectionner un fichier MP3/WMA dans un autre
dossier durant la lecture, appuyez sur le bouton [FOLDER], sélectionnez le dossier avec les boutons [
[] (précédent/suivant) et appuyez sur [ENTER]. Utilisez les boutons [ ]/[ ] (précédent/suivant) pour
choisir les fichiers MP3/WMA voulus dans le dossier
ouvert.
■
Interruption de la lecture (Pause)
Pour interrompre momentanément la lecture, appuyez
sur le bouton de pause [ ]. Pour reprendre la lecture,
appuyez de nouveau sur ce bouton.
■
Annulation du mode Navigation ou All Folder
Pour annuler le mode Navigation ou le mode All Folder
lors de la sélection de fichiers MP3/WMA, pressez le
bouton [ ] (arrête).
■
Choix de dossier et de fichier par numéro
Les fichiers et les dossiers peuvent être sélectionnés
durant la lecture ou quand celle-ci est arrêtée.
Pressez le bouton [FOLDER] pendant 2 secondes
1
pour passer en mode All Folder.
2
Entrez le numéro du dossier avec les boutons
numériques.
Pour sélectionner: Appuyez sur:
Si vous arrêtez la lecture, celle-ci reprend avec le
premier fichier MP3/WMA du dossier choisi. Si la
lecture est en cours, appuyez sur [ENTER] pour
lancer la lecture du premier fichier MP3/WMA du
dossier choisi.
3
Pressez les boutons numériques pour entrer le
numéro de fichier.
Pour sélectionner: Appuyez sur:
La lecture du fichier choisi démarre.
Si un dossier contient 99 fichiers MP3/WMA ou
moins,
appuyez sur le bouton [>10]. Si un dossier contient
100 fichiers ou plus, vous devez entrer trois chiffres
quand vous appuyez sur le bouton [>10]. Dans ce
cas, les numéros à un et deux chiffres doivent être
précédés de zéros.
Appuyez sur le bouton [ENTER]
ou de lecture [ ] pour lancer la
lecture.
La lecture commence avec le fichier ou
dossier spécifié et se poursuit jusqu’à
ce que tous les fichiers MP3/WMA du
disque aient été lus.
Le dossier 8
Le dossier 10
Le dossier 34
Entrée de numéros supérieurs à 10.
Le fichier 8
Le fichier 10
Le fichier 34
Entrée de numéros supérieurs à 10.
vous devez entrer deux chiffres quand vous
]
/
Fr-
25
Page 78

Lecture d’un CD
—Suite
Lecture des fichiers MP3/WMA d’un
seul dossier
DISPLAY
/
Normalement, tous les fichiers MP3/WMA de tous les
dossiers du disque sont lus. Avec la lecture “1-Folder”,
seuls les fichiers MP3/WMA du dossier choisi sont lus.
1
Appuyez sur le bouton [YES/
MODE] jusqu’à ce que le témoin
1FOLDER apparaisse.
YES/MODE
ENTER
Témoin 1FOLDER
Affichage d’informations sur MP3/
WMA
Vous pouvez afficher diverses informations sur le fichier
MP3/WMA en cours de lecture comme le titre, le nom
de l’artiste et de l’album.
Durant la lecture, appuyez
plusieurs fois sur le bouton
[DISPLAY] pour afficher les
informations MP3/WMA suivantes.
Temps écoulé:
fichier MP3/WMA (affichage par défaut). Si le temps
écoulé excède 99 minutes et 59 secondes, “– –:– –” est
affiché.
Nom de la fichier:
rante.
Nom du dossier:
Title:
Titre du morceau en cours (si le tag existe).
le temps écoulé depuis le début de la de
nom de la fichier MP3/WMA cou-
nom du dossier courant.
2
3
Sélectionnez le dossier avec les
boutons [ ]/[ ] (précédent/
suivant).
Vous pouvez choisir n’importe quel
dossier contenant des fichiers MP3/
WMA.
Appuyez sur le bouton [ENTER]
ou de lecture [ ] pour lancer la
lecture.
La lecture commence avec le premier
fichier du dossier spécifié et se poursuit
jusqu’à ce que tous les fichiers MP3/
WMA de ce dossier aient été lus.
Artist:
Nom de l’artiste (si le tag existe).
Album:
Nom de l’album (si le tag existe).
Taux d’échantillonnage et débit binaire:
tillonnage et débit binaire de la fichier MP3/WMA courante.
Remarques:
• Sur le CBX-300, vous pouvez aussi utiliser le bouton
[DISPLAY] pour afficher ces infos.
• Pour afficher le nom du disque, pressez [DISPLAY]
lorsque la lecture est arrêtée.
• Si une fichier ou un nom de dossier contient un caractère illisible, il sera affiché comme “File_n” ou
“Folder_n”, “n” étant le numéro de fichier ou de dossier.
taux d’échan-
Fr-
26
Page 79

Lecture d’un CD
—Suite
Lecture mémoire
La lecture programmée permet de créer une liste de lecture pouvant compter jusqu’à 25 plages.
Boutons numériques (voyez
page 23).
(ces boutons ne
fonctionnent pas
pendant la lecture
programmée.)
/
/
Pour programmer la lecture, il faut que la source d’entrée
soit réglée sur CD et que la lecture soit arrêtée.
1
Pressez [YES/MODE] à plusieurs
reprises jusqu’à ce que le témoin
MEMORY s’allume à l’écran.
Témoin MEMORY
CLEAR
ENTER
YES/MODE
3
Supprimer des plages de la liste de
lecture:
Appuyez sur le bouton [CLEAR]. Chaque pression supprime la dernière plage
de la liste.
Remarques:
• Si le temps de lecture total excède 99
minutes et 59 secondes, “– –:– –” est
affiché.
•Vous pouvez programmer jusqu’à 25
plages dans la liste. Si vous essayez
d’en ajouter plus, le message
“Memory Full” apparaît.
Appuyez sur le bouton Lecture
[] pour lancer la lecture programmée.
Plage en cours de lecture
Sur le CBX-300, appuyez sur le bouton
Lecture/Pause [ ] pour lancer la
lecture programmée.
/
2
Utilisez les boutons [ ]/[ ]
(précédent/suivant) pour sélectionner la première plage de la
liste de lecture et appuyez sur
[ENTER].
Numéro de plage à
stocker en mémoire
Répétez cette étape pour ajouter d’autres
plages à la liste.
Vous pouvez aussi utiliser les boutons de
la télécommande pour sélectionner les
plages.
Sélectionner des fichiers MP3/WMA
pour la lecture programmée:
En mode “Navigation”, effectuez les
opérations 1–4 à la page 24. En mode
“All Folder”, effectuez les opérations
1–4 à la page 25.
Temps total des
plages
programmées
■
Sélection d’autres plages durant la lecture
programmée
Pendant la lecture programmée, les boutons [ ]/
[] (précédent/suivant) permettent de choisir d’autres
plages dans la liste.
■
Vérification du contenu de la liste de lecture
Pour vérifier le contenu de la liste de lecture, arrêtez la
lecture et utilisez les boutons de recul/avance rapide
[ ]/[ ] pour faire défiler la liste.
■
Supprimer des plages de la liste de lecture
Appuyez sur le bouton [CLEAR] quand la lecture programmée est à l’arrêt. Chaque pression supprime la dernière plage de la liste.
La liste de lecture est effacée quand vous quittez le mode
de lecture programmée, sélectionnez la lecture aléatoire,
coupez le CBX-300 ou éjectez le CD.
Fr-
27
Page 80

Lecture d’un CD
—Suite
Lecture aléatoire
Avec la lecture aléatoire, toutes les plages du disque sont
lues dans un ordre aléatoire.
YES/MODE
Pour sélectionner la lecture aléatoire, il faut que la
source d’entrée soit réglée sur CD et que la lecture soit
arrêtée.
1
Pressez [YES/MODE] à plusieurs
reprises jusqu’à ce que le témoin
RANDOM s’allume à l’écran.
Témoin RANDOM
Lecture repeat
Avec la lecture répétée, vous pouvez lire en boucle un
CD entier ou une plage et combiner cette fonction avec
la lecture programmée pour lire la liste de lecture en boucle ou avec la lecture aléatoire pour lire en boucle toutes
les plages du disque selon un ordre aléatoire. Avec un
CD MP3/WMA, vous pouvez combiner la lecture répétée avec la lecture “1-folder” pour écouter en boucle tous
les fichiers d’un dossier.
REPEAT
Pressez [REPEAT] à plusieurs
reprises jusqu’à ce que le témoin
REPEAT ou REPEAT 1 s’allume à
l’écran.
Témoin REPEAT ou REPEAT 1
2
■
Annuler la lecture aléatoire
Pour annuler le mode de lecture aléatoire, arrêtez la lecture et appuyez sur le bouton [YES/MODE] jusqu’à ce
que le témoin RANDOM disparaisse.
La lecture aléatoire est annulée quand le CD est éjecté ou
quand le CBX-300 passe en veille.
Appuyez sur le bouton Lecture
[] pour lancer la lecture
aléatoire.
Plage en cours de lecture
La lecture “Repeat-1” ne peut pas être combinée avec la
lecture programmée, aléatoire ou “1-folder”.
■
Annuler la lecture en boucle
Pour annuler la lecture en boucle, appuyez plusieurs fois
sur le bouton [REPEAT] jusqu’à ce que les témoins
REPEAT et REPEAT 1 disparaissent.
La lecture répétée est annulée quand le CD est éjecté ou
quand le CBX-300 passe en veille.
Fr-
28
Page 81

Lecture d’un CD
—Suite
Réglage des préférences MP3/WMA
Avec les préférences MP3/WMA, vous pouvez changer
la façon dont les informations de fichiers MP3/WMA
sont affichées et dont les CD MP3/WMA sont lus.
/
Les préférences MP3/WMA ne peuvent être modifiées
que quand la lecture est à l’arrêt.
1
Appuyez plusieurs fois sur le bouton [MENU/NO] jusqu’à ce “Disc
Name?” apparaisse.
MENU/NO
ENTER
Éléments
Dans la présente section, le nom de chaque préférence
est suivi des options de réglage. L’option de réglage par
défaut est imprimée en gras.
Disc Name? (Display
Cette préférence permet d’activer ou de désactiver le
nom du disque lors de la lecture d’un CD MP3/WMA.
File Name? (Scroll
Cette préférence détermine si le nom de fichier défile à
l’écran ou non quand vous sélectionnez un fichier MP3/
WMA.
En mode “Navigation” (voyez page 24), le nom de
fichier défile à l’écran quel que soit le réglage choisi.
Folder Name? (Scroll
Cette préférence détermine si le nom de dossier défile à
l’écran ou non quand vous sélectionnez un dossier MP3/
WMA en mode “All Folder”.
En mode “Navigation” (voyez page 24), le nom de dossier défile à l’écran quel que soit le réglage choisi.
CD Extra? (Audio
Cette préférence s’applique aux CD Extra et définit si la
musique de la session audio ou les fichiers MP3/WMA
de la session de données sont lues.
/Not Display
/Not Scroll
/Not Scroll
/MP3, WMA
)
)
)
)
2
3
4
5
Vous pouvez annuler cette procédure à tout moment en
appuyant sur le bouton [MENU/NO].
Utilisez les boutons [ ]/[ ]
(précédent/suivant) pour sélectionner la préférence à modifier.
Les préférences sont décrites dans la
colonne suivante.
Pressez le [ENTER].
Sélectionnez les options des préférences avec les boutons [ ]/
[] (précédent/suivant).
Pressez le [ENTER].
Quand le réglage est terminé, le message
“Complete” s’affiche à l’écran.
Hide/Number? (Disable
Cette préférence définit si les numéros au début des
noms de fichier et de dossier sont affichés ou non.
Lorsque vous créez un CD MP3/WMA sur ordinateur,
vous ne pouvez normalement pas déterminer l’ordre de
lecture des fichiers. Vous pouvez cependant numéroter
les fichiers MP3/WMA selon l’ordre voulu (01, 02, 03
etc.) pour qu’ils soient lus dans cet ordre. Si vous ne voulez pas voir ces numéros à l’écran, choisissez “Enable”.
Le tableau suivant donne quelques exemples de noms de
fichiers et de dossiers numérotés ainsi que leur mode
d’affichage avec les options “Disable” et “Enable”.
Nom de fichier/
dossier
01 Pops 01 Pops Pops
10-Rock 10-Rock Rock
16_Jazz 16_Jazz Jazz
21st Century 21st Century 21st Century
05-07-20 Album 05-07-20 Album Album
Folder Key? (Navigation
Cette préférence définit le fonctionnement du bouton
[FOLDER]. Quand l’option “All Folder” est sélectionnée, une pression simple sur le bouton [FOLDER]
sélectionne le mode “All Folder” tandis qu’une pression
prolongée de 2 secondes sélectionne le mode “Navigation”. Quand l’option “Navigation” est sélectionnée, une
pression simple sur le bouton [FOLDER] sélectionne le
mode “Navigation” tandis qu’une pression prolongée de
2 secondes sélectionne le mode “All Folder”.
/Enable
Préférence ‘Hide Number’
Disable Enable
)
/All Folder
)
Fr-
29
Page 82

Lecture d’un iPod
/
Avec les boutons en face supérieure
Les iPod de 3ème génération ne sont pas compatibles.
/
iPod
DISPLAY
Remarques:
•Avant d’utiliser votre iPod avec le CBX-300, mettez
l’iPod à jour avec la dernière version du système, disponible sur le site internet d’Apple.
• Si vous laissez votre iPod en mode Pause lorsque vous
l’utilisez seul, il finira par s’éteindre. Si vous l’insérez
dans cet état dans le socle du CBX-300, il faut attendre
un certain temps avant que l’iPod ne soit prêt à fonctionner.
• Retirez toujours l’iPod du CBX-300 avant de déplacer
ce dernier.
1
2
Insérez votre iPod dans le socle
du CBX-300.
Socle pour iPod
Vérifiez que l’iPod est correctement
inséré dans le socle du CBX-300.
L’iPod passe en mode Pause.
Remarques:
• Retirez le cache de protection du
socle pour iPod du CBX-300 et insérez l’adaptateur approprié pour votre
iPod avant d’insérer ce dernier dans
le socle (voyez page 15).
• Pour éviter d’endommager le connecteur du socle, évitez de tourner ou
de forcer l’iPod dans le socle et ne le
heurtez pas une fois qu’il est inséré
dans le socle.
• N’utilisez pas d’autres accessoires
pour iPod tels que transmetteurs FM
et microphones car cela risquerait
d’entraîner des dysfonctionnements.
• Si votre iPod se trouve dans un étui,
retirez-le avant de l’insérer dans le
socle. Faute de quoi, la connexion
risque d’être mauvaise et d’entraîner
des dysfonctionnements.
Appuyez sur le bouton Lecture/
Pause [ ] de l’iPod.
La lecture commence.
Astuce:
• Si vous appuyez sur le bouton Lecture/Pause [ ] de l’iPod alors
que le CBX-300 est en veille, il
s’active automatiquement et la lecture démarre sur l’iPod.
/
/
iPod
Sélection des plages
Pour retourner au début de la
plage en cours de lecture ou la
pause, appuyez sur le bouton
[/] (précédent).
Appuyez plusieurs fois sur le bouton [ / ] (précédent) pour sélectionner des plages précédentes.
Appuyez plusieurs fois sur le bouton [
vant) pour choisir des plages suivantes.
/
] (sui-
Avance rapide et recul
Pendant la lecture ou la pause,
maintenez le bouton [ /
] (suivant) enfoncé pour
avancer rapidement; maintenez le bouton [ / ] (précédent) enfoncé pour reculer.
Pressez et maintenez
enfoncé
Interruption de la lecture (Pause)
Pour interrompre la lecture,
appuyez sur le bouton Lecture/
Pause [ ] de l’iPod.
Le témoin Pause apparaît sur
l’iPod. Appuyez de nouveau sur le
bouton Lecture/Pause [ ] de
l’iPod pour relancer la lecture.
/
Rétroéclairage de l’iPod
Pour allumer le rétroéclairage de
l’iPod, appuyez sur le bouton
[DISPLAY]. L’écran reste éclairé
durant 30 secondes.
Fr-
30
Page 83

Lecture d’un iPod
—Suite
Avec la télécommande
Avance rapide et recul
Appuyez et maintenez enfoncé pour avancer rapidement ou reculer quand la lecture
est en pause.
Sélectionne des morceaux
• Appuyez sur le bouton [ ] (précédent)
pour retourner au début de la plage en
cours de lecture ou de pause. Actionnezle plusieurs fois pour sélectionner des
plages précédentes.
• Appuyez plusieurs fois sur le bouton
[] (suivant) pour choisir des plages
suivantes.
• Quand un menu est affiché, ces boutons
sélectionnent des éléments du menu.
Annule le mode Menu du CBX-300
Sélectionne les albums
Durant la lecture, appuyez sur le bouton
[] pour passer à l’album suivant;
appuyez sur le bouton [ ] pour sélectionner le précédent.
Sélectionne les listes de lecture
Durant la lecture, appuyez sur le bouton
[] pour passer à la liste suivante ou sur
le bouton [ ] pour passer à la précédente.
Allume le rétroéclairage de l’iPod
L’écran reste éclairé 30 secondes.
Sélectionne l’iPod comme source
Affiche le menu
Sélectionne des éléments du menu
Règle la lecture Aléatoire sur Morceaux, Albums ou Non
Utilisez le menu “iPod’s Settings” pour
vérifier le mode sélectionné.
Règle la fonction Répéter sur Un,
Tous ou Non.
Lance/interrompt la lecture
Une pression sur ce bouton quand le
CBX-300 est en veille active le CBX-300 et
lance la lecture.
Remarque:
• Selon le modèle de votre iPod ou le type de contenu reproduit, certaines fonctions peuvent ne pas fonctionner comme
prévu.
Naviguer dans les menus de l’iPod avec la télécommande
Remarques:
• Les éléments du menu ne peuvent être sélectionnés
que si le point apparaît à droite du menu du CBX-300
(mode Menu). Dans ce mode, les boutons [ ] et
[] ne permettent pas de sélectionner des plages.
• Si le point est toujours “Now Playing” affiché alors
que l’iPod est repassé en mode de lecture, attendez
que le point disparaisse ou appuyez sur le bouton CD
Stop [ ] pour quitter le mode Menu du CBX-300 afin
de pouvoir utiliser les boutons [ ] et [ ] pour
sélectionner des plages.
• Lorsque vous naviguez dans les menus de l’iPod avec
la télécommande du CBX-300, n’actionnez aucun
bouton de l’iPod car ces opérations ne seraient pas
reconnues par le CBX-300 et perturberaient le pilotage de l’iPod par le CBX-300.
Remarques concernant l’utilisation:
Réglez le volume avec les boutons VOLUME [ / ]
du CBX-300 ou de sa télécommande. Le réglage du
volume sur l’iPod reste sans effet. Si vous changez le
réglage de la commande de volume de l’iPod par inadvertance, vérifiez que le volume n’est pas trop élevé
avant d’utiliser les écouteurs.
1
2
Appuyez sur le bouton MENU/
NO/CLEAR pour afficher le menu.
Actionnez-le de nouveau pour retourner à un menu précédent.
Un point apparaît du côté droit de
l’écran du CBX-300 pour indiquer
qu’un menu est affiché sur l’iPod. Il
s’agit du mode Menu.
Utilisez les boutons [ ] et [ ]
pour sélectionner un élément du
menu puis appuyez sur [ENTER].
Fr-
31
Page 84

Choix d’une radio
ou
Recherche d’une station radio
INPUT ,
TUNING
YES/MODE
TUNER
Le témoin s’affiche dès que l’appareil reçoit une
station. Lors de la réception d’une station FM stéréo, le
témoin FM ST apparaît aussi.
AUTO
Le bouton [YES/MODE] permet de choisir le mode
Auto ou Mono. En mode Auto, la sortie est stéréo ou
mono, selon la station reçue. En mode Mono, la sortie est
mono, quelle que soit la station.
FM ST
1
2
Réception d’un faible émetteur FM stéréo
Si le signal d’une station FM stéréo est faible, il peut être
impossible de la capter correctement. Dans ce cas,
appuyez sur le bouton [YES/MODE] pour passer en
mode Mono et écoutez la station en mono.
Appuyez plusieurs fois sur le bouton [TUNER] pour choisir FM ou
AM.
Vous pouvez aussi sélectionner FM our
AM avec les boutons INPUT [ ]/[ ].
Choisissez la station voulue avec
les boutons TUNING [ ]/[ ].
Chaque pression sur un bouton TUNING
change la fréquence de 0,2 MHz pour la
bande FM et de 10 kHz pour la bande
AM. Sur modèle européen, elle change
par pas de 0,05 MHz sur la bande FM et
de 9 kHz sur la bande AM.
Si vous maintenez un bouton TUNING
enfoncé, la fréquence change en continu.
Quand vous relâchez le bouton, la
recherche s’arrête automatiquement sur
une fréquence sur laquelle une station de
radio émet.
Réglage de l’antenne
■ Ajustement et installation de l’antenne FM
Ajustez l’emplacement de l’antenne FM lorsque vous écoutez
une radio FM.
1
Changez la direction de
l’antenne pour trouver la
meilleure réception.
Fr-
32
■ Régler l’antenne AM
Déterminez l’emplacement et la
position de l’antenne AM tout en
2
Fixez l’antenne au moyen d’une punaise.
(Ne transpercez pas l’antenne avec la punaise.)
Attention : veillez à ne pas vous percer les doigts !
écoutant une station AM pour obtenir une réception optimale.
Page 85

Choix d’une radio
—Suite
Recherche automatique de stations FM (Auto Preset)
La fonction “Auto Preset” permet de rechercher et de mémoriser en une fois toutes les stations de radio FM disponibles
dans votre région. Cette présélection facilite ensuite la sélection de vos stations favorites et vous évite de recommencer
une recherche quand vous changez de station. La fonction “Auto Preset” ne sélectionne pas les stations de radio AM
(voyez page 34).
Attention!
INPUT
/
MENU/NO
/
ENTER
La fonction “Auto Preset” écrase toutes les
programmations antérieures.
1
2
ou
TUNER
Appuyez sur le bouton [TUNER]
ou les boutons INPUT [ ]/[ ]
jusqu’à ce que le témoin “FM”
apparaisse.
Veillez à orienter l’antenne FM pour
obtenir une réception optimale.
Appuyez sur le bouton [MENU/NO]
et utilisez les boutons [ ]/[ ]
(précédent/suivant) pour sélectionner “AutoPreset?”.
4
Remarque:
• Selon l’endroit où vous êtes, une fréquence peut être
programmée sans station et vous n’entendez que du
bruit. Dans ce cas, effacez la présélection (voyez
page 39).
Appuyez sur [ENTER] pour lancer
la fonction “Auto Preset”.
Vous pouvez programmer jusqu’à 20 stations. Celles-ci sont sauvegardées selon
leur fréquence.
Après la mémorisation des présélections
vous pouvez:
• Les sélectionner (voyez page 35)
• Les nommer (voyez page 37)
• Les copier (voyez page 38)
• Les effacer (voyez page 39)
3
Pressez le [ENTER].
Le message de confirmation
“AutoPreset??” s’affiche à l’écran.
Vous pouvez encore annuler la fonction
“Auto Preset” en appuyant sur le bouton
[MENU/NO].
Fr-
33
Page 86

Choix d’une radio
ou
—Suite
Réglage manuel des stations FM/AM
La fonction “Preset Write” permet de régler manuellement des stations de radio FM et AM. Cette présélection facilite
ensuite la sélection de vos stations favorites et vous évite de recommencer une recherche quand vous changez de station.
Les stations FM peuvent aussi être réglées automatiquement (voyez page 33).
Présélections
MENU/NO
YES/MODE
ENTER
/
•Vous pouvez mémoriser jusqu’à 30 stations (présélections), FM et AM
selon n’importe quelle combinaison. Exemple: 27 FM et 3 AM ou 22 FM
et 8 AM.
• Bien que les présélections FM et AM partagent les mêmes numéros, il faut
les sélectionner séparément. Exemple: la présélection 1 propose une station
FM si vous avez choisi la bande FM ou une station AM avec la bande AM.
•Vous pouvez mémoriser les stations dans n’importe quel ordre. Vous
pouvez d’abord choisir la station de la présélection 5 puis celle de la
présélection 1 etc.
1
2
3
4
Recherchez la station à mémoriser
(voyez page 32).
Appuyez sur le bouton [MENU/NO]
et utilisez les boutons [ ]/[ ]
(précédent/suivant) pour sélectionner “Preset Write?”.
Pressez le [ENTER].
Le numéro de présélection clignote.
Vous pouvez encore annuler la fonction
“Preset Write” en appuyant sur le bouton
[MENU/NO].
Sélectionnez une présélection
avec les boutons [ ]/[ ] (précédent/suivant).
Si la présélection était déjà assignée à
une station, “Overwrite?” apparaît.
Pour mémoriser la nouvelle station et
effacer l’ancienne, appuyez sur
[ENTER] ou [YES/MODE].
Pour conserver l’ancienne station,
appuyez sur [MENU/NO].
Si le message “Memory Full” apparaît,
les 30 mémoires contiennent une station.
Pour mémoriser de nouvelles stations, il
faut effacer des présélections (voyez
page 39).
6
Remarques: (Uniquement sur le modèle européen)
• Si la station FM choisie transmet des signaux RDS et
PS (Program Service Name), le nom de la station
apparaît à l’écran au lieu de la fréquence. (Pour en
savoir plus sur RDS, voyez page 36).
Répétez les étapes 1 à 5 pour mémoriser
d’autres stations.
Fr-
34
5
Pour mémoriser la station,
appuyez sur [ENTER].
Si aucune station n’avait été mémorisée à
cet endroit, “Complete” apparaît et la
station est assignée à cette présélection.
Après la mémorisation de présélections
vous pouvez:
• Les sélectionner (voyez page 35)
• Les nommer (voyez page 37)
• Les copier (voyez page 38)
• Les effacer (voyez page 39)
Page 87

Choix d’une radio
—Suite
Choix d’une présélection
Il faut mémoriser des stations avant de pouvoir choisir
une présélection (voyez page 33 et 34).
INPUT
/
Boutons
numériques
PRESET
TUNER
1
ou
Utilisez le bouton [TUNER] ou les
boutons INPUT [ ]/[ ] pour
sélectionner FM ou AM.
La mémoire choisie la dernière fois que
vous avez écouté la radio est sélectionnée.
Utilisez les boutons numériques
de la façon illustrée ci-dessous
pour choisir des présélections.
Pour sélectionner:
La présélection 8
La présélection 10
La présélection 22
Entrée de numéros supérieurs
à 10.
■
Sélection de mémoires en face supérieure du
CBX-300
1 Appuyez sur le bouton [INPUT] pour choisir FM ou
AM.
2 Sélectionnez une présélection avec les boutons [ /
]/ [ / ] (précédent/suivant).
Astuce:
• Si vous appuyez sur le bouton [TUNER] de la
télécommande alors que le CBX-300 est en veille, il
s’active automatiquement et sélectionne la station
écoutée en dernier lieu.
Appuyez sur:
2
ou
Choisissez une mémoire avec les
boutons PRESET [ ]/[ ].
Pour passer à la mémoire précédente,
appuyez sur le bouton PRESET [ ].
Pour passer à la mémoire suivante,
appuyez sur le bouton PRESET [ ].
Fr-
35
Page 88

Choix d’une radio
—Suite
Affichage d’informations radio
DISPLAY
Appuyez sur le bouton [DISPLAY] de la télécommande pour afficher plus d’informations radio.
Sur le CBX-300, vous pouvez aussi utiliser le bouton [DISPLAY] pour afficher ces infos.
FM/AM
Fréquence
*Nom du programmé
* Si un canal programmé n’a pas de nom, l’appareil affiche
“No Name”, puis indique la fréquence. Voir “Nommer les
présélections” page 37.
Réception RDS (uniquement sur le modèle européen)
La réception RDS n’est possible que sur les modèles
européens et uniquement dans les zones où les diffusions
RDS sont disponibles.
Qu’est-ce que “RDS” ?
RDS est l’acronyme de
Appuyez plusieurs fois sur le bouton [DISPLAY]
pour afficher les informations RDS suivantes.
Fréquence et numéro programmé
Nom du canal programmé (le cas échéant)
Nom du Program Service
Radio Text (le cas échéant)
de transmission de données des signaux radio FM. Il a
été développé par l’Union de Diffusion Européenne
(EBU) et est disponible dans la plupart des pays
européens. De nombreuses stations FM y font appel.
Le CBX-300 reconnaît et affiche les données RDS
“Program Service Name” (PS) et “Radio Text” (RT).
Le témoin RDS s’allume quand le CBX-300 reçoit une
station FM émettant des informations RDS (“Radio Data
System”).
Remarques:
• Si le signal d’une station RDS est faible, les données
RDS peuvent apparaître par intermittence ou pas du
tout.
• Le message “Waiting” peut apparaître durant la
réception d’informations RT.
Radio Data System
, un système
Fr-
36
Page 89

Choix d’une radio
—Suite
Nommer les présélections
Vous pouvez nommer vos présélections pour les
identifier facilement. Ce nom peut contenir jusqu’à 8
caractères.
DISPLAY
Boutons
numériques
MENU/NO
1
2
3
4
/
Choisissez la présélection à
nommer (voyez page 35).
Appuyez sur le bouton [MENU/NO]
et utilisez les boutons [ ]/[ ]
(précédent/suivant) pour choisir
“Name In?”.
Pressez le [ENTER].
Appuyez plusieurs fois sur le bouton [DISPLAY] pour choisir un des
groupes de caractères suivants:
•“A” pour les majuscules.
• “a” pour les minuscules.
• “1” pour les numéros.
• Les symboles peuvent être entrés dans
n’importe quel groupe.
Groupe de caractères
YES/MODE
ENTER
5
6
• Sélection de lettres:
Appuyez plusieurs fois sur les boutons numériques pour sélectionner
les lettres. Exemple: appuyez plusieurs fois sur le bouton [2] pour
choisir: A, B ou C.
• Sélection de numéros:
Utilisez les boutons numériques pour
choisir des chiffres.
• Sélection de symboles:
Appuyez plusieurs fois sur le bouton
[>10] pour choisir: (space)./* - , !?
& ’ ( )
Remarque:
• Il n’est pas possible d’entrer tous les
symboles avec les boutons
numériques. Utilisez les boutons
(précédent et suivant) [ ] ou [ ]
pour accéder à toute la palette de
symboles.
Après avoir sélectionné un caractère, appuyez sur [ENTER] et
sélectionnez le caractère suivant.
• Changer des caractères:
Pour changer ou effacer un caractère,
utilisez les boutons de recul et
d’avance rapide [ ]/[ ] pour le
sélectionner et choisissez un autre
caractère ou appuyez sur le bouton
[CLEAR] pour l’effacer.
• Insérer un nouveau caractère:
Pour insérer un nouveau caractère,
utilisez les boutons de recul et
d’avance rapide [ ]/[ ] afin de
sélectionner le caractère immédiatement après le point d’insertion. Ce
caractère clignote. Utilisez le bouton
[] ou [ ] pour sélectionner
“ ”, appuyez sur [ENTER] et
sélectionnez le nouveau caractère.
Pour annuler la fonction “Name In”,
appuyez sur le bouton [MENU/NO]
durant 2 secondes.
Une fois que vous avez entré le
nom, appuyez sur le bouton [YES/
MODE].
La présélection a un nom et “Complete”
apparaît à l’écran.
Caractères disponibles
A B C D E F G H I J K L M N O P Q R S T U V W X Y Z
a b c d e f g h i j k l m n o p q r s t u v w x y z
0 1 2 3 4 5 6 7 8 9
_ @ ' < > # $ % & * = ; : + - / ( ) ?
! ’ ” , . (espace) (insertion)
Fr-
37
Page 90

Choix d’une radio
ou
—Suite
Copier des présélections
Avec la fonction “Preset Copy”, vous pouvez agencer
vos présélections dans l’ordre de votre choix. Quand
vous copiez une présélection, son nom est aussi copié.
MENU/NO
1
2
/
Choisissez la présélection à
copier (voyez page 35).
Appuyez sur le bouton [MENU/NO]
et utilisez les boutons [ ]/[ ]
(précédent/suivant) pour choisir
“PresetCopy?”.
YES/MODE
ENTER
5
Astuce:
• Si votre station favorite correspond à la présélection 5
au lieu de la présélection 1, copiez la présélection 5
dans la mémoire 1. Pour conserver la présélection se
trouvant dans la mémoire 1, copiez-la au préalable
dans une mémoire non utilisée.
Pour copier la présélection,
appuyez sur [ENTER].
Si aucune station n’avait été mémorisée à
cet endroit, “Complete” apparaît et la
présélection est copiée.
Si la mémoire était déjà assignée à une
station, “Overwrite?” apparaît.
Pour effacer l’ancienne station, appuyez
sur [ENTER] ou [YES/MODE].
Pour conserver l’ancienne station,
appuyez sur [MENU/NO].
Fr-
38
3
4
Pressez le [ENTER].
Le numéro de la présélection à copier
clignote.
Choisissez la mémoire de destination avec les boutons [ ]/[ ]
(précédent/suivant).
Le numéro de la destination clignote.
Page 91

Choix d’une radio
—Suite
Effacer des présélections
MENU/NO
/
YES/MODE
ENTER
Effacer le nom d’une présélection
1
2
Choisissez la présélection dont
vous voulez effacer le nom (voyez
page 35).
Appuyez sur le bouton [MENU/NO]
et utilisez les boutons [ ]/[ ]
(précédent/suivant) pour sélectionner “NameErase?”.
1
2
3
Choisissez la présélection à
effacer (voyez page 35).
Appuyez sur le bouton [MENU/NO]
et utilisez les boutons [ ]/[ ]
(précédent/suivant) pour
sélectionner “PresetErase?”.
Pressez le [ENTER].
Une demande de confirmation apparaît.
Vous pouvez encore annuler la fonction
“Preset Erase” en appuyant sur le bouton
[MENU/NO].
3
Pour effacer le nom de la présélection, appuyez sur le bouton
[ENTER].
Le nom de la présélection est effacé et
“Complete” apparaît à l’écran.
4
Pour effacer la présélection,
appuyez sur le bouton [ENTER].
La présélection est effacée et
“Complete” apparaît à l’écran.
Fr-
39
Page 92
Réglage de l’horloge
Réglage de l’horloge
STANDBY/ON
DISPLAY
Boutons
numériques
/
Si vous avez un modèle destiné aux Amérique du Nord,
réglez l’horloge de la façon suivante. Si vous avez un
modèle européen, l’horloge est réglée par la fonction
“AccuClock”.
La fonction AccuClock règle l’horloge automatiquement
lors de la première mise sous tension du CBX-300
(voyez page 19).
Si, pour une raison ou une autre, il est impossible de
régler l’horloge automatiquement, réglez-la manuellement de la façon suivante. Notez que quand vous réglez
l’horloge manuellement, elle n’est pas mise à jour automatiquement.
1
Pressez [TIMER] à plusieurs
reprises jusqu’à ce que “Clock”
s’affiche à l’écran.
CLOCK
CALL
TIMER
ENTER
5
6
7
8
Utilisez les boutons [ ]/[ ]
(précédent/suivant) pour
sélectionner le jour de la semaine.
Vous avez le choix entre: SUN, MON,
TUE, WED, THU, FRI ou SAT.
Pressez le [ENTER].
Pour alterner entre les formats 12h et
24h, appuyez sur le bouton [DISPLAY].
Vous pouvez aussi utiliser les boutons de la télécommande pour
entrer l’heure.
Vous pouvez aussi utiliser les boutons
[ ]/[ ] (précédent/suivant).
Pour le format 12 heures
bouton [>10] de la télécommande pour
sélectionner AM ou PM.
Pressez le [ENTER].
, utilisez le
2
3
4
Si vous avez un modèle destiné aux
Amérique du Nord, passez à l’étape 4.
Pressez le [ENTER].
Sélectionnez “ManualAdjust” avec
les boutons [ ]/[ ] (précédent/suivant).
Astuce:
• Si AccuClock fonctionne, une pression
sur le bouton [YES/MODE] règle
l’horloge en fonction des informations
RDS CT (voyez page 41, étape 6).
Pressez le [ENTER].
L’horloge est réglée et le second point se
met à clignoter.
Affichage de la date et de l’heure
Pour afficher la date et l’heure, appuyez sur le bouton
[CLOCK CALL] de la télécommande. Appuyez une fois
de plus sur ce bouton ou effectuez une autre opération
pour couper l’affichage de l’heure.
Si le CBX-300 est en mode Standby, l’heure et la date est
affichée durant 8 secondes.
Tant que le CBX-300 est activé, l’heure et la date sont
affichées en continu.
Format 12 ou 24 heures
Pour alterner entre les formats 12h et 24h tant que
l’heure et la date est affichée à l’écran, appuyez sur le
bouton [DISPLAY].
Affichage de l’heure en mode de veille
Vous pouvez régler le CBX-300 pour afficher l’heure
tant qu’il est en veille: mettez le CBX-300 sous tension
puis maintenez son bouton [STANDBY/ON] enfoncé 2
secondes. Pour désactiver l’affichage de l’heure, répétez
cette opération.
L’affichage de l’heure en veille augmente légèrement la
consommation électrique.
Fr-
40
Page 93

Réglage de l’horloge
—Suite
Régler AccuClock sur une station donnée (uniquement sur le modèle européen)
Si la fonction AccuClock ne permet pas de régler
l’heure, vous pouvez choisir vous-même la station FM
de référence pour la fonction AccuClock. C’est
particulièrement pratique si vous vivez près d’une frontière séparant deux zones horaires. Il faut toutefois que la
station FM en question émette des informations RDS CT
(Clock Time).
TUNING
/
TIMER
YES/MODE
ENTER
5
6
Utilisez les boutons TUNING [ ]/
[] pour entrer la fréquence d’une
station émettant des informations
RDS CT.
Appuyez sur [ENTER].
La fréquence spécifiée sera utilisée par la
fonction AccuClock.
Si la station choisie n’émet pas de données RDS, “Not RDS” apparaît et il est
impossible de régler l’horloge.
ou
Pour activer la fonction AccuClock
tout de suite, appuyez sur le bouton [YES/MODE].
Le CBX-300 passe en mode de veille et
“AccuClock…” apparaît de façon atténuée à l’écran quand la fonction AccuClock règle l’heure.
Quand le réglage de l’heure est terminé,
la date et l’heure apparaissent 2 secondes, de façon brillante.
1
2
3
4
Appuyez plusieurs fois sur le bouton [TIMER] jusqu’à ce “Clock”
apparaisse.
Appuyez sur [ENTER].
Sélectionnez “AccuClock” avec
les boutons [ ]/[ ] (précédent/suivant).
Appuyez sur [ENTER].
La fréquence d’une station que le
CBX-300 a cherchée au préalable peut
apparaître à l’écran.
Remarques:
• Quand AccuClock fonctionne, elle met automatiquement l’horloge à jour à 2h, 3h et 14h mais uniquement
si le CBX-300 est en veille.
• Si la fonction AccuClock est activée mais ne règle pas
l’heure automatiquement, vérifiez qu’un signal assez
fort est capté de la station RDS choisie. Vérifiez aussi
que la station émet des informations CT à ce moment.
Si nécessaire, changez de station.
Fr-
41
Page 94

Utilisation des minuteries
Le CBX-300 a cinq minuteries: quatre minuteries programmables permettant d’automatiser la lecture ou
l’enregistrement et une minuterie Sleep permettant de
couper le CBX-300 après un délai programmé.
Les minuteries peuvent lancer une station FM, AM, la
lecture d’un CD ou iPod au moment choisi sur le
CBX-300. Vous pouvez, par exemple, utiliser une minuterie pour activer le CBX-300 chaque matin, comme un
réveil radio.
A propos des minuteries (Timers)
Les réglages des quatre minuteries programmables sont
décrits ici. Pour en savoir plus sur la minuterie Sleep,
voyez page 47.
Minuteries à répétition
Chaque minuterie peut être programmée pour fonctionner une fois (Once), hebdomadairement (Every), quotidiennement (Everyday) ou sur une série de jours (Days
Set).
■
Once
La minuterie fonctionne une fois.
■
Every
La minuterie fonctionne chaque semaine, au jour et à
l’heure spécifiés.
• Everyday
La minuterie fonctionne chaque jour.
•Days Set
La minuterie fonctionne sur une série donnée de jours.
Ce réglage permet, par exemple, d’utiliser l’installation
comme réveil du lundi au vendredi.
Priorité des minuteries
Si plusieurs Timers sont réglés sur la même heure d’activation (On), c’est le Timer du numéro inférieur qui a
priorité. Exemple:
Timer 1:
Timer 2:
Si les programmations de deux Timers se chevauchent,
c’est le Timer dont l’heure d’activation est la plus proche
qui a priorité. Exemple:
Timer 1:
Timer 2:
Si deux minuteries ont les mêmes réglages “On”/“Off”,
la minuterie ayant démarré le plus tôt a priorité et l’autre
est ignorée. Exemple:
Timer 1:
Timer 2:
07:00 – 13:00 (Ce Timer est prioritaire.)
07:00 – 12:30
9:00 – 10:00
8:00 – 10:00 (Ce Timer est prioritaire.)
0:00 – 1:00 (Ce Timer est prioritaire.)
1:00 – 2:00
Indicateurs de minuterie
Quand une des minuteries a été
programmée, le témoin
TIMER apparaît à l’écran.
Quand une minuterie est réglée
sur Snooze, son numéro est
souligné (voyez page 46).
Remarques:
• Pour que les minuteries fonctionnent, il faut que le
CBX-300 soit en veille. S’il est activé à l’heure d’activation programmée pour la lecture, l’opération ne sera
pas déclenchée.
• Il est impossible de changer le réglage de fin de la
minuterie durant la lecture ou l’enregistrement programmé.
Témoin TIMER
Exemples de programmation des
minuteries
Réglez une minuterie comme suit pour vous réveiller
chaque matin au son de votre station radio préférée
(mémoire 1):
Snooze On
7:30
Pour vous réveiller au son de la radio uniquement les
jours de semaine, choisissez “Days Set” au lieu de “Everyday” et spécifiez les jours “MON–FRI”.
Fr-
42
➔FM➔#1➔
Every➔Everyday➔On 7:00➔Off
Page 95

Utilisation des minuteries
—Suite
Programmation d’une minuterie
Remarques:
• Pour pouvoir programmer les minuteries, il faut régler
l’heure.
• Pour pouvoir activer la radio avec une minuterie, il
faut mémoriser la station voulue. (Voyez pages 33 et
34.)
• Si vous n’actionnez aucun bouton durant 60 secondes
lors de la programmation d’une minuterie, la procédure est annulée et l’affichage précédent réapparaît.
STANDBY/ON
Boutons
numériques
/
TIMER
ENTER
3
4
Utilisez les boutons [ ]/[ ]
(précédent/suivant) pour sélectionner la source puis appuyez sur
[ENTER].
Vous pouvez sélectionner les sources suivantes:
FM, AM, LINE, CD ou iPod.
Si vous avez choisi LINE, CD ou iPod,
passez à l’étape 5.
Si vous avez sélectionné FM ou
AM, utilisez les boutons [ ]/
[] (précédent/suivant) pour
choisir la présélection radio puis
appuyez sur [ENTER].
1
2
Appuyez plusieurs fois sur le bouton [TIMER] pour choisir la minuterie 1, 2, 3 ou 4 puis appuyez sur
le bouton [ENTER].
Si “Clock” apparaît, réglez l’horloge
(voyez pages 19 et 40).
Utilisez les boutons [ ]/[ ]
(précédent/suivant) pour
sélectionner “Snooze On” ou
“Snooze Off” puis appuyez sur
[ENTER].
5
6
Utilisez les boutons [ ]/[ ]
(précédent/suivant) pour sélectionner “Once” ou “Every” puis
appuyez sur [ENTER].
Choisissez “Once” (une fois) pour une
seule opération (lancement et arrêt).
Choisissez “Every” pour effectuer la
même opération chaque semaine.
Si vous avez choisi “Every”, passez à
l’étape 7.
Si vous sélectionnez “Once”, choisissez le jour avec les boutons
[ ]/[ ] (précédent/suivant)
puis appuyez sur [ENTER].
Vous avez le choix entre: SUN, MON,
TUE, WED, THU, FRI ou SAT.
Passez à l’étape 9.
Fr-
43
Page 96

Utilisation des minuteries
—Suite
7
8
Avec “Every”, choisissez le jour,
“Everyday” (tous les jours) ou
“Days Set” (jours choisis) avec les
boutons [ ]/[ ] (précédent/
suivant) puis appuyez sur
[ENTER].
Vous avez les options suivantes:
MON
SUN
Si vous avez choisi un autre réglage que
“Days Set”, passez à l’étape 9.
Si vous sélectionnez “Days Set”,
choisissez le premier jour avec les
boutons [ ]/[ ] (précédent/
suivant) puis appuyez sur
[ENTER].
Choisissez ensuite le dernier jour
avec les boutons [ ]/[ ] puis
appuyez sur le bouton [ENTER].
TUE
Days Set Everyday
WED THU
FRI
SAT
10
11
Utilisez les boutons [ ]/[ ]
(précédent/suivant) pour choisir
l’heure d’arrêt (“Off”) puis
appuyez sur [ENTER].
Utilisez les boutons [ ]/[ ]
(précédent/suivant) pour régler le
volume de le CBX-300 et appuyez
sur [ENTER].
Vous pouvez sélectionner “Lst”, “1, 2, 3”
etc. sachant que “Lst” est le volume en
vigueur lors de la dernière mise hors tension du CBX-300.
Témoin TIMER
9
Vous ne pouvez sélectionner que des
jours consécutifs.
Utilisez les boutons [ ]/[ ]
(précédent/suivant) pour choisir
l’heure du démarrage (“On”) puis
appuyez sur [ENTER].
Vous pouvez aussi utiliser les boutons de
la télécommande pour entrer l’heure.
Exemple: pour entrer 7:29, appuyez sur
[7], [2] et [9].
Pour alterner entre A.M. et P.M. pour le
format 12h, appuyez sur le bouton [>10].
Remarque:
• Quand l’heure d’activation de la minuterie change, son heure de désactivation est automatiquement réglée 1
heure plus tard.
Numéro de la minuterie
programmée
“15” correspond au réglage par défaut.
12
Pour retourner à l’étape 1 et recommencer intégralement
la programmation de la minuterie, appuyez sur le bouton
[MENU/NO] à n’importe quel moment.
Appuyez sur le bouton [STANDBY/
ON] pour faire passer le CBX-300
en veille.
Remarques:
• N’oubliez pas de faire passer le
CBX-300 en veille, faute de quoi votre
programmation ne fonctionnera pas.
• Pour annuler une opération programmée en cours, appuyez sur le bouton
[TIMER] ou [SLEEP].
• Il est impossible de combiner la lecture programmée, aléatoire et “1-folder” avec les minuteries.
Fr-
44
Page 97

Utilisation des minuteries
—Suite
Activer/couper les minuteries
Quand une minuterie est programmée, vous pouvez
l’activer ou la couper. Ainsi, quand vous êtes en vacances, vous pouvez couper la minuterie servant de réveilmatin, par exemple.
MENU/NO
TIMER
ENTER
1
2
/
Appuyez plusieurs fois sur le bouton [TIMER] pour choisir la minuterie 1, 2, 3 ou 4.
Utilisez les boutons [ ]/[ ]
(précédent/suivant) pour sélectionner “Timer On” ou “Timer Off”.
Vérification des réglages de
minuterie
1
2
Appuyez plusieurs fois sur le bouton [TIMER] pour choisir la minuterie 1, 2, 3 ou 4 puis appuyez sur
le bouton [ENTER].
Appuyez sur le bouton [ENTER]
pour passer en revue les réglages
de toutes les minuteries.
Remarques:
•Vous pouvez changer les réglages avec
les boutons [ ]/[ ] (précédent/
suivant).
• Si vous changez les réglages d’une
minuterie qui est coupée, celle-ci est
réactivée.
• Pour retrouver l’affichage précédent,
appuyez à tout moment sur le bouton
[MENU/NO].
ou
Quand une minuterie est réactivée, son
numéro apparaît à l’écran.
L’affichage précédent réapparaît après
quelques instants.
Fr-
45
Page 98

Utilisation des minuteries
—Suite
Utiliser la fonction ‘Snooze’
Quand une lecture programmée a démarré, une pression
sur le bouton [SNOOZE] l’interrompt durant quelques
minutes. Quand le délai programmé a expiré, la lecture
recommence, comme avec la fonction Snooze d’un
réveil-matin. Le temps d’interruption par défaut est de 5
minutes mais il peut être réglé par minutes sur une plage
de 1 à 30 minutes. Tant que la lecture programmée est
entre les temps “On” et “Off” spécifiés, pouvez utiliser
la fonction Snooze.
SNOOZE
SNOOZE
ENTER
Réglage de minuterie
En réglant la minuterie, sélectionnez “Snooze On”
(voyez page 43).
Quand la programmation de la minuterie est terminée,
son numéro est souligné pour indiquer que la fonction
Snooze peut être utilisée avec la minuterie.
Snooze
Quand la lecture programmée a commencé, appuyez sur
le bouton [SNOOZE] de la télécommande ou le bouton
SNOOZE du CBX-300. La lecture s’interrompt et la
durée de l’interruption est affichée à l’écran. Quand le
délai est écoulé, la lecture redémarre.
Réglage de la durée d’interruption
‘Snooze’
Vous pouvez changer la durée de l’interruption Snooze
mais uniquement quand la lecture programmée par la
minuterie est en cours.
Appuyez sur le bouton
[SNOOZE] pour interrompre la
lecture. Quand le temps
d’interruption est éclairé
intensément (8 secondes),
utilisez les boutons [ ]/[ ]
(précédent/suivant) pour réglez
la durée de l’interruption entre 1
et 30 minutes.
Le nouvel intervalle d’interruption de
l’alarme entrera en vigueur à la prochaine utilisation de la fonction
“Snooze”.
Remarques:
• Si vous appuyez sur [SNOOZE] alors que la lecture
est déjà interrompue, la durée de l’interruption recommence à zéro.
• Pour annuler la fonction Snooze alors que le CBX-300
est en mode Snooze, appuyez sur le bouton [STANDBY/ON]. La minuterie est coupée et le CBX-300
passe en mode de veille.
• Quand “Snooze” est activé pour une minuterie, les
boutons [ / ] (précédent), [ / ] (suivant),
CD Lecture/Pause [ ], [ ] (stop) et [ ] (éjection) en face supérieure du CBX-300 servent de bouton SNOOZE durant la lecture minutée. Pour
bénéficier des fonctions accessibles avec ces boutons,
utilisez les boutons équivalents sur la télécommande.
Pour éjecter un CD avec le bouton [ ] (éjection),
attendez que la minuterie se coupe à la fin de la
période programmée ou annulez l’heure en appuyant
sur le bouton [TIMER].
• Même si la fonction “Snooze” du CBX-300 est activée, le CBX-300 passe en veille au moment d’extinction programmé pour la minuterie et la lecture ne
recommence pas.
/
Fr-
46
Page 99

Utilisation des minuteries
—Suite
Utilisation de la minuterie
(Sleep Timer)
Vous pouvez utiliser la fonction “Sleep” pour mettre
automatiquement le CBX-300 hors tension après un
délai déterminé.
SLEEP
Appuyez plusieurs fois sur le
bouton [SLEEP] pour choisir le
délai.
Le bouton [SLEEP] permet de définir un
délai compris entre 90 et 10 minutes (par
pas de 10 minutes).
Utilisez les boutons Précédent/Suivant
[ ]/[ ] pour régler le délai par pas
d’1 minute (de 99 à 1).
Témoin SLEEP
Quand vous réglez la fonction “Sleep”, le
témoin SLEEP apparaît à l’écran.
L’écran affiche le délai choisi pendant
environ 8 secondes avant de retourner à
l’affichage précédent.
Vérification du délai ‘Sleep’ résiduel
Pour vérifier la durée résiduelle, appuyez sur le bouton
[SLEEP].
Si vous appuyez sur [SLEEP] quand le délai de la minuterie est affiché, la durée du délai est raccourcie de 10
minutes.
Annuler la fonction ‘Sleep’
Pour annuler la programmation de la minuterie, appuyez
plusieurs fois sur le bouton [SLEEP] jusqu’à ce “Sleep
Off” apparaisse.
Fr-
47
Page 100

Régler le volume maximum
Vous pouvez régler le volume maximum du CBX-300.
Par défaut, le volume maximum est réglé sur “44”.
Si le morceau en cours de lecture est très doux et qu’un
volume maximum “44” ne suffit pas, augmentez-le.
Remarque:
• Lorsque vous augmentez le volume maximum, une
distorsion audio peut se produire lors d’une écoute à
un niveau proche du réglage Max.
/
MENU/NO
ENTER
1
2
3
4
Mettez le CBX-300 en veille
(Standby).
Maintenez le bouton MENU/NO
enfoncé 5 secondes jusqu’à ce
que le message “Max Vol”
apparaisse à l’écran.
Le volume maximum actuel s’affiche.
Utilisez les boutons [ ]
(précédent) et [ ] (suivant)
pour régler le volume maximum
entre “44” et “50”.
Appuyez sur [ENTER].
Le niveau maximum est réglé et
“Complete” apparaît brièvement à
l’écran qui retrouve ensuite son
affichage normal.
La valeur que vous réglez ici est la
valeur “Max”. Vous ne la voyez donc
pas à l’écran. Si, par exemple, vous
réglez le volume maximum sur “50”,
les volume valeurs que vous voyez à
l’écran sont “Min, 1–49, Max”.
Fr-
48
 Loading...