

Page 1
E
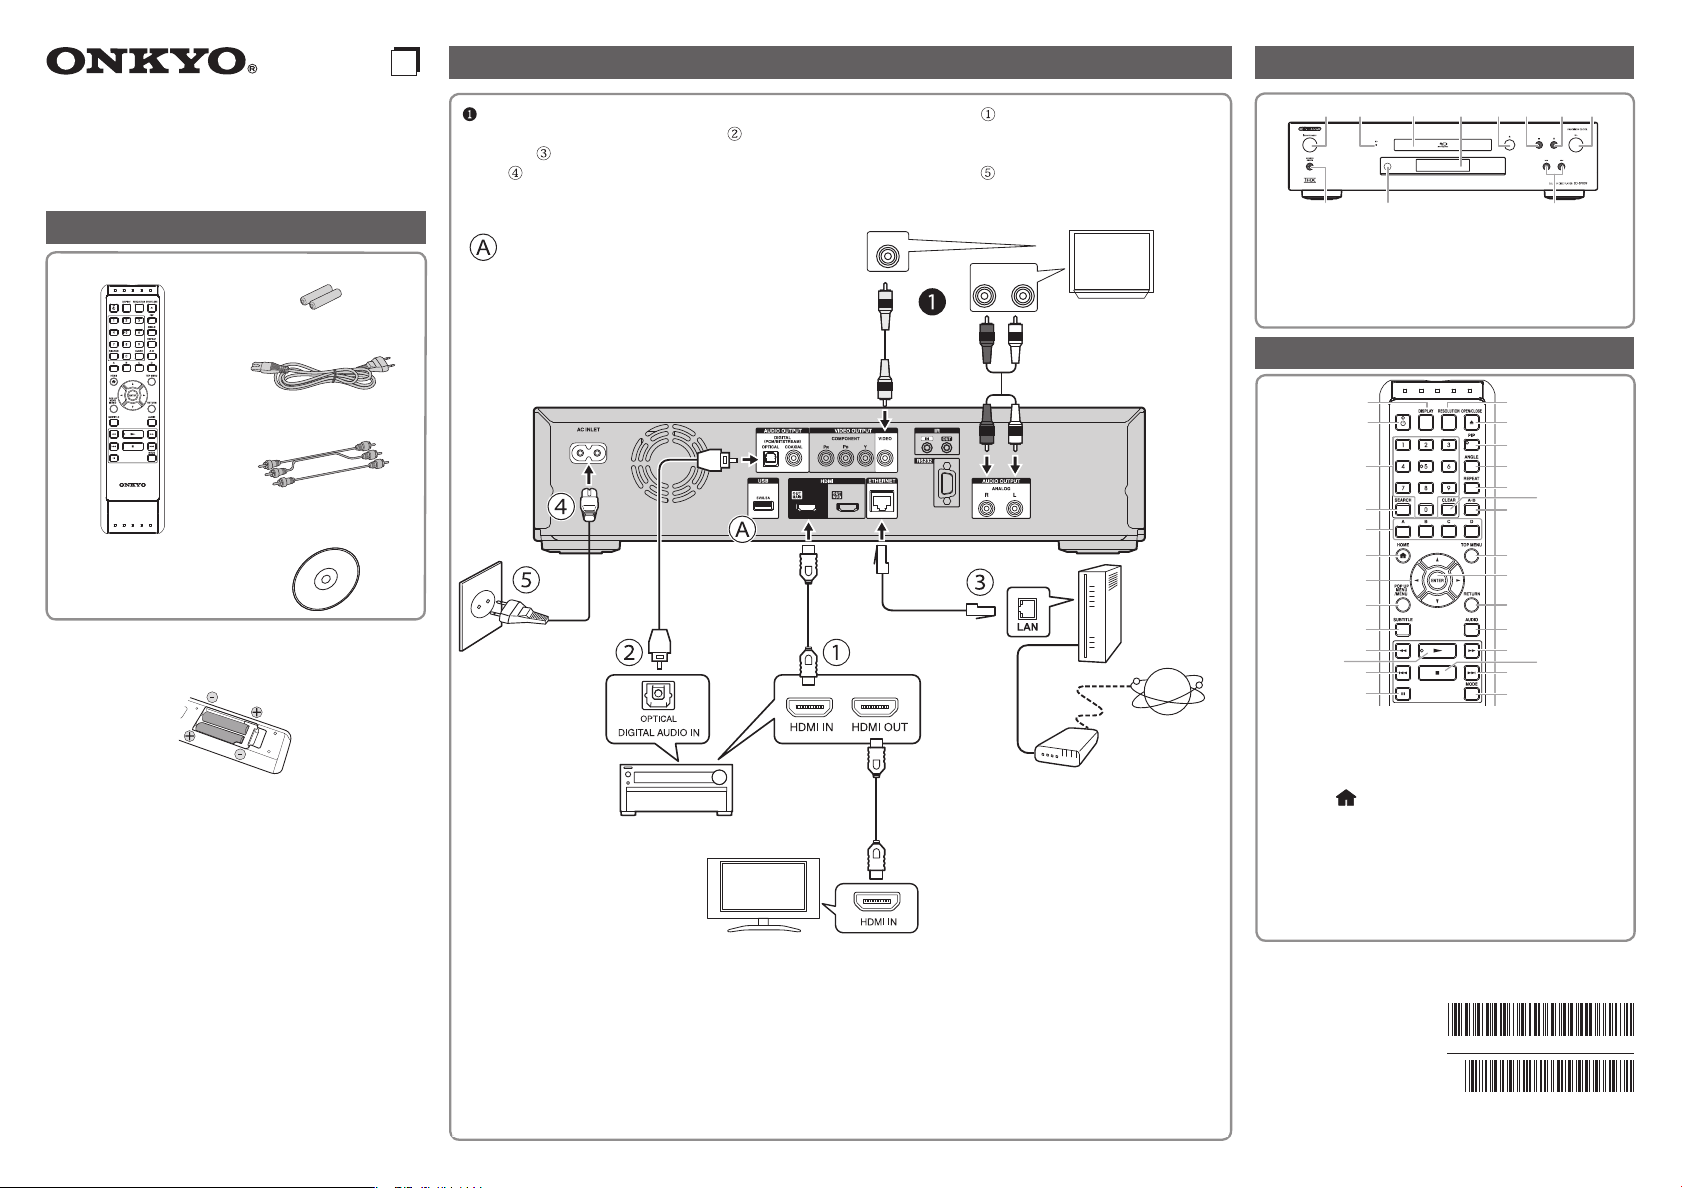
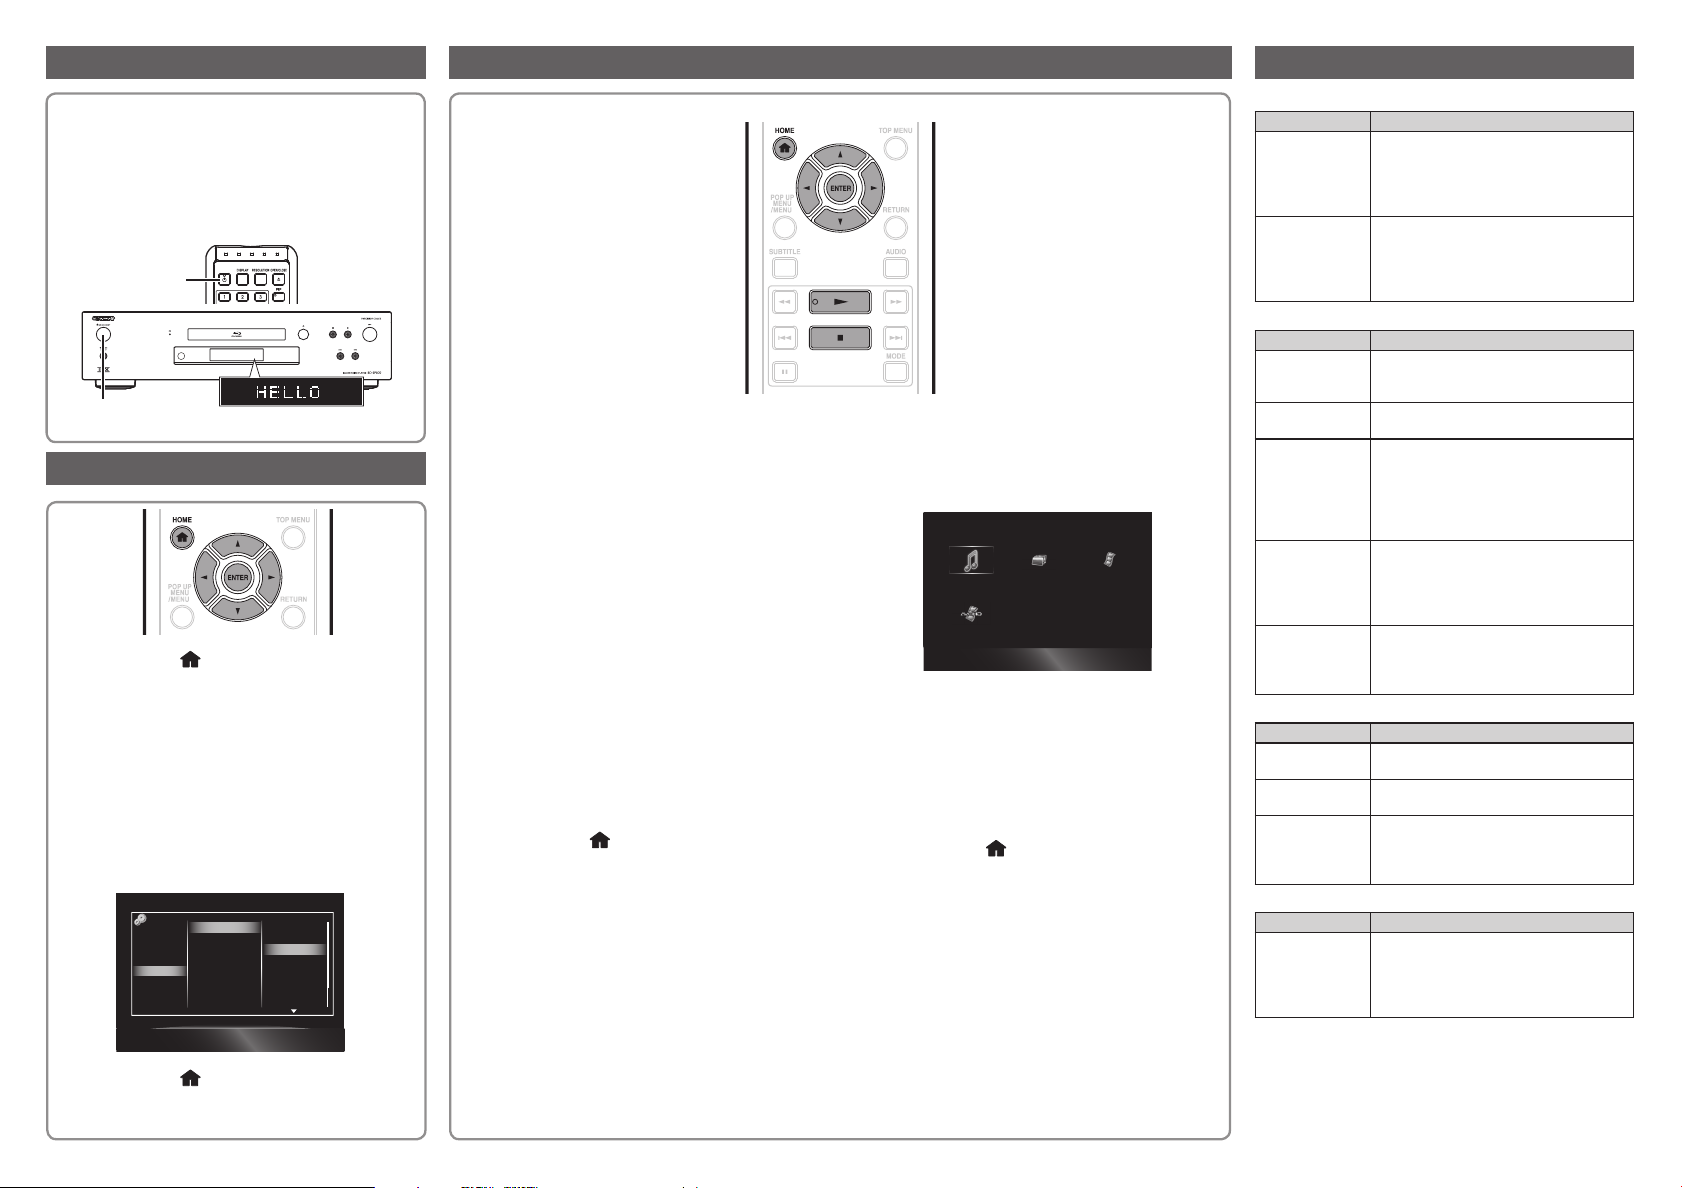
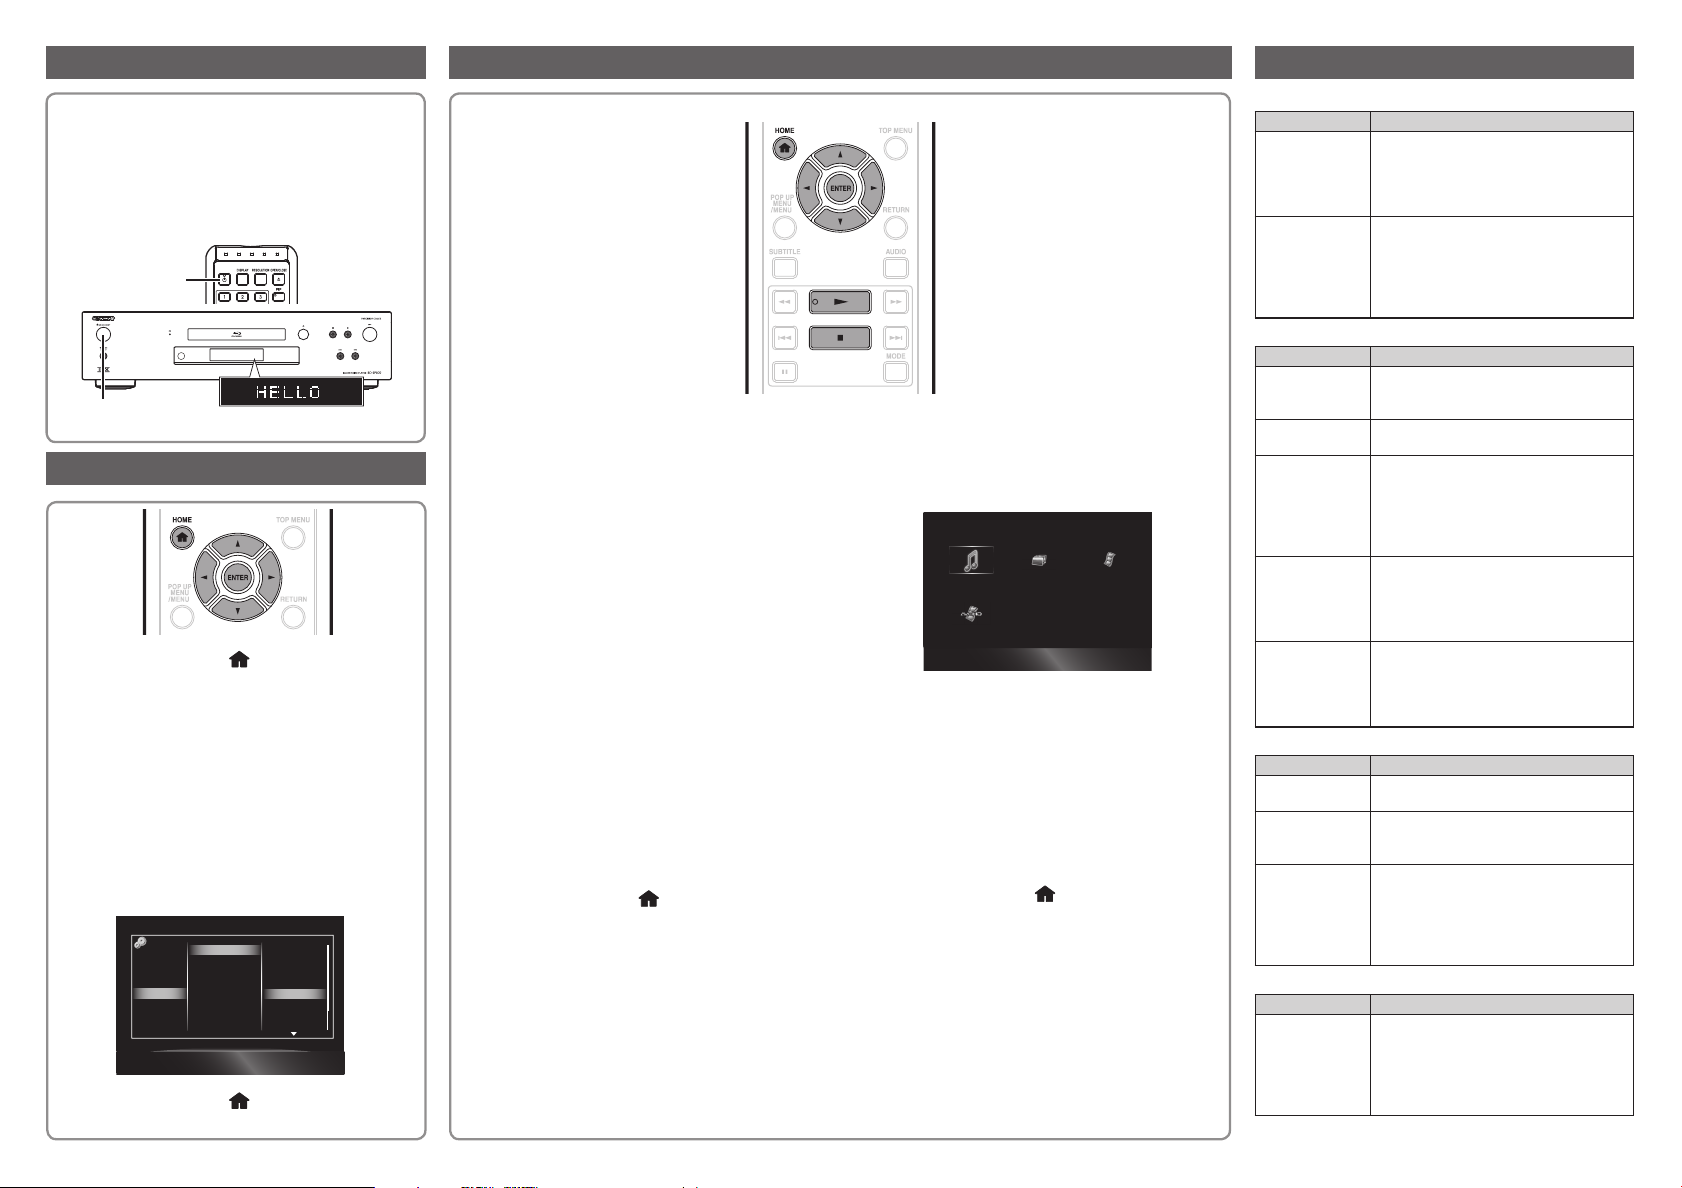
Connections Front Panel
n
BLU-RAY DISC™ PLAYER
BD-SP809
Quick Start Guide
Supplied Accessories
Remote Control (1) Batteries (2)
AC cord (1)
Audio / video cables (1)
Instruction Manual
(CD-ROM) (1)
Quick Start Guide (1)
Safety Information (1)
Installing the Batteries in the Remote Control
Install 2 R6 (1.5V) batteries matching the polarity indicated
inside battery compartment of the remote control.
Incorrect use of batteries can result in hazards such as
leakage and bursting. Please observe the following:
• Do not mix alkaline, standard (carbon-zinc), or
rechargeable (ni-cad, ni-mh, etc) batteries.
• Do not mix new and old batteries together.
• Do not use different kinds of batteries together. Although
they may look similar, different batteries may have
different voltages.
• Make sure that the + and - ends of each battery match
the indications in the battery compartment.
• Remove batteries from battery compartment, when the
remote is not going to be used for a month or more.
• When disposing of used batteries, please comply with
governmental regulations or environmental public rules
that apply in your country or area.
• Do not recharge, short-circuit, heat, burn or disassemble
batteries.
You can enjoy standard quality picture and sound using audio / video cables. You can enjoy high quality digital
picture and sound using an HDMI cable.
necessary.
router.
NOTE:
• To enjoy 3D images, connection to a 3D compatible TV is needed.
• When using an HDMI OUT jacks, 7.1ch digital output is available.
• When using AUDIO OUTPUT (DIGITAL OPTICAL), 5.1ch digital output is available. (7.1ch digital output is not
available.)
• When using a broadband Internet connection, a contract with an Internet service provider is required. For more
details, contact your nearest Internet service provider.
• Use a LAN cable/router supporting 10BASE-T/100BASE-TX.
• For more information, see “CONNECTIONS” in the Instruction Manual.
Connect a LAN cable to the ETHERNET terminal of this player and the LAN port of the broadband
Plug the AC cord into the AC INLET terminal on the rear of the player. Then plug it into the AC outlet.
USB input
• To enjoy BD-Live™ functions, connect a USB
flash drive (1 GB or greater) to this terminal.
Digital audio
optical cable*
AC cord
AV receiver
You can connect an AV receiver using a digital audio optical cable if
VIDEO IN
TV
HDMI cable*
TV
Video cable
HDMI cable*
LAN cable*
AUDIO IN
RL
Audio cable
Router / Modem
Broadband
service
* Not supplied
12 3 45678
1 . ON/STANDBY
10
2 3D indicator
3 Disc tray
4 Display
5 fl (open/close)
6 Δ (pause)
7 Ê (stop)
8 Æ (play)
9 H / G (skip down
/ up)
10 Infrared sensor window
11 SOURCE DIRECT
911
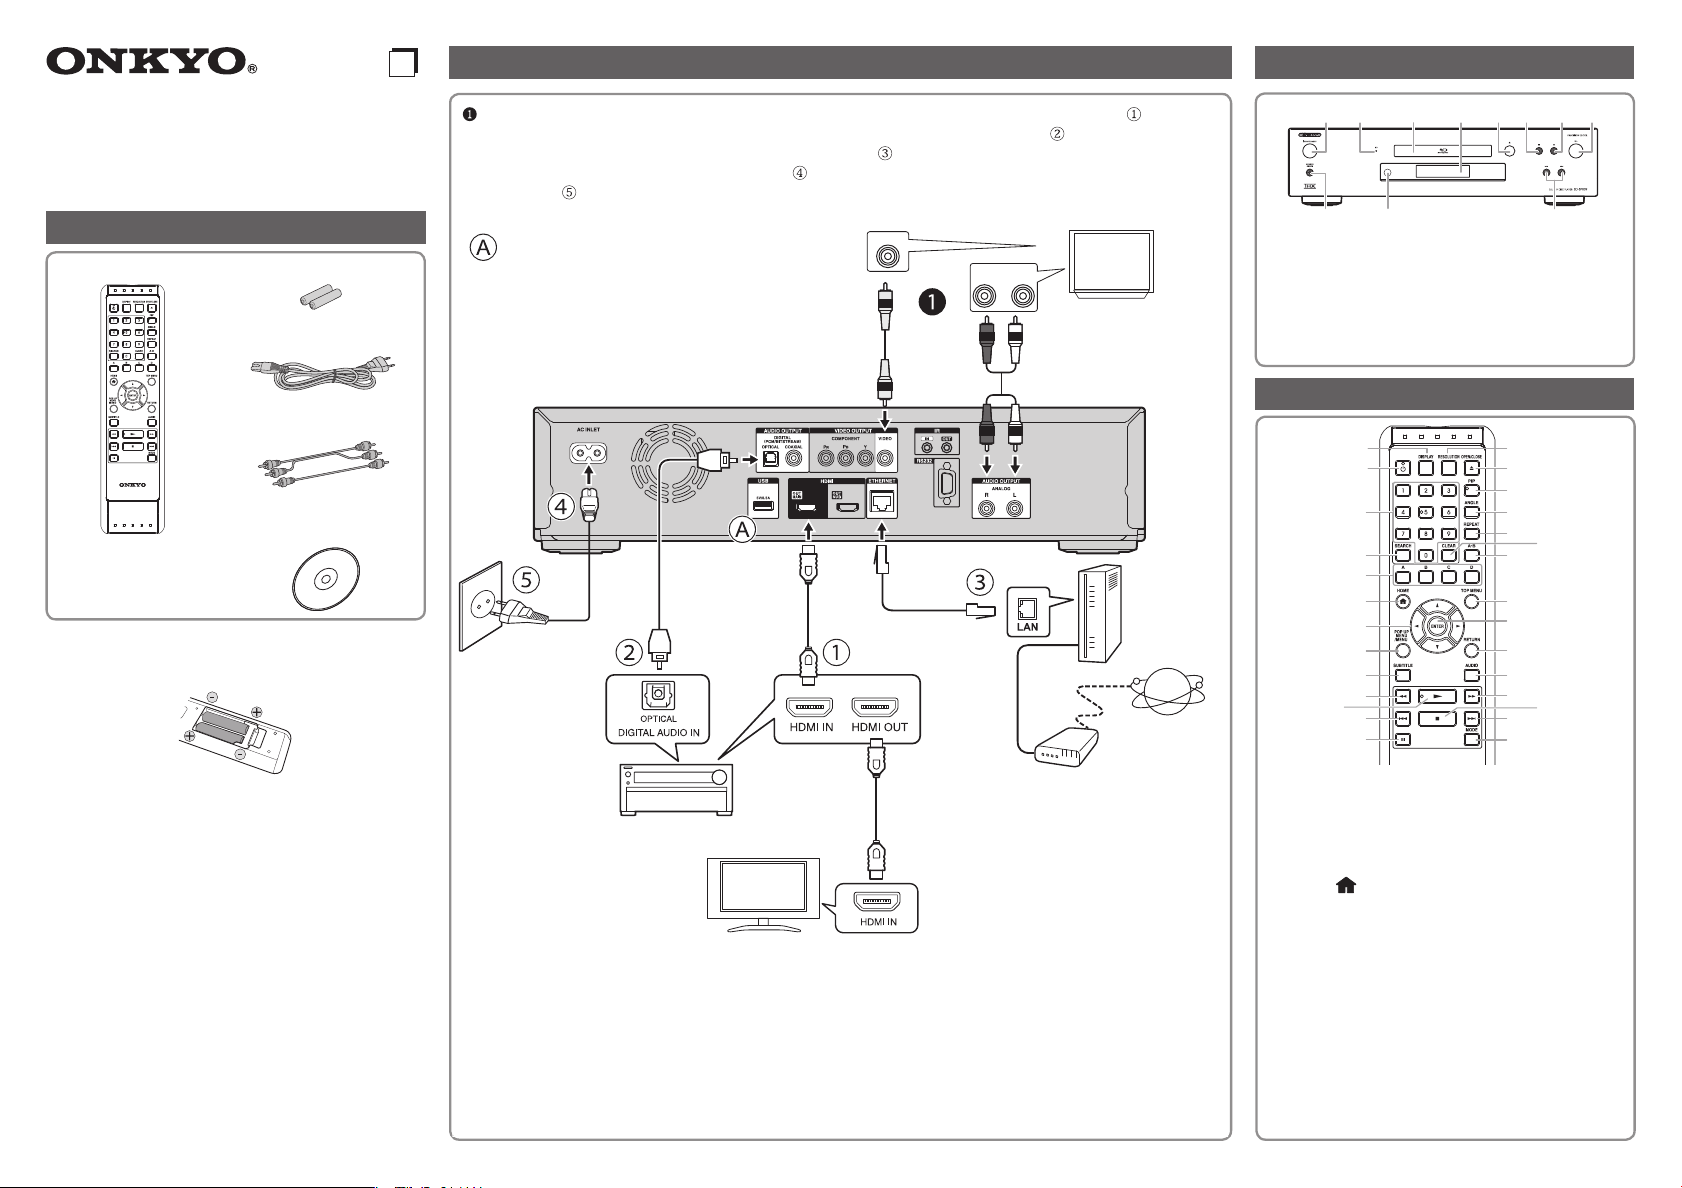
Remote Control
1
2
3
4
5
6
7
8
9
10
11
12
13
1 DISPLAY
2 . (on/standby)
3 Number buttons
4 SEARCH
5 A / B / C / D
6 HOME
7 Î / ï / Í / Æ
8 POP UP MENU / MENU
9 SUBTITLE
10 ¢ (reverse)
11 Æ (play)
12 H (skip)
13 Δ (pause)
14 RESOLUTION
SN29400880
(C) Copyright 2011 ONKYO SOUND & VISION CORPORATION
BD-SP809(B)CUP2BP_BD-SP809(S)CUP2BP
E5XB0ED_E5XB2ED / 1VMN31234★★★★★
Japan. All rights reserved.
15 OPEN / CLOSE fl
16 PIP
17 ANGLE
18 REPEAT
19 CLEAR
20 A-B
21 TOP MENU
22 ENTER
23 RETURN
24 AUDIO
25 ∫ (forward)
26 Ê (stop)
27 G (skip)
28 MODE
14
15
16
17
18
19
20
21
22
23
24
25
26
27
28
Printed in China
*1VMN31234*
*29400880*
Page 2
Turn on the Player and TV
Basic Operation Troubleshooting
After all of the necessary connections are complete,
press [. (on/standby)] or [. ON/STANDBY] on the
player to turn it on.
Turn on your TV and switch to the appropriate AV input
(Refer to your TV’s operation manual). (This may be
labelled “SOURCE”, “AV”, “AUX” or “SELECT”. etc.)
. (on/standby)
. ON/STANDBY
Language Setting
1 Press [HOME ] to display the home menu.
2 Use [Î / ï / Í / Æ] to select “Settings”, then
press [ENTER].
3 Use [Î / ï] to select “Playback”, then press
[ENTER].
4 Use [Î / ï] to select “Player Menu”, then press
[ENTER].
5 Press [Î / ï] to select the language you want
to display on the screen, then press [ENTER].
Video Out
Audio Out
HDMI
Playback
Network
Others
Player Menu
Audio
Subtitle
Disc Menu
DivX Subtitle
BD Rating Level
DVD Rating Level
Password Change
Auto
Deutsch
English
Español
Français
Italiano
Nederlands
Polski
1 Prepare the desired disc or content.
• Load a disc.
• Connect a USB flash drive into the USB
input.
• Make a broadband Internet connection and
settings.
NOTE:
• To remove the USB flash drive, in stop mode, pull it
out slowly.
• Some USB device may not work with this player.
• If you use a USB extension cable, USB hub or USB
card reader, the USB device may not be recognised.
• Virtual package/BD-Live
flash drive connected to this player.
To enjoy these functions, connect a USB flash drive
(1 GB or greater) to the USB input on this player.
TM
data is saved in the USB
2 Press [HOME ] to access the home menu.
3 Use [Î / ï / Í / Æ] to select the desired media in
the home menu, then press [ENTER].
4 Select the file type you want to play back, then
press [ENTER].
e.g.)
Music
5 For “AVCHD”, playback will start automatically.
For “Music”, track / file list will be displayed.
Select a group (folder) or track / file you want
to play back, then press [Æ (play)] or [ENTER]
to start playback.
6 Press [HOME ] or [Ê(stop)] to exit
playback.
NOTE:
• For more information, see “BASIC PLAYBACK” in the
Instruction Manual.
Power
Problem Possible causes and solutions
The player
power cannot
be turned on.
The player
power is turned
off.
• Is the AC cord firmly plugged into the
AC outlet?
• Unplug the AC cord once, and wait
for 5-10 seconds and then plug it in
again.
• Is “Auto Power Off” set to “On”?
When “Auto Power Off” is set to “On”,
the power will be automatically turned
off after 30 continuous minutes of
inactivity (no playback).
Basic Operation
Problem Possible causes and solutions
The remote
control does not
work.
Cannot operate
the player.
The player
cannot play a
disc.
The disc is
automatically
ejected after
closing the disc
tray.
Video stops. • Has the player been subjected to
• Use the remote control within its
operating range.
• Replace the batteries.
•
Are you operating the player within the
specified operating temperature range?
• Take out the disc and clean it.
• Make sure that the disc is loaded
properly (aligned in disc tray and
label-side up).
• Allow any condensation in or near the
player to dry.
• Make sure that the disc is loaded
properly (aligned in disc tray and
label-side up).
• Take out the disc and clean it.
• Make sure that the disc is playable.
shock or impact? Are you using it in
an unstable location? The player will
stop if it senses shock or vibration.
Picture
Problem Possible causes and solutions
No picture. • Make sure that the cable is connected
Noise appears. • If the TV supports Deep Color, use a
3D images
cannot be
output to a TV.
correctly.
recommended HDMI cable.
• Are a 3D compatible TV and 3D
glasses used?
•
Make sure that the connected TV and
the AV receiver are both 3D compatible.
Sound
Problem Possible causes and solutions
No sound,
or sound is
distorted.
•
If the volume of the TV or AV receiver
is set to minimum, turn the volume up.
• There is no sound during still mode,
slow motion playback, fast forward
and fast reverse.
6 Press [HOME ] to exit.
Page 3
Fr
Connexions Panneau avant
BLU-RAY DISC™ PLAYER
BD-SP809
Guide de démarrage
Accessoires fournis
Télécommande (1) Piles (2)
Câble d’alimentation CA (1)
Câbles audio / vidéo (1)
Manuel d’instructions
(CD-ROM) (1)
Guide de démarrage (1)
Information de sécurité (1)
Installer les piles dans la télécommande
Installez 2 piles R6 (1,5 V) correspondant à la polarité indiquée
à l’intérieur du compartiment des piles de la télécommande.
Une mauvaise utilisation des piles peut causer des risques de
fuite ou d’explosion. Veuillez respecter les points suivants :
• Ne mélangez pas des piles alcalines, ordinaires
(carbone-zinc) ou rechargeables (ni-cad, ni-mh, etc.).
• N’utilisez pas ensemble des piles neuves et des piles
usagées.
• N’utilisez pas ensemble des piles de types différents.
Même si elles se ressemblent, des piles différentes
peuvent avoir des tensions différentes.
•
Assurez-vous que les extrémités + et - de chaque pile
correspondent bien aux marques dans le compartiment des piles.
• Retirez les piles du compartiment si vous n’allez pas
utiliser la télécommande pendant un mois ou plus.
• Lorsque vous jetez des piles usagées, veuillez
vous conformer aux réglementations ou instructions
concernant la protection de l’environnement en vigueur
dans votre pays ou votre région.
• Les piles ne doivent pas être rechargées, courtcircuitées, chauffées, brûlées ou démontées.
Vous pouvez reproduire des images et des sons de qualité standard avec des câbles audio / vidéo. Vous
pouvez obtenir des images et des sons numériques de haute qualité avec un câble HDMI.
un récepteur AV à l’aide d’un câble optique audio si nécessaire.
de ce lecteur et au port LAN du routeur haut débit.
dos du lecteur.
Entrée USB
• Pour utiliser les fonctions BD-Live™, connectez
un lecteur flash USB (1 Go ou plus) à cette
borne.
Câble
d’alimentation
REMARQUE :
• Pour visualiser des images 3D, il est nécessaire de connecter un téléviseur 3D.
• Si vous utilisez un connecteur HDMI OUT, le mode de sortie 7.1 can. numérique est disponible.
• Si vous utilisez AUDIO OUTPUT (DIGITAL OPTICAL), le mode de sortie 5.1 can. numérique est disponible. (Le
mode de sortie 7.1 can. numérique n’est pas disponible.)
• Un contrat avec un fournisseur d’accès Internet est nécessaire pour utiliser la connexion Internet haut débit. Pour
plus d’informations, contactez votre fournisseur d’accès Internet le plus proche.
• Utilisez un câble/routeur LAN prenant en charge 10BASE-T/100BASE-TX.
• Pour plus d’informations, consultez la section « CONNEXIONS » dans le manuel d’instructions.
Branchez-le ensuite dans une prise secteur.
Câble
optique audio
numérique *
Câble HDMI *
Récepteur AV
Téléviseur
Branchez le câble d’alimentation dans la borne AC INLET au
Câble vidéo
Câble HDMI *
Connectez un câble LAN à la borne ETHERNET
VIDEO IN
AUDIO IN
RL
Câble LAN *
Vous pouvez connecter
Téléviseur
Câble audio
Services haut
débit
Routeur / Modem
* Non fourni
12 3 45678
10
1 . ON/STANDBY
2 Voyant 3D
3 Plateau de disque
4 Affichage
5 fl (ouvrir/fermer)
6 Δ (pause)
7 Ê (arrêt)
8 Æ (lecture)
9 H / G (saut arrière /
avant)
10
Fenêtre du capteur infrarouge
11 SOURCE DIRECT
Télécommande
1
2
3
4
5
6
7
8
9
10
11
12
13
1 DISPLAY
2 . (marche/veille)
3 Touches numériques
4 SEARCH
5 A / B / C / D
6 HOME
7 Î / ï / Í / Æ
8 POP UP MENU / MENU
9 SUBTITLE
10 ¢ (retour rapide)
11 Æ (lecture)
12 H (saut arrière)
13 Δ (pause)
14 RESOLUTION
15 OPEN / CLOSE fl
16 PIP (Image dans l'image)
17 ANGLE
18 REPEAT
19 CLEAR
20 A-B
21 TOP MENU
22 ENTER
23 RETURN
24 AUDIO
25 ∫ (avance rapide)
26 Ê (arrêt)
27 G (saut avant)
28 MODE
14
15
16
17
18
20
21
22
23
24
25
27
28
911
19
26
Page 4
Allumer le lecteur et le téléviseur
Opérations de base Dépannage
Une fois toutes les connexions nécessaires effectuées,
appuyez sur [. (marche/veille)] ou [. ON/STANDBY]
sur le lecteur pour l’allumer.
Allumez votre téléviseur et passez au mode d’entrée
AV approprié (voir le manuel d’instructions du
téléviseur). (Ceci peut être nommé « SOURCE »,
« AV », « AUX » ou « SELECT », etc.)
. (marche/veille)
. ON/STANDBY
Régler la langue
1 Appuyez sur [HOME ] pour afficher le
menu principal.
2 Utilisez [Î / ï / Í / Æ] pour sélectionner
« Settings », puis appuyez sur [ENTER].
3 Utilisez [Î / ï] pour sélectionner « Playback »,
puis appuyez sur [ENTER].
4 Utilisez [Î / ï] pour sélectionner « Player
Menu », puis appuyez sur [ENTER].
5 Appuyez sur [Î / ï] pour sélectionner la langue
d’affichage des écrans, puis appuyez sur [ENTER].
Video Out
Audio Out
HDMI
Playback
Network
Others
Player Menu
Audio
Subtitle
Disc Menu
DivX Subtitle
BD Rating Level
DVD Rating Level
Password Change
Auto
Deutsch
English
Español
Français
Italiano
Nederlands
Polski
6 Appuyez sur [HOME ] pour quitter.
1 Préparez le disque ou le contenu désiré.
• Chargez un disque.
• Connectez un lecteur flash USB au
connecteur USB.
• Configurez les réglages de connexion
Internet haut débit.
REMARQUE :
• Pour retirer le lecteur flash USB: en mode arrêt,
retirez le lecteur lentement.
• Certains périphériques USB peuvent ne pas
fonctionner avec ce lecteur.
• Si vous utilisez un câble d’allongement USB, un
concentrateur USB ou un lecteur de carte USB, le
périphérique USB peut n’être pas reconnu.
• Les données de package virtuel/BD-Live
enregistrées dans le lecteur flash USB connecté à ce
lecteur.
Pour profiter de ces fonctions, connectez un lecteur
flash USB (1 Go ou plus) à cette borne.
TM
sont
2 Appuyez sur [HOME ] pour accéder au
menu d’accueil.
3 Utilisez [Î / ï / Í / Æ] pour sélectionner le média
désiré dans le menu principal, puis appuyez
sur [ENTER].
4 Sélectionnez un type de média, puis appuyez
sur [ENTER].
par ex.)
Musique
5 Pour « AVCHD », la lecture démarre
automatiquement.
Si vous choisissez « Musique », la liste des
pistes / fichiers est affichée. Sélectionnez un
groupe (dossier) ou une piste / un fichier, puis
appuyez sur [Æ (lecture)] ou [ENTER] pour
lancer la lecture.
6 Appuyez sur [HOME ] ou [Ê(arrêt)] pour
arrêter la lecture.
REMARQUE :
• Pour plus d’informations, consultez la section
« LECTURE SIMPLE » dans le manuel d’instructions.
Alimentation
Problème Causes et solutions possibles
Le lecteur ne
peut pas être
allumé.
Le lecteur est
éteint.
• Est-ce que le câble d’alimentation est
bien branché dans la prise secteur?
• Débranchez le câble d’alimentation,
patientez 5 à 10 secondes, puis
rebranchez-le.
Est-ce que la fonction « Arret Auto »
•
est réglée sur « Ef » ? Si la fonction
« Arret Auto » est activée, l
s
’
éteint automatiquement après 30
minutes d
(aucune lecture).
’
inactivité interrompue
’
appareil
Opérations de base
Problème Causes et solutions possibles
La télécommande
ne fonctionne
pas.
Impossible
d’utiliser le lecteur.
Le lecteur ne
peut pas lire un
disque.
Le disque est éjecté
automatiquement
lorsque vous
fermez le plateau
de disque.
La vidéo
s’arrête.
• Utilisez la télécommande dans sa
plage d’opération.
• Remplacez les piles.
•
Utilisez-vous le lecteur dans la plage de
températures d’opération spécifiée?
• Retirez le disque et nettoyez-le.
• Assurez-vous de placer correctement
le disque sur le plateau de disque,
avec l’étiquette vers le haut.
• Laissez sécher toute condensation
dans ou autour du lecteur.
• Assurez-vous de placer correctement
le disque sur le plateau de disque,
avec l’étiquette vers le haut.
• Retirez le disque et nettoyez-le.
•
Assurez-vous que le disque soit lisible.
• Est-ce que le lecteur a été soumis
à un choc? Est-ce que que vous
l’utilisez dans un endroit instable? Le
lecteur s’arrête s’il détecte un choc ou
des vibrations.
Image
Problème Causes et solutions possibles
Aucune image. • Assurez-vous que le câble soit bien
Du bruit
apparaît.
Les images
3D ne peuvent
pas être
affichées sur un
téléviseur.
connecté.
• Si le téléviseur prend en charge
Deep Color, utilisez un câble HDMI
recommandé.
• Est-ce que le téléviseur est
compatible 3D, et utilisez-vous des
lunettes 3D?
•
Assurez-vous que le téléviseur
connecté et le récepteur soient tous
deux compatibles 3D.
Son
Problème Causes et solutions possibles
Aucun son,
ou le son est
distordu.
Vérifiez si le volume du téléviseur
•
ou du récepteur AV est réglé sur le
minimum.
•
Le son n’est pas émis en mode image,
lors de la lecture au ralenti, ou lors
d’opérations d’avance/retour rapide.
Page 5

Es
Conexiones Panel frontal
BLU-RAY DISC™ PLAYER
BD-SP809
Guía de inicio rápido
Accesorios suministrados
Mando a distancia (1) Pilas (2)
Cable de CA (1)
Cables de audio / vídeo (1)
Manual de instrucciones
(CD-ROM) (1)
Guía de inicio rápido (1)
Información sobre
seguridad (1)
Instalación de las pilas del mando a distancia
Instale las 2 pilas R6 (1,5 V) de forma que la polaridad
coincida con la que se indica en el compartimento de las
pilas del mando a distancia.
El uso incorrecto de las pilas puede provocar riesgos tales
como fugas y explosiones. Tenga en cuenta lo siguiente:
• No mezcle pilas alcalinas, estándar (zinc-carbono) o
recargables (ni-cad, ni-mh, etc).
• No mezcle pilas nuevas con antiguas.
• No mezcle distintos tipos de pilas. Aunque puedan
tener un aspecto similar, las pilas distintas pueden tener
distintas tensiones.
•
Compruebe que los extremos + y - de cada pila coincidan
con las indicaciones del compartimiento de las pilas.
• Retire las pilas del compartimiento de las pilas si no va a
utilizar el mando a distancia durante un mes o más.
• Cuando deseche las pilas usadas, cumpla con la
normativa del gobierno o las normas medioambientales
que se apliquen en su país o en su zona.
• No recargue, cortocircuite, desmonte, caliente ni queme
las pilas.
Puede disfrutar de una calidad estándar de imagen y sonido utilizando cables de audio / vídeo. Puede disfrutar
de una gran calidad de imagen y sonido digital utilizando un cable HDMI.
utilizando un cable óptico de audio digital, si es necesario.
reproductor y al puerto LAN del enrutador de banda ancha.
parte posterior del reproductor.
Entrada USB
• Para disfrutar de las funciones BD-Live™,
conecte una memoria flash USB (de 1 GB o
más) a este terminal.
Cable de CA
NOTA:
• Para disfrutar de imágenes en 3D, se requiere la conexión a un TV compatible con 3D.
• A través de las tomas HDMI OUT, dispone de una salida digital de 7.1 canales.
• A través de AUDIO OUTPUT (DIGITAL OPTICAL), dispone de una salida digital de 5.1 canales. (La salida digital de
7.1 canales no está disponible).
•
Si utiliza una conexión a Internet de banda ancha, deberá disponer de un contrato con el proveedor de servicios de
Internet. Para obtener más información, póngase en contacto con su proveedor de servicios de Internet más cercano.
• Utilice un cable y un enrutador LAN que sean compatibles con 10BASE-T/100BASE-TX.
• Para obtener más información, consulte la sección "CONEXIONES" del Manual de instrucciones.
A continuación, enchúfelo a la toma de corriente alterna.
Cable óptico
de audio
digital*
Cable HDMI*
Cable HDMI*
Receptor de AV
TV
Conecte un cable LAN al terminal ETHERNET de este
Enchufe el cable de CA en el terminal AC INLET de la
VIDEO IN
Cable de
vídeo
Puede conectar un receptor de AV
AUDIO IN
RL
Cable de audio
Cable LAN*
Enrutador / Módem
TV
Servicio de
banda ancha
* No suministrado
12 3 45678
10
1 . ON/STANDBY
2 Indicador de 3D
3 Bandeja del disco
4 Pantalla
5 fl (abrir/cerrar)
6 Δ (pausa)
7 Ê (parar)
8 Æ (reproducir)
9 H / G (arriba/abajo)
10 Ventana del sensor de
infrarrojos
11 SOURCE DIRECT
Mando a distancia
1
2
3
4
5
6
7
8
9
10
11
12
13
1 DISPLAY
2 . (encendido/espera)
3 Botones numéricos
4 SEARCH
5 A / B / C / D
6 HOME
7 Î / ï / Í / Æ
8 POP UP MENU / MENU
9 SUBTITLE
10 ¢ (retroceder)
11 Æ (reproducir)
12 H (saltar)
13 Δ (pausa)
14 RESOLUTION
15 OPEN / CLOSE fl
16 PIP
17 ANGLE
18 REPEAT
19 CLEAR
20 A-B
21 TOP MENU
22 ENTER
23 RETURN
24 AUDIO
25 ∫ (avanzar)
26 Ê (parar)
27 G (saltar)
28 MODE
14
15
16
17
18
20
21
22
23
24
25
27
28
911
19
26
Page 6

Encienda el reproductor y el TV
Funcionamiento básico Solución de problemas
Una vez realizadas todas las conexiones necesarias,
pulse [. (encendido/espera)] o [. ON/STANDBY]
en el reproductor para encenderlo.
Encienda el TV y cambie a la entrada de AV correcta
(consulte el manual de funcionamiento del TV). (Esta
entrada puede estar identificada como “SOURCE”,
“AV”, “AUX”, “SELECT”, etc.)
.
(encendido/espera)
. ON/STANDBY
Configuración de idioma
1 Pulse [HOME ] para mostrar el menú
inicial.
2 Utilice [Î / ï / Í / Æ] para seleccionar “Settings”
y, a continuación, pulse [ENTER].
3 Utilice [Î / ï] para seleccionar “Playback” y, a
continuación, pulse [ENTER].
4 Utilice [Î / ï] para seleccionar “Player Menu”
y, a continuación, pulse [ENTER].
5 Utilice [Î / ï] para seleccionar el idioma que
desee mostrar en la pantalla y, a continuación,
pulse [ENTER].
Video Out
Audio Out
HDMI
Playback
Network
Others
Player Menu
Audio
Subtitle
Disc Menu
DivX Subtitle
BD Rating Level
DVD Rating Level
Password Change
Auto
Deutsch
English
Español
Français
Italiano
Nederlands
Polski
6 Pulse [HOME ] para salir.
1 Prepare el disco o contenido que desee.
• Cargue un disco.
• Conecte una memoria flash USB a la
entrada USB.
• Establezca y configure una conexión a
Internet de banda ancha.
NOTA:
• Para retirar la memoria flash USB, en el modo de
parada, tire de ella lentamente.
• Es posible que algunos dispositivos USB no
funcionen con este reproductor.
• Si utiliza un cable alargador USB, un concentrador
USB o un lector de tarjetas USB, es posible que no
se reconozca el dispositivo USB.
• Los datos de paquete virtual / BD-Live
en la memoria flash USB conectada al reproductor.
Para disfrutar de dichas funciones, conecte una
memoria flash USB (de 1 GB o más) a la entrada
USB del reproductor.
TM
se guardan
2 Pulse [HOME ] para acceder al menú
inicial.
3 Utilice [Î / ï / Í / Æ] para seleccionar el soporte
que desee en el menú inicial y, a continuación,
pulse [ENTER].
4 Seleccione el tipo de archivo que desee
reproducir y, a continuación, pulse [ENTER].
p.ej.)
Música
5 En el caso de “AVCHD”, la reproducción se
iniciará automáticamente.
En el caso de "Música", se mostrará la
lista de pistas / archivos. Seleccione una
pista / archivo, o un grupo (carpeta) que
desee reproducir y, a continuación, pulse
[Æ (reproducir)] o [ENTER] para iniciar la
reproducción.
6 Pulse [HOME ] o [Ê(parar)] para detener
la reproducción.
NOTA:
• Para obtener más información, consulte la sección
"REPRODUCCIÓN BÁSICA" del Manual de
instrucciones.
Alimentación
Problema Posibles causas y soluciones
El reproductor
no se enciende.
El reproductor
se ha apagado.
• ¿Está bien enchufado el cable de
alimentación a la toma de corriente
alterna?
• Desenchufe el cable de alimentación,
espere de cinco a diez segundos y, a
continuación, enchúfelo de nuevo.
¿Ha seleccionado "Enc." en la opción
•
"Auto Apagado"? Si ha seleccionado
"Enc." en la opción "Auto Apagado", el
reproductor se apagará automáticamente
tras 30 minutos seguidos de inactividad
(sin reproducción).
Funcionamiento básico
Problema Posibles causas y soluciones
El mando a
distancia no
funciona.
El reproductor
no funciona.
El reproductor
no reproduce un
disco.
El disco
se expulsa
automáticamente
después de cerrar
la bandeja.
El vídeo se
para.
• Utilice el mando a distancia dentro de
su alcance operativo.
• Sustituya las pilas.
¿Está utilizando el reproductor dentro del
•
intervalo de temperatura de funcionamiento?
• Extraiga el disco y límpielo.
• Asegúrese de que el disco se haya
cargado correctamente, de forma que
quede alineado en su bandeja y con
la etiqueta orientada hacia arriba.
• Seque la humedad que pueda existir
por la condensación dentro o cerca
del reproductor.
• Asegúrese de que el disco se haya
cargado correctamente, de forma que
quede alineado en su bandeja y con
la etiqueta orientada hacia arriba.
• Extraiga el disco y límpielo.
• Asegúrese de que sea un disco que
se pueda reproducir.
• ¿Ha sufrido alguna sacudida o golpe
el reproductor? ¿Lo está utilizando
en una ubicación poco estable? El
reproductor se parará si percibe
alguna sacudida o vibración.
Imagen
Problema Posibles causas y soluciones
No hay imagen. • Asegúrese de que el cable esté
Aparece ruido. • Si el TV admite Color profundo, utilice
Las imágenes
en 3D no se
pueden emitir a
un TV.
conectado correctamente.
el cable HDMI que se recomienda.
• ¿Está utilizando un TV compatible
con 3D y gafas 3D?
•
Asegúrese de que el TV que haya
conectado y el receptor de AV sean
ambos compatibles con 3D.
Sonido
Problema Posibles causas y soluciones
No hay
sonido o está
distorsionado.
•
Si el volumen del TV o del receptor de
AV está al mínimo, suba el volumen.
•
Durante el modo Vista fija, la
reproducción de avance lento o el avance
/ retroceso rápido, no hay sonido.
Page 7

Collegamenti Pannello anteriore
It
BLU-RAY DISC™ PLAYER
BD-SP809
Guida di avvio rapido
Accessori in dotazione
Telecomando (1) Pile (2)
Cavo CA (1)
Cavi audio/video (1)
Manuale di istruzioni
(CD-ROM) (1)
Guida di avvio rapido (1)
Informazioni di sicurezza (1)
Inserimento delle pile nel telecomando
Inserire due pile R6 (1,5 V) rispettando la polarità indicata
nel vano pile del telecomando.
L’uso errato delle pile può causare pericoli, quali la perdita
di acido o lo scoppio. Osservare quanto segue:
• Non mischiare pile alcaline, standard (zinco-carbonio) o
ricaricabili (ni-cad, ni-mh e così via).
• Non mischiare pile vecchie e nuove.
• Non utilizzare insieme tipi diversi di pile. Anche se
sembrano uguali, le pile diverse possono avere tensioni
differenti.
• Accertarsi che i poli + e – di ciascuna pila corrispondano
alle indicazioni nel vano pile.
• Togliere le pile dal relativo vano se non si intende
utilizzare il telecomando per almeno un mese.
• Per lo smaltimento delle pile usate, osservare le
disposizioni governative o le norme delle istituzioni
pubbliche per l’ambiente in vigore nel proprio paese o
nella propria area di residenza.
• Non ricaricare, cortocircuitare, riscaldare, bruciare o
smontare le pile.
Utilizzando cavi audio / video è possibile ottenere suono e immagine di qualità standard. È possibile riprodurre
immagini digitali e audio di alta qualità per mezzo di un cavo HDMI.
utilizzando un cavo ottico per audio digitale, se necessario.
lettore e alla porta LAN del router a banda larga.
Inserirlo quindi nella presa CA.
Ingresso USB
• Per utilizzare le funzioni BD-Live™, collegare
un’unità flash USB (da almeno 1 GB) a questo
terminale.
Cavo ottico
per audio
digitale*
Cavo CA
Ricevitore AV
NOTA:
• Per riprodurre immagini 3D è necessario effettuare il collegamento a un televisore 3D compatibile.
• Se si utilizzano le prese HDMI OUT è disponibile l’uscita digitale 7.1 ch.
• Se si utilizza AUDIO OUTPUT (DIGITAL OPTICAL) è disponibile l’uscita digitale 5.1 ch. L’uscita digitale 7.1 ch non
è disponibile.
• Per utilizzare una connessione Internet a banda larga è necessario stipulare un contratto con un provider di servizi
Internet. Per maggiori dettagli rivolgersi a un provider di servizi Internet di zona.
• Utilizzare un cavo LAN/router che supporti 10BASE-T/100BASE-TX.
• Per ulteriori informazioni vedere “COLLEGAMENTI” nel manuale di istruzioni.
Cavo HDMI*
Inserire il cavo CA nel terminale AC INLET sul retro del lettore.
Cavo video
Cavo HDMI*
TV
È possibile collegare un ricevitore AV
Collegare un cavo LAN al terminale ETHERNET del
VIDEO IN
TV
Servizio a
banda larga
* Non in dotazione
Cavo LAN*
AUDIO IN
RL
Cavo audio
Router / Modem
12 3 45678
10
1 . ON/STANDBY
2 Indicatore 3D
3 Vassoio del disco
4 Display
5 fl (apri/chiudi)
6 Δ (pausa)
7 Ê (arresto)
8 Æ (riproduzione)
9 H / G (salta indietro/
avanti)
10 Sensore infrarossi
11 SOURCE DIRECT
Telecomando
1
2
3
4
5
6
7
8
9
10
11
12
13
1 DISPLAY
2 .
(accensione/standby)
3 Tasti numerici
4 SEARCH
5 A / B / C / D
6 HOME
7 Î / ï / Í / Æ
8 POP UP MENU / MENU
9 SUBTITLE
10 ¢ (indietro)
11 Æ (riproduzione)
12 H (salta)
13 Δ (pausa)
14 RESOLUTION
15 OPEN / CLOSE fl
16 PIP
17 ANGLE
18 REPEAT
19 CLEAR
20 A-B
21 TOP MENU
22 ENTER
23 RETURN
24 AUDIO
25 ∫ (avanti)
26 Ê (arresto)
27 G (salta)
28 MODE
14
15
16
17
18
20
21
22
23
24
25
27
28
911
19
26
Page 8

Accendere il lettore e il televisore
Operazioni di base Risoluzione dei problemi
Una volta completati i collegamenti necessari, premere
[. (
accensione/standby
lettore per accenderlo.
Accendere il televisore e passare all’ingresso AV
appropriato (consultare il manuale di istruzioni del
televisore). Potrebbe essere chiamato “SOURCE”,
“AV”, “AUX”, “SELECT” e così via.
.
(accensione/standby)
. ON/STANDBY
)] o [. ON/STANDBY] sul
Impostazione della lingua
1 Premere [HOME ] per visualizzare il menu
iniziale.
2 Utilizzare [Î / ï / Í / Æ] per selezionare
“Settings”, quindi premere [ENTER].
3 Utilizzare [Î / ï] per selezionare “Playback”,
quindi premere [ENTER].
4 Utilizzare [Î / ï] per selezionare “Player
Menu”, quindi premere [ENTER].
5 Premere [Î / ï] per selezionare la lingua da
utilizzare a video, quindi premere [ENTER].
Video Out
Audio Out
HDMI
Playback
Network
Others
Player Menu
Audio
Subtitle
Disc Menu
DivX Subtitle
BD Rating Level
DVD Rating Level
Password Change
Auto
Deutsch
English
Español
Français
Italiano
Nederlands
Polski
6 Premere [HOME ] per uscire.
1 Preparare il disco o il contenuto desiderato.
• Caricare un disco.
• Collegare un’unità flash USB all’ingresso
USB.
• Configurare una connessione Internet a
banda larga con le relative impostazioni.
NOTA:
• Per rimuovere l’unità flash USB è sufficiente estrarla
lentamente nella modalità di arresto.
• Alcuni dispositivi USB non sono utilizzabili con il
lettore.
• Se si utilizza una prolunga USB, un hub USB o un
lettore di schede USB è possibile che il dispositivo
USB non venga riconosciuto.
• I dati di pacchetto virtuale/BD-Live
nell’unità flash USB collegata al lettore.
Per utilizzare queste funzioni collegare un’unità flash
USB (da almeno 1 GB) a questo terminale.
TM
vengono salvati
2 Premere [HOME ] per accedere al menu
iniziale.
3 Utilizzare [Î / ï / Í / Æ] per selezionare il
supporto desiderato nel menu iniziale, quindi
premere [ENTER].
4 Selezionare il tipo di file che si desidera
riprodurre, quindi premere [ENTER].
per esempio)
Musica
5 Con la selezione di “AVCHD” la riproduzione
inizia automaticamente.
Con la selezione di “Musica” viene visualizzato
un elenco di brani/file. Selezionare un gruppo
(cartella) o un brano/file da riprodurre, quindi
premere [Æ (play)] o [ENTER] per avviare la
riproduzione.
6 Premere [HOME ] o [Ê(stop)] per
terminare la riproduzione.
NOTA:
• Per ulteriori informazioni vedere “RIPRODUZIONE DI
BASE” nel manuale di istruzioni.
Alimentazione
Problema Possibili cause e soluzioni
Non è possibile
accendere il
lettore.
Il lettore si
spegne.
• Il cavo CA è saldamente inserito nella
presa CA?
• Scollegare il cavo CA, attendere 5-10
secondi e ricollegarlo.
• “Off Automatico” è impostato su “On”?
Se “Off Automatico” è impostato
su “On”, il lettore viene spento
automaticamente dopo 30 minuti
consecutivi di inattività (nessuna
riproduzione).
Operazioni di base
Problema Possibili cause e soluzioni
Il telecomando
non funziona.
Non è possibile
utilizzare il
lettore.
Non è possibile
riprodurre un
disco.
Il disco viene
espulso
automaticamente
dopo la chiusura
del vassoio.
Il video si
interrompe.
• Utilizzare il telecomando nel suo
raggio d’azione.
• Sostituire le pile.
•
Il lettore viene utilizzato nell’intervallo di
temperature specificato?
• Estrarre il disco e pulirlo.
• Assicurarsi che il disco sia caricato
correttamente (allineato nel vassoio e
con l’etichetta verso l’alto).
• Lasciare asciugare la condensa
all’interno o nelle vicinanze del
lettore.
• Assicurarsi che il disco sia caricato
correttamente (allineato nel vassoio e
con l’etichetta verso l’alto).
• Estrarre il disco e pulirlo.
• Assicurarsi che il disco sia
riproducibile.
• Il lettore è stato soggetto a urti?
Viene utilizzato in un luogo instabile?
Il lettore interrompe le operazioni se
rileva urti o vibrazioni.
Immagine
Problema Possibili cause e soluzioni
L’immagine è
assente.
Sono visibili
disturbi.
Non è possibile
trasmettere le
immagini 3D al
televisore.
• Assicurarsi che il cavo sia collegato
correttamente.
• Se il televisore supporta Deep Color
procurarsi un cavo HDMI consigliato.
• Sono in uso un televisore 3D
compatibile e i relativi occhiali 3D?
•
Assicurarsi che il televisore e il
ricevitore AV collegati siano entrambi
3D compatibili.
Audio
Problema Possibili cause e soluzioni
L’audio è
assente o
distorto.
•
Se il volume del televisore o del
ricevitore AV è al minimo, alzare il
volume.
• Nelle modalità di fermo immagine,
riproduzione al rallentatore,
avanzamento veloce e riavvolgimento
l’audio non viene riprodotto.
Page 9

De
Anschlüsse Frontplatte
BLU-RAY DISC™ PLAYER
BD-SP809
Schnellstartleitfaden
Mitgeliefertes Zubehör
Fernbedienung (1) Batterien (2)
Netzkabel (1)
Audio-/Videokabel (1)
Bedienungsanleitung
(CD-ROM) (1)
Schnellstartleitfaden (1)
Sicherheitsinformation (1)
Einsatz der Batterien in der Fernbedienung
Setzen Sie 2 R6 (1,5V) Batterien ein, die mit der Polarität
übereinstimmen, die im Batteriefach der Fernbedienung
angegeben ist.
Sie können über Audio- und Videokabel Bilder und Ton von höchster Qualität genießen. Über ein HDMI-Kabel
können Sie digitale Bilder und Ton in höchster Qualität genießen.
Digitalaudio-Kabel einen AV-Receiver anschließen.
des Players und den LAN-Anschluss des Breitbandrouters an.
AC INLET-Anschluss auf der Rückseite des Players.
Netzsteckdose.
USB-Eingang
• Um die BD-Live™-Funktionen voll nutzen
zu können, schließen Sie einen USBMassenspeicher (1 GB oder mehr) an diesen
Anschluss an.
Optisches
DigitalaudioKabel*
Netzkabel
HDMI-Kabel*
Schließen Sie ein LAN-Kabel an den ETHERNET-Anschluss
Stecken Sie dann die andere Seite des Netzkabels in die
Videokabel
Auf Wunsch können Sie über ein optisches
Stecken Sie das Netzkabel in den
VIDEO IN
Fernsehgerät
Audiokabel
LAN-Kabel*
AUDIO IN
RL
Breitbanddienst
12 3 45678
10
1 . ON/STANDBY
2 3D-Anzeige
3 Disc-Schublade
4 Display
5 fl (Öffnen/Schließen)
6 Δ (Pause)
7 Ê (Stopp)
8 Æ (Wiedergabe)
9 H / G (Überspringen
vor/zurück)
10
Fernbedienungssignal-Sensor
11 SOURCE DIRECT
Fernbedienung
1
2
3
4
5
6
7
8
9
10
11
12
13
14
15
16
17
18
20
21
22
23
24
25
27
28
911
19
26
Eine unsachgemäße Handhabung von Batterien kann
Auslaufen von Elektrolyt und Platzen der Batterien zur Folge
haben. Bitte beachten Sie daher die folgenden Hinweise:
•
Mischen Sie keine Alkali-, Standard- (Karbon-Zink) oder
wiederaufladbaren Batterien (Ni-Kad, Ni-Mh usw.) miteinander.
• Verwenden Sie nicht gleichzeitig eine neue und eine
gebrauchte Batterie.
•
Legen Sie keine Batterien unterschiedlicher Sorten
gemeinsam ein. Trotz gleicher Größe können verschiedene
Batterien eine unterschiedliche Spannung besitzen.
• Achten Sie darauf, den Plus- und Minuspol jeder Batterie
auf die Polaritätsmarkierungen + und - im Inneren des
Batteriefachs auszurichten.
•
Entfernen Sie die Batterien, wenn die Fernbedienung
mindestens einen Monat lang nicht verwendet werden soll.
• Bitte befolgen Sie beim Entsorgen verbrauchter Batterien
die einschlägigen gesetzlichen Vorschriften oder
Umweltschutzbestimmungen Ihres Wohnorts.
• Versuchen Sie auf keinen Fall, Trockenzellen aufzuladen
oder zu zerlegen, schließen Sie sie nicht kurz, und
werfen Sie sie nicht in ein Feuer.
HDMI-Kabel*
AV-Receiver
Fernsehgerät
HINWEIS:
• Damit Sie 3D-Bilder betrachten können, schließen Sie ein 3D-kompatibles Fernsehgerät an.
• Wenn Sie HDMI OUT-Buchsen verwenden, ist ein digitaler 7.1ch-Ausgang verfügbar.
• Wenn Sie AUDIO OUTPUT verwenden (DIGITAL OPTICAL), ist ein digitaler 5.1ch-Ausgang verfügbar. (Der digitale
7.1ch-Ausgang ist nicht verfügbar.)
• Wenn Sie eine Breitband-Internetverbindung nutzen, müssen Sie einen Vertrag mit einem Internetprovider
abschließen. Um Einzelheiten dazu zu erfahren, setzen Sie sich mit einem nahe gelegenen Internetprovider in
Verbindung.
• Verwenden Sie ein LAN-Kabel/einen Router, das bzw. der 10BASE-T/100BASE-TX unterstützt.
• Weitere Informationen finden Sie in der Bedienungsanleitung unter „Buchsen“.
Router/Modem
* Nicht mitgeliefert
1 DISPLAY
2 . (Ein/Standby)
3 Zifferntasten
4 SEARCH
5 A / B / C / D
6 HOME
7 Î / ï / Í / Æ
8 POP UP MENU / MENU
9 SUBTITLE
10 ¢ (Rücklauf)
11 Æ (Wiedergabe)
12 H (Überspringen)
13 Δ (Pause)
14 RESOLUTION
15 OPEN / CLOSE fl
16 PIP
17 ANGLE
18 REPEAT
19 CLEAR
20 A-B
21 TOP MENU
22 ENTER
23 RETURN
24 AUDIO
25 ∫ (Vorlauf)
26 Ê (Stopp)
27 G (Überspringen)
28 MODE
Page 10

Einschalten des Players und des Fernsehgeräts
Grundlegende Bedienung Fehlerbehebung
Wenn Sie alle erforderlichen Anschlüsse vorgenommen
haben, drücken Sie [. (Ein/Standby)] oder
[. ON/STANDBY] am Player, um das Gerät einzuschalten.
Schalten Sie Ihr Fernsehgerät ein, und wechseln Sie
zum richtigen AV-Eingang (siehe Bedienungsanleitung
des Fernsehgeräts). (Dieser Eingang ist
möglicherweise mit „SOURCE“, „AV“, „AUX“ oder
„SELECT“ oder ähnlichem beschriftet.)
.
(Ein/Standby)
. ON/STANDBY
Spracheinstellung
1 Drücken Sie [HOME ], um das Home-Menü
aufzurufen.
2 Betätigen Sie [Î / ï / Í / Æ], um „Settings“
auszuwählen, und drücken Sie dann [ENTER].
3 Betätigen Sie [Î / ï], um „Playback“
auszuwählen, und drücken Sie dann [ENTER].
4 Betätigen Sie [Î / ï], um „Player Menu“
auszuwählen, und drücken Sie dann [ENTER].
5 Drücken Sie [Î / ï] , um die gewünschte
Anzeigesprache auszuwählen, und drücken Sie dann
[ENTER].
Video Out
Audio Out
HDMI
Playback
Network
Others
Player Menu
Audio
Subtitle
Disc Menu
DivX Subtitle
BD Rating Level
DVD Rating Level
Password Change
Auto
Deutsch
English
Español
Français
Italiano
Nederlands
Polski
6 Drücken Sie [HOME ], um das Menü zu
verlassen.
1 Bereiten Sie die gewünschte Disc oder
sonstige Inhalte vor.
• Laden Sie eine Disc.
• Schließen Sie einen USB-Massenspeicher
an den USB-Eingang an.
• Stellen Sie eine BreitbandInternetverbindung her, und nehmen Sie die
entsprechenden Einstellungen vor.
HINWEIS:
• Um den USB-Massenspeicher zu entfernen, ziehen
Sie ihn im Stopp-Modus langsam heraus.
• Einige USB-Geräte funktionieren möglicherweise mit
diesem Player nicht.
• Wenn Sie ein USB-Verlängerungskabel, einen USBHub oder einen USB-Kartenleser verwenden, wird
das USB-Gerät möglicherweise nicht erkannt.
• Virtual Package-/BD-Live
den Player angeschlossenen USB-Massenspeicher
gespeichert.
Damit Sie diese Funktionen nutzen können, schließen
Sie einen USB-Massenspeicher (1 GB oder mehr) an
diesen Anschluss an.
TM
-Daten werden auf dem an
2 Drücken Sie [HOME ], um das Home-Menü
aufzurufen.
3 Betätigen Sie [Î / ï / Í / Æ], um im Home-Menü
die gewünschten Medien auszuwählen, und
drücken Sie dann [ENTER].
4 Wählen Sie den Dateityp aus, den Sie
wiedergeben möchten, und drücken Sie dann
[ENTER].
z. B.)
Musik
5 Bei „AVCHD“ beginnt die Wiedergabe
automatisch.
Bei „Musik“ wird der Titel/die Dateiliste
angezeigt. Wählen Sie eine Gruppe (Ordner)
oder einen Titel/eine Datei aus, die Sie
wiedergeben möchten, und drücken Sie
[Æ (Wiedergabe)] oder [ENTER], um die
Wiedergabe zu starten.
6 Drücken Sie [HOME ] oder [Ê(Stopp)], um
die Wiedergabe zu beenden.
HINWEIS:
• Weitere Informationen finden Sie in der
Bedienungsanleitung unter „GRUNDLEGENDE
WIEDERGABEVERFAHREN“.
Energieversorgung
Störung Mögliche Ursachen und Lösungen
Das Gerät
lässt sich nicht
einschalten.
Das Gerät
schaltet sich ab.
• Wurde der Netzstecker richtig in die
Netzsteckdose gesteckt?
Trennen Sie den Netzstecker von der
•
Netzsteckdose, warten Sie 5-10 Sekunden,
und schließen Sie ihn dann erneut an.
• Ist „Abschaltung“ auf „An“ gestellt?
Wenn „Abschaltung“ auf „An“ gestellt
ist, schaltet sich das Gerät nach 30
Minuten durchgehender Inaktivität
(keine Wiedergabe) automatisch ab.
Grundlegende Bedienung
Störung Mögliche Ursachen und Lösungen
Die
Fernbedienung
funktioniert nicht.
Der Player lässt
sich nicht bedienen.
Der Player kann
eine Disc nicht
abspielen.
Die Disc wird
nach dem
Schließen der
Disc-Schublade
automatisch
ausgeworfen.
Die
Videowiedergabe
wird angehalten.
• Benutzen Sie die Fernbedienung
innerhalb der möglichen Reichweite.
• Tauschen Sie die Batterien aus.
•
Bedienen Sie den Player im angegebenen
Betriebstemperaturbereich?
• Nehmen Sie die Disc aus dem Player,
und reinigen Sie sie.
Stellen Sie sicher, dass die Disc richtig
•
eingelegt ist (in der Disc-Schublade
ausgerichtet und mit dem Label nach oben).
• Lassen Sie möglicherweise
auftretende Kondensation im oder in
der Nähe vom Player abtrocknen.
Stellen Sie sicher, dass die Disc richtig
•
eingelegt ist (in der Disc-Schublade
ausgerichtet und mit dem Label nach oben).
• Nehmen Sie die Disc aus dem Player,
und reinigen Sie sie.
• Stellen Sie sicher, dass die Disc
abgespielt werden kann.
• Wurde der Player Erschütterungen
oder sonstigen Einwirkungen
ausgesetzt? Benutzen Sie den
Player an einem instabilen Standort?
Der Player stoppt automatisch bei
Erschütterungen oder Vibrationen.
Bild
Störung Mögliche Ursachen und Lösungen
Kein Bild. • Stellen Sie sicher, dass das Kabel
Es treten
Bildstörungen
auf.
3D-Bilder können
nicht über ein
Fernsehgerät
ausgegeben
werden.
richtig angeschlossen ist.
• Wenn das Fernsehgerät Deep Color
unterstützt, verwenden Sie ein
empfohlenes HDMI-Kabel.
• Benutzen Sie ein 3D-kompatibles
Fernsehgerät und eine 3D-Brille?
•
Stellen Sie sicher, dass das
angeschlossene Fernsehgerät und der
AV-Receiver 3D-kompatibel sind.
Ton
Störung Mögliche Ursachen und Lösungen
Kein Ton, oder
der Klang ist
verzerrt.
Wenn die Lautstärke des Fernsehgeräts
•
oder AV-Receivers auf die niedrigste
Einstellung gesetzt ist, stellen Sie die
Lautstärke höher ein.
•
Im Standbildmodus, bei der
Zeitlupenwiedergabe, im Schnellvorlauf und
im Schnellrücklauf erfolgt keine Tonausgabe.
Page 11

Nl
Aansluitingen Voorpaneel
BLU-RAY DISC™ PLAYER
BD-SP809
Beknopte handleiding
Meegeleverde accessoires
Afstandsbediening (1) Batterijen (2)
Netsnoer (1)
Audio-/ videokabels (1)
Gebruiksaanwijzing
(CD-ROM) (1)
Beknopte handleiding (1)
Veiligheidsinformatie (1)
Batterijen in de afstandsbediening plaatsen
Plaats in het batterijenvakje van de afstandsbediening
twee R6-batterijen (1,5V) volgens de polariteit die daarin
is aangegeven.
Door verkeerd gebruik kunnen batterijen gaan lekken of
openbarsten. Let op het volgende:
• Gebruik geen alkalinebatterijen, gewone batterijen
(koolstof-zink) noch oplaadbare (ni-cad, ni-mh, enz.)
batterijen tegelijkertijd.
• Gebruik nooit tegelijkertijd nieuwe en oude batterijen.
• Gebruik nooit tegelijkertijd verschillende soorten
batterijen. Hoewel de batterijen op elkaar lijken, kunnen
ze toch verschillende voltages hebben.
• Zorg ervoor dat de + en de - van elke batterij
overeenkomt met de + en de - in het batterijenvakje.
Verwijder de batterijen uit het batterijenvakje als de
•
afstandsbediening een maand of langer niet wordt gebruikt.
• Wij verzoeken u de officiële wetgeving of milieuregels
van uw land of regio te respecteren wanneer u gebruikte
batterijen wegdoet.
• U mag batterijen niet opladen, kortsluiten, verhitten,
verbranden of demonteren.
Als u audio-/videokabels gebruikt, kunt u genieten van standaardkwaliteit beeld en geluid. Een HDMI-kabel
zorgt voor digitaal beeld en geluid van superieure kwaliteit.
digitaal-optische audiokabel.
poort van een breedband router.
Steek vervolgens de stekker in een stopcontact.
USB-ingang
• Sluit een USB flash drive (1 GB of meer
capaciteit) aan op deze aansluiting als u wilt
genieten van BD-Live™-functies.
Netsnoer
OPMERKING:
• Voor 3D-weergave moet het toestel worden aangesloten op een 3D-compatibele TV.
• Bij gebruik van een HDMI OUT-aansluiting is 7.1-kanaals digitale uitvoer beschikbaar.
• Bij gebruik van AUDIO OUTPUT (DIGITAL OPTICAL) is 5.1-kanaals digitale uitvoer beschikbaar. (7.1-kanaals
digitale uitvoer is niet beschikbaar.)
• Voor een breedband Internetaansluiting is een contract met een Internet service provider vereist. Neem voor meer
details contact op met uw Internet service provider.
• Gebruik een LAN-kabel/router die 10BASE-T/100BASE-TX ondersteunt.
• Zie "AANSLUITINGEN" in de gebruiksaanwijzing voor meer informatie.
Sluit een LAN-kabel aan op de ETHERNET-aansluiting van deze speler en de LAN-
Sluit het netsnoer aan op de AC INLET-aansluiting achteraan op de speler.
Videokabel
Digitaaloptische
audiokabel*
HDMI-kabel*
HDMI-kabel*
AV receiver
TV
U kunt een AV receiver aansluiten met behulp van een
VIDEO IN
TV
Breedband
service
* Niet meegeleverd
LAN-kabel*
AUDIO IN
RL
Audiokabel
Router / Modem
12 3 4 5678
10
1 . ON/STANDBY
2 3D indicator
3 Disc-lade
4 Display
5 fl (openen/sluiten)
6 Δ (pauzeren)
7 Ê (stoppen)
8 Æ (afspelen)
9 H / G (overslaan
neer / op)
10 Infraroodsensor
11 SOURCE DIRECT
Afstandsbediening
1
2
3
4
5
6
7
8
9
10
11
12
13
1 DISPLAY
2 . (aan/standby)
3 Cijfertoetsen
4 SEARCH
5 A / B / C / D
6 HOME
7 Î / ï / Í / Æ
8 POP UP MENU / MENU
9 SUBTITLE
10 ¢ (achteruit)
11 Æ (afspelen)
12 H (overslaan)
13 Δ (pauzeren)
14 RESOLUTION
15 OPEN / CLOSE fl
16 PIP
17 ANGLE
18 REPEAT
19 CLEAR
20 A-B
21 TOP MENU
22 ENTER
23 RETURN
24 AUDIO
25 ∫ (vooruit)
26 Ê (stoppen)
27 G (overslaan)
28 MODE
14
15
16
17
18
20
21
22
23
24
25
27
28
911
19
26
Page 12

Schakel de speler en de TV in
Basisfuncties Problemen oplossen
Druk na het verrichten van de nodige aansluitingen op
[. (aan/standby)] of [. ON/STANDBY] op de speler
om die in te schakelen.
Schakel uw TV in en kies de passende AV-ingang
(raadpleeg de handleiding van uw TV). (Dit kan
"SOURCE", "AV", "AUX" of "SELECT" enz. zijn.)
. (aan/standby)
. ON/STANDBY
Taalinstelling
1 Druk op [HOME ] om het startmenu te
laten verschijnen.
2 Gebruik [Î / ï / Í / Æ] om "Settings" te
selecteren en druk vervolgens op [ENTER].
3 Gebruik [Î / ï] om "Playback" te selecteren en
druk vervolgens op [ENTER].
4 Gebruik [Î / ï] om "Player Menu" te
selecteren en druk vervolgens op [ENTER].
5 Druk op [Î / ï] om de schermtaal te selecteren
en druk vervolgens op [ENTER].
Video Out
Audio Out
HDMI
Playback
Network
Others
Player Menu
Audio
Subtitle
Disc Menu
DivX Subtitle
BD Rating Level
DVD Rating Level
Password Change
Auto
Deutsch
English
Español
Français
Italiano
Nederlands
Polski
6 Druk op [HOME ] om het menu te sluiten.
1 Maak de gewenste disc of content klaar.
• Plaats een disc.
• Sluit een USB flash drive aan op de USBingang.
• Zorg voor een breedband Internetaansluiting
en verricht de nodige instellingen.
OPMERKING:
• Om de USB flash drive te verwijderen, trekt u die
traag uit in de stopstand.
• Sommige USB-apparaten werken niet met deze
speler.
• Bij gebruik van een USB-verlengkabel, USB hub of
USB-kaartlezer, wordt het USB-apparaat mogelijk niet
herkend.
• Virtual package/BD-Live
USB flash drive die is aangesloten op deze speler.
Om hiervan gebruik te maken, sluit u een USB flash
drive (1 GB of meer) aan op de USB-ingang van deze
speler.
TM
data is opgeslagen op de
2 Druk op [HOME ] om het startmenu te
tonen.
3 Gebruik [Î / ï / Í / Æ] om media te selecteren
in het startmenu en druk vervolgens op
[ENTER].
4 Selecteer het bestandstype om af te spelen en
druk vervolgens op [ENTER].
bv.)
Muziek
5 Voor "AVCHD" start het afspelen automatisch.
Voor "Musiek" verschijnt de track-/
bestandslijst. Selecteer een groep (map)
of track / bestand om af te spelen en druk
vervolgens [Æ (afspelen)] of [ENTER] om het
afspelen te starten.
6 Druk op [HOME ] of [Ê(stoppen)] om het
afspelen te stoppen.
OPMERKING:
• Zie "BELANGRIJKSTE AFSPEELFUNCTIES" in de
gebruiksaanwijzing voor meer informatie.
Voeding
Probleem Mogelijke oorzaken en oplossingen
De speler kan
niet worden
ingeschakeld.
De speler wordt
uitgeschakeld.
• Is het netsnoer goed aangesloten op
een stopcontact?
• Trek de stekker uit het stopcontact,
wacht 5-10 seconden en steek de
stekker weer in het stopcontact.
• Is "Auto Uitschakel " ingesteld op
"Aan"? Wanneer "Auto Uitschakel"
is ingesteld op "Aan", wordt de
speler automatisch uitgeschakeld
wanneer hij gedurende 30 minuten
onafgebroken niet werkt (niet
afspelen).
Basisfuncties
Probleem Mogelijke oorzaken en oplossingen
De
afstandsbediening
werkt niet.
De speler werkt
niet.
De speler kan
geen disc
afspelen.
De disc wordt
automatisch
uitgeworpen na
het sluiten van
de disc-lade.
Video stopt. • Stond de speler bloot aan schokken
• Gebruik de afstandsbediening binnen
het werkingsbereik.
• Vervang de batterijen.
•
Bevindt de speler zich
binnen het voorgeschreven
werkingstemperatuurbereik?
• Verwijder de disc en maak ze schoon.
• Controleer of de disc goed is
ingebracht (goed in de disc-lade met
label omhoog).
• Laat condens in of rond de speler
opdrogen.
• Controleer of de disc goed is
ingebracht (goed in de disc-lade met
label omhoog).
• Verwijder de disc en maak ze schoon.
• Controleer of de disc afspeelbaar is.
of stoten? Gebruikt u de speler op
een onstabiele plaats? De speler
stopt wanneer hij schokken of
trillingen detecteert.
Beeld
Probleem Mogelijke oorzaken en oplossingen
Geen beeld. • Controleer of de kabel goed is
Beeld vertoont
ruis.
3D-beelden
worden niet
weergegeven
door een TV.
aangesloten.
• Gebruik een aanbevolen HDMI-kabel
indien de TV Deep Color ondersteunt.
• Maakt u gebruik van een
3D-compatibele TV en een 3D-bril?
•
Controleer of de aangesloten TV en AV
receiver 3D-compatibel zijn.
Geluid
Probleem Mogelijke oorzaken en oplossingen
Geen geluid of
vervormd geluid.
•
Zet het volume hoger als het volume
van de TV of AV receiver volledig dicht
staat.
• Er is geen geluid tijdens stilstaand
beeld, vertraagd, snel vooruit en snel
achteruit afspelen.
Page 13

Sv
Anslutningar Frontpanel
BLU-RAY DISC™ PLAYER
BD-SP809
Snabbstartsguide
Medföljande tillbehör
Fjärrkontroll (1) Batteri (2)
Nätkabel (1)
Ljud- / videokablar (1)
Bruksanvisning
(CD-ROM-skiva) (1)
Snabbstartsguide (1)
Säkerhetsinformation (1)
Sätta i batterier i fjärrkontrollen
Sätt i 2 R6 (1,5V) batterierna med polerna vända enligt
markeringarna i batterifacket på fjärrkontrollen.
Du kan använda standardmässig bild och ljud med hjälp av ljud- / videokablar. Njut av digital bild och ljud av
hög kvalitet med en HDMI-kabel.
Anslut en LAN-kabel till ETHERNET-uttaget på spelaren och bredbandsrouterns LAN-kontakt.
AC INLET-terminalen på spelarens baksida.
USB-ingång
• För BD-Live™-funktioner, anslut ett USBflashminne (1 GB eller större) till detta uttag.
Nätkabel
Du kan ansluta en AV-mottagare med en digital optisk ljudkabel vid behov.
Anslut den sedan till vägguttaget.
VIDEO IN
AUDIO IN
RL
Videokabel
Ljudkabel
Optisk kabel
för digitalt
ljud*
HDMI-kabel*
LAN-kabel*
Anslut nätkabeln till
TV
Bredbandstjänst
12 3 4 5678
10
1 . ON/STANDBY
2 3D-indikator
3 Skivfack
4 Display
5 fl (öppna/stäng)
6 Δ (paus)
7 Ê (stopp)
8 Æ (spela upp)
9 H / G (hoppa ner/
upp mellan titlar)
10 IR-sensorfönster
11 SOURCE DIRECT
Fjärrkontroll
1
2
3
4
5
6
7
8
9
10
11
12
13
14
15
16
17
18
20
21
22
23
24
25
27
28
911
19
26
Felaktig användning av batterierna kan leda till att de
läcker eller spricker. Tänk på följande:
• Blanda inte batterier av typen alkaliska, standard (kolzink) eller uppladdningsbara batterier (Ni-cad, Ni-MH
o.s.v.).
• Använd inte gamla och nya batterier tillsammans.
• Använd inte olika batterityper tillsammans. De kan likna
varandra men ha olika spänningar.
• Se till att batteriernas +- och --poler överensstämmer
med markeringarna i batterifacket.
• Ta ut batterierna ur facket när fjärrkontrollen inte ska
användas under den närmaste månaden.
• När du slänger bort använda batterier måste du följa de
regeringsföreskrifter eller allmänna miljöanvisningar som
gäller i ditt land eller område.
• Batterier får inte laddas, kortslutas, värmas, brännas
eller tas isär.
HDMI-kabel*
AV-mottagare
TV
OBS:
• För att uppleva 3D-bilder behövs en anslutning till en 3D-kompatibel TV-apparat.
• När en HDMI OUT-kontakt används är 7.1-kanals digital utgång tillgänglig.
• Vid användning av AUDIO OUTPUT (DIGITAL OPTICAL) 5.1-kanalsdigital utgång tillgänglig. (7.1-kanals digital
utgång är inte tillgänglig.)
• När du använder en bredbandsanslutning krävs det ett avtal med en Internetleverantör. För mer information,
kontakta närmaste Internetleverantör.
• Använd en LAN-kabel/router med stöd för 10BASE-T/100BASE-TX.
• För mer information, se "ANSLUTNINGAR" i bruksanvisningen.
Router / Modem
* Medföljer ej
1 DISPLAY
2 . (på/viloläge)
3 Sifferknappar
4 SEARCH
5 A/B/C/D
6 HOME
7 Î / ï / Í / Æ
8 POP UP MENU / MENU
9 SUBTITLE
10 ¢ (bakåt)
11 Æ (spela upp)
12 H (hoppa över)
13 Δ (paus)
14 RESOLUTION
15 OPEN / CLOSE fl
16 PIP (bild-i-bild)
17 ANGLE
18 REPEAT
19 CLEAR
20 A-B
21 TOP MENU
22 ENTER
23 RETURN
24 AUDIO
25 ∫ (framåt)
26 Ê (stopp)
27 G (hoppa över)
28 MODE
Page 14

Slå på spelaren och TV:n
Grundläggande användning Felsökning
Efter att alla nödvändiga anslutningar är klara, tryck på
[. (på/viloläge)] eller [. ON/STANDBY] på spelaren
för att slå på enheten.
Slå på TV:n och byt till lämplig AV-ingång (Se TV:ns
bruksanvisning). (De kan heta "SOURCE", "AV", "AUX"
eller "SELECT o.s.v.)
. (på/viloläge)
. ON/STANDBY
Språkinställning
1 Tryck på [HOME ] för att visa startmenyn.
2 Använd [Î / ï / Í / Æ] för att välja "Settings" och
tryck sedan på [ENTER].
3 Använd [Î / ï] för att välja "Playback" och
tryck sedan på [ENTER].
4 Använd [Î / ï] för att välja "Player Menu" och
tryck sedan på [ENTER].
5 Tryck på [Î / ï] för att välja det språk som ska
visas på skärmen och tryck sedan på [ENTER].
Video Out
Audio Out
HDMI
Playback
Network
Others
Player Menu
Audio
Subtitle
Disc Menu
DivX Subtitle
BD Rating Level
DVD Rating Level
Password Change
Português
Русский
Svenska
6 Tryck på [HOME ] för att avsluta.
1 Förbered önskad skiva eller innehåll.
• Ladda en skiva.
• Anslut ett USB-flashminne till USB-ingången.
• Skapa en bredbandsanslutning och
inställningar.
OBS:
• Ta bort USB-flashminnet i stoppläget, dra ut den
varsamt.
• Vissa USB-enheter kanske inte fungerar med denna
spelare.
• Om du använder en USB-förlängsningskabel, USBhub eller USB-kortläsare kanske USB-enheten inte
hittas.
• Virtuellt paket/al package/BD-Live
i USB-flashminnen som är ansluten till den här
spelaren.
För dessa funktioner, anslut ett USB-flashminne
(1 GB eller större) till spelarens USB-ingång.
TM
-data sparas
2 Använd [HOME ] för att öppna startmenyn.
3 Använd [Î / ï / Í / Æ] för att välja önskad media i
startmenyn och tryck sedan på [ENTER].
4 Välj den filtyp du vill spela upp och tryck
sedan på [ENTER].
t.ex.)
Musik
5 For “AVCHD” startar uppspelningen
automatiskt.
För “Musik” visas spår-/fillistan. Välj en grupp
(mapp) eller spår/fil som du vill spela upp och
tryck sedan på [Æ (spela upp)] or [ENTER]
för att starta uppspelning.
6 Tryck på [HOME ] eller [Ê(stopp)] för att
avsluta uppspelning.
OBS:
• För mer information, se "GRUNDLÄGGANDE
UPPSPELNING" i bruksanvisningen.
Strömförsörjning
Problem Vanliga problem och lösningar
Spelarens
strömförsörjning
kan inte slås på.
Spelarens
strömförsörjning
är avslagen.
• Är nätkabeln ordentligt ansluten till
vägguttaget?
• Dra ut nätkabeln, vänta 5-10
sekunder och sätt sedan tillbaka den.
• Är "Auto Power Av" inställd på
"På"? När "Auto Power Av" är
inställd på "På" kommer strömmen
att stängas av automatiskt efter
30 sammanhängande minuter av
inaktivitet (ingen uppspelning).
Grundläggande användning
Problem Vanliga problem och lösningar
Fjärrkontrollen
fungerar inte.
Kan inte
använda
spelaren.
Spelare kan inte
spela upp en
skiva.
Skivan matas
automatiskt ut
när skivfacket
stängs.
Videofiler
stannar.
• Använd fjärrkontrollen inom dess
räckvidd.
• Byt ut batterierna.
•
Använder du spelaren inom den
angivna drifttemperaturen?
• Ta ut skivan och rengör den.
• Se till att skivan har lagts i ordentligt
(rakt i skivfacket och med etikettsidan
uppåt).
• Låt eventuell kondens i eller i
närheten av spelaren torka.
• Se till att skivan har lagts i ordentligt
(rakt i skivfacket och med etikettsidan
uppåt).
• Ta ut skivan och rengör den.
• Kontrollera så att skivan är
uppspelningsbar.
• Har spelaren utsatts för stötar eller
slag? Används den på en instabil
plats? Spelaren stannar om den
känner av stötar eller vibrationer.
Bild
Problem Vanliga problem och lösningar
Ingen bild. • Kontrollera så att kabeln är ordentligt
Brus uppstår. • Om TV-apparaten har stöd för Deep
3D-bilder sänds
inte till TVapparaten.
ansluten.
Color rekommender vi att en HDMIkabel används.
• Är TV:n 3D-kompatibel och används
3D-glasögon?
•
Kontrollera så att både TV:n och AVmottagaren är 3D-kompatibel.
Ljud
Problem Vanliga problem och lösningar
Inget ljud eller
störningar i
ljudet
Om volymnivån på TV:n eller AV-
•
mottagaren är inställd på minimum,
vrid upp volymnivån.
• Det är inget ljud vid stillbild, slow
motion, snabbspolning framåt och
bakåt.
Page 15

Fi
Liitännät Etupaneeli
BLU-RAY DISC™ PLAYER
BD-SP809
Aloitusopas
Mukana tulevat vakiovarusteet
Kaukosäädin (1) Paristo (2)
Virtajohto (1)
Ääni- / videokaapelit (1)
Käyttöohje
(CD-ROM) (1)
Aloitusopas (1)
Turvallisuustiedot (1)
Paristojen paneminen kaukosäätimeen
Pane kaukosäätimen paristokoteloon 2 R6 (1,5 V)
-paristoa. Varmista, että navat ovat oikein päin.
Audio-/videokaapeleita käytettäessä kuva ja ääni ovat normaalilaatuisia. HDMI-kaapelia käytettäessä kuvan
ja äänen laatu ovat korkealaatuisia.
audiokaapelilla.
porttiin.
USB-liitin
• Jos haluat käyttää BD-Live™ -toimintoja, liitä
USB Flash -muisti (enemmän kuin 1 Gt) tähän
liittimeen.
Virtajohto
Liitä lähiverkon kaapeli ETHERNET tämän soittimen liittimeen ja laajakaistareitittimen LAN-
Liitä virtajohto AC INLET soittimen takana olevaan liittimeen. Kytke sitten pistotulppa pistokkeeseen.
Tarvittaessa voit liittää laitteeseen AV-vastaanottimen digitaalisella optisella
VIDEO IN
TV
Digitaalinen
optinen
audiokaapeli*
HDMI-kaapeli*
Videokaapeli
LAN-kaapeli*
AUDIO IN
RL
Audiokaapeli
Laajakaistapalvelu
12 3 4 5678
10
1 . ON/STANDBY
2 3D-ilmaisin
3 Levykelkka
4 Näytä
5 fl (avaa/sulje)
6 Δ (tauko)
7 Ê (pysäytys)
8 Æ (toisto)
9 H / G
edelliseen / seuraavaan)
10 Infrapunasensori
11 SOURCE DIRECT
Kaukosäädin
1
2
3
4
5
6
7
8
9
10
11
12
13
14
15
16
17
18
20
21
22
23
24
25
27
28
911
(siirry
19
26
Jos paristoja käytetään väärin, tuloksena voi olla pariston
vuotaminen tai halkeaminen. Huomaa seuraavat
varoitukset:
• Älä käytä alkaliparistoja, normaaleja (hiilisinkki)
paristoja ja ladattavia akkuja (nikkelikadmium,
nikkelimetallihydridi) yhtä aikaa.
• Älä käytä uusia ja vanhoja paristoja yhtä aikaa.
• Älä käytä erilaisia paristoja yhtä aikaa. Vaikka paristot
voivat näyttää samalta, eri paristojen jännitteet voivat
vaihdella.
• Varmista, että jokaisen pariston plus- (+) ja miinusnapa
(-) on paristokotelon kuvien mukaisesti.
• Irrota paristot paristokotelosta, jos kaukosäädintä ei
käytetä yli kuukauteen.
• Noudata paikallisia säädöksiä ja ympäristöohjeita
hävittäessäsi paristoja.
• Älä lataa uudelleen, saata oikosulkuun, kuumenna, polta
tai pura paristoja.
HDMI-kaapeli*
AV-vastaanotin
TV
HUOMAA:
• Jos haluat katsella 3D-kuvia, soitin tulee liittää 3D-yhteensopivaan televisioon.
• Kun käytät HDMI OUT-liittimiä, voit valita 7.1-kanavaisen digitaalisen signaalin.
• Kun käytät ulostuloa AUDIO OUTPUT (DIGITAL OPTICAL), voit valita 5.1-kanavaisen digitaalisen signaalin.
(7.1-kanavainen digitaalinen signaali ei ole käytettävissä.)
• Internet-yhteyden käyttämiseen vaaditaan sopimus internet-palveluntarjoaja kanssa. Lisätietoja saat ottamalla
yhteyttä lähimpään internet-palveluntarjoajaan.
• Käytä lähiverkkokaapelia/reititintä, joka tukee 10BASE-T/100BASE-TX-verkkoa.
• Lisätietoja on käyttöohjeen kohdassa “CONNECTIONS”.
Reititin / modeemi
* Ei mukana pakkauksessa
1 DISPLAY
2 . (päälle/valmiustila)
3 Numeropainikkeet
4 SEARCH
5 A / B / C / D
6 HOME
7 Î / ï / Í / Æ
8 POP UP MENU / MENU
9 SUBTITLE
10 ¢ (pikakelaus
11 Æ (toisto)
12 H (ohita)
13 Δ (tauko)
14 RESOLUTION
15 OPEN / CLOSE fl
16 PIP
17 ANGLE
taaksepäin)
18 REPEAT
19 CLEAR
20 A-B
21 TOP MENU
22 ENTER
23 RETURN
24 AUDIO
25 ∫ (pikakelaus
eteenpäin)
26 Ê (pysäytys)
27 G (ohita)
28 MODE
Page 16

Soittimen ja television virran kytkeminen päälle
Peruskäyttö Vianetsintä
Kun kaikki liitännät on tehty, kytke soittimen virta päälle
painikkeesta [. (päälle/valmiustila)] tai soittimen
painikkeesta [. ON/STANDBY].
Kytke television virta ja käytettävä AV-sisääntulo päälle
(lisätietoja television käyttöohjeessa). (Kyseessä voi
olla “SOURCE”, “AV”, “AUX”, “SELECT” jne.)
.
(päälle/valmiustila)
. ON/STANDBY
Kieliasetukset
1 Avaa aloitusvalikko painikkeella [HOME ].
2 Siirry painikkeilla [Î / ï / Í / Æ] kohtaan
“Settings” (asetukset) ja paina [ENTER].
3 Siirry painikkeilla [Î / ï] kohtaan “Playback”
(toisto) ja paina [ENTER].
4 Siirry painikkeilla [Î / ï] kohtaan “Player
Menu” (soittimen valikko) ja paina [ENTER].
5 Siirry painikkeilla [Î / ï] sen kielen kohdalle,
jonka haluat näyttää ruudussa, ja paina [ENTER].
Video Out
Audio Out
HDMI
Playback
Network
Others
Player Menu
Audio
Subtitle
Disc Menu
DivX Subtitle
BD Rating Level
DVD Rating Level
Password Change
Auto
Deutsch
English
Español
Français
Italiano
Nederlands
Polski
6 Poistu painamalla [HOME ].
1 Valmistele toistettava levy tai sisältö.
• Lataa levy soittimeen.
• Liitä USB Flash -muisti USB-liittimeen.
• Muodosta internet-yhteys laajakaistalla ja
määritä asetukset.
HUOMAA:
• Irrota USB Flash -muisti pysäytystilassa vetämällä
muisti hitaasti ulos liittimestä.
• Kaikki USB-laitteet eivät välttämättä toimi tämän
soittimen kanssa.
• Jos käytät USB-jatkokaapelia, USB-keskitintä tai
USB-kortinlukijaa, USB-laitetta ei ehkä tunnisteta.
• Virtuaalipakettien/BD-Live
tallennetaan soittimeen liitettyyn USB Flash -muistiin.
Jos haluat käyttää näitä toimintoja, liitä USB Flashmuisti (enemmän kuin 1 Gt) tähän liittimeen.
TM
-toiminnon tiedot
2 Avaa aloitusvalikko painikkeella [HOME ].
3 Valitse painikkeilla [Î / ï / Í / Æ] haluttu
materiaali kotivalikosta ja paina [ENTER].
4 Valitse toistettava tiedostotyyppi ja paina
[ENTER].
esim.)
Music
5 “AVCHD”-tiedostojen toisto alkaa
automaattisesti.
Jos valitset “Music” (musiikki), näytetään
raita-/tiedostoluettelo. Valitse ryhmä (kansio)
tai raita / tiedosto, jonka haluat toistaa ja aloita
toisto painamalla [Æ (toisto)] tai [ENTER].
6 Pysäytä toisto painikkeella [HOME ] tai
[Ê(pysäytys)].
HUOMAA:
• Lisätietoja on käyttöohjeen kohdassa “BASIC
PLAYBACK”.
Virta
Ongelma Mahdollinen syy ja korjausehdotus
Soittimen virta
ei mene päälle.
Soittimen virta
sammuu.
• Onko virtajohdon pistotulppa kunnolla
kiinni pistorasiassa?
• Irrota virtajohto, odota noin 5-10
sekuntia ja kiinnitä se uudelleen.
• Onko “Auto Power Off”
(automaattinen sammutus) -toiminnon
asetuksena “On” (päällä)? Jos
“Auto Power Off” (automaattinen
sammutus) -toiminnon asetuksena on
“On” (päällä), soittimen virta sammuu
automaattisesti, kun sitä ei käytetä 30
minuuttiin (toisto ei ole päällä).
Peruskäyttö
Ongelma Mahdollinen syy ja korjausehdotus
Kaukosäädin ei
toimi.
Soitinta ei pysty
käyttämään.
Soitin ei toista
levyä.
Levykelkka
aukeaa
automaattisesti
sulkemisen
jälkeen.
Video pysähtyy. • Onko soittimeen kohdistunut iskuja?
• Käytä kaukosäädintä sen
toimintasäteen sisäpuolella.
• Vaihda paristot.
•
Onko soitin paikassa, jonka lämpötila
on määritellyn käyttölämpötilan
mukainen?
•
Ota levy pois soittimesta ja puhdista se.
• Varmista, että levy on ladattu
soittimeen oikein (kohdistettu oikein
levykelkkaan ja etikettipuoli ylöspäin).
• Anna soittimessa tai sen lähettyvillä
olevan kosteuden kuivua.
• Varmista, että levy on ladattu
soittimeen oikein (kohdistettu oikein
levykelkkaan ja etikettipuoli ylöspäin).
•
Ota levy pois soittimesta ja puhdista se.
• Varmista, että soitin pystyy
toistamaan levyn.
Käytätkö soitinta epävakaalla
alustalla? Toisto lopetetaan, jos soitin
tunnistaa iskun tai tärinää.
Kuva
Ongelma Mahdollinen syy ja korjausehdotus
Kuva ei näy. • Varmista, että kaapeli on kunnolla
Kuvassa on
kohinaa.
3D-kuvat eivät
näy televisiossa.
kiinni.
• Jos televisio tukee Deep Color
-toimintoa, käytä suositeltua HDMIkaapelia.
• Käytätkö 3D-yhteensopivaa
televisiota ja 3D-laseja?
•
Varmista, että sekä liitetty TV että AVvastaanotin ovat 3D-yhteensopivia.
Ääni
Ongelma Mahdollinen syy ja korjausehdotus
Ääni ei kuulu
tai se on
vääristynyt.
Jos television tai AV-vastaanottimen
•
äänenvoimakkuus on pieni, lisää
äänenvoimakkuutta.
• Pysäytyskuvan, taaksepäin
hidastuksen ja pikakelauksen eteen
ja taaksepäin aikana ei kuulu ääntä.
 Loading...