

Page 1

Contents
BLU-RAY DISC PLAYER
BD-SP309
Instruction Manual
Introduction . . . . . . . . . . . . . .2
Connection . . . . . . . . . . . . .15
Playback . . . . . . . . . . . . . . .19
Settings . . . . . . . . . . . . . . . .39
Troubleshooting . . . . . . . . .50
Appendix . . . . . . . . . . . . . . .54
Thank you for purchasing an Onkyo BLU-RAY DISC
PLAYER. Please read this manual thoroughly before
making connections and plugging in the unit. Following
the instructions in this manual will enable you to obtain
optimum performance and listening enjoyment from
your new BLU-RAY DISC PLAYER. Please retain this
manual for future reference.
E
n
Page 2

WARNING:
TO REDUCE THE RISK OF FIRE OR ELECTRIC
SHOCK, DO NOT EXPOSE THIS APPARATUS TO RAIN
OR MOISTURE.
CAUTION:
TO REDUCE THE RISK OF ELECTRIC SHOCK,
DO NOT REMOVE COVER (OR BACK). NO USERSERVICEABLE PARTS INSIDE. REFER SERVICING TO
QUALIFIED SERVICE PERSONNEL.
Important Safety Instructions
WARNING
RISK OF ELECTRIC SHOCK
DO NOT OPEN
The lightning ash with arrowhead symbol, within an equilateral triangle,
is intended to alert the user to the presence of uninsulated “dangerous
voltage” within the product’s enclosure that may be of suf cient
magnitude to constitute a risk of electric shock to persons.
The exclamation point within an equilateral triangle is intended to alert
the user to the presence of important operating and maintenance
(servicing) instructions in the literature accompanying the appliance.
AVIS
RISQUE DE CHOC ELECTRIQUE
NE PAS
OUVRIR
1. Read these instructions.
2. Keep these instructions.
3. Heed all warnings.
4. Follow all instructions.
5. Do not use this apparatus near water.
6. Clean only with dry cloth.
7. Do not block any ventilation openings. Install
in accordance with the manufacturer’s
instructions.
8. Do not install near any heat sources such
as radiators, heat registers, stoves, or other
apparatus (including ampli ers) that produce
heat.
9. Do not defeat the safety purpose of the
polarized or grounding-type plug. A polarized
plug has two blades with one wider than the
other. A grounding type plug has two blades
and a third grounding prong. The wide blade or
the third prong are provided for your safety. If
the provided plug does not t into your outlet,
consult an electrician for replacement of the
obsolete outlet.
10. Protect the power cord from being walked on
or pinched particularly at plugs, convenience
receptacles, and the point where they exit from
the apparatus.
11. Only use attachments/accessories speci ed by
the manufacturer.
12. Use only with the cart,
PORTABLE CART WARNING
stand, tripod, bracket,
or table speci ed by
the manufacturer, or
sold with the apparatus.
When a cart is used,
use caution when
moving the cart/
S3125A
apparatus combination to avoid injury from
tip-over.
13. Unplug this apparatus during lightning storms
or when unused for long periods of time.
14. Refer all servicing to quali ed service
personnel. Servicing is required when the
apparatus has been damaged in any way, such
as power-supply cord or plug is damaged,
liquid has been spilled or objects have fallen
into the apparatus, the apparatus has been
exposed to rain or moisture, does not operate
En
normally, or has been dropped.
2
15. Damage Requiring Service
Unplug the apparatus from the wall outlet and
refer servicing to quali ed service personnel
under the following conditions:
A When the power-supply cord or plug is
damaged,
B If liquid has been spilled, or objects have
fallen into the apparatus,
C If the apparatus has been exposed to rain or
water,
D If the apparatus does not operate normally
by following the operating instructions.
Adjust only those controls that are covered
by the operating instructions as an improper
adjustment of other controls may result in
damage and will often require extensive
work by a quali ed technician to restore the
apparatus to its normal operation,
E If the apparatus has been dropped or
damaged in any way, and
F When the apparatus exhibits a distinct
change in performance this indicates a need
for service.
16. Object and Liquid Entry
Never push objects of any kind into the
apparatus through openings as they may touch
dangerous voltage points or short-out parts that
could result in a re or electric shock.
The apparatus shall not be exposed to
dripping or splashing and no objects lled with
liquids, such as vases shall be placed on the
apparatus.
Don’t put candles or other burning objects on
top of this unit.
17. Batteries
Always consider the environmental issues
and follow local regulations when disposing of
batteries.
18. If you install the apparatus in a built-in
installation, such as a bookcase or rack, ensure
that there is adequate ventilation.
Leave 20 cm (8”) of free space at the top and
sides and 10 cm (4”) at the rear. The rear edge
of the shelf or board above the apparatus shall
be set 10 cm (4”) away from the rear panel or
wall, creating a ue-like gap for warm air to
escape.
Page 3

Precautions
1. Recording Copyright—Unless it’s for personal
use only, recording copyrighted material is
illegal without the permission of the copyright
holder.
2. AC Fuse—The AC fuse inside the unit is not
user-serviceable. If you cannot turn on the unit,
contact your Onkyo dealer.
3. Care—Occasionally you should dust the unit
all over with a soft cloth. For stubborn stains,
use a soft cloth dampened with a weak solution
of mild detergent and water. Dry the unit
immediately afterwards with a clean cloth. Don’t
use abrasive cloths, thinners, alcohol, or other
chemical solvents, because they may damage
the nish or remove the panel lettering.
4. Power
WARNING
BEFORE PLUGGING IN THE UNIT FOR
THE FIRST TIME, READ THE FOLLOWING
SECTION CAREFULLY.
AC outlet voltages vary from country to country.
Make sure that the voltage in your area meets
the voltage requirements printed on the unit’s
rear panel (e.g., AC 200-240 V, 50/60 Hz or AC
120 V, 60 Hz). The power cord plug is used to
disconnect this unit from the AC power source.
Make sure that the plug is readily operable
(easily accessible) at all times. Pressing the
ON/STANDBY button to select Stanby mode
does not fully disconnect from the mains, If you
do not intend to use the unit for an extended
period, remove the power cord from the AC
outlet.
5. Preventing Hearing Loss
Caution
Excessive sound pressure from earphones and
headphones can cause hearing loss.
6. Batteries and Heat Exposure
Warning
Batteries (battery pack or batteries installed)
shall not be exposed to excessive heat as
sunshine, re or the like.
7. Never Touch this Unit with Wet Hands—
Never handle this unit or its power cord while
your hands are wet or damp. If water or
any other liquid gets inside this unit, have it
checked by your Onkyo dealer.
8. Handling Notes
• If you need to transport this unit, use the
original packaging to pack it how it was when
you originally bought it.
• Do not leave rubber or plastic items on this
unit for a long time, because they may leave
marks on the case.
• This unit’s top and rear panels may get warm
after prolonged use. This is normal.
• If you do not use this unit for a long time, it
may not work properly the next time you turn
it on, so be sure to use it occasionally.
• When you’ve nished using this unit, remove
all discs and turn off the power.
9. Installing this Unit
• Install this unit in a well-ventilated location.
• Ensure that there’s adequate ventilation all
around this unit, especially if it’s installed in
an audio rack. If the ventilation is inadequate,
the unit may overheat, leading to malfunction.
• Do not expose this unit to direct sunlight
or heat sources, because its internal
temperature may rise, shortening the life of
the optical pickup.
• Avoid damp and dusty places, and places
subject to vibrations from loudspeakers.
• Never put the unit on top of, or directly above
a loudspeaker.
• Install this unit horizontally. Never use it on its
side or on a sloping surface, because it may
cause a malfunction.
• If you install this unit near a TV, radio, or
VCR, the picture and sound quality may be
affected. If this occurs, move this unit away
from the TV, radio, or VCR.
10. To Obtain a Clear Picture—This unit is a
hightech, precision device. If the lens on the
optical pickup, or the disc drive mechanism
becomes dirty or worn, the picture quality
may be affected. To maintain the best picture
quality, we recommend regular inspection
and maintenance (cleaning or worn part
replacement) every 1,000 hours of use
depending on the operating environment.
Contact your Onkyo dealer for details.
11. Moisture Condensation
Moisture condensation may damage this
unit.
Read the following carefully:
Moisture may condense on the lens of the
optical pickup, one of the most important parts
inside this unit.
• Moisture condensation can occur in the
following situations:
- The unit is moved from a cold place to a
warm place.
- A heater is turned on, or cold air from an air
conditioner is hitting the unit.
- In the summer, when this unit is moved
from an air conditioned room to a hot and
humid place.
- The unit is used in a humid place.
• Do not use this unit when there’s the
possibility of moisture condensation
occurring. Doing so may damage your discs
and certain parts inside this unit.
If condensation does occur, unplug the power
cord and leave the unit for two to three hours in
the room temperature.
En
3
Page 4

12. Region Codes—The BD/DVD standard
uses region codes to control how discs can
be played around the world, the world being
divided into three regions (BD) or six regions
(DVD). This unit will only play BD/ DVD discs
that match its region code, which can be found
on its rear panel.
13. About this Manual—This manual explains
how to use all of this unit’s functions. Although
the BD/DVD standard offers many special
features, not all discs use them all, so
depending on the disc being played, this unit
may not respond to certain functions. See the
disc’s sleeve notes for supported features.
This unit contains a semiconductor laser
system and is classi ed as a “CLASS 1 LASER
PRODUCT”. So, to use this model properly,
read this Instruction Manual carefully. In case of
any trouble, please contact the store where you
purchased the unit.
To prevent being exposed to the laser beam, do
not try to open the enclosure.
CAUTION:
CLASS 1M VISIBLE AND INVISIBLE LASER
RADIATION WHEN OPEN. DO NOT VIEW
DIRECTLY WITH OPTICAL INSTRUMENTS.
THIS PRODUCT UTILIZES A LASER. USE
OF CONTROLS OR ADJUSTMENTS OR
PERFORMANCE OF PROCEDURES OTHER
THAN THOSE SPECIFIED HEREIN MAY RESULT
IN HAZARDOUS RADIATION EXPOSURE.
For British models
Replacement and mounting of an AC plug on the
power supply cord of this unit should be performed
only by quali ed service personnel.
IMPORTANT
The wires in the mains lead are coloured in
accordance with the following code:
Blue: Neutral
Brown: Live
As the colours of the wires in the mains lead of this
apparatus may not correspond with the coloured
markings identifying the terminals in your plug,
proceed as follows:
The wire which is coloured blue must be connected
to the terminal which is marked with the letter N or
coloured black.
The wire which is coloured brown must be
connected to the terminal which is marked with the
letter L or coloured red.
IMPORTANT
The plug is tted with an appropriate fuse. If the
fuse needs to be replaced, the replacement fuse
must approved by ASTA or BSI to BS1362 and
have the same ampere rating as that indicated on
the plug. Check for the ASTA mark or the BSI mark
on the body of the fuse.
If the power cord’s plug is not suitable for your
socket outlets, cut it off and t a suitable plug. Fit a
suitable fuse in the plug.
The label on the right is
applied on the rear panel.
1. This unit is a CLASS 1
LASER PRODUCT and
employs a laser inside
the cabinet.
2. To prevent the laser from being exposed,
do not remove the cover. Refer servicing to
quali ed personnel.
En
4
For European Models
Declaration of Conformity
We, ONKYO EUROPE
ELECTRONICS GmbH
LIEGNITZERSTRASSE 6,
82194 GROEBENZELL,
GERMANY
declare in own responsibility,
that the ONKYO product
described in this instruction manual is in compliance with
the corresponding technical standards such as EN60065,
EN55013, EN55020 and EN61000-3-2, -3-3.
GROEBENZELL, GERMANY
K. MIYAGI
ONKYO EUROPE ELECTRONICS GmbH.
Page 5

Contents
Introduction
Important Safety Instructions. . . . . . . . . . . . . . . 2
Precautions . . . . . . . . . . . . . . . . . . . . . . . . . . . . . 3
Contents . . . . . . . . . . . . . . . . . . . . . . . . . . . . . . . . 5
Getting Started . . . . . . . . . . . . . . . . . . . . . . . . . . 6
Symbols Used in this Manual . . . . . . . . . . . . . . . 6
Supplied Accessories . . . . . . . . . . . . . . . . . . . . . 6
About Media Types . . . . . . . . . . . . . . . . . . . . . . . 7
Blu-ray Disc . . . . . . . . . . . . . . . . . . . . . . . . . . . . . 7
Types of Discs/Media Formats that Can Be
Used with This Player . . . . . . . . . . . . . . . . . . . . . 7
Discs that Cannot Be Used with This Player . . . . 8
About Disc Contents . . . . . . . . . . . . . . . . . . . . . 10
Important Information . . . . . . . . . . . . . . . . . . . . 11
Disc Precautions . . . . . . . . . . . . . . . . . . . . . . . . 11
License and Copyright . . . . . . . . . . . . . . . . . . . 12
Major Components . . . . . . . . . . . . . . . . . . . . . . 13
Main unit (Front) . . . . . . . . . . . . . . . . . . . . . . . . 13
Main unit (Rear) . . . . . . . . . . . . . . . . . . . . . . . . 13
Remote Control Unit . . . . . . . . . . . . . . . . . . . . . 14
Connection
Connecting to a TV/projector . . . . . . . . . . . . . . 15
Connecting to an amplifi er/AV receiver . . . . . . 16
HDMI connection . . . . . . . . . . . . . . . . . . . . . . . 16
Digital audio connection . . . . . . . . . . . . . . . . . . 17
Broadband Internet Connection . . . . . . . . . . . . 18
Wired connection (LAN cable) . . . . . . . . . . . . . 18
Playback
Before Starting Playback . . . . . . . . . . . . . . . . . 19
Loading the Batteries in the Remote Control . . 19
Connecting the Power Cord . . . . . . . . . . . . . . . 19
Turning the Power On . . . . . . . . . . . . . . . . . . . . 20
Language Setting . . . . . . . . . . . . . . . . . . . . . . . 20
Operating ONKYO AV Receiver Using the
Remote Control . . . . . . . . . . . . . . . . . . . . . . . . . 21
Using HDMI Control . . . . . . . . . . . . . . . . . . . . . 21
Using 3D . . . . . . . . . . . . . . . . . . . . . . . . . . . . . . 21
Video/Picture/Music Playback . . . . . . . . . . . . . 22
Loading a Disc . . . . . . . . . . . . . . . . . . . . . . . . . 22
BD/DVD Video Playback . . . . . . . . . . . . . . . . . .22
BD/DVD Menus . . . . . . . . . . . . . . . . . . . . . . . . . 23
Enjoying BONUSVIEW or BD-LIVE . . . . . . . . . 24
DVD-R/-RW (VR format) / BD-RE/-R (BDAV
format) Playback . . . . . . . . . . . . . . . . . . . . . . . . 25
Audio CD Playback . . . . . . . . . . . . . . . . . . . . . . 27
Audio Data (MP3 File) Playback . . . . . . . . . . . . 28
Displaying Still Images (JPEG fi les) . . . . . . . . . 29
Accessing UPnP* servers . . . . . . . . . . . . . . . . . 31
Playback Functions . . . . . . . . . . . . . . . . . . . . . . 33
Fast Forward/Reverse (Search) . . . . . . . . . . . . 33
Skipping to the Next or the Start of the
Current Chapter (Track/Title) . . . . . . . . . . . . . . . 33
Pause/Frame Advance Playback . . . . . . . . . . . 33
Slow Playback (Forward/Reverse) . . . . . . . . . . 34
Repeat Playback of a Title or Chapter
(Repeat Playback) . . . . . . . . . . . . . . . . . . . . . . .34
Partial Repeat Playback (Repeat Playback of
a Specifi ed Part) . . . . . . . . . . . . . . . . . . . . . . . .35
Displaying the Audio Information . . . . . . . . . . . 35
Switching Subtitles . . . . . . . . . . . . . . . . . . . . . . 35
Switching the Angle . . . . . . . . . . . . . . . . . . . . . 36
Displaying the Angle Mark . . . . . . . . . . . . . . . . 36
Settings During Playback . . . . . . . . . . . . . . . . . 37
Function Control . . . . . . . . . . . . . . . . . . . . . . . . 37
Settings
SETTINGS . . . . . . . . . . . . . . . . . . . . . . . . . . . . . . 39
Common operations . . . . . . . . . . . . . . . . . . . . . 39
Basic Operation for Playback Setting . . . . . . . . 39
Audio Video Settings . . . . . . . . . . . . . . . . . . . . . 40
Smart Settings . . . . . . . . . . . . . . . . . . . . . . . . . 41
HDMI Control . . . . . . . . . . . . . . . . . . . . . . . . . . 41
Playback Setting . . . . . . . . . . . . . . . . . . . . . . . . 41
On Screen Language . . . . . . . . . . . . . . . . . . . . 42
Version . . . . . . . . . . . . . . . . . . . . . . . . . . . . . . . 42
System . . . . . . . . . . . . . . . . . . . . . . . . . . . . . . . 42
Communication Setup . . . . . . . . . . . . . . . . . . . . 43
USB Memory Management. . . . . . . . . . . . . . . . 44
Software Update Settings . . . . . . . . . . . . . . . . . 45
Troubleshooting
Troubleshooting . . . . . . . . . . . . . . . . . . . . . . . . . 50
Appendix
On-screen Error Messages . . . . . . . . . . . . . . . . 54
Specifi cations . . . . . . . . . . . . . . . . . . . . . . . . . . 55
Glossary . . . . . . . . . . . . . . . . . . . . . . . . . . . . . . . 56
About Software License . . . . . . . . . . . . . . . . . . 59
Information on the Software License for This
Product . . . . . . . . . . . . . . . . . . . . . . . . . . . . . . . 59
Software License Notice . . . . . . . . . . . . . . . . . . 59
En
5
Page 6
Getting Started
Symbols Used in this Manual
Note
Indicates special notes and operating features.
Caution
Indicates cautions for preventing possible damage
from abuse.
A section whose title has one of the following
symbols are applicable only to the disc
represented by the symbol.
Indicates the functions that can be
performed for BD Video discs.
Indicates the functions that can be
performed for BD-RE discs.
Indicates the functions that can be
performed for BD-R discs.
Indicates the functions that can be
performed for DVD Video discs.
Indicates the functions that can be
performed for DVD-RW discs.
Indicates the functions that can be
performed for DVD-R discs.
Indicates the functions that can be
performed for Audio CDs.
Indicates the functions that can be
performed for CD-R discs.
Indicates the functions that can be
performed for CD-RW discs.
Indicates the functions that can be
performed for USB memory devices.
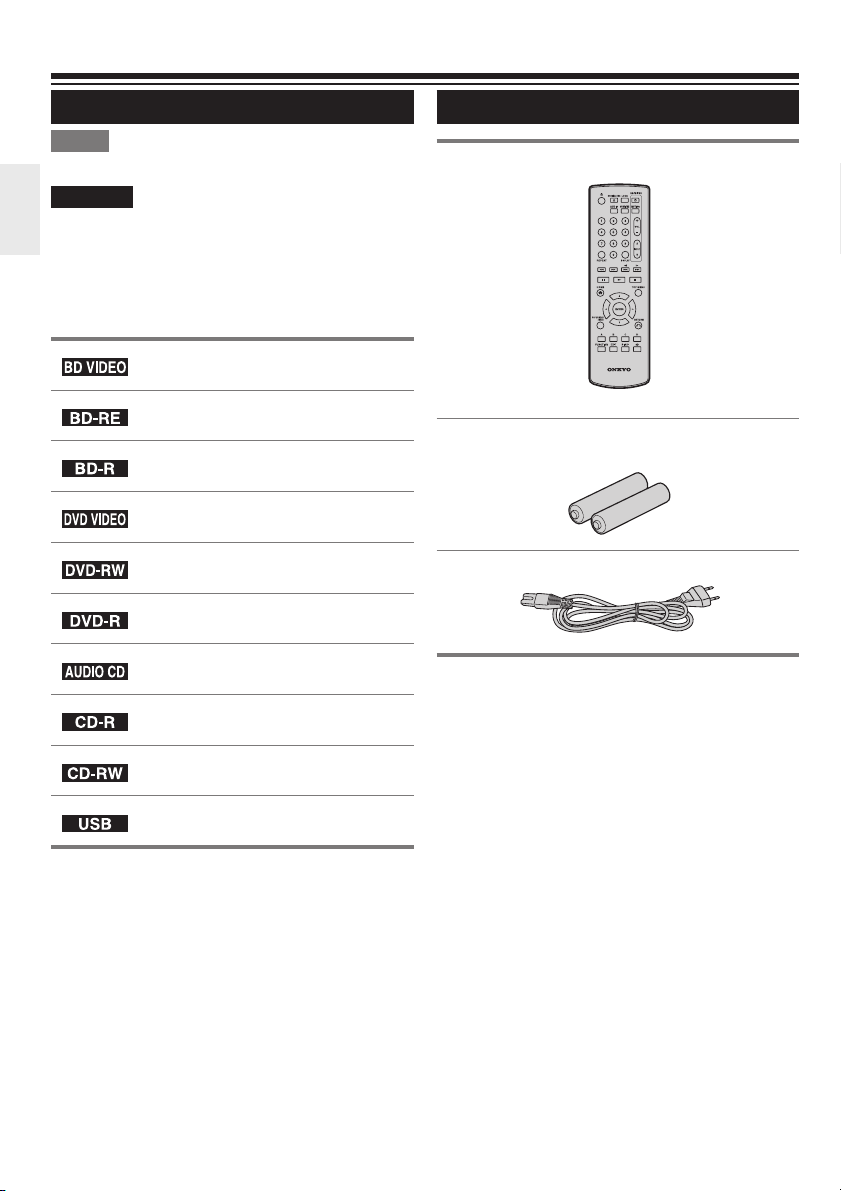
Supplied Accessories
Remote control unit (1)
RC-826DV
“AA” size battery (2)
AC cord (1)
En
6
Page 7
About Media Types
Blu-ray Disc
Blu-ray Disc is the ultimate next generation optical
media format, offering the following key features:
• Largest capacity (25 GB single layer – 50 GB
dual layer)
- with over 5 times the amount of content
possible with current DVDs, particularly well
suited for high de nition feature lms with
extended levels of interactive features
• Pristine picture quality with the capability for full
high de nition 1920 x 1080p resolution
• Best audio possible with uncompressed surround
sound (higher quality than even theatre audio)
• Broadest industry support – ensuring more
choice for consumers in the marketplace
• Hardware products will be backward compatible
with DVDs, allowing continued enjoyment of
existing DVD libraries.
• Disc Durability – new breakthroughs in hard
coating technologies gives Blu-ray Discs the
strongest resistance to scratches and nger
prints.
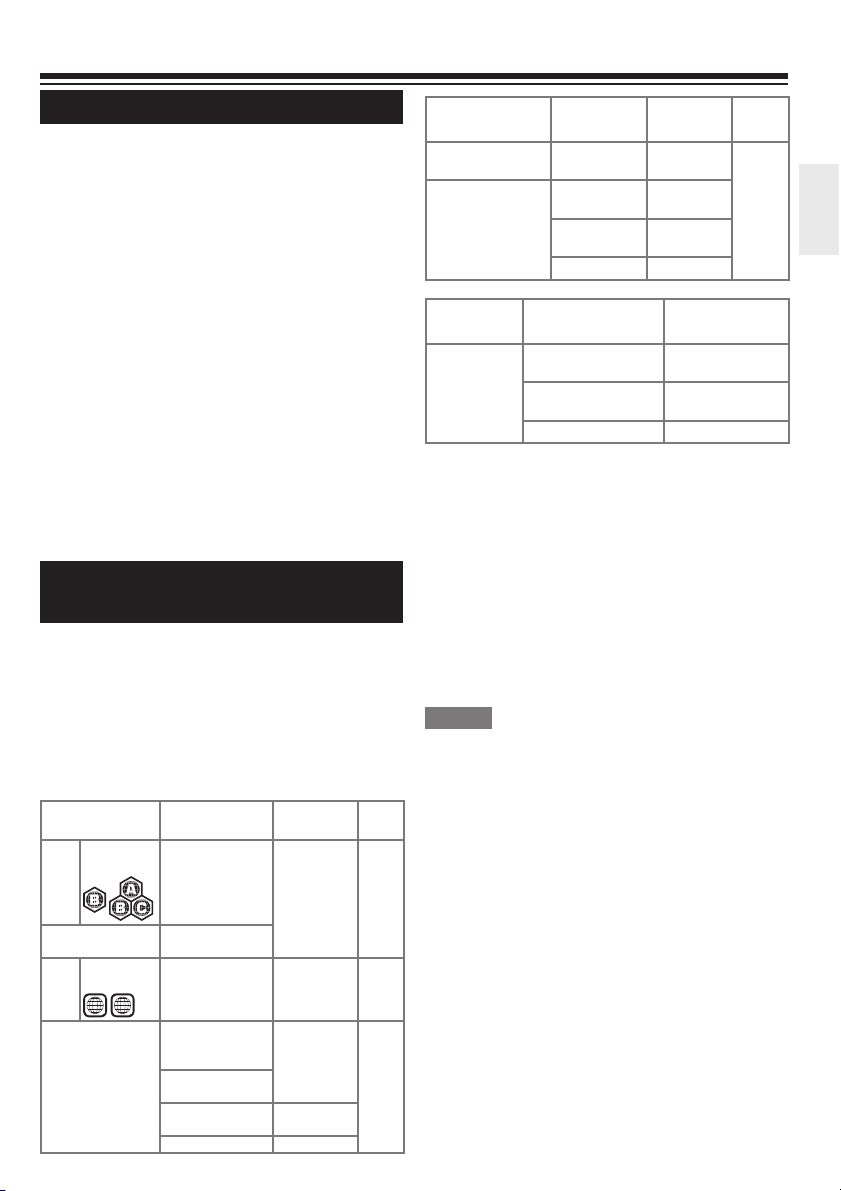
Types of Discs/Media Formats that
Can Be Used with This Player
• The following discs can be played back in this
Player. Do not use an 8 cm to 12 cm adapter.
• Use discs that conform to compatible standards
as indicated by the presence of of cial logos on
the disc label. Playback of discs not complying
with these standards is not guaranteed. In
addition, the image quality or sound quality is not
guaranteed even if the discs can be played back.
Disc Type
BD
Region code
Video
B/ALL
BD-RE DL
BD-R DL
DVD
Region code
Video
2/ALL
ALL
2
DVD+RW/DVD+R
DVD-RW/DVD-R
DVD+R DL/DVD-R
DL
Recording
Format
— Audio
BDMV/BDAV
format
Video format Audio
Video/VR/ AVCHD
format ( nalised
disc only)
DivX+HD
(H.264/MKV)
*2
JPEG
*3
MP3
Contents
+ Video
(Movie)
+ Video
(Movie)
Audio
+ Video
(Movie)
Still image
(JPEG le)
Audio
Disc
Size
12 cm
12 cm
8 cm
12 cm
8 cm
Disc Type
*1
Audio CD
CD-RW/CD-R Audio CD
Media
Format
USB memory
device
Recording
Format
Audio CD
(CD-DA)
(CD-DA)
*2
JPEG
*3
MP3
Recording
Format
DivX+HD Audio + Video
*2
JPEG
*3
MP3
Contents
Audio 12 cm
Audio
Still image
(JPEG le)
Audio
(Movie)
Still image
(JPEG le)
Audio
Disc
Size
8 cm
Contents
• BD/DVD video players and discs have region
codes, which dictate the regions in which a disc
can be played. This Player’s region code is B for
BD and 2 for DVD. (Discs marked ALL will play in
any player.)
• BD/DVD video operations and functions may be
different from the explanations in this manual
and some operations may be prohibited due to
disc manufacturer’s settings.
• If a menu screen or operating instructions are
displayed during playback of a disc, follow the
operating procedure displayed.
NOTE
• Playback for some of the discs in the left side
column tables may not be possible depending on
the disc.
• “Finalise” refers to a recorder processing a
recorded disc so that it will play in other DVD
players/recorders as well as this player. Only
nalised DVD discs will play back in this player.
(This player does not have a function to nalise
discs.)
• Some discs cannot be played back depending on
the recording format.
• DivX playback may not be available depending
on the DivX content. For details, refer to page 49.
En
7
Page 8

Discs that Cannot Be Used with
This Player
The following discs cannot be played back or will
not play back properly on this Player. If such a disc
is mistakenly played back, speaker damage may
occur. Never attempt to play back these discs.
CDG, Video CD, Photo CD, CD-ROM, CD-TEXT,
SVCD, SACD, PD, CDV, CVD, DVD-RAM,
DVD Audio, BD-RE with the cartridge, CD-WMA
Discs with unusual shapes cannot be played.
• Discs with unusual shapes (heart-shaped or
hexagonal discs, etc.) cannot be used. The use
of such discs will cause malfunction.
The following BD video discs cannot be
played.
• Discs not displaying “B” or “ALL” for the
region code (discs sold outside the authorised
marketing area).*
• Discs produced illegally.
• Discs recorded for commercial use.
* The region code for this product is B.
The following DVD video discs cannot be
played.
• Discs not displaying “2” or “ALL” for the
region code (discs sold outside the authorised
marketing area).*
• Discs produced illegally.
• Discs recorded for commercial use.
* The region code for this product is 2.
The following BD-RE/R, DVD-RW/R and
DVD+RW/R discs cannot be played.
• Discs on which data has not been recorded
cannot be played back.
• BD-discs may not be played back depending on
their recording status or the status of the disc
itself. The playback compatibility will be affected
by your choice of BD-recorder, BD-disc and BDburning software. Please always ensure you are
using the latest software versions on all units and
contact the individual manufacturers for further
help if required.
To avoid inconveniences, please check the
playback compatibility of your self-recorded disc
before you purchase this BD-player.
This BD-player uses the latest technology
available at the time of development and cannot
guarantee support for future enhancements or
changes to the standard.
The following Audio CD*1 discs cannot be
played.
• Discs containing a signal for the purpose of
protecting copyrights (copy control signal) may
not be played back with this Player.
• This Player has been designed on the premise
of playing back Audio CDs that comply with CD
(Compact Disc) standards.
The following CD-RW/R discs cannot be
played.
• Discs on which data has not been recorded
cannot be played back.
• Discs recorded in a format other than an Audio
CD and JPEG/MP3 le format cannot be played
back.
• Discs may not be played back depending on
their recording status or the status of the disc
itself.
• Discs may not be played back depending on
their compatibility with this Player.
*2 About the JPEG le format
JPEG is a type of le format for storing still-image
les (photos, illustrations, etc.). The Player lets you
play JPEG format still-image les.
File formats that are not compatible.
• Still images in formats other than JPEG (such as
TIFF) cannot be played.
• There may be some les that cannot be played
even if they are in JPEG format.
• Progressive JPEG les cannot be played.
• Moving image les as well as Motion JPEG
format les cannot be played, even though they
are JPEG les.
Other les that cannot be played back.
• You may not be able to play some still images
which you have created, touched up, copied or
otherwise edited on your computer.
• You may not be able to play some still images
you have processed (rotated or saved by
overwriting other images you have imported from
the Internet or e-mail).
En
8
Page 9
You may experience one or more of the
following symptoms when playing les.
• It may take some time to play les depending
on the number of folders, number of les and
volume of data involved.
• EXIF information will not be displayed. EXIF
stands for Exchangeable Image File Format, and
is a standard for storing interchange information
in image les, especially those using JPEG
compression. (Refer to http://exif.org for more
information.)
*3 About the MP3 le format
MP3 les are audio data compressed in the
MPEG1/2 Audio layer-3 le format. “MP3 les”
have “.mp3” as extensions. (Some les that have
“.mp3” extensions or les that have not been
recorded in MP3 format will produce noise or
cannot be played.)
Playing the MP3 le format
• The MP3 les are not played in the order they
were recorded.
• It is recommended to record data at a lower
speed as data recorded at a fast speed can
produce noise and may not be able to be played.
• The more folders there are, the longer the
reading time.
• Depending on the folder tree, reading MP3 les
can take time.
• The playing time may not be correctly displayed
during MP3 le playback.
The following les cannot be played on this
player.
• When both Audio CD [CD-DA] format and JPEG/
MP3 le formats are recorded on a disc. (The
disc is recognised to be an Audio CD [CD-DA]
only tracks in Audio CD [CD-DA] format are
played back.)
• Multi-session discs cannot be played.
About the DivX+HD (H.264/MKV) le
format
Some les may not be playable depending on the
le. For details, refer to page 49.
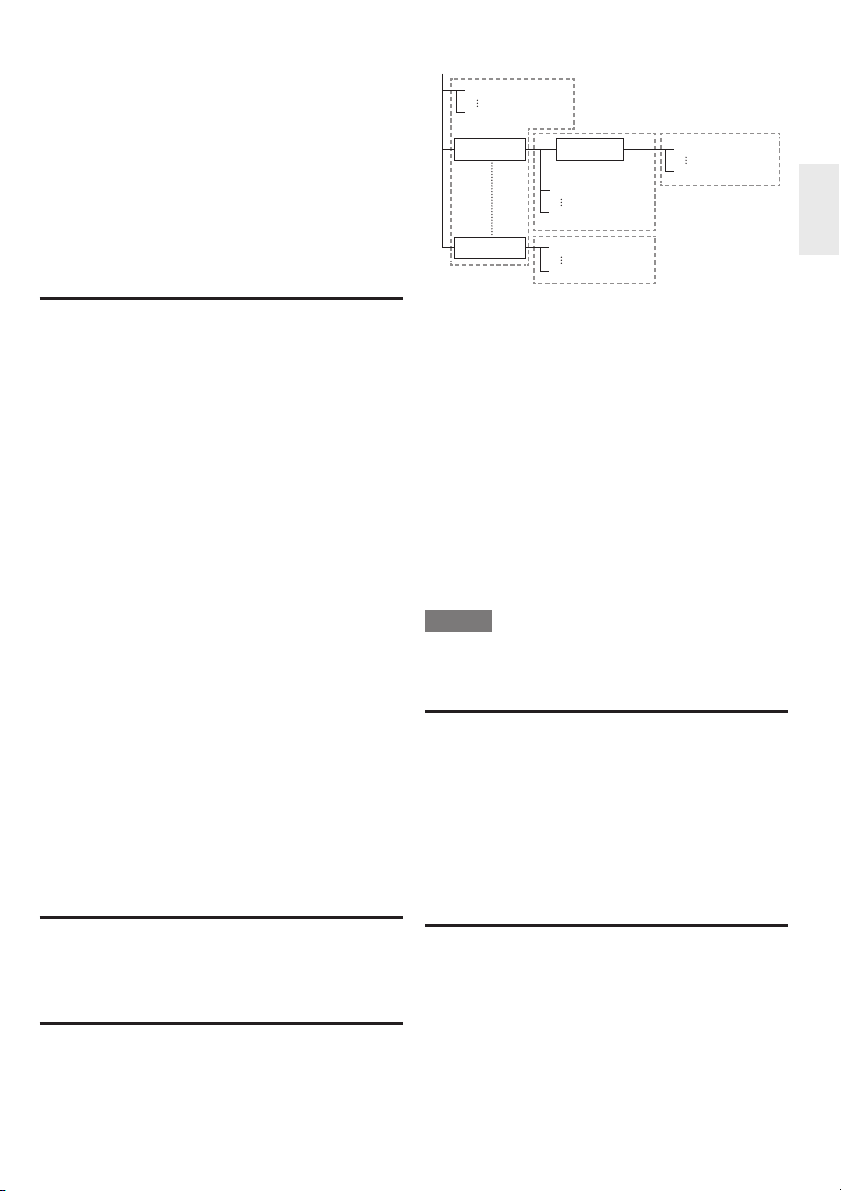
About les/folders for Still images (JPEG
les) and audio data (MP3 les)
You can play still images (JPEG les) /audio data
(MP3 les) with this unit by making folder(s) on
discs or USB memory devices as shown below.
Example of a folder structure:
Root
001.jpg/001.mp3
xxx.jpg/xxx.mp3
01 Folder
xxx Folder
*4.
Including the root directory, the maximum number of folders
and les in each folder are limited to 256 in total.
*4
Folder
001.jpg/001.mp3
255.jpg/255.mp3
001.jpg/001.mp3
256.jpg/256.mp3
*4
001.jpg/001.mp3
256.jpg/256.mp3
*4
*4
File and folder requirements
• The discs or USB memory devices which this
player can play back (recognise) are limited to
the following properties:
- Contains EXIF format les (only JPEG les)
- Picture resolution: Between 32 x 32 and 7680 x
4320 pixels (only JPEG les)
- Maximum number of folders and les in each
folder: 256
- Maximum hierarchy level of folders: 5
- File size:
20 MB or less (JPEG les)
200 MB or less (MP3 les)
NOTE
• File and folder names displayed on this player
may differ from those displayed on PCs.
ABOUT DivX VIDEO
• DivX® is a digital video format created by DivX,
Inc. This is an of cial DivX Certi ed
plays DivX video. Visit www.divx.com for more
information and software tools to convert your
les into DivX video.
DivX Certi ed
®
to play DivX® and DivX Plus™
HD (H.264/MKV) video up to 1080p HD including
premium content.
®
device that
ABOUT DivX VIDEO-ON-DEMAND
• This DivX Certi ed® device must be registered in
order to play purchased DivX Video-on-Demand
(VOD) movies. To obtain the registration code,
locate the DivX VOD section in your device setup
menu. Go to vod.divx.com for more information
on how to complete your registration.
En
9
Page 10
About Disc Contents
BD Video
Enjoy BD-speci c functions including BONUSVIEW
(BD-ROM Pro le 1 Version 1.1), such as picture in
picture, and BD-LIVE (Page 24).
For the BD video discs compatible with
BONUSVIEW/BD-LIVE, you can enjoy additional
contents by copying the data from the discs or
downloading it via the Internet. For instance, this
function is capable of playing the original movie as
the primary video while playing video commentary
from the lm director on a small screen as a
secondary video.
NOTE
• The available functions differ depending on the
disc.
Title, Chapter and Track
• Blu-ray discs and DVDs are divided into “Titles”
and “Chapters”. If the disc has more than one
movie on it, each movie would be a separate
“Title”. “Chapters”, on the other hand, are
subdivisions of titles. (See Example 1.)
• Audio CDs are divided into “Tracks”. You can
think of a “Track” as one tune on an Audio CD.
(See Example 2.)
Example 1: Blu-ray disc or DVD
Title 1
Chapter 1 Chapter 2 Chapter 3 Chapter 1
Example 2: Audio CD
Track 1 Track 2 Track 3 Track 4
Title 2
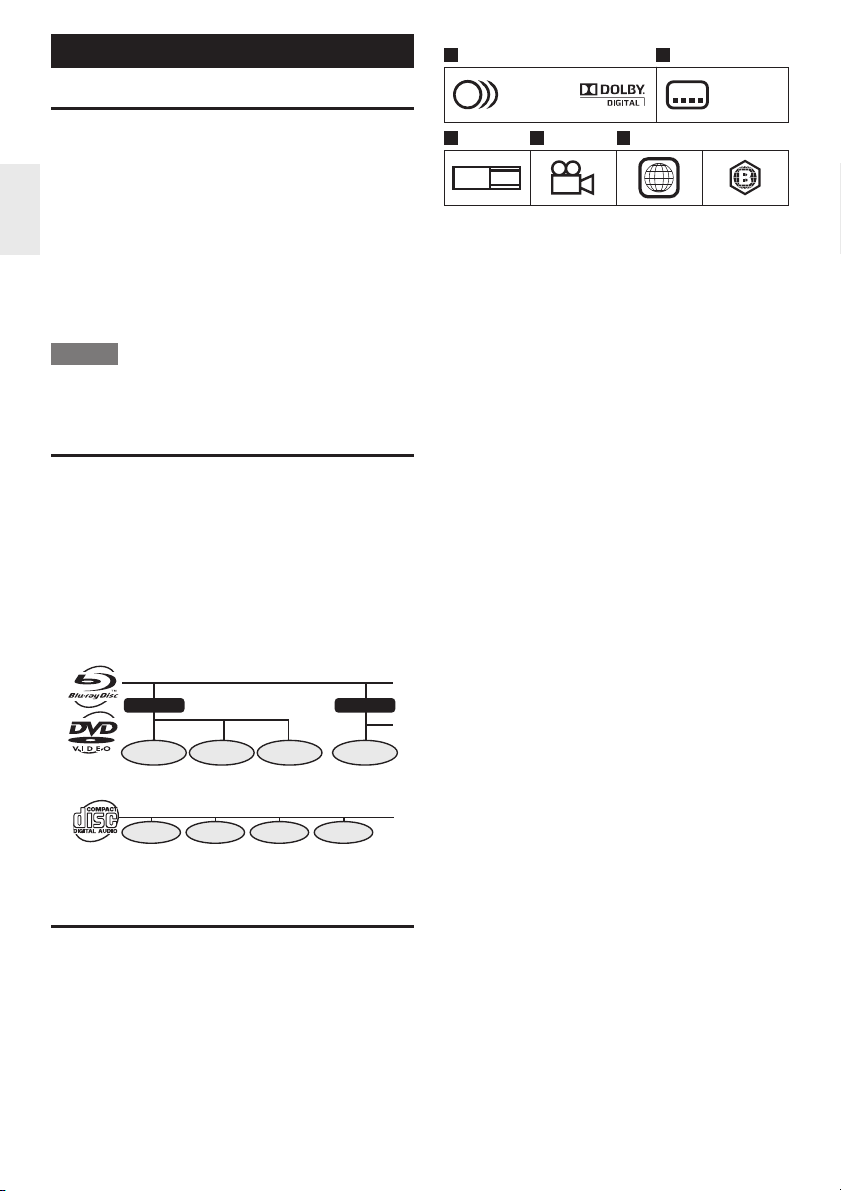
Icons Used on BD/DVD Video
Disc Cases
The back of the case of a BD/DVD that is
commercially available usually contains various
information about the contents of the disc.
1 2
1. English
2
2. Chinese
3 4 5
LB
16:9
2
213
546
2
DVD Video BD Video
1 Audio tracks and audio formats
BD and DVD discs can contain up to 8
separate tracks with a different language on
each. The rst in the list is the original track.
This section also details the audio format
of each soundtrack — Dolby Digital, DTS,
MPEG etc.
` Dolby Digital
A sound system developed by Dolby
Laboratories Inc. that gives movie theatre
ambience to audio output when the Player
is connected to a Dolby Digital processor or
ampli er.
` DTS
DTS is a digital sound system developed by
DTS, Inc. for use in cinemas.
` Linear PCM
Linear PCM is a signal recording format
used for Audio CDs and on some DVD and
Blu-ray discs. The sound on Audio CDs is
recorded at 44.1 kHz with 16 bits. (Sound is
recorded between 48 kHz with 16 bits and
96 kHz with 24 bits on DVD video discs and
between 48 kHz with 16 bits and 192 kHz
with 24 bits on BD video discs.)
2 Subtitle languages
This indicates the kind of subtitles.
3 Screen aspect ratio
Movies are shot in a variety of screen
modes.
4 Camera angle
Recorded onto some BD/DVD discs are
scenes which have been simultaneously
shot from a number of different angles (the
same scene is shot from the front, from the
left side, from the right side, etc.).
5 Region code
This indicates the region code (playable
region code).
1. English
2. Chinese
En
10
Page 11
Important Information
Disc Precautions
Be Careful of Scratches and
Dust
• BD, DVD and CD discs are sensitive to
dust, ngerprints and especially scratches. A
scratched disc may not be able to be played
back. Handle discs with care and store them in a
safe place.
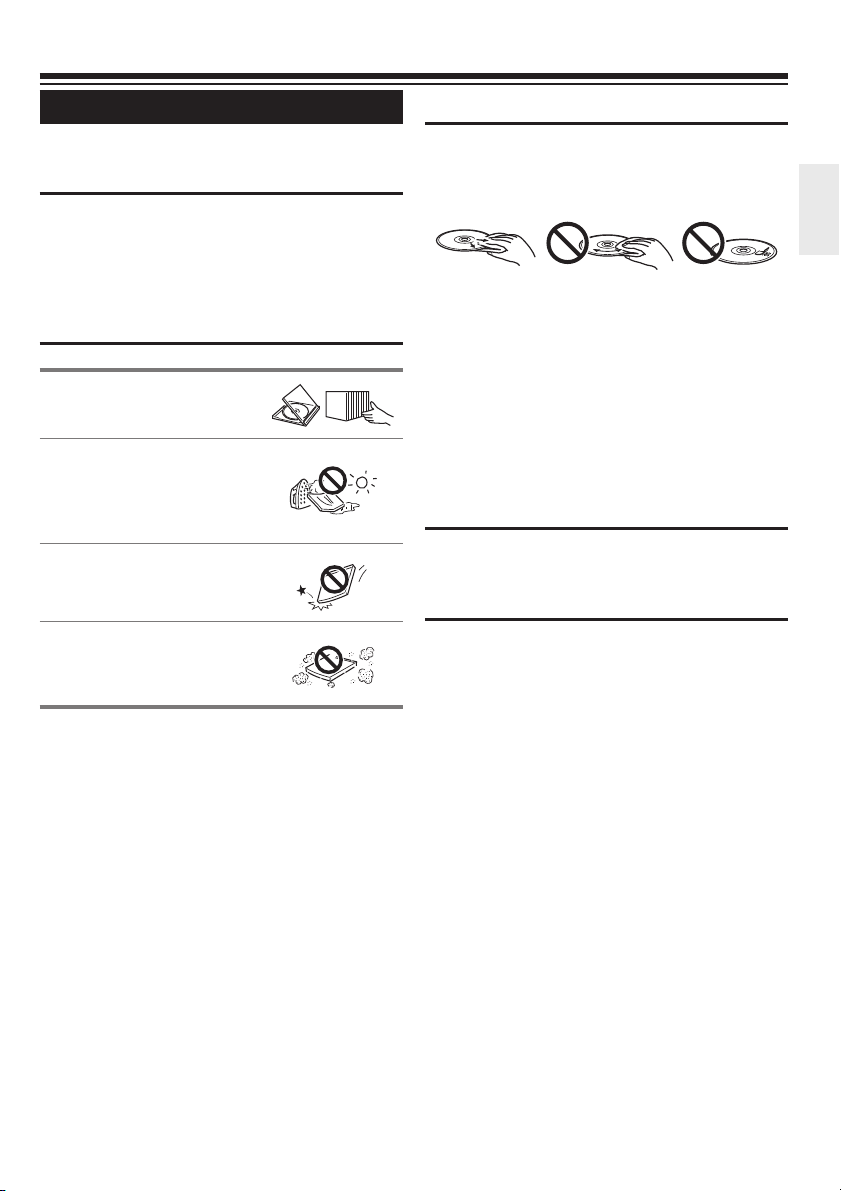
Proper Disc Storage
Place the disc in the centre
of the disc case and store the
case and disc upright.
Avoid storing discs in
locations subject to direct
sunlight, close to heating
appliances or in locations of
high humidity.
Do not drop discs or subject
them to strong vibrations or
impacts.
Avoid storing discs in
locations where there are
large amounts of dust or
moisture.
Handling Precautions
• If the surface is soiled, wipe gently with a soft,
damp (water only) cloth. When wiping discs,
always move the cloth from the centre hole
toward the outer edge.
• Do not use record cleaning sprays, benzene,
thinner, static electricity prevention liquids or any
other solvent.
• Do not touch the surface.
• Do not stick paper or adhesive labels to the disc.
• If the playing surface of a disc is soiled or
scratched, the Player may decide that the disc
is incompatible and eject the disc tray, or it may
fail to play the disc correctly. Wipe any dirt off the
playing surface with a soft cloth.
Cleaning the Pick Up Lens
• Never use commercially available cleaning discs.
The use of these discs can damage the lens.
Warnings about dew formation
• Condensation may form on pick up lens or disc
in the following conditions:
- Immediately after a heater has been turned on.
- In a steamy or very humid room.
- When the Player is suddenly moved from a
cold environment to a warm one.
` When condensation forms:
• It becomes dif cult for the Player to read the
signals on the disc and prevents the Player
from operating properly.
` To remove condensation:
• Take out the disc and leave the Player
with the power off until the condensation
disappears. Using the Player when there is
condensation may cause malfunction.
En
11
Page 12

License and Copyright
Audio-visual material may consist of copyrighted
works which must not be recorded without the
authority of the owner of the copyright. Refer to
relevant laws in your country.
• “This item incorporates copy protection
technology that is protected by U.S. patents
and other intellectual property rights of
Rovi Corporation. Reverse engineering and
disassembly are prohibited. It is forbidden by law
to copy, broadcast, show, broadcast on cable,
play in public, and rent copyrighted material
without permission. DVD videos are copy
protected, and any recordings made from these
discs will be distorted.”
• “x.v.Colour” and “x.v.Colour” logo are trademarks
of Sony Corporation.
• Blu-ray™, BONUSVIEW™ and the logos are
trademarks of the Blu-ray Disc Association.
• ABOUT DIVX VIDEO: DivX
format created by DivX, Inc. This is an of cial
DivX Certi ed® device that plays DivX video. Visit
www.divx.com for more information and software
tools to convert your les into DivX video.
• ABOUT DIVX VIDEO-ON-DEMAND: This DivX
Certi ed
play purchased DivX Video-on-Demand (VOD)
movies. To obtain your registration code, locate
the DivX VOD section in your device setup
menu. Go to vod.divx.com for more information
on how to complete your registration.
Covered by one or more of the following U.S.
patents: 7,295,673; 7,460,668; 7,515,710;
7,519,274
•LCフォント, LCFONT, エルシーフォント and LC
logo mark are registered trademarks of SHARP
Corporation. This product is embedded with
LC Font technology, which was developed by
SHARP Corporation for clearly displaying easytoread characters on an LCD screen. However,
other non-LCD fonts are used for displaying
some screen pages.
®
device must be registered in order to
®
is a digital video
Trademarks and Licenses
Blu-ray™ and the logos are
trademarks of the Blu-ray Disc
Association.
“Blu-ray 3D” and “Blu-ray 3D”
logo are trademarks of Blu-ray
Disc Association.
“BD-LIVE” logo is a trade-mark
of Blu-ray Disc Association.
“AVCHD” and the “AVCHD” logo
are trademarks of Panasonic
Corporation and Sony
Corporation.
DivX®, DivX Certi ed®, DivX
PlusTM HD and associated
logos are trademarks of DivX,
Inc. and are used under license.
“DVD Logo” is a trademark of
DVD Format/Logo Licensing
Corporation.
Manufactured under license
from Dolby Laboratories. Dolby
and the double-D symbol
are trademarks of Dolby
Laboratories.
Manufactured under
license under U.S. Patent
#’s: 5,451,942; 5,956,674;
5,974,380; 5,978,762;
6,226,616; 6,487,535;
7,392,195; 7,272,567;
7,333,929; 7,212,872 & other
U.S. and worldwide patents
issued & pending. DTS and
the Symbol are registered
trademarks, &
DTS-HD, DTS-HD Master
Audio | Essential and the DTS
logos are trademarks of DTS,
Inc. Product includes software.
©DTS, Inc. All Rights Reserved.
“HDMI, the HDMI logo and HighDe nition Multimedia Interface
are trademarks or registered
trademarks of HDMI Licensing
LLC in the United States and
other countries”.
Java and all Java based
trademarks and logos are
trademarks or registered
trademarks of Oracle America,
Inc. in the U.S. and other
countries.
En
12
Page 13
Major Components
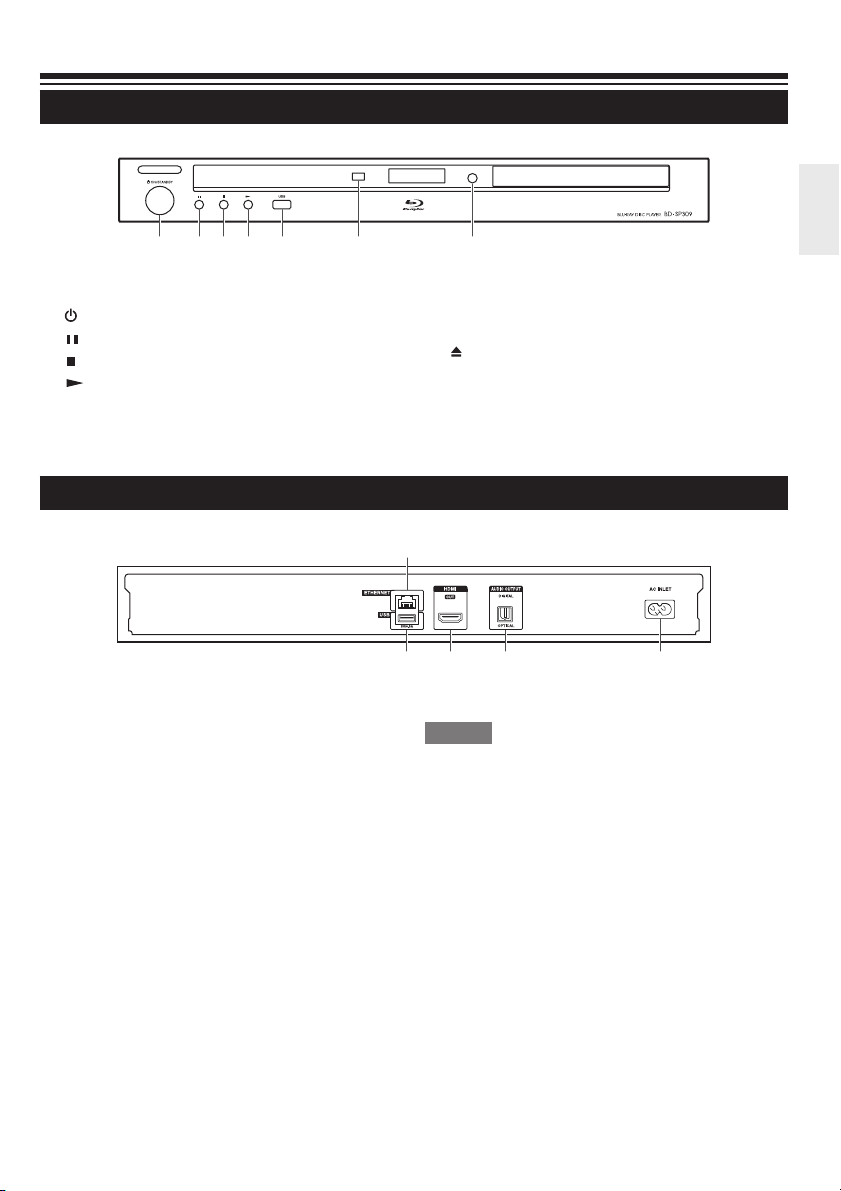
Main unit (Front)
4321567
1 ON/STANDBY (p.20)
2
(pause) (p.28)
3 (stop) (p.22)
4 (play) (p.22)
Main unit (Rear)
1 ETHERNET terminal (p.18)
2 USB (rear) terminal (p.24)
3 HDMI OUT terminal (p.16)
4 DIGITAL AUDIO OUT OPTICAL terminal (p.17)
5 AC INLET terminal (p.19)
5 USB (front) terminal (p.28)
6 Remote control sensor (p.19)
7 (open/close) (p.22)
1
23 4 5
NOTE
• When you insert or remove a USB memory
device, be sure to turn the main power off. If you
insert or remove the device with the player on,
the data may become damaged.
En
13
Page 14

Remote Control Unit
1
2
3
4
5
6
7
8
9
F
G
H
I
J
K
RC-826DV
L
M
N
O
P
Q
R
S
T
U
1 (on/standby) (p.20)
2
OPEN/CLOSE (p.22)
3 AUDIO (p.35), SUBTITLE (p.35)
4 Number buttons (p.38)
5 REPEAT (p.34)
6 (rewind) (p.33)
7
(forward) (p.33)
8 (pause) (p.33)
9 (play) (p.22)
F HOME (p.20)
G Cursor buttons (
H POP UP MENU/MENU (p.24)
I A (Red), B (Green), C (Yellow), D (Blue) (p.25)
J FUNCTION (p.37)
K EXIT (p.39)
L LOCK (See below)
M RECEIVER control buttons (p.21)
Be sure to set the “Remote ID” setting to “1” on
Onkyo AV receiver.
N DISPLAY (p.23)
O
/ (slow/skip) (p.33)
P / (slow/skip) (p.33)
Q (stop) (p.22)
R TOP MENU (p.23)
S RETURN (p.28)
T 3D (p.21)
U P IN P (picture in picture) (p.24)
/ / / ), ENTER (p.39)
Keylock function
You can set the keylock to prevent accidental
operations.
Press and hold LOCK for more than 2 seconds.
• Each time you perform this operation, the
function is activated or deactivated.
• If you try to operate the Player while the keylock
function is set, “Hold” blinks on the front display
panel to indicate that the keylock function is set.
En
14
Page 15
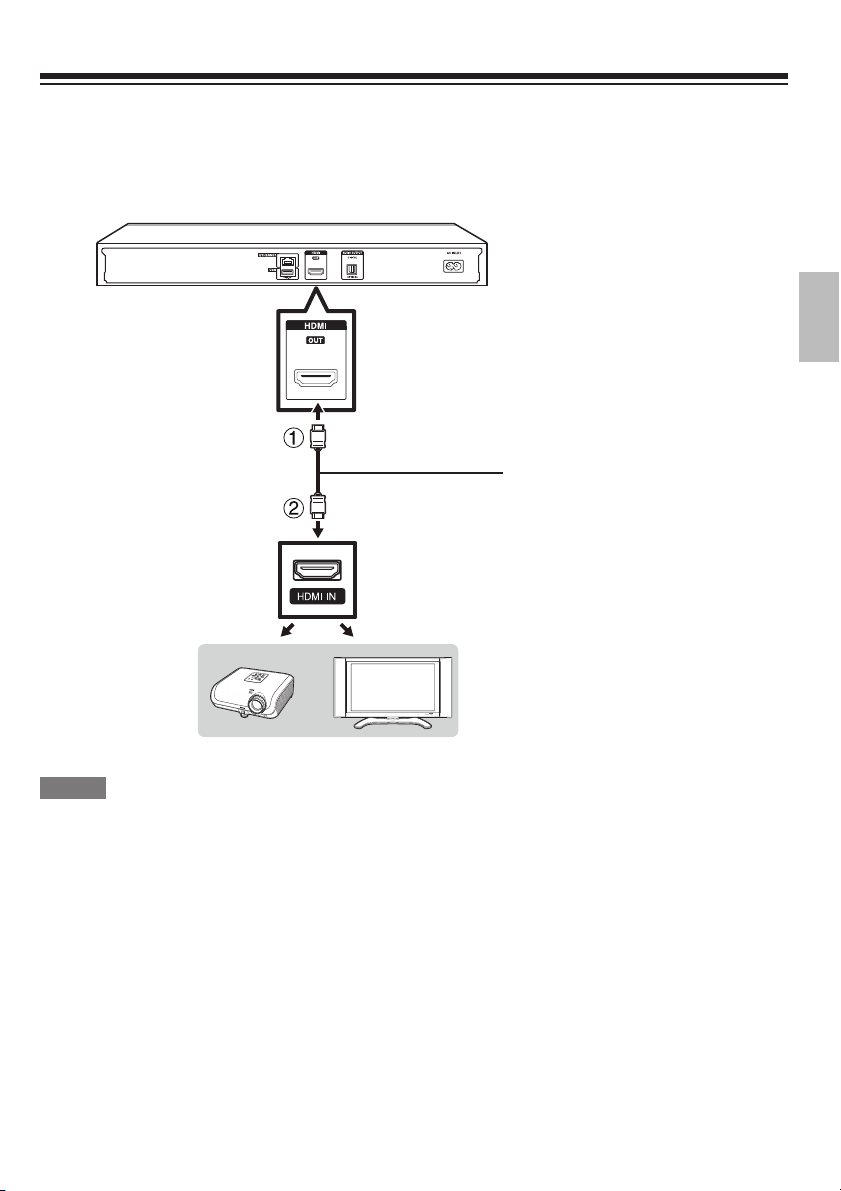
Connecting to a TV/projector
You can enjoy high quality digital picture and sound using an HDMI cable. (Only TVs/projectors with an
HDMI terminal can be connected to this player.)
Make sure to use a certi ed HDMI cable.
1. Be sure to turn off this Player and the TV/projector before making any connections.
2. Firmly connect an HDMI cable (commercially available) to the HDMI OUT terminal on the player (1)
and the HDMI IN terminal of the TV/projector (2).
HDMI cable
(commercially available)
Projector
NOTE
• In this player, “HDMI Video Out” is set to “Auto” as a default (see page 40). (Normally set to “Auto”.) If
you don’t get a stable image with “HDMI Video Out” set to “Auto”, select the output resolution which
corresponds to the connected equipment.
• To enjoy 3D images, connection to a 3D compatible TV is needed.
• For connection to a TV/projector, refer to the TV/projector’s operation manual.
After connecting
• If desired, connect audio equipment. (Page 17)
• If necessary, perform the Audio Video Settings. (Page 40)
• Prepare the desired disc or content and start playback. (Page 22)
TV
En
15
Page 16

Connecting to an ampli er/AV receiver
You can connect this player to an ampli er/AV receiver to enjoy digital surround sound. With this
player, the audio connection can be made using either one of the following methods depending on the
capabilities of the ampli er/AV receiver you connect.
• HDMI connection
• Digital audio connection
NOTE
• Be sure to turn off this Player and the equipment before making any connections.
• For details on output of audio formats, see page 49.
HDMI connection
HDMI cable*
HDMI cable*TV
* Commercially available
NOTE
• When using an HDMI output, 7.1ch Digital Output is available.
• Audio transmitted in DTS-HD High Resolution Audio and DTS-HD Master Audio formats is output from
the HDMI terminal as Bitstream. Connect an ampli er with a built-in decoder to enjoy the ne sound
quality.
• When a connection to a 3D TV is made via an ampli er/AV receiver, it is necessary to connect to a 3D
compatible ampli er/AV receiver. If the ampli er/AV receiver is not 3D compatible, connect the HDMI
cable to the TV directly while connecting the player and the ampli er/AV receiver using an optical digital
cable.
Ampli er/
AV receiver
En
16
Page 17
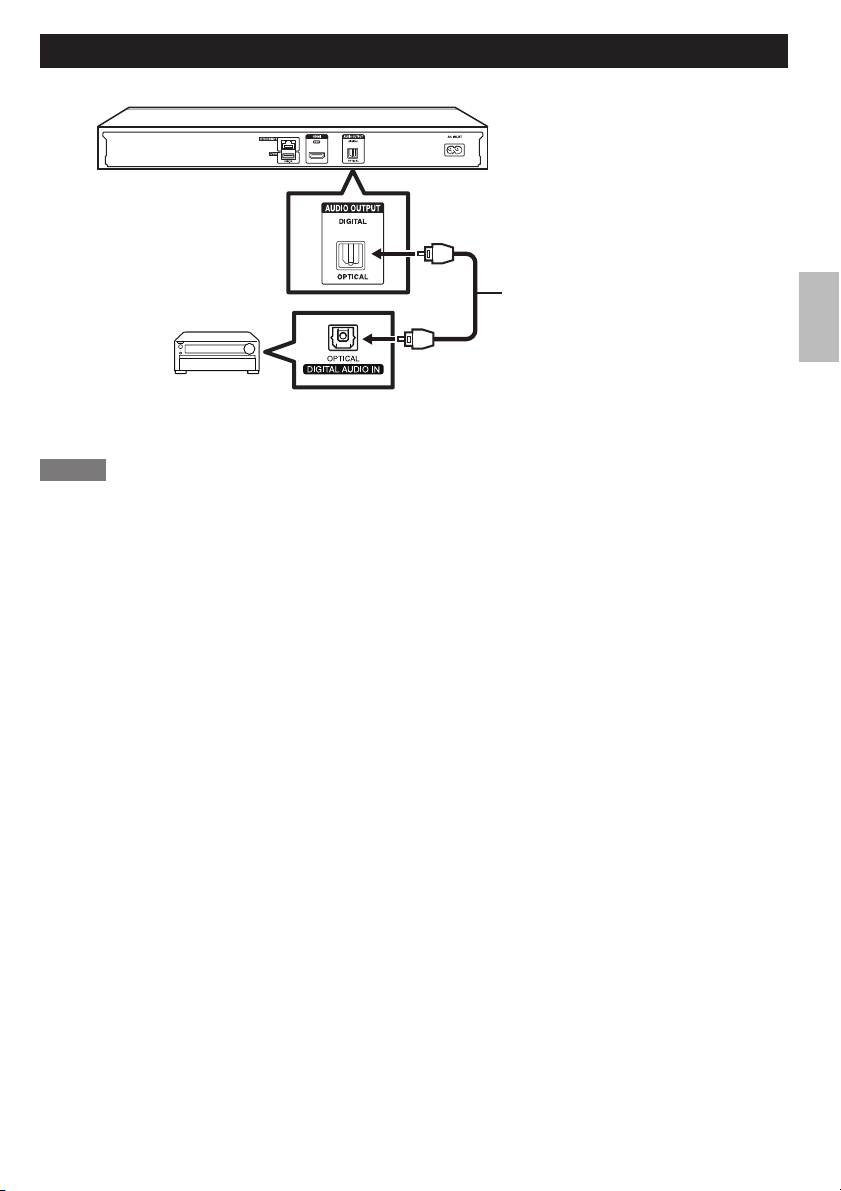
Digital audio connection
You can connect an ampli er/AV receiver using an optical digital audio cable (commercially available).
Optical digital cable*
Ampli er/AV receiver
* Commercially available
NOTE
• When using OPTICAL DIGITAL AUDIO OUT, 5.1ch Digital Output is available. (7.1ch Digital Output is
not available.)
After connecting
• If necessary, perform the Audio Video Settings. (Page 40)
• Prepare the desired disc or content and start playback. (Page 22)
En
17
Page 18
Broadband Internet Connection
By connecting this player to the Internet, you can enjoy a variety of content on your TV using BD-LIVE
functions, home networks and also perform software updates. In this player, the Internet connection can
be made using the following methods.
NOTE
• Be sure to turn off this Player and the equipment before making any connections.
CAUTION
• When using a broadband Internet connection, a contract with an Internet service provider is required.
For more details, contact your nearest Internet service provider.
• Refer to the operation manual of the equipment you have as the connected equipment and connection
method may differ depending on your Internet environment.
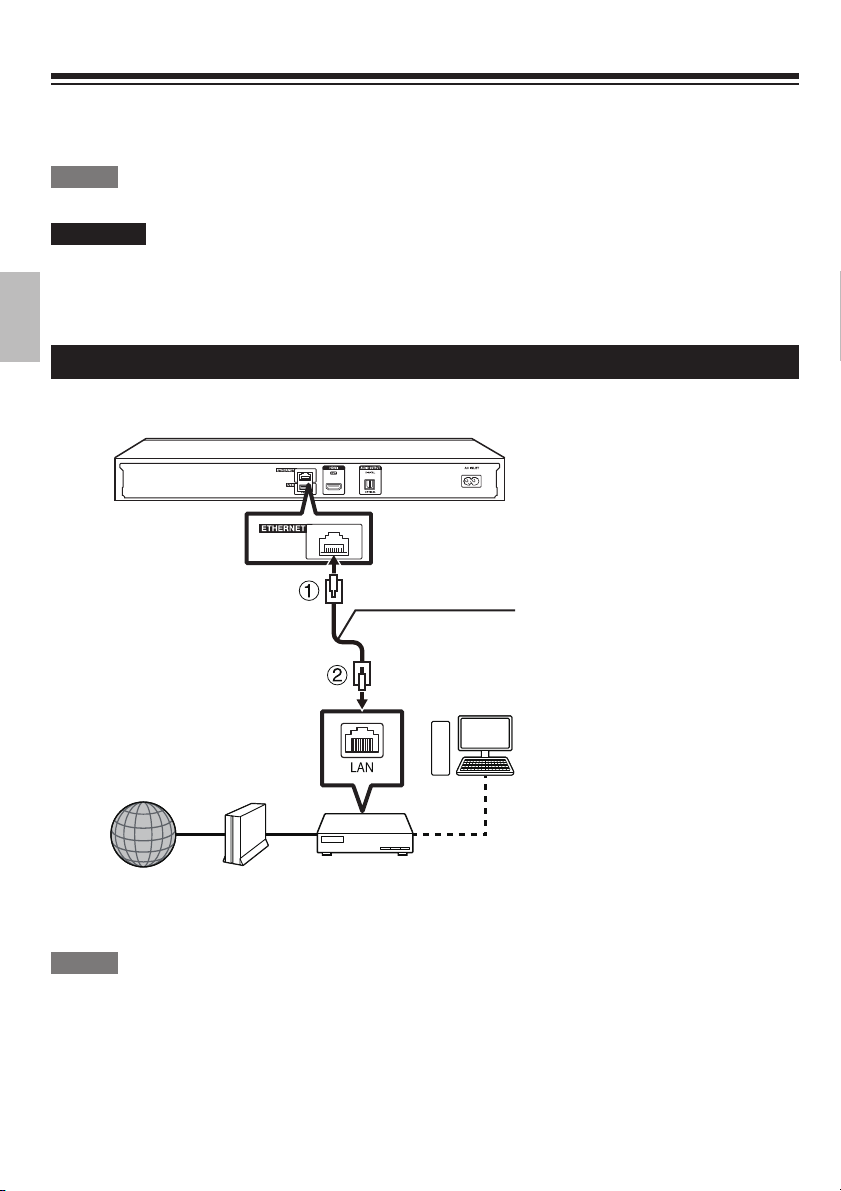
Wired connection (LAN cable)
Connect a LAN cable (commercially available) to the ETHERNET terminal of this player (1) and the LAN
port of the broadband router (2).
LAN cable*
PC
Internet Modem Broadband
* Commercially available
NOTE
• Use a LAN cable/router supporting 10BASE-T/100BASE-TX.
After connecting
• Perform the communication settings. (Page 43)
• When enjoying BD-LIVE functions, see pages 25 and 42.
• To play back les via the Home Network, see page 31.
• To update the software via the Internet, perform Software Update Settings. (Page 45)
router
En
18
Page 19

Before Starting Playback
Loading the Batteries in the
Remote Control
Hold in the tab on the battery cover and
1
pull the cover towards the direction of the
arrow.
Load the two “AA” size batteries (R-06
2
size, UM/SUM-3). Place batteries with their
terminals corresponding to the
indications in battery compartment.
Insert the smaller tab of the battery cover
3
into the opening 1, and press down on the
cover until it clicks in place 2.
and
• Remove the batteries if you will not use the
remote control unit for an extended period of
time.
Approximate operating range
of remote control
Remote control sensor
15º
15º
RC-826DV
Remote control unit
Connecting the Power Cord
Plug the supplied AC cord into the AC INLET
terminal on the rear of the Player (1). Then plug
into AC outlet (2).
Approx. 5m
30º30º
WARNING
• Do not use or store batteries in direct sunlight
or other excessively hot place, such as inside a
car or near a heater. This can cause batteries to
leak, overheat, explode or catch re. It can also
reduce the life or performance of batteries.
NOTE
• Do not subject the remote control unit to shock,
water or excessive humidity.
• The remote control unit may not function if the
Player’s remote sensor is in direct sunlight or any
other strong light.
• Incorrect use of batteries may cause them to
leak or burst. Read the battery warnings and use
the batteries properly.
• Do not mix old and new batteries, or mix different
brands.
NOTE
• Place the Player close to the AC outlet, and keep
the power plug within reach.
• TO PREVENT RISK OF ELECTRIC SHOCK,
DO NOT TOUCH THE UN-INSULATED PARTS
OF ANY CABLES WHILE THE AC CORD IS
CONNECTED.
• If you are not going to use this Player for a long
period of time, be sure to remove the AC cord
from the AC outlet.
En
19
Page 20

Turning the Power On
After all of the necessary connections are
complete, Turn on your TV and switch to the
appropriate AV input (Refer to your TV’s operation
manual). (This may be labeled HDMI/EXT/AUX
etc.)
Home screen
1
ON/STANDBY
Turning the power on
Press on the remote control or on the Player to
turn on the power of the Player.
NOTE
• When you turn on this player for the rst time
after purchase or when you turn on this player
after you perform “System Reset” (see page 42),
the language setting screen will be displayed, so
please perform the language setting.
Entering standby
Press on the remote control or on the Player to
enter standby.
• If you press again immediately after entering
standby, the Player may not turn on. If this
happens, wait for 10 seconds or more and then
turn on the power again.
About the Home screen
When turning on the player, the Home screen
appears.
32 4
1 Main menu
2 Icon for disc inserted
3 Icon for USB memory device connected
4 Icon for LAN connection
5 Button Guide
5
Language Setting
Press / to select “Settings”, then
1
press
Press / to select “On Screen
2
Language”, then press or ENTER.
Press / to select the language you
3
want to display on the screen, then press
ENTER.
or ENTER.
English Nederlands esky
Deutsch Svenska Magyar
Français Dansk Slovensky
Italiano Norsk Slovenšina
Español Suomi
Português Polski
En
20
Page 21

NOTE:
• When you turn on this player for the rst time
after purchase, the language setting screen will
be displayed.
• To select the DVD disc language, such as
subtitle language, etc., see page 23.
Operating ONKYO AV Receiver
Using the Remote Control
NOTE
• HDMI Control is available only when the TV
is connected by an HDMI cable, and when it
supports HDMI Control feature.
• Depending on the connected TV, HDMI Control
may not be performed correctly.
• Onkyo does not guarantee 100% interoperability
with other brands of HDMI Control compliant
devices.
The Universal Remote Control may operate the
basic functions of ONKYO AV Receiver.
ONKYO AV Receiver
Button Operation
Turn the AV receiver on
or off.
MUTING Mutes or unmutes the
AV receiver.
VOL +/– Adjust the volume of the
AV receiver.
INPUT
• Be sure to set the “Remote ID” setting to “1” on
• Depending on the unit being connected, you
/
the AV receiver.
may not be able to control your AV receiver using
some of the buttons.
Using HDMI Control
Direct Change
When this player is turned on, the TV is also turned
on and the appropriate external input channel
will be selected automatically. The appropriate
external input channel can also be selected on
your TV automatically when you press
the player’s power is on.
Switch the AV receiver’s
input source.
when
Using 3D
This sets output of 3D images.
To view 3D images, playback of 3D content (3D BD
video) is necessary with a 3D compatible TV and
3D glasses in addition to this player.
Press 3D to change to the 3D mode.
• Each time the button is pressed, the mode
switches between “Auto (3D)” and “2D”.
• The status of the selected mode will be displayed
on the TV screen.
Auto: Video signals are output as 3D when 3D
content (3D BD video) is played or as 2D when 2D
content is played.
2D: Even if 3D content (3D BD video) is played,
video signals are output as 2D at all times.
• This setting (Auto (3D)/2D) can also be
performed using the menu screen (see page 42).
NOTE
• The 3D mode can be switched only when
playback is stopped.
• Depending on the connected TV, the images
during playback may switch to 2D images due to
changes in the resolution, etc. Make sure the 3D
image setting is performed on the TV.
• The 3D images may not be output as set in
“HDMI Video Out”.
• When performing Fast Forward/Reverse, images
are shown in 2D.
CAUTION
• When viewing 3D images, viewing for a long
period of time or lying on your back may cause
eye strain and discomfort. In addition, 3D images
may affect the eyesight of young children/infants,
so keep them from viewing the images.
En
21
Page 22

Video/Picture/Music Playback
Loading a Disc
ON/STANDBY
Press on the remote control or on the
1
Player to turn on the power.
Press OPEN/CLOSE to open the disc tray.
2
Load a disc on the disc tray.
3
• Insert the disc with the label face up.
• In case of disc recorded on both sides, face
down the side to play back.
Press OPEN/CLOSE to close the disc tray.
4
(open/close)
Load a disc.
1
• Playback may begin automatically,
depending on the disc.
• Playback begins from the rst title.
• The menu may be displayed rst, depending
on the disc. Perform playback operation by
following the directions on the screen.
• When loading a disc containing 3D content
(3D BD video) with “Yes” selected in the “3D
Notice” setting (Page 42), playback will be
stopped and the 3D notice will be displayed
on the TV screen. In such cases, press
ENTER for con rmation, and then playback
will start.
Press if playback does not begin
2
automatically or playback is stopped.
NOTE
• The disc load time may vary depending on the
disc.
Regarding playback of BD video discs
• Some of the newly released BD video discs
cannot be played back unless you update the
player software to the latest version. Therefore,
it may be required to update the software of the
player.
• Refer to page 45 for more information regarding
software updates for the player.
BD/DVD Video Playback
This section explains playback of commercially
available BD Video and DVD Video discs (like
movies) and recorded DVD-RW/R discs.
• This player supports DVD upscaling during DVD
playback.
• For a description of other playback functions,
refer to “Playback Functions” on page 33.
En
22
To stop playback
Press .
Resume playback function
• If you press
from the point where the Player was previously
stopped. To playback from the beginning, cancel
resume mode by pressing
(This may not work depending on the type of
disc. In this case, open the disc tray or enter
standby.)
NOTE
• Resume playback may not function depending
on the disc.
next, playback will resume
, then press .
Page 23

Displaying the disc information
Press DISPLAY during playback.
• Each time you press DISPLAY, the display
switches as follows.
1
BD-VIDEO
2
3
4
4
1 Type of disc
2 Title number being played / Total number of
Titles
3 Chapter number being played / Total number
of Chapters
4 Elapsed playback time / Total playback time
for the Title
NOTE
• Disc Information Screen A disappears after
about 1 minute elapses without performing any
operations.
• For some commercially-released BD VIDEO
discs, the total playback time display for the
Chapter/Title may not appear.
1/1
10/1 1
00 :00 :12
03/ :12 :28
00 :00 :12
03/ :12 :28
No Display
BD/DVD Menus
• This section explains how to play back a BD/
DVD video disc with a top menu, disc menu or
pop-up menu.
• The titles listed in the top menu and a disc guide
(for options like subtitles and audio languages)
are given in the disc menu.
Disc
Information
screen A
Disc
Information
screen B
Start playback by selecting a
title from the top menu
Press TOP MENU.
1
• The top menu screen is displayed if present
on the BD/DVD video disc.
Example
TOP MENU
1
Jazz
3
Classic
Press / / / to select the title, then
2
press ENTER.
• The selected title is played back.
NOTE
• If no top menu is available, the TOP MENU
button will have no effect.
2
4
Latin
Rock
Using the disc menu
Example: Select “SUBTITLE LANGUAGE”.
Press POP UP MENU/MENU.
1
• The disc menu screen is displayed if present
on the DVD video disc.
Press / to select “SUBTITLE
2
LANGUAGE”, then press ENTER.
• The screen for selecting the subtitle
language is displayed.
Example
MENU
1 AUDIO LANGUAGE
2 SUBTITLE LANGUAGE
3 AUDIO
Press / to select the subtitle
3
language, then press ENTER.
Press POP UP MENU/MENU to exit.
4
En
23
Page 24

Using the pop-up menu
Press POP UP MENU/MENU during
1
playback.
• The pop up menu screen is displayed.
• The menu contents displayed vary
depending on the disc. For details on how to
see and operate the pop up menu, refer to
the manual for the disc.
Example
Press / / / to select the desired
2
item, then press ENTER.
Press POP UP MENU/MENU to exit.
3
• The pop up menu will automatically
disappear for some discs.
Enjoying BONUSVIEW or BD-LIVE
This Player is compatible with additional functions
of BD-Video, BONUSVIEW (BD-ROM Pro le 1
Version 1.1) and BD-LIVE.
For BD-Video discs compatible with BONUSVIEW,
the functions of Picture in Picture and Virtual
Package are available. For BD-LIVE compatible
discs, you can enjoy a variety of functions via the
Internet in addition to the BONUSVIEW functions.
Virtual Package/BD-LIVE data is saved in Local
Storage (USB memory device connected to this
Player). To enjoy these functions, connect a USB
memory device (2 GB or greater) supporting USB
2.0 High Speed (480 Mbit/s) to the USB (rear) or
USB (front) terminal on this player.
NOTE
• A USB memory device can be used with either
the USB (front) or USB (rear) terminal. When
two USB memory devices are connected to both
terminals at the same time, in certain situations
the USB (rear) terminal may give priority to Local
Storage and the USB (front) terminal cannot be
used for Local Storage.
• If there is insuf cient storage space, the data will
not be copied/downloaded. Delete unneeded
data or use a new USB memory device.
• If a USB memory device containing other data
(previously recorded) is used, the video and
audio may not play back properly.
En
24
Pop-up menu
Previous page
Next page
• If the USB memory device is disconnected from
this player during playback of Virtual Package/
BD-LIVE data, playback of the disc will stop.
• Some time may be required for the data to load
(read/ write).
• Refer to “USB Memory Management” on page 44
for erasing the Virtual Package data and the BDLIVE data in the USB memory device.
NOTE
• Some USB memory devices may not work with
this player.
• Only USB memory devices formatted with
FAT32/16 are compatible.
When formatting a USB memory device using a
PC, perform the following settings.
- Format File System: FAT32
- Allocation Unit Size: Default Allocation Size
• Do not use a USB extension cable when
connecting a USB memory device to the USB
terminal of the player.
- Using a USB extension cable may prevent the
player from performing correctly.
Use of Picture in Picture
function (secondary audio/
video playback)
BD-Video that includes secondary audio and
video compatible with Picture in Picture can be
played back with secondary audio and video
simultaneously as a small video in the corner.
Press P IN P during playback to show the
1
2-picture screen.
Primary audio/
video
Secondary
audio/ video
To remove the secondary video, press
2
P IN P again.
NOTE
• To listen to secondary audio, make sure that
“Secondary Audio” is set to “On”. (see page 40)
• The secondary audio and video for Picture
In Picture may automatically play back and
be removed depending on the content. Also,
playable areas may be restricted.
Page 25

Virtual Package
For BD-Video discs compatible with Virtual
Package, data is copied from the discs or Internet to
local storage. It is automatically copied to the local
storage prior to playback. You can enjoy a variety
of additional functions including secondary video,
secondary audio, subtitles, movie trailers, etc.
• The playback methods vary depending on the
disc. For details, refer to the disc manual.
BD-LIVE
In this Player, a variety of contents with interactive
functions are available through BD-LIVE
compatible Blu-ray discs by connecting to the
Internet. You can enjoy the download of bonus
features such as latest movie trailers to the USB
memory device, communication compatible BD-J
interactive games, etc.
• The available functions differ depending on the
disc.
NOTE
• Regarding playback method of BD-LIVE
contents, etc., perform the operations in
accordance with the instructions in the BD disc
manual.
• To enjoy BD-LIVE functions, perform the
broadband Internet connection (Page 18) and
communication settings (Page 43).
• Refer to page 42 regarding the setup to restrict
access to BD-LIVE contents.
• If the BD-LIVE screen does not appear for a
while after you select the BD-LIVE function in the
BD disc menu, the USB memory device may not
have enough free space. In such cases, eject
the disc from the player, and then erase the data
in the USB memory device in the “USB Memory
Management” menu on page 44.
DVD-R/-RW (VR format) / BD-RE/-R
(BDAV format) Playback
You can play back a recorded disc (DVD: VR
format nalised disc only / BD: BDAV format disc
only).
• For a description of other playback functions,
refer to “Playback Functions” on page 33.
NOTE
• “Finalise” refers to a recorder processing a
recorded disc so that it will play in other DVD
players/recorders as well as this player. Only
nalised DVD discs will play back in this player.
(This player does not have a function to nalise
discs.)
• Some discs cannot be played back depending on
the audio format.
• BD-RE/-R discs recorded from a BD recorder
comply with AACS copyright protection
technology. As this player is not intended to be
compliant with AACS, such discs cannot be
played back. (AACS: Advanced Access Content
System)
En
25
Page 26

Playback by selecting a title
Load a recorded disc.
1
• The Title List screen is displayed.
Example: Thumbnail screen
Program 1
21/5 Fri 9:30 AM 110 Min.
Program
1
Program
4
Select
A
Title Name
• If the Title List screen is not displayed, press
TOP MENU.
• When loading a BD disc with usage
restrictions placed by a BD recorder, the
password input screen appears. Then,
input your password. If you input a wrong
password three times, the disc tray will
open. Close the disc tray, and then input a
correct password.
Press / / / to select the desired title,
2
then press ENTER to start playback.
• If you want to select additional titles, switch
pages by pressing / or / .
• You can playback by pressing instead of
pressing ENTER.
Press to stop playback.
3
NOTE
• The Title List screen also can be displayed by
pressing TOP MENU when playback is stopped.
About Title List
• The Title List can be displayed in two types,
Thumbnail and Title Name.
• Each time you press A (Red), the screen
changes between Thumbnail and Title Name.
Thumbnail
21/5 Fri 9:30 AM 110 Min.
Program
1
Program
4
Select
A
Title Name
Enter Return Exit
By Chapter Playlist Functions
Program
2
Program
Enter Return Exit
By Chapter Playlist Functions
Program 1
Program2Program
Program5Program
Program
3
5
Program
6
DCB
3
6
DCB
Title Name
Program 1
21/5 Fri 9:30 AM 110 Min.
Program
Select
A
Thumbnail
1 Program 1
2 Program 2
1
3 Program 3
4 Program 4
5 Program 5
6 Program 6
Enter Return Exit
Sorting Playlist Functions
21/5
15/6
3/7
18/9
20/9 Sat
25/9
1/All 8 Titles
1 Information of selected title
2 Title Name
Recording Date
Recording Duration
3 Button Guide
Playback by selecting a chapter
Press B (Green) while the Thumbnail
1
screen is displayed.
• The chapter screen is displayed.
CHAPTER
1
CHAPTER
CHAPTER
2
4
CHAPTER5CHAPTER
• If you want to select additional chapters,
switch pages by pressing / or / .
• To return to the Thumbnail screen, press B
(Green).
Press / / / to select the desired
2
chapter, then press ENTER to start
playback.
• You can playback by pressing
pressing ENTER.
Press to stop playback.
3
Sorting the titles
Each time you press B (Green) while the Title
Name screen is displayed, the Title Name display
1
changes between displaying the newest title rst
and the oldest title rst.
3
Fri
Fri
Mon
Thu
DCB
110 Min.
110 Min.
CHAPTER
56 Min.
40 Min.
20 Min.
60 Min.Thu
3
6
instead of
1
2
3
En
26
Page 27

Playback by selecting a Playlist
Press C (Yellow) while the Title List screen
1
is displayed.
• The Playlist screen is displayed.
Example: Thumbnail screen
Program 1
21/5 Fri 9:30 AM 110 Min.
Program
1
Program
4
Select
A
Title Name
Press / / / to select the desired title,
2
then press ENTER to start playback.
Press to stop playback.
3
Program
2
Enter Return Exit
By Chapter Playlis
Program
3
DCB
t Functions
Playback from the beginning or
resume playback
When you play back the title from the Title List after
you stopped playback, you can select playback
from the beginning or from the point where it was
last stopped.
Audio CD Playback
This Player can play back audio CDs.
• For a description of other playback functions,
refer to “Playback Functions” on page 33.
Playback from the beginning
Load an audio CD.
1
• The CD screen is displayed. (The CD screen
is displayed only when a compact disc
recorded in the CD-DA format is inserted.)
• Playback may begin automatically,
depending on the disc.
Press D (Blue) when the desired title is
1
selected while the Title List screen is
displayed.
Press / to select the type of Playback,
2
then press ENTER to start playback.
• The type of Playback may be selected from
“From Beginning” or “From Continued”.
Press to stop playback.
3
Press if playback does not begin
2
automatically or playback is stopped.
To pause the playback at any time,
3
press .
• Press or to return to playback.
Press to stop playback.
4
To return to the HOME screen, press
5
again, and then press HOME or EXIT.
En
27
Page 28

Playback by selecting a track
Audio Data (MP3 File) Playback
Press / to select the track, then press
1
ENTER during playback or when playback
is stopped.
• Playback of the selected track will begin.
Press to stop playback.
2
Operation procedure for the
“Functions” menu
Press D (Blue) (Functions) when the CD
1
screen is displayed.
• The “Functions” menu is activated.
Press / to select the desired setting,
2
then press ENTER.
• When playback is stopped, only “Track” can
be selected.
• For a description of each setting, see
“Functions which can be set” (Page 38).
Press / / / to set, then press
3
ENTER.
• Operations vary depending on the setting.
Follow the operation instructions on the
screen.
Press RETURN or D (Blue) to exit the
4
“Functions” menu.
This Player can play back audio data (MP3 les)
recorded on CD-R/RW discs, DVD-R/RW discs
and USB memory devices or via a home network.
• For details on the audio data that you can play
using this player, refer to page 9.
• When data in the USB memory device is played
back, playback from the USB memory device
will stop when OPEN/CLOSE on the remote
control or the player is pressed or when a disc is
inserted into the player.
Load a disc or insert a USB memory
1
device* containing audio data (MP3 les).
* When you insert or remove a USB memory device, be
sure to turn the main power off.
Note
• A USB memory device can be used with
either the USB (front) or USB (rear) terminal.
When two USB memory devices are
connected to both terminals, use the USB
(front) terminal for playback video/music/
picture les.
• This player is not compatible with NTFS
formatted USB memory device. Be sure to
use FAT16 or FAT32 formatted USB memory
device.
Press / to select “Music”, then press
2
or ENTER.
Press / to select “DISC”*, “USB” or
3
“Home Network”, then press or ENTER.
* Display name varies depending on the type of media
inserted.
NOTE
• The displayed items vary depending on the disc.
En
28
Page 29

Press / to select a folder or le.
4
• When you select a folder, press ENTER to
open it, and then press / to select a le
in the folder.
Press ENTER to play back the selected le.
5
• Playback of the selected le will begin.
• When MP3 les are played, the “Functions”
menu is not available.
To return to the HOME screen, press
6
(press twice if during playback), and then
press HOME or EXIT.
List of available buttons during playback
Buttons Description
/
ENTER
/
/
NOTE
• The Fast Forward/Reverse function does not
work.
• The Repeat function does not work.
Select a desired audio le.
Play back audio le.
Pause audio le playback.
• Return to playback when paused.
Skip backward.
Skip forward.
Stop playback.
Displaying Still Images (JPEG fi les)
This Player can display still images (JPEG les)
recorded on CD-R/RW discs, DVD-R/RW discs
and USB memory devices or via a home network.
• For details on the still images that you can
display using this player, refer to page 9.
• Still images are played one by one while during
“Slide show”, they are automatically replaced
one after another.
• When data in the USB memory device is played
back, playback from the USB memory device
will stop when OPEN/CLOSE on the remote
control or the player is pressed or when a disc is
inserted into the player.
Load a disc or insert a USB memory
1
device* containing audio data (JPEG les).
* When you insert or remove a USB memory device, be
sure to turn the main power off.
Note
• A USB memory device can be used with
either the USB (front) or USB (rear) terminal.
When two USB memory devices are
connected to both terminals, use the USB
(front) terminal for playback video/music/
picture les.
• This player is not compatible with NTFS
formatted USB memory device. Be sure to
use FAT16 or FAT32 formatted USB memory
device.
Press / to select “Picture”, then press
2
or ENTER.
Press / to select “DISC”*, “USB” or
3
“Home Network”, then press or ENTER.
* Display name varies depending on the type of media
inserted.
En
29
Page 30

Press / to select a folder or le.
4
• When you select a folder, press ENTER to
open it, and then press
/ to select a le
in the folder.
• To set slide show speed/repeat playback,
press D (Blue) (Slide Show Menu).
Slide Show Menu
Slide Show Speed Setting of slide show playback
Repeat Mode
Setting
Guide Display
Setting
Press ENTER to display the selected le.
5
• The selected still image appears on the
speed
Setting of slide show repeat
playback
Guide display setting during still
image display
screen.
1/77
Operational buttons during still image display
Buttons Description
/ / /
/
RETURN
C (Yellow)
D (Blue)
A (Red)
Go to the previous/next picture in the
same directory.
Return to the selection screen.
Rotate the picture by 90 degrees to
the left.
Rotate the picture by 90 degrees
to the right.
Play back Slide Show.
• Return to slide show playback
when paused.
Pause slide show playback.
Stop still image display/slide show
playback.
Guide display on/off
NOTE
• Thumbnail data will be displayed when JPEG
les from a digital camera contain thumbnail
data.
• An icon will be displayed for JPEG les which do
not contain thumbnail data.
En
30
To return to the HOME screen, press
6
again, and then press HOME or EXIT.
Page 31

Accessing UPnP* servers
The player can browse and play movies, music
and photos stored on your UPnP compatible media
servers connected within your home network.
* UPnP: Universal Plug and Play
About a home network
This Player can display and play movies, photos
and music content from your UPnP compatible
digital media servers (such as a PC and consumer
electronics).
Before accessing UPnP compatible media
servers:
• UPnP compatible media servers and this
player must be connected to the same local
area network. Specify the settings required for
connecting this player to the local area network.
• UPnP compatible media servers must be turned
on.
• When a PC running UPnP compatible media
server software or other UPnP compatible
devices are connected to this player, some
setting changes of software or other devices may
be required.
• Please refer to the operating instructions for the
software or devices for more information.
NOTE
• Even if UPnP compatible, a connection may not
be able to be made depending on the server,
or playback may not be available even if a
connection is made successfully.
• Some les may not be playable depending on
the le. For details, refer to page 8.
• To enjoy this function, make a broadband
Internet connection to both your PC and this
player (see page 18), and then set communication
settings (see page 43), then perform the following
operation.
• To use this function, we recommend setting
“Auto Power Off” to “No”. (see page 41)
Types of playable les
Video DivX Plus HD (avi/divx/mkv)
Music mp3
Picture jpg
En
31
Page 32

Playback by selecting a le list
Press / to select Video/Music/Picture,
1
then press or ENTER.
Press / to select “Home Network” in
2
the sub window.
Sub Window
Press ENTER or .
3
• The player automatically scans and displays
UPnP servers within your local network.
Press / to select the folder or le which
5
you want to access, then press ENTER.
• When you select a folder, the le list of the
folder is displayed. Press
the le which you want to play, then press
ENTER.
• Playback starts.
• For operation during playback, refer to
page 33.
Press to stop playback.
6
• The le list reappears.
• The previous screen appears when
RETURN is pressed.
Press EXIT or HOME to exit playback.
7
• The Home screen reappears.
/ to select
En
32
Press / to select a UPnP server which
4
you want to access, then press ENTER or
.
• The folder list or le list of the UPnP server
which you accessed is displayed.
• The previous screen appears when
RETURN is pressed.
Page 33

Playback Functions
NOTE
• Some operations in the following playback
functions cannot be performed depending on the
speci cations of the disc.
Fast Forward/Reverse (Search)
The Fast Forward/Reverse function is enabled
when or is pressed during playback.
Example: When is pressed
• The search speed will change each time you
press the button.
When playing back a DVD
• You cannot perform Fast Forward/Fast Reverse
from one title and continue to another title
(except when playing audio CDs). At the end or
beginning of the title, Fast Forward/Fast Reverse
will be cancelled and normal playback will
automatically resume.
NOTE
• Subtitles are not played back with BD/DVD video
discs during Fast Forward and Fast Reverse.
Skipping to the Next or the Start of
the Current Chapter (Track/Title)
The Skipping (to the beginning of a chapter, track
or title) function is enabled when / or /
is pressed during playback.
Pause/Frame Advance Playback
The Pause function is enabled when
during playback. (If you are playing back an audio
CD, audio data [MP3 les] or still images [JPEG
les], these will also pause.)
The Frame Advance Playback function is enabled
when
/ is pressed during pause.
• Frame Advance Playback may not function
properly with discs other than DVD-RW/R (VR
format).
NOTE
• Some BD/DVD Video discs are not compatible
with Pause/Frame Advance Playback.
• Frame Advance/Reverse Playback can be
performed for DVD discs by pressing
/ during pause.
• Frame Reverse Playback cannot be performed
for DivX video.
is pressed
/ or
En
33
Page 34

Slow Playback (Forward/Reverse)
The Slow Playback (Forward/Reverse) function
is enabled when
more than 2 seconds during pause.
Press
• This doesn’t work for audio CDs.
• You cannot perform Slow Playback between
• Reverse Slow Playback cannot be performed for
• Reverse Slow Playback cannot be performed for
to return to normal playback.
NOTE
titles. At the end of the title, Slow Playback
will be cancelled and normal playback will
automatically resume.
BD video and DVD discs in AVCHD format.
DivX video.
/ or / is pressed for
Repeat Playback of a Title or
Chapter (Repeat Playback)
Play back the title or chapter you want to
1
repeat.
Press REPEAT.
2
Press / to select the type of Repeat
3
Playback.
• Playback Title: Repeats the title currently
being played back.
• Playback Chapter: Repeats the chapter
currently being played back.
• Scene Selection: Repeats the speci ed
scene of title or chapter.
Playback Title
Playback Chapter
Scene Selection
NOTE
• Press RETURN to cancel without
setting the type of Repeat Playback.
• For Audio CD, you can select “Playing Disc”,
“Playing Track” and “Specify The Part” as
Repeat Playback options.
• Repeat Playback cannot be performed for
DivX video.
Press ENTER.
4
Example: Repeat playback of a title (TITLE)
BD-VIDEO
1/3
55/2
00 :20 :30
2 English
1
1 DTS
On Title Repeat
En
34
On Title Repeat
Press REPEAT to return to normal
5
playback.
NOTE
• “Scene Selection” operation is not available for
BD video.
Page 35

Partial Repeat Playback (Repeat
Playback of a Specifi ed Part)
Press REPEAT during playback.
1
Press / to select “Scene Selection”,
2
then press ENTER.
• “Set Start Point” displays.
Playback Title
Playback Chapter
Set Start PointScene Selection
Press ENTER at the scene where you want
3
to set the start point.
• “Set End Point” displays.
Press ENTER at the scene where you want
4
to set the end point.
• You can press to fast forward to the
scene where you want to set the end point.
When you reach the desired scene, simply
press
point. To cancel Repeat Playback, press
REPEAT.
NOTE
• Press / , the Repeat Playback is cancelled
and the next chapter being play back.
• Press / once, the Repeat Playback is
cancelled and the player returns to the start of
current chapter (track).
• If you press
5 seconds) the player will skip to the beginning of
the previous chapter (track).
• For Partial Repeat Playback, set the start and
end points within the same title.
• Repeat Playback may be forbidden depending
on the disc.
• Partial Repeat Playback may not work in multiangle scenes.
• If you press DISPLAY, you can con rm the
Repeat Playback status.
and then ENTER to set the end
/ again (within about
Displaying the Audio Information
You can display the audio information on the disc
currently being played back by pressing AUDIO.
The displayed contents vary depending on the
disc.
The audio channel currently being played back will
be displayed.
If multiple audio channels are recorded, you can
switch the audio channel by pressing AUDIO.
When a recorded broadcast with stereo or
monaural audio is played back:
“Stereo” is displayed. (Audio cannot be switched.)
NOTE
• When you play a programme recorded in stereo
or monaural, and if you are listening to the
Bitstream sound via the digital output jack, you
cannot select the audio channel. Set “Audio Out”
to “PCM” (Page 40).
• Settings for audio can also be changed in the
Function Control screen (Page 37).
• The operation of audio differs according to each
disc. You may need to refer to the operation
manual of the disc.
• The display for audio information automatically
disappears after 5 seconds.
Switching Subtitles
If subtitles are provided in multiple languages, you
can switch between them.
Press SUBTITLE during playback.
• The display indicates the subtitle number
currently being played back, and the subtitles
appear. Each time SUBTITLE is pressed, the
subtitles change.
• “–” is displayed if a disc has no subtitles.
• You can also select “Off”.
NOTE
• Settings for subtitles can also be changed in the
Function Control screen (Page 37).
• The operation of subtitles differs according to
each disc. You may need to refer to the operation
manual of the disc.
• The display for subtitle information automatically
disappears after 5 seconds.
En
35
Page 36

Switching the Angle
Displaying the Angle Mark
If multiple angles are recorded, you can switch
between them.
Press FUNCTION during playback.
1
• The Function Control screen is displayed on
the TV.
Press / to select the Angle Number
2
column, then press ENTER.
BD-VIDEO
1/3
5 5 / 2
0 0 : 2 0 : 3 0
2 English
1
1 DTS
Off
Press / to select the desired Angle
3
Number, then press ENTER.
Press RETURN or FUNCTION to close
4
the Function Control screen.
NOTE
• The displayed items vary depending on the disc.
• If you access the Function Control screen
during playback of a BD/DVD video, it may
be impossible to operate the BD/DVD video
playback. In cases like this, close the Function
Control screen.
• The operation of angles differs according to each
disc. You may need to refer to the operation
manual of the disc.
• The display for angle information automatically
disappears after 5 seconds.
You can change settings so that Angle Mark
appears in the right bottom part of the screen when
multiple angles are recorded. The settings can be
changed in “Settings” – “Playback Setting” – “Angle
Mark Display” (Page 41).
En
36
Page 37

Settings During Playback
Function Control
This allows you to adjust various settings at once,
like subtitles, angle settings and the title selection
for Direct Playback. You can adjust the video and
audio to suit your preferences. The operations are
the same for BD and DVD.
Function Control screen
BD-VIDEO
1 / 3
5 5 / 2
0 0 : 2 0 : 3 0
2 English
1
1 DTS
Off
ENTER
Select Enter
Exit
3
1 Playback status display
Shows the operation status and the disc type.
2 Setting items
Selects a title (or track) or chapter for playback, or
performs video/audio settings.
• Title/Track Number (Direct Title/Track Skip)
• Chapter Number (Direct Chapter Skip)
• Playback Elapsed Time (Direct Time Skip)
• Subtitle Language
• Angle Number
• Audio
• Repeat
3 Operation guide display
Provides help on remote control button operations.
1
2
Return
Function control operation
procedure
Press FUNCTION during playback.
1
• The Function Control screen is displayed on
the TV.
Press / to select the desired setting,
2
then press ENTER.
• For a description of each setting, see
“Functions which can be set” (Page 38).
BD-VIDEO
1/3
5 5 / 2
0 0: 2 0 : 3 0
2 English
1
1 DTS
Off
Press / / / to set, then press
3
ENTER.
• Operations vary depending on the setting.
Follow the operation instructions on the
screen.
Press RETURN or FUNCTION to close
4
the Function Control screen.
NOTE
• If “– –” is displayed for an option like title number
or subtitles, the disc has no titles or subtitles
which can be selected.
• The displayed items vary depending on the disc.
• If you access the Function Control screen
during playback of a BD/DVD video, it may
be impossible to operate the BD/DVD video
playback. In cases like this, close the Function
Control screen.
En
37
Page 38

Functions which can be set
Title/Track Number (Direct Title/Track Skip)
• Shows the title number being played back (or
track number when playing back an audio CD).
You can skip to the start of the title (or track).
• To skip to the start of a selected title (or track),
press the Number buttons to enter the title (or
track) number when this option is highlighted.
Chapter Number (Direct Chapter Skip)
• Shows the chapter number being played back.
You can skip to the start of the chapter.
• To skip to the start of a selected chapter, press
the Number buttons to enter the chapter number
when this option is highlighted.
Playback Elapsed Time (Direct Time Skip)
• Shows the time elapsed from the beginning of
the current disc title (or track). This lets you skip
to a speci c time.
• Press
Second, then press / or the Number buttons
to set the time. Press ENTER to start playback at
the set time.
Subtitle Language
• Shows the currently selected subtitle language.
If subtitles are provided in other languages, you
can switch to your preferred language.
Angle Number
• Shows the currently selected angle number. If
the video is recorded with multiple angles, you
can switch the angle.
Audio
• Shows the currently selected type of audio. You
can select the desired type of audio.
• The current Title (or Chapter) or partial segments
can be repeatedly played back. Repeat Playback
is also possible with the REPEAT button on the
remote control.
NOTE
• These functions may not work with all discs.
/ to select the Hour, Minute or
Repeat
RC-826DV
En
38
Page 39

SETTINGS
Common operations
The “menu” enables various audio/visual settings
and adjustments on the functions using the remote
control unit. You need to call up the On Screen
Display to perform settings for this player. The
following is the explanation for the basic operations
of the “menu”.
Example: Setting “HDMI Control”
Home screen display
1
Press / to select “Settings”, then press
or ENTER.
Select a menu item
2
Press
press or ENTER.
Select the next item
3
Press / to select the desired item, then
press ENTER.
Press RETURN to return to the previous
“menu” page.
Exit the menu screen
4
Press HOME or EXIT to exit.
/ to select “HDMI Control”, then
Basic Operation for Playback
Setting
Example: Setting “Parental Control” under
“Playback Setting”
Press / to select “Settings”, then press
1
or ENTER.
Press / to select “Playback Settings”,
2
then press
Press / to select “Parental Control”,
3
then press or ENTER.
• When you operate this Player for the rst
time, the PIN code setting screen will be
displayed. See “When setting the PIN code
for the rst time” below.
Enter your 4-digit PIN code.
4
• You cannot move to the next setting screen
until you can input the correct PIN code.
When setting the PIN code for the rst
time.
1. To set the PIN code for the rst time, press
/ to select “Yes” to enter the PIN code
setting menu, then press or ENTER.
2. Enter a 4-digit number for the PIN
code, then the same 4-digit number for
con rmation.
3. Press ENTER to complete the PIN code
setting procedure and move to the next
setting screen.
Press / to select the parental control
5
level for DVD VIDEO, BD-ROM, and then
select the country code. Press ENTER after
making each selection.
Parental Control
Disc Language
Angle Mark Display
PIN Code Setting
BD Internet Access
3D Mode
3D Notice
Press HOME or EXIT to exit.
6
or ENTER.
Level 3
0
USA
NOTE
• Settings with (*) are the factory presets.
En
39
Page 40

Audio Video Settings
HDMI Video Out
This sets the resolution of the video output for the
HDMI terminal of this player.
Normally set to “Auto” (factory preset value).
` Item
Auto*, 1080p, 1080i, 720p, 576/480p
NOTE
• When the BD player is connected to a 1080p
24 Hz compatible TV and the “HDMI Video Out”
is set to “Auto”, 1080p 24 Hz will automatically
be displayed when compatible discs are played
back.
Secondary Audio
This toggles the clicking sound on the menu and
audio with secondary video in picture in picture
mode for BD-Video.
• Select “Off” when enjoying the high quality
sounds of BD-Video.
` Item
On*, Off
Audio Out
You can set the audio output when connecting to
SURROUND equipment.
1. This sets the audio output connected to
SURROUND equipment.
` Item
HDMI Output*
Select this when you connect using HDMI
OUT terminal.
Digital Output: Select this when you connect
using DIGITAL AUDIO OUT terminal
(OPTICAL).
2. You can set the audio output mode for each
output terminal.
A This sets the audio output mode for HDMI
OUT terminal when selecting “HDMI Output”.
NOTE
• When the secondary audio is set to “On”, PCM is
automatically selected as the audio output mode.
` Item
Bitstream:
• Select this when connecting to HDMI
En
40
equipment with a built-in decoder for
DOLBY DIGITAL, etc.
• Setting to Bitstream will output each audio
signal by Bitstream.
PCM (Surround):
• Select this when connecting to multichannel HDMI equipment.
• Setting to PCM (Surround) will output by
LINEAR PCM by decoding audio signals
recorded in each audio output mode such
as DOLBY DIGITAL, DTS.
B This sets the audio output mode for DIGITAL
AUDIO OUT (OPTICAL terminal) when
selecting “Digital Output”.
` Item
Bitstream:
• Select this when connecting to
SURROUND equipment with a built-in
decoder for DOLBY DIGITAL, etc.
• Setting to Bitstream will output each audio
signal by Bitstream.
PCM:
• Select this when connecting to 2 channel
stereo audio equipment.
• Setting to PCM will output by converting
each audio signal into PCM 2 channel
audio signal.
NOTE
• See page 49 for information on output of audio
formats.
Dynamic Range Control
This lets you adjust the range between the loudest
and softest sounds (dynamic range) for playback
at average volume. Use this when it is hard to hear
dialogue.
` Item
Normal: The same audio output range is
played as the original recorded audio output
range.
Shift: When Dolby Digital audio is played
back, the dynamic range of the audio is
adjusted so that the dialogue portion can be
heard easily. (If the audio sounds abnormal,
set to “Normal”.)
Auto*: When you play back audio in the
Dolby TrueHD format, the dynamic range is
automatically adjusted.
* Lower the audio volume before setting. If you do not do so,
the speakers may emit a loud sound or excessive output may
be applied to the speakers.
Page 41

SUPER PICTURE
This enhances the quality of video streaming
images with pixel by pixel processing technology.
` Item
On*, Off
Smart Settings
Auto Power Off
This sets the Player so that power is automatically
shut off if playback is stopped and you do not
perform any operations for about 10 minutes.
` Item
Yes*, No
HDMI Control
This lets you set the Player to receive the control
signal from the remote control via the HDMI cable.
` Item
Yes*, No
NOTE
• For details, refer to the operation manual of AV
receiver.
Playback Setting
Parental Control
This lets you set the Parental Control depending
on the disc content. The available Parental Control
Levels are shown below.
The 4-digit PIN code number needs to be entered
before the Parental Control Levels and the Country
Code are set. The Parental Control Levels and the
Country Code cannot be set if a PIN code has not
been created or the PIN code is not entered.
• Select the rating level appropriate for the age of
the user.
` Item (Parental control level for DVD-video)
8 and Off: All DVD-video can be played.
1–7: Prohibits play of DVD-video with
corresponding ratings recorded on them.
` Item (Parental control level for BD-video)
No Limit: All BD-video can be played.
0–99 year(s): Prohibits play of BD-video
with corresponding ratings recorded on
them.
` Item (Country code)
Select the country code.
The ratings differ according to the country.
NOTE
• Refer to “Basic Operation for Playback Setting”
on page 39 for details.
Disc Language (Disc Priority
Language)
This lets you select the language for subtitles,
audio and menus displayed on the screen.
` Item (Subtitle)
Select the subtitle language you want to
display.
` Item (Audio)
Select the audio language you want to hear.
` Item (Menu)
Select the menu language you want to
display.
NOTE
• When “Auto” is selected, the priority language of
the disc will be played back.
Angle Mark Display
This lets you turn the Angle Mark Display on or off
when BD/DVD video recorded with multiple angles
is played back. (The Angle Mark is displayed in the
lower right screen.)
` Item
Yes, No*
En
41
Page 42

PIN Code Setting
This sets the PIN code for setting or changing the
Parental Control Level.
` Item
Yes: Enter the 4-digit number.
No
NOTE
• When you forget the PIN code, you can reset the
current PIN code using “System Reset” under
“Settings”. (see page 42)
• You can also set the new PIN code if desired.
BD Internet Access
This allows you to set access restriction to BDLIVE contents.
` Item
Permit: Allows all BD-LIVE discs.
Limit*: Allows only discs with owner
certi cation.
Prohibit: Prohibits all BD-LIVE discs.
NOTE
• The available functions differ depending on the
disc.
• Regarding playback method of BD-LIVE
contents, etc., perform the operations in
accordance with the instructions in the BD disc
manual.
• To enjoy BD-LIVE functions, perform the
broadband Internet connection (Page 18) and
communication settings (Page 43).
3D mode
This sets output of 3D images.
To view 3D images, playback of 3D content (3D BD
video) is necessary with a 3D compatible TV and
3D glasses in addition to this player.
` Item
Auto*: Video signals are output as 3D when
3D content (3D BD video) is played or as 2D
when 2D content is played.
2D: Even if 3D content (3D BD video) is
played, video signals are output as 2D at all
times.
CAUTION
• When viewing 3D images, viewing for a long
period of time or lying on your back may cause
eye strain and discomfort. In addition, 3D images
may affect the eyesight of young children/infants,
En
so keep them from viewing the images.
42
3D Notice
This sets whether or not a notice is displayed
(“Yes” or “No”) on the connected TV every time 3D
content (3D BD video) is played.
` Item
Yes*, No
On Screen Language
You can set the language you want to display on
the screen.
` Item
English*, Deutsch, Français, Italiano,
Español, Português, Nederlands, Svenska,
Dansk, Norsk, Suomi, Polski, esky,
Magyar, Slovensky, Slovenšina
Version
When you select “Version”, the system software
version is displayed.
System
System Reset
You can reset all settings to the factory presets.
` Item
Reset, Not Reset
DivX(R) Registration
The DivX registration code is displayed.
` Item
Yes, No
NOTE
• To learn more, visit www.divx.com/vod.
DivX(R) Deregistration
You can deactivate your DivX information on then
player.
` Item
Yes, No
NOTE
• To learn more, visit www.divx.com/vod.
Page 43

Communication Setup
This allows you to perform and/or change the
communication settings and select the type of
Internet connection from Cable. This setting is
required to use BD-LIVE functions, home networks
and software updates that connect to the Internet.
NOTE
• Make sure that the LAN cable is connected to
this player (see page 18).
• For manually performing the setting, the
following information of the connected router or
modem is required. Con rm the information prior
to the setting.
- IP address, netmask, gateway, DNS address
1. Press / to select “Settings”, then press
or ENTER.
2. Press / to select “Communication Setup”,
then press
3. Press / to select “Ethernet Setup”, then
press or ENTER.
4. Press / to select “Change”, then press
ENTER.
• For initializing the current setting, select
“Initialize”, then press ENTER.
5. For setting the IP address, press
select “Yes” or “No”, then press ENTER.
or ENTER.
Setting the info. Of the Ethernet
[Current Setup]
IP Address
Netmask
Gateway
DNS
: Auto Setup
: Auto Setup
: Auto Setup
: Auto Setup
Change
Initialize
/ to
Do you obtain the IP address
automatically?
IP Address
Netmask
Gateway
Yes No
Next
• If selecting “Yes”: The IP address is
automatically obtained.
• If selecting “No”: The IP address, netmask
and gateway are manually entered using the
screen for inputting characters. Regarding
each of the setup values, con rm the
speci cations of your broadband router.
6. Select “Next”, then press ENTER.
•
If selecting “
Yes
” in the step 5, go to the step 8.
7. Enter your DNS address.
Enter your DNS address.
Primary
Secondary
Next
• The primary and secondary DNS addresses
are entered using the screen for inputting
characters. Regarding each of the setup
values, con rm the speci cations of your
broadband router.
8. Select “Next”, then press ENTER.
9. For testing the connection to the Internet, after
con rming the settings, press
/ to select
“Test”, then press ENTER.
• “Test” is available only when setting to obtain
the IP address automatically. “Test” cannot
be selected if the IP address has not been
obtained automatically.
Confirm the current setting.
IP Address
Netmask
Gateway
DNS Address
MAC Address
: xxx xxx xxx xxx
: xxx xxx xxx xxx
: xxx xxx xxx xxx
: xxx xxx xxx xxx
xxx xxx xxx xxx
: xx xx xx xx xx xx
Test
Complete
• As a result of the test, if the Internet
connection fails, enter the setup values
manually.
10. Press
/ to select “Complete”, then press
ENTER.
11. Press HOME or EXIT to return to the Home
screen.
• To perform other settings, press
RETURN.
En
43
Page 44

The operation procedure for
inputting numbers manually
Before using the USB memory
device
NOTE
• Numeric characters such as IP address can be
entered on the input screen either by selecting
each of the characters in the “Numeric” mode or
using the Number buttons on the remote control.
IP Address
Netmask
Gateway
123
1. Press ENTER at the boxes in which characters
are to be entered, and the input screen will
appear.
Numeric
Edit
1234567890
Selected by pressing /Selected by pressing
/
2. Press / to select the desired input mode.
3. Press
/ to select a number, then press
ENTER.
4. Repeat the step 3 to display all of the desired
characters in the input eld.
123
Numeric
Edit
1234567890
NOTE
• Press RETURN (Del.Char.) to delete a
number you have input.
• To change a number you have input, press B
(Green) (Left) or C (Yellow) (Right) to select
the number you want to change, and press
RETURN (Del.Char.). Then, press /
to select a new number you want to input, and
press ENTER.
5. Press D (Blue) (Complete) to x the numbers
which have been input.
IP Address
Netmask
Gateway
123
6. Repeat step 1 to 5 to nish inputting all the
required numbers.
En
44
CAUTION
• Do not remove the USB memory device or
unplug the AC cord while the operations are
being performed.
• Do not use a USB extension cable.
USB Memory Management
The following instructions explain how to delete
data such as the Virtual Package data and the BDLIVE data in a USB memory device.
When you insert or remove a USB memory device,
be sure to turn the main power off.
1. Insert the USB memory device into the USB
terminal on this player.
NOTE
• A USB memory device can be used with either
the USB (front) or USB (rear) terminal. When
two USB memory devices are connected to both
terminals at the same time, in certain situations
the USB (rear) terminal may give priority to
Local Storage and “Erase” and “Format” are not
available for the USB memory device connected
to the USB (front) terminal.
2. Press
3. Press / to select “Settings”, then press
or ENTER.
4. Press / to select “USB Memory
Management”, then press
to turn on the power.
or ENTER.
• The “USB Memory Management” screen is
displayed.
• “No USB Memory” appears when no USB
memory is inserted.
Page 45

5. Press / to select “Erase” or “Format”, then
press ENTER.
Erase: Deletes only BD-VIDEO data written
on the USB memory device such as BDLIVE data.
Format: Be aware that all data including BDVIDEO data and software update data will
be deleted.
• If you want to delete only the unneeded
software update data after the software is
updated, delete the data on the USB memory
device using a PC.
Erases BD-VIDEO data on USB memory.
Erase
Erase all contents on USB memory
Format
including protected contents.
6. Press / to select “Yes”, then press ENTER.
• A con rmation message is displayed. Check
that the correct USB memory device is
displayed, and then continue.
7. Start the process.
• The screen for the current operation will
display.
Complete
Software Update Settings
In this player, the software version can be updated
using either one of the following methods.
• Auto Update from Network
• Manual Update from Network
• Manual Update from USB memory device
CAUTION
• Do not remove the LAN cable or unplug the AC
cord while downloading or updating software.
Auto Update from Network
This function allows you to perform the update by
accessing an Internet connection automatically to
check if there is a new rmware version every time
the player is turned on.
NOTE
• Make sure that the LAN cable is connected to
this player (see page 18).
• Make sure to perform the communication
settings (see page 43).
OK
8. Press ENTER.
9. Press HOME or EXIT to exit.
NOTE
• Data which has been saved to the player’s
internal memory (game score, etc.) will also be
deleted.
Setup
1. Press / to select “Settings”, then press
or ENTER.
2. Press / to select “Software Update
Settings”, then press
3. Press / to select “Auto Update Setting”,
then press or ENTER.
4. Press / to select “Yes”, then press ENTER.
• After this, an Internet connection will be
made automatically every time this player is
turned on.
or ENTER.
En
45
Page 46

Update process
1. When this player is turned on, the Internet
connection starts automatically.
• “Accessing...” blinks on the screen.
• The current version of this unit software and
the latest version of the update le on the
network are displayed when latest version of
rmware has been found.
To update this player software with update
le, select “Yes”, and go to step 2.
Latest version of firmware has been found.
Firmware update is available.
Proceed with update?
Current Version :
Latest Version :
If “Yes” will be selected, version update will start.
• If the latest rmware version has been
already updated, nothing is displayed on the
screen.
2. Press ENTER to start updating.
Downloading latest firmware…
Version : yyyyyyyyyy
3. When the software is successfully updated, a
screen is displayed indicating that the update
process is completed.
• If the update has failed, an error message
appears. Retry the update after checking if
the broadband Internet connection (Page 18)
and communication settings (Page 43) are
performed properly.
4. Press
to turn off the player before using
again.
xxxxxxxxxx
yyyyyyyyyy
Yes
No
30%
Manual Update from Network
This function allows you to perform the update
operation by accessing an Internet connection
manually to check if there is a new rmware
version.
NOTE
• Make sure that the LAN cable is connected to
this player (see page 18).
• Make sure to perform the communication
settings (see page 43).
1. Press / to select “Settings”, then press
or ENTER.
2. Press / to select “Software Update
Settings”, then press or ENTER.
3. Press / to select “Manual Update”, then
press
4. Press / to select “Network”, then press
ENTER.
5. During access to the network and checking the
latest version of rmware, “Accessing...” blinks.
or ENTER.
• The current version of this unit software and
the latest version of the update le on the
network are displayed when latest version of
rmware has been found.
To update this player software with update
le, select “Yes”, and go to step 6.
Latest version of firmware has been found.
Firmware update is available.
Proceed with update?
Current Version :
Latest Version :
If “Yes” will be selected, version update will start.
xxxxxxxxxx
yyyyyyyyyy
Yes
No
En
46
Page 47

• If the Internet connection has failed, an error
message appears.
Retry the update after checking if the
broadband Internet connection (Page 18)
and communication settings (Page 43) are
performed properly.
6. Press ENTER to start updating.
Downloading latest firmware…
Version : yyyyyyyyyy
30%
7. When the software is successfully updated, a
screen is displayed indicating that the update
process is completed.
• If the update has failed, an error message
appears.
Retry the update after checking if the
broadband Internet connection (Page 18)
and communication settings (Page 43) are
performed properly.
8. Press
to turn off the player.
Manual Update from USB
memory device
This function allows software updates by inserting
a USB memory device with the update le into the
USB (front) or USB (rear) terminal on this player.
• When a software update is performed, the
software update data must be written onto the
USB memory device in advance using a PC.
• The USB memory device must be clear of all
les except software update data to allow new
software uploading.
To check for the availability of a software
update, visit http://www.onkyo.com
• When software update data is released, copy
the data onto a USB memory device after
downloading it to a PC.
• For methods such as downloading and copying
to a USB memory device, carefully read the
description shown on the website before
performing the operation.
NOTE
• Do not extract the rmware update le to any
folders other than the root directory on the USB
memory device. The rmware update le must
be only one le directly in the root directory.
When you insert or remove a USB memory device,
be sure to turn the main power off.
1. Insert the USB memory device with the update
le into the USB (front) terminal on this player.
USB memory
device
NOTE
• A USB memory device can be used with either
the USB (front) or USB (rear) terminal. When
two USB memory devices are connected to both
terminals at the same time, in certain situations
the USB (rear) terminal may give priority to Local
Storage and the USB (rear) terminal cannot be
used for Software Update.
En
47
Page 48

2. Press to turn on the power.
3. Press / to select “Settings”, then press
or ENTER.
4. Press
/ to select “Software Update
Settings”, then press or ENTER.
5. Press / to select “Manual Update”, then
press or ENTER.
6. Press / to select “USB Memory”, then
press ENTER.
• If you have not yet set the PIN code, go to
step 8.
7. Enter the 4-digit number using 0–9.
• If the USB memory device is not properly
installed or the correct update le cannot be
found on the USB memory device, an error
message is displayed.
Check the le on the USB memory device,
and then reinsert the USB memory device
correctly.
Software update file is not detected in the USB memory device.
Confirm that you have transferred the file
to the USB memory device and retry software update.
Confirm that you have inserted the USB memory device
into the correct device.
OK
Enter 4-digit PIN code
8. Press ENTER to start checking data in the USB
memory device.
Insert USB memory device containing
the software update file.
OK
9. During the data checking, “Checking” blinks.
Now checking the data in USB memory device.
Checking
• The current version of this unit software and
the version of the update le on the USB
memory device are displayed. To update this
player software with update le, select “Yes”,
and press ENTER.
Software update file is detected in the USB memory device.
Start update?
Current Ver. :
Update Ver. :
xxxxxxxxxx
yyyyyyyyyy
Yes
No
There is more than one software file
in the USB memory device.
Confirm that only the software update file is
in the USB memory device.
OK
10. Press ENTER to start updating.
• The screen becomes dark for a while until
the update screen can be displayed. Please
wait for the update screen to appear. Do not
unplug the AC cord.
The picture will temporarily go dark until
the software update display appears.
Wait several minutes and do not unplug the AC cord.
OK
Now updating
Do not unplug AC cord.
*
Update Version
yyyyyyyyyy
30%
11. When the software is successfully updated, a
screen is displayed indicating that the update
process is completed.
• If the update has failed, check the le in the
USB device and try Software Update again.
12. Press
to turn off the player.
• Delete unneeded software update data using
a PC after the software update process is
completed.
13. Remove the USB memory device.
En
48
Page 49

About Output of Audio Formats
Audio format
Maximum number of
channels
Dolby TrueHD 7.1ch (48 kHz/96 kHz) 7.1ch
5.1ch (192 kHz) 5.1ch
Dolby Digital PLUS 7.1ch (48 kHz) 7.1ch 7.1ch
DTS-HD Master Audio 7.1ch (48 kHz/96 kHz) 7.1ch
5.1ch (192 kHz) 5.1ch
DTS-HD High Resolution Audio 7.1ch (48 kHz/96 kHz) 7.1ch
LPCM 7.1ch (48 kHz/96 kHz) 7.1ch
5.1ch (192 kHz) 5.1ch
*1.
Core only
*2.
Down mixed
*3.
When “Secondary Audio” is set to “On”, the audio is output as 48 kHz.
*4.
When “Secondary Audio” is set to “On”, the audio is output as PCM.
*5.
When 5.1ch (192 kHz), the audio output is downsampled to 96 kHz.When 2ch, the audio is output as 192 kHz.
HDMI DIGITAL OUT
PCM Bitstream PCM Bitstream
*3
*3
*3
*3/*5
*3
*3
*3
*4
7.1ch
*4
5.1ch
*4
*4
7.1ch
*4
5.1ch
*4
7.1ch
– 2ch
– 2ch
2ch
2ch
2ch
2ch
2ch
2ch
About DivX le
DivX HD divx/avi
Video codec Resolution
MPEG4 SP
MPEG4 ASP
320x240 - 1920x1080
Audio codec Sampling Frequency Bit rate
MP3 (MPEG Audio Layer 3) 16-48 kHz 16-320 kbps
MP2 (MPEG Audio Layer 2) 16-48 kHz 16-320 kbps
AC3 -48 kHz 32-448 kbps
Subtitles
XSUB
XSUB+
Frame rate
(720p or less)
60, 59.94, 50, 30,
29.97, 25, 24, 23.97
(more than 720p)
30, 29.97, 25, 24,
23.97
*2
5.1ch
*2
5.1ch
*2
5.1ch
*2
5.1ch
*2
5.1ch
*2
5.1ch
*2
*2
Frame rate
*1/*3
*1/*3
*1/*3
*1/*3
*1/*3
*1/*3
–
–
DivX Plus HD MKV
Video codec Resolution
H.264 (MPEG4 AVC) 320x240 - 1920x1080
Audio codec Sampling Frequency Bit rate
MP3 (MPEG Audio Layer 3) 16-48 kHz 16-320 kbps
AAC/LC, AAC/HEv1, AAC/HEv2 6-48 kHz 8-1024 kbps
AC3 -48 kHz 32-448 kbps
Subtitles
SubRip
SubStation Alpha
Advanced SubStation Alpha
Frame rate
(720p or less)
60, 59.94, 50, 30,
29.97, 25, 24, 23.97
Frame rate
(more than 720p)
30, 29.97, 25, 24,
23.97
En
49
Page 50

Troubleshooting
The following problems do not always suggest a defect or malfunction of this Player.
Refer to the problems and lists of possible solutions below before calling for service.
Power
Problem Possible causes and solutions
The Player power cannot
be turned on.
The Player power is
turned off.
Basic Operation
Problem Possible causes and solutions
The remote control does
not work.
Cannot operate the
Player.
• Is the power cord rmly plugged into the AC outlet? (Page 19)
• Is “Auto Power Off” set to “Yes”? When “Auto Power Off” is set to “Yes”,
the power will be automatically turned off after 10 continuous minutes of
inactivity (no playback). (Page 41)
• Use the remote control within its operating range. (Page 19)
• Replace the batteries. (Page 19)
• Are you operating the Player within the speci ed operating temperature
range? (Page 55)
En
50
Page 51

Playback
Problem Possible causes and solutions
The Player cannot play
a disc.
The disc is automatically
ejected after closing the
disc tray.
Video stops. • Has the Player been subjected to shock or impact? Are you using it in an
The Player makes a
snapping sound when
starting playback or
loading a disc.
• Take out the disc and clean it. (Page 11)
• Make sure that the disc is loaded properly (aligned in disc tray and labelside up). (Page 22)
• Make sure that region code on the disc matches that of this Player.
(Page 7)
• Allow any condensation in or near the Player to dry. (Page 11)
• Check that the disc is recorded in the compatible TV system (PAL or
NTSC).
• The Player cannot play back video which was not recorded normally.
(Page 8)
• Proper playback may be impossible due to the state of the disc recording,
a scratched, warped or dirty disc, the state of the pick-up, or compatibility
issues between this Player and the disc being used. (Pages 8, 11)
• When the recorded time of a disc is unusually short, playback may not be
possible.
• BD-RE/R discs recorded in a format other than BDMV/BDAV cannot be
played back. (Page 7)
• Make sure that the disc is loaded properly (aligned in disc tray and labelside up). (Page 22)
• Take out the disc and clean it. (Page 11)
• Make sure that the disc is playable. (Page 7)
unstable location? The Player will stop if it senses shock or vibration.
• The player may sometimes make a snapping sound when starting
playback if it has not been operated in a while. These sounds are not
malfunctions of the player but are normal operating conditions.
En
51
Page 52

Picture
Problem Possible causes and solutions
No picture. • Make sure that the cable is connected correctly. (Page 15)
• Make sure that the connected TV or the AV receiver is set to the correct
input. (Page 16)
• Take out the disc and clean it. (Page 11)
• Make sure that region code on the disc matches that of this Player.
(Page 7)
• There is no picture from the HDMI output.
- Are the settings performed correctly? Please check the settings.
(Page 40)
Screen freezes and
operation buttons do not
work.
Square noise (mosaic)
appears on the screen.
Audio is not output, or
images are not played
back properly.
3D images cannot be
output to a TV.
Noise appears on the
screen.
• Turn off the power and turn on the power again.
• If the power is not turned off, perform a reset. (Page 53)
• Is the disc damaged or dirty? Check the condition of the disc. (Page 11)
• Blocks in images may be visible in scenes with rapid movement due to
the characteristics of digital image compression technology.
• The audio may not be output or the images may not be played back
properly for some discs in which copyright-protected contents are
recorded.
• Is an HDMI cable used?
• Are a 3D compatible TV and 3D glasses used?
• Is a proper connection made between the HDMI OUT terminal of the
player and the HDMI input terminal of the 3D compatible TV?
• Is the 3D setting on this player correct? (Pages 21, 42)
• Is the 3D setting on the TV correct?
• When a connection to a 3D TV is made via an ampli er/AV receiver, it is
necessary to connect to a 3D compatible ampli er/AV receiver.
• Is a 3D compatible BD disc being played back?
• When you watch TV broadcasts with the power of this player turned on,
noise may appear on the TV screen. In such cases, turn off the power to
this player or keep this player away from the TV.
Sound
Problem Possible causes and solutions
No sound, or sound is
distorted.
Audio is not output, or
images are not played
back properly.
En
52
• If the volume of the TV or ampli er is set to minimum, turn the volume up.
• There is no sound during still mode, slow motion playback, fast forward
and fast reverse. (Page 33)
• Check that the audio cable is connected correctly. (Page 17)
• Check that the cable plugs are clean.
• Take out the disc and clean it. (Page 11)
• Audio may not be output depending on the audio recording status, such
as when audio other than an audio signal or non-standard audio is
recorded for the audio content of the disc. (Page 8)
• The audio may not be output or the images may not be played back
properly for some discs in which copyrightprotected contents are
recorded.
Page 53

Network
Problem Possible causes and solutions
Cannot connect to the
Internet.
Cannot download BDLIVE contents.
Other
Problem Possible causes and solutions
The Player heats up
during use.
To Reset this Player
If this Player receives strong interference from a source such as excessive static electricity, strong
external noise, malfunction of power supply, or voltage caused by lightning during use or a wrong
operation is sent to the Player, errors like the Player not accepting an operation may occur.
• Press and hold
the Player does not operate properly even after the power has been turned off.
ON/STANDBY on the Player until “RESET” appears on the front panel display when
• Is the LAN cable connected properly?
• Is the wrong cable such as a modular cable used? Connect a LAN cable
to the ETHERNET terminal. (Page 18)
• Is the power for the connected equipment, such as a broadband router or
modem turned on?
• Is the broadband router and/or modem properly connected?
• Is the proper value(s) set in the network setting? Check “Communication
Setup”. (Page 43)
• Is the LAN cable connected properly?
• Is the USB memory device properly connected? Check that the USB
memory device is connected to the USB (front) or USB (rear) terminal of
this Player.
• Check if the BD disc supports BD-LIVE.
• Check the setting for “BD Internet Access”. (Page 42)
• When using this Player, the console cabinet may heat up depending on
the usage environment. This is not a malfunction.
ON/STANDBY
• When a reset is performed while the power is on, the Player will turn off. Turn the power on again. At
this point, it may take a few moments for the system processing to nish before the Player is ready for
use.
• Since all settings including the language setting stored in memory are also reset when a reset has been
performed, they must be set again.
• When the problem persists even after performing a reset, unplug the AC cord and plug it in again. If this
does not solve the problem, contact the nearest service centre approved by ONKYO SOUND & VISION
CORPORATION.
En
53
Page 54

On-screen Error Messages
The following messages appear on the TV screen in case of an error during operation.
Error message Possible Error Suggested Solution
Cannot play. • The disc cannot be played back with
this Player.
Incompatible disc. • If you load a disc which cannot be
played with this Player (i.e. a scratched
disc), or if you load a disc upside down,
this message will appear, and the disc
tray will automatically pop out.
• Occurs if the loaded disc cannot be
played because it is a non-standard
disc or scratched, etc.
Cannot operate. • Occurs if an operation is incorrect. This USB memory is not
formatted properly. Please
format the memory in USB
memory management.
The Connected USB Memory
cannot be used. It should be
compliant with USB 2.0
• Occurs if there is a formatting error.
• Occurs if the USB memory is not
formatted with FAT 32/16.
• Occurs if USB memory not compliant
with USB 2.0 High Speed (480 Mbit/s)
is used (i.e. USB 1.0/USB 1.1).
• Check the disc, and load it
correctly.
• Remove the disc.
• Format the USB memory
again.
• Format the USB memory
with your PC.
• Connect USB 2.0 High
Speed (480 Mbit/s)
compliant USB memory.
En
54
Page 55

Speci cations
Signal System PAL/NTSC
HDMI Resolution 576p/480p, 720p, 1080i, 1080p, 1080p 24 Hz
Audio Format LPCM, Dolby Digital, Dolby Digital Plus, Dolby
True HD, DTS, DTS-HD
Support Deep Colour / x.v.Colour (JPEG only)
Connector A Type
Audio Output (Digital) Optical
General
Power Supply AC 100 ~ 240 V, 50/60 Hz
Power Consumption 16 W
Stand-by Power Consumption 0.4 W
Dimensions (W x H x D) 435 mm x 57.3 mm x 201 mm
Weight 1.7 kg
Operation Condition Temperature/Humidity 5 °C ~ 35 °C / 10% ~ 80% (no condensation)
Bus Power Supply (USB) DC 5V, 0.5 A
Disc Compatibility CD-R, CD-RW, DVD-R, DVD-RW, DVD-R DL, DVD+R, DVD+RW, DVD+R
DL, BD-R, BD-RE
(Discs that have not been properly nalised may only be partially playable
or not playable at all.)
Design and speci cations are subject to change without notice.
En
55
Page 56

Glossary
AVCHD (Page 7)
AVCHD (Advanced Video Codec High De nition)
refers to a recording format (speci cation) for
digital video cameras which can record to a disc
such as 8 cm DVD disc and play back digital high
de nition images.
BDAV (Page 7)
BDAV (Blu-ray Disc Audio/Visual, BD-AV) refers
to one of the application formats used for writable
Blu-ray discs such as BD-R, BD-RE, etc. BDAV
is a recording format equivalent to DVD-VR (VR
mode) of the DVD speci cations.
BD-J application
The BD-ROM format supports Java for interactive
functions. “BD-J” offers content providers almost
unlimited functionality when creating interactive
BD-ROM titles.
BD-LIVE (Page 25)
A variety of interactive content is available from
BD-LIVE compatible Blu-ray discs via the Internet.
BDMV (Page 7)
BDMV (Blu-ray Disc Movie, BD-MV) refers to one
of the application formats used for BD-ROM which
is one of the Blu-ray Disc speci cations. BDMV is
a recording format equivalent to DVD-video of the
DVD speci cation.
BD-R (Pages 7, 25)
A BD-R (Blu-ray Disc Recordable) is a recordable,
write-once Blu-ray Disc. Since contents can be
recorded and cannot be overwritten, a BD-R
can be used to archive data or for storing and
distributing video material.
BD-RE (Pages 7, 25)
A BD-RE (Blu-ray Disc Rewritable) is a recordable
and rewritable Blu-ray Disc.
BD-ROM
BD-ROMs (Blu-ray Disc Read-Only Memory)
are commercially produced discs. Other than
conventional movie and video contents, these
discs have enhanced features such as interactive
content, menu operations using pop-up menus,
selection of subtitle display, and slide shows.
Although a BD-ROM may contain any form of
data, most BD-ROM discs will contain movies in
High De nition format for playback on Blu-ray Disc
players.
Blu-ray Disc (BD) (Page 7)
A disc format developed for recording/playing
highde nition (HD) video (for HDTV, etc.), and
for storing large amounts of data. A single layer
Blu-ray Disc holds up to 25 GB, and a dual-layer
Blu-ray Disc holds up to 50 GB of data.
Chapter number (Page 38)
Sections of a movie or a music feature that are
smaller than titles. A title is composed of several
chapters. Some discs may only be comprised of a
single chapter.
Copy guard
This function prevents copying. You cannot copy
discs marked by the copyright holder with a signal
which prevents copying.
Deep Colour
Deep Colour can reproduce rich colours,
increasing the number of bits describing colours.
This Player is compatible with Deep Colour. You
can enjoy this function by connecting to a Deep
Colour compatible TV using an HDMI cable.
Disc menu (Page 23)
This lets you select things like the subtitle
language or audio format using a menu stored on
the DVD video disc.
Dolby Digital
A sound system developed by Dolby Laboratories
Inc. that gives movie theatre ambience to audio
output when the product is connected to a Dolby
Digital processor or ampli er.
Dolby Digital Plus
A sound system developed as an extension
to Dolby Digital. This audio coding technology
supports 7.1 multi-channel surround sound.
Dolby TrueHD
Dolby TrueHD is a lossless coding technology
that supports up to 8 channels of multi-channel
surround sound for the next generation optical
discs. The reproduced sound is true to the original
source bitfor-bit.
DTS
This is a digital sound system developed by DTS,
Inc. for use in cinemas.
En
56
Page 57

DTS-HD High Resolution Audio
DTS-HD High Resolution Audio is a new
technology developed for the next generation high
de nition optical disc format.
DTS-HD Master Audio
DTS-HD Master Audio is a lossless audio
compression technology developed for the next
generation high de nition optical disc format.
DTS-HD Master Audio | Essential
DTS-HD Master Audio | Essential is a lossless
audio compression technology developed for the
next generation high de nition optical disc format.
DVD upscaling (Page 22)
Upscaling (upconverting) refers to a function
of various players and devices that enlarge the
image size to t the size of the screen of video
equipments such as a TV.
DVD video (Pages 7, 22)
A disc format that contains up to eight hours of
moving pictures on a disc the same diameter as
a CD. A single-layer single sided DVD holds up to
4.7 GB; a double layer single-sided DVD, 8.5 GB;
a single layer double-sided DVD, 9.4 GB; doublelayer double-sided DVD, 17 GB. The MPEG
2 format was adopted for ef cient video data
compression. It is a variable rate technology that
encodes the data to according to the status of the
video for reproducing high-quality images. Audio
information is recorded in a multi-channel format
such as Dolby Digital, allowing for a realistic audio
presence.
DVD+/-R (Pages 7, 22)
A DVD+/-R is a recordable, write-once DVD.
Since contents can be recorded and cannot be
overwritten, a DVD+/-R can be used to archive
data or for storing and distributing video material.
The DVD+/-R has two different formats: VR format
and Video format. DVDs created in Video format
have the same format as a DVD video, while discs
created in VR (Video Recording) format allow the
contents to be programmed or edited.
DVD+/-RW (Pages 7, 22)
A DVD+/-RW is a recordable and rewritable DVD.
The re-recordable feature makes editing possible.
The DVD+/-RW has two different formats: VR
format and Video format. DVDs created in Video
format have the same format as a DVD video,
while discs created in VR (Video Recording) format
allow the contents to be programmed or edited.
FAT (Pages 28, 29)
FAT (File Allocation Table) is a computer le
system architecture. It is commonly found on USB
memory device and many other portable devices
as FAT12, FAT16, FAT32 etc. Each version of FAT
differs in le size limitation and supporting OS.
This player is compatible with FAT formatted USB
memory device.
HDMI (Page 16)
HDMI (High-De nition Multimedia Interface) is an
interface that supports both video and audio on
a single digital connection. The HDMI connection
carries standard to high de nition video signals
and multi-channel audio signals to AV components
such as HDMI equipped TVs, in digital form without
degradation.
Interlace format
Interlace format shows every other line of an image
as a single “ eld” and is the standard method
for displaying images on television. The even
numbered eld shows the even numbered lines of
an image, and the odd numbered eld shows the
odd numbered lines of an image.
JPEG (Pages 8, 29)
JPEG (Joint Photographic Experts Group) is a still
image data compression format and is used in
most of digital cameras.
Linear PCM Sound
Linear PCM is a signal recording format used for
Audio CDs and on some DVD and Blu-ray discs.
The sound on Audio CDs is recorded at 44.1 kHz
with 16 bits. (Sound is recorded between 48 kHz
with 16 bits and 96 kHz with 24 bits on DVD
video discs and between 48 kHz with 16 bits and
192 kHz with 24 bits on BD video discs.)
MP3 (Pages 9, 28)
MP3 les are audio data compressed in the
MPEG1/2 Audio layer-3 le format. “MP3 les”
have “.mp3” as extensions.
MPEG-2
MPEG-2 (Moving Picture Experts Group phase 2)
is one of the video data compression schemes,
which is adopted for DVD videos and digital
broadcasts worldwide. Some Blu-ray Discs also
use high bitrate MPEG-2.
En
57
Page 58

Multi Angle (Page 36)
This is a feature of DVD and BD video discs. In
some discs, the same scene is shot from different
angles, and these are stored in a single disc so
you can enjoy playback from each angle. (This
function can be enjoyed if the disc is recorded with
multiple angles.)
Multi Audio
This is a feature of DVD and BD video discs. This
function makes it possible to record different audio
tracks for the same video, so you can enhance
your enjoyment by switching the audio. (You can
enjoy this function with discs recorded with multiple
audio tracks.)
NTFS (Pages 28, 29)
NTFS (New Technology File System) is a computer
le system architecture speci ed for certain OS. It
is mainly designed to expand the disk‘s capability
of large size les (especially for les larger than
4GB). Note that this player is not compatible with
NTFS formatted USB memory device.
Parental control (Page 41)
In some digital broadcasts and BD/DVD video
discs, a control level for disc viewing is set
depending on the age of the viewer. With this
Player, you can set the control level for viewing
such broadcasts and discs.
Pop up menu (Page 24)
An enhanced menu operation available on BD
video discs. The pop up menu appears when POP
UP MENU/MENU is pressed during playback, and
can be operated while playback is in progress.
Progressive format
Compared to the Interlace format that alternately
shows every other line of an image ( eld) to create
one frame, the Progressive format shows the entire
image at once as a single frame. This means that
while the Interlace format can show 30 frames/60
elds in one second, the Progressive format
can show 60 frames in one second. The overall
picture quality increases and still images, text, and
horizontal lines appear sharper.
Region code (Page 7)
Code identifying a geographic region of
compatibility for a BD/DVD.
Resume playback (Page 22)
If you stop playback while it is in progress, the
Player stores the stop position in memory, and this
function lets you playback from that point.
En
58
Skip (Page 33)
This returns to the start of the chapter (or track)
being played, or skips to the next chapter (or
track).
Subtitles (Page 35)
These are the lines of text appearing at the bottom
of the screen which translate or transcribe the
dialogue. They are recorded on many DVD and BD
video discs.
Time number
This indicates the play time which has elapsed
from the start of a disc or a title. It can be used to
nd a speci c scene quickly. (It may not work with
some discs.)
Title number (Page 38)
These numbers are recorded on DVD and Blu-ray
discs. When a disc contains two or more movies,
these movies are numbered as title 1, title 2, etc.
Top menu (Page 23)
In a BD/DVD video, this is the menu for selecting
things like the chapter to be played back and the
subtitle language. In some DVD videos, the top
menu may be called the “Title Menu”.
Track number (Page 38)
These numbers are assigned to the tracks which
are recorded on audio CDs. They enable speci c
tracks to be located quickly.
x.v.Colour
x.v.Colour reproduces a greater range of colour
than before, showing almost all of the colours that
the human eye can detect. (Applicable for JPEG
les only with this system)
Page 59

About Software License
Information on the Software
License for This Product
Software composition
The software included in this product is comprised
of various software components whose individual
copyrights are held by third parties.
Software developed by third parties and open
source software
The copyrights for the software components
and various relevant documents included with
this product that were developed or written by
third parties are owned by third parties and are
protected by the Copyright Act, international
treaties, and other relevant laws. This product
also makes use of freely distributed software
and software components whose copyrights are
held by third parties. These include software
components covered by a GNU General Public
License (hereafter GPL), a GNU Lesser General
Public License (hereafter LGPL) or other license
agreement.
You can obtain a copy of the GPL, LGPL licenses
from http://www.gnu.org/licenses/old-licenses/
gpl-2.0.html and http://www.gnu.org/licenses/oldlicenses/lgpl-2.1.html.
Software License Notice
Software License Notice Requirements
The software components incorporated into this
product include components whose copyright
holders require license notices. The license notices
for these software components are shown below.
OpenSSL License
This product includes software developed by the
OpenSSL Project for use in the OpenSSL Toolkit.
(http://www.openssl.org)
Original SSLeay License
This product includes cryptographic software
written by Eric Young (eay@cryptsoft.com).
BSD License
This product includes software developed by
the University of California, Berkeley and its
contributors.
Acknowledgements
The following open source software components
are included in this product:
• cairo • Curl • DirectFB • Droid Sans font • Droid
Sans Fallback font • Expat • Fltk • FreeType
• Gi ib • glib • Icu • Jpeg • libcurl • libidn • Libpng
• LibPThread • Librt • libsoup • libssl and libcrypto
• Libstdc++ • Libxml2 • libxml2 • lua • lua-slncryptop
• lua-xmlreader • No oss • OpenSSL • Optional
UnitTest++ Software • pango • swfdec • Webkit
• zlib
En
59
Page 60

2-1, Nisshin-cho, Neyagawa-shi, OSAKA 572-8540, JAPAN
Tel: 072-831-8023 Fax: 072-831-8163
http://www.onkyo.com/
18 Park Way, Upper Saddle River, N.J. 07458, U.S.A.
Tel: 800-229-1687, 201-785-2600 Fax: 201-785-2650
http://www.us.onkyo.com/
Liegnitzerstrasse 6, 82194 Groebenzell, GERMANY
Tel: +49-8142-4401-0 Fax: +49-8142-4401-555
http://www.eu.onkyo.com/
The Coach House 81A High Street, Marlow, Buckinghamshire, SL7 1AB, UK
Tel: +44-(0)1628-473-350 Fax: +44-(0)1628-401-700
Unit 1 & 12, 9/F, Ever Gain Plaza Tower 1, 88, Container Port Road, Kwai Chung,
N.T., Hong Kong. Tel: 852-2429-3118 Fax: 852-2428-9039
http://www.ch.onkyo.com/
1301, 555 Tower, No.555 West NanJin Road, Jin an, Shanghai,
China 200041, Tel: 86-21-52131366 Fax: 86-21-52130396
SN 29400765A
(C) Copyright 2011 ONKYO SOUND & VISION CORPORATION Japan.
All rights reserved.
* 2 9 4 0 0 7 6 5 A *
D1104-2
 Loading...