

Page 1
En
D
Nor
an
Instruction manual
h
s
i
l
g
Brugsanvisning . . . . . . . . . . . . . . . . . . . . . . . . . . . . . . . . . . . . . . . . .S. 27
k
s
Bruksanvisning . . . . . . . . . . . . . . . . . . . . . . . . . . . . . . . . . . . . . . . . . .P. 53
k
s
. . . . . . . . . . . . . . . . . . . . . . . . . . . . . . . . . . . . . . .P.
1
ve
S
omi
u
S
ППЛУИО¿
E
с
с
у
Р
rk
Tü
ts
u
e
D
añ
Esp
k
s
n
Bruksanvisning
. . . . . . . . . . . . . . . . . . . . . . . . . . . . . . . . . . . . . . . . . .P.
Käyttöohje . . . . . . . . . . . . . . . . . . . . . . . . . . . . . . . . . . . . . . . . . . . . .P. 105
√√‰‰ËËÁÁ››Â˜˜ ¯¯ÚÚ‹‹ÛÛˆˆ˜
Инструкция пользователя
кий
Kullanım kılavuzu
e
ç
Bedienungsanleitung . . . . . . . . . . . . . . . . . . . . . . . . . . . . . . . .P. 209
h
c
Guía del usario . . . . . . . . . . . . . . . . . . . . . . . . . . . . . . . . . . . . . . . .P. 235
ol
˜
. . . . . . . . . . . . . . . . . . . . . . . . . . . . . . . . . . . . . .P.
. . . . . . . . . . . . . . . . . .P. 157
. . . . . . . . . . . . . . . . . . . . . . . . . . . . . . . . . . . . .P. 183
URC-8305
Universal remote
Universal fjernbetjening
Universal fjernkontroll
Universal fjärrkontroll
Yleiskaukosäädin
∆∆ЛЛППВВ¯¯ВВИИЪЪИИЫЫЩЩ‹‹ЪЪИИФ
Универсальный пульт
дистанционного управления
Evrensel uzaktan kumanda
Universal Fernbedienung
Mando a Distancia Universal
79
131
Ô
Page 2

TABLE OF CONTENTS
English
ABOUT YOUR KAMELEON 5 . . . . . . . . . . . . . . . . . . . . . . . . . . . . . . . . . . . . . . . . . . . . . . . 2
BATTERIES
THE KEYPAD
•
. . . . . . . . . . . . . . . . . . . . . . . . . . . . . . . . . . . . . . . . . . . . . . . . . . . . . . . . . . . . . . . . . 3
. . . . . . . . . . . . . . . . . . . . . . . . . . . . . . . . . . . . . . . . . . . . . . . . . . . . . . . . . . 4 - 11
SETTING UP THE KAMELEON 5 . . . . . . . . . . . . . . . . Page 12
(How to set up the KAMELEON 5 to control your devices)
• Search Method
. . . . . . . . . . . . . . . . . . . . . . . . . . . . . . . . . . . . . . . . . . . . . . . . . . 13
SET-UP CODES
TV : Television / LCD / Plasma / Projector / Rear Projection
VCR : Video Cassette Recorder / TV/VCR Combi / PVR
. . . . . . . . . .
. . . . . . . . . . . . . . .
261
272
SAT : Satellite Receiver / Set-Top-Box / DVB-S / DVB-T /
Freeview (UK) / TNT (F) / Digitenne (NL) / DTT (I) / TDT (E)
SAT/HDD
CBL : Cable Converter / Set-Top-Box / DVB-C
. . . . . . . . . . . . . . . . . . . . . . . . . . . . . . . . . . . . . . . . . . . .
. . . . . . . . . . . . . . . . . . . .
275
280
VAC : Video Accessory like Media Centres / AV Accessories /
AV Selectors
AMP : Audio / Amplifier / Active Speaker System
. . . . . . . . . . . . . . . . . . . . . . . . . . . . . . . . . . . . . . . . .
. . . . . . . . . . . . . . . . . .
281
281
TUN : Audio / Audio Receiver/Tuner/Amplifier / (DVD)
Home Cinema
. . . . . . . . . . . . . . . . . . . . . . . . . . . . . . . . . . . . . . . .
CAS : Cassette Recorder (Tape Deck)
LDP : Laser Disc Player / Video CD
DAT : Digital Audio Tape / DCC
. . . . . . . . . . . . . . . . . . . . . . . . . . . . . . . .
. . . . . . . . . . . . . . . . . . . . . . . . . . .
. . . . . . . . . . . . . . . . . . . . . . . . . . . . .
281
283
283
283
DVD : DVD Player / DVD-R / DVD Home Cinema /
DVD Combi / DVD/HDD / DVD/PVR / DVD/VCR Combi
. . . . . . . . . .
283
CODE BLINK OUT . . . . . . . . . . . . . . . . . . . . . . . . . . . . . . . . . . . . . . . . . . . . . . . . . . . . . . . . . 14
(To find out which code is currently programmed)
QUICK CODE REFERENCE
LEARNING FEATURE
. . . . . . . . . . . . . . . . . . . . . . . . . . . . . . . . . . . . . . . . . . . . . . . . . 14
. . . . . . . . . . . . . . . . . . . . . . . . . . . . . . . . . . . . . . . . . . . . . . . . . . . . . . 15
(How to copy functions from your original working remote
onto the KAMELEON 5)
OPERATIONAL RESET
. . . . . . . . . . . . . . . . . . . . . . . . . . . . . . . . . . . . . . . . . . . . . . . . . . . . . 17
EXTRA FEATURES
• Key Magic® (How to program missing functions)
. . . . . . . . . . . . . . . . . . 18
• Mode re-assignment
(How to set up two of the same devices on the KAMELEON 5)
• Volume Punch-Through
• Device Sleeptimer
• KAMELEON 5 - Timer
• Macros (sequence of commands)
• Code upgrade technology
• Colour & Brightness
. . . . . . . . . . . . . . . . . . . . . . . . . . . . . . . . . . . . . . . . . . . 20
. . . . . . . . . . . . . . . . . . . . . . . . . . . . . . . . . . . . . . . . . . . . . . . . . 21
. . . . . . . . . . . . . . . . . . . . . . . . . . . . . . . . . . . . . . . . . . . . . . 21
. . . . . . . . . . . . . . . . . . . . . . . . . . . . . . . . . . 22
. . . . . . . . . . . . . . . . . . . . . . . . . . . . . . . . . . . . . . . . . 24
. . . . . . . . . . . . . . . . . . . . . . . . . . . . . . . . . . . . . . . . . . . . . . . 25
. . . . . 19
TROUBLE-SHOOTING
• Problem & Solution
• Customer Service
. . . . . . . . . . . . . . . . . . . . . . . . . . . . . . . . . . . . . . . . . . . . . . . 25
. . . . . . . . . . . . . . . . . . . . . . . . . . . . . . . . . . . . . . . . . . . . . . . . . . 26
Use the OneForAll Web Wizard to set up your remote with the help
of the Internet. This wizard tells you how to install your different devices
without reading the complete manual. To use this easy set-up tool, please
visit www.oneforallwebwizard.com.
WW W.ONEFORALL.COM 1
Page 3

About Your KAMELEON 5
Easy to use unique “EL” display
By choosing the ONE FOR ALL KAMELEON 5 universal remote control you have
opted for easy use. Your KAMELEON 5 features a unique, user-friendly backlit
display, which ensures you have easy access to all the keys you need, whilst
hiding those you don’t. Made of the strictest quality, it will provide long-term
satisfaction. When inserting the batteries the KAMELEON 5 will be in “demo-
mode” and show several screens. The “demo mode” will be cancelled by setting
up your remote (press and hold MAGIC for about 3 seconds then press and
release ESC) .
After replacing batteries, you will need to first press any key before the screen
will light up. From then on, the display will automatically illuminate
whenever the remote is picked up (touching screen and remote simultaneously).
It is also possible to change the activation-mode into activation by key press. To
set the ”EL” display to activation by key press, see page 4, section: ”EL” screen
activation setting.
Controls up to 5 devices
Your KAMELEON 5 is designed to let you use one remote to operate your Video
and Audio equipment; any device designed to be operated by an infrared signal.
Your KAMELEON 5 comes with 2 IR (infra-red) wide range transmitters for
maximum range and is High Frequency capable up to 450 kHz. You can choose
any combination of 8 devices you would like to operate.
TV Television / LCD / Plasma / Projector / Rear Projector
DVD DVD Player / DVD-R / DVD Home Cinema / DVD Combi / DVD/HDD /
SAT Satellite Receiver, Cable Converter, DSS / Video Accessory
AUD Audio / Audio Receiver/Tuner/Amplifier / (DVD) Home Cinema
LIGHT IR controlled light switches - The KAMELEON 5 also features a
Laser Disc Player, Video Cassette Recorder / TV/VCR Combi / DVD/VCR
Combi / Cassette Player (Tape Deck) / Digital Audio Tape / DCC
(e.g. Media Centres), Personal Video Recorder, Hard Disc Recorder
“LIGHT” mode, for control of power modules used in Light Control™
Dedicated addressable 433.92 MHz protocol. This mode will send out
InfraRed (IR) commands to a separately available “ONE FOR ALL Light
Control™ Starters Kit - HC-8300”, which will convert the IR commands in RadioFrequency (RF) to be received by power modules for
dimming and switching lights.
To enable Light Control™ on your KAMELEON 5 you must
purchase the „ONE FOR ALL Light Control™ Starters kit HC-8300“.
2 WWW.ONEFORALL.COM
Page 4

About Your KAMELEON 5
Learning feature
The KAMELEON 5 comes equipped with the unique “learning feature”, which
means that you can copy almost any function (max. ± 50) from your original
(working) remote control onto your new KAMELEON 5 (See “Learning Feature”
on page 15). This comes in handy, when after having setup your KAMELEON 5
you may find that some functions from your original remote are missing on your
KAMELEON 5 key pad.
Macros (sequence of commands)
Your KAMELEON 5 comes with an easy-to-use Macro feature, allowing you to
send several commands with the press of a single key (for example turning a few
devices on or off).
Once you programmed a macro on one of these keys, the sequence will be performed in every mode.
Code upgrade technology
Your ONE FOR ALL KAMELEON 5 also offers a Code upgrade technology.
This technology gives you the possibility to add codes to the memory. If your
device uses a particular code which is not found in the KAMELEON 5 memory
(using the “Direct code set up” on page 12 or the “Search Method” on page
13) you may use the ”Code Upgrade Technology” (see page 24). Thanks to this
technology your KAMELEON 5 will never become obsolete.
Batteries
Note: when inserting the batteries the KAMELEON 5 will be in
“demo-mode (showing several screens). The KAMELEON 5 will go
out of demo-mode automatically as you set it up.
Your KAMELEON 5 requires 2 AA/LR6 alkaline batteries.
1. Unscrew the battery door using a coin.
2. Insert the batteries with the positive end (+) upwards.
3. Replace the battery door back into position.
Low Voltage Indicator
As soon as the batteries run out of power the KAMELEON 5 will indicate this.
The IR indicator will flash 5 times whenever you press a key and you cannot
access programming mode.
Please make sure to replace the batteries with 2 new AA/LR6 alkaline
batteries.
WW W.ONEFORALL.COM 3
Page 5
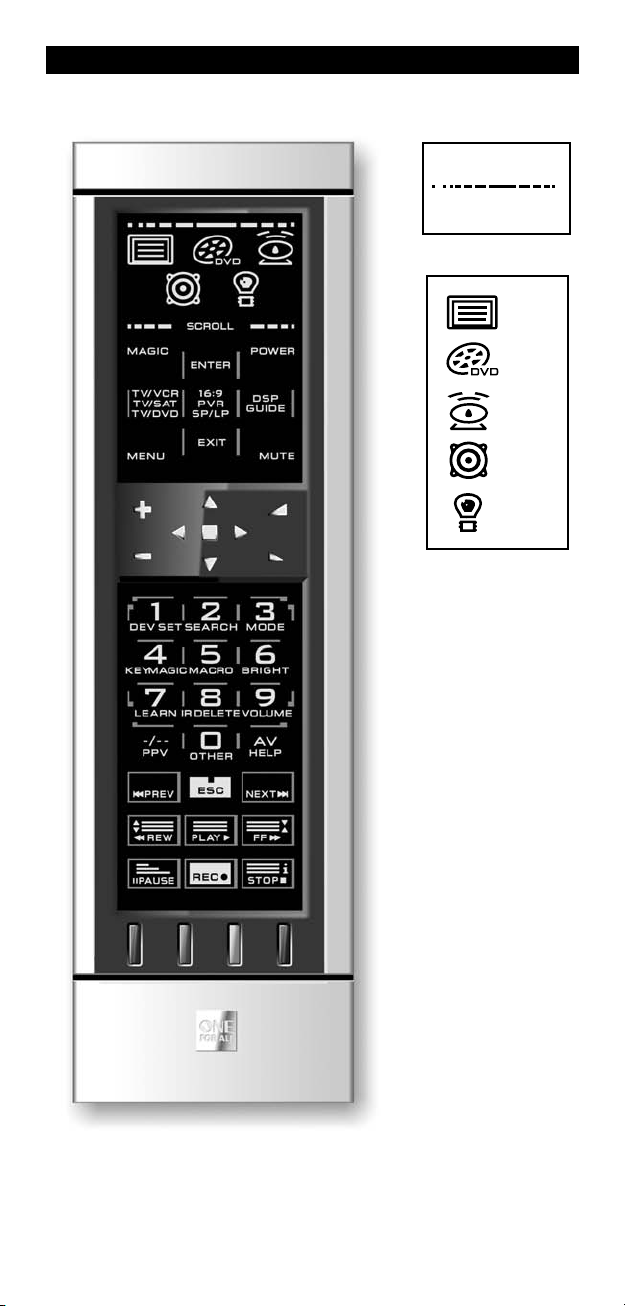
The Keypad
This product features an “EL” panel (Electro Luminescence technology) which is
activated by touching screen and remote simultaneously to activation by
keypress. In order to save battery life, the “EL” screen will stay illuminated for
8 seconds during normal use.
One of the key features of the KAMELEON 5 is the “EL” display, which changes
to suit the device you are controlling. The overview on page 6 will show you all
the possible functions that you may obtain.
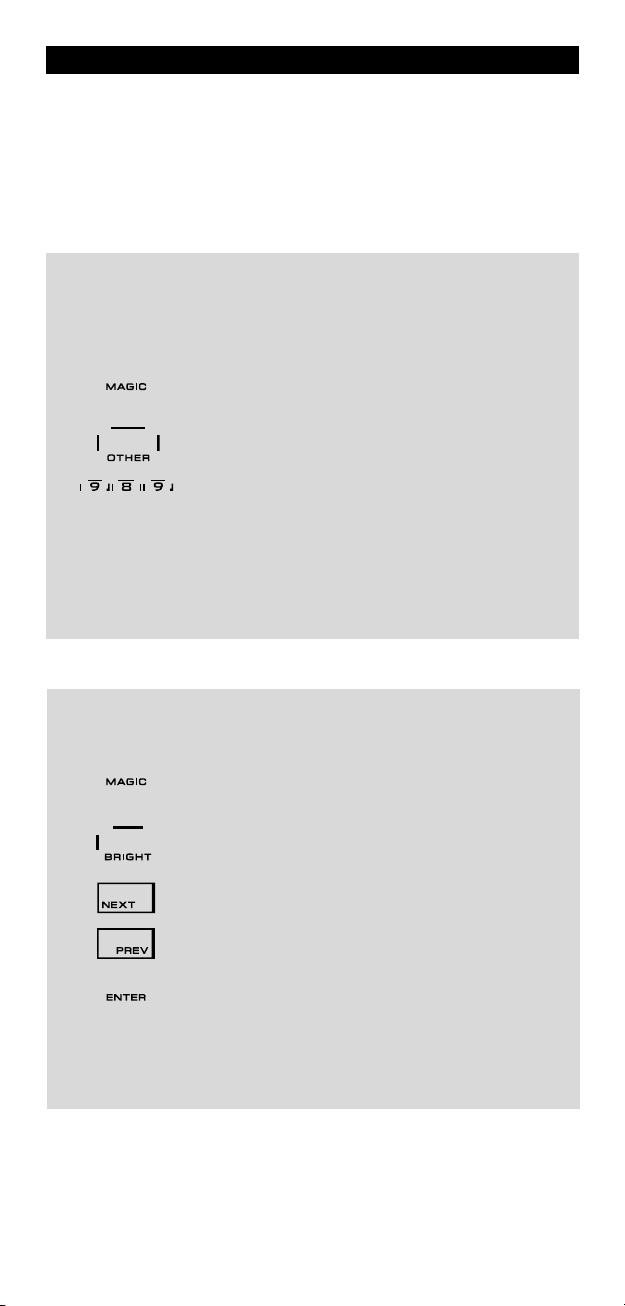
“EL” Screen activation setting
The KAMELEON 5 features an “EL” panel which is activated by touching screen
and remote simultaneously or by keypress.
It is possible to lock the KAMELEON 5 to one activation setting:
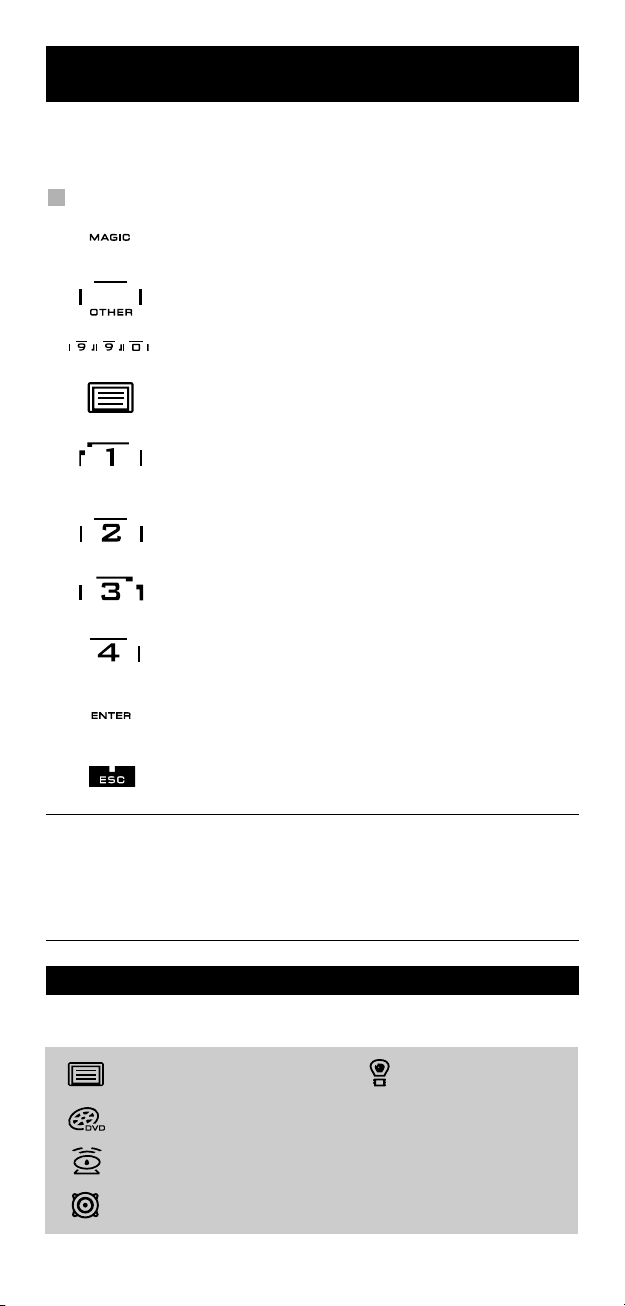
1. Press and hold the MAGIC key for about 3 seconds.
2. Press OTHER.
3. Now press 9 8 9. The IR Indicator will blink twice (or 4 times).
-> If the animated IR Indicator blinks twice the “EL” panel will be activated only
by touching screen and remote simultaneously.
-> If the animated IR Indicator blinks four times the “EL” panel will be activated
only by keypress.
Simply perform these steps to lock the KAMELEON 5 to the activation
setting that you prefer.
The screen will change to the setup screen.
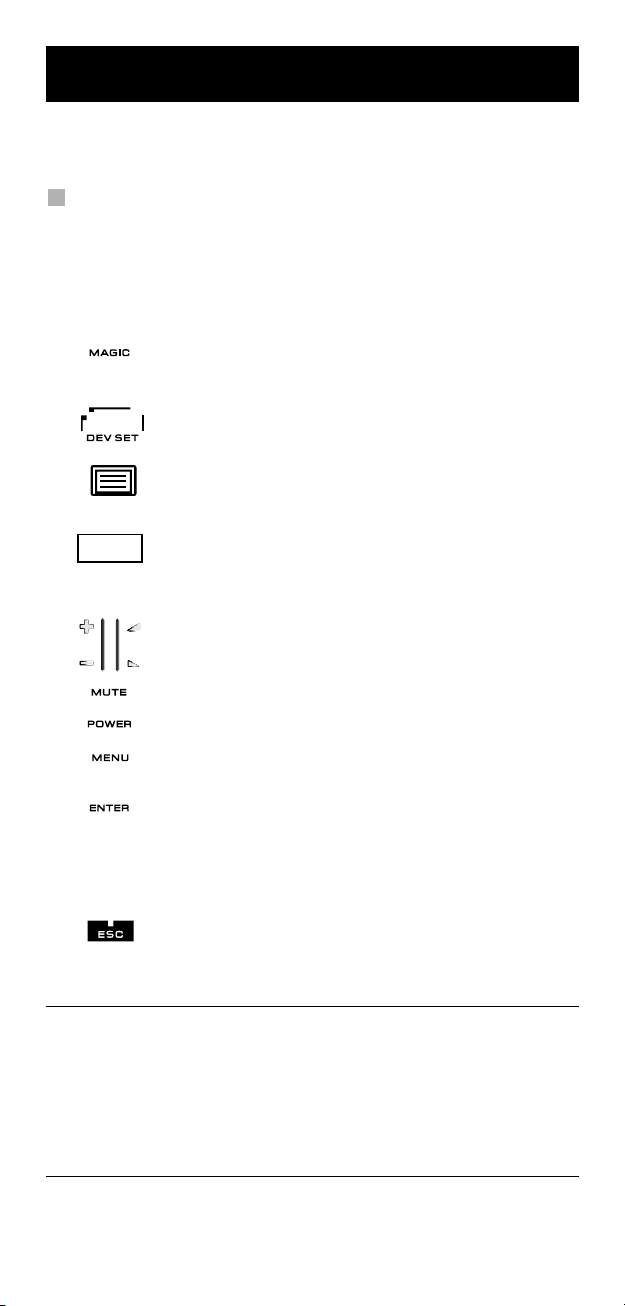
“EL” Screen brightness adjustment
To increase or decrease the brightness of the KAMELEON 5 “EL” screen:
1. Press and hold the MAGIC key for about 3 seconds.
2. Press BRIGHT.
3. > To increase the brightness of the “EL” screen press and
4. Press ENTER to store the brightness setting and return
- Increasing the brightness of the KAMELEON “EL” panel can decrease
the battery life. Battery life varies from 3 - 12 months (depending on
brightness setting and usage).
4 WWW.ONEFORALL.COM
The screen will change to the setup screen.
hold NEXT
> To decrease the brightness of the “EL” screen press and
hold PREVIOUS.
to the setup screen OR press ESC to return to the previously
set brightness level.
Page 6

The Keypad
“EL” On time setting
To change the duration (default: 8 sec.) that the KAMELEON 5 “EL” screen will be
ON, after each keypress during use of the remote (not programming mode):
1. Press and hold the MAGIC key for about 3 seconds.
2. Press OTHER.
3. Press 9 7 8. The IR Indicator will blink twice.
4. Press 1, 2, 3, 4 or 5 (e.g. 1 = 4 seconds) depending on
Selection “EL” On Time
14seconds
2 8 seconds (default)
3 12 seconds
4 16 seconds
5 20 seconds
The screen will change to the setup screen.
your choice, see table below. The animated IR Indicator
will blink twice. Press ENTER to store the new EL on time
setting and to return to the SETUP screen OR press ESC
to return to the previously set EL on-time setting.
WW W.ONEFORALL.COM 5
Page 7
The Keypad
IR Indicator
TV
DVD
SAT
AUD
LIGHT
6 WWW.ONEFORALL.COM
Page 8
The Keypad
1. IR (infra-red) Indicator
2. Device keys
The TV, DVD, AUD and LIGHT keys select the device to be controlled. After
pressing a device (mode) key on your KAMELEON 5 the applicable device
icon will animate, to show the currently activated mode. Pressing the device
key will allow you to return to the main screen (TV and AUD modes). The
KAMELEON 5 also features a “LIGHT” mode. Together with a separately
available “ONE FOR ALL Light Control™ Starters Kit - HC-8300”, this allows
you to dim and switch ON/OFF lights through-out your whole house.
The IR Indicator animates when IR is being “sent” or
“received”. The KAMELEON 5 animated IR Indicator will
show “outgoing IR” whenever a function key is pressed.
When using the “Learning Procedure” or “Code Upgrade
Procedure” the animated IR indicator will show “incoming
IR”. Outgoing IR will be indicated by an “outside to inside”
animation of the IR Indicator. Ingoing IR will be indicated
by an “inside to outside” animation of the IR Indicator. The
IR Indicator will give feedback when keys are pressed both
during normal use and in programming mode (middle segment of the IR Indicator will blink).
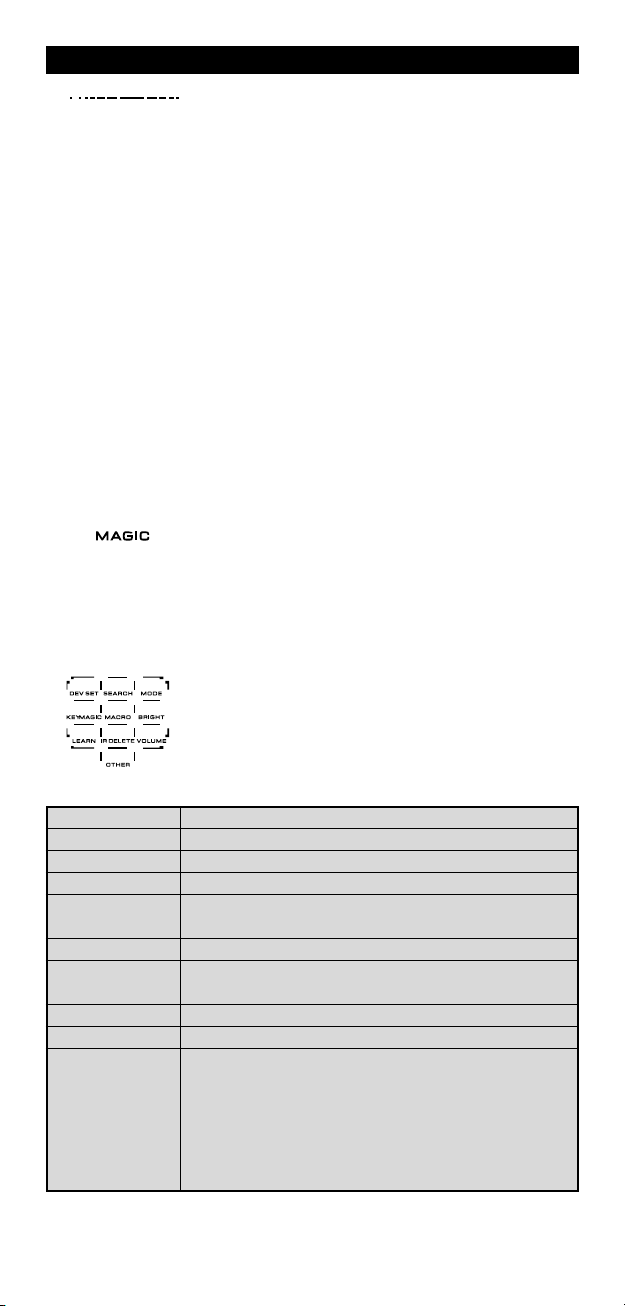
3. MAGIC (in ”shifted” or ”programming” mode)
DEV SET
SEARCH
MODE
KEY MAGIC
MACRO
BRIGHT
LEARN
IR DELETE
VOLUME
OTHER
The MAGIC key is used to set up your KAMELEON 5 and to
access special functions. If you press this key shortly, the
screen will go into ”shifted” mode (for 10 seconds) which
will give access to some secondary functions such as color,
brightness and sleeptimer.
Programming mode
If you press the MAGIC key longer (about 3 seconds), the
KAMELEON 5 will enter ”programming” mode. The screen
will change to the “setup screen”.
• Device Setup mode
• Search Method
• Mode re-assignment
• To program missing functions
• To setup a key with a Sequence of
commands
• “EL” Screen brightness adjustment
• To copy functions from your original working remote
onto the KAMELEON 5
• Deleting learned and Key Magic functions
• Volume punch through feature
• Variable EL On time (4 sec, 8 sec, 12 sec, 16 sec, 20 sec)
• Operational Reset
• KAMELEON 5 - Timer
• EL screen activation setting
• Code Verification
• Modem Upgrade
WW W.ONEFORALL.COM 7
Page 9
The Keypad
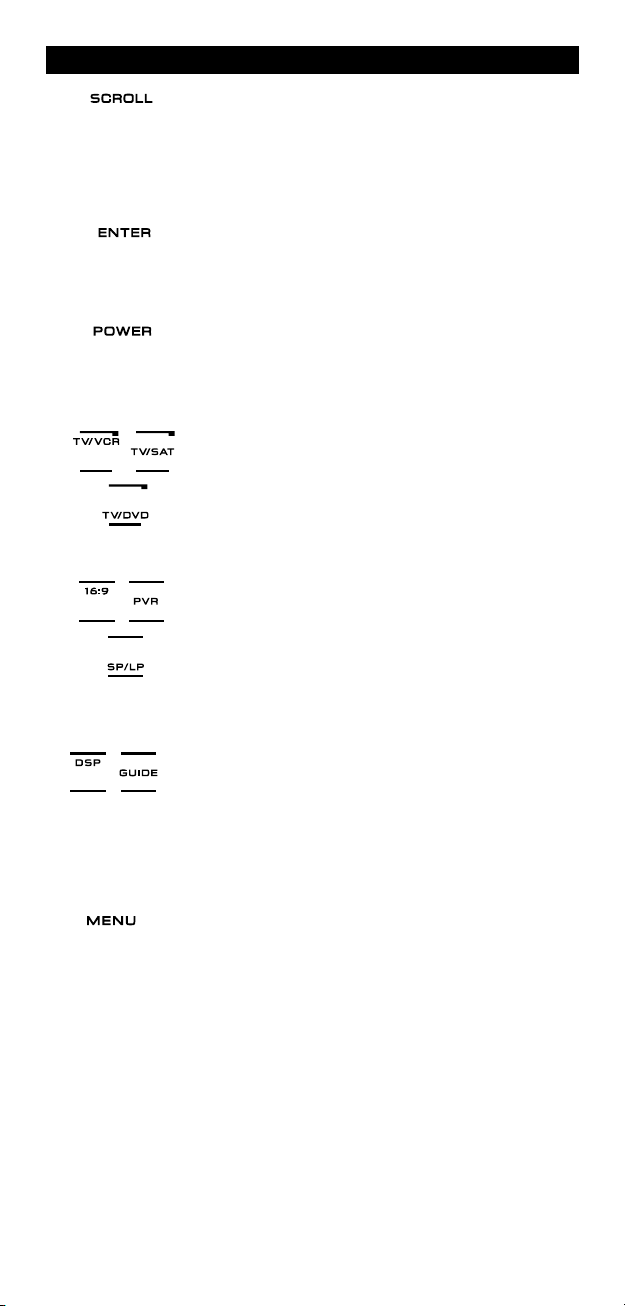
4. SCROLL
5. ENTER
6. POWER (in shifted mode; Sleeptimer)
7. TV/VCR / TV/SAT / TV/DVD
8. 16:9 / PVR / SP/LP
The SCROLL key gives you the possibility to move through
the different screens (if applicable) within a certain mode
during normal use and programming mode. This only
applies to TV and AUD modes.
The ENTER key allows you to confirm your choice in
programming mode.
The POWER key controls the same function as on your
original remote.
In DVD mode you will obtain the TV/VCR function (usefull
if you programmed a VCR code). In SAT mode you will
obtain the TV/SAT function. In DVD mode you will obtain
the TV/DVD function.
In TV mode you will obtain the 16:9 (screen format)
function. In SAT mode this key will activate the PVR
(Personal Video Recorder) function. In DVD mode you will
obtain the SP/LP (tape speed) function (usefull if you pro
grammed a VCR code).
9. DSP / GUIDE
10. MENU
If available on your original remote, in AUD mode you will
obtain the “DSP” function. In TV and DVD mode the
“GUIDE” key will provide you the “guide” function, if
available on your original remote control. In TV mode the
“GUIDE” key will change the screen to “menu mode
screen”.
Pressing this key will allow you to operate the Menu and
in TV and AUD mode will also change the screen to the
menu mode. The MENU key operates the same function it
did on your original remote control.
8 WWW.ONEFORALL.COM
Page 10

The Keypad
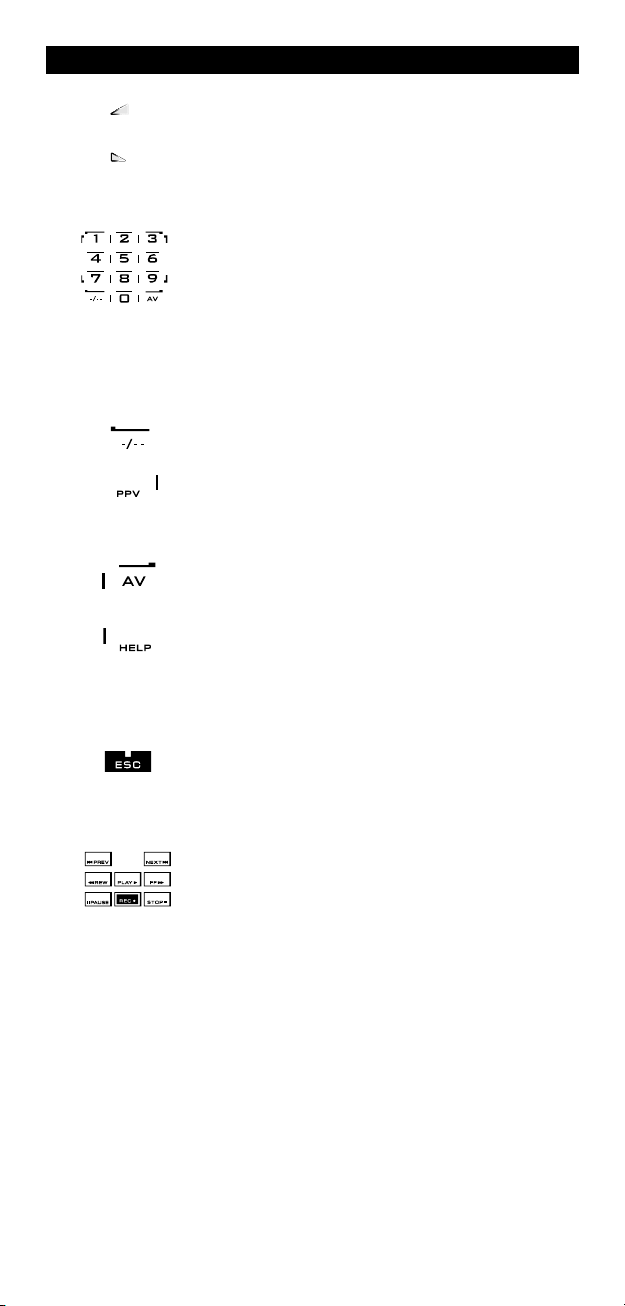
11. EXIT
12. MUTE
13. CH +/- (in shifted mode; brightness +/-)
14. Directional keys (Up, Down, Left, Right)
15. OK / SURROUND
The EXIT key will operate the same as on your original
remote. To return to the main screen (TV, SAT and AUD
mode) press the device key or use the SCROLL key.
The Mute key operates the same function it did on your
original remote control.
These keys operate just as those on your original remote.
In shifted TV mode (accessed by pressing MAGIC shortly
and releasing it) these keys may provide you the brightness +/- function.
If available on your original remote control, these keys
will allow you to navigate through the menu. On some
TV’s you may have to press CH+/- and VOL+/- keys OR the
color keys (red, green, yellow, blue) to navigate through
the menu, depending on your model of TV. In AUD main
mode these keys will (if available on your original remote)
allow you to adjust the CENTRE and REAR levels of your
speaker(s). In AUD menu mode these keys will (if available
on your original remote) allow you to navigate in the
menu-screen.
In menu mode this key will confirm your choice. On some
devices you can confirm your menu option simply by
pressing MENU. In AUD main mode this key will allow you
to access the surround mode of your device (if available
on your original remote).
WW W.ONEFORALL.COM 9
Page 11
The Keypad
16. VOL +/- (in shifted mode; colour +/-)
17. Number keys / INPUT (in prog. Mode; setup features)
18. -/-- / PPV
19. AV / HELP
The volume keys operate just as those on your original
remote. In shifted TV mode (accessed by pressing MAGIC
shortly and releasing it) these keys may provide you the
colour +/- function.
The number (1 – 9, 0) keys provide functions just like your
original remote. In AUD mode, the number (1 – 9, 0, -/—)
keys may provide (if available on your original remote) an
INPUT function (e.g. TUNER ). If your original remote features a “function select” or “input select” function you
may find this under the AV key. When in programming
mode, the digit keys will display the various setup
features.
If your original remote uses one/two digit input switching
(-/--), this function can be obtained by pressing the -/-- key.
In SAT (menu screen) and PVR mode you will obtain the
PPV function.
The AV key operates the same function it did on your
original remote control. If your original television or video
remote uses a 20 key, this function can be found by
pressing the AV key. If your original satellite or PVR
remote comes with a “help” function, you can obtain this
pressing the HELP key. In AUD mode you will obtain the
“input source” function.
20. ESC
21. Transport keys (PLAY, STOP etc.)
This key only appears in programming mode and is used to
return to the Setup screen or to exit programming mode.
These keys operate the transport functions like PLAY, FF,
REW, SKIP+/- (TRACK+/-) etc.of your device. To prevent accidental recording, the RECORD key must be pressed twice
to start recording.
10 WW W.ONEFORALL.COM
Page 12

The Keypad
22. Teletext Keys
EXPAND: Shows the top half of the teletext page in larger letters.
By pressing again, you can see the bottom half of the teletext page
enlarged. To return to regular teletext viewing, press the EXPAND key
again, or press the TEXT ON key, depending on your television.
TEXT ON: In TV mode: once in text mode, pressing this key may
switch to MIX or TURN OFF text, depending on your television.
This function is also available in SAT mode.
HOLD/STOP: Stops changing pages.
MIX: Shows both text and TV picture.
TEXT OFF: In TV mode: switches the television back to regular
viewing mode. On some televisions this may be done by pressing
the “TEXT ON” key several times. This function is also available in SAT
mode.
TEXT INDEX: This key will give you access to the index function
within the text mode.
These keys are used to operate the main teletext
functions. Of course, your Television must have teletext
capability. For a more detailed explanation of teletext and
fastext, please refer to the manual of your television.
Remember, different televisions control teletext and
fastext functions in different ways. Not all of the teletext
functions may be available on your particular model.
23. Red / Green / Yellow / Blue
WW W.ONEFORALL.COM 11
When accessing the text mode, the colour keys marked
red, green, yellow and blue, allow you to access the fastext
functions of your television. If on your original remote
control these keys are used for Menu navigation,
the KAMELEON 5 Fastext keys may operate the same.
Page 13
Setting up the KAMELEON 5
(How to set up the KAMELEON 5 to control your devices)
Note: when inserting the batteries the KAMELEON 5 will be in “demo-
mode (showing several screens). Just follow the next steps and
the KAMELEON 5 will go out of demo-mode automatically.
Example: To set up the KAMELEON 5 for your television:
1. Make sure your television is switched ON (not on standby).
2. Find your device code in the codelist (pages 261 - 288). Codes are list-
ed by device mode and brand name. The most popular code for each brand
is listed first. If your brand is not listed at all in the code section, try the
Search Method on page 13.
3. Press and hold the MAGIC key for about 3 seconds.
4. Press the DEV SET key.
The screen will change to the setup screen.
5. Press and release the TV key to select the device type you like
6. Enter the first four-digit code (see codelist pages 261 -
_ _ _ _
7. Now, aim your KAMELEON 5 at your television and try the
8. If your device is responding, press ENTER to save the code.
9. Press and keep ESC pressed for about 3 seconds to
- Most TV’s do not switch back on pressing the POWER key, please try
pressing “CHANNEL+” key to switch your TV back on.
- Some codes are quite similar. If your device does not respond or is not
functioning properly with one of the codes, try another code listed under
your brand.
- To set up your other devices, follow the same instructions above,
only press the appropriate device key during step 5.
- Remember to press the correct device key before operating your device.
Only one device can be assigned to a device key.
to setup.
288) using the number keys. The animated IR Indicator will
blink twice.
following keys to test if the KAMELEON 5 will work with your
device;
• CHANNEL +, CHANNEL-
• VOLUME +, VOLUME -
• MUTE
• POWER.
• MENU.
If your device does not respond, just enter the next code listed
under you brand. If none of the codes listed for your brand
operate your device, then try the Search Method described on
page 13.
return to user mode (all keys for the device mode are
displayed), OR press a device key to select the next
device you like to setup.
To set up a second TV, DVD, SAT or AUD (See page 19).
12 WW W.ONEFORALL.COM
Page 14
Setting up the KAMELEON 5
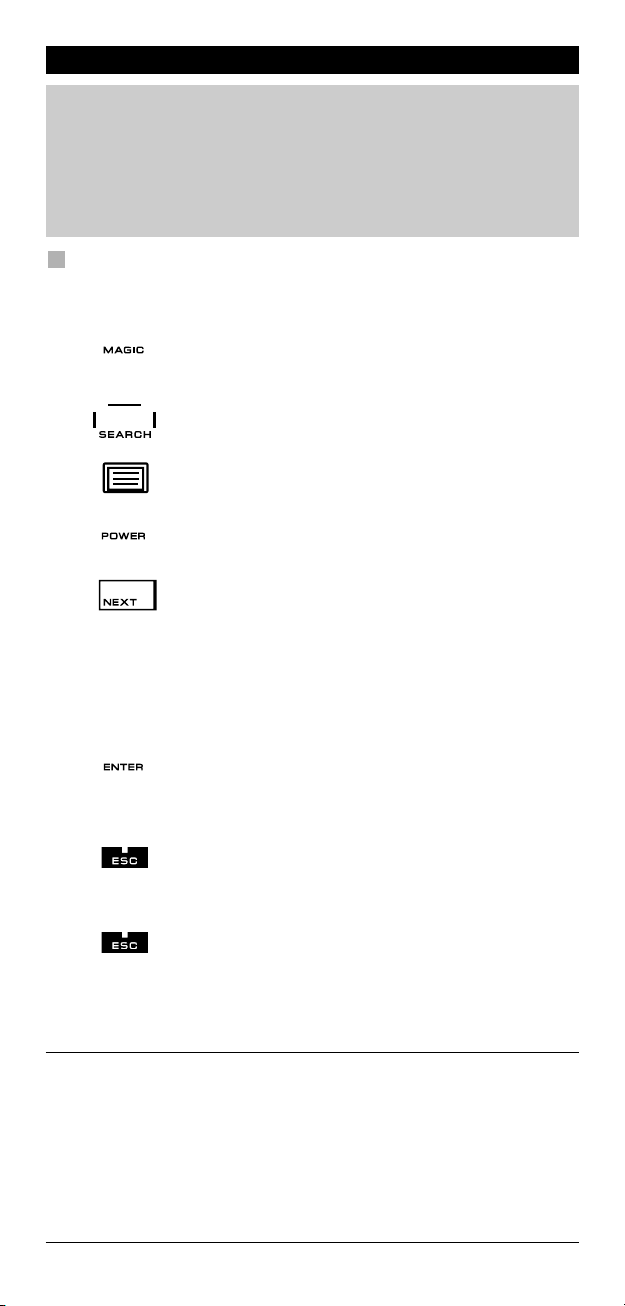
Search Method
--> If your device does not respond to the KAMELEON 5 after you have tried
all the codes listed for your brand.
--> If your brand is not listed at all.
The Search Method allows you to scan through all the codes contained in
the memory of the KAMELEON 5.
Example: To search for your TV code:
1. Switch ON your Television (not on standby).
2. Press and hold the MAGIC key for about 3 seconds.
3. Press SEARCH.
4. Press and release the TV key to select the device type you
5. Next, press POWER.
6. Point the KAMELEON 5 at your Television. Now press
7. When your Television switches off, press the ENTER
8. Press ESC to return to the setup screen, or press a
The screen will change to the setup screen.
like to setup.
NEXT over and over, until your Television turns off
(every time you press the NEXT key the KAMELEON 5 will
send out a POWER signal from the next code contained in
the memory). You may have to press NEXT many times
(up to 150 times) so please be patient. Remember to
keep pointing the KAMELEON 5 at your Television
while pressing this key. (If you skip past a code, you can
go to the previous code(s) by pressing the PREVIOUS key).
key to store the Code. The animated IR Indicator will
light up twice.
device key if you want to perform the Search Method for
another device.
9. Press ESC again to return to user mode (all keys are
- During step 5, instead of POWER you can also press any other key displayed.
This will be the function sent for the next key presses of NEXT or PREVIOUS
in step 6. If for example; during step 5 you press “2” instead of “POWER”,
the KAMELEON 5 will send the “number 2” signal every time you press
NEXT during step 6 (make sure your TV is switched to another channel).
- To search for your other devices, follow the same instructions above, only
press the appropriate device key during step 4.
- If your Video’s original remote control does not have a POWER key, press
PLAY instead of POWER during step 5.
- In the LIGHT-mode the Search Method does not work.
WW W.ONEFORALL.COM 13
displayed).
Turn your device (television) back on and try all the
remote’s functions to ensure they are working properly. If
you cannot control your Television properly, please continue the Search Method, you may be using the wrong Code.
Page 15
Code blink out
(To find out which code is currently programmed)
If you have set up your KAMELEON 5 via the Search Method, you can blink
back your code for future reference. Please note that the animated IR Indicator
will indicate the 4 digits by animated blinks.
Example: To blink out your television code:
1. Press and hold down the MAGIC key (for about 3 seconds).
2. Press OTHER.
3. Press 9 9 0, the animated IR Indicator will light up twice.
4. Press and release the TV key to select the device type you like
5. For the first digit of your four-digit code, press 1 and count
6. For the second digit, press 2 and count the animated blinks.
7. For the third digit, press 3 and count the animated blinks.
8. For the fourth digit, press 4 and count the animated blinks.
9. Press ENTER to return to the setup screen OR press a device
10. Press and hold ESC (for about 3 seconds) to return to user mode.
The screen will change to the setup screen.
to check the code for.
the blinks of the animated IR Indicator. If there are no blinks,
the digit is “0”.
If there are no blinks, the digit is “0”.
If there are no blinks, the digit is “0”.
If there are no blinks, the digit is “0”. Now you have found
your four-digit code.
key if you want to perform the blink out for another device.
- You can perform steps 5 – 8 in any order and as many times as you want. So,
if you lost count it is possible to blink back the corresponding number again
(e.g. if during step 6 you did not see exactly how many times the animated
IR Indicator blinked just press “number 2” again and count again).
- To blink back the code for your other devices follow the instructions above,
only press the appropriate device key during step 4.
Quick code Reference
Write down the codes for your devices in the boxes below for quick and
easy reference.
■■■■■■ ■
■
■■■■■■ ■
■
■■■■■■ ■■
■■■■■■ ■
■■■■■■ ■
14 WW W.ONEFORALL.COM
■
■
Page 16
Learning Feature
(How to copy functions from your original working
The KAMELEON 5 comes with a complete library of pre-programmed codes.
After you have set up the KAMELEON 5 for your device, you may find that there
are one or more keys that you had on the original remote control, which do not
have a place on the KAMELEON 5 keypad.
The KAMELEON 5 offers a special Learning feature that allows you to copy
almost any function from your original remote control onto the keypad of the
KAMELEON 5.
Before you start:
- Make sure your original remote is working correctly.
- Make sure neither your KAMELEON 5, nor your original remote control is
pointing at your device.
Learning (direct)
remote onto the KAMELEON 5)
Example: To copy the “mono/stereo” function from your original TV
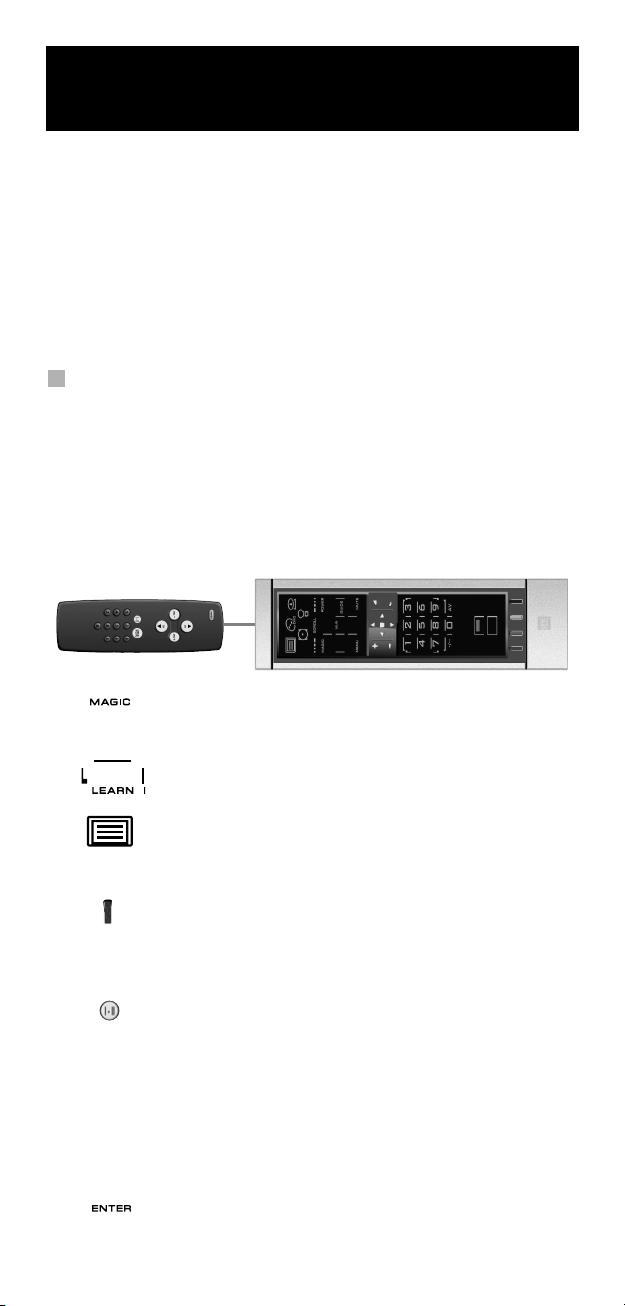
1. Place the KAMELEON 5 and your original remote control on a flat
2. Press and hold down the MAGIC key (for about
3. Press LEARN.
4. Press the device key (Example: TV key) on the KAMELEON 5
5. Press the key (Example: “red” key) on the KAMELEON 5
remote control onto the ”red”-key of your
KAMELEON 5.
surface. Make sure the ends which you normally point at your
device are facing each other. Point the original remote to the front
of the KAMELEON 5 (see picture below). Keep the remotes at a distance of 2 to 5 cm (0.8 to 2 inches).
3 seconds). The screen will change to the setup screen.
remote to select the mode to which you want to place the
learned function.
remote where you want to place the learned function. The IR
Indicator will show “incoming IR” three times and then the display will switch off.
6. Press and hold the key that you want to copy (Example:
7. If you want to copy other functions within the same mode, simply repeat
steps 5 and 6 pressing the next key you want to copy by learning. If you
want to copy another function in a different mode, simply continue with
step 4 followed by steps 5 and 6.
8. Press ENTER to exit the learning mode and return to the setup
WW W.ONEFORALL.COM 15
mono/stereo) on your original remote control. The display
switches back on and you will see two blinks to indicate
successful learning operation.
screen OR press and hold ESC to return to the user screen.
Page 17

Learning Feature
- As soon as the display switches off in step 5 you need to press the key (in
this example: the ”mono/stereo” key) on your original remote within
15 seconds. If no key is pressed while in learning mode, the remote will
return to user mode after 30 seconds.
- During learning, keys such as (TV) menu, (TV) guide etc. will not change
screen when pressed.
- If you learn a function on a key, the original KAMELEON 5 function
automatically becomes shifted. Press the MAGIC key then the key to access
it (this excludes the POWER, Channel and Volume keys). If you learned on a
digit key, access the original function by pressing magic twice and then
the digit.
- If you want to learn a function on a key that is not in the main screen, use
the SCROLL key to change the screen.
- The learning feature is mode specific. Therefore you can place one learned
function per mode on the same key.
- The KAMELEON 5 can learn approximately 50 functions. The amount of keys
depends on the other programmed functions and on the remote to be
learned from.
- You can replace a learned function by placing another learned function on
top.
- Please make sure not to use the learning procedure when in direct sunlight
or under incandescent lights.
- Make sure you are using new batteries before following the learning
instructions.
- Upon changing the batteries, your learned functions will be retained.
Shifted Learning
It is also possible to place a function shifted on a key to maintain the original
function.
Example: to place the mono/stereo function shifted on the “red” key.
To place the (e.g. mono/stereo) function shifted on the red key, simply follow
steps 1-8 on page 15, only press ”MAGIC” then the ”red” key during step 5.
To access the e.g. ”mono/stereo” function in this example; simply press
”MAGIC” and then the ”red” key.
- If a Shifted Learned function is placed on the Channel and Volume keys
then the “Colour & Brightness“ features will be sacrificed.
- If you place a function shifted on a digit key (0 - 9) you need to press
MAGIC twice then the digit key to access this shifted function.
16 WW W.ONEFORALL.COM
Page 18

Learning Feature
To delete a “Key Magic function” or “learned
function” from a certain key:
Example: to delete a “Key Magic function” or “learned function” from the “I”
key in TV mode:
1. Press and hold the MAGIC key for about 3 seconds. The screen will
change to the setup screen.
2. Press IR DELETE.
3. Press the corresponding device key (example TV).
4. Press the corresponding function key (example “I”).
5. Press ENTER to restore the original function OR press and hold ESC to
return to the user screen.
- The original function (if present) of the KAMELEON 5 will be restored.
To delete a shifted “Key Magic function” or “learned
function” from a certain key:
Example: To delete one single ”shifted” learned or Key Magic function, follow
the steps below.
Example: to delete the mono/stereo function learned shifted on the ”red” key
in TV mode:
1. Press and hold the MAGIC key for about 3 seconds. The screen will
change to the setup screen.
2. Press IR DELETE.
3. Press the corresponding device key (example TV).
4. Press MAGIC.
5. Press the corresponding function key (example “Red key”).
6. Press ENTER to restore the original function OR press and hold ESC to
return to the user screen.
- The original function (if present) of the KAMELEON 5 will be restored.
To delete all “Key Magic functions” or “learned
functions” from a certain mode:
Example: to delete all “Key Magic function” or “learned functions” from the TV
mode:
1. Press and hold the MAGIC key for about 3 seconds. The screen will
change to the setup screen.
2. Press IR DELETE.
3. Press the corresponding device key (example TV).
4. Press ENTER to restore the original function OR press and hold ESC to
return to the user screen.
- The original function (if present) of the KAMELEON 5 will be restored.
Operational Reset
The Operational Reset will erase all learned functions across all modes.
It will also delete some other programmed functions like Key Magic or Macros.
1. Press and hold the MAGIC key for about 3 seconds. The screen will
change to the setup screen.
2. Press OTHER.
3. Press 9 8 0. The IR Indicator will blink four times and the remote will return
to the setup screen.
WW W.ONEFORALL.COM 17
Page 19

Extra Features
Key Magic
(How to program missing functions)
Key Magic® is an exclusive ONE FOR ALL feature. The design of the KAMELEON
5 ensures that many functions of your original remote control can be operated even those that do not have their own key on the KAMELEON 5 keypad.
Frequently used functions can be assigned to a key of your choice using the Key
Magic® feature of your KAMELEON 5. In order to program a certain function
with Key Magic® you need to know the corresponding function code. As the
function codes vary with different types of devices, they cannot be found in the
manual. You can request your function codes through our consumer service
help-line, by letter, fax or e-mail.
All we need to know is:
• Brand and Model number of the device in question (for verification if you
are using the correct code).
• The 4-digit set-up code your device is working with.
• How the function was labeled on your original remote control.
You can also visit our website (www.oneforall.com) to find an answer to your
questions.
Once you obtain(ed) your function code(s) from customer service,
programming the code is easy:
1. Press and hold the MAGIC key for about 3 seconds. The screen will
change to the setup screen.
2. Press KEY MAGIC.
3. Press the device key (TV, DVD, SAT or AUD).
4. Press the MAGIC key once.
5. Enter the 5-digit function code (provided by customer service).
6. Press the key to which the function will be assigned (if this key is
located in a different screen than the main screen, use the SCROLL key
to access the screen). The IR Indicator will blink twice and the screen will
return to the Setup screen.
- Key Magic® functions are mode specific. To access the function you have
programmed, press the device key first.
- Key Magic® can be assigned to any key EXCEPT the following: Device keys,
ESC, ENTER, MAGIC key and the SCROLL key.
- Please note all the extended function codes you obtain from customer
service for easy future reference.
- Keys such as (TV) menu, (TV) guide etc. will not change screen when
pressed during Key Magic® programming.
®
EXTENDED FUNCTION REFERENCE
(first entry is an example):
DEVICE SET-UP CODE FUNCTION FUNCTIONCODE
TV 0556 16/9 format 00234
18 WW W.ONEFORALL.COM
Page 20
Extra Features
Mode re-assignment
(How to set up two of the same devices on the KAMELEON 5)
It is possible to change the mode of any device key. This is useful if you want to
set up two of the same devices on the KAMELEON 5. The modified device key
will display the applicable keys for the revised mode. The code can be set up
using the “Direct set up” (p. 12) or “Search method” (p. 13). To change a device
key, see the two examples below.
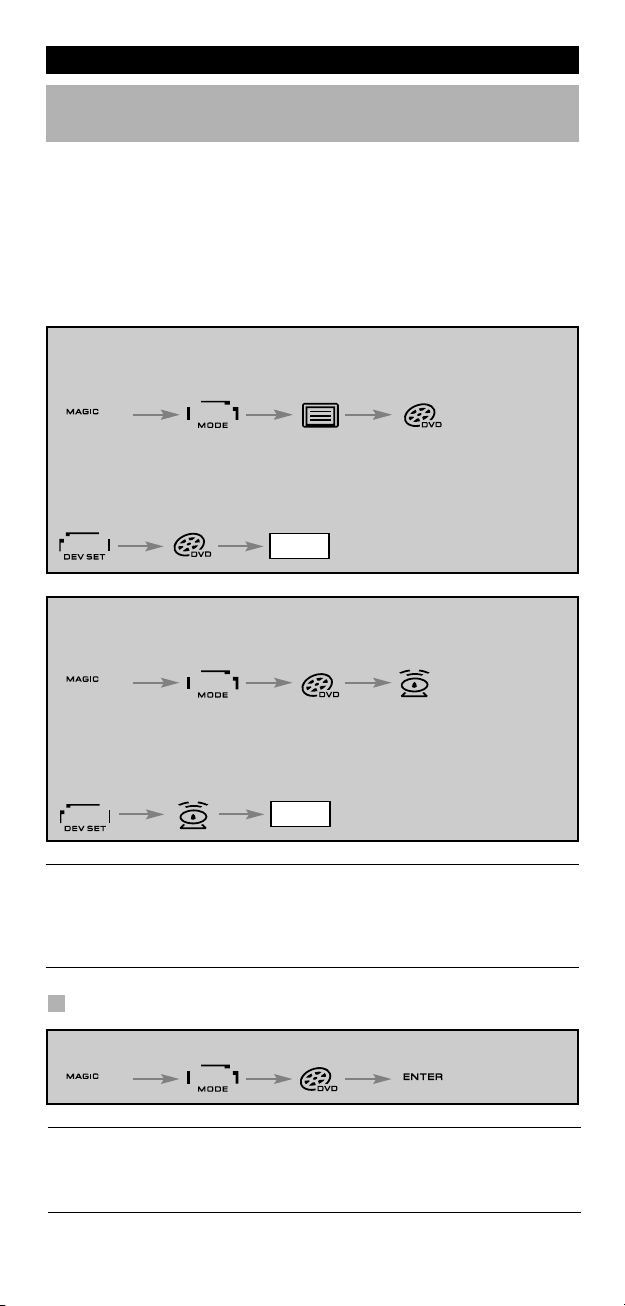
Example 1; if you like to program a second TV on the DVD key.
Example 2; if you like to program a second DVD player on the SAT key.
Example 1:
To program a second Television on the DVD key (for example), you need to
change the DVD key into a TV key, so press:
(*) (**)(*) (**)
The DVD key has now become a second TV key and will
display the applicable keys for this mode.
Now enter the Set-Up code for your second TV by pressing:
_ _ _ _
Example 2:
To program a second DVD player on the SAT key (for example), you need
to change the SAT key into a DVD key, so press:
(*) (**)
(TV Code) (**)
The SAT key has now become a second DVD key and will display the
applicable keys for this mode.
Now enter the Set-Up code for your second DVD by pressing:
_ _ _ _
- If you program a different device type on another key (e.g. second TV on
the DVD key) the original device key icon will remain, but the displayed
function keys will change to suit the new device mode. For example; if a
second TV is programmed on the DVD key, TV-text functions will be
displayed in DVD mode.
(DVD Code) (**)
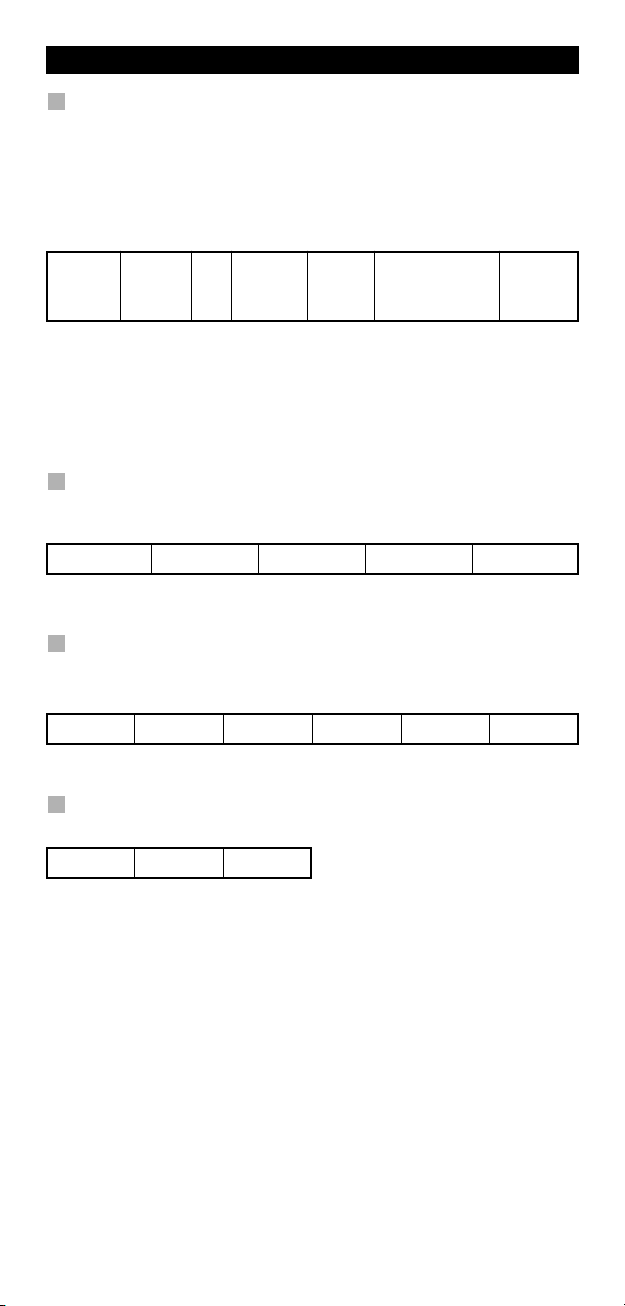
Resetting a Device key
Example: To reset the DVD key to its original mode, press:
(*) (**)
(*) Press and hold the MAGIC key for about 3 seconds. The screen
will change to the setup screen.
(**) The animated IR Indicator will blink twice (the screen will
change to the setup screen).
WW W.ONEFORALL.COM 19
Page 21

Extra Features
Volume Punch-Through
This feature allows you to adjust the volume of a certain mode (e.g. TV mode)
while being in a different mode (e.g. VCR). If for example you’re watching a
programme on your Video (in DVD mode), you can adjust the volume (a TV
function) without
first pressing the TV key. The chart below lists some of the possibilities:
Last key pressed: You can control:
DVD : TV volume up and down, mute
SAT : TV volume up and down, mute
AUD : TV volume up and down, mute
LIGHT : TV volume up and down, mute
Example: To punch through to AUD volume, being in any other mode
(e.g. SAT or DVD mode):
1. Press and hold the MAGIC key for about 3 seconds. The screen will
change to the setup screen.
2. Press VOLUME.
3. Then press the AUD key and the animated IR Indicator will blink twice and
the remote will return to the setup screen.
Result: VOL+/- and MUTE wil be from AUD mode independent of the selected
device mode.
To cancel the “Volume Punch Through” per mode:
Example: to cancel the “Volume Punch Through” for the VCR (in DVD mode):
1. Press and hold the MAGIC key for about 3 seconds. The screen will
change to the setup screen.
2. Press VOLUME.
3. Then press the VOL- ( ) key.
4. Press DVD once. The IR Indicator will blink four times and the unit will
return to the SETUP screen.
Result: being in DVD (VCR) mode, you will be able to control VOL+/- and MUTE
functions of your VCR (provided it has volume control).
To cancel the “Volume Punch Through” for all modes:
1. Press and hold the MAGIC key for about 3 seconds. The screen will
change to the setup screen.
2. Press VOLUME.
3. Then press the VOL+ ( ) key and the IR Indicator will blink four times
and the screen will return to the setup screen.
Result: In all modes the VOL+, VOL- and MUTE keys will now operate
the original functions again.
20 WW W.ONEFORALL.COM
Page 22

Extra Features
Device Sleeptimer
If your device has a “Sleeptimer” function built in, you can access this function
with your KAMELEON 5 remote. To do so:
1. Make sure your device is switched on.
2. Press the device key TV (or DVD, SAT, AUD).
3. Point the KAMELEON 5 at your device and press and release the MAGIC key
then press POWER. You should see the Sleeptimer activate on your device.
To increase the timer, simply press POWER again (within 10 seconds) until
the timer gets to the desired time.
- To deactivate the “Sleeptimer”, repeat steps 1 – 3 above. During step 3,
continue pressing POWER again (within 10 seconds) until the timer indicates
zero minutes.
- Depending on how you used sleeptimer on the original remote, you might
need to access sleeptimer in a different way (through menu for example).
KAMELEON 5 - Timer
The KAMELEON 5 – Timer function allows you to activate a <desired function>
from a specific <device mode> within a <specific amount of minutes>
(max. amount of timer is 60 minutes).
- The <desired function> can be an existing function within a specific mode, a
Macro, a Key Magic function or a Learned function.
Example: you want your TV to switch off after 45 minutes.
1. Press and hold the MAGIC key for about 3 seconds. The screen will
change to the setup screen.
2. Press OTHER.
3. Press 9 8 5 to enter the KAMELEON 5 –Timer programming mode.
The animated IR Indicator will blink twice.
4. Press TV to select the mode where the KAMELEON 5 – Timer function will
come from. The animated IR Indicator will blink twice.
5. Press the POWER key to select the desired function. The animated IR
Indicator will blink twice.
6. Now press 4 5 to enter the amount of minutes after which the <Desired
function> needs to be activated (e.g. for 5 min. press 05, max. up to 60).
7. Press ENTER. The animated IR Indicator will blink twice and the KAMELEON
5– Timer function will be activated.
- Invalid key presses during the programming of KAMELEON 5 - Timer will
be ignored.
- The <Desired function> can be any key except for Device keys, SCROLL,
ESC, ENTER and MAGIC.
- While the KAMELEON 5 – Timer is running, the IR animation will light
every 15 seconds.
- The KAMELEON 5 –Timer function is cancelled by setting up a new
KAMELEON 5 – Timer function.
- If no key is pressed while setting up a KAMELEON 5 – Timer function,
the remote will return to user mode after 30 seconds.
- The SCROLL key can be accessed any time during programming if
applicable in the current device mode.
WW W.ONEFORALL.COM 21
Page 23

Extra Features
Macros (sequence of commands)
Macros (direct)
You can program your KAMELEON 5 to issue a sequence of commands at the
press of one button. For example, you may want to turn off your TV, DVD and
Satellite at the same time. Any sequence of commands you regularly use can be
reduced to one key stroke for your convenience. A key that is programmed with
a Macro works through all modes (provided it’s accessible in that mode).
You can install a Macro on any key (provided it’s accessible in that mode), except
for the device keys (TV, DVD, SAT, AUD and LIGHT), MAGIC, ESC, ENTER and the
SCROLL key.
Example: To set up a Macro that switches off your TV, DVD player and SAT on
the “red” key on your KAMELEON 5:
1. Press and hold the MAGIC key for about 3 seconds. The screen will
change to the setup screen.
2. Press MACRO.
3. Press the device key (e.g. TV) to display all keys of the mode.
4. Then press the key to which the Macro will be assigned, in this case
the “red” key.
5. Next press TV, POWER, DVD, POWER, SAT, POWER.
6. To store the Macro, press ENTER. The screen will return to the setup screen.
Result: Whenever you press the “red” key, the KAMELEON 5 will turn off your
TV, DVD player and Satellite receiver.
- Each MACRO can consist of a maximum of 22 keystrokes.
- To include a function from a particular screen in a mode,
use the SCROLL key.
- Make sure that you program a Macro on a spare key that you don’t use in
any mode.
- Once you program a Macro on a specific key, the sequence will work
regardless of the mode (TV, DVD, SAT, AUD or LIGHT) you are using (if the
label is the same as the label on which the Macro was
programmed). This means that the function picked on that specific key
will be sacrificed.
- To avoid accidental recordings with the KAMELEON 5, you must press the
RECORD key twice to begin recording. Please note that if you assign a
Macro or Shifted Macro to the RECORD key, this will deactivate the double
key press. Therefore we recommend not to assign a Macro to this key.
- If you had to hold down a key for a few seconds on the original remote
control to get a function, this function may not work in a macro on your
KAMELEON 5 remote.
- Keys such as (TV) menu, (TV) guide etc. will not change screen when pressed
during Macro programming.
- Upon changing the batteries your Macro(s) will be retained.
- If you program a Macro on a key, the original function will become shifted
(excluding POWER, CH+/- and VOL+/- keys). Press MAGIC then the key to
access it. If you place a Macro on a digit key, access the original function by
pressing MAGIC twice and then the digit key.
- You can replace a Macro by placing another Macro on top.
22 WW W.ONEFORALL.COM
Page 24
Extra Features
Shifted Macros
It is also possible to place a shifted Macro on a key to maintain
the original function. The MAGIC key can be used as “SHIFT-function”.
Example: To set up a Shifted Macro that switches off your TV, DVD and SAT
on the “RED” key on your KAMELEON 5: (so that you will keep the original
function on the “RED” key).
MAGIC* MACRO TV MAGIC “Red” ENTER
Now every time you press ”MAGIC”, then the ”red” key, the KAMELEON 5 will
turn off your TV, DVD player and Satellite.
- If a Shifted Macro is placed on the POWER, CH+/- or VOL+/- keys, the
Sleeptimer and Colour/Brightness features will be sacrificed.
TV, POWER,
DVD, POWER,
SAT, POWER
To erase a (direct) Macro from a key
Example: To erase the Macro from the “red” key, press:
MAGIC* MACRO TV “red” ENTER
To erase a (shifted) Macro
Example: To erase the Shifted Macro from the ”red” key press:
MAGIC* MACRO TV MAGIC ”red” ENTER
To erase all Macros in all modes
MAGIC* MACRO ENTER
(*) Press and hold the MAGIC key for about 3 seconds.
The screen will change to the setup screen.
WW W.ONEFORALL.COM 23
Page 25

Extra Features
Code Upgrade Technology
Your KAMELEON 5 contains a unique feature, which allows new codes to
be added simply by holding it to your telephone. In a matter of seconds,
our magnetic coupling technology quickly and reliably transfers information
to the KAMELEON 5 without complex plugs, adapters or attachments.
This means, as you buy new products in the future, the KAMELEON 5 will never
become obsolete.
Internet download
(Upgrade your KAMELEON 5 remote…via your PC)
1. Visit our website “www.oneforall.com”.
2. Select your region.
3. Select “Product support”.
4. Select “Universal Remote
Controls”.
5. Select the ONE FOR ALL remote
you want to upgrade:
KAMELEON 5 (URC-8305).
6. Select ‘Internet Download’.
Now you have entered our special Online Download section. From this
point just follow the instructions on the screen for easy upgrade of your
remote.
Phone upgrade
(Upgrade your KAMELEON 5 remote…via your phone)
Alternatively ring our consumer help-line and one of our customer service
representatives will assist you through the entire process of upgrading your
KAMELEON 5. To ensure the process goes smoothly, here are a few steps to
follow:
1. Write down the brand name(s) and model number(s) of your device(s)
in the space provided on the Consumer Service page before you call.
2. Ring our consumer help-line and explain which device(s) you would like
added to your KAMELEON 5.
3. After our customer service agent records the brand name(s) and model
number(s) of your device(s), he/she will lead you through the set up
procedure and then will ask you to hold the KAMELEON 5 to the speaker
portion of your telephone (see diagram below). In doing this, the information needed for your device is transferred through the telephone into your
KAMELEON 5 in a matter of seconds.
Please note, cordless telephones, speaker telephones and mobile
telephones are not recommended.
4. After your KAMELEON 5 has
been upgraded by telephone,
stay on the line. Our customer
service agent will ensure that your
KAMELEON 5 is working properly
with your device(s) and will answer
any other questions you may have.
24 WW W.ONEFORALL.COM
Page 26

Extra Features
Colour & Brightness
Depending on the functions of your original remote control, the KAMELEON 5
can operate the colour and brightness settings of your Television.
To adjust the colour:
Press the MAGIC key followed by Volume + (for colour +) or
Volume - (for colour -).
To adjust the brightness:
Press the MAGIC key followed by Channel + (for brightness +) or
Channel - (for brightness -).
Depending on how you used colour and brightness on the original remote, you
may need to access colour and brightness in a different way (through menu for
example).
Trouble-Shooting
Problem & Solution
Problem:
Your brand is not listed in the
code section?
The KAMELEON 5 does not
operate your device(s)?
The KAMELEON 5 is not
performing commands
properly?
Problems changing channels?
The recording key on the
KAMELEON 5 does not work?
The KAMELEON 5 does not
respond after pressing a key?
Your original remote had a
“20” key?
Upon each key press, the IR
indicator will blink 5 times?
You are not able to enter
programming mode?
Solution:
Try the search method on page 13.
A) Try all the codes listed for your brand.
B) Try the search method on page 13.
You may be using the wrong code. Try
repeating the Direct Set-Up using another
code listed under your brand or start the
search method over again to locate the
proper code.
Enter the program number exactly as you
would on your original remote.
As a safety feature on your KAMELEON 5,
you must press the Record key twice.
Make sure you are using new batteries and
are aiming the KAMELEON 5 at your
device.
You can find this function on the AV key.
Replace batteries with 4 fresh, new
“AA/LR6” alkaline batteries.
Replace batteries with 4 fresh, new
“AA/LR6” alkaline batteries.
WW W.ONEFORALL.COM 25
Page 27

Trouble-Shooting
Customer Service
If you still have questions about the operation of your ONE FOR ALL KAMELEON
8 universal remote and could not find the answer(s) in the Trouble-Shooting
section (page 25), you may want to contact the customer service department for
assistance.
You may care to visit our Internet-site: www.oneforall.com
Our internet-site has many advantages:
- 24 hours access
- no waiting time
- page for Frequently Asked Questions
- info about the ONE FOR ALL product range
Before contacting us, by Fax, E-mail or Phone, make sure you have the
required information available by filling in the table below.
What do we need to know before you contact us:
1 That you have the ONE FOR ALL KAMELEON 5 URC-8305 (*)
universal remote.
2 The date of purchase (.........../.........../...........).
3 A list of your equipment/models: (see example below).
Device Brand Device Remote SET-UP
TV Sony KV-25C5D RM-883 1505 (example)
model nr. model nr. code
Type/model numbers can often be found in your equipment
owner’s manual or on the factory plate behind the device.
4. Then Fax, E-mail or Dial us:
In the UK
E-mail : ofahelp@uebv.com (***)
Fax : +31 53 432 9816
Tel. : 0901-5510010 (£ 0,50 per minute) (*) (**)
In Ireland In Australia
E-mail : ofahelp@uebv.com (***) E-mail : ofahelp@uebv.com (***)
Fax : +31 53 432 9816 Fax : 03 9672 2479
Tel. : 016015986 (*) (**) Tel. : 1 300 888 298
In South Africa In New Zealand
E-mail : support@oneforall.co.za E-mail : ofahelp@uebv.com (***)
Fax : 011 298 2302 Fax : (06) 878 2760
Tel. : 0860 100551 Tel. : 0508 ONE 4 ALL (663 4 255)
Tel. : 011 298 2300
(*) When you call us you will be asked to enter a URC-number.
The URC-number of your KAMELEON 5 is 8305.
(**) When calling with a mobile phone:
- You may be charged extra when calling us from; the UK or
France.
- You may not be able to contact us when calling from; Belgium,
the Netherlands, Luxemburg, Greece, Portugal, Switzerland,
Italy, Ireland or Austria.
(***) Just send a blank message, you’ll get a form to be filled out as
auto-reply.
26 WW W.ONEFORALL.COM
Page 28

INDHOLDSFORTEGNELSE
Dansk
OM DIN KAMELEON 5 . . . . . . . . . . . . . . . . . . . . . . . . . . . . . . . . . . . . . . . . . . . . . . . . . . . . 28
BATTERIER
TASTATURET
•
. . . . . . . . . . . . . . . . . . . . . . . . . . . . . . . . . . . . . . . . . . . . . . . . . . . . . . . . . . . . . . . . 29
. . . . . . . . . . . . . . . . . . . . . . . . . . . . . . . . . . . . . . . . . . . . . . . . . . . . . . . . . . 30 - 37
PROGRAMMERING AF KAMELEON 5 . . . . . . Seite 38
(Hvordan du programmerer KAMELEON 5 til at styre dine apparater)
• Søgemetode
. . . . . . . . . . . . . . . . . . . . . . . . . . . . . . . . . . . . . . . . . . . . . . . . . . . . 39
INSTALLATIONSKODER
TV : TV / LCD / Plasma / Projektor / Bagprojektions-TV
VCR : Videooptager / Kombineret TV og videooptager
. . . . . . . . . . . . .
. . . . . . . . . . . . .
261
272
SAT : Satelllitmodtager / Set-Top-boks / DVB-S / DVB-T /
Satellitmodtager med harddisk
CBL : Kabeldekodere / Set-Top-boks / DVB-C
VAC : Videotilbehør som Media Centre ol.
AMP : Forstærkere
. . . . . . . . . . . . . . . . . . . . . . . . . . . . . . . . . . . . . . . . . .
TUN : Tunere / Receivere / Home Cinema udstyr
CAS : Kassetteafspillere
LDP : Laser Disc afspillere
. . . . . . . . . . . . . . . . . . . . . . . . . . . . . . . . . . . . .
. . . . . . . . . . . . . . . . . . . . . . . . . . . . . . . . . . . .
DAT : Digital Audio Tape (DAT) afspillere
. . . . . . . . . . . . . . . . . . . . . . . . . . .
. . . . . . . . . . . . . . . . . . . . .
. . . . . . . . . . . . . . . . . . . . . . .
. . . . . . . . . . . . . . . . . . .
. . . . . . . . . . . . . . . . . . . . . . . .
275
280
281
281
281
283
283
283
DVD : DVD afspillere / DVD Home Cinema / DVD med harddisk /
kombinerede DVD og videomaskiner
. . . . . . . . . . . . . . . . . . . . . .
283
KODEBLINK METODEN . . . . . . . . . . . . . . . . . . . . . . . . . . . . . . . . . . . . . . . . . . . . . . . . . . . 40
(For at finde den kode der aktuelt er programmeret)
HURTIG KODE REFERENCE
LÆREFUNKTION
. . . . . . . . . . . . . . . . . . . . . . . . . . . . . . . . . . . . . . . . . . . . . . . . . . . . . . . . . . 41
. . . . . . . . . . . . . . . . . . . . . . . . . . . . . . . . . . . . . . . . . . . . . . . 40
(Hvordan man kopierer funktioner fra den originale fungerende
fjernbetjening til KAMELEON 5)
OPERATIONEL NULSTILLING
. . . . . . . . . . . . . . . . . . . . . . . . . . . . . . . . . . . . . . . . . . . . . 43
EKSTRA FUNKTIONER
• Key Magic (Programmering af manglende funktioner)
. . . . . . . . . . . . . 44
• Ændring af funktion (Hvordan man installerer to ens apparater
på KAMELEON 5)
• Volume "Punch-Through" funktion
• Apparat Sleeptimer
• KAMELEON 5 TIMER
• Macroer (serie af kommandoer)
• Kode opgraderingsteknologi
• Farve og lysstyrke
. . . . . . . . . . . . . . . . . . . . . . . . . . . . . . . . . . . . . . . . . . . . . . . . . 45
. . . . . . . . . . . . . . . . . . . . . . . . . . . . . . . . 46
. . . . . . . . . . . . . . . . . . . . . . . . . . . . . . . . . . . . . . . . . . . . . . . 47
. . . . . . . . . . . . . . . . . . . . . . . . . . . . . . . . . . . . . . . . . . . . . . 47
. . . . . . . . . . . . . . . . . . . . . . . . . . . . . . . . . . . 48
. . . . . . . . . . . . . . . . . . . . . . . . . . . . . . . . . . . . . . 50
. . . . . . . . . . . . . . . . . . . . . . . . . . . . . . . . . . . . . . . . . . . . . . . . . 51
PROBLEMLØSNING
• Problem & løsning
• Kundeservice
. . . . . . . . . . . . . . . . . . . . . . . . . . . . . . . . . . . . . . . . . . . . . . . . 51
. . . . . . . . . . . . . . . . . . . . . . . . . . . . . . . . . . . . . . . . . . . . . . . . . . . . . 52
Anvend OneForAll Web-guiden til at programmere din fjernbetjening via
Internettet. Guiden viser hvordan du installerer forskelligt udstyr uden at
læse hele manualen. Du finder dette nemme opsætningsværktøj på
www.oneforallwebwizard.com.
WW W.ONEFORALL.COM 27
Page 29

Om din KAMELEON 5
Unikt "EL" display for nem betjening
Ved at vælge ONE FOR ALL KAMELEON 5 universal fjernbetjening har du også
valgt nem betjening. Din KAMELEON 5 har et unikt, brugervenligt selvlysende
display der sikrer at du har adgang til alle de knapper du har brug for, mens de
knapper der ikke skal bruges, skjules. Den høje kvalitet sikrer en lang levetid.
Når batterierne isættes vil KAMELEON 5 være i "demo-mode" og vise forskellige
tastaturopsætninger. Annuller "demo-mode" ved at programmere fjernbetjeningen (tryk på og hold MAGIC i ca. 3 sekunder og tryk derefter på ESC).
Efter udskiftning af batterierne lyser displayet først op når en tast aktiveres.
Derefter vil displayet automatisk lyse op når fjernbetjeningen tages op (ved
berøring af skærm og fjernbetjening samtidig). Det er muligt at ændre
aktiveringsmetoden til aktivering ved tastetryk. For at opsætte "EL" displayet til
aktivering ved tastetryk, se side 32 afsnit: "EL" skærm aktiveringsindstilling.
Kontroller op til 5 apparater
Din KAMELEON 5 er designet så du kan bruge én fjernbetjening til at styre alt
dit video og audio udstyr og alt andet udstyr som styres af infrarøde signaler.
Din KAMELEON 5 leveres med 2 IR (infrarøde) sendere med lang rækkevidde og
kan håndtere frekvenser op til 450 kHz. Du kan vælge enhver kombination af op
til 5 apparater som du vil styre.
TV TV / LCD / Plasma / Projektor / Bagprojektions-TV
DVD DVD afspillere / DVD Home Cinema / DVD med harddisk / kombinerede
DVD og videomaskiner / Laser Disc afspiller
SAT Satelllitmodtager / Set-Top-boks / Kabel dekoder / Video tilbehør
(f.eks. Media Center) / Personlig Videooptager / Harddiskoptager.
AUD Audio / Audio receiver/tuner/forstærker / (DVD) Hjemmebiograf
LIGHT IR kontrollerede lyskontakter - KAMELEON 5 har også en "LIGHT"
funktion til styring af strømmoduler der anvendes af Light Control TM
dedikerede adresserbare 433,92 protokol. Denne funktion sender
infrarøde kommandoer til modtageren i "ONE FOR ALL Light Control
TM Starters Kit - HC-8300" der sælges separat. Modtageren konverterer
det infrarøde signal til radiofrekvens (RF) der kan modtages af
strømmodulerne til tænd/sluk og dæmpning af lyset.
For at kunne anvende Light Control TM med diin KAMELEON 5
må du anskaffe "ONE FOR ALL Light Control TM Starters Kit HC-8300".
28 WW W.ONEFORALL.COM
Page 30

Om din KAMELEON 5
Indlæringsfunktion
KAMELEON 5 er udstyret med en unik "indlæringsfunktion" som betyder at du
kan kopiere en næsten hvilken som helst funktion (maks. 50) fra din originale
(operative) fjernbetjening til din nye KAMELEON 5 (Se indlæringsfunktioner på
side 41). Det er praktisk hvis du, efter at have programmeret din KAMELEON 5,
fortsat savner nogle funktionstaster som findes på din originale fjernbetjening.
Macro (sekvens af kommandoer)
Din KAMELEON 5 er udstyret med en letanvendelig Macro funktion, som giver
dig mulighed for at udføre en række kommandoer ved et tryk på én enkelt
knap (f.eks. tænde eller slukke nogle få apparater). Du kan bruge specifikke
taster (I, II, III, IV) til denne funktion. Når du har programmeret en macro på en
af disse taster, vil sekvensen blive udført ved alle indstillinger.
Kode opgraderingsteknologi.
Din ONE FOR ALL KAMELEON 5 tilbyder også en kode opgraderingsteknologi.
Denne teknologi giver dig mulighed for at tilføre fjernbetjeningen nye koder.
Hvis dit apparat styres af en speciel kode, som ikke findes i hukommelsen til
KAMELEON 5 (ved brug af "Direkte installation med kode" på side 38 eller
"Søgemetoden" på side 39) Takket være denne teknologi vil din KAMELEON 5
aldrig blive forældet.
Batterier
Bemærk: når batterierne isættes vil KAMELEON 5 være i "demo-mode"
(viser forskellige tastatur opsætninger). KAMELEON 5 vil automatisk gå
ud af demo-mode når den programmeres.
Din KAMELEON 5 bruger 2 stk. AA/LR6 alkaline batterier.
1. Åben batteridækslet ved hjælp af en mønt.
2. Isæt batterierne med plus-enden vendende opad.
3. Sæt batteridækslet på igen.
Batteriindikator
Når batterierne løber tør for strøm vil KAMELEON 5 indikere dette.
IR indikatoren vil blinke 5 gange når du trykker på en tast og du kan ikke
få adgang til programmeringsfunktionen.
Udskift venligst batterierne med 2 nye AA/LR6 alkaline batterier.
WW W.ONEFORALL.COM 29
Page 31

Tastaturet
Dette produkt har et "EL" selvlysende display (Electro Luminescense technology)
som aktiveres ved at berøre display og fjernbetjening samtidig eller ved et
tastetryk. For at spare på batterierne vil "EL" displayet slukke efter 8 sekunder
ved normal brug.
En af nøglefunktionerne på KAMELEON 5 er "EL" displayet som tilpasser sig det
apparat du skal styre. Oversigten på side 32 viser alle de mulige funktioner du
kan bruge.
"EL" displayets aktiveringsindstilling
KAMELEON 5 indeholder et "EL" display som aktiveres ved berøring af display og
fjernbetjening samtidig eller ved tryk på en tast.
Det er muligt at låse KAMELEON 5 til en bestemt aktiveringsindstilling:
1. Tryk på og hold MAGIC-tasten nede i ca. 3 sekunder.
2. Tryk på OTHER.
Displayet vil skifte til "setup" indstilling.
3. Tryk nu på 9 8 9. IR indikatoren vil blinke to gange (eller 4
-> Hvis IR indikatoren blinker to gange vil "EL" displayet kun blive aktiveret
ved at berøre displayet og fjernbetjeningen samtidig.
-> Hvis IR indikatoren blinker fire gange vil "EL" displayet kun blive aktiveret
ved tastetryk.
Udfør disse trin for at låse KAMELEON 5 til den aktiveringsindstilling
du foretrækker.
gange).
"EL" displayets lysstyrkejustering
Gør følgende for at justere lysstyrken i KAMELEON 5 displayet:
1. Tryk på og hold MAGIC-tasten nede i ca. 3 sekunder.
2. Tryk på BRIGHT.
3. > Tryk på og hold NEXT-tasten nede for at øge lysstyrken.
4. Tryk på ENTER-tasten for at gemme lysstyrkeindstillingen og
- Ved at øge lysstyrken på KAMELEON 5 displayet kan batteriernes levetid blive
nedsat. Batterilevetiden varierer fra 3-12 måneder (afhængig af brug og
indstilling af lysstyrke).
Displayet vil skifte til "setup" indstilling.
> Tryk på og hold PREVIOUS-tasten nede for at dæmpe
lysstyrken.
returnere til "setup" indstillingen ELLER tryk på ESC-tasten
for at vende tilbage til den tidligere indstillede lysstyrke.
30 WW W.ONEFORALL.COM
Page 32

Tastaturet
"EL" tidsstyret indstilling
Sådan ændres den tid (standard 8 sekunder) hvor KAMELEON 5 displayet vil være
tændt efter hvert tastetryk ved brug af fjernbetjeningen (ikke ved programmering):
1. Tryk på og hold MAGIC-tasten nede i ca. 3 sekunder.
2. Tryk på OTHER.
3. Tryk 9 7 8. IR indikatoren vil blinke to gange.
4. Tryk på 1, 2, 3, 4, eller 5 (1 = 4 sekunder) afhængig af
Vælg "EL" tidsindstilling
1 4 sekunder
2 8 sekunder (standard)
3 12 sekunder
4 16 sekunder
5 20 sekunder
Displayet vil skifte til "setup" indstilling.
dit valg, se skema nedenfor. IR indikatoren vil blinke to
gange. Tryk på ENTER for at gemme den nye "EL"
tidsindstilling og returnere til "setup" indstilling ELLER
tryk på ESC for at vende tilbage til den tidligere
indstillede "EL" tidsindstilling.
WW W.ONEFORALL.COM 31
Page 33

Tastaturet
IR Indicator
TV
DVD
SAT
AUD
LIGHT
32 WW W.ONEFORALL.COM
Page 34

Tastaturet
1. IR (infra-rød) indikator
2. Apparat taster
Tasterne TV, DVD, SAT, AUD og LIGHT bruges for at vælge hvilket apparat
du vil styre. Hvis du f.eks. trykker på TV tasten kan fjernbetjeningen styre
funktionerne på dit TV, trykker du på VCR kan du betjene din videomaskine,
trykker du på SAT kan du betjene din satellitmodtager eller kabeldekoder
etc. (se side 28 for flere oplysninger). Efter at du har trykket på en apparattast på din KAMELEON 5 vil en animation vise den aktuelle indstilling du har
valgt. Trykker du på apparattasten igen vil du komme tilbage til hovedmenuen (TV, SAT og AUD indstilling). KAMELEON 5 indeholder også en
"LIGHT" funktion. Ved brug sammen med "ONE FOR ALL Light Control TM
Starters Kit - HC-8300" der sælges separat, kan du tænde/slukke og dæmpe
lyset i hele huset.
3. MAGIC (i "shifted" eller "programmerings"
Den infrarøde indikator lyser når IR signaler bliver "sendt"
eller "modtaget". KAMELEON 5 IR indikatoren vil vise
"udgående IR" når en funktionstast bliver benyttet. Ved
brug af "Lærefunktionen" eller "Kodeopgraderings proceduren" vil IR indikatoren vise "indkommende IR".
Indkommende IR vil blive vist ved en "indvendig til
udvendig" animation på IR indikatoren. IR indikatoren vil
give tilbagemelding når der trykkes på en tast, både ved
almindelig brug og ved programmering (den midterste del
af IR indikatoren vil blinke).
indstilling)
MAGIC-teasten bruges til at programmere din KAMELEON
5 og for at få adgang til specielle funktioner. Ved et kort
tryk på tasten vil displayet vise "shifted mode" (i 10
sekunder) hvilket vil give adgang nogle sekundære funktioner som farve, lysstyrke og "sleeptimer".
Programmerings indstilling
Hvis du trykker på MAGIC tasten i længere tid (ca. 3
sekunder) vil KAMELEON 5 gå i "programmerings
indstilling. Displayet vil skifte til "setup" indstilling.
DEV SET
SEARCH
MODE
KEY MAGIC
MACRO
BRIGHT
LEARN
IR DELETE
VOLUME
OTHER
WW W.ONEFORALL.COM 33
• Apparat "setup" indstilling
• Søgemetode
• Omprogrammering af standardindstilling
• For programmering af manglende funktioner
• For programmering af en sekvens af kommandoer
på en tast
• "EL" display lysstyrkejustering
• For kopiering af funktioner fra din originale
(fungerende) fjernbetjening til KAMELEON 5
• For sletning af indlærte kommandoer
• Volume "punch through" dobbelt funktion
• Variabel "EL" On time (4, 8, 12, 16, 20 sek.)
• Operationel nulstilling
• KAMELEON 5 timer
• "EL" display aktiveringsindstilling
• Kodebekræftelse
• Modem opgradering
Page 35

Tastaturet
4. SCROLL
5. ENTER
6. POWER (i "shifted" funktion; Sleeptimer)
7. TV/VCR / TV/SAT / TV/DVD
8. 16:9 / PVR / SP/LP
SCROLL-tasten giver dig mulighed for at skifte mellem de
forskellige displays (hvis til rådighed) ved en bestemt
indstilling i normal funktion eller programmeringsfunktion. Dette fungerer kun ved valg af TV, SAT og AUD.
ENTER-tasten anvendes til at bekræfte dit valg i
programmeringsfunktion.
POWER-tasten styrer de samme funktioner som på din
originale fjernbetjening.
I DVD indstilling vil du få adgang til TV/VCR funktioner
(praktisk hvis du har programmeret en VCR kode). I SAT
indstilling vil du få adgang til TV/SAT funktioner. I DVD
indstilling vil du få adgang til TV/DVD funktioner.
I TV indstilling vil du få 16:9 funktion (skærmformat). I SAT
indstilling vil denne tast aktivere PVR (Personlig
Videooptager) funktioner. I DVD indstilling kan du vælge
SP/LP (båndhastighed) - praktisk hvis du har programmeret
en VCR kode.
9. DSP / GUIDE
10. MENÜ
I AUD indstilling vil du få "DSP" funktion hvis det er
tilgængeligt på din originale fjernbetjening. I TV og DVD
indstilling vil du få "guide" funktion hvis det er tilgængeligt på din originale fjernbetjening. I TV indstilling vil
"GUIDE" tasten skifte til "menu skærmbilledet".
Ved tryk på denne tast vælges "Menu" og i TV og AUD
indstilling skiftes også til enu skærmbilledet. MENU tasten
styrer de samme funktioner som på den originale
fjernbetjening.
34 WW W.ONEFORALL.COM
Page 36

Tastaturet
11. EXIT
12. MUTE (Stumtaste)
13. CH +/- (i "shifted mode": lysstyrke +/-)
14. Pile-taster (op, ned, venstre, højre)
EXIT-tasten styrer de samme funktioner som din originale
fjernbetjening. For at vende tilbage til hovedmenuen (TV,
SAT og AUD indstilling) skal du trykke på apparattasten
eller bruge SCROLL-tasten
MUTE-tasten vil styre de samme funktioner som på din
originale fjernbetjening.
Disse taster fungerer på samme måde som på din originale
fjernbetjening. I "shifted" TV indstilling (du får adgang
ved trykke kortvarigt på MAGIC-tasten) kan disse taster
give dig lysstyrke +/- funktion.
Hvis disse taster er til rådighed på din originale fjernbetjening, vil de give dig mulighed for at navigere gennem
menuerne. På nogle TV-apparater skal du måske trykke på
CH+/- og VOL+/- tasterne ELLER farvetasterne (rød, grøn, gul,
blå) for at navigere gennem menuen, afhængig af din
TV-model. I AUD hovedmenu vil disse taster (hvis de er til
rådighed på din originale fjernbetjening) give dig mulighed
for at justere niveauet på dine center og baghøjttaler(e). I
AUD menu-funktion vil disse taster (hvis de er til rådighed
på din originale fjernbetjening) give dig mulighed for at
navigere i menuen.
15. OK / SURROUND
WW W.ONEFORALL.COM 35
Bekræfter dit valg i menufunktionen. På visse apparater
kan du bekræfte dit valg blot ved at trykke på MENU. I
AUD indstilling vil du få adgang til surround funktioner
(hvis de er tilgængelige på din originale fjernbetjening).
Page 37

Tastaturet
16. VOL +/- (i "shifted mode": farve +/-)
17. Ciffertaster / INPUT (i prog. indstilling: "setup"
18. -/-- / PPV
19. AV / HELP
Volume tasterne fungerer på samme måde som på din
originale fjernbetjening. I "shifted" TV indstilling (adgang
ved at trykke kortvarigt på MAGIC-tasten) vil disse taster
måske give dig farve +/- funktion.
egenskaber)
Ciffertasterne (1-9, 0) har samme funktioner som på din
originale fjernbetjening. I AUD indstilling vil ciffertasterne
(1-9, 0, -/--) måske give valg af INPUT (TUNER, CD etc.) (hvis
funktionen er til rådighed på din originale fjernbetjening).
Hvis din originale fjernbetjening har en "function select"
(funktionsvælger) eller "input select" funktion kan du
måske finde denne funktion under AV-tasten. I
programmeringsfunktion vil ciffertasterne vise de forskellige "setup" funktioner.
Hvis din originale fjernbetjening bruger en/to cifrede skiftende indtastninger (-/--) kan denne funktion opnås ved at
trykke på -/-- tasten. I SAT (menu display) og PVR indstilling
vil du få PPV funktion.
AV-tasten fungerer på samme måde som på din originale
fjernbetjening. Hvis din originale TV eller Video fjernbetjening har en 20-tast kan denne funktion findes ved at
trykke på AV-tasten. Hvis din originale satellit eller PVR
fjernbetjening har en "help" funktion kan denne findes
ved at trykke på HELP-tasten. I AUD indstilling vil du få
adgang til "input source".
20. ESC
21. Transport taster (PLAY, STOP etc.)
Denne tast vises kun ved programmering og anvendes for
at returnere til Setup display eller for at forlade programmeringsfunktionen.
Disse taster styrer transportfunktionerne (PLAY, FF, REW,
SKIP+/- etc.) på dit udstyr. For at undgå utilsigtet optagelse,
skal du trykke to gange på RECORD tasten for at starte en
optagelse.
36 WW W.ONEFORALL.COM
Page 38

Tastaturet
22. Teletext taster
EXPAND: Viser den øverste halvdel af teletekst siden med stor skrift.
Tryk igen for at se den nederste halvdel af siden med stor skrift. For
at vende tilbage til alm. størrelse, tryk på EXPAND igen eller tryk på
"TEXT ON" tasten afhængig af dit TV.
TEXT ON: I TV indstilling: Når du står i TEXT indstilling og trykker på
TEXT ON skifter billedet måske til "MIX" eller "TURN OFF" tekst
afhængig af dit TV. Denne funktion er også til rådighed i SAT
indstilling.
HOLD/STOP: Stopper sideskift.
MIX: Viser både tekst-TV og billede.
TEXT OFF: I TV indstilling: skifter tilbage til alm. TV billede. På visse
TV gøres dette ved at trykke på "TEXT ON" tasten flere gange.
Denne funktion er også til rådighed i SAT indstilling.
TEXT INDEX: Denne tast giver dig adgang til til indexfunktionen i
tekst-TV.
23. Rød / Grøn / Gul / Blå
Disse taster bruges til at betjene de vigtigste tekst-TV
funktioner. Dit TV skal have tekst-TV indbygget for at det
kan fungere. Se brugsanvisningen til dit TV for mere
detaljerede oplysninger om tekst-TV. Husk at tekst-TV og
hurtigtekst betjenes forskelligt på forskellige TV-modeller.
Det er måske ikke alle tekst-TV funktioner der er til
rådighed på dit TV.
Når du har aktiveret tekst-TV kan du med de farvede taster
rød, grøn, gul og blå, styre hurtigtekstfunktionerne på dit
TV. Hvis du, på din originale fjernbetjening, kan bruge
disse taster til at navigere i Menuen, kan du også gøre
dette med din KAMELEON 5.
WW W.ONEFORALL.COM 37
Page 39

Programmering af KAMELEON 5
(Hvordan du programmerer KAMELEON 5 til at styre dine apparater)
Bemærk: når batterierne isættes vil KAMELEON 5 være i "demo-mode"
1. Vær sikker på at dit TV er tændt (ikke i stand-by).
2. Find koden til dit apparat i kodelisten (side 261 - 288). Koderne er lis-
3. Tryk på og hold MAGIC-tasten nede i ca. 3 sekunder.
4. Tryk på DEV SET tasten.
5. Tryk kortvarigt på TV tasten for at vælge den apparattype du
6. Indtast den første firecifrede kode (se kodelisten side
7. Nu skal du rette din KAMELEON 5 mod dit TV og prøve
(viser forskellige displays). Følg blot de næste anvisninger og
KAMELEON 5 vil automatisk gå ud af "demo-mode".
Eksempel: Programmering af KAMELEON 5 til dit TV-apparat:
tet alfabetisk efter fabrikat og modelnummer. De mest brugte koder
koder for hvert fabrikat er listet først. Hvis dit fabrikat ikke er listet overhovedet i kodeafsnittet, så prøv søgemetoden på side 39.
Displayet vil skifte til "Setup" indstilling..
vil programmere.
_ _ _ _
261 - 288) ved hjælp af ciffertasterne. IR indikatoren vil
blinke to gange.
de følgende taster for at teste om KAMELEON 5 vil fungere med dit apparat;
• CHANNEL +, CHANNEL -
• VOLUME +, VOLUME -
• MUTE
• POWER.
• MENU.
8. Hvis dit apparat reagerer, tryk på ENTER for at gemme koden.
9. Tryk på og hold ESC-tasten nede i ca. 3 sekunder for at vende
- De fleste TV-apparater tænder ikke ved brug af POWER-tasten, prøv
venligst at trykke på en "CHANNEL+" tast for at tænde dit TV igen.
- Nogle koder er næsten ens. Hvis dit apparat ikke reagerer eller ikke
fungerer korrekt med en af koderne, så prøv en anden kode listet under
dit fabrikat.
- For at programmere andre apparater skal du følge samme fremgangsmåde
som beskrevet ovenfor, men vælge den aktuelle apparattast for det
pågældende apparat under punkt 5.
- Husk at trykke på den korrekte apparattast før du betjener dit apparat
Kun én apparattype kan lægges ind på en apparattast.
For at programmere et nr. 2 - TV, SAT, AUD eller DVD (se side 45).
Hvis dit apparat ikke reagerer, skal du vælge den næste kode i
listen under dit fabrikat. Hvis ingen af koderne listet under dit
fabrikat kan styre apparatet, så prøv søgemetoden beskrevet
på side 39.
tilbage til brugerindstilling (alle taster er vist), ELLER tryk på
en apparattast for at vælge det næste apparat som du vil
programmere.
38 WW W.ONEFORALL.COM
Page 40

Progammering af KAMELEON 5
Søgemetoden
--> Hvis dit apparat ikke reagerer på KAMELEON 5 efter at du har prøvet alle
koder listet under dit fabrikat.
--> Hvis dit apparat ikke er listet overhovedet.
Søgemetoden giver dig mulighed for at scanne igennem alle koderne som
findes i hukommelsen på KAMELEON 5.
Eksempel: Søge efter din TV kode:
1. Tænd for dit TV (ikke på stand-by).
2. Tryk på og hold MAGIC-tasten nede i ca. 3 sekunder.
3. Tryk på SEARCH.
4. Tryk kortvarigt på TV tasten for at vælge den apparattype
5. Tryk derefter på POWER.
6. Ret KAMELEON 5 mod dit TV-apparat. Tryk nu på
7. Når dit TV slukker, skal du trykke på ENTER-tasten
8. Tryk på ESC for at vende tilbage til "setup" displayet eller
9. Tryk på ESC igen for at vende tilbage til brugerindstilling
Displayet skifter til "Setup" indstilling.
som du vil programmere.
NEXT gentagne gange, indtil dit TV slukker (hver
gang du trykker på NEXT-tasten vil KAMELEON 5
sende et POWER signal fra den næste kode indeholdt
i hukommelsen). Det kan være nødvendigt at trykke
på NEXT mange gange (op til 150 gange) så du må
være tålmodig. Husk at holde KAMELEON 5 rettet
mod dit TV mens du trykker på tasten. (Hvis du
trykker forbi en kode, kan du gå tilbage til forrige
kode(r) ved at trykke på PREVIOUS-tasten).
for at gemme koden. IR indikatoren vil blinke to
gange.
tryk på en apparattast hvis du ønsker at anvende
Søgemetoden for et andet apparat.
(alle taster vises).
Tænd for dit apparat (TV) igen og prøv alle
fjernbetjeningens funktioner for at sikre, at de fungerer
korrekt. Hvis du ikke kan styre dit TV korrekt, så fortsæt
venligst med Søgemetoden, du bruger måske den
forkerte kode.
- Under trin 5, i stedet for POWER kan du også trykke på en anden tast. Det
vil så være funktionen der sendes ved det næste tryk på NEXT eller PREVIOUS i trin 6. Hvis f.eks. du under trin 5 trykker på "2" i stedet for "POWER",
vil KAMELEON 5 sende kommandoen "nummer 2" hver gang du trykker på
NEXT under trin 6 (kontroller at dit TV skifter til en anden kanal).
- For at søge efter dine andre apparater, følg samme procedure som ovenfor ,
men tryk i stedet på den aktuelle apparattast under trin 4.
- Hvis din videomaskines originale fjernbetjening ikke har en POWER tast, så
tryk på PLAY i stedet for POWER under trin 5.
- Ved LIGHT-funktion kan Søgemetoden ikke anvendes.
WW W.ONEFORALL.COM 39
Page 41

Kode blink metoden
(For at finde den kode der aktuelt er programmeret)
Hvis du har programmeret din KAMELEON 5 via Søgemetoden, kan du aflæse
koden ved hjælp af blink, for fremtidig brug. Bemærk venligst, at den
animerede IR indikator vil indikere de 4 cifre ved animerede blink.
Eksempel: Aflæsning af din TV-kode ved hjælp af blink:
1. Tryk på og hold MAGIC-tasten nede i ca. 3 sekunder.
2. Tryk på OTHER.
3. Tryk 9 9 0, den animerede IR indikator vil blinke to gange.
4. Tryk kortvarigt på TV-tasten for at vælge apparattypen som du
5. For det første ciffer i din fire-cifrede kode, tryk på 1 og tæl
6. For det andet ciffer, tryk 2 og tæl antal blink i den animerede
7. For det tredie ciffer, tryk 3 og tæl antal blink i den animerede
8. For det fjerde ciffer, tryk 4 og tæl antal blink i den animerede
9. Tryk på ENTER for at returnere til Setup displayet ELLER tryk på
10. Tryk på og hold ESC-tasten nede i ca. 3 sekunder for at vende
- Du kan udføre trin 5 - 8 i vilkårlig rækkefølge og så mange gange som du
ønsker. Så hvis du mener, at du har talt forkert, kan du få blinket det
pågældende ciffer igen (f.eks. hvis du under trin 6 ikke så nøjagtigt hvor
mange gange IR indikatoren blinkede, kan du blot trykke på "2" igen og
tælle blinkene).
- For at få blinket koden for dine øvrige apparater, skal du følge
instruktionen ovenfor, men trykke på den aktuelle apparattast under trin 4.
Displayet vil skifte til Setup display.
ønsker at aflæse koden for.
antal blink i den animerede IR indikator. Hvis indikatoren ikke
blinker er cifret 0.
IR indikator. Hvis indikatoren ikke blinker er cifret 0.
IR indikator. Hvis indikatoren ikke blinker er cifret 0.
IR indikator. Hvis indikatoren ikke blinker er cifret 0. Nu har du
aflæst din fire-cifrede kode.
en apparattast hvis du ønsker at udføre Kode blink aflæsning
for et andet apparat.
tilbage til brugerindstilling.
Hurtig Kode Reference
Notér koderne for dine apparater i rubrikkerne herunder for hurtig og
nem reference.
■■■■■■ ■
■
■■■■■■ ■
■
■■■■■■ ■■
■■■■■■ ■
■■■■■■ ■
40 WW W.ONEFORALL.COM
■
■
Page 42

Indlæringsfunktion
For kopiering (indlæring) af funktioner fra din originale, fungerende
KAMELEON 5 leveres med et komplet bibliotek af forprogrammerede koder.
Efter at du har programmeret KAMELEON 5 til dit apparat, finder du måske ud
af at der er en eller flere taster på din originale fjernbetjening som ikke findes
på KAMELEON 5 tastaturet.
KAMELEON 5 tilbyder en speciel indlæringsfunktion som gør det muligt at
kopiere næsten en hvilken som helst funktion fra din originale fjernbetjening til
KAMELEON 5.
Før du starter:
- Kontroller at din originale fjernbetjening fungerer korrekt.
- Kontroller at hverken din KAMELEON 5 eller din originale fjernbetjening
er rettet mod dit udstyr.
Indlæring (direkte)
fjernbetjening til KAMELEON 5)
Eksempel: For at kopiere "mono/stereo" funktionen fra din originale
1. Læg KAMELEON 5 og din originale fjernbetjening på et fladt under-
2. Tryk på og hold MAGIC-tasten nede i ca. 3 sekunder.
3. Tryk på LEARN.
4. Tryk på apparattasten (i eksemplet TV) på KAMELEON 5 for at
5. Tryk på tasten (i eksemplet "rød") på KAMELEON 5 hvor du
6. Tryk på og hold den tast du vil kopiere nedtrykket (i
TV fjernbetjening til "I, II, III, eller IV-tasten" på din
KAMELEON 5.
lag. Vær sikker på at enderne på fjernbetjeningerne som normalt
peger mod dit apparat, nu peger mod hinanden. Ret den originale
fjernbetjening mod fronten af KAMELEON 5 (se billedet nedenfor).
Afstanden mellem fjernbetjeningerne skal være 2-5 cm.
Displayet skifter til Setup display.
vælge den apparattype for hvilken du vil kopiere en funktion.
ønsker funktionen placeret. IR indikatoren vil vise "incoming
IR" tre gange, hvorefter displayet vil slukke.
eksemplet "mono/stereo") på din originale fjernbetjening. Displayet tænder igen og du vil se to blink der
indikerer succesfuld kopiering.
7. Hvis du ønsker at kopiere andre funktioner under samme indstilling, skal du
blot gentage trin 5 og 6 og trykke på den næste knap du vil kopiere ved
indlæring. Hvis du ønsker at kopiere en anden funktion under en anden
indstilling, skal du blot fortsætte med trin 4 efterfulgt af trin 5 og 6.
8. Tryk på ENTER for at forlade indlæringsfunktionen og vende
WW W.ONEFORALL.COM 41
tilbage til Setup displayet ELLER tryk på og hold ESC-tasten
nedtrykket for at vende tilbage til brugerindstilling.
Page 43

Indlæringsfunktion
- Så snart displayet slukker under trin 5, skal du trykke på tasten (i dette
eksempel "mono/stereo" tasten) på din originale fjernbetjening indenfor 15
sekunder. Hvis der ikke trykkes på en tast i indlæringsfunktion vil
fjernbetjenignen vende tilbage til brugerindstilling efter 30 sekunder.
- Under indlæring vil taster som (TV) menu, (TV) guide osv. ikke ændre
displayet når de aktiveres.
- Hvis du indlærer en funktion på en tast som allerede har en funktion, vil
den oprindelige KAMELEON 5 funktion automatisk ændres til en "shifted"
funktion. Tryk på MAGIC-tasten og derefter på tasten for at få adgang til
den oprindelige funktion (gælder ikke POWER, Kanal og Volume tasterne).
Hvis du har indlært en funktion på en ciffer-tast, får du adgang til den
oprindelige funktion ved at trykke to gange på MAGIC-tasten og derefter
på ciffer-tasten.
- Hvis du ønsker at indlære en funktion på en tast der ikke vises på
hoveddisplayet, kan du bruge SCROLL_tasten for at ændre displayet.
- Indlæringsfunktionen er specifik pr. indstilling, så du kan indlære en
funktion pr. indstilling på hver tast.
- KAMELEON 5 kan lære ca. 50 funktioner. Mængden af taster afhænger af
andre programmerede funktioner og af fjernbetjeningen der skal
læres fra.
- Du kan erstatte en indlært funktion ved at indlære en ny funktion på
samme tast.
- Brug ikke indlæringsfunktionen i direkte sollys eller i kraftig belysning.
- Vær sikker på at du anvender nye batterier inden du
følger indlæringsproceduren.
- Når du skifter batterier vil de indlærte funktioner blive bevaret.
"Shifted" Dobbelt indlæring
Det er også muligt at placere en funktion "shifted" (dobbelt) på en tast for at
bevare den oprindelige funktion.
Eksempel: for at placere "mono/stereo" funktionen "shifted" på den
For at placere en funktion (f.eks. "mono/stereo") "shifted" på den røde tast,
følg blot trin 1-8 på side 41, men tryk på MAGIC-tasten og derefter på den røde
tast (i stedet for "I") under trin 5.
For at få adgang til funktionen (i dette eksempel "mono/stereo"); tryk blot på
MAGIC-tasten og derefter på den røde tast.
- Hvis en "shifted" indlært funktion placeres på Kanal eller Volume tasterne,
- Hvis du placerer en funktion "shifted" på en ciffer-tast (0 - 9), skal du trykke
"røde" tast.
vil du miste "Farve og Lysstyrke" justering.
på MAGIC-tasten to gange og derefter på ciffer-tasten for at få adgang til
den "shiftede" funktion.
42 WW W.ONEFORALL.COM
Page 44

Indlæringsfunktion
Sletning af en "Key Magic funktion" eller "indlært
funktion":
Eksempel: for at slette en "KEY MAGIC funktion" eller "indlært" funktion
1. Tryk på og hold MAGIC-tasten nedtrykket i ca. 3 sekunder. Displayet vil
2. Tryk på IR DELETE.
3. Tryk på den pågældende apparattast (i eksemplet TV).
4. Tryk på den pågældende funktionstast (i eksemplet "I").
5. Tryk ENTER for at reetablere den oprindelige funktion ELLER tryk og hold
- Den oprindelige funktion (hvis tilstede) på KAMELEON 5 vil nu være
Eksempel: For at slette en enkelt "shifted" indlært eller Key Magic funktion,
Eksempel: for at slette "mono/stereo" funktion indlært "shifted" på den røde
1. Tryk på og hold MAGIC-tasten nedtrykket i ca. 3 sekunder. Displayet vil
2. Tryk på IR DELETE.
3. Tryk på den pågældende apparattast (i eksemplet TV).
4. Tryk på MAGIC.
5. Tryk på den pågældende funktinstast (i eksemplet den røde tast).
6. Tryk på ENTER for at reeatblere den oprindelige funktion ELLER tryk på og
- Den oprindelige funktion (hvis tilstede) på KAMELEON 5 vil nu være
fra "I"-tasten i TV indstilling:
skifte til Setup display.
ESC-tasten nedtrykket for at vende tilbage til brugerindstilling.
reetableret.
Sletning af en "shifted" "Key Magic" funktion eller
"indlært funktion":
følg nedenstående anvisning.
tast i TV indstillling:
skifte til Setup display.
hold ESC-tasten nedtrykket for at vende tilbage til brugerindstilling.
reetableret.
Sletning af alle "KEY Magic funktioner " eller
"indlærte" funktioner i en bestemt indstilling:
Eksempel: sletning af alle "Key Magic funktioner" eller "indlærte" funktioner
1. Tryk på og hold MAGIC-tasten nedtrykket i ca. 3 sekunder. Displayet vil
2. Tryk på IR DELETE.
3. Tryk på den pågældende apparattast (i eksemplet TV).
4. Tryk på ENTER for at reetablere den oprindelige funktion ELLER tryk på og
- Den oprindelige funktion (hvis tilstede) på KAMELEON 5 vil nu være
under TV indstilling:
skifte til Setup display.
hold ESC-tasten nedtrykket for at vende tilbage til brugerindstilling.
reetableret.
Operationel (Reset) nulstilling
Den operationelle nulstilling vil slette alle indlærte funktioner på tværs af alle
indstillinger.
Den sletter måske også visse andre programmerede funktioner som "Key Magic"
eller "macroer".
1. Tryk på og hold MAGIC-tasten nedtrykket i ca. 3 sekunder. Displayet
vil skifte til Setup display.
2. Tryk på OTHER.
3. Tryk 980. IR indikatoren vil blinke fire gange og fjernbetjeningen vil vende
tilbage til Setup indstilling.
WW W.ONEFORALL.COM 43
Page 45

Ekstra funktioner
Key Magic
(Programmering af manglende funktioner)
Key Magic er en eksklusiv ONE FOR ALL egenskab. Designet af KAMELEON 5 sikrer
at mange funktioner fra din originale fjernbetjening kan anvendes - endda funktioner der ikke har deres egen tast på KAMELEON 5 tastaturet. Ofte benyttede
funktioner kan tilknyttes en tast efter eget valg ved hjælp af Key Magic funktionen på din KAMELEON 5. For at programmere en bestemt funktion med Key
Magic skal du kende den tilsvarende funktionskode. Da funktionskoderne varierer
for forskellige apparattyper, vil du ikke finde dem i brugsanvisningen. Du kan
rekvirere dine funktionskoder gennem vores kundeservice pr. brev, fax eller e-mail.
Alt vi behøver at vide er:
• Fabrikat og modelnummer på det pågældende apparat (for at verificere at
du anvender den rigtige kode).
• Den fire-cifrede installationskode dit apparat fungerer med.
• Hvor funktionen var placeret på din originale fjernbetjening.
Du kan også besøge vores hjemmeside (www.oneforall.com) for at finde svar på
dine spørgsmål.
Når du har fået din(e) funktionskode(r) fra vor kundeservice, er det
nemt at indprogrammere den/dem:
1. Tryk på og hold MAGIC-tasten nedtrykket i ca. 3 sekunder. Displayet
vil skifte til Setup display.
2. Tryk på KEY MAGIC
3. Tryk på apparattasten (TV, DVD, SAT eller AUD).
4. Tryk én gang på MAGIC-tasten
5. Indtast den 5-cifrede funktionskode (oplyst af kundeservice)
6. Tryk på den tast som funktionen skal tilknyttes (hvis denne tast er et andet
sted end på hoveddisplayet, skal du bruge SCROLL-tasten for at få adgang
til displayet). IR indikatoren vil blinke to gange og displayet vil vende
tilbage til Setup display.
®
- Key Magic funktionerne er specifikke for hver indstilling. For at få adgang
til den funktion du har programmeret, må du først trykke på apparattasten.
- Key Magic kan programmeres på alle taster UNDTAGEN : Apparattaster, ESC,
ENTER, MAGIC og SCROLL tasten.
- Notér venligst de udvidede funktionskoder du modtager fra kundeservice til
fremtidig brug.
- Taster som (TV) menu, (TV) guide osv. vil ikke skifte display når de aktiveres
under Key Magic programmering.
Udvidet Funktion Reference
(første linie er et eksempel):
APPARAT INSTALLATIONSKODE FUNKTION FUNKTIONSKODE
TV 0556 16/9 format 00234
44 WW W.ONEFORALL.COM
Page 46

Ekstra Funktioner
Ændring af apparattast
(Hvordan du programmerer to ens apparater på KAMELEON 5)
Det er muligt at ændre indstilling for enhver apparattast. Det er nyttigt hvis du
vil indprogrammere to apparater af samme slags på KAMELEON 5. Den ændrede
apparattast vil vise de brugbare taster for den aktuelle indstilling. Koden kan
programmeres ved hjælp af "Direkte programmering" (side 38) eller
"Søgemetoden" (side 39). Se nedenstående to eksempler på ændring af en
apparattast.
Eksempel 1: hvis du vil programmere TV nr. 2 på DVD tasten.
Eksempel 2: hvis du vil programmere VCR nr. 2 på SAT tasten.
Eksempel 1:
For at programmere et TV nr. 2 på DVD tasten (for eksempel) må du ændre
DVD tasten til en TV tast, så tryk:
(*) (**)(*) (**)
DVD tasten er ændret til en nr. 2 TV tast og vil vise de taster der er
brugbare for denne indstilling.
Indtast nu "Setup" koden for dit TV nr. 2 ved at trykke:
_ _ _ _
(TV Code) (**)
Eksempel 2:
For at programmere videomaskine nr. 2 på SAT tasten (for eksempel), må du
ændre SAT tasten til en DVD tast, så tryk:
(*) (**)
SAT tasten er ændret til en nr. 2 DVD tast og vil vise de taster der er
brugbare for denne indstilling.
Indtast nu "Setup" koden for din DVD nr. 2 ved at trykke:
_ _ _ _
- Hvis du programmerer et apparat af en anden type på en apparattast (f.eks.
nr. 2 TV på DVD tasten) vil det oprindelige ikon på apparattasten være
uændret, men de viste funktionstaster vil skifte svarende til den nye
apparattype. For eksempel: hvis et nr. 2 TV programmeres på DVD tasten,
vil tekst-TV funktionerne blive vist under DVD indstillingen.
(VCR Code) (**)
Nulstilling af en apparattast.
Eksempel: for at nulstille DVD tasten til dens oprindelige indstilling, tryk:
(*) (**)
(*) Tryk og hold MAGIC-tasten nedtrykket i ca. 3 sekunder. Displayet
vil skifte til Setup display.
(**) IR indikatoren vil blinke to gange (displayet vil skifte til Setup
indstilling).
WW W.ONEFORALL.COM 45
Page 47

Ekstra Funktioner
Volume Punch-Through
Denne funktion giver dig mulighed for at justere volume ved en bestemt indstilling (f.eks. TV ) selv om du står i en anden indstilling (f.eks. VCR). Hvis f.eks.du ser
et program på din video, kan du justere volume (en TV funktion) uden først at
trykke på TV tasten. Skemaet nedenfor viser nogle af mulighederne:
Sidst aktiverede apparatknap: Du kan regulere:
DVD : TV volume op og ned, mute
SAT : TV volume op og ned, mute
AUD : TV volume op og ned, mute
LIGHT : TV volume op og ned, mute
Eksempel: for at benytte "punch through" til AUD volume, mens du har valgt en
anden apparatindstilling (f.eks. SAT eller DVD indstilling):
1. Tryk på og hold MAGIC-tasten nedtrykket i ca. 3 sekunder. Displayet skifter
til Setup display.
2. Tryk på VOLUME.
3. Tryk nu på AUD tasten og IR indikatoren vil blinke to gange og
fjernbetjeningen vil vende tilbage til Setup display.
Resultat: VOL+/- og MUTE for AUD indstilling kan styres uafhængigt af hvilket
Eksempel: slette "Volume Punch Through" for videooptager (i DVD indstilling) :
1. Tryk på og hold MAGIC-tasten nedtrykket i ca. 3 sekunder. Displayet
2. Tryk på VOLUME.
3. Tryk på VOL- ( ) tasten.
4. Tryk én gang på DVD tasten. IR indikatoren vil blinke fire gange og
Resultat: Hvis du står i DVD (VCR) indstilling vil du kunne styre VOL+/- og
apparat der er valgt.
Sletning af "Volume Punch Through" funktion pr. apparatindstilling:
skifter til Setup display.
fjernbetjeningen vil vende tilbage til Setup display.
MUTE funktionerne på din VCR (forudsat at videomaskinen har
volumekontrol).
Sletning af "Volume Punch Through" funktion for alle
apparatindstillinger:
1. Tryk på og hold MAGIC-tasten nedtrykket i ca. 3 sekunder. Displayet
skifter til Setup display.
2. Tryk på VOLUME.
3. Tryk på VOL+ ( ) tasten. IR indikatoren vil blinke fire gange og
fjernbetjeningen vil vende tilbage til Setup display.
Resultat: I alle apparatindstillinger vil VOL+/- og MUTE funktionerne fungere
med de oprindelige funktioner.
46 WW W.ONEFORALL.COM
Page 48

Ekstra Funktioner
Apparat Sleeptimer
Hvis dit apparat har en indbygget "Sleeptimer" funktion kan du anvende denne
funktion med din KAMELEON 5 fjernbetjening. Gør følgende:
1. Sørg for at dit apparat er tændt.
2. Tryk på apparattasten TV (eller DVD, SAT, AUD).
3. Ret KAMELEON 5 mod dit apparat og tryk kortvarigt på MAGIC-tasten og
tryk derefter på POWER. Du skulle nu se sleeptimeren aktiveres på dit apparat. For at øge tiden, tryk blot på POWER igen (inden 10 sekunder) indtil
timeren når den ønskede tid.
- For at deaktivere "Sleeptimer" funktionen, gentag trin 1-3 ovenfor. Under
trin 3 trykker du fortsat på POWER (inden 10 sekunder) indtil timeren viser
nul minutter.
- Afhængig af hvordan du brugte Sleeptimer funktionen på din originale
fjernbetjening, skal du måske anvende en anden fremgangsmåde for at få
adgang til Sleeptimeren (f.eks. via menufunktionen).
KAMELEON 5 - TIMER
KAMELEON 5 timerfunktionen giver dig mulighed for at aktivere en ønsket funktion
fra en specifik apparatindstilling indenfor et angivet antal minutter (maksimum
timertid er 60 minutter).
- Den ønskede funktion kan være en eksisterende funktion i en specifik apparatind-
stilling, en MAcro, en Key Magic funktion eller en indlært funktion.
Eksempel: du vil have dit TV til at slukke efter 45 minutter.
1. Tryk på og hold MAGIC-tasten nede i ca. 3 sekunder. Displayet
skifter til Setup display.
2. Tryk på OTHER.
3. Tryk 9 8 5 for at aktivere KAMELEON 5 timer programmering.
IR indikatoren vil blinke to gange.
4. Tryk på TV for at vælge den apparatindstilling hvor KAMELEON 5
timerfunktionen skal fungere. IR indikatoren vil blinke to gange.
5. Tryk på POWER for at vælge den ønskede funktion. IR indikatoren
vil blinke to gange.
6. Tryk nu 4 5 for at angive det antal minutter efter hvilket den ønskede
funktion skal aktiveres (f.eks. tast 5 for 5 minutter, maks. op til 60).
7. Tryk på ENTER. IR indikatoren vil blinke to gange og KAMELEON 5
timerfunktionen er aktiveret.
- Ugyldige tastetryk under programmering af KAMELEON 5 timerfunktionen
vil blive ignoreret.
- Den ønskede funktion kan være enhver tast undtagen apparattasterne,
SCROLL, ESC, ENTER og MAGIC.
- Mens KAMELEON 5 timerfunktionen er i gang, vil IR animationen lyse
hvert 15. sekund.
- KAMELEON 5 timerfunktionen annulleres ved at indtaste en
ny timerfunktion.
- Hvis du ikke trykker på en tast under programmering af KAMELEON 5
timerfunktionen vil fjernbetjeningen vende tilbage til brugerindstilling
efter 30 sekunder.
- SCROLL-tasten kan anvendes til enhver tid under programmering hvis
den er tilgængelig ved den aktuelle apparatindstilling.
WW W.ONEFORALL.COM 47
Page 49

Ekstra funktioner
Macroer (sekvens af kommendoer)
Macroer (direkte)
Du kan programmere din KAMELEON 5 til at udføre en serie af kommandoer
ved et tryk på kun én tast. F.eks. hvis du ønsker at slukke dit TV, DVD og SAT på
samme tid. Enhver serie af kommandoer som du bruger ofte, kan reduceres til ét
tastetryk for nem betjening. En tast der er programmeret med en Macro virker
på alle apparater (forudsat at kommandoen er tilgængelig for det pågældende
apparat).
Du kan programmere en Macro på enhver tilgængelig tast, undtagen apparattasterne (TV, DVD, SAT, AUD og LIGHT), MAGIC, ESC, ENTER og SCROLL-tasten.
Eksempel: Programmering af en Macro der slukker dit TV, DVD og SAT ved tryk
1. Tryk på og hold MAGIC-tasten nede i ca. 3 sekunder. Displayet skifter
2. Tryk på MACRO.
3. Tryk på en apparattast (f.eks. TV) for at vise alle tilgængelige taster.
4. Tryk nu på den tast som Macroen skal tilknyttes, i dette eksempel den
5. Tryk nu TV, POWER, DVD, POWER, SAT, POWER.
6. Tryk på ENTER for at gemme Macroen. Displayet vil vende tilbage til Setup
på den røde tast på din KAMELEON 5:
til Setup display.
røde tast.
display.
Resultat: Når du trykker på den røde tast vil KAMELEON 5 slukke dit TV, DVD
- Hver Macro kan bestå af op til 22 tastetryk.
- For at inkludere en funktion fra en speciel indstilling, skal du bruge
- Kontroller at du programmerer Macroen på en tast som du ikke bruger i
- Når du har programmeret en Macro på en given tast, vil Macroen virke
- For at undgå utilsigtet start af en optagelse med KAMELEON 5, skal du
- Hvis du skal holde en knap nedtrykket i nogle sekunder for at få en
- Taster som (TV) menu, (TV) guide osv. vil ikke ændre display når du trykker
- Ved udskiftning af batterierne vil din(e) Macro(er) blive bevaret.
- Når du programmerer en Macro på en tast, vil den oprindelige funktion
- Du kan erstatte en Macro ved at programmere en ny Macro på samme tast.
og Satellitmodtager.
SCROLL-tasten.
nogen indstilling.
uanset hvilken apparatindstilling (TV, DVD, SAT, AUD, eller LIGHT) der er
valgt (hvis den pågældende tast er tilgængelig i den aktuelle
apparatindstilling). Det betyder, at den oprindelige funktion for den
pågældende tast ikke fungerer.
trykke to gange på RECORD-tasten for at starte en optagelse. Bemærk, at
hvis du tilknytter en Macro til RECORD-tasten vil det deaktivere det
dobbelte tastetryk. Derfor anbefaler vi ikke at tilknytte en Macro til denne
tast.
funktion til at virke på din originale fjernbetjening, er det ikke sikkert at
denne funktion kan virke i en Macro på din KAMELEON 5.
på dem ved programmering af en Macro.
blive en "shifted" funktion (undtagen POWER, CH+/- og VOL+/- tasterne).
Tryk på MAGIC-tasten og derefter på den pågældende tast for at få adgang
til den oprindelige funktion. Hvis du programmerer en Macro på en
ciffer-tast, får du adgang til den oprindelige funktion ved at trykke to
gange på MAGIC og derefter på ciffertasten.
48 WW W.ONEFORALL.COM
Page 50

Ekstra Funktioner
"Shifted Macros" (dobbelte macro'er)
Det er også muligt at placere en "shifted" Macro på en tast for at bevare tastens
oprindelige fiunktion. MAGIC-tasten anvendes til "SHIFT-funktionen".
Eksempel: For at programmere en "shifted" Macro der slukker dit TV, DVD og
SAT ved tryk på den røde tast på din KAMELEON 5 (Så du beholder
den oprindelige funktion for den røde tast):
MAGIC* MACRO TV MAGIC “RØD” ENTER
Hver gang du nu trykker på MAGIC og derefter på den røde tast, vil KAMELEON
5 slukke dit TV, DVD og SAT.
- Hvis en "shifted" Macro placeres på POWER, CH+/- eller VOL+/- tasterne mister du funktionerne Sleeptimer og Farve/Lysstyrke.
TV, POWER,
DVD, POWER,
SAT, POWER
Sletning af en (direkte) Macro
Eksempel: Sletning af Macroen på den røde tast, tryk:
MAGIC* MACRO TV “RØD” ENTER
Sletning af en (shifted) Macro
Eksempel: Sletning af en "shifted" Macro på den røde tast, tryk:
MAGIC* MACRO TV MAGIC ”RØD” ENTER
Sletning af alle Macroer i alle indstillinger
MAGIC* MACRO ENTER
(*) Tryk på og hold MAGIC-tasten nede i ca. 3 sekunder.
Displayet vil skifte til Setup display.
WW W.ONEFORALL.COM 49
Page 51

Ekstra Funktioner
Kode Opgraderingsteknologi
Din KAMELEON 5 har en unik funktion der giver mulighed for at tilføje nye
koder via din telefon. På få sekunder overføres informationer til din KAMELEON
5 fra vores magnetiske koblingsteknologi, hurtigt og pålideligt, uden brug af
komplicerede adaptere, stik eller tilbehør. Det betyder, at selv om du i fremtiden
køber nyt udstyr, vil KAMELEON 5 aldrig blive forældet.
Internet download
(Opgrader din KAMELEON 5 fjernbetjening via din PC)
1. Besøg vores hjemmeside
"www.oneforall.com".
2. Vælg din region.
3. Vælg "Product Support"
4. Vælg
"Universal Remote Controls"
5. Vælg den ONE FOR ALL
fjernbetjening du ønsker
at opgradere: KAMELEON 5
(URC-8305).
Nu er du kommet til vores specielle "Online Download" sektion. Herefter følger
du blot instruktionerne på skærmen for nem opgradering af din fjernbetjening.
Telefon opgradering
(Opgrader din KAMELEON 5 via din telefon)
Du kan alternativt ringe til vores forbruger hjælpelinie og en af vores
kundeservicemedarbejdere vil assistere dig igennem processen med opgradering
af din KAMELEON 5. For at sikre at processen forløber uden problemer, beder vi
dig følge nedenstående anvisning:
1. Notér fabrikat og modelnummer på dine apparater i rubrikkerne på
Kundeservice-siden inden du ringer.
2. Ring til vores kundeservice og forklar hvilke apparater du gerne vil have
tilføjet til din KAMELEON 5.
3. Efter at vores kundeservice har registreret fabrikat og modelnummer på dit
udstyr, vil vedkommende lede dig igennem opgraderingsproceduren og vil
derefter bede dig holde din KAMELEON 5 mod højttaleren på din telefon
(se billedet nedenfor). Derved overføres de nødvendige informationer om
dit udstyr, på få sekunder via telefonen til din KAMELEON 5.
Bemærk venligst at trådløse telefoner, højttalertelefoner og
mobiltelefoner ikke kan anbefales.
4. Efter opgradering af din KAMELEON 5 via telefonen,
skal du ikke lægge røret på,
Vores kundeservice vil sikre sig,
at din KAMELEON 5 fungerer
korrekt med dit udstyr og vil
besvare eventuelle spørgsmål
du måtte have.
50 WW W.ONEFORALL.COM
Page 52

Ekstra Funktioner
Farve & Lysstyrke
Afhængig af funktionerne på din originale fjernbetjening kan KAMELEON 5
regulere indstillingerne for farve og lysstyrke på dit TV.
For at regulere farven:
Tryk på MAGIC-tasten og derefter på Volume + (for farve +) eller
Volume - (for farve -).
For at regulere lysstyrken:
Tryk på MAGIC-tasten og derefter på Channel + (for lysstyrke +) eller
Channel - (for lysstyrke -).
Afhængig af hvordan du brugte farve og lysstyrke indstillingerne på din
originale fjernbetjening, skal du måske bruge en anden fremgangsmåde
(f.eks gennem menu-funktionerne).
Fejlfinding
Problemer & løsninger
Problem:
Dit fabrikat findes ikke i
kodelisten
KAMELEON 5 kan ikke styre dit
udstyr?
KAMELEON 5 udfører ikke de
korrekte kommandoer
Problemer med at skifte kanal?
Video / PVR / DVD optager
ikke?
KAMELEON 5 reagerer ikke
når du trykker på en tast?
Din originale fjernbetjening
havde en "20"-tast?
Ved hvert tastetryk blinker IR
indkatoren 5 gange?
Du kan ikke få adgang til programmeringsfunktionen?
Løsning
Prøv søgemetoden på side 39.
A) Prøv alle koderne i listen under
dit fabrikat.
B) Prøv søgemetoden på side 39.
Du bruger måske den forkerte kode. Prøv
at gentage Direkte Set-Up ved at bruge en
anden kode listet under dit? fabrikat, eller
prøv med søgemetoden igen for at finde
den rigtige kode.
Indtast kanalnummeret på samme måde
som med din originale fjernbetjening.
Som en sikkerhedsforanstaltning skal du
trykke to gange på RECORD-tasten på din
KAMELEON 5.
Vær sikker på at du bruger nye batterier
og at din KAMELEON 5 peger mod dit
apparat.
Du finder denne funktion ved at trykke
på AV-tasten.
Udskift batterierne med 2 nye "AA/LR6"
alkaline batterier.
Udskift batterierne med 2 nye "AA/LR6"
alkaline batterier.
WW W.ONEFORALL.COM 51
Page 53

Problemløsning
Kundeservice
Hvis du fortsat har spørgsmål om brugen af din KAMELEON 5 universal
fjernbetjening og du ikke kunne finde svarene i afsnittet om Fejlfinding
(side 51), kan du kontakte vores kundeservice for assistance.
Du kan besøge vores hjemmeside: www.oneforall.com
Vores Internet-side har mange fordele:
- 24 timers adgang
- ingen ventetid
- side med FAQ (ofte stillede spørgsmål)
- information om ONE FOR ALL produktprogrammet
Før du kontakter os via fax, e-mail eller telefon, bør du sikre dig,
at du har de nødvendige informationer tilgængelige ved at udfylde
rubrikkerne nedenfor.
Hvad vi har brug for at vide når du kontakter os:
1 At du har en ONE FOR ALL KAMELEON 5 URC-8305 (*) universal
fjernbetjening.
2 Købsdato (.........../.........../...........).
3 En liste over dine apparater / Fabrikat, Type/modelnr. (se eksemplet i
skemaet herunder).
Type Fabrikat Model nr. Original Setup kode
TV Sony KV-25C5D RM-883 1505 (eksempel)
fjernbetjening.
Type/modelnummer kan ofte findes i brugsanvisningen til dit udstyr
eller på bagsiden af apparaterne.
4. Send en fax, e-mail eller ring til os:
I Danmark
E-mail: ofasupport@fovitech.dk
Telf.: 44 34 08 11 (8:30 - 16:00) (*)
Fax: 44 34 08 29
Internet: www.fovitech.dk
(*) Når du ringer til os vil du blive bedt om et URC-nummer.
URC-nummeret på din KAMELEON 5 er 8305.
52 WW W.ONEFORALL.COM52 WW W.ONEFORALL.COM
Page 54

INNHOLD
Norsk
OM DIN KAMELEON 5 . . . . . . . . . . . . . . . . . . . . . . . . . . . . . . . . . . . . . . . . . . . . . . . . . . . . 54
BATTERIER
TASTATURET
•
. . . . . . . . . . . . . . . . . . . . . . . . . . . . . . . . . . . . . . . . . . . . . . . . . . . . . . . . . . . . . . . . 55
. . . . . . . . . . . . . . . . . . . . . . . . . . . . . . . . . . . . . . . . . . . . . . . . . . . . . . . . . . 56 - 63
OPPSETT AV KAMELEON 5 . . . . . . . . . . . . . . . . . . . . . . . Side 64
(Hvordan sette opp KAMELEON 5 til å kontrollere enhetene dine)
• Søkemetode
. . . . . . . . . . . . . . . . . . . . . . . . . . . . . . . . . . . . . . . . . . . . . . . . . . . . 65
OPPSETTSKODER
TV : Televisjon / LCD / Plasma / Prosjektør / Bakprojeksjon
VCR : Videokasettopptaker / TV/VCR Kombi / PVR
. . . . . . . . . . . . . . . . .
. . . . . . . . .
261
272
SAT : Satellitttmottaker / Dekoderboks / DVB-S / DVB-T / Freeview (UK) /
TNT (F) / Digitenne (NL) / DTT (I) / TDT (E) SAT/HDD
CBL : Kabelkonverter / Dekoderboks / DVB-C
. . . . . . . . . . . . . . . . . . . .
VAC : Videotilbehør som mediasenter / AV tilbehør / AV velgere
AMP : Audio / Forsterker / Aktivt høyttalersystem
TUN : Audio / Audiomottaker/Tuner/forsterker / (DVD) hjemmekino
CAS : Kassettopptaker (Lydbåndspiller)
LDP : Laserdiskspiller / Video CD
DAT : Digital audioteip / DCC
. . . . . . . . . . . . . . . . . . . . . . . . . . . . . . . . .
. . . . . . . . . . . . . . . . . . . . . . . . .
. . . . . . . . . . . . . . . . . . . . . . . . . . . . . . .
. . . . . . . . . . .
. . . . . .
. . . . . . . . . . . . . . . . . .
. . .
275
280
281
281
281
283
283
283
DVD : DVD-spiller / DVD-R / DVD hjemmekino / DVD Kombi / DVD/HDD /
DVD/PVR / DVD/VCR Kombi
. . . . . . . . . . . . . . . . . . . . . . . . . . . . . .
283
KODEBLINKING . . . . . . . . . . . . . . . . . . . . . . . . . . . . . . . . . . . . . . . . . . . . . . . . . . . . . . . . . . 66
(For å finne ut hvilken kode som er programmert)
RASK KODEREFERANSE
LÆREFUNKSJON
. . . . . . . . . . . . . . . . . . . . . . . . . . . . . . . . . . . . . . . . . . . . . . . . . . 66
. . . . . . . . . . . . . . . . . . . . . . . . . . . . . . . . . . . . . . . . . . . . . . . . . . . . . . . . . . 67
(Hvordan kopiere funksjoner fra din opprinnelige fjernkontroll til KAMELEON 5)
NULLSTILLING UNDER BRUK . . . . . . . . . . . . . . . . . . . . . . . . . . . . . . . . . . . . . . . . . . . . . 69
EKSTRAFUNKSJONER
• Key Magic® (Hvordan programmere manglende funksjoner)
. . . . . . . 70
• Omfordeling av modus
(Hvordan sette opp to av samme enhet på KAMELEON 5)
• Volumgjennomslag
• Sovefunksjon på enheten
• KAMELEON 5 - Tidsfunksjon
• Makro (kommandosekvenser)
• Kode for teknologioppgradering
• Farge og lysstyrke
. . . . . . . . . . . . . . . . . . . . . . . . . . . . . . . . . . . . . . . . . . . . . . . 72
. . . . . . . . . . . . . . . . . . . . . . . . . . . . . . . . . . . . . . . . . 73
. . . . . . . . . . . . . . . . . . . . . . . . . . . . . . . . . . . . . . . 73
. . . . . . . . . . . . . . . . . . . . . . . . . . . . . . . . . . . . . 74
. . . . . . . . . . . . . . . . . . . . . . . . . . . . . . . . . . 76
. . . . . . . . . . . . . . . . . . . . . . . . . . . . . . . . . . . . . . . . . . . . . . . . . 77
. . . . . . . . . . 71
FEILFINNING
• Problem og løsning
• Kundeservice
. . . . . . . . . . . . . . . . . . . . . . . . . . . . . . . . . . . . . . . . . . . . . . . 77
. . . . . . . . . . . . . . . . . . . . . . . . . . . . . . . . . . . . . . . . . . . . . . . . . . . . . 78
Bruk OneForAll nettveiviseren for å sette opp fjernkontrollen din over
internett. Denne veiviseren forteller deg hvordan de forskjellige enhetene
skal installeres uten at du trenger å lese hele håndboken. For å bruke dette
enkle oppsettverktøyet, gå til www.oneforallwebwizard.com.
WW W.ONEFORALL.COM 53
Page 55

Om din KAMELEON 5
Enkelt og unikt ”EL” display
Når du valgte EN FOR ALLE KAMELEON 5 universell fjernkontroll valgte du
enkel bruk. KAMELEON 5 har et unikt, brukervennlig display med lys, som
sikrer enkel tilgang til alle taster som du trenger mens det skjuler de som
du ikke trenger. Den høye kvaliteten gjør at du vil være fornøyd med den i lang
tid. Når batteriene er satt i vil KAMELEON 5 være i “demomodus” og vise
forskjellige skjermbilder. “Demomodus” slås av når fjernkontrollen settes opp
(trykk og hold MAGIC i omtrent 3 sekunder og så trykk og slipp ESC) .
Etter at batteriene er byttet, må du trykke en tast først før skjermen lyser opp.
Etter det vil displayet automatisk slås på når fjernkontrollen plukkes opp
(skjermen og fjernkontrollen berøres samtidig). Det er også mulig å endre
aktiveringsmodus slik at den aktiveres med et trykk på tastene. For å sette “EL”
display aktivering til tastatur, se side 4, seksjon:
aktiveringsinnstilling for ”EL” skjerm.
Kontroller opp til 5 enheter
Din KAMELEON 5 er laget for at du skal kunne bruke en fjernkontroll for å styre
video- og audioutstyret ditt, alle enheter som styres av et infrarødt signal.
KAMELEON 5 kommer med 2 IR (infra-røde) bredbåndssendere for maksimal
avstand og kan gå så høyt opp i frekvens som til 450 kHz.
Du kan velge hvilken som helst kombinasjon av 5 enheter som du gjerne vil
styre.
TV Televisjon / LCD / Plasma / Prosjektør / Bakprojektor
DVD DVD-spiller / DVD-R / DVD hjemmekino / DVD Kombi / DVD/HDD
SAT Satellittmottaker, kabelkonverter, DSS / DVB-T, videotilbehør
AUD Audio / Audiomottaker/Tuner/forsterker / (DVD) hjemmekino
LIGHT IR-styrte lysbrytere KAMELEON 5 har også en “LIGHT” modus,
Laserdiskspiller, Videokasettopptaker / TV/VCR Kombi / DVD/VCR
Kombi / kasettspiller / DAT-spiller / DCC
(f.eks. mediasenter)
for styring av strømmoduler brukt i Light Control™
dedikert adresserbar 433,92 MHz protokoll. Denne modusen
sender ut infrarøde (IR) signaler til et “ONE FOR ALL Light
Control™ Starters Kit - HC-8300” som kjøpes separat, og som
konverterer IR-signaler til radiosignaler (RF) som mottas av
strømmoduler for å dempe og slå av/på lys.
For å aktivere Light Control™ på din KAMELEON 5 må
du kjøpe et „ONE FOR ALL Light Control™ Starters kit –
HC-8300“.
54 WW W.ONEFORALL.COM
Page 56

Om din KAMELEON 5
Lærefunksjon
KAMELEON 5 er utstyrt med en unik “lærefunksjon”, slik at du kan kopiere
nesten enhver funksjon (maks rundt 50) fra din opprinnelige (fungerende)
fjernkontroll til din nye KAMELEON 5 (Se “Lærefunksjon” på side 15). Dette er
nyttig hvis du etter at du har satt opp KAMELEON 5 finner ut at noen enkeltfunksjoner fra din opprinnelige fjernkontroll mangler på tastaturet på din
KAMELEON 5.
Makro (kommandosekvenser)
KAMELEON 5 er utstyrt med en enkel makrofunksjon, slik at du kan sende flere
kommandoer med et enkelt tastetrykk (for eksempel for å slå flere enheter på
eller av). Når du har programmert en makro på en av disse tastene,
kan sekvensen utføres i alle modi.
Kode for teknologioppgradering
Din ONE FOR ALL KAMELEON 5 har også kodeoppgraderingsteknologi. Denne
teknologien åpner muligheten for å legge til koder i minnet. Hvis enheten din
bruker en spesiell kode som ikke finnes i KAMELEON 5 minnet (bruk “Direkte
kodeoppsett” på side 12 eller “Søkemetoden” på side 13), kan du bruke
”Kodeoppgraderingsteknologi” (se side 24). Takket være denne teknologien vil
din KAMELEON 5 aldri bli gammeldags.
Batterier
Merk: Når batteriene er satt i vil KAMELEON 5 være i “demomodus” og
vise forskjellige skjermbilder. KAMELEON 5 vil automatisk gå ut
av demomodus når du setter den opp.
KAMELEON 5 trenger 2 AA/LR6 alkaliske batterier.
1. Skru av batterilokket med en mynt.
2. Sett inn batteriene med den positive enden (+) opp.
3. Sett batterilokket tilbake på plass.
Indikator for lav spenning
KAMELEON 5 vil indikere med en gang batteriene slipper opp for strøm.
IR-indikatoren blinker 5 ganger hver gang du trykker en tast og du kan ikke gå
inn i programmeringsmodus.
Pass på å bytte batteriene med 2 nye AA/LR6 alkaliske batterier.
WW W.ONEFORALL.COM 55
Page 57

Tastaturet
Dette produktet har en “EL”-skjerm (Elektro-Luminescent teknologi)
som aktiveres ved å berøre skjerm og fjernkontroll samtidig eller
gjennom tastetrykk. For å spare på batteriet vil “EL”-skjermen være
opplyst i 8 sekunder i normal bruk.
“EL”-displayet er en av hovedfunksjonene på KAMELEON, siden
det endres for å passe med enheten som du styrer. Oversikten på
side 6 viser deg alle mulige funksjoner som du kan få.
Aktiveringsinnstilling for ”EL” skjerm.
KAMELEON 5 inneholder et “EL”-panel som aktiveres ved å berøre
skjerm og fjernkontroll samtidig eller gjennom tastetrykk.
Det er mulig å låse KAMELEON 5 tl en aktiveringsinnstilling:
1. Trykk og hold MAGIC-tasten i omtrent 3 sekunder.
2. Trykk OTHER.
3. Trykk så 9 8 9. IR-indikatoren blinker 2 (eller 4) ganger.
-> Hvis den animerte IR-indikatoren blinker to ganger blir “EL”-skjermen aktivert
kun ved å berøre skjerm og fjernkontroll samtidig.
-> Hvis den animerte IR-indikatoren blinker fire ganger blir “EL”-skjermen aktivert
kun ved tastetrykk.
Suivez ces étapes afin de régler votre KAMELEON 5 sur le mode
d’activation que vous préférez.
Skjermen skifter til oppsettskjermen.
Aktiveringsinnstilling for ”EL” skjerm
For å øke eller minske lysstyrken på KAMELEON 5 “EL” skjermen:
1. Trykk og hold MAGIC-tasten i omtrent 3 sekunder.
2. Trykk BRIGHT.
3. -> For å øke lysstyrken på “EL”-skjermen, trykk på NEXT og
4. Trykk på ENTER for å lagre lysstyrkeinnstillingen og gå tilbake
- Å øke lysstyrken på KAMELEON “EL”-skjermen kan forkorte batteriets levetid.
Batteriets levetid varierer mellom 3 og 12 måneder avhengig av
lysstyrkeinnstilling og bruk..
56 WW W.ONEFORALL.COM
Skjermen skifter til oppsettskjermen.
hold den inne
-> Pour diminuer la luminosité de l’écran ”EL”, appuyez
sur PREVIOUS.
til oppsettskjermen ELLER trykk ESC for å gå tilbake til forrige
lysstyrkenivå.
Page 58

Tastaturet
Påslagstid for ”EL” skjerm
For å endre tiden (standard: 8 sek.) som KAMELEON 5 “EL”-skjermen står
PÅ etter hvert tastetrykk når fjernkontrollen brukes (ikke programmeringsmodus):
1. Trykk og hold MAGIC-tasten i omtrent 3 sekunder.
2. Trykk OTHER.
3. Trykk 9 7 8. IR-indikatoren blinker to ganger.
4. Trykk 1, 2, 3, 4 eller 5 (f.eks. 1 = 4 sekunder) avhengig av hva
Valg Påslagstid for ”EL” skjerm
1 4 sekunder
2 8 sekunder (standard)
3 12 sekunder
4 12 sekunder
5 12 sekunder
Skjermen skifter til oppsettskjermen.
du ønsker, se tabellen nedenfor. Den animerte IR-indikatoren
blinker to ganger. Trykk på ENTER for å lagre den nye tiden for
EL-skjermen og gå tilbake til oppsettskjermen ELLER trykk ESC
for å gå tilbake til forrige innstilling.
WW W.ONEFORALL.COM 57
Page 59

Tastaturet
IR-indikator
TV
DVD
SAT
AUD
LIGHT
58 WW W.ONEFORALL.COM
Page 60

Tastaturet
1. IR (infrarød) indikator
2. Enhetstaster
Tastene TV, DVD, AUD og LIGHT velger hvilken enhet som skal styres. Etter
at en enhets-(modus-)tast er trykket på KAMELEON 5, tennes enhetsikonet
det gjelder for å vise hvilken modus som er aktivert i øyeblikket. Et trykk på
enhetstasten lar deg gå tilbake til hovedskjermen (TV og AUD modus).
KAMELEON 5 har også en “LIGHT” (lys) modus. Sammen med et “ONE FOR
ALL Light Control™ Starters Kit - HC-8300” som kjøpes separat, kan du
dempe og slå lys PÅ/AV i hele huset.
3. MAGIC (i ”shift” eller ”programmering” modus)
IR-indikatoren aktiveres når IR “sendes” eller “mottas”.
Den animerte IR-indikatoren på KAMELEON 5 viser
“utgående IR” hver gang en funksjonstast trykkes. Når du
bruker “Læreprosedyren” eller
“Kodeoppgraderingsprosedyren”, vil den animerte IRindikatoren vise “innkommende IR”. Utgående IR vil blir
indikert med en “utside til innside” animasjon på IR-indikatoren. Innkommende IR vil blir indikert med en “innside til
utside” animasjon på IR-indikatoren. IR-indikatoren reagerer når taster trykkes både under normal bruk og i programmeringsmodus (midtre segment på IR-indikatoren blinker).
MAGIC-tasten brukes til å sette opp din KAMELEON 5 og
for tilgang til spesialfunksjoner. Hvis du trykker denne
tasten raskt, går skjermen i ”shift” modus (i 10 sekunder)
som gir deg tilgang til noen sekundærfunksjoner som
farge, lysstyrke og sovefunksjon.
Programmeringsmodus
Hvis du trykker MAGIC-tasten lenger (omtrent 3 sekunder),
går KAMELEON 5 inn i “programmeringsmodus”. Skjermen
skifter til oppsettskjermen.
DEV SET
SEARCH
MODE
KEY MAGIC
MACRO
BRIGHT
LEARN
IR DELETE
VOLUME
OTHER
WW W.ONEFORALL.COM 59
• Enhetens oppsettmodus
• Søkemetode
• Omfordeling av modus
• For å programmere funksjoner som mangler
• For å gi en tast en sekvens
av kommandoer
• Lysstyrkeinnstilling for ”EL” skjerm.
• For å kopiere funksjoner fra din opprinnelige
fjernkontroll til KAMELEON 5
• Sletter lærte og Key Magic funksjoner
• Volumgjennomslagfunksjon
• Variabel EL på-tid (4 sek, 8 sek, 12 sek, 16 sek, 20 sek)
• Nullstilling under bruk
• KAMELEON 5 - Tidsfunksjon
• Aktiveringsinnstilling for ”EL” skjerm.
• Kodeverifisering
• Modemoppgradering
Page 61

Tastaturet
4. SCROLL
5. ENTER
6. POWER (i shift-modus; Sovefunksjon)
7. TV/VCR / TV/SAT / TV/DVD
8. 16 :9 / PVR / SP/LP
SCROLL-tasten gjør det mulig å bevege seg gjennom
forskjellige skjermbilder (hvis de finnes) i en bestemt
modus i normal bruk og i programmeringsmodus. Dette
gjelder bare TV- og AUD-modus
ENTER-tasten lar deg bekrefte valget ditt i programmeringsmodus.
POWER-knappen har samme funksjon som på din originale
fjernkontroll.
I DVD-modus får du TV/VCR funksjonen (nyttig hvis du
programmerte en VCR-kode. I SAT-modus får du
TV/SAT-funksjon. I DVD-modus får du TV/DVD-funksjon.
I TV-modus får du funksjonen for å sette 16:9 skjermformat. I SAT-modus aktiverer denne tasten PVR-funksjonen
(Personlig video-opptaker). I DVD-modus får du funksjonen
for SP/LP (teiphastighet). (Nyttig hvis du programmerte en
VCR-modell.)
9. DSP / GUIDE
10. MENU
Hvis den fantes på din originale fjernkontroll, får du i
AUD-modus ”DSP”-funksjonen. I TV- og DVD-modus vil
GUIDE-taten gi ”guide”-funksjonen, hvis den fantes på din
originale fjernkontroll. I TV-modus vil GUIDE-tasten endre
skjermen til meny-modus.
Et trykk på denne tasten gir deg mulighet til å styre
menyen. I TV- og AUD-modus vil den også endre skjermen
til meny-modus. MENU-knappen har samme funksjon som
den hadde på din originale fjernkontroll.
60 WW W.ONEFORALL.COM
Page 62

Tastaturet
11. EXIT (sortie)
12. MUTE (Silence)
13. CH +/- (i shift-modus; lysstyrke +/-)
14. Retningstaster (Opp, ned, venstre, høyre)
EXIT-knappen har samme funksjon som på din originale
fjernkontroll. For å gå tilbake til hovedskjermen (TV-,
SAT- og AUD-modus), trykk på enhetstasten eller bruk
tasten SCROLL (rull).
Mute-knappen (høyttaler på/av) har samme funksjon som
den hadde på din originale fjernkontroll.
Disse tastene virker som på din originale fjernkontroll. I
shiftet TV-modus (som du får ved å trykke MAGIC raskt og
slippe den) kan disse tastene gi deg funksjonen lysstyrke
+/-.
Hvis de finnes på din originale fjernkontroll, gir disse
tastene deg muligheten til å navigere gjennom menyen.
På noen TV-er må du trykke CH+/- og VOL+/- tastene ELLER
de fargede tastene (rød, grønn, gul, blå) for å navigere i
menyen. Dette avhenger av hva slags TV du har. I AUD
hovedmodus vil disse tastene (hvis de finnes på din
originale fjernkontroll) la deg justere CENTRE (midtre) og
REAR (bakre) nivå på høyttaleren(-ene). I AUD hovedmodus vil disse tastene (hvis de finnes på din originale
fjernkontroll) la deg navigere i menyskjermen.
15. OK / SURROUND
WW W.ONEFORALL.COM 61
I menymodus bekrefter denne tasten valget du har gjort.
På noen enheter kan du bekrefte menyvalget ved bare å
trykke MENU. I AUD hovedmodus vil denne tastene (hvis
den finnes på din originale fjernkontroll) gi deg tilgang til
enhetens surroundmodus.
Page 63

Tastaturet
16. VOL +/- (i shift-modus; farge +/-)
17. Nummertaster / INPUT (i prog. modus; oppsett-
18. -/-- / PPV
19. AV / HELP
Volumtastene virker som på din originale fjernkontroll. I
shiftet TV-modus (som du får ved å trykke MAGIC raskt og
slippe den) kan disse tastene gi deg funksjonen farge +/-.
funksjoner)
Nummertastene (1 – 9, 0) gir de samme funksjonene som
din originale fjernkontroll. I AUD-modus, kan nummertastene (1 – 9, 0) gi (his det fantes på din originale fjernkontroll) en inngangsfunksjon (f. eks. TUNER). Hvis din originale fjernkontroll har en “funksjonsvalg” eller
“inngangsvalg” funksjon, kan du finne denne under AVtasten. I programmeringsmodus vil nummertastene
vise de forskjellige oppsettfunksjonene.
Hvis din originale fjernkontroll har bytte mellom ett/to
siffer (-/—), kan du få denne funksjonen ved å trykke -/-tasten. I SAT- (menyskjerm) og PVR-modus får du funksjonen PPV.
AV-tasten har samme funksjon som den hadde på din
originale fjernkontroll. Hvis din originale fjernkontroll har
en 20-er tast, vil denne funksjonen finnes ved å trykke på
AV-tasten. Hvis din originale satellitt- eller PVR-fjernkontroll har en ”hjelp" funksjon, kan du få denne funksjonen
ved å trykke HELP-tasten. I AUD-modus får du ”inngang
kilde” funksjon.
20. ESC
21. Transporttaster (PLAY, STOP (spill, stopp) osv.)
Denne tasten finnes bare i programmeringsmodus og
brukes for å gå tilbake til oppsettskjermen eller for å gå ut
av programmeringsmodus.
Disse tastene driver transportfunksjonene som PLAY, FF,
REW, SKIP+/- (TRACK+/-) (spill, raskt framover, bakover,
hopp +/-. spor +/-) som enheten har. For å forhindre overspilling ved et uhell, må RECORD (opptak) tasten trykkes
to ganger for å begynne opptak.
62 WW W.ONEFORALL.COM
Page 64

Tastaturet
22. Teletekst-tast
EXPAND: Viser øverste halvdel av teletekstsiden med større bokstaver.
Når du trykker igjen, kan du se nedre halvdel av teletekstsiden
forstørret. For å gå tilbake til vanlig teletekst igjen, trykk på EXPANDtasten (ekspander) igjen, eller trykk på TEXT ON (tekst på), avhengig
av TV-en din.
TEXT ON: (tekst på): I TV-modus: når en er i tekstmodus, kan et trykk
på tasten byttte til MIX eller TURN OFF tekst, avhengig av TV-en din.
Denne funksjonen er også tilgjengelig i SAT-modus.
HOLD/STOPP: Stanser sidebytte.
MIX: (miks) Viser både tekst og TV-bilde.
TEXT OFF: (tekst av) I TV-modus: setter TV-en tilbake til vanlig
tv-modus. På noen enheter kan dette gjøres ved å trykke “TEXT ON”
(tekst på) flere ganger. Denne funksjonen er også tilgjengelig i
SAT-modus.
TEXT INDEX: Denne tasten vil gi deg tilgang til indeksfunksjonen i
tekstmodus.
Disse tastene brukes på de viktigste teletekstfunksjonene.
Selvsagt må TV-en din ha teletekstmulighet. For en mer
detaljert forklaring på teletekst og hurtigtekst, se TVapparatets brukerhåndbok. Husk at forskjellige TV-er kontrollerer teletekst og fasttekst på forskjellige måter. Det er
ikke sikkert at alle teletekstfunksjoner er tigjengelige på
din spesifikke modell.
23. Rød / grønn / gul / blå
WW W.ONEFORALL.COM 63
Når du går inn i tekstmodus, lar tastene som er merket
med rødt, grønt, gult og blått deg gå inn i hurtigtekstfunksjonene på TV-en din. Hvis din originale fjernkontroll
brukte disse tastene for menystyring, kan hurtigteksttastene på din KAMELEON 5 virke på samme måte.
Page 65

Oppsett av KAMELEON 5
(Hvordan sette opp KAMELEON 5 til å kontrollere enhetene dine)
Merk: Når batteriene er satt i vil KAMELEON 5 være i “demomodus” og
vise forskjellige skjermbilder. Følg bare de neste trinnene og
KAMELEON 5 går automatisk ut av demomodus.
Eksempel: For å sette opp KAMELEON 5 for TV-en din:
1. Pass på at enheten er slått på (ikke i hvilemodus).
2. Finn koden for enheten din i kodelisten (side 261 - 288). Koder er
listet opp etter enhetstype og merkenavn. Den mest populære koden for
hvert merke står først. Hvis ditt merke ikke står i kodeseksjonen, prøv
søkemetoden på side 13.
3. Trykk og hold MAGIC-tasten i omtrent 3 sekunder.
4. Trykke DEV SET-tasten (sett enhet).
5. Trykk og slipp TV-tasten for å velge enhetstypen som
6. Legg inn den første firesifrede koden (se kodeliste side
_ _ _ _
7. Pek med KAMELEON 5 på TV-en din og prøv følgende taster
8. Hvis enheten reagerer, trykk ENTER for å lagre koden. Hvis
9. Trykk og hold ESC inne i omtrent 3 sekunder for å gå
Skjermen skifter til oppsettskjermen.
du vil sette opp.
261 - 288) med nummertastene. Den animerte IR-indikatoren
blinker to ganger.
for å se om KAMELEON 5 virker med din enhet;
• CHANNEL +, CHANNEL- (bytte kanal)
• VOLUME +, VOLUME – (endre volum)
• MUTE
• POWER (PÅ/AV)
• MENU.
enheten ikke reagerer, legg inn neste kode som er oppgitt
under ditt merke. Hvis ingen av kodene som er oppgitt for
merket ditt virker med din enhet, prøv søkemetoden beskrevet
på side 13.
tilbake til brukermodus (alle taster for enhetens modus
vises), ELLER trykk en enhetstast for å velge neste enhet
som du vil sette opp.
- De fleste TV-er slås ikke på igjen når POWER-tasten trykkes, prøv å trykke
“CHANNEL+” for å slå på TV-en på nytt.
- Noen koder er ganske like. Hvis enheten ikke reagerer eller ikke virker
skikkelig sammen med en av kodene, prøv en annen kode for samme
merke.
- For å sette opp andre enheter, følg instruksjonene overfor, men trykk riktig
enhetstast i trinn 5.
- Husk å velge tilsvarende enhetsmodus før du bruker enheten din. Bare en
enhet kan tilordnes en enhetstast.
- For å stille inn en TV, DVD ,SAT, eller AUD til (Se side 19).
64 WW W.ONEFORALL.COM
Page 66

Oppsett av KAMELEON 5
Søkemetode
--> Hvis enheten ikke reagerer på KAMELEON 5 etter at du har prøvd alle
kodene som er oppgitt for merket ditt.
--> Hvis merket ikke står i listen i det hele tatt.
Søkemetoden lar deg skanne gjennom alle kodene som finnes
i minnet på KAMELEON 5.
Eksempel: For å søke etter koden for TV-en din:
1. Slå TV-en PÅ (ikke i hvilemodus).
2. Trykk og hold MAGIC-tasten i omtrent 3 sekunder.
3. Trykk SEARCH.
4. Trykk og slipp TV-tasten for å velge enhetstypen som du vil
5. Trykk så POWER
6. Pek med KAMELEON 5 på TV-en din. Trykk så NEXT igjen
7. Når TV-en slår seg av, trykk ENTER-tasten for å lagre
8. Trykk ESC for å gå tilbake til oppsettskjermen, eller trykk en
Skjermen skifter til oppsettskjermen.
sette opp.
og igjen, til TV-en slås av (hver gang du trykker NEXT,
sender KAMELEON 5 ut signalet POWER fra den neste koden i
minnet). Det kan hende du må trykke NEXT mange
ganger (opp til 150 ganger), så vær tålmodig. Husk på
at KAMELEON 5 må peke rett på TV-en når tasten
trykkes. (Hvis du hopper over en kode kan du gå til forrige
kode(r) ved å trykke tasten PREVIOUS).
koden. Den animerte IR-indikatoren blinker to ganger.
enhetstast hvis du vil utføre søkemetoden for en annen
enhet.
9. Trykk ESC på nytt for å gå tilbake til brukermodus
- I trinn 5 kan du også trykke en annen tast som vises i stedet for POWER. Dette
vil være funksjonen som sendes med neste tastetrykk av NEXT eller PREVIOUS
i trinn 6. Hvis du for eksempel i trinn 5 trykker “2” i stedet for “POWER”, vil
KAMELEON 5 sende signalet for “nummer 2” hver gang du trykker NEXT i
trinn 6 (pass på at TV-en er slått på en annen kanal).
- For å søke for andre enheter, følg instruksjonene overfor, men trykk riktig
enhetstast i trinn 4.
- Hvis den originale fjernkontrollen på enheten din ikke har en POWER-tast,
trykk PLAY (spill) i stedet i trinn 5.
- I LIGHT-modus virker ikke søkemetoden.
WW W.ONEFORALL.COM 65
(alle taster vises). Slå på enheten (TV-en) på nytt og prøv
alle fjernkontrollens funksjoner for å sjekke at de virker
skikkelig. Hvis du ikke kan kontrollere TV-en skikkelig,
fortsett med søkemetoden. Du bruker kanskje feil kode.
Page 67

Kodeblinking
(For å finne ut hvilken kode som er programmert)
Når du har satt opp din KAMELEON 5 med søkemetoden, kan du blinke koden
tilbake for framtidig referanse. Merk at den animerte IR-indikatoren vil vise de 4
sifrene med animerte blink.
Eksempel: For å blinke koden for TV-en din:
1. Trykk og hold MAGIC-tasten (i omtrent 3 sekunder).
2. Trykk OTHER.
3. Trykk 9 9 0, den animerte IR-indikatoren blinker to ganger.
4. Trykk og slipp TV-tasten for å velge enhetstypen som du vil
5. For det første tallet i den firesifrede koden, trykk 1 og tell
6. For det andre tallet, trykk 2 og tell de animerte blinkene. Hvis
7. For det tredje tallet, trykk 3 og tell de animerte blinkene. Hvis
8. For det fjerde tallet, trykk 4 og tell de animerte blinkene. Hvis
9. Trykk ENTER for å gå tilbake til oppsettskjermen, ELLER trykk
10. Trykk og hold ESC inne (i omtrent 3 sekunder) for å gå tilbake til
- Du kan gjøre trinn 5 – 8 i den rekkefølgen og så mange ganger som du
ønsker. Hvis du mistet tellingen kan du blinke ut tilsvarende siffer på nytt
(f.eks. hvis du i trinn 6 ikke så akkurat hvor mange ganger den animerte
IR-indikatoren blinket, trykk ganske enkelt “nummer 2” på nytt og tell om
igjen).
- For å blinke koden for andre enheter, følg instruksjonene overfor, men
trykk riktig enhetstast i trinn 4.
Skjermen skifter til oppsettskjermen.
sjekke koden for.
blinkene fra den animerte IR-indikatoren. Hvis det ikke er noen
blink, er sifferet “0”.
det ikke er noen blink, er sifferet “0”.
det ikke er noen blink, er sifferet “0”.
det ikke er noen blink, er sifferet “0”. Nå har du funnet din
firesifrede kode.
en enhetstast hvis du vil utføre blinketelling for en annen
enhet.
brukermodus.
Hurtig kodereferanse
Skriv ned kodene for enhetene dine i boksene nedenfor for rask og
enkel referanse..
■■■■■■ ■
■
■■■■■■ ■
■
■■■■■■ ■■
■■■■■■ ■
■
■■ ■■ ■■ ■■
66 WW W.ONEFORALL.COM
Page 68

Lærefunksjon
(Hvordan kopiere funksjoner fra din opprinnelige
KAMELEON 5 har et komplett bibliotek med forhåndsprogrammerte koder.
Etter at du har satt opp KAMELEON 5 for enheten din, oppdager du kanskje at
en eller flere taster som du hadde på din opprinnelige fjernkontroll som ikke
har en plass på KAMELEON 5 tastaturet.
For å gjøre det enklere for deg, har KAMELEON 5 en spesiell lærefunksjon som
lar deg kopiere enhver funksjon fra din opprinnelige fjernkontroll til tastaturet
på din KAMELEON 5.
Før du begynner:
- Sjekk at din opprinnelige fjernkontroll virker skikkelig.
- Pass på at verken din KAMELEON 5 eller din opprinnelige fjernkontroll peker
på enheten din.
Læring (direkte)
fjernkontroll til KAMELEON 5)
Eksempel: For å kopiere “mono/stereo” funksjonen fra din originale TV
1. Plasser KAMELEON 5 og din opprinnelige fjernkontroll på en flat
2. Trykk og hold MAGIC-tasten (i omtrent 3 sekunder).
3. Trykk LEARN.
4. Trykk enhetstasten (for eksempel: TV-tasten) på KAMELEON 5
5. Trykk tasten (for eksempel: ”I”-tasten) på KAMELEON 5
6. Trykk og hold tasten som ønsker å kopiere (Eksempel:
fjernkontroll til tasten ”rød” på din KAMELEON 5.
overflate. Pass på at det er den enden du vanligvis peker på
enheten med som vender mot hverandre. Pek med den originale
fjernkontrollen mot fronten av KAMELEON 5 (se bildet nedenfor).
Hold fjernkontrollene på 2 til 5 cm avstand.
Skjermen skifter til oppsettskjermen.
fjernkontrollen for å velge modus der du vil plassere den lærte
funksjonen.
fjernkontrollen der du vil plassere den lærte funksjonen.
IR-indikatoren vil vise “innkommende IR” tre ganger og så vil
displayet slå seg av.
mono/stereo) på din originale fjernkontroll. Displayet slås på
på nytt og du ser to blink for å indikere at læringen var
vellykket.
7. Hvis du ønsker å kopiere andre funksjoner i samme modus, gjenta ganske
enkelt trinn 5 og 6 og trykk neste tast som du vil kopiere med læring. Hvis
du ønsker å kopiere andre funksjoner i en annen modus, fortsett ganske
enkelt med trinn 4 fulgt av trinn 5 og 6.
8. Trykk på ENTER for å gå ut av læremodus og gå tilbake til
WW W.ONEFORALL.COM 67
oppsettskjermen ELLER trykk og hold ESC inne for å gå tilbake
til brukerskjermen.
Page 69

Lærefunksjon
- Når displayet slås av i trinn 5, må du trykke tasten (i dette eksempelet:
mono/stereo) på din originale fjernkontroll innen 15 sekunder. Hvis det ikke
trykkes noen tast i læremodus, vil fjernkontrollen gå tilbake til brukermodus
etter 30 sekunder.
- Under opplæring vil ikke taster som (TV) meny, (TV) guide osv. endre
skjermen når de trykkes.
- Hvis du lærer en funksjon på en tast, vil den opprinnelige KAMELEON 5
funksjonen automatisk bli en shift-funksjon. Trykk MAGIC og så tasten for å
bruke den (unntatt POWER, kanalvelger og volumtastene). Hvis du lærte på
en nummertast, bruk den opprinnelige funksjonen ved å trykke MAGIC to
ganger og så nummertasten.
- Hvis du ønsker å lære en funksjon på en tast som ikke finnes på
hovedskjermen, bruk SCROLL-tasten for å endre skjermbildet.
- Læringsfunksjonen er spesifikk for modusen som er valgt. Derfor kan du
plasseres en lært funksjon per modus på samme tast.
- KAMELEON 5 kan lære omtrent 50 funksjoner. Antallet taster avhenger
av de andre programmerte funksjonene og av fjernkontrollen som det
læres fra.
- Du kan bytte en lært funksjon ved å plassere en annen lært funksjon over
den.
- Pass på å ikke gjøre læring i direkte sollys eller under sterke lamper.
- Pass på at du har nye batterier før du følger læreinstruksjonene.
- Når du bytter batterier, beholdes de lærte funksjonene.
Shift læring
Det er også mulig å plassere en funksjon med Shift makro på en
tast for å beholde originalfunksjonen.
Eksempel: for å plassere mono/stereo-funksjonen med shift på den “røde”
tasten.
For å plassere (f.eks. mono/stereo)-funksjonen med shift på den “røde” tasten,
følg ganske enkelt trinn 1-8 på side 15, men trykk ”MAGIC” og så den ”røde”
tasten i trinn 5.
For å bruke f.eks. ”mono/stereo”-funksjonen i dette eksemplet;
trykk ”MAGIC” og så den “røde” tasten.
- Hvis en Shift lært funksjon plasseres på kanal- og volumtastene, så blir
funksjonene ”Farge og lysstyrke” ofret.
- Hvis du plasserer en shift-funksjon på en nummertast (0 - 9), må du trykke
MAGIC to ganger og så nummertasten for å bruke den opprinnelige
funksjonen.
68 WW W.ONEFORALL.COM
Page 70

Lærefunksjon
For å slette en ”Key Magic® funksjon” eller ”lært
funksjon” fra en spesifikk tast:
Eksempel: For å slette en ”Key Magic® funksjon” eller ”lært funksjon” fra ”I”-
1. Trykk og hold MAGIC-tasten i omtrent 3 sekunder. Skjermen skifter til
2. Trykk IR DELETE.
3. Velg tilsvarende enhetstast (for eksempel TV).
4. Trykk tilsvarende enhetstast (for eksempel “I”).
5. Trykk på ENTER for å gjenopprette opprinnelig funksjon ELLER trykk og hold
- Den opprinnelige funksjonen (hvis slik finnes) på KAMELEON 5
tasten i TV-modus:
oppsettskjermen.
ESC inne for å gå tilbake til brukerskjermen.
gjenopprettes.
For å slette en shift ”Key Magic® funksjon” eller
”lært funksjon” fra en spesifikk tast:
Eksempel: For å slette en enkelt ”shiftet” lært tast eller Key Magic funksjon,
Eksempel: for å slette mono/stereo-funksjonen lært med shift på den “røde”
1. Trykk og hold MAGIC-tasten i omtrent 3 sekunder. Skjermen skifter til
2. Trykk IR DELETE.
3. Velg tilsvarende enhetstast (for eksempel TV).
4. Trykk MAGIC
5. Trykk tilsvarende funksjonstast (for eksempel “Rød tast”).
6. Trykk på ENTER for å gjenopprette opprinnelig funksjon ELLER trykk og
- Den opprinnelige funksjonen (hvis slik finnes) på KAMELEON 5 gjenopprettes.
følg trinnene nedenfor.
tasten i TV-modus:
oppsettskjermen.
hold ESC inne for å gå tilbake til brukerskjermen.
For å slette alle ”Key Magic® funksjon” eller ”lært
funksjon” fra en bestemt modus:
Eksempel: For å slette alle ”Key Magic® funksjoner” eller ”lærte funksjoner”
1. Trykk og hold MAGIC-tasten i omtrent 3 sekunder. Skjermen skifter til
2. Trykk IR DELETE.
3. Velg tilsvarende enhetstast (for eksempel TV).
4. Trykk på ENTER for å gjenopprette opprinnelig funksjon ELLER trykk og
- Den opprinnelige funksjonen (hvis slik finnes) på KAMELEON 5 gjenopprettes.
fra TV-modus:
oppsettskjermen.
hold ESC inne for å gå tilbake til brukerskjermen.
Nullstilling under bruk
Nullstilling under bruk vil slette alle lærte funksjoner i alle modi. Det vil også
slette noen andre programmerte funksjoner som Key Magic eller Makroer.
1. Trykk og hold MAGIC-tasten i omtrent 3 sekunder. Skjermen skifter til
oppsettskjermen.
2. Trykk OTHER.
3. Trykk 9 8 0. IR-indikatoren blinker fire ganger og fjernkontrollen går tilbake
til oppsettsskjermen.
WW W.ONEFORALL.COM 69
Page 71

Ekstrafunksjoner
Key Magic
(Hvordan programmere funksjoner som mangler)
Key Magic® er en eksklusiv ONE FOR ALL funksjon. Konstruksjonen av
KAMELEON 5 sikrer at mange funksjoner fra din opprinnelige fjernkontroll kan
utføres – også de som ikke har sin egen tast på KAMELEON 5 tastaturet.
Funksjoner som brukes ofte kan tilordnes en valgfri tast ved å bruke
Key Magic® funksjonen på din KAMELEON 5 . For å programmere en viss
funksjon med Key Magic® trenger du å vite den tilsvarende funksjonskoden.
Siden funksjonskoden varierer med forskjellige enheter, kan de ikke finnes i
denne bruksanvisningen. Du kan spørre etter dine funksjonskoder via vår kundestøttetelefon eller per brev, faks eller e-post.
Alt vi trenger å vite er:
• Merke og modellnummer på enheten det gjelder (for verifikasjon om du
bruker riktig kode).
• Den 4-sifrede oppsettkoden enheten din arbeider med.
• Hvordan funksjonen var merket på din opprinnelige fjernkontroll.
Du kan også besøke nettstedet vårt (www.oneforall.com)
for å finne svar på spørsmålene dine.
Når du har fått funksjonskoden(e) fra kundestøtte,
er programmering av koden enkel.
1. Trykk og hold MAGIC-tasten i omtrent 3 sekunder. Skjermen skifter
til oppsettskjermen.
2. Trykk KEY MAGIC
3. Trykk enhetstasten (TV, DVD, SAT, eller AUD).
4. Trykk MAGIC-tasten en gang.
5. Legg inn den 5-sifrede funksjonskoden (som du har fått av kundetjenesten)
6. Trykk tasten som funksjonen vil bli tilordnet (hvis denne tasten finnes på et
annet skjermbilde enn hovedskjermen, bruk SCROLL-tasten for å finne
skjermen. IR-indikatoren blinker to ganger og skjermen går tilbake til
oppsettsskjermen.
®
- Key Magic® funksjoner er spesifikke for modusen. For å få tilgang til
funksjonen som du har programmert, trykk enhetstasten først.
- Key Magic® kan tilordnes enhver tast UNNTATT følgende: Enhetstaster, ESC,
ENTER, MAGIC-tasten og SCROLL-tasten.
- Skriv ned alle utvidede funksjonskoder du får fra kundestøtte nedenfor for
enkel referanse framover.
- Taster som (TV) meny, (TV) guide osv. vil ikke endre skjermen når de trykkes
under Key Magic® programmering
REFERANSE UTVIDEDE FUNKSJONER
(første rekke er et eksempel):
ENHET OPPSETTSKODE FUNKSJON FUNKSJONSKODE
TV 0556 16/9 format 00234
70 WW W.ONEFORALL.COM
Page 72

Ekstrafunksjoner
Omfordeling av modus
(Hvordan sette opp to av samme enhet på KAMELEON 5)
Det er mulig å endre modus på alle enhetstastene. Dette er nyttig hvis
du ønsker å sette opp to av samme enhet på KAMELEON 5. Den
modifiserte enhetstasten vil vise de tastene som gjelder for den
reviderte modusen. Koden kan settes opp med “Direkteoppsett” (s. 12)
eller “Søkemetode” (s. 13). For å endre en enhetstast, se de to eksemplene
nedenfor.
Eksempel 1; hvis du vil programmere et TV nummer to til DVD-tasten.
Eksempel 2; hvis du vil programmere en DVD nummer to til SAT-tasten.
Eksempel 1:
For å programmere en TV nummer to til DVD-tasten (for eksempel),
må du endre DVD-tasten til en TV-tast, så trykk:
(*) (**)(*) (**)
DVD-tasten har nå blitt en TV nummer to og vil vise de tastene som
gjelder for denne modusen.
Legg nå inn oppsettskoden for din andre TV ved å trykke:
_ _ _ _
Eksempel 2:
For å programmere en DVD-spiller nummer to til SAT-tasten
(for eksempel), må du endre SAT-tasten til en DVD-tast, så trykk:
(*) (**)
(TV Code) (**)
SAT-tasten har nå blitt en DVD-tast nummer to og vil vise de tastene
som gjelder for denne modusen.
Legg nå inn oppsettskoden for din andre DVD ved å trykke:
_ _ _ _
- Hvis du programmerer en annen enhetstype på en annen tast (f.eks. andre
TV på DVD-tasten) vil det opprinnelige ikonet for tasten beholdes, men
funksjonstastene som vises vil endre seg for å passe med den nye enheten.
For eksempel; hvis en TV nummer to er programmert til DVD-tasten,
vil TV-tekstfunksjonene vises i DVD-modus.
(DVD Code) (**)
Nullstille en enhetstast
Eksempel: For å nullstille DVD-tasten til sin opprinelige modus, trykk:
(*) (**)
(*) Trykk og hold MAGIC-tasten i omtrent 3 sekunder. Skjermen
skifter til oppsettskjermen.
(**) Den animerte IR-indikatoren blinker to ganger (skjermen endres
til oppsettsskjermen).
WW W.ONEFORALL.COM 71
Page 73

Ekstrafunksjoner
Volumgjennomslag
Denne funksjonen lar deg justere volumet på en bestemt modus (f.eks.
TV-modus) mens du er i en annen modus (f.eks. VCR). Hvis du for
eksempel ser på et program på videoen din, kan du justere volumet
(en TV-funksjon) uten å trykke TV-tasten først. Tabellen nedenfor
viser noen av mulighetene:
Siste tast trykket: Du kan kontrollere:
DVD : TV-lyden opp og ned, mute
SAT : TV-lyden opp og ned, mute
AUD : TV-lyden opp og ned, mute
LIGHT : TV-lyden opp og ned, mute
Eksempel: For å slå gjennom til AUD-volum, start i en av de andre
modusene (f.eks. VCR, SAT eller DVD modus):
1. Trykk og hold MAGIC-tasten i omtrent 3 sekunder. Skjermen skifter til
oppsettskjermen.
2. Trykk VOLUME.
3. Trykk AUD-tasten, og den animerte IR-indikatoren blinker to ganger og
fjernkontrollen går tilbake til oppsettsskjermen.
Resultat: VOL+/- og MUTE vil komme fra AUD-modus uavhengig av enheten
Eksempel: For å slå av “Volumgjennomslag” for VCR-modus:
1. Trykk og hold MAGIC-tasten i omtrent 3 sekunder. Skjermen skifter til
2. Trykk VOLUME.
3. Trykk så VOL- ( ) tasten.
4. Trykk VCR en gang. IR-indikatoren blinker fire ganger og fjernkontrollen
Resultat: i DVD- (VCR) modus er du i stand til å kontrollere VOL+/- og MUTE
som er valgt.
For å slå av “Volumgjennomslag” per modus:
oppsettskjermen.
går tilbake til oppsettsskjermen (SETUP).
funksjonene på din VCR (hvis den har volumkontroll).
For å slå av “Volumgjennomslag” for alle moduser:
1. Trykk og hold MAGIC-tasten i omtrent 3 sekunder.
Skjermen skifter til oppsettskjermen.
2. Trykk VOLUME.
3. Trykk VOL+ ( ) -tasten, og IR-indikatoren blinker fire ganger
og skjermen går tilbake til oppsettsskjermen.
Resultat: VOL+, VOL- og MUTE-tastene vil nå ha sin opprinnelige funksjon i alle
moduser.
72 WW W.ONEFORALL.COM
Page 74

Ekstrafunksjoner
Sovefunksjon på enheten
Hvis enheten har en innebygd “Sovefunksjon”, kan du styre
denne funksjonen med din KAMELEON 5 fjernkontroll. For å gjøre dette:
1. Pass på at enheten er slått på.
2. Trykk enhetstasten TV (eller DVD, SAT, AUD).
3. Pek KAMELEON 5 mot enheten din og trykk og slipp MAGIC-tasten og trykk
så POWER. Du bør se Sovefunksjonen aktivert på enheten din. For å øke
tiden, trykk POWER på nytt (innen 10 sekunder) til klokka viser ønsket tid.
- For å deaktivere Sovefunksjonen, gjenta trinn 1-3 ovenfor. i trinn 3, fortsett
med å trykke POWER på nytt (innen 10 sekunder) til klokka viser null
minutter.
- Avhengig av hvordan du brukte sovefunksjonen på den opprinnelige
fjernkontrollen, kan du være nødt til å styre sovefunksjonen på en annen
måte (via menyen, for eksempel).
KAMELEON 5 - Tidsfunksjon
KAMELEON 5 – Tidsfunksjonen lar deg aktivere en <ønsket funksjon>
fra en spesifikk <enhetsmodus> innen et <spesifikt antall minutter>
(maks. antall på klokka er 60 minutter).
- Den <ønskede funksjonen> kan være en eksisterende funksjon i en spesifkk
modus, en makro, en key magic funksjon eller en lært funksjon.
Eksempel: du ønsker at TV-en slås av etter 45 minutter.
1. Trykk og hold MAGIC-tasten i omtrent 3 sekunder. Skjermen skifter til
oppsettskjermen.
2. Trykk OTHER.
3. Trykk 9 8 5 for å gå inn i KAMELEON 5 –Tidsur programmeringsmodus. Den
animerte IR-indikatoren blinker to ganger.
4. Trykk TV for å velge modus der KAMELEON 5 – Tidsurfunksjonen vil komme
fram. Den animerte IR-indikatoren blinker to ganger.
5. Trykk POWER-tasten for å velge den ønskede funksjonen. Den animerte
IR-indikatoren blinker to ganger.
6. Trykk så 4 5 for å legge inn antall minutter før <Ønsket funksjon> aktiveres
(f.eks. for 5 min. trykk 05, maks er 60).
7. Trykk ENTER. Den animerte IR-indikatoren blinker to ganger og KAMELEON
5 – Tidsurfunksjonen aktiveres.
- Ugyldige tastetrykk under programmering av KAMELEON 5 – Tidsur blir
ignorert.
- Den <Ønskede funksjon> kan være alle taster, unntatt enhetstaster,
SCROLL, ESC, ENTER og MAGIC.
- Når KAMELEON 5 – Tidsur løper, lyser IR-animeringen opp hvert 15.sekund.
- KAMELEON 5 –Tidsurfunksjon slås av ved å sette opp en ny KAMELEON 5 –
Tidsurfunksjon.
- Hvis det ikke trykkes noen mens KAMELEON 5 – Tidsurfunksjon settes opp,
vil fjernkontrollen gå tilbake til brukermodus etter 30 sekunder.
- SCROLL-tasten kan brukes når som helst under programmeringen hvis det
passer i den enhetsmodusen man er i.
WW W.ONEFORALL.COM 73
Page 75

Ekstrafunksjoner
Makro (kommandosekvenser)
Makro (direkte)
Du kan programmere din KAMELEON 5 til å gi en kommandosekvens
med ett tastetrykk. Du vil for eksempel kanskje slå av TV, DVD og satellitt
samtidig. Alle kommandosekvenser som du bruker ofte kan komprimeres
til ett tastetrykk for enkel bruk. En tast som er programmert med en makro
virker i alle moduser (forutsatt at den er tilgjengelig i modusen).
Du kan imidlertid installere en makro på alle taster (forutsatt at den er
tilgjengelig i modusen), unntatt enhetstastene (TV, DVD, SAT, AUD og LIGHT),
MAGIC, ESC, ENTER og SCROLL-tasten.
Eksempel: For å sette opp en makro som slår av TV, DVD-spiller og SAT med
1. Trykk og hold MAGIC-tasten i omtrent 3 sekunder. Skjermen skifter til
2. Trykk ”MACRO”.
3. Trykk enhetstasten (f.eks. TV) for å vise alle tastene i modusen.
4. Trykk tasten som makroen vil bli plassert på, i dette tilfellet “rød”-tasten.
5. Trykk så TV, POWER, DVD, POWER, SAT, POWER.
6. Trykk ENTER for å lagre denne makroen. Skjermen skifter til oppsettskjer-
Resultat: Når du trykker ”rød”-tasten, vil KAMELEON 5 slå av TV-en,
- Hver MAKRO kan bestå av maksimalt 22 tastetrykk.
- For å inkludere en funksjon fra en bestemt skjerm i en modus, bruk
- Pass på at du programmerer en makro på en ekstra tast som du ikke bruker
- Når du programmerer en makro på en spesifikk tast, vil sekvensen virke
- For å unngå opptak ved et uhell med KAMELEON 5, må du trykke RECORD-
- Hvis du måtte holde en tast nede i noen sekunder på den opprinnelige
- Taster som (TV) meny, (TV) guide osv. vil ikke endre skjermen når de trykkes
- Når du bytter batterier, beholdes makroene.
- Hvis du programmerer en makro på en tast, vil den opprinnelige funksjonen
- Du kan bytte en lært funksjon ved å plassere en annen lært funksjon over
“rød”-tasten på din KAMELEON 5:
oppsettskjermen.
men.
videospilleren og satellittmottakeren.
SCROLL-tasten..
i noen modus.
uansett hvilken modus (TV, DVD, SAT, AUD eller LIGHT) du bruker (hvis
merkingen er den samme som merkingen på tasten som makroen ble
programmert på). Det betyr at funksjonen som finnes på den spesifikke
tasten blir ofret.
tasten to ganger for å begynne opptak. Legg merke til at hvis du legger en
makro eller en shift-makro på RECORD-tasten, vil det deaktivere den doble
tastetrykkfunksjonen. Vi anbefaler derfor ikke å legge en makro til denne
tasten.
fjernkontrollen for å få en funksjon, er det ikke sikkert denne funksjonen
virker i en makro på din KAMELEON 5 fjernkontroll.
under makro-programmering
bli en shift-funksjon (Unntatt POWER, CH+/- og VOL+/- tastene). Trykk
MAGIC og deretter tasten for å bruke den. Hvis du plasserer en makro på en
nummertast, bruk den opprinnelige funksjonen ved å trykke MAGIC to
ganger og så nummertasten.
den.
74 WW W.ONEFORALL.COM
Page 76

Ekstrafunksjoner
Shiftet makro
Det er også mulig å plassere en funksjon med Shift makro på en tast
for å beholde originalfunksjonen. MAGIC-tasten kan brukes som en “SHIFTfunksjon”.
Eksempel: For å sette opp en shift-makro som slår av TV, DVD og SAT med
“RØD”-tasten på din KAMELEON 5: (slik at du kan beholde den opprinnelige
funksjonen på den “RØDE” tasten).
MAGIC* MACRO TV MAGIC “Rød tast” ENTER
Hver gang du nå trykker ”MAGIC”-tasten fulgt av rød tast, vil KAMELEON 5
slå av TV-en, DVD-spilleren og satellittmottakeren.
- Hvis en Shift makro funksjon plasseres på PÅ/AV, kanal- eller volumtastene,
så blir Sovefunksjonen og Farge/Lysstyrke ofret.
TV, VEILLE,
DVD, VEILLE,
SAT, VEILLE
For å slette en (direkte) Makro fra en tast
Eksempel: For å slette makroen fra ”rød”-tasten, trykk:
MAGIC* MACRO TV “I” ENTER
For å slette en (shiftet) makro
Eksempel: For å slette shiftet makroen fra ”I”-tasten, trykk:
MAGIC* MACRO TV MAGIC ”Rød tast” MAGIC**
For å fjerne alle Makroer i alle moduser
MAGIC* MACRO ENTER
(*) Trykk og hold MAGIC-tasten i omtrent 3 sekunder.
Skjermen skifter til oppsettskjermen.
WW W.ONEFORALL.COM 75
Page 77

Ekstrafunksjoner
Kode for teknologioppgradering
Din KAMELEON 5 fjernkontroll inneholder en unik funksjon, som lar
deg legge til nye koder ganske enkelt ved å holde den opp til telefonen din.
I løpet av noen sekunder, vil vår magnetiske koblingsteknologi
raskt og pålitelig overføre informasjon til KAMELEON 5 fjernkontroll
uten komplekse plugger, adaptere eller tilbehør.
Det betyr at hvis du kjøper nye produkter i framtiden, vil KAMELEON 5
fjernkontrollen aldri bli utdatert.
Nedlasting fra internett
(Oppgrader din URC8 fjernkontroll…via PC-en din)
1. Besøk vårt nettsted
“www.oneforall.com”.
2. Velg regionen din.
3. Velg “Product support”
(produktstøtte).
4. Velg “Universal Remote Controls”
(universell fjernkontroll).
5. Velg den ONE FOR ALL fjernkontrollen som du ønsker å oppgradere:
KAMELEON 5 (URC-8305)
6. Velg ‘Internet Download’ (nedlasting fra internett). Nå har du gått inn i vår
spesielle Online Download (direkte nedlasting) seksjon. Herfra følger du
bare instruksjonene på skjermen for en enkel oppgradering av
fjernkontrollen din.
Telefonoppgradering
(Oppgrader din KAMELEON 5 fjernkontroll…via telefonen din)
Eller du kan ringe vår hjelpetelefon for kunder og en kundeservicerepresentant
vil hjelpe deg gjennom hele prosessen med oppgradering av din KAMELEON 5
fjernkontroll. For å sikre at prosessen går greit, her er noen punkter å følge:
1. Skriv ned merkenavnet(-ene) og modellnummeret(-ene) på enhete(e) dine
der det er holdt av plass på kundeservicesiden, før du ringer.
2. Ring vår hjelpetelefon for kunder og forklar hvilke enheter som du vil
legge til din KAMELEON 5 fjernkontroll.
3. Etter at vår kundestøtteperson har skrevet ned merkenavnet og modellnummeret på enheten(e), vil han/hun lede deg gjennom oppsettsprosedyren og
vil deretter be deg om å holde din KAMELEON 5 fjernkontroll opp til høyttalerdelen av telefonen (se tegningen nedenfor). Når du gjør dette, blir
informasjonen som du trenger for
enheten overført gjennom
telefonen til din KAMELEON 5
fjernkontroll i løpet av noen
sekunder. Merk at trådløse
telefoner, høyttalende telefoner
og mobiltelefoner anbefales
ikke.
4. Etter at din KAMELEON 5 fjernkontroll er oppgradert via telefon, hold
linjen. Vår kundestøtteperson vil sikre seg at din KAMELEON 5 fjernkontroll
virker skikkelig med enheten(e) dine og vil besvare eventuelle andre
spørsmål du har.
76 WW W.ONEFORALL.COM
Page 78

Ekstrafunksjoner
Farge og lysstyrke
Avhengig av funksjonene på din opprinnelige fjernkontrollkontroll
kan KAMELEON 5 styre farge- og lysstyrkeinnstillingene på TV-en din.
For å justere fargen:
Trykk MAGIC-tasten fulgt av Volum + (for farge +) eller Volum -
(for farge -).
For å justere lysstyrken:
Trykk MAGIC-tasten fulgt av Channel + (for lysstyrke +) eller Channel -
(for lysstyrke -).
Avhengig av hvordan du brukte farge og lysstyrke på den opprinnelige
fjernkontrollen, kan du være nødt til å styre farge og lysstyrke på en annen
måte (via menyen, for eksempel).
Feilfinning
Problem og løsning
Problem:
Merket ditt ikke står i kodeseksjonen?
KAMELEON 5 virker ikke på
enhetene dine?
KAMELEON 5 utfører ikke
kommandoer riktig?
Problemer med å skifte kanal?
Opptaks-tasten på KAMELEON
5 virker ikke?
KAMELEON 5 reagerer ikke
når en tast er trykket?
Din opprinnelige fjernkontroll
hadde en “20” tast?
Etter hvert tastetrykk, blinker
IR-indikatoren 5 ganger?
Du får ikke til å gå inn i
programmeringsmodus?
Løsning:
Prøv søkemetoden på side 13.
A) Prøv alle kodene som står oppført for
ditt merke.
B) Prøv søkemetoden på side 13.
Du bruker kanskje feil kode. Prøv å gjenta
direkte oppsett med en annen kode som
står under ditt merke eller start søkemetoden på nytt for å finne riktig kode.
Legg inn programnummeret akkurat som
du ville på din opprinnelige fjernkontroll.
Som en sikkerhetsfunksjon på din
KAMELEON 5, må du trykke RECORD-tasten to ganger.
Pass på at du bruker nye batterier og
peker KAMELEON 5 mot enheten din.
Du kan finne denne funksjonen på
AV-tasten.
Bytt batteriene med 2 nye “AA/LR6 ”
alkaliske batterier.
Bytt batteriene med 2 nye “AA/LR6 ”
alkaliske batterier.
WW W.ONEFORALL.COM 77
Page 79

Kundeservice
Hvis du fortsatt har spørsmål om bruken av din KAMELEON 5 universal fjernkontroll, kan du ta kontakt med vårt kundeservice for assistanse.
Du kan besøke våre hjemmesider på :
Våre hjemmesider har mange fordeler :
- 24 timers service
- ingen ventetid
- egen side for " De mest vanlige spørsmålene".
- info om ONE FOR ALL's produktspekter.
Før du kontakter oss via Fax, E-mail eller telefon, forsikre deg om at du
har den nødvendige informasjonen tilgjengelig ved å fylle ut rubrikkene nedenfor.
Her er hva vi trenger å vite når du kontakter oss :
1 At du har en ONE FOR ALL URC-8305 KAMELEON 5 universal fjernkontroll
2 Innkjøpsdato (.........../.........../...........).
3 En liste over dine produkter/modeller ( se eksempel under)
Apparat Merke Type/Modell nr. Fjernkontroll Installasjonskode
TV Sony KV-25C5D RM-883 1505 (eksempel)
Type/modell nummer finner du i bruksanvisningen til apparatet eller på
baksiden av produktet.
4. Så kan du sende oss en fax, E- mail eller ringe oss:
I Norge
e-mail: ofa@turascandinavia.com
fax: +46 300568929
support-telefon . 020-985745
www.oneforall.com
modell nr.
78 WW W.ONEFORALL.COM
Page 80

INNEHÅLL
Svenska
OM KAMELEON 5 . . . . . . . . . . . . . . . . . . . . . . . . . . . . . . . . . . . . . . . . . . . . . . . . . . . . . . . . 80
BATTERIER
TANGENTBORDET
•
. . . . . . . . . . . . . . . . . . . . . . . . . . . . . . . . . . . . . . . . . . . . . . . . . . . . . . . . . . . . . . . . 81
. . . . . . . . . . . . . . . . . . . . . . . . . . . . . . . . . . . . . . . . . . . . . . . . . . . 82 - 89
STÄLL IN KAMELEON 5 . . . . . . . . . . . . . . . . . . . . . . . . . . . . . . . . . 90
(Hur du ställer in KAMELEON 5 för att kontrollera dina apparater)
• Sökmetod
. . . . . . . . . . . . . . . . . . . . . . . . . . . . . . . . . . . . . . . . . . . . . . . . . . . . . . 91
INSTÄLLNINGSKODER
TV : Television / LCD / Plasma / Projektor / Bakprojektions TV
VCR : Video / TV/VCR kombi / PVR
SAT : Satellitmottagare / Set-Top-Box / DVB-C
CBL : Kabelkonverterare / Set Top Box / DVB-C
. . . . . . . . . . . . . . . . . . . . . . . . . . . . . .
. . . . . . . . . . . . . . . . . . . .
. . . . . . . . . . . . . . . . . . .
VAC : Videotillbehör som Mediacenter / AV tillbehör / AV väljare
AMP : Audio / Förstärkare / Högtalarsystem
. . . . . . . . . . . . . . . . . . . . . .
TUN : Audio / Audio Mottagare/Tuner/Förstärkare / (DVD) Hemmabio
CAS : Kasettspelare
LDP : CD spelare / Video CD
DAT : Digital Audio Tape / DCC
. . . . . . . . . . . . . . . . . . . . . . . . . . . . . . . . . . . . . . . . .
. . . . . . . . . . . . . . . . . . . . . . . . . . . . . . . . . .
. . . . . . . . . . . . . . . . . . . . . . . . . . . . . . . .
. . . . . . .
. . . . .
261
272
275
280
281
281
. .
281
283
283
283
DVD : DVD Spelare / DVD-R / DVD Hemmabio / DVD kombi / DVD/HDD /
DVD/PVR / DVD/VCR Kombi
. . . . . . . . . . . . . . . . . . . . . . . . . . . . . . . .
283
NUVARANDE KOD . . . . . . . . . . . . . . . . . . . . . . . . . . . . . . . . . . . . . . . . . . . . . . . . . . . . . . . . 92
(Visar vilken kod som just är i bruk)
SNABBKODER
EGENSKAPER
. . . . . . . . . . . . . . . . . . . . . . . . . . . . . . . . . . . . . . . . . . . . . . . . . . . . . . . . . . . . 92
. . . . . . . . . . . . . . . . . . . . . . . . . . . . . . . . . . . . . . . . . . . . . . . . . . . . 93
(Hur man kopierar funktioner från din original fjärrkontroll till KAMELEON 5)
STÄLLA OM . . . . . . . . . . . . . . . . . . . . . . . . . . . . . . . . . . . . . . . . . . . . . . . . . . . . . . . . . . . . . . 95
EXTRA EGENSKAPER
• Key Magic® (Hur man programmerar funktioner som fattas)
. . . . . . . 96
• Läge anvisning (Hur man ställer in två likadana apparater
på KAMELEON 5)
• Volym
. . . . . . . . . . . . . . . . . . . . . . . . . . . . . . . . . . . . . . . . . . . . . . . . . . . . . . . . . . . . 98
• Sov timer
• KAMELEON 5 – Timer
• Macros
. . . . . . . . . . . . . . . . . . . . . . . . . . . . . . . . . . . . . . . . . . . . . . . . . . . . . . . . . . 100
• Koduppgradering
• Färg och ljusstyrka
. . . . . . . . . . . . . . . . . . . . . . . . . . . . . . . . . . . . . . . . . . . . . . . . . 97
. . . . . . . . . . . . . . . . . . . . . . . . . . . . . . . . . . . . . . . . . . . . . . . . . . . . . . . . . 99
. . . . . . . . . . . . . . . . . . . . . . . . . . . . . . . . . . . . . . . . . . . . . 99
. . . . . . . . . . . . . . . . . . . . . . . . . . . . . . . . . . . . . . . . . . . . . . . . 102
. . . . . . . . . . . . . . . . . . . . . . . . . . . . . . . . . . . . . . . . . . . . . . . 103
PROBLEMLÖSNING
• Problem och lösningar
• Kundservice
. . . . . . . . . . . . . . . . . . . . . . . . . . . . . . . . . . . . . . . . . . . . . . . . . . . . . 104
. . . . . . . . . . . . . . . . . . . . . . . . . . . . . . . . . . . . . . . . . . . 103
Använd OneForAll Web Wizard för att ställa in din fjärrkontroll via hjälp
över Internet. Här kan man ställa in funktioner utan att läsa manualen. För
användning av detta lätta verktyg besök: www.oneforallwebwizard.com.
WW W.ONEFORALL.COM 79
Page 81

Om KAMELEON 5
Unik ”EL” display
Genom att välja ONE FOR ALL KAMELEON 5 universell fjärrkontroll har du valt
en lätt väg. Din KAMELEON 5 har en unik, användarvänlig upplyst display. Den
ger dig tillgång till alla knappar du behöver. Av högsta kvalitet som ger lång
livslängd. När man sätter i batterierna visar sig ett demoläge med flera val.
Demoläget kan tas bort genom att trycka och hålla in MAGIC i ca 3 sekunder för
att sedan trycka ESC.
När man bytt batteri trycker man på valfri knapp innan skärmen lyser. Därefter
kommer displayen automatiskt när fjärrkontrollen tas upp.
Det är även möjligt att ändra aktiveringsläge till aktivering genom ett knapptryck. För att ställa in ”EL” displayen till aktivering genom ett knapp-tryck, se
sid. 82, kapitel: ”EL” skärm aktiveringsinställning.
Kontrollerar upp till 5 apparater
Din KAMELEON 5 är designad för dig för att kontrollera dina Video och Audio
tillbehör; eg. alla apparater som är designade med infraröd signal. Din
KAMELEON 5 har 2 IR (infraröd) frekvens sändare för max. frekvens upp till 450
kHz. Du kan välja att kombinera 8 olika apparater att kontrollera.
TV Television / LCD / Plasma / Projektor / Bakprojektion
DVD DVD Spelare / DVD-R / DVD Hemmabio / DVD Kombi / DVD/HDD /
SAT Satellitmottagare, Kabelkonverterare, DSS / Videotillbehör
AUD Audio / Audio mottagare/Tuner/Förstärkare / (DVD) Hemmabio
LIGHT Kontrollerade ljus knappar – KAMELEON 5 har även egenskaper som
Laserspelare, Videokasett spelare / TV/VCR Kombi / DVD/VCR Kombi /
Kasettspelare / Digital Audio Tape / DCC
(Mediacenter), Videoinspelning, Hårddisk inspelning
”LJUS” läge, för kontroll av moduler som används i Ljus Kontroll™
med 433.92 MHz protokoll. Detta läge ger Infrarött (IR) kommando
till en separat ”ONE FOR ALL Light Control™ Starters Kit – HC-8300”,
som konverterar IR kommando till Radiofrekvens (RF) som mottags av
strömmoduler för att kunna dimma och byta ljus.
För att få Light Control™ på din KAMELEON 5 måste du
inhandla ”ONE FOR ALL Light Control™ Starters Kit –
HC-8300”.
80 WW W.ONEFORALL.COM
Page 82

Om din KAMELEON 5
Lär sig egenskaperna
KAMELEON 5 kommer utrustad med en unik ”egenskapsinlärning”, vilket betyder att du kan kopiera nästan vilken funktion som helst (max. +- 50) från din
original fjärrkontroll till din nya KAMELEON 5 (Se ”Lära sig egenskaperna” på
sid 93). Efter att ha ställt in allt på KAMELEON 5 kan vissa funktioner från din
original fjärrkontroll fattas på din KAMELEON 5.
MACROS
Din KAMELEON 5 kommer med en Macro egenskap som låter dig göra flera
kommandon genom en knapptryckning (ex. stänga av eller sätta på ett par
apparater). När du programmerat ett macro på en av dessa knappar, kommer
sekvensen visa sig i alla lägen.
Kod uppgradering teknologi
Din ONE FOR ALL KAMELEON 5 erbjuder en Kod uppgradering teknologi. Denna
teknologi ger dig möjlighet att addera koder till minnet. Om din apparat
använder en speciell kod som inte finns i KAMELEON 5 minnet (använd
”Inställning direktkod” på sid 90 eller ”Sökmetod” på sid 91) kan du använda
”Kod uppgradering teknologi” (se sid 104). Tack vare denna teknologi kommer
aldrig din KAMELELON 5 bli omodern.
Batterier
Obs: KAMELEON 5 skall vara i ”demo-läge” (visar flera skärmar) när man
sätter i batterierna. Demo-läget försvinner automatiskt när du gör
inställningen.
Din KAMELEON 5 kräver 2 AA/LR6 alkaline batterier.
1. Skruva upp batteriluckan med hjälp av ett mynt.
2. Sätt i batterierna med + ändarna uppåt.
3. Sätt tillbaka batteriluckan.
Låg volt indikator
Så fort batterierna är slut kommer KAMELEON 5 att indikera detta. IR indikatorn
kommer att blinka 5 gånger så fort du trycker på någon knapp och det går inte
att komma åt något programmeringsläge.
Ersätt med 2 nya AA/LR6 alkaline batterier.
WW W.ONEFORALL.COM 81
Page 83

Tangentbordet
Produkten har en ”EL”-panel (Electro Luminescence technology) som aktiveras
genom att toucha skärmen. För att spara på batteriet, kommer ”EL” panelen
vara upplyst under ca 8 sekunder.
En av nyckelegenskaperna på KAMELEON 5 är ”EL” displayen som ändras
beroende på vilken apparat du vill kontrollera. På sid. 84 kan du läsa om alla
möjliga funktioner.
”EL” display inställningar
KAMELEON 5 har en ”EL” panel som aktiveras genom att toucha panelen eller
genom ett knapptryck.
Det är möjligt att låsa KAMELEON 5 till en inställning:
1. Tryck och håll MAGIC knappen i ca 3 sekunder. Skärmen
2. Tryck OTHER.
3. Tryck 9 8 9. IR indikatorn blinkar 2 gånger (eller 4 gånger).
-> Om IR indikatorn blinkar 2 gånger kommer ”EL” panelen aktiveras enbart
genom att toucha skärmen och kontrollen samtidigt.
-> Om IR indikatorn blinkar 4 gånger kommer ”EL” panelen aktiveras enbart
genom ett knapptryck.
Verkställ dessa steg för att låsa KAMELEON 5 till den inställning
du föredrar.
ändrar sig till skärm för inställningar.
”EL” panelen ljusjustering
För att höja eller dämpa ljusstyrkan på KAMELEON 5 ”EL” skärmen:
1. Tryck och håll MAGIC knappen i ca 3 sekunder. Skärmen ändrar
2. Tryck BRIGHT.
3. > 3. För att öka ljusstyrkan på ”EL” displayen tryck och
4. Tryck ENTER för att spara inställningen och gå tillbaks till
- Ökning av ljusstyrkan på KAMELEON ”EL” panelen kan orsaka försämrade
batterier. Livslängden på batterierna varierar mellan 3 – 12 månader (beroende
på ljusstyrkans inställning och användning).
82 WW W.ONEFORALL.COM
sig till skärm för inställningar.
håll inne NÄSTA.
> För att dämpa ljusstyrkan på ”EL” displayen tryck och håll
inne FÖREGÅENDE.
inställnings displayen eller tryck ESC för att komma tillbaka till
föregående inställd ljusstyrka.
Page 84

Tangentbordet
”EL” Inställning av tid
För att ändra varaktigheten (8 sek. utgångsläge) som KAMELEON 5 ”EL” displayen
skall vara på efter varje knapptryck under användning av fjärrkontrollen:
1. Tryck och håll MAGIC knappen i ca 3 sekunder.
2. Tryck OTHER.
3. Tryck 9 7 8. IR indikatorn blinkar 2 gånger.
4. Tryck 1, 2, 3, 4 eller 5 (e.g. 1=4 sekunder) beroende på
Val ”EL” Tid
1 4 sekunder
2 8 sekunder (utgångsläge)
3 12 sekunder
4 16 sekunder
5 20 sekunder
Skärmen ändras till skärm för inställningar.
ditt val, se tabell nedan. IR indikatorn blinkar 2 gånger.
Tryck ENTER för att spara den nya EL inställningen av tid
och för att gå tillbaka till skärmen med inställningar eller
tryck ESC för att komma tillbaka till den föregående
inställda EL inställningen av tid.
WW W.ONEFORALL.COM 83
Page 85

Tangentbordet
IR Indikator
TV
DVD
SAT
AUD
LIGHT
84 WW W.ONEFORALL.COM
Page 86

Tangentbordet
1. IR (infraröd) Indikator
2. Apparatens knappar
TV, DVD, AUD och LJUS knapparna kontrollerar apparaterna. Efter att ha tryckt
på en av nämnda knappar visar sig ikonen för vald apparat och nuvarande läge.
Genom att trycka på knappen för vald apparat har du möjlighet att återgå till
huvudskärmen (TV och AUD lägen). KAMELEON 5 erbjuder även ett ”LJUS”
läge. Ihop med ”ONE FOR ALL Light Control™Starters Kit – HC-8300, kan du
dimma och switcha PÅ/AV ljuset i hela ditt hus.
3. MAGIC (i ”VÄXLA” eller ”PROGRAMMERING” läge)
IR Indikatorn indikerar när IR sänds eller mottager. IR
Indikatorn visar ”utgående IR” när en knapp funktion är
tryckt. När man använder ”Inlärningsprocedur” eller ”Kod
uppgradering procedur” kommer IR Indikatorn visa
”inkommande IR”. Utgående IR kommer indikeras genom
en ”utifrån till inifrån” IR Indikator. Ingående IR indikeras
genom en ”inifrån till utifrån” IR Indikator. IR Indikatorn
ger feedback när knappar är tryckta både under normal
användning och i programmeringsläge (mittsegmentet av
IR Indikatorn blinkar).
MAGIC knappen används för att ställa in KAMELEON 5 och
för att komma åt specialfunktioner. Om man trycker ner
knappen snabbt, kommer skärmen visa ”VÄXLA” läge (för 10
sekunder) vilket ger access till andrahandsfunktioner såsom
färg, ljusstyrka och sov timer.
Programmerings läge
Om du trycker MAGIC knappen längre (ca 3 sekunder),
kommer KAMELEON 5 inta programmeringsläge. Skärmen
ändrar sig till skärm för inställningar.
DEV SET
SEARCH
MODE
KEY MAGIC
MACRO
BRIGHT
LEARN
IR DELETE
VOLUME
OTHER
WW W.ONEFORALL.COM 85
• Apparat inställningsläge
• Sökningsmetod
• Läge
• Inställning av missade funktioner
• Inställning av knapp för sekvenser
av kommandon
• ”EL” skärm för ljusstyrka
• Kopiera funktioner från din original fjärrkontroll till
KAMELEON 5
• Tar bort inlärda och Key Magic
funktioner
• Volymtryck
• ”EL” (4 sek, 8 sek, 12 sek, 16 sek, 20 sek)
• Operativ omställning
• KAMELEON 5 – Timer
• EL skärm inställningar
• Kodverifikation
• Modem uppgradering
Page 87

Tangentbordet
4. SKROLLA
5. ENTER
6. POWER (i växlat läge; sovtimer)
7. TV/VCR / TV/SAT / TV/DVD
8. 16:9 / PVR / SP/LP
Skroll knappen ger dig möjlighet att röra sig mellan olika
skärmar inom ett visst läge under normal användning och
programmeringsläge. Detta gäller enbart TV och AUD
lägen.
Enterknappen ger dig möjlighet att bekräfta ett val i programmeringsläge.
POWER knappen har samma funktion som på din original
fjärrkontroll.
I DVD läge har man TV/VCR funktion(användbar om du
programmerat en VCR kod). I SAT läge har man TV/SAT
funktion. I DVD läge har man TV/DVD funktion.
I TV läge har man 16:9 (skärm storlek) funktion. I SAT läge
kommer denna knapp aktivera PVR funktion. I DVD läge
har man SP/LP (kassett hastighet) funktion (användbar om
du programmerat en VCR kod).
9. GUIDE / DSP
10. MENY
I AUD läge på din original fjärrkontroll gäller ”DSP”
funktion. I TV och DVD läge ger dig ”GUIDE” knappen
”guide” funktion, om den finns tillgänglig på din original
fjärrkontroll. I TV läge kommer ”GUIDE” knappen ändra
skärmen till ”meny läge skärm”.
Att styra menyn och i TV och AUD läge ändras skärmen till
menyläge. Menyknapparna fungerar på samma sätt som
på din original fjärrkontroll.
86 WW W.ONEFORALL.COM
Page 88

Tangentbordet
11. EXIT
12. MUTE (sordina)
13. CH +/- (i växlat läge; ljusstyrka +/-)
14. Knapparna Upp, Ner, Vänster, Höger
15. SURROUND / OK
EXIT knappen fungerar på samma sätt som på din original
fjärrkontroll. För att komma till huvudskärmen (TV, SAT
och AUD läge) tryck apparat knappen eller använd
SKROLL knappen.
Mute knappen har samma funktion som på din original
fjärrkontroll.
Fungerar som på din original fjärrkontroll. I växlat TV läge
(tillgång genom tryck på MAGIC snabbt) kan dessa knappar
ge dig funktion för ljusstyrka +/-.
Om dessa knappar är tillgängliga på din original fjärrkontroll ger de dig möjlighet att navigera genom menyn. På
vissa TV kan du behöva trycka CH+/- och VOL +/- knapparna eller de färgade tangenterna (röd, grön, gul, blå) för
att navigera genom menyn, beroende på din TV-model. I
AUD utgångsläge kan dess knappar justera CENTER och
BAKRE nivå av dina högtalare. I AUD meny läge kan dessa
knappar navigera dig i meny-skärmen.
I menyläget kan denna knapp bekräfta ditt val. På vissa
apparater kan du bekräfta ditt menyval enkelt genom att
trycka MENY. I AUD utgångsläge kan denna knapp ge dig
access till kringliggande läge på din apparat.
WW W.ONEFORALL.COM 87
Page 89

Tangentbordet
16. VOL +/- (i växlat läge; färg +/-)
17. Nummerknappar / Input
18. -/-- / PPV
19. AV / HJÄLP
20. ESC
Volymknapparna fungerar som på din original fjärrkontroll. I växlat TV läge (genom att trycka MAGIC snabbt) kan
dessa knappar ge dig färg +/- funktion.
Nummer (1-9, 0) knapparna fungerar som din original fjärrkontroll. I AUD läge, ger nummerknapparna en Input
funktion (e.g. Tuner). Om din original fjärrkontroll har
”function select” eller ”input select” funktion hittar du
detta under AV knappen. I programmeringsläge kommer
siffertangenterna visa olika inställningsegenskaper.
Om din original fjärrkontroll använder en/två sifferinmatning (-/--), kan denna funktion nås genom att trycka -/-knappen. I SAT och PVR läge har man PPV funktion.
AV knappen fungerar som på din original fjärrkontroll. Om
din original fjärrkontroll har 20 knappar, kan denna funktion hittas genom AV knappen. Om din original satellit
eller PVR har en ”hjälp” funktion, kan du hitta den genom
att trycka ”Hjälp”. I AUD läge har du ”input source” funktion.
Denna knapp uppträder endast i programmerings läge och
används för att gå tillbaka till Setup screen eller för att gå
ur programmerings läge.
21. Transport knappar (PLAY, STOP etc.)
Dessa knappar fungerar för att transportera funktioner
som PLAY, FF, REW, SKIP+/- (TRACK+/-) etc. på din apparat.
För att spela in måste RECORD knappen tryckas in 2 gånger
för att starta inspelningen.
88 WW W.ONEFORALL.COM
Page 90

Tangentbordet
22. Text tv knappar
EXPAND: Visar övre halvan av text tv sidan i stora bokstäver. Genom
att trycka igen kan du se undre halvan av text tv sidan förstorad. För
att återgå till normal text, tryck EXPAND knappen igen eller tryck
TEXT ON knappen, beroende på din TV.
TEXT ON: I TV läge: när man är i text läge och trycker denna knapp
kan man växla till MIX eller TURN OFF text, beroende på din TV.
Denna funktion är även möjlig i SAT läge.
MIX: Visar både text och TV bild.
TEXT OFF: I TV läge: växlar tv:n tillbaka till vanligt tittar läge. På
vissa TV kan detta göras genom att trycka ”TEXT ON” knappen flera
gånger. Denna funktion är även möjlig i SAT läge.
TEXT INDEX: Denna knapp ger dig access till index funktion inom
nästa läge.
23. Röd / Grön / Gul / Blå
Dessa knappar används för att styra huvud text tv funktionerna. Självklart måste din TV ha text tv. För mer detaljerad förklaring av text tv och fastext, se din manual till
din TV. Kom ihåg att olika TV kontrollerar text tv och fastext funktionerna olika. Alla text tv funktioner kommer
kanske inte fungera på din nuvarande modell.
När man är i text läge, kommer färgknapparna markerade
röd, grön, gul och blå ge dig access till fastext
funktionerna i din TV.
WW W.ONEFORALL.COM 89
Page 91

Ställa in KAMELEON 5
(Hur man ställer in KAMELEON 5 för att kontrollera sina apparater)
OBS: När du sätter i batterierna måste KAMELEON 5 vara i ”demo-läge.
Följ kommande steg och KAMELEON 5 kommer ur demo-läge
automatiskt.
Exempel: Ställ in KAMELEON 5 för din TV:
1. TV:n skall stå på ON (inte på standby).
2. Hitta din kod för din apparat i kodlistan (sid. 261 - 288). Koderna är
listade som apparat läge och varumärke. Den mest populära koden för varje
varumärke är listad först. Om ditt varumärke inte är listat i kodsektionen,
försök med Search Method på sid 91.
3. Tryck och håll MAGIC knappen i ca 3 sekunder. Skärmen kommer
4. Tryck DEV SET knappen.
5. Tryck och släpp TV knappen för att välja den apparat typ du vill
6. Skriv in den fyrsiffriga koden (se kodlista sid. 261 - 288)
_ _ _ _
7. Rikta din KAMELEON 5 mot TV:n och pröva följande
8. Om din apparat svarar, tryck ENTER för att spara koden. Om
9. Tryck och håll ESC intryckt för ca 3 sekunder för att
ändra sig till skärm för inställningar.
ställa in.
genom att välja nummer knapparna. IR Indikatorn blinkar 2
gånger.
knappar för att testa att KAMELEON 5 fungerar med dina
apparater;
• KANAL +, KANAL –
• VOLYM +, VOLYM –
• TYST
• POWER
• MENY
den inte svarar ta då bara nästa kod listad under ditt
varumärke. Om ingen av koderna fungerar för din apparat,
försök med Sök Metoden beskriven på sid. 91.
komma tillbaka till användar läge (alla knappar för
apparatens lägen visas), ELLER tryck den apparats knapp
du vill ställ in.
- De flesta TV apparater sätts inte på genom att trycka på POWER knappen,
tryck istället på ”CHANNEL+” knappen för att sätta på din TV igen.
- Vissa koder är ganska lika. Om din apparat inte svarar eller inte fungerar
med någon av koderna, pröva en annan kod listad under ditt varumärke.
- För att ställa in dina andra apparater följ samma instruktioner ovan och
tryck vald apparats knapp under steg 5.
- Kom ihåg att trycka korrekt knapp för vald apparat innan användning av
apparaten. Enbart en apparat kan kopplas till en knapp.
För att ställa in en andra TV, DVD, SAT eller AUD (se sid 97).
90 WW W.ONEFORALL.COM
Page 92

Ställa in KAMELEON 5
Sökmetod
--> Om din apparat inte svarar på KAMELEON 5 efter att du försökt
med alla koder.
--> Om ditt varumärke inte är listat alls.
Sökmetoden hjälper dig att scanna genom alla koder i minnet
hos KAMELEON 5.
Exempel: Sökning av TV kod:
1. Sätt på din TV (inte standby).
2. Tryck och håll MAGIC knappen i ca 3 sekunder. Skärmen
3. Tryck SEARCH.
4. Tryck och släpp TV knappen för att välja den apparat du
5. Tryck POWER.
6. Rikta KAMELEON 5 mot din TV. Tryck NEXT om och
7. När din TV stängs av, tryck ENTER knappen för att
8. Tryck ESC för att gå tillbaka till skärmen för
9. Tryck ESC igen för att komma tillbaka till användar läge
ändras till skärm för inställningar.
vill ställa in.
om igen, tills TV:n stängs av (varje gång du trycker
NEXT sänder KAMELEON 5 ut en POWER signal från nästa
kod i minnet). Du får kanske trycka många gånger
(upp till 150 gånger). Kom ihåg att rikta KAMELEON 5
mot din TV medan du trycker på knappen. (Om du
trycker förbi en kod kan du gå tillbaka genom att trycka
PREVIOUS knappen).
spara koden. IR indikatorn blinkar 2 gånger.
inställningar eller tryck en knapp för en apparat om du
vill ha Sökmetoden för en annan apparat.
(alla knappar visas). Sätt på din apparat (TV) igen och
prova alla funktioner för att förvissa dig om att de fungerar. Om du inte kan kontrollera TV rätt, fortsätt med Sök
Metoden, du kanske använder fel kod.
- Under steg 5, istället för POWER kan man också trycka någon annan knapp
som visas. Detta är funktionen för nästa knapptryck av NEXT eller PREVIOUS
i steg 6. Om du under steg 5 t ex trycker ”2” istället för POWER, kommer
KAMELEON 5 sända ”nummer 2” signal varje gång du trycker NEXT under
steg 6 (din TV skall vara bytt till en annan kanal).
- För att söka efter dina andra apparater, följ instruktionerna ovan och tryck
på valfri apparats knapp under steg 4.
- Om din Videos original fjärrkontroll inte har en POWER knapp, tryck PLAY
istället för POWER under steg 5.
- I LJUS-läge fungerar inte Sök Metoden.
WW W.ONEFORALL.COM 91
Page 93

Blinkande kod
(För att veta vilken kod som är programmerad)
Om du har ställt in din KAMELEON 5 via Sök Metoden kan du blinka tillbaka
din kod för kommande referens. IR indikatorn kommer indikera de 4
nummerknapparna.
Exempel: Att blinka ut din TV kod:
1. Tryck och håll nere MAGIC knappen (i ca 3 sekunder). Skärmen
2. Tryck OTHER.
3. Tryck 9 9 0, IR indikatorn lyser upp 2 gånger.
4. Tryck och släpp TV knappen för att välja typ av apparat du vill ge
5. För den första siffran i din fyrsiffriga kod, tryck 1 och räkna blinken
6. För den andra siffran, tryck 2 och räkna blinken. Om det inte blinkar,
7. För den tredje siffran, tryck 3 och räkna blinken. Om det inte blinkar,
8. För den fjärde siffran, tryck 4 och räkna blinken. Om det inte blinkar,
9. Tryck ENTER för att komma tillbaka till skärmen för inställningar eller
10. Tryck och håll ESC (i ca 3 sek.) för att återgå till användar läge.
- Du kan utföra steg 5 – 8 i vilken ordning som helst och hur många gånger
som helst. Om du har tappat räkningen är det möjligt att gå tillbaka till det
valda numret igen (e.g. om du under steg 6 missade hur många gånger IR
indikatorn blinkade tryck ”nummer 2” igen och räkna igen).
- För att komma tillbaka till koden för dina andra apparater följ instruktionerna ovan och tryck vald apparats knapp under steg 4.
kommer ändras till skärm för inställningar.
koden.
på IR indikatorn. Om det inte blinkar, är siffran ”0”.
är siffran ”0”.
är siffran ”0”.
är siffran ”0”. Nu har du hittat din fyrsiffriga kod.
tryck på en knapp för en apparat om du vill prestera ett blink för
en annan apparat.
Snabb kod referens
Skriv ner koderna för dina apparater i boxarna nedan för snabb
och lätt referens.
■■■■■■ ■
■
■■■■■■ ■
■
■■■■■■ ■■
■■■■■■ ■
■■■■■■ ■
92 WW W.ONEFORALL.COM
■
■
Page 94

INLÄRNING EGENSKAPER
(Hur du kopierar funktioner från din original fjärrkontroll till
KAMELEON 5 kommer med ett helt kartotek med förprogrammerade koder.
Efter att du ställt in KAMELEON 5 för dina apparater kommer du se att det finns
en eller fler knappar på din original fjärrkontroll som inte får plats på ditt
KAMELEON 5 tangentbord.
KAMELEON 5 erbjuder en speciell inlärning som ger dig möjlighet att kopiera
nästan vilken funktion som helst från din original fjärrkontroll till ditt tangentbord på KAMELEON 5.
Innan du börjar:
- Se till att din original fjärrkontroll fungerar korrekt.
- Se till att varken din KAMELEON 5 eller din original fjärrkontroll är riktade mot
din apparat.
Inlärning (direkt)
KAMELEON 5)
Exempel: Att kopiera ”mono/stereo” funktionen från din original TV
1. Placera KAMELEON 5 och din original fjärrkontroll på en platt yta.
2. Tryck och håll nere MAGIC knappen (i ca 3 sek.). Skärmen
3. Tryck LEARN.
4. Tryck knappen för apparater (Exempel: TV) på din
5. Tryck på knappen (Exempel: ”röd” knapp) på KAMELEON 5
6. Tryck och håll knappen du vill kopiera (Exempel: mono/stereo)
fjärrkontroll till ”röd” knappen på din KAMELEON 5.
Lägg huvudändarna mot varandra. (se bild nedan). Håll ett avstånd
mellan 2 till 5 cm emellan enheterna.
ändrar sig till skärm för inställningar.
KAMELEON 5 för att välja det läge där du vill placera den
inlärda funktionen.
där du vill placera den inlärda funktionen. IR indikatorn visar
”inkommande IR” 3 gånger och sen slocknar displayen.
på din original fjärrkontroll. Displayen går på igen och du ser 2
blinkningar som indikerar färdig operation.
7. Om du vill kopiera andra funktioner i samma läge repetera steg 5 och 6
genom att trycka nästa knapp du vill kopiera. Om du vill kopiera en annan
funktion i ett annat läge, fortsätt med steg 4 följt av steg 5 och 6.
8. Tryck ENTER för att avsluta inlärningsläget och gå tillbaka till
WW W.ONEFORALL.COM 93
inställnings skärmen ELLER tryck och håll ESC för att komma
tillbaka till användar skärmen.
Page 95

Inlärningsfunktioner
- Så fort displayen släcks i steg 5 tryck på knappen (i detta exempel:
”mono/stereo” knappen) på din original fjärrkontroll inom 15 sekunder. Om
ingen knapp är tryck på i inlärningsläget kommer fjärrkontrollen gå tillbaka
till användarläge efter 30 sekunder.
- Om du lär dig en funktion på en knapp blir original KAMELEON 5
funktionen automatiskt ändrad. Tryck MAGIC knappen och sen knappen att
sätta den i funktion (detta exkluderar POWER, Channel och Volym
knapparna). Om du lärde dig på en sifferknapp, kom åt original funktionen
genom att trycka magic två gånger och sen siffran.
- Om du vill lära dig en funktion på en knapp som inte ligger i huvudskärmen
använd skroll knappen för att ändra skärm.
- Inlärningsegenskaperna är lägesspecifika. Därför kan man placera en inlärd
funktion per läge på samma knapp.
- KAMELEON 5 kan lära sig ca 50 funktioner. Mängden knappar beror på de
andra programmerade funktionerna och på fjärrkontrollen den lär ifrån.
- Du kan ersätta en inlärd funktion genom att placera en annan inlärd funktion på den första.
- Använd inte inlärningsproceduren i direkt solljus.
- Använd nya batterier innan du börjar med inlärningsinstruktionerna.
- När du byter batterier kommer dina inlärda funktioner att vara sparade.
Växlad inlärning
Det är även möjligt att placera funktionen shifted på en knapp för att bibehålla
original funktionen.
Exempel: För att placera mono/stereo funktionen shifted på den ”röda”
För att placera (e.g. mono/stereo) funktionen på den röda knappen, följ steg 1
– 8 på sid 93, tryck ”MAGIC” och sen ”röd” knapp under steg 5.
För att komma åt ”mono/stereo” funktionen i detta exempel; tryck ”MAGIC”
och sen den ”röda” knappen.
knappen.
- Om en Shifted Learned funktion är placerad på Channel & Volym knapparna
kommer egenskaperna ”Colour & Brightness” visas.
- Om du placerar funktionen shifted på den sifferknapp (0 – 9) behöver du
trycka MAGIC två gånger och sen sifferknappen för att komma åt denna
shifted funktion.
94 WW W.ONEFORALL.COM
Page 96

Inlärningsfunktion
Att ta bort en ”Magic funktion” eller ”inlärd
funktion” från en viss knapp:
Exempel: att ta bort ”Magic funktion” eller ”inlärd funktion” från ”I”
1. Tryck och håll MAGIC knappen i ca 3 sekunder. Skärmen kommer ändra sig
2. Tryck IR DELETE.
3. Tryck apparatens knapp (exempel TV).
4. Tryck funktionsknappen (exempel ”I”).
5. Tryck ENTER för att ställa om original funktionen ELLER tryck och håll ESC
- Originalfunktionen på KAMELEON 5 kommer återställas.
knappen i TV läge:
till skärm för inställningar.
för att gå tillbaka till användar skärmen.
Att ta bort en shifted ”Magic funktionsknapp” eller
”inlärd funktion” från en viss knapp:
Exempel: Att ta bort en ”shifted” lärd eller Magic funktionsknapp, följ stegen
Exempel: Att ta bort mono/stereo funktionen lärd shifted på den ”röda” knap-
1. Tryck och håll MAGIC knappen i ca 3 sekunder. Skärmen kommer skifta
2. Tryck IR DELETE.
3. Tryck den motsvarande apparatens knapp (ex. TV)
4. Tryck MAGIC.
5. Tryck motsvarande funktionsknapp (ex. ”Röd knapp”)
6. Tryck ”ENTER” för att spara originalfunktionen ELLER tryck och håll ESC för
- Originalfunktionen på KAMELEON 5 kommer återställas.
som följer.
pen i TV läge:
till skärmen med inställningar.
att återgå till användar skärmen.
För att ta bort alla ”Magicfunktioner” eller ”inlärda
funktioner” från ett visst läge:
Exempel: att ta bort alla ”Magicfunktioner” eller ”inlärda funktioner” från TV
1. Tryck och håll MAGIC knappen i ca 3 sekunder. Skärmen återgår till
2. Tryck IR DELETE.
3. Tryck motsvarande apparats knapp (ex. TV).
4. Tryck ENTER för att återspara original funktionen ELLER tryck och håll ESC
- Originalfunktionen på KAMELEON 5 kommer återställas.
läge:
skärmen för inställningar.
för att återgå till användar skärmen.
Operativ omställning
Operativ omställning tar bort alla inlärd funktioner över alla lägen. Det tar även bort
andra programmerade funktioner som Knapp Magic eller Macros.
1. Tryck och håll MAGIC knappen i ca 3 sekunder. Skärmen återgår till
skärm för inställningar.
2. Tryck OTHER.
3. Tryck 9 8 0. IR indikatorn blinkar 4 gånger och fjärrkontrollen återgår till
skärm för inställningar.
WW W.ONEFORALL.COM 95
Page 97

Extra Egenskaper
Key Magic
(Hur man programmerar funktioner som fattas)
Key Magic är en exklusiv ONE FOR ALL egenskap. Designen av KAMELEON 5 gör
att många funktioner från din original fjärrkontroll kan kommas åt – även de
som inte har sin egna knapp på KAMELELON 5 tangentbord. Frekvent använda
funktioner kan få en knapp du önskar genom att använda knappen Magics
egenskaper hos KAMELELON 5. För att programmera en viss funktion med knappen Magic måste du veta motsvarande funktionskod. Då koden för funktion
varierar för olika typer av apparater kan de inte hittas i manualen. Du kan efterfråga din funktionskod genom vår kundservice genom att skriva ett brev, fax
eller e-mail.
Allt vi behöver veta är:
• Varumärke och Modellnummer från apparaten (för verifikation att du
använder rätt kod.
• Den 4-siffriga inställningskoden som din apparat har.
• Hur funktionen var märkt på din original fjärrkontroll
Du kan även besöka vår hemsida (www.oneforall.com) för att finna svar på
dina frågor.
Så fort din funktionskod är i bruk är programmeringen av
koden lätt:
1. Tryck och håll MAGIC knappen i ca 3 sekunder. Skärmen återgår till
skärm för intällningar.
2. Tryck KNAPPEN MAGIC.
3. Tryck apparatens knapp (TV, DVD, SAT eller AUD).
4. Tryck MAGIC en gång.
5. Skriv in din 5-siffriga kod (som du fått av kundservice).
6. Tryck på önskad knapp som du vill att den skall vara kopplad till (om
denna knapp ligger på en annan skärm än huvudskärmen, använd SKROLL
knappen för att komma till skärmen). IR indikatorn blinkar 2 gånger och
skärmen återgår till skärm för inställningar.
- Knappen Magics funktioner är lägesspecifika. För att komma åt funktionen
du har programmerat, tryck på apparatens knapp först.
- Knappen Magic kan kopplas till vilken knapp som helst förutom följande:
Apparatknapparna, ESC, ENTER, MAGIC knappen och SKROLL knappen.
- Vänligen notera alla utomstående funktionskoder du får från kundservice
för framtida bruk.
- Knappar så som (TV) meny, (TV) guide etc. ändrar inte skärm under tiden
man trycker på Knappen Magic programmering.
®
REFERENS FÖR UTÖKADE FUNKTIONER
(nedan följer ett exempel):
DEVICE
TV 0556 16/9 format 00234
SET-UP CODE
FUNCTION FUNCTIONCODE
96 WW W.ONEFORALL.COM
Page 98

Extra Egenskaper
Lägesinställning
(Hur du ställer in 2 av samma apparat på KAMELEON 5)
Det är möjligt att ändra läget på vilken apparats knapp som helst. Detta är
användbart om du vill ställa in två av samma apparater på KAMELEON 5. Den
modifierade apparatens knapp visar de passande knapparna för det reviderade
läget. Koden kan ställas in om man använder ”Direktinställning” (sid 90) eller
”Sökmetod” (sid 91). För att ändra en apparats knapp, se exemplet nedan
Exempel 1; om du vill programmera en andra TV på DVD knappen.
Exempel 2; om du vill programmera en andra DVD spelare på din SAT knapp.
Exempel 1
För att programmera en andra TV på din DVD knapp (till exempel), behöver
du ändra DVD knappen till en TV knapp, så tryck:
(*) (**)(*) (**)
DVD knappen har nu blivit en andra TV knapp och visar de passande
knapparna för detta läge.
Ta nu fram din inställningskod för din andra TV genom att trycka:
_ _ _ _
Exempel 2:
För att programmera en andra DVD spelare på din SAT knapp (till exempel),
behöver du ändra SAT knappen till en DVD knapp, så tryck:
(*)
(TV Code) (**)
(**)
SAT knappen har nu blivit en andra DVD knapp och kommer att visa
de passande knapparna för detta läge.
Ta nu fram din inställningskod för din andra DVD genom att trycka:
_ _ _ _
- Om du programmerar en annan apparatstyp på en annan knapp (e.g. andra
TV på DVD knappen) kommer original apparatens knapp att återstå, men de
visade funktionsknapparna kommer att ändras för att lämpa sig för den nya
apparatens läge. Till exempel; om en andra TV är programmerad på DVD
knappen, kommer text-TV funktionerna visas i DVD läge.
(DVD Code) (**)
Ställ om en apparats knapp
Exempel: För att ställa om DVD knappen till dess original läge, tryck:
(*) (**)
(*) Tryck och håll MAGIC knappen i ca 3 sekunder. Skärmen ändras
till skärm för inställningar.
(**) IR indikatorn blinkar två gånger (skärmen ändras till skärm för
inställningar).
WW W.ONEFORALL.COM 97
Page 99

Extra Egenskaper
Volym
Denna egenskap ger dig möjlighet att justera volymen i ett visst läge (e.g. TV
läge) när man är i ett annat läge (e.g VCR). Om du t ex tittar på Video (i DVD
läge), kan du justera volymen (en TV funktion) utan att först trycka TV knappen.
Listan nedan visar olika möjligheter:
Senast tryckta knapp: Att kontrollera:
DVD : TV volym upp och ner, tyst
SAT : TV volym upp och ner, tyst
AUD : TV volym upp och ner, tyst
LIGHT : TV volym upp och ner, tyst
Exempel: För att få AUD volym och stå i ett annat läge (e.g. SAT eller
1. Tryck och håll MAGIC knappen i ca 3 sekunder. Skärmen återgår till
2. Tryck VOLYM.
3. Tryck AUD knappen och IR indikatorn blinkar 2 gånger och fjärrkontrollen
Resultat: VOL+/- och MUTE kommer vara från AUD läge oberoende av det
Exempel: att ta bort volymen för VCR (i DVD läge):
1. Tryck och håll MAGIC knappen i ca 3 sekunder. Skärmen återgår till
2. Tryck VOLYM.
3. Tryck VOL- ( ) knappen.
4. Tryck DVD en gång. IR indikatorn kommer att blinka 4 gånger och enheten
Resultat: i DVD (VCR) läge kan du kontrollera VOL+/- och MUTE funktionerna
DVD läge):
skärm för inställningar.
återgår till skärmen för inställningar.
valda apparatläget.
Att ta bort volymen i ett läge:
skärm för inställningar.
återgår till skärm med inställningar.
på din VCR (förutsatt att den har volymkontroll).
Att ta bort volymen i alla lägen:
1. Tryck och håll MAGIC knappen i ca 3 sekunder. Skärmen återgår till
skärm för inställlningar.
2. Tryck VOLYM.
3. Tryck VOL+ ( ) knappen och IR indikatorn blinkar 4 gånger och skärmen
återgår till skärm för inställningar.
Resultat: I alla lägen kommer VOL+, VOL- och MUTE knapparna fungera med
originalfunktionerna igen.
98 WW W.ONEFORALL.COM
Page 100

Extra Egenskaper
Sovtimer
Om din apparat har en ”Sovtimer” funktion inbyggd kan du använda denna
funktion med din KAMELEON 5 fjärrkontroll. Gör följande:
1. Se till att din apparat är påslagen.
2. Tryck knappen för apparaten TV (eller DVD, SAT, AUD).
3. Rikta KAMELEON 5 mot din apparat och tryck och släpp MAGIC knappen
för att sedan trycka POWER. Din ”Sovtimer” aktiveras på skärmen. För att
ställa timern tryck POWER igen (inom 10 sekunder) tills timern är inställd på
önskad tid.
- För att avaktivera ”sovtimern”, repetera steg 1 – 3 ovan. Under steg 3, fortsätt trycka POWER igen (inom 10 sekunder) tills timern indikerar 0 minuter.
- Beroende hur du använt sovtimern på din original fjärrkontroll, kan du
behöva komma åt sovtimern på ett annat sätt (genom menyn till exempel).
KAMELEON 5 – Timer
KAMELEON 5 – Timer funktionen ger dig möjlighet att aktivera en <önskad
funktion> från en specifik <apparats läge> inom ett <specifikt antal
minuter> (max. timer är 60 minuter).
- Den <önskade funktionen> kan bli en existerande funktion med ett specifikt
läge, ett Macro, en Magic funktion eller inlärd funktion.
Exempel: Du vill att din TV skall stängas av efter 45 minuter.
1. Tryck och håll MAGIC knappen i ca 3 sekunder. Skärmen återgår till
skärm för inställningar.
2. Tryck OTHER.
3. Tryck 9 8 5 för att komma åt KAMELEON 5 – Timer programmeringsläge.
IR indikatorn blinkar 2 gånger.
4. Tryck TV för att välja läge där KAMELEON 5 – Timer funktion skall komma
från. IR indikatorn blinkar 2 gånger.
5. Tryck POWER knappen för att välja den valda funktionen. IR indikatorn
blinkar 2 gånger.
6. Tryck 4 5 för att ange hur många minuter efter att <Önskad funktion>
behöver vara aktiverad (e.g. i 5 min. tryck 05, max. upp till 60).
7. Tryck ENTER. IR indikatorn blinkar 2 gånger och KAMELEON 5 – Timer
funktionen är aktiverad.
- Ogiltiga knapptryck under programmeringen av KAMELEON 5 – kommer
Timern att ignoreras.
- <Önskade funktioner> kan vara vilken knapp som helst förutom Apparat
knapparna, SKROLLA, ESC, ENTER och MAGIC.
- Under tiden KAMELEON 5 – timer går, lyser IR indikatorn var 15 sekund.
- KAMELEON 5 – Timer funktion stängs av när ny timer funktion sätts upp.
- Om ingen knapp trycks på under inställning av KAMELEON 5 – Timer
funktion, kommer fjärrkontrollen gå tillbaka till användar läge efter 30
sekunder.
- SKROLL knappen kan kommas åt under programmering om tillämplig i
nuvarande apparats läge.
WW W.ONEFORALL.COM 99
 Loading...