

Page 1
URC-7552
701919
Universal remote
F
D
UK
Page 2

2 WWW.ONEFORALL.COM
PICTURE OF ONE FOR ALL 5 REMOTE
3
INSTALLING THE BATTERIES
4
THE KEYPAD
4
SETTING THE CLOCK
6
INSTALLATION
Setting up your devices 7
The Search Method 8
CHANGING A DEVICE KEY
9
QUICK CODE REFERENCE
9
ADVANCED FEATURES
Colour and Brightness 10
Volume Punch-Through 10
Auto Scan 10
Favourite Programme Scan 11
Device Sleeptimer 12
ONE FOR ALL Sleeptimer 12
Macros 13
The Learning Feature 14
Key Magic 16
Telephone Upgradable Technology / Internet Download 17
TROUBLE-SHOOTING
Helpful Hints 18
Customer Service 19
Table of Contents
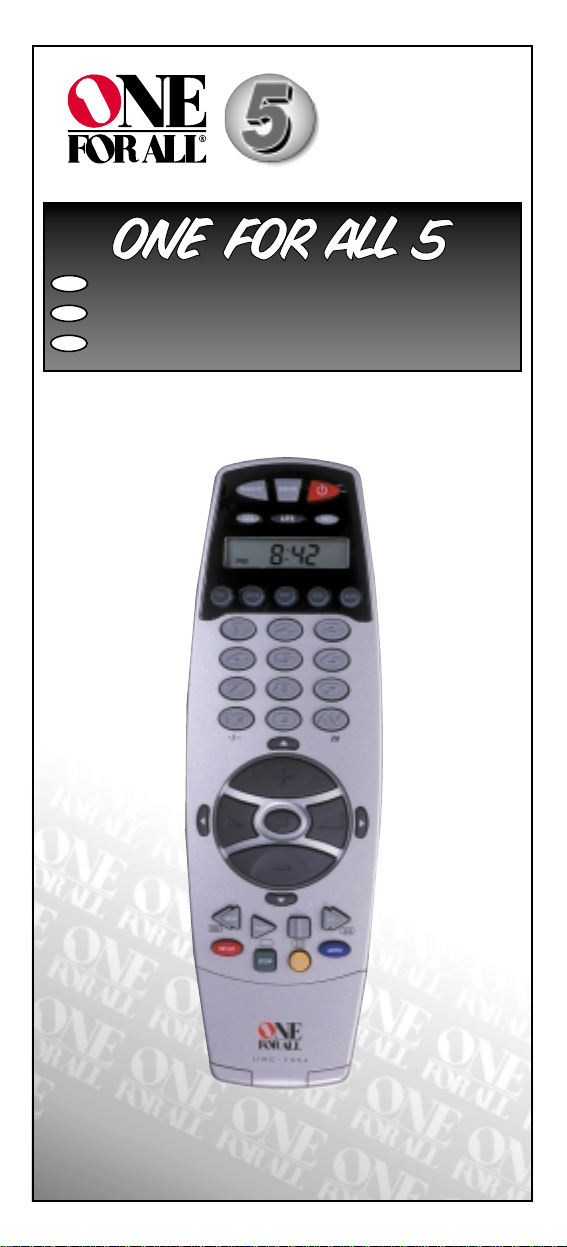
About Your ONE FOR ALL 5
Your ONE FOR ALL 5 Package contains:
• Your ONE FOR ALL 5 Remote
• Your ONE FOR ALL 5 Manual
• Your ONE FOR ALL 5 Codelist
You may need this guide again in the future, so please be sure to
keep it.
Your ONE FOR ALL 5 needs 2 new “AA/LR6” batteries.
Your ONE FOR ALL 5 is designed to let you use one remote to operate
your Video and Audio equipment; any device designed to be operated
by an infrared signal. This also includes those devices, which operate
over 100 kHz. You can choose any combination of five devices you would
like to operate. Also, what makes the ONE FOR ALL 5 even more unique
is the "Learning" feature, which allows you to customise any of the special functions of your original remote control onto the keypad of your
new ONE FOR ALL 5.
The following pages explain in simple steps how to customise the ONE
FOR ALL 5 to your home entertainment needs.
UK
Page 3
WWW.ONEFORALL.COM 3
7
13
11
10
9
3
5/6
4
8
16
14/15
12
2
1
Page 4

Installing the Batteries
Your ONE FOR ALL 5 needs 2 new “AA/LR6” alkaline batteries.
1 Remove the battery cover from the back of your ONE FOR ALL 5 by
pressing down on the tab.
2 Match the batteries to the + and - marks inside the battery case,
then insert the batteries.
3 Press the battery cover back into place.
See picture of ONE FOR ALL 5 remote on page 3.
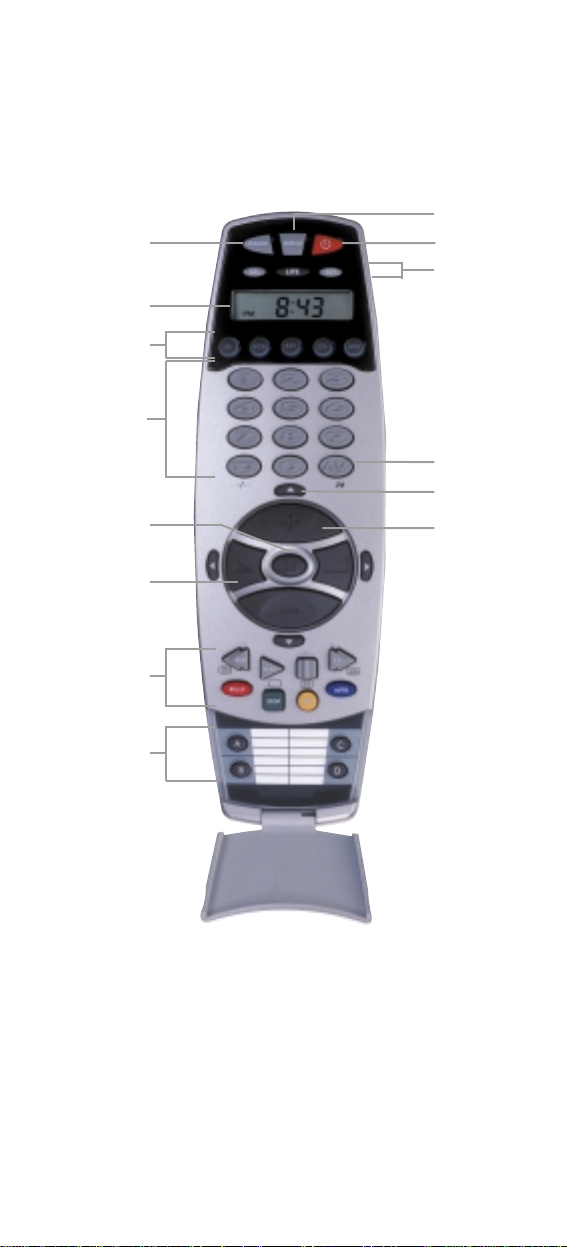
1 MAGIC Key
The MAGIC key is used to set up your ONE FOR ALL 5 and to access
special functions.
2
MENU Key
The MENU key controls the same function as it did on your original
remote. If available on your original remote control, this key will
also allow you to access the Surround mode of your device.
3
POWER Key
The POWER key controls the same function as it did on your original
remote.
4 LCD
The Liquid Crystal Display features a 12 or 24 hour clock (see page 6).
5 Lite Key
This key will light up the display of your clock.
6 SEL and SET Keys
The SEL and SET keys are used to set up the clock functions (see
page 6)
7 Backlit Device Keys
The TV, VCR, SAT, CD, and AUD keys select the home entertainment
device to be controlled. For example pressing the TV key allows the
remote to control the functions of your Television, after pressing
VCR you can operate your Video Cassette Recorder or DVD player,
etc. For more detailed information, please refer to the chart on
page 7. During operation of the ONE FOR ALL the device key will
light up to indicate the mode you are using.
8 Number Keys
The Number keys (0-9, 10, 20 (AV)) provide functions just like your
original remote. If your original remote uses one/two digit input
switching (-/-- symbol), this function can be obtained by pressing the
-/-- key, which is the same as the 10 key. If your original remote has a
20 key this function can be found under the AV key.
9 AV
The AV key operates the same function it did on your original remote control. Also, if your original remote control required that you
press an “EXIT” key during Menu operation, the AV key can be used
for this function. In VCR mode it obtains the TV/VCR function.
The Keypad
Important notes:
- On the inside of the battery compartment door you will find a
label on which to write your Set-Up codes after your ONE FOR
ALL 5 is set up for your device. Please write down your codes for
easy, future reference.
- Do not use rechargable batteries.
- Upon changing the batteries, your set-up codes and advanced
programming will be retained.
WWW.ONEFORALL.COM 4
Page 5

WWW.ONEFORALL.COM 5
10
Directional Keys
If available on your original remote, these keys will allow you to navigate through the menu and the Surround Sound mode of your device.
11 Programme (Channel) +/- Keys
These keys operate in the same way as the keys on your original
remote.
12 Mute Key (OK/Enter in Menu operation)
The Mute key operates the same function it did on your orginal
remote control. It is also used to activate the Auto Scan feature (see
page 10). Also, if your original remote control required that you
press an “OK” or “ENTER” key during Menu operation, the Mute
key can be used for this function.
13 Volume +/- Keys
These keys operate in the same way as the keys on your original
remote.
14 Video Recorder Keys
After pressing the VCR key, the Video Recorder keys operate the
functions of your Video Recorder. To prevent accidental recordings,
the Record key must be pressed twice to start recording.
The SP/LP key controls the tape speed function, the AUTO key controls the auto tracking function, just like on your original remote.
15 Teletext and Fastext Keys
After pressing the TV key, the top row of the VCR keys is used to
operate the main Teletext functions. The symbols below the keys are
for Teletext. The text keys are used to access the Teletext functions
of your television. Of course, your television must have Teletext
capability.
TEXT ON: Puts the television in the Teletext mode.
TEXT OFF: Switches the television back to regular viewing mode. On
some televisions, this may be done by pressing the TEXT ON key
several times.
HOLD/STOP: Stops changing pages.
EXPAND: Shows the top half of the Teletext page in larger letters.
By pressing again, you can see the bottom half of the Teletext page
enlarged. To return to regular Teletext viewing, press the EXPAND
key again, or press the TEXT ON key, depending on your television.
After pressing the TV key and accessing the text mode, the bottom row of
the Video Recorder keys marked red, green, yellow and blue, allow you
to access the Fastext functions of your television. If on your original
remote control these keys are used for Menu navigation, the ONE
FOR ALL Fastext keys may operate in the same way.
16 Custom keys
The Custom Keys are spare keys which give you the possibility to
customise the ONE FOR ALL remote using the learning and Key
Magic® features (page 14 and 16). These keys can also be used to
program Macros (see page 13).
For your convenience, the ONE FOR ALL 5 comes with an adhesive overlay
to label the “custom keys”.
Important note: For a more detailed explanation of Teletext and Fastext,
please refer to the manual of your television. Remember, different televisions
control Teletext and Fastext features in different ways. Not all of the Teletext
functions may be available for your particular model.
Page 6

After having installed the batteries you will get the real time mode on the
display.
Setting the Clock
1 Press the SET key 4 times.
2 Adjust the month by using the SEL key.
3 Press the SET key once.
4 Set the day, using the SEL key.
5 Press the SET key once to get the hour adjustment mode of the real
time.
6 Adjust the hour using the SEL key.
7 Press the SET key once.
8 Adjust the minutes use the SEL key.
9 When the minutes for the real time are installed, press the SET key
once, then the SEL key to exit the clock adjustment time.
During the set up of the real time, you can choose between a 12-hour
clock format and the 24-hour clock format. The "A" denotes the A.M. of
the 12-hour format the "P" denotes the P.M. of the 12-hour format and
the "H" denotes the 24-hour format. The hour format can be changed
by continuing to press the SEL key during step 5.
Setting the Alarm
1 Press the SET key once. The display will change to the alarm time
and blink.
2 Press the SET key again.
Use the SEL key to set the hour of the alarm time.
3 Press the SET key once.
4 Set the minutes for the alarm time using the SEL key.
5 When the alarm time is set up, press the SET key once to exit the
alarm adjustment time.
Turning the alarm/chime
on and off
The display screen will read the real time
1 Press the SET key once. The display will change to the alarm time
mode (which will blink continuously).
2 Now use the SEL key to turn off or on the chime and alarm of your
clock.
3 Press the SET key 3 times to exit this feature.
Setting the Clock
6 WWW.ONEFORALL.COM
Notes:
- The Alarm time hour format will update automatically to the real time
hour format.
- When the alarm goes off you can stop it by pressing the SET key.
Page 7

WWW.ONEFORALL.COM 7
Setting Up Your Devices
Example: To set up the ONE FOR ALL 5 for your television:
1 Find the code for your device in the Code list.
Codes are listed by device type and brand name.
The most popular code is listed first. Make sure your
device is switched on (not on standby).
2 Press the TV key on the ONE FOR ALL 5 for the device
you wish to Set-Up.
3 Press and hold down MAGIC until the device key blinks
twice. (The device key will blink once and then twice.)
4 Enter your four-digit device code using the number
keys. The device key will blink twice.
5 Now, aim the ONE FOR ALL 5 at your device and
press POWER. If your device switches off, the ONE
FOR ALL 5 is ready to operate your device.
6 Turn your device back on and try all the remote’s functions to ensure
they are working properly. If the functions do not work properly,
repeat steps 1-5 using another code listed under your brand.
7 If your device does not respond, follow steps 1 to 5 with
each code listed for your brand. If none of the codes listed
for your brand operate your device, or if your brand is not
listed at all, try the search method described on page 8.
8 Write your code in the four boxes provided in the battery
compartment and on page 9 for easy future reference.
Installation
Before you start, please read these instructions carefully
Important notes:
- Some codes are quite similar. If your device does not respond or is not func-
tioning properly with one of the codes, try another code listed under your
brand.
- If your device’s original remote control does not have a POWER key, press
PLAY instead of POWER when setting up your device.
- Remember to press the correct device key before operating your device.
Only one device (CD, amplifier, TV, etc.) can be assigned to a device key. If
your original remote operates more than one device (for example, a
receiver and CD player in one remote), you need to set up each device
separately.
ONE FOR A
Adyson
Agazi
AGB
Agef
0
0
0
9
0
0
8
7
, 0
0
9
3
, 0
3
6
3
, 0
4
1
0
2
1
7
, 0
2
1
6
0
2
6
4
0
5
1
6
0
0
8
7
0
2
1
6
, 0
0
0
9
, 0
0
3
7
, 0
0
0
3
7
, 0
2
7
4
, 0
2
0
8
, 0
3
7
1
____
To set up a second TV, VCR, SAT, CD or AUD see page 9.
Devices can be found under the following keys:
TV
TV
VCR
AUD
SAT
CD
CD /
Mini Disc
Television
Video /
DVD
Satellite /
Cable Converter
Audio Amplifier /
Tuner /
Miscellaneous Audio /
Page 8

8 WWW.ONEFORALL.COM
The Search Method
If your device does not respond to the ONE FOR ALL 5 after you have tried
all the codes listed for your brand, try searching for your code. The Search
Method allows you to find the code for your device by scanning through all
the codes contained in the memory of the ONE FOR ALL 5. The Search
Method may also work if your brand is not listed at all.
Example: To search for your TV code:
1 Switch your television on (not on standby) and aim your
ONE FOR ALL at your TV.
2 Press the TV key on your ONE FOR ALL 5.
3 Press and hold down MAGIC until the ONE FOR ALL 5’s
TV key blinks twice (The TV key will blink once and then
twice).
4 Press 9 9 1. The TV key will blink twice.
5 Now slowly, alternate between TV and POWER, over and
over, until your television turns off. You may have to
press these keys many times (up to 200!), so please
be patient. Remember to keep pointing the ONE FOR
ALL 5 at your television when you press these keys.
6 As soon as your television turns off, press MAGIC to
store the code.
The ONE FOR ALL remote should now be ready to operate your device.
Turn your device back on and try all the remote’s functions to ensure they
are working properly. If some of the ONE FOR ALL’s commands are not
operating correctly, try the search method again. You may be using the
wrong code.
Once you have Set-Up your ONE FOR ALL 5, you can blink back your
SET-UP CODE for future reference.
Example: To blink out your Television code:
1 Press TV once.
2 Press and hold MAGIC until the ONE FOR ALL 5’s TV key
blinks twice (The TV key will blink once and then twice).
3 Press 9 9 0. The TV key will blink twice.
4 For the first digit of your four-digit code, press 1 and
count all the red blinks. If there are no blinks, the digit is
"0".
5 For the second digit, press 2 and count all the red blinks.
If there are no blinks, the digit is "0".
6 For the third digit, press 3 and count all the red blinks.
If there are no blinks, the digit is "0".
7 For the fourth digit, press 4 and count all the red blinks.
If there are no blinks, the digit is "0". Now you have your
four-digit code.
Make sure you write your Television code in the boxes provided in
the battery compartment and on page 9 for easy future reference.
Important notes:
- To search for the code for another device follow the instructions above
only press the appropriate device key instead of TV during steps 2 and 5.
- If the original remote control of your device does not have a POWER key,
press PLAY instead of POWER during step 5.
Important note: To blink back the code for your other devices press the
appropriate device key during step 1.
TVTVTV
Page 9

WWW.ONEFORALL.COM 9
It is possible to change any device key.
Example 1:
To program a second Television on the AUD key (for example), you need
to change the AUD key into a TV key, so press:
1 (*) (**)
The AUD key has now become a second TV key.
2 Now enter the SET-UP code for your second TV by pressing:
(*) (4-digit TV SET-UP code) (**)
Example 2:
To program a second Video recorder on the CD key (for example), you
need to change the CD key into a VCR key, so press:
1 (*) (**)
The CD key has now become a second VCR key.
2 Now enter the SET-UP code for your second VCR by pressing:
(*) (4-digit VCR SET-UP code)(**)
(*) Hold down the MAGIC key until the device key blinks twice
(the device key will blink once then twice).
(**) The device key blinks twice.
Resetting a Device Key
Example: To reset the AUD key press:
(*) (**)
(*) Hold down the MAGIC key until the device key blinks twice
(the device key will blink once then twice)
(**) The device key blinks twice.
____
Quick Code Reference
Changing a Device Key
Write down the codes for your devices in the boxes below and in
the battery compartment for quick and easy reference.
Device Type Code
1._________________________
2._________________________
3._________________________
4._________________________
5._________________________
■■ ■■ ■■ ■■
■■ ■■ ■■ ■■
■■ ■■ ■■ ■■
■■ ■■ ■■ ■■
■■ ■■ ■■ ■■
AUD
TV
AUD
AUD
AUD
VCR
CD
____
CD
Page 10

10 WWW.ONEFORALL.COM
Colour and Brightness
Depending on the functions of your original remote control, the ONE FOR
ALL may operate the colour and brightness settings of your television.
Colour (+) = Press and release MAGIC then hold Volume (+)
Colour (-) = Press and release MAGIC then hold Volume (-)
Brightness (+) = Press and release MAGIC then hold Channel (+)
Brightness (-) = Press and release MAGIC then hold Channel (-)
Volume Punch-Through
You may be able to use some features of your Television, Video Recorder
and Satellite Receiver at the same time. If you're watching a programme on
your Video, you can adjust the volume (a TV function) without first pressing the TV key. The chart below lists some of the possibilities:
Last Key Pressed: You Can Control:
VCR TV volume up and down, mute
SAT TV volume up and down, mute
To punch through to TV Volume while in VCR or SAT mode press:
MAGIC* 9 9 3 TV key.
To punch through to AMP/TUN Volume while in CD mode press:
MAGIC* 9 9 3 AUD key.
To cancel the ”Volume Punch Through” press:
MAGIC* 9 9 3 Volume(+) (a device key will blink four times).
* Here you must hold down MAGIC until the device key blinks
twice.
Auto Scan
Your ONE FOR ALL 5 comes with a special Auto Scan function which lets
you “scan” through every programme available on your device.
For example, to scan the programmes on your TV:
1 Aim the ONE FOR ALL 5 at your TV. Press the TV key. Press and relea-
se MAGIC then press the MUTE key.
The ONE FOR ALL 5 will send the command to advance through all
the programmes available on your Television stopping at each programme for about three seconds. Remember, you must aim the ONE
FOR ALL at your device the entire time you are using Auto scan.
2 When you find a programme you would like to watch, simply press
any key on the ONE FOR ALL key pad to stop the Auto Scan
feature.
Advanced Features
Important note: Auto Scan may not work with devices that did not have
programme +/- keys on the original remote control.
Note: You have 5 seconds to press the Volume or Channel keys for colour or
brightness adjustment after pressing MAGIC.
Page 11

WWW.ONEFORALL.COM 11
Favourite Programme Scan
Instead of Auto Scan, you can set your ONE FOR ALL 5 to scan through up
to 10 of your favourite programmes. To set up your favourite programmes
for your TV:
1 Press and release the ONE FOR ALL 5’s TV key.
2 Hold down the MAGIC key until the TV key blinks twice (the TV
key will blink once then twice).
3 Press 9 9 6.
4 Enter the number for the first programme you wish to be inclu-
ded as a “favourite programme”. Then press and release MAGIC.
(You must enter the programme number exactly as you would on
your original remote. Example: If to get programme 5 you had to
press 05 or if you used the 10, 20 or -/-- keys, you will need to do the
same on the ONE FOR ALL 5.)
5 Enter the next programme number you wish to be included as a
“favourite programme”. Then press and release MAGIC.
6 Continue entering each programme you wish to be included as
your “favourite programmes”. After you have entered the last programme number, press and hold down MAGIC until the TV key
blinks twice. Remember, the ONE FOR ALL 5 can hold a maximum of
10 of your favourite programmes. After you have entered the 10
favourite programmes it will automaticallly exit the Favourite
Programme Scan.
7 When you want to scan through your “favourite programmes”, aim
the ONE FOR ALL 5 at your TV and press TV, MAGIC and then the
MUTE key. You will automatically move through your favourite
programmes, stopping at each for about three seconds. Remember
the ONE FOR ALL 5 must be aimed at your TV the entire time you
are using Scan.
8 When you find a programme you would like to watch, simply press
any key on the ONE FOR ALL key pad to stop the scan feature. To
continue the favourite programme scan, press MAGIC, then the
MUTE key again.
To clear the favourite programmes you have set up:
1 Press the device key.
2 Press and hold down the MAGIC key until the device key blinks
twice (the device key will blink once then twice).
3 Press 9 9 6.
4 Press the MAGIC key until the device key blinks twice (the device
key will blink once then twice). The ONE FOR ALL 5 will now perform the Auto Scan function whenever the MAGIC and MUTE keys
are pressed.
Notes:
- To set up your “favourite programmes” for another device, follow steps 1
through 8, only substitute the appropriate device key (VCR, SAT, CD, AUD)
during step 1.
- Favourite Programme Scan can only be set up for one device at a time.
Once you have set up your “favourite programmes” for one device, you
will not be able to use the Scan feature with any other device.
Page 12

12 WWW.ONEFORALL.COM
Device Sleeptimer
If your TV or Satellite has a “Sleeptimer” function built in, you can access
this function with your ONE FOR ALL remote. To do so:
1 Make sure your TV (or Satellite) is switched on.
2 Press the device key (TV or SAT).
3 Point the ONE FOR ALL at your TV (or Satellite) and press and relea-
se MAGIC then press POWER. You should see the Sleeptimer activa-
te on your TV screen.
To increase the timer, simply press POWER again (within 5 seconds)
until the timer gets to the desired time.
To deactivate the Sleeptimer, repeat steps 1-3 above. During step 3, continue
pressing POWER (within 5 seconds) until the timer indicates zero minutes.
ONE FOR ALL Sleeptimer
If your device does not have a sleeptimer function built in, you can install
the ONE FOR ALL sleeptimer function. To do so:
1 Press the device key (TV, SAT, CD or AUD).
2 Then, press and hold MAGIC until the device key blinks twice.
3 Press 970. The device key will blink twice again. It is only necessary
to perform steps 1, 2 and 3 once. Now to set the timer, continue
with the steps below.
Setting the ONE FOR ALL Sleeptimer:
It is possible to set the timer for 15, 30, 45 or 60 minutes. To do this, first
make sure your device is switched on.
Press the device key (TV, SAT, CD or AUD).
Now, press and release MAGIC then press POWER.
The device key will blink once which indicates the timer is
set for 15 minutes. To increase the timer, simply press
POWER again (this must be done within 5 seconds). The
device key will blink twice indicating the timer is set for 30
minutes (2x 15). You can press POWER to a maximum of
four times which will set the timer to 60 minutes.
Once you have set the timer to the desired time, set your ONE FOR ALL
remote down, pointing it at your device. When the programmed amount
of time has elapsed, the ONE FOR ALL will send the command for POWER,
hence turning off your device.
Important note: Depending on how you used sleeptimer on the original
remote, you might need to access sleeptimer in a different way (through
menu for example).
Important notes:
- The device key on the ONE FOR ALL will blink every 15 seconds indicating
that the remote is in Sleeptimer mode.
- To deactivate the Sleeptimer, simply press any key on the ONE FOR ALL
remote.
- Also, it is only necessary to follow steps 1,2 and 3 above once. For subsequent use of the Sleeptimer, simply begin with “Setting the Sleeptimer”.
- To switch the ONE FOR ALL back to Device Sleeptimer, repeat steps 1,2 and
3 above. The device key will blink 4 times.
- Remember, when using the ONE FOR ALL Sleeptimer, you must set the
remote so it is pointing to your device.
- The ONE FOR ALL Sleeptimer can be set up for only one device at a time.
(:15)
(:30)
(:45)
(:60)
Page 13

WWW.ONEFORALL.COM 13
Macros
You can program your ONE FOR ALL 5 to issue a sequence of commands at
the press of one button. For example, you may want to turn off your TV,
VCR and Satellite at the same time. Any sequence of commands you regularly use can be reduced to one key stroke for your convenience. A Macro
should only be set on the Custom keys.
Example: To set up the Macro mentioned above on the key labeled
A on your ONE FOR ALL 5:
1 Press and hold MAGIC until a device key blinks twice (the device
key will blink once then twice).
2 Press 9 9 5.
3 Then press the A key to which the Macro will be assigned.
4 Next press TV, POWER, VCR, POWER, SAT, POWER.
5 To store the Macro, press and hold MAGIC until the device key
blinks twice (the device key will blink once then twice).
6 Whenever you press the A key, the ONE FOR ALL 5 will turn off
your TV, VCR and Satellite.
• To erase the Macro from the A key, press:
MAGIC* 9 9 5 A key MAGIC*
*Here you must hold down MAGIC until the device key blinks twice.
Shifted Macros
You can install a Shifted Macro on any key, except for the device
keys (TV, VCR, SAT, CD and AUD), the MAGIC key, and the NUMBER
keys.
If for example, you want to program a shifted Macro on the POWER
key, simply press MAGIC once then the POWER key during step 3.
Now everytime you press MAGIC, then the POWER key, the ONE FOR ALL
will turn off your TV, VCR and Satellite.
• To erase the Shifted Macro from the POWER key press:
MAGIC* 9 9 5 MAGIC POWER key MAGIC*
* Here you must hold down MAGIC until the device key blinks twice.
Note: Each MACRO can consist of a maximum of 15 key strokes.
Notes:
- Make sure that you program a Macro on a spare key that you don’t use in
any mode.
- Once you program a Macro on a specific key, the sequence will work
regardless of the mode (TV, VCR, SAT, CD and AUD) you are using.
- To avoid accidental recordings with the ONEFOR ALL 5, you must press the
Record key twice to begin recording. Because of this, you cannot assign a
Macro or Shifted Macro to the Record key.
- If you had to hold down a key for a few seconds on the original
remote control to get a function, this function may not work in a
macro on your ONE FOR ALL remote.
- If a Shifted Macro is placed on the Mute, Channel and Volume keys
then Scan and Colour/Brightness will be sacrificed.
Page 14

14 WWW.ONEFORALL.COM
The Learning Feature
The ONE FOR ALL 5 comes with a complete library of preprogrammed
codes. After you have set up the ONE FOR ALL 5 for your device, you may
find that there are one or more keys that you had on your original remote,
which do not have a place on the ONE FOR ALL keypad.
As a convenience, the ONE FOR ALL 5 offers a special Learning feature that
allows you to copy any function from your original remote control onto the
keypad of the ONE FOR ALL 5.
To use the Learning feature, please follow the instructions below. Please
note, the "custom keys" A-D have been especially provided for this feature.
By using these keys, you will not have to sacrifice an existing function on
the ONE FOR ALL 5 keypad. (If you need to learn more than four features
per mode (max. approximately 25 functions), you will need to place the
learned function on another key. Please see the next section entitled
Shifted Learning).
Before you start:
- Make sure your original remote control is working correctly.
- Make sure neither your ONE FOR ALL, nor your original remote control is
pointing at your device.
Example: To copy the “mono/stereo” function from your original TV
remote onto the A-key of your ONE FOR ALL 5.
1 Place both remote controls (the ONE FOR ALL 5 and your ori-
ginal) on a flat surface. Make sure the ends which you normally point at your device are facing each other. Keep the
remotes at a distance of 2 to 5 cm.
2 Press and hold the MAGIC key until the device key
blinks twice (the device key blinks once then twice).
3 Press 975 (the device key will blink twice).
4 Press the device key (on the ONE FOR ALL remote)
to select the mode to which you want to copy the learned
function (Example: TV key).
5 Press the key (on the ONE FOR ALL remote) where
you want to place the learned function (Example: A
key). The device key will flash rapidly.
6 Press and hold the key (on your original remote)
that you want to copy until the device key on the ONE
FOR ALL blinks twice (Example: “mono/stereo” key).
7 If you want to copy other functions within the same
mode, simply repeat steps 5 and 6 pressing the next key
you want to copy by learning.
8 To exit the learning mode, press and hold MAGIC until
the device key blinks twice.
9 Learning is mode specific. To access your learned function,
press the appropriate device key first.
A
TV
Page 15

WWW.ONEFORALL.COM 15
Shifted Learning
You can also learn a function on a key of the ONE FOR ALL without sacrificing the original ONE FOR ALL function. The "custom keys" are an ideal
location for this. A Shifted Learning function can also be put on any key
EXCEPT for the following: Device keys, MAGIC key, Number keys.
To install a Shifted Learning function, simply follow steps 1-8 on the previous page. During step 5, press MAGIC once before
you press the key
where you are placing the learned function.
To access the shifted function, press MAGIC and then the key you have
learned on.
To delete a learned function:
1 Press and hold MAGIC until the device key blinks twice (the device
key will blink once then twice).
2 Press 9 7 6 (the device key will blink twice).
3 Press the device key in which the function will be deleted.
4 Press twice on the learned key which will be deleted
(the device key will blink twice).*
5 If there is another key which you wish to delete, repeat steps 1-4.
6 The original functions of the ONE FOR ALL 5 will now be present.
* To delete a Shifted Learned feature, press MAGIC before you press the
learned key to be deleted (during step 4).
To delete all learned functions across all modes:
1 Press and hold MAGIC until the device key blinks twice (will
blink once then twice).
2 Press 9 8 0 (the device key will blink four times).
Notes:
- During steps 2-7 (page 14), you have approximately 10 seconds to conduct
each step. If there is a gap of more than 10 seconds between two steps,
you will have to start again from step number 2.
- If you learn a function on another key besides the "custom keys", the original ONE FOR ALL feature automatically becomes shifted. You can press
MAGIC then the key to access it (this excludes the POWER, Mute, Channel
and Volume keys).
- The Learning feature is mode specific. Therefore you can place one learned
feature per mode on the same key.
- If a Shifted Learned function is placed on the Mute, Channel and Volume
keys then Scan and Colour/Brightness will be sacrificed.
- The ONE FOR ALL 5 can learn approximately 25 functions.
- You can replace a learned function by placing another learned function on
top.
- Learning should not be done in direct sunlight or under incandescent lights.
- Make sure you are using new batteries before following the instructions
above.
- Upon changing the batteries, your learned functions will be retained.
Page 16

16 WWW.ONEFORALL.COM
Key Magic
®
Key Magic is an exclusive ONE FOR ALL feature. The design of the ONE FOR
ALL ensures that many functions of your original remote control can be
operated - even those that do not have their own key on the ONE FOR ALL
keypad. Frequently used functions can be assigned to a key of your choice
using the Key Magic feature of your ONE FOR ALL.
In order to program a certain function with Key Magic you need to know
the corresponding function code. As the function codes vary with different
types of devices, they cannot be found in the manual. You can request your
function codes through our consumer service help-line or by letter, fax or
e-mail. All we need to know is the 4-digit set-up code your device is working
with and how the function was labeled on your original remote control.
You can also visit our website
(www.oneforall.com)
to find an answer to your questions.
Once you obtain(ed) your function code(s) from customer service, programming the code is easy:
1 Press the device key (TV, VCR, SAT, CD and AUD).
2 Press and hold the MAGIC key until the device key blinks twice
(the device key will blink once then twice).
3 Press 9 9 4. The device key will blink twice.
4 Press the MAGIC key once.
5 Enter the 3-digit function code (provided by customer service).
6 Press the key to which the function will be assigned. The device
key will blink twice.
EXTENDED FUNCTION REFERENCE
(first entry is an example):
DEVICE SET-UP CODE FUNCTION FUNCTION CODE
TV 0556 16/9 format 234
Important notes:
- To access the function you have programmed, press the device key first.
- Key Magic can be assigned to any key EXCEPT the following: Device keys,
MAGIC key, and the Mute key.
- The Custom Keys under the flip down door are spare keys, which can be
used for programming Key Magic functions. If you need more than four
keys, make sure you program your extended function on a spare key in the
device mode you are using.
- Please note all the extended function codes you obtain from
customer service below for easy future reference.
Page 17

WWW.ONEFORALL.COM 17
Telephone Upgradable Technology
Your ONE FOR ALL 5 contains a unique feature which allows new codes to
be added simply by holding it to your telephone. In a matter of seconds,
our magnetic coupling technology quickly and reliably transfers information to the ONE FOR ALL 5 without complex plugs, adapters or attachments. This means, as you buy new products in the future, the ONE FOR
ALL 5 will never become obsolete.
Simply ring our consumer help-line and one of our customer service representatives will assist you through the entire process of upgrading your ONE
FOR ALL 5. To ensure the process goes smoothly, here are a few steps to
follow:
1 Write down the brand name(s) and model number(s) of your devi-
ce(s) in the space provided on the Consumer Service page before
you call.
2 Ring our consumer help-line and explain which device(s) you would
like added to your ONE FOR ALL 5.
3 After our customer service agent records the brand name(s) and
model number(s) of your device(s), he/she will lead you through the
set up procedure and then will ask you to hold the ONE FOR ALL 5
to the speaker portion of your telephone (see diagram below). In
doing this, the information needed for your device is transferred
through the telephone into your ONE FOR ALL 5 in a matter of
seconds.
Please note, cordless telephones, speaker telephones and
mobile telephones are not recommended.
4 After your ONE FOR ALL 5 has been upgraded by telephone, stay on
the line. Our customer service agent will ensure that your ONE FOR
ALL 5 is working properly with your device(s) and answer any other
questions you may have.
Upgrade your ONE FOR ALL remote…
via your PC
Instructions for start up:
1 Visit our website
“www.oneforall.com”
2 Select your region
3 Select “Product support”
4 Select “Universal Remote Controls”
5 Select the ONE FOR ALL remote you want to
upgrade: ONE FOR ALL 5 (URC-7552)
6 Select ‘Internet Download’
Now you have entered our special Online Download section. From this
point just follow the instructions on the screen for easy upgrade of your
remote.
Page 18

18 WWW.ONEFORALL.COM
Trouble-Shooting
Problem:
Your brand is not listed
in the code section?
The ONE FOR ALL does
not operate your
device(s)?
The ONE FOR ALL is not
performing commands
properly?
Problems changing
channels?
Video not recording?
The ONE FOR ALL does
not respond after
pressing a key?
The device key does not
blink when you press
a key?
Solution:
Try the search method on page 8.
A) Try all the codes listed for
your brand.
B) Try the search method on
page 8.
You may be using the wrong
code. Try repeating the Direct
Set-Up using another code listed
under your brand or start the
search method over again to
locate the proper code.
Enter the programme number
exactly as you would on your
original remote.
As a safety feature on your ONE
FOR ALL, you must press the
Record key twice.
Make sure you are using new
batteries and are aiming the ONE
FOR ALL at your device.
Replace batteries with 2 fresh,
new “AA/LR6” alkaline batteries.
Helpful Hints
Page 19

WWW.ONEFORALL.COM 19
Customer Service
If you still have questions about the operation of your One For All 5 universal remote and could not find the answer(s) in the trouble shooting section,
you may want to contact the customer service department for assistance.
You may care to visit our Internet-site:
www.oneforall.com
Our internet-site has many advantages:
- 24 hours access
- no waiting time
- page for Frequently Asked Questions
- info about the ONE FOR ALL product range
Before contacting us, by Fax, E-mail or Phone, make sure you have
the required information available by filling in the table below.
What do we need to know before you contact us:
1 That you have the URC-7552 One For All remote
2 The date of purchase (.........../.........../...........).
3 A list of your equipment/models/helpcodes(*): (see example below)
Helpcode(*) Device Brand Device Remote SET-UP
model nr. model nr. code
2710805 TV Sony KVX-2950B RMT-V131B 0505 (example)
Type/model numbers can often be found in your equipment
owner’s manual or on the factory plate behind the device.
4. Then Fax, E-mail or Dial us:
In the UK In Ireland
e-mail : ofahelp@uebv.com(**) e-mail : ofahelp@uebv.com(**)
fax : +31 53 432 9816 fax : +31 53 432 9816
tel. : 0808-1000306(*) tel. : 1-800 553199(*)
In Australia In South Africa
e-mail : ofahelp@uebv.com(**) e-mail : support@oneforall.co.za
fax : 03 9672 2479 fax : 011 298 2302
tel. : 1 300 888 298 tel. : 0860 100551
tel. : 011 298 2300
In New Zealand
e-mail : ofahelp@uebv.com(**)
fax : (06) 878 2760
tel. : 0508 ONE 4 ALL (663 4 255)
(*) When you call us you will be asked to enter your helpcode(s). You
only have to enter the helpcode(s) of those devices you have a
problem with.The helpcode is a 7-digit code, which defines the ONE
FOR ALL-model you have, the device type and the brand of your
device. This helpcode can be found in the first column of the setup
code list.
(**) Just send a blank message, you’ll get auto-reply.
Page 20

URC-7552
701919
Printed on Recycled Paper
DD-0801
Guarantee UK UNIVERSAL ELECTRONICS INC./ONE FOR ALL warrants to the original purchaser that this
product will be free from defects in materials and workmanship under normal and correct use for a period of one (1)
year from the date of original purchase. This product will be replaced free of charge if it has been proven to be
defective within the one (1) year warranty period. This warranty does not cover cartons, carrying cases, batteries,
broken or marred cabinets or any other item used in connection with the product. Any further obligation than listed
above is excluded. To obtain warranty service during the warranty period, please call us at the number mentioned
on the Customer Service page.Please notice that we need your purchase receipt so that we may establish your
eligibility for service.
GARANTIE D UNIVERSAL ELECTRONICS INC./ONE FOR ALL garantiert dem Kunden, dass dieses Produkt
bei sachgemässem und ordentlichem Gebrauch für die dauer eines Jahres volkommen frei von Defekten materieller
oder technischer Art bleiben wird, gerechnet ab Kaufdatum. Falls erwiesen werden kann, dass innerhalb der
Garantiezeit eines Jahres ein Defekt entstanden ist, wird dieses Produkt gebührenfrei ersetzt, falls besagtes Produkt
innerhalb der Garantiezeit auf Kosten des Kunden zurückgeschickt wird. Diese Garantie erstreckt sich nicht auf
Verpackungen, Transportbehältnisse, Batterien, zerbrochene oder beschädigte Gehäuse oder ander Objekte, die in
Verbindung mit dem Produkt verwendet werden. Jegliche weitere Verpflichtung als die oben aufgeführte wird
ausgeschlossen. Um unseren Garantiesevice innerhalb der Garantiezeit in Anspruch nehmen zu können, wählen Sie
bitte die Nummer die Sie auf der Kundendienstseite finden um weitere Instruktionen zu erhalten. Bitte beachten Sie,
dass wir Ihren Kaufbeleg brauchen um fest zu stellen ob Sie Anspruch auf unseren Garantieservice erheben können.
GARANTIE F UNIVERSAL ELECTRONICS INC./ONE FOR ALL garantit à l’acheteur d’origine que ce produit
est certifié franc de défauts matériels et de main d’œuvre durant une période d’un (1) an à partir de la date d’achat
original à la condition exclusive que ce produit ait été utilisé de manière normale et correcte. Ce produit sera remplacé
gratuitement s’il s’est révélé défectueux pendant ladite période d’un (1) an, produit devant être retourné à la charge du
client durant la période de garantie. Cette garantie ne saurait couvrir d’aucune manière que ce soit emballages en
carton, coffrets portables quelconques, piles, corps d`appareil cassé ou endommagé ou tout autre article utilisé en
combinaison avec ce produit. Nous nous réservons le droit de rejeter tout autre engagement que ceux cités plus
haut. Pour pouvoir obtenir le service de garantie durant la période de garantie, veuillez nous contacter au numèro
mentionné sur la page ”Service Consommateurs” pour les instructions nécessaires. Veuillez noter que la preuve
d’achat est obligatoire afin de pouvoir déterminer votre droit à ce service.
Page 21

URC-7552
701921
2711
2710205 D
2710206 Dainichi
2710207 Dansai 0037
0009
2711160 Dansette 0412
2711083 Dantax 0370 0486
2711102 Datsura 0208
2710209 Dawa 0037
2710210 Daytron 0009 0374 0037
2710216 de Graaf 0208 0044 0227 0163
0548
2710214 Decca 0072 0516 0037 0272
0217
2711459 Deitron 0037
2710999 Denko 0264
2710217 Denon 0145
2711103 DER 0193 0190
2710219 Derwent 0201
2710220 Desmet 0320 0037
2711000 Diamant 0037
2711310 Digiline 0037
2710232 Dixi 0009 0037 0247 0217
2710235 Domland 0394
2710237 Doric 0201
2711255 Drean 0037
2710239 DTS 0009
2710240 Dual 0349 0217 0343 0259
0519 0037 0352 0394
0399 0303 0163
2710243 Dumont 0087 0104 0102 0217
0070 0072
2711162 Dux 0037 0012
2710247 Dynatron 0037
2710252 Elbe 0435 0238 0259 0362
0292 0370 0163 0037
0218 0411 0610
2710254 Elcit 0087 0247 0516 0102
0163
2710255 Elekta 0264 0282
2712093 ELG 0037
2710259 Elin 0216 0037 0105 0104
0548 0361 0305 0349
0163 0009
2710260 Elite 0218 0037
2710261 Elman 0102
2710263 Elta 0009 0264 0216
2710265 Emerson 0177 0087 0247 003
0179 0371 0070 02
0320
0037 0009
2710307 Flint
2711002 FNR
2710308 Forgestone 019
2710309 Formenti 0087 0216
0076
2710310 Fortress 0093 0087
2710313 Fraba 0370 0037
2711106 Friac 0009 003
2710319 Frontech 0247 02
0009
2710322 Fujitsu 0179
021
2711457 Fujitsu
General 0
2710323 Funai
2710326 Galaxi
2710327 Galaxis
2710331 GBC
2710333 GE
2711003 Geant
2710335 GEC
2710336 G
2710337
2710338
27103
2710
271
27
E
F
D
I
NL
P
UK
Codelist
Code Buch
Liste de codes
Libro de códigos
Livro de códigos
Libro dei codici
Codelijst
Kodebog
Kodeliste
Kodlista
Koodikirja
DK
N
S
SF
Page 22

1 WWW.ONEFORALL.COM
UK / D / F Televisions / Fernseher / Téléviseurs /
2
E / P Televisores / Televisões /
I / NL Televisori / Televisies
DK / N TV Koder / TV-Apparater
S / SF TV-Apparater / Televisiot
UK / D / F Video Recorders / Videorecorder / Magnétoscopes /
7
E / P Vídeos / Vídeo Gravadores /
I / NL Videoregistratori / Videorecorders
DK / N VCR Koder / Videospiller
S / SF Videobandspelare / Videonauhurit
UK / D / F Satellite Receivers / Satellitenempfänger / Récepteurs satellites /
9/10
E / P Receptores de satélite / Receptores de satélite /
I / NL Ricevitori via Satellite / Satelliet-ontvangers
DK / N SAT Koder / Satellittmotagere
S / SF Satellittmotagare / Satelliittivirittimet
UK / D / F Cable Converters / Kabelsignalumwandler / Décodeurs de câble /
13
E / P Decodificadores de TV por cable / Conversores de Cabo /
I / NL Convertitori di reti / Kabel Decoders
DK / N Cabel Converter / Kabeldecodere
S / SF Kabeldekodrar / Kotipäätteet
UK / D / F CD/Mini Disc / CD-/Mini Disc-spieler / Lecteurs CD/Mini Disc /
13
E / P CD/Mini Disc / CD/Mini Disc /
I / NL CD/Mini Disc / CD/Mini Disc
DK / N CD/Mini Disc / CD/Mini Disc
S / SF CD/Mini Disc / CD/Mini Disc
UK / D / F Miscellaneous Audio / Diverse Audio / Divers Audio /
13/14
E / P Audio Diverso / Áudio Misto /
I / NL Audio Misto / Overige Audioapparatuur
DK / N Miscellaneous Audio / Diverse Lydutstyr
S / SF Diverse Ljudutrustning / Muut audiolaitteet
UK / D / F Amplifiers / Audio-Verstärker / Amplificateur Audio /
14
E / P Amplificadores / Amplificadores /
I / NL Amplificatori / HiFi versterkers
DK / N Forstærker / Forsterkere
S / SF Förstärkare / Vahvistimet
UK / D / F Amp/Tuners / Audio-Verstärker/Tuner / Ampli/Tuner Audio /
14
E / P Amplificadores/Sintonizadores / Amplic./Aparelhagem /
I / NL Amplificatori/Sintonizzatori / Versterkers/ Tuners
DK / N Forstærker/Tuner / Receivere
S / SF Receivrar / Viritinvahvistimet
UK / D / F DVD / DVD / DVD /
15
E / P DVD / Leitor de DVD /
I / NL DVD / DVD
DK / N DVD / DVD
S / SF DVD / DVD
BskyB and On Digital information
16
Information Canal Satellite et TPS
17
Page 23

WWW.ONEFORALL.COM 14
Page 24

2 WWW.ONEFORALL.COM
Televisions
Fernseher
Téléviseurs
Televisores
Televisões
Televisori
Televisies
TV Koder
TV-Apparater
TV-Apparater
Televisiot
2710991 A.R. Systems 0037 0352
2711306 Accent 0037
2712089 Acec 0012
2710010 Admiral 0087 0093 0418 0305
0264
2710012 Adyson 0217 0216
2711080 Agashi 0216 0264
2710015 AGB 0516
2710997 Agef 0087
2710017 Aiko 0216 0009 0037 0371
0035 0072 0361 0264
0217
2710018 Aim 0037
2710020 Akai 0361 0208 0371 0037
0035 0009 0072 0218
0163 0516 0602 0556
0548 0480 0217 0631
0216 0264 0377 0606
2710021 Akiba 0218 0282 0455 0037
2710022 Akito 0272 0037
2710023 Akura 0218 0359 0282 0009
0412 0264 0037 0668
2711267 Alaron 0179 0216
2710024 Alba 0218 0235 0009 0418
0370 0355 0371 0037
0216 0247 0163 0487
0036 0668 0579
2710026 Alcyon 0076
2710029 Allorgan 0206 0294 0217
2710032 Allstar 0037
2710041 Amplivision 0217 0400 0320 0370
2710042 Amstrad 0177 0009 0516 0264
0354 0218 0371 0362
0412 0037
2711094 Anam 0037 0009
2711268 Anam
National 0037
2710044 Anglo 0009 0264
2710045 Anitech 0009 0076 0264 0037
2710047 Ansonic 0370 0292 0102 0009
0037 0374 0163 0411
0259 0247 0012
2710050 Apollo 0473
2710053 Arc en Ciel 0399 0109 0568 0333
2710054 Arcam 0216 0399 0217
2711307 Ardem 0486
2710057 Aristona 0037 0556 0012
2710059 Arthur Martin 0163 0400
2710060 ASA 0105 0346 0070 0104
0087
2710062 Asberg 0037 0076
2711095 Asora 0009
2710070 Asuka 0218 0264 0216 0282
0217
2710072 Atlantic 0037 0216 0206 0259
0320
2710074 Atori 0009
2710075 Auchan 0163 0400
2710080 Audiosonic 0037 0109 0217 0370
0337 0264 0218 0486
2710081 Audioton 0217 0486 0370 0264
2710084 Ausind 0076
2710085 Autovox 0087 0206 0237 0076
0349 0217 0247
2711156 AWA 0011 0036 0009 0157
0374 0412 0037 0216
0606
2711081 Ayomi 0238
2710091 Baird 0109 0193 0343 0190
0192 0072 0073 0217
0208
2710093 Bang &
Olufsen* 0565 0087
2710094 Barco 0380 0163
2710097 Basic Line 0218 0009 0374 0037
0567 0163 0282
2710098 Bastide 0217
2710099 Baur 0303 0195 0512 0037
0554 0361 0349 0505
0010
2711082 Bazin 0217
2710103 Beko 0370 0486 0037 0606
2710105 Beon 0037 0418
2710106 Best 0337 0370
2710107 Bestar 0037 0370 0374
2710108 Binatone 0217
2710110 Black Star 0247
2710111 Blacktron 0282
2710112 Blackway 0282
2710113 Blaupunkt 0554 0195 0200 0327
0328
2710114 Blue Sky 0218 0282 0455 0037
0487 0668
2710115 Blue Star 0282
2710118 Bondstec 0247
2710119 Boots 0272 0217
2710121 BPL 0282 0037
2710123 Brandt 0109 0399 0237 0333
0287 0335 0568 0625
2710126 Brinkmann 0418 0037 0519
2711030 Brionvega 0037 0087 0362
2710128 Britannia 0216 0217
2711444 Brother 0264
2710133 Bruns 0087
2710134 BSR 0163 0294
2710138 BTC 0218
2710139 Bush 0668 0218 0235 0163
0349 0009 0036 0282
0037 0272 0355 0371
0374 0519 0264 0361
0487 0208 0294 0217
2710149 Capsonic 0264
2711455 Carad 0610 0037
2710150 Carena 0455 0037
2710151 Carrefour 0036 0070
2710153 Carver 0170
2710998 Cascade 0009 0037
2710154 Casio 0037
2710155 Cathay 0037
2711231 CCE 0037 0217
2710160 Centurion 0037
2710161 Century 0087 0247 0238
2710162 CGE 0074 0084 0076 0247
0163 0418 0370
2710167 Cimline 0009 0235 0218
2710169 City 0009
2711073 Clarivox 0418 0070
2710172 Clatronic 0218 0264 0370 0371
0217 0076 0247 0037
0009 0102 0320 0579
2711308 CMS hightec 0217
Page 25

3 WWW.ONEFORALL.COM
2710186 Concorde 0009
2710187 Condor 0216 0247 0282 0320
0037 0370 0009 0102
0411 0418
2710191 Contec 0216 0009 0157 0011
0036
2710192 Continental
Edison 0109 0237 0399 0333
0287 0487 0568
2710194 Cosmel 0009 0337
2710196 Crosley 0087 0247 0074 0084
0076 0163
2710197 Crown 0009 0370 0486 0076
0037 0359 0579 0418
0208 0487 0053
2710200 CS Electronics 0247 0216 0218
2710201 CTC 0247
2710202 Curtis Mathes 0093 0145
2710203 Cybertron 0218
2711254 Daenyk 0179
2710205 Daewoo 0009 0037 0216 0374
0218 0217 0499
2710206 Dainichi 0218 0216
2710207 Dansai 0037 0264 0035 0216
0009
2711160 Dansette 0412
2711083 Dantax 0370 0486
2711102 Datsura 0208
2710209 Dawa 0037
2710210 Daytron 0009 0374 0037
2710216 de Graaf 0208 0044 0227 0163
0548
2710214 Decca 0072 0516 0037 0272
0217
2711459 Deitron 0037
2710999 Denko 0264
2710217 Denon 0145
2711103 DER 0193 0190
2710219 Derwent 0201
2710220 Desmet 0320 0037
2711000 Diamant 0037
2711310 Digiline 0037
2710232 Dixi 0009 0037 0247 0217
2710235 Domland 0394
2710237 Doric 0201
2711255 Drean 0037
2710239 DTS 0009
2710240 Dual 0349 0217 0343 0259
0519 0037 0352 0394
0399 0303 0163
2710243 Dumont 0087 0104 0102 0217
0070 0072
2711162 Dux 0037 0012
2710247 Dynatron 0037
2710252 Elbe 0435 0238 0259 0362
0292 0370 0163 0037
0218 0411 0610
2710254 Elcit 0087 0247 0516 0102
0163
2710255 Elekta 0264 0282
2712093 ELG 0037
2710259 Elin 0216 0037 0105 0104
0548 0361 0305 0349
0163 0009
2710260 Elite 0218 0037
2710261 Elman 0102
2710263 Elta 0009 0264 0216
2710265 Emerson 0177 0087 0247 0037
0179 0371 0070 0282
0320
2710267 Emperor 0282
2710271 Erres 0037 0012
2710272 ESC 0037
2710273 Etron 0037 0009 0163
2711632 Eurofeel 0264
2710278 Euroman 0216 0264 0037 0217
0370
2710279 Europa 0037
2710280 Europhon 0037 0516 0102 0217
0247 0163
2710291 Expert 0206 0400 0259 0163
0305
2711001 Exquisit 0037 0247
2711639 Family Life 0037
2710294 Fenner 0374 0009
2710296 Ferguson 0073 0287 0192 0190
0335 0238 0193 0109
0625
2710299 Fidelity 0193 0216 0371 0163
0264 0037
2711164 Filsai 0217
2710301 Finlandia 0208 0346 0359 0548
0361
2710302 Finlux 0105 0104 0037 0346
0217 0072 0163 0076
0516 0070 0087 0179
0102 0411 0631 0492
0480
2710304 Firstline 0294 0321 0216 0037
0374 0247 0009 0163
0102 0217 0411 0349
0238 0072 0235 0668
0208
2710305 Fisher 0104 0217 0036 0208
0370 0045 0087 0157
0361 0163 0303 0349
0072
2710307 Flint 0037 0455 0072 0218
2711002 FNR 0102
2710308 Forgestone 0193
2710309 Formenti 0087 0216 0320 0163
0076
2710310 Fortress 0093 0087
2710313 Fraba 0370 0037
2711106 Friac 0009 0037 0102
2710319 Frontech 0247 0264 0349 0217
0009
2710322 Fujitsu 0179 0206 0072 0102
0217 0163 0009 0352
2711457 Fujitsu
General 0009 0217
2710323 Funai 0264 0179 0294
2710326 Galaxi 0102 0037
2710327 Galaxis 0370 0418 0037 0102
2710331 GBC 0163 0009 0374 0218
2710333 GE 0109 0282 0287 0335
0343
2711003 Geant Casino 0163 0400
2710335 GEC 0043 0072 0163 0361
0516 0037 0217 0349
2710336 Geloso 0247 0009 0163 0374
2710337 General 0109 0287 0471
2710338 General
Technic 0009
2710339 Genexxa 0218 0037 0412
2710345 Goldhand 0216
2710346 Goldline 0337
2710347 GoldStar 0037 0370 0009 0377
0217 0247 0216 0163
0361 0044
2710349 Goodmans 0036 0072 0037 0009
0264 0516 0179 0374
0487 0371 0499 0556
0343 0235 0035 0480
0217 0335
2710350 Gorenje 0370
2710351 GPM 0218
2711248 Gradiente 0037 0053 0170
2710352 Graetz 0037 0361 0371
2710353 Granada 0037 0400 0226 0356
0359 0012 0045 0072
0108 0208 0217 0076
0036 0516 0201 0473
0335
2710354 Grandin 0282 0218 0400 0037
0009 0320 0163 0455
0579 0610
Page 26

WWW.ONEFORALL.COM 4
2711107 Gronic 0102 0217
2710355 Grundig 0195 0554 0487 0070
0076 0237 0037 0556
2710359 Halifax 0264 0216 0217
2710360 Hampton 0216 0217
2711108 Hanimex 0294
2710362 Hanseatic 0037 0292 0282 0349
0163 0361 0394 0320
0370 0009 0294 0217
0519 0087
2710363 Hantarex 0009 0037 0102
2710364 Hantor 0037
2711280 Harley
Davidson 0179
2711084 Harwood 0009 0412 0037
2711678 Hauppauge 0037
2710370 HCM 0264 0009 0282 0412
0217 0218 0418 0037
2710372 Hema 0217 0009
2710373 Hemmermann 0349
2710374 Hifivox 0109 0399 0568
2711682 Highline 0264 0037
2711110 Hikona 0218
2710377 Hinari 0208 0179 0036 0037
0218 0009 0163 0355
0443 0487 0235 0294
2710380 Hisawa 0282 0218 0400 0455
2711004 Hit 0087
2710381 Hitachi 0225 0036 0349 0356
0044 0043 0473 0163
0343 0578 0217 0227
0194 0516 0072 0481
0499 0037 0563 0145
0105 0556 0548
2711684 Hitachi Fujian 0108
2711170 Hitsu 0009 0455 0218
2711085 Hornyphone 0037 0012
2710384 Hoshai 0218 0455
2711086 Huanyu 0374 0216
2710388 Hygashi 0217 0216
2710389 Hyper 0009 0216 0217 0247
2710390 Hypersonic 0361
2710391 Hypson 0037 0264 0217 0282
0455 0400 0238
2711005 Iberia 0037
2710393 ICE 0264 0217 0037 0371
0218 0216 0009
2711006 Ices 0218 0216
2710395 Imperial 0037 0247 0370 0418
0163 0074 0084 0076
0349
2710396 Indesit 0237
2710397 Indiana 0037
2711343 Ingelen 0487 0610
2710398 Ingersoll 0009
2710401 Inno Hit 0009 0072 0037 0218
0217 0076 0516 0247
2711311 Innovation 0519
2711312 Interactive 0411
2710404 Interbuy 0009 0264 0247
2710405 Interfunk 0037 0012 0087 0512
0275 0327 0163 0361
0370 0109 0568
2711113 Internal 0037
2710408 Intervision 0282 0217 0455 0037
0371 0377 0519 0486
0370 0394 0487 0218
0102 0163 0264 0247
2710410 Irradio 0009 0037 0218 0247
0076
2710412 Isukai 0218 0037 0282
2710413 ITC 0217
2710414 ITS 0037 0371 0218 0282
0264 0216
2710415 ITT 0163 0480 0349 0361
0473 0548 0567 0193
0346 0208 0179
2710416 ITT Nokia 0361 0548 0163 0473
0480 0349 0346 0208
0179 0567 0606 0610
0631
2710417 ITV 0264 0037 0247
2711314 Jean 0036
2710420 JEC 0035
2710425 JVC 0653 0053 0094 0190
0036 0192 0193 0371
0218 0606
2710427 Kaisui 0218 0282 0037 0216
0455 0217 0009
2710428 Kamp 0216
2710429 Kapsch 0206 0163 0361 0259
0104
2710430 Karcher 0037 0370 0282 0102
0610 0264
2711283 Kawasho 0216
2711177 KB Aristocrat 0163
2710432 Kendo 0362 0235 0247 0102
0037 0370 0411 0610
0377 0519
2710433 Kennedy 0206 0163 0435
2710437 Kingsley 0216
2710438 Kneissel 0435 0259 0292 0370
0238 0037 0411 0610
2710441 Kolster 0037 0102 0349
2710442 Konka 0218 0371 0037
2711315 Kontakt 0487
2710443 Korpel 0037
2710444 Korting 0087 0370 0320
2710445 Kosmos 0037
2711181 Kotron 0412 0264
2711350 Kraking 0238
2711287 KTV 0217
2711117 Kyoshu 0264 0412 0418
2710451 Kyoto 0163
2712153 Lecson 0037
2711451 Lemair 0411
2710454 Lenco 0009 0374 0104 0163
0037
2710456 Lenoir 0009
2710458 Lesa 0247
2710461 Leyco 0264 0072 0037 0294
0579
2711072 LG 0037 0370 0009 0377
0217 0247 0216 0163
0361
2711008 Liesenkotter 0037 0327 0328 0012
2710463 Lifetec 0009 0264 0519 0037
0374 0218 0668 0512
2711240 Lloyd's 0009
2710472 Loewe 0512 0037 0087 0292
0370
2710474 Logik 0011 0193 0371
2711456 Logix 0668
2710478 Luma 0206 0305 0037 0362
0163 0259 0411 0374
0009
2711009 Lumatron 0206 0305 0037 0362
0163 0259 0361 0217
0264 0073
2710481 Lux May 0037 0009
2710485 Luxor 0194 0237 0480 0492
0349 0361 0208 0356
0548 0163 0346 0473
0179
2711316 Madison 0037
2710490 Magnadyne 0087 0247 0516 0102
0163
2710491 Magnafon 0516 0076 0102 0216
2710492 Magnavox 0036 0179 0037
2710495 Mandor 0264
2710496 Manesth 0037 0235 0217 0264
0320 0035 0294
2710497 Manhattan 0037 0668
2710500 Marantz 0037
2710503 Marelli 0087
Page 27

5 WWW.ONEFORALL.COM
2710504 Mark 0037 0217 0216 0374
0009
2711342 Masuda 0218 0009 0371
2710508 Matsui 0235 0177 0009 0355
0011 0072 0036 0037
0556 0487 0217 0354
0294 0371 0443 0579
0455 0272 0349 0516
0035 0163 0208 0045
0195 0335
2710513 McMichael 0043
2710517 Mediator 0037 0556 0012
2710518 Medion 0037 0668 0519
2711121 Megas 0610
2711291 Megatron 0145
2710487 Melectronic 0346 0037 0512 0109
0343 0247 0105 0104
0374 0009 0217 0480
0492 0216 0411 0349
2711010 Melvox 0400
2710520 Memorex 0009 0250
2710521 Memphis 0337 0072 0009
2710522 Mercury 0037 0009
2710525 Metz 0087 0195 0447 0239
0554 0275 0367 0388
0587
2711317 Micromaxx 0037 0668
2710531 Minerva 0487 0195 0070 0076
0554 0237
2710532 Minoka 0412 0037 0359
2710535 Mitsubishi 0108 0512 0037 0093
0354 0087 0036 0201
0237 0193
2710538 Mivar 0292 0370 0076 0216
0609
2711186 Monaco 0009
2710540 Morgan's 0037
2710541 Motion 0076
2711297 Motorola 0093
2710543 MTC 0370 0349 0512 0216
2711786 MTEC 0272
2711187 Multi-
broadcast 0193
2710545 Multi-
standard 0102
2711452 Multitec 0037 0668
2710547 Multitech 0217 0349 0009 0216
0247 0102 0486 0370
0037
2710551 Murphy 0104 0216 0072 0163
2711791 Musikland 0218
2710553 NAD 0361
2711124 Naiko 0037
2711125 Nakimura 0374 0037
2712099 NAT 0214 0226
2710562 National 0237 0214 0226
2710564 NEC 0170 0036 0320 0455
0009 0374 0217 0037
0011
2710565 Neckermann 0037 0370 0505 0010
0200 0554 0556 0163
0327 0418 0349 0087
0247 0217 0411
2710566 NEI 0037 0337 0371
2710567 Nesco 0247 0179
2711292 Netsat 0037
2710568 Network 0337
2711012 Neufunk 0037 0009 0556 0610
2710572 New Tech 0037 0009 0556 0343
0217
2710571 New World 0218
2710574 Nicamagic 0216
2710576 Nikkai 0072 0218 0037 0217
0264 0035 0337 0216
0009 0036
2711249 Noblex 0037 0264
2710578 Nobliko 0102 0076 0070 0216
2710579 Nogamatic 0399 0109 0568
2710580 Nokia 0361 0163 0480 0349
0548 0492 0359 0473
0208 0374 0631 0606
0346
2710582 Nordmende 0109 0287 0399 0343
0568 0195 0037 0335
2711013 Novatronic 0037 0105 0374
2710588 Oceanic 0567 0163 0400 0361
0294 0208 0563
2712100 Odeon 0264
2710590 Okano 0370 0037 0264 0072
2711014 Omega 0264
2710595 Onwa 0371 0602 0218
2710596 Opera 0037
2710598 Optimus 0250
2711299 Optonica 0093
2710599 Orbit 0037
2710602 Orion 0179 0235 0294 0177
0320 0355 0011 0037
0009 0321 0102 0443
0556 0264 0412
2711015 Orline 0037 0218
2711192 Ormond 0668
2710605 Osaki 0072 0218 0217 0264
0037 0412 0272 0374
2711193 Osio 0037
2710607 Oso 0218
2710608 Osume 0157 0072 0036 0218
2710610 Otto Versand 0010 0505 0036 0093
0512 0037 0556 0195
0349 0554 0361 0235
0109 0294 0226 0247
0303 0320 0217
2710614 Pael 0216
2710616 Palladium 0370 0037 0505 0010
0200 0418 0554 0556
0247 0327 0349 0087
0163 0217 0411 0519
2711129 Palsonic 0264 0412 0037 0217
0377
2710619 Panama 0009 0217 0264 0216
0037 0247
2710620 Panasonic 0226 0650 0250 0126
0214 0361 0237 0367
0516 0037 0163 0548
2710622 Panavision 0037 0411
2710628 Pathe Cinema 0163 0238 0216 0400
0320 0292 0349
2710629 Pathe
Marconi 0109 0333 0399 0237
0568
2710631 Pausa 0009
2710632 Perdio 0072 0320 0163 0037
2710633 Perfekt 0037
2711460 Pershin 0400
2710634 Philco 0087 0084 0074 0418
0076 0247 0163 0370
0037 0145
2710635 Philharmonic 0217
2710636 Philips 0037 0556 0012 0554
0043 0087 0193 0423
0343 0374
2710639 Phoenix 0037 0087 0320 0486
0370 0216 0163 0072
2710640 Phonola 0037 0556 0012 0087
0193 0216
2711336 Pilot 0037 0556
2710642 Pioneer 0037 0423 0370 0343
0361 0109
2711132 Pionier 0370 0486
2710644 Plantron 0037 0264 0009
2711066 Playsonic 0217
2710645 Policom 0568
2710647 Poppy 0009
2710648 Portland 0374
2711846 Powerpoint 0487
2710650 Prandoni-
Prince 0247 0516 0361 0076
2710651 Precision 0217
Page 28

WWW.ONEFORALL.COM 6
2710655 Prima 0009 0264
2710656 Prinz 0072 0349 0194
2710658 Profex 0009 0163
2710660 Profitronic 0037 0102
2710662 Proline 0321 0072 0037 0012
0625
2710664 Prosonic 0037 0214 0216 0370
0374 0579 0371 0668
2710665 Protech 0037 0217 0009 0247
0349 0102 0264 0418
0337 0668
2710669 Provision 0499 0037
2710672 Pye 0037 0374 0556 0012
0087
2710673 Pymi 0009
2711067 Quadra Vision0400
2710677 Quasar 0247 0250
2710678 Quelle 0037 0010 0011 0109
0512 0349 0554 0361
0036 0217 0247 0074
0084 0327 0070 0104
0105 0157 0195 0200
0264 0668
2710679 Questa 0036
2710680 R-Line 0037
2710682 Radialva 0109 0218 0163 0037
2710684 Radiola 0037 0556 0012
2710685 Radiomarelli 0087 0201 0516 0247
0037
2711088 RadioShack 0037
2710686 Radiotone 0009 0037 0370 0579
0418 0264 0412
2710690 Rank 0070
2710691 RCA 0625 0335 0093
2711016 Recor 0037
2712101 Rectiligne 0037
2710695 Rediffusion 0201 0361 0548 0036
2711017 Redstar 0037
2711018 Reflex 0037
2710698 Revox 0037 0370
2710699 Rex 0305 0206 0411 0247
0163 0259
2710700 RFT 0087 0292 0370 0072
0264
2711338 Rhapsody 0216
2710701 Roadstar 0009 0264 0218 0418
0037
2710703 Robotron 0087
2711885 Rodex 0037
2710711 Royal Lux 0370 0412
2710715 Saba 0625 0287 0087 0399
0163 0109 0516 0343
0361 0335 0568 0548
2710718 Sagem 0455 0610 0282
2710720 Saisho 0235 0516 0177 0009
0011 0217 0163 0264
0354
2710722 Salora 0194 0349 0163 0356
0359 0361 0516 0548
2710723 Sambers 0516 0076 0102
2710724 Samsung 0037 0556 0587 0009
0217 0370 0264 0216
0072 0208
2710726 Sandra 0216 0217
2711139 Sanela 0238
2710727 Sansui 0037 0371
2712102 Santon 0009
2710729 Sanyo 0208 0157 0292 0036
0011 0370 0072 0216
0217 0104 0045 0009
0163 0037
2711318 Save 0037
2710743 SBR 0037 0556 0012
2710745 Schaub
Lorenz 0349 0548 0606
2710746 Schneider 0037 0556 0012 0303
0349 0519 0394 0352
0259 0343 0217 0247
0371 0218 0361 0163
0668
2710750 Scott 0179
2711324 Sears 0179
2710753 SEG 0217 0264 0009 0247
0036 0102 0362 0163
0037 0216 0668 0487
2710754 SEI 0087 0102 0010 0163
0516 0349 0294 0206
0037
2710756 Seleco 0305 0206 0259 0362
0163 0411
2710757 Sencora 0009
2710759 Sentra 0035 0218 0009
2711019 Serino 0455 0610
2710762 Sharp 0093 0157 0036 0294
0653 0053 0094 0193
2710769 Shorai 0294 0179
2711263 Siam 0037
2710772 Siarem 0163 0087 0102
2710773 Siemens 0554 0200 0195 0327
0328 0157 0037
2711916 Siera 0037 0556 0012
2710776 Siesta 0370
2710780 Silva 0216 0037
2710781 Silver 0036 0037 0361 0179
2710782 Singer 0087 0102 0247 0400
0435 0009 0037
2710783 Sinudyne 0177 0087 0235 0102
0294 0163 0361 0516
0349 0010 0206 0037
2710784 Skantic 0356
2711298 Sky 0037
2710795 Sogera 0320
2710797 Solavox 0361 0072 0163 0548
2711927 Sonawa 0218
2710801 Sonitron 0208 0370 0217
2711035 Sonneclair 0037
2710802 Sonoko 0037 0009 0264 0282
0217
2710803 Sonolor 0208 0567 0163 0400
0505 0010 0548 0361
2710804 Sontec 0037 0370 0294
2710805 Sony 0505 0010 0011 0036
0102 0074
2710806 Sound &
Vision 0102 0218 0374
2710807 Soundesign 0179
2710809 Soundwave 0037 0320 0418
2711933 Spectra 0009
2711143 Ssangyong 0009
2710813 Standard 0218 0009 0217 0320
0037 0374
2710817 Starlite 0009 0163 0037 0264
2710822 Stenway 0282 0218
2710823 Stern 0305 0206 0259 0163
2711020 Strato 0037 0264 0009
2710828 Sunkai 0294 0355 0321 0455
0218 0235 0037 0487
2710831 Sunstar 0371 0037 0009 0579
2710833 Sunwood 0037 0009
2710835 Superla 0516 0216
2710838 SuperTech 0009 0037 0216 0556
0218
2710839 Supra 0374 0009
2710840 Susumu 0335
2710841 Sutron 0009
2711319 Swissline 0247
2710842 Sydney 0216 0217
2711021 Sytong 0216
2711344 Tactus 0272
2710849 Tandberg 0367 0411 0109 0337
0362 0361
2710850 Tandy 0218 0072 0217 0247
0093
Page 29

7 WWW.ONEFORALL.COM
2710852 Tashiko 0036 0043 0217 0170
0216 0359 0163
2710853 Tatung 0072 0516 0217 0272
0037 0011
2710854 Teac 0037 0512 0455 0264
0009 0412 0349
2710855 TEC 0217 0009 0247 0471
0335 0337 0259
2711320 Tech Line 0037 0668
2712107 Techica 0218
2710856 Technema 0320
2710857 Technics 0250
2711453 Tedelex 0217
2711978 Teiron 0009
2711328 Teknika 0179
2710866 Teleavia 0109 0287 0399 0333
0568
2710870 Telecor 0037 0163 0218 0217
0259 0394
2710872 Telefunken 0109 0471 0399 0287
0074 0084 0101 0335
0262 0073 0343 0037
0486 0568 0625
2711213 Telefusion 0037
2710874 Telegazi 0037 0163 0259 0218
0264
2710878 Telemeister 0320 0037
2710882 Telesonic 0037
2710883 Telestar 0037
2710884 Teletech 0009 0247 0337 0037
0668
2710885 Teleton 0217 0275 0206 0163
0349 0259 0036
2710887 Televideon 0320 0163 0216
2711022 Televiso 0400
2710889 Temco 0294
2711334 Tempest 0009 0037
2711991 Tennessee 0037
2710891 Tensai 0104 0218 0037 0217
0294 0320 0009 0105
0374 0371 0377 0247
2711023 Tenson 0320 0009
2711461 Tevion 0519 0037 0668
2710892 Texet 0217 0374 0009
2710895 Thomson 0287 0399 0109 0333
0471 0335 0237 0343
0037 0568 0625
2710897 Thorn 0193 0073 0190 0238
0192 0074 0084 0499
0037 0104 0335 0512
0359 0272 0374 0035
2710900 Tokai 0072 0037 0337 0163
0217 0374 0009
2710901 Tokyo 0216 0035
2710902 Tomashi 0282 0218
2710905 Toshiba 0035 0508 0243 0036
0070 0102 0217
2710906 Towada 0349 0102 0217
2712109 Toyoda 0009
2712110 Trakton 0264
2710908 Trans
Continens 0217 0037
2712111 Transonic 0037 0455 0587 0512
2712008 Transtec 0216
2710913 Trident 0516 0217
2710915 Tristar 0218 0193
2710916 Triumph 0177 0516 0346 0556
0037 0243
2710919 Uher 0076 0037 0206 0320
0303 0374 0418 0486
0370 0259
2711148 Ultra 0192
2710920 Ultravox 0087 0102 0374 0247
0216 0163 0037
2711024 Unic Line 0037 0473
2711215 United 0037
2710929 Universum 0346 0105 0195 0473
0361 0247 0492 0480
0370 0200 0418 0011
0512 0294 0036 0157
0070 0163 0264 0104
0037 0411 0074 0327
0328 0010 0505 0076
0349 0217 0109 0362
0337 0177 0631 0668
2710930 Univox 0337 0087 0037 0163
0238
2710937 Vestel 0037 0163 0217
2710938 Vexa 0009 0037
2710939 Victor 0053
2710942 Videologique 0216 0218 0217
2710943 VideoSystem 0037
2710944 Videotechnic 0216 0320 0217 0374
2711025 Videoton 0356 0163
2711322 Vidikron 0102
2711330 Vidtech 0036
2710947 Viper 0337
2710949 Visiola 0216
2710950 Vision 0037 0320
2710954 Vistar 0206 0361
2710956 Vortec 0037
2710957 Voxson 0087 0076 0037 0418
2710958 Waltham 0217 0356 0418 0287
0037
2710959 Watson 0037 0320 0163 0218
0305 0579 0519 0394
0009 0668
2710960 Watt Radio 0102 0349 0163 0216
2710961 Wega 0036 0087 0037
2711026 Wegavox 0009
2710963 Weltblick 0037 0320
2711245 Wharfedale 0037 0519
2710967 White Westing-
house 0320 0216 0037 0337
2711264 Winco 0412
2711027 Windstar 0282
2710976 Xrypton 0037
2710979 Yamishi 0282 0455 0218 0037
0217
2710980 Yokan 0037
2710981 Yoko 0217 0037 0218 0264
0009 0370 0305 0216
0247
2710983 Yorx 0218
2710984 Zanussi 0206 0305 0217
Video Recorders
Videorecorder
Magnétoscopes
Vídeos
Vídeo Gravadores
Videoregistratori
Videorecorders
VCR Koder
Videospiller
Videobandspelare
Videonauhurit
2721028 Adelsound 0004
2720012 Adyson 0072
2720019 Aiwa 0307 0000 0041 0348
0352 0037
Page 30

WWW.ONEFORALL.COM 8
2720020 Akai 0315 0041 0020 0352
0240
2720021 Akiba 0072
2720023 Akura 0072 0041
2720024 Alba 0278 0072 0333 0334
0352 0020 0000 0315
0348
2720029 Allorgan 0240
2720032 Allstar 0081
2720037 Ambassador 0020
2720042 Amstrad 0000 0278 0072
2720045 Anitech 0072
2720047 Ansonic 0004
2720057 Aristona 0081
2720060 ASA 0037 0081
2720070 Asuka 0072 0037 0081 0000
0038
2720080 Audiosonic 0278
2720081 Audioton 0020
2721156 AWA 0037 0278 0043
2720091 Baird 0278 0104 0107 0041
0000
2720093 Bang &
Olufsen 0499
2720097 Basic Line 0278 0020 0072
2720107 Bestar 0278 0020
2720109 Black Panther 0278
2720113 Blaupunkt 0081 0154 0162 0006
0195 0034
2720114 Blue Sky 0037 0348 0072 0352
2720118 Bondstec 0020 0072
2720120 Bosch 0154
2720123 Brandt 0041 0320 0493
2720126 Brinkmann 0348
2720139 Bush 0072 0278 0315 0333
0334 0352 0293 0000
0348
2720150 Carena 0081
2720151 Carrefour 0045
2720154 Casio 0000
2720155 Cathay 0278
2720156 Catron 0020
2720162 CGE 0041 0000
2720167 Cimline 0072
2720172 Clatronic 0020 0072
2720180 Combitech 0352
2720187 Condor 0020 0278
2720197 Crown 0278 0072 0020
2720205 Daewoo 0278 0020 0045 0352
2720207 Dansai 0072 0278
2720210 Daytron 0278
2720216 de Graaf 0042 0081 0104 0048
2720214 Decca 0000 0041 0081 0067
0348
2721459 Deitron 0278
2720999 Denko 0072
2721000 Diamant 0037
2720240 Dual 0041 0081 0278 0000
2720243 Dumont 0000 0081 0104
2720252 Elbe 0278 0038
2720253 Elcatech 0072
2720259 Elin 0240
2721031 Elsay 0072
2720263 Elta 0072 0278
2720265 Emerson 0072 0045
2720272 ESC 0278 0240 0020
2720274 Etzuko 0072
2720280 Europhon 0020
2720294 Fenner 0020
2720296 Ferguson 0107 0041 0320 0493
0000 0278
2720299 Fidelity 0000 0072 0240
2720301 Finlandia 0104 0081 0042 0000
0048
2720302 Finlux 0000 0081 0104 0042
2720304 Firstline 0072 0348 0043 0037
0045 0042 0293 0278
2720305 Fisher 0047 0104 0038 0020
2720319 Frontech 0020
2720322 Fujitsu 0000
2720323 Funai 0000
2720326 Galaxi 0000
2720331 GBC 0020
2720335 GEC 0081
2720337 General 0020
2720338 General
Technic 0348
2720339 Genexxa 0104
2720345 Goldhand 0072
2720347 GoldStar 0037 0000
2720349 Goodmans 0000 0072 0240 0278
0037 0020 0081 0348
0293
2720352 Graetz 0041 0104 0240
2720353 Granada 0104 0048 0081 0006
0240 0037 0042 0000
2720354 Grandin 0072 0037 0020 0000
0278
2720355 Grundig 0195 0081 0347 0006
0320 0348
2721108 Hanimex 0352
2720362 Hanseatic 0037 0278 0081
2720364 Hantor 0020
2721084 Harwood 0072
2720370 HCM 0072
2720377 Hinari 0004 0072 0293 0352
0041 0278
2720380 Hisawa 0352
2720381 Hitachi 0042 0041 0000 0240
0081 0004 0104
2721085 Hornyphone 0081
2720391 Hypson 0072 0278 0352
2720394 Impego 0020
2720395 Imperial 0000 0240
2720398 Ingersoll 0004 0240
2720401 Inno Hit 0020 0240 0278 0072
2720404 Interbuy 0037 0072
2720405 Interfunk 0081 0104
2721113 Internal 0278
2721114 International 0278
2720408 Intervision 0000 0278 0037 0348
2720410 Irradio 0072 0037 0081
2720415 ITT 0041 0104 0240
2720416 ITT Nokia 0048
2720417 ITV 0278 0037 0020
2720425 JVC 0041 0067
2720427 Kaisui 0072
2720430 Karcher 0278
2720432 Kendo 0315 0348 0072 0037
2720434 Kenwood 0041 0038
2721032 Kimari 0047
2720438 Kneissel 0352 0348 0037
2720443 Korpel 0072
2720448 Kuba 0047
2720451 Kyoto 0072
2720461 Leyco 0072
2721072 LG 0037 0000 0278
2720463 Lifetec 0348
2720472 Loewe 0081 0006 0037 0004
1162 0162 0454
2720474 Logik 0004 0240 0072
2721009 Lumatron 0278
2720485 Luxor 0043 0072 0104 0047
0048
2720492 Magnavox 0081
2720496 Manesth 0072 0045 0081
2720500 Marantz 0081 0038 0006
2720504 Mark 0278 0020
2720508 Matsui 0004 0348 0037 0240
0352 0000
2720517 Mediator 0081
2720518 Medion 0348 0352
2720487 Melectronic 0000 0037 0038
2720520 Memorex 0104 0000 0037 0048
0047
2720521 Memphis 0072
2720525 Metz 0195 0347 0081 1162
0162 0454 0006
Page 31

9 WWW.ONEFORALL.COM
2721323 Micormay 0348
2720529 Migros 0000
2720531 Minerva 0195
2720535 Mitsubishi 0043 0067 0081
2720547 Multitech 0000 0072 0020 0104
2720551 Murphy 0000
2720553 NAD 0104
2720562 National 0162
2720564 NEC 0041 0038 0067 0104
0037
2720565 Neckermann 0041 0006 0081
2720567 Nesco 0072 0000 0352
2720576 Nikkai 0020 0072 0278
2720580 Nokia 0104 0315 0041 0278
0240 0048 0042 0081
2720582 Nordmende 0041 0320 0494 0528
0067 0493
2720588 Oceanic 0000 0048 0081 0104
0041
2720590 Okano 0315 0348 0072 0278
2720602 Orion 0004 0352 0348 0333
0334
2720604 Orson 0000
2720605 Osaki 0000 0037 0072
2720608 Osume 0293
2720609 Otake 0333 0334
2720610 Otto Versand 0081
2720616 Palladium 0072 0315 0037 0041
0006 0004 0240
2721129 Palsonic 0072 0000
2720620 Panasonic 1162 0162 0454
2720628 Pathe
Cinema 0004 0043
2720629 Pathe
Marconi 0041
2720632 Perdio 0000
2720634 Philco 0038 0072
2720636 Philips 0081 0006
2720640 Phonola 0081
2720642 Pioneer 0067 0081 0042
2720648 Portland 0020 0278
2720656 Prinz 0000
2720660 Profitronic 0081 0240
2720662 Proline 0000 0293 0320
2721194 Prosco 0278
2720664 Prosonic 0278 0000
2720665 Protech 0081
2720669 Provision 0278
2720672 Pye 0081
2720678 Quelle 0006 0081
2720682 Radialva 0037 0072 0081 0048
2720684 Radiola 0081
2720690 Rank 0041
2720699 Rex 0041
2720700 RFT 0020 0072
2720701 Roadstar 0240 0072 0037 0278
2720710 Royal 0072
2720715 Saba 0041 0320 0494 0580
0278
2720720 Saisho 0004 0348
2720722 Salora 0043 0104
2720724 Samsung 0240 0432
2720725 Samurai 0020
2720727 Sansui 0041 0067 0072 0348
2720728 Sanwa 0004
2720729 Sanyo 0104 0047 0048 0067
2720742 Saville 0352 0278 0240
2720743 SBR 0081
2721200 Scan Sonic 0240
2720745 Schaub
Lorenz 0041 0104 0000 0315
2720746 Schneider 0072 0000 0037 0081
0278 0240
2722103 Seaway 0278
2720753 SEG 0072 0240 0278
2720755 Sei-Sinudyne 0004 0081
2720756 Seleco 0041 0020 0037
2721250 Semivox 0045
2720759 Sentra 0072 0020 0293
2721910 Setron 0072
2720762 Sharp 0048 0037
2720766 Shintom 0072 0104
2720768 Shivaki 0037
2720769 Shorai 0004
2720773 Siemens 0195 0006 0037 0104
0081
2721916 Siera 0081
2720780 Silva 0037
2720781 Silver 0278
2720783 Sinudyne 0004 0081
2720797 Solavox 0020
2720801 Sonitron 0047
2721035 Sonneclair 0072
2720802 Sonoko 0278
2720803 Sonolor 0048
2720804 Sontec 0037
2720805 Sony 0033 0034 0032
2720809 Soundwave 0037
2721143 Ssangyong 0072
2720813 Standard 0278
2720817 Starlite 0037 0104
2720823 Stern 0278
2720828 Sunkai 0348 0278
2720831 Sunstar 0000
2720832 Suntronic 0000
2720833 Sunwood 0072
2720839 Supra 0037 0240
2720843 Symphonic 0000 0072
2720847 Taisho 0004
2720849 Tandberg 0278
2720852 Tashiko 0000 0048 0240 0081
0037
2720853 Tatung 0000 0041 0081 0048
0043 0348 0352
2720854 Teac 0041 0000 0278 0037
0081 0307
2720855 TEC 0020 0278 0072
2720859 TechniSat 0348
2720866 Teleavia 0041
2720872 Telefunken 0041 0320 0493 0494
0529 0530 0278
2720884 Teletech 0072 0278 0000
2721334 Tempest 0020
2720890 Tenosal 0072
2720891 Tensai 0000 0037 0072 0004
2721461 Tevion 0348
2720895 Thomson 0041 0320 0493 0494
0528
2720897 Thorn 0041 0104 0037
2720900 Tokai 0072 0037 0041 0104
2722002 Tokiwa 0072
2720904 Topline 0348
2720905 Toshiba 0045 0041 0043 0081
2720906 Towada 0072
2722110 Trakton 0020
2720918 TVA 0020
2720919 Uher 0037 0240
2720920 Ultravox 0278
2720924 Unitech 0240
2720926 United Quick
Star 0278
2720929 Universum 0000 0081 0240 0037
0348 0195 0006
2720939 Victor 0067
2720959 Watson 0081 0352
2720963 Weltblick 0037
2720979 Yamishi 0072 0278
2720980 Yokan 0072
2720981 Yoko 0037 0072 0020 0240
Satellite Receivers
Satellitenempfänger
Récepteurs satellites
Page 32

WWW.ONEFORALL.COM 10
Receptores de satélite
Receptores de satélite
Ricevitori via Satellite
Satelliet-ontvangers
SAT koder
Satellitmottagere
Satellitmottagare
Satelliittivirttimet
2730994 ABsat 0832
2730013 Aegir 0520
2730020 Akai 0515 0200
2730024 Alba 0421 0515 0455 0362
0613 0713 0734
2730027 Aldes 0288 0362 0520 0734
2730028 Allantide 0333
2730030 Allsat 0067 0200 0364 0183
0734
2730031 Allsonic 0288 0369
2730033 Alltech 0644 0586 0713
2730034 Alpha 0200
2730036 Altai 0396
2730039 Amitronica 0713
2730040 Ampere 0396 0829 0132
2730042 Amstrad 0345 0847 0461 0252
0243 0689 0675 0713
0742 0396 0132 0882
0885 0863
2730044 Anglo 0713
2730046 Ankaro 0288 0217 0369 0220
0713
2730049 Anttron 0421 0183 0613
2730050 Apollo 0421
2730056 Arcon 0217 0373 0692
2730058 Armstrong 0243 0200
2730060 ASA 0397
2730061 Asat 0373 0200
2731154 ASLF 0713
2730064 AST 0351 0321
2730065 Astacom 0710
2730068 Astra 0108 0373 0530 0513
0243 0607 0346
2730069 Astro 0173 0358 0520 0613
0369 0501 0658
2731036 Atlantide 0333
2730081 Audioton 0364 0613
2731155 Austar 0863
2731037 Avalon 0396
2730089 Axis 0530 0369 0366 0834
2730095 Barcom 0217 0108
2730103 Beko 0455
2730106 Best 0217 0369
2730113 Blaupunkt 0173
2730114 Blue Sky 0713 0885
2730117 Boca 0243 0589 0513 0683
0794 0829 0132
2730122 Brain Wave 0332 0692
2730129 Broadcast 0346
2730130 Broco 0530 0713
2731070 BskyB 0847
2731531 BT 0515 0710
2731038 Bubu Sat 0713
2730139 Bush 0067 0183 0362
2731039 BVV 0692
2730143 Cambridge 0515 0683 0501
2730995 Canal
Satellite 0853 0292
2731158 Canary 0644
2731159 Carat.Som 0366
2730163 Channel
Master 0362
2731458 Chess 0605
2730170 CityCom 0394 0798 0818 0607
2731099 Clark 0613
2730172 Clatronic 0332
2730174 Clemens
Kamphus 0502 0333 0834
2730176 CNT 0520
2730182 Commander 0220
2730183 Commlink 0288
2731101 Communicado 0366
2730185 Comtec 0288 0366
2730187 Condor 0369 0607
2730189 Connexions 0396 0369
2730190 Conrad 0607 0589 0573 0369
0501
2730191 Contec 0394 0589 0366
2730193 Cosat 0592 0364
2730197 Crown 0243
2730198 Cryptovision 0455
2731092 D-box 0873
2730205 Daewoo 0373 0713 0421
2730208 Dansat 0067 0183
2731040 Daumling 0794
2730213 DDC 0362
2731161 Delfa 0863
2730221 Dew 0366 0373
2730222 Diamond 0586
2731300 Discoverer 0605
2731041 Diseqc 0710
2730229 Disk Express 0217
2731352 Distratel 0084 0885
2730230 Distrisat 0200 0592
2730233 DNR 0692
2730234 DNT 0200 0396
2731042 DST 0421
2730240 Dual 0373
2730244 Dune 0369
2730245 Dynasat 0593
2730248 Echostar 0396 0713 0871 0853
2730250 EIF 0674
2730251 Einhell 0333 0517 0243 0421
0288 0252 0513 0713
0501 0794 0132
2730255 Elekta 0520
2730262 Elsat 0689
2730263 Elta 0364 0421 0200 0369
2730264 Emanon 0421
2730266 Emme Esse 0369 0502 0871
2731043 Engel 0713
2730268 EP Sat 0455
2730275 Eurieult 0084 0885
2731044 Eurocrypt 0455 0108
2730279 Europa 0220 0589 0501 0200
0863 0607
2731045 European 0794
2730282 Eurosat 0243 0586
2730283 Eurosky 0243 0369 0607 0287
0132
2730285 Eurostar 0607 0880
2730287 Eutra 0644 0798
2730289 Exator 0421 0515 0613
2731046 Fagor 0592 0364
2730296 Ferguson 0067 0183 0455 0336
0614 0711
2730299 Fidelity 0252 0461 0675 0501
2730301 Finlandia 0455 0108
2730302 Finlux 0455 0108 0414 0573
2731165 Flair Mate 0713
2730315 Fracarro 0421 0871 0593
2730317 Freecom 0335 0421 0734
2730318 Freesat 0644
2730320 FTE 0331 0683 0589 0369
0713 0593
2730321 Fuba 0217 0369 0396 0421
0173 0414 0573 0394
0108
2730325 G-Sat 0183 0333
Page 33

11 WWW.ONEFORALL.COM
2730326 Galaxi 0217
2730327 Galaxis 0366 0288 0364 0530
0592 0369 0692 0834
0833 0863 0853
2730328 Galaxisat 0321
2731449 Gardiner 0818
2730344 GMI 0243
2731168 Goldbox 0292 0853
2730347 GoldStar 0335
2730349 Goodmans 0455
2730353 Granada 0108
2730354 Grandin 0084
2730355 Grundig 0173 0847 0571 0139
0750 0805 0345 0885
2730362 Hanseatic 0605
2730364 Hantor 0421 0332
2730365 Hanuri 0520
2731677 Harting und
Helling 0333 0502
2731047 Hase & Igel 0692
2730371 Heliocom 0607
2730377 Hinari 0362 0183 0421
2730379 Hirschmann 0287 0333 0397 0398
0173 0573 0593 0495
0442 0502 0798 0501
0396 0710
2730380 Hisawa 0332
2730381 Hitachi 0455
2731171 HNE 0742
2730385 Houston 0592 0220 0461
2731172 Humax 0863
2730387 Huth 0346 0607 0332 0364
0366 0288 0517 0220
0589 0502 0243 0794
0132
2731175 Imex 0084
2731114 International 0132
2730407 Intertronic 0243
2730408 Intervision 0592 0628 0607 0364
2731345 Invideo 0871
2731302 Italtel 0871
2730416 ITT Nokia 0108 0573 0455 0397
0873
2730423 Johansson 0332 0364
2730424 JOK 0690 0710
2730425 JVC 0515 0571
2731048 K-SAT 0713
2731176 Kamm 0880 0713
2730431 Kathrein 0331 0358 0173 0394
0442 0504 0480 0593
0200 0622 0092 0333
0658 0713 0613 0818
0898
2730436 Key West 0794
2730440 Kolon 0421
2731454 Konig 0607
2731439 Koscom 0834
2730445 Kosmos 0331 0442 0335 0502
2730446 KR 0613 0644 0798 0592
2730447 Kreiselmeyer 0173
2730450 Kyostar 0421 0613
2731304 L&S Electronic 0369
2730453 Lasat 0513 0520 0369 0607
0366 0243 0683 0132
2731049 Lemon 0692
2730454 Lenco 0335 0220 0373 0421
0713 0692 0530 0498
0369 0607
2730455 Lennox 0592
2730457 Lenson 0501
2730460 Lexus 0200
2730461 Leyco 0515
2731072 LG 0335
2730462 Lifesat 0605 0369
2730467 Lion 0333
2730472 Loewe 0243
2730475 Lorenzen 0220 0692 0794 0607
0742 0132
2730476 Lorraine 0335
2730479 Lupus 0369
2730485 Luxor 0108 0345 0573 0873
0501
2730486 M&B1 0605
2730489 Macab 0586
2731050 Manata 0710 0713
2730497 Manhattan 0455 0592 0520 0364
0498 0710 0834
2730500 Marantz 0200
2730505 Mascom 0442
2730506 Maspro 0092 0336 0495 0644
0750 0713 0173 0571
0692
2731052 Master's 0394
2730508 Matsui 0571 0710 0362 0173
2730509 Max 0607
2730511 MB 0605
2731053 Mediabox 0292 0853
2730515 Mediamarkt 0243
2730516 MediaSat 0530 0501 0292 0853
2730518 Medion 0713 0369
2731120 Medison 0713
2730519 Mega 0200
2730487 Melectronic 0818
2730524 Metronic 0421 0243 0613 0288
0520 0084 0818 0885
2730525 Metz 0173
2731123 Micro 0607 0613
2731054 Micro
electronic 0713
2730527 Micro
Technology 0333 0713 0530
2731185 Microtec 0713
2730531 Minerva 0571
2730535 Mitsubishi 0455
2730537 Mitsumi 0513
2730540 Morgan's 0243 0200 0513 0683
0794 0713 0364 0589
0829 0132
2730546 Multistar 0331
2730550 Muratto 0335 0321
2730552 Mysat 0713
2730563 Navex 0332
2730564 NEC 0178
2730568 Network 0183
2730569 Neuhaus 0530 0501 0220 0589
0692 0592 0713 0834
0607
2730570 Neusat 0692 0713 0834
2730577 Nikko 0243 0713 0734
2730580 Nokia 0108 0573 0873 0455
0397 0853
2730581 Nomex 0498
2731190 Norco 0498
2730582 Nordmende 0362 0455 0520 0421
0614
2730584 Novis 0332
2730586 NTC 0502 0798
2730588 Oceanic 0586 0333
2730589 Octagon 0373 0421 0220 0366
0613
2730590 Okano 0243 0502 0331
2731069 OnDigital 0133 0134 0241
2730597 Optex 0394 0592 0364 0831
0593
2731055 Optima 0502
2730599 Orbit 0351 0373 0333
2730600 Orbitech 0501 0589 0541 0421
0548 0262
2730601 Origo 0498
2730606 OSAT 0345
2730611 Oxford 0515
2730612 Pace 0455 0847 0067 0183
0336 0791 0795 0241
2730613 Pacific 0586
2731441 Packsat 0710
2730615 Palcom 0362
2730616 Palladium 0243 0571 0421 0501
2730617 Palsat 0501
Page 34

WWW.ONEFORALL.COM 12
2730620 Panasonic 0455 0847
2730623 Panda 0455 0067 0108 0607
0173 0834
2730630 Patriot 0515
2730636 Philips 0200 0292 0220 0183
0455 0667 0750 0710
0613 0805 0589 0217
0853 0571 0173 0133
0134 0818 0898
2730639 Phoenix 0366 0183
2730641 Phonotrend 0288 0592 0364 0502
0863
2730642 Pioneer 0853 0292
2730643 PK Sat 0333
2731133 Planet 0871
2730646 Polytron 0394 0396
2730652 Predki 0332 0421
2730653 Preisner 0243 0513 0589 0132
0396 0683 0794
2730654 Premier 0592 0502
2731056 Premiere 0292 0853 0873
2731853 Pro Visat 0734
2730663 Prosat 0288 0362 0628
2730664 Prosonic 0742
2730666 Protek 0586 0333
2730667 Proton 0333
2730669 Provision 0520
2730672 Pye 0571
2731087 Pyxis 0831 0834
2730676 Quadral 0362 0288 0369 0589
0628 0710
2730678 Quelle 0252 0607 0742
2730684 Radiola 0200
2730687 Radix 0396 0644 0882
2730689 Rainbow 0613 0644
2730694 Red Star 0369
2730696 Redpoint 0530
2730700 RFT 0541 0288 0220 0200
2730701 Roadstar 0713
2730708 Rover 0628 0713
2730715 Saba 0183 0520 0336 0614
0690 0734 0710 0692
0885 0607
2730716 Sabre 0455
2730718 Sagem 0820
2730721 Sakura 0366
2730722 Salora 0108
2730724 Samsung 0287 0421 0853
2730731 SAT 0351 0321 0461 0501
0362 0675
2730740 Sat Partner 0332 0502 0421 0335
0520 0613 0734
2730732 Sat Team 0713
2730734 Satcom 0346 0605 0607
2730735 Satec 0183 0713
2731057 Satelco 0369
2730737 Satford 0346
2730738 Satline 0628
2730739 Satmaster 0346
2731058 Schäcke 0613
2730746 Schneider 0667 0805 0898 0710
2730747 Schwaiger 0394 0183 0605 0504
0589 0607 0885 0692
2730751 Sedea
Electronique 0421
2730752 Seemann 0396 0243 0530 0515
2730753 SEG 0421 0369 0332 0605
0742
2730756 Seleco 0592 0364 0871
2731141 Servi Sat 0592
2730773 Siemens 0173 0683
2730780 Silva 0335
2730785 Skantin 0713
2730786 Skardin 0530
2731205 Skinsat 0501
2730787 SKR 0713
2731298 Sky 0847
2730789 Skymaster 0288 0605 0628 0713
0880
2730790 Skymax 0200 0333
2731206 SkySat 0605
2730793 Skyvision 0364
2730794 SL 0692 0132 0742 0243
2731207 Smart 0132
2730805 Sony 0847 0455 0853
2731059 SR 0513
2731443 Starland 0713
2730820 Starring 0332
2730824 Strong 0421 0613 0369 0593
0520 0373 0853
2730826 STVI 0644
2730827 Sumida 0243
2730829 Sunny Sound 0369
2730830 Sunsat 0713 0530
2730831 Sunstar 0513 0243 0369 0794
0132
2730846 Tagra 0364
2730851 Tantec 0336 0455
2730853 Tatung 0455
2730858 Techniland 0346 0592 0364
2730859 TechniSat 0262 0501 0548 0541
0005 0200
2730860 Technowelt 0607
2730862 Teco 0373 0243 0513
2730863 Telasat 0605 0607
2730868 Teleciel 0613 0734
2730869 Telecom 0713
2731060 Teledirekt 0183
2730872 Telefunken 0421 0710
2730875 Teleka 0243 0442 0613 0396
0798 0750 0692 0501
0262 0607 0834
2730876 Telemaster 0520
2730880 Telesat 0605 0607
2730883 Telestar 0501
2730884 Teletech 0880
2730886 Televes 0455 0501
2730888 Telewire 0592 0364
2730891 Tensai 0373 0332
2730895 Thomson 0455 0614 0713 0292
0853 0607 0820 0710
2730896 Thorens 0586
2730897 Thorn 0455
2730898 Tioko 0394 0243
2730900 Tokai 0200
2730903 Tonna 0346 0455 0592 0364
0501 0713 0834
2730905 Toshiba 0455
2730992 TPS 0820
2730910 Trendline 0513
2732010 Trendplain 0513
2730911 Triad 0351 0335 0321 0333
2730912 Triasat 0414 0501
2731061 Triax 0414 0501 0200 0396
0713 0853
2730915 Tristar 0373
2730922 Uniden 0831 0675
2730923 Unisat 0366 0243 0200
2730927 Unitor 0217 0332
2730929 Universum 0173 0571 0397 0607
0675 0461 0742
2730932 Variosat 0173
2730933 Vector 0333
2730936 Ventana 0200
2730937 Vestel 0742
2732036 Videocrypt 0711
2730947 Viper 0366
2730952 Visiosat 0351 0690 0713
2730955 Viva 0220
2730956 Vortec 0287 0421
2730931 VTech 0351 0321 0690 0818
2730962 Wela 0589 0713 0794 0132
2731091 Wetekom 0829 0605 0501
2730966 Wewa 0333 0455
2731217 Wibo 0243
2730968 Winersat 0332
2731062 Wintergarten 0288
Page 35

13 WWW.ONEFORALL.COM
2730969 Wisi 0173 0321 0690 0396
0589 0455 0351 0501
0834 0607
2730971 Woorisat 0520
2730972 World 0332
2732113 Worldsat 0710
2731151 XCOM 0832
2730976 Xrypton 0369
2730993 XSat 0832 0713
2732070 Zaunkonig 0692
2730986 Zehnder 0321 0331 0520 0504
0369 0818 0742 0394
0217
2731064 Zeta
Technology 0200
2730989 Zodiac 0613
2730990 Zwergnase 0794 0243
Cable Converters
Kabelsignalumwandler
Décodeurs de câble
Decodificadores
Conversores de Cabo
Convertitori di reti
Kabel Decoders
Cabel Converter
Kabeldekodere
Kabeldekodrar
Kotipäätteet
2730025 Alcatel 0896 0897
2731155 Austar 0276
2731531 BT 0105 0716
2730141 Cabletime 0271 0377 0448 0665
2731544 Canal Plus 0443
2731564 Comcrypt 0443
2731641 Filmnet 0443
2730996 France
Telecom 0451 0817 0896 0897
2731076 General
Instruments 0276
2730421 Jerrold 0003 0276
2731341 Kabelvision 0003
2730489 Macab 0817
2731782 MNet 0443
2732098 Mr Zapp 0817
2732072 NTL Cabletell 0276
2731447 Optus 0276
2730636 Philips 0451 0817
2731065 PVP Stereo
Visual 0003
2730718 Sagem 0817
2730748 Scientific
Atlanta 0008 0277
2730864 Tele+1 0443
2730879 Telepiu 0443
2730917 Tudi 0286
2730925 United Cable 0003
2732040 Videotron 0250
2730945 Videoway 0250
2730951 Visiopass 0451 0817
2732055 Westminster 0105 0716
CD / Mini Disc
2740019 Aiwa 0124
2740020 Akai 0362
2740024 Alba 0615
2741093 Alto 0625
2740054 Arcam 0157
2741485 Ariston 0625
2741228 Audio
Research 0157
2741097 Audiolab 0157
2741229 Audiomeca 0157
2740081 Audioton 0157
2740093 Bang &
Olufsen 0212
2742091 BAT 0157
2740139 Bush 0615
2742154 Cairn 0157
2740142 California
Audio Lab 0029
2741157 Cambridge
Audio 0625 0157
2740153 Carver 0179
2741232 Craig 0615
2740204 Cyrus 0157
2740217 Denon 0003 0873
2741234 DKK 0000
2741235 Dynamic Bass 0179
2740249 Eclipse 0625
2740299 Fidelity 0625
2740305 Fisher 0179
2741237 Gemini 0625
2740339 Genexxa 0000 0037 0179 0032
2741438 Goldmund 0157
2740349 Goodmans 0625 0362 0615
2740355 Grundig 0157
2740357 GTX 0362
2740366 Harman/-
Kardon 0173 0157
2740370 HCM 0625
2740378 Hiro 0625
2740425 JVC 0072
2740434 Kenwood 0037 0190 0028 0681
2741115 Krell 0157
2742096 Lansay 0625
2740466 Linn 0157
2740500 Marantz 0157
2740508 Matsui 0157
2741242 MCS 0029
2740487 Melectronic 0362
2740520 Memorex 0032
2740523 Meridian 0157
2740528 Micromega 0157
2740534 Mission 0157
2740543 MTC 0625
2740553 NAD 0000
2740557 Naim 0157
2740585 NSM 0157
2740620 Panasonic 0029 0303 0367
2740636 Philips 0157 0274 0626
2741838 Pink Triangle 0625
2740642 Pioneer 0032 0244
2740667 Proton 0157
2740674 QED 0157
2740675 Quad 0157
2740686 Radiotone 0615 0625
2740691 RCA 0179
2740693 Realistic 0179
2740698 Revox 0157
2740707 Rotel 0157
2740717 SAE 0157
2740727 Sansui 0157 0625
2740729 Sanyo 0179
2740746 Schneider 0615
2740762 Sharp 0037
2740773 Siemens 0157
2740805 Sony 0000 0397 0490
2740838 SuperTech 0625
2741211 Synergy 0625
2740850 Tandy 0032
2740854 Teac 0625
2740857 Technics 0029 0207 0303
Page 36

WWW.ONEFORALL.COM 14
2740896 Thorens 0157
2741227 Thule 0157
2740929 Universum 0157 0362
2740939 Victor 0072
2740959 Watson 0615
2741245 Wharfedale 0362
2740977 Yamaha 0036 0187
2740987 Zenith 0615
Miscellaneous Audio
Diverse Audio
Divers Audio
Audio Diverso
Áudio Misto
Audio Misto
Overige Audio
Miscellaneous Audio
Diverse Lydutrastning
Diverse Ljudutrustning
Muut audiolaitteet
2760019 Aiwa 0010 0159 0404
2760366 Harman/
Kardon 0477
2761078 JBL 0477
2760425 JVC 0073
2760729 Sanyo 0871
2760805 Sony 0159 0010
Amplifiers
Audio-Verstärker
Amplificateur
AudioAmplificadores
Amplificadores
Amplificatori
HiFi versterkers
Forstærker
Forsterkere
Förstärkare
Vahvistimet
2750019 Aiwa 0406
2752091 BAT 0269
2750139 Bush 0269 0421
2750217 Denon 0160 0272
2751438 Goldmund 0269
2750349 Goodmans 0421
2750355 Grundig 0269 0847
2750466 Linn 0269
2750500 Marantz 0269
2750504 Mark 1003 0269
2750523 Meridian 0269
2750528 Micromega 0269
2751793 Myryad 0269
2750557 Naim 0269
2750620 Panasonic 0308
2750636 Philips 0269
2750642 Pioneer 0013 0269
2750675 Quad 0269
2750701 Roadstar 0847
2750854 Teac 0421
2750857 Technics 0308
2750872 Telefunken 0847
2750896 Thorens 0269
2750929 Universum 0269
2750977 Yamaha 0143 0354
Amp/Tuners
Verstärker/Tuner
Ampl./Tuner Audio
Ampl./Sintonizadores
Ampl./Aparelhagem
Ampl./Sintonizzatori
Versterkers/Tuners
Forstærker/T uner
Forsterkere/Receivere
Receivrar
Viritinvahvistimet
2750019 Aiwa 0121 0405 0158
2750020 Akai 0346 0115 0440 0609
2751094 Anam 0281 0609
2750054 Arcam 0642 0189
2750093 Bang &
Olufsen 0799
2750123 Brandt 0824
2751157 Cambridge
Audio 0189
2750153 Carver 0042 0360
2750172 Clatronic 0744
2750217 Denon 0004 0273
2750263 Elta 0744
2750305 Fisher 0042 0360
2750330 Garrard 0281 0286 0440 0744
2750339 Genexxa 0186 0440
2751438 Goldmund 0189
2750347 GoldStar 0281
2750349 Goodmans 0609 0744 0440
2750355 Grundig 0189 0286 0281 0219
0744
2750366 Harman/-
Kardon 0110 0189 0208
2751084 Harwood 0744
2750399 Inkel 0027 0491
2750406 Intersound 0744
2751078 JBL 0110
2750425 JVC 0074 0464
2750434 Kenwood 0027 0313 0314 0186
0239
2751239 Koss 0744
2751072 LG 0281
2750466 Linn 0189
2751241 LXI 0744
2750500 Marantz 0189 0412 0219
2750508 Matsui 0744
2751242 MCS 0039 0346
2750520 Memorex 0014
2750528 Micromega 0189
2750535 Mitsubishi 0440
Page 37

15 WWW.ONEFORALL.COM
2750553 NAD 0320
2751127 Nikkei 0744
2751225 NTDE 0744
2750590 Okano 0440
2750594 Onkyo 0135
2751226 Orient Power 0744
2750620 Panasonic 0309 0518 0763 0039
2750636 Philips 0189 0412 0642
2750642 Pioneer 0014 0080 0289 0186
2750677 Quasar 0039
2751088 RadioShack 0744
2750691 RCA 0346
2750698 Revox 0189 0186
2750701 Roadstar 0346
2750715 Saba 0824
2750720 Saisho 0346
2750724 Samsung 0286
2750727 Sansui 0189 0609 0346
2750729 Sanyo 0360 0219 0042
2750746 Schneider 0110 0744
2750762 Sharp 0186
2750764 Sherwood 0491
2750773 Siemens 0609
2751244 Sonic 0281
2750805 Sony 0158 0415
2750809 Soundwave 0609
2751144 TaeKwang 0440
2750854 Teac 0609 0110
2750857 Technics 0309 0518 0763 0208
0039
2750861 Techwood 0281
2750872 Telefunken 0824
2750895 Thomson 0824
2750896 Thorens 0189
2750897 Thorn 0744
2750919 Uher 0346
2750929 Universum 0281 0609 0744 0286
0440 0189
2750939 Victor 0074
2751245 Wharfedale 0440 0609
2750977 Yamaha 0176 0186
2750987 Zenith 0281 0744
DVD
2782085 3DLAB 0539
2780019 Aiwa 0641
2780024 Alba 0717
2780042 Amstrad 0713
2782214 A-Trend 0714
2780114 Blue Sky 0695
2780139 Bush 0699 0690 0713 0689
2782192 cineULTRA 0699
2782163 CyberHome 0714
2780205 Daewoo 0705
2780217 Denon 0490
2781233 Denver 0699
2782092 Denzel 0665
2780222 Diamond 0651
2782191 DiViDo 0705
2780240 Dual 0665 0651
2780263 Elta 0690
2782136 Enzer 0665
2780347 Goldstar 0591
2780355 Grundig 0539 0695
2780362 Hanseatic 0591
2780381 Hitachi 0573 0665
2782145 JMB 0695
2780425 JVC 0558
2780434 Kenwood 0534 0490
2781729 Kiss 0665
2782168 Lawson 0705
2782153 Lecson 0696
2780454 Lenco 0699
2781072 LG 0591
2780463 Lifetec 0651
2781456 Logix 0705
2780492 Magnavox 0503
2780497 Manhattan 0705
2780500 Marantz 0539
2780508 Matsui 0651 0695
2780518 Medion 0705 0651
2781775 Micromedia 0503
2780528 Micromega 0539
2782117 Minowa 0705
2780535 Mitsubishi 0521
2781783 Monyka 0665
2781012 Neufunk 0665
2780594 Onkyo 0503
2780598 Optimus 0525
2780602 Orion 0695
2780603 Oritron 0651
2780620 Panasonic 0490
2780636 Philips 0539 0503
2780641 Phonotrend 0699
2780642 Pioneer 0525 0571
2780662 Proline 0651
2781135 Proscan 0522
2780669 Provision 0699
2781865 Raite 0665
2780691 RCA 0522
2781871 REC 0490 0689
2782220 Revoy 0699
2780701 Roadstar 0699 0690 0689
2780722 Salora 0591
2780724 Samsung 0573
2780727 Sansui 0695
2782161 Scan 0705
2780746 Schneider 0651
2780753 SEG 0665 0713
2780762 Sharp 0630
2781913 Shinco 0717
2781922 SM Electronic 0690
2780805 Sony 0533
2780813 Standard 0651
2780854 Teac 0717
2780857 Technics 0490
2780891 Tensai 0651 0690
2781461 Tevion 0651
2780895 Thomson 0551
2780900 Tokai 0665
2782002 Tokiwa 0705
2780905 Toshiba 0503
2780929 Universum 0591 0713
2782200 Walkvision 0717
2782156 Wesder 0699
2781245 Wharfedale 0696
2780977 Yamaha 0490
2782067 Yamakawa 0665 0710
2780987 Zenith 0503 0591 0705
* Excludes a few models in the LS, LX and MX series.
* Ausschließlich einige Modelle der LX, LS und MX Serie.
* Exclut quelques modèles de la serie LX, LS et MX.
* Excluye unos pocos modelos de la serie LX, LS y MX modelos.
* Exclui alguns modelos da série LX, LS y MX.
* Sono esclusi modelli della serie LX, LS e MX.
* Exclusief een paar modellen in de LX, MX en LS serie.
*Virker ikke på alle modeller i LX, MX og LS serien.
* Ekskluderer enkelte modeller i LX, MX og LS serien.
* Fungerar ej på vissa LX-, MX- och LS-modeller
* Ei koste joitakin LX-, MX-ja LS-sarjojen malleja
Page 38

WWW.ONEFORALL.COM 16
BskyB Sky digibox
On Digital
SAT code 0847 for Amstrad, Grundig, Pace, Panasonic
Functions on the Placement of the functions on the
BskyB remote ONE FOR ALL remote control
control
Standby Standby
00
11
22
33
44
55
66
77
88
99
Program (+) PROGRAM (+)
Program (-) PROGRAM (-)
Volume (+) VOLUME (+)
Volume (-) VOLUME (-)
Mute MUTE
Guide MENU
Services PLAY
Info PAUSE
Interactive FAST FORWARD
Up UP
Down DOWN
Left LEFT
Right RIGHT
Select MUTE (When in Menu)
TV AV (When in Menu)
Text REWIND
Red SP/LP
Blue AUTO
Yellow RECORD
Green STOP
Backup 10
SAT code 0241 for: Pace
SAT code 0133 and 0134 for: Philips
Functions on the Placement of the functions on the
Pace or Philips or... etc. ONE FOR ALL remote control
remote control
Standby Standby
00
11
22
33
44
55
66
77
88
99
Program (+) PROGRAM (+)
Program (-) PROGRAM (-)
Volume (+) VOLUME (+)
Volume (-) VOLUME (-)
Mute MUTE
Guide MENU
Menu PLAY
Info PAUSE
Cursor Up UP
Cursor Down DOWN
Cursor Left LEFT
Cursor Right RIGHT
Select MUTE (When in Menu)
Exit AV (When in Menu)
TV/DTV AV
Text REWIND
Red SP/LP
Blue AUTO
Yellow RECORD
Green STOP
Wide 10
Page 39

17 WWW.ONEFORALL.COM
Information Canal Sat et TPS
Pour retrouver l’emplacement des fonctions d’appareil TPS ou Canal Satellite sur les
touches de la télécommande universelle ONE FOR ALL, veuillez vous référer aux
tableaux ci-dessous.
Ne pas oublier de programmer le code de votre appareil (TPS ou Canal Satellite)
avant l’utilisation des informations suivantes.
Canal Satellite (code satellite 0853)
Fonctions de la Emplacement des fonctions sur les
télécommande touches de la télécommande
Canal Satellite ONE FOR ALL
00
11
22
33
44
55
66
77
88
99
Volume + VOLUME+
Volume - VOLUMEMute MUTE
Chaîne + CHAÎNE +
Chaîne - CHAÎNE Power POWER
Guide MENU ou PAUSE
Programme PLAY
Services FF
Haut HAUT
Bas BAS
gauche GAUCHE
droite DROITE
Ok OK (touche MUTE en mode Menu)
Exit AV (en mode Menu)
TV/SAT AV
Rewind RETOUR RAPIDE (REWIND)
Pilote SP/LP
Personal Menu AUTO
Chaînes Favorites 10
TPS (code satellite 0820)
Fonctions de la Emplacement des fonctions sur les
télécommande touches de la télécommande
TPS ONE FOR ALL
00
11
22
33
44
55
66
77
88
99
Volume + VOLUME+
Volume - VOLUMEMute MUTE
Chaîne + CHAÎNE +
Chaîne - CHAÎNE Power POWER
Guide MENU
MENU PLAY
Info PAUSE
Haut HAUT
Bas BAS
gauche GAUCHE
droite DROITE
Ok OK (touche MUTE en mode Menu)
Exit AV (en mode Menu)
TV/SAT AV
Rouge SP/LP
Bleu AUTO
Jaune RECORD
Vert STOP
RETURN 10
Page 40

URC-7552
701921
Printed on Recycled Paper
DD-0801
 Loading...