

Page 1
INSTRUCTION MANUAL
VIBRATING MESH NEBULIZER
Model NE-U22V
®
CAUTION: Federal law restricts this device to sale by or on the order of a
physician and/or licensed healthcare practitioner.
English Français
Español
Page 2

2
TABLE OF CONTENTS
Before Using the Device
Introduction.............................................................................. 3
Safety Information .................................................................... 4
Know Your Unit ...................................................................... 7
Accessories and Replacement Parts................................................ 8
Unit Assembly............................................................................ 9
Operating Instructions
Battery Installation .................................................................... 11
Using the AC Adapter ................................................................ 12
Filling the Medication Bottle ........................................................ 13
Selecting the Nebulization Mode .................................................. 14
Using the Device ...................................................................... 15
Care and Maintenance
Cleaning after Each Use.......................................................................... 16
Daily Disinfecting ...................................................................... 17
Caring for the Device .................................................................. 18
Troubleshooting
Troubleshooting Guide ................................................................ 20
Warranty Information ................................................................ 22
FCC Statement ........................................................................ 23
Specifications ............................................................................ 24
Page 3
3
INTRODUCTION
Thank you for purchasing the Omron®NE-U22V MICROAir®Vibrating Mesh Nebulizer.
Omron Healthcare has moved forward in the development of electronic nebulizer technology with
the introduction of the NE-U22V MICROAir
®
Vibrating Mesh Nebulizer. Focusing on patient
convenience and compliance as its goal, this device offers ultimate portability for wherever you go
and revolutionary vibrating mesh technology that provides a precise, powerful and effective
treatment every time.
The MICROAir
®
is a vibrating mesh nebulizer system designed to aerosolize liquid medications for
inhalation by the patient. The device may be used with pediatric and adult patients in the home,
hospital, and sub-acute care settings.
Your NE-U22V MICROAir
®
comes with the following components:
• Main Unit
• Unit Cover
• Medication Bottle
• Mesh Cap
• Mask and Mouthpiece Adapter
• Mouthpiece
• Storage Case
• Instruction Manual
• Instructional DVD
The following are optional accessories sold separately:
• AC Adapter
• Child Mask
Fill-in for future reference
DATE PURCHASED:
SERIAL NUMBER:
Staple your purchase receipt here.
The MICROAir
®
is a prescription medical device. Operate this device only as
instructed by your physician and/or licensed healthcare practitioner.
SAVE THESE INSTRUCTIONS
Page 4
4
SAFETY INFORMATION
To assure the correct use of the product basic safety measures should always be
followed including the warnings and cautions listed in this instruction manual.
OPERATING THE DEVICE
Read all the information in the instruction book and any other literature
included in the box before using the unit.
For type, dose, and regimen of medication follow the instructions of your
physician and/or licenced healthcare practitioner.
Pentamidine is not an approved medication for use with this device.
Do not use tap or mineral water in the nebulizer for nebulizing purposes.
Clean and disinfect the Medication Bottle, Mesh Cap, Mask, Mouthpiece
and Mask and Mouthpiece Adapter before using the device for the first time
after purchase.
If the device has not been used for a long period of time, clean and disinfect
the Medication Bottle, Mesh Cap, Mask, Mouthpiece, and Mask and
Mouthpiece Adapter before using them.
Always dispose of any remaining medication in the medication cup after each
use. Use fresh medication each time you use the device.
Do not leave the device or its parts where it will be exposed to extreme
temperatures or changes in humidity, such as leaving the device in a vehicle
during warm or hot months, or where it will be exposed to direct sunlight.
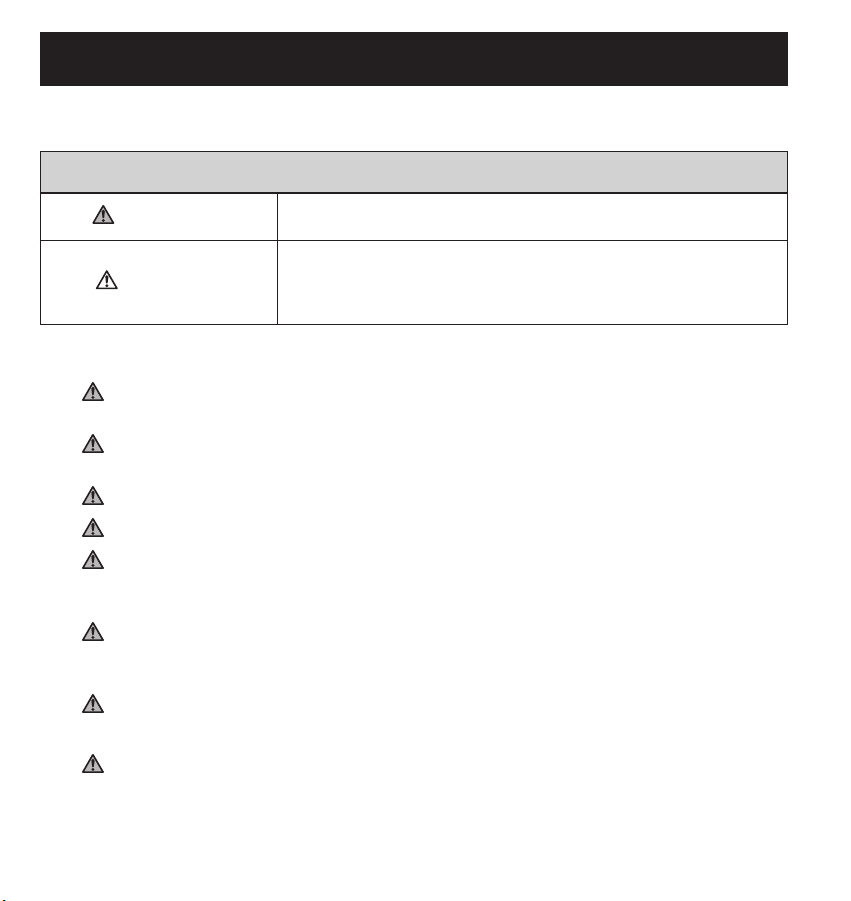
SAFETY ICONS USED IN THIS INSTRUCTION MANUAL
WARNING
Indicates a potentially hazardous situation which, if
not avoided, could result in death or serious injury
CAUTION
Indicates a potentially hazardous situation which, if
not avoided, may result in minor or moderate injury
to the user or patient or damage to the equipment or
other property.
Page 5
5
IMPORTANT SAFETY NOTES
OPERATING THE DEVICE (continued)
Provide close supervision when this device is used by, on, or near infants,
children or compromised individuals.
Inspect the main unit and the nebulizer parts each time before using the device.
Make sure no parts are damaged, the device is assembled properly, and the
device operates normally.
To prevent damage to the device, add the medication slowly. Do not allow the
medication to overflow the Medication Port.
Do not add more than 7 mL of medication to the medication cup.
To prevent damage to the device, make sure that the Mesh Cap is correctly in
place. If the Mesh Cap is not properly closed, medication will leak.
Do not operate the device at temperatures greater than +104º F (+40º C).
Do not subject the device or any of the components to strong shocks, such as
dropping on the floor.
This device is approved for human use only.
Do not disassemble or attempt to repair the device or components.
Operate the device only as intended. Do not use the device for any other purpose.
Dispose of the device, components and optional accessories according to
applicable local regulations. Unlawful disposal may cause environmental pollution.
Use only Omron authorized parts and accessories. Parts and accessories not
approved for use with the device may damage the unit.
Changes or modifications not approved by Omron Healthcare will void the
user warranty.
RISK OF ELECTRICAL SHOCK WHEN USING THE AC ADAPTER
Do not plug or unplug the power cord into the electrical outlet with wet hands.
Use only the AC adapter designed by Omron for this device. Use of any other
AC adapter may damage the device.
Page 6
6
IMPORTANT SAFETY NOTES
RISK OF ELECTRICAL SHOCK WHEN USING THE AC ADAPTER
(continued)
Do not overload power outlets. Plug the device into the appropriate voltage outlet.
Do not use extension cords. Plug the power cord directly into the electrical outlet.
Unplug the power cord from the electrical outlet after using the device.
Unplug the power cord from the electrical outlet before cleaning the device.
MAINTENANCE AND STORAGE
Keep the device out of the reach of unsupervised infants and children. The
device may contain small parts that can be swallowed.
Do not immerse the main unit in water or other liquid.
Do not use or store the device in humid locations, such as a bathroom. Use the
device within the operating temperature and humidity.
Do not leave the cleaning solution in the nebulizer parts. Rinse the nebulizer
parts with distilled water after disinfecting.
Rinse the nebulizer parts after each use. Dry the parts immediately after washing.
Store the device and the components in a clean, safe location.
To prevent damage to the device, do not carry or leave the Medication Bottle
filled with medication or distilled water.
Do not place or attempt to dry the device or any of its parts in a microwave oven.
To prevent damage to the device, do not rinse or immerse the Main Unit in any
liquid, do not wash or rinse any of the parts under strong running water, and do
not touch the mesh with your hand or any object.
Do not use household bleach. The mesh will rust and the Mesh Cap cannot be used.
To prevent damage to the device, do not clean the Main Unit using abrasive
cleaners or any type of chemical, and do not allow any moisture to contact the
electrodes or the AC Adapter jack on the Main Unit.
Do not put the AC Adapter in the Storage Case. The Storage Case is not
intended to carry the AC Adapter.
Page 7
7
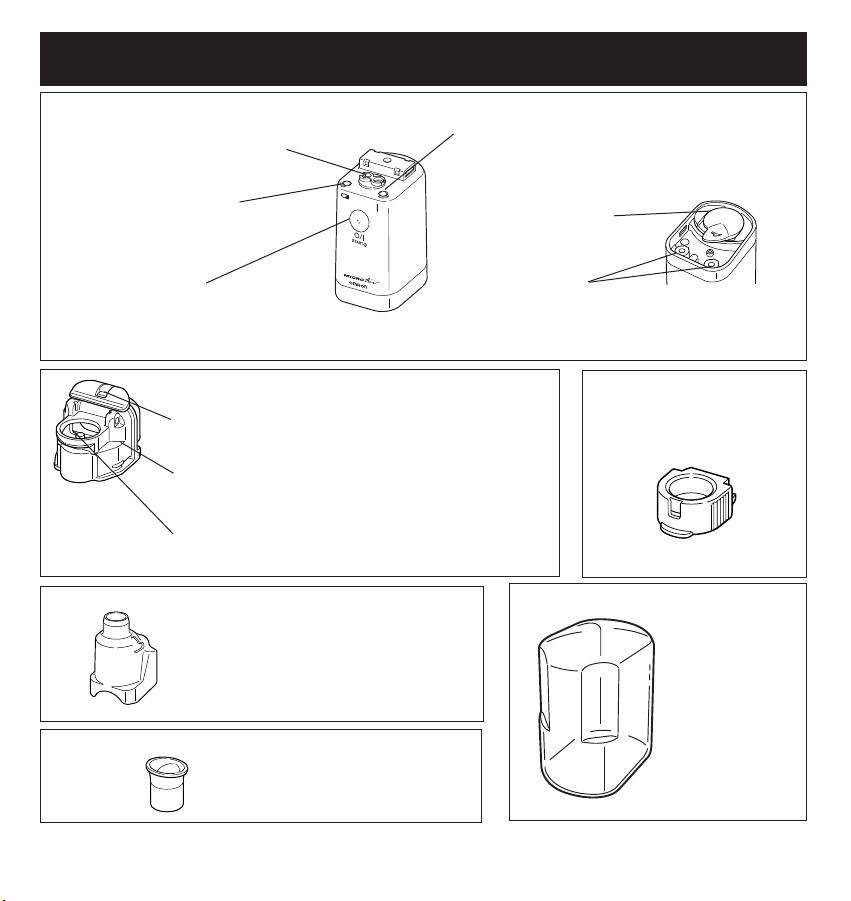
ON/OFF Button
Turns the power for the
Main Unit on and off
Bottle Cap Locking Lever
Opens the Medication Bottle for cleaning
Medication Bottle
Holds maximum capacity of 7mL for treatment
Medication Port
Add the medicine to the bottle
Electrode
Power conductor from the Main Unit
to the vibrator on the Medication
Bottle
Battery Low Indicator
An orange light blinks when the
batteries
are worn
Power Indicator
The green light shows the power is on
Main Unit
Bottom of Main Unit
Battery Cover
Push lever to
remove cover
Medicine Bottle
Mesh Cap
Metal Alloy Mesh creates
high efficiency aerosol
Mask and Mouthpiece Adapter
Mouthpiece
Main Unit Cover
Protects the Main
Unit with the
attached
Medication Bottle
and
Mesh Cap
during storage
Holds the Mouthpiece or Mask
securely on the device
Patient Interface
KNOW YOUR UNIT
Electrode
Power conductor from the Main
Unit to the AC Adapter
Connection Stand
®
Page 8
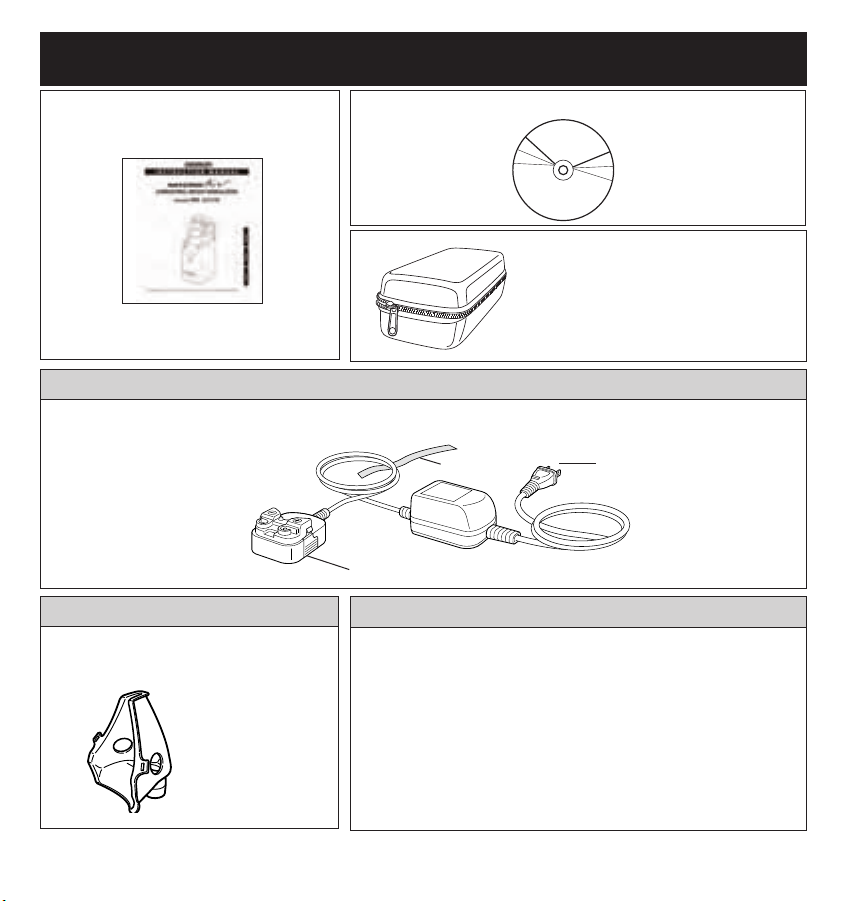
8
KNOW YOUR UNIT
Instruction Manual
Storage Case
Instructional DVD
Power Plug
Cord Band
AC Adapter Connection Stand
Case holds the Main Unit,
Medication Bottle, Mask and
Mouthpiece Adapter
AC Adapter Model No. U22-5
Optional Accessory
Optional Accessory
Replacement Parts
Model No.
BATTERY COVER U22-8
MAIN UNIT COVER U22-9
MASK AND MOUTHPIECE
ADAPTER U22-2
MEDICATION BOTTLE U22-3
MESH CAP U22-4
MOUTHPIECE U22-1
STORAGE CASE U22-7
Child Mask
Model No. C922
Patient Interface
for pediatric use
Page 9
9
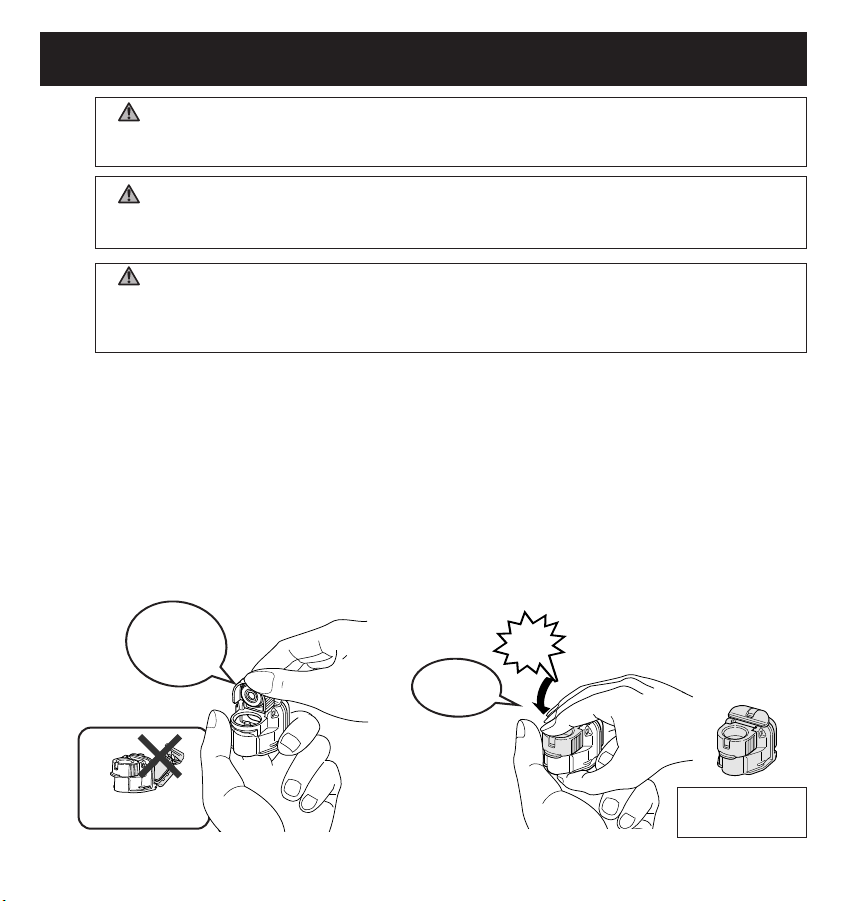
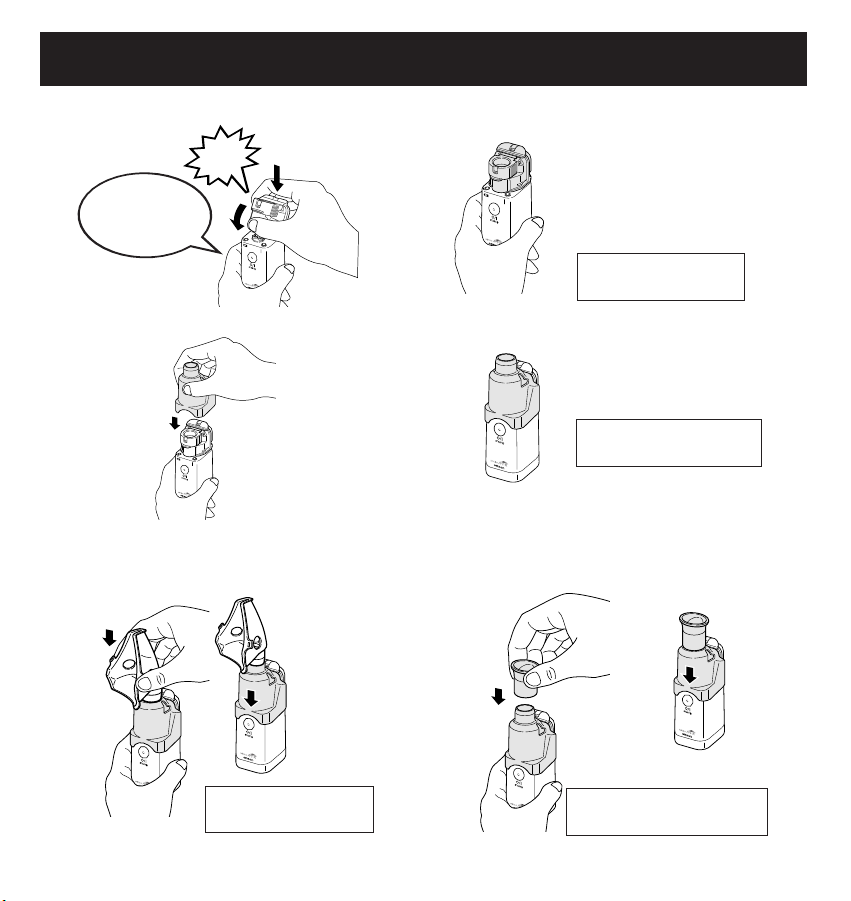
PREPARING THE NEBULIZER FOR USE
Insert the
Mesh Cap
vertically.
Do not open
the Bottle Cap.
Close it
securely.
You have finished
installation
.
WARNING
Read all the information in the instruction book and any other literature included
in the box before using the unit.
WARNING
Clean and disinfect the Medication Bottle, Mesh Cap, Mask, Mouthpiece and Mask
and Mouthpiece Adapter before using the device for the first time after purchase.
WARNING
If the device has not been used for a long period of time, clean and disinfect the
Medication Bottle, Mesh Cap, Mask, Mouthpiece, and Mask and Mouthpiece
Adapter before using them.
For directions on cleaning and disinfecting go to page 16 and 17 under Care and Maintenance.
The device must be assembled before it is used.
General Information
• Components may fit tightly since they are made to prevent the medication
from leaking.
• Hold the device securely with both hands.
• Install the parts securely. You may hear a click sound as you install some of the parts.
1. Attach the Mesh Cap to the Medication Bottle.
Click
Page 10
10
PREPARING THE NEBULIZER FOR USE
You have finished
installation.
You have finished
assembly.
You have finished
assembly.
Align both
electrodes with
each other.
You have finished
installation.
Click
2. Attach the Medication Bottle to the Main Unit.
3. Attach the Mask and Mouthpiece Adapter to the Main Unit.
4. Attach the Mouthpiece or the Child Mask to the Mask and Mouthpiece Adapter.
• How to attach the Child Mask • How to attach the Mouthpiece
Page 11
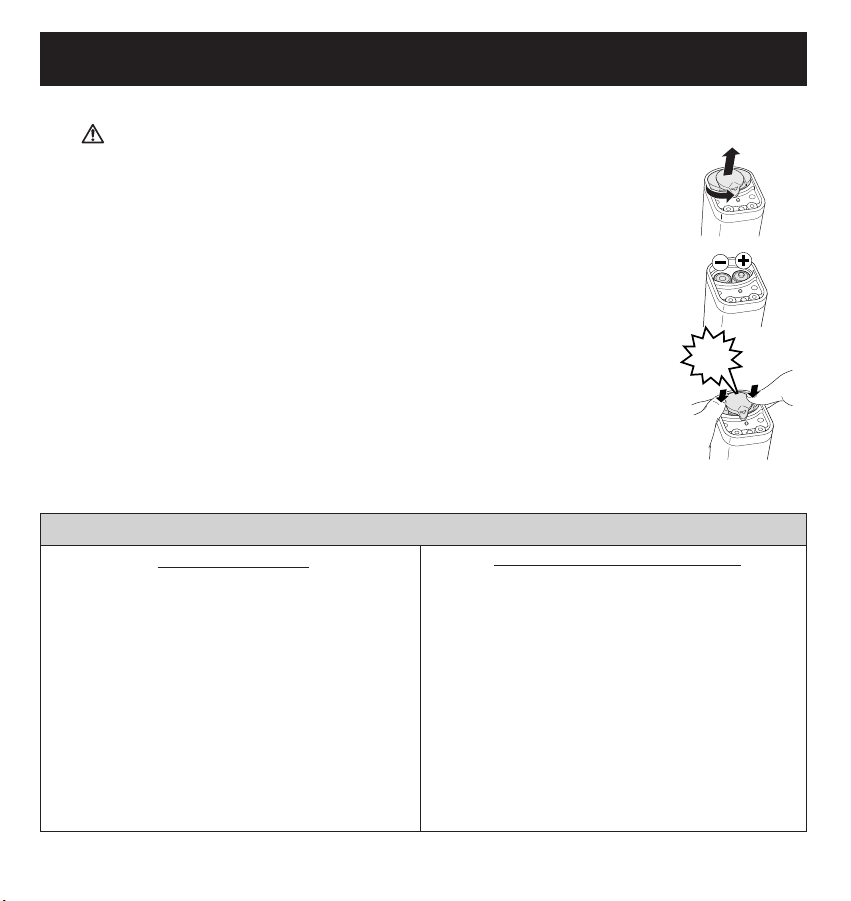
11
BATTERY INSTALLATION
Bottom of the
Main Unit
Alkaline Batteries
• The device can be used for approximately
8 days if operating for 30 minutes a day.
• The Battery Low Indicator (orange light) flashes to
signal the batteries are low. Replace both batteries
with new ones.
• The Battery Low Indicator (orange light) turns on
to signal the batteries are worn out. The device
will not nebulize.
Immediately replace both batteries with new ones.
NiMH Rechargeable Batteries
• The device can be used for approximately 8 days if
operating for 30 minutes a day when the batteries are
fully charged.
• The Battery Low Indicator (orange light) flashes to
signal the rechargeable batteries have little or no
residual power remaining. If the device will not
nebulize immediately echarge the batteries.
• Recharge the batteries using a commercially available
battery charger suitable for the batteries used in the
device.
• The AC Adapter does not function as a battery
charger.
Battery Life and Battery Replacement
Click
This device operates using two (2) AA alkaline batteries or two (2) NiMH AA rechargeable batteries.
CAUTION
Do not install worn and new batteries together.
Do not use different types of batteries together.
Remove the batteries if the device will not be used
for three months or longer.
1. Remove the Battery Cover.
(A) Rotate the Battery Cover lever in the direction of the arrow as shown in the
illustration.
(B) Remove the Battery Cover. The Battery Cover may appear to be tight
fitting since it was designed to prevent fluids from getting into the device.
2. Insert the batteries.
Correctly align the polarities (+ and -) with the batteryindication marks on the
device.
3. Replace the Battery Cover.
Use your thumbs to push on both ends of the Battery Cover Press down firmly
until you hear both tabs click into place.
(B)
(A)
Page 12
12
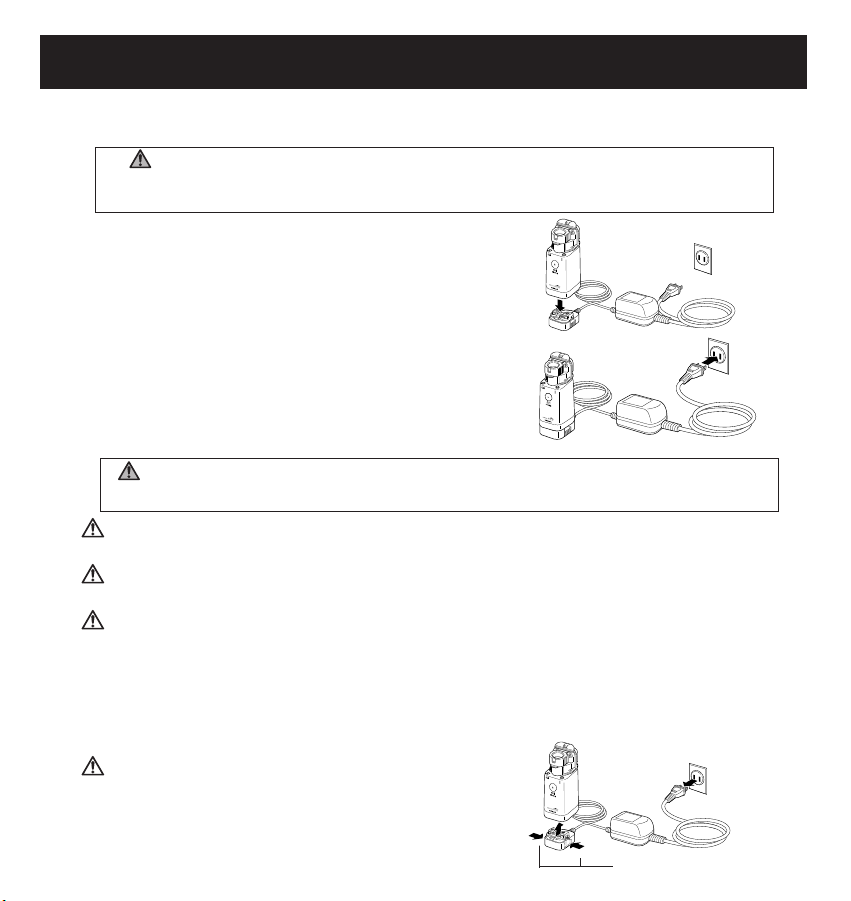
USING THE AC ADAPTER
The device is designed not to draw power from the batteries when the AC Adapter is used. The AC
Adapter is not a battery charger.
WARNING
Use only the AC adapter designed by Omron for this device. Use of any other
AC adapter may damage the device.
To connect the AC Adapter to the Main Unit
(1) Place the Main Unit on the AC Adapter
Connection Stand as shown in the
illustration below.
NOTE: It will click and lock to the stand.
(2) Insert the AC Adapter Power Plug into
a 120V electrical outlet.
WARNING
Do not plug or unplug the power cord into the electrical outlet with wet hands.
CAUTION
Do not overload power outlets. Plug the device into the appropriate voltage outlet.
CAUTION
Do not use extension cords. Plug the power cord directly into the electrical outlet.
CAUTION
Unplug the power cord from the electrical outlet before cleaning the device.
To remove the AC Adapter from the Main Unit
(1) Disconnect the AC Adapter Power Plug from the electrical outlet.
(2) Push on both sides of the Connection Stand to unlock the Main Unit.
(3) Remove the Main Unit
CAUTION
Unplug the power cord from the electrical
outlet after using the device.
(1) Unplug
(3) Remove
(2) Push both ends
Connection is completed.
(1)
(2)
Page 13
13
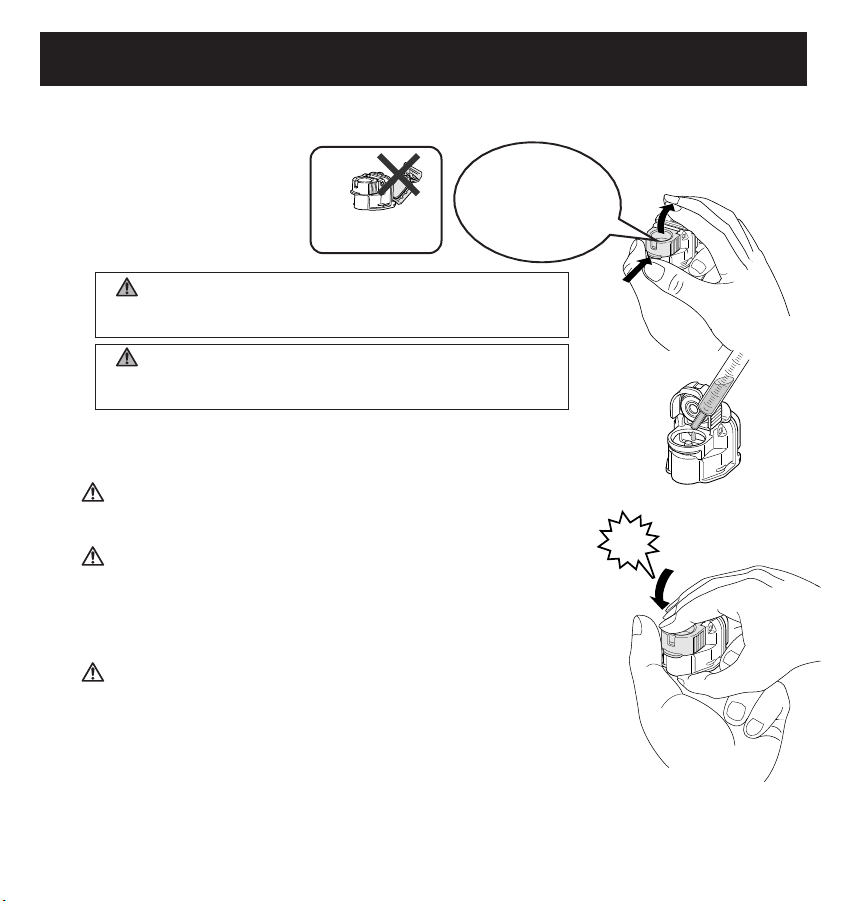
FILLING THE MEDICATION BOTTLE
Remove the Mouthpiece or Mask and the Mask and Mouthpiece Adapter from the Main Unit.
1. Open the Mesh Cap.
Hold the device securely
in your hand.
2. Fill the Medication Bottle.
WARNING
Pentamidine is not an approved medication for use
with this device.
WARNING
Do not use tap or mineral water in the nebulizer
for nebulizing purposes.
Be careful to prevent the Mesh Cap from closing
as shown in the illustration.
The maximum capacity of the Medication Bottle is 7mL.
CAUTION
Do not add more than 7 mL of medication to the
medication cup.
CAUTION
To prevent damage to the device, add the medication
slowly. Do not allow the medication to overflow the
medication port.
3. Close the Mesh Cap.
CAUTION
To prevent damage to the device, make sure that the Mesh Cap is
correctly in place. If the Mesh Cap is not properly closed,
medication will leak.
4. Attach the Mask and Mouthpiece Adapter to the Main Unit
Attach the Mouthpiece or the Child Mask to the Mask and Mouthpiece Adapter.
NOTE: For instructions on attaching the Mask and Mouthpiece Adapter
return to Unit Assembly on Page 10.
Do not open the
Bottle Cap.
Lift up the mesh
cap while pressing
your thumb upward
on the brim.
Check that the
Mesh Cap is
closed.
Click
Page 14

14
SELECTING THE NEBULIZATION MODE
This device operates in the Continuous Nebulization Mode or in the Manual Nebulization Mode.
• Continuous Nebulization Mode
To start the device using the continuous
nebulization mode press and hold the ON/OFF
Button down for 1 second.
Press the ON/OFF Button again to stop nebulization.
• Manual Nebulization Mode
In the Manual Nebulization Mode the
device will nebulize only when you press
and hold the ON/OFF Button down.
You can inhale on demand using this mode.
To start the device using manual nebulization
press and hold the ON/OFF Button down
for at least 2 seconds.
Press and hold the ON/OFF Button to
start nebulization.
NOTE: The power indicator (green light) illuminates during nebulization.
Press and hold the ON/OFF
Button down with your
finger for 1 second.
Press and hold the ON/OFF
Button down with your
finger for 2 seconds.
Page 15

15
USING THE DEVICE
WARNING
For type, dose, and regimen of medication follow the instructions of your
healthcare provider.
WARNING
Always dispose of any remaining medication in the medication cup after each
use. Use fresh medication each time you use the device.
CAUTION
Provide close supervision when this device is used by, on, or near infants,
children or compromised individuals.
CAUTION
Inspect the Main Unit and the nebulizer parts each time before using the device.
Make sure no parts are damaged, the device is assembled properly, and the
device operates normally.
CAUTION
Do not operate the device at temperatures greater than +104ºF (+40ºC).
CAUTION
This device is approved for human use only.
1. Slightly tilt the Main Unit toward yourself to immerse the Vibrating Mesh Cap
in the medication.
NOTE: If the vibrator is not immersed in the medication, the device will not nebulize.
2. Start inhalation in a relaxed position.
3. Place your lips lightly around the mouthpiece. If using the Child Mask position the
mask lightly against the face.
4. Start the treatment as directed by your healthcare provider.
5. Press the ON/OFF Button to turn off the device when finished with your treatment.
NOTE: The device has a built-in timer to turn off the power approximately 30 minutes
after the power is turned on.
When the AC Adapter is used, remove the power plug from the electrical outlet.
Page 16
16
CLEANING AFTER EACH USE
Following the cleaning instructions after each use will prevent any remaining medication in the
bottle from drying, adhering to the mesh cap, and resulting in the device not nebulizing effectively.
Wash the Medication Bottle, Mesh Cap, Mask, Mouthpiece, and Mask and Mouthpiece
Adapter after each use.
WARNING
Rinse the nebulizer parts after each use. Dry the parts immediately after washing.
CAUTION
To prevent damage to the device:
• Do not rinse or immerse the Main Unit in any liquid.
• Do not wash or rinse any of the parts under strong running water.
• Do not touch the mesh with your hand or any other object.
1. Remove the Mouthpiece or Mask and the Mask and Mouthpiece Adapter
from the Main Unit.
2. Remove the Medication Bottle from the Main Unit.
3. Open the Medication Bottle and discard any remaining medication.
4. Attach the Medication Bottle to the Main Unit. Open the Mesh Cap.
5. Pour a small amount of distilled water into the Medication Bottle and
close the Mesh Cap.
6. Turn on the device to nebulize the distilled water for 1 to 2 minutes to
remove residual medication from the mesh holes.
7. Turn off the device and remove the Medication Bottle from the Main Unit.
8. Remove the Mesh Cap from the Medication Bottle and discard any remaining
distilled water from the Medication bottle.
9. Rinse the Medication Bottle, Mesh Cap, Mask, Mouthpiece, and Mask
and Mouthpiece Adapter with distilled water.
10. Gently wipe off excess water with a soft clean cloth or allow the parts to air
dry in a clean environment.
11. Assemble the device. Store the device in the Storage Case or in a
clean environment.
Page 17
17
DAILY DISINFECTING
Disinfect the Medication Bottle, Mesh Cap, Mask, Mouthpiece, and Mask
and Mouthpiece Adapter after the last treatment of each day.
CAUTION
To prevent damage to the device:
• Do not rinse or immerse the Main Unit in any liquid.
• Do not wash or rinse any of the parts under strong running water.
• Do not touch the mesh with your hand or any other object.
1. Make a solution using one of the following solutions: Vinegar (1 part white vinegar
and 3 parts distilled water), OR mild detergent soap (dishwashing soap in distilled water).
CAUTION
Do not use household bleach. The mesh will rust and the Mesh Cap cannot be used.
2. Lift open the Mesh Cap and pour a small amount of disinfecting solution into the
Medication Bottle.
3. Turn on the device to nebulize the disinfecting solution for 1 to 2 minutes.
4. Turn off the device and remove the Medication Bottle from the Main Unit.
5. Remove the Mesh Cap from the Medication Bottle and discard any remaining
disinfecting solution from the Medication Bottle.
6. Soak the Medication Bottle, Mesh Cap, Mask, Mouthpiece, and Mask and
Mouthpiece Adapter in the disinfecting solution for 10 to 15 minutes.
7. Rinse the Medication Bottle, Mesh Cap, Mask, Mouthpiece, and Mask and
Mouthpiece Adapter in distilled water.
WARNING
Do not leave the cleaning solution in the nebulizer parts. Rinse the nebulizer
parts with distilled water after disinfecting.
8. Gently wipe off excess water with a soft clean cloth or allow the parts to air dry in
a clean environment.
9. Assemble the device. Store the device in the Storage Case or in a clean environment.
Page 18
18
CARING FOR THE DEVICE
To keep your device in the best condition and protect the unit from damage
follow these directions:
Keep the device out of the reach of unsupervised infants and children. The device may
contain small parts that can be swallowed.
Store the device and the components in a clean, safe location.
Do not use or store the device in humid locations, such as a bathroom. Use the device
within the operating temperature and humidity.
Do not leave the device or its parts where it will be exposed to extreme temperatures or
changes in humidity, such as leaving the device in a vehicle during warm or
hot months, or where it will be exposed to direct sunlight.
Do not subject the device or any of the components to strong shocks, such as dropping
on the floor.
Do not disassemble or attempt to repair the device or components.
Use only Omron authorized parts and accessories. Parts and accessories not approved for
use with the device may damage the unit.
Operate the device only as intended. Do not use the device for any other purpose.
Changes or modifications not approved by Omron Healthcare will void the user
warranty.
Dispose of the device, components, and optional accessories according to applicable local
regulations. Unlawful disposal may case environmental pollution.
Remove the batteries if the device will not be used for three months or longer. Always
replace all the batteries with new ones at the same time. Do not use different types of
batteries together.
Page 19
19
Cord band
CARING FOR THE DEVICE
Cleaning the Main Unit
To clean the casing of the main unit moisten a soft cloth with water or a mild detergent. Wipe the casing
and immediately dry using a soft clean cloth.
CAUTION
Do not place or attempt to dry the device or any of its parts in a microwave oven.
CAUTION
To prevent damage to the device:
• Do not rinse or immerse the Main Unit in any liquid.
• Do not clean the Main Unit using abrasive cleaners or any type of chemical.
• Do not allow any moisture to contact the electrodes or the AC Adapter Jack
on the Main Unit or AC Adapter connection stand.
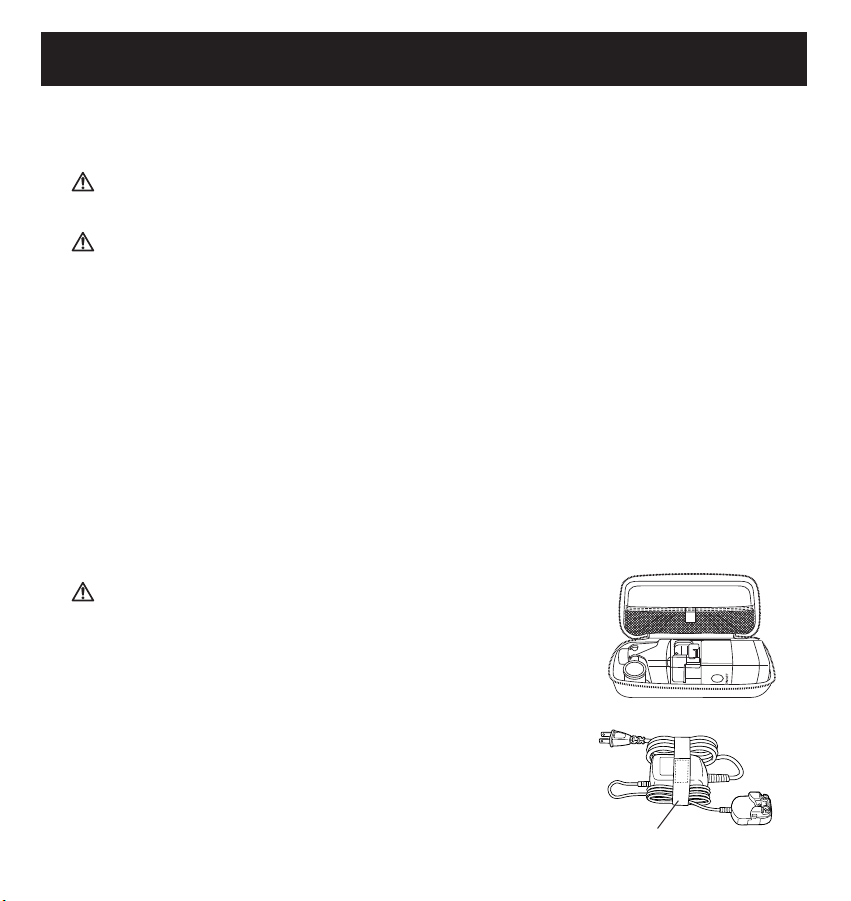
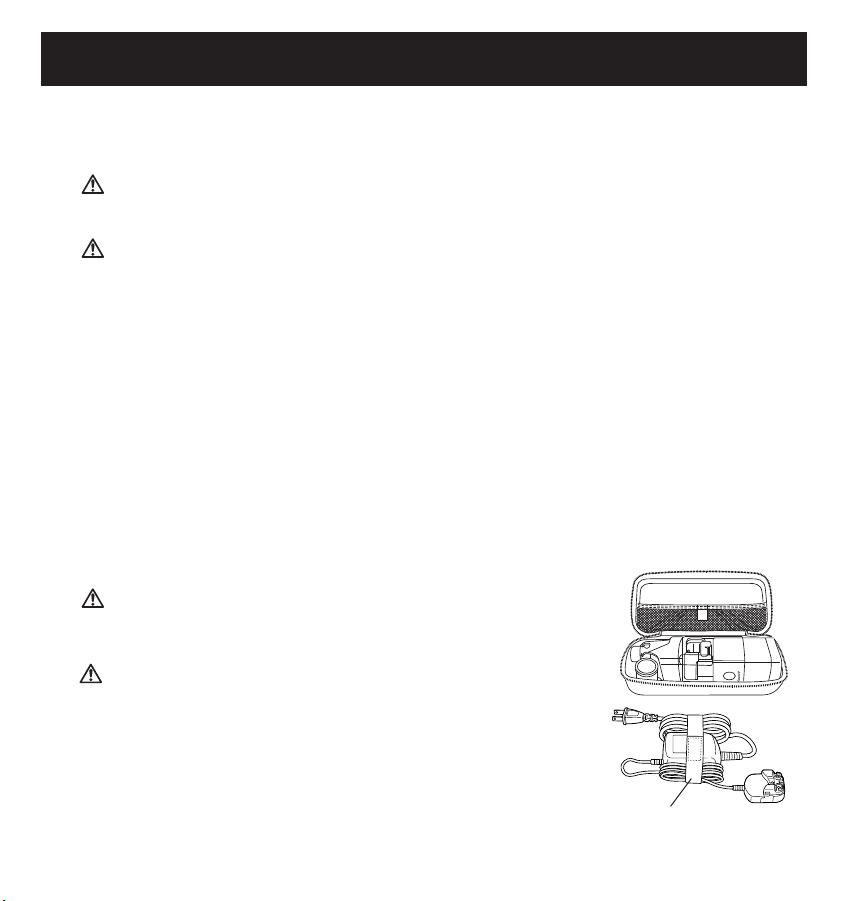
Carrying the device in the Storage Case
Assemble the device by attaching the Mesh Cap and the Medication Bottle to the Main Unit. Place the
Main Unit Cover on the device.
Position the device in the Storage Case as shown in the illustration.
The Mouthpiece and Mask Adapter can be easily placed in the Storage Case to carry with the Main
Unit.
CAUTION
To prevent damage to the device
• Do not carry or leave the nebulizer with
medication or distilled water in the Medicine Bottle.
• Do not put the AC Adapter in the Storage Case.
The Storage Case is not intended to carry the
optional AC Adapter.
To carry the AC Adapter bundle the power cord of the
AC Adapter and fasten it to the Main Unit of the AC
Adapter with the cord band as shown in the illustration.
Page 20
20
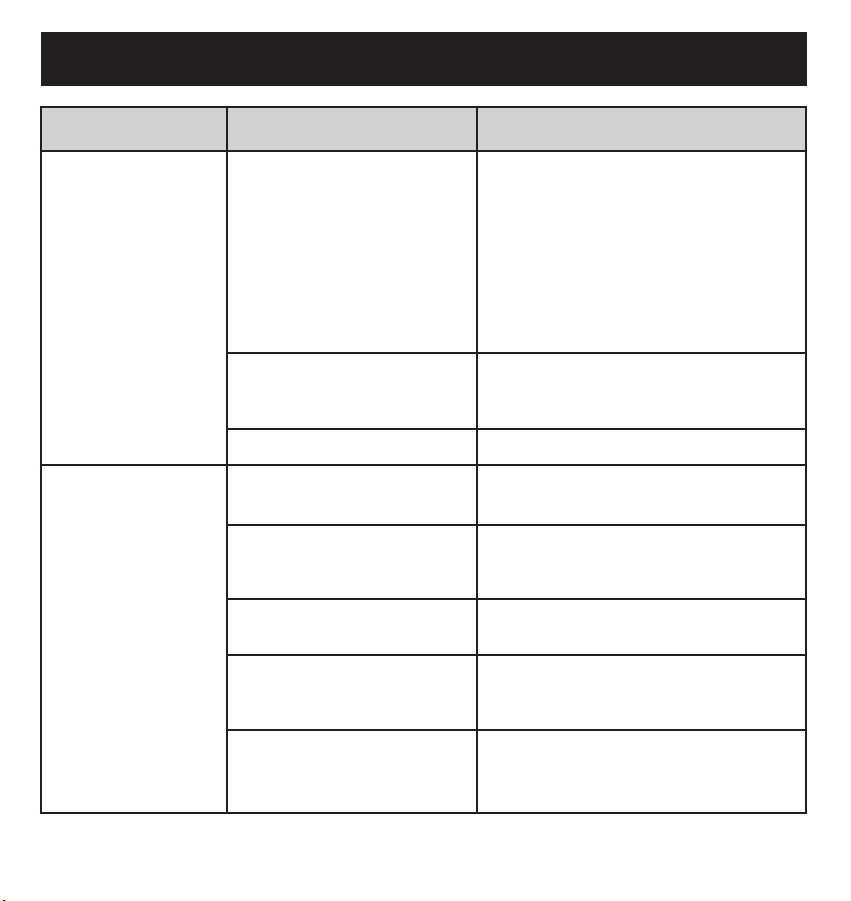
TROUBLESHOOTING GUIDE
PROBLEM CAUSE SOLUTION
The power indicator
does not illuminate.
The AC Adapter is not plugged
into an electrical outlet.
The connection stand is not
attached to the Main Unit.
The batteries have not been
inserted properly. The batteries
are low in charge.
Turn the power switch off. Plug the power
plug into an electrical outlet. Turn the device on.
Make sure Main Unit has been clicked onto
the Connection Stand.
Reinsert the batteries.
Replace both worn batteries immediately.
Recharge NiMH batteries with a
commercially available charger.
Residual medication has
dried on the components
and accessories.
Clean and disinfect the components
and accessories.
The mesh cap needs to be replaced.
Replace the Mesh Cap.
The power indicator
is illuminated but the
unit does not nebulize.
The batteries are low
in charge.
Replace same type batteries with new
alkaline or charged NiMH batteries.
The Medication Bottle has
too much medication in it.
Fill the Medication Bottle with the
proper amount of prescribed
medication. Max is 7 mL.
Liquid may have collected around
the electrodes of the Main Unit.
Absorb any moisture with a soft cloth.
There is liquid on top of the
Mesh Cap.
Remove visible liquid with a soft cloth
and a very light touch so as not to
damage the mesh.
The medication has not
come in contact with the
nebulizing parts.
Slightly slant the Main Unit towards you
with the ON/OFF button pointing down.
Page 21

21
TROUBLESHOOTING GUIDE
PROBLEM CAUSE SOLUTION
The unit is on;
however, it
nebulizes weakly,
or is taking too long
for treatment.
The Medication Bottle is not
properly installed.
Make sure the Medication Bottle is
properly installed.
The unit needs to be cleaned. Follow directions for cleaning after
each use.
The unit needs to be disinfected. Follow directions for disinfecting.
The batteries are low in charge. Replace the batteries per installation
instructions.
Nebulization rates vary based on
the medication used.
Treatment times may vary among
medications and patients.
Page 22

22
WARRANTY INFORMATION
LIMITED WARRANTIES
Your NE-U22V Nebulizer, excluding the mesh cap and accessories, is warranted to be free from defects
in materials and workmanship appearing within 2 years from date of purchase, when used in
accordance with the instructions provided with your device. The above warranty extends only to the
original retail purchaser.
We will, at our option, repair or replace without charge your Omron Nebulizer. Repair or replacement
is our only responsibility and your only remedy under the above warranties.
To obtain warranty service, contact Omron Healthcare's Customer Service by calling 1-800-634-4350
for the address of the repair location and the return shipping and handling fee. Information for
warranty service is available on our website at www.omronhealthcare.com.
Enclose the Proof of Purchase. Include a letter, with your name, address, phone number, and
description of the specific problem. Pack the product carefully to prevent damage in transit.
Because of possible loss in transit, we recommend insuring the product with return receipt requested.
ALL IMPLIED WARRANTIES, INCLUDING BUT NOT LIMITED TO THE IMPLIED
WARRANTIES OF MERCHANTABILITY AND FITNESS FOR PARTICULAR PURPOSE,
ARE LIMITED TO THE DURATION OF THE APPLICABLE WRITTEN WARRANTY
ABOVE. Some states do not allow limitations on how long an implied warranty lasts, so the above
limitation may not apply to you.
OMRON SHALL NOT BE LIABLE FOR LOSS OF USE OR ANY OTHER INCIDENTAL,
CONSEQUENTIAL OR INDIRECT COSTS, EXPENSES OR DAMAGES. Some states do not
allow the exclusion or limitation of incidental or consequential damages, so the above exclusions may
not apply to you.
This warranty gives you specific legal rights, and you may also have other rights, which may vary
from state to state.
FOR CUSTOMER SERVICE (US and CANADA)
Visit our web site at: www.omronhealthcare.com
Call toll free: 1-800-634-4350
Page 23

23
FCC STATEMENT
Note:
POTENTIAL FOR RADIO/TELEVISION INTERFERENCE (for U.S.A. only)
This product has been tested and found to comply with the limits for a Class B
digital device, pursuant to part 15 of the FCC rules.
These limits are designed to provide reasonable protection against harmful
interference in a residential installation. The product generates, uses, and can
radiate radio frequency energy and, if not installed and used in accordance with
the instructions, may cause harmful interference to radio communications. However, there
is no guarantee that interference will not occur in a particular
installation. If the product does cause harmful interference to radio or television reception,
which can be determined by turning the product on and off, the user
is encouraged to try to correct the interference by one or more of the following measures:
• Reorient or relocate the receiving antenna.
• Increase the separation between the product and the receiver.
• Connect the product into an outlet on a circuit different from that to
which the receiver is connected.
• Consult the dealer or an experienced radio/TV technician for help.
POTENTIAL FOR RADIO/TELEVISION INTERFERENCE (for Canada only)
This digital apparatus does not exceed the Class B limits for radio noise emissions from
digital apparatus as set out in the interference-causing equipment standard entitled “
Digital Apparatus”, ICES-003 of the Canadian Department of Communications.
Cet appareil numérique respecte les limites de bruits radioeléctriques applicables aux
appareils numériques de Clase B prescrites dans la norme sur le materiel brouilleur:
“Appareils Numériques”, ICES-003 édictée par le minister des
communications.
Changes or modifications not expressly approved by the party responsible for
compliance could void the user's authority to operate the equipment.
Page 24
24
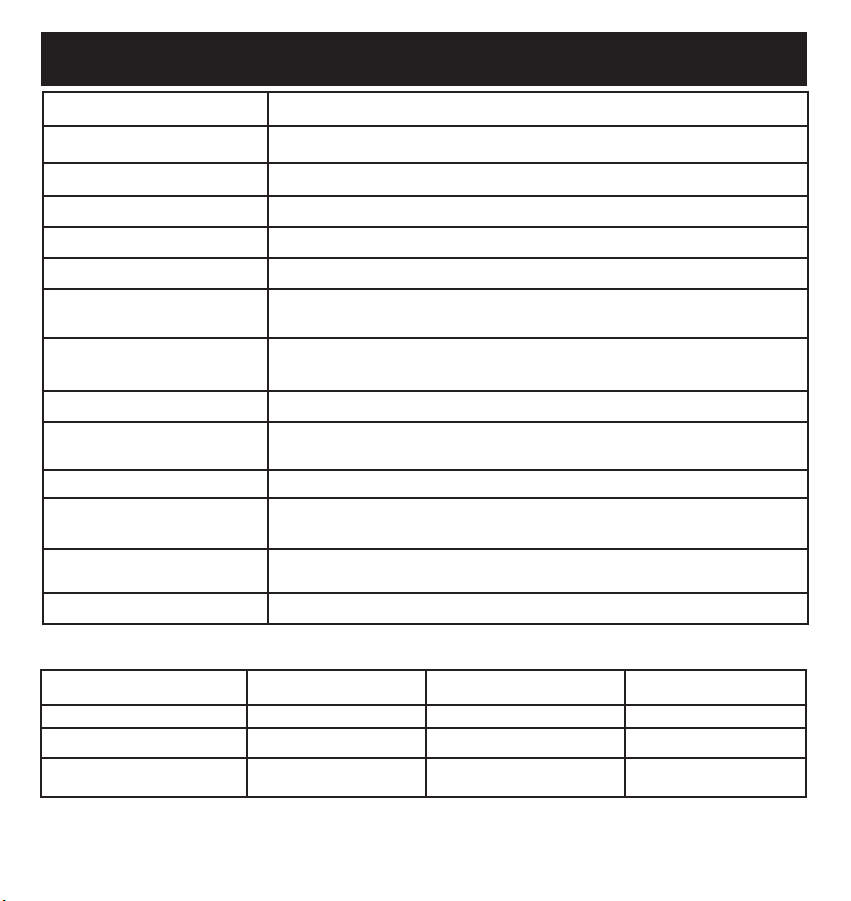
SPECIFICATIONS
Model: Omron NE-U22V Nebulizer with V.M.T.
®
Power Source: DC 3V AC 120V 60 Hz (with AC adapter)
Power Consumption: 1.5 W
Nebulization Rate: 0.25 mL/min minimum
Particle Size Range: MMD approximately 5μm
Medication Capacity: 7 mL maximum
Operating
Temperature/Humidity:
+50ºF to +104ºF (+10ºC to +40ºC) /
30% to 85% RH
Storage
Temperature/Humidity/
Air Pressure:
-4ºF to +140ºF (-20ºC to +60ºC) /
10% to 95% RH / 700hPa to 1060 hPa
Vibration Frequency: 180 kHz
Dimensions:
1.5” (l) x 2.1” (w) x 4.1” (h)
(38mm x 51mm x 104mm)
Weight: 3.4 oz. (97 g)
Battery:
2 “AA” Alkaline or NiMH Rechargeable
(not included)
Contents:
Main unit, medication bottle, carrying case, mouthpiece, mesh cap, mask
and mouthpiece adapter, video and instruction manual
UPC Code: 0 73796 45122 6
Pulmicort
®
Intal
®
Salubutamol
®
MMD (micron) 6.76μ 6.43μ 5.79μ
GSD (geometric
standard deviation)
2.08 2.56 2.75
Respirable fraction
(%mass 0.52 to 6 μ)
65.0% 66.0% 73.4%
• Subject to technical modification without prior notice
Cascade Impactor Testing at 13 lpm:
Treatment time 5 minutes for 2ml.
• Please note that specifications may vary with medication type used.
Page 25

25
NOTES
Page 26

Made in Japan
Distributed by:
OMRON HEALTHCARE, INC.
1200 Lakeside Drive
Bannockburn, Illinois 60015
www
.omronhealthcare.com
Copyright © 2007 Omron Healthcare
Page 27

NÉBULISEUR À FILTRE VIBRANT
Modèle NE-U22V
MISE EN GARDE: En vertu de la loi américaine, la vente de cet appareil n’est permise que sur
ordonnance d’un médecin ou d’un professionnel de la santé autorisé.
GUIDE DE L’UTILISATEUR
®
Français
Page 28

F2
TABLE DES MATIÈRES
Avant d’utiliser l’appareil
Introduction.................................................................................... F3
Renseignements sur la sécurité ............................................................F4
Familiarisez-vous avec l’appareil ...................................................... F7
Accessoires et pièces de rechange ...................................................... F8
Assemblage de l’appareil .................................................................. F9
Mode d’emploi
Installation des piles ...................................................................... F11
Utilisation de l’adaptateur c.a. .......................................................... F12
Remplissage du réservoir de médicament ............................................ F13
Sélection du mode de nébulisation .................................................... F14
Utilisation de l’appareil .................................................................. F15
Entretien et nettoyage
Nettoyage après chaque usage ...................................................................... F16
Désinfection quotidienne.................................................................. F17
Entretien de l’appareil...................................................................... F18
Dépannage
Guide de dépannage ........................................................................ F20
Renseignements sur la garantie .......................................................... F22
Conformité FCC ............................................................................ F23
Spécifications ................................................................................ F24
Page 29

INTRODUCTION
Nous vous remercions d’avoir acheté le nébuliseur à filtre vibrant MICROAir®modèle NE-U22V
d’Omron
®
.
Omron Healthcare va de l’avant dans le développement de la technologie des nébuliseurs
électroniques avec son nouveau nébuliseur à filtre vibrant MICROAir
®
modèle NE-U22V. Ayant pour
objectifs la commodité pour le patient et la conformité, cet appareil of fre une portabilité unique où que
vous alliez ainsi que la technologie révolutionnaire des filtres vibrants qui procure un traitement précis,
puissant et efficace en tout temps.
Le système MICROAir
®
est un nébuliseur à filtre vibrant conçu pour transformer en aérosol les
médicaments liquides pour permettre au patient de les inhaler. L’appareil peut être utilisé par les enfants
et les adultes à la maison, à l’hôpital et dans les établissements de soins subaigus.
Votre MICROAir
®
modèle NE-U22V est livré avec les composants suivants :
• Unité principale
• Couvercle de l’appareil
• Réservoir de médicament
• Bouchon-filtre
• Adaptateur pour masque et embout buccal
• Embout buccal
• Étui de rangement
• Guide de l’utilisateur
• DVD d’instructions
Les accessoires suivants sont en option et vendus séparément :
• Adaptateur c.a.
• Masque pour enfant
CONSERVEZ CES DIRECTIVES
Veuillez inscrire les renseignements demandés à des fins de référence
DATE D’ACHAT :
NUMÉRO DE SÉRIE :
Agrafez votre reçu d’achat ici.
Le MICROAir®est un appareil médical de prescription. Utilisez cet appareil uniquement
tel que prescrit par votre médecin ou votre professionnel de la santé autorisé.
F3
Page 30

Il est important de toujours respecter les mesures de sécurité de base ainsi que les
avertissements et les mises en garde de ce guide de l’utilisateur afin d’assurer une
utilisation appropriée du produit.
UTILISATION DE L’APPAREIL
Lisez tous les renseignements fournis dans le guide de l’utilisateur et dans tout document
inclus dans la boîte avant d’utiliser l’appareil.
Utilisez toujours le type, la dose et le régime posologique des médicaments prescrits par votre
médecin ou votre professionnel de la santé autorisé.
L’utilisation de la pentamidine avec cet appareil n’est pas approuvée.
N’utilisez pas l’eau du robinet ou de l’eau minérale dans le nébuliseur dans le but de la pulvériser .
Nettoyez et désinfectez le réservoir de médicament, le bouchon-filtre, le masque, l’embout buccal et
l’adaptateur pour masque et embout buccal avant la première utilisation de l’appareil après l’achat..
Si l’appareil n’a pas servi pendant une longue période, nettoyez et désinfectez le réservoir de
médicament, le bouchon-filtre, le masque, l’embout buccal et l’adaptateur pour masque et embout
buccal avant de les utiliser.
Jetez toujours tout reste de médicament qui se trouve dans le réservoir à médicament après
chaque utilisation. Utilisez un médicament frais à chaque utilisation de l’appareil.
Ne laissez pas l’appareil ni ses composants dans un endroit où ils pourraient être exposés à des
températures extrêmes ou à des changements d’humidité, par exemple en les laissant dans un
véhicule pendant les mois chauds, où ils seront exposés aux rayons directs du soleil.
F4
RENSEIGNEMENTS SUR LA SÉCURITÉ
SYMBOLES DE SÉCURITÉ UTILISÉS DANS CE GUIDE DE L’UTILISATEUR
AVERTISSEMENT
Indique une situation potentiellement dangereuse qui,
si elle n’est pas évitée, pourrait causer la mort ou une
blessure grave.
MISE EN GARDE
Indique une situation potentiellement dangereuse qui,
si elle n’est pas évitée, pourrait causer une blessure
mineure ou modérée à l’utilisateur ou au patient ou
bien endommager l’équipement ou d’autres objets.
Page 31

CONSIGNES DE SÉCURITÉ IMPORTANTES
UTILISATION DE L’APPAREIL (suite)
Assurez une supervision étroite quand cet appareil est utilisé par ou sur des bébés,
des enfants ou des personnes à risque ou en présence de ceux-ci.
Inspectez l’unité principale et les pièces du nébuliseur avant chaque utilisation de l’appareil.
Assurez-vous qu’aucune pièce n’est endommagée, que l’appareil est bien assemblé et que
l’appareil fonctionne normalement.
Ajoutez le médicament lentement pour éviter d’endommager l’appareil. Assurez-vous que le
médicament ne déborde pas de l’orifice d’admission du médicament.
Ne mettez pas plus de 7 ml de médicament dans le réservoir à médicament.
Pour éviter d’endommager l’appareil, assurez-vous que le bouchon-filtre est bien en place.
Si le bouchon-filtre n’est pas bien fermé, le médicament se renversera.
N’utilisez pas l’appareil à des températures supérieures à +104 ºF (+40 ºC)
Ne soumettez pas l’appareil ni les autres composants à un grand choc, tel que le laisser tomber sur
le plancher.
Cet appareil est approuvé uniquement pour utilisation par des humains.
Ne démontez et ne tentez pas de réparer l’appareil ou ses composants.
Utilisez l’appareil uniquement pour la fonction pour laquelle il est destiné. Ne l’utilisez pas à d’autres
fins.
Jetez l’appareil, les composants et les accessoires en option conformément aux
règlements locaux applicables. La disposition illégale peut causer de la pollution environnementale.
Utilisez uniquement les pièces et les accessoires Omron autorisées. Les pièces et accessoires
non approuvés pour l’utilisation avec l’appareil pourraient endommager l’appareil.
Tout changement ou altération non approuvés par Omron Healthcare entraînera l’annulation
de la garantie.
RISQUE DE CHOC ÉLECTRIQUE LORS DE L’UTILISATION DE
L’ADAPTATEUR C.A.
Ne branchez ou ne débranchez pas le cordon d’alimentation dans une prise de courant lorsque vous
avez les mains mouillées.
N’utilisez que l’adaptateur c.a. conçu par Omron pour cet appareil. L’utilisation de tout autre
adaptateur c.a. pourrait endommager l’appareil.
F5
Page 32

F6
CONSIGNES DE SÉCURITÉ IMPORTANTES
RISQUE DE CHOC ÉLECTRIQUE LORS DE L’UTILISATION DE
L’ADAPTATEUR C.A. (suite)
Ne surchargez pas les prises de courant. Branchez l’appareil dans une prise à la tension appropriée.
N’utilisez pas de rallonges électriques. Branchez le cordon d’alimentation directement dans la
prise de courant.
Débranchez le cordon d’alimentation de la prise de courant après avoir utilisé l’appareil.
Débranchez le cordon d’alimentation de la prise de courant avant de nettoyer l’appareil.
ENTRETIEN ET ENTREPOSAGE
Gardez l’appareil hors de la portée des bébés ou des enfants sans surveillance. L ’appareil peut
contenir de petites pièces qui peuvent être avalées.
N’immergez pas l’unité principale dans l’eau ou un autre liquide.
N’utilisez ou n’entreposez pas l’appareil dans un endroit humide, comme la salle de bain. Utilisez
l’appareil dans les conditions de température et d’humidité recommandées.
Ne laissez pas de solution nettoyante dans les pièces du nébuliseur. Rincez les pièces du
nébuliseur à l’eau chaude du robinet après les avoir désinfectées.
Rincez les pièces du nébuliseur après chaque usage. Asséchez les pièces immédiatement
après les avoir lavées.
Rangez l’appareil et ses composants dans un endroit sûr et sec.
Pour éviter d’endommager l’appareil, ne transportez et ne laissez pas le réservoir de médicament
rempli de médicament ou d’eau distillée.
N’essayez pas de sécher ou de mettre l’appareil ou l’une de ses pièces au four à micro-ondes.
Pour éviter d’endommager l’appareil, ne rincez pas l’unité principale ou ne l’immer gez pas dans
aucun liquide, ne lavez ni ne rincez aucune pièce à grande eau et ne touchez pas au bouchon-filtre
avec la main ou un objet.
N’utilisez pas de javellisant ménager. Le filtre rouillera et le bouchon-filtre ne sera plus utilisable.
Pour éviter d’endommager l’appareil, ne nettoyez pas l’unité principale à l’aide de nettoyants
abrasifs ou de tout autre produit chimique et ne laissez pas l’humidité toucher les électrodes ou la
prise d’adaptateur c.a. de l’unité principale.
Ne placez pas l’adaptateur c.a. dans l’étui de rangement. L’étui de rangement n’est pas conçu pour
transporter l’adaptateur c.a..
Page 33

FAMILIARISEZ-VOUS AVEC L’APPAREIL
F7
Touche ON/OFF
(MARCHE/ARRÊT)
Met l’unité principale en marche et
à l’arrêt
Languette de verrouillage du bouchon du réservoir
Ouvre le réservoir de médicament pour le nettoyage
Réservoir de médicament
Reçoit un quantité maximale de 7 ml pour le
traitement
Orifice d’admission du médicament
Permet d’ajouter le médicament au réservoir
Électrode
Conducteur d’alimentation de
l’unité principale vers le vibrateur sur le
réservoir de médicament
Indicateur de piles faibles
Un voyant lumineux orange
clignote lorsque les piles
sont usées
Indicateur d’alimentation
Le voyant vert indique que l’appareil est en marche
Unité principale
Partie inférieure de l’unité principale
Couvercle des piles
Poussez la languette
pour enlever le
couvercle
Réservoir de médicament
Bouchon-filtre
Le filtre en alliage
métallique produit un
aérosol de grande
efficacité
Adaptateur pour masque et
embout buccal
Embout buccal
Couvercle de
l’unité principale
Protège l’unité
principale,
le réservoir de
médicament et
le bouchon-filtre
qui y sont fixés
lors de
l’entreposage
Maintient l’embout buccal ou le masque
bien en place sur le dispositif
Interface du patient
Électrode
Conducteur d’alimentation
de l’unité principale au support de
branchement de l’adaptateur c.a.
®
Page 34

FAMILIARISEZ-VOUS AVEC L’APPAREIL
DVD d’instructions
F8
Étui de rangement
Fiche d’alimentation
Bande pour cordon
Support de branchement pour l’adaptateur c.a.
Contient l’unité principale, le
réservoir de médicament ainsi que
l’adaptateur pour masque et embout
buccal
Adaptateur c.a., modèle no U22-5
Accessoire en option
Accessoire en option
Pièces de rechange
No de modèle
COUVERCLE DES PILES U22-8
COUVERCLE DE L’UNITÉ PRINCIPALE U22-9
ADAPTATEUR POUR MASQUE ET
EMBOUT BUCCAL U22-2
RÉSERVOIR DE MÉDICAMENT U22-3
BOUCHON-FILTRE U22-4
EMBOUT BUCCAL U22-1
ÉTUI DE RANGEMENT U22-7
Masque pour enfant
modèle no C922
Interface du patient
à usage pédiatrique
Guide de l’utilisateur
Page 35

PRÉPARATION DU NÉBULISEUR POUR L’UTILISATION
Insérez
verticalement le
bouchon-filtre
N’ouvrez pas le
bouchon du
réservoir
Fermez-le bien
Vous avez terminé
l’installation
.
AVERTISSEMENT
Lisez tous les renseignements fournis dans le guide de l’utilisateur et dans tout document
inclus dans la boîte avant d’utiliser l’appareil.
AVERTISSEMENT
Nettoyez et désinfectez le réservoir de médicament, le bouchon-filtre, le masque, l’embout
buccal et l’adaptateur pour masque et embout buccal avant la première utilisation de
l’appareil après l’achat.
AVERTISSEMENT
Si l’appareil n’a pas servi pendant une longue période, nettoyez et désinfectez le réservoir de
médicament, le bouchon-filtre, le masque, l’embout buccal et l’adaptateur pour masque et
embout buccal avant de les utiliser.
Pour des directives sur le nettoyage et la désinfection, consultez la section Entretien et nettoyage
aux pages 16 et 17.
L’appareil doit être assemblé avant son utilisation.
Renseignements généraux
• Les composants peuvent s’ajuster bien serrés puisqu’ils sont prévus pour empêcher le
médicament de couler.
• Tenez bien l’appareil des deux mains.
• Fixez bien les pièces. Il se peut que vous entendiez un cliquement lorsque vous installez certaines pièces.
1. Fixez le bouchon-filtre au réservoir de médicament.
Clic
F9
Page 36

F10
PRÉPARATION DU NÉBULISEUR POUR L’UTILISATION
Vous avez terminé
l’installation.
Vous avez terminé
l’assemblage.
Vous avez terminé
l’assemblage.
Alignez les
électrodes l’une
vers l’autre.
Vous avez terminé
l’installation.
Clic
2. Fixez le réservoir de médicament à l’unité principale.
3. Fixez l’adaptateur pour masque et embout buccal à l’unité principale.
4. Fixez l’embout buccal ou le masque pour enfant à l’adaptateur pour masque et embout buccal.
• Comment fixer le masque pour enfant • Comment fixer l’embout buccal
Page 37

Cet appareil fonctionne à l’aide de deux (2) piles alcalines AA ou de deux (2) piles AA NiMH rechargeables.
MISE EN GARDE
N’utilisez pas une pile usée et une pile neuve ensemble.
N’utilisez pas différents types de piles.
Retirez les piles lorsque vous prévoyez que l’appareil
ne sera pas utilisé pendant au moins trois mois.
1. Ouvrez le couvercle des piles.
(A) Faites tourner le couvercle des piles dans le sens
de la flèche comme le montre l’illustration.
(B) Ouvrez le couvercle des piles. Le couvercle des piles
peut sembler s’ajuster serré puisqu’il est prévu
pour éviter que les liquides pénètrent dans l’appareil.
2. Insérez les piles.
Alignez correctement les polarités (+ et -) avec les repères
des piles sur l’appareil.
3. Fermez le couvercle des piles.
À l’aide de vos pouces, poussez les deux extrémités du couvercle des piles
Appuyez fermement jusqu’à ce que vous entendiez les deux languettes cliquer
en place.
Abcdefg Hijk Lmnop
INSTALLATION DES PILES
F11
Partie inférieure de
l’unité principale
Piles alcalines
• L’appareil peut être utilisé environ 8 jours à raison
de 30 minutes par jour.
• L’indicateur de piles faibles (voyant orange)
clignote pour signaler que les piles sont usées.
Remplacez les deux piles par des neuves.
• L’indicateur de piles faibles (voyant orange)
s’allume pour signaler que les piles sont à plat.
L’appareil ne nébulisera pas. Remplacez
immédiatement les deux piles par des neuves.
Piles NiMH rechargeables
• L’appareil peut être utilisé environ 8 jours à
raison de 30 minutes par jour lorsque les piles
sont complètement chargées.
• L’indicateur de piles faibles (voyant orange)
clignote pour signaler que les piles rechargeables
sont à plat ou presque à plat. Si l’appareil ne
nébulise pas immédiatement, rechargez les piles.
• Rechargez les piles au moyen d’un char geur
de piles disponible sur le marché et adapté aux
piles utilisées dans cet appareil.
• L’adaptateur c.a. ne sert pas de chargeur de piles.
Durée et remplacement des piles
Clic
(B)
(A)
Page 38

UTILISATION DE L’ADAPTATEUR c.a.
F12
L’appareil est conçu de façon à ne pas consommer la puissance des piles lorsque l’adaptateur c.a. est utilisé.
L’adaptateur c.a. n’est pas un chargeur de piles.
AVERTISSEMENT
Utilisez uniquement l’adaptateur c.a. conçu par Omron pour cet appareil.
L’utilisation d’un autre adaptateur c.a. pourrait endommager l’appareil.
Pour brancher l’adaptateur c.a. à l’unité principale
(1) Placez l’unité principale sur le support de branchement
de l’adaptateur c.a. tel qu’illustré ci-dessous.
REMARQUE : Il émettra un clic et s’enclenchera au support.
(2) Insérez la fiche d’alimentation de l’adaptateur c.a.
dans une prise de courant de 120 V.
AVERTISSEMENT
Ne branchez ou ne débranchez pas le cordon d’alimentation dans une prise de
courant lorsque vous avez les mains mouillées.
MISE EN GARDE
Ne surchargez pas les prises de courant. Branchez l’appareil dans une prise à la tension appropriée.
MISE EN GARDE
N’utilisez pas de rallonges électriques. Branchez le cordon d’alimentation directement dans
la prise de courant.
MISE EN GARDE
Débranchez le cordon d’alimentation de la prise de courant avant de nettoyer l’appareil.
Pour retirer l’adaptateur c.a. de l’unité principale
(1) Débranchez la fiche de l’adaptateur c.a. dela prise de courant.
(2) Poussez les deux côtés du support de branchement
pour débloquer l’unité principale.
(3) Retirez l’unité principale.
MISE EN GARDE
Débranchez le cordon d’alimentation de la prise de courant après l’utilisation de l’appareil.
(1) Débranchez
(3) Retirez
(2) Poussez les deux extrémités
Le branchement est terminé.
(1)
(2)
Page 39

REMPLISSAGE DU RÉSERVOIR DE MÉDICAMENT
F13
Retirez l’embout buccal ou le masque ainsi que l’adaptateur pour masque et embout buccal de l’unité principale.
1. Ouvrez le bouchon-filtre.
Tenez le dispositif fermement
dans votre main.
2. Remplissez le réservoir de médicament.
AVERTISSEMENT
L’utilisation de la pentamidine avec cet appareil
n’est pas approuvée.
AVERTISSEMENT
N’utilisez pas l’eau du robinet ou de l’eau minérale
dans le nébuliseur dans le but de la pulvériser.
Prenez garde que le bouchon-filtre ne se ferme
comme le montre l’illustration.
La capacité maximale du réservoir de médicament est de 7 ml.
MISE EN GARDE
Ne mettez pas plus de 7 ml de médicament dans le
réservoir à médicament.
MISE EN GARDE
Ajoutez le médicament lentement pour éviter d’endommager le
dispositif. Assurez-vous que le médicament ne déborde pas de
l’orifice d’admission du médicament.
3. Fermez le bouchon-filtre.
MISE EN GARDE
Pour éviter d’endommager l’appareil, assurez-vous que le bouchon-filtre est bien en
place. Si le bouchon-filtre n’est pas bien fermé, il y aura fuite de médicament.
4. Fixez l’adaptateur pour masque et embout buccal à l’unité principale
Fixez l’embout buccal ou le masque pour enfant à l’adaptateur pour masque et embout buccal.
REMARQUE: Pour des directives sur la façon de fixer l’adaptateur pour masque et embout buccal,
retournez la section Assemblage de l’unité à page 10.
N’ouvrez pas le
réservoi
Soulevez le
bouchon-filtre en
poussant le bord vers
le haut avec le pouce.
Vérifiez si le
bouchon-filtre
est fermé.
Clic
Page 40

F14
SÉLECTION DU MODE DE NÉBULISATION
Ce dispositif fonctionne en mode de nébulisation continue ou en mode de nébulisation manuelle.
• Mode de nébulisation continue
Pour démarrer l’appareil en mode de nébulisation
continue, appuyez sur la touche ON/OFF (MARCHE/ARRÊT)
en la maintenant enfoncée pendant 1 seconde.
Appuyez à nouveau sur la touche ON/OFF (MARCHE/ARRÊT)
pour arrêter la nébulisation.
• Mode de nébulisation manuelle
En mode de nébulisation manuelle, l’appareil
nébulise seulement si vous appuyez sur
la touche ON/OFF (MARCHE/ARRÊT)
en la maintenant enfoncée.
Ce mode permet l’inhalation sur demande.
Pour démarrer l’appareil en mode de nébulisation
manuelle, appuyez sur la touche ON/OFF (MARCHE/ARRÊT)
et maintenez-la enfoncée pendant au moins 2 secondes.
Appuyez sur la touche ON/OFF (MARCHE/ARRÊT)
en la maintenant enfoncée pour commencer la nébulisation.
REMARQUE : Le voyant d’alimentation (voyant vert)
s’allume pendant la nébulisation.
Appuyez sur la touche
ON/OFF (MARCHE/ARRÊT)
en la maintenant enfoncée
pendant 1 seconde
Appuyez sur la touche
ON/OFF (MARCHE/ARRÊT)
et maintenez-la enfoncée
pendant 2 secondes.
Page 41

UTILISATION DE L’APPAREIL
AVERTISSEMENT
Utilisez toujours le type, la dose et le régime posologique des médicaments prescrits par
votre fournisseur de soins de santé.
AVERTISSEMENT
Jetez toujours tout reste de médicament qui se trouve dans le réservoir à médicament après
chaque utilisation. Utilisez un médicament frais à chaque utilisation de l’appareil.
MISE EN GARDE
Assurez une supervision étroite quand cet appareil est utilisé par ou en présence des bébés,
des enfants ou des personnes à risque ou en présence de ceux-ci.
MISE EN GARDE
Inspectez l’unité principale et les pièces du nébuliseur avant chaque utilisation de l’appareil.
Assurez-vous qu’aucune pièce n’est endommagée, que l’appareil est bien assemblé et que
l’appareil fonctionne normalement.
MISE EN GARDE
N’utilisez pas l’appareil à des températures plus élevées que +104 ºF (+40 ºC).
MISE EN GARDE
Cet appareil est approuvé uniquement pour utilisation par des humains.
1. Inclinez légèrement l’unité principale vers vous pour immerger le bouchon-filtre vibrant
dans le médicament.
REMARQUE : Si le vibrateur n’est pas immergé dans le médicament, l’appareil ne nébulisera pas.
2. Commencez l’inhalation dans une position détendue.
3. Placez vos lèvres autour de l’embout buccal sans serrer . Si le masque pour enfant est utilisé,
positionnez-le délicatement contre le visage.
4. Commencez le traitement comme votre fournisseur de soins de santé vous l’a indiqué.
5. Appuyez sur la touche ON/OFF (MARCHE/ARRÊT) pour éteindre l’appareil lorsque vous avez
terminé votre traitement.
REMARQUE : L’appareil est muni d’une minuterie intégrée qui met l’appareil hors tension
environ 30 minutes après la mise sous tension.
Lorsque vous utilisez l’adaptateur c.a., retirez la fiche d’alimentation de
la prise de courant.
F15
Page 42

F16
NETTOYAGE APRÈS CHAQUE UTILISATION
Respecter les directives de nettoyage après chaque utilisation évitera que du médicament restant dans le flacon s’assèche
et adhère au bouchon-filtre, ce qui aurait pour résultat que l’appareil ne nébulise plus ef ficacement.
Lavez le réservoir de médicament, le bouchon-filtre, le masque, l’embout
buccal et l’adaptateur pour masque et embout buccal après chaque utilisation.
AVERTISSEMENT
Rincez les pièces du nébuliseur après chaque usage. Asséchez les pièces immédiatement
après les avoir lavées.
MISE EN GARDE
Pour éviter d’endommager l’appareil :
• Ne rincez ou n’immer gez pas l’unité principale dans aucun liquide.
• Ne lavez ou ne rincez aucune pièce sous un jet d’eau puissant.
• Ne touchez pas au filtre avec la main ou tout autre objet.
1. Retirez l’embout ou le masque ainsi que l’adaptateur pour masque et embout buccal de
l’unité principale.
2. Retirez le réservoir de médicament de l’unité principale.
3. Ouvrez le réservoir de médicament et jetez tout reste de médicament.
4. Fixez le réservoir de médicament à l’unité principale. Ouvrez le bouchon-filtre.
5. Versez une petite quantité d’eau distillée dans le réservoir de médicament et fermez le
bouchon-filtre.
6. Mettez l’appareil en marche pour nébuliser l’eau distillée pendant 1 à 2 minutes et
enlevez les restes de médicament du filtre.
7. Éteignez l’appareil et retirez le réservoir de médicament de l’unité principale.
8. Retirez le bouchon-filtre du réservoir de médicament et jetez toute l’eau distillée qui reste
dans le réservoir de médicament.
9. Rincez le réservoir de médicament, le bouchon-filtre, le masque, l’embout buccal et
l’adaptateur pour masque et embout buccal à l’eau distillée.
10. Essuyez délicatement l’excès d’eau à l’aide d’un chiffon doux et propre ou laissez les
pièces sécher à l’air libre dans un endroit propre.
11. Assemblez l’appareil. Rangez l’appareil dans l’étui de rangement ou dans un endroit
propre.
Page 43

DÉSINFECTION QUOTIDIENNE
Désinfectez le réservoir de médicament, le bouchon-filtre, le masque,
l’embout buccal et l’adaptateur pour masque et embout buccal chaque
jour après le dernier traitement.
MISE EN GARDE
Pour éviter d’endommager l’appareil :
• Ne rincez ou n’immergez pas l’unité principale dans aucun liquide.
• Ne lavez ou ne rincez aucune pièce sous un jet d’eau puissant.
• Ne touchez pas au filtre avec la main ou tout autre objet.
1. Préparez l’une des deux solutions suivantes : Vinaigre (1 partie de vinaigre blanc
pour 3 parties d’eau distillée) OU savon détergent doux (savon à vaisselle dans de
l’eau distillée).
MISE EN GARDE
N’utilisez pas de javellisant ménager. Le filtre rouillera et le bouchon-filtre ne sera plus utilisable.
2. Ouvrez le bouchon-filtre en le soulevant et versez une petite quantité de solution désinfectante dans
le réservoir de médicament.
3. Mettez l’appareil en marche pour nébuliser la solution désinfectante pendant 1 à 2 minutes.
4. Éteignez l’appareil et retirez le réservoir de médicament de l’unité principale.
5. Retirez le bouchon-filtre du réservoir de médicament et jetez le reste de la solution
désinfectante du réservoir de médicament.
6. Faites tremper le réservoir de médicament, le bouchon-filtre, le masque, l’embout buccal et
l’adaptateur pour masque et embout buccal dans la solution désinfectante pendant 10 à 15 minutes.
7. Rincez le réservoir de médicament, le bouchon-filtre, le masque, l’embout buccal et l’adaptateur
pour masque et embout buccal à l’eau distillée.
AVERTISSEMENT
Ne laissez pas de solution nettoyante dans les pièces du nébuliseur . Rincez les
pièces du nébuliseur à l’eau distillée après les avoir désinfectées.
8. Essuyez délicatement l’excès d’eau à l’aide d’un chiffon doux et propre ou laissez les pièces sécher
dans un endroit propre.
9. Assemblez l’appareil. Rangez l’appareil dans l’étui de rangement ou dans un endroit propre.
F17
Page 44

F18
ENTRETIEN DE L’APPAREIL
Afin de garder votre appareil dans le meilleur état possible et de bien le
protéger, suivez les directives ci-dessous :
Gardez l’appareil hors de la portée des bébés ou des enfants sans surveillance. L ’appareil peut
contenir de petites pièces qui peuvent être avalées.
Rangez l’appareil et ses composants dans un endroit sûr et sec.
N’utilisez ou n’entreposez pas l’appareil dans un endroit humide, comme la salle de bain. Utilisez
l’appareil dans les conditions de température et d’humidité recommandées.
Ne laissez pas l’appareil ni ses composants dans un endroit où ils pourraient être exposés à des
températures extrêmes ou à des changements d’humidité, par exemple en les laissant dans un véhicule
pendant les mois chauds, où ils seront exposés aux rayons directs du soleil.
Ne soumettez l’appareil ni les autres composants à un grand choc, tel que le laisser tomber
sur le plancher.
Ne démontez et ne tentez pas de réparer l’appareil ou ses composants.
Utilisez uniquement les pièces et les accessoires Omron autorisées. Les pièces et accessoires non
approuvés pour l’utilisation avec l’appareil pourraient endommager l’appareil.
Utilisez l’appareil uniquement pour la fonction pour laquelle il est destiné. Ne l’utilisez pas à
d’autres fins.
Tout changement ou altération non approuvés par Omron Healthcare entraînera l’annulation
de la garantie.
Jetez l’appareil, les composants et les accessoires en option conformément aux règlements
locaux applicables. La disposition illégale peut causer de la pollution environnementale.
Retirez les piles lorsque vous prévoyez que l’appareil ne sera pas utilisé pendant au moins trois
mois. Remplacez toujours toutes les piles en même temps par des piles neuves. N’utilisez pas
différents types de piles.
Page 45
Nettoyage de l’unité principale
Nettoyez le boîtier de l’unité principale à l’aide d’un chif fon doux humidifié avec de l’eau ou un déter gent
doux. Essuyez le boîtier et séchez-le immédiatement à l’aide d’un chif fon doux et propre.
MISE EN GARDE
N’essayez pas de sécher ou de mettre l’appareil ou l’une de ses pièces au four à micro-ondes.
MISE EN GARDE
Pour éviter d’endommager l’appareil :
• Ne rincez ou n’immergez pas l’unité principale dans un liquide.
• Ne nettoyez pas l’unité principale à l’aide de nettoyants abrasifs ou de tout autre produit chimique.
• Ne laissez pas l’humidité entrer en contact avec les électrodes ou la prise de l’adaptateur c.a.
sur l’unité principale ou le support de branchement de l’adaptateur c.a.
Transport de l’appareil dans l’étui de rangement
Assemblez l’appareil en fixant le bouchon-filtre et le réservoir de médicament à l’unité principale.
Placez le couvercle de l’unité principale sur l’appareil.
Placez l’appareil dans l’étui de rangement tel qu’illustré.
L’embout buccal et l’adaptateur pour masque se placent facilement dans l’étui de rangement avec
l’unité principale.
MISE EN GARDE
Pour éviter d’endommager l’appareil
• Ne transportez pas et ne laissez pas le nébuliseur lorsqu’il reste du
médicament ou de l’eau distillée dans le réservoir de médicament.
• Ne placez pas l’adaptateur c.a. dans l’étui de rangement.
L’étui de rangement n’est pas conçu pour le transport de
l’adaptateur c.a. en option.
Pour transporter l’adaptateur c.a., enroulez le cordon d’alimentation de
l’adaptateur c.a. et fixez-le à l’unité principale de l’adaptateur c.a.
à l’aide de la bande pour cordon, tel qu’illustré.
ENTRETIEN DE L’APPAREIL
Bande de cordon
F19
Page 46

F20
GUIDE DE DÉPANNAGE
PROBLÈME CAUSE SOLUTIONS
Le voyant d’alimentation
ne s’éclaire pas.
L’adaptateur c.a. n’est pas branché
dans une prise de courant.
Le support de branchement n’est
pas fixé à l’unité principale.
Les piles n’ont pas été insérées
correctement. Les piles sont presque
déchargées.
Éteignez en appuyant sur la touche ON/OFF
(MARCHE/ARRÊT). Branchez le cordon
d’alimentation dans une prise de courant. Mettez
l’appareil sous tension.
Assurez-vous que l’unité principale est bien fixée
au support de branchement.
Réinsérez les piles.
Remplacez immédiatement les deux piles usagées.
Rechargez les piles NiMH à l’aide d’un char geur
disponible sur le marché.
Des résidus de médicament ont
séché sur les composants et les
accessoires.
Nettoyez et désinfectez les composants
et les accessoires.
Le bouchon-filtre doit être doit être
remplacé.
Remplacez le bouchon-filtre.
Le voyant d’alimentation
s’éclaire, mais l’appareil
ne nébulise pas.
Les piles sont presque déchargées.
Remplacez les quatre piles du même type par des
piles neuves alcalines ou NiMH chargées.
Le réservoir de médicament
contient trop de médicament.
Remplissez le réservoir de médicament avec la
quantité prescrite de médicament. La quantité
maximale est de 7 ml.
Il se peut que du liquide se soit
accumulé autour des électrodes de
l’unité principale.
Absorbez le liquide à l’aide d’un chiffon doux.
Il y a du liquide sur le bouchonfiltre.
Enlevez le liquide délicatement à l’aide d’un
chiffon doux de manière à ne pas endommager
le filtre.
Le médicament n’est pas entré en
contact avec les pièces du
nébuliseur.
Inclinez légèrement l’unité principale vers vous
alors que la touche ON/OFF
(MARCHE/ARRÊT) pointe vers le bas.
Page 47

GUIDE DE DÉPANNAGE
PROBLÈME CAUSE SOLUTIONS
L’appareil est en marche;
toutefois, il nébulise
faiblement ou met trop de
temps pour le traitement.
Le réservoir de médicament n’est
pas bien installé.
Assurez-vous que le réservoir de médicament
est bien installé.
L’unité doit être nettoyée. Suivez les directives de nettoyage après
chaque utilisation.
L’unité doit être désinfectée. Suivez les directives de désinfection.
Les piles sont presque déchargées. Remplacez les piles en suivant les
directives d’installation.
La vitesse de nébulisation peut varier
selon le médicament utilisé.
La durée du traitement peut varier selon
les médicaments et les patients.
F21
Page 48

F22
RENSEIGNEMENTS SUR LA GARANTIE
GARANTIES RESTREINTES
Votre nébuliseur NE-U22, à l’exclusion du bouchon-filtre et des accessoires, est garanti contre tout défaut
de matériaux et de fabrication apparaissant dans les 2 années suivant la date d’achat, lorsqu’il est utilisé selon
les directives fournies avec l’appareil. La garantie ci-dessus n’est of ferte qu’à l’acheteur au détail original.
À notre discrétion, nous réparerons ou remplacerons sans frais votre nébuliseur Omron. La réparation ou le
remplacement est notre seule responsabilité et votre seul recours en vertu des garanties ci-dessus.
Pour obtenir du service en vertu de cette garantie, communiquez avec le Service à la clientèle d’Omron
Healthcare en composant le 1 800 634-4350 pour obtenir l’adresse de l’emplacement pour la réparation
ainsi que les frais d’expédition de retour et de manutention. Les renseignements relatifs au service en
vertu de la garantie sont disponibles sur notre site Web à l’adresse www.omronhealthcare.com.
Veuillez joindre une preuve d’achat. Veuillez également joindre une lettre dans laquelle vous indiquez
vos nom, adresse, numéro de téléphone, et une description du problème spécifique. Emballez le produit
avec soin afin d’éviter tout risque de dommages supplémentaires durant le transport. En raison des
risques de perte lors du transport, nous vous recommandons d’assurer le produit et de demander un avis de
réception.
TOUTES GARANTIES IMPLICITES INCLUANT, SANS S’Y LIMITER, LES GARANTIES
LIMITÉES DE QUALITÉ MARCHANDE ET D’ADAPTABILITÉ À DES FINS
PARTICULIÈRES, SONT LIMITÉES À LA DURÉE DE LA GARANTIE ÉCRITE
APPLICABLE CI-DESSUS. Certaines provinces/états ne permettent pas de limites quant à la durée de
la garantie implicite; il se peut donc que les limites ci-dessus ne s’appliquent pas à vous.
OMRON NE SERA PAS TENUE RESPONSABLE DES PERTES DÉCOULANT DE
L’UTILISATION OU D’AUTRES DOMMAGES INDIRECTS OU ACCESSOIRES OU DE COÛTS
INDIRECTS, DÉPENSES OU DOMMAGES. Certaines provinces ne permettent pas d’exclusions ou de
limites de dommages indirects; il se peut donc que les exclusions ci-dessus ne s’appliquent pas à vous.
CCette garantie vous donne des droits précis reconnus par la loi, et vous pouvez également avoir d’autres
droits qui varient d’une province à l’autre.
POUR LE SERVICE À LA CLIENTÈLE (É.-U. et CANADA)
Visitez notre site Web au : www .omronhealthcare.com
Téléphonez sans frais au : 1 800 634-4350
Page 49

CONFORMITÉ FCC
Remarque :
INTERFÉRENCES POTENTIELLES POUR LA RADIO/TÉLÉVISION
(pour les É.-U. seulement)
Ce produit a été testé et déclaré conforme aux limites de la section 15 du règlement
FCC, applicables aux appareils numériques de classe B.
Ces limites sont conçues pour fournir une protection satisfaisante contre les
interférences dans les installations résidentielles. Ce produit génère, utilise et émet des ondes de
fréquence radio et, s’il n’est pas installé conformément aux directives, les ondes risquent de
provoquer des interférences avec les communications radio. Il est cependant impossible de
garantir que des interférences ne surviendront pas dans une installation particulière. Si ce
produit est la cause d’interférences gênant la réception de programmes radio ou télévisés, ce qui
peut être déterminé en mettant l’appareil hors tension et de nouveau sous tension, l’utilisateur
doit tenter de remédier au
problème en prenant une ou plusieurs des mesures suivantes:
• Réorienter ou relocaliser l’antenne de réception.
• Augmenter la distance séparant l’équipement et le récepteur.
• Brancher l’équipement à une prise de courant ou à un circuit dif férent de celui
auquel le récepteur est branché.
• Contacter votre revendeur ou un technicien radio/TV qualifié.
INTERFÉRENCES POTENTIELLES POUR LA RADIO/TÉLÉVISION
(pour le Canada seulement)
Cet appareil numérique respecte les limites de bruits radioéléctriques applicables aux appareils
numériques de Classe B prescrites dans la norme sur le matériel brouilleur : « Appareils
numériques », ICES-003 édictée par le ministère des Communications.
Les changements ou modifications non approuvés expressément par l’autorité
responsable de la conformité peuvent annuler l’autorisation accordée à l’utilisateur de faire
fonctionner cet équipement.
F23
Page 50

F24
SPÉCIFICATIONS
Modèle : Nébuliseur Omron NE-U22V avec V.M.T.
®
Source d’alimentation : CC : 3 V, c.a. : 120 V, 60 Hz (avec adaptateur c.a.)
Consommation d’énergie : 1,5 W
Débit de nébulisation : 0,25 ml/min. minimum
Plage de taille des particules : DMM environ 5µm
Capacité du réservoir de
médicament :
7 ml maximum
Température/humidité
d’utilisation :
+50 ºF à +104 ºF (+10 ºC à +40 ºC) /
30 % à 85 % HR
Température/humidité
d’entreposage/pression d’air :
-4 ºF à +140 ºF (-20 ºC à +60 ºC) /
10 % à 95 % RH / 700 hPa à 1 060 hPa
Fréquence des vibrations : 180 kHz
Dimensions :
1,5 po (L.) x 2,1 po (l.) x 4,1 po (H.)
(38 mm x 51 mm x 104 mm)
Poids : 3.4 oz (97 g)
Pile : 2 piles « AA » ou NiMH rechargeables (non comprises)
Contenu :
Unité principale, réservoir de médicament, étui de transport, embout buccal,
bouchon-filtre, adaptateur pour masque et embout buccal, vidéo et guide de l’utilisateur
Code CUP : 0 73796 45122 6
Pulmicort
®
Intal
®
Salubutamol
®
DMM (microns) 6,76 µ 6,43 µ 5,79 µ
ETG
(écart type géométrique)
2,08 2,56 2,75
Fraction inhalable
(% masse : 0,52 à 6 µ)
65,0 % 66,0 % 73,4 %
• Sujet à des modifications techniques sans préavis
Essai de l’impacteur en cascade à 13 lpm:
Durée du traitement: 5 minutes pour 2 ml
• Veuillez noter que les spécifications peuvent varier selon le type de médicament utilisé.
Page 51

REMARQUES
F25
Page 52

Fabriqué au Japon
Distribué par :
OMRON HEALTHCARE, INC.
1200, Lakeside Drive
Bannockburn, Illinois 60015
www
.omronhealthcare.com
Copyright © 2007 Omron Healthcare
Page 53

MANUAL DE INSTRUCCIONES
NEBULIZADOR VIBRADOR
CON MALLA
Modelo NE-U22V
PRECAUCIÓN: Conforme a las leyes federales de los Estados Unidos, este
dispositivo sólo se puede vender a pedido de un médico.
®
Español
Page 54

E2
ÍNDICE
Antes de usar el dispositivo
Introducción .................................................................................. E3
Información de seguridad ................................................................ E4
Conozca su unidad ........................................................................ E7
Accesorios y repuestos .................................................................... E8
Armado de la unidad ........................................................................ E9
Instrucciones de funcionamiento
Instalación de las pilas .................................................................... E11
Uso del transformador de CA............................................................ E12
Llenado del depósito para el medicamento .......................................... E13
Selección del modo de nebulización .................................................. E14
Uso del dispositivo ........................................................................ E15
Cuidado y mantenimiento
Limpieza después de cada uso ...................................................................... E16
Desinfección diaria ........................................................................ E17
Cuidado del dispositivo.................................................................... E18
Solución de problemas
Guía para la solución de problemas .................................................... E20
Información sobre la garantía ............................................................E22
Declaración de la FCC .................................................................... E23
Especificaciones ............................................................................ E24
Page 55

INTRODUCCIÓN
Gracias por adquirir el nebulizador vibrador con malla Omron®NE-U22V MICROAir®.
Omron Healthcare ha progresado en el desarrollo de la tecnología de nebulizadores
electrónicos con la introducción del nebulizador vibrador con malla NE-U22V MICROAir
®
. Con el objetivo
de brindar comodidad al paciente y cumplir con la normativa vigente, este dispositivo ofrece la máxima
portabilidad dondequiera que vaya y una revolucionaria tecnología de malla vibradora que proporciona
un tratamiento preciso, poderoso y
efectivo cada vez que lo utiliza.
El MICROAir
®
es un sistema nebulizador vibrador con malla diseñado para convertir medicamentos
líquidos en aerosol para que los pacientes puedan inhalarlo. El dispositivo se puede usar con pacientes
pediátricos y adultos, en el hogar, en nosocomios y en
entornos de cuidados subagudos.
Su nebulizador NE-U22V MICROAir
®
cuenta con los siguientes componentes:
• Unidad principal
• Cubierta de la unidad
• Depósito para el medicamento
• Tapa de la malla
• Adaptador para la mascarilla y la boquilla
• Boquilla
• Estuche
• Manual de instrucciones
• DVD instructivo
Los siguientes accesorios son opcionales y se venden por separado:
• Transformador de CA
• Mascarilla para niños
Complete los siguientes datos para futuras consultas
FECHA DE COMPRA:
NÚMERO DE SERIE:
El MICROAir®es un dispositivo médico. Utilícelo únicamente según las indicaciones
del médico o del profesional autorizado.
GUARDE ESTAS INSTRUCCIONES
E3
Abroche aquí su recibo de compra.
Page 56

E4
INFORMACIÓN DE SEGURIDAD
Para asegurar el uso correcto del producto, siempre se deben tomar medidas de
seguridad básicas, entre ellas las advertencias y precauciones que se describen en este
manual de instrucciones.
FUNCIONAMIENTO DEL DISPOSITIVO
Antes de utilizar la unidad, lea toda la información del manual de instrucciones y
cualquier otro material impreso que se incluya en la caja.
Para el tipo, la dosis y el régimen de medicamento, siga las instrucciones del
médico y/o del profesional médico autorizado.
La pentamidina no es un medicamento aprobado para usar con este dispositivo.
No use agua mineral o agua corriente en el nebulizador para fines de nebulización.
Limpie y desinfecte el depósito para el medicamento, la tapa de la malla, la mascarilla,
la boquilla y el adaptador para la mascarilla y la boquilla antes de utilizar el dispositivo
por primera vez después de la compra.
Si el dispositivo no se ha utilizado durante un tiempo prolongado, limpie y desinfecte
el depósito para el medicamento, la tapa de la malla, la mascarilla, la boquilla
y el adaptador para la mascarilla y la boquilla antes de utilizarlos.
Siempre deseche el medicamento que queda en el recipiente después de cada uso.
Utilice medicamento nuevo cada vez que use el dispositivo.
No deje el dispositivo ni sus piezas en un lugar donde esté expuesto a extremas o
a cambios en la humedad, por ejemplo, no deje el dispositivo en un vehículo durante
los meses de temperatura cálida o alta o donde quede expuesto a la luz directa del sol.
ADVERTENCIA
Indica una situación potencialmente peligrosa que, si
no se evita, puede provocar la muerte o lesiones graves.
PRECAUCIÓN
Indica una situación potencialmente peligrosa que, si
no se evita, puede provocar lesiones leves o moderadas
al usuario o al paciente o puede provocar daños al equipo
o a otros bienes.
ÍCONOS DE SEGURIDAD USADOS EN ESTE MANUAL DE INSTRUCCIONES
Page 57

E5
FUNCIONAMIENTO DEL DISPOSITIVO (continuación)
Supervise atentamente el uso del dispositivo cuando sea utilizado por , en o cerca de bebés,
niños o personas enfermas.
Inspeccione la unidad principal y las piezas del nebulizador antes de usar el dispositivo.
Asegúrese de que las piezas no estén dañadas, de que el dispositivo esté armado correctamente
y de que el dispositivo funcione normalmente.
Para evitar que el dispositivo se dañe, agregue el medicamento lentamente. No permita que el
medicamento se derrame por el orificio del depósito para el medicamento.
No agregue más de 7 ml de medicamento en el recipiente del medicamento.
Para evitar que el dispositivo se dañe, asegúrese de que la tapa de la malla esté ubicada
correctamente. Si la tapa de la malla no está bien cerrada, el medicamento se derramará.
No haga funcionar el dispositivo a temperaturas superiores a los +104 ºF (+40 ºC).
No someta al dispositivo ni a ninguno de los componentes a golpes fuertes como, por ejemplo,
dejarlo caer al suelo.
Este dispositivo está aprobado para uso en seres humanos solamente.
No desarme ni trate de reparar el dispositivo ni los componentes.
Sólo haga funcionar el dispositivo para el fin para el que está diseñado. No use el dispositivo para
ningún otro fin.
Al desechar el dispositivo, los componentes y los accesorios opcionales, siga las normas locales
vigentes. Violar las normas establecidas para su eliminación puede provocar contaminación
ambiental.
Use sólo las piezas y los accesorios autorizados por Omron. Las piezas y los accesorios que
no hayan sido aprobados para ser usados con el dispositivo pueden causar daños en la unidad.
Los cambios o las modificaciones que no hayan sido aprobados por Omron Healthcare
anularán la garantía del usuario.
RIESGO DE CHOQUES ELÉCTRICOS MIENTRAS SE USA
EL TRANSFORMADOR DE CA
Noenchufe ni desenchufe el cable de alimentación en el tomacorrientes con las manos
mojadas.
Use sólo el transformador de CA diseñado por Omron para este dispositivo. El uso de
cualquier otro transformador de CA puede dañar el dispositivo.
INFORMACIÓN DE SEGURIDAD IMPORTANTE
Page 58

E6
RIESGO DE CHOQUES ELÉCTRICOS MIENTRAS SE USA EL
TRANSFORMADOR DE CA (Continuación)
No sobrecargue los tomacorrientes. Enchufe el dispositivo en un tomacorriente con el voltaje adecuado.
No use cables prolongadores. Enchufe el cable de alimentación directamente en el tomacorriente.
Desenchufe el cable de alimentación del tomacorriente después de usar el dispositivo.
Desenchufe el cable de alimentación del tomacorriente antes de limpiar el dispositivo.
MANTENIMIENTO Y ALMACENAMIENTO
Mantenga el dispositivo fuera del alcance de los bebés y niños si no están bajo estricta
su pervisión. El dispositivo puede contener piezas pequeñas que se pueden tragar .
No sumerja la unidad principal en agua u otro líquido.
No use ni guarde el dispositivo en lugares húmedos como, por ejemplo, el baño. Use el
dispositivo teniendo en cuenta los límites de temperatura y humedad de funcionamiento.
No deje solución de limpieza en las piezas del nebulizador. Enjuague las piezas del
nebulizador con agua destilada después de desinfectar.
Enjuague las piezas del nebulizador después de cada uso. Seque las piezas inmediatamente
después de lavarlas.
Guarde el dispositivo y los componentes en un lugar limpio y seguro.
Para evitar que el dispositivo se dañe, no transporte ni deje el depósito para el medicamento con
medicamento o agua destilada.
No coloque ni trate de secar el dispositivo o alguna de sus piezas en un horno de microondas.
Para evitar que el dispositivo se dañe, no enjuague ni sumerja la unidad principal en ningún
líquido, no lave ni enjuague ninguna de las piezas con un chorro de agua de alta presión y no toque la
malla con la mano ni con cualquier otro objeto.
No utilice un blanqueador de uso doméstico. La malla se oxidará y la tapa de la malla no se podrá usar .
Para evitar que el dispositivo se dañe, no limpie la unidad principal con limpiadores abrasivos
ni con ningún tipo de químicos, y no permita que la humedad entre en contacto con los
electrodos o el enchufe del transformador de CA en la unidad principal.
No coloque el transformador de CA en el estuche. El estuche no está diseñado para
transportar el transformador de CA.
INFORMACIÓN DE SEGURIDAD IMPORTANTE
Page 59

E7
CONOZCA SU UNIDAD
Botón ENCENDIDO/APAGADO
Enciende y apaga la unidad principal
Palanca de bloqueo de la tapa del depósito
Abre el depósito para el medicamento para limpiarlo
Depósito para el medicamento
Tiene una capacidad máxima de 7 ml
por tratamiento
Orificio para el medicamento
Agregue aquí el medicamento para el depósito
Electrodo
Conductor eléctrico desde la unidad
principal hasta el vibrador del
depósito para el medicamento
Indicador de pilas
descargadas
Una luz anaranjada titila cuando
las pilas están gastadas
Indicador de encendido
La luz verde indica que el dispositivo
está en funcionamiento
Unidad principal
Parte inferior de la unidad principal
Tapa del compartimiento
de las pilas
Presione la palanca para quitar
la tap
Depósito para el medicamento
Tapa de la malla
La malla de aleación
metálica produce
un aerosol de gran
eficacia
Adaptador para la mascarilla y
boquilla
Boquilla
Cubierta de la
unidad principal
Protege la unidad
principal, el depósito
para el medicamento
y la tapa de la
mallamientras está
almacenado
Mantiene la boquilla o la mascarilla
conectada firmemente al dispositivo
Pieza de contacto con el
paciente
Electrodo
Conductor eléctrico que transporta corriente
desde la unidad principal hasta la base de conexión
del transformador de CA
®
Page 60

E8
CONOZCA SU UNIDAD
DVD instructivo
Estuche
Enchufe de alimentación
Banda para el cable
Base de conexión del transformador de CA
El estuche está diseñado para
almacenar la unidad principal,
el depósito para el medicamento y el
adaptador para la mascarilla y
boquilla
Transformador de CA, modelo N.º U22-5
Accesorio opcional
Accesorio opcional
Piezas de repuesto
Modelo N.º
TAPA DELCOMPARTIMIENTO PARAPILAS U22-8
TAPA DE LA UNIDAD PRINCIPAL U22-9
ADAPATADOR PARA LA
MASCARILLA Y BOQUILLA U22-2
DEPÓSITO PARA EL MEDICAMENTO U22-3
TAPA DE LA MALLA U22-4
BOQUILLA U22-1
ESTUCHE U22-7
Mascarilla para niños
Modelo N.º C922
Pieza de contacto
con el paciente
para uso pediátrico
Manual de instrucciones
Page 61

E9
PREPARACIÓN DEL NEBULIZADOR PARA SU USO
No abra la tapa
del depósito.
Ciérrela
bien.
Click
ADVERTENCIA
Antes de utilizar la unidad, lea toda la información del manual de instrucciones
y toda otra información que se incluya en la caja.
ADVERTENCIA
Antes de utilizar el dispositivo por primera vez después de su compra, limpie y desinfecte
el depósito para el medicamento, la tapa de la malla, la mascarilla y el adaptador para la
mascarilla y la boquilla.
ADVERTENCIA
Si el dispositivo no se ha utilizado durante un tiempo prolongado, limpie y desinfecte el
depósito para el medicamento, la tapa de la malla, la mascarilla, la boquilla y el adaptador
para la mascarilla y boquilla antes de utilizarlos.
Para obtener instrucciones acerca de la limpieza y desinfección, consulte las páginas 16 y 17 de la
sección Cuidado y mantenimiento.
El dispositivo debe armarse antes de su uso.
Información general
• Los componentes encajan herméticamente ya que están diseñados para evitar que el medicamento
se derrame.
• Sostenga firmemente el dispositivo con las dos manos.
• Coloque las piezas correctamente. Es probable que escuche un clic cuando instala alguna de las piezas.
1. Coloque la tapa de la malla en el depósito para el medicamento.
La instalación ha
finalizado
.
Coloque
la tapa
de la malla
de arriba
hacia abajo.
Page 62

PREPARACIÓN DEL NEBULIZADOR PARA SU USO
E10
La instalación
ha finalizado.
El armado
ha finalizado.
El armado
ha finalizado.
Alinee los dos
electrodos
ente sí.
La instalación
ha finalizado.
Click
2. Conecte el depósito para el medicamento a la unidad principal.
3. Conecte el adaptador para la mascarilla y boquilla a la unidad principal.
4. Conecte la boquilla o la mascarilla para niños al adaptador para la mascarilla y boquilla.
• Cómo conectar la mascarilla para niños • Cómo conectar la boquilla
Page 63

Este dispositivo funciona con dos (2) pilas alcalinas AA o dos (2) pilas recargables NiMH AA.
PRECAUCIÓN
No instale pilas gastadas junto con pilas nuevas.
No combine diferentes tipos de pilas.
Quite las pilas si no se va a utilizar el dispositivo
durante tres meses o más.
1. Retire la tapa del compartimiento de las pilas.
(A) Gire la palanca de la tapa del compartimiento de las pilas en la dirección
de la flecha, como se indica en el dibujo.
(B) Retire la tapa del compartimiento de las pilas. Esta tapa
pude parecer que está demasiado ajustada, ya que fue diseñada
para impedir que ingresen líquidos dentro del dispositivo.
2. Coloque las pilas.
Alinee de forma correcta las polaridades (+ y -) con las marcas de indicación
de las pilas que están en el dispositivo.
3. Vuelva a colocar la tapa.
Presione ambos extremos de la tapa del compartimiento de las pilas con los pulgares.
Presione firmemente hasta que escuche que ambas pestañas hagan clic y queden
correctamente trabadas.
INSTALACIÓN DE LAS PILAS
Parte inferior de
la unidad principal
Pilas alcalinas
• El dispositivo se puede utilizar durante
aproximadamente 8 días si se lo hace funcionar durante
30 minutos por día.
• El indicador de pilas descargadas (luz anaranjada)
titila para indicar que las pilas tienen poca car ga.
Cambie las dos pilas por pilas nuevas.
• El indicador de pilas descargadas (luz anaranjada) se
enciende para indicar que las pilas están agotadas. El
dispositivo no funcionará. Reemplace
inmediatamente las dos pilas por otras nuevas.
Pilas NiMH recargables
• El dispositivo se puede utilizar durante
aproximadamente 8 días si se lo hace funcionar
durante 30 minutos por día cuando las pilas están
totalmente cargadas.
• El indicador de pilas descargadas (luz anaranjada) titila
para indicar que las pilas recargables tienen poca o casi
nada de carga. Si el dispositivo no nebuliza, recargue
inmediatamente las pilas.
• Recargue las pilas con un cargador que esté disponible
en el mercado y que sea adecuado para las pilas que se
utilizan en el dispositivo.
• El transformador de CA no funciona como un cargador
de batería.
Vida útil y recambio de las pilas
Click
E11
(B)
(A)
Page 64

El dispositivo está diseñado para no tomar ener gía de las pilas mientras se usa el transformador de CA. El
transformador de CA no es un cargador de pilas.
ADVERTENCIA
Use sólo el transformador de CA diseñado por Omron para este dispositivo.
El uso de cualquier otro transformador de CA puede dañar el dispositivo.
Para conectar el transformador de CA
a la unidad principal
(1) Coloque la unidad principal en la base de conexión
del transformador de CA, tal como se indica en la
siguiente figura.
NOTA: Se escuchará un clic y quedará sujeta a la base.
(2) Conecte el enchufe del transformador de CA a
un tomacorriente de 120V.
ADVERTENCIA
No enchufe ni desenchufe el cable de alimentación del tomacorriente con las manos mojadas.
PRECAUCIÓN
No sobrecargue los tomacorrientes. Enchufe el dispositivo en un tomacorrientes con
el voltaje adecuado.
PRECAUCIÓN
No use cables prolongadores. Enchufe el cable de alimentación directamente en
el tomacorriente.
PRECAUCIÓN
Desenchufe el cable de alimentación del tomacorriente antes de limpiar el dispositivo.
Para quitar el transformador de CA de la unidad principal
(1) Desconecte el enchufe del transformador de CA del tomacorriente.
(2) Presione ambos lados de la base de conexión
para desbloquear la unidad principal.
(3) Retire la unidad principal.
PRECAUCIÓN
Desenchufe el cable de alimentación del tomacorriente
después de usar el dispositivo.
E12
USO DEL TRANSFORMADOR DE CA
La conexión se completó.
(1)
(2)
(1) Desenchufe
(3) Retire
(2) Presione ambos extremos
Page 65

E13
1. Abra la tapa de la malla.
Sostenga el dispositivo firmemente
con las manos.
2. Llene el depósito para el medicamento.
ADVERTENCIA
La pentamidina no es un medicamento aprobado
para usar con este dispositivo.
ADVERTENCIA
No use agua mineral o agua corriente en el nebulizador
para fines de nebulización.
Tenga cuidado y evite que la tapa de la malla se cierre
como se indica en el dibujo.
La capacidad máxima del depósito para el medicamento es de 7 ml.
PRECAUCIÓN
No agregue más de 7 ml de medicamento en el
recipiente de medicamento.
PRECAUCIÓN
Para evitar que el dispositivo se dañe, agregue el medicamento
lentamente. No permita que el medicamento se derrame por el
orificio del depósito para el medicamento.
3. Cierre la tapa de la malla.
PRECAUCIÓN
Para evitar que el dispositivo se dañe, asegúrese de que la tapa de la
malla esté colocada correctamente. De lo contrario, el medicamento
se derramará.
4. Conecte el adaptador para la mascarilla y boquilla a la unidad principal.
Conecte la boquilla o la mascarilla para niños al adaptador para la mascarilla y boquilla.
NOTA: Para obtener instrucciones acerca de cómo conectar el adaptador para la mascarilla
y boquilla, consulte la página 10 de la sección Armado de la unidad.
LLENADO DEL DEPÓSITO PARA EL MEDICAMENTO
Quite la boquilla o la mascarilla y el adaptador para la mascarilla y boquilla de la unidad principal.
No abra la tapa
del depósito.
Verifique que
la tapa de la malla
esté cerrada.
Levante la tapa
de la malla mientras
presiona el borde
hacia arriba con
el pulgar.
Click
Page 66

E14
SELECCIÓN DEL MODO DE NEBULIZACIÓN
Este dispositivo funciona en modo de nebulización continua o en modo de nebulización manual.
• Modo de nebulización continua
Para utilizar el dispositivo en modo de nebulización
continua, mantenga presionado el botón de
APAGADO/ENCENDIDO durante 1 segundo.
Pulse el botón de ENCENDIDO/APAGADO
nuevamente para detener la nebulización.
• Modo de nebulización manual
En el modo de nebulización manual, el dispositivo
sólo funcionará cuando presione y mantenga presionado
el botón de ENCENDIDO/APAGADO.
En este modo, pude inhalar el tiempo que necesite.
Para utilizar el dispositivo en modo de nebulización
manual, mantenga presionado el botón de
ENCENDIDO/APAGADO durante por lo menos 2 segundos.
Presione y mantenga presionado el botón de
ENCENDIDO/APAGADO para iniciar la nebulización.
NOTA: El indicador de encendido (luz verde) estará encendido
durante la nebulización.
Presione y mantenga
presionado el botón de
ENCENDIDO/APAGADO
con el dedo durante 1 segundo.
Presione y mantenga
presionado el botón de
ENCENDIDO/APAGADO
con el dedo durante 2 segundos.
Page 67

E15
USO DEL DISPOSITIVO
ADVERTENCIA
Para el tipo, la dosis y el régimen de medicamento, siga las instrucciones del médico.
ADVERTENCIA
Siempre deseche el medicamento que queda en el recipiente después de cada
uso. Utilice medicamento nuevo cada vez que use el dispositivo.
PRECAUCIÓN
Se requiere una supervisión estricta cuando este dispositivo es usado por , o cerca de
bebés, niños o personas enfermas.
PRECAUCIÓN
Inspeccione la unidad principal y las piezas del nebulizador antes de usar el dispositivo.
Asegúrese de que las piezas no estén dañadas, de que el dispositivo esté armado
correctamente y de que el dispositivo funcione normalmente.
PRECAUCIÓN
No haga funcionar el dispositivo a temperaturas superiores a los +104 ºF (+40 ºC).
PRECAUCIÓN
Este dispositivo está aprobado para uso en seres humanos solamente.
1. Incline levemente la unidad principal hacia usted para sumergir la tapa de la malla vibradora en el
medicamento.
NOTA: Si el vibrador no está sumergido en el medicamento, el dispositivo no nebulizará.
2. Comience a inhalar en una posición relajada.
3. Coloque los labios ligeramente alrededor de la boquilla. Si utiliza la mascarilla para niños,
colóquela ligeramente contra la cara.
4. Comience el tratamiento según las indicaciones del médico.
5. Pulse el botón de ENCENDIDO/APAGADO para apagar el dispositivo cuando termine el
tratamiento.
NOTA: El dispositivo cuenta con un temporizador incorporado que lo apaga
aproximadamente 30 minutos después de que ha sido encendido.
Cuando utilice el transformador de CA, quite el enchufe del tomacorriente.
Page 68

E16
LIMPIEZA DESPUÉS DE CADA USO
Si sigue las instrucciones de limpieza después de cada uso, evitará que cualquier medicamento que haya quedado en el
depósito se seque y se adhiera a la tapa de la malla, lo que afectaría la efectividad de la nebulización.
Lave el depósito para el medicamento, la tapa de la malla, la mascarilla, la
boquilla y el adaptador para la mascarilla y boquilla después de cada uso.
ADVERTENCIA
Enjuague las piezas del nebulizador después de cada uso. Seque las piezas inmediatamente
después de lavarlas.
PRECAUCIÓN
Para evitar que el dispositivo se dañe:
• No enjuague ni sumerja la unidad principal en ningún líquido.
• No lave ni enjuague ninguna de las piezas con un chorro de agua de alta presión.
• No toque la malla con la mano ni con ningún otro objeto.
1. Quite la boquilla o la mascarilla y el adaptador para la mascarilla y boquilla de la unidad
principal.
2. Retire el depósito para el medicamento de la unidad principal.
3. Abra el depósito para el medicamento y elimine cualquier resto que pudiera quedar .
4. Conecte el depósito para el medicamento a la unidad principal. Abra la tapa de la malla.
5. Vierta una pequeña cantidad de agua destilada en el depósito para el medicamento y
cierre la tapa de la malla.
6. Encienda el dispositivo para nebulizar el agua destilada durante 1 ó 2 minutos para
eliminar los restos de medicamento que pudieran quedar en los orificios de la malla.
7. Apague el dispositivo y quite el depósito para el medicamento de la unidad principal.
8. Quite la tapa de la malla del depósito para el medicamento y elimine cualquier resto
de agua destilada que pudiera quedar en el depósito.
9. Enjuague con agua destilada el depósito para el medicamento, la tapa de la malla, la
mascarilla, la boquilla y el adaptador para la mascarilla y boquilla.
10. Seque cuidadosamente el exceso de agua con un paño suave y limpio o deje que
las piezas se sequen solas en un ambiente limpio.
11. Arme el dispositivo. Guarde el dispositivo en el estuche o en un lugar limpio.
Page 69

E17
DESINFECCIÓN DIARIA
Desinfecte el depósito para el medicamento, la tapa de la malla, la mascarila, la
boquilla y el adaptador para la mascarilla y boquilla después del último
tratamiento de cada día.
PRECAUCIÓN
Para evitar que el dispositivo se dañe:
• No enjuague ni sumerja la unidad principal en ningún líquido.
• No lave ni enjuague ninguna de las piezas con un chorro de agua de alta presión.
• No toque la malla con la mano ni con ningún otro objeto.
1. Prepare una solución con alguna de las siguientes soluciones: Vinagre (1 parte de vinagre
blanco y 3 partes de agua destilada) O deter gente o jabón suave (jabón para lavavajillas en
agua destilada).
PRECAUCIÓN
No utilice un blanqueador de uso doméstico. La malla se oxidará y la tapa de la malla no
se podrá usar.
2. Levante la tapa de la malla y vierta una pequeña cantidad de solución desinfectante
dentro del depósito para el medicamento.
3. Encienda el dispositivo para nebulizar la solución desinfectante durante 1 ó 2 minutos.
4. Apague el dispositivo y quite el depósito para el medicamento de la unidad principal.
5. Quite la tapa de la malla del depósito para el medicamento y elimine cualquier resto
de solución desinfectante que pudiera quedar en el depósito.
6. Enjuague el depósito para el medicamento, la tapa de la malla, la mascarilla, la boquilla y el
adaptador para la mascarilla y boquilla en la solución desinfectante durante 10 ó 15 minutos.
7. Enjuague con agua destilada el depósito para el medicamento, la tapa de la malla,
la mascarilla, la boquilla y el adaptador para la mascarilla y boquilla.
ADVERTENCIA
No deje solución de limpieza en las piezas del nebulizador. Enjuague las piezas del
nebulizador con agua destilada después de desinfectar.
8. Seque cuidadosamente el exceso de agua con un paño suave y limpio o deje que las piezas se
sequen solas en un ambiente limpio.
9. Arme el dispositivo. Guarde el dispositivo en el estuche o en un lugar limpio.
Page 70

E18
CUIDADO DEL DISPOSITIVO
Para mantener el dispositivo en buen estado y proteger la unidad para que no se
dañe, siga estas instrucciones:
Mantenga el dispositivo fuera del alcance de los bebés y niños si no están bajo estricta
supervisión. El dispositivo puede contener piezas pequeñas que se pueden tragar.
Guarde el dispositivo y los componentes en un lugar limpio y seguro.
No use ni guarde el dispositivo en lugares húmedos como, por ejemplo, el baño. Use el
dispositivo dentro de los límites de temperatura y humedad de funcionamiento.
No deje el dispositivo ni sus piezas en lugares que estén expuestos a temperaturas extremas o
cambios en la humedad, como por ejemplo en un vehículo durante los meses de calor o
donde quede expuesto a la luz directa del sol.
No someta al dispositivo ni a ninguno de los componentes a golpes fuertes como, por
ejemplo, dejarlo caer al suelo.
No desarme ni trate de reparar el dispositivo ni los componentes.
Use sólo las piezas y los accesorios autorizados por Omron. Las piezas y los accesorios
que no están aprobados para ser usados con el dispositivo pueden causar daños en la unidad.
Sólo haga funcionar el dispositivo para el fin para el que está diseñado. No use el dispositivo
para ningún otro fin.
Los cambios o las modificaciones que no hayan sido aprobados por Omron Healthcare
dejarán sin efecto la garantía del usuario.
Respete las normas locales vigentes al desechar el dispositivo, los componentes y los
accesorios opcionales. Violar las normas establecidas para su eliminación puede provocar
contaminación ambiental.
Retire las pilas si no va a utilizar la unidad durante tres meses o un período más
prolongado. Siempre reemplace todas las pilas por pilas nuevas al mismo tiempo. No
utilice diferentes tipos de pilas al mismo tiempo.
Page 71

E19
CUIDADO DEL DISPOSITIVO
Limpieza de la unidad principal
Limpie la carcasa de la unidad principal con un paño suave humedecido con agua o deter gente suave. Limpie
la carcasa y séquela inmediatamente con un paño suave y limpio.
PRECAUCIÓN
No coloque ni trate de secar el dispositivo o alguna de sus piezas en un horno de microondas.
PRECAUCIÓN
Para evitar que el dispositivo se dañe:
• No enjuague ni sumerja la unidad principal en ningún líquido.
• No limpie la unidad principal con limpiadores abrasivos ni con ningún tipo de producto químico.
• No permita que la humedad entre en contacto con los electrodos o con la entrada del
transformador de CA en la unidad principal o en la base de conexión del transformador de CA.
Transporte del dispositivo en el estuche
Arme el dispositivo, colocando la tapa de la malla y el depósito para el medicamento en la unidad principal.
Coloque la cubierta de la unidad principal en el dispositivo.
Coloque el dispositivo en el estuche, como se indica en el dibujo.
El adaptador para la boquilla y la mascarilla se puede colocar fácilmente en el estuche para transportarlo junto
con la unidad principal.
PRECAUCIÓN
Para evitar que el dispositivo se dañe
• No transporte ni deje el nebulizador con medicamento
o agua destilada en el depósito para el medicamento.
• No coloque el transformador de CA en el estuche.
El estuche no está diseñado para transportar el transformador
de CA opcional.
Para transportar el transformador de CA, enrolle el cable de alimentación
del transformador de CA y sujételo a la unidad principal del adaptador
de CA con la banda para el cable, como se indica en el dibujo.
Banda para el cable
Page 72

E20
GUÍA PARA LA SOLUCIÓN DE PROBLEMAS
PROBLEMA CAUSA SOLUCIONES
El indicador de encendido
no se enciende.
El transformador de CA no está
conectado a un tomacorriente.
La base de conexión no está
conectada a la unidad principal.
Las pilas no se instalaron
correctamente. Las pilas tienen poca
carga.
Apague la unidad con el interruptor. Conecte
el enchufede alimentación a un tomacorriente.
Encienda el dispositivo.
Asegúrese de que la unidad haya encajado
en la base de conexión.
Vuelva a colocar las pilas.
Reemplace ambas pilas gastadas de forma
inmediata. Recargue las pilas NiMH con
un argador que esté disponible en el mercado.
Hay restos de medicamento seco
en los componentes y accesorios.
Limpie y desinfecte los componentes
y accesorios.
Se debe reemplazar la tapa de la
malla.
Reemplace la tapa de la malla.
El indicador de encendido
está prendido, pero la
unidad no nebuliza.
Las pilas tienen poca carga.
Reemplace el mismo tipo de pilas con pilas
alcalinas nuevas o cargue las pilas NiMH.
El depósito para el medicamento
tienemucha cantidad de
medicamento.
Llene el depósito para el medicamento con la
cantidad correcta de medicamento recetado.
La cantidad máxima es 7 ml.
Se puede haber acumulado líquido
alrededorde los electrodos de la
unidad principal.
Absorba toda la humedad con un paño suave.
Hay líquido en la parte superior de la
tapa de la malla.
Quite el líquido visible con un paño suave,
con cuidado, para no dañar la malla.
El medicamento no ha tenido
contacto con las piezas de
nebulización.
Incline ligeramente la unidad principal hacia usted
con el botón de ENCENDIDO/APAGADO
apuntando hacia abajo.
Page 73

E21
GUÍA PARA LA SOLUCIÓN DE PROBLEMAS
PROBLEMA CAUSA SOLUCIONES
La unidad está
encendida; sin embargo,
nebuliza de forma suave
o demora mucho tiempo
por cada tratamiento.
El depósito para el medicamento
no está colocado correctamente.
Asegúrese de que el depósito para
el medicamento esté colocado correctamente.
Se debe limpiar la unidad. Siga las instrucciones de limpieza después de
cada uso.
Se debe desinfectar la unidad. Siga las instrucciones para la desinfección.
Las pilas tienen poca carga. Reemplace las pilas según las instrucciones
de instalación.
Las velocidades de nebulización
varían en base almedicamento que
se utiliza.
Los tiempos de duración de un tratamiento
pueden variar según los medicamentos y los
pacientes.
Page 74

E22
INFORMACIÓN SOBRE LA GARANTÍA
GARANTÍAS LIMITADAS
Su Nebulizador NE-U22V, salvo la tapa de la malla y los accesorios, estará garantizado contra defectos de
materiales y mano de obra que surjan dentro de los 2 años a partir de la fecha de compra, si se usa de acuerdo
con las instrucciones suministradas con el dispositivo. La garantía a la que se hace referencia
anteriormente se extiende sólo al comprador minorista original.
Nos comprometemos a reparar o reemplazar sin car go y según nuestro criterio su nebulizador Omron. La
reparación o el reemplazo son nuestra única responsabilidad y su único recurso conforme a las garantías
anteriormente mencionadas.
Para recibir el servicio de garantía, póngase en contacto con el servicio de atención al cliente de Omron
Healthcare llamando al 1-800-634-4350 para obtener la dirección donde se realizan las reparaciones y las
tarifas de envío y manipulación. Para obtener información relativa al servicio de garantía, visite nuestro
sitio Web en: www.omronhealthcare.com.
Adjunte el comprobante de compra. Incluya una carta con su nombre, dirección, número de teléfono y la
descripción del problema específico. Empaque el producto cuidadosamente para evitar que se dañe
durante el traslado. Dado que existe la posibilidad de pérdida durante el traslado, le recomendamos que
asegure el producto con solicitud de acuse de recibo.
TODAS LAS GARANTÍAS IMPLÍCITAS, INCLUIDAS, ENTRE OTRAS, LAS GARANTÍAS
IMPLÍCITAS DE COMERCIALIZACIÓN Y APTITUD PARA UN PROPÓSITO EN
PARTICULAR, SE LIMITAN A LA DURACIÓN DE LA GARANTÍA ESCRITA PERTINENTE
QUE APARECE ANTERIORMENTE. Algunos estados no aceptan limitaciones en cuanto a la
duración de una garantía implícita, de modo que es posible que la limitación anteriormente mencionada
no se aplique en su caso.
OMRON NO SERÁ RESPONSABLE DE LA PÉRDIDA DE USO O CUALQUIER OTRO COSTO,
GASTO O DAÑO INCIDENTAL, INDIRECTO O RESULTANTE. Algunos estados no aceptan la
exclusión o limitación de los daños incidentales o resultantes, de modo que es posible que las exclusiones
anteriores no se aplique en su caso.
Esta garantía le otorga derechos legales específicos, y es posible que también le correspondan otros
derechos que pueden variar de un estado a otro.
SERVICIO DE ATENCIÓN AL CLIENTE (EE.UU. y CANADÁ)
Visite nuestro sitio Web en: www.omronhealthcare.com
Llame sin cargo al: 1-800-634-4350
Page 75

DECLARACIÓN DE LA FCC
Nota:
POTENCIAL DE INTERFERENCIA DE RADIO/TELEVISIÓN (para EE.UU. solamente)
Este producto ha sido probado y cumple con los límites de un dispositivo digital de Clase B, de
acuerdo con la parte 15 de las normas de la FCC.
Estos límites fueron diseñados para proporcionar una protección razonable contra interferencias
perjudiciales cuando se utilice el equipo en una instalación residencial. El producto genera,
utiliza y puede irradiar energía de radiofrecuencia y, si no se
instala y utiliza de acuerdo con las instrucciones, puede provocar interferencias
perjudiciales en las comunicaciones por radio. Sin embar go, no se puede garantizar que no e
producirán interferencias en una instalación en particular. Si el producto
provoca interferencias perjudiciales en la recepción de radio o televisión, lo que se puede
determinar encendiendo y apagando el equipo, se sugiere que el usuario intente corregir la
interferencia a través de una o más de las siguientes medidas:
• Reoriente o reubique la antena receptora
• Aumente la distancia entre el equipo y el receptor .
• Conecte el equipo a un tomacorrientes que esté en un circuito distinto de aquél
al que se encuentra conectado el receptor.
• Consulte al distribuidor o a un técnico experimentado en radio/TV para obtener más
información.
POTENCIAL DE INTERFERENCIA DE RADIO/TELEVISIÓN (para Canadá solamente)
Este aparato digital no excede los límites de Clase B para las emisiones de ruido de radio
de los dispositivos digitales tal como se establece en la norma con respecto a equipos que causan
interferencia denominada “Dispositivos digitales”, ICES-003 del Departamento Canadiense de
Comunicaciones.
Cet appareil numérique respecte les limites de bruits radioeléctriques applicables aux
appareils numériques de Clase B prescrites dans la norme sur le materiel brouilleur: “Appareils
Numériques”, ICES-003 édictée par le minister des communications.
Todo cambio o modificación que no esté expresamente aprobado por la parte responsable encar gada
del cumplimiento podrá anular la autoridad del usuario para operar el equipo.
E23
Page 76

E24
ESPECIFICACIONES
Modelo: Nebulizador Omron NE-U22V con V.M.T.
®
Fuente de alimentación: CC 3V CA 120V 60 Hz (con adaptador de CA)
Consumo eléctrico: 1.5 W
Velocidad de nebulización: 0.25 ml/min. mínimo
Tamaño de las partículas: MMD aproximadamente 5µm
Capacidad de medicamento: 7 ml máximo
Temperatura/Humedad de
funcionamiento:
+50 ºF a +104 ºF (+10 ºC a +40 ºC) /
30% a 85% HR
Temperatura/Humedad/
Presión de aire de
almacenamiento
:
-4 ºF a +140 ºF (-20 ºC a +60 ºC) /
10% a 95% HR / 700hPa a 1060 hPa
Frecuencia de vibración: 180 kHz
Dimensiones:
1.5” (largo) x 2.1” (ancho) x 4.1” (alto)
(38 mm x 51 mm x 104 mm)
Peso: 3.4 onzas (97 gramos)
Pilas: 2 pilas alcalinas “AA” o pilas recargables NiMH (no incluidas)
Contenido:
Unidad principal, depósito para el medicamento, estuche para transportar
el dispositivo, tapa de la malla, adaptador para mascarilla y boquilla,
video y manual de instrucciones.
Código UPC: 0 73796 45122 6
Pulmicort
®
Intal
®
Salubutamol
®
MMD (micrón) 6.76µ 6.43µ 5.79µ
Desviación Estándar
Geométrica (GSD,
por sus siglas en inglés)
2.08 2.56 2.75
Fracción respirable
(% de masa 0.52 a 6 µ
)
65.0% 66.0% 73.4%
• Sujeto a modificaciones técnicas sin previo aviso.
Impactador de cascada probado a 13 Ipm (pulgadas por minutos):
Tiempo que dura el tratamiento: 5 minutos para 2 ml.
• Tenga en cuenta que las especificaciones pueden variar según el tipo de medicamento utilizado.
Page 77

NOTAS
E25
Page 78

Hecho en Japón
Distribuido por:
OMRON HEALTHCARE, INC.
1200 Lakeside Drive
Bannockburn, Illinois 60015
www
.omronhealthcare.com
Copyright © 2007 Omron Healthcare
1628676-6C
 Loading...