

Page 1

1
INSTRUCTION MANUAL
Thank you very much for purchasing
Nebulizer.
Read all instructions in the manual on the
care and use of this unit before operating.
Save these instructions for future reference.
VIBRATING MESH
NEBULIZER
Model NE-U22V
®
¤
This unit is a medical device. Operate this unit only as instructed by your physician
and/or Respiratory Therapist.
The illustrations shown in this Instruction Manual are image drawings.
Caution: Federal law restricts this device
to sale by or on the order of a physician.
Before Using the Unit
Safety Information . . . . . . . . . . . . . . . . . . . . . . 2
Features of the Product . . . . . . . . . . . . . . . . . . . 5
Components of the Product. . . . . . . . . . . . . . . . 6
Names and Functions of the Parts. . . . . . . . . . . 7
How to Assemble the Main Unit. . . . . . . . . . . . 8
Correct Use of the Unit
How to Prepare the Power Source . . . . . . . . . 10
How to Fill the Medication Bottle . . . . . . . . . 12
How to Select the Nebulization Mode . . . . . . 14
How to Inhale . . . . . . . . . . . . . . . . . . . . . . . . . 15
How to Care for Unit After Use . . . . . . . . . . . 16
How to Disinfect the Unit
How to Disinfect. . . . . . . . . . . . . . . . . . . . . . . 18
How to Replace the Mesh Cap . . . . . . . . . . . . 19
Troubleshooting and Warranty
Troubleshooting . . . . . . . . . . . . . . . . . . . . . . . 20
Specifications /
Replacement Parts and Accessories . . . . . . . . 22
Warranty . . . . . . . . . . . . . . . . . . . . . . . . . . . . . 23
¤
English Français
Español
Page 2

Safety Information
2
Safety InformationBefore Using the Unit
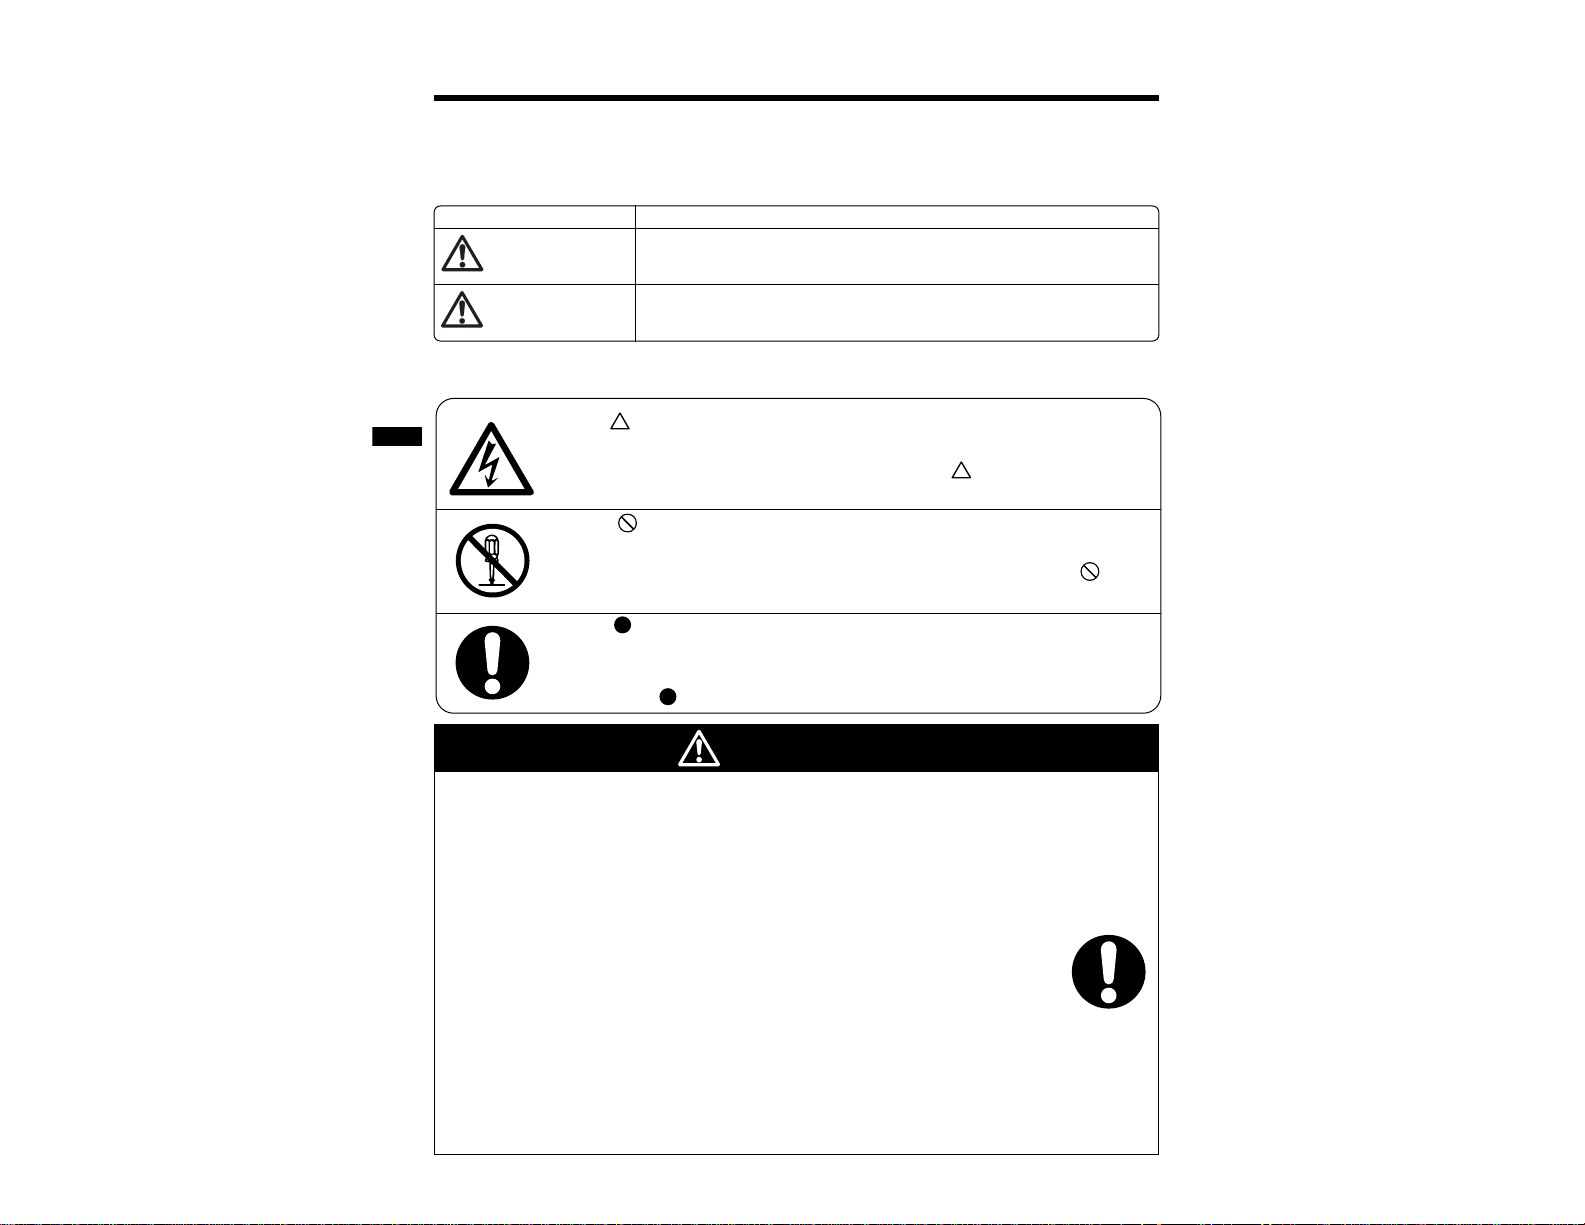
• The warning signs and icons are shown below so that you use this product safely
and correctly to prevent the risk of damage to yourself and others.
Contents
Indicates matters in which the possibility of death or serious injury may
arise as a result of incorrect handling.
Examples of signs
For the type, dose, and regimen of the medication, be sure to follow the instructions of a doctor.
•Your symptom(s) may worsen.
When using the unit for the first time after purchasing it or after not using it for a long period of
time, be sure to wash and disinfect Medication Bottle and Mesh Cap. (Refer to Page 14-18)
• Miscellaneous bacteria may be present and you could be infected.
Wash and disinfect Mesh Cap, Inhalation Mask, Mouthpiece, and Mask Adapter after each use.
(Refer to Page 18)
Be sure to dry the cleaned and disinfected parts promptly, and store them without
getting re-contamination.
• Miscellaneous bacteria may be present and you could be infected.
If the unit is used by more than one person, be sure to use the disinfected Medication Bottle Unit,
Child’s Inhalation Mask, Mouthpiece, and Mouth Adapter for each user.
• The user may be infected.
Keep the unit out of reach of infants or children.
• They may swallow small pieces such as Mesh Cap. The unit may be damaged or may cause injury
to infants or children. In case a child swallows the Mesh Cap, immediately consult with a physician.
Warning signs
The icon indicates prohibitions (what you should not do).
Matters involving actual prohibitions are indicated by text or pictures
in or near .
The icon to the left refers to “do not to disassemble”.
The icon indicates prohibitions (including warning and danger).
Matters involving actual prohibitions are indicated by text or pictures
in or near .
The icon to the left refers to “caution for electric shock”.
Indicates matters in which bodily harm or material damage* may
arise as a result of incorrect handling.
*Material damage refers to a wide range of damage involving your house,
household goods, domestic animals, and pets.
The icon indicates something that is important (always follow).
Matters involving actual important actions are indicated by text
or pictures in or near .
The icon to the left refers to “important information”.
Page 3

Safety Information
3
Before Using the Unit Safety Information
Do not plug in or pull out the AC Adapter with wet hands.
•You could suffer electric shock.
Do not wash the Main Unit and AC Adapter with water or hot water.
Avoid immersing them in water.
• Can damage unit.
Do not disassemble, repair, or modify the unit. This may void the warranty.
If you are not going to use the unit for a long period of time, be sure to unplug the
power plug from the electric outlet.
Do not use disinfecting solution containing sodium hypochlorite.
• Mesh cap will rust.
Do not spill medication on the Main Unit or the AC Adapter. If you spill
medication on the main unit or the AC Adapter, immediately wipe
it off with a soft cloth.
Do not drop or apply strong shock to the Main Unit, AC Adapter,
Medication Bottle, or the Mesh Cap.
Use only the Omron AC Adapter provided for this product.
Be sure to plug the AC Adapter into a 110VAC outlet.
Rinse the disinfectant from the disinfected pieces with water thoroughly.
Page 4

Notes on Safety
4
Notes on SafteyBefore Using the Unit
General Advice
Replace the worn batteries with new ones immediately.
Do not use different types of batteries together.
Do not use new and worn batteries together.
Do not use dry batteries and rechargeable batteries together.
Be careful not to insert batteries in the wrong way so that unit operates correctly.
You can use commercially available rechargeable NiMH batteries, but do not use
nickel cadmium batteries.
Charge the rechargeable batteries with a commercially available charger.
(The AC Adapter enclosed in the package cannot be used as a battery charger.)
Wash the Mesh Unit and the Vibrator sufficiently after each use so that no residual medication
is left on them. (Refer to Page 16)
Wash Medication Bottle, Mesh Cap, and Vibrator with clean tap water or commercially
available distilled water.
When rinsing Medication bottle under the tap, use gentle pressure, not strong running tap water.
Assemble the cleaned and disinfected parts after sufficiently drying them.
Do not use benzene, thinner, or gasoline to clean the unit.
Do not dry Main Unit, AC Adapter, Medication Bottle, and Mesh Cap in microwave oven
or boil them to clean.
Do not store the unit under high temperature and high humidity, or under direct sunshine.
Do not leave or carry the Medication Bottle Unit filled with medication or water.
Remove batteries from the unit when you are not going to use the unit for a long period
(approximately three months or more).
Page 5

Before Using the Unit Features of the Product
Features of the Product
5
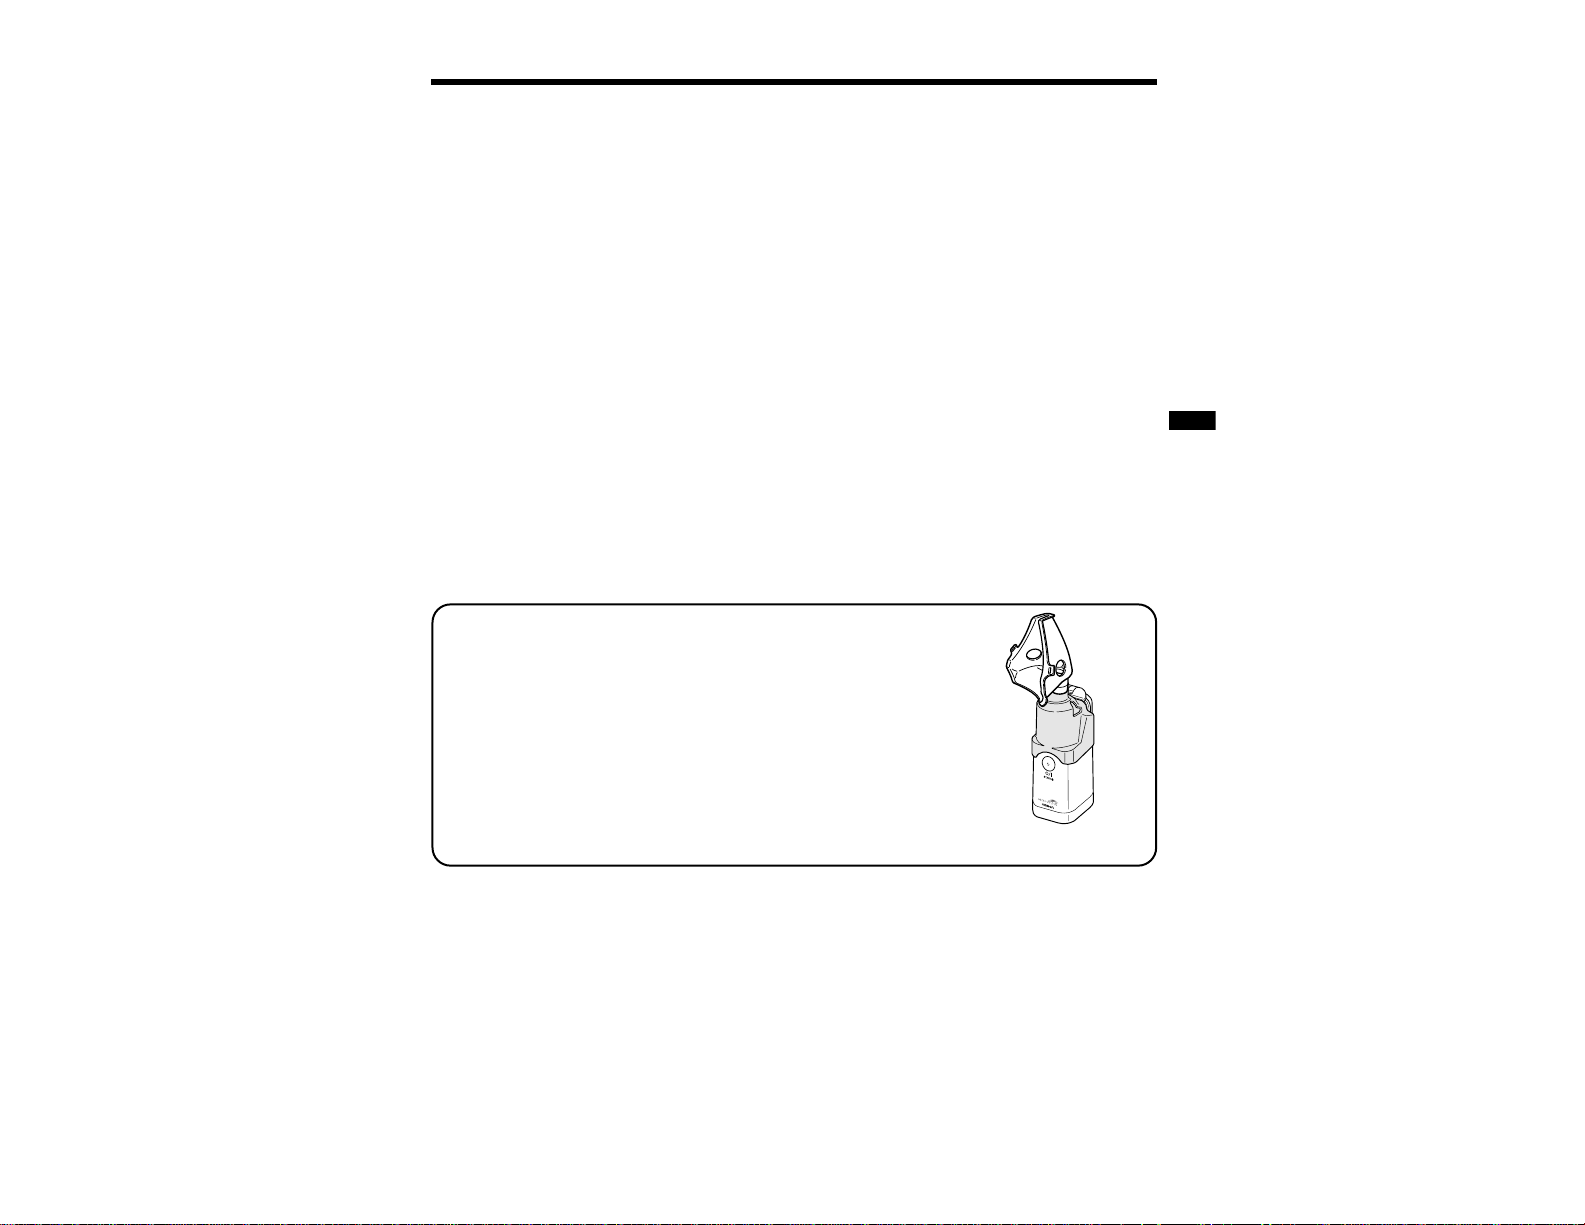
(This is an image of the unit using an Inhalation Mask.)
To start inhalation, you must assemble the unit.
Before starting to use the unit, please read the section on “How to
Assemble the Main Unit” and understand the points for assembling.
(Refer to Pages 8 and 9)
1
Pocket-sized unit can be easily carried anywhere you go
The unit is small enough to be placed in a carrying / storage case or purse, you can
easily carry it around wherever you go. The new titanium alloy mesh creates
a high efficiency aerosol.
2
Inhalation is possible at various angles
The new bottle structure enables inhalation at various angles with stable nebulization.
Therefore, the unit can be used even at bedside.
3
Simple care and easy use
The unit does not need any complex care. Just like the traditional compressor type
nebulizer, all you have to do is to remove the medication after inhalation and dry
the bottle immediately after washing it.
Page 6

Components of the Product Please check the product.
6
Components of the ProductBefore Using the Unit
Main Unit Cover
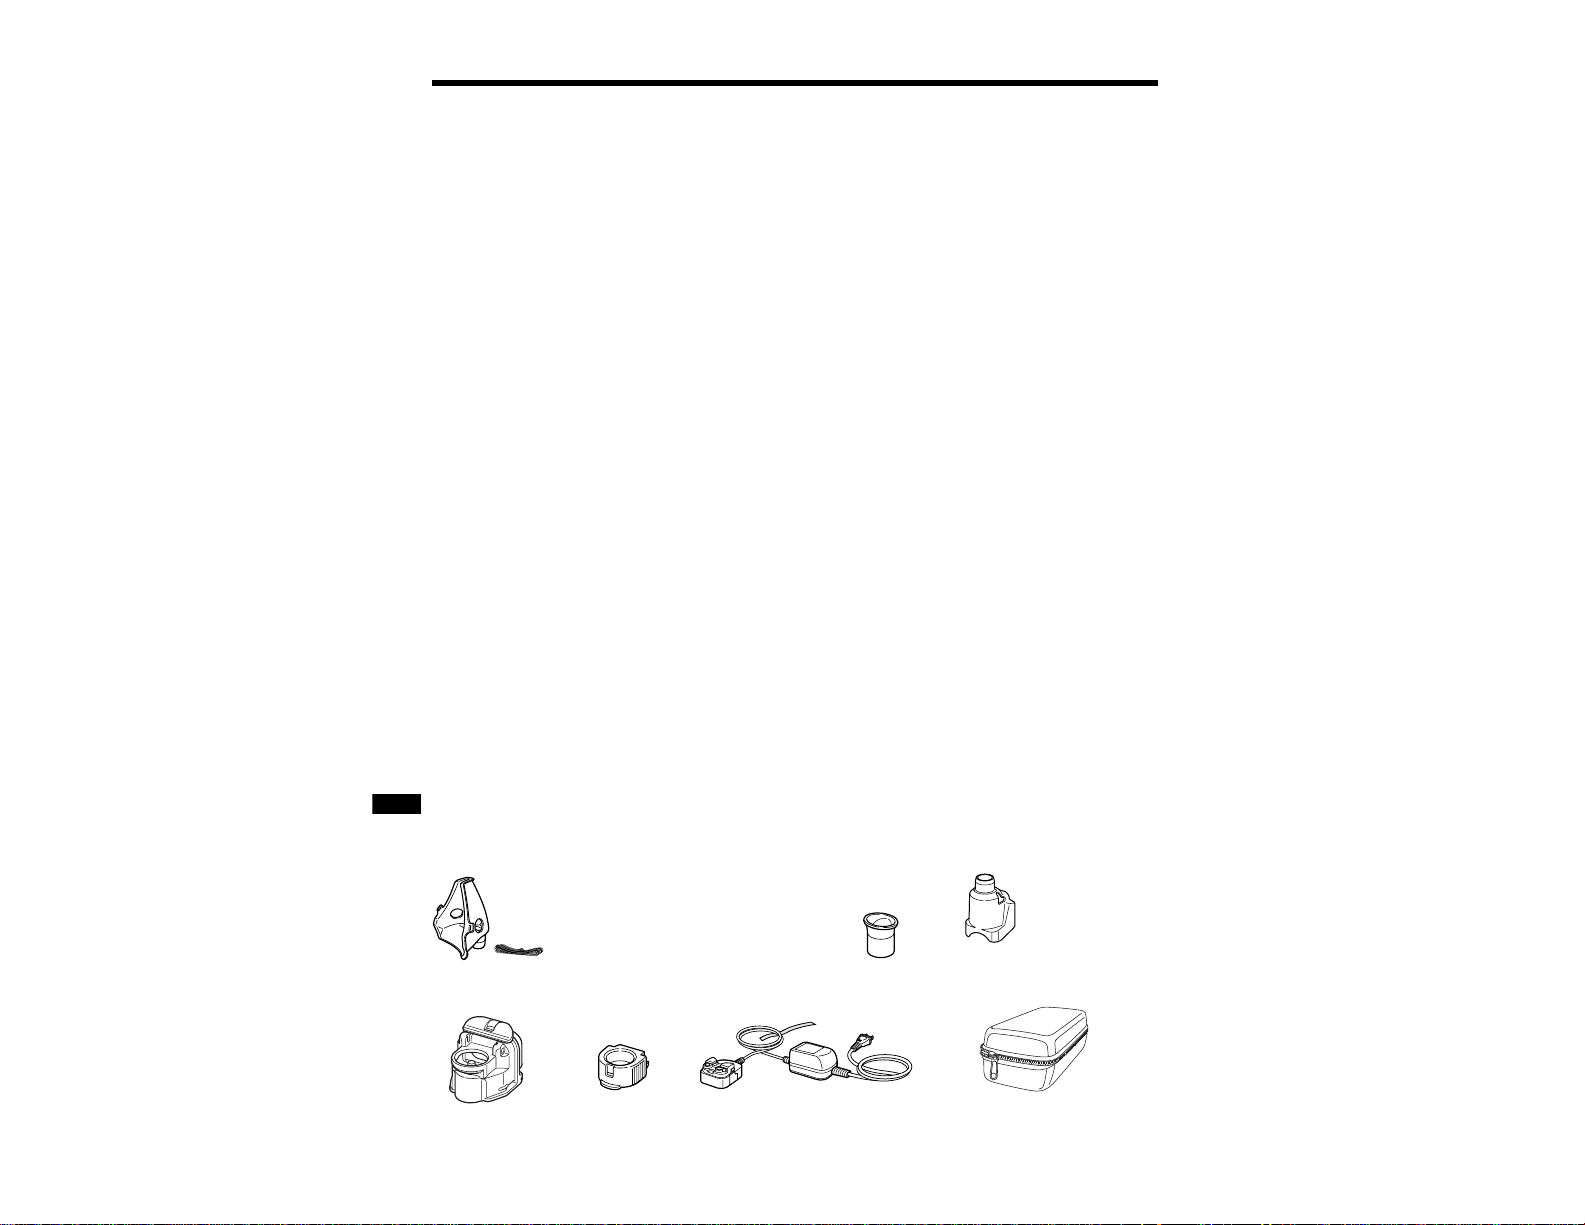
The following items are contained in the box.
If any item is missing, contact the store where you purchased the
product or the nearest OMRON dealer.
Main Unit Medication Bottle Mesh Cap
(with Mesh)
Instruction Manual
(with Quality Guarantee Card)
Storage Case
Mask Adapter
Mouthpiece
Child’s Mask
(Optional) 9921
Instruction Video
(with Quality Guarantee Card)
Page 7

Before Using the Unit Names and Functions of the Parts
Names and Functions of the Parts
7
Main Unit Cover
Stores the main unit.
Power Button
Turns Main Unit
on and off.
Mesh Cap
An alloy mesh is installed
for nebulization.
– Handle mesh with care because
it is very delicate.
Medication Bottle Cap Locking Lever
Opens the Medication Bottle Cap for washing.
– Do not open Medication Bottle Cap
except for washing.
Medication Bottle
A container to store the medication.
Power Plug
Main Unit Locking Board
AC Adapter as Standard Supply
Cord Band
AC Adapter Connection Stand
Battery Low Indicator
Orange light blinks when
the batteries are worn.
Electrode
Supplies the power from the
Main Unit to the Vibrator
of Medication Bottle.
Medication Port
Fill the medication by opening
the Mesh Cap.
Bottom of Main Unit
Power Indicator
A green lamp turns on when the
power is on.
Battery Cover
Disengaging Lever
AC adapter Jack on
Main Unit
AC Adapter ( Optional)
®
Page 8

How to Assemble the Main Unit
8
How to Assemble the Main UnitBefore Using the Unit
This unit must be assembled before it is used.
– Parts may fit tightly since they are made to prevent the medication from leaking.
–You must wash and disinfect all removable parts before using the unit.
Assemble the unit after washing, disinfecting, and drying.
(For how to disinfect the unit, refer to Page 18)
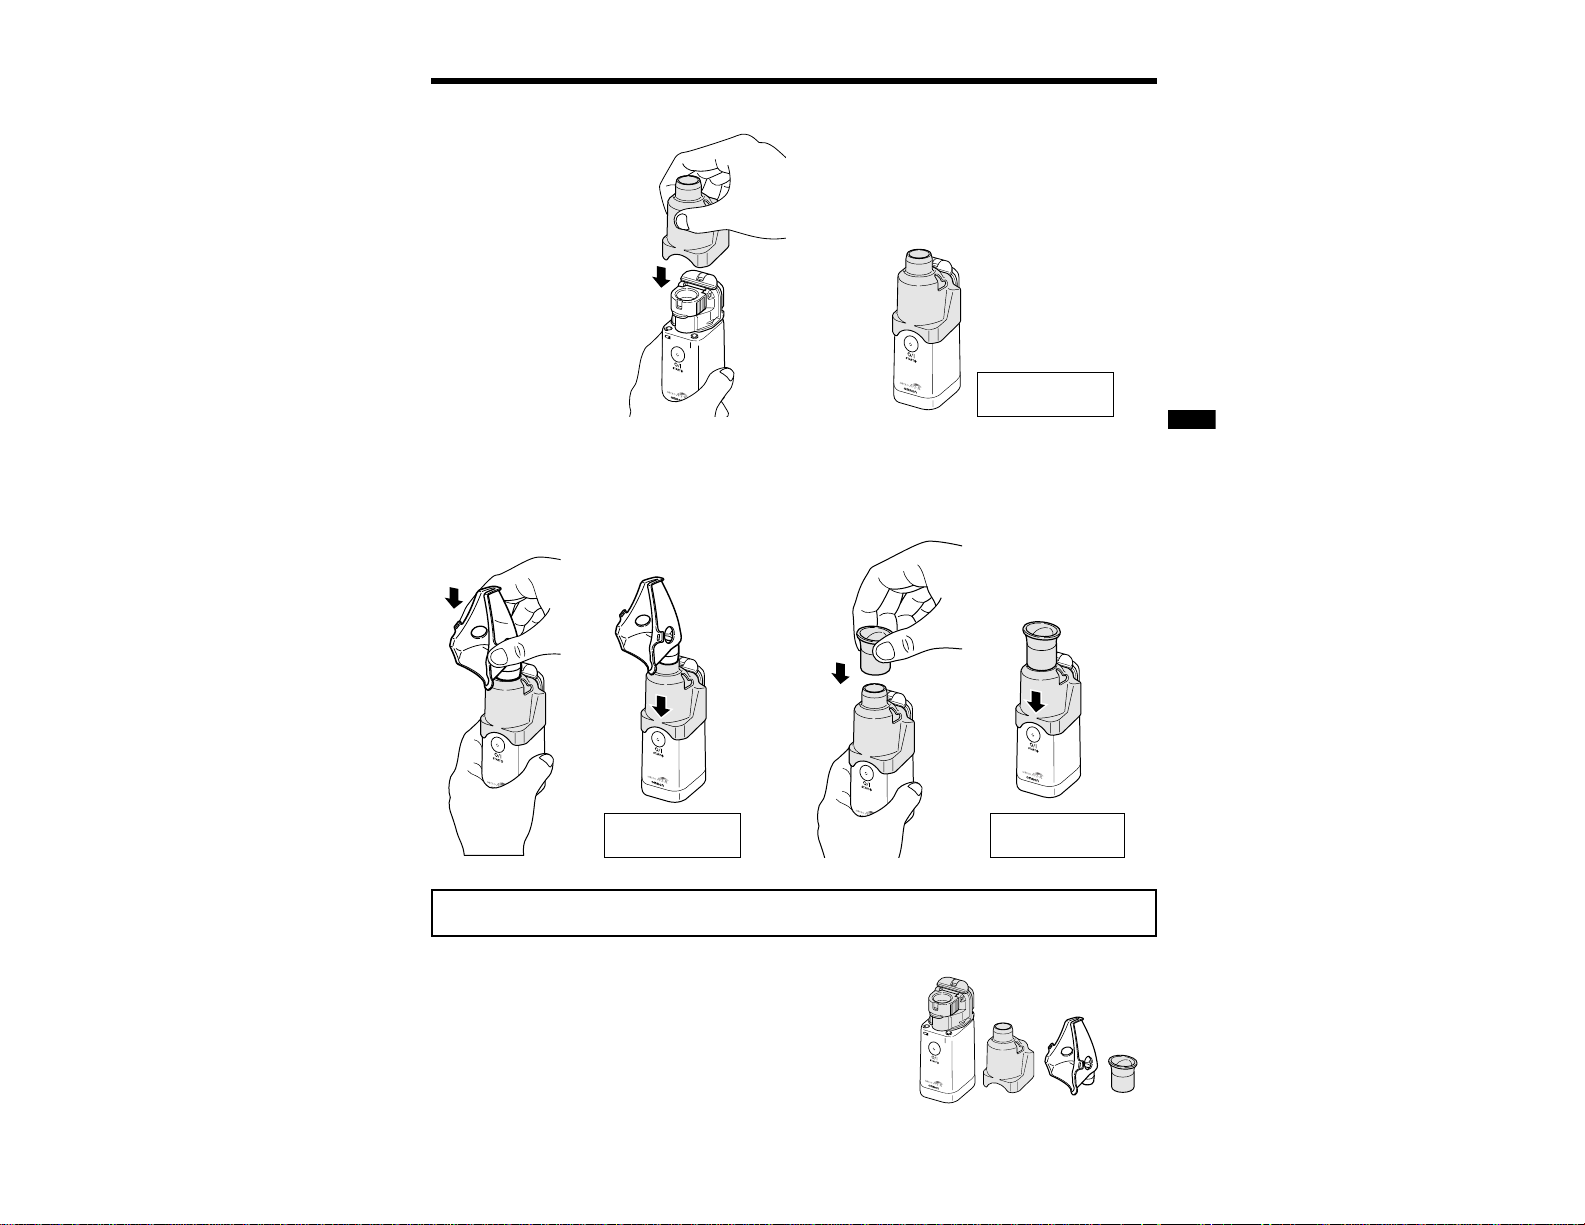
2 Attach the Medication Bottle to the Main Unit.
Insert the
Mesh Cap
vertically.
Align both
electrodes with
each other.
Do not open the
bottle cap.
You have finished
installation.
Click
General Advice
• Hold the unit securely with both hands.
• Install the parts securely. (You may hear clicks depending on the parts
at the time of installation.)
1 Attach the Mesh Cap on the Medication Bottle.
Close it
securely.
You have finished
installation.
Page 9
How to Assemble the Main Unit
9
Before Using the Unit How to Assemble the Main Unit
3 Attach the Mask Adapter to the Main Unit.
– If you are not going to use the unit soon after it is assembled,
disassemble the unit (as shown in the Figure to the right)
and store in the supplied Storage Case or store it in
clean environment.
(For the correct use of the unit, refer to Page 15)
You have finished
installation.
You have finished
assembly.
You have finished
assembly.
Now you have completed assembling the Main Unit.
4 Attach the supplied Mouthpiece or Child’s Inhalation Mask to the Mask Adapter.
•
How to attach the Child’s Inhalation Mask • How to attach the Mouthpiece
Page 10

How to Use the Power Source
10
How to Prepare the Power Source
How to Insert Batteries
Batteries are not supplied. Use two commercially available alkaline or NiMH AA batteries.
1 Remove the Battery Cover.
(1) Slightly rotate the Battery Cover Disengaging Lever
in the direction of an arrow.
(2) Remove the Battery Cover.
• The Battery Cover may not be removed easily when you try for the first time in order
to prevent water drop from getting inside the Unit.
2 Insert the batteries correctly by aligning the polarities
(+ and –) with the battery indication marks.
Bottom of the
Main Unit
• If you store this unit with the batteries or rechargeable batteries in it, the batteries may leak and damage the unit.
• If you are not going to use the unit for a long period of time (more than three months), remove the batteries.
•Do not use worn and new batteries together or batteries of different types (such as regular batteries and
rechargeable batteries) together.
•Follow the disposal method determined by the local community when it comes to disposal of used batteries.
Batteries
When using
NiMH batteries
–You may use NiMH batteries
(rechargeable batteries).
– If you use a commercially available battery
charger suitable for the batteries you are
using, you can save money by recharging the
batteries again and again.
The unit can be used for approximately 8 days
(if it is used for 30 minutes a day when the
batteries are fully charged.)
• The Battery Low Indicator (orange) flashes.
→ The rechargeable batteries have no residual
power. If the unit does not nebulize,
immediately recharge the batteries with
a commercially available charger.
• The supplied AC Adapter does not function
as a battery charger.
Use a commercially available battery charger
to recharge the batteries.
Battery replacement and battery life
When using alkaline batteries
The unit can be used for
approximately 8 days (if it is
used for 30 minutes a day.)
• The Battery Low Indicator
(orange) flashes.
→ Batteries are low. Replace both batteries
with new ones.
• The Battery Low Indicator (orange) turns on.
→ Batteries are worn out. As the unit will not
nebulize, immediately replace both batteries
with new ones.
3 Put on the Battery Cover.
Put the Battery Cover on the Battery Case. Push in the Battery Cover
until it catches the claws and clicks.
Push both ends firmly.
• You may find it difficult to push it through because the unit is made to prevent water
from getting inside the Unit.
Correct Use of the Unit
2
1
Page 11

How to Prepare the Unit Before Use
11
Correct Use of the Unit How to Prepare the Power Source
How to Use optional AC Adapter (optional)
Use the AC Adapter in a place where you have an electric outlet.
However, please note that this AC Adapter is not a battery charger.
1 Place the Main Unit on the AC Adapter Connection Stand as shown below.
How to remove the AC Adapter from the Main Unit
(1) Unplug the power plug from the electric outlet.
(2) Unlock the Main Unit by pushing in both ends
of the Main Unit Locking Board of the AC
Adapter Connection Stand.
(3) Remove the Main Unit.
(1) Unplug
(3) Remove
(2) Push both ends
Connection is completed.
Main Unit Locking Board
Note: It will click and be locked to the Stand.
2 Plug in the power plug of the AC Adapter to the electric outlet.
Page 12

How to Fill the Medication Bottle
12
How to Fill the Medication Bottle Correct Use of the Unit
Have you removed Mask Adapter and the supplied Mouthpiece?
(For how to assemble the Main Unit, refer to Page 8)
1 Remove Medication Bottle
from the Main Unit.
3 Fill Medication Bottle.
Be careful to prevent the Mesh Cap from closing
as shown in the Figure.
– The maximum capacity of Medication Bottle is 7 ml.
4 Close the mesh cap.
– Be sure to check that the Mesh Cap
is engaged. If it is not engaged,
medication will leak.
Click
Press gray tabs on
both side of Medication
Bottle at the same
time lift upwards.
Check that the
Mesh Cap is closed.
Do not open the
bottle cap.
Lift up the mesh
cap while pressing
your thumb hard
on the brim.
2 Open the Mesh Cap.
Hold the medication bottle as if covering
it with your hand.
Page 13

How to Fill the Medication Bottle
13
Correct Use of the Unit How to Fill the Medication Bottle
5 Attach the Medication Cup to the Main Unit.
– If the Medication Bottle is not installed
correctly, the power will not turn on.
– If the Electrodes on the Main Unit are
severely stained, the unit will not nebulize
normally. In that case, wipe off the stain.
(Refer to Page 17)
Click
Align both
electrodes with
each other.
You have
finished assembly.
You have
finished assembly.
• How to install the Child’s Inhalation Mask
7 Attach the Child’s Inhalation Mask or the Mouthpiece.
• How to install the Mouthpiece
6 Attach the Mouthpiece, Mask Adapter.
You have
finished assembly.
Page 14

How to Select the Nebulization Mode
14
How to Select the Nebulization ModeCorrect Use of the Unit
You can use this unit either in the continuous nebulization mode or in the manual mode.
– The power indicator (green light) illuminates during nebulization.
Push the Button and
immediately release
your finger
(within 1 second).
Keep on pressing
the Button
(for approximately
2 seconds or more).
Manual Nebulization Mode
When you keep pressing the Button (approximately
for 2 seconds or more), the unit nebulizes in Manual
Nebulization Mode. The unit nebulizes only while
you press the Button. You can inhale on demand.
Continuous Nebulization Mode
When you push the Button and immediately release
finger from the Button (within approximately
1 second), the unit nebulizes in Continuous
Nebulization Mode. When you push the Button
again, the unit stops nebulization.
Page 15

How to Inhale
15
Correct Use of the Unit How to Inhale
1 Hold the Main unit with your
hand and start inhalation in
relaxed posture.
Slightly slant the Main Unit towards yourself.
• Immerse the Vibrator in the medication. If the
Vibrator is not immersed, the unit will not nebulize.
Medication
Caution
Do not drop or apply strong pressure to Main
Unit, Medication Bottle Unit, or Mesh Cap.
• The unit may be damaged and cannot be used.
• If saliva or medication collects on the electrode
of Main Unit or on the Mesh, the unit stops
nebulization. In that case, turn off the power
and absorb the medication or saliva with
tissue paper or a soft cloth.
2 When you finish inhalation,
push the Button to turn off the
power.
•The unit has a built-in timer to turn off the
power in approximately 30 minutes after
the power is turned on.
•When an AC Adapter is used, unplug the
power plug from the electric outlet.
(Refer to Page 11)
Page 16

How to Care for Unit After Use
16
How to Care for Unit After UseCorrect use of the Unut
Be sure to wash and store the unit after use.
If you do not wash the unit after inhalation, the medication will dry and adhere, and may not be
nebulized. In that case, disinfect Mesh Cap and wash off dried medication.
(Refer to Page 18)
Disengage the
Medication Bottle
Cap Locking
Lever and open
the Medication
Bottle Cap.
3 Wash the parts.
Wash the Inhalation Mask or Mouthpiece, Mask Adapter,
and Medication Bottle in the water.
General Advice
Do not wash Medication Bottle and Mesh Cap under strong
running tap water.
• It may cause damage.
4 Dry parts thoroughly.
Immediately after washing the parts, wipe off excess water
with a dry cloth, and allow to air dry.
Remove the Mesh Cap from the Medication Bottle
and air dry. (Refer to Page 8)
– Do not touch the Mesh with your hand.
Discard the
remaining
medication.
1 Remove the parts from the Main Unit.
Remove the Child’s Inhalation Mask or Mouthpiece, Mask Adapter, and Medication Bottle
from the Main Unit. (For how to assemble the Main Unit, refer to Page 8 to 9)
2 Discard the remaining medication.
Page 17

How to Care for Unit After Use
17
Correct Use of the Unit How to Care for Unit After Use
5 After assembling the unit, store it in a clean environment.
Warning
Wash and disinfect Medication Bottle, Inhalation Mask,
Mouthpiece, and Mask Adapter after each use. (Refer to Page 16)
Be sure to dry the cleaned and disinfected parts promptly, and store them
without getting re-contamination.
When the main unit is dirty
General Advice
Do not leave or carry the Medication Bottle Unit filled with medication or water.
• The medication may drip or spill and damage the Main Unit.
Do not store the unit under high temperature, high humidity,
or in direct sunlight.
Cord band
Wipe the stain on the Main Unit with a soft cloth. If the Main Unit is heavily stained, wipe it with
a soft cloth moistened with water or detergent and squeezed well. Then wipe it with a dry soft cloth
.
General Advice
• Do not clean the Main Unit with volatile chemical such as benzene or thinner.
• Do not immerse the Main Unit in Water.
How to Carry the Unit
• You can put Mouthpiece and Inhalation Mask in the storage case to carry them with the unit.
• Put a Main Unit Cover over the Main Unit when carrying the unit.
• Do not put the AC Adapter in the storage case along with the Main Unit.
The Main Unit may be scratched.
Bundle the power cord of the AC Adapter and fasten it to the Main Unit of the
AC Adapter with the cord band.
Page 18

How to Disinfect
18
How to Disinfect How to Disinfect the Unit
The Micro-Air®nebulizer can be cleaned and disinfected easily because the Medication
Bottle and the Mesh Cap can be removed from the Main Unit. The unit can
be disinfected with benzalkonium chloride.
1 Make 0.1% dilute solution using benzalkonium chloride, and soak the
Medication Bottle and Mesh Cap in the solution for 10 minutes.
2 Take the Medication Bottle and Mesh Cap out of solution
to rinse it with water.
3 Wipe off the remaining water for faster drying.
4 If using commercial cleaners, follow manufacturers instructions.
Caution
Do not use disinfection solution containing sodium hypochlorite.
• The unit may not be able to be used after getting covered with rust.
5 The following parts can be disinfected:
• Medication Bottle
• Mesh Cap
• Mask
• Mouthpiece
• Mouthpiece Adapter
Page 19

How to Replace the Mesh Cap
19
How to Disinfect How to Replace the Mesh Cap
1 Open the Mesh Cap.
2 Remove the Mesh Cap from the
Medication Bottle.
3 Install a new Mesh Cap.
You can usually use the Mesh Cap for approximately 1 year (according to the test results of OMRON).
However, this may vary depending on medication type and individual use and care. In some cases,
the unit may not nebulize or may nebulize weakly even after disinfection is done.
If the unit does not nebulize or nebulizes poorly even after cleaning the Mesh Cap,
purchase a new Mesh Cap from your nearest Omron dealer or where you purchased your unit from.
The part number is U22-4.
Lift up the Mesh Cap
by strongly applying
your thumb on the brim.
Insert a new
Mesh Cap
vertically.
Close it
securely.
Lift up the
Mesh Cap
vertically.
Page 20

Troubleshooting
20
Troubleshooting Troubleshooting
If a problem occurs while you are using the unit, please check the following information before calling.
The nebulization rate is extremely low, or the unit does not nebulize at all.
Where to Inspect How to correct
Is the Battery Low Indicator turned on?
Is the Mesh dirty?
Replace the batteries with new ones.
(Refer to Page 10)
Where to Inspect
Are the batteries worn?
Is the AC Adapter securely plugged into
the electric outlet or the connection port
of Main Unit?
Is the capacity of the rechargeable batteries
(NiMH) low?
Is the Medication Bottle installed to the Main
Unit correctly?
Replace the batteries with new ones.
(Refer to Page 10)
Insert it correctly. (Refer to Page 11)
Recharge the batteries with the commercially
available recharger or replace them
with new ones.
Install it correctly. (Refer to Page 13)
The Power Indicator does not turn on and the unit does not nebulize.
Clean the Mesh Cap by disinfecting to remove
any stains. (Refer to Page 18)
• If the trouble is not corrected by the above
mentioned procedure, replace the Mesh cap
with a new one.
(Refer to Page 19)
Are the polarities of batteries or rechargeable
batteries placed in the wrong direction?
Insert batteries or rechargeable batteries in the
correct alignment.
(Refer to Page 10)
How to correct
Page 21

Troubleshooting
21
Troubleshooting Troubleshooting
The Power Indicator is illuminated, but the unit does not nebulize.
Where to Inspect How to correct
Is the Medication Bottle filled with medication?
Is the Mesh broken, stained,
or extremely soiled?
Has any medication or water collected on the
electrode of the Main Unit?
Fill with medication. (Refer to Page 12)
Clean the Mesh Cap by disinfecting.
(Refer to Page 18)
• If the unit does not nebulize even after
carrying out the above-mentioned procedure,
or the Mesh is broken, replace the Mesh Cap
with a new one.
(Refer to Page 19)
Wipe off the stain. (Refer to Page 17)
Is the medication being supplied to the
Medication Bottle?
(Is the medication in contact with the Vibrator?)
Use the unit slightly slanting the Main Unit
(the side with the Button) towards yourself.
(Refer to Page 15)
Absorb the medication or water with
a soft cloth.
(Refer to Page 15)
Is the electrode of the Main Unit stained?
Page 22

Specifications
22
Troubleshooting
Specifications
Replacement Parts and Accessories
9921
Child’s Inhalation Mask, with rubber string
(Mask and string optional accessories)
U22-3
Medication Bottle
U22-5
AC Adapter (optional accessories)
U22-7
Storage case
U22-4
Mesh Cap
U22-2
Mask Adapter
U22-1
Mouthpiece
For the inquiry on where to purchase the replacement parts and accessories, contact the store where you purchased
the unit or the nearest OMRON dealer.
Product name: OMRON Micro-Air®Vibrating Mesh Nebulizer
Model:
NE-U22V
Power supply: 110 VAC and 50/60 Hz (With the use of an AC Adapter)
3 VDC (two AA alkaline batteries)
2.4 VDC (two AA NiMH batteries)
Power consumption: Approx. 1.5 W*
Vibration frequency: Approx. 180 kHz
Nebulization rate: 0.4 to 0.5 mL/min average*
Particle size: MMAD approx. 5µm*
(1 to 5 µm for 80% of the entire volume particle distribution)
(Measured by OMRON based on CEN/TC215)
Capacity of
Medication Bottle:
Maximum of 7 mL
External dimensions: 38 (W) x 104 (H) x 51 (D) mm
Weight: Approx. 97 g (not including batteries)
Battery life: Approx. 4 hours with continuous operation*
Approx. 8 days when used about 30 minutes a day
(with the use of alkaline batteries)
Operating temperature
and humidity:
10 to 40°C (No ice formation is allowed.) 30 to 85% RH
Accessories: Child’s Inhalation Mask, Mouthpiece, Mask Adapter,
Storage case, AC Adapter, Instruction Manual
* When physiological saline is used. These figures may vary depending on the type of medication.
Specifications and appearance may be subject to change without prior notice for improvement.
Specifications / Replacement Parts and Accessories
Page 23

Warranty
23
Warranty Warranty
Your NE-U22V Omron Nebulizer is warranted to be free from defects in material and workmanship for
a period of 2 years from the date of purchase. This warranty extends only to the original retail
purchaser. This warranty does not cover failures resulting from misuse, abuse, alteration of the Omron
Nebulizer System, use of improper components or failure to comply with the operating instructions.
The 2 year warranty excludes mesh cap and accessories.
To make a warranty claim, return your Omron Nebulizer System, freight prepaid and insured
(or assume the risk of loss or damage during shipment) to Omron Healthcare, Inc., 300 Lak
eview
Parkway, Vernon Hills, IL 60061, Attention: Service Department. All requests for warranty service
should include the model number of your Omron Nebulizer System, proof of purchase (including
date of purchase), your phone number and the nature or your service request. Omron will either repair
or at its option replace free of charge any parts necessary to correct defects in material or workmanship
covered by this limited warranty.
This limited warranty is in lieu of all other warranties, whether oral, written, express or implied.
There are no warranties of merchantability or fitness for a particular purpose, except for those
implied warranties arising by operation of law which are limited in duration to the 2 year term of this
warranty. Omron’s liability, whether based on contract, tort, warranty, strict liability, or any other
theory, shall not exceed the price of the individual Omron nebulizer system which is the basis of
the claim. In no event shall Omron be liable for any loss of profits, facilities, equipment or other
incidental, consequential or special damages.
Some states do not allow limitations on how long an implied warranty lasts, or allow the exclusion
or limitations on how long an implied warranty lasts, or allow the exclusion or limitation of incidental,
consequential, or special damages, so the above limitations or exclusions may not apply to you.
This warranty gives you specific legal rights. You may also have other rights
which vary from state to state.
For Customer Service
Call Toll Free: 1-800-634-4350
Page 24

Distributed by:
OMRON HEALTHCARE, INC.
300 Lakeview Parkway
Vernon Hills, Illinois 60061
Toll Free Customer Service: 1-800-634-4350
www.omronhealthcare.com
Copyright © 2002 Omron Healthcare, Inc.
NEU22VINST Rev
Page 25

A1
GUIDE D’UTILISATION
Merci d’avoir acheté le Nébuliseur
d’OMRON®. Avant d’utiliser
cet appareil pour la première fois, veuillez
lire attentivement ce guide d’utilisation.
Veuillez garder ce guide d’utilisation
à portée de la main pour référence future.
NÉBULISEUR À
FILTRE VIBRANT
Modèle NE-U22V
®
¤
Cet appareil est un dispositif médical. Utilisez cet appareil uniquement de la façon indiquée par
votre médecin et/ou votre inhalothérapeute.
Les illustrations présentées dans ce guide d’utilisation sont des dessins.
Mise en garde: La loi fédérale soumet cet appareil
à une restriction de vente par ou sur ordonnance
d’un médecin.
Avant d’utiliser l’appareil
Conseils de sécurité . . . . . . . . . . . . . . . . . . . . . 2
Caractéristiques du produit . . . . . . . . . . . . . . . . 5
Composants du produit . . . . . . . . . . . . . . . . . . . 6
Description des pièces . . . . . . . . . . . . . . . . . . . 7
Assemblage de l’appareil principal. . . . . . . . . . 8
Utilisation de l’appareil
Utilisation de la source d’énergie . . . . . . . . . . 10
Comment remplir bouteille de médicament
12
Sélection du mode de nébulisation . . . . . . . . . 14
Inhalation . . . . . . . . . . . . . . . . . . . . . . . . . . . . 15
Entretien après utilisation . . . . . . . . . . . . . . . . 16
Désinfection de l’appareil
Désinfection . . . . . . . . . . . . . . . . . . . . . . . . . . 18
Remplacement de la capsule-filtre . . . . . . . . . 19
Dépannage et garantie
Dépannage . . . . . . . . . . . . . . . . . . . . . . . . . . . 20
Spécifications, pièces de remplacement
et accessoires. . . . . . . . . . . . . . . . . . . . . . . . . . 22
Garantie . . . . . . . . . . . . . . . . . . . . . . . . . . . . . 23
¤
Français
Page 26

Conseils de sécurité
2
Conseils de sécurité
Avant d’utiliser l’appareil
• Les indicateurs d’avertissement et les exemples d’icônes sont présentés pour vous
aider à utiliser le produit correctement et de façon sécuritaire pour prévenir les
risques de vous blesser ou de blesser d’autres personnes.
Signification
Indique un point où la possibilité de décès ou de blessures sérieuses
peut se produire à la suite d’une manipulation incorrecte.
Exemples d’icônes
En ce qui concerne le type, la dose et le schéma posologique du médicament, assurez-vous de suivre
les directives d’un médecin.
•Vos symptômes peuvent s’aggraver.
Lorsque vous utilisez l’appareil pour la première fois après l’avoir acheté, ou après une longue période
sans l’utiliser, assurez-vous de laver et de désinfecter la coupelle à médicament et la capsule-filtre
(référez aux pages 14 à 18).
•Diverses bactéries peuvent être présentes et vous pourriez être contaminé.
Lavez et désinfectez la capsule-filtre, le masque d’inhalation, l’embout buccal et l’adaptateur
de masque après chaque usage (référez à la page 18).
Assurez-vous d’assécher rapidement les pièces nettoyées et désinfectées, et de les ranger
de façon qu’elles ne soient pas contaminées à nouveau.
•Diverses bactéries peuvent être présentes et vous pourriez être contaminé.
Si plus d’une personne utilisent l’appareil, assurez-vous d’utiliser la coupelle à médicament, le masque
d’inhalation pour enfant, l’embout buccal et l’adaptateur buccal désinfectés pour chaque utilisateur.
•L’utilisateur pourrait être contaminé.
Gardez l’appareil hors de portée des bébés et des enfants.
• Ils peuvent avaler les petites pièces telle que la capsule-filtre. L’appareil peut être endommagé ou peut
occasionner des blessures aux bébés et aux enfants. Dans le cas où un enfant aurait avalé la capsule-filtre,
consultez immédiatement un médecin.
Indicateur de
mise en garde
L’icône indique une interdiction (vous ne pouvez pas faire).
Les sujets impliquant de réelles interdictions sont indiquées par
un texte ou des illustrations dans ou près de .
L’icône de gauche réfère à « l’interdiction de désassembler ».
L’icône indique une interdiction (incluant mise en garde et
avertissement). Les sujets impliquant de réelles interdictions sont
indiquées par un texte ou des illustrations dans ou près de .
L’icône de gauche réfère à « avertissement de choc électrique ».
Indique un point où des lésions corporelles ou des dommages matériels*
peuvent se produire à la suite d’une manipulation incorrecte.
*Dommages matériels réfère à une vaste gamme de dommages impliquant votre
maison, vos biens, les animaux domestiques et les animaux de compagnie.
L’icône indique un point obligatoire (vous devez toujours
respecter). Les sujets impliquant de réels points obligatoires sont
indiqués par un texte ou des illustrations dans ou près de .
L’icône de gauche réfère à une « renseignement important ».
MISE EN
GARDE
ATTENTION
MISE EN GARDE
Page 27

Conseils de sécurité
3
Avant d’utiliser l’appareil
Conseils de sécurité
Ne branchez ou ne débranchez pas l’adaptateur CA si vous avez les mains mouillées.
- Vous pourriez subir un choc électrique.
Ne lavez pas l’appareil principal et l’adaptateur CA avec de l’eau ou de l’eau chaude.
Évitez de les plonger dans l’eau.
•Vous pourriez endommager l’appareil.
Ne pas désassembler, réparer ou modifier cet appareil. Cela pourrait
annuler la garantie.
Si vous n’utilisez pas l’appareil durant une longue période, assurez-vous
de le débrancher.
N’utilisez pas de solution de décontamination contenant de l’hypochlorite de sodium.
La capsule-filtre rouillerait.
Ne pas renverser de médicament sur l’appareil principal ou sur l’adaptateur c.a.
Si un médicament est renversé sur l’appareil principal ou sur l’adaptateur c.a.,
l’essuyer immédiatement avec un chiffon doux.
N’échappez pas ou ne soumettez pas l’appareil principal, l’adaptateur CA,
la coupelle à médicament ou la capsule-filtre à un choc violent.
Utiliser seulement l’adaptateur Omron c.a. fourni avec ce produit.
S’assurer que l’adaptateur c.a. est branché dans une prise de courant de 110 V c.a.
Après avoir désinfecté les pièces, rincez à fond le désinfectant avec de l’eau.
MISE EN GARDE
ATTENTION
Page 28

Conseils de sécurité
4
Conseils de sécurité
Avant d’utiliser l’appareil
Conseils généraux
Remplacez immédiatement les piles à plat par des neuves.
N’utilisez pas différents types de piles ensemble.
N’utilisez pas des piles neuves et usagées ensemble.
N’utilisez pas des piles sèches et des piles rechargeables ensemble.
Pour que l’appareil fonctionne adéquatement, assurez-vous d’insérer les piles correctement.
Vous pouvez utiliser les piles au nickel-hydrogène disponibles en magasin, mais n’utilisez
pas les piles au nickel-cadmium.
Rechargez les piles rechargeables à l’aide d’un chargeur disponible en magasin.
(L’adaptateur CA inclus dans l’emballage ne peut être utilisé pour charger une pile.)
Lavez bien la capsule-filtre et le dispositif de vibration après chaque usage pour qu’aucun
résidu de médicament n’y soit laissé (référez à la page 16).
Lavez la coupelle à médicament, la capsule-filtre et le dispositif de vibration avec de l’eau
courante propre ou de l’eau distillée disponible en magasin.
Lorsque vous rincez la coupelle à médicament sous l’eau du robinet, n’utilisez pas l’eau
provenant d’un robinet ouvert à pleine capacité; utilisez plutôt un léger filet d’eau.
Rassemblez les pièces nettoyées et désinfectées après qu’elles aient suffisamment séché.
N’utilisez pas de benzène, de diluant ou d’essence pour nettoyer l’appareil.
Ne faites pas sécher l’appareil principal, l’adaptateur CA, la coupelle de médicament
et la capsule-filtre au micro-ondes; ne les nettoyez pas par ébullition.
Ne rangez pas l’appareil dans un endroit où il subira des niveaux de température ou d’humidité
élevés, ou dans un ensoleillement direct.
Ne laissez pas de médicament ou d’eau dans la coupelle à médicament, et ne la transportez
pas alors qu’elle en contient.
Si vous n’utilisez pas l’appareil durant une longue période (trois mois ou plus),
retirez les piles de l’appareil.
Page 29
Avant d’utiliser l’appareil
Caractéristiques du produit
Caractéristiques du produit
5
(Ceci est une représentation de l’appareil doté du masque d’inhalation)
Avant de commencer l’inhalation, vous devez
assembler l’appareil.
Avant d’utiliser l’appareil, veuillez lire la section concernant
l’ « Assemblage de l’appareil principal »; assurez-vous de
comprendre les étapes d’assemblage (référez-vous aux pages 8 et 9).
1
L’appareil de format réduit peut facilement être transporté
partout où vous allez
L’appareil est assez petit pour être placé dans un étui de rangement ou un sac à main;
vous pouvez facilement le transporter partout où vous allez. Le nouveau filtre en alliage
de titane crée un aérosol à rendement élevé.
2
Inhalation possible à divers angles
La nouvelle structure de la bouteille permet l’inhalation à divers angles, avec une
nébulisation stable. Ainsi, l’appareil peut même être utilisé au lit.
3
Entretien et utilisation faciles
L’appareil ne requiert aucun soin compliqué. Tout comme le nébuliseur traditionnel
à compresseur, tout ce que vous avez à faire est d’enlever le médicament après inhalation
et d’assécher la coupelle immédiatement après l’avoir lavée.
Page 30

Composants du produit
(Veuillez vérifier sur le produit)
6
Composants du produit
Avant d’utiliser l’appareil
Couvercle de
l’appareil principal
Les items suivants sont contenus dans la boîte.
S’il manque un de ces items, veuillez communiquer immédiatement
avec le magasin où vous avez acheté le produit, ou le marchand
OMRON le plus près.
Appareil
principal
Coupelle
à médicament
Capsule-filtre
(avec filtre)
Guide d’utilisation(wi
Quality GuarateCard)
Étui de rangement
Adaptateur
de masque
Embout buccal Masque pour enfant
(en option) 9921
Vidéo d’instruction
Page 31

Avant d’utiliser l’appareil
Description des pièces
Description des pièces
7
Couvercle de
l’appareil principal
Protège l’appareil principal
Bouton de Puissance
Unité principale de tours
marche-arrêt..
Capsule-filtre
Un filtre en alliage est installé
pour la nébulisation.
- Manipulez le filtre avec soin car
il est très délicat.
Levier de blocage du bouchon de la
coupelle à médicament
Ouvre la capsule de médicament pour le lavage.
– N'ouvrez pas la capsule de médicament
excepté le lavage.
Coupelle à médicament
Remplissez médicament en ouvrant
le dessus de la capsule.
Fiche
d’alimentation
Verrouillage pour appareil principal
Adaptateur CA pour approvisionnement standard
Bande pour cordon
Base de connexion pour adaptateur CA
Indicateur de
décharge de pile
Un indicateur orange
clignote lorsque les piles
sont à plat.
Électrode
Alimente la puissance de l’appareil
principal au dispositif de vibration
de la coupelle à médicament.
Orifice d’injection du médicament
Introduisez le médicament en ouvrant
la capsule-filtre.
Dessous de l’appareil principal
Voyant de mise en circuit
Un voyant vert s’allume lorsque
l’appareil est en marche.
Levier de blocage
du couvercle à pile
Prise pour adaptateur CA
sous l’appareil principal
Adaptateur CA (en option)
®
Page 32

Assemblage de l’appareil principal
8
Assemblage de l’appareil principal
Avant d’utiliser l’appareil
Cet appareil doit être assemblé avant d’être utilisé.
- Les pièces peuvent s’emboîter de façon assez serré puisqu’elles sont conçues pour
empêcher le médicament de couler.
- Vous devez laver et désinfecter toutes les pièces amovibles avant d’utiliser l’appareil.
Assemblez l’appareil après en avoir lavé, désinfecté et asséché les composants.
(Pour connaître la façon de procéder pour désinfecter l’appareil, référez-vous à la page 18)
2 Fixez la coupelle à médicament à l’appareil principal
Insérez
verticalement
la capsule-filtre
Alignez les
électrodes
l’une sur
l’autre
N’ouvrez pas
le bouchon de
la coupelle
à médicament
Vous avez terminé
l’assemblage
Conseils généraux
• Tenez bien l’appareil avec vos deux mains.
• Assemblez solidement les pièces (selon les pièces, il se peut que vous entendiez un petit
bruit sec au moment de l’assemblage).
1 Fixez la capsule-filtre sur la coupelle à médicament
Vous avez terminé
l’assemblage
Fermez-la bien
Page 33

Assemblage de l’appareil principal
9
Avant d’utiliser l’appareil Assemblage de l’appareil principal
3 Fixez l’adaptateur de masque à l’appareil principal
– Si vous n’utilisez pas l’appareil après l’avoir
assemblé, désassemblez-le (tel qu’indiqué ci-contre),
et rangez-le dans l’étui de rangement fourni ou dans
un environnement propre. (Pour en savoir davantage
sur l’utilisation adéquate de l’appareil, référez-vous
à la page 15)
Vous avez terminé
l’assemblage
Vous avez terminé
l’assemblage
Vous avez terminé
l’assemblage
Vous avez maintenant complété l’assemblage de l’appareil principal.
4 Fixez l’embout buccal fourni ou le masque d’inhalation pour enfant
à l’adaptateur de masque.
•
Fixation du masque d’inhalation pour enfant • Fixation de l’embout buccal
Page 34

Utilisation de la source d’énergie
10
Utilisation de la source d’énergie
Installation des piles
Les piles ne sont pas fournies. Utilisez deux piles alcalines ou au nickel-hydrogène
AA disponibles en magasin.
1 Enlevez le couvercle de pile.
(1) Tournez légèrement le levier de blocage du couvercle
de pile dans la direction de la flèche.
(2) Enlevez le couvercle de pile.
• La première fois, il se peut que le couvercle de pile soit difficile à enlever puisqu’il
est serré afin d’empêcher l’eau de pénétrer à l’intérieur de l’appareil.
2 Insérez correctement les piles en alignant les polarités
(+ et -) sur les marques d’indication.
Dessous de
l’appareil
principal
• Si vous rangez l’appareil alors que les piles ou les piles rechargeables sont en place, elles peuvent couler
et endommager l’appareil. Si vous n’utilisez pas l’appareil durant une longue période (plus de trois mois),
enlevez les piles.
• N’utilisez pas des piles neuves et usées, ou des piles de différents types (telles que piles régulières et piles
rechargeables), ensemble.
• Respectez les méthodes d’élimination déterminées par votre communauté locale lorsque vous devez disposer
des piles usagées.
Piles
Piles au nickel-hydrogène
–Vous pouvez utiliser des piles au nickel-
hydrogène (piles rechargeables).
– Si vous utilisez un chargeur de piles
convenant aux piles que vous utilisez
(disponible en magasin), vous épargnerez de
l’argent en rechargeant régulièrement les piles.
L’appareil peut être utilisé durant environ 8 jours
(à raison de 30 minutes par jour lorsque les piles
sont complètement chargées).
•L’indicateur de décharge de pile (orange) clignote.
→ Les piles rechargeables n’ont pas de puissance
résiduelle. Puisque l’appareil ne produit
aucune nébulisation, rechargez immédiatement
les piles à l’aide d’un chargeur
disponible en magasin.
•L’adaptateur CA fourni ne peut servir à charger
les piles.Utilisez un chargeur de piles disponible
en magasin pour recharger les piles.
Remplacement et durée de vie des piles
Piles alcalines
L’appareil peut être utilisé durant
environ 8 jours (à raison de 30
minutes par jour)
• L’indicateur de décharge
de pile (orange) clignote.
→ Les piles sont presque déchargées.
Remplacez les deux piles par des neuves.
•L’indicateur de décharge de pile (orange) s’allume.
→ Les piles sont à plat. L’appareil ne
produira aucune nébulisation.
Remplacez immédiatement les
deuxpiles par des neuves.
3 Replacez le couvercle de pile.
Placez le couvercle de pile sur le compartiment à piles. Poussez le
couvercle jusqu’à ce qu’il s’adapte aux pattes et produise un petit bruit sec.
Poussez fermement sur les deux extrémités.
• Il se peut que vous trouviez difficile de le pousser jusqu’au bout puisque l’appareil a été
conçu pour empêcher l’eau d’atteindre l’intérieur.
Utilisation de l’appareil
2
1
Page 35

Préparation de l’appareil avant utilisation
11
Utilisation de l’appareil Utilisation de la source d’énergie
Utilisation facultative de l’adaptateur CA (en option)
Utilisez l’adaptateur CA aux endroit où vous disposez d’une prise électrique.
Notez cependant que cet adaptateur CA n’est pas un chargeur de piles.
1 Placez l’appareil principal sur la base de connexion pour adaptateur CA,
tel qu’indiqué ci-après.
Enlèvement de l’adaptateur CA de l’appareil principal
(1) Débranchez le cordon d’alimentation de la prise électrique.
(2) Déverrouillez l’appareil principal en poussant
sur les deux extrémités du dispositif de
verrouillage de la base de connexion pour
adaptateur CA.
(3) Enlevez l’appareil principal.
(1) Débranchez
(3) Enlevez
(2) Poussez sur les deux extrémités
La connexion est complète.
Verrouillage pour appareil principal
Notez: cependant que cet adaptateur CA
n’est pas un chargeur de piles.
2 Branchez le cordon d’alimentation de l’adaptateur CA dans la prise électrique.
Page 36

Comment remplir bouteille
de médicament
12
Remplissage de la coupelle à médicament Utilisation de l’appareil
Avez-vous enlevé l’adaptateur de masque et l’embout buccal fourni?
(Pour les directives sur l'assemblage de l'appareil principal, référez-vous à la page 8)
1 Enlevez la coupelle à médicament
de l’appareil principal.
3 Remplissez la coupelle à médicament
Tel qu’indiqué à la Figure ci-contre, empêchez
la capsule-filtre de se refermer lorsque
vous remplissez la coupelle à médicament
– La capacité maximale de la coupelle
à médicament est de 7 ml.
4 Fermez la capsule-filtre.
– Assurez-vous de vérifier que la capsule-filtre
soit bien fermée. Dans le cas contraire,
le médicament s’écoulera.
Appuyez sur les leviers
de blocage gris des deux
côtés de la coupelle
à médicament tout
en la soulevant
Vérifiez que la
capsule-filtre soit
bien fermée.
N’ouvrez pas le bouchon
de la coupelle à médicament
Soulevez la
capsule-filtre tout
en appuyant
fermement sur
l’arête du rebord
avec votre pouce
2 Ouvrez la capsule-filtre Retenez
la coupelle à médicament en
la couvrant avec votre main
.
Page 37

Comment remplir bouteille de médicament
13
Utilisation de l’appareil
Comment remplir bouteille de médicament
5 Fixez la coupelle à médicament à l’appareil principal.
– Si la coupelle à médicament n’est pas correctement installée,
l’appareil ne se mettra pas en marche.
– Si les électrodes de l’appareil principal
sont très sales, l’appareil ne pourra
produire une nébulisation normale.
Dans ce cas, nettoyez les saletés.
(Référez-vous à la page 17)
Alignez les
électrodes l’une
sur l’autre.
Vous avez terminé
l’assemblage
Vous avez terminé
l’assemblage
• Installation du masque d’inhalation pour enfant
7 Fixez la masque d’inhalation pour enfant ou l’embout buccal.
• Installation de l’embout buccal
6 Fixez l’embout buccal et l’adaptateur de masque
Vous avez terminé
l’assemblage
Page 38

Sélection du mode de nébulisation
14
Sélection du mode de nébulisation Utilisation de l’appareil
Vous pouvez utilisez l’appareil en mode de nébulisation continue ou en mode manuel.
– Le voyant de mise en circuit (vert) s’allume durant la nébulisation.
Appuyez sur la touche
et relevez immédiatement
votre doigt (dans la seconde)
Continuez d’appuyer sur
la touche (durant environ
2 secondes ou plus)
Nébulisation en mode manuel
Lorsque vous continuez d’appuyer sur la touche
(durant 2 secondes ou plus), l’appareil produit une
nébulisation en mode manuel. L’appareil produit une
nébulisation seulement pendant que vous appuyez sur
la touche. Vous pouvez inhaler à votre convenance.
Nébulisation en mode continu
Lorsque vous appuyez sur la touche et enlevez
immédiatement votre doigt de la touche (après
environ 1 seconde), l’appareil produit une
nébulisation en mode continu.
Lorsque vous appuyez de nouveau sur la touche,
l’appareil arrête la nébulisation.
Page 39

Inhalation
15
Utilisation de l’appareil Inhalation
1 Tenez l’appareil principal d’une
main et commencez l’inhalation
dans une position détendue.
Inclinez légèrement l’appareil principal vers
vous (la touche vous faisant face).
• Immergez le dispositif de vibration dans le médicament.
Si le dispositif de vibration n’est pas immergé, l’appareil
ne produit pas de nébulisation.
Médicament
Avertissement
N’échappez pas ou ne soumettez pas l’appareil
principal, la coupelle à médicament ou la capsule-filtre
à un choc violent.
•L’appareil peut être endommagé et ne peut être utilisé.
• Si de la salive ou du médicament se dépose sur
l’électrode de l’appareil principal ou sur le filtre,
l’appareil arrête la nébulisation. Le cas échéant,
éteindre l’appareil et absorber le médicament ou la
salive avec un mouchoir en papier ou un chiffon doux.
2 Lorsque vous avez terminé
l’inhalation, appuyez sur la
touche et arrêtez l’appareil.
•L’appareil est doté d’une minuterie intégrée qui
arrête l’appareil environ 30 minutes après qu’il
ait été mis en circuit.
•Lorsqu’on utilise l’adaptateur CA, débrancher
le cordon d’alimentation de la prise électrique.
(Référez-vous à la page 11)
Essuyez le médicament
ou la salive.
Page 40

Entretien après utilisation
16
Entretien après utilisation Utilisation de l’appareil
Assurez-vous de laver et de ranger l’appareil
après utilisation.
Si vous ne lavez pas l’appareil après inhalation, le médicament séchera, adhérera à la coupelle
et ne pourra plus être nébulisé. Dans ce cas, désinfectez la capsule-filtre et faites partir
le médicament au lavage. (Référez-vous à la page 18)
Libérez le levier
de blocage du bouchon de
la coupelle à médicament
et ouvrez la coupelle
à médicament.
3 Lavez les pièces.
Lavez le masque d’inhalation ou l’embout buccal, l’adaptateur
de masque, la coupelle de médicament dans l’eau.
Conseils généraux
Lorsque vous rincez la coupelle à médicament et la capsule-filtre
sous l’eau du robinet, n’utilisez pas l’eau provenant d’un
robinet ouvert à pleine capacité.
• Vous pourriez endommager l’appareil.
4 Asséchez bien les pièces.
Immédiatement après avoir lavé les pièces, essuyez l’excès
d’eau à l’aide d’un chiffon sec, et laissez-les sécher à l’air.
Enlevez la capsule-filtre de la coupelle à médicament
et laissez-les sécher à l’air (référez-vous à la page 8).
• Ne touchez pas au filtre avec vos mains.
Jetez le reste
du médicament
1 Enlevez les pièces de l’appareil principal.
2 Jetez le reste du médicament
En le masque d’inhalation pour enfant ou l’embout buccal, l’adaptateur de masque,
et la coupelle à medicament de l’appareil principal. Pour en savoir davantage sur la façon
d’assembler l’ appareil, (référez-vous aux pages 8 et 9).
Page 41

Entretien après utilisation
17
Utilisation de l’appareil Entretien après utilisation
5 Après avoir assemblé l’appareil, rangez-le dans un environnement propre.
Mise en garde
Lavez et désinfectez la coupelle à médicament, le masque d’inhalation, l’embout buccal
et l’adaptateur de masque après chaque utilisation. (Référez-vous à la page 16)
Assurez-vous d’assécher rapidement les pièces nettoyées et désinfectées, et rangez-les
en vous assurant qu’elles ne soient pas contaminées de nouveau.
Si l’appareil principal est sale
Conseils généraux
Ne laissez pas de médicament ou d’eau dans la coupelle à médicament, et ne la transportez
pas alors qu’elle en contient.
• Le médicament peut dégoutter ou se renverser et endommager l’appareil principal.
Ne rangez pas l’appareil dans un endroit où il subira des niveaux de température ou d’humidité
élevés, ou dans un ensoleillement direct.
Bande pour cordon
Essuyez les taches sur l’appareil principal à l’aide d’un chiffon doux. Si l’appareil
principal est très sale, nettoyez-le à l’aide d’un chiffon doux trempé dans de l’eau
et du détergent, et bien essoré. Asséchez-le ensuite à l’aide d’un chiffon doux sec.
Conseils généraux
• Ne lavez pas l’appareil principal avec des produits chimiques volatiles tels
du benzène ou du diluant.
• N’immergez pas l’appareil principal dans l’eau.
Transport de l’appareil
• Vous pouvez placer l’embout buccal et le masque d’inhalation dans l’étui de rangement pour
les transporter avec l’appareil.
• Lorsque vous transportez l’appareil, installez le couvercle de l’appareil principal.
• Pour éviter d’égratigner l’appareil principal, ne placez pas l’adaptateur CA dans l’étui
de rangement avec l’appareil principal.
Rassemblez le cordon d’alimentation de l’adaptateur CA et fixez-le
à l’adaptateur à l’aide de la bande pour cordon.
Page 42

Désinfection de l’appareil
18
Désinfection de l’appareil Désinfection de l’appareil
La coupelle à médicament et la capsule-filtre pouvant être enlevées de l’appareil
principal, le nébuliseur Micro-Air®peut être nettoyé et désinfecté facilement. On peut
désinfecter l’appareil avec du chlorure de benzalkonium.
1 Préparez une solution diluée de 0,1 % de chlorure de benzalkonium,
et faites tremper la coupelle à médicament et la capsule-filtre dans
la solution durant 10 minutes.
2 Retirez la coupelle à médicament et la capsule-filtre de la solution
et rincez-les à l’eau.
3 Pour un séchage rapide, essuyez l’excès d’eau.
4 Si vous utilisez des nettoyants commerciaux, suivez les
directives du fabricant.
Mise en garde
N’utilisez pas de solution de décontamination contenant de l’hypochlorite de sodium.
• La capsule-filtre rouillerait.
5 Les pièces suivantes peuvent être désinfectées:
• La coupelle à médicament
• La capsule-filtre
• Le masque
• L’embout buccal
• L’adaptateur d’embout buccal
Page 43

Replacement de la capsule-filtre
19
Désinfection de l’appareil Replacement de la capsule-filtre
1 Ouvrez la capsule-filtre.
2 Enlevez la capsule-filtre de la
coupelle à médicament.
3 Installez une nouvelle capsule-filtre.
Vous pouvez utiliser la capsule-filtre durant environ 1 an (selon les résultats de tests d’OMRON).
Cependant, cette durée peut varier en fonction du type de médicament, de l’utilisation individuelle
et de l’entretien. Dans certains cas, il se peut que l’appareil ne produise pas de nébulisation, ou qu’il
produise une faible nébulisation, même après avoir été désinfecté.
Si l’appareil ne produit pas de nébulisation ou qu’il produit une faible nébulisation, même
après que la capsule-filtre ait été nettoyée,
achetez une nouvelle capsule-filtre chez votre
marchand Omron le plus près, où à l’endroit où vous avez acheté votre appareil.
Le numéro de pièce est U22-4.
Soulevez la capsule-filtre tout
en appuyant fermement
sur l’arête du rebord avec
votre pouce.
Insérez
verticalement
une nouvelle
capsule-filtre.
Fermez-la
solidement.
Soulevez
verticalement
la capsule-filtre.
Page 44

Dépannage
20
Si un problème se présente pendant que vous utilisez l’appareil, veuillez vérifier les
renseignements suivants avant d’appeler.
Le débit de nébulisation est très bas, ou l’appareil
ne produit aucune nébulisation
Recherchez Corrigez
L’indicateur de décharge de pile est-il allumé?
Le filtre est-il sale?
Remplacez les piles par des neuves.
(Référez-vous à la page 10)
Recherchez
L’adaptateur CA est-il bien branché dans
une prise électrique ou dans la prise pour
adaptateur CA sous l’appareil principal?
La capacité du chargeur de piles
(au nickel-hydrogène) est-elle faible?
La coupelle à médicament est-elle bien
installée sur l’appareil principal?
Remplacez les piles par des neuves.
(Référez-vous à la page 10)
Rechargez les piles à l’aide d’un chargeur
disponible en magasin ou remplacez les
piles par des neuves.
Insérez-la correctement.
(Référez-vous à la page 13)
Le voyant de mise en circuit ne s’allume pas et l’appareil
ne produit aucune nébulisation
Nettoyez la capsule-filtre par la désinfection
pour enlever toute saleté.
(Référez-vous à la page 18)
• Si le problème n’est pas corrigé après la
procédure ci-haut indiquée, remplacez la
capsule-filtre par une neuve.
(Référez-vous à la page 19)
Les polarités des piles ou des piles
rechargeables sont-elles dans la
mauvaise position?
Insérez les piles ou les piles rechargeables
dans la bonne position.
(Référez-vous à la page 10)
Corrigez
Dépannage Dépannage
Les piles sont-elles à plat?
Insérez-le correctement.
(Référez-vous à la page 11)
Page 45

Dépannage
21
Dépannage Dépannage
Le voyant de mise en circuit est allumé, mais l’appareil
ne produit aucune nébulisation
Recherchez Corrigez
La coupelle à médicament contient-elle le
médicament?
Le filtre est-il brisé, taché,
ou extrêmement sale?
De l’eau ou du médicament s’est-il déposé sur
l’électrode de l’appareil principal?
Remplissez-la de médicament.
(Refer to Page 12)
Nettoyez la capsule-filtre par la désinfection.
(Référez-vous à la page 18)
• Si l’appareil ne produit pas de nébulisation
après la procédure ci-haut indiquée, ou si le
filtre est brisé, remplacez la capsule-filtre
par une neuve.
(Référez-vous à la page 19)
Essuyez la tache.
(Référez-vous à la page 17)
Le médicament se rend-il dans la coupelle?
(Le médicament est-il en contact avec le
dispositif de vibration?)
Inclinez légèrement l’appareil principal vers
vous (la touche vous faisant face).
(Référez-vous à la page 15)
Essuyez l’eau ou le médicament à l’aide
d’un chiffon doux.
(Référez-vous à la page 15)
L’électrode de l’appareil principal est-il sale?
Page 46
Spécifications
22
Dépannage
Pièces de remplacement et accessoires
9921
Masque d’inhalation pour enfant, avec attaches
en caoutchouc (Le masque et les attaches sont
des accessoires en option)
U22-3
Coupelle à médicament
U22-5
Adaptateur CA (accessoire en option)
U22-7
Étui de rangement
U22-4
Capsule-filtre
U22-2
Adaptateur de masque
U22-1
Embout buccal
Pour connaître les endroits où vous procurer les pièces de remplacement et accessoires, communiquez avec le magasin où vous
avez acheté l’appareil, ou le marchand OMRON le plus près.
Nom du produit: Nébuliseur à filtre vibrant Micro-Air®d’OMRON
Modèle:
NE-U22V
Alimentation: 110 V a.c. et 50/60 Hz (avec l’utilisation d’un adaptateur CA)
3 V c.c. (deux piles alcalines AA)
2.4 V c.c. (deux piles au nickel-hydrogène AA)
Consommation d’énergie: Environ 1.5 W*
Fréquence de vibration: Environ 180 kHz
Débit de nébulisation: 0,4 à 0,5 ml/min en moyenne*
Dimension des particules: MMAD environ 5 µm
(1 to 5 µm pour 80 % de tout le volume de la distribution des
particules) (Mesuré par OMRON sur la base de CEN/TC215)
Capacité de la coupelle Maximum de 7 ml
de médicament:
Dimensions extérieures: 38 (l.) x 104 (H.) x 51 (P.) mm
Poids: Environ 97 g (excluant les piles)
Durée de vie des piles: Environ 4 heures en mode continu*
Environ 8 jours à raison de 30 minutes par jour (avec piles alcalines)
Température et humidité 10 à 40 °C (aucune formation de glace n’est permise), 30 à 85 % HR
de fonctionnement:
Accessoires: Masque d’inhalation pour enfant, embout buccal, adaptateur
de masque, étui de rangement, adaptateur CA, guide d’utilisation
* Lorsqu’on utilise une solution saline. Ces chiffres peuvent varier en fonction du type de médicament.
Les spécifications et l’apparence peuvent être modifiées sans avis en vue d’y apporter des améliorations.
Spécifications / Remplacement de la capsule-filtre
Page 47

Garantie
23
Garantie Garantie
Votre Nébuliseur NE-U22V d’Omron porte une garantie contre tout vice de fabrication pour une
période de deux ans à compter de la date d’achat. Cette garantie est consentie à l’acheteur au détail original
seulement. Cette garantie ne couvre pas les défaillances causées par un mauvais usage, un usage abusif,
ou une modification au Nébuliseur Omron, l’utilisation de mauvais composants ou le défaut de respecter
les directives d’utilisation. La garantie de 2 ans exclut la capsule-filtre et les accessoires.
Pour présenter une réclamation sur garantie, expédiez l’unité port payé et assurée (ou assumez les risques
de perte ou dommage durant l’expédition) à Omron Healthcare, Inc., 300 Lakeview Parkway, Vernon Hills,
IL 60061, U.S.A., à l’attention du Service des réparations. Toutes les demandes sur garantie doivent inclure
le numéro du modèle de votre Nébuliseur Omron, la preuve d’achat (incluant la date d’achat), votre
numéro de téléphone et la nature de votre demande. Omron réparera ou remplacera (à son choix)
gratuitement toute pièce qui se révélera défectueuse en raison d’un vice de matière ou de fabrication
couvert par cette garantie limitée.
Cette garantie limitée remplace toute autre garantie, orale, écrite, expresse ou implicite. Il n’y a pas
de garantie de qualité marchande ou de compatibilité dans un but particulier, à l’exception des
garanties implicites résultant de l’effet de la loi, qui sont limitées dans le temps au terme des
2 années de cette garantie. La responsabilité d’Omron, qu’il s’agisse d’un contrat, d’une action,
d’une garantie, d’une responsabilité sans faute, ou de tout autre théorie, n’excédera pas le prix
d’un nébuliseur individuel Omron, qui est la base de la réclamation. Omron ne sera en aucun
cas responsable d’aucune perte de profit, d’installation, d’équipement ou autres dommages
indirects, consécutifs ou particuliers.
Certaines provinces ne permettant pas les limitations d’une garantie implicite dans le temps, ou l’exclusion
ou la limitation de dommages indirects ou consécutifs dans le temps, ou l’exclusion ou la limitation de
dommages indirects, consécutifs ou particuliers, ces limitations ou exclusions peuvent ne pas s’appliquer
à vous. Cette garantie vous donne des droits légaux spécifiques, et vous pouvez avoir d’autres droits qui
varient d’une province à une autre.
Numéro sans frais du
Service à la clientèle: 1-800-634-4350
Page 48

Distribué par:
OMRON HEALTHCARE, INC.
300 Lakeview Parkway
Vernon Hills, IL 60061 É.-U.
Service à la clientèle, sans frais: 1-800-634-4350
www.omronhealthcare.com
Copyright © 2002 Omron Healthcare, Inc.
NEU22VINST Rev
Page 49

B1
MANUAL DE
INSTRUCCIONES
Gracias por adquirir el Nebulizador
OMRON®. Lea todas las
instrucciones del manual sobre el cuidado
y uso de esta unidad antes de utilizarla.
Guarde estas instrucciones para consultarlas
en el futuro.
NEBULIZADOR
VIBRADOR
CON MALLA
Modelo NE-U22V
®
¤
Esta unidad es un dispositivo médico. Utilícela solamente según las indicaciones
de su médico o terapeuta respiratorio.
Las ilustraciones de este manual son dibujos de imágenes.
Precaución: Conforme a leyes federales,
este dispositivo sólo se puede vender a
pedido de un médico.
Antes de usar esta unidad
Información de seguridad . . . . . . . . . . . . . . . . . 2
Características del producto . . . . . . . . . . . . . . . 5
Piezas del producto . . . . . . . . . . . . . . . . . . . . . . 6
Nombres y funciones de las piezas. . . . . . . . . . 7
Cómo armar la unidad principal . . . . . . . . . . . . 8
Uso correcto de la unidad
Cómo utilizar la fuente de alimentación. . . . . 10
Cómo llenar el depósito para el medicamento 12
Cómo seleccionar el modo de nebulización . . 14
Cómo inhalar. . . . . . . . . . . . . . . . . . . . . . . . . . 15
Cuidado de la unidad después de su uso. . . . . 16
Cómo desinfectar la unidad
Cómo desinfectar . . . . . . . . . . . . . . . . . . . . . . 18
Cómo reemplazar la tapa reticulada . . . . . . . . 19
Solución de problemas y garantía
Solución de problemas . . . . . . . . . . . . . . . . . . 20
Especificaciones técnicas /
Accesorios y piezas de repuesto . . . . . . . . . . . 22
Garantía . . . . . . . . . . . . . . . . . . . . . . . . . . . . . 23
¤
Español
Page 50
Información de Seguridad
2
Información de seguridadAntes de usar esta unidad
• A continuación se detallan iconos y señales de advertencia para el uso correcto
y seguro de este producto y para evitar que usted y terceros corran el riesgo
de sufrir perjuicios.
Contenido
Indica situaciones que pueden provocar un riesgo de muerte o lesiones
graves como resultado del uso incorrecto del aparato.
Ejemplo de señales de advertencia
Asegúrese de cumplir con las indicaciones de su médico en cuanto al tipo, dosis y régimen de los medicamentos.
• Sus síntomas pueden empeorar.
Asegúrese de lavar y desinfectar el depósito para el medicamento y la tapa reticulada cuando use la unidad
por primera vez después de comprarla o después de no haberla usado durante mucho tiempo.
(Consulte las páginas 14 a 18).
• Puede haber diversas bacterias presentes que pueden provocar infecciones.
Lave y desinfecte la tapa reticulada, la mascarilla de inhalación, la boquilla y el adaptador de la mascarilla
después de cada uso. (Consulte la página 18)
Asegúrese de secar inmediatamente las piezas ya limpias y desinfectadas, y guárdelas
para que no vuelvan a contaminarse.
• Puede haber diversas bacterias presentes que pueden provocar infecciones.
En el caso de que más de una persona use la unidad, asegúrese de que cada usuario utilice
un depósito para el medicamento, mascarilla pediátrica de inhalación, boquilla y adaptador para
la boquilla desinfectados.
• Los usuarios podrían tener alguna infección.
Mantenga la unidad alejada de bebés y niños.
• Podrían tragar piezas pequeñas tales como la tapa reticulada. La unidad podría sufrir daños o provocar
lesiones a bebés o niños. En caso de que un niño tragase la tapa reticulada, consulte
a un médico inmediatamente.
Señales de advertencia
El icono indica prohibición (aquello que no debe hacerse).
Aquellas situaciones que impliquen prohibiciones propiamente dichas están indicadas
mediante mensajes de texto o imágenes en el icono o en sus inmediaciones .
El icono de la izquierda significa "no desarmar".
El icono indica prohibición (e incluye advertencias y peligros). Aquellas situaciones
que impliquen prohibiciones propiamente dichas están indicadas mediante mensajes
de texto o imágenes en el icono o en sus inmediaciones . El icono de la izquierda
significa "peligro de electrocución".
Indica situaciones que pueden provocar lesiones corporales o daños
materiales* como resultado del uso incorrecto del aparato.
*Daños materiales se refiere a una amplia variedad de daños relacionados
con su hogar, artefactos del hogar, animales domésticos y mascotas.
El icono indica instrucciones importantes (siempre deben seguirse).
Aquellas situaciones que impliquen acciones importantes que se deben realizar
están indicadas mediante mensajes de texto o imágenes en el icono o en sus
inmediaciones . El icono de la izquierda significa "información importante".
Precaución
Advertencia
Precaución
Page 51

Información de seguridad
3
Antes de usar esta unidad Información de seguridad
No enchufe ni desenchufe el transformador de CA con las manos húmedas.
• Podría electrocutarse.
No lave la unidad principal ni el transformador de CA con agua fría ni caliente.
No los sumerja en agua.
• Eso podría dañar la unidad.
No desarme, repare ni modifique la unidad. Esto puede dejar sin efecto la garantía.
Si no va a utilizar la unidad durante un periíodo prolongado, asegúrese
de desconectar el enchufe del tomacorriente.
No utilice soluciones desinfectantes que contengan hipoclorito de sodio.
• La tapa reticulada se oxidará.
Asegúrese de que no caiga medicamento en la unidad principal ni en el
transformador de CA. Si se derramara medicamento en la unidad o transformador
de CA, límpielo inmediatamente con un paño suave.
No deje caer ni ejerza demasiada presión sobre la unidad principal, el transformador
de CA, el depósito para el medicamento ni sobre la tapa reticulada.
Utilice solamente el transformador proporcionado por Omron.
Asegúrese de enchufar el transformador de CA en un tomacorriente de 110 VCA.
Enjuague con abundante agua el desinfectante que pueda haber quedado en las piezas.
Precaución
Advertencia
Page 52

Recomendaciones de seguridad
4
Recomendaciones de seguridadAntes de usar esta unidad
Consejos
Recambie las pilas agotadas por nuevas inmediatamente. No combine diferentes tipos de pilas.
No combine pilas usadas con nuevas. No combine pilas secas con pilas recargables.
Inserte las pilas correctamente para que la unidad pueda funcionar correctamente. Puede utilizar
pilas de níquel-hidrógeno disponibles en el mercado, pero no utilice pilas de níquel-cadmio.
Cargue las pilas recargables con un cargador disponible en el mercado.
(El transformador de CA suministrado con la unidad no puede ser utilizado como cargador de
pilas.) Después de cada uso, lave bien la unidad con la malla y el vibrador para que no queden
restos de medicamento. (Consulte la página 16).
Lave el depósito para el medicamento, la tapa reticulada y el vibrador con agua corriente limpia
o agua destilada disponible en el mercado.
Cuando enjuague el depósito para el medicamento con agua corriente, utilice
un chorro de baja presión.
Arme las partes limpias y desinfectadas después de secarlas bien.
No utilice benceno, diluyente ni gasolina para limpiar la unidad.
No seque en el horno de microondas la unidad principal, el transformador de CA, el depósito
para el medicamento ni la tapa reticulada, ni tampoco los hierva para limpiarlos.
No guarde la unidad en ambientes con altas temperaturas y humedad, ni bajo luz solar directa.
No deje ni transporte agua ni medicamentos cuando el depósito para tal fin esté lleno.
Cuando no vaya a utilizar la unidad por un período de tiempo prolongado (aproximadamente
tres meses o más), quítele las pilas.
Page 53

Antes de usar esta unidad Características del producto
Características del producto
5
(Esta imagen muestra la unidad con la mascarilla de inhalación.)
Para comenzar a realizar una inhalación, se debe
armar la unidad.
Antes de empezar a utilizar la unidad, lea la sección "Cómo armar
la unidad principal" y asegúrese de comprender los pasos
que se deben seguir.
(Consulte las páginas 8 y 9)
1
La unidad de bolsillo puede ser llevada adonde usted vaya.
La unidad es lo suficientemente pequeña como para llevarla o guardarla en un estuche
o cartera y se la puede llevar fácilmente adondequiera que uno vaya. La nueva malla
de aleación de titanio produce un aerosol altamente eficiente.
2
Se puede inhalar utilizando distintos ángulos
La nueva estructura del depósito permite que se pueda realizar una inhalación estable
utilizando distintos ángulos. Por lo tanto, la unidad puede utilizarse incluso en la cama.
3
Cuidados sencillos y fácil uso
La unidad no necesita cuidados complejos. Como cualquier nebulizador tradicional de
tipo de compresión, todo lo que usted debe hacer es retirar el medicamento luego de
inhalar y secar el depósito inmediatamente después de lavarlo.
Page 54

Piezas del producto Controle el producto.
6
Piezas del producto Antes de usar esta unidad
Protector de
la unidad principal
La caja del producto contiene los siguientes componentes. En caso
de que alguno faltara, comuníquese con la tienda donde realizó la
compra o con el representante de OMRON más cercano.
Unidad principal
Depósito para
el medicamento Tapa reticular
(con malla)
Manual de instrucciones
calidad)
Estuche
Adaptador para
la mascarilla
Boquilla
Mascarilla pediátrica
9921(opcional)
Video de instrucciones
calidad)
Page 55

Antes de usar esta unidad Nombres y funciones de las piezas
Nombres y funciones de las piezas
7
Protector de la
unidad principal
Sirve para guardar
la unidad principal.
Botón para encender
Enciende y apaga la
unidad con sólo pulsar
un botón.
Tapa reticulada
Cuenta con una malla de aleación
para nebulizaciones.
- Manipule la malla con cuidado,
pues es muy delicada.
Palanca de traba de la tapa del depósito
para el medicamento
Abre la tapa del depósito para lavar dicha
tapa. No abra la tapa del depósito para
el medicamento excepto para lavarlo.
Depósito para el medicamento
Depósito para el medicamento
Enchufe
Base de fijación de la unidad principal
Transformador de CA incluido
Banda para el cable
Base de conexión del transformador de CA
Indicador de pilas
descargadas
Una luz anaranjada
titila cuando las pilas
están agotadas.
Electrodo
Suministra energía desde la
unidad principal al vibrador
del depósito para el medicamento.
Orificio para el medicamento
Para cargar medicamentos, abra
la tapa reticulada.
Parte inferior de la unidad principal
Indicador de encendido
Cuando la unidad está en funcionamiento,
se enciende una luz verde.
Palanca para desenganchar
la tapa del compartimiento
de las pilas
Enchufe hembra en la
unidad principal para el
transformador de CA
Transformador de CA (Opcional)
®
Page 56

Cómo armar la unidad principal
8
Cómo armar la unidad principalAntes de usar esta unidad
Esta unidad debe armarse antes de su uso.
Las piezas encajan herméticamente, pues están diseñadas para impedir que el
medicamento se filtre. Lave y desinfecte todas las piezas desmontables antes de
utilizar la unidad. Arme la unidad después de lavar, desinfectar y secar sus piezas.
(Para desinfectar la unidad, consulte la página 18)
2 Conecte el depósito para el medicamento a la unidad principal.
Coloque la
tapa reticulada
de arriba
hacia abajo.
Alinee ambos
electrodos entre sí.
No abra la tapa
del depósito.
El armado ha
finalizado.
Click
Consejos
• Sostenga firmemente la unidad con ambas manos.
• Coloque las piezas correctamente. (Durante la instalación, puede escuchar
"clics" en algunas de las piezas.)
1 Coloque la tapa reticulada en el depósito para el medicamento.
Ciérrela bien.
El armado ha
finalizado.
Page 57

Cómo armar la unidad principal
9
Antes de usar esta unidad Cómo armar la unidad principal
3 Conecte el adaptador para mascarilla a la unidad principal.
Si no va a utilizar la unidad inmediatamente después de armarla,
desármela (como lo muestra la figura de la derecha)
y guárdela en el estuche provisto o en un lugar limpio.
(Para saber cómo usar correctamente la unidad, consulte la página 15)
El armado ha
finalizado.
El armado ha
finalizado.
El armado ha
finalizado.
Ya terminó de armar la unidad principal.
4 Coloque la mascarilla pediátrica de inhalación o la boquilla
en el adaptador para la mascarilla.
•
Cómo colocar la mascarilla pediátrica
de inhalación
• Cómo colocar la boquilla
Page 58

Cómo utilizar la fuente de alimentación
10
Cómo utilizar la fuente de alimentación
Cómo colocar las pilas
Las pilas no se suministran con la unidad. Utilice dos pilas "AA" alcalinas o de níquel-hidrógeno
de las disponibles en el mercado.
1 Retire la tapa del compartimiento de las pilas.
(1) Gire un poco la palanca para desenganchar la tapa de las
pilas en la dirección que indica la flecha.
(2) Retire la tapa.
• La primera vez que intenta retirar la tapa del compartimiento de las pilas puede resultarle difícil,
pues está diseñada para impedir que entre agua a la unidad.
2 Coloque las pilas correctamente haciendo coincidir las
polaridades (+ y -) con los símbolos correspondientes.
Parte inferior
de la unidad
principal
• Si esta unidad se guarda con pilas recargables o comunes en su interior, éstas pueden
producir derrames y dañar la unidad. Si no va a utilizar la unidad durante un periodo prolongado
(más de tres meses), retire las pilas.
• No combine pilas nuevas y usadas, ni pilas de diferentes tipos (tales como pilas recargables y pilas comunes).
• Siga las disposiciones locales para desechar las pilas usadas.
Pilas
Al utilizar pilas de níquel-hidrógeno
- Puede utilizar pilas de níquel-hidrógeno
(pilas recargables).
La utilización del cargador adecuado para las
pilas que utiliza le permite ahorrar dinero,
ya que podrá recargarlas una y otra vez.
La unidad se puede utilizar durante
aproximadamente 8 días
(si se la usa durante 30 minutos por día cuando
las pilas tienen carga completa).
• El indicador de pilas descargadas (anaranjado) titila.
→ Las pilas recargables carecen de energía
residual. Debido a que la unidad no puede
nebulizar, recargue inmediatamente las pilas
con un cargador disponible en el mercado.
• El transformador de CA suministrado no funciona
como cargador de pilas.
Utilice un cargador de pilas disponible
en el mercado para tal fin.
Duración y recambio de las pilas
Al utilizar pilas alcalinas
La unidad se puede utilizar durante
aproximadamente 8 días (si se la
usa durante 30 minutos por día.)
• El indicador de pilas descargadas
(anaranjado) titila.
→ Las pilas tienen poca carga. Recámbielas
por otras nuevas.
• El indicador de pilas descargadas
(anaranjado) se enciende.
→ Las pilas están agotadas. Debido a que la
unidad no podrá nebulizar, reemplace
inmediatamente ambas pilas
por otras nuevas.
3 Coloque la tapa del compartimiento de las pilas.
Coloque la tapa en el compartimiento de las pilas. Presióne la tapa hasta
que enganche la traba y haga clic. Presione firmemente ambos extremos.
• Tal vez le resulte difícil presionarla hasta el tope debido a que la unidad está diseñada para
impedir que le entre agua.
Uso correcto de la unidad
2
1
Page 59
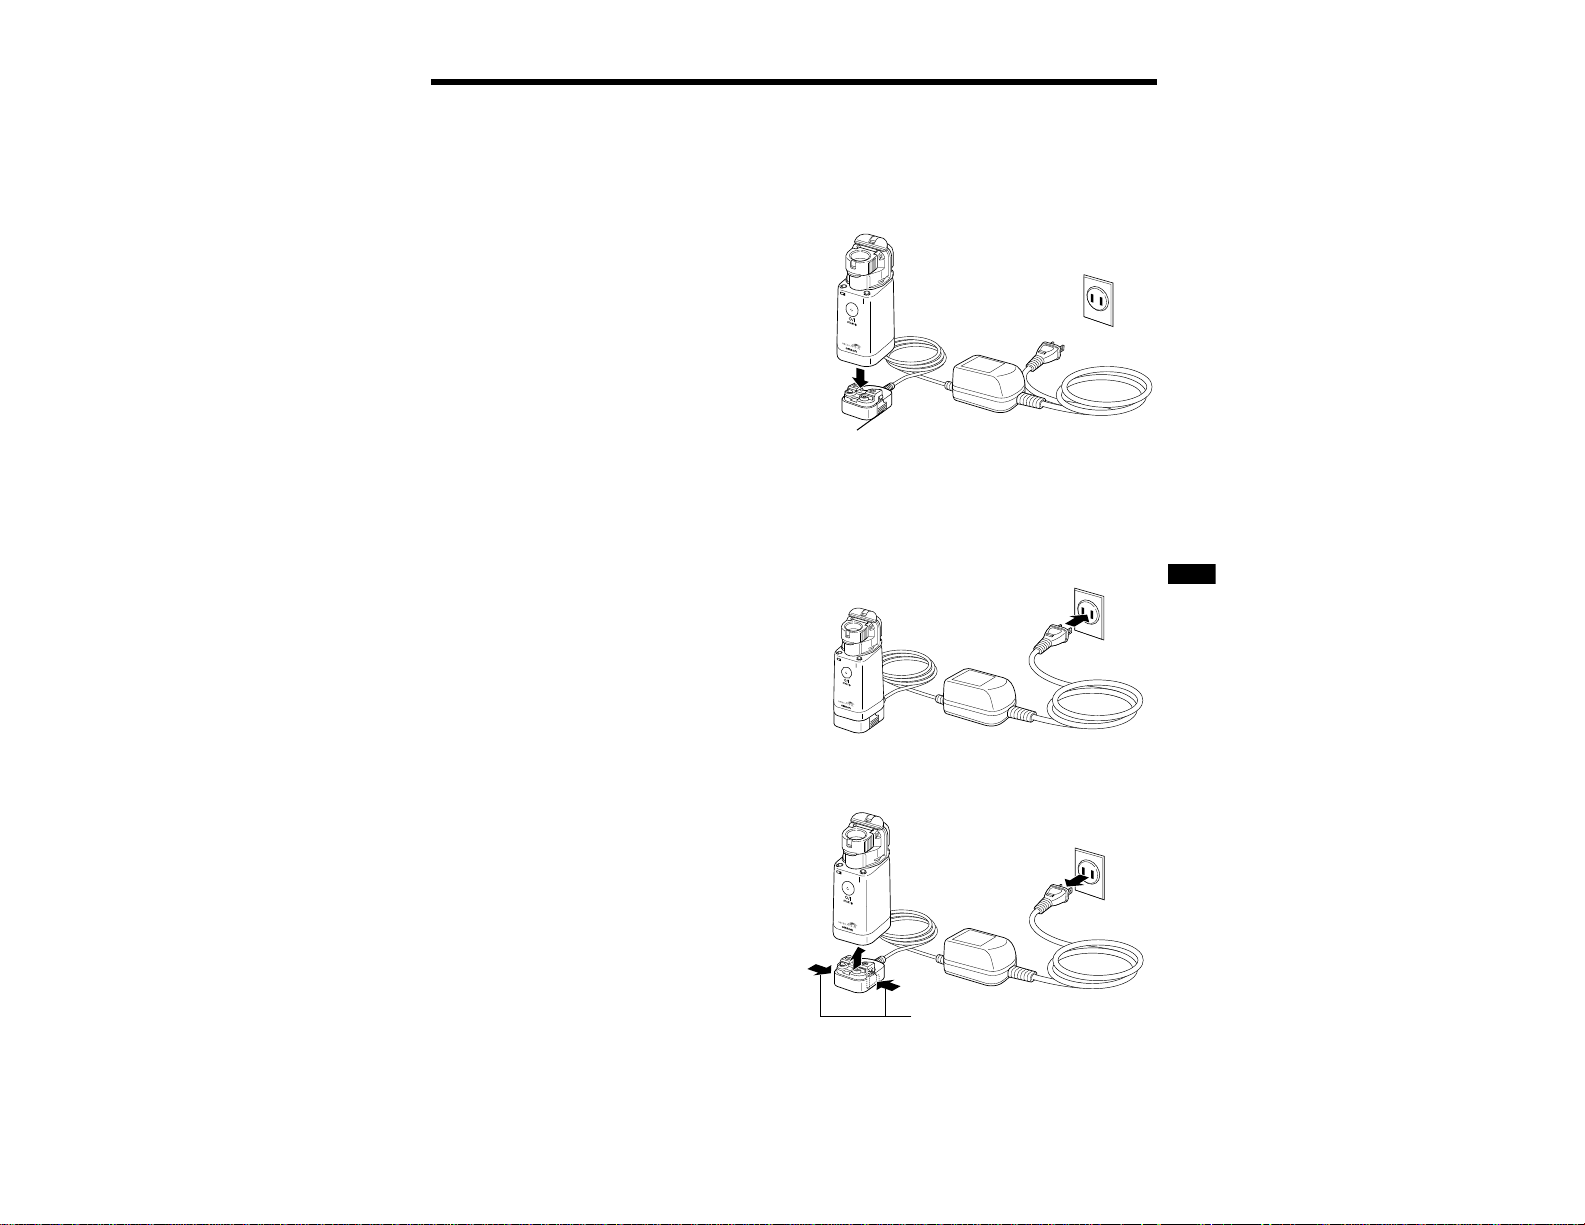
Cómo preparar la unidad antes de usarla
11
Uso correcto de la unidad Cómo preparar la fuente de alimentación
Cómo utilizar el transformador de CA (opcional)
Utilice el transformador de CA en algún lugar donde haya una toma de corriente eléctrica.
Tenga en cuenta, sin embargo, que este transformador no es un cargador de pilas.
1 Coloque la unidad principal en la base de conexión del transformador de CA
según se muestra a continuación.
Cómo sacar el transformador de CA de la unidad principal
(1) Desenchufe la unidad del tomacorriente.
(2) Para liberar la unidad principal, presione sobre
ambos lados de la base de sujeción de la unidad
principal ubicada en la base de conexión del
transformador de CA.
(3) Retire la unidad principal.
(1) Desenchufe
(3) Retire
(2) Presione ambos lados
La conexión ha finalizado.
Base de fijación de la unidad principal
Nota: hará clic y quedará enganchada con la base.
2 Conecte el enchufe del transformador de CA al tomacorriente.
Page 60

Cómo llenar el depósito
para el medicamento
12
Cómo llenar el depósito para el medicamentoUso correcto de la unidad
¿Ha retirado el adaptador para la mascarilla y la boquilla suministradas?
(Para armar la unidad principal, consulte la página 8)
1 Retire el depósito para
el medicamento
de la unidad principal.
3 Llene el depósito para el medicamento.
Llene el depósito para el medicamento con
cuidado (como se muestra en la figura) para que
la tapa reticulada no se cierre.
- La capacidad máxima del depósito para
el medicamento es de 7 ml.
4 Cierre la tapa reticulada.
- Asegúrese de que la tapa
esté trabada. De lo contrario,
el medicamento se filtrará.
Click
Presione las pestañas grises
ubicadas a ambos lados del
depósito para el medicamento
y al mismo tiempo tire hacia arriba.
Controle que la
tapa reticulada esté
cerrada.
No abra la tapa
del depósito.
Levante la tapa
reticulada mientras
presiona firmemente
el borde con el pulgar.
2 Abra la tapa reticulada.
Sostenga el depósito para el
medicamento como si lo cubriera
con la mano.
Page 61

Cómo llenar el depósito para el medicamento
13
Uso correcto de la unidad Cómo llenar el depósito para el medicamento
5 Conecte el depósito para el medicamento
a la unidad principal.
Si no se lo coloca correctamente, el nebulizador no
se encenderá. Si los electrodos de la unidad principal
están demasiado manchados, la unidad no nebulizará
normalmente. En tal caso, quite las manchas.
(Consulte la página 17)
Click
Alinee ambos
electrodos entre sí.
El armado
ha finalizado.
El armado
ha finalizado.
• Cómo conectar la mascarilla pediátrica
de inhalación
7 Conecte la boquilla o la mascarilla pediátrica de inhalación.
• Cómo colocar la boquilla
6 Coloque el adaptador para
mascarilla o boquilla.
El armado
ha finalizado.
Page 62

Cómo seleccionar el modo
de nebulización
14
Cómo seleccionar el modo de nebulizaciónUso correcto de la unidad
La unidad se puede utilizar en modo de nebulización continuo o manual.
Durante la nebulización se encenderá el indicador de encendido (luz verde).
Pulse el botón y levante
el dedo inmediatamente
(en 1 segundo).
Mantenga presionado
el botón (durante
aproximadamente
2 segundos o más).
Modo manual de nebulización
Al mantener pulsado el botón (aproximadamente
durante 2 segundos o más), la unidad funciona en modo
manual de nebulización. La unidad nebuliza sólo
mientras el botón se mantiene presionado. Puede
inhalar según lo necesite.
Modo continuo de nebulización
Al pulsar el botón y liberarlo inmediatamente
(durante aproximadamente 1 segundo), la unidad
funciona en modo continuo de nebulización.
Al volver a presionar el botón, la unidad deja de nebulizar.
Page 63

Cómo inhalar
15
Uso correcto de la unidad Cómo inhalar
1 Sostenga la unidad principal con la
mano y comience a inhalar en una
posición relajada.
Incline levemente la unidad principal
(con el lado que tiene el botón) hacia usted.
• Sumerja el vibrador en el medicamento. Si no está
sumergido, la unidad no nebulizará.
Medicamento
Precaución
No deje caer ni ejerza demasiada presión sobre
la unidad principal, el depósito para el
medicamento ni la tapa reticulada.
• La unidad podría dañarse y no funcionar.
• Si se acumula saliva o medicamento en el electrodo
de la unidad principal o en la malla de la tapa, la
unidad dejará de nebulizar. En tal caso, apague la
unidad y absorba el medicamento o la saliva con
un pañuelo de papel o paño suave.
2 Cuando haya terminado de inhalar,
pulse el botón para apagar la unidad.
•La unidad posee un temporizador incorporado
para apagarse aproximadamente a los 30 minutos
de haberse encendido.
•Si utiliza un transformador de CA, desconecte
el enchufe del tomacorriente. (Consulte la página 11)
Page 64

Cuidado de la unidad después de su uso
16
Cuidado de la unidad después de su usoUso correcto de la unidad
Asegúrese de lavar y guardar la unidad después de usarla.
Si no la lava después de una inhalación, el medicamento se seca y se adhiere, y la unidad puede no
funcionar. En ese caso, desinfecte la tapa reticulada y elimine el medicamento seco.
(Consulte la página 18)
Desenganche la
palanca de sujeción
de la tapa del
depósito para
el medicamento
y abra la tapa.
3 Lave todas las piezas.
Lave con agua la boquilla o la mascarilla de inhalación,
el adaptador para la mascarilla y el depósito
para el medicamento.
Consejos
No utilice un chorro demasiado potente de agua para lavar
el depósito o la tapa reticulada.
• Esto puede dañarlos.
4 Seque bien todas las piezas.
Inmediatamente después de lavarlas, elimine el exceso de
agua con un paño seco y deje secar al aire. Retire la tapa
reticulada del depósito para el medicamento y póngala
a secar. (Consulte la página 8).
No toque la malla con la mano.
Elimine el
medicamento
residual.
1 Retire las piezas de la unidad principal.
Separe de la unidad principal la boquilla o mascarilla pediátrica, el adaptador para la mascarilla
y el depósito para el medicamento. Para armar la unidad principal, consulte las páginas 8 y 9).
2 Elimine el medicamento residual.
Page 65

Cuidado de la unidad después de su uso
17
Uso correcto de la unidad Cuidado de la unidad después de su uso
5 Después de armar la unidad, guárdela en un lugar limpio.
Advertencia
Lave y desinfecte el depósito para medicamento, la mascarilla de inhalación,
la boquilla y el adaptador de la mascarilla cada vez que los use. (Consulte la página 16)
Asegúrese de secar inmediatamente las piezas ya limpias y desinfectadas, y guárdelas
para que no vuelvan a contaminarse.
Cuando la unidad principal esté sucia
Consejos
No deje ni transporte agua ni medicamentos cuando el depósito para tal fin esté lleno.
• El medicamento puede gotear o derramarse y dañar la unidad principal.
No guarde la unidad en ambientes con altas temperaturas y humedad,
ni bajo luz solar directa.
Banda para el cable
Con un paño suave, elimine las manchas de la unidad principal. Si la unidad
principal está muy sucia, límpiela con un paño suave humedecido con agua
o detergente y bien escurrido. Luego séquela bien con un paño suave y seco.
Consejos
• No limpie la unidad principal con productos químicos volátiles tales como
el benceno o diluyentes.
• No sumerja la unidad principal en agua.
Cómo transportar la unidad
• Puede guardar la boquilla y la mascarilla de inhalación en el estuche para llevarlas
junto con la unidad.
•Para transportar la unidad principal, cúbrala con la funda.
• No guarde el transformador de CA en el estuche junto con la unidad principal.
Ésta puede rayarse.
Enrolle el cable del transformador de CA y, con la banda para el cable,
asegúrelo a la unidad principal del transformador.
Page 66

Cómo desinfectar
18
Cómo desinfectarCómo desinfectar la unidad
El nebulizador Micro-Air®puede limpiarse y desinfectarse con facilidad, pues el
depósito para el medicamento y la tapa reticulada pueden desconectarse de la unidad
principal. La unidad puede desinfectarse con cloruro de benzalconio.
1 Prepare una solución diluida al 0,1% de cloruro de benzalconio y, durante 10
minutos, sumerja en ella al depósito para el medicamento y la tapa reticulada.
2 Retire a ambos de la solución y enjuáguelos con agua.
3 Elimine el agua residual para lograr un secado más rápido.
4 Si utiliza productos de limpieza comerciales, siga las
instrucciones del fabricante.
Precaución
No utilice soluciones desinfectantes que contengan hipoclorito de sodio.
• Si la unidad se oxida, puede dañarse.
5 Se pueden desinfectar las siguientes piezas:
• Depósito para el medicamento
• Tapa reticulada
• Mascarilla
• Boquilla
• Adaptador para la boquill
a
Page 67

Cómo reemplazar la tapa reticulada
19
Cómo desinfectar Cómo reemplazar la tapa reticulada
1 Abra la tapa reticulada.
2 Retire la tapa reticulada del
depósito para el medicamento.
3 Coloque una nueva tapa reticulada.
Normalmente, puede utilizar una tapa reticulada durante aproximadamente 1 año (según los
resultados de las pruebas realizadas por OMRON). Sin embargo, esto puede variar según el tipo
de medicamentos y el uso y cuidado individuales. En algunos casos, la unidad puede ser
incapaz de nebulizar o puede no nebulizar correctamente, incluso después de una desinfección.
Si la unidad no nebuliza o lo hace en forma deficiente, incluso luego de haber
limpiado la tapa reticulada,
compre una nueva tapa a su representante Omron más cercano o donde adquirió su unidad.
El número de pieza es U22-4.
Levante la tapa reticulada
mientras presiona
firmemente el borde
con el pulgar.
Coloque una nueva
tapa reticulada de
arriba hacia abajo.
Ciérrela bien.
Levante la tapa
reticulada.
Page 68

Solución de problemas
20
Solución de problemasSolución de problemas
Si surge algún problema mientras utiliza la unidad, verifique la siguiente información antes de llamar.
La velocidad de nebulización es extremadamente baja o la unidad
no nebuliza en absoluto.
Qué revisar Cómo corregirlo
¿El indicador de pilas descargadas está
encendido?
¿La malla está sucia?
Recambie las pilas por otras nuevas.
(Consulte la página 10)
Qué revisar
¿Las pilas están agotadas?
¿El transformador de CA está bien enchufado
en el tomacorriente y en el puerto de
conexión de la unidad principal?
¿La capacidad del cargador de pilas
recargables (de níquel-hidrógeno) es baja?
¿El depósito para el medicamento
está colocado correctamente
en launidad principal?
Recambie las pilas por otras nuevas.
(Consulte la página 10)
Colóquelo correctamente.
(Consulte la página 11)
Cargue las pilas con un cargador disponible
en el mercado o reemplácelas por unas nuevas.
Colóquelo correctamente.
(Consulte la página 13)
El indicador de encendido no se prende y la unidad no nebuliza.
Limpie la tapa reticulada por desinfectar a fin
de eliminar todas las manchas.
(Consulte la página 18)
• Si el problema no se corrige con los
procedimientos antes descriptos, reemplace
la tapa reticulada por una nueva.
(Consulte la página 19)
¿Las polaridades de las pilas comunes
o recargables están colocadas incorrectamente?
Inserte las pilas (comunes o recargables)
siguiendo la alineación correcta.
(Consulte la página 10)
Cómo corregirlo
Limpie el casquillo del acoplamiento
desinfectando para quitar cualquier mancha.
Page 69

Solución de problemas
21
Solución de problemas Solución de problemas
El indicador de encendido está prendido, pero la unidad no nebuliza.
Qué revisar Cómo corregirlo
¿El depósito de medicamento está lleno?
¿La malla está rota, manchada
o demasiado sucia?
¿Hay agua o medicamento acumulados en el
electrodo de la unidad principal?
Llene con medicamento.
(Consulte la página 12)
Limpie la tapa reticulada por desinfectar .
(Consulte la página 18)
• Si la unidad no nebuliza incluso luego de
haber realizado los procedimientos antes
descriptos, o si la malla está rota, reemplace
la tapa reticulada por una nueva.
(Consulte la página 19)
Limpie las manchas. (Consulte la página 17)
¿Se ha colocado medicamento en el
depósito para tal fin?
(¿El medicamento está en contacto con el
vibrador?)
Utilice la unidad inclinando levemente la
unidad principal (con el lado que tiene el
botón) hacia usted.
(Consulte la página 15)
Absorba el medicamento o el agua con
un paño suave.
(Consulte la página 15)
¿El electrodo de la unidad principal está
manchado?
Page 70

Especificaciones técnicas
22
Accesorios y piezas de repuesto
Especificaciones técnicas
Accesorios y piezas de repuesto
9921 Mascarilla pediátrica para inhalaciones con
cordón de caucho
(La mascarilla y el cordón son opcionales)
U22-3 Depósito para el
medicamento
U22-5 transformador de CA
(accesorios opcionales)
U22-7 Estuche
U22-4 Tapa
reticulada
U22-2
Adaptador
para mascarilla
U22-1
Boquilla
Para saber dónde comprar repuestos y accesorios, comuníquese con la tienda donde adquirió
la unidad o bien con el representante de OMRON más cercano.
Nombre del producto: Nebulizador vibrador con malla OMRON Micro-Air
®
Modelo: NE-U22V
Alimentación: 110 VCA y 50/60 Hz (utilizando un transformador de CA)
3 VCC (dos pilas alcalinas "AA")
2,4 VCC (dos pilas "AA" de níquel-hidrógeno)
Consumo de energía: Aproximadamente 1,5 W*
Frecuencia de vibracion: Aproximadamente 180 kHz
Velocidad de nebulización: 0,4 a 0.5 mL/min promedio*
Tamaño de partículas: DMMA aproximadamente 5µm*
(1 a 5 µm para el 80% de la distribución total de partículas
en el volumen)
(Medido por OMRON según CEN/TC215)
Capacidad del
Máximo de 7 mL
depósito para el medicamento
Dimensiones externas: 38 mm (ancho) x 104 mm (alto) x 51 mm (profundidad)
Peso: Aproximadamente 97 g (sin las pilas)
Duración de las pilas: Aproximadamente 4 horas de funcionamiento continuo*
Aproximadamente 8 días si se utiliza durante 30 minutos por día
(si se usan pilas alcalinas)
Temperatura y humedad
de funcionamiento:
10 a 40°C (No dejar que se forme hielo.) 30 a 85% de HR
Accesorios: Mascarilla pediátrica, boquilla, adaptador para mascarilla, estuche,
transformador de CA, manual de instrucciones
* Cuando se utiliza solución salina fisiológica. Estas cifras pueden variar según el medicamento que se utilice.
Las especificaciones técnicas y la presentación pueden estar sujetas a cambios sin previo aviso.
Especificaciones técnicas
Page 71

Garantía
23
Garantía Garantía
Su Nebulizador NE-U22V Omron está garantizado contra defectos de material y mano de obra por
un periodo de 2 años a partir de la fecha de compra. La presente garantía sólo se extiende al comprador
original. Esta garantía no cubre fallas ocasionadas por el uso incorrecto o negligente, alteración del
Sistema Nebulizador Omron, utilización de componentes inadecuados o incumplimiento de las
instrucciones de uso. La garantía por 2 años no incluye a la tapa reticulada ni a los accesorios.
Para presentar un reclamo conforme a la garantía en los EE.UU., envíe su Sistema Nebulizador
Omron, con flete y seguro pagados por anticipado (o asuma el riesgo de pérdida o daño durante el
envío) a Omron Healthcare, Inc., 300 Lak
eview Parkway, Vernon Hills, IL 60061, Attention: Service
Department. Toda solicitud de servicio de garantía deberá incluir el número de modelo de su Sistema
Nebulizador Omron, comprobante de compra (debe incluir la fecha de compra), número de teléfono
de quien presenta el reclamo y la naturaleza del servicio que se solicita. Omron reparará o cambiará
(a criterio de Omron) sin cargo cualquier pieza necesaria para corregir defectos de los materiales
o mano de obra cubiertos por esta garantía limitada. Para los clientes Fuera de los EE.UU., por favor
comuníquese con el distribuidor autorizado en du país.
Esta garantía limitada reemplaza toda otra garantía oral, escrita, explícita a o implícita.
Se excluyen otras garantías tales como las de comercialización o de adecuación para una
finalidad determinada, excepto aquellas garantías implícitas que surjan de pleno derecho y que están
limitadas al término de 2 años de la presente garantía. La responsabilidad de Omron, ya sea originada
por contratos, ilícitos civiles, responsabilidad objetiva, garantía o cualquier otra teoría, no superará
el precio del equipo nebulizador Omron individual que constituye la base del reclamo. Bajo ninguna
circunstancia, Omron será considerado responsable de ninguna pérdida de ganancias, instalaciones,
equipos u otros daños incidentales, indirectos o derivados de circunstancias especiales. En algunos
estados no se permiten limitaciones en cuanto a la duración de una garantía implícita ni la exclusión
ni limitación de la duración de una garantía implícita, ni se permite la exclusión ni limitación de daños
incidentales, indirectos o derivados de circunstancias especiales, y por lo tanto en dicho caso las
limitaciones o exclusiones antes mencionadas pueden no corresponder a su caso.
La presente garantía le otorga derechos legales específicos y, además, usted puede gozar de otros
derechos que varían según el estado de residencia.
Número telefónico gratuito de servicio al cliente
(para EE.UU. solamente): 1-800-634-4350
Page 72

Distribuido por:
OMRON HEALTHCARE, INC.
300 Lakeview Parkway Vernon Hills, Illinois
60061 Número telefónico gratuito
(para EE.UU. solamente): 1-800-634-4350
www.omronhealthcare.com
Copyright © 2002 Omron Healthcare, Inc.
NEU22VINST Rev
 Loading...