

Page 1
Professional Blood Pressure Monitor
HBP-1100-EAM06120810.pdf
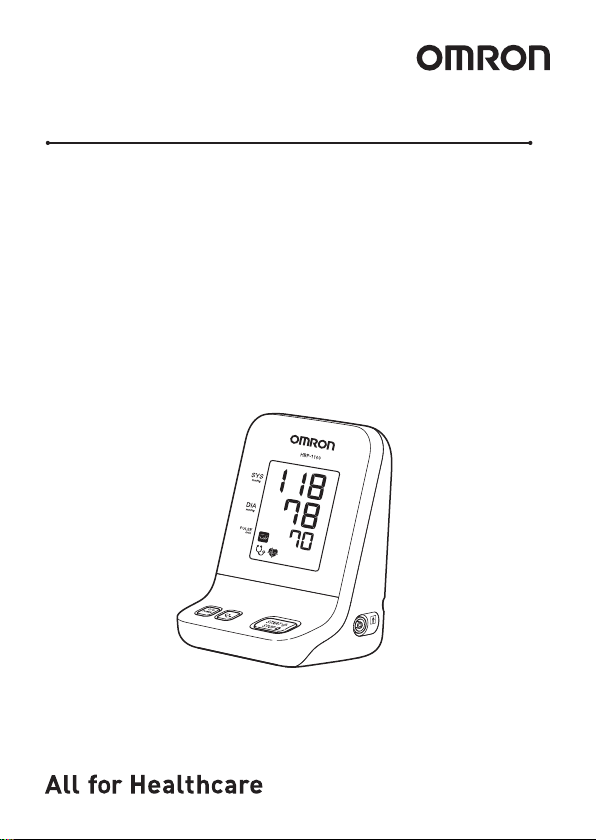
HBP-1100
Instruction Manual
Thank you for purchasing this OMRON Professional Blood
Pressure Monitor.
Please completely read this Instruction Manual before using the
monitor for the first time.
Read this manual to ensure the safe and accurate use of the
monitor.
XXXXXXX-X A
Page 2

Exemptions
OMRON will not bear any responsibilities on the following matters.
1. When a problem or damage occurs caused by the maintenance and/
or repair conducted by a person other than OMRON or the dealer
specified by OMRON
2. The problem or damage of OMRON product caused by the product of
other manufacturer not delivered by OMRON
3. The problem and damage caused by the maintenance and/or repair
using the repair parts not specified by OMRON
4. The problem and damage caused by the results not observing the
Notes on Safety or the operational method mentioned in this
Instruction Manual
5. Under the circumstances not within the operating conditions of this
unit including the power source or the setting environment mentioned
in this Instruction Manual
6. The problem and damage caused by the result(s) of remodeling or
improper repair of this product
7. The problem and damage caused by act of god such as fire,
earthquake, flood, or lightning
1. The contents of this Instruction Manual may be changed without prior
notice.
2. We have thoroughly reviewed the contents of this Instruction Manual.
However, if an inadequate description or error is found, please let us
know.
3. It is prohibited to copy a part of or the entire Instruction Manual without
getting OMRON’s permission. Unless this Instruction Manual is used
by an individual (company), it cannot be used without getting
OMRON’s permission from the standpoint of the Copyright Law.
Page 3

Table of Contents
Introduction
Intended Use ................................................................................2
Features of the Product ................................................................2
Notes on Safety............................................................................3
Using the Unit
Components of the Product..........................................................10
Features / Functions of Unit .........................................................11
Installing the Batteries ..................................................................13
Connecting the AC Adapter..........................................................13
Cuff Selection and Connection .....................................................14
Applying the Cuff to the Patient ....................................................15
Zero indicator function ..................................................................17
Non-Invasive Blood Pressure (NIBP) Measurement
Measurement in normal mode......................................................18
Measurement in auscultation mode..............................................20
Stopping the Measurement ..........................................................21
Non-Invasive Pressure Measurement Principles..........................22
Maintenance
Maintenance Inspection and Safety Management .......................23
Device Maintenance .....................................................................23
Accessory Care ............................................................................23
Managing Supplies .......................................................................23
Check before Use.........................................................................24
Checking pressure accuracy ........................................................25
Troubleshooting............................................................................26
List of Error Codes .......................................................................29
Disposal........................................................................................31
Specifications
Specifications ...............................................................................32
Manufacturer's Declaration...........................................................36
Optional Accessories
Optional Medical Accessories ......................................................40
1
Page 4

Introduction
Intended Use
Medical Purpose
The device is a digital monitor intended for use in measuring blood
pressure and pulse rate in adult and pediatric patient population with arm
circumference ranging from 12 cm to 50 cm (from 5 inches to 20 inches).
Intended User
This device should be used by a medical professional.
Patient Population
This device is intended for use on adults and children of age 3-years and
older.
Environment
The instrument is designed for use in physicians' offices, hospitals, clinics
and other medical facilities.
Measurement Parameter
■
Non-Invasive Blood Pressure
■
Pulse rate
Precautions for Use
Warnings and cautions described in the instruction manual should be observed
at all times.
Features of the Product
The blood pressure accuracy of the HBP-1100 is clinically proven. Easy to
use, the HBP-1100 is intended for use by medical professionals.
■
Zero indicator function (page 14): Before each measurement, this device
indicates that "zero calibration" was successful.
■
Auscultation mode
■
5 cuffs available - (XL: 42 to 50 cm, L: 32 to 42 cm, M: 22 to 32 cm, S: 17
to 22 cm, SS: 12 to 18 cm)
■
This device and cuff can be cleaned with a soft cloth moistened with
alcohol.
■
Compact, can be stored in a drawer
■
Motion stop function: When body movement is detected, this device
stops deflation for 5 seconds.
■
Irregular pulse icon: Helps identify changes in heart rate, rhythm, and
pulse that may be caused by heart disease or other serious health
problems.
2
Page 5
Notes on Safety
The warning signs and symbol examples indicated below are intended to
ensure safe use of the product and prevent damage and injury to you and
others. The signs and symbols are explained below.
Safety Symbols used in this Instruction Manual
Warning
Caution
Indicates the matters in which death or severe bodily
damage may arise as a result of incorrect handling.
Indicates the matters in which bodily harm or material
damage may arise as a result of incorrect handling.
General Information
Note:
Indicates general information to keep in mind when using the unit and
other useful information.
Setup
Warning
• Do not use the cuff or AC adapter to lift the unit, it can also cause the unit
to malfunction.
• If the unit has broken down, contact your local OMRON representative.
• Do not use in combination with a hyperbaric oxygen therapy device, or in
an environment where combustible gas may be generated.
• Do not use in combination with magnetic resonance imaging (MRI)
equipment. If MRI is to be performed, remove cuff connected to the unit
from the patient.
• Do not use with a defibrillator.
• Do not install the unit in the following locations:
- Locations subject to vibration such as ambulances and emergency
helicopters.
- A location where there is gas or flame.
- A location where there is water or steam.
- A location where chemicals are stored.
• Do not use at extremely high temperature, high humidity, or high altitude.
Use only within the required ambient conditions.
• Do not subject the unit to intense shock.
• Do not place heavy objects on the AC adapter cable, or allow the unit to
sit on the cord.
• Clinical testing has not been conducted on newborn infants and pregnant
women. Do not use on newborn infants and pregnant women.
• Do not plug in or unplug the AC adapter with wet hands.
3
Page 6

Caution
• Do not install the unit in the following locations:
- Locations with dust, salt, or sulfur.
- Locations directly exposed to sunlight for extended periods of time (in
particular, do not leave in direct sunlight or near a source of ultraviolet
light for extended periods, as ultraviolet light will cause deterioration of
the LCD).
- Locations subject to vibration or shock.
- Near heaters.
• Do not use the unit near large equipment that uses a switching relay for
power ON/OFF.
Before use / during use
Warning
• The unit complies with the EMC standard (IEC60601-1-2). As such, it
can be used simultaneously with multiple medical instruments. However,
if instruments that generate noise such as an electric scalpel or a
microwave therapy device are near the unit, check the operation of the
unit during and after use of these instruments.
• If an error occurs or a measurement result is questionable, check the
vital signs of the patient by auscultation or palpation. Avoid relying solely
on the measurement results of the unit when judging the patient's
condition.
• Only trained healthcare providers should use this device. Do not allow
patients to operate this device.
• Properly connect the connectors and AC adapter cable.
• Do not place objects or liquids on top of this unit.
• Check the following before using the unit:
- Make sure the AC adapter cable is not damaged (wires are not
exposed or broken), and the connections are firm.
• For the AC adapter connected to the unit, supplies, and optional devices,
use only the standard accessories or OMRON-specified products.
• Do not use in a location with moisture, or a location where water may
splash on the unit.
This unit is intended for use in a physician's office.
• Do not use the unit if it emits smoke, an abnormal odor, or abnormal
noise.
• Do not bring cellular telephones or transceivers into the room where the
unit is installed or being used.
• Do not connect multiple monitors to the same patient.
• Do not connect the unit to a power outlet that is controlled by a wall
switch.
4
Page 7

Caution
• Before using the unit, verify that none of the following apply to the
patient:
- Poor peripheral circulation, noticeably low blood pressure, or low body
temperature (there will be low blood flow to the measurement position)
- The patient uses an artificial heart and lung (there will be no pulse)
-An SpO
- The patient has an aneurysm
- The patient has frequent arrhythmia
- Body motions such as convulsions, arterial pulsations, or trembling
(cardiac massage in progress, minute continuous vibrations,
rheumatism, etc.)
• Before use, visually inspect the unit to make sure there are no
deformations due to falling, and that there is no dirt or moisture on the
unit.
• When the unit has not been used for an extended period of time, always
verify that it operates normally and safely before use.
• Do not use in a location where the unit may easily fall. In the event that
the unit falls, verify that it operates normally and safely.
sensor and the cuff are attached to the same arm
2
5
Page 8

Cleaning
Warning
• When cleaning the unit, turn off the power and disconnect the AC
adapter from the unit.
• After cleaning the unit, make sure it is completely dry before connecting
to a power outlet.
• Do not spray, pour, or spill liquids into or onto the unit, accessories,
connectors, buttons, or openings in the housing.
Caution
• Do not use thinner, benzene, or other solvents to clean the unit.
• Do not sterilize by autoclave or gas sterilization (EOG, formaldehyde gas,
high-concentration ozone, etc.).
• If using an antiseptic solution for cleaning, follow the instructions of the
manufacturer.
• Clean the unit regularly.
Maintenance and inspection
Warning
• To use the unity safely and correctly, always inspect the unit when starting work.
• Unauthorized modification is prohibited by law. Do not attempt to disassemble or modify the unit.
6
Page 9

Dry cell battery
Warning
• If battery fluid comes in contact with the eye, immediately flush with
copious amounts of water. Do not rub. Seek medical attention
immediately.
• Do not throw into flame, disassemble, or heat.
• Always disconnect the AC adapter from the unit before removing or
installing a battery.
• If the unit will not be used for a month or longer, remove the battery from
the unit and store.
• Do not attempt to disassemble or modify the battery.
• Do not apply pressure to and deform the battery. Do not throw, pound,
drop, bend, or hit the battery.
• The battery has positive/negative polarity. Do not insert batteries with
their polarities reversed.
• Do not connect the positive and negative terminals of the battery with a
wire or other metal object.
• Do not use the AC adapter and battery at the same time.
Caution
• If battery fluid comes in contact with skin or clothing, rinse immediately
with water.
• Do not use new and old batteries together, or use different types of
batteries together.
Non-Invasive Blood Pressure (NIBP) measurement
Warning
• If a cuff is used on a patient with an infection, treat the cuff as medical
waste, or sterilize before reuse.
• If frequently performing NIBP measurement using a cuff over an extended
period of time, periodically check the patient's circulation. In addition,
wrap the cuff as indicated in the cautionary points in this manual.
• Do not connect the NIBP cuff or cuff joint to a luer lock adapter.
• Do not bend cuff tube during inflation and deflation, particularly after a
change of body position.
• Do not wrap the cuff on the following parts:
- An upper arm on which intravenous drip or a blood transfusion is being
performed.
- An upper arm on which SpO
is attached.
- An upper arm with a shunt for hemodialysis
• If measuring blood pressure with the cuff wrapped on the arm on the side
of the body where a mastectomy was performed, check the patient's
condition.
sensor, IBP catheter, or other instrument
2
7
Page 10

Caution
• NIBP measurement should be performed on the upper arm.
• During NIBP, stop excessive body movement by the patient and
minimize trembling.
• If a doctor has indicated that the patient has hemorrhagic diathesis or
hypercoagulability, check the condition of the arm after measurement.
• Use the appropriate cuff size to ensure correct measurements. If too
large a cuff is used, the measured blood pressure value tends to be
lower than the actual blood pressure. If too small a cuff is used, the
measured blood pressure value tends to be higher.
• Before and during measurement, verify that none of the following apply
to the patient:
- An inappropriate cuff size is used.
- The part where the cuff is wrapped is at a different height than the
heart.
(A difference of 10 cm (4 inches) in height may cause a variation in the
blood pressure value of up to 7 or 8 mmHg.)
- Body movement or conversing during measurement.
- Cuff wrapped over thick clothing.
- Pressure on the arm due to a rolled up sleeve.
• In the case of a cuff for adults, the cuff should be wrapped to a tightness
that allows two fingers to be inserted in between the cuff and the arm.
• The accuracy of a flashing measurement value that is out of the
measurement range cannot be guaranteed. Always check the patient's
condition before deciding what steps to take.
• Do not use the cuff if it is damaged or has holes.
• Only an OMRON GS CUFF can be used with this device. The use of any
other cuff may result in incorrect measurement.
8
Page 11

Note:
Setup
• Read and understand the manual for each optional accessory. This
manual does not contain cautionary information for optional accessory.
• Exercise caution with the cables and arrange so that the patient does not
become entangled or bound.
Before use / during use
• Check the following after turning on the power:
- No smoke, abnormal odor, or abnormal sound is emitted.
- Press each button and verify that it operates.
- For functions that cause icons to light or flash, verify that the icons light
or flash.
- Measurement can be performed normally, and measurement error is
within the tolerance value.
• If the screen is not displayed normally, do not use the unit.
• When recycling or disposing of parts (including batteries) of the unit,
follow local government rules and regulations.
Cleaning
• For cleaning, see page 23.
Non-Invasive Blood Pressure (NIBP) measurement
• If the patient has acute inflammation, a pyogenic ailment, or an external
wound at the location where the cuff is to be wrapped, follow the
instructions of the doctor.
• Non-Invasive Blood Pressure measurement (NIBP) is performed by
compressing the upper arm.
Some people may experience intense pain, or transient spotting caused
by subcutaneous hemorrhaging (bruising) may appear. The spotting will
disappear with time; however, it may be appropriate to inform patients for
whom this may be a concern that spotting sometimes occurs, and if
necessary, refrain from measurement.
• To measure correctly, it is recommended that the patient relax and not
talk during measurement.
• To measure correctly, it is recommended that the patient rest quietly for 5
minutes before measurement.
9
Page 12
Using the Unit
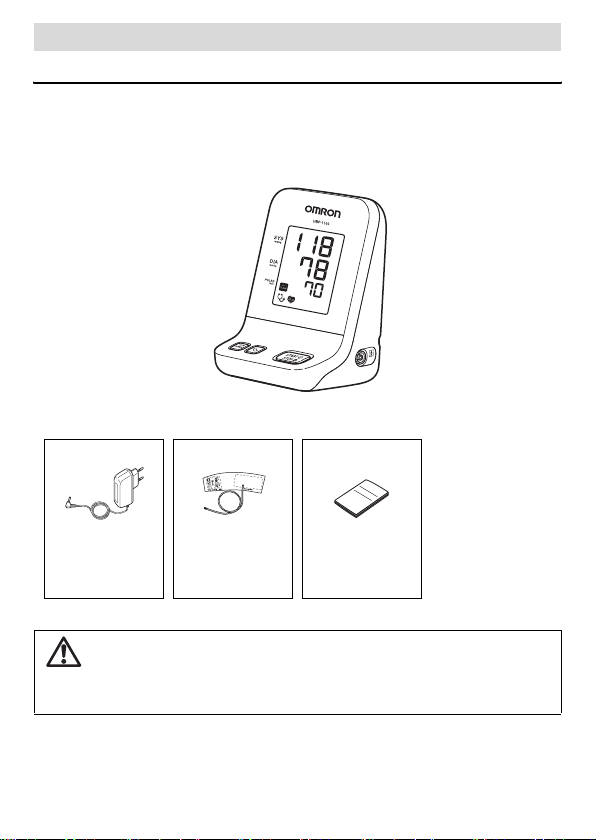
Components of the Product
Before using the unit, make sure that no accessories are missing and that
the unit and accessories are not damaged. If an accessory is missing or
there is damage, please contact your local OMRON representative.
Main unit
Standard Medical Accessories
AC adapter GS CUFF M Instruction
Manual
Caution
• Only an OMRON GS CUFF can be used with this device. The use of
any other cuff may result in incorrect measurement.
10
Page 13
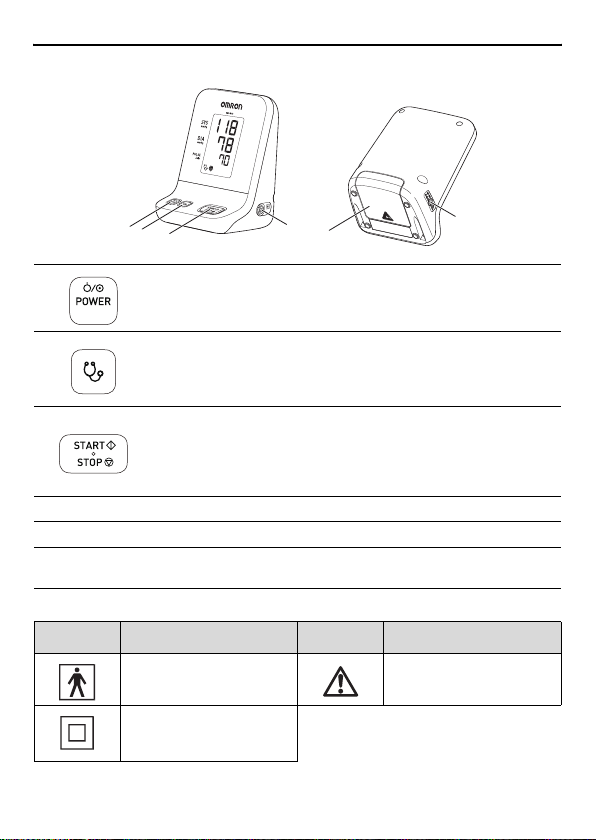
Features / Functions of Unit
Front and bottom of unit
1
2
3
1
2[
3
[Power ON/OFF]
button
Auscultation] button
[START/STOP]
button
4
6
Turns the power ON/OFF.
Press to enter auscultation mode.
(page 20).
Press to start blood pressure
measurement.
While the cuff is inflating, hold
down to continuously inflate (page
18).
5
4 NIBP connector Connects the cuff tube.
5 Power connector Connects the AC adapter.
6 Battery cover
Open to install or replace the
batteries.
Other symbols
Symbol Description Symbol Description
Type BF Caution
Class 2
Internal powered
equipment
11
Page 14
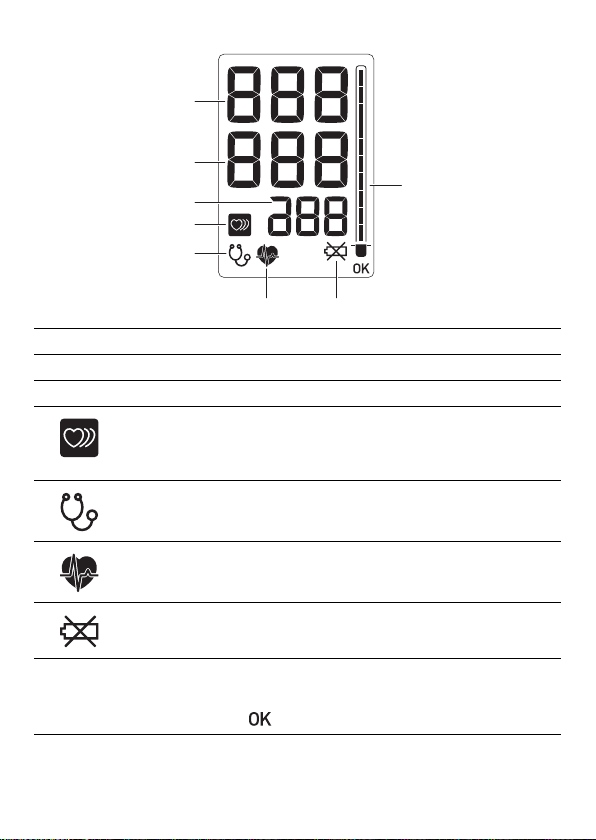
LCD Display
1
2
8
3
4
5
6
7
1 SYS Displays systolic blood pressure.
2 DIA Displays diastolic blood pressure.
3 Pulse Displays the pulse rate.
4
Irregular pulse
wave icon
Lights in the measurement result display if
the pulse wave interval was irregular or
there was body movement during
measurement.
5 Auscultation icon Lights when "Auscultation Mode" is ON.
6
Pulse
synchronization
icon
7
8
Battery
replacement icon*
Zero indicator
icon
Flashes in synchronization with the pulse
during measurement.
When this icon lights, an E40 error also
appears. Replace the batteries. (page 13)
Lights when "zero calibration" is being
performed prior to blood pressure
measurement. When calibration finishes,
appears.
* Only when the batteries are installed.
12
Page 15

Installing the Batteries
Warning
• If battery fluid comes in contact with the eye, immediately flush with
copious amounts of water. Do not rub. Seek medical attention
immediately.
• Do not throw into flame, disassemble, or heat.
• Do not attempt to disassemble or modify the battery.
• Do not use the AC adapter and battery at the same time.
Caution
• If battery fluid comes into contact with the skin or clothes, immediately
rinse with water.
1. Make sure the AC adapter has
been disconnected.
2. Remove the battery cover from the
bottom of the unit.
3. Insert the batteries in the correct
orientation.
4. Replace the battery cover.
Battery replacement icon
When this icon lights, an E40 error also appears. Replace the
batteries.
Connecting the AC Adapter
AC power
Verify that the power outlet supplies the specified voltage and frequency
(100 - 240 V AC, 50/60 Hz).
Connect the AC adapter to the power connector on the unit and the
power outlet.
2
1
13
Page 16

Cuff Selection and Connection
Warning
• Treat a cuff used on a patient with an infection as medical waste, or
sufficiently sterilize the cuff before reuse.
Caution
• Do not use the cuff if it is damaged or has holes.
• Use the appropriate cuff size to ensure correct measurements. If too
large a cuff is used, the measured blood pressure value tends to be
lower than the actual blood pressure. If too small a cuff is used, the
measured blood pressure value tends to be higher.
• Only an OMRON GS CUFF can be used with this device. The use of any
other cuff may result in incorrect measurement.
Note:
• It is important to use the correct sized cuff for a patient in order to get an
accurate reading.
Selecting the cuff
Measure the circumference of the patient's arm and select the cuff
size that is appropriate for the circumference.
Select the cuff that is suitable for the patient from the cuffs below.
Cuff name
GS CUFF XL*
GS CUFF L*
GS CUFF M
GS CUFF S*
GS CUFF SS*
*Available as an optional accessory.
Connecting the cuff
Connect the cuff tube to the NIBP connector
on the unit and turn clockwise to lock.
Arm circumference
(cm) (inch)
42 - 50 17-20
32 - 42 13-17
22 - 32 9-13
17 - 22 7-9
12 - 18 5-7
14
Page 17

Applying the Cuff to the Patient
The device can be used on either
the right or left arm.
Wrap the cuff on a bare arm or over
thin clothing. Thick clothing or a
rolled up sleeve will cause
inaccurate blood pressure
measurements.
1. Make sure the cuff tube is not bent.
The cuff tube should be on the peripheral side.
2. Wrap the cuff so that the INDEX ARTERY " " is directly over
the brachial artery.
The brachial artery is on the inner side of the patient's upper arm.
1. 2. 3.
1 to 2 cm
Make sure that the INDEX ARTERY " " is within
the range. If outside the range, there will be
greater error in the blood pressure value. In this case, use the
appropriate cuff size.
* Attach the cuff so that the bottom edge is 1 to 2 cm from the inner side
of the elbow joint.
* The cuff should be wrapped to a tightness that roughly allows two
fingers to be inserted under the cuff.
3. During measurement, keep the brachial artery on which the cuff is
wrapped at the same height as the right atrium of the heart.
15
Page 18

Caution
• Make sure the cuff is wrapped in the correct arm position and is at the
same height as the heart.
NOTE:
• If measurement is difficult due to arrhythmia, use a different blood
pressure measurement method.
• If the patient has acute inflammation, a pyogenic ailment, or an external
wound at the location where the cuff is to be wrapped, follow the
instructions of the doctor.
• Non-Invasive Blood Pressure (NIBP) measurement is performed by
compressing the upper arm.
transient spotting caused by subcutaneous hemorrhaging may appear. The
spotting will disappear over time, however, if it is possible that this will
disturb the patient, try the following technique:
-Wrap a thin towel or cloth (one layer) under the cuff.
If the towel or cloth is too thick, there will be insufficient cuff compression
and the blood pressure value will measure high.
• If the patient moves or the cuff is touched, this may be falsely detected
as a pulse and over-inflation will occur.
• Do not inflate the cuff when it is not wrapped on the upper arm. This may
damage the cuff.
Some people may experience intense pain, or
16
Page 19

Zero indicator function
Before each measurement, this device indicates that “zero calibration” was
successful.
■
When the power is turned on, “zero calibration” starts after the entire
indicator blinks. When completed, appears.
■
When the power is already on, “zero calibration” takes place from the
ready screen (which shows “0”). When completed, appears.
17
Page 20

Non-Invasive Blood Pressure (NIBP) Measurement
Measurement in normal mode
1. Press the [START/STOP] button.
Blood pressure measurement is performed once.
2. The measurement results are displayed.
If a measurement value is outside the corresponding range below, the
value will flash.
SYS: 59 mmHg or less, or 251 mmHg or higher.
DIA: 39 mmHg or less, or 201 mmHg or higher.
PULSE: 39 bpm or less, or 201 bpm or higher.
■ Normal measurement
Manual inflation in normal mode
If the cuff is not sufficiently inflated, it can be inflated manually.
During inflation, hold down the [START/STOP] button to inflate
continuously.
"-" appears below the value to indicate that manual inflation is in
progress.
■ Measurement error / failure
18
Page 21

Caution
• The accuracy of a flashing measurement value that is outside the
measurement range is not guaranteed. Always check the patient's
condition before deciding what steps to take.
NOTE:
• If inflation is insufficient, inflation may restart automatically while
measurement is in progress.
Irregular pulse wave detection function
If the pulse wave interval becomes irregular during measurement, the
irregular pulse wave detection icon will light to notify you.
Motion stop function
If body movement is detected during measurement, deflation stops for 5
seconds and "-" "|" blink below the value.
After 5 seconds, measurement resumes, and an attempt is made to
complete measurement in one cycle.
NOTE:
• When the motion stop function has activated, the irregular pulse wave
icon appears in the measurement result.
19
Page 22

Measurement in auscultation mode
In auscultation mode, this device does not measure blood pressure.
Measurement should be performed by a health care professional
using a stethoscope.
The healthcare professional uses a stethoscope to determine SYS
and DIA by means of the auscultation method.
1. Make sure the power is on.
"0" is displayed.
2. Press the [Auscultation] button.
The auscultation icon appears and the
device enters auscultation mode.
3. Press the [START/STOP] button.
Inflation starts. When the cuff is
sufficiently inflated, deflation
automatically starts.
4. At the SYS point that you determine by auscultation, press the
[Auscultation] button.
The first time you press the [Auscultation] button, the SYS value
appears.
5. At the DIA point that you determine by auscultation, press the
[Auscultation] button.
The second time you press the [Auscultation] button, the DIA value
appears and the cuff rapidly deflates.
Manual inflation in auscultation mode
If the cuff is not inflated sufficiently or you want to re-inflate, you can
inflate the cuff manually.
Hold down the [START/STOP] button during inflation or deflation to
inflate continuously.
"-" appears below the value to indicate that manual inflation is in
progress.
20
Page 23

NOTE:
• The body movement detection function is disabled while "Auscultation
Mode" is in use.
• In auscultation mode, the pulse rate is not measured and does not
appear.
Stopping the Measurement
To stop measurement while measurement is in progress, press [START/
STOP] button.
21
Page 24

Non-Invasive Pressure Measurement Principles
Oscillometric method
The beat in the pulsation generated by the contraction of the heart is
captured as the pressure inside the cuff to measure the blood pressure. If
the cuff wrapped around the upper arm is pressurized sufficiently, the blood
flow stops, but the beat of the pulsation is present and the pressure inside
the cuff receives this and oscillates. Next, as the pressure inside the cuff
gradually decreases, the oscillation of the pressure within the cuff gradually
increases and reaches a peak. As the pressure within the cuff decreases
further, the oscillation decreases from its peak.
The pressure within the cuff and the relationship with the increase and
decrease of the oscillation within the cuff in this series of processes are
stored into memory, calculations are carried out, and the blood pressure
value is determined.
The pressure within the cuff when the oscillation increases drastically is the
systolic pressure and the pressure within the cuff when the oscillation
decreases drastically is the diastolic pressure. Also, the pressure within the
cuff when the oscillation peaks is taken as the average pulsation pressure.
The oscillometric method does not determine the blood pressure value
instantly like a microphone type automatic blood pressure gauge with the
auscultation method, but rather determines it from the series of change
curves as explained above. Therefore, it is not easily affected by external
noise, an electric scalpel or other electro surgical instruments.
22
Page 25

Maintenance
Maintenance Inspection and Safety Management
The HBP-1100 must be maintained to ensure functionality and to secure
the safety of patients and operators.
Daily checks and maintenance should be performed by the operator.
In addition, qualified personnel are necessary to maintain the performance
and the safety, and to conduct periodic inspections. We recommend that
the verification test be performed at least once a year.
Device Maintenance
Cleaning and disinfecting should be performed in accordance with your
facility's infection control practice.
Wipe with a cloth that has been moistened with isopropyl alcohol diluted to
50 v/v%, or ethyl alcohol (disinfection alcohol) diluted to 76.9 - 81.4 v/v%
and wrung out.
Do not wipe the Power connector or allow it to become wet.
Use a moistened cotton bud to remove dust that has accumulated on the
vent ports.
The device requires no routine service other than cleaning, and visually
checking the cuffs, tubing, etc.
Caution
• Do not sterilize by autoclave or gas sterilization (EOG, formaldehyde
gas, high-concentration ozone, etc.).
• If using an antiseptic solution for cleaning, follow the instructions of the
manufacturer.
Accessory Care
Non-Invasive Blood Pressure Measurement (NIBP)
Cuff/Cuf tube
Wipe clean on the surface of the cuff with a cloth moistened with a 70 v/v%
dilution of isopropyl alcohol, or a 76.9 to 81.4 v/v% dilution of disinfection
ethanol (ethyl alcohol).
Do not allow any liquids inside the cuff. If a liquid gets in the cuff, dry the in
Managing Supplies
Keep the following supplies on hand.
• GS CUFF - All sizes
• Battery
23
Page 26

Check before Use
Before turning on the power
Before turning on the power, check for the following
■
External appearance
• The device or accessories are not deformed due to falling or other
impact.
• The device is not dirty.
• The device is not wet.
■
AC adapter
• The AC adapter is firmly connected to the connector on the device.
• There are no heavy objects lying on the AC adapter cable.
• The AC adapter cable is not damaged (core-wire exposure, breaks, etc.).
When turning on the power
When you turn on the power, check the
LCD display.
• When the [START/STOP] button is
pressed to turn on the power, the screen
below appears and the alarm lamp
lights.
After turning on the power
After turning on the power, check for the following
■
External appearance
• There is no smoke or odor coming from the device.
• The device is not making any unusual noises.
■
Buttons
• Press each button and check that it works.
■
Non-invasive blood pressure (NIBP)
• Make sure that a suitable OMRON GS CUFF is attached (one that fits
the circumference of the patient's arm).
• The cuff tube is firmly connected.
• The person checking the cuff should wrap the cuff around arm, perform
cuff measurement and check to see that blood pressure is in the vicinity
of normal measurements.
• While measurement is in progress, bend the relevant arm and move
body to halt discharge and during this halt check that cuff pressure does
not drop.
24
Page 27

Checking pressure accuracy
You can check the pressure accuracy of the device.
[Power ON/OFF]
button
[Auscultation]
button
1. Make sure the power is on.
2. Hold down the [Auscultation] button for 3 seconds.
"Zero calibration" is performed.
When calibration is finished, the pressure accuracy verification screen
appears.
3. Check the "0" display, and perform the
pressure accuracy check.
Apply the external pressure.
Compare with the displayed value and make sure
there is no problem.
Example:
1. Connect the blood pressure
monitor, the standard pressure
gauge, and the cuff and rubber
ball.
2. Check the blood pressure value of the blood pressure monitor
and the blood pressure value of the standard pressure gauge.
Note:
• The standard is within ± 3 mmHg or 2 % of manometer reading.
4. Turn off the power and exit utility mode.
[START/STOP]
button
"0"
25
Page 28

Troubleshooting
The power does not turn on
Cause Solution
If the unit is being powered by the
batteries, the batteries are not
installed or depleted.
The AC adapter is disconnected. Connect the AC adapter (page 13).
If the power does not turn on and the above is not the cause, turn off the
unit power, disconnect the AC adapter, remove the batteries, and contact
your local OMRON representative.
The unit display does not operate
Cause / solution
Stop using the unit and contact your local OMRON representative.
The unit becomes hot
Cause Solution
An object is on top of the unit or right
next to the unit.
If the unit becomes too hot to be touched, there may be a problem in the
unit. Turn off the unit power, disconnect the AC adapter, remove the
batteries, and contact your local OMRON representative.
The cuff does not inflate when the [START/STOP] button is pressed
Cause Solution
Loose cuff tube connection. Check the connection.
There is an air leak in the cuff. Replace the cuff.
If pressure is displayed, the cuff tube
is bent.
Insert batteries or replace with new
batteries (page 13).
Keep the area around the unit free of
objects.
Make sure no part of the cuff tube is
bent.
26
Page 29

Measurement was not possible
Cause / solution
Check the patient by palpation or other method.
After checking the patient, check the error code and see "List of Error
Codes" (page 29) for Non Invasive Blood Pressure (NIBP) measurement.
Abnormal measurement value
Cause / solution
The causes below are possible. Check the patient by palpation and then
repeat measurement.
• Body movement (chills or other trembling)
• Arrhythmia.
• Noise in the cuff
- A nearby person touched the patient.
- Cardiac massage was being performed.
27
Page 30

The measurement value is questionable
Cause Solution
Deflates quickly Check for a loose cuff connection.
Incorrect cuff size used.
Cuff wrapped over thick clothing.
Patient not seated properly.
Patient ate, drank, or exerted
themselves recently.
Simultaneously perform measurement with a stethoscope.
Place the stethoscope and listen while viewing the
pressure display of the manometer.
Blood pressure may vary widely due to physiological effects.
The causes below are possible.
• Emotional excitement or agitation
- Pain due to cuff wrapping
- White coat hypertension
• Cuff size or wrapping method not correct
• Cuff wrapping position on upper arm not at the same height as the heart
• Patient's blood pressure not stable due to pulsus alternans, respiratory
changes, or other reason
Measure circumference or patient's
arm and ensure correct sized cuff is
used.
Ensure cuff is applied to a bare arm,
or very thin clothing.
Ensure patient is seated, feet flat on
the floor, cuff at heart level.
Ensure before measurement taken,
patient has not had food, caffeinated
or alcohol beverages, or exerted/
exercised in the last 30 minutes.
Stethoscope
28
Page 31

List of Error Codes
■
Example: E2
SYSTEM
Error
code
Description Points to check
• Sensor failure
E9
• EEPROM failure
• Switch error
NIBP
Error
code
Description Points to check
The cuff tube is not connected Firmly connect the cuff tube.
E1
Air is leaking from the cuff.
Did not inflate properly because
the arm or body moved during
measurement.
Moved body or arm during
measurement, or talked.
The cuff is not applied correctly. Correctly apply the cuff.
The sleeve is rolled up and is
compressing the arm.
E2
Measurement time has
exceeded specified time.
Specified time: 165 seconds
Contact your local OMRON
representative.
Replace with an OMRON GS
CUFF that does not leak.
Have the patient not move the
arm or body, and repeat
measurement.
Have the patient not talk or
move, and repeat measurement.
Remove the garment and rewrap the cuff.
The measurement time exceeds
the expected time, so the
measurement was ended in
order to avoid patient discomfort.
There is a possibility that
measurement is being repeated
over and over due to air leaking
from the cuff.
29
Page 32

Other problems
Error
code
Description Points to check
Cuff inflated to 300 mmHg or
higher during manual inflation in
auscultation mode
E3
Over-inflation occurs
E40 The batteries are depleted.
E42 Battery voltage error
When inflating manually in
auscultation mode, release the
button when the pressure
reaches the desired value.
If this occurs during
measurement, repeat
measurement.
If this occurs when not
performing measurement,
contact your local OMRON
representative.
Replace with new batteries.
(page 13)
Replace the batteries with new
batteries. If the error continues,
contact your local OMRON
representative.
30
Page 33

Disposal
As there is a risk of environmental pollution, follow your applicable national
and local legal regulations regarding disposal or recycling of this
equipment and batteries.
The main constituents of each part are listed in the table below. As there is
a risk of infection, do not recycle patient attachments such as cuffs, but
dispose of them as instructed by your facility's procedures and applicable
regulations.
Item Parts Material
Box Cardboard
Package
Main unit
Battery AA battery
Cuff / Cuff tube
AC adapter
Cushion Cardboard
Bag PE
Enclosure ABS, PC , SR
Intererna General electronic components
Battery (Commercially
available)
Cuff C3604B
Tube PVC
Connector Nickel
Enclosure PC
Code PVC
Internal parts General electronic components
31
Page 34

Specifications
Specifications
Main unit
Measurement
Parameter
Dimension
Weight
Display 7 segment LCD
Safety
Standards
Protection
Class
Degree of
Protection
MDD
Classification
Power supply
AC adapter
NIBP, PR
Main unit: 120 x 190 x 110 (mm) 4.72 x 7.48 x 4.33
(inch) (W x H x D)
AC adapter: 46 x 66 x 37 (mm) 1.81 x 2.60 x 1.46
(inch) (W x H x D)
Main unit: Approx. 0.6 kg (not including accessories
and options)
AC adapter: Approx. 0.2 kg
IEC 60601-1:1988+A1:1993+A2:1995
Medical electrical equipment-Part1:General
requirements for safety
Class 2
Internal powered equipment
Type BF
Class 2 a
Input voltage range: AC 100 V to 240 V
Rated Current: 0.5 A
Frequency: 50/60 Hz
Output voltage range: DC 6 V ±5%
32
Page 35

Type: AA batteries, x4
Number of operation cycles when fully charged: 250
• Measurement conditions
- New battery fully charged (AA high-performance
Dry cell
battery
manganese)
- Ambient temperature of 23°C (73.4°F)
- Using M-size cuff
- SYS120 / DIA80 / PR60
- One 5-minute cycle consisting of "cuff
measurement time + wait time"
Environmental Conditions
Environmental
Conditions
Storage and
transportation
EMC:
Reference
standard
Temperature range: 5 to 40°C (41 to 104°F)
Humidity range:
Atmospheric pressure: 700 to 1060hPa
Temperature range: -20 to 60°C (-4 to 140°F)
Humidity range: 10 to 95%RH (not condensed)
Atmospheric pressure: 500 to 1060hPa
IEC60601-1-2:2007
Medical electrical equipment Part 1-2: General requirements for basic safety and
essential performance - Collateral standard:
Electromagnetic compatibility - Requirements and
tests.
15 to 85%RH (not condensed)
33
Page 36

Non-Invasive Blood Pressure (NIBP)
Measurement
technology
Measurement
method
Pressure
display range
Pressure
display
accuracy
NIBP
measurement
range
NIBP
accuracy*
Pulse rate
accuracy
Reference
Standard:
* Comparison with auscultation method performed by a trained
professional.
DIA determined by the auscultation method is "K5".
Pulse rate accuracy
Dynamic Linear Deflation method
0 to 300 mmHg
Within ±3 mmHg or 2 %
SYS 60 to 250 mmHg
DIA 40 to 200 mmHg
Pulse rate 40 to 200 /min
Maximum mean error within ±5 mmHg
Maximum standard deviation within ±8 mmHg
Within ±5 % of reading
ANSI/AAMI SP-10:2002+A1:2003+A2: 2006/(R)2008
ISO81060-2:2009
34
Page 37

Important information regarding Electro Magnetic Compatibility (EMC)
With the increased number of electronic devices such as PC’s and mobile (cellular)
telephones, medical devices in use may be susceptible to electromagnetic
interference from other devices. Electromagnetic interference may result in
incorrect operation of the medical device and create a potentially unsafe situation.
Medical devices should also not interfere with other devices.
In order to regulate the requirements for EMC (Electro Magnetic Compatibility) with
the aim to prevent unsafe product situations, the EN60601-1-2:2007 standard has
been implemented. This standard defines the levels of immunity to electromagnetic
interferences as well as maximum levels of electromagnetic emissions for medical
devices.
This medical device manufactured by your local OMRON representative conforms
to this EN60601-1-2:2007 standard for both immunity and emissions.
Nevertheless, special precautions need to be observed:
• Do not use mobile (cellular) telephones and other devices, which generate strong
electrical or electromagnetic fields, near the medical device. This may result in
incorrect operation of the unit and create a potentially unsafe situation.
Recommendation is to keep a minimum distance of 7 m. Verify correct operation
of the device in case the distance is shorter.
Further documentation in accordance with EN60601-1-2:2007 is available within this
manual, refer to section "Manufacturer's Declaration".
Correct Disposal of This Product
(Waste Electrical & Electronic Equipment)
This marking shown on the product or its literature, indicates that it
should not be disposed with other household wastes at the end of
its working life. To prevent possible harm to the environment or
human health from uncontrolled waste disposal, please separate
this product from other types of wastes and recycle it responsibly to
promote the sustainable reuse of material resources.
Household users should contact either the retailer where they purchased this
product, or their local government office, for details of where and how they can take
this item for environmentally safe recycling.
Business users should contact their supplier and check the terms and conditions of
the purchase contract. This product should not be mixed with other commercial
wastes for disposal.
This product does not contain any hazardous substances.
Disposal of used batteries should be carried out in accordance with the national
regulations for the disposal of batteries.
35
Page 38

Manufacturer's Declaration
The HBP-1100 is intended for use in the electromagnetic environment specified
below.
The customer or the user of the HBP-1100 should assure that it is used in such an
environment.
Electromagnetic Emissions (IEC60601-1-2)
Emission Test Compliance Electromagnetic Environment
The HBP-1100 uses RF energy only for
RF emission
CISPR 11
RF emissions
CISPR 11
Harmonic emissions
IEC 61000-3-2
Voltage fluctuations/
flicker
IEC 61000-3-3
Group 1
Class B
Class A
Complies
internal functions. Therefore, this RF emission
is extremely weak and there is little chance of it
creating any kind of interference whatsoever
with nearby electronic equipment.
The HBP-1100 is suitable for use in all
establishments, including domestic
establishments and those directly connected to
the public low voltage power supply network
that supplies buildings used for domestic
purposes.
36
Page 39

Electromagnetic Immunity (IEC60601-1-2)
Immunity test IEC60601-1-2
test level
Electrostatic
discharge (ESD)
IEC 61000-4-2
Electric fast
transient/burst
IEC 61000-4-4
Surge
IEC 61000-4-5
Voltage dips, short
interruptions and
voltage variations
on power supply
input lines
IEC 61000-4-11
: Rated voltage of
U
T
test unit
Power frequency
(50/ 60 Hz)
magnetic field
IEC 61000-4-8
is the a.c. mains voltage prior to application of the test level.
Note: U
T
±6 kV contact
±8 kV air
±2 kV for
power supply
lines
±1 kV for
input/output lines
±1 kV
differential mode
±2 kV
common mode
<5 % U
T
for 0.5 cycle
40 % U
T
for 5 cycles
70 % U
T
for 25 cycles
<5 % U
T
for 5 sec.
3 A/m (r.m.s) 3 A/m (r.m.s)
Compliance
level
±6 kV contact
±8 kV air
±2 kV for
power supply
lines
±1 kV for
input/output lines
±1 kV
differential mode
±2 kV
common mode
<5 % U
T
for 0.5 cycle
40 % U
T
for 5 cycles
70 % U
T
for 25 cycles
<5 % U
T
for 5 sec.
Electromagnetic
environment guidance
Floors should be wood,
concrete or ceramic tile.
If floors are covered with
synthetic material, the
relative humidity should
be at least 30 %.
Mains power quality
should be that of a
typical commercial or
hospital environment.
Mains power quality
should be that of a
typical commercial or
hospital environment.
Mains power quality
should be that of a
typical commercial or
hospital environment. If
the user of the HBP1100 requires continued
operation during power
mains interruptions, it is
recommended that the
HBP-1100 be powered
from an uninterruptible
power supply or
batteries.
Power frequency
magnetic fields should
be at levels
characteristic of a typical
location in a typical
commercial or hospital
environment.
37
Page 40

Immunity test
Conducted RF
IEC 61000-4-6
Radiated RF
IEC 61000-4-3
Note1:At 80 MHz and 800 MHz, the higher frequency range applies.
Note2:These guidelines may not apply in all situations. Electromagnetic propagation
is affected by absorption and reflection from structures, objects, and people.
* Field strengths from fixed transmitters, such as base stations for radio (cellular/cordless)
telephones and land mobile radios, amateur radio, AM and FM radio broadcast and TV
broadcast cannot be predicted theoretically with accuracy. To assess the
electromagnetic environment due to fixed RF transmitters, an electromagnetic site
survey should be considered. If the measured field strength in the location in which the
HBP-1100 is used exceeds the applicable RF compliance level above, the HBP-1100
should be observed to verify normal operation. If abnormal performance is observed,
additional measures may be necessary, such as reorienting or relocating the HBP-1100.
**Over the frequency range 150 kHz to 80MHz, field strengths should be less than 3 V/m.
IEC60601-1-2
test level
3 Vrms
150 kHz to 80
MHz
80% AM (2Hz)
3 Vrms
80 MHz to 2.5
GHz
80% AM (2Hz)
IEC60601-1-2
test level
3 Vrms
3 V/m
Electromagnetic
environment - guidance
Portable and mobile RF
communications equipment should
be used no closer to any part of
the HBP-1100, including cables,
than the recommended separation
distance calculated from the
equation applicable to the
frequency of the transmitter.
Recommend separation distance
d = 1,2
d = 1,2 80 MHz - 800 MHz
d = 2,3 800 MHz - 2,5 GHz
where P is the maximum output
power rating of the transmitter in
watts (W) according to he
transmitter manufacturer and d is
the recommended separation
distance in meters (m).
Field strengths from fixed RF
transmitters as determined by an
electromagnetic site survey*,
should be less than the
compliance level in each
frequency range**.
Interference may occur in the
vicinity of equipment marked with
the following symbol:
38
Page 41

Recommended Separation Distances:
Recommended separation distance between portable and mobile RF
communications equipment and the HBP-1100
The HBP-1100 is intended for use in an electromagnetic environment in which
radiated RF disturbances are controlled. The customer or the user of the HBP1100 can help prevent electromagnetic interference by maintaining a minimum
distance between portable and mobile RF communications equipment
(transmitters) and the HBP-1100 as recommended below, according to the
maximum output power of the communications equipment.
Rated maximum
output power of
transmitter (W)
0,01 0,12 0,12 0,23
0,1 0,38 0,38 0,73
1 1,2 1,2 2,3
10 3,8 3,8 7,3
100 12 12 23
For transmitters rated at a maximum output power not listed above, the
recommended separation distance d in metres (m) can be determined using the
equation applicable to the frequency of the transmitter, where P is the maximum
output power rating of the transmitter in watts (W) according to the transmitter
manufacturer.
Note1:At 80MHz and 800MHz, the separation distance for the higher frequency
range applies
Note2:These guidelines may not apply in all situations. Electromagnetic
propagation is affected by absorption and reflection from structures,
objects and people.
Separation distance according to frequency of transmitter (m)
150 kHz to 80 MHz
d = 1,2
80 MHz to 800
MHz
d = 1,2
800 MHz to 2.5
GHz
d = 2,3
39
Page 42

Optional Accessories
Optional Medical Accessories
AC adapter
60240HW5SW
GS CUFF S
HXA-GCUFFSLB
GS CUFF XL
HXA-GCUFFXLLB
GS CUFF SS
HXA-GCUFFSSLB
GS CUFF L
HXA-GCUFFLLB
Instruction
Manual
GS CUFF M
HXA-GCUFFMLB
40
Page 43

Page 44

Manufacturer OMRON HEALTHCARE Co., Ltd.
EU-representative OMRON HEALTHCARE EUROPE B.V.
Asia Pacific HQ
53, Kunotsubo, Terado-cho, Muko, Kyoto, 617-0002 JAPAN
Scorpius 33, 2132 LR Hoofddorp, THE NETHERLANDS
www.omron-healthcare.com
OMRON HEALTHACARE SINGAPORE PTE LTD
438A Alexandra Road, #05-05/08 Alexandra Technopark,
Singapore 119967
www.omron-healthcare.com.sg
Production facility
OMRON (DALIAN) CO., LTD.
Dalian, CHINA
Made in China
 Loading...