

Page 1
Page 2

General Precautions
The user must operate each product according to the performance specifications described in
the operation manuals.
Before using the product under conditions which are not described in the manual or applying the
product to nuclear control systems, railroad systems, aviation systems, vehicles, combustion
systems, medical equipment, amusement machines, safety equipment, and other systems,
machines and equipment that may have a serious influence on lives and property if used
improperly, consult your OMRON representative.
Make sure that the ratings and performance characteristic of the product are sufficient for the
systems, machines, and equipment, and be sure to provide the systems, machines, and
equipment with double safety mechanisms.
This manual provides information for using the programmable terminal model NS12. Be sure to
read this manual before attempting to use the software and keep this manual close at hand for
reference during operation.
Page 3

Contents
Section1. Operation Flow
Operation Flow
Section2. CX-Designer
1. Preparations and settings
2. Starting up the CX-Designer
3. Creating a new project
4. Setting project properties
5. Communications settings
6. System settings
7. Saving a project
8. Screen properties
9. Displaying a text
10.ON/OFF Button
11.Repeat function
11-1 Repeat function (Button)
11-2 Repeat function (Text)
12. Bit Lamp
13. Adding a screen
14. Frame
15. Numeral Display & Input
16. Macro
17. Alarm/Event Display
18. Alarm/Event Summary & History
19. Pop-up Screen
20. Sheet
21. Word Button/Command Button
22. Creating another language label
22-1 Creating a Dutch label
22-2 Alarm/Event settings in Dutch
23. Useful functions
23-1 Find (Address)
23-2 Find (Label)
23-3 Select Object
23-4 Reuse of screen (by copying)
24.Test function
••••••••••••••••••••••••••••••••••••••••••••••••••••••••••••••••••••••••••••••••••••••••••••••••••••••••••••••••••••••••••••••••••••••••••••••••••••••••• 48
••••••••••••••••••••••••••••••••••••••••••••••••••••••••••••••••••••••••••••••••••••••••••••••••••••••••••••••••••••••••••••••••••••••••••••••••••••••••• 63
21-1 Switch label button
21-2 Switch screen button
••••••••••••••••••••••••••••••••••••••••••••••••••••••••••••••••••••••••••••••••••••••••••••••••••••••••••••••••••••••••••••••••••••••••••• 2
••••••••••••••••••••••••••••••••••••••••••••••••••••••••••••••••••••••••••••••••••••••••••••••••••••••••••••• 4
••••••••••••••••••••••••••••••••••••••••••••••••••••••••••••••••••••••••••••••••••••••••••••••••••••••• 10
•••••••••••••••••••••••••••••••••••••••••••••••••••••••••••••••••••••••••••••••••••••••••••••••••••••••••••••••••••• 11
••••••••••••••••••••••••••••••••••••••••••••••••••••••••••••••••••••••••••••••••••••••••••••••••••••••••••••••• 12
••••••••••••••••••••••••••••••••••••••••••••••••••••••••••••••••••••••••••••••••••••••••••••••••••••••••••••••• 14
••••••••••••••••••••••••••••••••••••••••••••••••••••••••••••••••••••••••••••••••••••••••••••••••••••••••••••••••••••••••••••••••••••• 15
•••••••••••••••••••••••••••••••••••••••••••••••••••••••••••••••••••••••••••••••••••••••••••••••••••••••••••••••••••••••••••••••••••• 17
•••••••••••••••••••••••••••••••••••••••••••••••••••••••••••••••••••••••••••••••••••••••••••••••••••••••••••••••••••••••••••••••• 18
••••••••••••••••••••••••••••••••••••••••••••••••••••••••••••••••••••••••••••••••••••••••••••••••••••••••••••••••••••••••••••••••••• 19
•••••••••••••••••••••••••••••••••••••••••••••••••••••••••••••••••••••••••••••••••••••••••••••••••••••••••••••••••••••••••••••••••••• 22
•••••••••••••••••••••••••••••••••••••••••••••••••••••••••••••••••••••••••••••••••••••••••••••• 24
••••••••••••••••••••••••••••••••••••••••••••••••••••••••••••••••••••••••••••••••••••••••••••••••••• 26
••••••••••••••••••••••••••••••••••••••••••••••••••••••••••••••••••••••••••••••••••••••••••••••••••••••••••••••••••••••••••••••••••••••••••••••••••• 30
••••••••••••••••••••••••••••••••••••••••••••••••••••••••••••••••••••••••••••••••••••••••••••••••••••••••••••••••••••••••••••••••• 35
••••••••••••••••••••••••••••••••••••••••••••••••••••••••••••••••••••••••••••••••••••••••••••••••••••••••••••••••••••••••••••••••••••••••••••••••••• 37
•••••••••••••••••••••••••••••••••••••••••••••••••••••••••••••••••••••••••••••••••••••••••••••••••••••••••••••• 46
•••••••••••••••••••••••••••••••••••••••••••••••••••••••••••••••••••••••••••••••••••••••••••••••••••••••••••••••••••••••• 50
•••••••••••••••••••••••••••••••••••••••••••••••••••••••••••••••••••••••••••••••••••••••••••• 55
•••••••••••••••••••••••••••••••••••••••••••••••••••••••••••••••••••••••••••••••••••••••••••••••••••••••••••••••••••••••••••••••••••• 56
••••••••••••••••••••••••••••••••••••••••••••••••••••••••••••••••••••••••••••••••••••••••••••••••••••••••• 64
•••••••••••••••••••••••••••••••••••••••••••••••••••••••••••••••••••••••••••••••••••••••••••••••••••• 66
•••••••••••••••••••••••••••••••••••••••••••••••••••••••••••••••••••••••••••••••••••••••••••••••••• 71
••••••••••••••••••••••••••••••••••••••••••••••••••••••••••••••••••••••••••••••••• 78
••••••••••••••••••••••••••••••••••••••••••••••••••••••••••••••••••••••••••••••••••••••••••••••••••••••••••••••••••• 81
••••••••••••••••••••••••••••••••••••••••••••••••••••••••••••••••••••••••••••••••••••••••••••••••••••••••••••••••••••••••• 83
••••••••••••••••••••••••••••••••••••••••••••••••••••••••••••••••••••••••••••••••••••••••••••••••••••••••••••••••••••• 84
••••••••••••••••••••••••••••••••••••••••••••••••••••••••••••••••••••••••••••••••• 85
•••••••••••••••••••••••••••••••••••••••••••••••••••••••••••••••••••••••••••••••••••••••••••••••••••••••••••••••••••••••••••••••••••••••••• 87
Section3.Transferring project data
1.Transferring project data via serial cable (RS232C)
2.Transfer project data using a memory card
•••••••••••••••••••••••••••••••••••••••••••••••••• 92
••••••••••••••••••••••••••••••••••••••••••••••••••••••••••••••••••••• 95
Page 4

Page 5
Page 6
Operation Flow
CX-Designer
CX-Designer
Installing CX-Designer to a
personal computer
Starting up the CX-
Starting up the CX-
Designer
Designer
Creating a screen
Creating a screen
Setting Project
Properties
Entering project title and labels
System Setting
Allocate system memory,
set communication port etc...
NS8-V1
NS8-V1
Mount NS on
the control panel
Refer to NS
Setup Manual
Connecting power supply/
communication cable
Refer to NS
Setup Manual
Power ON
System Menu Setting
System Menu Setting
Host side (PLC)
Host side (PLC)
Setting communication
Setting communication
port
port
Refer to NS
Setup Manual
Creating Ladder program
Power ON
Creating a Screen
Data
Creating lamp, touch switch,
numeral display and graph
etc...
Test/ Validation
Checking errors on the CXDesigner
Transferring the screen data to NS Hardware
Transferring the screen data to NS Hardware
Start Operation
Start Operation
Maintenance and Inspection
Maintenance and Inspection
Page 7
*A screen image depends on a CX-Designer system version; when you use a different
system version from the one used in this manual, the screen image may not be the same.
*Certain settings depend on the hardware that you use. In this manual, NS8-V1 is used to
create screens.
Page 8
Start up
CX-D
1. Preparations and settings
1. Preparations and settings
Creating a
new project
Introduction
Introduction
This manual describes how to use the CX-Designer and its functions with a visual assistance in
creating sample screens.
Necessary Equipment
Necessary Equipment
Item
- CX-Designer
-NS Hardware
-PLC
- NS Hardware – PC Serial communication cable
- NS Hardware – PLC Serial communication cable
-PC
Configuration &
Configuration &
Communication Settings
Communication Settings
PLC
Project
property
System
setting
NS hardware
Creating
Validation
a screen
Model
NS-CXDC1-V[]
- NS8-TV1[](B)-V1
- CS Series, CJ Series
- XW2Z-S002
- XW2Z-200T
- Widows PC on which CX-Designer performs
PC
Transferring
a project
RS232C Port
Serial
NS Hardware
- Serial Port A NT Link (1:N), No. of units: 0, Communication Speed: High-speed
Serial Port B Setting is not necessary
PLC
- Host Link Port Communication Speed: High-speed NT Link, Communication Mode: NT Link (1:N), NT Link Max. No. of units: 1
Allocation Address
Allocation Address
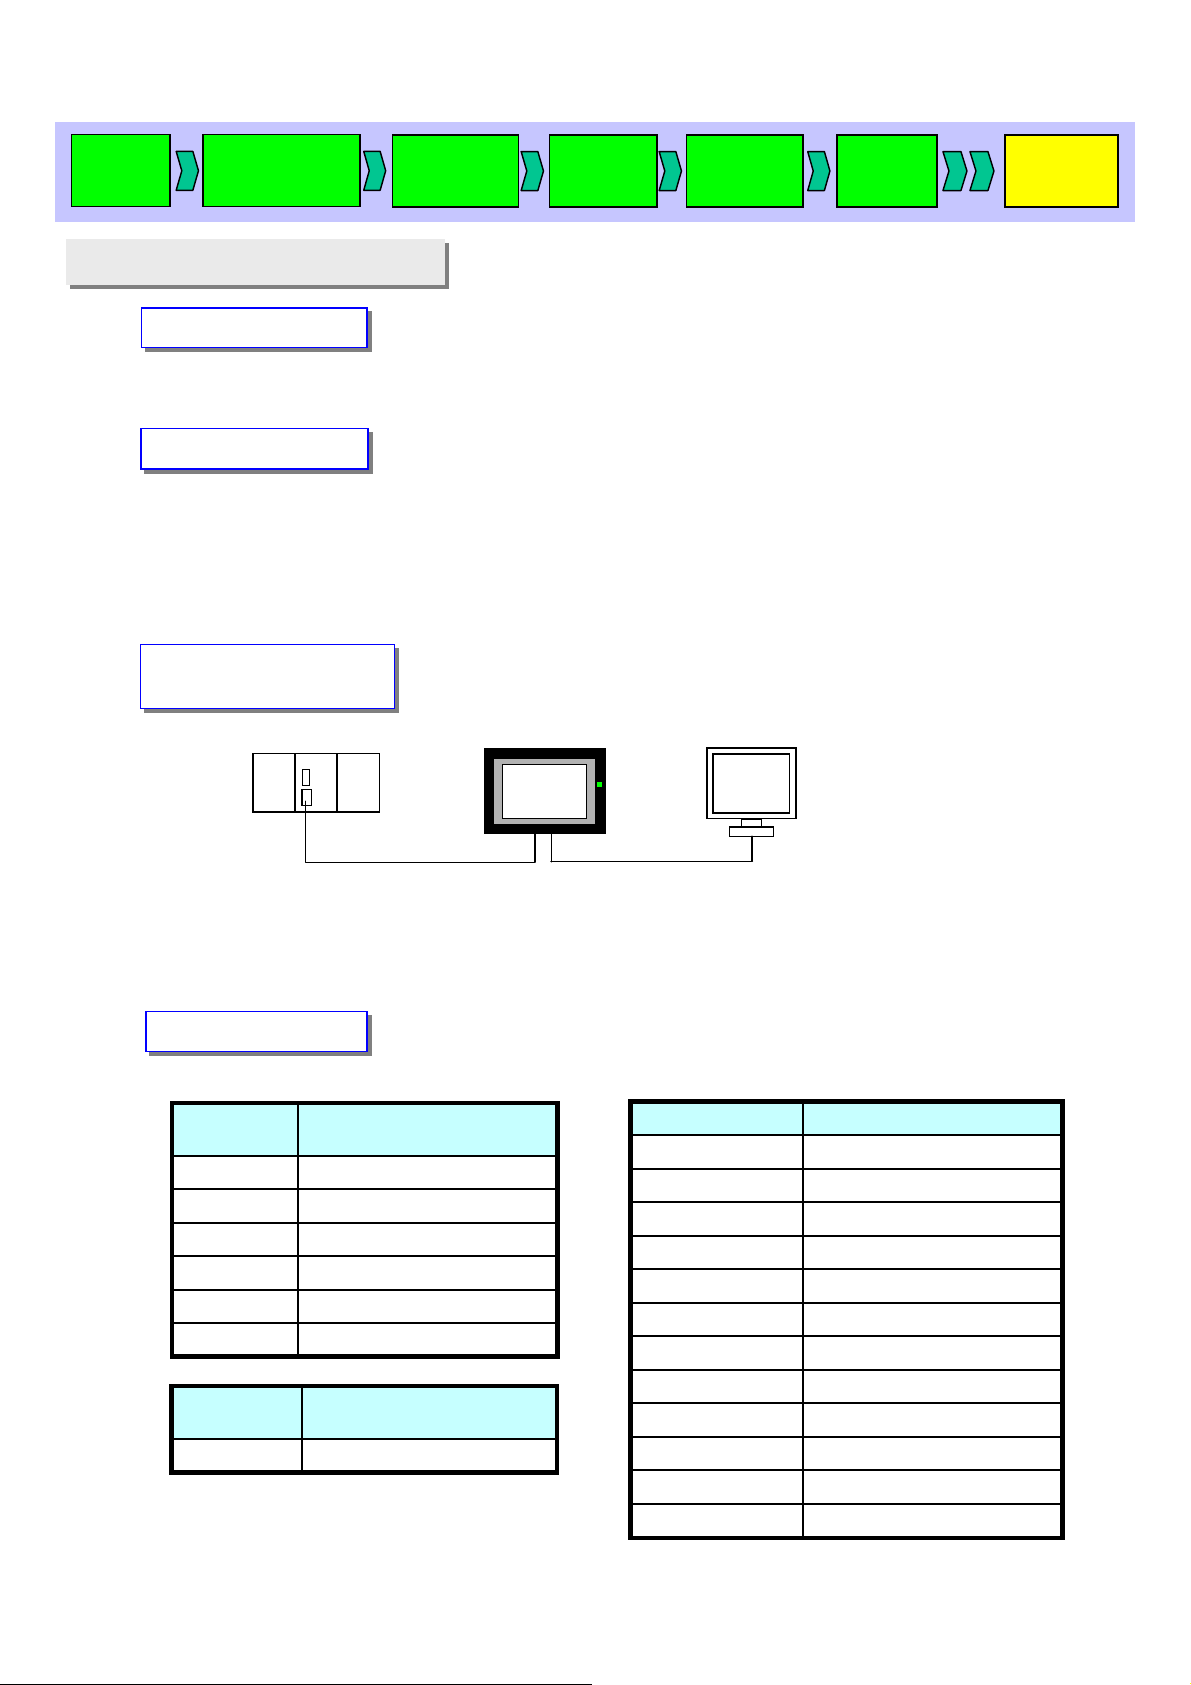
The following PLC allocation addresses are used for sample screens shown in this manual.
Address
Power 1 Running / Stopped00000.00
Power 2 Running / Stopped00000.01
Power 3 Running / Stopped00000.02
Power 4 Running / Stopped00000.03
Power 5 Running / Stopped00000.04
Power 6 Running / Stopped00000.05
Address
Present valueDM100
DescriptionAllocation
DescriptionAllocation
Port A
Serial
Port B
COM Port
DescriptionAllocation Address
Alarm 1 Occurred / Released00001.00
Alarm 2 Occurred / Released00001.01
Alarm 3 Occurred / Released00001.02
Alarm 4 Occurred / Released00001.03
Alarm 5 Occurred / Released00001.04
Alarm 6 Occurred / Released00001.05
Alarm 7 Occurred / Released00002.00
Alarm 8 Occurred / Released00002.01
Alarm 9 Occurred / Released00002.02
Alarm 10 Occurred / Released00002.03
Alarm 11 Occurred / Released00002.04
Alarm 12 Occurred / Released00002.05
Page 9

Start up
CX-D
Creating a
new project
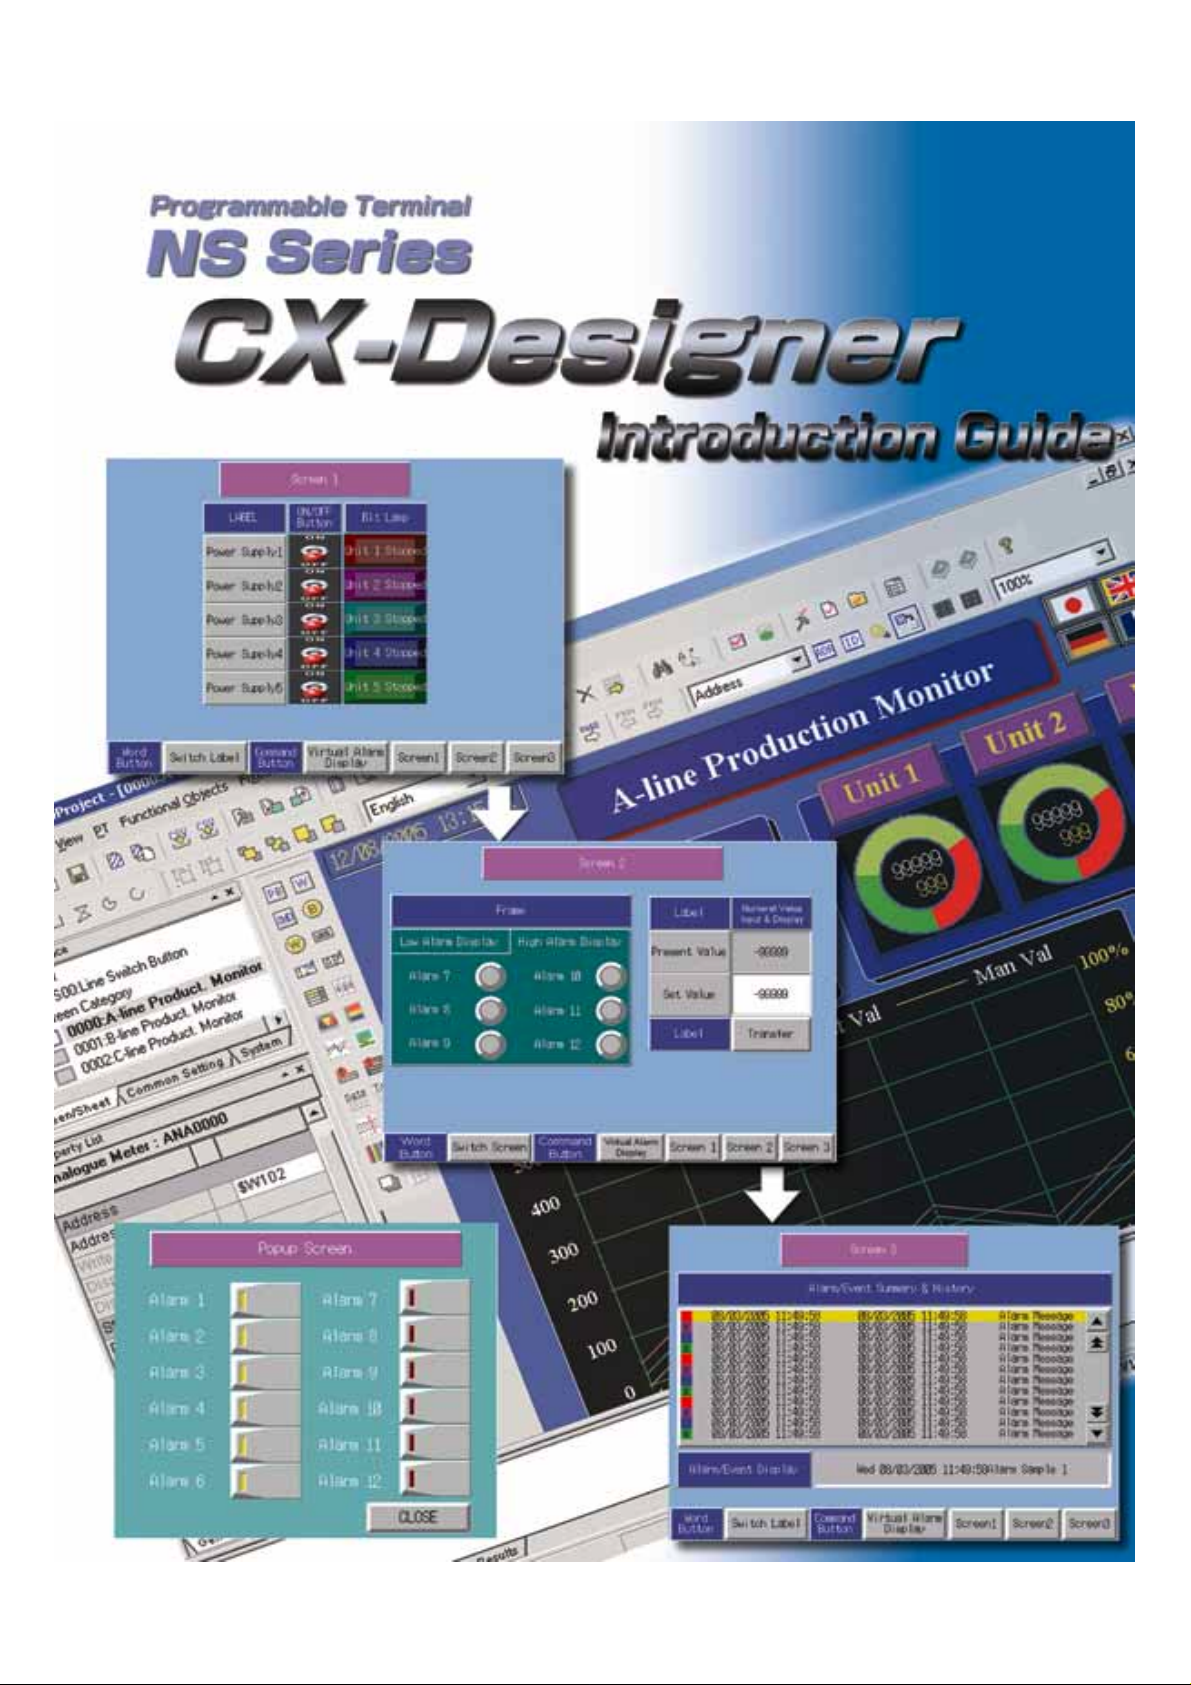
Sample Screen
Sample Screen
Project
property
System
setting
Creating
a screen
Validation
Create 5 screens using the CX-Designer.
All screens are designed to display labels in two languages (English/Dutch) with
“Switch Label” function.
Screen 1
Screen 1
Here, you will create a screen that turns ON/OFF specified addresses of the PLC.
On the screen 1, lamps (bit lamp) are lit/out according to the status of bits
allocated to the PLC.
The screen below illustrates an example of a touch panel screen used to operate a
machinery.
Transferring
a project
ON/OFF Button
1. ON/OFF Button
Press the button to switch ON/OFF status.
2. Operational Status Display
“RUN/STOP” lamp is lit/out in linked with the status of an ON/OFF button.
Operational Status Display
Page 10
Start up
CX-D
Creating a
new project
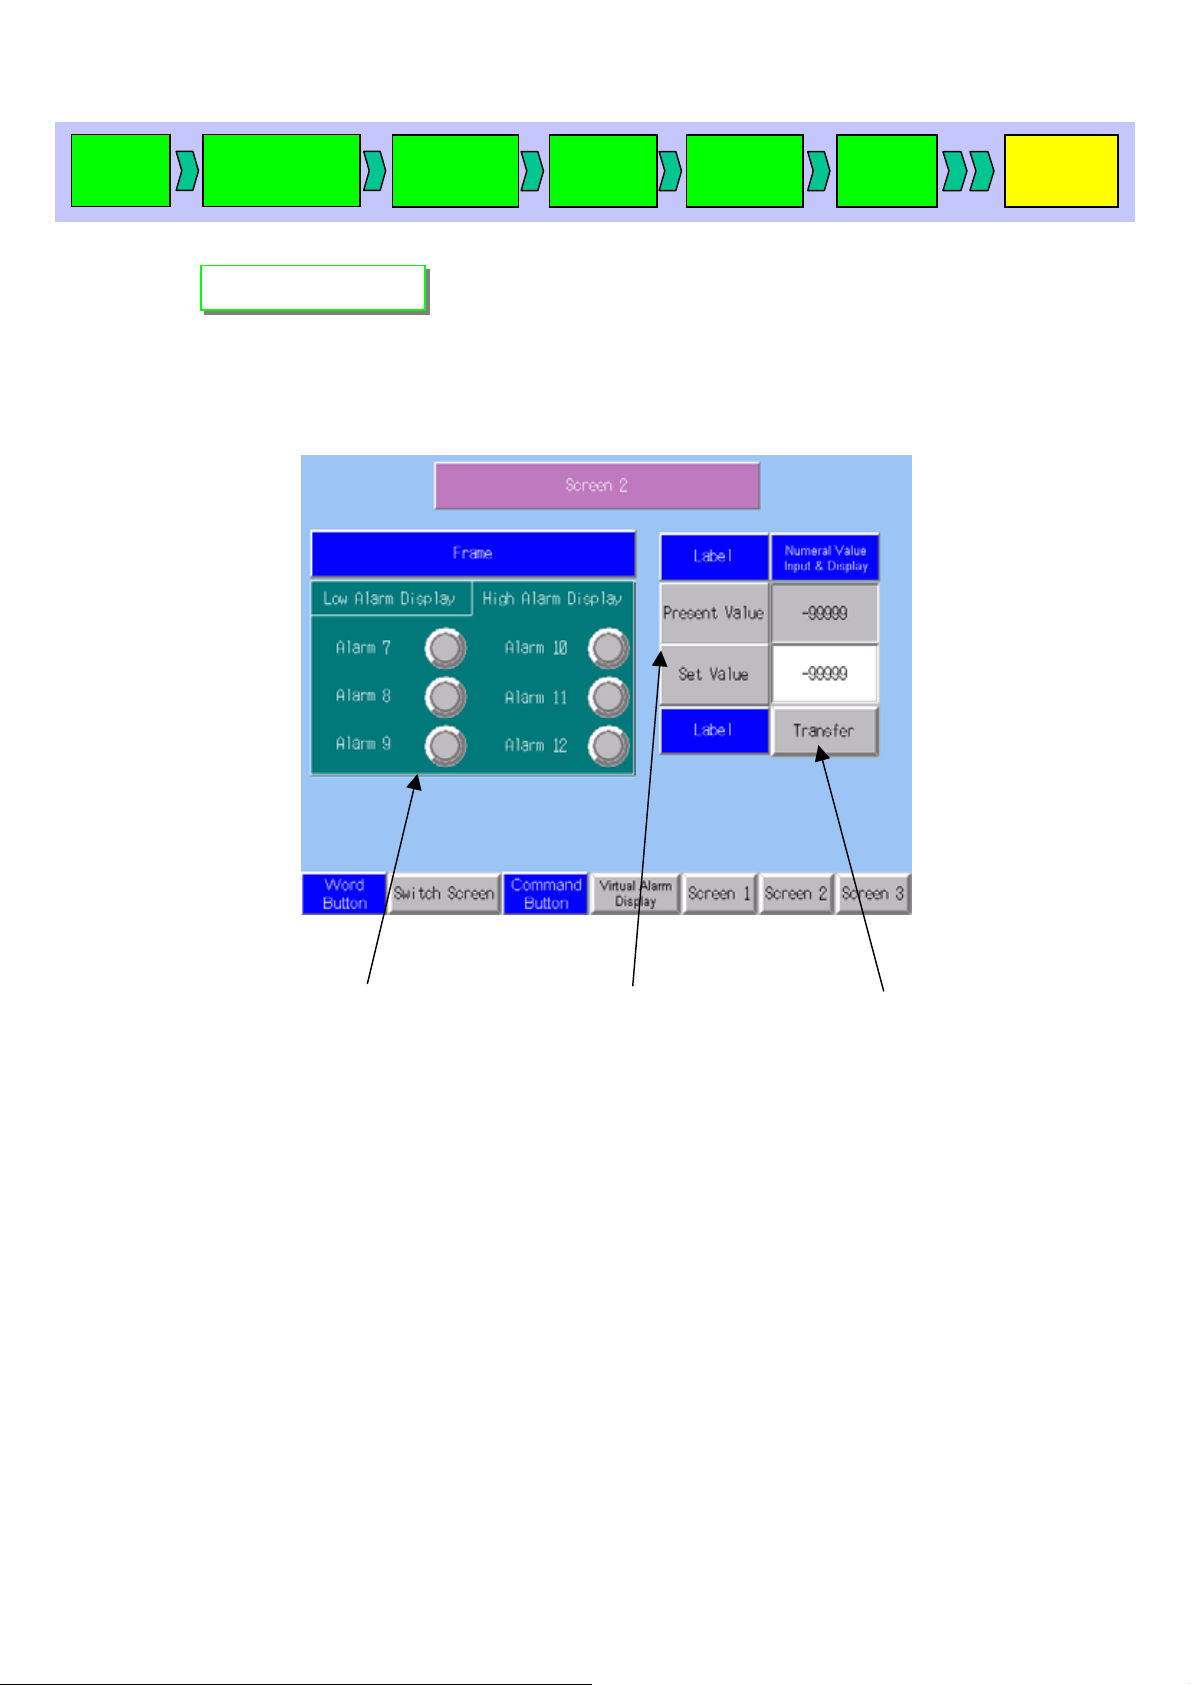
Screen 2
Screen 2
Project
property
System
setting
Creating
a screen
Validation
Transferring
a project
On Screen 2, you will create a screen with 2 functions: one is a frame where more
than one small screens are displayed by switching a tab; the other is to write values
to memories in the PLC.
Alarm Display
1. Alarm Display
Is used to switch a Low Alarm Display and a High Alarm Display by pressing the tab of the
Frame function.
Alarm lamps are respectively allocated to bits of the PLC as shown in the table on page 4.
2. Present Value / Set Value
An object that displays the numeral value of an address is used to show the content of the
PLC memory as a present value.
3. Set Value/Transfer Button
Numeral Display & Input object lets the user to enter numeral values. In this manual, you
will create a screen where values entered by the user are saved in the NS’s internal
memory area and be transferred to the PLC memory areas by pressing the Transfer button.
Present Value / Set Value
Transfer Button
Page 11
Start up
CX-D
Creating a
new project
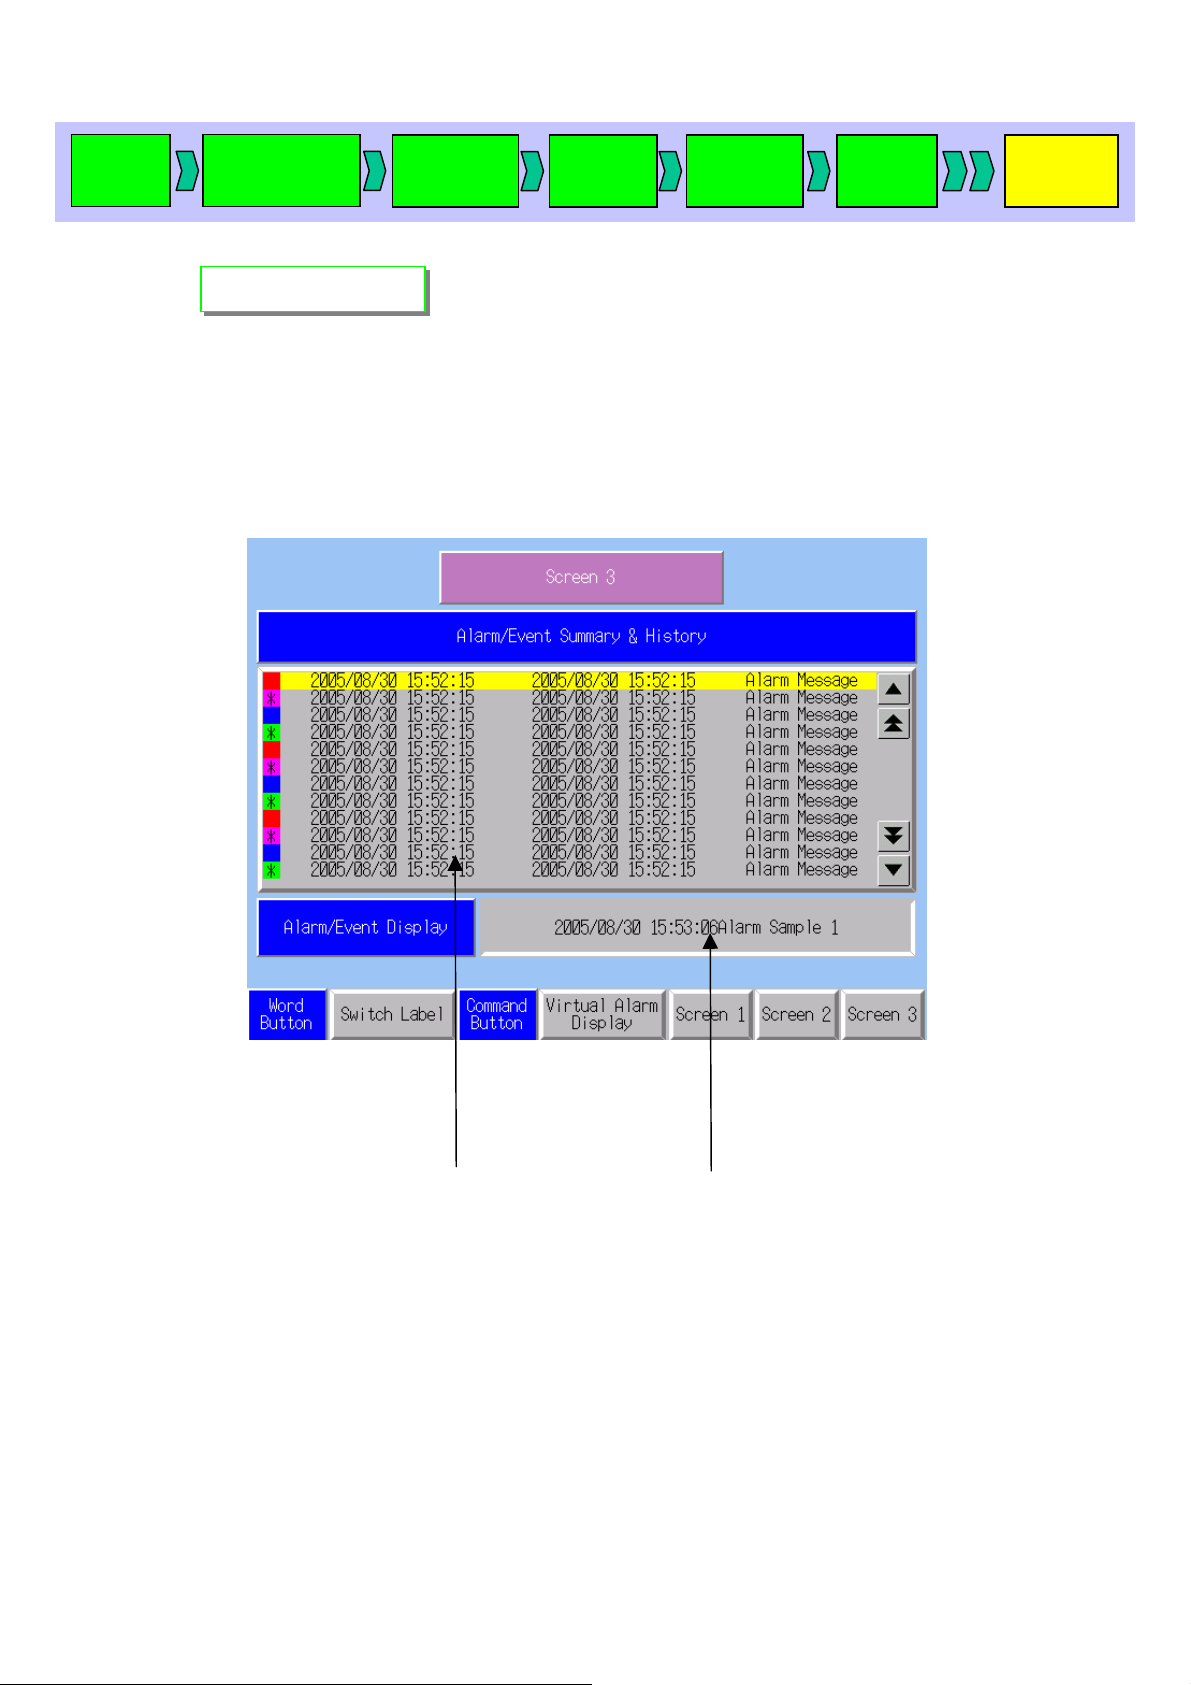
Screen 3
Screen 3
Project
property
System
setting
Creating
a screen
Validation
Transferring
NS has a function that shows the ON/OFF status of a specified bit as an alarm
history. On screen 3, you will generate a virtual alarm on the pop-up screen
(described later) and display its history.
a project
Alarm History
Latest Alarm
1. Alarm History
Displays a virtual alarm history that was occurred and cancelled on the pop-up
screen.
2. Latest Alarm
Displays the latest virtual alarm that has occurred on the pop-up screen.
Page 12
Start up
CX-D
Creating a
new project
Sheet 1
Sheet 1
Project
property
System
setting
Creating
a screen
Validation
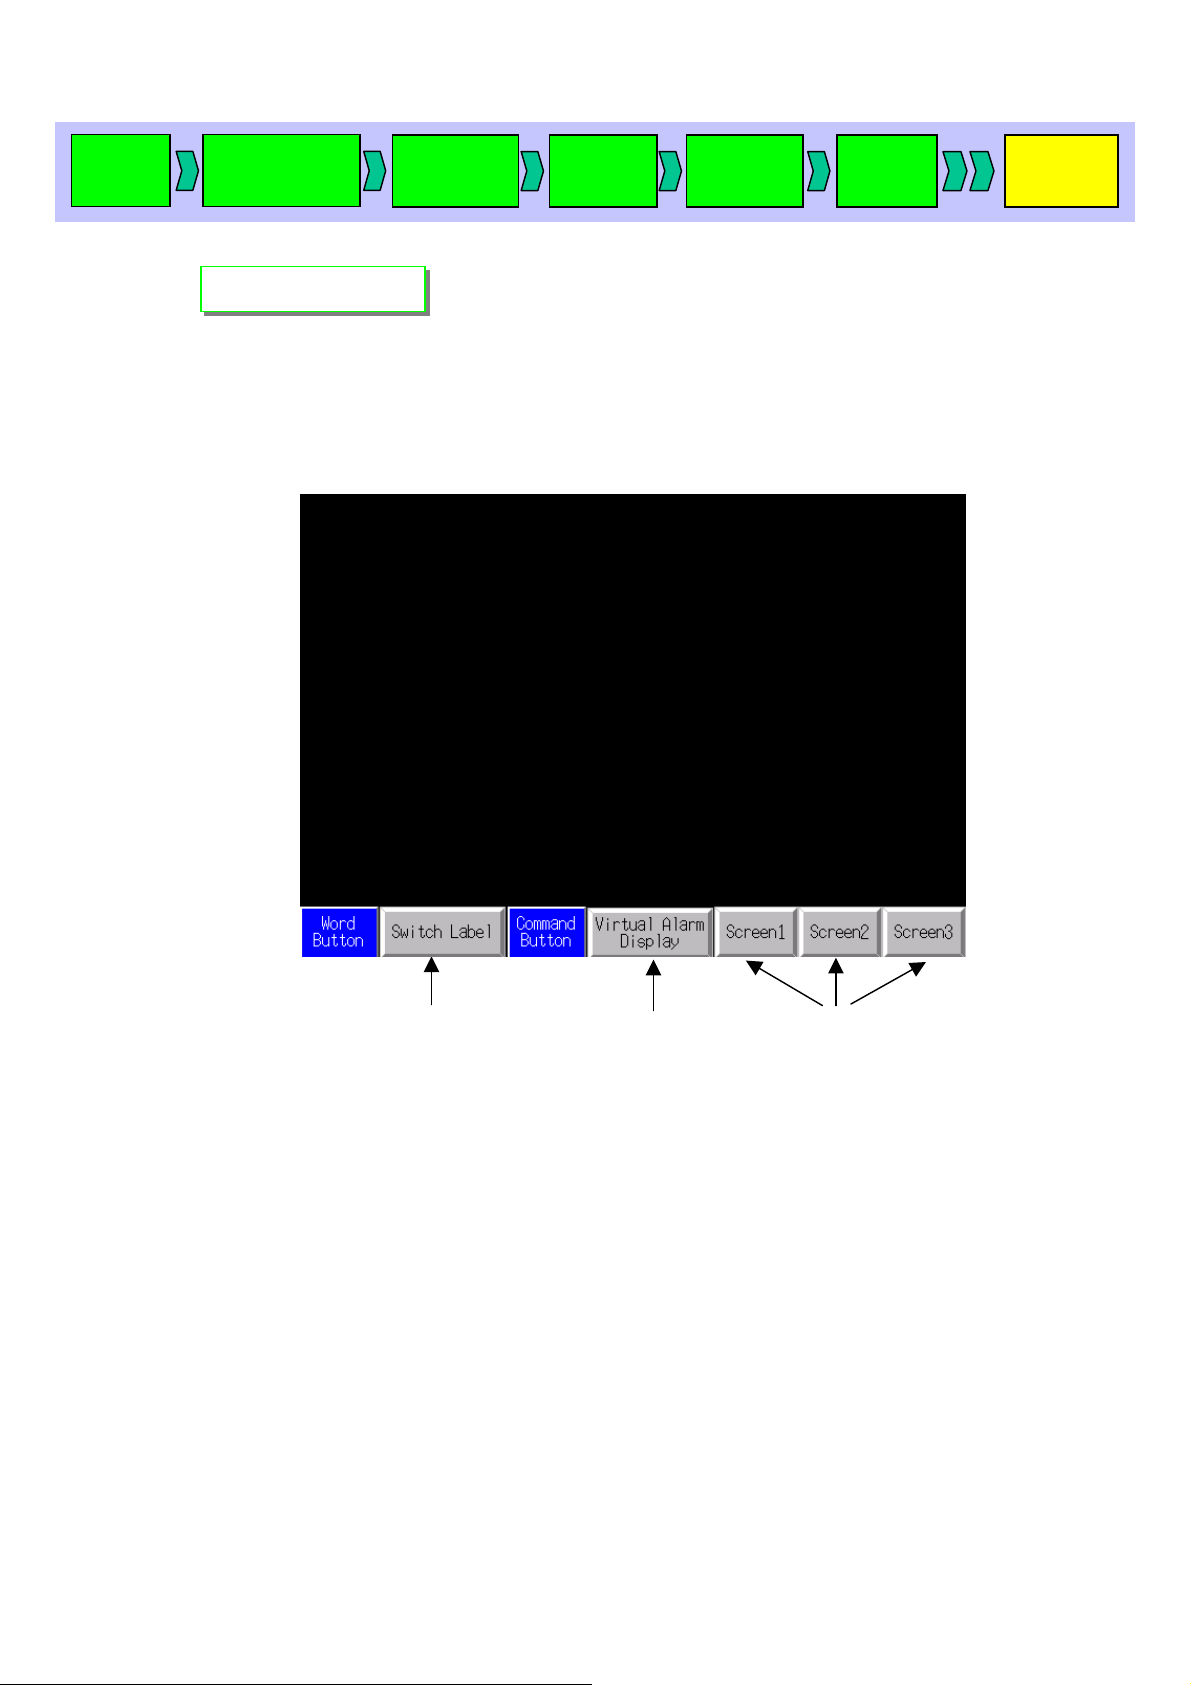
A sheet is a screen that contains objects commonly used on several screens.
In this manual, you will create a sheet with a “Switch Label” function to switch
labels between English and Dutch, a function to display a screen (to be
described later) for generating a virtual alarm, and a function to switch screens.
Transferring
a project
Switch Label Button
Virtual Alarm
Screen Switch Buttons
Display Button
1. Switch Label Button
Press this button to show a pop-up menu from which you can switch a label in
English and Dutch.
2. Virtual Alarm Display Button
Press this button to display the pop-up screen (to be described later) with a
Virtual Alarm Display button.
3. Screen Switch Button
Press a button to display the screen number (1 to 3) shown on the button .
Page 13

Start up
CX-D
Creating a
new project
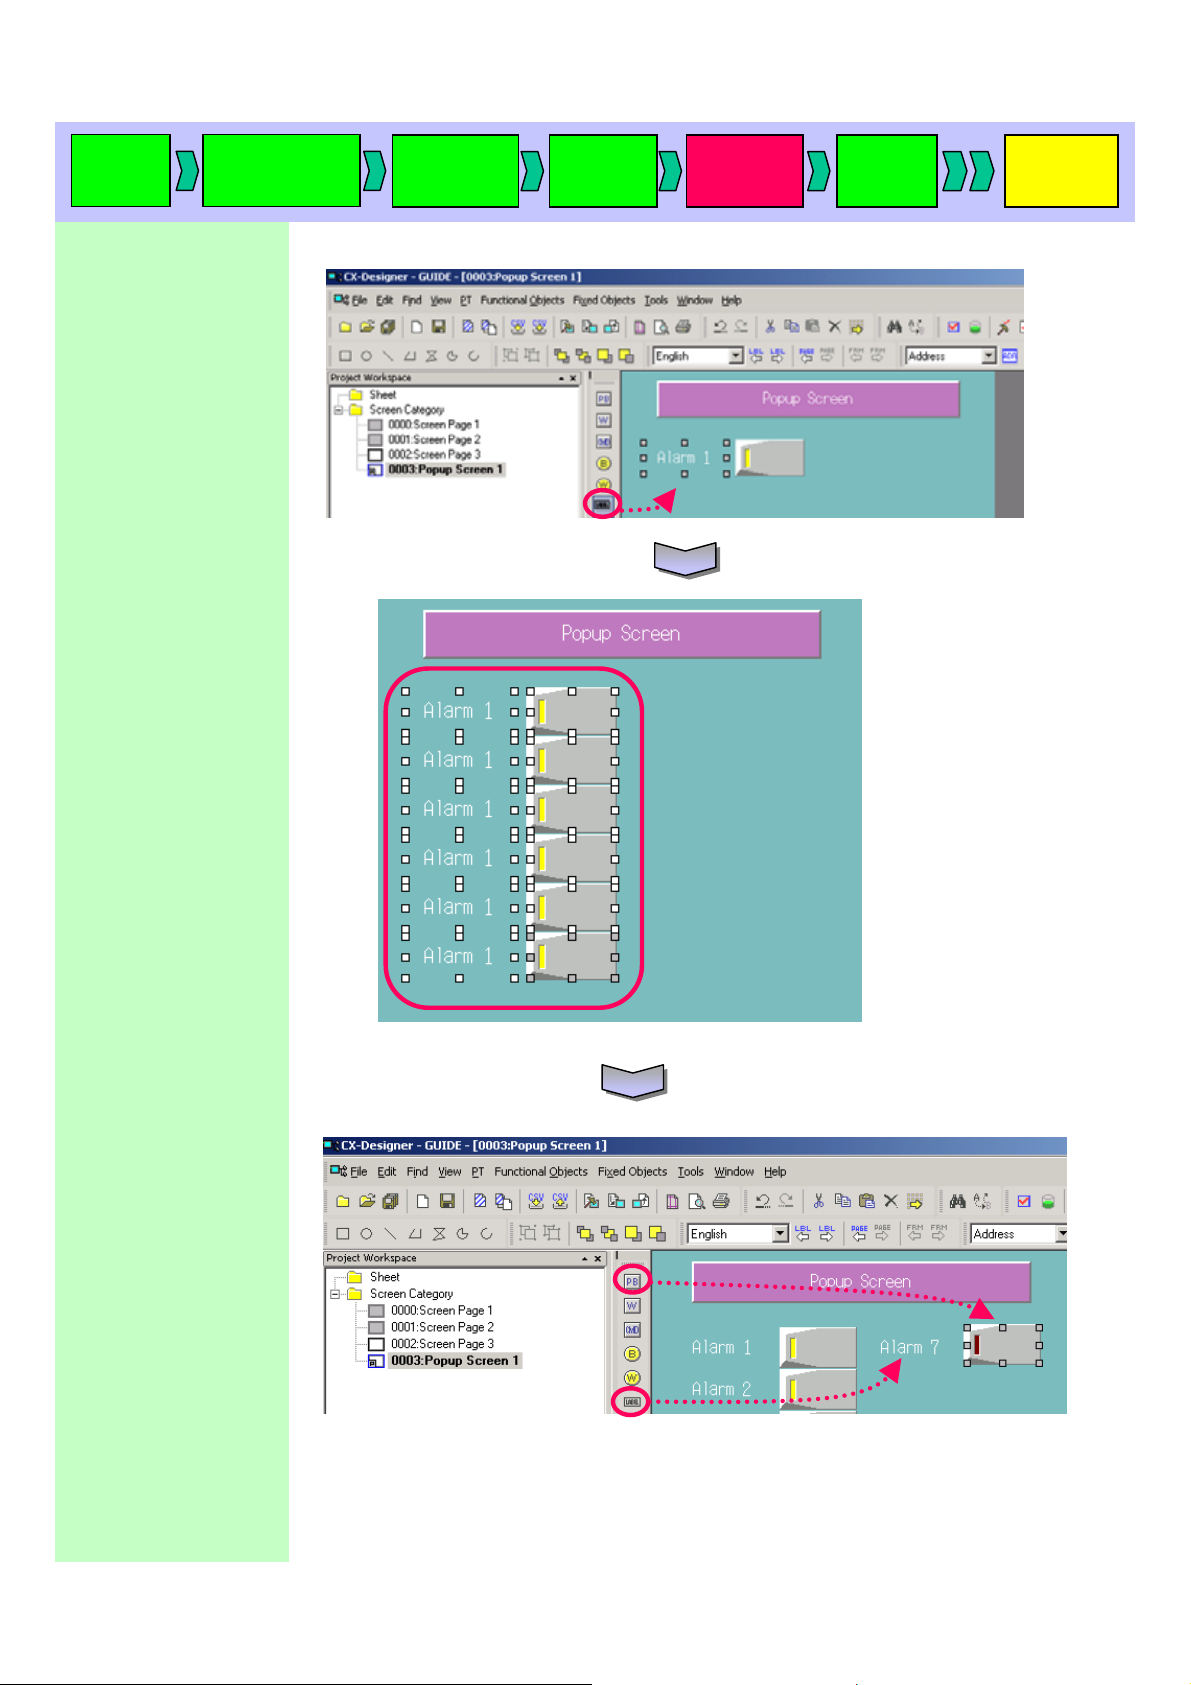
Pop-up Screen
Pop-up Screen
Project
property
System
setting
Creating
a screen
Validation
Transferring
A pop-up screen is a small screen that can be displayed as needed on top of
another screen.
You will create a pop-up screen that turns ON/OFF the PLC allocation
addresses 00001.00 to 0001.05, and 00002.00 to 0002.05 and generate/cancel
virtual alarms.
a project
Low Alarm buttons
Close button High Alarm button
1. Low Alarm button
Press this button to switch ON/OFF (Occurrence/Recovery).
2. High Alarm button
Press this button to switch ON/OFF (Occurrence/Recovery).
3. Close button
Closes the pop-up screen.
Page 14
Start up
CX-D
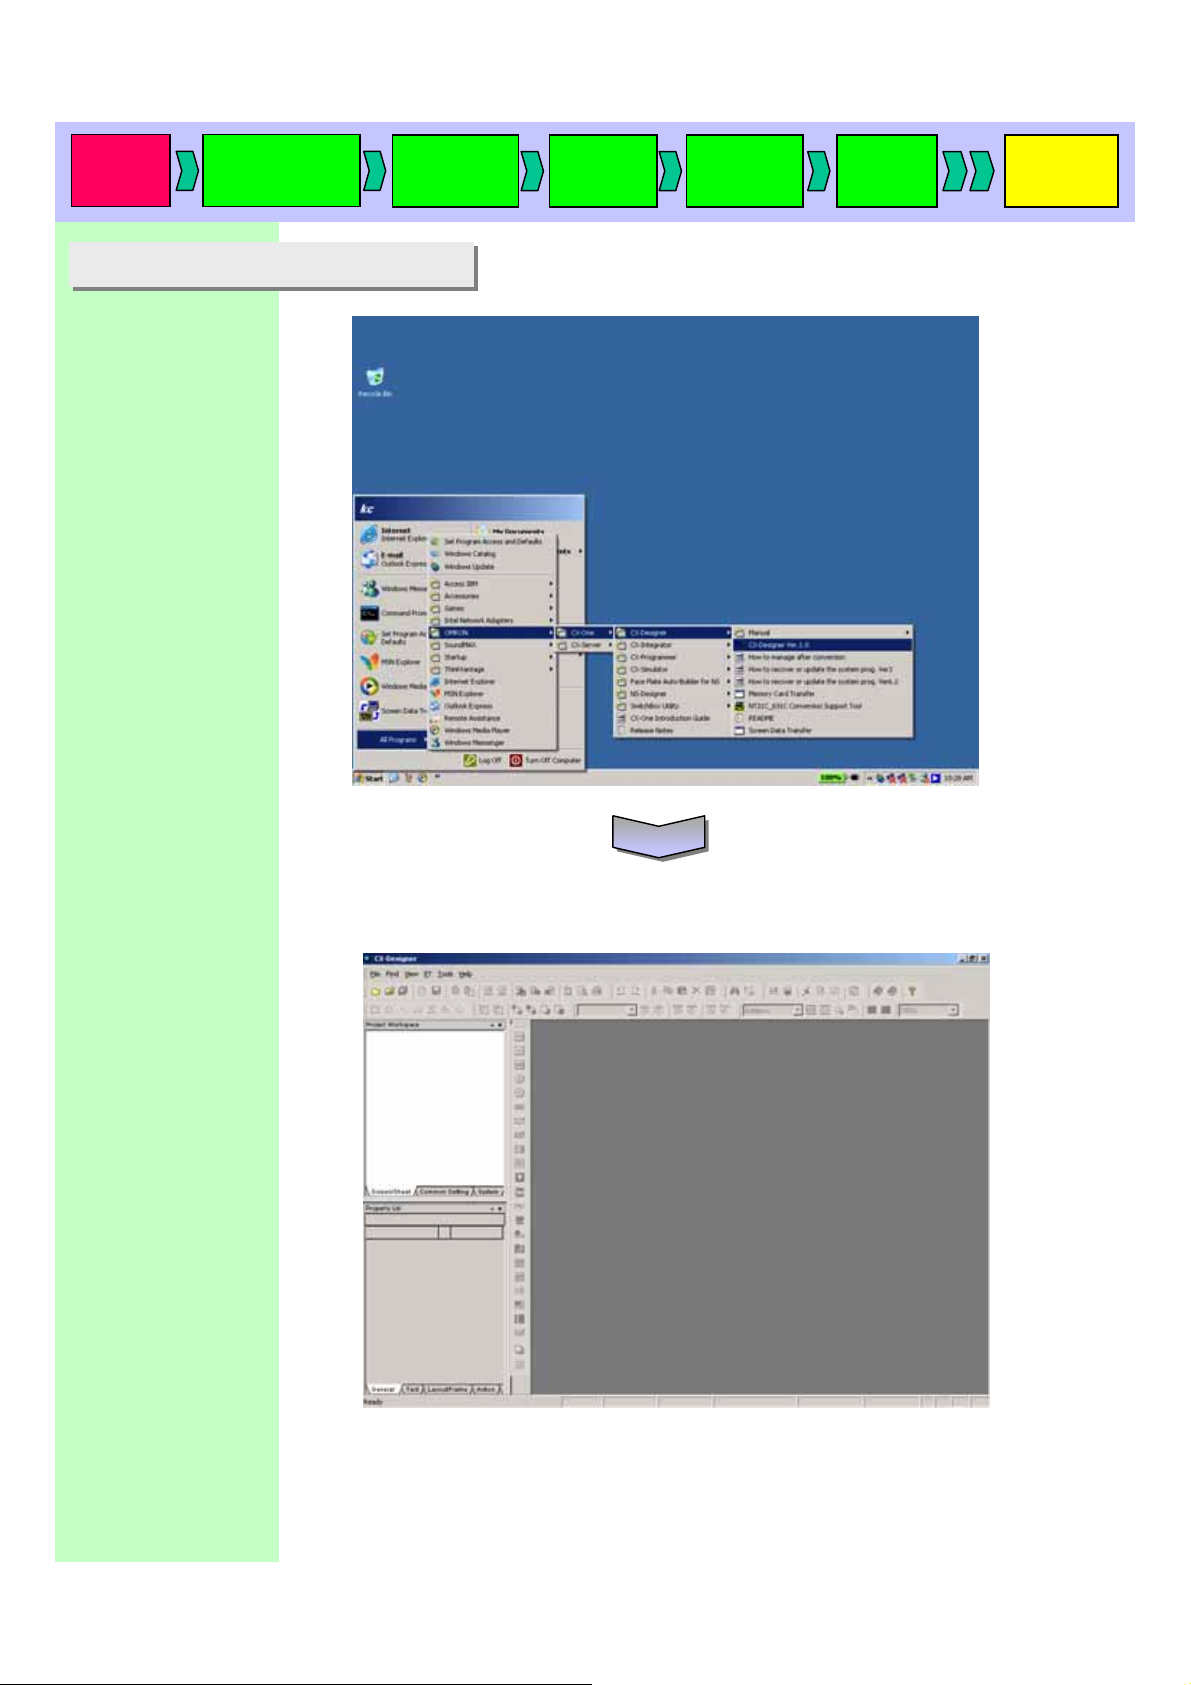
2. Starting up the CX-Designer
2. Starting up the CX-Designer
Select [Start]-[Program][Omron]-[CX-One]
-[CX-Designer]
-[CX-Designer Ver. xx]
(CX-Designer Ver. 1.0
is used here.)
Creating a
new project
Project
property
System
setting
Creating
a screen
Validation
Transferring
a project
When the CX-Designer is started up, the main window will appear.
Page 15
Start up
CX-D
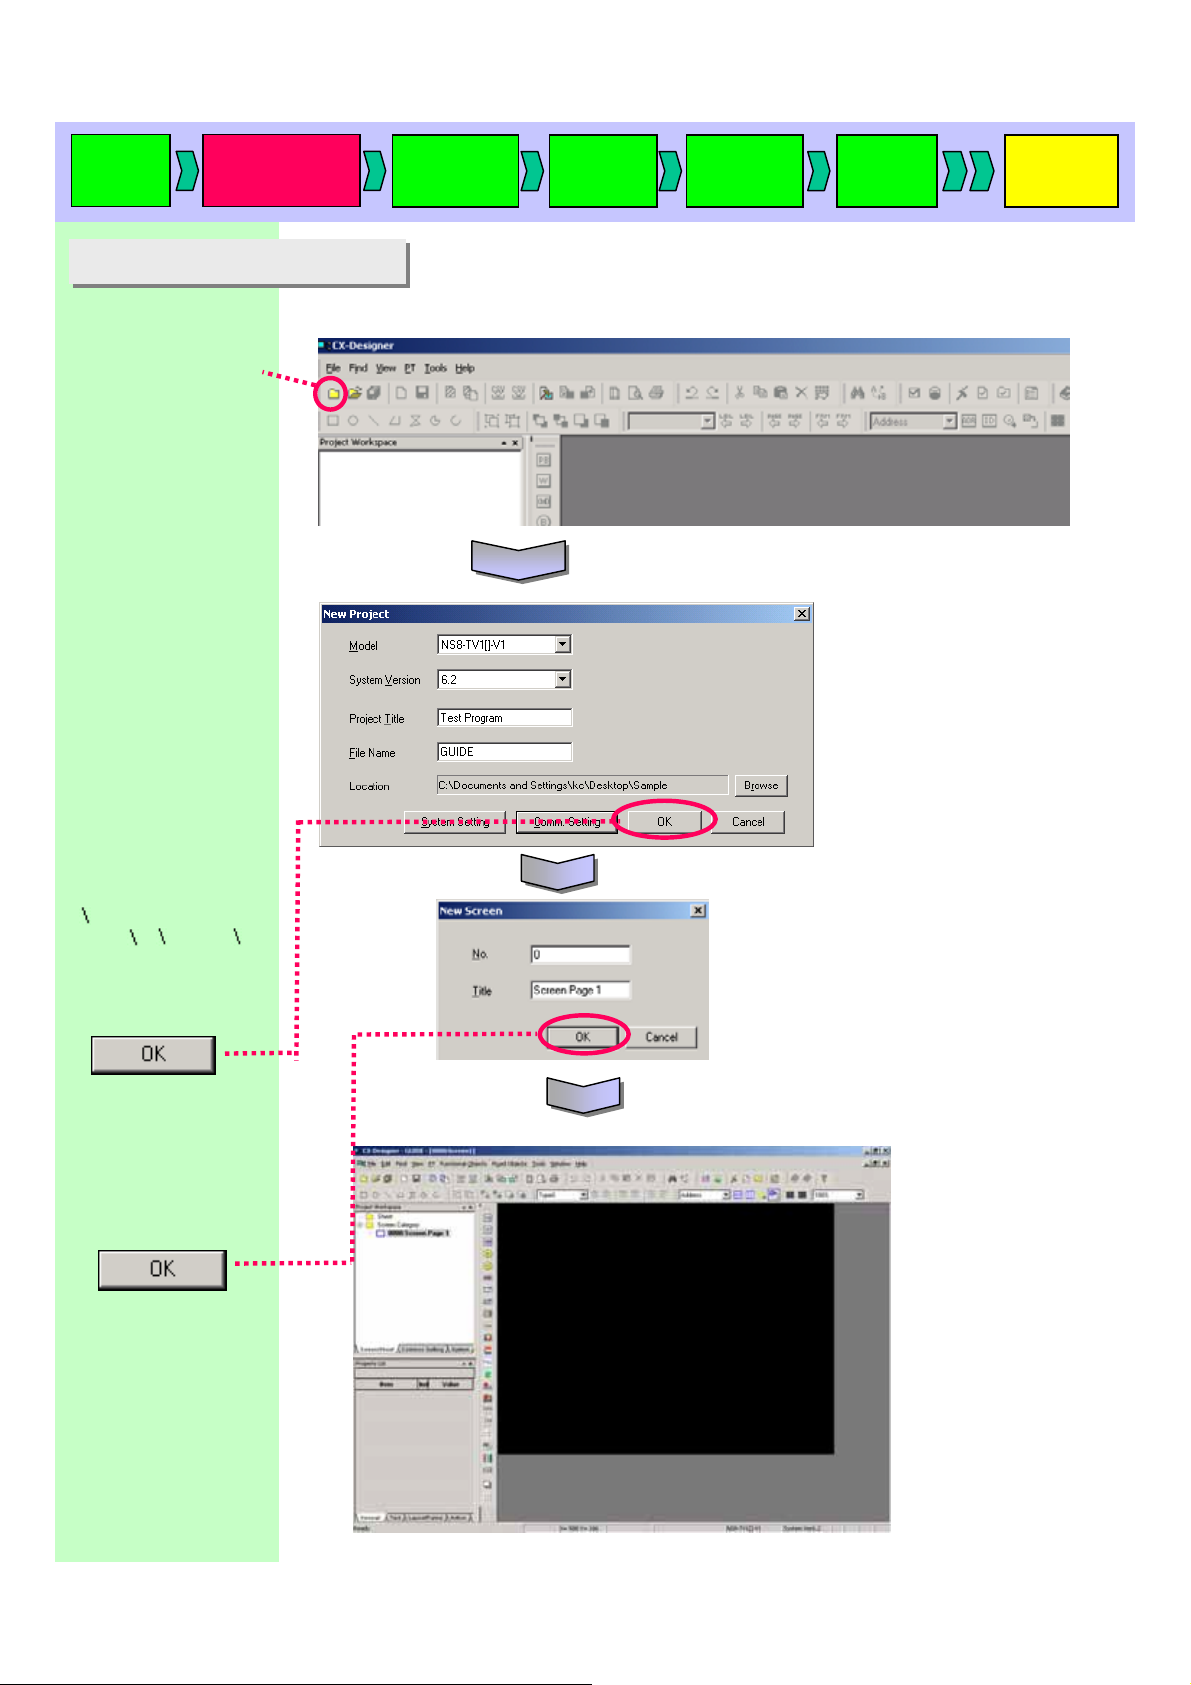
3. Creating a new project
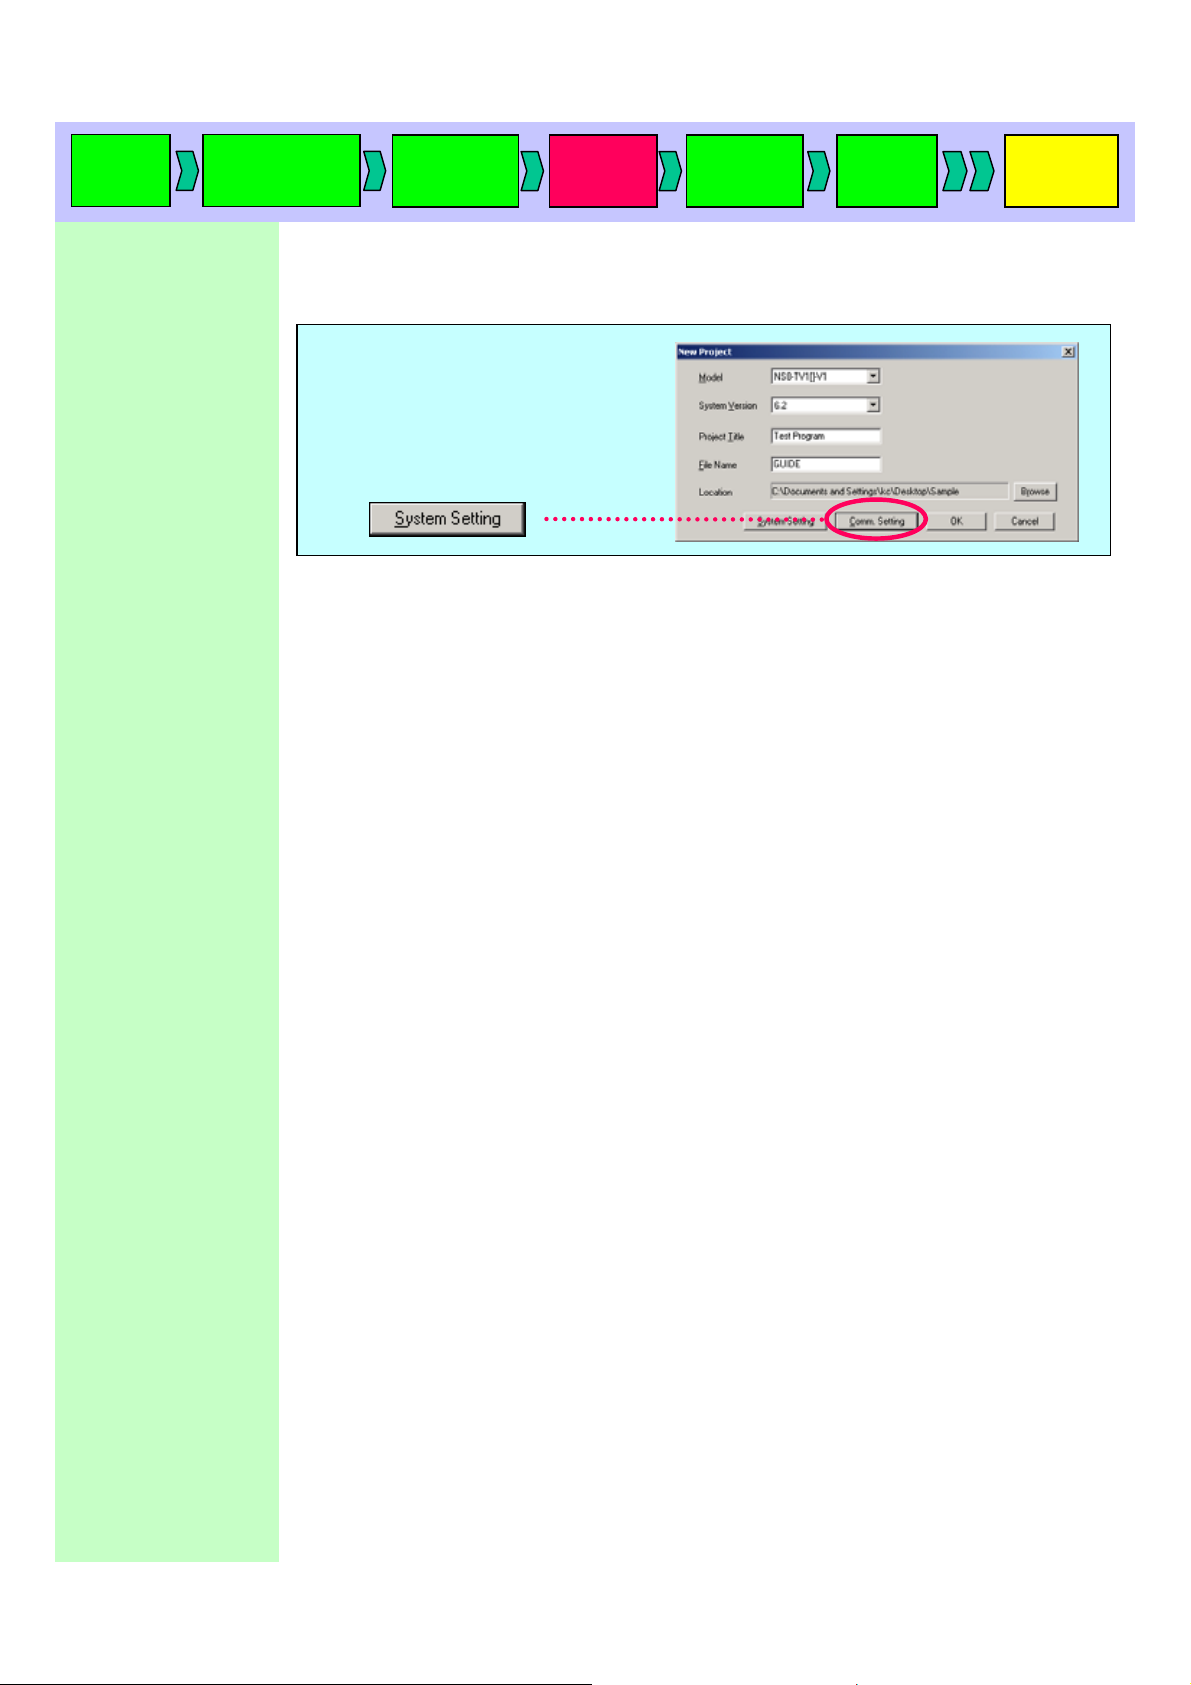
3. Creating a new project
Creating a
new project
Click [New project] button on the CX-Designer.
Left-click the icon
Project
property
System
setting
Creating
a screen
Validation
Transferring
a project
Set as follow:
[Model name]
NS8-TS1[]-V1
[System Version]
System Ver.6.2 (* Note)
[Project Title]
Enter a title.
“Test Program” is
entered here.
[File Name]
Enter a file name.
“GUIDE” is entered here.
[Location]
Specifies a location
where the file is saved.
The file is saved in
[C¥Documents and
Settings¥kc¥Desktop¥Sam
ple] here.
Click
* Note the following points when
you enter the project name.
-A file name can be as long as
42 characters including extension
(.IPP).
-A file name may use any
number or letter, underscore(_),
and dollar mark($).
If project name is not entered
correctly( e.g. using wide size
characters etc…)
the error occurs when
transferring data.
It is now ready to create a screen.
Enter a title name.
“Screen 1” is
entered here.
Click
*System Ver.6.2 is used here.
Select [System Version]
according to yours
Page 16
Start up
CX-D
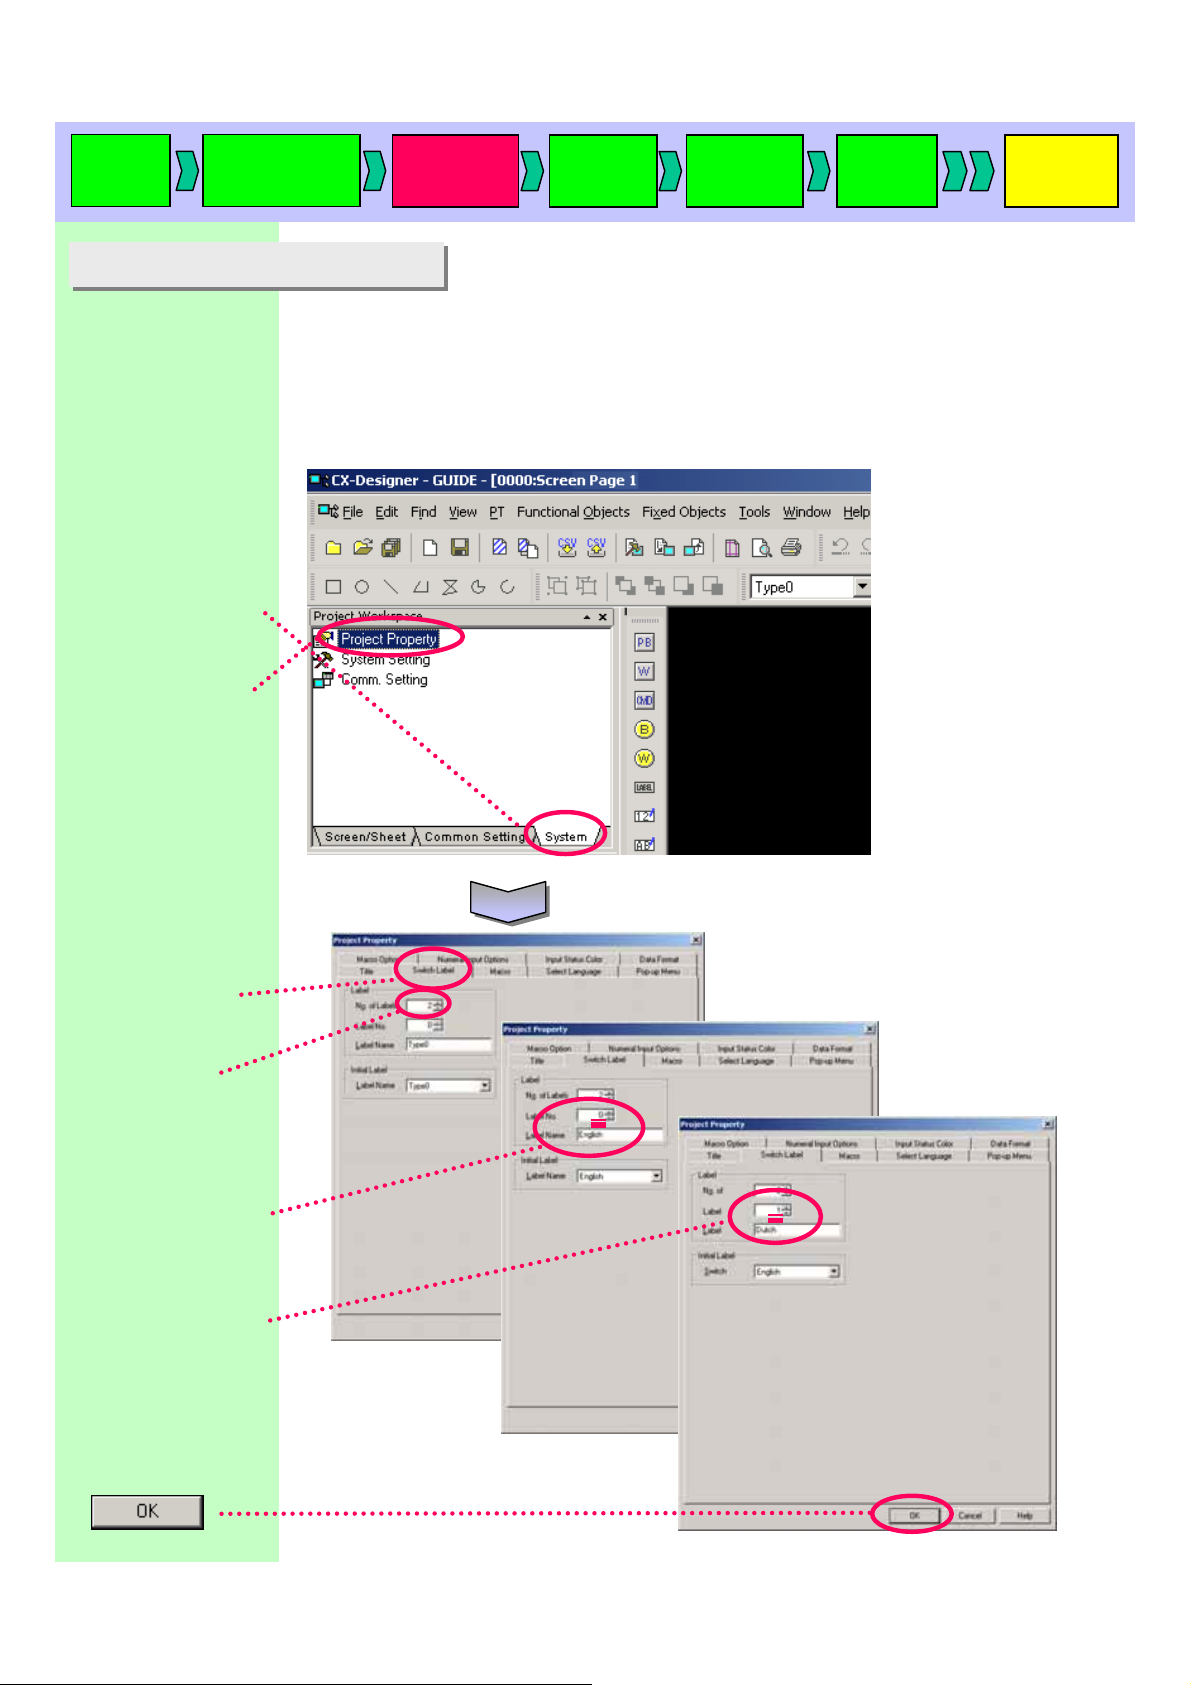
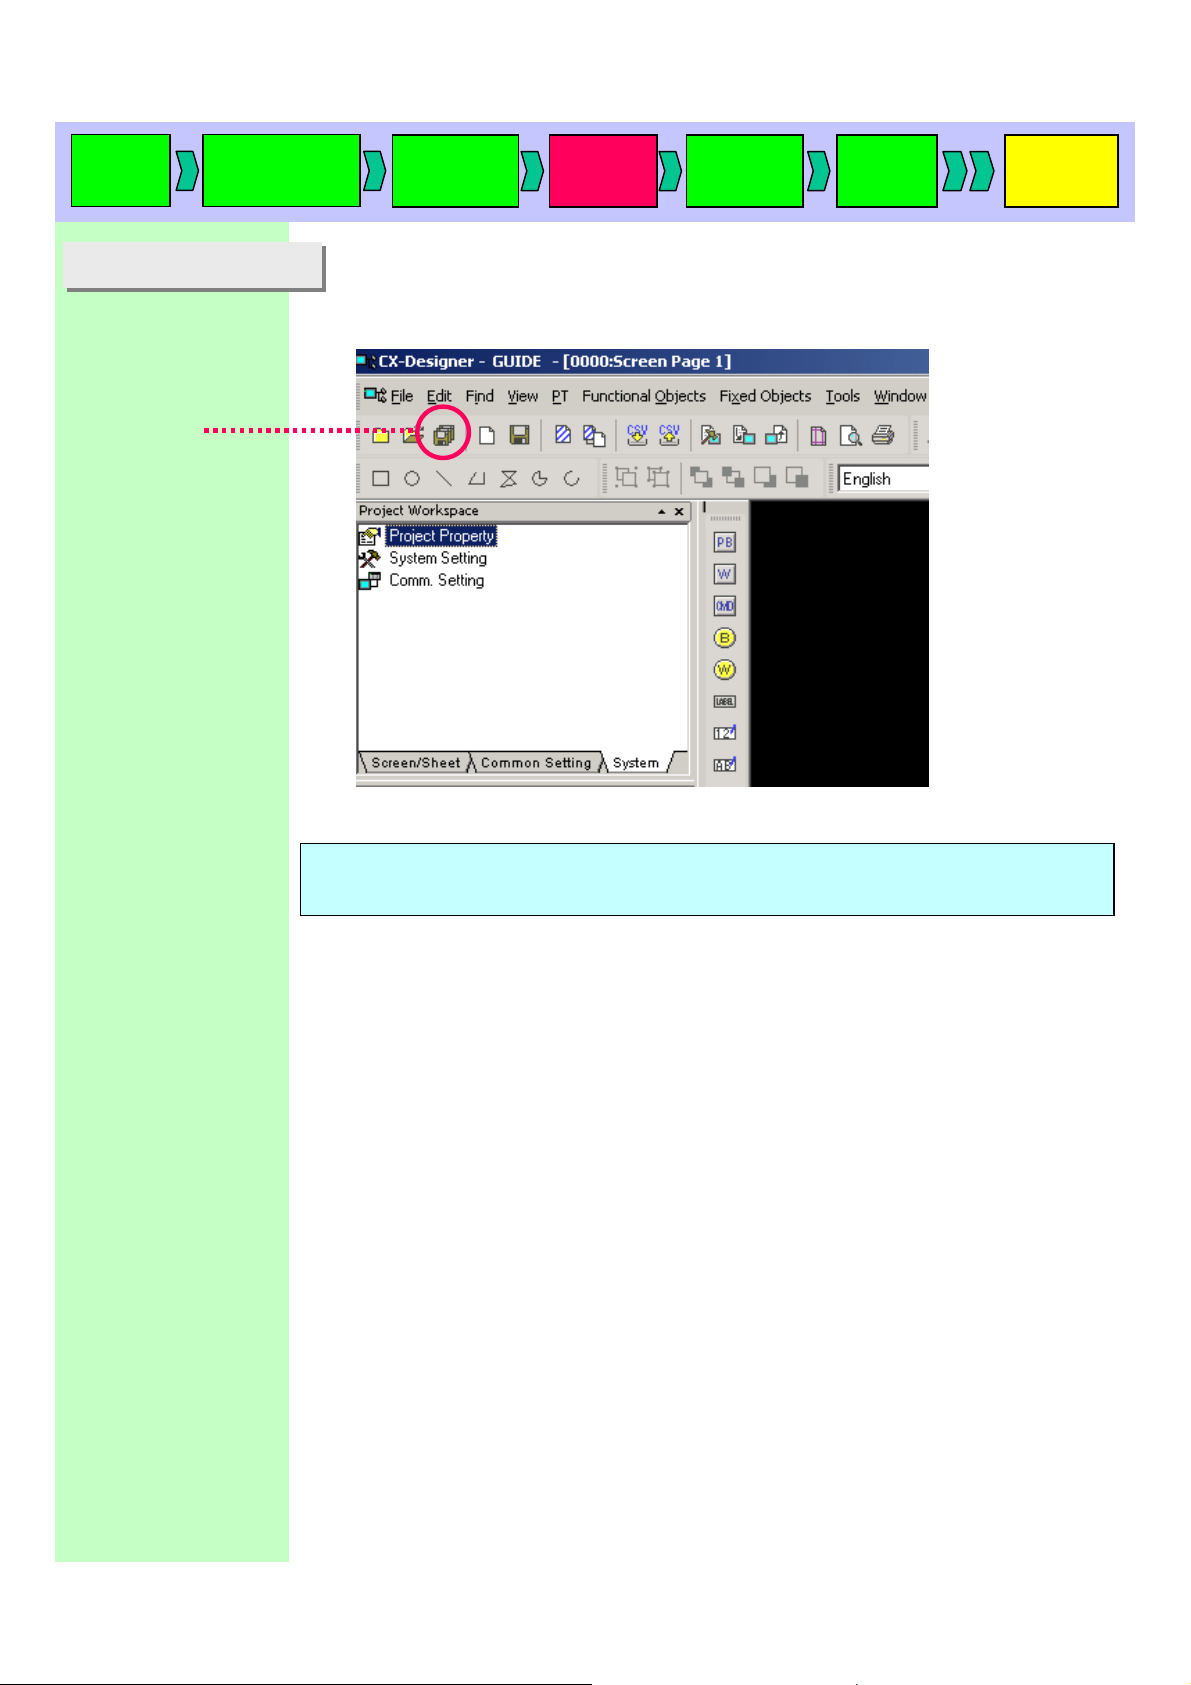
4. Setting project properties
4. Setting project properties
Click the [System] tab
in the project workspace.
Double-click [Project
Property]
Creating a
new project
Making settings for a project data.
In this section, you will make a project that is able to show two
language labels – English and Dutch by switching them. Here, it is necessary
to set a project property for a label switching function is required.
Project
property
System
setting
Creating
a screen
Validation
Transferring
a project
Click the [Switch
Label] tab.
Set 2 for No. of
Labels.
Set 0 to Label No. and
enter English
as a label name.
Set 1 to Label No. and
enter Dutch
as a label name.
Click
Page 17

Start up
CX-D
Click [Yes]
Click [Yes to All]
Creating a
new project
Project
property
System
setting
Creating
a screen
Validation
Transferring
a project
Page 18

Start up
CX-D
5 Communications settings
5 Communications settings
Click
[System] in the Project
Workspace.
Double-click
[Comm. Setting].
Creating a
new project
Making communications settings for the NS hardware to connect with the PLC.
In this manual, you will connect th e NS to the PLC thru Serial port A.
Project
property
System
setting
Creating
a screen
Validation
Transferring
a project
Click [Serial Port A]
Set as follow:
Serial Port
![PLC]
Host Name
![HOST1]
Protocol
![NT Link(1:N)]
Comm. Speed
![High-speed]
[Comm.-All], [Ethernet],
[Controller Link] settings
are not required.
Click
<Note>
You can make communication
settings when creating a new project.
Click [Comm. Setting] in the New
Project dialog box as described in 3
“Creating a new project”.
Page 19
Start up
CX-D
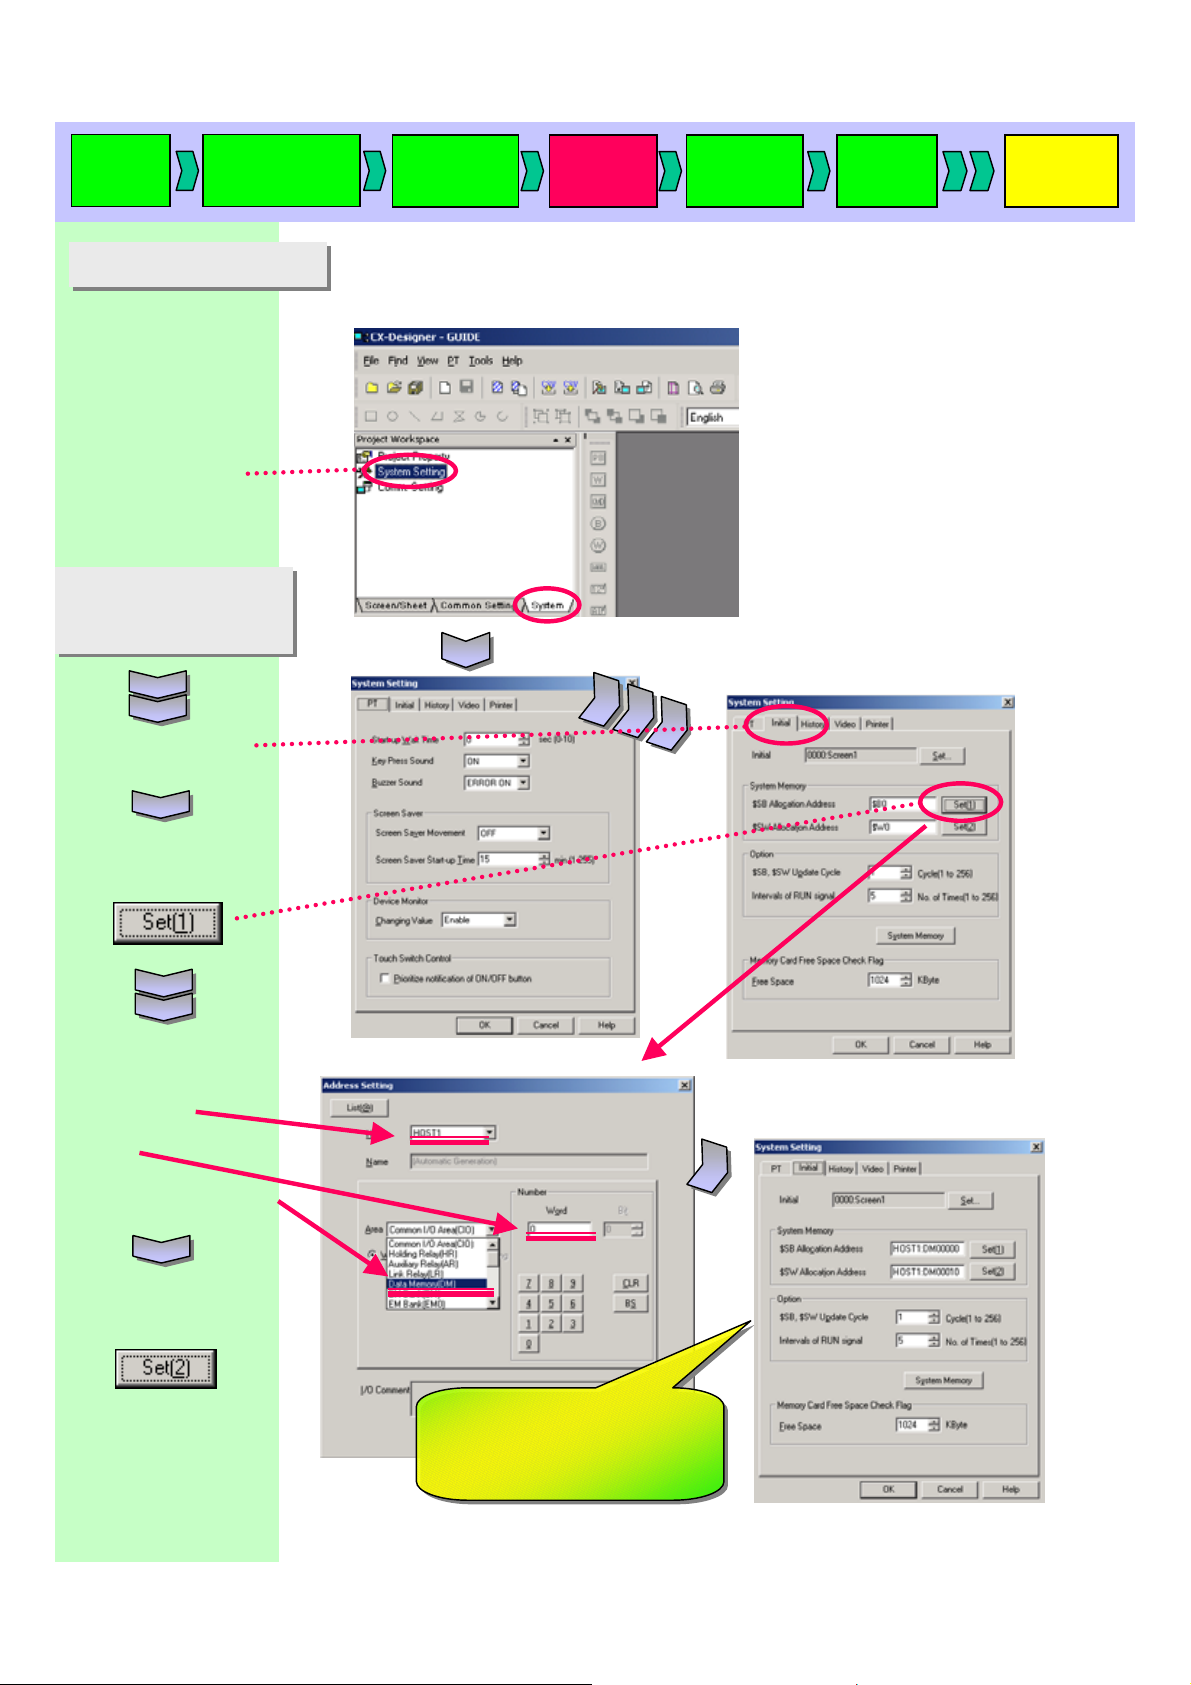
6. System settings
6. System settings
Click
[System]
In the “Project
Workspace”.
Double-click
[System Setting].
Allocate a word to
Allocate a word to
the PLC for controlling
the PLC for controlling
screen No.
screen No.
Creating a
new project
Project
property
Allocating NS system memory areas to the PLC.
System memory area is memory area that is used to control the NS from the
host (PLC) or to notify operation status from the NS to the host.
In this manual, you will allocate system memory areas to the PLC.
System
setting
Creating
a screen
Validation
Transferring
a project
Click the [Initial] tab
Click
Set as follow:
Host name
! [HOST 1]
Word
! “0”
Area Type
! [Data Memory (DM)]
Set address in the same
way as [Set(1)]
Complete
Host name
! [HOST 1]
Word
! “10”
Area Type
! [Data Memory (DM)]
With this setting, a present
With this setting, a present
value of DM0010CH is shown
value of DM0010CH is shown
on the PT.
on the PT.
Page 20
Start up
CX-D
Creating a
new project
<Note>
You can make system settings when
creating a new project.
Click [System Setting] in the New
Project dialog box as described in 3
“Creating a new project”.
Project
property
System
setting
Creating
a screen
Validation
Transferring
a project
Page 21
Start up
CX-D
Creating a
new project
Project
property
System
setting
Creating
a screen
Validation
Transferring
a project
7. Saving a project
7. Saving a project
Click the icon.
Saving a whole project.
In this manual, you will save the project’s system settings and screens/sheets
all together.
<Note>
We recommend to save projects and screens frequently.
Page 22
Start up
CX-D
Creating a
new project
Project
property
System
setting
Creating
a screen
Validation
Transferring
a project
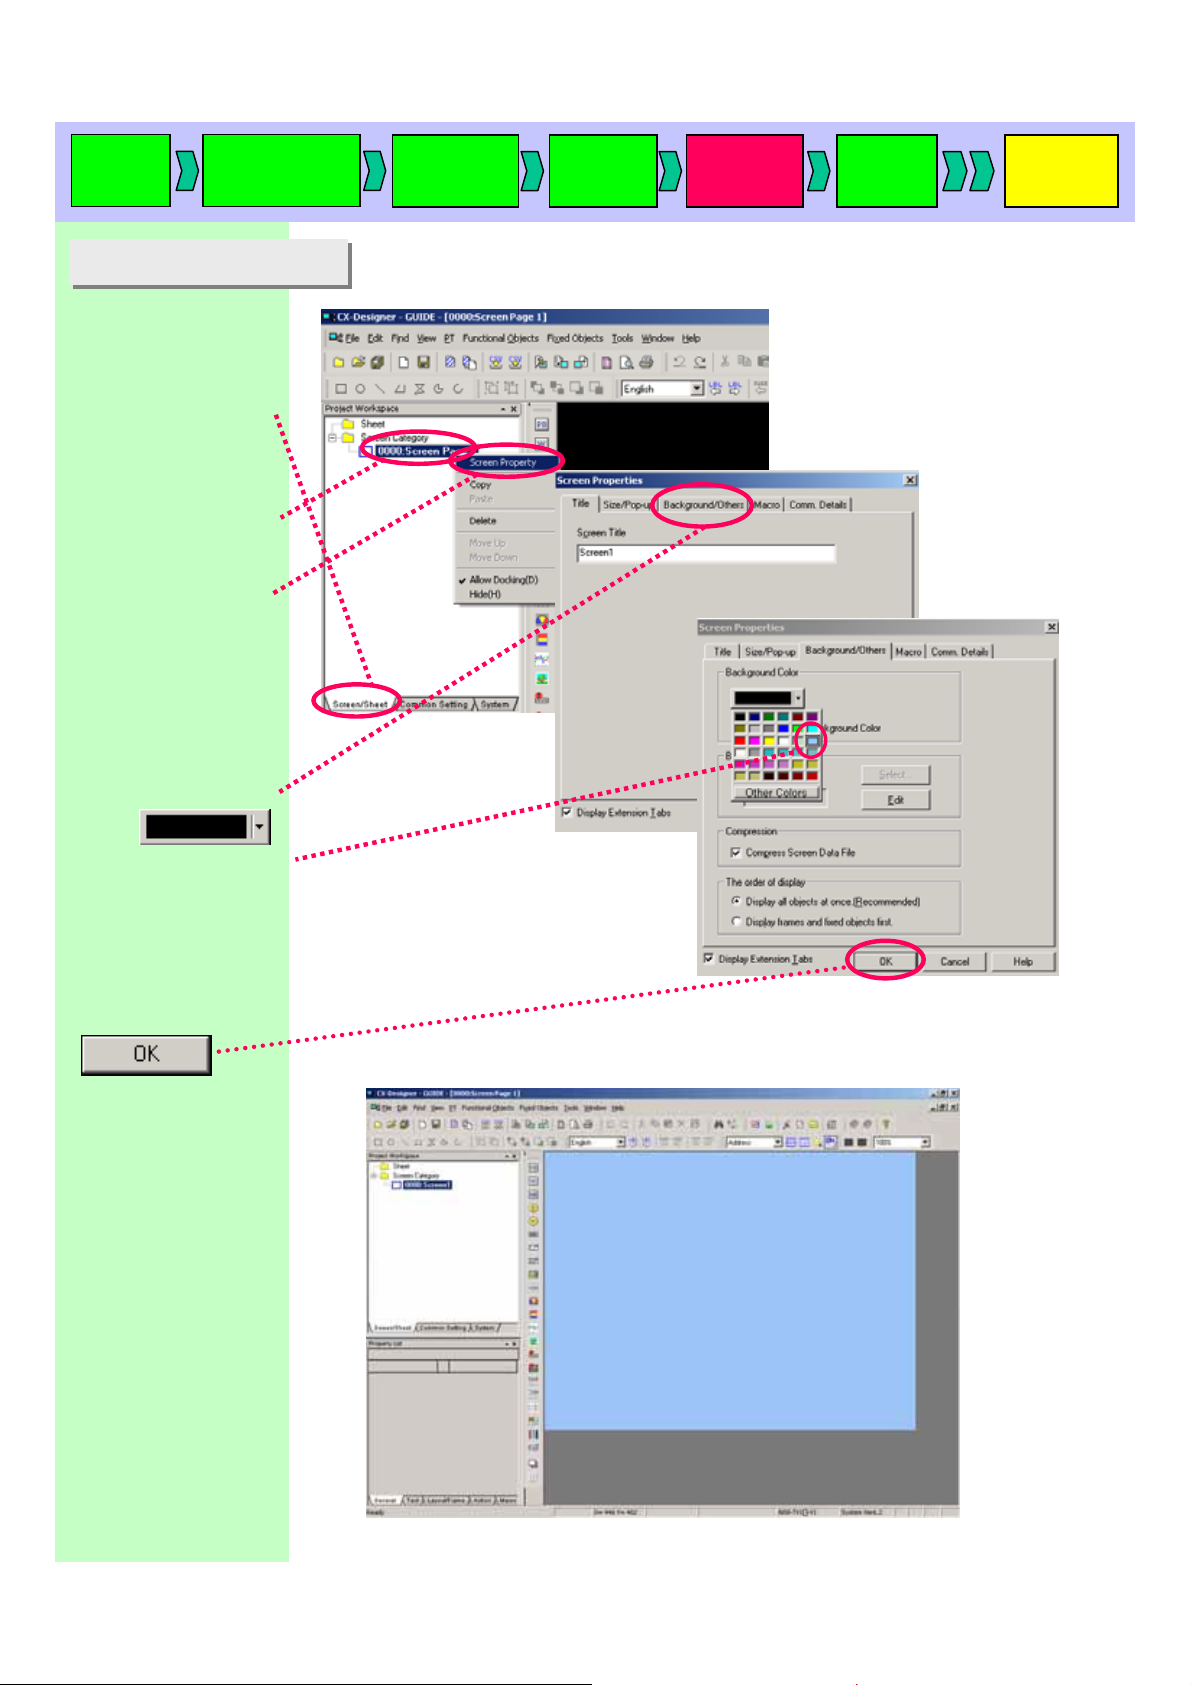
8. Screen properties
8. Screen properties
Click the [Screen/Sheet]
tab in the project
workspace.
Right-click the
[0000: Screen Page 1] to
display the menu.
Click [Screen Property]
on the menu.
The screen property
dialog appears.
Click the
[Background/Other] tab.
Click
to display the color
selection dialog and select
a background color.
Making basic settings when creating a new screen.
In this manual, you will change the screen background color.
Click
Completed image
Page 23
Start up
CX-D
Creating a
new project
Project
property
System
setting
Creating
a screen
Validation
Transferring
a project
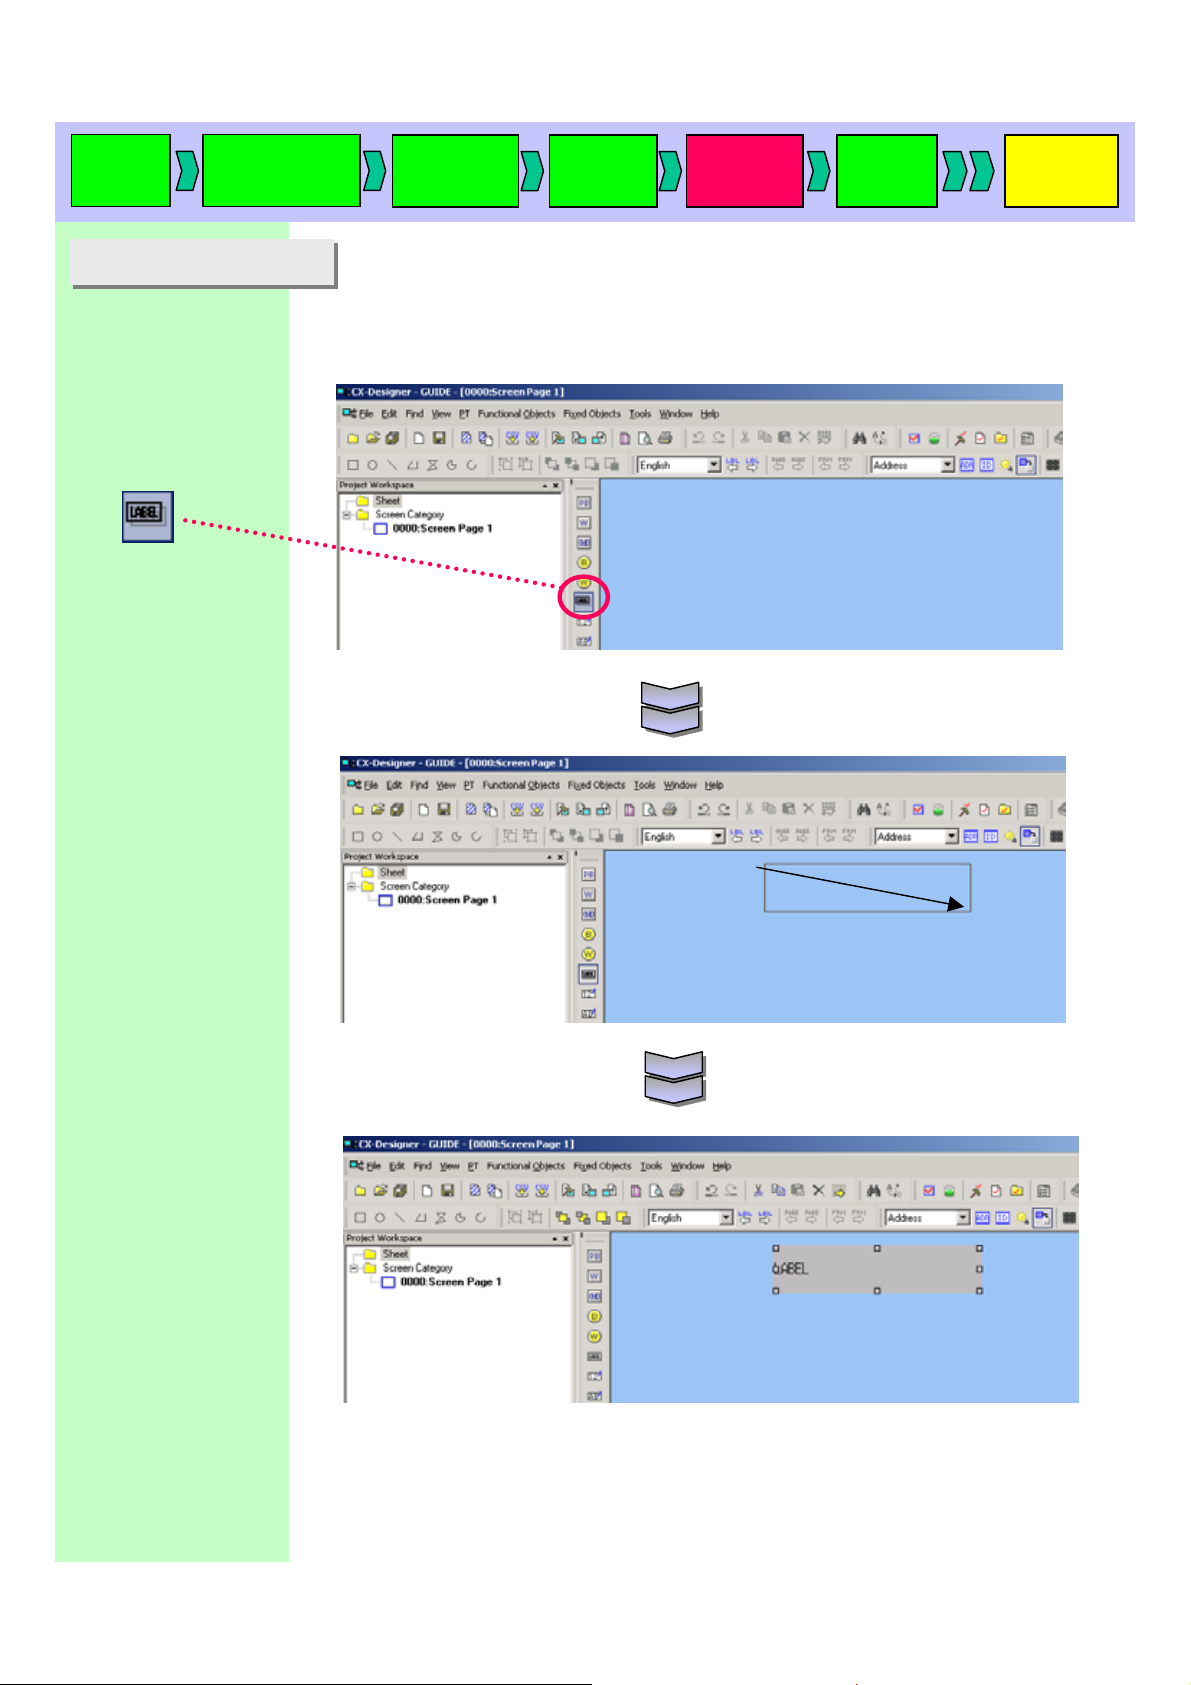
9. Displaying a text
9. Displaying a text
Click the [Text] icon
on the list.
Drag & drop the mouse
on the editing screen till
you get the size you
want. (The size and
position of the object can
be changed later.)
Creating a text object on the screen. A text object is used to display a fixed
character string.
In this manual, it is used for a string character that displays a screen title or item
name and does not have a special function.
A new text object is
created as shown
on the right.
Page 24
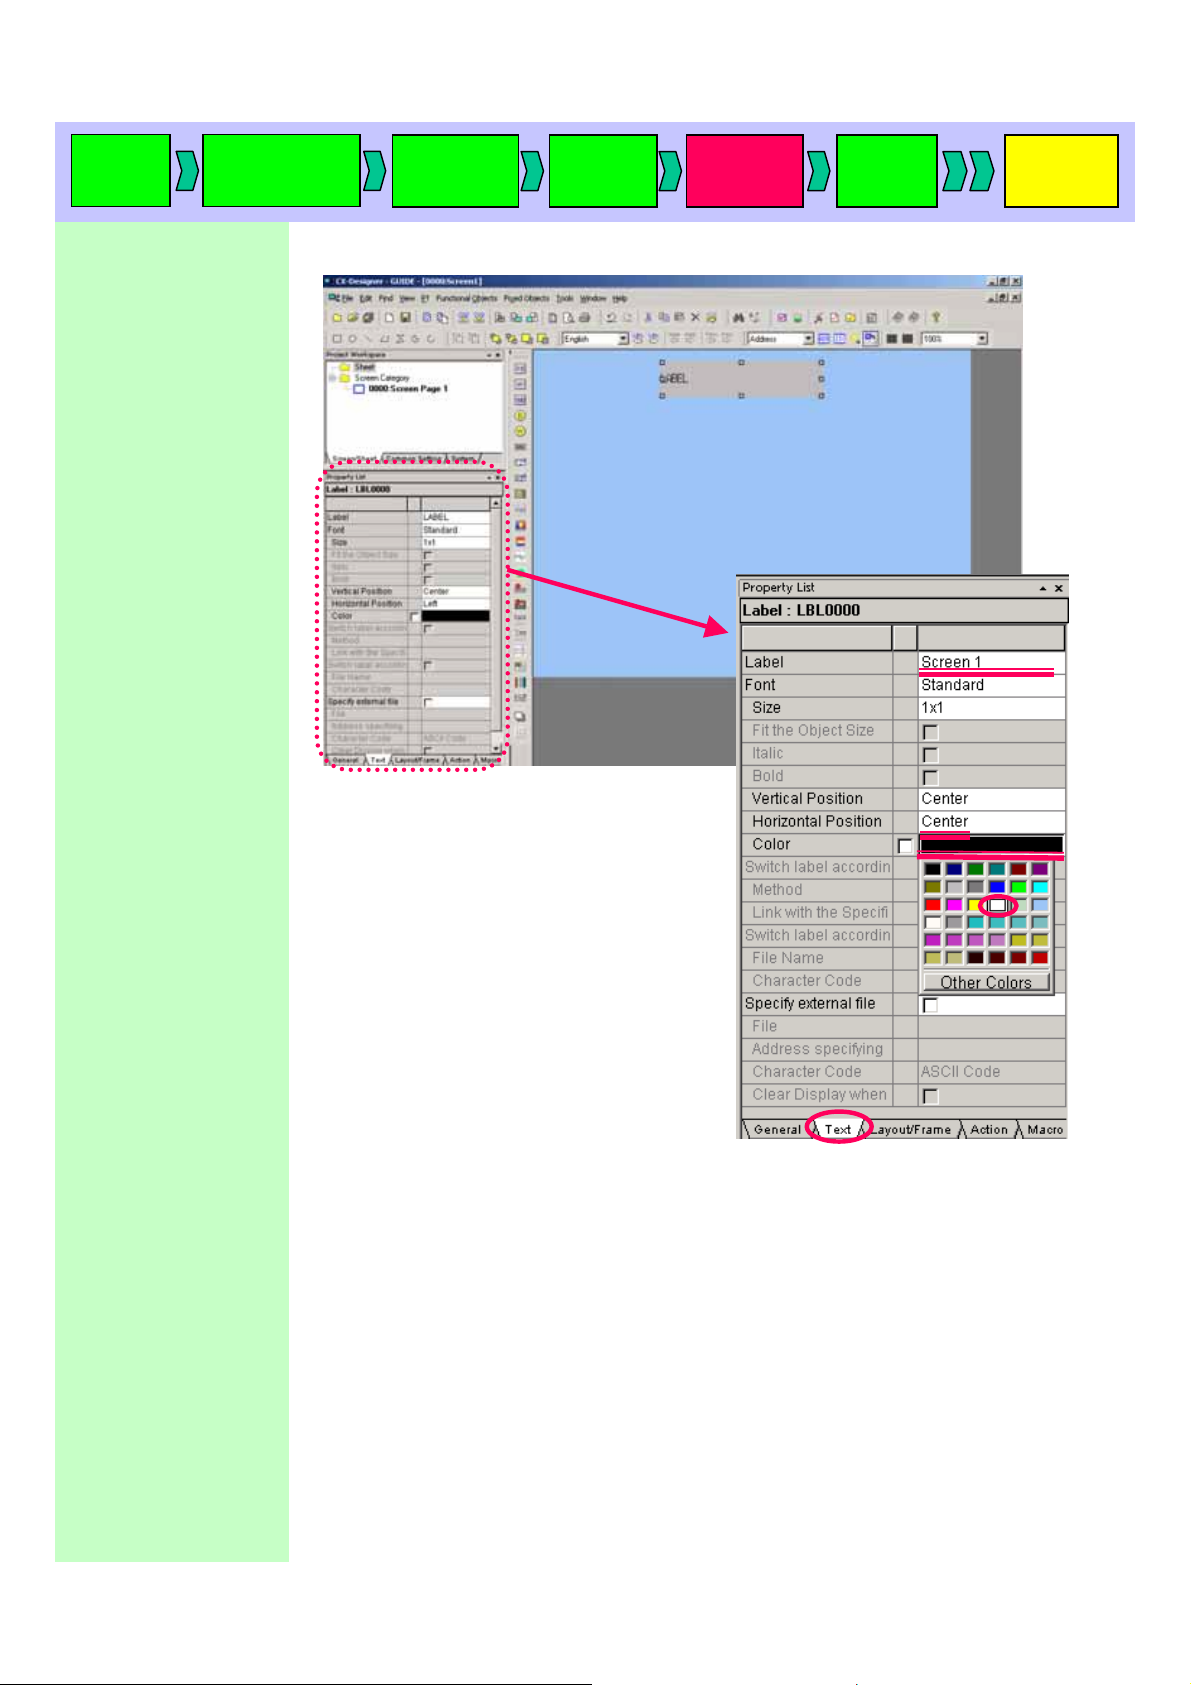
Start up
CX-D
The property list is
displayed by clicking
the text object to
display.
Click the property list
and set as follow:
Text tab
[Label]
! “Screen1”
Vertical position
![Center]
Horizontal position
![Center]
Creating a
new project
Project
property
System
setting
Creating
a screen
Validation
Transferring
a project
Select a color.
Page 25
Start up
CX-D
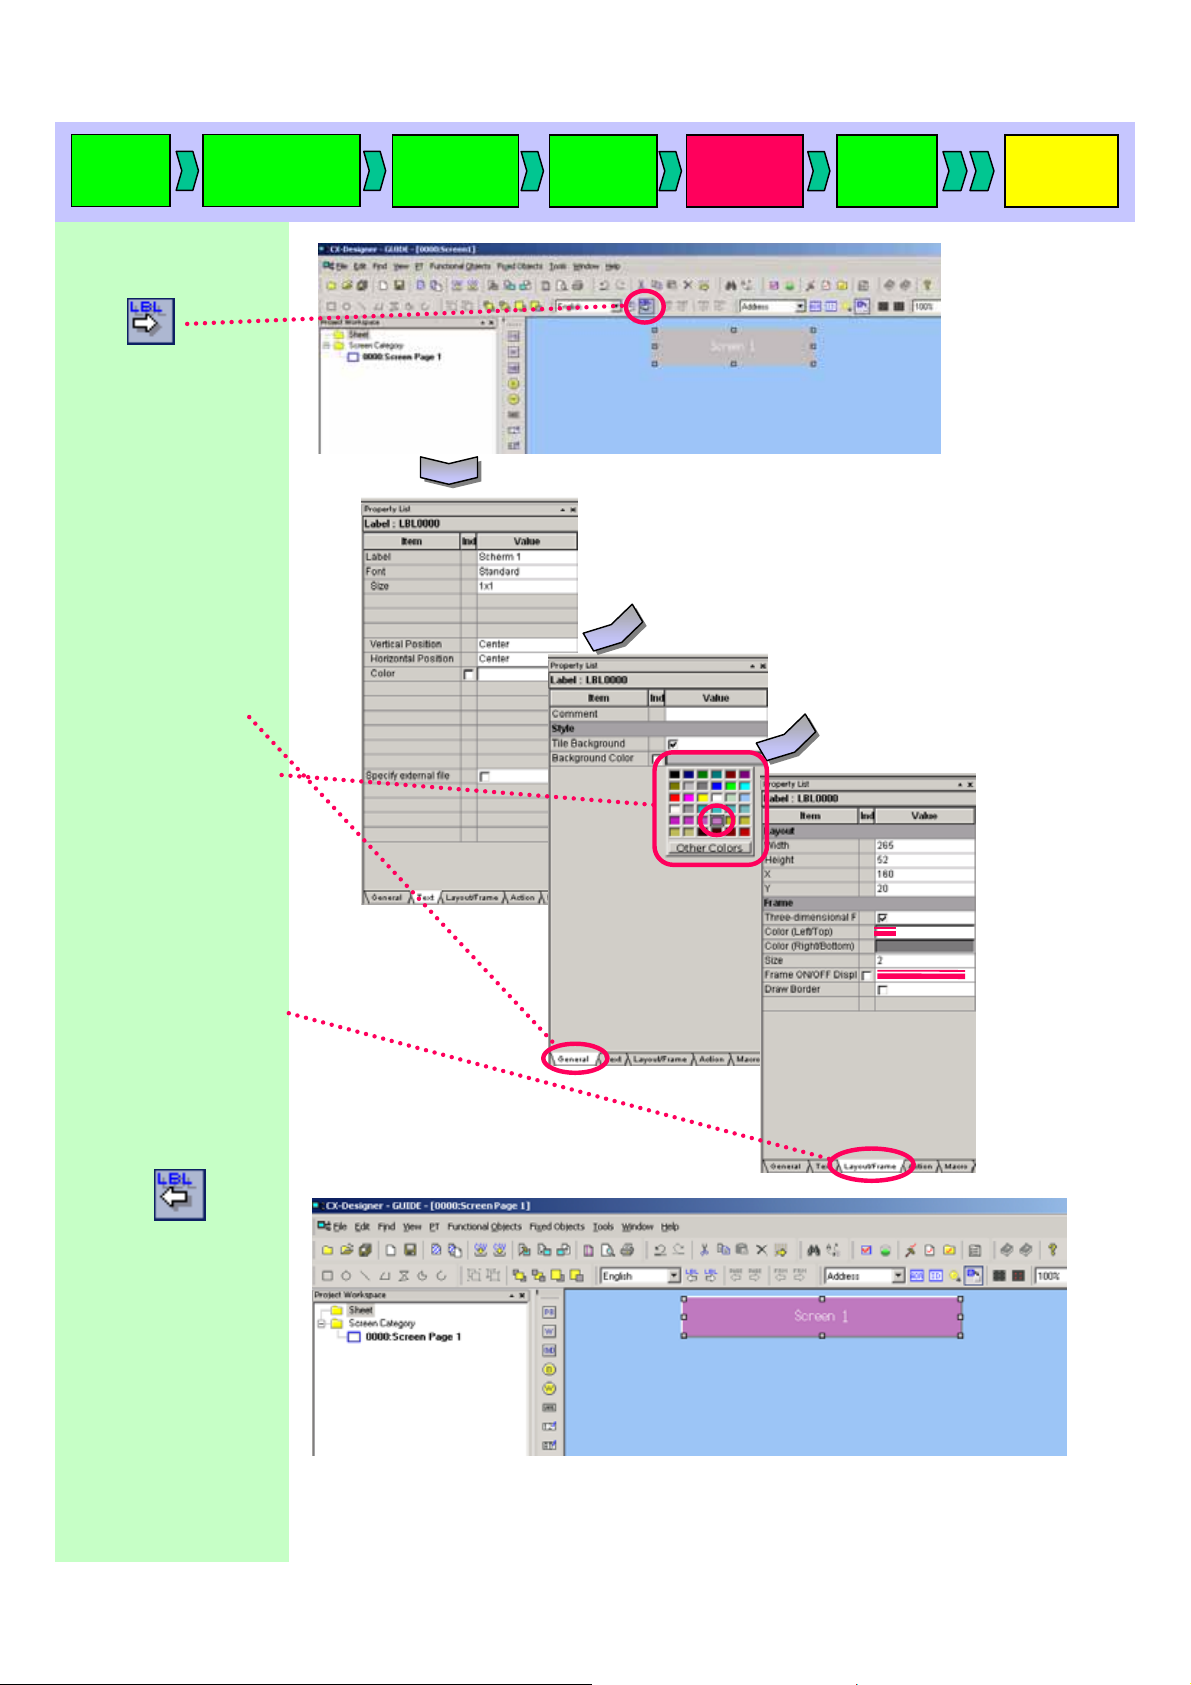
Click
to switch to the [Dutch]
label.
Set the following items on
the property list.
Text tab
[Label]
! “Screen 1”
[Horizontal Position]
! “Center”
Click the [General] tab on
the property list.
Creating a
new project
Project
property
System
setting
Creating
a screen
Validation
Transferring
a project
Click the [Background
Color] and select a color.
Select the [Layout/Frame]
tab.
Check “Three-dimensional
Frame” check box.
Set “2” to [Size].
Click
to switch back to the
[English] label.
Completed image
Page 26
Start up
CX-D
Creating a
new project
Project
property
System
setting
Creating
a screen
Validation
Transferring
a project
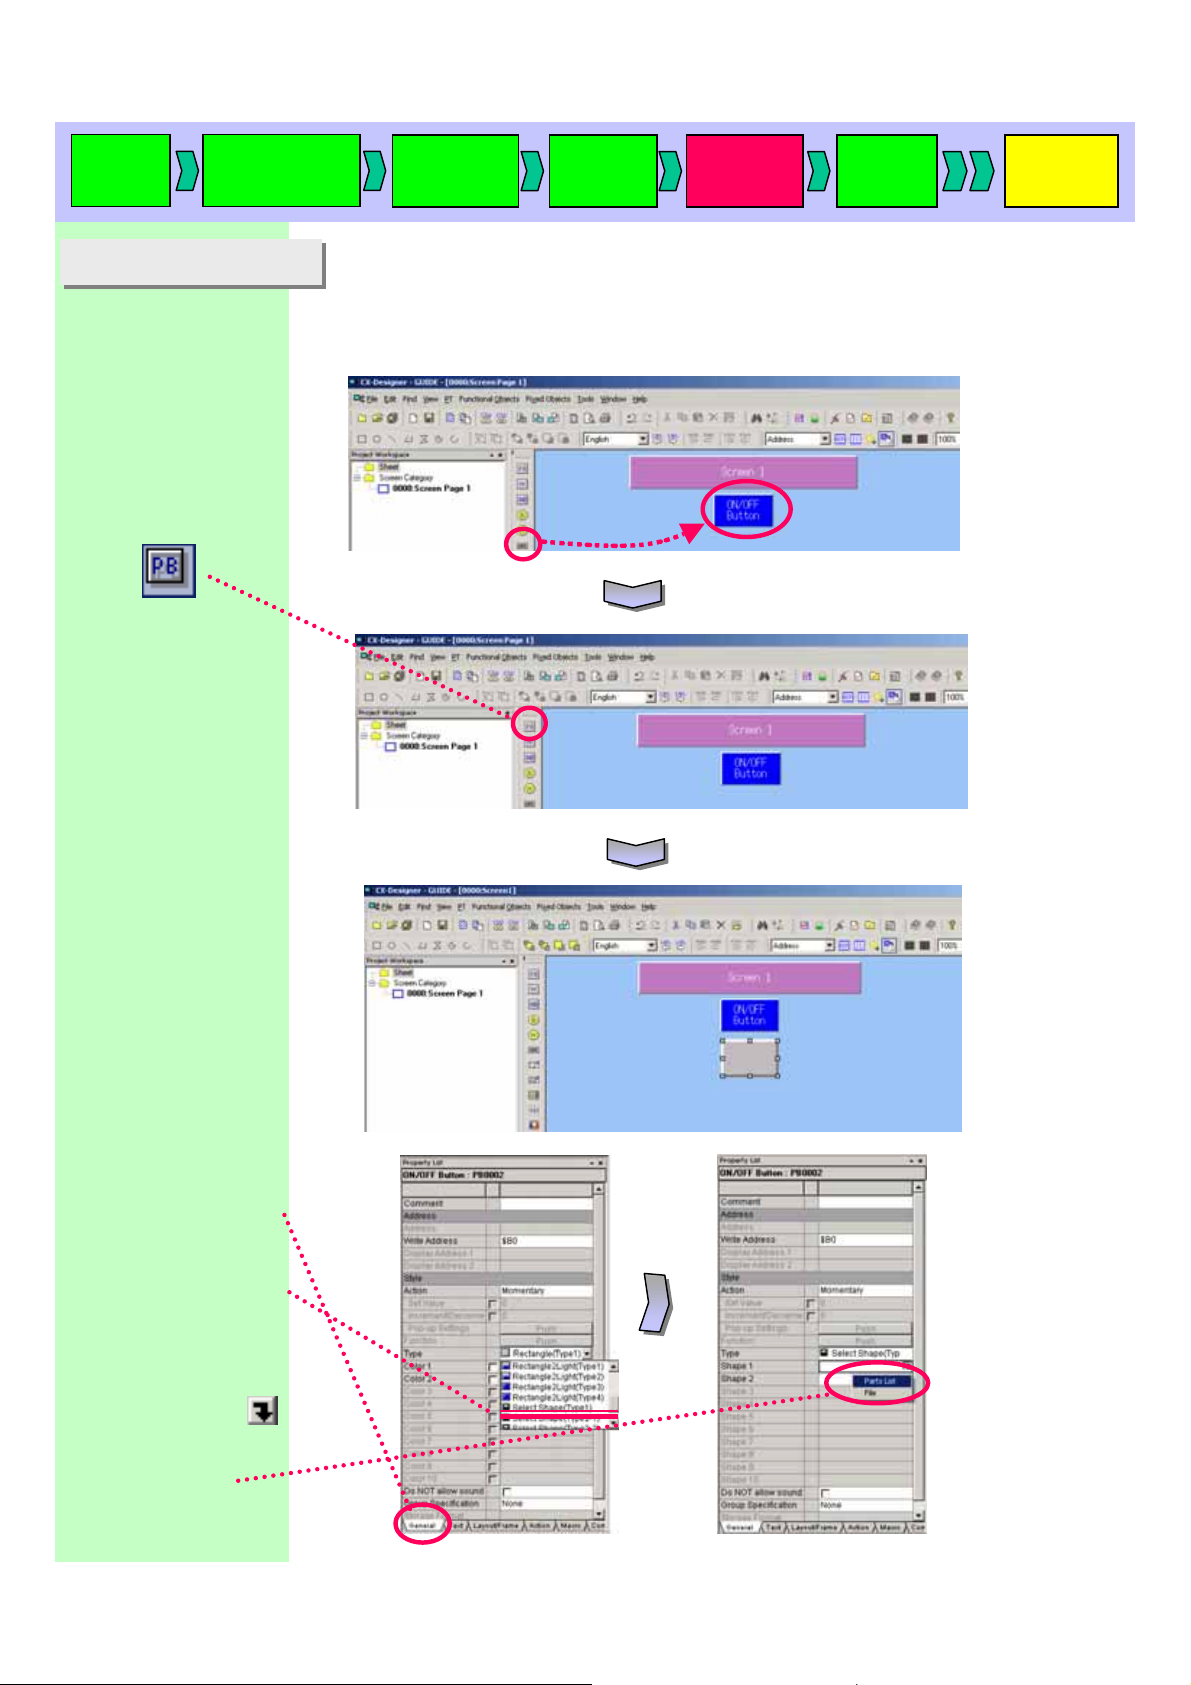
10. ON/OFF Button
10. ON/OFF Button
Create a text object by
referring to a “Display a
Text”.
Click the [ON/OFF] icon
on the list.
Creating a ON/OFF button on the screen.
ON/OFF Button has a function that goes ON/OFF according to the ON/OFF states
of specified address (bit) by operation such as touch switch input.
In this manual, a button is used as ON/OFF button and Occurred/Cancelled
button of virtual alarms.
Drag and drop a mouse
to make a shape, same
as performed for the text
object on page 19.
Select the [General] tab.
Click [Type] and se lect
“Select Shape (Type 1)”.
Click “Shape 1” and
Select “Parts List”
Page 27
Start up
CX-D
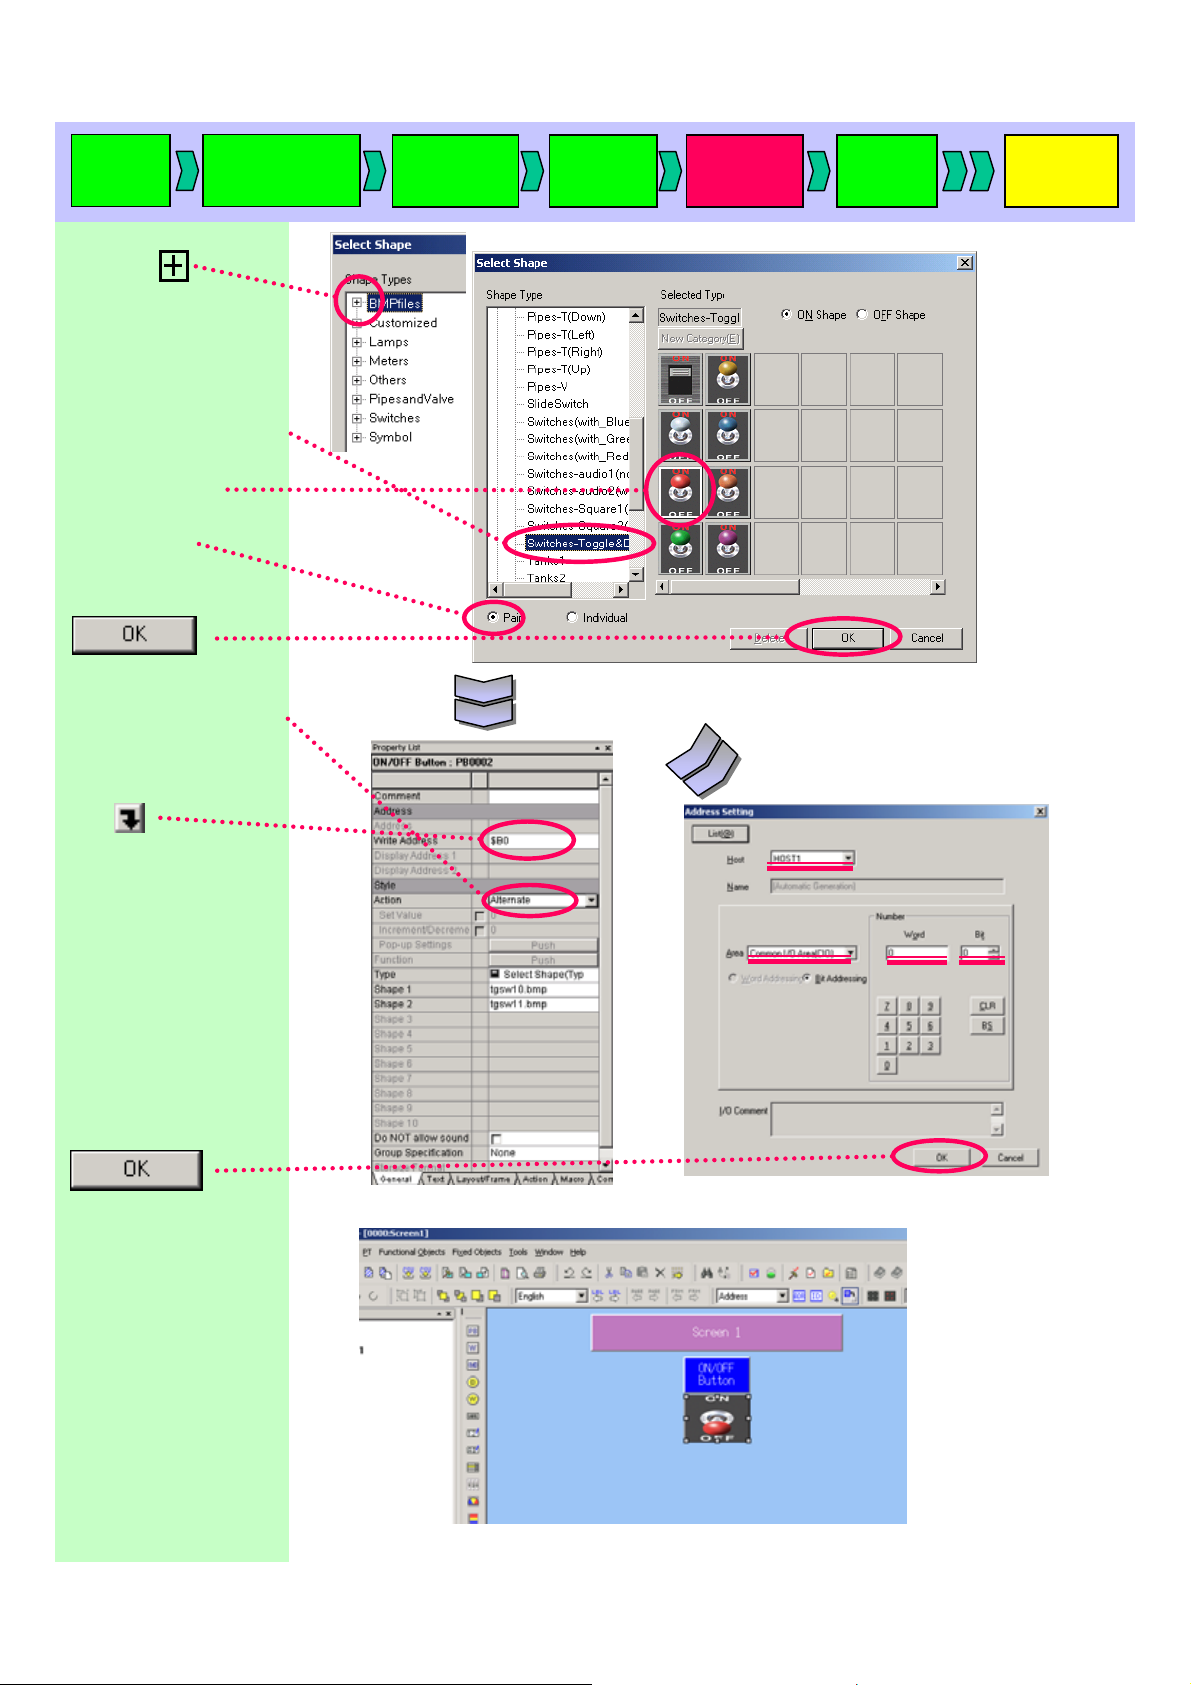
Click
to display the [BMPfiles]
pull-down menu.
Select “Switches-Toggle&Dip”
in the BMPfiles.
Select the shape.
Check [Pair].
Click
Click [Action] in the
ON/OFF button property
list and select [Alternate].
Creating a
new project
Project
property
System
setting
Creating
a screen
Validation
Transferring
a project
Click [Write Address]
and
Set as follow:
Host
! [HOST1]
Area
! [Common I/O Area
(CIO)]
Word
! [0]
Bit
! [0]
Click
Then,
complete.
Completed image.
Page 28
Start up
CX-D
Creating a
new project
Project
property
System
setting
Creating
a screen
Validation
Transferring
a project
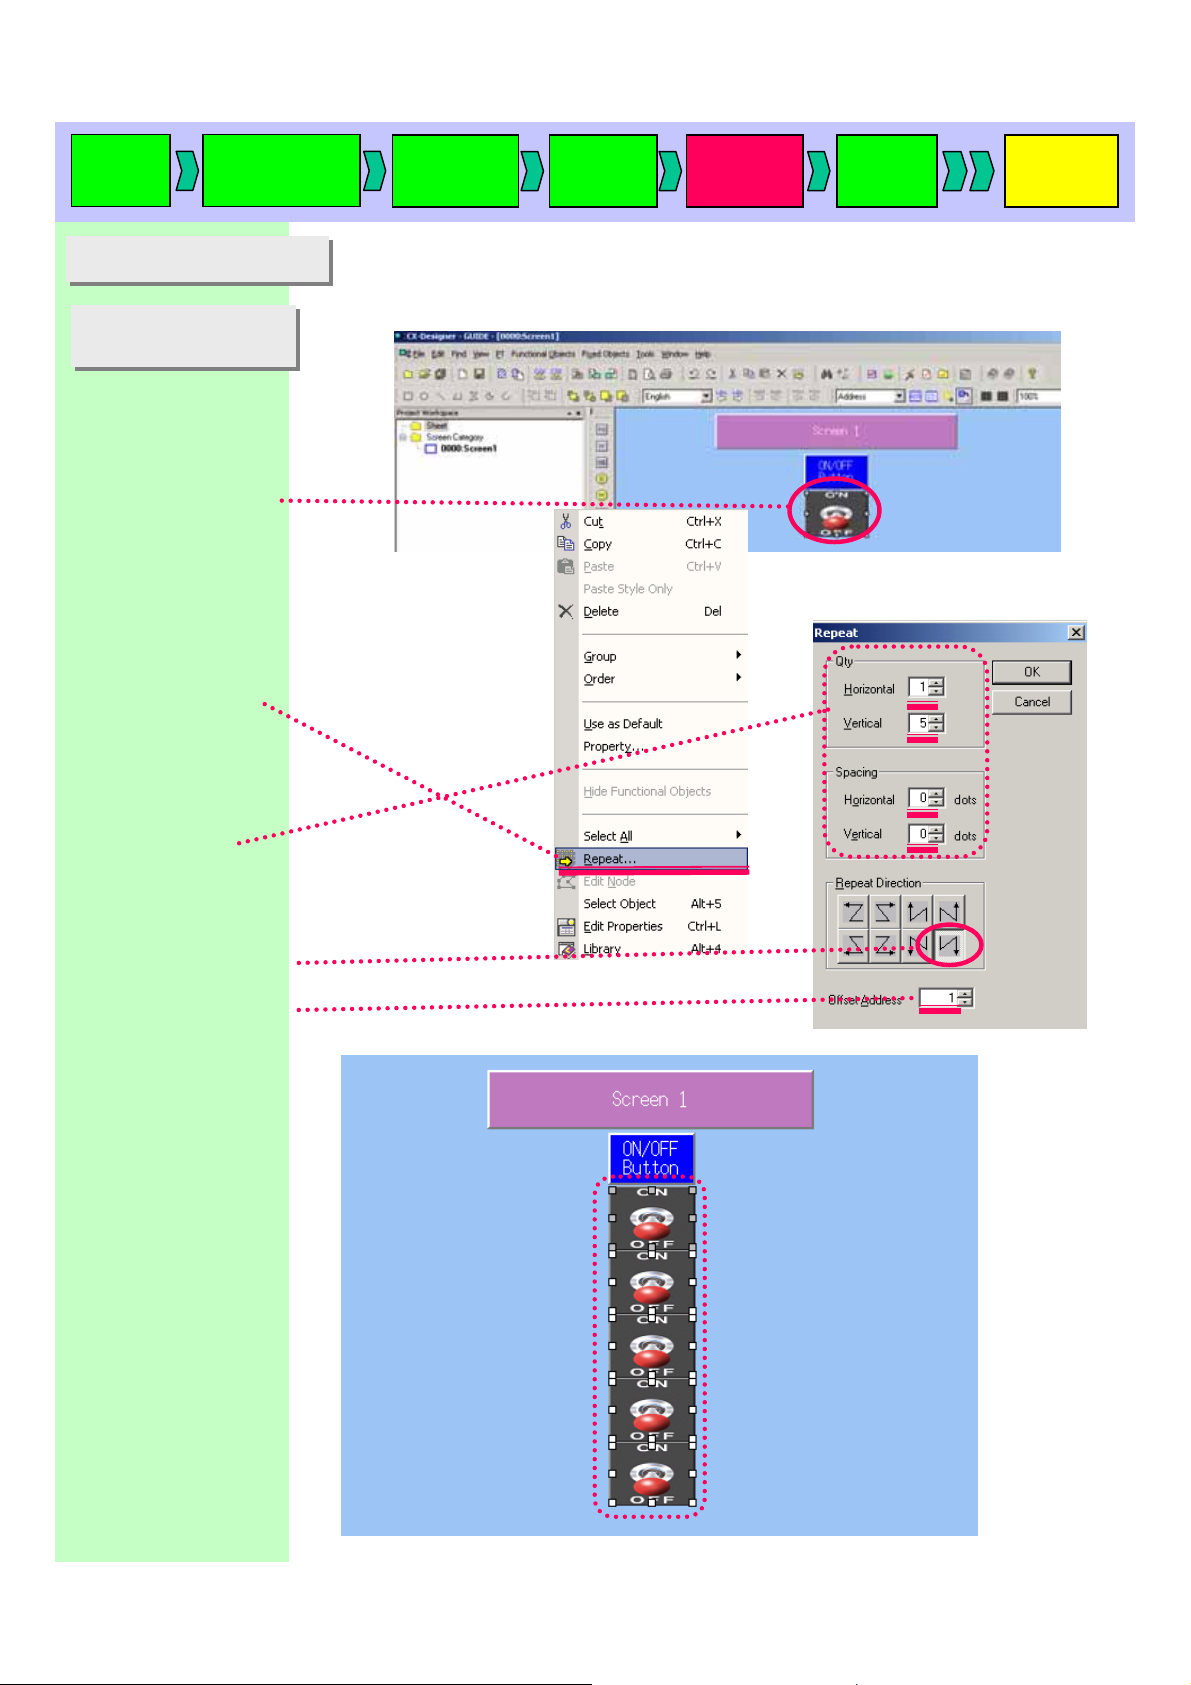
11.Repeat function
11.Repeat function
11-1 Repeat function
11-1 Repeat function
(Button)
(Button)
Right-click the created
button.
Select [Repeat(R)] from
the pop-up menu.
Set as follow:
[Qty]
Horizontal ![1]
Vertical ! [5]
[Spacing]
Horizontal ! [0]
Vertical ! [0]
Using a [Repeat] function to copy a object already created.
In this manual, you will copy an ON/OFF button with [Repeat] function.
Select a repeat direction.
Set 1 to [Offset Address].
Page 29

Start up
CX-D
You can check an
allocated address of a
functional object
(switch) from the
[Property list].
Creating a
new project
Project
property
System
setting
Creating
a screen
Validation
Transferring
a project
<Note>
You can display and edit a list of allocated addresses by selecting ON/OFF button in the
Edit Properties dialog box.
See “11-2. Repeat Function (Label)” for how to use “Edit Properties”.
Page 30
Start up
CX-D
Creating a
new project
Project
property
System
setting
Creating
a screen
Validation
Transferring
a project
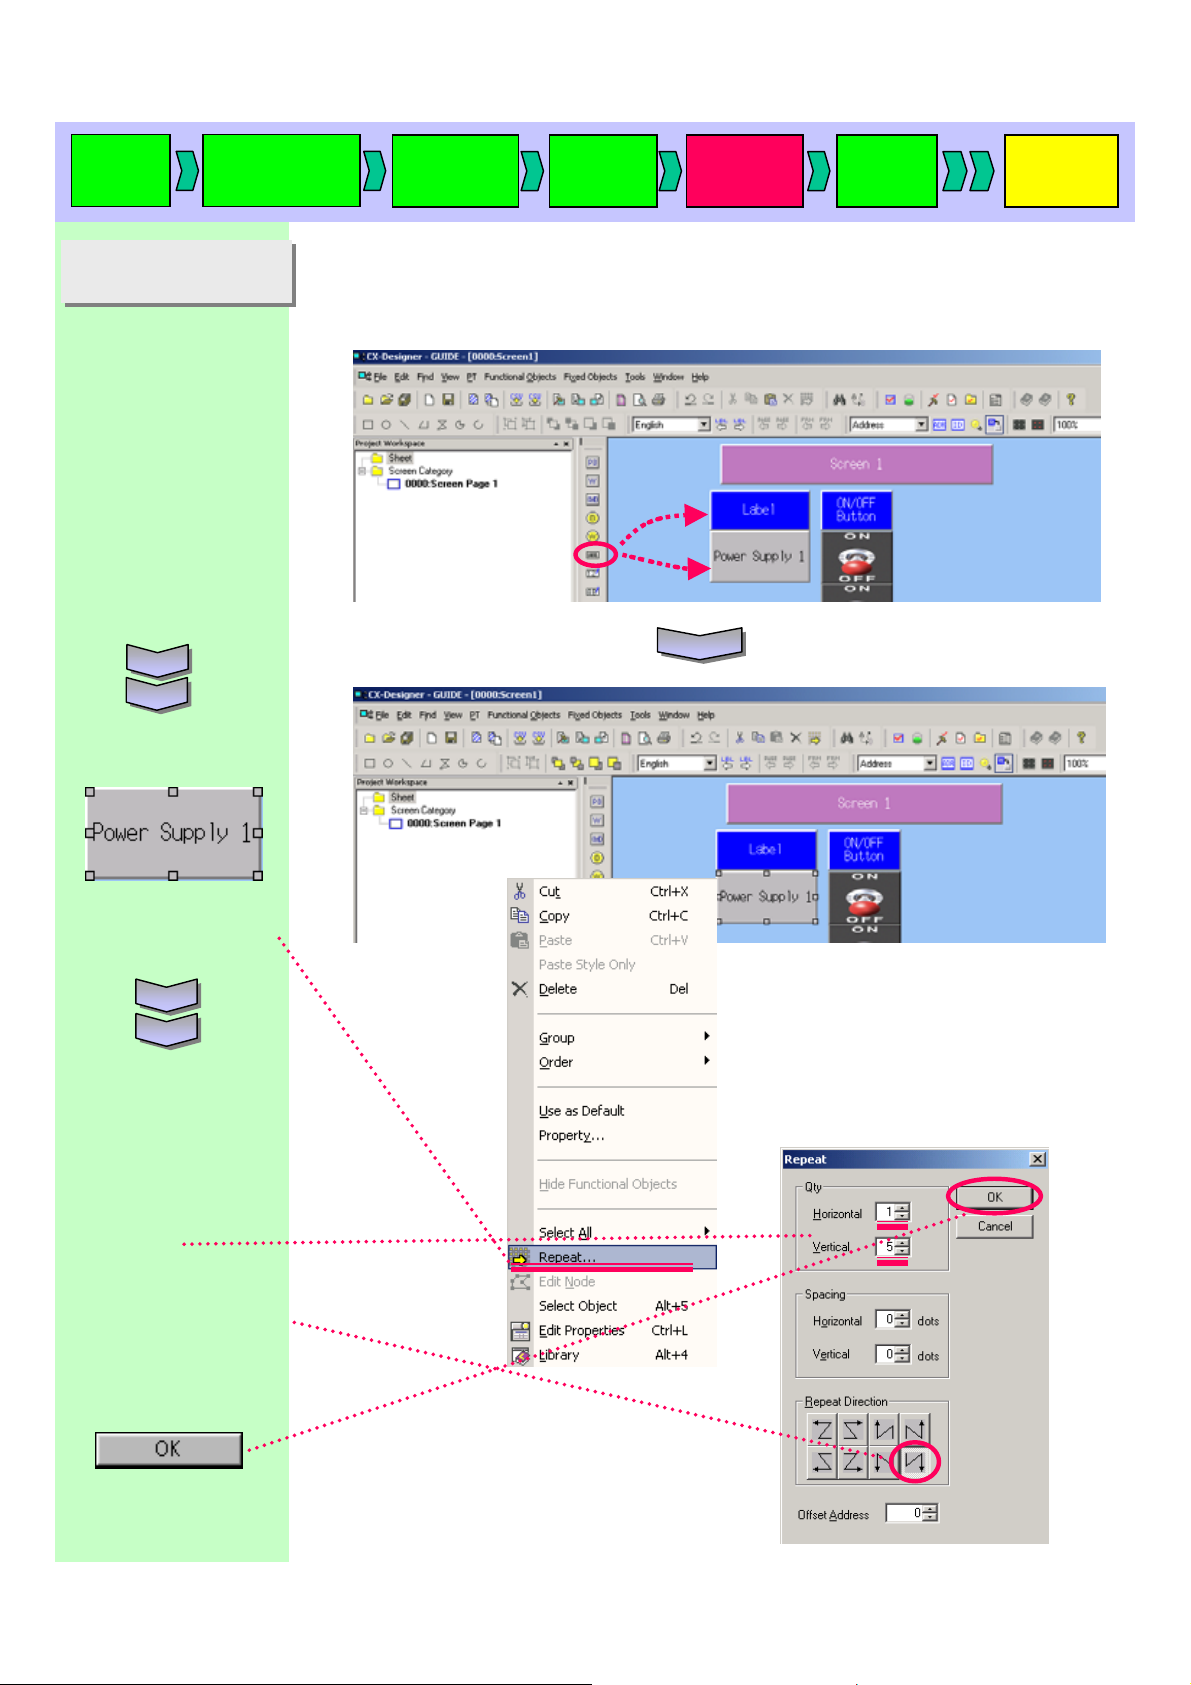
11-2 Repeat Function
11-2 Repeat Function
(Text)
(Text)
Add two more texts as
shown on the right by
referring to “9 Displaying
a Text”.
Upper text
[Label]
! “Label”
Bottom text
[Label]
! “Power Supply 1”
Right-click this button,
Using [Repeat] function to copy a text object to cr eate multiple objects.
In this manual, you will copy a text object using this function.
then select [Repeat]
from the pull-down menu.
Enter Qty:
Horizontal
! [1]
Vertical
! [5]
Select a repeat direction
Click
Page 31
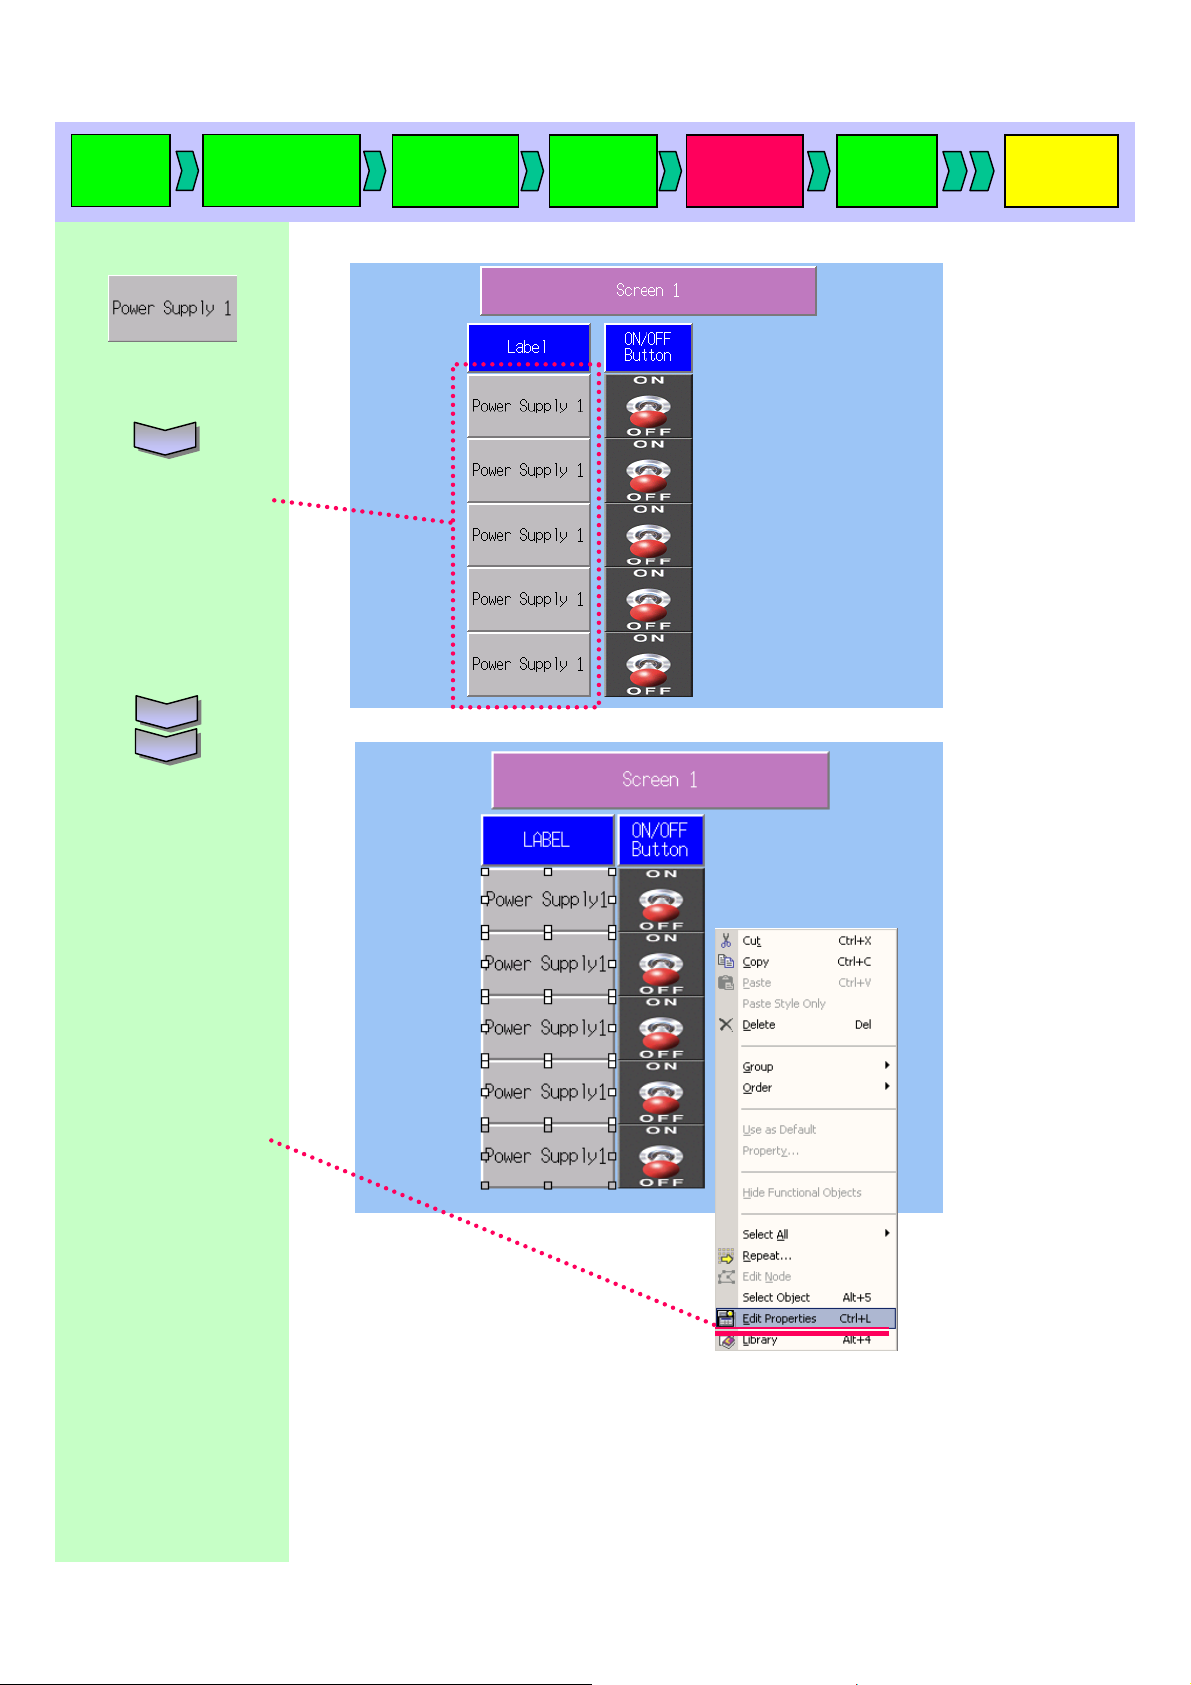
Start up
CX-D
Five labels are copied.
Enclose whole texts
while dragging the mouse.
Creating a
new project
Project
property
System
setting
Creating
a screen
Validation
Transferring
a project
With all the texts selected,
right-click to display the
pull-down menu and
select [Edit Properties].
Page 32
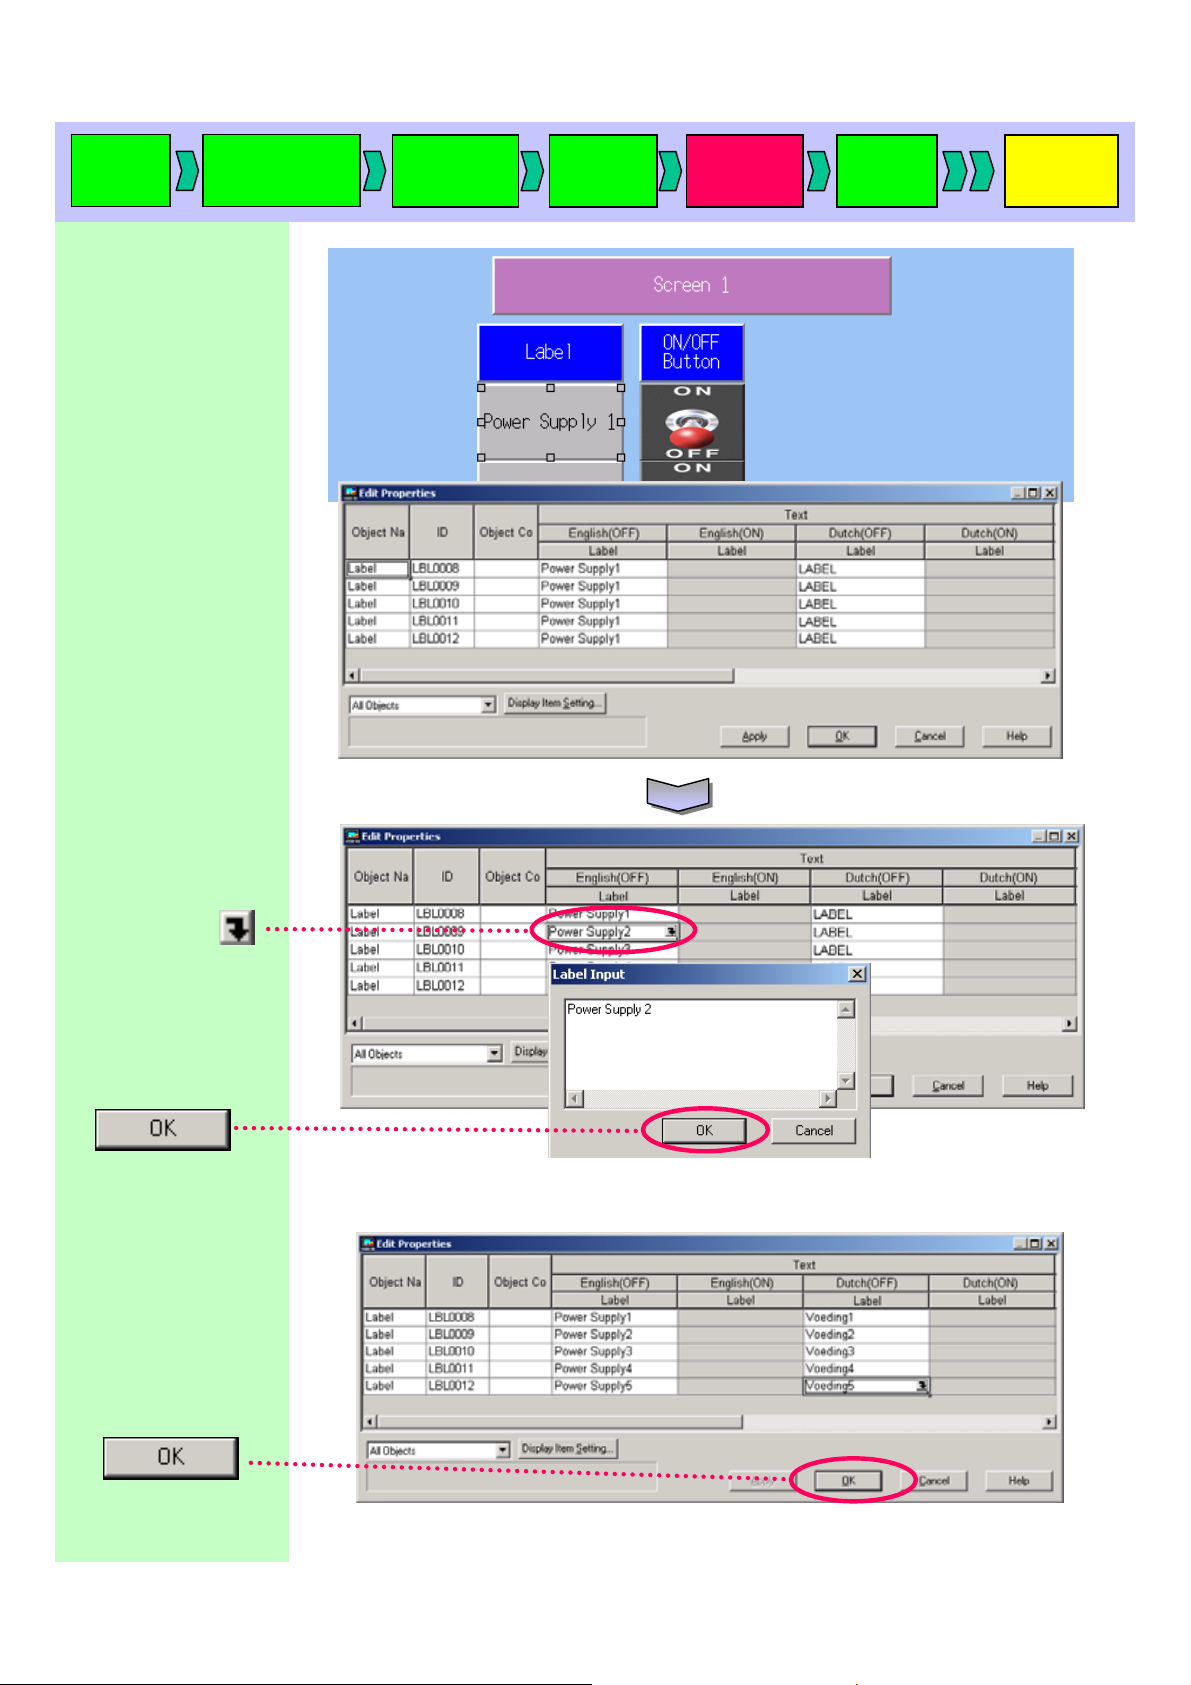
Start up
CX-D
The [Edit Properties]
dialog for the selected text
objects appear.
Creating a
new project
Project
property
System
setting
Creating
a screen
Validation
Transferring
a project
English(OFF)
label and click
Enter [Power Supply 2].
Click
Enter “Power Supply1 to 5”
to English (OFF), and
“Voeding1 to 5” to Dutch
(OFF) in the same way
above.
Click
Page 33

Start up
CX-D
The label displays are
changed.
Creating a
new project
Project
property
System
setting
Creating
a screen
Validation
Transferring
a project
Page 34

Start up
CX-D
Creating a
new project
Project
property
System
setting
Creating
a screen
Validation
Transferring
a project
12. Bit Lamp
12. Bit Lamp
Create a label as shown
on the right by referring to
the “9. Displaying a Text”.
[Label]
! “Bit Lamp”
Click
Drag the object until you
get the size you want.
Creating bit lamps on the screen.
Bit lamp is an object that switches display color according to ON/OFF
status of an address. In this manual, you will create bit lamps that link
to ON/OFF button status.
Change settings on the
property list.
Click [Display
Address 1] and
Host
! [HOST1]
Area
! [Common I/O Area
(CIO)]
Word
! [0]
Bit
! [0]
Click
Click “Select Type”
from [Type].
Page 35

Start up
CX-D
Check [ON Shape].
Select a shape.
Click
new project
Creating a
Project
property
System
setting
Creating
a screen
Validation
Transferring
a project
Click the property list and
set the following items.
Double-click the [Text]
tab.
[Label]
! “Unit 1 Stopped”
[Switch according to
the value]
! Check the box
Page 36

Start up
CX-D
Right-click the button
and click [Repeat] from the
pull-down menu.
Creating a
new project
Project
property
System
setting
Creating
a screen
Validation
Transferring
a project
Set as follow:
[Qty]
Horizontal ! “1”
Vertical ! “5”
[Spacing]
Horizontal ! “0”
Vertical ! “0”
[Repeat Direction]
[Offset Address ] ! 1
Page 37

Start up
CX-D
Five buttons are copied.
Enclose whole bit lamps
while dragging the mouse.
Creating a
new project
Project
property
System
setting
Creating
a screen
Validation
Transferring
a project
With all bit lamps selected,
right-click the mouse to
display the pull-down
menu and click
[Edit Properties].
Page 38

Start up
CX-D
Change texts by
referring to
“11-2 Repeat Function
(Text)”.
Enter as follow:
English (OFF)
! “Unit 1 Stopped”
to “Unit 5 Stopped”
English (ON)
! “Unit 1 Running”
to “Unit 5 Running”
Dutch (OFF)
! “Unit1 Inactief”
to “Unit5 Inactief”
Dutch (ON)
! “Unit1 Actief”
to “Unit5 Actief”
Click
Creating a
new project
Project
property
System
setting
Creating
a screen
Validation
Transferring
a project
Bit lamp labels are
changed.
Change a lamp type for
Units 2 to 5 on the
property list in the same
way you created “Unit 1
Stopped”.
Page 39

Start up
CX-D
Creating a
new project
Project
property
System
setting
Creating
a screen
Validation
Transferring
a project
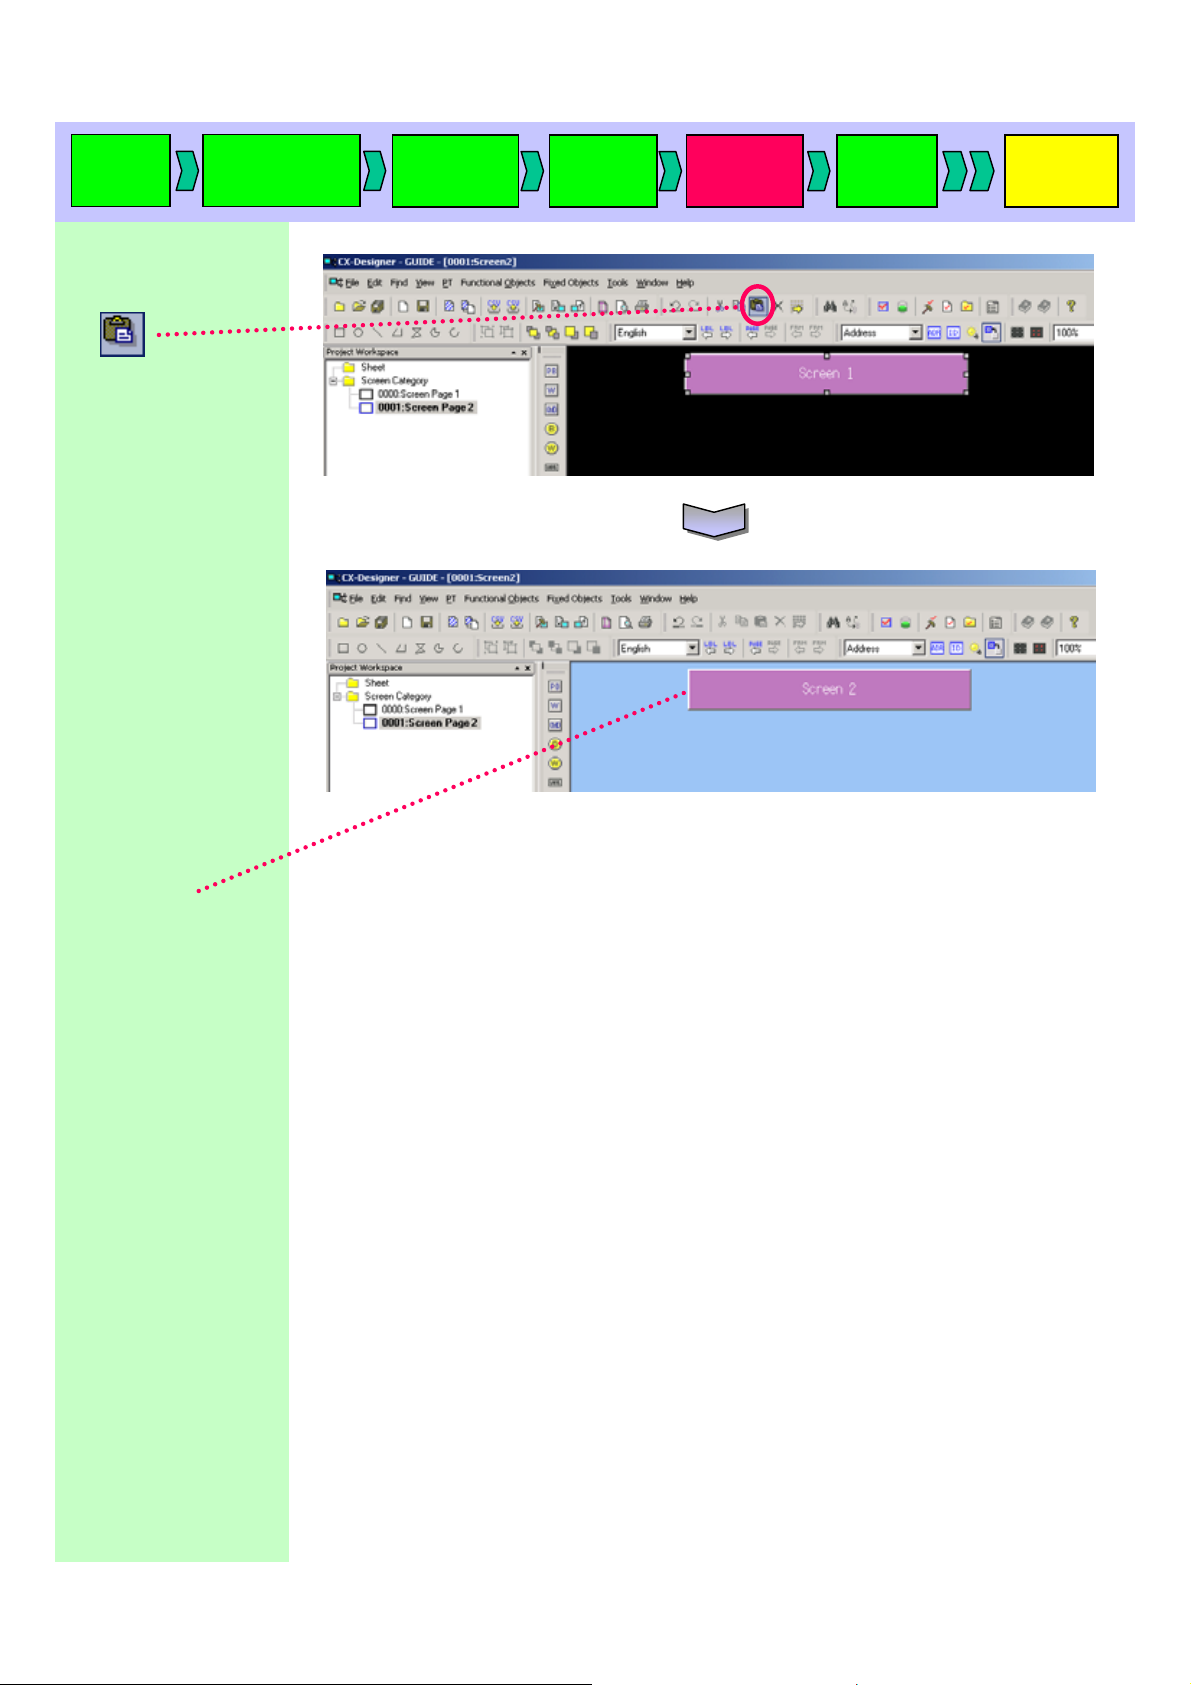
13. Adding a screen
13. Adding a screen
Copy the title label of
screen 1.
Right-click the object
and select [Copy].
Adding a new screen.
In this manual, you will first create screen 0001 and copy the title label of the
screens 0000 to 0001.
Creating Second Screen
Left-click [New screen]
icon.
Open the New Screen
menu.
Enter “Screen 2” to [Title].
Click
Page 40
Start up
CX-D
Click
or [Ctrl] + [V].
A label object is
copied.
Change [Background] in
the screen property dialog
by referring to “8. Screen
properties”.
Creating a
new project
Project
property
System
setting
Creating
a screen
Validation
Transferring
a project
Set as follow from the
text object property list.
[Label]
! Screen 2
Page 41
Start up
CX-D
Creating a
new project
Project
property
System
setting
Creating
a screen
Validation
Transferring
a project
14. Frame
14. Frame
Create a label as shown
on the right by referring
to “9 Display a Text.
[Label]
! “Frame”
Frame is an object that changes a displayed text on objects that have a page
switch function. In this manual, a frame is used to switch a low alarm and a high
alarm display.
Select the icon
and drag it until you get
the size you want.
Right-click the object
and select [Property] from
the pull-down menu.
Page 42

Start up
CX-D
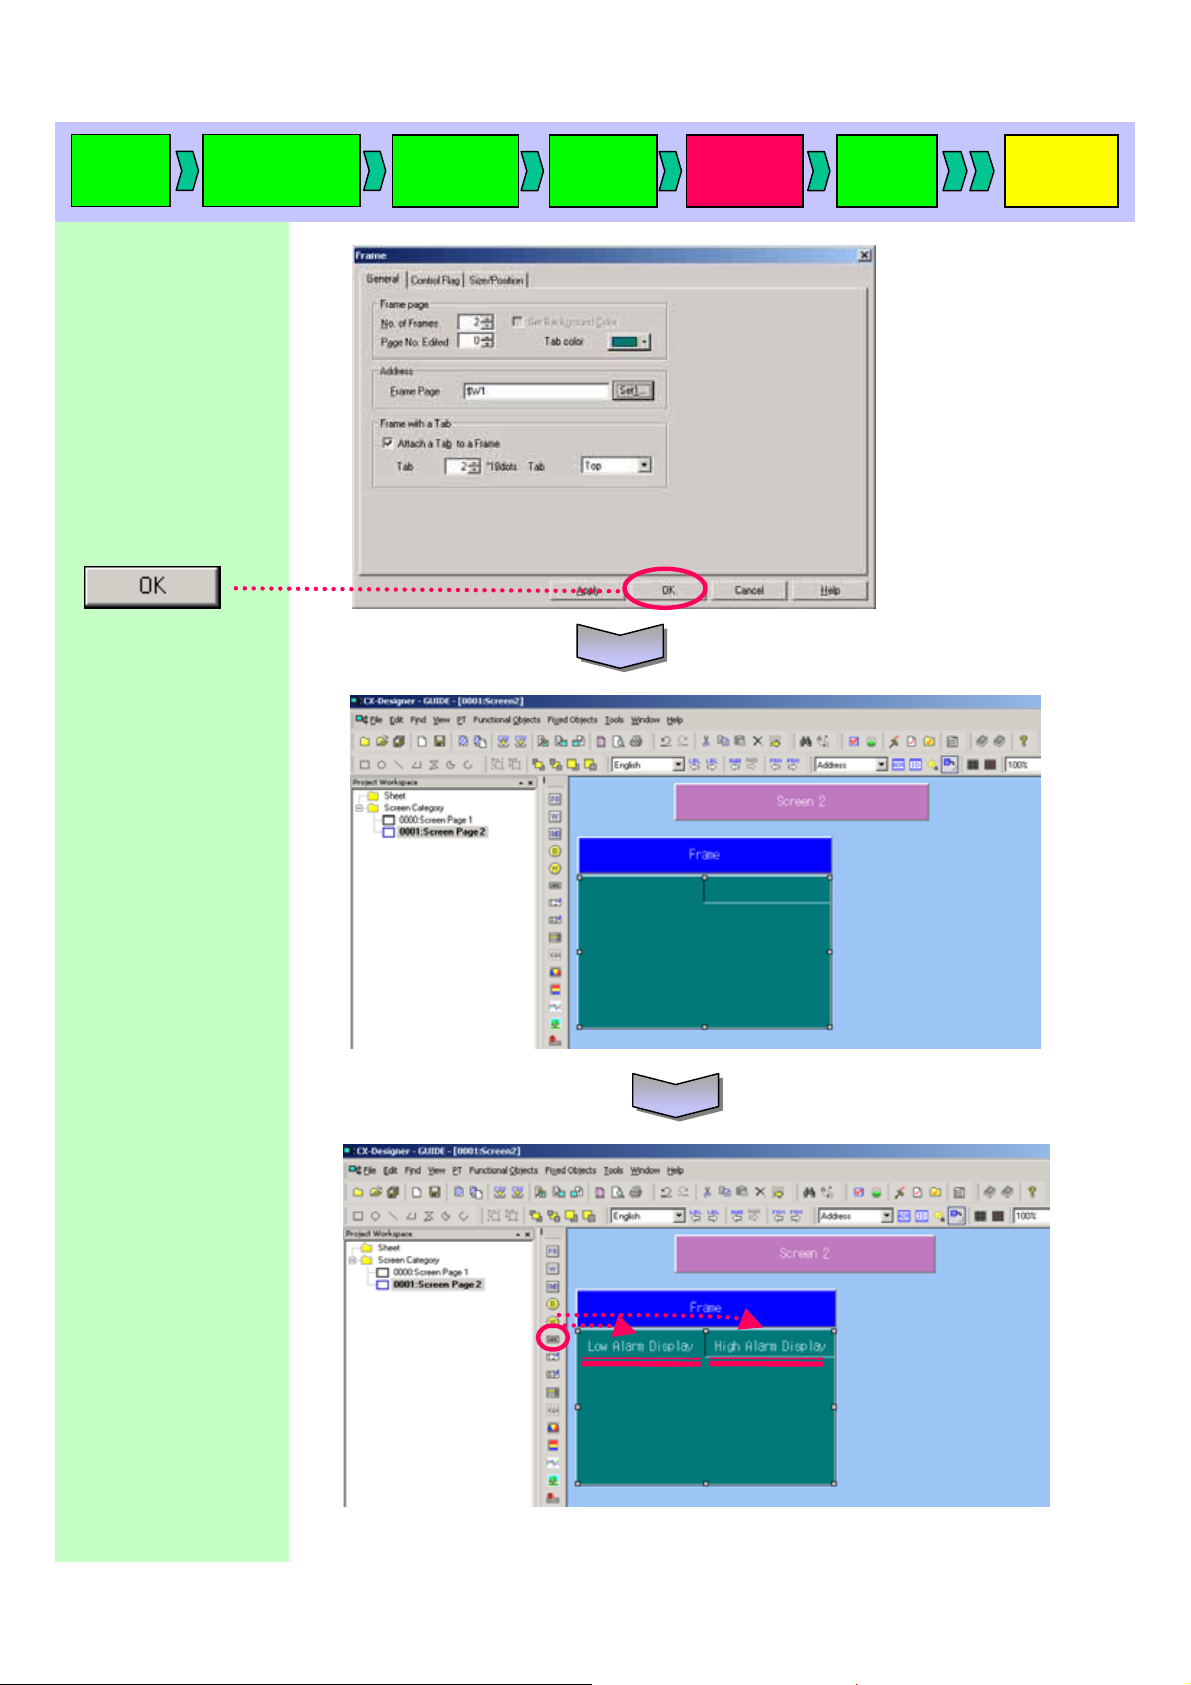
Select as follow:
[No. of Frames]
! “2”
Select a color
Check the [Frame with a
tab] box.
[Height] ! “2”
Creating a
new project
Project
property
System
setting
Creating
a screen
Validation
Transferring
a project
Set as follow from the
address setting menu.
Host Name
! [PT memory]
Area Name
! [Internal memory
($W)]
Word
! [1]
Click
Page 43
Start up
CX-D
Click
Creating a
new project
Project
property
System
setting
Creating
a screen
Validation
Transferring
a project
Create two labels as
shown on the right by
referring to “9. Displayin g
a Text”.
[Label]
! “Light Alarm Display”
[Tile Background]
! Uncheck the box.
[Label]
! “High Alarm Display”
[Tile Background]
! Uncheck the box.
Page 44

Start up
CX-D
Double-click the
frame object.
Check the “Do not
show this dialog
again” box.
Click
Creating a
new project
Project
property
System
setting
Creating
a screen
Validation
Transferring
a project
Create a bit lamp by
referring to “12. Bit Lamp”.
Enter the following settings
for [Display Address 1]
in the property list.
Host
! [HOST 1]
Area Name
! [Common I/O Area
(CIO)]
Word
! [1]
Bit
! [0]
[Type]
! Double-line Circle
Set [Color 1] and
[Color 2].
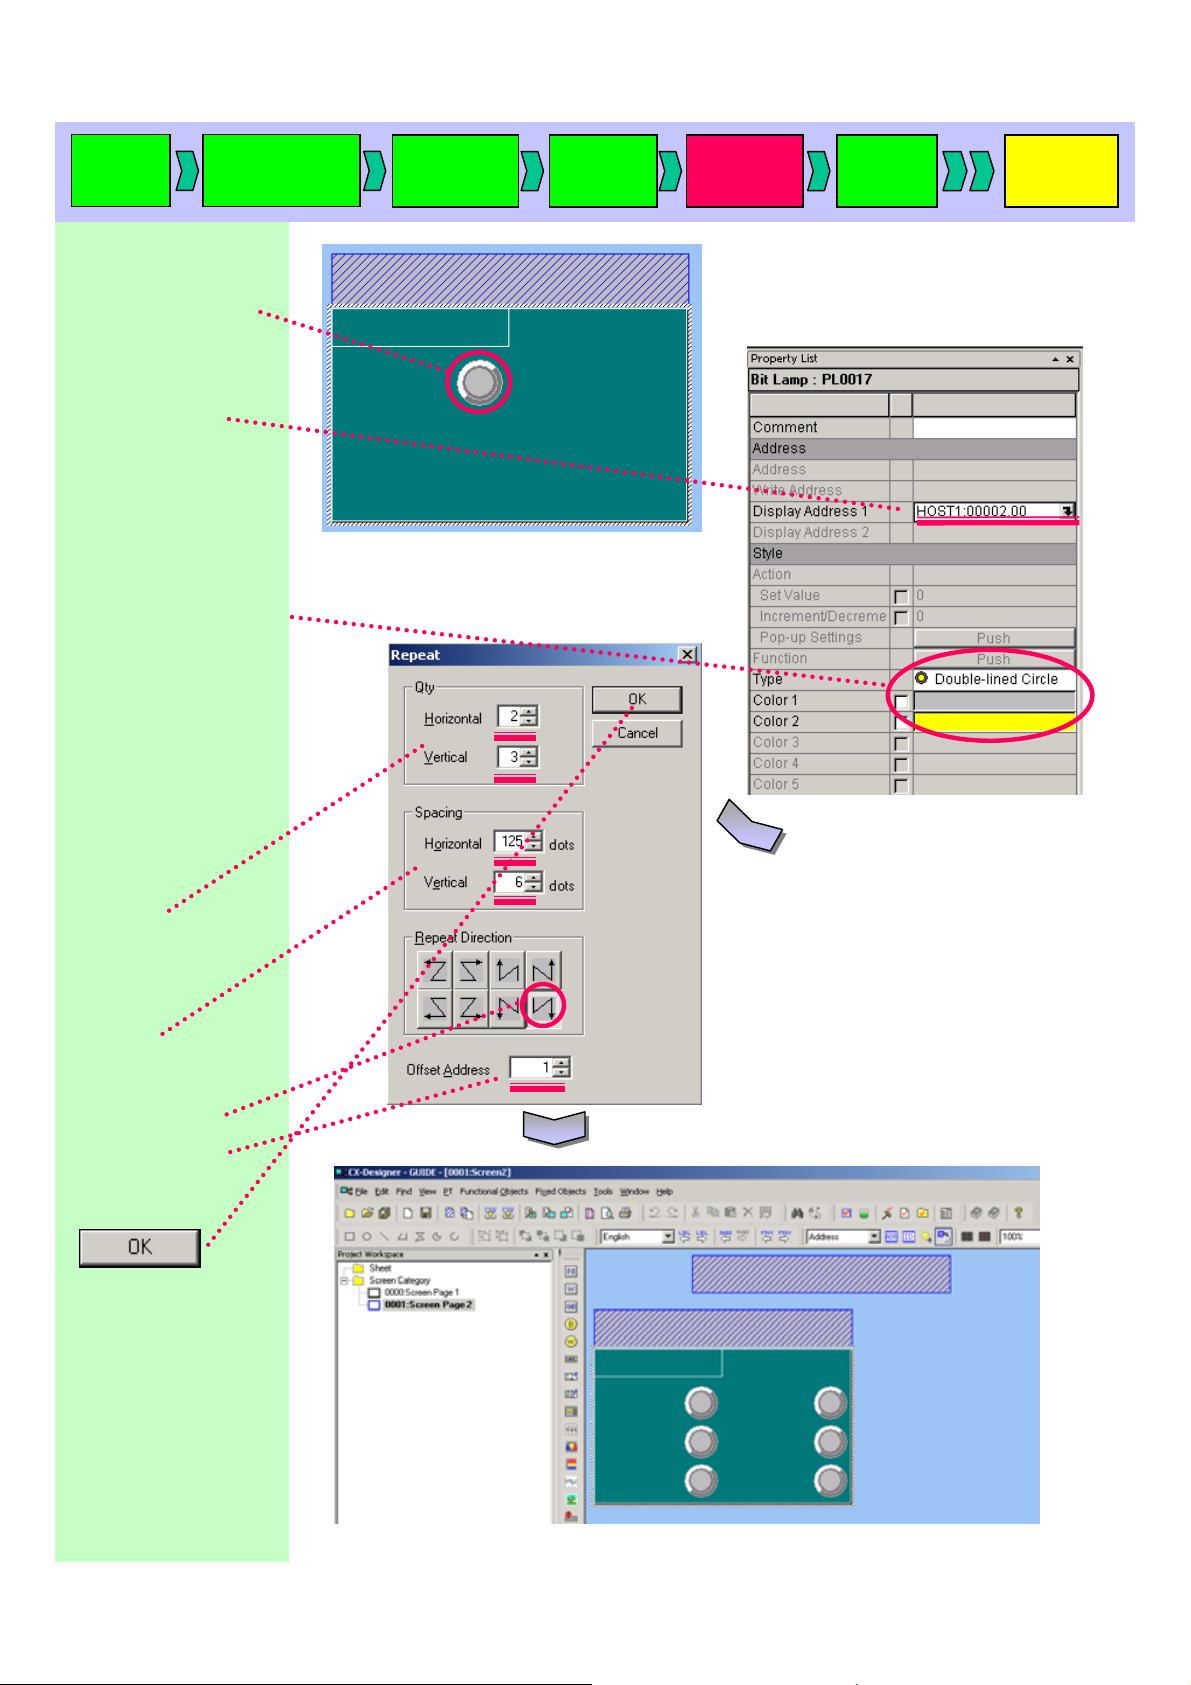
Page 45

Start up
CX-D
Create six bit lamps
by referring to “11.
Repeat function”.
Set as follow:
[Qty]
Horizontal
! “2”
Vertical
! “3”
[Spacing]
Horizontal
! 125”
Vertical
! “6”
Creating a
new project
Project
property
System
setting
Creating
a screen
Validation
Transferring
a project
Repeat direction
Set “1” to [Offset
Address]
Click
Create a label “Alarm1”
by referring to “9.
Displaying a Text”.
[Label]
! “Alarm 1”
[Tile Background]
! Uncheck the box.
Page 46

Start up
CX-D
Copy a label object by
dropping & dragging
the label “Alarm 1”
while holding down the
[Ctrl] key.
Creating a
new project
Project
property
System
setting
Creating
a screen
Validation
Transferring
a project
With three labels
selected, select as
follow:
[Edit] menu
-[Align/Distribution]
-[Distribute Vertically]
With three labels
selected, select as
follow:
[Edit] menu
-[Align/Distribution]
-[Align Left]
Page 47

Start up
CX-D
Create labels “Alarm 4 to
6” in the way you created
“Alarms 1 to 3”.
Creating a
new project
Project
property
System
setting
Creating
a screen
Validation
Transferring
a project
Left-click
The next page of the
Frame object (page 1) is
displayed.
Page 48
Start up
CX-D
Create a bit lamp by
referring to “12. Bit Lamp”.
Set [Display Address 1]
from the property list as
follow:
Host
! [HOST 1]
Area
! [Common I/O Area
(CIO)]
Word
! [2]
Bit
! [0]
[Type]
! Double-lined Circle
Select [Color 1] and [Color 2]
Create6 bit lamps by
referring to “11. Repeat
function”.
Creating a
new project
Project
property
System
setting
Creating
a screen
Validation
Transferring
a project
Set as follow:
[Qty]
Horizontal
! “2”
Vertical
! “3”
[Spacing]
Horizontal
! 125”
Vertical
! “6”
Repeat direction
Set “1” to [Offset
Address]
Click
Page 49

Start up
CX-D
Create a label as shown
on the right by referring
to “9. Displaying a Text”.
[Label]
! “Alarm 7”
[Tile Background]
! Uncheck it.
Creating a
new project
Project
property
System
setting
Creating
a screen
Validation
Transferring
a project
Create labels for “Alarms
8 to 12” in the way you
created “Alarms 1 to 6”.
Click any area on the
screen except frame
objects to finis h “Edit
Inside Group/Frame.
Page 50

Start up
CX-D
15. Numeral Display & Input
15. Numeral Display & Input
Creating a
new project
Numeral Display & Input is an object that displays data of an addr ess as numeral
value and changes data by inputting numeral value from a virtual key board.
Touch the object on the screen.
Touch the object on the screen.
Project
property
System
setting
Creating
a screen
Validation
Ten key pad appears.
Ten key pad appears.
The user can enter values
The user can enter values
to the specified area.
to the specified area.
Transferring
a project
Create labels as shown
on the right by referring to
“9. Displaying a Text”.
Upper
[Label]
! “Present Value”
Lower
[Label]
! “Set Value” .
Page 51

Start up
CX-D
Select the Numeral
Display& Input icon
and place it next to the
label “Present Value”.
Set as follow from the
object property list.
Common tab
[Enable input]
! Uncheck the box.
[Display]
! Uncheck the box.
[Numeral Display]
! Check the box.
Creating a
new project
Project
property
System
setting
Creating
a screen
Validation
Transferring
a project
General tab
[Address]
! “HOST 1 DM00100”
[Display Format]
! “Decimal”
[Storage Format]
! “INT (Signed 1 word)”
[Integer]
! “5”
[Decimal]
! “0”
Select the Numeral
Display & Input icon
from the object list
Set as follow from
the object property
list.
Common tab
[Enable Input]
! Check the box.
General tab
[Address]
! “$W0”
[Background]
! “White”
Page 52

Start up
CX-D
Creating a
new project
Project
property
System
setting
Creating
a screen
Validation
Transferring
a project
16. Word Button
16. Word Button
Paste a Word button.
Using a Word button.
Word button is an object that writes constants to the address (DM etc…) when it is
pressed, or increases/decreases the value of the address. It is possible to display a
pop-up menu and select the value from constants. In this manual, you will create a
word button to write the set value (Internal address) to the present value (PLC address).
Set as follow on the
object property list.
General tab
[Address]
! “HOST1 DM00100”
[Action]
! “Set Value”
[Set Value]
! “$W0”
Also set [Color 1] and
[Color 3].
Text tab
[Label]
! “Transfer”
Page 53

Start up
CX-D
Create three labels by
referring to “9. Displayin g
a Text”.
[Label]
! “Label”
[Label]
! “Numeral Value
Input & Display”
[Label]
! “Word Button”
Creating a
new project
Project
property
System
setting
Creating
a screen
Validation
Transferring
a project
Page 54

Start up
CX-D
Create three labels by
referring to “13. Add a
Screen”.
Click
A new screen is created.
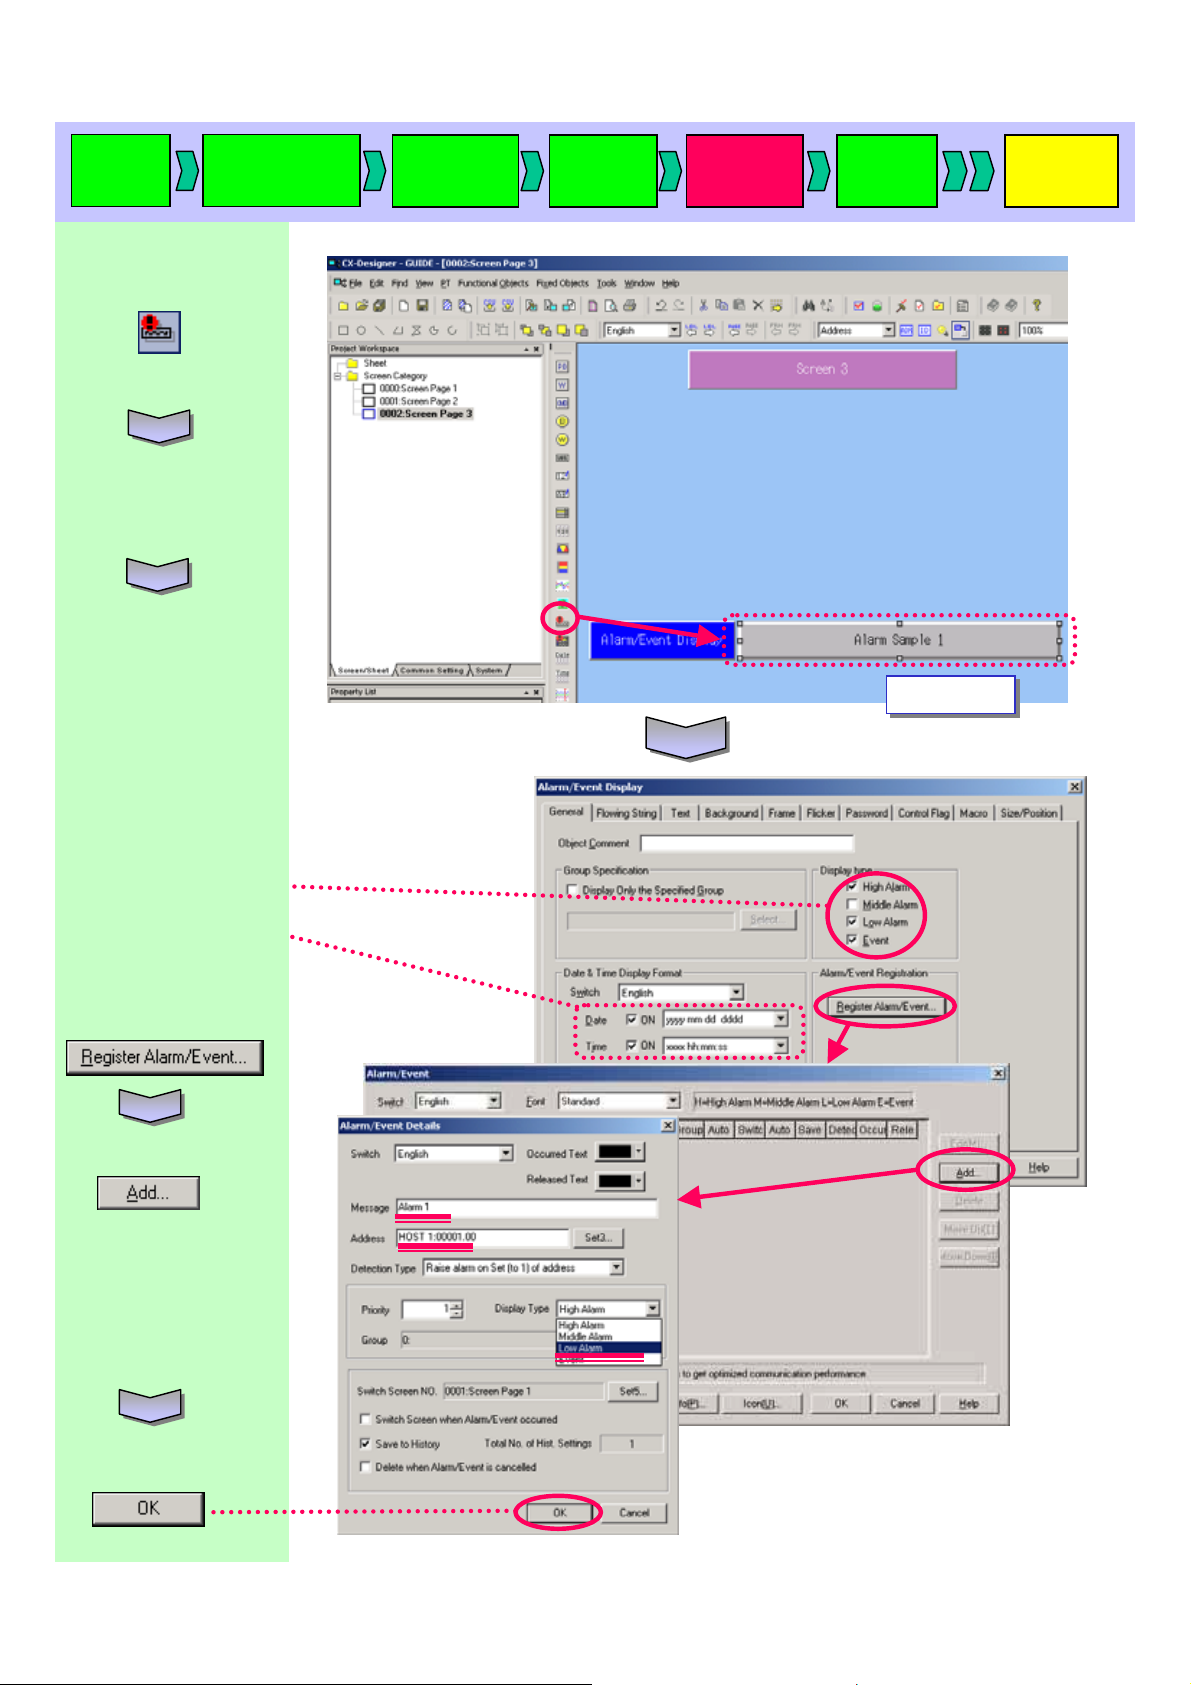
17. Alarm/Event Display
17. Alarm/Event Display
Creating a
new project
Alarm/Event Summary is a functional object that displays a current recorded
alarm/event in one line. Normally, the highest priority alarm/event is displayed, buy it
is also possible to display more than one alarm/ev ent occurring at the same time
according to the priority by specifying flowing string. In this manual,
It is used to display low alarm, high alarm, and running status (event).
Project
property
System
setting
Creating
a screen
Creating Third Screen
Validation
Transferring
a project
Create a label as shown
on the right by referring
to “9. Displaying a Text”.
[Label]
! “Alarm/Event Display”
Page 55
Start up
CX-D
Select the Alarm/Event
Display icon
on the list.
Create an Alarm/Event
Display where you want it.
Double-click the object
to display its property.
Creating a
new project
Project
property
System
setting
Creating
a screen
Validation
Double-click
Double-click
Transferring
a project
Uncheck “Low Alarm”.
Check “Date” and “Time”.
Click Register
Alarm/Event…
Click
Set as follow:
[Message]
! “Alarm 1”
[Address]
! “Host1:00001.00.
Click
Page 56

Start up
CX-D
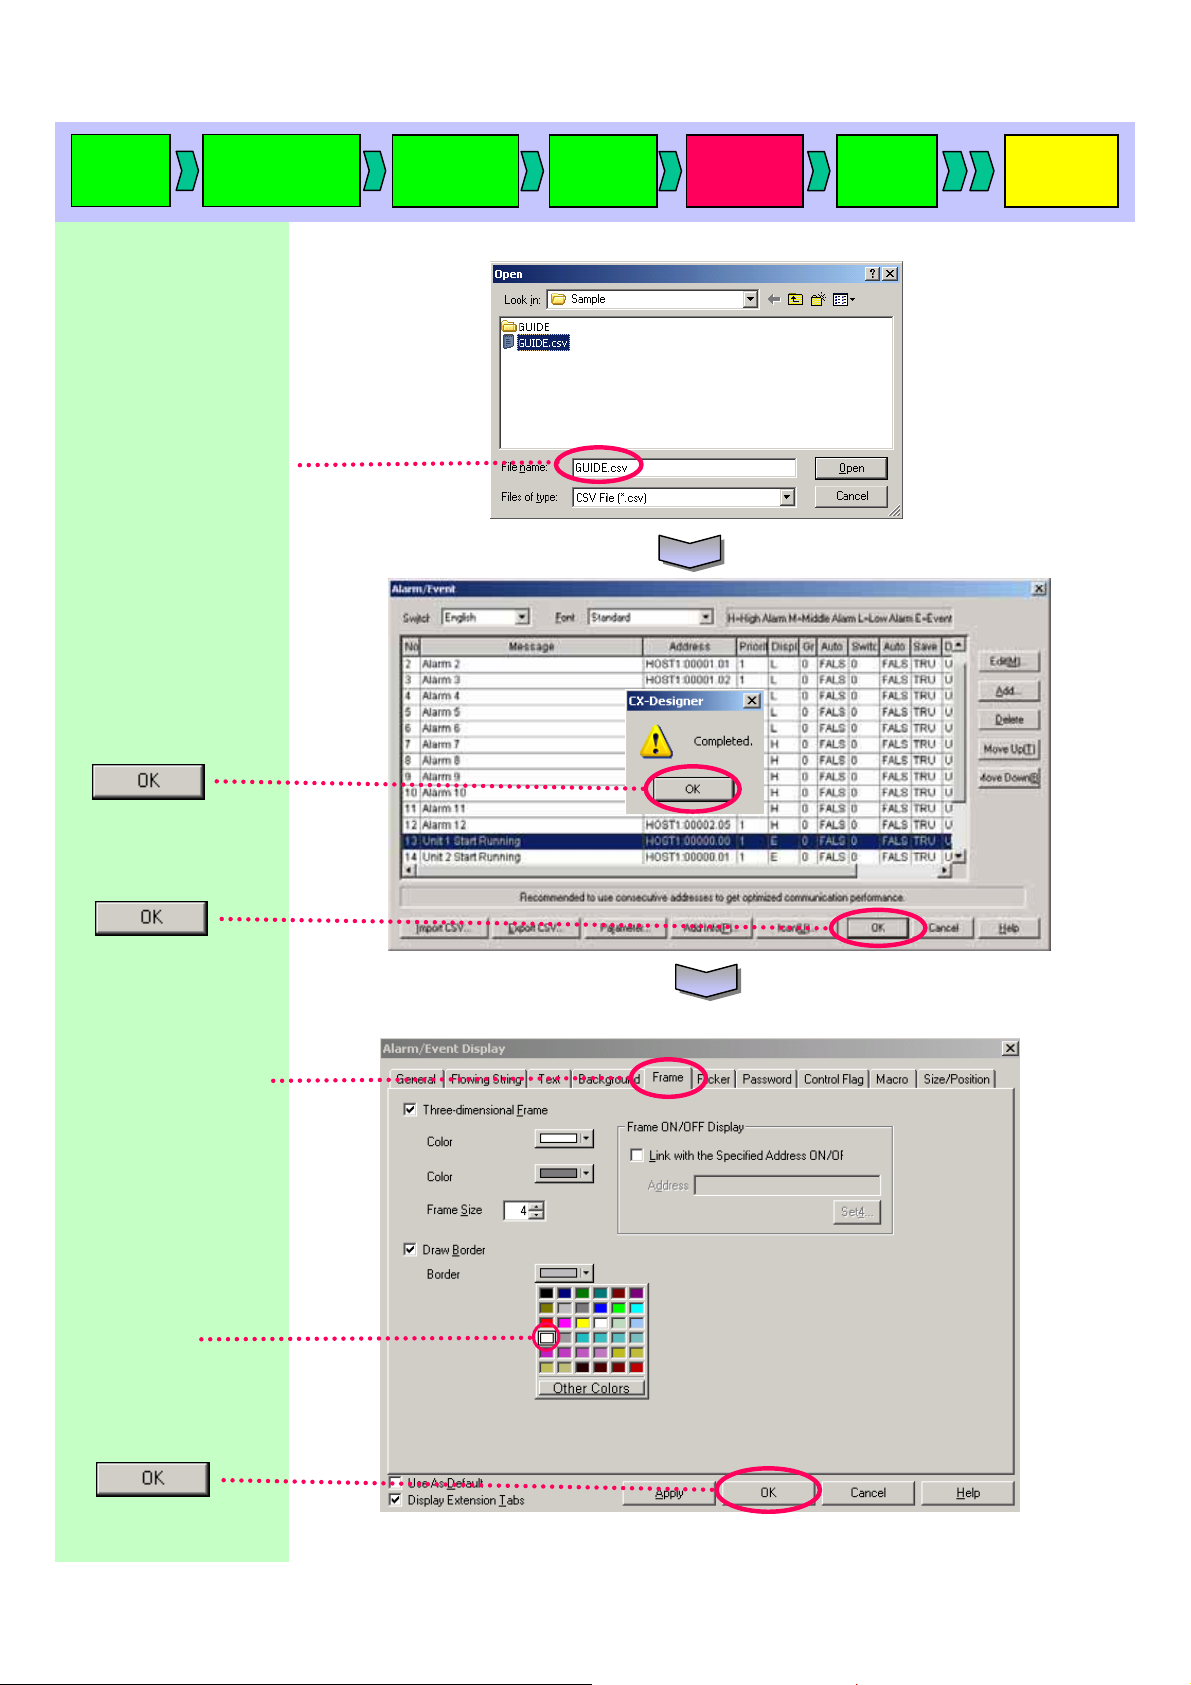
Click Export CSV
Select “ASCII Code”.
Click
Creating a
new project
Project
property
System
setting
One item of Alarm/Event is created.
Edit other items using CSV file import/
export function.
Creating
a screen
Validation
Transferring
a project
Enter a file name.
“GUIDE” is used here.
and click
Click
Read the file saved above with EXCEL. (Select [Data] menu – [Get External Data] – Import Text File…].
Left-click the right bottom
Left-click the right bottom
of the cell and draw the mouse
of the cell and draw the mouse
down while holding it down.
down while holding it down.
Only the numeral value in the
Only the numeral value in the
character string is incremented.
character string is incremented.
Page 57

Start up
CX-D
Creating a
new project
Compete the following table using operation described on the previous page as well as Copy
& Paste function.
When you finish editing, save the file.
Project
property
System
setting
Creating
a screen
Validation
Transferring
a project
Click Import CSV
Check “Add to Current
Alarm”.
Go back to work on the CX-Designer.
Click
Page 58
Start up
CX-D
Specify the file name that
was saved on the previous
page.
The “Completed”
message is displayed
to indicate that a file h as
been read.
Creating a
new project
Project
property
System
setting
Creating
a screen
Validation
Transferring
a project
Click
Click
Click the Frame tab.
Select a color.
Click
Page 59
Start up
CX-D
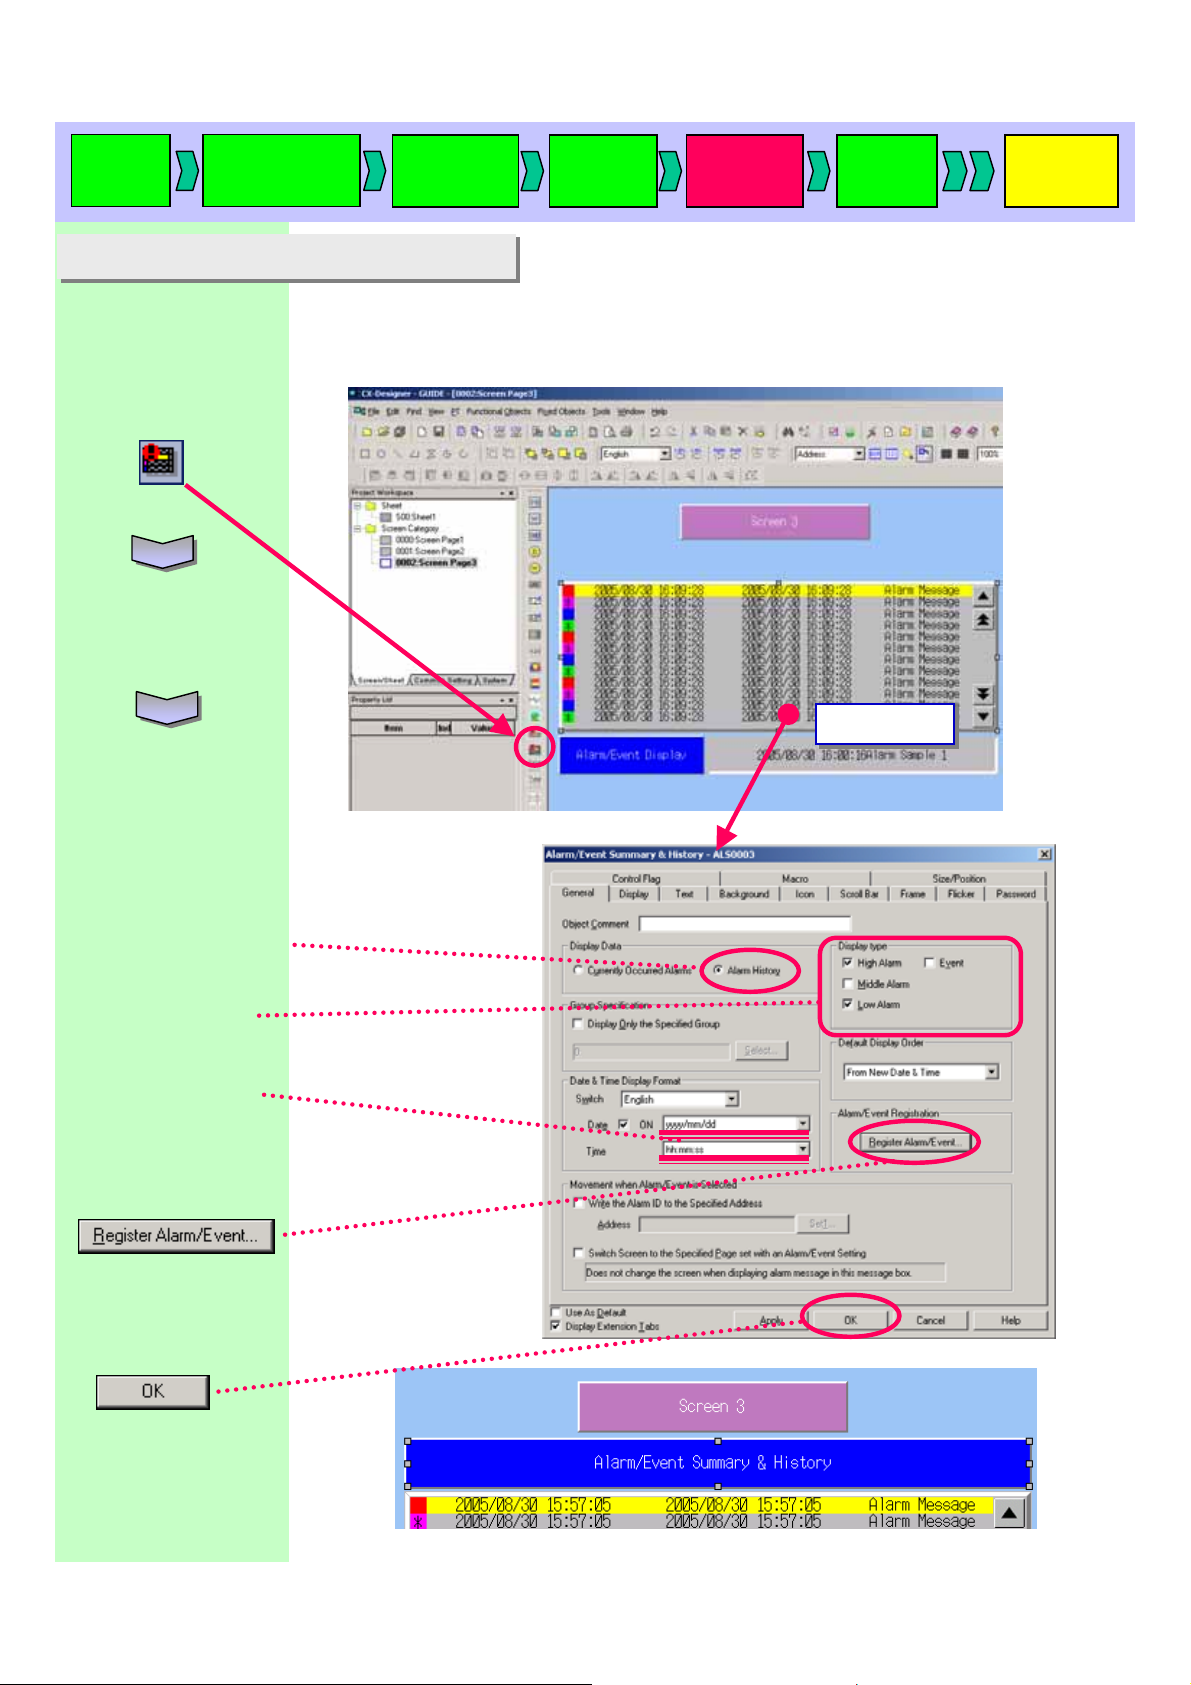
18. Alarm/Event Summary&History
18. Alarm/Event Summary&History
Select Alarm /Event
Summary & History
on the list
Create Alarm/Event
Summary &History
on the screen.
Creating a
new project
Alarm/Event Summary & History is an object that displays current alarms/events
in a list.You can specify display order such as checked time, priority and frequency. In
this manual, it is used to display the s tatus (Occurrence/Recovery) of light alarms, and
high alarms.
Project
property
System
setting
Creating
a screen
Validation
Double click
Double click
Transferring
a project
Double-click the
object to display its
property.
Set properties as follow:
[Display Data]
! Check Alarm History
Check “High Alarm”
and “Low Alarm”.
[Date] ! yyyy/mm/dd
[Time] ! hh:mm:ss]
Click
Check the settings.
Click
Add a label and name it
as“Alarm/Event Summary
& History”.
Page 60

Start up
CX-D
Creating a
new project
Project
property
System
setting
Creating
a screen
Validation
Transferring
a project
19. Pop-up Screen
19. Pop-up Screen
Click the icon to open
the New Screen menu.
Enter “Pop-up Screen 1”
in [Title].
Click
Usually only one screen is displayed on the NS hardware, however, a pop-up
screen can be overlapped on the normal screen.
In this manual, you will create a button on a pop-up screen to generate/c ancel low
and high alarms.
Page 61

Start up
CX-D
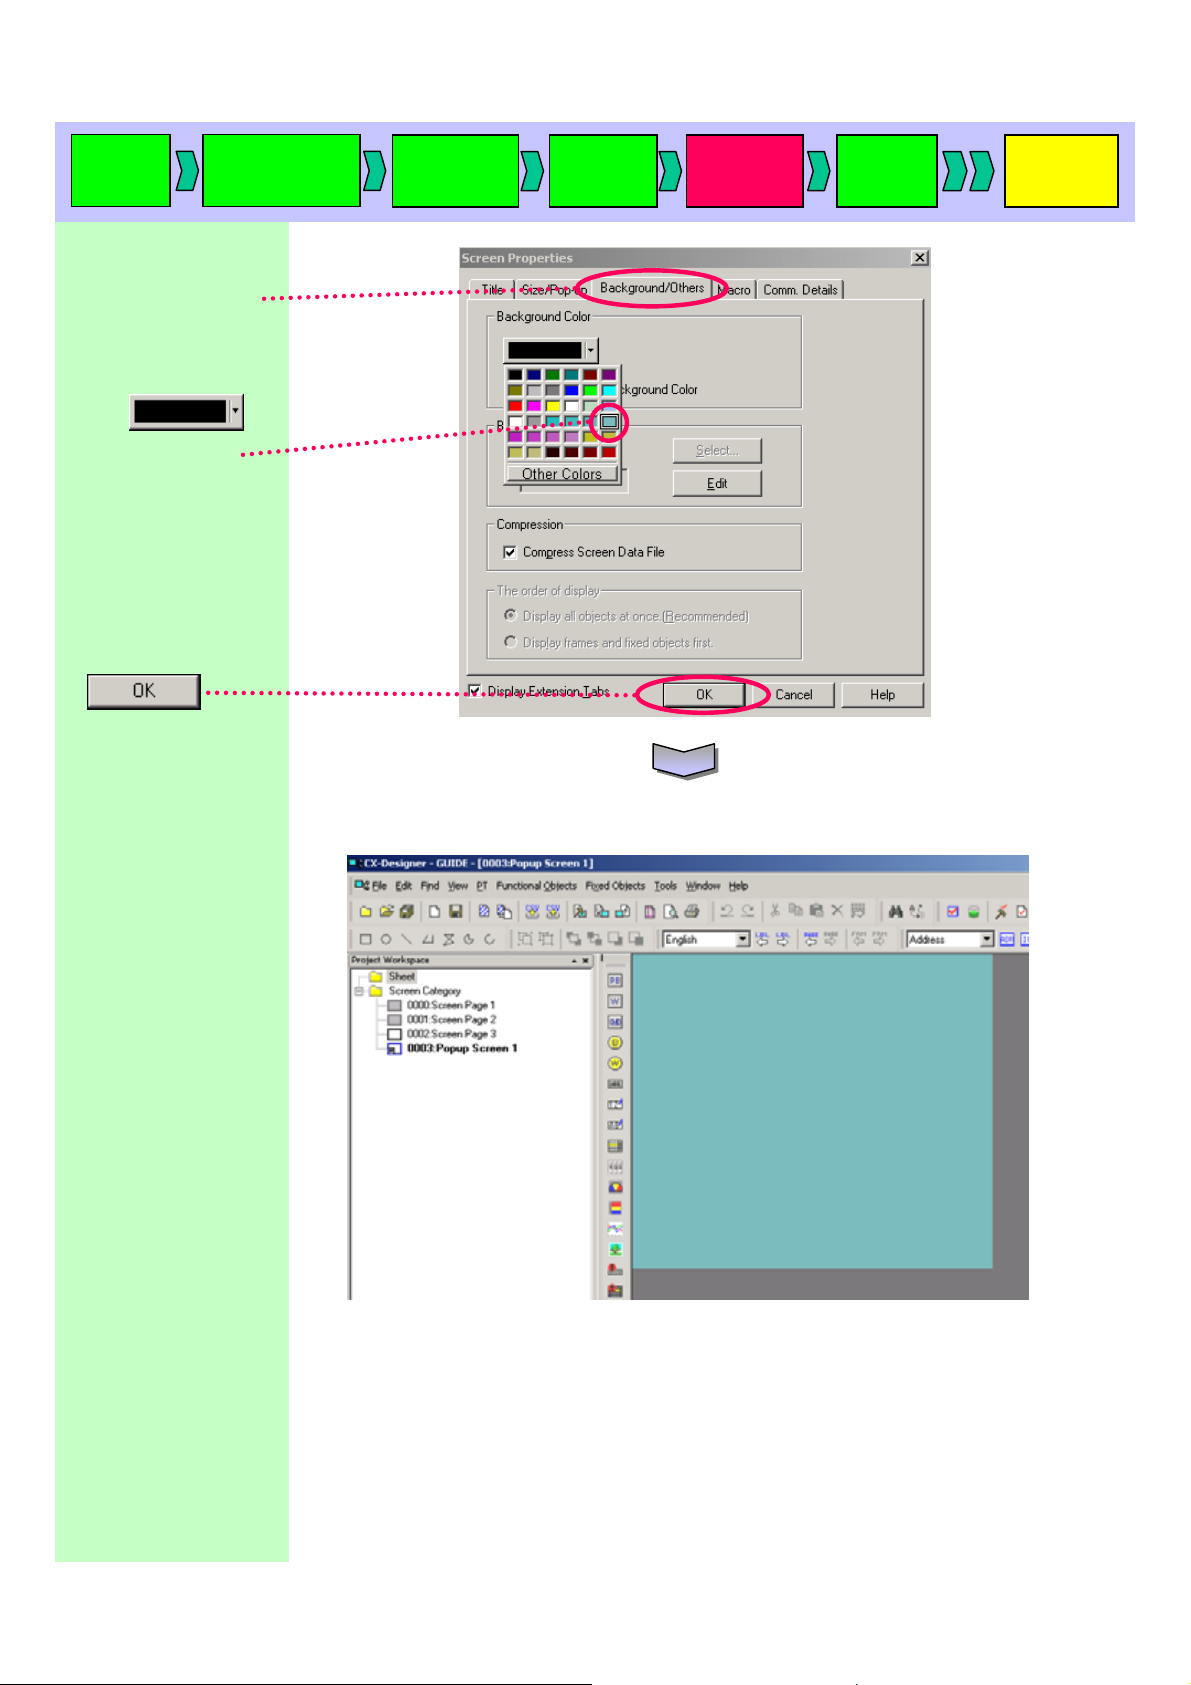
Right-click [0003:
Pop-up Screen 1] in the
Project Workspace to
display the menu.
Click “Screen Property”
from the menu.
The Screen Property
Dialog appears.
Creating a
new project
Project
property
System
setting
Creating
a screen
Validation
Transferring
a project
Click the [Size/Pop-up] tab.
Set screen size as follow:
[Width]
! “320”
[Height]
! “240”
Check “Use as Pop-up
Screen”.
[Pop-up Screen Display
Position]
! “Center of Screen”
[Pop-up Screen Setting]
! Check “Enable input on
Other screens”.
Page 62
Start up
CX-D
Click the [Background/
Others] tab.
Click Background
Color
and select a color
from the color
selection dialog.
Click
Creating a
new project
Project
property
System
setting
Creating
a screen
Validation
Transferring
a project
- Screen size set in this property will be the pop-up screen size -
Page 63

Start up
CX-D
Create a label as shown
on the right by referring
to “9. Displaying a Text”.
[Label]
! “Pop-up Screen”
Select the ON/OFF
button
Creating a
new project
Project
property
System
setting
Creating
a screen
Validation
Transferring
a project
on the list.
On the object property list,
set as follow:
General tab
[Address]
! “HOST1: 00001.00
[Action]
! “Alternate”
[Type]
! “Select Shape”
(Type1)”
[Shape 1]
! Click
to display the Select the
Shape dialog box and
select a switch.
[Shape 2]
! Click
to display the Select
Shape dialog box and
select a switch.
Page 64
Start up
CX-D
Create a label as shown
on the right by referring
to “9. Displaying a Text”.
[Label]
! “Alarm 1”
Create six ON/OFF
buttons and labels using
the Repeat function.
Repeat Function
Creating a
new project
Project
property
System
setting
Creating
a screen
Validation
Transferring
a project
[Qty]
Horizontal ! “1”
Vertical ! “6”
[Spacing]
Horizontal ! “0”
Vertical ! “0”
[Offset Address] ! “1”
Enter an object label as
“Alarm 1” to “Alarm 6”
respectively.
Create an ON/OFF button
and label it as “Alarm 7”
in the way you made
“Alarm 1”.
Set the text object property
list as follow:
[Label]
! “Alarm 7”
Page 65

Start up
CX-D
Set the ON/OFF button
property list as follow :
General tab
[Address]
! “HOST1: 00002.00
[Action]
! “Alternate”
[Type]
! “Select Shape
(Type1)”
[Shape 1]
! Click
to display the Select
Shape dialog box and
select the switch
“SS1042.VEC”.
[Shape 2]
! Click
To display the Select
Shape dialog box and
select the switch
“SS1043.VEC”
Creating a
new project
Project
property
System
setting
Creating
a screen
Validation
Transferring
a project
Create six ON/OFF
buttons and labels using
the Repeat function.
Repeat function
Set as follow:
[Qty]
Horizontal ! “1”
Vertical ! “6”
[Spacing]
Horizontal ! “0”
Vertical ! “0”
[Offset Address] ! “1”
Enter an object label as
“Alarm 7” to “Alarm 12”
respectively.
Page 66
Start up
CX-D
Select the Command
button
on the list.
Set the object property
list as follow.
Creating a
new project
Project
property
System
setting
Creating
a screen
Validation
Transferring
a project
Text tab
[Label]
! “Close”
General tab
[Function]
Click
[Function]
! “Control Pop-up”
Screen”
[Action]
! “Close Local Pop-up
Screen”
Click
Page 67
Start up
CX-D
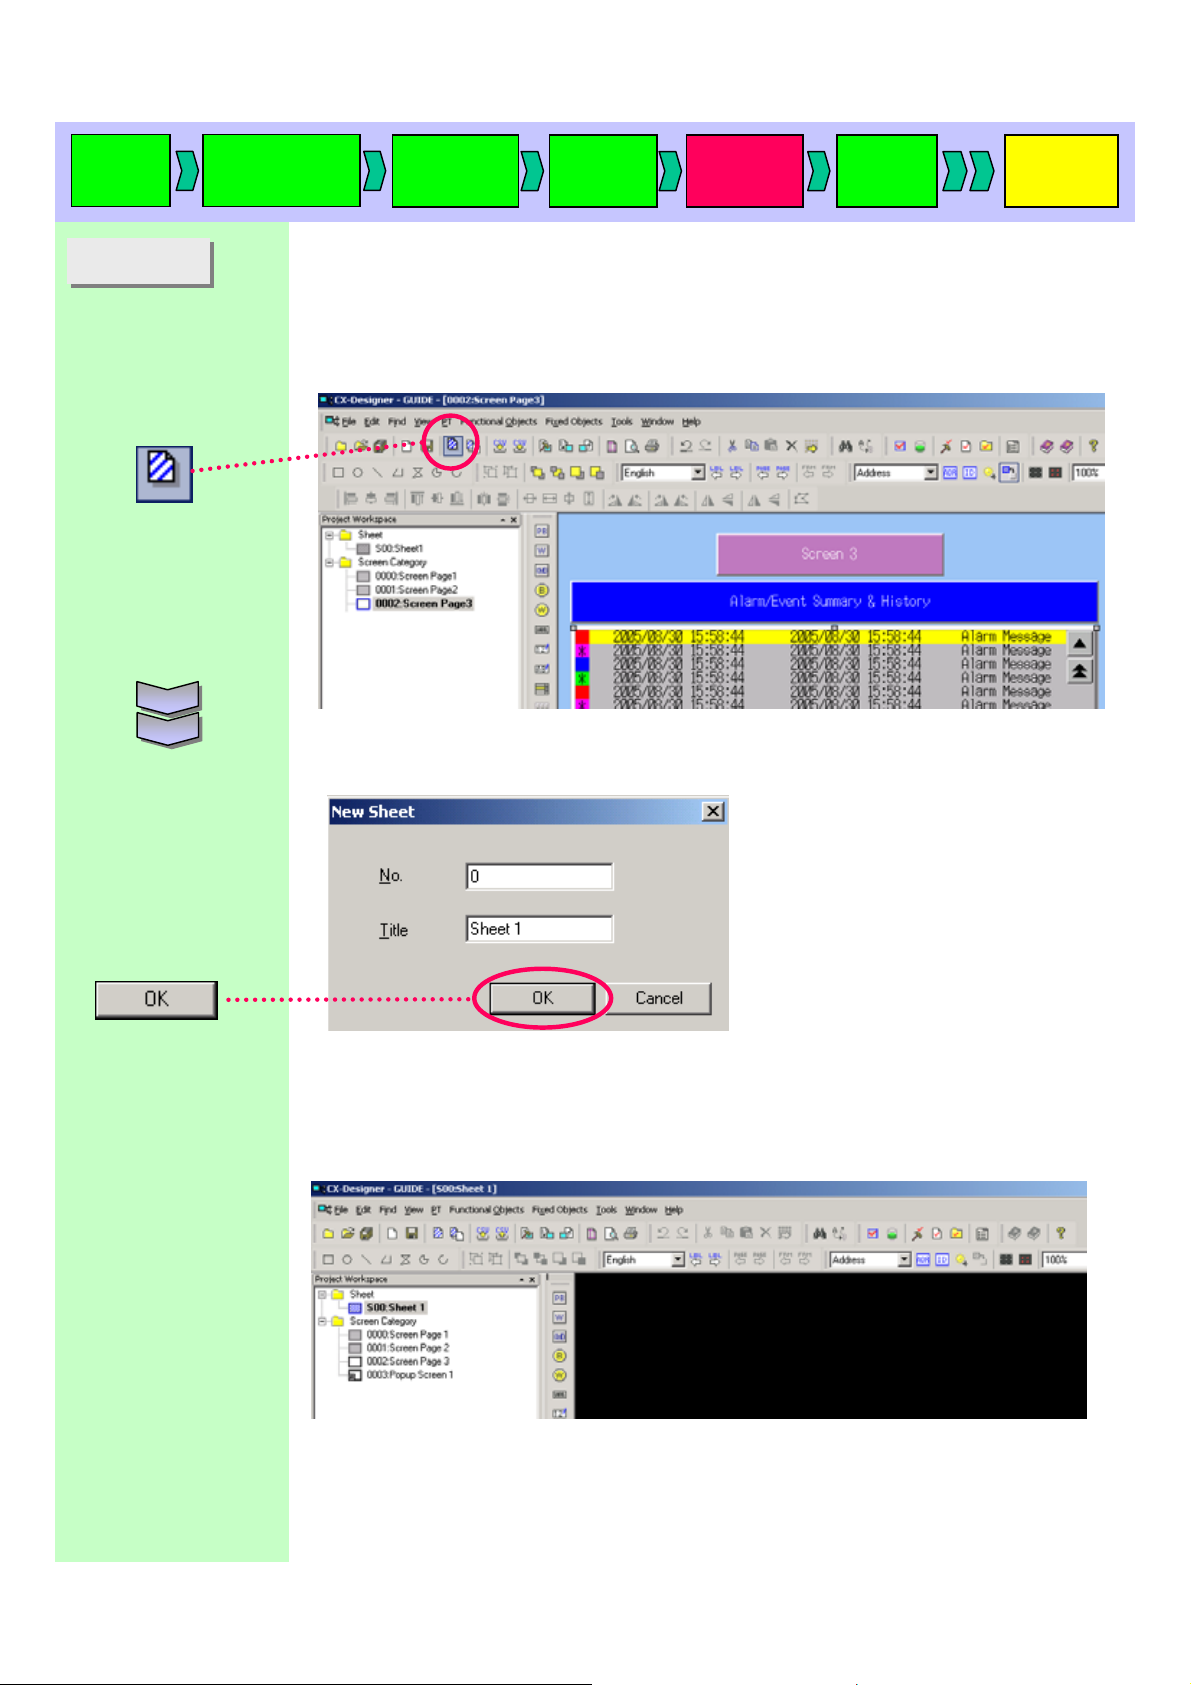
20. Sheet
20. Sheet
Select the Sheet icon.
Creating a
new project
Project
property
Sheet is a screen th at is able to be overlapped on a normal screen and displayed.
If you create functional objects on a sheet that you want to use for more than one
screen, those objects can be used on all screens applied to the sheet just by setting at
[apply sheet].
In this manual, you will create a Switch Label button, a Pop-up Display button, and a
Switch Screen button in the sheet, that are commonly used on screens 1 to 3.
System
setting
Creating
a screen
Validation
Transferring
a project
Enter “Sheet 1” in Title.
Click
A new sheet is created.
Page 68

Start up
CX-D
21. Word Button/Command Button
21. Word Button/Command Button
21-1 Switch label button
21-1 Switch label button
Click the Word button
on the list
Creating a
new project
Project
property
Word button is an object that writes constants to a specified address when it is
pressed,
or increases/decreases a value of the specified address. It is possible to
write a specified value to the item selected from a pop-up menu.
In this manual, you will make a button to switch labels (switching English and
Dutch here) using a pop-up menu.
System
setting
Creating
a screen
Validation
Transferring
a project
Set as follow in the object
property list:
General tab
[Write Address]
! “$W10”
[Action]
! “Display Pop-up Menu”
Click the Push button
of the Pop-up Settings
on the General tab.
The value of $SW10 (NS system memory) is
The value of $SW10 (NS system memory) is
set to display a specified label No.
set to display a specified label No.
(The settings of label No. 0 (English) and
(The settings of label No. 0 (English) and
No. 1 (Dutch) made to the initial project
No. 1 (Dutch) made to the initial project
property are applied.
property are applied.
Page 69

Start up
CX-D
Click
Add the following
settings in the Pop-up
settings:
[1]
[Menu] ! “English”
[Set Value] ! “0”
[2]
[Menu] ! “Dutch”
[Set Value] ! “1”
Creating a
new project
Project
property
System
setting
Creating
a screen
Validation
Transferring
a project
Click
Page 70

Start up
CX-D
Creating a
new project
Project
property
System
setting
Creating
a screen
Validation
Transferring
a project
21-2 Switch screen button
21-2 Switch screen button
Click the Command
button
on the list
Using a command button.
Command button is a object to switch screens and send a string code.
In this manual, it is used to switch the virtual alarm pop-up screen and screens
1 to 3. Create a command button to display the pop-up screen on the sheet
created on the previous page.
Set as follow on the object
property list:
Text tab
[Label]
! “Virtual Alarm Display”
Click the Push button
of [Function] on the
General tab.
Page 71

Start up
CX-D
Click the [Select]
button.
The Screen List dialog
appears.
Select “Pop-up 1” and
Click
Creating a
new project
Project
property
System
setting
Creating
a screen
Validation
Transferring
a project
Click
Page 72

Start up
CX-D
Create a screen switching
button (CMD button)
labeled as Screen 1 to
Screen 3 in the way you
made “Virtual Alarm
Display”.
Click the PUSH button on
the right side of [Function]
to display the dialog. Set
each button as follow:
[Screen 1]
[Specified Screen]
! “0000: Screen 1”
[Screen 2]
[Specified Screen]
! “0001: Screen 2”
Creating a
new project
Project
property
System
setting
Creating
a screen
Validation
Transferring
a project
[Screen 3]
[Specified Screen]
! “0002: Screen 3”
Create two labels as shown
on the right by referring
to “9. Displaying a Text”.
[Label]
! “Word Button”
[Label]
! “Command Button”
Click the Apply
Sheet button.
Page 73

Start up
CX-D
Check the Sheet No. 0
boxes to all of the
Screen No. 0000 to
0003.
Click
Creating a
new project
Screen No.
Screen No.
Project
property
System
setting
Sheet No.
Sheet No.
Creating
a screen
Validation
Transferring
a project
Page 74

Start up
CX-D
Creating a
new project
Project
property
System
setting
Creating
a screen
Validation
These are the three screens created so far.
Transferring
a project
Page 75
Start up
CX-D
22. Creating another Language label
22. Creating another Language label
22-1 Creating a Dutch
22-1 Creating a Dutch
label
label
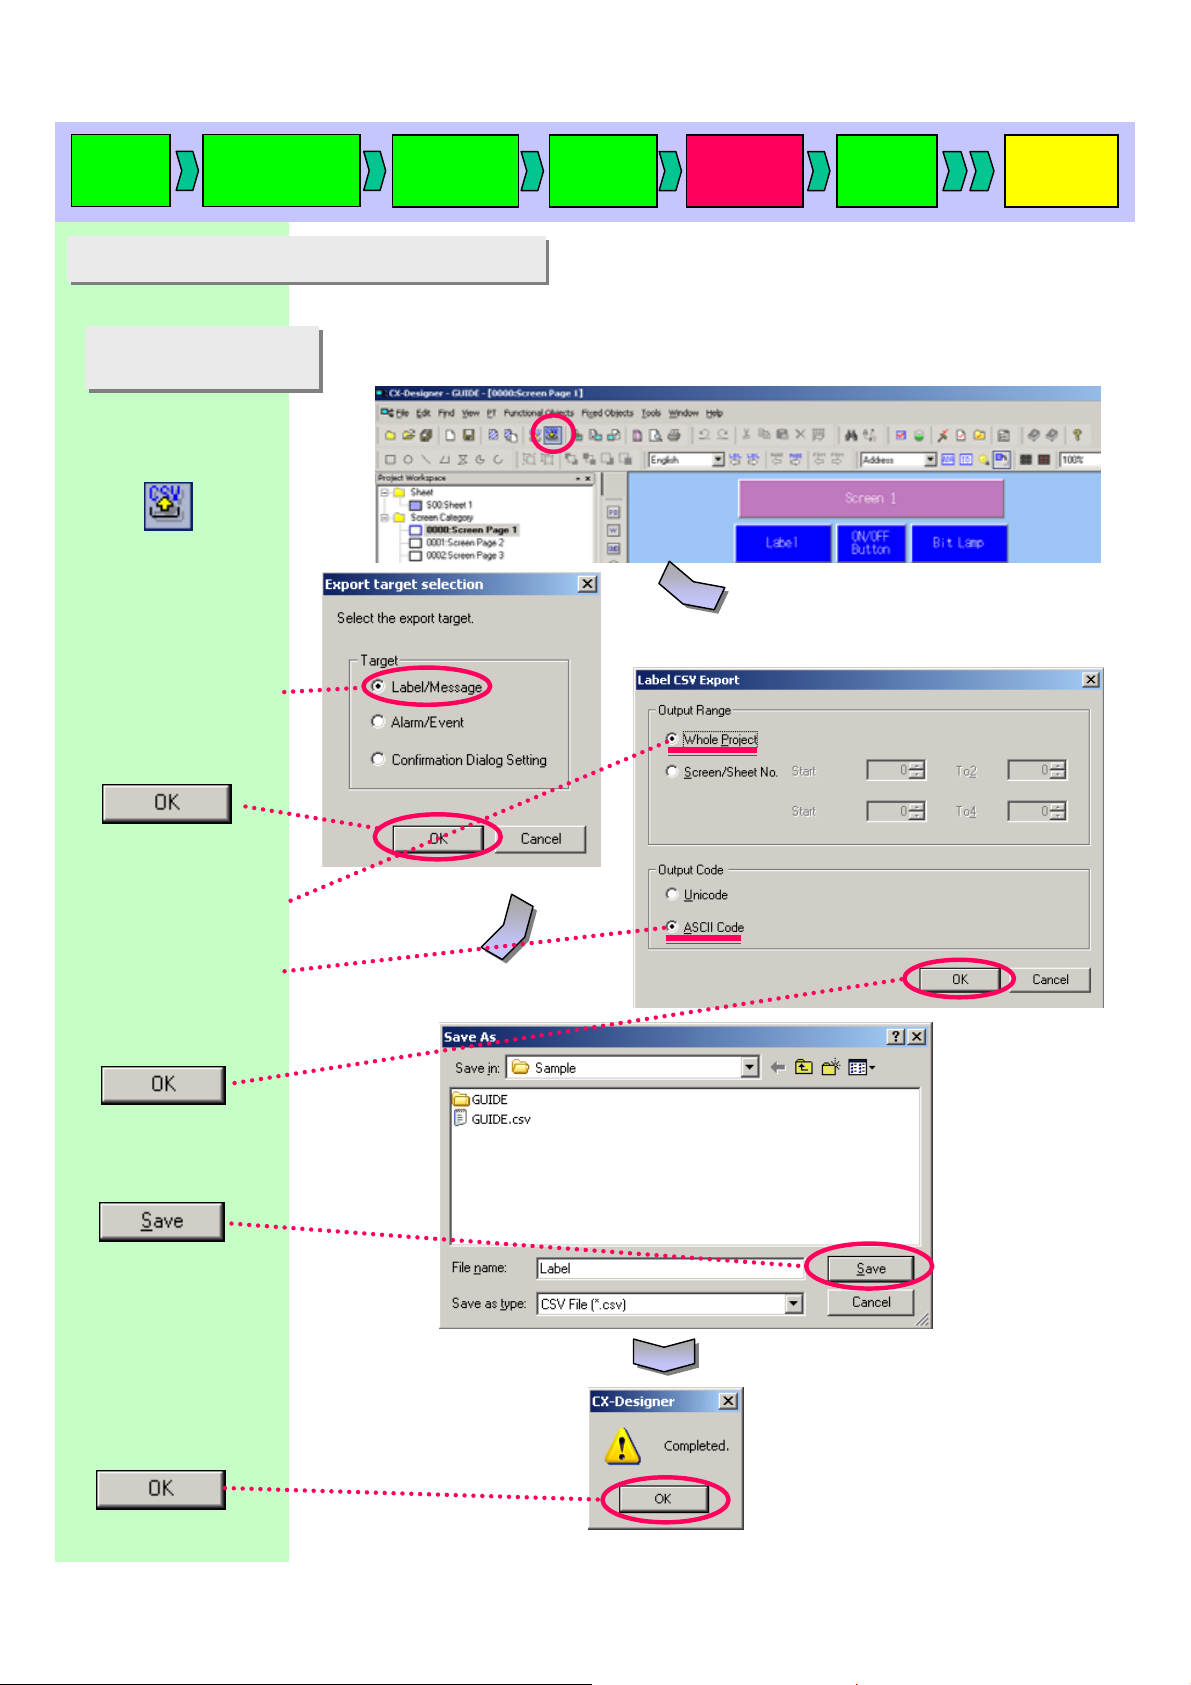
Click the [CSV File Export]
button.
Check [Label/Message]
in the [Target].
Creating a
new project
Project
property
Up to 16 different labels (characters) can be set for each functional object.
In this manual, you will create a project with two labels, English and Dutch,
that can be switched by a one-touch operation using the label switching
function.
System
setting
Creating
a screen
Validation
Transferring
a project
Click
Check [Whole Project] in
the [Output Range].
Check [ASCII Code] in
the [Output Code].
Click
Enter a file name (here
Label) and click Save.
Click
Page 76

.
Start up
CX-D
Read the file saved on the previous page with EXCEL. (Select [Data] menu – [Get External Data] – Import Text File…]
Creating a
new project
Project
property
System
setting
Creating
a screen
English
English
Validation
Transferring
a project
Dutch
Dutch
Enter labels in Dutch
for the Screen Page 1.
Screen Page 1
Screen Page 1
English
English
Dutch
Dutch
Page 77

Start up
CX-D
Creating a
new project
Project
property
System
setting
Creating
a screen
Validation
Transferring
a project
Enter labels in Dutch for
the Screen Pages 2 to 3.
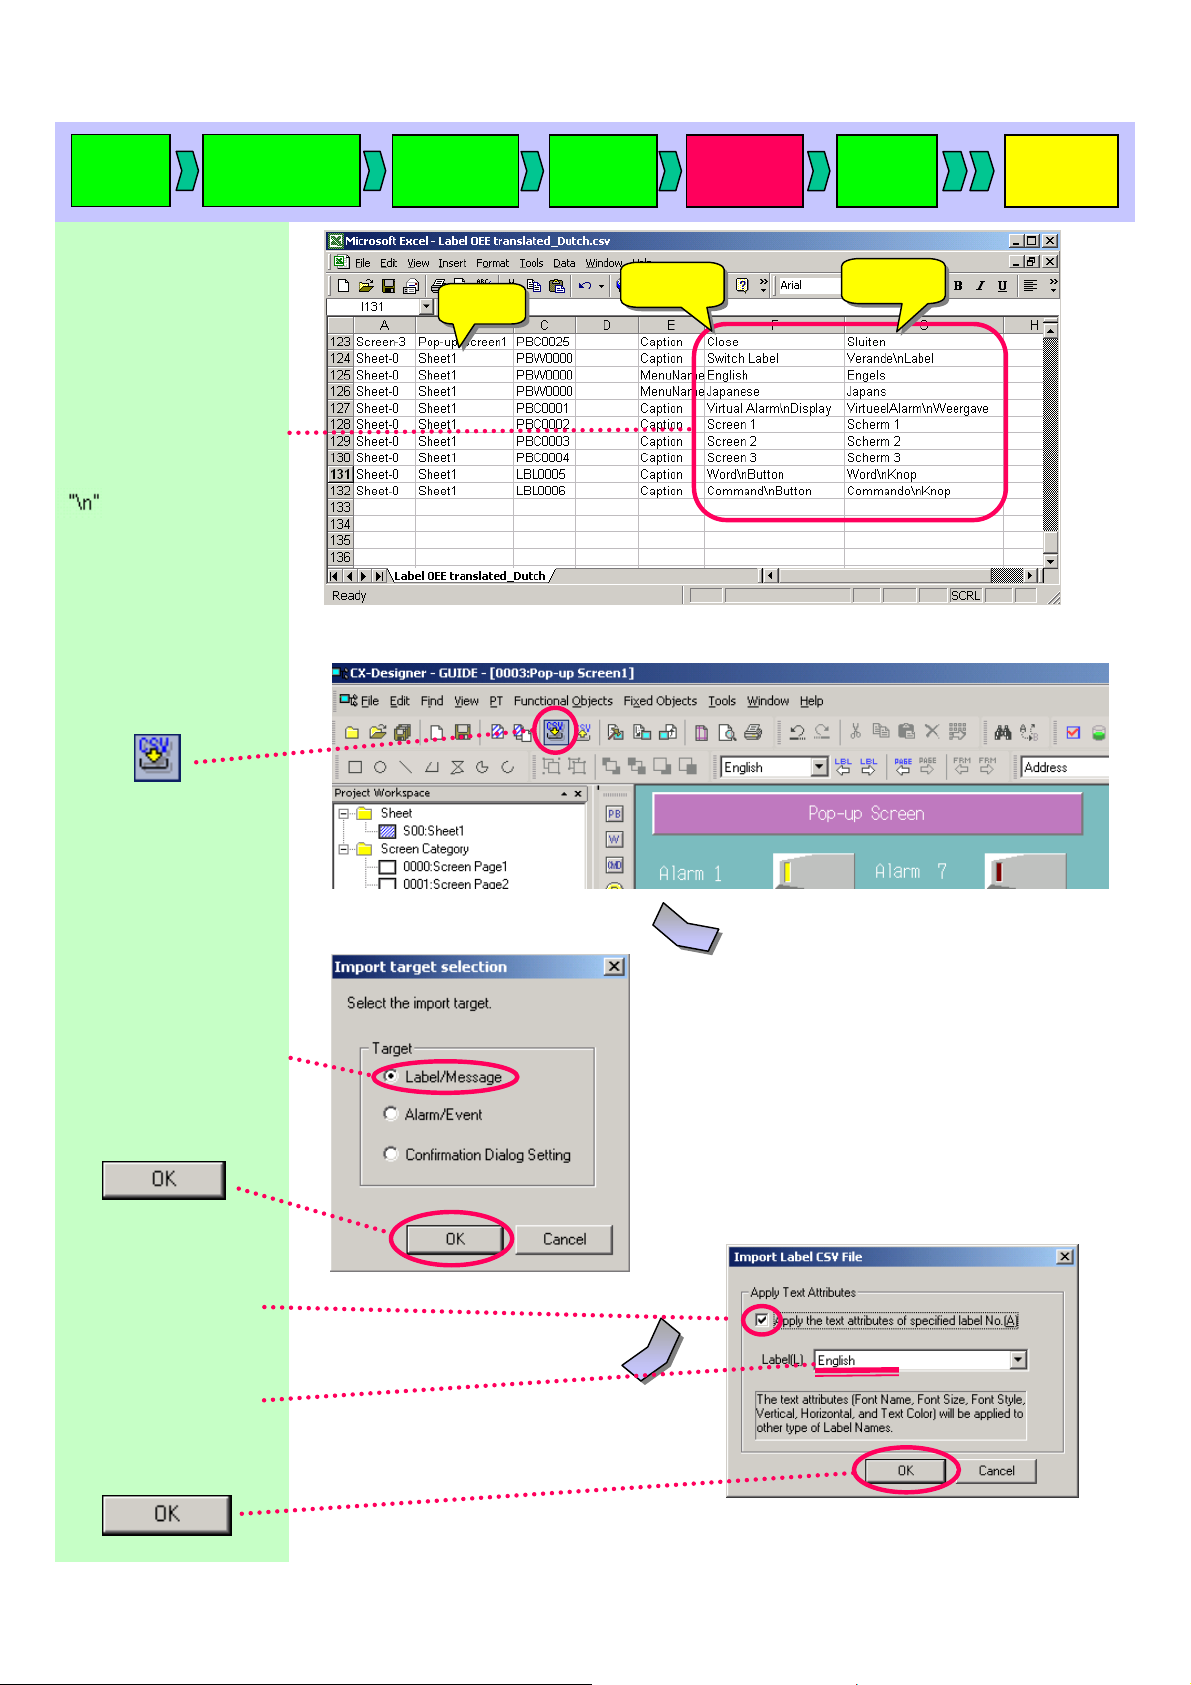
“ n” in character strings is
a line feed.
Screen Page 2
Screen Page 2
English
English
Dutch
Dutch
Screen Page 3
Screen Page 3
Page 78

Start up
CX-D
Creating a
new project
Project
property
System
setting
Creating
a screen
Validation
Transferring
a project
Enter labels in Dutch for
the Pop-up Screen.
“¥n” in character strings
is a line feed.
Pop-up Screen 1
Pop-up Screen 1
English
English
Dutch
Dutch
Page 79
Start up
CX-D
Creating a
new project
Project
property
System
setting
Creating
a screen
Validation
Transferring
a project
Enter labels for [Sheet] in
Dutch.
“¥n” in character strings
is a line feed.
Click [CSV File Import]
English
Sheet
Sheet
English
Save the file when you have finished editing.
Dutch
Dutch
Check [Label/Message]
in the
[Target]
Click
Check the [Apply the
text Attributes of
specified No. (A)] box.
Select [English] from
the [Label] pull-down
menu.
Click
Page 80

Start up
CX-D
Enter the file name that
has just been specified
and click the [Open]
button.
Creating a
new project
Project
property
System
setting
Creating
a screen
Validation
Transferring
a project
Click
Page 81
Start up
CX-D
Creating a
new project
Project
property
System
setting
Creating
a screen
Validation
Transferring
a project
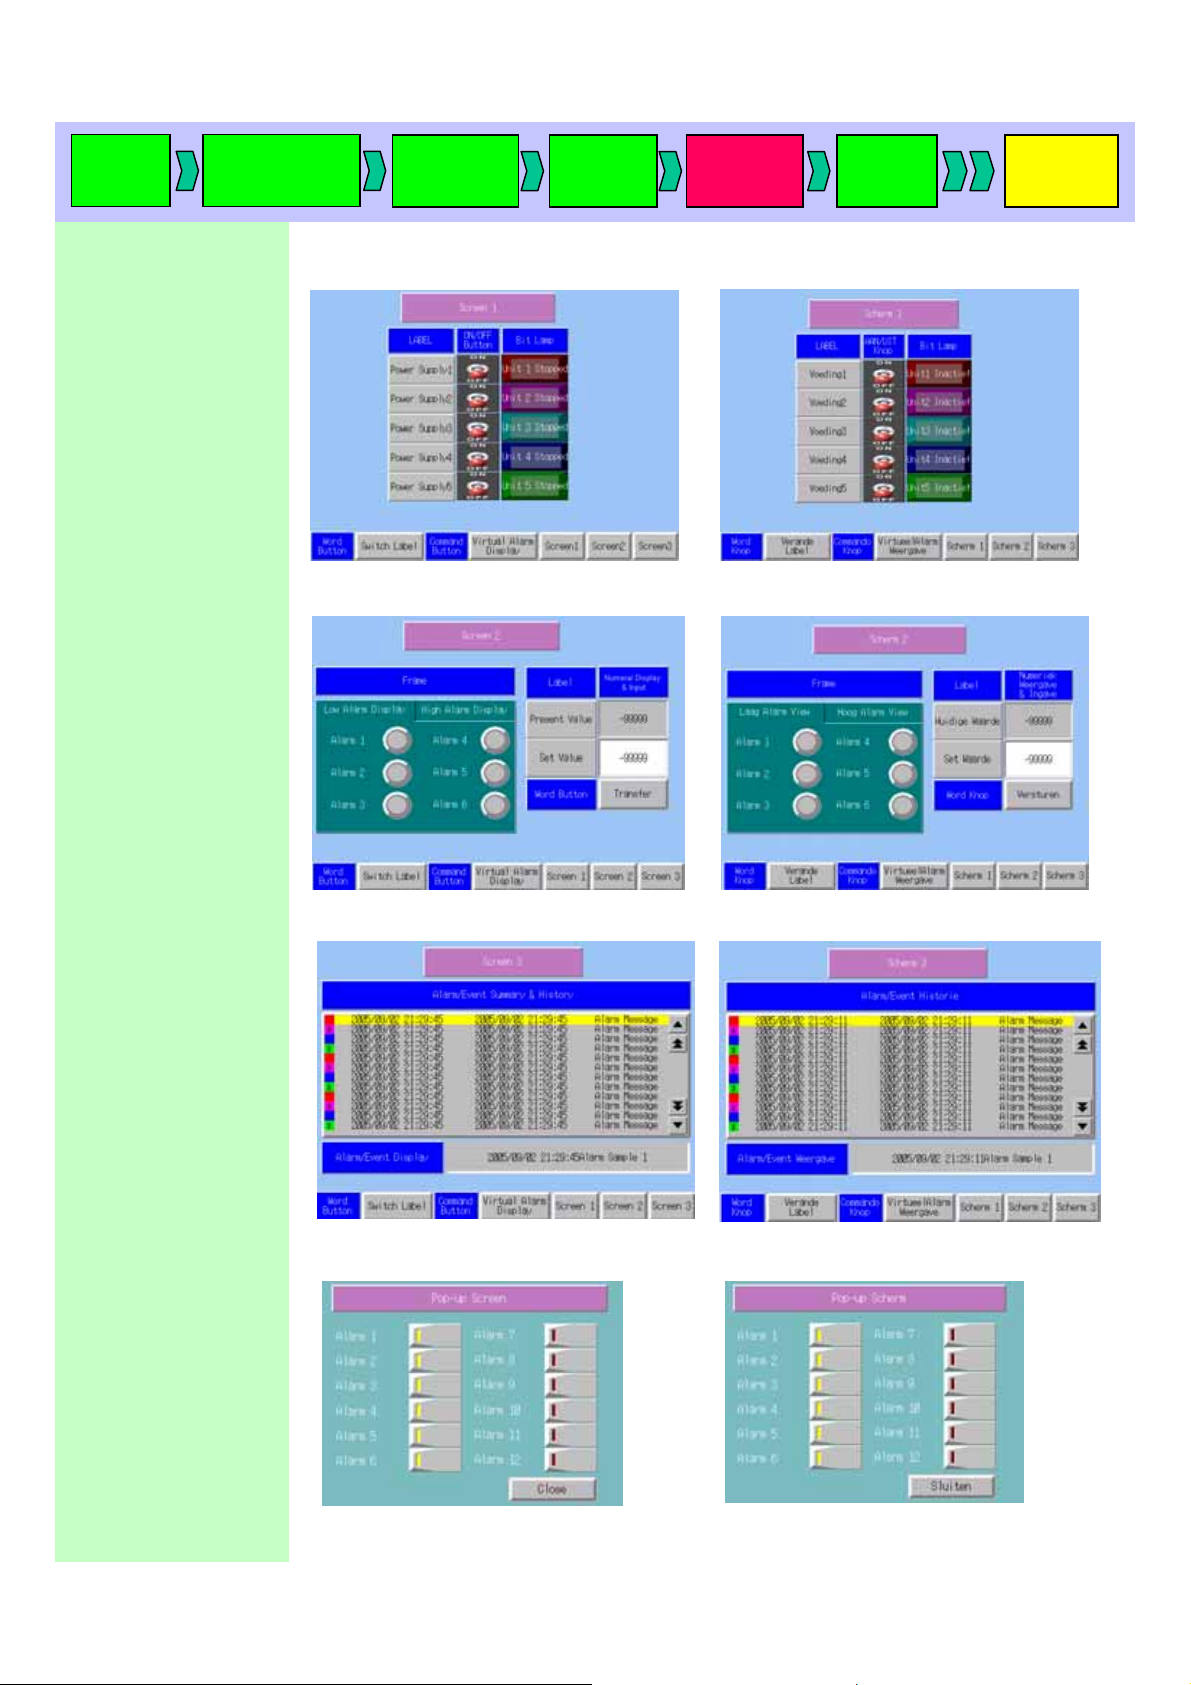
English Labels
Screen 1
Screen 2
Dutch Labels
Screen 1
Screen 2
Screen 3
Pop-up Screen
Screen 3
Pop-up Screen
Page 82

Start up
CX-D
22-2 Setting Alarm/Ev ent in Dutch
22-2 Setting Alarm/Ev ent in Dutch
Click the [CSV File
Export] button.
Check [Alarm/Event] in
the [Target].
Click
Creating a
new project
Making settings for alarm /event in Dutch.
In this manual, you will create a project with two language labels, English and Dutch.
Project
property
System
setting
Creating
a screen
Validation
Transferring
a project
Check [ASCII Code] in
the [Output Code].
Click
Enter a file name (Alarm
is used here) and click
Click
Page 83

Start up
CX-D
Read the file save on a previous page with EXCEL. (Select [Data] menu – [Get External Data] – Import Text File…].
Creating a
new project
Project
property
highalarm
lowalarm
lowalarm
highalarm
event
event
System
setting
Creating
a screen
Validation
English
English
Transferring
a project
Dutch
Dutch
Write [lowalarm],
[highalarm], and [event]
In Dutch.
Click the [Import CSV File]
button.
Page 84

Start up
CX-D
Check [Alarm/Event] in
the [Target].
Click
Check [Add to Current
Alarm] in the [Selected
Import Alarm].
Creating a
new project
Project
property
System
setting
Creating
a screen
Validation
Transferring
a project
Click
Enter the file name that
has just been specified
and click the [Open]
button.
Click
English Label
Dutch Label
Page 85

Start up
CX-D
Creating a
new project
Project
property
System
setting
Creating
a screen
Validation
Transferring
a project
23. Useful Functions
23. Useful Functions
23-1 Find (Address)
23-1 Find (Address)
Click the [Find] button.
Check [Address] in the
[Find What].
Click
Searching addresses used in a project.
In this manual, you will search OCH of Common I/O Area (CIO) allocated to the
PLC.
Host
! [HOST 1]
Area
! [Common I/O Area
(CIO)]
! Check “Word
Addressing”
Word
! [0]
Click
Page 86

Start up
CX-D
Click the [Find] button.
Creating a
new project
Project
property
System
setting
Creating
a screen
Validation
Transferring
a project
Search results are
displayed as a list.
Page 87

Start up
CX-D
Creating a
new project
Project
property
System
setting
Creating
a screen
Validation
Transferring
a project
23-2 Find (Label)
23-2 Find (Label)
Click the [Find] button.
Enter “Power Supply” in
[Find What].
Check [Label/Object
Comment(D) in the [Find
From]
Searching labels and obj ect comments used in a project.
In this manual, you will search labels including the character string “Power Supply”.
Click
Search results are
displayed in a list.
Page 88

Start up
CX-D
Creating a
new project
Project
property
System
setting
Creating
a screen
Validation
Transferring
a project
23-3 Select Object
23-3 Select Object
Right-click the screen
to display the pull-down
menu.
Click [Select Object].
Click [ON/OFF Button].
Using “Select Object” function facilitates your search for certain kinds of objects
when many kinds of objects are on a screen.
In this manual, you will select ON/OFF buttons.
The ON/OFF Buttons are
displayed .
Page 89

Start up
CX-D
23-4 Reuse of screen (by copying)
23-4 Reuse of screen (by copying)
Right-click [0000:
Screen Page 1] on the
Project Workspace to
display the pull-down
menu.
Click [Copy].
Creating a
new project
“Reuse of Screen” is a function to use an already-made screen and copy them to
another project.
In this manual, you will reuse Screen Page 1 made in the sample project (GUIDE) to
another project (GUIDE 2).
Project
property
System
setting
Creating
a screen
Validation
Transferring
a project
Start-up another CXDesigner and create a
project “GUIDE 2” by
referring to“3. New Project”.
Do not close the CXDesigner on which you
have been editing the
project “GUIDE”.
Right-click [Screen
Page] to display the
pull-down menu.
Click [Paste].
Enter [Paste from No.].
(“0” is set in this manual.)
Click
Page 90

Start up
CX-D
Click
The process dialog
appears.
Creating a
new project
Project
property
System
setting
Creating
a screen
Validation
Transferring
a project
[0000: Screen Page 1]
is added.
Page 91
Start up
CX-D
Creating a
new project
Project
property
System
setting
Creating
a screen
Validation
Transferring
a project
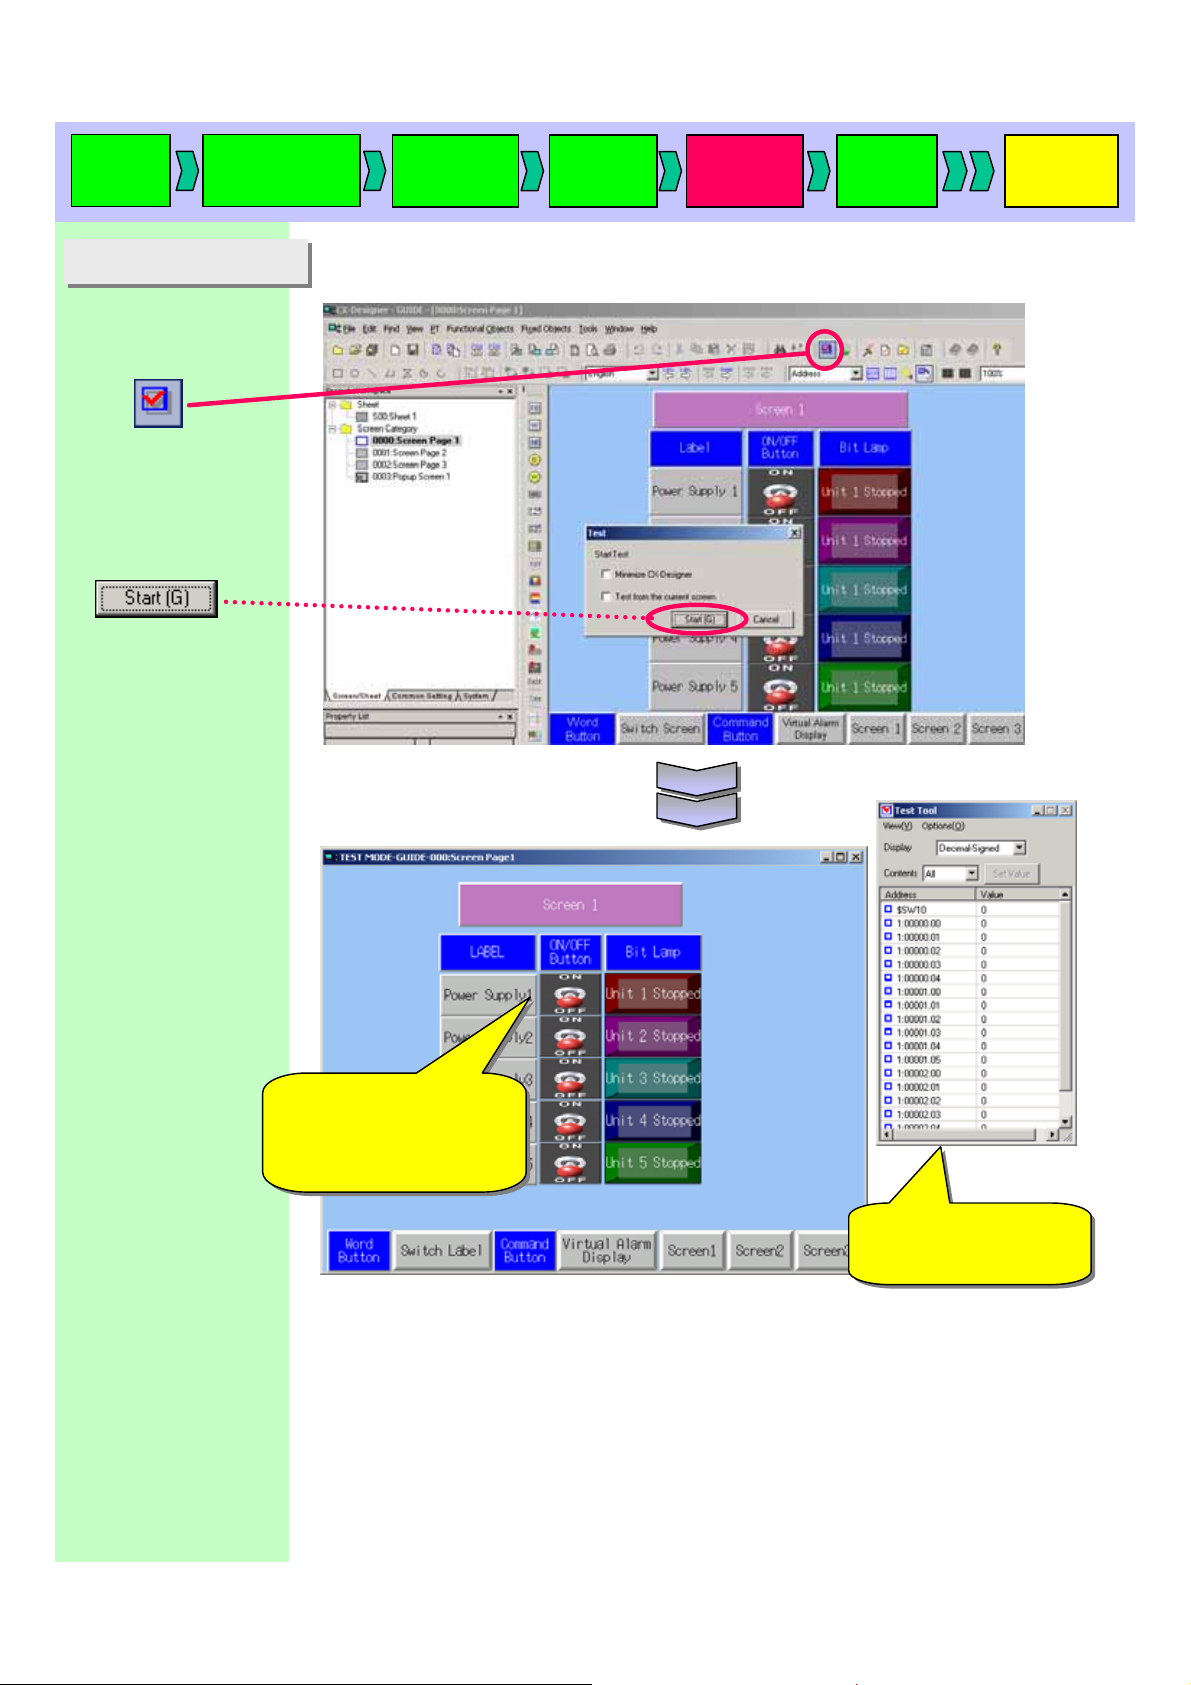
24. Test function
24. Test function
Click the [Test]
button.
Click the [Start]
button.
Before transferring the data, you can check it on the CX-Desig ner.
The first screen “0000:
Screen Page 1” and the
Test Tool dialog appear.
It is possible to confirm
It is possible to confirm
actual movement on NS 8
actual movement on NS 8
by clicking a functional
by clicking a functional
object (a button, etc…).
object (a button, etc…).
You can directly change
You can directly change
values on the Test Tool
values on the Test Tool
dialog.
dialog.
Page 92

Start up
CX-D
The Power Supply (1
to 3) bit lamps will lit
by turning ON the
ON/OFF buttons.
You can check that
the addresses of the
Power Supply (1 to 3)
is turned ON on the
Test Tool dialog.
Click the Screen 2.
Creating a
new project
Project
property
[Confirming a movement of ON/OFF buttons and bit l amps of “Power Supply 1 to 5”.]
System
setting
Creating
a screen
Validation
Transferring
a project
Click the Virtual Alarm
Display.
[Check the ON/OFF buttons and bit lamps of Alarms.]
Page 93

Start up
CX-D
Pop-up Screen appears.
Turn ON the ON/OFF
button of Alarm 1.
Creating a
new project
Project
property
System
setting
Creating
a screen
Validation
Transferring
a project
Alarm bit 1 is lit by turning
ON the ON/OFF button of
Alarm 1.
You can also check
that the address of
the Alarm 1 is turned
ON on the Test Tool
dialog.
Click the Close
button.
Click the Screen 3 button.
Page 94
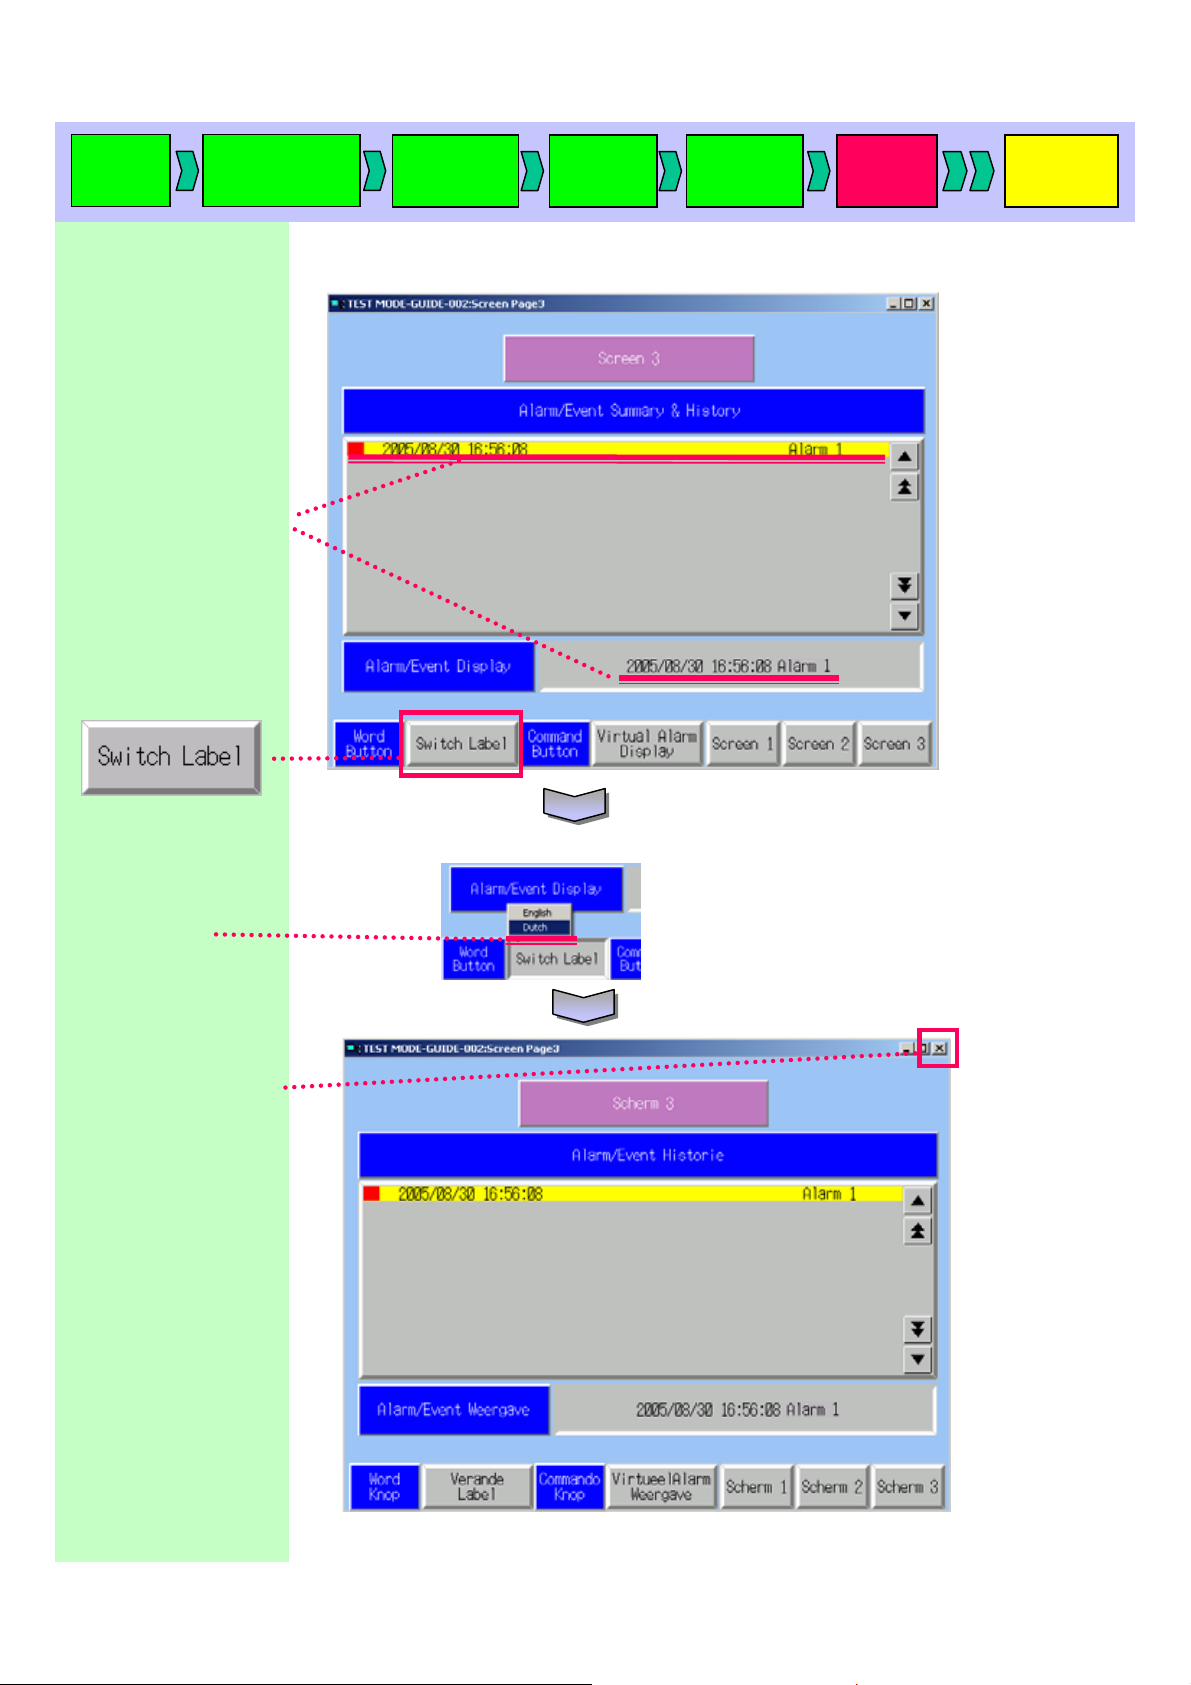
Start up
CX-D
You can check the alarm
that was occurred on the
previous page.
Click the Switch Label
button.
Creating a
new project
Project
property
[Confirming a movement of Alarm/Event.]
System
setting
Creating
a screen
Validation
Transferring
a project
Click [Dutch] in
the menu.
Click the [X] button to end
the Test tool.
[Check a movement of the Switch Label button.]
Page 95
Page 96

Start up
CX-D
Transferring project data
Transferring project data
1. Transferring project data via serial cable(RS232C)
1. Transferring project data via serial cable(RS232C)
Click
Creating a
new project
Transferring projects created on CX-Designer to the NS hardware.
There are six ways to transfer a project: serial cable, Modem, Ethernet,
Controller link, USB and Memory ca rd.
In this manual, you will transfers project data via serial cable and using a memory card.
Before you start…
(XW2Z-S002).
Project
property
Connect the NS hardware to the personal computer with the communication cable
System
setting
Creating
a screen
Validation
Transferring
a project
Click the Setting button.
Select “Serial” from the
Comms. Method pulldown menu.
Click the Set… button.
Page 97

Start up
CX-D
Select [Port] for
connection. “COM1” is
selected here. Select
COM port to be used to
connect with the NS
hardware according to
your working environment.
Click
Creating a
new project
Project
property
System
setting
Creating
a screen
Validation
Transferring
a project
Click
Click the Yes button.
Page 98

Start up
CX-D
NS hardware screen
changes to the transfer
preparation screen.
The transfer processing
dialog appears.
On the NS hardware, the
process bar appears, too.
Creating a
new project
Project
property
System
setting
Connection Complete
Connection Complete
Start downloading/uploading
Start downloading/uploading
Creating
a screen
Validation
Transferring
a project
Click
to restart the NS
hardware.
Click
Page 99

Start up
CX-D
2. Transferring project dada u sing a memory card
2. Transferring project dada u sing a memory card
Click
Change the settings to
the “Direct data transfer
to NS/Computer” on the
Comm. Method dialog.
[Comms. Method]
! “Memory Card”
[Drive]
! “H”
*Select the drive to
which the memory card
is installed.
[Bank]
! “Bank 1”
*There are four banks
available for memory
cards. One project is
downloaded to a bank.
Here, you specify the
bank to be transferred.
Creating a
new project
Before you start…
Project
property
Install the memory card to the personal computer.
System
setting
Creating
a screen
Validation
Transferring
a project
Click
Click
Page 100
Start up
CX-D
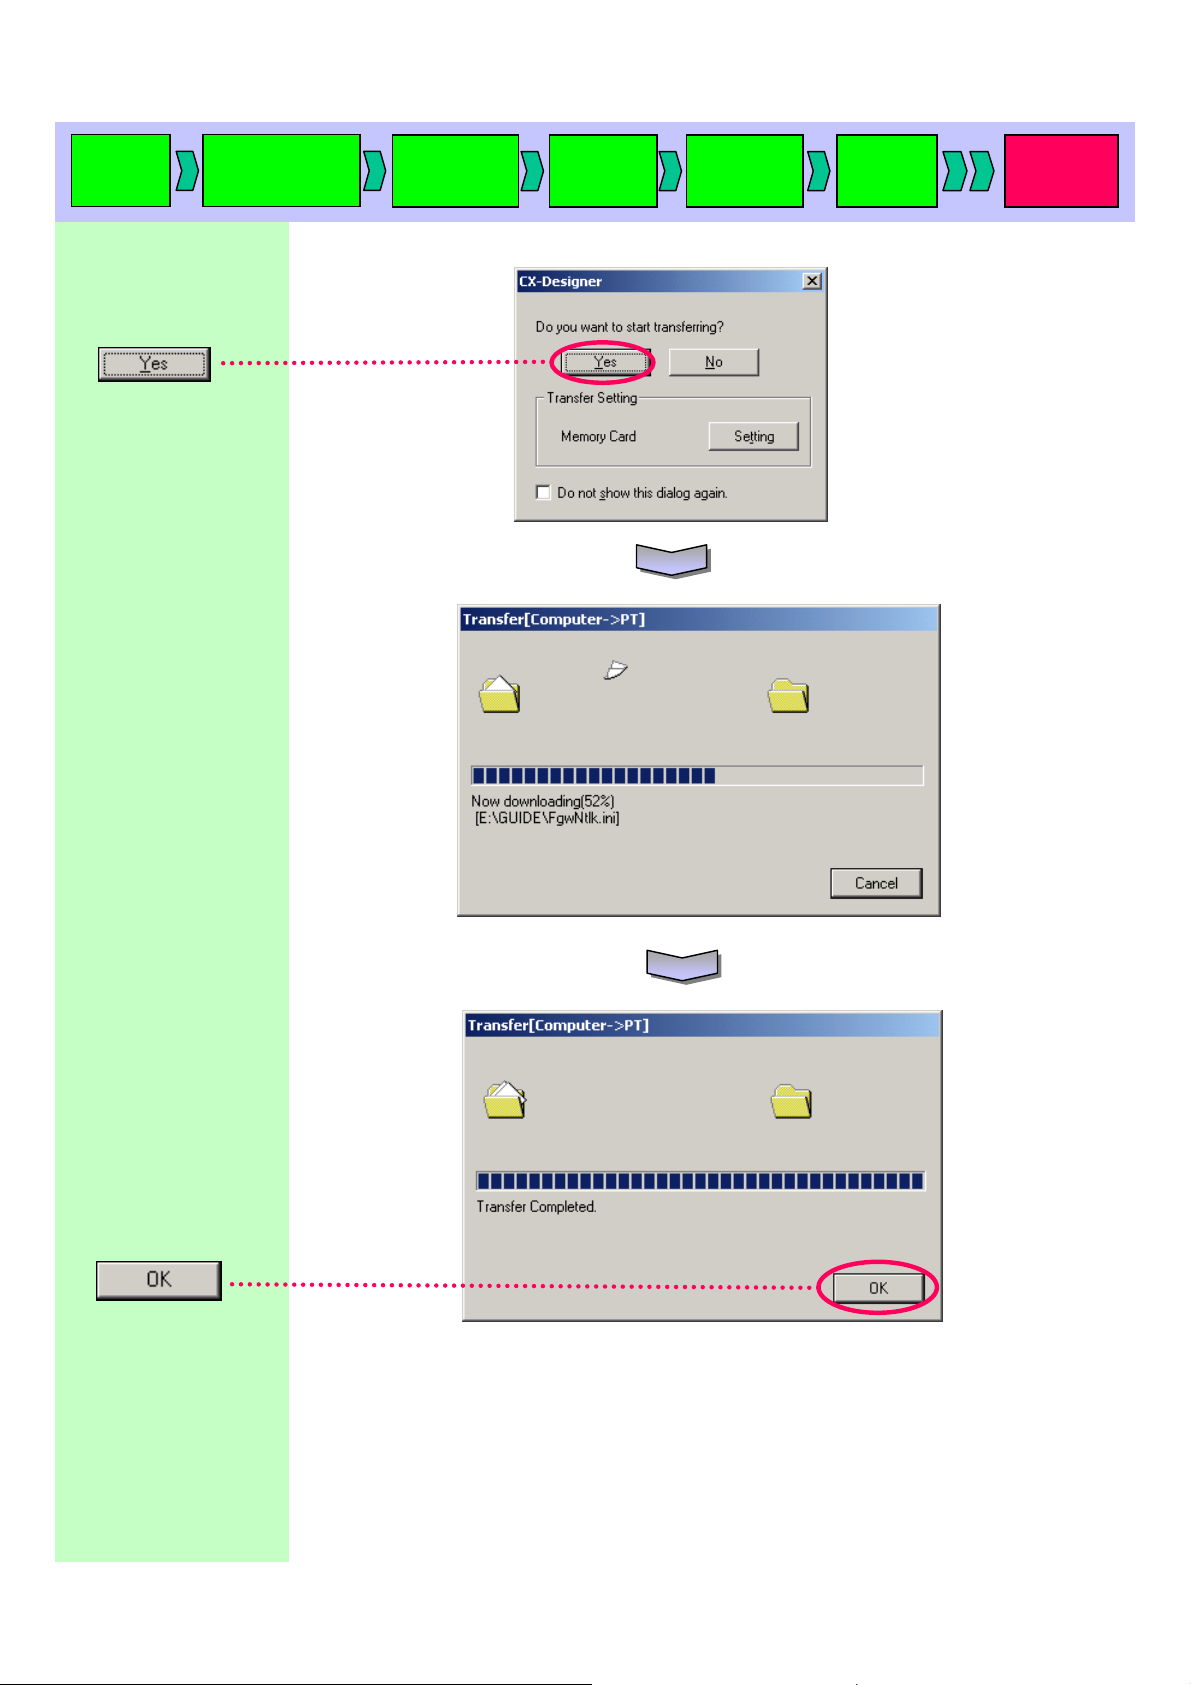
Click Yes
Creating a
new project
Project
property
System
setting
Creating
a screen
Validation
Transferring
a project
The transfer processing
dialog appears.
Click
 Loading...