


OMRON HEALTHCARE Co., Ltd.
53, Kunotsubo, Terado-cho, Muko, Kyoto, 617-0002 JAPAN
Distributed by:
OMRON HEALTHCARE, INC.
1925 West Field Court, Lake Forest, IL 60045 U.S.A.
OmronHealthcare.com
©2019 OMRON HEALTHCARE, INC.
Made in Japan
Model BP8000-M
Instruction Manual
4615954-8A

Table of ConTenTs
Introduction .............................................................................. 3
Safety Instructions ....................................................................................................... 3
Intended Use ..................................................................................................................4
Receiving and Inspection ..........................................................................................4
Symbols Glossary .......................................................................................................... 4
Important Safety Information ................................................. 5
1. Know Your Monitor ............................................................. 13
1.1 Contents .................................................................................................................. 13
1.2 Monitor ....................................................................................................................14
1.3 Display and Symbols .......................................................................................... 15
1.4 Classification of BP (Blood Pressure) ............................................................ 18
2. Preparation .......................................................................... 19
2.1 Charging the Bat tery ..........................................................................................19
2.2 Installing the Cuf f Sleeve ..................................................................................21
2.3 Wearing the Monitor on the Left Wrist .......................................................21
2.4 Turn Your Monitor On ........................................................................................ 23
3. Using Your Monitor without a Smart Device.................... 24
3.1 Taking a Blood Pressure Measurement .......................................................24
4. Using Your Monitor with a Smart Device.......................... 32
4.1 Pairing Your Monitor with a Smart Device .................................................32
4.2 Taking a Blood Pressure Measurement ...................................................... 34
4.3 Taking Activity Measurements ......................................................................35
4.4 Taking Sleep Measurements ...........................................................................38
4.5 Receiving Notification from Your Smart Device .....................................40
4.6 Receiving a Reminder ........................................................................................41
1

5. Recording an Event ............................................................. 42
6. Viewing the Readings Stored in Memory ......................... 43
Readings Details ..........................................................................................................45
Sleep Mode Details ....................................................................................................46
7. Settings ................................................................................ 47
7.1 Function Settings .................................................................................................47
7.2 Bluetooth Settings ..............................................................................................49
7.3 Restoring Your Monitor to the Default Settings ......................................51
7.4 Turning Off Your Monitor..................................................................................52
8. Error Messages and Troubleshooting............................... 53
8.1 Error Messages ......................................................................................................53
8.2 Troubleshooting ..................................................................................................57
9. Maintenance ........................................................................ 59
9.1 Maintenance ..........................................................................................................59
9.2 How to Replace the Cuff Sleeve .....................................................................59
9.3 Storage .....................................................................................................................60
9.4 Cleaning ..................................................................................................................60
9.5 Dispos al ...................................................................................................................61
10. Optional Accessories ........................................................ 62
11. Specifications ....................................................................63
12. FCC Statement ................................................................... 68
13. Limited Warranty .............................................................. 69
14. Guidance and Manufacturer’s Declaration .................... 70
2

Introduction
Thank you for purchasing the OMRON BP8000-M Wrist Blood Pressure
Monitor. This blood pressure monitor is to be worn on your wrist. This
blood pressure monitor uses the oscillometric method of blood pressure
measurement. When the band inflates, the monitor senses the pressure
pulsations of the artery underneath the band. The pulses are called
oscillometric pulses. The electronic pressure sensor displays a digital
reading of blood pressure.
This monitor can also track measurements such as steps, calories burned,
hours slept and awake time.
Safety Instructions
This instruction manual provides you with important information about the
OMRON BP8000-M Wrist Blood Pressure Monitor. To ensure the safe and
proper use of your monitor, READ and UNDERSTAND all of the safety and
operating instructions. If you do not understand these instructions or
have any questions, contact 1-800-634-4350 before attempting to use
your monitor. For specific information about your own blood pressure,
contact your physician.
3

Introduction
Intended Use
The device is a digital monitor intended for use in measuring blood pressure
and pulse rate in adult patient population with wrist circumference ranging
from 6.3 to 7.5 inches (16 to 19 cm).
The device detects the appearance of irregular heartbeats during
measurement and gives a warning signal with readings.
Environments of Use :
Home
Patient Population :
Adult
Receiving and Inspection
Remove this monitor from the packaging and inspect for damage. If this
monitor is damaged, DO NOT USE and contact 1-800- 634-4350.
Symbols Glossary
For symbol information, visit:
OmronHealthcare.com/symbols-glossary
Contraindications
Blood Pressure Measurement Usage
• The monitor is contraindicated for use in ambulatory environments.
• The monitor is contraindicated for use on aircraft.
4

Important Safety Information
Warning
Read the Important Safety Information in this instruction manual
before using this monitor.
Follow this instruction manual thoroughly for your safety.
Keep for future reference. For specific information about your own blood
pressure, CONSULT WITH YOUR PHYSICIAN.
• DO NOT use this monitor on infants, toddlers, children or persons who
cannot express themselves.
• DO NOT adjust medication based on blood pressure readings from this
blood pressure monitor. Take medication as prescribed by your physician.
• ONLY a physician is qualified to diagnose and treat high blood pressure.
• DO NOT use this monitor on an injured wrist or a wrist under medical
treatment.
• DO NOT wear this monitor on your wrist while on an intravenous drip or
blood transfusion.
• DO NOT use this monitor in areas containing high frequency (HF) surgical
equipment, magnetic resonance imaging (MRI) equipment, computerized
tomography (CT) scanners. This may result in incorrect operation of the
monitor and/or cause an inaccurate reading.
• DO NOT use this monitor in oxygen rich environments or near flammable
gas.
5
Indicates a potentially hazardous situation which, if not
avoided, c ould result in d eath or serious i njury.

Important Safety Information
• Consult with your physician before using this monitor if you have
common arrhythmias such as atrial or ventricular premature beats or atrial
fibrillation; arterial sclerosis; poor perfusion; diabetes; pregnancy; preeclampsia or renal disease.
NOTE that any of these conditions in addition
to patient motion, trembling, or shivering may affect the blood pressure
measurement reading.
• NEVER diagnose or treat yourself based on your readings. ALWAYS consult
with your physician.
• To help avoid strangulation, keep the charging cable away from infants,
toddlers or children.
• This product contains small parts that may cause a choking hazard if
swallowed by infants, toddlers or children.
Data Transmission
• This product emits radio frequencies (RF) in the 2.4 GHz band. DO NOT
use this product in locations where RF is restricted, such as on an aircraft
or in hospitals.
Turn off the Bluetooth® feature in this monitor when in RF restricted
areas. For further information on potential restrictions refer to
documentation on the Bluetooth usage by the FCC.
AC Adapter / Charging Cable Handling and Usage
• DO NOT use the AC adapter if the monitor or the charging cable is
damaged. If this monitor or the charging cable is damaged, turn off the
power and unplug the AC adapter immediately.
6

Important Safety Information
• Plug the AC adapter into the appropriate voltage outlet. DO NOT use in a
multi-outlet plug.
• NEVER plug in or unplug the AC adapter from the electric outlet with wet
hands.
• DO NOT disassemble or attempt to repair the AC adapter.
• DO NOT touch (with wet hands) or wet the charging port of the band,
terminal of the charging clip and plugs of cables.
Rechargeable Battery Handling and Usage
• The rechargeable battery has been specifically designed for this monitor.
DO NOT use it in any other devices.
• DO NOT recharge the rechargeable battery once it has been removed
from this monitor.
• DO NOT dispose of the battery in a fire.
• DO NOT crush or puncture the battery because it may cause spontaneous
flames.
• DO NOT disassemble or modify the battery.
• DO NOT connect the + and – poles using a piece of metal or other
conductive objects.
• DO NOT carry it or store it together with item such as necklaces and hair
pins.
• DO NOT recharge, use, or leave the battery in any high temperature
environment such as in a location near a fire or in direct sunlight. Doing so
may cause the battery to overheat, ignite or rupture.
7
Important Safety Information
• DO NOT leave the battery that has been removed within the reach of
infants, toddlers, children or pets. Doing so may result in an injury or an
accident. If liquid comes in contact with the battery, a fire or an accident
may occur.
• This monitor has a built-in rechargeable battery. To prevent the risk
of overheating, fire or explosion, DO NOT throw into fire, apply heat,
puncture or crush, use or leave in a high temperature environment.
Indicates a potentially hazardous situation which, if not
Caution
avoided, may result in minor or moderate injury to the user or
patient, or cause damage to the equipment or oth er property.
• Stop using this monitor and consult with your physician if you experience
skin irritation or discomfort.
• DO NOT use this device if you have a metal allergy.
• Keep this monitor clean. If this monitor is causing skin irritation
due to sweat or contamination, stop using it and consult with your
dermatologist.
• Prolonged rubbing and pressure may irritate the skin. Give your wrist a
break by removing the monitor for a while after ex tended wear.
• DO NOT let chemical products such as lotions, oils, skin creams or
cosmetics collect on the band. To avoid damage to the band material,
make sure to wipe off any chemical products that have collected on the
band.
8

Important Safety Information
• Consult with your physician before using this monitor on a wrist where
intravascular access or therapy, or an arterio-venous (A-V) shunt, is
present because of temporary interference to blood flow which could
result in injury.
• Consult with your physician before using this monitor if you have had a
mastectomy.
• Consult with your physician before using this monitor if you have severe
blood flow problems or blood disorders as cuff inflation can cause
bruising.
• DO NOT take blood pressure measurements more often than necessary
because bruising, due to blood flow interference, may occur.
• ONLY inflate the cuff when the band is applied to your wrist.
• Remove the band if it does not start deflating during a blood pressure
measurement.
• During measurement, make sure that no mobile device or any other
electrical device that emits electromagnetic fields is within 12 inches
(30 cm) of this monitor. This may result in incorrect operation of the
monitor and/or cause an inaccurate reading.
• DO NOT disassemble or attempt to repair this monitor or other
components. This may cause an inaccurate reading.
• DO NOT use in a location where there is moisture or a risk of water
splashing this monitor. This may damage this monitor.
9

Important Safety Information
• The monitor, AC adapter and charging cable are not designed for use in
water or wet environments.
• DO NOT use this monitor in a moving vehicle such as in a car.
• DO NOT drop or subject this monitor to strong shocks or vibrations.
• DO NOT use this monitor in places with high or low humidity or high or
low temperatures. Refer to section 11.
• Ensure this monitor is not impairing blood circulation by observing the
wrist while blood pressure measurement is occurring.
• DO NOT use this monitor in high-use environments such as medical
clinics or physician offices.
• DO NOT use this monitor with other medical electrical (ME) equipment
simultaneously. This may result in incorrect operation of the monitor
and/or cause an inaccurate reading.
• Avoid bathing, drinking alcohol or caffeine, smoking, exercising
and eating for at least 30 minutes before taking a blood pressure
measurement.
• Rest for at least 5 minutes before taking a blood pressure measurement.
• Remove tight-fitting and thick clothing and any accessories from your
wrist while taking a blood pressure measurement.
• Remain still and DO NOT talk while taking a blood pressure measurement.
• ONLY use this monitor on persons whose wrist circumference is within the
specified range of the cuff.
10

Important Safety Information
• Ensure that this monitor has acclimated to room temperature before
taking a measurement. Taking a measurement after an extreme
temperature change could lead to an inaccurate reading. OMRON
recommends waiting for approximately 2 hours for the monitor to warm
up or cool down when the monitor is used in an environment within the
temperature specified as operating conditions after it is stored either at
the maximum or at the minimum storage temperature. For additional
information of operating and storage/transport temperature, refer to
sec tio n 11.
• DO NOT use this monitor after the durable period has ended. Refer to
sec tio n 11.
• DO NOT crease the band excessively.
• DO NOT use the blood pressure measuring function for any other purpose.
• DO NOT use this monitor to diagnose sleep disorders.
• Consult with your physician or healthcare provider if you begin a weight
reduction or exercise program.
AC Adapter / Charging Cable Handling and Usage
• DO NOT plug the charging cable into any device other than this monitor.
• Fully insert the AC adapter into the outlet.
• When unplugging the AC adapter from the outlet, be sure to safely pull
from the AC adapter. DO NOT pull from the charging cable.
11

Important Safety Information
• When handling the charging cable:
- DO NOT damage it. -DO NOT break it.
- DO NOT tamper with it. -DO NOT forcibly bend or pull it.
- DO NOT twist it. -DO NOT use it if it is gathered in a bundle.
- DO NOT pinch it. -DO NOT place it under heavy objects.
• Wipe any dust off of the AC adapter.
• Unplug the AC adapter when not in use.
• Unplug the AC adapter before cleaning this monitor.
• ONLY use the AC adapter and charging cable specified for this monitor.
Use of unsupported AC adapters or cables may damage and/or may be
hazardous to this monitor.
Rechargeable Battery Handling and Usage
• DO NOT charge the battery when the AC adapter is wet.
12
1. Know Your Monitor
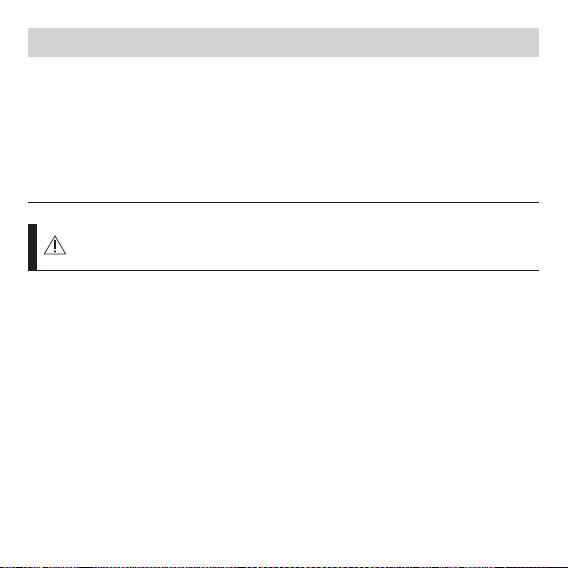
1.1 Contents
Monitor Charging clip
Model: HEM- CLIP-01
Charging cable
Model: HHX-CB07U
13
Replacement cuff
sleeve
Mod el: HEM- CUCV- 01
(2 pcs.)
AC adapter
Model: HHP-AM02
Instruction manual
Quick start guide
Paper sizing guide
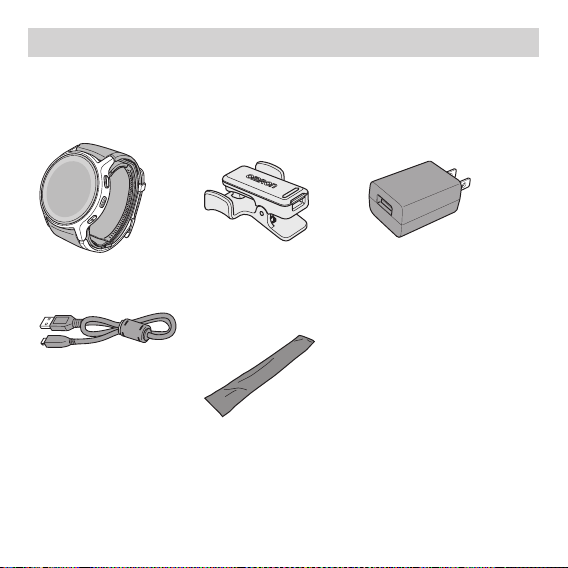
1.2 Monitor
f
1. Know Your Monitor
a
a
b
c
d
Display
[START/STOP] button
[FORWARD] button
[HOME] button
Press this b utton from any scr een
to go back to H OME screen.
b
c
g
d
e
e
Band
f
Charging port
g
Cuff
14
1. Know Your Monitor
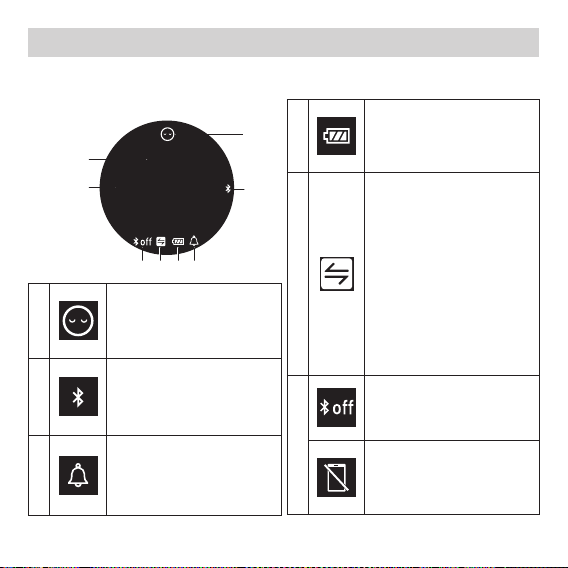
<HOME screen>
1.3 Display and Symbols
Date
Time
A
B
C
15
WED 4
12:35
CEFD
Sleep mode symbol
Appears when your monitor
is in sleep mode. Refer to
sub-section 4.4 (page 38)
Bluetooth symbol
Appears when your
readings are being
transferred.
Reminder symbol
Appears when a reminder is
set. Refer to sub-section 4.6
(page 41) .
Battery symbol
A
D
B
E
.
Appears when any button is
pressed or battery is low.
Refer to page 17.
Sync symbol
Appears when your data
needs to be transferred
because the stored memory
is either almost or completely
full. Once you pair your
monitor with your smart
device, transfer your readings
immediately before the
monitor deletes the oldest
reading. Refer to page 17
for each internal memory.
Bluetooth OFF symbol
Appears when Bluetooth is
disabled.
F
Disconnect symbol
Appears when your monitor is
not connec ted with your smart
device and Bluetooth is enabled.
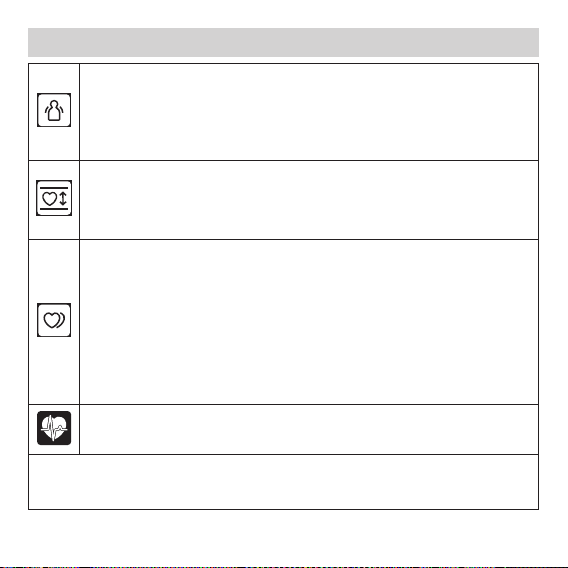
1. Know Your Monitor
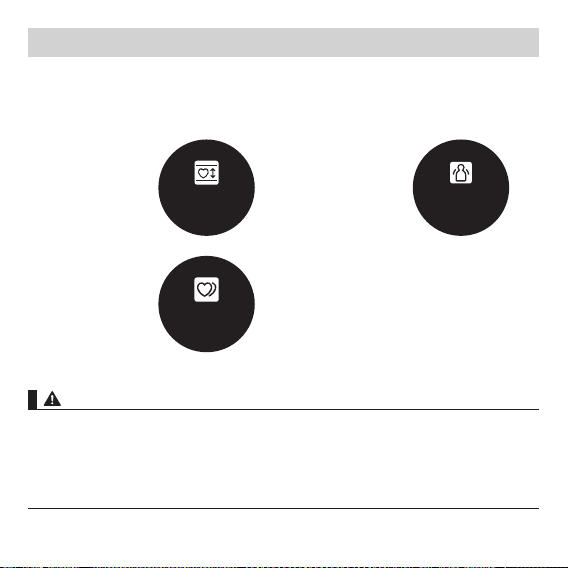
Movement error symbol
Appears along with a blood pressure reading when your body is moving during a
blood pressure measurement. If it appears, check if the band is applied correctly.
Refer to sub -section 2.3 (page 21). After applying the band correctly, wait for 2
to 3 minutes. Then, remain still and take another measurement.
Heart zone error symbol
Appears when your monitor is not positioned at heart level during a
measurement. Refer to page 30 for more information about heart zone
indicator.
Irregular heartbeat symbol
Appears along with readings when an irregular rhythm is detected 2 or more
times during a blood pressure measurement. An irregular heartbeat rhy thm
is defined as a rhythm that is 25 % less or 25 % more than the average rhythm
detected while your monitor is measuring the blood pressure. The irregular
heartbeat symbol may be displayed when the monitor detects arm movements.
Refer to section 8 to solve the problem.
If it continues to appear, we recommend you consult with and follow the
directions of your physician.
Heartbeat symbol
Flashes while taking a blood pressure measurement.
Blood pressure level indicator (color)
When your systolic or diastolic blood pressure is above the AHA guideline, the number
will be shown in red. Refer to sub-section 1.4 (page 18) for more information.
16
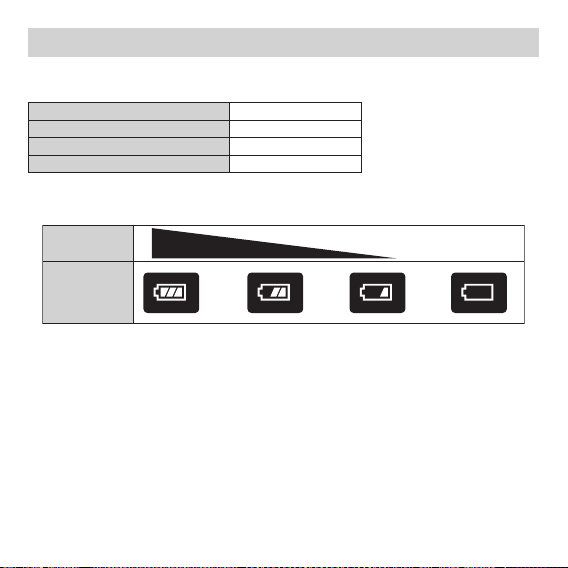
Remaining
LowFull
Symbols
Depleted
1. Know Your Monitor
Storable Readings of Each Measurement
Your monitor can store readings in its internal memory as follows:
Blood pressure measurements Up to 100 readings
Activit y data Up to 7 days
Sleep data Up to 7 times
Event data Up to 100 items
Battery Symbols
Indicates current battery remaining.
17
Warning
1. Know Your Monitor
1.4 Classification of BP (Blood Pressure)
ACC/AHA 2017 Hypertension guidelines define categories of BP in adults as
below.
Categories of BP in Adults*
BP Category Systolic BP Diastolic BP
Normal < 120 mmHg and < 80 mmHg
Elevated 120 -129 mm Hg and < 80 mmHg
Hypertension
Stage 1 130-139 mmH g or 80-89 mmHg
Stage 2 ≥ 140 mmHg or ≥ 90 mmHg
Hypertensive crisis > 180 mmHg and/or > 120 mmHg
* Individuals with Systolic BP and Diastolic BP in 2 categories should be designated to
the higher BP category.
BP indicates blood pressure (based on an average of ≥ 2 careful readings obtained
on ≥ 2 occasions).
Source: ACC/AHA 2017 High Blood Pressure Clinical Practice Guideline
NEVER diagnose or treat yourself based on your readings. ALWAYS consult
with your physician.
18
Charging clip
2. Preparation
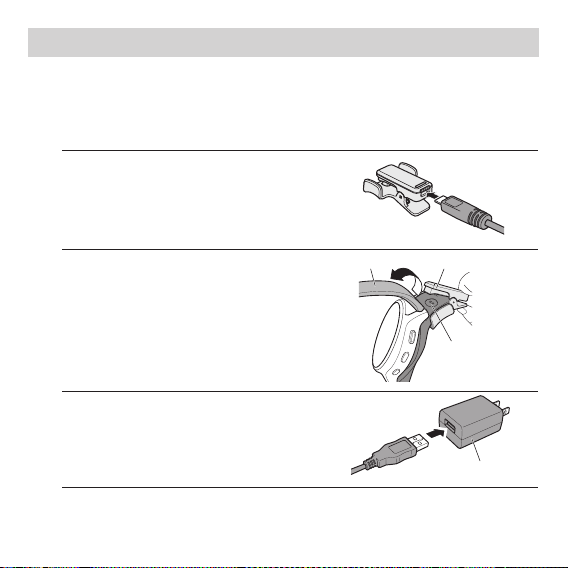
2.1 Charging the Battery
We recommend charging the batter y to a full 100 % charge. Once fully
charged, the battery will last for approximately 2 days. It takes about 2.5
hours to fully charge once the battery is empty.
1.
Plug the smaller end of the
charging cable into the charging
clip.
2.
Lift the band and connect the
clip to the charging port of your
monitor.
Make sure the cuff sleeve does not cover
the charging port.
3.
Plug the larger end of the charging
cable into the AC adapter.
19
Band
Charging port
AC adapter
2. Preparation
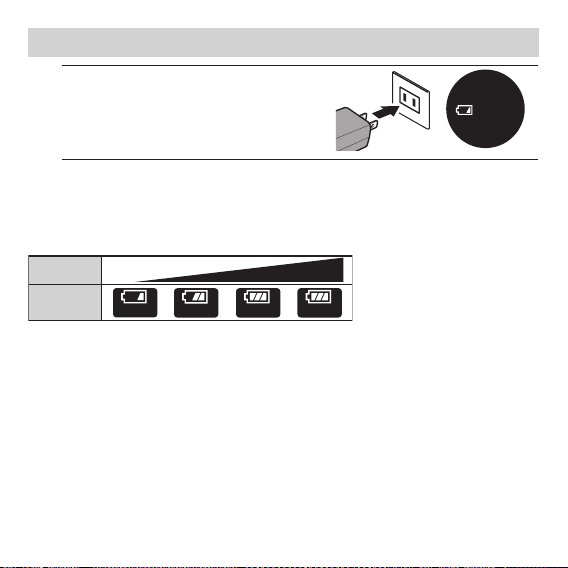
4.
Plug the AC adapter into an
electrical outlet.
The charging screen shown as the image
on the right will appear.
Note
If your monitor has not been used for 3 months, recharge it. Do not charge
battery in environments where there is high heat or cold temperatures.
the
-- --:
Charging Status
Remaining
Symbols
Low Full
FULL
Battery Life
Your monitor will last up to 2 days per charge, depending on use and
storage condition. Refer to “Battery Life Information” (page 65) for the
terms of the battery life.
Note
• The battery life will eventually get shorter due to recharging the monitor
repeatedly. When the battery life becomes extremely short, it is coming
to the end of its service life. For disposal information, refer to sub-section
9.5 (page 61).
• Temperature during the battery charging should be 50 to 95 °F (10 to 35 °C).
20

2. Preparation
2.2 Installing the Cuff Sleeve
To use your monitor comfortably, install the cuff sleeve to the cuff of the monitor.
Note
• Install the cuff sleeve correctly, otherwise the blood pressure readings may not be
accurate.
Insert the longer side of the cuff to the
1.
replacement cuff sleeve’s hole from inside as
the illustration shown on the right.
Cover the cuf f by pulling the cuff sleeve toward
2.
the charging port.
Cover the charging port.
3.
Charging port
2.3 Wearing the Monitor on the Left Wrist
Blood pressure can differ between the right and left wrists, and readings
can be different. OMRON recommends always using the same wrist when
measuring blood pressure. Consult with your physician to determine which
wrist you should use for your measurements.
Caution
Remove tight-fitting and thick clothing and any accessories from your wrist
while taking a blood pressure measurement.
21

<Correct> <Not correct>
2. Preparation
Note
• Your monitor does not have water-resistant functionality. Do not immerse your
monitor in water.
Position the monitor and leave approximately 1
inch (2.5 - 3 cm) between the band and the bottom
of your palm.
Use your forefinger and middle finger as a guide.
If you cannot determine which hole is appropriate, use the
“paper sizing guide”.
Note
• Your monitor must have a snug fit prior to measuring; not
too tight, not too loose. Your index finger should NOT
easily slide between the band and your wrist.
1 inch
(2.5 - 3 cm)
• Make sure that the cuff is positioned
correctly. When the upper and lower sides
of the cuff are overlapped, the lower side
should be positioned under the upper
side. Refer to the illustration.
Wearing the Monitor on the Right Wrist
Your monitor can also be worn on your right wrist. Configure the Right /
Upper side
Lower side
Left Wrist setting. Refer to sub-section 7.1.2 (page 48).
22
Connect to the
Smart device app
for pairing.
--:--
2. Preparation
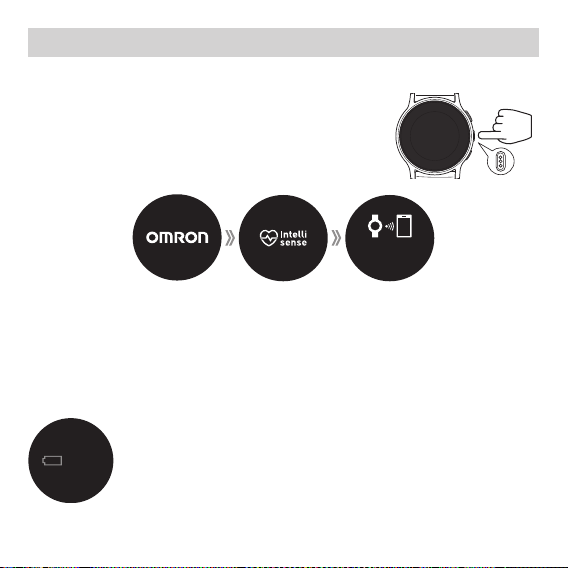
2.4 Turn Your Monitor On
Press and hold the [FORWARD] button for more
than 3 seconds.
The monitor turns on and the screen below appears on the
display.
Note
• You can use your monitor without pairing to your smart device. Refer to section 3
(pag e 24).
• To take ac tivity measurements and sleep measurements, pair your monitor with
your smart device. Refer to sub-section 4.1 (page 32).
• If the monitor does not turn on or the screen below appears on the display, charge
the battery. Refer to sub -section 2.1 (page 19).
23

3. Using Your Monitor without a Smart Device
Caution
You can use your monitor as a blood pressure monitor without pairing to a
smart device. To pair your monitor with a smart device, refer to sub-section
4.1.
• DO NOT use this monitor with other medical electrical (ME) equipment
simultaneously. This may result in incorrect operation of the monitor
and/or cause an inaccurate reading.
• Remain still and DO NOT talk while taking a blood pressure measurement.
Note
• When using your monitor without a smart device, you can take only blood
pressure measurements.
• When using your monitor without a smart device, you will not be able to
view your prior readings that have been stored in memory.
24
3. Using Your Monitor without a Smart Device
3.1 Taking a Blood Pressure Measurement
3.1.1 Blood Pressure Measurement Tips
To help ensure an accurate reading, be aware of the following:
• Stress raises blood pressure. Avoid taking measurements during stressful
times.
• Measurements should be taken in a quiet place.
• It is important to take measurements at the same times each day. Taking
measurements in the morning and in the evening is recommended.
• Remember to have a record of your blood pressure and pulse readings for
your physician.
• A single measurement does not provide an accurate indication of your
true blood pressure. You need to take and record several readings over a
period of time.
Caution
• Avoid bathing, drinking alcohol or caffeine, smoking, exercising and eating
for at least 30 minutes before taking a blood pressure measurement.
• Rest for at least 5 minutes before taking a blood pressure measurement.
25

3. Using Your Monitor without a Smart Device
3.1.2 Positioning the Band
To take an accurate blood pressure measurement, the position of the band
is important.
1.
Find the positioning mark on the
band.
2.
Position the positioning mark on
the center of your wrist (align with
your middle finger).
The positioning mark may be covered by
the buckle, depending on your wrist size.
Positioning
mark
Positioning mark
26

Place the monitor
over your heart.
3. Using Your Monitor without a Smart Device
3.1.3 Sitting Correctly
To t ake a blood pressure measurement, you need to be relaxed and
comfortably seated in a room with a comfortable temperature.
• Keep your upper arm next to the body.
• Sit in a comfortable chair with your back supported.
• Keep your feet flat and your legs uncrossed.
• Relax your wrist and hand. Do not bend your wrist back, clench your fist
or bend your wrist forward.
3.1.4 Taking a Blood Pressure Measurement
Note
• To stop the measurement, press the [START/STOP] button once to deflate
the cuff.
1.
Press the [START/STOP] button.
The heart zone indicator will appear.
27
Connect to the
Smart device app
for pairing.

3. Using Your Monitor without a Smart Device
2.
Adjust the position of your wrist.
Place your monitor over your heart
while a measurement.
zone indicator appears, raise or lower
your wrist until it is at hear t level. Make
sure your wrist is about 2 inches apart
from your chest. When your wrist is in the
proper position, your monitor will vibrate
once. After approximately 2 seconds,
the monitor will start a measurement
and the cuf f will start to inflate.
monitor is too high above your heart,
your blood pressure will be artif icially
low. If the monitor is too low below
your heart, your blood pressure will be
artificially high.
Note
• DO NOT make the band and your body touch while taking a measurement.
• After approximately 5 seconds your monitor will start a measurement
and the cuf f will start to inflate, even when your monitor is not positioned
properly.
• For more information about the heart zone indicator, refer to “Heart Zone
Indicator“ on page 30.
Once the heart
If the
2 inches
space
28

3. Using Your Monitor without a Smart Device
Place the monitor
over your heart.
3.
Remain still and do not move or talk until the entire measurement
process is completed.
As the cuf f inflates, your monitor automatically determines your ideal inflation
level. Your monitor detects your blood pressure and pulse rate during inflation.
The heatbeat symbol flashes at every heartbeat.
After your monitor has detected your blood pressure and pulse rate, the cuff
automatically deflates. Your blood pressure and pulse rate are displayed.
If either the systolic or the diastolic reading is high (refer to sub-section 1.4), the
number and indicator will be shown in red.
67
mmHg
Note
• To stop a measurement, press any but ton.
• Wait 2-3 minutes bet ween measurements. The wait time allows the ar teries
to decompress and return to their pre-measurement state. You may need
to increase the wait time depending on your individual physiological
characteristics.
29
SYS
mmHg
DIA
mmHg
PULSE
/
min
5/17
118
78
70
8:38
AM

3. Using Your Monitor without a Smart Device
Heart Zone Indicator
Your monitor has a built-in heart zone indicator that is used as an aid in
determining if your monitor is at the correct height and position. It has
been designed to work with most people so that when your wrist is at
the correct position relative to your heart, your monitor will vibrate once.
If it does not vibrate, your monitor may not be at the correct height and
position relative to your heart.
Due to differences in individual size and physique, this feature may not be
helpful in all cases and you may wish to turn off this feature. If you feel the
position of the wrist, according to the heart zone indicator’s guidance, does
NOT match your heart level, please turn off this feature and follow your
judgment. To disable this feature, refer to sub-section 7.1 (page 47).
30
3. Using Your Monitor without a Smart Device
Warning
Error Symbols
If the error screens below are displayed, please take another measurement.
Refer to sub-section 1.3 (page 16).
• Your monitor is
not at the correct
height.
• Irregular
heartbeats are
detected.
Position device
at heart-level.
Irregular heartbeat
• Your body
moved during
measurement.
Do not move and
take another
measurement.
• DO NOT adjust medication based on your readings from this blood
pressure monitor. Take medication only as prescribed by your physician.
ONLY a physician is qualified to diagnose and treat high blood pressure.
• NEVER diagnose or treat yourself based on your readings. ALWAYS consult
with your physician.
31

4. Using Your Monitor with a Smart Device
4.1 Pairing Your Monitor with a Smart Device
Pairing your monitor with the “HeartAdvisor” app on your smart device will
set the date and time on the monitor. Once you have paired with the app,
all future measurements will include the date and time when you transfer.
If you do not pair the monitor, any measurements you take will not include
the date and time.
Review the list of compatible smart devices at OmronHealthcare.com.
1.
Enable Bluetooth on your smart device.
2.
Download and install the free “HeartAdvisor” app onto your
smart device.
3.
Open the app and follow the pairing instructions shown on your
smart device.
32
4. Using Your Monitor with a Smart Device
4.
Confirm that your monitor is connected successfully.
If your monitor is connected
successfully to your smar t device, “OK”
flashes on the display.
If “Error” flashes on the display,
follow the instructions in the
HeartAdvisor” app. If it still appears
“
after checking the app, contact
customer service. Refer to sec tion 13
(page 69).
Error
OK
Note
• “HeartAdvisor” is the only app that we recommend that you use with your
monitor to transfer data correctly.
• Be aware that OMRON will not be responsible for the loss of data and/or
information in the app.
• If you change your smart device that was paired with your monitor,
delete the pairing information from your old smart device to avoid
communication issue.
33
4. Using Your Monitor with a Smart Device
4.2 Taking a Blood Pressure Measurement
1.
Take a measurement.
Refer to sub -section 3.1 (page 25) to start a measurement.
2.
Your reading will be transferred to your smart device
automatically.
Past readings cannot be viewed on either of the monitor’s displays. Open the
app on your smart device and follow the instructions.
Note
• Make sure your monitor is within 16 ft. (5 m) of your smart device.
• When the Bluetooth OFF symbol (
monitor, enable Bluetooth. Refer to sub -section 7.2 (page 49).
• When the sync symbol (
almost full. Transfer the data immediately before your readings are deleted.
• Once you transfer your readings to the app, your readings cannot be sent
again to any app or smart device.
) appears on the display of your
) appears on the display, the stored memor y is
34

4. Using Your Monitor with a Smart Device
4.3 Taking Activity Measurements
Your monitor automatically measures your activities when you are wearing
your monitor. The following items will be measured:
• Steps
• Calories burned
• Distance
• Aerobic steps
Refer to “Readings Details“ in section 6 (page 45) for more information.
Note
Do not wear your monitor other than on your wrist.
1.
Pair your monitor with your smart device.
Refer to sub -section 4.1 (page 32). The personal information you are asked to
provide on the app is to help calculate measurements accurately.
You can also set your daily target steps on the app.
2.
Set your stride length.
The initial stride length displayed on the app is an estimated value calculated
by your height setting.
You may choose to adjust your stride length by adding the new value in
the app. For instructions on calculating your stride manually, refer to the
instructions below.
1. Walk 10 steps with your normal stride as illustrated below.
2. Measure the distance from START to END in inches.
3. Calculate your stride length by dividing the total distance by 10.
35
1
2
39
10
320 inches
START
END
4. Using Your Monitor with a Smart Device
Example:
Total distance = 320’’
320 ÷ 10 = 32’’
(2 feet 8 inches)
Conversion Chart
12 inches = 1 foot
24 inches = 2 feet
36 inches = 3 feet
48 inches = 4 feet
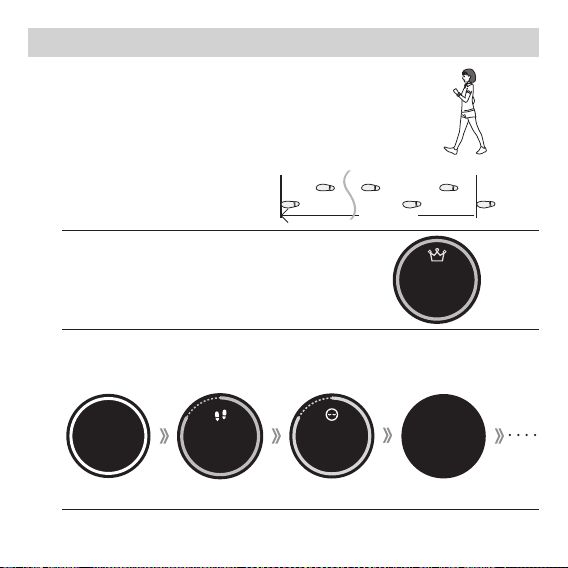
3.
Wear your monitor wherever you go.
When your target steps are achieved, the
achievement screen appears.
4.
Press the [FORWARD] button to view the readings stored in the
memory.
Refer to section 6 (page 43) for more information.
SYS
118
mmHg
DIA
mmHg
78
PULSE
/
min
70
8:38
5/17
AM
<Blood pressure> <Activities> <Sleep>
10217
5.1mile 328 kcal
7h 26
80% /
8h12
5/17-5/18
Congratulations!
steps
5000
THU 17
8:38
<Date/time>
36

4. Using Your Monitor with a Smart Device
Your monitor may not track yo ur activity data correctly:
Improperly Wearing
• Wearing your monitor somewhere other than your wrist.
• Putting your monitor inside a bag or pocket.
Moving Irregularly
• Placing your monitor inside or attached to a bag and the bag moves irregularly.
• Moving your arm continuously when not walking.
• Carr ying a bag
• Extremely slow arm movements.
• Doing housework without walking.
Walking at an Inconsistent Pace
• Shuffling or wearing sandals.
• Constantly starting and stopping walking or moving at some other inconsistent pace.
• Walking ex tremely slowly.
Moving Up and Down
• Standing up and sitting down.
• Playing sports other than walking.
• Going up or down stairs or a steep slope.
Vibrations from a Moving Vehicle
• When you are on a bicycle, automobile, train or bus.
37

4. Using Your Monitor with a Smart Device
4.4 Taking Sleep Measurements
Your monitor measures your sleep by detecting movement of your body
while you sleep. The following items will be measured:
• Sleep period time
• Awake time
Refer to “Readings Details” in section 6 (page 45) for more information.
Note
• Only wear your monitor on your wrist.
• During the sleep mode, your monitor does not count your steps.
• If you set the sleep mode manually, you cannot take a blood pressure
measurement or change settings.
1.
Pair your monitor with your smart device.
Before taking a measurement, pair your monitor with your smar t device. Refer
to sub-section 4.1 (page 32).
You can also set your target sleep period time on the app.
38
4. Using Your Monitor with a Smart Device
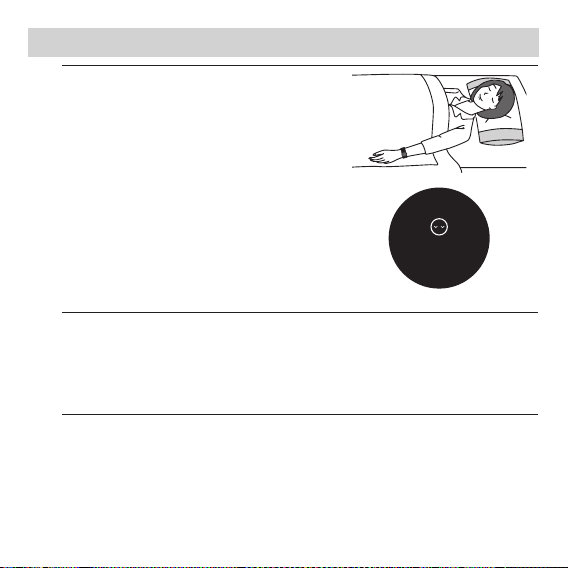
2.
Go to sleep with your monitor on.
To detect and track your sleep automatically,
set your approximate daily bedtime and
wake-up time on the app first.
Note
• When you take a measurement, do not
place your monitor on the f loor, bed or
shelf.
• To enable the sleep mode manually, refer to
the “HeartAdvisor“ app.
• If the “Auto sleep” function is disabled, press
and hold the [START/STOP] button to start
the sleep measurement.
3.
Get up.
Your monitor will detect rising and disable the sleep mode automatically.
Note
• If the “Auto sleep” function is disabled, press and hold the [START/STOP] button
to stop the sleep measurement.
Sleep mode
Sleep mode : ON
Your monitor may not track your sleep data in the following instances:
• Wearing your monitor somewhere other than your wrist.
• Wearing your monitor too loosely, so that you can insert more than one pointer
finger in between your wrist and the band.
• Sleeping in a chair or on a couch
39

4. Using Your Monitor with a Smart Device
4.5 Receiving Notification from Your Smart Device
Your monitor receives a notification (phone call, message and email) from
your smart device.
When your monitor receives a notification, your monitor vibrates.
Press any button to close the notification.
Call from
1-847-555-1212
Phone call
Message from
Brian
Message
Mail from
mail@omron.com
Email
Note
• Refer to “HeartAdvisor” for compatible email apps or any other information.
• Your monitor cannot receive a notification from your smart device during
the following:
- When taking a blood pressure measurement.
-
When the Bluetooth function of your monitor or smart device is disabled.
• Only English alphabets and digits can be displayed correctly on your
monitor.
• Your monitor may not able to receive a notification for any reason other
than your monitor or the app.
• For more details, refer to the app.
40

4. Using Your Monitor with a Smart Device
4.6 Receiving a Reminder
The reminder function will alert you at a specific time of day with vibration
and the “Reminder” icon on the display. The reminder can only be set on
the app.
11:30AM 11:30AM 11:30AM
Note
• To stop the vibration, press any button.
• If the reminder time comes while taking a blood pressure measurement,
the alert will start af ter the measurement.
• The reminder will not alert you when the monitor is being charged or the
battery is depleted.
41

5. Recording an Event
You can record the time of your action or activity as an “Event”, such as time you ate,
took a medicine, exercised or had another event.
Note
The recorded time of your events can be viewed on the app only.
1.
Press and hold the [FORWARD] button for
more than 3 seconds.
2.
“Record” appears on the display.
THU 17
8:38
Record
42

6. Viewing the Readings Stored in Memory
Only your latest reading can be viewed on the monitor’s display. Use the “HeartAdvisor”
app to view all the readings stored in the memory.
1.
Press the [FORWARD] button.
THU 17
8:38
2.
Press the [FORWARD] button one by one.
The display of your readings changes as below.
For activities and sleep, the ring around the reading describes the level of
achievement against your target.
SYS
118
mmHg
DIA
mmHg
78
PULSE
/
min
70
8:38
5/17
AM
<Blood pressure> <Activities> <Sleep>
10217
5.1mile 328 kcal
43
7h 26
80% /
8h12
5/17-5/18
THU 17
8:38
<Date/time>

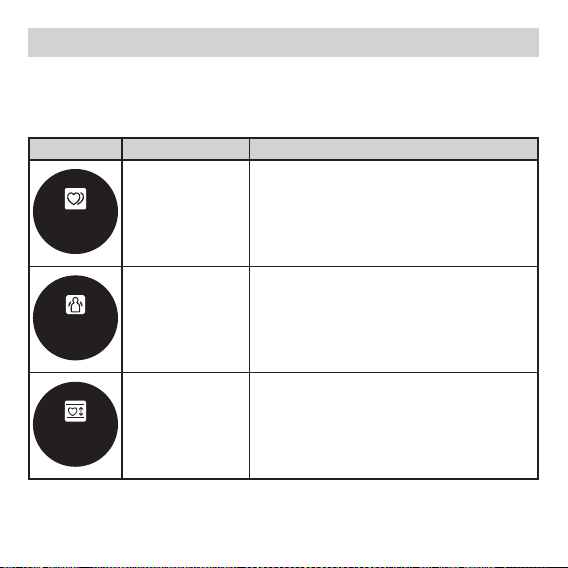
<Activities> <Sleep>
6. Viewing the Readings Stored in Memory
If this monitor detects any errors during a measurement, the following symbols will
appear on the display.
Alternating
pulse/symbols
display
Symbo l
Meaning
This monitor is not at the
SYS
mmHg
DIA
mmHg
PULSE
/
min
5/17
118
78
70
8:38
AM
SYS
118
mmHg
DIA
mmHg
78
8:38
5/17
AM
correct height.
Irregular heartbeats are
detected.
Movement during measuring.
Meaning of each display item
Total steps
10217
5.1mile 328 kcal
Distance
Calories
burned
Sleep period time
Percent
achieved
7h 26
80% /
8h12
5/17-5/18
Target sleep
period time
44

6. Viewing the Readings Stored in Memory
Readings Details
Calories burned Indicates the amount of calories burned by
Distance Indicates you distance traveled by using your step
Aerobic steps Aerobic steps are the physical exercise that helps us
Sleep period time Indicates your actual time asleep.
Awake time Indicates the time of movement at “restless level 2”
45
measuring the intensity of your activity.
count.
Note
If you have jogged, climbed up or down stairs, or walked at brisk
walking pace, some errors may occur in the value.
stay healthy. Aerobic steps are counted separately
when walking more than 60 steps per minute and
more than 10 minutes successively. If a rest of less
than 1 minute is taken after a continuous walk of
more than 10 minutes, this will be regarded as part of
“a continuous walk”.
Note
Aerobic steps can be viewed on the app only.
after you fell asleep.
For more information on restless levels, refer to
“Sleep Mode Details” on the next page.
Note
Awake time can be viewed on the app only.
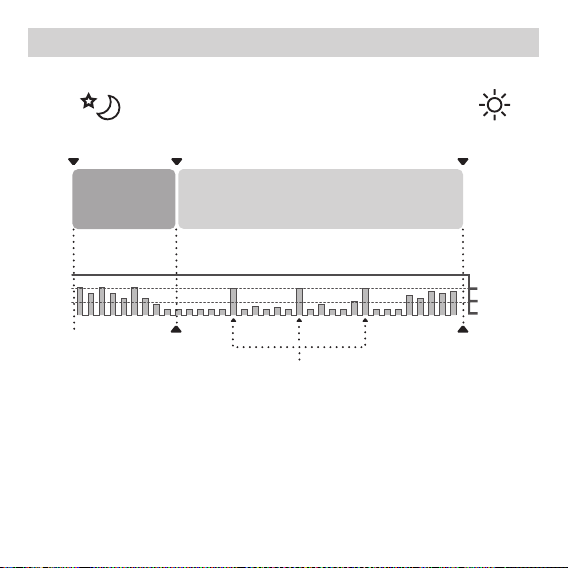
Sleep Mode Details
6. Viewing the Readings Stored in Memory
Bedtime Fall asleep time
Time until
you fall asleep
Total amount of sleep period time is from when the time
sleep mode is enabled to the time sleep mode is disabled,
except the awake time.
Sleep mode
enabled
Time of movement at restless level 2
Sleep period time
Awake time
during sleep period time.
Wake up time
Restless
level
2
1
0
Sleep mode
disabled
46
7. Settings
ON / OFF
L / R
ON / OFF
L / R
[ ON ]
OFF
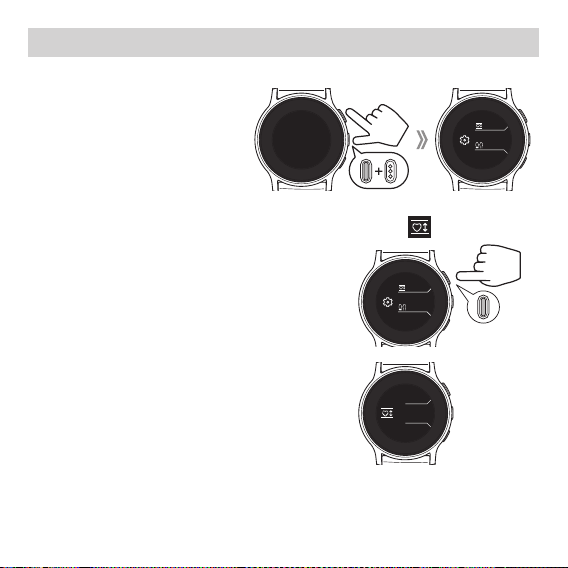
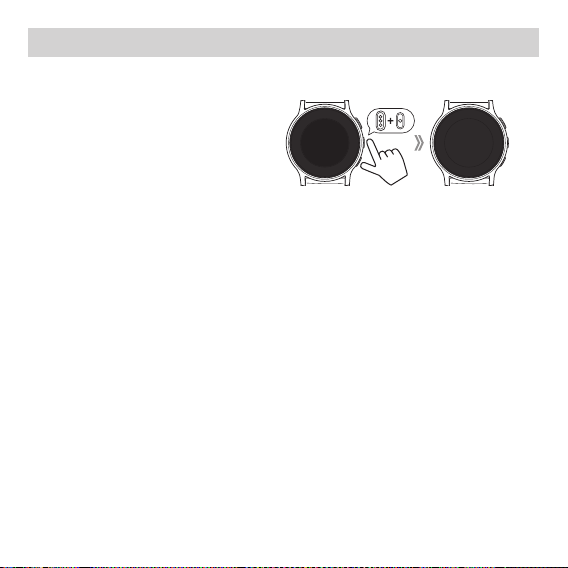
7.1 Function Settings
To change the function settings
on your monitor, press and hold
both the [START/STOP] button
and the [FORWARD] button for
more than 3 seconds.
7.1.1 Enabling/Disabling Heart Zone Indicator ( )
Press the [START/STOP] button for hear t
1.
zone indicator setting.
Press the [START/STOP] button to enable,
2.
or press the [HOME] button to disable.
Note
The heart zone indicator is enabled by default.
The current setting is shown in the bracket.
47
THU 17
8:38
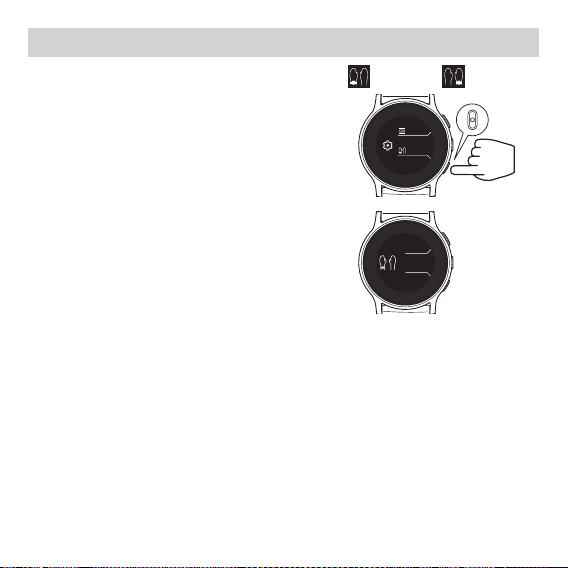
7.1.2 Selecting Your Wrist to Wear ( Left or Right )
ON / OFF
L / R
Press the [HOME] button for wrist setting.
1.
Press the [START/STOP] button if you
2.
wear your monitor on the left wrist, or
press the [HOME] button if you wear the
monitor on the right wrist.
Note
Left is set by default. Current setting is
indicated in the bracket.
[ L ]
R
7. Settings
48
7. Settings
7.2 Bluetooth Settings
To enter the pairing mode or change Bluetooth setting, follow the
instructions below.
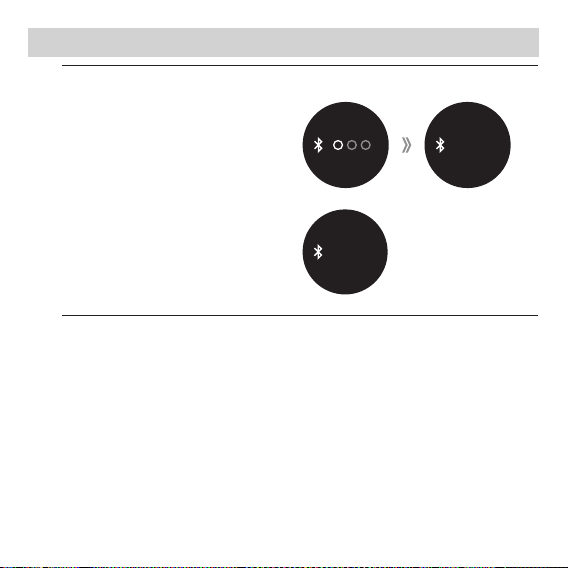
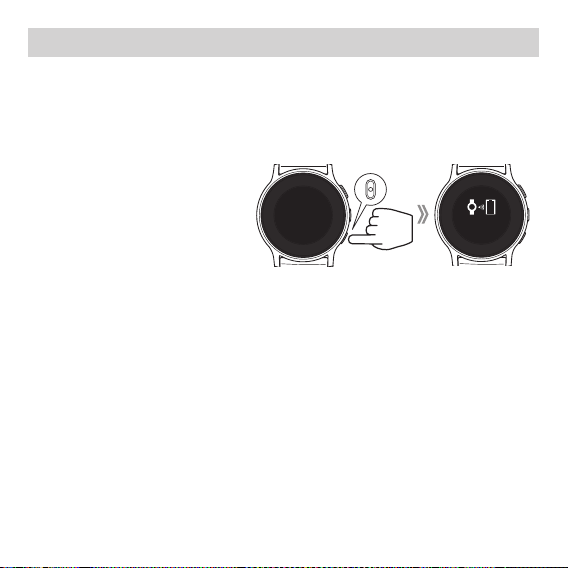
7.2.1 Entering Pairing Mode
Press and hold the [HOME]
button for more than 3 seconds.
Refer to sub-section 4.1 (page
32) to pair your monitor with
your smart device.
Note
Bluetooth will be enabled
automatically after pairing with
your smart device sucessfully.
49
THU 17
8:38
Connect to the
Smart device app
for pairing.
Warning
7. Settings
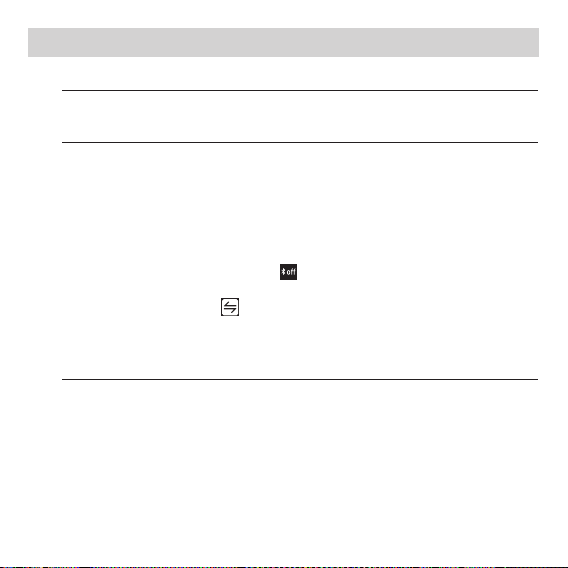
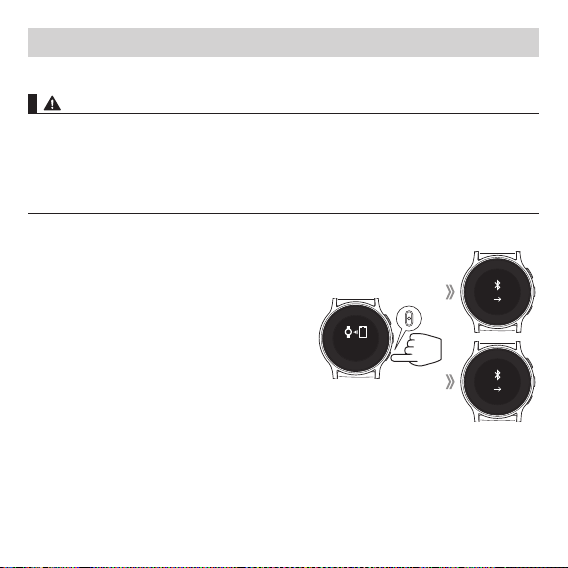
7.2.2 Disabling/Enabling Bluetooth
This product emits radio frequencies (RF) in the 2.4 GHz band. DO NOT
use this product in locations where RF is restricted, such as on an aircraft
or in hospitals. Turn off the Bluetooth feature in those areas. For further
information on potential restrictions refer to documentation on the
Bluetooth usage by the FCC.
Press and hold the [HOME] button for at
least 3 seconds when your monitor is in
the pairing mode.
When Bluetooth is enabled, this operation
will make it disabled.
When Bluetooth is disabled, this operation
will make it enabled.
Note
• Bluetooth is enabled by default.
Connect to the
Smart device app
for pairing.
ON OFF
OFF ON
50

7. Settings
7.3 Restoring Your Monitor to the Default Settings
To delete all the information stored in your monitor, follow the instructions
below.
Press and hold both the [START/STOP] button and the [HOME] button for at
least 7 seconds.
When the confirmation screen appears, press the [START/STOP] button to
restore your monitor.
THU 17
8:38
Clear All
Cancel
Cleared
Note
• Reverting to its default setting of your monitor does not delete the information in
the app.
• You will need to re-pair your monitor when using the monitor again. Without
repairing, your readings will not be transferred to your app. Refer to sub-section 4.1
(pag e 32).
51
7. Settings
7.4 Turning Off Your Monitor
Press and hold both the
[FORWARD] button and the
[HOME] button for more than 7
seconds.
Turn off and restart your monitor if either of the following occurs:
• When “Error” with a number other than 1 to 9 appears on the display.
• Your monitor cannot be operated even though you pressed a button.
Note
• Turning off your monitor will not delete your reading or any information
in the monitor and the app, however; your step numbers from the past
hour may be lost.
• After restarting, open “HeartAdvisor“ app to communicate. The date and
time will be set automatically.
When using your monitor without a smart device, you can only take
blood pressure measurements.
When using your monitor without a smart device, you will not be able to
view your prior readings that have been stored in memory.
• If the “Error” with a number other than 1 to 9 appears on the display after
restarting, refer to section 13 (page 69).
THU 17
8:38
52
8. Error Messages and Troubleshooting
Irregular heartbeat
Position device
at heart-level.
In case any of the below problems occur during measurement, first check that no
other electrical device is within 12 inches (30 cm). If the problem persists, please refer
to the table below.
8.1 Error Messages
Display Cause Solution
Irregular heartbeat
detected.
Remove your monitor. Wait for 2 - 3 minutes and
then take another measurement. Repeat the steps
in sub-section 3.1 (page 25). If this error continues
to appear, we recommend that you consult with
your physician.
Do not move and
take another
measurement.
53
Your body
moved during a
measurement.
Your monitor is
not at the correct
height.
Carefully read and repeat the steps in subsection 3.1 (page 25).
Adjust the height of your wrist following the
heart zone indicator. Refer to sub-section 3.1
(page 25).
12:35
Please see
the manual.
Error
8. Error Messages and Troubleshooting
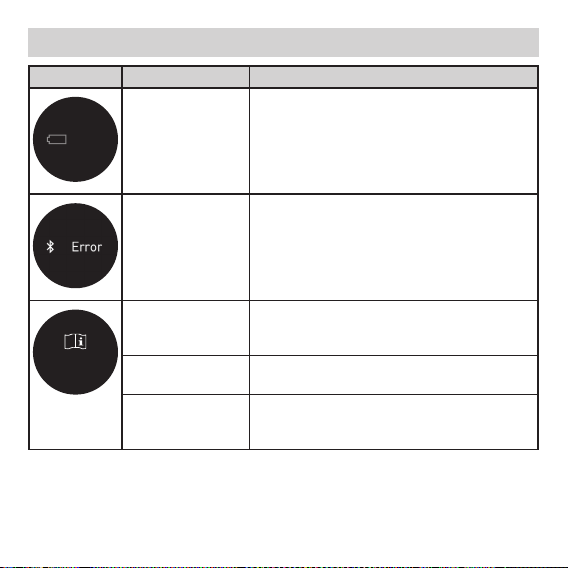
Display Cause Solution
The battery is
depleted.
Charge the battery.
Refer to sub -section 2.1 (page 19).
The monitor cannot
connect to a smart
device or transmit
data correctly.
The band is not
applied correctly.
Air is leaking from
1
the cuff.
Clothing is
interfering with the
band.
Follow the instructions shown in the
“HeartAdvisor” app. If it still appears after
checking the app, contact customer service.
Refer to section 13 (page 69).
Apply the band correctly, then take another
measurement. Refer to sub-sec tion 2.3
(p age 21).
Contact customer service. Refer to section 13
(page 69).
Remove any clothing interfering with the band.
Refer to sub -section 2.3 (page 21).
54
Please see
the manual.
Error
Please see
the manual.
Error
Please see
the manual.
Error
Please see
the manual.
Error
8. Error Messages and Troubleshooting
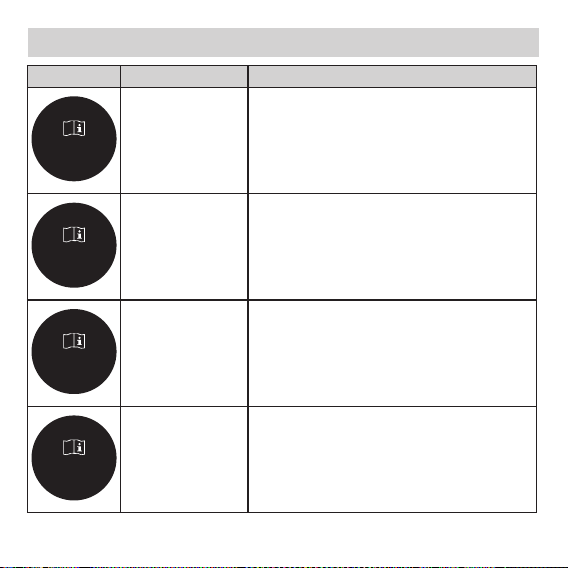
Display Cause Solution
The band may be
applied too
2
Apply the band correctly, then take another
loosely
.
measurement. Refer to sub-sec tion 2.3
(p age 21).
55
The cuff was inflated
exceeding the
maximum allowable
pressure.
3
You move or
talk during a
measurement.
Vibrations disrupt a
4
measurement.
The band was not
applied correctly or
was moved during a
measurement.
5
Do not touch your monitor while taking a
measurement.
Remain still and do not talk during a
measurement.
Apply the band correctly, then take another
measurement. Refer to sub-sec tion 2.3
(p age 21).
Remain still and sit correctly during a
measurement. Refer to sub-sec tion 3.1
(page 25).

Please see
the manual.
Error
Please see
the manual.
Error
Please see
the manual.
Error
Error
8. Error Messages and Troubleshooting
Display Cause Solution
Your wrist is moved
up and down during
a measurement.
7
Take another measurement making sure not
to move your wrist. Refer to sub-sec tion 3.1
(page 25).
Temperature error is
detected.
The monitor has
malfunctioned.
8
The band may be
applied too
9
Room temperature
is too high to charge
the bat tery.
The monitor has
malfunctioned.
Wait for few minutes, then take another
measurement in a place with moderate room
temperature. If the error appears again, contact
customer service. Refer to sec tion 13
(page 69).
Apply the band correctly, then take another
tightly
.
measurement. Refer to sub-sec tion 2.2
(p age 21).
Charge the battery at a moderate room
temperature.
If the error appears in moderate temperature,
contact customer service. Refer to section 13
(page 69).
56

8. Error Messages and Troubleshooting
Display Cause Solution
Error
123
The monitor has
malfunctioned.
Turn off and restart your monitor. Refer to subsection 7.4 (page 52).
If the error still appears, contac t customer
service. Refer to section 13 (page 69).
8.2 Troubleshooting
Problem Cause and Solution
Nothing appears on
the display of the
monitor.
Readings appear too
high or too low.
Any other
communication issue
occurs.
The monitor cannot be
operated.
57
• Charge the battery. Refer to sub -section 2.1 (page 19).
• Your monitor is turned off. Refer to sub-section 2.4 (page
23) to turn on your monitor.
Blood pressure varies constantly. Many factors including
stress, time of day, and/or how you apply the band, may
affec t your blood pressure. Review sub-section 3.1
(page 25).
Follow the instructions shown in the smart device, or visit
the “Help” section in the “Hear tAdvisor” app for further help.
If the problem still persists, contact customer service. Refer
to section 13 (page 69).
Turn off and restart your monitor. Refer to sub-sec tion 7.4
(page 52).
If your monitor still does not operate, contact customer
service. Refer to section 13 (page 69).

8. Error Messages and Troubleshooting
Problem Cause and Solution
The monitor or the AC
adapter is abnormally
hot when charging the
bat tery.
The operating time is
short, or the monitor
does not operate, even
when the battery is
fully charged.
The monitor or the AC adapter may be damaged. Unplug
the AC adapter from the outlet immediately and contac t
customer service. Refer to sec tion 13 (page 69).
This may be due to the life of the rechargeable batter y. The
battery cannot be replaced. Contact customer service (refer
to section 13 (page 69)) or dispose of your monitor. Refer
to sub-section 9.5 (page 61).
58

9. Maintenance
9.1 Maintenance
To protect this monitor from damage, please follow the directions below:
• Changes or modifications not approved by the manufacturer will void the
user warranty.
Caution
DO NOT disassemble or attempt to repair this monitor or other
components.
9.2 How to Replace the Cuff Sleeve
Clean the cuff sleeve when it becomes dirty (once-a-week cleaning is
recommended).
Replace the cuf f sleeve to new one in half a year.
Detach the cuff sleeve.
1.
Refer to sub-section 2.2 (page 21) to
2.
install the cuf f sleeve.
59

9. Maintenance
9.3 Storage
• Store your monitor in a clean, safe location.
• Do not store your monitor:
- If your monitor is wet.
- In locations exposed to extreme temperatures, humidity, direct sunlight,
dust or corrosive vapors such as bleach.
- In locations exposed to vibrations or shocks.
9.4 Cleaning
• Do not use any abrasive or volatile cleaners.
• Use a soft dry cloth or a soft cloth moistened with neutral soap to clean
your monitor, and then wipe them with a dry cloth.
• Do not wash or immerse your monitor in water.
• Do not use gasoline, thinners or similar solvents to clean your monitor.
• Do not use a wet cloth on the plugs of the AC adapter. The charging cable,
or the terminal of the charging clip.
• Hand-wash with mild detergent and air-dry the cuff sleeve. Do not soak
it in water for long periods of time. Do not use any sterilization chemicals,
disinfectants, or softeners.
60

9. Maintenance
Caution
• Stop using this monitor and consult with your physician if you experience
skin irritation or discomfort.
• Prolonged rubbing and pressure may irritate the skin. Give your wrist a
break by removing your monitor for a while after extended wear.
• Be careful not to let chemical products such as lotions, oils, skin creams
or cosmetics collect on the band. If this happens, wipe them immediately,
otherwise it may impact the material and lifetime of product.
9.5 Disposal
Dispose of your monitor and other components according to applicable
local regulations. Unlawful disposal may cause environmental pollution.
61
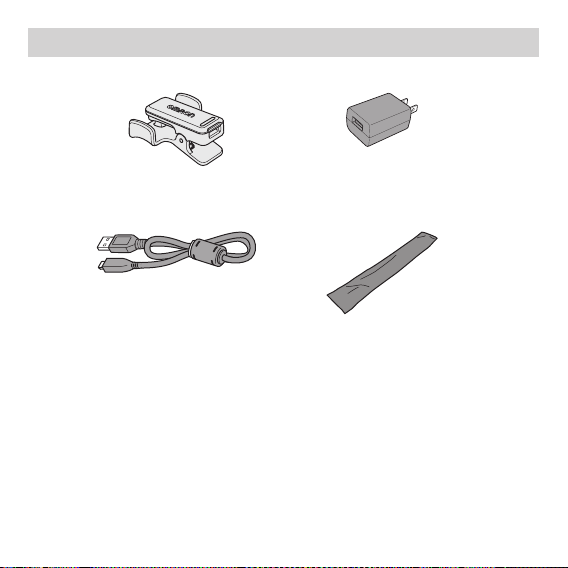
10. Optional Accessories
■ Charging clip
Model: HEM- CLIP-01
■ Charging cable
Model: HHX-CB07U
For further information, visit our website at OmronHealthcare.com.
■ AC adapter
Model: HHP-AM02
■ Cuff sleeve
Mod el: HEM- CUCV- 01
62
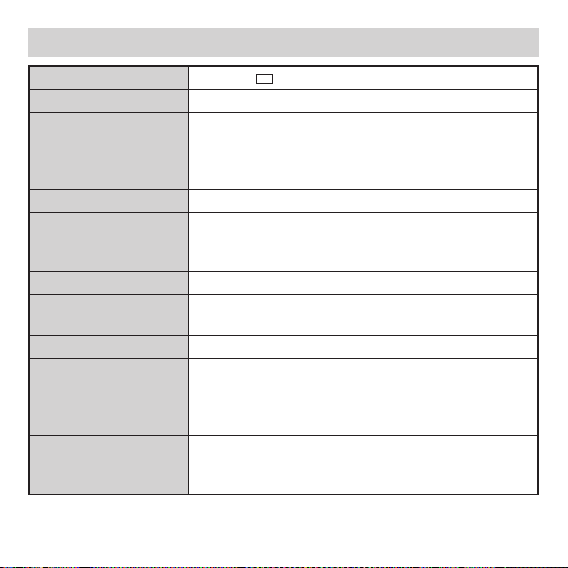
11. Specifications
Model
Display Transflective memory-in-pixel LCD
Memory Blood pressure measurement: Up to 100 times
Transmission method Bluetooth® low energy technology
Wireless
communication
Operation mode Continuous operation
IP classification Monitor: IP22
Rating DC 3.8 V 3.0 W
Power source 1 Lithium ion polymer rechargeable batter y
Battery lifespan Will last for approximately 500 cycles,
63
BP8000-M
Activit y measurement: Up to 7 days
Sleep measurement: Up to 7 times
Event: Up to 100 items
Frequency range: 2.4 GHz (2400 - 2483.5 MHz)
Modulation: GFSK
Effec tive radiated power: <20 dBm
AC adapter: IPX0
(3.8 V; Approximately 164 mAh)
AC adapter
(INPUT AC100-240 V, 50-60 Hz 0.2-0.13 A)
8 times/day measurements in normal temperatures of
77.0 °F (25 °C) when new battery fully charged.
REF
HEM-6411T-ZM
11. Specifications
Battery Life Up to 2 days (48 hours) battery life* per charge.
Durable period
(Service life)
Operating conditions 41 to 104 °F (5 to 40 °C) / 15 to 90 % RH (non-condensing)
Chargin g / data
transmission conditions
Storage conditions
Transport conditions
Weight Approximately 4.1 oz. (115 g)
Dimensions
Measurable wrist
circumference
Contents Monitor, charging clip (HEM-CLIP-01), charging cable
* Refer to “Bat tery Life Information” (page 65) for the
terms of the battery life.
Monitor: 2 years
AC adapter: 2 years
Cuff sleeve: 0.5 years
/ 800 to 1060 hPa
50 to 95 °F (10 to 35 °C)
-4 to 104 °F (-20 to 40 °C) / 10 to 90 % RH (non-condensing)
-4 to 140 °F (-20 to 60 °C) / 10 to 90 % RH (non-condensing)
Case diameter: Approximately 1.89” (48 mm)
Case thickness: Approximately 0.55” (14 mm)
Band width: Approximately 1.18” (30 mm)
6.3” to 7.5” (160 to 190 mm)
(HHX-CB07U), AC adapter (HHP-AM02), paper sizing
guide, replacement cuff sleeve (HEM-CUCV-01),
instruction manual, quick start guide
64
11. Specifications
Applied part Type BF (cuff )
Protection against
electric shock
Maximum temperature
of the app lied part
Internally powered ME equipment
Class II ME equipment (AC adapter)
Lower than +118.4 °F (+48 °C)
Battery Life Information
The battery life is based on 2 days (48 hours) with the following use: in
23°C environment, 170 mm wrist circumference, 8 times of blood pressure
measurement (inflates to 150 mmHg) per day, 16-hour step counting per
day, 8-hour sleep measurement per day, 96 times of button pressing per
day, 16 times of incoming call per day, 1 time of ringing alarm per day, 16hour Bluetooth communication per day.
The battery life depends on the terms of use and the environment of storage.
Blood pressure measurement
Cuff pre ssure range 0 to 299 mmHg
Blood pressure
measurement range
Pulse measurement
range
Accuracy Pressure: ±3 mmHg
Inflation Automatic by electric pump
Deflation Automatic rapid deflation
Measurement method Oscillometric method
65
SYS: 60 to 230 mmHg
DIA: 40 to 160 mmHg
40o 180 beats / min.
Pulse: ±5 % of display reading

11. Specifications
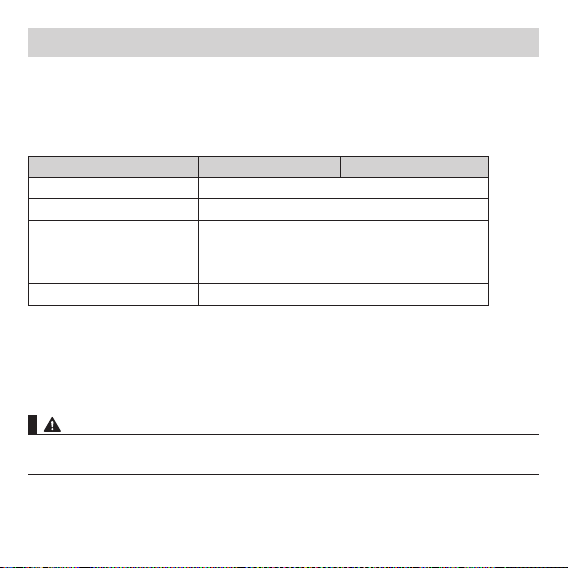
Activity / Sleep measurement
Measurement range Steps: 0 to 99,999 steps
Distance: 0.0 to 621.3 mile
Time: 12:00 AM to 11:59 PM
Calories burned: 0 to 59,999 kcal
Setting range Time: 12:00 AM to 11:59 PM (0:00 to 23:59)
Weight: 22 to 300 lb (in increments of 1 lb)
Height: 3’ 4” to 6’ 6” (in increments of 1 inch)
Stride length: 12” to 48” (in increments of 1 inch)
Notes
• These specifications are subject to change without notice.
• In the clinical validation study, K5 was used on 85 subjects for
determination of diastolic blood pressure.
• This monitor is comply with the requirements of ISO 81060-2:2013.
• This monitor has not been validated for use on pregnant patients.
• IP classification is degrees of protection provided by enclosures in
accordance with IEC 60529. This monitor is protected against ingress of
dust which would cause issues during a normal operation, and against
splashing water which may cause issues during a normal operation.
• This AC adapter is not protected against water.
• Rating indication is printed on the cuff.
66
11. Specifications
About a wireless communication interference
This product operates in an unlicensed ISM band at 2.4 GHz. In the event
this product is used near other wireless devices such as microwave and
wireless LAN, which operate on the same frequency band as this product,
there is a possibility that interference may occur. If interference occurs,
stop the operation of the other devices or relocate this product away from
other wireless devices before attempting to use it.
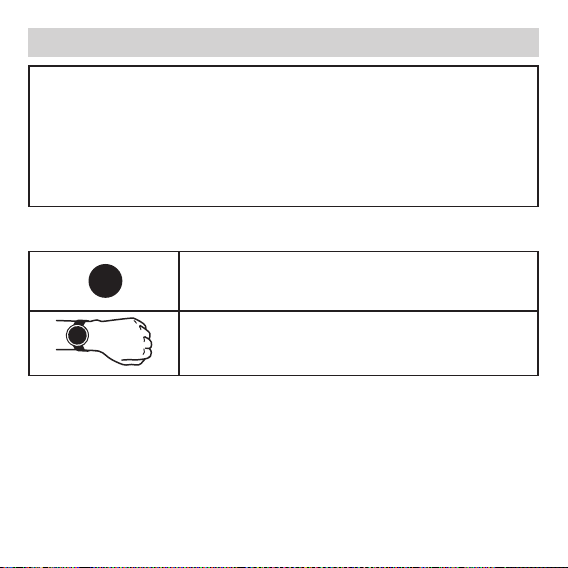
Pictogram on the Product
Indicates the correct positioning for the band on
the wrist.
Indicates the correct positioning for the monitor on
the wrist.
67

12. FCC Statement
FCC CAUTION
Changes or modifications not expressly approved by the party responsible for
compliance could void the user’s authority to operate the equipment.
This devi ce complies with pa rt 15 of the FCC Rules. Ope ration is subjec t to the following t wo
conditio ns: (1) This dev ice may not cause harm ful interfere nce, and (2) this device mu st accept any
interference received, including interference that may cause undesired operation.
Note
This equi pment has been tes ted and found to com ply with the limit s for a Class B digital d evice,
pursuan t to part 15 of the FCC Rules. T hese limits are de signed to provide r easonable prote ction
against harmful interference in a residential installation. This equipment generates, uses and can
radiate r adio frequenc y energy and, if no t installed and us ed in accordance wi th the instructi ons, may
cause har mful interfer ence to radio commun ications. Howeve r, ther e is no guarantee that i nterference
will not occur in a particular installation. If this equipment does cause harmful interference to radio
or televi sion reception, w hich can be deter mined by turning th e equipment of f and on, the user is
encoura ged to try to corre ct the interfe rence by one or more o f the following mea sures:
• Reo rient or reloca te the receiving an tenna.
• Increase the separation betwee n the equipment and receiver.
• Connec t the equipment int o an outlet on a circui t different fro m that to which the rec eiver is connect ed.
• Consu lt with the dealer o r an experience d radio/TV t echnician for he lp.
This transmitter must not be co-located or operated in conjunction with any other
antenna or transmitter.
This equipment complies with FCC radiation exposure limits set forth for an
uncontrolled environment and meets the FCC radio frequency (RF) Exposure
Guidelines. This equipment has very low levels of RF energy that are deemed to
comply without testing of specif ic absorption ratio (SAR).
68

13. Limited Warranty
Your BP8000 -M Wrist Blood Pressure Monitor, excluding AC adapter and charging
cable, is warranted to be free from defects in materials and workmanship appearing
within 1 year from the date of purchase, when used in accordance with the
instructions provided with the monitor. The above warranty extends only to the
original retail purchaser. We will, at our option, replace without charge any monitor or
band covered by the above warranty. Replacement is our only responsibility and your
only remedy under the above warranty.
To obtain warrant y service, contac t customer service by calling 1-800-634-4350
for the address of the inspection center and the return shipping and handling fee.
Enclose the original printed receipt. Include a letter with your name, address, phone
number, and description of the specif ic problem. Pack the product carefully to
prevent damage in transit. Because of possible loss in transit, we recommend insuring
the product with return receipt requested.
THE FOREGOING IS THE SOLE WARRANTY PROVIDED BY OMRON IN CONNECTION
WITH THIS PRODUCT, AND OMRON HEREBY DISCLAIMS ANY OTHER WARRANTIES,
EXPRESS OR IMPLIED, INCLUDING IMPLIED WARRANTIES OF MERCHANTABILITY AND
FITNESS FOR A PARTICULAR PURPOSE. IMPLIED WARRANTIES AND OTHER TERMS
THAT MAY BE IMPOSED BY LAW, IF ANY, ARE LIMITED IN DURATION TO THE PERIOD OF
THE ABOVE EXPRESS WARRANTY.
OMRON SHALL NOT BE LIABLE FOR LOSS OF USE OR ANY OTHER SPECIAL, INCIDENTAL,
CONSEQUENTIAL OR INDIRECT COSTS, EXPENSES OR DAMAGES.
This warranty provides you with specific legal rights, and you may have other rights
that vary by jurisdiction. Because of special local requirements, some of the above
limitations and exclusions may not apply to you.
For Customer Service
Visit our web site at: OmronHealthcare.com
Call toll free: 1-800 -634 -4350
69
14. Guidance and Manufacturer’s Declaration
OMRON Battery-operated Blood Pressure Monitor Information for
Accompanying Documents in the Scope of IEC60601-1-2:2014
Important information regarding Electromagnetic Compatibility
(EMC)
BP8000-M manufactured by OMRON HEALTHCARE Co., Ltd. conforms to
IEC60601-1-2:2014 Electromagnetic Compatibility (EMC) standard.
Further documentation in accordance with this EMC standard is available
at OmronHealthcare.com/emc. Refer to the EMC information for BP8000-M
on the website.
The Bluetooth® word mark and logos are registered trademarks owned by
the Bluetooth SIG, Inc. and any use of such marks by OMRON HEALTHCARE
Co., Ltd. is under license.
App Store and the App Store logo are service marks of Apple Inc., registered
in the U.S. and other countries.
Google Play and the Google Play logo are trademarks of Google LLC.
Other trademarks and trade names are those of their respective owners.
70
 Loading...