

Page 1

BF500
Body Composition Monitor
• Instruction Manual
• Mode d’emploi
• Gebrauchsanweisung
• Manuale di istruzioni
• Manual de instrucciones
• Gebruiksaanwijzing
• РУКОВ ОДСТВО ПО ЭК СПЛУАТАЦИИ
Thank you for purchasing the OMRON Body Composition Monitor.
Before using this unit for the first time, please be sure to read this
Instruction Manual carefully and use the unit safely and properly.
Please keep this Instruction Manual at hand all the time for future
reference.
IM-BF-500-E-04-10/08
9054902-7E
EN
FR
DE
IT
ES
NL
RU
Page 2

Before using the unit
Contents
Before using the unit
Notes on Safety ................................................................................... 3
Features of the Product......................................................................5
What You Should Know When Using This Unit................................6
Operating instructions
1. Know Your Unit ............................................................................10
2. Inserting and Replacing the Batteries .......................................13
3. How to Set the Date and Time.....................................................14
4. Setting and Storing Personal Data.............................................16
5. Taking a Measurement ................................................................20
6. Measuring Weight Only ...............................................................27
7. Using the Memory Function........................................................28
Care and maintenance
8. Error Displays ..............................................................................33
9. Troubleshooting...........................................................................34
10.How to Care and Store the Unit ..................................................35
11.Technical Data.............................................................................. 36
Understanding the Results ................................................... 39
Quick Reference Guide ......................................................... 47
2
Page 3

Notes on Safety
Danger:
Never use this unit in combination with medical electronic devices such as:
(1) Medical electronic implants such as pacemakers.
(2) Electronic life support systems such as an artificial heart/lung.
(3) Portable electronic medical devices such as an electrocardiograph.
• This unit may cause the above mentioned medical electronic devices to malfunction.
Warning:
• Never start weight reduction or exercise therapy without the instructions of a doctor or
specialist.
• Do not use the unit on slippery surfaces, such as a wet floor.
• Keep the unit out of the reach of young children.
• Do not jump onto the unit, or hop up and down on the unit.
• Do not use this unit when your body and/or feet are wet, such as after taking a bath.
• Stand on the main unit bare-footed. Attempting to stand on it with socks on may cause
you to slip and result in injury.
• Do not step on the edge or display area of the main unit.
• People with disabilities, or who are physically frail, should always be assisted by
another person when using this unit. Use a handrail or so when stepping on the unit.
• If battery fluid should get in your eyes, immediately rinse with plenty of clean water.
Consult a doctor immediately.
Notes on Safety
Caution:
• Do not disassemble, repair, or remodel the display unit or the main unit.
• Do not use a cellular phone near the display unit or the main unit.
• Take care when storing the display unit. Your fingers may be trapped between the grip
and the main unit if you press it too strongly.
• Do not use batteries not specified for this unit. Do not insert the batteries with the
polarities in the wrong direction.
• Replace worn batteries with new ones immediately.
• Do not dispose of batteries in fire.
• If battery fluid should get on your skin or clothing, immediately rinse with plenty of clean
water.
• Remove the batteries from this unit when you are not going to use it for a long period of
time (approximately three months or more).
• Do not use different types of batteries together.
• Do not use new and worn batteries together.
General Advice:
• Do not place this unit on a cushioned floor surface such as on a carpet or a mat.
Correct measurement may not be possible.
• Do not place this unit in highly humid environments and protect it from splashing water.
• Do not place this unit near heat sources or below air conditioners and avoid direct
sunlight.
• Do not use this unit for purposes other than described in this manual.
EN
3
Page 4

Notes on Safety
• Do not pull the cord of the display unit attached to the main unit with force.
• As this unit is a precision instrument, do not drop, vibrate, or apply strong shock.
• Disposal of used batteries should be carried out in accordance with the national
regulations for the disposal of batteries.
• Do not wash the display unit or the main unit with water.
• Do not wipe the unit with benzene, gasoline, paint thinner, alcohol, or other volatile
solvents.
• Do not place this unit where it will be exposed to chemicals or corrosive vapors.
Medical electrical equipment is subject to special safety measurement regarding
electromagnetic compatibility.
The documentation in accordance with EN60601-1-2:2001 is available.
Don’t use mobile telephones, microwave and other devices, which generate strong
electrical or electromagnetic fields, near the medical device. This may result in incorrect
operation of the unit.
Save these instructions for future reference.
4
Page 5

Features of the Product
Features of the Product
More accurate measurement of the entire body
As measurement is conducted between both upper and lower limbs, the measurement
values are less affected by the variation of physique as compared to traditional body fat
monitors.
Visceral fat is displayed in 30 levels
Visceral fat is closely related to lifestyle-related diseases, such as hypertension,
diabetes, and hyperlipidemia.
* OMRON BF500 can help you check your visceral fat level easily.
Easily check skeletal muscle percentage
Skeletal muscle is displayed as a percentage.
The unit only measures skeletal muscle, muscle connected to bone and used to move
the body. It does not include smooth muscle, found in internal organs.
Display of BMI and resting metabolism
In addition to calculating body fat percentage, it can also access your health using the
BMI method
metabolism from personal data input and the measured body weight. Use those
calculated values as reference for planning your weight reduction program.
*1 BMI: Body Mass Index = Body weight (kg) / (height (m))²
*1
, while taking your physique into consideration. It estimates the resting
Memory function to store up to four users’ personal data
For the measurement of body composition, it is necessary to set personal data such as
age, gender, and height. Once you set and store the data, the unit is ready for use by
pressing the personal profile number button. This unit can be shared as it can store up
to four different users’ data.
Comparison with previous results to monitor progress
The unit stores the measurement results, so you can easily monitor any changes. You
can display measurements for 1 day, 7, 30, and 90 days before.
The display unit can be operated easily and is easy to read.
For additional information, please see Section “Understanding the Results”.
EN
5
Page 6

What You Should Know When Using This Unit
What You Should Know When Using This Unit
Principle of body composition calculation
Body fat has low electric conductivity
The BF500 estimates the body fat percentage by the Bioelectrical Impedance (BI)
method. Muscles, blood vessels and bones are body tissues with a high water content
that conducts electricity easily. Body fat is tissue that has little electric conductivity. The
BF500 sends an extremely weak electrical current of 50 kHz and less than 500 µA
through your body to determine the amount of fat tissue. This weak electrical current is
not felt while operating the BF500.
In order for the scale to determine body composition, it uses the electrical impedance,
along with your height, weight, age and gender information to generate results based on
OMRON’s data of body composition.
Measures the whole body to avoid the influence of fluctuations
During the course of a day, the amount of water in the body tends to gradually shift to
the lower limbs. This is why there is a tendency for the legs and ankles to swell in the
evening or at night. The ratio of water in the upper body and lower body is different in
the morning and evening, and this means that the electrical impedance of the body also
varies. Since the BF500 uses electrodes for both hands and feet to take measurements,
it can reduce the influence of these fluctuations on measurement results.
What is the Bioelectrical Impedance method?
Muscles, blood vessels and bones are body tissues having a high water content that
conduct electricity easily. Body fat is tissue that has little electric conductivity. The
BF500 sends an extremely weak electrical current of 50 kHz and less than 500 µA
through your body to determine the amount of fat tissue. This weak electrical current is
not felt while operating the BF500. The Bioelectrical Impedance Method safely
combines the electric resistance with the distance of the electricity conducted. Correct
posture and consistent measuring conditions need to be maintained for the best results.
Uses the best methods to measure different aspects of body composition
OMRON has conducted research using exhalation and MRI analysis to develop an
algorithm by which the bio impedance method of the BF500 works.
Body Fat Percentage: This is based on the DXA (Dual Energy X-Ray Absorptiometry)
method, which has been the established method for accurate evaluation of body
composition. OMRON has used research information from several hundred people
using the DXA method to develop the formula by which the BF500 works. The body fat
mass and body fat percentage is calculated by a formula that includes five factors:
electric resistance, height, weight, age and gender.
The DXA method uses two different frequency X-Rays and rates of absorption of the
body and determines the value based on the difference between the two.
Resting Metabolism: This is based on exhalation analysis, where the composition of
exhaled air is analysed. This makes it possible to calculate the resting metabolism by
measuring the consumption of oxygen in exhaled air.
Visceral Fat Level: This is based on MRI (Magnetic Resonance Imaging) analysis,
which uses nuclear magnetic resonance that take non-intrusive images of the body. This
makes it possible to calculate the area of visceral fat in the body.
6
Page 7

What You Should Know When Using This Unit
Skeletal Muscle Percentage: This is based on MRI (Magnetic Resonance Imaging)
analysis, which uses nuclear magnetic resonance that take non-intrusive images of the
body. This makes it possible to calculate the amount of skeletal muscle in the body.
The reason calculated results may differ from actual body fat percentage
There are certain conditions, such as with dialysis patients, when significant differences
may occur between the estimated and actual body fat values.
These differences may be related to changing ratios of body fluid and/or body
composition.
EN
7
Page 8
What You Should Know When Using This Unit
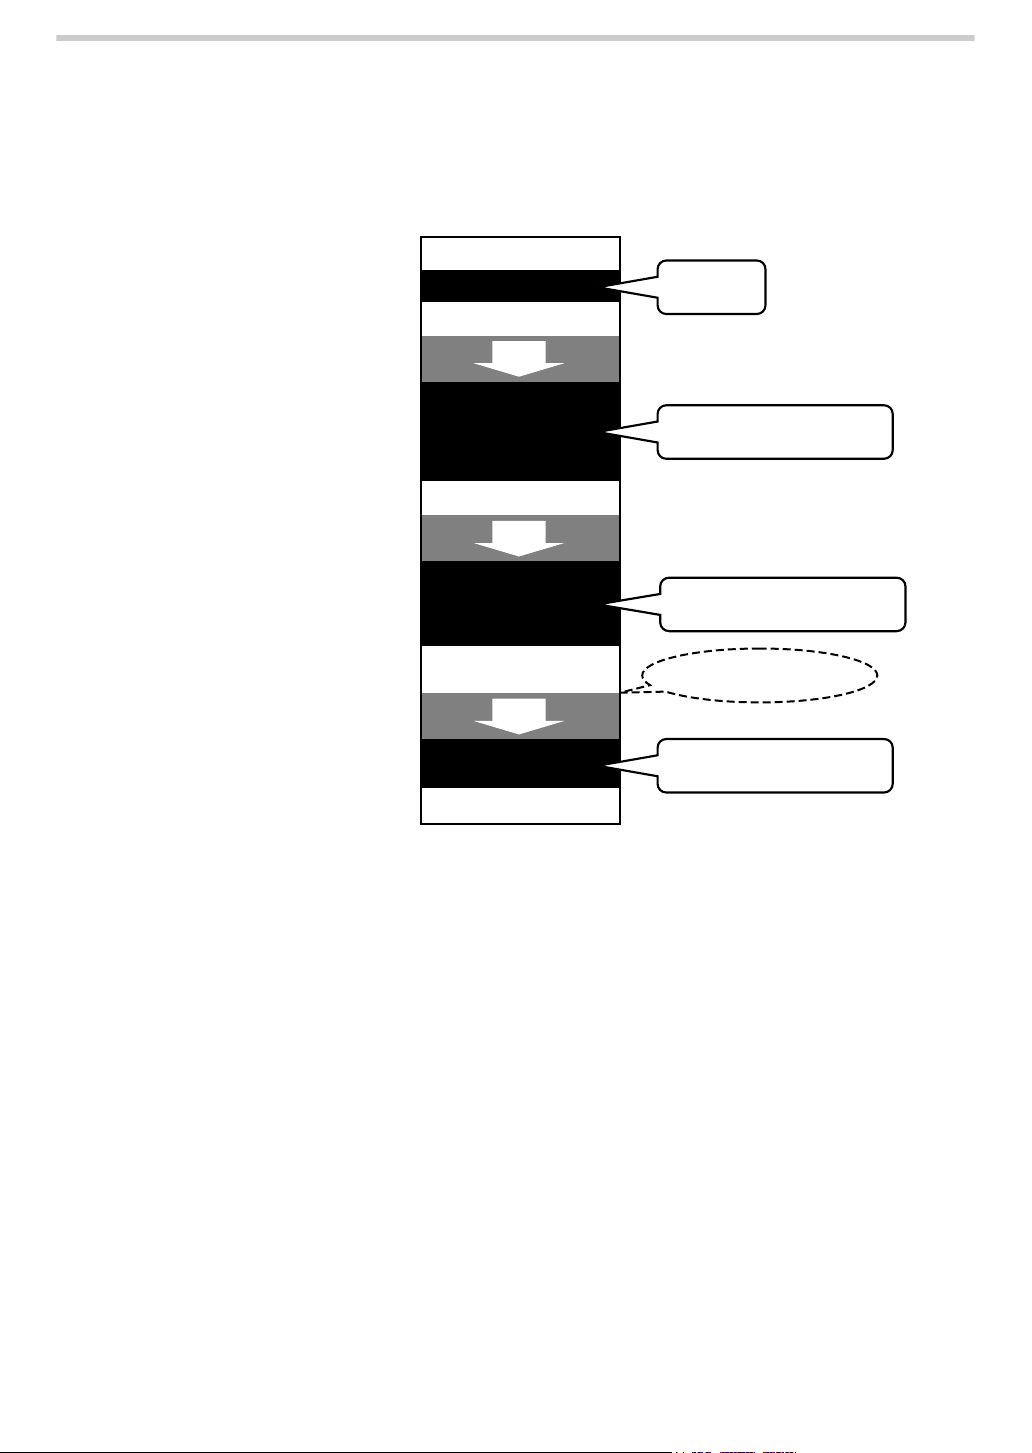
Recommended measurement times
Understanding the normal changes in your body fat percentage can help you in
preventing or reducing obesity. Being aware of the times when the body fat percentages
shift within your own daily schedule will assist you in obtaining an accurate trending of
your body fat. It is recommended to use this unit in the same environment and daily
circumstances. (See chart)
Daily activities
Waking up
Recommended time
Breakfast
2 hours
After waking up
Recommended time
Lunch
2 hours
Recommended time
Taking a bath or
eating dinner
2 hours
Recommended time
Going to bed
Before lunch and about 2 hours or
more after breakfast
In the afternoon about 2 hours or
more after lunch and before taking
a bath or eating dinner
Avoid measurement immediately
after eating or bathing.
Before going to bed and about 2
hours or more after dinner or bath
Avoid taking measurements under the following conditions
If a measurement is made under the following physical conditions, the estimated body
fat percentage may differ significantly from the actual one because the water content in
the body is changing.
Avoid taking measurements:
- immediately after vigorous exercise
Please wait for 1 to 2 hours:
- after a bath or sauna
- after drinking alcohol
- after drinking lots of water
- after eating a meal
Measurement should be taken on a hard, level surface
To ensure accurate measurement results, measurements should be taken on a hard,
level surface.
8
Page 9
What You Should Know When Using This Unit
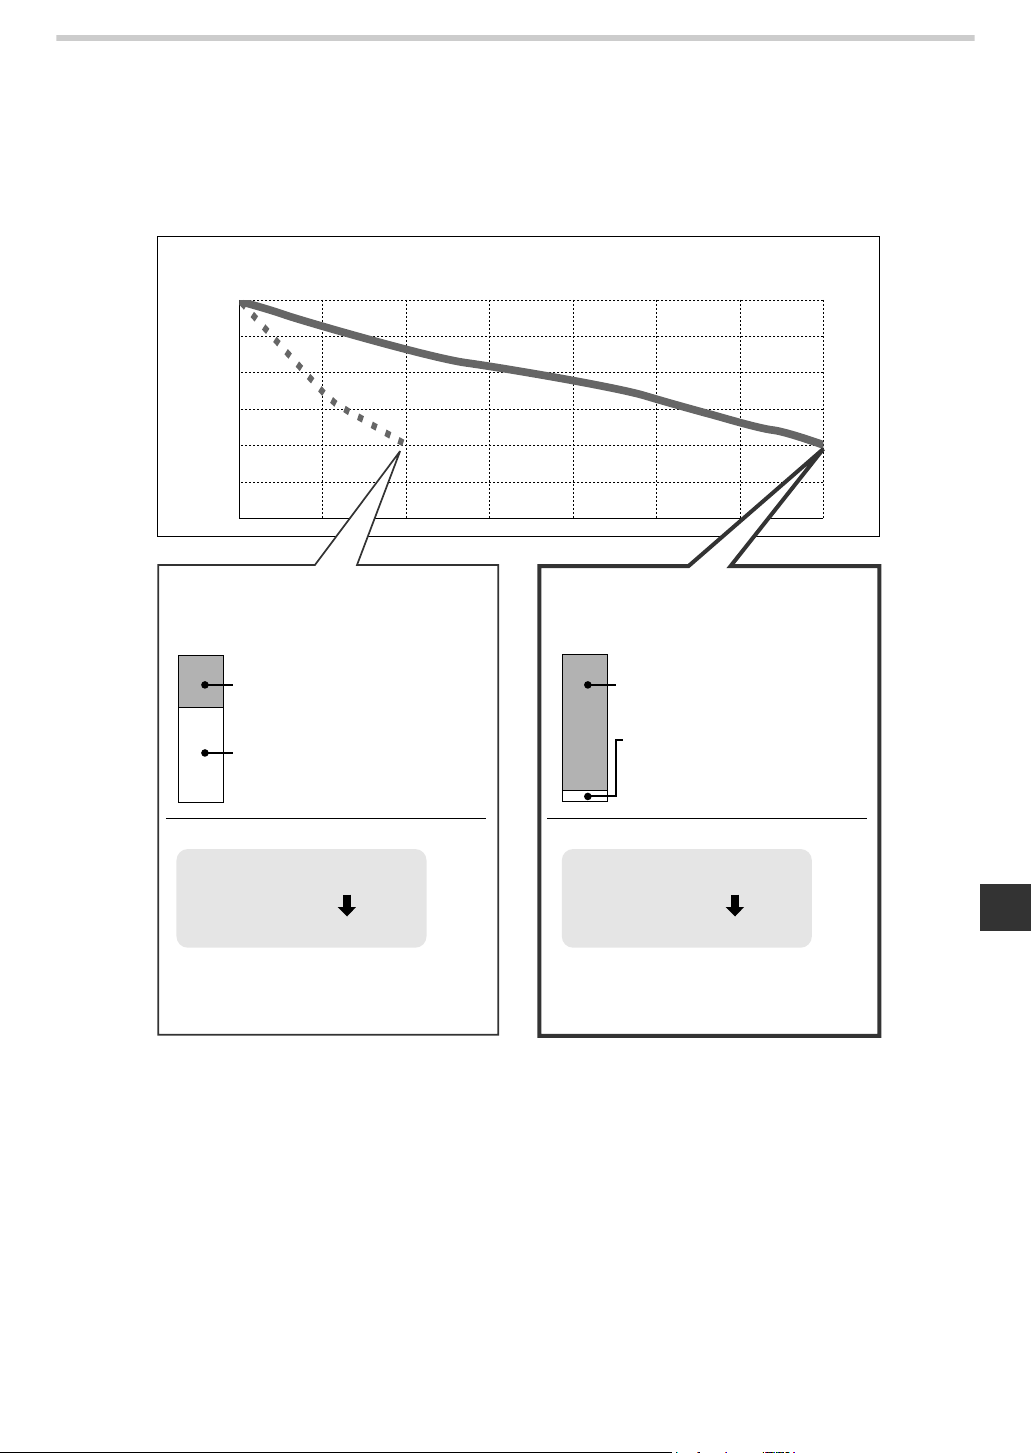
Long-term planning for successful weight loss
Ignoring a balanced diet and simply reducing food intake to lose weight can lead to a decline in
muscle and bone. This may result in weight loss but not in the reduction in fat levels. So even
though your weight goes down, your resting metabolism is reduced making the body more
prone to putting on fat.
Example comparing the same loss of 10 kg
Weight
(Kg)
1234567
80
75
70
65
A starvation-like diet produces
rapid weight loss of 10 kg,
but disrupts body mass...
Fat reduction: 3 kg
Lean body mass reduction
(muscle, bone etc.): 7 kg
Change in body fat percentage
Body fat percentage
Before diet:
After diet:
36.0%
36.9%
A healthy diet
with weight loss of 10 kg...
Fat reduction: 9 kg
Lean body mass reduction
(muscle, bone etc.): 1 kg
Change in body fat percentage
Body fat percentage
Before diet:
After diet:
36.0%
28.3%
Months
EN
Lean body mass (muscle, bone etc.) is
greatly reduced, while the body fat
percentage has not changed.
Body fat percentage reduced to a normal
level.
Repeated dieting and regaining weight leads to increased visceral fat levels
It is easy to regain weight after sudden diets. This regained weight tends to appear as visceral
fat rather then subcutaneous fat. Increased visceral fat levels are thought to increase the
likelihood of common diseases. Repeated dieting and subsequent regaining of weight leads to
increased visceral fat levels.
9
Page 10
Operating instructions
1.Know Your Unit
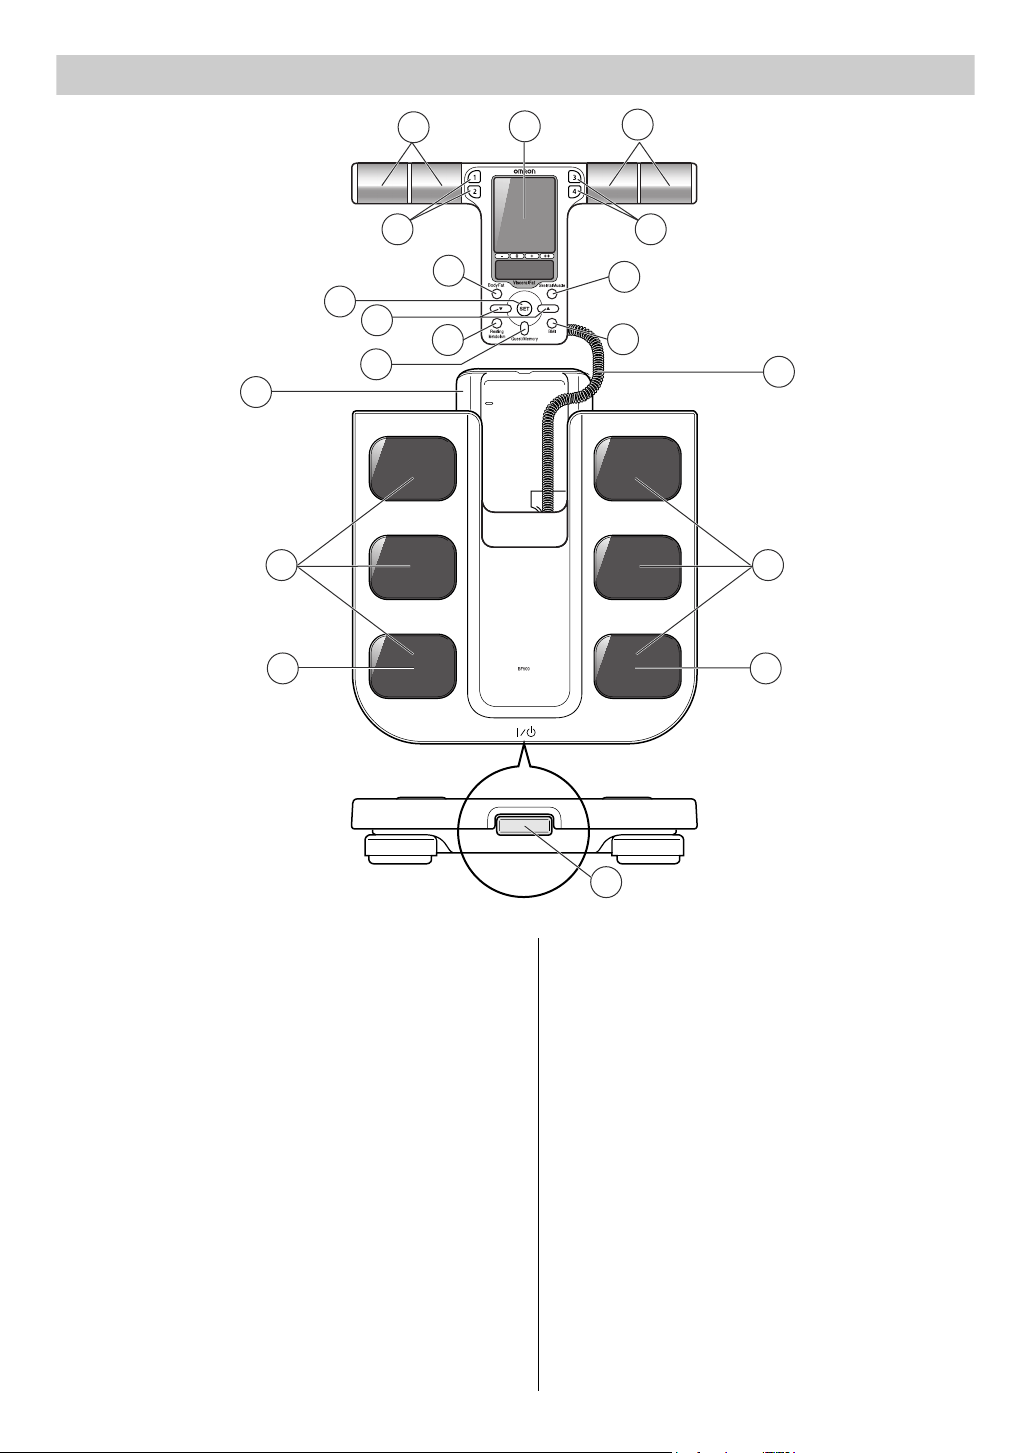
1. Know Your Unit
Display Unit
K
Main Unit
(Measurement Platform)
M M
N N
A
B
C C
G
D
E
H
F
A
J
I
L
Front View
A. Grip Electrodes
B. Display
C. Personal Profile Number Button
D. SET Button
Use this button to confirm the
personal data or move to the next
item after confirming the set item.
E. Up/Down Buttons
Use these buttons to set the value or
the gender for personal data.
These are also used to select the
measurement units used for the
height and weight display.
O
F. Guest/Memory Button
Use this button to set the personal
data for each measurement or to
view measurement results stored in
memory.
G. Body Fat Button
H. Resting Metabolism Button
I. BMI Button
J. Skeletal Muscle Button
K. Display Unit Holder
L. Cord
M.Foot Electrodes
N. Heel Electrodes
O.Power Switch
10
Page 11
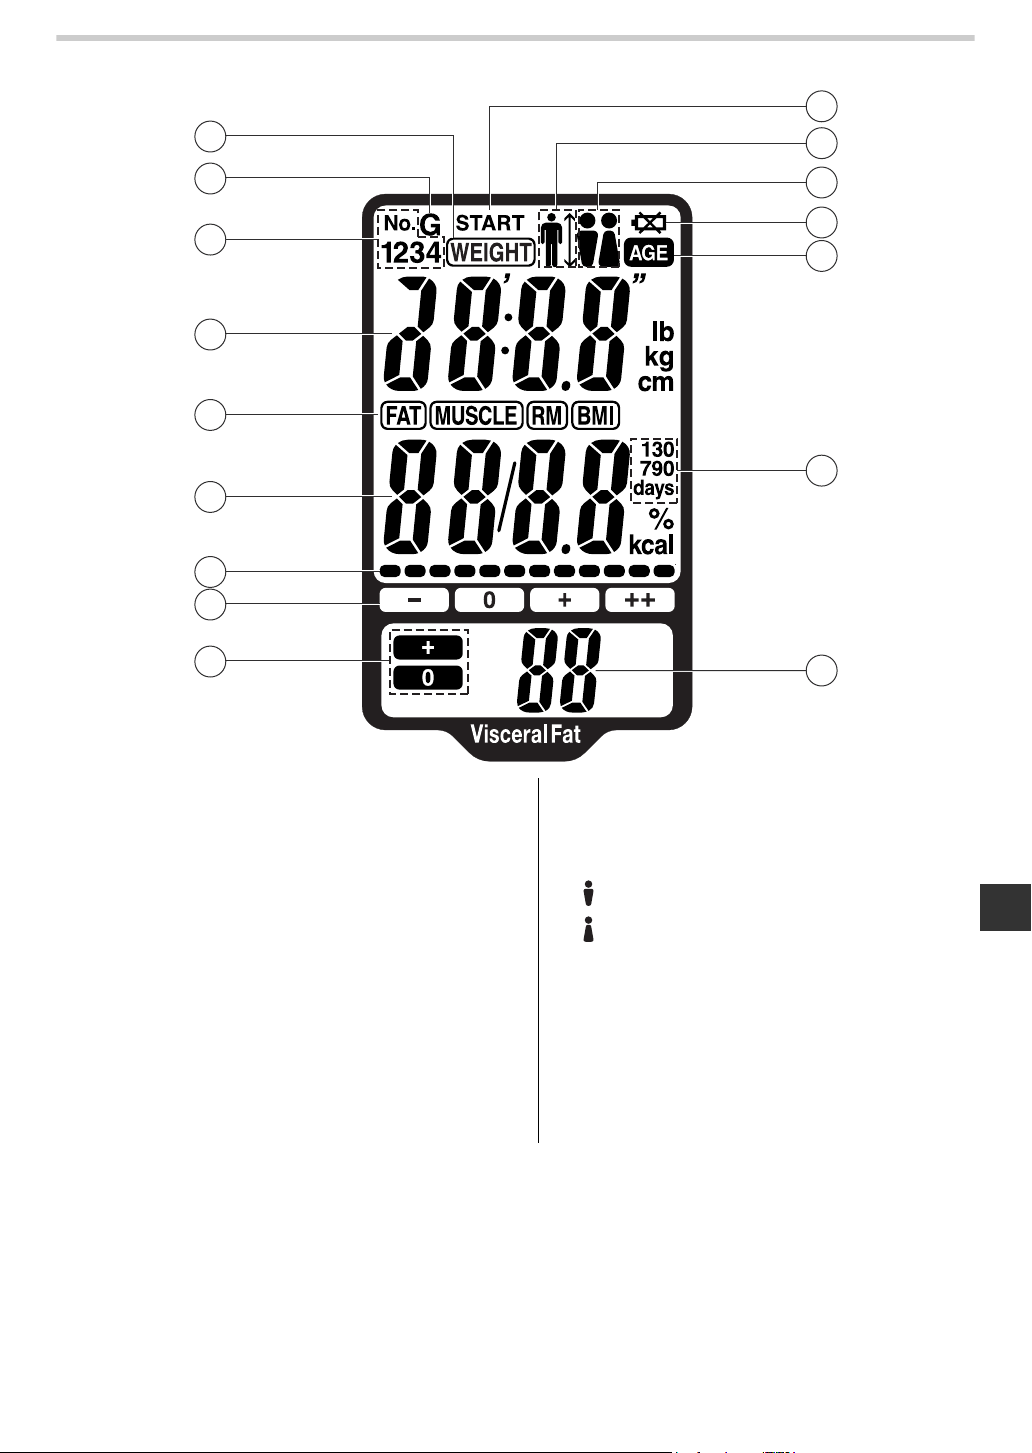
Display
P
1.Know Your Unit
Y
Z
Q
R
S
T
U
V
W
X
AA
AB
AC
AD
AE
P. Weight Indicator
Q.Guest Indicator
R. Personal Profile Number
S. Weight Results
T. Display Mode Indicator
U. Body Composition Results
V. Body Fat Percentage and BMI
Assessment 12 Levels Bar
W.Body Fat Percentage and BMI
Classification Indicator
X. Visceral Fat Classification Indicator
Y. Measurement Start Indicator
Z. Height Indicator
AA.Gender Indicator
(male)
(female)
AB.Battery Low Indicator
AC.Age Indicator
AD.Memory Indicator
AE.Visceral Fat Results
EN
11
Page 12
1.Know Your Unit
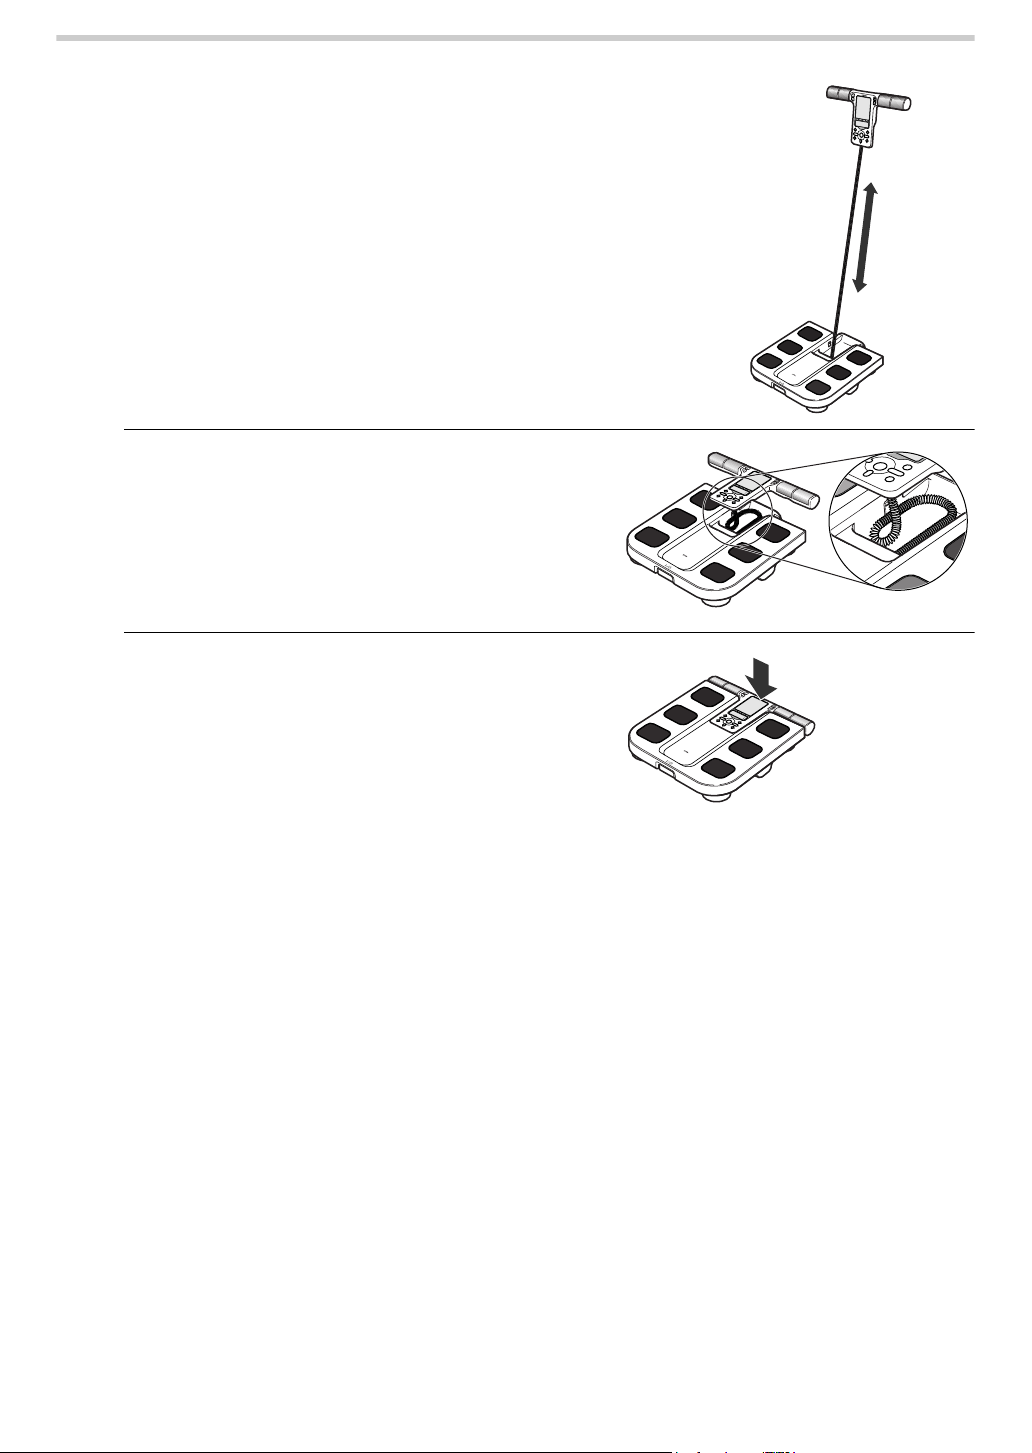
Storing the Display Unit
Extend the cord and store the display unit as described
below.
1. Coil the cord into the display unit holder.
Note: Make sure that the cord does not stick out of the
holder and that the cord is coiled evenly.
2. Push the display unit into the holder.
Push the display unit until it clicks into place.
About the Auto Power Off Function
The power will be automatically switched off in the following conditions:
• If the unit is not used within one minute of 0.0 kg appearing on the display.
• If no information is entered for 5 minutes when entering personal data.
• If the unit is not used for 5 minutes after measurement results are displayed.
• 5 minutes after the result is displayed when measuring weight only.
12
Page 13
2.Inserting and Replacing the Batteries
2. Inserting and Replacing the Batteries
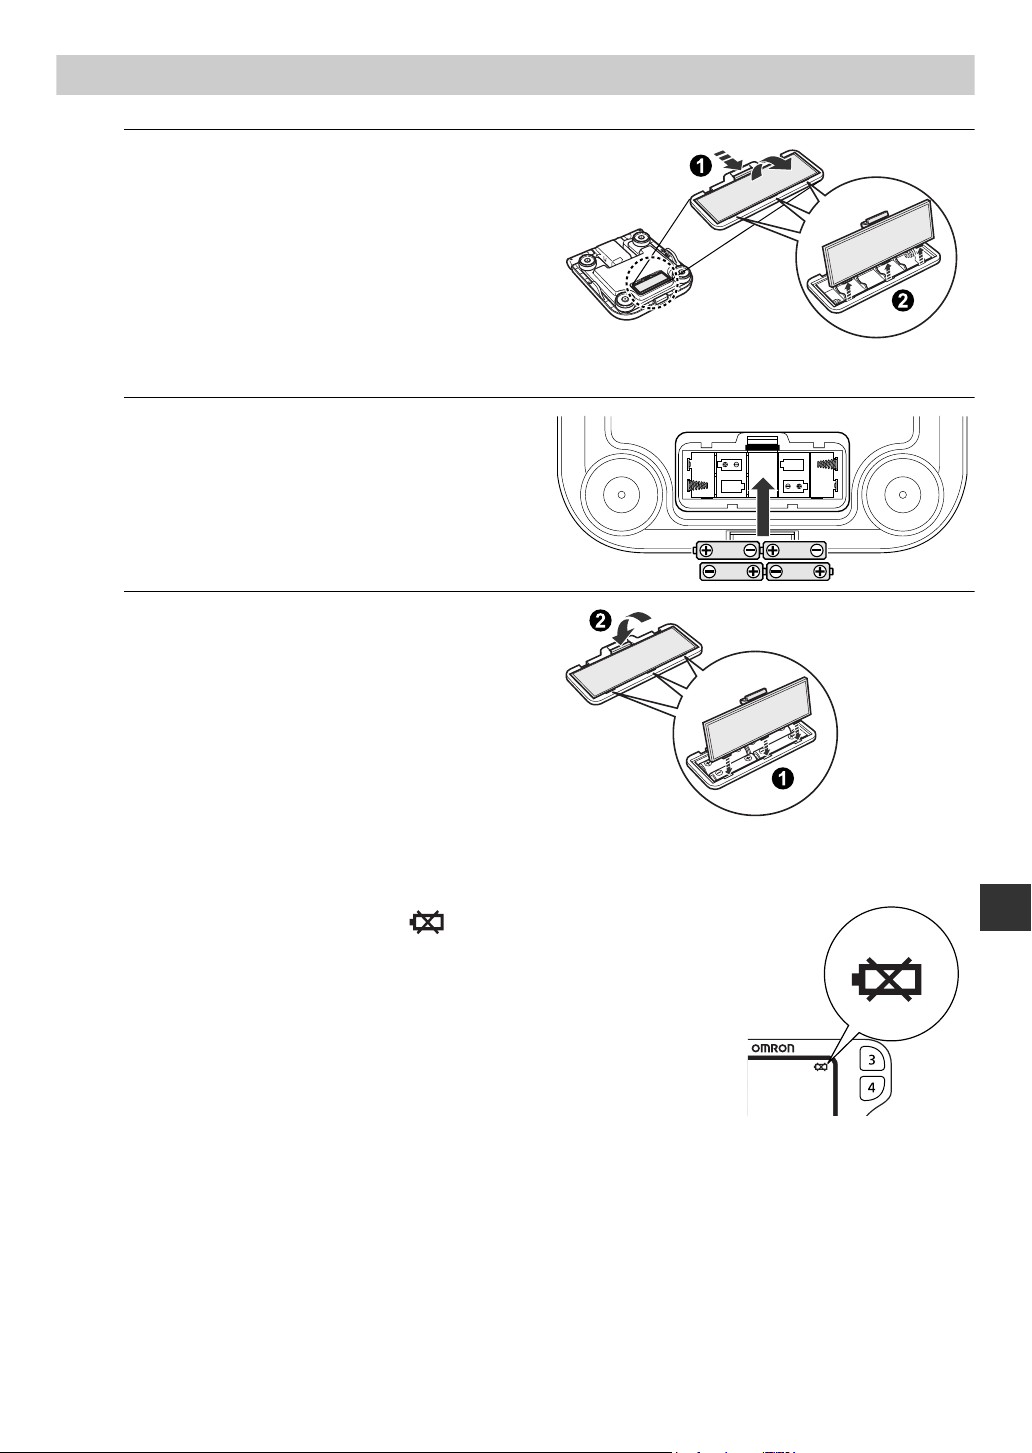
1. Remove the battery cover on the rear
side of the main unit.
1) Press the tab of the battery cover in the
direction of the arrow to release the
cover.
2) After releasing the battery cover, pull the
tab of the cover upwards.
2. Insert the batteries by aligning them as
indicated.
Make sure that their polarity (+/–) is aligned with
the polarity (+/
compartment.
–) indicated in the battery
Rear
3. Close the battery cover.
1) Align the hooks on the battery cover with
the slots in the battery compartment.
2) Push the battery cover until the tab clicks
into place.
Battery Life and Replacement
When the battery low indicator ( ) appears, replace all four
batteries with new ones.
Items stored in memory are retained even if the batteries are
removed. However, if the batteries are removed or replaced, you will
be prompted to set the date and time the next time the unit is turned
on.
• Replace the batteries after turning off the power.
• Disposal of used batteries should be carried out in
accordance with the national regulations for the disposal of
batteries.
Battery life
• Four AA batteries will last approximately 1 year (when measurements are made four
times a day).
• Because the supplied batteries are for trial use only, they may have a shorter life.
Battery low indicator
EN
13
Page 14
3.How to Set the Date and Time
3. How to Set the Date and Time
When the power is turned on for the first time, it is necessary to set the date and time.
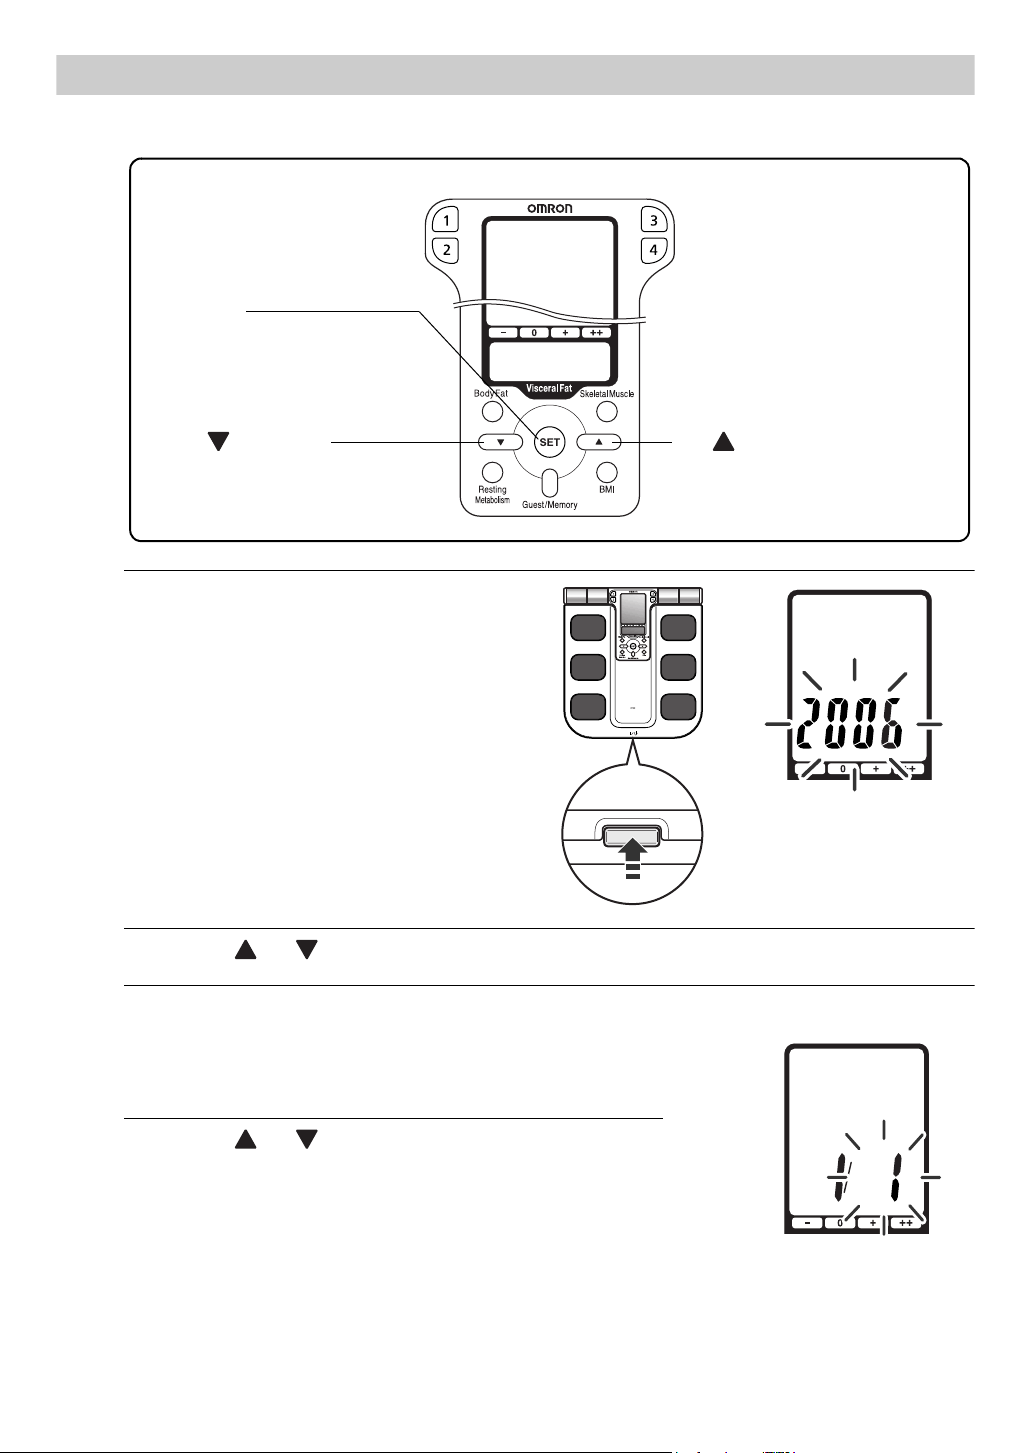
Buttons Used in this Procedure
SET button
Use this button to confirm the
setting or move to the next item
after confirming the set item.
Down ( ) button
Press this button to go back one.
Press continuously to rapidly
decrease.
Up ( ) button
Press this button to advance
one. Press continuously to
rapidly advance.
1. Press the power switch to turn the unit
on.
If this is the first time that the unit has turned on,
the year setting flashes.
[TO SET THE YEAR]
2. Press the or button to adjust the year setting to the desired year.
3. Press the SET button.
The year setting is confirmed and the month flashes on the
display.
[TO SET THE MONTH]
4. Press the or button to adjust the month
setting to the desired month.
14
Page 15
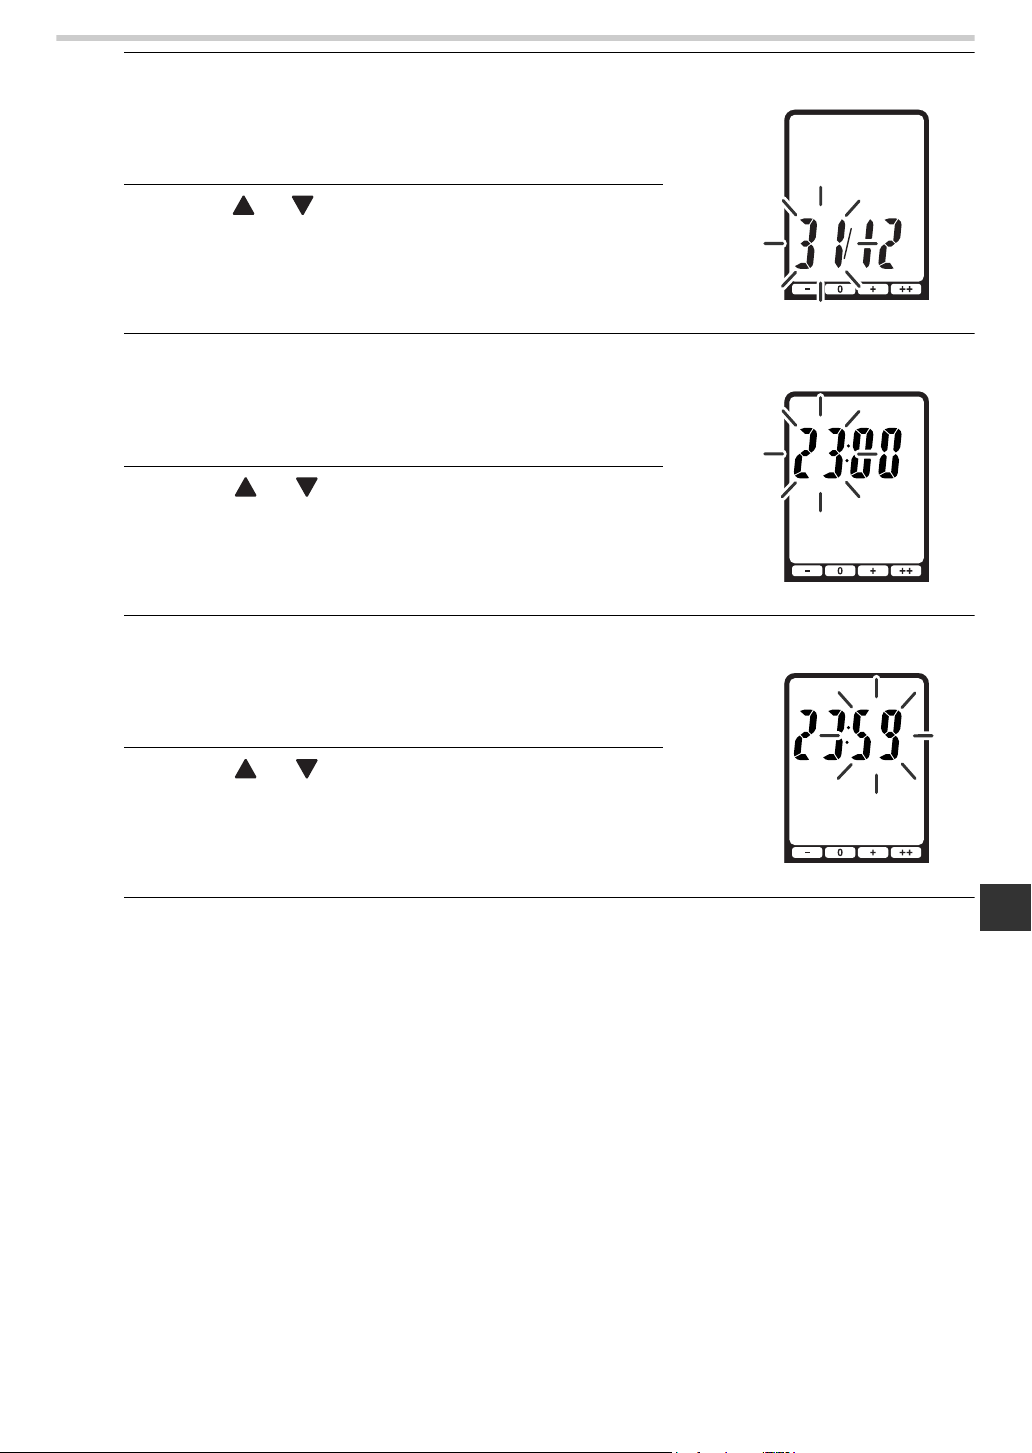
5. Press the SET button.
The month setting is confirmed and the day flashes on the
display.
[TO SET THE DAY]
6. Press the or button to adjust the day setting to
the desired day.
7. Press the SET button.
The day setting is confirmed and the hour flashes on the
display.
[TO SET THE HOUR]
8. Press the or button to adjust the hour setting
to the desired hour.
3.How to Set the Date and Time
9. Press the SET button.
The hour setting is confirmed and the minute flashes on the
display.
[TO SET THE MINUTE]
10.Press the or button to adjust the minute
setting to the desired minute.
11. Press the SET button.
The minute setting is confirmed.
After the settings for year, month, day, hour and minute are displayed in that sequence, the
power is automatically turned off.
EN
15
Page 16

4.Setting and Storing Personal Data
4. Setting and Storing Personal Data
For the measurement of body fat percentage and visceral fat level, it is necessary to set
your personal data (age, gender, height).
This section describes setting the personal profile setting for number 1 as an example.
Buttons Used in this Procedure
Personal profile number
button
SET button
Use this button to confirm the
personal data and move to the
next item after confirming the set
item.
Down ( ) button
Press this button to go back one.
Press continuously to rapidly
decrease.
1. Push the power switch to turn on the unit.
“CAL” blinks on the display, then the display changes to
0.0 kg.
Wait until 0.0 kg appears on the display.
Personal profile number
button
Up ( ) button
Press this button to advance one.
Press continuously to rapidly
advance.
2. Take out the display unit.
Note: You can change the measurement units used for the height and weight settings. All height
and weight measurements are displayed using the new measurement units. The change
remains in effect until you change the measurement unit setting again.To change the
measurement unit:
1) Keep the
2) Press the
automatically change “cm” and “in”.
3) Press the SET button to confirm the change.
16
button pressed until “lb” and “kg” blink on the display.
or button to select the desired measurement unit, “lb” or “kg”. This will
Page 17

4.Setting and Storing Personal Data
3. Select the personal profile number to store the personal data.
1) Press the personal profile number button to select a
personal profile number.
The display of the selected personal profile number
flashes.
2) Press the SET button.
The personal profile number is confirmed and the default
age setting blinks on the display.
4. [TO SET THE AGE]
Setting range: 10 to 80 years old
1) Press the or button to adjust the age setting to
the desired age.
2) Press the SET button.
The age setting is confirmed, and the gender icons blink
on the display.
5. [TO SET GENDER]
1)
Press the or button to adjust the gender
setting to the desired gender.
To select Gender (male) or (female), press the or
button.
2) Press the SET button.
The gender setting is confirmed, and the default height
setting blinks on the display.
EN
17
Page 18

4.Setting and Storing Personal Data
6. [TO SET HEIGHT]
Setting range: 100.0 to 199.5 cm (Display range in inch display mode: 3' 4" to 6' 6 3/4")
1) Press the or button to adjust the height setting
to the desired height.
2) Press the SET button to confirm the settings.
After the settings for age, gender, and height are displayed in
that sequence, then 0.0 kg appears on the display. You can
now start taking measurements. (Proceed to Step 3 in
Section 5 “Taking a Measurement”.)
When using GUEST mode, the unit starts measurement after
the height setting has been confirmed. Refer to Section 5.
The personal data has been stored in selected personal profile number.
Changing the Information for a Personal Profile Number
If the personal data stored for any of the personal profile numbers (1-4) changes, the
settings for that personal profile number will need to be modified.
1. Push the power switch to turn on the unit.
“CAL” blinks on the display, then the display changes to 0.0 kg.
Wait until 0.0 kg appears on the display.
2. Take out the display unit.
3. Select the personal profile number for which you want to modify the personal
data.
1) Press the personal profile number button to select a personal profile number.
The display of the selected personal profile number flashes once.
2) Press the SET button.
The personal profile number is confirmed and the selected
age setting blinks on the display.
4. Change the stored data.
1) Modify the age setting.
a)Press the or button to adjust the age setting to the desired age.
18
b)Press the SET button.
The age setting is confirmed, and the gender icon blinks on the display.
Page 19

4.Setting and Storing Personal Data
2) Modify the gender setting.
a)Press the or button to adjust the gender setting to the desired gender.
b)Press the SET button.
The gender setting is confirmed, and the height setting blinks on the display.
3) Modify the height setting.
a)Press the or button to modify the height setting.
b)Press the SET button to confirm the change.
If you are going to change other data, repeat this procedure.
Deleting a Personal Profile Number
1. Push the power switch to turn on the unit.
“CAL” blinks on the display, then the display changes to 0.0 kg.
Wait until 0.0 kg appears on the display.
2. Select the personal profile number for which you want to delete the personal
data.
1) Press the personal profile number button to select a personal profile number.
The display of the selected personal profile number flashes once.
2) Press the SET button.
The personal profile number is confirmed and the selected
age setting blinks on the display.
3. Delete the personal data.
Press the Guest/Memory button for two seconds or longer.
“Clr” will appear in the display and the personal data and
measurement values are deleted from memory.
4. Turn off the unit.
EN
Press the power switch to turn off the power.
19
Page 20

5.Taking a Measurement
5. Taking a Measurement
How to Measure Body Composition
Please see Step 4 on this section for correct posture.
1. Turn on the power, by pressing the power switch.
“CAL” blinks on the display, then the display changes to
0.0 kg.
Notes:
• If you step onto the unit before 0.0 kg appears on the
display, an error message “Err” will appear.
• You can change the measurement units used for the height
and weight settings. To change the measurement unit:
1) Keep the
the display.
2) Press the
automatically change “cm” and “in”.
3) Press the SET button to confirm the change.
button pressed until “lb” and “kg” blink on
or button to select the desired measurement unit, “lb” or “kg”. This will
2. When the 0.0 kg appears on the display, take out
the display unit.
Note: Do not take out the display unit until 0.0 kg appears on
the display. The weight of the display is then added to
your body weight which causes an incorrect result.
How to Hold the Grip Electrodes
Press your palms firmly on the grip
electrodes.
20
Place both middle fingers
along the dents of the grip
electrodes.
Hold the inner grip
electrodes firmly with your
thumb and index finger.
Hold the outer
grip electrodes with your
ring finger and small finger.
Page 21

5.Taking a Measurement
p
3. Select the personal profile number button or the Guest/Memory button.
If you have personal data (Personal
rofile number) stored on the unit:
Press the stored personal profile number
button while holding the display unit. The
stored personal profile number will appear
after blinking once.
If you do not have personal data stored
on the unit (GUEST mode):
Even if you do not have personal data stored
on the unit, you can measure your body
composition by entering your age, gender,
and height before taking a measurement.
1) Press the Guest/Memory button
while holding the display unit.
Ex.: To select personal profile number
“1”, press button .
“G” will be indicated at the top of the
If the following display is indicated:
Your personal data is not stored in the
personal profile number you have selected.
Please see Section 4 to store personal data.
display while “AGE” data flashes.
2) Set the personal data (age, gender,
and height). Read steps 4 through 6
in Section 4 “Setting and Storing
Personal Data”.
EN
21
Page 22

5.Taking a Measurement
4. Start measurement.
1) Step on the main unit and place your feet on the foot electrodes with your weight
evenly distributed.
The display will show your weight
and then the weight result will blink
twice.
The unit will then start to measure
Step onto the unit.
Distribute weight evenly.
2) When “START” appears on the display extend your arms straight at a 90° angle to
your body.
your body fat percentage and
visceral fat level.
3) After measurement completes, your weight is
displayed again. At this point you may step off the
unit.
22
The indicators in the measurement
progress bar at the bottom of the
display will gradually appear, from
left to right.
Page 23

5.Taking a Measurement
Correct Posture for Measurement
When taking a measurement using a personal profile number, you need to store the
personal data before hand. (Refer to
Section 4.)
(2)
After measuring
your weight.
(1)
Stand with your
knees and back
straight and look
straight ahead.
The arm is horizontally
raised, and the elbow is
extended straight.
Extend your arms straight
at 90° angle to your body.
90°
(3)
Step on the main unit bare-footed.
Make sure each of your heels is positioned on a heel
electrode. Stand with your weight evenly distributed
on the measurement platform.
Heel Electrodes
Hold the display unit so
that you can see the
display.
EN
23
Page 24

5.Taking a Measurement
POSTURES TO AVOID DURING MEASUREMENT
Incorrect posture may result in inaccurate measurement of body composition.
Movement during measurement Arms bent
Arms too low or high Display facing upwards
24
Knees bent Standing on edge of unit
Page 25

5.Taking a Measurement
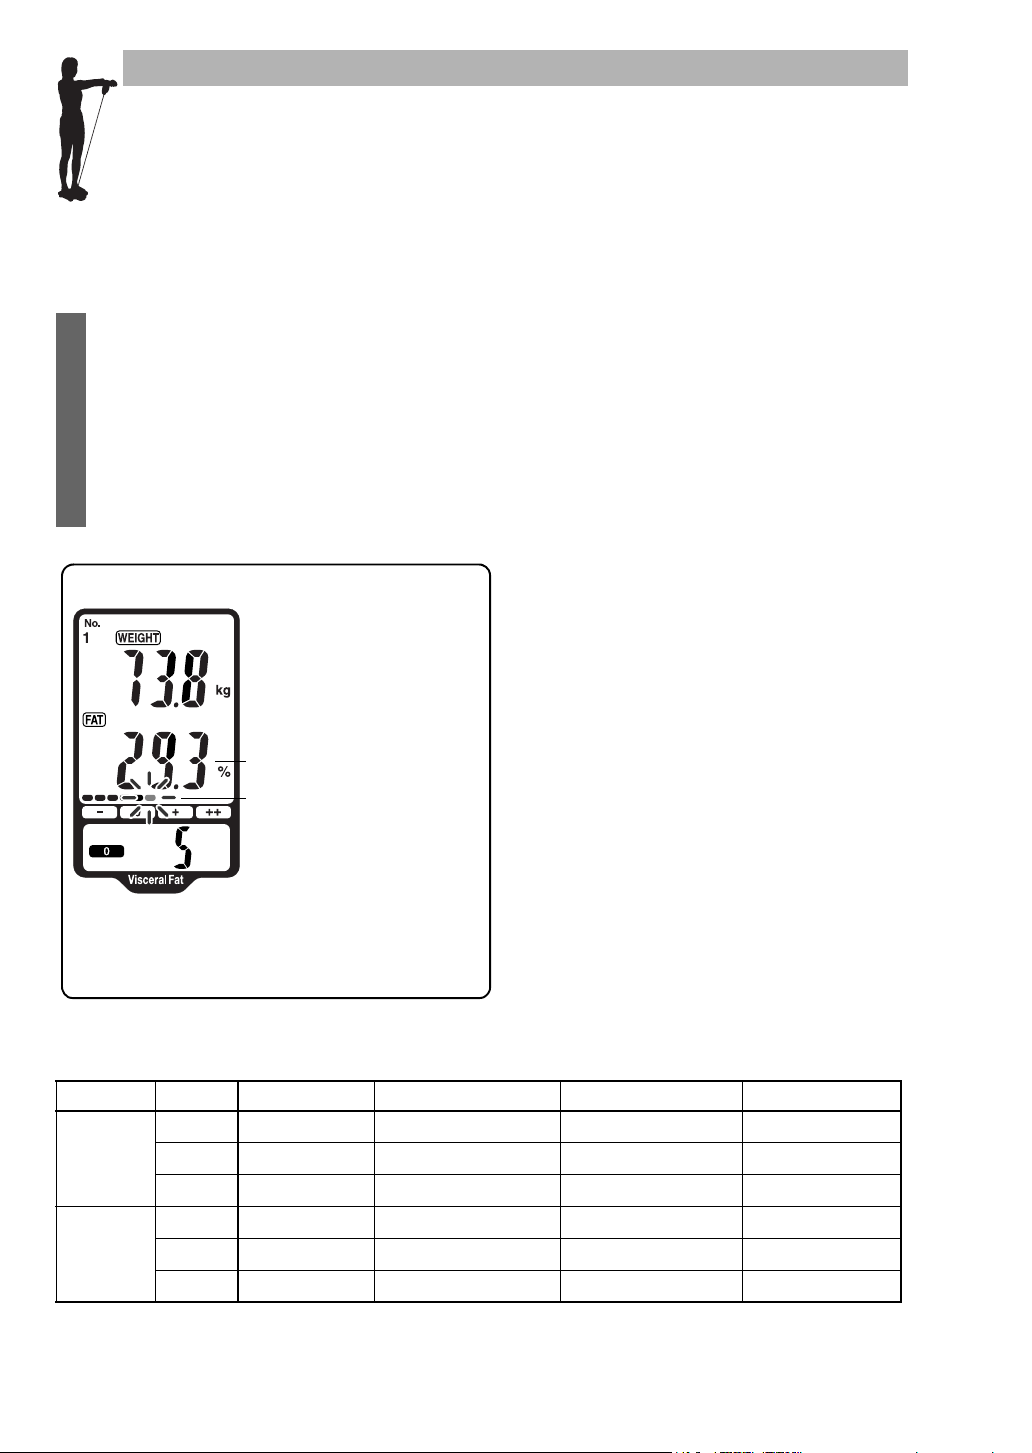
5. Check the measurement results.
Press the appropriate button to view the desired measurement results.
For an explanation of the body composition results, see “Understanding the Results”.
Weight
Body Fat Percentage
Body Fat Percentage
Classification
Visceral Fat Level/
Visceral Fat Classification
Example of display:
• Weight: 73.8 kg
• Body Fat Percentage: 29.3%
• Body Fat Percentage Classification: 0
• Visceral Fat Level: 5
• Visceral Fat Classification: 0
Weight
Skeletal Muscle
Percentage
Visceral Fat Level/
Visceral Fat Classification
Example of display:
• Weight: 73.8 kg
• Skeletal Muscle Percentage: 28.1%
• Visceral Fat Level: 5
• Visceral Fat Classification: 0
EN
Weight
Resting Metabolism
Visceral Fat Level/
Visceral Fat Classification
Example of display:
• Weight: 73.8 kg
• Resting Metabolism: 1186 kcal
• Visceral Fat Level: 5
• Visceral Fat Classification: 0
Weight
BMI
BMI Classification
Visceral Fat Level/
Visceral Fat Classification
Example of display:
• Weight: 73.8 kg
•BMI: 27.7
• BMI Classification: +
• Visceral Fat Level: 5
• Visceral Fat Classification: 0
25
Page 26

5.Taking a Measurement
Interpreting the BMI Result
BMI
Less than 18.5
18.5 or more and less than 25
25 or more and less than 30
30 or more
The above-mentioned indices refer to the values for obesity judgment proposed by the WHO, the World Health Organization.
BMI (Designation by the WHO)
- (Underweight)
0 (Normal)
+ (Overweight)
++ (Obese)
BMI Classification Bar
BMI Rating
7.0 - 10.7
10.8 - 14.5
14.6 - 18.4
18.5 - 20.5
20.6 - 22.7
22.8 - 24.9
25.0 - 26.5
26.6 - 28.2
28.3 - 29.9
30.0 - 34.9
35.0 - 39.9
40.0 - 90.0
Interpreting the Body Fat Percentage Result
– (Low) 0 (Normal) + (High) ++ (Very High)
Interpreting the Visceral Fat Result
_
_
_
_
Visceral Fat Level 9
<
Visceral Fat Level 10
>
0 (Normal) + (High)
Visceral fat area (0 - approx. 300 cm2, 1 inch=2.54 cm) distribution 30 levels.
Example level determined
0: 1 - 9 level
+: 10 - 30 level
* The data referenced by Omron Healthcare.
6. When the measurement is completed, step off from the main unit and turn off the
power.
Press the power switch to turn the power off.
Notes:
• If you forget to turn the power off, the unit will be turned off automatically after 5 minutes.
• Store the display unit in the display unit holder.
26
For additional information, please see Section “Understanding the Results”.
Page 27

6. Measuring Weight Only
1. Turn on the power, by pressing the power switch.
“CAL” blinks on the display, then the display changes to
0.0 kg.
Notes:
• If you step onto the unit before 0.0 kg appears on the
display, an error message “Err” will appear.
• You can change the measurement units used for the height
and weight settings. To change the measurement unit:
6.Measuring Weight Only
1) Keep the
the display.
2) Press the
automatically change “cm” and “in”.
3) Press the SET button to confirm the change.
button pressed until “lb” and “kg” blink on
or button to select the desired measurement unit, “lb” or “kg”. This will
2. When the 0.0 kg appears on the display, step onto
the unit.
EN
3. Check the measurement results.
Your weight is displayed on the display and blinks twice to
indicate that measurement is complete.
Note: You can also check the measurement result by taking
out the display unit.
Example: Weight 73.8 kg
4. When the measurement is completed, step down from the unit and turn off the
power.
27
Page 28

7.Using the Memory Function
7. Using the Memory Function
Measurement results are automatically stored in memory when you take a
measurement using a personal profile number button. In order to assist your tracking of
measurements, the device has stored 97 memories, and allows you to view the results
for only 1 day, 7, 30, and 90 days before.
When 97 sets of measurement values are stored in the memory, the oldest record is
deleted to save the most recent measurement values.
Notes:
• If you did not take a measurement on the exact date for 1, 7, 30, or 90 days before, the results
for the previous day are displayed. If there is no measurement result for the previous day, then
the results for the day before that are displayed. For example, when viewing the 7 days before
result, if there are no results for 7, 8, or 9 days before, then the result for 10 days before is used.
This is done for up to 14 days before the appropriate date.
• Only one set of measurement results is stored for each personal profile number each day. If
more than one measurement is taken during a day, the results from the last measurement are
stored.
Buttons Used in this Procedure
Personal profile number
button
Guest/Memory button
Press this button to view
previous results for only 1 day,
7 days, 30 days, and 90 days
before.
Body Fat button
Resting Metabolism button BMI button
Comparing Results After Taking a Measurement
1. View the measurement results after taking a
measurement.
Personal profile number
button
Skeletal Muscle button
28
Current weight/Body Fat
Percentage
Page 29

2. Press the Guest/Memory button once to compare
with the result from the previous day.
3. Press the Guest/Memory button again to compare
it with the result from 7 days ago.
7.Using the Memory Function
Weight and Body Fat Percentage
- 1 day ago -
4. Press the Guest/Memory button a third time to
compare with the result from 30 days ago.
5. Press the Guest/Memory button a fourth time to
compare with the result from 90 days ago.
Weight and Body Fat Percentage
- 7 days ago -
EN
Weight and Body Fat Percentage
- 30 days ago -
Weight and Body Fat Percentage
- 90 days ago -
29
Page 30

7.Using the Memory Function
Notes:
• If there are no results for a selected memory, “- - - -” is
displayed for that item.
• To view previous results for other items, press the button for the desired item. The results for the
selected item are displayed.
Then press the Guest/Memory button to cycle through the previous results for that item in the
same way as for weight and body fat percentage.
[Example only. The screen for
the item selected will be
displayed.]
Previous Body Fat results for the currently selected period.
Press the Guest/Memory button to cycle through the other
results.
Previous Skeletal Muscle result for the currently selected
period. Press the Guest/Memory button to cycle through
the other results.
Previous Resting Metabolism results for the currently
selected period.
Press the Guest/Memory button to cycle through the other
results.
Previous BMI results for the currently selected period.
Press the Guest/Memory button to cycle through the other
results.
6. Press the power switch to turn the display off.
30
Page 31

7.Using the Memory Function
Viewing Previous Measurement Results
Follow this procedure if you just want to view and compare previous measurement results,
without taking a measurement.
1. Turn on the power, by pressing the power switch.
“CAL” blinks on the display, then the display changes to
0.0 kg.
Note: Do not step on the unit to view previous
measurements.
2. When the 0.0 kg appears on the display, take out
the display unit.
Note: Do not take out the display unit until 0.0 kg appears on
the display.
3. Press the desired personal profile number
button.
Ex.: To select personal profile number
“1”, press button .
EN
31
Page 32

7.Using the Memory Function
4. View the previous measurement results.
1) Press the Guest/Memory button once.
The results for the previous day are displayed.
[Example]
2) Press the Guest/Memory button to cycle through the results from “1 day”, “7 days”,
“30 days”, and “90 days” ago.
5. Press the power switch to turn the display off.
32
Page 33

Care and maintenance
8. Error Displays
Error Display Cause Correction
8.Error Displays
Your palms or soles are not in firm
contact with the electrodes.
The posture for measurement is
wrong or the palms or soles are not
in firm contact with the electrodes.
The palms or soles are too dry.
Values of body composition are out
of measurable range.
Press your palms or soles firmly to
the electrodes, then measure.
(Refer to Section 5.)
Measure without moving the hands
or soles. (Refer to Section 5.)
Moisten the palms or soles with a
wet towel, then repeat
measurement. (Refer to Section 5.)
Please ensure that your personal
data is within the measurable range
of the device. (see Section 11).
Abnormal operation.
You stepped on the unit before the
display indicated 0.0 kg.
You moved the main unit before the
display indicated 0.0 kg.
You moved your body while
measuring body weight.
Your weight is 135 kg or over.
Insert the batteries again and
repeat measurement.
If this error still occurs, consult your
OMRON service representative.
Step on the main unit after the
display indicates 0.0 kg.
Do not move the main unit until the
display indicates 0.0 kg.
Do not move while measuring body
weight.
Body weight of 135 kg or over is out
of the measuring range of this unit.
You cannot use this unit.
EN
33
Page 34

9.Troubleshooting
9. Troubleshooting
Problem Cause Correction
The displayed value of body
composition is abnormally high
or low.
The power turns off
approximately 10 seconds after
the body weight is confirmed
and before your body fat
percentage and visceral fat
level is measured.
Nothing is displayed when the
power is turned on.
Refer to “The reason calculated results may differ from actual
body fat percentage” and “Recommended measurement times”
in “ What You Should Know When Using This Unit”.
You did not press the correct
personal profile number or the
Guest/Memory button.(The
personal profile number or “G”
is not displayed on the display
unit.)
Batteries are not inserted. Insert the batteries.
The polarities of batteries are
not aligned correctly.
The batteries are worn out.
The cord connecting the main
unit and the display unit is
damaged or worn.
Press the correct personal
profile number or the Guest/
Memory button. (Refer to
Section 5.)
Insert the batteries in correct
alignment.
Replace all four batteries with
new ones. (Refer to Section 2.)
Contact the nearest OMRON
service representative.
34
Page 35

10.How to Care and Store the Unit
How to Clean the Unit
• Always keep the unit clean before use.
• Wipe the main unit with a soft dry cloth.
If necessary, use a cloth moistened with water or
detergent and squeeze it well before wiping the unit,
then wipe dry with a dry cloth.
• Please make sure water does not get into the main unit.
• Do not use benzene, thinner, or gasoline to clean the
unit.
Care and Storage
• Store the display unit in the main unit as shown in the figure.
As you push the lower portion of the display unit, it clicks and fits into the holder.
• When storing the display unit, be careful not to crease the cord.
10.How to Care and Store the Unit
Thinner
Benzene
Gasoline
• Do not store the unit in the following conditions:
- Humidity, where moist or water may get in the unit
- High temperatures, direct sunlight and dusty places
- Places with the risk of sudden shocks or vibrations
- In storage places of chemicals or where corrosive gas is
present.
• Do not carry out repairs of any kind yourself. If a defect occurs, consult the OMRON
distributor or Customer Services as mentioned on the packaging.
EN
35
Page 36

11.Technical Data
11.Technical Data
Name BF500
Product Body Composition Monitor
Model HBF-500-E
Display
Set Items Height: 100.0 to 199.5 cm (3' 4" to 6' 6 3/4")
Weight Accuracy
Accuracy (S.E.E.)
Power Supply
Battery Life
Operating Temperature
/Humidity
Storage Temperature/
Humidity/Air Pressure
Weight
External Dimensions
Package Contents
Display of minimum body weight:
Body Fat percentage:
5.0 to 60.0% with an increment of 0.1%
Skeletal Muscle percentage:
BMI:
7.0 to 90.0 with an increment of 0.1
Resting Metabolism:
Visceral Fat Level:
385 to 5000 kcal with an increment of 1 kcal
30 levels with an increment of 1 level
0 to 135 kg with an increment of 100 g
5.0 to 50.0% with an increment of 0.1%
BMI classification:
– (Underweight) / 0 (Normal) / + (Overweight) / ++ (Obese) with 12 levels of Bar display
Body fat percentage classification:
– (Low) / 0 (Normal) / + (High) / ++ (Very High) with 12 levels of Bar display
Visceral fat classification:
Memory:
0 (Normal) / + (High)
1 day ago / 7 days ago / 30 days ago / 90 days ago
Age: 10 to 80 years old
Gender: Male/Female
* Height and the contents of a memory are displayed in the unit.
*The age range for the skeletal muscle percentage, resting metabolism and visceral fat level is
18 to 80 years old. The age range for the body fat percentage classification is 20 to 79 years
old.
0.0 kg to 40.0 kg: ± 400 g
40.1 kg to 135.0 kg:
Body Fat percentage:
Skeletal Muscle percentage:
Resting Metabolism:
Visceral Fat Level:
±
1%
3.5%
3.5%
120 kcal
3 levels
4 AA batteries (R6) (You may also use AA alkaline batteries (LR6).)
Approximately 1 year (when manganese batteries are used with four
measurements a day)
+10°C to +40°C, 30% to 85% RH
-20°C to +60°C, 10% to 95% RH, 700 hPa - 1060 hPa
Approximately 2.2 kg (including batteries)
Display unit:
Main unit:
Approx. 300 (W) × 35 (H) × 155 mm (D)
Approx. 300 (W) × 57 (H) × 325 mm (D)
4 AA manganese batteries (R6), instruction manual
Note: Subject to technical modification without prior notice.
= Type BF
Please read the instruction manual carefully before using the device.
36
Page 37

11.Technical Data
Correct Disposal of This Product
(Waste Electrical & Electronic Equipment)
This marking shown on the product or its literature, indicates that it should not be disposed of, with
other household wastes at the end of its working life. To prevent possible harm to the environment or
human health from uncontrolled waste disposal, please separate this from other types of wastes and
recycle it responsibly to promote the sustainable reuse of material resources.
Household users should contact either the retailer where they purchased this product, or their local
government office, for details of where and how they can take this item for environmentally safe
recycling.
Business users should contact their supplier and check the terms and conditions of the purchase
contract. This product should not be mixed with other commercial wastes for disposal.
This product does not contain any hazardous substances.
Disposal of used batteries should be carried out in accordance with the national regulations for the
disposal of batteries
Important information regarding Electro Magnetic Compatibility (EMC)
With the increased number of electronic devices such as PC.s and mobile (cellular) telephones,
medical devices in use may be susceptible to electromagnetic interference from other devices.
Electromagnetic interference may result in incorrect operation of the medical device and create a
potentially unsafe situation.
Medical devices should also not interfere with other devices.
In order to regulate the requirements for EMC (Electro Magnetic Compatibility) with the aim to
prevent unsafe product situations, the EN60601-1-2 standard has been implemented. This standard
defines the levels of immunity to electromagnetic interferences as well as maximum levels of
electromagnetic emissions for medical devices.
This medical device manufactured by OMRON Healthcare conforms to this EN60601-1-2:2001
standard for both immunity and emissions.
Nevertheless, special precautions need to be observed:
• Do not use mobile (cellular) telephones and other devices, which generate strong electrical or
electromagnetic fields, near the medical device. This may result in incorrect operation of the unit
and create a potentially unsafe situation. Recommendation is to keep a minimum distance of 7 m.
Verify correct operation of the device in case the distance is shorter.
Further documentation in accordance with EN60601-1-2:2001 is available at OMRON Healthcare
Europe at the address mentioned in this instruction manual.
Documentation is also available at www.omron-healthcare.com.
EN
37
Page 38

11.Technical Data
Manufacturer
EU-representative
Subsidiary
OMRON HEALTHCARE CO., LTD.
24, Yamanouchi Yamanoshita-cho, Ukyo-ku, Kyoto,
615-0084, Japan
OMRON HEALTHCARE EUROPE B.V.
Kruisweg 577, 2132 NA Hoofddorp, The Netherlands
www.omron-healthcare.com
OMRON HEALTHCARE UK LTD.
Opal Drive
Fox Milne, Milton Keynes MK15 0DG, United Kingdom
OMRON Medizintechnik Handelsgesellschaft mbH
John-Deere-Str. 81a, 68163 Mannheim, Germany
www.omron-medizintechnik.de
OMRON SANTÉ FRANCE SAS
14, rue de Lisbonne, 93561 Rosny-sous-Bois Cedex, France
EC REP
Made in China
38
Page 39

Understanding the Results
BF500
Body Composition Monitor
Making the Best Use of Your BF500
Contents
Weight & BMI .....................................................................................40
Body Fat Ratio & Visceral Fat Level................................................42
Resting Metabolism & Skeletal Muscle ...........................................44
Note: The body fat percentage measured by this unit may significantly differ from the actual
body fat percentage in the following situations:
• Elderly people
• People with a fever
• Body builders or highly trained athletes
• Patients undergoing dialysis
• Patients with osteoporosis who have very low bone density
• Pregnant women
• Post-menopausal women
• People with swelling
EN
Page 40

WEIGHT & BMI
BMI & IDEAL WEIGHT
Everybody is concerned about their weight. But what is the basis for determining your ideal
weight?
The key is BMI.
What is BMI?
BMI is short for Body Mass Index. This index uses the following simple formula to indicate
the ratio between weight and height of a person.
BMI = weight (kg) / height (m) / height (m)
The OMRON BF500 uses the Height information stored in your personal profile number to
calculate your BMI classification.
Let’s look at an example
WEIGHT
BMI
BMI CLASSIFICATION
Example of display:
• Weight: 73.8 kg
• BMI: 27.7
• BMI Classification: +
40
Page 41

Hidden Fat Not Revealed by BMI
Although BMI calculates a simple obesity
level, there is also hidden fat levels that is
not revealed by a BMI designation.
The examples below show two cases that
were revealed by OMRON’s research.
Although both cases are for people of
almost the same height and weight, and
their BMI designation is normal, the body
fat percentage (p. 42) for case B is high.
That is, although case B has normal body
weight, the actual fat level is high,
revealing the “hidden fat”. This hidden fat
indicates high levels of visceral fat (p. 43)
71664040-3C, even though the BMI
designation is normal.
Interpreting the BMI Result
Examples of hidden fat
CaseA CaseB
F
34
172.1cm
65.3kg
22.0
(Normal)
19.2%
Normal
Body fat percentage
Gender
Age
Height
Weight
BMI
Weight & BMI
F
34
171.1cm
63.9kg
21.8
(Normal)
35.2%
High
BMI
Less than 18.5
18.5 or more and less than 25
25 or more and less than 30
30 or more
The above-mentioned indices refer to the values for obesity judgment proposed by the WHO, the World Health Organization.
BMI (Designation by the WHO)
- (Underweight)
0 (Normal)
+ (Overweight)
++ (Obese)
BMI Classification Bar
BMI Rating
7.0 - 10.7
10.8 - 14.5
14.6 - 18.4
18.5 - 20.5
20.6 - 22.7
22.8 - 24.9
25.0 - 26.5
26.6 - 28.2
28.3 - 29.9
30.0 - 34.9
35.0 - 39.9
40.0 - 90.0
EN
41
Page 42
BODY FAT RATIO & VISCERAL FAT LEVEL
BODY FAT ANALYSIS
Body fat is classified as subcutaneous fat and visceral fat etc., depending on where it is located
in the body. In particular, visceral fat level is known to have a close connection to susceptibility
common diseases.
What is Body Fat Percentage?
Body fat percentage refers to the amount of body fat mass in regards to the total body
weight expressed as a percentage.
The BF500 uses BI(Bioelectrical Impedance) to calculate your body fat percentage using
the following simple formula.
Body fat percentage (%) = {Body fat mass (kg) / Body weight (kg)} × 100
The BF500 uses body fat percentage to measure your body fat percentage using the
above simple formula.
Body fat percentage classification
Let’s look at an example
BODY FAT PERCENTAGE
BODY FAT PERCENTAGE
CLASSIFICATION
differs for men and women
When most people think of body fat, they have
a negative image of it. However, it serves a vital
role in storing energy, protecting internal
organs, etc. While too much body fat is
unhealthy for you, having too little is also
unhealthy.
The distribution of body fat in men and women
is different, so the basis of classifying the body
fat percentage for male and female is different.
Example of display:
• Body Fat Percentage: 29.3%
• Body Fat Percentage Classification: 0
Interpreting the Body Fat Percentage Result
Gender Age – (Low) 0 (Normal) + (High) ++ (Very High)
_
_
20-39
Female
40-59
60-79
20-39
Male
40-59
60-79
Based on NIH/WHO guidelines for BMI
Based on Gallagher et al., American Journal of Clinical Nutrition, Vol. 72, Sept. 2000
< 21.0 21.0 - 32.9 33.0 - 38.9
< 23.0 23.0 - 33.9 34.0 - 39.9
< 24.0 24.0 - 35.9 36.0 - 41.9
< 8.0 8.0 - 19.9 20.0 - 24.9
< 11.0 11.0 - 21.9 22.0 - 27.9
< 13.0 13.0 - 24.9 25.0 - 29.9
42
>
_
_
>
_
_
>
_
_
>
_
_
>
_
_
>
39.0
40.0
42.0
25.0
28.0
30.0
Page 43

Body Fat Ratio & Visceral Fat Level
Let’s look at an example
Visceral fat area (0 - Approx. 300 cm2,
1 inch=2.54 cm) distribution 30 levels.
Example level determined
0: 1 - 9 level
+: 10 - 30 level
* The data referenced by Omron
Healthcare.
VISCERAL FAT LEVEL/
VISCERAL FAT CLASSIFICATION
Example of display:
• Visceral Fat Level: 5
• Visceral Fat Classification: 0
What is Visceral Fat Level?
Visceral fat = fat surrounding internal organs
Too much visceral fat is thought to be closely linked to increased levels of fat
in the bloodstream, which can lead to common diseases such as
hyperlipidemia and diabetes, which impairs the ability of insulin to transfer
energy from the bloodstream and using it in cells. In order to prevent or
improve conditions of common diseases, it is important to try and reduce
visceral fat levels to an acceptable level. People with high visceral fat levels tend to have large
stomachs. However, this is not always the case and high visceral fat levels can lead to hidden
fat.
Visceral fat area (0 - Approx. 300 cm2,
1 inch=2.54 cm) distribution 30 levels.
Example level determined
0: 1 - 9 level
+: 10 - 30 level
* The data referenced by Omron Healthcare.
What is Subcutaneous fat?
Subcutaneous fat = fat below the skin
Subcutaneous fat not only accumulates around the stomach but also around
the upper arms, hips and thighs, and can cause a distortion of the body’s
proportions. Although not directly linked to increased risk of disease, it is
thought to increase pressure on the heart and other complications.
Subcutaneous fat is not displayed in this unit, but is included in the body fat percentage.
EN
43
Page 44

RESTING METABOLISM & SKELETAL MUSCLE
INCREASING SKELETAL MUSCLE THROUGH
EXERCISE
Skeletal muscle is muscle that is connected to bone and used to move parts of the body.
The maintenance and increase of this skeletal muscle is closely linked to resting metabolism.
This section describes resting metabolism and skeletal muscle.
What is Resting Metabolism?
Regardless of your activity level, a minimum level of energy is required to sustain the
body’s everyday functions. Resting metabolism, the amount of calories needed to supply
the body with the minimum level of energy, differs between individuals depending on
variables such as age, weight, body composition, and energy expenditure.
60-70% of daily energy use is for resting
Let’s look at an example
metabolism
The total amount of energy burned by the body
in a typical day is as follows.
RESTING METABOLISM
Example of display:
• Resting Metabolism: 1186 kcal
SKELETAL MUSCLE
PERCENTAGE
Resting metabolism
Daily activity metabolism
Diet-induced
thermogenesis
Energy required to
maintain vital functions.
Energy used for daily
activities such as
commuting to work,
household chores,
hobbies etc.
Energy emitted after
eating a meal.
The ratio of these is 60%-70% for resting
metabolism, 20%-30% for daily activity, and
10% for diet induced thermogenesis. This
means that resting metabolism accounts for
most of our daily energy consumption.
If our daily food intake exceed the amount of
energy required for these activities, the
additional energy is stored as fat.
Calories
Calories
Diet-induced thermogenesis
Daily activity metabolism
Example of display:
• Skeletal Muscle Percentage: 28.1%
44
Food
Resting metabolism
Page 45

Resting Metabolism & Skeletal Muscle
What is Skeletal Muscle?
Muscle is divided into two types, muscle in internal organs, such as the heart, and muscle
attached to bones that is used to move the body. Skeletal muscle can be increased
through exercise and other activity.
Resting metabolism reduces as we get older
Resting metabolism level peaks in the late teenage years and then gradually reduces over the
years. This leads to reductions in the body’s functions as we get older and in particular, it is one
of the main causes for muscle reduction as we get older.
Even when not being used to move parts of the body, muscles burn energy throughout the day
to generate heat for the body which is part of the resting metabolism. As the amount of muscle
decreases, so does the amount of energy burned. If people continue to eat the same amount of
food as when they are younger, then they develop an increasing abdominal circumference.
In order to avoid this, it is important to know your resting metabolism and maintain muscles
through exercise.
Skeletal Muscle Percentage (average value for all ages)
Average Female Approximately 28%*
Average Male Approximately 37%*
* According to Omron Healthcare figures.
45
EN
Page 46

Resting Metabolism & Skeletal Muscle
46
Page 47

Quick Reference Guide
Quick Reference Usage Guide
Use this as a quick reference guide only. If you are using this device for the first time,
please carefully read the full instruction manual.
1. Insert the batteries. (Refer to Section 2.)
Make sure that their polarity (+/–) is aligned with
the polarity (+/
compartment.
2. Set the date and time. (Refer to Section 3.)
3. Set a personal profile number. (Refer to Section 4.)
In order to measure body composition, personal data for age,
gender, and height, needs to be set.
–) indicated in the battery
Resting Metabolism & Skeletal Muscle
IF USING A PERSONAL PROFILE NUMBER...
Once you have stored the personal data, you do not need to
set the personal data each time you take a measurement.
Press the personal profile number button for future
measurements.
FOR GUEST USERS
For guest users, set the personal data with each
measurement. When using the Guest/Memory button, set the
personal data for every measurement.
4. Measure body composition. (Refer to Section 5.)
5. Check the measurement results.
(Refer to Section 5.)
To view the measurement results, press the Body Fat,
Resting Metabolism, Skeletal Muscle or BMI buttons.
EN
!
47
 Loading...