

Page 1
User's Guide
Shop online at
omega.com
email: Info@omega.com
For latest product manuals:
omegamanual.Info
FTB700-Series
Inline Turbine Meters
Page 2

Servicing North America:
U.S.A.: One Omega Drive, P.O. Box 4047
ISO 9001 Certified
Stamford, CT 06907-0047
TEL: (203) 359-1660 FAX: (203) 359-7700
e-mail: info@omega.com
Canada: 976 Bergar
Laval (Quebec) H7L 5A1, Canada
TEL: (514) 856-6928 FAX: (514) 856-6886
e-mail: info@omega.ca
For immediate technical or application assistance:
U.S.A. and Canada: Sales Service: 1-800-826-6342 / 1-800-TC-OMEGA
®
Customer Service: 1-800-622-2378 / 1-800-622-BEST
®
Engineering Service: 1-800-872-9436 / 1-800-USA-WHEN
®
TELEX: 996404 EASYLINK: 62968934 CABLE: OMEGA
Mexico: En Espan˜ol: (001) 203-359-7803 e-mail: espanol@omega.com
FAX: (001) 203-359-7807 info@omega.com.mx
Servicing Europe:
Benelux: Postbus 8034, 1180 LA Amstelveen, The Netherlands
TEL: +31 (0)20 3472121 FAX: +31 (0)20 6434643
Toll Free in Benelux: 0800 0993344
e-mail: sales@omegaeng.nl
Czech Republic: Frystatska 184, 733 01 Karviná, Czech Republic
TEL: +420 (0)59 6311899 FAX: +420 (0)59 6311114
Toll Free: 0800-1-66342 e-mail: info@omegashop.cz
France: 11, rue Jacques Cartier, 78280 Guyancourt, France
TEL: +33 (0)1 61 37 2900 FAX: +33 (0)1 30 57 5427
Toll Free in France: 0800 466 342
e-mail: sales@omega.fr
Germany/Austria: Daimlerstrasse 26, D-75392 Deckenpfronn, Germany
TEL: +49 (0)7056 9398-0 FAX: +49 (0)7056 9398-29
Toll Free in Germany: 0800 639 7678
e-mail: info@omega.de
United Kingdom: One Omega Drive, River Bend Technology Centre
ISO 9002 Certified
Northbank, Irlam, Manchester
M44 5BD United Kingdom
TEL: +44 (0)161 777 6611 FAX: +44 (0)161 777 6622
Toll Free in United Kingdom: 0800-488-488
e-mail: sales@omega.co.uk
OMEGAnet®Online Service Internet e-mail
omega.com i n f o @ o m e g a . c o m
It is the policy of OMEGA Engineering, Inc. to comply with all worldwide safety and EMC/EMI
regulations that apply. OMEGA is constantly pursuing certification of its products to the European New
Approach Directives. OMEGA will add the CE mark to every appropriate device upon certification.
The information contained in this document is believed to be correct, but OMEGA accepts no liability for any
errors it contains, and reserves the right to alter specifications without notice.
WARNING: These products are not designed for use in, and should not be used for, human applications.
Page 3

GENERAL INFORMATION and SPECIFICATIONS
GENERAL INFORMATION
This unique system of 2" to 8" turbine meters uses just one
moving part, a precision helical rotor. Rotation of the rotor
is electronically detected and processed. The high-quality
jewel bearings and polished zirconia ceramic shafts minimize
friction while providing long wear life in non-lubricating
fluids. The entire rotor assembly can be easily removed
for field service without removing the meter from the pipe.
FTB700-P bodies are fabricated from Schedule 80 PVC
fittings, and FTB700-C bodies from carbon steel tubing.
The FTB700-S meter (available as special order only) is
fabricated from stainless steel tubing, with a turbine insert
SPECIFICATIONS
Pipe Sizes
Materials Meter Body
Turbine Inser t
Rotor
Shafts
Bearings
Cable
Flanges
Maximum Pressure
Maximum Temperature
Accuracy
Flow Range (GPM)
Minimum
Maximum
2”, 3”, 4”, 6”
PVC Schedule 80 fittings
PVC (Polypro in 2” size)
Kynar (PVDF)
Zirconia ceramic
Sapphire journal, ruby endstone
#22 AWG 3-con, 18’; 2000’ max
Optional (See Dimensions)
150 psi @ 75˚ F
(10 bar @ 24˚ C)
120˚ F (50˚ C)
+/- 1% of full scale
2” 3” 4” 6”
2 3 6 12
150 400 600 1200
FTB700-P FTB700-C
of single piece casting stainless. Turbine rotors on all models
are Kynar (PVDF).
FTB700-Series meters can be or dered with various
output options. The basic model (FTB700) comes with
pulse output only. An electronics module FTB700-D can
be mounted to display flow rate and total (resettable or
non-resettable), and provide a programmable pulse or
4-20 mA output. The FTB700-T is a blind 4-20 mA transmitter.
All of these controls/displays can be mounted on the meter
or remotely mounted on a wall or panel up to 2,000 feet away.
FTB700-S‡
2”, 3”, 4”, 6”, 8”
Painted carbon steel
CF8M cast stainless
Kynar (PVDF)
Zirconia ceramic
Sapphire journal, ruby endstone
#22 AWG 3-con, 18’; 2000’ max
150 lb. drilling (3-8” only)
200 psi (14 bar)
200˚ F (93˚ C)
+/- 1% of full scale
2” 3” 4” 6” 8”
2 3 6 12 30
150 400 600 1200 3000
2”, 3”, 4”, 6”, 8”
304 Stainless steel (316 SS optional)
CF8M cast stainless
Kynar (PVDF)
Zirconia ceramic
Sapphire journal, ruby endstone
#22 AWG 3-con, 18’; 2000’ max
150 lb. drilling (3-8” only)
200 psi (14 bar)
200˚ F (93˚ C)
+/- 1% of full scale
2” 3” 4” 6” 8”
2 3 6 12 30
150 400 600 1200 3000
‡Special Order-Consult Omega
Electronic Options Specifications
FTB700 (Pulse Output Only)
Power 6-24 Vdc
Pulse Output 0-75 pulse/second current sinking
FTB700-T (Blind 4-20 Transmitter)
Power 24 - 36 Vdc (isolated)
Analog Output 4-20 mA loop
Response Time 2-60 seconds, 90% of full scale
(depends on input averaging)
FTB700-D (Powered Rate/Totalizer with Pulse or Analog Output)
Power 12-32 Vdc (for 4 mA DC min);
24-32 Vdc (for accuracy of 4-20 mA loop)
Rate 6-digit autorange
Total 8-digit
Memory Non-volatile (no battery needed)
Pulse Output 0.1 second open collector (scaled);
0-75 pulse/second passthrough
(unscaled); High alarm or low alarm
Analog Output 4-20 mA loop (24-32 Vdc required)
Page 4
INSTALLATION, CONNECTIONS, MAINTENANCE and REPAIR
10X Dia. 5X Dia.
Straight coupling can
be part of length
FLOW
WTP
A
A
Optional
Flanges
B
A
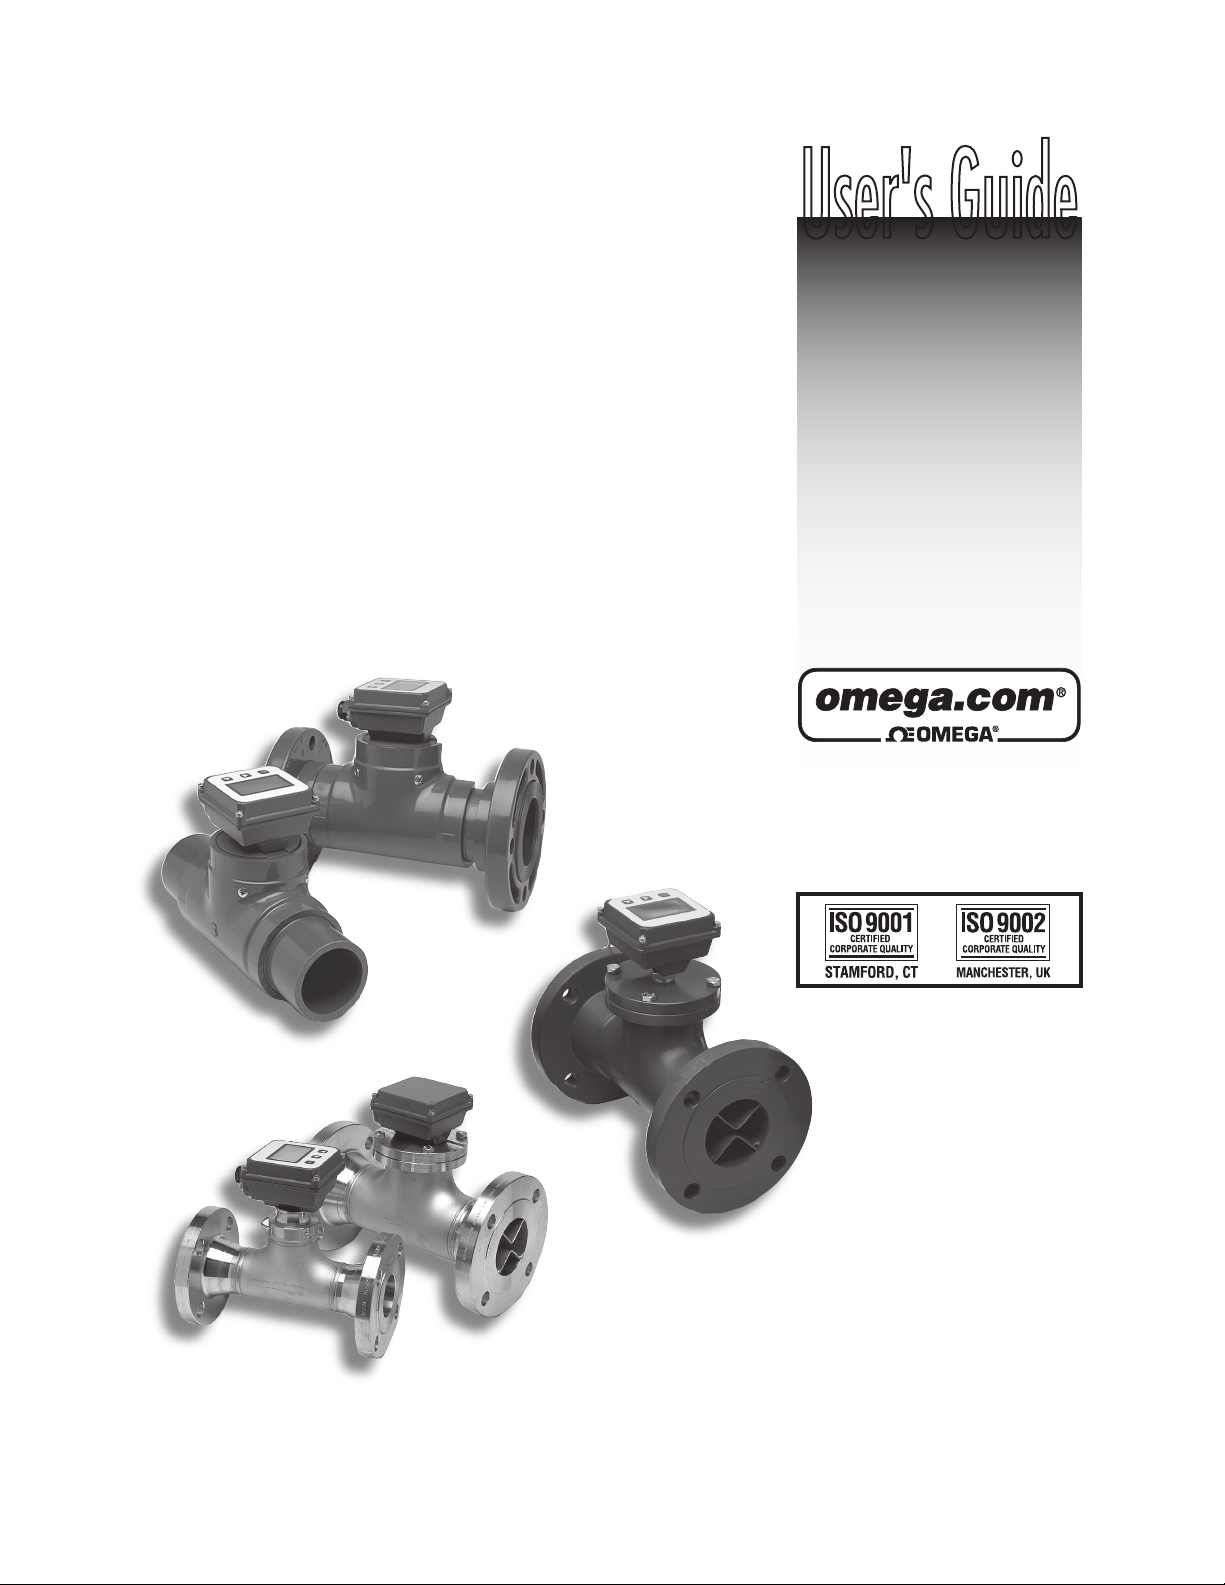
INSTALLATION
CAUTION: These water meters are not
recommended for installation downstream
of the boiler feedwater pump where installation fault may expose the meter to boiler
pressure and temperature. Maximum rec-
ommended temperature is 120˚ (PVC) or 200˚ (Metal).
Piping Conditions. Installing the meter with 10 diameters
of straight pipe upstream and 5 downstream is recommended.
FTB700-P
Flanges. For 3-8” FTB700-C and -S meters, standard
flanges are 150 lb. ANSI drilling. 2” FTB700-C or -S meters
and all FTB700-P meters can be installed with optional
flanges according to pipe manufacturer’s recommendations.
For FTB700-P a bolt torque of 10-20 ft-lbs. for 2” flanges,
20-30 ft-lbs. for 3” and 4” flanges, and 35-50 ft-lbs. for 6”
flanges is recommended.
Either partial or full-face gaskets can be used. Tighten the
bolts evenly. Use care to prevent a misaligned gasket from
entering the flow stream.
Position. The FTB700-Series are all-position meters, operable in a ver tical or horizontal position, with the meter insert
in any radial position. A horizontal position is preferred if
there is a risk of air becoming trapped due to constant low
flows. Operating the meter in partially-filled pipe will result
in inaccuracies.
CONNECTIONS
See Connection Diagrams and Operating Instructions for
FTB700-D (rate/total display) or FTB700-T (blind analog
transmitter) on following pages.
FTB700-C and -S Meters
2"
Size Dim A
3"- 8"
2" * 8"/‡10"
3" 12"
4" 14"
6" 18"
8" 20"
*Without flange
‡With flange
FTB700-P Meter
Size A B
2” 10" 7.5"
3" 12" 6.5"
4" 14" 7.0"
6" 18" 8.5"
MAINTENANCE and REPAIR
Recalibration. If it is necessary to recalibrate the meter
for any reason, please contact Omega.
Turbine Insert Removal and Installation. First remove all
pressure from the line. Then remove the screws that hold
the insert in place (or the U-clip in the 2” meters) and tug
gently until the insert comes free. A twisting motion can
help to loosen the O-ring seal. Reverse the procedure to
reinstall, after coating the O-ring with a plastics-compatible
lubricant. Do not over tighten the screws. Snug tightening
with a hand screwdriver is sufficient.
Rotor and Shaft Replacement. Examine the rotor to determine if bearings or shaft are damaged or excessively worn.
The rotor should spin smoothly and freely, with no visible
wobble. Back and forth play should be very minor, less than
1/64”. If it is necessary to replace the rotor or shafts, first
back out both shafts with a small blade screwdriver. The
rotor will come free as soon as the shaft ends come free
of the rotor bearings. Reverse the procedure to reinstall.
Note: Do not over tighten the shaft screws. Check to be
sure that a small amount of free play between the shaft
ends and the bearings remains.
Sensor Replacement. This is rarely necessary. However,
certain electrical conditions can damage the sensor. To
replace it, first remove the electronics module. Disconnect
the sensor leads from the electronics module terminals and
remove the threaded plug over the sensor. Finally, remove
the sensor by pulling on the sensor leads. A gentle tug
should be sufficient. Reverse the process to replace the
sensor.
Page 5
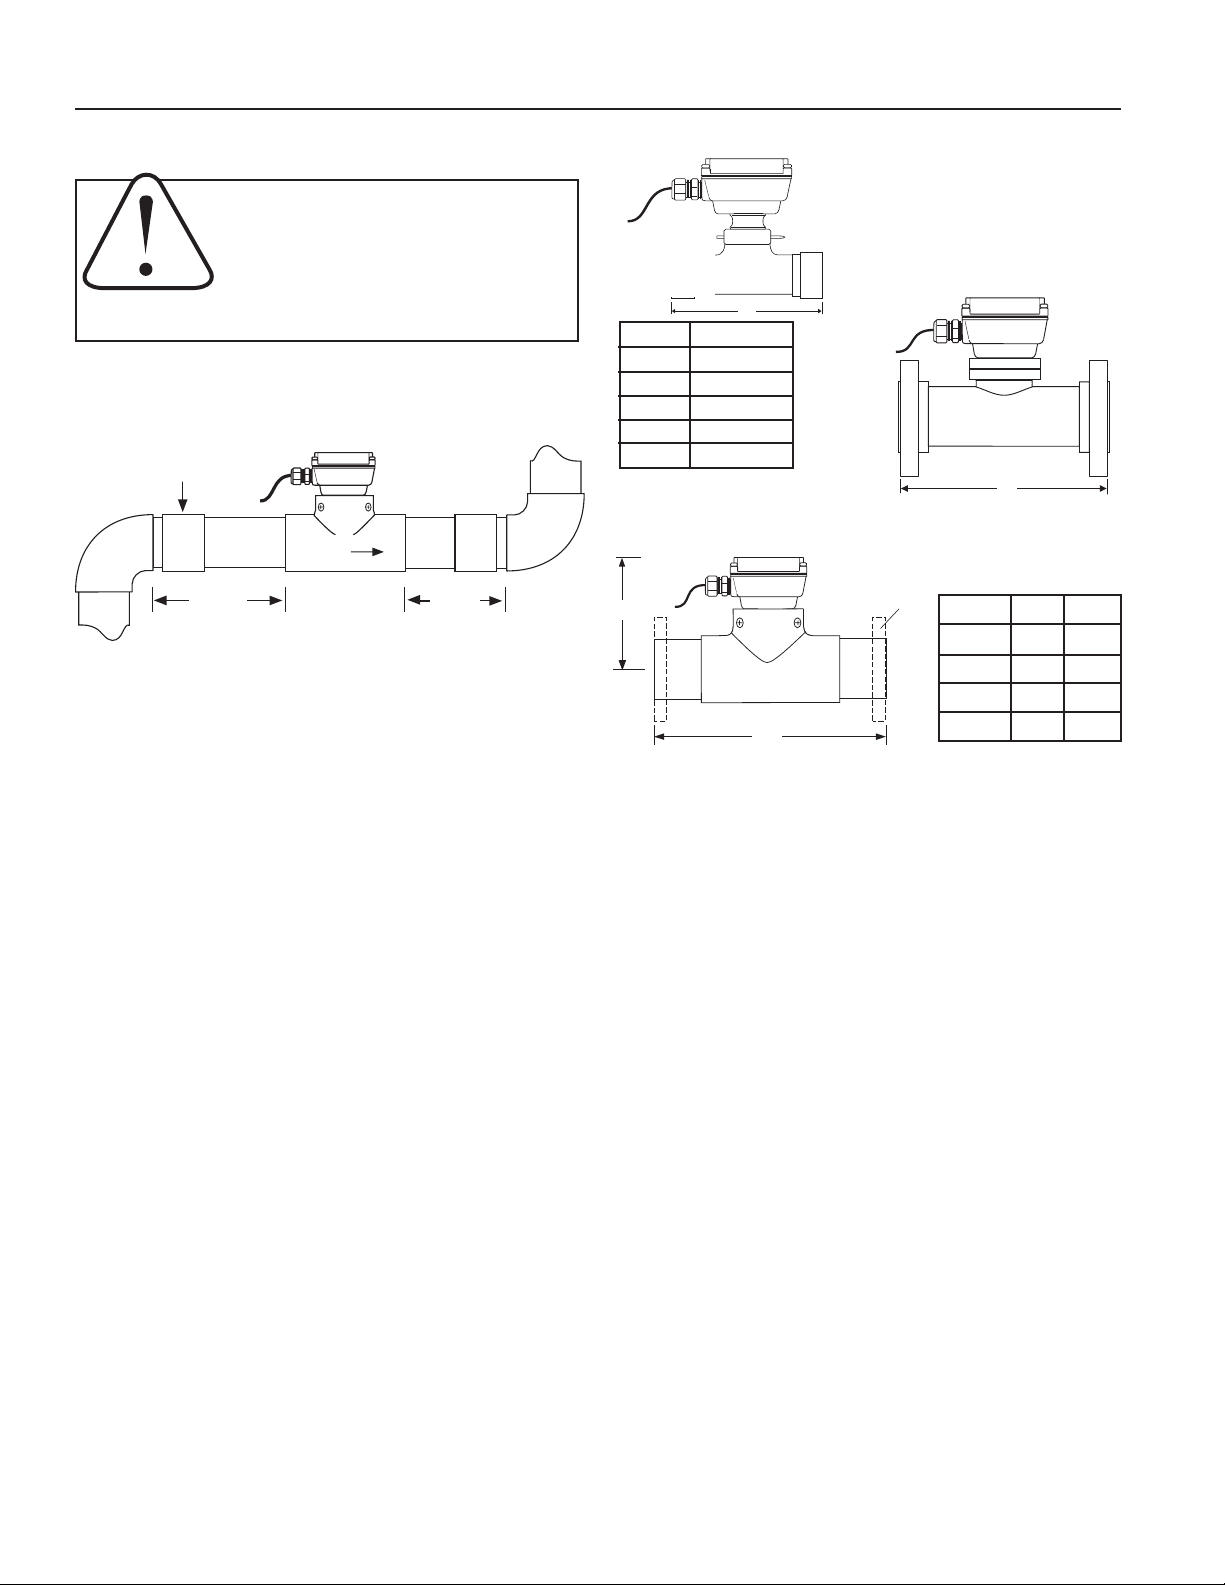
REPLACEMENT PARTS
8
10
11a
12
13
14
1
65
2
7
3
4
9
FLOW
15
11b
11c
WTC/WTS
WTP
12
WTP
11
10
13
12
9
2
1
4
3
7
8
14
65
15
WTC/WTS
WTP
2” METERS
1-6 Housing see 3 - 8”
7 Strain relief 07655
8 Square housing adapter Not Available
9 Pickup retaining screw 25321
10 Pickup 26310
11 O-ring, EPDM 25081
12 Insert Contact Factory
13 Shaft assembly, ceramic (2 req) 16710
Rotor (PVDF)/bearing assembly
Rotor repair kit (1-1/2”, 2” PVDF)
15 U-clip, stainless 15527
2594714
Electronics Module Repair.
Non e o f the elec troni cs
modules have replaceable
components. Printed circuit
boards must be replaced as
complete units. In order to
replace an entire electronics module, loosen the four
retaining screws and the unit
will lift free from the inser t
housing.
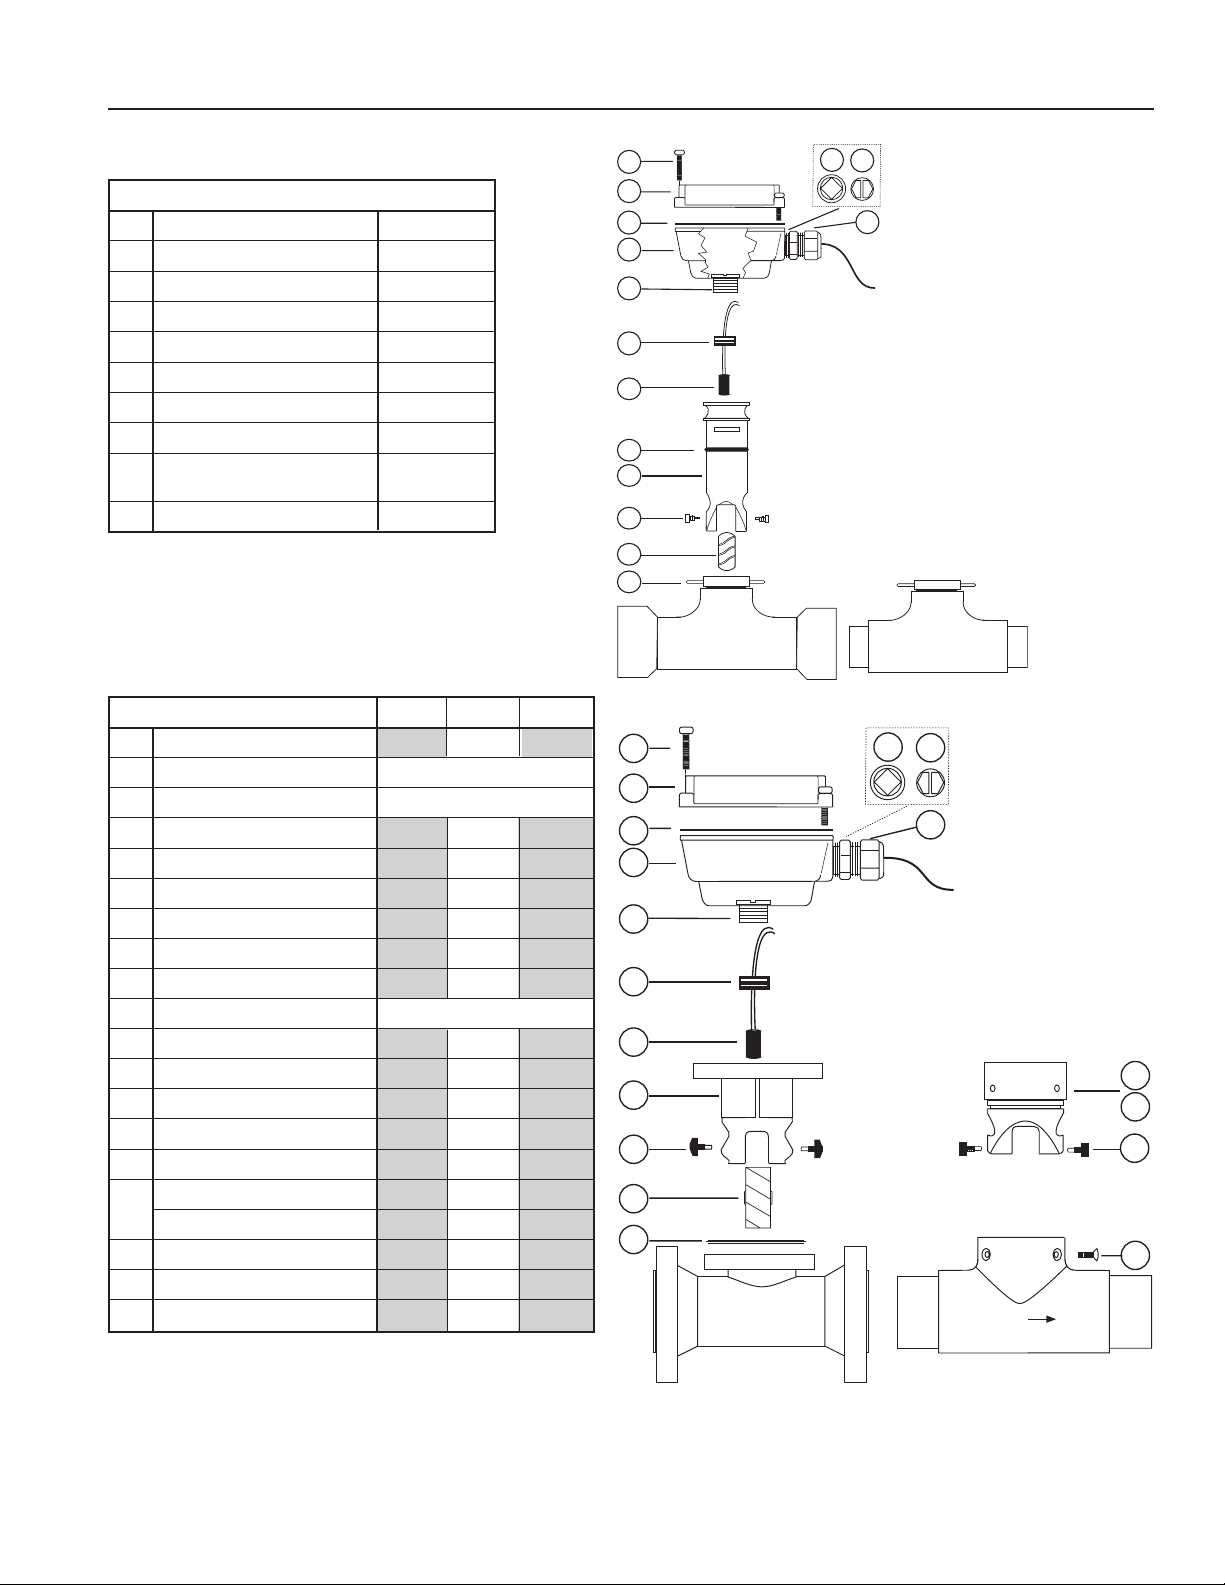
3” - 8” METERS FTB700 -C -P -S
1 Upper blind housing assembly 30475 30475 30475
1 Powered rate/totalizer FTB700-D
1 Blind 4-20 mA transmitter FTB700-T
2 Lower housing gasket 26211 26211 26211
3 Lower housing 29930 29930 29930
4
Upper housing screw assembly (4 req)
26229 26229 26229
5 Plug, steel 26073 26073 26073
6 Water seal assembly 26079 26079 26079
7 Strain relief 07655 07655 07655
8 Square housing adapter Part Not Replaceable
9 Pickup retaining screw 25321 25321 25321
10 Pickup 26310 26310 26310
11a Insert, 3”-8” WTC and WTS 26464 N/A 26464
11b Insert, 3” PVC N/A 26461 N/A
11c Insert, 4”-6” PVC N/A 26462 N/A
Shaft assembly, ceramic (2 req) 16710 16710 16710
12
Shaft assembly, carbide (2 req) 30473 30473 30473
13 Rotor (PVDF) /bearing assembly 15316 25962 15316
14 O-ring, EPDM 25105 16426 25105
15 Insert screw (4 req’d) N/A 07689 N/A
FTB700-C and -S
FTB700-PFTB700-C and -S
FTB700-P
FTB700-P
Page 6

FTB700-D FLOW COMPUTER
INSTRUCTIONS
GENERAL INFORMATION
The FTB700-D is a loop-powered microcontroller-based
transmitter/indicator. It displays rate and total, and
provides a 4-20 mA analog signal proportional to flow. A
programmable pulse output, high flow or low flow alarm
are also standard for metering pump control or data
logging.
The rugged cast-aluminum housing is gasketed for maximum environmental protection, and the electronics are
potted into a solid block of urethane. A membrane keypad allows settings to be changed without removing the
cover. The wall mount version comes with brackets for
mounting.
FEATURES
SPECIFICATIONS
Power
Display Rate
Total
Output Pulse
Analog
Pulse Output Range
Input
Input Range
K-Factor Range
Flow Alarm Output Range
Temperature
Environmental
12-32 Vdc (for 4 mA DC min)
24-32 Vdc (for accuracy of 4-20 mA loop)
6-digit autorange, 1/2" character height
8-digit, 5/16" character height
0.1 second open collector pulse (scaled);
0-75 pulse/sec passthrough (unscaled);
High alarm or low alarm
4-20 mA loop (requires 24-32 Vdc)
0.1 - 9999999.9 units/pulse
Open collector/switch @ 5 Vdc
1.0 - 1,500 pulses/second
.001 - 99999.999
.01 - 999999.99
0˚ C - 70˚ C (32˚ - 158˚ F)
NEMA 4X
Cover Screws
Electronics Module
Display
Setting Keys
Wall-Mount Brackets
Lower Housing
Strain Relief
Page 7

FTB700-D INSTALLATION and SETTINGS
2.78"
SET
3.93"
4.52"
3.93"
2.06"
2341678.9
10.5
Wall Mounting. To mount the FTB700-D on a wall, hold the
unit in the desired position, mark the holes in the mounting
feet, drill, and mount with screws.
CONNECTIONS
See Connections Diagram for FTB700-D, next page.
Caution: If output is being used to
control an external device, such as a
metering pump, do not connect the device until programming is completed. If
malfunction or incorrect programming of
the output could cause personal injury
or property damage, separate safeguards must be
installed to prevent such injury or damage.
K-FACTOR
At a minimum, every FTB700-D flow computer must be
programmed with the “K-factor”. (This is the number of
pulses that the meter produces per gallon of flow.) If you
wish the to read in units other than gallons, see below.
SETTINGS
Set K. Begin by pressing the SET key once. The prompt SET
K should appear on the display. The digit to the far right will
be blinking. Use the up arrow key to reach your desired value.
Then press the left arrow key to move to the next digit. Repeat
the process until the entire number is entered. (Note that the
decimal is fixed at three places. If you only have two decimal
places for your K-factor, enter a zero for the third digit.) Press
SET to advance.
Set P/Flow Alarm. At this screen you may select between
pulse output (P) or flow alarm (A) functions. If the pulse output
and flow alarm features are not being used, this step can be
skipped. The P (pulse output) setting does not affect anything
if it is not being used.
Set P is the default that appears on a new FTB700-D. On a unit
that has been previously set up with flow alarm function, an A
will appear on this screen. To move between P and A screens,
firmly press all three keys for 5-10 seconds, then use the up
arrow to scroll through the three options: P, AL HI (high flow
alarm) and AL LO (low flow alarm).
Set P. From this screen, follow the same process as for Set
K to enter the desired pulse rate. This is the number of gallons (or whatever units are programmed) between pulses.
(Note: Using the pulse output function disables the high and
low flow alarm functions.)
Set Flow Alarm. From the A screen, use the up arrow key
to choose either AL HI or AL LO and then press the SET key
to set the alarm rate. Use the up arrow and left arrow as
above to reach the desired digits. (Note: Using the flow alarm
function disables the pulse output function.)
The K-factor can be found on the model-serial label. The
line reading K = xxxx gives the desired number.
READING IN OTHER UNITS
Changing Volume Units. The default K-factor units are
pulses per gallon. To read your total in metric or other
units instead, the standard K-factor must be converted
to the desired volume units. For example, to read in
pulses per liter, the K-factor must be multiplied by the
applicable number shown below.
NOTE: Both rate & total will read in whatever units you choose.
To Convert K to: Multiply by:
Liters .26418
Cubic Meters 264.18
Fluid Ounces .0078
Cubic Feet 7.48
Changing Time Units: To read your rate in liters per second (for example), convert the K-factor volume units as
shown above and change the time units to Seconds,
using the Set Time Unit instructions at right.
Set 20 mA. Press the SET key to advance to SET 20, to set
the flow rate, in volume units per time unit, at which 20 mA
is desired. Use the up arrow key to reach your desired value.
Then press the left arrow key to move to the next digit. Repeat
the process until the entire number is entered. The processor
will automatically scale the 4-20 mA loop accordingly, with 4
mA at zero flow.
Set Decimal Point. Press the SET key again for the D prompt.
Pressing the up arrow key switches among no decimal place,
one decimal place and two decimal places.
Set Time Unit. When the SET key is pressed again,
a blinking time unit appears. Press the up arrow key
to select SEC (seconds), MIN (minutes), HR (hours) or
DAY (days) (for example, gal/min, or gal/hr).
To return to normal operation after entering settings, press
SET again. When the unit is connected to an operating flow
sensor, the rate (larger digits) and total (smaller digits) indicator numbers should appear in the display.
Page 8

FTB700-D CONNECTIONS and OPERATION
SET
SEC
MIN
HR
DAY
To Other
Control
Pulse Responsive
Metering Pump
PULSE
SCALED
PULSE
PASSTHRU
-
+
-
+
24-32 Vdc
Loop Power,
4-20 mA Output
POWER
4-20 mA
Red
White
Black
SENSOR
INPUT
Optional Chart
Recorder or Other
4-20 mA Device
FTB700-D CONNECTION DIAGRAM
FTB700-Series
FTB700-D
If the 4-20 mA current signal is not required, connect the power terminals to any 12-32 Vdc current source.
FTB700-D OPERATION
Resettable/Non-Resettable Totalizer. Unless the unit has
been ordered with the non-reset option, a RESET prompt is
visible in the lower right corner above the up arrow key, when
the display is in use. Press the up arrow key at any time to
reset the totalizer to zero.
1234.1
123456.7
RESET
This key resets total to zero
when in normal run mode.
CAUTION: Do
not touch Up
Arrow button
unl e s s y o u
intend to RE-
SET Total to Zero. TOTAL
IS NOT RECOVERABLE.
Indicates resettable totalizer
Operation of 4-20 mA Output. If the 4-20 mA output is in use
and is correctly connected, the signal should vary between 4
mA and 20 mA in proportion to the flow, with the top flow rate
set by the user. At no time should the signal drop below 4
mA. A reading between 0 and 4 mA indicates a fault of some
type, typically in the loop power supply or the connections (see
Troubleshooting). In the rare instance that the 4-20 signal
fluctuates excessively (“paints”) it may need to be damped
by additional averaging. Contact Omega for information on
how to increase filtering.
Operation of the Pulse Output. If the pulse output is being
used, it should pulse for 0.1 second every time the set number of gallons has been totalized. If a pulse-responsive metering pump is properly connected to this output, it should stroke
periodically. If this does not occur, see Troubleshooting.
Page 9

FTB700-D TROUBLESHOOTING
Problem
Display blank No power to the unit Check for minimum 12 Vdc at power
terminals
Short in sensor circuit Disconnect sensor, see if display returns
(zero flow rate)
Display missing segments Damaged display module Contact Omega for return/replacement
Display reading meaningless Unit’s microcontroller crashed Disconnect and reconnect power. If problem
characters repeats, contact Omega for return/replacement
Display reads normally, Wrong K-factor or time base entered Enter correct K-factor from meter
Display reads normally, Wrong pulse output setting Use “Set P” to correct pulse output setting
incorrect pulse output
Polarity reversed on pulse output terminals Reverse leads
Display reads normally, but Wrong 20 mA setting Use “Set 20” to correct target top flow rate
no (or incorrect) 4-20 mA
output
Inadequate loop power supply voltage Check voltage (For 4-20 mA applications,
24-32 Vdc recommended)
Probable Cause Try...
Polarity incorrect in 4-20 mA loop circuit Compare to Connections diagram
Display reads zero when Flow sensor failed Consult Omega
there is flow
Break in flow sensor circuit Check for continuity with multimeter
Display reads flow rate when Long flow sensor wire, running parallel to Reroute wire or change to shielded wire
there is none power wires
Flow sensor malfunction Consult Omega
Flow “jitter” (oscillating slosh) reads as flow Consult Omega for “anti-jitter” setting
Page 10

FTB700-T BLIND ANALOG TRANSMITTER
Loop
Power
(Vdc)
Load Resistance (Ohms)
700 900 1100 1300
Load vs. Supply Voltage
Operat i n g
Region
36
34
32
30
28
26
24
1500
INSTRUCTIONS
GENERAL INFORMATION
The Omega FTB700-T is a blind (non-indicating) 4-20 mA
transmitter. It accepts a pulse frequency input from the flow
sensor, and conver ts this input into a continuous analog
output signal. Power for the transmitter is taken from the
current loop itself, so only two wires are required. The digital
design makes it possible to span the unit in the field without
tools. The frequency at which 20 mA is desired is entered on
a set of rotary switches, and an internal microcontroller automatically scales all other values accordingly. An additional
benefit of the microcontroller is its ability to average inputs,
for smoothing of the output signal. The degree of averaging
can be selected in the field, from 2 to 16 seconds.
For maximum environmental protection, the electronic components are encased in a special semi-flexible urethane
potting material. The housing is cast from aluminum and
fuse-coated. The clamshell housing is provided with mounting feet for remote mounting.
The FTB700-T will operate on a relatively wide range of current loop voltages, 24 to 36 Vdc. Lower voltages limit the
load that can be applied to the loop without distortion of the
signal. (See Load/Supply chart below if there is a question
regarding voltage vs. load.) A built-in power regulator supplies the appropriate power to the flow sensor.
SPECIFICATIONS
Power
Temperature
Input
Input Averaging
Response Time
Frequency Minimum
Maximum
Setting
Output
24 - 36 Vdc
32˚ - 130˚ F (0˚ - 55˚ C)
Open-collector solid state
2 - 16 seconds (switch selectable)
2-60 seconds; 90% of full scale
(dependent on input averaging)
10 Hz (@20 mA)
999.9 Hz
4 Rotary DIP switches
Proportional 4-20 mA
Typical applications for this transmitter are telemetr y (or
SCADA), distributed control systems, programmable controllers, data logging, and chart recording.
FEATURES
Fusion coated cast aluminum housing
Easy to use rotary switches for
frequency setting
Potted for moisture protection
Loop power indicator light
4-20 mA adjustment switches
Averaging time switches
Page 11

FTB700-T INSTALLATION and SETTINGS
0
9
8
7
6
5
4
3
2
1
0
9
8
7
6
5
4
3
2
1
0
9
8
7
6
5
4
3
2
1
0
9
8
7
6
5
4
3
2
1
Power
Sensor
4-20 mA
AO55
Frequency
2.78"
3.93"
3.93"
2.57"
1/2"
2.06"
4.52"
3.93"
3.93"
INSTALLATION
Wall Mounting. The FTB700-T comes with mounting
feet and requires four screws to attach it to any stable
surface.
Connection. The upper por tion of the housing must be
removed to make connections. Use a standard hex wrench
(5/32” or 4 mm) to loosen the screws, then remove the
upper half. The connections are made to terminal blocks
in the upper half, which contains the potted electronics.
The terminal blocks are removable and can be unplugged
and plugged back in for convenience.
Consult the FTB700-T Connections Diagram before
connecting to the current loop and flow sensor. Be careful
to follow the color coding of the flow sensor wires in order
to establish the correct polarity. Incorrect polarity can
damage the sensor.
Caution: If output is being used to
control an external device, such as a
metering pump, do not connect the device until programming is completed. If
malfunction or incorrect programming of
the output could cause personal injury
or property damage, separate safeguards must be
installed to prevent such injury or damage.
SETTINGS
Setting Frequency. The FTB700-T converts a train of off/on
pulses from the flow sensor into a continuous milliAmp signal
that ranges from 4 mA at zero flow to 20 mA at the desired
maximum flow. The desired maximum is determined by the
user and entered as a frequency as follows:
1)
Decide what flow rate should represent the top of the
scale. This is ordinarily the maximum expected flow,
or a value just above it, in gallons per minute.
2)
Locate the K-factor of the flow sensor (found on
the Serial Number label on your meter). K-factor is
the number of pulses the flow sensor produces per
gallon of flow.
3)
Calculate frequency, using this formula:
K-Factor x Top Flow (GPM) = Frequency
60
4)
Enter the frequency using the four rotary Frequency
switches. Note the decimal point between the third
and fourth switches.
SETTING FREQUENCY EXAMPLE
In an installation with an estimated maximun flow rate
1)
of about 150 GPM, a flow rate of 170 GPM is selected
as the full-scale maximum, the flow at which the current
loop will register 20 mA.
In this example, "K = 54.50". (In your actual ap-
2)
plication, look for the K-factor on the Serial Number
label on your meter.)
Calculate the frequency as
3)
54.50 x 170
60
4)
Rounding to one decimal point, enter 154.4 on the
= 154.42
rotary switches by turning the rotary switch pointer
to the desired digit.
1 5 4
.
4
Page 12

0
9
8
7
6
5
4
3
2
1
0
9
8
7
6
5
4
3
2
1
0
9
8
7
6
5
4
3
2
1
0
9
8
7
6
5
4
3
2
1
AO55
Frequency
Power
Sensor
4-20 mA
UP
DOWN
L R
0
9
8
7
6
5
4
3
2
1
0
9
8
7
6
5
4
3
2
1
0
9
8
7
6
5
4
3
2
1
0
9
8
7
6
5
4
3
2
1
AO55
Frequency
Power
Sensor
4-20 mA
4mA Adjust
Force 4 mA
Force 20 mA
20 mA Adjust
S
FTB700-T SETTINGS and CONNECTIONS
0
9
8
7
6
5
4
3
2
1
0
9
8
7
6
5
4
3
2
1
0
9
8
7
6
5
4
3
2
1
0
9
8
7
6
5
4
3
2
1
Frequency
Power
Sensor
4-20 mA
-
+
4-20 mA Device
(e.g. Pump, PLC,
Chart Recorder)
24-36 Vdc
Power Supply
(may be
included in
control unit)
Red
White
Black
-
+
-
+
S
FTB700-Series
FTB700-T
4mA Adjust
Force 4 mA
Force 20 mA
20 mA Adjust
Setting Averaging Time. For most applications, this
step can be ignored, as the standard setting will work
fine. However, when a particularly steady output signal is
desired, or in large pipe, a larger averaging period may be
desirable. Note however that the averaging period requires
a tradeoff, since a longer averaging period implies a slower
response time. If steady signal is more impor tant than
fast response, increase the averaging time as desired.
See the diagram below for the switch positions and their
corresponding times.
Switch Position
Seconds L R
2 down down
4 down up
8 up down
16 up up
Checking Calibration
Normally it should not be necessar y to check calibration,
since the digital design of this unit virtually eliminates drift.
However, there are two types of calibration check that can
be performed. Look at the diagram below to locate the 4
and 20 mA force switches. To force the 4 mA output, put its
switch in the up position. Check the current output at the
Power terminals, and if necessary trim to 4.00 mA using the
appropriate trimpot. Return the switch to the down position,
and repeat the process with the 20 mA switch.
FTB700-T CONNECTION DIAGRAM
Page 13

FTB700-T TROUBLESHOOTING
Problem
No analog signal at
reading device
Output stuck at 4 mA
mA signal does not
match flow rate
Probable Cause Try...
Break in current loop
Dead power supply
Reversed polarity
No frequency input from flow sensor
Inadequate voltage
Wrong frequency setting
Check if loop indicator light is on
Check multimeter voltage on power supply
Check polarity
Check flow sensor connections
Check flow sensor polarity
Be sure terminal blocks are firmly plugged in
With flow sensor disconnected, use short wire
to repeatedly short between sensor “S” and
“-” terminals. Output should rise.
Check Load vs. Supply chart
Review setting procedure
Check multimeter voltage on power supply
Page 14

NOTES
Page 15

WARRANTY/DISCLAIMER
OMEGA ENGINEERING, INC. warrants this unit to be free of defects in materials and workmanship for a
period of 13 months f rom date of purchase. OMEGA’s WARRANTY adds an additional one (1) month
grace period to the normal one (1) year product warranty to cover handling and shipping time. This
ensures that OMEGA’s customers receive maximum coverage on each product.
If the unit malfunctions, it must be re t u rned to the factory for evaluation. O M E G A’s Customer Serv i c e
D e p a rtment will issue an Authorized Return (AR) number immediately upon phone or written re q u e s t .
Upon examination by OMEGA, if the unit is found to be defective, it will be re p a i red or replaced at no
c h a rge. O M E G A’s WARRANTY does not apply to defects resulting from any action of the purc h a s e r,
including but not limited to mishandling, improper interfacing, operation outside of design limits,
i m p roper re p a i r, or unauthorized modification. This WARRANTY is VOID if the unit shows evidence of
having been tampered with or shows evidence of having been damaged as a result of excessive corro s i o n ;
or current, heat, moisture or vibration; improper specification; misapplication; misuse or other operating
conditions outside of OMEGA’s c o n t rol. Components in which wear is not warranted, include but are not
limited to contact points, fuses, and triacs.
OMEGA is pl eased to offer suggestions on the use of its various products. However,
OMEGA neither assumes responsibility for any omissions or errors nor assumes liability for any
damages that result from the use of its products in accordance with information provided by
OMEGA, either verbal or written. OMEGA warrants only that the parts manufactured by the
company will be as specified and free of defects. OMEGA MAKES NO OTHER WARRANTIES OR
R E P R E S E N TATIONS OF ANY KIND WHATSOEVER, EXPRESSED OR IMPLIED, EXCEPT THAT OF
TITLE, AND ALL IMPLIED WARRANTIES INCLUDING ANY WARRANTY OF MERCHANTA B I L I T Y
AND FITNESS FOR A PA RTICULAR PURPOSE ARE HEREBY DISCLAIMED. LIMITATION OF
L I A B I L I T Y: The remedies of purchaser set forth herein are exclusive, and the total liability of
OMEGA with respect to this ord e r, whether based on contract, warr a n t y, negligence,
indemnification, strict liability or otherwise, shall not exceed the purchase price of the
compone nt upon which liabi lity is bas ed. In no event sh all OM EGA be li able for
consequential, incidental or special damages.
CONDITIONS: Equipment sold by OMEGA is not intended to be used, nor shall it be used: (1) as a “Basic
Component” under 10 CFR 21 (NRC), used in or with any nuclear installation or activity; or (2) in medical
applications or used on humans. Should any Product(s) be used in or with any nuclear installation or
a c t i v i t y, medical application, used on humans, or misused in any way, OMEGA assumes no re s p o n s i b i l i t y
as set forth in our basic WA R R A N TY/ DISCLAIMER language, and, additionally, purchaser will indemnify
OMEGA and hold OMEGA h a rmless from any liability or damage whatsoever arising out of the use of the
P roduct(s) in such a manner.
RETURN REQUESTS/INQUIRIES
Direct all warranty and repair requests/inquiries to the OMEGA Customer Service Department. BEFORE
RETURNING ANY PRODUCT(S) TO OMEGA, PURCHASER MUST OBTAIN AN AUTHORIZED RETURN
(AR ) N U MBER F R OM OMEG A’S CUSTO MER SERVIC E D E PA RT M E NT (IN OR D ER TO AV O I D
PROCESSING DELAYS). The assigned AR number should then be marked on the outside of the return
package and on any correspondence.
The purchaser is responsible for shipping charges, freight, insurance and proper packaging to prevent
breakage in transit.
FOR WARRANTY RETURNS, please have the
following information available BEFORE
contacting OMEGA:
1 . P u rchase Order number under which the pro d u c t
was PURCHASED,
2. Model and serial number of the product under
warranty, and
3. Repair instructions and/or specific problems
relative to the product.
FOR NON-WARRANTY REPAIRS,
consult OMEGA
for current repair charges. Have the following
information available BEFORE contacting OMEGA:
1. Purchase Order number to cover the COST
of the repair,
2. Model and serial number of the product, and
3. Repair instructions and/or specific problems
relative to the product.
OMEGA’s policy is to make running changes, not model changes, whenever an improvement is possible. This affords
our customers the latest in technology and engineering.
OMEGA is a registered trademark of OMEGA ENGINEERING, INC.
© Copyright 2005 OMEGA ENGINEERING, INC. All rights reserved. This document may not be copied, photocopied,
reproduced, translated, or reduced to any electronic medium or machine-readable form, in whole or in part, without the
prior written consent of OMEGA ENGINEERING, INC.
Page 16

W h e re Do I Find Eve rything I Need for
P rocess Measurement and Control?
OME GA…Of Cours e !
Shop online at omega.com
T E M P E R AT U R E
Thermocouple, RTD & Thermistor Probes, Connectors, Panels & Assemblies
Wire: Thermocouple, RTD & Thermistor
Calibrators & Ice Point References
Recorders, Controllers & Process Monitors
Infrared Pyrometers
PRESSURE, STRAIN AND FO RC E
Transducers & Strain Gages
Load Cells & Pressure Gages
Displacement Transducers
Instrumentation & Accessories
F LOW / L E V E L
Rotameters, Gas Mass Flowmeters & Flow Computers
Air Velocity Indicators
Turbine/Paddlewheel Systems
Totalizers & Batch Controllers
p H / C O N D U C T I V I TY
pH Electrodes, Testers & Accessories
Benchtop/Laboratory Meters
Controllers, Calibrators, Simulators & Pumps
Industrial pH & Conductivity Equipment
DATA AC Q U I S I T I O N
Data Acquisition & Engineering Software
Communications-Based Acquisition Systems
Plug-in Cards for Apple, IBM & Compatibles
Datalogging Systems
Recorders, Printers & Plotters
H E AT E R S
Heating Cable
Cartridge & Strip Heaters
Immersion & Band Heaters
Flexible Heaters
Laboratory Heaters
E N V I RO N M E N TA L
M O N I TORING AND CONTRO L
Metering & Control Instrumentation
R e f r a c t o m e t e r s
Pumps & Tubing
Air, Soil & Water Monitors
Industrial Water & Wastewater Treatment
pH, Conductivity & Dissolved Oxygen Instruments
PL-OM-10618-C
11/12/07
M-1966/1207
 Loading...