omega.com
®
®
User’s Guide
http://www.omega.com
e-mail: info@omega.com
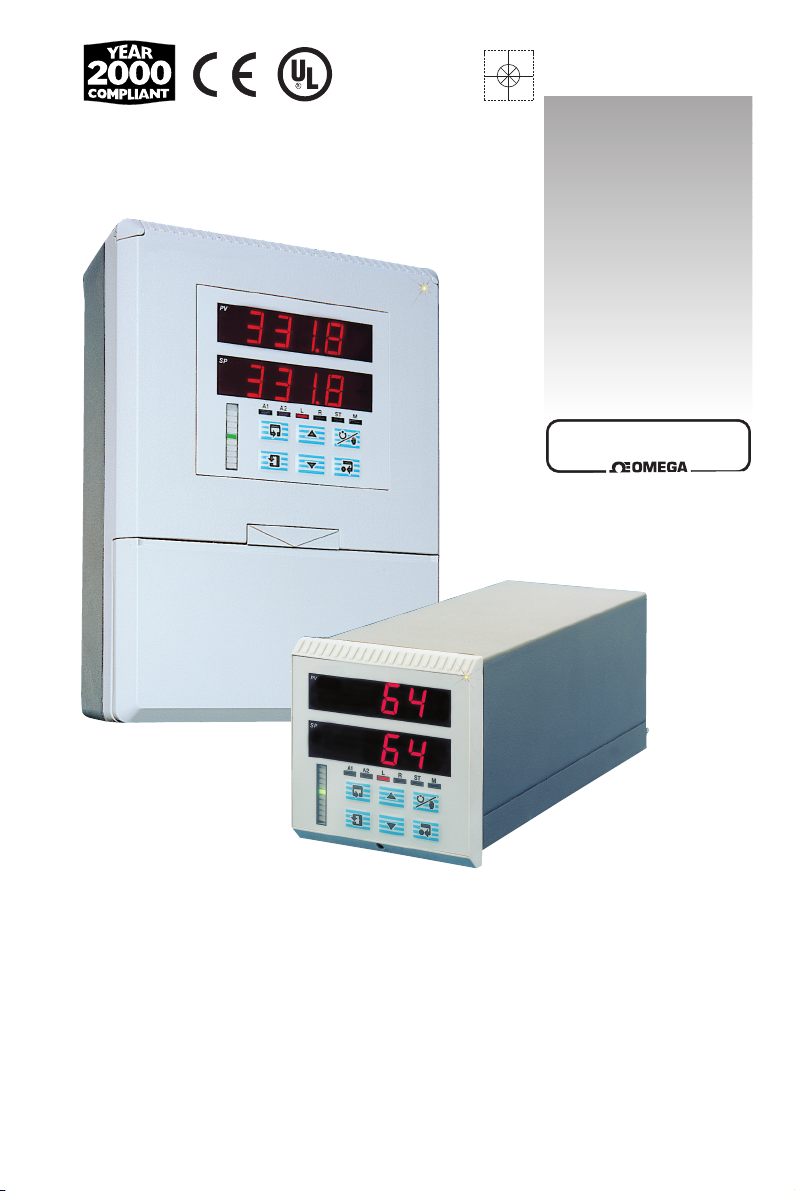
Universal Temperature & Process
CN3430 & CN3440 SERIES
Controllers
Operating Guide

WARRANTY/ DISCLAIMER
OMEGA ENGINEERING, INC. warrants this unit to be free of defects in materials and workmanship for a
period of 37 months from date of purchase. OMEGA Warranty adds an additional one (1) month
grace period to the normal three (3) year product warranty to cover handling and shipping time.
This ensures that OMEGA’s customers receive maximum coverage on each product.
If the unit malfunctions, it must be returned to the factory for evaluation. OMEGA’s
Customer Service Department will issue an Authorized Return (AR) number immediately upon phone
or written request. Upon examination by OMEGA, if the unit is found to be defective, it will be repaired
or replaced at no charge. OMEGA’s WARRANTY does not apply to defects resulting from any action of
the purchaser, including but not limited to mishandling, improper interfacing, operation outside of
design limits, improper repair, or unauthorized modification. This WARRANTY is VOID if the unit shows
evidence of having been tampered with or shows evidence of having been damaged as a result of
excessive corrosion; or current, heat, moisture or vibration; improper specification; misapplication;
misuse or other operating conditions outside of OMEGA’s control. Components which wear are not
warranted, including but not limited tocontact points, fuses, and triacs.
OMEGA is pleased to offer suggestions on the use of its various products. However,
OMEGA neither assumes responsibility for any omissions or errors nor assumes
liability for any damages that result from the use of its products in accordance with information
provided by OMEGA, either verbal or written. OMEGA warrants only that the parts
manufactured by it will be as specified and free of defects. OMEGA MAKES NO OTHER
WARRANTIES OR REPRESENTATIONS OF ANY KIND WHATSOEVER, EXPRESS OR IMPLIED,
EXCEPT THAT OF TITLE, AND ALL IMPLIED WARRANTIES INCLUDING ANY WARRANTY OF
MERCHANTABILITY AND FITNESS FOR A PARTICULAR PURPOSE ARE HEREBY DISCLAIMED.
LIMITATION OF LIABILITY: The remedies of purchaser set forth herein are exclusive, and the
total liability of OMEGA with respect to this order, whether based on contract, warranty,
negligence, indemnification, strict liability or otherwise, shall not exceed the purchase price of
the component upon which liability is based. In no event shall OMEGA be liable for
consequential, incidental or special damages.
CONDITIONS: Equipment sold by OMEGA is not intended to be used, nor shall it be used: (1) as a
“Basic Component” under 10 CFR 21 (NRC), used in or with any nuclear installation or activity; or (2) in
medical applications or used on humans. Should any Product(s) be used in or with any nuclear
installation or activity, medical application, used on humans, or misused in any way, OMEGA assumes
no responsibility as set forth in our basic WARRANTY/ DISCLAIMER language, and, additionally,
purchaser will indemnify OMEGA and hold OMEGA harmless from any liability or damage whatsoever
arising out of the use of the Product(s) in such a manner.
Direct all warranty and repair requests/inquiries to the OMEGA Customer Service Department.
RETURN REQUESTS / INQUIRIES
BEFORE RETURNING ANY PRODUCT(S) TO OMEGA, PURCHASER MUST OBTAIN AN AUTHORIZED
RETURN (AR) NUMBER FROM OMEGA’S CUSTOMER SERVICE DEPARTMENT (IN ORDER TO AVOID
PROCESSING DELAYS). The assigned AR number should then be marked on the outside of the
return package and on any correspondence.
The purchaser is responsible for shipping charges, freight, insurance and proper packaging to
prevent breakage in transit.
FOR WARRANTY
following information available BEFORE
contacting OMEGA:
1. Purchase Order number under which
the product was PURCHASED,
2. Model and serial number of the product under
warranty, and
3. Repair instructions and/or specific
problems relative to the product.
OMEGA’s policy is to make running changes, not model changes, whenever an improvement is possible.
This affords our customers the latest in technology and engineering.
OMEGA is a registered trademark of OMEGA ENGINEERING, INC.
© Copyright 1998 OMEGA ENGINEERING, INC. All rights reserved. This document may not be copied,
photocopied, reproduced, translated, or reduced to any electronic medium or machine-readable form, in
whole or in part, without the prior written consent of OMEGA ENGINEERING, INC.
RETURNS, please have the
FOR NON-WARRANTY REPAIRS,
OMEGA for current repair charges. Have the
following information available BEFORE
contacting OMEGA:
1. Purchase Order number to cover the COST of
the repair,
2. Model and serial number of the product, and
3. Repair instructions and/or specific problems
relative to the product.
consult

CONTENTS
Section Page
1 INTRODUCTION .................................. 2
2 SETTING UP ........................................ 3
2.1 Instrument Power-up .................... 3
2.2 Simple Fault-finding ..................... 3
3 DISPLAYS & CONTROLS ................... 4
3.1 Displays and LED Indicators ........ 4
3.2 LED Indication .............................. 4
3.3 Use of Controls ............................ 5
4 GENERAL OPERATION ...................... 6
5 OPERATING LEVEL ............................ 7
5.1 Operating Page Introduction ........ 7
5.1.1 Set Point Tracking ............ 7
5.1.2 Auto/Manual Transfer ....... 7
5.1.3 Heat/Cool Control ............. 7
5.2 Operating Page Displays ............. 8
5.2.1 Time Proportioning
and Analog Control ........... 8
5.2.2 Motorized Valve Control ... 9
5.2.3 Heat/Cool Control ........... 10
5.3 Operating Page Messages ........ 11
5.4 Alarm Acknowledge Page .......... 13
5.4.1 Mode Alarm Trips ........... 13
5.5 Access to Configuration Levels .. 14
5.5.1 Security Code Page ........ 14
6 TUNING LEVEL .................................. 15
6.1 Introduction to Self-tuning .......... 15
6.2 Self-tuning Page ........................ 16
6.3 Self-tune Diagnostic Messages . 20
7 CONTROL LEVEL .............................. 21
7.1 Introduction to Standard Control 21
7.2 Control Page .............................. 23
7.3 Introduction to Heat/Cool
Control ....................................... 25
7.3.1 Control Page
(Heat/Cool Control) ......... 26
7.3.2 Calculating the Crossover
Value .............................. 28
7.3.3 Calculating the Transition
Bandwidth Value ............. 28
8 PROFILE OPERATION ...................... 29
8.1 Profile Operating Page ............... 29
8.2 Profile States Page .................... 30
1
1 INTRODUCTION
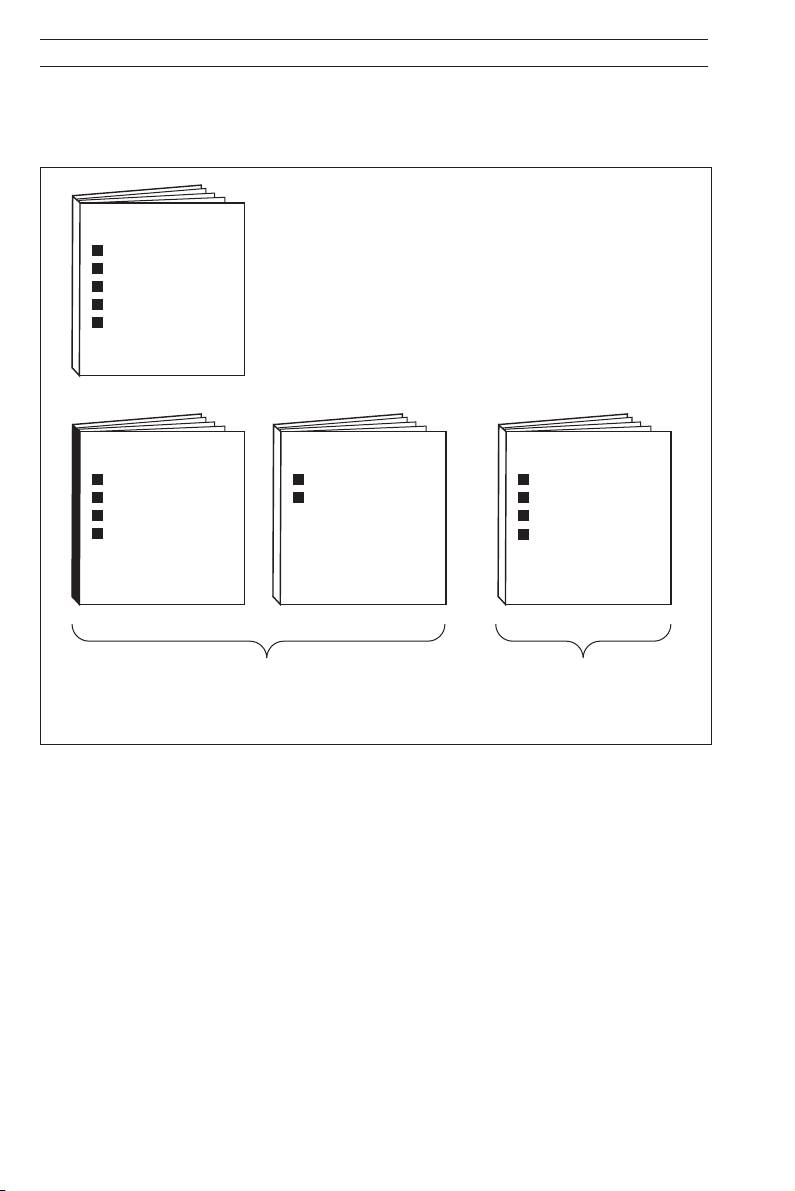
The instrument documentation is shown in Fig. 1.1. The Standard Manuals, including the
specification sheet, are supplied with all instruments. The Modbus Supplement is supplied with
instruments configured for Modbus Serial Communications.
INSTALLATION
Product Identification
Siting
Mounting
Electrical Connections
Installation Record
OPERATION
Setting Up
Displays & Controls
Operating Level
Simple Fault Finding
Standard Manuals Modbus Supplement
PROGRAMMING
Basic Config. Level
Advanced Config.
Level
Fig. 1.1 Documentation
MODBUS (RTU).
Serial Adaptors
Serial Connections
Programming Page
Modbus Registers
2
2 SETTING UP
2.1 Instrument Power-up – Fig. 2.1
Caution. Ensure that all connections, especially to the earth stud, are made
correctly.
a) Check that the input sensors are installed correctly.
b) Switch on the supply to the instrument, any power-operated control circuits and the input
signals.
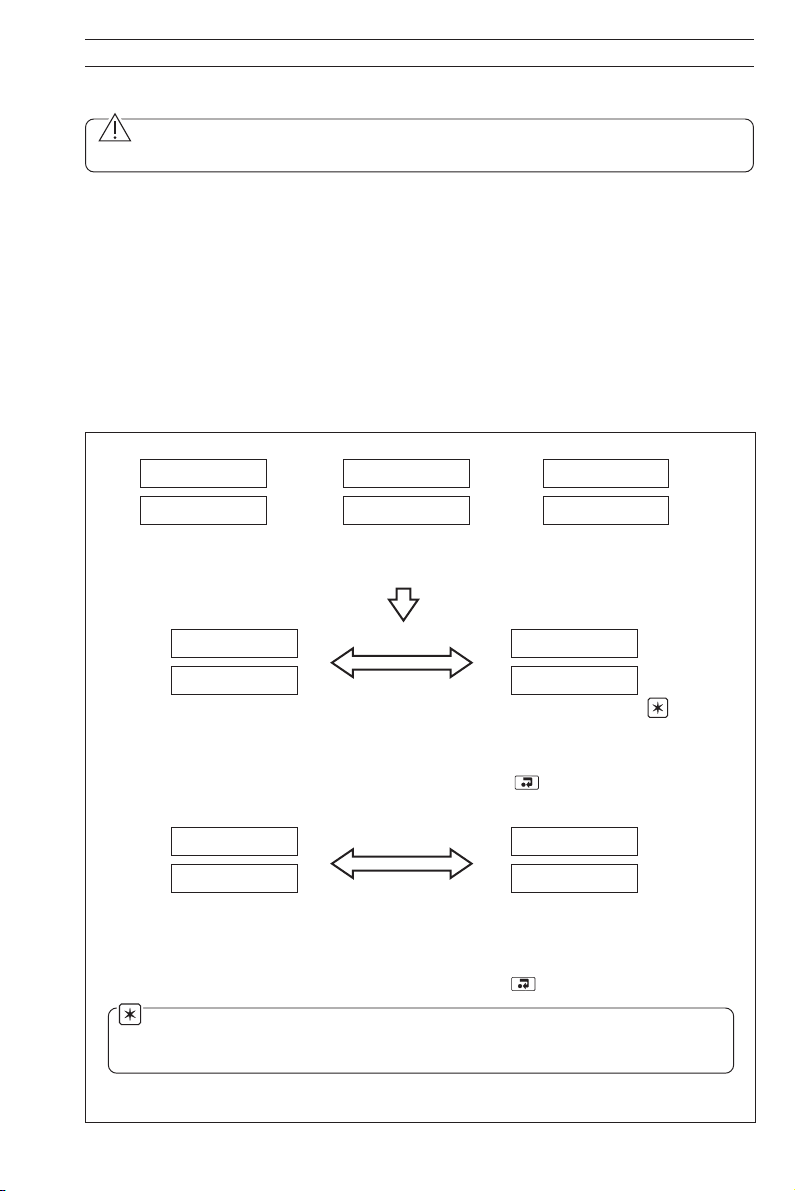
c) The start-up sequence shown in Fig. 2.1 is displayed when the supply is first switched on.
2.2 Simple Fault-finding
If the instrument does not appear to be working satisfactorliy, carry out the following checks
before contacting the Service Organization:
• Are all connections made correctly?
• Is there power to the instrument?
• Is there a signal at the process variable input and/or the control output terminals?
C300
tESt
Instrument Test identifies the instrument type
– see
100.3
200.5
Normal Display
100.3
200.5
Normal Display
Note. Acknowledging error clears the display but does not rectify the fault. First
check critical parameters. Power down and then power up the instrument. If the fault
persists after checking all parameters, contact the Service Organization.
C301
or
tESt
Table 2.1 in the Installation Guide.
Flashing
between
Configuration Check
indicates configuration error.
Acknowledged by pressing
the switch.
or
Flashing
between
Line Failed indicates power
has been restored after a
failure. Cleared by pressing
the switch.
C310
or
tESt
CONFIG
CHECK
LINE
FAILEd
Fig. 2.1 Instrument Displays at Power-up
3
3 DISPLAYS & CONTROLS
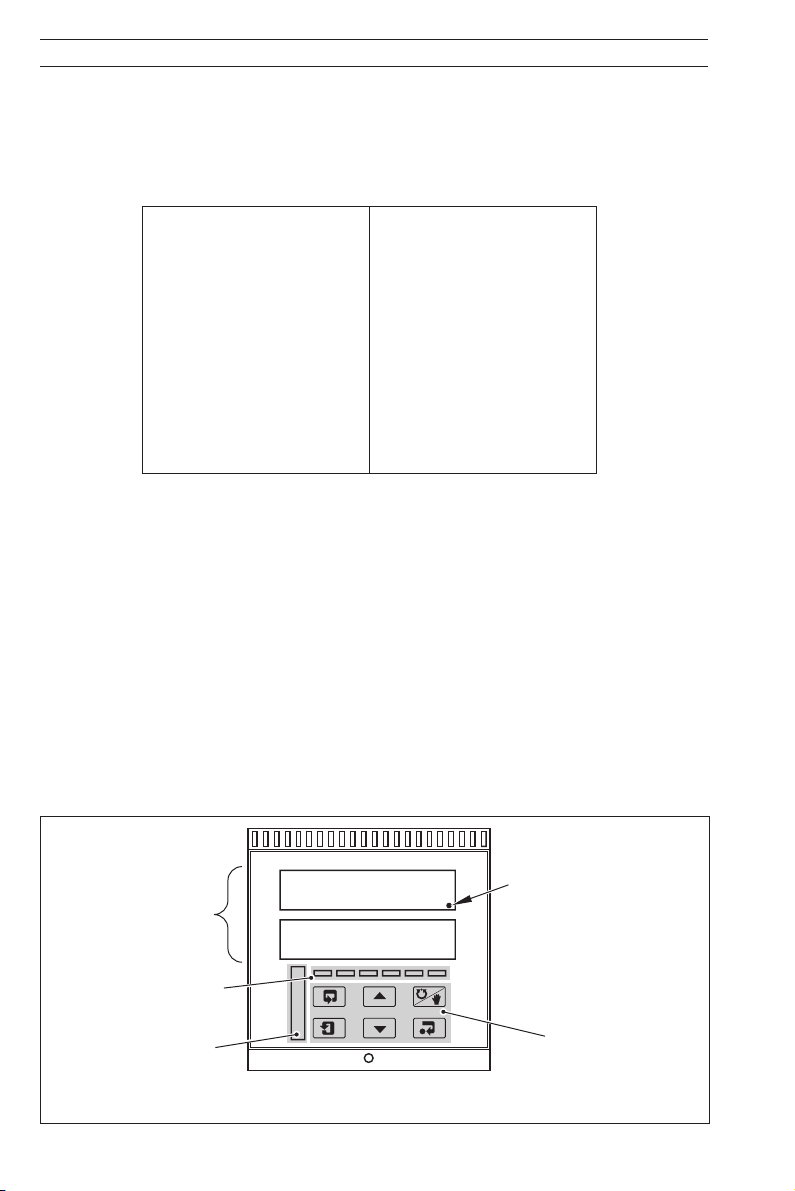
The displays, l.e.d. indicators and operation/programming controls are located on the faceplate
on the front of the instrument.
3.1 Displays and LED Indicators – Fig. 3.1
The displays comprise 2 rows of 6 characters.
A
B
C
D
E
F
G
H
I
J
K
A
b
C or c
d
E
F
G
H or h
I
J
K
Table 3.1 Character Set
L
M
N
O
P
Q
R
S
T
U
V
Y
L
M
N or n
O or o
P
Q
r
S
t
U
V
Y
3.2 LED Indication – Fig 3.1
LED indications are as follows:
A1 Alarm states for alarms 'A' to 'E' – see
A2 Alarm states for alarms 'F' to 'K' – see
LED Flashing – alarm active but not acknowledged
LED On – all active alarms acknowledged
LED Off – alarms inactive
L On if the local set point is being used – see
R On if the remote set point is being used – see
(Both L and R off if dual set point or dual fixed set points are used – see
Programming Guide).
ST On while the self-tune procedure is being performed (flashes when procedure is
complete) – see Section 6.2.
M On when the instrument is in Manual control mode.
Section 4.11 in Programming Guide.
Section 4.11 in Programming Guide.
Section 4.2 in Programming Guide.
Section 4.2 in Programming Guide.
Section 4.2 in
Bar Graph Display
4
Displays
LED Indicators
Fig. 3.1 Familiarisation with Controls, Displays and Indicators
'Enter' Switch LED
Controls – Refer to
Figs. 3.2 to 3.6
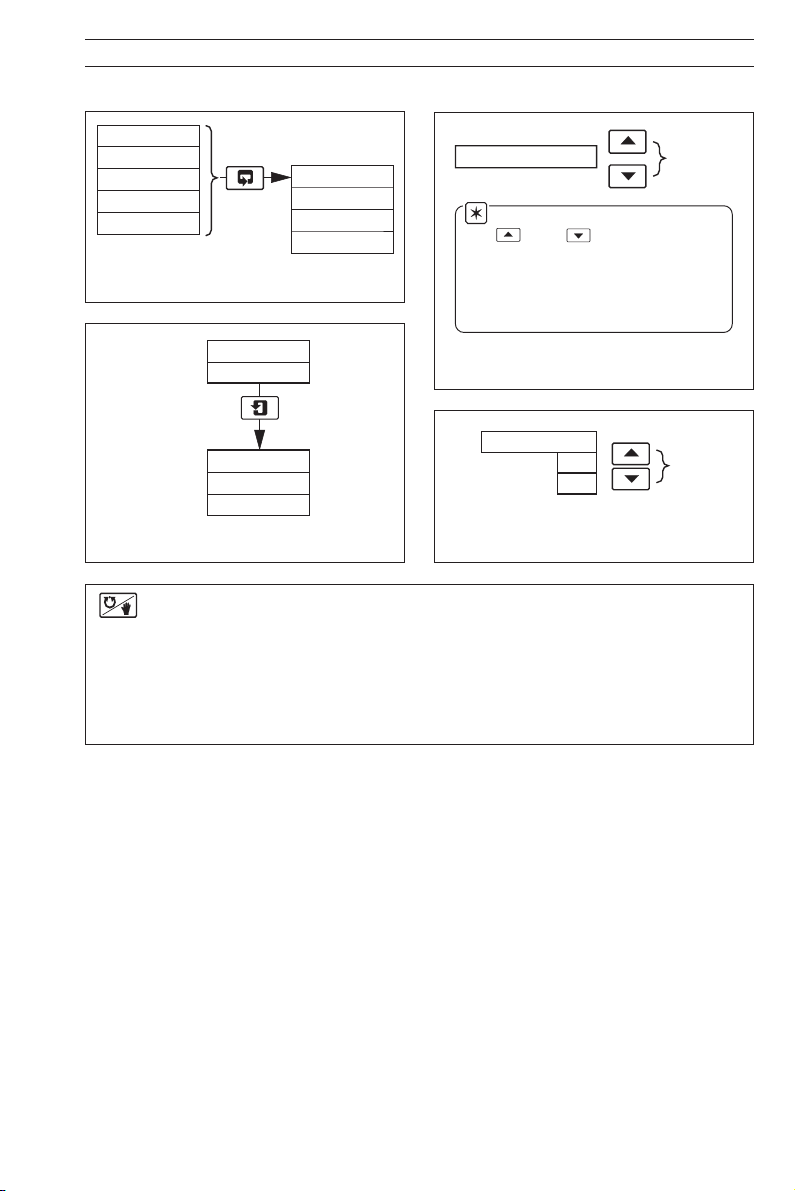
3.3 Use of Controls – Fig. 3.2 to 3.6
Parameter X
Y
Z
Select
3 DISPLAYS & CONTROLS…
Page 1
Frame 1
Frame 2
Frame 3
Frame 4
Fig. 3.2 Advancing to Next Page
Page 2
Frame 1
Frame 2
Frame 3
Parameter Value
Note. Continued pressure on
the and switches causes
the rate of change of the displayed
value to increase. To make small
adjustments operate the switches
momentarily.
Adjust
Page X
Frame 1
Advance to
next Frame
Fig. 3.4 Adjusting a Parameter Value
Frame 2
Frame 3
Frame 4
Fig. 3.3 Moving between Frames
Fig. 3.5 Selecting a Parameter Choice
Used for selecting Automatic or Manual mode on alternate operations. When
Manual mode is selected the displays revert automatically to the process variable
values and control output or valve position (if position-proportioning or boundless
motorized valve control is selected at
– See
Section 4.10 in the Programming Guide.
Fig. 3.6 Auto/Manual Switch Functions
Control Type
frame in the
Set Up Control Page
)
5

4 GENERAL OPERATION
Programming
Pages – See
Programming
Guide.
SELF
tUNE
PrOFLE
StAtES
SECOdE
MMMM
P-StAt
MMMM
ACKNLG
ALArMS
CONtrL
PAGE
000.00
000.00
Process Variable
Operating Page
(Section 5.2,
Page 8)
Alarm Acknowledge
Page
(Section 5.4, Page 13)
Security Code Page
(Section 5.5,
Page 14)
Profile Operating Page*
(Section 8.1, Page 29)
Self-tuning Page†
(Section 6.2,
Page 16)
Control Page
(Section 7.2, Page 23)
Profile States Page*
(Section 8.2,
Page 30)
Set
Point
*Page hidden if Profile Function is 'OFF'
†Page hidden if Profile Function is 'ON' or 'Boundless' control is selected
Incorrect Security Code
Correct Security Code
– see
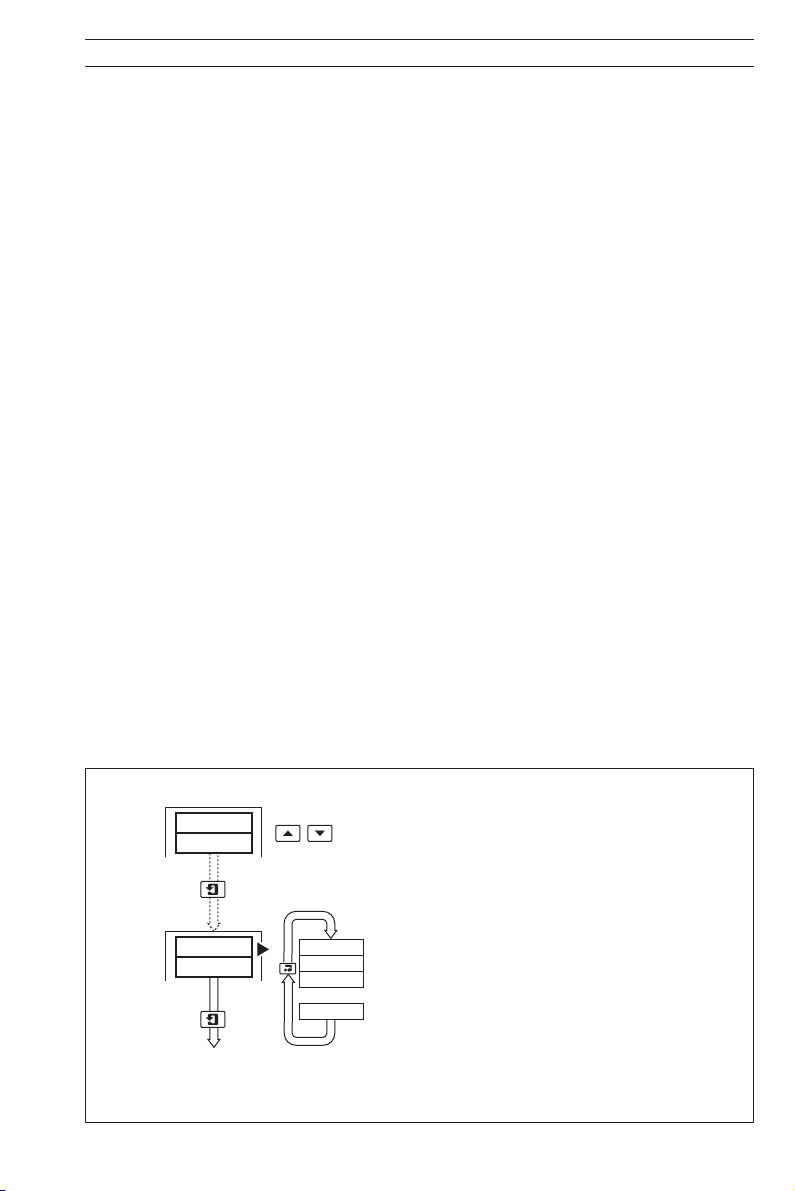
Information. The instrument has dedicated Operating Pages. These pages are used for general monitoring of the process
Section 5.5.
measurements and are not affected by the security system which inhibits access to the programming and control pages only
6
Fig. 4.1 Summary of Operating Levels
5 OPERATING LEVEL
5.1 Operating Page Introduction
5.1.1 Set Point Tracking
With set point tracking enabled (in the Set Points Page), the Local set point value tracks the
process variable when the controller is in Manual control mode. In this mode of operation the
set point limits do not apply. If the set point value is outside its limits when Automatic control
mode is selected, the local set point remains outside its limits and can only be adjusted in one
direction, towards its limits. Once inside the limits they apply as normal.
With remote set point tracking enabled, the Local set point tracks the remote set point value
when in the remote set point mode. In this mode of operation the Local set point limits do not
apply. If the set point value is outside its limits when the Local set point value is selected, the
Local set point remains outside its limits and can only be adjusted in one direction, towards its
limits. Once inside the limits they apply as normal.
5.1.2 Auto/Manual Transfer
All auto-to-manual transfers are bumpless. If the Local set point is used and set point tracking
is enabled, all manual-to-auto transfers are bumpless, since the set point is always at the same
value as the process variable. Without set point tracking enabled, the response following a
manual-to-auto transfer depends on the control settings. With an integral action setting the
output is ramped up or down to remove any process variable offset from the set point (providing
the process variable is within the proportional band). If the integral action is off, the output may
step to a new value when the controller is transferred back to Automatic control mode.
With remote set point tracking enabled, the control set point switches automatically from
Remote to Local when Manual mode is selected.
5.1.3 Heat/Cool Control – Fig. 6.3
When in Automatic control mode both the heat and cool outputs are turned off when in the
Output Off Hysteresis Band. In Manual control mode the Output Off Hysteresis Band has no
effect. If the PID output is within the Off Hysteresis Band when the controller is returned to auto
control mode, the Off Hysteresis Band has no effect until either the PID output goes outside the
band or becomes equal to the Crossover Value.
100.3
110.5
LOCAL
110.5
Fig. 5.1 Set Point Type Selection Facility (see Section 5.2 overleaf)
Control Set Point frame
To adjust Local or Dual Set Point value
LOCAL
bALNCE
rEMOtE
or
dUAL
Balance Set Point – shows the difference
between the Local and Second Set Point values
(remote or dual), i.e.
Balance = Second set point – Local set point
7
…5 OPERATING LEVEL
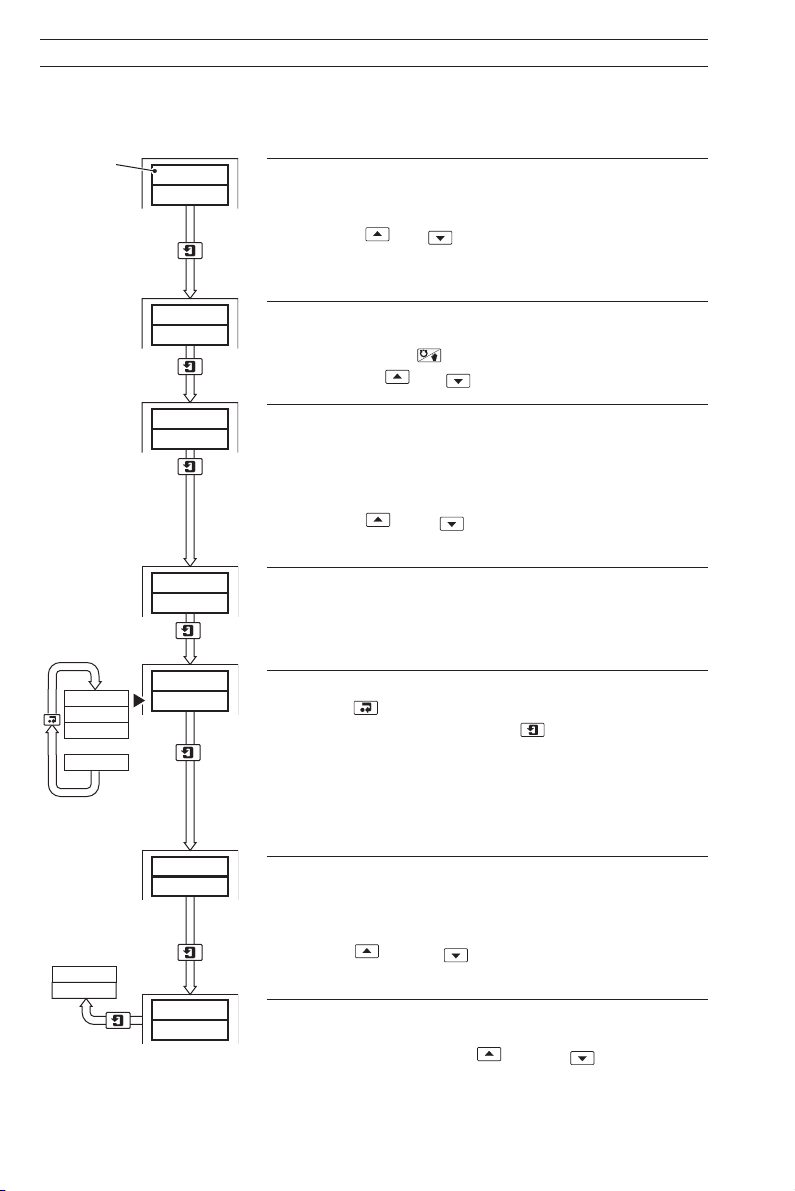
5.2 Operating Page Displays
5.2.1 Time Proportioning and Analog Control
Process
Variable
100.3
110.5
Control Set Point
The set point in use is displayed (Local, Remote or Dual).
If the Local or Dual set point is displayed it can be adjusted
using the and switches, providing Set Point Adjust
is set to YES – see
Enable
Guide,
Set Points Page
Section 4.2 of the Programming
.
LOCAL
bALNCE
rEMOtE
dUAL
100.3
110.3
100.3
OP 50.0
100.3
r50.0
100.3
dEG F
LOCAL
110.5
or
rAtIO
1.000
bIAS
0.0
Control Output Value (0 to 100%).
To adjust the output value manually: select Manual control
mode using the switch ('M' l.e.d. is illuminated) and
then use the and switches to set the required value
Manual Reset (0 to 100%).
This frame is not displayed if an Integral Action Time is set
or Manual Reset Adjust Enable is set to OFF – see Section
7.2, Control Page.
Use the and switches to set a value which
eliminates any offset from the set point.
Temperature Units
This frame is not displayed if the Display Units parameter is
set to NONE – see
Set Up Display Page
Set Point Type Selection – Fig. 5.1 (previous page)
Use the switch to view the various set point values. If the
difference is too great, press the switch and return to the
Control Set Point frame and adjust the Local set point to obtain
an acceptable difference. The Local set point tracks the
Remote set point when the Remote set point is selected,
providing Remote Set Point Tracking Enable is set to YES – see
Section 4.2 of the Programming Guide,
Remote Set Point Ratio
The remote set point input (in engineering units) is
multiplied by the ratio to obtain the control set point value, i.e.
Remote Set Point Value = Input x Ratio + Bias
Use the and the switches to set the ratio required,
between 0.010 and 9.999 in 0.001 increments
Remote Set Point Bias
The bias value is added to the remote set point value (see
previous frame) Use the and the switches to set
the bias required. The bias can be set to either a positive or
negative value (in engineering units).
Section 4.8 of the Programming Guide
.
Set Points Page
.
8
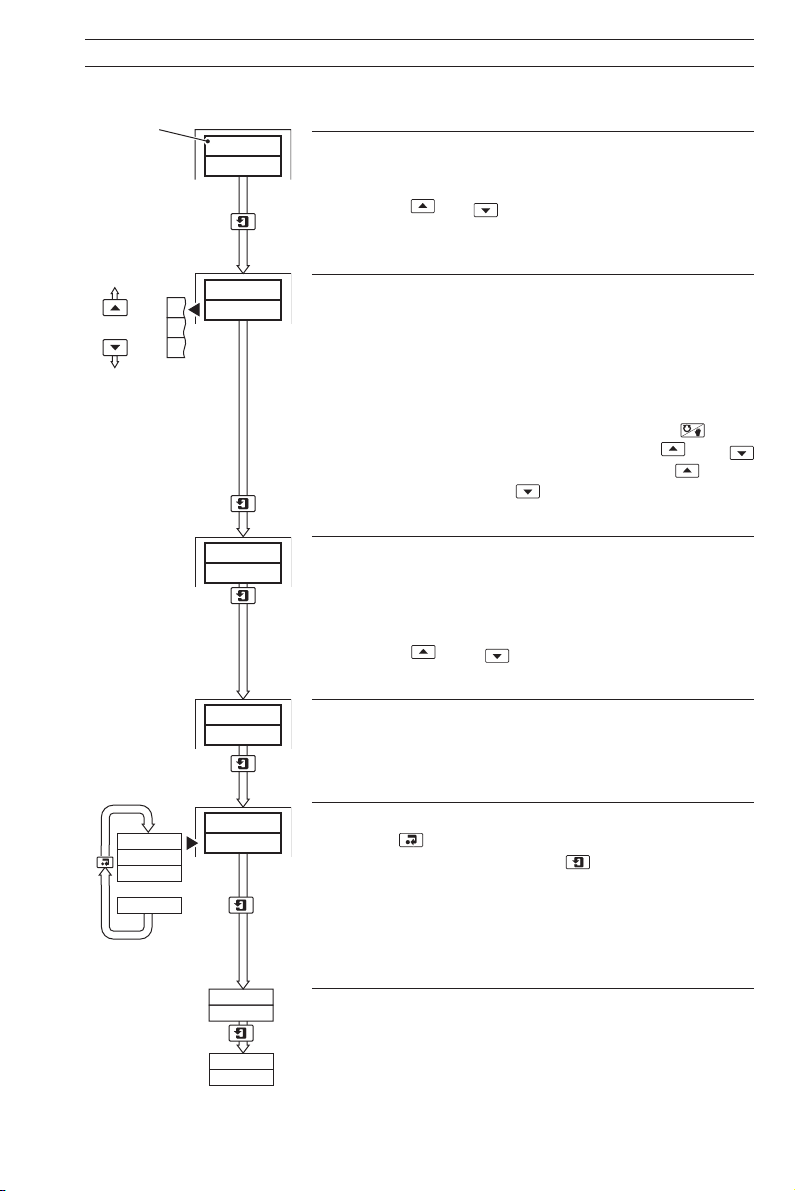
5.2.2 Motorized Valve Control
Process
Variable
100.3
110.5
5 OPERATING LEVEL…
Control Set Point
The set point in use is displayed (Local, Remote or Dual).
If the Local or Dual set point is displayed it can be adjusted
using the and switches, providing Set Point Adjust
Enable is set to YES – see
Guide,
Set Points Page
Section 4.2 of the Programming
.
O
W
C
100.3
W 50.0
Open
Stop
Close
Motorized Valve
(position-proportioning
and boundless)
100.3
r500
100.3
dEG F
LOCAL
LOCAL
bALNCE
rEMOtE
or
dUAL
110.5
rAtIO
1.000
Valve Status and Valve Position (%)
W – valve stopped
O – valve opening
C – valve closing
The valve position is displayed as a percentage of its full
travel position (not displayed on boundless controllers with
position indication disabled). To adjust the valve position
manually: select Manual control mode using the switch
('M' l.e.d. is illuminated) and then use the and
switches to set valve position required (the switch
opens the valve and the switch closes the valve). With
neither switch pressed the valve is stopped.
Manual Reset (0 to 100%).
This frame is not displayed if an Integral Action Time is set
or Manual Reset Adjust Enable is set to OFF – see Section
7.2, Control Page.
Use the and switches to set a value which
eliminates any offset from the set point.
Temperature Units
This frame is not displayed if the Display Units parameter is
set to NONE – see
Set Up Display Page
Set Point Type Selection – Fig. 5.1 (previous page)
Use the switch to view the various set point values. If the
difference is too great, press the switch and return to the
Control Set Point frame and adjust the Local set point to obtain
an acceptable difference. The Local set point tracks the
Remote set point when the Remote set point is selected,
providing Remote Set Point Tracking Enable is set to YES – see
Section 4.2 of the Programming Guide,
For Remote Set Point Ratio and Remote Set Point Bias
settings, refer to opposite page.
Section 4.8 of the Programming Guide
.
Set Points Page
.
bIAS
0.0
9
 Loading...