

Olympus SP-550, SP-550UZ - 7.1MP Digital Camera Instruction Manual
DIGITAL CAMERA
SP-550UZ
Quick Start Guide
Instruction
Manual
Button operations
This manual will help you
get started using your
camera right away.
Menu operations
Printing pictures
Using OLYMPUS Master
Getting to know your
camera better
Appendix
Thank you for purchasing an Olympus digital camera. Before you start to use your new camera, please
read these instructions carefully to enjoy optimum performance and a longer service life. Keep this manual
in a safe place for future reference.
We recommend that you take test shots to get accustomed to your camera before taking important photographs.
In the interest of continually improving products, Olympus reserves the right to update or modify information
contained in this manual.
The screen and camera illustrations shown in this manual were produced during the development
stages and may differ from the actual product.
Contents
Quick Start Guide P.3
Button operations P.10
Menu operations P.19
Printing pictures P.46
Using OLYMPUS Master P.53
Test out the functions of the camera
buttons by following the illustrations
and trying them out on the camera.
Learn everything about the menus,
from basic operations to the functions
of each menu and their various
settings.
Learn how to print pictures you have
taken.
Learn how to transfer pictures to a
computer and save them.
Getting to know your camera better P.61
Appendix P.76
Arrow pad indication
The directions of the arrow pad are indicated with
124 3 in this manual.
Find out more about your camera and
learn what to do when you have a
question regarding operations.
Read about convenient functions and
safety precautions on how to use your
camera more effectively.
2 EN
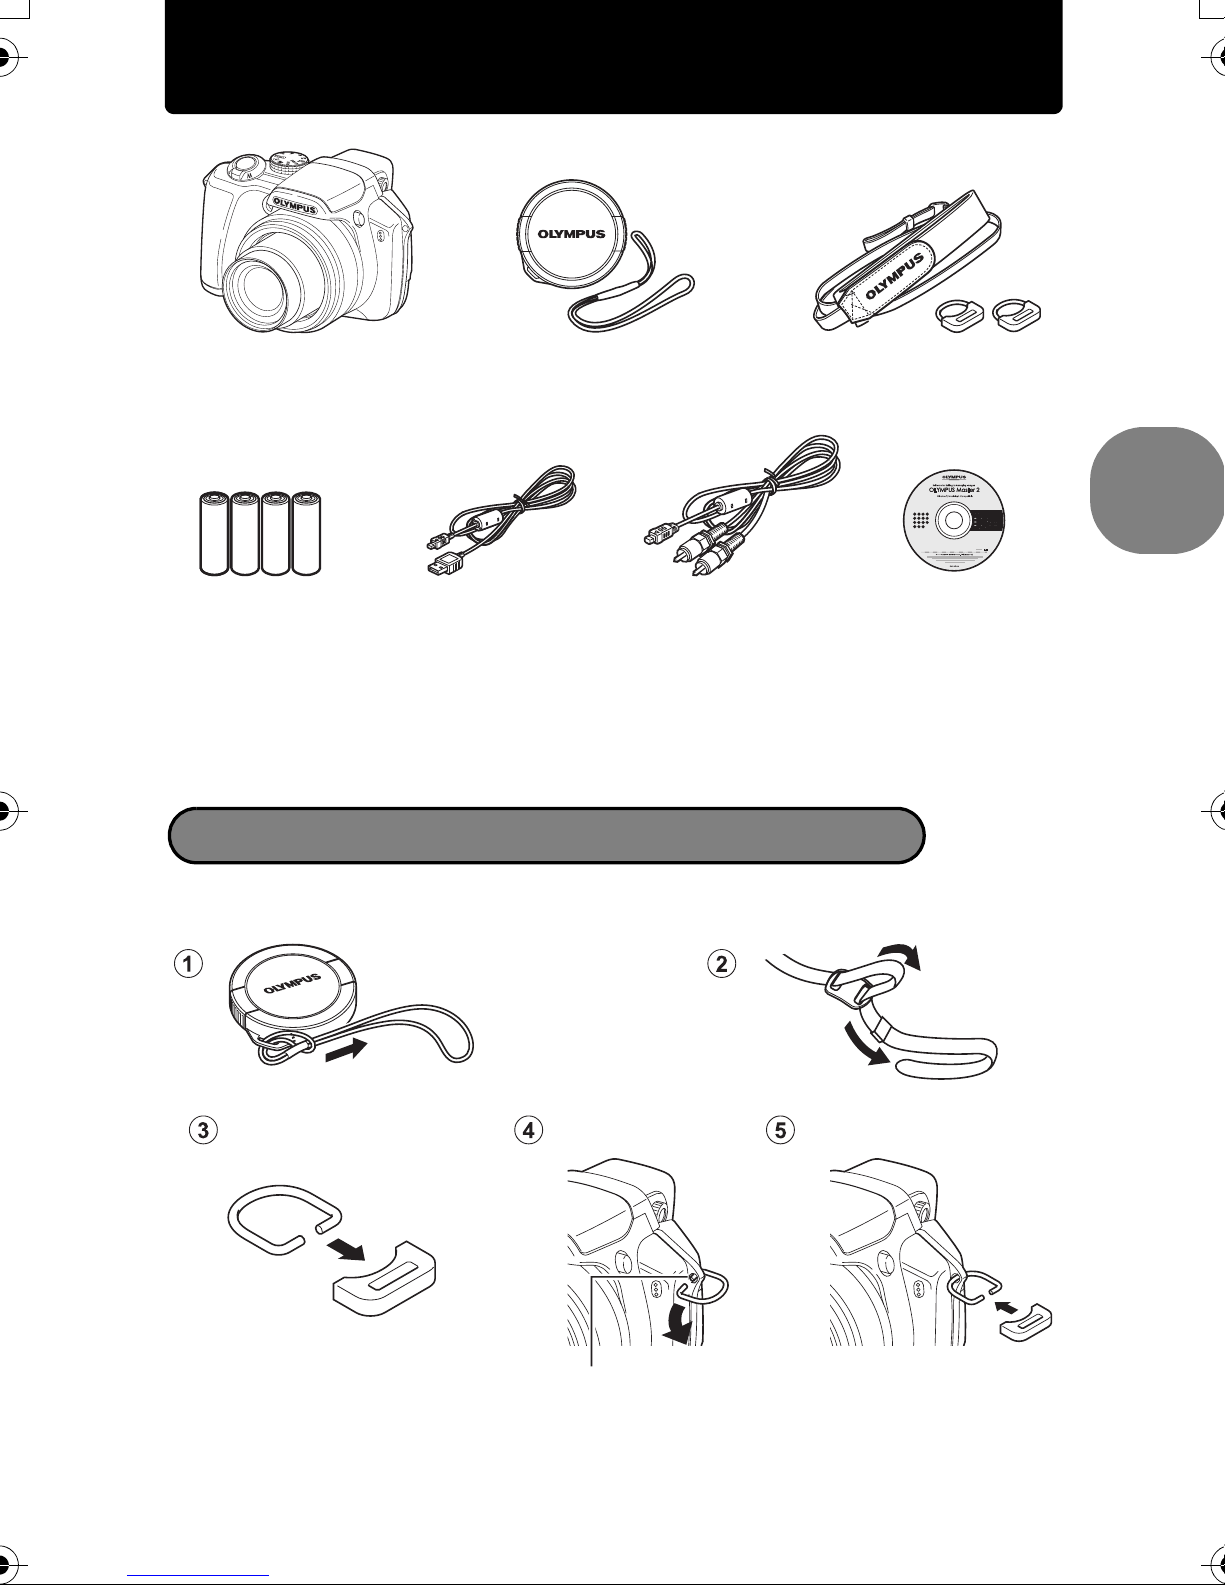
Gather these items (box contents)
Digital Camera Strap/Strap ringsLens Cap/Lens Cap
String
AA Batteries (four) USB cable AV Cable OLYMPUS Master
CD-ROM
Quick Start Guide
Items not shown: Instruction Manual (this manual), warranty card.
Contents may vary depending on purchase location.
Attach the strap and the lens cap
Be sure to use the strap and strap rings provided.
Strap Eyelet
EN 3
• Attach the strap to the other eyelet
in the same manner.
Pull the strap tight so that it does not come loose.
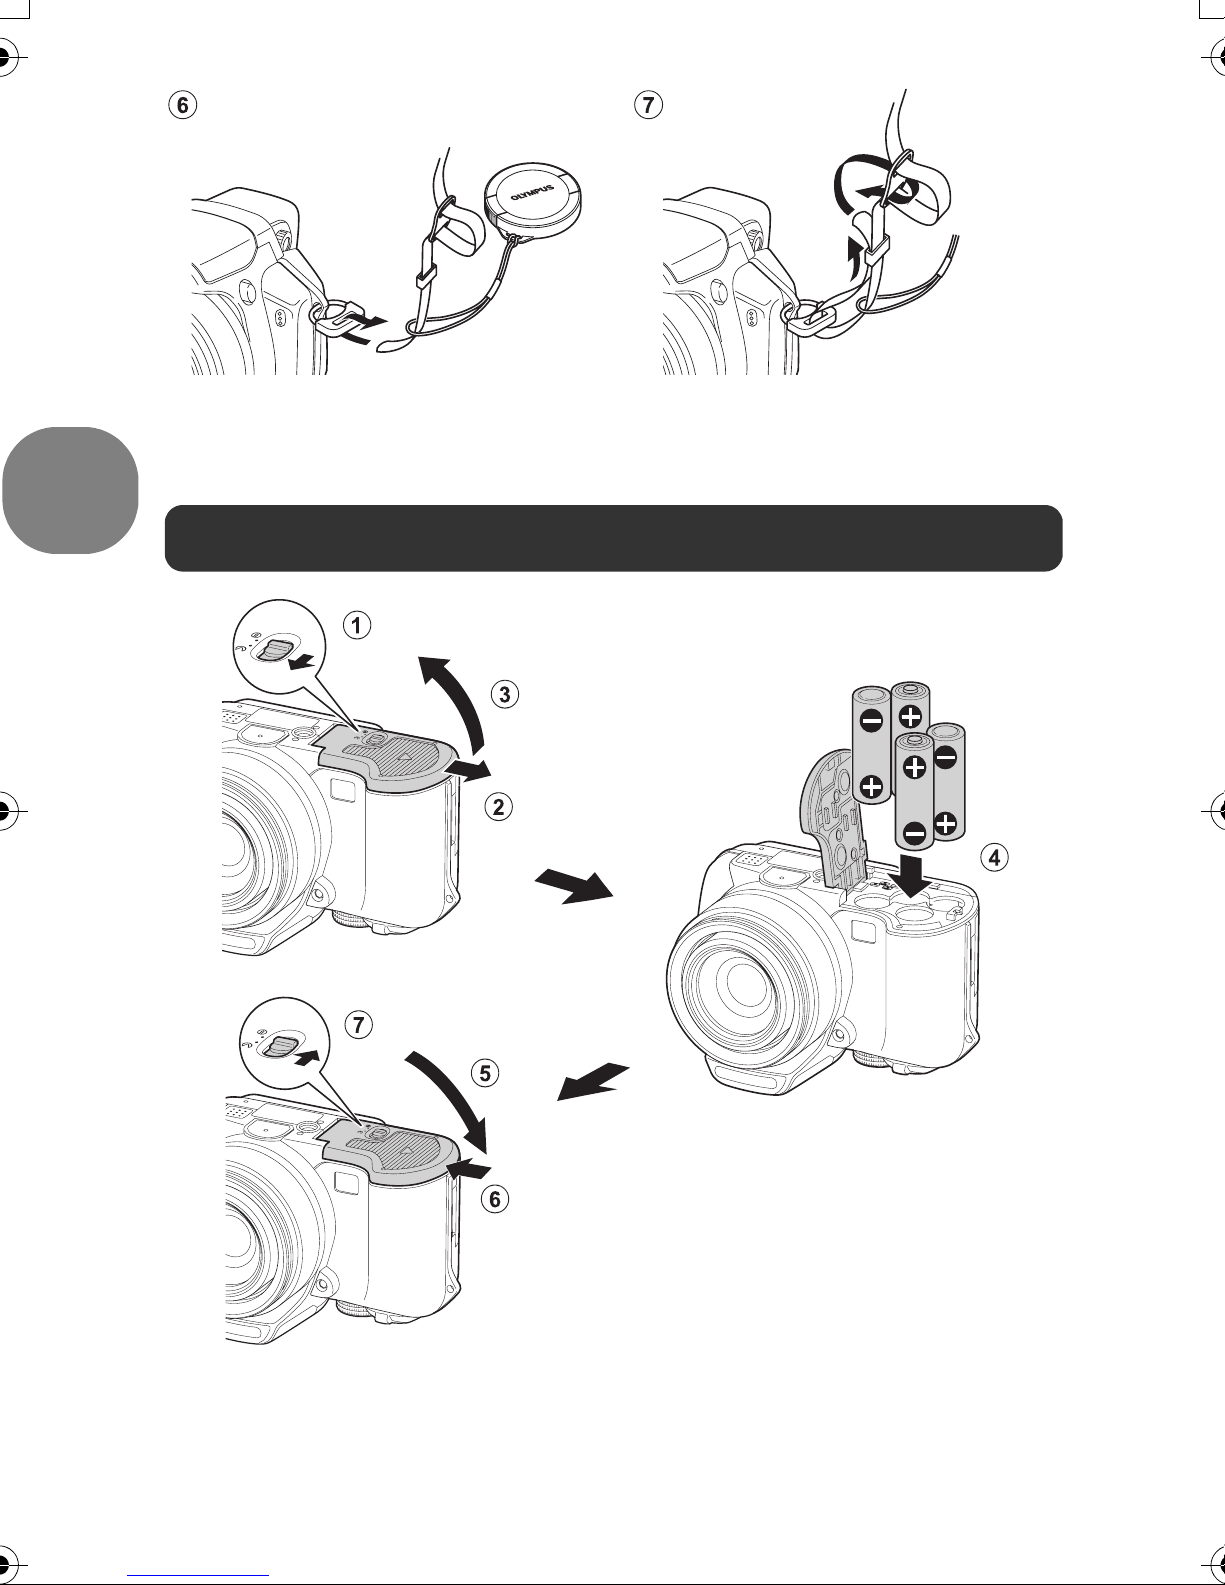
Prepare the battery
Quick Start Guide
This camera allows you to take pictures without using an optional xD-
Picture Card (hereinafter called the card). For details on inserting the
card, please refer to “Inserting and removing the card” (P.78).
4 EN
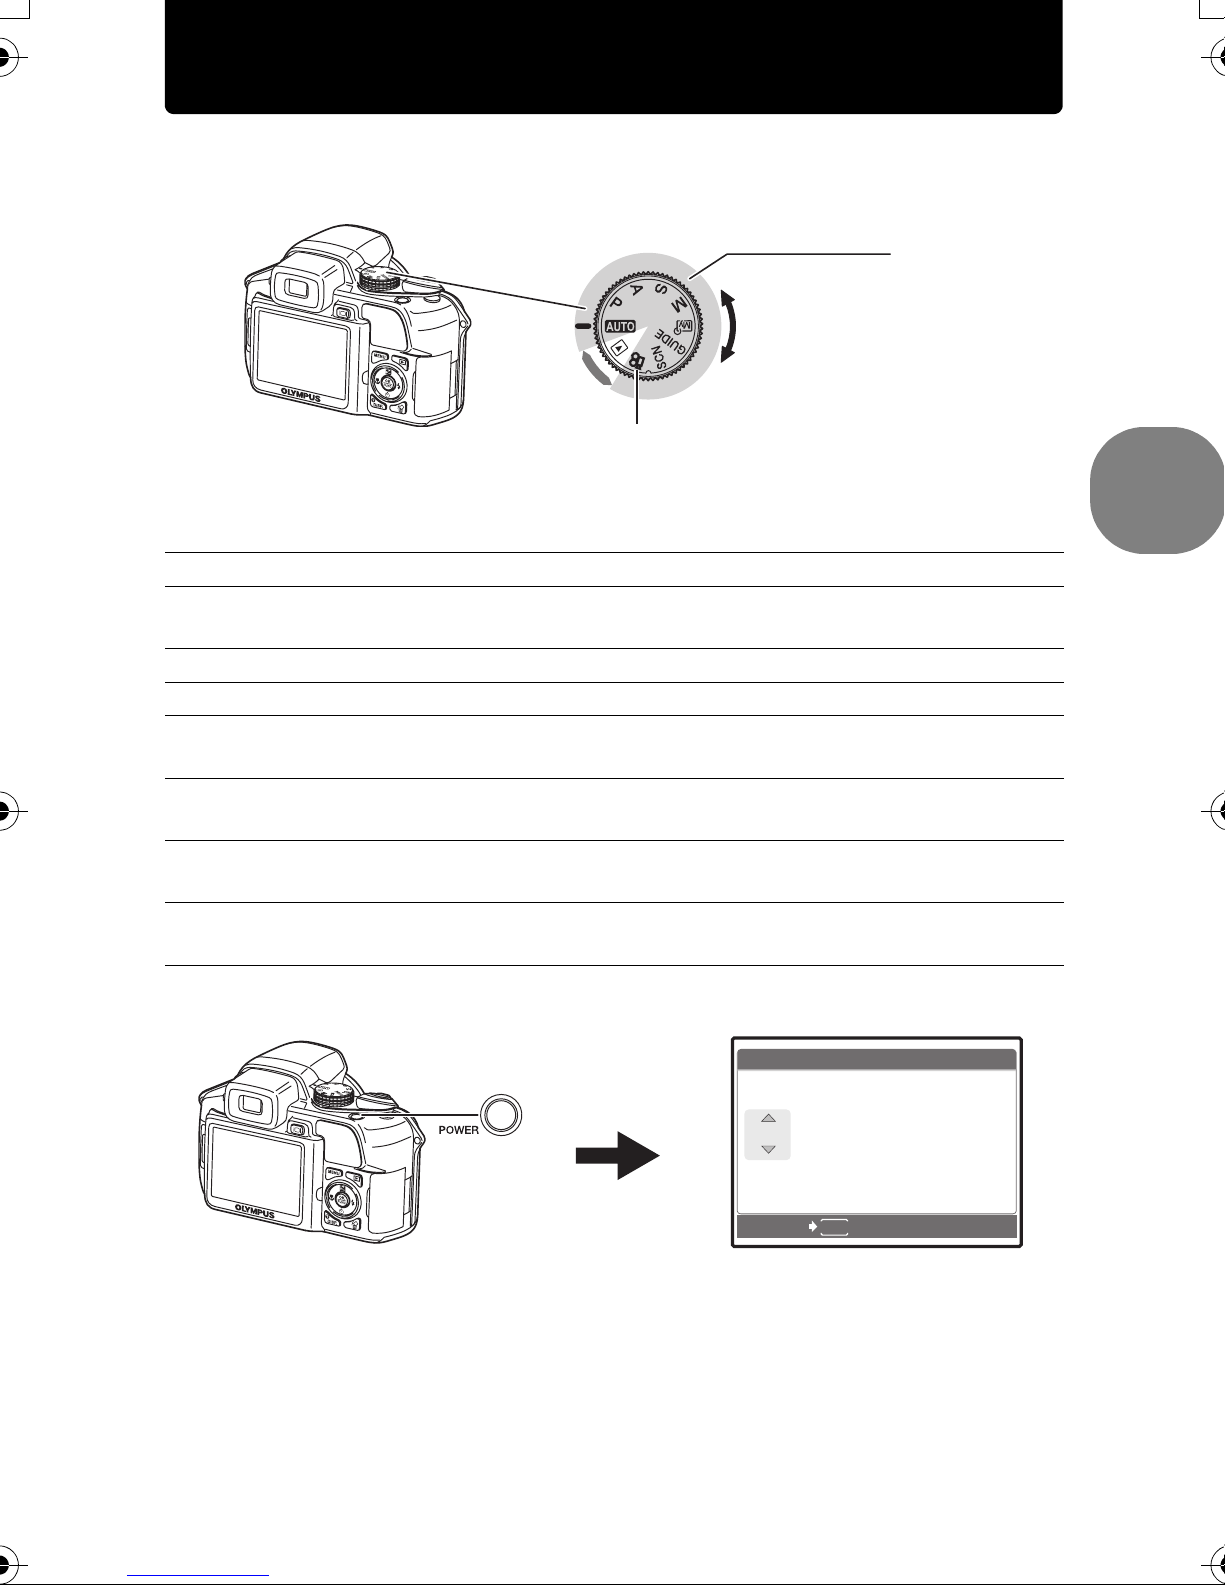
Turn the camera on
Y / M / D
Y M D T I M E
----.--.-- --:--
This explains how to turn on the camera in shooting mode.
a. Set the mode dial to h.
Shooting Mode
When shooting movies
(shooting mode)
Still picture shooting modes
h This function allows you to take pictures with full automatic settings.
P The camera automatically sets the optimum aperture value and shutter
speed.
A This function allows you to change the aperture manually.
S This function changes the shutter speed for shooting pictures.
M This function allows you to change the aperture and shutter speed
manually.
r This function allows you to set each shooting function manually and use
as your original shooting mode.
g This function allows you to set the target items by following the shooting
guide displayed on the screen.
s This function allows you to shoot pictures by selecting a scene
according to the shooting condition.
Quick Start Guide
b. Press the o button.
To turn on the camera, press the o button after removing the
lens cap.
To turn off the camera, press the o button once again.
X
Y M D TIME
----.--.-- --:--
CANCEL
MENU
Y/M/D
• When the date and time
have not yet been set, this
screen will appear.
EN 5
Set date and time
Y / M / D
Y M D T I M E
----.--.-- --:--
2007
.--.-- --:--
Y M D T I M E
Y / M / D
2007
.-- --:--
Y M D T I M E
Y / M / D
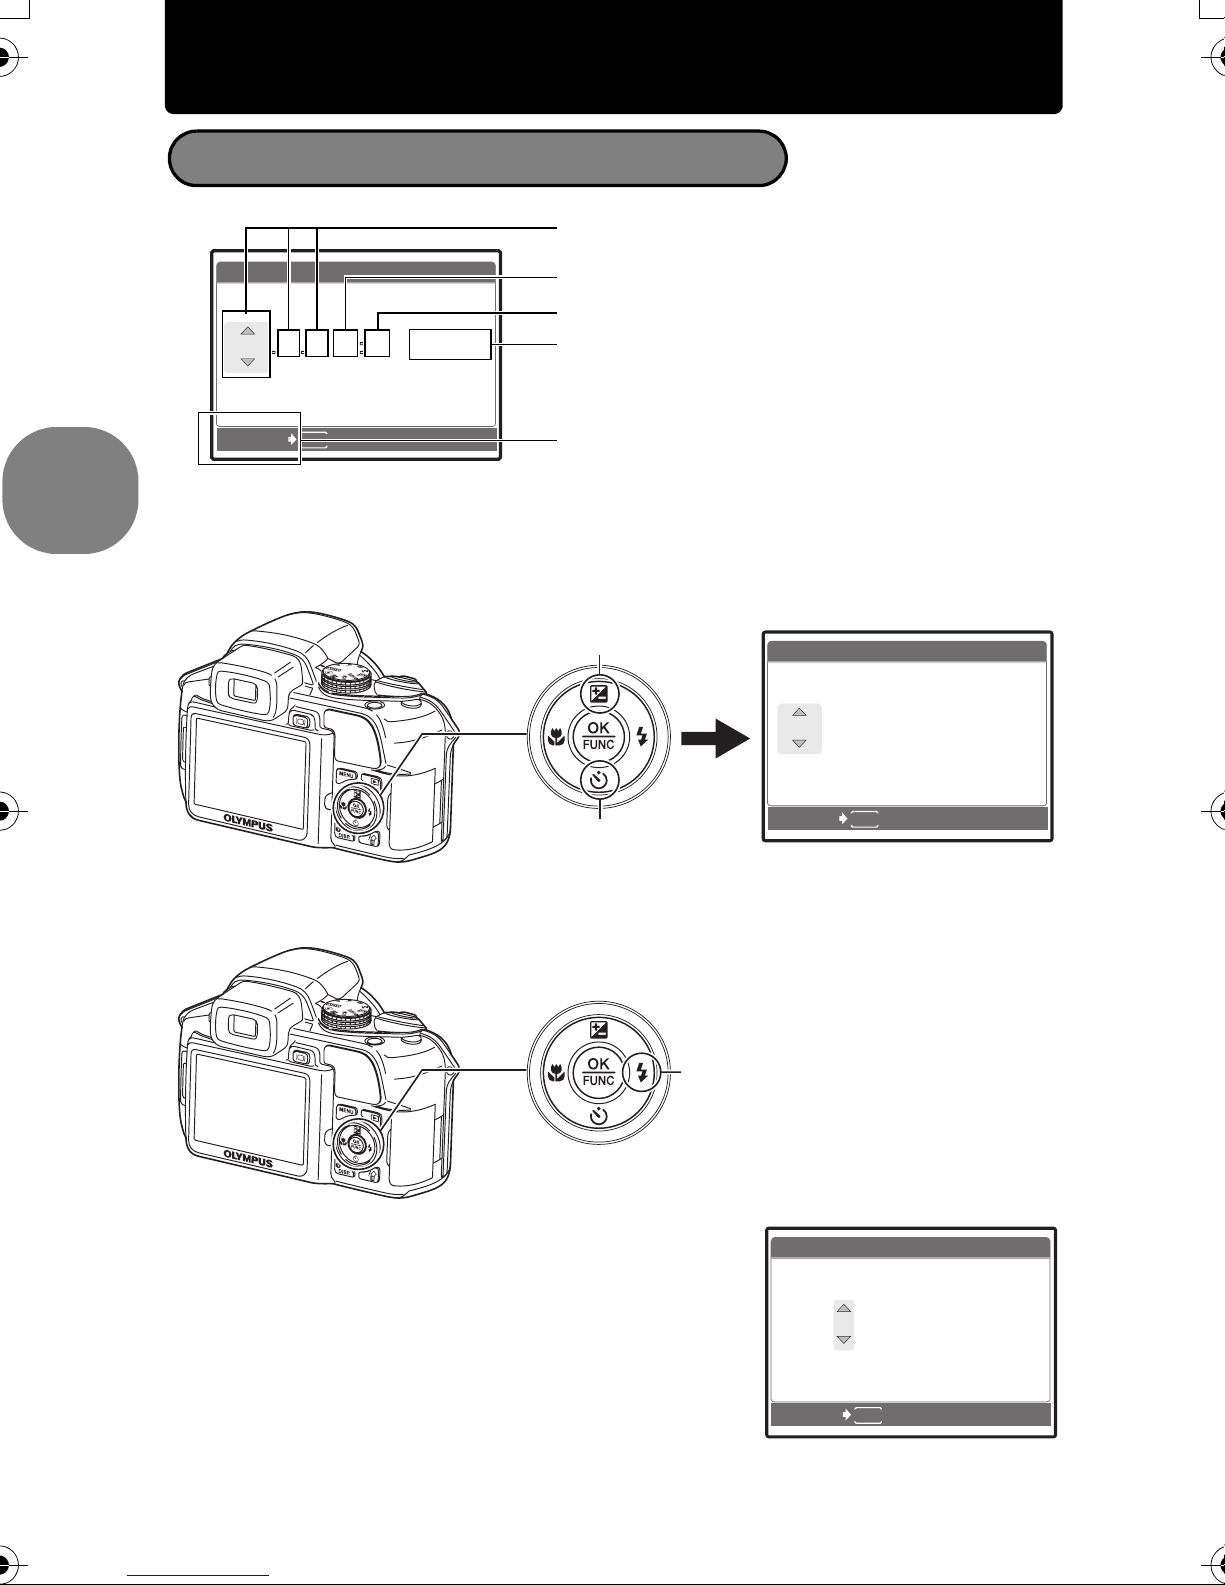
About the date and time setting screen
Y-M-D (Year-Month-Day)
X
Y M D TIME
----.--.-- --:--
CANCEL
MENU
Y/M/D
Hour
Minute
Date formats (Y/M/D, M/D/Y, D/M/Y)
Exits a setting.
a. Press the 1 F button and the 2Y button to
select [Y].
The first two digits of the [Y] are fixed.
1 F button
Quick Start Guide
2Y button
X
Y M D TIME
2007
.--.-- --:--
CANCEL
MENU
Y/M/D
b. Press the 3# button.
3# button
c. Press the 1 F button and the
2Y button to select [M].
X
Y M D TIME
2007
.
0808.-- --:--
CANCEL
MENU
Y/M/D
6 EN
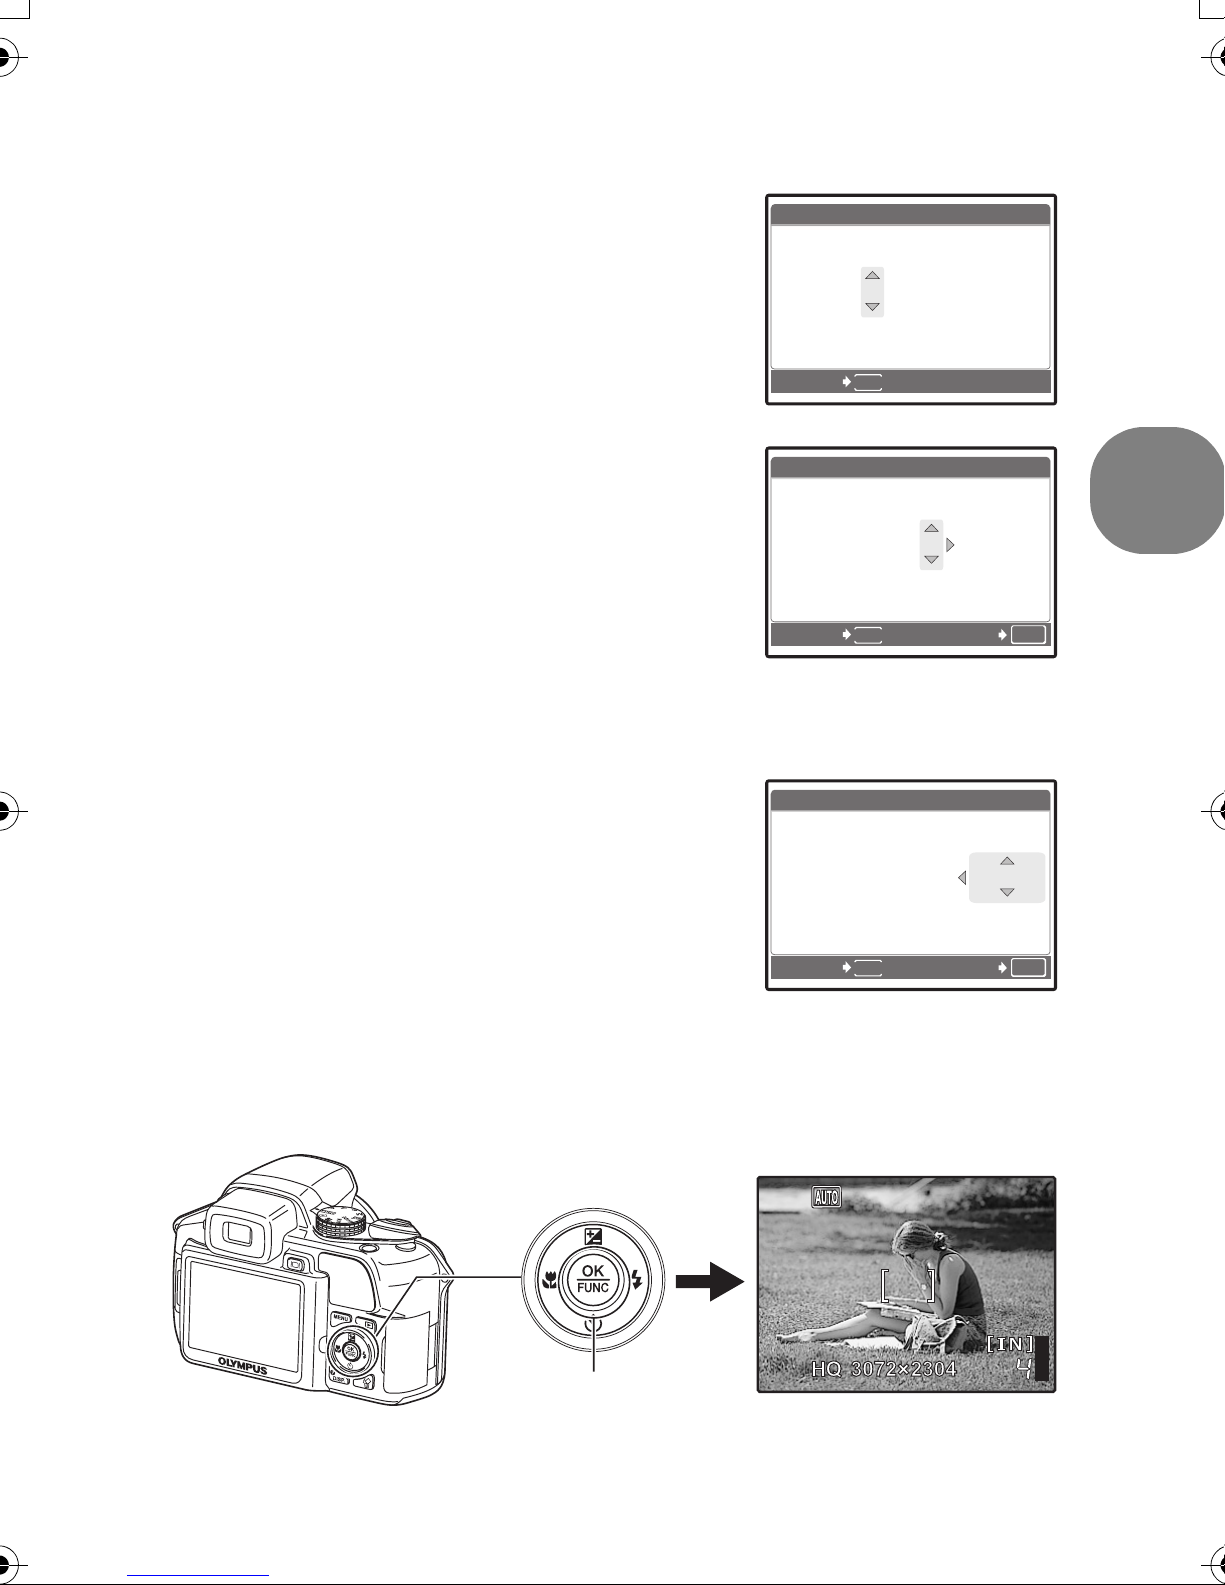
d. Press the 3# button.
2007
--:--
Y M D T I M E
Y / M / D
2007
30
Y M D T I M E
Y / M / D
2007
30
Y / M / D
Y M D T I M E
e. Press the 1 F button and the
2Y button to select [D].
f. Press the 3# button.
g. Press the 1 F button and the
2Y button to select “hour”,
“minute”.
The time is displayed in the 24-hour
format.
h. Press the 3# button.
X
Y M D TIME
2007
.
0808.
2626 --:--
CANCEL
X
2007
CANCEL
MENU
Y M D TIME
.
0808.
2626
MENU
1212:
30
Y/M/D
Y/M/D
SET
Quick Start Guide
OK
i. Press the 1 F button and the
2Y button to select [Y/M/D].
X
Y M D TIME
2007
.
0808.
2626
CANCEL
MENU
1212:
30
Y/M/D
SET
OK
j. After all items have been set, press the o button.
For precise time setting, press the o button as the time signal
strikes 00 seconds.
o button
EN 7

Take a picture
a. Hold the camera
Horizontal grip Vertical grip
b. Focus
Shutter button
The green lamp
indicates the focus and
exposure are locked.
Place this mark over
your subject.
(Pressed Halfway)
Quick Start Guide
c. Shoot
Shutter button
(Pressed Completely)
Adjusting the viewfinder’s focus using the diopter
a. Press the u button.
b. While looking through the
The number of remaining
still pictures is displayed.
The card access lamp blinks.
Diopter adjustment dial
u button
viewfinder, rotate the diopter
adjustment dial little by little.
When you can see [ ] (AF target mark)
clearly, adjustment is complete.
8 EN
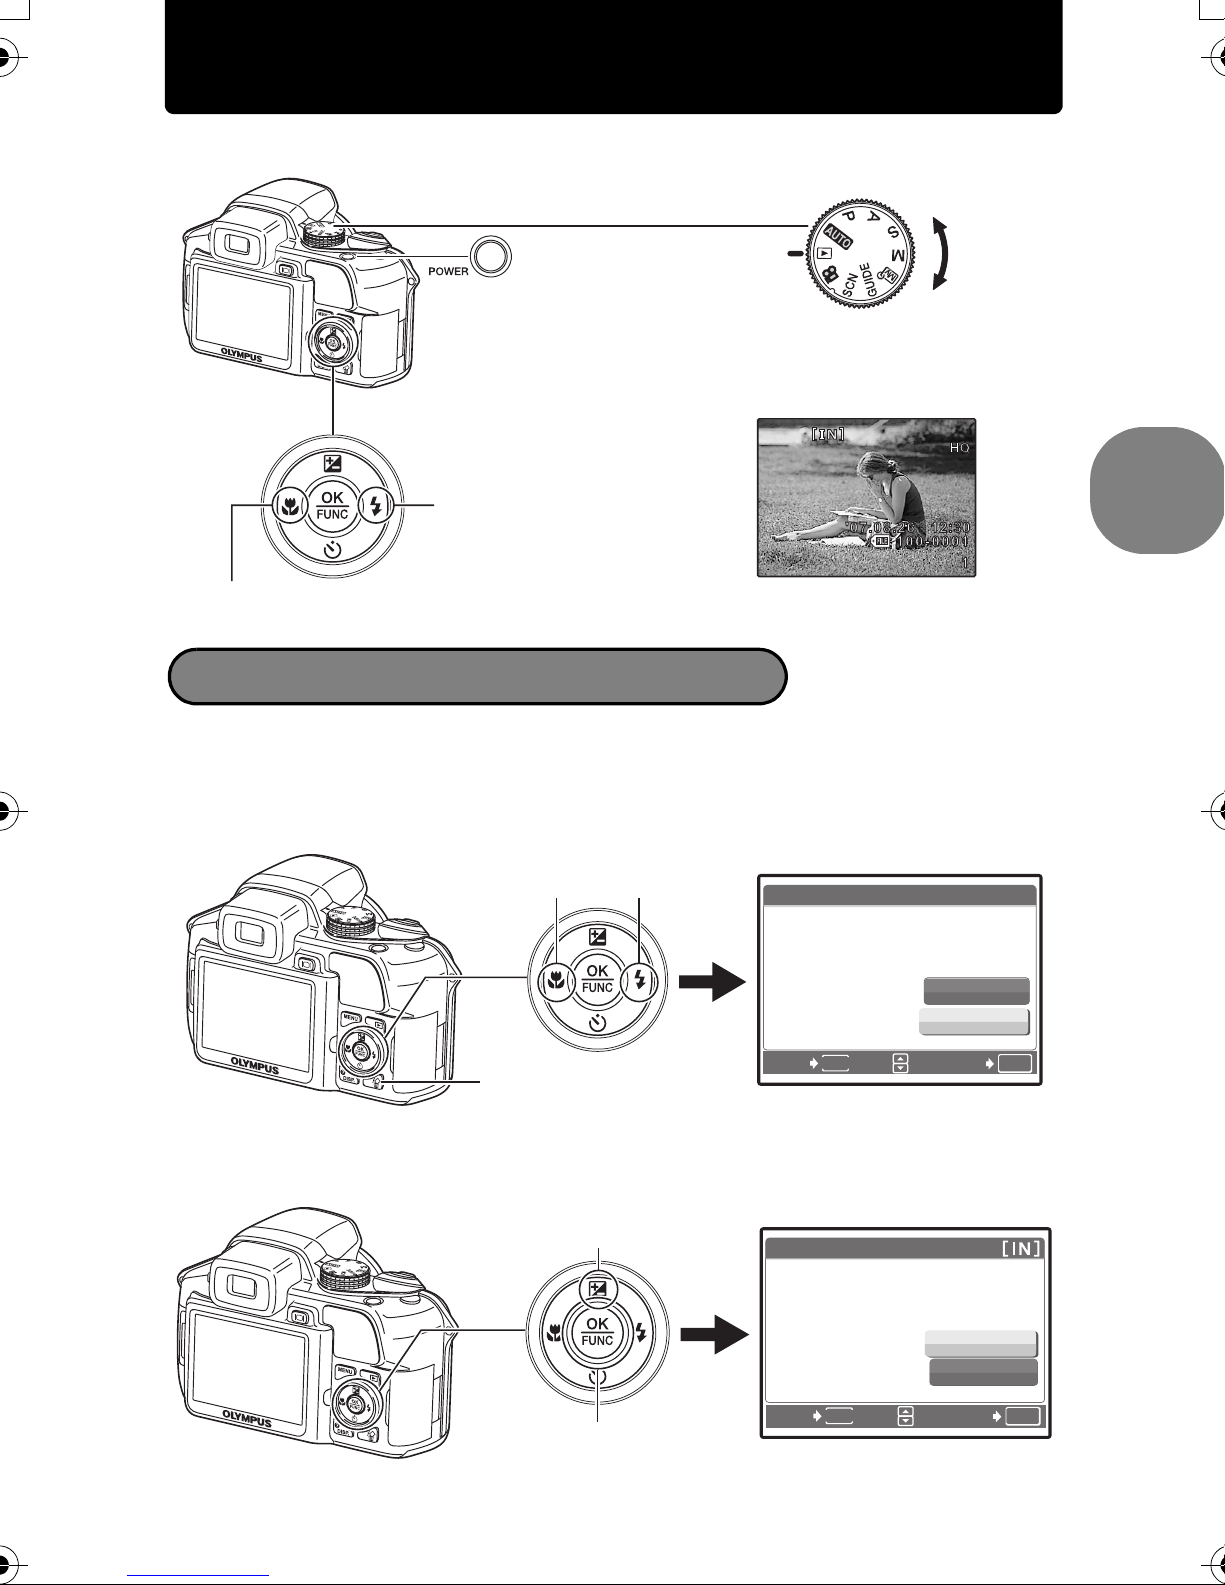
View pictures
a. Set the mode dial to q.
Arrow pad
Next Picture
Prev. Picture
Mode Dial
Quick Start Guide
Erase pictures
a. Press the 4& button and the 3# button to display
the picture you want to erase.
b. Press the S button.
4& button
S button
3# button
ERASE [IN]
YES
NO
BACK
MENU
SET
OK
c. Press the 1 F button to select [YES], and press
the o button to erase the picture.
1 F button
ERASE
o button
BACK
MENU
YES
NO
SET
OK
EN 9
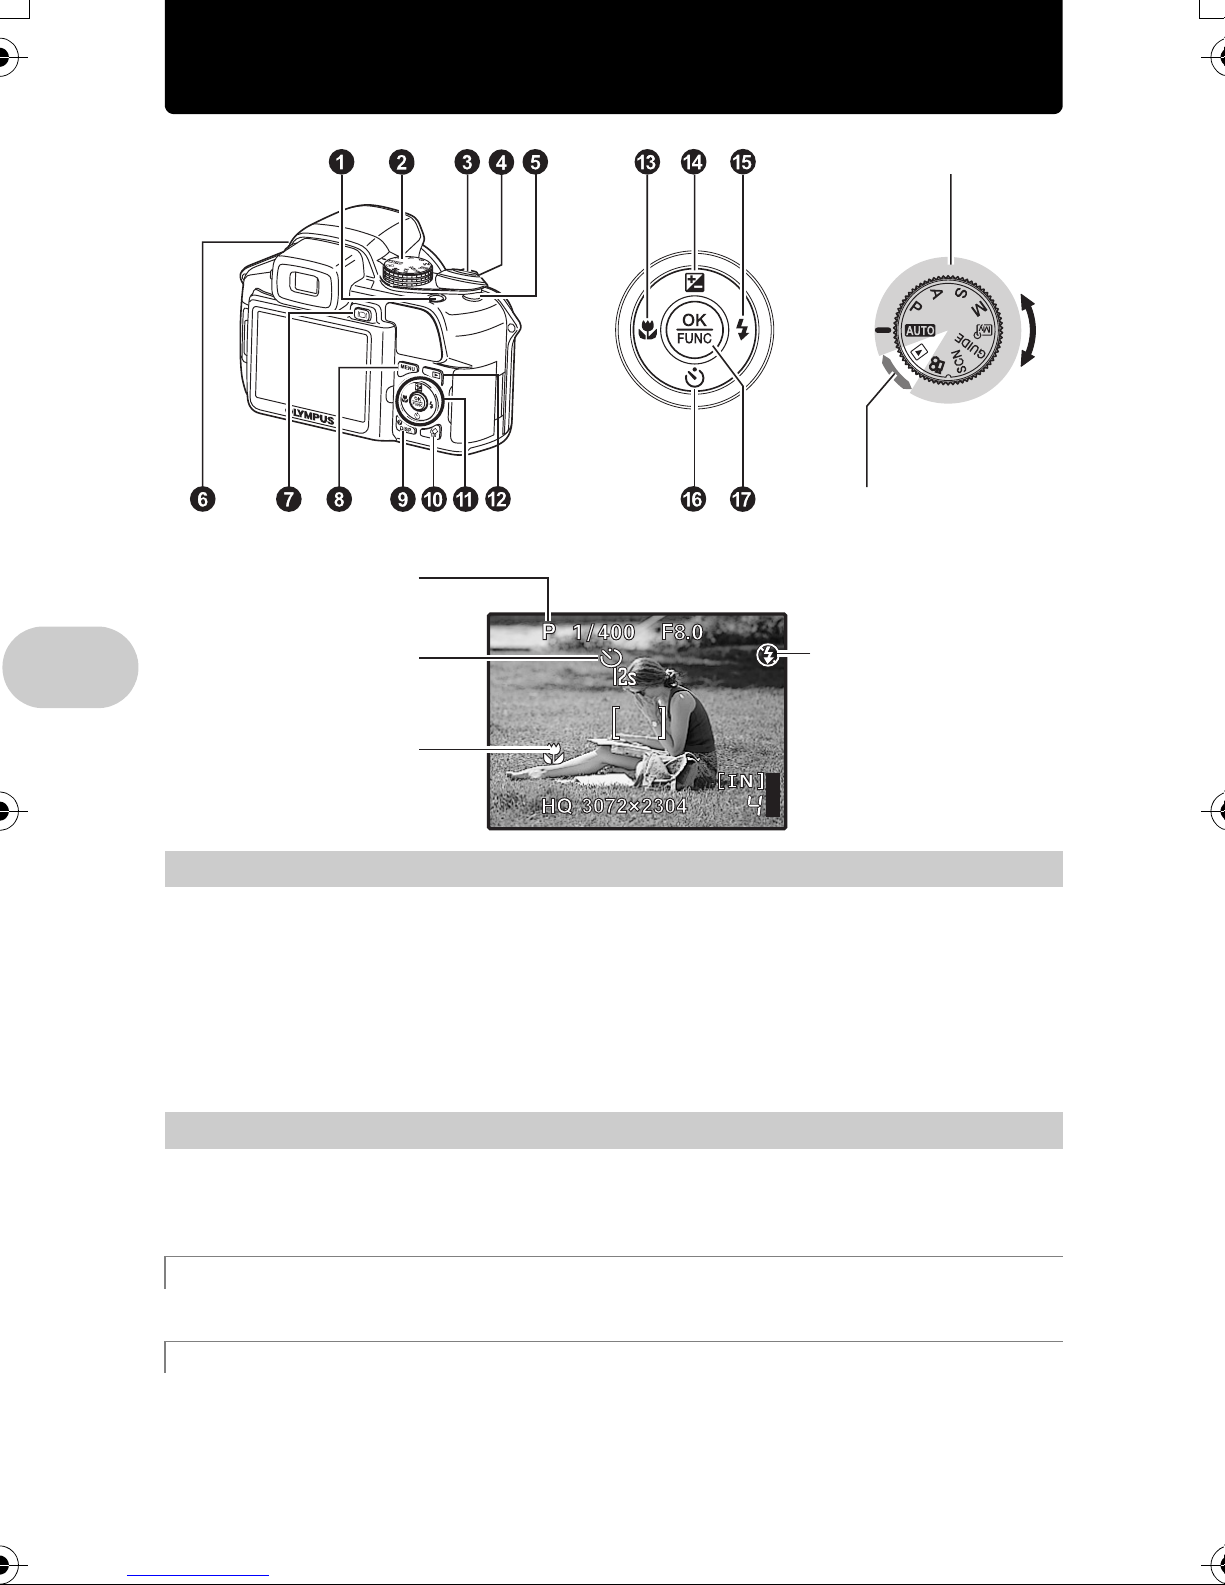
Button operations
Shooting Mode
Shooting Mode
Playback mode
Self-timer
Macro mode/ Super
macro mode
1 o button
Power on: Shooting Mode
Button operations
2 Mode dial
Set the mode dial to the desired shooting or playback mode.
• Some functions cannot be set depending on the position of the mode dial.
g “Functions available in shooting modes and scene modes” (P.72)
• Monitor turns on
• Lens extends
• Before turning the camera on in shooting mode, remove the lens cap.
Playback mode
• Monitor turns on
Switching between shooting and playback modes
Flash mode
Turning the camera on and off
h Shooting pictures with full automatic settings
The camera determines the optimum settings for the shooting conditions automatically.
P Set the optimum aperture value and shutter speed
The camera automatically sets the optimum aperture value and shutter speed for the brightness of
the subject.
10 EN
A Changing the aperture value for shooting pictures
F4.0
0.0
1/1000
F2.8
1/100
0.0
F2.8
1/1000
+2.0
Press 12 after pressing 1 F. The camera automatically sets
A
1/1000
F4.0
0.0
the shutter speed.
Aperture value
[ ]
1 : Increases the aperture value.
2 : Decreases the aperture value.
When the correct exposure cannot be obtained, the aperture value
is displayed in red.
o : Sets the settings.
Adjustment range
W : F2.8 to F8.0
T : F4.5 to F8.0
SET
OK
S Changing the shutter speed for shooting pictures
Press 12 after pressing 1 F. The camera automatically sets
S
1/100
F2.8
[ ]
SET
Shutter speed range:
1/2 to 1/1000
(When [NOISE REDUCT.]
is set to [ON]: up to 4 sec.)
0.0
the aperture value.
Shutter speed
1 : Sets the shutter speed faster.
2 : Sets the shutter speed slower.
When the correct exposure cannot be obtained, the aperture value
OK
is displayed in red.
o : Sets the settings.
Button operations
M Changing the aperture value and shutter speed for shooting pictures
Press 124 3 after pressing 1 F.
Exposure differential
M
1/1000
F2.8
+2.0
[ ]
OK
SET
Setting range:
Aperture value F2.8 to F8.0
Shutter speed: 15" to 1/2000
(The shutter speed varies
depending on the aperture
value.)
To take long exposure (bulb) shots
Press 2 to set shutter speed to BULB. The shutter remains open as long as the shutter button is
pressed. (The maximum time that it can remain open is 8 minutes, however, this is possible only
when [ISO] is set to [50], [100] or [200].)
When this range has been exceeded ±3.0EV, the exposure
differential is displayed in red.
Aperture value
4 : Increases the aperture value.
3 : Decreases the aperture value.
Shutter speed
1 : Sets the shutter speed faster.
2 : Sets the shutter speed slower.
o : Sets the settings.
EN 11
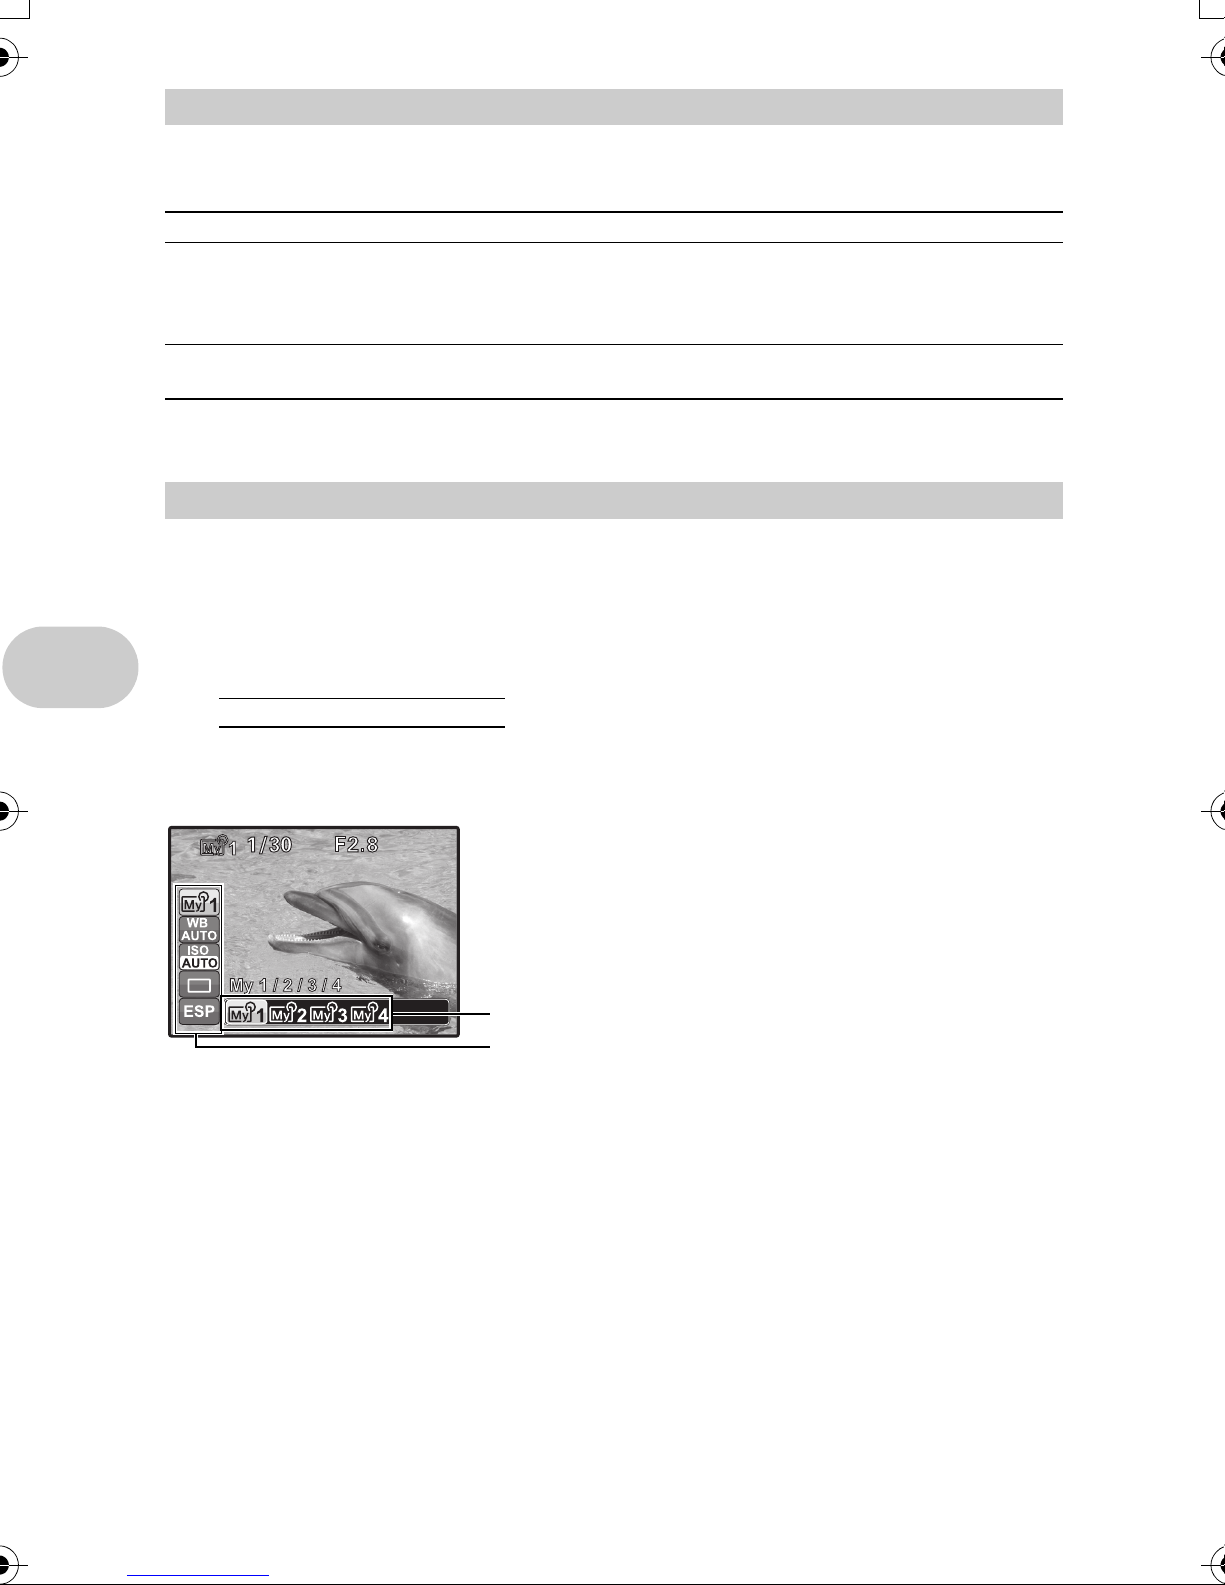
rSetting your own original mode for shooting pictures
This mode allows you to set each shooting function manually and use as your original shooting
mode.
g “MY MODE SETUP
Setting and saving shooting-related functions
” (P.45)
Use the function menu to switch my mode.
g “The functions you can set with the function menu” (P.18)
g Follow the shooting guide for setting
SHOOTING GUIDE 1/3
1
Brightening subject.
2
Shooting into backlight.
3
Set particular lighting.
Blurring background.
4
Adjusting area in focus.
5
SET
OK
This function allows you to set the target items by following the
shooting guide displayed on the screen.
• Press m to display the shooting guide again.
• To change the setting without using the shooting guide, set the
shooting mode to another one.
• Functions set using the Shooting Guide will revert to the default
settings when m is pressed or when the shooting mode is
changed.
s Shoot pictures by selecting a scene according to the situation
You can shoot pictures by selecting a scene mode according to the situation.
Select a scene mode/change the scene mode to another one
• Press m and select [SCN] from the top menu. Use the 12 to select a scene and press o.
• By switching to the other scene mode, most settings will be changed to the default settings of
each scene mode.
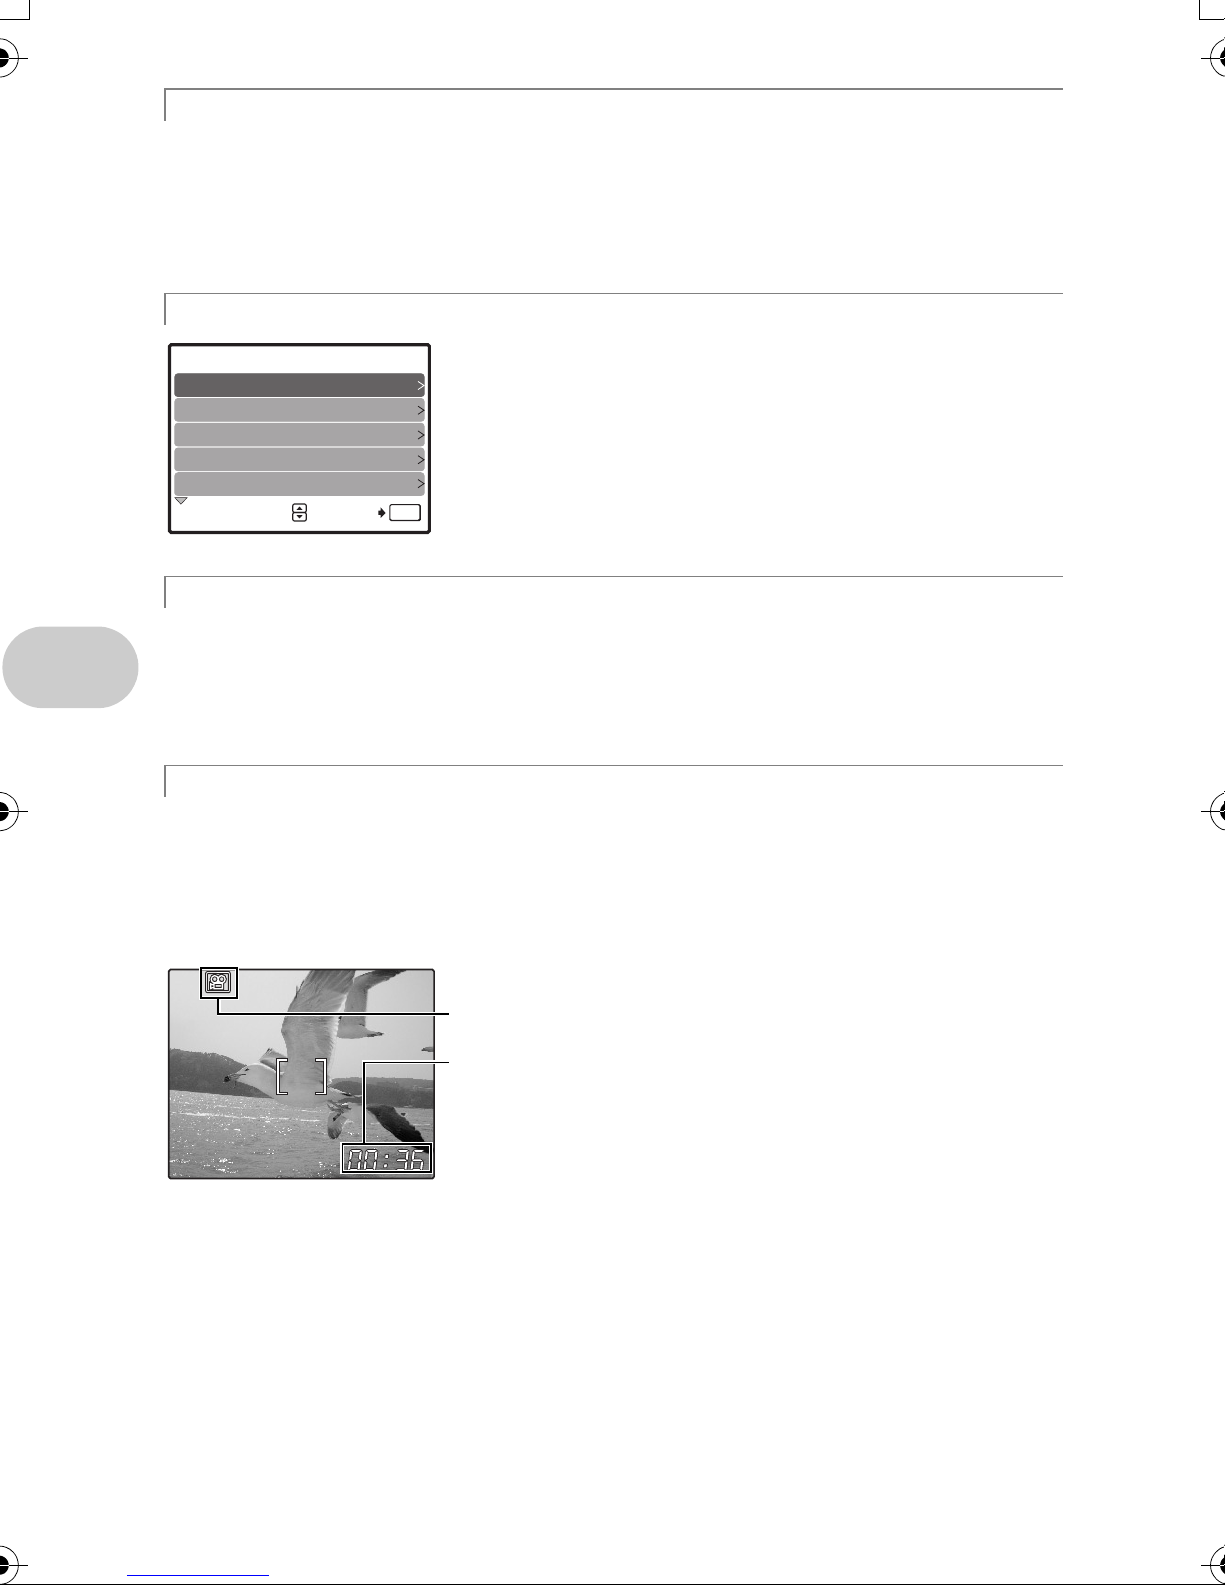
nRecording movies
When [R] (movies) is set to [ON], audio is recorded with the movie.
• When [R] (movies) is set to [ON], optical zoom cannot be used during the shooting.
g “R (movies)
• To zoom in when [R] (movies) is set to [ON], set [DIGITAL ZOOM] to [ON].
Button operations
g “DIGITAL ZOOM
Recording sound with movies
Zooming in on your subject
” (P.31)
” (P.26)
• When [IMAGE STABILIZER] is set to [ON], continuous movie recording for a long period will
cause the camera’s internal temperature to rise and the camera may stop operation
automatically. Remove the battery and allow the camera to cool down for some time before you
begin shooting again. Or you can set [IMAGE STABILIZER] to [OFF].
In addition, the temperature of the camera’s exterior also rises during usage. This is not a
malfunction.
12 EN
This icon lights red during movie recording.
The remaining recording time is displayed.
When the remaining recording time reaches 0, recording stops.
qSelecting playback mode
The last picture taken is displayed.
• Press the arrow pad to view other pictures.
• Use the zoom lever to switch among close-up playback, index display and calendar display.
g “MOVIE PLAY
Playing back movies
” (P.33)
3 Shutter button
Shooting pictures
Shooting still pictures
Set the mode dial to h, P, A, S, M, r, g or s, and lightly press the shutter button
(halfway). The green lamp lights when the focus and exposure are locked (focus lock). Now press
the shutter button all the way (completely) to shoot a picture.
Green lamp
Locking the focus and then composing the shot
(focus lock)
Compose your picture with the focus locked, and then fully
press the shutter button to shoot a picture.
• When the green lamp blinks, the focus is not adjusted
properly. Try locking the focus again.
Recording movies
Set the mode dial to n, and press the shutter button halfway to lock the focus, and then press the
shutter button completely to start recording. Press the shutter button again to stop recording.
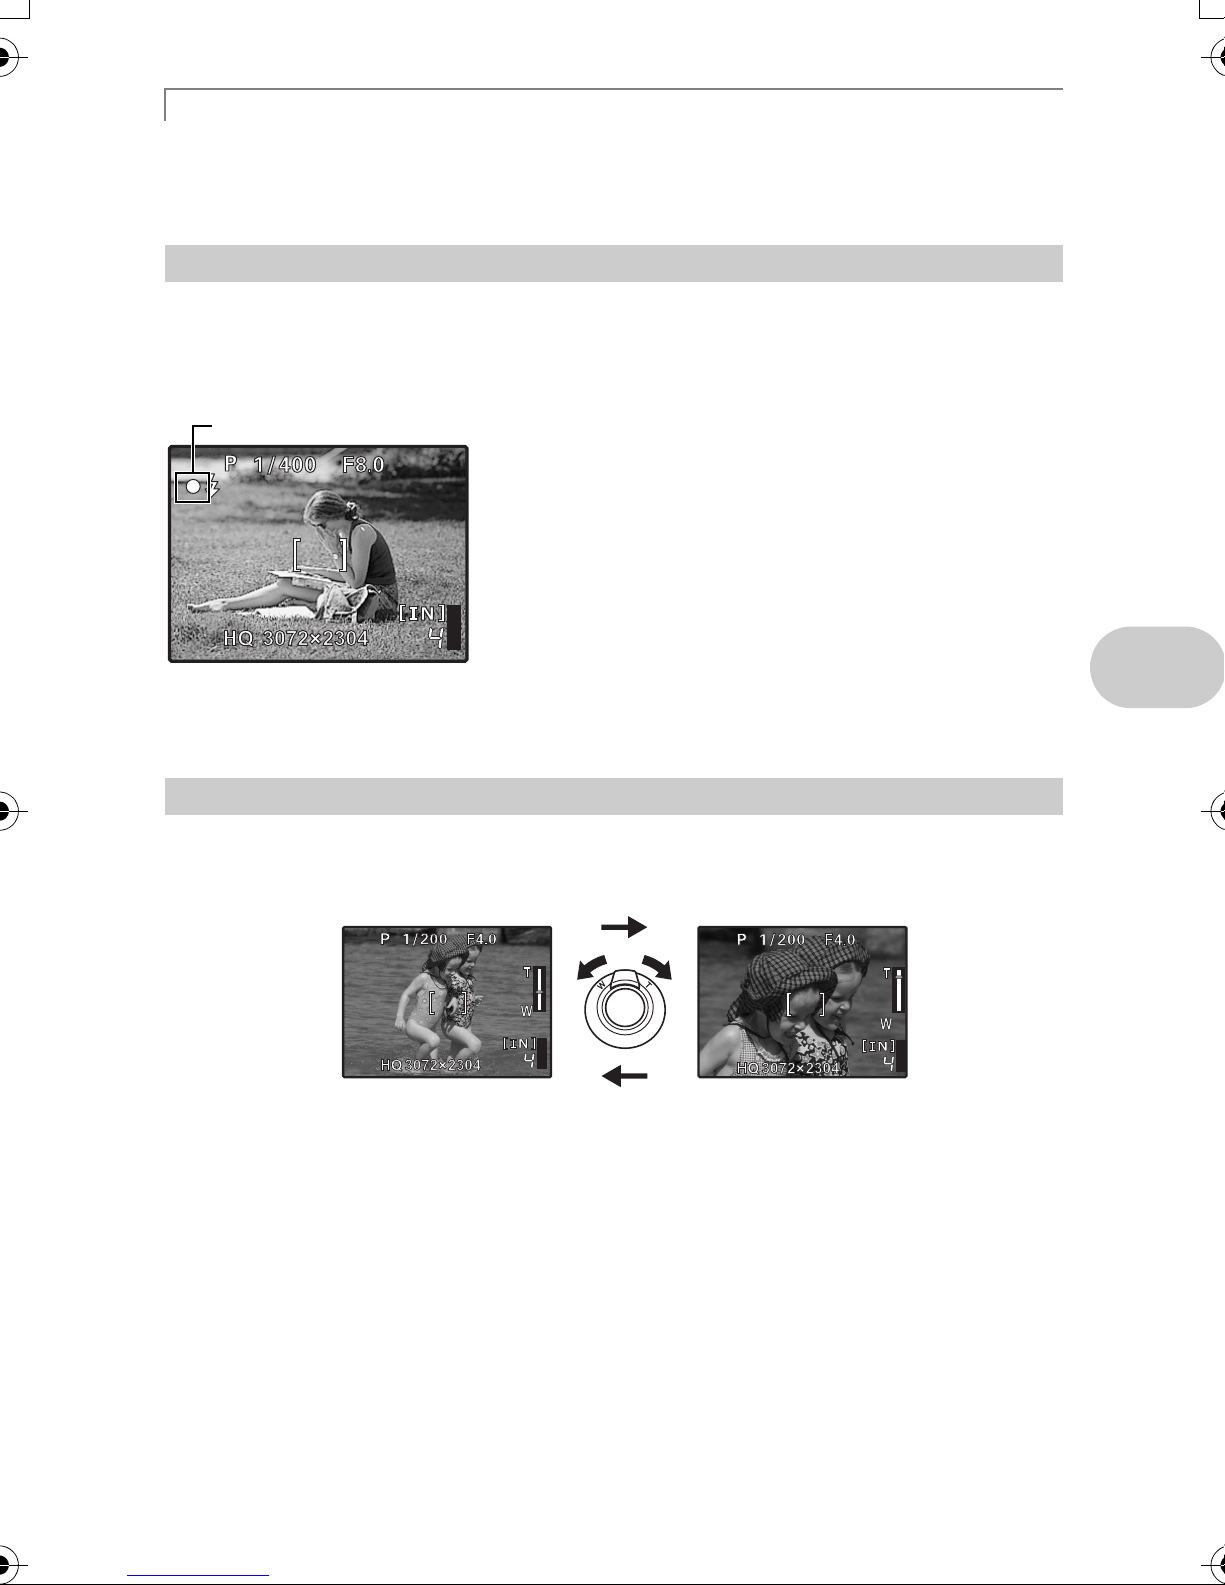
4 Zoom Lever
Zooming while shooting/close-up playback
Shooting mode: Zooming in on your subject
Optical zoom: 18×
Button operations
Zoom out:
Push the lever toward W.
Zoom in:
Pull the lever toward T.
EN 13
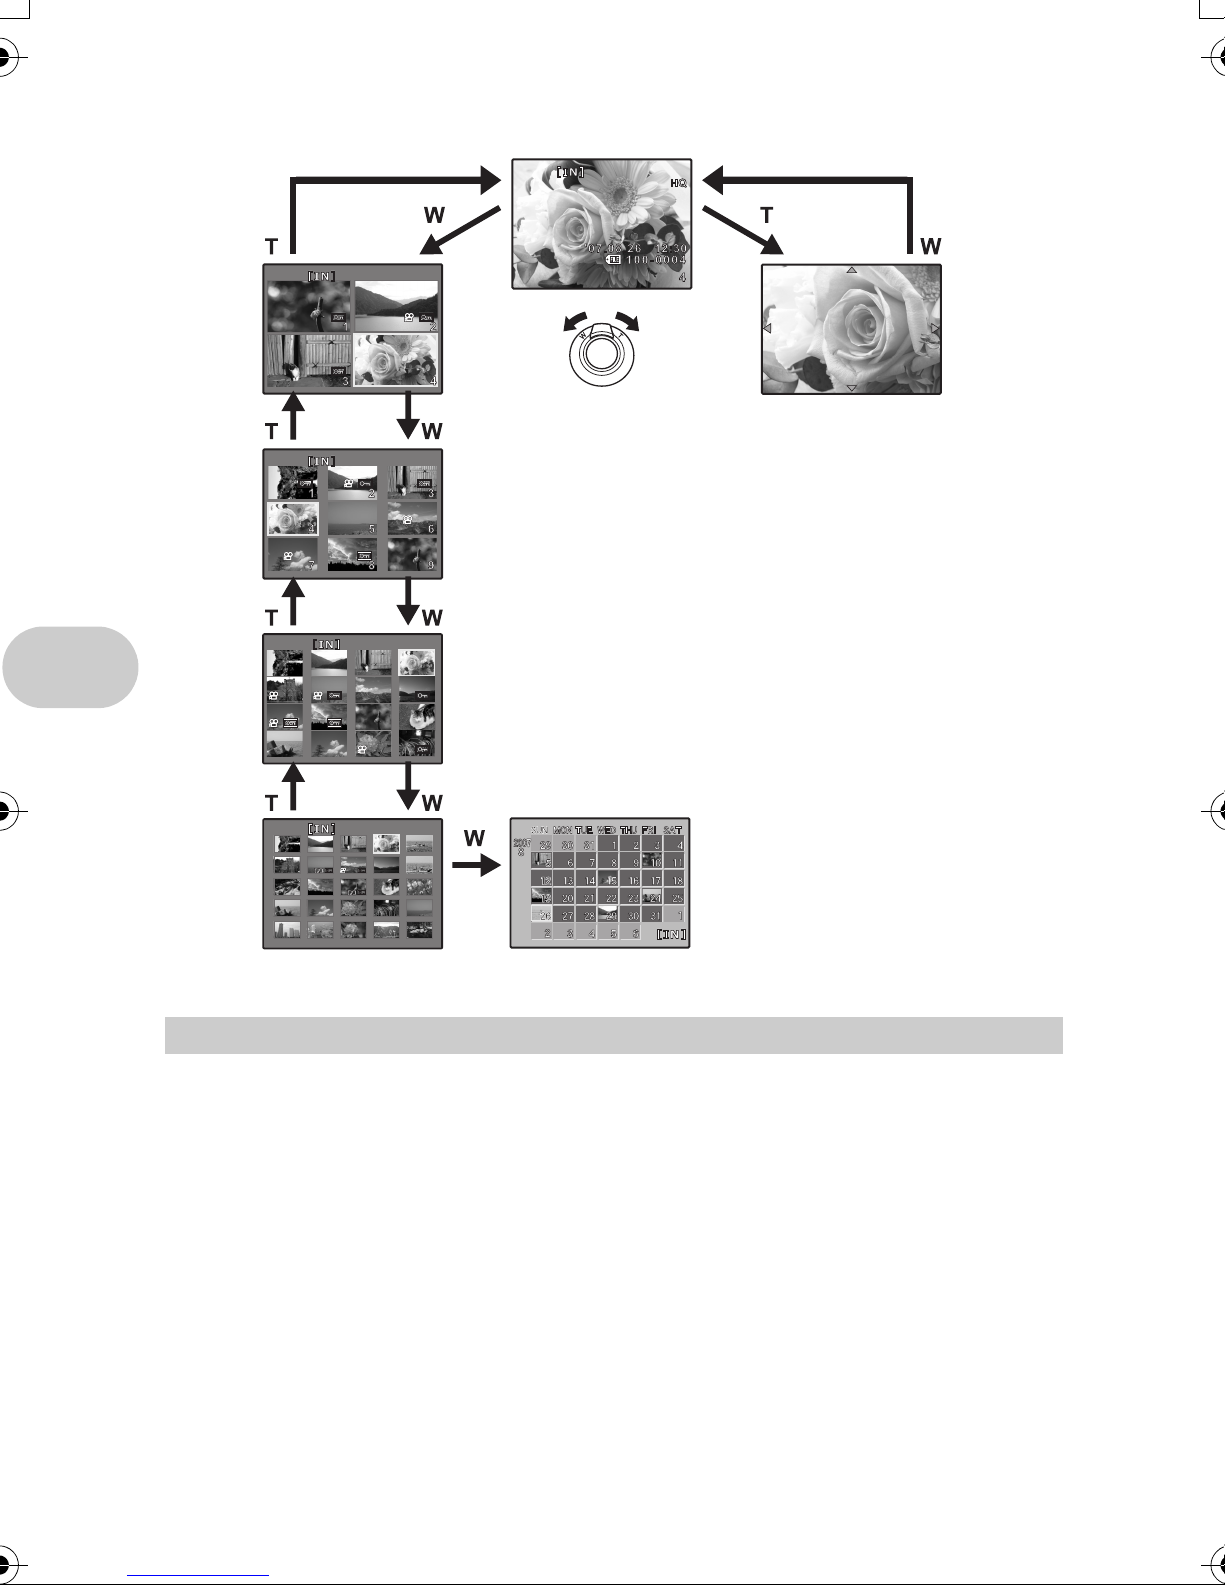
Playback mode: Changing the picture display
Single-frame playback
• Use the arrow pad to browse pictures.
Button operations
Index display
• Use the arrow pad to select a
picture for playback, and press
o to play back the singleframe of the picture selected.
Close-up playback
• Pull the lever toward T to
incrementally enlarge the picture
up to 10 times the original size.
Push the lever toward W to
reduce the size.
• Use the arrow pad during closeup playback to scroll around the
picture.
• Press o to return to the singleframe playback.
Calendar display
• Use the arrow pad to select the date,
and press o or pull the lever toward
T on the zoom lever to display the
pictures on the date selected.
5 h button
Press h in shooting mode to select the digital image stabilization.
Press o to set.
g “IMAGE STABILIZER
Frequently used functions can be assigned to h as a custom button when the mode dial is set to
P, A, S, M, r or s.
The digital image stabilization is activated when the mode dial is set to h or n.
g “CUSTOM BUTTON
“Functions that can be assigned to My Mode/custom button” (P.71)
14 EN
Shooting with digital image stabilization
Shooting pictures using digital image stabilization
Assigning functions to the custom buttons
” (P.45)
” (P.27)
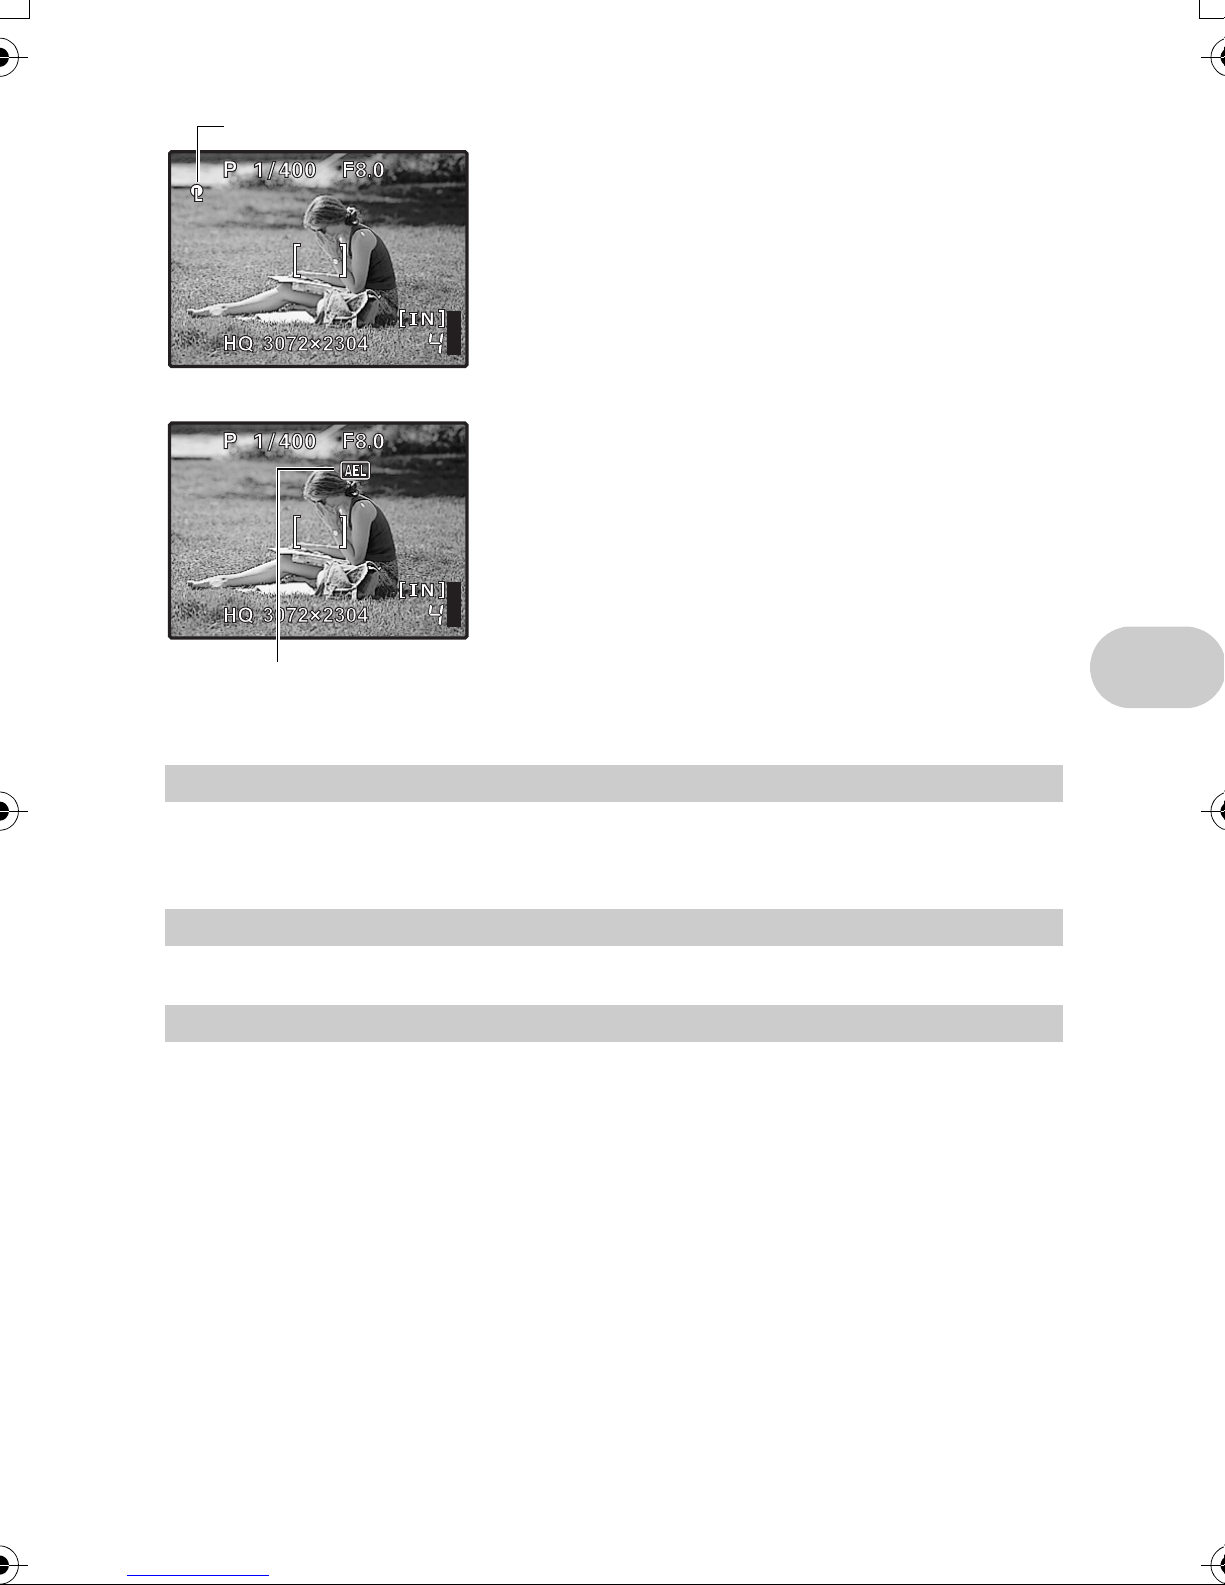
AF lock mark
B is displayed while in AE lock.
Locking the focus position (AF Lock)
• Assign the AF lock function to h so that the focus is
locked by pressing h, and V (AF lock mark) is displayed
on the monitor. Press h again to cancel the AF lock.
Each time you press the button, focus is locked and
canceled alternately.
• To save the locked focus position after taking a picture (AF
memory), hold down h for more than 1 second so that
U (AF memory mark) is displayed on the monitor. Press
h again to reset the AF memory.
• If the zoom is operated after engaging the AF lock, the
picture may be out of focus. Engage the AF lock after
operating the zoom.
Locking the exposure (AE lock)
• Assign the AE lock function to h so that the meter
reading is saved by pressing h and the exposure is
locked. B (AE lock mark) is displayed on the monitor.
Press h again to cancel the AE lock. Each time you
press the button, focus is locked and canceled alternately.
• AE lock is automatically canceled after each shooting.
• To save the locked meter reading after taking a picture (AE
memory), hold down h for more than 1 second so that
C (AE memory mark) is displayed on the monitor. C
is displayed while the meter reading is being saved. Press
h again to reset the AE memory.
Button operations
6 # button
Opens the flash.
Press this button to take a picture with flash.
g “3# button
7 u button
Toggles between the monitor and viewfinder.
Flash shooting
” (P.17)
Monitor/Viewfinder
8 m button (MENU)
Displays the top menu.
Flash pop-up
EN 15
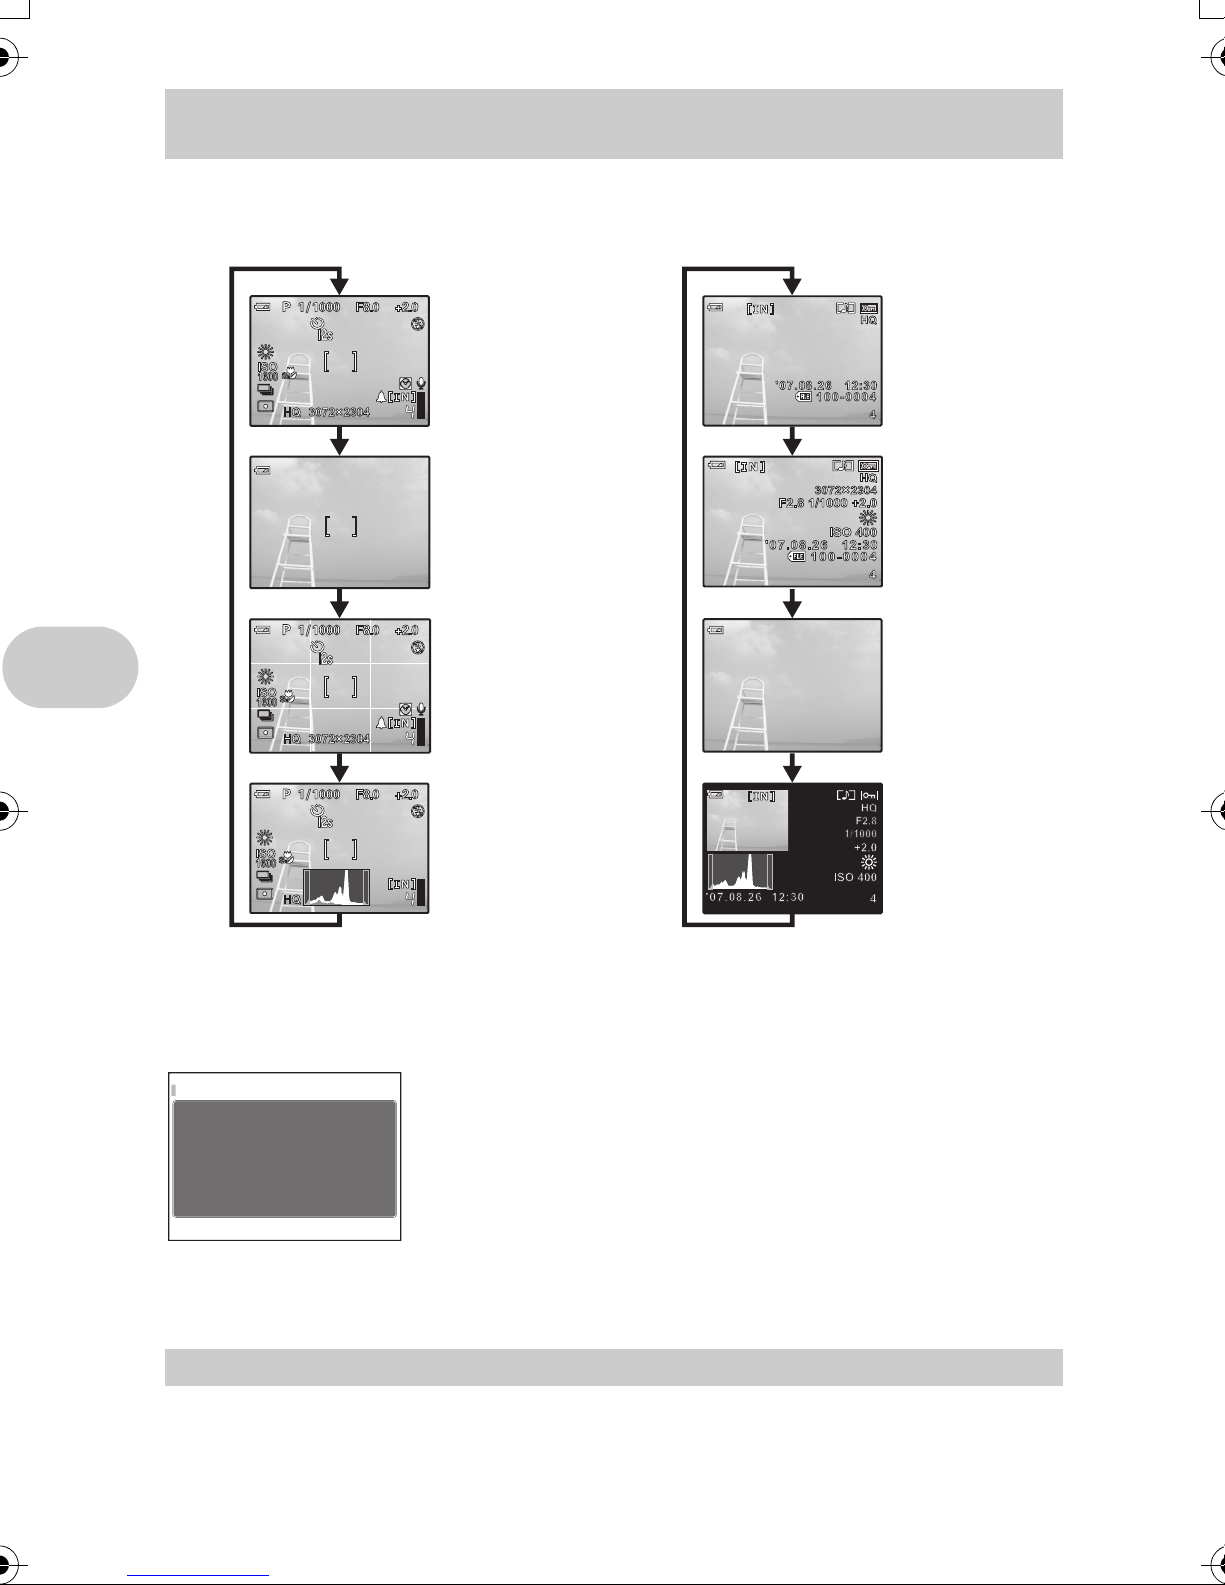
9 DISP./E button
METERING
Changing the information on display/Display the menu guide/Checking the time
Changing the information displays
Press DISP./E to change the display in the following order.
Shooting Mode
Playback mode
Normal display
Simple display
FRAME ASSIST
(Horizontal and
vertical lines or
diagonal lines)
Histogram
display
*1*2
*1
*1*2
Normal display
Detailed display
No information
display
Histogram
display
*1
Button operations
*1 Not displayed in case of n.
*2 Not displayed if it is set to [OFF] in the menu.
g “u
Displaying the histogram
“FRAME ASSIST
Displaying the frame assist/Determining the type of frame assist
Displaying the menu guide
ESP/
Sets picture brightness
for taking pictures.
Checking the time
While the camera is off, press DISP./E to display the set alarm time (when [ALARM CLOCK] is
set) and the current time for 3 seconds.
0 S button
Display a picture to erase in playback mode, and press the S.
• Once erased, pictures cannot be restored. Check each picture before erasing to avoid
accidentally erasing pictures you want to keep.
g “0
Protecting pictures
” (P.44)
” (P.44)
With menu items selected, hold down DISP./E to display the
menu guide. Release DISP./E to close the menu guide.
Erasing pictures
” (P.37)
16 EN
a Arrow pad (124 3)
F8.0
1/1000
+2.0
Use the arrow pad to select scenes, playback picture, and the items on the menus.
b q button
Viewing pictures/Printing pictures
Shooting mode: Viewing pictures
The last picture taken is displayed on the monitor. Press q in shooting mode.
Press q again or press the shutter button halfway to return to shooting mode.
Playback mode: Printing pictures
When the printer is connected to the camera, display a picture to be printed out in playback mode,
and press q.
g“Easy print” (P.46)
c 4& button
Press 4& in shooting mode to select the macro mode.
Press o to set.
OFF Macro mode is deactivated.
& (Macro mode) Allows you to shoot from as close as 10 cm/3.94 in. (when the zoom
is set for the zoom-out angle) to your subject.
% (Super macro mode) Allows you to shoot from as close as 1 cm/0.39 in. to your subject.
• During super macro mode, the zoom, flash and AF predict are not available.
d 1 F button
Press 1 F in shooting mode, set using 43 then press o.
P
1/1000
F8.0
+2.0
• Adjustable from -2.0 EV to +2.0 EV.
Shooting pictures close to the subject
Changing picture brightness
Button operations
3 : Brighten.
[ ]
OK
SET
e 3# button
4 : Darken.
Activate the setting contents.
Flash shooting
Press 3# in shooting mode to select the flash mode.
Press o to set.
AUTO (Auto-flash) The flash fires automatically in low light or backlight conditions.
!(Red-eye reduction flash) This emits pre-flashes to reduce the occurrence of red-eye in
your pictures.
#(Fill-in flash) The flash fires regardless of the available light.
H(Red-eye fill-in flash) The flash always fires after pre-flashes for red-eye reduction are
emitted.
#SLOW The flash fires with slow shutter speed. Set the flash timing in
[#SYNCRO]. g“#SYNCRO
Selecting the flash timing
” (P.28)
$(Flash off) The flash does not fire even in low light conditions.
• To take a picture with the flash, press # (Flash Popup). The settings cannot be made if the flash
is not popped up.
g “# button
• Some items cannot be set depending on the position of the mode dial.
Flash pop-up
” (P.15)
EN 17
f 2Y button
Press 2Y in shooting mode to select on and off of the self-timer.
Press o to set.
YOFF Cancel the self-timer.
Y12 SEC After the setting, press the shutter button completely. The self-
timer lamp lights for approximately 10 seconds, then starts
blinking. After blinking for approximately 2 seconds, the picture
is taken.
Y2 SEC After the setting, press the shutter button completely. The self-
timer lamp flashes for 2 seconds, the picture is taken.
• To cancel the self-timer, press 2Y.
• Self-timer shooting is automatically canceled after one shot.
Self-timer shooting
g o button (OK/FUNC)
Displays the function menu which contains the functions and settings frequently used during
shooting. This button is also used to confirm your selection.
Setting using the function menu
The functions you can set with the function menu
My 1/2/3/4 ..................................................
s/E/c/d
• Displayed when the mode dial is set to r.
• Settings are registered on s as a factory default.
Function menu
Switching the registered original shooting mode
Button operations
43 : Select a setting, and press o.
12 : Select the function to be set.
Other functions you can set with the function menu
g “WB
Adjusting the color of a picture
“ISO
Changing the ISO sensitivity
“DRIVE
“METERING
Continuous shooting
Changing the area for measuring the brightness of a subject
18 EN
” (P.23)
” (P.24)
” (P.25)
” (P.25)
Menu operations
SCN
SETUP
SILENT
MODE
RESET
IMAGE
QUALITY
SCN
CAMERA
MENU
CA M E RA M EN U
SCN
SETUP
SILENT
MODE
RESET
IMAGE
QUALITY
SCN
CAMERA
MENU
Mode Dial
o button
m button
Arrow pad
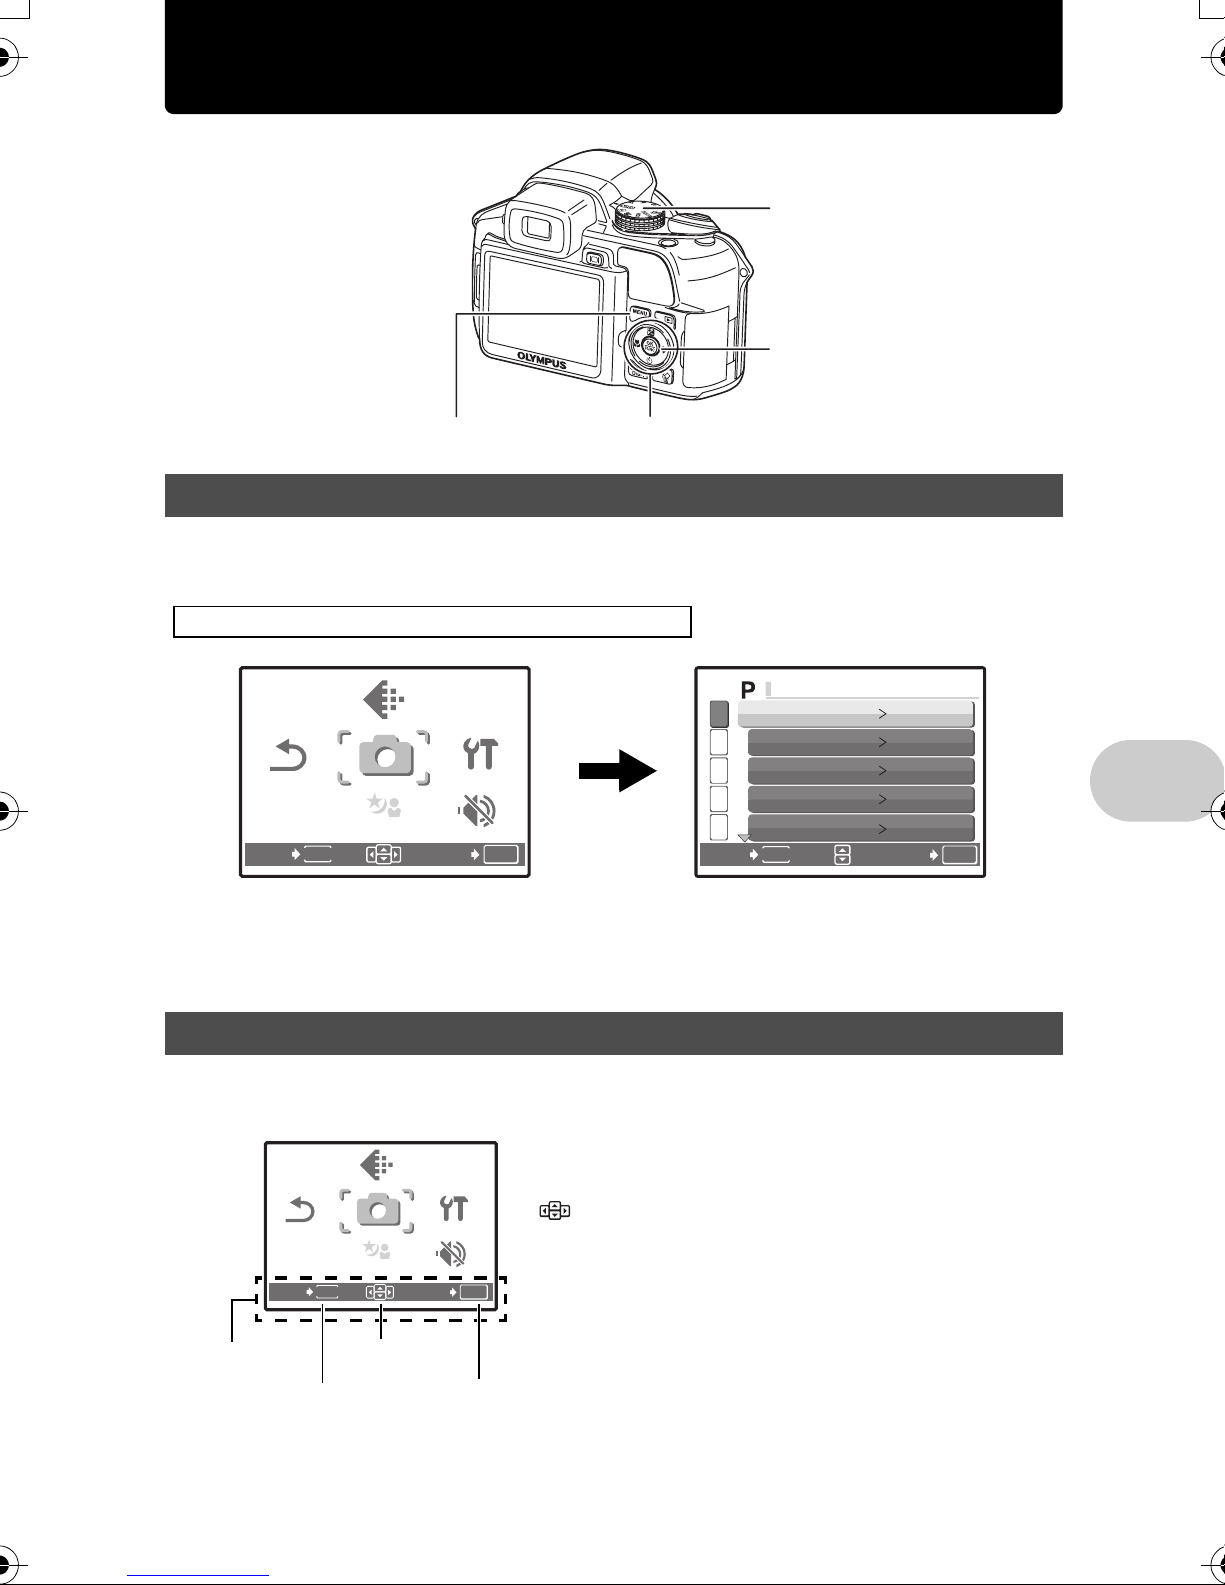
About the menus
Pressing m displays the top menu on the monitor.
• The items displayed on the top menu differ according to the mode.
Top menu (in still picture shooting mode)
IMAGE
IMAGE
QUALITY
QUALITY
CAMERA
RESET
RESET
EXIT
MENU
CAMERA
MENU
MENU
SCN
SCN
SCN
SETUP
SETUP
SILENT
SILENT
MODE
MODE
SET
OK
• When [CAMERA MENU], [PLAYBACK MENU], [EDIT], [ERASE] or [SETUP] is selected, the
menu corresponding to the respective functions is displayed.
• When your camera is set according to the shooting guide with the mode dial set at g,
press m to display the shooting guide screen.
1
WB
2
ISO AUTO
3
DRIVE
4
METERING
5
FINE ZOOM
MENU
BACK
AUTO
o
ESP
OFF
SET
OK
Menu operations
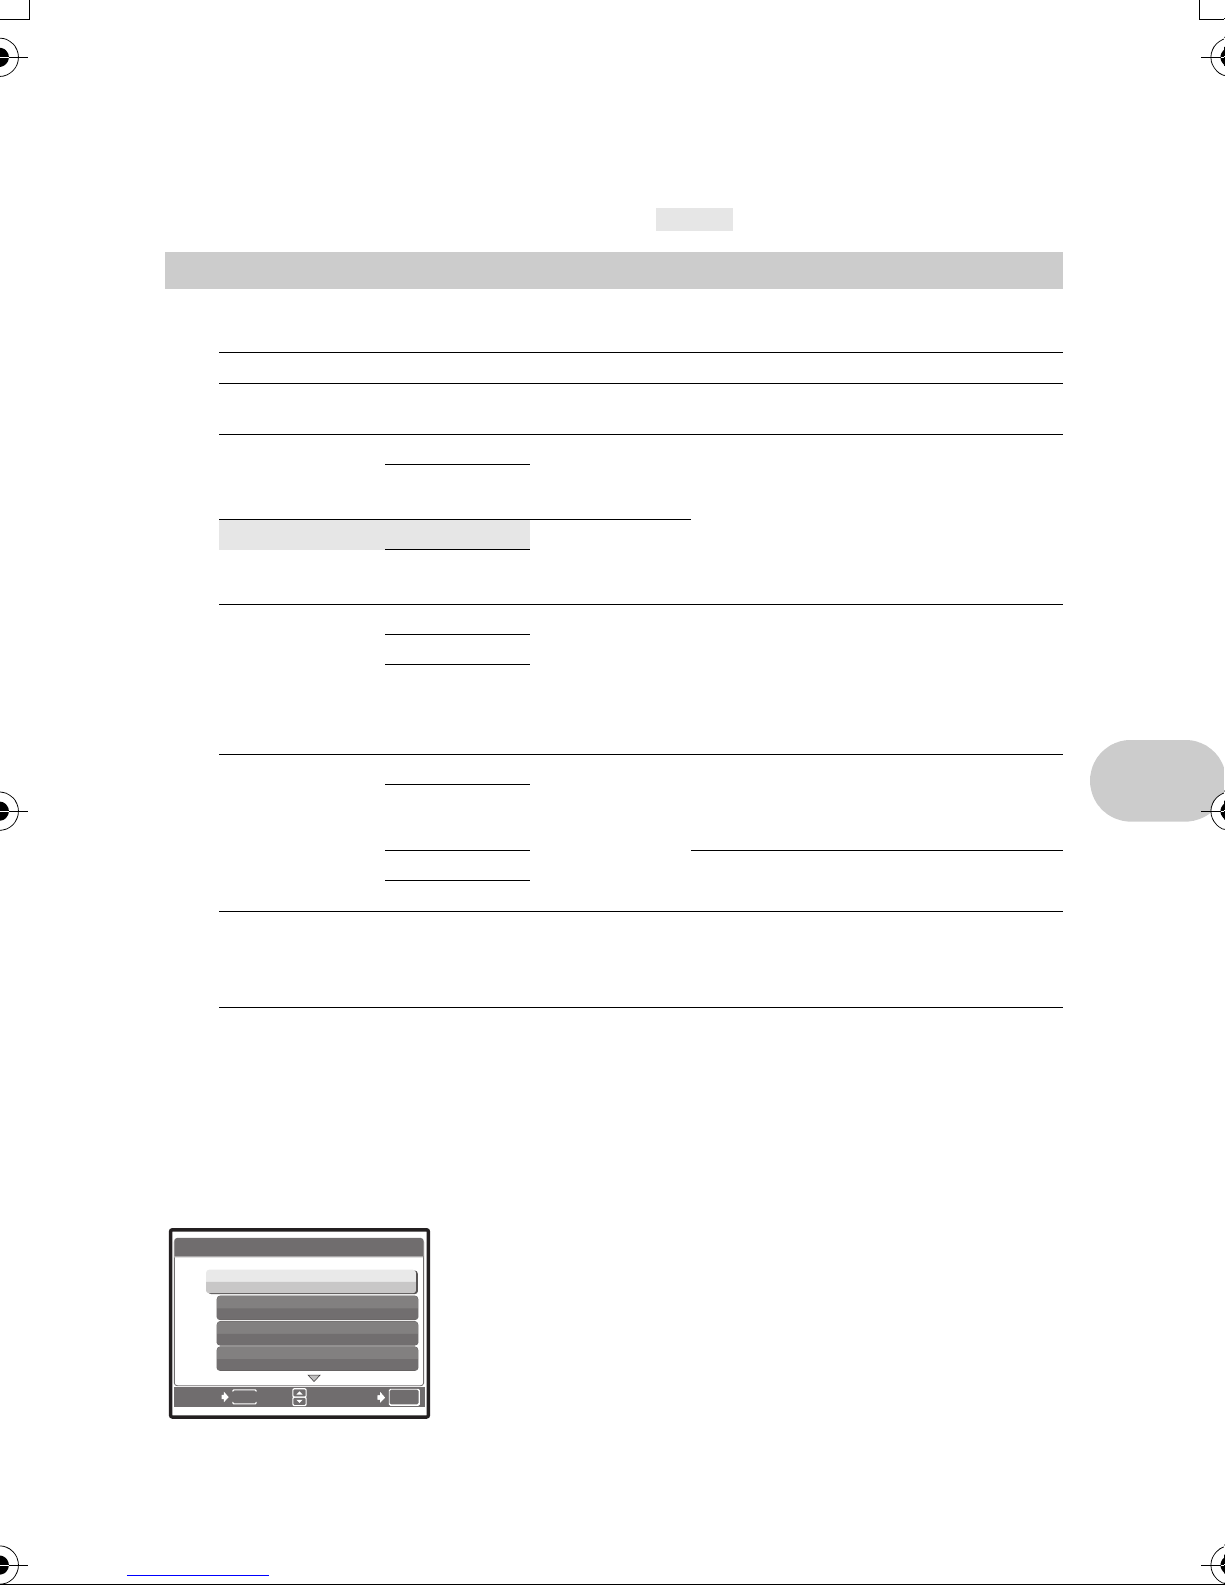
Operation guide
During menu operations, the buttons and their respective functions are displayed at the bottom of
the monitor. Follow these guides to navigate the menus.
IMAGE
IMAGE
QUALITY
QUALITY
CAMERA
MENU
m
CAMERA
MENU
MENU
SCN
SCN
SCN
Arrow pad
RESET
RESET
EXIT
Operation guide
SETUP
SETUP
SILENT
SILENT
MODE
MODE
SET
BACKa : Returns to the previous menu.
EXITa : Exits the menu.
: Press 124 3 to select a setting.
SETf : Sets the selected item.
OK
o
EN 19
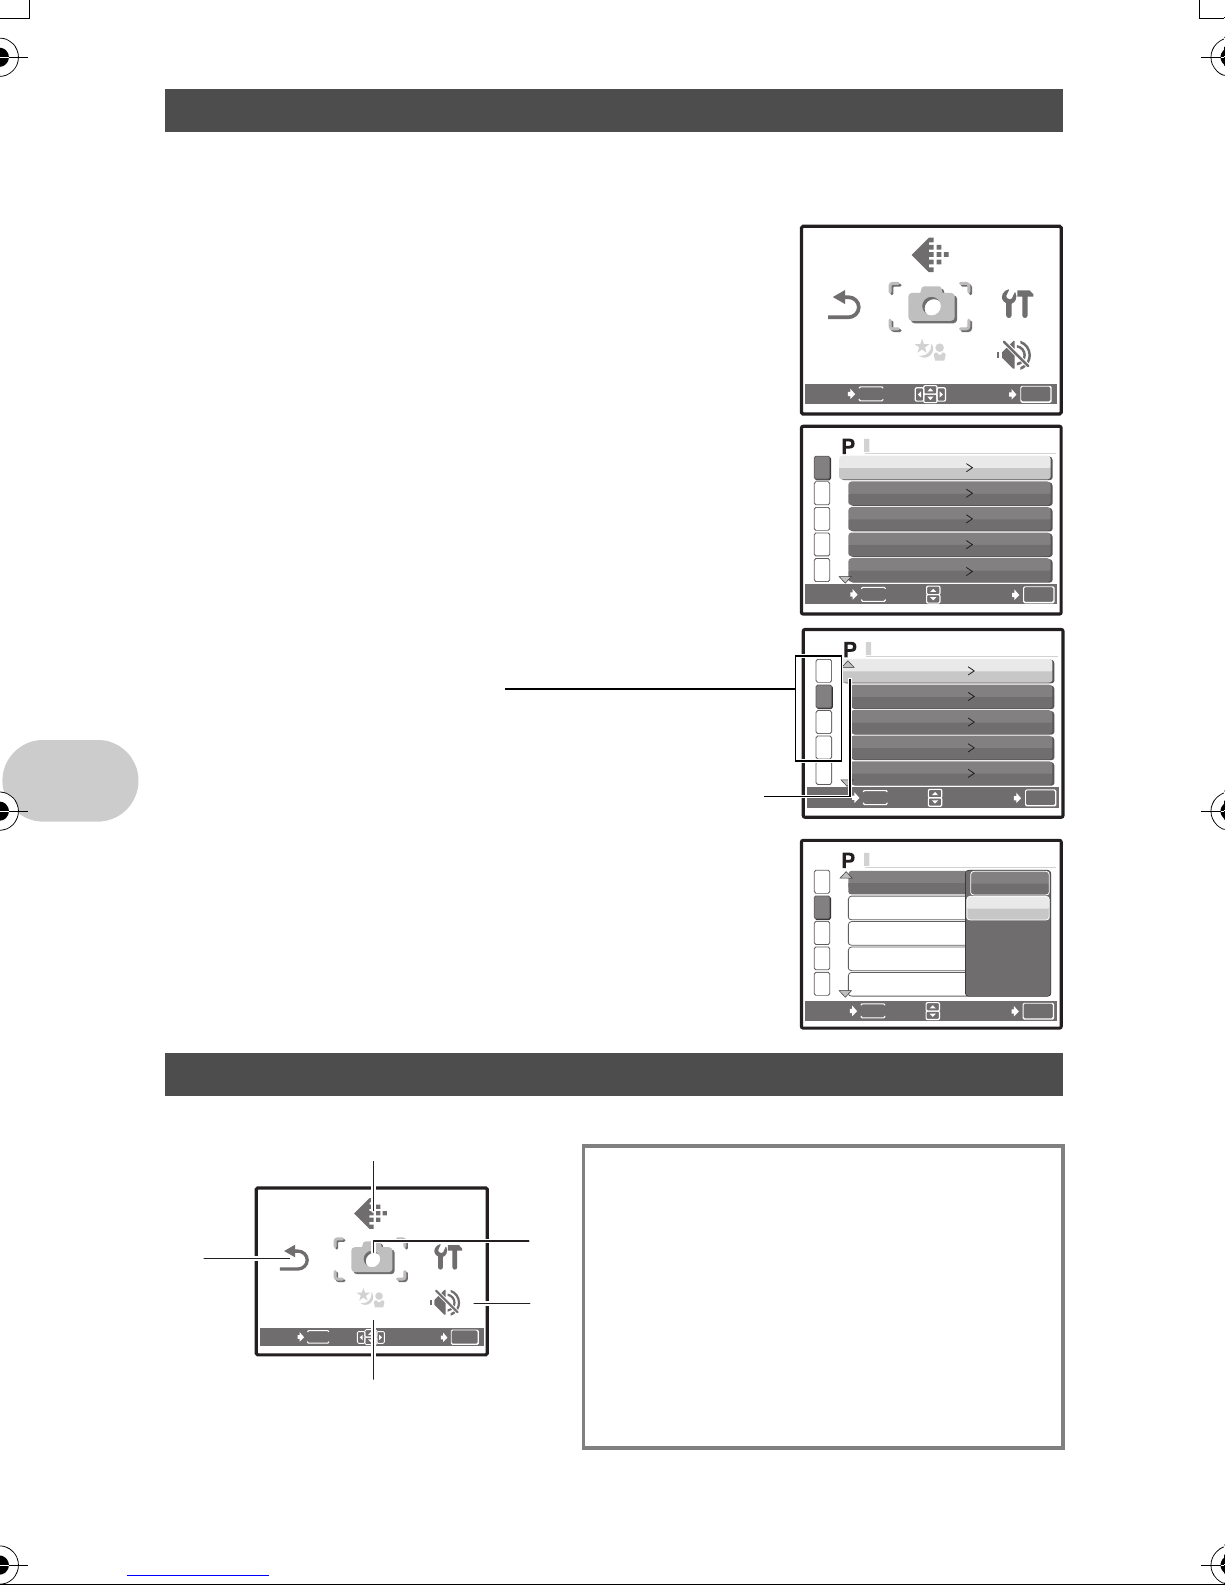
Using the menus
SCN
SETUP
SILENT
MODE
RESET
IMAGE
QUALITY
SCN
CAMERA
MENU
CAM E R A M E N U
CAM E R A M E N U
CAM E R A M E N U
SCN
SETUP
RESET
IMAGE
QUALITY
SCN
CAMERA
MENU
SILENT
MODE
1
This explains how to use the menus with [DIGITAL ZOOM] as an example.
1 Set the mode dial to P.
2 Press m to display the top menu.
Select [CAMERA MENU] and press o.
• [DIGITAL ZOOM] is on a menu in [CAMERA MENU].
Press o.
3 Press 12 to select [DIGITAL ZOOM], and
press o.
• Unavailable settings cannot be selected.
• When pressing 4 on this screen, the cursor moves to the
page display. Pressing 12 changes the page. To return
to item selection, press 3 or o.
Page display:
The page display mark is displayed when there
are additional menu items on the next page.
The selected item is displayed
in a different color.
IMAGE
IMAGE
QUALITY
QUALITY
CAMERA
RESET
RESET
EXIT
1
2
3
4
5
BACK
1
2
3
4
5
BACK
CAMERA
MENU
MENU
SCN
SCN
SCN
MENU
WB
ISO AUTO
DRIVE
METERING
FINE ZOOM
MENU
DIGITAL ZOOM
AF MODE iESP
FOCUS MODE AF
FULLTIME AF
AF PREDICT
MENU
SETUP
SETUP
SILENT
SILENT
MODE
MODE
SET
AUTO
o
ESP
OFF
SET
OFF
OFF
OFF
SET
OK
OK
OK
4 Press 12 to select [OFF] or [ON], and
press o.
• The menu item is set and the previous menu is displayed.
Press m repeatedly to exit the menu.
• To cancel changes and continue menu operation, press
m before pressing o.
Menu operations
Shooting mode menu h P A S M r s n
IMAGE
IMAGE
QUALITY
QUALITY
CAMERA
MENU
CAMERA
MENU
MENU
SCN
SCN
SCN
3
2
20 EN
RESET
RESET
EXIT
SETUP
SETUP
SILENT
SILENT
MODE
MODE
SET
OK
1
DIGITAL ZOOM
2
AF MODE
3
FOCUS MODE
4
FULLTIME AF
5
AF PREDICT
MENU
BACK
4CAMERA MENU
4
5
WB
ISO
DRIVE
METERING
FINE ZOOM
DIGITAL ZOOM
AF MODE
FOCUS MODE
FULLTIME AF
AF PREDICT
AF ILLUMINAT.
IMAGE STABILIZER
#SYNCRO
QFLASH
R (still pictures)
PANORAMA
>
SHARPNESS
CONTRAST
SATURATION
NOISE REDUCT.
TIMELAPSE
1 (conversion lens)
R (movies)
w
*1 An OLYMPUS xD-Picture Card is required.
OFF
ON
OK
SET
*1
• Some menu items are not available depending on the position of the mode dial.
g “Functions available in shooting modes and scene modes” (P.72)
g “SETUP menus” (P.39)
• The factory default settings are displayed in gray ( ).
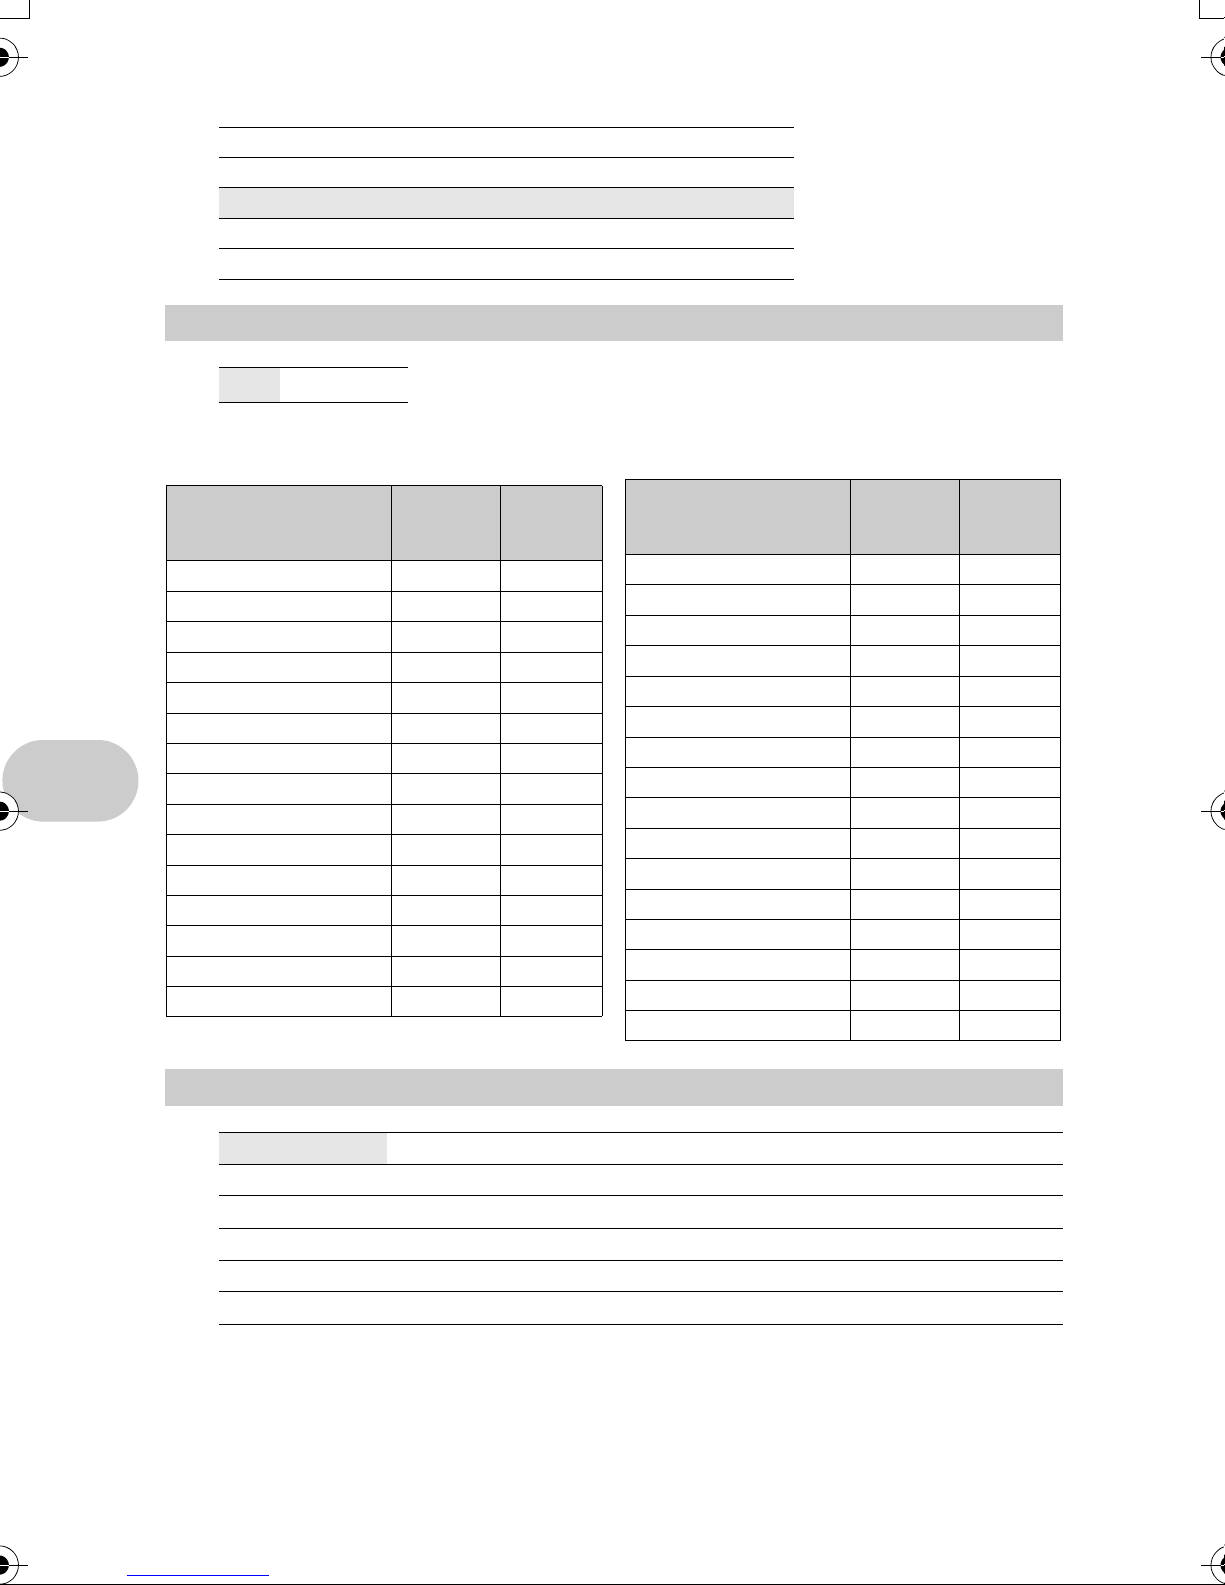
1 IMAGE QUALITY
Changing the image quality
Still picture image quality and their applications
Image quality/ Image size Compression Application
*1
RAW
3072x2304 —
SHQ 3072x2304 Low
3 : 2
compression
3072x2048
HQ 3072x2304 Standard
3 : 2
compression
3072x2048
*2
SQ1
2560x1920 Low
2304x1728
2048x1536
compression
(High quality) /
Standard
(Standard
compression)
SQ2
*2
1600x1200 Low
1280x960
compression
(High quality) /
Standard
1024x768
640x480
(Standard
compression)
16 : 9 1920x1080 Standard
compression
*1 Not displayed when set to h or s.
*2 If you select [SQ1] or [SQ2], select [HIGH] or [NORMAL] after selecting the image size.
• Raw uncompressed data.
• Data is in ORF format.
• This is useful for printing large images on
full-size paper. (For [3072x2304].)
• This is useful for ordering prints from a
photo store. (For [3 : 2 3072x2048].)
• This is useful for performing computer
image processing, such as contrast
adjustment and red-eye correction.
• This is useful for printing on full-size
paper.
• This is useful for computer editing such
as rotating or adding text to a picture.
• This is useful for printing on A5 paper and
below.
• This is useful for viewing pictures on a
computer.
• This is useful for sending as e-mail
attachments.
• This is useful for expressing the
broadness of a subject such as
landscapes and for viewing pictures on a
wide-screen television.
Menu operations
JPEG copy
Pictures taken in the [RAW] data format can be stored in JPEG format at the same time as they are
recorded in raw data. To record pictures in JPEG format you can select [SHQ], [HQ], [SQ1] or [SQ2]
for the record mode, but you cannot select the image size. Pictures are recorded in the size
currently set for each record mode.
JPEG DUPLICATE SETTING
OFF
SHQ
HQ
SQ1
MENU
BACK
SET
[IN]
OK
• In the [IMAGE QUALITY] screen, select [RAW], and press 3.
• Select a JPEG duplicate setting from [OFF], [SHQ], [HQ], [SQ1]
and [SQ2] and press o. (Select [OFF] to save raw data only.)
EN 21
Movie image quality
Image quality/ Image size Number of frames
SHQ 640x480 30 frames/sec.
HQ 640x480 15 frames/sec.
SQ1 320x240 30 frames/sec.
SQ2 320x240 15 frames/sec.
2 RESET
Change the shooting functions back to default settings
NO / YES
It restores shooting functions back to default settings.
Functions restored to the factory default settings
Factory
Function
Flash AUTO P.17
& OFF P.17
YYOFF P.18
F 0.0 P.17
IMAGE QUALITY HQ P.21
WB AUTO P.23
ISO AUTO P.24
DRIVE o P.25
METERING ESP P.25
FINE ZOOM OFF P.26
DIGITAL ZOOM OFF P.26
AF MODE iESP P.26
FOCUS MODE AF P.27
FULLTIME AF OFF P.27
AF PREDICT OFF P.27
default
setting
Ref. Page
Menu operations
Factory
Function
AF ILLUMINAT. ON P.27
IMAGE STABILIZER ON P.27
w ± 0.0 P.28
#SYNCRO #SYNC1 P.28
QFLASH IN P.28
R (still pictures) OFF P.28
> ± 0 P.29
SHARPNESS ± 0 P.30
CONTRAST ± 0 P.30
SATURATION ± 0 P.30
NOISE REDUCT. ON P.30
TIMELAPSE OFF P.31
1 (conversion lens) OFF P.31
R (movies) OFF P.31
Monitor/Viewfinder (u) Monitor P.15
s PORTRAIT P.22
default
setting
Ref. Page
3 s (Scene)
PORTRAIT /LANDSCAPE/LANDSCAPE+PORTRAIT/SPORT/
NIGHT SCENE
*1
/NIGHT+PORTRAIT*1/INDOOR/CANDLE/SELF PORTRAIT/
AVAILABLE LIGHT/SUNSET/FIREWORKS
DOCUMENTS/AUCTION/SHOOT & SELECT1
BEACH/SNOW/UNDER WATER WIDE1
UNDER WATER MACRO
22 EN
Shooting pictures by selecting a scene according to the situation
*1
/CUISINE/BEHIND GLASS/
*2
/SHOOT & SELECT2*3/
*4
/UNDER WATER WIDE2
*4
*4*5
/
The scene mode selection screen displays sample images as well
Scene mode selection screen
as a description of the shooting situation for which it is designed.
• By switching to the other scene mode, most settings will be
changed to the default settings of each scene mode.
*1 When the subject is dark, noise reduction is automatically
activated. This approximately doubles the shooting time, during
which the next picture cannot be taken.
*2 The focus is locked at the first frame.
*3 During sequential shooting, the camera focuses for each frame.
*4 Use a waterproof protector.
*5 The focus distance is fixed at approximately 5.0 m (16.4 ft).
1 PORTRAIT
B
F
D
j
G
BACK
MENU
Set the scene mode.
SET
OK
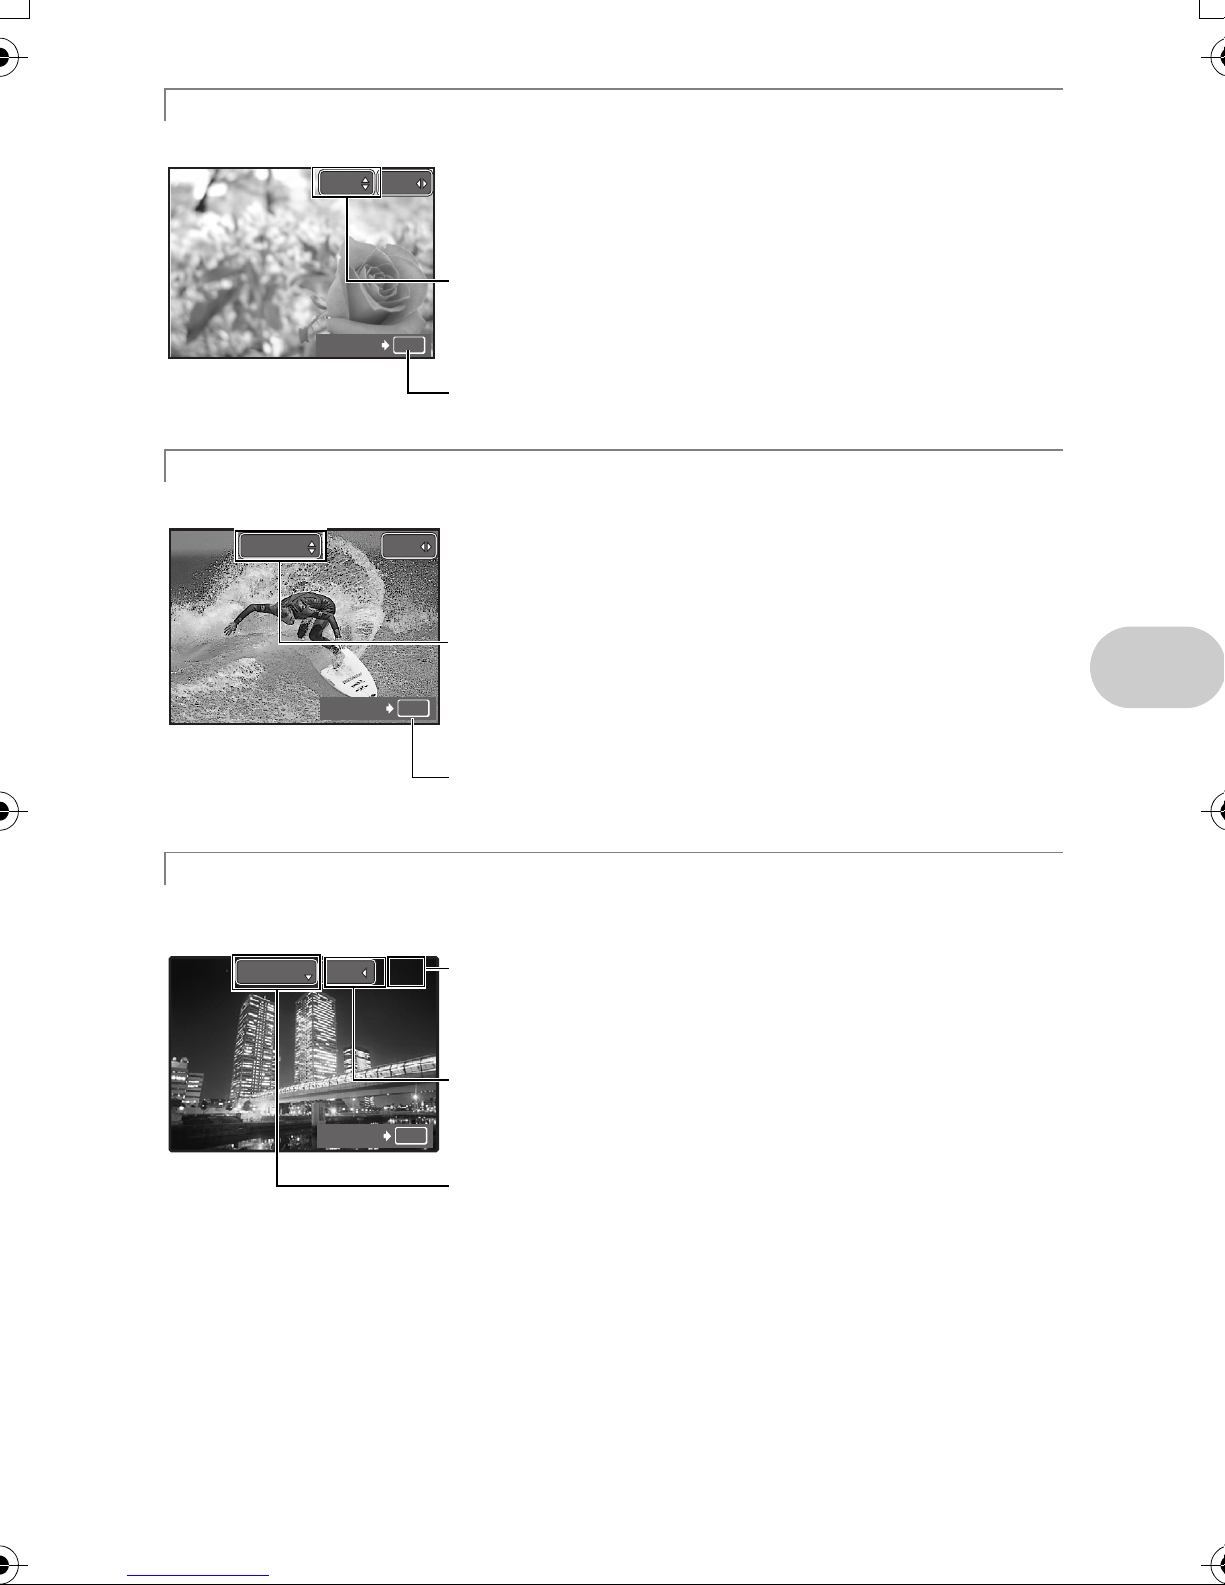
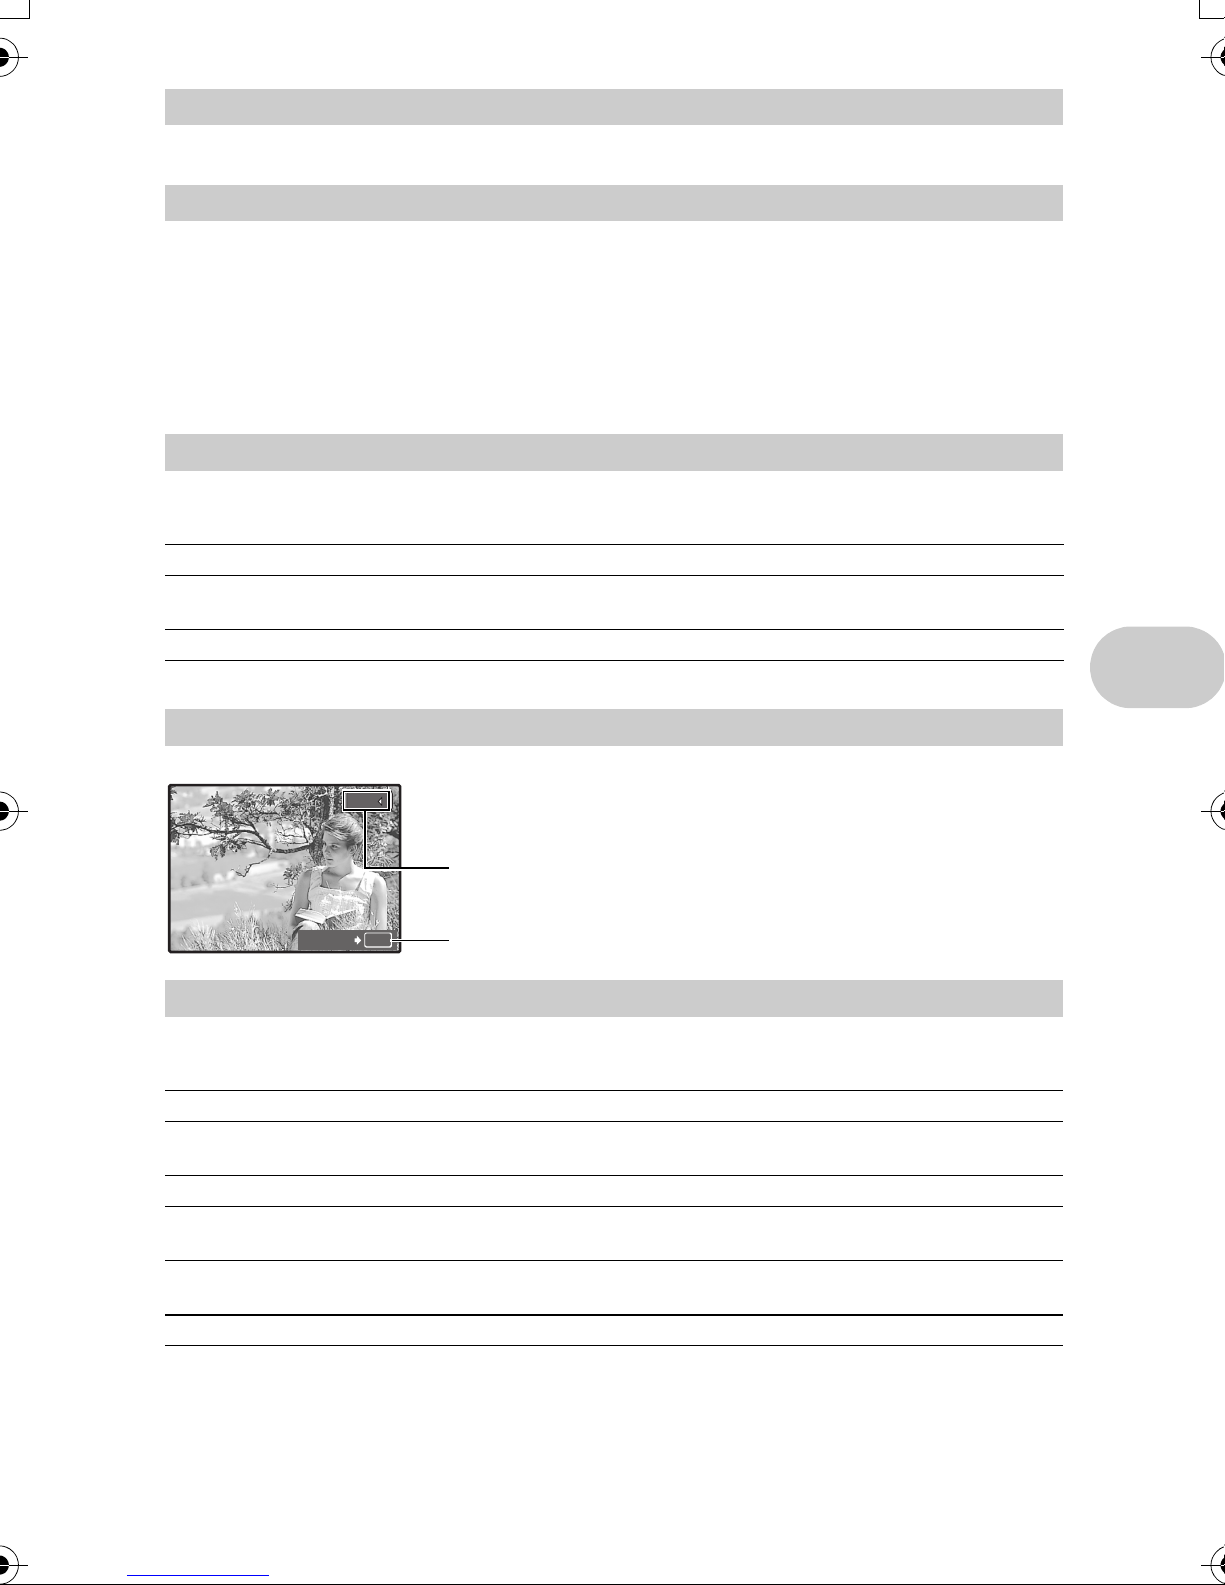
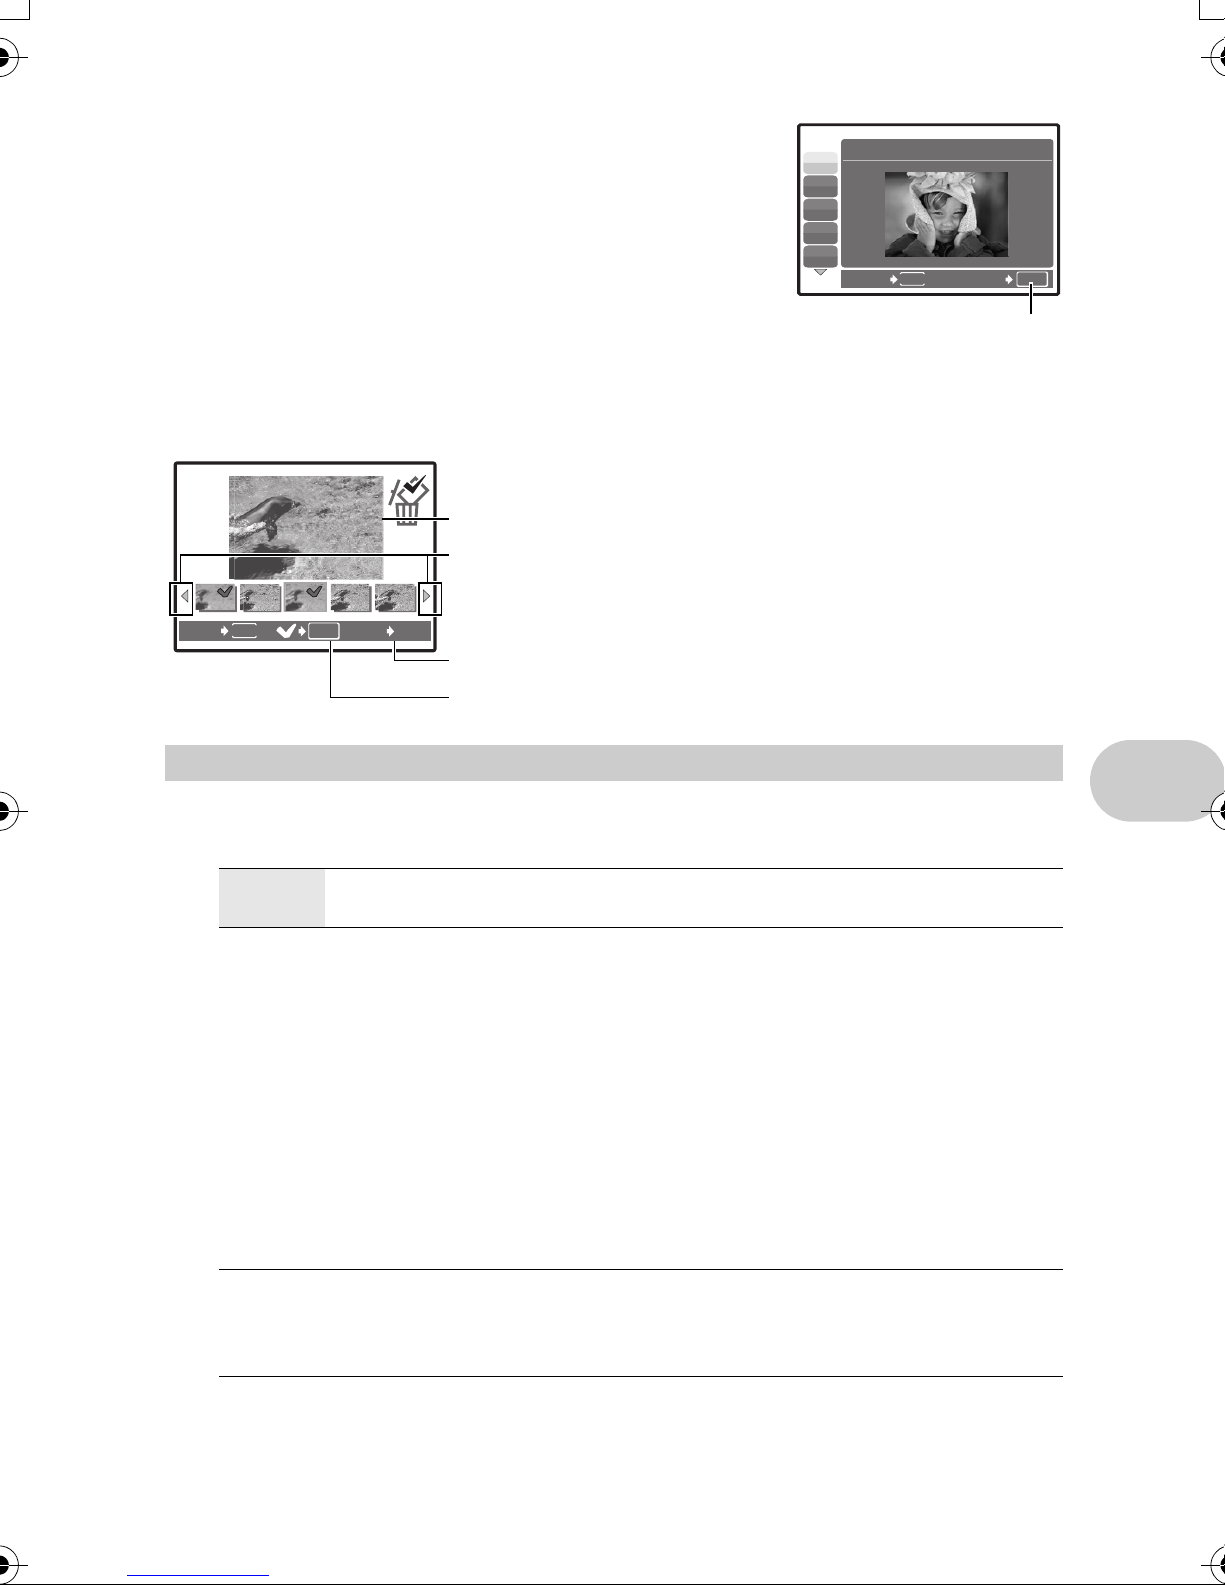
[eSHOOT & SELECT1] [fSHOOT & SELECT2]
• Press and hold the shutter button to shoot sequential pictures. After shooting pictures, select the
ones you want to erase, put R to them, and press S to erase them.
ee
Selected picture.
Press 43 to scroll through the pictures.
MENU
BACK GO
OK
S
Pictures with R are erased.
Select the pictures to be erased.
4 CAMERA MENU
WB ....................................................................................
AUTO The white balance is adjusted automatically for natural
color, regardless of the light source.
PRESET Selects the white balance according to the light
source.
5 Sunny day For shooting under a clear sky.
3 Cloudy day For shooting under a cloudy sky.
1 Tungsten light For shooting under tungsten lighting.
w Fluorescent lamp 1 For shooting under daylight fluorescent lighting. (This
type of lamp is mainly used in homes.)
x Fluorescent lamp 2 For shooting under a neutral white fluorescent lamp.
(This type of lamp is mainly used in desk lamps.)
Adjusting the color of a picture
Menu operations
y Fluorescent lamp 3 For shooting under a white fluorescent lamp. (This
V One-touch WB For setting a more precise white balance than preset
type of lamp is mainly used in offices.)
white balance can provide.
You can set and save the optimum white balance for
the shooting conditions.
EN 23

When [PRESET] is selected
PRESET WB
5
3
1
w
MENU
BACK
SET
OK
Press 12 to select a white balance setting, then press o.
When [V] is selected
o
• With the [ONE TOUCH WB] screen displayed, point the camera at a sheet of white paper.
Position the paper so that it fills the screen, making sure there are no shadows.
• Press o. The new white balance is set.
ISO .......................................................................................
Changing the ISO sensitivity
AUTO Sensitivity is automatically adjusted according to the conditions of the
subject.
HIGH ISO AUTO This function has a higher sensitivity compared to [AUTO] and
stabilizes the blur caused by a moving subject or camera movement
when taking pictures.
50/100/200/400/
800/1600/3200/
5000
A low value lowers the sensitivity for daylight shooting of clear, sharp
pictures. The higher the value, the better the camera’s light sensitivity
and ability to shoot with a fast shutter speed and in low light conditions.
However, high sensitivity introduces noise into the resulting picture,
Menu operations
which may give it a grainy appearance.
• If set to over [3200], [IMAGE QUALITY] is limited to below [2048x1536].
• If [FINE ZOOM] or [DIGITAL ZOOM] is set to [ON], [3200] and [5000] cannot be set.
• If [DRIVE] is set to [c] or [d(15fps)], [HIGH ISO AUTO], [50], [100] and [200] cannot be set.
24 EN
DRIVE ............................................................................................
Continuous shooting
o Shoots 1 frame at a time when the shutter button is pressed.
j Focus and exposure are locked at the first frame. The sequential
shooting speed varies depending on the setting of image quality.
c Pictures can be taken at a faster speed than normal sequential
shooting.
d(15fps) Sequential shooting at a speed of 15 frames/sec.
e Adjusts the focus 1 frame at a time. The shooting speed is slower than
for normal sequential shooting.
BKT Takes pictures sequentially while changing the exposure for each
frame. Focus and white balance are locked at the first frame.
You can take a sequence of pictures at one time by holding down the shutter button. The camera
will take pictures continuously until you release the shutter button.
• Only [o] is available when record mode is set to [RAW].
• Flash cannot be used when [c] or [d(15fps)] is set.
• When [c] is set, [IMAGE QUALITY] is limited to below [2048x1536] and the maximum number
of pictures that can be taken for sequential shooting is approximately less than 15.
• When [d(15fps)] is set, [IMAGE QUALITY] is limited to below [1280x960] and the maximum
number of pictures that can be taken for sequential shooting is approximately less than 20. (This
includes the 5 pictures stored shortly before shooting if [PRE-CAPTURE] is set to [ON].)
• If [FINE ZOOM] or [DIGITAL ZOOM] is set to [ON], [c] and [d(15fps)] cannot be set.
When [d(15fps)] is selected
PRE-CAPTURE
OFF /ON
• When [PRE-CAPTURE] is set to [ON], pressing the shutter button halfway stores 5 frames of a
picture shortly before shooting.
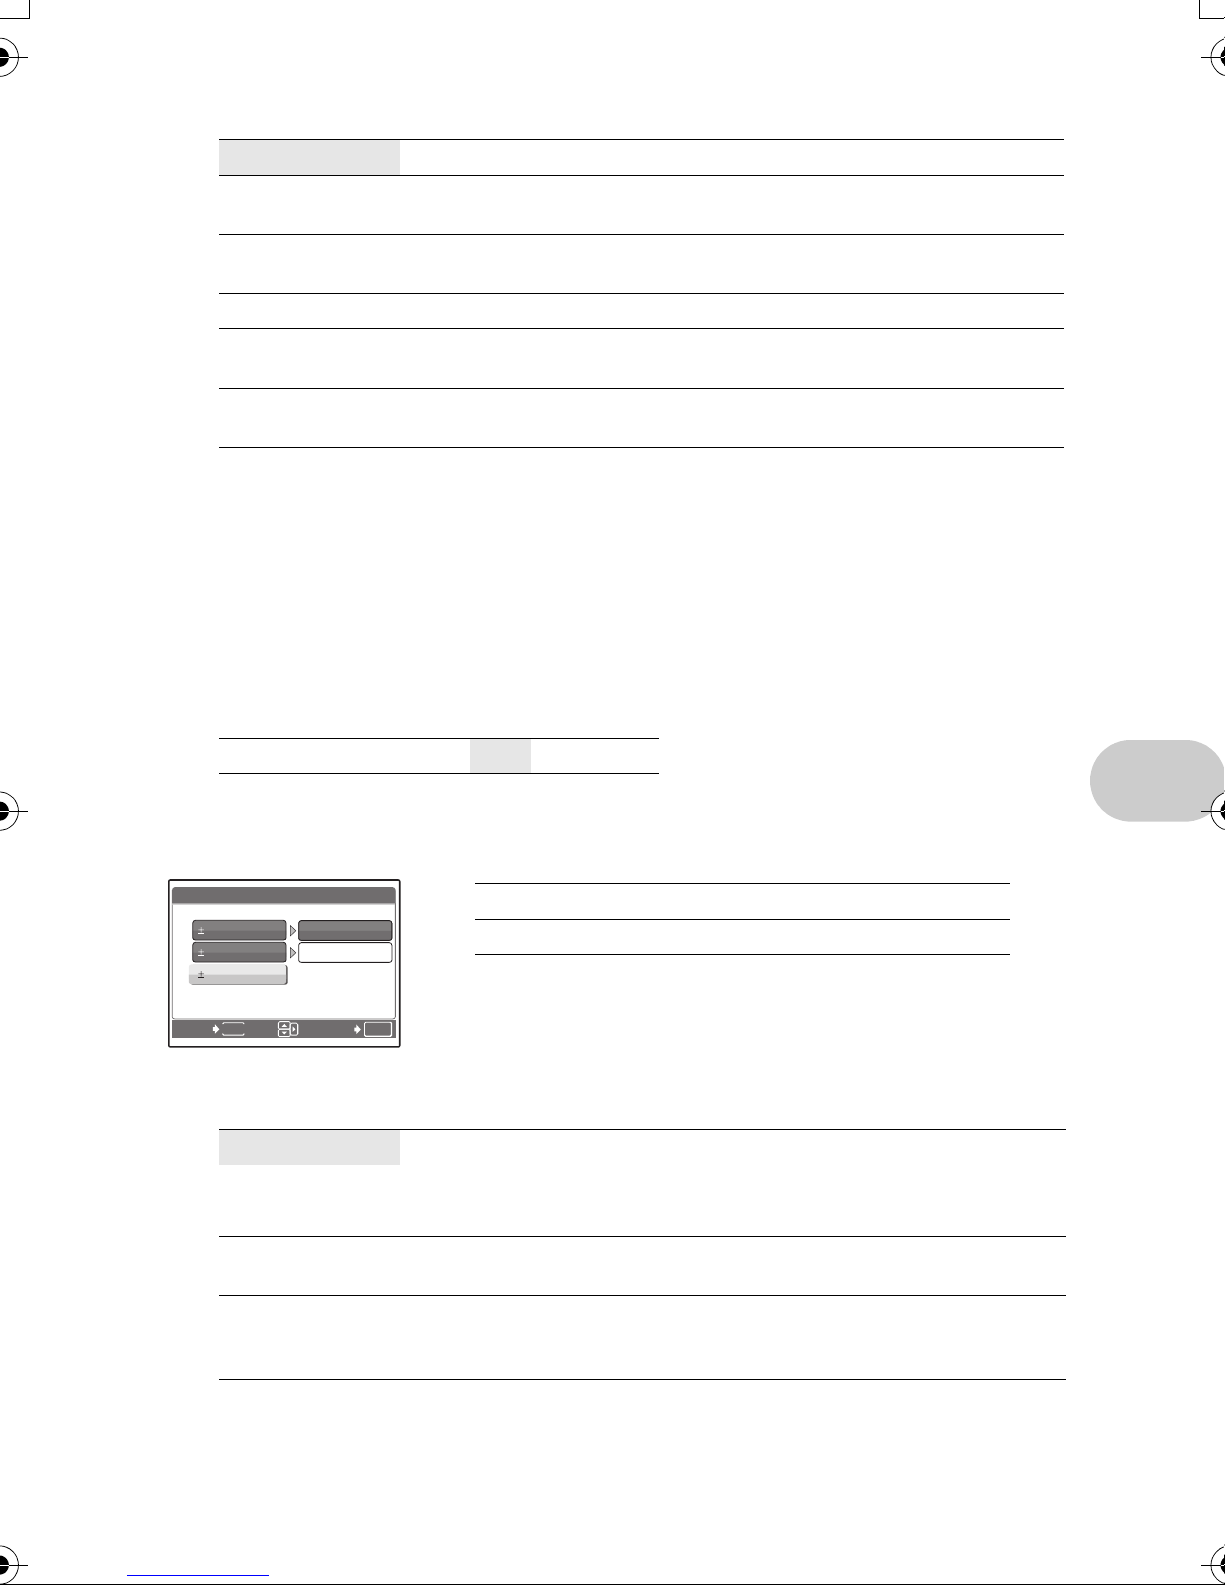
When [BKT] is selected
BKT
BACK
0.3
0.7
1.0
MENU
×3
×5
OK
SET
METERING ................................
ESP Meters the brightness at the center of the monitor and the surrounding
n Only the center of the monitor is metered. Recommended for taking a
4 Meters the brightness over a wide area with emphasis on the center of
Exposure differential ± 0.3 / ± 0.7 / ± 1.0
Number of frames x3 / x5
• Press the shutter button completely and keep it pressed to shoot the
preset number of pictures. You can stop shooting at any time by
releasing the shutter button.
Changing the area for measuring the brightness of a subject
area separately to capture an image with balanced brightness. When
taking pictures against strong backlight, the center of the picture may
appear dark.
picture against strong backlight.
the screen. This method is used when you do not want to allow
surrounding light to affect the picture.
Menu operations
EN 25
FINE ZOOM .................................
OFF /ON
This function allows you to zoom up to 27x by combining the optical zoom and image cropping.
• [IMAGE QUALITY] is limited to below [2048x1536].
Zooming in on your subject without reducing image quality
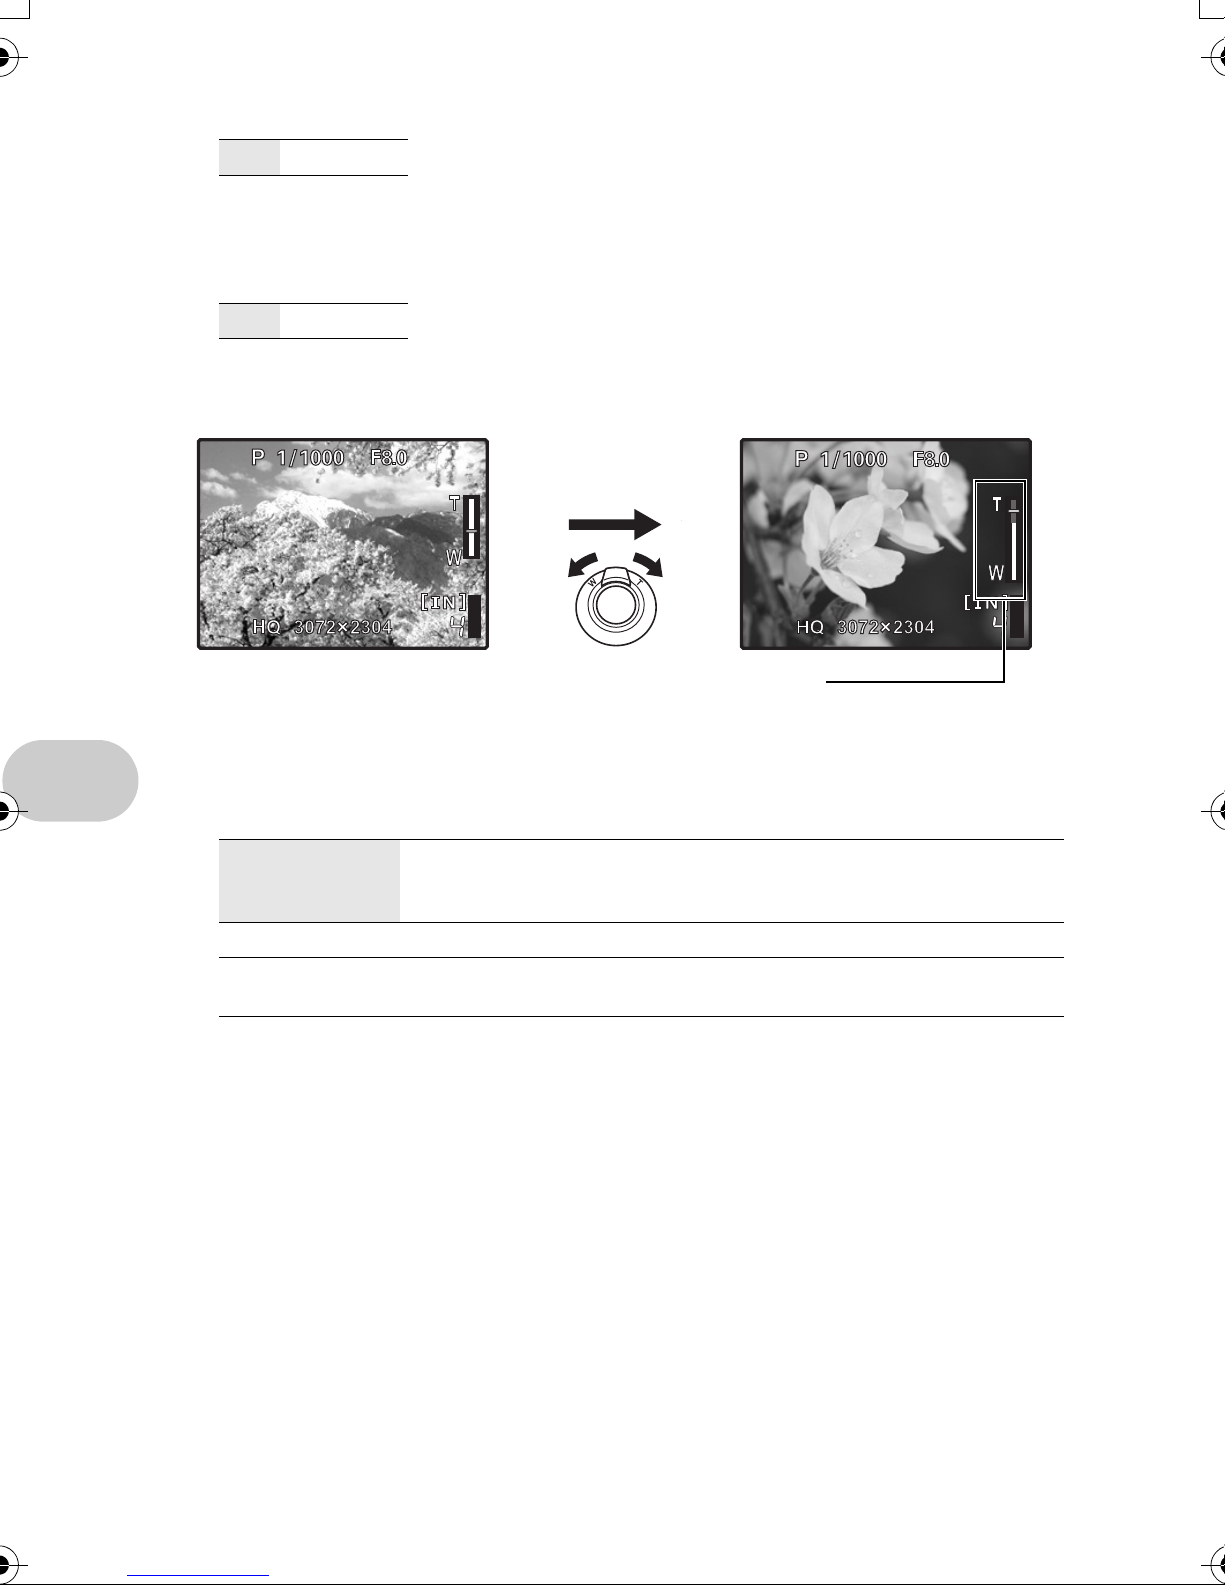
DIGITAL ZOOM ....................................................................
OFF /ON
The digital zoom can be used to take close-up pictures with stronger magnification than the optical
zoom.
Optical zoom Digital zoom
Maximum magnification:
Still picture shooting modes
Optical zoom × digital zoom: Approx. 100x (max.)
Movie shooting mode
Optical zoom × digital zoom: Approx. 54x (max.)
Zoom bar
White area: The optical zoom area
Red area: The digital zoom area
AF MODE ..............................................................................
Zooming in on your subject
Changing the focusing area
iESP The camera determines which subject within the screen to focus on.
Even when the subject is not in the center of the screen, focusing is
possible.
SPOT Focus selection is based on the subject within the AF target mark.
AREA Move the AF target mark to select the area you want to focus on to take
a picture.
Menu operations
• If [FINE ZOOM] or [DIGITAL ZOOM] is set to [ON], [AREA] cannot be set.
When [AREA] is selected
• To move the AF target mark
Press the arrow pad (the AF target mark is displayed in green).
You can take pictures while in this status.
• To set the position of the AF target mark
Hold down o.
To change the position of the mark, hold down o again.
26 EN
FOCUS MODE ......................................................................
AF Press the shutter button halfway. The camera automatically focuses.
MF Adjust the focus manually.
Changing the focus method
FULLTIME AF ......................................
OFF Press the shutter button halfway to focus.
ON Fulltime AF keeps the subject in front of the lens in focus at all times,
AF PREDICT ....................
OFF AF predict is deactivated.
ON When activated, position the AF target mark on the subject and press
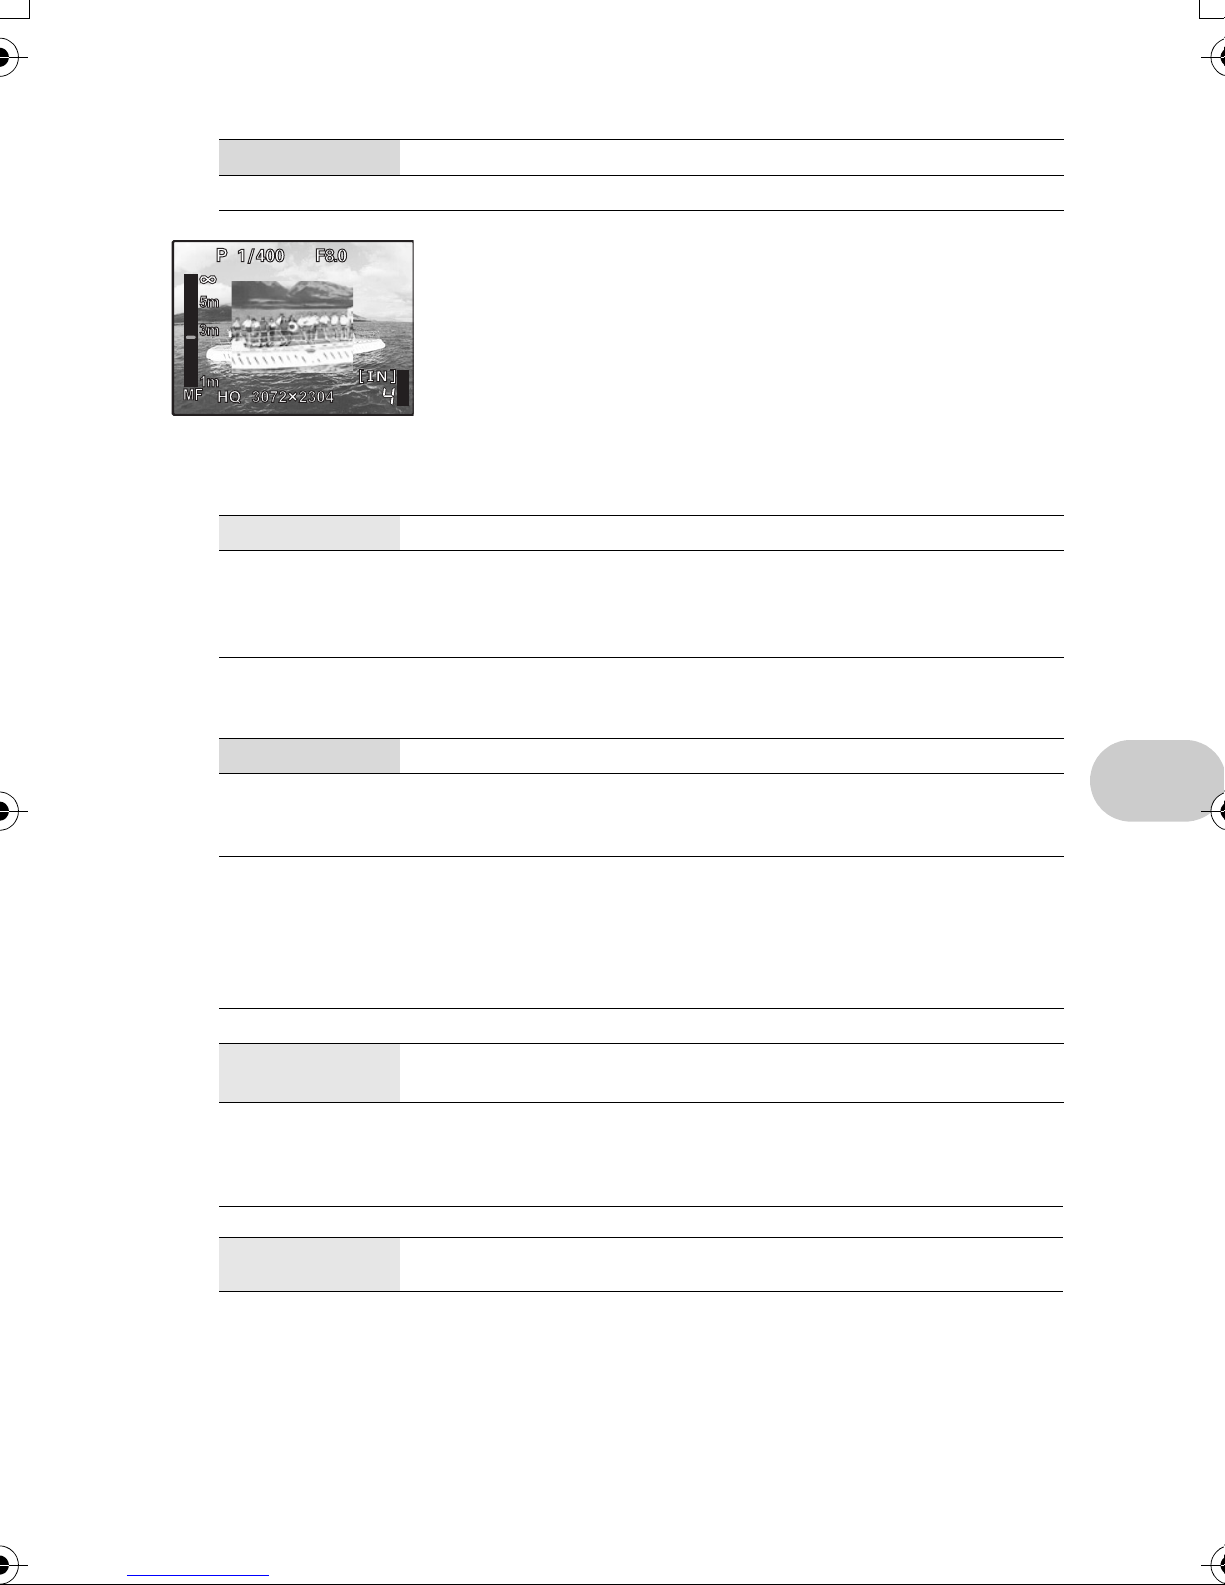
When set to [MF]
• Press 12 to set the focus. During operation, the focus area is
enlarged.
• Hold down o to fix the focus. The focus is locked at the
distance you have set, and MF is displayed in red on the
monitor. To adjust the focus, hold down o again.
Shooting pictures while keeping the subject in focus
without having to press the shutter button halfway. The focusing time
is reduced, so you will not miss snapshot opportunities. Also, the
subject is automatically kept in focus during movie recording.
Shooting pictures with the focus on subjects moving back and forth
the shutter button halfway to engage the AF predict. Then, press the
shutter button completely to take the picture.
Menu operations
• { blinks and AF predict continues to operate while the shutter button is pressed halfway.
• Depending on the subject, the picture may be out of focus even if [AF PREDICT] is set.
• During macro and super macro mode, [AF PREDICT] is not available.
AF ILLUMINAT. .............................................
OFF AF illuminator does not light.
ON Press the shutter button halfway. The AF illuminator automatically
lights.
IMAGE STABILIZER ..............................
This function stabilizes the blur caused by camera movement when taking pictures.
OFF Digital image stabilization is deactivated.
ON Digital image stabilization is activated after pressing the shutter button
halfway.
• It is recommended to make the image stabilizer inactive, when mounted on a tripod.
• At very slow shutter speeds (for example when taking night photographs), some images may not
acquire the proper stabilization effect.
• If the camera is severely shaken, the image stabilizer may not be as effective.
Setting to light the illuminator in a dark place
Shooting pictures using digital image stabilization
EN 27
w ............................................................
Adjusting the amount of light emitted by the flash
Depending on situations such as shooting small subjects or distant backgrounds, it may be
advisable to adjust the amount of light emitted by the flash. In addition, this function is useful when
increased contrast is desired.
+2.0EV to 0.0 to -2.0EV
Press 12 to adjust, and press o.
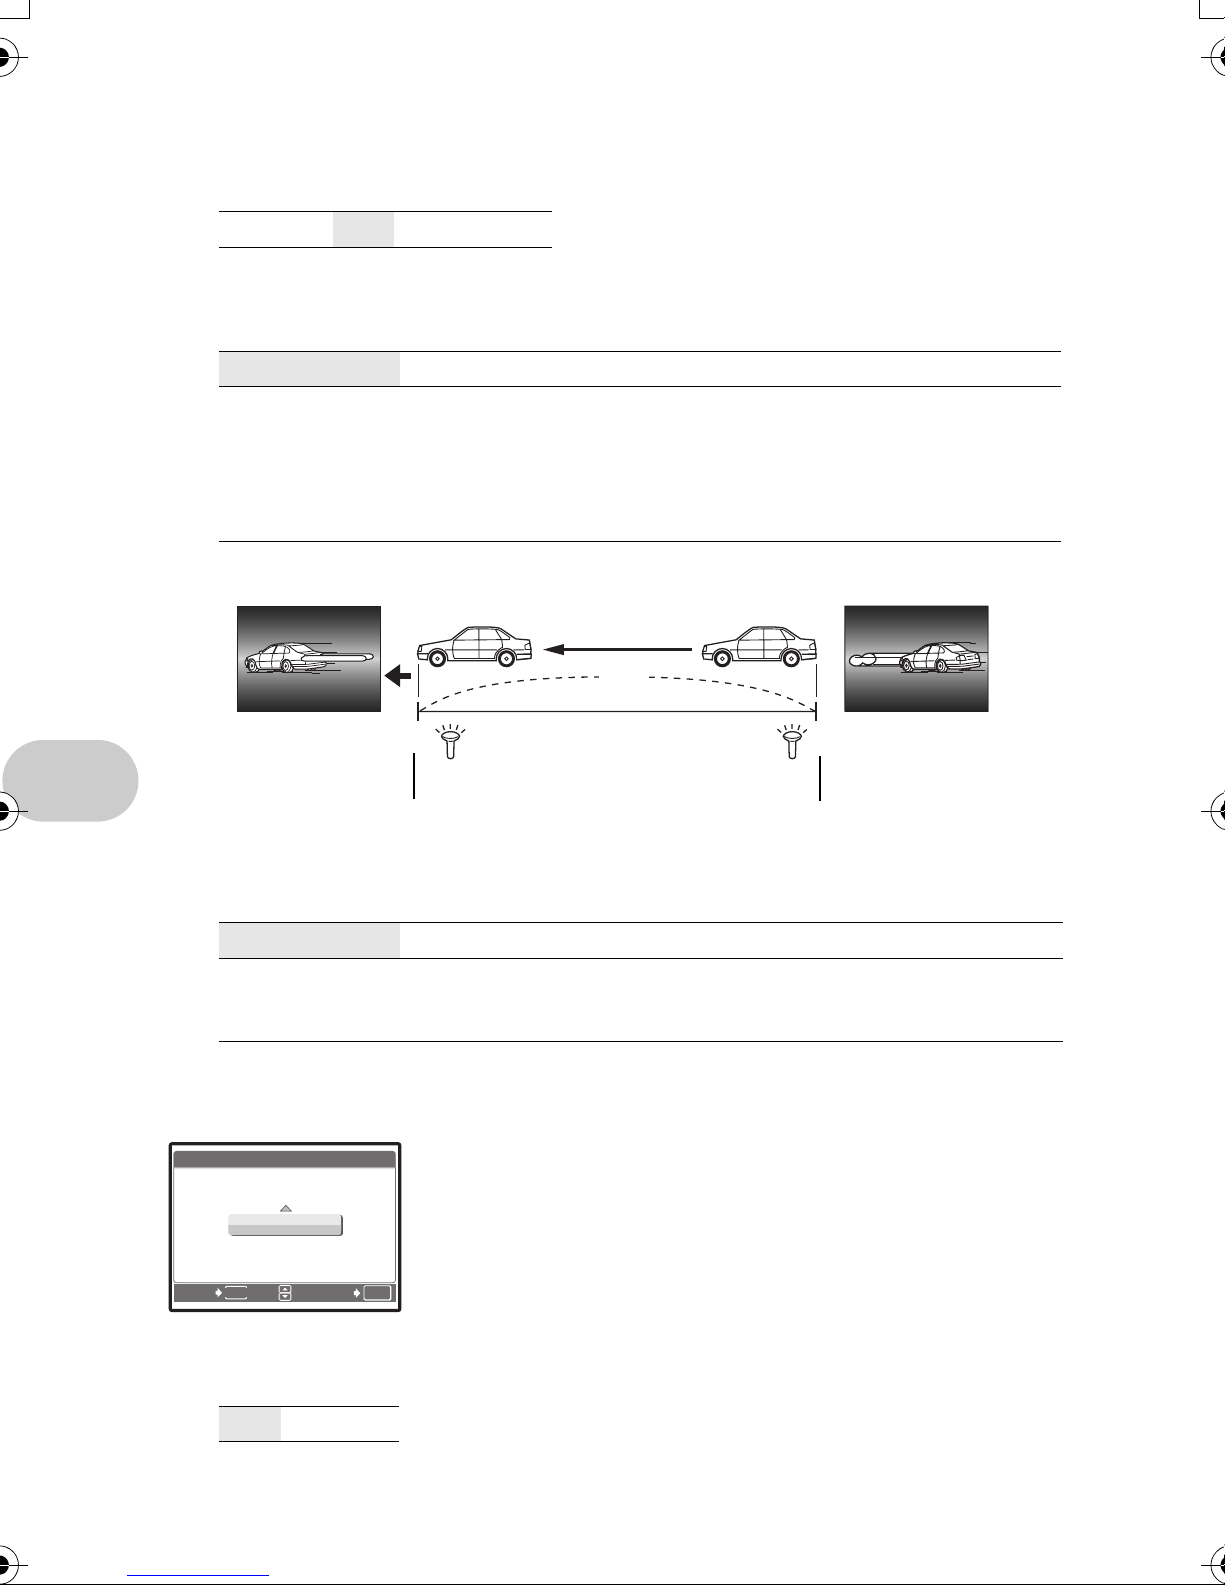
#SYNCRO ..............................................................................
Selecting the flash timing
#SYNC1 The flash fires right after the shutter fully opens (front curtain).
#SYNC2 With the rear curtain, the flash fires just before the shutter closes (rear
curtain). You can use this setting to create interesting effects in your
picture, such as expressing the movement of a car by showing the taillights streaming backwards. The slower the shutter speed, the better
the effects turn out. If the shutter speed is faster than 1/200, the flash
fires automatically with the front curtain.
When the shutter speed is set to 4 sec.
4 sec.
Rear curtain
Shutter closes
4 sec.
Rear curtain flash fires
Front curtain flash
fires
Shutter button completely pressed
QFLASH ........................................................................
Setting to use an external flash
Front curtain
0
IN Allows you to take pictures using the built-in flash.
SLAVE When using a commercially available slave flash that is synchronized
with the camera flash, the amount of the light emitted by the flash can
Menu operations
be adjusted in 10 levels.
Selecting an emission level
• When flash is set to [SLAVE], flash mode automatically changes to [#] (Fill-in flash) for all flash
modes except [$] (Flash off).
SLAVE FLASH
1
BACK
MENU
SET
OK
R (still pictures) .........................................................
OFF /ON
It automatically starts recording for about 4 seconds after shooting pictures.
When recording, aim the camera microphone at the source of the sound you want to record.
Press 12 to select an emission level from [1] to [10], then press o.
The bigger number indicates the bigger amount of light emitted by the
flash.
• The flash can fire in sequential shooting mode, but the interval
between shots will be longer if a high emission level is set.
Recording sound with still pictures
28 EN
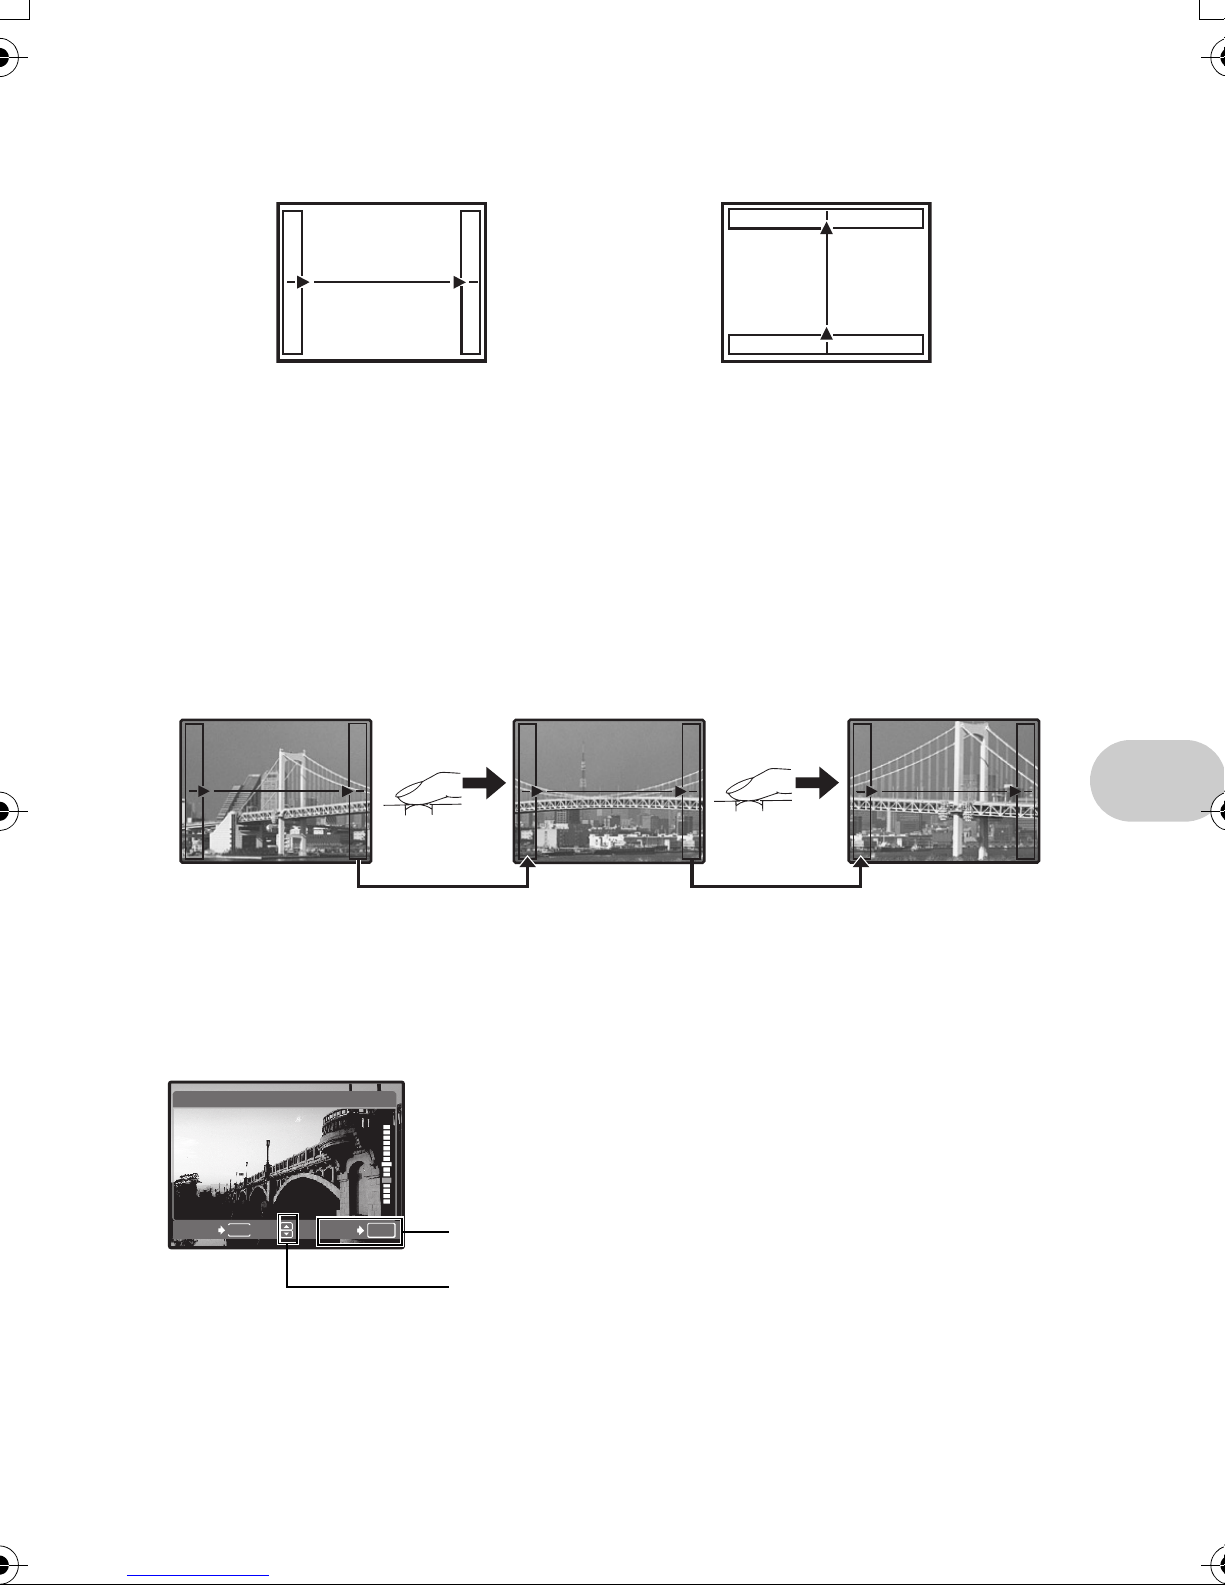
PANORAMA .......................................................................
RED
BLUE
Creating a panoramic picture
Panorama shooting lets you create a panoramic picture, using the OLYMPUS Master software from
the provided CD-ROM. An Olympus xD-Picture Card is required for panorama shooting.
Connects pictures from left to
right
3: The next picture is connected at the
right edge.
4: The next picture is connected at the
left edge.
1 : The next picture is connected at the
2: The next picture is connected at the
Connects pictures from
bottom to top
top.
bottom.
Use the arrow pad to specify at which edge you want to connect the pictures, and then compose
your shots so that the edges of the pictures overlap. The part of the previous picture that will be
combined will not remain in the frame. Remember the frame displayed on the monitor as a rough
indication, then compose the shot so that the edges of the previous picture in the frame overlap with
the next shot.
• Press o to exit panorama shooting.
• Panorama shooting is possible for up to 10 pictures. A warning mark g is displayed after 10
pictures are taken.
Menu operations
> ..................................................................
>
MENU
BACK
SET
BLUE
RED
OK
Adjusting the white balance compensation
• The white balance can be adjusted in 7 increments in both the
[BLUE] and [RED] directions.
Press o after setting is complete.
1 : Each press makes the color more blue.
2 : Each press makes the color more red.
EN 29
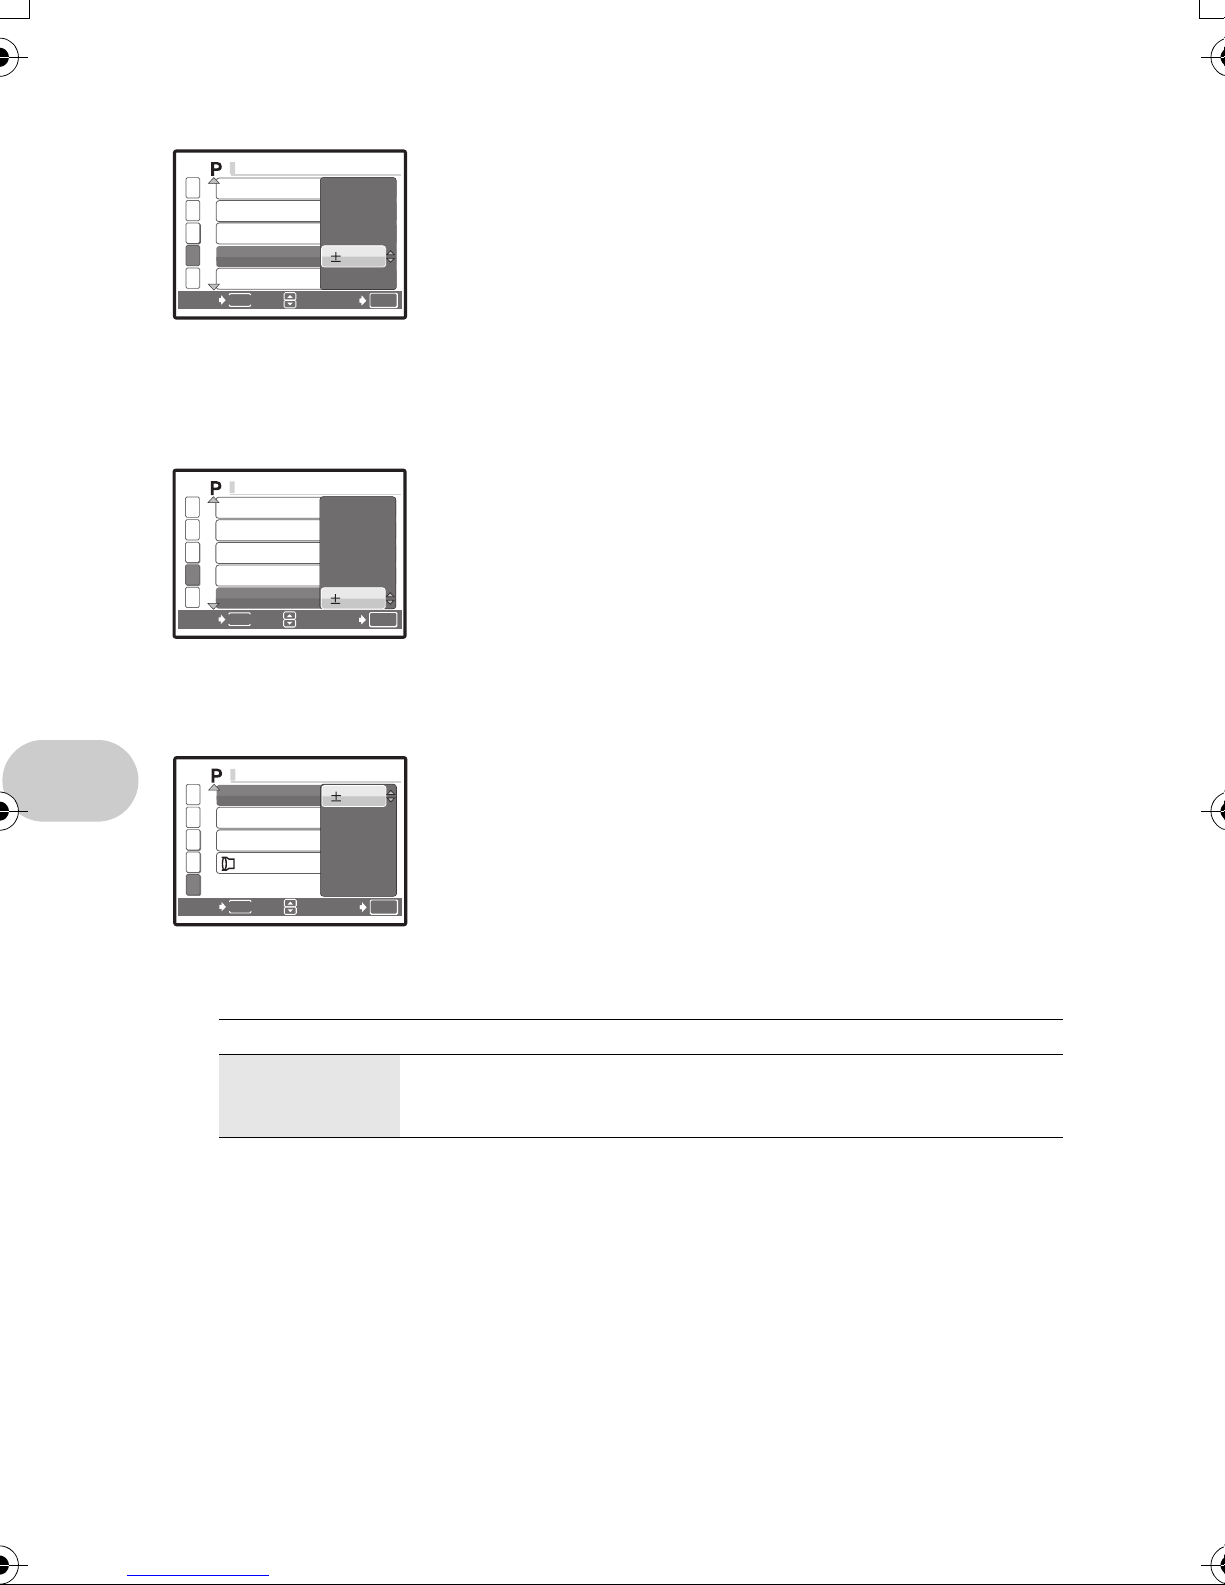
SHARPNESS ...........................................................
CA M E R A ME N U
CA M E R A ME N U
CA M E R A ME N U
Adjusting the sharpness of the image
1 (Toward +) : The image contours are emphasized,
making the image appear sharper and
more vivid. Use this setting when you
want to print pictures. If you adjust the
sharpness too far toward +, noise may
become conspicuous in the picture.
OK
2 (Toward –) : The image contours are softened. Use
1
2
3
4
5
BACK
R
PANORAMA
>
SHARPNESS
CONTRAST
MENU
CAMERA MENU
0
SET
this setting when you want to edit
images on a computer.
CONTRAST ................................................................
CAMERA MENU
1
R
2
PANORAMA
3
>
4
SHARPNESS
5
BACK
CONTRAST
MENU
0
SET
SATURATION ...........................................................
1 (Toward +) : The light and dark areas are defined
more clearly, making the image look
crisper.
2 (Toward –) : The light and dark areas become less
defined, giving the image a softer
OK
impression. Use this setting when you
want to edit images on a computer.
Adjusting the saturation of the image
Adjusting the contrast of the image
CAMERA MENU
1
SATURATION
2
NOISE REDUCT.
3
TIMELAPSE
4
5
BACK
MENU
0
SET
NOISE REDUCT. ..............................................
Menu operations
OFF Noise is not reduced. Noise may be conspicuous at slow shutter speeds.
1 (Toward +) : Colors become stronger.
2 (Toward –) : Colors become weaker.
OK
Reducing the noise during long exposures
ON Noise is reduced. Shooting time takes twice as long as usual. Shooting
is not available during noise reduction. Noise reduction can only be used
when the shutter speed is slower than 1/2 sec.
• This function may not work effectively with some shooting conditions or subjects.
30 EN
 Loading...