

Page 1

INSTRUCTIONS
OLYMPUS
Page 2
Please read this instruction manual carefully before using
the camera, so that you may be sure of taking correctly
exposed, properly focused and beautifully composed pictures every time you use your OM-2S PROGRAM. We
sincerely wish tha t your OM- 2S PROGRAM w il l become a
source of unending satisfaction for you.
Note: All the components of the Olympus OM-2S PROGRAM are carefully designed and their produc-
tion and assembly is strictly controlled to enhance the unmatched performance of the system. If
any interchangeable lenses, flashes, or accessories other than Olympus products are used, Olympus
cannot be responsible for poor results or damage of t he OM-2S PROGRAM.
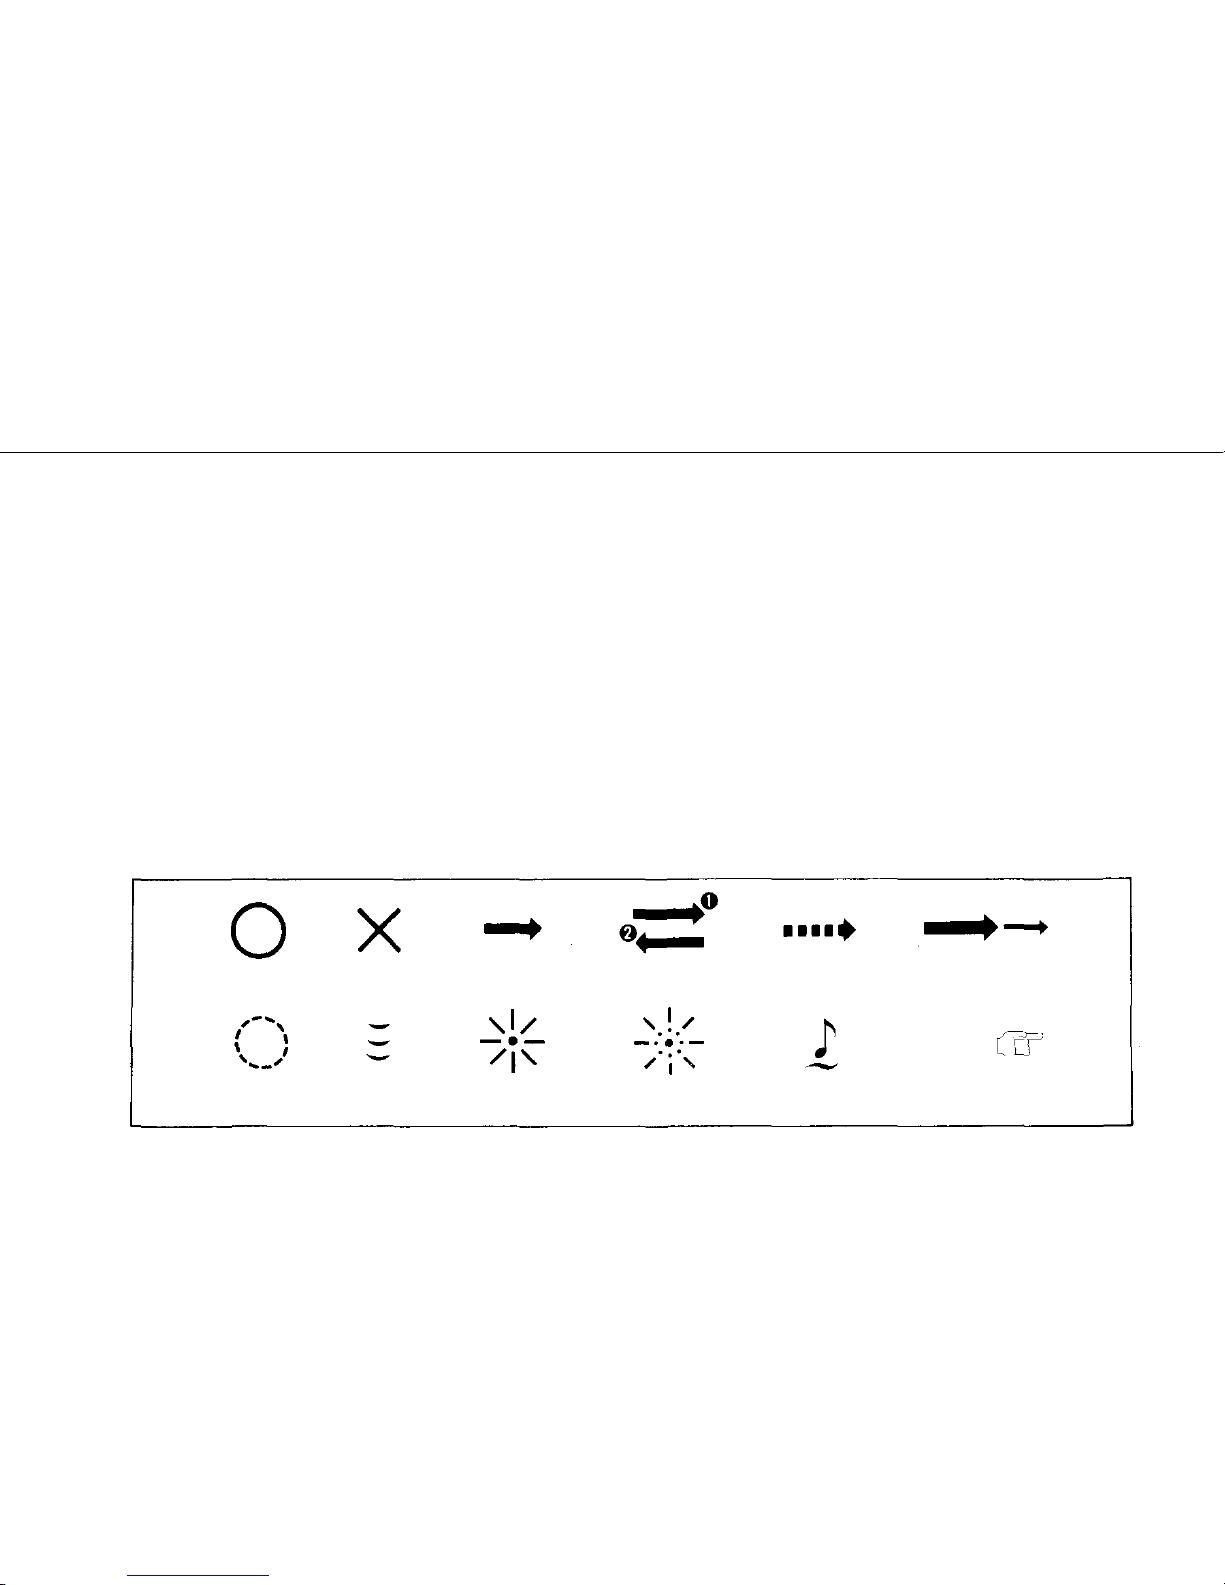
Correct
Incorrect
Operation
Operation order
Automatic
operation
Two-step operation
Attention
Press lightly
Lamp on
Lamp blinking
Continuous sound
Reference
A-1
Page 3

TABLE OF CONTENTS
< Preparations before Taking Pictures >
• Mounting the Lens ...................4
• Detaching the Lens ..................5
• Inserting the Batteries .................6
• Checking the Batteries ................7
• Loading the Film ....................8
• Setting the Exposure Counter to "1" .......11
• Setting the ISO Film Speed ............12
< Basic Shooting Mode >
• Programmed Exposure on TTL Direct
"OTF" Light Metering ...............14
• Rewinding the Film ....... ....................................17
• TTL Direct "OTF" Light Metering .........19
• What to Do when Overexposure
Warning Appears? .................22
• What to Do when Shutter Speed
is too Slow? ....................22
< Sophisticated Shooting Mode >
• How to Use the MANUAL/SPOT .........24
• Exposure Compensation ..............27
• How to Shoot w hen the Batteries
are Exhausted ...................27
< Other Operations >
• The Use of the Self-Timer .............30
• Using the Viewfinder Illuminator .........31
• How to Turn off the Beeper ............32
• Attaching the Grip ..................32
< OM System >
• Changing the Focusing Screen .......... 35
• Changing the Camera Back ............ 36
• Attaching the Electronic Flash ........... 37
• Attaching the Motor Drive or Winder .......39
• Handling Care .....................41
• Storage Care .....................42
• Battery Precaution ..................42
• Description of Controls ...............43
• Specifications .....................47
A-2
Page 4

OM-2S
PROGRAM
< Preparations before Taking Pictures >
A-3
Page 5
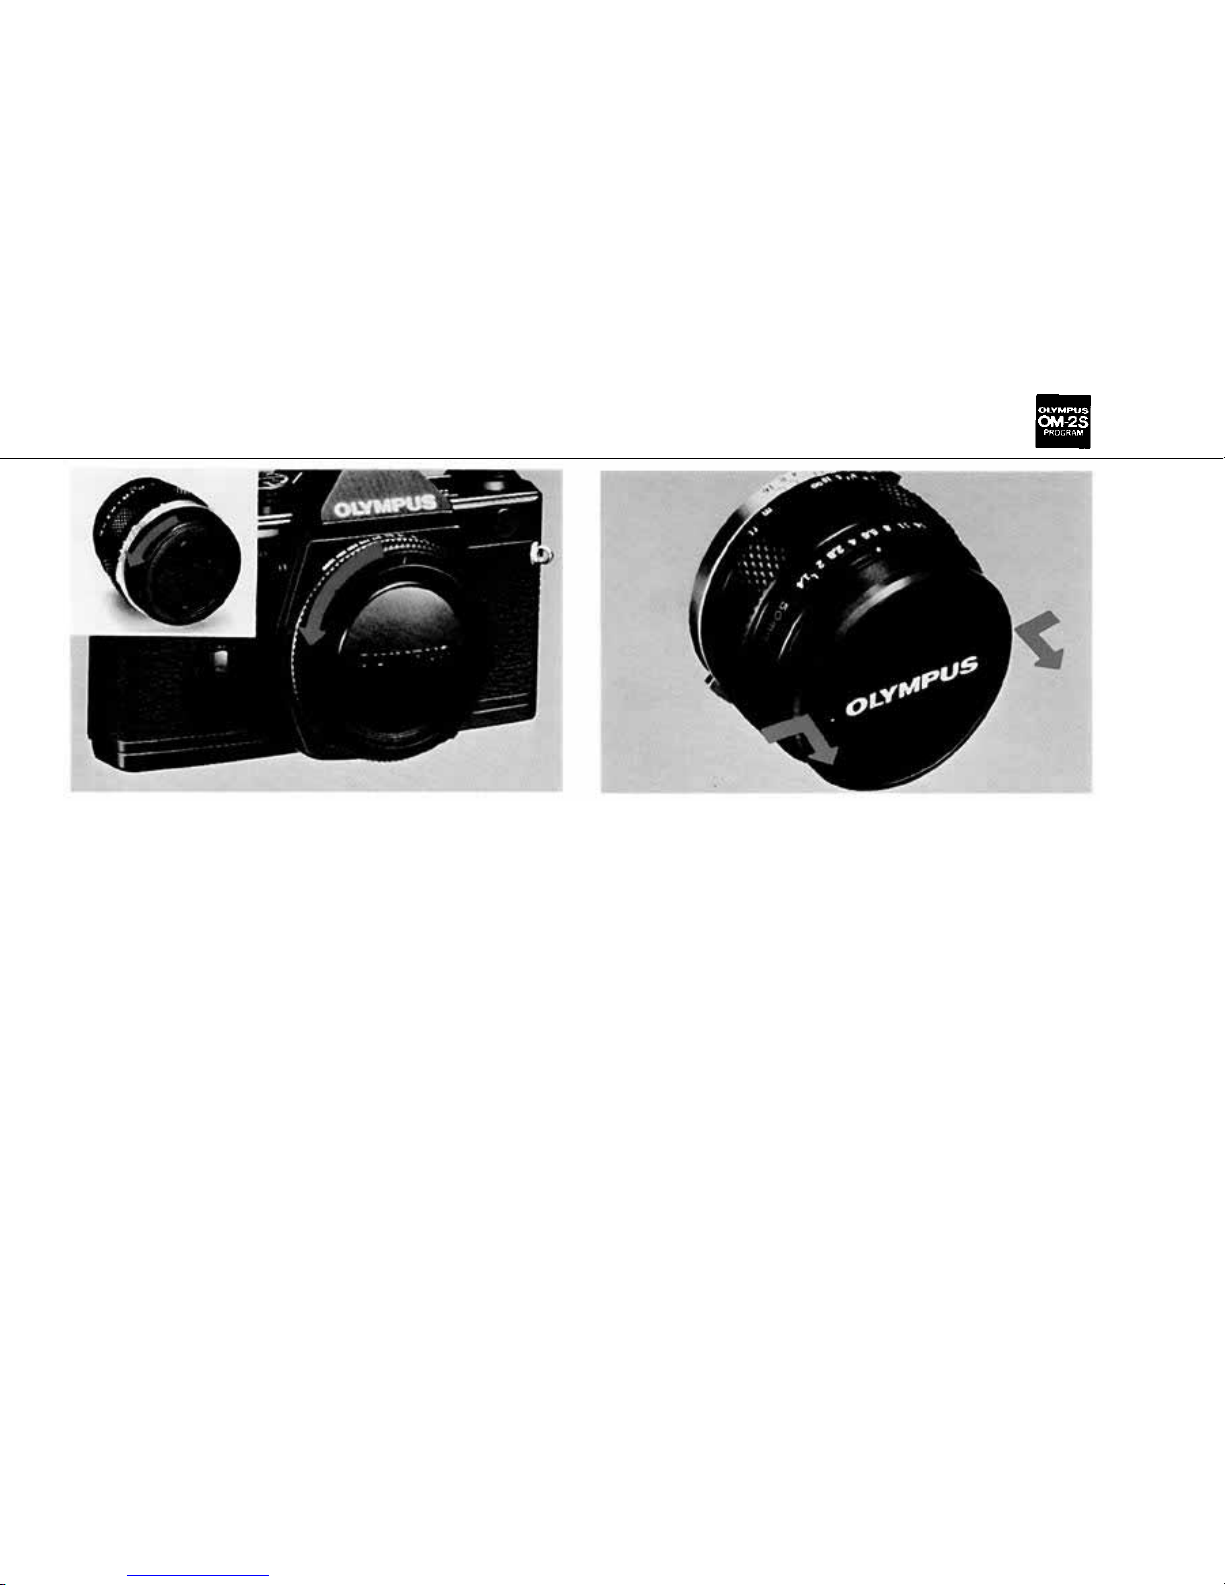
Mounting th e Len s
Remove the body and rear lens caps.
Remove
the
front
lens
cap.
(Press
in the
mount
tabs on the edges of the lens cap parallel with
"OLYMPUS").
2
1
A-4
Page 6
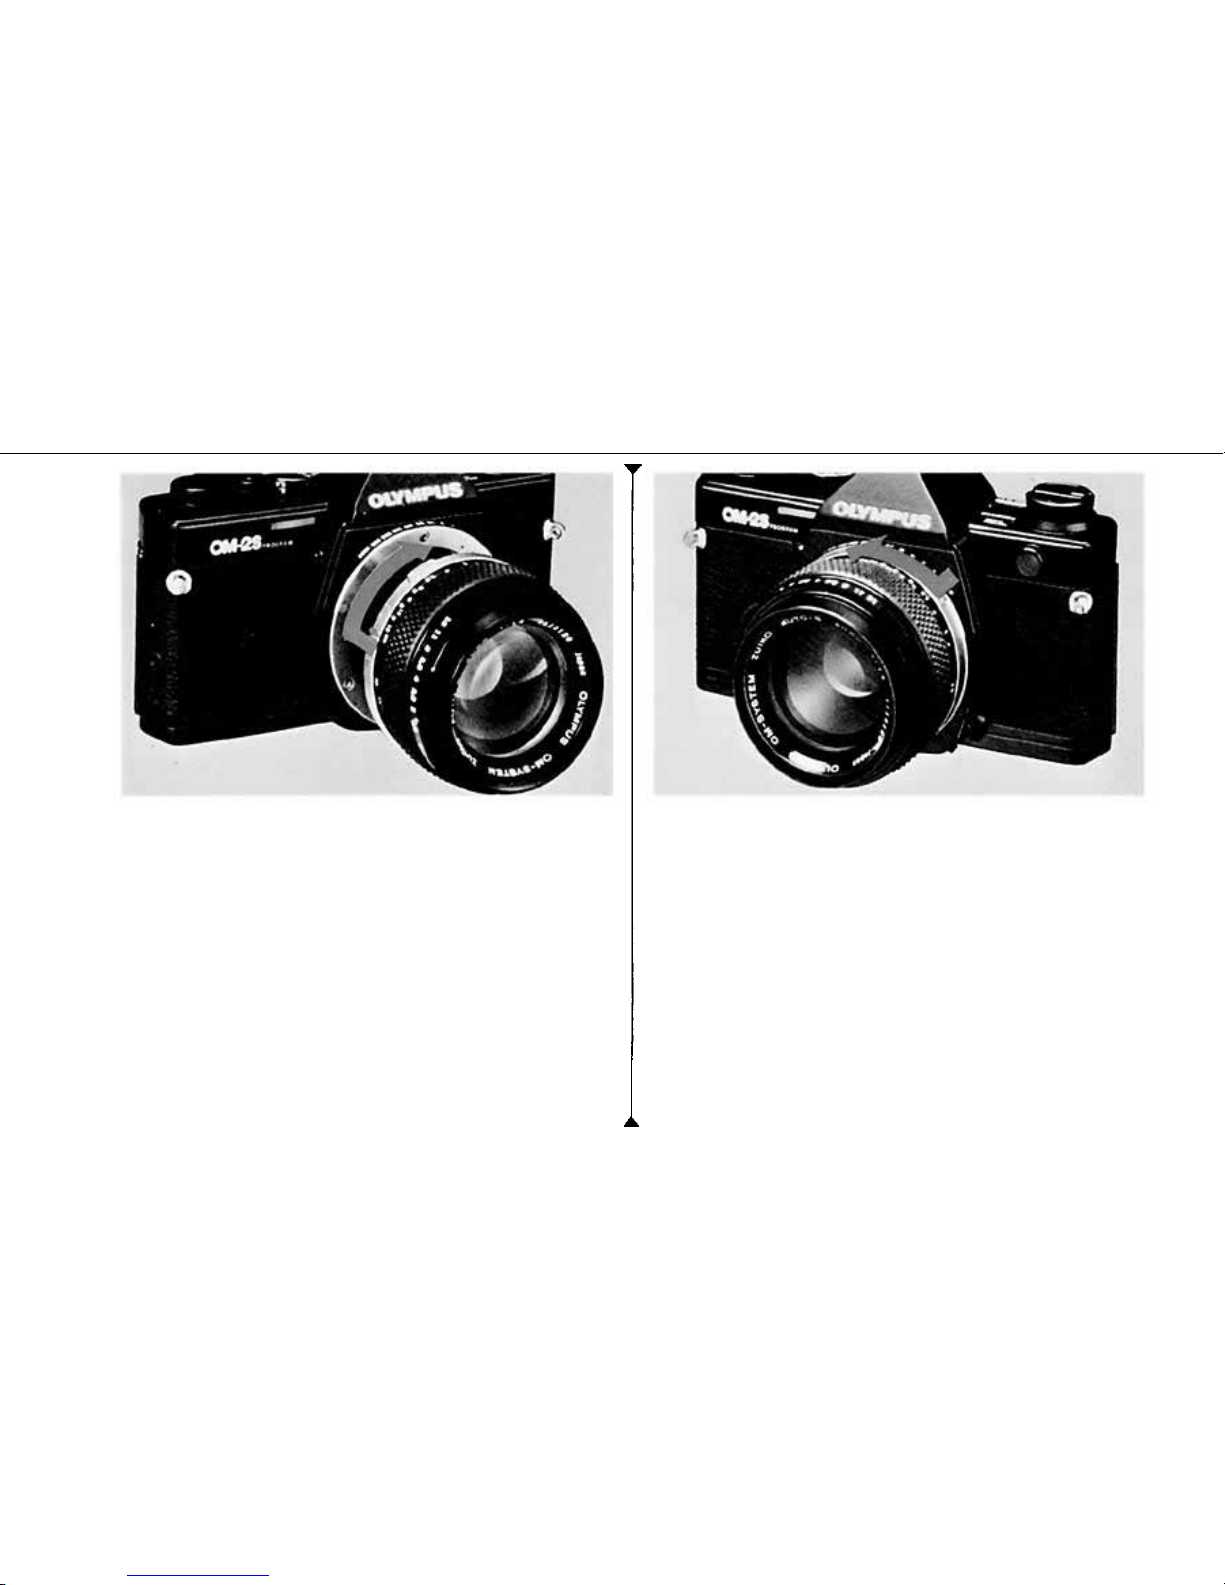
Detaching the Lens
3
Align the red dots and rotate the lens clock-
wise until it locks.
Press
the
lens
release
button
and
turn
the len
counter-clockwise.
A-5
Page 7
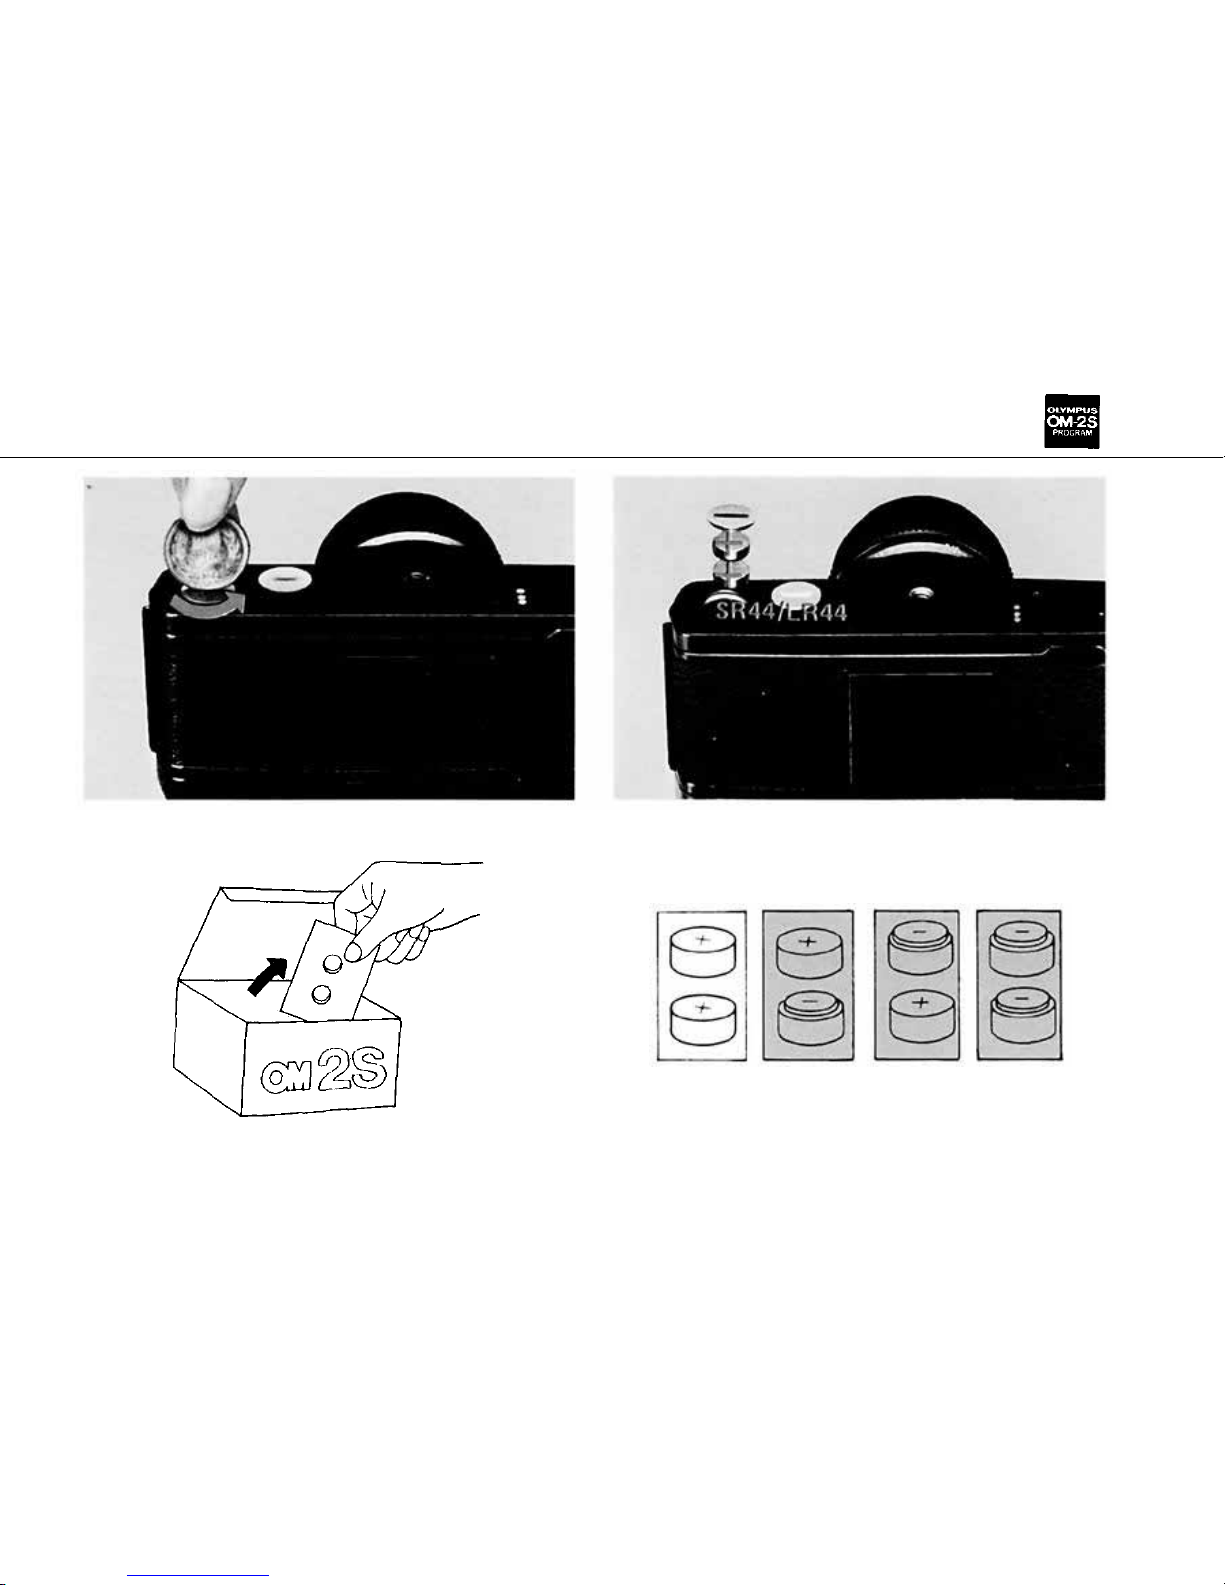
Inserting the Batteries
2
1
Remove the battery cover.
Wipe battery surfaces clean. Make sure that +
signs are facing upwards.
Correct Incorrect
SR44 ( LR44) × 2
A-6
Page 8
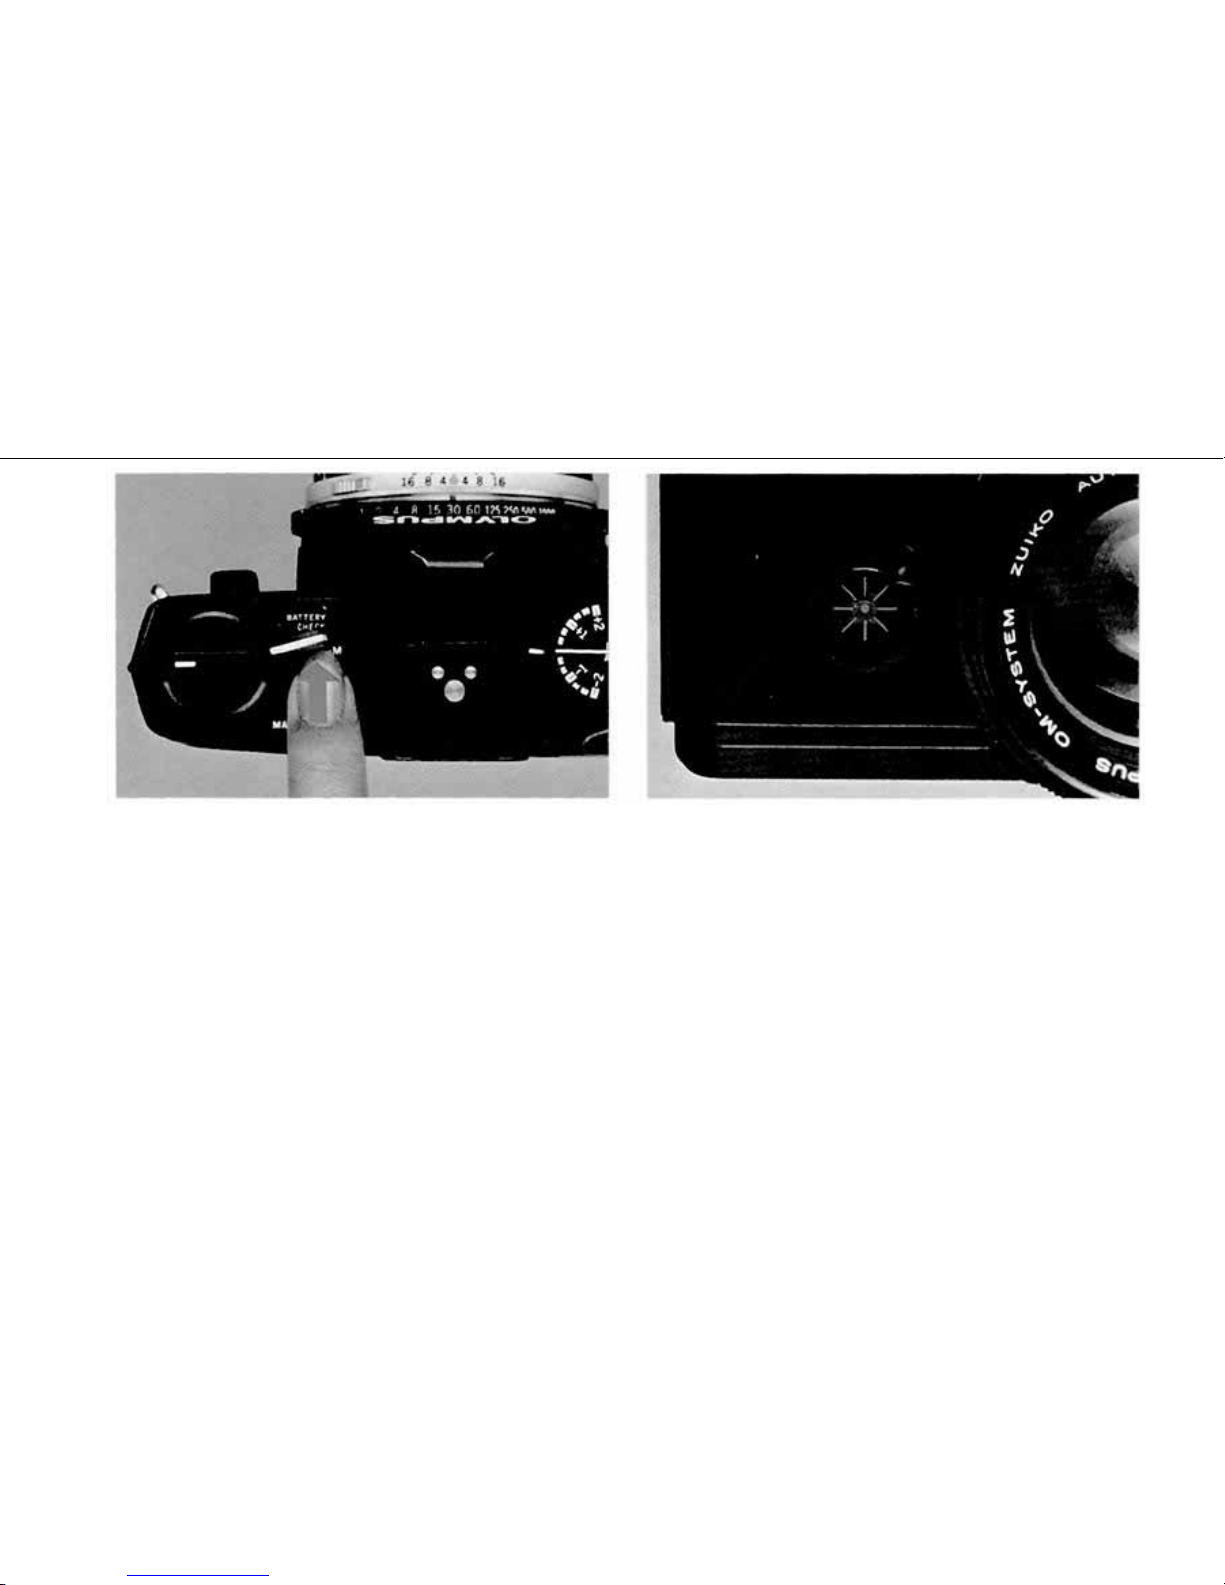
Checking the Batteries
2
Press the mode selector lever to the "BAT-
TERY CHECK" position.
The audible and visual signals will tell you that
the battery voltage is sufficient.
If these signals are emitted intermittently, it means
that the batteries are almost worn out. Replace
them with new ones as soon as possible.
* Make sure that the shutter speed ring is not set
at
1/60 sec.
or B (in
red).
** Be sure to make battery check after replacing
batteries.
1
A-7
Page 9
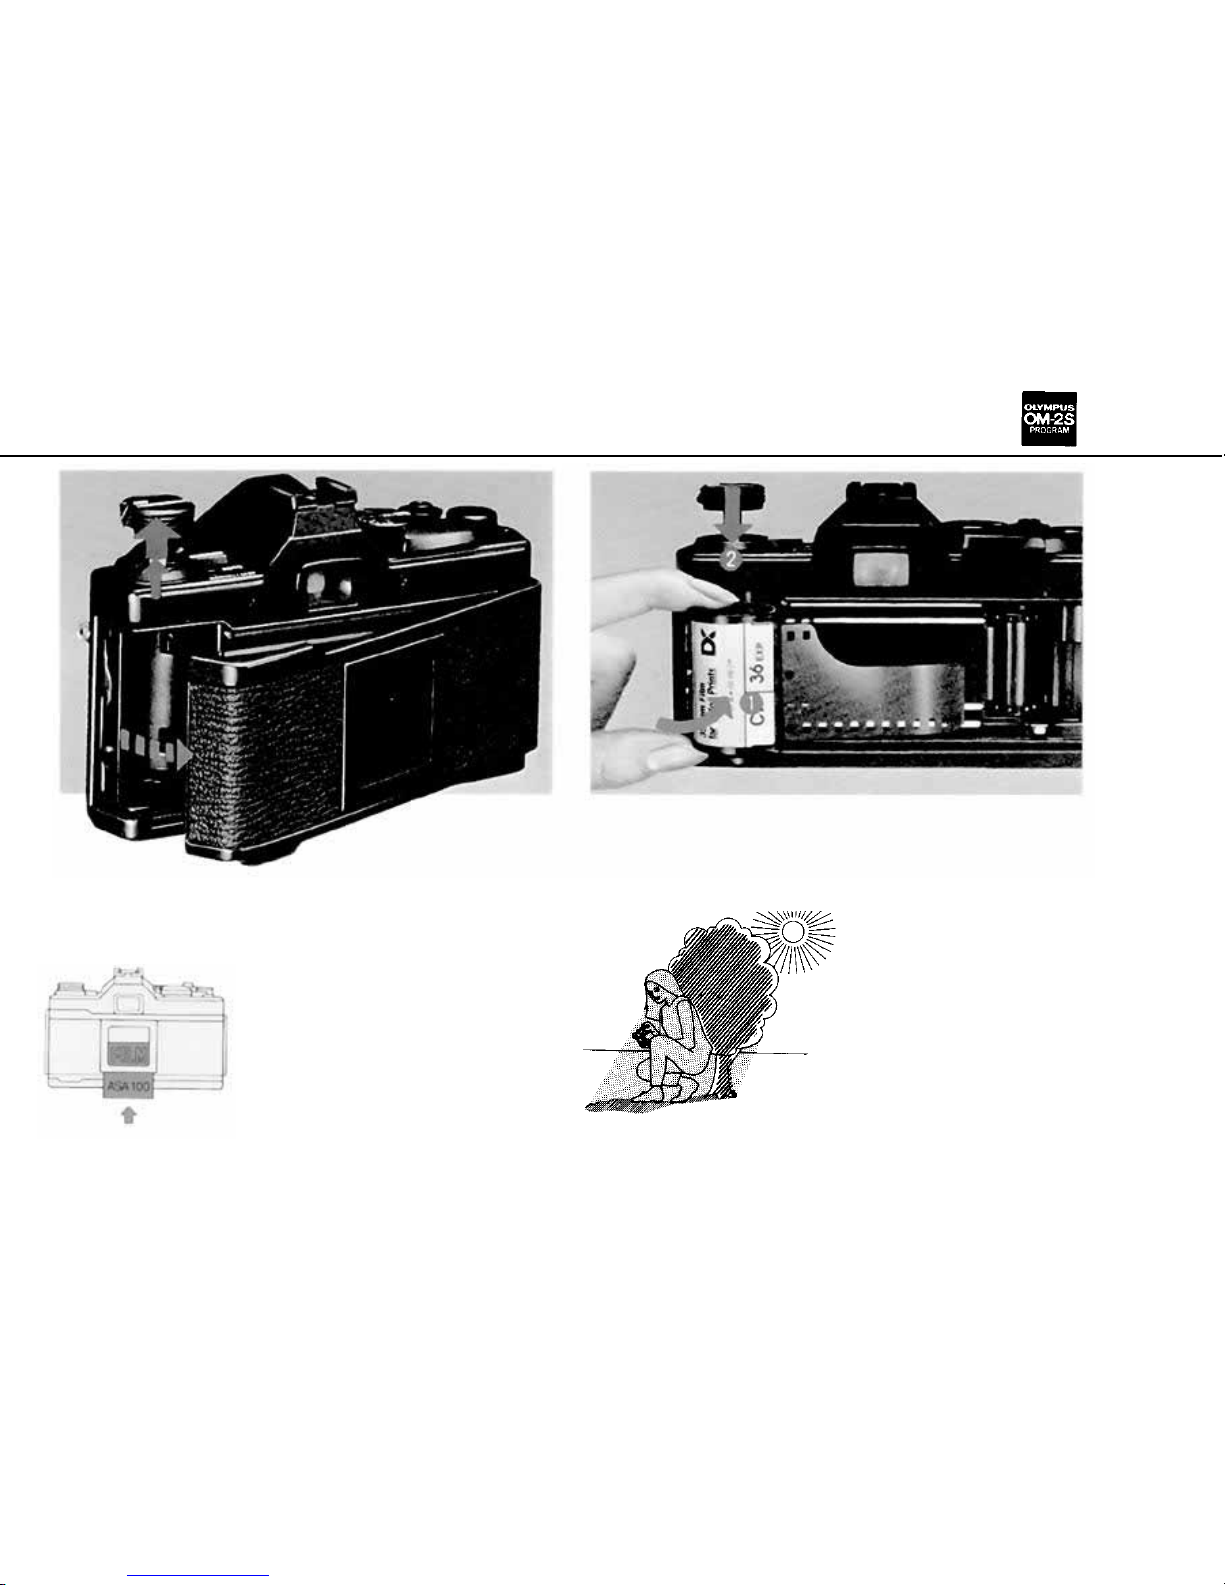
Loading the Film
1
2
Place the fil m cartridge in the film chamber.
Pull up on the rewind knob to open the cam-
era back.
Tear off the top of the
film box and insert it into the
memo holder. It will remind
you which film you are using.
Always load film
in the shade.
A-8
Page 10
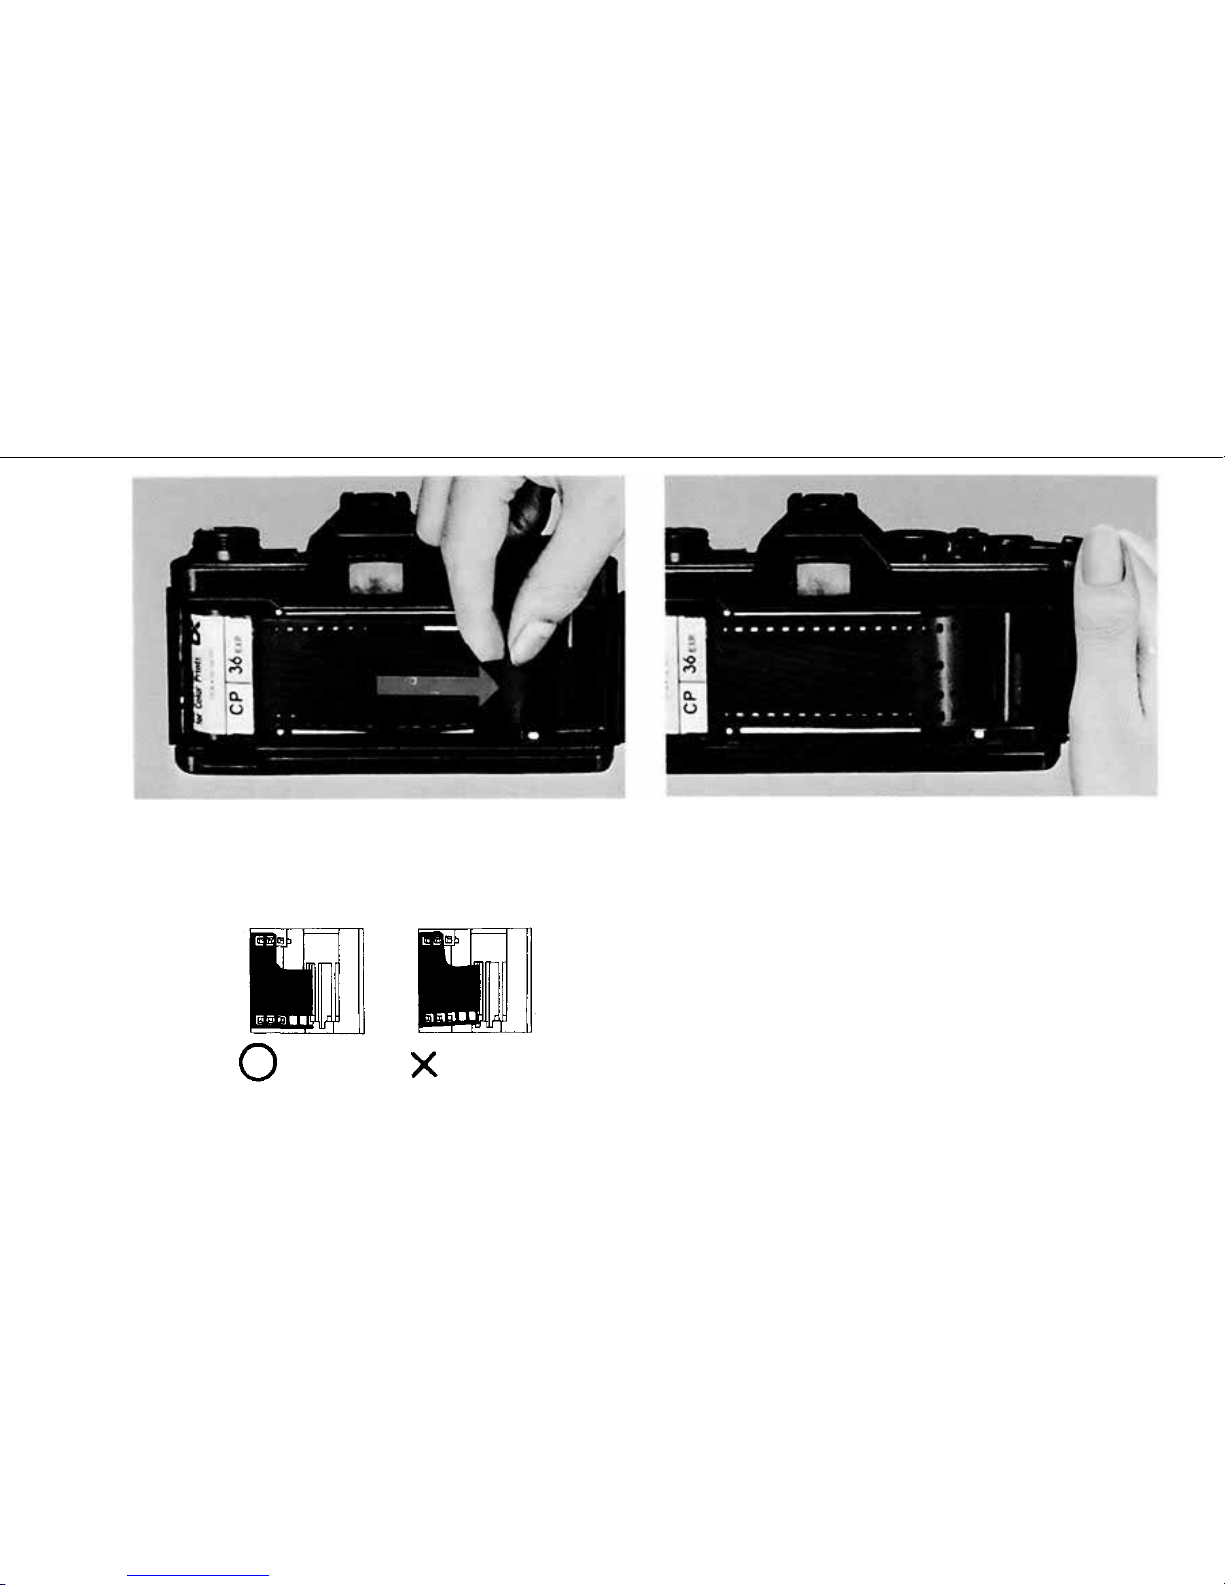
3
4
Insert the film leader into the take-up spool.
Wind the film once.
Correct
Incorrect
A-9
Page 11
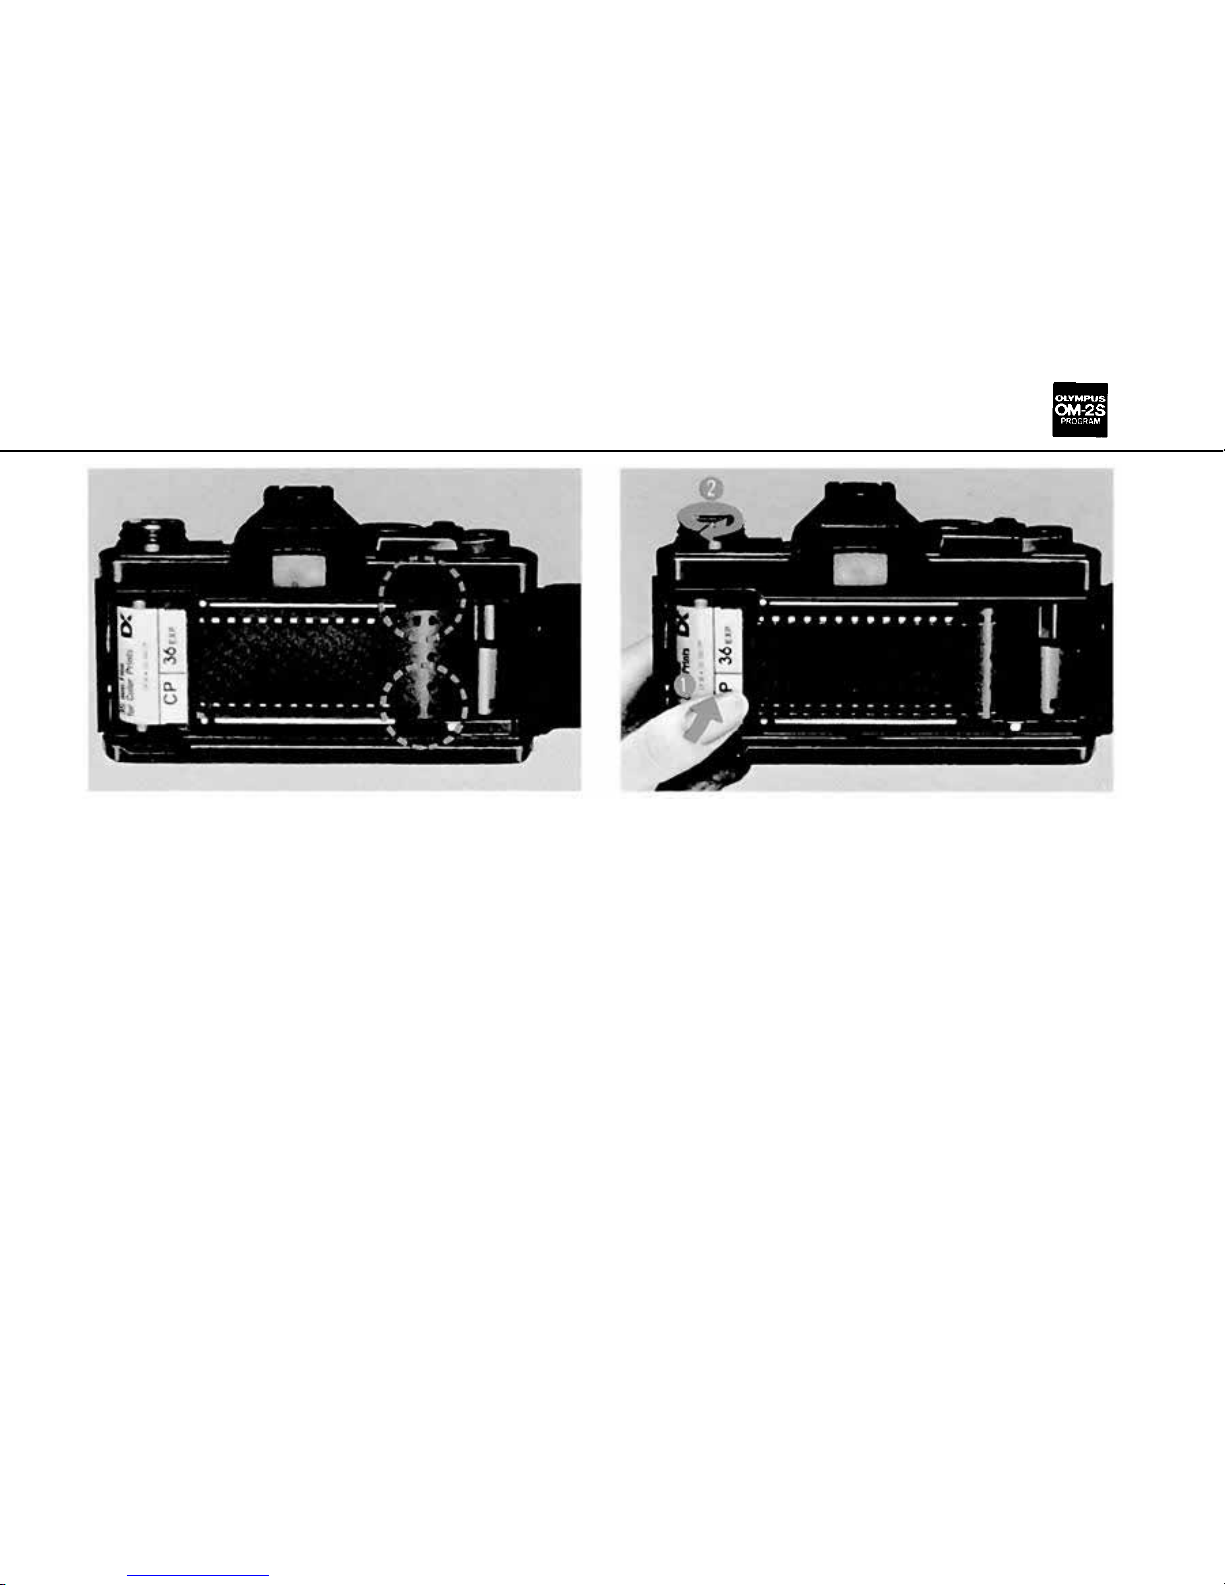
5
6
Continue
to
advance
the
film
till
sprockets
are
caught
on
both
edges
of the
film.
Take up the slack by turning th e rewind crank
clockwise.
A-10
Page 12
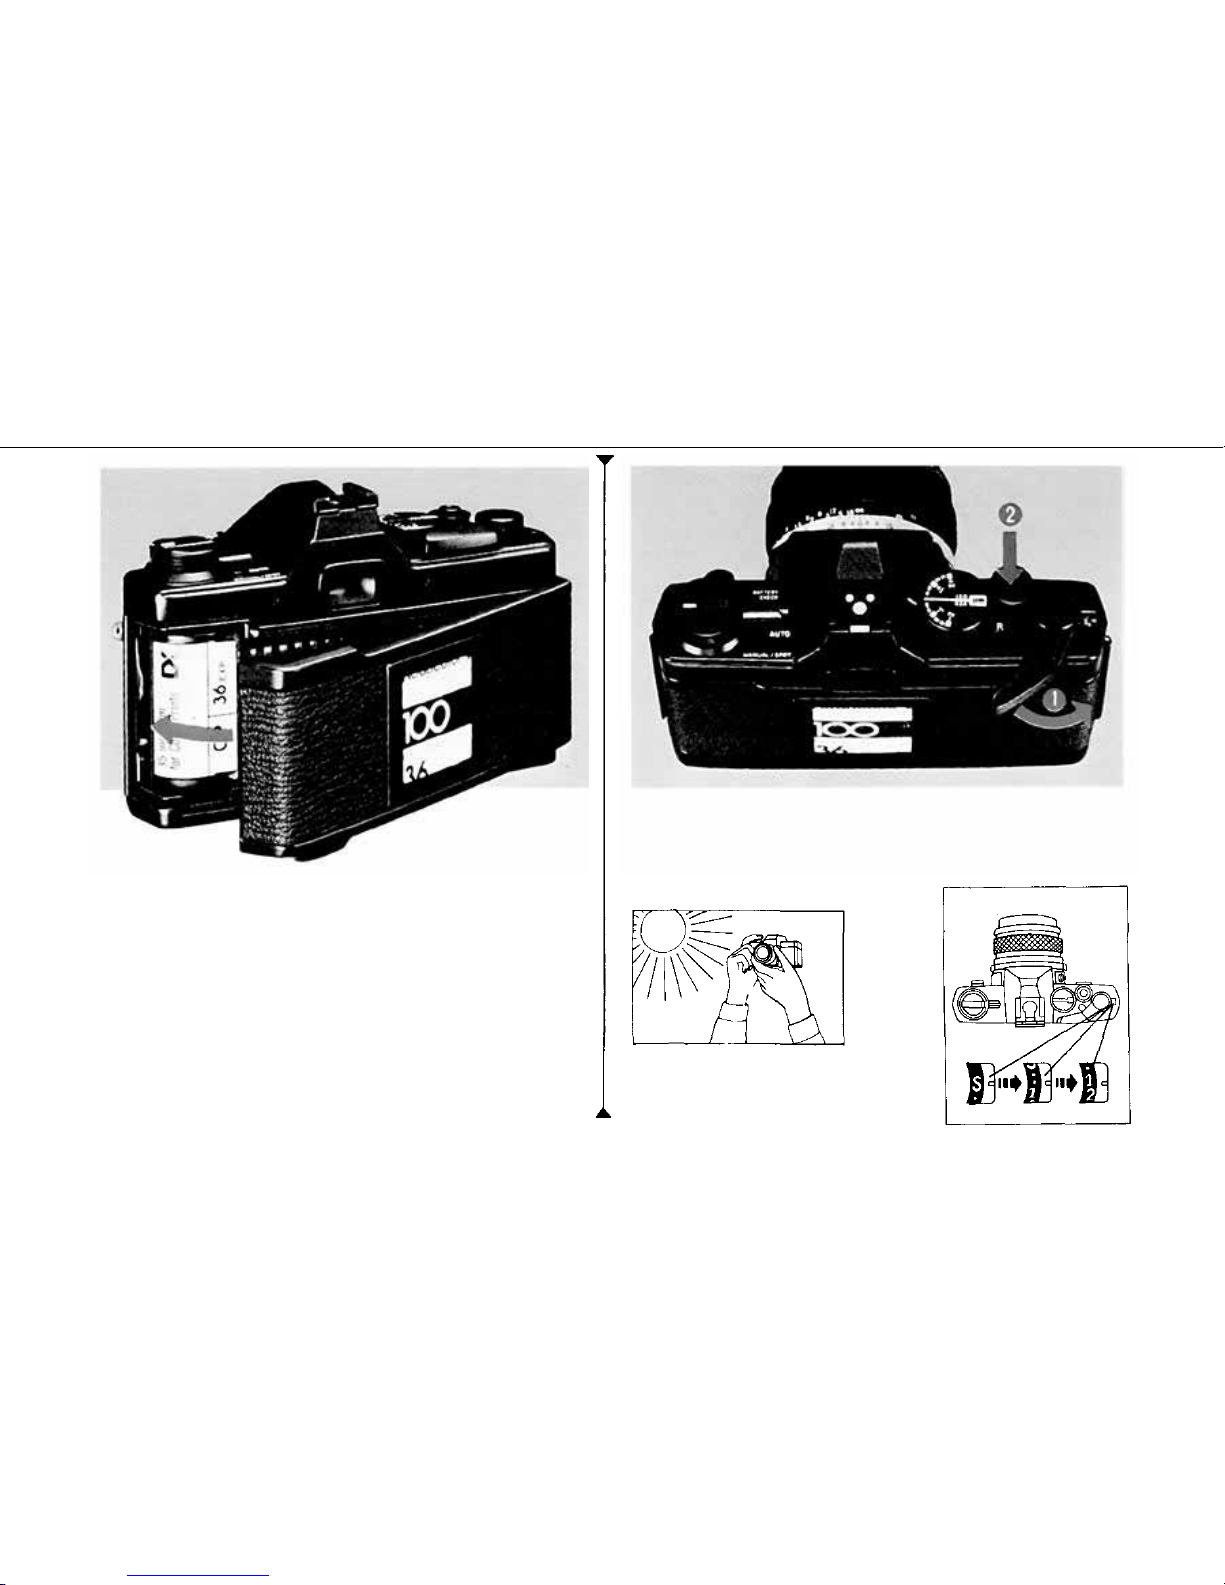
Setting the Exposure Counter to "1"
7
Close the camera back until it clicks into place.
Face the camera toward light and take two
blind shots.
1
A-11
Page 13
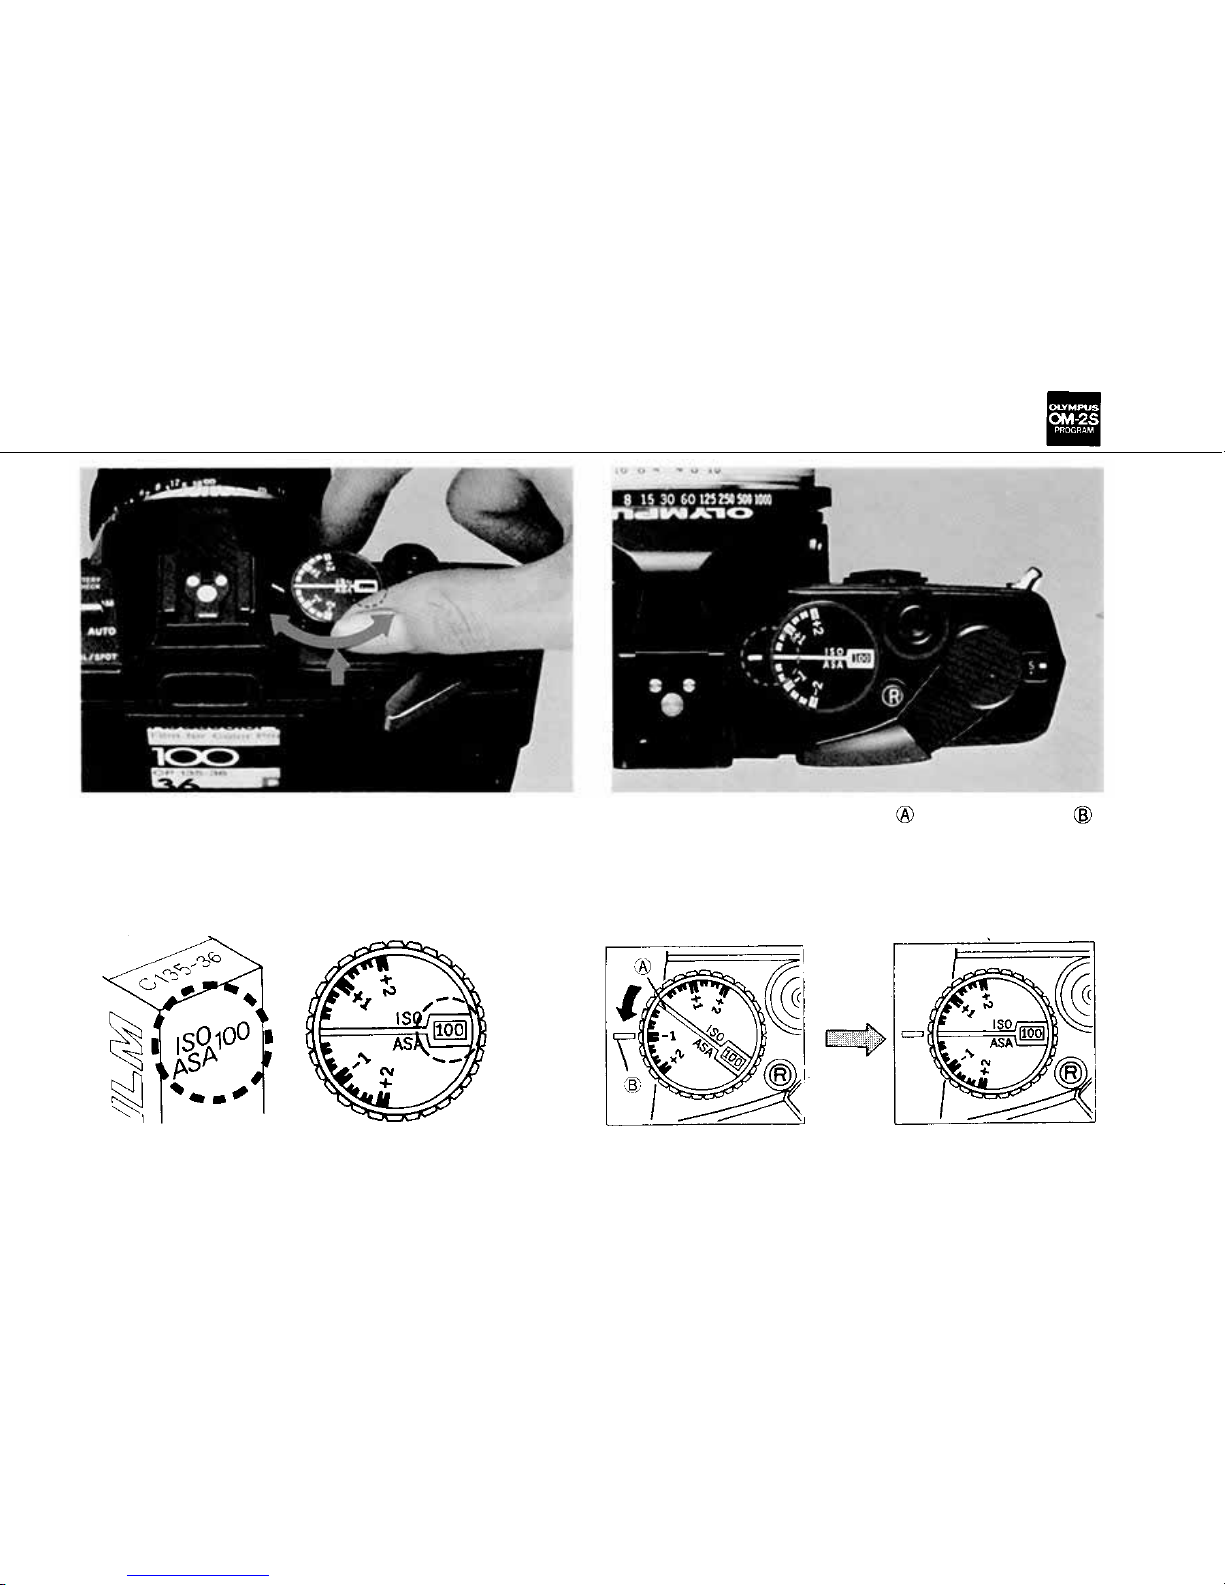
Setting the ISO Fi l m Speed
1
2
Lift up the outer collar and rotate until the
ISO speed appears in the window.
Align the exposure line with the index
A-12
Page 14

OM-2S
PROGRAM
< Basic Shooting Mode >
A-13
Page 15
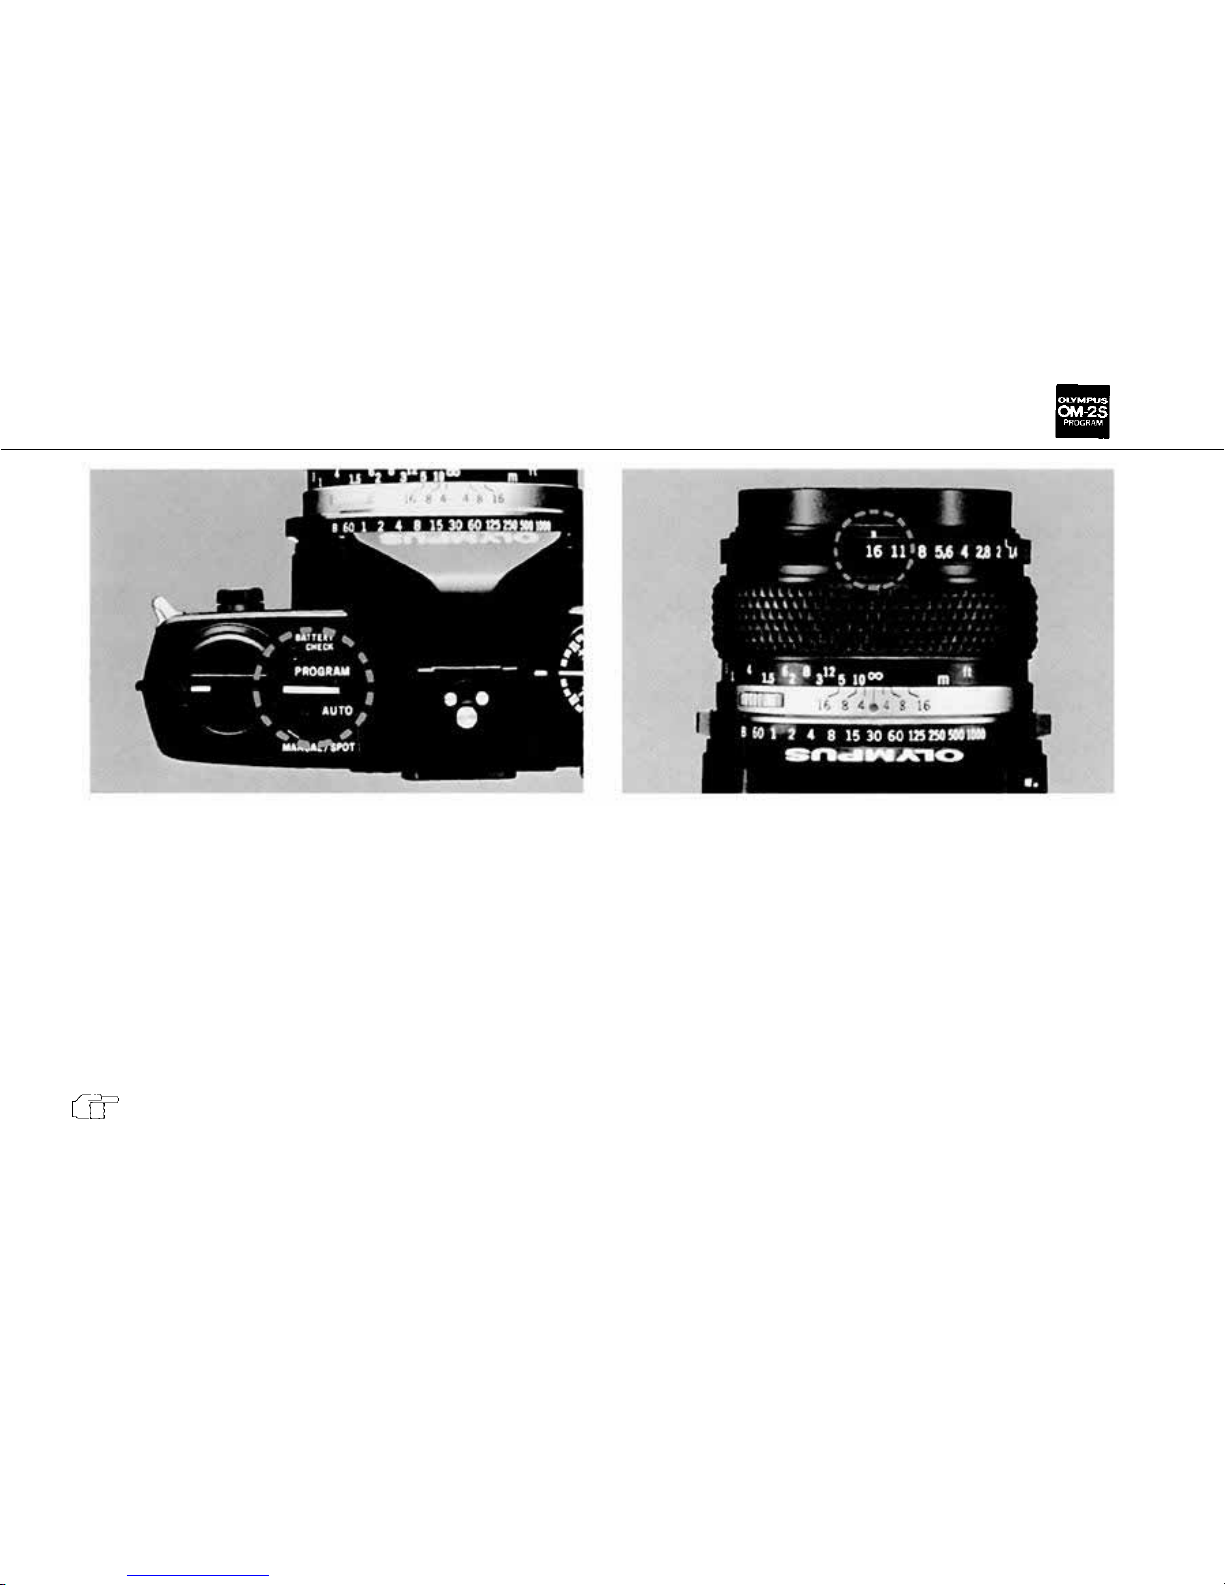
Programmed Exposure on TTL Direct "OTF" Light Metering (Center-Weighted Averaging Method)
1 2
Set the mode selector lever to the "PRO-
GRAM" position.
Set the lens to its minimum aperture.
B-7
A-14
Page 16
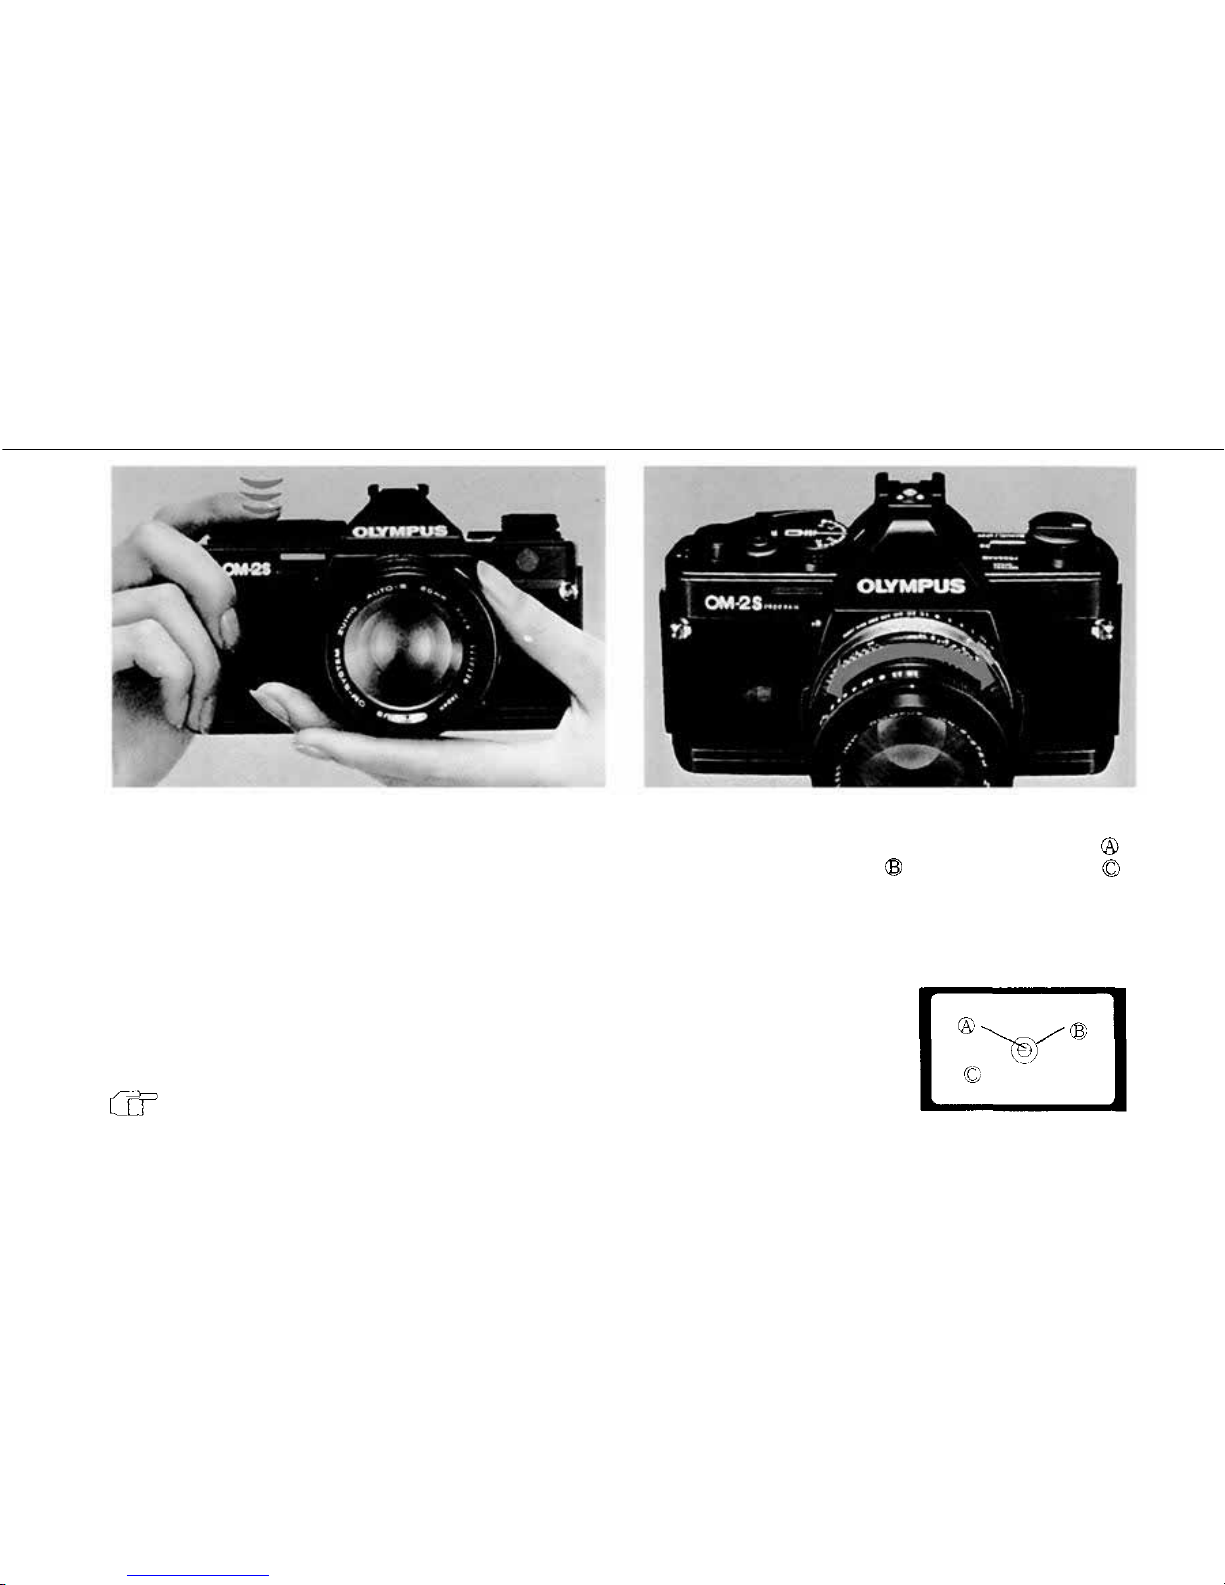
B-10
3
4
Press
the
shutter
release
slightly
to
turn
on the
viewfiner.
(A built-in battery conserver turns off the view-
finder display after 90 sec.)
Turn
the
focus
ring
in
either
direction
until
the subject is sharpest.
You can focus using any of the focusing aids:
Split-image rangefinder Microprism collar
Surronding ground glass.
A-15
Page 17
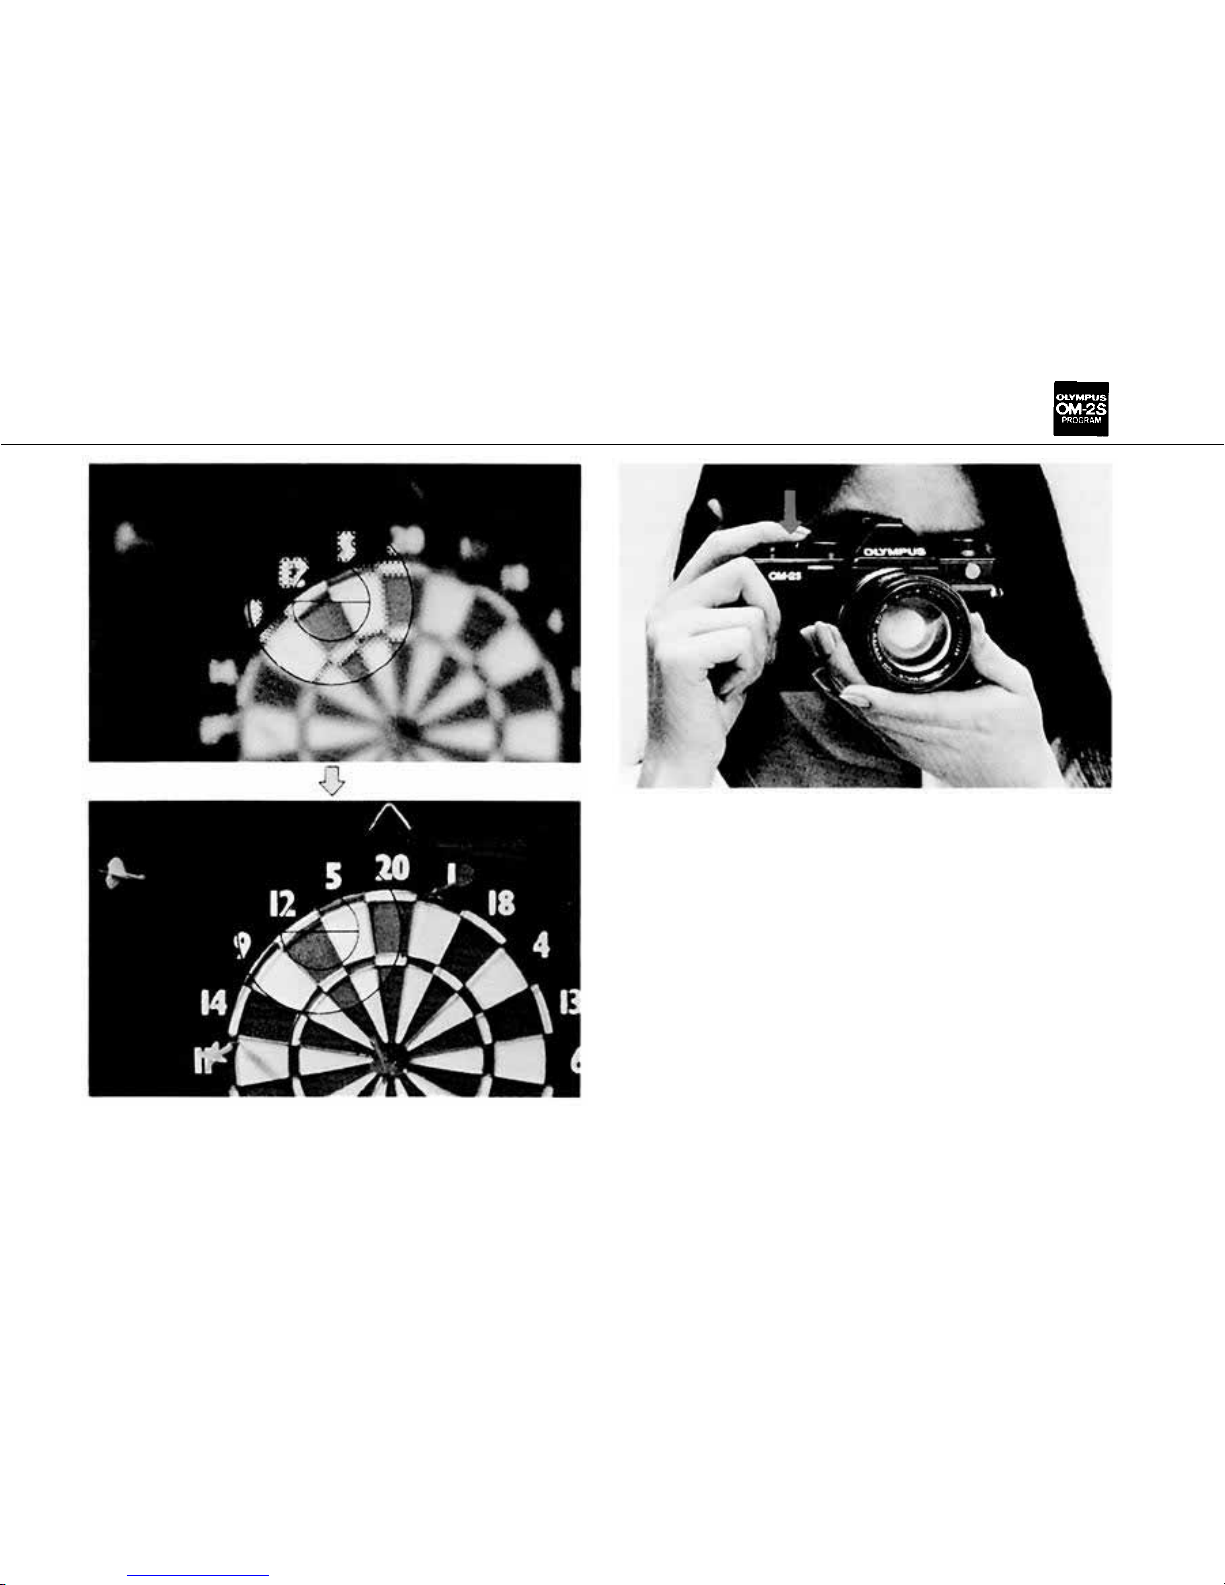
5
6
Press
the
shutter
release
to
take
the
picture.
A-16
Page 18
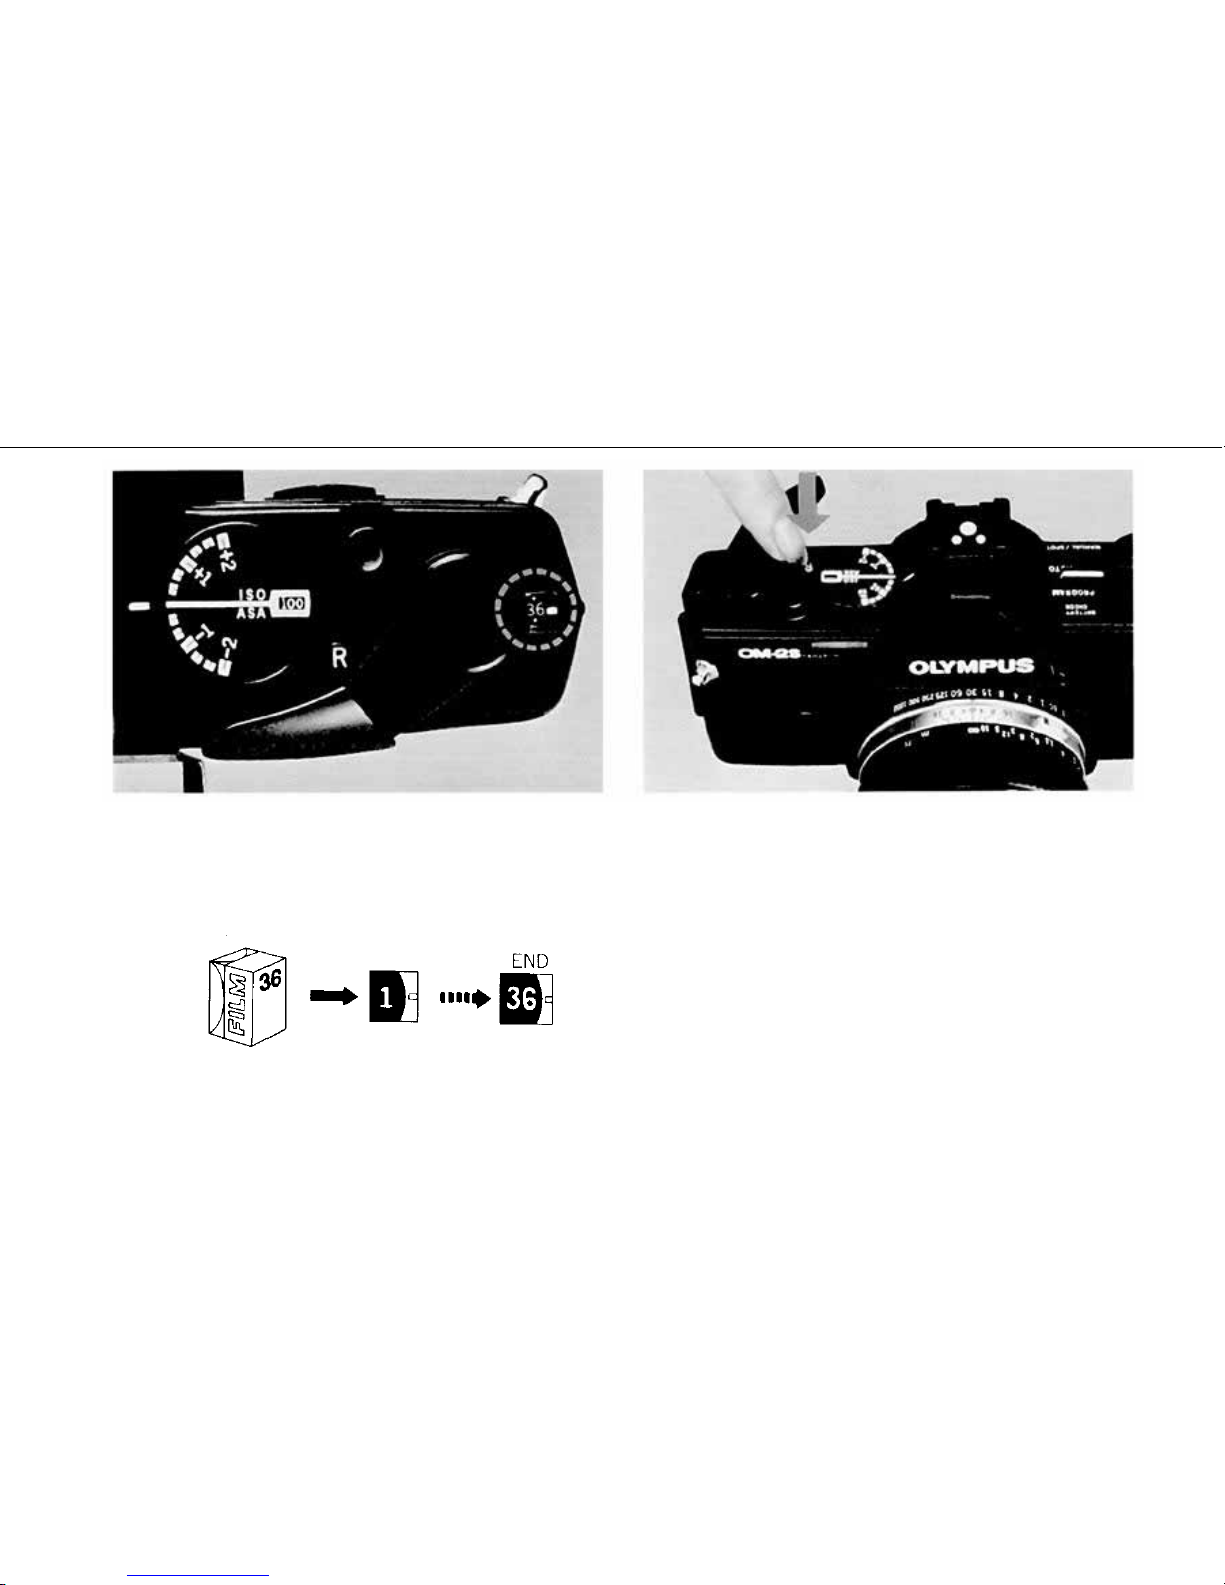
Rewinding the Fi lm
When the exposure counter indicates the end
of your roll of film
Push
the "R"
button.
1
2
A-17
Page 19
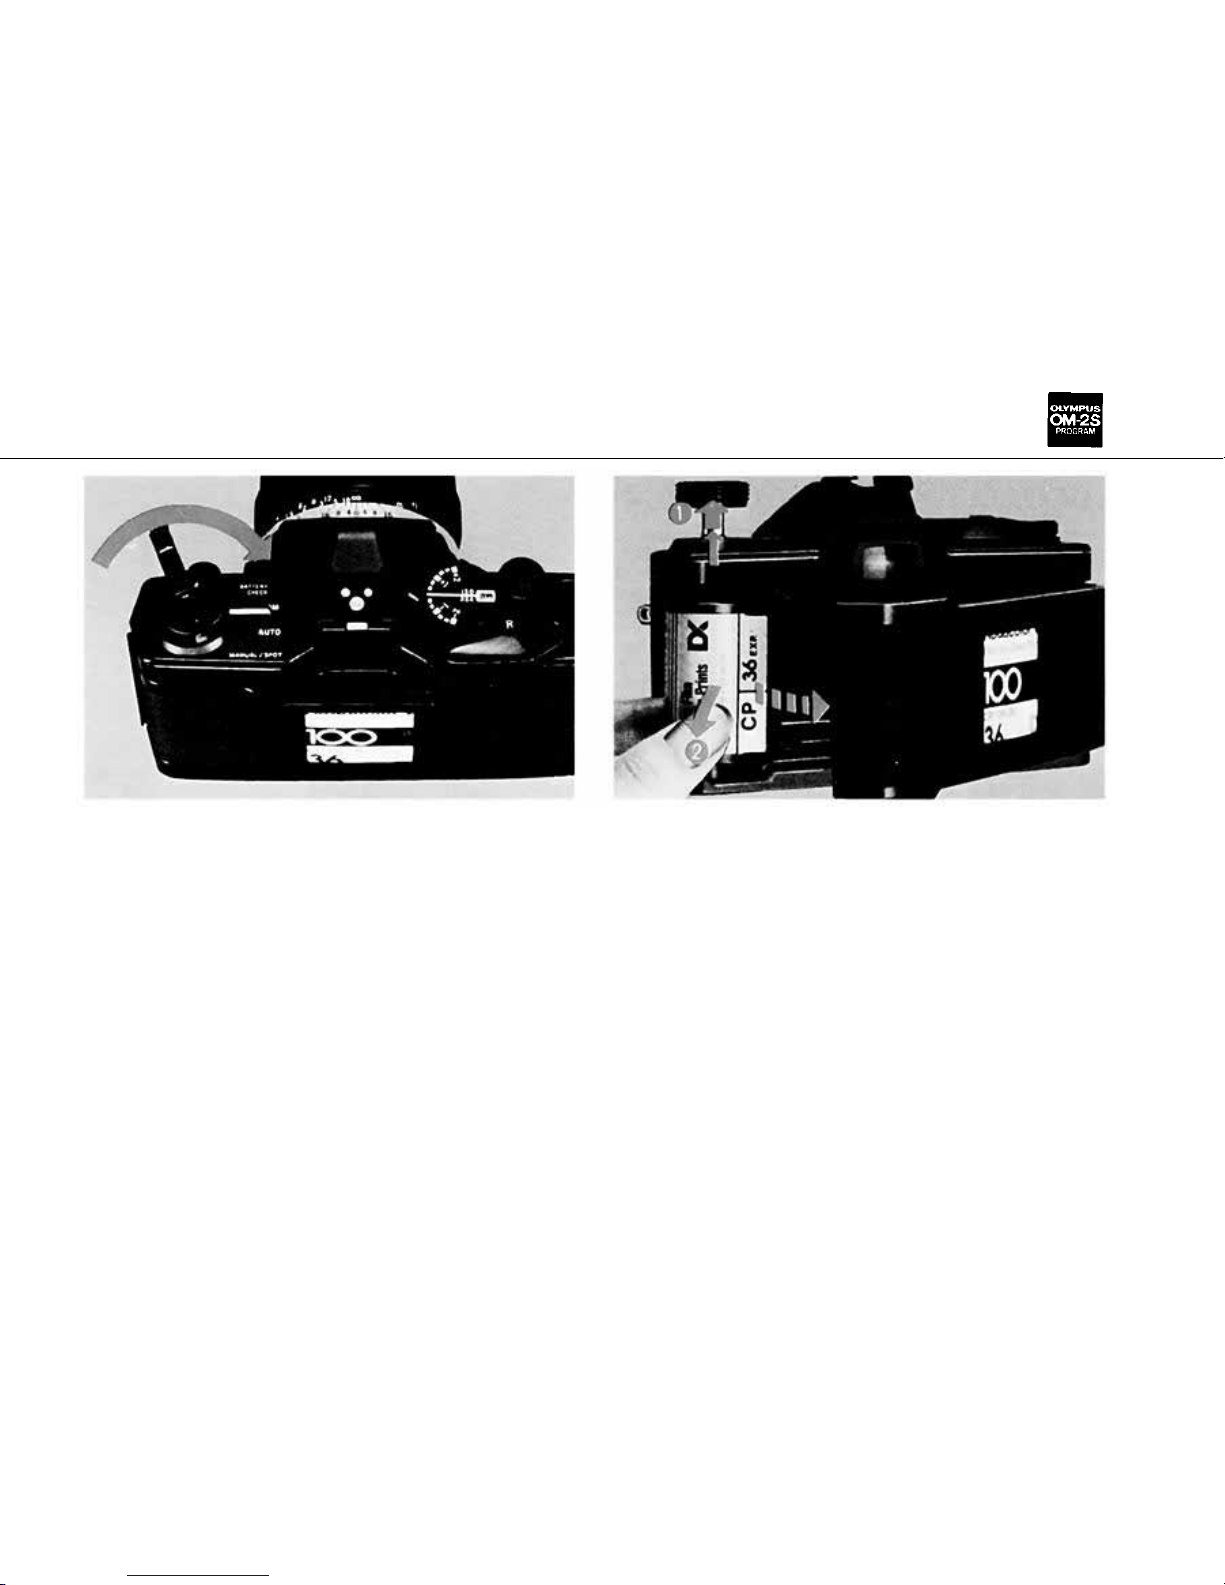
3
4
Fold out the rewind crank and wind it until
the
film
tension
is
released.
Open the camera back by pulling up on the
rewind knob and remove the film.
A-18
Page 20
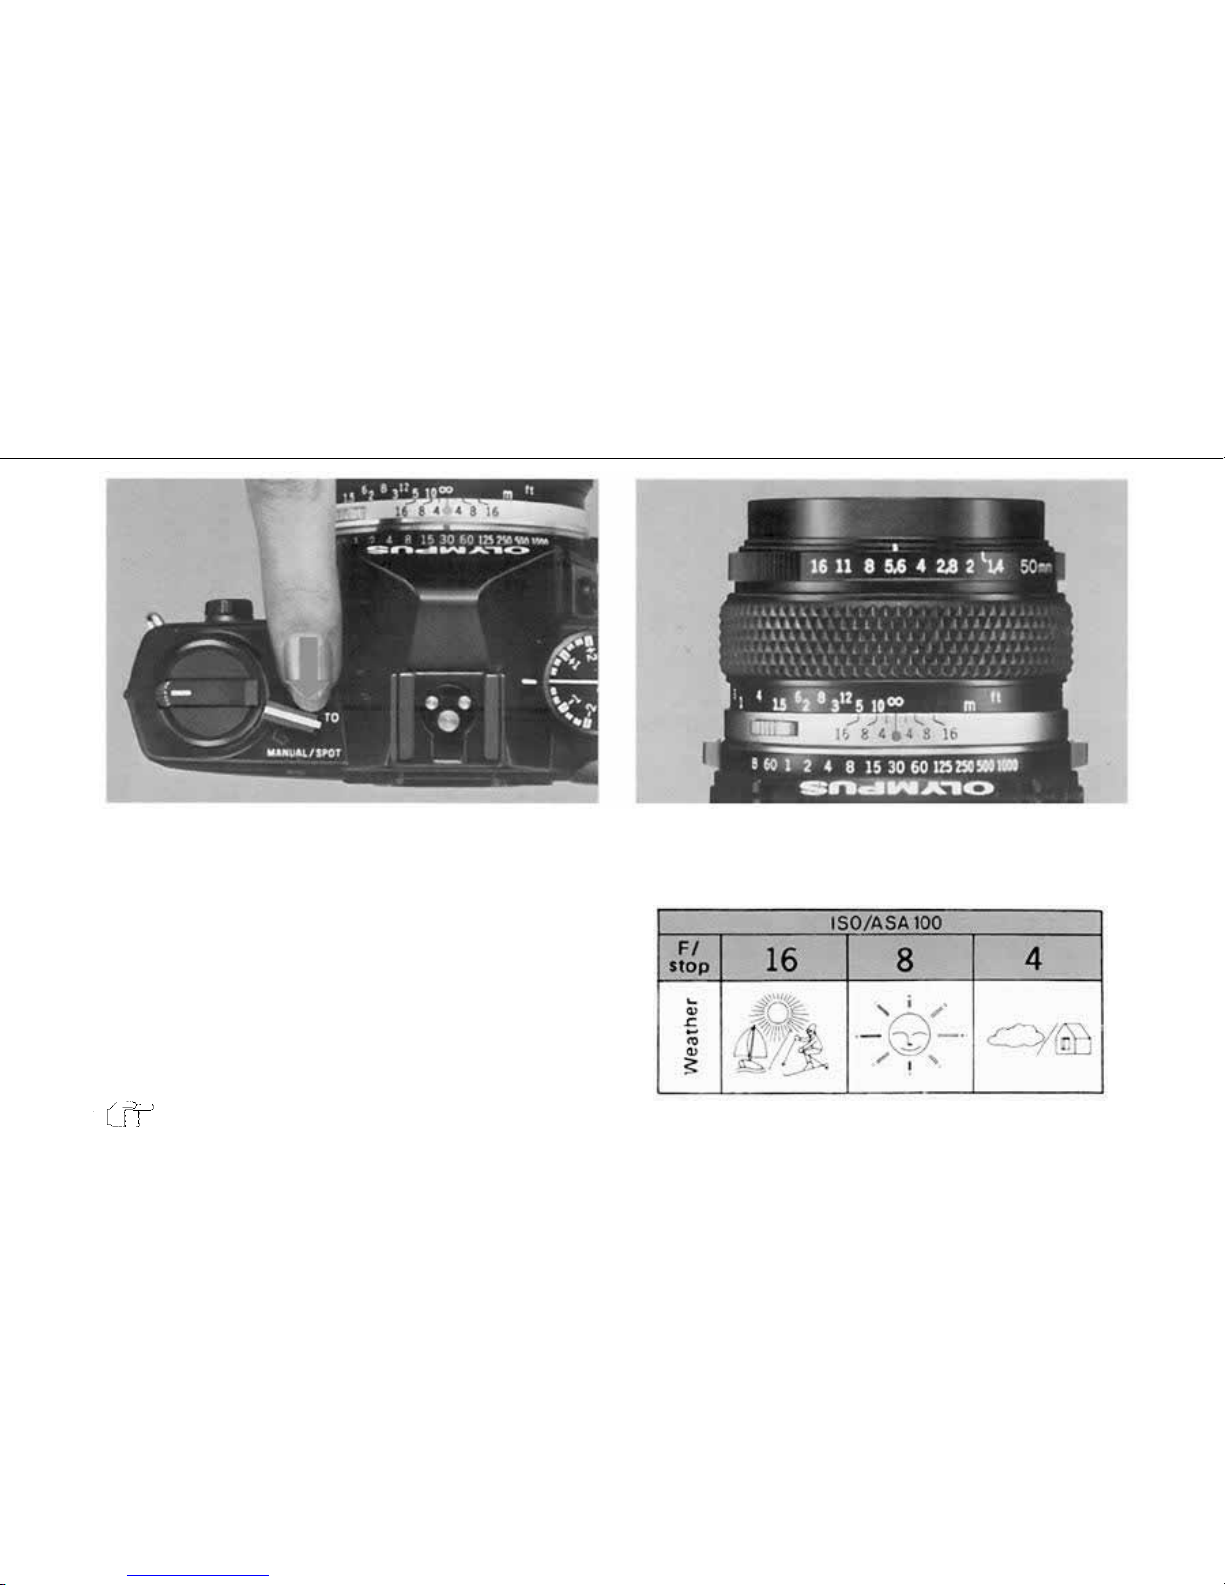
TTL Direct "OTF" Light Metering (Center-Weighted Averaging Method)
1
2
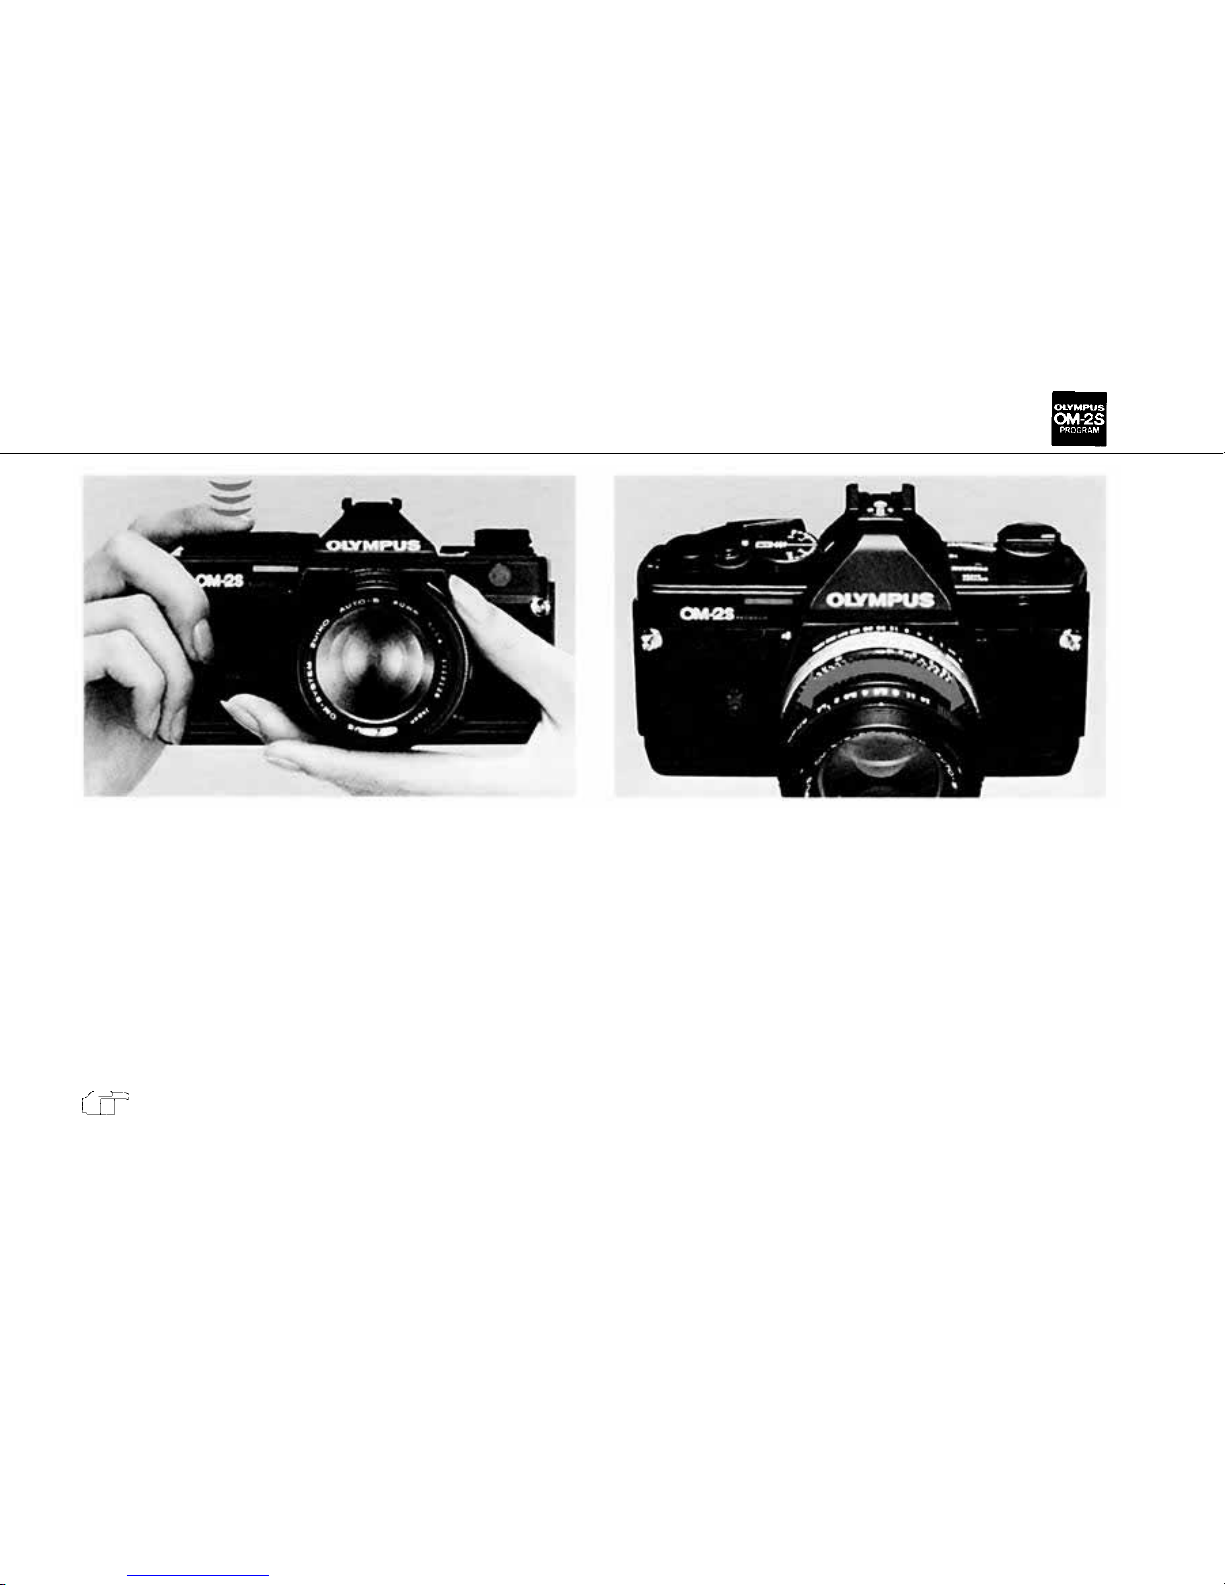
Set the mode selector lever to the "AUTO"
position.
Set the aperture.
B-20
A-19
Page 21
3
4
Press
the
shutter
release
slightly
to
turn
on the
viewfinder.
(A built-in battery conserver turns off the view-
finder display after 90 sec.)
Turn the focus ring in either direction until
the subject is sharpest.
B-24
A-20
Page 22
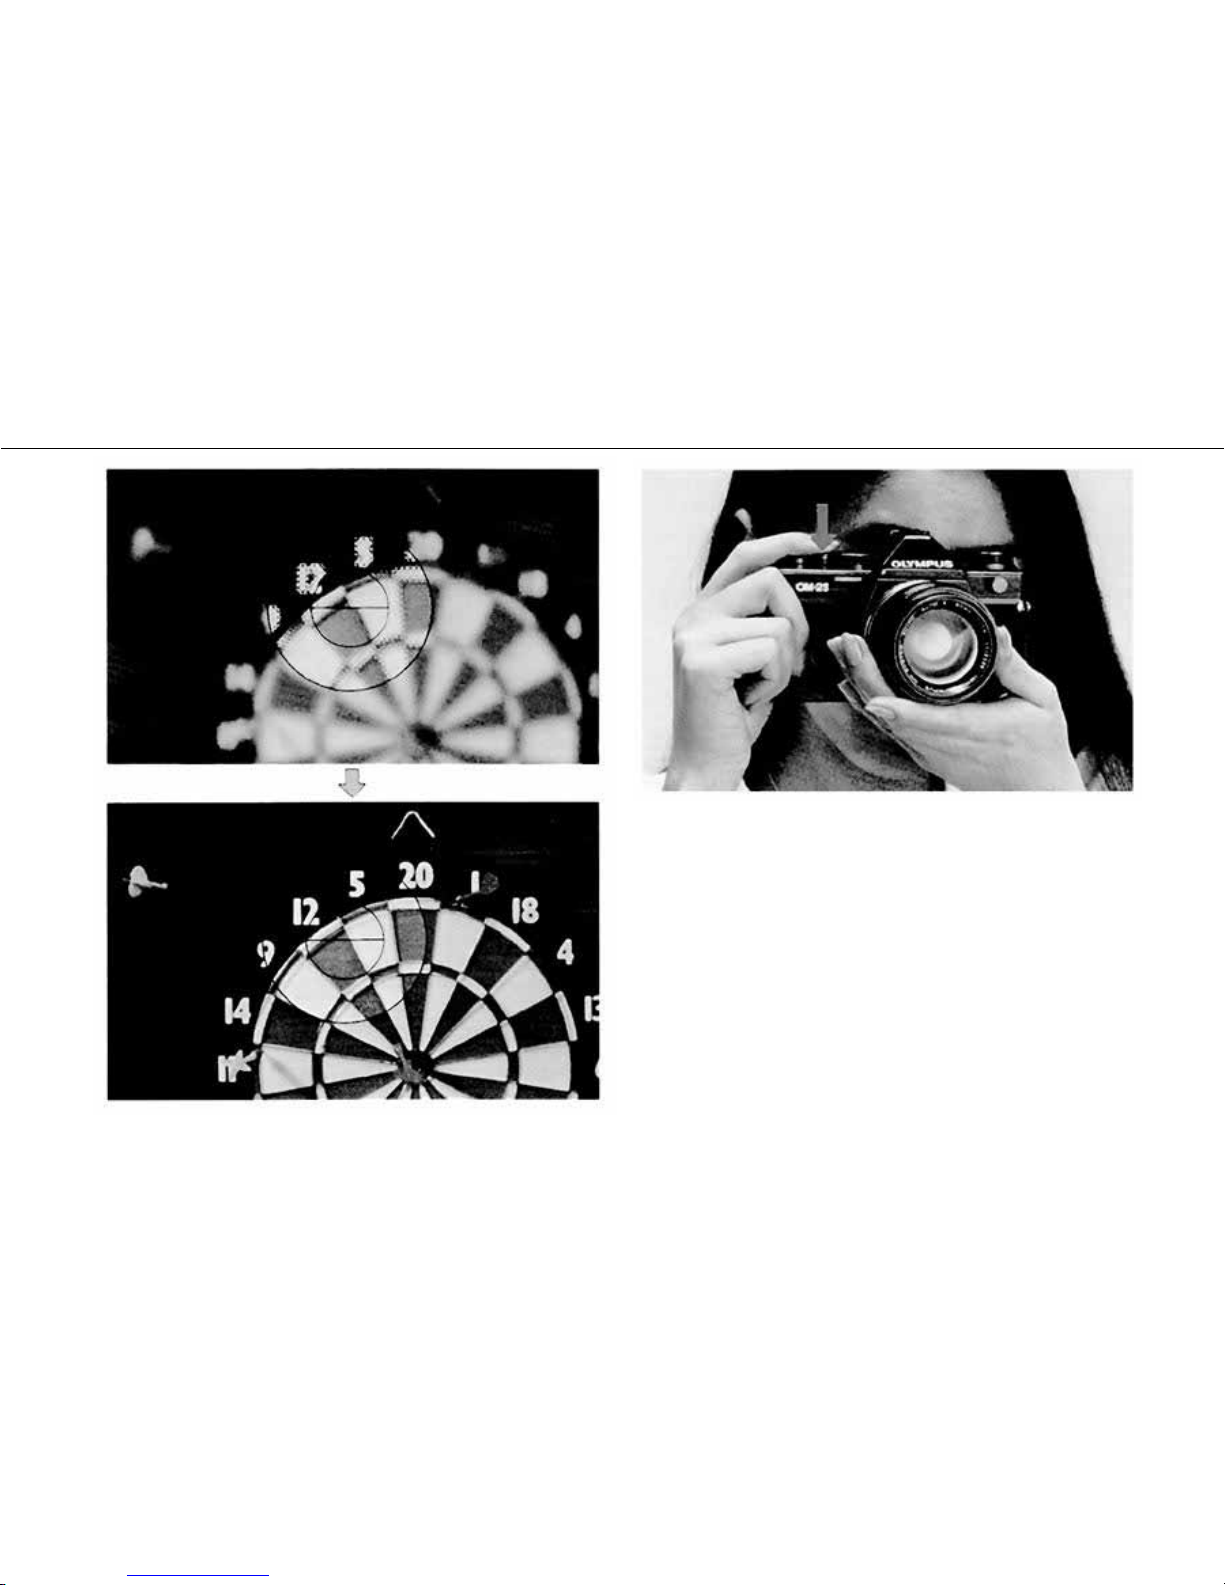
5
6
Press the shutter release to take the picture.
A-21
Page 23
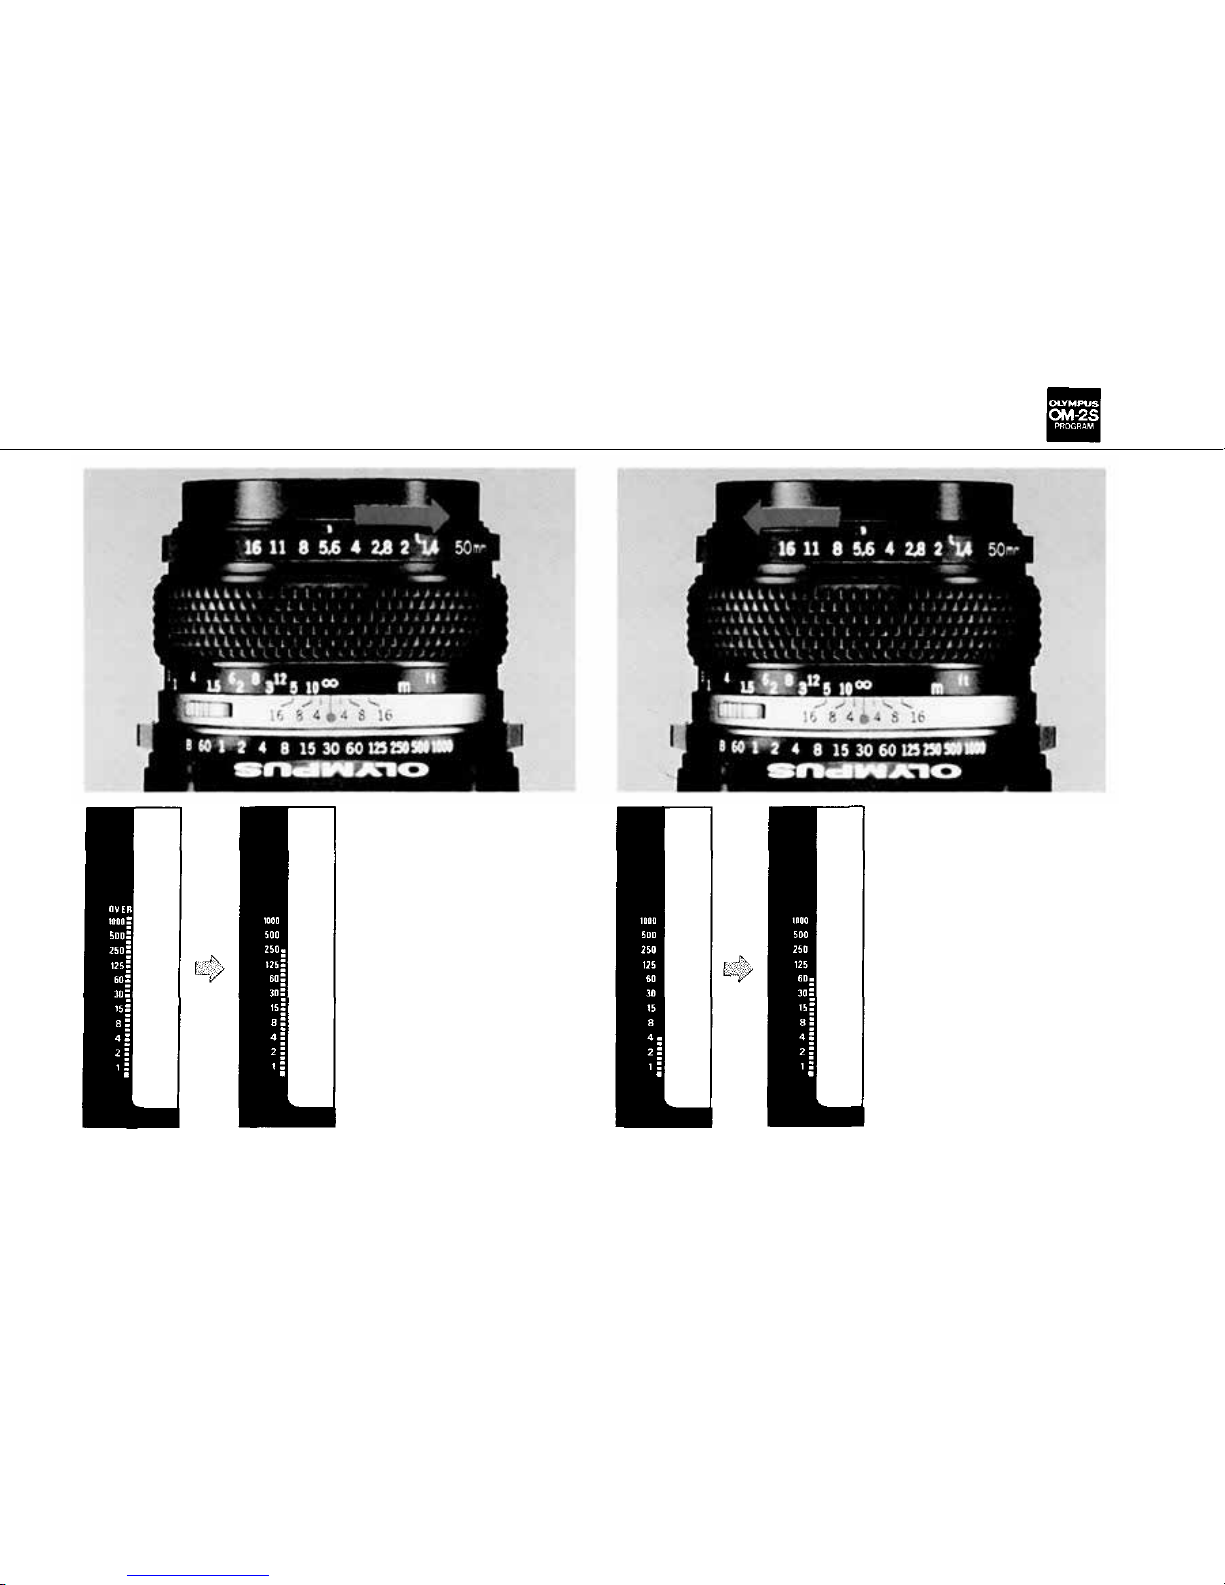
What to Do when Overexposure Warning Appears?
What to Do when Shutter Speed is too Slow?
Turn the aperture
ring to the higher F-
numbers until th e shut-
ter speed is in the ac-
ceptable range.
Turn the aperture
ring to the lower F-
numbers. This will speed
up the shutter speed ac-
cordingly.
A-22
Page 24

OM-2S
PROGRAM
< Sophisticated Shooting Mode >
A-23
Page 25
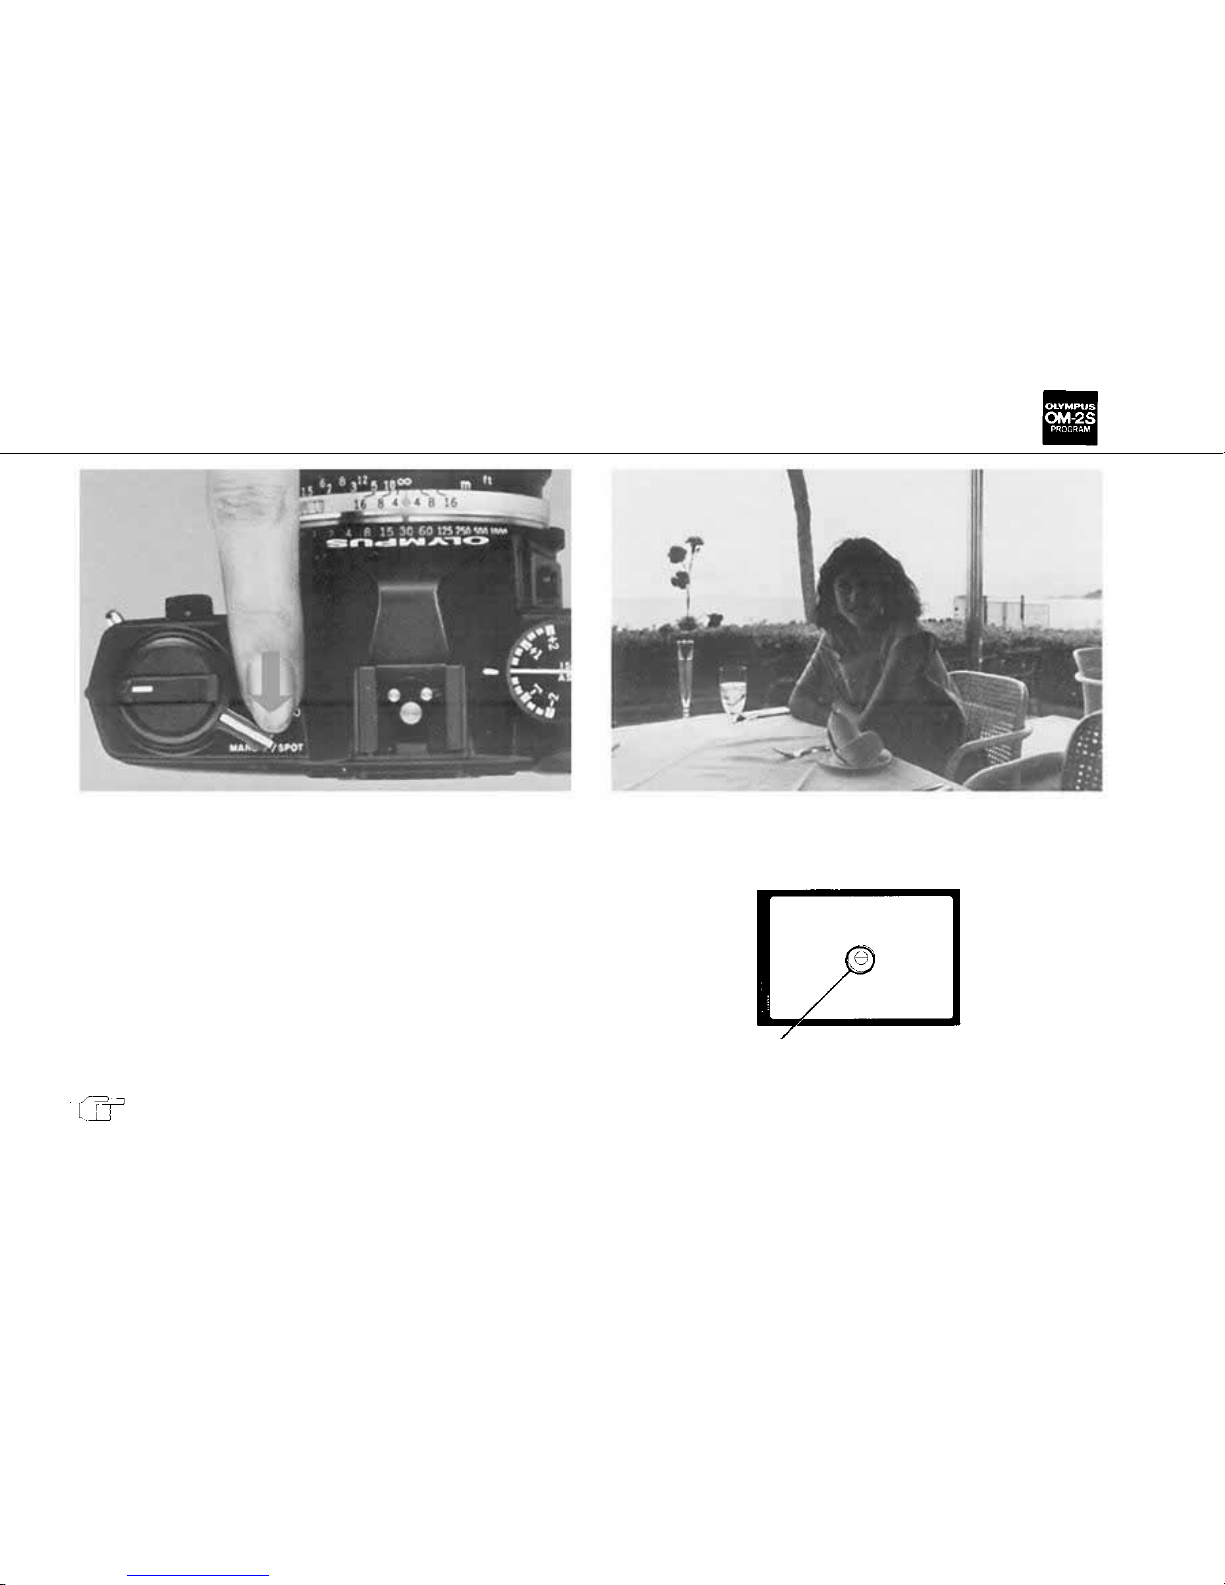
How to Use the MANUAL/SPOT
1
2
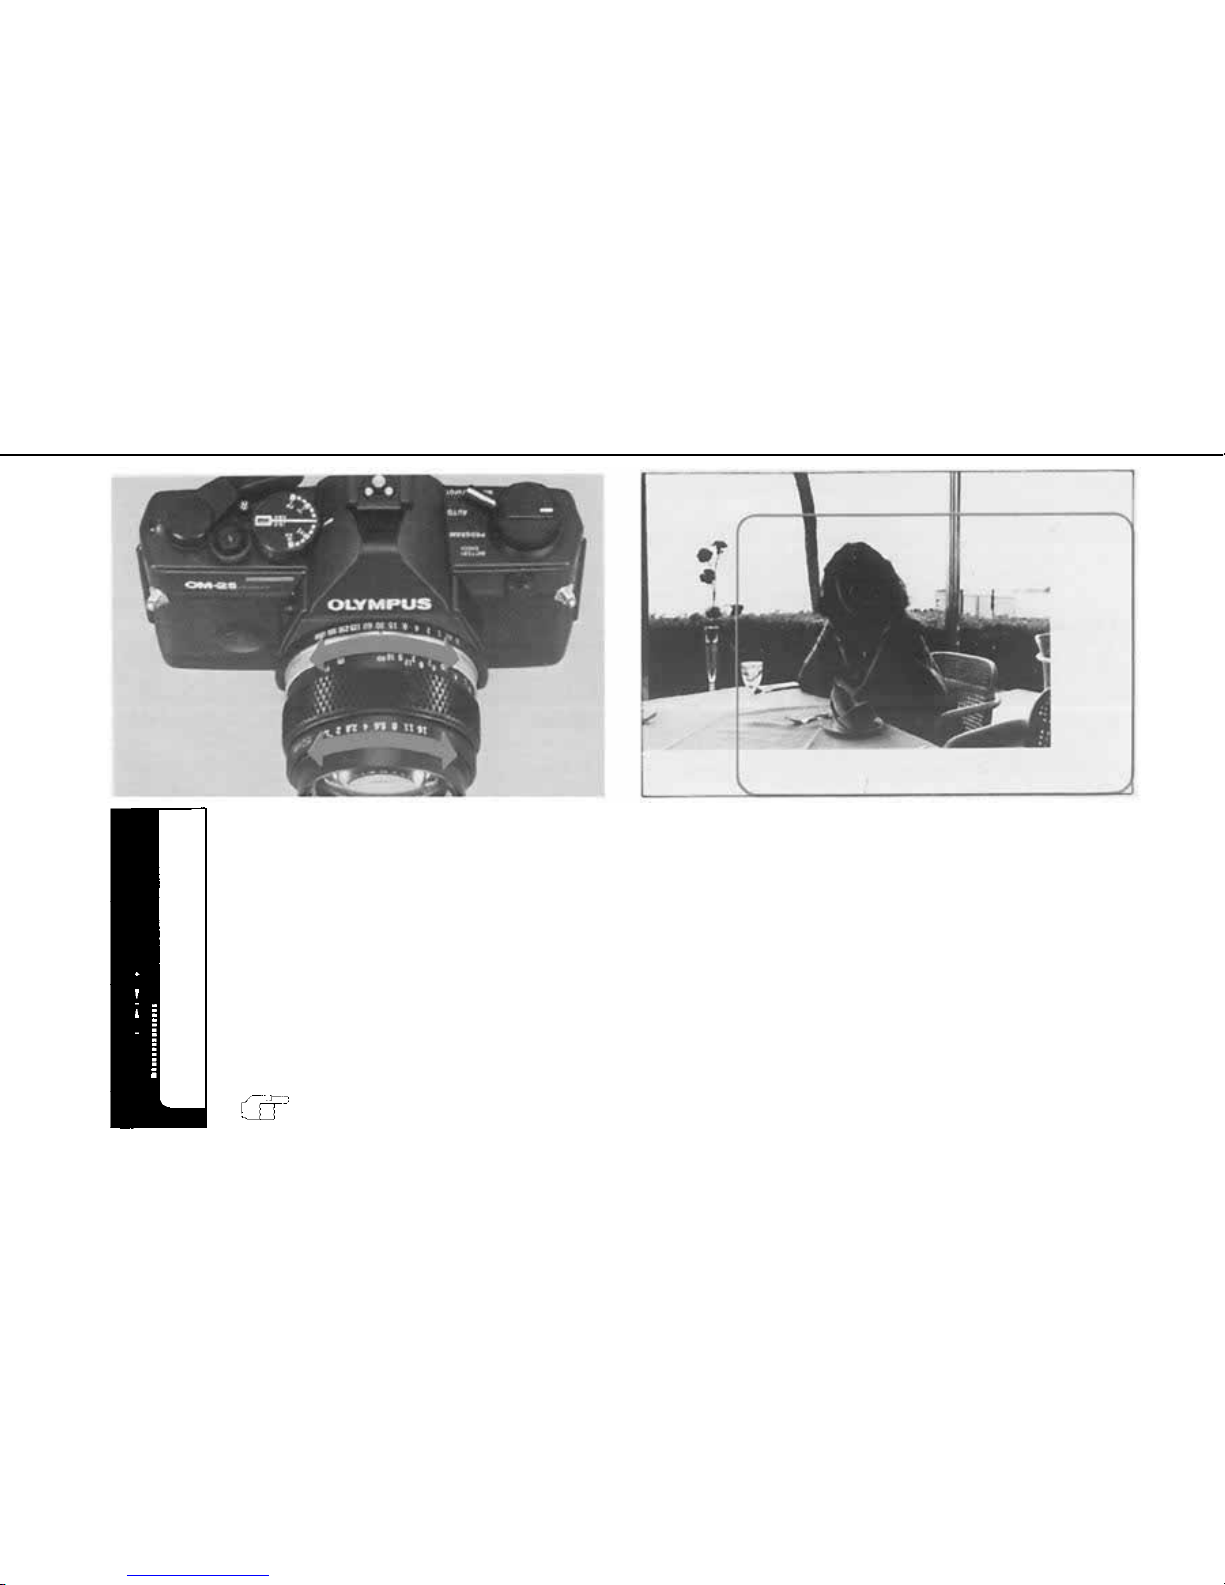
Set the mode selector lever t o the "MANUAL
SPOT" position.
Align the microprism area with the area you
want to measure.
B-ll
The spot metering range is outlined by
the outer edge of the microprism.
A-24
Page 26
3
4
Set the bar graph tip t o the fixed
point between the arrows by adjust-
ing the aperture and/or shutter speed
rings.
Frame the composition as you desire.
In MANUAL/SPOT mode, frame your subject
after setting exposure.
B-19
A-25
Page 27
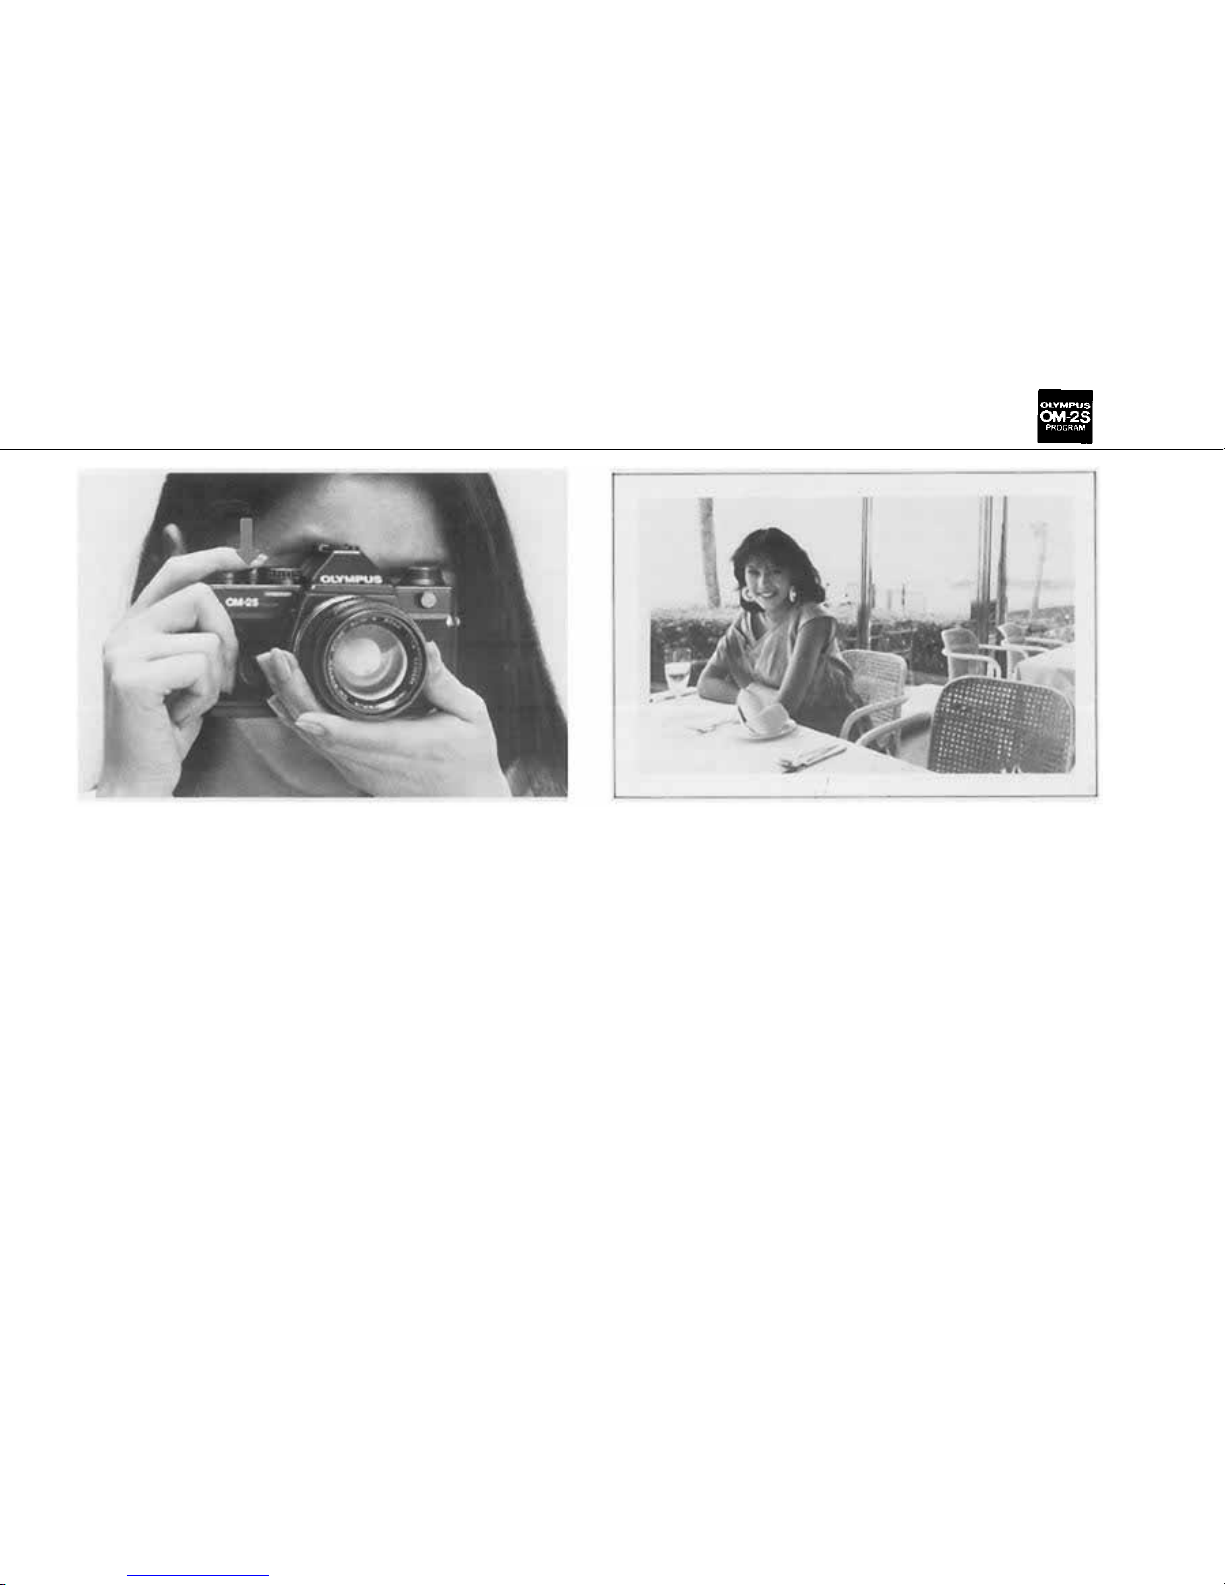
Press the shutter release to take the picture.
5
6
A-26
Page 28
Exposure Compensation
How to Shoot when the Batteries are Exhausted
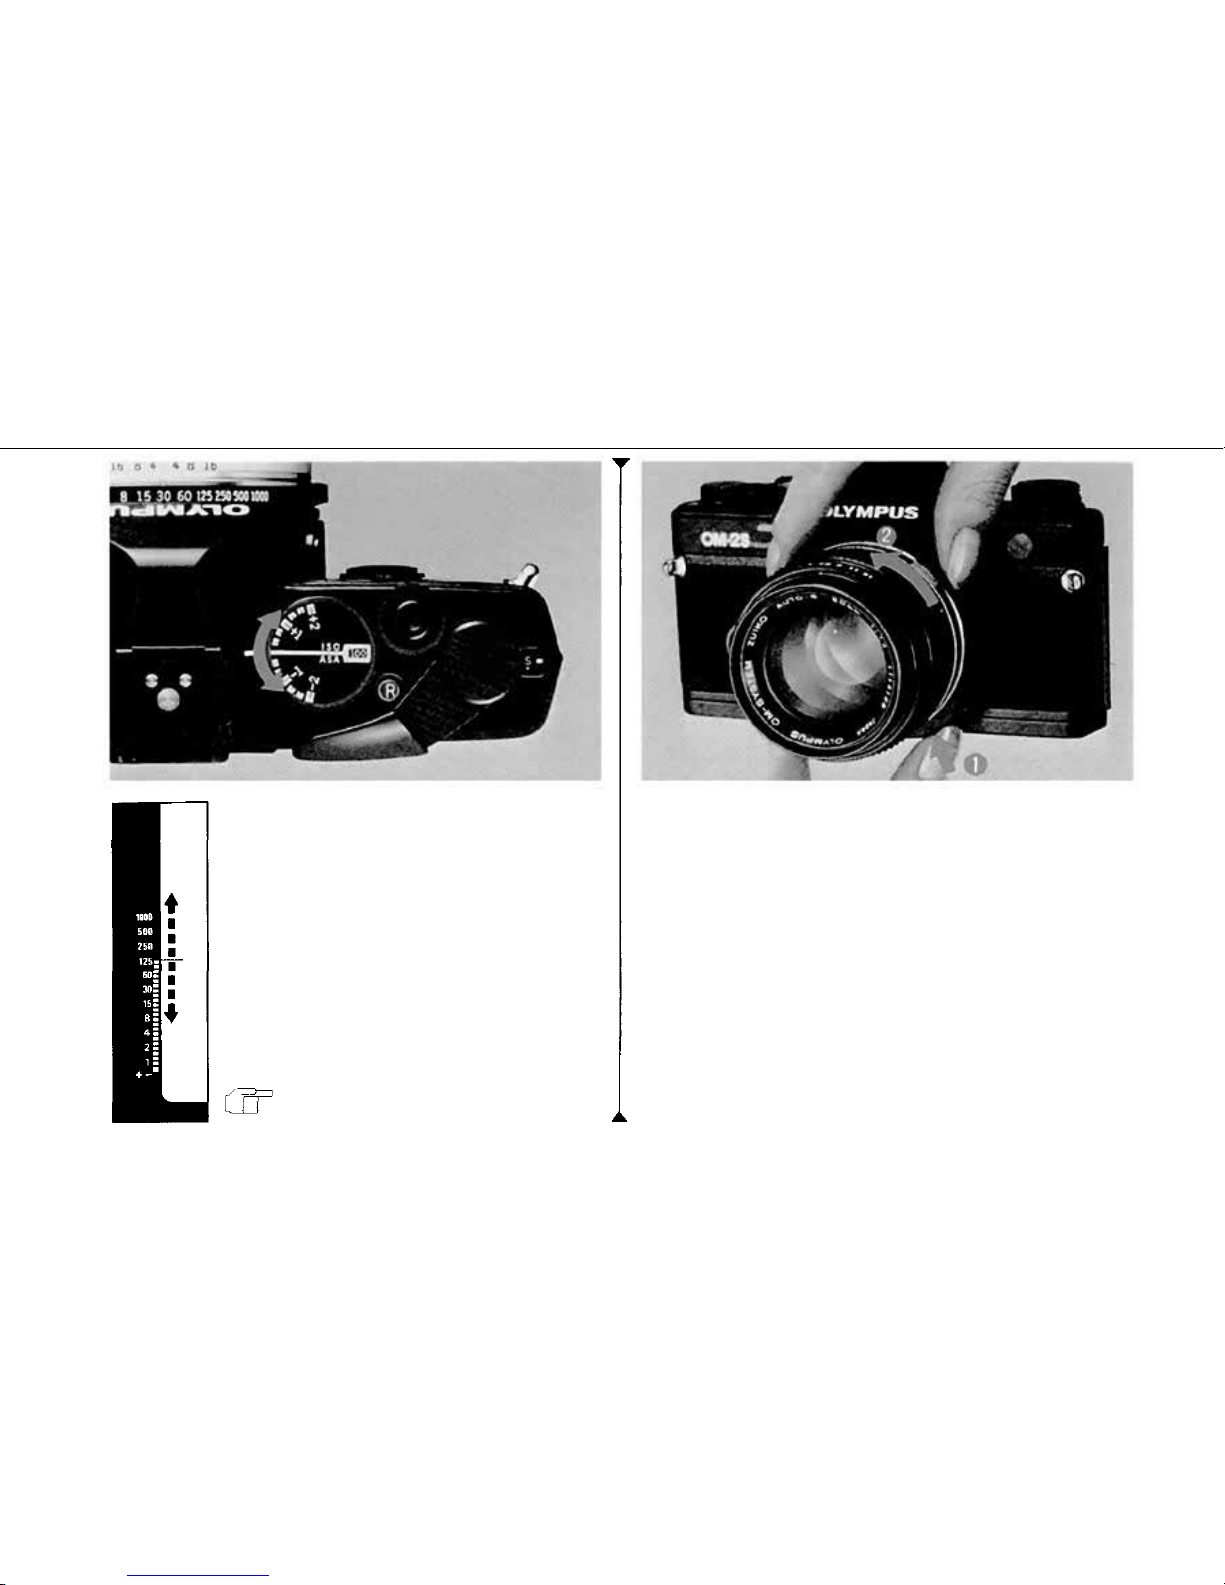
The exposure compensation dial
provides ±2 stops adjustment in 1/3
stop increments, "±" indicator lights
when an ex po su re compensation is set.
(A ft e r use, be sure t o return the dial to
the normal setting.)
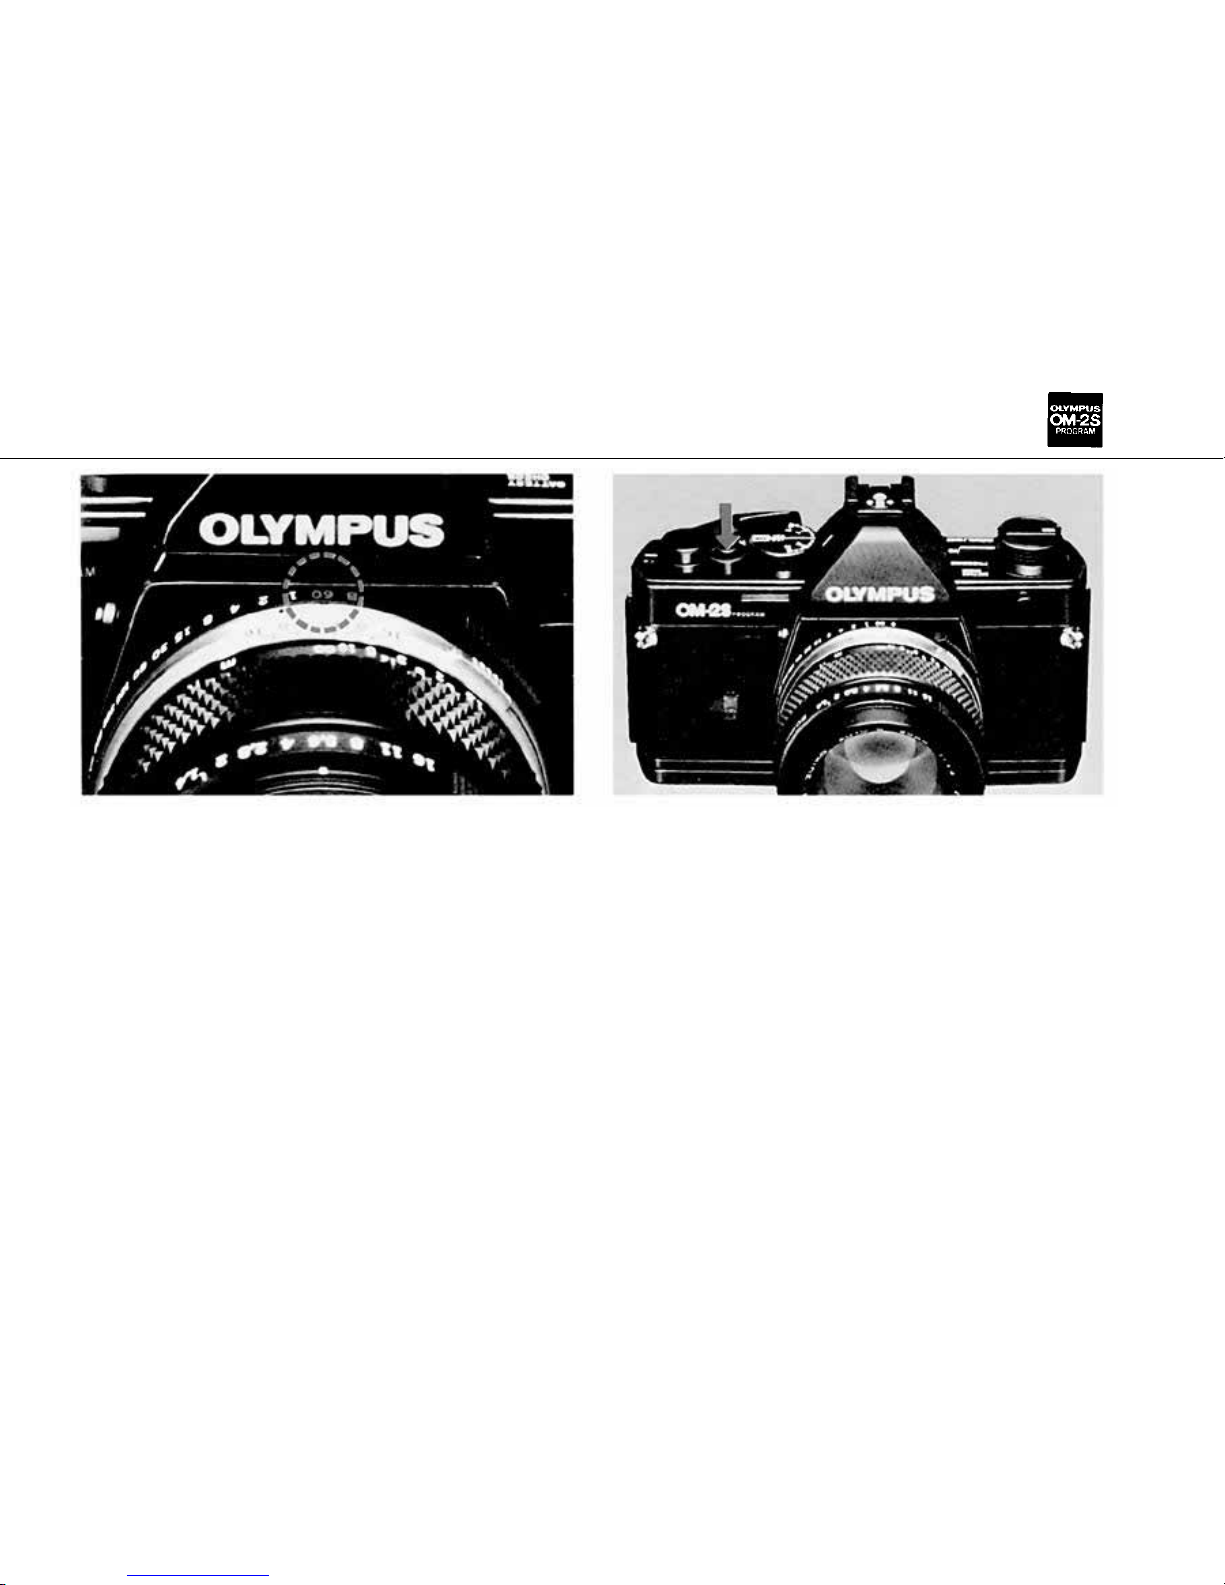
While pressing the "B" Lock button, rotate
the shutter ring to the red "60" position.
B-27
A-27
Page 29
2
3
Mechanical shutter speed of 1/60 sec.
Press the shutter release to tak e the picture.
A-28
Page 30

OM-2S
PROGRAM
< Other Operations>
A-29
Page 31
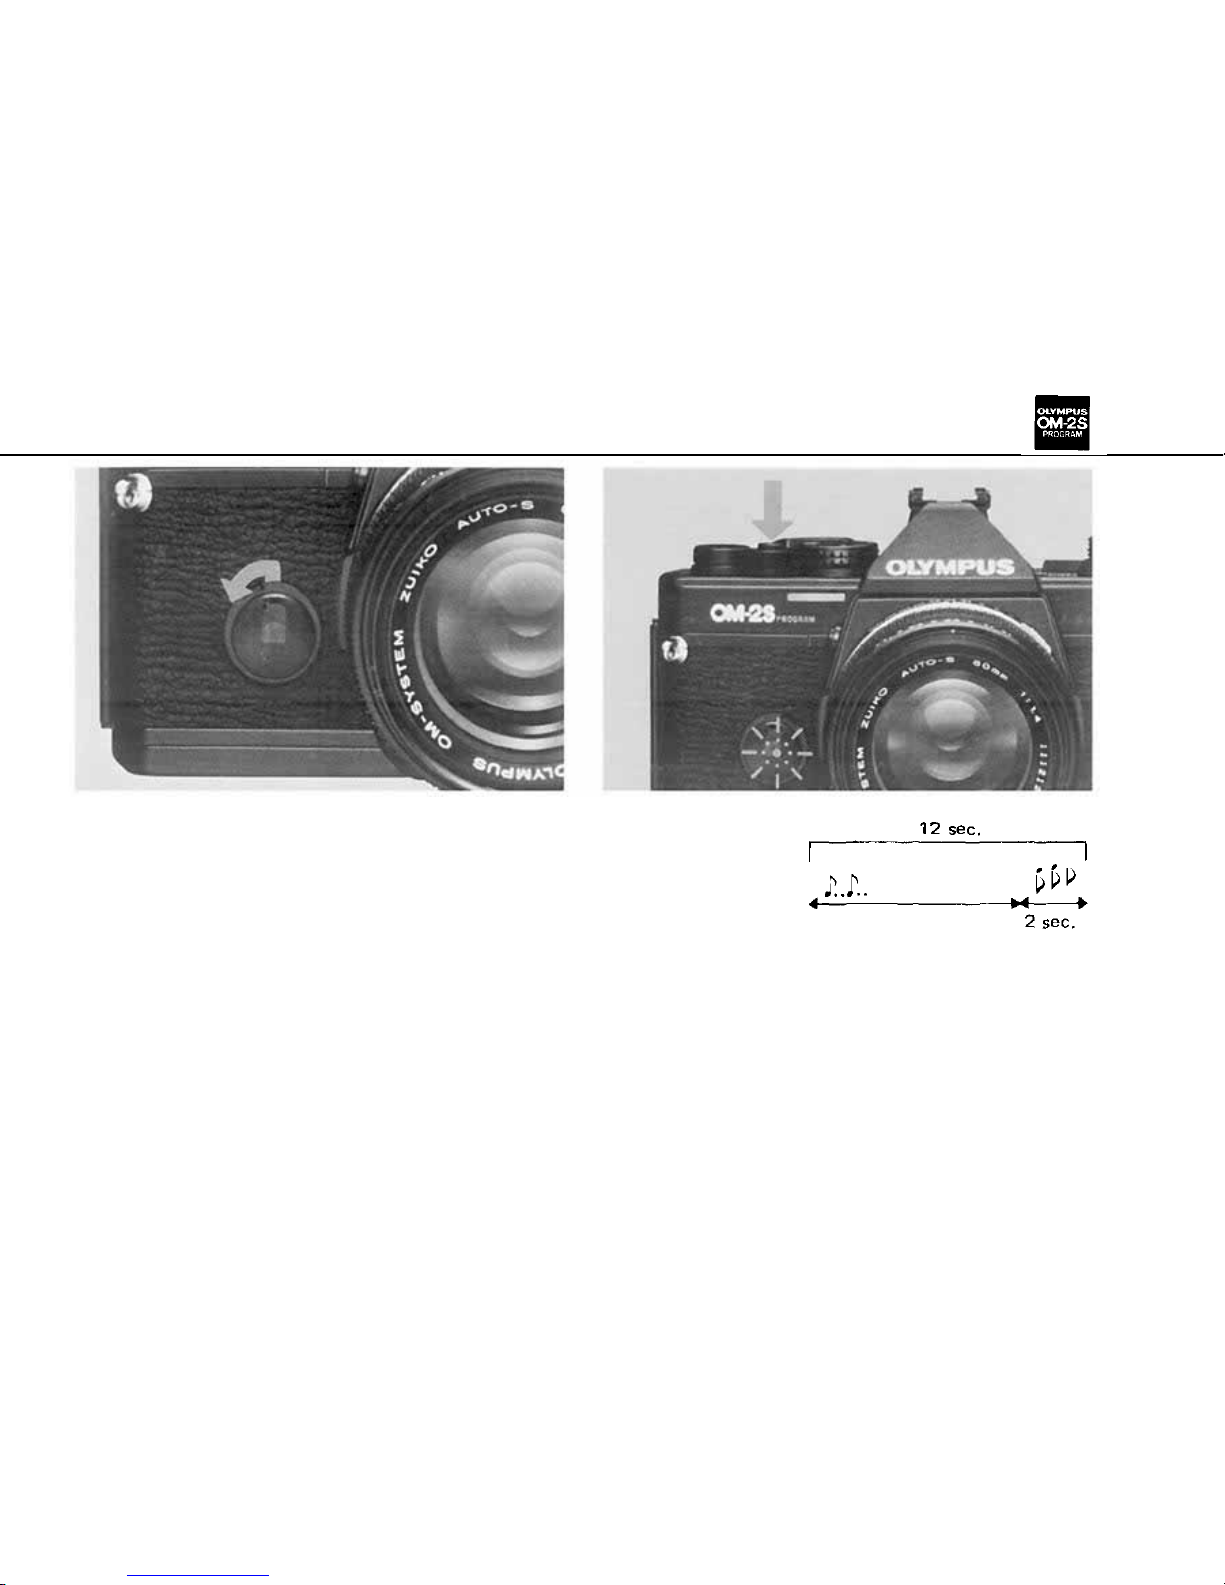
The Use of the Self-Timer
1
2
With the camera facing you, lift up on the
self-timer lever, and turn it counter-clockwise (as
indicated).
Press the shutter release to start the selftimer. The shutter will fire in 12 seconds. (After
use, be sure to return the lever t o t he normal position.)
A-30
Page 32
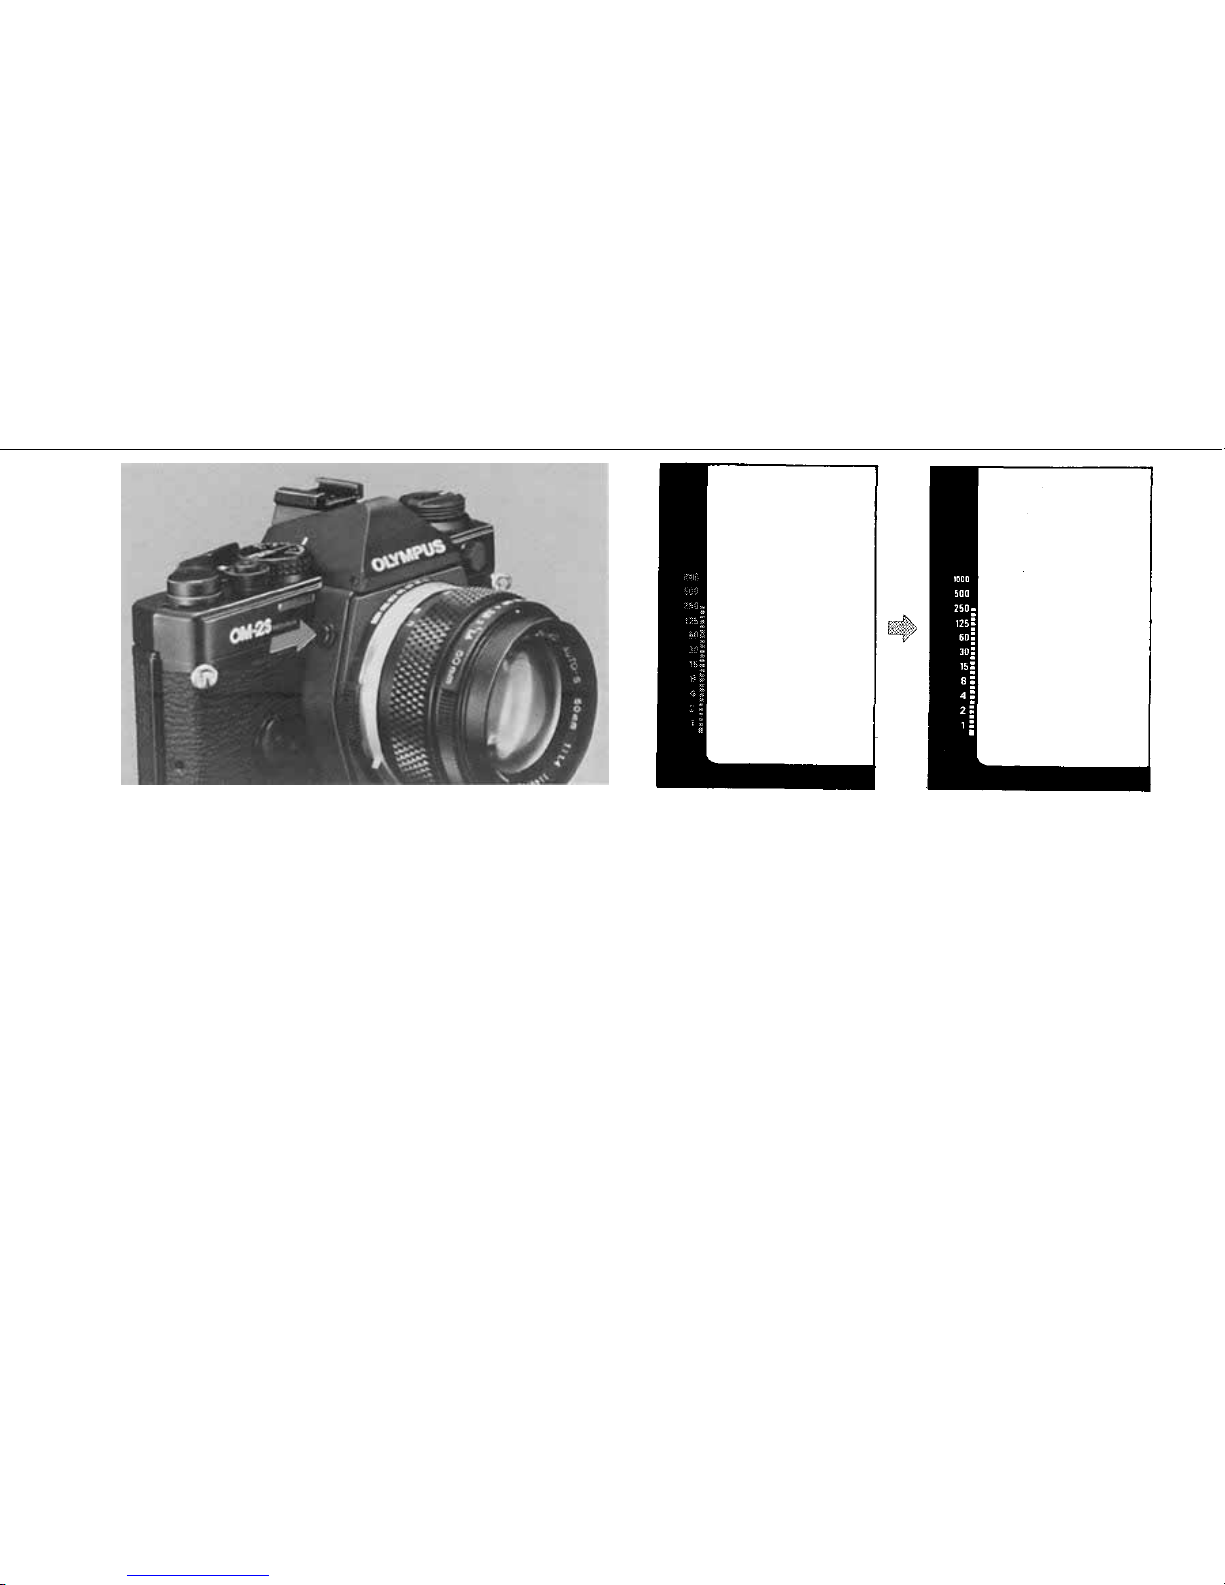
Using t h e Viewfinder Illuminator
1
2
Push the button if the viewfinder display is
too dark to read.
The illuminator is limited to 10 sec. or until
you take the photograph, whichever comes first.
A-31
Page 33
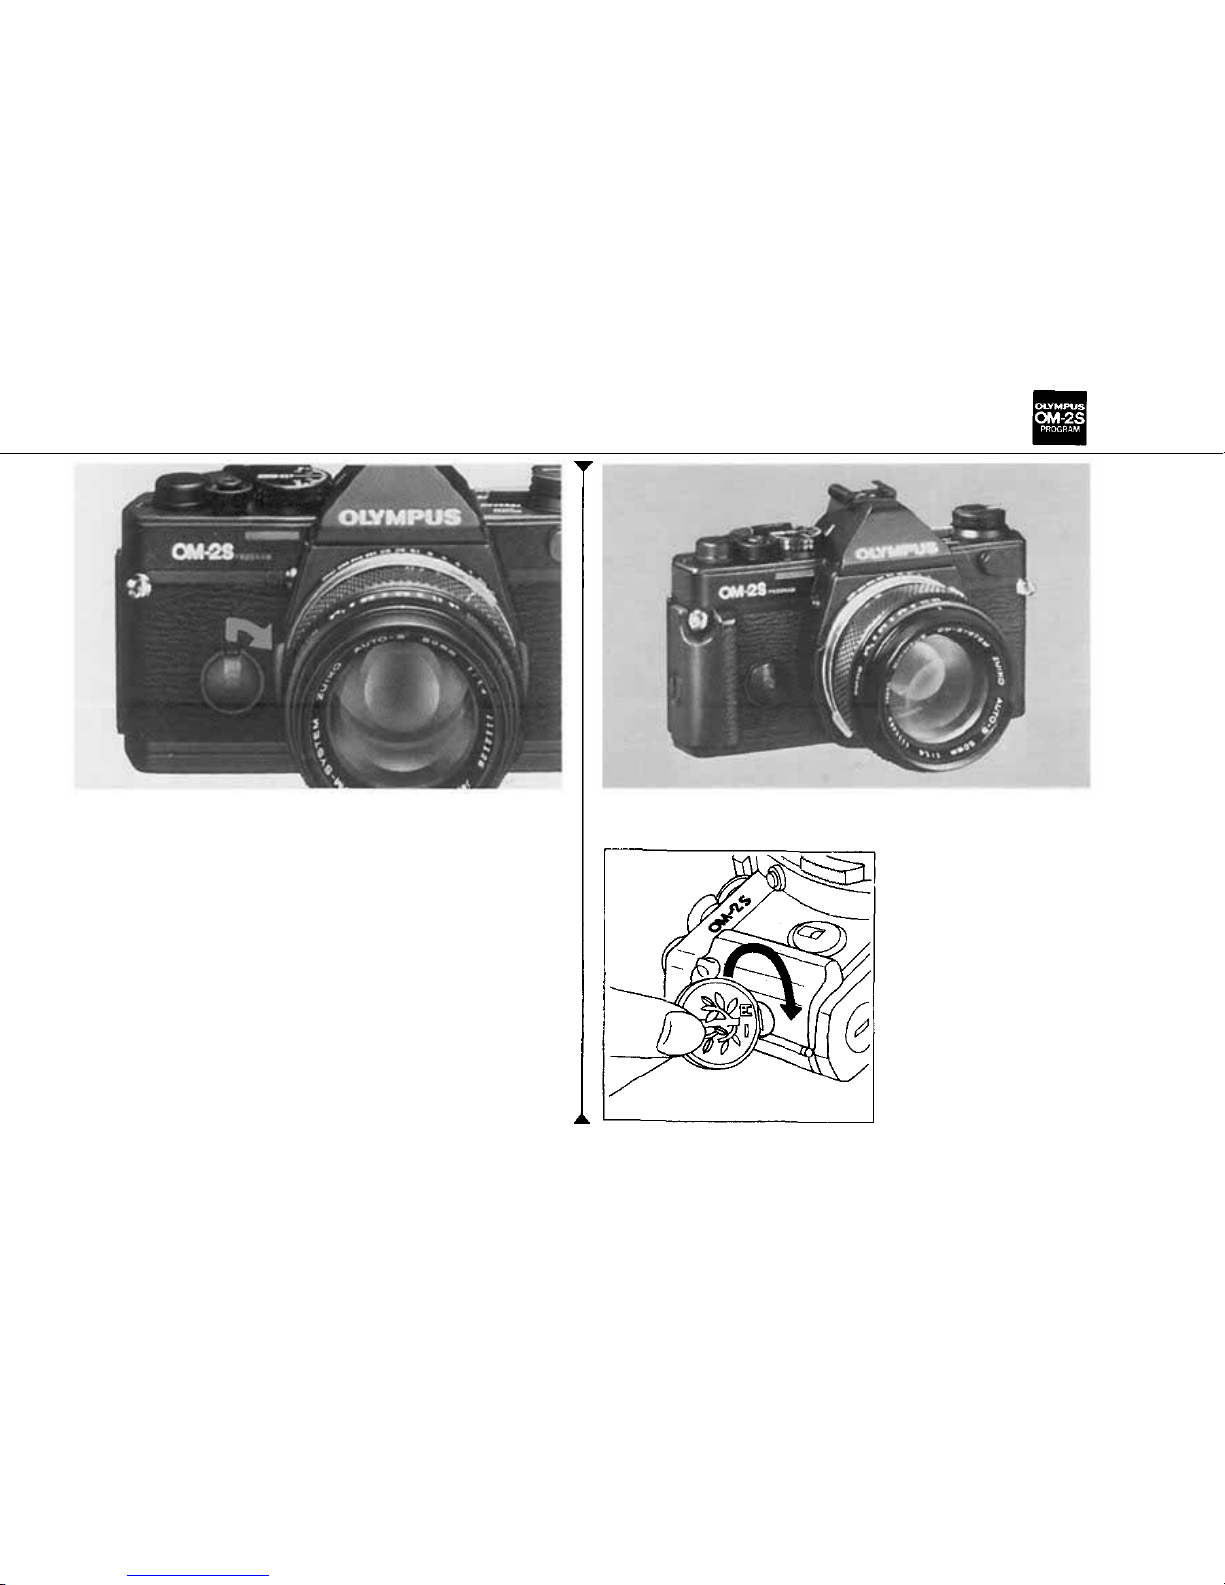
How to Turn Off the Beeper
Attaching the Grip
If you want to turn off the audible signal, lift
up the lever and push it clockwise around towards
the lens.
Camera Grip 1 (optional)
This grip pro-
vides a firm hand
hold for increased
steadiness.
A-32
Page 34
A-33
Page 35

A-34
Page 36
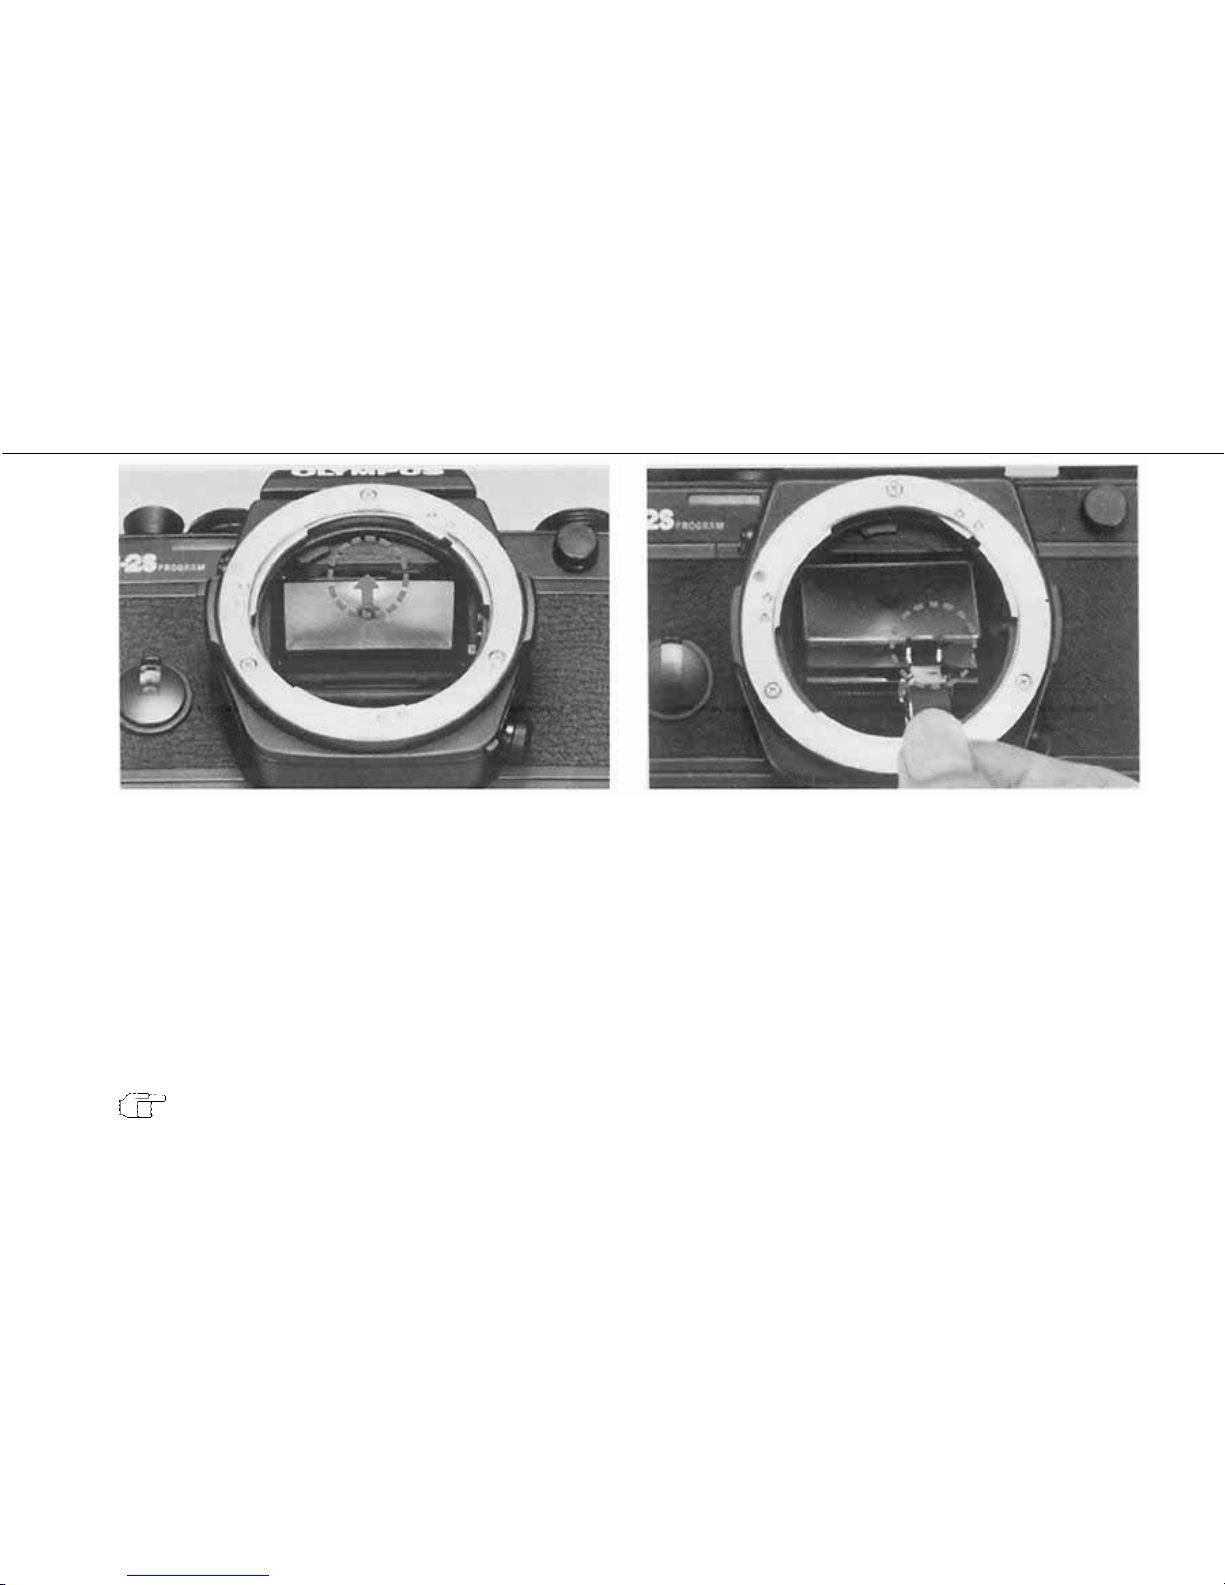
Changing the Focusing Screen
1
2
Push up on the release catch, and the focusing
screen and its frame will unlock.
Carefully remove the focusing screen using
the tools provided.
Carefully pl ac e the new focusing screen in the frame,
and push the frame up until it locks.
B-47
A-35
Page 37
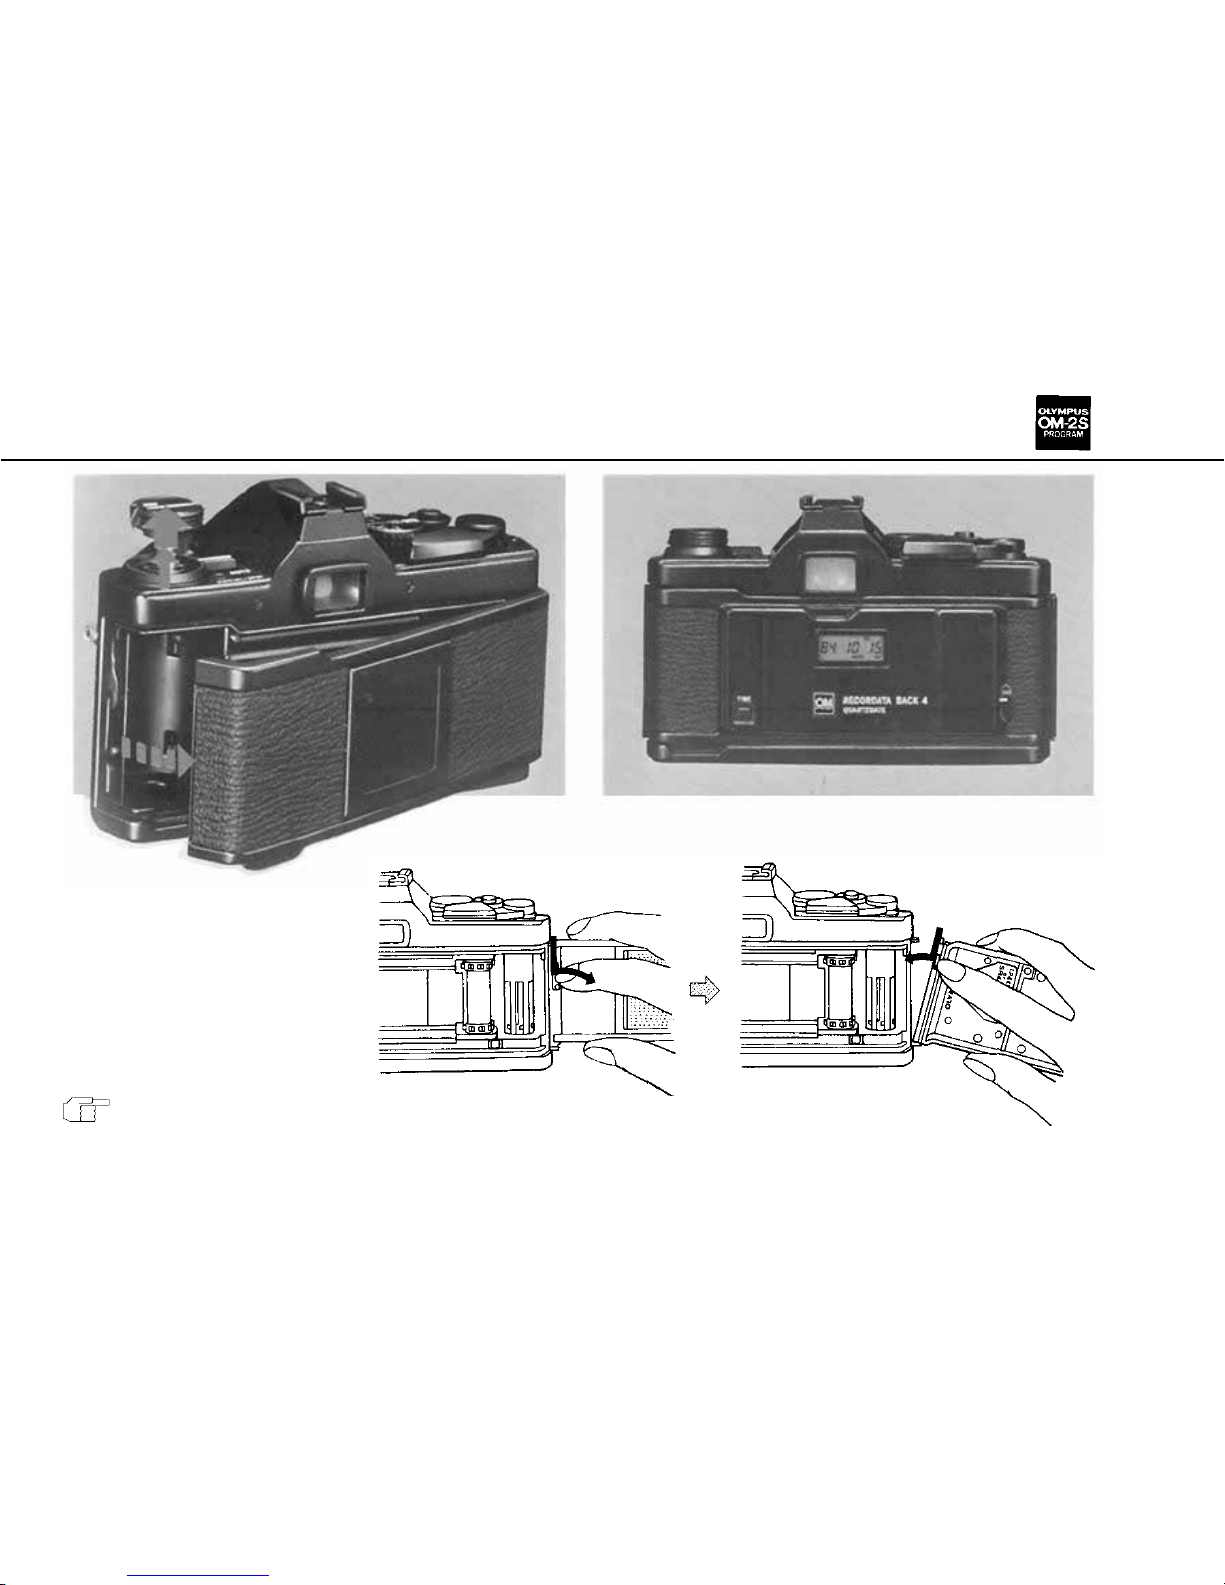
Changing the Cam era Back
1 2
Pull up on the rewind
crank to open the camera back.
Recordata back 4 (optional)
B-39
A-36
Page 38
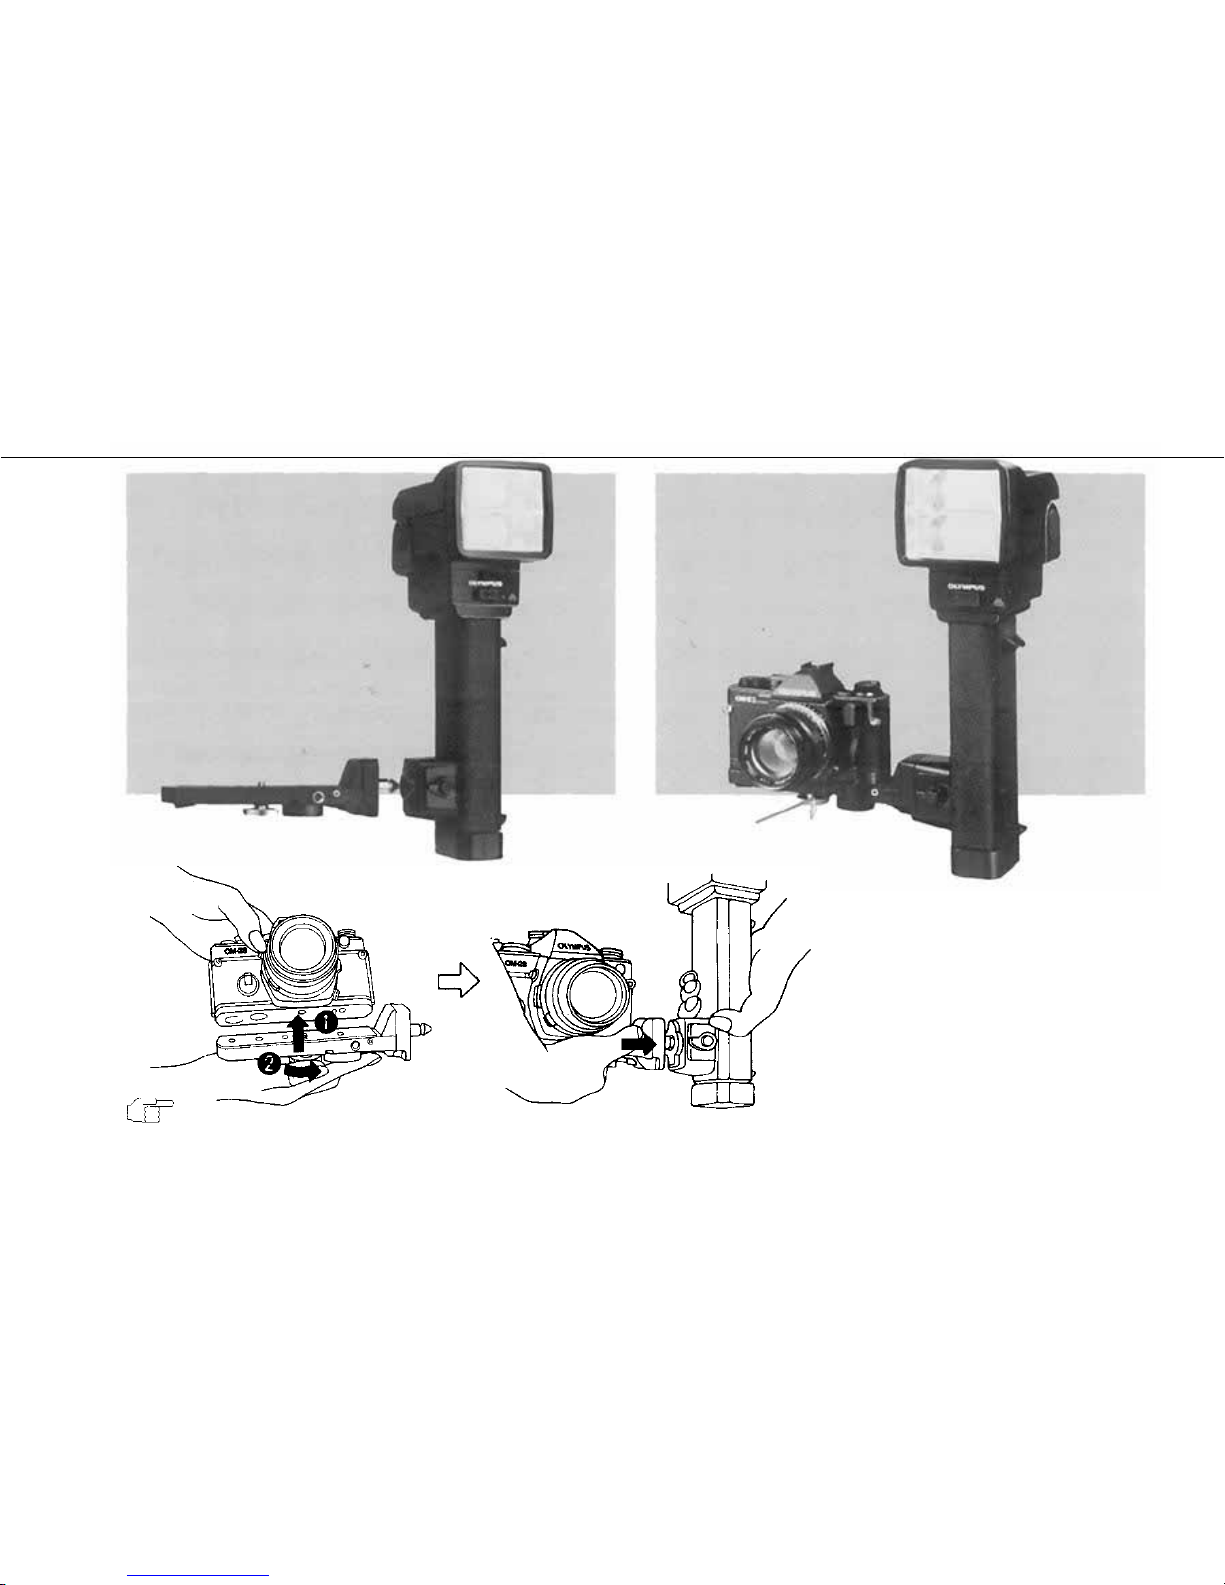
Attaching the Electronic Flash
1 2
Electronic Flash T45
TT L A u t o C or d T 2 (0.1m)
B-31
Connect the camera's TTL
Auto Cord Socket to the base of
the T45 with TTL Auto Cord T2
(0.1m, 0.15m).
A-37
Page 39
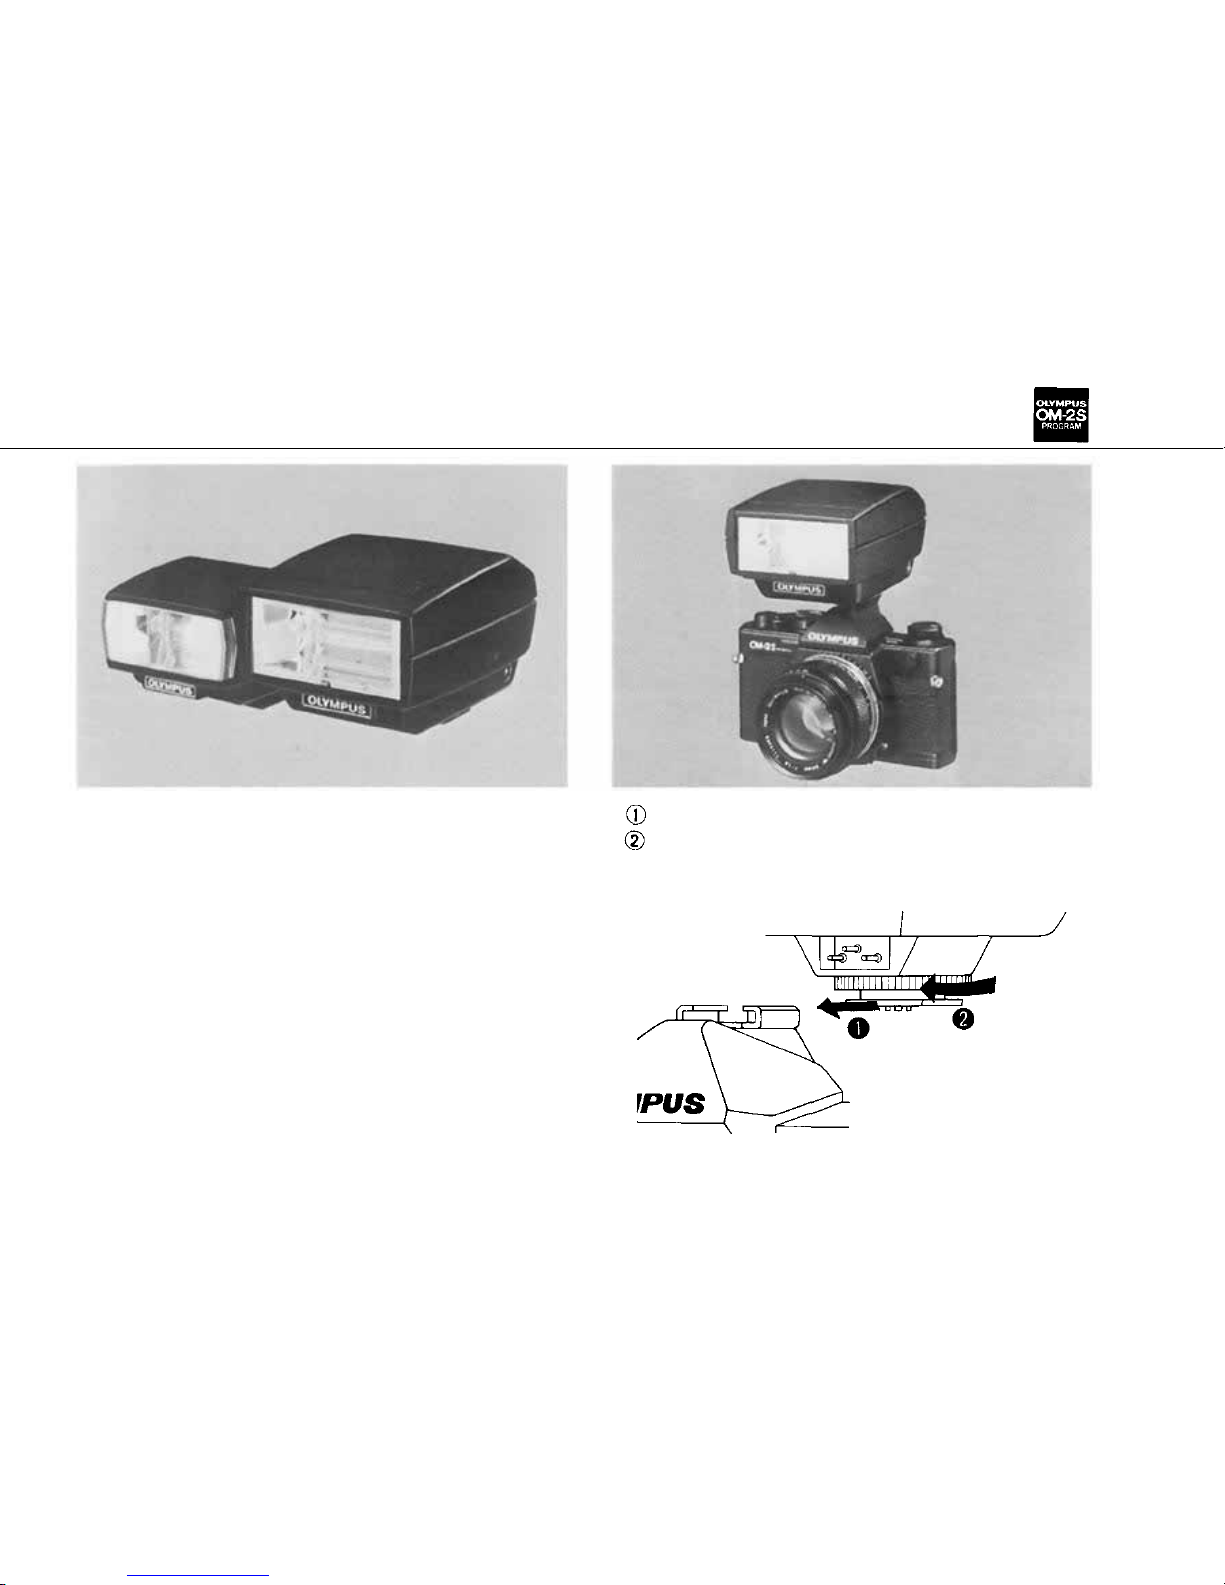
1 2
Electronic Flash T32 and T20
Slide the flash into the hot shoe.
Tighten the flash mount with the knurled ring .
A-38
Page 40
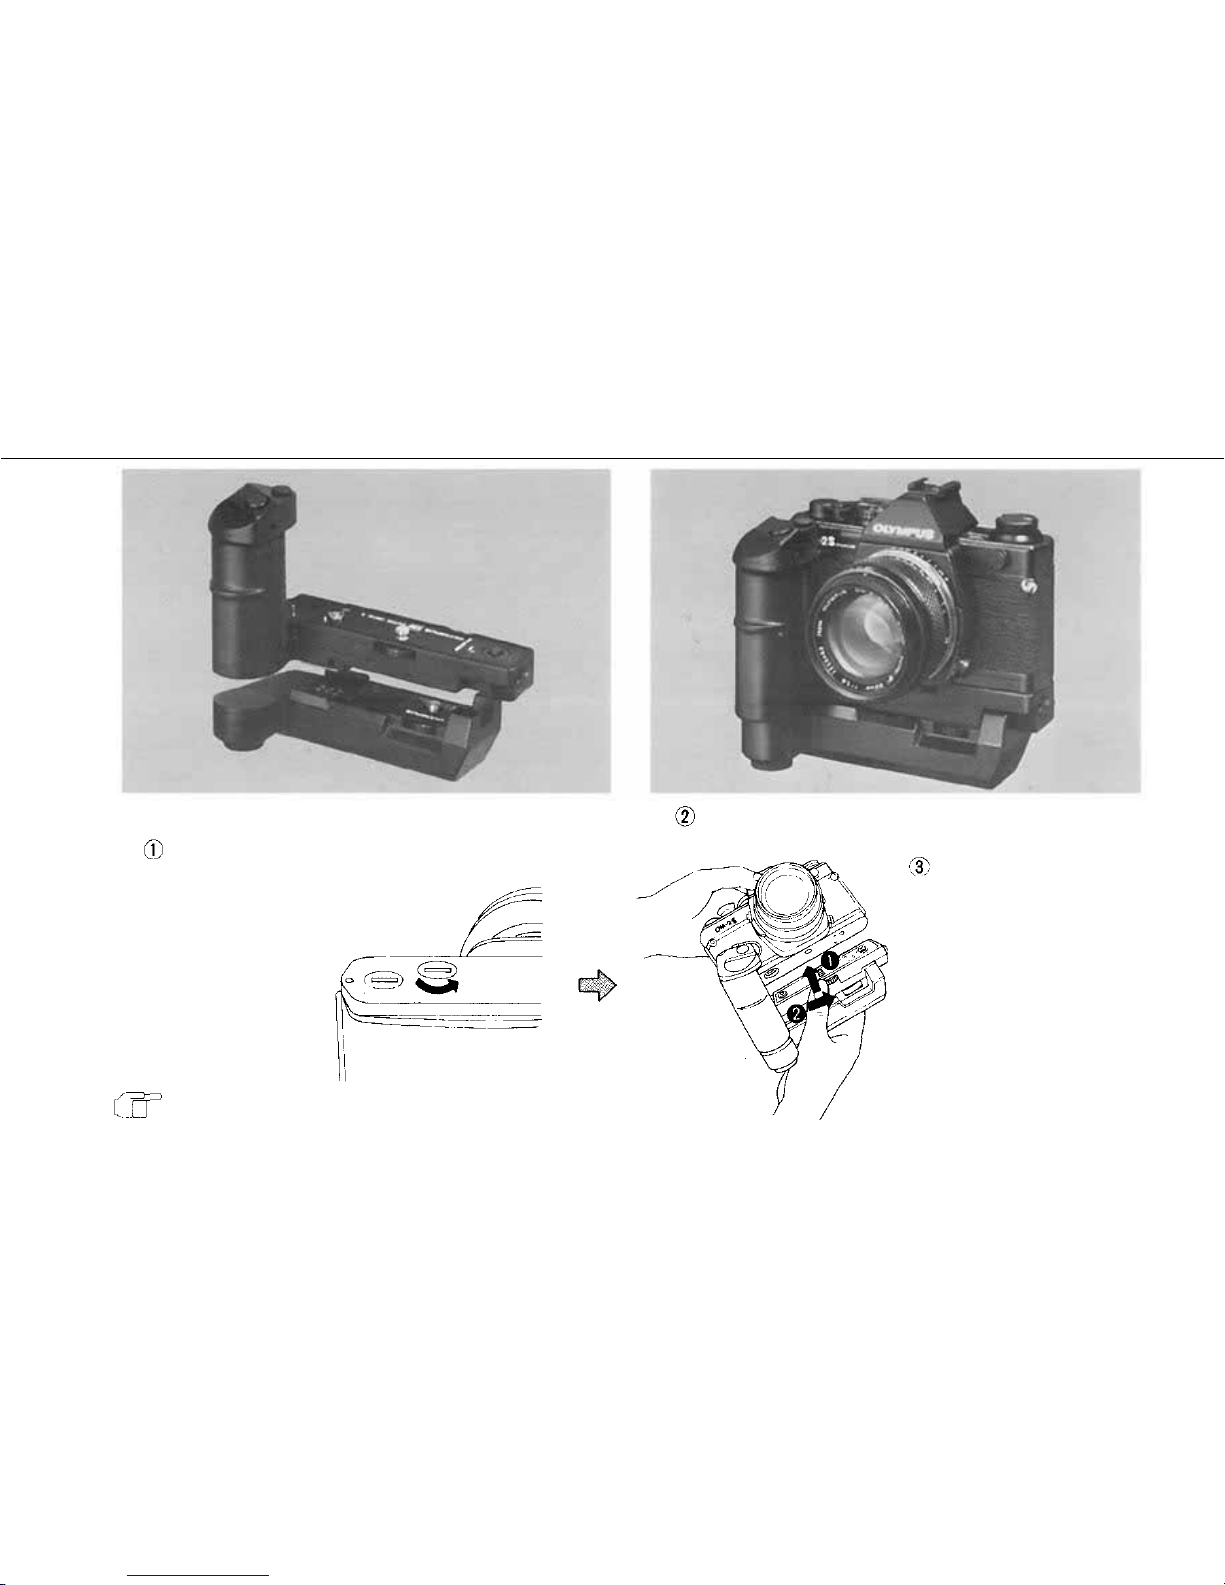
Attaching the Motor Drive or Winder
1
2
Motor Dr ive 2 / M.15V Ni-Cd Control Pack 2
Remove the motor
driv e cover.
Insert the fastening screw of the Motor Drive
or Winder into t he tripod socket of the camera.
Finger tighten until
locked.
B-35
A-39
Page 41
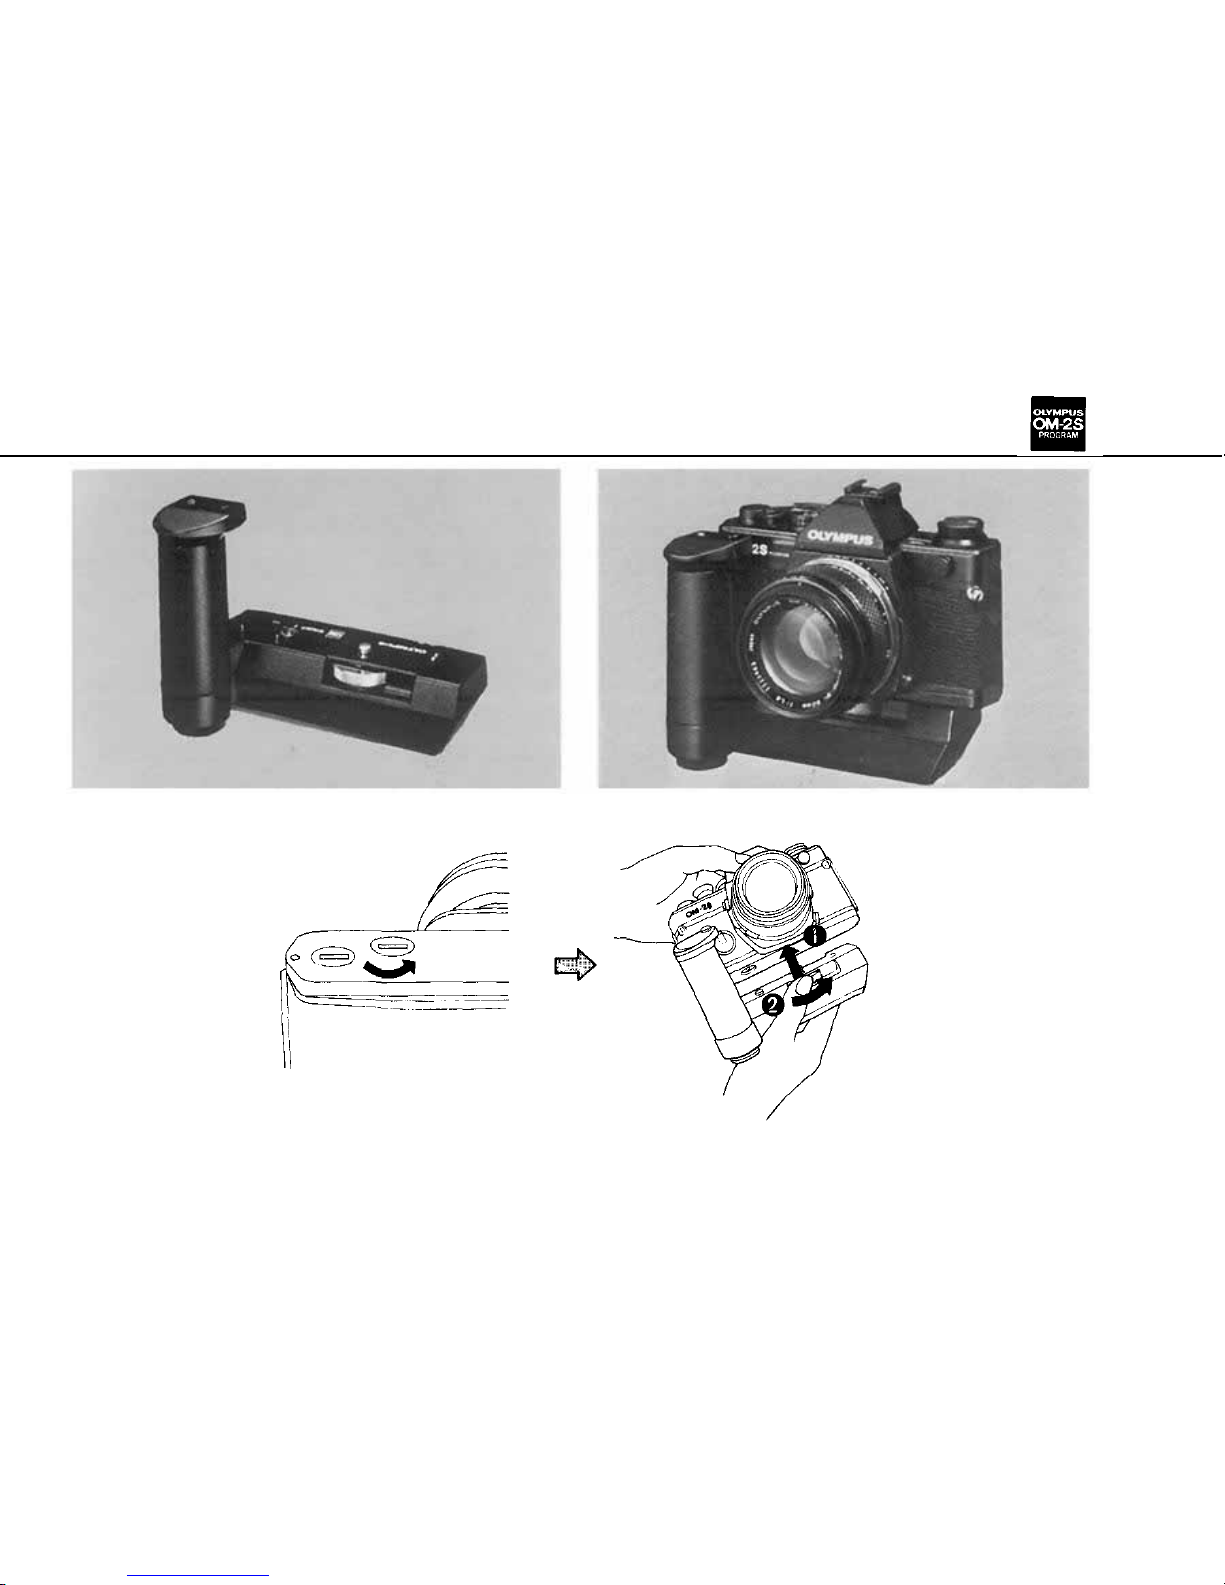
1
2
Winder 2
A-40
Page 42
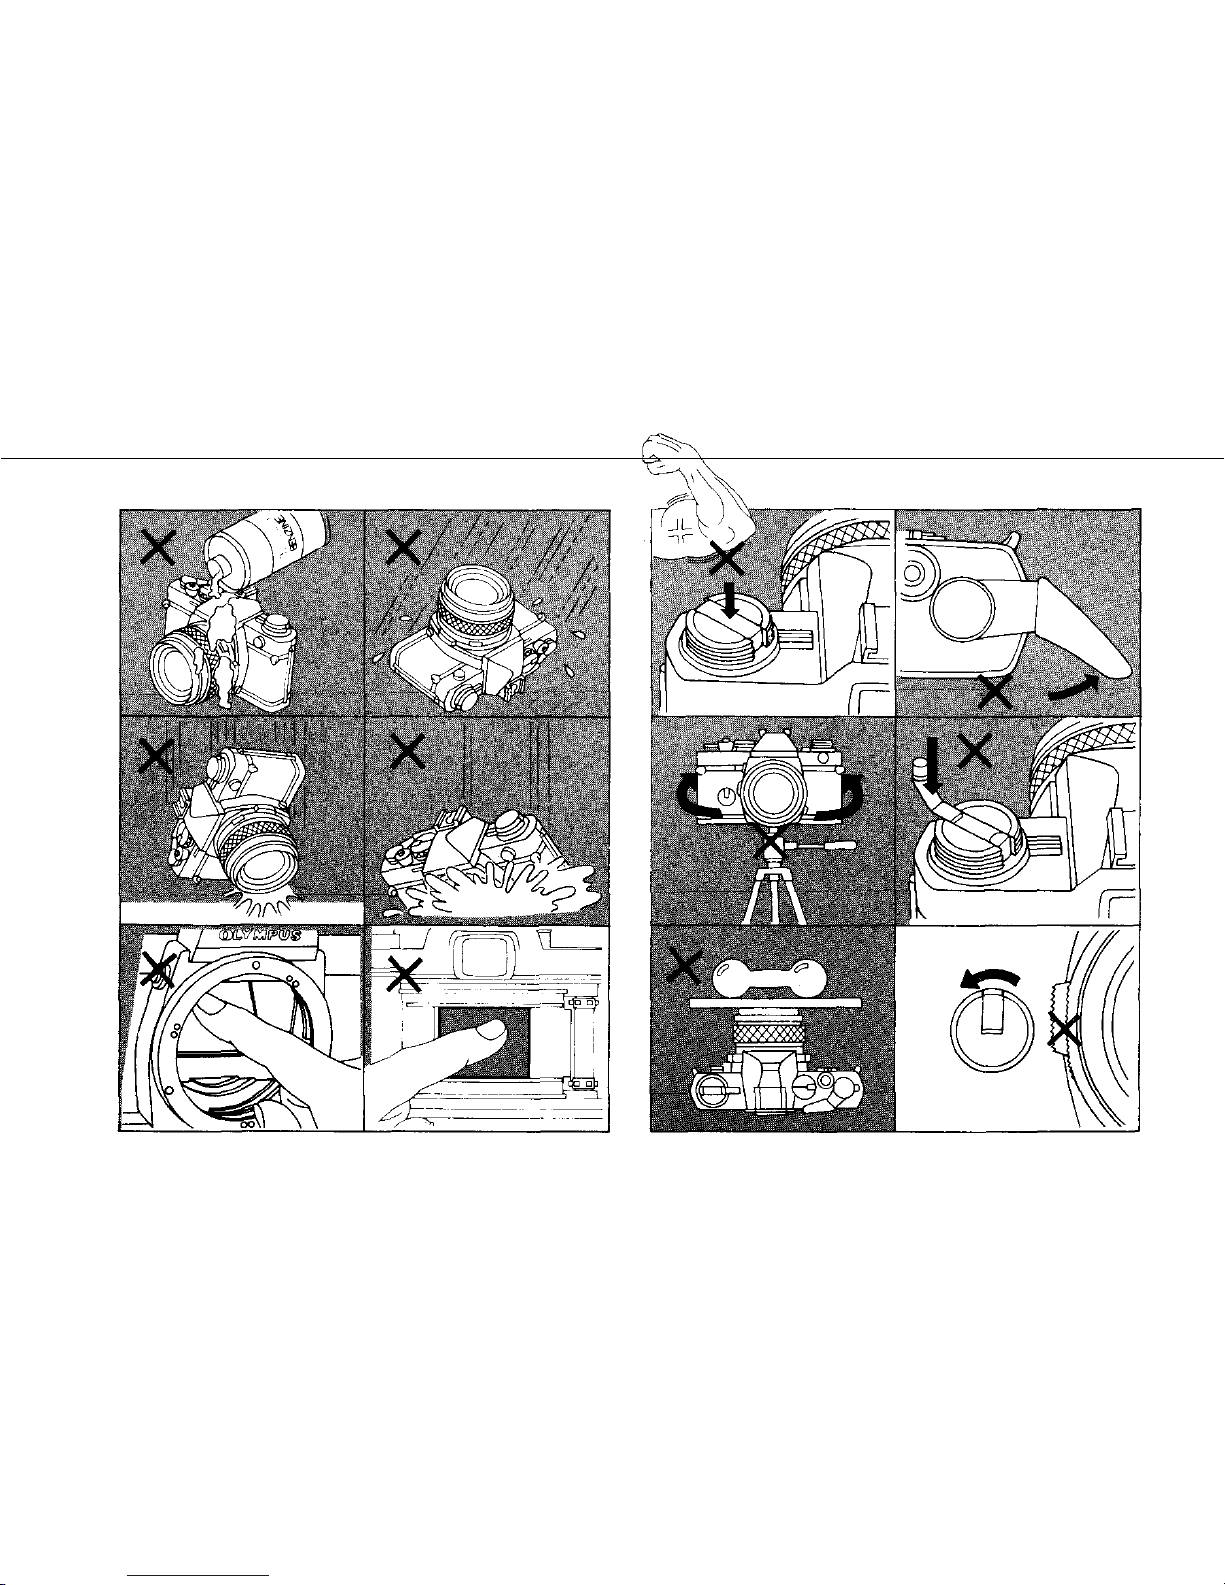
Handling Ca re
Take care in handling the camera.
Do not apply excessive force.
A-41
Page 43
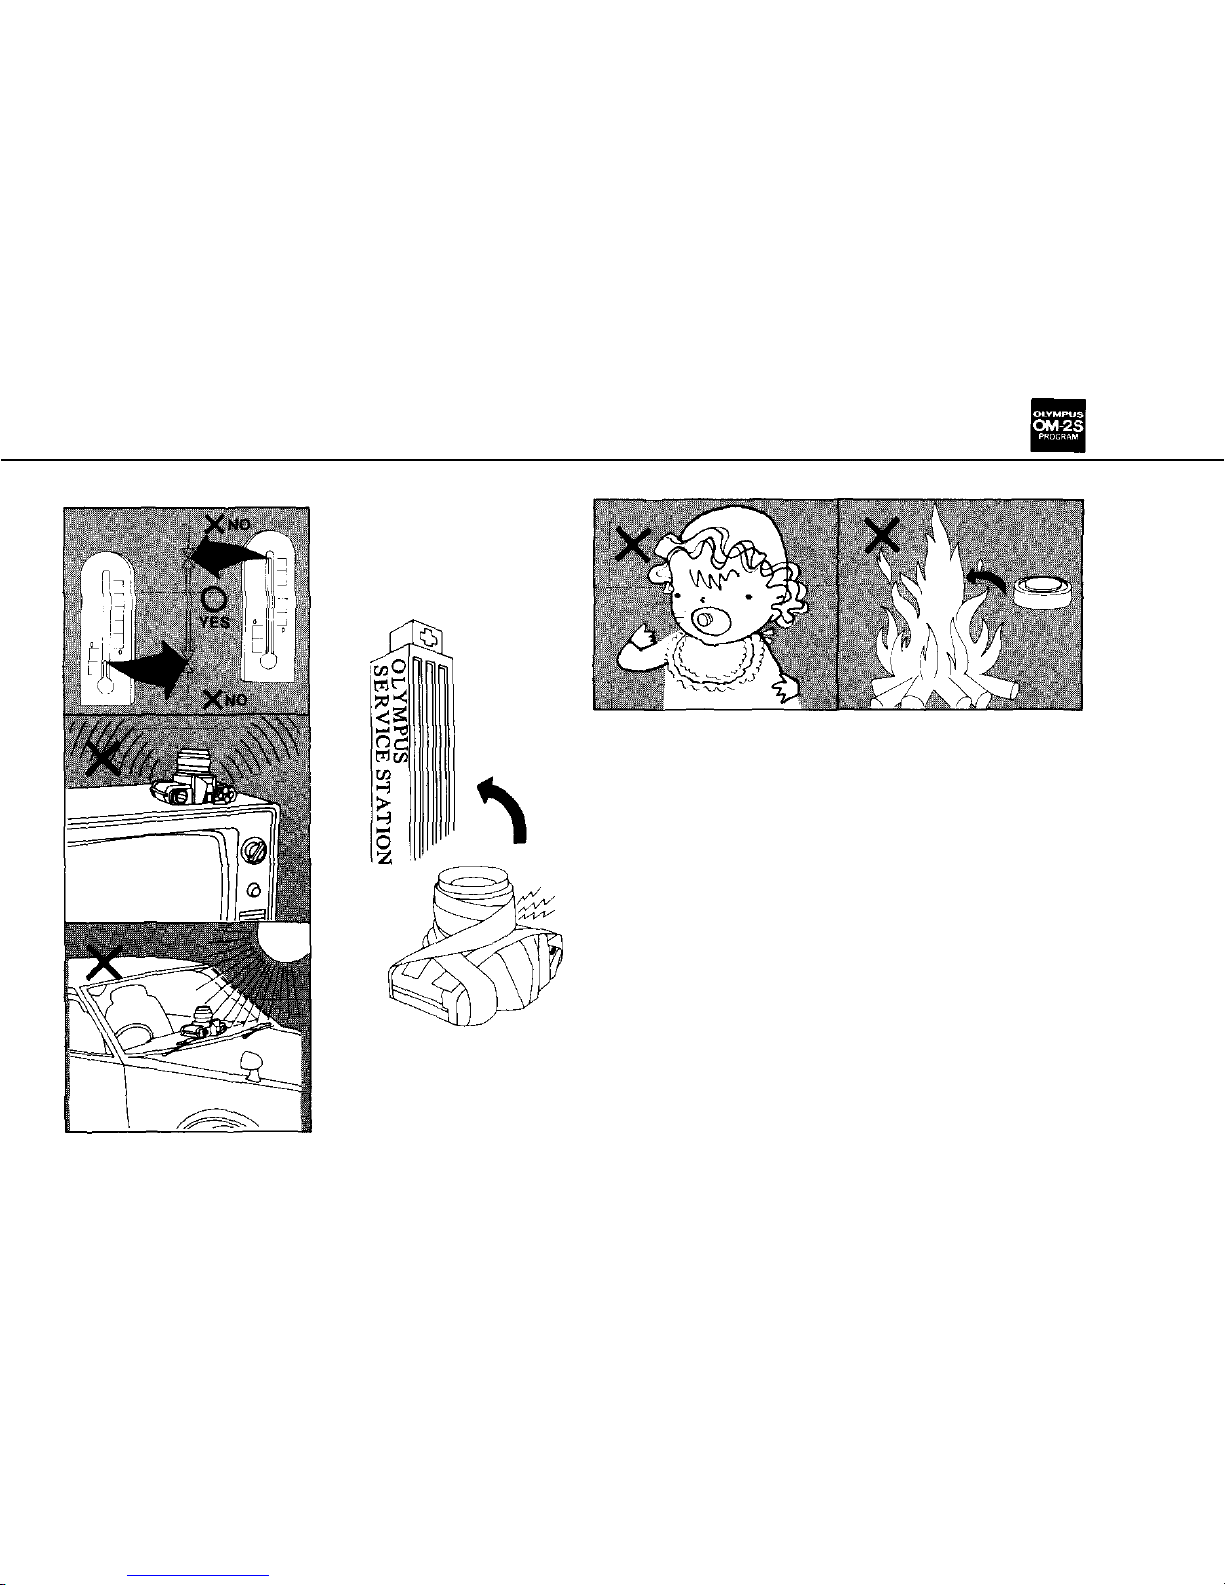
Storage Care
Battery Precaution
Guard against high temperature and magnetic fields.
In case of malfunction, take the camera to
you r nearest Olympus service station.
A-42
Page 44
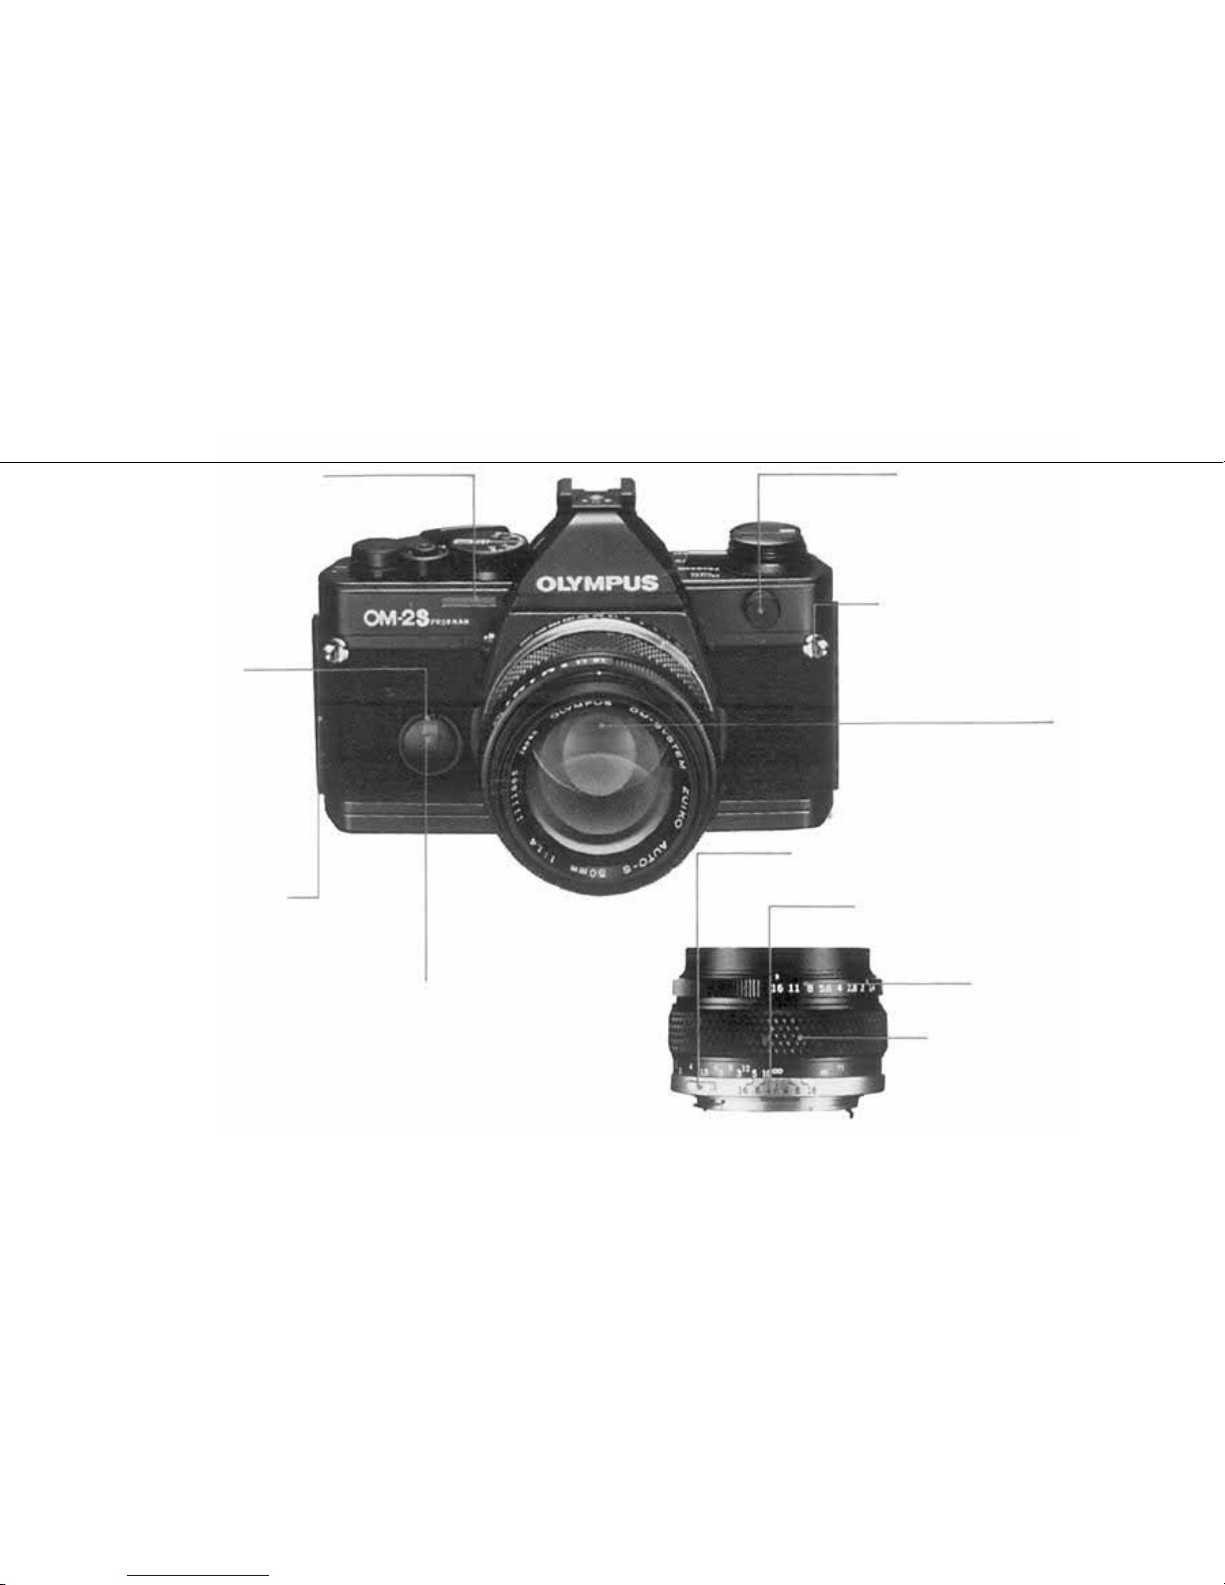
Description of Controls
Finder Light Window
Self-Timer/
Electronic
Beeper on-off
Lever
TTL Auto Cord Socket
Shoulder Strap Eyelet
Lens
Lens Release Button
Grip Lock Screw
Depth of Field Scale
Aperture Ring
Self-Timer/Battery Check Signal
Focusing Ring
A-43
Page 45
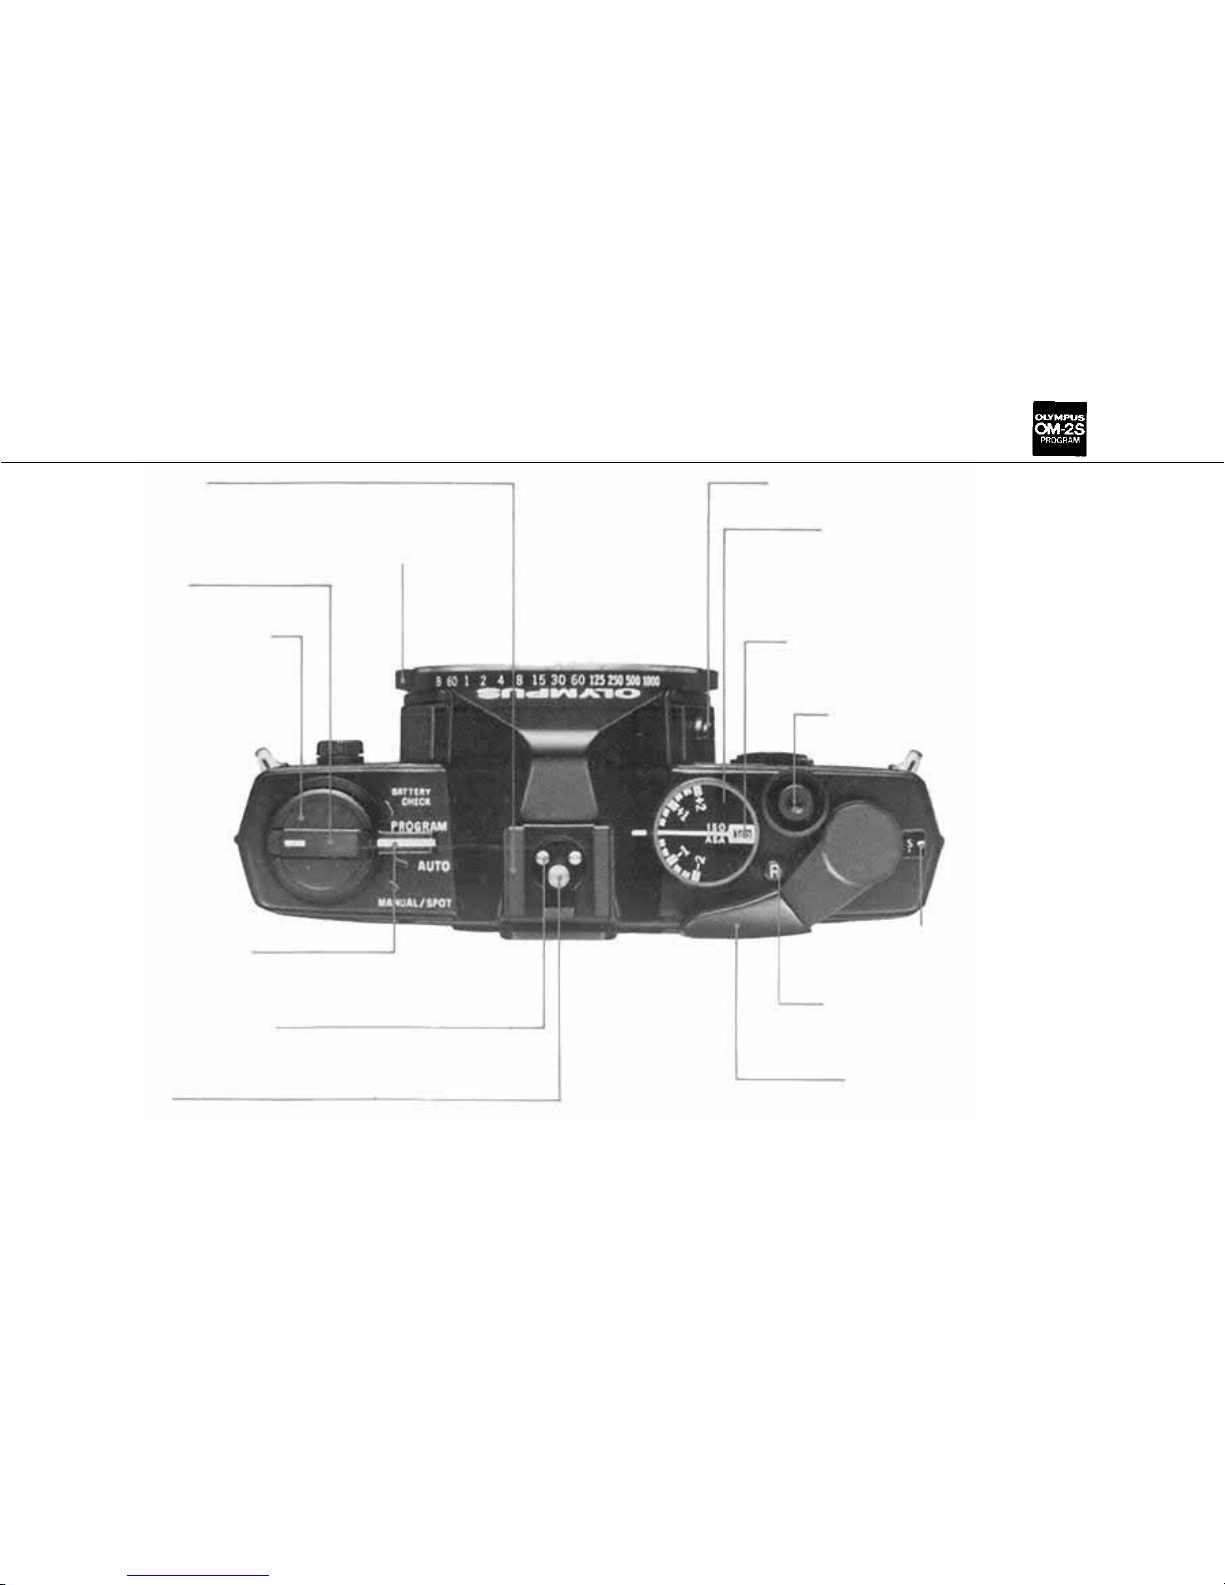
Accessory Shoe
Manual Shutter Speed Ring
Rewind Crank
Rewind Knob/Camera
Back Release
Mode Selector Lever
Flash Control Contact
X Contact
Viewfinder Illumination Button
Film Speed Dial/Exposure
Compensation Dial
ISO/ASA Film Speed Window
Shutter Release Button
Exposure Counter
Rewind
Release
Button
Film Advance Lever
A-44
Page 46
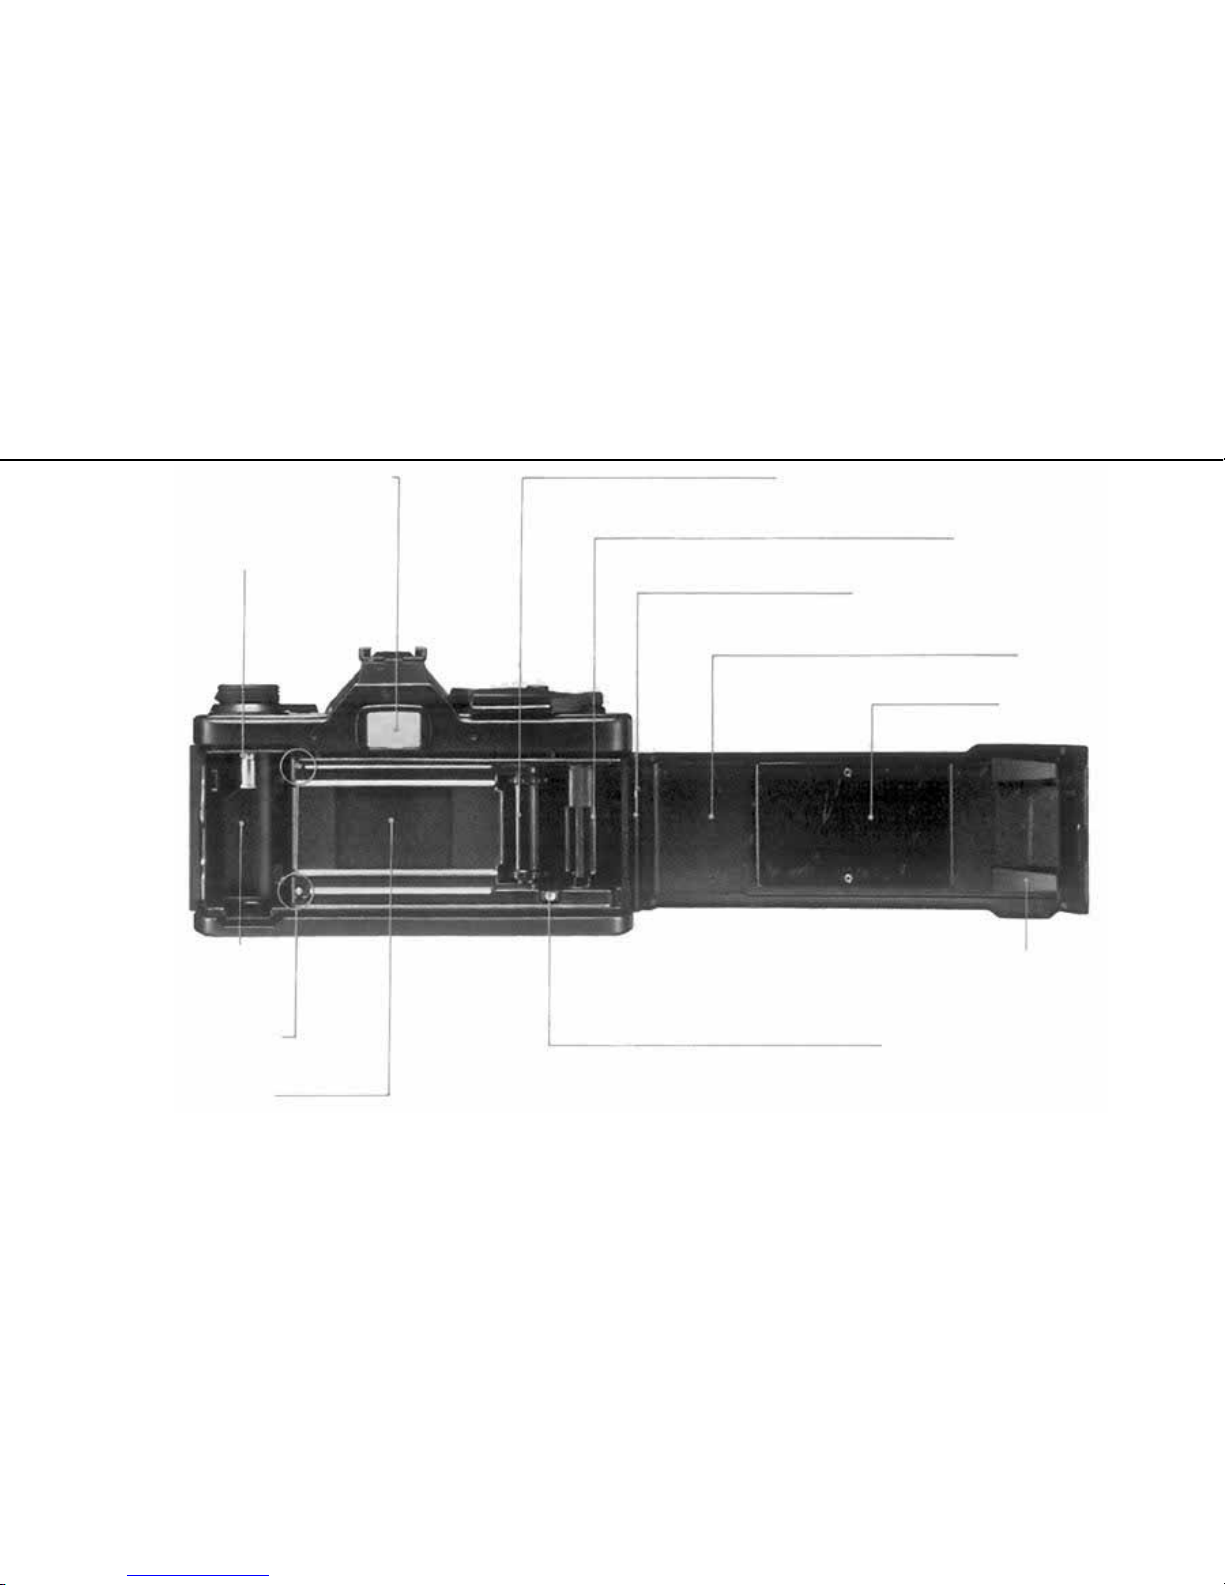
Viewfinder Eyepiece Frame
Film Rewind Shaft
Sprocket
Fil m Take-up Spool
Camera Back Release Pin
Camera Back
Pressure Plate
Film Cartridge Pressure Spring
Recordata Back Contact
Film Chamber
Film Guide Pins
Shutter Curtain
A-45
Page 47
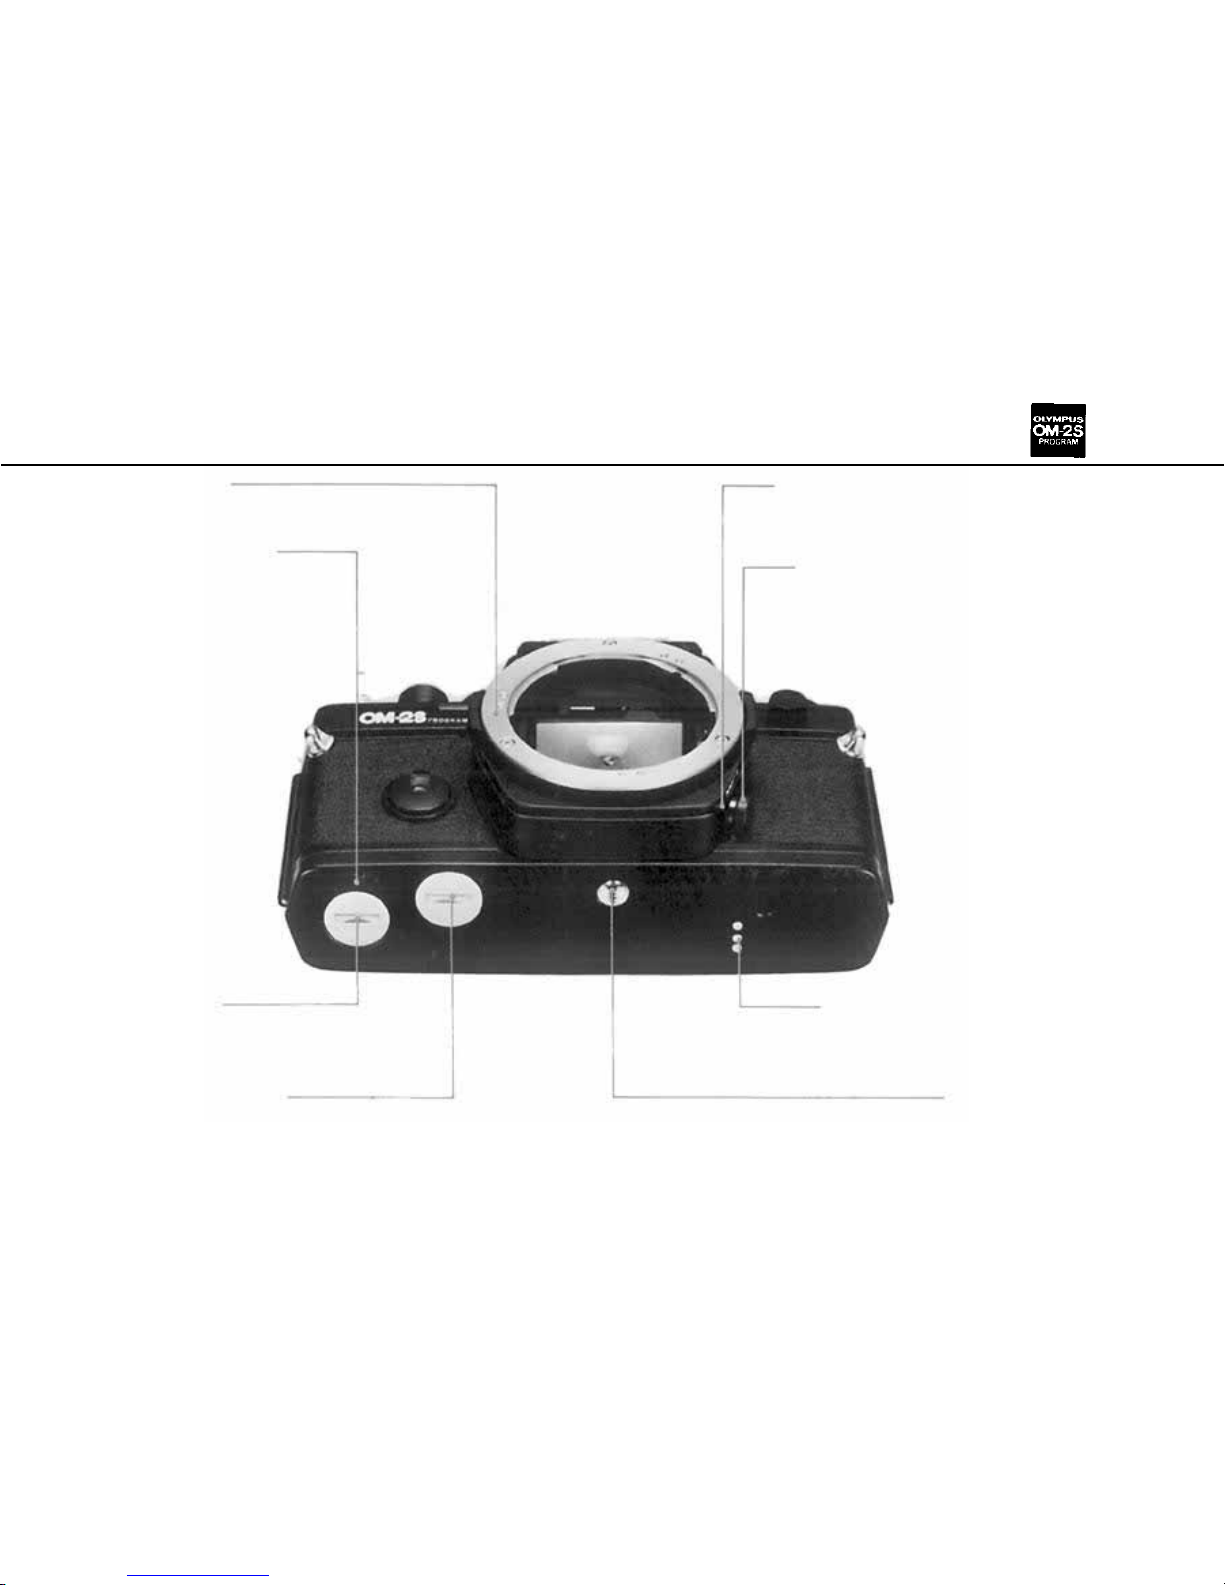
Lens Mount Ri ng
Motor Guide Pin Hole
B Lock Button
Flash Synchronization Socket
Battery Chamber
Motor Coupling Socket
Motor Coupling Terminals
Tripod Socket
A-46
Page 48

Specifications
Type: TTL auto-exposure 35mm SLR camera
Film Format: 24mm × 36mm
Lens Mount: Olympus OM mount
Shutter: Electronically controlled cloth focal plane shutter; 1/1000 sec. max.
shutter speed; 1/60 sec. mechanical shutter speed
Synchronization: X contact (synchronization at speeds of 1/60 sec. or slower;
hot
shoe
with
contact
for
T-series
flash;
5-pin
connector
for
T-series
flash;
PC synchro socket
Metering system: Olympus direct metering in body; viewfinder display for
center-weighted averaged metering and spot metering; TTL direct (offthe-film) light metering for automatic exposure control; SBC photocell
Programmed Automatic Exposure: Type: Programmed exposure control on
TTL
direct
"off-the-film"
light
measuring (center-weighted
average
light
measurement); exposure control range: about 1 min. ~ 1/1000 sec.; light
measuring range: approx. -5EV ~ 18EV (ISO/ASA 100, 50mm F1.4,
normal temperature and humidity); Flash control: Automatic flash exposure at 1/60 sec. or slower speeds with T-series flash; programed automatic aperture control
Aper ture-pr eferred Automatic Exposure: Type: Automatic exposure control
by TTL
direct
"off-the-film"
light
measuring
with
aperture-preferred
electronic shutter (center-weighted average light m easurement); exposure control range: about 1 min. ~ 1/1000 sec.; light measuring range: approx.
-5EV~ 18EV
(ISO/ASA
100,
50mm
F1.4,
normal
temperature
and
humidity);
Flash
control:
Automatic
flash
exposure
at
1/60
sec.
or
slower
speeds with T-series flash
Manual Exposure: Mechanical shutter for B and 1/60 sec., electronic shutter
for 1 ~ 1/1000 sec,; fixed point exposure setting; spot metering on microprism of focusing screen 1-13; flash synchronization at 1/60 sec. or
slower
Exposure Compensation: 2 steps and 1/3 step
Film Speed: I SO/ASA 12 ~ 3200
Film
Advance:
Film
advance
lever
with
130°
angle
for one
long
or
several
short strokes and pre-advance angle 30 ; motor drive and winder usable
Film Rewind: Rewind crank
Self-timer: 12 sec. delay electronic self-timer
Power Source: Tow 1.5V silver-oxide batteries SR44 (Eveready EPX-76) or
alkaline manganese batteries LR4 4
Battery Check: 3-level display with LED and alarm sound; automatic lock
with batteries exhausted
Viewfinder: Pentaprisrn type wide-vision finder; interchangeable focusing
screens; microprisrn/split image-matte type screen standardized; finder
view field: 97% of actual picture field; magnification: 0.86x at i nfinity with
50mm lens
Viewfinder Information: 1) Shutter speeds; 1/3 EV-step bar display of
1 ~ 1/1000 sec. 2) Display in programmed mode: PRGM signal and
blinking of OVER to indicate that the aperture has to be stopped
down. 3} Fixed point display in manual mode 4) Blinking of OVER for
overexposure 5) Blinking of + - for exposure compensation 6) display
at
"60"
with
flash installed
7)
Green
LED
lights
with
flash
fully
charged 8) On firing f lash, green LED blinks to indicate correct exposure;
OVER blinks for overexposure, and UNDER for underexposure
Camera Back: Removable hinge type, with memo holder; interchangeable
with Recordata Backs and 250 Film Back
Dimensions: 136 × 84 × 50mm (5.35" × 3.30" × 1.97") (body alone)
Weight: 540g. (19 oz.) (body alone)
Page 49

OM
SYSTEM
OLYMPUS
®
OLYMPUS OPTICAL CO.,LTD.
San-Ei Building,
22-2,
Nishi Shinjuku 1-chome, Shinjuku-ku Tokyo, Japan. Tel. 03-340-2211
OLYMPUS CORPORATION
Crossways Park, Woodbury, New York 11797, U.S.A. Tel. 516-364-3000
OLYMPUS OPTICAL CO.(EUROPA) GMBH
Postfach 104908, Wendenstrasse 14-16, 2 Hamburg 1, West Germany. Tel: 040-23773-0
OLYMPUS OPTICAL CO . (U. K. ) LTD.
2-8 Honduras Street, London EC1Y OTX, England. Tel. 01-253-2772
PRINTED IN JAPAN12EOM2SA • 1184 • 25MS
 Loading...