

Page 1
DIGITAL CAMERA
OLYMPUS·
StLilus
1030
Instruction
Manual
SW
IP
1030
k Start. Guide
Button operations
Menu operations
SW
Printing pictures
Using OLYMPUS Master
Getting to know your
camera better
Appendix
• Thank you for purchasing an Olympus digital camera. Before you start to use your new camera, please
read these instructionscarefully to enjoy optimum performance and a longerservice life. Keep this manual
in
a safe place for future reference.
• We recommend thatyou take test shots to get accustomed to your camera before taking important
photographs.
In
the interest of continually improving products, Olympus reserves the right to update or modify
•
in
information contained
• The screen and camera illustrations shown
and may differ from the actual product.
this manual.
in
this manual were produced during the development stages
Page 2
Contents
Quick Start Guide
Button operations
P.
P.3
11
Menu operations P.21
Printing pictures
Using OLYMPUS Master
P.
P.
41
46
Getting to know your camera
better P.51
:-s-:t-<·
Te$~out
the
-:~
functioQsofthe
buttons.byfollowing'
illustrations.
~._
_h
'
".
>
along
came"
with
Appendix
P.62
Page 3

I
Gather these items (box contents)
i~'
~o
Digital Camera
L1-50C
Battery
Items not shown: Instruction Manual (this manual), warranty card. Contents may vary
depending on purchase location.
Charger
USB
Cable
Strap
AV
Cable
L1-50B
Lithium Ion Battery
OLYMPUS
Software CD-ROM
Master
Attach the strap
o
c
o'
2
'"
en
.....
Q)
:4-
G)
c
c-
CD
• Pull the strap tight so that it does not come loose.
Page 4
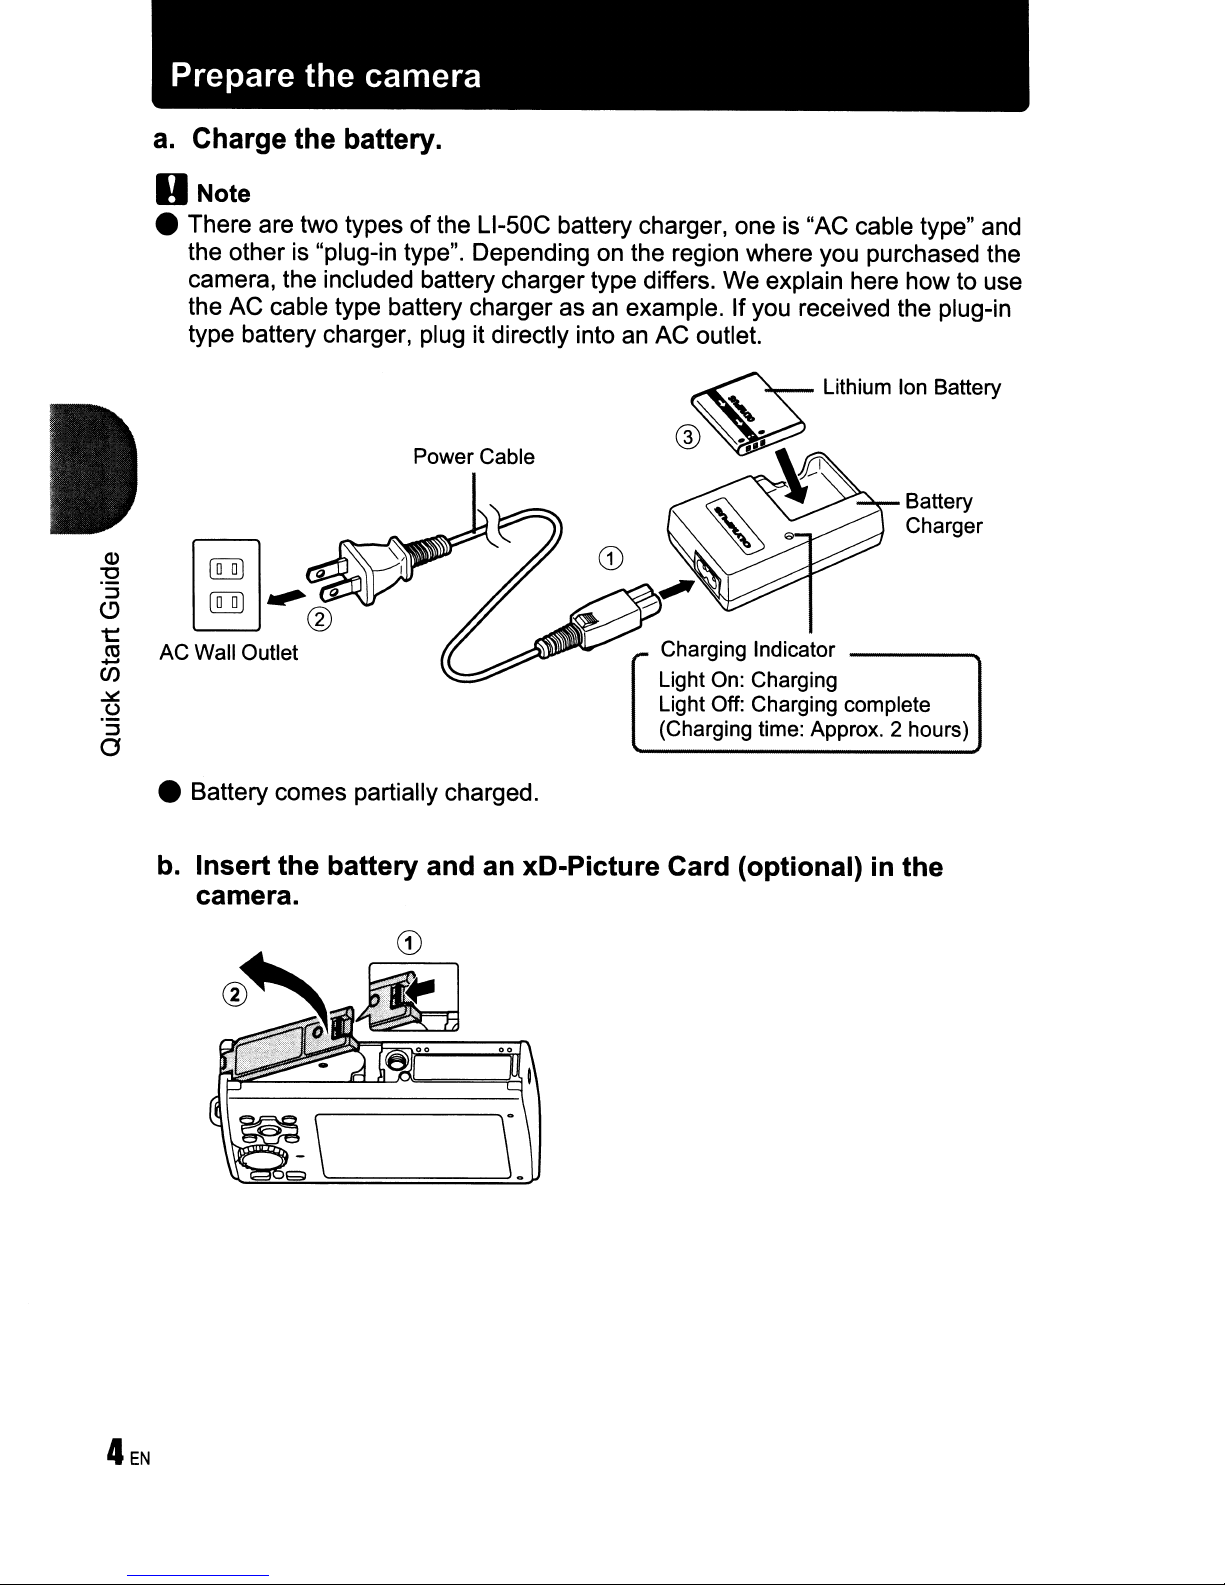
Prepare the camera
a.
Charge the battery.
U Note
• There are two typesofthe
the other is "plug-in type". Depending on the region where you purchased the
camera, the included battery charger type differs. We explain here how to use
the AC cable type battery charger as an example. If you received the plug-in
type battery charger, plug it directly into an AC outlet.
Power Cable
L1-50C
battery charger, one is "AC cable type" and
Battery
Charger
f[[il
~.,®
AC Wall Outlet
Charging Indicator
Light On: Charging
Light Off: Charging complete
(Charging time: Approx. 2 hours)
~
• Battery comes partially charged.
b.
Insert the battery and an xC-Picture Card (optional)
camera.
in
the
Page 5
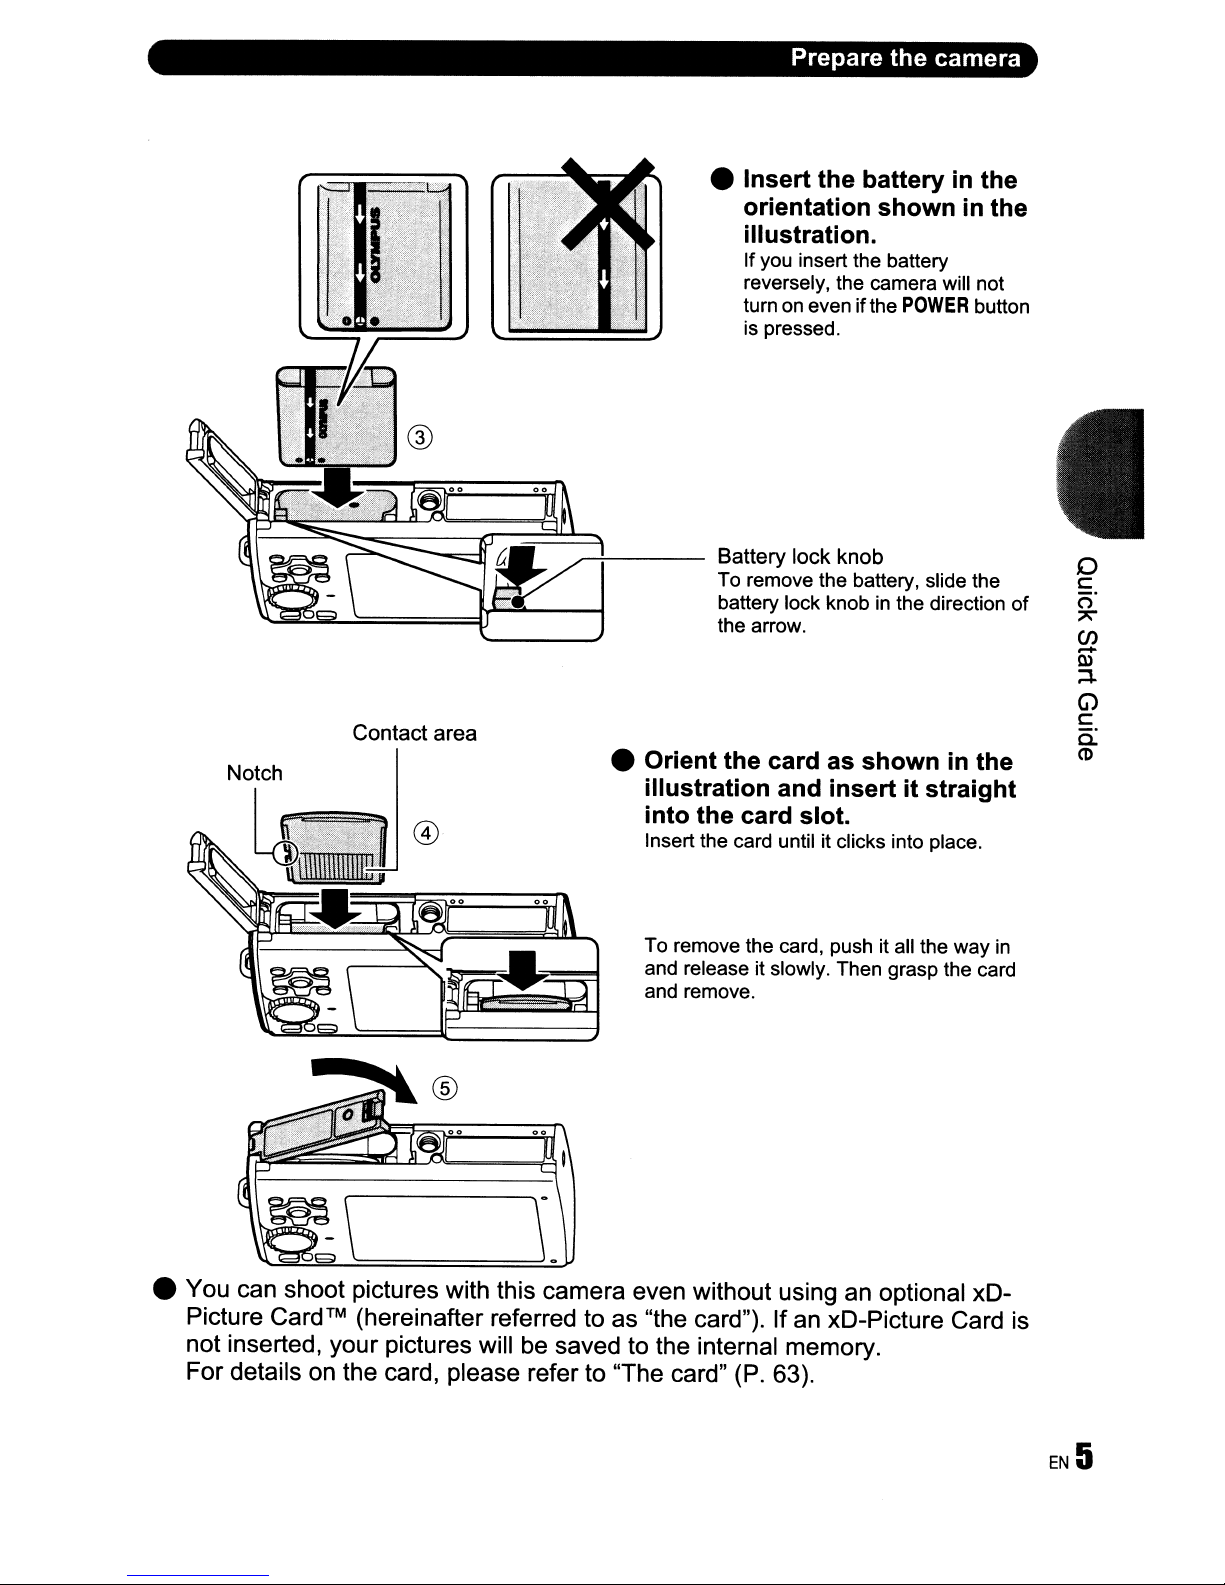
•
Insert
orientation
Prepare
the
the
batteryinthe
showninthe
illustration.
If you insert the battery
reversely, the camera will not
turn on even ifthe
is pressed.
POWER
camera
button
--~~
l\~~~.k====lJ.a....;::lV---1
.....
Contact area
fA
...
~
I battery lock knob
•
Orient
illustration
into
Insert the card until it clicks into place.
To remove the card, push it all the way
and release it slowly. Then grasp the card
and remove .
Battery lock knob
To remove the battery, slide the
in
the arrow.
the
the
card
card as
and
insertitstraight
slot.
the direction
showninthe
o
c:::
of
in
o'
~
en
.-
Q)
::l-
G>
c:::
a.
CD
• You can shoot pictures with this camera even without using an optional xD-
Picture Card™ (hereinafter referred to as "the card"). If an xD-Picture Card is
not inserted, your pictures will be saved to the internal memory.
For details on the card, please refer to "The card" (P. 63).
Page 6
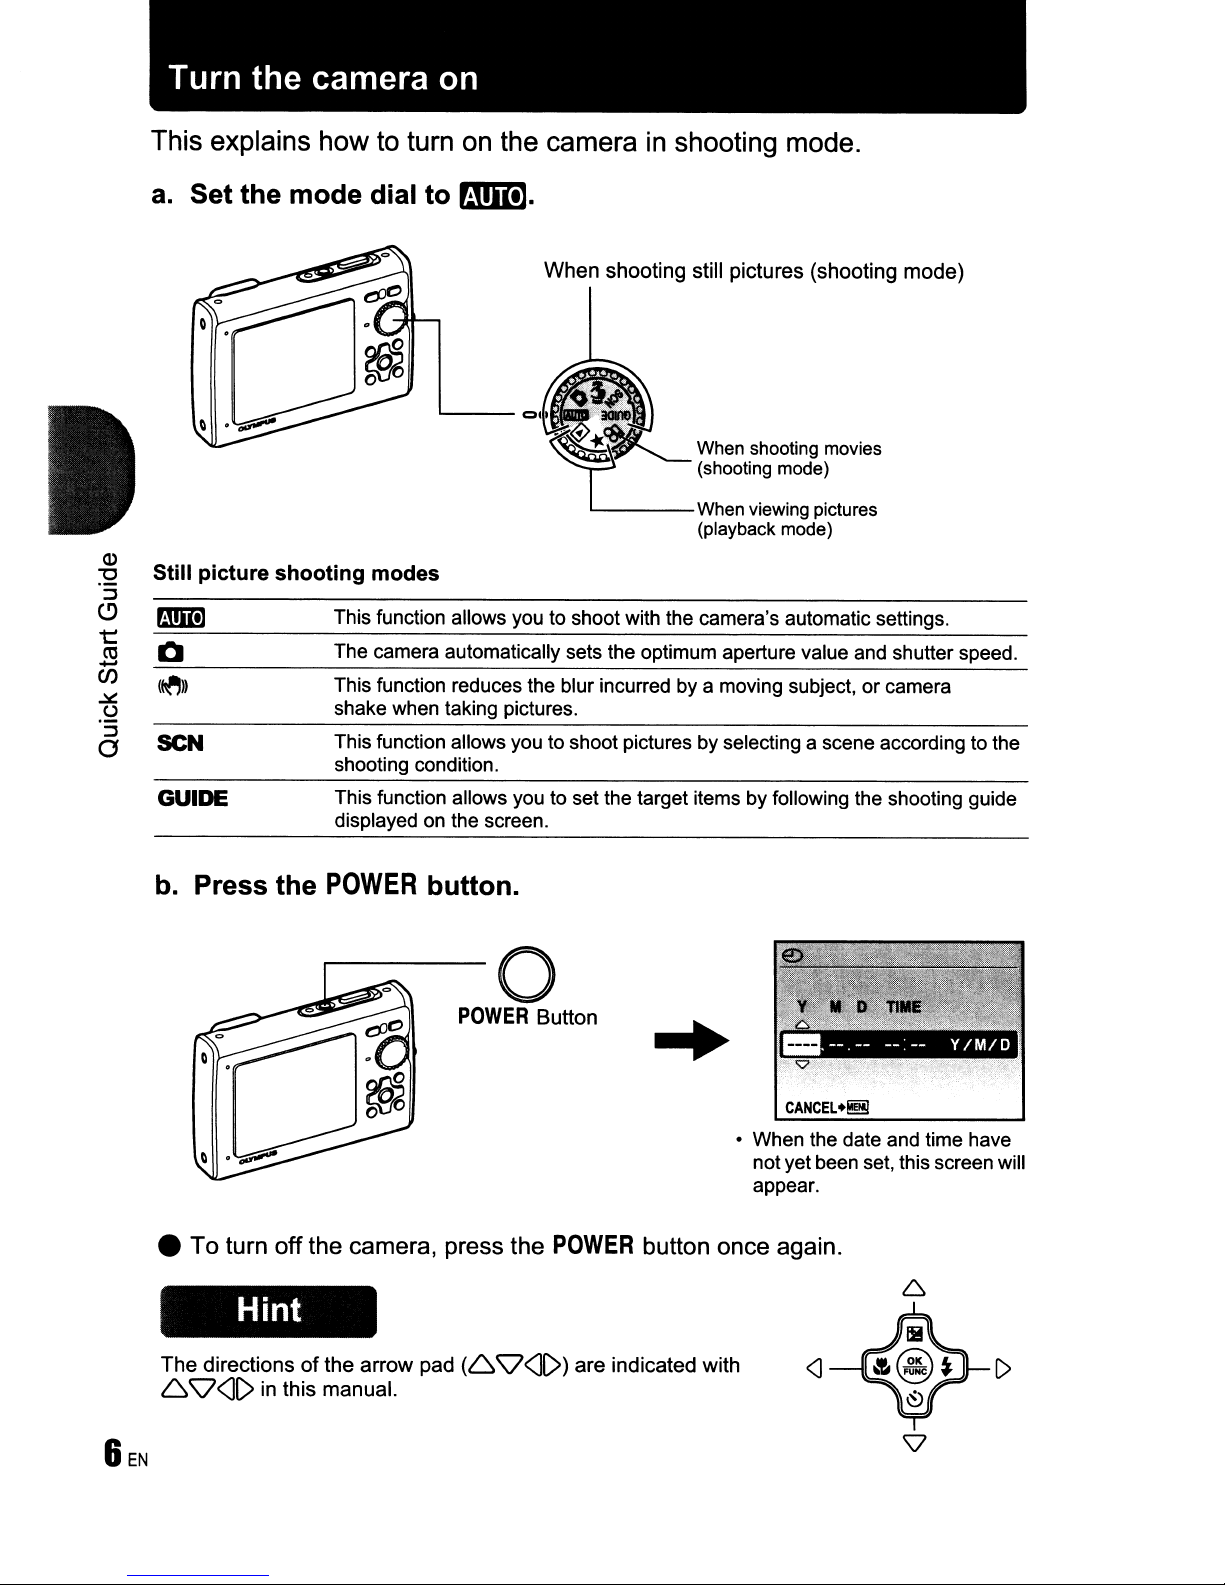
Turn
the
camera on
This explains how to turn on the camerainshooting mode.
a.
Set the
mode
dial
to
rmD].
Still picture
Q
SCN
GUIDE
When
shooting
modes
This function allows you to shoot with the camera's automatic settings.
The camera automatically sets the optimum aperture value and shutter speed.
This function reduces the blur incurred by a moving subject, or camera
shake when taking pictures.
This function allows you to shoot pictures by selecting a scene according to the
shooting condition.
This function allows you to set the target items by following the shooting guide
displayed on the screen.
shooting still pictures (shooting
mode)
b. Press the
POWER
button.
o
POWER
• To turn off the camera, press the
Hint
The
directionsofthe
6
Q<l1>
in this manual.
arrow
pad
(6
Q<lI»
Button
POWER
are indicated with
button once again.
CANCEL
+!!!!I
• When the date and time have
notyet been set, this screen will
appear.
<J
[)
Page 7
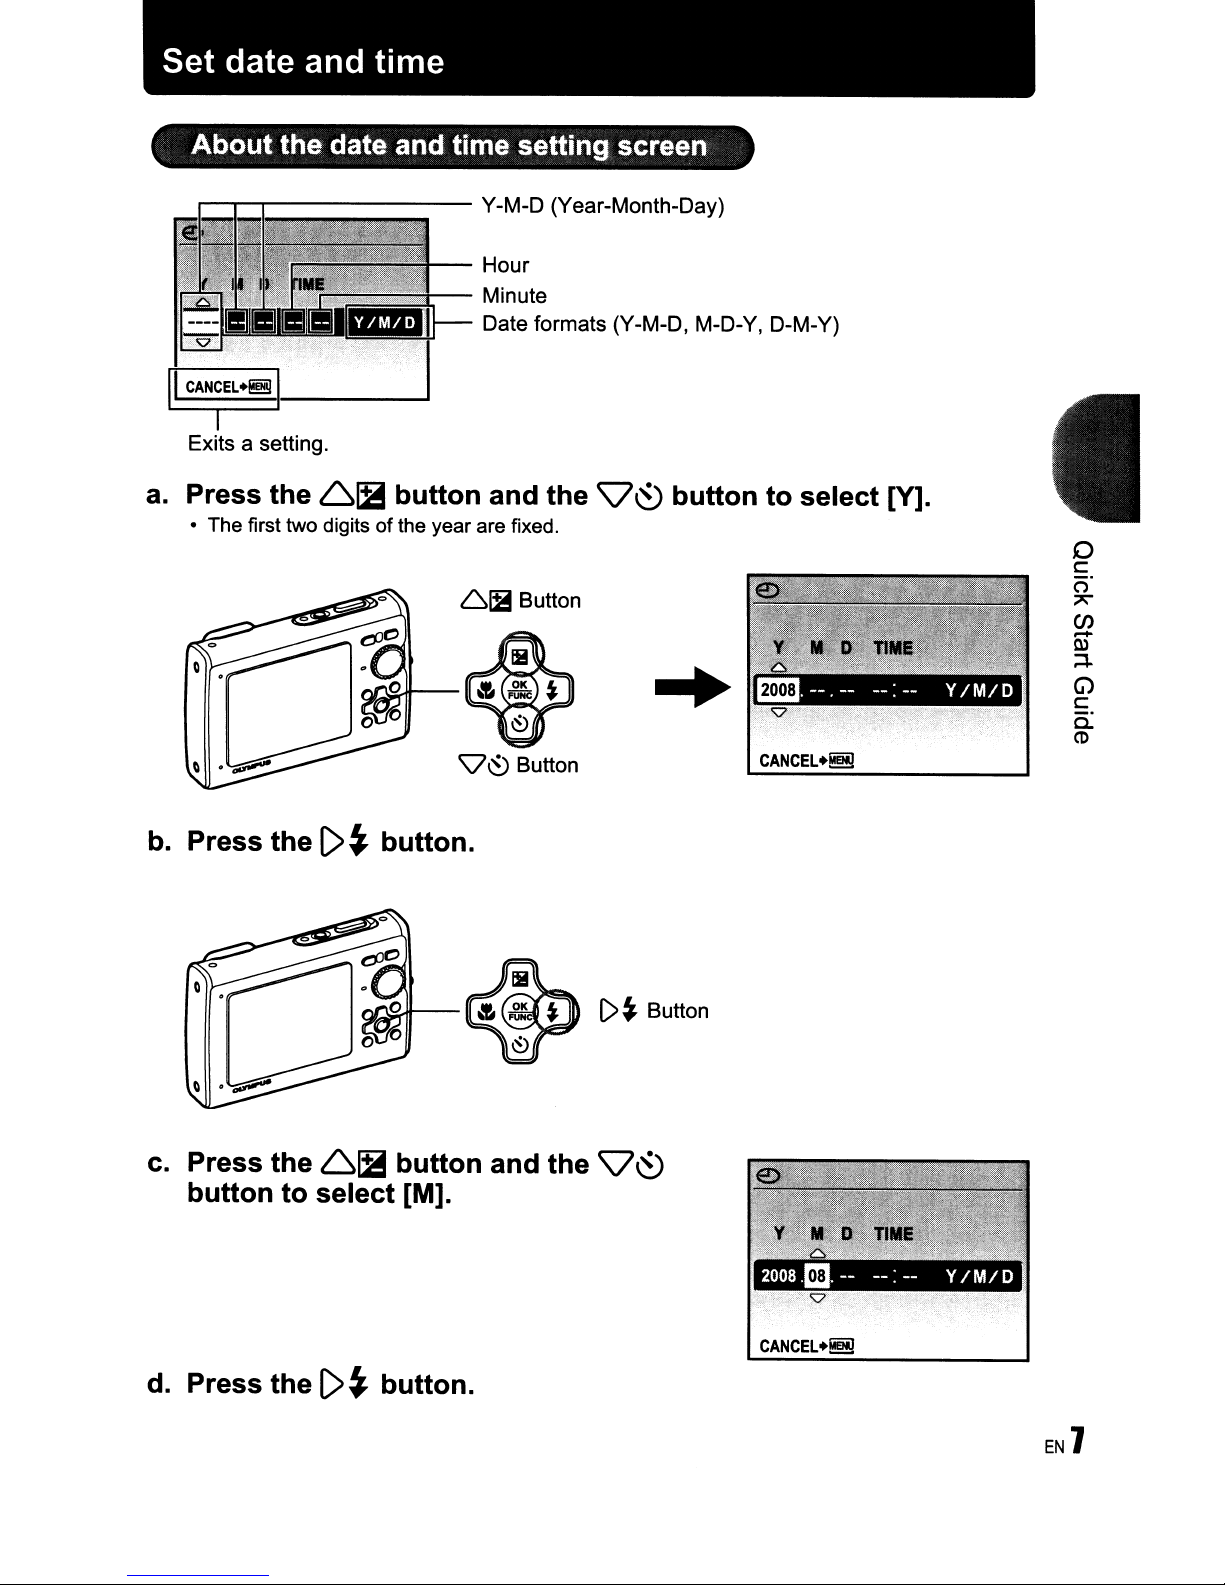
Set date and time
About the date and time setting screen
r--.,....-~------
II
CAN~EL~
Exits a setting.
a.
Press the
• The first two digits ofthe year are fixed.
11-----
6~
button and the
~-~~
Y-M-D (Year-Month-Day)
Hour
Minute
Date formats (Y-M-D, M-D-Y, D-M-Y)
61it
9~
Button
button to select [Y].
..
~
9~
Button
o
c
o'
"
(J)
Q)
-
:4-
G)
c
c-
CD
b.
Press the
c.
Press the
button to select [M].
d.
Press the
()~
6~
()
~
button.
button and the 9
button.
I>~
Button
~
Page 8
Set date and time
e.
Press the 61B button and the
CV~
button to select [0].
f.
Press the
g.
Press the 61B button and the
()
~
button.
CV~
button to select the hours and minutes.
• The time is displayedinthe 24-hour format.
CANCEL.~
CANCEL.~
h.
Press the
i.
Press the 61B button and the
()~button.
CV~
button to select [V/M/D].
CANCEL+~
j. After all items have been set, press the @ button.
• For precise time setting, press the @ button
as
the time signal strikes 00 seconds.
SET+loKI
SET+loKI
@ Button
The
numberofstorable
still pictures is displayed.
Page 9
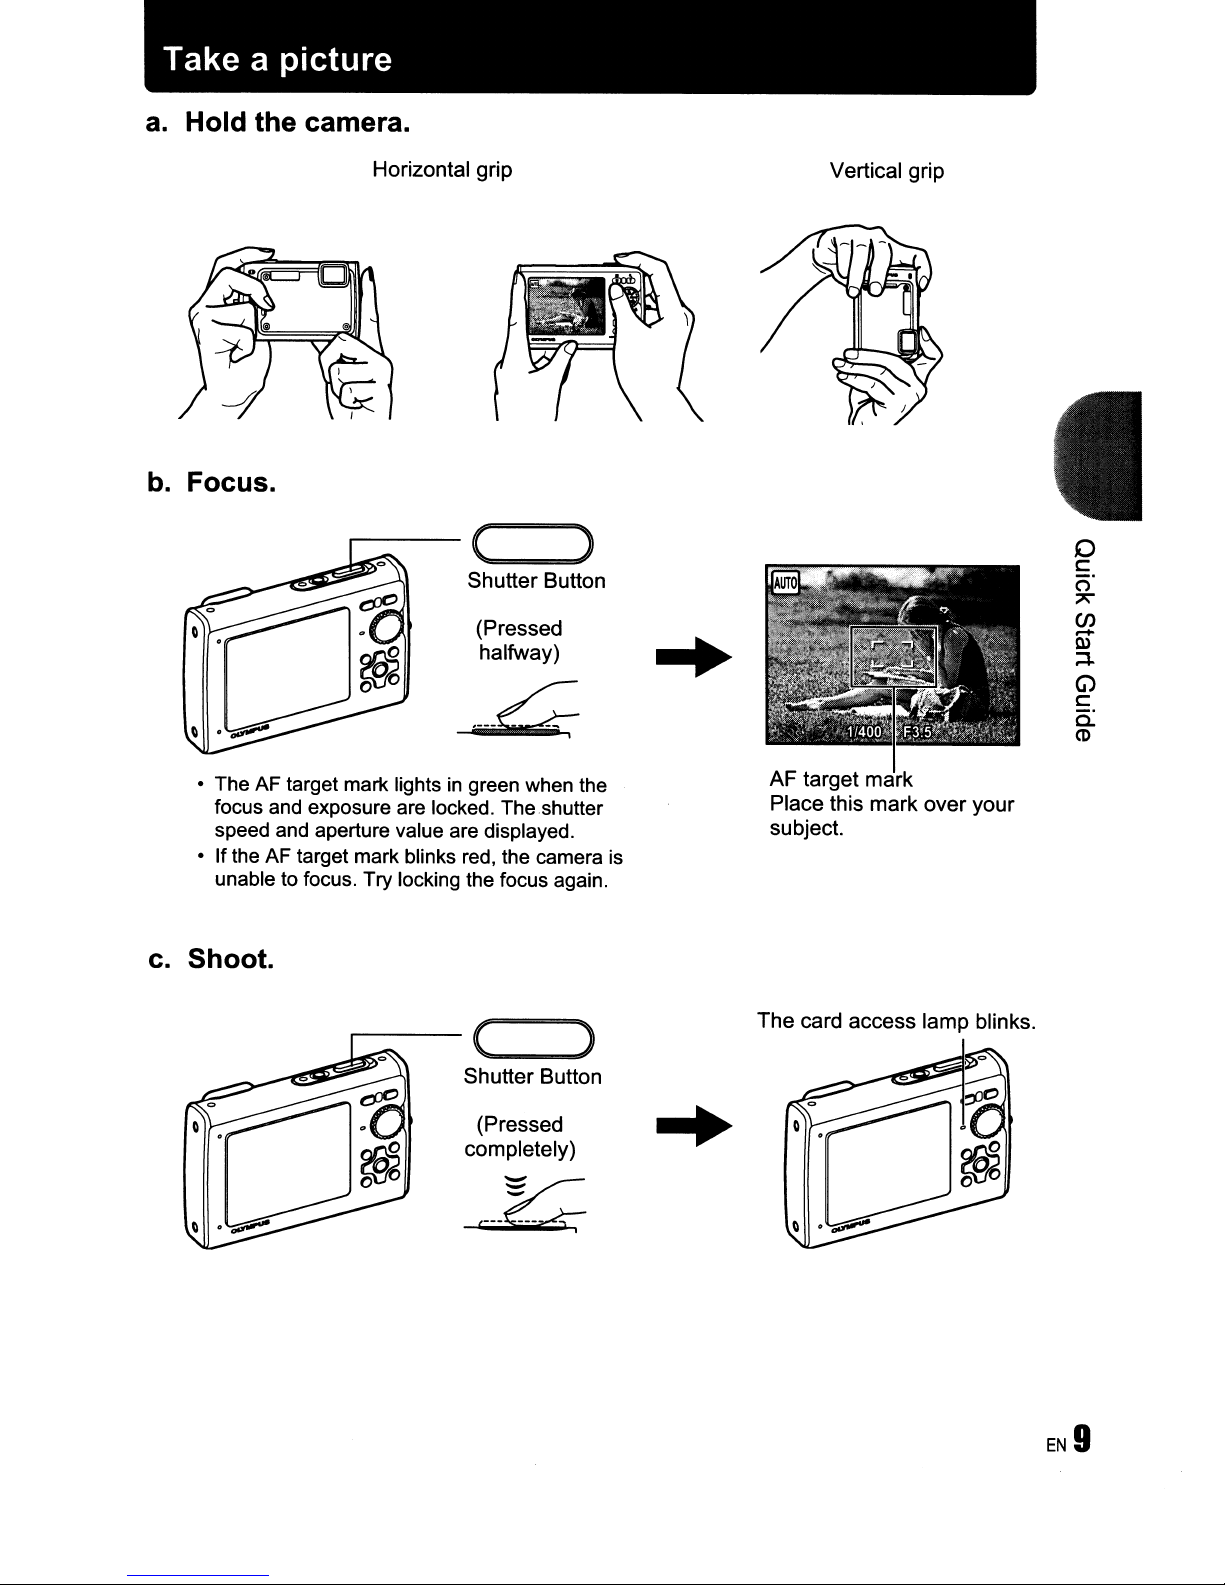
Take a picture
a.
Hold the camera.
b.
Focus.
~~~~
Horizontal grip
....-----
( )
Shutter Button
(Pressed
halfway)
..
Vertical grip
o
c:
(")
7\
(J)
.-..
Q)
;:::1.
G)
c:
a:
CD
• The AF target mark lightsingreen when the
focus and exposure are locked. The shutter
speed and aperture value are displayed.
• Ifthe AF target mark blinks red, the camera is
unable to focus. Try locking the focus again.
c.
Shoot.
(
Shutter Button
(Pressed
completely)
c--~
AF target mark
Place this mark over your
subject.
The card access lamp blinks.
)
Page 10
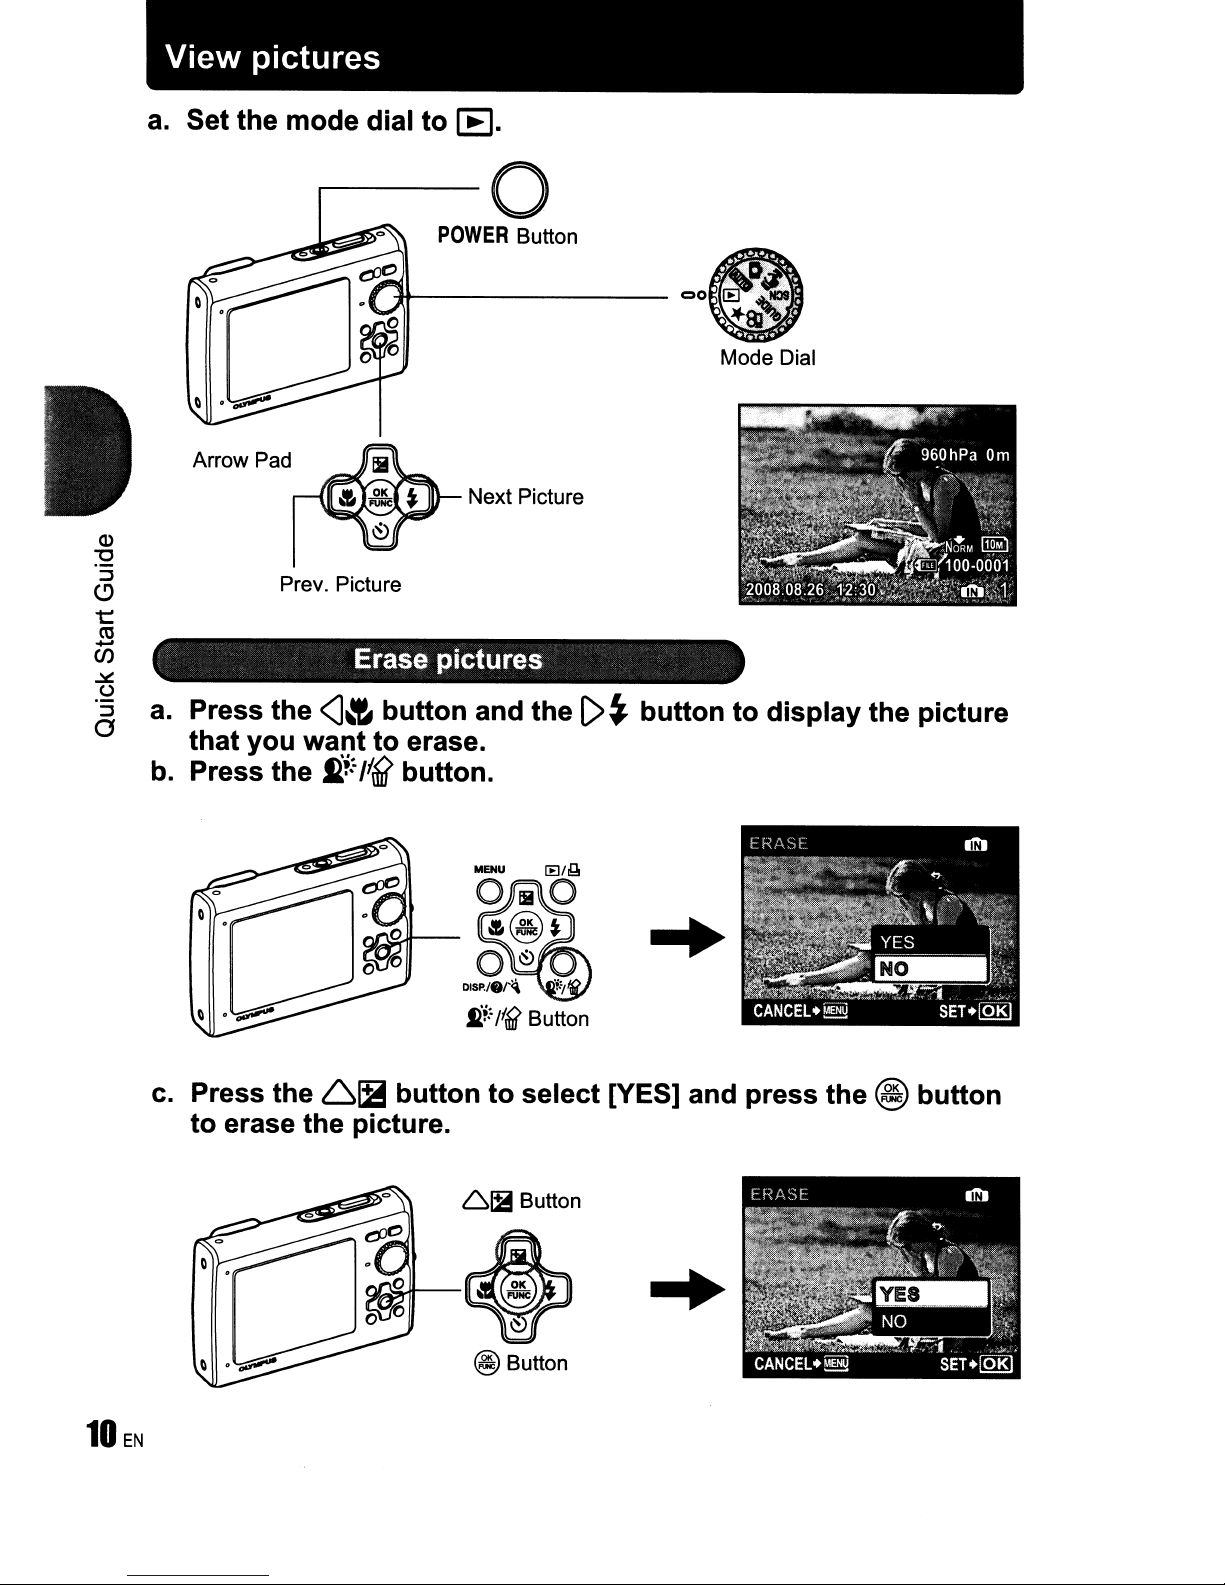
View
a.
Set the mode dial
pictures
.---------0
to
[E
.
Prevo
a.
Press the
that
you
b. Press the
Picture
Erase
<J&
want
~+~
liB button.
POWER
-fl---------
pictures
button
to
erase.
Button
Next Picture
and
the
()
~
button
00
0
Mode Dial
[E]'
~NOI
Jf.81~
°"
to
display
the picture
c. Press the
to
erase the picture.
61it
nI
button
fi.i~
/f(ff
Button
to
select
61ii
Button
~
~
@ Button
[YES] and press
...
the
@
button
Page 11
I
Button
operations
Flash mode
Shooting mode
Self-timer
-----,
----tl
08
------
~-8
....
a.ttt--O
Shooting modes
e
Macro model
Super macro model
S-macro LED mode
The number
still pictures
00
Playback modes
of
is
storable
displayed.
Power on:
Shooting mode
• Lens cover opens
• Monitor turns on
Playback mode
• Monitor turns on
8 Shilllerbu
Shooting
Set the mode dial to
(halfway). The AF target mark lights
lock). The shutter speed and aperture value are displayed (only when the mode dial is setto
mm,
AF target mark
still
pictures
mm,
0
or
(~))).
Now, press the shutter button all the way (completely) to shoot a picture.
0,
(~),
SCN
or GUIDE, and lightly press the shutter button
in
green when the focus and exposure are locked (focus
Focus
shot
Compose your picture with the focus locked, and then fully
press the shutter button to shoot a picture.
• Ifthe AF target markblinks red, the camera is unable tofocus.
lock-Locking
Try locking the focus again.
the
focus
and then
composing
the
OJ
c
::::
o
::J
o
"'0
(1)
....,
Q)
.....
o·
::J
en
EN
11
Page 12
AF lock mark
Lock-Locking
When the scene is
by pressing \7. Press
~
"SCN (Scene) Selecting a scene mode according to the
shooting situation" (P. 26)
• AF lock is automatically canceled after one shot.
the
:1
focus
• or
\7
position
~~,
you can lock the focus position
again to cancel the AF lock.
AF
Recording movies
Setthe modedial to
the shutter button completely to start recording. Press the shutter button again to stop
recording.
Set the mode dial to the desired shooting or playback mode.
I
B!Im
The camera determines the optimum settings for the shooting conditions automatically.
Setting in the [CAMERA MENU] such aswhite balance and ISO sensitivitycannotbe changed.
Shooting
fi9,
and press the shutter button halfway to lock the focus, and then press
pictures
with
full
automatic
settings
I0 (P:Program auto) Set the
en
The camera automatically sets the optimum aperture value and shutter speed for the
c
o
brightnessofthe subject.
:.;::::
Setting in the [CAMERA MENU] such as white balance and ISO sensitivity can be changed.
~
Q)
a.
o
I
(~))
c
o
This function reduces the blur caused by a moving subject or camera movement when taking
i::
pictures.
:::J
CO
• By switching to another mode, most settings will be changed to the default settings
ISCN
You can shoot pictures by selecting a scene mode according to the situation.
Shooting
mode.
Shoot
pictures
pictures
using
by
optimum
digital
aperture value and
image stabilization
selecting a scene
mode
shutter
accordingtothe
Select a scene mode/change another scene mode to another one
• Press MENU and select [SCN]from thetop menu. Usethe
6'\7
to selecta scene and press
@.
• By switching to anotherscene mode, most settings will be changed to the default settings
each scene mode.
~
"SCN (Scene) Selecting a scene mode according to the shooting situation" (P. 26)
speed
of
each
situation
of
12
EN
Page 13

I
GUIDE
Shoot pictures by comparing previews of different effects
Use
display.
When [Exposure
effects.] is selected
Follow the shooting guide to take better pictures
Follow the shooting guide displayed on the screen to setthe
target items.
<lC>
to change the
• Press
• To change the setting without using the shooting guide, set
• Functions setusing the shooting guidewill revert tothe default
Select oneofthe[1Shoot w/ effects preview.] options from the
[SHOOTING GUIDE] menu to preview a live, multi-frame
window on the monitor showing four different levelsofthe
selected shooting effect. You can usethe fourpreviewframes to
compare the desired setting/effect.
• Usethe arrowpad toselecttheframewiththedesired settings
MENU
the shooting mode to another one.
settings when
changed.
and press
mode and allows you to shoot with the selected effect.
to display the shooting guide again.
MENU
is pressed or when the shooting mode is
@. The camera automaticallyswitches to shooting
I
~
Recording movies
Audio is recorded with the movie (When [MOVIE] is set to [NON-WATER MOVIE]).
This icon lights during movie recording.
The remaining recording time is displayed.
When the remaining recording time reaches
recording will stop auto":,atically.
• You can switch the movie recording mode between [NON-WATER MOVIE] and
[UNDERWATER MOVIE].
~
"MOVIE Switching the movie recording mode" (P. 27)
I
[E]
View pictures/Selecting playback mode
The last picture taken is displayed.
• Press the arrow pad to view other pictures.
• Use the zoom button to switch between close-up playback, index display and calendar
display.
0,
OJ
c:
:::
o
:::J
o
"'0
CD
~
Q)
-
c)"
:::J
en
EN13
Page 14
Playing back movies
Select the movie in the playback mode and press @ to play.
Operations during movie playback
Playing timelTotal recording time
6:
Increases the volume.
'\:?:
Reduces the volume.
[>:
Each time you press the button, the playback speed changes in the following order:
x
2
<3:
changes in the following order: 1
x
20
and back to 1
;
;
Plays the movie in reverse. Each time you press the button, the playback speed
x.
x
x; 2
x
20
;
;
and back to 1
x.
• Press @ to pause the playback.
C/)
c
Operations during pause
o
:0=;
~
Q)
a.
o
c
o
t::
::1
en
~I='-I.
•
To
resume the movie, press
•
To
cancel the playbackofthe movie in the middleofitorduring pause, press
[>:
Displays the nextframe.
<I:
Displays the previous frame.
6:
Displays the first frame.
'\:?:
Displays the last frame.
@.
Viewing panoramic pictures taken with [COMBINEINCAMERA 1] [COMBINE IN
CAMERA 2] (Panorama playback)
• Usethe arrow pad to selecta panoramic picture and press @
to begin scrolling the picture from leftto right (or bottomto top
for rotated pictures).
• Use the zoom button to zoom in
scrolling. Use the arrow pad to change the scrolling direction
of
a zoomed in picture.
•
To
stoporresume scrolling in the original magnification,
press@.
• To exit panorama playback, press
~
"PANORAMA
(P. 24)
Taking and combining panoramic pictures"
or
out while a picture is
MENU.
MENU.
Page 15
*Viewing
"My
Favorite"
The still pictures registeredin"My Favorite" are displayed.
• Press the arrow pad to view other pictures.
• Use the zoom button to switch among close-up playback and
Press MENU during "My Favorite" playback to display the top
menu, and then select [SLIDESHOW]
~
index display.
or
[ADD FAVORITE].
"SLIDESHOW Playing back pictures automatically" (P. 30)
"ADD FAVORITE Adding favorite images" (P. 31)
EXIT.!!!!!
Erasing
• Use the arrow pad to select the picture you want to erase, and press
and
• Erasing a picture from "My Favorite" does not erase the original picture recorded
internal memory
Use the arrow pad to select scenes, playback pictures, and to select the items on the menus.
.
e"
.,~
Displays the Function Menu which contains the functions and settings used during shooting.
This button is also used to confirm your selection.
The
~
pictures
YES/
press@
..
~.
'
functions
"WB Adjusting the colorofa picture" (P. 27)
"ISO Changing the ISO sensitivity" (P. 28)
"DRIVE Using sequential (continuous) shooting" (P. 28)
"ESP/[!]
"IMAGE QUALITY Changing the image quality" (P. 23)
SET.lQK)
from
"My
Favorite"
NO
fi~:
Ilf?
Select [yES],
.
or
to the card.
you
can
set
with
the
Function
Changing the area for measuring the brightnessofa subject" (P. 29)
Menu
in
the
Function Menu
The current camera settings are displayed.
6
Q:
Select the function to be set.
<II>:
Select a setting, and press
@.
EN
15
Page 16
e
MENU:
Displays the top menu .
•
:.Z~ni
Shooting mode: Zoominginon your subject
Optical zoom ratio: 3.6x
buttori(MENUl.".
buttq,)
."
?:.'
,~~~~Ing
wttJI,cts~~~ngLglos.-uPPI~~i!Ck
i
Zoom out:
Press W on the
zoom button.
Playback mode: Changing the picture display
Single-frame playback
• Use the arrow pad to browse pictures.
(J)
c
o
:;:::;
~
Q)
a.
o
c
o
~
:::J
CC
~---~~
T
I
~'f
(
Index display
• Use the arrow pad to select a
picture forplayback, and press
@ to play back the single-
frame
of
the picture selected.
Zoom in:
Press T on the
zoom button.
W
Close-up playback
• Press T to incrementally enlarge
the picture up to 10 times the
original size. Press W to reduce
the size.
• Use the arrow pad during closeup playback to scroll around the
picture.
• Press
@ toreturn to single-frame
playback.
T t
16
EN
~w
W
-+
Calendar display
• Use the arrow pad to select the date,
and press
to display the picture on the date
selected.
@ or T on the zoom button
Page 17
.·~Sbutton
·;:Chilnglng
pfttti~
brl~ht~!ss:(~pos~~:,Comp8n.;!If?nf,1
•
~~":,6utton
Press
Press
C>~
in shooting
@
to
confirm
AUTO Auto-flash
modetoselect
your
selection.
@ Red-eye reduction flash
~
~
.
Press
Press
OFF
ON
•
•
•
Fill-in flash
Flash off
~.
<vr~
Q~
@
After
pressing
seconds,
To
cancel
Self-timer
~uttonHJ!r
in shooting
to
confirm
blinks
the
self-timer,
shooting is
the
modetoselectonand
your
selection.
shutter
for
approximately
automatically
Press 61B in shooting mode,
frame
selection.
•
Use
with
the
Adjustable
<lC>
to
change
desired brightness. Press @
from -2.0
the
EV
display
",
the
flash setting.
The flash fires automatically
This emits pre-flashes to reduce the occurrence of red-eye in
your pictures.
The flash fires regardless of the available light.
The flash does notfire.
off
for
Cancel the self-timer.
Set the self-timer.
button completely,
2 seconds,
press
Q~.
canceled
the
and
after
self-timer
then
one
to
the
self-timer.
the
shot.
use
the
arrow
padtoselect
to
confirm
+2.0 EV.
.
in
low light or backlight conditions.
lamp
lights for
picture is taken.
approximately
your
the
10
OJ
c::
::::
o
~
o
"'0
CD
...,
Q)
...
o'
~
en
Press
Press @toconfirm
•
• [ISO] is fixed
<J-:r,
in shooting
OFF Macro mode off Macro mode is deactivated.
~
s!-
&i
~
Macro mode This mode lets you shoot as close as10cm/3.9 in. (wide) and
Super macro mode This mode lets you shoot as close as 2 cm/0.8 in. from your
S-macro LED mode The LED lightilluminates from 7 cm/2.8 in. to 20 cm/7.9 in. from
Zoom
and flash
"ISO
at
Changing
modetoselect
your
selection.
cannotbeusedinsuper
[AUTO]
the
when
ISO
the
macro
30 cm/11.8 in. (tele) from your subject.
subject. If the distance between the camera and the subject is
over 50 cm/19.7 in., the picture will be out of focus.
the lens
to turn
shooting in
sensitivity" (P. 28)
in
on
mode.
super macro mode. Press the shutter button halfway
the LED light.
macro
modelS-macro
S-macro
LED
mode.
LED
mode.
EN
11
Page 18
I
[E
Viewing pictures immediately
Press
[E
in
shooting mode to switch to playback mode and display the last picture taken.
[E
Press
~
I
~
When a printer is connected to the camera, display the picture you want to printinplayback
mode and press
~
I
i!:
again or press the shutter button halfwayto return to shooting mode.
"[E
View pictures/Selecting playback mode" (P. 13)
Printing pictures
J1.
"EASY PRINT" (P. 41)
Brightening the subject against backlight
Press
setting. A frame is displayed on the monitor around your subject's face (except for
This function makes the subject's face appear brighter, even against strong backlighting, and
adjusts the background to ensure proper exposure
en
c::
o
• It may take a few seconds until the frame is displayed
:.0::
• The faces may not be detected depending on the subject.
~
(1)
• When [ON] is selected, the following setting restrictions apply:
a.
o
c::
o
::::
• You can also use Shadow Adjustment Technology to compensate for backlighting
~
11l
liB
In
• Once erased, pictures cannot be restored. Check each picture before erasing to avoid
Ii!"
in
shooting mode to turn on or off Shadow Adjustment Technology. Press @ for
of
your picture.
OFF
ON
[ESP/G]
•
• [AF MODE] is fixed at [FACE DETECT].
still pictures.
~
"PERFECT FIX Editing images" (P. 30)
is fixed at [ESP].
Shadow
Shadow
Adjustment Technologyisdeactivated.
Adjustment Technologyisactivated.
on
Erasing pictures
playback mode, select the picture you want to erase, and press
accidentally erasing pictures you want to keep.
~
"Oon
Protecting pictures" (P. 33)
the monitor.
I({
B!
~).
in
shot
IDisplaying the button guide
Hold down
Ii!"
/IB
in
shooting mode to display the guide indicating the locationofthe buttons.
Page 19

eD
I
DISP.
1S
e'.I'4\,·button
Changing the information displays
Chang(ngthelnformatlon
. .Turningonthe
'.
' -,_,:_,,'. ,
onddls,PI~Y/DI.plaY'~he
LEQ;
U1~minator/Ch8cking
•..
-
O,i$._.
."c.
menl;l
the
,.
gUI~"
til"
<c..
..-_._,
Press
Shooting
DISP.
r----.,~--.,--.,--.,"""'ZI
to change the display in the following order.
mode
•
Simple display
Frame assis(1
Histogram display*1
*1
Playback
mode
•
Normal display
Detailed display
No
information
display
Histogram
display*2
OJ
c::
...
...
0
;:,
0
"0
(1)
..,
Q)
...
o'
;:,
en
*1
This is not displayed when the mode dial is set to~or
*2 This is not displayed when a movie is selected.
[ • Displaying the menu guide
GUIDE.
With a menu item highlighted, press and hold
the menu guide which will provide more information on the
functionorsetting.
down.
to
display
Page 20
I
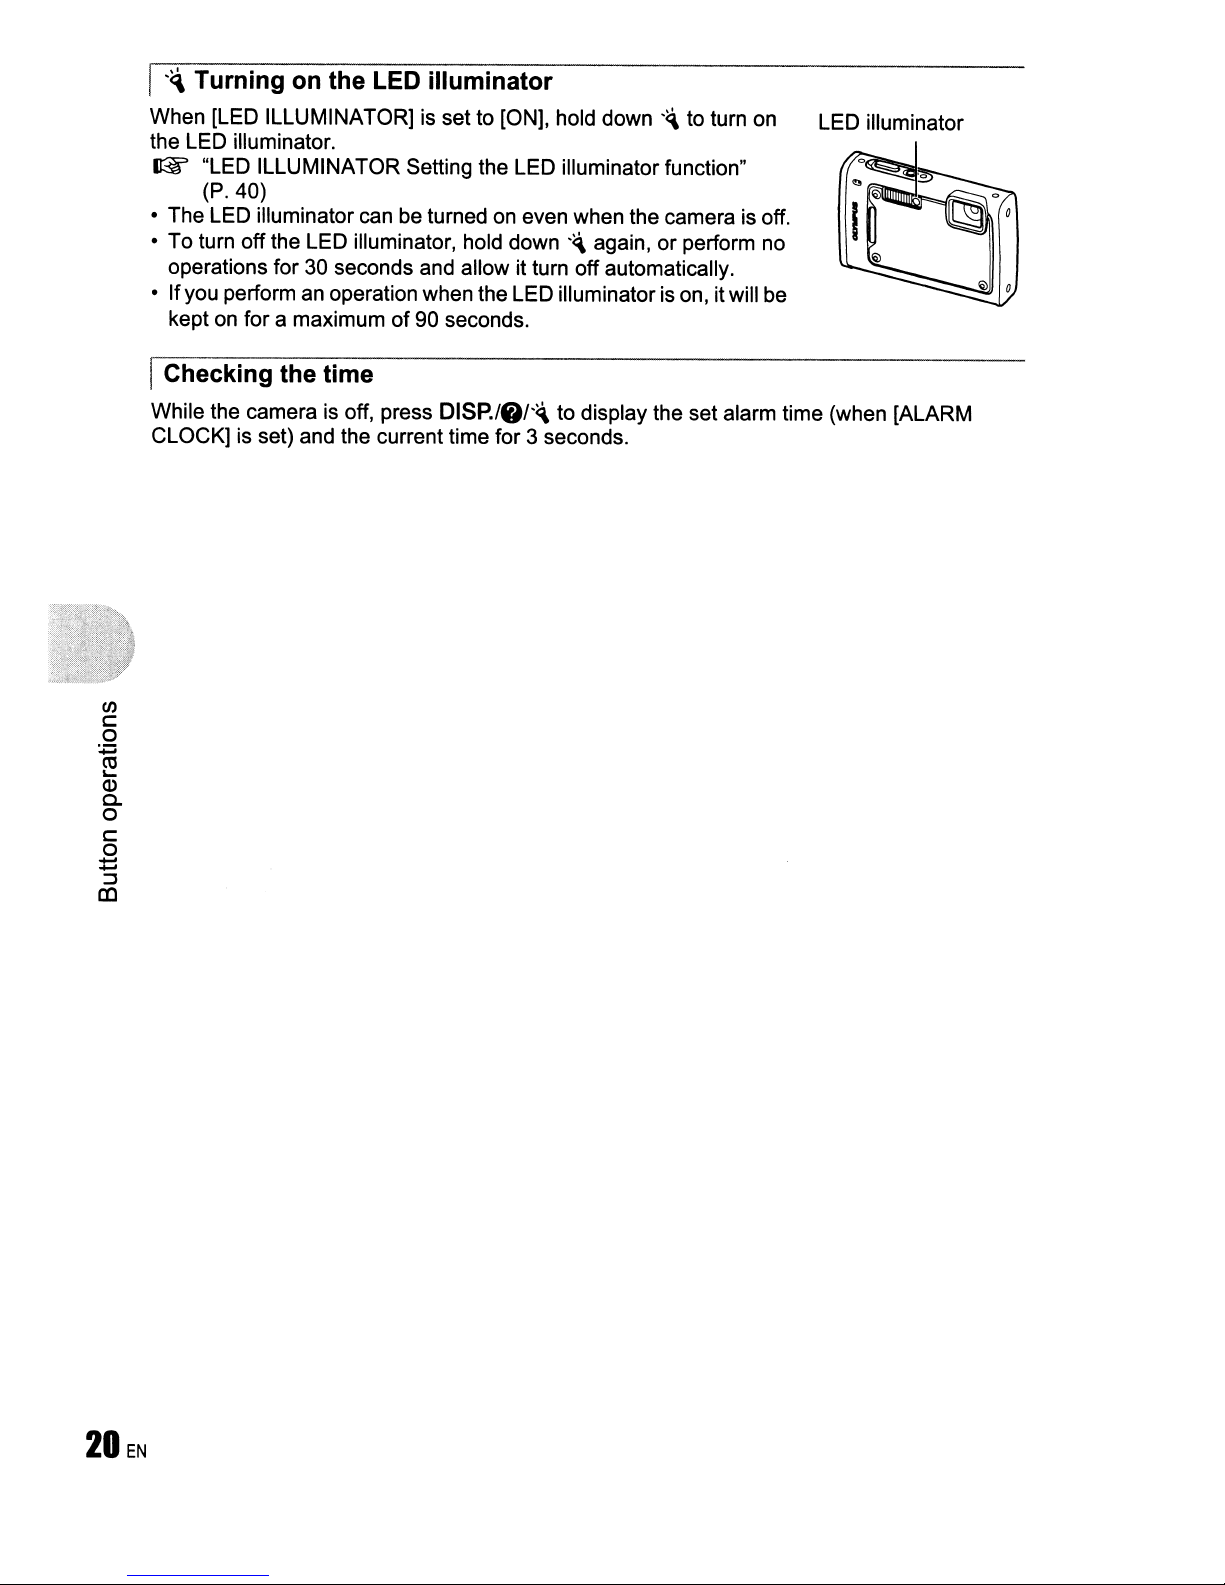
'~
Turning on the LED illuminator
When [LED ILLUMINATOR] is set to [ON], hold down'~to turn on LED illuminator
the LED illuminator.
~
"LED ILLUMINATOR Setting the LED illuminatorfunction"
(P.40)
o The LED illuminator can be turned on even when the camera is off.
o To turn off the LED illuminator, hold down
'~
again, or perform no
operations for 30 seconds and allow it turn offautomatically.
o If you perform an operation when the LED illuminator is on, itwill be
of
kept on for a maximum
90 seconds.
IChecking the time
While the camera is off, press
DISP.l.I'~
CLOCK] is set) and the current time for 3 seconds.
(/J
c
o
:;::
~
Q)
c.
o
c
o
:::::
:::J
a:l
to display the set alarm time (when [ALARM
Page 21

Menu operations
MENU
button
Arrow pad
(6'\7<1»
About the menus
@ button
Pressing
• The items displayed on the top menu differ according to the mode.
MENU
displays the top menu on the monitor.
ITop menu (in still picture shooting mode) I
SEHloKI
• When [CAMERA MENU], [PLAYBACK MENU], [EDIT], [ERASE], or [SETUP]isselected,
the menu corresponding to the respective functions is displayed.
• When the mode dial
guide, press
MENU
Operation guide
During menu operations, the buttons and their respective functions are displayed atthe bottom
of
the monitor. Follow these guides to navigate the menus.
is
set to
GUIDE
to display the shooting guide screen.
and the settings are made by following the shooting
~
CD
:::J
c:
o
"0
CD
OJ
...
c5'
:::J
en
t;;
~?~.
~-~--~
I'"
EXIT+1!!!l
IL.
-
-1-
I
MENU
Operation guide
~
....
~.
SET+~'
-- -- -t -
button
@
BACK+~
EXIT+~
SET+loKI
oJ
: Returns to the previous menu.
: Exits the menu.
:Sets the selected item.
EN
21
Page 22
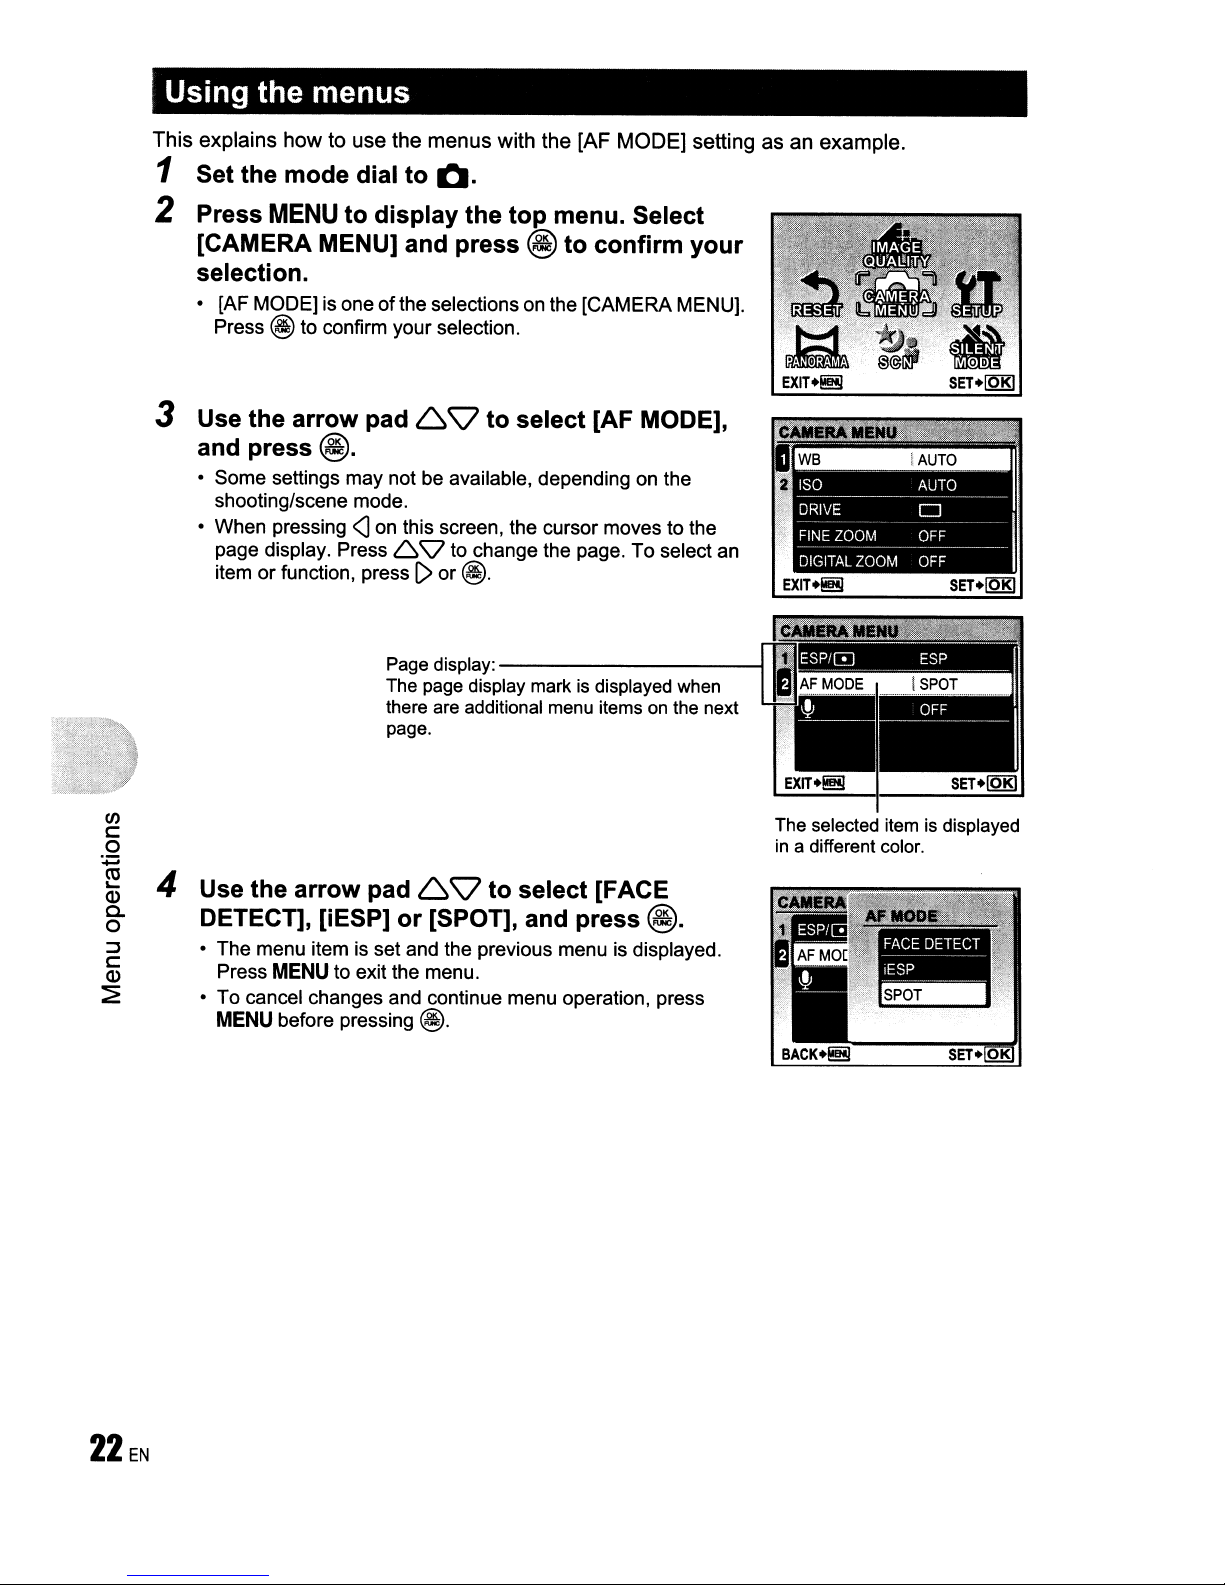
Using the menus
This
explains
howtouse
the
menus
with
the
[AF
MODE]
settingasan
example.
1 Set the mode dial to
2 Press
[CAMERA MENU] and press
MENU
to display the top menu. Select
Q.
@ to confirm your
selection.
• [AF
MODEl
Press
3 Use the arrow pad
and
press@.
• Some settings may not be available, depending on the
shooting/scene mode.
• When pressing
page display. Press
or
item
is oneofthe selections on the [CAMERA MENU).
@to confirm your selection.
69
<J
on this screen, the cursor moves to the
6'\1
function, pressI>or
Page display:
The
page display markisdisplayed
there are additional
page.
to select [AF MODE],
to change the page.Toselect an
@.
-------------i
menu
when
itemsonthe next
(/)
c
o
~
~
4 Use the arrow pad
g-
::J • The menu item is set and the previous menu is displayed.
~
:;;E
DETECT], [iESP] or [SPOT], and press @.
Press
MENU
• To cancel changes and continue menu operation, press
MENU
to exit the menu.
before pressing
69
@.
to select [FACE
The selected itemisdisplayed
in
a different color.
Page 23
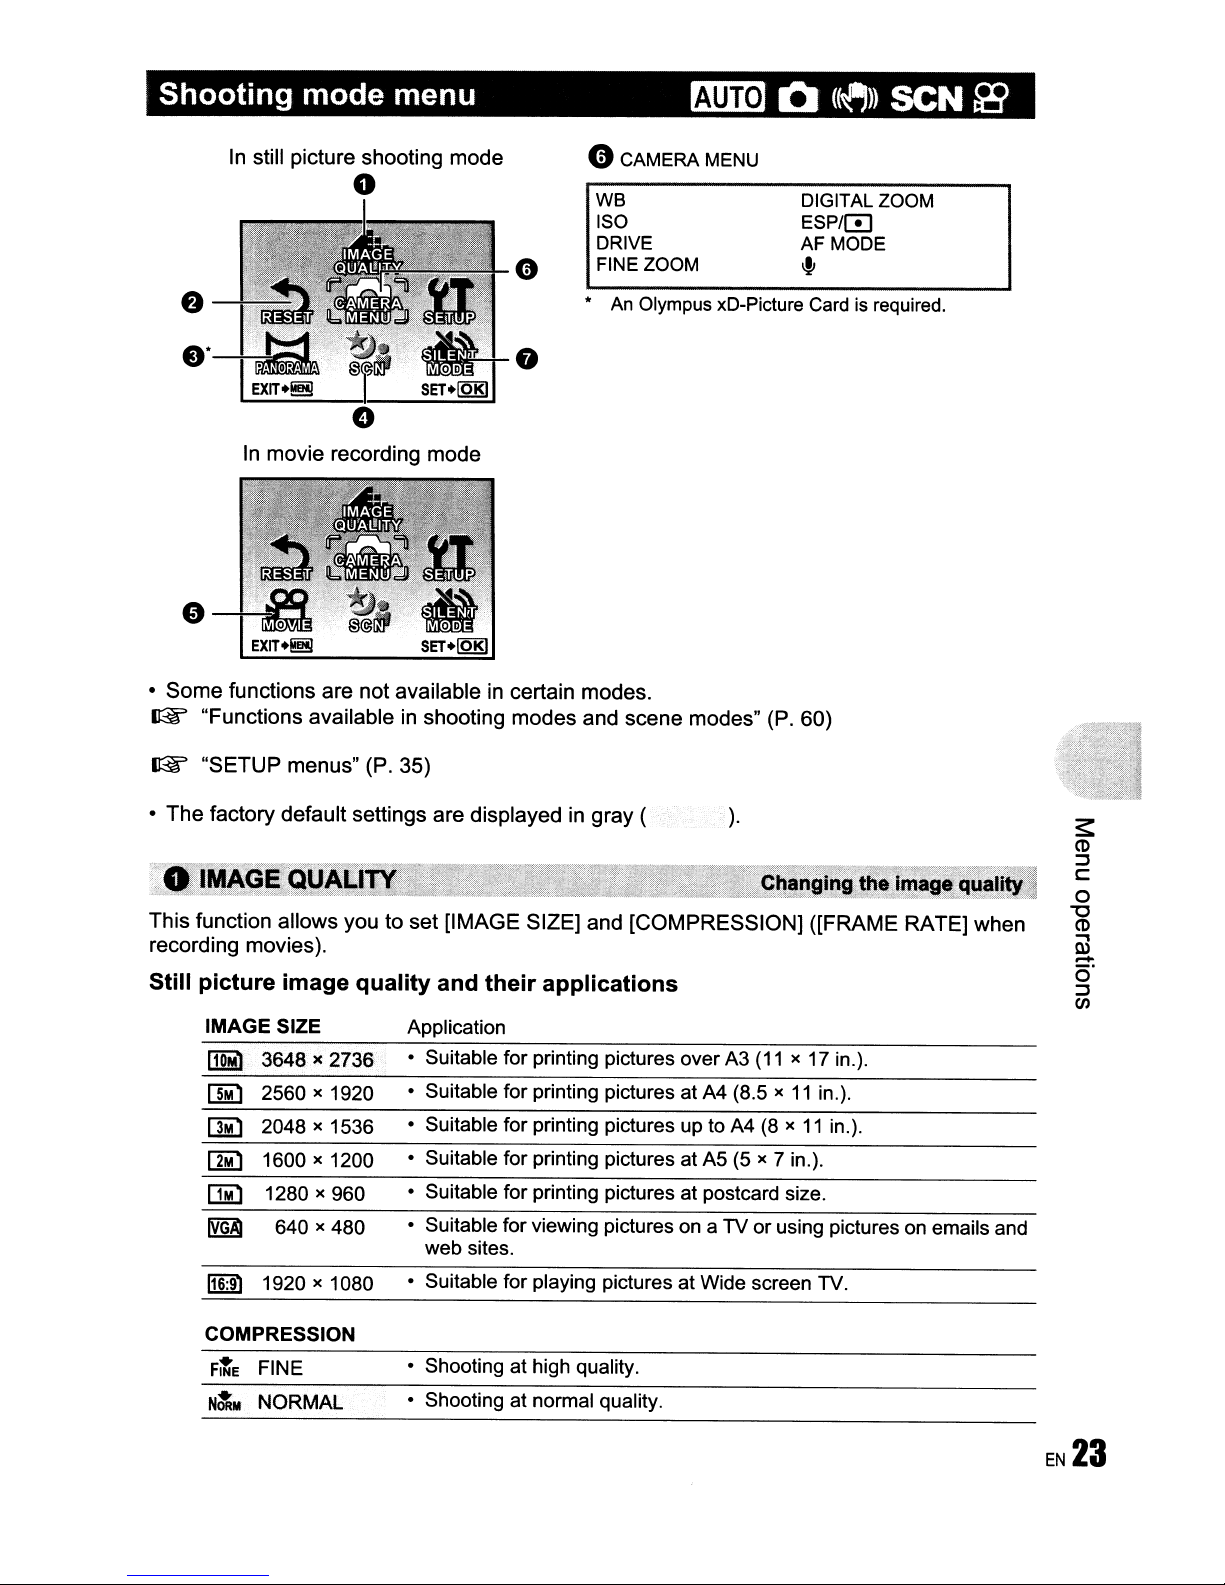
Shooting mode menu
r.mE
Q
(~»
SCN fa
•
Some
~
In still
In
movie
functions
"Functions
picture
shooting
o
recording
are
not
availableinshooting
mode
availableincertain
mode
modes
oCAMERA
we
ISO
DRIVE
FINE ZOOM
•
An
Olympus xD-Picture Cardisrequired.
modes.
and
scene
MENU
modes"
DIGITAL ZOOM
ESP/[!]
AF MODE
~
(P.
60)
~
"SETUP
•
The
factory
This
function
recording
menus"
default
allows
movies).
(P.
35)
settings
youtoset
are
displayedingray
[IMAGE
SIZE]
(
and
[COMPRESSION]
Still picture image quality and their applications
IMAGE
110M1
[]i)
[1MJ
~
[]i)
~
116:91
SIZE
3648)(
2560 x 1920
2048 x 1536
1600 x 1200
1280 x 960
1920 x 1080
640)(
2736
480
COMPRESSION
Flte
FINE
Nit
..
NORMAL
Application
for
• Suitable
• Suitable for printing pictures at A4 (8.5
• Suitable
• Suitable for printing pictures at
• Suitable for printing pictures
• Suitable for viewing pictures on a
web
sites.
• Suitable for playing pictures
• Shooting
• Shooting at normal quality.
printing pictures overA3(11)(17 in.).
for
printing pictures up to A4 (8 x11in.).
at
high quality.
).
~~
Changing
_,",.,,,.." _
([FRAME
x
11
in.).
AS
(5 x 7 in.).
at
postcard size.
TVorusing pictures on emailsand
at
Wide screen TV.
the
~~.
image
.",~",'%i;;
,
RATE]
.
qual~
when
"1
,
Page 24
Movie image quality
IMAGE SIZE
~
~
~
"Numberofstorable still pictures and recording lengthofmovies" (P. 54)
fJ
RESET"·;
NO / YES
It restores shooting functions back to default settings. The mode dial must not be set to
640 x 480
320 x 240
FRAME RATE
00
30
frames/sec.
mJ 15 frames/sec.
Restoring
GUIDE.
trill
Shadow Adjustment Technology
IMAGE SIZE (Still picture/ Movie)
COMPRESSION (Still picture)
FRAME RATE (Movie)
WB
en
ISO
c:
o
DRIVE
:.;::::;
~
FINE ZOOM
Q)
a.
DIGITAL ZOOM
o
::J
ESP/0
c:
Q)
AF MODE
~
0.0
AUTO
OFF
OFF
OFF
AUTO
AUTO
o
OFF
OFF
ESP
SPOT
OFF
P.17
P.17
P.
17
P.
17
P.18
P.23
P.23
P.23
P.27
P.28
P.28
P.28
P.28
P.29
P.29
P.29
def!lult
settings.,)
COMBINEINCAMERA1
COMBINEINCAMERA2
COMBINEINPC
• An Olympus xD-Picture Card is required for shooting.
• When the card capacity is insufficient, this function cannot be selected.
While panning thecamera, the camera automatically shoots and
combines picturesinthe camera.
Pictures are manually shot, and the camera automatically
combines picturesinthe camera.
Pictures are manually shot to be combinedona computer.
Page 25
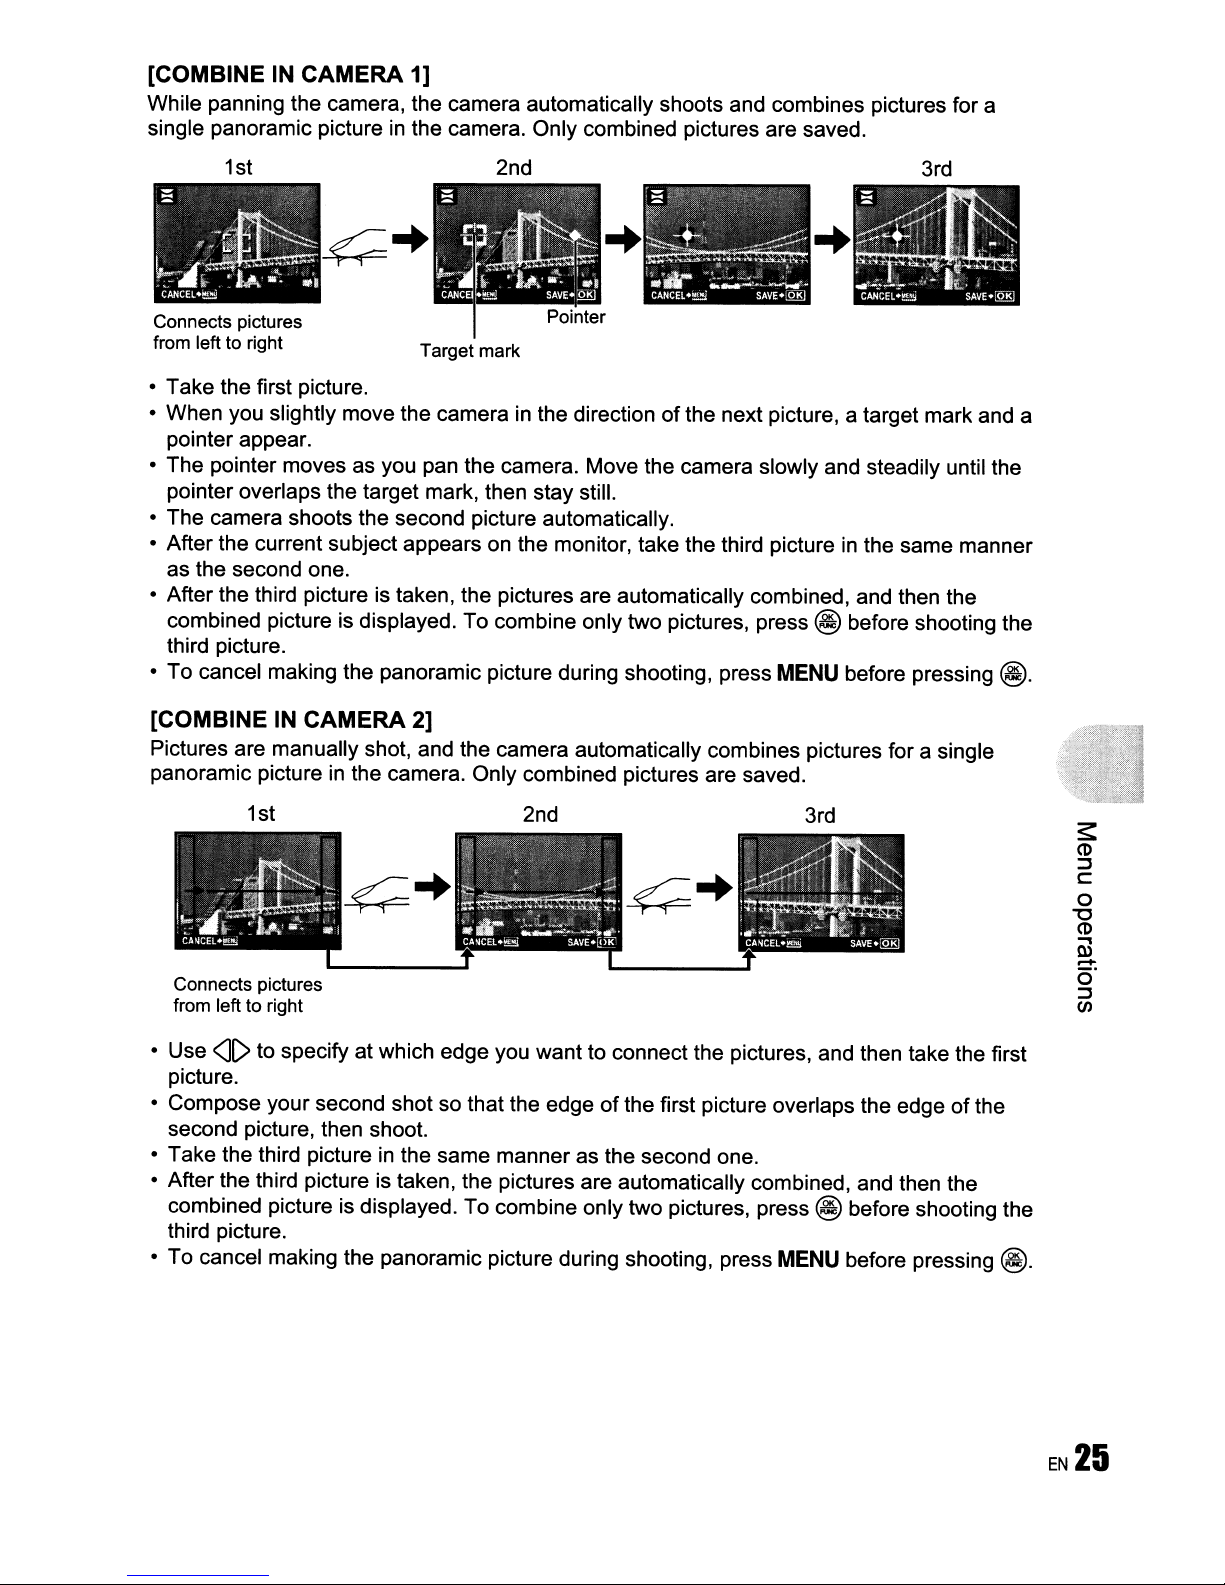
[COMBINE IN CAMERA 1]
While panning the camera, the camera automatically shoots and combines pictures for a
in
single panoramic picture
the camera. Only combined pictures are saved.
1st
Connects pictures
from left to right
• Take the first picture.
• When you slightly move the camera in the direction
pointer appear.
• The pointer moves as you pan the camera. Move the camera slowly and steadily until the
pointer overlaps the target mark, then stay still.
• The camera shoots the second picture automatically.
• After the current subject appears on the monitor, take the third picture
as the second one.
• After the third picture
combined picture is displayed. To combine only two pictures, press
third picture.
• To cancel making the panoramic picture during shooting, press
Target mark
is
taken, the pictures are automatically combined, and then the
2nd
of
the next picture, a target mark and a
in
@ before shooting the
MENU
before pressing
3rd
the same manner
@.
[COMBINEINCAMERA 2]
Pictures are manually shot, and the camera automatically combines pictures for a single
in
panoramic picture
the camera. Only combined pictures are saved.
1st
Connects pictures
from left to right
• Use
• Compose your second shot so that the edge
• Take the third picture
• After the third picture
• To cancel making the panoramic picture during shooting, press
<II>
to specify at which edge you want to connect the pictures, and then take the first
picture.
second picture, then shoot.
in
the same manneras the second one.
is
taken, the pictures are automatically combined, and then the
combined picture is displayed. To combine only two pictures, press
third picture.
2nd 3rd
of
the first picture overlaps the edgeofthe
@ before shooting the
MENU
before pressing
@.
EN
25
Page 26
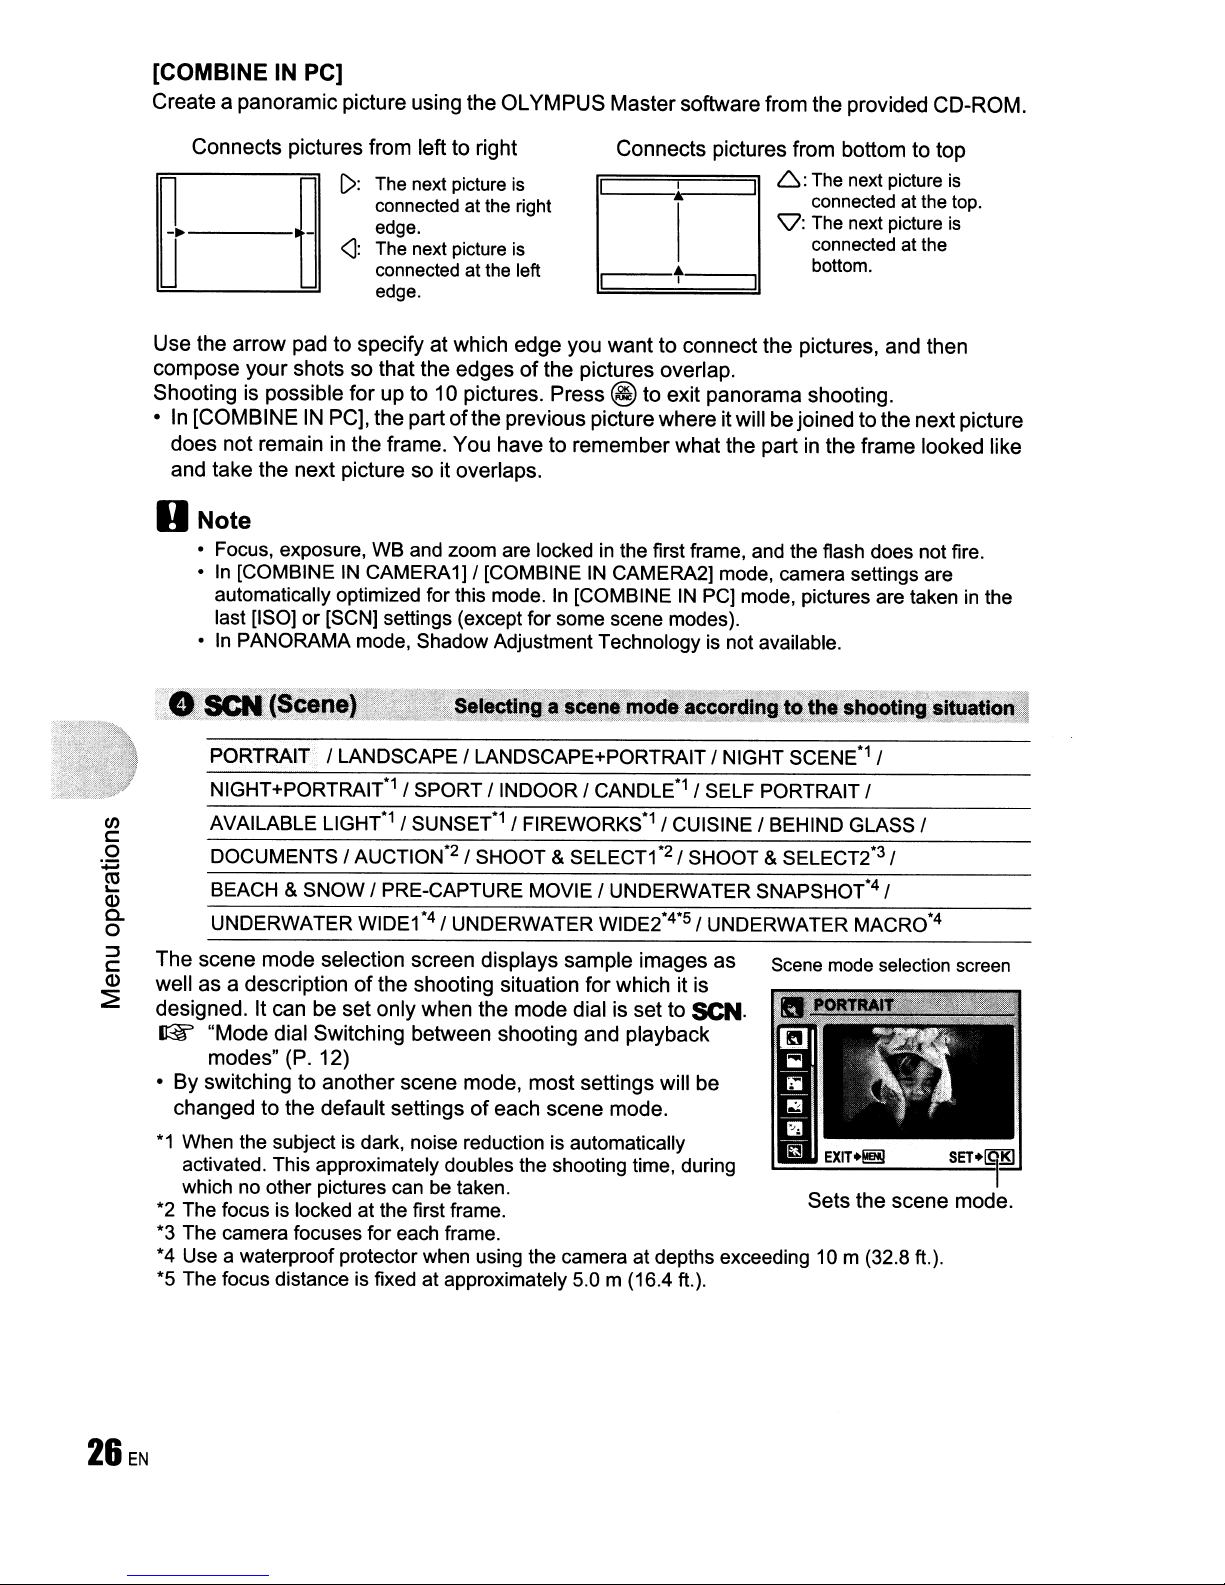
[COMBINEINPC]
Create a panoramic picture using the OLYMPUS Mastersoftware from the provided CD-ROM.
Connects pictures from left to right
[>:
The next picture is
____
_ edge.
~~
~
Use the arrow pad to specify at which edge you want to connect the pictures, and then
compose your shots so that the edgesofthe pictures overlap.
Shooting is possible for up to 10 pictures. Press @to exit panorama shooting .
•In[COMBINEINPC], the part
does not remain
and take the next picture so it overlaps.
connected at the right
<]:
The next picture is
connected at the left
edge.
ofthe
previous picture where itwill be joinedto the next picture
in
the frame. You have to remember what the partinthe frame looked like
Connects pictures from bottom to top
6:
I
1
The next picture is
I
connected at the top.
'\7: The next picture
I
..
I
I
connected at the
bottom.
I
is
ONate
• Focus, exposure, WB and zoom are lockedinthe first frame, and the flash does not fire.
•In[COMBINEINCAMERA1] {[COMBINEINCAMERA2] mode, camera settings are
automatically optimized for this mode.In[COMBINEINPC] mode, pictures are takeninthe
last [ISO] or [SCN] settings (except for some scene modes).
•InPANORAMA mode, Shadow Adjustment Technology is not available.
PORTRAIT {LANDSCAPE { LANDSCAPE+PORTRAIT { NIGHT
NIGHT+PORTRAIT*1 { SPORT
~
o
~
CJ)
c::
~
(1)
a.
o
:::J
c::
(1)
AVAILABLE L1GHT*1{ SUNSET*1{ FIREWORKS*1{ CUISINE
DOCUMENTS { AUCTION*2 { SHOOT &
BEACH & SNOW{PRE-CAPTURE MOVIE {UNDERWATER SNAPSHOT*4{
UNDERWATER
The scene mode selection screen displays sample images as Scene mode selection screen
well as a descriptionofthe shooting situation for which it is
designed. It can be set only when the mode dial is set to
~
"Mode dial Switching between shooting and playback
modes" (P. 12)
• By switching to another scene mode, most settings will be
changed to the default settings
*1
When the subject is dark, noise reduction is automatically
activated. This approximately doubles the shooting time, during
which no other pictures can be taken.
*2 The focus is locked at the first frame.
*3 The camera focuses for each frame.
*4 Use a waterproof protector when using the camera at depths exceeding
*5 The focus distance is fixed at approximately 5.0 m (16.4 ft.).
WIDEf4{ UNDERWATER WIDE2*4*S{ UNDERWATER MACRO*4
{INDOOR
of
each scene mode.
{ CANDLE*1 { SELF PORTRAIT {
SELECTf2{ SHOOT & SELECT2*3 {
SCN.
SCENE*1
{BEHIND
Sets the scene mode.
10m
{
GLASS {
(32.8 ft.).
Page 27
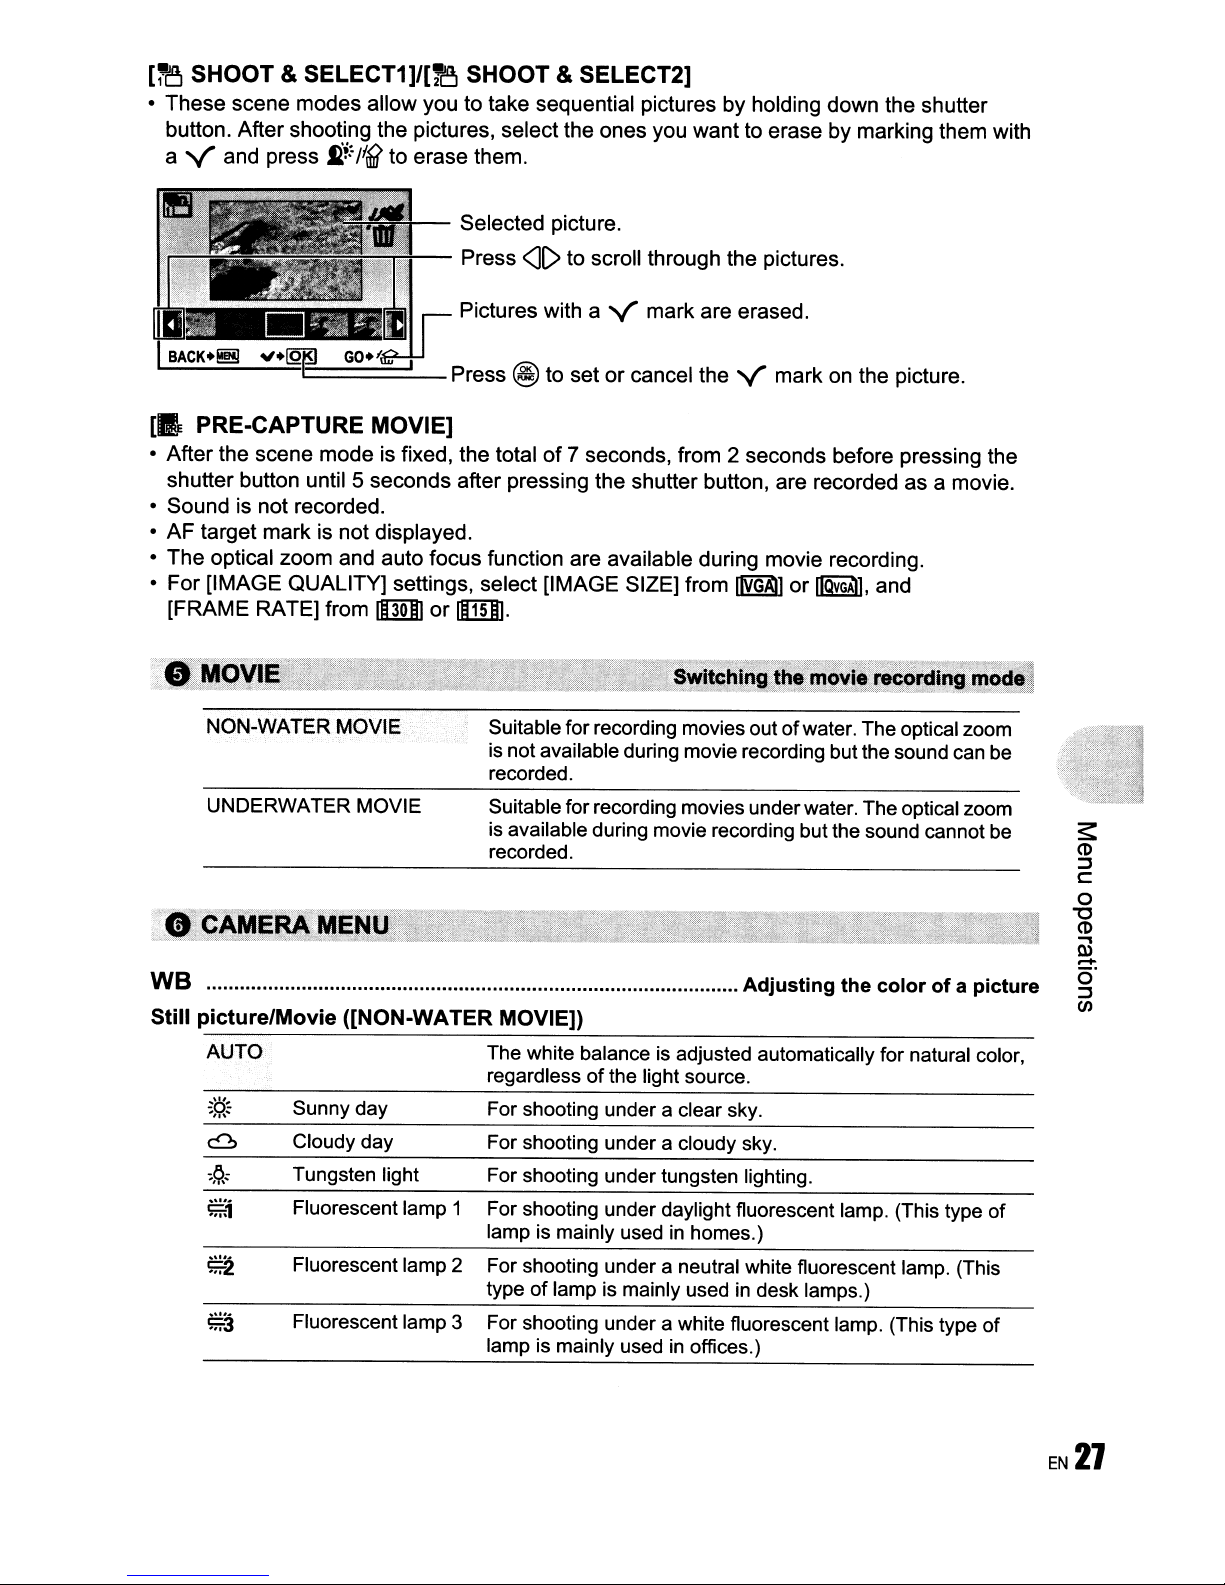
[i"eJ
SHOOT & SELECT1]/[1'8 SHOOT & SELECT2]
•
These
button. After shooting the pictures, selectthe
a V and press
scene
modes
fi.+:/
allow you to take sequential picturesbyholding down the shutter
I
(1
to
erase them.
Selected picture.
ones
you
want
to erasebymarking them with
Press
Pictures with a V mark are erased.
=====~-
[.
PRE-CAPTURE MOVIE]
• After the scene
shutter button until 5
• Sound is not recorded.
•
AF
target mark is
•
The
optical
•
For
[IMAGE QUALITY] settings, select [IMAGE SIZE] from
[FRAME
RATE] from
NON-WATER MOVIE
UNDERWATER MOVIE
mode
is fixed, the totalof7 seconds, from 2 seconds before pressing the
seconds
not
displayed .
zoom
and auto focus function are available during movie recording.
1m
Press @ to
after pressing the shutter button, are recorded as a movie .
or
mJ·
<II>
to scroll through the pictures.
set
Suitable forrecording movies outofwater. The optical zoom
is not available during movierecording but the sound can
recorded.
Suitable forrecording movies underwater. The optical zoom
is
available during movie recording but the sound cannot
recorded.
or
cancel the V mark on the picture.
mJ
or
~,
and
be
be
WB Adjusting the color
Still
picture/Movie
AUTO The white balance is adjusted automatically for natural color,
.:-o~
;,
.....
CJ>
;~:
€i
~2
S.3
([NON-WATER MOVIE])
Sunny day
Cloudy day
Tungsten light
Fluorescent lamp 1
Fluorescent lamp 2
Fluorescent lamp 3
regardless ofthe light source.
For shooting under a clear sky.
For shooting under a cloudy sky.
For shooting under tungsten lighting.
For shooting under daylight fluorescent lamp. (This type of
lamp is mainly usedinhomes.)
For shooting under a neutral white fluorescent lamp. (This
type of lamp is mainly usedindesk lamps.)
For shooting under a white fluorescent lamp. (This type of
lamp is mainly usedinoffices.)
of
a picture
Page 28

Movie ([UNDERWATER MOVIE])
CXl1
CXl2
CXl3
Under water 1
Under water 2
Under water 3
Adjusts the color balance to
shooting.
be
suitable for under water
ISO Changing the ISO
AUTO Sensitivityisautomatically adjusted according to the conditions ofthe
sUbject.
80/100/200/400/ A low value lowers the sensitivity for daylight shooting ofclear, sharp
800/1600 pictures. The higherthe value, the betterthe camera's light sensitivity and
ability to shoot with a fast shutter speed
However, high sensitivity introduces noise into the resulting picture, which
may give it a grainy appearance.
DRIVE Using sequential
andinlow light conditions.
(continuous)
o Shoots 1 frame at a time when the shutter button is pressed.
QI
HiA
You can take a sequence
camera will take pictures continuously until you release the shutter button.
• When
• The flash
• [ISO] is fixedat[AUTO] .
rn
c
o
:.;::;
~
Q)
a.
o
::J
C
Q)
:2E
• [IMAGE SIZE] is limited to
• [FINE ZOOM], [DIGITAL
FINE ZOOM
This function allows youto zoom up to
This function will not reduce the image quality since it dose not convert the data with fewer
pixels into the data with larger pixels.
•
The
• [IMAGE SIZE] is limited to
[~]
is selected, the following setting restrictions apply:
mode
OFF /
available zoom factor varies depending on the [IMAGE QUALITY] setting.
Focus and exposure are locked at the first frame. The sequential shooting
on
speed varies depending
Pictures
is fixed
ON
canbetaken at a faster speed than normal sequential shooting.
of
picturesatone time by holding down the shutter button.
at
[@].
~
ZOOM]
IIJM)]
and lower.
and
Zooming
21
and lower.
the image quality setting.
[\fJ]
are
not
available.
in on
your
subject
x bycombining the optical zoom and image cropping.
without
reducing image
sensitivity
shooting
The
quality
DIGITAL ZOOM
OFF /
The
digital zoom can be used to take close-up shots with stronger magnification when
combined with optical zoom. (Optical Zoom
• This function cannot be set when [FINE ZOOM] is [ON].
ON
Zoominginon
x Digital Zoom: maximum 18
your
subject
x
)
Page 29

Optical zoom
Zoom bar
White:
The optical zoom area
Yellow:
Digital zoom
The digital zoom area
ESP/[!]
ESP Meters the brightness at the centerofthe monitorand the surrounding area
separately to capture
pictures against strong backlight, the center ofthe picture may appear dark.
Changing
the area
an
image with balanced brightness. When taking
for
measuring
the
brightnessofa
subject
o Only the centerof the monitoris metered. Recommended for taking a picture
against strong backlight.
AF MODE Changing
FACE
DETECT
iESP
SPOT
• Even when [FACE DETECT]isset, faces may not be detected depending on the subject.
• When [FACE DETECT] or [iESP] is selected, AF target mark is not displayed
standby.
~
OFF
ION
The camera searches a face within the frame and focusonit.
The camera determines which subject within the screen to focus on. Even
when the subject is not
Focus selection is based
in
the center ofthe screen, focusing is possible.
on
the subjectwithin the AF target mark.
Recording
sound
the
with
focusing
in
shooting
still
pictures
area
When activated [ON], the camera will record about 4 seconds of audio
after the picture is taken.
When recording, aim the camera microphone at the source ofthe sound
you want to record.
When holding the camera, keep yourfingers away from the microphone.
OFF
ION
This function allows you to mute operational sounds during shooting and playback
(e.g. warning beeps, shutter sounds, etc...
).
EN
29
Page 30

Playback mode menu
eEl
*
oEDIT
~*2
+1"*2
COLOR EDIT
FRAME
LABEL
CALENDAR
INDEX
~
"SETUP menus" (P. 35)
"SILENT MODE Turning
• The factory default settings are displayed
*2
*3
*2
*2
*2
off
camera sounds" (P. 29)
in
gray (
oPLAYBACK
MENU
If
*1
A card is required.
*2
This is not displayed
when a movie is
selected.
*3
This is not displayed
when a still picture is
selected.
).
SLiDESHOW ALL / STILL PICTURE / MOVIE / CALENDAR
TYPE
BGM
• After setting [BGM], press @ to start the slideshow.
• Press
The recorded image is corrected and saved as a new one.
~~~"""!""'~~-"""!""'~.
EXIH!!!!!
@ or
MENU
NORMAL
OFF / 1
to cancel the slideshow.
• Use
SET.~
/ FADER / SLIDE / ZOOM
/2
Use 6 '\J to select the item you want to edit and press @ to
execute the selected feature.
<JI>
to display picture you want to edit and press
ALL
SHADOWADJ
REDEYE FIX Corrects a subject with red-eye.
Shadow adjustment and red-eye fix are
activated together.
Edit only the portions that photographed dark
when there is backlighting.
@.
Page 31

• Movies, pictures shot by anothercamera, and previously fixed or edited pictures cannot be
corrected.
• Depending on the picture, the editing may not be effective.
• Editing an image may cause it to suffer a minor loss in quality.
A.'AaD[fA~
,
"'~~'~:'
,.,'~
,h;,:,::,;:::~:;·':uL,::::":::::<':~",,,,;·;:,;,:::;,~
This function registers your favorite still pictures as separate still pictures in the internal
memory. You can register up to 9 favorite pictures.
~
"*
Viewing "My Favorite"" (P. 15)
• Use the arrow pad to select a picture, and press
• Registered pictures cannot be erased even by formatting the internal memory.
vcuite;
Irj)IIg
;--""."''>::'':,*",~;X~N':',::,:~"{",,,
,
@.
• A registered picture can be used as the startup screen picture or menu screen background
picture.
~
"PW
ON SETUP Setting the startup screen and volume" (P. 36)
"MENU COLOR Setting the menu screen color and background" (P. 36)
oNote
• Please note that registered pictures cannotbeedited, printed, copiedtoa card, transferred
a computer, or played backona computer.
to
..................................................................................................Changing the sizeofpictures
~
640 x 480 This function changes the picture size to 640 x 480
file.
IQVGAl
320 x240 This function changes the picture size to 320 x 240
file.
-P'
Crop a picture, and save the cropped picture as a new picture.
• Select the picture to be cropped with
• Use the arrow pad and zoom button to adjust the position and
size
of
the area-selection box, and press
• This function cannot be used when a panoramic picture is
selected.
and
and
<lC>,
and press
@.
savesitas
saves itasa new
Cropping a picture
a new
@.
EN
31
Page 32

COLOR EDIT Changing the color
This function changes the colorofa picture and saves it as a new file.
of
pictures
• Select the picture with
• Use the arrow pad to select the desired color, and press
CD
Black & White Creates a black
<JC>,
and press @.
and
white picture.
@.
® Sepia Creates a sepia picture.
@ Saturation This increases the saturation ofthe picture.
(High)
@ Saturation
(Low)
This slightly increases the saturation of
picture.
FRAME Add a frame to your picture
This function lets you select a frame, integrate the frame with an image, and save it as a new
picture.
• Select the picture to be integrated with the frame with
press
@.
(Press 6 Q to turn the picture 90 degrees clockwise
or 90 degrees counterclockwise.)
<JC>
• Select a frame with
• Press the arrow pad and the zoom button to adjust the position
and size
• This function cannot be used when a panoramic picture is
selected.
of
the picture, and press
and press
@.
@.
LABEL Add a label to your picture
the
<JC>,
and
This function lets you select a label, integrate the label with an image, and save it as a new
picture.
:;:;
~
en
c:
a
~
Q.)
a.
a
:::::l
c:
Q.)
• Select the picture with
• Selectthe label with
label 90 degrees clockwise
• Press the arrow pad and the zoom button to adjust the position
and sizeofthe label, and press
• Set the colorofthe label with the arrow pad, and press
• This function cannot be used when a panoramic picture is
selected.
<JC>,
<JC>,
and press
and press
or
90 degrees counterclockwise.)
@.
@.
(Press 6 Q to turn the
@.
CALENDAR Create a calendar print with a picture
This function letsyou select a calendar format, integratethe calendar with a picture, and save
it as a new file.
c~,
'
,.J:_
"4
•••••••
:;
Il!ml
F
BJ+ffi
....
• Select the picture with
• Selectthe calendarwith
the picture 90 degrees clockwise
counterclockwise.)
• Set the date ofthe calendar, and press
• This function cannot be used when a panoramic picture
selected.
<JC>,
and press
<JC>,
and press
or
90 degrees
@.
@.
(Press 6 Q to turn
@.
@.
is
32
EN
Page 33

INDEX Making an index picture from a movie
This function extracts 9 frames from a movie and saves them as a new picture (INDEX)
containing thumbnails of each frame.
• Select a movie with
• The [BUSY] bar will be temporarily displayed.
•
p~t:!t 9RD,~~~:
This function allows you to save printing data (the numberofprints and the date and time
information) with the pictures stored on the card.
Ir@f'
"Print settings (DPOF)" (P. 44)
,.·"p~!e1i9K
M!f!U: .
<J[),
and press
.
M!~g
@.
print
re;ervatlon~(!>ePf)i
O-n Protecting pictures
OFF
ION
Protected pictures cannot be erased with [ERASE], [SEL.lMAGE],
or
[ALL ERASE], but they are all erased by formatting.
• Select the picture with
6'\7.
displayed when the picture is protected.
You can protect several framesinsuccession.
<J[),
and protect it by selecting [ON] with
IOnI
is
o Rotating pictures
'CJ
+90°1 - 0° I
Pictures taken with the camera held vertically are displayed horizontally during playback. This
function lets you rotate such pictures so thatthey are displayed vertically
the new picture orientations will be saved even after the power is turned off.
+90° 0° -90°
Select a picture with
several frames
in
~
-90°
<J[),
and use
succession.
6'\7
to select
['CJ
+90°],[-0°],
on
the monitor, and
or~-90°]. You can rotate
s:
CD
:::J
c:
o
"'0
CD
03
.-
o'
:::J
CJ)
Page 34

~
Adding sound to still pictures
YES
/
NO
Sound is recorded for about 4 seconds.
• Select a picturewith
<![), and select[YES] with 6 '\},then press
@ to begin recording.
• The [BUSY] bar will be temporarily displayed.
8E~SE
Protected pictures cannot be erased. Cancel protection before erasing protected pictures.
Once erased, pictures cannot be restored. Check each picture before erasing to avoid
accidentally erasing pictures you want to keep.
• When erasing the pictureinthe internal memory, do not insert the card into the camera.
• When erasing the picture from the card, insert a card into the camera in advance.
or
• You can confirm on the monitor whether the internal memory
~
"Using the internal memory or card" (P. 63)
SEL. IMAGE Erase by selecting the single-frame
• Use the arrow pad to selectthe picture, and press@ to add V .
• Press @ again to cancel the selection.
• When all individual pictures to be erased have been marked,
press
fir/If{.
• Select [yES], and press
@.
card is being used.
CJ)
r::
o
:t=:
~
ALL ERASE Erase all the pictures
Q)
a.
• Select [YES], and press
o
~
r::
Q)
@.
:E
in
the internal memory or the card
34EN
Page 35

SETUP menus
Shooting mode
(In still picture shooting mode)
Playback mode
----------
*1
A card is required.
in
*2 This feature is not available
~
"SILENT MODE Turning off camera sounds" (P. 29)
• The factory default settings are displayedingray (
[SILENT MODE].
MEMORY FORMAT
(FORMAT
BACKUP
e.@
....
PWON
....
MENU COLOR
SOUND SETTINGS
RECVIEW
FILE NAME
PIXEL MAPPING
ICJI
.....
(2)
DUALTIME
.....
ALARM CLOCK
......~VIDEO OUT
....
POWERSAVE
LED ILLUMINATOR
MANOMATER
mlft
).
*1
SETUP
SETUP
*1)
*2
MEMORY FORMAT (FORMAT)
All existing data, including protected pictures, are erased when the internal memory orcard is
formatted (images registered to "My Favorite" are not erased). Make sure that you save or
transfer important data to a computer before formatting the internal memory orcard.
in
• Make sure there is no card inserted
• When the internal memory is formatted, the data
the provided OLYMPUS Master software will be deleted.
• Be sure that the card is inserted
• Before using non-Olympus cards or cards which have been formatted on a computer, you
must format them with this camera.
BACKUP
Insert the optional card into the camera. Copying data does not erase the picturesinthe
internal memory.
• It takes some time to back up data. Check that the battery is charged before starting the
copy, or use the AC adapter.
the camera when formatting the internal memory.
in
the camera when formatting the card.
Copying
.e
You can select a language for on-screen display. Available languages vary depending on the
area where you purchased this camera.
Formatting
of
the frames and labels downloaded with
picturesinthe
the
internal
internal
Selecting a
memorytothe
memoryorcard
display
language
card
~
co
:::J
c:::
a
"0
co
ii3
.....
o'
:::J
en
EN
35
Page 36

PW ON SETUP Setting
the
startup
screen and
volume
SCREEN
VOLUME OFF (No sound) / LOW /
• Select [2] and press @to set a still picture
OFF
(No picture is displayed.) / 1 / 2 /
HIGH
in
MY
FAVORITE
the internal memoryorcard as the startup
screen.
• Select [MY FAVORITE] and press @ to set a still picture registered in "My Favorite" as the
startup screen.
~
"ADD FAVORITE Adding favorite images" (P. 31)
• [VOLUME] cannot be set in the following cases.
• When [SCREEN] is set to [OFF]
• When [SILENT MODE] is set to [ON]
MENU COLOR Setting
NORMAL /
COLOR1
/ COLOR2 / COLOR3 /
the
MY
menu
screen
FAVORITE
color
and
background
• Select [MY FAVORITE] and press[>to set a still picture registeredin"My Favorite" as the
background.
~
"ADD FAVORITE Adding favorite images" (P. 31)
SOUND SETTINGS Setting
the
sounds
output
from
the
camera
You can make the following settings with [SOUND SETTINGS].
• Setting the typeofbutton operation sounds and volume. (BEEP)
• Selecting the soundofthe shutter button. (SHUTTER SOUND)
• Adjusting the volumeofthe camera warning sound. (.l»))
• Adjusting the volume during playback. ([E VOLUME)
(J)
c:
0
:;:;
ro
~
Q)
c..
0
:::J
c:
Q)
::1E
BEEP
SOUND TYPE
VOLUME
SHUTTER SOUND SOUND TYPE
VOLUME
all)
IE VOLUME
OFF (No sound) /
OFF
(No sound) /
1
/2
OFF
(No sound) /
1
/2
OFF
(No sound) /
LOW / HIGH
LOW
• You can set all the sounds muted at once by setting [SILENT MODE].
~
"SILENT MODE Turning offcamera sounds" (P. 29)
REC
ViEW
OFF
The picture being recordedisnot displayed. This is useful
Viewing
pictures
prepare for your next shot while the previous pictureisbeing recorded.
ON
The picture being recorded is displayed. Thisisuseful for making a brief check of
the picture you have just taken.
You
can
resume shooting while the picture is still
being displayed.
LOW
/3
LOW
/HIGH
immediately
after
when
you
they
want to
/HIGH
/
HIGH
are taken
36EN
Page 37

FILE NAME Resetting the file names of pictures
RESET
AUTO
The file number and folder number are reset every time a newcard
the camera. The folder number returnsto[No.
to
[No.
0001].
Even ifa new card is inserted, the folder number
from the previous card. This helps
Structureoffile name and folder name
Folder name File name
__
--'-1
__
.....
---, I
I I
100]
and
the file number returns
and
file number are retained
youtomanage multiple cards.
Month: Jan. - Sep. =1 Oct. =
A,
Nov.
=
B,
is
inserted
Dec. =C
9,
\DCIM\***OLYMP\Pmdd****.jpg
-,-
Folder No. Month
(100-999)
PIXEL MAPPING
The pixel mapping feature allows the camera to check and adjust the CCD and image
processing functions. It is not necessary to operate this function frequently. Approximately
once a
the pixel mapping function to perform properly. Ifyou turn the camera
start again.
Select [PIXEL MAPPING]. When [START] is displayed, press
year
is recommended.
Waitatleastone minute after takingorviewing picturestoallow
T T I F'I N
(1
- C) L L...-_____
Day(01-31)
Adjusting
the image processing function
@.
leo.
(0001-9999)
off
during pixel mapping,
in
~9J
6:
Brightens the monitor.
Q:
Darkens the monitor.
Press
@ to confirm your selection.
€)
The date and time is saved with each image, and is usedinthe file name.
Y-M-D (Year-Month-Day)
l~1
C~A~NC~E;;L.~~~:I=========::r--
• The first two digitsofthe year are fixed.
• The time is displayed
• To setthe time precisely, with the cursor eitheron "Minute"
signal strikes
00 seconds.
in
MENU:
the 24-hourformat.
Cancels the setting.
Adjusting the brightness of monitor
Setting the date and time
or
[V/M/D],
press @ as the time
Page 38

DUAL
TIME Setting
the
date and
time
for
another
time
zone
OFF Switchestothe date
time setin[(2)).
ON
I
CANCEL.!!!!l
• The date format is the same as that set with
• The first two digitsofthe year are fixed.
• The time is displayed in the 24-hour format.
Switchestothe
[ON),
select
in
[DUAL
and
TIME).
I MENU: Cancels the setting.
and
time setin[(2)]. Pictures are recorded
date
and
time setin[DUALTIME].
then
setthe time. Pictures are recorded
[€)].
When
setting
with
with
the
the date
the date
dual time,
and
time set
and
ALARM CLOCK Setting alarms
OFF
ONE
TIME Alarmisactivated
DAILY Alarm
No
alarmisset or alarmiscanceled.
once.
After
is
activated dailyatthe set time.
the
alarm goes
off,
the
settingiscanceled.
[€)]
• When
• When [SILENT MODE] is set to [ON], the alarm will not sound.
• When [DUALTIME] is setto [ON], the alarm soundsaccording to the dualtimedate and time
~
~
en
c:
o
ctl
L-
a.>
a.
o
:::J
c:
a.>
setting.
Setting an alarm
ALA.' • Select [ONE TIME]
TIME
SNOOZE
SOUND TYPE
VOLUME
has not been set, [ALARM CLOCK] is not available.
or
[DAILY], and set the alarm time.
• You can set snooze or alarm sounds and volume.
Sets the alarm time.
OFF
ON
1/2/3
LOW/HIGH
No
snoozeisset.
Alarmisactivated every 5 minutes,upto
7 times.
38EN
Page 39

Operating, shutting off and checking the alarm
o Operating the alarm:
Turn offthe camera. The alarm only operates when the camera is off.
o Shutting off the alarm:
While the alarm
Note that pressing
When [SNOOZE] is [OFF], the alarm stops automatically and the camera turns off after 1
minute
o Checking the alarm settings:
of
While the camera is off, press
will be displayed for
is
sounding, press any button to shut offthe alarm and turn offthe camera.
POWER
no operation.
3 seconds.
will turn the camera on.
DI5P.l./·~
to display the current and alarm set times. Times
VIDEO OUT Playing back pictures
NTSC
/
PAL
on
a TV
The factory default settings differ according to the region where the camera is sold.
To play back camera images on a TV, set the video outputaccording to yourTV's video signal
type.
o
TV
video signal typesdifferby country/region. Check the videosignaltype before connecting
the camera to the TV.
NTSC: North America, Taiwan, Korea, Japan
PAL: European countries, China
Playing back pictures on a TV
Turn off the camera and the
TV
before connecting.
Connecttothe TV'svideo
input (yellow) and audio
input (white) terminals.
Connector cover
Settings on the camera
Press
POWER
in
playback mode to turn the
camera on.
o The last picture taken is displayed on the
TV. Use the arrow pad to select the
picture you want to display.
AV cable (provided)
Settings on the
Turn the
TV
TV
on, and set it to video input
mode.
o For details of switching to video input,
refer to your TV's instruction manual.
o Images and the information displayed on
the screen may become cropped
depending on the TV's settings.
Page 40

POWER SAVE Setting the camera
to
the power save mode
OFF ION
When no operation has been performed forapproximately 10 seconds whileinshooting mode,
the monitor automatically shuts off. Pressing the zoom button or other buttons restores the
camera from power save mode.
LED ILLUMINATOR Setting the LED
OFF /
ON
illuminator
This function provides additional lighting when a quick light source is needed and to help you
compose your picture in a dark environment.
~
"DISP././·~
button Changing the information on display/Display the menu guide/
Turning on the LED illuminator/Checking the time" (P. 19)
MANOMATER Displaying the atmospheric pressure and
OFF
ION
/ CALIBRATE
This displays the atmospheric pressure and altitude/depth
during shooting (from -10 m (-32.8
A warning message is displayed when a water depth close to
10 m (32.8 ft.) is reached.
• Select [CALIBRATEl and press
[CALIBRATElscreen. Usethe arrow pad 6 Q to adjustyour
current position.
• The displayed value may have a margin
on meteorological conditions. Use this for your reference.
en
c:
mlft
o
~
~
~
Q)
Cl.
o
::::J
c:
Q)
m
/ft
Set to display the altitude/depthinmeters or feet.
Setting the
altitude/depth
ft.) to 5,000 m (16,400 ft.)).
C>
to display the
units
for
the altitude/depth
during
of
error depending
function
shooting
display
Page 41

i
Printing pictures
Direct printing (PictBridge)
By connecting the camera to a PictBridge-compatible printer, you can print out pictures
directly.
EASY PRINT Prints the picture displayedinthe monitor by using
of
the standard settings
CUSTOM PRINT Prints with the various print settings .
• PictBridgeisa standard for connecting digital cameras and printersofdifferent makers and
printing out pictures directly. To find outif your printer is compatible with PictBridge, refer to
the printer's instruction manual.
• For printer's standard settings, available printing modes, the setting items such as paper
sizes, and printer's specifications such as available types
and ink cassettes, etc., refer to the printer's instruction manual.
your printer.
of
paper, how to install the papers
EASY f'RIN
1
~%
In
playback mode, display the picture you want to print out on the
monitor.
2 Turn the printer on and plug the USB cable provided with the camera into
the multi-connector of the camera and the printer's USB port.
Connector cover
• The easy print start screen is displayed.
3 Press [E/J1.
• Printing starts.
• When printing is finished, the picture selection screen is displayed.
To print another picture, press
[E)/~.
<JI>
to select a picture, and press
USB cable
4 Disconnect the USB cable.
EN
41
Page 42

Ot~erprintin(;d~S
and'
pr,nt
~.t!~n'g,
(ClJ~!QMft~!~·T):!;:
1 Follow Steps 1 and 2 on
then press
@.
P.
41
to displaythe screen forStep 3 above, and
2 Select [CUSTOM PRINT], and press @.
3 Follow the operation guide to adjust print settings.
Selecting a print mode
PRINT
ALL PRINT
MULTI PRINT
ALL INDEX
PRINT ORDER
Setting the print paper
Prints the selected picture.
Prints all the pictures stored
memoryorthe card.
Prints one picture in multiple layout format.
Prints an index
internal memoryorthe card.
Prints the pictures according to the print
reservation data on the card.
I&'
"Print settings (DPOF)" (P. 44)
of
all the pictures stored in the
in
the internal
SIZE Choose from the available paper sizes on your
printer.
BORDERLESS Select with
mode, you cannot print with a border.
PieS/SHEET Select the number
sheet
only.
• Ifthe [PRINTPAPER] screen isnot displayed, [SIZE], [BORDERLESS] and [PICS/SHEET] are
set to the standard.
or
without borders.In[MULTI PRINT]
of
pictures to be laid out on a
of
paper. Available in [MULTI PRINT] mode
Selecting the picture to print
Press
<II)
to
select
the
a
picture
from
the
picture
index
you
wanttoprint.
display.
PRINT Prints one copy
SINGLE PRINT Makes a print reservation for the displayed
MORE Sets the number
You
can
also
use
the
zoom
button
of
the selected picture. When
or
[SINGLE PRINT]
a single copy or more copies are printed.
picture.
for the displayed picture.
[MORE] has been selected,
of
prints and data to be printed
and
select
42
EN
Page 43

Setting the numberofprints and data to be printed
Sets the numberofprints. You can select up to
10 prints.
DATE
~c.:...)
<E!»)
FILE NAME Ifyou select[WITH], pictures are printed with the
Ifyou select [WITH], pictures are printed with the
date.
fi_le_n_a_m_e_.
+t Use the arrow pad and zoom button, adjust the
location and size of the trimming frame, then
press @ to print the cropped picture.
4 Select [PRINT], and press @.
• Printing starts.
• When [OPTION SET] is selectedin[ALL PRINT] mode,
[PRINT INFO] screen is displayed.
• When printing is finished, the [PRINT MODE SELECT] screen is
displayed.
To
cancel printing
_
SEr.@Sl
L....-
Screen during data transfer
5
In
the [PRINT MODE SELECT] screen, press
• A message is displayed.
II=CA:::NC::EL:::.@Sl:==I}-Press@.
6 Disconnect the USB cable.
Select
[CANCEL], and
press@.
MENU.
Page 44

Print settings (DPOF)
Print reservation
information)
With
print reservation,
compatible
record
.
automatic
• Only the images storedonthe card can be reserved to print. Insert a card with recorded
pictures into the camera before making print reservations.
• DPOF reservations set by another device cannot be changed by this camera. Make changes
using the original device. Ifa card contains DPOF reservations set by another device, entering
reservations using this camera may overwrite the previous reservations.
• You can make DPOF print reservations for up to 999 images per card.
• Not all functions may be available on all printers, or at all photo stores.
'~~~l~g:i!~~njkfe$i~@$ltf
1 Press MENU
2 Select [J1] or
dJJ
~
• When
When
~
allows
with
the
printerorataphoto
Makes a print reservation for the selected picture.
Makes print reservations for all the pictures storedonthe card.
[~]
is
selected
you to
pictures storedonthe
you
print information from digital
in
the playback mode and select [PRINT ORDER].
[~],
is selected, go to step
save
printing
can
print
out
store
that
and press @.
5.
data
(the
card.
pictures easily
supports
DPOF.
cameras.
numberofprints
eitherathome
DPOF
is a
and
the
date
using a personal
standard
format
and
DPOF-
used
time
to
3 Press
and then press
• You cannot make print reservations for pictures with
• Repeat Step 3 to make print reservations for other pictures.
<II>
to selectthe frames forprint reservations,
6'\7
to set the numberofprints.
~.
4 When you finish making print reservations, press @.
C/)
~
5 Select the date and time print setting, and press @.
:::J
t5
'0. DATE The selected pictures are printed with the shooting date.
0> TIME The selected pictures are printed with the shooting time.
c
~
c
·C
a..
NO The pictures are printed without the date and time.
6 Select [SET], and press @.
Page 45

~~~k~.""_'."
p~n~
'reser!~ti~IlJ!!t~(·~
;
You can reset all the print reservation dataorjust
1 Select top menu
To
reset the print reservation data for
2 Select [J1]
or
~
[PRINT ORDER], and press @.
[~],
and press @.
for
all
the pictures
selected pictures.
3 Select [RESET], and press @.
BACK+1!!!l
To
reset the print reservation data for a selected picture
2 Select [t!1], and press @.
3 Select [KEEP], and press @.
4 Press
cancel, and press
• Repeat Step 4 to cancel print reservations for other pictures.
<II)
to select the picture with the print reservations you want to
Q to decrease the number
of
prints to
o.
5 When you are finished canceling print reservations, press @.
6 Select the date and time setting, and press @.
• The setting is applied to the remaining pictures with print reservations.
SEHIQK)
7 Select [SET], and press @.
Page 46

Using OLYMPUS Master
Using the USB cable provided with your camera, you can connect the camera and computer
and download (transfer) the images to your computer using the OLYMPUS Master software,
also provided with the camera.
Prepare the following items before starting.
OLYMPUS
Master2
CD-ROM
USB
cable
----------------..,.
Acomputer that satisfies
environment
the
(P.
46) requirements
operating
What is OLYMPUS Master?
OLYMPUS Master is a software application for managing your digital images on your
computer.
Install the OLYMPUS Master software
L..
2 Before installing the OLYMPUS Master software, please confirm that your computer is
en
ro
compatible with the following system requirements.
::iE
For neweroperating systems, please refer to the Olympus web site as shown on the back
en
coverofthis manual.
:)
~
Operating environment
>-
.....J
OS
o
0>
c
CPU
'en
:)
RAM 256 MB or more
Hard disk capacity 500 MB or more
Monitor
Other
Windows 2000 Professional/XP Home Mac OS X v10.3 or later
Edition/XP ProfessionalNista
Pentium III 500 MHz or later
1,024 x 768 pixels or more 65,536
colors
more recommended)
USB port or IEEE 1394 port
Internet Explorer 6 or later
QuickTime 7 or later recommended
DirectX 9 or later recommended
or
Windows Macintosh
Power PC G3 500 MHz orlater
Intel Core SololDuo 1.5 GHz or later
256 MB or more
500 MB or more
x 768 pixels or more 32.000
1,024
more (16.77 million colors or
colors or more (16.77 million colors or
more recommended)
USB port or IEEE 1394 port (FireWire)
Safari 1.0 or later (1.3 or later
recommended)
QuickTime 6 or later
Page 47

oNote
• Use a computerwith a pre-installed operating system. Operations are not guaranteed on
or
home-built computers
• Operations are not guaranteed when using an added USB or IEEE 1394 (FireWire) port.
• To install the software, you must log on as a userwith administrators' privileges.
If
you are using Macintosh, be sure to remove the media (drag & drop onto the trash icon)
•
before performing the following operations. Failure to
operation and the need to reboot.
• Disconnect the cable connecting the camera to the computer
• Turn off the camera
• Open the camera's battery/card compartment cover
For how to install the OLYMPUS Master software, refer to the installation guide
includedinthe CD-ROM.
Connecting the camera to a computer
1 Make sure the camera is turned off.
• The monitor is off.
• The lens cover is closed.
2 Connect the multi-connector
the USB port on the computer using the
provided USB cable.
• Refer to your computer's instruction manual to locate the
position
• The camera turns on automatically.
• The monitorturns on and the selection screen for the USB
connection is displayed.
of
the USB port.
computers with an updated operating system.
do
so could result in unstable computer
on
the camera to
Connector cover
Monitor
C
en
~
co
o
r-
-<
$:
""0
C
en
$:
Q)
en
.-..
CD
~
3 Select [PC], and press @.
Page 48

4 The camera
• Windows
When you connect the camera to your computer for the first time, the computer attempts to
recognize the camera. Click "OK" to exit the message that is displayed. The camera is
recognized as a "Removable Disk".
• Macintosh
The iPhoto program is the default application for managing digital images. When you connect
your digital camera for the first time, the iPhoto application starts automatically, so close this
application and start OLYMPUS Master.
is
recognized by the computer.
D Note
• The camera functions are disabled while the camera is connected to a computer.
• Connecting the camera to a computer via a USB hub may cause unstable operation.
case, do not use a hub, but connect the camera directly to the computer.
• Images cannot be transferred to your computer with OLYMPUS Master if [PC] is selected in
3,I>is pressed and [MTP] is selected.
Step
Start up the OLYMPUS Master software
Windows
In
this
1 Double-click the "OLYMPUS Master 2" icon a
L-
Macintosh
a>
.....
rn
1 Double-click the "OLYMPUS Master 2"
co
~
en
:::::>
a..
~
>-
.....J
o
0>
c:
'00
:::::>
Master 2" folder.
• The browse window is displayed.
• When OLYMPUS Master is started up for the first time afterinstallation, the OLYMPUS Master
initial setting screen and user registration screen are displayed before the browse window.
Follow the on-screen instructions. ,
Displaying camera images on a computer
Q'~W~';'='0"<Yi·
1 Click "Transfer Images"
window, and then click "From Camera"
• The window for selecting the pictures you want to transfer from
the camera is displayed. All the images in the camera are
displayed.
2 Select "New Album" and enter
..
"'"
.d
~.
on
the browse
an
album name.
icon"
:.a.
on
the desktop.
in
the "OLYMPUS
-;;r::':"""lIIiy
~:.
_
;'1:"_NO
...
"":"0''''
II··
...,.iii
2.1
II
!lin
•••
iWl1lI
••
•
111
...
••••••••
••
_Ill
"/llIf!ll.a._.
111111
•••
:IJ_IPJ•
•••••
".
ilCii.
.....
•••••
I ltJ!III
IBD
!
3 Select the image files and click "Transfer
Images".
• A window indicating that the download is complete is displayed.
4 Click "Browse images now".
• The downloaded images are displayedinthe browse window.
Page 49

To
disconnect the camera
1 Make sure that the card access lamp has stopped
blinking.
Card access lamp
2 Make the following preparations for
disconnecting the USB cable.
Windows
CD
Clickthe "Unplug orEject Hardware" icon
tray.
@ Click the message that
@)
When a message is displayed saying that the hardware can
be ejected safely, click "OK".
Macintosh
CD
The trash icon changes to the eject icon when the "Untitled"
or "NO_NAME" icon on the desktop is dragged. Drag and
drop it on the eject icon.
is
displayed.
in
the system
g
..
3 Disconnect the USB cable from the camera.
oNote
• Windows: When you click "Unplug or Eject Hardware", a warning message may be displayed.
Make sure that image data is not being downloaded from the camera and that all applications
are closed. Click the "Unplug or Eject Hardware" icon again and disconnect the cable.
Fordetailed operations
(
upon startup or the helpofthe OLYMPUS Master.
of
OLYMPUS Master, refer tothe quick start guide displayed I
c
~.
~
<C
o
r
-<
s::
""U
C
en
s::
ll)
en
.....
CD
..,
Page 50

To download and save images to a computer without using
OLYMPUS Master
This camera is compatible with
computer
using
connect the camera to
Windows:
Macintosh:
using the
OLYMPUS
Windows
Mac
Master.
OS
oNote
• If your computer is running Windows Vista, you can select [PC]inStep 3onP.
and select [MTP]touse Windows Photo Gallery.
• Data transfer is not guaranteed
equipped with a USB port.
• Computers with a USB port added by means of
• Computers without a factory-installed
L-
a>
...
rJJ
ro
~
(j)
::J
a..
~
>-
....J
o
0>
r::
'(j)
::J
USB
mass
storage. You can connect the camera to
USB
cable providedwith the cameratodownload and save imageswithout
The
following environment is required to use the
your
computer.
2000
Professional/XP Home Edition/XP
X v10.3orlater
in
the following environments, evenifyour computer is
ProfessionalNista
an
extension card, etc.
USB
cable to
47,
as and home-builtcomputers
your
press I),
Page 51

Getting to know your camera better
Shooting tips and information
IThe camera does not turn
The direction of the battery is incorrect
• Insert the batteryinthe correct direction.
The battery is not fully charged
• Charge the battery with the charger.
The battery is temporarily unable to function because of the cold
• Battery performance declinesinlow temperatures, and the charge may not be sufficient to
turn on the camera. Remove the battery and warm it by putting it
on
even when a battery is loaded
ICannot use the card
• If the card's contact area is dirty, the [CARD SETUP] screen may display without reading
In
the card.
the contact area with a soft, dry cloth.
this case, select [CLEAN CARD], and press
@.
Then, remove the card and wipe
INo picture is taken when the shutter button is pressed
The camera isinsleep mode
• To save battery power, the camera automatically goes into sleep mode and the monitor
turns off
cover is open and the monitor
pressed in this mode. Operate the zoom button orother buttons to restore the camera from
sleep mode before taking a picture. Ifthe camera
turns off (the lens covercloses and the monitor turns off). Press
on.
The mode dial is set to
• This is the playback mode for displaying pictures on the monitor. Set the mode dial to a
shooting mode.
The mode dial isinthe position of
• No pictures can be taken when the shooting guideisbeing displayed. Take pictures after
selecting yourdesired shooting effect
GUIDE
The flash is charging
• Wait until the~(flash charge) mark stops blinking before taking the picture.
if
there is nooperation after 3 minuteswhen the camera is turned on (when the lens
is
on). No picture is taken evenifthe shutter buttonisfUlly
is
left on for15minutes, it automatically
[E]
or *
GUIDE
in
the shooting guide or set it to a setting other than
in
shooting mode.
in
your pocket for a while.
POWER
to turn the camera
IThe date and time have not been set
The camera has been usedinthe same conditions from the timeofpurchase
• No date and time have been set for the camera at the timeofpurchase. Set the date and
time before using the camera.
~
"Turn the camera on"
"<2) Setting the date and time" (P. 37)
The battery has been pulled outofthe camera
• The date and time settings will be returned to the factorydefault settings ifthe camera is left
without battery for approximately 1 day. Also, the date and time setting will be canceled
earlierthan this ifthe battery has been
important pictures, check that the date and time settings are correct.
(P.6)
in
the camera for a short periodoftime. Before taking
EN
51
Page 52

Shooting tips ;
IFocusing
There are several
on
the subject
waystofocus, depending on
the
When the subject is not in the centerofthe frame
• Place the subjectinthe center ofthe frame, lock the focusonthe subject, and then
recompose your picture.
• Set [AF MODE] to [iESP).
~
"AF MODE Changing the focusing area"
(P.29)
The subject is moving quickly
• Focus the camera on a point roughly the same distance away as the subject you want to
shoot and lock the focus (by pressing the shutter button halfway). Then recompose your
picture and press the shutter button completely
Subjects that are difficult to focus on
• Under certain types of conditions, it is difficult to focus using auto focus.
Subject with low contrast
Subject with an extremely
bright area in the center
the frame
subject.
as
the subject enters the frame.
of
Subject without vertical
lines
Subjects at different
distances
In
these cases, focus (focus lock)onan object with high contrast at the same distance as
Fast-moving subject
the intended subject, recompose your shot and then take the picture. If the subject has no
vertical lines, hold the camera vertically and focus the camera using the focus lock function
by pressingthe shutterbutton halfway, and then return thecamera to the horizontal position
while keeping the button pressed halfway and take the picture.
Prevent blur by using image stabilization
Be
sure to hold the
moving
avoid
~
"(~»
Pictures are
• images are shot ata high-magnification zoom setting,
zoom functions,
• the object is dark and the shutter speed is slow, or
• scene modes where the flash
the
camera
camera.
firmly with both hands and press
You
can reduce
the
blur
Shooting pictures using digital image stabilization"
more
likelytobe blurry when:
is
turned offand/or the shutter speed is slow.
when
The subject is not
center
of
the frame
the
shutter
shooting
(P.
12)
Le.
using both optical zoom and digital
button slowlysoas
the
picture in
in
(~)
the
to
mode.
52
EN
Page 53

ITaking stabilized pictures without the flash
The
flash is activated
shaken.
follows:
To
take
Increase the [ISO] setting
Il@f
"ISO Changing the ISO sensitivity"
automatically
pictures withnoflash in
when
there
dark
(P.28)
is insufficient light,orwhen
places,
set
the
flash
mode
the
to
[(I)] and
camera
set
is
as
IThe picture
There
are several factors
is
too grainy
that
can
cause
the picture to
Using the digital zoom to take close-up pictures
• With the digital zoom, part ofthe image is cropped and enlarged. The greater the
magnification, the grainier the picture appears.
Il@f
"DIGITAL ZOOM Zoominginon
your subject"
Increasing the ISO sensitivity
• When you increase the
unevenness in the color, can be introduced and give the picture a grainy appearance. This
camera is equipped with a function to allow shooting at high sensitivity while suppressing
noise; however, increasing the ISO sensitivity can result
shooting conditions.
Il@f
"ISO Changing the ISO sensitivity"
[ISOJ
setting, "noise", which appears as spots of unwanted color or
(P.28)
ITaking pictures with the correct color
• The reason why there are sometimes differences between the actual colors and the colors
recorded
function that helps the camera determine the true colors. Normally, the [AUTO] setting
provides the optimal white balance, but depending
you manually adjust the
Il@f
"WB Adjusting the colorofa picture"
in
a picture is related to the light source illuminating the subject.
[WBJ
setting.
is
• When the subject
• When the subject is illuminated by both natural light and indoor lighting, such as when
near a window
• When there is no white
in the shadeona sunny day
in
the center ofthe frame
(P.27)
appear
(P.28)
on
grainy.
in
some noise, dependingonthe
[WBJ
is the
the subject, results may be better if
ITaking pictures
• Take pictures with [JA
beach or
Il@f
"SCN (Scene) Selecting a scene mode according to the shooting situation"
• Often, bright subjects (such as snow) tum out darkerthan their natural colors. Use
adjust toward
are shooting dark subjects, itcan be effective to adjust toward the [-J. Sometimes, using the
flash may not produce the brightness (exposure) that was intended.
Il@f
"61B button Changing picture brightness (Exposure Compensation)"
of
in
the snow.
[+J
a white beach or snow scene
in
SCN mode. Suitable for taking pictures
to make these subjects closer to theirtrue shades. Conversely, when you
Misalignment of panoramic pictures
• Panning along the camera central axis reduces picture misalignment. When you shootclose
subjects, panning along the axis
In
[COMBINEINCAMERA1J mode, the camera automatically detects its own position
•
except forthe following cases (In such cases, use [COMBINE
IN
PC).):
• Camera moves too fast, orthe camera was not moved along a straight line.
• Subject with low contrast (the whole screen is filled with the sky, etc.).
• A moving subject is taking up most of the screen.
• Camera is moved while processing.
of
the lens gives good results.
on
a sunny day at the
(P.26)
61B
(P.
17)
IN
CAMERA2Jor[COMBINE
to
Page 54

I Taking pictures
• When Shadow Adjustment Technology is set to [ON], the subject's face appears brighter
even against backlight and the color
function can also be used to shoot indoor pictures from outdoors.
~
"fi.~:
Brightening the subject against backlight"
• With
~
• Set the flash to
~
• It is effective to set the exposure compensation to [+] by pressing
~
~
L-
IIncreasing the number
a>
;::
There
a>
.0
Recording pictures to the internal memory
~
a>
E
ro
u
L-
Using a card (xD-Picture Card) (optional)
:::J
a
>-
~
a
c:::
.::i:.
a
.-
0>
c:::
B
Numberofstorable still pictures and recording lengthofmovies
a>
(j
are
~
[ESP/[!]]
of
the monitor without being affected by the lightin the background.
"ESP/[!]
the face ofthe subject appearing dark.
under fluorescent and other artificial lighting.
,,[)~
button Flash shooting" (P. 17)
against strong backlighting.
"61i\t button Changing picture brightness (Exposure Compensation)" (P. 17)
• Adjusting exposure
subject's face appear brighter even against strong backlighting.
"AF MODE Changing the focusing area"
two
• Pictures are recorded to the internal memory, and when the numberofstorable still pictures
reaches
erase the pictures from the internal memory.
• Pictures are recorded to the card inserted in the camera. When the card isfull, you download
the pictures to a computer, and then either erase the pictures from the card or use a new
card.
• Pictures are not recorded to the internal memory when a card is inserted
Pictures in the internal memory can be copied to the card using the [BACKUP] function.
"BACKUP Copying picturesinthe internal memory to the card"
'The
card"
Still
pictures
of
a subject against backlight
of
the background is enhanced in the picture. This
(P.18)
set to
[[!]],
the picture can be taken based on the brightness atthe center
Changing the area for measuring the brightnessofa subject"
[~]
to activate fill-in-flash. You can shoot a subject againstbacklight without
[~]
is effective for shooting against backlight and
of
person's face by setting [AF MODE] to [FACE DETECT] makes the
(P.29)
of
pictures that can
waystorecord
0,
you mustconnect the camera to a computer todownload the pictures, and then
(P.63)
the
pictures
you
take
be
with this
taken
camera.
(P.29)
61i\t when shooting
in
the camera.
(P.35)
110M)
3648 x 2736
(]M)
2560 x 1920
11M)
2048 x 1536
1600 x 1200
lRl
54
EN
FitE
N1RM
FitE
N~M
FitE
N~M
FitE
N1RM
3 3
5 5
5 6
12
9
18 19
15 15 1031 1066
28 30 1938 2063
12 820
9 615 627
204 205
399 404
404 410
841
1254 1305
Page 55

FItE
NtRM
FItE
NtRM
FItE
NtRM
IRl
~
116:91
Movie
~
~
1280 x 960
640 x 480
1920 x 1080
640 x 480
320 x 240
!ill] 38 sec. 39 sec.
*1
When [MOVIE] is set to [NON-WATER MOVIE].
*2 When [MOVIE] is set to [UNDERWATER MOVIE].
IUsing a new card
• If you use a non-Olympus card or a card that was usedona computer for another
application, use the
I@f
"MEMORY FORMAT (FORMAT) Formatting the internal memory or card"
The card access lamp is blinking
• An image or movie is being recorded or downloaded (when connected to a computer).
• Do not do any
the image data from being saved and render the internal memory or card unusable.
• Open the battery/card compartment cover.
• Remove the battery and card.
[FORMAn
of
the following while the card access lamp is blinking. Doing so may prevent
23
43 47
75 89 4920 5815
121
14
26 28 1827 1938
8 sec.
16
sec.
19
sec.
function to format the card.
24 1560 1640
163 7996 10661
14
16 sec.
19 sec.
2907 3198
954 984
10
sec.
18 min. 18 min.
37 sec. 47 sec.
22 min. 22 min.
(P.
17 sec.
35)
3 sec.
29 min. 29 min.
<0
'<
G)
CD
a
~
.-+
o
';1\
~
o
:E
o
c
..,
(')
Q)
3
CD
..,
Q)
CT
CD
.-+
.-+
CD
..,
Extending the useful lifeofthe battery
• Performing anyofthe following operations when not actuallytaking pictures can deplete the
battery power.
• Repeatedly pressing the shutter button halfway
• Repeatedly using the zoom
• To minimize the battery consumption, set [POWER SAVE] to [ON] and tum off the camera
whenever it is not
I@f
"POWER SAVE Setting the camera to the power save mode"
in
use.
(P.40)
Page 56

Functions
selected even
• Some items are not be selectable from the menus when using the arrow pad.
• Some functions cannot be set by pressing the function buttons dependingonthe camera
• Some functions cannot be used when there is no cardinthe camera.
• You cannot change the function settings when the mode dial is set to GUIDE.
that
cannot be selected
by
pressing the
(The menu items displayedingray cannot be selected.)
• Items that cannot be set with the current shooting mode
• Items that cannot be set becauseofan
When [DRIVE] is set to [H;i]. [FINE ZOOM] or [DIGITAL ZOOM] cannot be set.
setting.
[sl],
Flash Mode, etc.
[PANORAMA], [PRINT ORDER], [FORMAT]. [BACKUP]
from
function
menus/Functions
that
buttons
item that has already been set:
cannot
Restoring default settings
be
• This camera retains the settings (except for
return the settings to default settings, execute [RESET].
~
"RESET Restoring default settings" (P. 24)
IConfirming the exposure when the
The monitor may be difficult to see and the exposure difficultto confirm when shooting
outdoors.
Press DISP./.,',:\ repeatedlytodisplay
• Set the exposure so that the graph is concentratedonthe outer edges and the graph is
balanced on both sides.
How to
CD
@ If the peak fills too much ofthe frame, the image will appear
@ The part indicated
~
"DISP.l./'~
on the LED illuminator/Checking the time" (P. 19)
read
the histogram
Ifthe peak fills too muchofthe frame. the image will appear
mostly black.
mostly white.
in
greeninthe histogramshows the luminance
distributioninthe center areaofthe monitor.
button Changing the informationondisplay/Display the menu guidelTurning
the histogram
SCN)
even after the power is turned off. To
monitorisdifficulttosee
outdoors
IThe red-eye cannot be fixed
'."'.V.•_ fixed.
/ • Dependingonthe picture, the red-eye may not be fixed. Also, parts except the eye may be
56
Bright
EN
specks appear in the picture
• Light reflecting from dust and other particlesinthe air at night mayappear as bright specks
in
pictures taken using the flash.
Page 57

Playbac~
t.!PS
J
IPlaying back the picture
• When a card has been inserted in the camera, the pictureinthe internal memory cannot
played back. Pull outthe card before operating the camera.
in
the internal memory
IViewing picture information
• Play back a picture, and press DISP.l8/'<\. Press DISP.l8/'<\ repeatedly to change the
amount of information displayed.
~
"DISP./8/'<\ button Changing the information
on
the LED illuminator/Checking the time" (P. 19)
on
display/Display the menu guidelTurning
IQuickly displaying a desired picture
• Press Wonthe zoom button to view the pictures as thumbnails (index display) orina
calendar format (calendar display).
~
"Zoom button Zooming while shooting/Close-up playback"
Erasing sound recorded to still pictures
• Once soundisadded to a picture, itisnot possible to erase the sound.Inthis case, make a
re-recording with silence. Re-recording
in
space
~
"~
the intemal memory oronthe card.
Adding sound to still pictures"
IViewing the entire picture on a computer screen
The
sizeofthe picture displayed on a
settings.
a picture with an
without
screen.
When
scrolling.
the monitor setting is 1,024 x
image
There
sizeof2,048 x 1,536at100%, the entire picture cannot be viewed
are several
View the picture using image browsing software
• Install the OLYMPUS Master 2 software from the provided CD-ROM.
Change the monitor setting
• The iconsonthe computerdesktop mayberearranged. Fordetailsonchanging the settings
on
your computer, refer to the computer's instruction manual.
computer
ways
of
(P.34)
768
you can
the sound is not possible ifthere is insufficient
screen changes depending on the
and
you
view
the entire picture on the
(P.
16)
are
using Internet Explorer to
computer
computer
be
view
G)
CD
a
co
'<
~
r-+
o
7\
~
o
:E
o
c:::
....,
(')
Q)
3
CD
@
C'"
CD
::+
CD
....,
Page 58

When you get an error message
on
the camera...
Monitor indication
[IJ
CARD ERROR card.
[IJ
WRITE PROTECT
ill
MEMORY FULL cannot store any new data.
[IJ
CARD FULL
L
..
NO PICTURE
L..
<J.)
.....
.....
<J.)
..0
~
<J.)
E
co
()
L..
:::J
0
>-
~
0
c
~
0 BATTERY EMPTY
.....
0>
c
~
.....
<J.)
PICTURE ERROR be played back on this done, the image file is damaged.
CANNOT BE
CARD-COVER
<.9
.J
IT] selected pictureand it cannot picture on a computer. Ifthat cannot be
IT]
THE IMAGE
EDITED
OJ
OPEN
c:J
Possible cause Corrective action
There is a problem with the Thiscard cannot be used. Inserta newcard.
Writing to the card is The recorded image
on
prohibited. only)
computer
The internal memory has no Inserta card or erase unwanted data.
available memory and Before erasing, back up the data
important pictures using the card, or
download such pictures to a computer.
The card has no available Replace the card or erase unwanted data.
memory and cannot store Before erasing, download important
any new data. pictures to a computer.
There are no pictures in the The internal memoryorthecard contains no
internal memory oron the pictures.
card. Record pictures.
There is a problem with the Use image processing software to view the
camera.
Pictures taken by other Use image processing software to edit the
1\16:911
cameras, taken in
previously edited or
corrected pictures cannot be
edited or fixed.
The battery/card
compartment cover is open.
The battery is empty.
The card was not read. Or,
the card is not formatted.
or
pictures .
Close the battery/card compartment cover.
Charge the battery.
• Select [CLEAN CARD] and press
• Select [FORMA
a computer. Download the imagetoa
and
Remove the card and wipe the contact
area with a soft, dry cloth.
All data on the card is erased.
cancel
has
been
the
read-only setting.
T]
~
[YES] and press
protected (read-
of
~.
@.
There is an error
internal memory.
SET·1llKI
58EN
in
the
select@EMORY
~.
press
erased.
All data in the internal memory is
FORMA
T]
~
[YES] and
Page 59

Monitor indication
~
NO CONNECTION
1..L
1
NO PAPER
·0
~
NO INK
8Jv
JAMMED
SETTINGS
CHANGED
~
PRINT ERROR
CANNOT PRINT
OJ
Possible cause
The camera is notconnected
to the computeror printer correctly.
correctly.
There is no paperinthe
printer.
The printer hasrun outofink.
The paper is jammed. Remove the jammed paper.
The printer's paper tray has Do not operate the printer while changing
been removed or the printer
has been operated while
changing settings on the
camera.
There is a problem with the Turn off the camera and printer. Check the
printer and/or camera. printer and remedy any problems before
Pictures recorded on other Use a computer to print.
cameras may not be printed
on this camera.
Disconnectthe camera and connect itagain
Load some paper
Replace the ink cartridge
settings on the camera.
turning the power on again.
Corrective action
in
the printer.
in
the printer.
co
'<
G)
CD
~
::J
r-+
o
:;l\
::J
o
:E
o
c:
..,
(')
ll)
3
CD
@
0"
CD
:=
CD
..,
Page 60

Functions available
in
shooting modes and scene modes
Some functions cannot be setincertain shooting modes. For more details, refer to the table
below.
c:=:=l
~
indicates a restriction to the respective functionofeach SCN mode.
"Functions availableinshooting scenes"
(P.
61)
Functions availableinshooting modes
Function
~
IB
~
,,"/s~/&i
~
Shadow Adjustment
Technology
Optical zoom
IMAGE QUALITY
PANORAMA -
L-
a>
:::
SILENT MODE
a>
.!:)
WB
~
ISO
a>
E
DRIVE -
co
U
FINE ZOOM
L-
:::J
DIGITAL ZOOM
o
>.
ESP/[!J
~
o
AF MODE -
c
.::s:.
~
o
*1
-
0>
C
E
a>
C>
[&i)isnot available.
*2
The optical zoom is not available during movie recording. Set [DIGITAL ZOOM) to [ON)toenable
the zoom function for shooting.
*3 [CONBINE
(~))
mmJ
v" v" v"
v"
v"
v"
v"
-
-
-
-
-
IN
CAMERA1)and [CONBINEINCAMERA2)are not available.
0
v"
v" v"
v"
v"
v"
v"
v"
v"
v"
v"
v"
v"
v" v"
v" v"
v"
v"
v" v"
v" v"
SCN
v"
v"
;'
v"
v"
v"
v"
/3
v" v"
v"
,
I'd
v"
v"
""'7:,
"~lmi;;
NON-WATER UNDERWATER
MOVIE MOVIE
v"
?'A
..
;'
v" v"
- -
/1 /1
v" v"
v"
.,
Y•..'
';,
oj
v" v" v"
.....
<9/
.
.;,y
'S
/2
v"
-
v" v"
- -
-
v" v"
v" v"
- -
-
~
Ref.
Page
P.17
P.17
P.17
P.17
v"
v"
v"
-
-
-
P.
18
P.16
P.23
P.24
P.29
P.27
P.28
P.28
P.28
P.28
P.29
P.29
P.29
GlEN
Page 61

Functions
available in
shooting
scenes
n
~
..
if.
TI
~
~
~/s~/&i
~
Shadow
Adjustment
Technology
Optical zoom
IMAGE QUALITY
PANORAMA
ISO
DRIVE
FINE ZOOM
DIGITAL ZOOM
ESP/0
AF MODE
~
*1
[@]
is not available.
*2
[s~l
and
*3 AF lock is on.
*4
Onlyanimage quality at
*5 The image quality is fixed at
*6 [CONBINEINCAMERA1]and [CONBINEINCAMERA 2] are not available.
*7
[~l
cannot be selected.
*8
[SPOT] is not available.
*9 [FACE DETECT] is not available.
rJA
./
./
./
./
./ ./ ./ ./
./ ./
/6 /6
- - - - - - - - - - - -
/7 /7
./
./ ./ ./
./
./
./ ./
[&il
are not available.
~
II
r.
ill
./ ./
/2
/2
./
./
./
- -
./
/6
- -
./
./
./ ./
./ ./ ./
./ ./
[J]M)]
Ui
II
0
-
./
./ ./ ./ ./ ./ ./
/4
/6
- -
- -
./
or lower is available.
~.
a
•
./
-
-
/2 /2
./
-
./ ./ ./ ./
-
/7
-
/8
./
-
./
-
./
./
./*6
/6
- -
./ ./ ./
./
./
./
./ ./
./
-
./ ./ ./
~
~
i"8
i'8
~~
•
./*1
- -
-
./
./
./
/6
./*7
./
./
./
./
-
- - -*3-
./
./
./ ./ ./
_*S
/4
- - -
-
-
-
./
-
./ ./ ./ ./ ./ ./ ./
./ ./
./
- - -
./ ./
./ ./
./
-
./
./
./ ./ ./ ./
./*6 ./*6 ./*6
/7
-
./ ./ ./
./ ./
./
./
:1
•
./
*3
- -
./
./ ./
./*7
./
/9
./
:2
./
-
-
-
/7
- -
-
-
./
•
-
/2
./
./
./
-
-
-
./
-
-
Ref
Page
P.17
P.17
P.17
P.18
P.16
P.23
P.24
P.28
P.28
P.28
P.28
P.29
P.29
P.29
.
G)
CD
Ef.
::J
co
o
-
::J
"
o
:E
'<
o
c
..,
(')
Q)
3
CD
0)
0"
CD
~
CD
..,
EN
61
Page 62

Appendix
Camera care
ICleaning the camera
Exterior:
o Wipe gently with a soft cloth. If the camera is very dirty, soak the cloth
the
Wipe the camera with
use
beach,
o If any dirt, dust, sand, or other foreign material adheres to the periphery ofthe lens cover after use, or the
lens cover does not move smoothly, wash the camera using the method described
Monitor:
o Wipe gently with a soft cloth.
Lens:
o Blow dust offthe lens with a commercial blower, then wipe gently with a lens cleaner.
Battery/Charger:
o Wipe gently with a soft, dry cloth.
a cloth soakedinclean water
damp cloth
and
then dry it with a dry cloth. If you have used the camera at the
and
wrung well.
U Note
o
Do
not
use strong solvents suchasbenzeneoralcohol,orchemically treated cloth.
o Mold
may
form on the lens surfaceifthe lens is left dirty.
in
mild soapy water
onP.65.
and
wring well.
Storage
o When storing the camera for extended periods, remove the battery,
cool, dry place thatiswell ventilated.
o Periodically insert the battery
and
test the camera functions.
UNote
o Avoid leaving the camera in places where chemical products are handled since this
in corrosion.
Battery and charger
.
"0
«
~
c:
Q)
a.
a.
This camera uses
•
used.
Power
•
During theconditions describedbelow, power isconsumed continuously andthe batterybecomes
•
exhausted quickly.
o The zoom is used repeatedly.
o The shutterbutton is pressed halfway repeatedly in shooting mode, activating the auto focus.
o A picture is displayed on the monitor for an extended period
•
warning.
The rechargeable batteryis not fullycharged
•
the L1-50C charger before use.
•
•
•
consumption bythe camera varies depending on which functions are used.
o The camera is connected to a computer
Using an exhausted battery
The provided rechargeable battery usually takes approximately 2 hours to charge (varies on
usage).
The
supplied L1-50C battery charger is used only
battery with the supplied battery charger. It might cause explosion, leaking, overheatingorfire.
For plug-in type battery charger:
This power unit is intended to be correctly orientated in a vertical or floor mount position.
one
Olympus lithium ion battery (L1-50B). No other typeofbatteries can be
or
printer.
may
cause the camera to turn
at
AC
adapter
of
off
without displaying the battery level
the timeofpurchase. Chargethe battery fullywith
for
L1-50B battery.Donot
time.
and
card, and keepina
charge other type
may
result
of
62
EN
Page 63

Use
The
of
the accessories
card·
Pictures
The internal memory and card are the camera's media for recording pictures, similar to filmina film camera.
Pictures recorded
computer.
Unlike portable storage media,
The number of recordable pictures
CD
canberecordedonthe
to
the internal memory or card canbeeasily erasedonthe
Index area
You can use this space to write the contents
optional
the
internal memory cannotberemoved or exchanged.
canbeincreased by using a card with a larger capacity.
card.
of
the card.
camera or processed using a
@ Contact area
The part where the datatransferred fromthe camera entersthecard.
Do not touch the contact area on the card.
Compatible cards
xD-Picture Card 16MB - 2GB (Type
HIM,
Standard)
Using the internal memory or card
You
can confirmonthe monitorwhether the internal memory or cardisbeing
playback operations.
Shooting
mode
used
during shooting
Playback
and
mode
Memory indicator
diiJ:
No
When using the internal memory
icon: When using a card
oNote
• Do not open the battery/card compartment coverwhile the card
access lamp is blinking, as this indicates that data is being read
or
written. Doing so maydamage thedata in the internal memory
or
the card and render the internal memoryorcard unusable.
Card
access
lamp
"'0
"'0
»
CD
:::J
a.
x·
Page 64

AC adapter'
An AC adapter is useful fortime-consuming tasks such as image downloads to a computer
when running a slideshow for a long periodoftime. To use an AC adapterfor this camera, the
multi-adapter (CB-MA1/accessory) is required.
Do not use any otherAC adapter with this camera.
Using
• The charger and AC adaptercan be used in most home electrical sourceswithin the range of 100
V to 240 V AC (50/60Hz) around the world. However, depending on the country or area you are
in, the AC wall outlet may be shaped differently and the charger may require a plug adapter to
match the wall outlet. For details, ask at your local electrical shop or travel agent.
• Do not use travel voltage converters as they could damage your charger and AC adapter.
your
charger
and AC adapter abroad
or
IMPORTANT INFORMATION ABOUT WATER AND SHOCK
RESISTANT FEATURES
Water resistance: The waterproof feature is warranted'1 to operate at depths up to
for upto one hour. The waterprooffeature maybe compromised if the camera is subjectto substantial
or excessive impact.
Shockresistance: The anti-shockfeature warrants
impact incurred from everyday use ofyour digital compact camera. The anti-shock feature does not
unconditionally warrant all defective operation or cosmetic damage. Cosmetic damage, such as
scratches and dents, are not covered underthe warranty.
As with anyelectronic device, propercare and maintenance are required to preserve the integrity and
operation of yourcamera. To maintain camera performance, please take yourcamera to the nearest
Olympus Authorized Service Center to have it inspected afterany major impact.Inthe event the
camera is damaged as a result
with the service or repair
the Olympus website for your local area.
Please observe the following care instructions for your camera.
of
negligence or misuse, the warranty will not cover costs associated
of
your camera. For additional information on ourwarranty, please visit to
'2
the operationofthe camera against accidental
10m
(32.8 feet)
.~
'0
ai
a.
a.
« 0
64
Before Use:
o Check the camera for foreign material including dirt, dust or sand.
o Be sure to close the battery/card compartment cover and connector cover firmly so that each lock
makes clicking sound.
o Do not open the battery/card compartment cover and connectorcover with wet hands, while under
water, or in a damp or dusty environment (e.g. beach).
After
0 Be sure to wipe off any excess water or debris after using the camera under water.
EN
After
water
firmly
o Water
or
connector
them
Use:
the camera is used
for
about
10 minutes (with the battery/card compartment
closed).
drops
off
After
that,
may be observed on the
cover
afteryou open each cover.Ifany water
before using the camera.
under
sea water, immerse the camera in a bucket containing fresh
cover
and
connector
dry
the camera in a shade
inner
surfaceofthe battery/card compartment
with
good
drops
ventilation.
are found, be suretowipe
cover
cover
Page 65

Notes after use
• Any foreign material may be adhered to the peripheryofthe lens cover, after you use the camera
in an environment containing foreign material including dirt, dust or sand, or when the lens cover
won't move smoothly.
in
If you continue to use the camera
may become stuck, causing a failure. To avoid such a failure, wash the camera using the following
method.
CD
Insert the battery and close the battery/card
compartment cover and connector coverfirmly
so that each lock makes the clicking sound.
such a condition, the lens maybedamaged or the lens cover
@ Fill a bucket with fresh water, immerse the
camera
downward and shake the camera thoroughly.
@ Press the
waterand close/open the lens cover repeatedly.
in
the bucket with the lens surface
POWER
button several timesinthe
@ Furthermore, shake the camera further with the
cover opened.
CD
Follow the steps
If the lens cover does not move smoothly, rinse the lens face by placing it directly under a strong
of
stream
tap water and pressing the
to@,then checkifthe lens cover moves smoothly.
POWER
button repeatedly.
Storage and Maintenance
• Do not leave the camerainan environment at high temperature (40°C (104°F) or more) or at low
temperature (-10°C (14°F) or less). Failure to do so may break down water resistance.
• Do not usechemicals for cleaning, rust prevention, anti-fogging, repairing, etc. Failure to doso may
break down water resistance.
• Do
not
leave
the
camerainwater
camera's
•Inaddition do not pour water overthe camera directly from the water faucet.
• In
ordertopreserve the
recommended
For
replaced,
the
Olympus
appearance
that
the
distributorsorservice
visit
Olympus
and/or
water
waterproof
website
foralong
deteriorate
resistant
packing (and seals) are replaced annually.
for
your
time. Failuretodosowill
water
resistance.
feature, as
stations
local area.
with
where
any
the
underwater
waterproof
cause damagetothe
housing,itis
packing can be
Closing
Note: The included accessories (e.g. charger) do not offer shock or water resistance.
*1
as determined by Olympus pressuretesting equipmentinaccordance to IEC Standard Publication
529 IPX8 - This means that the camera can be used normally under water ata specified water
pressure.
*2 This anti-shock performance
STD-810F, Method 516.5, Procedure IV (Transit Drop Test). For more details
conditions, please refer to the Olympus website for your local area.
Battery/Card
Battery/card
Compartment
compartment
is
confirmed by Olympus' testing conditionsinaccordance with MIL-
Cover and
cover
Connector
~~IlOi.,;Ir---Connector
cover
cover
of
Olympus' testing
EN
65
Page 66

SAFETY PRECAUTIONS
CAUTION: TO REDUCE THE RISK OF ELECTRICAL SHOCK, DO NOT
REMOVE COVER (OR BACK). NO USER-SERVICEABLE PARTS INSIDE.
REFER SERVICING TO QUALIFIED OLYMPUS SERVICE PERSONNEL.
An exclamation mark enclosedina triangle alerts you to important operating and
~
maintenance instructions in the documentation provided with the product.
DANGER
~
WARNING
~
CAUTION
~
Ifthe product is used without observing the information given underthis symbol, serious
injury
or
death may result.
If the product is used without observing the information given under this symbol, injury
death may result.
If the product is used without observing the information given under this symbol, minor
personal injury, damage to the equipment, or loss of valuable data may result.
WARNING!
TO
AVOID
THIS
General'
Read
All
manuals and documentation for future reference.
Cleaning
for cleaning. Never use any type
this product.
Attachments
recommended by Olympus.
.
"'0
«
~
c:
(1)
a.
a.
Water
and
weatherproofing sections.
Location
or bracket.
Power
Lightning
immediately.
Foreign
Heat- Never use orstore this product nearany heat source such as a radiator, heat register, stove,
or any type of equipment or appliance that generates heat, including stereo amplifiers.
Source
Objects
THE
PRODUCTTOWATEROROPERATEINA
Precautlcins
Instructions
- Always unplug this product from the wall outlet before cleaning. Use only a damp cloth
Moisture
- To avoid damage to the product, mount the product securely on a stable tripod, stand,
- If a lightning storm occurs while using an AC adapter, remove it from the wall outlet
RISKOFFIREORELECTRICAL
, .
- Before you use the product, read all operating instructions. Save all
of
liquid or aerosol cleaner, or any typeoforganic solvent to clean
- For your safety, and to avoid damaging the product, use only accessories
- For precautions on products with weatherproof designs, read the
- Connect this product only to the power source described on the product label.
- To avoid personal injury, never insert a metal object into the product.
SHOCK,
HIGH
HUMIDITY
NEVER
DISASSEMBLE,
ENVIRONMENT.
or
EXPOSE
66
EN
Page 67

Han~~~1~6g.he
cam!ra
.
Lt.
WARNING
• Do not use the camera near flammable or explosive gases.
• Do not use the flash and LED on people (infants, small children, etc.) at
close range.
o You mustbe at least 1m (3 ft.) away from the faces
to the subject's eyes could cause a momentary loss
of
your subjects. Firing the flash too close
of
vision.
• Keep young children and infants away from the camera.
o Always use and store the camera out
following dangerous situations which could cause serious injury:
o Becoming entangled
o Accidentally swallowing the battery, cards orother small parts.
o Accidentally firing the flash into their own eyes or those
o Accidentally being injured by the moving parts
• Do not look at the sun
or
• Do not use
store the cameraindustyorhumid places.
in
the camera strap, causing strangulation.
or
of
the reachofyoung children and infants to preventthe
of
another child.
of
the camera.
strong lights with the camera.
• Do not cover the flash with a hand while firing.
Lt.
CAUTION
• Stop using the camera immediately ifyou notice any unusual odors,
noise, or smoke around it.
o Never remove the batteries with bare hands, which may cause a fire or burn your hands.
• Do not leave the camerainplaces where it may be subject to extremely
high temperatures.
o Doing so may cause parts to deteriorate and, in some circumstances, cause the camera to
catch fire. Do not use the charger or AC adapter ifit is covered (such as a blanket). This could
in
cause overheating, resulting
fire.
• Handle the camera with care to avoid getting a low-temperature burn.
o When the camera contains metal parts, overheating can result
attention to the following:
o When used for a long period, the camera will get hot. If you hold on to the camera in this
state, a low-temperature burn may be caused.
o
In
places subjectto extremely cold temperatures, the temperatureofthe camera's body may
be lowerthan the environmental temperature. If possible, wear gloves when handling the
in
camera
cold temperatures.
in
a low-temperature burn. Pay
• Be careful with the strap.
o Be careful with the strap when you carry the camera. It could easily catch on stray
and cause serious damage.
objects-
• Do not touch the metallic partsofthe camera for a long periodoftime at
low temperatures.
o This may damage yourskin. At low temperatures, handle the camera while wearing gloves.
»
"'0
"'0
CD
:::J
a.
x·
Page 68

,
Battery Handling
Follow these important guidelines to prevent batteries from leaking, overheating, burning,
exploding, or causing electrical shocks or burns.
J?recautiol1~
?~.
~
• The camera uses a lithium ion battery specified by Olympus. Charge the battery with the specified
• Never heat or incinerate batteries.
• Take precautions when carrying orstoring batteries to prevent them from coming into contact with
• Never store batteries where they will be exposed to direct sunlight, or subjected to high
• To prevent causing battery leaks or damaging theirterminals, carefully follow all instructions
• If battery fluid gets into your eyes, flush youreyes immediately with clear, cold running water and
• Always store batteries out ofthe reach
• Keep batteries dry at all times.
• To prevent batteries from leaking, overheating, or causing a fire or explosion, use only batteries
• Insert the battery carefully as described in the operating instructions.
• Ifrechargeable batteries have not been recharged within the specified time, stopcharging them and
• Do not use a battery
• If a battery leaks, becomes discolored or deformed, or becomes abnormal in any otherway during
• Ifa battery leaksfluid ontoyour clothing
DANGER
charger. Do not use any other chargers.
any metal objects such as jewelry, pins, fasteners, etc.
temperatures in a hotvehicle, near a heat source, etc.
regarding the use of batteries. Never attempt to disassemble a battery or modify it in any way, by
soldering, etc.
seek medical attention immediately.
of
small children. If a child accidentally swallows a battery,
seek medical attention immediately.
~
• Never subject batteries to strong shocks or continuous vibration.
WARNING
recommended for use with this product.
do not use them.
if
it is cracked or broken.
operation, stop using the camera.
or
skin, remove the clothing and flush the affected area with
clean, running cold water immediately. Ifthe fluid burns your skin, seek medical attention
immediately.
~
• Before loading, always inspect the battery carefully for leaks, discoloration, warping, orany other
• The battery may become hot during prolonged use. To avoid minor burns, do not remove it
.~
"'0
• Always unload the battery from the camera before storing the camera for a long period.
C
Q)
a.
a.
«
GlEN
CAUTION
abnormality.
immediately after using the camera.
Page 69

Caution
• To protect the high-precision technology containedinthis product, never leave the camerainthe places
listed below, no matter ifinuse or storage:
• Places where temperatures and/or humidity are high or go through extreme changes. Direct sunlight,
beaches, locked cars, or near other heat sources (stove, radiator, etc.) or humidifiers.
•Insandy or dusty environments.
• Near flammable items or explosives.
In
•
their manuals as well.
• In places prone to strong vibrations.
• Never drop the camera or subject it to severe shocks orvibrations.
• When mounted
• Do not touch electric contacts on cameras.
• Do not leave the camera pointed directly at the sun. This may cause lens orshutter curtain damage, color
failure, ghosting on the CCD, or may possibly cause fires.
• Do notpush or pull severely on the lens.
• Before storing the camera for a long period, remove the battery. Select a cool, dry location for storage to
prevent condensation or mold from forming inside the camera. After storage, test the camera by turning it
on and pressing the shutter release button to make sure that it is operating normally.
• Always observe the operating environment restrictions described
• The altitude/depth measurementfunction
your reference.
for
Usage
wet places, such as bathrooms orinthe rain. When using products with weatherproof designs, read
on
Environm~nt
a tripod, adjust the positionofthe camera with the tripod head. Do not twist the camera.
in
the camera's manual.
is
not approved by an official institution. Use the readings only for
BatterY
• This camera uses a lithium ion battery specified by Olympus. Do not use any other typeofbattery. For safe
and proper use, read the battery's instruction manual carefully before using it.
• If the battery's terminals get wet or greasy, camera contact failure may result. Wipe the battery well with a
dry cloth before use.
• Always charge a battery when using it for the first time, or if it has not been used for a long period.
• When operating the camera with battery power at low temperatures, try to keep the camera and spare
battery as warm as possible. A battery that has run down at low temperatures may be restored after it is
warmed at room temperature.
• The number of pictures you can take may vary depending
• Before going on a long trip, and especially before traveling abroad, purchase extra batteries. A
recommended battery may be difficultto obtain while traveling.
• Please recycle batteries to help save our planet's resources. When you throwaway dead batteries,
to cover their terminals and always observe local laws and regulations.
• Do not push the monitorforcibly; otherwise the image may become vague, resultingina playback mode
failure or damage to the monitor.
• A strip of light may appear on the top/bottom of the monitor, but this is not a malfunction.
• When a subject
is not a malfunction; it willbeless noticeableinplayback mode.
• In places subject to low temperatures, the monitor may take a long time to turn on or its color may change
temporarily. When using the camera
warm place. A monitor exhibiting poor performance due to low temperatures will recover
temperatures.
• The LCD used for the monitor
of
light may appear constantly on the Monitor. Due to its characteristics or the angle at which you are
viewing the monitor, the spot may not be uniform
Handling'Precautions
.......
.-
is
viewed diagonallyinthe camera, the edges mayappear zigzaggedonthe monitor. This
is
made with high-precision technology. However, black spots orbright spots
on
the shooting conditions or battery.
be
in
extremely cold places, it is a good idea to occasionally place itina
in
normal
in
color and brightness. This is not a malfunction.
sure
Page 70

L.egal
• Olympus makes no representations orwarranties regarding any damages,orbenefit expected by using this
unit lawfully,
• Olympus makes no representations
this unit lawfully which are caused by erasing picture data.
• Olympus makes no representations orwarranties, eitherexpressed orimplied, by orconcerning anycontent
of
merchantabilityorfitness forany particularpurpose orforany consequential, incidental orindirectdamages
(including but notlimited to damages for loss
information) arising from the use
countries do not allow the exclusion or limitation
above limitations may not apply to you.
• Olympus reserves all rights to this manual.
Unauthorized photographing or use of copyrighted material mayviolate applicable copyright laws. Olympus
assumes no responsibility for unauthorized photographing, use or other acts that infringe upon the rights
copyright owners.
and
Other
or
any request from athird person, which are caused by the inappropriate use of this product.
these written materials or software, and in no event shall be liable for any implied warranty
Nptices
or
warranties regarding any damagesor any benefit expected byusing
of
business profits, business interruption and lossofbusiness
or
inability to use these written materialsorsoftware or equipment. Some
of
liability for consequential or incidental damages, so the
of
of
Copy.fjght
All rights reserved. No partofthese written materials orthis software may be reproduced or used in any form
or by any means, electronic or mechanical, including photocopying and recording
information storage and retrieval system, without the prior written permissionofOlympus. No liability is
assumed with respect to the useofthe information containedinthese written materials or software, or for
damages resulting from the use
features and contentsofthis publication or software without obligation or advance notice.
• Radio and Television Interference
• Changes or modifications not expressly approved by the manufacturermay void the user's authority to
operate this equipment. This equipment has been tested and found to comply with the limits for a Class B
digital device, pursuant to Part 15
protection against harmful interference
• This equipment generates, uses, and can radiate radio frequency energy and, if not installed and used
accordance with the instructions, may cause harmful interference to radio communications.
• However, there is no guarantee that interference will not occurina particular installation. If this equipment
.~
"'0
c:
(1)
a.
a.
«
does cause harmful interference to radio or television reception, which can be determined by turning the
equipment offand on, the user is encouraged to try to correct the interference by one or more
following measures:
- Adjust
- Increase the distance between the camera and receiver.
- Connect the equipmenttoanoutlet on a circuit different from that to which the receiver is connected.
- Consult your dealer or an experienced radiolTV technician for help. Only the OLYMPUS-supplied USB
cable shouldbeused to connect the camera to USB enabled personal computers (PC).
Any unauthorized changes or modifications to this equipment would void the user's authority to operate.
Notice
"-.
~.=
of
the information contained therein. Olympus reserves the right to alter the
of
or
relocate the receiving antenna.
or
the useofany type
the FCC Rules. These limits are designed to provide reasonable
in
a residential installation.
of
of
in
the
Page 71

For'customers
Int·iorth
~A<
anCi
South
For customersinUSA
Declaration of Conformity
Model Number :Stylus 1030 SW/'tl1030
Trade Name :OLYMPUS
Responsible Party :
Address :3500 Corporate Parkway,
Telephone Number: 484-896-5000
To
HOME
Comply With
OR
Tested
FOR
OLYMPUS
PA
OFFICE
18034-0610, U.S.A.
FCC
USE
IMAGING
Standards
'America
-:-
,-.
SW
AMERICA
P,O.
Box
~
INC.
610,
Center Valley,
This device complies
(1)
This device may not cause harmful interference.
(2)
This device must accept any interference received, including interference that may cause undesired
operation.
with
Part15of the
FCC
rules. Operationissubjecttothe following two conditions:
For customersinCanada
This Class B digital apparatus meets
Regulations.
all
requirements of the Canadian Interference-Causing Equipment
Use Only Dedicated Rechargeable Battery and Battery Charger
We strongly recommend that you use only the genuine Olympus dedicated rechargeable
battery and battery charger with this camera.
Using a non-genuine rechargeable battery and/or battery charger may result
in
fireorpersonal
injury due to leakage, heating, ignitionordamage to the battery. Olympus does not assume
any liability for accidents or damage that may result from the useofa battery and/or battery
charger that are not genuine Olympus accessories.
OLYMPUS WORLDWIDE LIMITED WARRANTY - IMAGING PRODUCTS
Olympus warrants thatthe enclosed Olympus® imaging product(s) and related Olympus®
accessories (individually a "Product" and collectively the "Products") will be free from defects in
materials and workmanship under normal use and service for a periodofone (1) year from the date
of
purchase.
If any Product proves to be defective within the one-yearwarranty period, the customermust return
the defectiveProductto anyofOlympus Service Centers, following the procedure setforth below (See
"WHAT TO DO WHEN SERVICE IS NEEDED").
Olympus, at its sole discretion, will repair, replace, or adjust the defective Product, provided that
Olympus investigation and factory inspection disclose that (a) such defect developed under normal
and proper use and (b) the Product is covered under this limited warranty.
or
Repair, replacement,
customer's sole remedy hereunder.
The customer is liable and shall pay for shipment
Olympus shall not be obligated to perform preventive maintenance, installation, deinstallation,
maintenance.
Olympus reserves the right to
meet Olympus's quality assurance standards) for warranty
internal or external design and/or feature changes on
incorporate such changes on or to the Products.
adjustmentofdefective Products shall be Olympus's sole obligation and the
of
the Products to the Olympus Service Center.
or
(i) use reconditioned, refurbished, and/or serviceable used parts (that
or
any other repairs and (ii) make any
or
to its products without any liability to
WHAT IS NOT COVERED BY THIS LIMITED WARRANTY
Excluded from this limited warranty and not warranted by Olympus in any fashion, either express,
implied, or by statute, are:
(a) products and accessories notmanufactured by Olympus and/or not bearing the "OLYMPUS"
of
brand label (the warranty coverage for products and accessories
may be distributed by Olympus, is the responsibility
accessories in accordance with the terms and duration
of
the manufacturersofsuch products and
of
such manufacturers' warranties);
other manufacturers, which
Page 72

(b) any Product which has been disassembled, repaired, tampered with, altered, changed, or
modified by persons other than Olympus's own authorized service personnel unless repair by
others is made with the written consent of Olympus;
(c) defects or damage to the Products resulting from wear, tear, misuse, abuse, negligence, sand,
of
liquids, impact, improperstorage, nonperformance
battery leakage, use of non-"OLYMPUS" brand accessories, consumables, orsupplies, or use
the Productsincombination with non-compatible devices;
(d) software programs;
(e) supplies and consumables (including but not limited to lamps, ink, paper, film, prints, negatives,
cables and batteries); and/or
(f) Products which do notcontain a validly placed and recorded Olympus serial number, unless they
are a model on which Olympus does not place and record serial numbers.
EXCEPT FOR THE LIMITED WARRANTY SET FORTH ABOVE, OLYMPUS MAKES NO AND
DISCLAIMS ALL OTHER REPRESENTATIONS, GUARANTIES, CONDITIONS, AND
WARRANTIES CONCERNING THE PRODUCTS, WHETHER DIRECT OR INDIRECT, EXPRESS
OR IMPLIED, OR ARISING UNDERANY STATUTE, ORDINANCE, COMMERCIAL USAGE OR
OTHERWISE, INCLUDING BUT NOT LIMITED TO ANY WARRANTY OR REPRESENTATION AS
TOTHE SUITABILITY,DURABILITY, DESIGN, OPERATION, OR CONDITON OFTHE PRODUCTS
(OR ANY PART THEREOF) OR THE MERCHANTABILITYOF THE PRODUCTS OR THEIR
FITNESS FOR A PARTICULAR PURPOSE, OR RELATING TO THE INFRINGEMENT OF ANY
PATENT, COPYRIGHT, OR OTHER PROPRIETARY RIGHT USED OR INCLUDED THEREIN.
IF ANY IMPLIED WARRANTIES APPLY AS A MATTER OF LAW, THEY ARE LIMITED IN
DURATION TO THE LENGTH OF THIS LIMITED WARRANTY.
SOME STATES MAY NOT RECOGNIZE A DISCLAIMER OR LIMITATION OF WARRANTIES AND/
OR LIMITATION OF LIABILITY SO THE ABOVE DISCLAIMERS AND EXCLUSIONS MAY NOT
APPLY.
THE CUSTOMERMAY ALSO HAVEDIFFERENT AND/ORADDITIONAL RIGHTS AND REMEDIES
THAT VARY FROM STATE TO STATE.
THE CUSTOMER ACKNOWLEDGES AND AGREES THAT OLYMPUS SHALL NOT BE
RESPONSIBLE FOR ANY DAMAGES THAT THE CUSTOMER MAY INCUR FROM DELAYED
SHIPMENT, PRODUCT FAILURE, PRODUCT DESIGN, SELECTION, OR PRODUCTION, IMAGE
OR DATA LOSS OR IMPAIRMENT OR FROM ANY OTHER CAUSE, WHETHER LIABILITY
ASSERTEDINCONTRACT, TORT (INCLUDING NEGLIGENCE AND STRICT PRODUCT
IN
LIABILITY) OR OTHERWISE.
INCIDENTAL, CONSEQUENTIAL ORSPECIAL DAMAGES OF ANY KIND (INCLUDING WITHOUT
LIMITATION LOSS OF PROFITS OR LOSS OF USE), WHETHER OR NOT OLYMPUS SHALL BE
OR SHOULD BE AWARE OF THE POSSIBILITY OF SUCH POTENTIAL LOSS OR DAMAGE.
Representations and warranties made by any person, including but not limited to dealers,
representatives, salespersons, or agents of Olympus, which are inconsistent or
of
addition to the terms
writing and approved by an expressly authorized officer of Olympus.
.
~
This limited warranty is the complete and exclusive statement of warranty which Olympus agrees to
"'0
provide with respect to the Products and it shall supersede all prior and contemporaneous oral or
a5
written agreements, understandings, proposals, and communications pertaining tothe subject matter
a.
hereof.
a.
~
This limited warranty is exclusively for the benefit of the original customer and cannotbetransferred
or assigned.
this limited warranty, shall not be binding upon Olympus unless reduced to
NO EVENT SHALL OLYMPUS BE LIABLE FOR ANY INDIRECT,
scheduled operatorand maintenance items,
in
conflict with or in
WHAT TO DO WHEN SERVICE IS NEEDED
The customer must transfer any image or other data saved on a Product to anotherimage or data
storage medium and/orremove any film from the Product priorto sending the Product to Olympusfor
service.
IN
NO EVENT SHALL OLYMPUS BE RESPONSIBLE FOR SAVING, KEEPING OR MAINTAINING
ANY IMAGE OR DATA SAVED ON A PRODUCT RECEIVED BY IT FOR SERVICE, OR ON ANY
FILM CONTAINED WITHIN A PRODUCT RECEIVED BY IT FOR SERVICE, NOR SHALL
12
OLYMPUS BE RESPONSIBLE FOR ANY DAMAGES
LOST OR IMPAIRED WHILE SERVICE IS BEING PERFORMED (INCLUDING, WITHOUT
LIMITATION, DIRECT, INDIRECT, INCIDENTAL, CONSEQUENTIAL OR SPECIAL DAMAGES,
LOSS OF PROFITS OR LOSS OF USE), WHETHER OR NOT OLYMPUS SHALL BE OR SHOULD
EN
BE AWARE OF THE POSSIBILITY OF SUCH POTENTIAL LOSS OR IMPAIRMENT.
IN
THE EVENT ANY IMAGE OR DATA IS
of
IS
Page 73

Package the Product carefully using ample padding material to prevent damage in transit and either
deliver it to the Authorized Olympus Dealer that sold you the Product orship it postage prepaid and
of
insured to any
When returning Products for service. your package should include the following:
1.
Sales receipt showing date and placeofpurchase.
2.
Copyofthis limited warranty bearing the Product serial number corresponding to the serial
number on the Product (unless it is a model
numbers).
3.
A detailed descriptionofthe problem.
4. Sample prints, negatives, digital prints (or files on disk) if available and related to the problem.
When service is completed, the Product will be returned to you postage prepaid.
our Olympus Service Centers.
on
which Olympus does not place and record serial
WHERE TO SEND PRODUCT FOR SERVICE
See "WORLDWIDE WARRANTY" for the nearest service center.
INTERNATIONAL WARRANTY SERVICE
• International warranty service is available under this warranty.
of
• IBM is a registered trademark
• Microsoft and Windows are registered trademarks
• Macintosh is a trademark
• xD-Picture
• All othercompany and product names are registered trademarks and/or trademarks
respective owners.
• The standards for camera file systems referred to
File System/DCF" standards stipulated by the Japan Electronics and Information Technology
Industries Association (JEITA).
Card™
is a trademark.
of
International Business Machines Corporation.
of
Microsoft Corporation.
Apple Inc.
in
this manual are the "Design Rule for Camera
of
their
EN
13
Page 74

SPECIFICATIONS
.Camera
Product type
Recording system
Memory
No. ofpictures
(when fully charged)
No. ofeffective pixels
Image pickup device
Lens
Photometric system
Shutter speed
Shooting range
Monitor
Flash charge time
Outer connectors
Automatic calendar system
Water resistance
.~
"C
C
a.
a.
Dust resistance
Operating environment
Q)
«
Power supply
Dimensions
Weight
Still pictures
Applicable standards
Sound with still
pictures
Movies
Type
Meaning
Temperature
Humidity
Digital camera (for recording and playback)
Digital recording, JPEG (in accordance with Design rule for
Camera File system (DCF))
Exif 2.2, Digital Print Order Format (DPOF), PRINT Image
Matching III, PictBridge
Wave format
AVI Motion JPEG
Intemal memory
xD-Picture Card 16 MB to 2 GB (TypeH/M, Standard)
Approx.260
(based on CIPA battery life measurement standards)
10,100,000 pixels
1/2.33" CCD (primary color filter), 10,700,000 pixels (gross)
Olympus lens 5.0 to 18.2 mm, f3.5 to
(equivalent to 28 to 102 mm on a 35 mm camera)
Digital ESP metering, spot metering system
4 to
1/1000 sec.
0.5 m (1.6
0.1
m (0.3 ft.) to
0.02 m (0.8 in.) to 0.5 m (1.6
0.07 m (2.8 in.) to 0.2 m (0.7
2.7" TFT color LCD display, 230,000 dots
Approx. 3.5 sec. (forfull flash discharge at room temperature using
a new fully charged battery)
Multi-connector (DC-IN jack, USB connector,
2000 up to 2099
Equivalentto IEC Standard publication 529 IPX8 (under OLYMPUS
test conditions), available
Camera can normally be used under water at a specified water
pressure.
IEC Standard pUblication 529 IP6X (under OLYMPUS test
conditions)
-10°C to 40°C (14°F to 104°F) (operation)1
-20°C to 60°C (-4°F to 140°F) (storage)
30% to 90% (operation)/10% to 90% (storage)
One Olympus lithium ion battery (L1-50B) or Olympus AC adapter
93.2 mm (W)
(excluding protrusions)
173 g
ft.) to
00
(WIT) (normal)
00
(W), 0.3 m (1.0 ft.) to
ft.) (W only) (super macro mode)
ft.) (W only) (S-macro LED mode)
in
10 m (32.8 feet) deep water
x 61.4 mm (H) x 21.3 mm (D) (3.7 x 2.4 x 0.8 in.)
(6.1
oz) (excluding battery and card)
5.1
00
(T) (macro mode)
AN
OUTjack)
"Shadow Adjustment Technology" function contains patented technologies from Apical
Limited.
~
..
~[4
~~
apical
)
Page 75

·Lithium
ion battery (LI-50B)
Product type
Model No.
Standard voltage
Standard capacity
Battery life
Operating environment
Temperature
Dimensions
Weight
.Battery
Model No.
Power requirements
Output
Charging time
Operating environment
Temperature
Dimensions
Weight
charger (LI-50C)
Lithium ion rechargeable battery
1I-50BA/lI-50BB
DC 3.7 V
925 mAh
Approx. 300 full charges (varies on usage)
O°C
to 40°C (32°F to 104°F) (charging)/
-10°C to 60°C (14°F to 140°F) (operation)/
-10°C to 35°C (14°F to 95°F) (storage)
x 40.0 x 7.0 mm (1.4 x 1.6 x 0.3 in.)
34.4
Approx. 20 g (0.7 oz)
LI-50CAAlLI-50CAB/LI-50CBAlLI-50CBB
AC 100 to 240 V (50 to 60 Hz)
DC 4.2 V, 700 rnA
Approx. 2 hours
O°C
to 40°C (32°F to 104°F) (operation)/
-20°C to 60°C (-4°F to 140°F) (storage)
62.0
x 23.8 x 90.0 mm (2.4 x 0.9 x 3.5 in.)
Approx. 70 g (2.5 oz)
.Using
Low temperature operationofthe optional Olympus xD-Picture Card and lithium ion battery are
guaranteed to
temperatures up to -10°C (14°F).
Olympus xD-Picture
Standard
TypeM
TypeH
Olympus lithium
1I-50B
• The number
Design and specifications subject to change without notice.
in
low temperatures
O°C
(32°F). However, the following have been tested for use with this product
Card
16 MB 32 MB
./
-----
-----
ion
of
storable still pictures is reducedinlow temperatures.
./
-----
----- ----- -----
battery
64MB
./
-----
128 MB 256 MB 512 MB 1 GB
-----
./
in
2GB
./
./
./
./
./
./
./
-----
./
./:
Operation confirmed
-----
./
./
»
"'0
"'0
CD
::l
a.
x·
Page 76

CAMERA DIAGRAM
Multi-Connector
39,
41, 47) Microphone
(P.
Strap Eyelet
Connector Cover
(P. 39, 41, 47)
(Po
Speaker
Shutter Button
(P.9,11)
(Po
29)
3)
Flash (P. 17)
POWER
(P.
Button
6,
11)
LED Illuminator/
Self-Timer Lamp
(P. 17,
19,40)
Lens
(P.
62)
.~
"'0
C
Q)
a.
a.
«
Monitor (P 37,
I~....
I
:II-+-------+------+--H
: (P. 10, 18)
I MENU Button
(Po
:
I
""
Card Access Lamp
(P
77)
49,63)
0,-------+--""""\
r+-------+-Tf-)
------t-----
OLYMPUS
16)
DISP././·~
(P.19)
l~lL
11((
j)
,..-
/
~.
mo~
__
Q.
j,i---
Zoom Button (P. 16)
Mode Dial
(P.
6,10,12)
-~~
I.---+-o~~ic~~
~
~~
J "i
~-.I.~~~~-t-:--
1[&
!Iiii!
.-----+--I--~.
Button
~
~
rOl.:J--H--i1f---
..
J:'i
"....
.,-n
-IE/J;;h
.....
~
I Arrow Pad (6'V<J[»
button
(Playback/Print)
@Button(OKlFUNC)
(Po
15)
fj,,!c/I(ff
Button
(Shadow Adjustment
Technology/Erase)
(P.
6,15)
(Po
..
L.-!:::
flt
~
©II
ff
n
'"
Battery/Card Compartment
Cover (P.
4)
18)
Tripod Socket
Page 77

Monitor
•
Monitor-Shooting
Sy~bots'&
Ico~s
mode
1
23
~
~~-...
45
-1-1
67
-a1
2 3
4
8
24-
23
22
21
20
19
18
Still picture
.9.
,.
1 Shooting modes
Flash mode
2
Silent mode
3
4 Macro mode
Super macro mode
S-macro LED mode
Shadow
5
AF lock mark
6
Battery check
7
Flash standby
8
Camera movementwarning/
flash charge
AF target mark
9
10 Pressure, altitude/depth 960hPa
Sound record
11
12 Dualtime
Alarm
13
Number
14
pictures
Remaining recording time 00:34
Current memory
15
16 Self-timer
17 Shutter speed/ 1/30 F3.5, etc. -
Aperture value
18 Exposure compensation -2.0 - +2.0
19 Compression
Frame rate
20 Image size
21
Spot metering
22 Drive
Adjustment
of
storable still 4
ynn
,?BS;W'
,f
;:
Technology
?';~':~!lli'Y;ji':
~,~,~,~,~,~,~,e~.
@,~,@
~
~
s~
IIi
~+:
IAFLI
00
~
~
...
L..
t
~
•
c:lliJ
No icon (Recording pictures to the card)
~
N~M
[Ill
110M1,~,116:91,
0
Qb,~
9
10
etc.
FItE
~,
21
20
19
/
(FINE)
etc.
18
..
00
'AWY}'!!:
(30 frames/sec.)
16
Movie
iii
Ai)BiY;~ltfP':B:
11
12
13
iri~;,;~i"
=full power, a=low power
(Lit)
(Blinks)
.,
...
Om
(Recording pictures to the internal memory),
(NORMAL),
(15 frames/sec.),
15
>~;:i\
+;
9
·Re~<ptige
P.12,
15,26
P.17
P.29
P.17
P.18
P.12
P.58
P.51
P.
9,11,
29
P.40
P.29
P.38
P.38
P.54
"'0
"'0
»
m
:::J
a.
x·
P.63
P.17
P.17
P.23
P.23
P.29
P.28
Page 78

,
Item
23 ISO ISO 100, ISO 400, ISO 1600, etc.
24 White balance
,,'
·o·~
-"1\:'
,':0,
f>.
\:,
..........
S1-
Indication,;,
t
~3
e
c.
345
':,/" .
Ref.
P.28
P.27
Page-
.~
"0
C
(1)
Cl.
Cl.
«
1514
Still
picture
Item
.:/'
1 Silent mode
Print reservation/Number of
2
prints
Sound record
3
4 Protect
5 Battery check
Pressure, altitude/depth 960hPa
6
7 Shutter speed/ 1/1000 F3.5, etc.
Aperture value
Exposure compensation -2.0 - +2.0
8
White balance WB AUTO,
9
10 Image size
11
File number
12 Number of frames 4
Elapsed time/
Total recording time
13 Current memory
14 Compression
Frame rate
ISO ISO 100, ISO 400, ISO 1600, etc.
15
16 Date and time
\:«0
13 13
.
~;",
p
~
~x10
[JlJ
10-..1
00
=full power,~=low power
Om
etc.
~l?~,
110M),
lli),
116:9),~,
6E!
100-0004
00:
14/00:34
@ (Playing back the picture
No icon (Playing back the pictureinthe card)
NfRM
(NORMAL),
[j]]
(15 frames/sec.),
2008.08.2612:30
'\4:'
~,
FItE
Indicati<)n
;f>..,
etc.
(FINE)
00
Movie
si-
€-3
etc.
in
the intemal memory),
(30 frames/sec.)
;,
'ft;f~
"'.
Ref-Page
P.29
P.44
P.34
P.33
P.58
P.40
-
P.17
P.27
P.23
P.37
-
P.14
P.63
P.23
P.28
P.7,37
lIEN
Page 79

Index
CAMERA DIAGRAM 76
[EVOLUME
36
A
AC adapter 64
ADD FAVORITE 15,
Adding sound to still pictures
AF lock 12
AF MODE 29
AF target mark
ALARM CLOCK 38
ALL (SLIDESHOW) 30
ALL ERASE
ALL INDEX 42
ALL PRINT 42
All-frame reservation
AUTO (Auto-flash) 17
AUTO (ISO) 28
AUTO (WB) WB AUTO 27
Auto focus 52
AV cable 3, 39
16r
~
~
9,
31
34
11,29
34
44
B
BACKUP 35
Battery
Battery charger
Battery check 77
BEEP 36
BGM 30
Black &White 32
3,
4, 62, 64
4,
62
C
CALENDAR 32
CALENDAR (SLIDESHOW) 30
Calendar display 16
CAMERA MENU 23, 27
Card
CCD 37
Close-up playback 0. 16
Cloudy day
COLOR EDIT 32
COMBINEINCAMERA1 24
COMBINEINCAMERA2 24
COMBINEINPC 24
COMPRESSiON 23
Continuous recording length 55
Cropping a pictute
CUSTOM PRINT 42
~
.p-
24,35,63
31,43
o
Date and time
Digital image stabilization mode
DIGITAL ZOOM 28
Direct printing
Display language •
DPOF 44
DRIVE 28
DUALTIME
~
€)
.@
(~»
7,
6,
.41
27
37
12
35
38
E
EASY PRINT
EDIT
ERASE 34
Erase
Error message 58
ESP 29
ESP/[!]
EV 17
Exposure 17
Exposure compensation
1B
41
31
10,18
29
17, 78
F
FACE DETECT 29
FILE NAME 37, 43
File name 37
Fill-in flash
FINE
FINE ZOOM 28
Flash charge 51, 77
Flash mode
Flash
Fluorescent lamp1/2/3
Focus 9, 11,
Focus lock
FORMAT 35
Format 35
FRAME 32
Frame number 78
FRAME RATE 24
Function menu 15
F~E
off@
~
~
23
11, 17
Si~2~3
12,28,52
G
GUIDE
(Shooting guide)
6,
H
High speed sequential shooting
Histogram display 19, 56
I
iESP 29
IMAGE QUALITY 23
IMAGE SIZE 23
INDEX 33
Index display
Information displays 19
Internal memory 35, 63
ISO 28
~
L
LABEL 32
LED ILLUMINATOR .40
Lithium ion battery 3,4,62
Hii
M
m/ft 40
Macro mode
MANOMETER 40
MEMORY FORMAT 35
Menu
~
11, 17
17
17
27
11
13
28
16
21
EN
19
Page 80

MENU COLOR 36
Menu guide 19
Monitor brightness adjustment
Monitor Symbols & Icons 77
MOVIE (SLIDESHOW) 30
MOVIE (Topmenu) 27
MULTI PRINT 42
~gJ
37
N
NON-WATER MOVIE
NORMAL
NTSC 39
Numberofstorable still pictures
N~M
~
27
23
54
o
OLYMPUS Master
Operation guide 21, 42, 44
Optical zoom 16. 28
P
PAL
PANORAMA 24
Panorama playback 14
PC 47
PERFECT FiX
PictBridge
Picture rotation 0
PIXEL MAPPING
Play "My Favorite" * 15
PLAYBACK MENU 30.
Playback mode
Playbackona TV 39
Playing timelTotal recording time 14
POWER SAVE .40
PRE-CAPTURE MOVIE
Press completely
Press halfway
PRINT ORDER
Print settings
Printing pictures
Protect
PW ON SETUP
o-n
IE
~
~
1O.11, 13, 16. 19. 35
R
RECVIEW
Recording movies
Recording sound with still pictures t 29
REDEYE FIX
Red-eye reduction flash @ 17
RESET 24
Resizing
~
~
3,
46
39
30
41
33
37
33
27
9.
11
9,
11
33, 42
44
.41
33
36
36
30
31
12
Shooting mode
Shooting still pictures (Full auto mode)
............................................................6,12
Shooting still pictures (Program auto) Q
............................................................6,12
SHUTTER SOUND 36
SILENT MODE
Single-frame playback 16
Single-frame reservation
Single-frame shooting D 28
Sleep mode
SLIDESHOW 30
S-macro LED mode
SOUND SETTINGS 36
SPOT (AF MODE) 29
Spot metering
STILL PICTURE (SLIDESHOW)
Strap 3
Sunny day
Super macro mode
~
~
&i
[!]
~$?;
s!l
11,
16, 19, 35
mum
29
44
51
11, 17
29
30
27
11, 17
T
Top menu
Tungsten light
Turn the camera
TYPE 30
:f>.:
on
21
27
U
Under water 1/2/3
UNDERWATER MOVIE
USB cable 3. 41, 46. 47. 49
~1a2~3
~
28
27
V
VIDEO OUT 39
W
Warning sound
White balance WB 27
.1))
X
xD-Picture Card 24. 63
Z
Zoom 16, 28
6
36
S
Saturation (High) 32
Saturation (Low)
SCN (Scene)
SEL.IMAGE
Self-timer
Sepia
Sequential shooting Q 28
SETUP menus 35
SHADOW ADJ
EN
80
SHOOT & SELECT1/2
~
~
1"eJ
i'8
6,
32
12,26
34
11,
17
32
30
27
Page 81

MEMO
Page 82

MEMO
82
EN
Page 83

MEMO
EN
83
Page 84

OLYMPUS*
http://www.olympusamerica.com/
OLYMPUS
3500
Corporate
Technical
24/7 online automated help: http://www.olympusamerica.com/support
Phone customer support: Tel. 1-888-553-4448 (Toll-free)
Our phone customer support
http://olympusamerica.com/contactus
Olympus software updates
To
find the nearest Service Centers, please visit: http://www.olympusamerica.com/digital.
and
clickonthe Worldwide Warranty icon at the bottom ofthe page.
U.S.A.:
California
New
York
Canada:
Mexico:
Argentina:
Parkway,
Support
Olympus Imaging America Inc.
10805
Holder
Cypress,CA90630-5145
Tel:
(888)
Olympus Imaging America Inc.
400
Rabro
Hauppauge,NY11788-4258
Tel:
(888)
Olympus Canada Inc.
Consumer Products Group
151
Telson
Markham,
Tel.
(888)553-4448
Olympus
WTC
Mexico,
Montecito
Col.
Napoles,
Tel.
(01800)800-2128
E-mail:
oimx@olympus.com
Jesus Labrador
Paraguay
Tel:
(011)4313-3174
E-Mail:
olympus@jesuslabrador.com.ar
Jesus Labrador
Bartolome
C1036AAP-Buenos
Tel:
(011)4331-1227
E-mail:
service@basr.com.ar
P.O.
Box
(USA)
is
canbeobtained
Street
Suite
553-4448
Drive
553-4448
Road
Ontario
Canada
ImagingdeMexico
NO.38-Lobby-Office
Mexico
D.F.
755
PB,
C1057AAI-
Fax:
Mitrte
860
Aires
Fax:
IMAGING
610,
Center Valley,PA18034-0610,
available from 8amto10pm
at:
Service
170
L3R1E7
S.A.deC.V.
3
03810
Buenos
(011)4312-5239
(011)4331-1247
Aires
AMERICA
http://www.olympusamerica.com/digital
Centers
Brazil:
Chile:
Colombia:
Panama:
Uruguay:
Venezuela:
INC.
U.S.A.
(Monday to Friday)
Olympus Optical do Brasil Ltda.
RuadoR6cio
CEP
04552-906-Sao
Tel:
+55113046-6427
Fax:
+55113046-6412
E-mail:
obl-cameras@olympus.com
REIFSCHNEIDER
CaminoEIConquistador
Huechuraba,
Tel:
56-2-6781200
E-mail:
olympus@reifschneider.cl.
serviciotecnico@reifschneider.c1
CV
TronlcaLTDA
Calle68No
Tel:
(0571
Fax:
(0571)
E-mail:
servicio@cvtronica.com
CV
Tronlca LTDA
Cra9No
23-49
Tel:
(0571
CV
Tronlca LTDA
Av,
Cra15No
Tel:
(0571)637-3540
FOTOSER
Edit.EIPaical,
Urb.
Herbruger,
(Detras
del
Tel/Fax:
E-mail:
Fotocamara S.R.L.
Rondeau
Tel:
E-mail:
MlcronC.A.
4ta.
Edificio
Tel:
E-mail:
(507)
rearanda@rocketrnail.com
(02)
900-2004
FOTOCAM@ADINET.COM.UY
transversal
America,
(0212)
serviciotecnico@micron.com.ve
----
Tel.
484-896-5000
ET
430-2andar-Vila
Paulo-Brasil
S.A.
del
Santiago
12-57,
)235-7260/348-1573
348-1574
Local
215
)284-4365
105A-22
Oficina
Transistmica
SIM
Riba
261-0436
1470
Montevideo
Urb.
Mezanine,
238-3526
Monte
Fax:
56-2-6781202
Bogota
C,C
Intercentro,
Piso2Local5,Bogota
N03,
P.A.
Smith),
Fax:
(02)
Horizonte,
Caracas
Fax:
(0212)
........
Ollmpia
5024
Bogota
900-8430
1070-A
239-8598
© 2008
PrintedinChina
OLYMPUS
IMAGING
CORP.
VS457401
Page 85

© 2008 OLYMPUS IMAGING CORP.
A
VS480501
lID
• This camera comes with a microSD attachment (hereinafter attachment).
You
can use a microSD card (optional) with this Olympus digital camera by inserting the card
to the attachment.
For the list
(http://www.olympus.com/).
This is useful for playback
Lt.
Do
microSD
printers,
Doingsonot
malfunctionofthe device.
A.lnserting
Push the microSD card into the position as shown in the diagram.
of
Olympus digital cameras that support the attachment, please visit our website
Caution
not
use
the
attachment
attachment,aswellaswith
and
other
devices
only
may
the
microSD
on
damage
Instruction
devices that do not support xD-Picture Card.
with
Olympus
digital
other
that
support
xD-Picture Card.
the
pictures
card
Manual
cameras
brandsofdigital
taken,
but
may
thatdonot
cameras,
also
resultinthe
support
computers,
this
...
B
c
•
•
D
~k~~Owsn:.n=1
bJ
B.
Removing
Pull out the card straightly.
Lt.
Caution
If
the
distributors/service
C.lnserting
Insert the attachment into the camera's xD-Picture Card slotinthe same direction as the
xD-Picture Card.
For details, please refer
CD
Inserting
@
Inserting
D.
Numberofstorable
Numberofstorable still pictures and recording length vary according to the camera model.
For details, please visit our website (http://www.olympus.com/).
You
can also check the numberofstorable still pictures and recording lengthonthe monitor
the camera.
CD
Numberofstorable
@
Recording
_Compatible
microSD
For the listoftested microSD cards, please visit our website (http://www.olympus.com/).
_Sending
You
camera.
To
send data to other devices, remove the attachment from the camera and use the microSD
card adapter.
-Formatting
Formatting the card using the camera deletes not only images stored inside the camera
(including protected images), but also data recorded by devices otherthan the camera.
Make sure that there
-Handling
Do
not touch the contact areaofthe attachment or microSD card. Doing so may cause failure
in
reading the images.
When fingerprints or stains are foundonthe contact area, wipeitwith a soft dry cloth.
_Safety
Make
• Do not insert anything other than the microSD card
This attachmentisexclusive for useofmicroSD cards only. Other typesofcards cannot be
installed.
Do not insertanything other than xD-Picture Card or attachmenttothe camera
If you insert a card by mistake, such as a microSD card, do not use force.
Contact authorized distributors/service centers.
Damages such as scratches may result in heat up or burst.
Keep young children and infants away from camera
Children might swallow it accidentally.
Ifthis product is swallowed, seek medical attention immediately.
Do not disassemble or alterthis product
Doing so may result
Do not allow water or other foreign objects from entering the product
Inserting
the camera.
-Trademarks
xD-Picture
microSD is a trademark
-
Specifications
Product type
Environment
Dimensions
Weight
Design and specifications
Push the microSD card into the position
as
:v:
microSD
can send imagestoa computer or printer by using the USB cable provided with this
sure
showninthe
the
card
into
the
xD-Picture Card
the
Attachment
length
cards
card
images
the
precautions
Precautions
that
you
an
attachment containing water or other foreign objects to the camera maydamage
Card™
is a trademark.
diagram.
microSD
cannot
centers.
the
to
the camera's instruction manual.
still
card
is
no important data before formatting.
read
through
in
injuries.
of
Attachment for microSD
Temperature
Humidity
25 mm(W) x 20.3 mm(H) x 1.7 mm(D) (1.0 x 0.8 x 0.07 in.)
(Handle:2.2
Approx. 0.9 g (0.03 oz)
subJecttochange Without nollce.
card
be removed,donot
camera
still
picturesIRecording
pictures
the camera's
theSDAssociation.
-10
to
to
-20
95% and below (operation)
mm
(0.09 in.))
use
force.
Contact
authorized
length
instruction
40"C (14 to 104"F) (operation) /
65"C (-4to149"F) (storage)
manualaswell
/85%
and below (storage)
.
of
Page 86

IiiII
Cet appareil photo est foumi avecunlecteur pour cartes microSD (ci-apres appele lecteur).
Vous pouvez utiliser
I'inserant dansIelecteur.
Pour
la
Iiste les appareils photo numeriques Olympus qui sont compatibles avecIelecteur,
veuillez visiter notre site Web (http://www.olympus.com/).
Ce dispositif est utile pour
carte xD-Picture Card.
it.
Attention
N'utilisez
compatibles
d'appareils
compatibles
Sinon,
vous
I'appareil.
A.lnstallation
Poussezlacarte microSD jusqu'alaposition indiquee surIediagramme.
B.
Retraitdela
Retirez la carte d'un mouvement precis.
it.
Attention
Si la carte
distributeursoules
les
C.lnsertion
InserezIelecteur danslafente pour cartes xD-Picture Card de I'appareil photo dans la meme
direction que
Pour plus de details. veuillez consulter
eD
Insertiondela carte xD-PictureCard
®
Insertiondulecteur
D.
Nombredephotos
Le
nombre des photos stockables
I'appareil photo.
Pour plus de details. veuillez visiter notre site Web (http://www.olympus.com/).
Vous pouvez aussi verifier
I'ecran de I'appareil photo.
eD
Nombredephotos
® Duree
de
.Cartes
Carte
microSD
Pour plus de details, veuillez visiter notre site Web (http://www.olympus.com/).
• Envoi
•
.Consignesdemanipulation
.Consignes
•
d'images
Vous pouvez envoyer des images versunordinateur ou une imprimante a I'aide d'un cable
USB foumi avec I'appareil photo.
Pour envoyer des donnees a d'autres appareils, enlevez
utilisez I'adaptateur pour cartes microSD.
Formatagedela
Si
vous formatezlacarte a partir de I'appareil photo, vous risquez de supprimer non
seulementles images stockees dans I'appareil photo (y compris les images protegees), mais
aussi des donneesenregistrees par des dispositifs autres que I'appareil photo.
Assurez-vous qu'il n'y a pas de donnees importantes avantd'effectuer
Ne touchez pas a la zone de contact du lecteurou delacarte microSD. Ceci peut empecher la
lecture des images.
Lorsque vous apercevez des empreintes digitales ou des taches sur la zone de contact,
nettoyez-Ies avec
Assurez-vousdelireIeguide
N'inserez rien d'autre que
Ce lecteur est reserve a I'usage exclusif de la carte microSD.
D'autres types de cartes
N'inserez dans I'appareil photo rien d'autre que
Si vous y inserez une carte par erreur. telle que la carte microSD, n'utilisez pas de force.
Communiquez avec les distributeurs ou les centres de service autorises. Les dommages tells
que les rayures peuvent causer
Keep young children and infants away from camera
Les enfants pourraientl'avaler par accident.
Si ce produit est avale, demandez immediatement de I'aide medica
Ne demonteznine modifiez pas ce produit
Ceci peutcauser des blessures.
Ne permettez pas que I'eau ou autres objets exterieurs penetrent dans I'appareil photo
L'insertion d'un lecteur contenant de I'eau ou autres objets exterieurs dans I'appareil photo
peutl'endommager.
Marquesdecommerce
xD-Picture
microSD est une marque de commerce de
la
carte microSD (optionnelle) avec cet appareil photo Olympus
la
pas Ie
lecteur
avec ce
photo
avec la carte
risquez
avec les appareils
lecteur
numeriques,
non
seulement
delacarte
la
Poussez
position indiquee surIediagramme.
carte microSD jusqu'a
carte
microSDnepeut
la
carte xD-Picture Card.
I'enregistrement
dans
stockables
centresdeservice
I'appareil
Ie
compatibles
carte
un
tissu doux et sec.
de
securite
la
ne
Card™
est une marque de commerce.
Guide
d'utilisation
en
lecture dans desappareils quinesont pas compatibles avec la
photo
pour
cartes
ordinateurs,
xD·Picture
microSD,niavec
imprimantesouautres
Card.
d'endommager
numeriques
les
d'autres
photos
Olympus
marques
appareils
prises,
quinesont
mais
aussi
microSD
la
microSD
pas
etre retiree,
n'utilisez
autorises.
pas de force.
Communiquez
photo
Ie
guide d'utilisation pour I'appareil photo.
stockablesIdureedeI·enregistrement
etla
duree de I'enregistrement varient selonIemodele de
nombre des photos stockables
d'utilisationdeI'appareil
carte microSD
peuvent pas y etre installes.
Ie
surchauffage
la
SO
Association.
etla
duree d'enregistrement sur
Ie
lecteur de I'appareil photo et
Ie
formatage.
photo
egalement.
carte xD-Picture Card ouIelecteur
etla
brOlure.
Ie.
.Specifications
Type de produit Lecteur pour cartes microSD
Environnent
Dimensions
Poids Environ 0,9 9
Temperature -10 a 40
Humidite
25mm(Iargeur)x20,3mm(hauteur)x1,7mm(profondeur)
95%et
'C
(fonctionnement)
moins
(fonctionnement)
/-20
a 65'C(stockage)
/85
%et moins (stockage)
(poignee:
pas
avec
2,2mm)
EiI
Esta camara viene conunaccesorio microSD (a partir de ahora, el accesorio).
Usted puede utilizar una tarjeta microSD (opcional) con esta camara digital Olympus
introduciendo
Para ver
visite nuestro sitio web (http://www.olympus.com/).
Esto es utiI para reproducir en dispositivos que noadmiten la tarjeta xD-Picture Card.
it.
No
utiliceelaccesorio
accesorio
impresorasyotros
Hacerlo
como
A.lnstalacion
Empuje la tarjeta microSDenla
B.
Extracciondela
Tire dela tarjeta recto hacia fuera.
it.
Sinose puede
centros
C.lntroduccion
Introduzca el accesorio enlaranura para la tarjeta xD-Picture Card delacamaraenla
direcci6n que la tarjeta xD-Picture Card.
Para obtener detalles, por favor consulte el manual de instrucciones de la camara.
eD
Introducciondela tarjeta xD-Picture Card
®
Introducirelaccesorio
D.
Numerodefotos
EI
numero de fotos fijas almacenables ylalongitud de grabaci6n varian segun el modele de
camara.
Para ver detalles, porfavor visite nuestro sitio web (http://www.olympus.com/).
Tambien puede comprobar las fotos fijas almacenables yla longitud de grabaci6n en el monitor
de la camara.
eD
Numerodefotos
®
Longitud
.Tarjetas
tarjeta
Para verlaIista de las tarjetas microSD probadas, por favor visite nuestro sitio web (http://
www.olympus.com/).
• Enviodeimagenes
Usted puede enviar imagenes aunordenador 0 impresora utilizando el cable USB incluido
con esta camara.
Para enviardatos a otros dispositivos, extraiga el accesorio delacamara y utilice el adaptador
para tarjetas microSD.
•
Formateodela
Formatearlatarjeta utilizandolacamara elimina no
camara (incluyendo las imagenes protegidas), sino que
dispositivos distintos de
Compruebe que no hay datos importantes antes del formateo.
.Precauciones
No toque el area de contacto del accesorionide la tarjeta microSD. Hacerlo puede provocar
fallos
Cuando se encuentren huellas dactilares 0 manchas en el area de contacto, Iimpielascon
pano seco y suave.
.Precauciones
Compruebe
No introduzca nada que sea distinto de
Este accesorio es exclusivo solamente para
se
No
No introduzca nada que sea distinto de
camara.
Si introduce una tarjeta por error. como una tarjeta microSD, no utilice
contacto con centros autorizados de distribuci6n/reparaci6n.
Los danos como los aranazos pueden provocar calentamientos 0 explosiones.
Mantenga a los ninos pequenos y bebes lejos de la camara
Los ninos
Si
se traga este producto, busque atenci6n medica inmediatamente.
No desmonte
Hacerlo puede tener heridas como resultado.
No permita que el agua
La
introducci6n deunaccesorio que contenga agua u otros objetos extranos enlacamara
puede danar
.Marcas
xD-Picture
microSD es una marca registrada de
•
Especificaciones
Tipo de producto Accesorio para microSD
Entomo
Dimensiones
Peso Aprox. 0,99
la
tarjeta en el accesorio.
la
lista de las camaras digitales de Olympus que admiten el accesorio, por favor
Cuidado
microSD,
asi
no
resultado
dispositivos
solo
puede
fallosdefuncionamiento
delatarjeta
Empuje
se
segun
Cuidado
extraer
autorizadosdedistribucion/reparacion.
enlacamara
fijas
grabable
compatibles
microSD
de
enlalectura de las imagenes.
de
quehaleido
pueden instalar otros tipos de tarjetas.
selapodrian tragarpor accidente.
ni
altere este producto
la
camara.
registradas
Card™
es una marca registrada.
Temperatura
Humedad
25 mm (An) x 20,3 mm (AI) x 1,7mm (P) (Asa:2,2 mm)
Manualdeinstrucciones
con
las camaras
como
daiiar
las
posicion segun se muestra eneldiagrama.
la
tarjeta microSD en la posici6n
muestra en el diagrama.
tarjeta
la tarjeta microSD,noutilice
fijas
almacenables
tarjeta
la
camara.
digitales
otras
marcasdecamaras digitales,
que
admitan
fotografias
la tarjeta
tomadas,
del
dispositivo.
Olympus
xD·Picture
sino
microSD
microSD
la fuerza. Pongaseencontacto
almacenablesILongituddegrabacion
s610
las imagenes almacenadas en la
tambiEm
manipulacion
seguridad
tambien
todoelmanualdeinstruccionesdela camara.
la
tarjeta microSD
su
uso con tarjetas microSD.
la
tarjeta xD-Picture Card 0 del accesorio en
ni
otros objetos extranos entren en el producto
la
asociaci6n
De
95%ymenos
-10
a40'C
SO.
(funcionamiento)/de
(funcionamiento)
quenoadmitan
que
tambien
los datos grabados por
-20
/85%ymenos
este
ordenadores,
Card.
puede
la
fuerza. P6ngase en
a65'C
(almacenamiento)
(almacenamienlo)
tener
con
misma
la
un
Page 87

OLYMPUS
""'~A
Software
Guide
~-J!ljj''''''''
Installation
d'installation
Master
Guide
du
logiciel
Software-Installationsanleitung
Guia de instalacion del
Guia
de
Instala~ao
PyKOBOAcTBO
no
yCTaHoBK8
de
progr
So
m.
. -
nporpaMMbl
~
li
E
!f~1Oi~
xl
J
~
0Ic
$x1*~~j~iW
'X~~~~t~if.j
Guida all'installazione del software
Pruvodce
Software-installatiehandleiding
Vejledning
Instrukcja
instalaci
til
softwareinstallation
instalacji
softwaru
programu
en
2
OLYMPUS
http://www.olympus.com/
handleiding
System
Operating
System
Processor
RAM
Free Hard Drive
Space
Monitor Settings
Others
1
Requirements
.'t!jfff;
Turnonyour
Master2setup
Turnonyour
ROM
Double-clickonthe
Windows
XP
ProfessionalNista
Pentium
256MBormore
500MBormore
1024x768
Minimum
colors
USB
portorIEEE
Internet Explorer 6 or later
QuickTime 7orlater recommended QuickTime 6orlater
DirectX9or
Windows
2000
Professional/XP
III
500MHzorfaster
pixelsormore
65,536
colors
recommended)
1394
later
recommended
(Minimum
port
Home
16,770,000
Edition!
Mac
PowerPCG3
Intel
256MBormore
500MBormore
1024x768
Minimum
colors recommended)
USB
Safari
asxv1
Core
portorIEEE
1.0orlater
(.h't-
computer
computer
icon
appearsonyour
screen
appears.
Setup
and
and
desktop,
icon
insert
insert
that
the
CD-ROM
the
CD-ROM
double-click
appears.
(OLYMPUS
(OLYMPUS
it.
Macintosh
0.3orlater
500MHzorfaster
Solo/Duo
pixelsormore
32,000
colors
1394
(1.3orlater
Master
Master
1.5GHzorfaste
(Minimum
(FireWire)
recom
2).
The
2).
Wh
11
p,
CD
contents
Windows
• OLYMPUS Master 2 (Including Online
• QuickTime 7
• OLYMPUS muvee theaterPack Trial Version
Macintosh
• OLYMPUS Master 2 (Including Online
•
WindowS®isa
• QuickTime
trademarkofthe
•
Other
respective owners.
Copyright
as Windows
CPU
RAM
HDDO)~~g.
'to-$'
-t-O)it!l
and
company
2007
registered
trademarkofMicrosoft
the
QuickTime logo are trademarksofApple Computer Inc.,
same
companyinthe
and
product
OLYMPUS
XP
Home Edition /XPProfessional/Vista
Pentium
III
256MB
~;U
500MB
~;U
1024x768I''y
65,536
feJ;(J::.
USB;t{-
HUd<t
Internet Explorer 6
QuickTime 7
DirectX 9
USA
names
appearinginthis
IMAGING
Windows
2000
Professional /
500MHz
J;(J::.
I-~;<J::.
(1.677
IEEE
J;(J::.
J;(J::.!t~
J;(J::.!t~
1
H'J
::J~1,tEItlIJ"t'
OLYMPUS
Master
CD-ROM
2 -t!
")
...
User
Resistration)
User
Resistration)
Corporationinthe
and
other
countries.
manual
CORP.
J)tg~;<J::.llt~)
1394
;t{-I-
1'7'1':11<:
7 ")
CD-ROM
7iiiifiibl~jjt2n*9
USA
and
are
trademarksorregistered
Printed in China VH834901
Mac
as
PowerPCG3
Intel Core Solo / Duo 1.5GHz
256MB
500MB
1024x768
32,000
USB
;t{-I;t{-ISafari 1.0
QuickTime 6
(OLYMPUS
0
other
countries.
and
Macintosh
x
vl
0.3
J;(J::.
500MHz
J;(J::.
J;(J::.
I"Y
feJ;(J::.
I-J;(J::.
0.677
,Ud<t
IEEE
J;(J::.
(1.3
J;(J::.
Master2)1,tAnllc,
Macintoshisa registerd
trademarksoftheir
J;(J::.
J;(J::.
J)feJ;(J::.!t~)
1394
(FireWire)
J:)J::.!t~)
OLYMPUS
2
Selectadisplay
•
Follow
the
•
After
installing
FR
Guide d'installation du-' fclel
Configuration
Systeme
d'exploitation
Processeur
RAM
Espace
disponible
Parametres du
moniteur 65536
Autres
E'lftP(.Ii?t_
1
Mettez
L'ecran
Windows
XP
Pentium
256Moau
disque
500Moaupiuse
1024x768
minimum recommandees) minimum recammandees)
Port
Internet
QuickTime 7 ou ulterieur recommande
DirectX 9 au ulMrieur recammande QuickTime 6 au ulterieur
votre
d'installationdeOLYMPUS
o
Master
Z
language
displayed
systeme
ProfessionnelNista
USBauport
ordinateur
directions
OLYMPUS
2000
Professionnel/XP
III
500
MHzausuperieur
plus
pixelsouplus
couleurs
minimum
IEEE
Explorer6au
minimale
Windows
sous
and
click
[OLYMPUS
.
Master2,updateitfirst
Home
(16770000
1394
ulterieur
tensionetinserezIeCD-ROM
Master2apparait.
OLYMPUS
on
slideshow
transitions
with
Trytouse
Edition!
couleurs
Master
software
BGM,
Mac
PowerPCG3
Intel
256Moau
500Moau
1024x768
32000
Port
Safari
recommande)
-"".
!!J
Setup
2).
muvee
theaterPack
that
allows
withavarietyofe
addedtoimages
and
burn
using
0.3ouulterieur
Solo/Duo
plus
piUS
pixelsauplus
couleurs
ontoaCD
muvee
it.
Macintosh
500
MHzausuperie
1,5
minimum
IEEE
(OLYMPUS
OLYMPUS
before
asxv1
Core
USBauport
1.0auulterieur
you
thea
GHzouSl
(16
770
1394
(Fire'
(1.3auulter
Mast
t
a
or
H'J::J~1,tEItlIJ"t'
TA?'"
';I 71<:
?1J*90
Setup
7'1'::J~bl~jjt2n*90n·,
I 0
OLYMPUS
CD-ROM
CD-ROM
Master
1'7'1'/1<:
7'1'::J~bl~jjt2n*90)"t",CD-ROM
2
CD-ROM
Setup
-+
(OLYMPUS
7'1'
::J~1,t$'/Jj,?
.•
,orlln
Master
2)1,tAnllc,
7'1'::J~1,t$'/Jj,?
')
';I?
1.,,*90
I)
';I
Mettez
votre
Lorsque
Double-cliquez
!'iconeduCD-ROM
OLYMPUS
ordinateur
sur
I'icone
o
Master
sous
tensionetinserezIeCD-ROM
apparait
surIebureau,
Setup
qui
apparait.
Z
-+
(OLYMPUS
double-cliquez
·e
sur
Mast
celie
Page 88

OLYMPUS
*:
Window~only
**:English help only
Software for Editing &
OLYMPUS
Windows",
Macintosh
Managing
Images
Master
Compatible
2
QuickTime
""i~ml
S"
'......::
~
..........................................................
<0
2008
Wi~
isaregistered
QuickTime
and
lvee
..
oProduo..r
OLYMPUS IMAGING CORP. All rights reserved.
trademarkofMicrosoft
and
the
Macintoshisa
in
W]O§[B
DIGITAL
Quicklime
the
U.S.A.
Logo
registered
and
MadeinChina
DATA
Corporationinthe
are
trademarksofApple
trademarkofApple
other
countries.
U.S.A.
Inc.
and
Inc.
VS389201
other
countries.
12041
Page 89

OLYMPUS~
WORLDWIDE
thiS worldwlde warranty
Gene identifICatIOn de garantledolt lme presentee a un centre de rilparsiion agree Olympus avant
Esta tar]eta de garantla debe ser presentada en un
Serial
No
Num de Sene
I N°de sene
WARRANTY
mustbepresented atanOlympus authorized repair service station before any repair can be made under conditIOns of the warranty
Model
Modele
Modele"
Name Name and address
Nom: Nom at adresse
Nombre
Address:
Adresse
Direccl6n:
Sty
Customer I Acheteur I Comprador Dealer I Revendeur I Vendedor
GARANTIE INTERNATIONALE
seMelO
teenlCO Olympus autonzado para efectuar cualQUIer reparaclon
I
us
030SW
1
-
Que
loute
reparation pUlsse etre
DateofPurchase
Date dachat:
Fechadecampra
Nombre
y dlrecclOn
GARANTIA
lalle
sous les conditionsdela
cublerta
MUNDIAL
garan{le
par aSIa garantla
The provisIOns are
It is recommended that the
Departmentat1·80CH>22-6372,toattempttodetermine
problem.
IF YOU HAVEQUESTIONSORNEEO HELP
If you have questIons about the
have any questIOns
States whICh have not been resolved
Olympus
3500
Corporate ParkwayPOBox
Center Valley, PA 18034.Q610
Attn:
Customer
Do
not send
shownInthe
Imaging Amenca
Care
productstothiS address
or
comments
customer
Inc
instruction
first call Olympus's Consumer Support
useorperformanceofyour
regardIng service
to
your satisfactIOn,
610
USA
performedInthe UnIted
the
natureofthe
ProductsorIf you
wnte
dIrectly to·
Les disposItions
11
est
recommandeauclientdecontacter
d'Olympusaunumero
probli:lme
SI
VOUS
Si
vous avez
vos ProdUits ou
des
servICes eHectues aux Etats·UnlS
veUillez ecnre
Olympus
3500
Corporate Parkway
Center Valley, PA 18034.Q610
Attn:
Customer
Ne
pas envoyerde produrts a
sont
Indlquees dans les Instructions
1--800-622.f)372 pour essayer
AVEZ
OES
QUESTIONS au BESOIN O'AIDE
des
questions a propos de I'utllisatlon ou
Sl
vous avez
dlrectement
Imaging Amenca Inc.
Care
a
PO.
des
questIons ou
Box
610
U.SA
cette
adresse
d'abordIeServIce a la
qUi
n'ont
d'ldenuflerlanature du
des
commentalres
pas
attemt
VS517401
des
performances de
concemant
\laue satisfaction,
clientele
PrintedinChina
Page 90

Las
condiciones aparecen indicadas en las instrucciones.
recomiendaalcliente
Se
ConsumidordeOlympusal1-800-622-6372
naturaleza del problema.
51
TIENE
Si
algunas
Estados
directar.lente
Olympus Imaging America Inc.
3500 Corporate Parkway P.O. Box 610
Center Valley, PA 18034-0610 U.S.A.
Attn:
No
ALGUNA5
tiene preguntas ace
preguntas0comentariosenrelaci6nalservicio
Customer
envie
Unidos,
productos
quenohan
a:
Care/Servicioalcliente
Ilamar
primeroalDepartamentodeAtenci6n
PREGUNTA5 0 NECE51TA
rca
del uso 0
a esta direcci6n.
rendimientodesus Productos 0sitiene
side
resueltosasu
para
AVUDA
intentar
realizado en
satisfacci6n,
determinar
escriba
al
la
los
SERVICE CENTERS
WHERE
Olympus Imaging America Inc.
400 Rabro Drive
NY
Hauppauge,
11788-4258
1-800"O"CAMERA(622-6372)
Olympus Imaging America Inc.
10805 Holder Street, Suite 170
Cypress, CA 90630-5145
1-800"O"CAMERA(622-6372)
Olympus Canada Inc.
Consumer Products Group
151
Telson
Road
Markham, Ontario Canada
1-866-267-3039
*Please refer to the appended list for the authorized international Olympus service network.
TO
L3R1E7
SEND PRODUCT FOR SERVICE.
Olympus Imaging de Mexico S.A. de C.V.
WTC Mexico, Montecito
NO.38
- Lobby - Office 3
Col. Napoles, Mexico D.F. 03810
(01800) 800-2128
 Loading...