

Page 1

INSTRUCTIONS
Read this manual carefully before using your
camera.
Page 2

WARNING
Indicates circumstances
under which mishandling
resulting from ignoring this
symbol could result in
personal injury or property
damage.
KEEP THE BATTERIES AWAY FROM
FIRE. NEVER TRY TO
DISASSEMBLE, RECHARGE, OR
SHORT-CIRCUIT BATTERIES.
KEEP THE BATTERY OUT OF THE
REACH OF CHILDREN. IF A CHILD
SWALLOWS A BATTERY, CONTACT
2
A DOCTOR IMMEDIATELY.
Page 3

NEVER ATTEMPT TO DISASSEMBLE
THE CAMERA; IT CONTAINS A HIGHVOLTAGE CIRCUIT. IF THE INTERNAL
PARTS OF THE CAMERA ARE
EXPOSED DUE TO DROPPING OR
DAMAGE, REMOVE THE BATTERIES
IMMEDIATELY TO PREVENT
FURTHER USAGE.
IN CASE OF MALFUNCTION,
CONSULT YOUR NEAREST
OLYMPUS DEALER OR OLYMPUS
SERVICE CENTER.
3
Page 4

Names of parts .................................. 5
Viewfinder display/LCD panel ............ 7
Cartridge ............................................ 8
Loading the battery ............................ 9
Checking the battery ........................ 10
Loading the cartridge film ................. 12
Taking pictures ................................. 13
Unloading the cartridge film ............. 14
Setting the print type ........................ 15
Print area on film .............................. 16
Using the Flash ................................ 17
Selftimer ........................................... 19
Care and storage ............................. 20
Specifications .................................. 24
4
Page 5
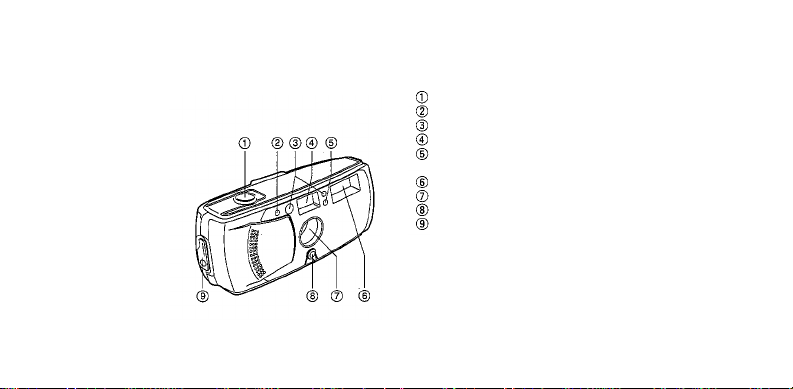
NAMES OF PARTS
Camera body
Shutter release button
AE light sensor*
Autofocus window*
Viewfinder
Red-eye reduction lamp/selftimer
signal
Flash*
Lens*
Lens barrier switch
Cartridge cover release
*Do not soil as this can cause blurred
pictures. Wipe clean with a soft cloth.
5
Page 6
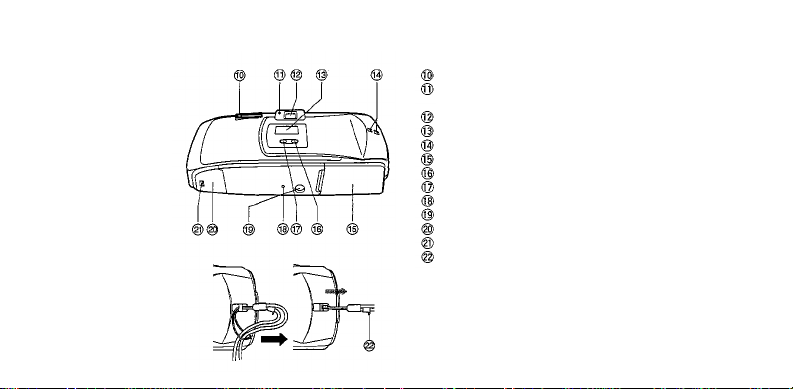
Print type selector switch
Green lamp (ready-to-shoot
indicator)
Viewfinder
LCD panel
Strap eyelet
Cartridge cover
Selftimer button
Flash mod e button
Mid-roll rewind button
Tripod socket
Battery compartment cover
Battery compartment cover release
Strap ring tip
ATTACHING THE STRAP
The camera strap ring tip can be used
to press the mid-roll rewind button.
6
Page 7

VIEWFINDER DISPLAY/
LCD PANEL
Viewfinder
Green lamp (ready-to-shoot indicator)
Picture frame
Autofocus frame
LCD panel
Fill-in mode (Forced Activation mode)
Flash-Off mode
Night Scene Flash mode
Exposure counter
Battery check
Cartridge mark
Film wind/rewind mark
Red-Eye Reduction Flash mode
Selftimer mode
Auto Flash mode
Notes:
• The Viewfinder format changes in accordance
with the print type selected (p. 15).
• The LCD panel does not actually display all
indications simultaneously as shown.
7
Page 8

CARTRIDGE
IX240 Cartridge Film
Visual Exposure Indicator
• Only cartridges with the
(unexposed) visual exposure
indicator can be used with this
camera.
• When a cartridge with other than the
visual exposure indicator is
loaded, the camera will rewind the
film and set the cartridge to
(exposed).
• Take along plenty of film cartridges
when traveling to foreign countries
and other areas where cartridge
purchasing may be difficult.
• Do not forcibly move the visual
exposure indicator because this may
damage the cartridge. Using a
damaged cartridge can result in
camera trouble.
8
Page 9

LOADING THE BATTERY
Use one 3V lithium battery (CR2).
1. Slide the battery compartment
cover release and open the
cover
2. Load the battery and align the
and ends correctly.
3. Turn the lens barrier switch to
turn on the camera. Check the
battery power on the LCD panel (p.
10). About 15 rolls of film can be
used with one new 3V lithium
battery (when the flash is used on
half of pictures).
Notes:
• Dispose of used batteries in the bat te ry
recycling boxes at stores selling batteries.
• if lithium batteries are not fully discharged,
protect them against short-circuiting (e.g., by
taping th e contacts) before disposal.
9
Page 10

CHECKING THE BATTERY
Turn the lens barrier switch to turn
on the camera.
Display: lights.
Meaning: Battery is OK. You can
shoot.
Display: lights.
Meaning: Battery power is low and
should be replaced with a
new battery.
Display: blinks.
Meaning: Battery power is dead and
should be replaced with a
new battery.
10
Page 11

Battery Handling
• Observe the precautionary remarks
written on the batteries.
• When the camera is not used for an
extended period of time, remove the
battery.
• Keep spare batteries on hand when
going on a long trip or to a cold area.
• Sweat, oil, and so on can prevent a
battery's terminals from making
electrical contact. To avoid this, wipe
both terminals before loading the
battery.
11
Page 12

LOADING THE CARTRIDGE
FILM
Use unexposed negative-color IX240
cartridge film (ISO 100~400).
1. Make sure that is displayed on the
camera's exposure counter. Turn the
cartridge cover release to open the
cartridge cover
2. Insert a cartridge with the
(unexposed) visual exposure indicator
and close the cartridge cover
film will automatically advance to t he
first frame and"I" will appear in the
exposure counter
• If starts blinking after the cartridge
has been loaded, reload the cartridge.
The battery must already be loaded
before you load a cartridge.
• If you remove t he battery before the
roll of film has been fully exposed, the
exposure counter returns to . (You
12
will be able to continue shooting,
however.)
, The
Page 13

TAKING PICTURES
1. Turn the lens barrier switch tto turn on
the camera.
2. Look through the viewfinder and position
the autofocus frame on your subject.
3. Press the shutter release button
halfway to make sure the flash green lamp
lights. (The focus and exposure are
locked on the subject.)
• When the green lamp is blinking, the
flash is being recharged and the shutter
cannot be released.
4.
Compose the shot within the picture frame-
. Press the shutter release button
to take the picture,
• Working distance:0.9m(3ft)~ .
• Always turn off the camera when you
finish taking pictures.
WARNING: SERIOUS EYE DAMAGE MAY
RESULT FROM L OOKING DIRECTLY AT
THE SUN THROUGH THE VIEWFINDER.
13
Page 14

UNLOADING THE
CARTRIDGE FILM
1. The film wil l be rewound
automatically when the end of the
roll is reached
2. Wait until the motor stops and "E"
and the cartridge mark start blinking
in the exposure counter. Then
open the cartridge cover
3. Remove the cartridge .The
cartridge visual exposure Indicator
will be set to (exposed).
•The camera will not operate until
the rewound cartridge is removed.
4. To rewind the film before the end of
the roll, pr ess the mid-ro ll re w ind
button using the camera strap
ring tip or anything equivalent. The
cartridge will be set to (exposed).
14
Page 15

SETTING THE PRINT TYPE
Set the print type selector switch to the
desired type: C, H or P .
Print type selector switch
C type viewfinder
H type viewfinder
P type viewfinder
Always keep the print type selector
switch set correctly. The print type
setting is optically recorded on the film.
The number of exposures does not
change even when the print type is
changed.
15
Page 16

PRINT AREA ON FILM
Print Type Setting Configuration
Print type
C type
c
H type
P type
H
P
16
Aspect ratio
Approx. 2:3
Approx. 9:16
Approx. 1:3
Page 17

USING THE FLASH
Press the flash mode button to
select the appropriate mode for the
shooting conditions or your requirements.
1. AUTO Auto Flash: This mode is used
normally. The flash fires automatically in dar k places.
2. AUTO Red-Eye Reduction: Minimizes the effect which causes
eyes to appear red in pictures.
3. Flash Off: Use this mode when
you do not want the flash to fire
even in dark places.
4. Fill-In: Use this mode when
you want the flash to fire regardless of lighting conditions.
5. Night Scene Flash: Lights the
subjec t in the foreground with a
night scene in the background.
17
Page 18

• In the Flash Off and Night Scene
Flash modes, use a tripod to prevent
camera-shake.
• When the flash mark is displayed
on the LCD panel and the green
lamp blinks, the flash is being recharged and the shutter does not
release.
• Turning off the camera restores the
Auto Flash mode except when the
camera is set to the Red-Eye Re-
duction Flash mode.
ISO
200
400
Flash Range
0.9~2.3 m (3~7.5 f t )
0.9
3.3m
(3
10.8
~
~
ft)
Using colo r negative film
18
Page 19

SELFTIMER
Attach the camera to a tripod or similar
support.
1. Press the selftimer burton to
display
2. Aim at your subject, and press the
shutter release button . The selftimer signal will light, and the
shutter will be released about 12
seconds later. The signal sta r t s
blinking right before the shutter releases.
• When the green lamp is blinking,
the flash is being recharged and
the selftimer does not work.
• To cancel the selftimer while operating, again press the selftimer
button or turn the camera off.
• Focus and exposure are locked
when the selftimer button is
pressed. Do not press the selftimer
button while you are in front of the
camera.
19
Page 20

CARE AND STORAGE
1. Do not leave the camera in any
place exposed to excessive heat,
humidity, or direct sunlight — for
example, in a car or on the beach.
2. Do not expose the camera to
formali n o r naphthalene.
3. If the camera gets wet, wipe it with
a dry towel. The salt in seawater
can be especially damaging.
4. Do not use organic solvents, such
as alcohol or paint thinner when
cleaning the camera.
20
Page 21

5. Do not leave the camera on or near
a television, refrigerator, or other
appliance with a magnetic field.
6. Do not expose the camera to dust
or sand as this could cause serious
damage.
7. Do not shake or shock the camera.
• Keep the camera in a well-ventilated
place.
• Do not expose t h e camera to
extr eme heat (over 40°C/104°F) or to
extreme cold (below -5°C/23°F). Low
temperatures, even within this range,
may sometimes cause deterioration
in battery performance, temporarily
disabling the camera.
21
Page 22

• When transporting the camera from
a cold place to a warm place or in
the event of a sudden temperature
change, put the camera into a plastic
bag. This allows the camera's
temperature to change slowly. Once
the camera has adjusted to the new
temperature, you can remove it from
the bag and use it.
22
Page 23

• Avoid leaving the camera unused for
long periods of time. This can cause
mold to grow on the camera as well
as other problems. Try to press the
shutter release button and check the
operation of the camera before use.
• Some airport X-ray machines can
damage the film in your camera. Try
to avoid passing your camera
through these machines. Give it to
the security officer for manual
inspection.
• This camera is not suitable for
professional use or for use under
extreme conditions.
23
Page 24

SPECIFICATIONS
Type: Autofocus lens-shutter camera.
Film format: IX240 cartridge film.
Image size: 16.7 x 30.2 mm.
Print type: Selection between C, H and P print
types.
Lens: Olympus lens, 24 mm F7,3 elements in
3 groups.
Shutter: Programmed electronic shutter (1/200
~ 1/3
sec).
Viewfinder: Albada viewfinder 0.33X
magnification. Shooting ready indicator
(green lamp).
Focusing: Active type autofocus with focus
lock. Focus range: 0.9 m (3 ft) ~ .
Exposure counter: Progressive type, reverses
during rewind.
Selftimer: Electronic selftimer with approx. 12
sec. delay. Cancellation is po ssi ble .
Film speed: Automatic setting (ISO 100, 200
and
400).
24
Page 25

Film loading: One-touch insertion, automatic
loading (automatically advanced to first
frame when cartridge cover is closed}.
Film advance: Automatic film winding.
Film rewind: Automatic rewind at end of roll.
Mid-roll rewind also possible.
Rash: Built-in flash.
Flash modes: Auto Flash (automatic activation
in low light), Red-Eye Reduction Flash,
Flash-Off, Fill-in and Night Scene Flash.
Data recording: Optical recording system (print
type information only)
Power source: One 3V lithium battery (CR2).
Dimensions: 123 (W) x 50 (H) x 36 (D) mm (4.8
x2x1.4in).
Weight: 135 g (4.8 oz) (without batte r y).
Design and specifications are subject to
change without notice.
25
Page 26

OLYMPUS
OLYMPUS
OLYMPUS
OLYMPUS
OLYMPUS
This device complies with part 15 of the FCC Rules. Operation is subject
to the conditions that this device does not cause harmful interference.
This Class B digital apparatus meets all requirements of the Canadian Interference-Causing Equipment Regulations.
OPTICAL
AMERICA
OPTICAL
SINGAPORE
KOREA
This camera complies with EU directive 89/336/EEC for CE marking.
CO.,
CO.,
INC.
CO.
LTD
San-Ei
Two
(EUROPA)
PTE.
LTD.
8F
Building,
22-2,
Corporate
GMBH.
LTD.
491B
Tel. 7387838/1 -800-OLYMPUS(6596787)
Central
Banking
Nishi
Center
Drive,
Melville,
(Premises/Goods
(Letters) Postfach 10 49 08, 20034 Hamburg, Germany.
River
Valley
Road,
Corporation
Shinjuku 1 -chome,
NY
11747-3157,
delivery)
Wendenstrasse
#13-04
Valley
Bldg.,
826-20
Yoksam-dong,
Shinjuku-ku,
Point
Fax. 0081-3-3346-8380
Tel. 00852-2730-1505 Fax. 00852-2730-7976
U.S.A.
Tel. 1-800
14-18,
Office
Tower,
Kangnam-gu,
Tokyo,
20097
Japan.
"O"
Singapore
Seoul
CAMERA(622-6372)
Hamburg,
Tel.
03-3340-2211
248373
135-081
Germany.
Korea.
Tel.
Tel.
040-237730
02-3466-2910
CS0475
63139-400-OLY
A
0201
 Loading...