

Page 1
DETAILED
INSTRUCTIONS
DIGITAL VOICE
RECORDER
Thank you for purchasing an Olympus
Digital Voice Recorder.
Please read these instructions for information
about using the product correctly and safely.
Keep the instructions handy for future reference.
To ensure successful recordings, we recommend that
you test the record function and volume before use.
EN
Register your product on w ww.olympus- consumer.com/r egister
and get additional benefits from Olympus!
Page 2
EN
Introduction
• The contents of this document may be changed in the future without advanced notice.
Contact our Customer Suppor t Center for the latest information relating to product names
and model numbers.
• The utmost care has been taken to ensure the integrity of the content s of this document. In
the unlikely event that a questionable item, error, or omission is found, please contact our
Customer Support Center.
• Any liability for passive damages or damage of any kind occurred due to data loss incurred
by a defect of the product, repair per formed by the third party other than Olympus or an
Olympus authorized service station, or any other reason is excluded.
Tradema rks and reg istered tr ademark s
• IBM and PC/AT are the trademark s or registered trademark s of International Business
Machines Corporation.
• Microsoft, Windows and Windows Media are registered trademark s of Microsoft
Corporation.
• Macintosh and iTunes are the trademarks of Apple Inc.
• microSD and microSDHC are the trademarks of SD Card Association.
• MPEG Layer-3 audio coding technology licensed from Fraunhofer IIS and Thomson.
• EUPHONY MOBILE
TM
is a trademark of DiMAGIC Corporation.
• DVM
TM
is a trademark of DiMAGIC Corporation.
• The product was developed based on noise- canceling technology under license from NEC
Corporation.
Other product and brand names mentioned herein may be the trademark s or registered
trademarks of their respective owners.
2
Page 3
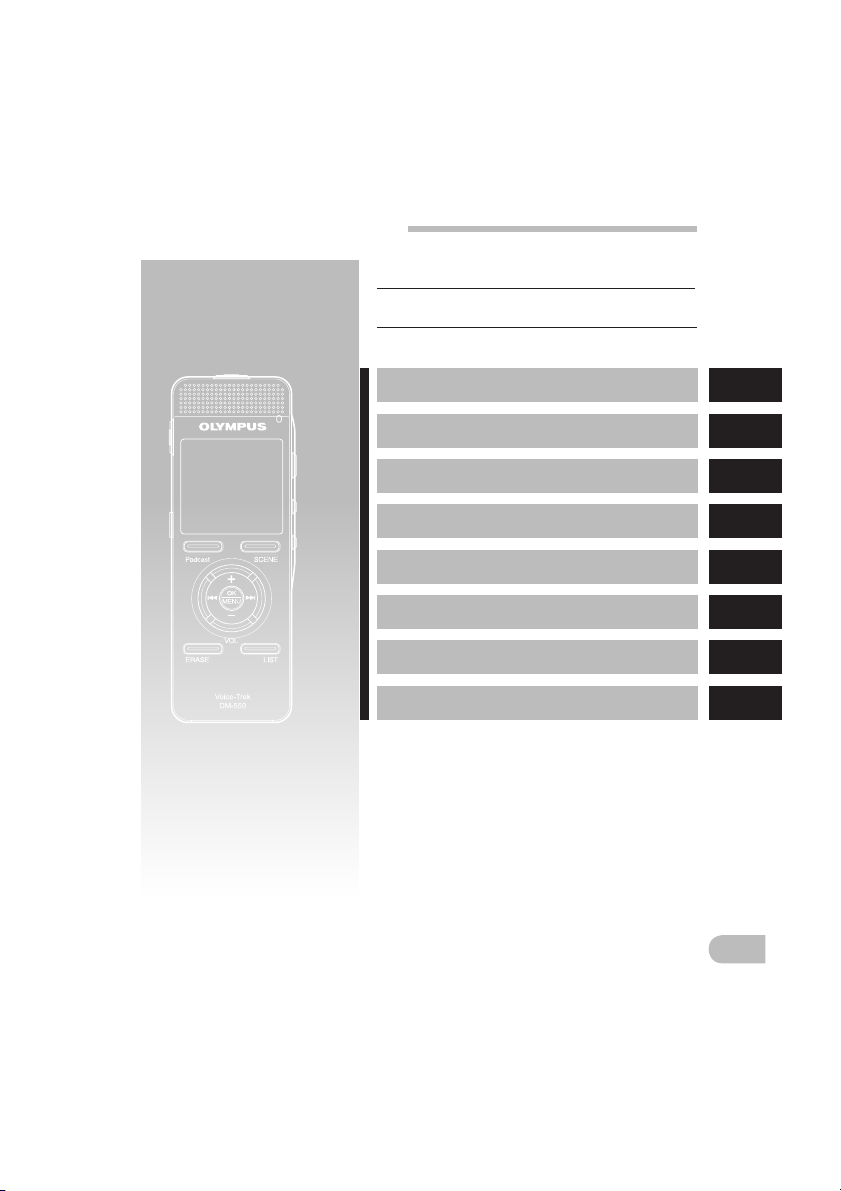
Table of Con tents P.4
EN
Impor ting Content fo r Listening
on the Rec order
P.94
Other I nformation P.120
INDEX
Safe an d Proper Usage P.6
Getti ng Started P.8
About Re cording P
About Pl ayback P
Menu Set ting P.4 4
Using th e Recorder on Your P C P.73
Managi ng Files on Your PC P.8 5
.28
.33
1
2
3
4
5
6
7
8
3
Page 4

Table of contents
Introduction
INDEX ....................................................... 3
Safe and p roper usage .............................. 6
General Pr ecautions ....................................... 6
Batter ies ......................................................... 6
1 Getting Started
Main fea tures ........................................... 8
Identi fication of p arts ............................ 10
Display (LCD pa nel)
[Recorde r] Mode Display Scree n ..............11
Display (LCD pa nel) [Music] [Podcast]
[Audible] Mode Di splay Screen ................12
Power supp ly ......................................... 14
Insert ing batterie s ........................................14
Charging b y connecting to a co mputer
via USB .....................................................15
Connec t to the USB connecti ng AC adapter
(optional) to c harge .................................16
Turning on/of f the power ..............................18
HOLD ...................................................... 19
Setti ng time and date [ Time & Date] ....... 20
Changing t he time and date..........................21
Inser ting and Ejec ting a microSD c ard ..... 22
Insert ing a microSD card .............................. 22
Eject ing a microSD card ................................2 3
Notes on th e folders ............................... 24
About the f olders for voice r ecordings ..........24
About the f older for music play back ............ 25
About the f older for Podcas t Contents ......... 26
About the f older for Audibl e Contents ......... 26
Selec ting the fold ers and files ................ 27
2 About Recording
Record ing .............................................. 28
Recommen ded settings b y recording
conditi on ................................................. 30
Recordi ng from exter nal microphone or
EN
other devi ces ............................................31
4
3 About Playback
Playbac k ................................................ 33
Bookma rk mode ........................................... 36
Setti ng an index mark or a tem p mark ........ 38
How to begin s egment repeat play back ...... 40
Erasin g ................................................... 42
Partia lly erase a file (Fo r DM-550) ............... 43
4 Menu Setting
Menu set ting method ............................. 44
File Menu ................................................. 46
Rec Menu ................................................. 47
Play Menu ................................................ 50
LCD/Sound Men u ..................................... 53
Device Men u ............................................ 54
Rearran ging files [Repla ce] .......................... 56
Moving/Co pying Files [File Move /Copy]
(For DM-550) ........................................... 57
Splitt ing Files [File Div ide] (For DM-550) ..... 59
Timer Rec ording [Timer Re c] ........................6 0
Setti ng the Recording S cene [Rec Scene] ..... 62
Alarm Playb ack Function [Alar m] ................ 6 4
Setti ng the Playback scen e [Play Scene] ...... 66
Guidance [ Voice Guide] ................................ 68
Changing t he USB Class [USB Setti ngs] ........ 69
Format ting the recorde r [Format] ............... 71
5 Using the Recorder on Your PC
Saving Fi les in Your PC ............................ 73
Operat ing environm ent ...........................74
Functi ons Available i n
the Oly mpus Sonorit y ........................ 75
Instal ling Soft ware ................................ 76
Uninst alling Sof tware ............................ 78
Using On line Help ................................... 79
Connec ting to Your PC ............................. 80
Connec ting to your PC .................................. 80
Disconne cting from yo ur PC ......................... 81
Runnin g Olympus Son ority ..................... 82
Window Na mes (Olympus So nority) ........ 83
Page 5

Table of contents
6 Managing Files on Your PC
Downlo ad Voice Files from t he Recorder
Play a Voice Fil e ...................................... 87
Using th e Waveform Editin g Function ..... 88
Using th e One-touch ef fect Funct ion ....... 88
Upload Voi ce Files to the Reco rder .......... 89
Copying Vo ice Guide Data ....................... 90
USB Micro phone/USB Spe aker ................. 91
Upgrad e Function ................................... 92
Functi ons Available i n
the Oly mpus Sonorit y Plus ................. 93
Functi ons Available w ith the
Music Ed iting Plug-in ......................... 93
7 Importing Content for
Listening on the Recorde
Impor ting Content fo r Listening on th e
Record er ............................................ 94
Using Wi ndows Media Playe r .................. 95
Window nam es ............................................ 96
Copying mu sic from CD ................................ 97
Transferr ing music file to t he recorder ......... 98
Copying voi ce file to the CD .........................101
Using iTune s ..........................................103
Window nam es ...........................................103
Copying mu sic from CD .............................. 104
Transferr ing music file to t he recorder ........105
Copying voi ce file to the CD ........................ 106
Impor ting Podcast Co ntent....................107
Registe r a Podcast progr am ........................107
Update a pro gram ...................................... 108
Downloa d the Content ............................... 109
Transfer Con tent to the Recorder ................110
Progra m Guide Functi ons ......................111
To register pr ograms ...................................111
Loadin g Audible Conte nt ....................... 112
Install ing AudibleManage r .........................112
Adding Dev ice to AudibleManag er .............113
Purchasi ng Audible Content ........................ 113
Transfer ring Audibl e Content ................114
Enjoy Aud ible Content wi th
... 85
the Reco rder .....................................115
Audible Mo de ..............................................115
Playback Po sition and Sec tion ....................116
Operati ng Recorder in Audi ble Mode ..........117
Using as e xternal memo ry of the PC .......119
8 Other Information
Alarm me ssage list ................................120
Troubles hooting....................................121
Accesso ries (optional) ............................123
Speci fications .......................................124
Technica l assistanc e and support ...........127
r
EN
5
Page 6

Safe and proper usage
Before using you r new recorder, rea d this
manual c arefully to ens ure that you know
how to operate it safely and c orrectly.
Keep thi s manual in an easily accessible
location for future reference.
• The warning symbols indicate impor tant
safety related information. To protect
yourself and others from personal injury or
damage to property, it is essential that you
always read the warnings and information
provided.
General Precautions
• Do not leave the recorder in hot,
humid locations such as inside a
closed automobile under direct
sunlight or on the beach in the
summer.
• Do not store the recorder in
places exposed to excessive
moisture or dust.
• Do not use organic solvents such
as alcohol and lacquer thinner to
clean the unit.
• Do not place the recorder on top
of or near electric appliances such
as TVs or refrigerators.
• Avoid recording or playing back
near cellular phones or other
wireless equipment, as they may
cause interference and noise.
If you experience noise, move
to another place, or move the
recorder further away from such
equipment.
• Avoid sand or dirt. These can
cause irreparable damage.
• Avoid strong vibrations or
shocks.
• Do not disassemble, repair or
modify the unit yourself.
EN
• Do not operate the unit while
operating a vehicle (such as a
bicycle, motorcycle, or go-cart).
• Keep the unit out of the reach of
children.
<Warning regardi ng data loss>
Record ed content in mem ory may
be destroyed or erased by op erating
mistakes, unit malfun ction, or duri ng
repair work.
It is recommend ed to back up and save
impor tant content to ot her media such a s
a computer hard disk.
Any liability fo r passive damage s or
damage o f any kind occurre d due to data
loss inc urred by a defect of the product ,
repair p erformed by the third p arty other
than Olympus or an Olympus authorize d
service stat ion, or any other reasons i s
exclud ed from the Olympus’s liabilit y.
Batterie s
D Danger:
• Batteries should never be
exposed to flame, heated, shortcircuited or disassembled.
• Never store batteries where
they will be exposed to direct
sunlight, or subjected to high
temperatures in a hot vehicle,
near a heat source, etc.
D Warning:
• Do not solder lead wires or
terminals directly onto a battery
or modify it.
• Do not connect the
- terminals together. This may
cause fire, overheating or electric
shock.
= and
6
Page 7

Safe and proper usage
• When carrying or storing the
batteries, be sure to put it in
the provided case to protect its
terminals. Do not carry or store
the batteries with any metal
objects (such as key rings).
If this warning is not followed,
fire, overheating or electric shock
may occur.
• Do not connect the batteries
directly to a power outlet
or a cigarette lighter of an
automobile.
• Do not insert the batteries with
their
= and - terminals reversed.
• If any liquid from a battery gets
into your eyes, promptly wash it
off with clean water and consult
your doctor at once.
• Do not attempt to recharge
alkaline, lithium or any other
non-rechargeable batteries.
• Never use any batteries with a
torn or cracked outer cover.
• Keep batteries out of the reach of
children.
• If you notice anything unusual
when using this product such as
abnormal noise, heat, smoke, or a
burning odor:
1 remove the batteries immediately
while being careful not to burn
yourself, and;
2 call your dealer or local Olympus
representative for service.
• Do not expose the batteries to
water. Do not allow water to
contact the terminals.
• Do not remove or damage the
batteries insulating sheet.
• Do not use the batteries if you
find something wrong with them
such as leakage, color change or
deformity.
• Unplug the charger if the
charging is still incomplete after
the specified time it should take.
• Should any batteries liquid get on
skin or clothing, promptly wash it
off with clean water.
• Keep batteries away from fire.
D Caution:
• Do not mix and use a charged
battery with a discharged
battery.
• Do not use dry cell batteries,
batteries that have different
capacities or are of different
types and brands.
• Charge the two batteries
simultaneously to use them.
• Do not subject batteries to strong
shocks.
• When using rechargeable
batteries that have not been used
for a while, be sure to recharge
them before use.
• Rechargeable batteries have
limited lifetime. When the
operating time becomes shorter
even if the rechargeable battery
is fully charged under the
specified condition, replace it
with a new one.
EN
7
Page 8

Getting Started
Main features
s Supports the linear PCM format,
which is capable of recording
sound quality equivalent to or
surpassing CD-level (For DM-550).
Capable of realistically recording various
1
different sound sources. High resolution
Main fea tures
recording at a high sampling frequency
equivalent or superior to that of a music
CD (Sampling frequency 44.1 kHz, Bit
count 16bit) is possible ( P.47).
s Supports a wide range of
recording formats. Can handle
the MP3 format (MPEG-1 Audio
Layer 3), and the Windows Media
Audio (WMA) format.
This device can save files in a highly
compressed manner, thereby allowing
for extended recording times ( P.47).
In addition, when connected to an
external device, the recorder can encode
incoming analog audio signals without a
PC ( P.32).
s Supports high capacity recording
media.Besides the 4GB (DM-550)
or 2GB (DM-450) built-in memory,
you can also record onto a
commercially-available microSD
card (
P. 22).
Check the OLYMPUS website regar ding
mi cro SD c ard s wh ich ar e co nfir med
operation with this recorder.
s You can playback WAV, WMA, and
MP3 format files transferred from
a computer in addition to files
recorded by the device itself.
You can be enjoyed as a music player at
any time.
s It has a built-in Variable Control
Voice Actuator (VCVA) function
EN
( P. 48).
8
s The Low Cut Filter minimizes
air conditioner noise and other
similar noises while recording
( P. 48).
s The recording level can be
adjusted automatically or
manually (For DM-550) (
s A Noise Cancel function ( P. 50)
and a Voice Filter function
( P. 50) cut noise and enable
clear audio playback.
s For WMA-format recording, you
can select one of 6 recording
modes such as stereo or monaural
( P. 47).
s Has built in recording scene
setting (
scene setting (
to register the recording or
playback sound quality or mode
according to different usages.
s You can move or copy files
between the built-in memory
and microSD card, and within the
folders in the memory (For DM-
550) (
s You can split files ( P. 59), or
delete a part of a file (
recorded in PCM format in this
recorder (For DM-550).
s It has a backlight full-dot display
(LCD panel) (
s It features various repeat
functions (
s Index mark and temp mark
features allow you to quickly find
desired locations (
P. 62) and playback
P. 66) functions
P. 57).
P. 11).
P. 40, P.50).
P. 47).
P. 43)
P. 38).
Page 9

Main features
s The playback speed can be
controlled as preferred (
P. 51).
s The guidance feature (in English
and other languages) gives
audio notification of operating
conditions. Various functions can
be operated easily (
P. 68).
s You may assign your own names
to folders (
P. 54).
s Timer Rec ( P. 60) and Alarm
features (
P. 64) enable
automatic recording and playing
at a set time.
s A directional microphone feature
has been included that allows
switching between broad stereo
recording and recording with
a highly directional quality
( P. 48).
s A convenient intro play feature
has been included for when
searching for a file that you want
to listen to (For DM-550)(
P. 53).
s EUPHONY MOBILE has been
included to produce a natural,
realistic experience without
degrading sound quality
( P. 50).
s Fast forward and rewind are
possible at set intervals (
P. 52).
s Comes with “Olympus Sonority”
software for Windows and
Macintosh (
If you trans fer voice files recorded
with the recorder to a PC, you can
easily playback, organize, and edit the
files.
You can perform waveform editing,
file joining, and file splitting.
If you connect the recorder to a
computer, you can use it as a USB
microphone or USB speaker ( P. 91).
P.75).
s The “Olympus Sonority” can be
upgraded to a “Olympus Sonority
Plus”, which is equipped with a
enhanced functionality (Option)
( P. 92).
In addition to the “Olympus Sonority ”
functions, editing of MP3 files
and creation of music CDs can be
performed.
s This recorder is compatible
with USB 2.0, enabling fast data
transfer to a computer.
s It has a USB charging function
( P.15, P.16).
s It is compatible with Podcasting
( P.107).
If favorite Podcast URLs are registered
in the “Olympus Sonority ”, the latest
broadcasting content will be received
automatically. Press the Podcast
button on the recorder to quickly
listen to the program (f ile) transferred
from the “Olympus Sonorit y” to the
recorder.
s Compatible with Audible
broadcasting (
P. 112).
1
Main fea tures
EN
9
Page 10
1
1
&
$
#
9
0
@
%
2
3
4
5
6
!
8
^
q
(
-
)
w
=
e
*
7
7
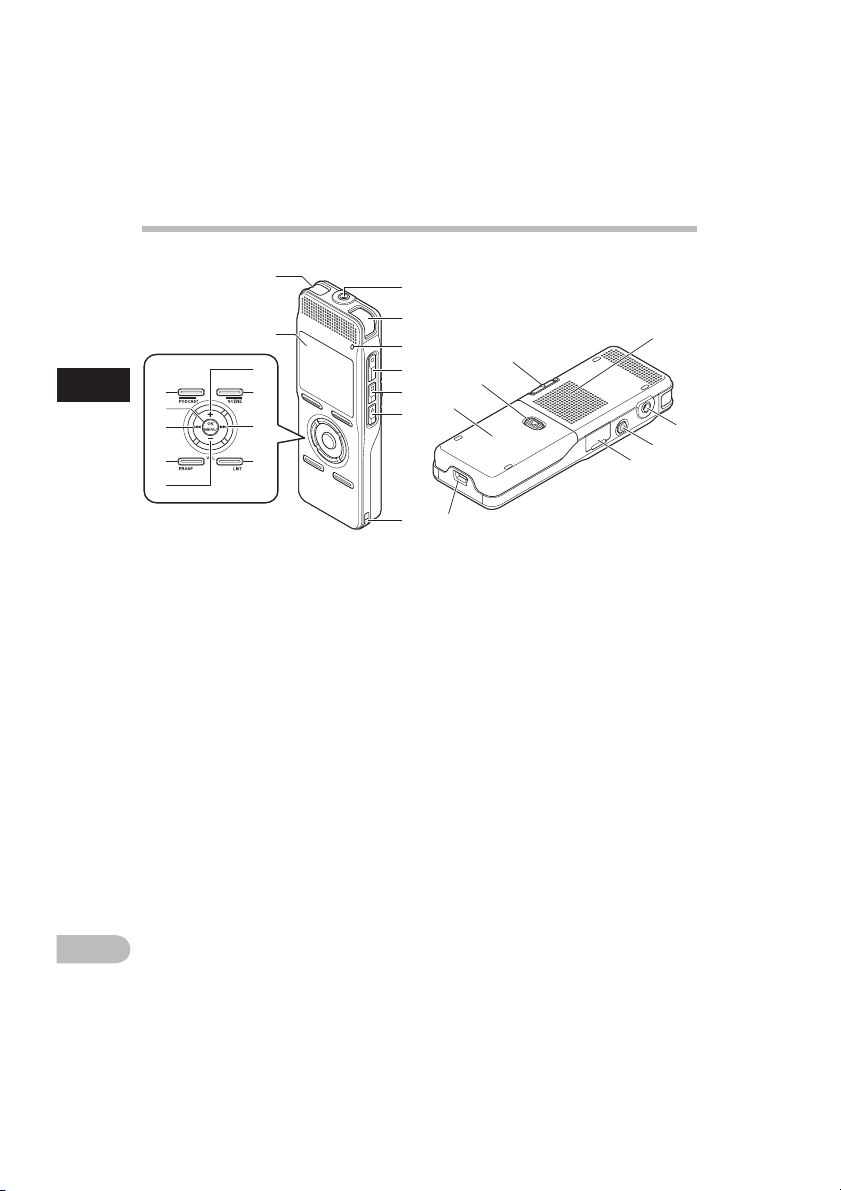
Identification of parts
1
MIC
(Microphone) jack
2 Record indicator light
3
REC
s (Record) button
4
STOP
4 button
5
PLAY
` button
6 Strap hole
7 Built-in stereo microphone
8 Display (LCD panel)
9
+
button
0
F2/SCENE
button
! 9 button
@
LIST
button
#
–
button
$
ERASE
button
% 0 button
^
OK/MEN U
button
&
F1/PODCA ST
button
* Built-in speaker
(
EAR
(Earphone) jack
)
REMOTE
jack
Connec t the receiver of th e exclusive remo te
control s et (optional). Th e recorder's rec ording
and stop f unctions can b e operated thro ugh
the remot e control.
- Card cover
= USB connector
q Battery cover
w Battery cover release button
e
POWER/ HOLD
switch
Identi fication o f parts
EN
10
Page 11
4
1
2
3
5
1
4
2
3
5
4
5
6
@
9
0
!
7
8
1
2
3
Identi fication o f parts
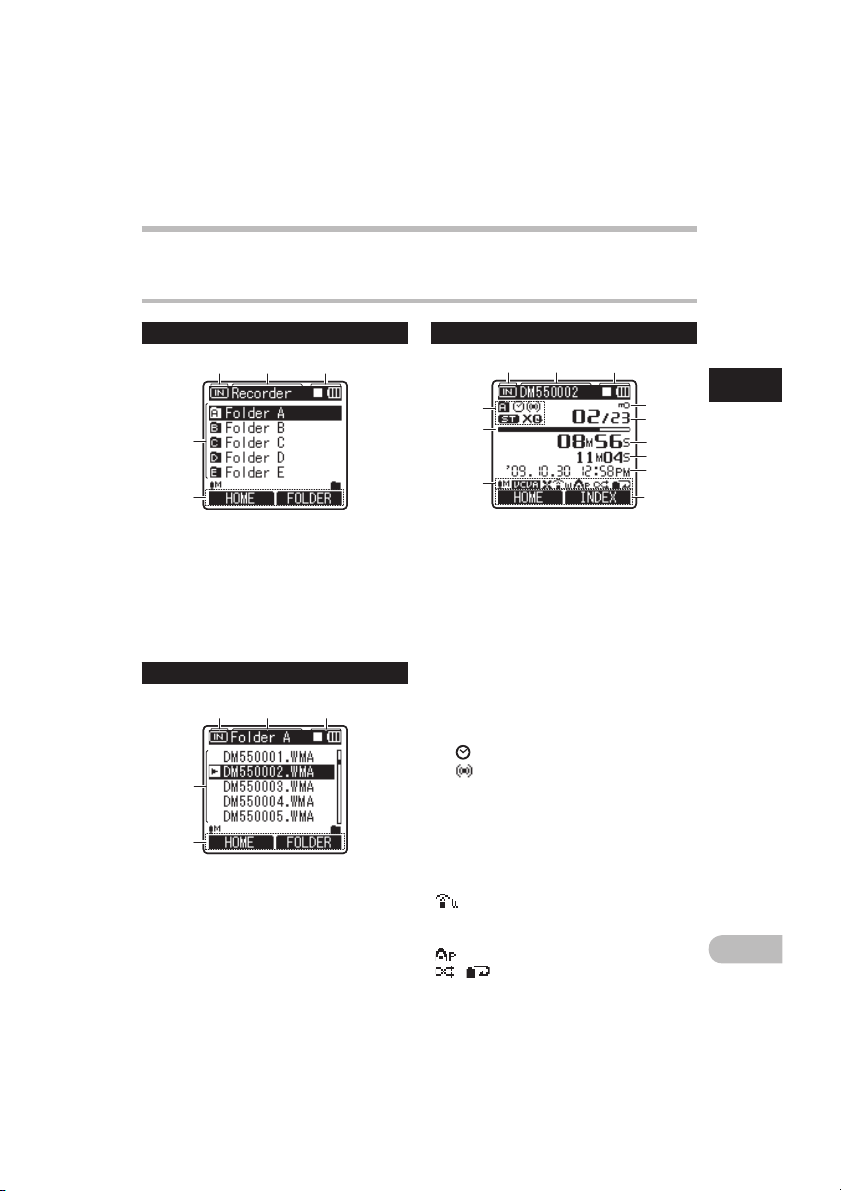
Display (LCD panel)
[Recorder] Mode Display Screen
Folder l ist displ ay
1 Recording media indicator
2 Current folder name
3 Recorder status indicator/
Batter y indicator
4 Folder name
5 Function guide indicator
1 Recording media indicator
2 Current folder name
3 Recorder status indicator/
Batter y indicator
4 File name
5 Function guide indicator
File lis t display
File dis play
1 Recording media indicator
2 Current file name
3 Recorder status indicator/
Batter y indicator
[`]Play indicator
[s]Record indicator
[5]Pause indicator
[4]Stop indicator
[]F. Play indicator
[]S. Play indicator
4 Folder indicator/
Recording mode indicator/
[
] Timer indicator
[
] Alarm indicator
5 Remaining memory bar indicator/
Playback position bar indicator
6 Icon display
[]
Microphone sensitivity indicator
[] VCVA indicator
[] Low Cut Filter indicator
[
] Zoom Mic indicator
[] Noise Cancel indicator
[] Voice Filter indicator
[
] EUPHONY indicator
[
][ ] Playback mode indicator
Identification of parts
1
EN
11
Page 12
1
4
5
1
2
3
4
5
1
2
3
5
4
8
6
7
!
9
@
0
1
2
3
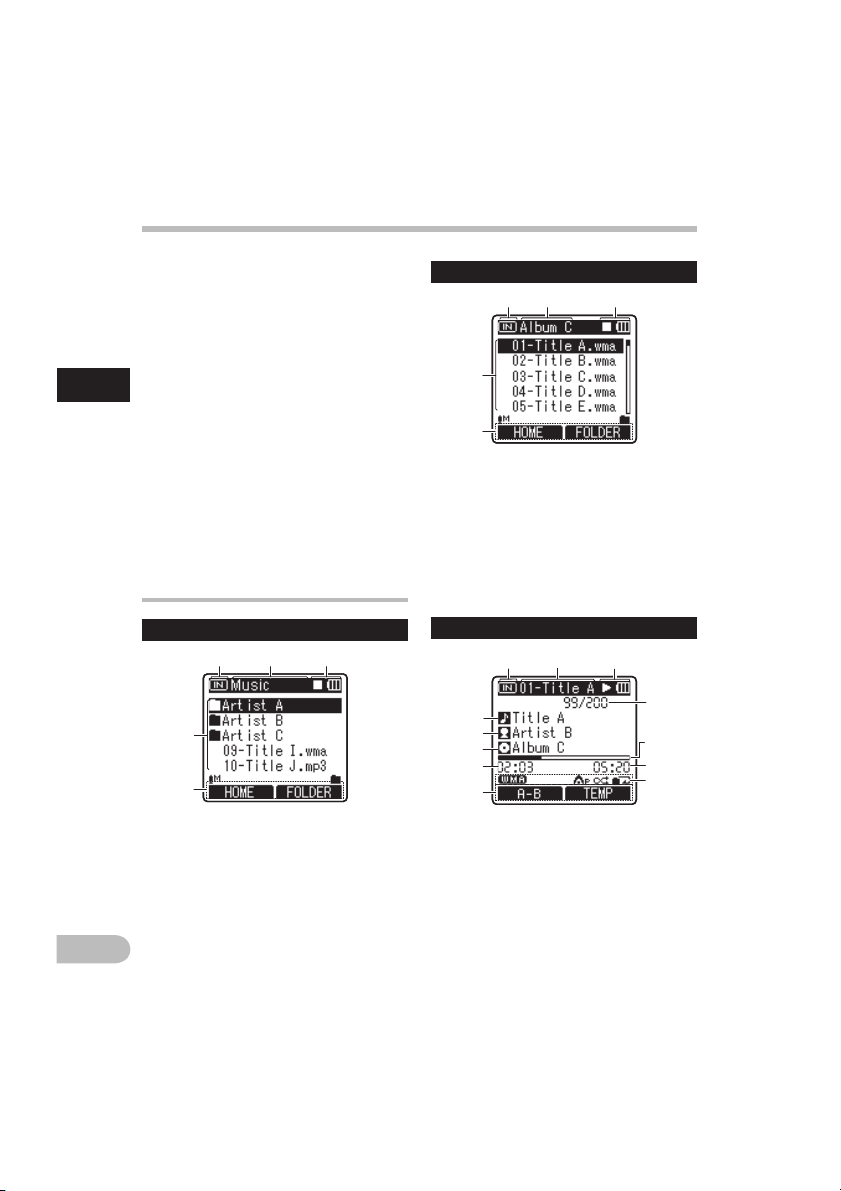
Display (LCD panel)
[Music] [Podcast] [Audible] Mode
Display Screen
List di splay
1
When there are files and folders in the folder
When there are only f iles in the folder
List di splay
2
File dis play
1 Recording media indicator
2 Current file name
3 Recorder status indicator/
Batter y indicator
4 Title name
5 Artist name
6 Album name
7 Elapsed playback time
8 Function guide indicator
7 File Lock indicator
8 Current file number/
Total number of recorded files in
the folder
9 Elapsed recording time/
Elapsed playback time
0 Remaining recording time/
File length
! Recording date and time/
Level meter
@ Function guide indicator
Identification of parts
1 Recording media indicator
2 Current folder name
3 Recorder status indicator/
Batter y indicator
4 Folder name/File name
5 Function guide indicator
1 Recording media indicator
2 Current folder name
3 Recorder status indicator/
Batter y indicator
4 File name
5 Function guide indicator
Identi fication o f parts
EN
12
Page 13
9 Current file number/
] File format
[
] EUPHONY indicator
[ ][ ] Playback mode indicator
Identification of parts
Total number of recorded files in
the folder
0 Playback position bar indicator
! File length
@ Icon display
[
1
Identi fication o f parts
EN
13
Page 14
1
Power supply
2 Insert battery, observing the
correct
= and - polarities.
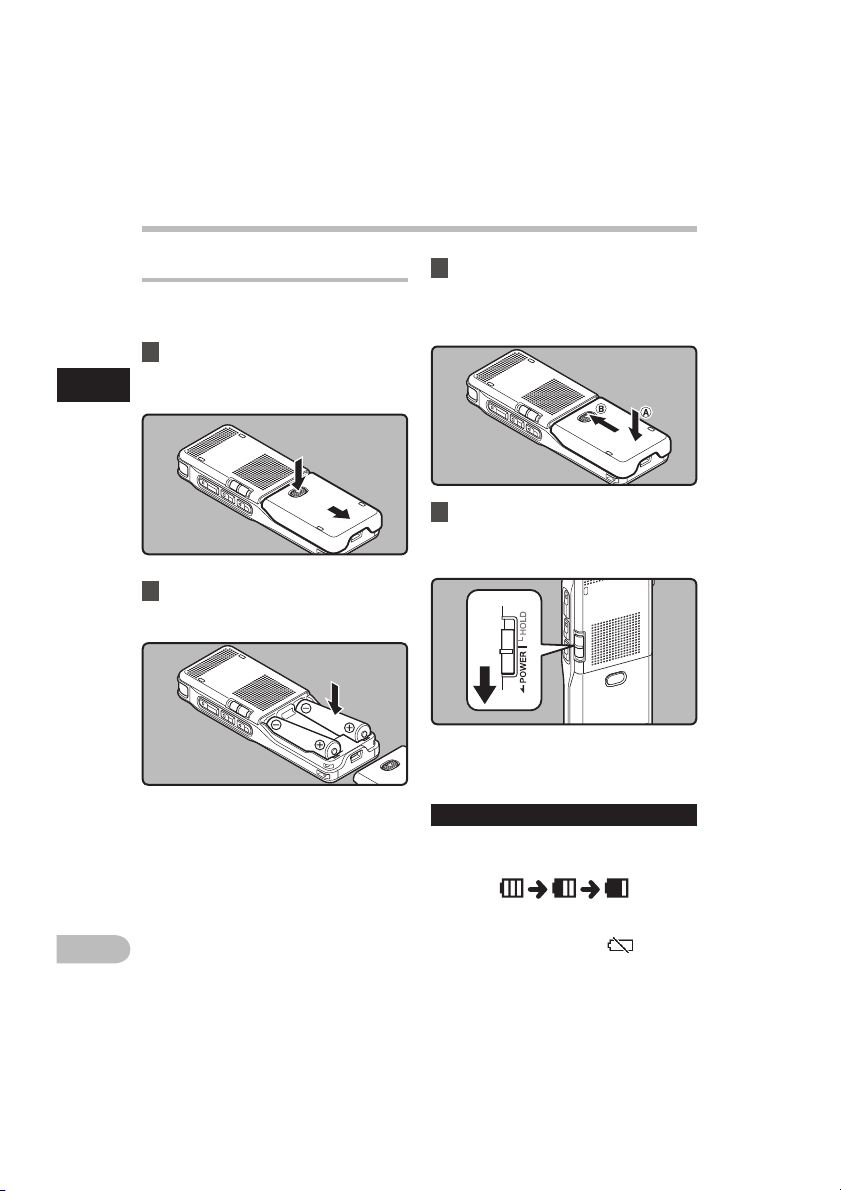
Inserting batteries
This recorder can be used with either Ni- MH
Rechargeable Bat teries or AAA Alkaline
Batteries.
1 Slide the battery cover open
while lightly pressing the battery
cover release button.
• When charging the recorder, be sure
to use the supplied specified Ni-MH
rechargeable (BR4 01) batteries.
• The supplied rechargeable batteries
are not fully charged. Before using
the unit the f irst time or after long
periods of disuse, it is recommended
that you charge them until full (
P.15, P.16).
4 Slide the
POWER/ HOLD
switch in
the direction indicated by the
arrow, and turn the power on.
3 Close the battery cover
completely by pressing to the
direction
A, then sliding to the
direction
B.
• If the “hour” indicator f lashes in the
display, see “Setting time a nd date
[Time & Date]
” ( P.20).
Batte ry indica tor
The battery indicator on the display changes
as the batteries lose power.
• When [
] appears on the display, replace
the batteries as soon as possible. When
the batteries are too weak, [
] and
[Battery Low] appears on the display, the
recorder shuts down.
Power supp ly
EN
14
Page 15
Power supp ly
Note s
• Manganese batteries may not be used in
this recorder.
• When changing batteries, AAA alkaline
batteries or Olympus Ni-MH rechargeable
batteries are recommended.
• Be sure to stop the recorder before
replacing the batteries. Unloading the
batteries while the recorder is in use may
corrupt the le. If you are recording into
a le and the batteries run out, you will
lose your currently recorded le because
the le header will not b e able to close.
It is crucial to change the batteries once
you see only one Hash mark in the battery
indicator.
• If it takes longer than 15 minute to replace
the dead batteries or if you take the
batteries in and out repeatedly at shor t
intervals, you may have to reset the time
when you have loaded fresh batteries
( P.20).
• Remove the batteries if you are not going
to use the recorder for an extended period
of time.
• When playing a voice/music le, the
recorder may be reset due to the
reduction of the voltage output of the
batteries depending on the volume level
even if [] is displayed in the battery
indicator. In this case, lower the volume of
the recorder.
• When replacing rechargeable batteries, be
sure to use Ni-MH rechargeable batteries.
The use of other manufacturers' products
can damage the recorder and should be
avoided.
Power supply
Charging by connecting to a
computer via USB
You can charge the batteries by connec ting
to a PC's USB por t. When charging, be sure
to correctly place the rechargeable bat teries
(supplied) into the recorder ( P.14).
Do not charge primar y batteries such as
alkali or lithium bat teries. It may cause
batter y leakage heating and recorder
malfunc tion.
1 Boot the PC.
2 Connect the USB connection
cable to the USB port of the PC.
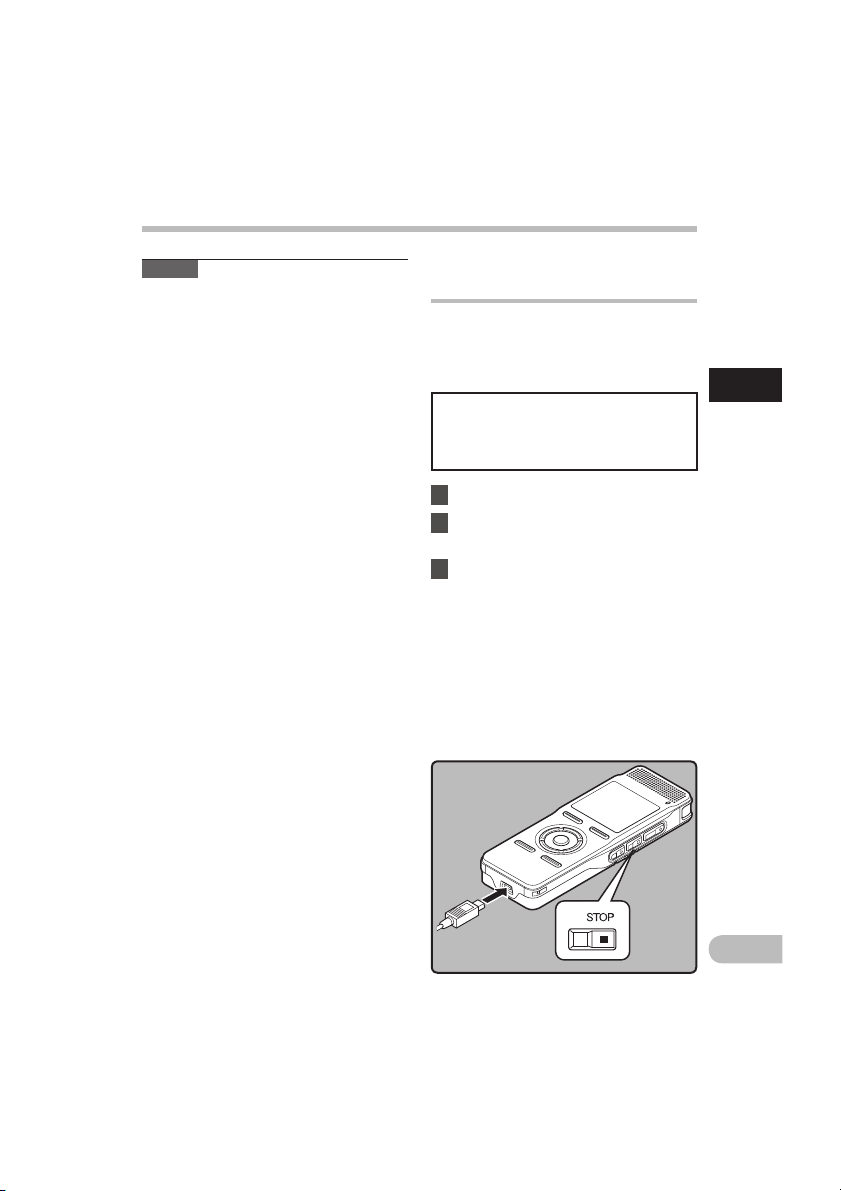
3 In the Stop or Hold status,
connect the USB cable to the
connecting terminal on the
bottom of this recorder while
pressing the
STOP
4 button.
• [Batt.Char ge mode] appears in the
display while pressing the STOP 4
button.
• Press and hold the STO P
4 button
until [Charging] appears in the
display.
1
EN
15
Page 16
1
Connect to the USB connecting AC
adapter (optional) to charge
It can be charged by connecting to the USB
connecting AC adapter (A514) (optional).
Before connecting the AC adapter, switch
the USB Connection setting to [AC Ada pter]
( P.69).
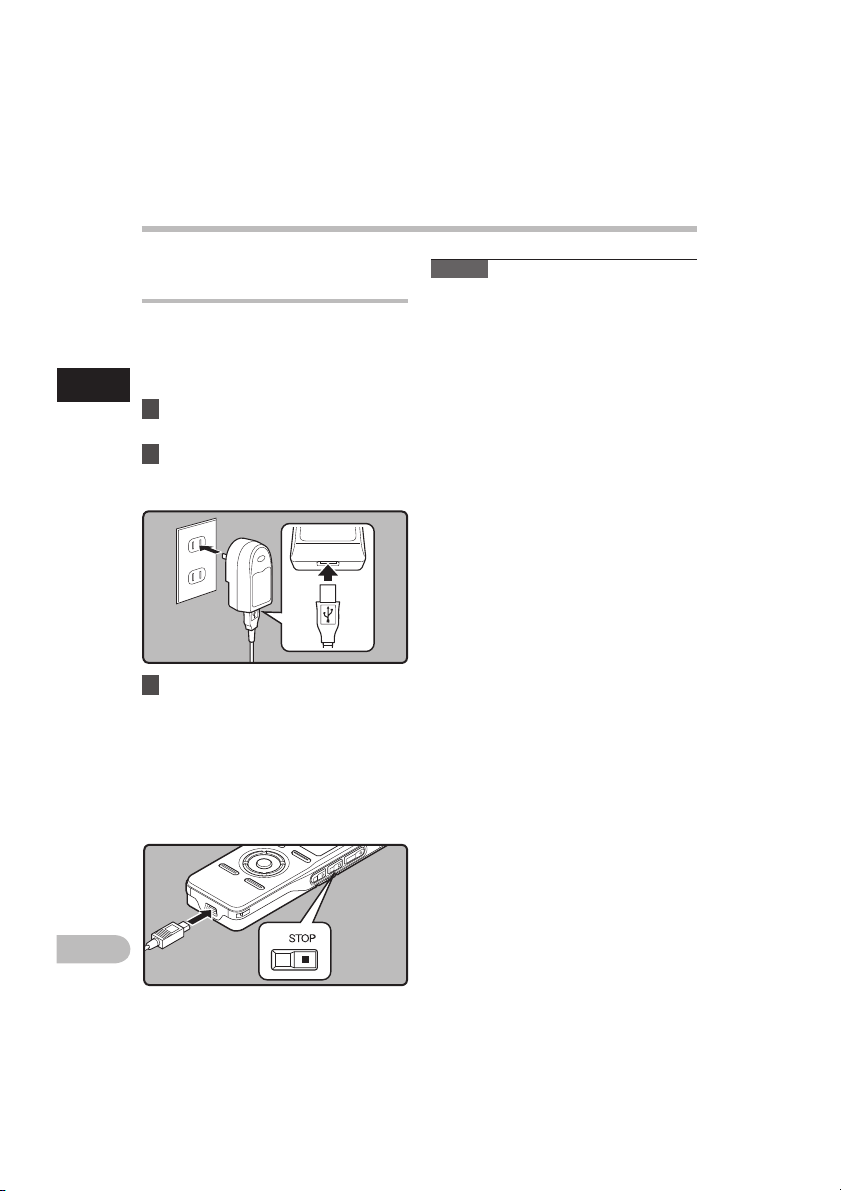
1 Plug the AC Adapter into a socket
for domestic power.
2 Plug the recorder’s USB
connecting cable into the AC
Adapter.
3 With the Power at OFF, connect
the USB cable to the connecting
terminal on the bottom of this
recorder while pressing the
STOP
4 button.
• [Batt. Charge mode] will be
displayed on the screen.
• Charging will start when [
Charging]
appears in the display.
Power supply
Note s
• Charging will stop temporarily during
recording, playback or data transmission.
• The recorder cannot be charged when the
PC is not turned on. Also, it may not be
charged when the PC is not switched on,
or when it is in the standby, hibernate or
sleep mode.
• Do not charge the recorder with the USB
hub connec ted.
• If [Cannot charge
] is displayed, it means
that a battery that cannot be charged is
in the recorder. Replace the batteries with
supplied ones at once ( P. 14).
• Charging is completed when battery
indication becomes to [] (charging time:
approximately 4 hours *).
* It shows the approximate time when
charging the rechargeable bat tery fully
from no remaining power at the room
temperature. The charging time will be
changed depending on the remaining
amount and the state of batteries.
• You cannot charge when [
]*1 or
[]*2 blinks. Charge the batteries at the
temperature from 5°C to 35°C (41°F to 95°F).
*1
[]: When surrounding temperature is
low.
*2 []: When surrounding temperature is
high.
• When using time becomes notably short
even after the batteries are fully charged,
replace them with new ones.
• Be sure to push the USB connector all the
way in. Otherwise, the recorder may not
operate properly.
• Be sure to use the attached dedicated
cable for the USB connection cable. If any
other company’s cable is used, it cause
problems. Also, please do not connect this
dedicated cable to any other company’s
product.
Power supp ly
EN
16
Page 17

Power supply
Cauti ons concer ning the rec hargeabl e batterie s
Read the following descriptions carefully
when you use the Ni-MH rechargeable
batteries.
Discharging:
The rechargeable batteries self-discharge
while this is not in use. Be sure to charge
them regularly before use.
Operating tem perature:
The rechargeable batteries are chemical
products. The rechargeable batteries
efficiency may fluc tuate even when
operating within the recommended
temperature range. This is an inherent
nature of such produc ts.
Recomm ended temperature range:
When operating appliance:
0°C - 42°C/ 32°F - 107.6°F
Charging:
5°C - 35°C/ 41°F - 95°F
Storage f or a long period:
–20°C - 30°C/ –4° F - 86°F
Using the rechargeable batteries outside
the above temperature range may result in
declining efficienc y and shorter battery life.
In order to prevent battery leakage or rust,
remove the rechargeable batteries from the
products when you will not be using them
for a long time, and store them separately.
Note s
• This recorder is designed to fully charge
batteries regardless of their energy level.
However, for best results when charging
newly purchased rechargeable batteries
or batteries that have not been used
for a long time (more than one month),
it is recommended to fully charge the
batteries then discharge repeatedly for 2
to 3 times.
• When disposing rechargeable batteries,
always observe the local laws and
regulations. Contact you local recycling
center for proper disposal methods.
• If Ni-MH rechargeable bat teries are not
fully discharged, protect against shortcircuiting (e.g. by taping the contacts)
before disposing.
For customers in G ermany:
Olympus has a contrac t with the GRS (Joint
Batter y Disposal Association) in Germany to
ensure environmentally friendly disposal.
1
Power supp ly
EN
17
Page 18
1
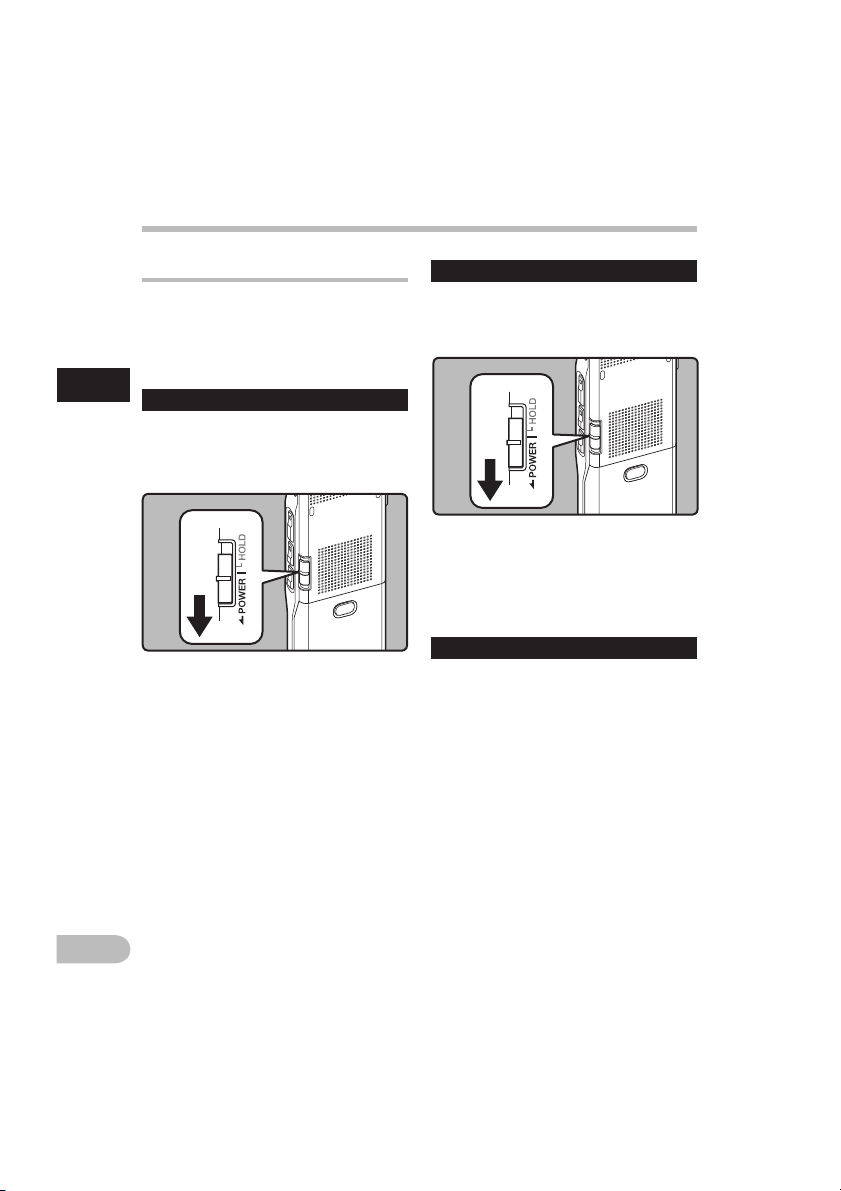
Turning o ff the power
Slide the
POWER/ HOLD
switch in the
direction indicated by the arrow for
0.5 seconds or longer.
• The display will turn on, and the power will
be turned on.
Turning on/off the powe r
When the recorder is not being used,
turn the power off to reduce battery
consumption to a minimum. Even if
the power is turned of f, existing data,
mode set tings, and clock settings will be
maintained.
Turning o n the power
While the recorder’s power is off,
slide the
POWER/ HOLD
switch in the
direction indicated by the arrow.
Power supply
• The display shuts of f, and the power will
be turned off.
• The resume function remembers the stop
position before the power is turned off.
Power save m ode
If the recorder is on and stops for 10 minutes
or longer (default), the display shuts off and
it goes into power save mode. You can
set the time to enter power save mode
from among [5minutes], [10minutes],
[30minutes], [1hour] and [Off] ( P.54).
To exit power save, press any but ton.
Power supp ly
EN
18
Page 19
A
HOLD
HOLD
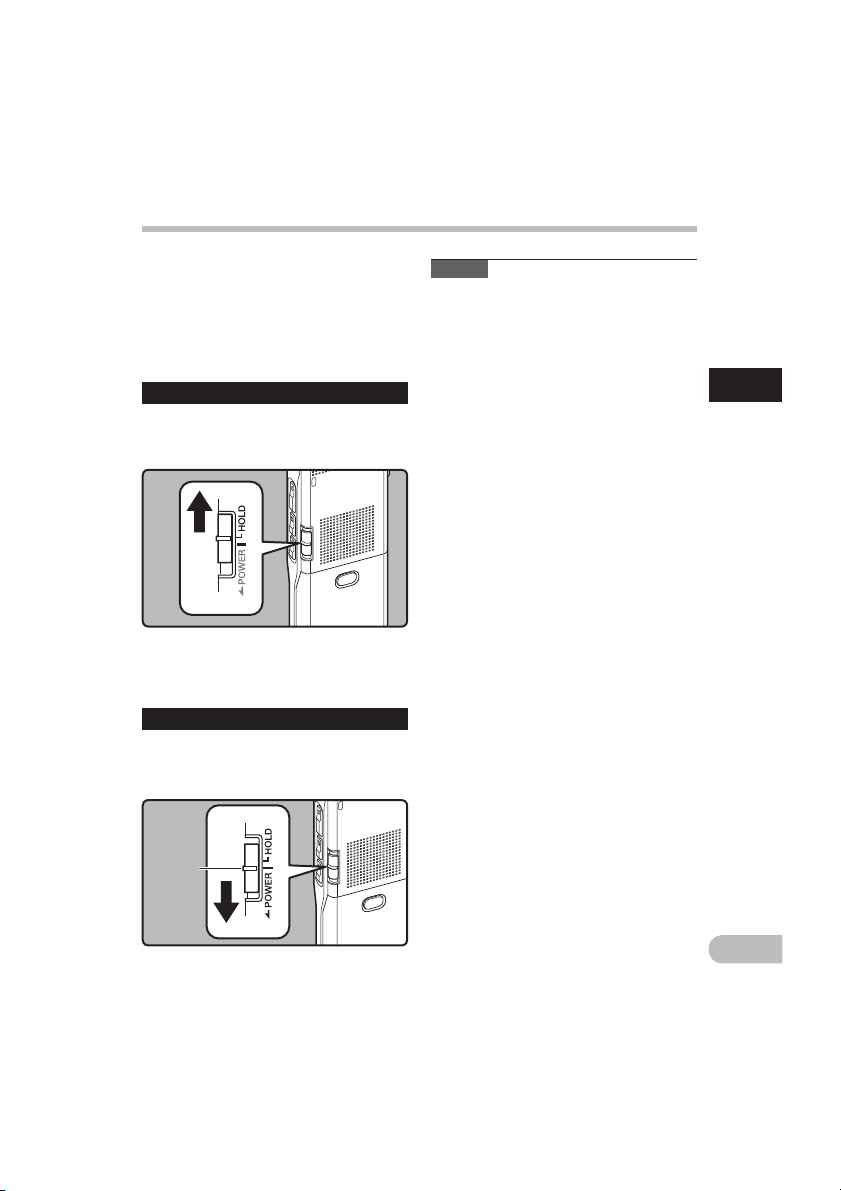
Set the r ecorder to HO LD mode
Slide the
POWER/ HOLD
switch to the
HOLD position.
If you bring the POWER/HOLD switch to the
HOLD position, the current conditions will
be preserved, and all buttons and switches
will be disabled.This feature is useful when
the recorder has to be carried in a bag
or pocket. Also, you can stop to prevent
accident during recording.
• After [
Hold] appears on the display, the
recorder is set to HOLD mode.
Exit HOL D mode
Slide the
POWER/ HOLD
switch to the
A position.
Note s
• If you press any button in HOLD mode, the
clock display ashes for 2 seconds, but it
will not operate the recorder.
• If HOLD is applied during playback
(recording), operation is disabled with
the playback (recording) state unchanged
(When playback has ended and the
recording has ended due to the remaining
memory being used up, it will stop).
• This recorder can be eectively operated
via the connected exclusive remote
control set RS30W (optional), even when it
is in HOLD mode.
1
EN
19
Page 20
1
F1
butto n
+−
butto n
9 0
butto n
OK
butto n
If you set the time an d dat e b eforehand ,
the information when the file is recorded is
automatically stored for each file. Setting the
time and date beforehand enables easier file
management.
When you use this recorde r for the
first t ime after purchasin g, or when
you switch it on af ter removing the
batteries for more than 15 minutes
when exc hanging batte ries, etc, the
[
Set Tim e & Date
] will app ear. When
the “
hour
” is flashing, co nduct the
setup from Step 1.
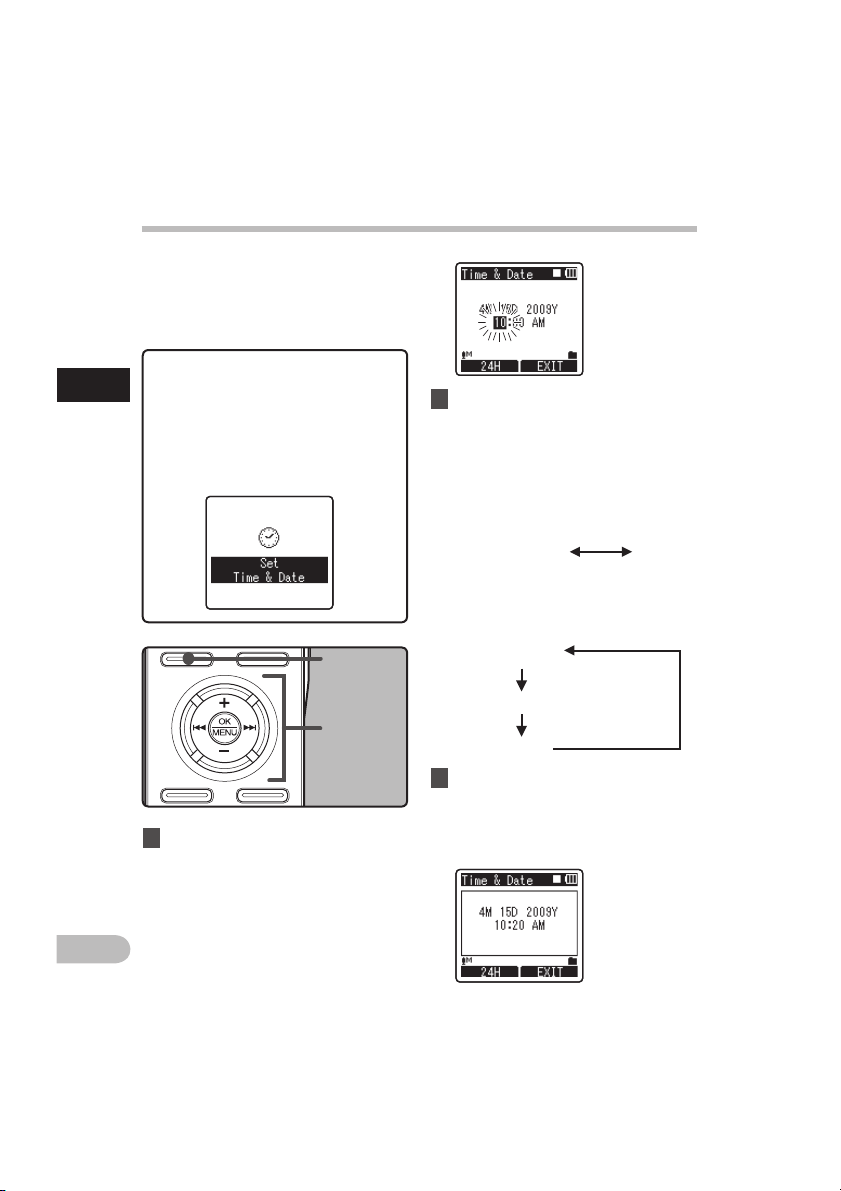
1 Press the 9 or 0 button to
select the item to set.
• Select the item from the “hour”,
“minute”, “year”, “month” and “day”
with a flashing point.
2 Press the + or − button to set.
• Follow the same steps by pressing the
9 or 0 button to select the next
item, and press the + or − button to
set.
• You can select between 12 and 24 hour
display by pressing the F1 button while
setting the hour and minute.
Example: 10:20 P.M
10:20 PM
(Init ial setting)
22:20
• You can select the order of the “month”,
“day” and “year ” by pressing the F1
button while setting them.
Example: April 15, 20 09
4M 15D 200 9Y
(Init ial setting)
15D 4M 200 9Y
2009 Y 4M 15D
3 Press the OK button to complete
the setting.
• The clock will start from the set
date and time. Press the OK button
according to the time signal.
Setting time and date [Time & Date]
Setti ng time and date
EN
20
Page 21
STOP
butto n
+−
butto n
9 0 butto n
OK
butto n
F2
butto n
Setti ng time and date
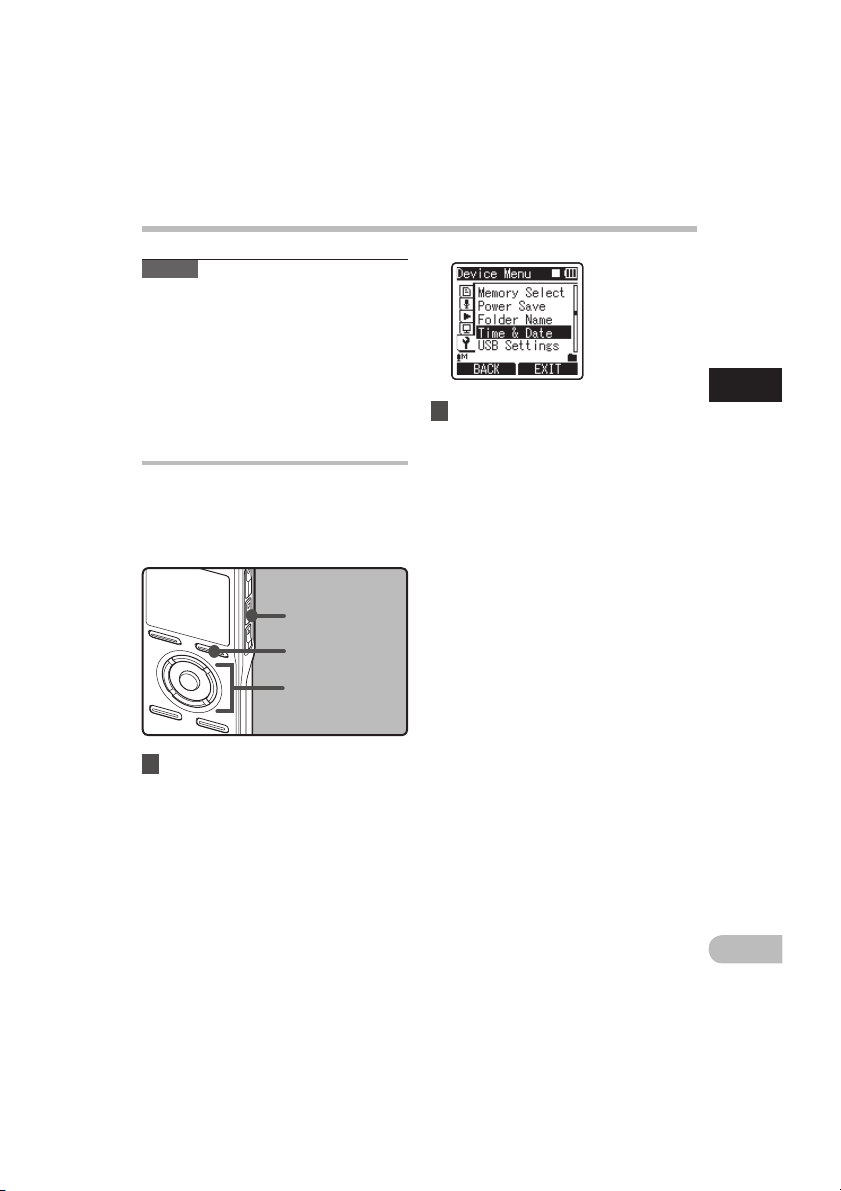
1 Select [
Time & Date
] from the
menu in [
Device M enu
].
• [Time & Date] will appear on the
display.
• For details on menu settings, please
refer to P. 44, P.45.
• The “
hour” will flash on the display,
indicating the start of the Time and
Date setup process.
The following steps are the same as Step 1
through Step 3 of “Setting time and date
[Time & Date]
” ( P.20).
Changing the time and date
While the recorder is during stop mode,
press and hold the STOP 4 button to display
the [Time & Date], and [Remai n]. If the
current time and date is not correct, set it
using the procedure below.
2 Press the
F2
or
STOP4
button to
close the menu screen.
Note s
• If you press the OK button during the
setup operation, the recorder will save the
items that were set to that point.
• After setup, a message will sound saying
that If the guidance is not required, selec t
[Off ], and the screen goes into [Voic e
Guide] ( P.68) setup. If you don’t want
the guidance feature, select [Off ].
Setting time and date [Time & Date]
1
EN
21
Page 22
1
Inserting and Ejecting a microSD card
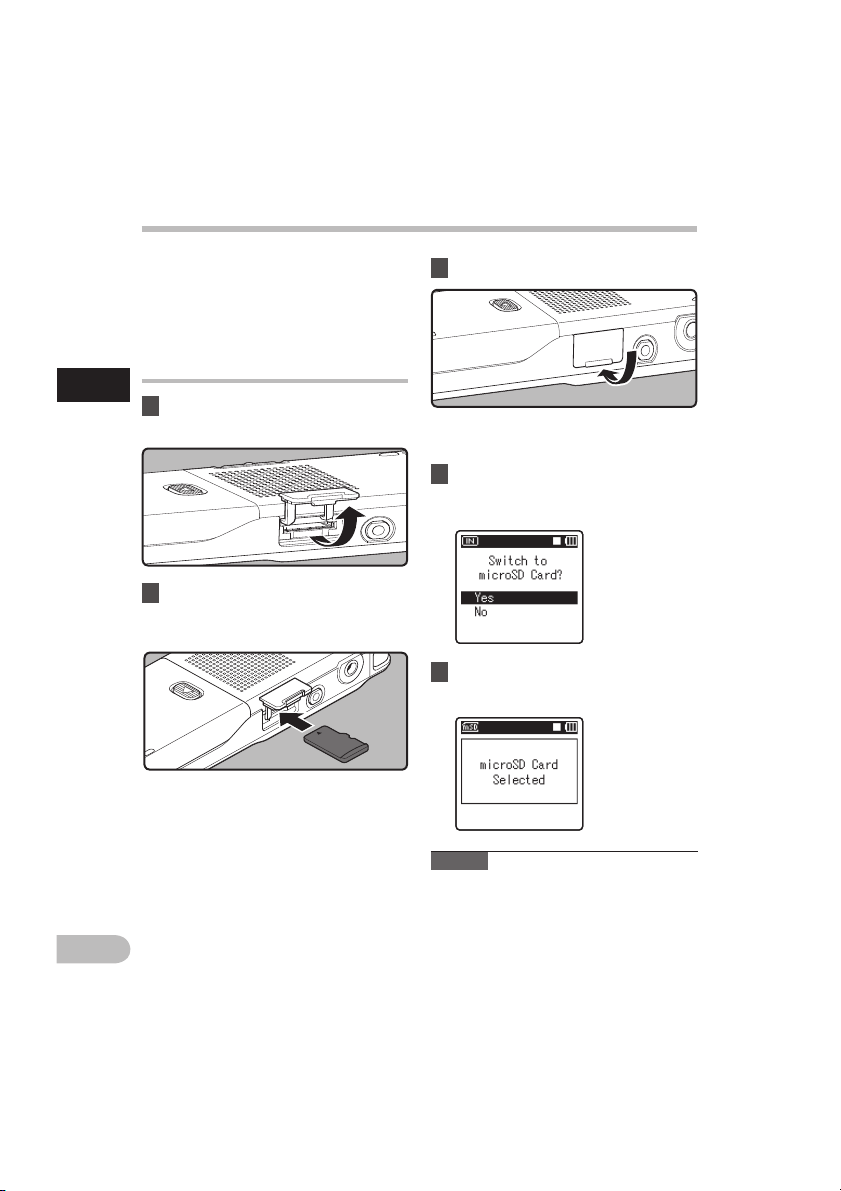
2 Face the microSD card the correct
way and insert it into the card
slot as shown in the diagram.
The "microSD" indicated in the instruction
manual refers to both microSD and
microSDHC .
This recorder can be used with commercially
available microSD cards as well as the builtin memor y.
Inserting a microSD card
1 While the recorder is during stop
mode, open the card cover.
• Insert the microSD card keeping it
straight.
• The microSD card stops with a click
when it is inserted all the way.
• Inserting the microSD card the wrong
way or at an angle could damage the
contact area or cause the microSD
card to jam.
• If the microSD card is not inserted all
the way, data may not be written to
the microSD card.
3 Close the card cover securely.
• When you insert the microSD card,
the recording media changeover
display will appear.
4 When you are recording to a
microSD card, press the
+
or −
button and select [Yes].
5 Press the OK button to complete
the setting.
Note s
• It is possible to switch the recording media
over to the built-in memory ( P.54).
• In some cases microSD card which have
been formatted (initialized) by another
device, such as a computer, cannot be
recognized. Be sure to format them with
this recorder before using ( P.71).
Inser ting and Ejec ting a micro SD card
EN
22
Page 23
Inser ting and Ejec ting a micro SD card
Ejecting a microSD card
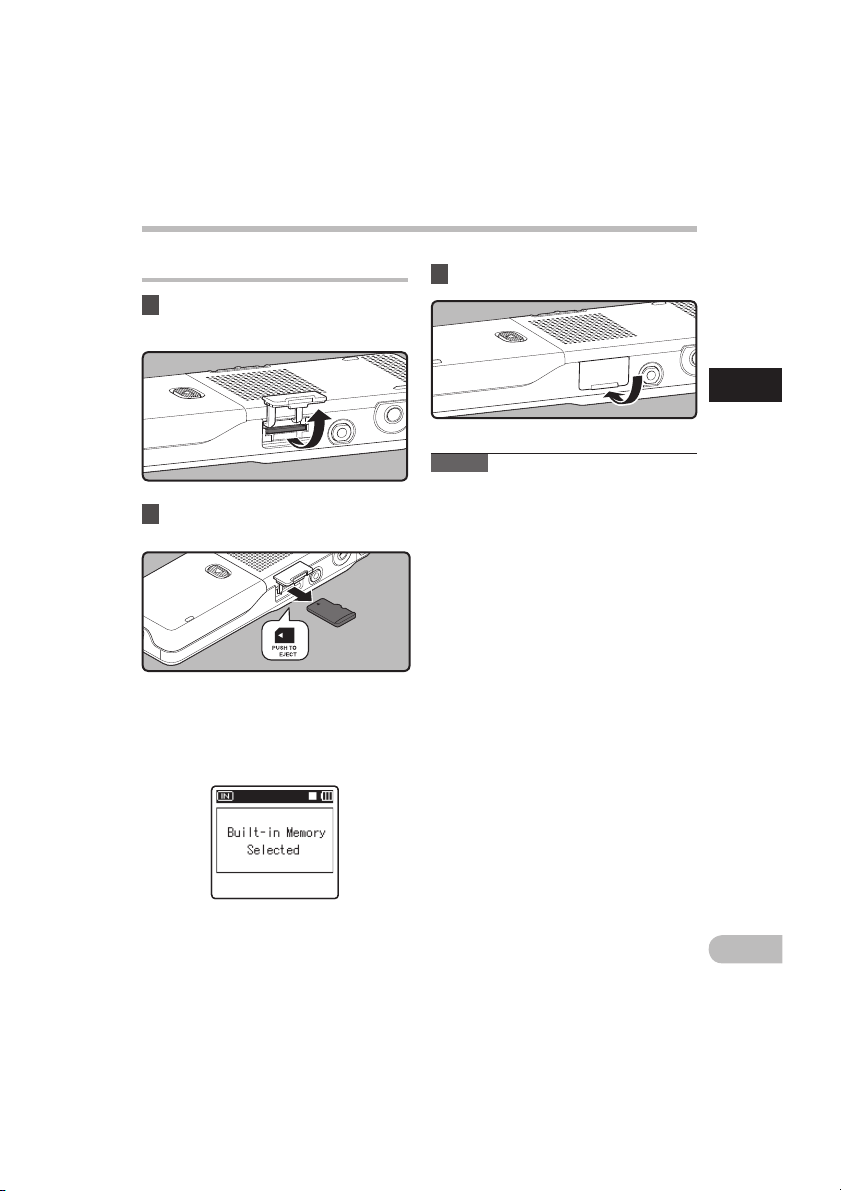
1 While the recorder is during stop
mode, open the card cover.
2 Push the microSD card inward to
unlock it, and let it eject partially.
• The microSD card is visibly out of the
slot and can be removed safely.
• When [Memory S elect
] is set to
[microSD Card], [Built- in Memory
Selec ted] will appear.
3 Close the card cover securely.
Inserting and Ejec ting a microSD card
Note s
• Releasing your nger quickly after pushing
the microSD card inward may cause it to
eject forcefully out of the slot.
• Before inserting the microSD card, turn o
the write protection function. Check the
Olympus website regarding microSD cards
which are confir med operati on w ith this
recorder.
• This recorder may not recognize correctly
on some microSD cards which are not
compatible with this recorder.
• In the case when the microSD card cannot
be recognized, remove the microSD card
then put it in again to see if this recorder
recognizes the microSD card.
• The processing performance reduces in a
microSD card when you repeat writing and
delete. In this case, format the microSD card
( P.71).
1
EN
23
Page 24
1
DM55 0001 .WMA
1 2 3
EN
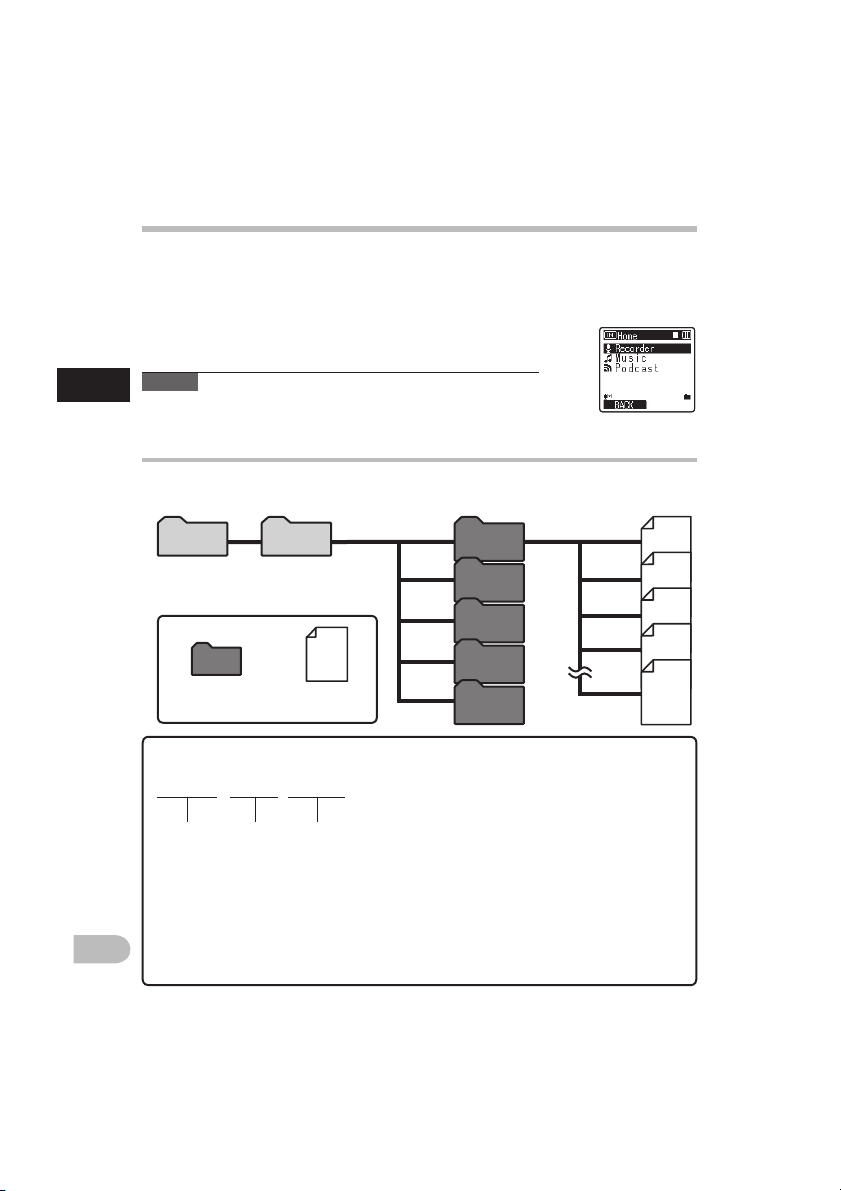
Notes on the folders
The built-in memor y or the microSD card can be used for the recording media. Regardless
of the recording media, voice file, music f iles, and contents f iles are separated and saved
respec tively into the [
Recor der
], [
Music
], [
Podcas t
] and [Audible] folders organized in a
branching tree-style.
When [
Home
] is displayed in the Function Guide display section,
press the F1 key to return to the home screen. This is useful when
switching the [
Recor der
], [
Music
], [
Podcas t
] and [
Audib le
] modes.
About the folders for voice recordings
[
Folder A
] - [
Folder E
] within the [
Recor der
] folder are the folders for voice recordings.
When recording with this recorder, select any one of the f ive folders and then record.
File names will be automatically created for files recorded by this recorder.
1 User ID:
The user ID name that has been set on the Digital
Voice Recorder. The user ID can be changed in the
Olympus Sonorit y.
2 File number:
A serial number automatically assigned by a
Digital Voice Recorder.
3 Extension:
These are the file name extensions for the
recording format when recording with this device.
• Linear PCM format .WAV
• MP3 format .MP3
• WMA format .WMA
Each folder can stor e
up to 999 f iles.
Notes on th e folders
Note
• Files or folders located under the folder [
Home
] or [
Recor der
]
will not be indicated on the recorder.
Home
24
Folder
Recorder
Folder A
Folder B
Folder C
File
Folder D
Folder E
001
002
003
004
999
Page 25
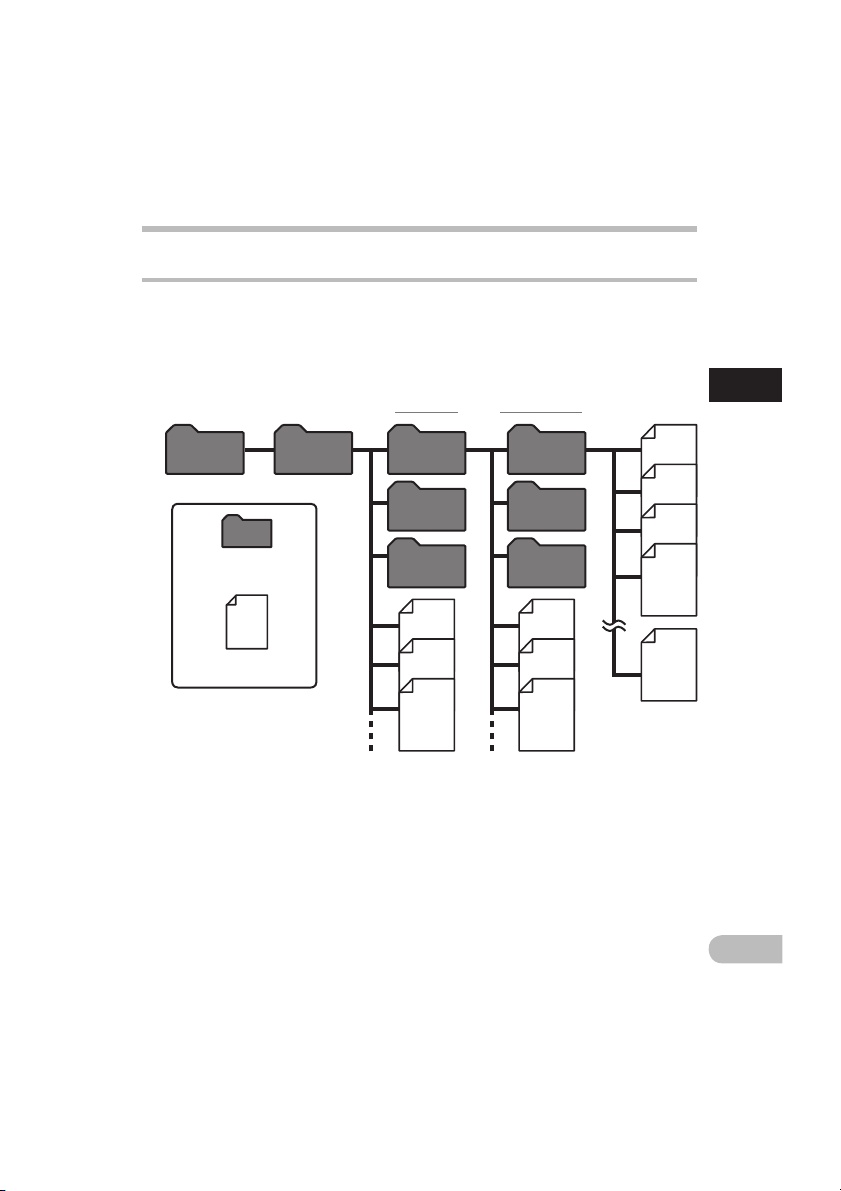
Notes on the folders
About the folder for music playback
When transferring music files to the device using Windows Media Player, a folder is
automatically created within the [
diagram below.
Music files that are in the same folder can be rearranged in preferential order and replayed
( P.56).
Music
] folder which has a layered struc ture as shown in the
First layer
Second l ayer
1
Notes on th e folders
MusicHome
Folder
File
Up to 128 folder s can be created und er
the [Mus ic] folder, includ ing [Music].
Artist 01
Artist 02
Artist 03
Album 01
Album 02
Album 03
001
002
003
004
999
Each fol der can store
up to 999 f iles.
EN
25
Page 26
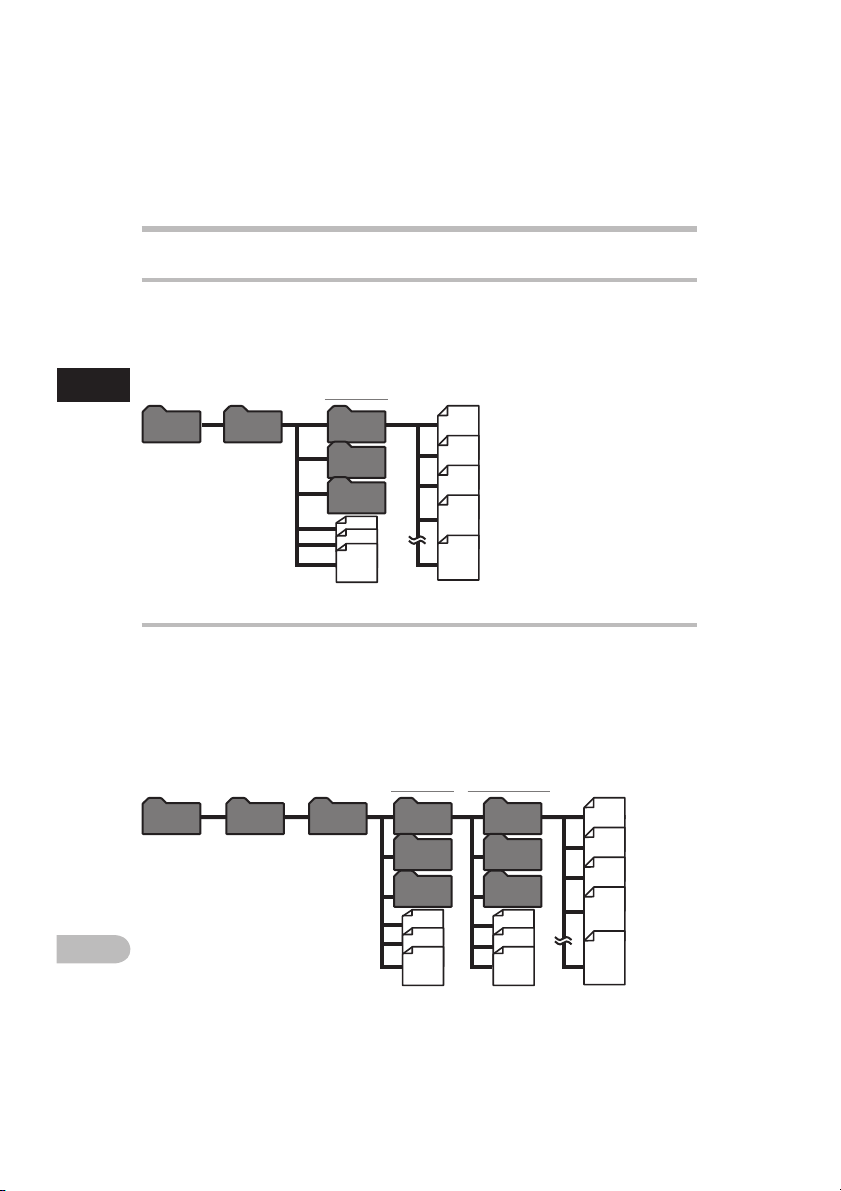
Notes on the folders
About the folder for Podcast Contents
Podcas t
A [
inside the [
played. With the recorder stopped, pressing the [
will open the [
folder will appear. For "
1
Notes on th e folders
Up to 128 fo lde rs can be
created under the [Podca st]
folder, inc luding [Podcas t].
] folder, for saving files distributed ( P.107) by Podcast, is prepared in advance
Home
] folder. Programs (files) transmit ted from the "Olympus Sonority" can be
Podcas t
] folder under the [
Podcas t
" please see P.107.
First layer
Podcas tHome
Progra m
01
Progra m
02
Progra m
03
Podcas t
Home
] button for one second or longer
] folder. A list of files and folders within the
001
002
003
004
Ea ch f old er c an
st or e up t o 99 9
999
files .
About the folder for Audible Contents
Audible f iles can be redirected from the Audible website to the recorder using the Audible
Manager ( P.112) or Windows Media Player.
When redirecting Audible f iles to this recorder using the Audible Manager, an [Audibl e]
folder for playing Audible files will automatically be created in the [Mu sic] folder, and the
files stored there.
When redirecting Audible f iles to this recorder using the Windows Media Player, an [Artist]
folder for playing will be created in the [Music] folder, just like for music files, and the f iles
will be stored there.
Music
First layer
Audibl eHome
Artis t 01
Artis t 02
Artis t 03
Second l ayer
Album 01
Album 02
Album 03
001
002
003
004
EN
26
Up to 128 folders can be crea ted under the [Audibl e] folder,
includi ng [Audible].
999
Ea ch fo ld er
can store up
to 999 fi les.
Page 27
Home fo lder
File dis play
EN
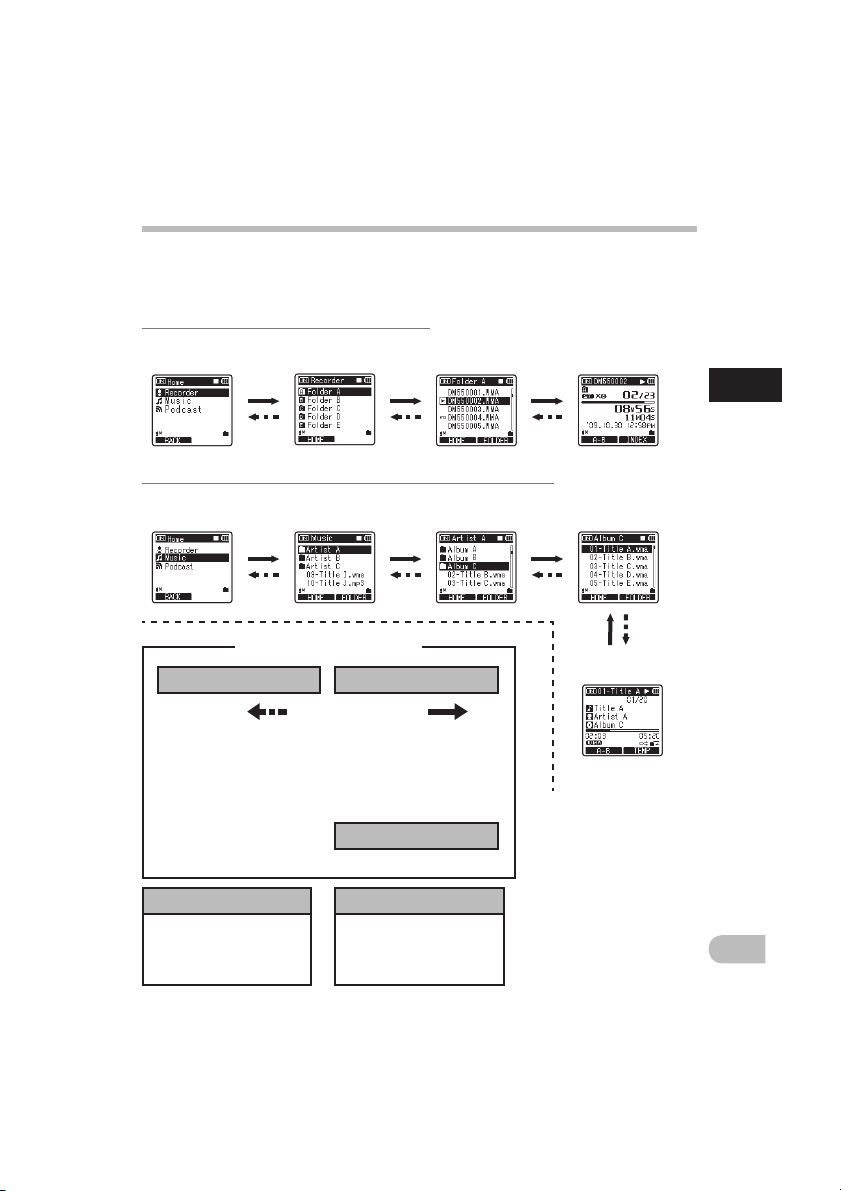
Selec ting the fol ders and fil es
Selecting the folders and files
Change folders while the operation is playing back or stopped. For information on the
layered structure of the folders, see the section entitled “No tes on the folde rs” ( P.24
to P.26).
Operation of the folde rs for music playbacks/Content p laybacks:
Operation of the folde rs for voice recordings:
OK
butto n
LIST
butto n
File dis play
Each time you press thi s it ope ns
the fo lder or f ile sele cted in t he
list display and p roceeds down
one level .
The li st displ ay s cree n c an be
operat ed by the 9 button.
Each time you press this it retur ns
up on e leve l. The l ist di spla y
ca n b e ope rate d by the 0
butto n.
Whe n y ou press an d h old the
LIST butt on wh ile m oving in a
hierarc hy of fold ers, it will return
to the fil e display.
Inform ation of the sele cted
file is d isplayed. Enter s in
playbac k standby mode .
List dis play
The fold ers and files
record ed in this recorde r are
displaye d.
+
or − butto n
Selec t the folder or f ile.
Moving t hrough th e levels
list di splay
Folder l ist display File lis t display
Home fo lder
list di splay
Folder l ist display
(First l ayer)
Folder l ist display
(Secon d layer)
File dis play
1
File lis t display
Retur n
Procee d
27
Page 28
f
a
b
c
d
e
REC
butto n
STOP
butto n
EN
About Recording
Before starting recording, select a voice
recording folder between [] to [] in the
[Recor der] folder. These five folders can be
selectively used to distinguish the kind of
recording; for example, Folder [] might
be used to store private information, while
Folder [ ] might be dedicated to holding
business information.
Recording
• [Rec Mode] cannot be changed in
the recording standby mode or while
recording. Configure this while the
recorder is stopped ( P.47).
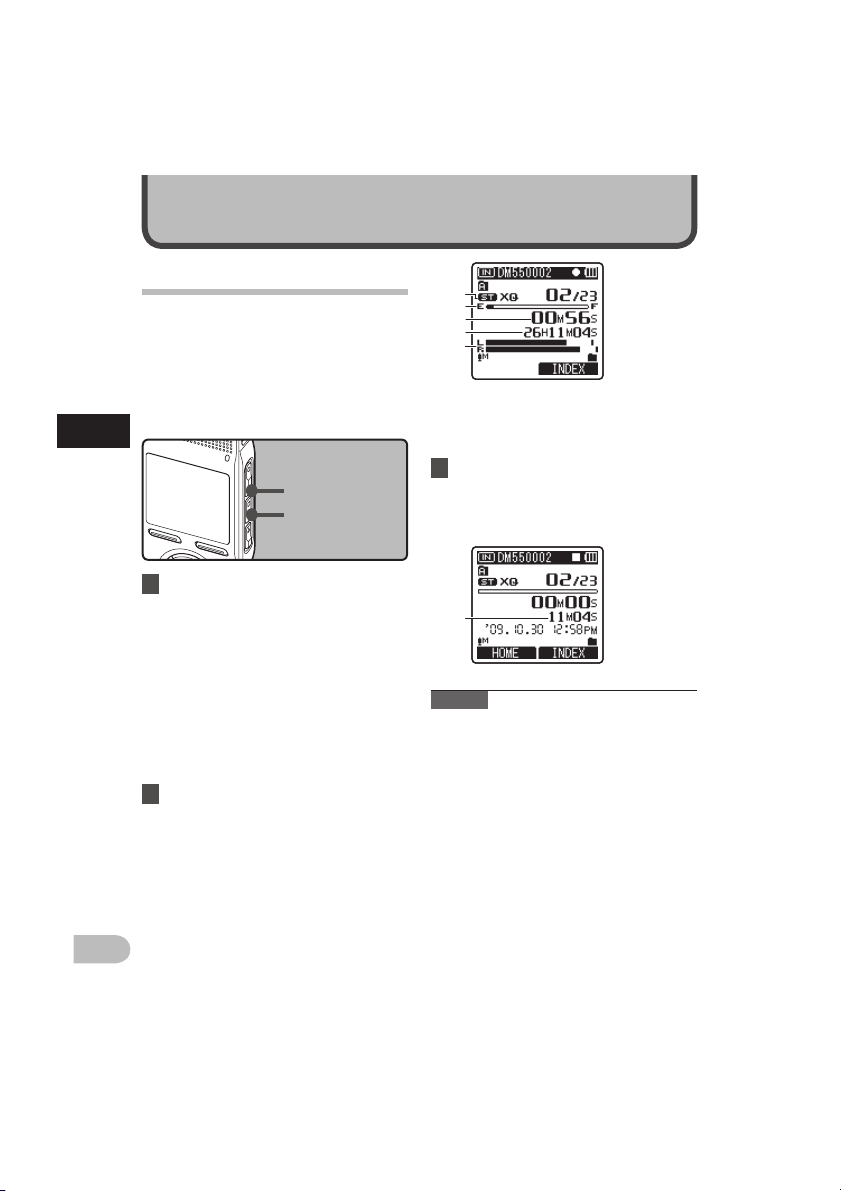
3 Press the
STOP
4 button to stop
recording.
• [4] will appear on the display.
f F ile length
Note s
• Whe n a micr oSD card is inserted in the
recorder, be sure to conrm the recording
me dia a s eit her [Bu ilt- in Me mor y] or
[microSD Card] so that there is no mistake
( P.54).
• If you select a folder other than
through $ and press the
REC
s button,
a [Cannot re cord in this fol der] message
will ash. Select a folder from through
$ and star t recording again.
• To ensure recording from the beginning,
start speaking after you see the recording
indicator light on.
• When remaining recording time is less
than 60 seconds, the recording indicator
light starts ashing. When the recording
time is decreasing to 30 or 10 seconds, the
light ashes faster.
1 Select the recording folder
( P.24 to P.27).
How to change fold ers:
1 Pressing the LIST button at the file
display while stopped will return you
to the next higher level. Pressing the
LIST button repeatedly will bring you
to the folder list display.
2 Pressing the + or − button at the
folder list display will select the
folders for voice recordings.
Newly recorded audio will be saved as
the last file in the selected folder.
2 Press the
REC
s button to start
recording.
• The recording indicator light glows
and [s] will appear on the display.
• Turn the microphone in the direction
of the source to be recorded.
a R ecording mode
b R emaining memo ry bar indica tor
c E lapsed record ing time
d R emaining reco rding time
e L evel meter (change a ccording to the
recordi ng level and reco rding functi on
setti ngs)
Record ing
2
28
Page 29
To EAR jack
REC
butto n
PLAY
butto n
EN
Record ing
• [`] will appear on the display.
• Stop recording and the f ile that was just
recorded will be played back.
Pause
While the recorder is during recording
mode, press the
REC
s button.
• [] will appear on the display.
• The recorder will time out after 120
minutes when left in “Rec Pause”.
Resume R ecording:
Press the
REC
s button again.
• Recording will resume at the point of
interruption.
To quickl y check on th e recorded c ontents
While the recorder is during
recording mode, press the
PLAY
`
button.
Listen ing while au dio is reco rded
If you st art re cording af ter ins erting the
earphone into the EAR jack on the recorder,
you can hear the sound being recorded. The
recording monitor volume can be adjusted by
pressing the + or − button.
Connect the earphone to the
EAR
jack
on the recorder.
• After recording has started, you can hear
the sound bein g recor ded throu gh the
earphone.
• When [Fol der Full] appears, the recorder
will not be able to record anymore. Delete
any unnecessary les before recording any
further ( P.42).
• Recorder will not be able to record
anymore when [Memo ry Full] appears.
Delete any unnecessary les b efore
recording any further ( P.42).
• We recommend formatting the record
media in the recorder before recording
( P.71).
Recording
2
29
Page 30

Note s
• Recording level cannot be controlled using
the volume button.
• When using the earphones, do not set the
volume too high. Liste ning at very high
volume may lead to hearing loss.
• Do not place earphones near a microphone
as this may cause feedback.
• When the external spea ker is connecte d
while recording, there is a risk that audio
feedback will occur.
2
Record ing
Recommended settings by recordi ng condition
The recorder is initially set to the [ST XQ] mode so that you can make high quality stereo
recordings immediately after purchasing it. The various functions relating to recording can
be configured in detail to suit the recording conditions.
The following table shows the standard recording settings with the recording environment
as an example.
Recording
EN
30
Record ing
condit ion
Recordi ng for
conferences
and other l arge
groups.
Meetings and
business negotia tions with a small
number of people.
Dic tati on with a
lot of background
noise.
Music play ing,
wild bird s singing, and railway
sounds.
Dictation in a
quiet environment.
Recommended Settings
[Rec Mode]
( P.47)
[PCM]: [44.1kHz]
[ST XQ]
[MP3]: [320k bps]
[ST XQ]
[ST HQ]
[MP3]: [256kbps]
[MP3]: [192kbps]
[HQ]
[PCM]: [48kH z]
[PCM]: [44.1kHz]
It can be us ed in any type of s etting.
Selec t a setting for r ecording.
[Mic Sens e]
( P.47)
High]
[
Middle]
[
[Low]
Set the mi cro-
phone se nsitivity
accordin g to the
volume b eing
record ed.
[Low Cut Filter]
( P.48)
[On]
[Off] [Off]
[Zoom Mic]
( P.48)
[Wide]
[Wide]
[Off]
Page 31

To MIC jack
EN
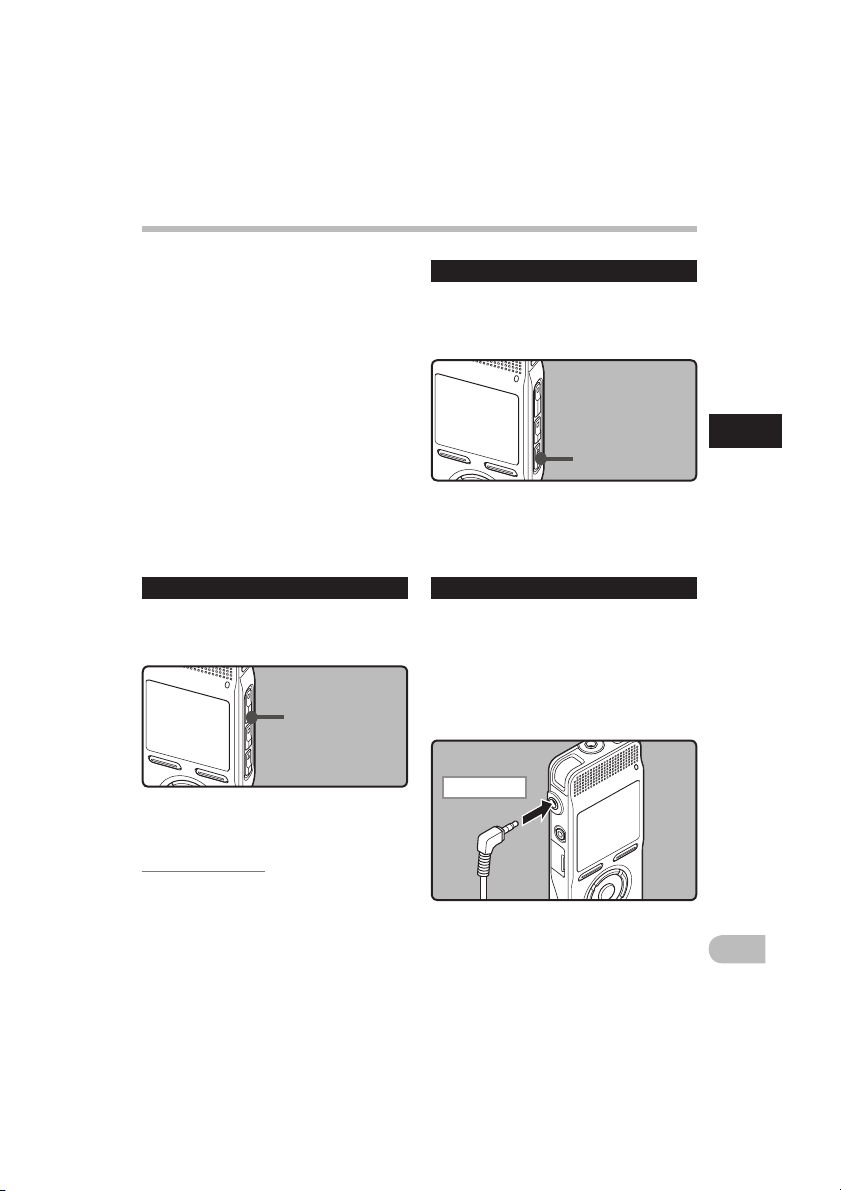
Record ing
Recording from external microphone
or other devices
The external microphone and other devices
can be connected and the sound can be
recorded. Connec t as follows by the device
to be used.
• Do not plug and unplug devices into the
recorder’s jack while it is recording.
Recording with external
microphone:
Connect an external microphone to
the
MIC
jack of the recorder.
Applicable external microphones
2 channe l microphone
(omni-direc tional): ME30W
These are highly sensitive omni-
directional microphones suppor ted by
plug-in power which are well-suited to
recording musical performances.
Highly sensit ive noise-c ancellation
monaural micro phone (unidirection al):
ME52W
This microphone is used to record
sound at a distance while minimizing
surrounding noise.
Compact Gun Mic rophone
(unidirectio nal): ME31
The directional microphones are useful
for recordings such as outdoor re cording
of wild birds singing. The metal-cut
body provides a sturdiness to the high
rigidit y.
Tie clip microp hone (omni-directional):
ME15
Small concealing microphone with a
tie-clip.
Telephone pickup: TP7
Earphone type microphone can be
plugged into your ear while phoning.
The voice or conversation over the
phone can be clearly recorded.
Note s
• Use the connecting cord sold separately
for dubbing (KA333) to connect the
recorder with other devices.
• The detailed input levels cannot be
adjusted with this recorder. When you
connect the recorder to an external
device, execute a test recording and adjust
the output level of the external device.
• The built-in microphone will become
inoperable when an external microphone
is plugged into the recorder’s MIC jack.
• Microphones supp orted by plug-in power
can also be used.
• When an ex ternal monaural microphone
is used while [Rec Mo de] is set to a stereo
recording mode, it enables recording only
with the L channel microphone ( P.47).
Recording
2
31
Page 32

2
To MIC
jack
To audio outp ut
termina l of other
devices
To EAR
jack
To audio inpu t
termina l of
other dev ices
EN
Note
• The detailed input levels cannot be
adjusted with this recorder ( P.47). When
external devices are connec ted, perform a
test recording and then adjust the output
level for the external devices.
Recording the sound of other
devices with this recorder:
The sound can be recorded when
connecting to the audio output terminal
(earphone jack) of the other device, and the
MIC jack of the recorder with the connecting
cord KA333 (optional) for dubbing.
Note
• When you adjust the various sound
quality settings related to playback on
the recorder, the audio output signal sent
out from the EAR jack will change as well
( P.50).
Recording the sound of this
recorder with other devices:
The sound of this recorder can be recorded
to other devices when connected to the
audio input terminal (microphone jack)
of other devices and the E AR jack of this
recorder, with the connecting cord KA333
(optional) for dubbing.
Recording
Record ing
32
Page 33

b
c
d
e
a
STOP
butto n
+−
butto n
9 0 butto n
OK
butto n
PLAY
butto n
LIST
butto n
EN
Playback
The recorder can playback WAV, MP3
and WMA format files. To playback a file
recorded with other machines, you need to
transfer (copy) it from a computer.
About Playback
3 Press the
PLAY
` or OK button to
start playback.
• [`] will appear on the display.
a F ile name
b F older indicato r
c P layback positi on bar indicator
d E lapsed playba ck time
e F ile length
4 Press the + or − button to adjust
to a comfortable listening
volume.
• The volume can be adjusted within a
range from [00] to [
30
].
5 Press the
STOP
4 button at
any point you want to stop the
playback.
• [4] will appear on the display.
• This will stop the file being played
back midway. When the resume
function is activated the stopped
location will be registered, even if the
power is turned off. The next time the
power is turned on, playback may be
resumed from the registered stopped
location.
1 Select the folder which
contains the files to be played
back (
P.24 to P.27).
How to change fold ers:
1 Pressing the LIST button at the file
display during playback or while
stopped will return you to the next
higher level. Pressing the LIST button
repeatedly will bring you to the folder
list display.
2 Press the
+
or − button at the folder
list display to selec t folder, and then
press OK or 9 button.
2 In the File list display, press the +
or
−
button to select the file that
you want to playback.
• In the File display, press the 9 or
0 button to select a file.
Playbac k
3
33
Page 34

EN
• [] will appear on the display.
• If you release the
9 button, it will stop.
Press the PLAY ` or OK button to start
playback from where it was stopped.
While the recorder is during
playback mode, press and hold the
9 button.
• When you release the 9 button the
recorder will resume normal playback.
• If there is an index mark or temp mark in
the middle of the file, the recorder will
stop at that location ( P. 38).
• The recorder stops when it reaches the
end of the file. Continue pressing the 9
button to proceed with the cue from the
beginning of the next file.
Rewind ing
While the recorder is during stop
mode in the file display, press and
hold the
0 button.
Forwa rding
While the recorder is during stop
mode in the file display, press and
hold the
9 button.
• [] will appear on the display.
• If you release the
0 button, it will stop.
Press the PLAY ` or OK button to start
playback from where it was stopped.
While the recorder is during
playback mode, press and hold the
0 button.
• When you release the 0 button the
recorder will resume normal playback
• If there is an index mark or temp mark in
the middle of the file, the recorder will
stop at that location ( P. 38).
• The recorder stops when it reaches the
beginning of the file. Continue pressing
the 0 button to proceed with the
review from the end of the previous file.
Locat ing the begi nning of the f ile
While the recorder is during stop
mode or playback mode, press the
9 button.
• The recorder skips to the beginning of the
next f ile.
While the recorder is during
playback mode, press the
0
button.
• The recorder skips to the beginning of the
current f ile.
While the recorder is during stop
mode, press the
0 button.
• The recorder skips to the beginning of
the previous file. If the recorder stop the
midway of the file, return to the beginning
of the file.
Playback
Playbac k
3
34
Page 35

To EAR
jack
EN
Playbac k
While the recorder is during
playback mode, press the
0
button twice.
• The recorder skips to the beginning of the
previous file.
Note s
• When you skip to the beginning of the file
during playback, the recorder will stop at
the position of the index mark and temp
mark. The index mark and temp mark
will be skipped when you per form the
operation in stop mode ( P. 38).
• When [Ski p Space
] set to other than
[File Skip], the recorder will skip forward/
reverse the specif ied time, then will start
playback ( P. 52).
Playba ck throug h earphone
An earphone can be connected to the EAR
jack of the recorder for listening.
• When the earphone is used, the recorder
speaker will be switched-off.
Note s
• To avoid irritation to the ear, insert the
earphone after turning down the volume
level.
• When you listen with the earphone during
playback , do not raise the volume too
much. It may cause hearing impairment
and decrease in hearing abilit y.
Setti ngs relat ing to playba ck
[Segme nt
repea t]
( P.40)
This fun ction enable s
repeate d playback of par t of
the fil e being played.
[Repla ce]
( P.56)
This chan ges the order of th e
files i n the selected f older. It
is usefu l for playing back f iles
in a prefe rred order whil e in
normal p layback mode etc .
[Noise C ancel]
( P.50)
If recor ded audio is dif ficult
to under stand becaus e of
noisy su rroundings, a djust
the Nois e Cancel settin g
level.
[EUPHO NY]
( P.50)
Level adj ustments of
the [EUP HONY] set ting can
be set to fo ur stages accord ing to pref erence.
[Voice Fi lter]
( P.50)
The reco rder has a Voice
Filter Func tion to cut low
and high f requency ton es
during n ormal, fast, or s low
playbac k, and enable cl ear
audio pl ayback.
[Play Mod e]
( P.50)
You can sele ct the playback
mode that f its your pref erence.
[Play Spe ed]
( P.51)
The play back speed can b e
set to slow s peed or fast
speed p layback.
[Skip Sp ace]
( P.52)
The ski p interval leng th can
be set.
[Alarm]
( P.52)
The alar m playback func tion
can be set t o play a selecte d
file at a p re-set time.
[Play Sce ne]
( P.52)
Playback s ettings of you r
choice ca n be saved to suit
diffe rent sound qual ities and
playbac k methods.
[Intro P lay]
(For DM- 550)
( P.53)
You can liste n to the first few
second s of a file by touchi ng
the curs or to a file within a
folder.
Playback
3
35
Page 36

STOP
butto n
9 0 butto n
OK
butto n
PLAY
butto n
EN
About m usic file
In cases where the recorder is unable
to playback music files that have been
transferred to it, check to make sure that the
sampling rate and bit rate are in the range
where playback is possible. Combinations of
sampling rates and bit rates for music files
which the recorder can playback are given
below.
File
format
Sampl ing
frequ ency
Bit rate
WAV
format
44.1 kHz, 4 8 kHz 16 bit
MP3
format
MPEG1 Layer 3:
32 kHz, 44 .1 kH z,
48 kHz
MPEG2 Lay er3:
16 kHz, 22.0 5 kHz,
24 kHz
From 8 kbps u p to
320 kbps
WMA
format
8 kHz, 11 kHz,
16 kHz, 22 kHz ,
32 kHz, 44 .1 kH z,
48 kHz
From 5 kbps u p to
320 kbps
• Variable bitrate MP3 les (in which
conversion bitrates can vary) may not play
properly.
• For WAV les, this recorder can only
playback those in the linear PCM format.
WAV les other than these cannot be
played back.
• This recorder is compatible with Microsoft
Corporation DRM9, but not with DRM10.
1 Selecting the content file in the
[
Podcas t
] or the Audible file in
the [
Music
] folder.
2 Press the
PLAY
` or OK button to
start playback.
Bookmark mode
The recorder has the bookmark mode in
the contents file of the Podcast or Audible
file which is transferred to the recorder.
When the recorder is in bookmark mode,
it automatically memorizes the last stop
position as a [Playback Posit ion]. Even
the recorder is stopp ed while a file is being
played back, the last stop position is recalled
from the f ile, and the file can be played back
from that position next time.
Playback
• [`] will appear on the display.
When you play the file which you
have previously played back, the
playback starts from the last stop
position.
Playbac k
3
36
Page 37

EN
Playbac k
3 Press the
STOP
4 or OK button at
any point you want to stop the
playback.
• The recorder stops when it reaches the
end of the le. Continue pressing the 9
button to proceed with the cue from the
beginning of the next le.
Rewind ing
Press and hold the 0 button while the
recorder is stopped.
± W hen you rel ease the butt on, the
re cord er sto ps, but the [Pl ayba ck
Position] will not be updated. Press the
PLAY ` or OK button to start playing
back from where it was stopped.
Press and hold the 0 button while playing
a file.
±
When you release the 0 button the
recorder will resume normal playback.
• If a temp mark ( P.38) or [Playback
Position] is marked in the middle of
the le, the playback stops once at that
position.
• The reco rder sto ps when it rea ches the
beg inning of t he fil e. Continue pressing
the 0 button to proceed with the review
from the end of the previous le.
• If the
0 button is kept pressed while the
recorder is stopped at the start of the top
le, the recorder will fast rewind starting
from the end of the last le.
Locat ing the Begin ning of the Fi le
Press the 9 button during playback, slow
playback , or fast playback.
± The next f ile is cued and playback
start s at the previously set speed.
Press the 0 button during playback, slow
playback , or fast playback.
±
Th e file b ein g pla yed i s cue d and
play back starts at the previously set
speed.
Press the 0 button 2 times during playback,
slow playback or fast playback .
±
The previous file is cued and playback
start s at the previously set speed.
Playback
• Stop a fil e pla yba ck at a ny po int .
The stop positi on is memorize d as a
[Playbac k Position] in the file. In this
status, even if you select an empty file,
move to the other folder, or turn the
recorder off, the playback starts from
the last memorized position when you
play the same file.
4 Playing back the contents file
which has been played back
halfway.
• Pres s the PLAY ` or OK but ton to
start playing back from where it was
stopped.
Forwa rding
Press and hold the 9 button while the
recorder is stopped.
± W hen you rel ease the butt on, the
re cord er sto ps, but the [Pl ayba ck
Position] will not be updated. Press the
PLAY ` or OK button to start playing
back from where it was stopped.
Press and hold the 9 button while playing
a file.
±
When you release the 9 button the
recorder will resume normal playback.
• If a temp mark ( P.38) or [Playback
Position] is marked in the middle of
the le, the playback stops once at that
position.
3
37
Page 38

F2
butto n
9 0 butto n
OK
butto n
PLAY
butto n
ERASE
butto n
EN
1 Press the F2 button during file
recording, recording pause,
playing, or playback pause.
• Even after an index or temp mark is
placed, recording or playback will
continue so you can place index or
temp marks in other locations in a
similar manner.
• A number appears on the display and
an index mark or temp mark will be
placed.
Setting a n index mark or a temp ma rk
If index marks and temp marks are placed,
you can quickly find a location you want
to listen to in fast forward and fast rewind
and when cuing a file. Index marks cannot
be placed on MP3 files or files created on
machines other than Olympus IC recorders,
but temp marks can be placed instead to
temporarily remember desired positions.
• If a temp mark ( P.38) is marked in the
middle of the le, it reproduces from the
position.
• If the skip space is set at other than le sk ip
( P.52), the recorder will F. Sk ip (forward
skip) or R . Skip (reverse skip) for a set time
before playback.
To skip a fi le
Press the 9 button while the recorder is
stopped.
± It skips to the [Playback Position] of
the next file.
Press the 0 button when the playback is
stopped at the beginning of the file.
±
It skips to the [Pl ayback Position] of
the previous file.
Press the 0 button when the playback is
stopped in the middle of the file.
±
It skips to the head of the f ile.
Note s
• The bookmark mode is compatible with
the les within the [Pod cast] folder and
Audible les.
• If the le is deleted with this recorder,
the [Playback Position] information is
deleted simultaneously.
• Management le for the [Playback
Position] will be created for each le.
Playback
Playbac k
3
38
Page 39

EN
Playbac k
Clearing an index mark or a temp
mark:
1 Locate the index or temp mark
you want to clear.
2 Press the 9 or 0 button to
select the index or temp mark to
erase.
3 While the index or temp number
appears for approximately 2
seconds on the display, press the
ERASE
button.
• The index or temp mark is erased.
• Index or temp numbers after the
erased index or temp number will
automatically move up.
Playback
Note s
• Temp marks are temporar y markings, so
if you transmit a le to the PC, or move
it with a PC, they will be automatically
erased.
• Up to 16 index and temp marks can be
set in a le. If you try to place more than
16 index or temp marks, the [Index Full]
message will appear for index marks, and
[Temp Mark Full] for temp marks.
• Index or temp marks cannot be set or
erased in a locked le ( P.46).
• When the index or temp marks are set, the
management le will be created for each
le.
3
39
Page 40

+−
butto n
9 0 butto n
OK
butto n
F1
butto n
PLAY
butto n
EN
1 Select a file that has a segment
you would like to playback
repeatedly (
P.24 to P.27).
2 In the File list display, press the +
or
−
button to select the file.
• In the File display, press the 9 or
0 button to select a file.
3 Press the
PLAY
` or OK button to
start playback.
4 Press the F1 button at the point
you want to start segment repeat
playback.
How to begin segment repea t
playback
This func tion enables repeated playback of
part of the file being played.
• [ ] will flash on the display.
• Fast forwarding and rewinding can
be conduc ted when [ ] is flashing
in the same manner as during normal
playback , and you can quickly
proceed as far as the end position
( P.37).
• When it reaches to the end of the file
while [ ] is f lashing, the point will
become the end position, and repeat
playback will star t.
5 Press the F1 button again at the
position where you want to end
segment repeat playback.
• The recorder repeatedly plays back
the segment until the segment repeat
playback is cancelled.
Note
• As in normal playback mode, playback
speed can be change d during segment
repeat playback as well ( P.51). If an
index mark and temp mark are inser ted
or eliminated ( P.38) during segment
repeat playback, segment repeat playback
will be canceled and it will return to
normal playback mode.
Playback
Playbac k
3
40
Page 41

d
e
a
b
c
EN
Playbac k
a Press the
STOP
4 button
Pressing the
STOP
4 button will release
segment repeat playback and stop
playback .
b Press the
F1
button
Pressing the F1 button will release
segment repeat playback, and it will
return to normal playback mode.
c Press the 0 button
Pressing the 0 button will release
segment repeat playback, and reverse to
the beginning of the current file.
d Press the 9 button
Pressing the 9 button will release
segment repeat playback, and fast
forward and cue to the beginning of the
next f ile.
e Press the
LIST
button
Pressing the LIST button will release
segment repeat playback, and it will
return to the display of the file.
Cance l the segmen t repeat play back func tion
Pressing any of the following
buttons will release the segment
repeat playback.
Playback
3
41
Page 42

+−
butto n
9 0 butto n
OK
butto n
ERASE
butto n
EN
Erasing
A selected file can be erased from a folder.
Also, all files in a folder can be erased
simultaneously.
1 Select the folder or file you want
to erase (
P.24 to P.27).
2 In the File list display, press the +
or
−
button to select the file you
want to erase.
• In the File display, press the 9 or
0 button to select a file.
3 While the recorder is during stop
mode, press the
ERASE
button.
4 Press the + or − button to select
[
Erase in Fo lder
] or [
File Eras e
].
Note s
• The locked les and les set as read-only
cannot be erased ( P.46).
• If an action is not selected within 8
seconds, the recorder will return to stop
status.
• It may take over 10 seconds to complete
processing. Never remove batteries during
this time because data may be corrupted.
In addition, replace the batteries with new
ones in order to ensure that the batteries
will not run out while processing.
• [
Record er] folder ( -$) as well as
[Music], and [Podca st] folders cannot b e
deleted.
7 Press the OK button.
• The display changes to [Erase !] and
erasing will start. [Erase Done] is
displayed when the file is erased.
5 Press the OK button.
6 Press the + button to select
[
Start
].
Erasi ng
3
42
Page 43

EN
Erasi ng
1 Play the file you want to partial
erase.
• Forward a file to the position that
shall be erased. If the file is long,
use the 9 but ton to move to the
position you want to delete.
2 At the starting position of the
partial erase, press the
ERASE
button.
• [Erase start] will flash on the display.
Partially erase a file
(For DM-550)
Only a PCM file recorded in the recorder can
be partially erased.
3 Press the
ERASE
button again.
• [Start point] and [End point] on
the display f lash alternatively. When
the lights are flashing, playback
continues and you can rewind or fastforward as usual and fast-for ward to
the end of erase. If the f ile reaches the
end during the flashing of the lights,
that will be the position where erase
ends.
4 At the position you want to end
partial erase, press the
ERASE
button again.
• The display will switch to [Partial
erasin g !
] and star t the partial
erase. The deletion is completed
when [Par tial erase completed.] is
displayed.
• Playback will stop at the end location
of the partial erase.
Note s
• Partial erase is not applicable to les
recorded in the WMA or MP3 formats.
• The File Created Date will not change even
if the le is partially erased.
Erasing
3
43
Page 44

+−
butto n
9 0 butto n
OK/ME NU
butto n
STOP
butto n
F2
butto n
EN
Menu setting method
1 While the recorder is recording,
playing or stopped, press the
MENU
button for 1 second or longer.
Menu Setting
• The menu will appear on the display.
• Menu items can be set during a
recording or playback ( P.45).
2 Press the + or − button to move
to the tab that contains the item
you want to set.
• You can change the menu display by
moving the settings tab cursor.
3 Press the OK or 9 button to
move the cursor to the item to
set.
4 Press the + or − button to move
to the item you want to set.
5 Press the
OK
or 9 button.
• Moves to the setting of the selected
item.
6 Press the + or − button to change
the setting.
Items in menus are categorized by tabs, so
select a tab first and move to a desired item
to quickly set it. You can set each menu item
as follows.
Menu set ting method
4
44
Page 45

EN
Menu set ting method
• You will be informed that the settings
have been established via the screen.
• Pressing the
F1 or 0 button
without pressing the OK button will
cancel the settings and return you to
the previous screen.
8 Press the F2 or
STOP
4 button to
close the menu screen.
• When in the menu screen during
recording or playback, pressing the
F2 button will allow you to return
to the playback screen without
interrupting recording or playback.
Note s
• The recorder will stop if you leave it idle for
3 minutes during a menu setup operation,
when a selected item is not applied.
• When entering menu settings during
recording or playback, the menu settings
will be cancelled if 8 seconds elapse with
no buttons being pressed.
7 Press the OK button to complete
the setting.
4 Setting menu during recording:
Functi on Sett ing
Mic Sen se
To menu item
optio ns
Rec Leve l
Zoom Mi c
Low Cut Fil ter
VCVA
Backl ight
LED
4 Setting menu during playback:
Functi on Sett ing
Prope rty
To menu item
optio ns
Noise C ancel
EUPHONY
Voice Fil ter
Play Mod e
Play Spe ed
Skip Sp ace
Backl ight
LED
Menu setting method
4
45
Page 46

Menu setting method
File Menu
Erase Lo ck
Locking a f ile keeps important data from
being accidentally erased. Locked files are
not erased when you select to erase all files
from a folder ( P.42).
[On]:
Locks the file and prevents it from being
erased.
[Off ]:
Unlocks the file and allows it to be erased.
Replac e
4
Refer to “Rearran ging files [Replace]”
Menu set ting method
( P.56).
File Move /Copy (For DM-550)
Refer to “M oving/Copying Files [File
Move/Copy]” ( P.57).
File Div ide (For DM-550)
Refer to “S plitting Files [File Divide]”
( P.59).
Prope rty
File and folder information can be
confirmed from the menu screen.
When the file is selected:
[Name] (File name), [Date] ( Time stamp),
[Size] (File size), [Bit Rate]*1 (File format)
[Artist]*2 (Artist name) and [Album]*2
(Album name) will appear on the display.
*1 When a linear PCM format file has been
selected, [Bit Rate] area displays the
sampling frequency and bit rate.
*2 When a file contains no tag information,
[UNKN OWN_ARTIST], [UNKNOWN _
ALBUM] will appear on the display.
When voice f ile is selected, [Artist] and
[Album] will not appear on the display.
When the folder is selected:
[Name] (File name), [Fold er] (Number of
folder) and [File]*1 (Number of file) will
appear on the display.
*1 Files which cannot be recognized by this
recorder are not included in the number
of files.
• Select the files for which you would like
to confirm information in advance before
operating the menu.
EN
46
Page 47

Menu setting method
Rec Menu
Mic Sen se
Microphone sensitivity is adjustable to meet
recording needs.
[High]:
Highest recording sensitivity suitable
for conferences with large crowds and
recording audio at a distance or low
volume.
[Middle]:
Suitable for recording meetings and
seminars with a small number of people.
[Low]:
Lowest recording sensitivity suitable for
dictation.
• When you would like to clearly record
a speaker’s voice, set [Mic Sense] to
[Low] and hold recorder’s built-in stereo
microphone close to the speaker’s mouth
(5-10 cm) before recording.
Rec Mode
The recorder can record in the linear PCM
format (For DM-550). High resolution
recording at a high sampling rate and high
bit rate equivalent or superior to that of
a music CD is possible. Moreover, it also
suppor ts the MP3 and WMA formats.
1 Select the recording format.
[PCM]:
This is an uncompressed audio format
which is used for music CDs and the like.
[MP3]:
MPEG is the international standard
established by a working group of the
ISO (International Organization for
Standardization).
[WMA]:
This is an audio compression encoding
method that was developed by the
Microsoft Corporation in the US.
2 Select the recording rate.
[PCM]: [48k Hz/16bit] or [44.1kHz/16bi t]
[MP3]: [320kbps] to [128kbps]
[WMA]: [ST XQ],[ST HQ],[ST SP], [HQ ], [SP], [LP]
• To record a meeting and lecture clearly, set
other than [LP] in Rec Rate.
• When the external monaural microphone
is used while [Rec Mo de] is set to a stereo
recording mode, it enables recording only
with the L channel microphone.
Set the m ethod for ad justing th e recordin g level
[Rec Level ] (For DM-550)
You can set the device to automatically or
manually adjust the recording level.
[Manual]:
Recording is per formed by manually
adjusting the recording level.
[Auto]:
Recording is per formed by automatically
adjusting the recording level. This is useful
for when you will be recording right away.
Adjust the recording level:
Press the
9 or 0 button while
the recorder is recording or paused
to adjust the recording level.
• The recording level will be automatically
adjusted when the recording level is set
to [Auto]. Set the recor ding level to
[Manual] to use the recording leve l
adjustment feature.
•
Wh en the u nit is s et to [M an ual ],
the limiter function will be disab led.
Di stor te d so und wi ll b e re cor de d
during [OVER] is displayed. Adjust the
reco rding level so that [OVER] is not
displayed.
4
Menu set ting method
EN
47
Page 48

Menu setting method
• [OVER] may be displayed even when
the indicator of the recording level
meter does not reach or is over to
the right.If sound distortions do not
disappear even after the recording
level has been adjusted, change the
setting for microphone sensitivit y (
P.47) and adjust the recording level
again .
•
In putti ng a ver y l oud sou nd ma y
produce noise even when the recording
level is set to [Auto].
•
The level can be adjusted from [01] to
[16]. The higher the number, the higher
the level and the larger the indicator
position on the level meter.
4
Zoom Mic
Menu set ting method
The directional microphone function utilizes
DiMAGIC’s (DiMAGIC Co., Ltd.) DiMAGIC
Virtual Microphone (DVM) technology. DVM is
an audio pickup system which allows you
to record by focusing on sound from any
direction. From expansive stereo recording
to high directivity recording, DVM represents
the latest in directional control methods
that allow you to switch to a single exclusive
microphone.
[Zoom]:
Recording with monaural, however you
can record high directivit y sound.
[Narrow]:
Recording by a directivity stereo sound.
[Wide]:
Recording by an expansive stereo sound.
[Off ]:
Disables this function.
Low Cut Fil ter
The recorder has a Low Cut Filter func tion to
minimize low-frequency sounds and record
voices more clearly. This function can reduce
noise from air conditioners, projec tors and
other similar noises .
[On]: Enables the Low Cut Filter function.
[Off ]: Disables this function.
VCVA
When the microphone senses that sounds have
reached a preset threshold volume level, the
built-in Variable Control Voice Actuator (VCVA)
star ts recordi ng automat ically, and stops
when the volume drops below the threshold
level. The VCVA featur e ex tends recor ding
tim e a nd conserves memor y by sto pping
recording during silent periods, which helps
the playback to be more efficient.
[On]: Enables the VCVA function. Will start
recording in VCVA mode.
[Off ]: Disables this function. Will resume
recording in normal mode.
Adjust the start/stop actuation
level:
1 Press the
REC
s button to start
recording.
• When the sound volume is lower than
the preset threshold sound level,
recording automatically stops after
1 sec approximately, and [Standby]
flashes on the display. The recording
indicator light glows when recording
start s and flashes when recording
pauses.
EN
48
Page 49

a
b
c
EN
Menu set ting method
2 Press the 9 or 0 button
adjust the start/stop actuation
level.
• The VCVA level can be set to any of 15
different values.
• The higher the value, the more
sensitive the recorder to sounds. At
the highest value, even the faintest
sound will activate recording.
a Level meter (varies according to the
sound volume being recorded)
b Start level (moves to the right /left
according to the set level)
c Start level/Recording level switch
button (Only when [ VCVA]:[On],[Rec
Level]:[M anual] is set, it is displayed.)
• Press the
F1 button to change
the recording level during VCVA
recording. The recording level can be
adjusted.
• The star t/stop actuation level also varies
depending on the selected microphone
sensitivity mode ( P.47).
• If the starting level is not adjusted within
2 seconds, the display will return to the
previous.
• If the surrounding noise is loud, the
starting sensitivity of the VCVA can be
adjusted according to the recording
situation.
• To ensure successful recordings, prior
testing and adjustment of the start/stop
actuation level is re commended.
VCVA standby monitor setting:
When [Standby] is set to [On] with the menu
setting, the reco rding will not be outp ut
from the earphone while in VCVA standby.
When you monitor your recording with the
earphone connected, you can check whether
VCVA is launched or not by checking if an
audio is output.
[On]:
Enables the Standby Monitor function.
[Off ]:
Disables this function.
Timer Re c
Refer to “Timer Recordi ng [Timer Rec]”
( P.60).
Rec Scen e
Refer to “S etting the Re cording Scene [R ec
Scene]” ( P.62).
Menu setting method
4
49
Page 50

Menu setting method
Play Menu
Noise C ancel
If recorded audio is di fficult to und erstand
bec ause of noisy surroun dings, adjust the
Noise Cancel setting level.
[High] [Low]:
Enables the Noise Cancel function. Noise will
be reduced in the file when it’s played back
for better sound quality.
[Off ]:
Disables this function.
• When [No ise Cancel
[High], [ Voice Filter] [E UPHONY] and
[Play Speed] func tions will not func tion.
To use these func tions, set [Nois e Cancel]
4
to [Off ].
Menu set ting method
EUPHONY
This record er i s eq uipped with “EUPHONY
MOBILE”, the latest in surround sound systems
wh ich c omb ine s ban dwi dth c orr ecti on,
expansion technology, and virtual acoustical
source processing technology. In add ition
to its natur al, expansive feel, the recorder
is equip ped wit h t he excepti onal featu re
wherein listeners are less prone to developing
an compressed or closed-in feel, or to growing
tired over extended listening.
On top of this, liste ners are less pro ne to
developing an oppressed or closed-in feel, or
to growing tired over extended listening. Level
adjustments of the [EUPHONY ] setting can be
set to four stages according to preference.
[Power]:
This mode focuses more on lower sound
registers.
[Wide]:
Th is mode has an eve n more ex pansi ve
feel.
EN
] is set to [Low] or
[Natural]:
This mode achieves natural bandwidth
correction and acoustical f ield expansion.
[Off ]:
Disables this function.
EUPHONY] feature is not available
• The [
while [Play Speed] ( P.51), [Noi se
Cancel] ( P.50) and [Voice Fil ter] is set.
Voice Filt er
The recorder has a Voice Filter Function to cut
low and high frequenc y tones during normal,
fast, or slow playback, and enable clear audio
playback .
[On]:
Enables the Voice Filter function.
[Off ]:
Disables this function.
• When [Voi ce Filter
Cancel] and [EUPHONY] will not function.
To use this functions, set [Voice Fil ter] to
[Off ].
Play Mod e
You can selec t the playback mode that fits
your preference.
] is set to [On], [N oise
Select the desired playback range:
1 Select [
2 Select [
Play Area
File
[File]:
Selects the current file.
[Folder]:
Selects the current folder.
[All]:
Selects all files in the internal
memory.
], [
].
Folder
] or [
All
].
50
Page 51

Menu setting method
Select the desired playback mode:
1 Select [
2 Select [On] or [
• In [
to the end of the last le in the folder,
[End] ashes for two seconds on the
display and the recorder stops at the start
of the last le.
• In [
comes to the end of the last le in the
folder, [En d] ashes for two seconds on
the display and the recorder stops at the
start of the rst le in the folder.
• In [
the folder, the recorder will start playing
from the rst le in the next folder. When
it comes to the end of the last le in the
recorder, [End] ashes for two seconds on
the display and the recorder stops at the
start of the rst le in the recorder.
Repeat
] or [
Random
].
[Repeat]:
Sets to repeat playback mode.
[Rando m]:
Sets to random playback mode.
Off
].
[On]:
Sets the playback range to be played
back repeatedly or randomly.
[Off ]:
Disables this func tion.
File] mode, when the recorder comes
Folder] mode, when the recorder
All] mode, after playing the last le in
Play Spe ed
The playback speed of the file can be changed
between [0.5] and [2] times speed. Change the
speed according to need such as listening to
meeting content at a fast speed or reviewing
spots that you couldn't catch in a language
lesson at a slow spe ed. Th e tone will b e
auto mati call y adju sted dig ita lly with out
changing the voice so it sounds natural.
1 Select [
2 Set the playback speed.
Slow Playbac k
[
Fast Playbac k
When [
Slow Pla yback
Speed at interval of 0.05 times can
be selected between [x0 .50] and
[x0.95].
When [
Fast Play back
Speed at interval of 0.05 times can
be selected between [x1.05] and
[x2.0 0].
] or
].
] is selected:
] is selected:
Change Playback Speed:
1 Press the
PLAY
` or
OK
button to
start playback.
2 Press the
PLAY
` button to switch
playback speed.
• Every time the PLAY ` button is
pressed, the playback speed will
switch.
• Even if playback is stopped, the
changed playback speed will b e
retained. The next playback will be at
that speed.
Normal p layback
speed.
Slow playback
down, and [ ] will appear on the
display (default at 0.75 times as fast).
Fast playback:
faster, and [ ] will appear on the
display (default at 1.50 times as fast).
: Playback at normal
: Playback speed slows
Playback speed becomes
4
Menu set ting method
EN
51
Page 52

Menu setting method
Restrictions on doub le speed playback:
Normal operation may not be available
depending on the sampling frequenc y and
the bit rate of the file to be played back. In
such a case, reduce the speed of the fast
playback .
• As in normal playback mode, you can stop
playback , cue a file, or insert an index
mark ( P.38) in slow playback and fast
playback modes as well.
• The slow playback or fast playback is
available even if either [Voice Fi lter] (
P.50) is set.
• The slow playback or fast playback is not
available if either [Noise Cancel] ( P.50)
or [EUPHONY] ( P.50) eect is set.
4
Menu set ting method
Skip Sp ace
This function enables you to skip (forward) or
reverse skip (rewind) a file being played for
a set period. This function is convenient for
quickly skipping to another playback position
or repeatedly playing back short phrases.
1 Select [
2 Set the skip space.
Forwa rd Skip
[
Reverse S kip
When [
[File Skip
[1min. Skip] [5mi n. Skip]
[10min. Skip]
When [
[File Skip
[10sec. Sk ip] [30sec. Skip]
[1min. Skip] [5mi n. Skip]
[10min. Skip]
].
Forwa rd Skip
Revers e Skip
] is selected:
] [10sec. Sk ip] [30sec. Skip]
] is selected:
] [1sec. Skip] – [5sec. Skip]
] or
Forwa rd/Reverse S kip Playbac k:
1 Press the
PLAY
` or OK button to
start playback.
2 Press the 9 or 0 button.
• The recorder will skip (for ward) or
reverse sk ip (rewind) a set space and
start playing back.
• If there is an index mark/temp mark or
a cue closer than the skip space, the
recorder will forward skip/reverse sk ip to
that position.
Alarm
Refer to “Alarm Playba ck Function [Alarm]”
( P.64).
Play Sce ne
Refer to “S etting the Play back scene [Play
Scene ]
” ( P.66).
EN
52
Page 53

Menu setting method
LCD/Sound Menu
Backl ight
The display will remain lit for about 10 (Initial
setting) seconds when a button on the
recorder is pressed.
1 Select [
2 Set the lighting time.
3 Set the brightness.
Contra st
Display contrast can be adjusted in 12 levels.
You can adjus t the LCD display contr ast level from
[01] to [12].
LED
You can set it so the LED indicator light does
not turn on.
[On]:
LED light will be set.
[Off ]:
Disables this function. LED light will be
cancelled.
Lighti ng Time
[
Bright ness
[Off ]:
Disables this func tion.
[5second s] [10seconds] [30 seconds]
[1minutes]:
Enables the Backlight function.
[High] [Low]:
Sets the brightness of the backlight
when lit.
].
] or
Beep
The recorder beeps to alert you to button
operations or warn you of error s. System
sounds may be turned off.
[Volume3]:
Increase the volume of beeps.
[Volume2]:
Return the volume of beeps to normal.
[Volume1]:
Decrease the volume of beeps.
[Off ]:
Deactivate beeps.
Langu age (Lang)
You can selec t the display language for this
recorder.
[Engli sh] [Français] [Deut sch] [Italiano]
[Españ ol] [Русский] [ᶮ㔈]:
• The selectable language diers depending
on the region.
Guida nce
Refer to “Guidance [Voice Gu ide]” ( P.68).
Intro Pl ay (For DM-550)
You can listen to the f irst few seconds of a
fil e by touching the cursor to a fil e within
a folder. This feat ure is convenient whe n
looking for files.
[10seconds]:
The first 10 seconds of a file will be played.
[5second s]:
The first 5 seconds of a file will be played.
[3seconds]:
The first 3 seconds of a file will be played.
[Off ]:
Disables this function.
4
Menu set ting method
EN
53
Page 54

Menu setting method
Device Menu
Memor y Select
When an microSD card is inserted you
can select to record to either the built-in
memory or to the microSD card ( P.22).
[Built-in Memory]:Built-in memory.
[microSD Card]:microSD card.
Chang ing Power Save [Powe r Save]
Forget ting to turn the po wer of f can be
prev ented. If the recorder remains in stop
mod e f or ove r 10 min utes (Ini tial set ting)
while the power is turned on, the power will
4
be turned off.
Menu set ting method
[5minute s] [10minutes] [30 minutes]
[1hour]:
Set the length of time before the power will
be turned off.
[Off ]:
Disables this function.
• If any button is pressed, the elapsed time
count before the power turns o will start
over again.
Chang ing Folder Na mes [Folder Na me]
You can change the folder names of Folder
to Folder $ for audio recording into names
preset in the template. You can also change
folder names registered in the template with
"Olympus Sonority".
[Setti ngs]:
Sets a folder name from the preset
template.
EN
54
Time & Dat e
Refer to “S etting time and date [T ime &
Date]” ( P.20).
USB Class [ USB Setting s]
Refe r to “Cha ngin g the US B C lass [US B
Setti ngs]” ( P.69).
Reset Se ttings
This returns the functions back to their initial
settings (factory default).
[Start]:
Returns the settings to their initial values.
[Cancel]:
Takes you back to the [Device Menu
• After resetting the settings, the time
settings and le numbers will be
preser ved from before the reset and will
not return to their initial settings.
].
Menu settings after setting reset
(initial settings):
Rec Menu:
[Mic Sen se] [Middl e]
[Rec Mo de]
[Reco rding format]
[Rec ording rate] [ST XQ
[Rec Leve l] [Auto]
[Zoom M ic] [Off ]
[Low Cut Fil ter] [Off ]
[VCVA]
[
On/Of f] [Off]
[
Standb y] [Off ]
Play Menu:
[Nois e Cancel] [Off ]
[EUPHO NY] [Off ]
[Voice Fi lter] [Off]
[Play Mod e]
[Play Ar ea] [
[
Repea t] [Off]
[
Rando m] [Off ]
[Play Spe ed]
[Slow Pl ayback] [x0.75 Play
[Fast Pl ayback] [x1. 50 Play
[Skip Sp ace] [File Sk ip]
[ WMA]
File]
]
]
]
Page 55

Menu setting method
LCD/Sound M enu:
[Back light]
[Lig hting Time] [
[
Bright ness] [Low]
[Contra st] [Level 0 6]
[LED] [On]
[Beep] [Volum e2]
[Lang uage(Lang)] [Engl ish]
[Voice G uide]
[
ON/OFF] [On]
[
Speed] [S peed3]
[
Volume] [Vo lume3]
[Intr o Play] [Of f]
10secon ds]
Device Menu:
[Memor y Select]
[Power Sav e] [10minu tes]
[Folde r Name] [Initi al setting ]
[USB Set tings]
[USB Co nnect] [
[USB C lass] [Storage Cl ass
[Buil t-in Memor y]
PC]
]
Format
Refer to “Formatting the record er
[Format]” ( P.71).
Memor y Info.
The recordable capacit y remaining and overall
capacit y of the recording media can be seen
from the menu screen.
• When no microSD card is inserted only
information for the built-in memory will
seen.
• The domain area which uses the
administrative les which the recorder
uses is included in the remaining capacit y
for the recording media. For microSD
cards in particular, in addition to this
administrative domain the administrative
domain area for the microSD card is added
in as well. Owing to this, the remaining
capacit y will be displayed as less than the
card’s specied capacity, yet this is not
abnormal.
System In fo.
You can check the recorder ’s information on
the menu screen. [Mo del] (Model Name),
[Version] (System version) and [Seri al No.]
(Serial Number) appears on the display.
4
Menu set ting method
EN
55
Page 56

+−
butto n
9 0 butto n
OK
butto n
STOP
butto n
F2
butto n
EN
Rearrangi ng files [Replace]
You can move a file in a folder to change the
order of playback. First select the folder (file)
for which you want to change the playback
order. The song order can be changed by
using the provided "Olympus Sonorit y"
software.
1 Select the folder for which you
would like to rearrange the song
order (
P.24 to P.27).
2 Select [
Replac e
] from the menu
on the [
File Menu
].
• Please refer to P.44, P.45 for details on
menu settings.
3 Press the + or − button to select
the file you want to move.
4 Press the OK or 9 button.
• The cursor will f lash to confirm that
the file can be moved.
5 Press the + or − button to select
the location to move it to.
6 Press the OK button to complete
the setting.
• If there are more f iles to move, repeat
Steps 3 through 6.
• Pressing the
0 button without
pressing the OK button will cancel
the settings and return you to the
previous screen.
7 Press the F2 or
STOP
4 button to
complete the setting.
Menu setting method
Menu set ting method
4
56
Page 57

+−
butto n
9 0 butto n
OK
butto n
STOP
butto n
F2
butto n
EN
Menu set ting method
Moving/Copying Files
[File Move/Copy] (For DM-550)
Files saved in the built-in memor y or the
microSD card can be moved or copied
within the memory. Files can also be moved
or copied b etween memor y.
1 Select the folder where the file
you want to move or copy is
saved.
2 Select [
File Move/Co py
] from the
menu on the [
File Menu
].
• Please refer to P.44, P.45 for details on
menu settings.
3 Press the + or − button to select
the position to move or copy the
file to.
[move > memor y]:
Move a file in the built-in memory or
microSD card to another folder within the
built-in memory.
[copy > memory]:
Copy a file in the built-in memory or
microSD card to another folder within the
built-in memory.
[move > microSD]:
Move a file in the built-in memory or
microSD card to another folder in the
microSD card.
[copy > microSD]:
Copy a file in the built-in memory or
microSD card to another folder in the
microSD card.
4 Press the OK or 9 button.
• [Move] will appear on the display.
5 Press the + or − button to select
the number of files to move or
copy.
[1file]:
Select only the specif ied file.
[Selec ted files]:
Select multiple files.
[All files]:
Select all files in the folder.
6 Press the OK or 9 button to
move to the respective setting.
Menu setting method
4
57
Page 58

EN
When you select [
1file
]:
1 Press the + or − but ton to select the
file you want to move or copy.
2 Press the OK but ton to select the f ile.
Proceed to Step 8.
When you select [
Selec ted file s
]:
1 Press the + or − but ton to select the
file you want to move or copy.
2 Press the OK or 9 button to che ck
the file(s) selected.
9 Press the F2 button.
• [Moving!] or [Copy ing!] will appear
on the display and moving or copying
will star t. During the process, the
progress status will be shown in
percentage. The process is completed
when [File move completed] or [File
copy comp leted
] is displayed.
Note s
• The recorder cannot copy when the
memory capacity is not sucient.
• The recorder cannot move or copy when
the number of le exceeds 999.
• Do not remove the batteries during
moving or copying. This may damage the
datas.
• A le cannot be moved or copied to the
same folder.
• When the op eration is cancelled during
moving or copying, only the le that is
being moved or copied is eective, all
other les will become not eec tive.
• Files which are locked will remain so even
after they are moved or copied.
• DRM les cannot be moved or copied.
• Files cannot be moved or copied directly
under the [Recorder] folder.
When you select [
All fi les
]:
When all files are selected, all the f iles
in the folder will be automatically
selected and the recorder will move
to the [Fold er to move] screen.
Proceed to Step 8.
7 Press the F2 button.
The recorder will move to the [Fold er
to move
] screen.
8 Press the 9 , 0 or + , −
button to select the folder you
want to move or copy the file to.
Menu setting method
Menu set ting method
4
58
Page 59

+−
butto n
OK
butto n
EN
Menu set ting method
Splitti ng File s [File Divide]
(For DM-550)
PCM files recorded in this recorder can be
split.
Files with large capacities and long
recording times can be split so that they are
easier to manage and edit.
1 Select the PCM file you want to
split, play or fast-forward the file
and stop at where you want to
split the file.
• Files with the recording mode of
[PCM48 k] or [PCM44.1k] are files
recorded in the PCM format.
2 While file display appears, select
[
File Div ide
] in the [
File Menu
] in
the menu.
• Please refer to P.44, P.45 for details on
menu settings.
3 Press the + button to select
[
Start
] and then press the OK
button.
• [Dividing!] will be displayed and
file splitting will star t. Splitting
is completed when [File divid e
comple ted] is displayed.
Note s
• The le split cannot be done when the le
list is displayed.
• The recorder cannot split les when the
number of les in the folder exceeds 998.
• Locked les cannot be split.
• After a le has been split, the original le
will be renamed [Fil e name_1.WAV] and
the new le will be named [File nam e_
2.WAV]
• If a le has an extremely shor t recording
time, it may not be split even if it is a PCM
le.
• Do not remove the batteries during
spliting le. This may damage the data.
Menu setting method
4
59
Page 60

+−
butto n
9 0 butto n
OK
butto n
STOP
butto n
F2
butto n
EN
Timer Recording [Timer Rec]
Timer recording is the function to execute a
recording at a set time. You can program up to
three desired set tings (Preset 1-3) ([On/Off ],
[Day], [T ime], [Re c M ode] , [Fo lde r], and
[Mic Sense]).
1 Select [
Timer Re c
] from the menu
in [
Rec Menu
].
• Please refer to P.44, P.45 for details on
menu settings.
2 Press the + or − button to select a
preset number.
• Press the 9 button to show the
[
Day
] and the [
Time
] set for the preset
number the cursor is pointing at.
3 Press the OK button.
4 Press the + or − button to select
the item to set.
• Select items you want to set from
among [On/O ff], [Day], [Time], [Rec
Mode], [Fo lder], and [Mic Sen se].
• Select [
Finish] to complete the
setting and return to the preset
number selection display in Step 2.
5 Press the OK or 9 button to
move to the respective setting.
[On/Off] setting:
1 Press the + or – but ton to select
between [On] and [Of f].
[On]: Setting will be applied.
[Off ]: Setting will not be applied.
2 Press the OK but ton to exit [On/Off ]
selection.
[Day] setting:
1 Press the + or – but ton to select from
[One Time], [Everyd ay], and [Every
Week].
[On e T ime]: Records only once at the
specif ied time.
[Ev eryday ]: Reco rds eve ry day at the
specif ied time.
[Every Week]: Make a recording at a set
time on a specified day of the week.
Select [Every Week] and press the OK button
to move to the selection of [Day]. Press the +
or – button to selec t a day of the week.
2 Press the OK but ton to exit [Day]
selection.
Menu setting method
Menu set ting method
4
60
Page 61

a
EN
Menu set ting method
[Time] se tting:
1 Press the 9 or 0 but ton to
select "Hour"and "Minute" in the
[Start Time] and "Hour" and "Minute"
in the [Stop Time].
2 Press the + or – but ton to set.
3 Press the OK but ton to exit [Time]
selection.
[Rec Mode] setting:
Regardless of the regular [Rec Mode] (
P.47), timer re cord ing wil l s tar t i n a set
recording mode.
1 Press the + or – but ton to select a
recording mode.
2 Press the OK or 9 button.
3 Press the + or – but ton to select a
recording rate.
4 Press the OK but ton to exit Recording
mode selection.
[Folder] se tting:
1 Press the + or – button to select the
destination to save to (Memory) (For
DM-550)
2 Press the OK or 9 button to move
to the [Fold er] setting.
3 Press the + or – but ton to select the
destination to save to (Folder).
4 Press the OK but ton to exit [Folder]
setting selection.
[Mic Sens e] se tting:
Regardless of the recorder’s microphone
sensitivity setting ( P.47), timer recording
will star t at a set microphone sensitivity.
1 Press the + or – but ton to select from
[High], [M iddle], and [Low].
2 Press the OK but ton to exit [Mic
Sense] selection.
6 Completing the setting.
1 Pressing + or − button to select
[Finish].
2 Press the OK but ton to complete the
setup screen.
Prog ramm ed set tin gs will be ap plied
and the screen will return to the preset
number selection menu. If the [On/Off ]
setting is set to [On],
will appear on
the display.
a When setting to [On]
Menu setting method
Wh en se tti ng ot her pre set n umb ers ,
repeat Steps 2 through 6.
When the 9 button is pressed in the
Sele ct in Adv ance Menu, the se ttin gs
selected can be confirmed.
7 Press the F2 or
STOP
4 button to
complete the setting.
• The
will appear on the display.
Note s
• If the recorder is in use at the preset start
time, the timer recording will start directly
after stopping the recorder.
• Even if the power if turned o or the recorder
is put on Hold, timer recording will start at a
specied time.
• If thre e t imer reco rdings have the same
star ting times, [Preset 1] has the highest
priority and [Preset 3] has the lowest.
• If the starting time for timer recording and
alarm playback ( P.64) is set for the same
time, timer recording will have priority.
• If the batt eries run out while recordi ng
based on the timer setting, the recorder will
stop recording. Check the batter y power
before starting the timer recording.
4
61
Page 62

+−
butto n
9 0 butto n
OK
butto n
STOP
butto n
F2
butto n
EN
Setting the Recording Sc ene
[Rec Scene]
The recording setting can be selected from
the [Dic tation], [Confer ence], [Lecture]
templates to suit the recording scene or
situation. You can also save a recording
setting of your choice.
1 Select [
Rec Scen e
] from the menu
in [
Rec Menu
].
• Please refer to P.44, P.45 for details on
menu settings.
2 Press the + or − button to select
the item to set.
3 Press the OK or 9 button to
move to Settings.
When [
Scene S elect
] is selected:
1 Press the + or – but ton to select the
recording scene you want to set.
2 Press the OK but ton to complete the
selection.
• To confirm the respec tive recording
scene set tings, press the + or – button
in the [Scen e Select] screen to select
the item you want to confirm, then
press the 9 button to confirm in
the setting confirmation screen. To
end the set ting confirmation screen,
press the F1 button and the display
will return to the [Scen e Select]
screen.
• When the recorder is stopped,
pressing and holding the F2 button
will return the screen to [Scene
Selec t].
Menu setting method
• If the [Time & Date] is not correc t, timer
recording cannot be set at the specied
time, so make sure the [T ime & Date] is
correct before setting timer recording. If
it is not correct, reset [Time & Date] (
P.20).
• The recorder will record in the built-in
memory [Folde r A] when the microSD
card is selected as the recording
destination and the microSD card is not
inserted during T imer Recording.
Menu set ting method
4
62
Page 63

EN
Menu set ting method
Template for Setting a Recording sc ene
In [Scene Sel ect], you can select a recording scene that is most suitable for the recording
scene or situation from three templates. The recording settings for the respective recording
scenes are as follows.
Recor d Setting
Recor ding Scene
Off Dictatio n Confer ence Lect ure
[Mic Sen se] Midd le Low Mi ddle High
[Rec Mo de] ST XQ HQ ST XQ ST XQ
[Rec Leve l] Auto Auto Auto Aut o
[Zoom M ic] Off Off Wide Zoom
[
Low Cut Fil ter
] Off On O n On
[VCVA] Of f Off Off Of f
[Standb y]
On On O n O n
Menu setting method
When [
Scene S ave
] is selected:
Besides the [Rec Scene] templates found
in the reco rder, yo u can also save the
menu settings of a recording you have set
to your choice.
1 Press the + or – but ton to select the
[User Se tting] you want to save.
2 Press the OK but ton to complete the
settings.
4 Press the
F2 or STOP
4 button to
complete the setting.
4
63
Page 64

+−
butto n
9 0 butto n
OK
butto n
STOP
butto n
F2
butto n
EN
Alarm Playback Function [Alarm]
The alarm playback function can be set to play
a selected file at a pre-set time.
You can program up to three desired settings
(Pr eset 1-3) ([O n/Of f], [Day], [S tar t T ime] ,
[V olu me] , [Ala rm So und ] and [P lay bac k
File]).
1 Select [
Alarm
] from the menu in
[
Play Menu
].
• Please refer to P.44, P.45 for details on
menu settings.
2 Press the + or − button to select a
preset number.
• Press the 9 button to show the [Day]
and the [Start Time] set for the preset
number the cursor is pointing at.
3 Press the OK button.
4 Press the + or − button to select
the item to set.
• Select items you want to set from
among [On/O ff] [Day] [Star t Time]
[Volume] [Alarm Soun d] [Playback
File].
• Select [
Finish] to complete the
setting and return to the preset
number selection display in Step 2.
5 Press the OK or 9 button to
move to the respective setting.
[On/Off] setting:
1 Press the + or – but ton to select
between [On] and [Of f].
[On]: Setting will be applied.
[Off ]: Setting will not be applied.
2 Press the OK but ton to exit [On/Off ]
selection.
[Day] setting:
1 Press the + or – but ton to select from
[One Time], [Everyd ay], and [Every
Week].
[One Time]: Alarm Playback will be
performed only once at the sp ecified
time.
[Everyd ay]: Alarm Playback will be
performed at the specif ied time every
day.
[Every Week]: Make a Alarm Playback
at a set time on a specif ied day of the
week.
Menu setting method
Menu set ting method
4
64
Page 65

a
EN
Menu set ting method
• Select the memory with an alarm
playback f ile using the + or – button
and press the OK or 9 button.
The recorder will move to the folder
settings with the f ile with alarm
playback .
• Select the folder using the + or
– buttons and press the OK or 9
button to move to file selection.Use
the + or – button to select the file in
the same way.
2 Press the OK or 9 button to exit
[Playbac k File] selection.
6 Completing the setting.
1 Pressing + or − button to select
[Finish].
2 Press the OK or 9 button to
complete the setup screen.
Prog ramm ed set tin gs will be ap plied
and the screen will return to the preset
number selection menu. If the [On/Off ]
setting is set to [On], will appear on
the display.
a When setting to [On]
Menu setting method
Select [Every Wee k] and press the OK or
9 button to move to the selection of
[Day]. Press the + or – button to select a
day of the week.
2 Press the OK but ton to exit [Day]
selection.
[Start Time] sett ing:
1 Press the 9 or 0 but ton to
select "Hour"and "Minute" in the
[Start Time] and "Hour" and "Minute"
in the [Stop Time].
2 Press the + or – but ton to set.
3 Press the OK but ton to exit [Start
Time] selection.
[Volume] se tting:
1 Press the + or – but ton to adjust the
volume. Press the PLAY ` button to
check the volume.
2 Press the OK but ton to exit [Volume]
selection.
[Alarm Sound] sett ing:
1 Press the + or – but ton to select an
alarm sound from among [Alarm1],
[Alarm2] and [Ala rm3]. Press the
PLAY
` button to check the alarm
sound.
2 Press the OK but ton to exit [Alarm
Sound] selection.
[Playback File] setting:
1 Press the + or – but ton to select from
[No File Play], [File Se lect].
[No File Play
]: Sounds alarm only.
[File Select
]: Plays back a selected file
after the alarm.
• When [File Select
] is selec ted and
the OK or 9 button is pressed, the
recorder will move to the [Memor y
Selec t] setting.
Wh en se tti ng ot her pre set n umb ers ,
repeat Steps 2 through 6.
When the 9 button is pressed in the
Sele ct in Adv ance Menu, the se ttin gs
selected can be confirmed.
7 Press the
F2 or STOP
4 button to
complete the setting.
• The
will appear on the display.
4
65
Page 66

+−
butto n
9 0 butto n
OK
butto n
STOP
butto n
F2
butto n
EN
Setting the Playback scene
[Play Scene]
Voice files recorded in the recorder and
music files downloaded from the PC can be
saved in the playback settings of your choice
to suit the different sound qualities and
playback methods.
1 Select [
Play Scen e
] from the menu
in [
Play Menu
].
• Please refer to P.44, P.45 for details on
menu settings.
2 Press the + or − button to select
the item to set.
Menu setting method
Note s
• If [Everyday] is selected, the alarm will
sound at the scheduled time ever y day
unless alarm playback is canceled.
• The alarm will sound for ve minutes
and then stop. Even if a le is selected for
Alarm Playback, it will not be automatically
played when the alarm sounds.
• If three alarm playback have the same
starting times, [Preset 1] has the highest
priority and [Preset 3] has the lowest.
• If the recorder is in use or if operations are
being performed at the scheduled time,
the Alarm Playback function will not be
available.
• The alarm will sound at the scheduled
time even if the power is turned o or the
recorder is set to Hold mode. The recorder
begins to play the selected le when you
press any button, and stops playing when
you press the STOP 4 button.
• If the selected le is moved, erased or the
microSD card removed, le playback will
not be per formed and only the alarm will
sound.
• If the starting times for timer recording
and alarm playback are set for the same
time, timer recording will have priority.
• If the recorder is formatted (
P.71), alarm
data will also be erased, so you won’t be
able to set an alarm. When the data has
been erased by accident, connect to PC
and copy the alarm sound data to the
recorder by using supplied "Olympus
Sonority" ( P.90).
Menu set ting method
4
66
Page 67

EN
Menu set ting method
When [Sce ne Select] is se lected:
1 Press the + or – but ton to select the
playback scene you want to set.
2 Press the OK but ton to complete the
selection.
• After purchase, all the settings from
1 to 5 of [User S etting] are the same
(initial settings). Register the user
settings in the [Sce ne Save] then
select playback scene.
• To confirm the respec tive playback
scene set tings, press the + or – button
in the [Scen e Select] screen to select
the item you want to confirm, then
press the 9 button to confirm in
the setting confirmation screen. To
end the set ting confirmation screen,
press the F1 button and the display
will return to the [Scen e Select]
screen.
3 Press the OK or 9 button to
move to Settings.
When [Sce ne Save] is selecte d:
You can save the menu settings of a playback you have set to your choice.
1 Setting the menu of a playback in the
recorder to your choice.
2 Press the + or – but ton to select the
[User Se tting] you want to save.
3 Press the OK but ton to complete the
settings.
• When the recorder is stopped,
pressing and holding the F2 button
will return the screen to [Scene
Selec t].
4 Press the
F2 or STOP
4 button to
complete the setting.
Menu setting method
4
67
Page 68

+−
butto n
9 0 butto n
OK
butto n
STOP
butto n
F2
butto n
EN
Guidance [ Voice Guide]
This feature gives audio announcements
of recorder operating conditions. Adjust
the speed and the volume of guidance
announcements.
1 Select [
Voice Gui de
] from the
menu in [
LCD/Soun d Menu
].
• Please refer to P.44, P.45 for details on
menu settings.
2 Press the + or − button to select
the item to set.
• Select items you want to set from
among [On/O ff], [Spee d] and
[Volume].
3 Press the OK or 9 button to
move to the respective setting.
Menu setting method
[On/Off] setting:
1 Press the + or – but ton to select
between [On] and [Of f].
[On]: Guidance will be provided.
[Off ]: Guidance will be canceled.
2 Press the OK but ton to exit [On/Off ]
selection.
[Speed] setting:
1 Press the + or – but ton to select
from [Spe ed5], [Speed4], [Speed3],
[Speed2], and [Speed1].
2 Press the OK but ton to exit [Speed]
selection.
[Volume] se tting:
1 Press the + or – but ton to select from
[Volume5], [Volume4], [ Volume3],
[Volume2], and [Volume1].
2 Press the OK but ton to exit [Volume]
selection.
4 Press the
F2 or STOP
4 button to
complete the setting.
Note s
• The star ting tune/closing tune when the
power is turned On/O ( P.18) can be
canceled if you set the guidance to [O ff].
• If the recorder is formatted (
P.71), when
the data has been erased by accident,
connect to PC and copy the guidance
data to the recorder by using supplied
"Olympus Sonority" ( P.90).
• Set the starting tune/closing tune at the
guidance [ Volume] setting.
Menu set ting method
4
68
Page 69

+−
butto n
9 0 butto n
OK
butto n
STOP
butto n
F2
butto n
EN
Menu set ting method
Changing the USB Class [USB Settings]
Besides settings such as [PC ], which is using
the USB cable provided to connect to the
PC to transmit files, etc. and [AC Adap ter],
which is connecting the USB Connecting AC
Adapter (A514) (optional) for charging, the
USB class can be switched to suit different
usages.
1 Select [
USB Sett ings
] from the
menu in [
Device M enu
].
• Please refer to P.44, P.45 for details on
menu settings.
2 Press the + or – button to select
[
USB Connec t
] or [
USB Class
].
3 Press the OK or 9 button to
move to the respective setting.
4 Press the + or − button to select
the item to set.
Menu setting method
When [
USB Conne ct
] is selected:
[PC]: Setting for connecting to the
PC using the USB cable provided.
Connected as Storage or Composite.
[ACAdapter]: Setting for connecting
to the USB connecting AC Adapter
(A514) (optional) using the USB
cable provided. The recorder can be
operated on during charging.
[Optional]: Set ting to confirm the
connection method each time a USB
connection is made.
When [
USB Clas s
] is selected:
[Storage Class]: Recognized as an
external memor y device from the PC.
[Composi te]: Setting when connected
to the PC and used as an external
memory device, USB speaker or
microphone.
5 Press the OK button to complete
the setting.
• Pressing the F1 or 0 button will
cancel the settings and return you to
the previous screen.
4
69
Page 70

Menu setting method
6 Press the
F2 or STOP
complete the setting.
• When this recorder is connec ted to
the computer for the first time under
[Storage Class] or [Comp osite], the
driver will be installed automatically
to the computer. The display will
show [Rem ote] when the recorder is
connected to the PC.
Note s
• When the USB Connecting AC Adapter is
connected in the [PC] status, the recorder
will display [Please wait] and cannot be
operated on. Only charging is possible.
4
• The PC cannot recognize when the
Menu set ting method
recorder is connected to the PC when
setting for the [US B Connect] is set to [AC
Adapter].
• Even if the [
the recorder will automatically switch to
[Storage Class] when the connection to
charge ( P. 15) is made.
• Switch to [Stora ge Class
recorder is not recognized as an external
memory device by the PC even if the
[Composi te] setting is selected.
Composite] setting is selec ted,
] when the
4 button to
EN
70
Page 71

+−
butto n
OK
butto n
EN
Menu set ting method
Formatting t he recorder [Format]
If you format the recorder, all files will be
removed and all function set tings will return
to defaults except date and time settings.
Transfer any important files to a computer
before formatting the recorder.
1 Select [
Format
] from the menu in
[
Device M enu
].
• Please refer to P.44,P.45 for details on
menu settings.
2 Press the + or − button to select
the recording media to format.
3 Press the OK button.
• [Star t],[Cancel] will appear on the
display.
4 Press the + button to select
[
Start
].
5 Press the OK button.
• After the [Data will be cl eared]
message is on for two seconds,
[Start] ,[Cancel] will turn on.
6 Press the + button again to select
[
Start
].
Menu setting method
4
71
Page 72

EN
Menu setting method
7 Press the OK button.
• Format ting begins and [Format !]
flashes on the display.
• [Format Done
] appears when
formatting ends.
Note s
• When an microSD card is inserted in the
recorder, be sure to conrm the recording
me dia a s eit her [Bu ilt- in Me mor y] or
[microSD Card] so that there is no mistake
( P.54).
• Never per form operations such as the
following while processing, as they may
damage the data. In addition, replace the
batteries with two new ones in order to
ensure that the batteries will not run out
while processing.
1 Unplugging the AC Adapter while
processing.
2
Removing the batteries while processing.
3 Remove the microSD card ard during
processing when [microSD C ard] is
being used as the recording media.
Performing any of these operations
may damage the data.
• Never format the recorder from a PC.
• Once the recorder is formatted, the music
les with DRM may not be transferred to
the recorder again.
• When the recorder is formatted, all the
saved data, including locked les and
read-only les, are erased.
• After formatting, recorded voice le
names may start from [0001].
• When returning the settings for the
functions to their initial settings, use
[Reset S ettings] ( P.54).
• Formatting on the recorder will be
Quick Format. If you format the microSD
card, information of le management is
refreshed and the data inside the microSD
card is not deleted completely. When
handing over and disposing the microSD
card, be careful about the data leakage
from the microSD card. We recommend
the microSD card to be destroyed when
you dispose the microSD card ( P.22).
• If the recorder is formatted, when the data
has been erased by accident, connect
to PC and copy the guidance data to the
recorder by using supplied "Olympus
Sonority" ( P.90).
Menu set ting method
4
72
Page 73

Using the Recorder on Your PC
Windows
and function
items that can be used in Macintosh will be
displayed as
Macintosh
. Items that only have
Windows
or
Macintosh
indicated can only be
suppor ted by the target system.
Saving Fi les in Your PC
Saving Files in Your PC
By being connecte d to a PC, the recorder
enables you to do the following:
• Playback voice les on your PC (
Voice les recorded using the recorder can
be playe d us ing the "Ol ympus Sonorit y"
software included on the provided CD-ROM
or "Windows Media Player" ( P.95).
• Voice les recorded on the recorder can be
played and managed on the PC using the
"Olympus Sonority".
• Usi ng the "W indows Me dia Play er", the
stored WMA or MP3 les on your PC can
be tr ansferred and pl ayed back on this
recorder.
• If an upgrade (Option) to the "Olympus
Sonority Plus" is exe cuted or a Music
Editing Plug-in is added (Option), various
additional functions can be utilized (
P.93).
Preca utions on us ing the reco rder conne cted
to a PC
• When you are downloading a le from
the recorder or uploading a le to the
recorder, do not remove the USB cable
even if the screen is indicating you can.
Data is still being transferred while the
recording indicator light is blinking. When
removing the USB cable, be sure to follow
the description in P.81. If the USB cable
is removed before the drive is stopped,
data may not be successfully transferred.
• On a PC, do not format the drive of the
recorder. Initialization is not successfully
achieved on a PC. For initialization, follow
the instructions in the [Format] screen of
the recorder ( P.71).
P.87).
• Folder (director y) names displayed by
le management tools such as Explorer
in Microsoft Windows and Finder in
Macintosh are dierent from the folder
names that can be set with the recorder or
the "Olympus Sonority".
• If folders or les stored on the recorder
are moved or renamed by using a
le management tool in Windows
or Macintosh, the order of les may
be changed or les may become
unrecognizable.
• Data can be written or uploaded to the
recorder even though the attribute of the
recorder drive is shown as Read- only by
the operating system of the PC.
• As the noise may cause adverse eects on
electronics devices nearby the recorder,
unplug the external microphone and
earphone when you connect the recorder
to a PC.
Impor tant Notic e on the Expla nation of
Soft ware Func tions
Function items that can be used in Windows
will be displayed as
5
EN
73
Page 74

Operating environment
Windows
Operating Syste m:
Microsoft® Windows® XP Home Edition
Service Pack 2, 3
Microsoft® Windows® XP Professional
Service Pack 2, 3
Microsoft® Windows® XP Professional x64
Edition Service Pack 2
Microsoft® Windows Vista® Home Basic,
Service Pack 1 (32bit/64bit)
Microsoft® Windows Vista® Home
Premium, Service Pack 1 (32bit/64bit)
Microsoft® Windows Vista® Business,
Service Pack 1 (32bit/64bit)
Microsoft® Windows Vista® Enterprise,
Service Pack 1 (32bit/64bit)
Microsoft® Windows Vista® Ultimate,
Service Pack 1 (32bit/64bit)
CPU:
32 bits (x86) of 1GHz and above or 64 bits
(x64) processor
RAM: 512 MB or more
Hard dri ve space:
300 MB or more
Drive:
CD- ROM, CD-R, CD -RW, DVD-ROM drive
Browser:
Microsoft Internet Explorer 6.0 later
Display:
1024 x 768 pixels or more, 65,536 colors
or more (1,6770,000 colors or more is
recommended)
USB port:
One or more free por ts
Other s:
• Audio device
• Enviro nment where the Interne t c an be
utilized.
Macintosh
Operating Syste m:
Mac OS X 10.4.11 - 10.5.
CPU:
PowerPC® G5 or Intel Multicore Processor
1.5 GHz and above
RAM: 512 MB or more
Hard dri ve space:
300 MB or more
Drive:
CD- ROM, CD-R, CD -RW, DVD-ROM drive
Browser:
Macintosh Safari 2.0 later
Display:
1024 x 768 pixels or more, 32,000 colo rs
or m ore (1,6 770, 000 co lor s or mo re is
recommended)
USB port:
One or more free ports
Other s:
• Audio device
• Environment where the Internet can be
utilized (Quick Time version 7.2 or more is
recommended).
Note s
Windows
• The support ser vice will not cover if your
PC has been updated from Windows
95/98/Me/2000 to Windows XP/Vista.
• Any failure on a self-modied PC will
not be covered under the operational
warrant y.
Macintosh
• Some functions in "Olympus Sonority"
require QuickTime 7.2 and above.
The latest version of QuickTime can
be obtained from the MacOS Sof tware
Update.
Operat ing environ ment
5
EN
74
Page 75

Functions Available in the Olympus Sonority
Various functions such as file management and editing are installed in the "Olympus
Sonority". For information on operating procedures and detailed settings, please refer to the
respec tive items on online help ( P. 79).
Wavefor m Editing Func tion
Using the Waveform Editing Function Tab, you can easily process the voice data. In the
Waveform Editing Mode, you can also delete unnecessar y parts, paste and re-save the data.
One-to uch Effec t Functio n
Using the One-touch Effect Function, you can easily apply special effects to the voice file and
carry out noise reduction in any specified area.
Send Voic e Files with E- mail
Voice files are stored in the Message folder on the hard disk. Voice file can be sent as an Email attachment.
Chang ing User ID
The user ID will be automatically given to files that are recorded with the recorder.
Chang ing a Folder Na me
You can change a folder name. A folder name can be up to 12 characters long and cannot use
\ /:*?”<>|.
When changing the folder name using an OS in a language not supported by the main
device, the words may sometimes be garbled.
Editin g File Commen ts
It is possible to add comments to the files downloaded from the recorder by using the "Olympus
Sonority".
Chang ing the file f ormat to oth er format*
The current saved file format can be changed to other formats.
Joini ng Files*
In "Olympus Sonority", designated multiple voice files can be joined and one voice file can be
created.
Split ting Files *
One designated voice f ile can be split into the two files in "Olympus Sonority".
* Changing to a MP3 format upgrade to the "Olympus Sonority Plus" is necessary ( P. 92).
5
Functi ons Availabl e in the Olymp us Sonorit y
EN
75
Page 76

EN
Installing Software
Before you connect the recorder to your PC and use it, you must first install the "O lympus
Sonority" sof tware from the included Software CD.
Be sure to c onfirm the following before in stallation:
• Exit all running applications.
• You need to log on as an Administrator.
Windows
1 Insert "Olympus Sonority" into
the CD-ROM drive.
•
The installation program will start
automatically. Once the program
start s, jump to step 4. If it does not,
follow the procedures in steps 2 and 3.
2 Opening contents in the CD-ROM
with [
Explo rer
].
3 Double-click [
Setup
] in the CD-
ROM.
4 When the "Olympus Sonority"
launch screen is displayed, click
the desired language to select it.
5 When [
Olym pus Sonorit y Setup
]
is clicked, the Installer Opening
screen will start up. Follow the
Installer Wizard instructions.
6
Conf ir m your accep tance of the
terms of the Licensing Agreement.
• You must accept the terms of the
Licensing Agreement to install
"Olympus Sonority". After checking
the [Agree] box, click [N ext].
7 [Registration of User Registration
Information]
• Please enter your name, company
name and serial number which is
listed on the separate sheet. Click
[Next] after entering.
8 [Select Setup Type]
• The installation destination can be
changed. Click [Ne xt] if you do not
want to change (Select [Custom] if
you want to change).
9 [Start Installation]
• Click [I nstall] to star t installing. Do
not carr y out other operations before
the installation is completed and the
[Complet e] screen is displayed.
10 [Installation Complete]
• When the installation is completed,
the completed [Ins tall Shield] screen
will be displayed.
• To connect the recorder to a PC,
refer to "Connect ing to your PC"
( P.80), to start up the Olympus
Sonority, refer to "Runnin g Olympus
Sonority" ( P. 82).
Insta lling Soft ware
5
76
Page 77

Macintosh
1 Insert "Olympus Sonority" into
the CD-ROM drive.
•
Proceed to step 3 when the content of
CD-ROM is displayed, and go to step 2
and 3 when nothing is displayed.
2 Opening contents in the CD-ROM
with
[Finder]
.
3 Double-click [
setup
] in the CD-
ROM.
4 When the "Olympus Sonority"
launch screen is displayed, click
the desired language to select it.
5 When [
Olym pus Sonorit y Setup
]
is clicked, the installer opening
screen will start up. Follow the
Installer wizard instructions.
6
Conf ir m your accep tance of the
terms of the licensing agreement.
• You must accept the terms of the
licensing agreement to install
"Olympus Sonority". After checking
the [Agree] box, click [N ext].
7 [Changing the Installation
Destination]
• The installation destination can be
changed. Click [Ne xt] if you do not
want to change (Select [Change
Installatio n Destination
] if you want
to change).
8 [Start Installation]
• When the installation is completed,
the completed [Ins taller] screen will
be displayed.
• To connect the recorder to a PC, refer
to "Connec ting to Your PC" ( P.80),
to start up the "Olympus Sonority",
refer to "Running Olympus
Sonority" ( P. 82).
• After starting up the "Olympus
Sonority", the serial number entry
dialog box will appear. Serial number
which is listed on the separate sheet.
After entering, click [OK] and the
"Olympus Sonority" will start up.
Installing Software
5
Insta lling Soft ware
EN
77
Page 78

Uninstalling Software
Windows
1 Exit "Olympus Sonority".
2 Select [
Start
] from [
Contro l Panel
]
menu.
3 Click [
Add/R emove program s
] in
the control panel window.
4 When the installed application
list is displayed, select [
Olym pus
Sonori ty
].
5 Click [
Change /Remove
].
6 Confirmation of deleting the file.
• Click the [OK] but ton to start
uninstalling. An additional message
may appear, if so, read it carefully and
follow the instructions given.
7 When the [
Mainte nance
Comple te
] screen is displayed,
click [
Finish
] to complete
uninstalling.
Macintosh
1 Exit "Olympus Sonority".
2 Open [
Finder
] and double-click
the [
Sonori tyUninst aller.pkg
] in
the application folder.
3 The Uninstaller will start up.
Follow the wizard instructions.
4 When the administrator
password is asked, enter the
password then click [
OK
].
5 Uninstall will start and when
[
Succes sful
] is displayed, click
[
Close
].
Files le ft after u ninstall ation
The voice f iles you made are stored in the [MESSAGE] folder. If you don’t need them, delete
them.
You can confirm the location of the [M ESSAGE] folder by clicking [Op tions] in the [Tools]
menu before uninstalling.
Unins talling Sof tware
To uninstall any of the sof tware component of the "Olympus Sonority" soft ware installed on
your PC, follow the steps below.
5
EN
78
Page 79

2
3
1
2
EN
Using On line Help
Using Online Help
Windows
Macintosh
To open Online Help, you have the following options.
• While "Olympus Sonority" is running, select [
Content s] from the [Olympus Son ority Help]
menu.
Searc h by Contents
1 Once the Online Help screen
appears, click the Contents tab.
2 Double-click the icon of the
desired topic heading.
3 Double-click the icon of the
desired topic.
• An explanation of the topic is
displayed.
Searc h by Key word
1 Open Online Help and click the
[
Index
] item.
• Matching keywords are located
automatically.
2 Click keyword.
• An explanation of the topic is
displayed.
Note
• For more information on menus and operations, refer to Online Help. You will be able to
use Online Help after Olympus Sonority is installed.
5
79
Page 80

EN
Connecting to Your PC
Connecting to your PC
Windows
Macintosh
1 Turn the recorder’s power ON.
2 Connect the USB connection
cable to the USB port of the PC.
3 Make sure that the recorder is
stopped, and then connect the
USB cable to the connecting port
on the bottom of this recorder.
• [Remote (Storage)] is displayed
on recorder if the USB cable is
connected.
• When the recorder is using the
USB connection set ting, it will not
be connec ted to the PC when [AC
Adapter] is selected. Select [PC ] in
the USB connection setting ( P.69).
Windows:
Wh en you co nne ct th e re cor der to a
Windows and open [My Computer], it will
be recognized by the drive name of the
product name. If a microSD card is inserted,
[Remova ble Disc] will be displayed.
Macint osh:
When you connect the recorder to a Mac
OS, it will be recognized by the drive name
of the product name on the desktop. If a
microSD card is inser ted, [Untitle d] will
be displayed.
Note s
• Be sure to use the included dedicated
cable for the USB connecting cable. If
any other company’s cable is used, it will
be the cause trouble. Also, please do not
connect this dedicated cable to any other
company’s product.
• When connecting the recorder through
an USB hub the operation may become
unstable. In such cases, refrain from using
a USB hub.
Connec ting to Your PC
5
80
Page 81

EN
Connec ting to Your PC
Connecting to Your PC
Disconnecting from your PC
Windows
1 Click [ ] on the task bar
located at the lower-right corner
of the screen. Click [
Safel y
remove USB M ass Storage Devi ce
].
• The drive letter will dif fer depending
on the PC being used.
2 Confirm that the recorder
display lamp is gone before
disconnecting the USB cable.
Macintosh
1 Move the drive icon for this
recorder that is appear on the
desktop to the garbage bin by
Drag & Drop it.
2 Confirm that the recorder
display lamp is gone before
disconnecting the USB cable.
Note s
• NEVER disconnect the USB cable while the
recording indicator light is ashing. If you
do, the data will be destroyed.
• When the recorder is connected to a PC,
the power will be supplied from the USB
cable.
• Refer to the user’s manual for your PC
regarding the USB por t on your PC.
• Be sure that you connect the USB cable
either directly to the USB port on your PC.
• Be sure to push the cable connector all the
way in. Otherwise, the recorder may not
operate properly.
• Cancel Hold mode.
5
81
Page 82

Running Olympus Sonority
Windows
Disab ling autom atic star t
1 Right click on the [ ] of the
taskbar on the lower right of the
screen, and select [Setting].
• The application which enables set ting
will be displayed by dialog.
2 Click the [ ] of the [Olympus
Sonority].
• The check mark on [Olympus
Sonority] disappears. For automatic
start, selec t and click "Olympus
Sonority" to reinstate again.
Manua l start
1 Start Windows.
2 Click the [Start] button, select
[All Programs], then [Olympus
Sonority].
• Information display area will appear.
• After start up, a [
] icon will be
displayed in task bar in the bottom
right of the screen.
Macintosh
Disab ling autom atic star t
1 From the menu bar, click [ ] {
[
System Env ironment Se tting
] {
[
].
• The setting dialog box will appear.
2 Turn the automatic start up in the
setting check box to [
OFF
].
Manua l start
1 From Finder, double-click
[
Appli cation
] { [
Olym pus
Sonori ty
] { [
Olym pus Sonorit y
].
• When starting up for the f irst time,the
serial number registration dialog box
will appear.
2 Enter the Serial Number.
• For the product serial number, refer
to the serial number on the separate
sheet.
• The information Display Area will
appear if the serial number is correct.
Note s
• You cannot run more than one "Olympus
Sonority" program or multiple copies of
the same program simultaneously.
• When other applications such as DSS
Player, etc. are opened, close these
applications rst before starting up the
"Olympus Sonority".
Runni ng Olympus So nority
By connec ting the recorder to your PC, you can automatically start the application.
5
EN
82
Page 83

1
2
4
5
6
3
EN
Window Na mes (Olympus S onority)
Window Names (Olympus Sonority)
1 Menu Bar
The OS standard menu bar.
2 Tool Bar
Tool Bar to be used in the Browse Screen
will be displayed.
3 Playback Control Bar
Used to play selected files in the File
Display Area.
4 Main Tree View
Files downloaded from the recorder, files
recorded in the "Olympus Sonority", etc.,
and folders containing voice/music files
managed by the PC’s "Olympus Sonority"
will be displayed.
Olymp us Sonori ty Browse Sc reen
This is the main screen of the "Olympus Sonority" (The display screen is the display screen in
Windows).
5 Device Tree View
Folders in the connected device will be
displayed.
6 File List Display Area
Detailed information of the folders
selected in the Main Treeview or Device
Treeview and all voice files in the
recorder will be displayed.
The Information Display Area (Initial
Setting) will be displayed when the
"Olympus Sonority" is started up, and
the basic information of the "Olympus
Sonority" can be displayed, updated and
upgraded ( P.84).
5
83
Page 84

1
2
3
4
5
7
6
When the "Olympus
Sonority" is started up for
the first time, Information
Display Area will be
displayed in the File List
Display Area in the Browse
Screen.
EN
Window Names (Olympus Sonority)
Olymp us Sonori ty Informa tion Displ ay Area
"Olympus Sonority" Information Display Area Update of the "Olympus Sonority" and
confirmation and update of the f irmware of the connected recorder can be carried out.
Upgrade to the "Olympus Sonority Plus" and registration of Podcast programs can also be
carried out.
1 Audio File List
Selects Folder A in the Main Treeview
and displays the File List Display Area.
2 Opening the Program Guide
Displays the latest information on the
Podcast Program Guide.
3 Updating latest information
Updates the latest information from
Olympus.
4 Viewing updated information
Confirms the updated information of the
"Olympus Sonority" and recorder that is
connected.
5 Registering the Upgrade Key
Number
Registers the purchased upgrade key
number.
6 Upgrade
Select the upgrade you want to
purchase. When upgrade is completed,
the button will be replaced by the
upgrade key.
7 Display/Hide
Select to show or hide the Information
Display Area the next time "Olympus
Sonority" is started. When hide is
selected, the File List Display Area ( P.
83) will be shown.
Window Na mes (Olympus S onority)
5
84
Page 85

2
1
EN
Downlo ad Voice Files fro m the Recorder
Managing Files on Your PC
Download Voice Files from the Recorder
Windows
Macintosh
There are 3 download options to transfer voice files from the recorder to the PC:
• Download Selected Files
• Download Folders
• Download All
The following is an explanation of [Download S elected File s
]. For explanations of
[Download Folders] and [Download All], refer to Online Help ( P. 79).
Downlo ad Selec ted Files
1 Select the folder.
• From the Device Tree View, select
the folder that contains the voice
file you would like to download. The
illustration shows that [Folder A] has
been selected.
2 Select the voice file.
• Select the voice file you want to
download from the File List Display
Area.
To select more than one f ile:
Windows
:
Hold either the [Ctrl] or [Shif t] key and
select files.
Macintosh
:
Hold either the [Command] key and select
files.
6
85
Page 86

3
EN
3 Download the voice file.
• From the [
Device
] Menu, select
[
Downl oad Selec ted Files
] or click
[ ] on the Tool Bar.
4 Download complete.
• Do not disconnect the USB cable
while the re cord indicator light on the
recorder is flashing. Disconnecting
the USB cable when the recorder
lamp is flashing will result in data loss
or corruption ( P.81).
Note s
• NEVER disconnect the USB while the
record indicator light is ashing. If you do,
the data will be destroyed.
• Depending on the size of the voice le
and your PC, it may take some time to
download the les.
• The downloaded les will be stored in the
download tray folder that corresponds to
the folder in the recorder.
(Example: A voice le downloaded from
[Folder A] will be stored in download
[Folder A] on the Main Treeview.)
• When the same le name already exists,
the new le is saved with another le
name only when the contents are
dierent. When the contents are the same,
it will not be downloaded.
Download Voice Files from the Recorder
Downlo ad Voice Files fro m the Recorder
6
86
Page 87

Play a Voice File
Windows
Macintosh
1 Select the folder.
• Select the folder that contains the
voice file you would like to play.
2 Select the voice file.
• Select the file to playback from the
File List Display Area.
3 Play the voice file.
• Click the [ ] (play) button of the
Play Control Bar.
Other playback control such as Rewind,
Fast Forward, Stop, Speed Control, Volume
Control, Time Axis and Index Skip are
available from the Play Control Bar.
1
2
3
6
Play a Voice Fi le
EN
87
Page 88

Using the Waveform Editing Function
Windows
Macintosh
You can use the Waveform Editing Tab in the "Olympus Sonority" to easily process voice data.
In the Waveform Editing Mode, you can also delete unnecessary par ts, paste and re-save the
data.
1 From the Browse screen, select
the file you want to edit, select
[
File
] { [
Edit
].
• The waveform editing screen will
appear and the waveform will be
displayed.
2 Drag and select the waveform
you want to delete.
• Selected par ts will become grey in
the waveform display.
3 Select [
Cut
] from the [
Edit
] Menu.
• The selected waveforms will be
deleted.
4 Click on any waveform display
part.
• Selected waveforms in the waveform
display will become grey.
5 Select [
Paste
] from the [
Edit
]
Menu.
• The waveforms that were cut
previously will be inserted in the par t
selected.
6 Click the Write Track Zone [ ]
• The Save dialog box will appear.
Using the One-touch effect Function
Windows
Macintosh
You can use the Waveform Editing Tab in the "Olympus Sonority" to easily process voice data.
Using the One-touch Effect Function, you can easily apply special effects to the voice file.
Here we show you how to carr y out noise reduction in a specified area.
1 From the Browse screen, select
the file you want to edit, select
[
File
] { [
Edit
].
• The waveform editing screen will
appear and the waveform will be
displayed.
2 Drag and select the waveform
part you want to apply special
effects on.
• Selected par ts will become grey in
the waveform display.
3 Press the noise reduction
adjustment button [
].
• Noise will be removed from the
selected part.
4 Clic k the star t locat ion of t he
selected part and press the [
]
but ton on the Playback Control
Bar.
• The part where noise has been
reduced will star t to play.
Using th e Waveform Editi ng Function /
Using th e One-touch e ffect Func tion
6
EN
88
Page 89

1
2
3
4
EN
Upload Voice Files to the Recorder
Windows
Macintosh
"Olympus Sonority" has a feature to enable you to upload files from your PC to the recorder.
1 Select the folder.
• Select the folder that contains the
voice file to upload from the Main
Tree View.
2 Select the voice file.
• Select the file you want to transmit
from the File List Display Area.
3 Select the folder to upload.
• From the [D evice] menu select
[Uploa d Selected Files] or click the
Upload icon [ ]. Once the folder list
box where the file is to b e uploaded
is displayed, selec t the folder from
which the f ile is to be uploaded.
4 Upload the voice file.
• Click [OK ] to upload the voice f ile to
the recorder.
5 Upload complete.
• Once the transmission screen closes
and the record indicator light on the
recorder is OFF, upload is completed.
You can also transmit a file by selec ting the
file you want to transmit from the File List
Display Area, and then drag and drop it in
the Device Treeview folder (move the mouse
while pressing the left mouse button, and
release the button at the destination).
Note s
• NEVER disconnect the USB while the
record indicator light is ashing. If you do,
the data will be destroyed.
• When the same le name already exists in
the folder on the recorder, the new le is
saved with another le name only when
the contents are dierent. If contents are
the same, it will not be uploaded.
Upload Vo ice Files to the Rec order
6
89
Page 90

{
4
EN
Copying Voice Guide Data
Windows
Macintosh
If you format the recorder and erase data by mistake, you can copy the voice guide data from
"Olympus Sonority" to the recorder.
1 Make sure that the recorder ’s
voice guide is set to [On].
• If the recorder’s voice guide is set to
[Off ] the voice guide data cannot be
copied.
2 Connect the recorder to a PC.
• For how to connect to a computer,
see [Conne cting to your PC ] (
P.80).
3 Start "Olympus Sonority".
• If the recorder does not have voice
guide data, the [File Transfer] dialog
will appear.
4 Copy voice guide data.
• If you click the [OK] button in the
[File Transfer] dialog, it will start
copying voice guide data, and a
window indicating copying progress
will appear.
5 Copying of the voice guide data
will be completed.
• Once the transmission screen closes
and the record indicator light on the
recorder is OFF, upload is completed.
Note s
• The alarm sound ( P.64), the Starting
tune that plays when the recorder is
starting up, and the Closing tune that
plays when the recorder is turning o (
P.18), will be copied together with the
guidance data.
• NEVER disconnect the USB while the
record indicator light is ashing. If you do,
the data will be destroyed.
Copyin g Voice Guide Data
6
90
Page 91

USB Microphone/USB Speaker
Windows
Macintosh
It is possible to use the recorder as a USB
microphone or speaker with the "Olympus
Sonority", to inser t/add/overwrite
recordings onto voice f iles downloaded
onto a computer, or to save new recordings
directly onto a computer. In addition, it
is also possible to operate the "Olympus
Sonority" using buttons on the recorder.
Audio se t up
In order to use this recorder as a USB speaker
or a USB microphone in the "Olympus
Sonority", connect the recorder to the
PC, then carry out the settings below.
When connecting the recorder for the first
time, the driver will be installed into the
computer.
Start the "Olympus Sonority" and
switch to the Waveform Editing
Screen with the Waveform Editing
Tab [
].
Uses as a USB S peaker
When the recorder is being used as a USB
speaker, it is possible to output the sound
through the recorder, rather than from the
speakers attached to a computer.
Select [
Record er Speaker
] from the
[
Tool
] Menu or click [ ] on the Tool
Bar.
The recorder connected by USB connection
can be used as a speaker.
Uses as a USB m icropho ne
When the recorder is used as a USB
microphone, it can used to make recordings
with the "Olympus Sonority", and can
also be used to input data on a computer
using voice recognition software or other
applications.
Select [
Record er Microfon e
] from
the [
Tool
] Menu or click [ ] on the
Tool Bar.
The recorder connected to the PC by USB
connection can be used as a microphone.
Note
• When using it as a USB microphone,
regardless of the recording mode of
this recorder, it becomes the USB stere o
microphone. If you want to connect an
external microphone to this recorder, use
a stereo microphone.
6
USB Micr ophone/USB Sp eaker
EN
91
Page 92

Upgrade Function
Windows
Macintosh
The "Olympus Sonority" can be upgraded
to the Plus Version (Optional) to expand and
improve its functions. In addition, in the
"Olympus Sonority Plus", you can purchase a
Music Editing Plug-in to enjoy high-quality
effect editing. To add a Music Editing Plugin, you will need to upgrade the "Olympus
Sonority Plus".
Purch ase and Upgr ade
To purchase "Olympus Sonority Plus" and to
upgrade from "Olympus Sonority " is shown
in the following procedures.
1 Start the "Olympus Sonority".
• Please see P.82 for the star ting
method.
2 Select [
Purch ase Olympu s
Sonori ty Plus
] in the [
Help
] Menu
or click the [
] button in the Tool
Bar.
• The web browser will start and
the purchase site of the "Olympus
Sonority Plus" will be displayed.
Please operate according to guidance
on the screen. When the purchase
procedure is completed, the Upgrade
Key will be issued by mail.
3 Select [
Upgrad e to Olympus
Sonori ty Plus
] from the [
Help
]
menu.
• The [Upgrade to Olympus Sonority
Plus] dialog will be displayed.
4 In the [
Upgrad e to Olympus
Sonori ty Plus
] dialog, enter the
Upgrade Key of your purchase,
and click the [
OK
] button.
• When starting the application next
time, "Olympus Sonority" will be
upgraded to "Olympus Sonority Plus".
Upgrad ing to Olym pus Sonori ty Plus
Click the root of the Main Treeview,
[Olympus Sonority], in the Browse Screen
to display the Information Screen. You can
confirm that the upgrade key is registered.
In addition, when [ Version Inf ormation]
in the [Help] Menu is selected, the upgrade
key registered in "Olympus Sonority Plus"
will be displayed. The Music Editing Plug-in
includes more than 20 types of effec t
functions and spectrum analyzer functions.
For details, please refer to the Online Help
( P. 79).
Note s
• To purchase the Upgrade Key, it requires
an environment where the Internet can be
utilized.
• Please see the details in the website
regarding the purchase of the Upgrade
Key.
Upgrad e Function
6
EN
92
Page 93

Functions Available in the Olympus Sonority Plus
Besides the usual functions, the "Olympus Sonority Plus" also includes various functions to
edit music files. For information on operating procedures and detailed set tings, please refer
to the Online Help ( P. 79).
MP3 Editi ng
MP3 file and tag editing and writing func tion.
Creati ng Music CD
Function to create music CD from voice f iles registered in the CD writable folder.
Record er Menu Set ting
Function for settings in this recorder (detailed settings such as recording mode, alarm
setting, timer recording, etc.).
Functions Available with the Music Editing Plug-in
By purchasing a Music Editing Plug-in, you can add high-quality functions to e xpand the
music editing range in the "Olympus Sonority Plus". For detailed purchasing method and
operating procedures, please refer to the Online Help ( P. 79).
Effe ct Functi ons
You can use more than 20 high- quality effect functions to edit your music files.
Spec trum Analy zer
Displays in the Waveform Display Screen the waveform distribution of an voice file being
played in the real time.
Beside s unrestr icted trac k editing
It also removes the restriction on the number of track s that can be edited.
6
Functi ons Availabl e in the Olymp us Sonorit y Plus/
Functi ons Availab le with the Musi c Editing Plug -in
EN
93
Page 94

Importing Content for Listening on the Recorder
Importing Content for Listening on the Recorder
You can transfer language content and music files impor ted from language CDs and the
Internet using iTunes or Windows Media Player for playing on the recorder. You can also use
"Olympus Sonority" to import and enjoy Podcast content found on the Internet. The recorder
is compatible with WMA and MP3 language content. In addition, recorder is compatible with
the Audible content of the ACELP and MP3 formats when recorder is in the Audible mode.
Impor t files usi ng Windows Me dia Player
• Copy music les and language content from CDs to a computer.
± Please see "Copying mus ic from CD" ( P.97) for details.
• Transfer copied music les and language content from the computer to the recorder.
± Please see "Transferring music file to t he recorder" ( P.98) for details.
Impor t files usi ng iTunes
• Copy music les and language content from CDs to a computer.
± Please see "Copying mus ic from CD" ( P.104) for details.
• Transfer copied music les and language content from the computer to the recorder.
± Please see "Transferring music file to t he recorder" ( P.105) for details.
Impor t files usi ng Olympu s Sonorit y
• Import Podcast content from the Internet to a computer.
± Please see "Impor ting Podcast Content" ( P.107) for details.
7
Downlo ad Audible c ontent usi ng the Audib le Manager
Impor ting Content fo r Listening on t he
Record er
• Download Audible content available from the Audible web site for a fee to a computer.
± See "Load ing Audible Content" ( P.112) for details.
Direc tly recor d files to th e Recorder
• Connect the recorder to another device to record directly to the recorder.
± Please see "Record ing the sound of ot her devices wit h this recorde r" ( P.32) for
details.
EN
94
Page 95

7
EN
Using Windows Media Player
Using Windows Media Player
Music files that have been imported to your
computer from music CDs and acquired
over the Internet can be transferred to and
played back with this recorder. It supp orts
WAV, MP3, and WMA format music f iles.
By using Windows Media Player, music files
from music CDs can be converted (ripped)
( P.97) and music files that you have
bought from any music distribution sites can
be easily transferred to the recorder ( P.98).
Copyright and copyright protection feature (DRM)
By the Copyright Act, any voice/music
files and music CDs downloaded from the
Internet without the copyright holder’s
permission may not be reproduced,
distributed, publicized/re-publicized on the
Internet, or converted into WAV,WMA or MP3
files for the purpose of commercial business
or sale.
A WMA file may be provided with DRM
(Digital Right Management) for copyright
protection. DRM limits the f ile to copy or
distribute music files that are converted
(ripped) from a music CD or downloaded
from music distribution ser vices. To transfer
a WMA file with DRM to the recorder, you
need to use appropriate methods such as
Windows Media Player. Copying the music
files with DRM purchased from online music
distribution ser vice to a portable device
such as this recorder may be restricted.
Note
• This recorder is compatible with Microsoft
Corporation DRM9, but not with DRM10.
95
Page 96

5 7 9
6 8 04
32
1
1 2
5
4
3
7
6
8 0
9
@
!
7
EN
Using Windows Media Player
1 Features taskbar
2 Seek slider
3 Shuffle button
4 Repeat button
5 Stop button
6 Previous button
7 Play button
8 Next button
9 Mute button
0 Volume slider
Window names
Window s Media Player 11 Window s Media Player 10
1 Features taskbar
2 Quick Access Panel button
3 Seek slider
4 Rewind button
5 Play button
6 Stop button
7 Previous button
8 Next button
9 Mute button
0 Volume slide
! Shuffle/ Repeat button
@ Fast Forward button
Using Windows Media Player
96
Page 97

Using Windows Media Player
243
43
2
7
EN
Using Wi ndows Media Play er
Copying music from CD
1 Insert CD into the CD-ROM drive,
and start Windows Media Player.
2 From the Features taskbar, click
[
Rip
] menu.
• After clicking [Rip] menu, click
[View A lbum Info] for Windows
Media Player 10 as necessar y.
• If Internet connectivity is available,
CD information is searched.
3 Put a check mark on the music
file that you want to copy.
4 Click [
Start R ip
].
• For Windows Media Player 10 Click
[Rip Music].
• Files copied to a PC are stored in
WMA format. Music files copied are
categorized by artist, album, genre,
etc. and added to the play list.
Window s Media Player 11
Window s Media Player 10
97
Page 98

Using Windows Media Player
3
2, 3
7
EN
Transferring mus ic file to the recorder
You can transfer the music f iles saved in your PC to this recorder. For how to copy the music
files from the CD to your PC, see “Co pying music from CD” ( P.97).
Window s Media Player 11
1 Connect the recorder to a PC, and
start Windows Media Player.
2 From the Features taskbar, click
[
Sync
].
3 Click [
Sync
] menu again to select
[
DVR
] { [
Advanc ed Options
] {
[
Set Up Sync
], and set as follows.
• Click on the [Create folder hi erarchy
on device
] to check.
If you uncheck and syncronize the
file, it will be transfered under the
folder [Home], and the file will not be
indicated. *1 *2
• The folder with artist name or album
name is automatically created. This
will make you f ind the file you want to
listen to more easily.
*1 If [Create folder hi erarchy on
device] is checked by default, click
to uncheck the box once, and click it
again to check.
*2 After the s ynchronous transfer to the
recorder, a file named “WMPInfo.xml”
is created. If you delete this file, the *1
may need to be set again.
Using Windows Media Player
98
Page 99

54
2 43
7
EN
Using Wi ndows Media Play er
4 Select the desired category from
[
Librar y
] on the left, and select
music files or albums to transfer
to the recorder, and Drag & Drop
them in [
Sync List
] on the right.
5 Click [
Start Sy nc
].
• The file is trans ferred to the recorder.
Window s Media Player 10
1 Connect the recorder to a PC, and
start Windows Media Player.
2 From the Features taskbar, click
[
Sync
].
3 From the pull down menu on
the left side window, select the
play list to be transferred to
the recorder, and put the check
marks on the music file that you
want to transfer.
• The order of music pieces can be
changed by Drag & Drop of the music
file in the play list displayed.
4 From the pull down menu on
the right side window, select
the drive corresponding to the
recorder.
• The recorder is recognized as a
Removable Disk.
Using Windows Media Player
99
Page 100

56
6
7
EN
5 Click [ ] on the upper
right corner, and set the
synchronization options.
• Click on the [Create folder hi erarchy
on device
] to check.
If you uncheck and syncronize the
file, it will be transfered under the
folder [Home], and the file will not be
indicated. * 1 *2
• The folder with artist name or album
name is automatically created. This
will make you f ind the file you want to
listen to more easily.
*1 If [Create folder hi erarchy on
device] is checked by default, click
to uncheck the box once, and click it
again to check.
*2 After the s ynchronous transfer to the
recorder, a file named “WMPInfo.xml”
is created. If you delete this file, the *1
may need to be set again.
6 Click [
Start Sy nc
].
• The file is trans ferred to the recorder.
The music f ile transferred to the
recorder is displayed in Item on
Device.
Note s
• Copying the music les with DRM purchased online music distribution service to a por table
device such as this recorder may be restricte d.
• To transfer the les by using Windows Media Player 9, check the Olympus website.
• If the music les are transferred to the recorder until it reaches to the maximum memory,
the message [Can’t make the syst em file. Connect to PC and d elete unnecessary f ile]
may appear on this recorder’s display. In such a case, erase the les to make free space
(hundreds of KB to dozens of MB depending on the music le sizes) for the management
le. (The more capacity for the management le will be necessary as the number of the
music les increases).
Using Windows Media Player
Using Windows Media Player
100
 Loading...