

Page 1

DIGITAL VOICE RECORDER
DM-4/DM-2
INSTRUCTIONS
INSTRUCCIONES
MODE D’EMPLOI
EN
ES
FR
1
3
5
6
2
2
7
#
%
8
@
0
!
9
$
4
REC
VOL
STOP
^
(
*
&
)
-
1
8
7
2
3
5
6
4
9
!
0
1
3
4
2
2
1
3
4
8
7
5
6
4
9
!
0
3
2
1
2
1
3
4
2
1
3
4
^
(
*
&
)
-
a
b
c
d
e
Thank you for purchasing an Olympus Digital Voice Recorder. Please read these instructions for information about using the product
correctly and safely. Keep the instructions handy for future reference. To ensure successful recordings, we recommend that you test the
record function and volume before use.
Merci d'avoir porté votre choix sur cet enregistreur vocal numérique. Lisez ce mode d'emploi pour les informations concernant l'emploi
correct et sûr de l'appareil. Conservez-le à portée de la main pour toute référence ultérieure. Nous vous recommandons de tester la
fonction d'enregistrement et le volume avant l'utilisation pour obtenir de bons enregistrements.
Gracias por haber comprado esta grabadora de voz digital Olympus. Lea estas instrucciones para información sobre el uso correcto
de este producto y para su seguridad. Guarde estas instrucciones en un lugar a mano para su referencia en el futuro. Para tener éxito
en las grabaciones se recomienda hacer un ensayo previo de la función de grabación y su volumen.
Page 2
1
A C E
B
D
F
1
3
5
6
2
2
7
#
%
8
@
0
!
9
$
4
REC
VOL
STOP
^
(
*
&
)
-
1
8
7
2
3
5
6
4
9
!
0
1
3
4
2
2
1
3
4
8
7
5
6
4
9
!
0
3
2
1
2
1
3
4
2
1
3
4
^
(
*
&
)
-
a
b
c
d
e
Page 3
2
3 4
-
1
a
b
c
d
e
4
-
2
Page 4
a
b
c
e
d
5 7
-
1
7
-
2
6
-
1
6
-
2
Page 5
8
9
p
q
Page 6

6
EN
Introduction
EN
• This manu al is a basic versio n.
Please re fer to the complet e
advance d manual either f rom the
stored d ata in the [OL_ MANUAL]
folder o f the recorder or d ownload
the data f rom the OLYMPUS
website.
• The conte nts of this docume nt
may be chan ged in the future
withou t advanced notic e. Contact
our Custo mer Support Ce nter for
the lates t information re lating
to produ ct names and mod el
number s.
• The scre en and recorder
illustr ations shown in th is manual
were pro duced during the
develop ment stages an d may
diffe r from the actua l product.
The utmo st care has been t aken
to ensure th e integrity of t he
contents o f this document . In the
unlikel y event that a questi onable
item, er ror, or omission is fo und,
please co ntact our Custo mer
Suppor t Center.
• Any liabil ity for passiv e damages or
damage of a ny kind occurre d due
to data los s incurred by a def ect of
the prod uct, repair p erformed by
the third p arty other th an Olympus
or an Oly mpus authorize d service
statio n, or any other reaso n is
exclude d.
Trademar ks and regis tered
trade marks:
• IBM and PC /AT are the tr ademarks
or regis tered tradema rks of
Internat ional Business M achines
Corpor ation.
• Microso ft, Windows a nd Windows
Media ar e registered tr ademarks of
Microso ft Corporat ion.
• Macintos h and iTunes are the
tradem arks of Apple In c.
• microSD an d microSDHC are the
tradem arks of SD Card As sociation.
• MPEG Layer-3 a udio coding
technol ogy licensed f rom
Fraunhof er IIS and Thomso n.
• EUPHONY MO BILE
TM
is a trade mark
of DiMAGI C Corporation .
• DVM
TM
is a trade mark of DiMAGIC
Corpor ation.
• The prod uct was develo ped based
on noise -cancelin g technology
under li cense from NEC
Corpor ation.
Safety precautions
Be fore us ing yo ur new re cord er,
read this manual carefu lly to ensure
tha t you know h ow to oper ate it
sa fe ly a nd c orr ec tl y. Ke ep thi s
ma nu al i n a n ea si ly a cce ss ib le
locat ion for futur e reference .
•
Th e wa rn in g s ym bo ls in di ca te
importa nt safety related informatio n.
To prote ct your self and others from
personal injury or damage to property,
it is essential that you always read the
warnin gs and informati on provided.
Cauti on for usage e nvironme nt
• To pr otect the h igh-pr ecisio n tech nology
con tai ned i n t his p rod uct , n eve r l eav e
the rec order in t he places l isted be low, no
matte r if in use or s torage:
• Pl ac es whe re te mpe ra tu res
and/or humidity are high or go
through extreme changes. Direct
sunlight, beaches , locked cars, or
near other heat sources (stove,
radiato r, etc. ) or humidifie rs.
• In sandy or du sty environme nts.
•
Near fl ammable items or e xplosives.
•
In wet pl aces, such as ba throoms
or in the rain. When using products
with weatherproof designs, read
their man uals as well.
•
In places pr one to strong vibr ations.
• Never dr op the reco rder or su bject it t o
severe s hocks o r vibrati ons.
•
The recor der may malfu nction if it is us ed in
a locati on where it is sub ject to a magn etic/
elec tromagn etic fiel d, radio wav es, or high
volta ge, suc h as near a TV set, microw ave,
video gam e, lou d sp eakers , lar ge mo nitor
unit, TV/radio tower, or transm ission towers.
In s uch c ases, turn the re corder off a nd on
again b efore fu rther op eration .
•
Avoi d r ecor din g o r p layi ng back ne ar cell ular
phones or othe r wireless equi pment, as they may
cause inter ferenc e and n oise. I f you e xperie nce
no ise , mo ve to a no the r pl ac e, or m ov e the
recor der fur ther away fr om such eq uipmen t.
• Do not us e organic s olvents s uch as
alcoh ol and lacq uer thin ner to clea n the
unit.
<Warnin g regarding d ata loss>
Re co r de d co nt en t in me mo r y m ay b e
destr oyed o r eras ed by opera ting mistake s,
uni t mal fun cti on, or d uri ng rep air w ork .
It i s re co mme nd ed t o ba ck u p and sav e
impor tant content to ot her me dia su ch as a
compu ter hard di sk.
Any lia bility for pass ive dama ges or da mage
of any kind occu rred due to data loss inc urred
by a defe ct of the p roduc t, repai r perfor med
by the th ird pa rty ot her th an Oly mpu s o r
an O ly mpu s au th ori ze d se rv ice s ta ti on,
or any oth er reas ons is excl uded fr om the
Olymp us’s liab ility.
Handl ing the reco rder
f Warnin g:
•
Do not us e the recor der near fl ammable
or expl osive gas es.
•
Keep you ng child ren and inf ants away
from th e record er.
Always use and store the recor der out of
the reach of youn g children and infant s to
prevent the following dangerous situations
which cou ld cause seriou s injury:
1
Becoming entangled in the recorder
strap, c ausing strangu lation.
2 A cci den tal ly sw all owi ng t he
ba tte ry, ca rds o r o the r sma ll
part s.
3 Accident ally being injured by the
moving p arts of the reco rder.
•
Do not us e or store th e record er in dust y
or humi d places.
• Nuance, the Nuance logo, RealSpeak
an d V oC on a re tr ad em ar ks or
reg ister ed trade marks of Nua nce
C om mu n ic at io n s, I n c. o r i t s
sub sidi arie s i n t he Unit ed State s
and/or oth er countries.
• The Dais y OK mark is a tradem ark
of the Dais y Consortium .
Other pr oduct and bra nd names
mention ed herein may be th e
tradem arks or regist ered trademar ks
of their re spective own ers.
Page 7

7
EN
• Do not di sassem ble, repa ir or modif y the
unit yo urself.
• Use mic roSD/micr oSDHC memo ry card s
only. Neve r use othe r types of c ards.
If you accidently insert another type of card
into the recorder, contact an authoriz ed
distri butor or serv ice center. Do not tr y to
remove th e card by force.
• Do not op erate the u nit while o peratin g a
vehic le (such as a b icycle, m otorcy cle, or
go-c art).
f Cauti on:
• Stop usi ng the rec order imm ediatel y if
you noti ce any unus ual odor s, noise, o r
smoke a round it.
Never remove the batteries with bare hands,
which may c ause a re or burn you r hands.
• Be care ful with t he strap.
Be caref ul with the strap w hen you carry
the recor der. It could easily c atch on stray
objec ts and cause ser ious damage.
• Do not le ave the reco rder in pl aces wher e
it may be su bject to e xtreme ly high
tempe ratures .
Doing so may cause par ts to deteriorate and,
in some circumsta nces, cause the re corder
to catch re. Do not use the ch arger or AC
adapter if it is covered (such as a blanket). This
could cau se overheating , resulting in re.
• Han dle th e r ecor der wi th car e t o a void
getti ng a low-tem peratu re burn.
• Wh en t he re co rde r con tai ns
me tal pa rts , o verh eat ing ca n
result in a low-tempera ture burn.
Pay attent ion to the followi ng:
•
When used f or a l ong per iod, the
recorde r will get hot. If you hold on
to the reco rder in this sta te, a lowtemper ature burn may be ca used.
•
In places subjec t to extrem ely cold
tem per atur es, the te mpe ratu re
of th e rec ord er’s b ody m ay be
lo wer t han t he en vir onm ent al
te mpe rat ure . If po ssi ble , wea r
gloves when handling the recorder
in cold tem peratures.
• Do not tou ch the metal lic parts
of the re corder for a lo ng period
of time a t low temperat ures.
This may damag e your s kin. At l ow
temper atures, handle t he recor der
while wea ring gloves.
Batte ry handli ng precau tions
Follow these impo rtant guideli nes to prevent
batterie s from leakin g, overheating, burning,
ex pl odi ng , or c au si ng e le ct ric al s ho ck s
or burn s.
f Dange r:
•
The re cor der use s a li thi um ion ba tter y
speci fied by Oly mpus. Charge the batter y
with the specifi ed AC adapt er or charger. Do
not use a ny other AC ad apters or c harger s.
• Batteries should never be exposed to flame,
heated , short-c ircui ted or disa ssembl ed.
• Never he at or incin erate bat teries .
• Take preca utions whe n carryi ng or storing
bat teri es t o p reven t t hem fro m c omin g
into conta ct wi th an y met al ob jects such
as jewel ry, pins, f astener s, etc.
• Never stor e bat teries whe re th ey wi ll b e
expos ed to direct sun light, or sub jected to
high te mperatu res in a hot ve hicle, ne ar a
heat so urce, etc .
•
To pr ev en t ca us in g ba tt er y le ak s or
da ma g in g t he ir t er mi na ls , ca re fu ll y
follo w all inst ructi ons rega rding th e use of
batte ries. Never a ttempt to di sassem ble a
batte ry or modi fy it in any w ay, solder, et c.
• Do not co nnect th e batter y direc tly to a
power ou tlet or a ci garett e lighter o f an
automo bile.
• If b atter y flui d get s in to you r eye s, flu sh
you r e yes im medi ate ly with c lear , c old
runni ng water and seek medi cal attent ion
immed iately.
f Warnin g:
•
Keep bat teries d ry at all ti mes.
• If rech argeab le batter ies have not b een
recha rged wit hin the spe cified ti me, stop
charg ing them a nd do not use t hem.
• Do not us e a batter y if it is cra cked or
broke n.
• Never su bject ba tterie s to strong s hocks
or cont inuous vi bratio n.
• If a bat tery leaks, beco mes d iscolo red o r
def orme d, or b eco mes abno rma l i n an y
oth er w ay duri ng o pera tion , s top usin g
the rec order.
•
If a batter y lea ks flu id ont o your cloth ing
or sk in, remo ve the c lothing and flus h the
affected area with clean, running cold water
immed iately. If t he flui d bur ns yo ur sk in,
seek me dical at tention i mmediat ely.
•
Keep bat tery ou t of the reac h of child ren.
• If you not ice anyt hing unus ual when
using t his prod uct such a s abnorm al
noise, h eat, smo ke, or a burni ng odor:
1
remov e the batte ry im mediatel y
whi le b eing care ful not to burn
yourse lf, and;
2
call your dea ler or local Olympus
repres entative for ser vice.
f Cauti on:
• Pleas e re cycle batt eries to help save our
plane t’s reso urces. When you throw aw ay
de ad ba tte rie s, b e s ur e to co ver t hei r
term inals and alwa ys ob serve loc al l aws
and reg ulation s.
• Always charge a batter y when u sing it f or
the firs t time, or if it ha s not been use d for
a long pe riod.
•
Rechargeab le batte ry have limited lifetime.
When the o peratin g time becom es short er
even if the rec harg eable bat ter y is fu lly
cha rge d u nde r t he spe cif ied c ondi tio n,
repla ce it with a ne w one.
•
Th e b at te ry ma y b ec om e ho t d ur in g
prol onged us e. To avoi d mi nor burns , do
not rem ove it imme diately a fter usi ng the
recor der.
AC adapt er
f Dange r:
•
Be sure to use the AC adapte r with the proper
volta ge (AC 100 - 240 V). Usi ng it with oth er
volt age leve ls m ay c ause fir e, e xplos ion,
overhe ating, el ectric s hock or in jury.
•
Fo r sa fe t y, be s ur e t o un pl u g t h e A C
adapt er fr om th e out let b efore perf orming
mainte nance or c leaning . Also, neve r plug in
or disconnec t the power plug with a wet hand.
This may c ause ele ctric s hock or inj ury.
f Warnin g:
•
Do not attem pt to dis assem ble, repa ir o r
modif y the AC ada pter in any wa y.
•
Ke ep fo re ign obj ec ts i ncl ud in g wat er,
me ta l, or f la mm ab le s ubs ta nc es fr om
getti ng insid e the prod uct.
•
Do n ot moi sten the AC adapt er or touch it
with a wet h and.
•
Do not u se the AC a dapter in the vici nity of
flammabl e gas (including gasolin e, benzine
and lac quer thin ner).
In case
•... the i nternal par ts o f the AC a dapter are
expo sed becau se i t has bee n dr opped or
other wise dam aged:
•... t he AC adapter is d ropped in w ater, or if
wat er, met al fl amma ble s ubst anc es or
other f oreign ob jects g et inside i t:
Page 8

8
EN
•... you notice anythi ng unusu al when using
the AC adap ter suc h a s ab norm al nois e,
heat, s moke, or a bur ning odo r:
1
do not touch any of the exposed
part s;
2
immediately disconnect the power
supply plug from the power outlet,
and;
3 cal l your dealer or local Oly mpus
re pre sen tat ive f or se rvi cin g.
Continue d use of the AC adapter
under these circumstances could
resu lt in e lectr ic s hock, fi re o r
injur y.
f Cauti on:
• Do not us e the AC adapt er if the pow er
plug is d amaged or t he plug is n ot
compl etely con nected t o the outle t. This
may cau se fire, over heating , electr ic
shock , short c ircuit o r damage.
• Unplu g the AC adapt er from AC ou tlet
when no t using. If t his prec aution is n ot
follo wed, fire, ove rheatin g or elec tric
shock m ay occur.
• Make su re to hold th e plug when
remov ing the powe r plug fro m the
outle t. Do not ben d the cord e xcessive ly
or put a he avy objec t on it. Th is may
cause fi re, overhe ating, el ectri c shock or
damag e.
• If some thing app ears to be w rong wit h
the AC ada pter, unpl ug the AC adap ter
from th e outlet a nd consul t your near est
serv ice cente r. Using the AC ad apter may
cause fi re, overhe ating, el ectri c shock or
injur y.
• Do not us e or keep the AC a dapter in v ery
hot pla ces, such a s in direc t sunlig ht, in a
close d car on a sun ny day, near a he ater,
on an ele ctric c arpet, et c. Do not use t he
AC adapt er if somet hing is cov ering it
(such as a b lanket). T his may cau se fire,
explo sion, lea kage or ove rheatin g
.
LCD moni tor
• The LCD use d for the mon itor is mad e with
high- precis ion techn ology. How ever,
black s pots or br ight spot s of light m ay
appea r consta ntly on the LC D Monitor.
Due to it s charac terist ics or the an gle
at whic h you are vie wing the mo nitor,
the spo t may not be un iform in co lor and
brigh tness. Th is is not a mal funct ion.
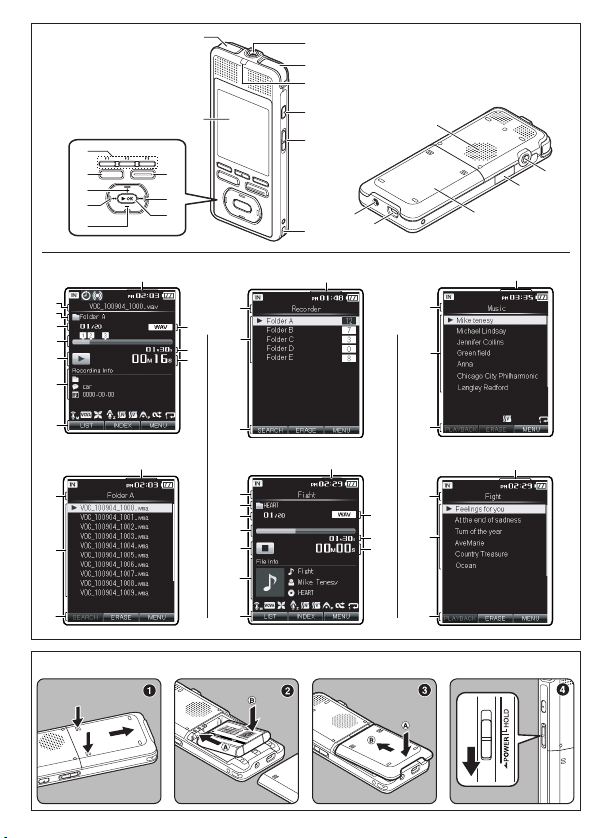
Identification of parts
1
MIC
(Micro phone) jack
2 Built-in st ereo microp hone
3 LED indicato r light
4
VOICE
butto n (For DM-4)
HOME
butto n (For DM-2)
5
POWER/ HOLD
switc h
6 Strap hole
7 Display(LCD Pa nel)
8
REC
(Recor d) button
9 9 button
0 `OK butto n (Play/Set)
! Fn butto n (F1/F2/F3)
@
STOP
butto n
# + butto n
$ 0 button
% – butto n
^ Built-in sp eaker
&
EAR
(Earph one) jack
* Card cover
( Battery cov er
) USB connect or
- Power jack
[Recor der] mode dis play scree n
File dis play: A
1 File name
2 Folder name/ Keyword/D ate
3 Current file n umber/
Total numb er of recorde d files
in the li st
4 Playback pos ition bar ind icator
5 Recorder st atus indica tor
[
] Play indi cator
[ ] Recor d indicator
[ ] Pause in dicator
[ ] Stop ind icator
6 Index indic ator/
File inf ormation in dicator
7 Function gui de indicato r
8 Current time
9 File format
0 File length/
Elaps ed recordin g time
! Elapsed play back time/
Remai ning record ing time
Icon display (For all modesty)
[h][g] M emory indi cator
[j] Timer ind icator
[i] Alarm ind icator
[k] Batte ry indicat or
[A] Microph one Sensit ivity
ind icator
[Z] VCVA ind icator
[c] Low Cut Fi lter indic ator
[Q] Zoom Mic i ndicator
[a] Noise C ancel indic ator
[b] Voice Fil ter indicat or
[W] EUPHO NY indicato r
[d][e] Re peat indica tor
[f] Rando m indicator
File lis t display: B
1 Current time
2 Folder name/ Keyword/D ate
3 File name
4 Function gui de indicato r
Folder l ist display : C
1 Current time
2 Current fold er name
3 Folder name
4 Function gui de indicato r
[Music ] [Podcast] mo de display
scree n
File dis play: D
1 File name
2 Search cate gory/Progr am name
3 Current file n umber/
Total numb er of recorde d files
in the li st (folder)
4 Playback pos ition bar ind icator
5 Recorder st atus indica tor
6 Informati on display are a
7 Function gui de indicato r
8 Current time
9 File format
0 File length
! Elapsed play back time
Folder l ist display : E
When the re are only file s in the folder
1 Current time
2 Current fold er name
3 Artist list /Program li st
4 Function gui de indicato r
File lis t display: F
1 Current time
2 Current fold er name
3 File name
4 Function gui de indicato r
Page 9

9
EN
Inser ting batt eries (Fig. 1)
1 Whi le pushing d own on the
groove s using both t humbs, sli de
the bat tery cover i n the direc tion
indic ated by the arr ow.
2
With the b ack label o f the batter y
facin g up, line up the t erminals o f
the rec order and ba ttery. Inse rt the
batte ry by slidi ng in direc tion A
while p ushing dow n in direct ion B.
3 Clo se the batte ry cover by sl iding
all the w ay in direct ion B while
pushi ng down in dir ection A.
Charg ing using AC a dapter
Lithi um ion batter y is self
disch arging. Aft er unpacki ng
this pr oduct, cha rge the supp lied
lithi um ion batter y before us ing
the rec order for the f irst time.
1 Con nect the AC ad apter in to an AC
outle t.
2 Con nect the AC ad apter to the
recor der.
•
Cha rging ha s s tart ed when LED
indi cator light is orange and the
bat tery ind icato r o n th e d isplay
changes to th e charging indic ator.
Turning o n/off the po wer
Turning on t he power (Fig. 1 -4)
W hile the re corder i s turned of f, slide t he
POWER/ HOLD
switc h in the dir ection
indic ated by the a rrow for 2 se conds or
longe r.
Turning of f the power (Fig . 1-4)
S lide the
POWER/ HOLD
switc h in the
direc tion ind icated by t he arrow f or 1
secon ds or longe r.
Auto Powe r off mode
If the reco rder is on and sto ps for 10
minutes o r longer (defaul t setting),
the recor der enters Auto Powe r off
mode and t urns off the pow er. You
can set th e time to enter power s ave
mode fro m among [
5minut es],
[10minut es], [30minu tes], [1hour],
[2hour] , [3hour] and [Off ].
To exit Auto Power o ff mode , turn o n
the power a gain.
Setting time and date
[Time & Date] (Fig. 3)
When you us e this recorder f or the
firs t time after pur chasing, or when
you switc h it on after remo ving the
batter ies for more than 15 minu tes
when exch anging batte ries etc, the
[Set Tim e & Date] will appe ar. When
the “hour ” is flashing , conduct the
setup fr om Step 2.
1 Sel ect [
Time & Dat e
] from th e
menu on t he [
System Me nu
].
2 Pre ss the 9 or 0 but ton to
selec t the item to se t.
3 Pre ss the + or − butto n to set.
4 Af ter the date an d time have been
set, pr ess the `OK butto n.
5 Pre ss the F3
(HOME)
butto n to
close t he menu scr een.
Inser ting a mic roSD card (Fig . 2)
This reco rder can be used w ith
commerc ially availabl e microSD
cards as we ll as the built-in m emory.
1 Whi le the recor der is duri ng stop
mode, op en the card c over.
2 Face th e microSD ca rd the corr ect
way and in sert it int o the card slo t
as show n in the diagr am.
• Inser t the microSD card ke eping
it strai ght.
• Inser ting the microSD ca rd the
wrong way o r at an angle could
damage th e contact area or
cause the m icroSD card to jam.
• If the micr oSD card is not
inser ted all the way, data may
not be wri tten to the microS D
card.
3 Clo se the card c over secure ly.
• When you i nsert the microS D
card, th e recording med ia
change over display will ap pear.
4 Whe n you are reco rding to a
micro SD card, pre ss the + or −
butto n and selec t [
Yes
].
5 Pre ss the `OK butto n to complet e
the set ting.
Recording (Fig. 4)
Recor ding to a reco rding fol der
(Fig. 4- 1)
Before starting recording, select a voice
recording folder between [
Folder A] to
[Fo lder E] in the [Rec orde r] f older.
Thes e fi ve fo lders can be se lectiv ely
us ed to di st in gu is h t he k ind of
recordi ng.
1 Sel ect the rec ording fo lder.
2 Pre ss the
REC
butto n to start
recor ding.
• The LED ind icator light glo ws
orange a nd [
] will app ear on
the displ ay.
• Turn the micro phone in the
direc tion of the source t o be
record ed.
a R ecording mode
b E lapsed record ing time
c R emaining reco rding time
d L evel meter (change a ccording
to the reco rding level and
recordi ng function s ettings)
3 Pre ss the
STOP
butto n to stop
recor ding.
e F ile length
Speci fying a key word befo re
recor ding (Fig. 4- 2)
A keywor d that matches the con tents
to be recor ded can be spec ified
before r ecording star ts. This
funct ion is very usef ul for classif ying
recordi ngs by keywords .
1 In th e Folder lis t display, pre ss
F1
(SEARCH)
to show th e Keyword
searc h display.
2 Pre ss the + or − but ton to speci fy
the des ired keywor d, and then
press t he `OK or 9 butt on.
3 Pre ss the
REC
butto n to start
recor ding.
4 Pre ss the
STOP
butto n to stop
recor ding.
• Record ed files are auto matically
tagged w ith the specif ied
keywor d and managed usi ng the
keywor d list.
Page 10

10
EN
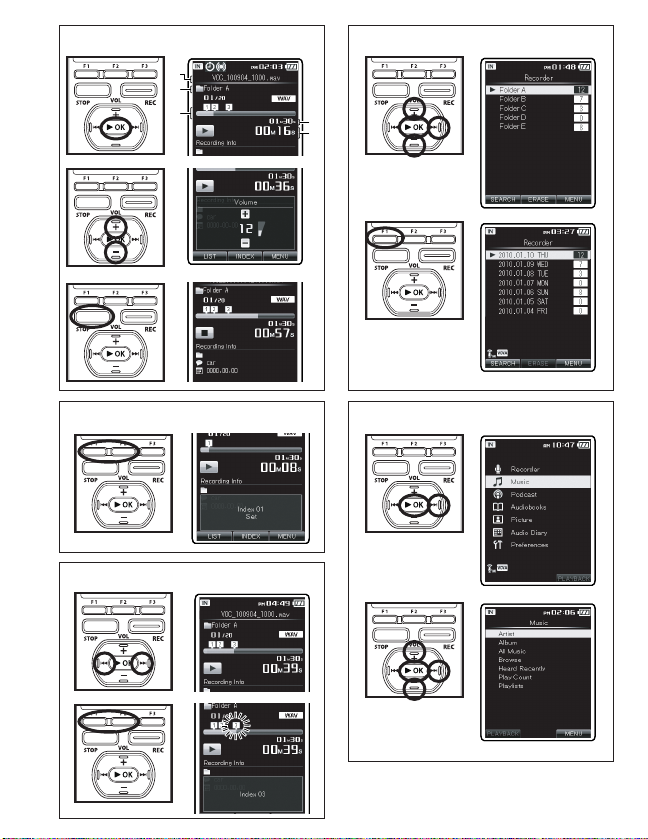
Playback (Fig. 5)
1 Sel ect the fol der which c ontains th e
file s to be played bac k.
2 In th e File list di splay, press t he +
or − butto n to select t he file that
you want t o playback .
3 Pre ss the `OK butto n to start
playba ck.
a F ile name
b F older indicato r
c P layback positi on bar indicator
d F ile length
e E lapsed playba ck time
4 Pre ss the + or − butto n to adjust to
a comfo rtable li stening vol ume.
• The volu me can be adjuste d
within a ra nge from [
00] to [30].
5 Pre ss the
STOP
butto n at any point
you want t o stop the play back.
Setti ng an index m ark
This operation can be performed
whe n th e [
INDE X
] and [
Era se
]
funct ion has been assigne d to
a Fn butto n (F1 or F2).
Sett ing an index mar k (Fig. 6-1)
1 Pre ss the
Fn (INDEX)
butto n
durin g file reco rding, rec ording
pause, p laying, or p layback pa use.
• Even aft er an index mark is
placed , recording or pl ayback
will conti nue so you can plac e
index ma rks in other loc ations in
a similar m anner.
Cleari ng an index mar k (Fig. 6-2)
1 Loc ate the inde x mark you want t o
clear.
2 Pre ss the 9 or 0 but ton to
selec t the index m ark to erase.
3 Whi le the index num ber is displaye d
(approx imately 2 second s), press the
Fn (ERASE)
butto n.
• Index nu mbers after t he erased
index nu mber will autom atically
move up.
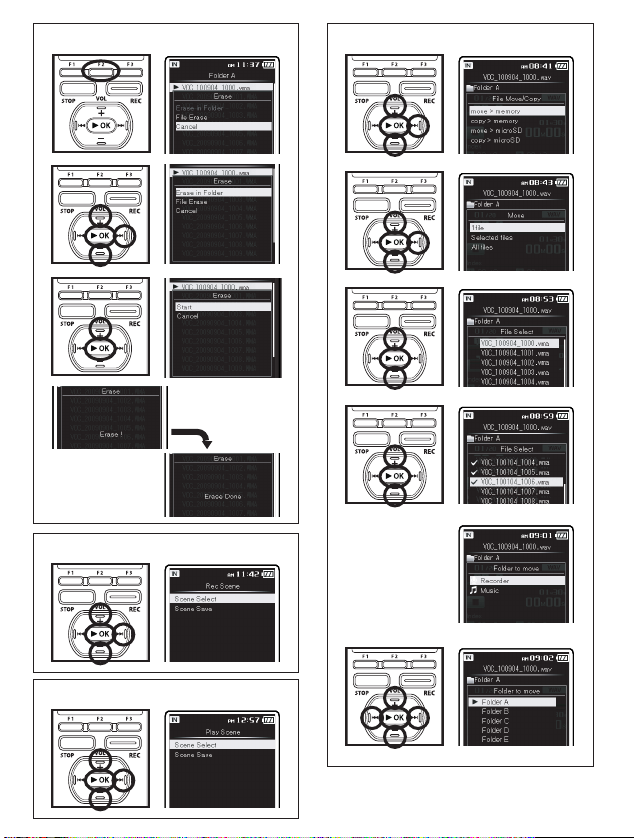
Erasing (Fig. 8)
1 Sel ect the fol der or file y ou want to
erase.
2 In th e list disp lay, press the + or −
butto n to select t he file you wa nt to
erase.
3 Whi le the recor der is stop mo de,
press t he
F2 (ERASE)
butto n.
4 Pre ss the + or − butto n to
selec t [
Erase i n Folder
] or
[
File Era se
], and the n press the
`OK or 9 butt on.
5 Pre ss the + butto n to select
[
Start
], and the n press the `OK
butto n.
• The display changes to [Erase!] and
eras ing will star t. [
Eras e D one] is
displaye d when the file i s erased.
File search (Fig. 7)
Th is r eco rd er m ana ges rec ord ed
files and mu sic file s impor ted from a
perso nal compute r using a database.
File s are aut omatica lly sorted usi ng
items such as date and keyword, which
makes sea rching for file s easier.
Opening the file search display from
the [
Recor der
] folde r (Fig. 7-1)
File sea rch type:
[Browse]
Searc h
The folder system (Folder A to Folder E) is used to
search fo r files.
[Day]
Searc h
Files are s earched for
by record ing date.
[Keywor d]
Searc h
Files are s earched for
by a keywo rd.
1 From t he [
Home
] menu di splay,
selec t [
Recor der
], and the n press
the `OK or 9 butt on to open
the fol der list dis play.
2 Pre ss the
F1 (SEARCH)
butto n to
open th e file sear ch display.
• The sear ch display change s
every ti me the
F1 (SEARC H)
butto n is pressed.
Opening the file search display from
the [
Music
] folde r (Fig. 7-2)
File sea rch type:
[Artis t]
Searc h
Files are s earched for
from a lis t of artists.
[Album]
Searc h
Files are searched for from
a list of alb um names.
[All Music]
Searc h
Files are search ed fo r
from a lis t of all songs.
[Browse]
Searc h
A list of al l son gs an d
album s in the [
Musi c]
folder i s displayed.
[Heard
Recen tly]
Searc h
Files played on this recorder are disp layed rev erse
chrono logical order.
[Play
Count]
Searc h
Fi les ar e disp lay ed in
order of the number of
tim es they h ave bee n
played on t his recorder.
[Playli sts]
Searc h
Display s playlists
transf erred to the
record er.
1 From t he [
Home
] menu di splay,
selec t [
Music
] folde r, and then
press t he `OK or 9 butt on to
open th e search dis play.
2 Pre ss the + or − butto n to select
the fil e search t ype, and then p ress
the `OK or 9 butt on.
Fn. setting
The Fn buttons (F1 and F2) of this recorder
ca n be ass ign ed to s uit yo ur de sir ed
method of use. Assigned buttons can be
operat ed during record ing and playbac k.
1 Sel ect [
Fn. sett ing
] from th e
menu on t he [
System Me nu
].
2 Sel ect the [F1] or [F2].
• You can assign s ettings to suit
the way you us e the recorder.
3 Pre ss the + or − butto n to select
the item y ou want to assi gn, and
then pr ess the `OK butto n.
Fn butt on list:
Off Repeat Random
Play Spee d
INDEX A- B
Erase DISPLAY LIST
Page 11

11
EN
Setting the playback scene
[Play Scene] (Fig. p)
1 Sel ect [
Play Sce ne
] from th e
menu in [
Play Men u
].
2 Sel ect [
Scene S elect
] or [
Scene
Save
].
When [Sc ene Select] i s selecte d: A
1
Press the + or − button to selec t the
playbac k scene you want to se t.
2 Pres s the `OK butto n to
comple te the selecti on.
• After p urchase, all the se ttings
from 1 to 5 of [
User Se tting]
are the sa me (initial set tings).
Regist er the user sett ings in the
[Scene S ave] then selec t the
playbac k scene.
• To confirm th e respective
playbac k scene settin gs, press
the
+ or – butt on in the [Scene
Selec t] screen to sel ect the item
you want to co nfirm, then pr ess
the
9 butto n to confirm in
the set ting confirma tion screen.
To end the set ting confirma tion
screen , press the
0 butto n
and the dis play will return t o the
[Scene S elect] scree n.
When [Sc ene Save] is sele cted: B
You can save the m enu settings
of a playb ack you have set to your
choice.
1 Set ting the menu of a p layback
in the reco rder to your choic e.
2
Press the + or − button to selec t the
[User Se tting] you wa nt to save.
3 Pres s the `OK butto n to
comple te the settings .
3 Pre ss the
F3 (HOME)
butto n to
compl ete the sett ing.
Moving/Copying files
[File Move/Copy] (Fig. q)
1 Sel ect the fol der where t he file you
want to mo ve or copy is save d.
2 Sel ect [
File Move /Copy
] from th e
menu on t he [
File Men u
].
3 Pre ss the + or − butto n to select
the pos ition to move or c opy the file
to.
4 Pre ss the `OK or 9 butt on.
5 Pre ss the + or − butto n to select
the num ber of file s to move or copy.
6 Pre ss the `OK or 9 butt on to
move to the r especti ve setting .
When you s elect [1file]:
1 Pres s the + or − button to se lect
the fil e you want to move or
copy.
2 Pres s the `OK butto n to select
the fil e. Proceed to Step 8.
When you s elect [Sel ected file s]:
1 Pres s the + or − button to se lect
the fil e you want to move or
copy.
2 Pres s the `OK butto n to check
the fil e(s) selected.
When you s elect [All fi les]:
When all f iles are selec ted,
all the f iles in the folde r will
be automa tically sele cted
and the re corder will move to
the [
Folder t o move] screen.
Proceed t o Step 8.
7 Pre ss the
F2 (GO)
butto n.
8 Pre ss the 9, 0 or +, −
butto n to select t he folder you w ant
to move or co py the file to.
9 Pre ss the `OK butto n.
• [Moving !] or [Copying! ]
will app ear on the display
and movin g or copying will
star t. During the pro cess, the
progre ss status will be s hown
in percen tage. The proce ss is
comple ted when [
File move
compl eted] or [File c opy
compl eted] is displa yed.
Setting the recording
scene [Rec Scene] (Fig. 9)
1 Sel ect [
Rec Sce ne
] from th e menu
in [
Rec Menu
].
2 Sel ect [
Scene S elect
] or [
Scene
Save
].
When [Sc ene Select] i s selecte d: A
1
Press the + or − button to selec t the
recordi ng scene you want to s et.
2 Pres s the `OK butto n to
comple te the selecti on.
• To confirm th e respective
recordi ng scene setti ngs, press
the
+ or – butt on in the [Scene
Selec t] screen to sel ect the item
you want to co nfirm, then pr ess
the
9 butto n to confirm in
the set ting confirma tion screen.
To end the set ting confirma tion
screen , press the
0 butto n
and the dis play will return t o the
[Scene S elect] displ ay.
When [Sc ene Save] is sele cted: B
Beside s the [Rec Scene] te mplates
found in t he recorder, you can a lso
save the me nu settings of a re cord
-
ing you have s et to your choice.
[Scene S ave] cannot be used d uring recor ding. While the r ecorder
is pause d, enter the menu fr om the
[Home] me nu display, and then
perf orm this settin g.
1
Press the + or − button to selec t the
[User Se tting] you wa nt to save.
2 Pres s the `OK butto n to
comple te the settings .
3 Pre ss the
F3 (HOME)
butto n to
compl ete the sett ing.
Other features
Besides the usual func tions, the recorder
also includes various funct ions as follows.
For information on operating procedures
and de tailed set ting, pleas e refer to the
[DETAILED IN STRUCTION S] online.
•
This re corder c an tag reco rded file s or files
trans ferred f rom a pers onal com puter
with key words to m anage a file d atabas e.
➥ [
Keywor d
] (☞ P.75)
• The set tings an d functi ons of thi s
recor der can be c ontroll ed using s peech
recog nition (Fo r DM-4).
➥ [Using vo ice reco gnition] ( ☞ P.107)
• By conn ecting a d igital c amera, yo u can
impor t and view i mages (For D M-4).
➥ [
Viewi ng images
] (☞ P.103)
• It featu res a sche duling f unctio n.
➥
[Sche dule set tings [Audi o Diary] ] (☞ P.96)
• It is com patible w ith DAISY (Fo r DM-4).
➥ [
About DA ISY
] (☞ P.132)
• It is com patible w ith Podca sting.
➥ [
About Po dcast
] (☞ P.127)
• It is com patible w ith Audio B ook.
➥ [
About A udio Book s
] (☞ P.157)
• This re corder c an impor t text dat a and
read it a loud (For DM- 4).
➥ [
About Tex t Speech
] (☞ P.158)
• Compat ible wit h Audible b roadca sting.
➥ [Loadi ng Audibl e content] ( ☞ P.159)
Page 12

12
EN
Using the recorder on your PC
Window s
Opera ting System:
Microsoft® Windows® XP Service Pack 2, 3
Microsof t® Windows ® XP Professional
x64 Edit ion Service Pa ck 2
Micr osoft® Windows Vista® Service
Pack 1, 2 (32bit/6 4bit)
Microso ft® Windows ® 7 (32bit/64bit)
CPU:
32 bits ( x86) of 1GHz and above or
64 bits ( x64) processor
RAM:
512 MB or more
Hard dr ive space:
300 M B or more
Drive
CD-R OM, CD-R, CD -RW, DVD-ROM d rive
Browse r:
Microso ft Internet E xplorer 6.0 la ter
Displ ay:
1024 x 768 pixels o r more, 65,536
colors o r more (1,6770,000 colo rs
or more is r ecommended)
USB por t:
One o r more free por ts
Other s:
• Audio dev ice
• Environm ent where the Inte rnet
can be uti lized.
Macin tosh
Opera ting System:
Mac OS X 10.4 .11 - 10.6
CPU:
Power PC® G5 or Intel Multi core
Processo r 1.5 GHz and above
RAM:
512 MB or more
Hard dr ive space:
300 M B or more
Drive:
CD-R OM, CD-R, CD -RW, DVD-ROM d rive
Browse r:
Maci ntosh Safari 2.0 l ater
Displ ay:
1024 x 768 pixels o r more, 32,000
colors o r more (1,6770,000 colo rs
or more is r ecommended)
USB por t:
One o r more free por ts
Other s:
• Audio dev ice
• Environ ment wh ere the Intern et
can be utilized (Quick Time version
7.2 or more is rec ommended).
Connecting to your PC
1 Turn th e recorde r’s power ON.
2 Con nect the USB co nnectio n cable
to the USB po rt of the PC.
3 Make s ure that the r ecorder i s
stopp ed, and then co nnect the US B
cable t o the connec ting por t on the
botto m of this reco rder.
Window s:
When you connec t the recor der to a
Windows and open [
My Computer],
it will be recog nized by the drive
name o f the prod uct name. If a mi
-
croSD card is ins erted, [
Remova ble
Disc] wil l be displayed.
Macin tosh:
When you connect the re corder to a
Mac OS, i t will be recogni zed by the
drive name of the product name on the
deskto p. If a microSD c ard is inser ted,
[NO NAM E] will be displ ayed.
Disco nnecti ng from your PC
Window s
1 Cli ck [ ] on the ta sk bar locat ed
at the lowe r-right co rner of the
scree n. Click [
Safel y remove
USB Mass St orage Devic e
].
•
T he d ri ve l et te r w il l d if fe r
depend ing on the PC bein g used.
2 Con firm that t he recorde r LED
indic ator light i s gone befor e
disco nnectin g the USB cable.
•
The LED i ndicator light will light
up (orange) in case of chargin g,
however you ca n still disconnec t
the USB cab le in such conditi on.
Macin tosh
1 Move t he drive icon f or this reco rder
that is a ppear on the d esktop to th e
garba ge bin by Drag & Dr op it.
2 Con firm that t he recorde r LED
indic ator light i s gone befor e
disco nnectin g the USB cable.
•
The LED i ndicator light will light
up (orange) in case of chargin g,
however you ca n still disconnec t
the USB cab le in such conditi on.
Note
•
NEVER disconnect the USB cable while
the LED indic ator ligh t is ashing. If
you do, the d ata will be destr oyed.
Accessories (optional)
s
USB conn ecting AC ada pter: A514
s 2 c hannel mic rophone (omni -
direc tional): ME 30W
s C ompact Gun M icrophone
(unidir ectional ): ME31
s
Hig hly sen siti ve noise -ca ncel lati on
monaural microphone (unidirectional):
ME52W
s T ie clip micr ophone (omni -
direc tional): ME15
s E xclusive re mote contro l set:
RS30W
s Tel ephone pick up: TP7
s C onnectin g cord: KA333
s L ithium ion ba ttery: LI -50B
Specifications
Gener al points
4 R ecording me dium:
Built-i n memory
DM-4 : 8 GB
DM-2: 4 GB
microSD ca rd (512 MB to 16 GB)
4 R ecording fo rmat:
Linear PC M (Pulse Code Modu lation)
MP3 (MPEG-1 Audi o Layer3)
WMA (Win dows Media Audi o)
4 I nput level:
[Mic Sens e]:[Middle] - 60 dBv
4 M aximum work ing output :
280 mW (8 Ω speak er)
4 M aximum head phone outp ut:
≤_ 150 mV (according to EN
50332-2)
4 W ide band chara cteristi c
headp hone output :
75 mV ≤_ (according to E N 50332-2)
4 Sp eaker:
Built-i n ø 23 mm round dynam ic
speaker
4
MIC
jack:
ø 3.5 mm min i-jack, imp edance
2.2 kΩ
4
EAR
jack:
ø 3.5 mm min i-jack, imp edance
8Ω or more
4 I nput power re quirement :
Batter ies: Lithium ion b attery
Exte rnal power suppl y:
AC adapter (A515) 5 V
4 E xternal di mensions:
113.6 mm × 45. 6 mm × 15.2 mm
(withou t protrusions)
4 We ight:
98 g (inclu ding batter y)
4 O perating te mperature :
0°C - 42°C / 32°F - 107.6°F
Page 13

13
EN
Guide t o recording t imes
Linear P CM format
Recordi ng
mode
Built-i n memory
(4 GB) (DM-2)
Built-i n memory
(8 GB) (DM- 4)
microSD ca rd
1 GB 2 GB 4 GB
48 kHz 5 h. 15 min. 11 h. 05 min. 1 h. 15 min. 2 h. 45 min. 5 h. 30 min.
44.1 kHz 5 h . 45 min. 12 h. 05 min. 1 h. 20 min. 3 h. 6 h.
MP3 form at
Recordi ng
mode
Built-i n memory
(4 GB) (DM-2)
Built-i n memory
(8 GB) (DM- 4)
microSD ca rd
1 GB 2 GB 4 GB
320 kbps 25 h . 30 min. 53 h. 6 h. 30 min. 13 h. 30 min. 27 h.
128 kbps 63 h. 3 0 min. 133 h. 16 h. 30 min. 34 h. 68 h .
WMA form at
Recordi ng
mode
Built-i n memory
(4 GB) (DM-2)
Built-i n memory
(8 GB) (DM- 4)
microSD ca rd
1 GB 2 GB 4 GB
ST XQ 62 h. 30 min. 130 h. 16 h. 33 h. 66 h .
LP 977 h. 2043 h. 255 h. 531 h. 1042 h.
Maxim um recordin g time per fil e
Linear P CM format MP3 for mat WMA form at
48 kHz 3 h.
320kbps 29 h. 40 min. ST XQ 72 h. 50 min. HQ 291 h. 30 min.
44.1 kHz 3 h. 20 min.
256kbp s 37 h. 10 min. ST HQ 145 h. 4 0 min. SP 574 h.
192kbps 49 h. 40 min. ST SP 291 h. 30 min. L P
1139 h. 20 min.
128kbps 74 h. 30 min.
Guide t o battery li fe
Recordi ng mode
Built-i n stereo microp hone
(During r ecording mod e)
Built-i n speakers
(During p layback mode)
Earpho ne Playback
PCM 48k Hz 13 h. 12 h. 20 h.
MP3 128kbps 25 h. 12 h. 30 mi n. 20 h.
ST XQ 24 h. 12 h. 30 min. 21 h.
LP 29 h. 13 h. 2 2 h.
• The above v alues are stric tly rough guid es.
•
Batter y life is measur ed by Olympus. I t varies greatly a ccording to the ty pe of batterie s used and the cond itions of use.
Speci cations and desi gn are subject to c hange without n otice.
Overal l frequenc y response
4 D uring recor ding or playba ck
mode:
Linear P CM format
Recordi ng
mode
Overal l frequency
respon se
48 kHz 40 Hz to 23 kH z
44.1 kHz 40 Hz to 21 kHz
MP3 form at
Recordi ng
mode
Overal l frequency
respon se
320 kbps 40 Hz to 20 kHz
256 kbps 40 Hz to 20 kHz
192 kbps 40 Hz to 19 kHz
128 kbps 40 Hz to 17 kHz
WMA form at
Recordi ng
mode
Overal l frequency
respon se
ST XQ 40 Hz to 19 kHz
ST HQ 40 Hz t o 16 kHz
ST SP 4 0 Hz to 9 kHz
HQ 40 Hz to 13 kHz
SP 40 Hz t o 8 kHz
LP 40 H z to 3 kHz
4 B uilt-in ste reo microph one (During r ecording mo de):
DM-4 : 70 Hz to 20 kHz
DM-2: 70 Hz to 20 kH z
• Howeve r, when r ecording by the MP3 f ormat or the WMA fo rmat, the upper l imit value of the f requency
respon se depends on eac h recording mod e (see above diagra m).
Page 14

14
FR
Introduction
•
Ce ma nuel e st une v ersi on de ba se.
Re po rt ez -v ou s a u ma nu el av an cé
comp let dispo nible dans les don nées
stockée s dans le dossier [
OL_ MANUAL]
de l’e nre gist reur o u t éléc harg ez ces
donnée s à partir du site Web O LYMPUS.
•
Le co ntenu de ce doc ument pe ut être
modifié par la suite sans préavis. Veuillez
co nta ct er n otr e ce ntr e de s er vic e
après- vente pour o btenir les dernières
infor mations concer nant l es no ms de
produi ts et les numéros d e modèles.
•
Les captu res d’écran et les ill ustrations
de l’enre gistre ur p résent ées dans ce
manuel ont été réalisée s au cou rs des
phases de développ ement et pe uvent
ne pas correspond re au produit rée l. Le
plus gran d soin a été pr is afin d’assurer
l’intég rité du conten u de ce document.
Dans le cas peu probable où vous auriez
un doute ou si vou s trouvez une erreu r
ou un e o miss ion ,veui llez co nta cter
notre cent re de service ap rès-vente.
•
Toute respon sabilité pour do mmages
pa ssif s ou do mmag es de qu elq ue
natur e que ce soit surven us à cause
d’une perte de donné es caus ée par un
défaut du produit, réparation effectué e
par un t iers autre qu e Olympus ou un
serv ice agré é par Olympus , ou toute
autre rai son est exclue.
Marqu es de fabriqu e et marques
de fabri que déposé es:
•
IBM et PC /AT sont des ma rques
de fabri que ou des marque s de
fabriq ue déposées pa r Internationa l
Busines s Machines Corpo ration.
•
Microso ft, Windows e t Windows
Media de s marques de fabr ique
déposé es par Microsof t Corporatio n.
• Macintos h et iTunes sont des
marques d e fabrique d’App le Inc.
•
microSD et microSDHC sont des marques
de fabri que de SD Card Asso ciation.
•
La technologi e de codage audio MPEG
à 3 couches est incorporée sous licence
de Fraunho fer IIS et Thomso n.
•
EUPHON Y MOB ILETM est un e marq ue
de fabri que de DiMAGIC Cor poration.
• DVMTM est une ma rque de fabriqu e
de DiMAGI C Corporation .
•
Le produit a été développé en étant basé
sur la te chnologi e de suppres sion d e
bruit so us licence de NEC Cor poration.
•
Nuance, le logo Nuance, RealSpeak et
VoCon sont des marques commerciales
ou des marques déposées de Nuance
Communications, Inc ou de ses filiales
aux État s-Unis ou d'autr es pays
.
Précautions de sécurité
A v an t d ’ ut i l i s e r v o t r e n o u v e l
en reg is tre ur, lis ez a tte nt ive men t ce
manu el p our s avoir comme nt l’u tilise r
de manière sûre et correcte. Conserve z ce
manuel à un endroit facilement accessible
pour to ute référen ce ultérieu re.
•
Les symboles Averti ssement indiquent
des informations import antes lié es à la
sécurité. Pour vous protéger vous-même
et les autres contre les blessures ou contre
les dé gâts matérie ls, il est e ssentiel que
vou s p renie z t oujo urs en comp te les
avertis sements et info rmations four nis.
Préca utions pou r
l’envir onnement d ’utilisa tion
• Pou r p rot ége r l a tech nol ogi e d e hau te
pré cis ion con tenu e dans ce pr odu it, ne
ja mai s la is ser l’e nre gi str eu r da ns l es
endr oits indiq ués c i-des sous, que ce soit
en util isation o u pour le ra ngement :
•
En dro it s où l es te mp éra tur es e t/o u
l’humidité sont élevées ou passent par des
changem ents extrêm es. En plein soleil , à
la plage, dans des vo itures fermées, ou
près d’autres sources d e chaleur (poêle,
radiate ur, etc.) ou des humid ifi cateurs.
• Dans des endroits sablonn eux ou
poussi éreux.
• Près de p roduits infl ammables
ou expl osifs.
•
Dans d es endroits humides, telle qu’une
salle de bain ou sous la pluie. En utilisant des
produits avec une conception imperméable,
lire également leurs manuels.
•
Dans des en droits prédis posés à de
forte s vibrations.
•
Ne j am ais l ai ss er to mb er l ’en re gis tr eu r ou l e
soume ttre à des c hocs vio lents ou à d es vibrat ions.
•
L’enregistreur peut présenter un dysfonctionneme nt
s’il est ut ilisé en pré sence d’un ch amp magné tique/
éle ct roma gné tiq ue, d’o nde s r adi o ou de lig nes
à hau te ten sio n, par e xemp le à pro xim ité d ’un
télévise ur, d’un four à micro- ondes, d’une console de
jeux vidé os, de haut-parl eurs, d’un gran d moniteur,
d’ une tou r de tél év is ion /r ad io o u de p yl ône s
élect riques. Le cas échéa nt, éteignez l’enr egistreu r,
puis ra llumez- le avant de co ntinue r à l’utilis er.
•
Evitez d’effectuer un enregistr ement ou une lectur e près
d’un téléph one cellulai re ou de tout aut re appareil sans
fil, car ils risquent de provoq uer des interfére nces et des
parasit es. En cas de paras ites, installez- vous ailleurs, ou
éloig nez davan tage l’enre gistre ur de ces ap pareils .
•
N’utilisez pas de solvant organiq ue,tel qu’alcool ou
dilua nt pour ver nis,pou r nettoye r l’enregi streur.
<
Averti ssement rel atif aux per tes de donnée s
>
Les do nnée s e nre gist rée s d ans la mé moir e r isq uent
d’ êt re dé tr ui te s o u e f fa cé es en ca s d ’e rr eu r d e
pro cédu re,d ’anom ali e de l ’enre gist reur, ou pe ndan t
des trav aux de r épara tion. Nou s vo us r ecomm andon s
d’en reg ist rer et de s auve gar der to utes l es don nées
imp or tan tes su r un au tre su ppo rt , p ar ex emp le un
dis que. Toute re spon sabi lité pou r do mmag es passi fs
ou d ommage s de quelq ue na ture que c e soi t sur venus
à c ause d’une per te d e do nnées cau sée par un d éfaut
du produ it, répar ation eff ectuée s par un tiers au tre que
Olymp us ou un ser vice agréé par Olymp us, ou toute autre
raiso n est excl ue de la resp onsabi lité de Oly mpus.
Manie ment de l’enre gistreu r
f Averti ssement :
• Ne pas ut iliser l ’enregist reur à pro ximité
de gaz in fl ammable s ou explo sifs.
• Ne pas la isser l’en registr eur à la por tée
des enf ants.
Toujour s uti liser et r anger l’enregi streur
hors de la porté e de s jeu nes enfants et
des bébés pour empêc her le s situ ations
dan ger euse s s uiva ntes qu i pour raie nt
causer d es blessures grav es:
1
S’enrouler d ans la courroie de
l’enregi streur, causant la s trangulation .
2
Avaler accid entelleme nt la batter ie,
des car tes ou d’autres pet ites pièces.
3 Se b lesser accid entellement p ar
des par ties en mouve ment de
l’enregi streur.
•
Ne pas ut iliser ni r anger l’en regist reur
dans de s endroit s poussi éreux ou h umides.
•
La marqu e Daisy OK est une mar que
déposé e du consortiu m Daisy.
Les autre s noms de produit s et de
marques i ndiqués ici peu vent être
des marqu es de fabrique o u des
marques d e fabrique dép osées de
leurs pr opriétaire s respectifs .
FR
Page 15

15
FR
•
Ne démo ntez pas, ne r éparez pa s et ne
modifi ez pas cet en regist reur vous -même.
• N’utili sez que de s cartes m émoire
micro SD/microS DHC. N’util isez jam ais
d’autr es types d e cartes .
Si vous insérez accid entellem ent u n autr e
type de carte da ns l’enregistr eur, contacte z
un revende ur agréé ou un centre de serv ice.
N’essayez p as de retirer la car te par la force.
• N’utili sez pas cet enr egistr eur pen dant la
condu ite d’un véhic ule (tel que bi cyclet te,
motoc yclett e ou voitur e).
f Atten tion:
•
Arrêter immédiatement d’utiliser l’enregistreur
si vous remar quez une odeur, un bru it anormal
ou de la fu mée prove nant de l’enr egistr eur.
Ne jamais retirer les batteries les mains nues,
ce qui pour rait vous brûle r les mains.
• Faire at tention a vec la cour roie.
Faire attention avec la courroie en portant
l’ enr egi str eur . Ell e peu t fa cil eme nt
s’accroch er à des obj ets sur le passage
et cause r des dommages sé rieux.
• Ne pa s la iss er l’ enr egi st reu r dan s de s
endr oits où i l po urrai t êtr e so umis à de s
tempé ratures t rès élevé es.
Ce ci p ou rr ait cau se r un e dé té ri ora ti on
de ce rt ai nes pi èc es e t, da ns c er ta in es
circons tances, l’enregis treur pourrait pre ndre
feu. Ne pas utiliser le chargeur ni un adaptateur
se cte ur s’i l e st co uver t (pa r e xem ple pa r
une couvert ure). Ce qui pourrait cause r une
surchau e, débouchant s ur un incendie.
•
Manip uler l’enreg istreur so igneuse ment afi
n d’évite r une brûlu re à basse t empérat ure.
•
Lorsque l’enregistreur contient des
parties métalliques, une surchauffe
peut déb oucher sur une b rûlure à
basse température. Faire attention
aux poin ts suivants:
•
Utilisé pendant une longu e durée,
l’e nre gist reur d evie nt cha ud. Si
vous tenez l’enregistre ur dans ces
con diti ons , u ne brû lure à ba sse
tempér ature risque de se pro duire.
•
Dans des en droits sujets à d es
tempér atures très froi des, la
tempér ature du corps de l’en registreur
peut êtr e plus basse que la te mpérature
ambiante . Si possible, me ttre des
gants en te nant l’enregist reur à des
tempér atures basses.
•
Ne pas toucher les parties métalliques
de l’enregis treur pendant une longue
durée l orsqu’il fa it froid.
Vo tre pe au peu t êtr e b les sée. À
de s temp éra tur es bas ses , ten ez
l’enregi streur avec des ga nts.
Préca utions de ma nipulat ion de
la batt erie
Veuillez suivre ces consignes importantes pour éviter
le coulag e du liquide de la batter ie, une générat ion
de chaleur, des brûlures, une explosio n, ou de causer
des déc harges é lectri ques ou br ûlures.
f Dange r:
•
L’en re gis tr eu r uti li se u ne ba tt er ie au
lithi umion spéc ifi ée par Olympus . Chargez
la bat terie av ec l’adap tateur s ecteur ou le
char geur spéci fi é. N’util isez aucun autr e
adapt ateur sec teur ou ch argeur.
• Les p iles ne doivent jamai s être exposée s
à une flamme , chauf fées,c ourt-ci rcuité es
ou démo ntées.
•
Ne jama is chauf fer ni met tre au feu l a batteri e.
•
Pr end re de s pr éca uti on s en tr ans po rta nt o u
range ant la batter ie pour évit er qu’elle vie nne en
cont act avec des o bjets mét alliq ues c omme des
bijou x, des épi ngles à che veux, des a grafes, e tc.
•
Ne jamai s ranger la bat terie dans u n lieu où
elle serait exp osée en plein soleil, ou sujette
à des températures élevée s dans un véhicu le
chaud , près d’un e source de c haleur, et c.
Pour éviter de causer des coulages de liquide de la
batter ie ou d’endommager ses bornes , respecter
sc ru pu l eu se me nt to ut es le s in s tr uc ti on s
con cern ant l’u sag e d e l a b atte rie. Ne ja mai s
tenter de démo nter une batteri e ni la m odifi er
de quel que façon q ue ce soit , ni la soude r, etc.
• Ne br anchez jamais dire ctement les piles
sur une prise de cour ant ou l’allume-c igare
d’un véh icule.
• Si du l iqui de d e l a ba tteri e e ntrai t da ns
vos yeux, les laver imm édiateme nt avec de
l’eau claire et froide du robinet et consulter
imméd iatemen t un médec in.
f Averti ssement :
•
Mainte nir à tout m oment la ba tterie au s ec.
•
Si les bat teries r echarg eables n ’ont pas été
recha rgées au b out de la dur ée spéci fi ée,
arrêt er de les cha rger et ne p as les util iser.
• Ne pas ut iliser un e batter ie si elle es t
endom magée ou ca ssée.
•
Ne jama is soumet tre la bat terie à de s chocs
viole nts ni à des v ibratio ns contin ues.
•
Si la b atter ie c oule, devi ent décol orée ou
déformée, ou devient anorma le sous d’autres
aspec ts pendant le fonctionn ement, arrêter
d’util iser l’enr egistr eur.
•
Si du liqu ide de la batterie coule sur vos vêtements
ou sur v otre peau, ret irer le vê temen t et laver
immé diate ment la zone affec tée avec de l ’eau
clair e et froide du robinet. Si le liqui de vous brûle
la peau , consult er immédi atement u n médeci n.
•
Conse rvez les pi les hors d e portée d es enfant s.
• Si vous no tez quelq ue chose d ’inhab ituel
à l’util isatio n de ce produ it, par exe mple
un brui t anorma l, de la chal eur, de la
fumée o u une odeu r de brûlé:
1
re tir ez im méd iate men t les p ile s en
prenant g arde de ne pas vous b rûler,et;
2
appelez votre revendeur ou le représentant
Olymp us local pour une r évision.
f Atten tion:
• Ve ui ll ez re c yc le r l es ba t te ri es po ur
prése rver les r essourc es de notre p lanète.
Qua nd vous je tez des bat ter ies mor tes,
s’assurer de recouvri r les born es et toujou rs
respe cter la ré glemen tation lo cale.
• To uj ou rs ch ar ge r une b at te ri e p ou r
l’util iser la pre mière fo is, ou si ell e n’a pas
été util isée pen dant une lo ngue pér iode.
•
Le s b at t er i es r e ch a rg e ab l es d i sp o se n t
d’u ne lo ngé vit é l im ité e. Qua nd la d uré e d e
fonc tionnem ent racco urcit, mê me si la bat terie
est complètement recha rgée suivant la condition
spéci fiée, remp lacez-l a par une bat terie ne uve.
•
La batterie peut deven ir chaude pendant une
utilisatio n prolongé e. Pour éviter des brûlures
mineu res, ne pas la retir er immé diateme nt
après av oir utili sé l’enreg istreu r.
Adapt ateur sect eur
f Dange r:
•
Veillez à utiliser le chargeur à la tension (secteur
100 - 240 V) adéqu ate. Son emploi s ur d’autr es
tens ions peu t p rovoq uer une surc hauf fe, un
incen die, une él ectroc ution ou d es blessu res.
•
Pou r v otre sé curi té, ass urez -vous
d’avoir débranché l’adaptateur secteur
de la prise de courant avant d’effectuer
de l’entret ien ou du nett oyage. De
pl us, ne b ran che z n i déb ran chez
jamais la fiche d’alimentation avec les
mains mouillées. Ceci pourrait causer
un choc électrique ou des blessures.
f Averti ssement :
• N’es saye z p as de dé mont er, rép are r o u
modifi er l’ada ptateur secte ur de qu elque
maniè re que ce soi t.
•
Ev i te z l a p én é tr a ti o n de m a ti è re s
ex té ri e ur es , te l le s q u’e au , m ét al ou
subst ances in flammabl es, dans le p roduit .
•
Ne moui llez pas l ’adaptate ur sect eur, ne le
touch ez pas avec de s mains mou illées .
•
N’utilise z pas l’adaptateur secteu r près d’un
gaz inflam mable (tel que d e l’es sence, du
benzè ne ou un dilu ant pour ve rnis).
Dans le c as où
•...les pièc es internes de l’adap tateur sec teur
sont exposées parce qu’il est tombé ou a été
endom magé d’une a utre man ière:
Page 16

16
FR
•...
l’a dapt ate ur sec teu r t omb e d ans l’e au,
ou s i de l’eau, un obj et mé talliqu e ou une
substance inflammabl e ou d’autres matières
extér ieures p énètren t à l’inté rieur:
•...
vou s n otez qu elq ue cho se d’i nhab itu el à
l’emploi de l’adaptateu r secteur, tel que bruit
anorm al, chale ur, fumée ou o deur de br ûlé:
1
ne touche z aucune pièce ex posée;
2
déc onne ctez im médi ateme nt la
fiche d ’alimentation d e la prise, et;
3
a pp el ez v ot r e r ev en de ur o u l e
rep rése ntant Ol ympu s l ocal po ur la
révision. Continuer à utiliser l’adaptateur
sec teur dans ces condit ions pourr ait
eng endre r un e dé charg e él ectr ique,
un feu ou de s blessures.
f Atten tion:
•
N’u til ise z p as l’a dap tat eur s ect eur s i l a fic he
d’alime ntation est endo mmagée ou si elle ne peut
pas être branchée à fond dans la fiche. Ceci pourr ait
ca use r un in ce ndi e, un e su rch auf fe , un ch oc
élec trique, u n court-c ircuit o u des domm ages.
•
Débra nchez la fic he d’alim entatio n de
l’adap tateur se cteur qu and il n’est p as
en ser vice. Si vou s ne prenez p as cette
préca ution, il p eut se pro duire un i ncendie,
une sur chauffe ou u n choc éle ctriq ue.
•
Pour d ébranch er le co rdon d ’alimenta tion,
ret irer la f iche d’a lime nta tion sa ns tire r
sur le cord on. Ne pas tord re le c ordo n, n i
plac er d’obje ts l ourd s de ssus . Ce la r isqu e
d’endo mmage r le cor don et de pro voquer
l’élec trocut ion, la sur chauffe o u l’incen die.
•
Si qu elque chose d e mauv ais se produi t avec
l’adaptate ur secteur, débranchez-le de la prise
de coura nt et consu ltez le centr e de servi ce le
plus proc he. Utiliser ainsi le char geur pourrai t
caus er un ince ndie, une surcha uffe, un ch oc
élec trique ou d es bless ures.
•
N’utilisez pas et ne laissez pas l’adapt ateur secteur
dans des e ndroit s très chaud s, tels qu’ex posés en
plei n so leil, da ns u ne vo itur e fe rmée par beau
temps, près d’un a pparei l de c hauffag e, sur une
couver ture c hauffan te élec trique, etc. N ’utilise z
pas l ’ad apt ate ur sec te ur si qu elq ue ch ose l e
reco uvre (tel qu’u ne c ouver ture) . Ce ci p ourra it
cause r un incen die, u ne ex plosion , une fuite de
liqui de ou une su rchauffe .
Écran ACL
•
L’écran à crista ux liquides utilisé pour l’écran ACL est
produ it avec une tec hnolog ie de h aute pr écisio n.
Toutefo is, d es po ints noirs ou lumine ux pe uvent
appar aître const amment sur l’écran ACL. À cau se
de ses carac téristi ques ou selon l’ang le sous lequel
vous vision nez l ’écran ACL, le s poi nts pe uvent ne
pas êtr e uniform es en couleu r ni en lumin osité. Ce
n’est pas u n mauvais f onctio nnemen t.
Identification des éléments
1 Prise
MIC
(micro phone)
2 Microphon e stéréo inté gré
3 Voyant d’LED
4 Touc he
VOICE
(Pour DM -4)
Touche
HOME
(Pour DM -2)
5 Commutateu r
POWER/ HOLD
6 Trou s de courroie
7 Affichag e (panneau ACL)
8 Touc he
REC
(enreg istrement)
9 Touc he 9
0 Touc he `OK (Lect ure / Set)
! Touc he Fn (F1/F2/F3)
@ Touc he
STOP
# Touc he
+
$ Touc he 0
% Touc he
–
^ Haut-parl eur intégré
& Prise
EAR
(écoute ur)
*
Couverc le du logeme nt de la carte
(
Couverc le du logeme nt de la pile
) Connecteu r USB
- Prise d’alime ntation
Affi chage du mo de [Recorde r]
Affic hage de fich iers: A
1 Nom de fichi er
2 Nom de dossie r/Mot-clé / Da te
3 Numéro du fic hier actue l/
Nombr e total de fic hiers
enreg istrés dans l a liste
4
Barre de p rogressi on de la lectu re
5
Indic ateur de l'éta t de l’enregist reur
[ ] Indic ateur Repro duction
[ ] Indic ateur Enreg istrer
[ ] Indic ateur Pause
[ ] Indic ateur Arrêt
6 Indicateu r de Index/I ndicateur
des inf ormations d e fichier
7 Indicateu r guide de fonc tion
8 Temps a ctuel
9 Format de fich ier
0 Longueur de f ichier/
Durée d ’enregistr ement écoul ée
! Durée de lec ture écoulé e/
Durée d ’enregistr ement resta nte
Affichage des icônes (Pour tous les modes)
[h][g] I ndicateur d e mémoire
[j] Témoin de prog rammation
[i] Témoin de la le cture d’ala rme
[k] Indic ateur de capa cité de pile
[A] Témoin de sens ibilité du mi cro
[Z]
Témoin du Dé clenchem ent à la voix
[c] Témoin d u filtre LowCu t
[Q] Indicat eur de Zoom Mi c
[a] Indic ateur de supp ression de
p arasites
[b] Indic ateur de fil tre vocal
[W] Indic ateur de EUPH ONY
[d][e] In dicateur de r épétitio n
[f]
Indic ateur de lect ure aléatoi re
Affic hage de la lis te de dossier s: B
1 Temps a ctuel
2 Nom de dossie r/Mot-clé / Da te
3 Nom de fichi er
4 Indicateu r guide de fonc tion
Affic hage de la lis te de fichier s: C
1 Temps a ctuel
2 Nom du dossie r courant
3 Nom de dossie r
4 Indicateu r guide de fonc tion
Affi chage du mo de [Music] [Pod cast]
Affic hage de fich iers: D
1 Nom de fichi er
2 Catégorie de r echerche /
Nom du pr ogramme
3 Numéro du fic hier actue l/
Nombr e total de fic hiers
enreg istrés dans l a liste (dossi er)
4
Barre de p rogressi on de la lectu re
5
Indic ateur de l'éta t de l’enregist reur
6
Zone d'af fichage de s informati ons
7 Indicateu r guide de fonc tion
8 Temps a ctuel
9 Format de fich ier
0 Longueur de f ichier
! Durée de lec ture écoulé e
Affic hage de la lis te de fichier : E
Lorsqu ’il n'y a que des fic hiers dans
le dossie r
1 Temps a ctue
2 Nom du dossie r courant
3 liste des art istet/
liste du p rogramme
4 Indicateu r guide de fonc tion
Affic hage de la lis te de dossier s: F
1 Temps a ctue
2 Nom du dossie r courant
3 Nom de fichi er
4 Indicateu r guide de fonc tion
Page 17

17
FR
Insér er la batter ie (Fig. 1)
1
Tou t e n pou ssa nt sur le s rai nur es
en utilis ant vo s deu x pou ces, f aites
glisser le couvercle de la batter ie dans
la dire ction ind iquée par la f lèche.
2
Avec l'éti quette au dos de la ba tterie
or ien tée ve rs l e h aut , ali gne z les
bornes de l'enregistreur et la batte rie.
Insérez la batterie en la faisant glisser
dans la direction A, tout en poussan t
vers le b as en direc tion B.
3 Fer mez le couver cle de la bat terie
en le fai sant gliss er à fond dan s la
direc tion B tout en po ussant ver s
le bas en d irectio n A.
Recha rgement à l ’aide de
l’adap tateur sec teur
L'adap tateu r C A in clus (A515) peu t
êt re con nect é à c et app arei l pour
le rec harge r. N ous reco mman dons
d'utiliser l'adaptateur secteur lors d'un
enreg istremen t ou d'une utilisa tion
prolo ngée de l'enre gistreur.
1 Bra nchez l'ada ptateur sec teur dans
une pri se secteu r.
2 Bra nchez l’adap tateur sec teur à
l’enreg istreur.
•
Le cha rgeme nt a d ébuté qu and
vo yan t DEL e st o ran ge e t que
l'indicateur de batterie sur l'écran se
change en i ndicateur de cha rge.
Allum er/couper l ’alimentat ion
Allume r l’alimenta tion (Fig. 1- 4)
L orsque l ’enregis treur es t éteint, g lissez
le comm utateur
POWER/ HOLD
dans la
direc tion ind iquée pa r la flèch e pendan t
2 secon de au moins .
Couper l ’alimentat ion (Fig. 1- 4)
G lissez le c ommuta teur
POWER/ HOLD
dans la d irecti on indiq uée par la f lèche
penda nt 1 second e au moins.
Mode éc onomie d’éner gie
Si l'enreg istreur est en marche et s'arrêt e
pend ant 10 minu tes o u pl us (ré glage par
défaut), Il passe en mode économie d’énergie
et se met hors tension . Vous pouvez régler le
mode économie d’énergie parmi [
5minutes],
[10minutes], [30minutes], [1hour], [2hour],
[3hour] e t [Off].
Po ur so r ti r d u m od e é co no mi e
d’énergi e, réactivez l'a limentation.
Réglage de l’heure et date
[Time & Date] (Fig. 3)
Lorsqu e vous utilisez ce t enregistreu r
pour la pr emière fois apr ès l'achat, ou
lorsqu e vous l’allumez ap rès avoir ôté
les bat teries pour plu s de 15 minu tes
lors de l'é change des bat teries etc.
[Set Tim e & Date] apparaî tra.
Quand « he ure » clignote, réa lisez la
config uration à part ir de l’étape 2.
1 Sél ectionn ez [
Time & Dat e
] dans
le menu d ans [
System Me nu
].
2 App uyez sur la tou che 9 ou
0 pour sé lection ner l’élémen t à
conf igurer.
3 App uyez sur la tou che + ou −
conf igurer l’élé ment.
4
Après q ue la date et l' heure aien t été
fixée s, appuyez su r le bouton `OK.
5 App uyez sur la tou che F3
(HOME)
pour re fermer le me nu.
Inser tion d’une c arte micr oSD (Fig. 2)
Cet enreg istreur peut êt re utilisé avec
des cartes microSD disponible s dans
le commerce ains i qu’avec la mémoi re
flash in tégrée.
1 Qua nd l’enregi streur est e n mode
d’arrê t, ouvrez le c ouvercle d u
logem ent de la car te.
2
Présentez la carte microSD correctement
et intr oduisez- la dans la f ente comme
indiq ué sur l’il lustrati on.
• Tenez la car te microSD droite
pendan t que vous l’insér ez.
• La car te microSD s’arrête
avec un déc lic lorsqu’ell e est
complè tement insérée .
• Si la car te microSD n'est pas
inséré e à fond, les donné es
peuvent n e pas être enregi strées
sur la car te microSD.
3 Fer mez bien le cou vercle du
logem ent de carte .
•
Quand vous insérez la carte microSD,
l’écran de changemen t de suppor t
d’enregi strement s’aff iche.
4 Qua nd vous enre gistrez sur une carte
micro SD, appuyez sur la tou che + ou
−
et séle ctionnez [
Yes
].
5 App uyez sur la tou che `OK pour
valid er le réglag e.
Enregistrement (Fig. 4)
Enreg istreme nt dans un dos sier
d'enre gistrem ent (Fig. 4-1)
Avant de commen cer l 'enregi stremen t,
sélect ionnez un dossie r d'enregi strement
de voix entre [
Folder A] à [Folde r E] dans
le dossier [
Recorder]. Vous pouvez utiliser
ces c inq dos sier s séle cti veme nt pou r
diffé rencier les t ypes d’enregis trements.
1 Sél ectionn ez le dossie r
d’enreg istremen t.
2 App uyez sur la tou che
REC
pour
démar rer l’enregi strement .
• L'indicateur L ED s'allume en
orange c lair et le signe [
]
appara îtra à l'écran.
•
Tou rne z le mi cro ph one d ans l a
direc tion de la source à en registrer.
a F ormat d’enregis trement
b
Durée d ’enre gistrement éc oulée
c
Durée d ’enre gistrement re stante
d N iveau sonorité (c hange selon
les régl ages d’enregist rement
et fonc tion d’enregist rement)
3 App uyez sur la tou che
STOP
pour
arrêt er l’enregis trement.
e L ongueur de fic hier
Défi nition d'u n mot-clé ava nt
l'enre gistrem ent (Fig. 4-2)
Un mot clé qu i corresponda nt au
contenu ét ant enregistr é peut être
défin i avant l'enregis trement. Cet te
fonct ion est très util e pour classer les
enregi strements par m ots clés.
1
Dans l'affic hage de la liste des dos siers,
appuyez sur
F1(SEARCH)
pour afficher
l'écra n de recherc he par Mot-cl é.
2
Ap puye z sur la t ouc he + ou − pou r
sélec tionner le m ot cl é souh aité, pu is
appuye z sur la touch e `OK
ou 9.
3 App uyez sur la tou che
REC
pour
démar rer l’enregi strement .
4 App uyez sur la tou che
STOP
pour
arrêt er l’enregis trement.
• Les fich iers enregis trés sont
automati quement assoc iés aux
mots clé s spécifiés et g éré à
l'aide de l a liste des mots clé s.
Page 18

18
FR
Lecture (Fig. 5)
1 Sél ectionn ez le dossie r qui contie nt
les fic hiers à lir e.
2 Dan s l’affic hage de la lis te de
fich iers, appu yez sur la touc he + ou
−
pour ch oisir le fi chier que vo us
souha itez lire.
3 App uyez sur la tou che `OK pour
démar rer la lect ure.
a N om de fichier
b N om de dossier
c
Barre de p rogression de l a lecture
d L ongueur de fic hier
e D urée de lectu re écoulée
4 App uyez sur la tou che + ou −
pour aj uster à un volu me d’écoute
confo rtable.
• Celui- ci peut être rég lé entre
[00] et [30].
5
Appuye z sur la touche
STOP
au point
où vous so uhaitez ar rêter la lec ture.
Réglag e d’une marq ue index
Cette o pération pe ut être
effe ctuée lors que la fonct ion
[
INDEX
] ou [
Erase
] a été
assig née à une touch e Fn (F1
ou F2).
Régla ge d’une marqu e index (Fig. 6 -1)
1 App uyez su r la touche
Fn (IN DEX)
lor s d e l 'enre gist remen t, la pause
d'enregistre ment, la reproduc tion ou
la paus e de reprodu ction du f ichier.
•
Même après qu’un index est placée,
l'enre gistrem ent ou la lectur e se
poursui t de sorte que vous pouvez
placer des index à d'autres endroit s
de la même m anière.
Effac ement d’une mar que index (Fig . 6-2)
1 Rep érez la marq ue index que vo us
souha itez effac er.
2 App uyez sur la touc he 9 ou 0
pour sél ectionne r une marque index
à effa cer.
3 A lor s qu e le n umé ro d 'in de x es t
affic hé (environ 2 secondes), appuyez
sur la to uche
Fn (ERASE)
.
•
Les numér os index sont
automati quement dépl acés
lorsqu ’un numéro index e st effacé.
Effacement (Fig. 8)
1 Sél ectionn ez le dossie r qui contie nt
les fic hiers que v ous voulez ef facer.
2 Dan s l’affic hage de la lis te, appuyez
sur la to uche + ou − pour ch oisir le
fich ier que voule z effacer.
3
Quand l’enreg istreur est en mode d’arrêt,
appuye z sur la touch e
F2 (ERASE)
.
4 A pp uy ez su r l a t ou ch e + o u –
pour sélectionner [
Erase in Folder
]
ou [
File Eras e
], puis app uyez sur la
touch e `OK ou 9.
5
Appu yez su r la touc he + et s élect ionnez
[Start], p uis appuy ez sur la touch e `OK
.
•
L’a f fi ch ag e p as se à [E ra s e! ] e t
l’efface ment commence. [
Erase Done]
s’affi che lorsque le f ichier a été ef facé.
Recherche de fichier (Fig. 7)
Cet enregistr eur gère les fichi ers enregistrés et les
fichiers de musique importés depuis un ordinateur
perso nnel en ut ilisant une base de d onnées. Le s
fichi ers sont automatiq uement t riés à l'aide d es
élémen ts tels que la date e t les mots-clé, ce qui
rend la re cherche de fich iers plus faci le.
O uv er t ur e d e l 'a f fi c ha g e de
rec herc he de fich iers à par tir du
dossi er [
Recor der
] (Fig. 7- 1)
Reche rche par ty pe de fichi ers:
Reche rche
[Browse]
Le système de dossier (Folder
A au Folder E) est utili sé pour
recher cher des fichie rs.
Reche rche
[Day]
Les fichiers sont recherc hés
par date d'e nregistreme nt.
Reche rche
[Keywor d]
Les fichiers sont recherchés par mo t-clé.
1 Depui s le menu [
Home
] sélectionnez
[
Rec ord er
], pu is app uyez s ur la
touc he `OK o u 9 pour ouv rir
l'écra n de liste des do ssiers.
2 App uyez sur la touche
F1 (SEARCH)
pour ouvrir l 'écran de recherc he des
fich iers.
• L'écran de reche rche change
chaque fo is que la touche
F1
(SEARC H) est pressée.
O uv e rt u re d e l 'a f f ic h ag e d e
rec her che de fic hie rs à p arti r du
dossi er [
Music
] (Fig. 7- 2)
Reche rche par ty pe de fichi ers:
Reche rche
[Artis t]
Les fichiers sont recherchés
dans une li ste d'artistes .
Reche rche
[Album]
Les fichiers sont recherchés dans
une liste d e noms d'album.
Reche rche
[All Musi c]
Les fichie rs sont rec herchés sur une
liste de to utes les
chanson s.
Reche rche
[Browse]
Une liste de toutes les chansons et album s du do ssier
[Music] e st af
fiché .
Reche rche
[Heard
Recen tly]
Les fichie rs lus sur cet appareil sont a ffichées p ar ordre
chrono logique invers e.
Reche rche
[Play
Count]
Les f ich iers s ont af fic hés
dans l'ordre du nom bre de
fois où ils ont été joués s ur
cet enreg istreur.
Reche rche
[Playli sts]
Affi che les listes de
lectu re (playlists) tr ans
-
férées s ur l'enregistr eur.
1 Depui s le menu [
Home
] sélectionnez
[
Music
] pu is appu yez sur la tou che
`OK o u 9 pour ou vrir l'éc ran
de list e des dossier s.
2 App uyez su r la touche + ou − po ur
sélec tionner le t ype de reche rche de
fic hier, puis app uyez sur la touch e
`OK ou 9.
Configuration des touches de fonction
Les tou ches Fn (F1 et F2) de ce t appareil
peuv ent ê tre attrib uées en f onctio n de
votr e mo de d 'utili sation sou haitée . Le s
bo utons a ssign és peu vent êt re util isé
pendan t l'enregistre ment et la lectu re.
1 Sél ectionn ez [
Fn. sett ing
] dans le
menu [
System Me nu
].
2 Sél ectionn ez [F1] ou [F2].
• Vous pouve z attribuer de s
réglag es en fonction d e la façon
dont vous u tilisez l'enre gistreur.
3 App uyez sur la tou che + ou − pour
sélec tionner l'é lément que vo us
souha itez attri buer, puis app uyez
sur la to uche `OK.
Liste d es boutons Fn :
Off Repeat Random
Play Spee d
INDEX A- B
Erase DISPLAY LIST
Page 19

19
FR
Réglage de la plateforme de
reproduction [Play Scene] (Fig. p)
1 Sél ectionn ez [
Play Sce ne
] dans le
menu en [
Play Men u
].
2 Sél ectionn ez [
Scene S elect]
ou
[
Scene S ave
].
Lorsq ue [Scene Sele ct] est sélec tionné:A
1
Appuyez sur + ou – pour sélectionner
la plate forme de repro duction que
vous souh aitez défini r.
2 App uyez sur le bouto n `OK
pour ter miner la sélec tion.
•
Après l 'achat, tous le s paramètres de 1 à 5
de [
User Setting] sont les mêmes (réglage s
in iti au x). Enr egi st rez les par am ètr es
ut il is at eu r d an s [
Sc e ne S ave ] p ui s
sélec tionnez Platef orme de reprod uction.
•
Pour confir mer les paramètres de la platefo rme
de re pro duc tion , app uyez s ur la to uche
+
ou
– da ns la f enê tre [ Sce ne Se le ct] p our
sé lect ionn er l'é léme nt que vo us souh aite z
con firm er, puis app uyez sur la to uche
9
pour confirmer dans la fenêtre confirmation des
paramètres. Pour quitter la fenêtre confirmation
des par amètres, app uyez sur la to uche
0 et
l'aff ichage revien t à la fenêtre [
Scene S elect].
Lorsq ue [Scene Save] est s électio nné:B
Vous pouve z enregistrer l es réglages du menu d ’une reproduc tion
que vous ave z défini votre ch oix.
1
Réglage du menu d’une reproduction
dans l’enre gistreur de vot re choix.
2
Appuyez sur la touche + ou – pour
sél ectio nner les[
Use r Se ttin g]
que vous so uhaitez enreg istrer.
3 App uyez sur le bouto n `OK
pour ter miner les régla ges.
3 Ap puyez sur la to uche
F3 (HOME)
pour f inaliser l e réglage.
Déplacer/copier des fichiers
[File Move/Copy] (Fig. q)
1 Sél ectionn ez le dossie r où le fichi er
que vous s ouhaitez d éplacer ou
copie r est enregi stré.
2 Sél ectionn ez [
File Move /Copy
]
dans le m enu [
File Men u
].
3 App uyez sur la tou che + ou − pour
sélec tionner l a position à d éplacer
ou copi er le fichi er.
4
Appuye z sur la touch e `OK ou 9 .
5 App uyez sur la tou che + ou − pour
sélec tionner l e nombre de f ichiers à
copie r ou à déplace r.
6 App uyez sur la touche `OK
ou 9
pour al ler aux régl ages respe ctifs.
Lorsq ue vous sélec tionnez [1fil e]:
1 App uyez sur + ou − pour
sélec tionner le fi chier que vous
souhai tez déplacer ou co pier.
2 Appu yez sur la touche `OK pour
sélec tionner le f ichier. Passez à
l'étape 8 .
Lorsq ue vous sélec tionnez
[Selec ted files]:
1 App uyez sur + ou − pour
sélec tionner le fi chier que vous
souhai tez déplacer ou co pier.
2 App uyez sur le bouto n `OK
ou
9 pour vér ifier le fich ier
sélec tionné.
Lorsq ue vous sélec tionnez
[All file s]:
Lorsqu e tous les fichie rs
sont sél ectionnés, t ous les
fichi ers dans le dossie r seront
automati quement séle ctionné
et l'enre gistreur pass e à la
fenêtr e [
Folder t o move].
Passez à l'é tape 8.
7 App uyez sur la tou che
F2 (GO)
.
8 App uyez sur la tou che 9, 0
ou +, − pour sé lection ner le dossi er
dans le quel vous sou haitez dép lacer
ou copi er le fichi er.
9 App uyez sur la tou che `OK .
• [Moving!] ou [Copying!] Apparaît
sur l'a ffichage et le dé placement
ou la c opie démarr e. Au cours d e
ce processus , l'état d'avan cement
sera prés enté en pourcentage . Le
processus est achevé lorsque [
File
move c ompleted] ou [Fil e copy
compl eted] s'aff iche.
Réglage de la plateforme
d’enregistrement
[Rec Scene] (Fig. 9)
1 Sél ectionn ez [
Rec Sce ne
] dans le
menu [
Rec Menu
].
2 Sél ectionn ez [
Scene S elect
] ou
[
Scene S ave
].
Lorsq ue [Scene Sele ct] est sélec tionné:A
1
Appuyez sur + ou – pour sélectionner
la plateforme d'enregistrement que
vous souh aitez configu rer.
2 App uyez sur le bouto n `OK
pour ter miner la sélec tion.
•
Pou r c onfi rmer l'e nregi stre ment de la
platefo rme, app uyez sur le bo uton
+ o u
– dans la fe nêtr e [S cene Se lec t] p our
sélectio nner l'élément que vous souhaitez
conf irme r, pu is a ppuye z su r le bo uton
9 po ur co nfi rme r dan s l a fen êtr e
confir mation de paramètre . Pour qu itter
la fen être con firm ation de par amèt re,
appuye z sur la touche
0 et l’af fichage
retourn era à la fenêtre [
Scene S elect].
Lorsq ue [Scene Save] est s électio nné :B
Outre les modèles [Rec Scene] trouvés
dans l’enregistr eur, vous pouvez égale
ment enregistrer les paramètres du menu
d'enreg istrement que vo us avez défini.
[Sc ene Sa ve] ne pe ut pas êt re uti lisé
pend ant l' enregist rement. Penda nt que
l'enreg istreur est en pause, en trez dans le
menu [
Home], p uis effectu er ce réglage.
1
Appuyez sur + ou – pour sélecti onner
le b outon [
User Setting ] que vous
souhai tez enregistre r.
2 App uyez sur le bouto n `OK
pour ter miner les régla ges.
3 App uyez s ur le bouton
F3 (H OME)
pour ter miner le ré glage.
Autres caractéristiques
Outre les foncti ons ha bituelles , m'enr egistreur
co mp re nd ég al em en t d ive rs es fo nc tio ns
suivantes. Pour des informations détaillé es sur les
procéd ures d'utilisa tion et de rég lage, repor tezvous au [MOD E D’EMPLOI DÉTAILLÉ ] en ligne.
•
Cet app areil pe ut marqu er des fich iers en registr és ou des
fichi ers t ransf érés depui s un ordi nateur per sonnel avec
des mot s clés pou r gérer une b ase de don nées de fich iers.
➥ [
Mot-cl é [Keywor d]
] (☞ P.75)
• Les réglages et les fonction s de cet apparei l
pe uve nt ê tr e co ntr ôl é en u ti lis an t la
recon naissa nce vocal e (Pour DM-4).
➥
[Util iser la re connai ssance vo cale] (☞ P.107)
•
En connectant un appareil photo numérique,
vou s po uve z imp or ter e t vis ual is er de s
image s (Pour DM-4).
➥ [Visu alisat ion des ima ges] (☞ P.103)
•
Il dispo se d'une fon ction de pr ogramma tion.
➥
[Sche dule set tings [Audi o Diary] ] (☞ P.96)
•
Il est co mpatibl e avec les DAIS Y (Pour DM-4).
➥ [
A Propo s de la DAISY
] (☞ P.132)
• Il est co mpatibl e avec les po dcasts.
➥ [A Propos de l a Podcas t] (☞ P.127)
• Il est co mpatibl e avec les Aud io Book.
➥
[A Propos d e la Audio Boo ks] (☞ P.157)
•
Cet enregistr eur permet d'importe r des donné es
de text e et les lire à h aute voix (P our DM-4).
➥
[A Propos de l a Text Speec h] (☞ P.158)
• Compat ible avec l a diffusi on Audibl e.
➥
[Téléc harger d u conten u Audible] ( ☞ P.159)
Page 20

20
FR
Utilisation de l ’enregistreur
avec votre PC
Window s
Système d ’exploitat ion:
Microsoft® Windows® XP Service Pack 2, 3
Microsof t® Windows ® XP Professional
x64 Edit ion Service Pa ck 2
Micr osoft® Windows Vista® Service
Pack 1, 2 (32bit/6 4bit)
Microso ft® Windows ® 7 (32bit/64bit)
CPU:
Proce sseur de 32 bits (x8 6) et au-
dessus de 1 G Hz ou 64 bits (x6 4)
RAM:
512 Mo ou plus
Espac e disque dur:
300 M o ou plus
Lecte ur
Lecteu r CD-ROM, CD -R, CD-RW, DV D-ROM
Naviga teur:
Microso ft Internet E xplorer 6.0
ultérie urlater
Affic hage:
1024 x 768 pixels o u plus, 65536
couleur s ou plus (1,6770,000
couleur s ou plus est reco mmandé)
Port USB :
Un ou pl usieurs por ts libres
Autre s:
• Périphé rique audio
• Environn ement où vous pou vez
utilise r Internet.
Macin tosh
Système d ’exploitat ion:
Mac OS X 10.4 .11 - 10.6
CPU:
Proce sseur PowerPC ® G5 ou I ntel
Multico re 1,5 GHz et supérie ur
RAM:
512 Mo ou plus
Espac e disque dur:
300 M o ou plus
Lecte ur:
Lecteu r CD-ROM, CD -R, CD-RW, DV D-ROM
Naviga teur:
Maci ntosh Safari 2.0 u ltérieur
Displ ay:
1024 x 768 pixels o u plus, 32000
couleur s ou plus (1,6770,000
couleur s ou plus est reco mmandé)
Port USB :
Un ou pl usieurs por ts libres
Autre s:
• Périphé rique audio
•
Env ironn emen t o ù v ous pou vez
utiliser Internet (Quick Time version
7.2 ou supérieu r est recommandé).
Connecter l’enreg istreur
à votre PC
1 All umez l’enreg istreur.
2 Bra nchez le câb le de connex ion USB
au por t USB du PC.
3
Assur ez-vous que l'enregi streur est arrê té,
pui s conn ect ez le câb le USB au po rt de
conne xion sur le fo nd de cet enre gistreur.
Window s:
Lorsque vous raccordez l'enregistreur
à u n ordin ateur Wi ndows e t ouvre z
[My Comput er], il sera reconnu s ous
le nom de lect eur dans le nom du
produit. Lorsqu'une carte microSD est
inséré e, [
Remova ble Disc] s'aff iche.
Macin tosh:
Lorsqu e vous c onnectez l'enregistr eur
à un ordinate ur Mac OS, il sera reconn u
par le nom du lecteur du nom du produit
sur le bureau. Lorsqu'une carte microSD
est insé rée, [
NO NAME ] sera affi ché.
Décon necter l’enr egistre ur de votre PC
Window s
1
Cliq uez sur [ ] de la bar re d e tâ ches
sit uée da ns le coi n infé rie ur dro it de
l’écran. Cliquez sur [Retirer Périphériqu e
de stoc kage de mass e USB].
•
La lettre du lecteu r sera dif férente
en fonc tion du PC utilisé .
2 Véri fiez que le voy ant LED de
l'enreg istreur s oit éteinte a vant de
débra ncher le câb le USB.
•
Le voyant LED s'allume (ora nge)
pendan t la charge, tou te fois vous
pouv ez to ujours décon necter le
câble USB .
Macin tosh
1
Dé plac ez l’ icôn e du lec teu r p our c et
enregi streur, qui s’affiche sur le bureau,
vers la c orbeille p ar un glisse r-dépose r.
2 Véri fiez que le voy ant LED de
l'enreg istreur s oit éteinte a vant de
débra ncher le câb le USB.
•
Le voyant LED s'allume (ora nge)
pendan t la charge, tou te fois vous
pouv ez to ujours décon necter le
câble USB .
Remar que
•
N’ôt ez JAMAI S l e c âble de con nexi on
USB tant que le voyant LED clignote. Ceci
entraîn erait la destru ction des don nées.
Accessoires (en options)
s A daptateur AC d e connexion
USB: A514
s M icrophon e à 2 canaux
(omnidi rectionn el): ME30W
s M icrophon e-fusil (co mpact):
ME31
s M icrophone mono à suppres sion
de bru it de gran de sensi bili té
(unidir ectionne l): ME52W
s M icro-c ravate
(omnidi rectionn el): ME15
s Tél écommande e xclusive:
RS30W
s C apteur télé phonique : TP7
s
Cordon d e raccordem ent: KA333
s B atterie au l ithium-i on: LI-50B
Spécifications
Génér alités
4 Su pport d’enr egistreme nt:
Mémoir e incorporée
DM-4 : 8 Go
DM-2: 4 Go
Carte mi croSD (de 512 Mo à 16 Go)
4 Fo rmat d’enregi strement :
Linear PC M (Pulse Code Modu lation)
MP3 (MPEG-1 Audi o Layer3)
WMA (Win dows Media Audi o)
4 N iveau d’entrée :
[Sens. mi cro]:[médium] - 60 dBv
4 Pu issance de tr avail max:
280 mW (haut- parleur 8 Ω)
4
Puissa nce maxi de sor tie casque:
≤_ 150 mV (selon la nor me EN
50332-2)
4 S ortie écou teur large ba nde:
75 mV ≤_ (selon EN 50332-2)
4 H aut-parle ur:
Dynami que rond ø 23 mm intég ré
4 Pr ise
MIC
:
Prise min i-jack ø 3,5 mm,
impéda nce MIC 2,2 kΩ.
4 Pr ise
EAR
:
Prise min i-jack ø 3,5 mm,
impéda nce EAR 8 Ω ou plus.
4 Al imentati on:
Pile: Bat terie au lithium -ion
Aliment ation extern e:
Adaptate ur AC (A515) 5 V
4 D imensions e xtérieur es:
113,6 mm × 45, 6 mm 15,2 mm
(Hors pr otubérances)
4 Po ids:
98 g (Piles co mprises)
4 Temp érature d’ut ilisatio n:
0°C - 42°C / 32°F - 107.6°F
Page 21

21
FR
Guide s ur les durées d ’enregistr ement
Format P CM linéaire
Modes
d’enregis trements
Mémoir e intégrée
(4 Go) (DM-2)
Mémoir e intégrée
(8 Go) (DM- 4)
Carte mi croSD
1 Go 2 Go 4 Go
48 kHz 5 h. 15 min. 11 h. 05 min. 1 h. 15 min. 2 h. 45 mi n. 5 h. 30 min.
44.1 kHz 5 h. 45 min. 12 h. 05 min. 1 h. 2 0 min. 3 h. 6 h.
Format M P3
Modes
d’enregis trements
Mémoir e intégrée
(4 Go) (DM-2)
Mémoir e intégrée
(8 Go) (DM- 4)
Carte mi croSD
1 Go 2 Go 4 Go
320 kbps 25 h. 30 min. 53 h . 6 h. 30 min. 13 h. 30 min. 27 h.
128 kbps 63 h. 30 min. 133 h. 16 h. 30 min. 34 h. 68 h.
Format WM A
Modes
d’enregis trements
Mémoir e intégrée
(4 Go) (DM-2)
Mémoir e intégrée
(8 Go) (DM- 4)
Carte mi croSD
1 Go 2 Go 4 Go
ST XQ 62 h. 30 min . 130 h. 16 h. 33 h. 66 h.
LP 977 h. 20 43 h. 255 h. 531 h. 1042 h.
Durée d ’enregistr ement maxim ale par fich ier
Format P CM linéaire For mat MP3 Format WM A
48 kHz 3 h.
320kbps 29 h. 40 min. ST XQ 72 h. 50 min. HQ 291 h. 30 min.
44.1 kHz 3 h. 20 min.
256kbp s 37 h. 10 min. ST HQ 145 h. 4 0 min. SP 574 h.
192kbps 49 h. 40 min. ST SP 291 h. 30 min. L P
1139 h. 20 min.
128kbps 74 h. 30 min.
Guide s ur la durée de vi e des piles
Modes
d’enregi strements
Microp hone stéréo inté gré
(En mode d ’enre gistrement)
Haut-pa rleur stéréo in tégré
(En mode de l ecture)
Lectu re sur écouteurs
PCM 48k Hz 13 h. 12 h. 20 h.
MP3 128kbps 25 h. 12 h. 30 mi n. 20 h.
ST XQ 24 h. 12 h. 30 min. 21 h.
LP 29 h. 13 h. 2 2 h.
• Les vale urs ci-dessu s servent uniqu ement d’indi cation.
•
La durée d e vie est estimé e par Olympus. E lle peut varie r considérable ment selon le t ype de piles et le s conditions d’ut ilisation.
Les spéc ications et la co nception sont suj ettes à modi cation sans préav is.
Répon se en fréque nce général e
4 E n mode d’enregi strement o u
de lect ure:
Format P CM linéaire
Modes
d’enregis trements
Répons e en
fréque nce générale
48 kHz 40 Hz à 23 kHz
44.1 kHz 40 Hz à 21 kHz
MP3 form at
Modes
d’enregis trements
Répons e en
fréque nce générale
320 kbps 40 Hz à 20 kH z
256 kbps 40 Hz à 20 kH z
192 kbps 40 Hz à 19kHz
128 kbps 40 Hz à 17 kHz
WMA form at
Modes
d’enregis trements
Répons e en
fréque nce générale
ST XQ 40 Hz à 19 kH z
ST HQ 40 Hz à 16 kHz
ST SP 40 Hz à 9 k Hz
HQ 40 Hz à 13 kHz
SP 40 Hz à 8 kHz
LP 40 Hz à 3 kHz
4 M icrophone s téréo intég ré (En mode d’enr egistrem ent):
DM-4 : 70 Hz à 20 kHz
DM-2: 70 Hz à 20 kHz
• La val eur limite de fré quence pour les e nregistreme nt en format MP3 ou fo rmat de WMA, dép end de chaque
mode d’enr egistrement (v oyez le tableau ci dessus).
Page 22

22
ES
Introducción
•
Est e ma nual es una versi ón básic a.
Co n su lt e e l m an u al a va nz a do
completo desde los datos almacenados
en la car peta [
OL _MA NUAL] de la
grabad ora o bien des cargue los datos
desde el s itio web de OLYMPUS.
•
El contenido de este documento puede
cambiar se en el futuro sin previo aviso.
Para la información más recien te sobre
nom bres y n úmero s de mo delos de
pr od uct os , con ta cte con nue str o
Centro de Ate nción al Cliente .
•
Las ilustracion es de las pantallas y de
la gra bado ra que apar ecen en es te
ma nua l fue ro n hec has d ura nte e l
proceso de de sarrollo y puede n diferir
del p roducto re al. Se ha puesto su mo
cuidad o para garantizar la int egridad
del contenido de este documento. En el
caso im probable de que se encu entre
un a spe ct o cue sti ona bl e, er ror , u
omi sión , póng ase en co ntac to con
nuestr o Centro de Atención a l Cliente.
•
Se excluye cualquier responsabilidad de
daños pasivos o daños de cualquier tipo
debido s a una pérdida de informaci ón
po r un de fe cto d el pr odu ct o, una
re para ció n llev ada a ca bo po r u na
tercera parte que no es O lympus, por
un se rvicio a utorizado por Olym pus o
por cual quier otro motiv o.
Marca s comercial es o marcas
regis tradas:
• IBM y PC/AT son marcas comerc iales
o marcas registradas de International
Busines s Machines Corpo ration.
• Microso ft, Windows y W indows
Media so n marcas regist radas de
Microso ft Corporat ion.
• Macintos h y iTunes son marcas
regist radas de Apple In c.
• microSD y mi croSDHC son marc as
regist radas de SD Card Ass ociation.
• Tecnologí a de codifica ción de
audio MPEG L ayer-3 con licencia d e
Fraunhof er IIS y Thomson .
•
EU PH ON Y M OB IL ETM e s ma rc a
comerci al de DiMAGIC Corp oration.
• DVMTM es marca co mercial de
DiMAGIC Co rporation.
• El product o se desar rolló basado en
la tecnología de cancelación de ruido
bajo lice ncia de NEC Corpor ation.
•
Nuance, el logo Nuance logo, RealSpeak y
VoCon son marcas registradas de Nuance
Communi cations, Inc . o sus subsidia rias
en los EE.U U., y/u otros países.
• Daisy OK e s una marca regist rada
de Daisy Co nsortium.
Precauciones de seguridad
Antes de usar su nueva grabado ra,
lea ate ntame nte este manua l p ara
as e gu ra rs e d e q u e s ab e c óm o
manejarla de modo seguro y correcto.
Mante nga e ste m anual en un luga r
fácilmente accesible por si lo necesita
como re ferencia en e l futuro.
•
L os s ím b ol o s d e a d ve r te nc i a
proporcionan información importante
re l ac io na da c on l a s eg ur id ad .
Pa ra p ro te ger se a us ted mi smo
y a los d emás c ontr a las le sio nes
perso nales o evitar daños materi ales,
es imp resc indib le que obs erve en
todo momento las ad vertencias y la
inform ación proporc ionadas.
Preca ución sob re el ambien te de uso
• Para proteger la tecnología de alta precisión
conten ida en est e produc to, nunca d eje la
grab adora en los luga res lista dos abajo,
duran te su uso o alm acenami ento:
•
Lu gar es d on de l a tem pe rat ur a
y/o humedad sea(n) alta(s) o sufra(n)
cambios extremos. Luz solar directa,
playas, vehículos cerrados, o cerca de
fuentes de calor (estufas, radiadores,
etc.) o hum idifi cadore s.
• En ambie ntes arenosos o
polvor ientos.
•
Cer ca de p rodu ctos inf lamab les o
explos ivos.
•
En lugare s húm edos, tales como
cuar tos de b año o baj o la lluv ia.
Cuando utilice productos diseñados
a pr ueb a d e la in temp eri e, le a
tambié n sus manuales.
•
En lugare s propensos a fue rtes
vibrac iones.
• Jamás d eje caer la g rabado ra ni la some ta
a fuer tes impac tos o vibr acione s.
•
La gr aba dora p ued e f unc ion ar mal s i s e
utili za e n un lugar dond e es té so metida a
cam pos mag nét icos / e lec trom agné tic os,
on das de ra di o, o a lto s vo lta je s, c omo
por ej empl o ce rca de tel evis ores , h orno s
mic roo nda s, jueg os de víd eo, al tavo ces ,
mo ni to re s de gr an t am añ o, t or re s d e
televisió n o radio, o torres de transm isión. En
tales casos, apague la grabador a y vuélval a a
encen der antes d e seguir op erándo la.
•
Ev ite l a gr ab aci ón o r ep ro duc ci ón c erc a de
telé fonos celu lares u o tro equipo ina lámbr ico,
ya que pue de p rodu cir inte rfe renc ias y r uido.
Si siente rui do, m ueva a otr o lu gar o mue va l a
graba dora más al lá de ese eq uipo.
•
No use disolventes orgánicos tales como alcohol
y diluy ente de bar niz, para l impiar l a unidad.
<Adver tencia res pecto a la
pérdi da de datos>
El co nt en id o gr ab ad o e n l a me mo ri a p ue de
de st ru ir se o bor ra rs e c omo co nse cu en ci a de
erro res de o perac ión, despe rfec tos del equip o, o
duran te trabaj os de repar ación.
Se r eco mie nd a rea liz ar c opi as de s eg uri da d y
guard ar la i nforma ción im porta nte en o tro med io
como el d isco dur o de un orden ador.
Ol ym pus n o se r es pon sa bi liz ar á de l os d año s
pas ivo s o d e otr o t ipo q ue se hay an pr odu cid o
debi do a pérd ida d e dat os pr oduci da po r de fecto
del pro ducto, n i de la repa ración re alizad a por una
terc era par te d ifer ente a O lymp us o a un cent ro
autor izado de Ol ympus o po r cualqu ier otra ra zón.
Manej o de la grabad ora
f Adver tencia:
• No util ice la grab adora cer ca de gase s
inflam ables o exp losivos .
•
Manten ga a los niño s alejad os de la grab adora.
Utilice y guarde siempre la grabadora fuera
del alc ance de los niñ os, para prev enir
las siguientes situacion es de peligro que
podría n causarles ser ias lesiones:
1
En red ar se co n la c orr ea de la
grabad ora, ocasion ando asfi xia.
2
Ingeri r accidental mente una pil a,
tarjet as, u otras piez as pequeñas.
3
Lesionarse accidentalmente con las
pieza s móviles de la grab adora.
• No util ice ni guar de la grab adora en
lugar es polvor ientos o hú medos.
Otros nomb res de produ cto o marca s
mencionados en este manual pueden ser
marcas comerciales o marcas registradas
de sus resp ectivos prop ietarios.
ES
Page 23

23
ES
• No desm onte, repa re o modifi que la
unida d por sí mis mo.
•
Ut il ic e s ó lo ta rj et as de me mo ri a mic r oS D/
micro SDHC. No uti lice nunc a otro tip o de tarjet as.
Si por acciden te insert ara otro t ipo
de tarjet a en la graba dora, póngase
en contac to con un distrib uidor o
cent ro d e se rvicio aut oriza do. N o
intente qu itar la tarjeta a l a fuerza.
• No haga f unciona r la unida d mientra s
condu ce un vehíc ulo (por ej emplo un a
bicic leta, mo tocicle ta o patín).
f Preca ución:
• Interr umpa inm ediata mente el us o de la
graba dora si pe rcibe al gún olor, ru ido o
humo ex traño al rededor d e la misma .
Nu nc a re tir e la s p ila s co n la s ma no s
de scub ier tas , y a que po drí a c aus ar un
incendi o o quemarle las ma nos.
• Tenga cui dado con l a correa.
Tenga cuidado con la correa cuando
tr ansp or te la gr aba dora . Pod ría
enga nchars e en obje tos sueltos y
provoca r daños graves.
• No deje l a grabado ra en luga res donde
pueda e star suj eta a tempe ratura s
extr emadame nte altas .
Si lo hace pue de provocar el de terioro de las
pieza s y, en algunas circun stancias, provoc ar
que s e prenda fuego. No utilice el carg ador
o el ad aptador de CA s i est á cubi erto (por
ejempl o con una man ta). Esto pod ría causar
recale ntamiento, resu ltando en incen dio.
• Mani pule la g rabado ra c on cu idado par a
evita r una quema dura de lev e.
•
Ya que la grabadora contiene partes
me tál ica s, el r eca len tam ien to
puede resultar en una quemadura
de ba ja tem pe ra tu ra. Pr es te
atenció n a lo siguiente:
•
Cuando la utili ce durante un largo
período, la grabadora se recalentará.
Si m ant ien e a la g ra bad ora e n
es te es tad o, po drí a caus ar un a
quemad ura de baja temper atura.
•
En lugar es s ujetos a temper aturas
e x t re m a d a m en t e b a j a s , l a
te mpe rat ura d e la ca rca sa de l a
grabado ra pued e ser más baja que la
tempera tura ambiente. Si es posi ble,
póngase guantes cuando manipule la
grabad ora en temperat uras bajas.
• No toque las partes metálicas de la
grabadora de forma prolongada a
bajas te mperatura s.
Puede dañarse la piel. Si la temperatura
es b aja , uti lic e la gr aba do ra co n
guantes pu estos.
Preca uciones ac erca del us o de la baterí a
Siga estas importantes indicacion es para evitar
que se prod uzca n fu gas, rec alen tamie ntos,
incendi os o explos ión de la baterí a, o que cause
desca rgas elé ctric as o quemad uras.
f Pelig ro:
• La gr abadora utili za una batería de ion es
de liti o espec ifi cada p or Olymp us. Carg ue
la batería con el adaptador de CA o cargador
especifi cados . No utilice otros adapt adores
de CA o ca rgadore s.
•
Las pilas nunca deben ser expu estas al fueg o,
al calo r, a un corto c ircuito o d esmont adas.
• Nunca c aliente n i incine re las bate rías.
• Tome precauciones al transportar o guardar
las b aterías a fi n de evi tar qu e entre n en
contac to con objetos metálic os, tales como
alhaj as, horqu illas, c ierres, e tc.
• Nunca guarde las baterías en lugares donde
quede n exp uestas a la luz solar direc ta o
sujet as a altas temp eratura s en el interio r
de un v ehícu lo con cale facci ón, cerca de
fuent es de calor, e tc.
•
Para evi tar que oc urran f ugas de líq uido de
las bat erías o da ños de sus t ermina les, siga
cui dad osa ment e t oda s l as ins tru cci ones
res pect ivas al us o de la s b ater ías. Nun ca
intent e desarma r una pila ni modi ficarla de
ningu na manera , realiz ar soldad uras, etc .
•
No conec te dire ctamen te las pila s a una
toma de c orrient e o a un mecher o de coche.
• Si el f lui do de la b ate ría pe net rar a en
sus ojo s, l ávelo s d e in medi ato con agua
corrien te fresca y limpi a, y solici te atención
médic a inmedi atament e.
f Adver tencia:
•
Conse rve la bate ría siem pre seca.
• Si las ba terías re cargab les no han si do
recar gadas de ntro del ti empo esp ecifi
cado, in terrum pa la carg a y no las util ice.
•
No util ice una bate ría si est á rajada o q uebrada .
• Nunca e xponga l a batería a f uertes
impac tos ni a vib racion es contin uas.
•
Si se producen fugas de líquido, decoloración
o d efor mació n de la bate ría, o c ualq uier
otr a an orma lida d d uran te la o pera ción ,
inter rumpa el u so de la grab adora.
•
Si el fluido de la pila entrara en co ntacto con
su rop a o con su piel, qu ítese la r opa y lav e de
inmediat o la parte afect ada con agua corri ente
fres ca y limp ia. S i el fluid o qu emara su p iel,
solic ite atenc ión médic a inmedi atamen te.
• Manten ga las pilas fue ra del alcance de los
niños .
• Si al usa r este pro ducto not a cualqu ier
cosa fu era de lo no rmal tal co mo un ruid o
extr año, calor, h umo u olor a qu emado:
1
re ti re in me di at ame nt e la s p il as
teniend o cuidado de no qu emarse, y;
2 e nca rg ue u na i nsp ec ció n al
di str ibu ido r o r epr ese nta nte
local de O lympus.
f Preca ución:
• Sírv ase rec iclar la s bater ías para ayudar a
conser var los recur sos del planeta . Cuando
desec he las bater ías en desu so, asegúr ese
de cubrir los termi nales y siempre tenga en
cuent a las regu lacione s y leyes loc ales.
• Cargu e siemp re la bate ría ante s de usa rla
por p rimera vez, o si n o se ha util izado la
bater ía durant e un períod o largo.
•
La s b at er ía s r ec ar ga bl es ti en en un a
vi d a ú t il l im it a da . Si el t ie m po d e
fun cio nam ien to se red uce , a un cu and o
la b ate ría r eca rg abl e est á to tal men te
carga da bajo las condicione s especifica das,
susti túyala p or una nuev a.
•
Las ba terías pueden r ecalen tarse d urante
el uso prolong ado. Para evitar quemad uras
men ore s, no l a r eti re in med iat ame nte
despu és de utili zar la gra badora.
Adapt ador de CA
f Pelig ro:
•
Asegúre se de utili zar el adaptador de CA con el
voltaj e adecuado (CA 100 - 240 V). Si lo usa con
otros nive les de voltaje, pod ría produc irse un
incendi o, una expl osión, un recalenta miento,
una des carga el éctric a u otros da ños.
•
Po r su se gur id ad , a seg úr es e d e de se nc hu far
el a d ap ta d or d e CA a nt e s de c om en z ar e l
man teni mien to o l a l impi eza. Tam poco en chu fe
ni desco necte el ench ufe c on l as m anos mojad as.
Podría n produc irse dañ os o una des carga el éctric a.
f Adver tencia:
•
No inte nte desmo ntar, rep arar o mod ificar e l
adapt ador de CA b ajo ningu na circu nstanc ia.
•
No per mit a q ue cos as ext rañ as, inc luy endo
agua, objetos de metal o sustancia s inflama bles,
se intr oduzca n en el inter ior del pr oducto.
•
No h umedez ca e l ada ptador de CA y no lo
toque c on las mano s húmeda s.
•
No use e l ad aptad or de CA cerc a de gas es
in fl am ab le s ( in cl uye nd o l a g as ol in a,
benci na, dilu yentes de ba rniz).
En el cas o de que
•...l as p ieza s in terna s d el a dapt ador de CA
est én expu esta s a co nsec uen cia de una
caída o c ualqui er daño:
•...se le haya caído al a gua e l ad aptado r de
CA, o se hay a introdu cido agua , objetos de
metal , sustan cias infl amables o cualqu ier
otra co sa extra ña:
Page 24

24
ES
•...al usar el adapta dor de C A note c ualqui er
cosa f uera de lo nor mal tal como un ruido
extr año, calor, h umo u olor a qu emado:
1
no toqu e ni nguna de las pie zas
expues tas;
2
des cone cte inm edia tame nte el
enchufe de alime ntación eléctr ica
de la toma de c orriente, y;
3
en ca rg ue u na in spe cc ió n a s u
con cesio nari o o al rep rese ntant e
local de Olympu s. El uso continuado
de l ada pta dor d e CA b ajo t ale s
circuns tancias podría ocasi onar una
sacudi da eléctric a, fuego o lesió n.
f Preca ución:
• No util ice el adap tador de C A si el ench ufe
de alim entaci ón está dañ ado o el enc hufe
no está c omplet amente co nectad o a la
corri ente. Podr ía produ cirse un i ncendio ,
un reca lentam iento, una d escarg a
eléc trica, un c ortoci rcuito u o tros daño s.
•
Dese nchuf e el ada ptado r de CA de l a s alida
de CA cuand o n o lo uti lice. Si no sigu e es ta
advertenc ia, podría producirse un incendio, un
recal entami ento o una de scarga e léctri ca.
• Asegú rese de su jetar el e nchufe c uando
lo reti re de la toma d e tierra. N o enroll e
el cab le excesiv amente ni c oloque s obre
éste un o bjeto pes ado. Podrí a produc irse
un ince ndio, un re calenta miento, u na
desca rga eléc trica o a lgún daño.
• Si cree qu e el adaptad or de CA no func iona
bien, d esench ufe el ada ptador de CA de la
corri ente y consulte al ser vicio técni co más
cerca no. El uso de l adapta dor de CA pu ede
provoca r un ince ndio, un recalenta miento,
una des carga el éctric a o algún da ño.
• No util ice ni gua rde el ada ptador d e CA en
lugar es mu y cal ientes, como en contac to
di rec to co n la lu z del s ol, e n un co che
cerr ado e n un día cal uroso, cer ca d e una
estuf a, sobr e una al fombra eléctr ica, et c.
No utilice el adapta dor de CA si está cubier to
por alg o (por ejem plo, una man ta). Podría
produc irse un incendio, una explosi ón, una
fuga o un r ecalen tamient o.
Monito r LCD
• La pantalla de cristal líquid o (LCD) utiliza da
para el mo nitor est á hecha co n tecnolo gía
de alt a pr eci sión. Si n e mbar go, pued en
apar ecer con stan temen te p unto s de luz
neg ro s o b ril lan tes e n el mon ito r LCD.
Deb ido a s us cara cter ísti cas o a l á ngul o
en el cual es tá visu aliz ando el mon itor,
el pun to puede no ser u niforme en colo r y
brill o. Esto no es u na anomal ía.
Identificación de las piezas
1 Toma de
MIC
(micró fono)
2 Micrófono e stéreo inte grado
3 Luz indicad ora de LED
4 Botón
VOICE
(Para DM -4)
Botón
HOME
(Para DM -2)
5 Dial
POWER/ HOLD
6 Orificio s para la correa
7
Pantal la (panel de cr istal líqui do
8 Botón
REC
(grabac ión)
9 Botón 9
0 Botón `OK (Escuc har/Set)
! Botón Fn (F1/F2/F3)
@ Botón
STOP
# Botón
+
$ Botón 0
% Botón
–
^ Altavoz integ rador
& Toma de
EAR
(auricu lar)
* Tapa de l a tarjeta
( Tapa de l a pila
) Conector US B
- Toma de l cable de ali mentación
Visua lizació n de los modos d e la
[
Recor der
]
Pantal la de archivos : A
1 Nombre de la ar chivo
2 Nombre de la ca rpeta/
Palabr a clave/Fech a
3 Número del ar chivo actua l/
Númer o total de fic heros
grabad os de la lista
4 Barra indica dora de la posi ción
de repr oducción
5
Indic ador del estad o de la grabadora
[ ] Indic ador de Repro ducción
[ ] Indic ador de Graba ción
[ ] Indic ador de Pausa
[ ] Indic ador de deten ción
6 Indicador d e índice/In dicador
de info rmación de fi cheros
7
Indic ador de la guía d e funciones r
8 Hora actual
9 Formato de fic heros
0 Duración de a rchivo/
Tiemp o de traducci ón
trans currido
!
Tiempo de reproducción transcurrido/
Tiemp o de grabació n restante
Visualización de icono
(Para todos los modos)
[h][g] I ndicador de m emoria
[j] Indicad or de tempori zador
[i] Marca de a larma
[k] Indic ador de pila
[A] Indicad or de sensibi lidad del
micró fono
[Z]
Indic ador de activ ación por voz
[c] Indi cador del fi ltro LowCut
[Q] Indica dora de Zoom Mic
[a]
Indic ador de Cancel ación de Ruido s
[b] Indic ador de Filtr o de Voz
[W] Indic ador EUPHON Y
[d][e] In dicador Rep etir
[f] Indic ador Aleator io
Pantal la lista de car petas: B
1 Hora actual
2 Nombre de la ca rpeta/Pal abra
clave/F echa
3 Nombre de la ar chivo
4
Indic ador de la guía d e funciones
Pantal la lista de arc hivos: C
1 Hora actual
2 Nombre de la ca rpeta actu al
3 Nombre de la ca rpeta
4
Indic ador de la guía d e funciones
Visua lizació n de los modos d e la
[
Music
] [
Podcas t
]
Pantal la de archivos : D
1 Nombre de la ar chivo
2 Buscar cate goría/
Nombr e del program a
3 Número del ar chivo actua l/
Númer o total de fic heros
grabad os de la lista (ca rpeta)
4 Barra indica dora de la posi ción
de repr oducción
5
Indic ador del estad o de la grabadora
6 Área para most rar informa ción
7
Indic ador de la guía d e funciones
8 Hora actual
9 Formato de fic heros
0 Duración de a rchivo
! Tiempo de rep roducción
trans currido
Pantal la lista de arc hivos: E
Cuando so lamente hay archi vos en
la carpe ta
1 Hora actual
2 Nombre de la ca rpeta actu al
3 Lista de art istas/
Lista d e programas
4
Indic ador de la guía de func iones
Pantal la lista de car petas: F
1 Hora actual
2 Nombre de la ca rpeta actu al
3 Nombre de la ar chivo
4
Indic ador de la guía de func iones
Page 25

25
ES
Inser ción de la bat ería (Fig. 1)
1 Pre sionando e n las guías co n los
dedos p ulgares, d eslice la ta pa del
compa rtimento d e las baterí as en la
direc ción indic ada por la f lecha.
2
Con la parte posteri or de la etiqu eta de la
batería hacia arriba, alinee los terminale s
de la gr abador a y la b atería. Inser te l a
bat ería de sliz ándo la e n d irec ción A,
mient ras presio na en direcc ión B.
3 Vuel va a poner la t apa del
compa rtimento d e las baterí as,
desli zando en la di rección B,
mient ras presio ne en direcc ión A.
Carga m ediante el a daptador d e CA
La s bat erí as d e ion es de l it io se
d es c ar ga n a ut o má t ic a me nt e .
D es pu é s d e d es em p ac a r es t e
pr oduc to, c arg ue las b ater ías d e
iones de litio suministradas, antes de
usar la g rabadora por p rimera vez .
1 Con ecte el adap tador de CA e n la
toma AC cor respond iente.
2 Con ecte el adap tador de CA a l a
base.
•
Cuando la ca rga empi eza, la luz del
indica dor LED cambi a a color naranja
y el indica dor de batería de la pantalla
cambia a l indicador de ca rga.
Encen dido/Apaga do
Encen dido (Fig. 1- 4)
Mientras la alimentació n de la grabadora esté
apag ada, desl ice el inter rupto r
P OWER/
HOLD
en la di recció n indica da por la f lecha
duran te 2 segund os como mí nimo
.
Apagad o (Fig. 1-4)
D eslice el i nterru ptor
POWER/ HOLD
en la dir ección i ndicad a por la fle cha
duran te 1 segund os como mín imo.
Modo de a pagado auto mático
Si se de ja la gra bad ora enc endi da
y sin u sar la dur ante 10 m inu tos o
más (configur ación p redetermin ada)
la gr abad ora en tra en el m odo de
apagad o automáti co. Puede elegir el
tiempo d e entrada en el modo ah orro
de e nergía [
5minut es], [10min utes],
[3 0 mi nu te s] , [ 1ho u r], [ 2h ou r] ,
[3hour] y [O ff].
Pa ra s al ir d el m od o de a pa gad o
aut omáti co, enci enda nu evame nte
la graba dora.
Ajuste de la hora y fecha
[Time & Date] (Fig. 3)
Cu an do u sa es ta g ra ba dor a p or
primer a vez después de co mprarla o
cuando la encie nde después de quitar
las baterías por más de 15 minutos etc.,
aparece rá [
Set Tim e & Date]. Cuando
“hora” est é parp adeando, lleve a cabo
la insta lación desde el Pa so 2.
1 Esc oja [
Time & Dat e
] desde e l
menú [
System Me nu
].
2
Pulse el botón 9 o 0 para seleccionar
el elem ento que dese e ajustar.
3 Pul se el botón + o − para re alizar
el ajus te.
4 Des pués de def inir la fec ha y la
hora, pu lse el botón `OK.
5 Pul se el botón F3
(HOME)
para
cerra r la pantall a del menú.
Inser ción de una t arjeta mic roSD (Fig. 2)
Esta grabadora se puede usar con tarjetas
microSD comercialmente disponibles, así
como tamb ién memoria int egrada.
1 Cua ndo la graba dora esté en m odo
parad a, abra la tap a de la tarjet a.
2 Col oque la tapa e n la posició n
corre cta e insér tela en la ra nura de
la tarj eta microS D como se mues tra
en el dia grama.
• Al inser tar la tarjeta m icroSD,
manténg ala recta.
• Si inser ta la tarjeta mi croSD
al revés o en á ngulo oblicuo,
podría d añarse el área de
contac to o atascarse la t arjeta
microSD.
• Si no inser ta bien la tarj eta
microSD, no s e podrá grabar
inform ación en dicha tar jeta.
3 Cie rre la tapa d e la tarjeta d e
maner a segura.
• Cuando int roduce la tarje ta
microSD, ap arecerá la panta lla
de graba ción de documen tos.
4 Cua ndo está gra bando en una
tarje ta microSD, pu lse el botón + o
−
y selec ción [
Yes
].
5 Pul se el botón `OK para co nfirmar
el ajus te.
Grabación (Fig. 4)
Graba ción en una c arpeta de
graba ción(Fig. 4-1)
Antes de empez ar a grabar, sele ccione
una carpet a de graba ción de voz entre
[Fold er A] a [Fo lder E ] en la c arpeta
[Reco rder]. Usted pued e utilizar estas
cinco carp etas de forma selecti va para
difere nciar los tipos de g rabaciones.
1 Sel ección la c arpeta de g rabación.
2 Pul se el botón
REC
y prepá rese
para gr abar.
•
El indicador LED cambia al color naranja
y aparece e n la pantalla [
].
• Dirija e l micrófono haci a la
direcci ón de la fuente que s e
grabar á.
a M odos de grabaci ón
b T iempo de tradu cción
transcu rrido
c T iempo de graba ción restante
d
Medido r de nivel (ca mbie según el
nivel de grabación y la configuración
de las fun ciones de graba ción)
3 Pul se el botón
STOP
para de tener
la grab ación.
e D uración de arch ivo
Espec ificar u na palabra c lave
antes de g rabar (Fig. 4-2)
Ante s d e e mpez ar a gr abar, se pue de
especificar una palabra clave que coincida
con l os conteni dos que se van a grabar.
Esta funci ón es muy útil para clasif icar las
grabac iones por palab ras claves.
1 D es de l a c ar pet a m os tr ar l is ta ,
pr esio ne
F1 (SE ARCH)
para q ue
apa rezc a l a p anta lla de búsq ueda
de pala bras claves .
2 Puls e el botón + o − para seleccionar
la pa lab ra cl ave de sea da y lue go
pulse e l botón `
OK
o 9.
3 Pul se el botón
REC
y prepá rese
para gr abar.
4 Pul se el botón
STOP
para de tener
la grab ación.
• Los fich eros grabados s e
identif ican automát icamente
con la pala bra clave especi ficada
y se maneja n usando la list a de
palabr as claves.
Page 26

26
ES
Reproducción (Fig. 5)
1 Sel ección la c arpeta que c ontiene
los arc hivos que qu iere repro ducir.
2 En la panta lla de l ista de archi vos,
pulse el botón + o − para seleccionar
el arch ivo que quie re reprod ucir.
3 Pul se el botón `OK para em pezar
a repro ducir.
a N úmero del carp eta
b I ndicador de ca rpeta
c B arra indicad ora de la posició n
de repro ducción
d D uración de arch ivo
e T iempo de repro ducción
transcu rrido
4 Pul se el botón + o − para aj ustar el
volume n a un nivel de co nfortab le.
• Puede aju starse en un ran go de
[00] a [30].
5
Pulse el botón
STOP
en cualquier punto
en que de see parar la r eproducc ión.
Ajust e de una marc a índice
Esta operaci ón se puede hacer
cua ndo la fun ción [
INDE X
] y
[
Er ase
] se h a asi gna do a la
tecla Fn (F1 o F2)
Ajuste d e una marca índi ce (Fig. 6-1)
1
Puls e e l bo tón
Fn (INDEX )
d urant e la
grabac ión de un archi vo, pause la gra bación,
repro duzca o paus e la reprod ucción.
• Even aft er an index mark is
placed , recording or pl ayback
will conti nue so you can plac e
index ma rks in other loc ations in
a similar m anner.
Borrad o de una marca ín dice (Fig. 6- 2)
1 Loc alice la mar ca índice a b orrar
que des ea borrar.
2
Pu lse e l bot ón 9 o 0 par a
selec cionar una m arca índi ce a borrar.
3 Mi entra s se mue stra el núme ro d e
índ ice (aprox imada mente du rante
2 seg undo s), pres ion e l a t ecla
Fn
(ERASE)
.
• Los númer os índice despué s
del núme ro índice borra do
ascende rán automática mente.
Borrado (Fig. 8)
1 Sel ección la c arpeta que c ontiene
los arc hivos que de sea elimin ar.
2
En la panta lla de lista de archivos, pulse el
botón + o − pa ra selecc ionar el arc hivo.
3
Mientr as la graba dora esté en mo do
parad a, pulse el bo tón
F2 (ERASE)
.
4 Puls e el botón + o − para seleccionar
[
Erase in Folder
] y [
File Erase
], y
luego p ulse el botó n `OK o 9.
5 Pul se el botón + y seleccio ne [Start],
despu és pulse el bo tón `OK.
• La pant alla camb ia a [E rase! ] y
comenzará el borrado. Se visualiza
[Erase D one] al borrar e l archivo.
Búsqueda de ficheros (Fig. 7)
Esta grabadora maneja los ficheros grabados
y los de música importado s desde una PC,
usando una base de datos . Los fi cheros se
clasifican automáticamente usando campos
como la fec ha y la pala bra clave, lo cual
facilit a el proceso de bú squeda.
Ab r a e l c u ad ro de d iá lo go d e
bú sq ue da d e fi ch er os d es de l a
carpe ta [
Recor der
] (Fig. 7- 1)
Tipos d e búsqueda s de ficher os:
Búsqu eda
[Browse]
La carpet a siste ma (Fol der A hasta Folder E) se usa
para bus car ficheros .
Búsqu eda
[Day]
Los fich eros se buscan
por fech a de grabación.
Búsqu eda
[Keywor d]
Los fiche ros se busc an
por pala bra clave.
1 Des de el menú [
Home
] selec cione
[
Recor der
], y lueg o pulse el bot ón
`OK o 9 para ab rir la muest ra
de la lis ta de carpe tas.
2
Presione la tecla
F1 (SEARCH)
para abrir
la mues tra de la búsq ueda de fic heros.
•
Cada vez que presiona F1 (SEARCH)
la muest ra de búsqueda ca mbia.
Ab r a e l c u ad ro de d iá lo go d e
bú sq ue da d e fi ch er os d es de l a
carpe ta [
Music
] (Fig. 7- 2)
Tipos d e búsqueda s de ficher os:
Búsqu eda
[Artis t]
Los ficheros se buscan desde una lis ta de artistas .
Búsqu eda
[Album]
Los ficheros se buscan desde una
lista de no mbres de álbum es.
Búsqu eda
[All Musi c]
Los ficheros se buscan desde una
lista de to das las cancion es.
Búsqu eda
[Browse]
Se muest ra una lista de to das las canciones y álbumes
de la carp eta [
Music].
Búsqu eda
[Heard
Recen tly]
Los ficheros reproducidos en
esta grabad ora se muestran
en orden cronol ógico inver
-
so.n cron ológico invers o.
Búsqu eda
[Play
Count]
Los ficheros se muestran con
base en el orden del núme ro
de veces que se han reprodu
-
cido en est a grabadora .
Búsqu eda
[Playli sts]
Muestr a las listas de
reprod ucción transfe
-
ridas a la gr abadora.
1 Des de el menú [
Home
] selec cione
[
Music
] y luego p ulse el botó n
`
OK
o 9 para ab rir la muest ra
de la lis ta de carpe tas.
2 Puls e el botón + o − para seleccionar
el tipo de búsqueda de fichero y luego
pulse e l botón `OK o 9.
Configuración de las
teclas de funciones
Las tec las Fn (F1 a F2) de es ta grabador a
se les puede asignar una función desea da.
Dicha s tecla s se pueden usar durante la
grabac ión o reproducci ón.
1 Esc oja [
Fn. sett ing
] desde e l
menú [
System Me nu
].
2 Sel eccione [F1] o [F2].
•
Puede configurarlas para personalizar
el uso de su g rabadora.
3 Puls e el botón + o − para seleccionar
el e lem ent o q ue de sea a sig nar y
luego `OK.
Lista d e teclas Fn:
Off Repe at
Random Play Spee d
INDEX A-B
Erase DISPLAY
LIST
Page 27

27
ES
Co nfig urac ión d e la es cena de
reproducción [Play Scene] (Fig. p)
1 Esc oja [
Play Sce ne
] desde e l
[
Play Men u
].
2
Escoj a [ Scene Sele ct] o [Scene Sa ve].
Cuando s e seleccion a [Scene Sele ct]: A
1
Pulse el bo tón + o – para selecci onar
la escena de reproducc ión que dese a
defin ir.
2 Puls e el botón `OK para
termina r la selección.
•
De sp ué s de co mpr ar, to das la s
especif icaciones desde 1 a 5 de [
User
Setting] son iguales (especificaciones
iniciales). Registre las especificaciones
del us uario en [
Scene Save] y lue go
selecc ione escena de rep roducción.
•
Para confirmar las especific aciones de
la escena de rep roducción respec tiva,
pulse el botón
+ o – de la pantalla [Scene
Sel ect] para sel eccion ar e l el emento
que de sea conf irma r, l uego pu lse el
botón
9 p ara con firmar la pant alla
con fir mar las es peci fica cion es. Par a
term inar la panta lla confir mació n de
especi ficaciones , pulse el botó n
0 y
se mostr ará la pantalla [
Scene S elect].
Cuando s e seleccion a [Scene Save]: B
Puede gu ardar las especi ficaciones
del menú d e reproducció n. Tiene
que def inir su opción.
1 Conf iguración de l me nú de una
reprod ucción de la graba dora.
2
Pulse el botón + o – para sele ccionar
[User Se tting] lqu e desea guardar.
3 Puls e el botón `OK para
termina r la selección.
3 Pul se el botón
F3 (HOME)
para
termi nar la confi guració n.
Mover/Copiar archivos
[File Move/Copy] (Fig. q)
1 E sco ja la ca rp eta do nde d ese a el
archi vo que des ea mover o copiar s e
encue ntra guard ado.
2 Esc oja [
File Move /Copy
] desde e l
menú [
File Men u
].
3 Pul se el botón + o − para es coger
la posi ción a donde d esea mover/
copia r el archivo.
4 Pul se el botón `OK o 9.
5 Puls e el botón + o − para seleccionar
el n úme ro de ar chi vos a m over o
copia r.
6 Pul se el botón `OK o 9 para
movers e al ajuste co rrespond iente.
Cuando s eleccione [1 f ile]:
1 Puls e el botón + o − para
selecc ionar el archivo q ue
desea mov er o copiar.
2 Puls e el botón `OK para
selecc ionar el archivo. P rosiga
con el paso 8 .
Cuando s eleccione [S elected f iles]:
1 Puls e el botón + o − para
selecc ionar el archivo q ue
desea mov er o copiar.
2 Puls e el botón `OK para rev isar
el archiv o seleccionad o.
Cuando s elecciona [Al l files]:
Cua ndo s ele ccio na to dos lo s
ar ch iv os , s e s el ec ci on ar án
todos los archivo s de la carpeta
automáticam ente y la grabadora
empez ará a m over a la pantal la
de l a [
Folder to move] . Prosiga
con el paso 8 .
7 Pul se el botón
F2 (GO)
.
8 Pulse el botón 9 , 0 o el botón
+, −
par a s ele cci ona r la ca rpe ta
a do nde d ese a mov er o co pia r el
archi vo.
9 Pul se el botón `OK.
•
Aparecer á [Movin g!] o [Copying !]
en l a pa nta lla y emp eza rá l as
acciones de mover o copiar. Durante
el proce so, el estado de l progreso
se m os tra rá e n por cen ta je. E l
proces o termin a cuand o apare ce
[Fi le move c ompl ete d] o [Fil e
copy com pleted]
.
Configuración de la escena de
grabación [Rec Scene] (Fig. 9)
1 Esc oja [
Rec Sce ne
] desde e l [
Rec
Menu
].
2 Sel eccione [
Scene S elect
] o
[
Scene S ave
].
Cuando s e seleccion a [Scene Sele ct]: A
1
Pulse el botón + o – para seleccionar
la escena de grabación q ue desea
defin ir.
2 Puls e el botón `OK para
termina r la selección.
•
Para confirmar las especifi caciones de la
escena de grabaci ón respec tiva, puls e
el botón
+ o – de la pantal la [S cene
Sele ct] para selecc ionar el element o
que des ea confi rmar, lueg o p ulse el
botón
9 pa ra confir mar la pantalla
con firm ar las espe cifi cacio nes. Pa ra
term inar la p antalla conf irmaci ón de
especi ficaciones , pulse el botón
0 y
se mostr ará la pantalla [
Scene S elect].
Cuando s e seleccion a [Scene Save]: B
Además de las p lantillas de [Rec Sc ene]
enc ontra das en la graba dora , p uede
también guardar las especif icaciones del
menú de la grabación que ha definido
a su gusto.
[Scene Save] no se puede usar durante la
grabaci ón. Cuando la grab adora esté en
el modo de pausa, entre al menú [
Home]
y luego ha ga esta config uración.
1
Pulse el botón + o – para seleccionar
[User Se tting] lqu e desea guardar.
2 Puls e el botón `OK para
termina r la selección.
3 Pul se el botón
F3 (HOME)
para
termi nar la confi guració n.
Otras funciones
Ademá s de las funcione s usua les, la gr abadora
también incluye las siguientes funciones: Para más
informa ción sobre los procedimiento s operat ivos
y espe cificacion es detalla das, por fa vor consulte
las [INST RUCCIONES DETALL ADAS] en línea.
•
Esta gr abador a puede ide ntifica r ficheros
graba dos o ficher os trans ferido s desde
una PC pe rsonal c on palabr as claves p ara
manej ar una base d e datos de fic heros
➥ [
Keywor d
] (☞ P.75)
• La confi guraci ón y las func iones de e sta
graba dora, se pu eden con trolar co n
recon ocimie nto de voz (Par a DM-4).
➥
[Uso de r econoci miento d e voz] (☞ P.107)
• Al cone ctar una c ámara di gital, se p ueden
impor tar y ver im ágenes (Pa ra DM-4).
➥ [
Ver imág enes
] (☞ P.103)
• Tiene l a funció n de progra mación .
➥ [Co nf i gu rac ió n d e p ro gr am ac ió n
[Audio D iary]] (☞ P.96)
• Es comp atible co n DAISY (Para D M-4).
➥ [
Acerc a de la DAISY
] (☞ P.132)
• Es comp atible co n Podcas ting.
➥ [
Acerc a de la Podca st
] (☞ P.127)
• Es comp atible co n Audio Boo k.
➥
[Acerca d e los Audio B ooks] (☞ P.157)
• Esta gr abador a permite i mport ar datos
de text o y leerlos e n voz alta (Pa ra DM-4).
➥ [Acerca d e la Text Spee ch] (☞ P.158)
• Compat ible con e misione s Audibl e.
➥
[Carga d e conten ido Audib le] (☞ P.159)
Page 28

28
ES
Utilización de la Grabadora
en el PC
Windows
Sistem a operativo:
Microso ft® Windows® XP Service Pack 2, 3
Microsoft® Windows® XP Professional x64
Edition S ervice Pack 2
Micros oft® Windows Vista® Service Pack
1, 2 (32bit/64b it)
Microso ft® Windows® 7 (32b it/64bit)
CPU:
Proc esador de 32 bits ( x86) 1GHz o
superio r y de 64 bits (x6 4)
RAM:
512 MB o más
Espaci o en el disco du ro:
300 M B o más
Unidad
U nida d de CD -RO M, CD -R , CD- RW,
DVD-R OM
Navegad or:
Microso ft Internet E xplorer 6.0 po sterior
Pantall a:
1024 x 768 píxel es o más, 65,536
colores o m ás (se recomienda n
1,6770,000 co lores o más)
Puert o USB:
Uno o ma s puertos disp onibles
Otros :
• Disp ositivo de Audio
• Entorn o en el que se pueda u tilizar
Interne t.
Macint osh
Sistem a operativo:
Mac OS X 10. 4.11 - 10.6
CPU:
Proc esador PowerPC® G 5 o Intel
Multinú cleos de 1.5 GHz o sup erior
RAM:
512 MB o más
Espaci o en el disco du ro:
300 M B o más
Unidad :
U nida d de CD -RO M, CD -R , CD- RW,
DVD-R OM
Navegad or:
Mac intosh Safari 2. 0 posterior
Pantall a:
1024 x 768 píxel es o más, 32,000
colores o m ás (se recomienda n
16,770,000 co lores o más)
Puert o USB:
Uno o ma s puertos disp onibles
Otros :
• Disp ositivo de Audio
• Entorn o en el que se p ueda ut ilizar
Interne t (Se recomien da Quick Time
versión 7.2 o sup erior).
Conexión a su PC
1 Enc ienda la ali mentaci ón de la
graba dora.
2 Con ecte el cab le USB al puer to USB
de la PC.
3 Ve rf iq ue que la g ra ba dor a e stá
detenida y luego conecte el cable USB
al puer to co rresp ondien te ub icado
en la par te inferi or de la graba dora.
Window s:
Cuando conecte la grabadora a Windows
y a bra [
My Computer], se reconocerá
por el no mbre del contro lador del pro
ducto. Si se insert a una tarjet a microS D,
se mostr ará [
Remova ble Disc].
Macin tosh:
Cuando cone cte la grabadora a Ma c OS, se
recono cerá por el nombre de l controlador
del producto del escritorio. Si se inserta una
tarjet a microSD, se mostra rá [
NO NAME ].
Desco nexión de su P C
Window s
1
Ha ga cl ic e n [ ] l a bar ra d e tar ea s,
ubica da en el extremo infer ior derecho de la
pantalla. Haga clic en [Extracción segura
de Disposit ivo de almacenamiento
masivo USB].
•
La letra de la unidad diferir á según
el orden ador que esté uti lizando.
2 Con firme que l a luz indica dora LED
de la gra badora se hay a apagado
antes de d esconec tar el cabl e USB.
•
La luz del indicador LED se enciende en color
anaranja do cuando se está en el proceso de
carga, sin embargo puede d esconectar el
cable USB e n dicha condició n.
Macin tosh
1 Arr astre el ico no de la grab adora
que apa rece en el esc ritorio ha sta la
papel era de recic laje.
2 Con firme que l a luz indica dora LED
de la gra badora se hay a apagado
antes de d esconec tar el cabl e USB.
•
La luz del indicador LED se enciende en color
anaranja do cuando se está en el proceso de
carga, sin embargo puede d esconectar el
cable USB e n dicha condició n.
Nota
•
Nunca desconecte el cable USB mientras
la luz ind icadora LED esté d estellando.
Si lo hace, l os datos se perder án.
Accesorios (optional)
s A daptador AC US B: A514
s M icrófono d e 2 canales
(omnidi reccional ): ME30W
s M icrófono d e fusil compa cto
(Unidi reccional) : ME31
s M icrófono mono con cancelación
de rui do con alt a se nsib ilid ad
(unidir eccional): ME52
s T ie clip micr ophone
(omnidi reccional ): ME15
s
Mando a d istancia ex clusivo: RS30 W
s A uricular de l teléfono: T P7
s C able de conex ión: KA333
s B atería de ion es de litio: LI -50B
Especificaciones
Puntos g enerales
4 M étodo de grab ación:
Memori a integrada
DM-4 : 8 GB
DM-2: 4 GB
Tarjeta SD (de 512 MB a 16 GB)
4 Fo rmato de graba ción:
PCM linea l (Pulse Code Modu lation)
MP3 (MPEG-1 Audi o Layer3)
WMA (Win dows Media Audi o)
4 N ivel de entrad a:
[Propie dades]:[Medio] - 6 0 dBv
4 S alida Máxim a:
280 mW (altavoz 8 Ω)
4 M áxima salid a de los
auricu lares:
≤_ 150 mV (de acuerdo con l a
norma EN 50332-2)
4 S alida de audí fonos con
carac terística s de banda anch a:
75 mV ≤_ (de acuerdo co n la norma
EN 50332-2)
4 Al tavoz:
Altavoz di námico redondo d e ø23 mm
4 Toma
MIC
:
ø 3,5 mm, im pedancia MIC: 2 ,2 kΩ
4 Toma
EAR
:
ø 3,5 mm, im pedancia EAR: 8 Ω o má s
4 R equisitos d e entrada de
alime ntación:
Batería : Batería de iones d e litio
Aliment ación exter na:
Adaptad or AC (A515) 5 V
4 D imensione s externas :
113,6 mm × 45, 6 mm 15,2 mm
(sin sali entes)
4 Pe so:
98 g (inclu yendo pila)
4 Temp eratura dur ante el
funci onamiento:
0°C - 42°C / 32°F - 107.6°F
Page 29

29
ES
Guía de t iempos de gra bación
Format o PCM lineal
Modos de
grabac ión
Memoria integrada
(4 GB) (DM-2)
Memoria integrada
(8 GB) (DM- 4)
Tarjeta micr oSD
1 GB 2 GB 4 GB
48 kHz 5 h. 15 min. 11 h. 05 min. 1 h. 15 min. 2 h. 45 mi n. 5 h. 30 min.
44.1 kHz 5 h . 45 min. 12 h. 05 min. 1 h. 20 m in. 3 h. 6 h.
Format o MP3
Modos de
grabac ión
Memoria integrada
(4 GB) (DM-2)
Memoria integrada
(8 GB) (DM- 4)
Tarjeta micr oSD
1 GB 2 GB 4 GB
320 kbps 25 h . 30 min. 53 h. 6 h. 30 min. 13 h. 30 mi n. 27 h .
128 kbps 63 h. 3 0 min. 133 h. 16 h. 30 min. 34 h . 68 h.
Format o WMA
Modos de
grabac ión
Memoria integrada
(4 GB) (DM-2)
Memoria integrada
(8 GB) (DM- 4)
Tarjeta micr oSD
1 GB 2 GB 4 GB
ST XQ 62 h. 30 min. 130 h. 16 h. 33 h. 66 h .
LP 977 h. 2043 h . 255 h. 531 h. 1042 h.
Tiemp o de grabació n máximo por ar chivo
Format o PCM lineal Format o MP3 Formato WM A
48 kHz 3 h.
320kbps 29 h. 40 min. ST XQ 72 h. 50 min. HQ 291 h. 30 min.
44.1 kHz 3 h. 20 min.
256kbp s 37 h. 10 min. ST HQ 145 h. 4 0 min. SP 574 h.
192kbps 49 h. 40 min. ST SP 291 h. 30 min. L P
1139 h. 20 min.
128kbps 74 h. 30 min.
Guía pa ra la vida útil d e las pilas
Modos de
grabac ión
Mi cróf ono es tér eo int egr ado
(Durante e l modo de grabaci ón)
Altavoz estéreo integrado (Durante el mo do reproducci ón)
Reprod ucción de auricu lar
PCM 48k Hz 13 h. 12 h. 20 h.
MP3 128kbps 25 h. 12 h. 30 mi n. 20 h.
ST XQ 24 h. 12 h. 30 min. 21 h.
LP 29 h. 13 h. 2 2 h.
• Los valo res arriba most rados son estri ctamente una ap roximación.
•
La vida út il de la batería es me dida por Olym pus. Puede vari ar en gran medida , dependien do del tipo de pila s que se
utiliz a y de las condicion es de uso.
Las espe cicaciones y d iseño están suj etos a cambios sin p revio aviso.
Respu esta de frecu encia gene ral
4 D urante el mod o de grabación
o repro ducción:
Format o PCM lineal
Modos de
grabac ión
Respue sta de
frecue ncia general
48 kHz 40 Hz a 23 kHz
44.1 kHz 40 Hz a 21 kHz
Format o MP3
Modos de
grabac ión
Respue sta de
frecue ncia general
320 kbps 40 Hz a 20 kHz
256 kbps 40 Hz a 20 kHz
192 kbps 40 Hz a 19 kHz
128 kbps 40 Hz a 17 kHz
Format o WMA
Modos de
grabac ión
Respue sta de
frecue ncia general
ST XQ 40 Hz a 19 kHz
ST HQ 40 Hz a 16 kH z
ST SP 4 0 Hz a 9 kHz
HQ 40 Hz a 13 kHz
SP 40 Hz a 8 k Hz
LP 40 H z a 3 kHz
4 M icrófono es téreo integ rado (Durant e el modo de grab ación):
DM-4 : 70 Hz a 20 kHz
DM-2: 70 Hz a 20 kHz
• Sin emb argo, cuando se gr aba en formato MP3 o WM A, el máximo va lor de la respues ta de frecuenc ia depende
de cada mo do de grabació n (ver diagrama sup erior).
Page 30

30
MEMO
Page 31

31
Declaration o f Conformity
Model N umber : DM- 4/DM-2
Trade Name : DIGITAL VOICE RECORD ER
Respon sible Party : OLYMPUS IMAG ING AMERICA IN C.
Address : 350 0 Corporate Park way, P.O. Box 610, Center Val ley, PA 18034 -0610,
U.S.A .
Telephon e Number :1-888 -553-4448
This dev ice Complies with P art 15 of the FCC Rules. Op eration is subje ct to the follow ing two conditi ons:
(1) This device may no t cause harmful i nterference , and (2) this device mus t accept any interf erence
receive d, including in terference th at may cause undesi red operatio n.
Canadian RFI
This digi tal apparatus d oes not exceed th e Class B limits for r adio noise emiss ions from digit al apparatus as s et out in
the Radio I nterference R egulations of th e Canadian Depa rtment of Comm unications.
Cet appar eil numérique n e dépasse pas les l imites de la Catégo rie B pour les émi ssions de bruit ra dio émanant
d’appare ils numérique s, tel que prévu dan s les Règlement s sur l’Inter férence Radio du D épartemen t Canadien des
Communic ations.
Tested To Comply
With FCC Standard s
FOR HOME OR O FFICE USE
Page 32

U1-BS0452-01
AP1005
Shinjuku Monolith, 3-1 Nishi-Shinjuku 2-chome, Shinjyuku-ku, Tokyo 163-0914, Japan. Tel. +81 (0)3-3340-2111
http://www.olympus.com
3500 Corporate Parkway, P.O. Box 610, Center Valley, PA 18034-0610, U.S.A. Tel. 1-888-553-4448
http://www.olympusamerica.com
 Loading...