


Basic Manual
Manuel de base
Einfache Anleitung
Manual básico
This manual provides simple instructions. For more details, refer to the
Reference Manual on the CD-ROM provided with the camera.
Le présent manuel mentionne des instructions simples. Pour obtenir
de plus amples détails, référez-vous au manuel de référence du
disque CD-ROM fourni avec l'appareil photo.
Dieses Handbuch enthält einfache Anleitungen. Für weitere Hinweise
siehe die Bedienungsanleitung auf der CD-ROM, die der Kamera
beiliegt.
Este manual contiene instrucciones sencillas. Para las instrucciones
más detalladas, consulte el manual de referencia del CD-ROM
suministrado con la cámara.
English
Français Deutsch
Español

Contents
English
Getting Started ...................................... 4
Taking Pictures .................................... 11
Viewing and Managing Images ........... 14
Shooting Features ............................... 17
Special Settings .................................. 23
Deutsch
Zu Beginn ............................................ 60
Aufnahmen machen ............................ 67
Wiedergabe und Bearbeitung von Bildern ..
Aufnahme-Funktionen ......................... 73
Besondere Einstellungen .................... 79
Anhang ................................................ 80
70
Reference ............................................ 24
Français
Mise en marche ................................... 32
Prise de vues ...................................... 39
Visionner et gérer les images .............. 42
Caractéristiques de prise de vues ....... 45
Paramétrage spécial ........................... 51
Référence ............................................ 52
Español
Para empezar ...................................... 88
Para fotografíar .................................... 95
Para mirar y administrar imágenes ..... 98
Características fotográficas ............... 101
Ajustes especiales ............................ 107
Referencia ......................................... 108

© Copyright 2001. Olympus Optical Co., Ltd. All rights reserved.
Thank you for purchasing an Olympus digital camera. Before you start
to use your new camera, please read these instructions carefully to
enjoy optimum performance and a longer service life. Keep this manual
in a safe place for future reference.
For Customers in Europe
“CE” mark indicates that this product complies with the European
requirements for safety, health, environment and customer protection.
“CE” mark cameras are intended for sales in Europe.
For Customers in North and South America
For Customers in USA
Declaration of Conformity
Model Number : E-20
Trade Name : OLYMPUS
Responsible party : Olympus America Inc.
Address : 2 Corporate Center Drive, Melville, New York
11747-3157 U.S.A.
Telephone number : 631-844-5000
Tested to comply with FCC standards
FOR HOME OR OFFICE USE
This device complies with Part 15 of the FCC rules. Operation is subject to the
following two conditions:
(1) This device may not cause harmful interference.
(2) This device must accept any interference received, including interference that
may cause undesired operation.
English
For Customers in Canada
This Class B digital apparatus meets all requirements of the Canadian
Interference-Causing Equipment Regulations.
Trademarks
• IBM is a registered trademark of International Business Machines Corporation.
• Microsoft and Windows are registered trademarks of the Microsoft Corporation.
• Macintosh is a trademark of Apple Computer, Inc.
• All other company and product names are registered trademarks of their respective owners.
3

Getting Started
Important Parts and Names
1
2
3
4
5
6
7
8
9
0
A
B
C
W
X
V
U
T
S
R
Q
P
O
N
M
L
K
J
I
H
G
F
E
D
l
m
n
o
p
q
r
s
t
u
v
•
¶
wxy
z
§
£
¢
†
ç
å
~
}
|
{
ø
æ
º
Y
Z
c
d
e
b
a
`
ß
]
®
\
[
j
i
h
¬¡… ‹
f
4
k
g
™
©
⁄¤
µ
¥
fl
fi
›

1 Metering mode button*
2 Drive button*
3 Remote cable jack
4 Built-in flash
5 Flash button
6 Manual focus ring
7 Zoom ring
8 Exposure compensation
button*
9 Macro button*
0 Flash synchro socket
A Focus mode switch
B Strap eyelet
C DC IN jack cap/DC IN jack
D Monitor
E Eyepiece shutter lever
F Diopter adjustment ring
G Viewfinder
H Main dial
I Card cover
J Card cover lock
K SM/CF memory card button*
L Card access lamp
M Light button
N AE lock button
O Power switch
P Mode dial
Q White balance mode button*
R Sub dial
S Control panel
T Record mode button*
U Flash mode button*
V Hot shoe
W Video OUT jack
X USB connector
Y Monitor lock/release button
Z INFO button
[ Protect button
\ Erase button
] Arrow pad
^ OK button
a Menu button
b Monitor button
c Shutter button
d Remote control receiver/
self-timer lamp
e Strap eyelet
f Battery compartment
g Tripod socket
h Lens
i Quick reference (one touch)
white balance button
j AF port
k Speaker
Control panel
Flash control
l Flash intensity control
m Slow synchro
n Fill-in flash
o Red-eye reduction
p 2nd-curtain
q Shutter speed
r Aperture value
s Macro
t Self-timer
u Conversion lens
v Sequential shooting
w Remote control
x Battery check
y Selected memory card
z Number of storable pictures
{ Card error
| Memory gauge
} Metering mode
~ Exposure compensation/
Exposure level
å Auto bracket
ç Manual focus
† White balance
¢ ISO
£ displays in PS mode and/
or when sharpness/contrast
is not NORMAL.
blinks in noise reduction
mode.
§ Record mode (Blinking
“TIFF” indicates RAW. In PS
mode, “SHQ,” “HQ,” or “SQ”
blinks.)
Viewfinder
• Spot metering area
¶ AF correct mark
ß Flash warning
® Macro
© Shutter speed
™ Aperture value
¥ White balance
µ AE (Automatic Exposure)
Lock
º Exposure compensation/
Exposure level
æ Metering mode
ø AF target mark
Monitor Display
¡ AF correct mark
¬ Flash warning
… Macro
⁄ Shutter speed
¤ Aperture value
‹ White balance
› AE Lock
fi Exposure compensation/
Exposure level
fl Metering mode
English
* Press and hold, then tum the main dial or sub dial to operate.
Main dial and sub dial
For your convenience, the main dial and sub dial can be used in the same way in most cases to
select the camera settings. However, when the mode dial is set to M (manual mode), the main dial
is used to set the aperture value and the sub dial is used to select the shutter speed.
5
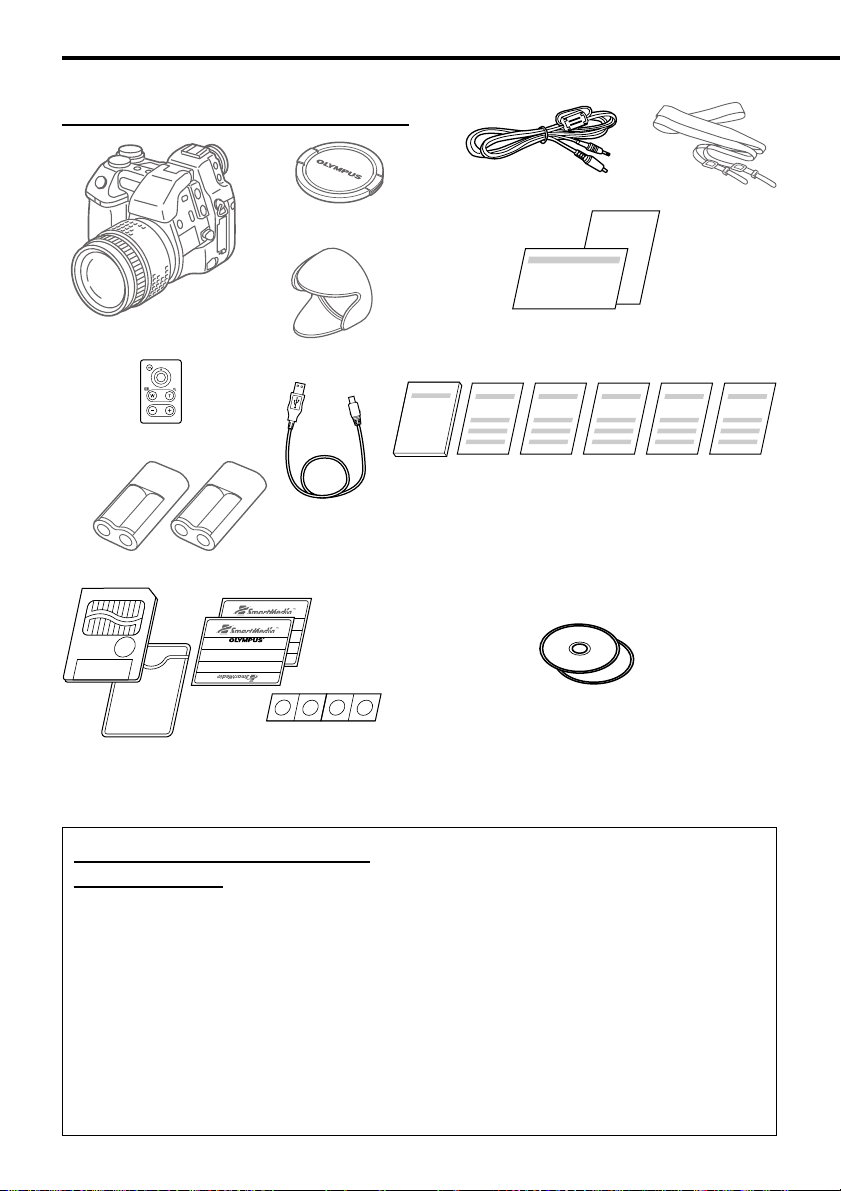
Make Sure That You Have Everything
Camera
Lens hood
RM-1 remote control
USB cable
Lithium battery packs (CR-V3)
• SmartMedia card (1)
• SmartMedia Static-free case (1)
• SmartMedia labels (2)
• SmartMedia protect seals (4)
Lens cap
Video cable
• Customer Registration card (Not provided in
some regions)
• Warranty card
• Basic Manual
• Quick Start Guide
• Remote control instructions
• SmartMedia instructions
• Software Installation Guide (Included in the
Software CD pack in some regions)
•
Olympus Raw File Import Plug-in Installation Guide
• Software CD
The following are included:
– CAMEDIA Master Software
– Windows 98/98SE USB driver
– Olympus RAW File Import Plug-in
– Reference Manual
Strap
Optional Accessories Available
for This Camera
• Dedicated External Flash (FL-40)
• 1 m Coiled Flash Cable (FL-CB05)
• Dedicated Flash Bracket (FL-BK01)
• Dedicated Bracket Cable (FL-CB01 - 04)
• Conversion Lenses
• Remote Cable (RM-CB1)
• Camera Case (Semi-Hard Case)
• AC Adapter
• AA (R6) Ni-MH (Nickel-Metal Hydride)
battery
• Dedicated Recharge Device
• B-32LPS (latest model)
The following are included:
– B-12LPB (one lithium polymer battery)
6
– B-20LPC (one lithium polymer battery
charger)
– B-HLD10 (one power battery holder)
• B-30LPS
The following are included:
– B-10LPB (one lithium polymer battery)
– B-20LPC (one lithium polymer battery
charger)
– B-HLD10 (one power battery holder)
• SmartMedia (8MB, 16MB, 32MB, 64MB, or
128MB)
• PC Card Adapter MA-2(E)
• Floppy Disk Adapter FlashPath MAFP-2N(E)
• Olympus-brand Removable Media Reader/
Writer
• Printer P-400/P-330N(E)/P200
September 2001

Attaching the Strap
Slide one end of the strap through a strap
eyelet on the camera. Slide the end of the strap
through the sleeve and frame on the strap, and
then slide the sleeve completely up to the
eyelet. Pull the strap tight around the frame and
make sure that it does not slip. In the same
way, attach the other end of the strap to the
eyelet on the other side of the camera.
Inserting the batteries
You can use two lithium battery packs (CR-V3),
or four AA (R6) Ni-MH, Ni-Cd, or Alkaline
batteries.
Make sure the power switch is in the OFF
position. Make sure the card access lamp is off.
Underneath the camera, lift the battery
compartment knob and turn it to the open
position. Then, pull out the battery holder.
Place two battery packs (CR-V3 batteries
1
- 3) or four AA batteries [AA (R6) batteries
1
and 2] in the holder. Make sure the polarity
markings on the batteries match the markings
as shown and inside the battery holder. Gently
press the batteries into the holder until they
lock in place (AA batteries fit loosely in the
holder even when locked in place).
Insert the holder into the camera, then gently
push in the holder while turning the lock to the
closed position. Finally, fold down the battery
compartment knob.
Battery compartment knob
CR-V3 batteries
If insulation seal
is attached, peel
it off.
Do not remove
the seal.
1
English
Battery holder
AA (R6) batteries
1
2
2
3
7

Inserting and Selecting Memory
Cards
Memory cards, hereafter referred to simply as
“cards,” store the digital images of the pictures
that you take with the camera. The camera can
hold one SmartMedia (SM) and one
CompactFlash (CF)/Microdrive* media card.
* Use of the Microdrive requires the B-32LPS/
B-30LPS lithium polymer battery set due to
the power requirements of the Microdrive.
SmartMedia CompactFlash/
Microdrive
Make sure that the card access lamp is off. Lift
up the card cover lock while pressing the round
release button under it to open the card cover.
To insert a SmartMedia card, hold it with the
notched corner down and insert it straight into
the narrow slot closest to the rear of the
camera. Gently push in the card until it stops.
(You can see about 2 mm of the card above the
edge of the slot.)
To insert a CompactFlash/Microdrive card, hold
the card so that the arrow on the card can be
seen and points into the slot, then insert it
straight into the wider slot. Gently push in the
card until it stops.
Close the card cover and press it gently until it
locks.
To remove the SmartMedia card, press on it
gently to release it then remove it from its slot.
To remove the CompactFlash/Microdrive card,
gently press the eject button to release it then
remove it from its slot.
When one card is installed in the camera, that
card is automatically selected to store images.
With both cards installed, you can select either
card for storage. When one card becomes full,
you can quickly switch to the other card and
continue shooting. Press and hold down the
SM/CF memory card button, and then slowly
turn the main dial or sub dial until you see
(SmartMedia) or (CompactFlash/
Microdrive) displayed in the control panel.
When you see , the SmartMedia card is
selected for image storage, and when you see
, the CompactFlash/Microdrive card is
selected.
Connecting the AC Adapter
Use the optional CAMEDIA-brand AC adapter
as an alternate power source for long shooting
sessions in order to conserve battery power.
Switch the camera off and make sure that the
card access lamp is not blinking.
Plug the AC adapter power cord into a power
outlet.
Open the DC IN jack cap on the left side of the
camera and connect the AC adapter to the DC
IN jack. Then switch on the camera.
Use only the AC adapter intended for use with
this camera. For details about using the AC
adapter in any country other than where you
purchased the camera and AC adapter, contact
an Olympus Service Center.
OFF
ON
DC IN jack
AC adapter power cord
plug
AC adapter
Power outlet
8

Switching the Camera On/Off
To switch the camera on or off, move the power
switch to ON or OFF. When the camera is in the
shooting mode (mode dial set to P, A, S, or M),
if it remains idle for a specified length of time it
will switch off the displays automatically and
enter the sleep mode to conserve battery
power. To restore the camera to full operation,
press any button on the camera. If the camera
remains idle for one hour after entering the
sleep mode, the camera will shut itself off
completely. In order to restore full operation,
switch the camera off and switch it on again.
The first time that you switch the camera on,
you should set the date and time.
Checking the Battery
The battery check mark [shaped like an AA
(R6) battery] in the control panel indicates
battery performance. When the camera is
switched on, if the battery check appears full
and goes off this means the batteries are fully
charged. If the battery check mark appears
partially filled and continues blinking, the
batteries are low and should be replaced as
soon as possible. If the battery check mark
partially filled goes off and the control panel
extinguishes completely, this means the
batteries are fully discharged and you cannot
continue shooting pictures unless you replace
the batteries.
Checking the Number of Storable Pictures
The large two-digit number in the lower right
section of the control panel displays the
number of storable images. When this number
reaches zero, replace the card or if you have
two cards installed in the camera, select the
other card. The number of images that you can
store on a card is determined by the size of the
images. The size of the image is determined by
the record mode and its settings (resolution
and compression). See “Setting the Record
Mode.”
English
Number of storable picturesSelected card
Estimates of memory card storage capacity
Record Resolution (pixels) Compression File Size
mode (Default settings) (Default settings) (Reference value)
RAW* 2560 x 1920 (FULL) 1:1
TIFF 2560 x 1920 (FULL) 1:1
SHQ 2560 x 1920 (FULL) 1:2.7 3.9 MB 4 shots 8 shots
HQ 2560 x 1920 (FULL) 1:8 1.5 MB 10 shots 21 shots
IS mode
SQ 1280 x 960 (SXGA) 1:8 320 KB 49 shots 99 shots
SHQ 2560 x 1920 (FULL) 1:2.7 3.9 MB 4 shots 8 shots
HQ 2560 x 1920 (FULL) 1:8 1.5 MB 10 shots 21 shots
PS mode
SQ 1280 x 960 (SXGA) 1:8 320 KB 49 shots 99 shots
* To display RAW data files on your PC, CAMEDIA Master software or Photoshop is required.
(Photoshop requires the Olympus RAW File Import Plug-in included in the software CD.)
(not compressed)
(not compressed)
10 MB 1 shot 3 shots
15 MB 1 shot 2 shots
Images per Card (Reference value)
16 MB 32 MB
9

Date or Time
You can use settings in the setup/connection
mode to set the date, time and date format.
When you take a picture, the current date and
time are recorded with the image. This
recorded date or time can be stamped on the
printed image if you use “select date or time” in
the DPOF print stamping mode for printing.
Processing and handling images with
CAMEDIA Master ensures that this date and
time information is preserved, even after the
images are transferred to a computer.
Otherwise, this date and time information may
be lost with other graphics software
applications.
After you set up date or time stamping, the
setting applies to all images selected for
printing. Insert the memory card that contains
the pictures that you want to select for date or
time stamp printing. Check the control panel
display and make sure that the mark for the
source card, SmartMedia or CompactFlash/
Microdrive is displayed. If the correct mark
is not displayed, press and hold the SM/CF
memory card button, and then turn the main
dial or sub dial until it is displayed. Set the
mode dial to the print reserve mark . Press
the menu button to open the menu in the
monitor. Press or to move the green
highlight to the date/stamp mark . Press
to move the green highlight to the right, and
then press again to move the green highlight to
DATE or TIME, or if you want to cancel the date
or time setting move the green highlight to OFF.
Press the button to select the setting. Press
the button again to close the menu.
10

Taking Pictures
Composing Pictures
Make sure that the camera is switched on,
remove the lens cover, and look through the
viewfinder. To adjust the viewfinder for your
eyes, turn the diopter adjustment ring until the
AF target mark in the center of the viewfinder is
sharp and clear. If you cannot see the AF target
mark, make sure that the eyepiece shutter lever
on the left side of the viewfinder is up. With the
strap around your neck, hold the camera by the
grip on the right side of the camera, and use
your left hand to support the camera base.
Make sure that your fingers do not block the
lens, flash (if it is up), the AF port or the remote
control receiver/self-timer lamp on the front of
the camera. Holding the camera as steady as
possible, point at the subject and compose the
picture in the viewfinder.
Composing a Picture with the
Monitor
Make sure that the camera is switched on,
remove the lens cover, and press the monitor
button . Lower the eyepiece shutter lever on
the left side of the viewfinder. Push the monitor/
lock release button to release the monitor
slightly from the camera. To raise the monitor,
pull the bottom of the monitor out. Make sure
that your fingers do not block the lens, flash (if
it is up), the AF port, or the remote control
receiver/self-timer lamp on the front of the
camera. Holding the camera as steady as
possible, point at the subject and compose the
picture in the monitor.
Releasing the Shutter
The shutter release is a two-step operation. Set
the mode dial to P, A, S, or M. Compose the
picture in the viewfinder or monitor. Half-press
the shutter button to start automatically setting
the focus and exposure. When you hear a small
beep and see the AF correct mark in the lower
left corner of the viewfinder light, the subject is
in focus. As long as you keep the shutter button
depressed half way, the subject will remain in
focus with the selected exposure. This is called
AF/AE lock. Fully-press the shutter button to
release the shutter and take the picture. After
the picture is taken, the image of the picture will
appear briefly in the monitor and the card
access lamp will blink for a few seconds and
then go off after the image is stored on the
card. The camera requires a few seconds to
store each picture. However, you can take quick
shots until the memory gauge starts blinking,
which indicates temporary memory (a buffer) is
full. The number of the memory gauge bars
indicates the number of pictures in the buffer.
The timing when the memory gauge starts
blinking varies depending on the IS/PS/Noise
Reduct and record mode settings.
Half-press
(gently pressing the button down half-way)
Full-press
(after half-pressing, gently press down all
the way.)
English
If the AF correct mark blinks, the subject is not
in focus. Lift your finger from the shutter button,
and compose the picture again by pointing to
another part of the picture and then half-press
the shutter button. While keeping the shutter
button depressed half-way, compose the
picture again. Some subjects are difficult to
focus. If you see the flash warning appear in
the viewfinder, the picture is underexposed,
and you should use the flash. Press the flash
button to raise the flash unit and shoot the
picture with the flash.
11
Using the Zoom and Macro Functions
To zoom in and make the subject larger in the
viewfinder, rotate the zoom ring to the left. To
zoom out and make the subject smaller, rotate
the zoom ring to the right. You can take a
picture up to 0.6 m from the subject.
You can also take very close shots within a
range of 0.2 m to 0.6 m from the subject by
setting the camera in the macro mode. To set
the camera in the macro mode, hold down the
macro button and then turn the main dial or
sub dial until you see the macro mark in the
control panel. Repeat the procedure to switch
off the macro mark and return the camera to
normal operation.
Using the Built-in Flash
When the flash warning blinks in the lower left corner of the viewfinder, there is not enough light to
take the picture. Press the flash button to raise the built-in flash unit, and then take the picture.
After raising the flash, the flash warning may continue to blink until the flash is fully charged. When
you take the picture, the flash will fire with an intensity adjusted automatically for the best exposure.
Flash Range
ISO Max. WIDE (WIDE Limit) Max. TELE (TELE Limit)
AUTO 0.6 - 8.9 m 0.5 - 7.4 m
80 0.6 - 6.3 m 0.5 - 5.2 m
160 0.9 - 8.9 m 0.7 - 7.4 m
320 1.3 - 12.5 m 1.0 - 10.4 m
Use the flash within these ranges to prevent overexposure and underexposure of your pictures.
Rapidly firing the flash could cause it to overheat. Do not fire it more than 30 times in succession.
After prolonged use, allow the flash to cool for at least 10 minutes between shooting sessions. Before
using the flash, make sure that its face is clean.
12

To select the flash mode
The flash mode selection determines how the flash is fired to achieve various effects. To select the
flash mode, hold down the flash mode button , and then turn the main dial or sub dial button to the
left or right until you see the desired setting.
Control Panel Flash Mode Function
Display
(none) Auto Flash Adjusts flash intensity according to the brightness of the subject.
SLOW Slow Flash fires just before the end of the shutter release. When
2nd-CURTAIN Synchronization 2nd-CURTAIN is not selected, the camera is set to release to fire the
Fill-in Flash always fires, regardless of the light conditions.
Red-eye Camera fires 10 short bursts to contract the pupils of the subject’s eyes
Reduction to reduce the red-eye effect. There is a 1-second delay before the
The number of available flash control mode settings is determined by the current shooting mode
selection.
Flash control modes for P (Program) and A (Aperture priority) modes
Control Panel Display
(None)
(Red-eye Reduction)
(Red-eye Reduction)
flash at the beginning of the shutter release (1st-CURTAIN).
shutter releases after pressing the shutter button.
Flash mode Flash Timimg
Auto flash
Auto flash
Slow synchro
Slow synchro
Red-eye
Reduction
NO
YES
YES
NO
1st-curtain YES
1st-curtain
1st-curtain
1st-curtain
Fires automatically
in dark light,
backlighted subject
YES
YES
YES
Always
fires
NO
NO
NO
NO
English
Slow synchro
(2nd Curtain)
Fill-in flash
NO
NO
2nd-curtain
1st-curtain
YES
NO
NO
YES
Flash control modes for S (Shutter priority) and M (Manual) modes
Control Panel Display
Flash mode
Fill-in flash
(Red-eye Reduction)
Fill-in flash
(2nd Curtain)
Fill-in flash
Red-eye
Reduction
YES
NO
Flash Timimg
1st-curtain
2nd-curtain
1st-curtain
Fires automatically
in dark light,
backlighted subject
NO
NO
NONO
Always
fires
YES
YES
YES
To use flash mode compensation
If you encounter difficulty with a subject that is too bright or too dark when shooting with the flash,
use flash control compensation. Set the mode dial to P, A, S, or M, and then press the menu button
. In the shooting mode, select the flash control mark and set the flash compensation value.
After you press the button to close the menu, take the picture. To release the flash mode
compensation setting, repeat this procedure and select zero for the flash compensation setting.
13

Viewing and Managing Images
Playing Back Images
To enter the playback mode so you can view
images, set the mode dial to , or with the
mode dial set to P, A, S, or M, rapidly press the
monitor button twice. The image of the
most recent picture taken is displayed in the
monitor. Press or to display the previous
or next image. Press or to jump 10
frames to the previous image or jump 10 to the
next image.
If you want to enlarge an image, set the mode
dial to playback , and then turn the main dial
to the right toward the magnifying glass mark
(or turn the sub dial clockwise). Every time
you move the dial one position to the right, the
magnification of the image increases. Use the
pointers on the arrow pad to scroll the image
left, right, up, or down. To restore the original
display, rotate the main dial to the left (or rotate
the sub dial counterclockwise).
If you want to display more than one image in
the monitor, use the index display. Set the
mode dial to playback , and then turn the
main dial to the left toward the index mark (or
turn the sub dial counterclockwise). Every time
you move the dial one position to the left, the
number of images displayed in the index
increases (4, 9, 16). To move the green
highlight in the index, press or to select
the previous or next image. Press or to
display the previous or next index. With the
green highlight on the image you want to
select, rotate either dial to the right to return to
the single-image display.
To leave the playback mode, if the mode dial is
set to playback , set the mode dial to P, A, S,
or M. If the mode dial is set to P, A, S, or M,
press the monitor button once to switch off
the monitor.
You can also use the playback mode menu to
set up a slide show that will automatically
display each image for 5 seconds continuously,
starting with the currently displayed image, until
you press the or button.
Displaying Image Information
While viewing an image during playback, you can display the information about the settings when the
picture was taken. Set the mode dial to playback (or with the mode dial set to P, A, S, or M,
rapidly press the monitor button twice). Hold down the button and then turn the main dial or
sub dial to the right or left to select one of the three information display formats superimposed on the
displayed image. If the histogram feature is switched on, an additional display will show the
histogram. The histogram display can be switched on in the shooting mode. The sample below shows
the display with all the information (without the histogram).
Memory card
Folder name/
file name
DCF Standard
file number
Date picture
taken
14
Protected
Time picture
taken
Selected for printing
Resolution, compression
Shutter speed, aperture value
Exposure compensation
White balance setting
ISO (When set AUTO, the ISO value
while shooting appears)
Flash intensity compensation
Frame number (or rate of enlargement if
image enlarged for display)

Protecting Images
Images stored on a card can be protected from
accidental deletion. Enter the playback mode
and display the image that you want to protect.
Press the protect button . A protect mark
is displayed on the image. To remove
protection, display the protected image and
press the protect button to switch off the
protect mark. If you want to protect all the
images on a SmartMedia card, attach a protect
seal to the card. Please remember that
protecting an image does not protect it if the
card is formatted.
Deleting Images
Delete poorly exposed or other images that you
do not want to keep to create more storage
space on a card. Enter the playback mode and
display the image that you want to delete. (You
can also delete images in the index display.
Just move the green highlight to the image that
you want to delete.) Press the erase button
, press to select YES, and then press
the button. The card access lamp blinks as
the image is erased. If you want to delete all
images on the card, select the card that you
want to erase. Use the card erase option of the
CARD SETUP feature in the shooting mode to
erase all the images on the card.
Copying Images to Another Card
With two cards installed in the camera, you can
select images one by one for copying to the
other card, or copy all images to the other card.
Insert the source and destination cards in the
camera.
Formatting a Memory Card
A card which has been formatted for use on a
computer or another camera, must be
formatted before it can be used with this
camera. Formatting deletes all images and
information stored on a card.
Selecting an Image File Naming
Scheme
The camera automatically assigns a file name
to every image and then saves it in a folder on
the card. These file names can be used to
select and process images on a computer.
Folders are named with three digits in the
format 000OLYMP. Files are named with four
digits in the format Pmdd0000.jpg.
All folders
DCIM
100 OLYMP
P2030001.jpg
P2030002.jpg
P2030003.jpg
P2030004.jpg
Day (01 - 31)
Month (10, 11, 12 are
numbered A, B, C)
File number (0001 - 9999)
After taking 9999 pictures, the counter is reset
to 0001 for the next picture, the folder number
increments by 1 to name and create a new
folder where the next image (file) is stored.
Set the mode dial to the setup/connection mark
, and then press the menu button . On the
arrow pad, press or to select FILE NAME.
Press to move the green highlight to the
right. Press or to move the green highlight
to AUTO or RESET. Press the button to
select the setting, and then press the button
to close the menu.
You can select the naming scheme with the
FILE NAME item in the setup/connection mode
menu. The AUTO selection numbers all files
and folders consecutively for every card you
use to ensure that no file names are duplicated.
The RESET selection restarts file numbering
every time you insert another card.
Folder name
000OLYMP
Folder number
(100 - 999)
File name
Pmdd0000.jpg
English
15

Selecting Images for Printing
You can select images one by one or select all
images on the card for printing on a DPOF
compatible printer or printing by a DPOF
printing service.
To select single images for printing
Insert and select the card with the images that
you want to select for printing. Set the mode
dial to print reserve mode . Use the arrow
pad to display the image that you want to select
for printing, and then press the button. Press
or to select the number of copies that you
want to print, and then press the button. The
image is marked with the print reserve mark
and the number of copies that you have
selected. Repeat this procedure to select and
mark more images for printing. Reset the mode
dial to leave the print reserve mode. To cancel a
selection, repeat this procedure and select zero
for the number of copies.
To select or cancel all images for printing
Insert and select the card with the images that
you want to select for printing. Set the mode
dial to print reserve mode , and then press
the menu button . Use the print reserve item
on the print reserve mode menu to select
or clear all images on the card for printing.
To select images for date or time stamping
Insert and select the memory card that
contains the images that you want to select for
date or time stamping. Set the mode dial to
print reserve mode , and then press the
menu button . In the print reserve mode
menu use the Date or Time Stamping item
to set date or time stamping for the image.
To select or cancel index printing
Insert and select the memory card that
contains the images that you want to select for
index printing. Set the mode dial to print
reserve mode , and then press the menu
button . In the print reserve mode menu, use
the Index Printing item to select or clear all
previous selections for printing.
Reading Images with a Computer
You can use the USB cable provided with the
camera to connect the camera to a computer
equipped with a USB interface and read
images from either card in the camera with the
computer.
The following are required:
• A USB cable provided with the camera.
• (For Windows 98/98SE)
The Windows 98/98SE USB driver included in
the software CD.
Refer to the “Software Installation Guide” for
installing the USB driver.
Also refer to “Transferring Pictures to a
Computer” in the Reference Manual in the
software CD.
• (For Windows 2000 Professional/Me)
Refer to “Transferring Pictures to a Computer”
in the Reference Manual in the software CD.
• (For Mac OS9/OS9.1)
Refer to “Transferring Pictures to a Computer”
in the Reference Manual in the software CD.
Optional Devices for Reading Cards
You can also use one of the optional devices to
read image files from a memory card if your
computer is not equipped with a USB port.
Before you purchase one of these optional
devices, make the device can be used with
your computer. For more details, contact an
Olympus Service Center.
To read a SmartMedia card
• Floppy Disk Adapter FlashPath MAFP-2N(E).
A 3.5-inch floppy disc drive is required on your
computer.
• PC Card Adapter MA-2(E).
A PCMCIA card slot is required on your
computer.
• Olympus-brand Removable Media Reader/
Writer
A USB connector is required on your computer.
To read a CompactFlash/Microdrive card
• PC Card Adapter.
A PCMCIA card slot is required on your
computer.
16

Shooting Features
Selecting the Shooting Mode
Set the mode dial to P, A, S, or M to select the
shooting mode.
• P (Program mode) The camera automatically
selects the aperture value and shutter speed
for the pictures.
• A (Aperture priority mode) You set the
aperture value while the camera automatically
selects the correct shutter speed. A large
aperture value focuses the subject and blurs
the background for portrait shots, and a small
aperture value will focus both foreground and
background for group shots or scenery.
• S (Shutter priority mode) You set the shutter
speed while the camera selects the correct
aperture value. Use a fast shutter speed to
freeze moving subjects, or select a slow
shutter speed to create the effect of blurred
motion.
• M (Manual mode) You set the aperture and
shutter speed manually to achieve special
effects in your pictures.
Adjusting Aperture Value
Set the mode dial to A (Aperture priority
mode), and then turn the main dial or sub dial
to adjust the aperture value in 1/3 increments.
Turn the main dial to the right (or turn the sub
dial clockwise) for a large aperture or turn the
main dial to the left (or turn the sub dial
counterclockwise) for a smaller aperture. The
selected aperture value is displayed in the
viewfinder and control panel. The diameter of
the aperture is inversely proportional to the
aperture value. The larger the aperture value
the smaller the diameter of the aperture and
the greater the depth of field, allowing both the
subject and background to be in sharp focus.
The smaller the aperture value, the larger the
diameter of the aperture and the shallower the
depth of field, allowing you to focus the subject
against a blurred background.
Selecting the Metering Method
The metering method determines whether the
camera meters the light in a wide or smaller
area of the picture composed in the viewfinder.
Hold down the metering mode button on
top of the camera, and then turn the main dial
or sub dial until you see the icon for the
metering method that you want to set displayed
in the viewfinder or control panel.
Control
Panel
ESP Digital ESP metering. The entire
image is metered for light and
brightness patterns. Displayed
only in the control panel.
Center weighted averaging
metering. Meters the entire
picture, yet concentrates on the
area in the mark in the viewfinder,
approximately 3 times the size of
the spot metering area. Displayed
in the viewfinder and control
panel.
Spot metering. Only the area
covered by the spot metering
mark in the viewfinder is metered,
approximately 1.2% of the
viewfinder display. Displayed in
the viewfinder and control panel.
Method
Adjusting Shutter Speed
Set the mode dial to S (Shutter priority mode),
and then turn the main dial or sub dial to select a
shutter speed. For every position that you move
the dial the shutter speed is increased (or
decreased) in 1/3 steps. Turn the main dial to the
right (or turn the sub dial clockwise) for a faster
shutter speed or turn the main dial to the left (or
turn the sub dial counterclockwise) for a slower
shutter speed. (Shutter speed range: 2 - 1/640
sec. in IS mode, and 2 - 1/4000 sec. and 1/18000
sec. in PS mode) The selected shutter speed is
displayed in the viewfinder and control panel.
The flash may not be effective with shutter
speeds of 1/250 or faster.
English
17

Using the IS mode
(Interlace Scan Mode)
This is the normal shooting mode. The
mechanical shutter speed can be adjusted up
to 1/640 sec.
Press the menu button to display the menu
on the monitor. On the arrow pad, press to
move the green highlight to and press to
move the green highlight to IS mode. Press the
button. Check the record mode in the control
panel since it may have been changed.
To focus a difficult subject
If the AF correct mark in the lower left corner of
the viewfinder continues to blink the camera
cannot achieve focus automatically. Some
subjects are difficult to focus.
Subject of low contrast
A subject without
distinct patterns could
be difficult to focus.
Using the PS mode
(Progressive Scan Mode)
The electronic shutter speed can be adjusted
as follows:
P and A modes: up to 1/4000 sec.
S and M modes: up to 1/4000 sec. and
1/18000 sec.
When shooting without an ND filter and the
aperture wide open, this mode can be used
when a super fast shutter speed may be
required. However, jaggies and noise may
appear when printing large sizes because
vertical resolution thins out.
Press the menu button to display the menu
on the monitor. On the arrow pad, press to
move the green highlight to and press to
move the green highlight to PS mode. Press
the button. Check the record mode in the
control panel since it may have been changed.
Focusing
The camera can focus a subject automatically.
Set the focus mode switch to AF (Automatic
Focus). Compose the picture with the AF target
mark in the center of the viewfinder on the
subject. If you compose the picture with the
monitor, make sure the subject is in the center
of the monitor. Half-press the shutter button
until the camera beeps and the AF correct
mark in the viewfinder lights, and then fullypress the shutter button to take the picture.
Subject with center glare
A subject with center
glare could be difficult
to focus.
Two objects at different distances from the
camera
The camera cannot
autofocus on a single
subject with two objects
at different distances
from the camera in the
viewfinder.
Subject in light from street lights and
windows
A subject at night in
light from street lights
or from building
windows could be
difficult to focus.
Subject without vertical lines
The camera cannot
focus on a subject with
only horizontal lines.
Hold the camera
vertically, half-press the
shutter button, and
then hold it down to lock the focus. Re-position
the camera horizontally, compose the picture,
and then full-press the shutter button to shoot
the picture.
18

Moving subject
It is impossible to hold
a fast moving object in
the center of the
viewfinder long enough
for automatic focusing,
so lock the focus on an
object that is at the same distance from the
camera as the subject you want to shoot, wait
for the subject to appear, and then shoot the
picture.
Shooting through glass or glaring surface
A picture taken through a window, or shooting a
glaring surface like shiny metal, could be
difficult to focus. If this problem occurs, set the
focus mode switch to MF (manual focus) and
focus the subject manually.
Backlit subjects
Strongly backlit subjects could be difficult to
focus. Set the focus mode switch to MF
(manual focus) and focus the subject manually.
Close-up Subjects
When shooting a subject closer than 1 m, the
location where you see the AF target mark and
the actual metered AF distance could be
different. Try to point the camera at a large area
of the subject to focus, or take the picture in the
conversion lens mode (with a conversion lens).
In such situations, you can use substitute
focusing. Compose a picture with the AF target
mark in the viewfinder on an object that is the
same distance from the camera as the subject
that you want to shoot. Half-press the shutter
button to focus on the substitute object, keep
the shutter button half pressed, compose the
picture again with the original subject and then
fully-press the shutter button to take the picture.
(If you are waiting for a fast moving subject to
appear, keep the shutter button half pressed
until the subject appears in the viewfinder.)
To focus manually
Set the focus mode switch to MF (Manual
Focus). Turn the manual focus ring until you
see the subject focused in the viewfinder or the
monitor. The image in the monitor is doublesize to make focusing easier, and the camerato-subject distance is displayed in the lower
part of the monitor.
Exposure Compensation
Use exposure compensation to manually
increase or decrease the exposure setting
automatically selected by the camera to create
a brighter or darker image. Set the mode dial to
P, A, or S. Hold down the exposure
compensation button , and then turn the
main dial or sub dial to select the exposure.
Exposure compensation can be adjusted in the
range of ±3EV in 1/3EV steps. You can confirm
changes in brightness in the range ±2EV on the
monitor.
AE Lock
Point the camera at the subject, press the
automatic exposure lock button , halfpress the shutter button to focus the subject
automatically, and then fully-press to take the
picture. The exposure setting will not change as
long as the button is depressed so you
can continue to shoot with the same exposure
setting.
Bracketing Shots
You can set the camera to automatically
bracket a shot with three different exposure
settings at 1/3EV, 2/3EV, or 1EV full exposure
step for each shot.
Changing ISO
The ISO setting is equivalent to the ISO
settings performed with traditional SLR
cameras that employ film.
White Balance
The light source can affect how the camera
reproduces color. Normally, the camera uses a
white portion of the composed picture as a
base to reproduce other colors, but if the
picture does not contain white, or if you are
shooting under artificial lights (especially
fluorescent lights), you may need to adjust the
white balance to achieve the most natural color
reproduction in your pictures. White balance
can be adjusted three ways.
• Auto white balance. The camera performs
balance color automatically using a white
portion of the composed picture as a
reference. Press and hold down the white
19
English

balance mode button , turn the main dial or
sub dial until you see -A- in the viewfinder and
control panel, or AUTO WB in the monitor,
and then take the picture.
• Quick reference (one touch) white balance.
Under the same light source where you intend
to take the picture, point the camera at a
white surface (wall, sheet of paper, etc.), fill
the viewfinder with the white surface, and
then press the quick reference white balance
button on the front of the camera. When
you see GOOD displayed in the monitor,
press the button to save the setting. Press
and hold down the white balance mode button
, and then turn the main dial or sub dial to
zero for the color temperature setting. Then
take the picture. If you see NO GOOD, this
means that not enough white surface was
available, the white surface reflected too
much light, or color around the corners of the
sheet interfered with the registration.
• Preset white balance. Hold down the white
balance mode button , and then turn the
main dial or sub dial until you see the desired
color temperature setting, and then release
the button. Select AUTO, a color
temperature setting in the range 3000K to
7500K, or Quick Reference.
Setting the Record Mode
The record mode settings determine the quality
of the images and also affects the file sizes.
The better the quality, the larger the file size.
Hold down the record mode button , and then
turn the main dial or sub dial to the left until you
see the desired setting in the control panel
[Blinking TIFF (indicates RAW), TIFF, SHQ, HQ
(default), and SQ], or turn to the right to display
them in reverse order. RAW and TIFF can be
set only in the IS mode.
TIFF, SHQ, HQ, and SQ respectively stand for
“Tagged Image File Format,” “Super High
Quality,” “High Quality,” and “Standard Quality.”
RAW indicates the raw output from the CCD. To
display RAW data files on your PC, CAMEDIA
Master software or Photoshop is required.
(Photoshop requires the Olympus RAW File
Import Plug-in included in the software CD.)
Setting Factory-set Factory-set
RAW 2560 x 1920 1:1(not compressed)
TIFF 2560 x 1920 1:1(not compressed)
SHQ 2560 x 1920 1:2.7
HQ 2560 x 1920 1:8
SQ 1280 x 960 1:8
* The resolution and compression for a record
mode can be customized using the menu.
Resolution Compression
(no. of pixels)
Adjusting Sharpness
You can select HARD, NORMAL, or SOFT for
the sharpness setting using the menu.
Adjusting Contrast
You can select HIGH, NORMAL, or LOW to
adjust the amount of gradation between areas of
different brightness in the image using the menu.
Using the Noise Reduct
(Noise Reduction Mode)
Use this mode to reduce the amount of noise that
appears in images when shooting night scenes or
other shots that require a long exposure time. The
noise reduction function operates only when you
are shooting with the shutter speed set slower
than 1/2 or in the bulb shooting mode.
Taking Sequential Exposures
(Burst Mode)
With the burst mode, press and hold down the
shutter button to take rapid shots. In IS mode
you can take up to three or four sequential shots
(depending on the record mode). In PS mode
you can take up to seven sequential shots.
Set the mode dial to P, A, S, or M, and then
hold down the drive button until you see the
sequential mode mark in the control panel.
Press and hold down the shutter button. The
camera will take sequential shots until you
release the shutter button. The pictures are
taken at the same exposure, while bracketing
exposures takes multiple pictures at different
exposures.
20

Using the Self-Timer
The self-timer delays shutter release for 12
seconds so you can include yourself in a group
picture.
Using the RM-1 Remote Control
With the camera in the remote mode, you can
use the RM-1 remote control to release the
shutter without touching the camera. Point the
remote control toward the front of the camera to
operate.
Using the Optional RM-CB1
Remote Cable
Use the remote cable to prevent camera shake,
caused by pressing the shutter button with your
finger, when shooting at a slow shutter speed.
Using Time Lapse
In the time lapse mode, the camera takes
pictures automatically at specified intervals. You
can specify the time interval in hours and
minutes in a range from 1-minute to 24-hour
time intervals. The camera will continue to
shoot until the batteries discharge, or until the
selected card fills up. For a long shooting
session, connect the optional CAMEDIA-brand
AC adapter to the camera to conserve the
battery power.
For details and important notes about using this
feature, refer to the Reference Manual in the
software CD pack.
English
Using the Optional Dedicated
External Flash FL-40
Use the optional External Flash FL-40,
dedicated for exclusive use with this camera,
alone or with the camera’s built-in flash. Before
you use the dedicated flash, read the External
Flash FL-40 instructions.
For details, see “Using the Optional Dedicated
External Flash FL-40” in the Reference Manual
in the software CD.
Various uses of the FL-40 with the additional
options (e.g. flash bracket and off camera use)
are also described there.
21

Using an Optional Conversion Lenses
The conversion lenses listed below can be used with this camera. Before you use a conversion lens,
make sure that the zoom is set to TELE or WIDE, whichever is required.
Conversion Lens
Type
3x Extension Lens Tele 300 Pro
TCON-300
f2.8
f=420mm equivalent
Filter diameter 49mm
Fully Multi-Coated
1.45x Tele Extension Lens Pro
TCON-14B
f2.4
f=200mm equivalent
Filter diameter 86mm
Fully Multi-Coated
0.8x Wide Extension Lens Pro
WCON-08B
f=28mm equivalent
Filter diameter 105mm
Fully Multi-Coated
f2
Attachment
Method
Support
arm
Screw
Screw
Zoom
Setting
TELE
TELE
WIDE
Control Panel
Display
blinking
displayed
Macro Extension Lens Pro
MCON-35
f2 - f2.4
Possible to shoot area up
to size of approx. 49mm x 37mm
Filter diameter 72mm
Fully Multi-Coated
To select the conversion lens mode (not close-up shooting)
Press and hold down the macro button , and then turn the main dial or sub dial until you see the
conversion lens mark in the control panel. If a 3x Extension Lens Tele 300 Pro is attached, the
mark will blink. Otherwise the mark will not blink.
To set up close-up shooting with a conversion lens
Set the mode dial to setup/connection , and then press the menu button. In the Setup/connection
mode menu, select the macro mode/conversion lens mark .
Screw
WIDE - TELE
22
Special Settings
Shutter Sound
You can use settings in the shooting mode to
set the camera to emit a beep upon shutter
release, or you can switch this feature off. If you
set the camera to emit a beep, this will tell you
that the shutter has released when you are
using the remote unit or remote cable to take a
picture. If you set the camera to emit a beep,
you can also adjust the volume of the sound.
Warning Sound
You can use settings in the shooting mode to
set the camera to beep twice when the picture
is in focus, beep once when exposure is locked,
or you can switch this feature off. Use the
shooting mode to set up this feature.
RecView Time
You can use settings in the shooting mode to
set the length of time that a picture is displayed
on the monitor immediately after it is taken.
Three settings are provided: AUTO, OFF, and
5sec.
Pixel Mapping
Pixel mapping checks and adjusts the CCD.
This check and adjustment is performed at the
factory before shipping. This procedure needs
to be performed at least once a year.
Sleep Mode
You can use settings in the shooting mode to set the amount of time the camera remains idle before
the camera enters the sleep mode. When the camera enters the sleep mode, the monitor, control
panel, and viewfinder displays are switched off to conserve battery power, or the camera switches
itself off, depending on the mode dial setting. To restore the camera to full operation after it has
entered the sleep mode, just press any button. If the camera remains in the sleep for one hour, the
camera switches itself off automatically. To restore normal operation, switch the camera off and on
again.
English
OFF
1MIN
2MIN
5MIN
10MIN
Camera never enters sleep mode.
Camera neither enters sleep mode, nor switches itself off.
Camera enters sleep mode if it remains idle for 1 minute
and turns off in 1 hour.
Camera enters sleep mode if it remains idle for 2 minutes
and turns off in 1 hour.
Camera enters sleep mode if it remains idle for 5 minutes
and turns off in 1 hour.
Camera enters sleep mode if it remains idle for 10 minutes
and turns off in 1 hour.
23

Reference
Using the Menus
Use the menus to set up how the camera operates. Four menus are provided. To open a menu, set
the mode dial to the appropriate setting and press the menu button .
Mode Dial Mode Press to display:
P, A, S, or M Shooting Shooting mode menu
Playback Playback mode menu
Print reserve Print reserve mode menu
Setup/connection Setup/connection mode menu
Set the mode dial to the setting to display the desired menu. Press the menu button to open the
menu in the monitor. On the arrow pad, press to move the green highlight down the menu, or
press to move the green highlight up the menu.
Note
Some menus have more than one page. The notation in the upper left corner of the page tells you which page you
are currently viewing. For example, if you see 1/3 you are viewing page 1 of 3 pages. To display the next page of the
menu, just press
With the green highlight on the option that you want to set, press to move the green highlight to
the right. Select the desired setting. If more than one setting is available for selection, press or
to move the green highlight to the desired setting, and then press the button. If the setting requires
an entry (a number for a date or time, ON or OFF selection) press or to move the green
highlight to the desired setting, and then press or to until you see the setting you desire, and
then press the button. If more than one setting is required (a time setting for example), the green
highlight will move to the next setting so you can select the desired setting by pressing or . After
you press the button to select your choices, the green highlight returns to the right. When you are
finished performing settings in the menu, press the button to close the menu. For detailed
summaries of the menus and their settings, refer to the tables on the following pages.
when the green highlight is at the last selection.
24

List of Menu
For more details refer to the software CD’s Reference Manual on CD-ROM.
Shooting mode menus for P (Program mode), A (Aperture
priority mode), S (Shutter priority mode), M (Manual mode)
1/3
2/3
3/3
Delete all images from selected
SmartMedia or CompactFlash
card, and format a card.
ISO (sensitivity) setting.
Bracket same subject with 3
rapid shots with different
exposures.
Flash intensity control
Sharpness.
Overall image contrast.
Record mode customization
(resolution, compression).
Set interval time (specify time
interval between shots during
automatic time lapse photography).
Shutter sound setting (high,
low, OFF).
Default
Setting after and
pressed at the same time
—
AUTO
OFF
±0EV
NORMAL
NORMAL
—
OFF
OFF
English
Warning sound (ON, OFF).
Image display after shooting.
Select IS mode/PS mode/
Noise Reduct.
ON
OFF
IS mode
25

Playback mode menu
Default
Setting after and
pressed at the same time
Print reserve mode menu
Setup/connection mode menu
1/2
Slide show
(Automatic playback).
Copy images card-to-card.
Delete all images from card,
format card.
Monitor brightness.
Select or cancel all pictures for
printing.
Set date or time stamping on
prints.
Select or cancel all pictures for
index printing.
Determines whether conversion lens
is selected when marcro button
is pressed.
Set year/month/day format.
Year/month/day
Set current date and time.
After you replace a memory card, you can
restart file numbering (RESET) or continue
sequential file numbering (AUTO).
Monitor preview mode
When shooting in the M (manual) mode,
select:
•
MANUAL to check the image to be
shot with the monitor, or
•
AUTO to gain the best monitor image.
AUTO
MANUAL
—
—
—
±0
—
OFF
—
∗
∗
∗
∗
∗
∗
26
2/2
Switches histogram on and off.
Pixel mapping
Checks the image processing
circuit and adjusts the CCD.
Sleep mode timer setting.
∗ Unchanged even after pressing and .
OFF
—
1MIN
∗

Error Messages
If a problem occurs with a memory card, a message will be displayed in the control panel and the
monitor. When a memory card error message is displayed, first remove the card and then insert it
again. If the error message occurs again, refer to the table below to solve the problem.
Viewfinder
Control
Panel
Monitor
CARD COVER
OPEN
CARD ERROR
NO CARD Card is not present. Insert the card in the camera.
UNFORMATED
CARD
WRITE
PROTECT
Explanation Solution
Card cover is open.
You cannot store
pictures, play back
images, or delete
images from the card.
Card is not formatted
or is damaged.
The card is protected
with an adhesive seal,
or a folder on the card
has been designated
“read-only.” The card
has been selected only
for playback, so it
cannot be used for
taking pictures, images
cannot be deleted, and
it cannot be initialized.
Insert the card and lock the card
cover.
Remove the card, wipe clean the
electrical contacts, insert the card, and
then try again. If the message is
displayed again, the card can no
longer be used.
You may be able to use the card again
if you format it. However, formatting
the card will erase all images stored
on the card.
Format the card. Formatting the card
will erase all images stored on the
card. On the arrow pad, press to
select YES, and then press the
button to format the card.
If the card is protected with an
adhesive seal, remove the seal, or if
the card has been selected for
playback only, cancel the playbackonly selection. If this does not solve
the problem, the card is operating
abnormally. Try to transfer the images
to a computer, or try to copy the
images to another card installed in the
camera. After copying the images, try
to format the card again.
English
No display
NO PICTURE Playback cannot be
executed because
there are no pictures
stored on the card.
Make sure that a card that contains
images is inserted, or take a picture.
27

Viewfinder
No display
No display
Control
Panel
(No more
images can
be stored
on the
card.)
Monitor
CARD FULL
(Card is full.
No space for
storing more
pictures.) *1
CARD FULL
No display
Explanation Solution
Card is full and you
cannot continue
shooting.
During Shooting
Folder numbering has
reached 999, or file
numbering has
reached 9999, so you
cannot continue
shooting.
During Print Selection
Card is full so you
cannot continue
selecting or cancelling
pictures for printing.
(Selecting pictures for
printing stores data on
the card.)
Camera interior has
overheated.
Replace the card with a fresh card, or
delete images that you do not need,
or transfer the images to a computer,
and then delete all the images from
the card.
Replace the card with a fresh card, or
transfer the images to a computer,
and then delete all the images from
the card.
Replace the card with a fresh card, or
delete images that you do not need, or
transfer the images to a computer, and
then delete all images from the card.
Switch the camera off and allow it to
cool, and then switch the camera on
again.
No display No display
No display
No display
PICTURE
ERROR
CANNOT
OPEN FILE
The selected picture
cannot be displayed for
playback, but be used for
other processing.
Picture shot
with this camera
The selected
picture cannot be
displayed for
playback, but be
used for other
processing.
Picture shot
with another
camera
The picture cannot
be displayed for
playback with this
camera.
Remove the card, wipe clean the
electrical contacts, insert the card
and then try again. If the message is
displayed again, the card can no
longer be used.
You may be able to use the card
again if you format it. However,
formatting the card will erase all
images stored on the card.
Select and display the picture on the
camera used to take the picture.
*1
The sizes of the clusters are different on a SmartMedia and CompactFlash/Microdrive card, so you
may not be able to store exactly the same number of images on either card. For this reason, you may
not be able to copy all the images from a full card to the other card, even if it is completely empty.
(You will see the CARD FULL message before copying is completed.) In this case, you should delete
some images that you do not need, or for the target card use a higher capacity card.
28

Specifications
Product type SLR digital camera (recording, playback)
Recording system Digital recording, JPEG, in accordance with Design rule for
Memory 3V (3.3V) SmartMedia: 4MB, 8MB, 16MB, 32MB, 64MB,
Storable pictures Approx. 10 frames (HQ mode, 16 MB card)
Number of effective pixels 4,950,000 pixels
Image pickup element 2/3 in. primary color filter
Image recording 2560 x 1920 pixels
White balance Auto (full TTL), Preset (7 steps), Quick Reference
Lens Olympus 9 mm - 36 mm, f/2.0 - f/2.4, 14 elements in 11
Filter diameter 62 mm
Metering system Digital ESP (Electro Selective Pattern) metering, Center
Exposure control P (Program mode), A (Aperture priority), S (Shutter priority),
Aperture WIDE : f 2.0 - f11,
Shutter P, A 2 - 1/640 sec. (IS mode)
Exposure compensation ±3EV (1/3EV Steps)
Working range (from lens)
Viewfinder SLR (optical viewfinder)
Monitor 1.8 in. TFT color liquid crystal display
Monitor resolution Approx. 118,000 pixels
Camera File (DCF), TIFF (non-compressed), DPOF
compatible.
128MB;
CompactFlash (Compatible with Type I and II )
Microdrive (CF+Type II standard)
Approx. 21 frames (HQ mode, 32 MB card)
5,230,000 pixels (gross)
1792 x 1344 pixels
1280 x 960 pixels
1024 x 768 pixels
640 x 480 pixels
(one-touch)
groups (equivalent to 35 mm - 140 mm lens on standard
SLR 35 mm camera)
weighted averaging metering, Spot metering
M (Manual mode)
TELE : f 2.4 - f11
2 - 1/4000 sec. (PS mode)
S 2 - 1/640 sec. (IS mode)
2 - 1/4000 sec.,1/18000 sec. (PS mode)
M 60 - 1/640 sec. (IS mode)
60 - 1/4000 sec.,1/18000 sec. (PS mode)
bulb to a maximum of 8 min. in manual
Standard: 0.6 m - ∞ (2 ft. - ∞)
Macro: 0.2 m - 0.6 m (0.7 ft. - 2 ft.)
Finder view field 95%, Wide x 0.42, Tele x 1.60
Operation : Used to compose pictures, just like the viewfinder.
Playback : Image display (single-frame, multi-frame
index display, enlarged display)
English
29

Flash recharge time Approx. 7 sec. at normal temperature with new batteries
Flash working range (ISO 80) WIDE 0.6 m - 6.3 m (2 ft. - 20.8 ft.)
(from lens surface) TELE 0.5 m - 5.2 m (1.7 ft. - 17.2 ft.)
Flash modes Auto (auto activated in low light, backlight)
Autofocus Dual autofocus
Detection system Contrast detection system/active AF method
Focusing range Normal shooting mode: 0.6 m - ∞ (2 ft. - ∞),
Self-timer Operation time: 12 sec.
External connectors DC IN jack, USB connector, video OUT jack
Date, time Recorded with image file information
Automatic calendar Auto correction up to year 2030
Print reserve selection DPOF standard (setting number of copies, index
RAW data output feature 10-bit AD output data (ORF file format), ICC profile not
Interval time for time-lapse shooting
Calendar power supply Non-removable manganese-lithium
Operating environment
Temperature Operation: 0°C - 40°C (32 - 104°F) 30% - 90% Humidity
Power supply 3V lithium battery pack CR-V3 (x 2)
(CR-V3)
Red-eye reduction
Fill-in flash (disabled if built-in flash closed),
Slow synchronization, 2nd-CURTAIN
Off (no flash)
Macro: 0.2 m - 0.6 m (0.7 ft. - 2 ft.)
For camera information display, or date or time stamp
for printing possible
printing, date or time stamping)
attached
1 min. to 24 hours
without condensation
Storage: −20°C - 60°C (−4 - 104°F) 10% - 90% Humidity
without condensation
AA (R6) nickel-metal hydride batteries (x 4)
AA (R6) Ni-Cd batteries (x 4)
Lithium polymer battery*
AA (R6) alkaline batteries (x 4)
AC Adapter
* B-32LPS lithium polymer batter y set (B-12LPB lithium
polymer battery included)
B-30LPS lithium polymer battery set (B-10LPB lithium
polymer battery included)
Note: Never use AA (R6) zinc-carbon (manganese) or AA (R6) lithium batteries. They
could overheat and damage the camera.
Dimensions 128.5 mm W x 103.5 mm H x 161 mm D
Weight 1050 g (37 oz) Without batteries and SmartMedia™ card
Specifications are subject to change without prior notice or obligation.
(5" W x 4.1" H x 7" D)
(protuberances not included)
30
 Loading...